Summer is basically the perfect excuse to make bracelets in the happiest colors you can mix up in clay. These ideas are all about that warm-weather vibe—think beachy stacks, punchy palettes, and little details that feel like a mini vacation on your wrist.
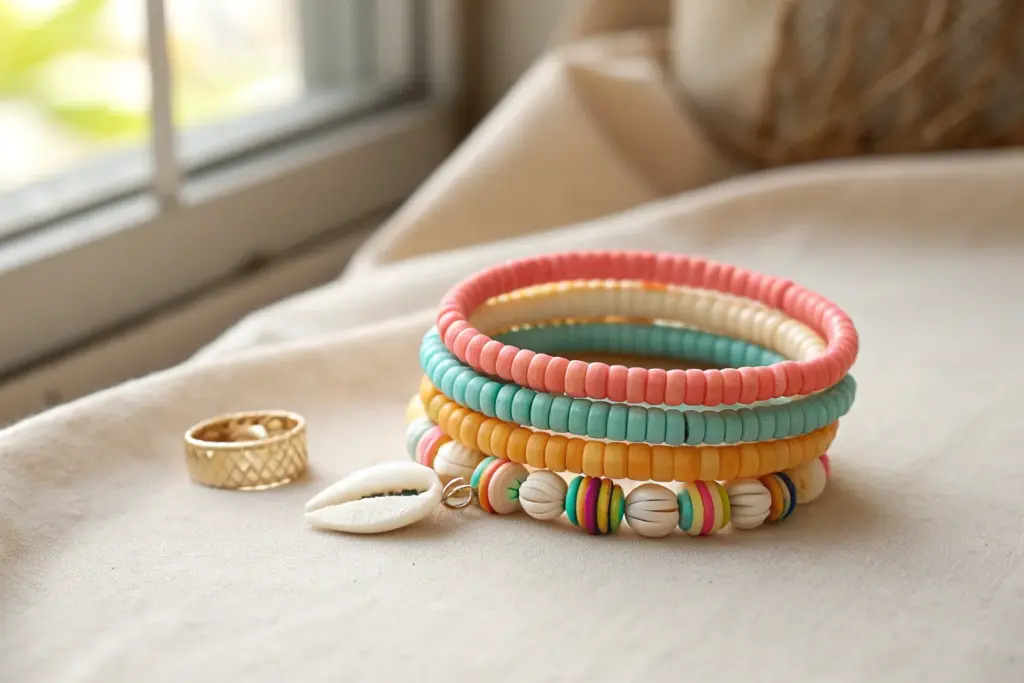
Classic Bright Heishi Bead Summer Stack
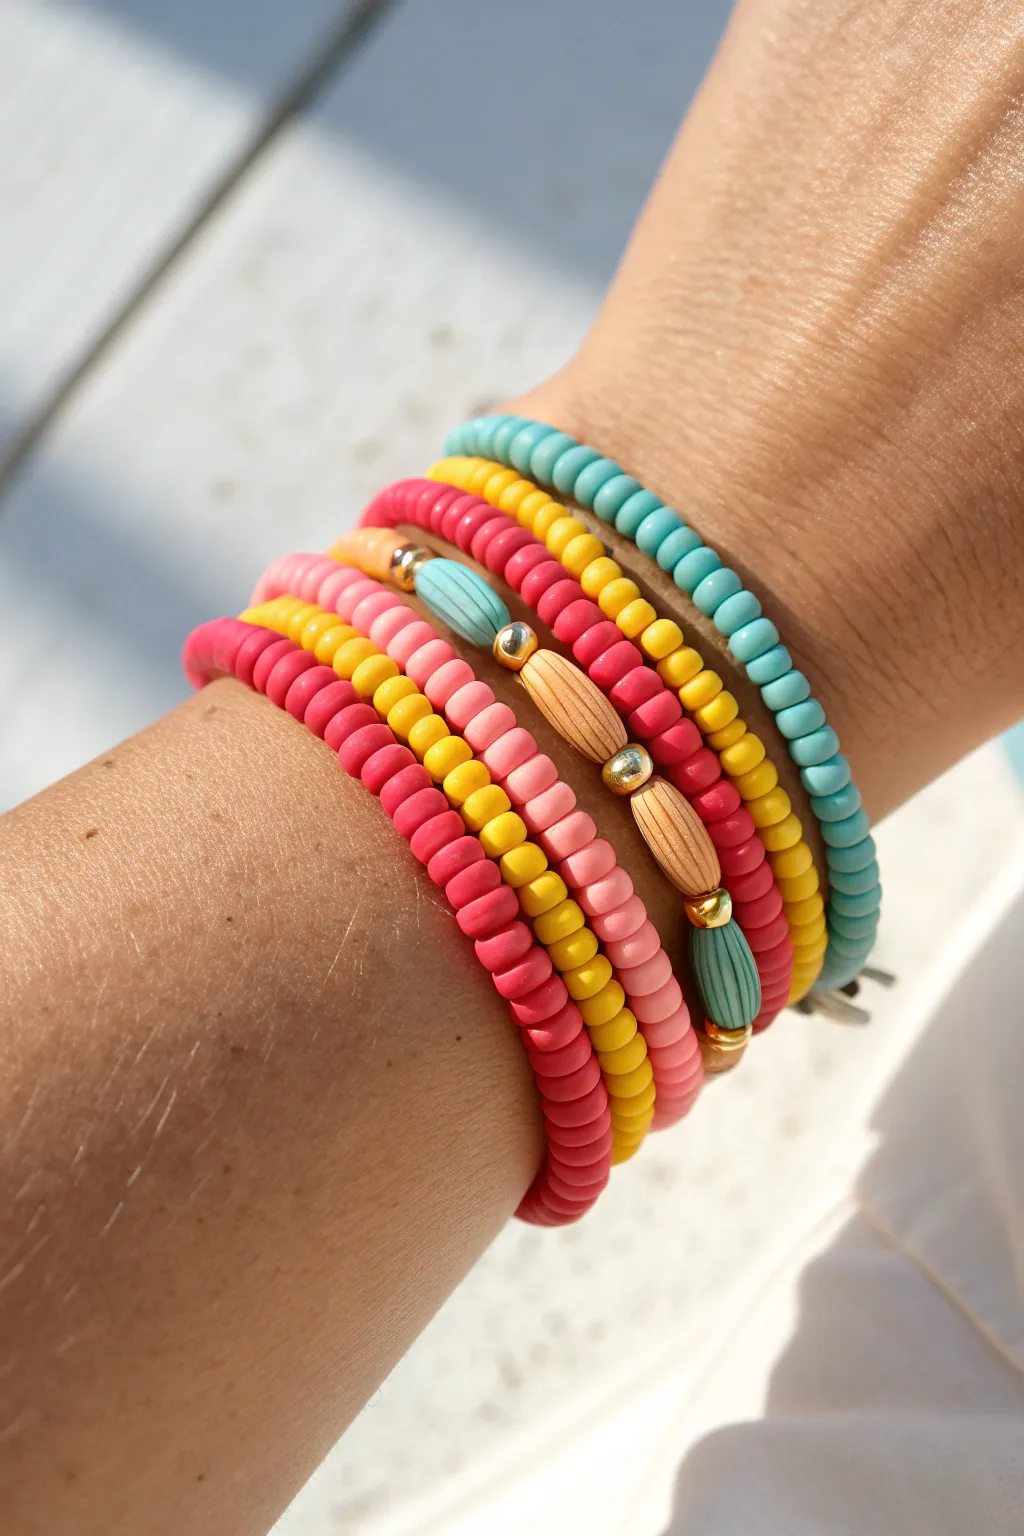
Brighten up your summer wardrobe with this vibrant set of polymer clay Heishi drip bracelets. This stack combines cheerful hot pinks, sunny yellows, and refreshing turquoise with natural wood accents for a beach-ready layered look.
Step-by-Step Tutorial
Materials
- Hot pink polymer clay heishi beads (6mm)
- Bright yellow polymer clay heishi beads (6mm)
- Light pink/coral polymer clay heishi beads (6mm)
- Turquoise polymer clay heishi beads (6mm)
- Elongated natural wood beads or textured beige beads
- Small gold round spacer beads (3-4mm)
- Strong elastic stretch cord (0.7mm or 0.8mm)
- Scissors or jewelry snips
- Super glue or jewelry adhesive (optional but recommended)
- Bead stopper or painter’s tape
- Ruler/Tape measure
Step 1: Planning and Prep
-
Measure your wrist:
Wrap a flexible measuring tape around your wrist to find your size. Add about 0.5 to 1 inch to this measurement depending on how loose you like your stack to fit. -
Cut the cord:
Cut five lengths of elastic cord, each about 10-12 inches long. Having extra length makes tying the knots much easier later on. -
Secure the ends:
Attach a bead stopper or a piece of painter’s tape to one end of each cord so your hard work doesn’t slide off while beading.
Knot Hiding Trick
Use a bead with a slightly larger hole (like a metal spacer or the wooden accent bead) next to your knot so you can easily pull the knot inside to hide it.
Step 2: Creating the Solid Color Strands
-
The Pink Strand:
Start with the first cord. Thread on only the hot pink heishi beads until you reach your target length. -
The Yellow Strand:
Repeat the process with a second cord using only the bright yellow beads. I find it helpful to hold the strands up to each other occasionally to ensure they are the exact same length. -
The Coral Strand:
Create a third simple strand using only the light pink/coral beads. -
The Turquoise Strand:
Make the fourth solid-color bracelet using the turquoise beads. This cool tone really makes the warmer colors pop.
Step 3: Designing the Accent Strand
-
Start the pattern base:
For the fifth and final bracelet, begin by threading a section of light pink/coral beads, roughly 1.5 inches long. -
Add the focal section:
Slide on one gold spacer bead, followed by an elongated turquoise bead (or a stack of turquoise heishi beads), and another gold spacer. -
Insert natural texture:
Add an elongated wooden bead. If you can’t find this specific shape, you can stack several beige heishi beads together to mimic the look. -
Center gold detail:
Place a gold spacer bead, followed by another wooden bead. -
mirror the design:
Place a gold spacer, followed by a turquoise focal section, and one final gold spacer. This creates a symmetrical centerpiece. -
Finish the loop:
Complete the rest of the strand length using the light pink/coral beads until it matches the length of your other four bracelets.
Stiff Bracelet?
If your bracelet feels rigid and doesn’t drape nicely, you strung the beads too tightly. Leave a tiny 1-2mm gap of exposed cord before knitting to allow movement.
Step 4: Finishing Touches
-
Pre-stretch the cord:
Before tying, give each bracelet a gentle tug from both ends. This ‘pre-stretching’ helps prevent the elastic from loosening up after the first wear. -
Tie a surgeon’s knot:
Remove the tape or stopper. Cross the ends, loop one side through twice, and pull tight. Repeat this knotting process to secure it firmly. -
Secure with glue:
Apply a tiny dot of jewelry glue or super glue to the knot. Let it dry completely before trimming. -
Trim the excess:
Cut off the extra elastic close to the knot. If possible, slide a nearby bead over the knot to hide it. -
Stack them up:
Roll the bracelets onto your wrist carefully—rolling prevents over-stretching—and enjoy your colorful summer stack.
Now you have a brilliantly colorful accessory set that captures the essence of summer fun


Rainbow Gradient Bracelet in Sunny Order
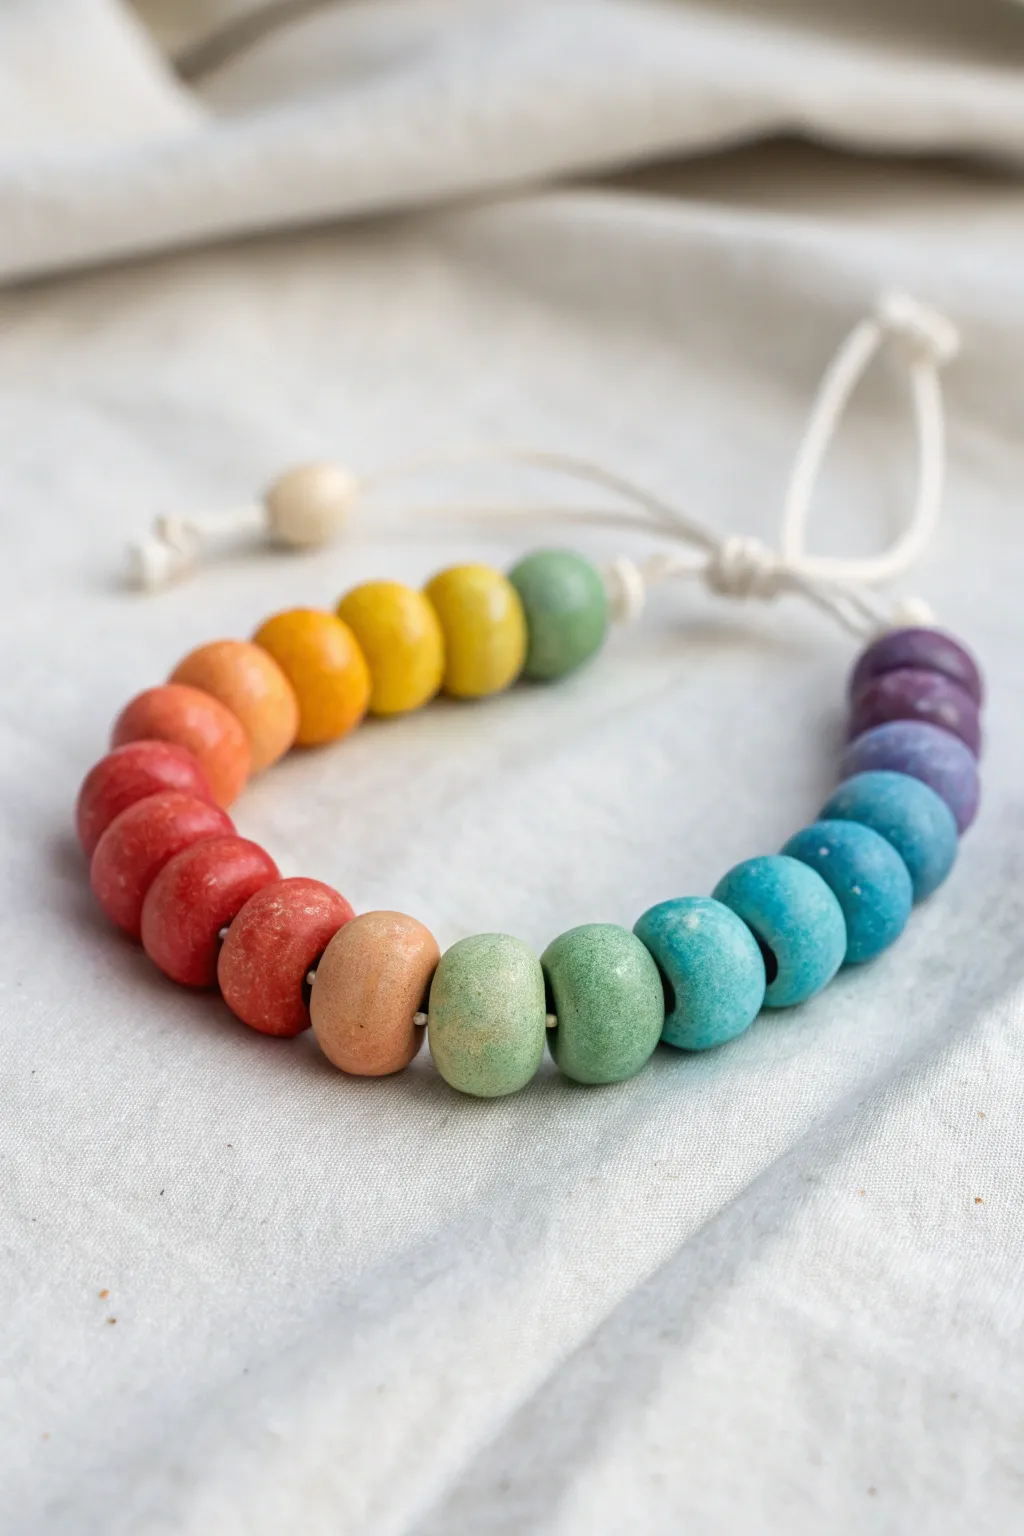
Capture the essence of summer with this vibrant, handmade bracelet featuring a beautiful spectrum of colors. The chunky clay beads are formed by hand for an organic, artisanal look, strung on a simple white cord that adds a touch of bohemian flair.
Step-by-Step
Materials
- Polymer clay in rainbow colors (Purple, Indigo, Blue, Teal, Green, Lime, Yellow, Orange, Red)
- White cotton or nylon cording (1mm-1.5mm thickness)
- Bamboo skewer or toothpick (for piercing holes)
- Baking sheet
- Parchment paper
- Oven (for baking polymer clay)
- Acrylic roller or glass bottle
- Scissors
- Clear matte varnish (optional)
Step 1: Preparing the Clay Beads
-
Condition the clay:
Start by taking small amounts of each color of polymer clay. Knead each piece in your hands until it becomes soft, pliable, and warm to the touch. -
Portion the beads:
Pinch off pea-sized amounts of clay for each bead. For the gradient shown, you will need approximately 2-3 beads of each main color, plus a transition shade if you want a smoother blend. -
Roll into spheres:
Roll each pinch of clay between your palms to create a smooth, round ball. Try to keep them consistent in size, though slight variations add to the handmade charm. -
Flatten into discs:
Gently press each ball down onto a clean work surface with your thumb or an acrylic roller. You want a thick disc shape, somewhat resembling a rounded donut, rather than a flat wafer. -
Smooth the edges:
Pick up each disc and gently tap the edges with your finger to round them off, removing any sharp corners created by the flattening process. -
Pierce the holes:
Using a bamboo skewer or a toothpick, carefully pierce the center of each bead. Twist the tool gently as you push through to avoid distorting the bead’s shape. -
Widen the openings:
I find it helpful to wiggle the skewer in a small circular motion to slightly widen the hole, ensuring the thick cord will pass through easily later. -
Texture the surface (optional):
For the slightly rustic look seen in the photo, you can lightly roll the bead over a piece of canvas or sandpaper to give it a subtle texture before baking.
Baking Pro-Tip
To prevent flat spots on your round beads, bake them directly on a bed of cornstarch or baking soda. This cradles the curved shape perfectly.
Step 2: Baking and Finishing
-
Arranging for baking:
Place your pierced beads on a baking sheet lined with parchment paper. Ensure they aren’t touching each other so they bake evenly. -
Bake the clay:
Bake the beads according to the manufacturer’s instructions on your specific package of clay. Typically, this is around 275°F (135°C) for 15-30 minutes. -
Cool down:
Once baked, turn off the oven and let the beads cool completely before handling. They harden as they cool. -
Optional varnish:
If you prefer a sealed finish or want to protect the colors, apply a thin coat of matte varnish to each bead and let dry.
Level Up: Essential Oils
Use unfinished wooden beads or highly porous air-dry clay for a few beads in the mix. Add a drop of essential oil to turn your bracelet into a diffuser.
Step 3: Assembly
-
Prepare the cord:
Cut a length of white cord approximately 12-14 inches long. Tie a sturdy overhand knot about 3 inches from one end to act as a stopper. -
Add a wooden accent (optional):
If you want to match the reference image exactly, thread a small raw wooden bead onto the cord first, sliding it down to your stopper knot. -
String the gradient:
Begin threading your colored beads. Start with your purples, moving into blues, teals, greens, yellows, oranges, and finally reds. -
Check the fit:
Wrap the strung section around your wrist to check the size. Add or remove beads as needed to get the perfect fit. -
Secure the end:
Once all beads are strung, tie another tight overhand knot snugly against the last red bead to keep everything in place. -
Create the closure:
To make the adjustable closure, form a loop with the remaining cord ends. You can use a sliding knot technique or simply tie loose knots at the very tips, allowing you to tie the bracelet onto your wrist manually. -
Trim excess:
Trim any excessively long tails of the cord, leaving just enough to manipulate the knots comfortably.
Enjoy wearing your vibrant new accessory that brings a pop of color to any outfit


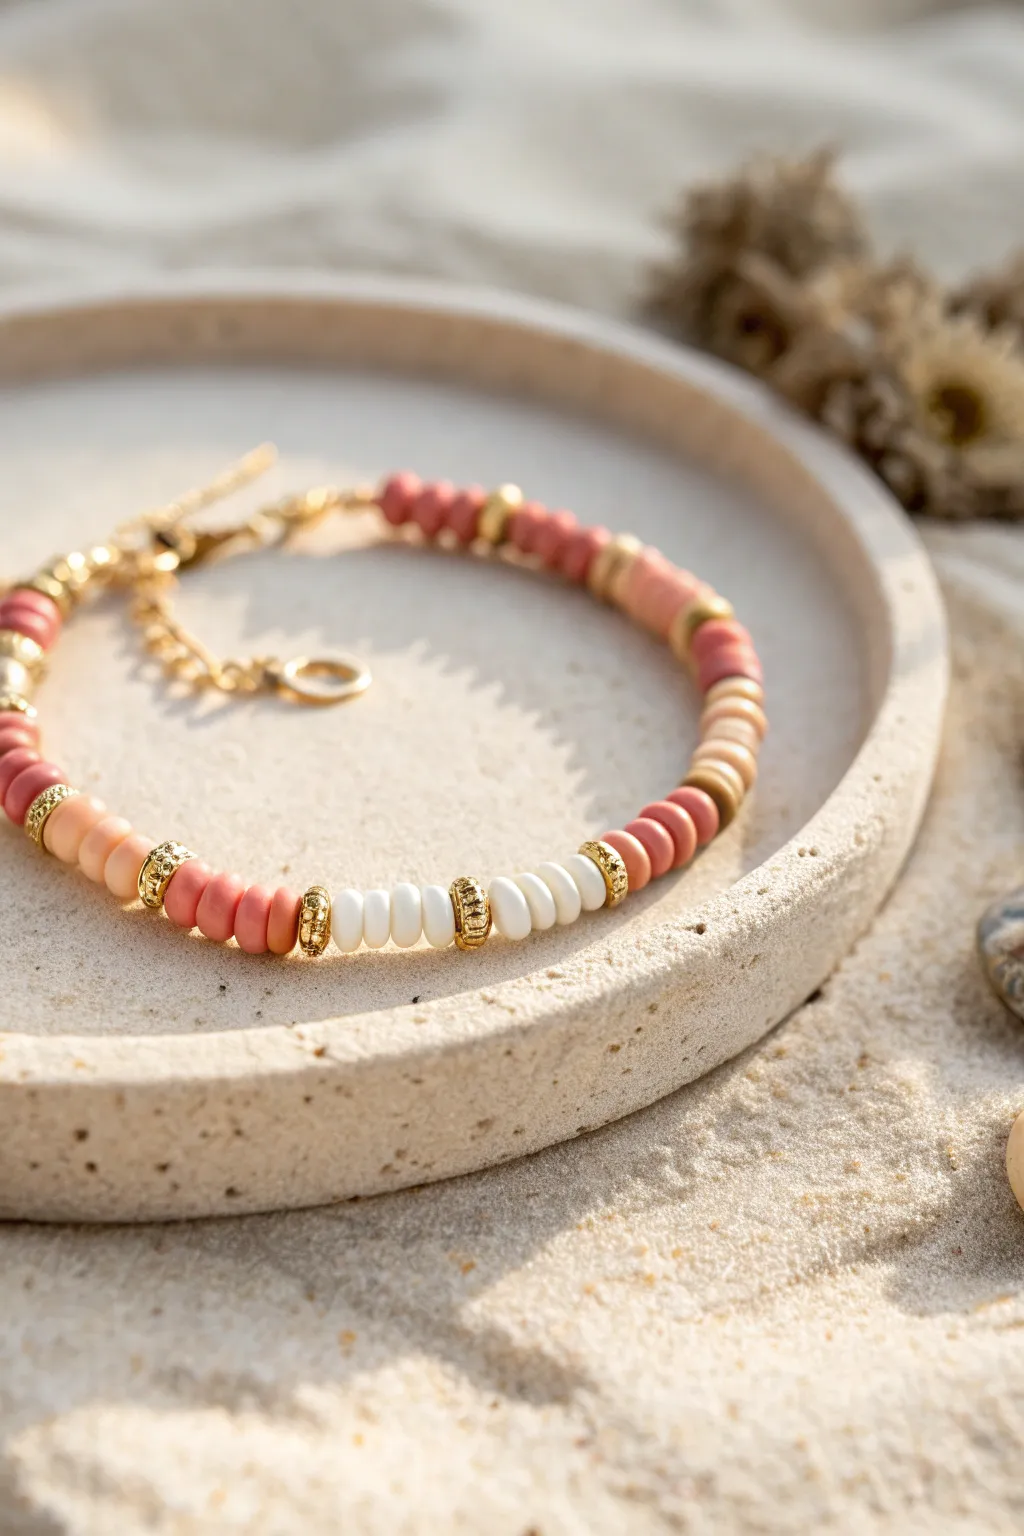
Ocean Teal and White Surf-Inspired Stack
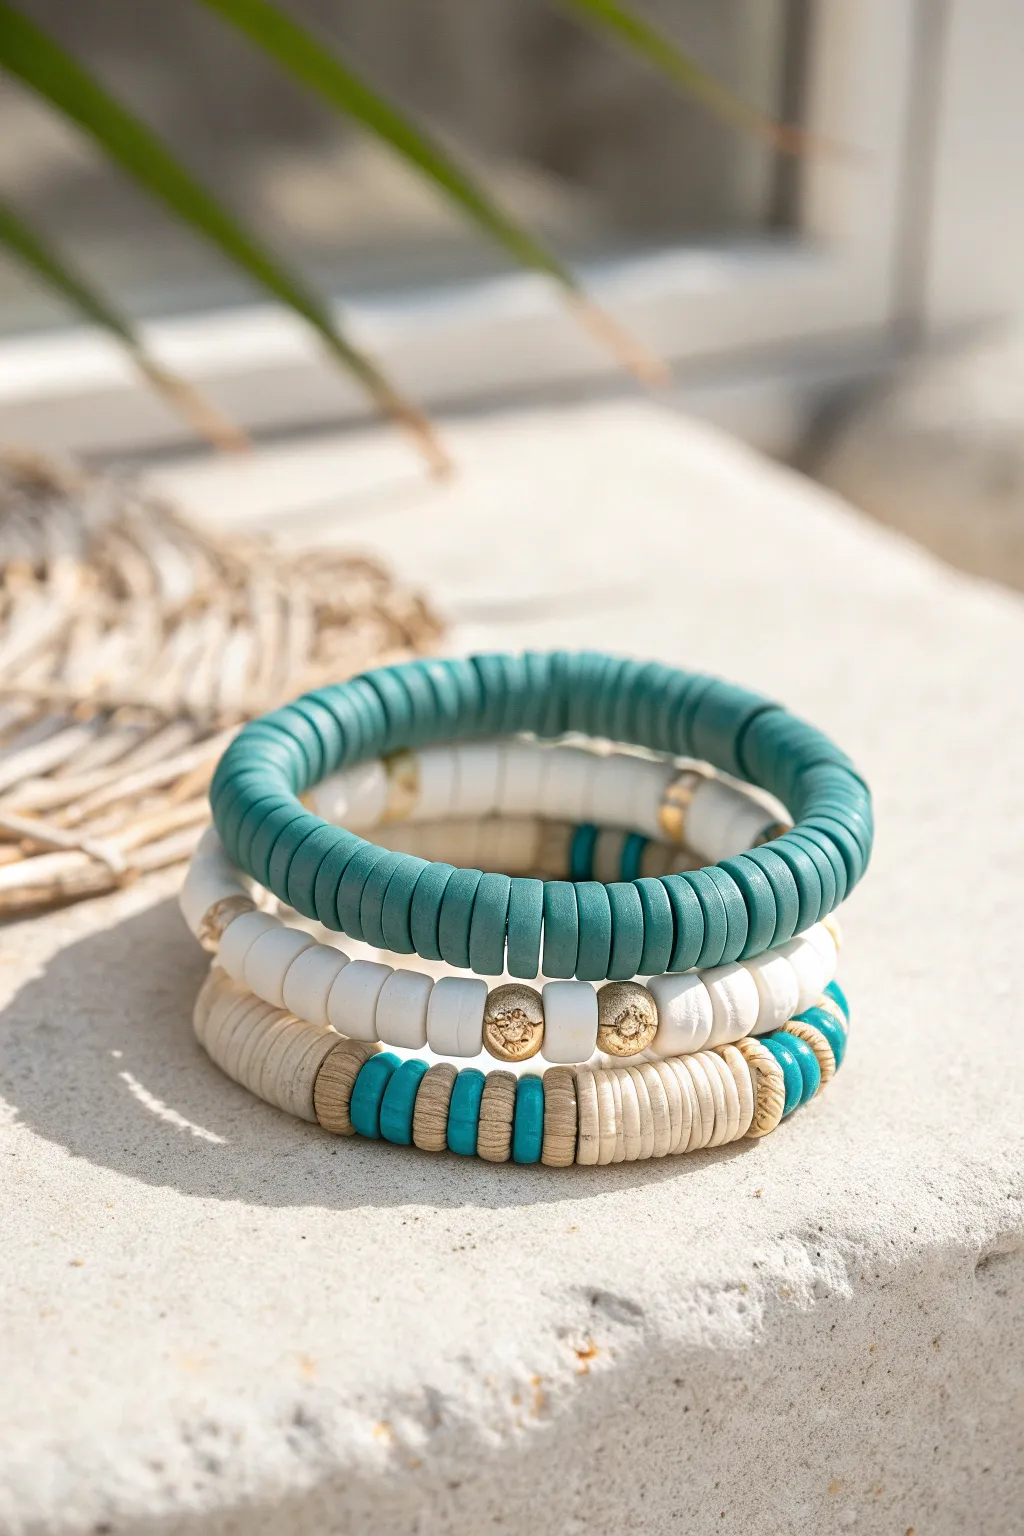
Capture the essence of a tranquil shoreline with this stack of three polymer clay heishi bead bracelets featuring shades of deep teal, sandy beige, and crisp white. Accented with metallic gold touches, this set mimics the interplay of surf, sand, and ocean depths for a perfect summer accessory.
Step-by-Step Guide
Materials
- Polymer clay heishi beads (6mm or 8mm flat disc) in Deep Teal
- Polymer clay heishi beads in Matte White
- Polymer clay heishi beads in Sandy Beige/Tan
- Gold tone metallic spacer beads (round or textured)
- Textured gold accent beads (larger rondelle or nugget style)
- Stretch cord (0.8mm or 1mm thickness)
- Jewelry glue (e.g., E6000 or GS Hypo Cement)
- Scissors
Step 1: The Solid Teal Bangle
-
Measure and Cut:
Begin by wrapping the stretch cord around your wrist to find the comfortable length. Add about 3-4 inches of extra cord to allow plenty of room for knotting later, then cut. -
Pre-stretch the Elastic:
Give the cut piece of cord a few gentle tugs. Pre-stretching helps prevent the bracelet from sagging or loosening immediately after you wear it for the first time. -
String the Base:
Thread the Deep Teal heishi beads onto the elastic continuously. Keep checking the length against your wrist until it fits comfortably but isn’t overly tight. -
Add Minor Accents (Optional):
If desired, stick to a solid color look as shown in the top bracelet, or sneak in one single gold spacer near the knot to hide it later. -
Secure the Knot:
Tie a surgeon’s knot (right over left, left over right twice). Pull tight, add a dab of jewelry glue, and let it set before trimming the tails.
Step 2: The White & Gold Accent
-
Prepare the Cord:
Cut another length of elastic cord, ensuring you have the same excess length for tying as before. -
Start the Pattern:
Begin threading the Matte White heishi beads. Add about 1 to 1.5 inches of solid white beads. -
Insert Gold Texture:
Select two of the larger, textured gold nugget beads. Slide them onto the cord to act as the focal point of this layer. -
Complete the Circle:
Continue stringing the remaining white beads until the bracelet matches the size of the teal one you just finished. -
Check Symmetry:
Before tying, ensure the gold beads sit roughly opposite where your knot will be, so the focal point remains uninterrupted. -
Finalize:
Tie off the bracelet securely with a glue-reinforced knot and trim the excess cord.
Knot Hiding Trick
Use a crimp cover or slide a larger-hole metal bead directly over your knot while the glue is wet to completely hide the join.
Step 3: The Sandy Pattern Mix
-
Pattern Planning:
This bottom layer relies on color blocking. Lay your beads out on a mat first: sections of Sandy Beige separated by small pops of Deep Teal. -
String the Sand Sections:
Thread a long section—about 2 inches—of the Sandy Beige heishi beads onto your third piece of cord. -
Create the Teal Stripe:
Add a small gold spacer, followed by 3-5 Deep Teal beads, and another gold spacer. -
Repeat the Pattern:
Switch back to the Sandy Beige beads for another inch, then repeat the teal stripe sequence. -
Add Variation:
I prefer to vary the length of the beige sections slightly to give it a more organic, washed-up-on-the-shore vibe. -
Close the Stack:
Join the ends of the cord with your standard knotting procedure. Ensure the knot is tight and tucked inside a bead hole if possible. -
Set and Dry:
Allow the glue on all three bracelets to dry completely (usually 24 hours for full cure) before stretching them over your hand.
Curling Beads?
If your heishi beads twist or curl, your cord is likely too tight. Restring loosely—the elastic should pull the beads together, not crush them.
Slip on your new stack and enjoy the breezy, beach-ready vibe they bring to your outfit


Sunset Ombre Bracelet From Coral to Lavender
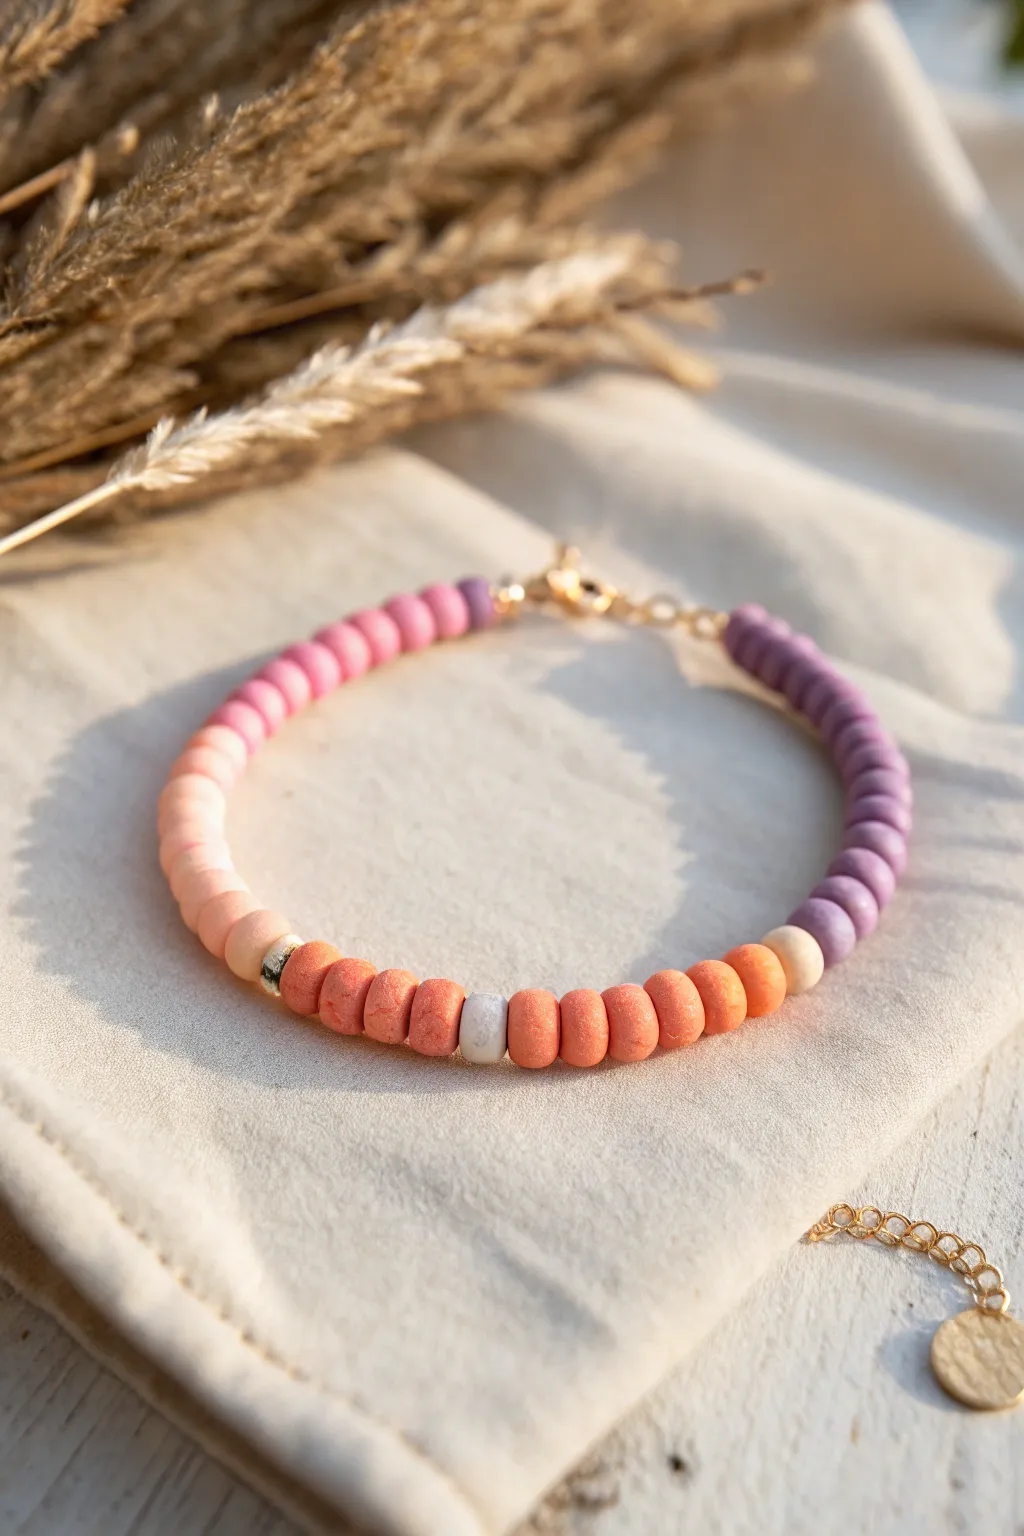
Capture the magic of a summer evening with this warm, gradient-style bracelet featuring handmade polymer clay beads. The design transitions seamlessly from deep coral reds to soft lavender purples, accented by touches of white and gold.
Step-by-Step
Materials
- Polymer clay in coral, light pink, lavender, purple, and white
- Gold spacer beads
- Gold finish lobster clasp and jump rings
- Gold extension chain with charm (optional)
- Strong elastic beading cord (0.8mm)
- Clay roller or pasta machine
- Small circle cutter (approx. 5-6mm)
- Needle tool or toothpick
- Jewelry pliers
- Super glue or jewelry adhesive
- Oven and baking sheet
Step 1: Creating the Clay Disks
-
Condition the Clay:
Begin by thoroughly conditioning each color of polymer clay until it is soft and pliable. I find this prevents cracking later on. -
Roll Flat Sheets:
Roll each color out into a thin, even sheet. Aim for a thickness of about 2-3mm. A pasta machine set to a medium setting works perfectly for consistent thickness. -
Cut the Circles:
Using your small circle cutter, punch out numerous discs from each color sheet. You will need roughly 10-15 discs of each main color for a standard wrist size. -
Make the Holes:
Use a needle tool or a toothpick to carefully poke a hole directly in the center of each clay disc. Wiggle the tool slightly to ensure the hole is large enough for your cord. -
Bake the Beads:
Arrange your clay discs on a baking sheet lined with parchment paper or cardstock. Bake according to the manufacturer’s instructions for your specific brand of clay—usually around 275°F (135°C) for 15-30 minutes. -
Cool Down:
Allow the beads to cool completely before handling them. They harden fully as they cool.
Sticky Situation?
If your clay sticks to the cutter, dip the cutter into a little bit of cornstarch or water before pressing it into the clay sheet.
Step 2: Designing the Gradient
-
Lay Out the Pattern:
Before stringing, lay your cooled beads on a bead board or cloth to establish the ombre transition. Start with the deepest purple. -
Create the Transition:
Move from deep purple to lavender, then to pink, light pink, and finally into the coral and orange tones. The goal is a smooth visual fade. -
Add Accents:
Insert a single white bead between the coral and orange sections to break up the warmth. Add a gold spacer bead near the transition points for a little metallic sparkle.
Step 3: Assembly
-
Cut the Cord:
Cut a piece of elastic cord about 10 inches long so you have plenty of room to tie knots. -
String the Beads:
Thread the beads onto the cord following your laid-out pattern. Keep the tension loose so the beads can move slightly. -
Attach the Clasp Hardware:
Thread one end of the cord through the loop of a jump ring attached to the lobster clasp. Thread the other end through a jump ring attached to the extension chain. -
Tie the Knot:
Bring the cord ends together and tie a strong surgeon’s knot or a square knot. Pull tight to secure the beads. -
Secure with Glue:
Place a tiny drop of super glue or jewelry adhesive on the knot. I usually let this dry for a minute while holding it taut. -
Hide the Knot:
If hole size permits, gently pull the knot inside one of the adjacent beads to hide it. -
Trim Excess:
Trim the excess cord ends close to the knot, being careful not to cut the main cord. -
Add Charms:
Using your pliers, attach a small gold disc charm to the end of the extension chain for a professional finish.
Texture Trick
For a rustic, stone-like texture on the beads (like in the photo), gently rub the raw clay surface with a coarse sanding sponge before cutting.
Wear your beautiful sunset creation alone or stack it with gold bangles for a complete summer look

The Complete Guide to Pottery Troubleshooting
Uncover the most common ceramic mistakes—from cracking clay to failed glazes—and learn how to fix them fast.
Citrus Slice Beads for a Fresh Summer Pop
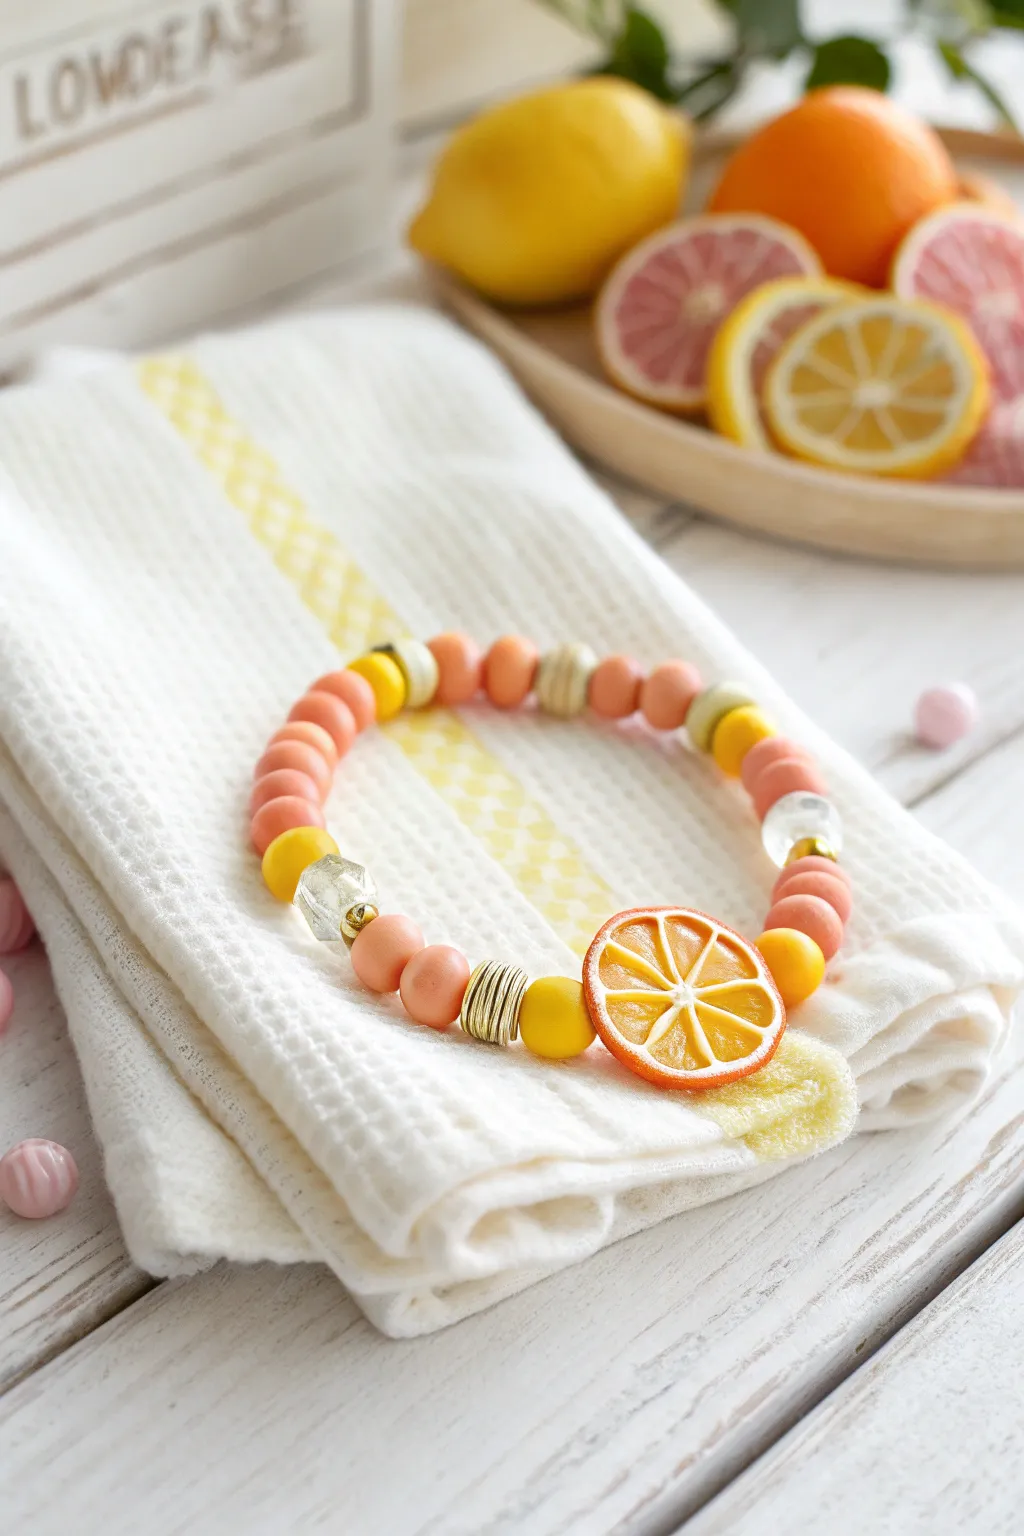
Capture the refreshing essence of summer with this vibrant beaded bracelet featuring a realistic orange slice focal bead. The mix of coral and yellow matte beads combined with gold accents creates a warm, sunny accessory perfect for beach days.
Detailed Instructions
Materials
- Polymer clay (translucent orange, opaque orange, white, yellow)
- Small round cutter or circle template
- Blade or craft knife
- Needle tool or bead piercing pins
- Matte round beads (8mm-10mm) in coral/peach
- Matte round beads (8mm-10mm) in bright yellow
- Gold spacer beads or gold coil beads
- Clear or frosted faceted glass beads
- Strong elastic beading cord (0.8mm)
- Super glue or jewelry cement
Step 1: Creating the Citrus Slice Cane
-
Form the segments:
Start by conditioning your translucent orange clay. Roll it into a thick log, about 1 inch in diameter. This will be the juicy interior of your fruit slice. -
Wrap the log:
Roll out a very thin sheet of white polymer clay. Wrap this sheet around your orange log, trimming the excess so the seams meet perfectly without overlapping. -
Shape the segments:
Gently squeeze and roll the log to elongate it slightly, then use your blade to cut the log into 8 equal wedges. These will become the individual fruit segments. -
Reassemble the fruit:
Place a thin sheet of white clay between the wedges as you reassemble the log into a round shape. This creates the pith lines separating the segments. -
Add the rind:
Wrap the entire reassembled log in a thin layer of white clay, followed by a slightly thicker layer of opaque orange clay textured slightly with a toothbrush or sandpaper for a peel effect.
Uneven Slices?
If your cane squishes when slicing, chill it in the fridge for 20 minutes first. Cold clay is much firmer and holds its shape better against the blade.
Step 2: Shaping the Focal Bead
-
Reduce the cane:
Gently squeeze and roll the cane from the center outwards to reduce its diameter to about 1.5 inches. Let the cane rest for 15 minutes to firm up before slicing. -
Slice the bead:
Use a sharp tissue blade to cut a slice about 4-5mm thick. I find a consistent, straight downward motion prevents distorting the pattern. -
Drill the hole:
Carefully pierce a hole through the side of the slice using a bead pin. Ensure the hole is low enough to secure the bead but high enough not to break the edge. -
Bake:
Bake the slice according to your clay manufacturer’s instructions (usually 275°F for 15-30 minutes). Allow it to cool completely.
Level Up: Glossy Finish
After baking, coat just the ‘juicy’ inner segments of your fruit slice with UV resin or gloss glaze. This makes the fruit look wet and freshly cut.
Step 3: Assembling the Bracelet
-
Prepare the cord:
Cut a length of elastic cord about 10 inches long. Pre-stretch the cord by pulling it firmly a few times to prevent it from sagging later. -
Start the pattern:
Begin threading beads onto the cord. Start with a yellow matte bead, followed by a gold coil spacer to frame your focal piece. -
Add the focal bead:
Thread your baked and cooled citrus slice onto the cord. Follow it immediately with another gold coil spacer and a yellow bead to mirror the other side. -
Create the bead strand:
Continue stringing beads, alternating between the coral/peach matte beads. Every few beads, insert a clear faceted glass bead or a decorative striped bead for visual interest. -
Check the fit:
Wrap the strand around your wrist to check the length. Add or remove coral beads until it fits comfortably comfortably without being too tight. -
Secure the knot:
Tie a surgeon’s knot (a square knot with an extra loop through). Pull the elastic tight to secure the knot firmly. -
Finish the piece:
Apply a tiny drop of super glue to the knot. once dry, trim the excess cord and gently tuck the knot inside one of the larger beads to hide it.
Now you have a refreshing burst of color to wear all summer long
Cowrie Shell and Sea Life Charm Bracelet Mix
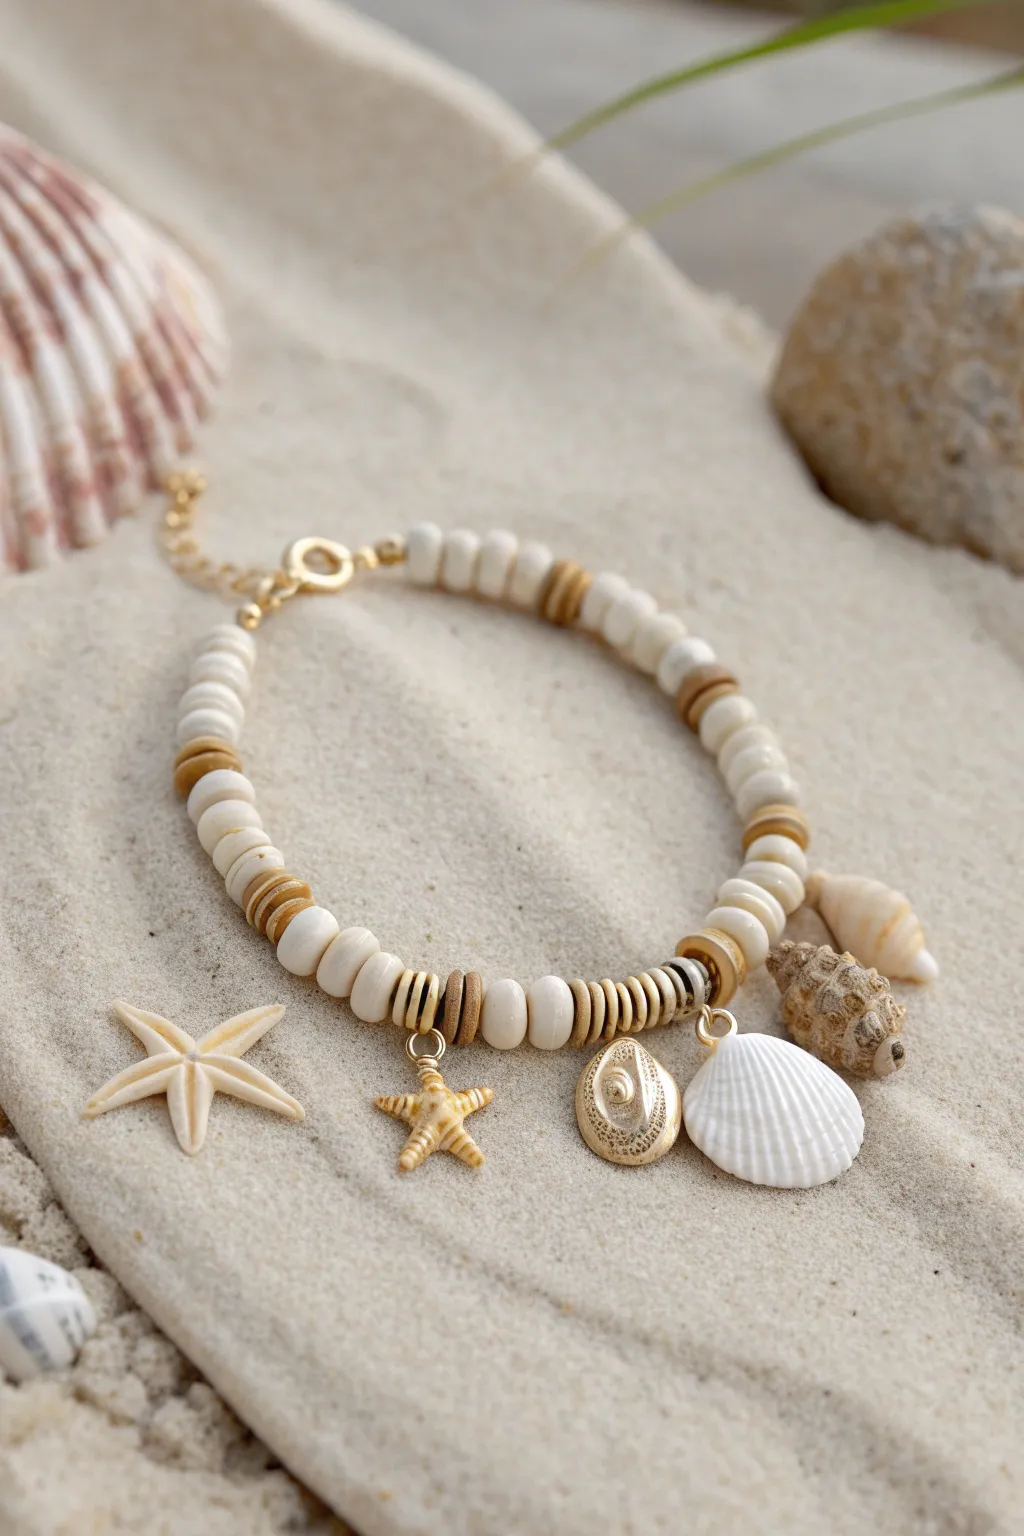
Capture the essence of a beach day with this elegant anklet or bracelet design. Mixing matte white clay beads with warm wood tones and delicate sea life charms creates a sophisticated, shore-side accessory perfect for summer wear.
Step-by-Step Guide
Materials
- White polymer clay heishi beads (approx. 4-6mm)
- Tan or natural wood heishi/spacer beads (approx. 4-6mm)
- Small gold-tone flat spacer beads or washers
- Gold-tone jump rings (4mm and 6mm)
- Gold-tone starfish charm (small)
- Gold-tone oval shell or coin charm
- White scallop shell charm (with top loop)
- Gold-tone clasp (lobster claw or spring ring)
- Gold-tone extension chain
- Beading wire (flexible, 7-strand or 19-strand recommended)
- 2 Crimp tubes (2mm)
- 2 Crimp bead covers (gold-tone, optional)
- Jewelry pliers (flat nose and chain nose)
- Crimping pliers
- Wire cutters
Step 1: Planning and Preparation
-
Measure your wrist:
Before cutting any wire, measure your wrist or ankle. Add about an inch to this measurement to account for the thickness of the beads and ease of movement. -
Cut the beading wire:
Cut a length of flexible beading wire about 3-4 inches longer than your final desired length. This extra room prevents beads from sliding off while you work. -
Plan your pattern:
Lay your beads out on a mat to visualize the rhythm. Looking at the example, the pattern relies on blocks of white clay beads separated by accents of tan wood and gold spacers.
Stiff Bracelet?
If your finished piece feels rigid and doesn’t drape well, you likely pulled the wire too tight before the final crimp. Leave a tiny bit of slack.
Step 2: Stringing the Core
-
Secure the first end:
Thread a crimp tube onto one end of the wire, followed by the extension chain. Loop the wire back through the crimp tube. -
Crimp the wire:
Use your crimping pliers to flatten or fold the crimp tube securely, locking the chain in place. Trim the excess tail of wire close to the crimp. -
Start the bead sequence:
Begin stringing your beads. Start with a sequence of about 5-6 white clay heishi beads to form a solid base section. -
Add the first accent:
Slide on a tan wood spacer, followed by a larger white bead or gold washer, and another tan spacer. This creates the striped visual break seen in the design. -
Continue the rhythm:
Return to stringing a block of 4-8 white clay beads. I like to vary these lengths slightly for a more organic, natural feel. -
Create the charm section:
As you approach the center of the bracelet, you need to create the focal area with the mixed spacers. String a pattern of: tan spacer, gold washer, thin white bead, gold washer, tan spacer.
Personalize It
Try swapping the white heishi beads for soft turquoise or coral clay beads to add a pop of color while keeping the beachy vibe.
Step 3: Adding the Charms
-
Prepare the charms:
Open your jump rings using two pairs of pliers. Gently twist the ring ends apart sideways (never pull them apart). Attach each charm—the starfish, gold oval, and shell—to its own jump ring. -
String the starfish:
Slide the jump ring holding the small gold starfish directly onto the beading wire. Place it after a gold washer for a clean look. -
Build the center gap:
Add a few more mixed beads—perhaps a white clay bead sandwiched by two tan wood spacers—to create space between the charms. -
Add the gold oval:
Slide the jump ring with the gold oval charm onto the wire. -
Attach the white shell:
Add a small cluster of thin gold spacers or a single heishi bead, then slide on the jump ring holding the white scallop shell. Ensure the charms hang facing the same direction. -
Finish the bead stringing:
Complete the rest of the bracelet by mirroring the pattern you started with: blocks of white clay beads interspersed with the occasional tan and gold accent sections.
Step 4: Finishing Touches
-
Check the fit:
Wrap the unfinished strand around your wrist to verify the size. Add or remove white spacer beads at the end if you need to adjust the length. -
Add the clasp:
Thread a crimp tube onto the remaining wire tail, followed by the jump ring attached to your clasp. Pass the wire back through the crimp tube. -
Tighten and crimp:
Pull the wire snug so there are no large gaps between beads, but not so tight that the bracelet becomes stiff. Crimp the tube securely. -
Trim and cover:
Trim the excess wire. If you have crimp covers, gently close them over the crushed crimp tubes using pliers for a polished, professional gold finish.
Now you have a stunning piece of jewelry that carries the calm of the ocean wherever you go


What Really Happens Inside the Kiln
Learn how time and temperature work together inside the kiln to transform clay into durable ceramic.
Nautical Stripe Color Blocks in Navy, Red, and White
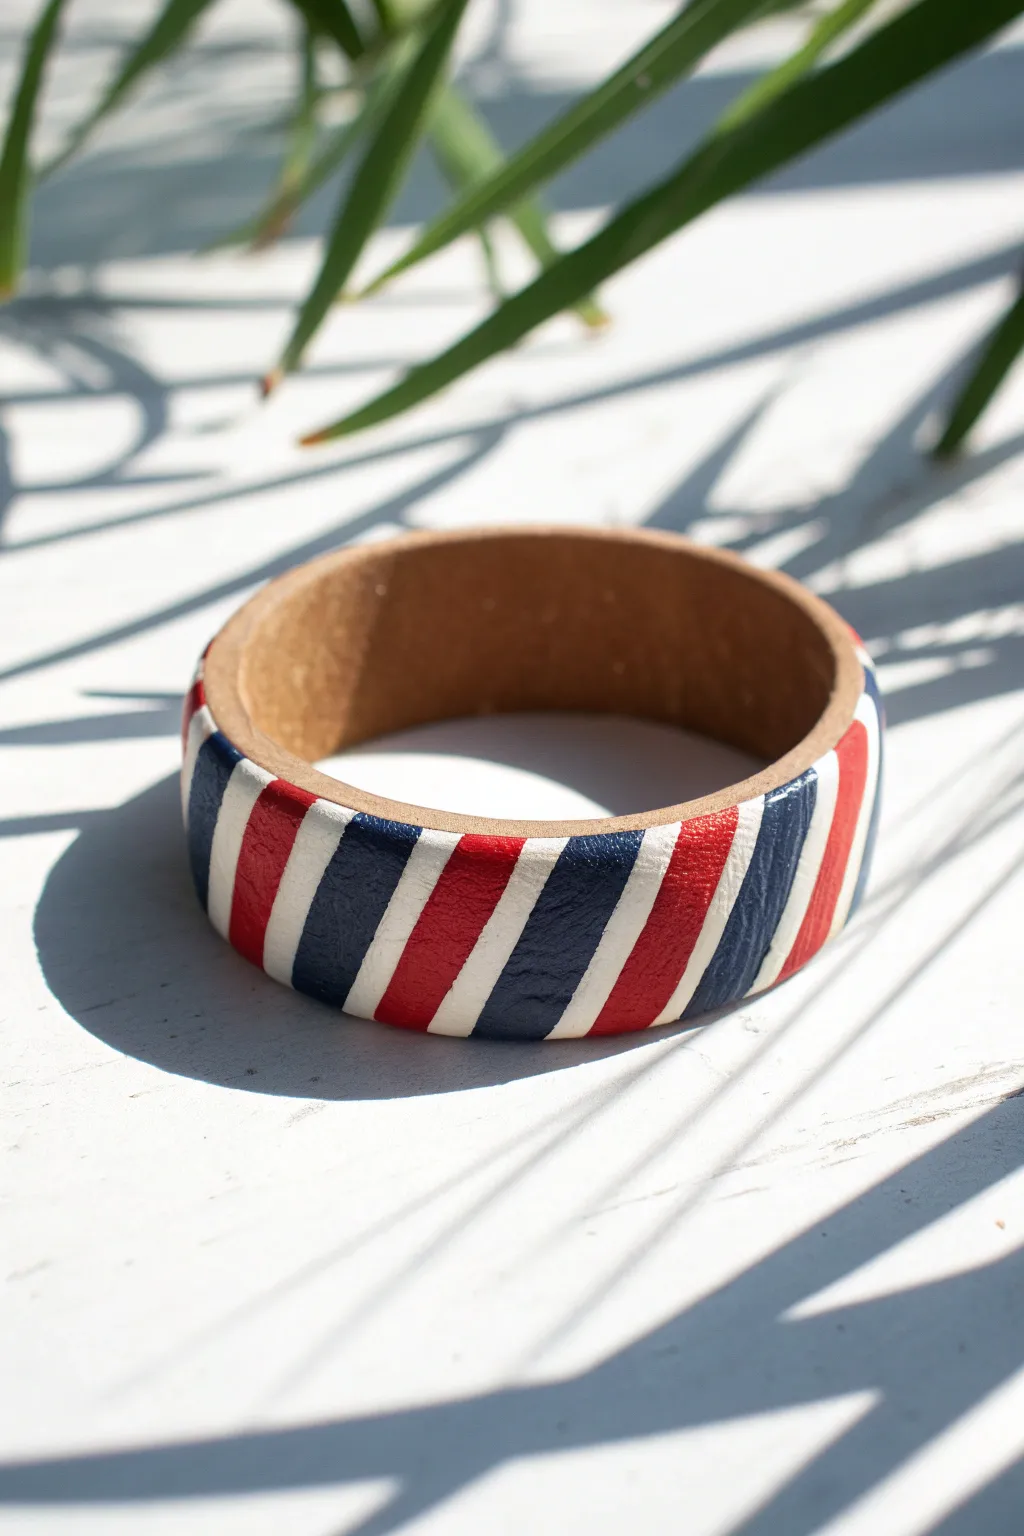
Channel sleek maritime vibes with this bold, patriotic bangle that pairs perfectly with summer linens. Using a wooden bangle base ensures structural stability while the polymer clay exterior provides that smooth, professional finish in classic navy, red, and white.
How-To Guide
Materials
- Wide wooden bangle base (flat exterior)
- Polymer clay (Navy Blue, Bright Red, White)
- Liquid polymer clay (clear)
- Pasta machine or acrylic roller
- Flexible tissue blade
- Craft knife
- Ruler
- Medium grit sandpaper
Step 1: Preparation
-
Condition the Clay:
Begin by thoroughly conditioning your navy, red, and white polymer clay separately until each is soft and pliable. -
Roll Specific Thicknesses:
Run each color through your pasta machine on a medium setting (around 2mm-3mm). I prefer the white to be just a hair thicker to prevent the darker colors from shadowing through if you decide to layer them later. -
Prepare the Base:
Lightly sand the exterior of your wooden bangle to create a gripping surface. -
Apply Adhesive:
Smear a very thin, even layer of clear liquid polymer clay all around the outside of the wooden bangle. This acts as the glue between the wood and the decorative clay.
Uneven Strip Widths?
If your hand-cut strips vary too much, tape two blades together with a spacer (like cardstock) in between. This creates a custom double-cutter for perfectly consistent strip widths every time
Step 2: Creating the Stripes
-
Cut Uniform Strips:
Using a ruler and a sharp craft knife or tissue blade, cut long, even strips of each color. Aim for widths of about 1/2 inch for the colored sections and slightly narrower 1/4 inch strips for the white dividers. -
Measure the Angle:
Decide on your diagonal angle. Place the first navy strip on the bangle at a 45-degree slant to test the look. -
Begin Assembly:
Press the first navy strip firmly onto the bangle. Trim the overhanging clay at the top and bottom edges flush with the wood rim. -
Add the Divider:
Place a thin white strip directly next to the navy one, ensuring the edges touch perfectly without overlapping. Gently smooth the seam with your finger. -
Place the Red Strip:
Add a red strip next to the white one, maintaining that parallel 45-degree angle. Press firmly to adhere it to the liquid clay base. -
Repeat the Pattern:
Continue the pattern (Navy, White, Red, White) around the entire circumference of the bangle. Work slowly to keep the lines straight. -
Manage the Seam:
When you circle back to the start, you may need to trim the final strip width slightly to make the pattern fit seamlessly.
Go Metallic
Swap the plain white strips for metallic gold or silver clay. The shimmer against the matte navy and red adds a high-end, jewelry-store finish perfect for evening wear
Step 3: Finishing Touches
-
Smooth the Surface:
Gently roll the bangle on your work surface to flatten the strips and ensure they are all level with one another. This helps fuse the seams. -
Texture Option:
The example image has a subtle leather-like texture. To mimic this, gently press a piece of coarse sandpaper or a texture sponge over the clay surface before baking. -
Trim Edges:
Run your blade along the top and bottom rims of the bangle one last time to ensure absolutely clean, flush edges. -
Bake:
Bake the bracelet according to your specific clay manufacturer’s instructions (usually 275°F for 30-45 minutes). Tent with foil to prevent white strips from scorching. -
Cool Down:
Let the bangle cool completely inside the oven to prevent thermal shock cracks. -
Seal (Optional):
If you want extra durability, apply a thin coat of matte polyurethane varnish to protect the white clay from getting dirty.
Enjoy styling this crisp nautical accessory with your favorite summer whites
Personalized Summer Words With Letter Beads

Capture the warmth of the season right on your wrist with this vibrant, text-focused bracelet stack. Featuring flat Heishi clay beads in a sunset-inspired palette and bold letter beads, this project creates a personalized accessory perfect for beach days.
Detailed Instructions
Materials
- Polymer clay Heishi beads (disc beads): Red-orange
- Polymer clay Heishi beads: Teal/Mint
- Polymer clay Heishi beads: Bright Yellow
- White circular alphabet beads with black letters (S, U, N, N, Y)
- Strong elastic beading cord (0.8mm recommended)
- Scissors or jewelry snips
- Super glue or jewelry adhesive
- Beading needle (optional but helpful)
- Tape or a bead stopper
Step 1: Preparation
-
Measure your wrist:
Wrap a piece of string around your wrist to find your size, then add about 1/2 inch to that measurement for a comfortable fit. Cut your elastic cord to roughly 10 inches to give yourself plenty of room for tying knots later. -
Secure the end:
Place a piece of tape or a bead stopper on one end of your elastic cord immediately. This prevents your beads from sliding off while you design your pattern. -
Plan your word:
Find your ‘S’, ‘U’, ‘N’, ‘N’, and ‘Y’ beads. Lay them out on your work surface to ensure you have the correct orientation and spacing before you start stringing.
Sticky Situation?
If the elastic knot keeps slipping undone before you can glue it, try dabbing a tiny bit of clear nail polish on the knot as a temporary hold while you tie.
Step 2: Stringing the Design
-
Start with color blocking:
Begin stringing the teal/mint clay disc beads first. String enough to cover about one-third of your wrist circumference. I usually aim for about 2 inches of solid color here. -
Add the yellow accent:
Transition into the bright yellow beads. String a slightly shorter section of yellow, perhaps about an inch, to create a bright pop of color leading into the centerpiece. -
Insert the word:
Thread your letter beads onto the cord in the correct order: S-U-N-N-Y. Double-check that they are facing the right way up relative to how you want to read them on your wrist. -
Finish with warm tones:
On the other side of the word, switch to the red-orange beads. String these until the bracelet reaches your desired total length. The asymmetry of the colors is part of the charm, so don’t worry about matching the lengths exactly to the teal side. -
Check the fit:
Carefully wrap the unfinished bracelet around your wrist to check the sizing. If it feels too tight or too loose, add or remove a few clay discs from the ends as needed.
Designer Details
Make a matching second bracelet using just the yellow and red-orange beads in a solid pattern to create the stacked look seen in the photo.
Step 3: Finishing Touches
-
Pre-stretch the elastic:
Before tying, give the ends of the elastic a gentle pull. This ‘pre-stretching’ helps prevent the bracelet from sagging or loosening up immediately after you wear it. -
Tie the first knot:
Remove the tape or stopper. Bring the two ends together and tie a standard overhand knot, pulling it tight against the beads without causing them to boucle. -
Secure with a surgeon’s knot:
For extra security, tie a surgeon’s knot. This is just like a regular square knot, but you loop the elastic through the knot an extra time before pulling tight. -
Apply adhesive:
Place a tiny drop of super glue or jewelry adhesive directly onto the knot. Be precise so you don’t glue the beads to the cord, which can make the bracelet stiff. -
Let it cure:
Allow the glue to dry completely according to the package instructions. This usually takes just a few minutes, but patience ensures a long-lasting bracelet. -
Hide the knot:
Trim the excess elastic ends close to the knot. If the hole of one of your adjacent clay beads is large enough, gently slide the bead over the knot to hide it completely.
Now you have a custom piece of summer jewelry ready to mix and match with your favorite outfits

TRACK YOUR CERAMIC JOURNEY
Capture glaze tests, firing details, and creative progress—all in one simple printable. Make your projects easier to repeat and improve.
Golden-Hour Sparkle With Metal Spacer Beads
Capture the warmth of golden hour with this stunning beaded bracelet that combines matte polymer clay discs with textured gold accents. Its ombre-inspired palette of terracotta, peach, and cream evokes sun-drenched beaches and endless summer days.
Step-by-Step
Materials
- 6mm Polymer clay heishi beads (Terracotta/Brick Red)
- 6mm Polymer clay heishi beads (Peach/Coral)
- 6mm Polymer clay heishi beads (Cream/Off-White)
- Gold tone textured metal spacer beads (6mm rondelle or wheel shape)
- Gold tone smooth round spacer beads (3-4mm)
- Elastic beading cord (0.8mm clear)
- Gold tone crimp bead covers (optional)
- Gold tone jump rings (4mm)
- Gold tone lobster clasp
- Gold tone extension chain (with charm)
- Jewelry glue (like G-S Hypo Cement)
- Scissors or jewelry wire cutters
- Flat nose pliers
- Beading board or measuring tape
Step 1: Planning and Stringing
-
Measure the cord:
Cut a piece of elastic cord approximately 10-12 inches long. This generous length gives you plenty of room to tie secure knots without struggling against tension. -
Pre-stretch the elastic:
Holding the cord firmly at both ends, give it a few gentle tugs. Pre-stretching helps prevent the bracelet from loosening up over time once you start wearing it. -
Secure the end:
Attach a piece of tape or a bead stopper to one end of the cord so your beads don’t slide off while you work. I prefer using a piece of masking tape folded over the end for a quick fix. -
Establish the pattern:
The pattern follows a distinct rhythm: sections of solid color separated by the textured gold spacers. A typical section consists of 5-7 heishi clay beads of the same color. -
Start with the cream section:
Thread on 5 cream colored heishi beads. Follow this group with one textured gold rondelle spacer bead. -
Transition to peach:
Next, string on 3 to 5 peach-colored heishi beads. This creates a soft gradient effect moving away from the white center section. -
Add a gold accent:
Place another textured gold spacer bead after the peach section. These metal accents are key to achieving that ‘golden hour’ sparkle. -
Build the terracotta sections:
Thread on a longer section of terracotta (brick red) heishi beads—about 7 or 8. Following this, add a small, smooth gold round bead, then another section of terracotta. -
Continuing the pattern:
Repeat the sequence around the wrist, alternating your color blocks. For the design shown, you want the white section to be the focal point, flanked by the gradient colors. -
Check sizing:
Wrap the strung beads around your wrist to check the fit. Add or remove beads from the back section (usually the darkest color) until it sits comfortably.
Step 2: Finishing Touches
-
Prepare for closure:
Instead of a simple knot, we will add hardware for a professional finish. Thread a crimp bead (or just knot directly if keeping it simple) onto one end. -
Attach the clasp:
Thread the cord through the loop of the lobster clasp, then loop it back through your crimp bead (if using) or tie a secure surgeon’s knot tight against the last bead. -
Secure the knot:
Apply a tiny drop of jewelry glue exclusively to the knot. Be careful not to get glue on the clay beads as it can mar their finish. Let it dry for a minute. -
Add the extension chain:
On the opposite end of the bracelet, repeat the tying process, this time attaching a jump ring connected to your gold extension chain. -
Clean up ends:
Trim any excess elastic cord close to the knot using your sharp scissors or cutters. -
Hide the mechanics:
If you have large enough holes in your end beads, gently tug the knot so it slides inside the nearest bead, hiding it from view. -
Final inspection:
Give the bracelet a gentle tug to ensure everything is secure and the pattern flows smoothly without awkward gaps.
Knot Slipping?
If using elastic without crimps, tie a surgeon’s knot (loop twice) and pull tight. Add a drop of GS Hypo Cement, let cure for 15 mins, then hide inside a bead.
Level Up: Charm Addition
Attach a small gold seashell or starfish charm to the extension chain’s end link. This adds movement and reinforces the summery beach aesthetic.
Slip on your new creation and enjoy the warmth it brings to your summer outfit
Neon Confetti Pattern for Poolside Energy
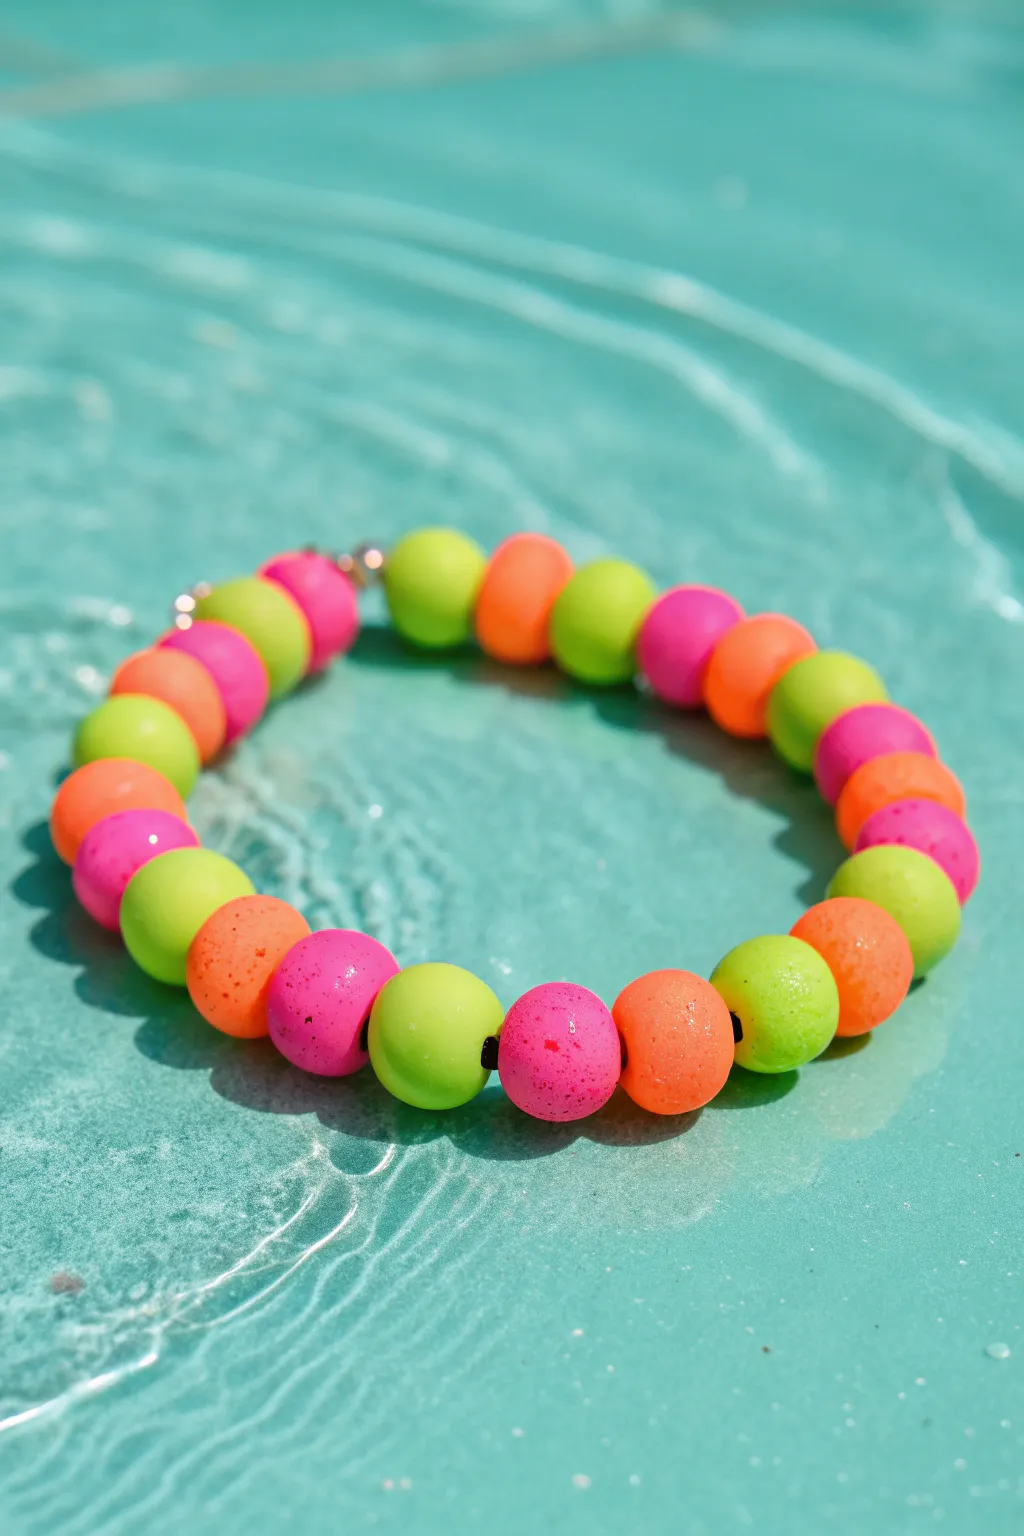
These vibrant neon beads feature a fun, speckled confetti finish that perfectly captures the energy of summer days by the pool. The contrast between the bright lime, hot pink, and zesty orange creates a playful accessory that looks amazing against sun-kissed skin.
Step-by-Step Tutorial
Materials
- Polymer clay in neon lime green
- Polymer clay in neon hot pink
- Polymer clay in neon orange
- Acrylic paint (dark pink or reddish-orange for speckles)
- Old toothbrush or stiff bristle brush
- Bead rolling tool or clear acrylic block
- Toothpicks or bead pins
- Baking sheet with parchment paper
- Elastic stretch cord (0.7mm or 0.8mm)
- Super glue or jewelry cement
- Gloss glaze (optional for water resistance)
- Small jump ring (optional)
- Small metal crimp bead or decorative bead (optional to hide knot)
Step 1: Shaping the Base Beads
-
Condition the Clay:
Start by warming up your designated colors of polymer clay—neon lime, hot pink, and orange. Knead each color separately in your hands until they are soft, pliable, and easy to work with. -
Portion Control:
Pinch off small pieces of clay from each color block. Aim for pieces that are roughly the size of a large pea or a chickpea to keep the bracelet uniform. -
Create Uniform Spheres:
Roll each pinch of clay between your palms to form a rough ball. For perfectly round beads, I like to use a bead rolling tool or gently roll them under a clear acrylic block on a flat surface. -
Check Consistency:
Line up your spheres to ensure they are all approximately the same diameter. You’ll need about 20-25 beads depending on your wrist size.
Splatter Control
To get tiny mist-like speckles instead of big blobs, keep your brush relatively dry and stand further back from the beads when flicking the bristles.
Step 2: Creating the Confetti Effect
-
Prepare Your Work Station:
Lay down some scrap paper or a cardboard box to catch overspray. This part can get a little messy. -
Dilute the Paint:
Squeeze a small amount of dark pink or reddish-orange acrylic paint onto a palette. add a tiny drop of water to thin it just slightly so it flicks easily. -
Load the Brush:
Dip just the tips of an old toothbrush or stiff bristle brush into the paint. Test the splatter pattern on a scrap piece of paper first to ensure the drops aren’t too large. -
Splatter the Beads:
Hold the brush a few inches above your row of unbaked clay beads. Run your thumb across the bristles to flick tiny specks of paint onto the clay surface. -
Rotate and Repeat:
Once the top side is speckled, gently roll the beads over to expose the clean sides and repeat the splattering process until the coverage is even. -
Let Paint Dry:
Allow the paint speckles to dry completely on the raw clay before handling them again to avoid smearing the pattern.
Step 3: Piercing and Baking
-
Pierce the Holes:
Gently twist a toothpick or bead pin through the center of each bead. Twist as you push through to prevent squashing the round shape. -
Smooth the Exit:
Check the exit hole on each bead; if the clay has pushed out, gentle tap it back down with your finger for a clean edge. -
Bake:
Arranged the pierced beads on a parchment-lined baking sheet. Bake according to your polymer clay package instructions (usually 275°F/135°C for 15-30 minutes). -
Cool Down:
Let the beads cool completely on the tray before touching them. They harden fully as they cool. -
Optional Glazing:
If you plan to wear this in the pool like the photo, apply a coat of water-resistant gloss glaze to seal the paint speckles.
Texture Twist
Mix gritty black pepper or dried used coffee grounds into the clay before rolling for a natural, embedded speckled look without using paint.
Step 4: Assembly
-
Measure the Cord:
Cut a piece of elastic cord about 10 inches long. Pre-stretch the elastic by pulling it gently a few times; this prevents the bracelet from stretching out later. -
Create the Pattern:
Thread your beads onto the elastic. Follow the pattern shown: Lime, Orange, Pink, Lime, Orange, Pink. Repeat this sequence for the entire length. -
Check the Fit:
Wrap the strand around your wrist to check the sizing. Add or remove beads as needed for a comfortable fit. -
Add Accents:
Thread on a small metal spacer bead or a crimp bead at the end if you want to hide the knot later. -
Tie the Knot:
Tie a secure surgeon’s knot (right over left, left over right). Pull the elastic tight to secure the tension. -
Secure and Trim:
Add a tiny drop of super glue to the knot. Let it dry, then trim the excess cord ends close to the knot. Hide the knot inside a bead if possible.
Slip on your colorful creation and enjoy the bright pop of neon all summer long
Festival Bracelet With a Tassel or Pom Charm
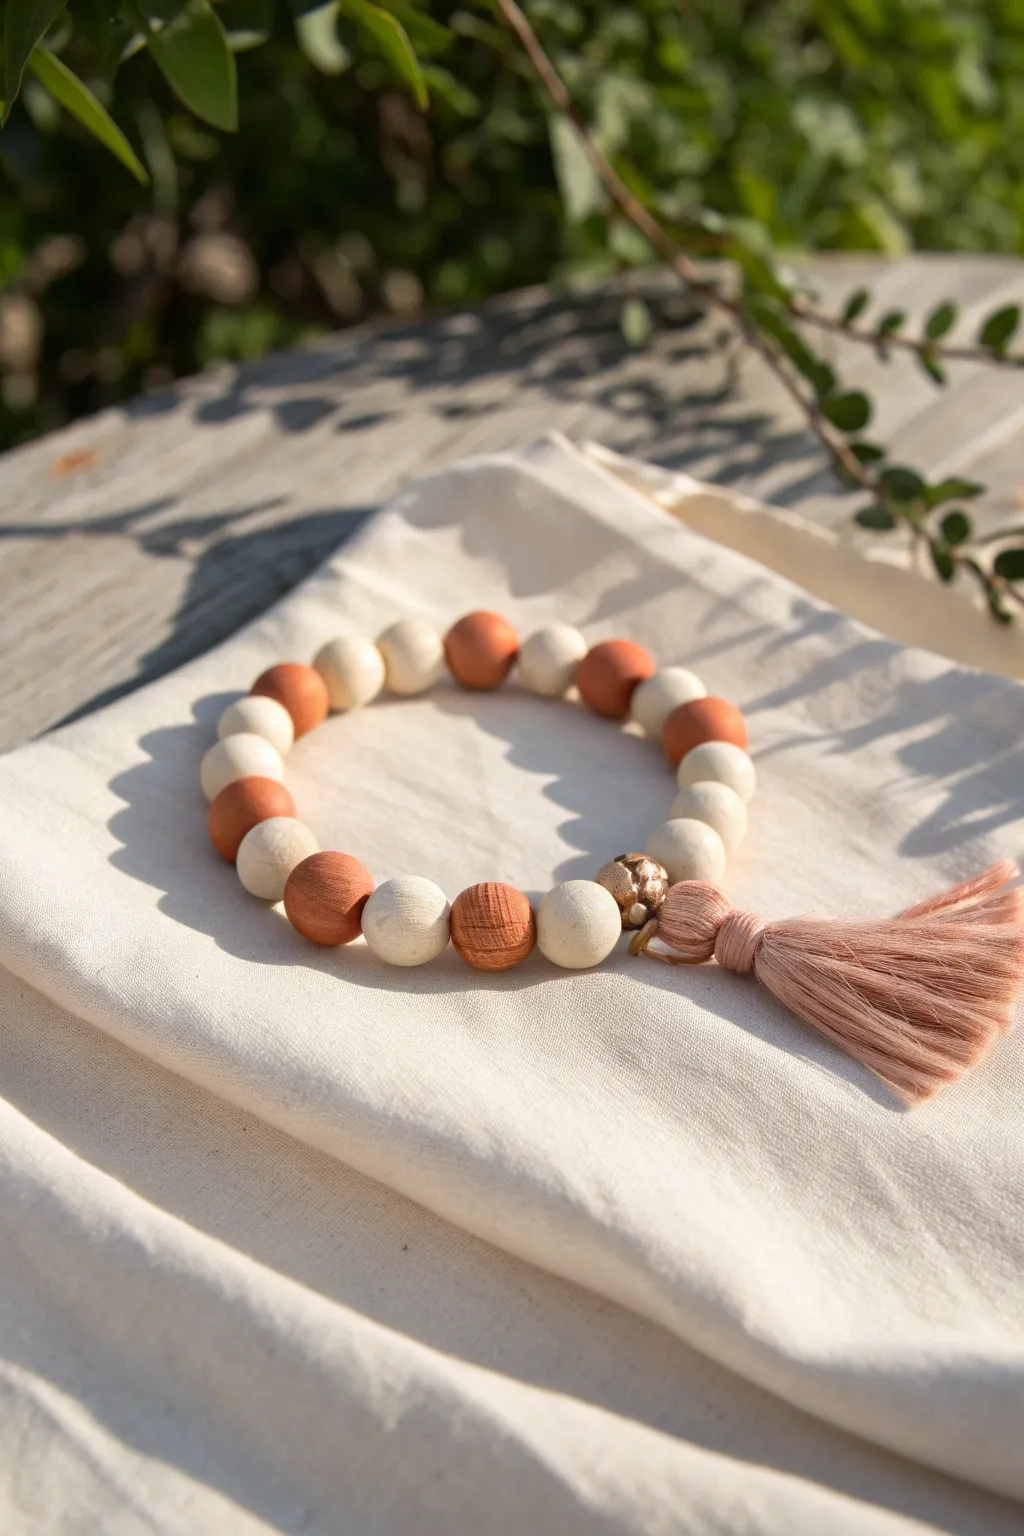
Embrace a relaxed festival vibe with this earthy, textured bracelet featuring alternating natural tones and a soft, handmade tassel. While it mimics the look of natural wood, we’ll create this using polymer clay for a completely custom, lightweight accessory perfect for summer days.
How-To Guide
Materials
- Polymer clay (white or cream)
- Polymer clay (terracotta or reddish-brown)
- Texturing tool or sandpaper (medium grit)
- Elastic cord (0.8mm or 1mm)
- Embroidery floss or cotton thread (dusty rose/blush)
- Gold tone bead or connector
- Gold jump ring (6mm or 8mm)
- Bead roller (optional)
- Skewer or toothpick
- Super glue or jewelry cement
Step 1: Creating the Clay Stone Beads
-
Condition the white clay:
Start by taking your white or cream polymer clay and kneading it in your hands until it becomes soft and pliable. This conditioning step prevents cracking later on. -
Form the spheres:
Pinch off small, equal-sized pieces of the conditioned clay. Roll them between your palms or use a bead roller to create smooth, uniform spheres roughly 10-12mm in diameter. -
Add texture:
To mimic the organic, matte look in the photo, gently roll the unbaked beads over a piece of medium-grit sandpaper or lightly tap the surface with a stiff-bristle brush. This removes the plastic shine. -
Pierce the holes:
Use a skewer or a toothpick to carefully pierce a hole through the center of each bead. Rotate the tool as you push through to keep the hole clean and prevent distorting the bead’s shape. -
Make the terracotta beads:
Repeat the previous steps using your terracotta or reddish-brown clay. Create an equal number of these beads so you can alternate them in the final pattern. -
Refine the texture:
For the terracotta beads, I like to add slight horizontal striations using a needle tool to mimic a wood-grain effect before baking. -
Bake the beads:
Arrange all projected beads on a baking sheet or tile. Bake according to your specific clay package’s instructions (usually around 275°F/135°C for 15-30 minutes). Let them cool completely.
Smooth Operator
To remove fingerprints from your raw clay beads before baking, lightly brush them with a tiny amount of cornstarch or baby oil.
Step 2: Crafting the Tassel
-
Prepare the floss:
Take your dusty rose embroidery floss and wrap it around three fingers (or a piece of cardboard about 2 inches wide) approximately 20-30 times, depending on how full you want the tassel. -
Tie the top:
Cut a separate 6-inch piece of floss. Thread it through the loop of wrapped floss at one end and tie it tightly with a double knot. This will be the hanging loop. -
Create the neck:
Cut another piece of floss about 10 inches long. Wrap this tightly around the bundle of threads, about 1/4 inch down from the top knot, to create the tassel’s ‘neck.’ Tie it off securely and tuck the ends inside using a needle. -
Trim the fringe:
Cut the loops at the bottom of the tassel bundle. Trim the ends straight across with sharp scissors so they are even and the tassel measures about 1.5 inches long.
Step 3: Assembly
-
Measure the elastic:
Cut a piece of elastic cord about 10-12 inches long. Pre-stretch it by pulling on it gently a few times; this prevents the bracelet from stretching out permanently later. -
Secure one end:
Place a piece of tape or a bead stopper on one end of the elastic cord to prevent beads from sliding off while you work. -
String the beads:
Thread your cooled clay beads onto the elastic, alternating between the cream and terracotta colors. Continue until the strand is long enough to fit comfortably around your wrist (usually about 7 inches). -
Add the focal point:
Before tying it off, slide on the gold-tone decorative bead. This gold accent acts as a sophisticated separator for the tassel. -
Attach the tassel:
Open your gold jump ring using two pliers. Slide the loop of your handmade tassel onto the ring, then hook the ring onto the elastic cord next to the gold bead. Close the jump ring securely. -
Knot the elastic:
Tie the ends of the elastic cord together using a strong surgeon’s knot (right over left, left over right twice). Pull it very tight. -
Secure the final knot:
Apply a tiny drop of super glue or jewelry cement to the knot for extra security. Once dry, trim the excess elastic close to the knot and gently hide the knot inside the hole of the adjacent gold bead.
Aromatic Touch
Use unfinished wood beads for the terracotta colored ones instead of clay. You can then add a drop of essential oil to them, turning your bracelet into a diffuser.
Slip on your beautiful new accessory and enjoy the handmade festival vibes all summer long
Beach Glass Look With Translucent Clay Pebble Beads
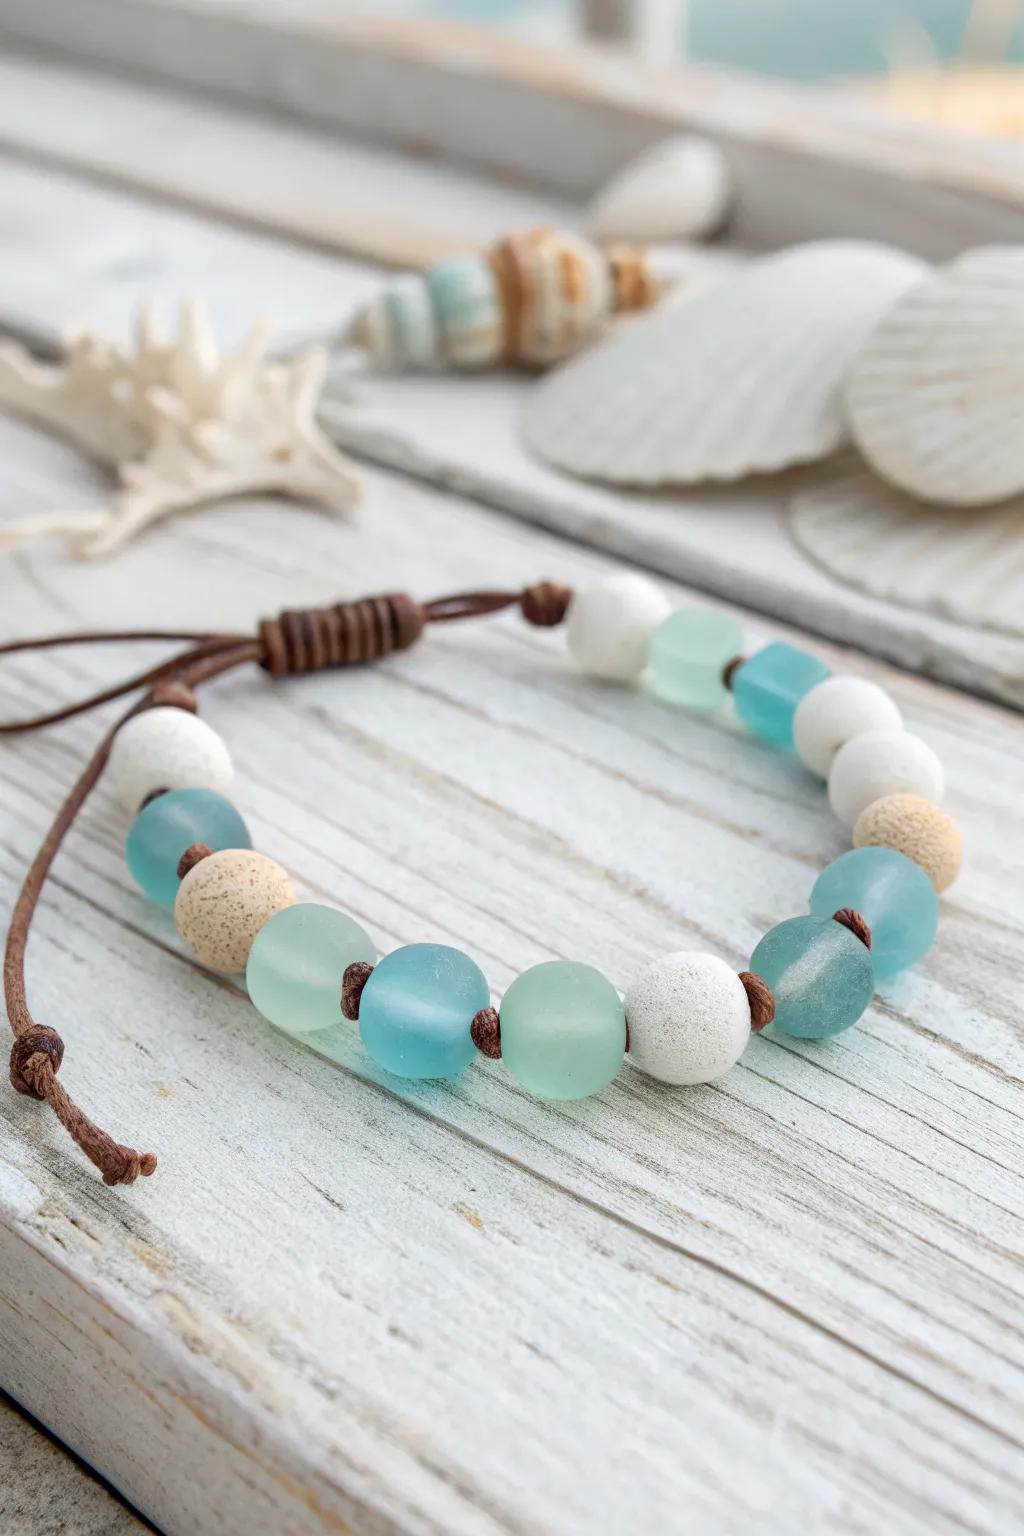
Capture the essence of a serene beach walk with this stunning bracelet that mimics the look of tumbled sea glass and sandy pebbles. Using translucent polymer clay and clever texturing techniques, you can recreate these ocean-inspired treasures without ever leaving your craft room.
Step-by-Step Guide
Materials
- Translucent polymer clay (frost/clear)
- Alcohol inks (teal, aqua blue, sea green)
- White or Beige polymer clay (for the sand/opaque beads)
- Fine grit sandpaper or coarse salt/sugar
- Buffing sponge or denim cloth
- Brown leather cord (1.5mm or 2mm)
- Toothpicks or a bead piercing tool
- Oven for baking
- Small bowl of ice water
Step 1: Creating the Sea Glass Beads
-
Tint the Translucent Clay:
Start by conditioning your translucent polymer clay until it is soft and pliable. Divide it into three small portions. Add a tiny drop of alcohol ink to each portion—one teal, one aqua, and one light green—and knead thoroughly until the color is evenly distributed but remains translucent. -
Form the Shapes:
Pinch off small pieces of the tinted clay and roll them into varying sizes of round beads. To make them look organic like tumbled glass, don’t worry about being perfectly spherical; slight imperfections add to the realism. -
Create the Matte Texture:
To achieve that frosted sea glass finish, roll the raw clay beads in a bed of fine salt or sugar before baking. Alternatively, you can bake them smooth and sand them later, but the salt method creates instant texture. Rinse the salt off quickly before they fully soften if using sugar, or wait until after baking for salt.
Cloudy Beads?
If your sea glass beads look murky after baking, slice one open. If you see tiny moon-shaped plaques, the clay wasn’t conditioned enough, or you trapped air while rolling. Knead more next time.
Step 2: Crafting the Sand & Stone Beads
-
Mix the Sand Color:
Take your beige or white clay and mix in a tiny amount of brown or tan to create a sandy base. For texture, you can knead in actual sand, coarse black pepper, or embossing powder to mimic the look of sandstone. -
Roll and Pierce:
Roll these opaque mixtures into round beads similar in size to your glass ones. You’ll want a few plain white ‘pumice’ style beads as well, which can be made by texturing white clay with a stiff toothbrush or sandpaper. -
Poke the Holes:
Using a toothpick or piercing tool, carefully bore a hole through the center of each bead. Ensure the hole is wide enough to accommodate your leather cord—spin the tool gently to avoid squishing the bead’s shape. -
Bake the Beads:
Arrange all your beads on a baking sheet or tile. Bake according to the manufacturer’s instructions for your specific brand of clay (usually around 275°F/135°C for 15-30 minutes). -
Quench and Finish:
Once baked, immediately plunge the translucent beads into a bowl of ice water. I find this shock-cooling helps increase the transparency of the clay. If you used the salt method, scrub the beads under warm water to dissolve the crystals and reveal the pitted surface.
Make it Shine
For a ‘wet’ sea glass look like it was just pulled from the tide, lightly buff the high points of the translucent beads with denim, leaving the pits matte and frosted.
Step 3: Assembly
-
Cut the Cord:
Cut a length of leather cord approximately 12-14 inches long. This gives you plenty of room for knotting and adjusting the size. -
Start the Knotting:
Fold the cord in half if doing a double strand, or keep it single. At one end, tie a simple overhand knot to act as a stopper. Leave a small loop if you plan to use a button closure, or leave tails for a sliding knot. -
String the Pattern:
Begin threading your beads onto the leather cord. Alternate your translucent ‘sea glass’ beads with the opaque ‘sand’ and white stone beads to create a balanced, organic rhythm. -
Secure with Knots:
Tie a small overhand knot in the leather cord between each bead or every few beads. This separates them visually and keeps them from sliding around, adding to that rustic beachcomber aesthetic. -
Finish the Closure:
Once all beads are strung, finish the other end with a knot. Create a sliding macramé square knot joining the two tail ends so the bracelet is adjustable, or tie a loop that fits over your last bead.
Wear your new bracelet and enjoy the coastal vibes wherever you go
Sandy Speckle Discs for a Coastal Neutral Summer Bracelet
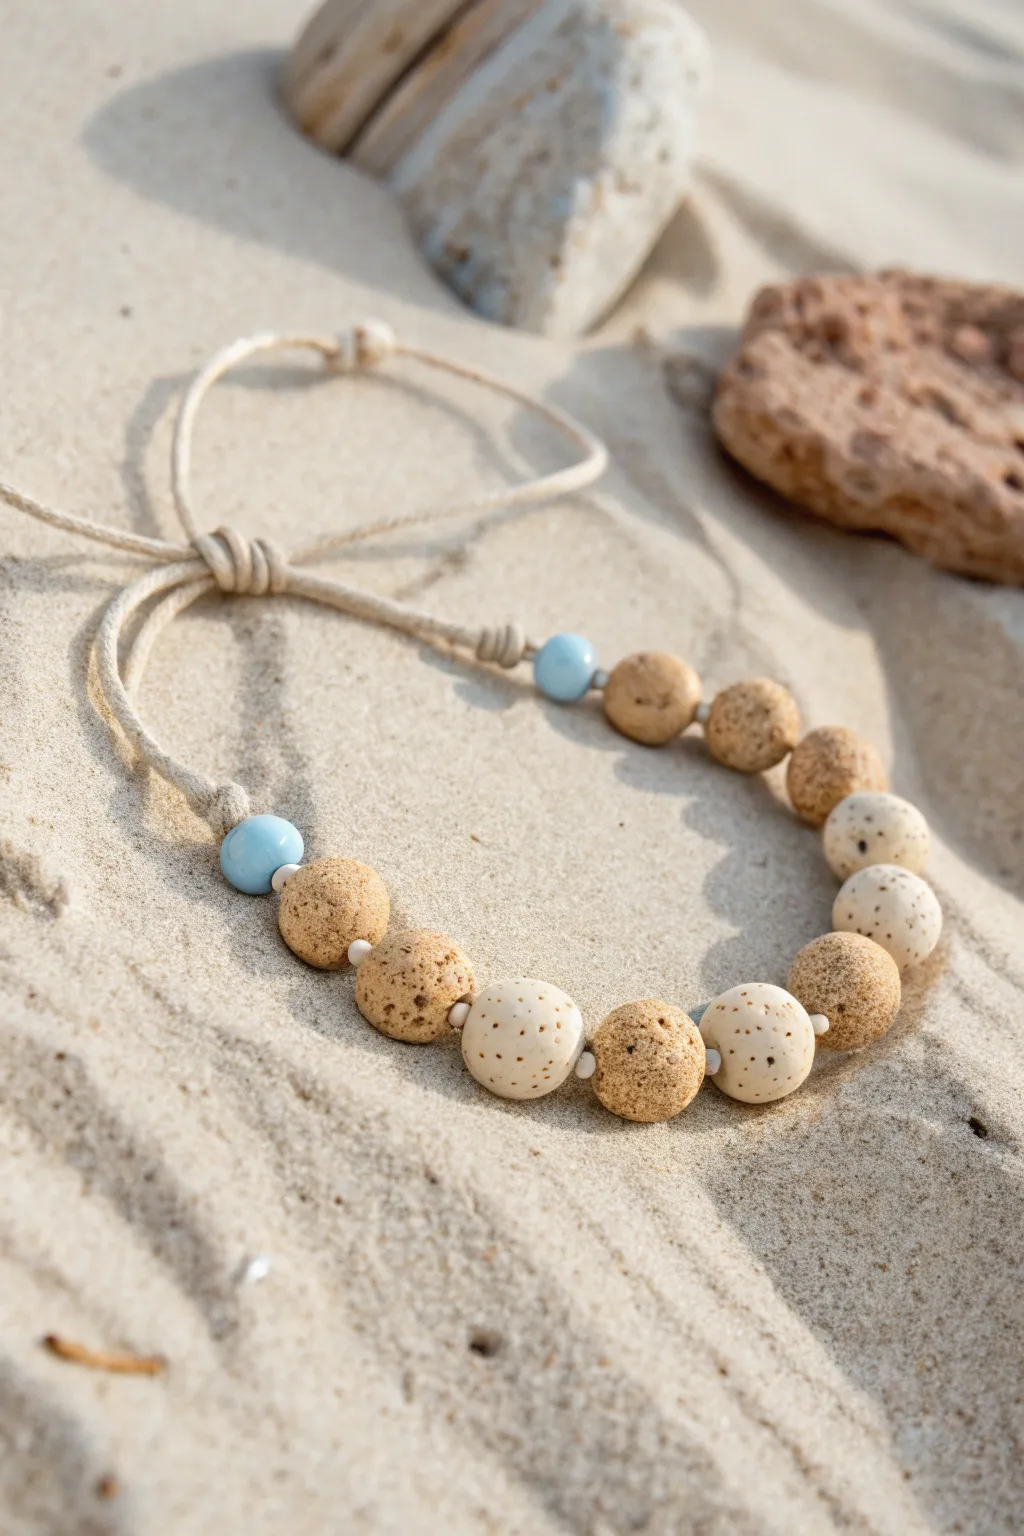
Capture the essence of a serene beach day with this textured, neutral-toned bracelet. Featuring handmade polymer clay beads that mimic the look of sandy stones and sea-weathered pebbles, this adjustable piece is the perfect accessory for a laid-back summer style.
How-To Guide
Materials
- Polymer clay (white)
- Polymer clay (beige or tan)
- Coarse sand or ground black pepper (for speckling)
- Blue ceramic or glass pony beads (2 beads)
- Small white seed beads (optional spacers)
- Hemp cord or 1mm waxed cotton cord (natural color)
- Toothpick or bead piercing pin
- Oven for baking clay
- Scissors
Step 1: Crafting the Clay Beads
-
Prepare the clay base:
Start by conditioning your beige and white polymer clay separately until they are soft and pliable. You want a warm, sandy tan and a cooler, off-white tone. -
Add texture:
To achieve that organic, speckled look, mix a pinch of real sand or coarsely ground black pepper into both clay colors. Knead it thoroughly so the specks are distributed evenly throughout the material. -
Form the spheres:
Roll small balls of clay, roughly 1/2 inch in diameter. Aim for slight variations in size to keep the look natural rather than manufactured. -
Shape the discs:
Gently press each ball between your thumb and forefinger to flatten them slightly into thick, rounded disc shapes rather than perfect spheres. -
Create texture:
I like to take an old toothbrush or a piece of textured sandpaper and lightly press it onto the surface of the unbaked beads to give them a porous, stone-like appearance. -
Pierce the holes:
Use a toothpick or bead pin to create a hole through the center of each disc. Wiggle the tool slightly to ensure the hole is wide enough for your thick cord to pass through later. -
Bake the beads:
Arrange your beads on a baking sheet and bake them according to your clay package instructions (usually 275°F for 15-30 minutes). Let them cool completely before handling.
Step 2: Assembling the Bracelet
-
Cut the cord:
Cut a length of hemp cord approximately 24 inches long. This gives you plenty of slack for knotting and the adjustable closure. -
Start the center:
Begin threading your beads onto the cord. Start with the alternating pattern of tan and white speckled clay beads in the middle section of the cord. -
Add spacers:
Between some of the larger clay beads, slip on a tiny white seed bead if you want extra separation, though the clay beads can also sit flush against each other for a dense look. -
Place accent beads:
At both ends of your clay bead row, thread on one light blue ceramic bead. This pop of color represents the ocean against the sand. -
Secure the beads:
Tie a simple overhand knot tightly against the blue bead on both sides of the beaded section. This keeps all your beads centered and prevents sliding.
Hole Distortion?
If the bead shape squishes while piercing, let the clay sit in the fridge for 10 minutes to firm up, then pierce it again with a twisting motion.
Step 3: Creating the Adjustable Closure
-
Form the loop shape:
Bring the two loose ends of the cord together so they overlap, creating a circle shape with the bracelet. -
Tie the first sliding knot:
Take the right tail end and tie a sliding knot around the left cord strand. Loop it around twice before pulling tight ensures a good grip. -
Tie the second sliding knot:
Repeat the process with the left tail end, tying it around the right cord strand. The two knots should slide towards and away from each other to adjust the size. -
Knot the ends:
Tie a small, tight overhand knot at the very tip of each cord tail to prevent the sliding knots from slipping off completely. -
Trim excess:
Snip off any extra cord extending past your end knots for a neat finish.
Beach Scent
Add a drop of essential oil to the raw clay, or used porous lava stone beads alongside your clay creations to turn this into a passive diffuser bracelet.
Now you have a piece of wearable art that brings the calming vibes of the coast to your wrist wherever you go
Tropical Flower Slice Beads for a Vacation Statement
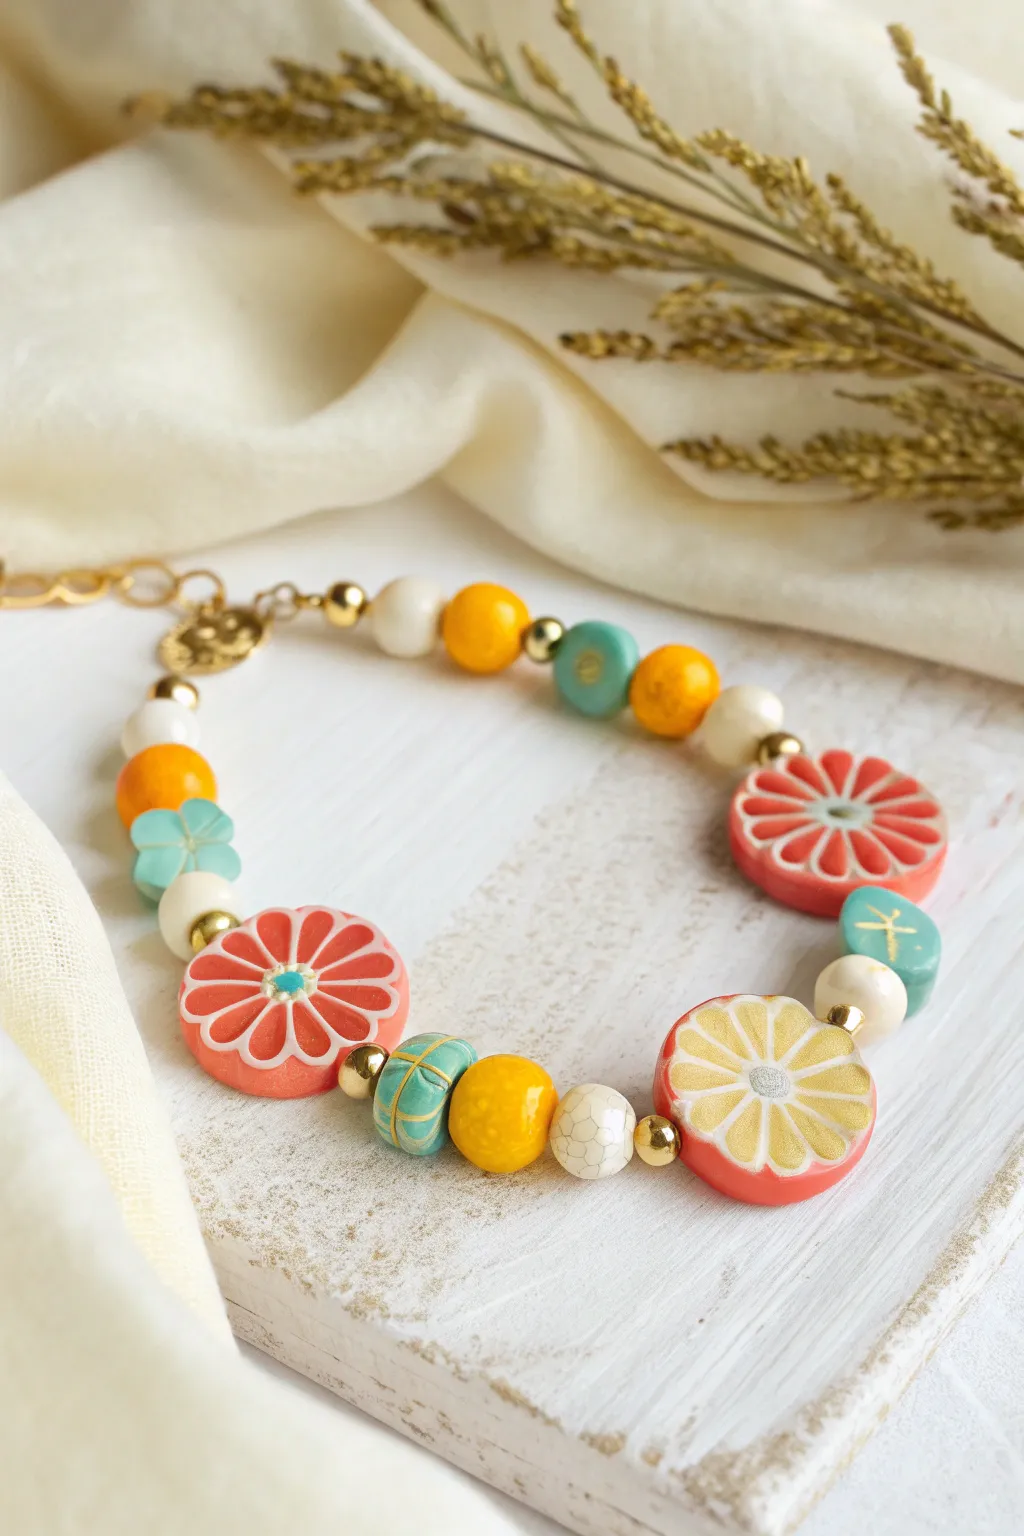
Brighten up your wrist with this juicy, summer-inspired clay bracelet featuring handmade citrus slice beads. The vibrant coral and yellow tones mixed with turquoise accents create the perfect accessory for a sunny vacation day.
Detailed Instructions
Materials
- Polymer clay in coral pink, sunny yellow, white, and turquoise
- Gold polymer clay or gold mica powder
- Jewelry wire or strong beading cord
- Gold spacing beads (small rounds)
- Small white ceramic or glass beads
- Lobster clasp and jump rings
- Clay blade or craft knife
- Acrylic rolling pin
- Round clay cutters (approx. 2cm diameter)
- Needle tool or toothpick
- Baking sheet and parchment paper
- Jewelry pliers
Step 1: Making the Citrus Cane
-
Form the segments:
Start by conditioning your coral pink and sunny yellow clay. Roll each color into a thick log, then flatten slightly into a teardrop shape to form the pulp of your fruit slices. -
Wrap in pith:
Roll out a thin sheet of white polymer clay. Wrap this sheet around your colored teardrop logs to create the white ‘pith’ that separates the fruit segments. -
Assemble the fruit:
Arrange 8-10 of these wrapped teardrops in a circle, points facing inward, to form a complete citrus wheel. Gently squeeze them together so they adhere. -
Wrap the exterior:
Roll a thicker sheet of the corresponding rind color (coral or yellow) and wrap it around the entire bundle to form the outer skin of the fruit. -
Reduce the cane:
Gently squeeze and roll the cane on your work surface to reduce its diameter to about 2cm. I prefer to let the cane rest in the fridge for 10 minutes here so it slices cleanly without squishing.
Smoother Slicing
If your fruit slices are squashing into ovals as you cut, rotate the cane a quarter turn after every single cut. This distributes the pressure evenly for perfect circles.
Step 2: Creating the Beads
-
Slice the beads:
Using your sharp clay blade, slice discs from your fruit canes. Aim for a thickness of about 4-5mm so they are sturdy enough to be beads. -
Pierce the holes:
The holes need to run through the bead horizontally. Carefully insert a needle tool through the side of the slice, rotating it gently as you push through to avoid warping the circle. -
Add gold details:
For the yellow bead shown, you can hand-paint the segments with gold mica powder before baking, or make a separate cane using gold clay for the pulp to get that metallic shimmer. -
Make accent beads:
Using turquoise clay, roll small round beads and press them slightly flat. Use a blade to impress subtle lines or a needle tool to scratch a starburst pattern for texture. -
Bake everything:
Arrange all your clay beads on a parchment-lined baking sheet. Bake according to your clay manufacturer’s instructions, usually at 275°F (135°C) for 30 minutes.
Step 3: Assembly
-
Prepare the wire:
Cut a length of jewelry wire about 9 inches long. Crimp one end to a jump ring attached to your lobster clasp to secure the start of your strand. -
Start the pattern:
Begin stringing with smaller spacer beads. Thread a gold spacer, a white ceramic bead, and a yellow clay bead to create a transition from the clasp. -
Add first focal bead:
Thread a turquoise accent bead, followed by a white spacer, and then your first coral citrus slice. Flank the slice with small gold round beads to act as bumpers. -
Build the center:
Creating the middle section involves alternating your textures. Add a turquoise bead, a yellow round bead, and a white crackle bead, separating each with a tiny gold spacer. -
Add central lemon:
String the golden-yellow citrus slice as the centerpiece. Follow it with a similar pattern of white and turquoise beads leading to the final coral slice. -
Finish the strand:
Mirror the beginning of the bracelet on the other end, finishing with smaller beads. Crimp the wire to a jump ring and attach the catch.
Go Tropical
Swap the citrus colors for green and pink to make watermelon slices, or create a translucent green cane with black seeds for a kiwi version.
Wear your fresh, fruity creation with a linen dress or denim jacket for instant summer vibes
Ice Cream Truck Pastels in a Sweet Summer Palette
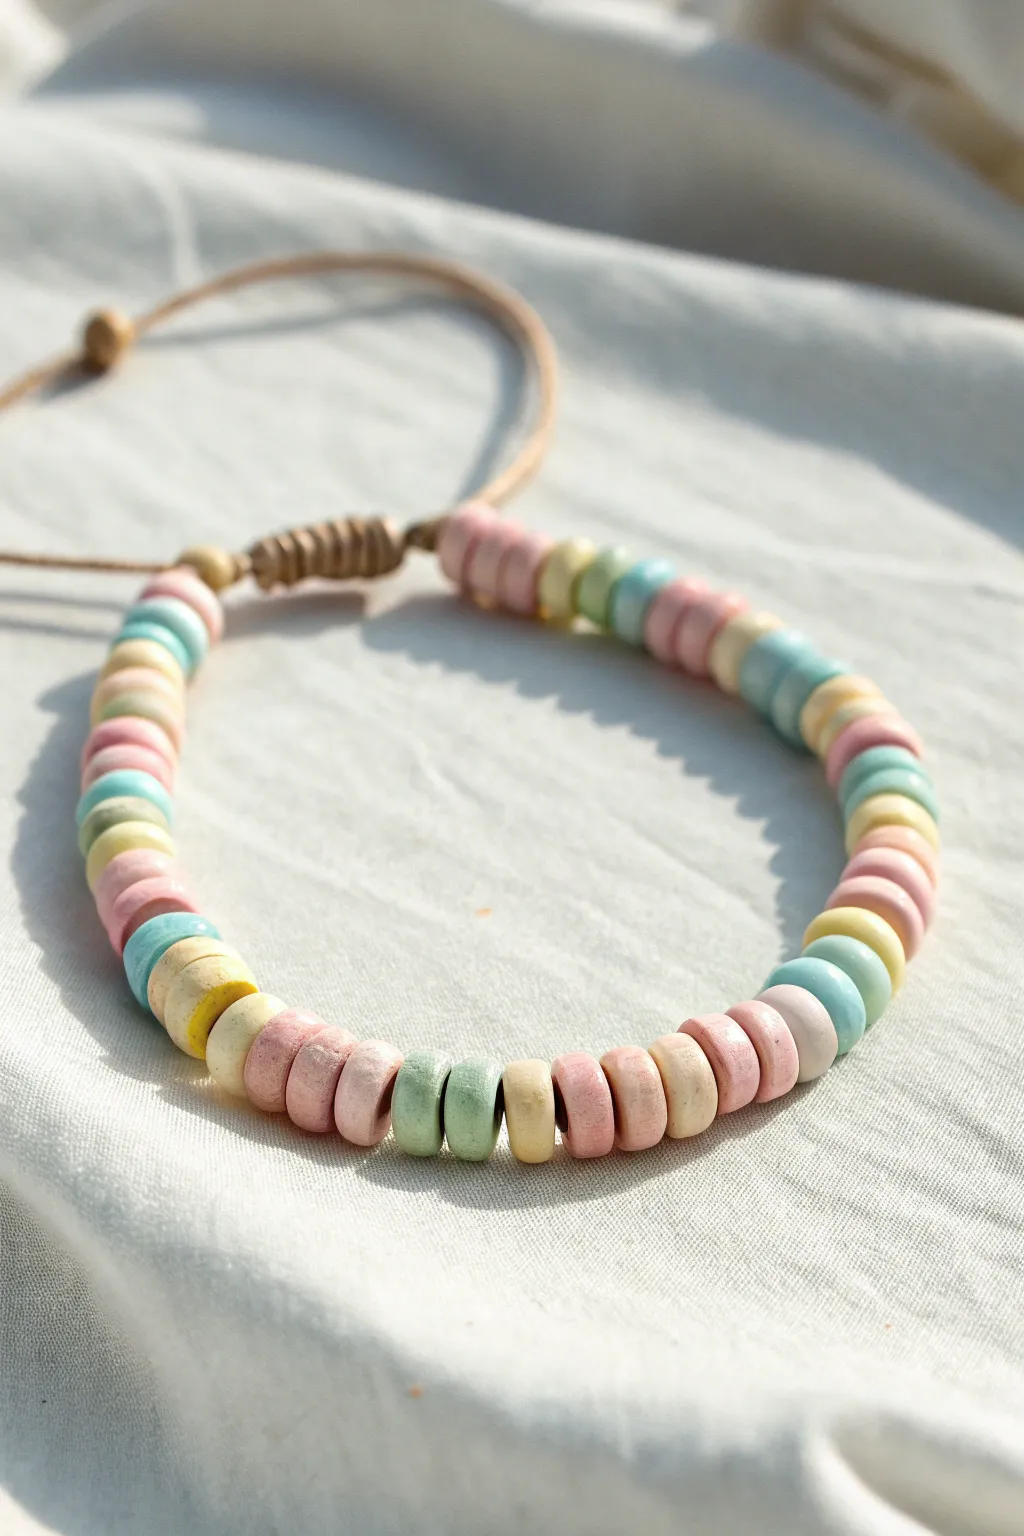
Capture the nostalgic joy of chasing the ice cream truck with this candy-colored accessory. Featuring a soft array of matte pastel discs on a natural cord, this bracelet brings a refreshing pop of sweetness to any summer outfit.
Step-by-Step
Materials
- Polymer clay (baby pink, soft yellow, mint green, baby blue, lilac)
- Small circle cutter (5-6mm diameter) or a straw
- Toothpick or needle tool
- Rolling pin or clay machine
- Parchment paper or baking tile
- Waxed cotton cord or light leather cord (natural tan color)
- Scissors and ruler
- Oven for baking
Step 1: Prepping the Palette
-
Condition the clay:
Begin by kneading each block of pastel polymer clay until it is soft and pliable. You want the colors (pink, yellow, mint, blue, lilac) to be smooth without any cracks. -
Roll out slabs:
Roll each color into a thin, even sheet, aiming for about 2mm to 3mm in thickness. A pasta machine works wonders for consistency, but a hand roller creates a lovely organic feel. -
Create the shape:
Using your small circle cutter or a sturdy straw, punch out numerous small discs from each color sheet. You will need about 40-50 beads total depending on your wrist size. -
Pierce the beads:
Gently poke a hole through the exact center of each disc using a toothpick or needle tool. Using a twisting motion helps prevent the soft clay from warping. -
Refine the edges:
Before baking, quickly smooth the edges of each disc with your fingertip to remove any stray bits of clay or jagged cuts. -
Bake the batch:
Arrange your beads on a parchment-lined baking sheet or ceramic tile. Follow the baking temperature and time instructions specific to your brand of polymer clay.
Step 2: Stringing the Sweetness
-
Prepare the cord:
Cut a length of natural waxed cord about 12-14 inches long. This generous length makes tying the final sliding knot much easier. -
Tie a stopper knot:
Create a simple overhand knot about 3 inches from one end of the cord. This will hold your beads in place as you work. -
Plan your pattern:
Arrange your baked and cooled beads on a mat. Create a random, confetti-style mix of the pastel tones rather than a strict repeating pattern to mimic the ‘ice cream truck’ vibe. -
Thread the beads:
String the beads onto the cord one by one, watching the pastel gradient grow. I like to occasionally group two of the same color together for a more relaxed look. -
Check the length:
Continue threading until the beaded section covers the top and sides of your wrist, leaving the underside bare for the closure. -
Secure the end:
Tie a second overhand knot snugly against the last bead to lock the design in place.
Smooth Operator
To get that matte, stone-like finish shown in the photo, lightly buff your baked beads with fine-grit sandpaper or a denim cloth to remove any fingerprints.
Step 3: The Sliding Finish
-
Form the circle:
Bring the two cord ends together so they overlap parallel to each other, forming a circle shape. -
Start the macramé knot:
Cut a separate small piece of cord (about 5-6 inches). Lay it under the parallel cords and tie a square knot or macramé sliding knot around them. -
Build the slider:
Continue tying square knots until you have a sliding section about 1cm long. This creates that professional adjustable finish seen in the image. -
Trim and knot ends:
Trim the excess from your sliding knot cords. Then, tie small knots at the very tips of the main bracelet cords so they can’t slip through the slider.
Sprinkle Effect
Mix tiny flecks of black or dark brown clay into your pastel colors before rolling them out to mimic vanilla bean speckles or cookie dough chunks.
Slide on your new pastel creation and enjoy the subtle pop of color it adds to your day
Mini Sun, Wave, and Palm Charm Beads You Sculpt
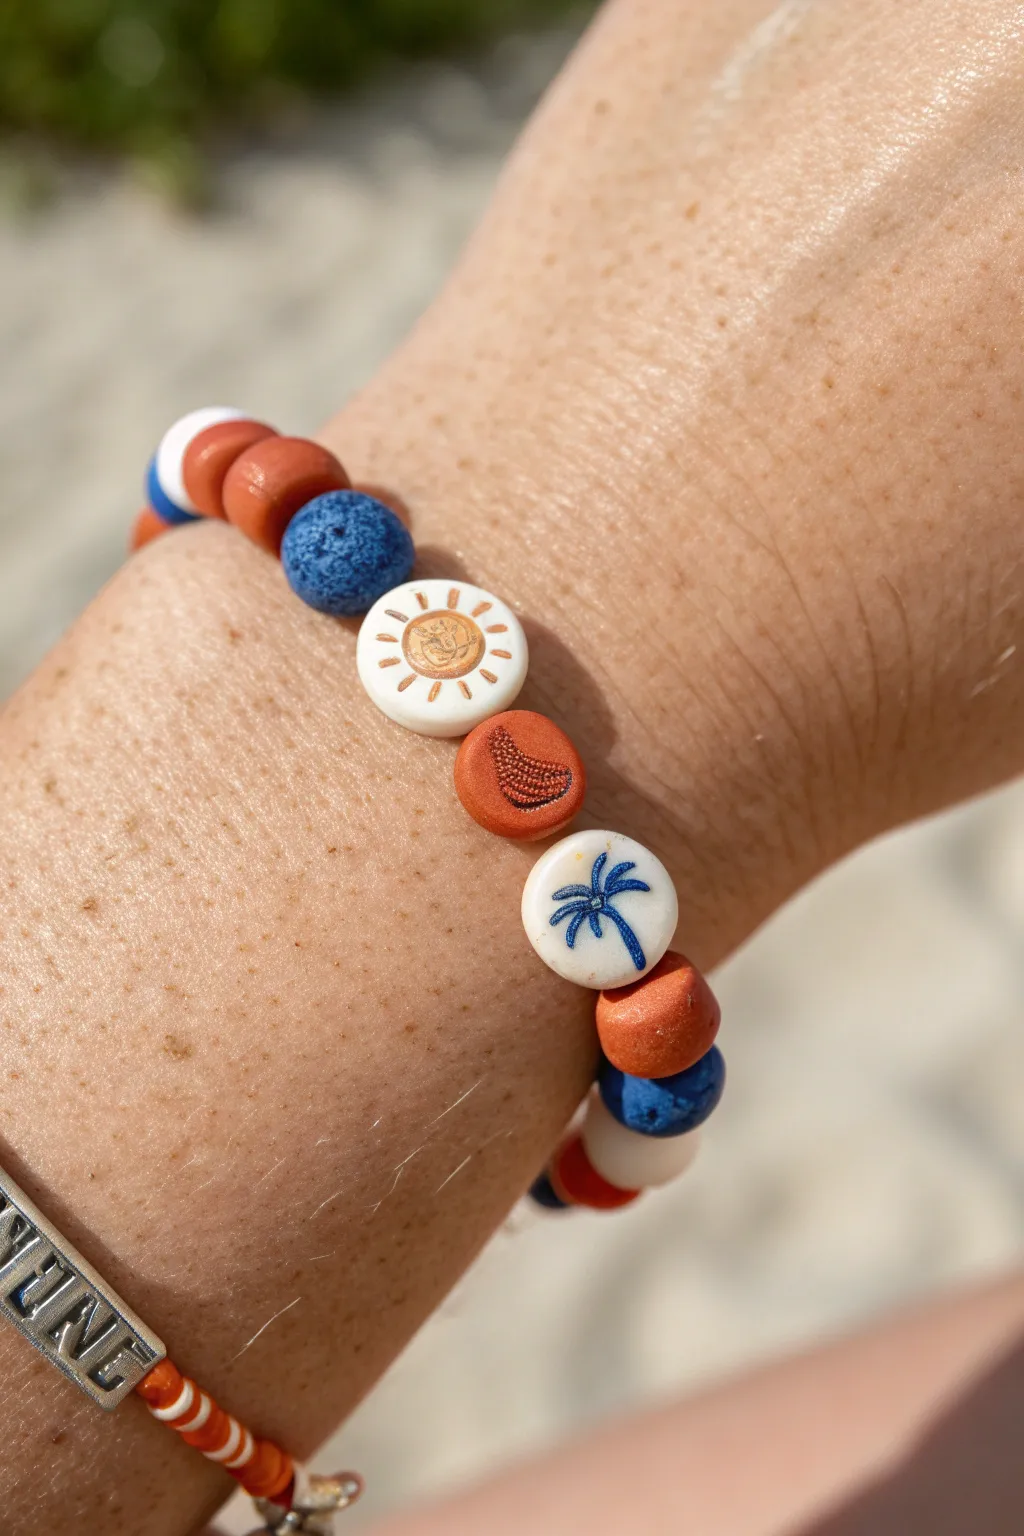
Capture the essence of a beach day with this charming polymer clay bracelet featuring handmade sun, shell, and palm tree beads. The mix of terracotta, deep blue, and cream tones creates a laid-back, nautical vibe perfect for summer styling.
Detailed Instructions
Materials
- Polymer clay (white, terracotta orange, navy blue)
- Acrylic paint (gold metallic, dark brown, navy blue)
- Fine detail paintbrush (00 or 000 size)
- Clay roller or pasta machine
- Small circle cutter (approx. 1 cm)
- Needle tool or toothpick
- Bead piercing pin or thin skewer
- Stretch cord (0.8mm)
- Super glue or jewelry cement
- Optional: Clay varnish or glaze (matte or gloss)
Step 1: Sculpting the Bead Bases
-
Condition the clay:
Begin by kneading your white, terracotta, and navy blue polymer clay separately until each is soft and pliable. This conditioning step prevents cracks during baking. -
Roll the sheets:
Roll out a portion of the white and terracotta clay into flat sheets, about 3-4mm thick. You want them thick enough to be sturdy but not chunky. -
Cut the discs:
Using your small circle cutter, punch out two white circles and one terracotta circle. These will become your focal charm beads. -
Create spacer beads:
Take the remaining terracotta, white, and navy blue clay and roll them into small, equal-sized spheres for the spacer beads. Aim for about 6-8mm in diameter. -
Pierce the beads:
Carefully pierce a hole through the center of each disc (side-to-side) and through the center of each ball bead using your bead piercing pin. Twist the pin gently as you push to avoid distorting the shape. -
Texture the round spacers:
For the navy blue spacer beads, lightly roll them over a piece of sandpaper or tap them with a toothbrush to create a stone-like, porous texture similar to lava rock.
Distorted Holes?
If your bead holes squish while piercing, let the clay sit for 15 mins to firm up slightly, or drill the holes *after* baking using a small hand drill.
Step 2: Creating the Designs
-
Impress the sun center:
On one white disc bead, gently press a small, rounded tool or the end of a paintbrush into the center to create a shallow indentation for the sun’s face. -
Carve the shell motif:
On the terracotta disc bead, use a needle tool to lightly scratch or carve a crescent or shell shape into the surface. Add tiny dots or lines inside the shape for texture. -
Smooth edges:
Before baking, run your finger lightly around the edges of all beads to smooth out any fingerprints or sharp ridges. -
Bake the beads:
Arrange all beads on a baking sheet or tile. Bake according to your clay manufacturer’s instructions (usually around 275°F/130°C for 15-30 minutes). Let them cool completely before painting.
Step 3: Painting & Assembly
-
Paint the sun:
Use metallic gold paint to fill in the center circle of the white sun bead. Then, using your finest brush with brown paint, carefully paint small radiating lines around the circle for the sun’s rays. -
Paint the palm tree:
On the second plain white disc bead, paint a simple palm tree silhouette using navy blue acrylic paint. Start with a curved line for the trunk and add 4-5 fronds bursting from the top. -
Enhance the shell:
Take a tiny amount of dark brown paint and wash it over the carved area of the terracotta bead, then quickly wipe the surface with a paper towel. The paint will stay in the crevices, highlighting the texture. -
Seal the designs:
I like to protect the painted details with a thin coat of matte varnish once the paint is fully dry. This prevents the acrylic from scratching off during wear. -
String the beads:
Cut a length of stretch cord about 10 inches long. Begin threading your beads, alternating the colored spacer beads with your special hand-painted charm beads in a pattern that pleases you. -
Check the fit:
Wrap the strung beads around your wrist to check the size. Add or remove spacer beads until it fits comfortably but isn’t too loose. -
Tie the knot:
Tie the ends of the stretch cord together using a surgeon’s knot (looping the cord through twice before pulling tight). Pull firmly to secure it. -
Secure and trim:
Place a tiny drop of super glue on the knot and let it dry. Trim the excess cord ends close to the knot, and tuck the knot inside one of the bead holes if possible.
Make it Luxe
Add real gold spacer beads between your clay beads or mix in some actual small seashells with holes drilled in them for authentic beach texture.
Now you have a custom piece of wearable art that carries the warmth of summer wherever you go
Glow-at-Dusk Summer Night Bracelet With Luminescent Accents
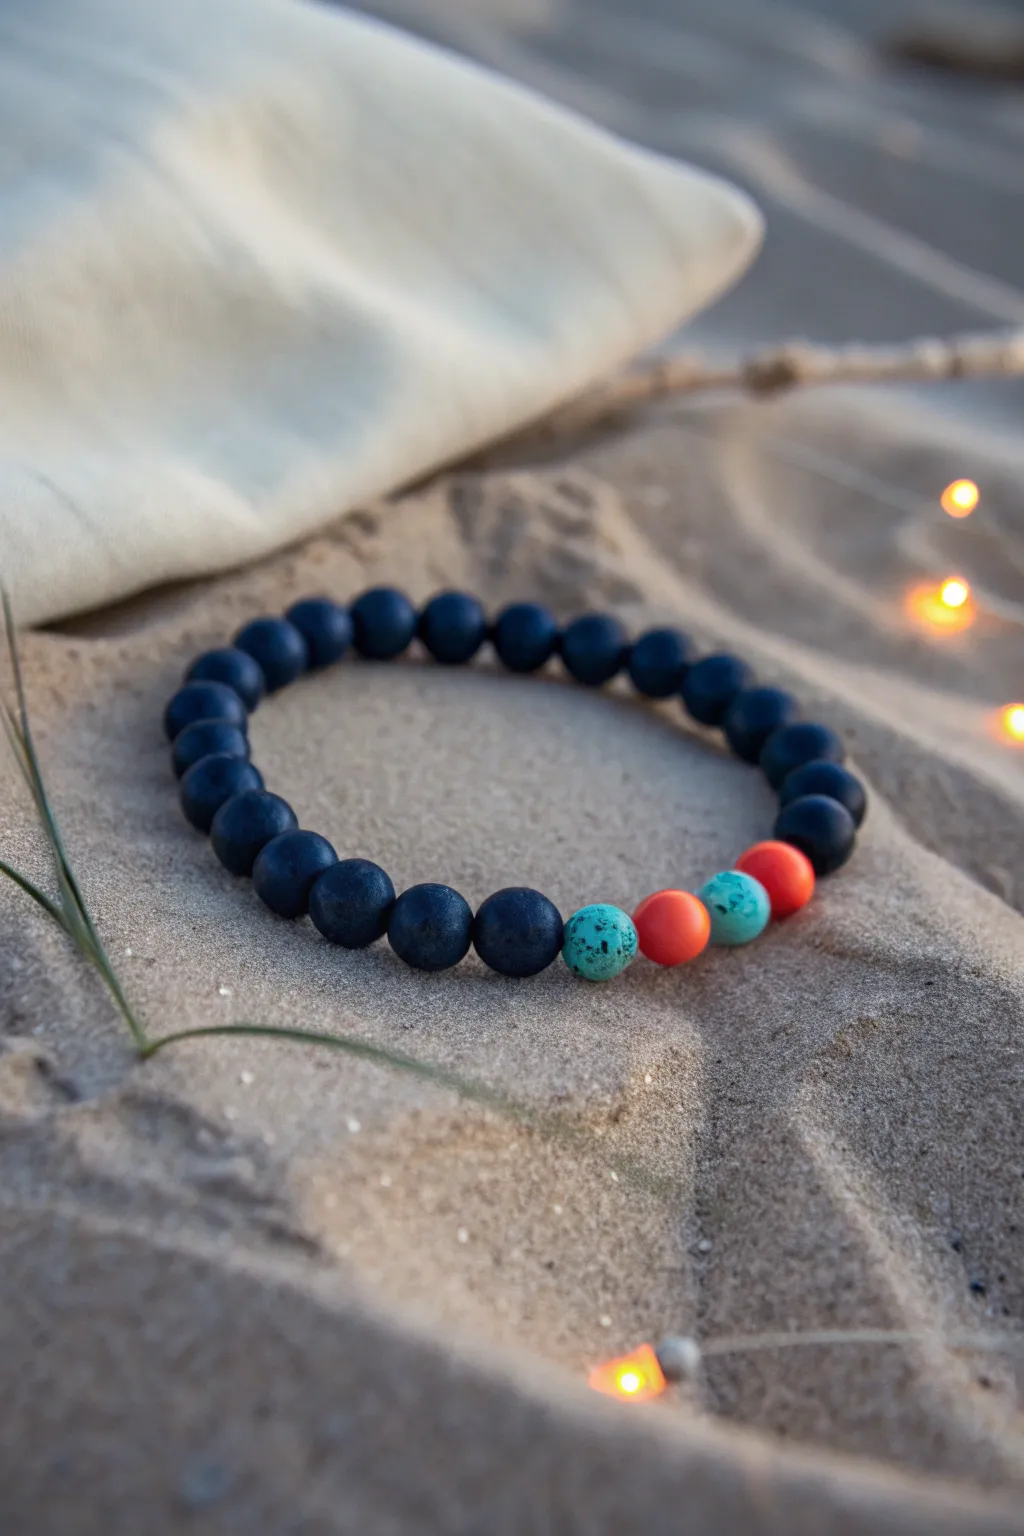
Capture the magic of a summer evening with this striking beaded bracelet that combines the deep tones of night with vibrant sunset hues. Using dark, matte beads against pops of turquoise and coral creates a sophisticated contrast perfect for beach bonfires.
Step-by-Step Guide
Materials
- Matte black or dark navy polymer clay
- Turquoise polymer clay
- Bright coral or orange polymer clay
- Black coarse pepper or dark glitter (for speckling)
- Sandpaper or a rough texturing sponge
- Elastic jewelry cord (0.8mm or 1mm)
- Bead piercing pin or needle
- Super glue or jewelry cement
- Gloss glaze (optional for accent beads)
- Oven for baking clay
Step 1: Creating the Lava-Style Base Beads
-
Condition the dark clay:
Start by thoroughly conditioning your matte black or very dark navy polymer clay until it is soft and pliable. This ensures your beads won’t crack during baking. -
Measure equal portions:
Roll the clay into a long, even log or snake. Use a blade to slice the log into equal-sized segments to ensure all your main beads are roughly the same size, about 8-10mm in diameter. -
Roll spheres:
Take each segment and roll it between your palms to create smooth, round spheres. -
Add texture:
To mimic the porous look of lava stone shown in the image, gently roll each black sphere over a piece of coarse sandpaper or dab it with a rough texturing sponge. You don’t want deep gouges, just a matte, organic surface. -
Pierce the holes:
Carefully pierce the center of each bead with your bead pin. I like to twist the pin gently as I push through to prevent squashing the sphere’s shape.
Sticky Situation?
If your bead holes close up during baking, use a small hand drill or a heated needle to carefully re-open them after the clay has cooled and hardened.
Step 2: Crafting the Accent Beads
-
Prepare the turquoise clay:
Take a small amount of turquoise clay. To get that natural stone look, mix in a tiny pinch of coarse black pepper or dark glitter specks. Knead technically until the specks are distributed like natural mineral veins. -
Form the turquoise beads:
Roll two spheres from the turquoise mixture. These should match the size of your dark base beads perfectly. -
Texture the turquoise:
Lightly press these turquoise beads with your texture tool to give them a stone-like finish similar to the dark beads. -
Prepare the coral clay:
Condition your bright coral or orange clay. You need enough for two beads. -
Form the coral beads:
Roll two smooth spheres of the coral clay. Unlike the stone-textured beads, leave these relatively smooth to make the color pop. -
Pierce accent beads:
Create center holes in your two turquoise and two orange beads, ensuring the hole size matches the dark beads.
Step 3: Baking and Assembly
-
Bake the beads:
Arrange all your pierced beads on a baking sheet or bead rack. Bake according to your polymer clay package instructions (usually around 275°F/135°C for 15-30 minutes). Let them cool completely. -
Cut the cord:
Cut a length of elastic cord about 10-12 inches long. This gives you plenty of extra room for tying knots later. -
Pre-stretch the elastic:
Give the elastic cord a few firm tugs. This pre-stretching prevents the bracelet from loosening up after the first few times you wear it. -
String the focal pattern:
Start by threading on the accent beads in this specific order: Turquoise, Coral, Turquoise, Coral. This creates the offset color splash seen in the photo. -
Fill the strand:
Continue threading the dark lava-style beads until the bracelet reaches your desired length (usually about 7 inches for an average wrist). -
Test the fit:
Wrap the strand around your wrist to check the size. Add or remove dark beads if necessary to get a comfortable fit. -
Tie the knot:
Tie a secure surgeon’s knot (right over left, left over right). Pull the elastic tight so the beads bunch together snugly. -
Secure and trim:
add a tiny drop of super glue or jewelry cement to the knot for security. Let it dry, then trim the excess cord close to the knot. If possible, tug the knot inside one of the beads to hide it.
Glow Up
Mix glow-in-the-dark powder into the coral clay before rolling. This makes the bright accents actually luminescent when the sun goes down!
Slip on your new bracelet and enjoy how those vibrant colors catch the fading light of a summer evening