When you’re craving that satisfying “I built this” feeling, clay building is where the magic happens. These ideas lean into hand-building techniques like slabs, coils, and pinching so you can create sturdy, lovable forms without needing a wheel.
Coil-Built Round Planter With Textured Bands
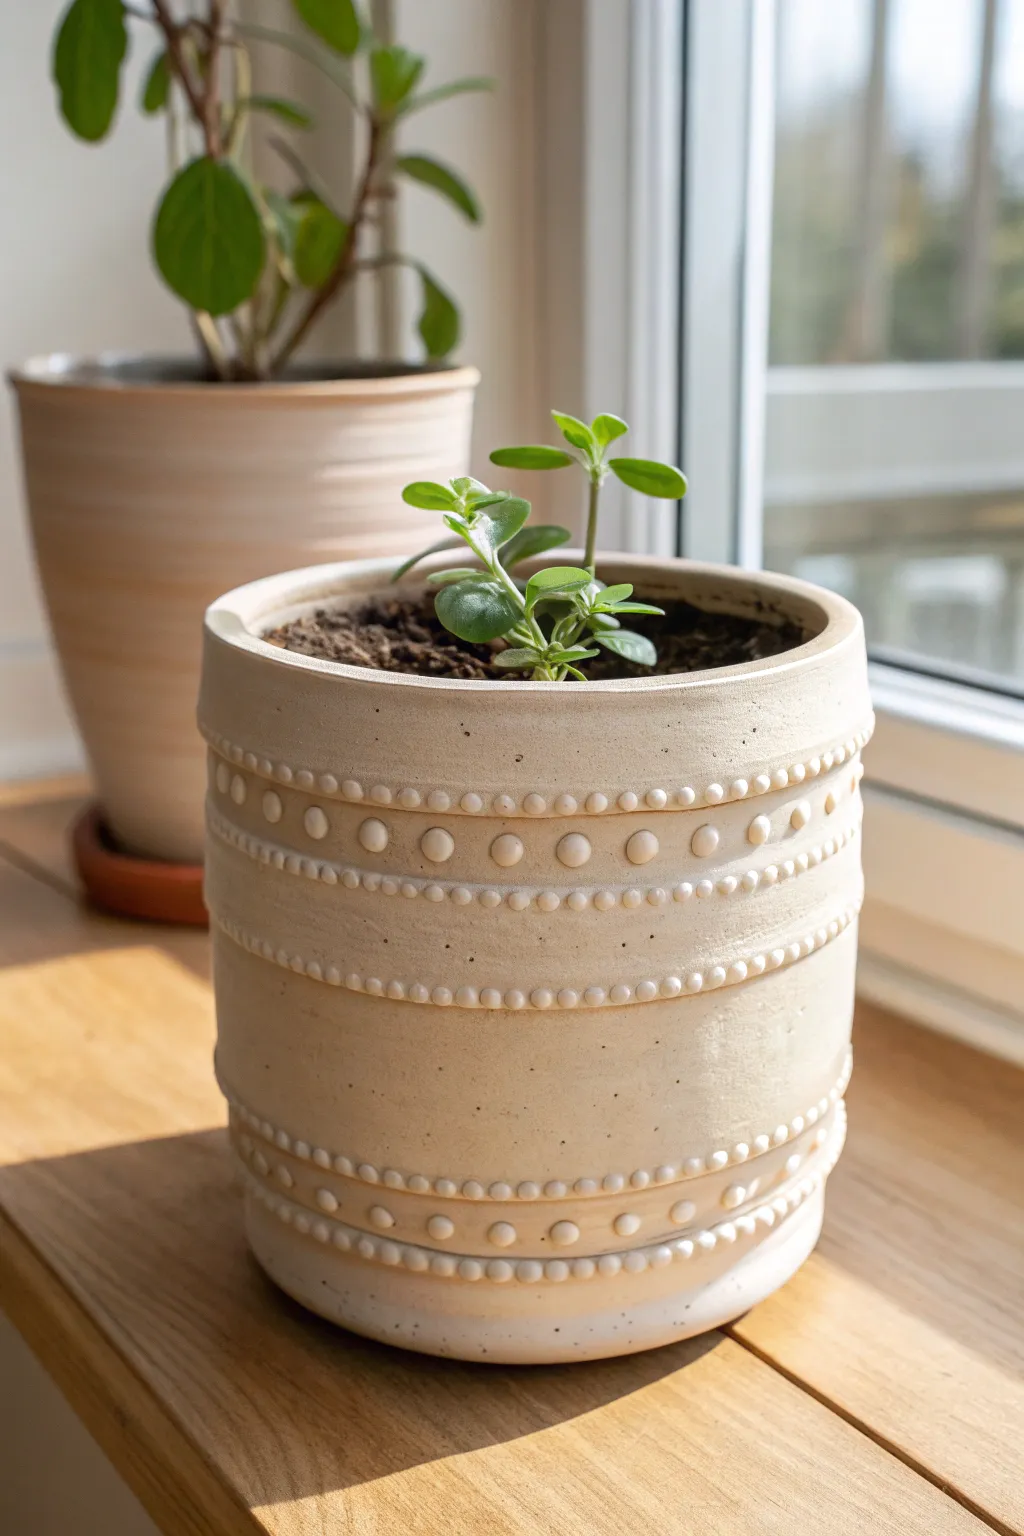
This charming, cream-colored planter features a classic cylindrical shape adorned with delightful rows of textured dots and beads. Its gentle, tactile surface adds a whimsical yet sophisticated touch perfect for showcasing small succulents or seedlings.
Step-by-Step Tutorial
Materials
- Stoneware clay (cream or buff color)
- Circular bat or banding wheel
- Rolling pin and guide sticks (3/8 inch)
- Scoring tool or serrated kidney
- Slip (clay mixed with water)
- Wooden modeling tool
- Sponge
- Needle tool
- Small round piping tip or straw (optional for uniform dots)
Step 1: Base Construction
-
Prepare the base:
Begin by rolling out a slab of clay to an even 3/8-inch thickness using your guide sticks. Cut out a perfect circle, about 5 inches in diameter, to serve as the floor of your planter. -
Roll coils:
Roll several long, consistent snakes of clay, each about the thickness of your pinky finger. Try to keep them uniform to ensure the walls rise evenly. -
First layer application:
Score the outer edge of your circular base and brush on a little slip. Lay your first coil around the perimeter, pressing it firmly onto the base. -
Build the walls:
Continue stacking coils one on top of the other. As you add each layer, use your thumb or a wooden tool to smudge the clay from the new coil down into the one below it, blending the seams completely smooth on the inside. -
Smooth the exterior:
Once you have reached your desired height (around 5–6 inches), use a rib or serrated kidney to vertically scrape and smooth the outside walls, erasing the coil lines to create a blank canvas for your texture. -
Refine the rim:
Level off the top rim with a needle tool if it’s uneven. Compress the rim with a damp sponge or piece of chamois to make it rounded and durable.
Slip Consistency Matters
Make sure your slip is like thick yogurt. If it’s too runny, the dots will slide down the wall; too dry, and they will pop off during the firing.
Step 2: Adding the Texture
-
Mark horizontal guides:
Using a needle tool and a steady hand (or by spinning the banding wheel), lightly scribe horizontal lines around the pot where you want your decorative bands to sit. The reference image shows bands near the top, middle, and bottom. -
Create tiny beads:
Roll very thin, spaghetti-like coils of clay. Cut them into tiny, uniform segments and roll each into a minuscule sphere. -
Attach the bead rows:
Score the clay along your guide lines. Apply slip, then press the tiny spheres side-by-side to create the ‘pearl necklace’ effect seen bordering the main decorative bands. -
Make larger accent dots:
For the larger central dots, roll slightly bigger balls of clay. Flatten them gently onto the pot’s surface between your rows of tiny beads, spacing them rhythmically. -
Alternative dot method:
I prefer to sometimes form these dots directly on the pot by taking a small ball of soft clay and pressing it on with my thumb, then smoothing the edges slightly for a more organic, integrated look. -
Refine the raised details:
Once all dots are attached, gently brush over them with a very lightly damp sponge. This removes any sharp burrs and ensures they are securely bonded to the wall.
Troubleshooting: Cracking Dots
If dots crack away from the pot as it dries, the moisture content was too different. Always attach wet clay to leather-hard clay, never wet to bone-dry.
Step 3: Finishing Touches
-
Add the rim detail:
Notice the distinct, slightly recessed lip at the very top. Use a modeling tool to press a shallow groove just below the rim, creating a defined ‘collar’ for the planter. -
Final smooth:
Check the interior one last time to ensure it is watertight and smooth. Run a clean sponge over the entire exterior to tidy up any slip streaks. -
Dry slowly:
Cover the pot loosely with plastic to let it dry slowly. Uneven drying can cause the added decorative dots to pop off. -
Bisque fire:
Once bone dry, bisque fire the piece to the appropriate cone for your clay body (usually Cone 06 or 04). -
Glaze application:
Dip or brush the pot with a satin matte cream or white glaze. A satin finish works best here because a high gloss might obscure the delicate texture of the dots. -
Final firing:
Glaze fire the piece to maturity. Ensure the foot is wiped clean so it doesn’t fuse to the kiln shelf.
Now you are ready to pot up your favorite plant in this handmade beauty


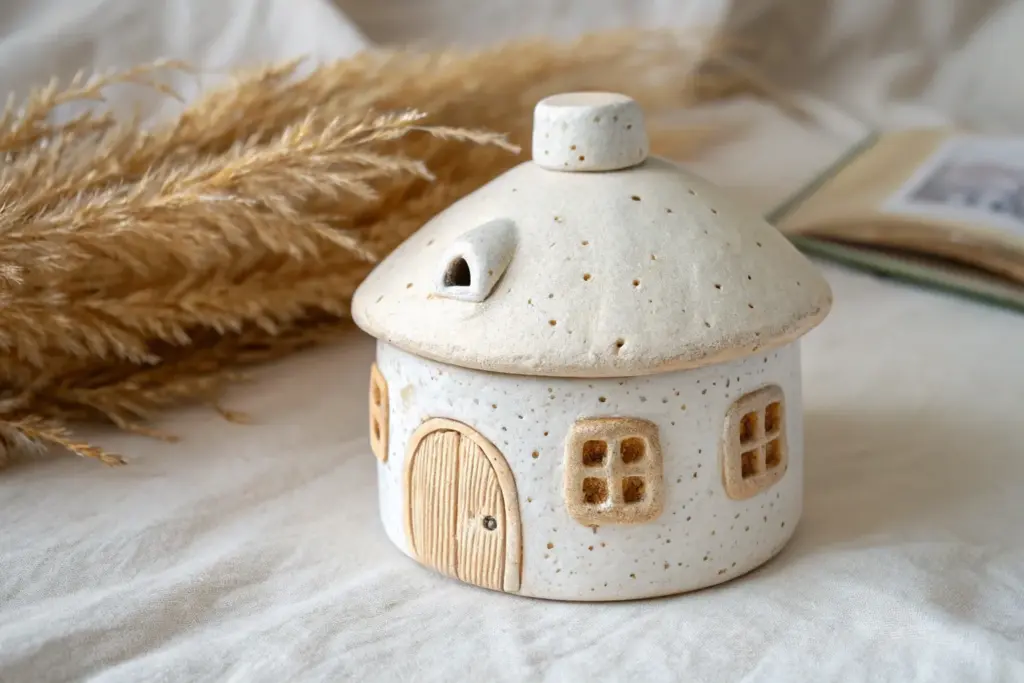
Tea Light Lantern With Cutout Windows

Illuminate your space with the warm, structured beauty of this handcrafted ceramic lantern, featuring a charming grid of cutout windows. The speckled, creamy clay body and clean lines create a modern yet rustic vessel perfect for holding your favorite tea lights.
Step-by-Step Tutorial
Materials
- Speckled cream stoneware clay (slab rolled)
- Rolling pin with guide strips (approx. 1/4 inch thick)
- Ruler and square tool
- Fettling knife or X-Acto blade
- Slip and scoring tool (or serrated rib)
- Small square cookie cutter (optional, or cut by hand)
- Sponge and water
- Circular cookie cutter (approx. 2-3 inches dia.)
- Wooden paddle
- Tea light candle for testing fit
Step 1: Preparing the Slabs
-
Roll the clay:
Begin by wedging your speckled stoneware clay thoroughly to remove air bubbles. Roll it out into a large, even slab using guide sticks to maintain a consistent thickness of about 1/4 inch. -
Smooth the surface:
Before cutting, take a damp sponge or a soft rib tool and gently compress the clay surface on both sides. This aligns the clay particles to prevent warping and creates that smooth, professional finish we’re aiming for. -
Measure the walls:
Using your ruler and square, mark out four identical rectangles for the walls. A good size is roughly 4 inches wide by 4.5 inches tall, depending on how large you want the final lantern. -
Cut the walls:
Carefully slice out your four rectangular wall pieces with a sharp blade. Keep your cuts straight and perpendicular to the table so the corners will meet cleanly later. -
Create the top surface:
Cut a square piece for the top of the lantern. This should be the same width as your side walls (4 inches square). Set aside scrap clay for later reinforcements.
Step 2: Creating the Windows
-
Mark the grid:
On each of the four wall panels, lightly sketch a 2×2 grid of squares using a needle tool. Ensure you leave a sturdy frame border (about 1/2 inch) around the edges and between the windowpanes. -
Cut the panes:
Using a sharp X-Acto knife or a square cutter, remove the four inner squares from each panel to create the window effect. I like to work slowly here to keep the corners crisp. -
Smooth the cutouts:
Once the windows are cut, dip your finger or a small sponge in water and gently smooth the sharp edges of the cutouts. This softens the look and prevents sharp burrs after firing. -
Prepare the top opening:
Take your top square slab and center a circular cutter in the middle. Cut out a hole large enough for a tea light to be dropped in easily—usually about 2 to 2.5 inches in diameter. -
Add the rim detail:
Roll a small coil or cut a thin strip of clay. Attach it around the circular opening on the top piece to create a raised lip. Score and slip this securely to define the candle’s entry point.
Clean Corner Pro-Tip
When cutting out the window squares, don’t drag the knife all the way to the corner. Stop slightly before the corner and cut outward from it instead. This prevents over-cutting into the frame.
Step 3: Assembly
-
Bevel the edges:
For a seamless box joint, cut the long vertical edges of your four wall panels at a 45-degree angle. This mitering allows them to fit together snugly at 90 degrees. -
Score and slip:
Roughen all the beveled edges thoroughly with a serrated tool and apply a generous amount of clay slip. -
Construct the box:
Stand the walls up and press the corners together to form a hollow cube (without a top or bottom yet). Use a square tool inside the corners to ensure they are perfectly distinct and not leaning. -
Reinforce the seams:
Roll very thin coils of soft clay and press them into the interior corners of the box. Smear the clay out with a modeling tool to reinforce the joints invisibly. -
Attach the top:
Score and slip the top edges of your box walls and the underside of your top panel (the one with the circle). Place the top panel on, pressing gently to seal. -
Paddle into shape:
With the box fully closed (except for the bottom and top hole), gently tap the exterior walls with a wooden paddle. This consolidates the joints and straightens any bowing that happened during handling. -
Refine the surface:
Do a final pass with a damp sponge to clean up any excess slip squeezed out at the seams. Pay attention to the corners of the windows, ensuring they remain sharp and clear. -
Add inner supports (optional):
If you plan to place a candle deeper inside rather than dropping it in a holder on top, you can create a small internal shelf or floor slab near the bottom before closing perfectly. -
Dry slowly:
Place plastic loosely over the finished piece to let it dry very slowly. This prevents the thin window frames from cracking due to uneven shrinkage. -
Fire and finish:
Bisque fire the piece, then glaze if desired, or leave the raw speckled clay exposed like in the photo for a natural stone look. Fire to the maturity temperature of your specific clay body.
Sagging Walls?
If your clay is too soft and the walls slump while building, let the slabs stiffen to a ‘leather hard’ state before assembly. They should be firm enough to hold shape but soft enough to score.
Once fired, the light from a flicker of flame will dance beautifully through your handcrafted architectural grid


Slab Birdhouse With a Removable Roof
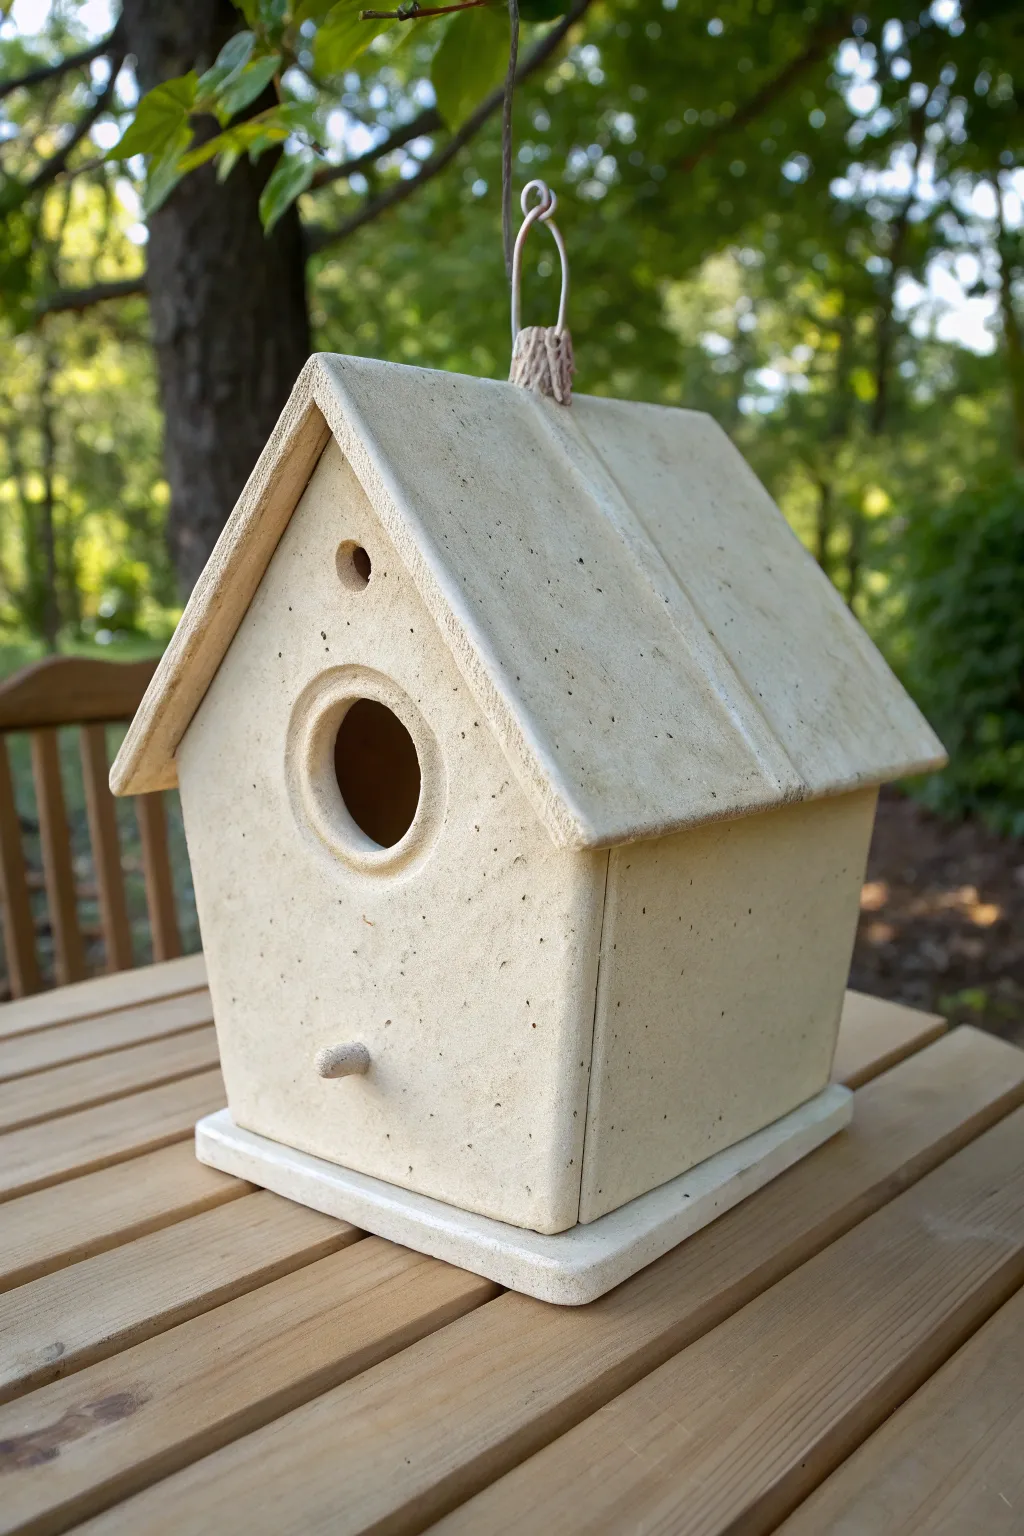
Create a charming, rustic haven for your garden birds with this sturdy slab-built clay birdhouse. Featuring a natural stoneware finish, a removable roof for easy cleaning, and a classic pitched design, this project blends perfectly into any outdoor setting while practicing your fundamental hand-building skills.
How-To Guide
Materials
- Stoneware clay (groggy for strength)
- Rolling pin
- Two wooden guide slats (approx. 1/4 inch thick)
- Fettling knife or clay knife
- Needle tool
- Ruler
- Slip and scoring tool (or serrated rib)
- Circle cutters (various sizes)
- Wooden sculpting tool
- Small sponge
- Twine or wire for hanging
- Wooden dowel or strong stick (for the loop handle)
Step 1: Preparing the Slabs
-
Roll out the clay:
Begin by wedging your clay thoroughly to remove air bubbles. Using your wooden guide slats on either side of the clay, roll out a large, even slab. The slats ensure a consistent 1/4 inch thickness, which is crucial for structural integrity. -
Smooth the surface:
Before cutting, compress the clay slab on both sides using a rib tool. This aligns the clay particles to prevent warping and creates that smooth, stone-like finish seen in the final piece. -
Create templates:
Design paper templates for your walls: two rectangles for the sides, two pentagons (house shapes) for the front and back, two rectangles for the roof panels, and one square for the base. I like to measure my base slightly larger than the walls to create a nice ledge. -
Cut the shapes:
Lay your templates onto the slab and carefully cut around them using a fettling knife. Keep the knife perpendicular to the table for straight edges, except where you might want beveled joints. -
Firm up the slabs:
Let the cut pieces sit until they reach a ‘leather-hard’ state. They should be firm enough to hold their shape without bending but still soft enough to join. This is essential for the walls to stand upright.
Step 2: Constructing the Body
-
Cut the entrance:
On the front pentagon piece, use a large circle cutter to remove the main entrance hole. Use a significantly smaller cutter or hole punch to add a ventilation hole near the peak. -
Refine the entrance:
Smooth the edges of the entrance hole with a damp sponge or finger. You can press a slight indentation around the perimeter of the hole to give it a finished, framed look. -
Add the perch:
Roll a small coil or cylinder of clay for the perch. Score and slip a spot just below the main entrance and attach the perch securely, blending the clay at the join so it’s seamless. -
Score and slip edges:
Take your base piece and the four wall pieces. thoroughly score (scratch) and apply slip to all the contact points where the walls will meet the base and each other. -
Assemble the walls:
Attach the side walls to the base first, then add the front and back pieces. Press the seams firmly together. Support the inside with one hand while smooth the outside seams with a wooden tool. -
Reinforce the interior:
Roll thin coils of clay and press them into the interior corners of the birdhouse. Smooth these coils down to act as reinforcement for the joints.
Fixing Warp
If your slabs warp while drying, place them under a wooden board with a light weight on top. This gently forces them back into a flat alignment before you assemble.
Step 3: Creating the Removable Roof
-
Join the roof panels:
Take your two roof rectangles. Bevel the long edge where they will meet at the peak to a 45-degree angle. Score, slip, and join them to form a ‘V’ shape. -
Add the ridge detail:
To hide the seam and add character, roll a thin strip of clay and apply it over the roof peak. Smooth it down gently so it looks like a ridge cap. -
Check the fit:
Gently place the roof onto the house body to ensure it fits. Do not score and slip this join! The roof needs to remain removable. You may want to add small clay tabs on the underside of the roof to keep it from sliding off. -
Create the hanger loop:
Fashion a loop from a coil of clay or use a small twig embedded in a clay lug. Attach this securely to the center ridge of the roof. -
Texture and clean up:
Use a damp sponge to smooth away any rough fingerprints. The goal is a clean, stone-like matte surface. You can tap the surface lightly with a stiff brush if you want a subtle speckled texture.
Texture Pop
Before the clay dries, gently press real leaves or coarse fabric into the roof slabs and peel them back. This leaves a beautiful, organic fossil impression.
Step 4: Hanging Mechanism
-
Prepare the wire loop:
Once the piece has been fired, you will need a hanging mechanism. Cut a length of sturdy wire. -
Attach the handle:
Identify the clay loop you created on the roof ridge. Feed your wire through this loop. -
Twist and secure:
Twist the wire securely at the base near the clay loop to lock it in simply. Create a larger loop at the top for hanging over a tree branch. -
Final wrap:
For a rustic touch shown in the image, wrap the base of the wire twist with natural twine or hemp cord.
Once fired to maturity, your stoneware birdhouse will be ready to weather the seasons and welcome its first feathered tenants


Wonky Cottage House With Curved Walls

Create a cozy, rustic atmosphere with this textured clay house, featuring arched windows and a uniquely weathered finish. Its rugged surface and simple lines give it the charm of an old English stone cottage.
Step-by-Step Tutorial
Materials
- Stoneware or earthenware clay (groggy texture preferred)
- Rolling pin
- Two wooden guide strips (approx. 5mm thickness)
- Fettling knife or craft knife
- Needle tool
- Scoring tool (or serrated kidney)
- Slip (clay and water slurry)
- Wooden sculpting tools
- Texture tools (rough sponge, toothbrush, or crumpled foil)
- Small round cutter or drinking straw (for vent holes)
- Natural sponge
- White or cream underglaze/slip
- Matte transparent glaze
Step 1: Creating the Base Structure
-
Roll the Slabs:
Begin by wedging your clay to remove air bubbles. Place your clay between two wooden guide strips and roll it out into a smooth, even slab about 5mm thick. -
Cut Wall Shapes:
You will need four walls. Cut two rectangles for the side walls (approx. 4 inches tall) and two pentagon shapes for the front and back gable walls (approx. 6 inches at the peak). Make sure the vertical sides of all four pieces match in height. -
Texture the Walls:
Before assembly, use a rough sponge, a rock, or crumpled aluminum foil to press a distinct stone-like texture into the exterior surface of all four wall slabs. Don’t be afraid to press firmly to get deep crevices. -
Cut Openings:
Using a needle tool, carefully cut out the arched doorway on the front gable. Save the cutout piece—this will become the door later. -
Window Cutouts:
Cut out the arched window spaces: three on the front (one high, two low) and one on the visible side wall. Keep the shapes slightly organic rather than perfectly geometric. -
Score and Slip:
Score the vertical edges of all four wall pieces aggressively with your scoring tool. Apply a generous amount of slip to the scored areas. -
Assemble the Walls:
Stand the walls up and press the scored edges together to form the house box. Reinforce the inside corners by pressing a thin coil of clay into the seams and smoothing it out with a wooden tool.
Step 2: Roof and Architectural Details
-
Create the Roof Slabs:
Roll out two rectangular slabs for the roof. They should be wide enough to overhang the walls slightly and long enough to meet at the peak. -
Add Roof Texture:
Before attaching, gently tap the roof slabs with the side of a wooden tool or paddle to create gentle vertical undulations. -
Attach the Roof:
Score and slip the top edges of your house walls. Place the roof panels on, ensuring they are well-connected at the very top ridge. I find slightly pinching the ridge creates a nice, handmade seam. -
Trim the Ridge:
Roll a very thin coil of clay and press it along the very top ridge of the roof. Use a tool to make small, evenly spaced indentations along this strip to mimic ridge tiles. -
Ventilation Holes:
Use a small hole cutter or a drinking straw to punch a row of small holes near the roofline on the roof slabs. This adds decorative flair and helps airflow if you use a candle inside. -
Construct the Chimney:
Form a small cylinder of clay and attach it to the center of the roof ridge. Hollow it out using a tool so smoke can escape.
Clean Edges Trick
After cutting your windows, let the clay firm up to leather-hard before smoothing the inside edges with a damp brush. It prevents the frame from warping.
Step 3: Frames and Finishing
-
Window Frames:
Roll thin coils of clay to create raised frames around each window cutout. Score the area around the window, apply slip, and press the coils into place. Add a vertical and horizontal strip inside each arch to create window panes. -
Create the Door:
Take the clay piece you saved from the door cutout earlier. Use a needle tool to draw vertical wood grain lines on it. Add a tiny ball of clay for a doorknob. -
Attach the Door:
Score and slip the back of the door piece and attach it back into the door frame, but position it slightly ajar or recessed to give it depth. -
Dry and Bisque:
Allow the house to dry slowly under plastic for a few days to prevent warping. Once bone dry, bisque fire it according to your clay body’s temperature. -
Surface Treatment:
To achieve the look in the photo, brush a white or cream underglaze over the entire textured surface. Once it’s touch-dry, use a damp sponge to wipe most of it away, leaving the white pigment only in the textures and crevices. -
Final Glaze:
Apply a thin layer of matte transparent glaze over the exterior to seal it without making it too shiny, preserving the stone-like appearance. Fire one last time.
Light Up The Night
Leave the bottom of the house completely open or cut a large hole in the base. This allows you to easily place the finished house over an LED tea light.
Place your finished cottage on a shelf or mantle and enjoy the warm, welcoming vibe it brings to your space

The Complete Guide to Pottery Troubleshooting
Uncover the most common ceramic mistakes—from cracking clay to failed glazes—and learn how to fix them fast.
Mushroom Cottage With a Chimney
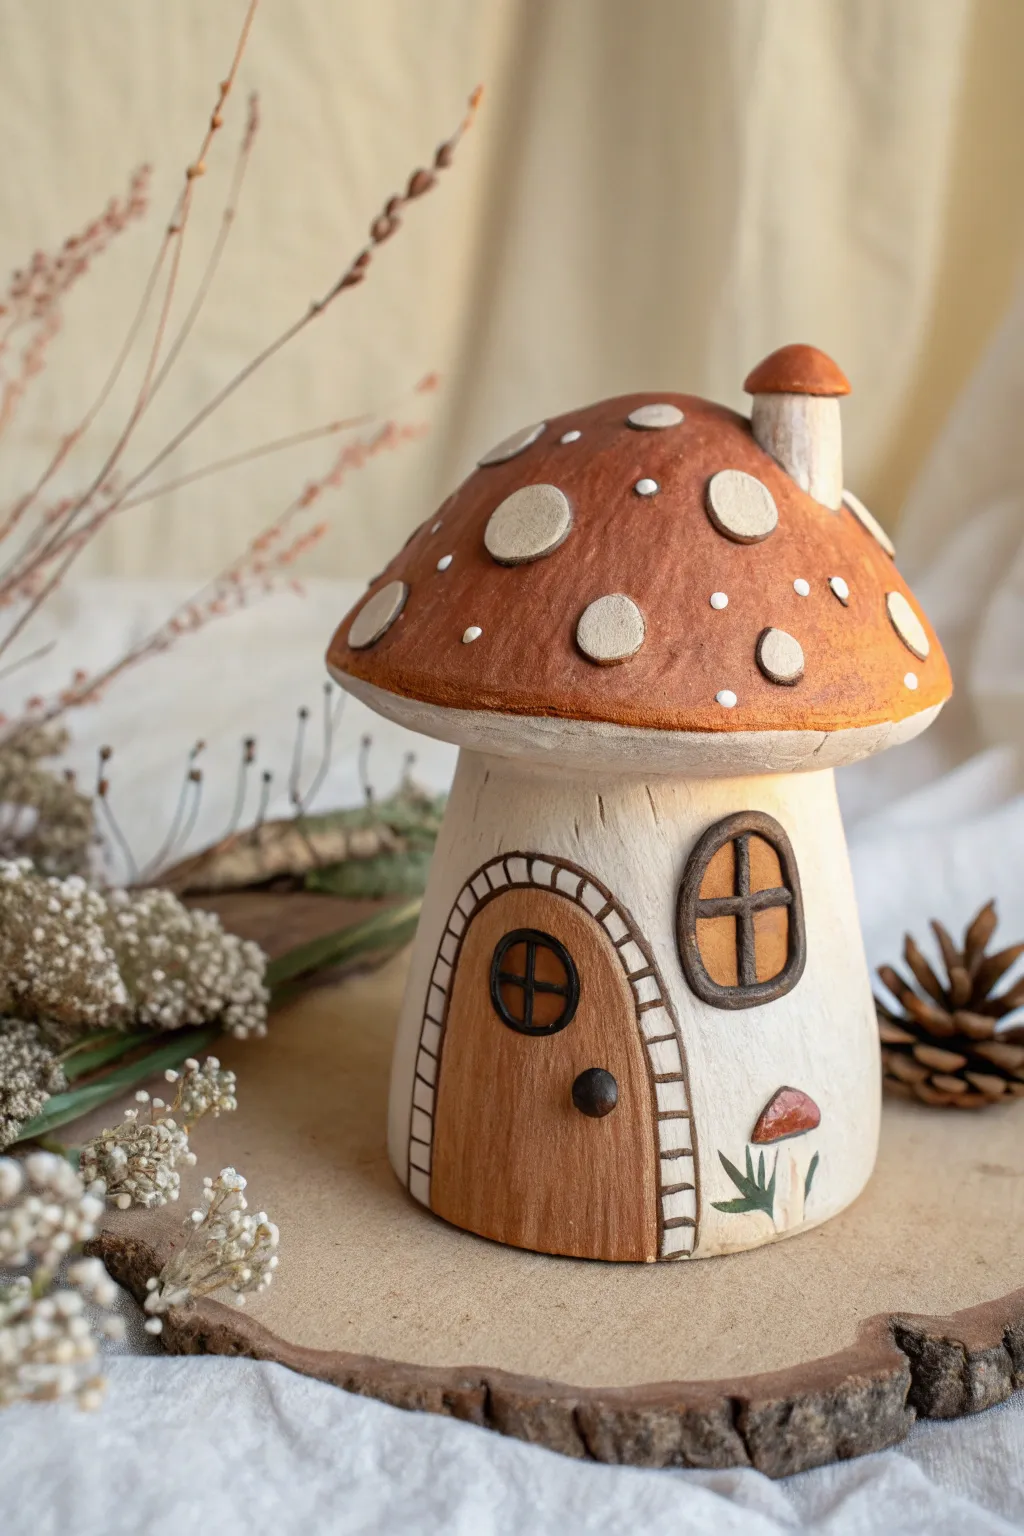
Create a cozy, fairy-sized dwelling straight out of a storybook with this charming mushroom house project. Featuring a textured terracotta-colored cap, a rustic arched door, and a tiny chimney, this piece brings a touch of woodland magic to any shelf.
How-To Guide
Materials
- Air-dry clay (white or light grey)
- Acrylic paints (terracotta/burnt orange, white, dark brown, black, leafy green)
- Sculpting tools (needle tool, small ball stylus)
- Small rolling pin
- Water and sponge for smoothing
- Paintbrushes (medium flat, fine detail)
- Scoring tool or old toothbrush
- Work surface or mat
Step 1: Sculpting the Base Structure
-
Form the stem:
Begin with a fist-sized ball of clay and roll it into a thick cylinder. Gently taper the top slightly so the base is wider, creating a stable foundation for your mushroom house. -
Hollow the stem (optional):
If you want to save weight or clay, gently press your thumb up into the bottom of the cylinder to hollow it out, being careful not to distort the exterior walls. -
Shape the cap:
Take a larger ball of clay and flattening it into a thick pancake. Gently curve the edges downward to form a dome shape, ensuring it’s slightly wider than your stem. -
Attach the cap:
Score the top of the stem and the underside of the cap with your needle tool. Add a dab of water or clay slip, then press the cap firmly onto the stem. Smooth the join underneath so the cap looks seamlessly connected.
Step 2: Adding Architectural Details
-
Create the chimney:
Roll a small cylinder for the chimney stack and a tiny cone for its cap. Attach the stack to the side of the roof using the score-and-slip method, then add the cap on top. -
Define the door:
Use a needle tool to lightly sketch an arched door shape on the front of the stem. Gently press the area inside the arch inward slightly to make the door look recessed. -
Add the door frame:
Roll a very thin snake of clay and flatten it. Attach this around the door arch to create a stone frame. Use a knife or needle tool to press vertical lines into this strip, making it look like individual bricks. -
Form the windows:
Shape small ovals of clay for window frames and attach them to the ‘walls’. Press the center in slightly, then add tiny crisscross clay snakes to form the window panes. -
Texture the roof:
For the spots, roll small, flat discs of clay in varying sizes. Press these randomly onto the mushroom cap, flattening them well so they look embedded rather than just stuck on.
Keep it Proportioned
Before attaching the cap permanently, test the balance. If the cap is too heavy, the stem might slump. Let the stem stiffen for an hour before attaching the roof.
Step 3: Painting and Finishing
-
Let it dry completely:
Allow your sculpture to air dry for 24-48 hours. It should feel room temperature (not cool) to the touch when fully dry. -
Base coat the stem:
Paint the main stem of the mushroom with a creamy off-white or light beige. I like to keep this layer slightly irregular to give it an organic, aged look. -
Paint the cap:
Apply a warm terracotta or burnt orange paint to the mushroom cap. Carefully paint around the raised white spots. If you accidentally paint a spot, you can touch it up with white later. -
Detail the door:
Paint the recessed door area with a medium brown. Once dry, dry-brush a little lighter brown texturing to mimic wood grain, and paint the door handle black. -
Window details:
Paint the window frames dark brown and the ‘glass’ area a warm golden yellow to look like light glowing from within. Accent the cross-panes with dark brown. -
Highlight the stonework:
Paint the brick archway around the door cream or grey. Use a fine brush to outline the ‘mortar’ lines in dark brown to make the individual stones pop. -
Add the mini mushroom:
Using your smallest brush, paint the tiny mushroom detail near the base of the house using the same terracotta and white palette. -
Final touches:
Add tiny white dots to the orange roof for extra whimsy, and outline the edges of the roof spots with a very diluted brown wash to create depth.
Make it a Lantern
Cut the windows all the way through and leave the bottom open. Once dry, place an LED tea light underneath to make the windows truly glow.
Now your little cottage is ready to welcome its fairy inhabitants to their new home
Tiny Clay Village Built on a Base Tile
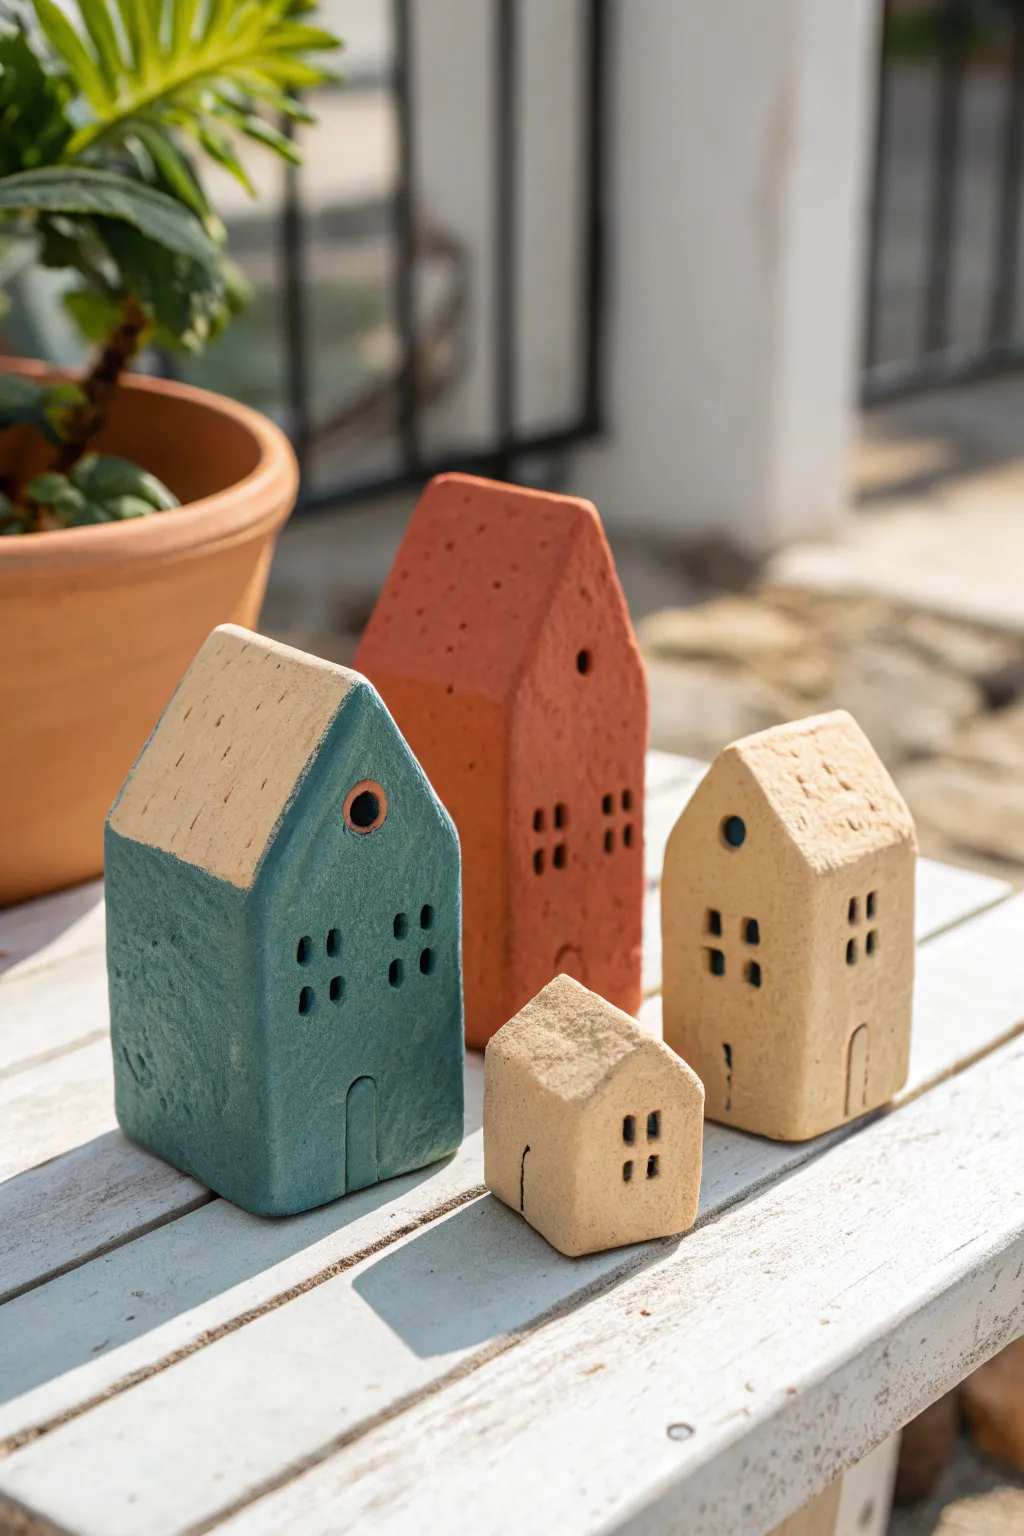
Create a charming set of minimalist houses that evoke the feeling of a sun-drenched European village. These textured ceramic pieces feature simple geometric shapes and earthy tones, perfect for adding a touch of whimsy to a shelf or windowsill.
Detailed Instructions
Materials
- Earthenware or stoneware clay (one darker groggy body, one smooth white body)
- Rolling pin
- Two wooden guide strips (approx. 1/4 inch thick)
- Pottery knife or fettling knife
- Needle tool
- Ruler
- Slip (clay scraps mixed with water)
- Scoring tool (or an old fork)
- Underglazes (teal, warm terracotta)
- Clear matte glaze (optional)
- Sponge
Step 1: Shaping the Village Blocks
-
Prepare the slab:
Begin by wedging your clay to remove air bubbles. Place the clay between two wooden guide strips and roll it out into a uniform slab that is roughly 1 inch thick. You want these houses to feel solid and substantial, not hollow. -
Cut the basic blocks:
using your ruler and fettling knife, cut four rectangular blocks of varying heights and widths. Don’t worry about them being perfectly identical; variation adds character. Aim for heights ranging from 2 to 5 inches. -
Sculpt the rooflines:
Decide which ends will be the tops. Slice diagonal cuts on the upper corners of each block to create pitched roofs. You can make some steep and sharp, while others can be more shallow and asymmetrical. -
Smooth the surfaces:
Once you have the basic house shapes, use a slightly damp sponge to smooth away the sharp cutting lines. Gently run your thumb along the edges to soften them, giving the clay a worn, stone-like appearance.
Cracking Issues?
Solid clay blocks can crack if dried too fast. Dry them very slowly under plastic for at least a week before firing. If cracks appear, fill them with a vinegar-slip mixture.
Step 2: Adding Details & Texture
-
Carve the windows:
Use a needle tool or a small square cutter specifically for clay to punch out window shapes. Create groups of four small squares for larger houses, or just two for smaller ones. Push the tool deep enough to create shadow, but you don’t need to go all the way through. -
Define the doors:
Use the needle tool to outline a simple arched or rectangular door at the base of each house. For the teal house, press a small indentation in to simulate a recessed entryway. -
Add roof accents:
For the tall teal house, create a circular attic window near the peak. I find that pressing deeply with the back of a paintbrush handle works perfectly for this round shape. -
Texture the walls:
To achieve the rustic finish seen in the photo, gently tap the sides of the houses with a stiff-bristled brush or a smooth stone. This removes the ‘perfect’ manufactured look. -
Dry slowly:
Cover the houses loosely with plastic and let them dry slowly for several days until they are bone dry. Solid blocks of clay take longer to dry than hollow forms, so patience is key here.
Pro Tip: Hollow Out
If your clay blocks are thicker than 1 inch, hollow them out from the bottom using a loop tool. This reduces drying time and prevents explosions in the kiln.
Step 3: Bisque & Glazing
-
Bisque fire:
Fire the bone-dry pieces in a kiln to cone 04 (or according to your specific clay’s instructions). This initial firing hardens the clay into ceramic. -
Mask the roofs:
For the two larger houses, use wax resist or masking tape to cover the roof area and the inside of the circular window. We want to keep the raw clay color visible in these spots. -
Apply the teal:
Brush three even coats of a matte teal underglaze onto the walls of the first house. Be careful around the door and window indentations; let the glaze pool slightly in the recessed lines to define them. -
Apply the terracotta:
Brush a warm, brick-red underglaze onto the entire surface of the second tallest house. For this one, cover the roof as well to create a monochromatic look. -
Leave natural houses:
For the two smallest beige houses, simply wipe them down with a damp sponge. These will remain unglazed to show off the natural sandy texture of the clay body. -
Define recessed areas:
If you want darker windows on the beige houses, mix a tiny amount of black underglaze with water and paint just inside the deep window holes. -
Final wipe back:
Take a clean, damp sponge and very lightly wipe the surface of the teal house. This exposes some of the clay’s texture through the color, enhancing that weathered, old-world aesthetic. -
Glaze fire:
Fire the pieces a second time to the temperature required by your clay and underglaze. Note that because we aren’t using glossy glaze, the finish will remain beautifully matte and stone-like.
Now arrange your little village on a shelf to enjoy a piece of handcrafted architecture every day


What Really Happens Inside the Kiln
Learn how time and temperature work together inside the kiln to transform clay into durable ceramic.
Owl Planter Family Built From Pinch Pots
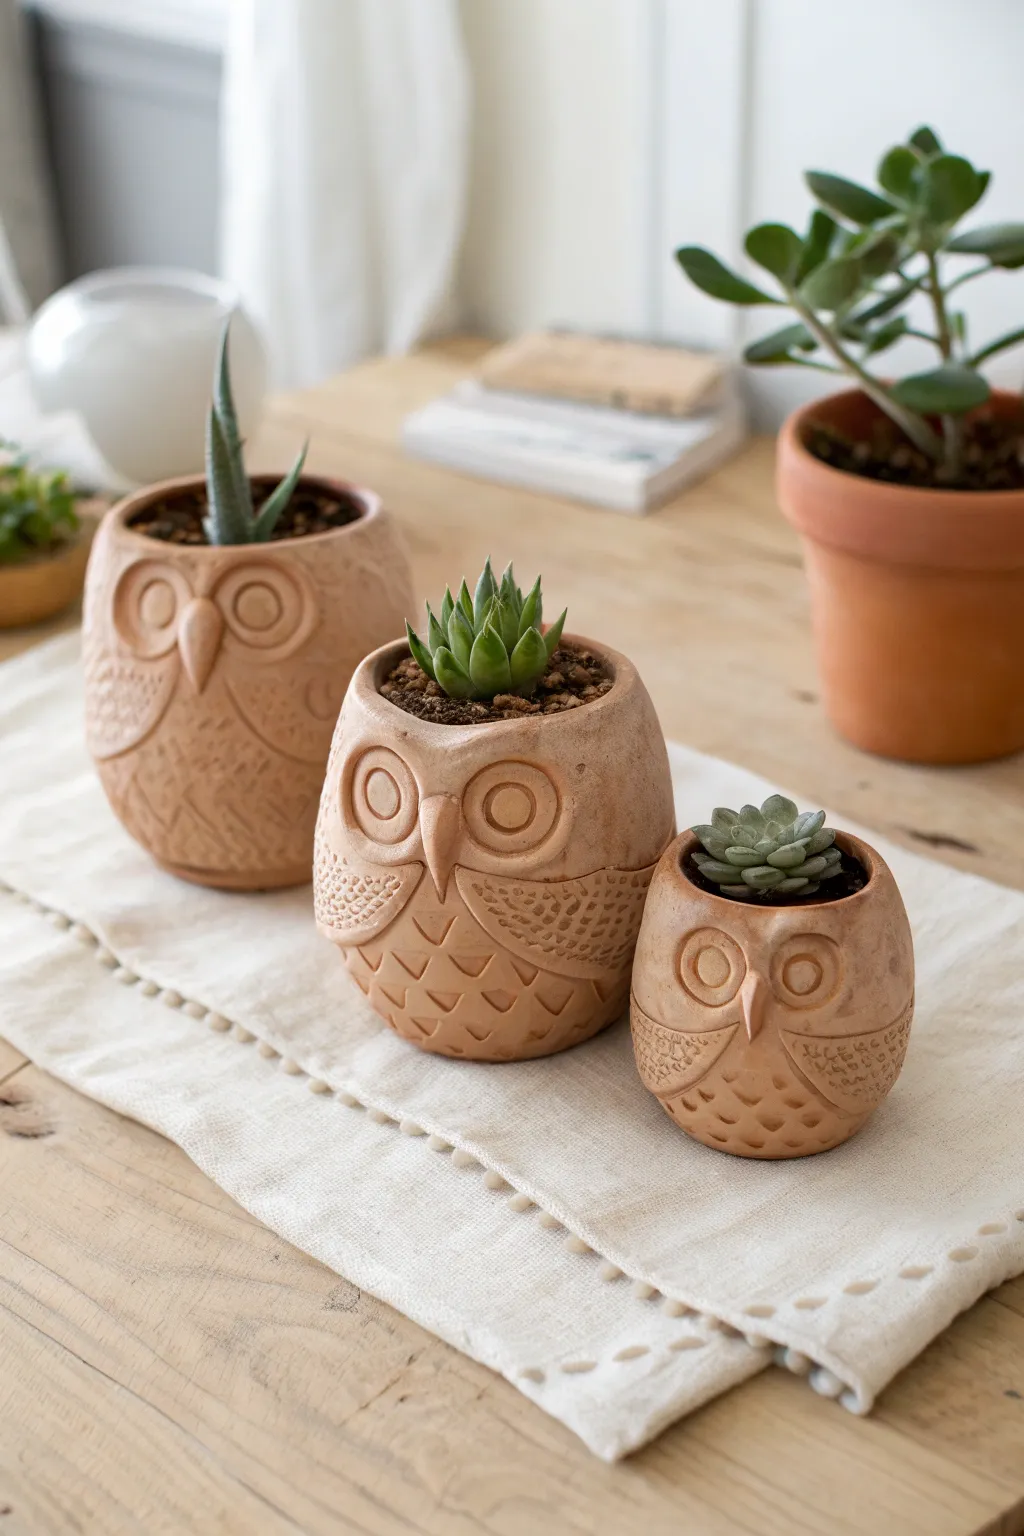
Create a charming trio of rustic owl planters using the simple and satisfying pinch pot method. These textured terracotta-style pots feature distinct owl faces with large eyes and feather detailing, perfect for housing your favorite small succulents.
How-To Guide
Materials
- Terracotta-colored air-dry clay or kiln-fire clay
- Small bowl of water
- Needle tool or toothpick
- Loop tool or small spoon (for carving)
- Small rolling pin
- Sponge
- Canvas or cloth work surface
Step 1: Forming the Bodies
-
Prepare the clay balls:
Start by dividing your clay into three portions of varying sizes to create a large, medium, and small owl. Roll each portion into a smooth, tight sphere between your palms. -
Begin the pinch pot:
Hold the largest clay ball in one hand. Press your thumb into the center, stopping about a half-inch from the bottom. This hole will be the interior of your planter. -
Shape the walls:
Gently pinch the clay between your thumb and fingers, rotating the ball as you go. Work from the bottom up to thin the walls evenly, aiming for a consistent thickness of about 1/4 inch. -
Refine the form:
Instead of flaring the rim out like a bowl, gently curve the top edge inward slightly to create an egg-like shape with an opening at the top. -
Repeat for the family:
Repeat the pinching process for the medium and small clay balls. I like to tap the bottom of each finished pot gently on the table to create a flat, stable base so they don’t roll away. -
Smooth the surfaces:
Dip a sponge in a little water and wipe down the exterior of each pot to remove any fingerprints or cracks, creating a smooth canvas for your details.
Slip & Score Secret
Always scratch (score) both clay surfaces and add water (slip) before joining parts like eyes or beaks. This acts like velcro and glue, preventing pieces from popping off as they dry.
Step 2: Adding Facial Features
-
Create the eye discs:
Roll out a small slab of clay about 1/8 inch thick. Use a small round cutter or a bottle cap to cut out two large circles for each owl’s eyes. -
Attach the eyes:
Score the back of the eye circles and the face area on the pot with your needle tool. Dab a little water (slip) on the scored areas and press the circles firmly onto the pot. -
Sculpt the pupils:
Roll tiny balls of clay, flatten them slightly, and attach them to the center of the eye discs. Use a tool to press a small indentation in the center of each pupil for depth. -
Form the beak:
Roll a small cone shape for the beak. Attach it between and slightly below the eyes, blending the top edge into the clay so it looks like it’s emerging from the face. -
Define the eye rims:
Roll thin coils or ‘snakes’ of clay. Wrap one around the outer edge of each eye disc to create a raised rim, smoothing the outer edge onto the main body.
Level Up: Colored Washes
After bisque firing (or drying), apply a dark iron oxide wash or diluted brown acrylic paint, then wipe it back. The dark color stays in the textured feathers, making the details pop.
Step 3: Texturing and Finishing
-
Mark the wings:
Use your needle tool to lightly draw a curved line on each side of the owl’s body to outline where the wings will be. -
Create wing texture:
Inside the wing outlines, use the tip of a small loop tool or a textured stamp to create a pattern. The image shows a stippled or cross-hatched texture that mimics downy feathers. -
Add chest feathers:
On the owl’s belly area, use a loop tool to carve small, U-shaped scallops. Stagger them in rows like roof shingles to resemble breast feathers. -
Clean up edges:
Go over your carving work and gently brush away any clay crumbs with a soft, dry brush or your finger. Ensure the rim of the pot is smooth and comfortable to touch. -
Final drying check:
Check that the bottom is still flat. If using air-dry clay, set them aside in a cool, dry place. If using ceramic clay, prepare them for the kiln according to your clay body’s instructions. -
Optional drainage:
If you plan to plant directly into these rather than using a nursery pot insert, poke a hole in the bottom center now for drainage.
Once dry and finished, nestle your succulents inside to complete your adorable owl family display
Architectural Bookends That Look Like Building Facades
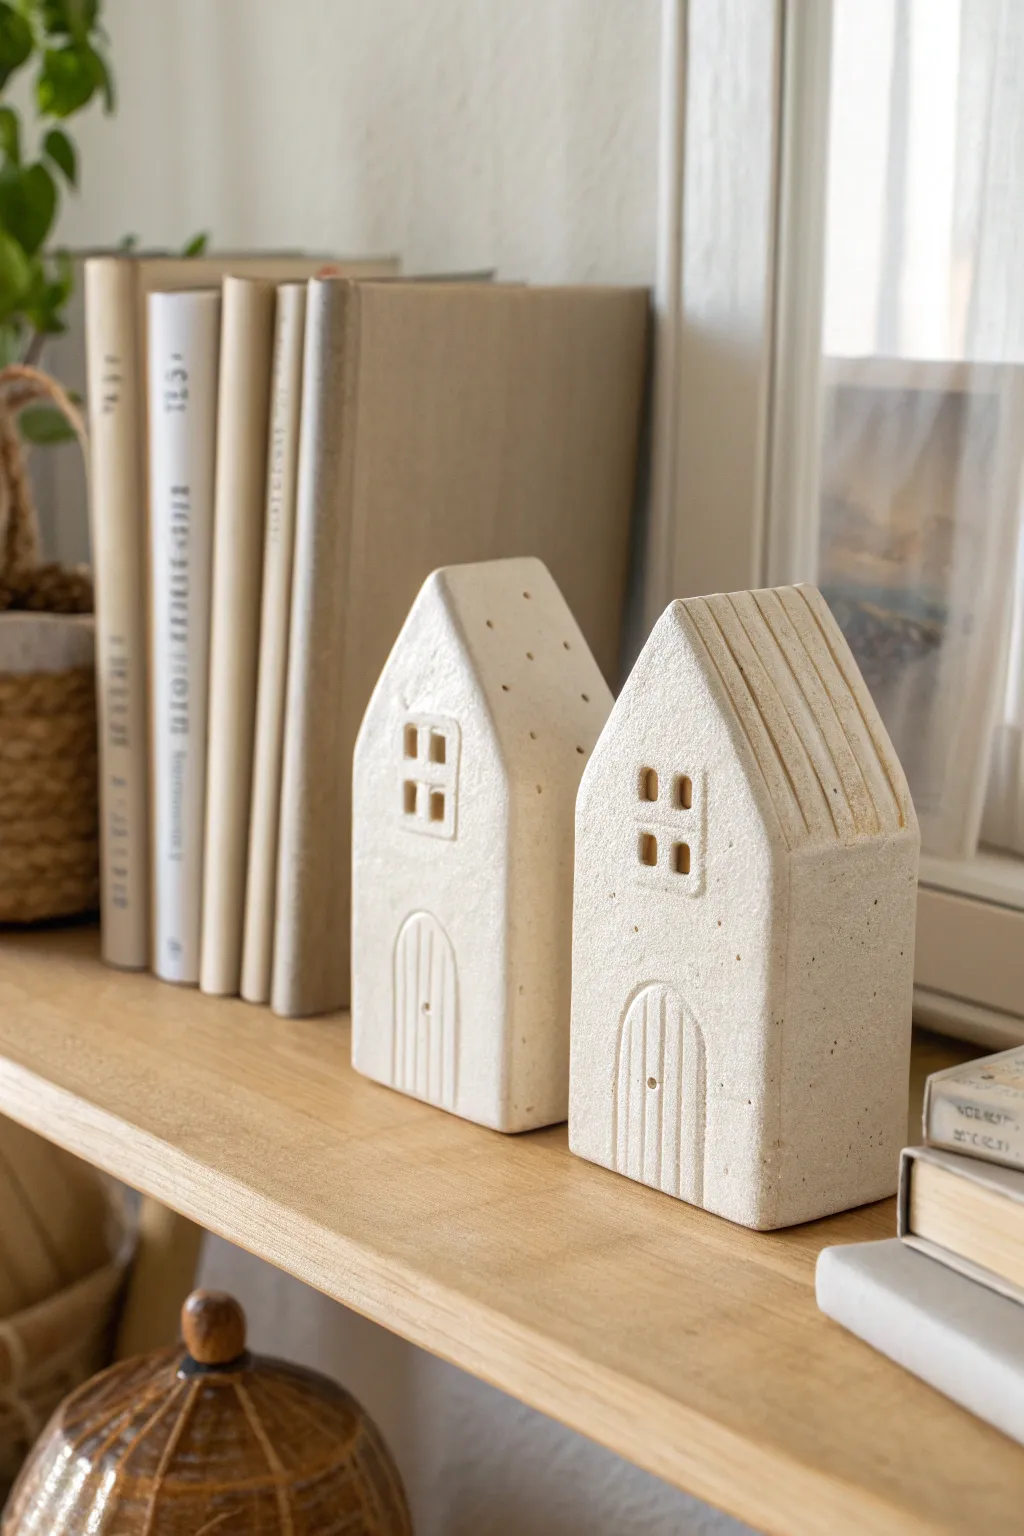
These minimalist clay houses bring a serene, Scandinavian touch to any bookshelf, serving as both charming decor and functional bookends. Their textured finish and simple geometric details celebrate the imperfect beauty of hand-built pottery.
Step-by-Step
Materials
- Air-dry clay (stone or white color) or polymeric clay
- Rolling pin
- sharp craft knife or scalpel
- Ruler
- Texturing tool (old toothbrush or stiff bristle brush)
- Slip (clay mixed with water) for joining
- Needle tool or toothpick
- Sandpaper (fine grit)
- Small square cutter (optional, for windows)
- Acrylic matte varnish (optional)
Step 1: Planning and Cutting
-
Prepare your templates:
Sketch your house dimensions on cardstock first. You will need a front/back piece with a peaked roof (approx. 3 inches wide by 6 inches tall at the peak), side walls, and a separate roof piece if you plan to build a hollow structure, though solid block sculpting is easier for heavy bookends. -
Condition the clay:
Knead your clay thoroughly until it is soft and pliable. If you want the speckled look shown in the image, you can mix in some coarse sand or dried coffee grounds at this stage. -
Form the main block:
For sturdy bookends, form a solid rectangular block of clay. Tap it firmly against your work surface to flatten the bottom so it stands perfectly straight. -
Shape the roof:
Using your knife or a wire cutter, slice the top of your block at an angle to create the gable roof shape. I prefer to slice one side, then use that cut piece as a guide for the other side to ensure symmetry.
Cracks Appearing?
If small cracks appear while drying, mix a tiny amount of clay with water to make a paste (slip) and fill them in immediately, then smooth with a finger.
Step 2: Detailing the Facade
-
Outline the door:
Use a needle tool to gently scribe an arch shape at the base of the front facade for the door. -
Create door planks:
Vertical lines are key here. Carefully draw parallel vertical grooves inside your door outline to simulate wooden planks. -
Add the doorknob:
Press a small, round indentation into the right side of the door using the back of a paintbrush or a ball stylus. -
Carve the window:
Above the door, carve out a four-pane window. You can cut four small squares individually, or press a square cutter in deeply and then add a cross of fresh clay back in to form the mullions. -
Refine the window edges:
Smooth the inside edges of your window frames with a damp brush so they look intentional and tidy.
Level Up: Illumination
Instead of a solid block, build the house hollow using slab construction. Cut the windows all the way through so you can place an LED tea light inside.
Step 3: Texturing and Finishing
-
Add roof texture:
For one house, use your needle tool to poke small, random holes across the roof slope. For the other, use the side of a ruler to press horizontal or vertical lines to mimic roofing tiles or standing seam metal. -
Create surface texture:
To mimic the stone-like finish in the photo, gently tap the entire surface of the house with a stiff toothbrush or a ball of crumbled foil. This removes the ‘plastic’ look of smooth clay. -
Check stability:
Stand the houses up again to ensure they haven’t warped during detailing. If they wobble, gently press them down on a flat surface. -
Allow to dry:
Let the clay dry completely. For a solid block of this size, this might take 3-5 days. Rotate them occasionally to ensure even airflow. -
Sand imperfections:
Once fully bone dry, lightly sand any sharp corners or burrs left from the carving process. -
Seal the piece:
Apply a coat of matte varnish to protect the surface while keeping that natural, raw clay aesthetic intact.
Now you have a set of unique architectural pieces ready to organize your favorite novels

TRACK YOUR CERAMIC JOURNEY
Capture glaze tests, firing details, and creative progress—all in one simple printable. Make your projects easier to repeat and improve.
Stacked Totem Tower With Windows and Negative Space
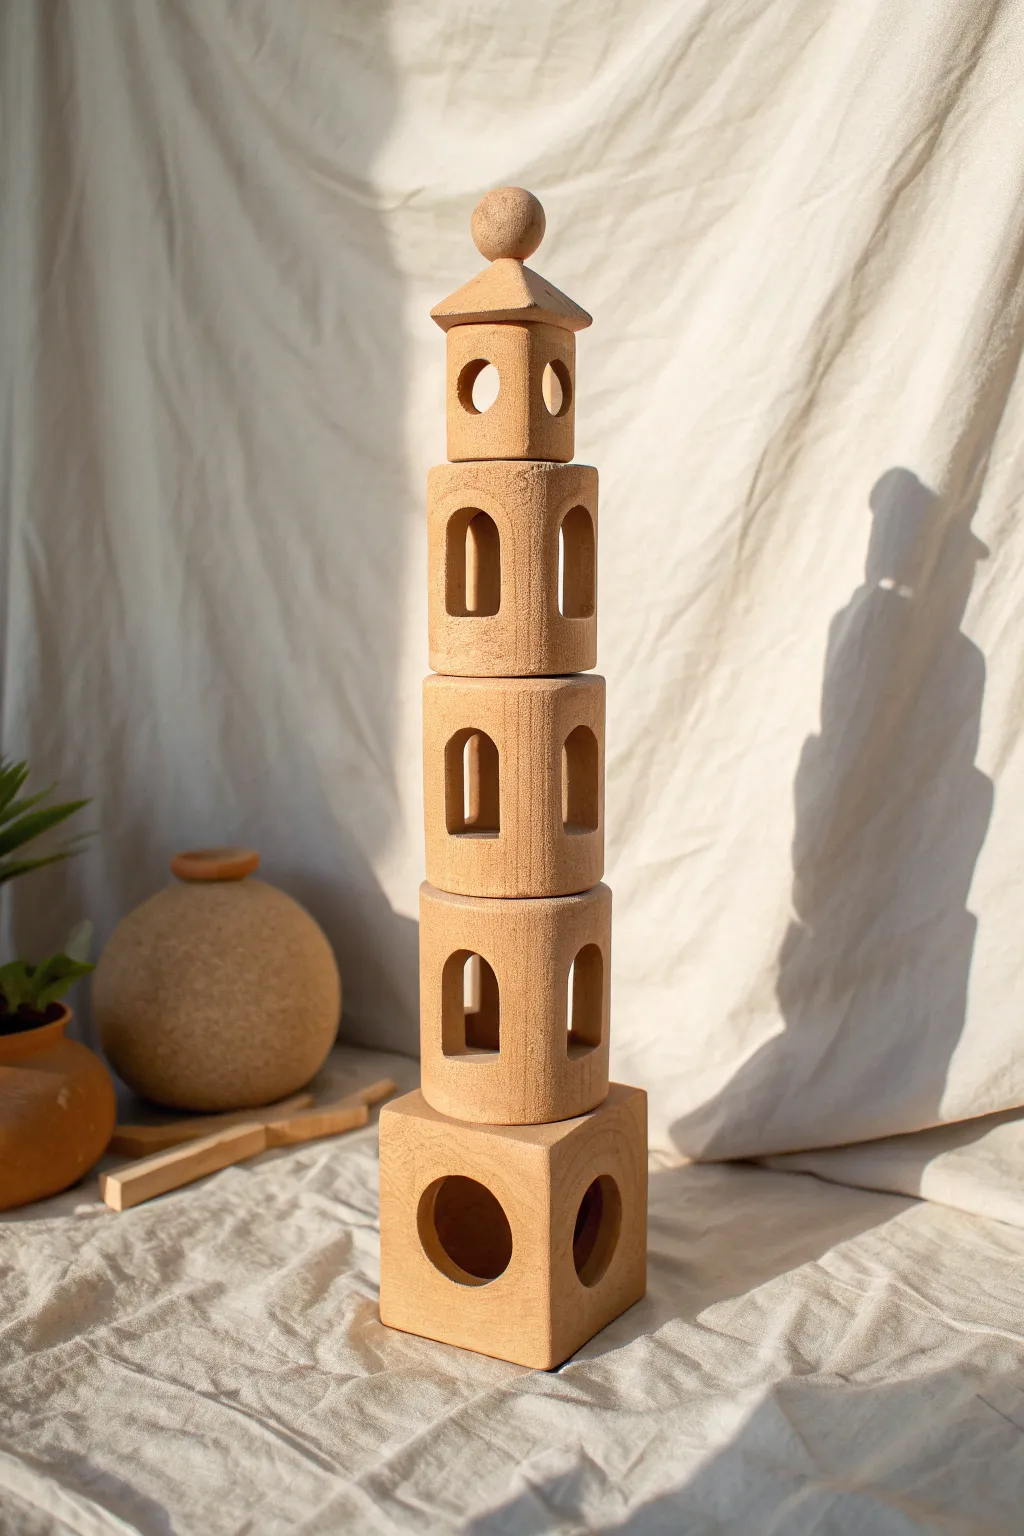
This elegant tabletop sculpture combines geometric precision with the earthy warmth of unglazed clay. By stacking distinct modular components—cubes, cylinders, and arches—you create a towering structure that plays beautifully with light and shadow.
Step-by-Step Tutorial
Materials
- Smooth terracotta or stoneware clay (grooless or fine grog)
- Rolling pin and guide slats (approx. 1/4 inch)
- Circle cutters (various sizes)
- Fettling knife or X-Acto blade
- Slip and score tool (serrated rib)
- Wooden paddle
- Ruler
- PVC pipe or wooden dowel (for shaping cylinders)
- Sponge and water
- Cardstock (for templates)
Step 1: Forming the Base Cube
-
Roll the Slabs:
Begin by rolling out a consistent slab of clay, roughly 1/4 inch thick. Use guide slats to ensure even thickness, which is crucial for structural integrity during the stacking phase. -
Cut Square Panels:
Using a ruler and knife, cut five squares of equal size (roughly 3×3 inches). These will form the walls and top of your base block. Let them firm up to a ‘leather-hard’ state so they don’t slump. -
Create the Circular Windows:
Before assembly, select two or three of your wall panels. Use a large circle cutter to remove a hole directly in the center of each panel. Smooth the interior rim of these cuts with a damp sponge. -
Assemble the Cube:
Score the edges of your squares and apply clay slip. Join the four walls together, reinforced by a small coil of clay pressed into the interior corners. Add the top square slab to close the box. Paddle the outside gently to sharpen the corners.
Step 2: Constructing the Tower Body
-
Cut Cylinder Walls:
Roll out a fresh slab. Measure and cut three rectangular strips. The length should be the circumference of your desired cylinder, and the height should be slightly taller than wide (approx. 2.5 inches tall). -
Cut Arched Windows:
While flat, cut your window shapes. I like to make a small cardstock template for the arch to ensure every window matches. Cut two or four windows per strip, spacing them evenly. -
Form the Cylinders:
Wait until the clay is firm but pliable. Wrap each rectangle around a PVC pipe or dowel to form a tube. Score, slip, and join the seam. Smooth the seam so it becomes invisible. -
Cap the Cylinders:
Cut circular slabs slightly larger than your cylinders. Attach a cap to the top and bottom of each cylinder (or just the top if you want them hollow-bottomed for weight reduction). Trim the excess clay flush with the walls.
Slumping Walls?
If your cylinders or boxes collapse, the clay is too wet. Let your slabs sit uncovered for 30-60 minutes before cutting and assembling to reach leather-hard stiffness.
Step 3: The Crowning Details
-
Build the Top Block:
Create a smaller version of the base cube, or a small cylinder, roughly 1.5 inches wide. Cut small circular windows into the sides to echo the design of the base. -
Shape the Roof:
Form a small pyramid. You can do this by pinching a solid lump of clay into shape or by cutting four small triangles and joining them. Ensure the base of the pyramid matches the top of your small block. -
Add the Finial:
Roll a small sphere of clay. Score and attach it to the very peak of your pyramid roof. -
Refine the Surfaces:
Once all pieces are constructed and leather hard, use a slightly damp sponge to wipe away any fingerprints or rough texture. The beauty of this piece relies on smooth, clean surfaces.
Internal Lighting
Leave the bottom of every component open (no floor slabs). Once fired, this allows you to place an LED tea light or fairy lights inside for a glowing luminary effect.
Step 4: Final Assembly
-
Dry Fitting:
Carefully stack your leather-hard pieces to check the balance and alignment. If any tops or bottoms are bowing, sand them flat gently. -
Firing:
Fire the pieces separately. This allows you to rearrange the tower later and prevents cracking during shrinkage. Fire to the maturity temperature of your specific clay body.
Enjoy arranging and rearranging your architectural sculpture to catch the changing light of the day.