Whenever I’m stuck creatively, I come back to a clay bust—it’s the perfect mix of technique practice and personal storytelling. Here are my favorite bust ideas, starting with the classics you’ll actually want to try and drifting into the weirder, artsier experiments once you’re warmed up.
Classic Self-Portrait Bust
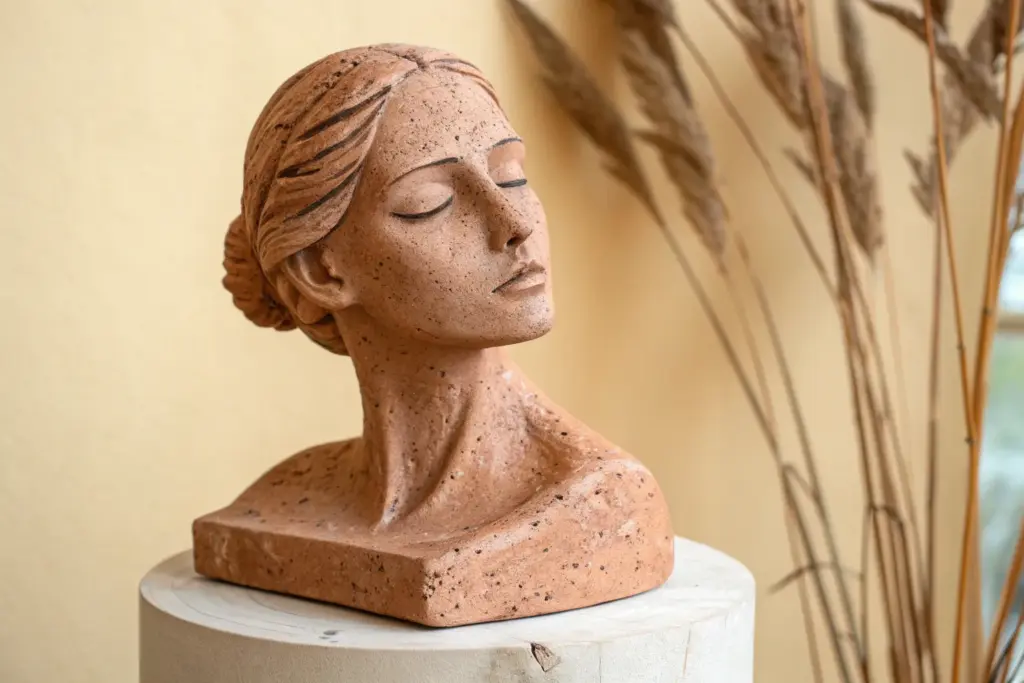
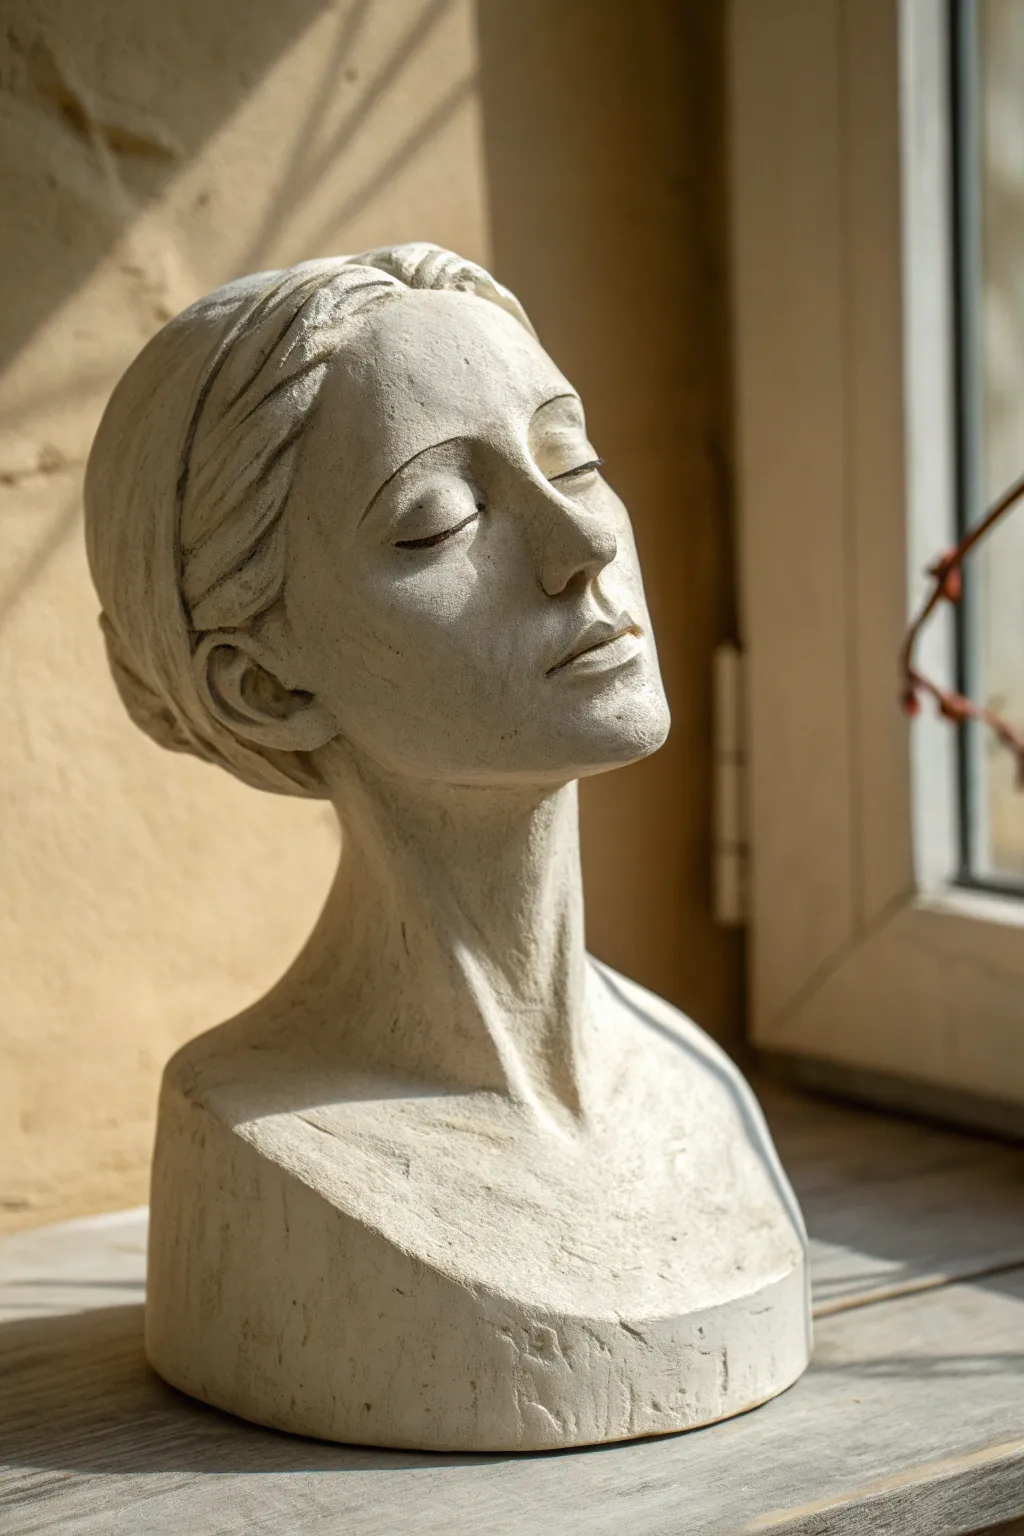
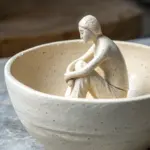
Capture timeless elegance with this classic clay bust project, emphasizing a calm, meditative expression and a weathered, antique finish. The beauty of this piece lies in its rough, textural details, giving it the appearance of a sculpture unearthed from a forgotten studio.
How-To Guide
Materials
- White sculpting clay (air-dry or stoneware, approx. 5-7 lbs)
- Armature wire (heavy gauge)
- Wooden base board
- Aluminum foil
- Masking tape
- Sculpting tools (loop tool, wooden modeling tool, needle tool)
- Sponge and water bucket
- Optional: Clay pedestal base or plaster block
Step 1: Building the Foundation
-
Form the armature:
Begin by creating a strong internal skeleton. Secure a sturdy loop of heavy-gauge wire to your wooden base board to represent the neck and head height. -
Bulk up with foil:
Does the head shape feel intimidating? Don’t worry. Crumple aluminum foil tightly around the wire loop to create a rough egg shape for the head and a cylinder for the neck. This saves clay and reduces drying time. -
Secure the core:
Wrap masking tape completely around the foil structure. The tape creates a surface that the clay will adhere to much better than slick foil. -
Apply the first layer:
Roll out slabs of clay about half an inch thick and drape them over the foil armature. Press firmly to ensure no air pockets remain between the tape and the clay.
Step 2: Drafting the Features
-
Establish the planes:
Using your hands or a flat wooden paddle, shape the clay into the basic planes of the face. Flatten the sides for the temples and create a ridge for the nose. -
Mark specific landmarks:
Use a needle tool to lightly sketch a horizontal line for the eyes (halfway down the head) and the bottom of the nose (halfway between eyes and chin). -
Add volume for features:
Add small balls of clay to build up the nose bridge, cheeks, and chin. Blend the edges of these additions seamlessly into the base clay using your thumbs. -
Sculpt the closed eyes:
For that peaceful look, form two almond-shaped mounds of clay for the eyelids. Press them gently into the eye sockets and smooth the edges. I find using a small wooden tool helps distinctively carve the crease of the lid. -
Define the nose and mouth:
Carve the nostrils carefully from beneath. For the mouth, shape the upper and lower lips separately, keeping the expression neutral and relaxed.
Cracks happen
If cracks appear while drying, mix a small amount of dry clay dust with vinegar to create a specific ‘slip’ paste. Fill the cracks, smooth over, and cover tightly with plastic to slow the drying process.
Step 3: Refining and Texturing
-
Suggest the hair:
Lay thin slabs of clay over the top and back of the head. Use a rake tool or a fork to drag subtle lines through the clay, pulling it back into a low chignon or bun to mimic hair texture without over-detailing. -
Refine the neck and chest:
Smooth the neck muscles (sternocleidomastoid) down towards the collarbones. Keep the bust’s base somewhat rough or abruptly cut off for that classical fragment look. -
Check symmetry:
Rotate your sculpture constantly. Look at the profile view to ensure the forehead and chin alignment feels natural. -
Create the texture:
Instead of smoothing everything perfectly, use a slightly coarse sponge or a stiff brush to dab the surface. This creates a stone-like, porous texture. -
Final carving details:
Use a sharp tool to re-define the eyelids and the line of the lips if they became muddy during texturing. -
Create the pedestal:
Form a simple clay cube or rectangular block to serve as the fused base, or prepare a separate plaster block to mount the head on later. -
Finish and dry:
Allow the piece to dry slowly under a loose plastic bag for several days to prevent cracking. Once fully dry or fired, the raw white clay provides the perfect antique finish.
Faux-Antique Patina
To age the finished bust, apply a wash of diluted raw umber acrylic paint. Wipe it off almost immediately with a rag, leaving pigment only in the sculpted crevices and hair texture.
Place your finished bust near a window where natural light can highlight the serene expression and delicate shadows


Simplified Planes Study Bust
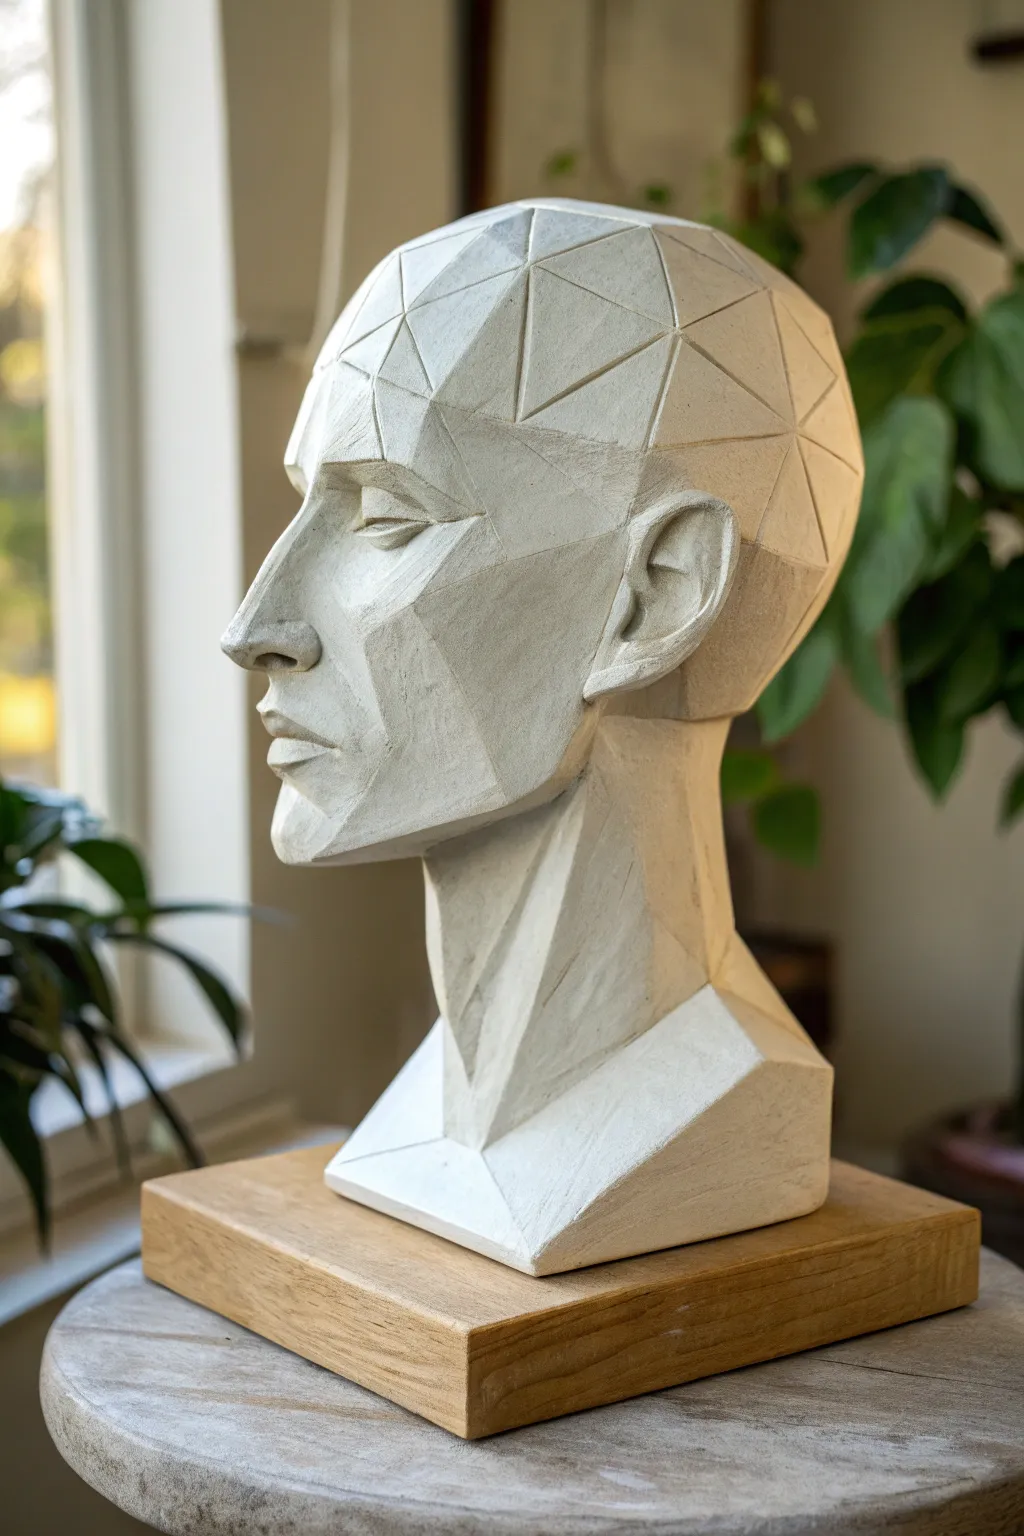
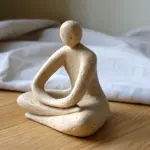
This striking sculpture captures the human form through a stylized, low-poly aesthetic that breaks the face down into its essential geometric planes. The sharp angles and flat surfaces create a dynamic play of light and shadow, offering a modern twist on the classical clay bust.
Step-by-Step Tutorial
Materials
- White sculpting clay (air-dry or kiln-fire depending on preference)
- Armature wire (heavy gauge)
- Wooden base for armature
- Foil or newspaper (for bulking)
- Loop tools (various sizes)
- Flat wire end modeling tool
- Metal kidney scraper or rigid fettling knife
- Sponge
- Fine-grit sandpaper
- Wooden display plinth
Step 1: Armature and Massing
-
Build the armature:
Begin by constructing a sturdy T-shape armature using your heavy gauge wire attached to a temporary working base. The vertical post should represent the neck, while the horizontal bar supports the width of the head. -
Bulk the core:
Crumple newspaper or aluminum foil tightly around the wire to create an egg-shaped core. This saves clay and reduces weight. Secure the bulking material with masking tape or thin wire. -
Apply the first layer:
Cover the entire core with a layer of clay about half an inch thick. Press it extensively to ensure it adheres well to the core without trapping air pockets. -
Establish basic proportions:
Add more clay to shape the general cranial mass and the jawline. At this stage, focus on the silhouette; don’t worry about details, just ensure the volume of the back of the head balances the face.
Step 2: Defining the Planes
-
Mark the center line:
Draw a faint line down the center of the face to maintain symmetry. Even though this style is abstract, the underlying anatomy must remain aligned. -
Carve the primary planes:
Using a large wire tool, slice away clay to establish the major flat surfaces: the forehead, the side of the head (temporal plane), and the cheeks. Think of the head as a boxy structure first. -
Shape the nose block:
Add a wedge of clay for the nose. Instead of rounding it, use a knife or flat tool to cut distinct top, side, and bottom planes. The bridge should be a sharp, clear ridge. -
Structure the eye sockets:
Carve out deep, angular sockets. Insert small amounts of clay for the eyelids, shaping them as distinct geometric shapes—triangles or trapezoids—rather than curved folds. -
Define the jaw and chin:
Cut sharp angles for the jawline. I like to keep the chin very square at this stage to emphasize the masculine geometry of the reference image. -
Model the polygonal hair:
For the scalp, don’t carve hair texture. Instead, create a geodesic dome effect. Scribe lines to map out triangles and carving shallowly along these lines to distinguish the panels.
Keep Edges Crisp
If you inadvertently round an edge while smoothing, let the clay firm up slightly (leather hard) and then slice a thin layer off the plane with a sharp knife to restore the sharpness.
Step 3: Refining and Surfacing
-
Sharpify the neck muscles:
Build up the sternocleidomastoid muscles (the V-shape on the neck). Slice the clay vertically to create long, flat facets that lead down to the collarbone area. -
Construct the ear:
Form a stylized ear using flat slabs of clay. Keep the helix and lobe angular. It should look architectural rather than organic. -
Smooth the facets:
Use a metal kidney scraper or a rigid knife to burnish each plane. The goal is to remove all fingerprints and create perfectly flat ‘facets’ like a cut gemstone. -
Tighten the edges:
Go over every intersection where planes meet. These ridges catch the light, so make them crisp. A slightly damp sponge can clean up crumbs, but don’t round off your sharp corners. -
Create the base connection:
Slice the bottom of the bust cleanly so it tapers into a geometric pedestal shape, ensuring it sits flat and stable.
Metallic Finish
After sealing, dry-brush a bronze or copper metallic paint over the ridges. This highlights the geometric structure and mimics the look of a heavy cast metal statue.
Step 4: Finishing Touches
-
Drying:
Allow the piece to dry slowly under a loose plastic bag for several days to prevent cracking, especially at the thin angular edges. -
Sanding:
Once bone dry (or fired), use fine-grit sandpaper on a block to further flatten the planes. Be careful not to sand away the sharp ridges between planes. -
Surface treatment:
Leave the clay raw for a matte finish or apply a white gesso to unify the surface texture. -
Mounting:
Secure the finished bust onto your final wooden plinth using epoxy or a measured mounting rod for a gallery-ready presentation.
Place your sculpture near a window where changing daylight will dance across the faceted planes throughout the day


Gentle Head Tilt Expression Bust
Capture a moment of quiet contemplation with this elegant clay bust, featuring a gentle upward tilt and soft, closed eyes. This project focuses on refining facial anatomy to convey emotion, resulting in a timeless piece with a raw, textured finish.
Step-by-Step Guide
Materials
- White sculpting clay (earthenware or stoneware with fine grog)
- Armature wire and wooden base
- Newspaper or aluminum foil (for bulking)
- Sculpting tools (loop tools, wooden modeling tools, needle tool)
- Sponge and water
- Calipers (optional for measuring)
- Clay cutting wire
Step 1: Armature and Basic Massing
-
Prepare the armature:
Begin by securing a strong wire loop onto a wooden base to support the neck and head. The wire should reach roughly to the top of the skull. -
Bulk out the core:
Tightly wrap newspaper or foil around the wire to create a rough egg shape for the head and a cylinder for the neck. This reduces clay weight and allows for even drying. -
Apply the clay base:
Roll out thick slabs of clay and cover your armature completely. Ensure the clay is firmly compacted to avoid air pockets between the layers and the core. -
Establish the tilt:
Position the clay mass so the chin is lifted and the ‘face’ plane is angled slightly upward. This initial angle is crucial for the final expression.
Cracking at the Neck?
If cracks appear at the neck during drying, the head is too heavy for the wet clay. Support the chin with a sponge prop until leather-hard.
Step 2: Blocking the Features
-
Map facial proportions:
Lightly draw a vertical center line and a horizontal eye line directly onto the clay. Remember, with the head tilted back, the ear placement will seem lower relative to the nose. -
Build the nose and brow:
Add a wedge of clay for the nose and a distinct ridge for the brow bone. Smooth these additions into the main mass, focusing on the bridge of the nose connecting to the brow. -
Form the eye sockets:
Press thumbs firmly into the eye area to create deep sockets. The shadows here will help define the peaceful expression later. -
Add the jaw and neck:
Define the jawline, ensuring it sweeps back towards where the ears will be. Build up the neck muscles (sternocleidomastoid) which become prominent when the head tilts and turns.
Step 3: Refining the Expression
-
Sculpt the closed eyes:
Place small spheres of clay into the sockets for eyeballs, then lay thin coils over them for eyelids. Smooth the lids so they look heavy and relaxed, not tightly shut. -
Shape the mouth:
Form the lips with a slight separation to suggest breathing. I find it helpful to look at the profile view often to ensure the lips protrude naturally from the face plane. -
Refine the cheekbones:
Add subtle volume to the cheeks, blending it softly towards the jaw. High, gentle cheekbones enhance the serene aesthetic. -
Adding the ears:
Attach ear shapes roughly halfway back on the head. Keep the detailing simple, focusing on the outer rim (helix) and the lobe.
Make it Bronze
After firing, apply a dark acrylic wash, wipe it back, and dry-brush with metallic gold or bronze paint to simulate a classic cast metal finish.
Step 4: Hair and Texture
-
Block in the hair volume:
Apply larger chunks of clay to the back and top of the head to represent pulled-back hair. Don’t worry about individual strands yet; focus on the overall silhouette. -
Carve hair direction:
Use a heavy loop tool to carve deep groves indicating the direction the hair is pulled. Keep the strokes fluid and confident to mimic tension. -
Create surface texture:
Instead of smoothing everything perfectly, use a serrated kidney tool or cross-hatching to leave a raw, stony texture on the skin, particularly on the neck and chest. -
Hollow out projection:
Once the clay is leather-hard, slice the head off the neck (or scalping the top) to remove the armature and hollow the inside to an even wall thickness. Reattach carefully with score and slip. -
Final touches:
Clean up the join lines from hollowing. Allow the bust to dry slowly under plastic to prevent cracking before firing.
Place your finished sculpture near a window to let natural light reveal the subtle contours of the face

Big Smile or Laughing Bust
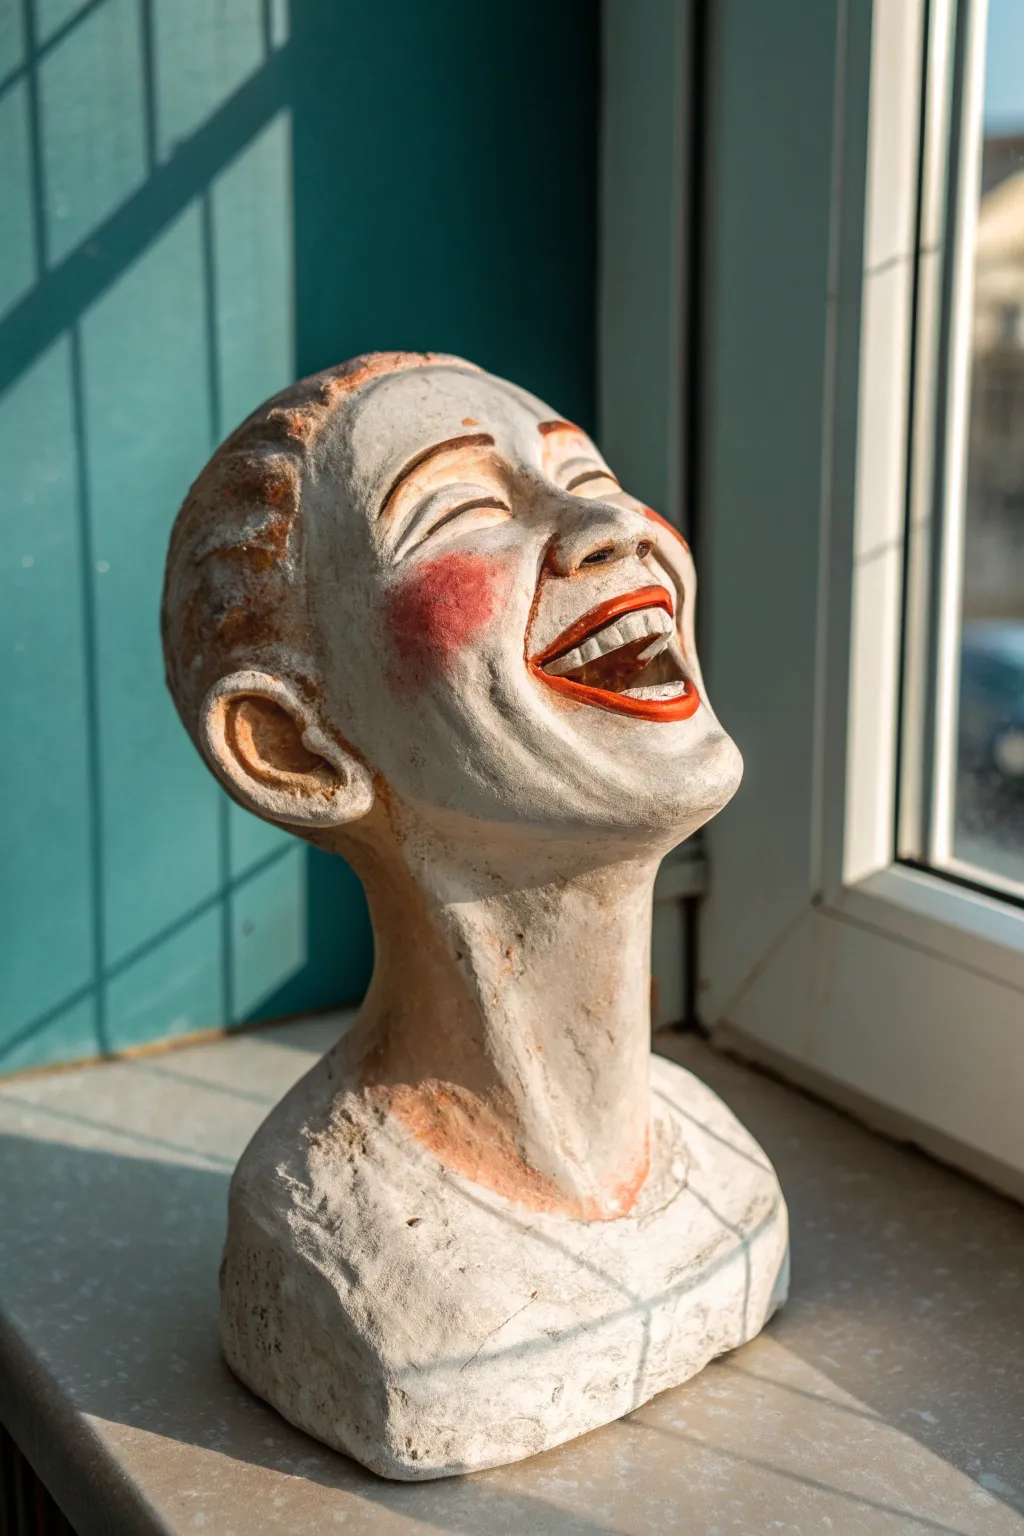
Capture the infectious energy of a hearty laugh with this stylized, expressive bust. Featuring exaggerated facial features and a textured, whitewashed finish, this piece uses white clay and simple acrylics to create a sculpture that feels both classic and lively.
Step-by-Step Tutorial
Materials
- Air-dry clay or polymer clay (white or light grey)
- Armature wire and aluminum foil
- Wooden sculpting tools (needle tool, loop tool)
- Sponge and water bucket
- Gesso or white primer
- Acrylic paints: Burnt Sienna, Red Oxide, Black, and Off-White
- Small flat brush and fine detail brush
- Sandpaper (medium and fine grit)
- Clear matte varnish (optional)
Step 1: Building the Core
-
Form the armature:
Create a simple T-shape with armature wire to represent the spine and shoulder line. Bunch up aluminum foil tightly around the wire to form the bulk of the head, neck, and upper chest, keeping the head tilted slightly backward. -
Apply the base layer:
Roll out slabs of clay about 1/4 inch thick. Wrap these over your foil core, pressing firmly to remove air pockets and smoothing the seams together with a damp sponge. -
Shape the neck and chin:
Since the head is tilted back in laughter, elongate the neck muscles slightly and define a strong jawline that angles upwards. Ensure the chin is prominent.
Cracking Clay?
If cracks appear while drying, don’t panic. Mix a small amount of fresh clay with water to make a paste (slip) and fill the cracks, then smooth over.
Step 2: Sculpting the Expressive Face
-
Block in facial masses:
Add small balls of clay for the cheeks, nose, and brow ridge. For a laughing face, the cheeks need to be high and pushed upwards toward the eyes. -
Carve the mouth cavity:
Use a loop tool to dig out a deep curved shape for the open mouth. Don’t be afraid to go deep here; the depth adds to the illusion of a hearty laugh. -
Define the teeth and gums:
Roll a small strip of clay and press it into the upper part of the mouth cavity. Use a needle tool to vertically score the individual teeth and gently shape the gum line above them. -
Sculpt the closed eyes:
Laughing eyes often squeeze shut. Add crescent-shaped mounds for the eyelids and use a tool to press a deep, curved line across the center where the lids meet. -
Add laugh lines:
This step brings the emotion to life. Carve deep crescent lines bracketing the nose and mouth (nasolabial folds) and add crow’s feet near the eyes. -
Model simple ears and hair:
Attach ear shapes low on the head, as the face is tilted up. For the hair, simply drag a rake tool or stiff brush through the wet clay to create textured strands that look swept back.
Step 3: Texturing and Refining
-
Create skin texture:
Instead of smoothing everything perfectly, dab the surface with a coarse sponge or a crumpled ball of foil to give the skin a pitted, artistic texture. -
Refine the neck muscles:
Define the sternocleidomastoid muscles (the V-shape on the neck) which stretch when the head tilts back. Smooth the clay down into the rounded base of the shoulders. -
Dry the sculpture:
Allow the clay to dry completely. For air-dry clay of this thickness, this may take 48-72 hours. Rotate it occasionally for even drying.
Pro Tip: Eye Geometry
When sculpting closed ‘laughing’ eyes, ensure the curve arcs upward like a rainbow. Downward curves look like sleeping or sadness.
Step 4: Painting and Finishing
-
Prime the surface:
Once dry, coat the entire bust with a layer of white gesso or primer. This seals the clay and provides a grippy surface for the paint. -
Apply base color wash:
Dilute a mix of off-white and a tiny drop of brown with water. Brush this wash over the whole piece, letting it settle into the textures, then wipe away the excess with a rag. -
Paint the rosy cheeks:
Mix a watery Red Oxide or terra-cotta color. Gently stipple this onto the apple of the cheeks, blending the edges so it looks like a natural flush rather than a circle of paint. -
Define the mouth:
Paint the lips with a stronger red tone. Use black or dark brown for the deep interior of the mouth to create shadow, but keep the teeth bright white or slightly cream. -
Add warm highlights:
I like to dry-brush a little Burnt Sienna lightly over the hair texture and the tips of the ears to simulate warmth and depth. -
Distress the finish:
Use fine-grit sandpaper to scuff the painted surface gently, revealing the white clay underneath on high points like the nose tip and brow. This creates that weathered, antique look.
Place your finished bust near a window to let the natural light highlight the joyful contours of your work.

The Complete Guide to Pottery Troubleshooting
Uncover the most common ceramic mistakes—from cracking clay to failed glazes—and learn how to fix them fast.
Aging Lines and Wrinkles Bust
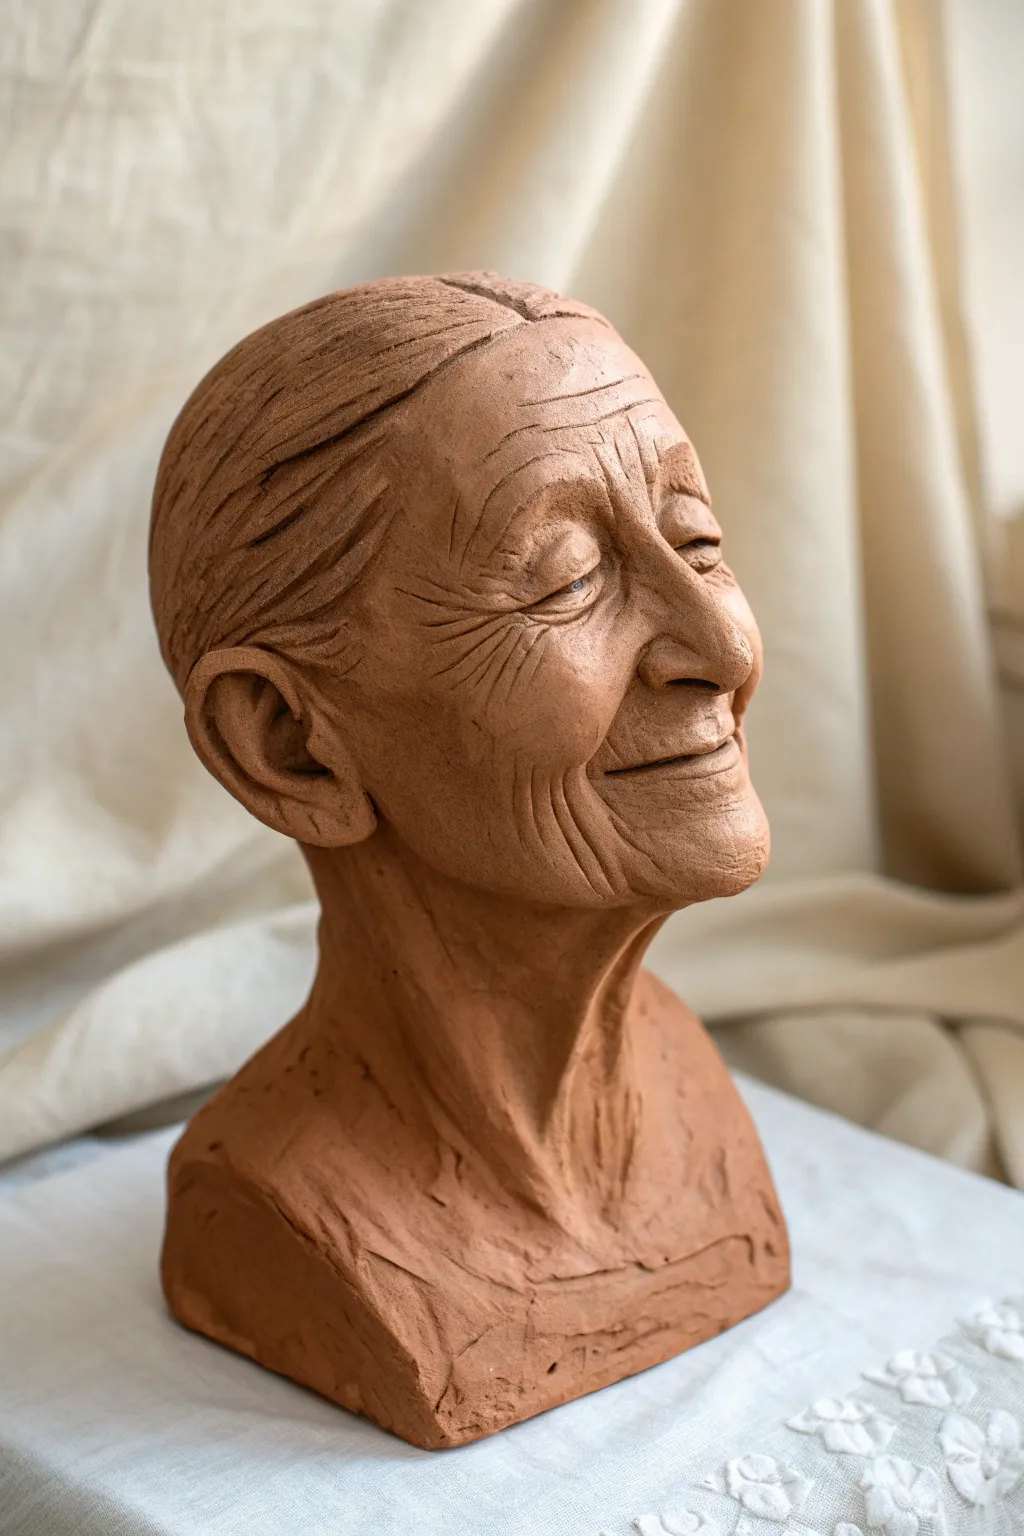
Sculpting the human face is a journey, and capturing the dignity of age offers a unique challenge that results in a deeply expressive piece. This project focuses on realistic aging textures, deep-set wrinkles, and the gentle sagging of skin to create a bust full of character and history.
Step-by-Step Guide
Materials
- Water-based clay or polymer clay (terracotta color recommended)
- Armature wire and aluminum foil (for internal support)
- Wooden sculpting base
- Loop tools (various sizes)
- Needle tool
- Modeling tools (wooden and metal)
- Sponge and water
- Texture tools (or stiff bristle brush)
- Plastic bag (for keeping clay moist during breaks)
Step 1: Building the Foundation
-
Prepare the Armature:
Secure a strong wire loop onto your wooden base to simulate the neck and head height. Crumple aluminum foil firmly around the wire to form a rough egg shape for the skull and a cylinder for the neck. This saves clay and reduces weight. -
Bulk Out the Form:
Pack your clay firmly over the foil armature. Ensure the layer is at least half an inch thick everywhere. Smooth the clay into a basic bust shape, defining the slope of the shoulders and the angle of the neck. -
Establish the Head Structure:
Shape the head into a cranium and jawline. For an elderly subject, the jawline might be less defined due to softer skin, but the underlying bone structure—cheekbones and brow ridge—needs to be prominent.
Softening the Cut
When carving wrinkles, roll a tiny snake of clay and place it *inside* the deep cut, then blend. This creates a realistic fold of skin rather than just a slice in the clay.
Step 2: Facial Features
-
Position the Features:
Mark the eye line (roughly halfway down the head), the nose base, and the mouth line. Use your thumbs to press in the eye sockets, creating hollows that are slightly deeper than you would for a younger face. -
Sculpt the Nose:
Add a wedge of clay for the nose. Elderly noses often have a slight droop at the tip due to cartilage changes. Shape the nostrils and bridge, keeping the forms somewhat prominent and distinct. -
Form the Mouth and Chin:
Add a small roll of clay for the mouth area. Carve the mouth slit, turning the corners slightly upward for a gentle expression. Keep the lips relatively thin, as lips tend to lose volume with age. Define a slightly protruding chin. -
Add the Ears:
Attach two flat ovals of clay to the sides of the head, aligned between the eye and nose base. Carve out the inner ear structures (helix and anti-helix). Don’t forget that ears often appear larger or longer on older subjects.
Step 3: The Art of Aging
-
Create Skin Folds:
Add small snakes of clay running from the nose wings down past the mouth corners (nasolabial folds). Blend the outer edges smoothly into the cheek, but leave a distinct crease on the inner edge. -
Sculpt the Eyes:
Place small spheres in the sockets for eyeballs. Build eyelids over them using thin strips of clay. I find that making the upper lid slightly heavy or hooding over the eye instantly adds age and wisdom to the gaze. -
Forehead Wrinkles:
Using a modeling tool, carve horizontal lines across the forehead. Don’t make them straight; let them wave and break naturally. Soften the edges of these cuts with a damp finger or sponge so they look like skin folds, not cuts. -
Crow’s Feet and Eye Bags:
Etch fine lines radiating from the corners of the eyes. Add small, subtle pouches of clay beneath the lower eyelids to suggest loose skin and fat pads settling under the eyes. -
Neck Texture:
The neck reveals age clearly. Carve vertical distinct muscle bands (platysma bands) running from the jaw to the clavicle. Add horizontal rings or loose skin folds around the base of the neck for realism.
A Life’s Work
Try tinting the clay with a wash of watered-down acrylics after baking (if polymer) or firing. A subtle burnt umber wash settles into the wrinkles, highlighting the texture instantly.
Step 4: Hair and Final Details
-
Block in the Hair:
Add sheets of clay to the top and back of the head. For the pulled-back style shown, smooth the clay backwards from the hairline toward a bun or gathering point at the rear. -
Detail the Strands:
Use a needle tool or rake tool to carve flow lines into the hair mass. Keep the lines sweeping and organic. Don’t over-detail every single hair; focus on the direction and volume of the sections. -
Surface Texture:
Gently stipple the skin areas (cheeks, nose, chin) with a stiff brush or a specialized texture tool to mimic pores. Avoid the eyes and lips to keep those surfaces distinct. -
Refine the Expression:
Step back and look at your sculpture from different angles. Deepen the smile lines or adjust the tilt of the head to ensure the feeling of quiet contentment is coming through. -
Base Texture:
Leave the chest and shoulder area rougher, using a rake tool or your fingers to create an ‘unfinished’ clay texture. This artistic contrast draws more attention to the detailed face.
Allow your piece to dry slowly under plastic to prevent cracking before firing or sealing your work
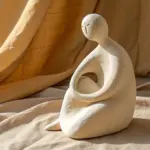
Soft Baby-Face Proportions Bust
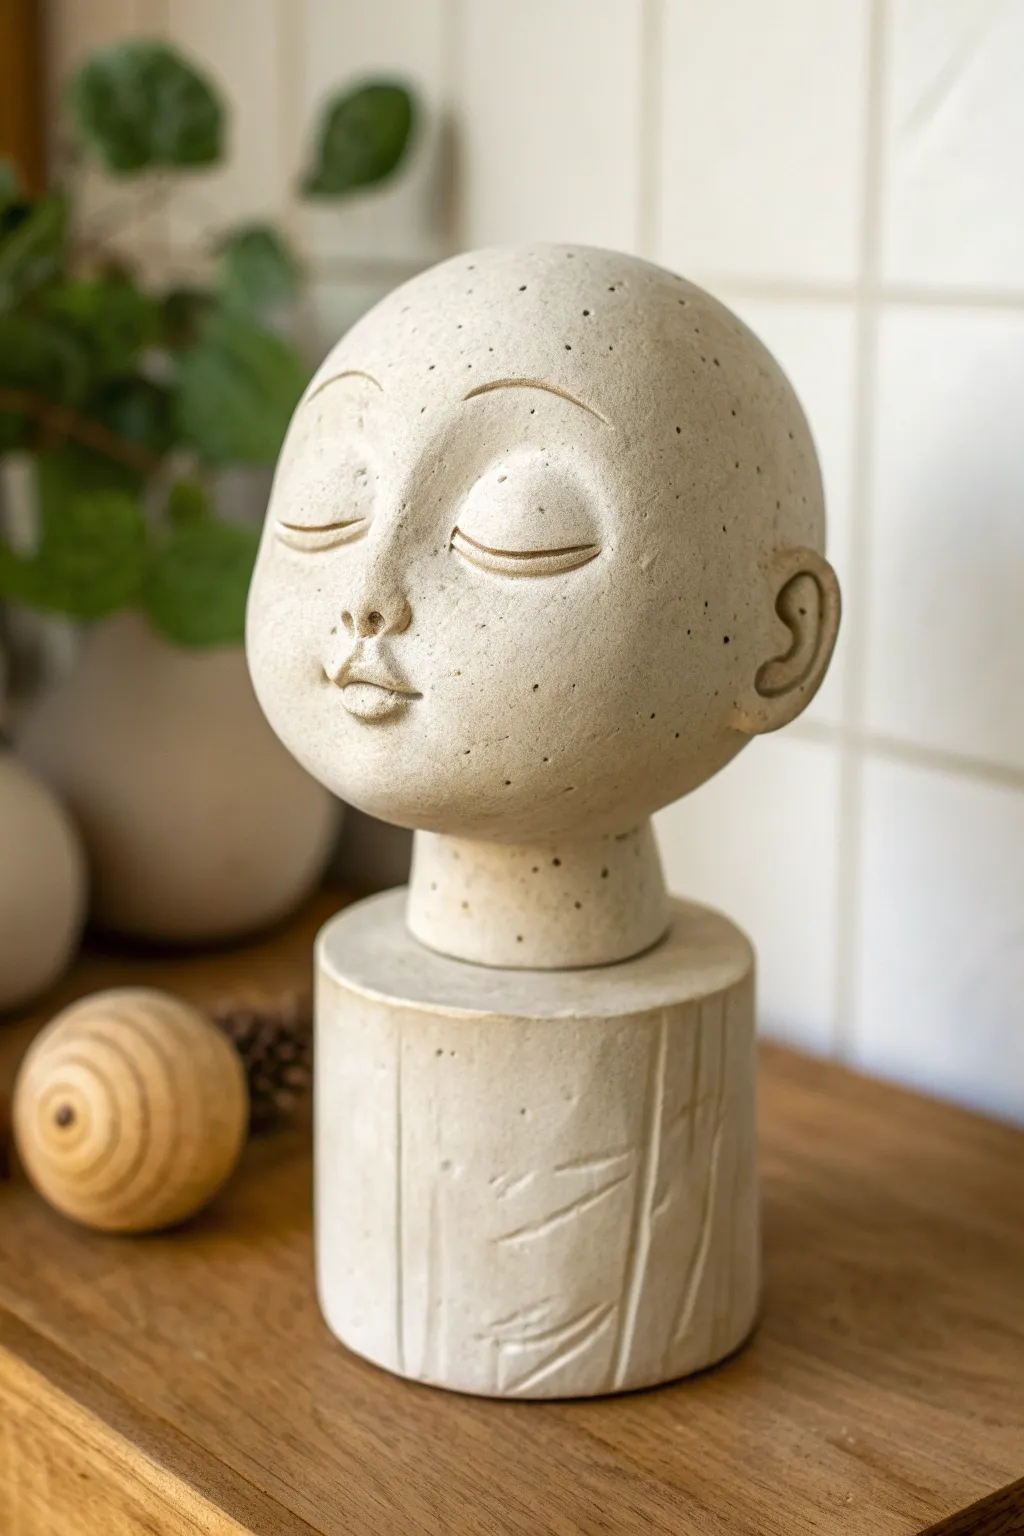
Capture the peaceful essence of a sleeping child with this stylized ceramic project. Featuring exaggerated round features and a speckled, stone-like finish, this bust sits elegantly on a textured cylindrical pedestal for a modern, artistic touch.
Detailed Instructions
Materials
- White or cream stoneware clay (preferably with grog/speckles)
- Wooden modeling tools
- Wire clay cutter
- Potter’s needle tool
- Flexible metal kidney scraper
- Sponge
- Rolling pin
- Slip (liquid clay)
- Scoring tool (or fork)
- Clear matte glaze or finishing wax
Step 1: Forming the Base Structure
-
Prepare the cylinder:
Begin by rolling out a thick slab of clay, roughly 1/2 inch thick and large enough to form a cylinder about 4 inches in diameter. Cut a rectangular strip and join the ends to create a sturdy tube. -
Cap the pedestal:
Cut a circular disc from your slab to fit the top of your cylinder. Score and slip the edges, then attach the disc firmly to create a closed, flat surface on top of the pedestal. -
Create the texture:
Using a sharp wooden tool or a needle, carve seemingly random vertical lines into the sides of the pedestal. These should look like organic scratches or wood grain, adding visual interest to the support. -
Form the neck:
Roll a thick coil or small cylinder of clay for the neck. It needs to be wide enough to support the head but shorter than the pedestal. Attach this securely to the center of your pedestal cap using the score and slip method.
Step 2: Sculpting the Head
-
Shape the core:
Take a large lump of clay and form it into a smooth, slightly flattened sphere. Because we want baby-like proportions, keep the overall shape very round and full rather than anatomically skull-like. -
Hollow the form:
If you are working with a solid lump, slice off the top or bottom and carefully hollow out the inside until the walls are an even 1/2 inch thick. Reattach the slice thoroughly before moving on. -
Attach head to neck:
Score the top of the neck and the bottom of the head heavily. Apply slip and press the head firmly onto the neck. Smooth the clay at the seam so the transition is seamless. -
Define the eye sockets:
Using your thumbs, gently press into the clay halfway down the face to create shallow depressions for the eyes. Baby faces have eyes set lower than adults, so keep this area central. -
Add the nose:
Roll a very small ball of clay and attach it between the eye depressions. Blend the edges outward to create a tiny button nose, keeping the bridge soft and undefined. -
Sculpt the lips:
Add a small, flattened oval of clay below the nose. Use a modeling tool to press a horizontal line across the middle, then gently push the clay up and down to form a pouty upper and lower lip.
Uneven Features?
If eyes look crooked, look at the bust mirror or upside down. This fresh perspective instantly highlights asymmetry so you can fix it while the clay is soft.
Step 3: Refining Features and Surface
-
Create the eyelids:
Roll two distinct semi-circles or crescents of clay. Attach these into the eye sockets you made earlier. They should bulge slightly outward to mimic closed, sleeping eyes. -
Detail the eye slit:
Use a fine needle tool or knife to carve a single curved line across the center of each eye bulge. This simple line defines the separation between the upper and lower eyelid. -
Add eyebrows:
I prefer to simply carve the eyebrows rather than adding clay. Use a sharp tool to etch two high, arching curves above the eyes to enhance the expression of innocence. -
Attach the ears:
Form two ‘C’ shaped pieces of clay. Score the sides of the head and attach them aligned with the eyes. Use a small loop tool to carve out the inner ear detail. -
Smooth the surface:
Use a slightly damp sponge to wipe down the entire piece. This softens any sharp tool marks and brings the ‘grog’ or speckles in the clay to the surface for texture. -
Burnish for sheen:
Once the clay is leather hard, run a flexible metal kidney scraper or the back of a spoon over the smooth areas of the face (cheeks, forehead) to compress the clay and give it a slight sheen. -
Vent steps:
Don’t forget to poke a hole from the bottom of the pedestal up through the neck into the hollow head cavity. This allows air to escape during firing so your piece doesn’t explode.
Add Gold Accents
After firing, use gold leaf or metallic paint inside the carved eyelid lines or on the lips. This creates a stunning contrast against the raw, matte stone texture.
Step 4: Firing and Finishing
-
Bisque fire:
Allow the sculpture to dry very slowly under loose plastic for several days, then completely uncover it until bone dry. Fire it in a kiln to cone 04 (or according to your clay body specs). -
Finish:
Since the beauty of this piece is the raw clay, apply a clear matte glaze or a simple finishing wax to seal the surface without adding color. This preserves natural speckling.
Place your finished serenity bust on a shelf where the light can catch the soft curves of the face.


What Really Happens Inside the Kiln
Learn how time and temperature work together inside the kiln to transform clay into durable ceramic.
Textured Coil-Hair Cap Bust
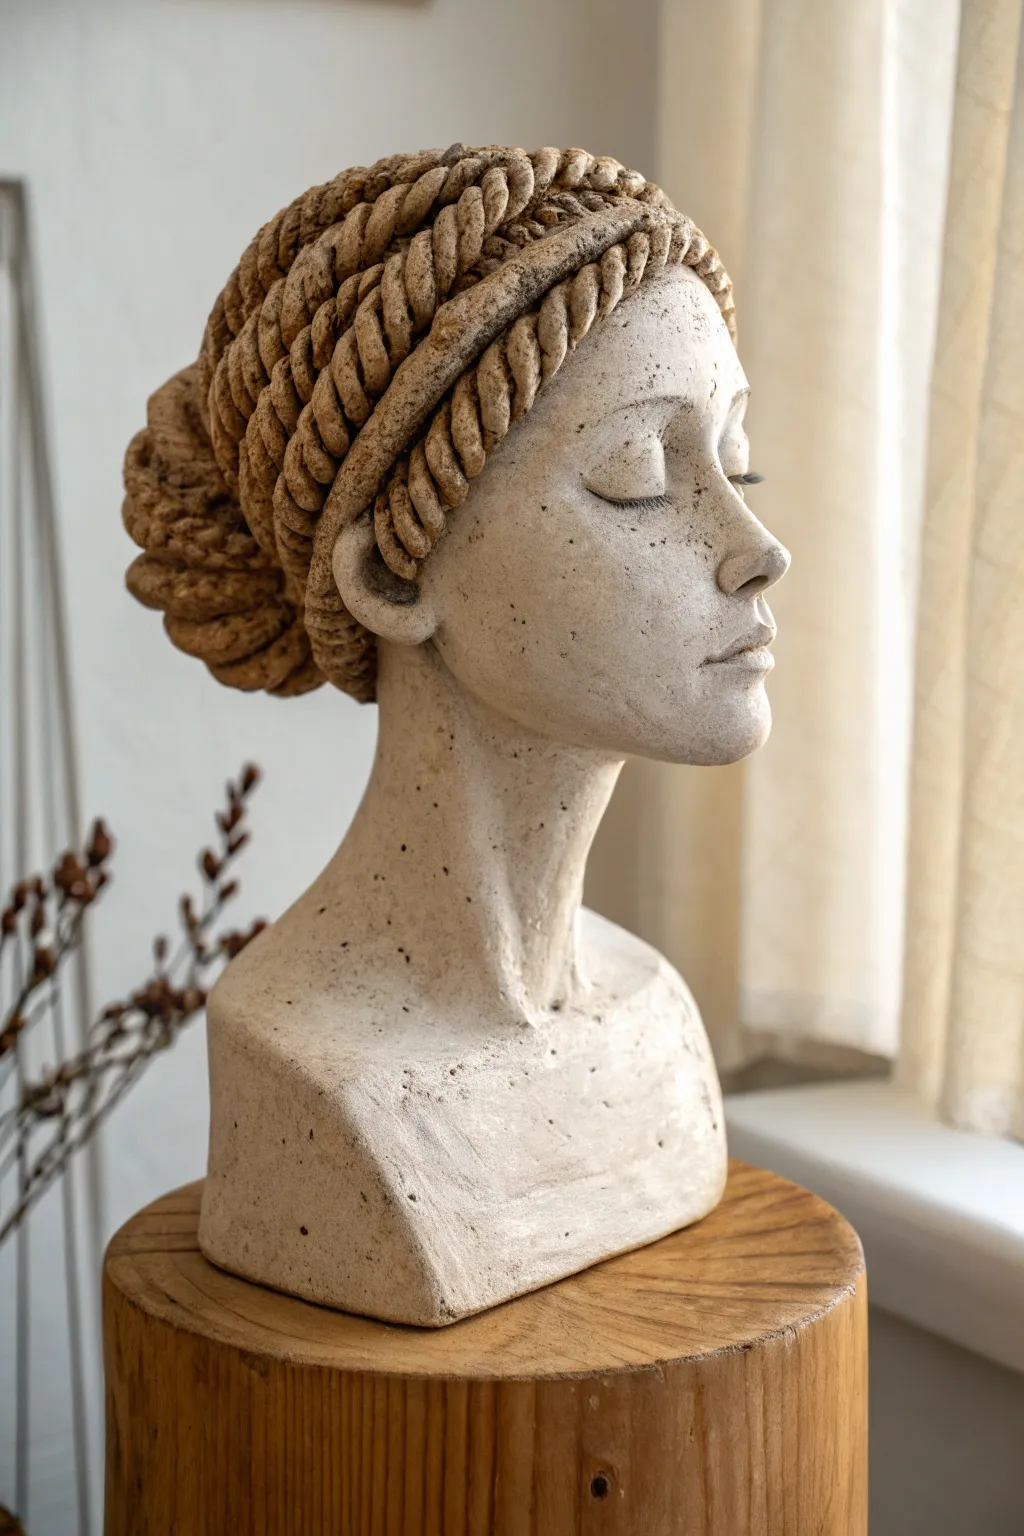
Capture a moment of tranquility with this elegant clay sculpture featuring a distinctive, textured hairstyle made from thick, twisted coils. The contrast between the smooth, serene face and the rugged, rope-like hair creates a striking visual balance perfect for modern decor.
Step-by-Step
Materials
- Stoneware clay (smooth or slightly groggy body)
- Armature wire and aluminum foil (for internal support)
- Wooden sculpting base
- Modeling tools (loop tools, wooden shapers, kidney rib)
- Needle tool
- Slip (clay slurry)
- Score and seal tool (or serrated rib)
- Sponge
- Spray bottle with water
Step 1: Building the Form
-
Prepare the armature:
Begin by constructing a simple T-shape armature on your wooden base using stiff wire. Crumple aluminum foil tightly around the wire to form a rough egg shape for the head and a triangular wedge for the chest and shoulders. -
Apply the base layer:
Roll out thick slabs of clay, roughly 1/2 inch thick. Wrap these slabs over your foil core, pressing firmly to ensure no air pockets remain between the clay and the foil. Blend the seams together aggressively so you have a solid, seamless blank canvas. -
Establish landmarks:
Using your thumbs, press into the ‘egg’ to mark the eye sockets halfway down the face. Mark the bottom of the nose and the center line of the mouth. I like to keep a reference photo of human anatomy nearby to check proportions at this stage. -
Build the neck:
Ensure the neck is thick enough to support the head. Add coils of clay to transition smoothly from the shoulders up to the jawline, blending downwards to create the sternocleidomastoid muscles that give the neck its form.
Step 2: Sculpting the Features
-
Shape the nose:
Add a wedge of clay for the nose. Blend it onto the face, smoothing the bridge into the brow bone. Use a small wooden tool to carve out the nostrils and shape the rounded tip. -
Create the closed eyes:
Roll two small balls of clay and press them into the sockets for eyeballs. Roll thin coils for lids and blend them over the spheres to create the look of closed eyes, smoothing the seam so the eyelids look heavy and relaxed. -
Form the mouth:
Add a small mound of clay below the nose. Use a wire tool to cut the horizontal line of the mouth, then embrace the subtle pout by pushing the clay up for the top lip and down for the bottom lip. -
Refine the surface:
Once the primary features are set, use a damp sponge or kidney rib to smooth the skin texture. Don’t over-polish; leave a few natural tool marks or sponge texture to mimic the stone-like finish seen in the reference.
Twist Trick
When twisting clay ropes, twist in the opposite direction you rolled them. This prevents the clay from unraveling or cracking as you form the shapes.
Step 3: Creating the Coiled Hair
-
Roll the coils:
Roll out several long, even snakes of clay, about the thickness of your index finger. You will need quite a few of these to cover the entire head. -
Twist the rope:
Take two clay snakes and twist them together gently to create a rope effect. Repeat this until you have enough twisted ‘ropes’ to form the cap. -
Score the scalp:
Before attaching anything, thoroughly score the top of the head area with a serrated rib and apply a generous amount of slip. -
Start the hairline:
Begin placing your first twisted rope along the hairline, framing the face. Press it firmly into the slipped surface without crushing the texture. -
Build the crown:
Continue laying twisted ropes parallel to the first one, working your way backward over the crown of the head. Ensure each row touches the previous one securely. -
Form the bun:
At the nape of the neck or lower back of the head, manipulate the ends of your ropes into a coiled bun shape. You can add extra short twisted segments here to build volume.
Ancient Patina
After bisque firing, apply a wash of black acrylic or oxide, wipe it back with a sponge, and drybrush with cream paint to enhance the ‘aged stone’ effect.
Step 4: Finishing Touches
-
Detail the rope:
Go back over your hair coils with a modeling tool to deepen the crevices between the twists, ensuring the ‘rope’ texture reads clearly from a distance. -
Hollow out the sculpture:
Once the clay is leather-hard, carefully slice the top of the head off (or work from the bottom) to remove the foil and wire armature. Hollow out the neck and head to a consistent wall thickness (about 1/2 to 3/4 inch) to prevent cracking during firing. -
Reattach and seal:
Score and slip the cut pieces back together. Smooth the seam perfectly so it becomes invisible. -
Add texture speckles:
To mimic the speckled stone look, you can gently flick a toothbrush loaded with iron oxide wash or a dark underglaze over the surface before the final drying phase. -
Dry slowly:
Cover the bust loosely with plastic and let it dry very slowly over the course of a week to ensure the thick areas and the coil details dry at the same rate.
Your finished bust will carry an air of timeless calm, bringing a gallery-worthy presence to your home.
Braids, Buns, and Hair Volume Bust
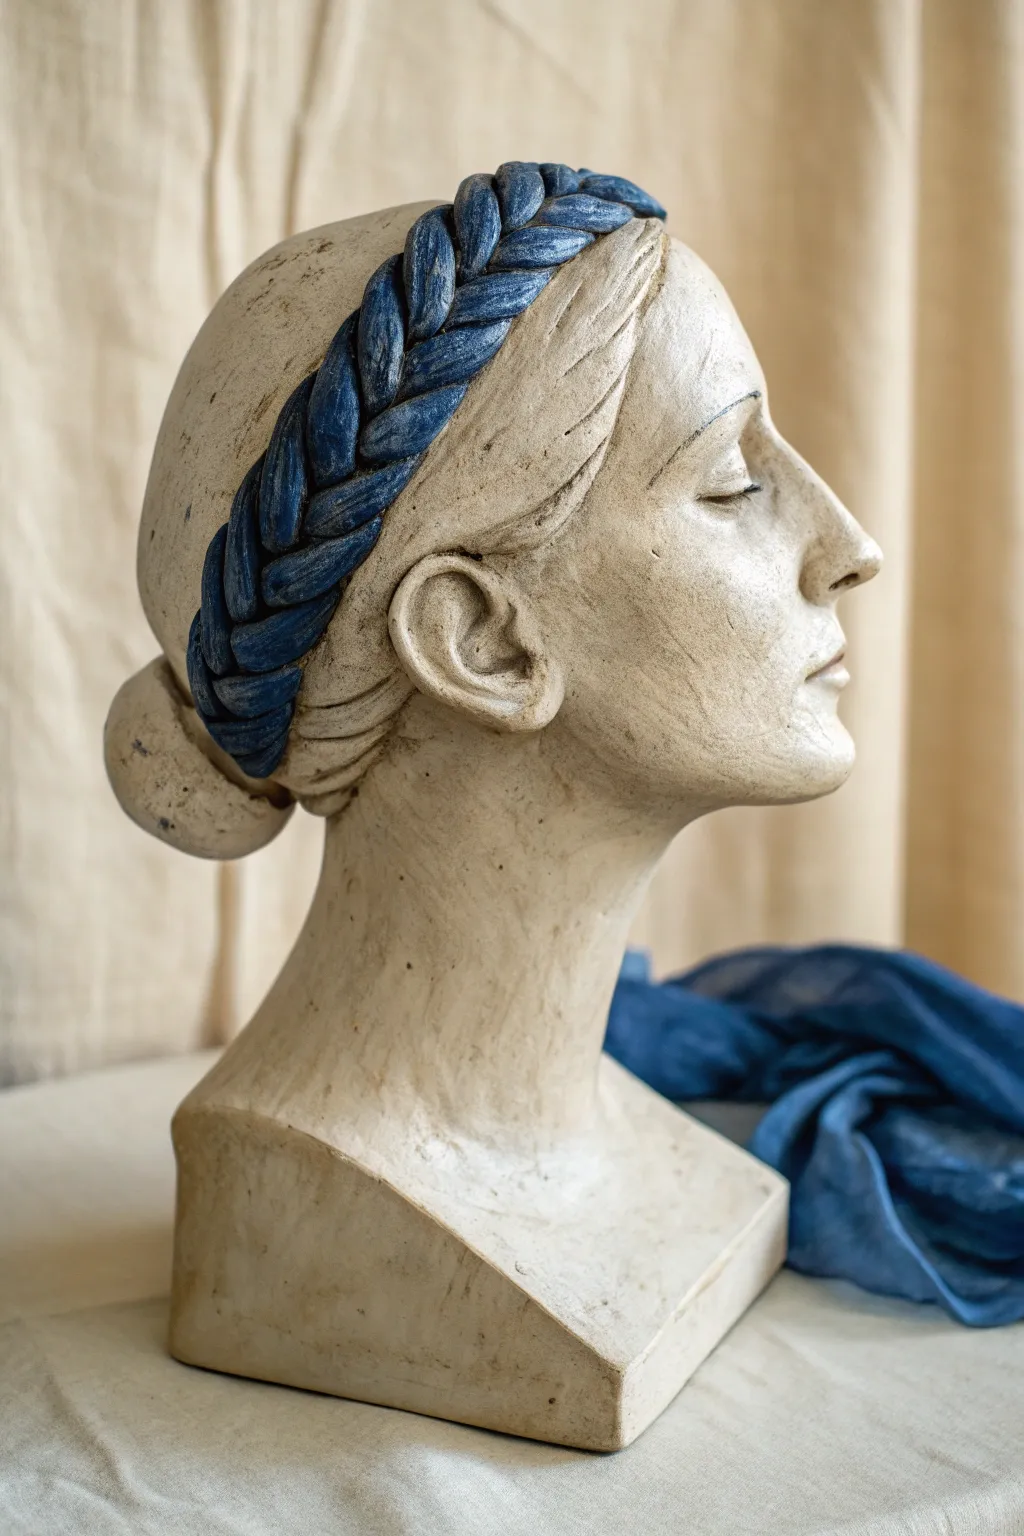
Capture the timeless elegance of a classical profile with this sculptural project, featuring a prominent, textured braid that adds stunning volume and contrast. The finished piece combines the raw beauty of unglazed clay with a striking pop of stained blue detail, perfect for practicing anatomical contours and hair textures.
Step-by-Step Guide
Materials
- White sculpture clay (stoneware or earthenware)
- Armature wire and aluminum foil (for inner support)
- Sculpting tools (loop tool, needle tool, wooden shapers)
- Slip (clay and water mixture)
- Sponge and water
- Blue underglaze or oxide wash
- Clear matte glaze (optional)
- Kiln (or air-dry clay alternatives if not firing)
Step 1: Building the Foundation
-
Prepare the Armature:
Begin by creating a rudimentary T-shape armature using sturdy wire mounted on a wooden base. Crumple aluminum foil around the wire to form the roughly egg-shaped mass of the head and the cylindrical neck. -
Add the Base Layer:
Roll out thick slabs of clay or add large chunks directly onto the foil. Ensure the clay is tightly packed against the foil to prevent air pockets, building up the general volume of the skull, neck, and shoulders. -
Establish the Profile:
Rough in the facial planes. Focus on the slope of the forehead, the protrusion of the nose, and the curve of the chin. Don’t worry about details yet; just get the silhouette correct from the side view.
Pro Tip: Hollow Out
If your bust is thick, slice the top of the head off (wire cutter) before it gets too hard, hollow out the inside to 1/2 inch thick, and reattach. This prevents explosions in the kiln.
Step 2: Refining Features
-
Map Facial Features:
Using a needle tool, lightly sketch guidelines for the eyes, nose base, and mouth. Remember that the eyes are typically halfway down the head. -
Sculpt the Nose and Mouth:
Add small coils of clay to build the bridge of the nose and the lips. Smooth them into the main mass, refining the nostril shape and the cupid’s bow. Keep the expression neutral and relaxed. -
Form the Closed Eyes:
Since the subject has eyes closed, sculpt the roundness of the eyeball first, then layer the eyelids over it. Smooth the transition into the brow bone for a peaceful look. -
Detail the Ear:
Create a C-shaped wed of clay for the ear. Attach it securely behind the jawline, roughly aligned between the eye and nose base. Use a small loop tool to carve out the inner ear structure. -
Smooth the Neck:
Refine the connection between the head and shoulders. Add the sternocleidomastoid muscle (the V-shape) running from behind the ear to the collarbone for realistic anatomy.
Level Up: Metallic Accents
After the final firing, use gold leaf or gold wax on just a few high points of the braid. The metallic shine against the matte blue creates a stunning, regal contrast.
Step 3: The Crown and Hair
-
Block in Hair Mass:
Apply thin slabs of clay to the back and sides of the head to represent the pulled-back hair. Use a raking tool to create directional lines simulating strands being pulled toward the nape. -
Create the Low Bun:
Roll a sphere of clay and attach it firmly to the nape of the neck. Score and slip aggressively here so it doesn’t fall off. Flatten it slightly and texturize it to match the rest of the hair. -
Roll the Braids:
Roll out three long, even coils of clay. Braid them together on your work surface first. This is much easier than trying to braid directly on the slippery head. -
Attach the Braided Crown:
Score the path where the headband will sit. Carefully lift your clay braid and drape it over the top of the head, tucking the ends behind the ears or into the hair mass. Use slip to bond it. -
Enhance Braid Texture:
Once attached, use a modeling tool to deepen the crevices between the braid strands. This extra definition is crucial for holding the stain later.
Step 4: Finishing and Color
-
Surface Texture:
Instead of smoothing everything perfectly, use a coarse sponge or a toothed tool to give the skin a slight texture resembling natural stone or aging plaster. -
Drying and Bisque Fire:
Allow the piece to dry slowly under plastic for several days to prevent cracking, especially around the added braid. Once bone dry, bisque fire the piece according to your clay body’s instructions. -
Apply the Blue Wash:
Mix a blue underglaze or oxide with a little water. Paint this specifically onto the braided headband. I find it helpful to be messy here, getting deep into the cracks. -
Wipe Back Technique:
Using a damp sponge, wipe away the excess blue from the raised surfaces of the braid. This leaves the color in the recesses, emphasizing the woven texture. -
Final Oxide Wash:
Apply a very diluted brown or black oxide wash over the entire piece (skin and hair) and wipe it back almost immediately. This highlights the stone-like texture and gives it an antique patina. -
Final Firing:
Fire the piece a final time to set the stains. No glossy glaze is needed if you want that matte, excavated-artifact finish shown in the photo.
Display your finished bust near a window where natural light can play across the textured braid and serene facial features

TRACK YOUR CERAMIC JOURNEY
Capture glaze tests, firing details, and creative progress—all in one simple printable. Make your projects easier to repeat and improve.
Statement Collar or Draped Cloth Bust
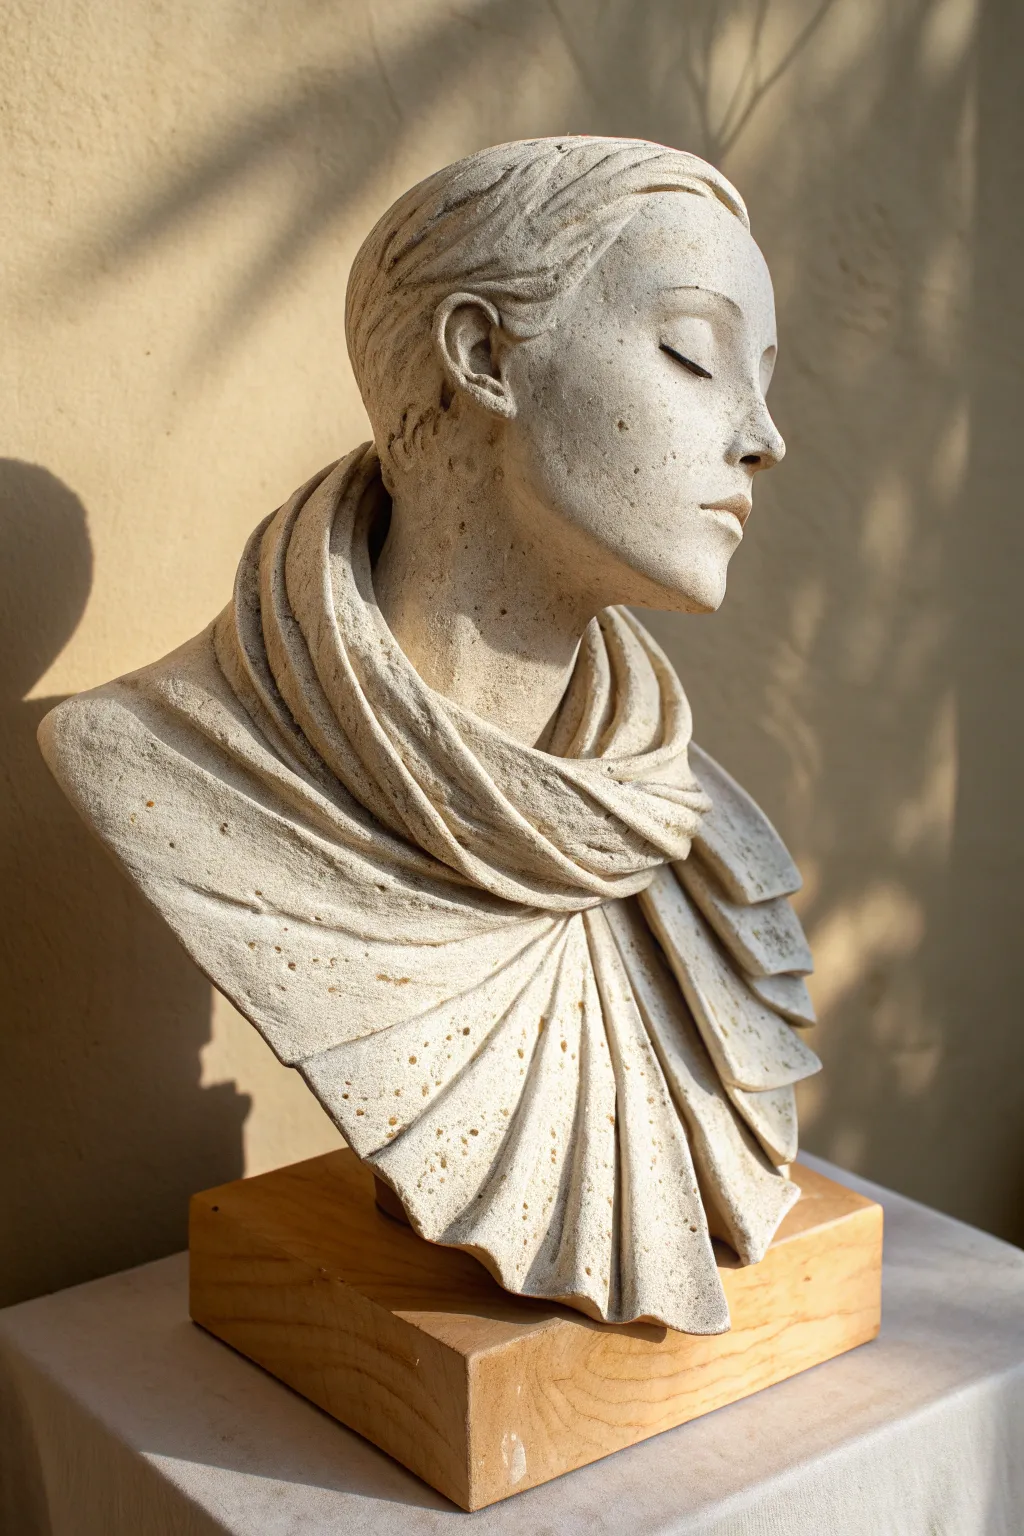
Capture a moment of peaceful contemplation with this elegant clay sculpture featuring a striking, oversized draped collar. The contrast between the smooth facial features and the highly textured, pleated folds creates a sophisticated artwork that mimics the look of carved limestone.
Step-by-Step
Materials
- Water-based clay or firing clay (groggy clay works best for texture)
- Wooden armature stand
- Aluminum foil and masking tape
- Sculpting tools (loop tools, wooden modeling tools, needle tool)
- Paddle tool or flat wooden spatula
- Texture sponge or coarse brush
- Wooden block for final mounting
- Slip (clay and water slurry)
- Spray bottle with water
Step 1: Building the Armature and Core
-
Prepare the Armature:
Begin with a sturdy wooden armature stand. Secure crumpled aluminum foil around the post to create the basic bulb shape for the head and a wider base for the shoulders. -
Secure the Form:
Wrap the aluminum foil tightly with masking tape. This prevents the foil from springing back and gives the clay a surface to grip onto. -
Apply the Base Layer:
Pack clay firmly over the entire foil form to a thickness of about half an inch. Ensure there are no air pockets between the clay and the armature.
Crack Prevention
If the thin edges of the collar dry too fast, they will crack. Cover the edges with strips of damp plastic or spray them lightly while you work on the face.
Step 2: Sculpting the Portrait
-
Establish Facial Planes:
Using your thumbs, press in the eye sockets and build up a wedge of clay for the nose. Don’t worry about details yet; focus on the primary planes of the face. -
Refine the Profile:
Check the profile view frequently. Add the chin, define the jawline, and angle the forehead. The goal is a serene, upward-tilted posture. -
Sculpt the Features:
Carve the closed eyelids as smooth, convex shapes. Add the nose bridge and lips. Keep the expression subtle and relaxed. -
Hair Cap:
Add a thin slab of clay over the skull to represent hair. Use a modeling tool to carve deep, sweeping lines that pull back from the face, hinting at a pulled-back hairstyle. -
Surface texturing:
Before moving to the collar, gently stipple the skin surface with a coarse sponge or brush to give it that stone-like, slightly pitted texture shown in the reference.
Step 3: Creating the Statement Collar
-
Roll Out Slabs:
Roll out several long, even slabs of clay, approximately 1/4 inch thick. These will become the fabric folds. -
Form the Neck Wrap:
Take your first slab and drape it loosely around the neck area. Create a deep fold by looping it over itself, making it look like a heavy scarf. -
Build the Pleated Fan:
For the dramatic lower section, I find it easiest to fan out a large slab or attach multiple overlapping wedge shapes. Score and slip each attachment point securely. -
Define the Folds:
Use a wooden modeling tool to deepen the recesses between the ‘fabric’ folds. The shadows created here are essential for the final look. -
Add Texture to the Cloth:
Pockmark the collar surface more aggressively than the face. Use a stiff thistle brush or a rock to press irregular indentations into the clay folds.
Faux Stone Finish
After firing (or drying), sponge on a wash of diluted iron oxide or burnt umber acrylic. Wipe away key areas to leave color only in the deep textures.
Step 4: Finishing Touches
-
Refine Edges:
Check the edges of your drapery. They shouldn’t be razor-sharp; smooth them slightly with a damp finger to suggest the thickness of heavy cloth. -
Hollow Out:
Once the clay is leather-hard, slice off the top of the head or cut the piece in half (if necessary for your armature type) to remove the foil core and hollow the thickest parts to prevent cracking. -
Re-assemble and Heal:
Score and slip the cut pieces back together. Smooth the seam carefully so it disappears into the hair texture. -
Mounting Preparation:
Ensure the bottom of the bust is perfectly flat so it will sit flush on your wooden block later. -
Final Drying:
Let the sculpture dry slowly under loose plastic for several days to ensure even shrinkage before firing or sealing.
Once mounted on its block, your sculpture will have a timeless, museum-quality presence
Hands Framing the Face Bust
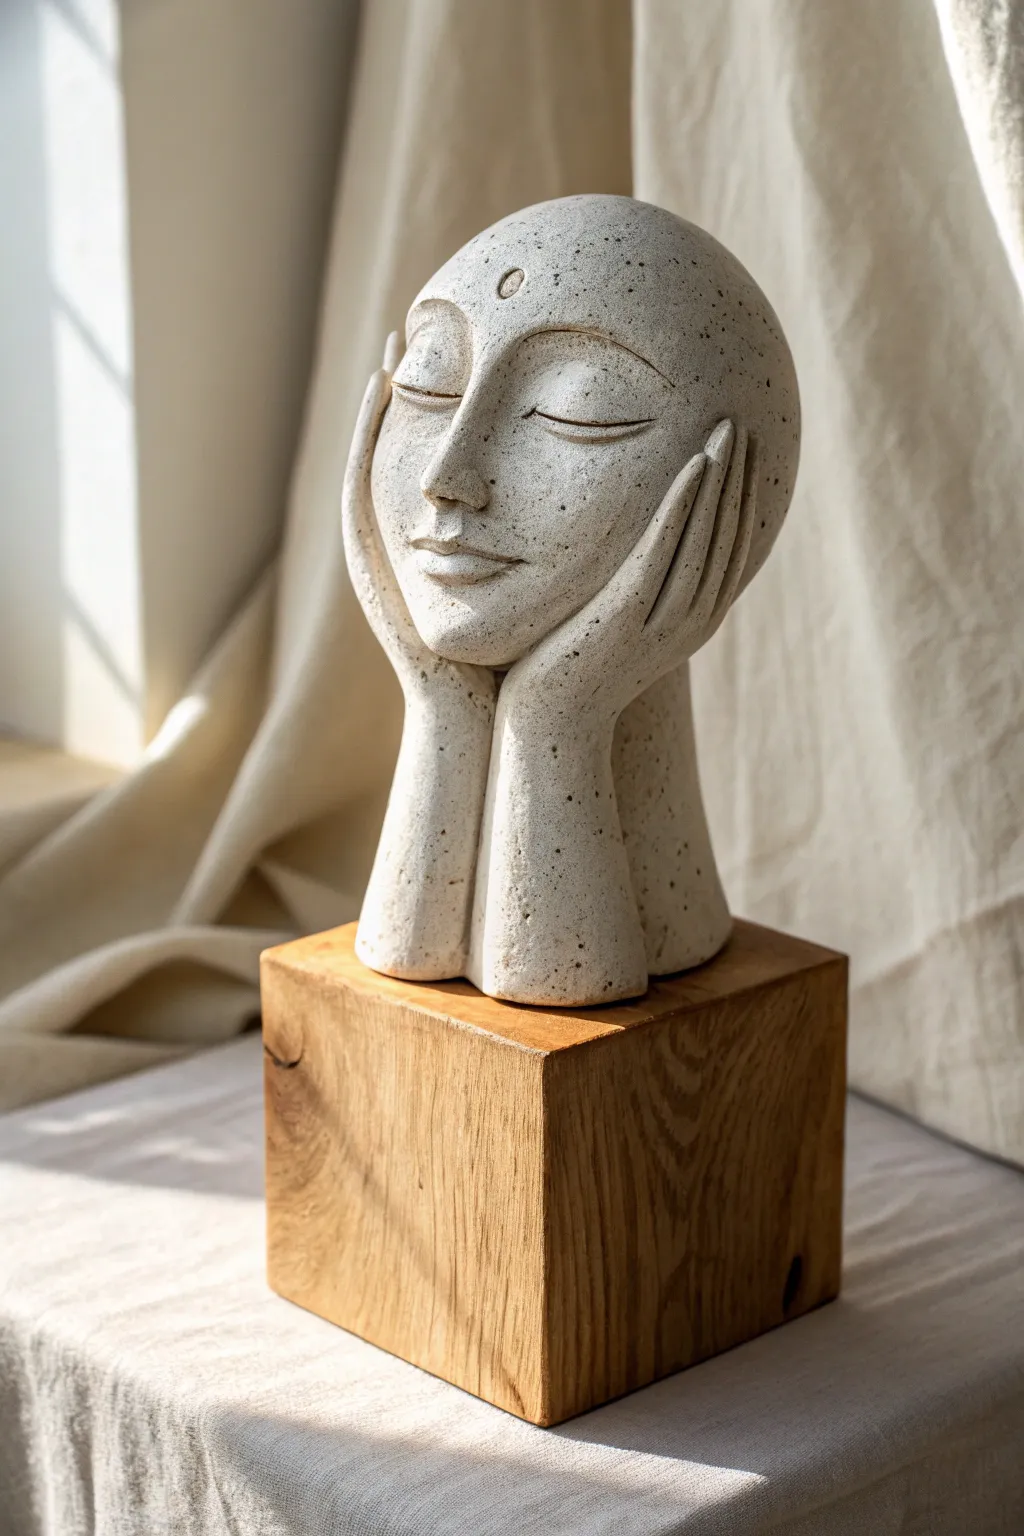
Capture a moment of quiet reflection with this elegant stylized bust, featuring elongated hands gently cradling a peaceful face. The speckled stone effect gives it a modern, organic feel that contrasts beautifully with the warm wooden base.
Step-by-Step Tutorial
Materials
- Air-dry clay or stoneware clay (white or light grey)
- Wooden block base (cube)
- Speckled clay additive or black pepper/sand (if not using speckled clay)
- Sculpting tools (loop tool, needle tool, wooden shapers)
- Strong adhesive (E6000 or epoxy)
- Sponge and water bowl
- Aluminum foil (for armature)
- Wire armature kit
- Sandpaper (fine grit)
Step 1: Building the Core
-
Create the armature:
Begin by twisting your armature wire into a basic T-shape to support the head and neck. Secure this onto a temporary working base so it doesn’t wobble while you sculpt. -
Bulking out the form:
Crumple aluminum foil tightly around the wire to form an egg shape for the head and a cylinder for the neck. This saves clay and reduces drying time. -
Prepare the clay:
If your clay isn’t pre-speckled, knead in a small amount of black sand or coarse pepper to achieve that stone-like texture visible in the reference image. -
Cover with clay:
Roll out sheets of clay about 1/4 inch thick. Wrap these around your foil armature, smoothing the seams together with a bit of water until you have a solid clay blank.
Step 2: Sculpting the Features
-
Define the face shape:
Using your palms, gently elongate the face so it tapers towards the chin. The aesthetic here is stylized and smooth, not hyper-realistic. -
Map the features:
Lightly trace a vertical center line and a horizontal eye line with a needle tool. Keep the eyes closed and slanted slightly upward for that serene expression. -
Add the nose:
Add a small wedge of clay for the nose. Blend it seamlessly into the forehead and cheeks, keeping the bridge straight and elegant. -
Sculpt the closed eyes:
Roll two small crescent shapes and press them onto the eye line. Smooth the edges so they look like eyelids resting naturally, then carve a clean, curved line underneath to define the lash line. -
Form the mouth:
Create a small, gentle smile. I find it works best to keep the lips subtle rather than pouty, blending the corners into the cheeks for a soft expression. -
Add the forehead mark:
Press a small circle or oval into the center of the forehead to create the decorative recessed mark.
Smooth Seams Tip
When attaching the hands, score both surfaces (scratch hatches) and apply slip (clay water) before pressing together to ensure they don’t pop off while drying.
Step 3: The Hands & Finishing
-
Form the basic hand shapes:
Roll two thick coils of clay for the arms/wrists and flatten the tops to create the palm area. Attach these vertically on either side of the neck. -
Sculpt the fingers:
Rather than sculpting individual fingers from scratch, cut the flattened tops of your coils into four long strips. Gently round and elongate them. -
Position the hands:
Press the clay fingers against the cheeks and temples. They should look like they are supporting the weight of the head. Ensure the palms merge smoothly into the jawline area. -
Refine and smooth:
Use a damp sponge to wipe down the entire piece, removing fingerprints and softening any harsh tool marks. This brings out the speckled texture nicely. -
Drying:
Allow the clay to dry slowly under a loose plastic bag for 2-4 days to prevent cracking. -
Sanding:
Once fully dry (and fired if using kiln clay), use fine-grit sandpaper to polish the surface, paying special attention to the cheeks and forehead. -
Mounting:
Apply a strong epoxy or E6000 glue to the bottom of the dried bust and center it firmly onto your wooden cube base.
Gilded Accent
Mix gold mica powder with varnish and paint just the recessed circle on the forehead or the lash lines for a touch of luxurious contrast.
Place your finished sculpture near a window to let the natural light highlight those serene curves and stone textures
Open-Back Cutaway Bust
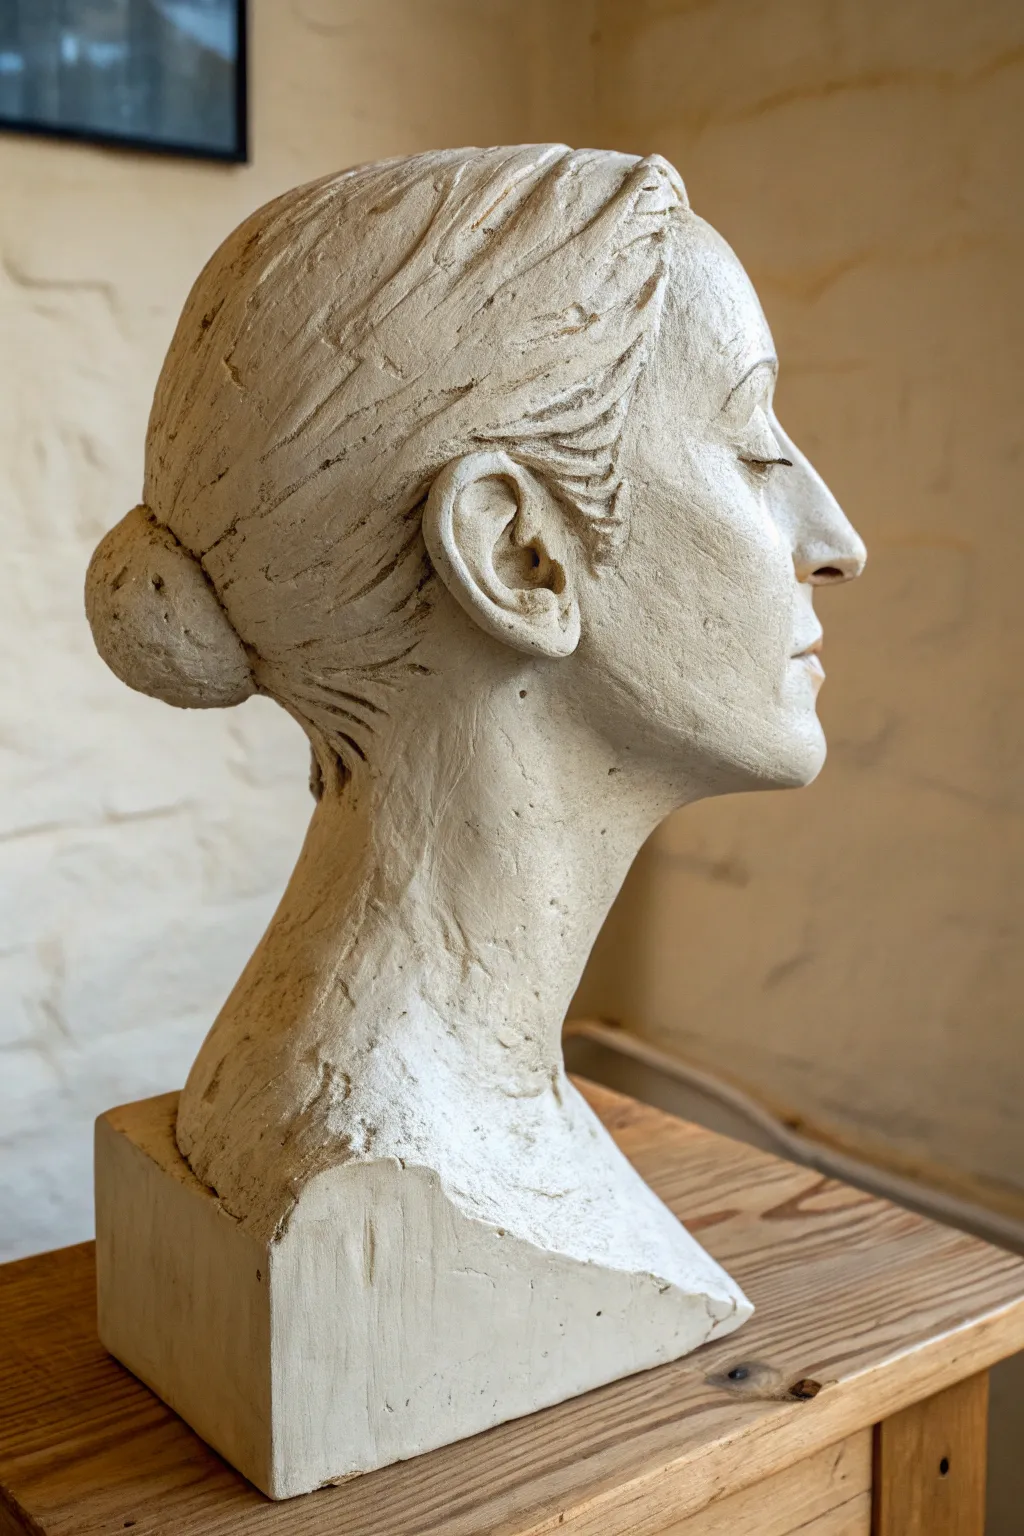
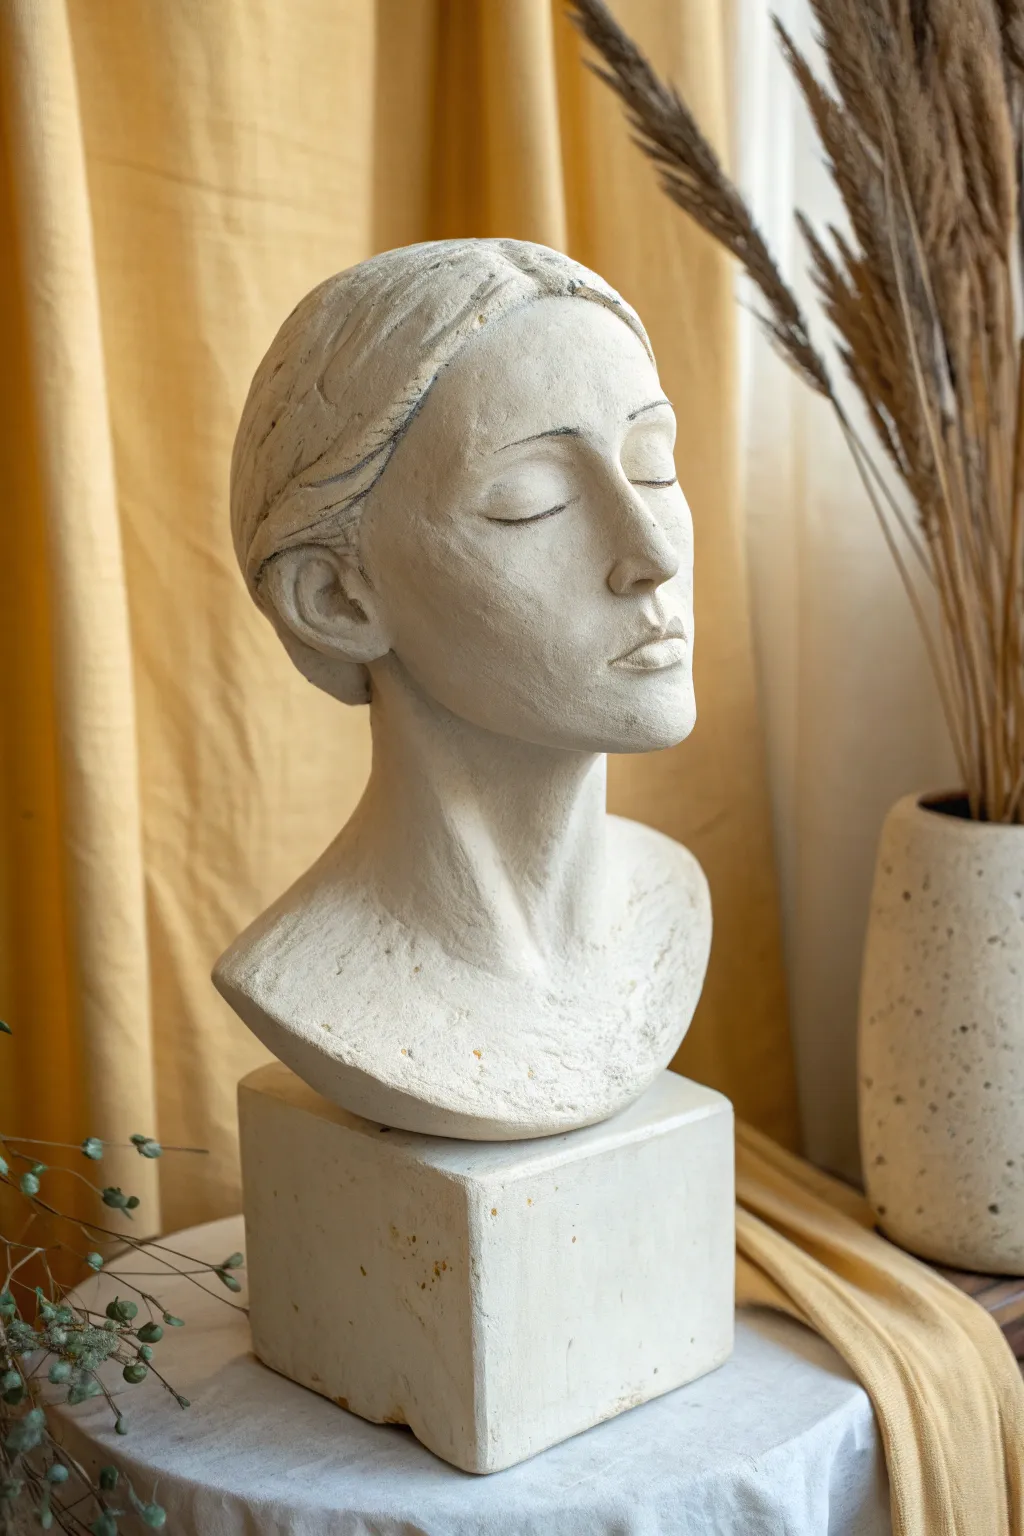
Capture a moment of quiet contemplation with this textured clay bust, featuring a serene female profile and a classic chignon hairstyle. This project balances realistic anatomical forms with expressive surface textures, resulting in a timeless piece that feels both antique and modern.
Step-by-Step
Materials
- Water-based sculpting clay (white or light grey)
- Armature wire and wooden base
- Sculpting tools (loop tools, wood modeling tools, needle tool)
- Kidney scraper (smooth and serrated)
- Sponge and water spray bottle
- Calipers (optional, for measuring proportions)
- Wooden paddle or flat stick
Step 1: Building the Foundation
-
Prepare the armature:
Begin by securing a sturdy armature wire to a wooden base. Create a simple loop for the head and a vertical support for the neck, ensuring it’s rigid enough to hold the weight of the clay. -
Bulk out the core:
Pack the clay tightly around the armature wire to form the basic mass of the neck and head. Don’t worry about features yet; focus on establishing the correct volume and the tilt of the head. -
Define the blocky base:
Build up the clay at the bottom into a squared-off, blocky plinth. This transition from the organic neck to the geometric base acts as the ‘cutaway’ effect, giving the sculpture a contemporary, unfinished edge.
Step 2: Establishing Proportions
-
Map facial landmarks:
Using your thumb or a wooden tool, mark the eye line, the bottom of the nose, and the mouth line. Viewed from the side, ensure the ear placement aligns roughly behind the jawline. -
Shape the profile:
Add clay to build the bridge of the nose and the chin. Step back frequently to check the silhouette against a light background to ensure the profile captures the serene expression you want. -
Sculpt the neck muscles:
Add strips of clay to represent the sternocleidomastoid muscle—the long muscle running from behind the ear down to the collarbone area. This adds essential realism and movement to the neck.
Keep it Fresh
Keep a spray bottle handy. If the clay gets too dry while working on details like the ear, a light misting will make it pliable again without destroying your texture.
Step 3: Refining Features
-
Detail the eye and brow:
Carve out the socket and add a small sphere for the eye, then overlap it with clay for the eyelids. Since the eyes are closed, focus on the gentle curve of the lid and the subtle heaviness of the lashes. -
Refine the nose and mouth:
Sharpen the bridge of the nose and define the nostril wing. For the mouth, ensure the corners tuck in slightly to create depth, giving the lips a soft, natural pout. -
Sculpt the ear:
Build the ear using a ‘C’ shaped coil. Use a small loop tool to hollow out the concha (the inner bowl) and define the helix. Keep the texture slightly rough to match the overall style.
Make it Bronze
After the clay dries completely or is fired, apply a dark faux-bronze acrylic paint, then dry-brush with gold for a classic museum-quality finish.
Step 4: Hair and Texture
-
Add hair volume:
Apply slabs of clay over the skull to form the hair mass. Sweep the clay backward from the forehead towards the nape of the neck to simulate pulled-back hair. -
Form the bun:
Attach a rounded lump of clay at the back of the head. Press it firmly to join it with the main mass, but leave the edges distinct to show where the hair gathers. -
Texture the strands:
I find dragging a serrated tool or a stiff brush through the damp clay creates the most convincing hair strands. Create flow lines that follow the curvature of the skull into the bun. -
Create surface interest:
Instead of smoothing everything perfectly, leave some tool marks and ‘imperfections’ on the skin and neck. Use a wooden paddle to lightly texture the flat surfaces of the base and neck for an artistic finish.
Step 5: Final Touches
-
Clean the cutaway:
Use a wire cutter or sharp knife to slice the sides of the base cleanly if they became misshapen. The contrast between the smooth bust and the sharp, geometric cutaway is key to this look. -
Hollow out (optional):
If you plan to fire this piece in a kiln, carefully slice off the top of the head or cut the piece in half to hollow out the insides to a uniform thickness, then reattach the pieces with slip. -
Final wipe down:
Gently wipe high points like the nose and cheekbone with a damp sponge to smooth them slightly, emphasizing the light that will hit these areas.
Allow your sculpture to dry slowly under plastic to prevent cracking before displaying your serene masterpiece
Contour Line Drawing on a Bust
This elegant clay bust captures the human form in a moment of quiet contemplation, focusing on smooth planes and realistic proportions. It serves as a perfect canvas for further decoration or stands alone as a striking study in anatomical grace.
Detailed Instructions
Materials
- Water-based clay or stoneware clay (approx. 10-15 lbs)
- Armature wire (heavy gauge)
- Wooden base board
- Newspaper or aluminum foil
- Loop tools (various sizes)
- Wooden modeling tools
- Needle tool
- Serrated metal rib
- Smooth rubber kidney or sponge
- Spray bottle with water
Step 1: Building the Foundation
-
Prepare the armature:
Begin by drilling a hole in your wooden base and securing a heavy gauge wire upright to support the neck and head. The wire should be shorter than the final piece so it doesn’t poke through. -
Create the core:
Crumple newspaper or aluminum foil tightly around the wire to create a rough egg shape for the skull and a cylinder for the neck. Secure this core with masking tape or thin wire to prevent it from shifting. -
Apply the initial clay:
Cut slabs of clay about half an inch thick and press them firmly onto your armature core. Cover the entire form, ensuring there are no air pockets between the core and the clay surface. -
Rough out the basic masses:
Add large chunks of clay to establish the major volumes: the cranium, the width of the face, the cylinder of the neck, and the slope of the shoulders (trapezius).
Keep it Fresh
Work with a spray bottle nearby to keep the clay leather-hard. If the clay gets too dry, it won’t bond well; too wet, and it loses structural integrity.
Step 2: Establishing Proportions
-
Mark the guidelines:
Using a needle tool, lightly draw a vertical center line down the face and horizontal lines for the eyes, nose base, and mouth. The eyes generally sit at the vertical midpoint of the head. -
Block in the nose:
Add a wedge of clay for the nose structure. Don’t worry about nostrils yet; just establish the bridge and the tip’s projection. -
Define the eye sockets:
Use your thumbs or a large loop tool to press into the clay where the eye sockets belong. This creates the brow ridge and the depression for the eyes. -
Build the jaw and chin:
Define the jawline by adding strips of clay along the mandible area. Shape the chin so it protrudes slightly, aligning roughly with structural anatomy. -
Add the ears:
Form two C-shaped pieces of clay and attach them to the sides of the head. The top of the ear typically aligns with the eyebrows, and the bottom with the base of the nose.
Contour Line Twist
Once fully dry or bisque fired, use a black acrylic marker or underglaze pencil to draw topographic contour lines across the face for a modern, surrealist aesthetic.
Step 3: Refining Features
-
Sculpt the eyelids:
Roll tiny coils of clay to form the upper and lower eyelids. Place them inside the sockets and smooth them onto the surrounding skin, creating a closed-eye look for a serene expression. -
Refine the lips:
Add small rolls of clay for the lips. Use a wooden tool to shape the philtrum (the dimple above the lip) and define the corners of the mouth. -
Shape the neck muscles:
Add clay to define the sternocleidomastoid muscles—the V-shape leading from behind the ear to the collarbone pit. This adds realistic tension and structure to the bust. -
Integrate the bust base:
Build up the shoulder area and chest block. Instead of sculpting full arms, create a clean, angular cut-off at the bottom to give it a classic bust silhouette.
Step 4: Smoothing and Finishing
-
Even out the surface:
Use a serrated metal rib to scrape across the surface in varying directions. This removes bumps and unifies the form. I find this step essential for merging the added clay pieces together. -
Remove tool marks:
Go over the serrated marks with a smooth rubber kidney or a slightly damp sponge. Be gentle around sharp details like the eyelids and nostrils to avoid blurring them. -
Detail the texture:
For the hair, rather than sculpting individual strands, use subtle directional strokes with a modeling tool to suggest the flow of short hair or a shaved head look. -
Final check:
Rotate the sculpture and look at it from all angles, including from below. Make sure the symmetry feels natural (not necessarily perfect) and fix any accidental fingerprints. -
Hollow out (optional but recommended):
If you plan to fire this piece in a kiln, slice off the top of the head carefully, scoop out the interior clay until the walls are roughly 1/2 inch thick, and reattach the top with slip and scoring.
Allow your bust to dry slowly under plastic for several days to prevent cracking before firing or sealing
Cracked Face With Highlighted Seams
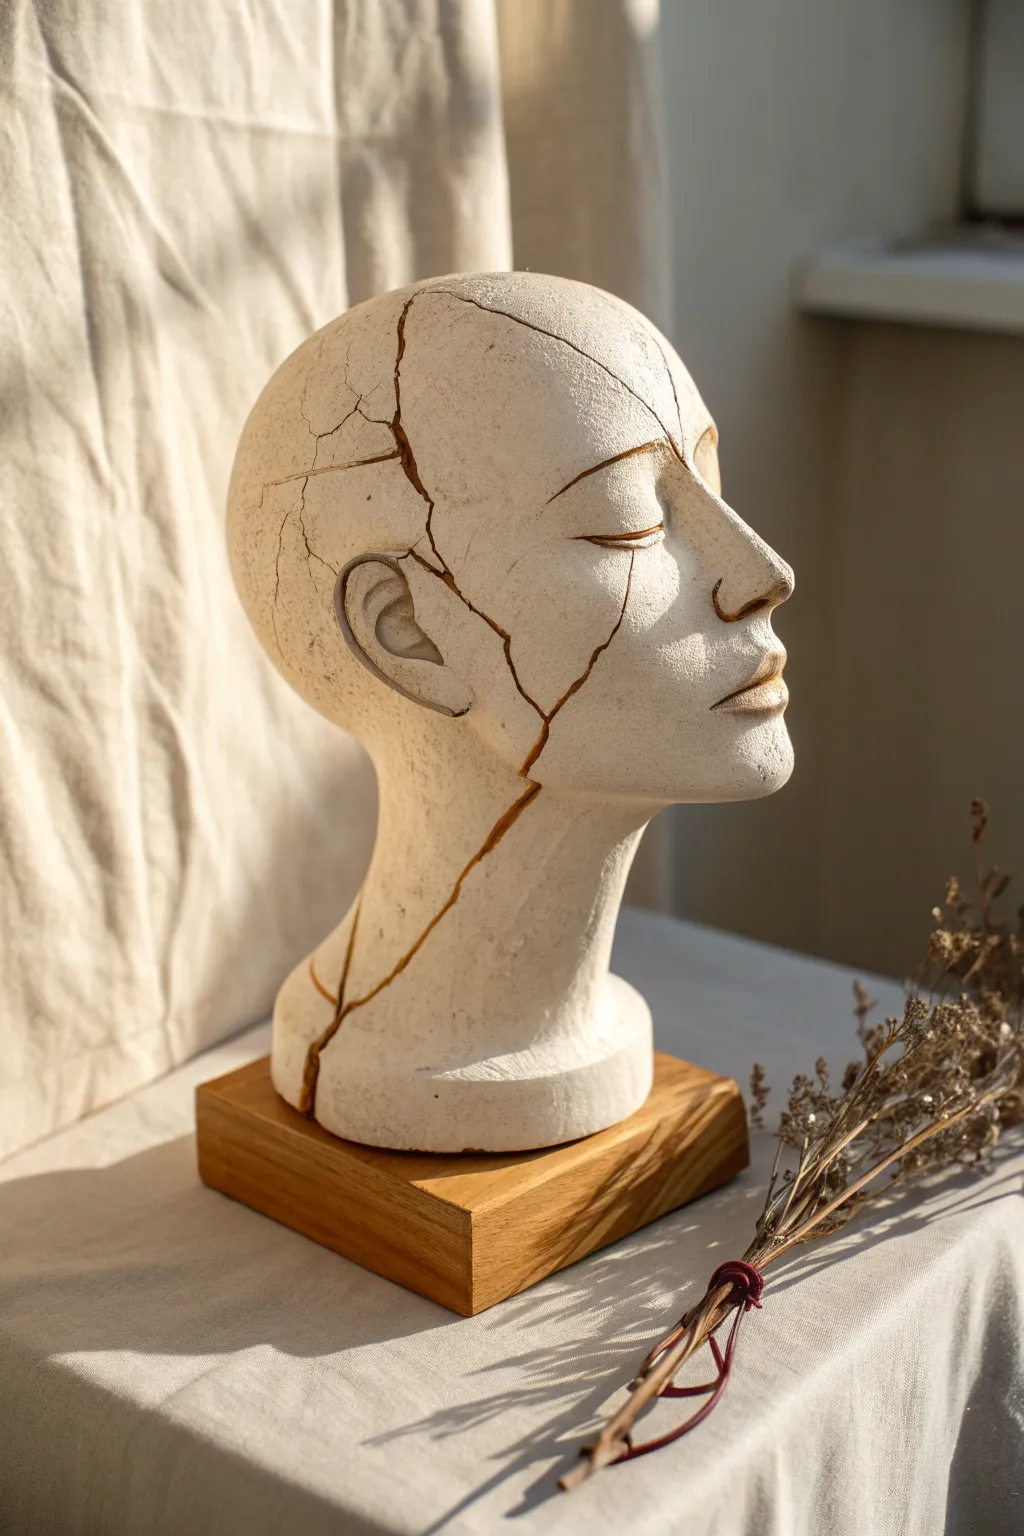
Embrace the beauty of imperfection with this striking project that turns breakage into a focal point. You’ll sculpt a classic bust and then intentionally fracture it, highlighting the seams with gold to mimic the Japanese art of Kintsugi.
Step-by-Step
Materials
- Air-dry clay or kiln-fire clay (white or light grey)
- Sculpting tools (loop tool, needle tool, smoothing sponge)
- Wire clay cutter
- Water spray bottle
- Sandpaper (various grits)
- Acrylic paint (matte white or cream)
- Epoxy glue or heavy-duty ceramic adhesive
- Gold leaf paint or gold pigment powder
- Fine detail paintbrush
- Wooden block base
- Strong adhesive (like E6000) for mounting
Step 1: Sculpting the Base Form
-
Form the armature:
Start by creating a solid core using tightly crumpled aluminum foil or a dedicated armature stand. This saves clay and ensures the head isn’t too heavy. -
Build the volume:
Pack your clay firmly around the core to build the basic shape of a skull and neck. Aim for a smooth, egg-like shape for the cranial area and a cylindrical form for the neck. -
Map the features:
Using a needle tool, lightly sketch horizontal guidelines for the eyes, nose, and mouth. Place the eyes halfway down the head. -
Refine facial planes:
Add small clay pellets to build up the nose, cheeks, and chin. Blend these well into the base using your thumb or a wooden modeling tool. -
Carve details:
Use a loop tool to hollow out the eye sockets and define the jawline. For this specific look, keep the expression serene with closed eyes. -
Smooth the surface:
Once the anatomy is set, use a damp sponge to smooth out fingerprints and tool marks. Surface texture is important here—you want a clean, matte finish.
Step 2: The Break and Repair
-
Wait for leather-hard stage:
Let the sculpture dry until it is ‘leather-hard’—firm but still cold to the touch. This is crucial for a clean break rather than a mushy deformation. -
Create the fractures:
Here is the scary part: firmly strike the piece or use a sharp tool to induce cracks. I find using a chisel to direct the crack results in better composition. Aim for one major vertical fissure. -
Separate and clean:
Gently pull the broken pieces apart. Clean up any loose crumbs from the edges, but don’t smooth the broken jagged edges themselves; you need that texture for the glue. -
Full drying:
Allow the separated pieces to dry completely. If using kiln clay, fire the pieces now. If using air-dry clay, wait 24-48 hours until bone dry. -
Base painting:
Paint the individual shards with a matte white or cream acrylic. Two thin coats are better than one thick one to preserve the texture. -
Prepare the gold adhesive:
Mix a small amount of epoxy glue. If using gold pigment powder, mix it directly into the glue now. If using gold paint later, just use clear glue. -
Reassemble:
Apply the glue to the broken edges and press the pieces back together. Allow the glue or epoxy to ooze out of the seam slightly—this is exactly what we want. -
Highlight the seams:
If you didn’t mix gold into the glue, wait for the adhesive to cure, then carefully paint over the seam lines with high-quality liquid gold leaf paint.
Clean Breaks
If the clay is crumbling instead of cracking cleanly, it’s too dry. Mist it lightly with water, wrap it in plastic for an hour, and try breaking it again once it rehydrates slightly.
Step 3: Finishing
-
Prepare the wooden base:
Sand your wooden block until smooth and apply a clear varnish or oil to bring out the grain. This warmth contrasts well with the cool white clay. -
Mount the sculpture:
Apply a strong adhesive (like E6000) to the bottom of the neck and press it firmly onto the center of the wooden block. -
Final touches:
Do a final check for any white paint that needs touch-ups, but leave the ‘accidental’ drips or irregularities in the gold seam to maintain the wabi-sabi aesthetic.
Modern Twist
Instead of traditional gold, try using a neon resin or a bright blue epoxy for the cracks. This creates a striking, modern pop-art contrast against the classical white bust.
Display your mended masterpiece near a window where natural light can catch the golden seams
Botanical Hair and Blooming Head Bust
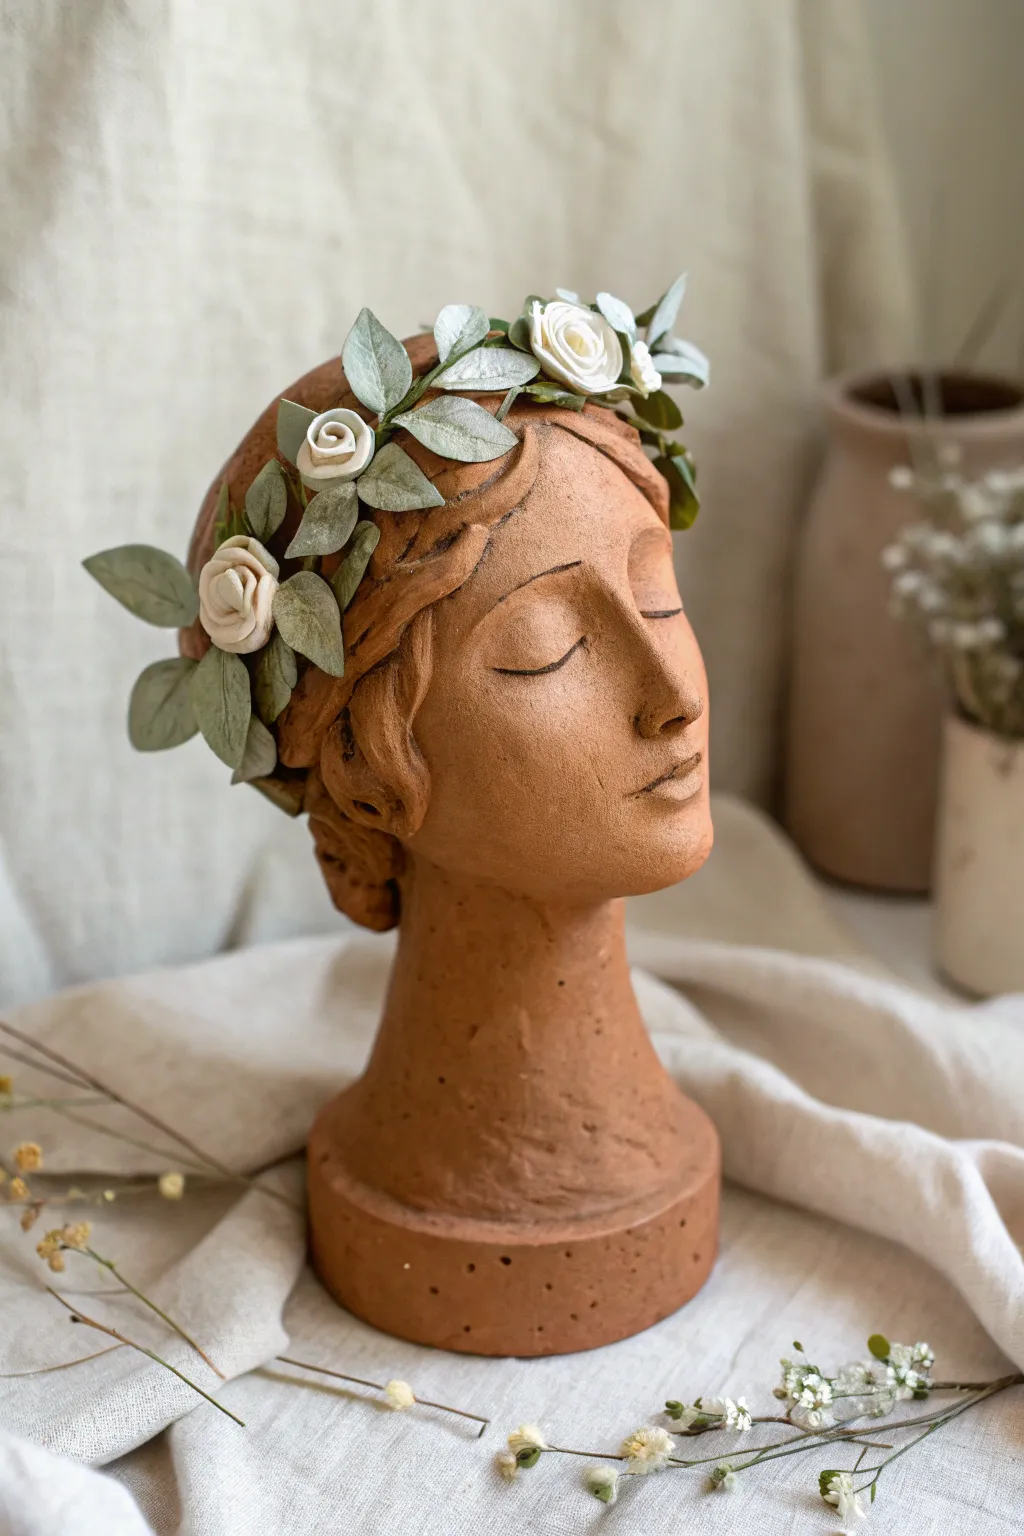
Capture a moment of peaceful contemplation with this classical-inspired bust project. By combining the earthy warmth of faux terracotta with a delicate, handmade botanical wreath, you will create a piece that feels both ancient and refreshingly modern.
Step-by-Step Guide
Materials
- Terracotta colored air-dry clay (approx. 2-3 lbs)
- Aluminum foil and masking tape
- Wooden dowel and small wooden base
- Clay sculpting tools (wire loop, needle tool, sponge)
- Fine-grit sandpaper
- Sage green cardstock or crepe paper
- White crepe paper
- Green floral wire and floral tape
- Hot glue gun
Step 1: Sculpting the Bust
-
Build the armature:
Crumple aluminum foil into a tight egg shape for the head and a distinct cylinder for the neck. Tape these securely to your wooden dowel, which should be mounted in a base for stability. -
Apply the base layer:
Flatten pieces of the terracotta clay into pancakes and press them firmly over the foil armature. Ensure the clay is an even thickness (about 1/4 inch) so it dries uniformly. -
Establish facial planes:
Smooth the clay into a seamless form. Use your thumbs to gently press into the face area to mark where the eye sockets will sit, creating the bridge of the nose in the process. -
Form the nose and mouth:
Add a small wedge of clay for the nose and blend the edges seamlessly into the face. Roll two tiny coils for lips, pressing them gently below the nose. -
Refine the eyelids:
Since the eyes are closed, shape two smooth, half-moon shapes of clay and place them into the sockets. I like to smooth the edges significantly here to make the expression look peaceful rather than sleeping. -
Sculpt the hair:
Add thicker slabs of clay over the forehead and sides of the head to represent hair mass. Use a modeling tool to carve deep, flowing grooves that mimic wavy strands pulled back. -
Create the pedestal:
Build up the neck area slightly, widening it at the bottom into a cylindrical pedestal base. This mimics the classic ‘herm’ busts of antiquity. -
Add texture:
Instead of smoothing everything perfectly, use a slightly coarse damp sponge to dab the surface of the skin and pedestal. This gives it that gritty, authentic fired-clay look. -
Drying time:
Allow the sculpture to dry in a cool, dry place away from direct sunlight for at least 48 hours. Turn it occasionally if possible to ensure even airflow.
Step 2: Crafting the Botanical Crown
-
Construct the vine base:
Measure a piece of floral wire around the dried clay head to get the size right. Twist the ends together to form a loop, leaving it slightly loose to accommodate leaves. -
Create the leaves:
Cut simple, elongated oval leaf shapes from sage green paper. Make about 20-30 leaves. Gently fold them down the center to add dimension. -
Form the rosebuds:
Cut a strip of white crepe paper (about 1 inch wide). Roll it tightly at first, then looser as you go, twisting the bottom to form a small rosebud shape. Secure the base with a dab of glue. -
Attach foliage:
Using floral tape, wrap the base of your leaves onto the wire circle. Overlap them so they flow in the same direction, covering the wire completely. -
Place the blooms:
Hot glue your white rosebuds sporadically amongst the greenery. Focus on placing three or four clustered slightly to one side for visual interest. -
Final assembly:
Once the bust is fully dry and hardened, gently place the wreath onto the head. Adjust the angle so it rests naturally on the sculpted hair waves.
Cracking Prevention
If you see hairline cracks forming while drying, mix a tiny bit of fresh clay with water to make a paste (slip) and fill them in immediately, then smooth over.
Pro Tip: Antique Finish
Once dry, dilute a drop of dark brown acrylic paint in water. Brush this wash over the textured hair and wipe it off with a rag to highlight the deep grooves.
Place your finished muse on a sunny shelf or mantelpiece to bring a touch of timeless, artistic serenity to your space.
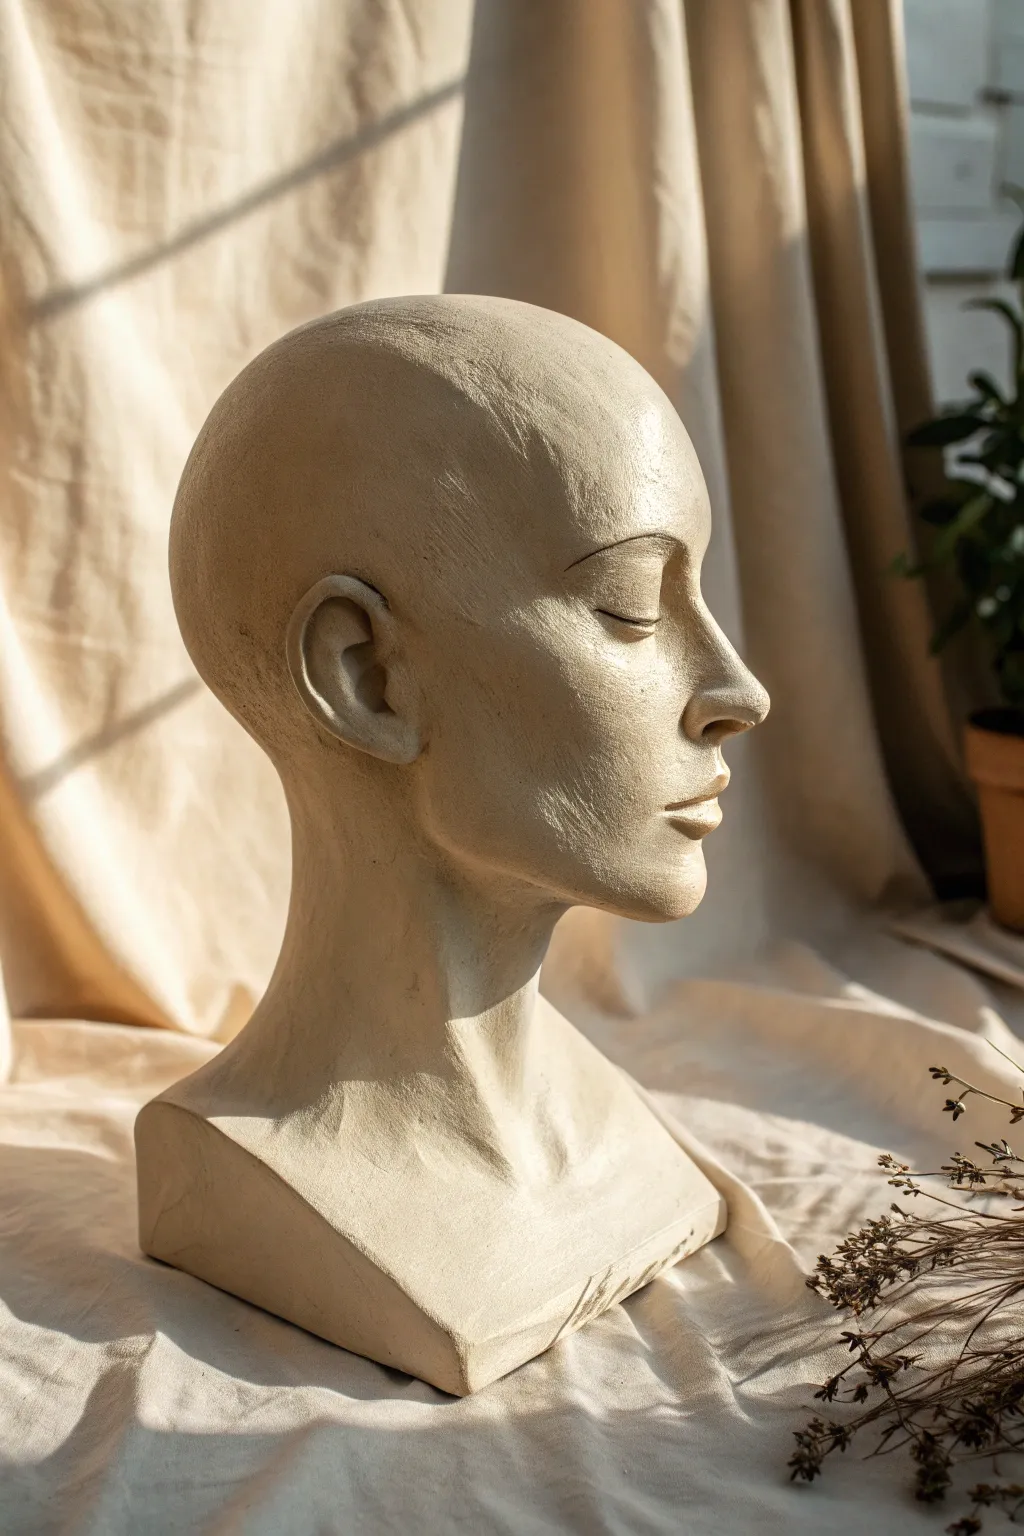
Masked or Faceless Minimal Bust
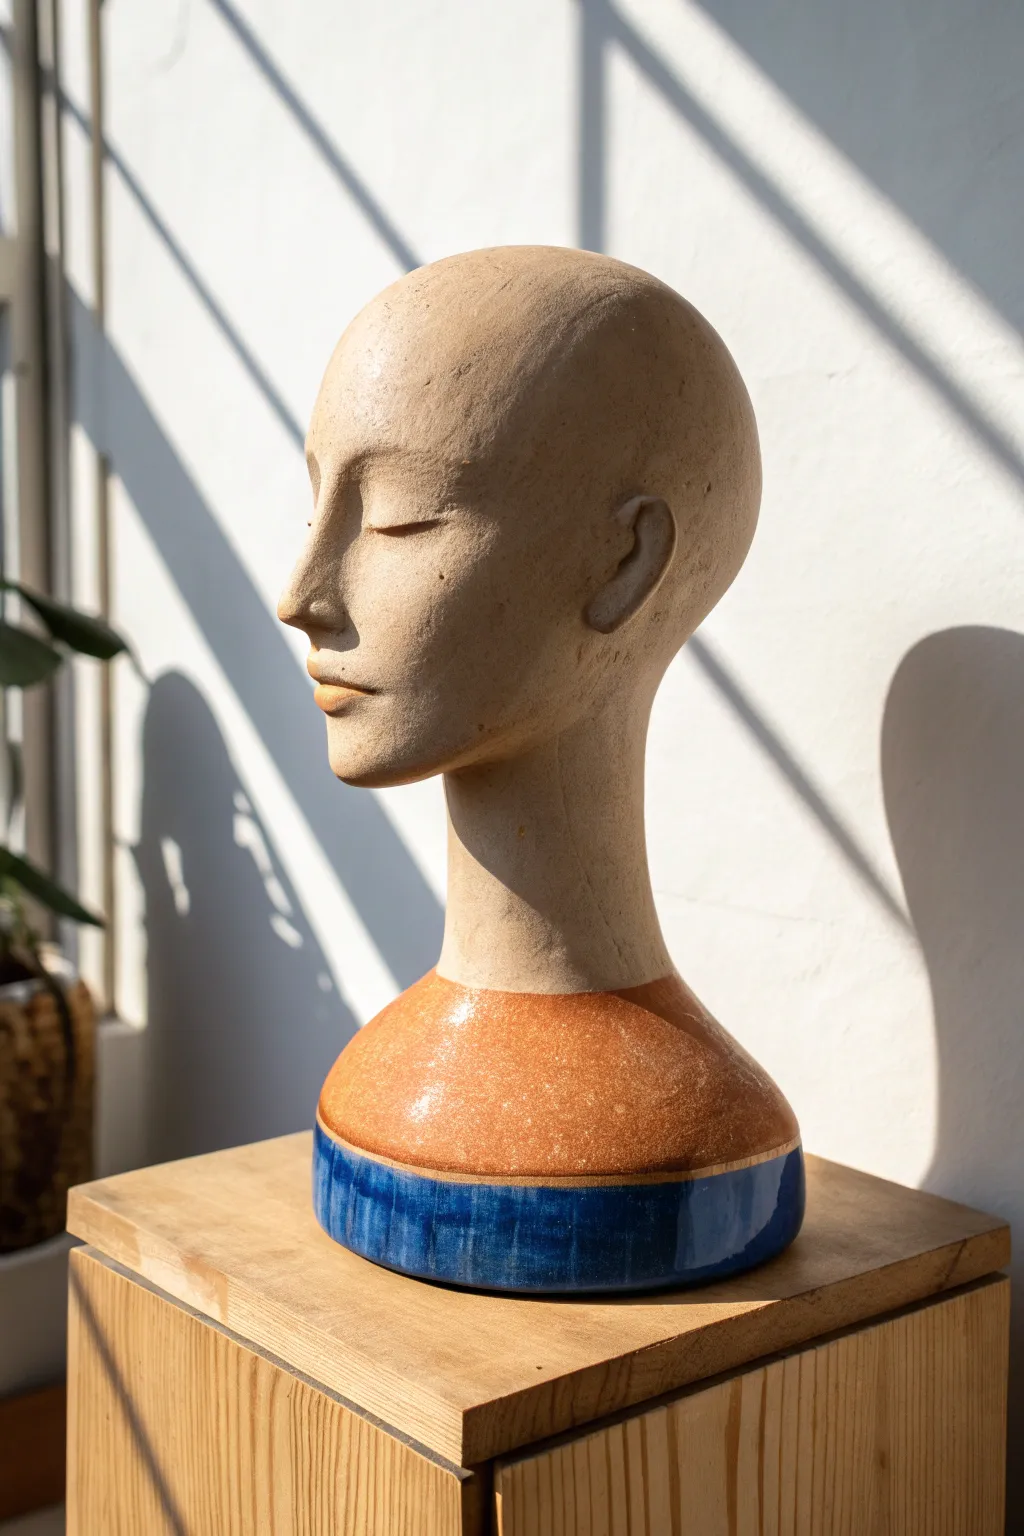
This project captures the quiet elegance of a serene clay bust, balancing the raw, earthy texture of unglazed stoneware with bold bands of glossy color. The stylized, hairless features create a timeless, statue-like quality perfect for modern interiors.
Step-by-Step Tutorial
Materials
- Buff stoneware clay (groggy for structural support)
- Pottery wheel (for the base, optional) or coil building tools
- Sculpting tools (loops, ribs, wooden knives)
- Sponge and water
- Clear plastic bag (for slow drying)
- Paring knife or needle tool
- Scoring tool or fork
- Slip (liquid clay)
- Rust/Ochre speckled glaze
- Cobalt blue glaze
Step 1: Forming the Base Structure
-
Create the base:
Start by throwing a domed cylinder on the wheel or building one with coils. It should be roughly 6-8 inches in diameter at the bottom, tapering upwards to mimic a chest and shoulder line. -
Extend the neck:
From the center of your domed base, build a strong vertical cylinder for the neck. Keep the walls roughly 1/2 inch thick to support the weight of the head. -
Form the cranium:
Construct a hollow egg shape for the head using the coil and pinch method. Attach this firmly to the neck cylinder, ensuring you score and slip the connection point thoroughly so the head doesn’t detach later. -
Refine the structural shape:
Using a metal rib, smooth the transition between the head, neck, and shoulders. Aim for a seamless, continuous surface before you begin detailing facial features.
Neck Cracks?
If hairline cracks appear at the neck during drying, score the crack deeply, fill with soft clay slip, and compress the area with a wooden tool immediately.
Step 2: Sculpting the Features
-
Establish facial planes:
Mark the center line of the face and the eye line (halfway down the head). Gently flatten the face area and use your thumbs to press in the eye sockets. -
Build the nose:
Add a wedge of clay for the nose. I find it helpful to blend the clay upwards into the brow bone first, creating that strong, classic profile seen in the image. -
Carve the eyes:
Instead of open eyes, sculpt closed, serene eyelids. Roll small half-moons of clay and blend them into the sockets, smoothing them to look like peaceful, sleeping eyes. -
Shape the mouth and chin:
Add a small mound for the mouth area. Cut a horizontal line for the lips, then carefully shape the upper and lower lips. Keep the expression neutral and relaxed. Refine the chin to be slightly pointed but soft. -
Attach the ears:
Form two ‘C’ shapes for ears. Attach them roughly in line with the eyes and the bottom of the nose. Keep them simplified and stylized rather than hyper-realistic. -
Surface smoothing:
Once the sculpting is complete, use a slightly damp sponge to smooth out tool marks on the face and neck. The texture should look like smooth stone.
Step 3: Drying and Bisque Fire
-
Hollow check:
If your head is solid or very thick, use a wire tool to slice off the top of the skull, hollow it out to an even wall thickness, and reattach carefully. Puncture a small hidden hole (perhaps under the base) for air to escape. -
Slow drying:
Cover the bust loosely with plastic to dry slowly over several days. This prevents cracking, especially at the neck join. -
Bisque fire:
Fire the piece to cone 04 (or your clay body’s bisque temperature) to prepare it for glazing.
Smooth Operator
Burnish the unglazed ‘skin’ areas with the back of a spoon when bone dry. This aligns the clay particles, creating a silky, skin-like sheen after firing.
Step 4: Glazing the Geometry
-
Mark the glaze lines:
Using a pencil (which burns off in the kiln), draw a horizontal line across the chest/shoulder area where the glaze will stop. The head and neck remain raw clay. -
Apply the rust glaze:
Brush or dip the upper section of the base (up to the neck seam) with the rust/ochre speckled glaze. Apply 2-3 coats for opacity. -
Apply the blue band:
Mask off the bottom inch or carefully paint a band of cobalt blue glaze around the absolute bottom rim of the base. This creates a grounding contrast. -
Final wipe:
Use a clean, damp sponge to wipe away any stray glaze specks from the face, neck, or ears. The raw clay needs to be pristine. -
Glaze fire:
Fire the piece to cone 5/6 (stoneware temperature). The unglazed clay will toast to a warm buff color, while the glazes will become glossy and hard.
Place your finished bust near a window where natural light can highlight the peaceful contours of the face
Split-Face Double-Identity Bust
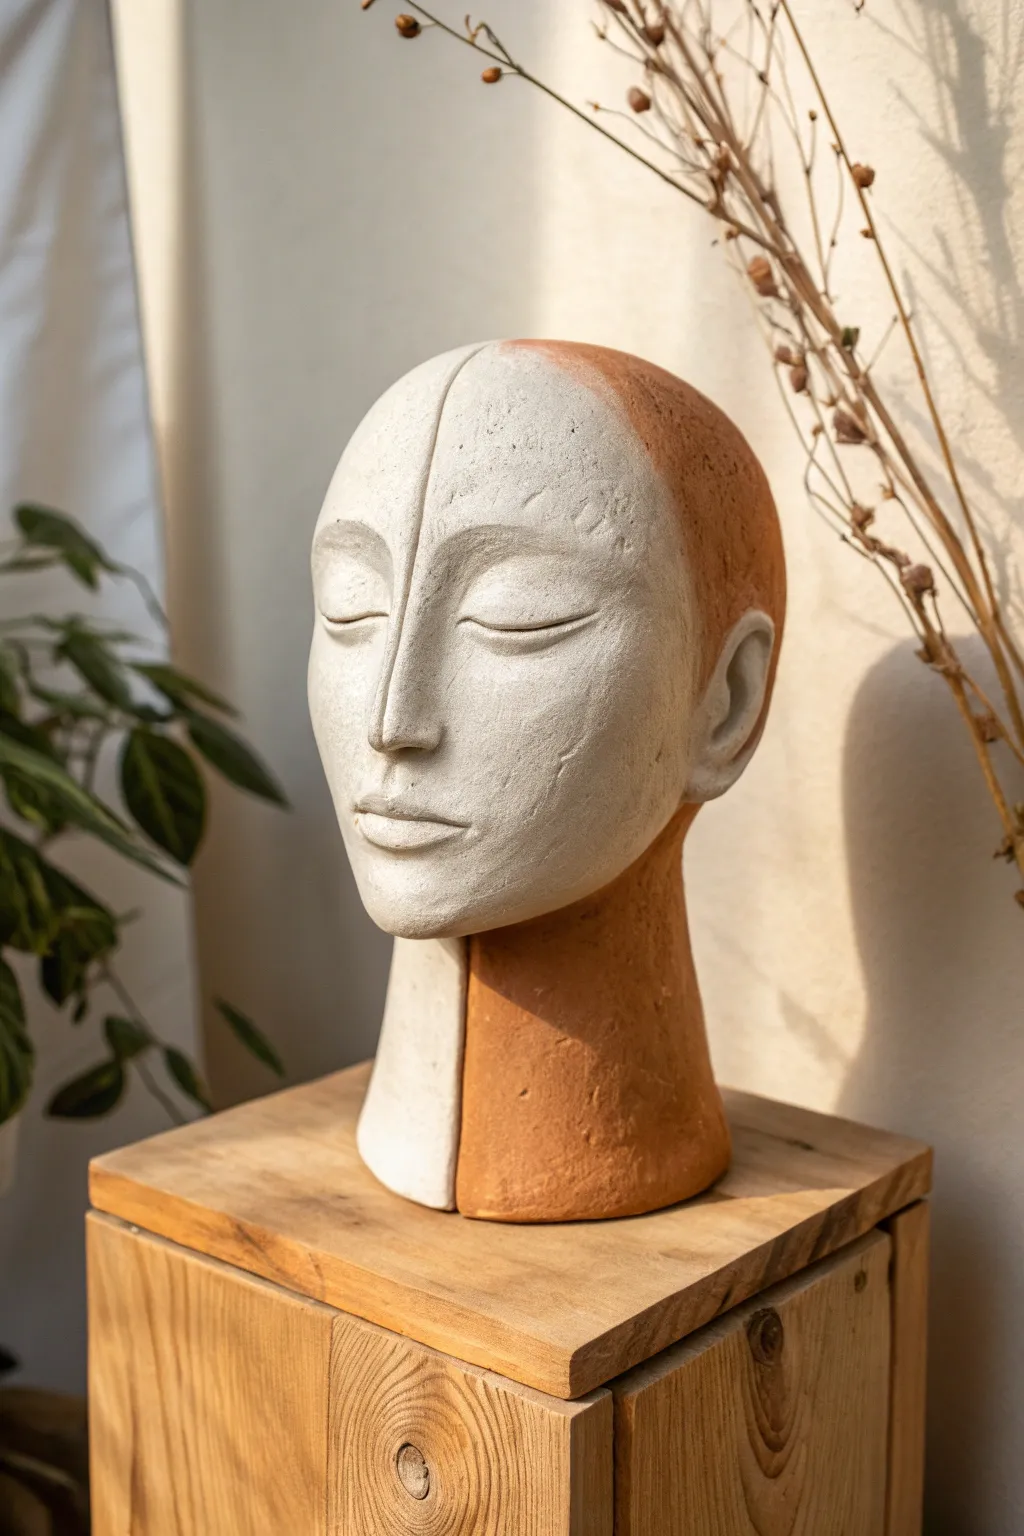
This serene and striking split-face bust explores the concept of duality through contrasting clay bodies. By merging a creamy white finish with raw terracotta textures, you’ll create a modern, minimalist centerpiece with timeless appeal.
Step-by-Step
Materials
- White air-dry clay or polymer clay
- Terracotta air-dry clay or polymer clay
- Alternatively: White clay only + terracotta acrylic paint
- Wire armature kit (or heavy gauge wire)
- Aluminum foil
- Wooden sculpting tools
- Sponge
- Needle tool
- Clear matte varnish
- Wooden base plinth (optional)
Step 1: Building the Core
-
Prepare the Armature:
Begin by constructing a simple wire armature to support the weight of the head and neck. Twist heavy-gauge wire into a loop for the skull and a stem for the neck, securing it firmly to your working base. -
Bulk Out with Foil:
Crumple aluminum foil tightly around your wire frame to form the basic egg shape of the head and the cylinder of the neck. This saves clay and reduces drying time significantly. -
Apply the Base Layer:
Cover the foil core with a uniform layer of clay about 1/4 inch thick. If you are using two different colored clays, decide your split line now—vertically down the center—and apply white clay to the left and terracotta to the right, blending the seam thoroughly on the inside so they adhere.
Step 2: Sculpting Features
-
Define the Center Line:
Using a needle tool, lightly score a vertical line down the center of the face. This will guide your symmetry and mark where the color split or texture difference will eventually emphasize the duality. -
Block in Facial Masses:
Add small balls of clay to build up the nose, brow ridge, cheeks, and chin. Focus on the overall structure rather than details initially, ensuring the profile view looks balanced. -
Refining the Nose:
Shape the nose bridge, blending it smoothly into the brow. For this stylized look, keep the bridge relatively straight and the nostrils subtle. -
Sculpting Closed Eyes:
Roll two small spheres for the eyeballs and press them into the sockets. Lay thin flattened coils over them to create the eyelids. Smooth the edges down so the eyes appear gently closed and peaceful. -
Shaping the Lips:
Form the mouth by adding a small oval and cutting a horizontal line through the middle. Sculpt the top and bottom loops to be full but relaxed, reinforcing the calm expression. -
Adding the Ear:
On the side of the head, position the ear so the top aligns roughly with the eye and the bottom with the nose. Keep the detailing simple and stylized to match the modern aesthetic.
Cracking at the Seam?
If the two clay types separate while drying, fill the gap with a ‘slip’ made of clay and water (or liquid clay for polymer). Smooth it over and re-sand once dry.
Step 3: The Split Effect
-
Refining the Seam:
Return to your center vertical line. If you used two clay types, smooth the joint carefully. If using one clay type (to be painted later), carve a distinct groove or line from the forehead, down the nose bridge, and through the lips. -
Adding Texture:
On the forehead and cheeks, add subtle scratch marks, pocks, or canvas textures using a roughened sponge or texture tool. I like to keep the ‘face’ area smoother while leaving the back of the head slightly rougher for contrast. -
Smooth the Surface:
Use a slightly damp sponge or finger to smooth out the skin texture on the face, softening any harsh tool marks around the eyes and lips. -
Final Shaping:
Check the neck structure; it should be sturdy and flare slightly at the bottom to form a solid base (bust style). Ensure the head sits naturally without looking stiff.
Level Up: Gold Leaf
Apply a thin line of gold leaf directly into the central groove separating the two colors. The metallic shimmer adds a Kintsugi-inspired elegance to the split.
Step 4: Finishing Touches
-
Drying or Curing:
Allow the sculpture to dry completely (for air-dry clay) or bake it according to manufacturer instructions (for polymer). Air-dry clay may take 2-4 days depending on thickness. -
Sanding:
Once hardened, use fine-grit sandpaper to polish the ‘white’ side of the face or any areas where you want a pristine finish. Wipe away all dust with a damp cloth. -
Painting the Split (If Needed):
If you sculpted with a single white clay, now is the time to paint. Mask off the left side with tape and paint the right side using a matte terracotta acrylic. Mix in a little burnt sienna or texture paste to mimic real clay. -
Sealing the Work:
Apply a clear matte varnish over the entire piece. This protects the clay, unifies the surface sheen, and prevents the white sections from yellowing over time.
Place your finished bust near a window to let natural light play across the split textures throughout the day