When I’m hunting for Christmas gifts, I love anything made from clay because it’s personal, practical, and feels like a tiny keepsake. Here are my go-to clay Christmas gift ideas—classic first, then a few fun curveballs once you’re warmed up.
Botanical-Imprint Evergreen Ornaments
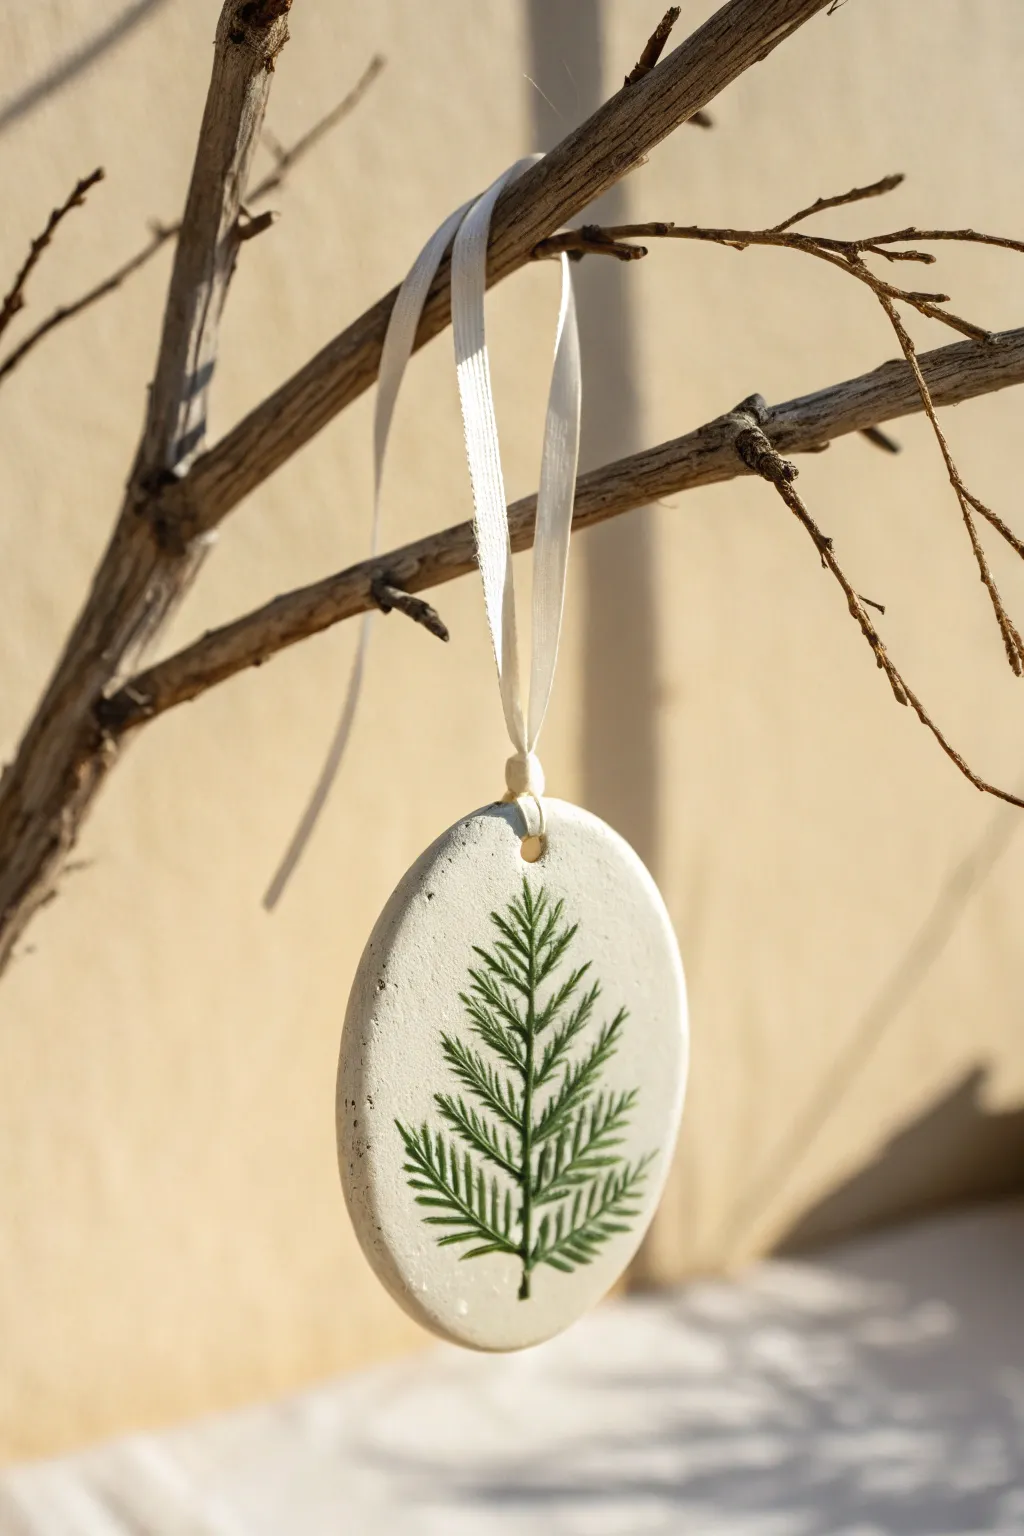
Capture the delicate beauty of winter foliage with these understated clay ornaments. Minimalist and elegant, they feature a crisp, green evergreen imprint pressed directly into white clay, finished with a rustic ribbon perfect for holiday gifting.
How-To Guide
Materials
- Air-dry clay (white)
- Fresh evergreen clippings (flat cedar or similar)
- Rolling pin
- Oval cookie cutter (or a knife and oval template)
- Green acrylic paint (pine or forest shade)
- Fine-grit sandpaper
- Small artist paintbrush
- Drinking straw
- Wax paper or parchment paper
- Cotton or chiffon ribbon (cream or off-white)
Step 1: Preparing the Clay Base
-
Condition the clay:
Begin by taking a handful of white air-dry clay and kneading it in your hands until it becomes soft, pliable, and free of cracks. -
Roll out the slab:
Place the clay on a sheet of wax paper to prevent sticking. Use your rolling pin to flatten the clay into a smooth slab about 1/4 inch thick, ensuring an even surface. -
Select your greenery:
Choose a small sprig of fresh evergreen. Flat cedar works exceptionally well here because its unique scaly leaves create a beautiful, geometric pattern when pressed. -
Make the impression:
Arrange the greenery on top of the rolled clay. Using your rolling pin, gently roll over the plant material with firm, even pressure to embed it slightly into the clay surface. -
Remove the botanical:
Carefully peel the evergreen sprig away from the clay. Use a needle tool or tweezers if any small bits get stuck inside the impression. -
Cut the shape:
Position your oval cookie cutter over the imprint, framing the botanical design nicely in the center. Press down firmly to cut the shape. -
Create the hanging hole:
While the clay is still wet, use a drinking straw to punch a clean hole near the top of the oval for the ribbon. -
Smooth the edges:
Dip your finger in a tiny bit of water and run it along the cut edges of the oval to smooth out any roughness or stray clay bits. -
Drying process:
Transfer the ornament to a flat, dry surface lined with parchment paper. Let it air dry completely for 24 to 48 hours, flipping it halfway through to prevent curling.
Step 2: Finishing Touches
-
Sanding:
Once fully dry and hard, inspect the edges. If there are any sharp points or irregularities, lightly buff them away with fine-grit sandpaper. -
Prepare the paint:
Squeeze a small amount of forest green acrylic paint onto a palette. You can mix in a tiny drop of black if you want a deeper, more realistic pine color. -
Painting the impression:
Using a small, fine paintbrush, carefully paint inside the depressed areas of the evergreen imprint. I like to keep the brush fairly dry so the paint doesn’t flood the texture. -
Handling excess paint:
If any paint gets on the flat surface around the imprint, quickly wipe it away with a damp paper towel or wait for it to dry and gently sand the top layer off. -
Sealing (optional):
For longevity, you can apply a matte varnish over the painted area, though leaving the clay raw preserves its natural, matte stoneware look. -
Adding the ribbon:
Cut a length of cream cotton or chiffon ribbon, about 8 inches long. -
Threading the hanger:
Thread the ribbon through the hole at the top of the ornament. Tie the ends together in a simple knot to create a loop for hanging. -
Final check:
Give the ornament a final inspection to ensure the paint is dry and the ribbon is secure before gifting or hanging it on the tree.
Use fresh greenery
Use freshly cut sprigs rather than dried ones. Fresh leaves are flexible and won’t crumble into the clay during rolling, leaving a much cleaner impression.
Preventing curling
If your ornament edges start to curl upward while drying, place a lightweight board or book on top of them (sandwiching them between parchment paper) to weigh them down flat.
These elegantly simple ornaments bring a permanent touch of nature into the home and look wonderful tied onto gift packages


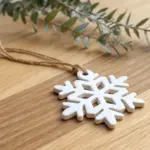
Minimal Snowflake Cutout Ornaments
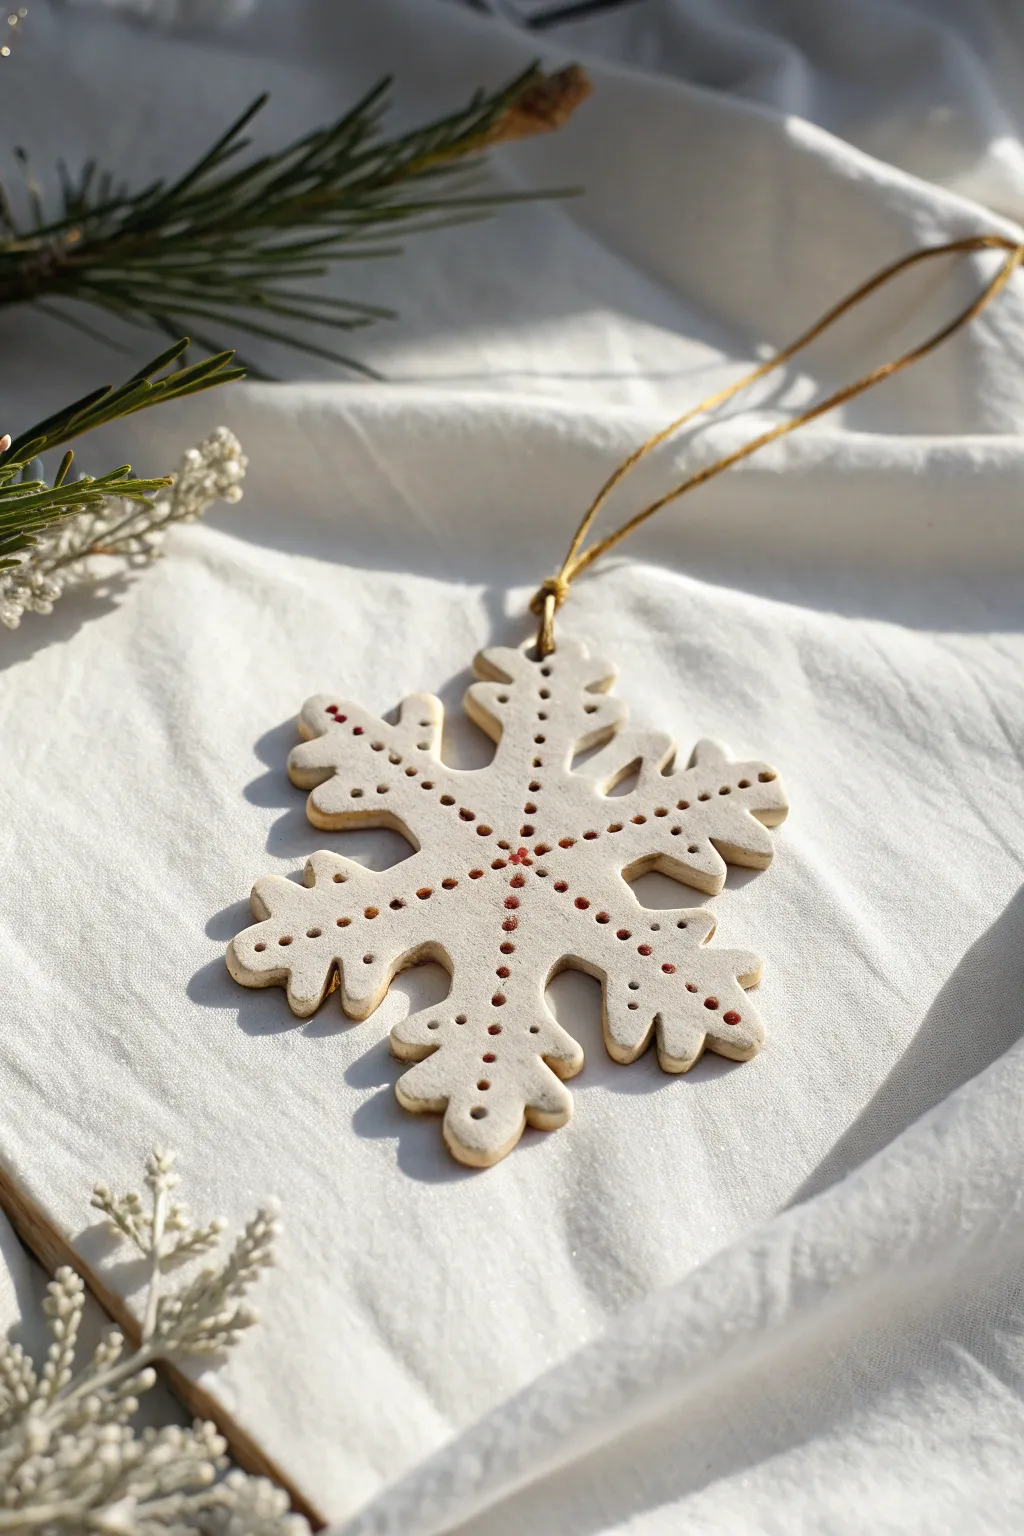
Embrace the understated beauty of Scandinavian design with this textured clay snowflake. The warmth of the unglazed clay paired with delicate, rustic dotted details creates a timeless ornament perfect for winter gifting.
Detailed Instructions
Materials
- White air-dry clay or polymer clay (oven-bake)
- Snowflake cookie cutter (approx. 3-4 inches wide)
- Rolling pin
- Parchment paper or canvas working surface
- Fine-grit sandpaper (optional)
- Small round tool (like a blunt toothpick or dotting tool)
- Rust-colored acrylic paint or terracotta pigment powder
- Fine detail paintbrush
- Gold embroidery thread or twine
- Clear matte varnish (optional)
Step 1: Shaping the Snowflake
-
Prepare the Clay:
Begin by conditioning your clay. Knead a palm-sized amount until it is soft, pliable, and free of cracks. If using air-dry clay, keep your hands slightly moist to prevent drying. -
Roll it Out:
Place the clay on a sheet of parchment paper. Roll it out to an even thickness of about 1/4 inch (6mm). You want it substantial enough to be sturdy, but light enough to hang. -
Cut the Shape:
Press your snowflake cookie cutter firmly into the clay. Give it a gentle wiggle to separate the shape from the excess clay before lifting the cutter straight up. -
Clean the Edges:
Carefully peel away the excess clay. If the edges of your snowflake look a bit ragged, smooth them gently with a water-dampened finger or a soft brush. -
Create the Hanging Hole:
Using your round tool or a straw, punch a hole at the tip of one snowflake arm. Make sure the hole is big enough for your twine but not so close to the edge that the clay might break.
Use a Release Agent
Use cornstarch or baby powder on your tool tips! Dipping your dotting tool in powder before pressing into the clay prevents sticking and keeps your dots crisp and clean.
Step 2: Adding Texture and Curing
-
Mark the Center:
Identify the exact center of the snowflake. Press your small round tool gently into the clay to create a central indentation. Do not pierce all the way through; you just want a surface divot. -
Create the Radial Arms:
Starting from the center dot, press a line of evenly spaced dots extending out towards the tip of one arm. Repeat this for all six arms of the snowflake. -
Add Branching Details:
To mimic the crystalline structure, add smaller rows of dots branching off the main lines into the snowflake’s decorative points. Keep the pressure consistent for uniform dots. -
Dry or Bake:
If using air-dry clay, let the ornament sit on a flat surface for 24-48 hours, flipping halfway through. If using polymer clay, bake according to the manufacturer’s temperature instructions, usually about 15-20 minutes. -
Refine the Surface:
Once fully cured and cool, check for any sharp burrs or rough spots. I like to lightly run a piece of fine-grit sandpaper over the edges for a professional finish.
Try Spicing It Up
Knead actual spices like cinnamon or nutmeg into the white clay before rolling. This adds a lovely speckled texture and a festive scent to the finished ornament.
Step 3: Decoration and Finishing
-
Prepare the Paint:
Squeeze a tiny dot of rust or terracotta-colored acrylic paint onto a palette. You can slightly water it down if you want the color to soak into the texture more like a stain. -
Fill the Dots:
Dip your finest brush into the paint. Carefully touch the tip of the brush into each indented dot. The goal is to fill the divot with color without painting the flat surface around it. -
Wipe Excess (Optional):
If you accidentally get paint outside the dots, quickly wipe the surface with a slightly damp paper towel. This leaves paint in the recesses while cleaning the top, enhancing the rustic look. -
Let it Set:
Allow the paint to dry completely. This usually takes only about 10-15 minutes for acrylics. -
Seal the Ornament:
To protect the finish, you can apply a light coat of matte varnish. This is optional, but it helps keep white clay from getting dusty over time. -
Add the Hanger:
Cut a length of gold embroidery thread or twine (about 8 inches). Thread it through the top hole and tie a secure knot at the base near the clay. -
Final Loop:
Tie the loose ends of the thread together to create a hanging loop, ready for the tree.
Now you have a charming, handcrafted piece that brings a touch of cozy winter magic to any holiday display


Stamped Clay Gift Tags With Merry Messages
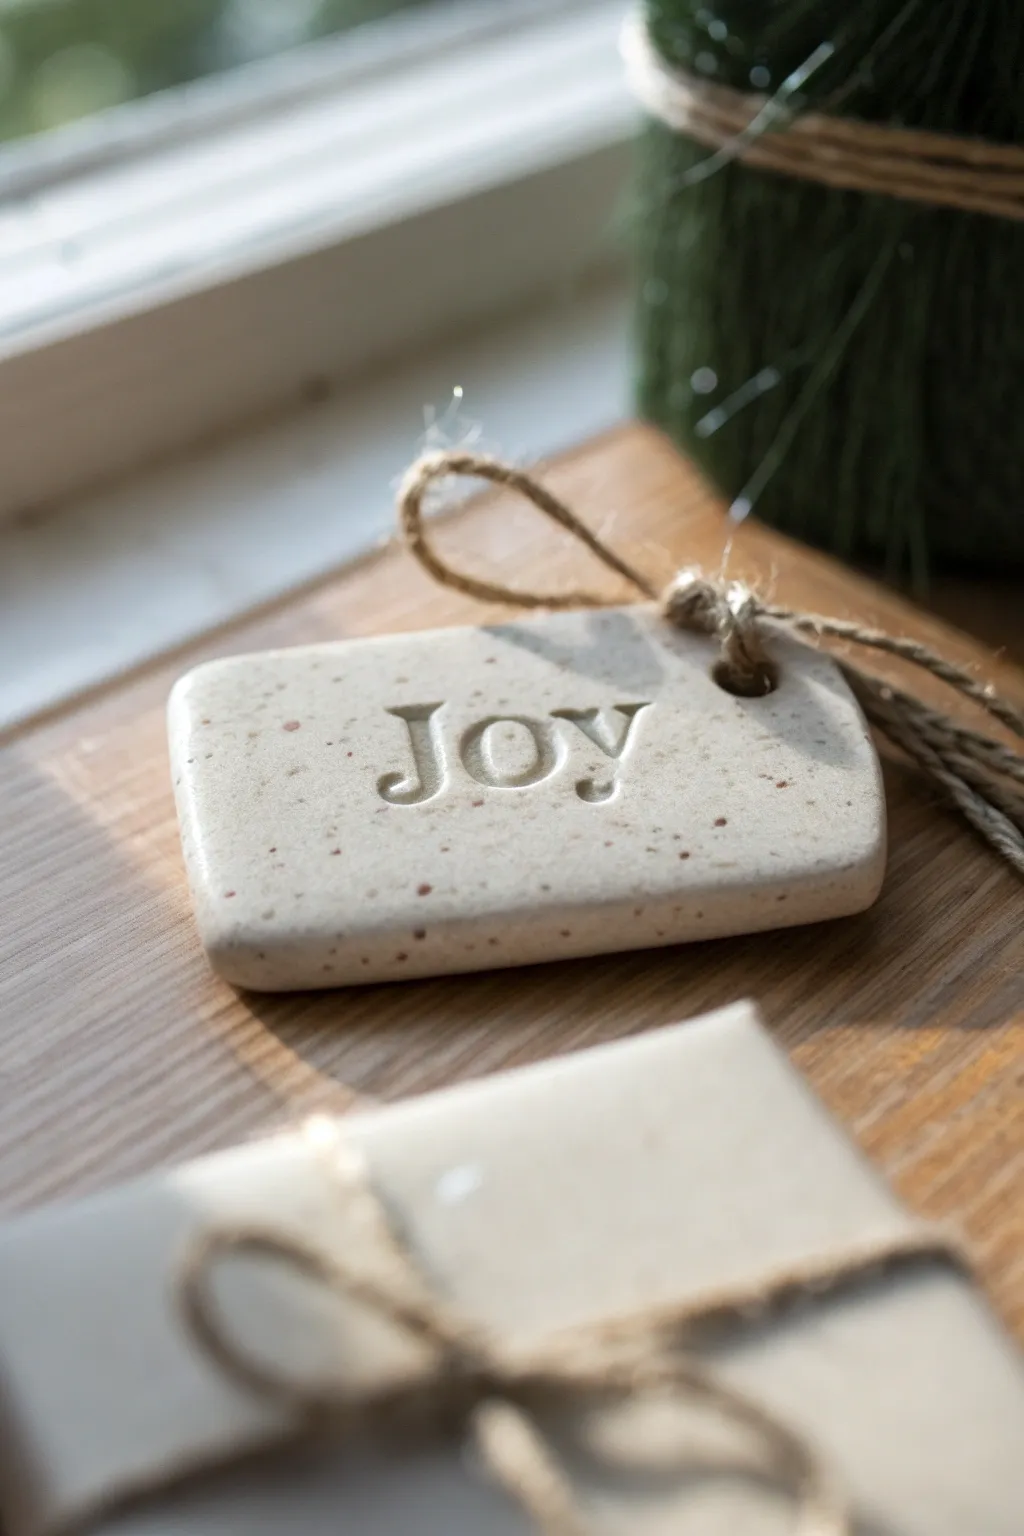
Achieve a minimalist, rustic elegance with these handcrafted ceramic-style gift tags. The speckled finish mimics the look of stoneware pottery, making a simple word carry distinctive warmth and charm.
Step-by-Step Tutorial
Materials
- Polymer clay (white or beige)
- Speckles inclusion (fine ground black pepper or coarse sand)
- Rolling pin or acrylic roller
- Rectangular clay cutter (approx. 2×1 inch)
- Letter stamps (serif font)
- Straw or small circle punch
- Parchment paper
- Baking sheet
- Oven
- Jute twine
- Fine-grit sandpaper (optional)
- Matte glaze (optional)
Step 1: Preparation & Mixing
-
Condition the Clay:
Start by warming a block of white or beige polymer clay in your hands. Knead it thoroughly until it is soft, pliable, and free of cracks. -
Create the Texture:
To get that beautiful stoneware look without buying expensive specialty clay, sprinkle a small pinch of fine ground black pepper or clean, coarse sand onto your flattened clay. -
Incorporate the Speckles:
Fold the clay over the inclusions and knead again. Repeat the folding and kneading process until the specks are evenly distributed throughout the entire batch. -
Roll it Out:
Place the clay on a sheet of parchment paper. Use your acrylic roller to flatten the clay into a smooth sheet, aiming for a consistent thickness of about 1/4 inch so the tag feels substantial.
Step 2: Shaping & Stamping
-
Cut the Shape:
Use a rectangular clay cutter with rounded corners to punch out your tag shape. If you don’t have a cutter, you can carefully cut a rectangle with a blade and smooth the corners with your finger. -
Smooth the Edges:
Gently run your finger along the cut edges of the rectangle to soften the sharpness and remove any loose bits of clay. -
Position Your Stamps:
Arrange your letter stamps to spell ‘JOY’. I find it helpful to press them gently into a scrap piece of clay first to ensure they are facing the right way and spaced correctly. -
Impress the Word:
Center the stamps over the clay rectangle. Press down firmly and evenly, ensuring the impression is deep enough to catch the light but not so deep it distorts the tag’s back. -
Punch the Hole:
Use a drinking straw or a small circle cutter to create a hole in the top right corner. Twist the straw slightly as you pull it out to get a clean hole.
Clean Impressions
Dust your letter stamps with a tiny bit of cornstarch or baby powder before pressing into the clay. This prevents sticking and ensures crisp, clean letters.
Step 3: Baking & Finishing
-
Prepare for Baking:
Transfer the parchment paper with the tags directly onto a baking sheet. Avoid lifting the raw clay tags individually to prevent warping their shape. -
Bake:
Bake the tags according to your specific brand of polymer clay instructions (usually around 275°F or 135°C for 15-30 minutes). Create an aluminum foil tent over them if your oven runs hot to prevent scorching. -
Cool Down:
Once baked, remove the tray from the oven and let the tags cool completely on a flat surface before handling them. -
Sand (Optional):
If there are any rough spots or fingerprints, lightly buff the edges or surface with fine-grit sandpaper under running water. -
Seal (Optional):
For a more polished ceramic look, you can brush on a thin layer of matte glaze, though the raw matte finish looks wonderful as is. -
Cut the Twine:
Cut a length of natural jute twine, approximately 8-10 inches long. -
Loop the Twine:
Fold the twine in half and push the looped end through the tag’s hole from front to back. -
Secure the Knot:
Pull the loose ends of the twine through the loop and tighten gently to create a cow hitch knot.
Golden Touch
After baking, outline the inside of the stamped letters with a fine-tip gold paint pen or rub ‘Rub ‘n Buff’ wax into the grooves for a festive shine
These timeless tags are now ready to add a thoughtful, handcrafted touch to your holiday packages


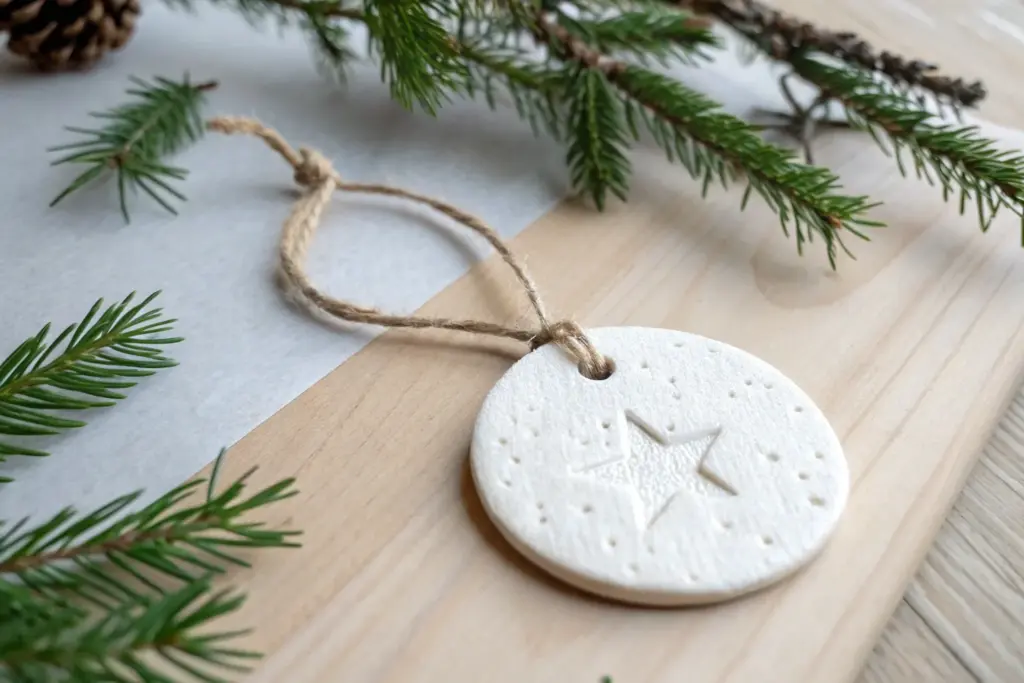
Classic Star Ornaments With Painted Details
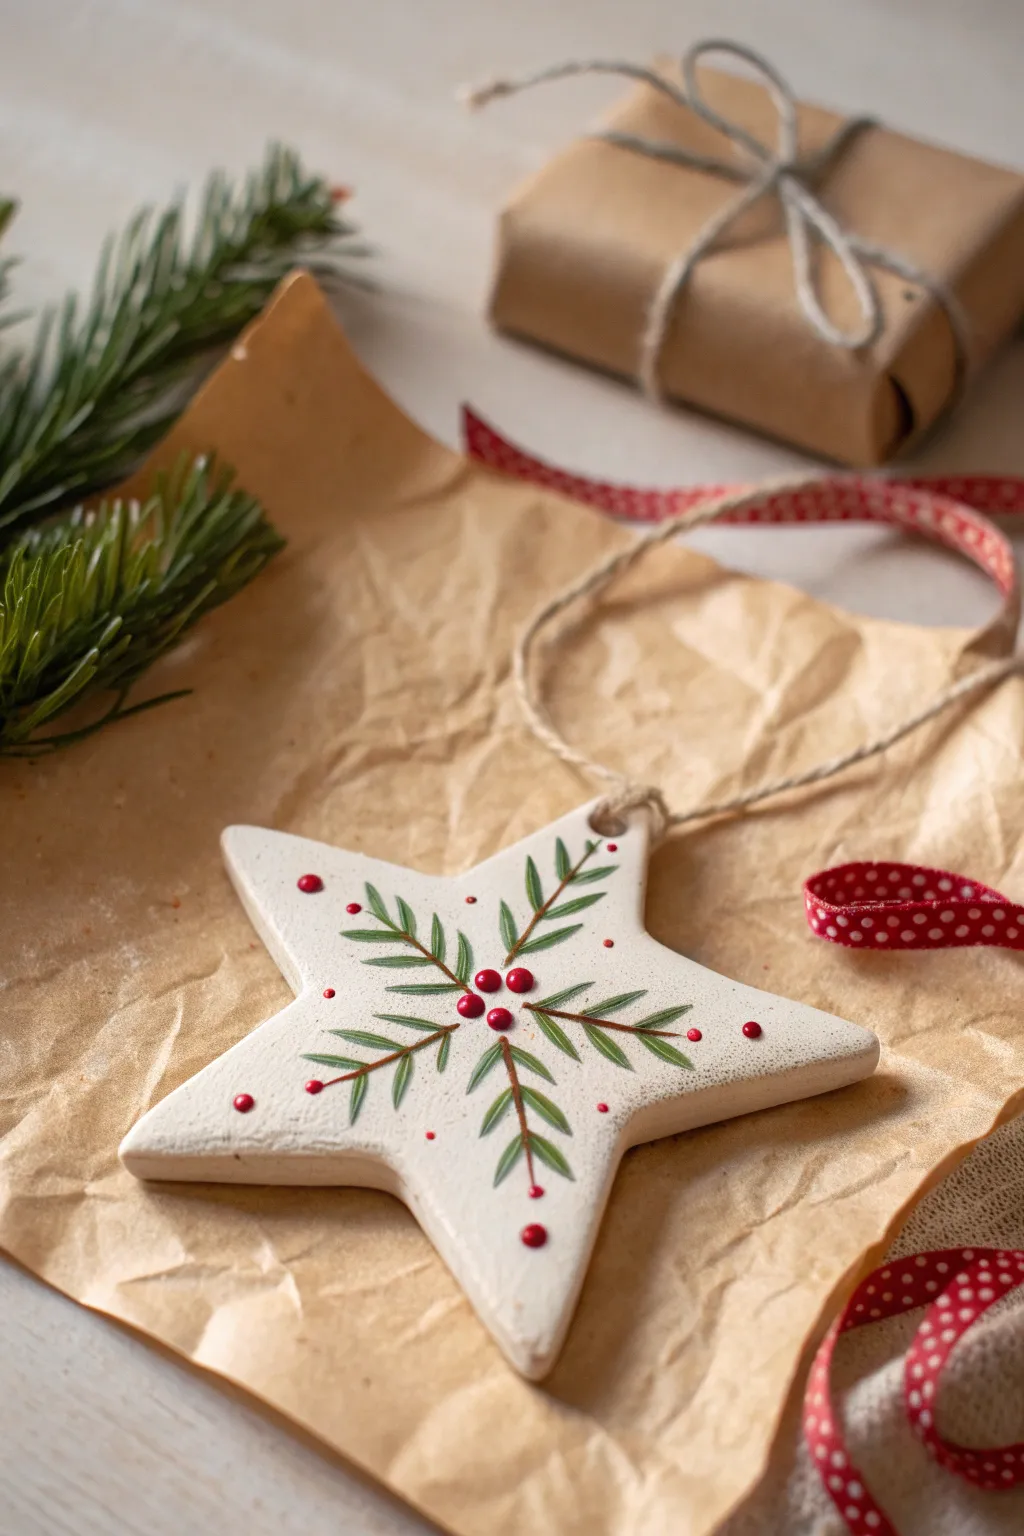
Bring the beauty of a winter forest indoors with this beautifully simple white clay star. Featuring delicate hand-painted pine sprigs and bright red berries, this ornament captures a classic holiday aesthetic that looks stunning on any tree.
Step-by-Step Guide
Materials
- Air-dry clay (white) or polymer clay
- Star-shaped cookie cutter (medium size)
- Rolling pin
- Fine-grit sandpaper (optional)
- Acrylic paints (Forest Green, Ruby Red)
- Very fine detail paintbrush (size 0 or 00)
- Ball point tool or toothpick
- Jute twine or thin hemp cord
- Matte or satin varnish (optional)
- Drinking straw or skewer (for the hole)
- Parchment paper or craft mat
Step 1: Shaping the Clay Base
-
Condition the Clay:
Start by taking a handful of your white clay and kneading it in your hands until it becomes soft, pliable, and free of cracks. If you are using polymer clay, the warmth of your hands is essential here. -
Roll it Out:
Place the clay on a smooth surface or craft mat. Use a rolling pin to flatten the clay to an even thickness of about 1/4 inch (6mm). You want it substantial enough to be sturdy, but not too heavy for a branch. -
Cut the Star:
Press your star-shaped cookie cutter firmly into the clay. Give it a tiny wiggle to ensure it cuts all the way through, then lift the cutter. Carefully peel away the excess clay from around the star shape. -
Create the Hanging Hole:
Using a drinking straw or a skewer, puncture a hole near the top point of the star. Make sure the hole is not too close to the edge to prevent the clay from breaking later. -
Smooth the Edges:
Dip your finger in a little water (if using air-dry clay) or baby oil (if using polymer) and gently run it along the cut edges of the star to soften any sharp ridges left by the cutter. -
Drying or Baking:
If using air-dry clay, lay the star flat on parchment paper and let it dry for 24-48 hours, flipping it halfway through to prevent curling. If using polymer clay, bake according to the package instructions. -
Prepare the Surface:
Once fully cured or dry, inspect your star. If there are any rough spots, use a fine-grit sandpaper to gently smooth the surface, creating a perfect canvas for painting.
Step 2: Painting the Details
-
Map the Design:
Visualize a center point on your star. The design relies on symmetry, with sprigs radiating outward from the middle towards the points and the valleys between points. -
Paint the Stems:
Load your fine detail brush with thinned brown or dark green paint. Paint thin lines radiating from the center—one going up towards the top point, two going sideways, and two downwards, creating a star-burst skeleton. -
Add Pine Needles:
Switch to your Forest Green paint. Using the very tip of your brush, flick short, quick strokes outward from each stem line to create the look of pine needles. Keep these strokes light and airy. -
Layering Shades:
I like to mix a slightly lighter green and add a few needle strokes on top of the darker ones; this subtle depth makes the foliage look more realistic. -
Create Center Berries:
Dip a ball tool or the end of a paintbrush handle into Ruby Red paint. Dot a cluster of three distinct berries right at the center where all your stems meet. -
Add Accent Berries:
Using a smaller dotting tool or toothpick, add single red berries further out on the design—place them near the tips of the pine sprigs or floating in the empty white space for balance. -
Let Paint Dry:
Allow the acrylic paint to dry completely. This usually takes about 15-20 minutes depending on how thick your berry dots are.
Fixing Wobbly Lines
If a painted line goes astray, don’t panic. Let it dry completely, then gently scrape the mistake off with a craft knife or paint over it with a tiny dab of white acrylic.
Step 3: Finishing Touches
-
Seal the Ornament:
To protect your painting, apply a thin coat of matte or satin varnish over the front face of the star. This seals the clay and makes the red berries pop. -
Prepare the Twine:
Cut a length of jute twine or hemp cord, approximately 8-10 inches long. -
Attach the Hanger:
Thread one end of the twine through the hole at the top of the star. Bring the ends together and tie a secure knot to form a loop. -
Final Check:
Trim any excess tail from your twine knot for a clean look. Your rustic, hand-painted ornament is now ready to gift or hang.
Sharper Needles
For the finest pine needles, slightly thin your green acrylic paint with a drop of water. This helps the paint flow smoothly off the brush for crisp, tapered lines.
Hang this charming star on your tree and enjoy the handmade warmth it adds to your holiday decor

The Complete Guide to Pottery Troubleshooting
Uncover the most common ceramic mistakes—from cracking clay to failed glazes—and learn how to fix them fast.
Mini Christmas Tree Ornaments in Modern Shapes
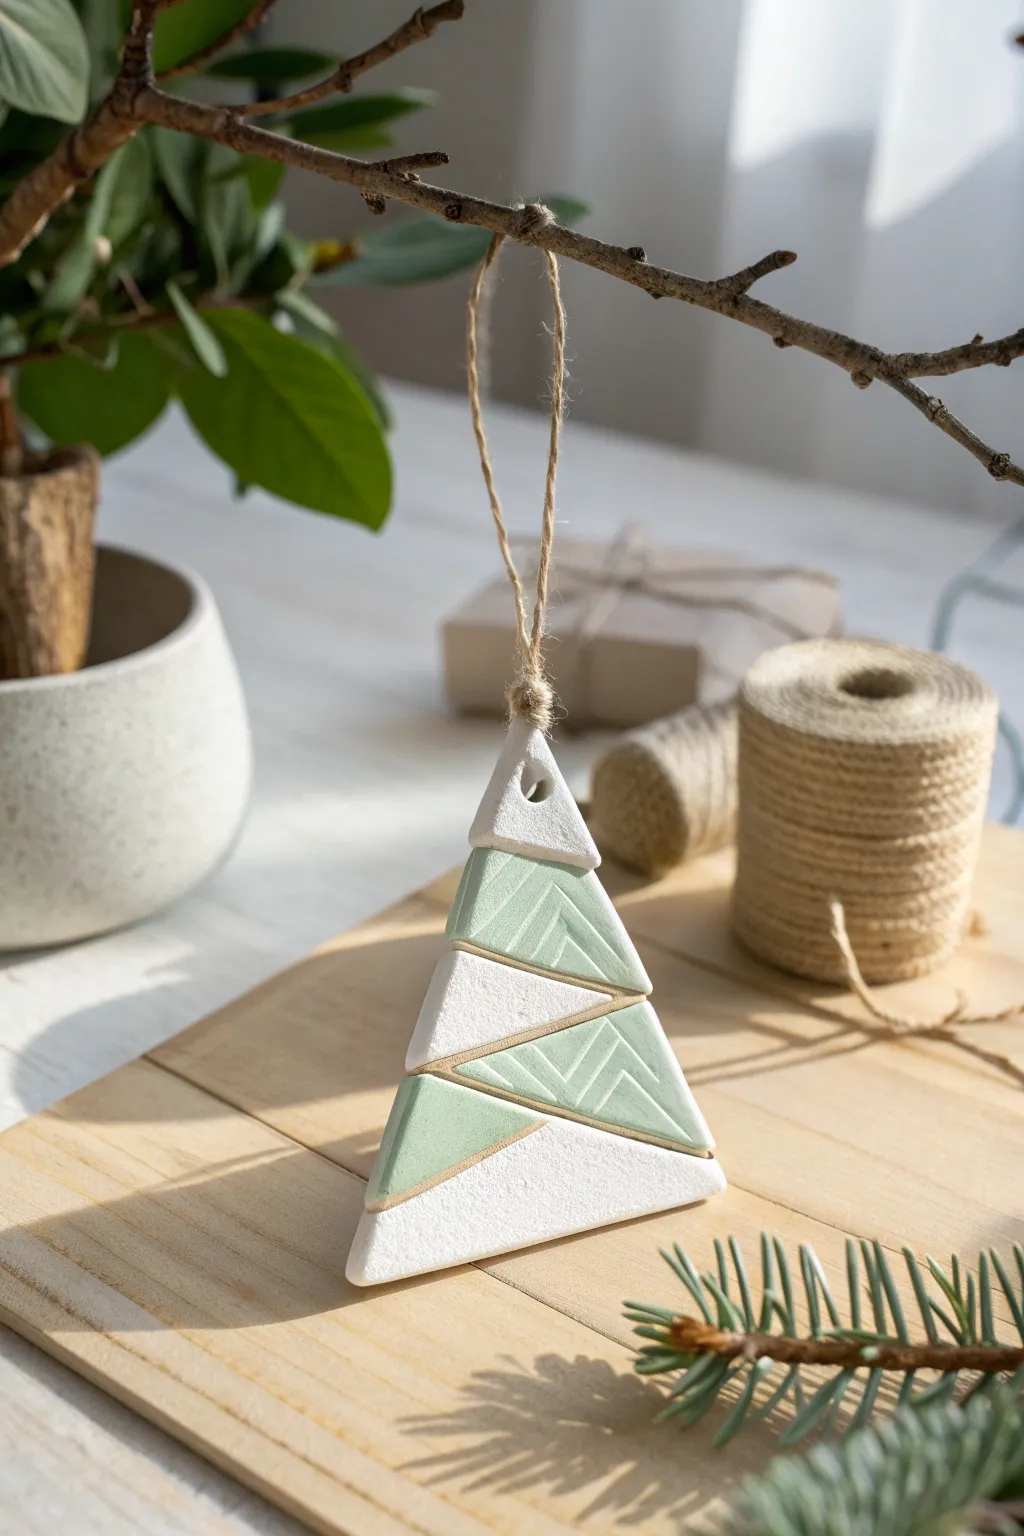
Embrace minimalist holiday decor with this sleek, triangular ornament featuring clean lines and alternating textures. The modern combination of matte white and sage green, separated by deep grooves, creates a sophisticated look perfect for a contemporary Christmas tree.
How-To Guide
Materials
- White air-dry clay or polymer clay
- Rolling pin
- Sharp craft knife or clay blade
- Ruler
- Toothpick or needle tool
- Acrylic paints (Sage Green, White)
- Small flat paintbrush
- Fine-grit sandpaper
- Jute twine
- Clear matte varnish (optional)
Step 1: Shaping the Base
-
Preparing the clay:
Begin by conditioning your clay slightly so it is pliable. Roll it out on a smooth surface to an even thickness of about 1/4 inch (6mm). Using depth guides or two stacks of playing cards can help keep it uniform. -
Cutting the triangle:
Use your ruler and craft knife to cut a tall, isosceles triangle shape. A good size is roughly 3 inches wide at the base and 4 inches tall. -
Smoothing edges:
Dip your finger in a little water (if using air-dry clay) or baby oil (for polymer) and gently run it along the cut edges to soften any sharpness or stray crumbs. -
Adding the hanging hole:
Using a straw or a tool with a small circular tube, punch a hole near the very top peak of the triangle. Ensure it’s not too close to the edge to prevent breaking.
Step 2: Creating the Design
-
Drafting the lines:
With your ruler and a needle tool, lightly sketch diagonal lines across the triangle to divide it into four or five distinct segments. These lines should slant slightly downwards for a dynamic look. -
Deepening the grooves:
Once happy with the spacing, use the craft knife or a sculpting tool to carve these lines deeper. You want a distinct ‘V’ channel that separates the segments clearly. -
Clean up:
Go back into the grooves with a damp brush or tool to remove any clay burrs created during carving. The lines need to be crisp. -
Adding texture:
Select alternating segments to be your ‘green’ sections. In these specific areas, use your craft knife to gently press a chevron or striped pattern into the clay surface. Don’t cut all the way through; just impress the design.
Clean Grooves Tip
Use a damp cotton swab to run along the carved grooves immediately after sculpting. This smooths the channel walls perfectly without needing sandpaper later.
Step 3: Drying and Painting
-
Drying phase:
Allow the ornament to dry completely according to package instructions. For air-dry clay, I usually flip it over halfway through the 24-48 hour drying period to prevent curling. -
Sanding:
Once fully cured and hard, barely skim the edges and flat surfaces with fine-grit sandpaper to achieve a professional, smooth finish. -
Painting the white:
Paint the smooth, non-textured segments with matte white acrylic paint. You may need two thin coats for opaque coverage. -
Painting the green:
Carefully paint the textured segments with sage green acrylic. Use a small brush to get near the grooves without flooding them. -
Highlighting the grooves:
Leave the deep carved lines unpainted to show the natural clay color, or use a very fine brush to paint them a soft metallic gold or beige to emphasize the separation. -
Dry brushing (Optional):
If the texture gets lost in the green paint, lightly dry brush a tiny amount of lighter green or white over the chevron pattern to make it pop.
Make it Metallic
Instead of leaving the grooves natural, paint the deep separation lines with liquid gold leaf. The metallic flash adds an elegant, high-end touch.
Step 4: Final Assembly
-
Sealing:
Apply a coat of clear matte varnish to protect the paint and clay from moisture, which ensures your ornament lasts for years. -
Adding the loop:
Cut a 6-inch length of jute twine. Thread it through the hole at the top. -
Securing:
Tie a secure knot at the ends of the twine to form a hanging loop. Trim any excess twine near the knot for a tidy finish.
Now you have a stunning, modern geometric ornament ready for gifting or hanging on your own tree
Wreath-Shaped Clay Earrings
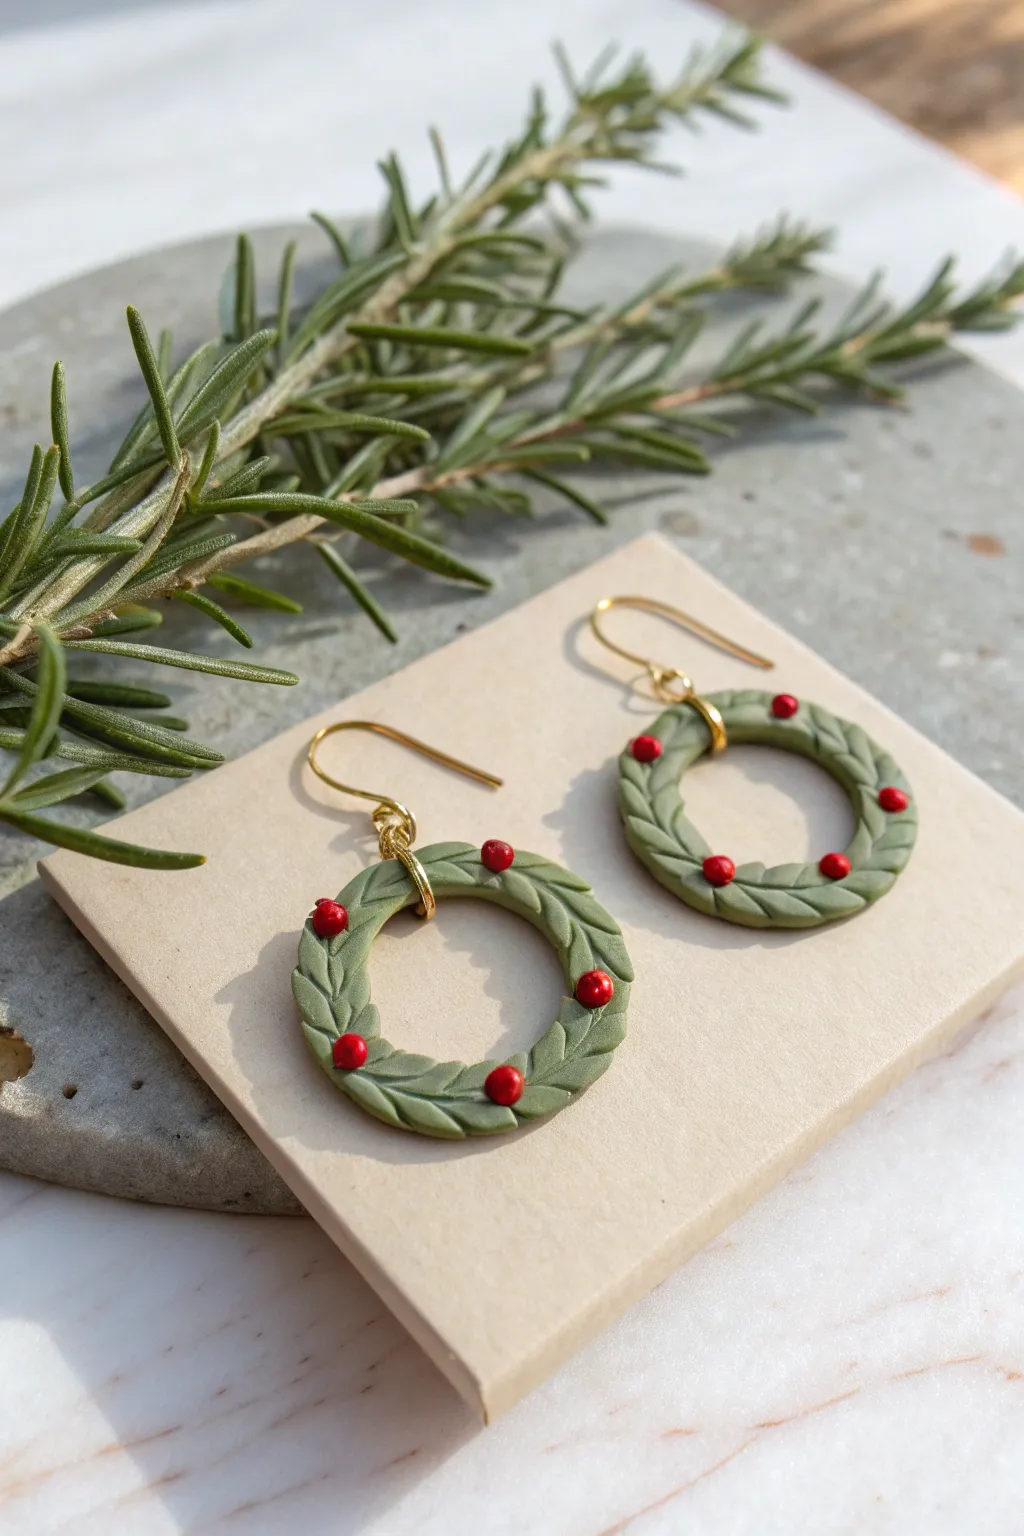
Bring the timeless charm of evergreen wreaths to your jewelry collection with these delicate polymer clay earrings. Featuring textured leaves and bright red berries, they dangle elegantly from gold hooks for a perfect holiday accent.
Step-by-Step Tutorial
Materials
- Olive green polymer clay
- Red polymer clay
- Liquid polymer clay (optional)
- Small circular clay cutter (approx. 1 inch)
- Smaller circular cutter (for the center hole)
- Needle tool or toothpick
- Clay knife or scalpel
- Gold jump rings (4mm or 6mm)
- Gold French hook ear wires
- Jewelry pliers
- Ceramic tile or baking surface
- Oven
Step 1: Forming the Base
-
Condition the Clay:
Begin by warming up your olive green polymer clay in your hands until it is soft and malleable. This prevents cracks during baking. -
Roll the Slab:
Roll the green clay out into a thick, even slab, approximately 3mm to 4mm thick. You want it substantial enough to hold the jump ring but light enough for ears. -
Cut the Donuts:
Use your larger circular cutter to punch out two circles. Then, use the smaller cutter to remove the centers, creating two donut shapes. These serve as your wreath bases.
Sticky Situation?
If your clay gets too soft and sticky to handle, pop it in the fridge for 10 minutes. This firms it up, making tiny details like the leaves much easier to sculpt without squishing them.
Step 2: Creating the Leaves
-
Roll Snakes:
Take the remaining green clay and roll it into several very thin, long snakes or logs. -
Slice Tiny Segments:
Use your clay knife to cut dozens of tiny, equal-sized segments from the snakes. These will become the individual leaves. -
Shape the Leaves:
Take one tiny segment and roll it into a ball, then flatten it into a teardrop shape with your fingers. -
Apply the First Layer:
Press the teardrop onto the wreath base. I like to start at the top where the jump ring will go. -
Texture the Leaf:
Use a needle tool to gently press a central vein down the middle of the leaf, slightly impressing it into the base. -
Continue the Pattern:
Repeat this process, layering the leaves in a directional pattern (like rosemary or laurel) around the entire circle. Overlap them slightly to hide the base. -
Create the Top Loop:
Before adding the final leaves at the top, ensure there is a small gap or a specific loop of clay added to accommodate the jump ring later.
Step 3: Adding Details & Baking
-
Make the Berries:
Roll tiny amounts of red clay into very small spheres. You will need about 5-6 berries per earring. -
Attach the Berries:
Gently press the red berries onto the wreath in a random, scattered pattern. If the clay is dry, use a tiny dot of liquid clay to ensure they stick. -
Check Connections:
Ensure all leaves and berries are securely adhered to the base and that your top attachment point is clear. -
Bake:
Place the earrings on a ceramic tile and bake according to the manufacturer’s instructions for your specific brand of clay (usually around 275°F/135°C for 15-30 minutes). -
Cool Down:
Let the earrings cool completely in the oven before moving them to prevent brittleness.
Add Some Shine
After baking and cooling, brush a thin layer of gloss glaze or UV resin over the red berries only. This makes them look like real, juicy holly berries against the matte green leaves.
Step 4: Assembly
-
Open Jump Rings:
Use two pairs of jewelry pliers to twist open a gold jump ring. Never pull them apart; always twist sideways. -
Attach to Wreath:
Loop the open jump ring through the top of the clay wreath. -
Add Ear Wire:
Slide the gold French hook ear wire onto the open jump ring. -
Close the Ring:
Twist the jump ring back into a closed position, ensuring the ends meet perfectly flush so the hook doesn’t slip out.
Now you have a charming pair of handmade holiday earrings ready for gifting or wearing to your next party


What Really Happens Inside the Kiln
Learn how time and temperature work together inside the kiln to transform clay into durable ceramic.
Holly Berry Ring Cone Holder
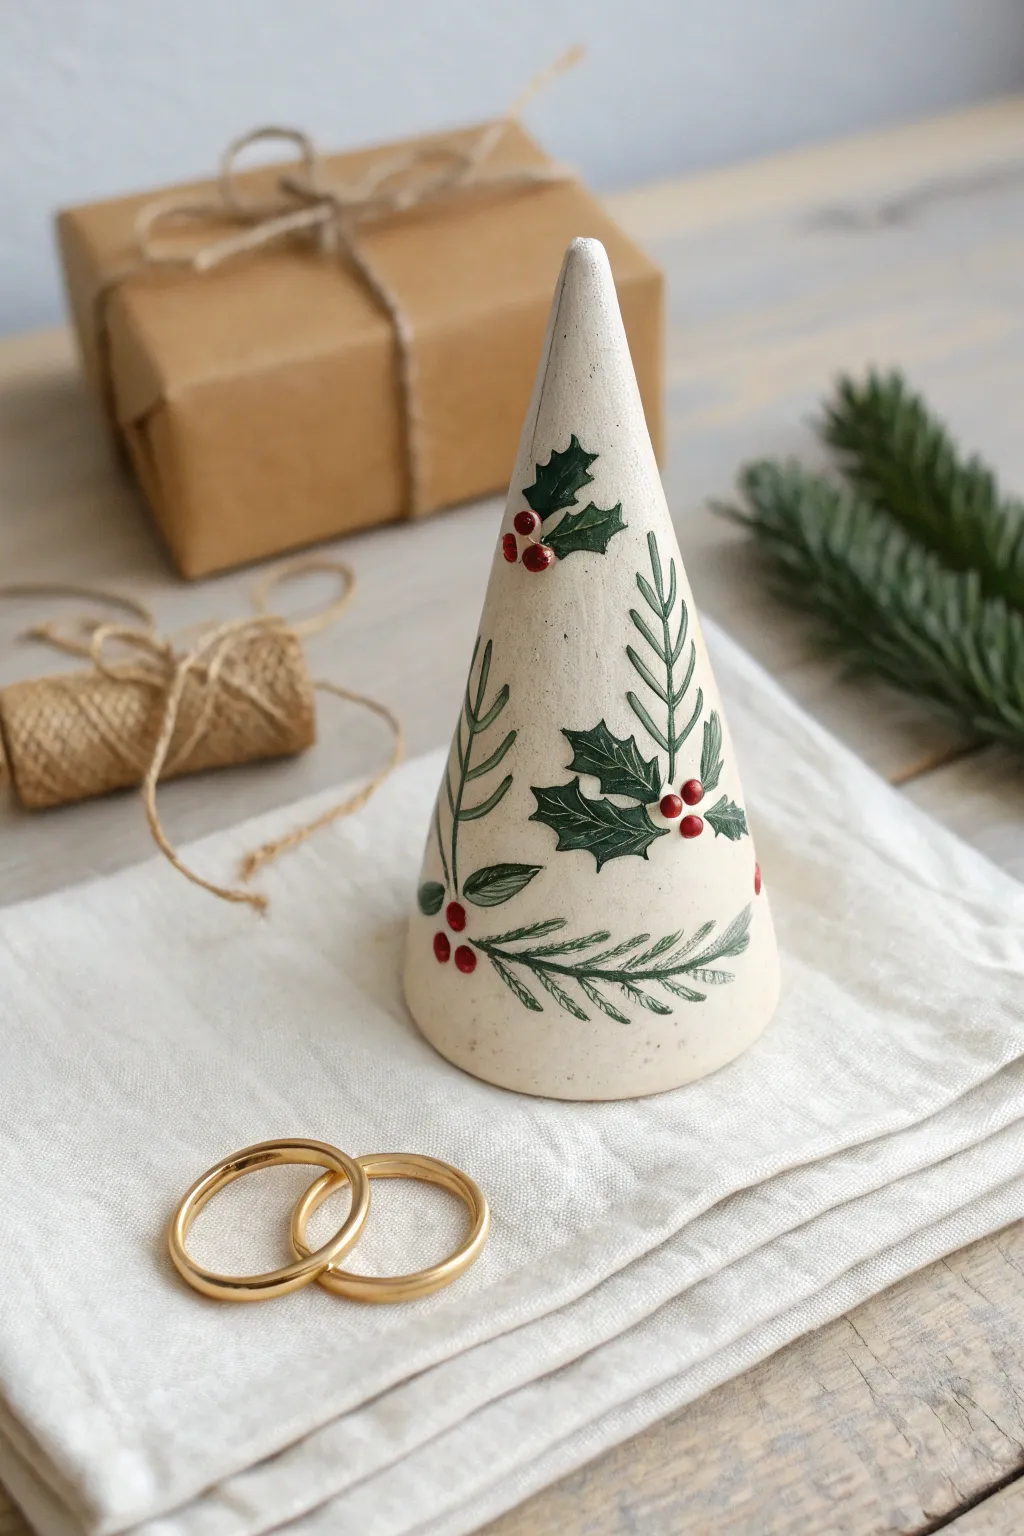
This elegant yet rustic ring holder brings a touch of winter woodland charm to your dresser. Sculpted from polymer or air-dry clay into a simple cone shape, it features delicately hand-painted holly leaves and raised berries that serve a functional purpose.
How-To Guide
Materials
- White air-dry clay or polymer clay
- Rolling pin
- Cone template (paper or cardstock)
- Craft knife or clay blade
- Fine-grit sandpaper
- Water and sponge (for smoothing)
- Acrylic paints (dark green, sage green, deep red)
- Fine detail paintbrushes (sizes 0 and 00)
- Clear matte or satin varnish
Step 1: Sculpting the Base
-
Prepare your clay:
Begin by conditioning your clay. If using air-dry clay, knead it briefly to ensure it is pliable. If using polymer clay, warm it in your hands until soft. -
Roll out a slab:
Roll the clay out into an even slab, aiming for a thickness of about 1/4 inch (6mm). Using depth guides or rulers on either side can help maintain uniformity. -
Create a cone shape:
Cut a semi-circle or pie-wedge shape from the slab using your craft knife. Gently roll this wedge into a cone shape, bringing the straight edges together. -
Seamless joinery:
Score the joining edges (make little scratches) and add a tiny bit of water or slip. Press the edges together firmly. Use your finger or a clay tool to smooth the seam until it completely disappears. -
Refine the form:
Stand the cone upright on your work surface. If it wobbles, gently tap the base against the table to flatten it or slice off any unevenness with your blade to ensure it stands straight. -
Clean and dry:
Smooth out any fingerprints with a slightly damp sponge. Let air-dry clay cure for 24-48 hours, or bake polymer clay according to the package instructions. -
Sanding preparation:
Once fully cured or dried, use fine-grit sandpaper to gently buff the surface. This removes any tiny imperfections and creates a perfect canvas for painting. Wipe away all dust with a damp cloth.
Step 2: Painting the Foliage
-
Sketching the design:
Lightly pencil your design onto the cone. Plan for a mix of spiky holly leaves and softer pine sprigs, distributing them evenly so the cone looks good from every angle. -
Base green leaves:
Using a size 0 brush and dark green acrylic paint, carefully fill in the holly leaf shapes. I find that keeping the paint slightly fluid helps achieve sharp points on the leaves. -
Adding dimension:
While the dark green is still slightly tacky, mix a tiny bit of white or yellow into your green and add a highlight to one side of each leaf for a subtle 3D effect. -
Painting pine needles:
Switch to a sage or lighter green color. Using your finest brush (00), paint long, sweeping lines for the pine branches, then add short, feathery strokes for the needles. -
Veining details:
Once the holly leaves are completely dry, use a very diluted dark paint or a fine-tip black pen to draw the central veins on the leaves.
Seamless Smoothing
Use a tiny bit of vinegar on your finger instead of water to smooth the seams of air-dry clay. It breaks down the surface slightly better for a truly invisible join.
Step 3: Adding Berries and Finish
-
Creating berries:
To make the raised berries shown in the photo, use a high-viscosity heavy body acrylic paint or dimensional fabric paint in deep red. Dab small dots in clusters of three. -
Letting berries set:
Allow these raised dots to dry completely flat so they retain their rounded dome shape. This usually takes longer than standard paint drying. -
Berry highlights:
Add a microscopic dot of white paint to the top right of each red berry to replicate the shine of real fruit. -
Sealing the work:
Apply a coat of clear matte or satin varnish over the entire piece. This protects the paint from chipping and gives the clay a finished, professional look. -
Final cure:
Let the varnish dry fully in a dust-free area before placing your rings on the cone.
Gilded Edges
Before sealing, carefully paint the very rim of the base with liquid gold leaf or metallic gold paint to add a luxurious, festive border to the piece.
Now you have a beautiful handmade piece ready to hold your most precious jewelry or to give as a thoughtful gift
Snowman or Reindeer Mini Desk Buddy

Brighten up any workspace with this adorable, minimalist snowman figure crafted from air-dry clay. Its textured, stone-like finish and simple scarf detail make it a sophisticated yet charming little companion for the holiday season.
Step-by-Step Guide
Materials
- White air-dry clay (or polymer clay)
- Small rolling pin
- Modeling tools (or a toothpick and plastic knife)
- Small piece of orange clay (for the nose)
- Brown acrylic paint or tiny beads (for buttons/eyes)
- Fine-grit sandpaper
- Texture sponge or toothbrush
- Clear matte varnish (optional)
Step 1: Forming the Body
-
Create the base:
Start with a ball of white clay roughly the size of a tangerine. Roll it firmly between your palms until it is smooth, then gently press the bottom onto your work surface to create a flat base so it stands securely. -
Shape the head:
Roll a second, smaller ball of white clay for the head. It should be about two-thirds the size of the body. -
Join the parts:
Place the head on top of the body. If using air-dry clay, score both joining surfaces with a needle tool and add a dab of water to create ‘slip’ for a strong bond. Gently press them together. -
Add surface texture:
To achieve that rustic, snowy look, lightly tap the entire surface of the snowman with a clean toothbrush or a texture sponge. This removes fingerprints and gives it a natural finish.
Step 2: Adding the Scarf
-
Roll a clay strip:
Flatten a small piece of white clay into a strip about 3mm thick. Cut a long, even rectangle approximately 1cm wide. -
Wrap the neck:
Drape the strip around the snowman’s neck where the head meets the body. Cross the ends over each other at the front, slightly off-center to the right. -
Trim the ends:
Cut the excess length off the scarf tails so they drape naturally down the snowman’s belly without touching the table. -
Create fringe details:
Use a craft knife or a toothpick to carefully impress small vertical lines at the very ends of the scarf tails to mimic fabric fringe. -
Add fabric texture:
Using your needle tool, gently etch diagonal lines across the scarf strip to simulate the weave of wool or knitting.
Cracks while drying?
Mix a tiny bit of fresh clay with water to make a paste. Fill the cracks with this paste, smooth it with a wet finger, and let it dry again.
Step 3: Details & Finishing
-
Form the carrot nose:
Take a tiny pinch of orange clay and roll it into a very small, pointed cone. Attach this to the center of the face, pressing gently so it sticks. -
Add the eyes:
For the eyes, you can either press two small black beads into the clay now, or use the end of a paintbrush to make shallow indentations to paint later. -
Add the buttons:
Create three indentations down the center of the body for buttons using a round tool. Insert small brown clay balls or beads into these spots. -
Let it dry:
Allow the snowman to dry completely. For air-dry clay, this usually takes 24-48 hours depending on thickness. I find rotating it occasionally helps it dry evenly. -
Refine the texture:
Once dry, use fine-grit sandpaper to gently smooth any harsh ridges, but be careful not to remove the texture you created earlier. -
Paint details:
If you used indentations instead of beads, carefully paint the eyes black and the buttons brown using a fine-tip brush. -
Seal the piece:
Finish by applying a coat of clear matte varnish to protect your snowman and keep him looking fresh year after year.
Make it a Reindeer
Skip the scarf and add two small twig-like antlers made of brown clay (or real twigs!) to the head, plus a larger red nose.
Now you have a frosty little friend to keep you company during the workday

TRACK YOUR CERAMIC JOURNEY
Capture glaze tests, firing details, and creative progress—all in one simple printable. Make your projects easier to repeat and improve.
Candle and Match Holder Set in Holiday Shapes
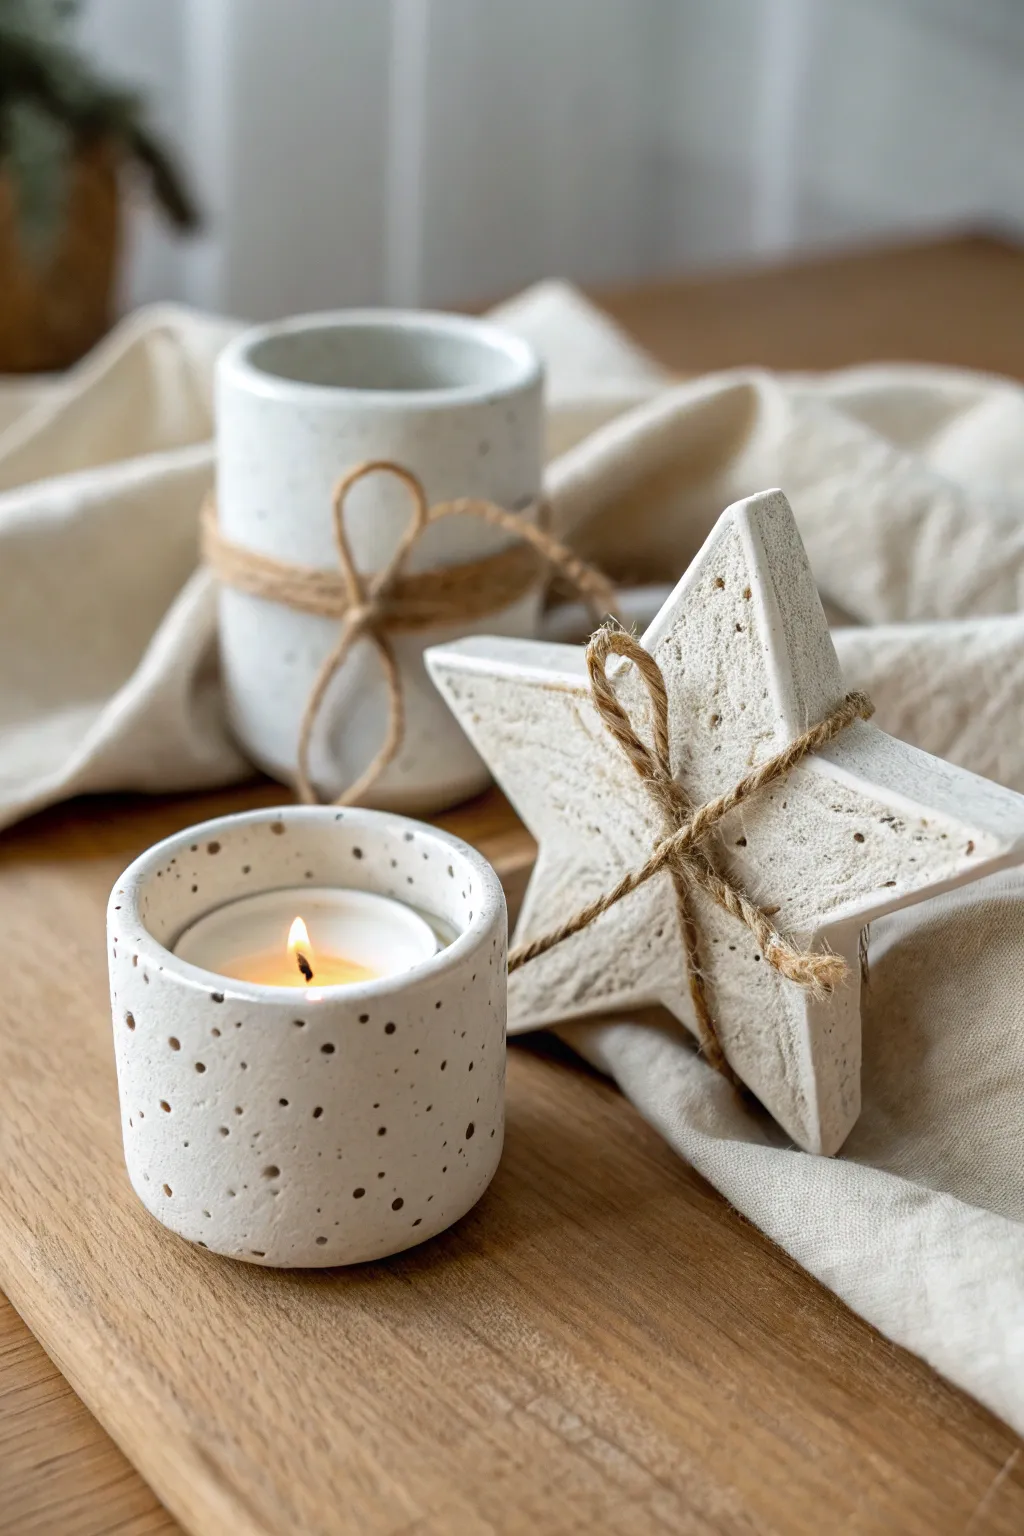
Create a cozy, winter-ready atmosphere with this charming handmade clay set featuring a speckled tealight holder, a matching vessel, and a decorative star. The rustic, speckled finish gives these pieces a modern farmhouse appeal that makes for a perfect, thoughtful holiday gift.
Step-by-Step
Materials
- White air-dry clay or polymer clay
- Used coffee grounds (dried) or black pepper
- Rolling pin
- Star-shaped cookie cutter
- Circular cookie cutters (various sizes)
- Craft knife
- Small bowl of water
- Fine-grit sandpaper
- Jute twine
- Tealight candle
- Matte sealant or varnish (optional)
Step 1: Preparing the Speckled Clay
-
Condition the clay:
Start by kneading a large block of white clay until it is soft, pliable, and free of cracks. Warm hands help this process go faster. -
Add texture:
To achieve the signature speckled look, sprinkle a pinch of dried coffee grounds or coarse black pepper onto the flattened clay. -
Mix thoroughly:
Fold the clay over the grounds and knead repeatedly until the speckles are evenly distributed throughout the batch. Add more for a denser pattern if desired. -
Roll it out:
Roll the clay out on a smooth surface to an even thickness of about 1/4 inch (6mm). Using depth guides can help keep it perfectly level.
Step 2: Crafting the Tealight Cup
-
Cut the base:
Use a round cutter slightly larger than a standard tealight candle to punch out a circular base. -
Measure the circumference:
Measure around your base circle to determine the length needed for the jar walls, or wrap a string around it to gauge the length. -
Cut the wall strip:
Cut a rectangular strip of rolled clay that matches your measured length and stands about 2 inches high. -
Score and slip:
Score (scratch) the outer edge of the base and the bottom edge of the wall. Dab a little water (slip) on the scored areas to act as glue. -
Assemble the cup:
Wrap the wall strip around the base, pressing the scored edges together gently. -
Seal the seam:
Where the two ends of the wall meet, use a modeling tool or your finger to smooth the clay together until the seam disappears. I find wetting my finger slightly helps create a seamless finish. -
Smooth the interior:
Don’t forget to blend the inside seam where the wall meets the floor of the cup for structural integrity.
Fixing Cracks
If small cracks appear while drying, mix a tiny bit of fresh clay with water to make a paste. Fill the crack, smooth it over, and let it dry again before sanding.
Step 3: Creating the Accessories
-
Make the tall vessel:
Repeat the cup-building process to make the taller holder shown in the background, but cut your wall strip about 4 inches high. -
Cut out stars:
Use the remaining rolled clay to punch out a thick star shape using your cookie cutter. If you want a thick, chunky star like the photo, you may need to re-roll a thicker slab of clay first. -
Refine the edges:
Dip your finger in water and run it along the sharp edges of the star and the rims of your cups to soften them for a more handmade pottery look. -
Dry completely:
Allow all pieces to air dry for 24-48 hours. Turn them occasionally to ensure even drying and prevent warping.
Scented Clay Twist
Knead a few drops of essential oil like cinnamon or pine into the clay before drying. The warmth of the candle will release a subtle holiday fragrance.
Step 4: Finishing Touches
-
Sand imperfections:
Once fully dry, use fine-grit sandpaper to gently smooth out any rough fingerprints or sharp ridges. -
Seal the clay:
Apply a coat of matte varnish or sealant to protect the pieces, especially inside if you plan to ever wipe them clean. -
Wrap the twine:
Cut a length of jute twine and wrap it multiple times around the taller vessel, tying it off in a casual loop-knot. -
Tie the star:
Wrap twine around the star in a crisscross pattern, securing it with either a knot or a small bow to complete the rustic aesthetic.
Place a tea light inside the small cup and enjoy the warm glow of your handmade creation
Festive Mug Charm or Mug Hanger

Transform a plain mug into a festive gift with this adorable clay Christmas tree charm. This simple project combines rustic charm with holiday cheer, featuring a tiny evergreen shape adorned with red baubles dangling from delicate jute twine.
Step-by-Step Tutorial
Materials
- White polymer clay or air-dry clay
- Rolling pin or clay roller
- Small hobby knife or scalpel
- Cardstock or paper (for template)
- Pencil
- Sandpaper (fine grit)
- Acrylic paints: Forest Green, Bright Red
- Small paintbrush (flat and detail round)
- Stylus tool or toothpick
- Clear varnish (matte or satin)
- Jute twine or thin hemp cord
- Scissors
Step 1: Shaping the Tree
-
Create a template:
Begin by sketching a small, simple Christmas tree shape on a piece of cardstock. Aim for a height of about 1.5 inches to ensure it isn’t too heavy for the mug rim. -
Cut the template:
Carefully cut out your paper tree shape and set it aside. -
Condition the clay:
Take a small ball of your clay and knead it in your hands until it is warm, pliable, and free of cracks. -
Roll out the slab:
Using your roller, flatten the clay to an even thickness of approximately 1/8th of an inch. You don’t want it too thin, or it might snap. -
Cut the clay:
Place your paper template onto the rolled clay slab. Gently trace around it with your hobby knife to cut out the tree shape. -
Smooth the edges:
Dip your finger in a tiny bit of water (for air dry clay) or baby oil (for polymer) and gently smooth the cut edges to remove any sharp angles. -
Punch the hole:
Use a stylus tool, a straw, or the end of a paintbrush to poke a hole at the very top of the tree. Make sure the hole is large enough for your twine to pass through later. -
Create bauble divots:
Using a smaller stylus or a toothpick, gently press small indentations where you want the red ornaments to sit. This helps guide your painting later. -
Dry or Bake:
Follow manufacturer instructions to harden your clay. If using polymer, bake at the recommended temperature. If using air-dry, let it sit for 24-48 hours until fully cured.
Step 2: Decorating and Assembly
-
Sand imperfections:
Once hardened, inspect your tree. Use fine-grit sandpaper to buff away any rough spots on the edges or back. -
Base coat:
Paint the entire front and sides of the tree with Forest Green acrylic paint. You may need two coats for full opacity. -
Add ornaments:
Using your smallest detail brush or dipping the tip of a toothpick into Bright Red paint, carefully fill in the small indentations you made earlier to create the ornaments. -
Seal the charm:
I prefer to apply a coat of matte varnish over the entire piece once the paint is completely dry to protect it from moisture and scratches. -
Prepare the hanger:
Cut a length of jute twine, roughly 6 inches long. -
Thread the loop:
Fold the twine in half and thread the loop end through the hole in the tree from front to back. -
Secure the knot:
Pull the loose ends of the twine through the loop to create a lark’s head knot, securing the clay piece firmly. -
Final tie:
Tie the two loose ends of the twine together at the top to create a large loop that can easily drape over a mug handle or rim.
Clay cracking?
If using air-dry clay, cracks often mean it dried too fast. Repair small fissures by filling them with a wet slip made of clay and water, then sand smooth.
Make it sparkle
Before the varnish dries, sprinkle ultra-fine white glitter over the green paint to mimic fresh snow, or use metallic gold paint for the ornaments.
Now you have a charming accessory ready to hang on a mug of hot cocoa
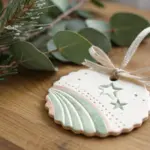
Mini House Ornaments for a Christmas Village Feel
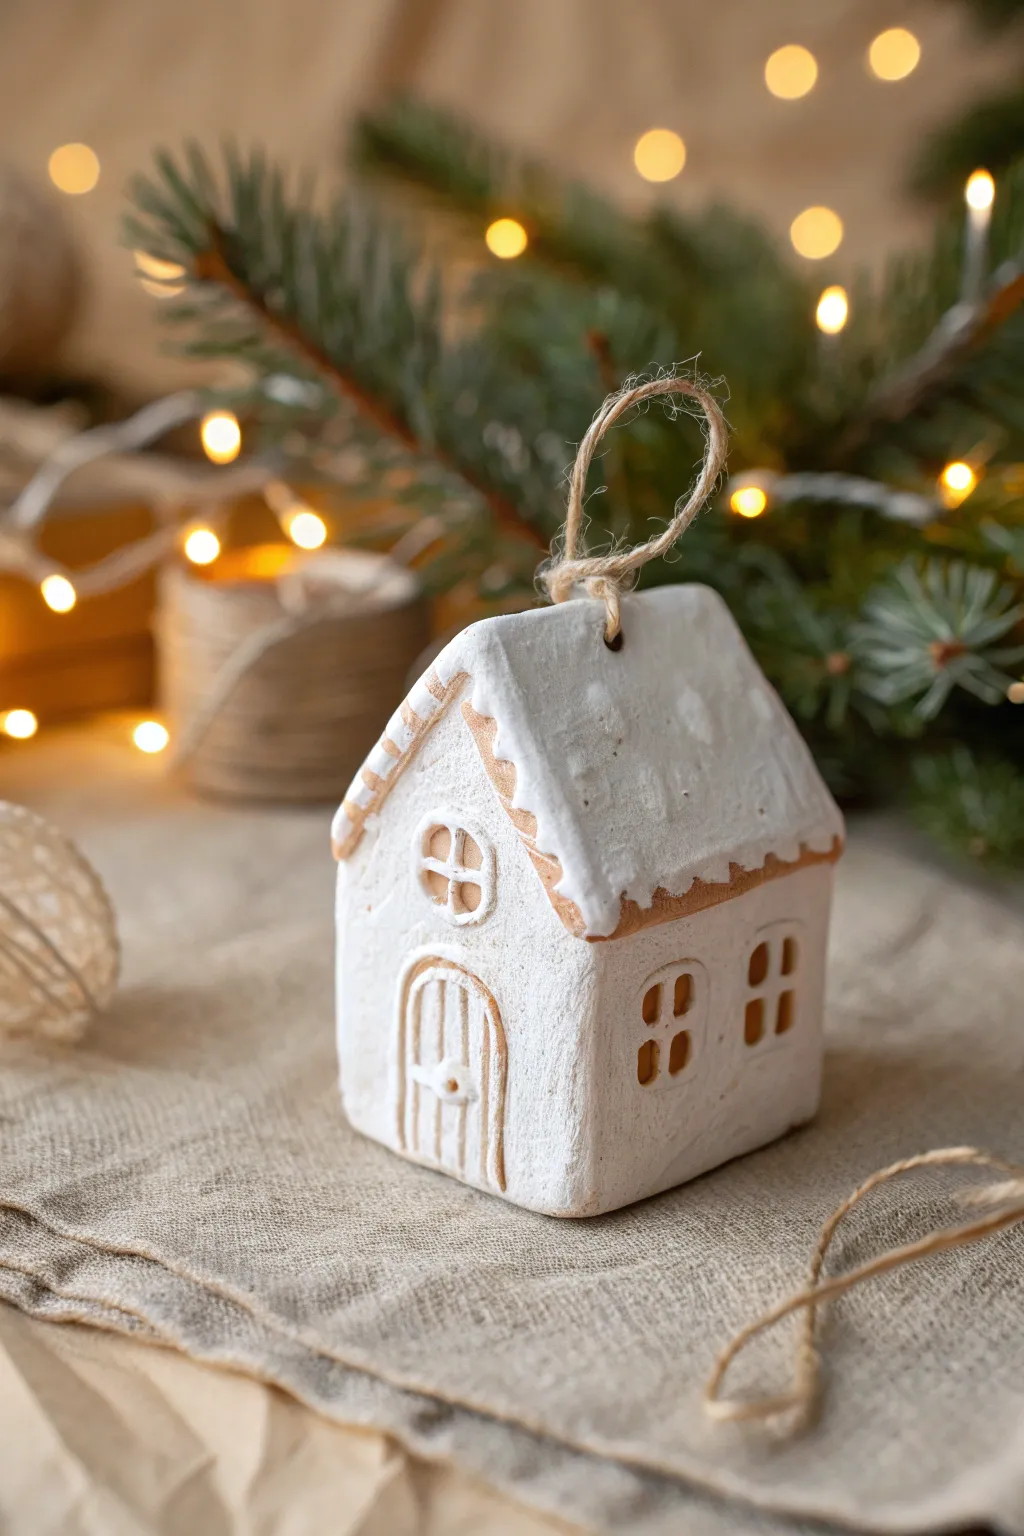
Capture the cozy charm of a Scandinavian Christmas village with these miniature house ornaments. Made from air-dry or polymer clay, they feature a whitewashed, snowy finish that reveals warm biscuit tones underneath, perfect for a natural holiday aesthetic.
Step-by-Step Guide
Materials
- White or terracotta air-dry clay (or polymer clay)
- Small rolling pin
- Sharp craft knife or clay blade
- Ruler
- White acrylic paint
- Medium-grit sandpaper
- Small sponge or thick paintbrush
- Wooden skewer or toothpick
- Jute twine
- Matte sealant (optional)
- Fine-grit sandpaper
- Water cup (for smoothing)
Step 1: Planning and Shaping the Clay
-
Roll out the slab:
Begin by kneading your clay until it’s pliable and smooth. Roll it out on a flat surface to a uniform thickness of about 1/4 inch. If you want the ‘gingerbread’ look shown in the photo, starting with terracotta or a light brown clay is ideal. -
Cut the basic shape:
Using a craft knife and a ruler, cut a simple house silhouette. A rectangle base with a triangle on top works best. You don’t need separate walls; create a solid block or a chunky flat shape to mimic the ornament style. -
Refine the edges:
Dip your finger in a little water and smooth down any sharp or ragged cut edges. This helps the finished piece look more polished and handmade rather than industrial. -
Create the roof overhang:
Roll a separate, slightly thinner rectangle of clay. Lay this over the top triangle of your house shape to create the roof. Gently press it down so it adheres, letting the edges hang over slightly like eaves.
Fixing Cracks
If your clay cracks while drying, mix a small amount of fresh clay with water to make a paste (slip). Fill the crack, smooth it over, and let it dry again before painting.
Step 2: Adding Details and Drying
-
Carve the windows:
Use the tip of your craft knife carefully to carve out small, arched window shapes. Don’t cut all the way through—just remove a layer of clay to create depth. -
Detail the door:
Carve an arched doorway at the bottom center. Use a toothpick to impress vertical lines into the door area to mimic wood planks, and add a tiny ball of clay for a doorknob. -
Make the window panes:
Roll very thin ‘snakes’ of clay and gently press them into the window recesses to create a cross shape for the panes. -
Texture the roof:
To mimic the uneven, snowy roof texture shown, dab the wet clay roof with a crumpled piece of foil or a stiff brush. This roughness will grab the white paint later. -
Add the hanging hole:
Insert a wooden skewer through the peak of the roof to create a hole for the twine. Wiggle it slightly to ensure the hole is wide enough, as clay shrinks when drying. -
Let it dry completely:
Allow your cottage to dry for 24-48 hours. Turn it over occasionally to ensure even drying and prevent warping.
Step 3: Finishing and Painting
-
Sand the surfaces:
Once bone dry, take your medium-grit sandpaper and gently sand the flat surfaces of the walls to smooth out any unintentional fingerprints. -
Apply the whitewash Base:
Squeeze some white acrylic paint onto a palette. Use a dense sponge or stiff brush to dab the paint onto the house. Focus on getting a thick, opaque layer on the roof to look like heavy snow. -
Dry brush the walls:
For the walls, use slightly less paint. I prefer to dab it on so that the texture of the clay beneath still subtly influences the surface, avoiding a ‘plastic’ look. -
Distress for the gingerbread look:
Once the paint is fully dry, take fine-grit sandpaper and gently sand the edges of the roof, the door frame, and the window outlines. You want the original brown clay color to peek through these raised areas. -
Detail the snowy roof:
If your roof looks too flat, dab a second, thicker layer of white paint just on the roof edges and the very top ridge to enhance the snow-capped effect. -
Attach the hanger:
Cut a length of jute twine, thread it through the hole in the roof, and tie a simple loop knot at the top. -
Seal the ornament:
Finish with a light coat of matte spray sealant to protect the paint and clay from moisture without making it shiny.
Illuminated Village
Instead of a solid block, build a hollow house from slabs and cut the windows out completely. Place an LED tea light underneath to make the windows glow warmly.
Hang your new miniature dwelling on the tree and enjoy the handmade warmth it brings to your holiday decor
Starry Night Luminary Jar Wrap
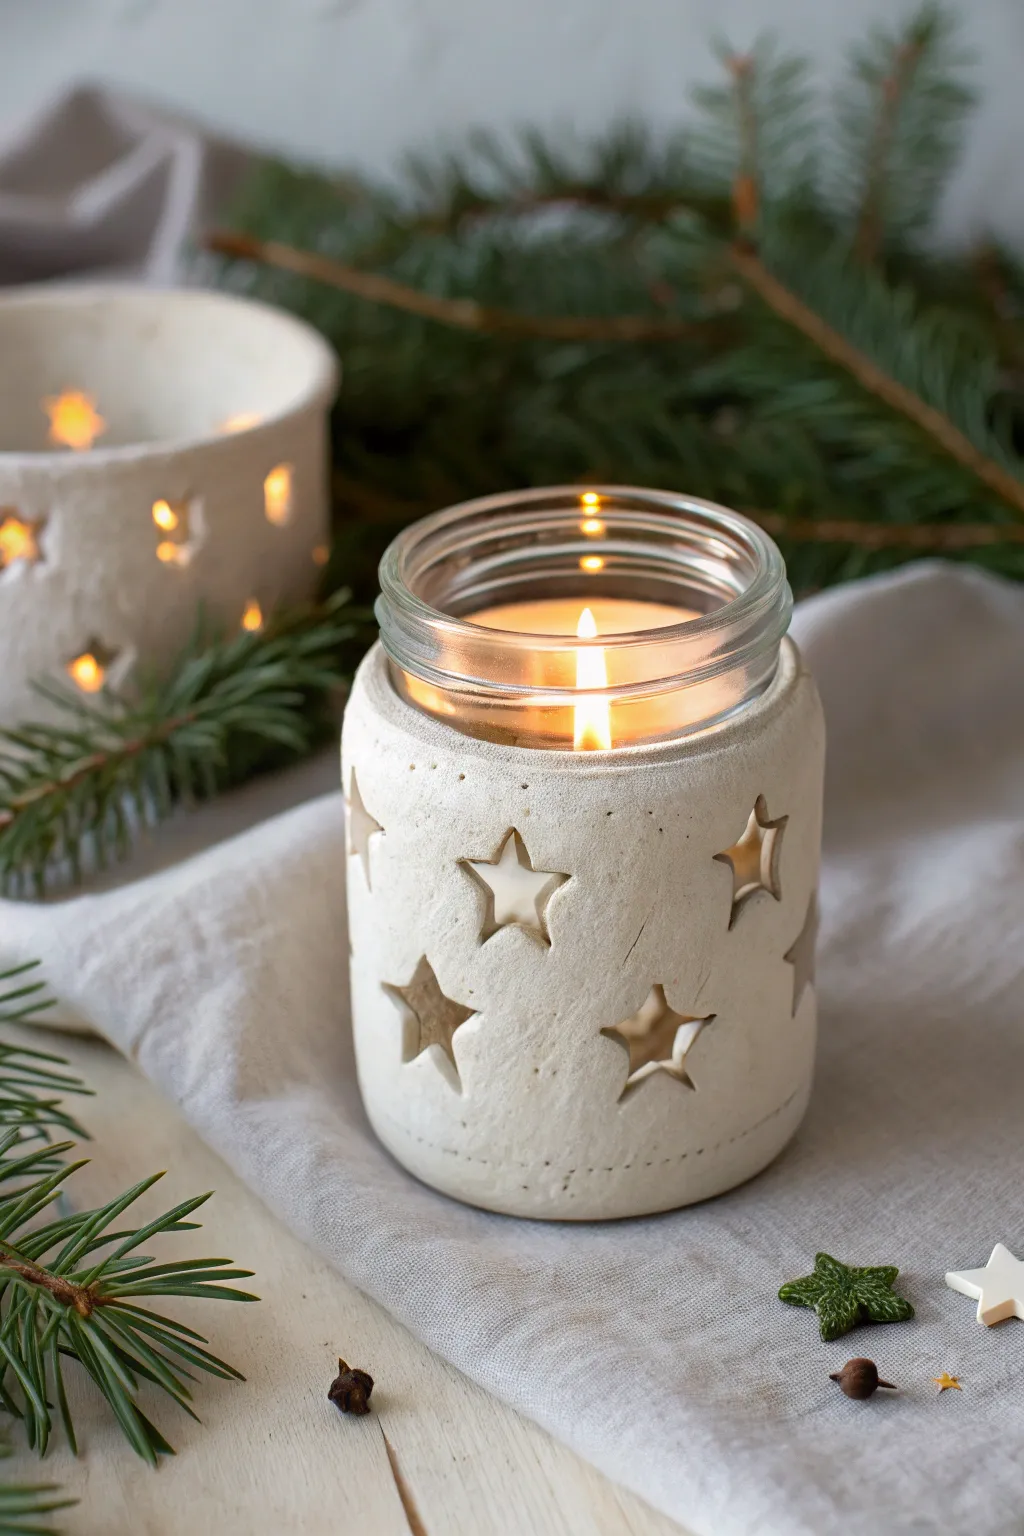
Transform ordinary glass jars into glowing winter decorations with this simple clay wrap technique. The matte white finish and cut-out stars create a warm, rustic ambiance perfect for holiday evenings.
How-To Guide
Materials
- Glass jar (mason jar or recycled jam jar)
- White air-dry clay (or polymer clay)
- Small rolling pin
- Star-shaped cookie cutters (small)
- Craft knife or toothpick
- Non-stick baking mat or parchment paper
- Sandpaper (fine grit)
- Bowl of water
- Tea light or votive candle
Step 1: Preparation and Rolling
-
Clean your jar:
Begin by thoroughly cleaning and drying your glass jar to ensure you have a pristine base to work around. -
Condition the clay:
Take a handful of white air-dry clay and knead it until it is soft, pliable, and free of cracks. Warm hands help make this process easier. -
Roll out a slab:
Place your clay on a non-stick surface or baking mat. Use your rolling pin to create a long, rectangular slab. You want it to be roughly 1/4 inch thick. -
Measure the circumference:
Wrap the clay slab gently around your jar to check the length. It needs to overlap slightly at the seam. -
Trim to size:
Using a craft knife, trim the slab into a neat rectangle that fits the height of your jar, leaving the rim exposed. Keep the width just long enough to wrap around once.
Cracking Clay?
If small cracks appear while drying, mix a tiny bit of fresh clay with water to make a paste and fill them in gently.
Step 2: Creating the Starry Design
-
Cut the first stars:
Lay the trimmed clay slab flat again. Take your small star-shaped cutter and press firmly into the clay to create your first cutout. -
Create a pattern:
Continue cutting out stars in a random, scattered pattern across the slab. Vary the angles slightly for a whimsical, starry-sky look. -
Remove the cutouts:
Gently lift the cut-out stars from the slab. You can save these tiny clay stars for other ornaments or tags. -
Smooth the edges:
Dip your finger in a little water and gently smooth around the inside edges of each star cutout to remove any rough burrs.
Step 3: Assembly and Finishing
-
Wrap the jar:
Carefully lift your starry clay slab and wrap it around the glass jar. Press it gently against the glass so it adheres slightly. -
Seal the seam:
Where the two ends of the clay meet, overlap them slightly or butt them together. Use water and your finger or a modelling tool to smudge the clay across the seam until it disappears. -
Add detail:
I like to use a toothpick to poke tiny dots around the top and bottom rims for a subtle stitched effect. -
Dry completely:
Let the jar sit in a cool, dry place for at least 24-48 hours. Drying time will depend on humidity and clay thickness. -
Sand rough spots:
Once fully hardened, use fine-grit sandpaper to buff away any fingerprints or sharp edges on the rim. -
Insert candle:
Place a tea light or small votive candle inside the jar. The glass protects the flame, while the clay casts beautiful star-shaped shadows.
Glow Up
For a warmer, golden glow, paint the inside of the clay wrap (before assembly) with gold acrylic paint.
Light your candle and enjoy the warm, flickering starlight patterns on your table