
If you’ve ever made a cute little pot and then got stuck on the lid part, you’re in good company. Here are my favorite clay container with lid ideas that keep the build beginner-friendly while letting the lid become the star of the piece.
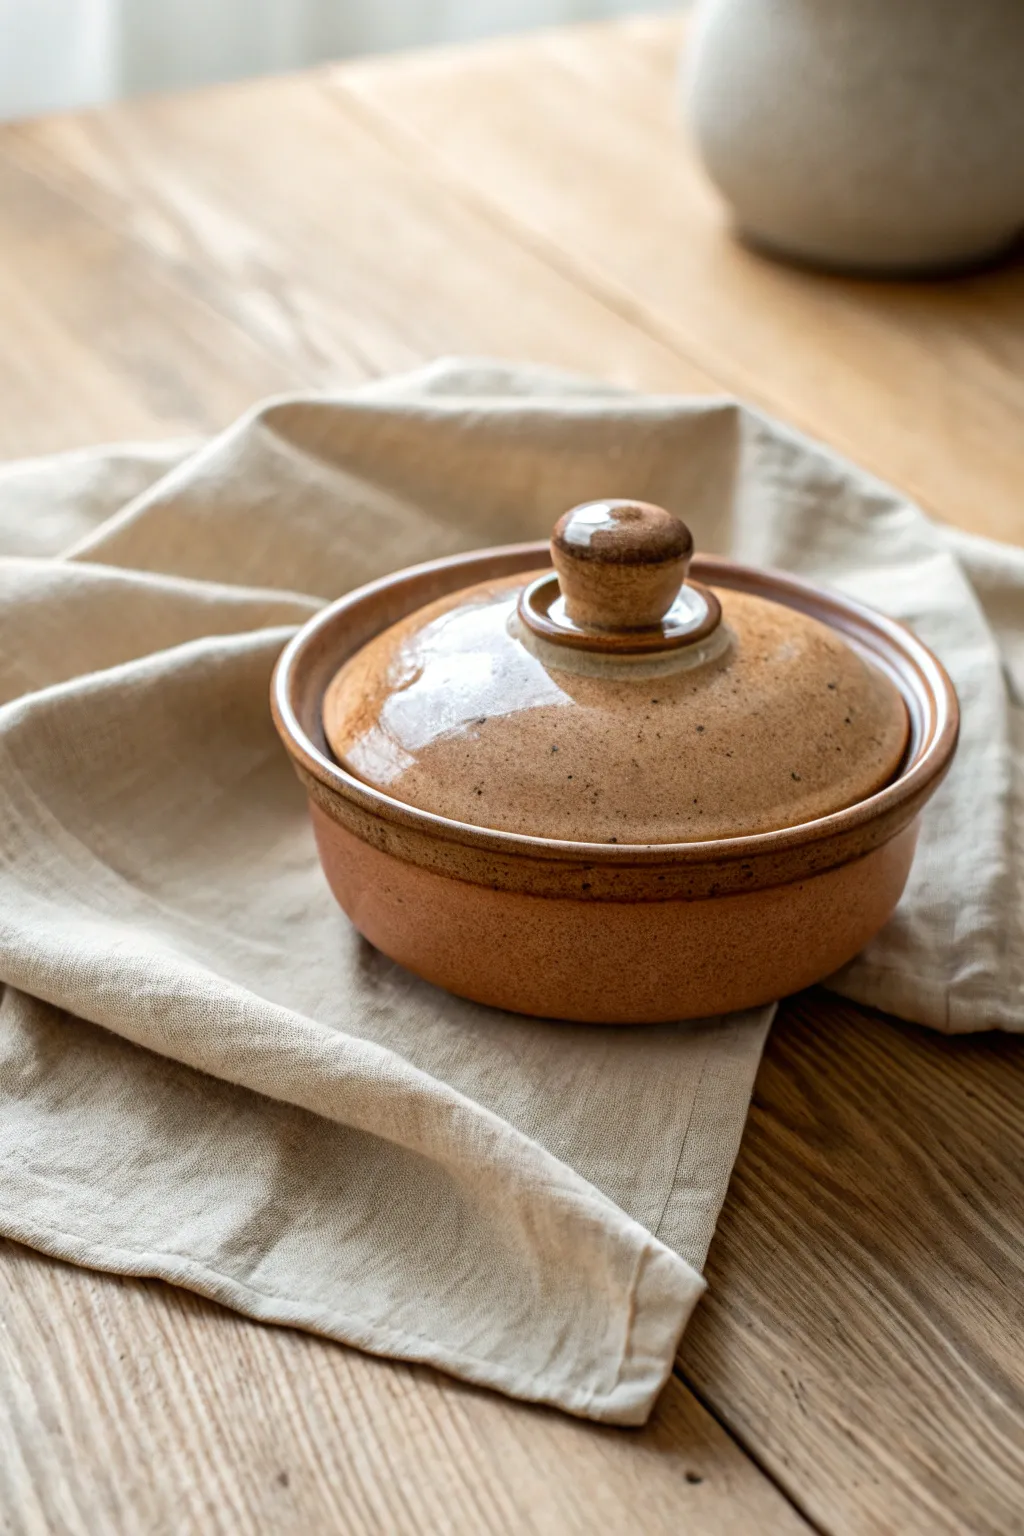
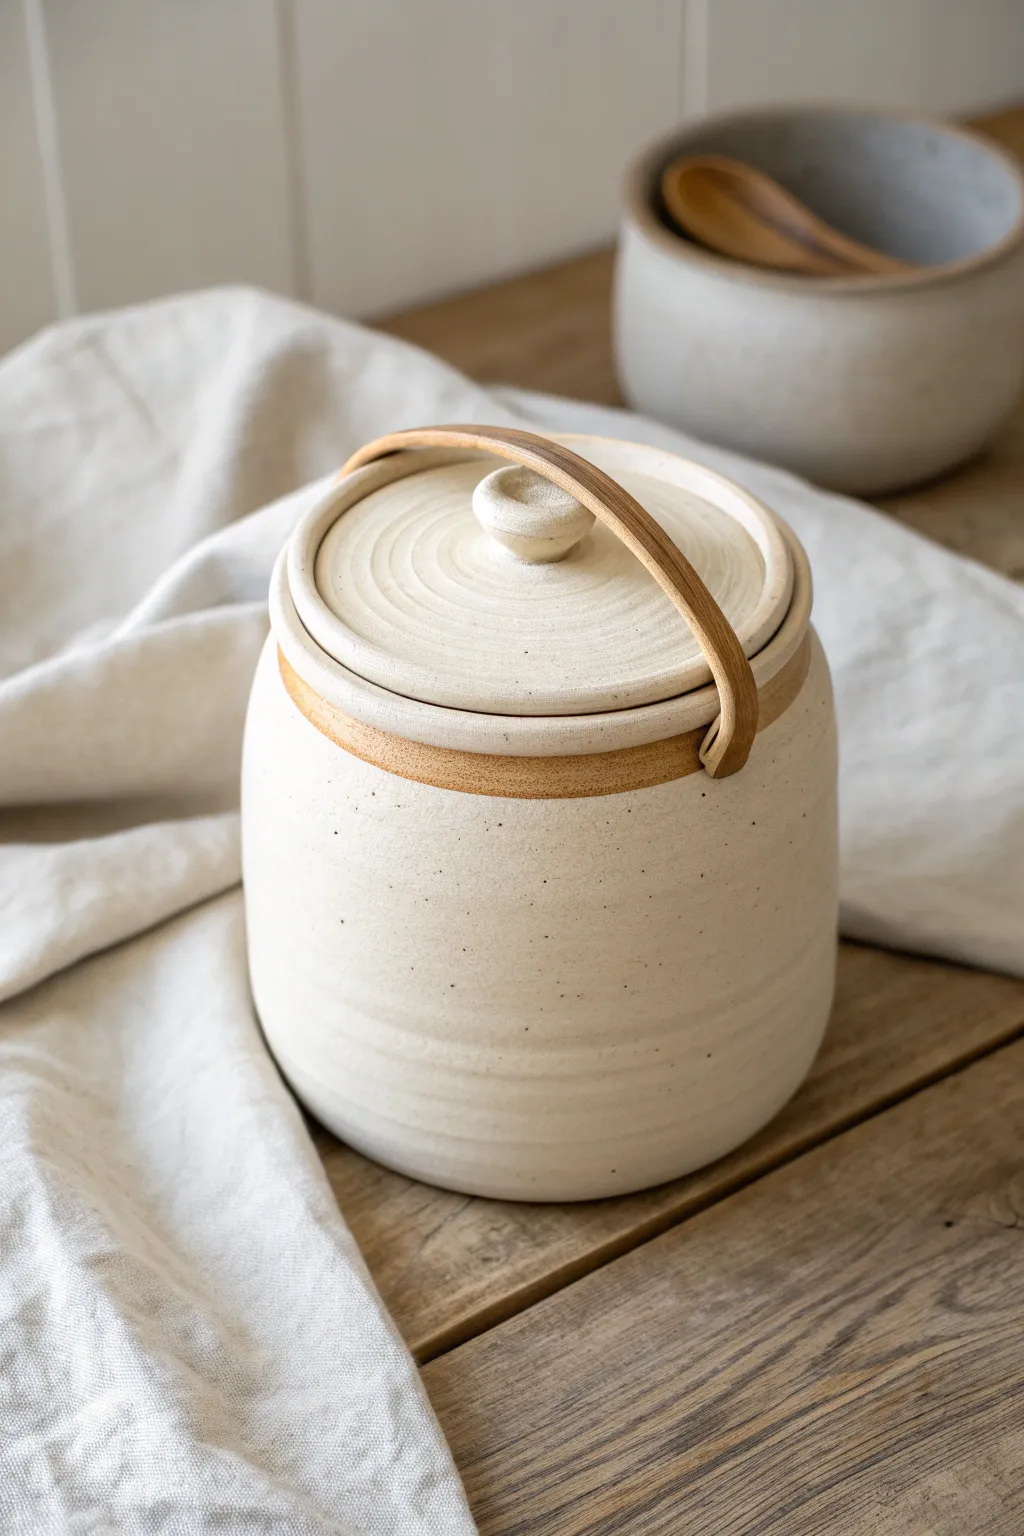
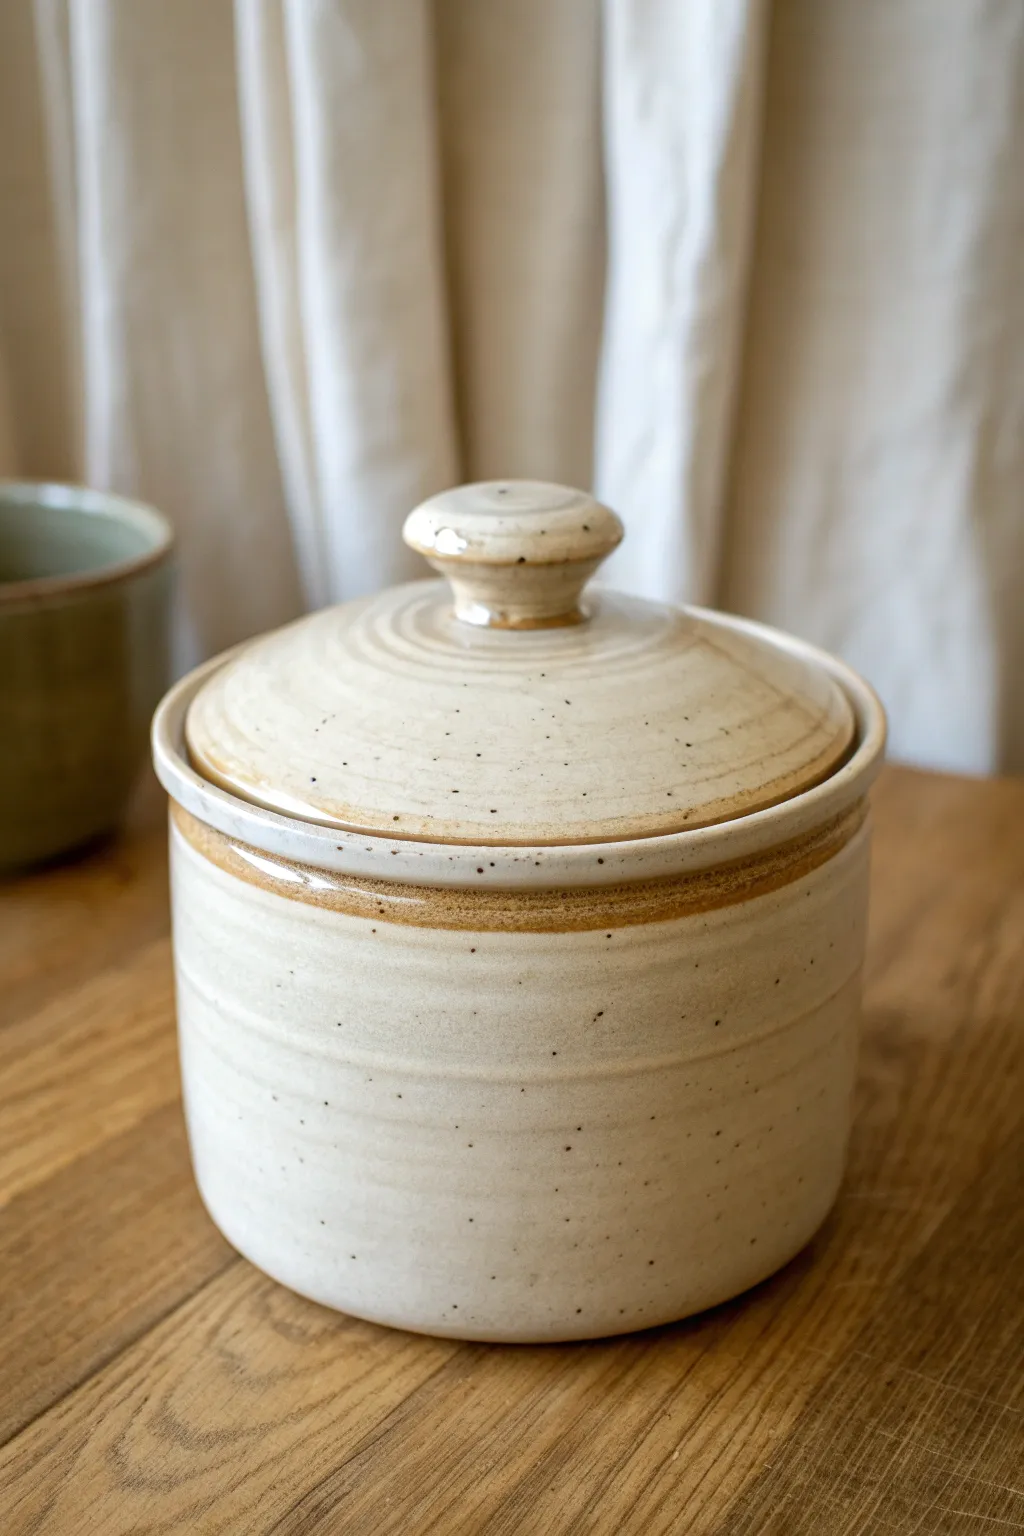
Classic Canister With Gallery Lid
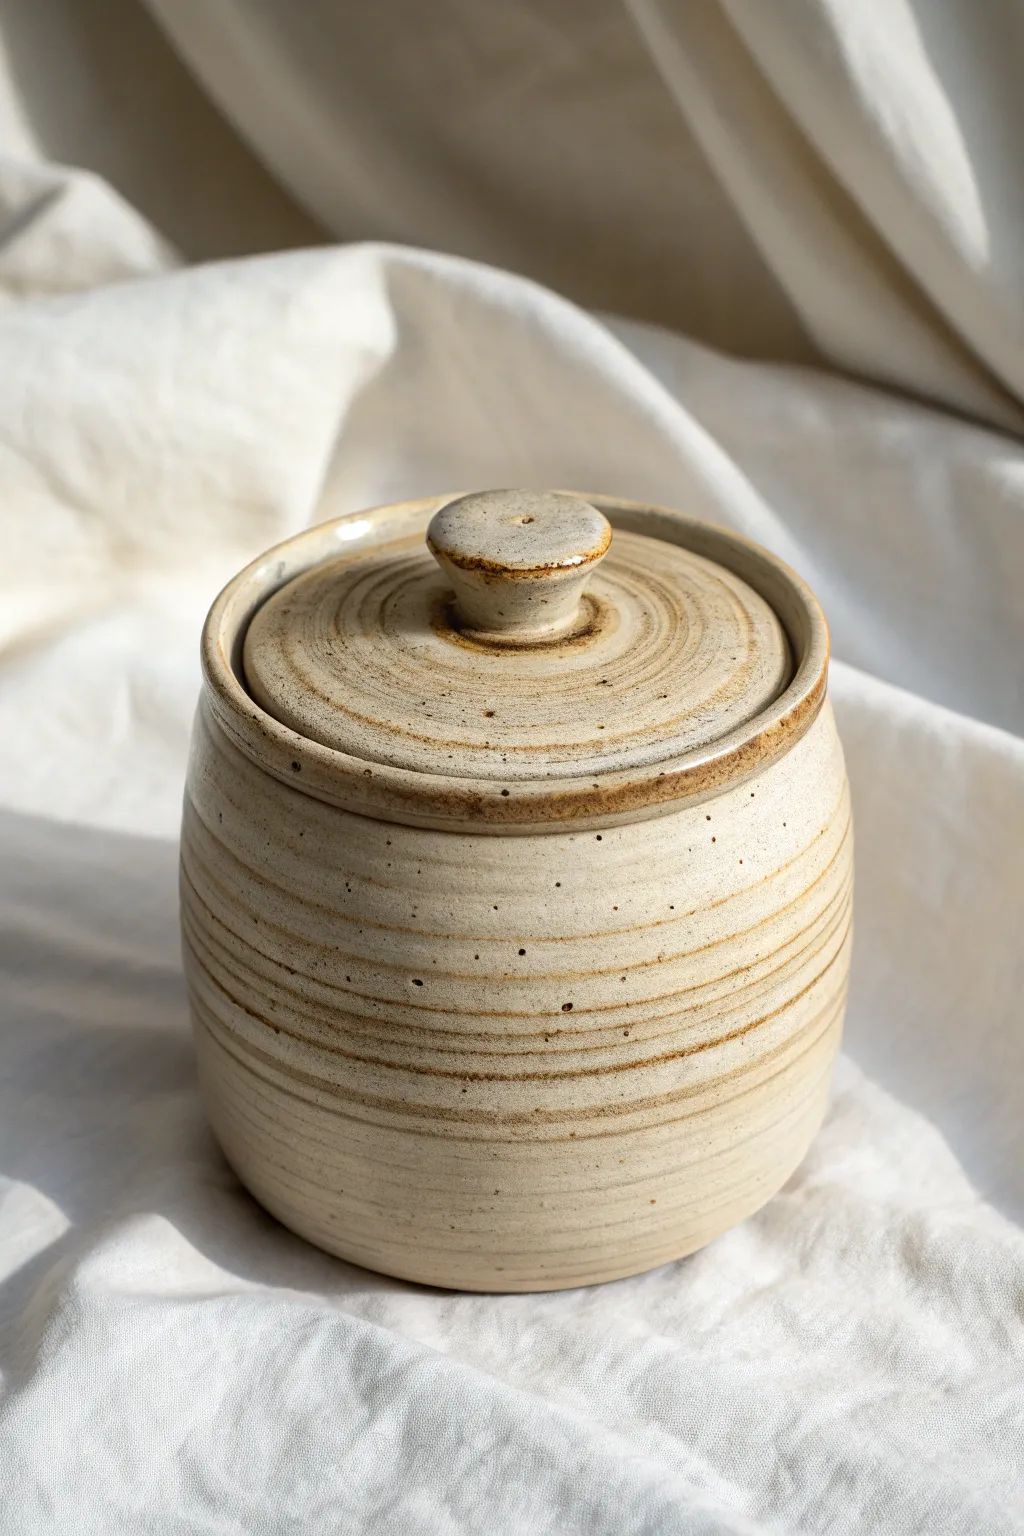
This rustic, speckled stoneware canister features a timeless silhouette with prominent throwing rings that highlight the handmade process. The fitted gallery lid sits snugly inside the rim, creating a secure seal perfect for storing dry goods or treasures.
Step-by-Step
Materials
- 2 lbs speckled stoneware clay (adjust for size preference)
- Pottery wheel
- Bucket of water and sponge
- Needle tool
- Wooden rib tool
- Wire cutter
- Calipers
- Trimming tools
- Clear or light oatmeal matte glaze
Step 1: Throwing the Canister Body
-
Center and Open:
Start with about 1.5 lbs of your clay, wedged well. Center the clay on the wheel head, then open it up, leaving the floor about 1/4 to 1/2 inch thick to allow for trimming later. -
Pull the Walls:
Pull up the walls into a cylinder. For this specific shape, aim for a slightly rounded belly rather than a straight pipe. As you pull, gently push from the inside out to create that subtle curve. -
Create the Texture:
Instead of smoothing the walls perfectly with a rib, I like to leave the throwing lines visible. You can accentuate them by gently pressing your fingertips or a soft rib against the clay as the wheel spins. -
Form the Gallery:
At the rim, you need to create a seat for the lid. Split the rim slightly with your finger or a tool. Push the inner wall down half an inch and flattening it to create a horizontal shelf (the gallery). -
Refine the Rim:
Compress the remaining outer rim and the gallery shelf with a shammy or sponge to prevent cracking. Ensure the gallery shelf is perfectly flat. -
Measure for the Lid:
Use your calipers to measure the exact diameter of the gallery shelf (the inner recessed opening). Lock the calipers in place. -
Cut and Dry:
Undercut the base with a wooden knife, wire the pot off the bat, and set it aside to reach leather-hard consistency.
Warped Lid Fix
If your lid wobbles after firing, apply a dab of grinding paste (lapping compound) to the gallery. Rotate the lid back and forth against the pot until they grind a perfect fit.
Step 2: Throwing the Gallery Lid
-
Center Remaining Clay:
Take the remaining clay (about 0.5 lb) and center it low and wide on the wheel. -
Establish Width:
Using the locked calipers, mark the width needs on the clay mound. You want the lid to fit inside the vertical wall of your canister’s rim but rest on the shelf. -
Shape the Lid:
Throw the lid right-side up or upside down (off the hump) depending on your preference. I prefer throwing right-side up for this style. Flatten the clay to the measured width, keeping a slight dome shape. -
Add Spiral Detail:
Using a trimming tool or just your finger, create a spiral starting from the center outward to mimic the texture on the canister body. -
Form the Knob:
Pinch a small amount of clay in the center to form the knob. Shape it into a small mushroom or button shape, ensuring it has a slight undercut for easy gripping. -
Check the Fit:
Double-check your measurements against the calipers one last time before cutting the lid off the hump or bat.
Add Oxide Wash
Before glazing, wipe a thin iron oxide wash into the throwing rings and deeply into the gallery crevice. This accentuates the texture and gives it that aged, defined look.
Step 3: Trimming and Finishing
-
Trim the Canister:
Once the body is leather hard, center it upside down on the wheel. Trim the bottom to create a clean foot ring that mirrors the width of the rim. -
Trim the Lid:
If necessary, trim the underside of the lid to remove excess weight. You can use a chuck or place the lid knob-down in a trimming spinner. -
Dry Fit:
Gently place the lid onto the canister. It should sit flush on the gallery shelf. If it’s tight, sand it slightly once bone dry, or trim a hair more off now. -
Bisque Fire:
Let both pieces dry completely (bone dry) before loading them into the kiln for a bisque fire (usually Cone 04 or 06). -
Glazing:
Wax the gallery shelf on the pot and the outer rim of the lid where they touch to prevent them from fusing. Dip or brush on a clear or light oatmeal matte glaze to let the clay speckles show through. -
Final Fire:
Fire the glazed pieces to the maturity temperature of your clay body (likely Cone 5 or 6 for stoneware).
Once cooled, your canister is ready to bring a touch of handmade warmth to your kitchen counter


Pinch-Pot Trinket Jar With Sitting Lid
This charming, textured trinket jar relies on simple hand-building techniques to achieve its organic shape and tactile finish. With its snug-fitting sitting lid and subtle decorative groove, it makes a perfect home for jewelry, salt, or small keepsakes.
Step-by-Step Tutorial
Materials
- Stoneware clay with grog (for texture)
- Potter’s needle tool
- Wooden modeling tool or flat spatula
- Synthetic sponge
- Rib tool (kidney shaped)
- Small bowl of water
- Canvas mat or work board
- Plastic wrap (for slow drying)
Step 1: Forming the Jar Body
-
Prepare the clay:
Start with a ball of clay roughly the size of a large orange. Wedge it thoroughly to remove any air bubbles, which ensures the walls will be consistent later. -
Open the pot:
Hold the ball in your non-dominant hand. Press your thumb into the center, stopping about a half-inch from the bottom to create a thick, sturdy base. -
Pinch the walls:
Using your thumb on the inside and fingers on the outside, gently pinch and rotate the clay. Work from the bottom up in a spiral motion to thin the walls evenly. -
Shape the belly:
As you pinch upward, gently push the clay outward from the inside to create a rounded, bulbous ‘belly’ shape, bringing the rim back in slightly at the top for a narrower opening. -
Refine the rim:
Once you have your desired height, tap the rim gently with a flat wooden spatula to level it. Use your fingers to compress the clay at the lip, making it smooth and uniform.
Step 2: Creating the Lid and Details
-
Measure the opening:
Measure the inner diameter of your jar’s rim using calipers or by lightly marking a spare piece of paper. -
Form the lid slab:
Flatten a smaller ball of clay into a thick disk. It needs to be slightly wider than your jar’s opening to overhang just a bit. -
Add the flange:
Flip the lid disk over. Score a circle in the center that matches your jar’s inner measurement. Roll a small coil of clay and attach it to this scored circle to create a flange that will sit inside the jar. -
Dome the lid:
Flip the lid back over. Gently stroke the top with your thumb or a rib tool to create a slight dome shape, mirroring the curve of the jar’s belly. -
Test the fit:
Carefully place the lid on the jar. If the flange is too tight, shave a little clay off; if it’s too loose, gently push the flange outward. Remove the lid before it sticks.
Clean Grooves Tip
When carving the accent line near the rim, lay a piece of plastic wrap over the clay first. Drawing the tool through the plastic creates a soft, burnished line without burrs.
Step 3: Texturing and Finishing
-
Carve the accent line:
While the jar is leather-hard but still pliable, spin the jar slowly on your work surface while holding a needle tool steady against the neck. I find this creates that perfect horizontal groove seen in the final piece. -
Enhance the texture:
Instead of smoothing everything perfectly, use a slightly damp sponge to wipe away fine clay particles, exposing the grog (sand) in the clay for that gritty, stone-like appearance. -
Clean the bottom:
Running your thumb around the base edge creates a slight undercut or shadow line, lifting the visual weight of the pot off the table. -
Slow drying:
Place the lid on the jar with a thin piece of paper between them to prevent sticking. Cover loosely with plastic wrap to let the moisture equalize slowly over 2-3 days. -
Bisque fire:
Once bone dry, fire the piece in a kiln to bisque temperature (usually Cone 04 or 06). -
Glazing:
Apply a matte white or unglazed cream slip to the exterior if your clay body isn’t naturally light. For the interior, use a clear food-safe glaze for functionality. -
Final wipe:
Before the final firing, ensure no glaze is on the rims where the lid and jar meet, or they will fuse together forever.
Go Botanical
Before the clay dries, gently press a dried leaf or a piece of linen fabric into the lid’s surface to create a subtle fossil-like impression that complements the rustic texture.
Once fired, sit back and enjoy the earthy elegance of your handcrafted storage jar


Slab-Built Square Box With Flat Lid
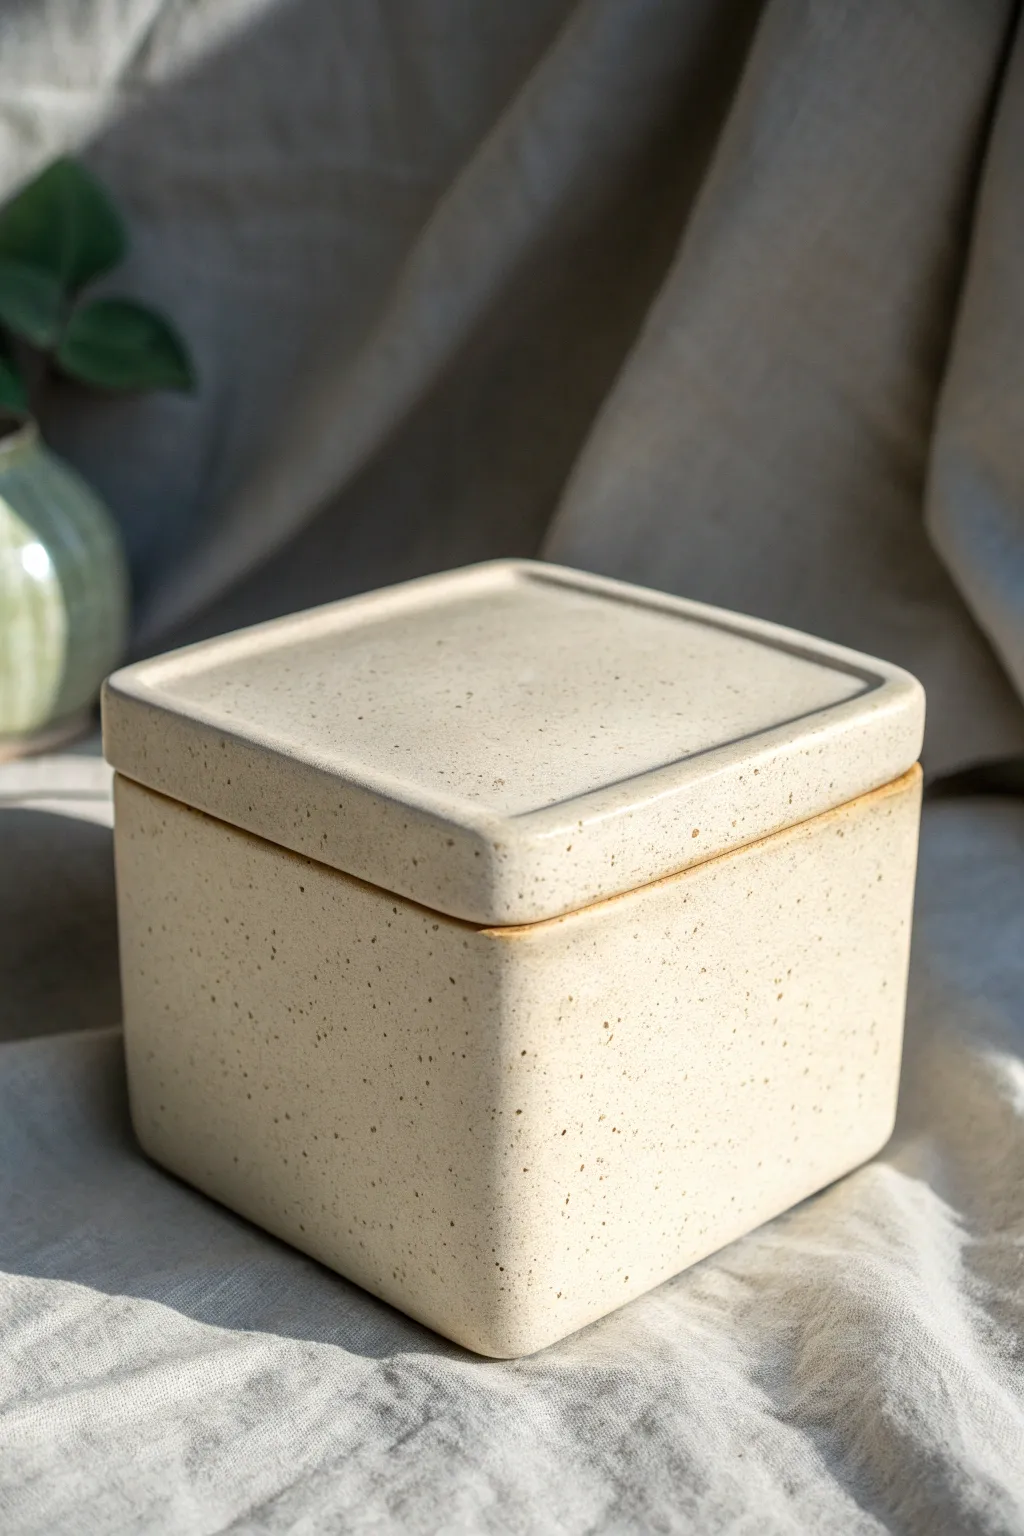
This elegant, cube-shaped container utilizes slab-building techniques to create a clean, modern form with a perfectly fitted recessed lid. Its soft, speckled matte finish gives it a timeless, organic warmth that looks beautiful on any countertop.
Step-by-Step Guide
Materials
- Speckled stoneware clay (light cream or buff firing body)
- Rolling pin
- Two 1/4-inch thickness strips (guide rails)
- Fettling knife or precision blade
- Rectangular soft rib (rubber or silicone)
- Serrated rib or scoring tool
- Slip (clay and water mixture)
- Ruler and square tool
- Beveled cutting tool (optional but recommended for mitered joints)
- Sponge
- Matte cream glaze
Step 1: Prepping the Slabs
-
Roll out the clay:
Begin by wedging your speckled clay thoroughly to remove air bubbles. Using your thickness strips, roll out a large, even slab approximately 1/4-inch thick. Smooth both sides with a soft rib to compress the clay particles, which helps prevent warping later. -
Measure and cut walls:
Allow the slab to stiffen slightly to a ‘soft leather-hard’ state so it holds its shape. Using a ruler and square, measure and cut four identical square panels for the walls and one slightly smaller square for the base. -
Cut the lid components:
Cut another square piece matching the base size for the top of the lid. You will also need to cut four narrow rectangular strips (flanges) that will fit inside the box opening to keep the lid secure.
Dry Fit Check
Always dry the lid ON the box. Covering the contact points with a thin strip of paper towel prevents sticking, but drying together ensures they warp or shrink in unison for a perfect fit.
Step 2: Assembling the Box
-
Bevel the edges:
For the sharpest, cleanest corners, I prefer to cut the vertical edges of your four wall pieces at a 45-degree angle. This allows them to miter together perfectly. -
Score and slip:
Deeply score the mitered edges and apply a generous amount of slip. Stand the walls up on the base piece, pressing the scored joints firmly together. -
Reinforce the interior:
Roll a very thin coil of soft clay. Place this coil into the interior corners where the walls meet, and smear it smooth with your finger or a modeling tool to reinforce the joints. -
Paddle the shape:
Gently paddle the exterior walls with a flat wooden paddle to ensure the sides are straight and the corners are tight. This also helps compress the joints from the outside.
Step 3: Creating the Fitted Lid
-
Construct the lid slab:
Take your lid square and flip it over. Score and slip the four narrow flange strips and attach them to the underside, inset about 1/4-inch from the edge so they will slot inside the box walls. -
Test the fit:
Once the lid assembly has stiffened slightly, test the fit on the box. It should slide in without forcing. If it’s too tight, shave down the flange strips slightly with a rasp or knife. -
Refining the profile:
With the lid in place, use a rasp or shredder tool to ensure the exterior walls flow seamlessly into the lid edge, creating that continuous block look shown in the image.
Make it Functional
Add a small leather pull tab or a sculpted ceramic knob to the center of the lid for easier lifting, or carve a small notch in the rim to accommodate a serving spoon.
Step 4: Finishing and Glazing
-
Soften the edges:
The box in the photo has a lovely softness to it. Use a damp sponge to round over all sharp corners and rims. Don’t over-wet the clay, just enough to remove the angular sharpness. -
Dry and bisque fire:
Let the piece dry slowly under plastic for a few days to prevent uneven shrinkage. Once bone dry, bisque fire the piece to the appropriate cone for your clay body. -
Wax the contact points:
Apply wax resist to the underside of the lid rim and the top rim of the box where the clay touches clay. This prevents the lid from fusing to the pot during the glaze firing. -
Apply glaze:
Dip or spray a creamy aesthetic matte glaze. The semi-opaque nature of this glaze allows the iron speckles in the clay body to bleed through, creating the texture seen in the photo. -
Final firing:
Fire the piece to maturity. Ensure the lid is fired separately or heavily wadded if you are unsure about your glaze runniness.
Once fired, you’ll have a beautifully understated storage vessel perfect for holding sea salt, butter, or trinkets


Coil-Built Cookie Jar With Domed Lid
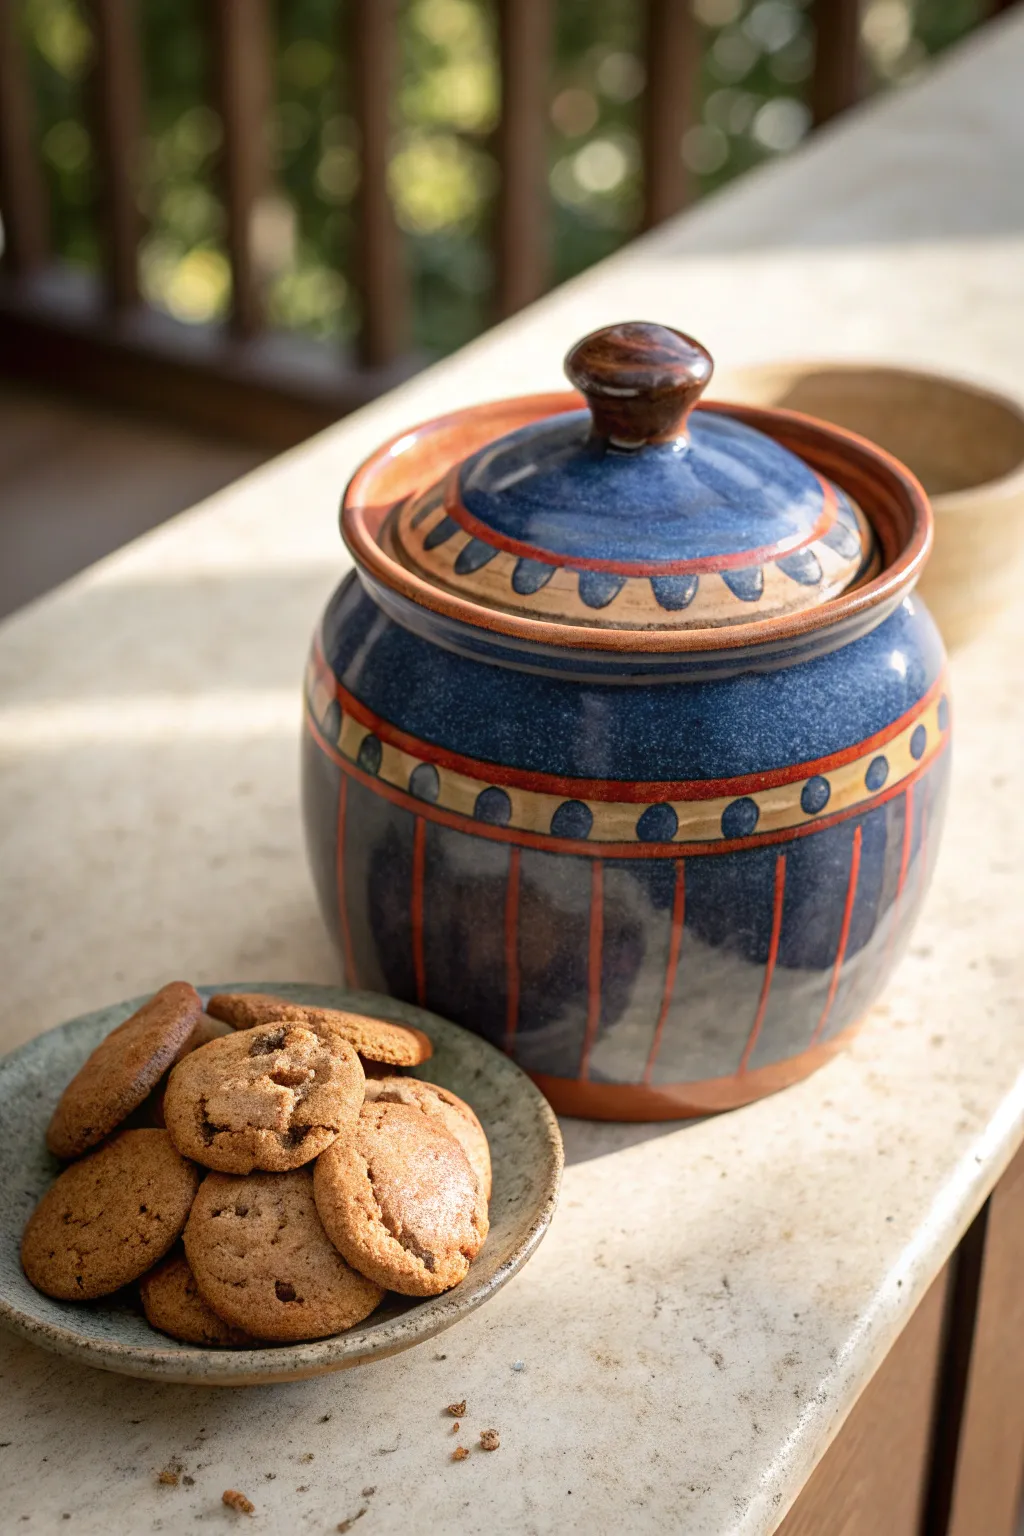
This delightful ceramic jar combines sturdy coil-building techniques with a vibrant, folk-inspired surface design. Its deep blue glaze, accented by rust-red stripes and dot-patterned bands, creates a warm, inviting vessel perfect for storing your favorite homemade treats.
Step-by-Step Tutorial
Materials
- Red earthenware or stoneware clay (approx. 5-7 lbs)
- Pottery wheel (for centering/finishing) or turntable (for hand-building)
- Scoring tool and slip
- Wooden modeling tools
- Ribs (metal and rubber)
- Sponge
- Underglazes: Deep Blue, Rust/Terra-cotta Red, Cream/Ochre
- Clear glaze (food-safe)
- Paintbrushes (various sizes for banding and details)
- Fettling knife
- Calipers
Step 1: Building the Base
-
Form the floor:
Begin by rolling out a circular slab about 1/2 inch thick and 6 inches in diameter to serve as the base of your jar. If you are using a wheel, you can throw a flat bat instead. -
Prepare coils:
Roll out several consistent coils of clay, each about the thickness of your thumb. Keep them covered under plastic to prevent them from drying out while you work. -
Build the walls:
Score and slip the edge of your base, then attach the first coil. Work your way up, layering coil upon coil. Smooth the inside and outside seams thoroughly as you go to ensure structural integrity. -
Shape the belly:
As you build height, gently push the clay outward from the inside to create a rounded, bulbous belly shape. The jar should curve inward slightly as you reach the shoulder area. -
Form the gallery:
At the rim, create a gallery—a small interior ledge—that will support the lid. You can do this by adding a final coil and splitting it, or by pressing down with a tool to create an inset seat. -
Measure for the lid:
Use calipers to measure the exact diameter of the gallery seating. This measurement is crucial for a tight-fitting lid, so double-check it before setting the jar aside to stiffen.
Step 2: Constructing the Domed Lid
-
Create the lid curve:
Using the measurement from your calipers, form a slightly domed slab or throw a small bowl shape on the wheel that fits those dimensions. Invert it to test the fit on the jar’s gallery. -
Add the knob:
Fashion a sturdy knob for the center of the lid. Attach it securely by scoring and scratching the surfaces. I often like to make the knob slightly mushroom-shaped for an easier grip. -
Trim and refine:
Once the clay is leather hard, trim away any excess weight from the underside of the lid and refine the shape of the foot ring on the jar body.
Wobbling Lid Issues?
If the lid rocks after firing, use a bit of grinding paste (valve grinding compound) between the lid and gallery. Rotate the lid back and forth until the seat is perfectly smooth.
Step 3: Decoration and Glazing
-
Bisque fire:
Allow the entire piece to dry slowly and completely before loading it into the kiln for a bisque firing. -
Apply base bands:
Using a banding wheel, paint two thick horizontal rust-red bands: one encircling the shoulder of the jar and another matching band on the lid. -
Paint the cream detail:
Fill the space between the rust bands on the shoulder with a cream or ochre underglaze. Do the same for the decorative band on the lid. -
Add vertical stripes:
Paint thin vertical rust-red stripes extending from the bottom of the jar up to the shoulder band. Space them evenly around the circumference. -
Dot the details:
Using a dark blue underglaze, carefully paint large dots or ovals onto the cream bands on both the jar and the lid. Let the underglaze dry fully. -
Main body glazing:
Brush or dip the remaining exterior surface (the main body behind the stripes and the knob) with a deep, speckled blue glaze. Be careful not to obscure your rust stripes. -
Clear coat and fire:
Apply a clear, food-safe glaze over the underglaze sections if they aren’t glossy by nature. Wipe the foot clean and fire to cone 5 or 6, depending on your clay body.
Wax Resist Magic
Apply wax resist over your underglaze stripes and dots before dipping the pot in the main blue glaze. This saves hours of wiping back glaze and keeps lines crisp.
Fill your beautiful new jar with cookies and enjoy the functional art you’ve created

The Complete Guide to Pottery Troubleshooting
Uncover the most common ceramic mistakes—from cracking clay to failed glazes—and learn how to fix them fast.
Low Lidded Bowl With Easy Knob
Recreate the rustic charm of this low-profile lidded bowl, perfect for serving warm dishes or storing kitchen treasures. The piece features a gentle, speckled glaze and a distinctively easy-to-grip knob that makes lifting the lid a simple pleasure.
Detailed Instructions
Materials
- Stoneware clay body (speckled buff recommended)
- Pottery wheel
- Throwing tools (sponge, rib, needle tool, wire tool)
- Trimming tools
- Calipers or ruler
- Warm amber/honey glaze (glossy)
- Small brush for wax resist
- Kiln
Step 1: Throwing the Bowl Body
-
Center the clay:
Start with about 2-3 lbs of well-wedged speckled stoneware clay. Center it low and wide on the wheel head, establishing a sturdy base for your bowl. -
Open and widen:
Open the clay down to about a 1/4-inch thickness for the floor. Pull the floor outward until you reach a diameter of roughly 6-7 inches, keeping it flat. -
Pull the walls:
Pull the walls up vertically, aiming for a height of about 3 inches. Keep the walls relatively thick at the rim to support the future gallery for the lid. -
Shape the profile:
Use a rib on the inside to gently curve the walls outward, creating a rounded, belly-like quality while maintaining a vertical rim section. -
Create the gallery:
At the rim, use a wooden tool or your thumb to press down and create a recessed ledge (gallery) on the inside edge. This is where your lid will sit. Measure the interior diameter of this gallery carefully with calipers.
Lid Wobbling?
If your lid rocks after firing, use a circular sanding stone or grinding paste. Rotate the lid back and forth on the bowl gallery to grind down high spots for a perfect, silent fit.
Step 2: Creating the Lid
-
Prepare the lid clay:
Center a smaller amount of clay (about 1-1.5 lbs). You will be throwing this lid upside down, like a shallow bowl. -
Establish the width:
Flatten the mound until its diameter matches the caliper measurement from your bowl’s gallery. It’s crucial to measure repeatedly here; create a flange that fits snugly inside the gallery. -
Shape the dome:
Refine the curve of the upside-down lid so it has a gentle, shallow dome shape. Smooth the surface with a rib to compress the clay and remove throwing lines. -
Separate and dry:
Cut the lid from the hump or bat with a wire tool. Allow both the bowl and the lid to dry to a leather-hard state.
Step 3: Trimming and Assembly
-
Trim the bowl:
Place the bowl upside down on the wheel, center it, and trim the bottom to create a clean foot ring. Smooth the edges with a damp sponge. -
Trim the lid:
Secure the lid (top side up) onto the wheel head. You might need a chuck or just secure it to the wheel head with clay lugs. Trim away excess weight from the top to reveal the dome shape. -
Form the knob:
While the lid is centered on the wheel, you can either attach a coil and throw a knob or carve one from the existing clay mass if you left enough thickness. Shape a rounded, mushroom-cap style knob with a distinct neck for easy gripping. -
Refine the fit:
Test the lid on the bowl. If it’s too tight, carefully sand or trim the flange. The fit should be comfortable but not loose.
Pro Tip: Gallery Depth
Make your gallery slightly deeper than you think is necessary. Glaze can sometimes pool or clay can warp, and a deeper gallery ensures the lid won’t slide off if the fit changes slightly.
Step 4: Glazing and Firing
-
Bisque fire:
Fire both pieces to cone 04 (or your clay’s specific bisque temperature). Wipe them down with a damp sponge afterwards to remove dust. -
Wax resist:
Apply wax resist to the foot ring of the bowl, the gallery where the lid sits, and the flange of the lid where it touches the gallery. This prevents the lid from fusing to the bowl during firing. -
Apply glaze:
Dip or pour a warm amber glaze over the exterior and interior. The glaze shown has high transparency to let the clay speckles show through, darker and thicker where it pools in the crevices. -
Clean up:
Wipe away any stray glaze droplets from the waxed areas with a damp sponge. -
Final fire:
Loaded the kiln, placing the lid on the shelf next to the bowl (not on it) to ensure even heat distribution. Fire to cone 5/6 oxidation or as directed by your glaze.
Once cooled, fill this charming vessel with a hot meal or display it prominently on your rustic table setting
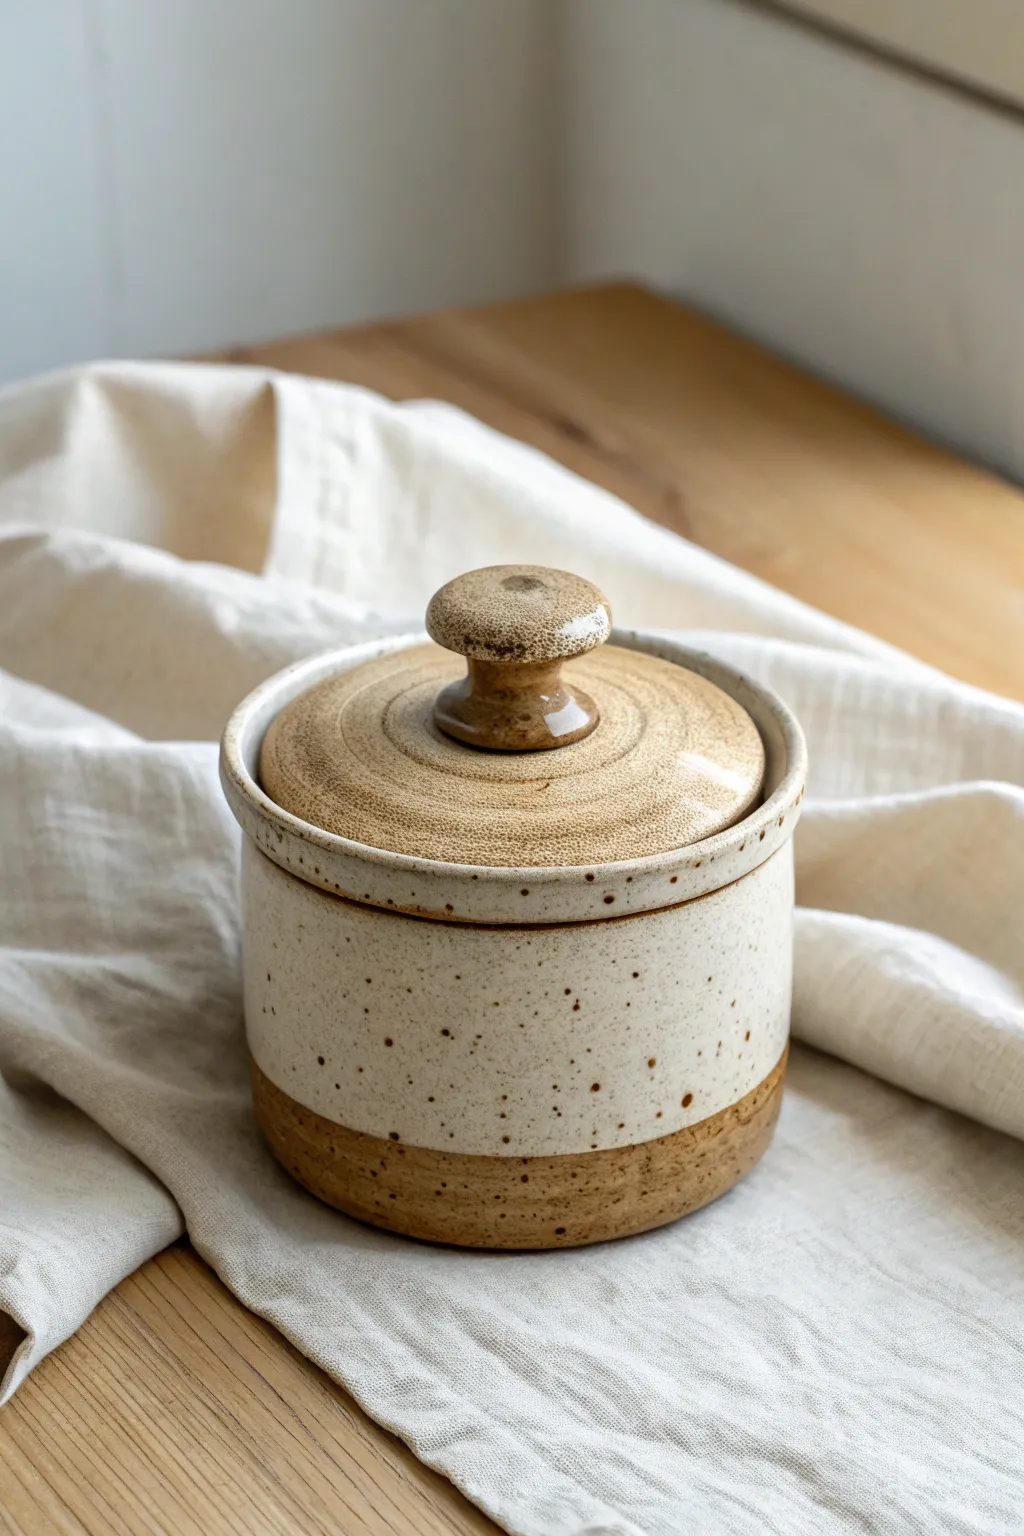
Tea Caddy Container With Deep Lid Seat
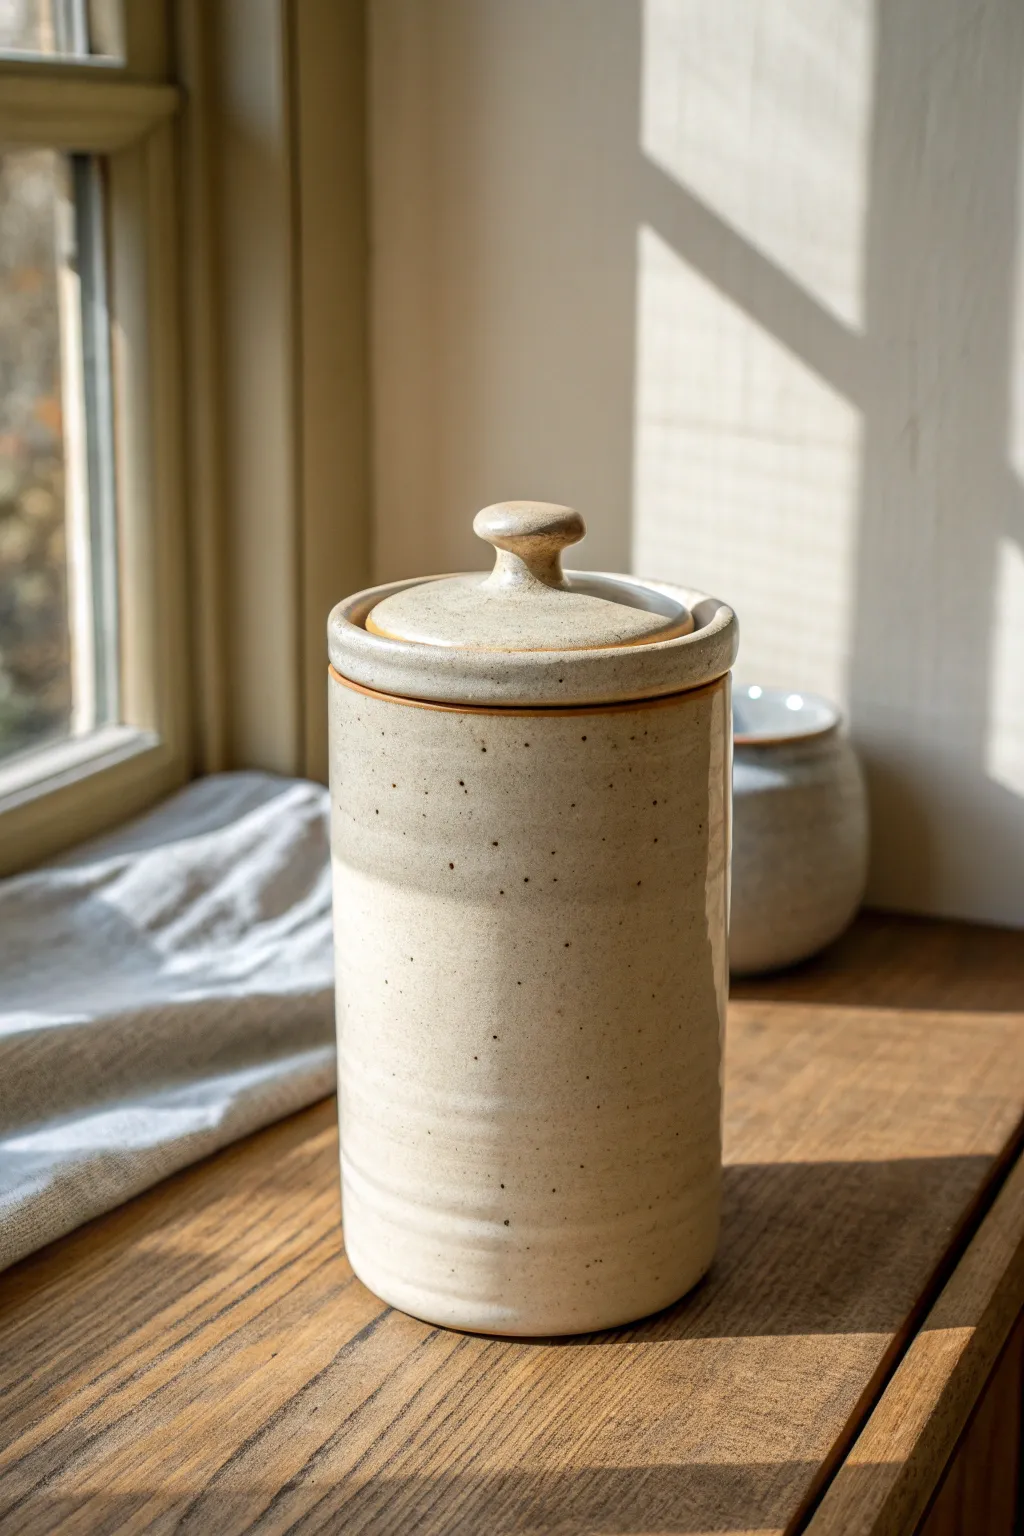
This elegant, tall ceramic canister features a creamy, speckled glaze and a distinctive deep lid seat that ensures a snug fit. Its minimalist form and natural texture make it a beautiful functional piece for storing loose leaf tea or dry goods.
How-To Guide
Materials
- Stoneware clay (speckled or buff)
- Pottery wheel
- Throwing tools (sponge, needle tool, rib, wooden knife)
- Wire cutter
- Trimming tools
- Calipers
- Glossy cream or oatmeal glaze
- Kiln
Step 1: Throwing the Body
-
Prepare the clay:
Begin by wedging about 2-3 pounds of speckled stoneware clay to remove air bubbles and ensure consistency. -
Center and open:
Center the clay on your wheel head. Open the center hole, leaving a base thickness of about 1/2 inch to allow for later trimming. -
Pull the walls:
Pull the walls straight up into a tall cylinder shape. Aim for even thickness from bottom to top, keeping the form relatively narrow for that classic caddy look. -
Refine the shape:
Use a straight rib tool to smooth the outside walls, removing throwing lines and compressing the clay. I find this creates a perfect canvas for the speckled glaze later. -
Create the gallery:
At the rim, gently split the clay to create a deep, recessed gallery (seat) for the lid. This ledge needs to be flat and sturdy to support the lid. -
Measure the gallery:
Use your calipers to measure the exact interior diameter of the gallery seating area. Lock the calipers in place; you will need this measurement for the lid. -
Cut specifically:
Run a wire tool under the base and set the cylinder aside to firm up to leather-hard.
Warped Lid Syndrome
If lids warp during firing, try drying the lid *on* the jar next time. Place a strip of paper towel between the leather-hard lid and jar to prevent sticking while they dry together slowly.
Step 2: Creating the Lid
-
Center lid clay:
Take a smaller ball of clay (about 1 pound) and center it on the wheel. -
Throw the lid form:
Flatten the clay into a thick disk. Use your caliper measurement to determine the width, ensuring the flange will fit inside your jar’s gallery. -
Shape the knob:
While throwing the lid right-side up (or off the hump), pull a small amount of clay from the very center upwards to form a solid knob. Pinch and smooth it into a comfortable button shape. -
Refine the flange:
Define the flange that will sit in the jar. It should be slightly tapered to ensure an easy fit. -
Check the fit:
If your jar is steady enough, carefully test the lid fit. It’s better to be slightly larger now and trim it down later than too small.
Step 3: Trimming and Finishing
-
Trim the jar base:
Once leather hard, center the jar upside down on the wheel. Trim the bottom to create a clean foot ring and remove excess weight. -
Clean the gallery:
Flip the jar right side up and use a trimming tool to sharpen the inner corners of the gallery seat if needed. -
Trim the lid:
Place the lid upside down (resting on its knob in a chuck or centered on the wheel) and trim the underside to remove excess weight. -
Final dry fit:
Check the lid fit one final time. It should slide into the gallery smoothly with just a hair of wiggle room to account for glaze thickness. -
Bisque fire:
Allow both pieces to bone dry completely, then load them into the kiln for a bisque firing (usually Cone 04 or 06).
Pro Tip: Gallery Depth
Cut the gallery seat slightly deeper than you think is necessary. A deep seat prevents the lid from rattling or sliding off easily when the detailed caddy is moved or bumped.
Step 4: Glazing
-
Wax crucial areas:
Apply wax resist to the foot of the jar, the underside of the lid rim where it touches the gallery, and the gallery ledge itself. -
Apply glaze:
Dip the jar and lid into a cream or oatmeal-colored stoneware glaze. The glaze should respond to the iron specks in the clay body. -
Clean up:
Wipe away any stray glaze droplets from the waxed areas with a damp sponge. -
Final firing:
Fire the pieces to maturity (usually Cone 5 or 6 depending on your clay). Let the kiln cool completely before unloading.
Once cooled, fill your new handmade canister with your favorite tea blend and enjoy the satisfying clink of the ceramic lid.


What Really Happens Inside the Kiln
Learn how time and temperature work together inside the kiln to transform clay into durable ceramic.
Oval Covered Dish With Rimmed Lid
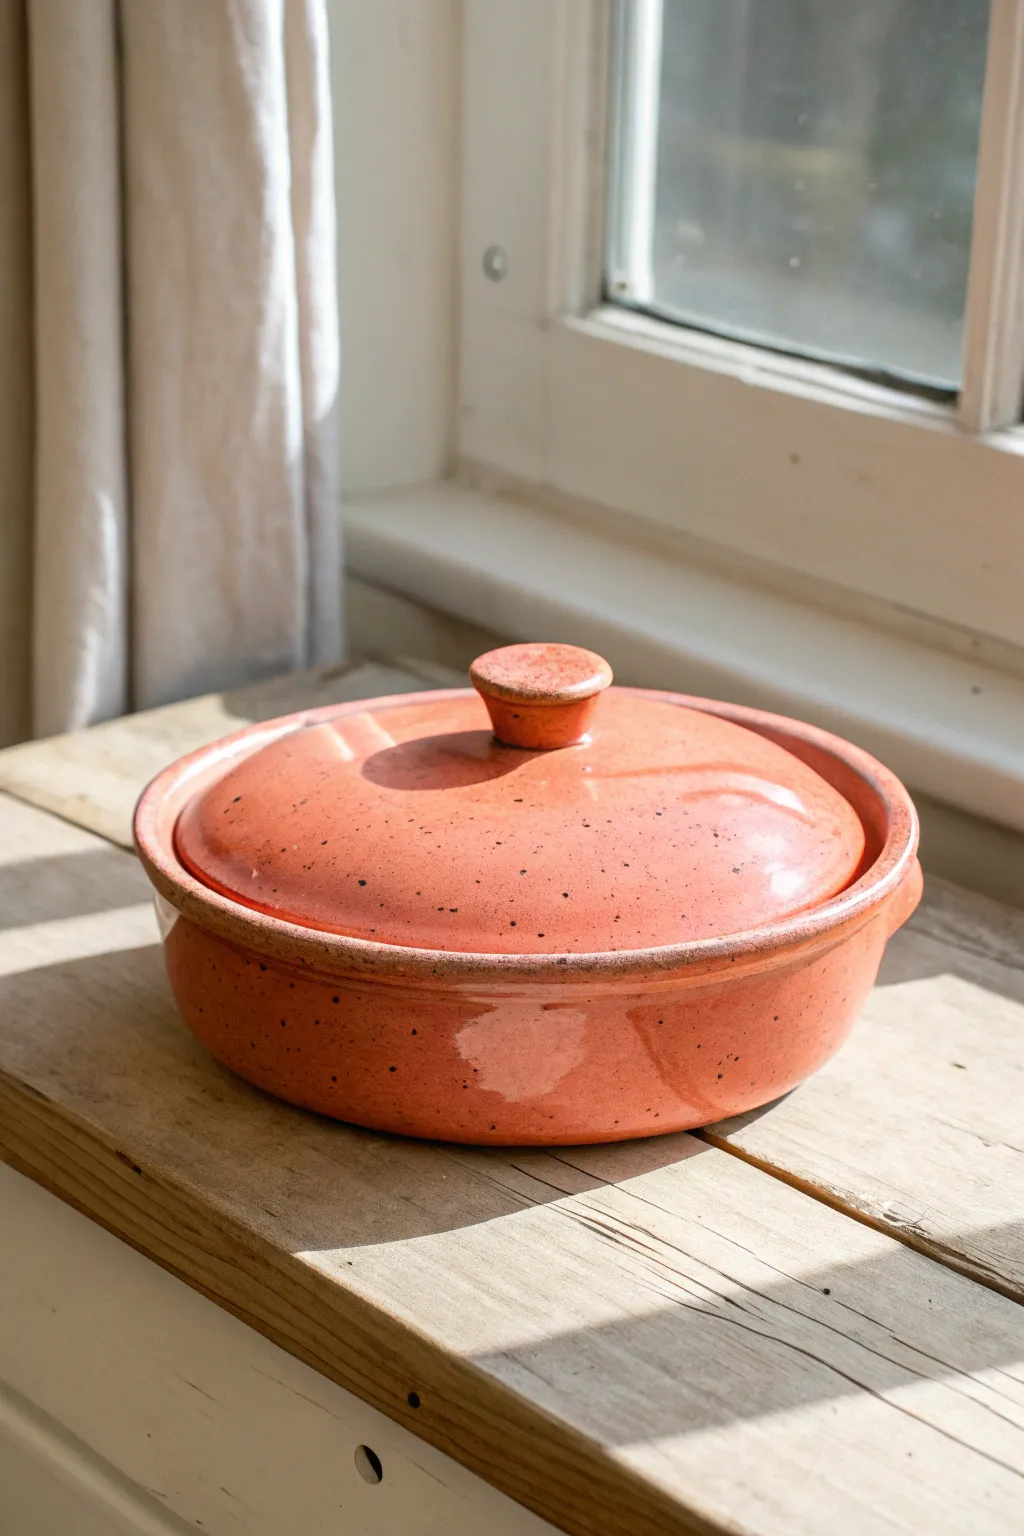
This charming, low-profile covered casserole dish features a warm, coral-pink glaze speckled with iron accents for a rustic, earthy feel. Its snug, rimmed lid and sturdy knob make it perfect for oven-to-table serving or simply as a beautiful countertop accent.
Detailed Instructions
Materials
- Stoneware clay (smooth or with fine grog)
- Pottery wheel
- Throwing tools (sponge, rib, needle tool, wire cutter)
- Trimming tools
- Calipers
- Speckled coral/pink glaze (or clear glaze over speckled clay)
- Kiln
- Bat system
Step 1: Throwing the Base
-
Center and open:
Begin with about 3-4 lbs of well-wedged clay on the wheel. Center it low and wide. Open the clay to create a flat floor, leaving about a 1/2 inch thickness at the bottom. -
Establish the floor:
Compress the floor thoroughly with a rib or sponge to prevent future cracking. Measure the diameter to ensure it matches your desired final size, accounting for shrinkage. -
Pull the walls:
Pull the walls up vertically, keeping them distinctively thick enough to support a lid. Stop when the walls are about 3-4 inches high. Shape the vessel gently into a slight curve, wider at the top than the bottom. -
Create the gallery:
This is a crucial step for the ‘rimmed lid.’ Using a wooden rib or your thumb, split the rim at the top. Push the inner half down about 1/2 inch to create a shelf (gallery) for the lid to sit on. Keep the outer rim vertical and smooth. -
Refine and measure:
Smooth the gallery with a chamois or sponge to ensure it is perfectly round. Use calipers to measure the *inside* diameter of the outer rim—you will need this exact measurement for the lid.
Lid Wobbles?
If the lid rocks after firing, use a circular motion with grinding paste (or wet sand) between the lid and gallery. Rotate the lid back and forth until the fit grinds down to be perfectly flush.
Step 2: Creating the Lid
-
Throw the lid inverted:
Using a smaller amount of clay (approx 1.5-2 lbs), center it on a bat. You will throw the lid upside down, like a shallow bowl. -
Shape the dome:
Open the clay properly, but keep the curve shallow. Extend the clay outward until it matches the caliper measurement you took from the base. -
Form the flange:
Create a distinct rim on this ‘shallow bowl’ that perfectly matches the gallery of your base. I always double-check measurements here; it’s better to be slightly wider and trim later than too narrow. -
Dry to leather hard:
Wire the lid off the bat but leave it to stiffen. Do the same for the base. Wait until both are leather hard—firm enough to handle without deforming.
Step 3: Trimming and Assembly
-
Trim the base:
Place the base upside down on the wheel. Trim away excess clay from the bottom to create a defined foot ring or a flat, smooth bottom depending on your preference. Smooth any rough edges. -
Trim the lid:
Shape a chuck or use foam to hold the lid upside down (dome side up). Trim away excess clay to create a smooth, domed curve that mimics the interior shape. -
Attach the knob:
While the lid is centered for trimming, score and slip the very center. Attach a small ball of soft clay. Throw this small ball into a simple, sturdy knob shape as seen in the photo—wide at the top for a good grip. -
Test the fit:
Gently place the lid onto the base. It should sit flush in the gallery without wobbling. If it’s tight, sand or lightly trim the edge of the lid carefully.
Go Custom
Add two small lug handles to the side of the main dish body before firing. This mimics the classic casserole look and makes removing the hot dish from an oven much easier and safer.
Step 4: Glazing and Firing
-
Bisque fire:
Once bone dry, load both pieces into the kiln and bisque fire to Cone 04 (or your clay’s specific bisque temperature). -
Wax the contact points:
Apply wax resist to the foot of the base, the gallery shelf on the base, and the underside rim of the lid where it touches the gallery. This prevents the lid from fusing to the pot. -
Apply glaze:
Dip or pour a speckled coral-pink glaze over the pieces. If you don’t have a speckled glaze, you can use a speckled clay body and a semi-transparent coral glaze to achieve the look. -
Clean up:
Sponge away any stray glaze droplets from the waxed areas. Ensure the fit remains clean. -
Glaze fire:
Fire the piece to maturity (steps assume Stoneware, typically Cone 5-6). Allow the kiln to cool completely before removing the finished casserole.
Enjoy using your beautiful handmade vessel for your next family meal.
Loop Handle Lid for a Clean Look
This project combines the rustic charm of speckled stoneware with a sleek, cane-style loop handle for a truly timeless look. The result is a versatile container perfect for storing kitchen essentials or simply displaying as a piece of functional art.
Step-by-Step Guide
Materials
- Speckled stoneware clay (white or buff)
- Pottery wheel
- Throwing tools (ribs, sponge, wire cutter)
- Trimming tools
- Needle tool
- Extruder or clay roller (for the handle loops)
- Cane or rattan handle material (pre-made or raw)
- Matte cream or white glaze
- Wax resist
- Kiln
Step 1: Throwing the Body
-
Center the Clay:
Begin with about 3-4 lbs of speckled stoneware clay. Center it firmly on the wheel head, ensuring a wide enough base for stability. -
Open and Pull:
Open the clay and pull the walls up to form a cylinder. Aim for a slightly rounded, barrel-like shape rather than perfectly straight walls to soften the silhouette. -
Create a Gallery:
Using a wooden rib or your fingers, split the rim to create a deep, well-defined gallery inside the lip. This is where your lid will sit flush, so measure it carefully. -
Smooth the Surface:
Run a metal rib up the exterior while the wheel is spinning slowly to remove throwing lines and compress the surface, highlighting the clay’s natural grit. -
Define the Rim:
Use a chamois or sponge to compress the rim, ensuring it is smooth and durable.
Shrinkage Woes
If the lid no longer fits after drying, remember that lids often shrink at different rates if thrown from clay with different moisture levels. Throw lids immediately after the body.
Step 2: Creating the Lid
-
Determine Size:
Measure the diameter of the gallery on your main vessel using calipers. I always measure twice here just to be safe. -
Throw the Lid:
Center a smaller amount of clay (about 1-1.5 lbs). Throw a flat lid upside down (as a bowl shape) or right-side up, ensuring the flange fits your caliper measurements exactly. -
Carve Spirals:
While the lid is spinning, use a trimming tool or finger to gently press a spiral texture into the top surface, starting from the center and working outward. -
Add a Knob:
Throw or hand-build a small, mushroom-shaped knob and attach it to the center of the lid using scoring and slip.
Step 3: Trimming and Lugs
-
Trim the Foot:
Once leather hard, trim the bottom of the main vessel to create a clean, defined foot ring. -
Create Lugs:
Form two small clay loops or ‘ears’ from a coil. Attach these securely to opposite sides of the vessel, just below the rim. Make sure the holes are large enough to accommodate your cane handle later. -
Clean Up:
Smooth around the lug attachments with a damp sponge so they look integrated into the pot rather than just stuck on.
Dual Texture Texture
Try using a different clay body for the knob or the rim accent—like a dark chocolate clay against the white body—to create high contrast without glaze.
Step 4: Glazing and Finishing
-
Bisque Fire:
Fire both pieces to cone 04 (or your clay’s specific bisque temperature). -
Wax Resist Detail:
Apply a thin band of wax resist just below the exterior rim on the main body. This will leave a stripe of raw, toasted clay exposed after firing, adding warmth. -
Glaze Application:
Dip or pour a matte cream glaze over the entire piece (except the foot and the waxed band). Ensure the coating is even but not too thick, as matte glazes can crawl. -
Glaze Firing:
Fire to cone 5/6 (or appropriate temp for your stoneware). Let the kiln cool completely before opening. -
Attach Handle:
Soak your cane or rattan handle in warm water to make it pliable if necessary. Thread the ends through the ceramic lugs and bend them upward to secure. If using a pre-made metal wire handle wrapped in cane, simply hook the ends into the lugs.
Fill your new vessel with something special and enjoy the handmade warmth it brings to your space.

TRACK YOUR CERAMIC JOURNEY
Capture glaze tests, firing details, and creative progress—all in one simple printable. Make your projects easier to repeat and improve.
Twisted Ribbon Handle Lid
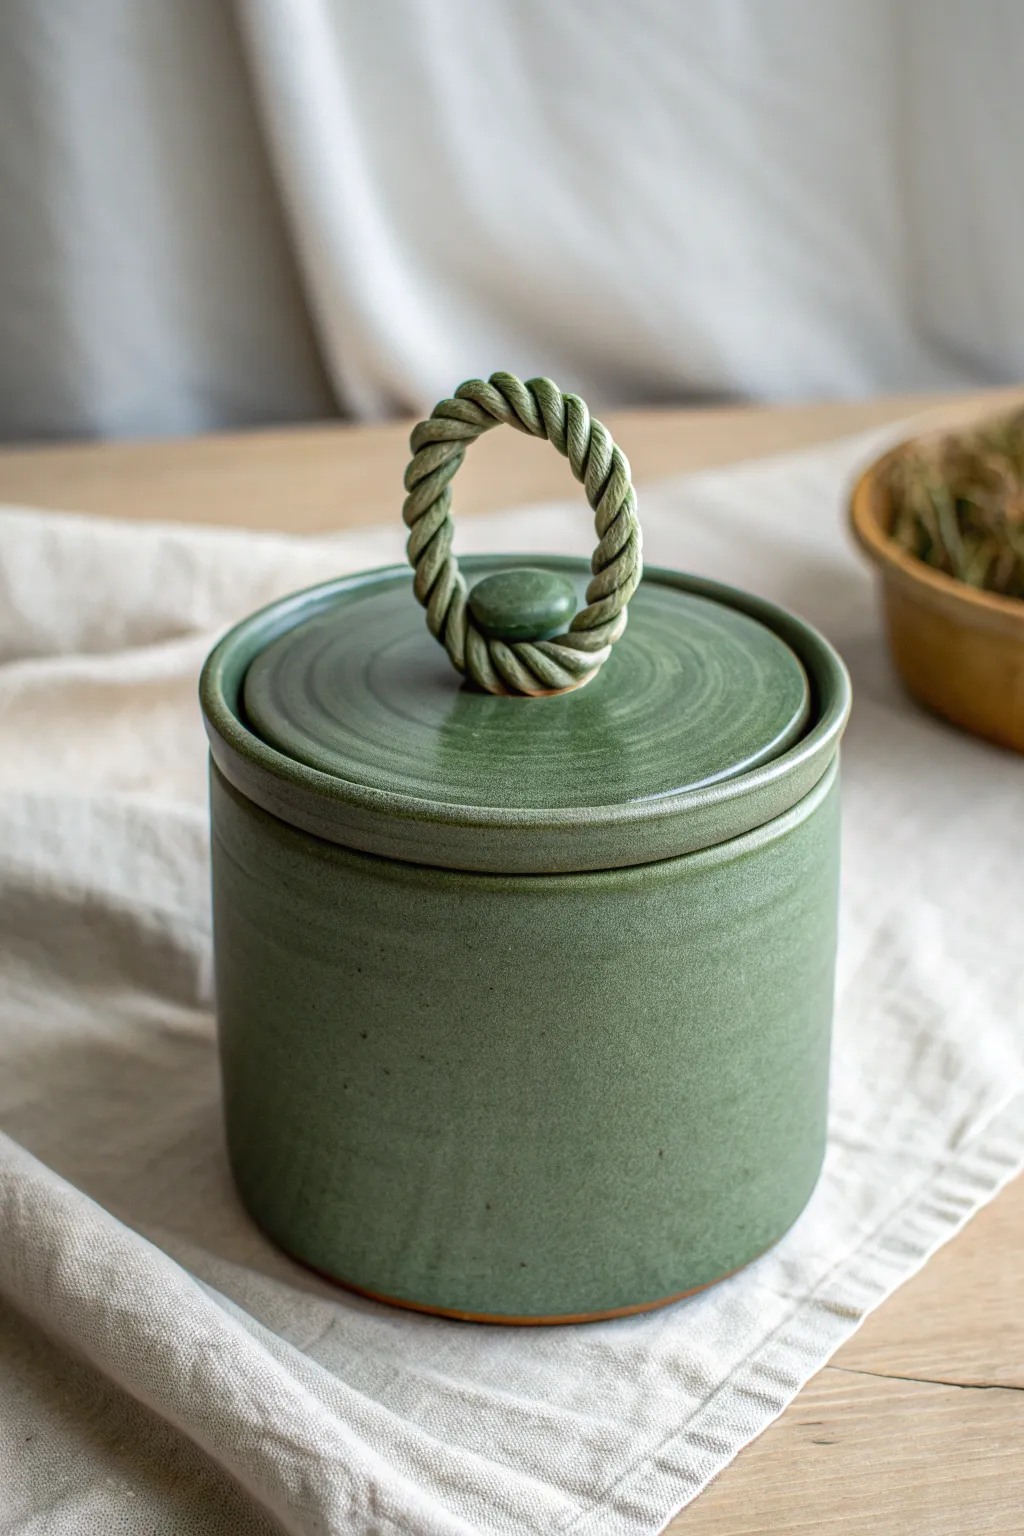
This project features a sleek cylindrical body topped with a lid that showcases a deceptively simple twisted rope handle. The finish is a lovely, semi-matte moss green glaze that breaks beautifully over the texture of the handle, highlighting the craftsmanship.
How-To Guide
Materials
- Stoneware clay body (smooth)
- Pottery wheel
- Throwing tools (rib, sponge, wire cutter)
- Calipers
- Trimming tools
- Scoring tool or serrated rib
- Slip
- Moss/Sage green glaze (semi-matte)
- Kiln
Step 1: Throwing the Body
-
Center and open:
Center approximately 1.5 to 2 pounds of clay on your wheel. Open the center to create a flat floor about 4 inches wide. -
Pull the walls:
Pull the clay up into a straight-sided cylinder. Aim for a height of about 5 inches, keeping the walls even in thickness from bottom to top. -
Refine the shape:
Use a metal or wooden rib on the outside while supporting the inside with your hand to remove throwing lines and create a perfectly smooth, straight vertical profile. -
Define the rim:
Chamois or sponge the rim to make it smooth and rounded. This is crucial for lid fit later. -
Measure:
Before cutting the pot off the wheel, use your calipers to measure the *interior* diameter of the rim precisely. Lock the calipers at this width.
Cracking at the Twist?
If the rope handle cracks while drying, cover the newly attached handle with wax resist while it’s still leather hard. This forces it to dry slowly and evenly with the rest of the lid.
Step 2: Creating the Lid
-
Throw the lid slab:
Using a smaller ball of clay (about 3/4 lb), throw a flat, thick disk. Create a flange on the underside that matches the caliper measurement you took from the jar body. -
Refine the top:
On the top surface of the lid, create a slight dome shape using a rib. Smooth it thoroughly, as this will be the stage for your handle. -
Add a central anchor:
Throw or attach a very small, flattened button of clay exactly in the center of the lid’s top surface. This will serve as the connection point for the inner part of the handle loop.
Step 3: Sculpting the Handle
-
Roll the coil:
Roll out a long, consistent coil of clay, roughly the thickness of a pencil or slightly thicker. -
Twist the rope:
Take the long coil, fold it in half, and gently twist the two strands around each other to create a rope effect. Keep the twist tight and even. -
Form the loop:
Cut a section of your twisted rope. Curve it into an inverted ‘U’ shape to form the handle loop. -
Prepare the connection:
Wait until the lid is leather hard. Score the central button anchor and the spots on the lid surface where the handle ends will rest. -
Attach the handle:
Using slip, firmly press the ends of the twisted rope onto the lid. I like to blend the clay slightly at the very bottom hidden edge to make sure the bond is permanent. -
Clean up:
Use a small brush with a little water to clean up any excess slip around the connection points, keeping the twist texture crisp.
Dual-Tone Texture
After glazing, gently wipe the raised surfaces of the twisted handle with a damp sponge. This reveals the raw clay body on the high points, creating a stunning contrast with the green crevices.
Step 4: Finishing and Glazing
-
Bisque fire:
Once bone dry, bisque fire the jar and lid to Cone 04 (or your clay’s specific bisque temperature). -
Wax the contact points:
Apply wax resist to the bottom of the jar, the rim of the jar, and the flange of the lid where they will touch during firing. -
Glaze application:
Dip or spray the piece with a moss green glaze. A semi-matte or satin finish works best here to emphasize the twisted texture without creating distracting high-gloss reflections. -
Wipe back:
Check the handle carefully. If the glaze is too thick in the crevices of the twist, the detail will be lost. Gently dab it with a sponge if it looks pooled. -
Final fire:
Fire to the maturation temperature of your clay and glaze (likely Cone 5 or 6 for stoneware).
Once cooled, your jar is ready to hold tea, sugar, or simply sit pretty on a shelf
Sculptural Mushroom Knob Lid
This charming lidded jar combines the rustic warmth of exposed stoneware with a creamy, speckled glaze for a timeless look. The defining feature is the prominent mushroom-style knob, which offers a comfortable grip and a sculptural focal point.
Step-by-Step
Materials
- Speckled stoneware clay body (e.g., Lagunitas or similar buff clay with manganese)
- Pottery wheel
- Throwing tools (sponge, rib, wire cutter)
- Trimming tools (large and small loop tools)
- Calipers
- Needle tool
- Creamy white glaze (semi-opaque)
- Wax resist
- Kiln
Step 1: Throwing the Gallery Jar
-
Center and open:
Begin with about 1.5 to 2 lbs of wedged clay. Center it firmly on the wheel head and open the vessel, keeping the floor flat and about a half-inch thick to allow for trimming later. -
Pull the walls:
Pull the walls straight up into a cylinder shape. Aim for a height of about 4-5 inches, keeping the walls even but slightly thicker at the rim to support the gallery. -
Form the gallery:
Use a wooden rib or your thumb to split the rim. Gently press the inner half of the rim downward to create an L-shaped shelf (the gallery) inside the neck. This ledge is where your lid will rest. -
Refine and measure:
Clean up the gallery with a square-edged tool to ensure a sharp 90-degree angle. Before cutting the pot off the wheel, use your calipers to measure the exact interior diameter of the gallery opening.
Wobble Watch
If the lid rattles after firing, apply a tiny dab of grinding paste (valve grinding compound) to the gallery, insert the lid, and twist back and forth to sand it into a perfect fit.
Step 2: Creating the Mushroom Lid
-
Throwing off the hump:
I find it easiest to throw lids ‘off the hump’ (using a large mound of clay). Center the top portion of your mound and isolate enough clay for the lid. -
Shape the flange:
Flatten the clay into a disc shape first. Using your caliper measurement, create a vertical flange underneath the disc that will fit snugly inside the jar’s gallery. -
Sculpt the knob:
Instead of cutting it loose immediately, shape the top of the disc. Pinch extra clay in the center upward to form a stem, then flatten the very top into a button shape to create the mushroom knob profile. -
Check fit:
Double-check your measurements with calipers. The flange should be slightly smaller than the jar opening to account for glaze thickness later. Undercut the lid deeply and slice it off the hump with a wire.
Pro Tip: Swirls
Leave subtle throwing rings on the top of the mushroom lid before bisque firing. The glaze will break beautifully over these ridges, emphasizing the concentric texture.
Step 3: Trimming and Assembly
-
Trim the jar base:
Once leather hard, center the jar upside down on the wheel. Trim the bottom third of the exterior to reveal the raw clay texture, creating a distinct foot ring. -
Define the two-tone line:
While trimming, create a crisp line where the future glaze will stop. This separation between the smooth wall and the textured base is crucial for the final aesthetic. -
Refine the lid:
Place the lid upside down in a chuck or directly on the wheel head if stable. Clean up the underside of the flange and smooth the mushroom knob’s edges with a rib. -
Bisque fire:
Once bone dry, load both pieces into the kiln and bisque fire to Cone 04 (or your clay’s specific bisque temperature).
Step 4: Glazing
-
Wax resist application:
Apply wax resist to the bottom third of the jar (the exposed clay area), the bottom of the foot, and importantly, the flange of the lid where it touches the jar. -
Waxing the lid top:
For this specific look, also apply wax to the entire top surface of the mushroom lid, leaving only the outer rim or very underside to accept glaze if desired, or leave the whole lid raw. -
Dip into glaze:
Holding the jar by the foot, dip it upside down into your creamy white glaze up to the wax line. Hold for 3 seconds and lift. Shake gently to remove drips. -
Clean up:
Use a damp sponge to wipe away any glaze beads that formed on the waxed areas. Ensure the contact points between lid and jar are completely free of glaze. -
Final firing:
Load the kiln and glaze fire to maturity (likely Cone 5 or 6 depending on your stoneware). The heat will interact with the iron in the clay, creating those beautiful speckles through the cream glaze.
Fill your new handmade canister with tea or spices and enjoy the tactile beauty of your work
Minimal Geometric Knob Lid
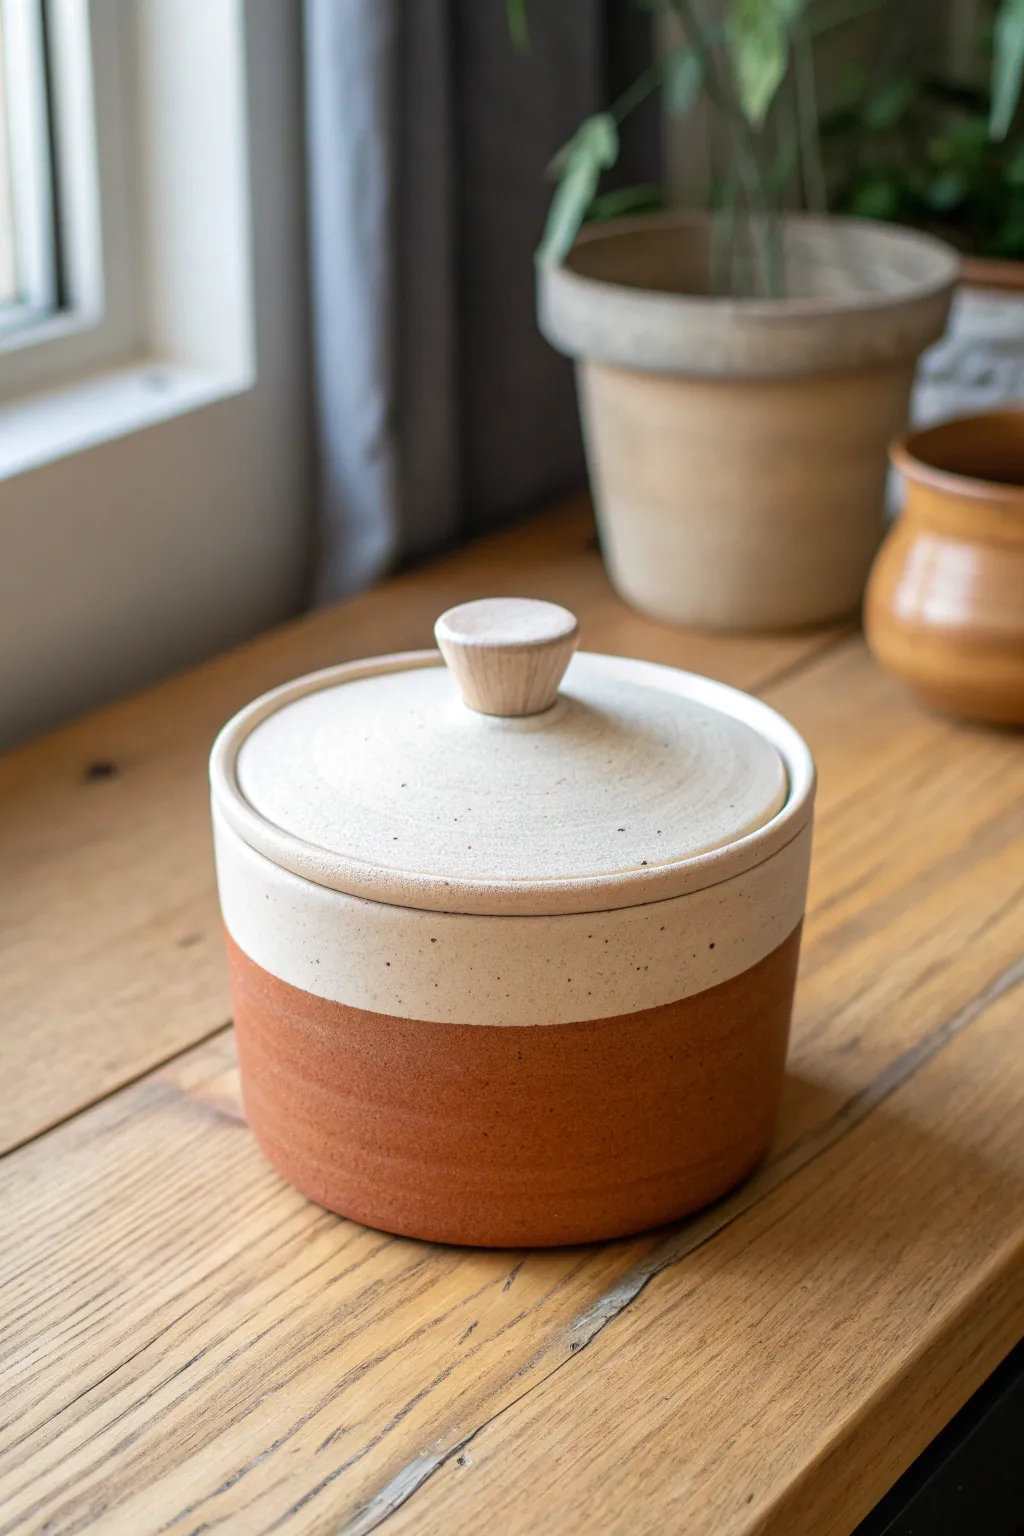
This handmade ceramic canister blends the raw warmth of exposed terracotta with a clean, speckled white glaze for a contemporary look. The simple cylindrical form and geometric knob lid make it a functional yet stylish addition to any countertop.
Step-by-Step Tutorial
Materials
- Red stoneware or terracotta clay (approx. 2-3 lbs)
- Pottery wheel
- Throwing tools (sponge, needle tool, rib tool, wire cutter)
- Trimming tools
- Calipers
- Matte white speckle glaze
- Wax resist
- Brush for wax resist
- Sponge for cleanup
- Kiln
Step 1: Throwing the Base
-
Center and open:
Start with about 1.5 to 2 lbs of well-wedged clay. Center it firmly on the wheel head and open it up, creating a flat floor about 4-5 inches wide. -
Pull the walls:
Pull the walls up into a straight cylinder. Aim for a height of about 4-5 inches. Keep the walls even, roughly 1/4 inch thick throughout. -
Refine the rim:
Use a rib to compress and smooth the outside wall, ensuring it is perfectly vertical. Compress the rim with a chamois or your finger so it’s rounded and smooth. -
Measure the opening:
Before you finish the base, use your calipers to measure the inside diameter of the rim. Lock the calipers in place; you will need this exact measurement for the lid. -
Cut and dry:
Wire the pot off the bat but leave it on a ware board. Let it dry to leather hard consistency.
Straight Lines Made Easy
Rest your hand on a steady object while spinning the banding wheel to apply the wax resist. This keeps your hand stable for a perfectly straight horizon line.
Step 2: Creating the Gallery Lid
-
Throw the lid:
Using the remaining clay (approx 1 lb), center a small mound. Flatten it into a thick pancake shape slightly wider than your caliper measurement. -
Form the flange:
Instead of opening a hole, press down to create a recessed interior, leaving a raised rim. This rim needs to fit *inside* your jar’s opening, or sit atop it with a flange underneath. For this style, throw a flat lid with a downward-facing flange underneath to lock into the jar. -
Check the fit:
Use your calipers to check the flange diameter. It needs to be just slightly smaller than the jar opening to account for shrinkage and glaze fit. -
Add the knob:
Once the basic lid shape is thrown, you can either pull a knob directly from the center hump of clay (if thrown right-side up) or attach one later. For this geometric look, I prefer to throw a small, tapered knob directly from the excess clay in the center. -
Refine the knob shape:
Use a small metal rib to sharpen the angles of the knob. It should be an inverted cone shape—wider at the top and tapering down to the lid surface.
Step 3: Trimming and Assembly
-
Trim the base:
Once leather hard, center the jar upside down on the wheel. Trim away excess weight from the bottom and create a flat, stable foot. Smooth the surface with a rib. -
Trim the lid:
Place the lid upside down (resting on its knob) in a chuck or centered on a foam bat. Trim the underside to remove excess weight and sharpen the flange’s edge. -
Dry fit:
Check that the lid fits comfortably on the jar. It should not be tight; a little wiggle room is good. -
Bisque fire:
Allow both pieces to dry completely until bone dry. Load them into the kiln for a bisque firing (usually cone 04 or 06).
Lid Don’t Fit?
If the lid is too tight after the glaze firing, use a diamond sanding pad or grinding stone under running water to gently sand down the flange until it fits.
Step 4: Glazing
-
Clean the bisque:
Wipe both pieces down with a damp sponge to remove any dust. -
Apply wax resist:
Place the jar on a banding wheel. While spinning it, carefully apply a line of wax resist around the middle of the exterior wall. Paint wax everywhere *below* this line, including the bottom. This creates that sharp division between clay and glaze. -
Glaze the interior:
Pour your matte white glaze inside the jar, swirl it to coat, and pour out the excess. Wipe any drips off the rim immediately. -
Glaze the exterior:
Hold the jar by the foot (which is waxed) and dip the top half into the glaze bucket. Hold it just long enough for coverage—about 3 seconds. The wax will repel the glaze on the bottom half. -
Glaze the lid:
Wax the flange where it touches the jar. Dip the entire lid into the glaze. If you want the knob unglazed like wood, wax it beforehand; otherwise, glaze the whole top surface. -
Clean up:
Use a sponge to wipe away any tiny beads of glaze that might be sitting on the waxed areas. The line should be perfectly crisp. -
Final fire:
Load into the kiln for the glaze firing (likely cone 5 or 6 depending on your clay body). Ensure the lid is not on the jar during firing unless you have thoroughly waxed the contact points to prevent sticking.
Now you have a stunning, modern canister ready to organize your kitchen counters.
Peek-A-Boo Animal Lid Handle
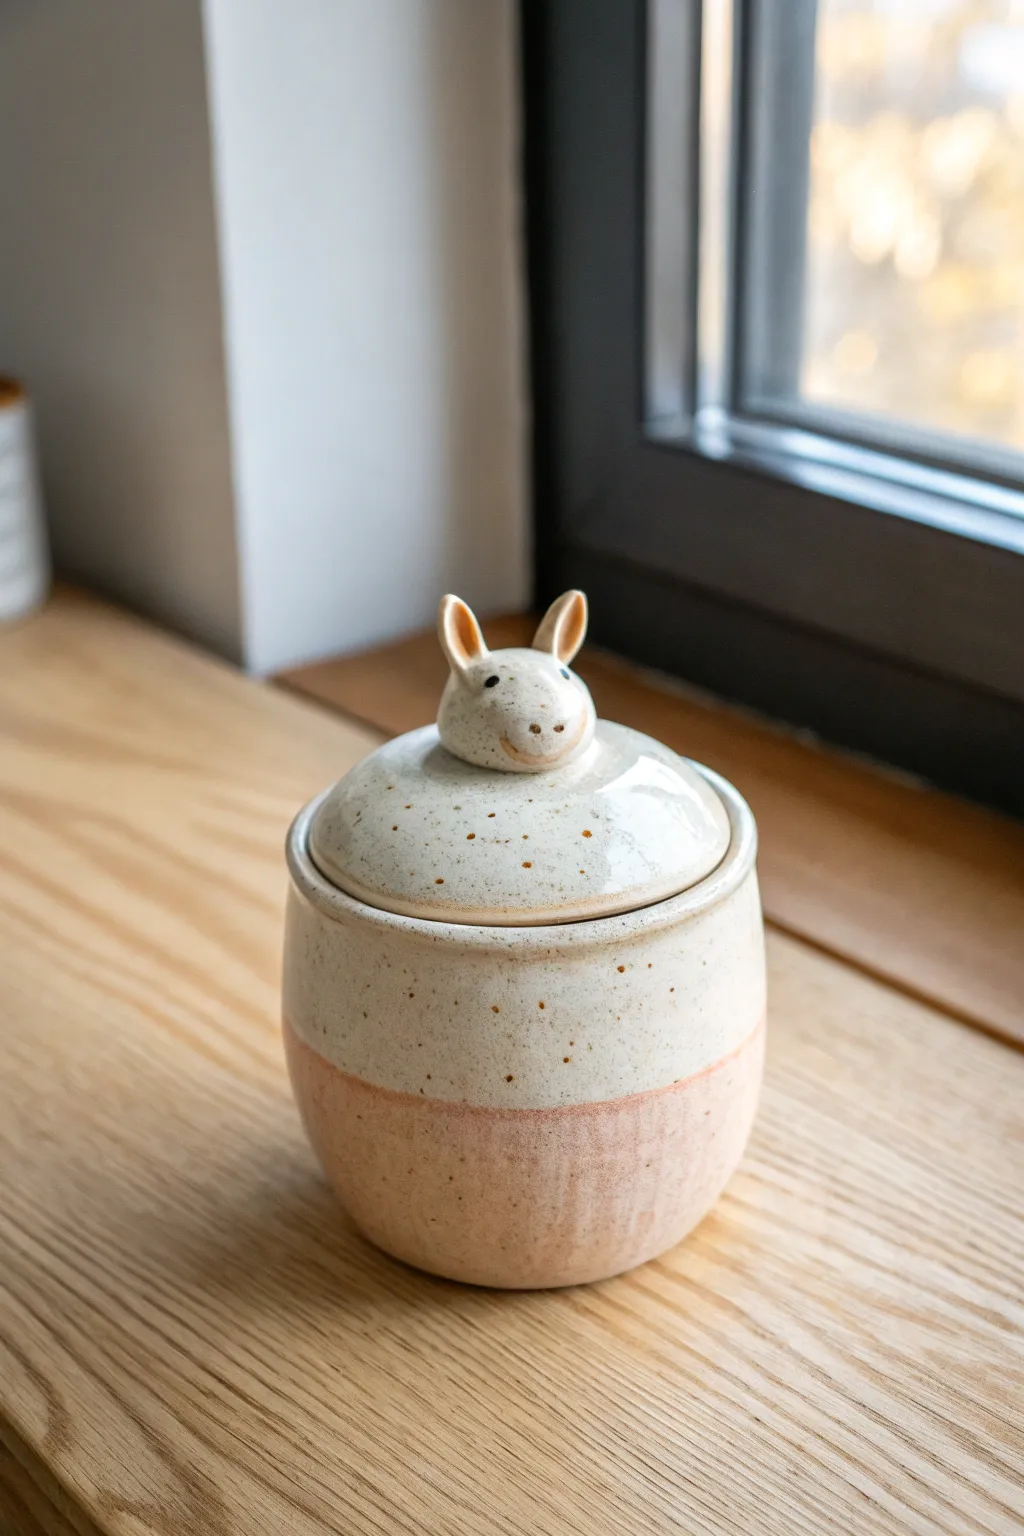
Add a touch of playful charm to your kitchen storage with this speckled stoneware jar featuring an adorable sculpted rabbit handle. The two-tone design combines a creamy speckled glaze with a warm, raw clay texture or a matte pink dip for a modern, earthy finish.
Detailed Instructions
Materials
- Speckled stoneware clay (mid-fire)
- Pottery wheel (or slab roller/pin for hand-building)
- Throwing tools: sponge, ribs (wood and metal), wire cutter
- Trimming tools
- Needle tool
- Scoring tool or serrated rib
- Slip (clay slurry)
- Modeling tools (small wooden knife, rubber shaper)
- Calipers
- Glossy white or cream glaze (translucent enough for speckles)
- Optional: Matte pink/blush underglaze or glaze for the base
- Small detail brush for the face
- Black underglaze or oxide for eyes
Step 1: Throwing the Body
-
Center and open:
Start with about 1-1.5 lbs of speckled clay. Wedge it thoroughly to remove air bubbles. Center the clay on the wheel and open it up, leaving a floor thickness of about 1/4 inch. -
Pull the walls:
Pull the cylinder walls up into a gentle curve. Aim for a rounded, belly-like shape that curves slightly inward at the rim. Keep the walls consistent, around 1/4 inch thick. -
Create a gallery:
Using a wooden tool or the side of your thumb, split the rim to create a ‘gallery’—a small internal shelf where the lid will sit. Compress this area well to prevent warping. Measure the diameter of the gallery seating area with calipers. -
Refine the curve:
Use a flexible metal rib on the exterior to smooth the curve and remove throwing lines if you want a cleaner look, or leave slight finger ridges for texture. Cut the pot from the bat with a wire tool.
Loosey Goosey Lid?
If your lid rattles after firing, mix a paste of silicone carbide and water. Apply it to the gallery and grind the lid against the pot in a circular motion to sand them for a perfect fit.
Step 2: Creating the Lid
-
Throw the lid:
Using a smaller ball of clay (about 0.5-0.75 lbs), throw a shallow bowl shape upside down or throw it ‘off the hump.’ Ensure the outer rim diameter matches the measurement you took with your calipers earlier, accounting for shrinkage if necessary. -
Shape the dome:
Create a gentle dome shape for the top of the lid. You don’t need to throw a knob, as we will be attaching a sculpture later. Smooth the surface with a rib. -
Check the fit:
Before removing the lid from the wheel, double-check your measurements against the pot’s gallery. It’s better to be slightly larger and trim down later than too small.
Step 3: Sculpting the Hare
-
Form the head base:
Once the lid is leather hard and trimmed, roll a small ball of clay into an egg shape for the rabbit’s head. It should be proportional to the lid size. I like to tap the base gently on the table to flatten the connection point. -
Pinch the ears:
Take two tiny elongated teardrop shapes of clay. Gently flatten them and use a modeling tool to create an indentation in the center of each, forming the inner ear. -
Attach components:
Score and slip the bottom of the ears and attach them firmly to the top of the egg-shaped head. Smooth the seams with a rubber shaper so they look seamless. -
Add facial details:
Use a needle tool or small modeling tool to gently press in eyes (or leave smooth for painting later) and define the snout. Add a tiny nose bump if desired. -
Mount to lid:
Score the center of your leather-hard lid and the bottom of the rabbit head. Apply slip and press the head firmly onto the lid. Use a small brush or tool to clean up any excess slip around the base of the sculpture.
Seasonal Switch
Make multiple lids for the same base pot! Create a pumpkin handle for autumn or a tiny bird for spring to rotate the look without making a whole new container.
Step 4: Finishing and Glazing
-
Bisque fire:
Allow both pieces to dry slowly to prevent the sculpted handle from cracking off. Once bone dry, bisque fire to cone 04 (or your clay’s specific bisque temperature). -
Wax resist:
Apply wax resist to the gallery of the pot, the rim of the lid where it touches the pot, and the foot ring. If you want the raw clay bottom look shown in the image, wax the bottom third of the exterior as well. -
Dip glazing:
Dip the lid (holding it by the rim, not the rabbit ears if they feel fragile) into a creamy white or transparent speckled glaze. Dip the top two-thirds of the pot body into the same glaze. -
Detail the face:
Using a very fine brush and black underglaze or oxide, paint two small dots for eyes. You can also add a faint dab of pink underglaze inside the ears or on the cheeks before the final glaze firing. -
Glaze fire:
Fire the piece to cone 6 (or your clay’s maturity temperature). Ensure the lid is not on the pot during firing unless you have thoroughly waxed the contact points and use alumina hydrate to prevent sticking.
Fill your new jar with honey, sugar, or trinkets and enjoy the friendly face greeting you every time you open it
Creature Box Container With Shell-Like Lid
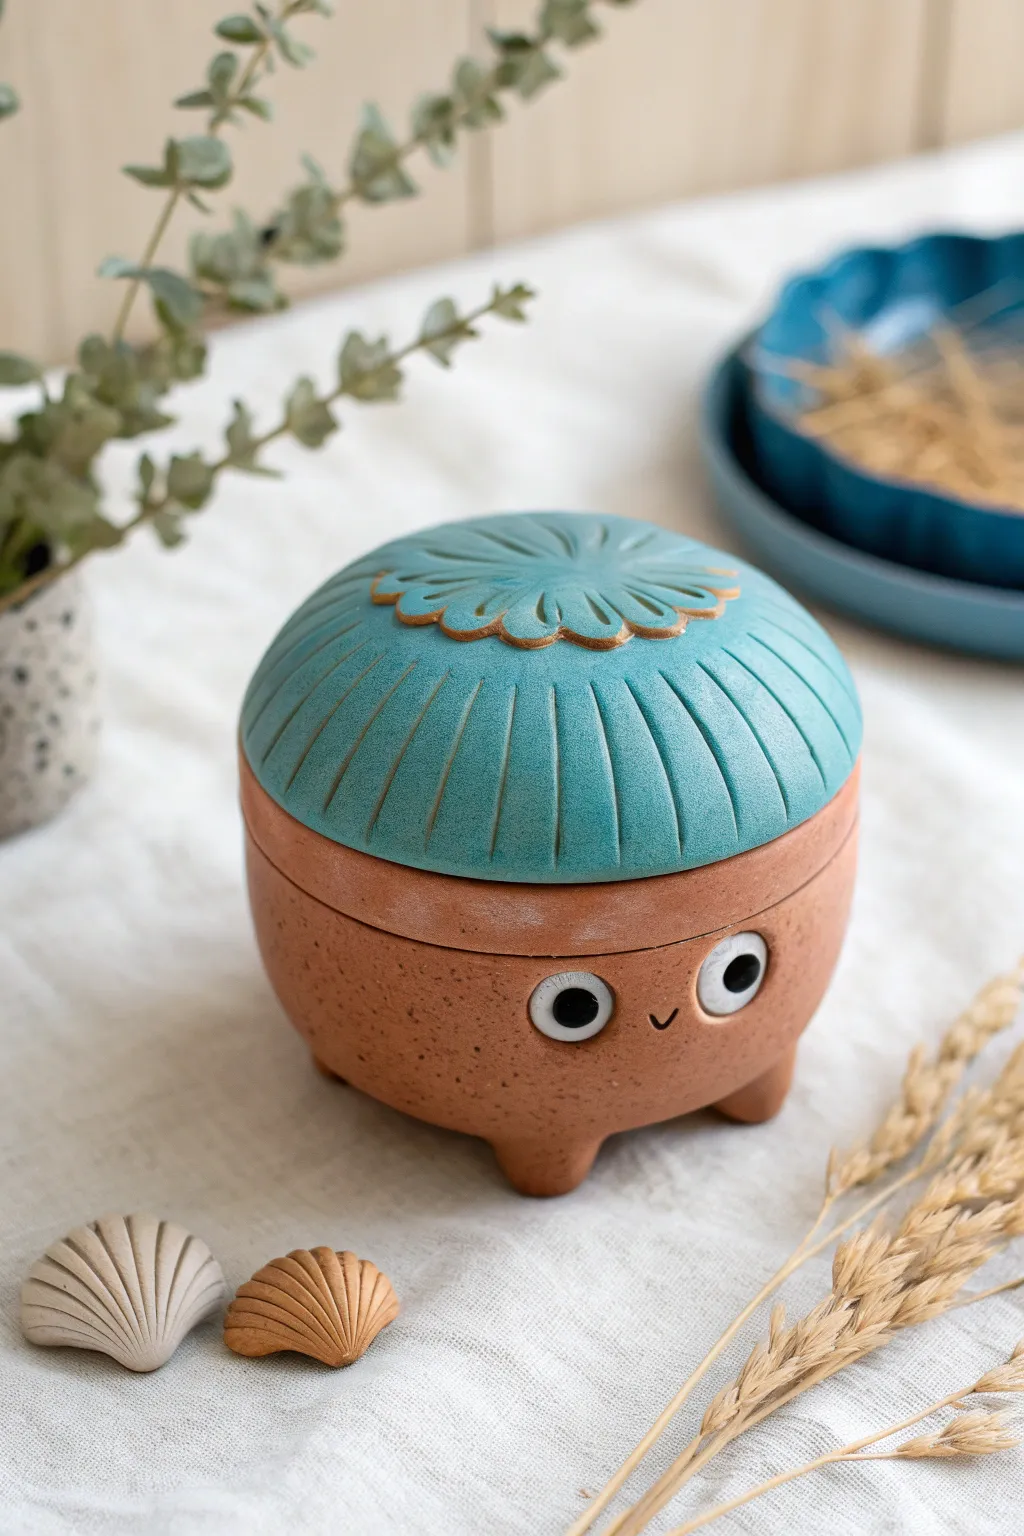
Craft a charming little friend for your desk with this playful clay container project. Featuring a warm, speckled terracotta base with an adorable face and a contrasting teal lid carved with shell-like details, this piece is perfect for storing small treasures.
Step-by-Step
Materials
- Terracotta-colored polymer clay or air-dry clay (speckled effect optional)
- Teal or turquoise polymer clay
- White and black clay (for eyes)
- Acrylic rolling pin
- Circle cutters (large for container, small for details)
- Clay sculpting tools (needle tool, ball stylus)
- Gold acrylic paint or gilding wax
- Fine detail paintbrush
- Small bowl or sphere mold (for forming the lid shape)
- Sponge or texture tool
- Clear matte varnish
Step 1: Forming the Base Creature
-
Prepare the Body Clay:
Start by conditioning a large ball of terracotta-colored clay. If you want that natural, speckled pottery look seen in the photo, knead in a small amount of dark brown clay rolled into tiny ‘sand’ grains or use pre-mixed granite-effect clay. -
Shape the Pinch Pot:
Form the ball into a smooth sphere, then push your thumb into the center. Gently pinch and rotate the clay to open it up into a bowl shape, keeping the walls relatively thick (about 1/4 inch) for stability. -
Smooth the Surface:
Place the bowl upside down on your work surface. Use a damp sponge or your fingers to smooth out any fingerprints, ensuring the outer curve is delightfully round. -
Create the Feet:
Roll four small, equal-sized balls of the same terracotta clay. Shape them into slight cones. -
Attach the Feet:
Score the bottom of the pot and the tops of the cones. Press the feet firmly onto the base of the pot, blending the seams with a sculpting tool so they look like they grew organically from the body. -
Check Stability:
Turn the pot right-side up and gently press it down to ensure it stands level on its new feet.
Step 2: Sculpting the Decorative Lid
-
Size the Lid:
Roll out a slab of teal clay. Cut a circle that is slightly larger than the opening of your terracotta pot to create an overhang. -
Dome the Lid:
Gently drape the clay circle over a sphere mold, a lightbulb, or a ball of aluminum foil to give it a domed shape that matches the curve of the base. -
Add the Center Motif:
Roll a smaller, thin circle of teal clay. Cut a wavy, flower-like edge around it and place it dead center on top of the dome. -
Carve the Texture:
Using a needle tool or a dull knife, score deep, radiating lines from the center motif down to the edge of the lid, mimicking the grooves of a scallop shell. -
Create the Inner Rim:
On the underside of the lid, attach a snake of clay in a circle that fits snugly *inside* the terracotta pot’s opening. This prevents the lid from sliding off.
Lid Won’t Fit?
If the lid warps during baking, sandpaper is your friend. Gently sand the inner rim of the lid until it sits flush. Test the fit frequently to avoid removing too much material.
Step 3: Bringing the Face to Life
-
Make the Sclera:
Roll two balls of white clay and flatten them into discs. Press them onto the front of the pot, spacing them slightly apart. -
Add Pupils:
Roll two much smaller balls of black clay. Press them into the center of the white discs to create the wide-eyed look. -
Carve the Mouth:
Use a small needle tool or the edge of a straw to impress a tiny ‘v’ or ‘u’ shape between the eyes for a small, shy smile. -
Bake or Dry:
Follow the manufacturer’s instructions for your specific clay. If baking polymer clay, I usually tent it with foil to prevent the teal from darkening too much.
Customize Your Creature
Swap the teal shell design for a leafy green pattern or a mushroom cap. You can also give the creature different expressions by changing the pupil placement or adding clay cheeks.
Step 4: Finishing Touches
-
Highlight the Lid:
Once cool and dry, use a dry brush or your finger to rub a tiny amount of gold acrylic paint or gilding wax onto the raised edges of the center flower motif. -
Dust the Rim:
Lightly dust the rim of the terracotta base with white chalk pastel or very diluted white paint to mimic the ‘sanded’ look of real pottery. -
Seal the piece:
Apply a coat of matte varnish to the entire piece to protect the surface and unify the sheen. -
Gloss the Eyes:
For that extra spark of life, add a drop of gloss glaze or UV resin specifically to the eyes to make them shine.
Place your finished creature on a shelf or fill it with treats and enjoy its friendly little face every day.
Dessert-Inspired Drip Lid Jar
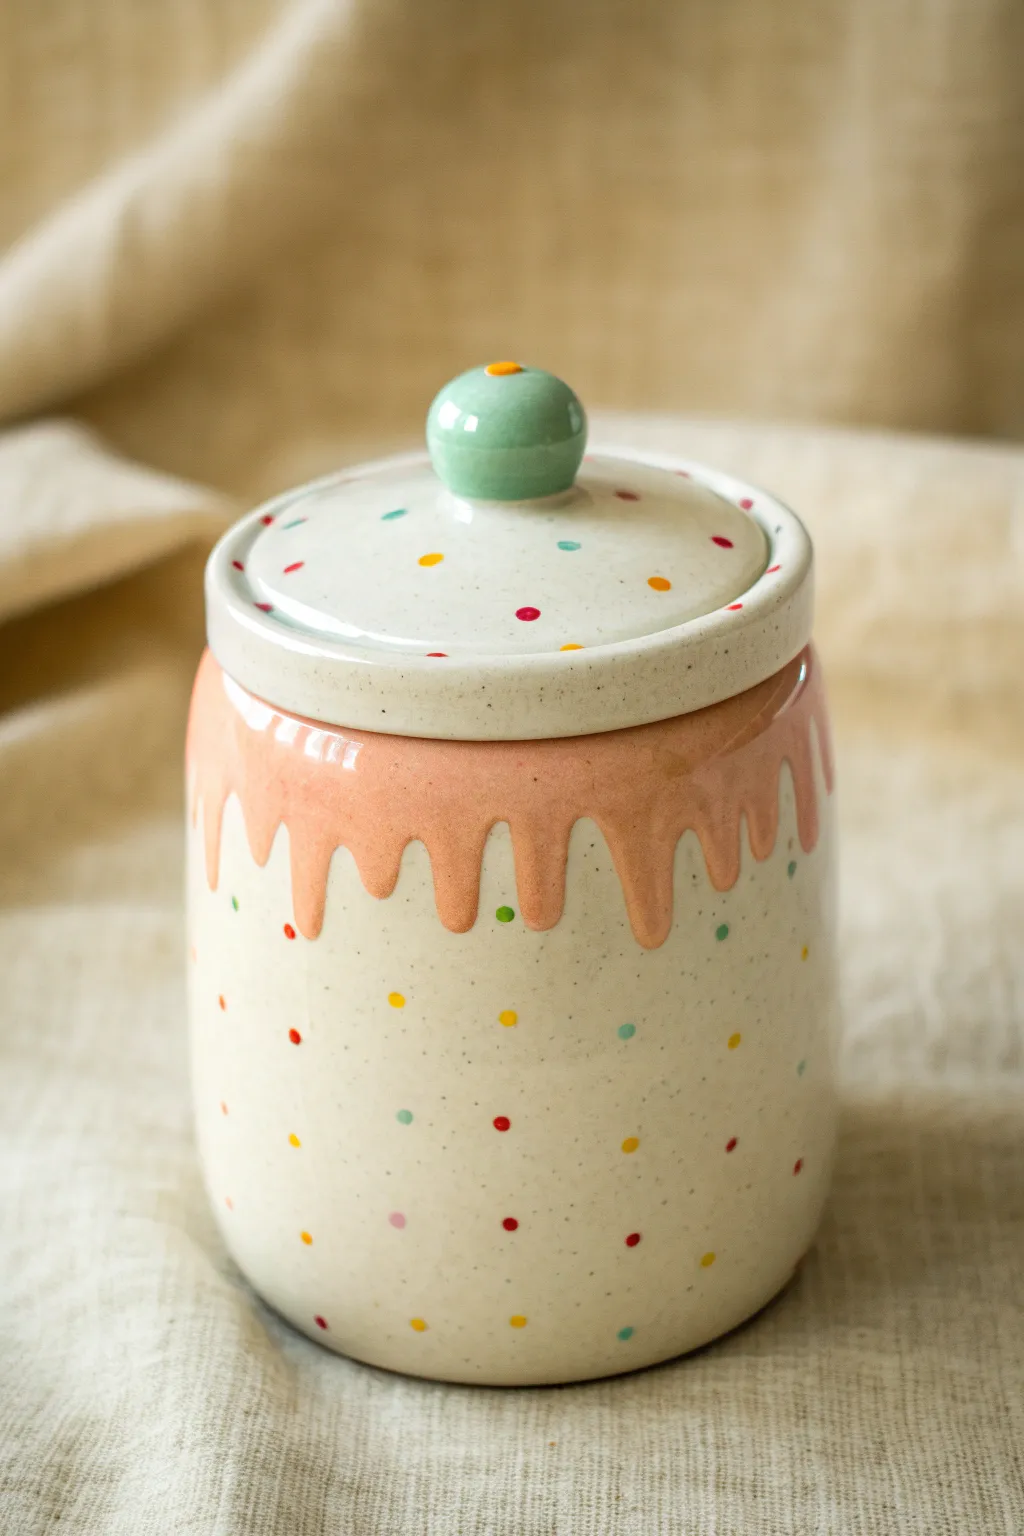
Create a playful storage solution that looks good enough to eat with this dessert-inspired ceramic jar. Featuring a charming “melted ice cream” drip glaze and festive confetti polka dots, this project turns a simple clay cylinder into a functional piece of art.
Step-by-Step Tutorial
Materials
- White or speckled stoneware clay
- Pottery wheel (or rolling pin for hand-building)
- Needle tool
- Rib tool
- Wire cutter
- Sponge
- Underglazes: Pink, Mint Green, Red, Yellow, Teal
- Clear transparent glaze
- Small round paintbrush
- Medium flat paintbrush
- Caliper tool (optional)
- Kiln
Step 1: Forming the Body and Lid
-
Throw the cylinder:
Begin by wedging your clay to remove air bubbles. Center the clay on the wheel and throw a straight-walled cylinder, pulling the walls up to your desired height. Smooth the outside with a rib tool to create a clean canvas for your design. -
Shape the rim:
Refine the rim of the jar, ensuring it is slightly rounded but mostly flat to accept a lid. Measure the inner diameter with calipers if you have them, which will help size the lid correctly. -
Trim the base:
Once the jar is leather-hard, trim the bottom to create a neat foot ring. This adds stability and gives the piece a professional finish. -
Throw the lid:
Using a smaller amount of clay, throw a lid ‘off the hump’ or centered directly. Create a gallery (a ridge that fits inside the jar) that matches your jar’s measurements. Make sure the top surface curves gently upward. -
Create the knob:
While the lid is still on the wheel (or by hand-building separately), shape a small, rounded knob on the very top center. This will eventually be painted green. Allow all pieces to dry slowly to the bone-dry stage. -
Bisque fire:
Load your bone-dry greenware into the kiln and fire to cone 04 (or your clay’s specific bisque temperature). This prepares the piece for glazing.
Sticky Lid Fix
If you’re worried about the lid fusing to the jar during firing, apply a wash of alumina hydrate or wax resist to the touching surfaces (the gallery and rim).
Step 2: Applying the Design
-
Apply base color (optional):
If your clay isn’t naturally speckled like the reference image, you might want to apply a layer of speckled cream underglaze or a transparent glaze with speckles later. For this tutorial, we assume the clay body provides the base speckle. -
Outline the drip:
Using a pencil, lightly sketch a wavy ‘drip’ line around the top exterior of the jar, extending about an inch or two down the sides. Pencil marks will burn off in the kiln, so don’t worry about mistakes. -
Paint the pink drip:
Using pink underglaze and a medium brush, fill in the area above your wavy line, covering the rim and the ‘drips’. Apply 2-3 coats for solid opacity, letting each coat dry before adding the next. -
Add confetti dots:
Dip a small round brush into your various underglaze colors (red, yellow, teal, pink). Dot them randomly around the lower half of the jar and across the top of the lid. Vary the spacing to keep it looking organic. -
Paint the knob:
Carefully paint the knob specifically with the mint green underglaze. I find using a smaller brush helps get underneath the curve of the knob without smearing paint on the lid surface. -
Add the final accent:
Place a tiny dot of yellow on the very peak of the green knob for a cute finishing detail. -
Clear glaze application:
Once the underglaze designs are totally dry, dip the entire jar and lid into a clear transparent glaze. If you used a plain white clay earlier, use a speckled clear glaze here to achieve the granite effect seen in the photo. -
Wipe the foot:
Use a damp sponge to meticulously wipe any glaze off the very bottom of the jar and the rim where the lid sits to prevent them from fusing to the kiln verify shelf. -
Glaze fire:
Load the kiln again for the final glaze firing (usually cone 5 or 6 depending on your materials). Ensure the lid is fired separately or on a stilt if the contact points aren’t perfectly clean.
Puffy Paint Drips
For a 3D effect, mix your pink underglaze with a little slip, or use a slip trailer to apply the drip section. This creates physical texture you can feel.
Now you have a charming vessel perfect for hiding cookies or brightening up a kitchen shelf
Polymer Clay Trinket Box With Snug Lid
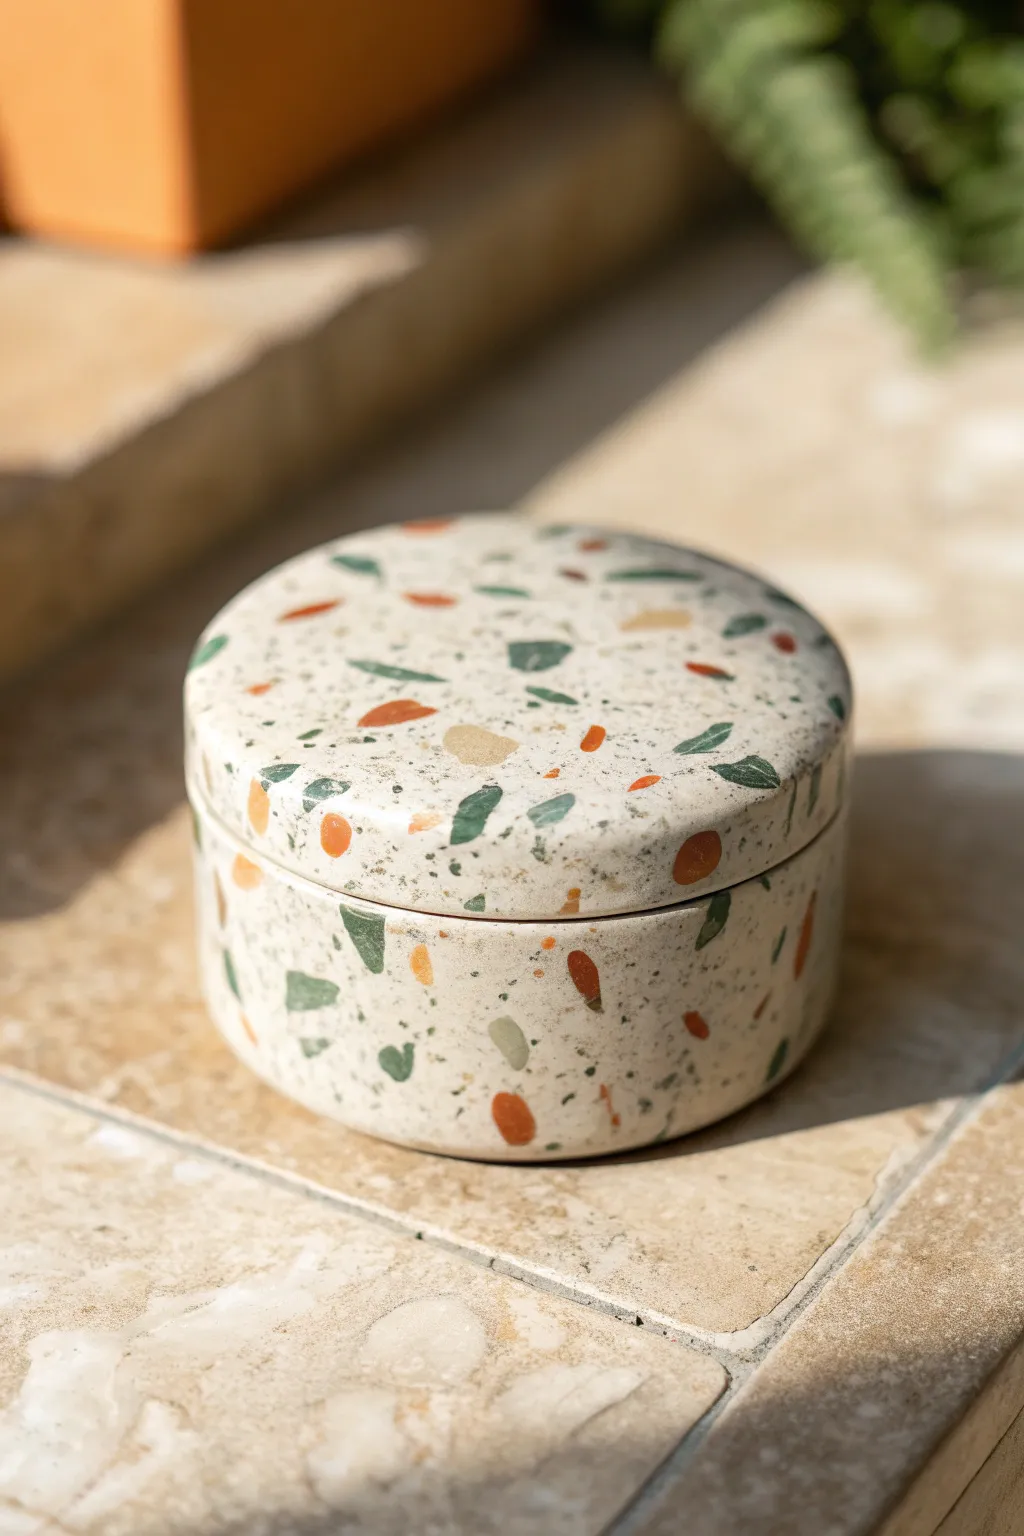
Recreate the sophisticated look of terrazzo stone using accessible polymer clay techniques with this charming, speckled trinket box. The scattered chips of muted terracotta, sage green, and cream create a modern, earthy aesthetic perfect for storing jewelry or small treasures.
Detailed Instructions
Materials
- Polymer clay (White, translucent, terracotta/orange, sage green, dark green, beige)
- Acrylic rolling pin
- Tissue blade or craft knife
- Round cookie cutters (two sizes: one for the base, slightly larger for the lid)
- Metal or glass jar/canister form (oven-safe) to use as a mold
- Cornstarch or baby powder (release agent)
- Fimo liquid or Sculpey Bake & Bond
- Sandpaper (various grits: 400, 600, 1000)
- UV resin or clear polyurethane varnish (optional for shine)
Step 1: Preparing the Terrazzo Chips
-
Conditioning Colors:
Begin by conditioning your colored clays independently: terracotta, sage green, dark green, and beige. Roll them out into very thin sheets, roughly 1mm thick. -
Baking the Chips:
Place these thin colored sheets on a tile or baking sheet and bake them for about 10-15 minutes at the manufacturer’s recommended temperature. They need to be hard enough to chop. -
Chopping:
Once cooled, take your tissue blade and chop the baked sheets into irregular, jagged fragments. Aim for a variety of sizes, from tiny specks to larger triangles.
Uneven Surface?
If your chips are sticking out too much after baking, don’t worry. Start with a coarser grit sandpaper (like 320) to level the surface aggressively before moving to finer grits for polishing.
Step 2: Creating the Base Slab
-
Mixing the Base Color:
Mix white polymer clay with a small amount of translucent clay (about a 3:1 ratio). This gives the base a more realistic, stone-like depth rather than a flat plastic white look. -
Rolling the Sheet:
Roll your white mixture into a smooth, thick sheet, approximately 3-4mm thick. Ensure it is wide enough to wrap around your chosen jar mold and cover the lid area. -
Embedding the Chips:
Scatter your pre-baked colored chips generously over the raw white sheet. Gently press them down with your fingers to secure them initially. -
Integrating the Pattern:
Use your acrylic roller to roll over the chips, pressing them fully flat into the white clay. Roll in multiple directions to ensure the surface is even and the chips are flush with the white base.
Make It Food Safe
Polymer clay isn’t food safe on its own. To use this for mints or spices, insert a small glass jar or metal tin permanently inside the clay shell instead of using the clay as the raw container.
Step 3: Forming the Container
-
Preparing the Mold:
Lightly dust your glass or metal jar mold with cornstarch to prevent the clay from sticking permanently. -
Cutting the Walls:
Cut a long rectangular strip from your terrazzo slab. The height should match your desired box depth, and length should be the circumference of your mold plus a tiny overlap. -
Wrapping the Base:
Wrap the strip around the base of your mold. Carefully join the seam by cutting through both overlapping layers with a blade and removing the excess, then smoothing the join with a tool. -
Adding the Bottom:
Cut a circle from the remaining slab using your cookie cutter. Place the wrapped mold onto this circle. Use a blending tool to smooth the clay walls down onto the base circle, sealing the container bottom.
Step 4: Creating the Lid
-
Cutting the Top:
Use a slightly larger cookie cutter to cut the top of the lid from your terrazzo slab. It needs to be just slightly wider than the container walls. -
Forming the Lid Rim:
Cut a narrow strip of clay residue (plain white is fine, or terrazzo) to create the inner lip. This strip needs to fit *inside* the container opening. -
Attaching the Lip:
Form the narrow strip into a ring that fits snugly inside your container’s opening. Center this ring on the underside of your lid disc and attach it using a thin smear of liquid clay. -
Initial Bake:
Bake the container (still on the mold) and the lid separately according to package instructions. I typically bake for 45 minutes to ensure durability.
Step 5: Refining and Finish
-
Removing the Mold:
Once fully cooled, carefully slide the clay container off the mold. If it resists, popping it in the freezer for 5 minutes can help the clay contract and release. -
Sanding:
This is the magic step. Under running water (to avoid dust), sand the entire surface starting with 400 grit, moving to 600, then 1000. This reveals the sharp edges of the chips and makes the surface distinctively smooth. -
Checking the Fit:
Test the lid fit. If the inner lip is too tight, sand the outside of the lip ring until the lid slides on and off smoothly. -
Buffing or Sealing:
For a matte look, buff vigorously with denim fabric. For a glossy ceramic finish, apply a thin coat of UV resin or polyurethane varnish.
Now you have a stylish, durable faux-stone box that looks beautiful on any shelf
Full-Glaze Look With a Wadding Stilt Lid Trick
Learn to throw and glaze this classic canister form that features a continuous glazed surface even under the lid’s rim. By utilizing a clever wadding trick during the firing process, you can achieve a seamless finish without the dreaded stuck lid.
Step-by-Step Tutorial
Materials
- Speckled stoneware clay (approx. 2-3 lbs)
- Pottery wheel
- Throwing tools (sponge, loop tools, wire cutter)
- Calipers
- Ribs (metal and wood)
- Throwing bats
- Glossy off-white/cream glaze
- Alumina hydrate and wax resist (for wadding recipe)
- Wadding (clay mixed with alumina)
- Kiln
Step 1: Throwing the Body
-
Center and open:
Begin with about 1.5 to 2 lbs of wedged speckled stoneware clay. Center it firmly on the wheel head and open the clay to create a flat internal floor about 4 inches wide. -
Pull the walls:
Pull the walls up vertically to form a cylinder. Aim for straight sides with even thickness throughout. Smooth the outside using a metal rib to remove throwing lines if you want a cleaner look, or leave slight finger ridges for texture as seen in the photo. -
Create the gallery:
At the rim, gently split the clay to create a ‘gallery’—an internal ledge where the lid will sit. Use a square-edged tool or your thumb to compress this ledge so it is flat and distinct. -
Measure with calipers:
Before removing the pot from the wheel, use your calipers to measure the exact width of the gallery seating area. Lock the calipers at this measurement.
Step 2: Creating the Lid
-
Throw the lid off the hump:
Using a separate lump of clay (or throwing ‘off the hump’ if you’re comfortable), center the clay and flatten it into a disc shape. -
Match the measurements:
Use the locked calipers to ensure the lid’s flange will fit perfectly into the jar’s gallery. The lid should be slightly inverted (curved downwards) to match the jar’s profile. -
Form the knob:
As you shape the top of the lid, pull a small amount of clay upwards in the center to form a classic knob. Refine the shape with a sponge so it’s comfortable to grip. -
Trim and dry:
Once leather hard, trim the underside of the lid and the bottom of the jar to clean up any excess weight. Let both pieces dry slowly until bone dry.
Stuck Lid Rescue
If a drip fused the lid despite wadding, gently tap the seam with a wooden spoon. If stuck fast, reheat slowly in an oven to expand the clay, then retry.
Step 3: Glazing and The Wadding Trick
-
Bisque fire:
Introduction to the first firing: load your bone-dry pieces into the kiln for a bisque fire (usually Cone 04-06). -
Check fit:
After the bisque, double-check that the lid still fits the jar. Ceramics can warp slightly, so ensure they sit flush. -
Apply wax resist:
Wax the very bottom foot of the jar. Usually, you would wax the gallery too, but for this ‘full glaze’ look, you can glaze the gallery rim lightly—just be careful not to pool it. -
Glaze application:
Dip or pour your speckled cream glaze over the entire jar. Do the same for the lid. I find dipping gives the most even coat for this specific creamy look. -
Clean the distinct line:
Wipe away a thin strip of glaze just where the lid meets the jar gallery if you want that exposed toasted clay line visible in the reference image. This creates a beautiful contrast. -
Prepare wadding:
Mix up small balls of wadding using alumina hydrate and kaolin or a dedicated wadding mixture. These should be pea-sized. -
Place wadding stilts:
Place 3-4 small wads of wadding on the gallery of the jar. This will physically lift the lid up slightly during firing, preventing the glaze from fusing the lid to the jar. -
Load the kiln:
Place the lid gently on top of the wads. Ensure it creates a ‘tent’ over the jar opening but doesn’t touch the glazed gallery directly. -
Fire to maturity:
Fire the kiln to the glaze’s maturation temperature (e.g., Cone 6). The high heat will melt the glaze, pulling out those lovely iron speckles. -
Post-fire finishing:
Once cool, snap off the wads. You will be left with tiny unglazed marks on the gallery which can be sanded smooth with a diamond pad or grinding stone.
Level Up: Oxide Wash
Before glazing, brush iron oxide on the rim and knob edges. The white glaze will break over it, intensifying that golden-brown toasted edge effect.
Once the wadding marks are sanded away, you’ll have a beautifully functional jar perfect for kitchen storage