If you’ve ever wanted a clay cookie jar that looks as sweet as what’s inside, you’re in the right place. I pulled together my favorite ideas—from classic handbuilt ceramics to easy polymer clay and air dry clay upgrades—so you can pick a style that fits your skill level and your kitchen vibe.
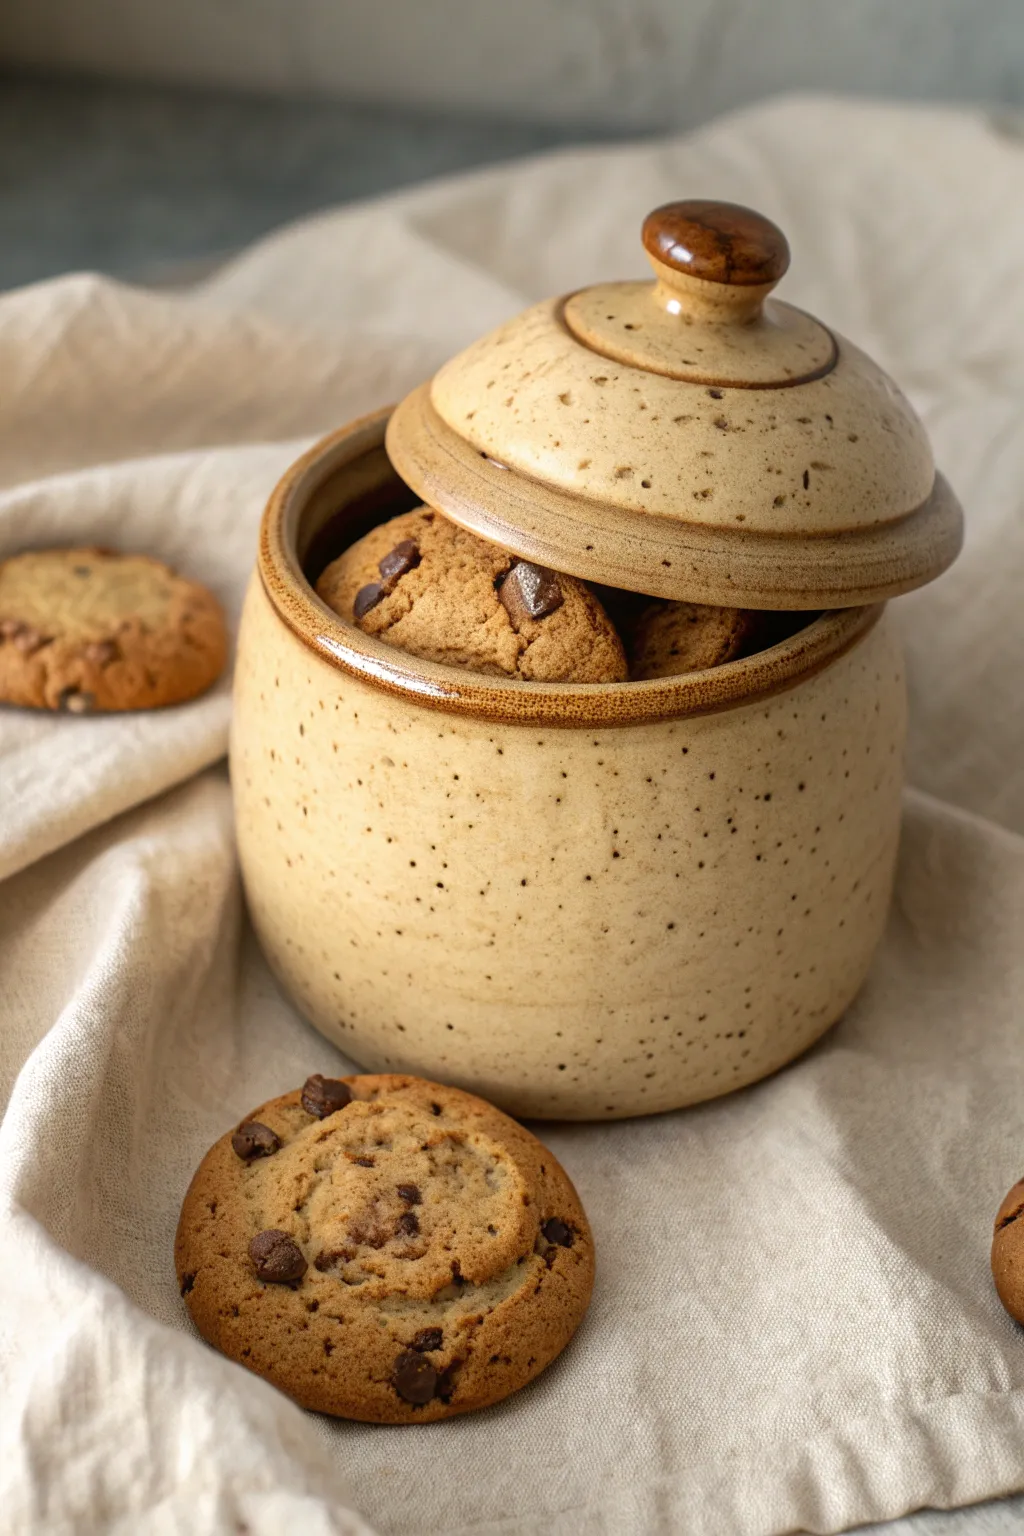
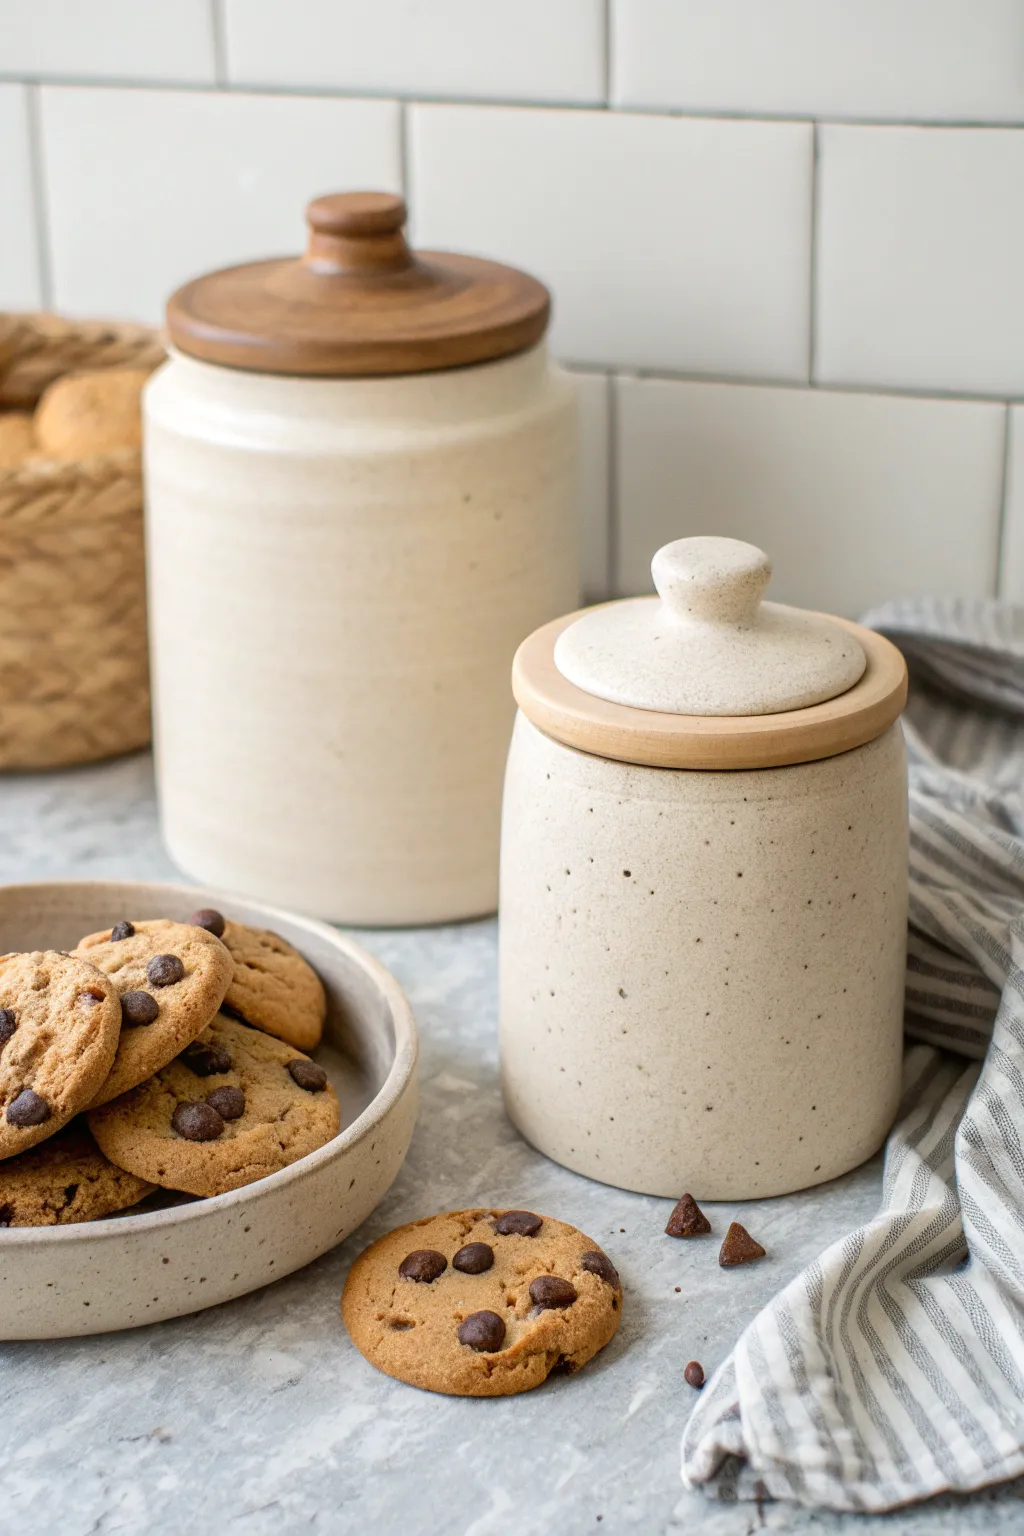
Classic Chocolate Chip Cookie Lid
Transform a simple wheel-thrown jar into a delightful trompe-l’œil masterpiece with a lid that looks good enough to eat. This project focuses on sculpting a realistic, oversized chocolate chip cookie that serves as a functional stoneware lid, complete with melty-looking chocolate chunks.
Step-by-Step
Materials
- Stoneware clay (speckled buff recommended)
- Pottery wheel
- Throwing tools (sponge, playful ribs, wire cutter)
- Sculpting tools (needle tool, small loop tool)
- Dark brown underglaze or slip
- Clear matte glaze
- Golden-brown or warm tan glaze (for cookie dough)
- Texture tool (clean toothbrush or stiff bristle brush)
- Calipers
Step 1: Throwing the Base
-
Center and open:
Begin with about 3-4 lbs of speckled stoneware clay. Center it firmly on the wheel and open the clay to create a floor about 5 inches wide. -
Pull the walls:
Pull the walls up into a simple cylinder first, then gently shape it outward into a rounded belly form. Aim for a height of about 6-7 inches. -
Form the gallery:
At the rim, compress the clay and split it slightly or push it inward to create a gallery—a ledge where your lid will eventually sit. Measure the diameter of this gallery with calipers; you’ll need this exact measurement for the lid. -
Smooth and trim:
Use a smooth metal rib to refine the exterior curve. I like to leave some subtle throwing rings or speckles visible to enhance the handmade feel. Cut the pot from the wheel and set aside to firm up to leather hard.
Sticky Lid Situation?
If the lid rocks after firing, use a diamond sanding pad or grinding paste on the gallery ledge. Rotate the lid against the jar until the fit is airtight.
Step 2: Sculpting the Cookie Lid
-
Prepare the slab:
While your base dries, roll out a slab of clay about 1/2 inch thick. Using your caliper measurement from earlier, cut a circle that fits loosely inside the gallery of your base jar. -
Add the cookie dome:
Roll a slightly larger, irregular circle of clay about 3/8 inch thick. Place this on top of your fitted circle and gently curve the edges down to mimic the slump of a baked cookie. It should overhang the fitted circle slightly to hide the gallery. -
Texture the dough:
This is the crucial realism step. Take a stiff toothbrush or a texturing stone and avidly tap the surface of the top slab. You want that porous, crumbly baked goods look. -
Create chocolate chunks:
Roll small, irregular nuggets of clay. Don’t make them perfect balls; squish them slightly so they look like chunks. Score and slip these onto the lid surface randomly. -
Refine the edges:
Work around the rim of your ‘cookie,’ creating small cracks and undulations. A real cookie isn’t a perfect circle, so intentional imperfections are key here. -
Construct the flange:
Flip the lid over carefully. Attach a coil of clay to the bottom circle you cut first, ensuring it fits snugly inside the jar’s gallery but allows for shrinkage. Smooth this connection well.
Make It a Set
Make matching ‘cookie’ coasters using the same texturing technique, but flattened. They pair perfectly with the jar for milk and cookies time.
Step 3: Glazing and Finishing
-
Bisque fire:
Once both pieces are bone dry, bisque fire them to your clay body’s recommended temperature (usually cone 04). -
Paint the chocolate:
Using a small brush, carefully apply a rich dark brown underglaze or glaze specifically to the clay chunks. Be careful not to drip onto the ‘dough’ area. -
Glaze the jar body:
Dip or brush the main jar body in a creamy, speckled white or oatmeal glaze. A satin or matte finish works beautifully to contrast with the cookie lid. -
Glaze the cookie dough:
Apply a golden-brown or warm tan glaze to the rest of the lid. If your clay body is naturally toasty (like a reduction stoneware), you might just use a light wash or a clear matte glaze to let the clay color serve as the ‘dough’. -
Wipe back:
Briefly wipe the textured areas of the lid with a damp sponge. This leaves glaze in the crevices (the texture you made with the toothbrush) and highlights the high points. -
Glaze fire:
Fire the final piece to cone 6 (or your clay’s maturity). Make sure the lid is fired separately or heavily wadded so it doesn’t fuse to the jar.
Your kitchen counter will now have a charming, handmade focal point that keeps treats fresh


Iced Sugar Cookie Topper
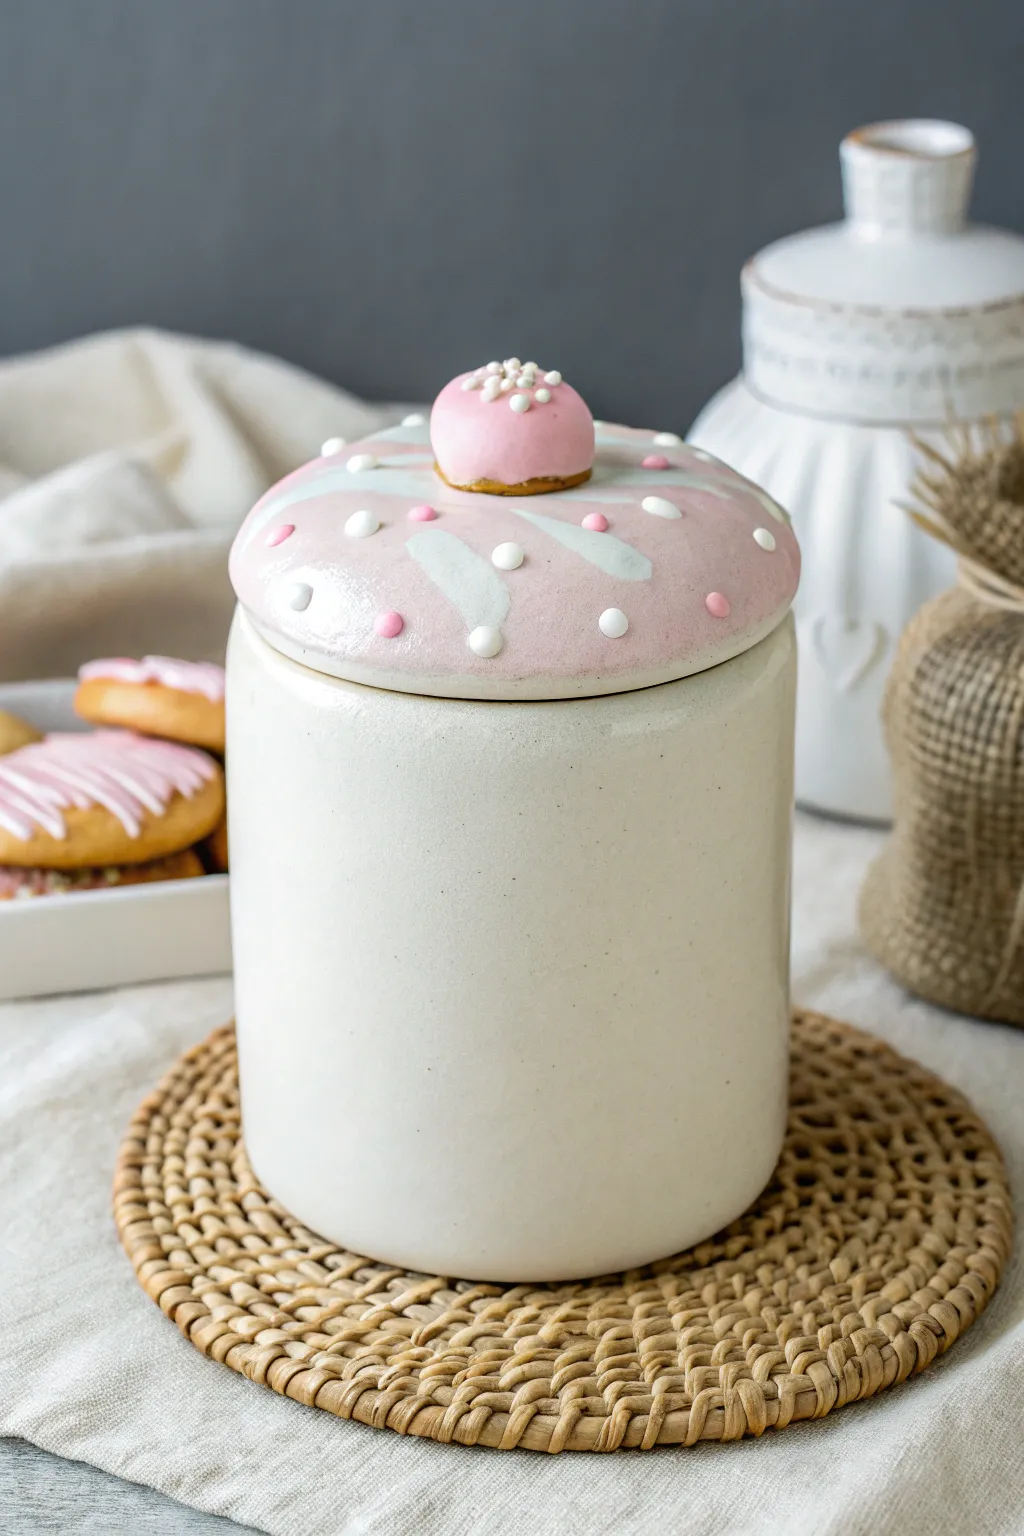
Transform a simple slab of clay into this delightful cookie jar that looks good enough to eat. With a lid designed to mimic a pink-frosted sugar cookie complete with sprinkles, this functional piece adds a whimsical touch to any kitchen counter.
Step-by-Step Tutorial
Materials
- White stoneware clay or porcelain
- Rolling pin
- Canvas work surface
- Circle templates (large for jar, medium/small for lid)
- Pottery wheel (optional, can be hand-built)
- Fettling knife
- Scoring tool and slip
- Rib tool
- Sponge
- Underglazes: Light pink, white, soft brown/tan
- Clear transparent glaze
- Fine detail paintbrush
- Medium soft paintbrush
- Kiln
Step 1: Forming the Jar Body
-
Create the base:
Roll out a slab of clay to about 1/4 inch thickness. Cut a perfect circle for the base of your jar using a template or cutter that matches your desired diameter. -
Build the walls:
Roll a rectangular slab for the walls. The length should be the circumference of your base plus a little overlap. Alternatively, if throwing on a wheel, pull a cylinder with straight, even walls. -
Attach and smooth:
Score and slip the edge of the base and the bottom of the wall slab. wrap the wall around, join the seam firmly, and smooth the connection inside and out so the join is invisible. -
Refine the rim:
Ensure the rim is perfectly level. I like to use a damp sponge to soften the edge slightly, preventing it from being too sharp after firing.
Lid Fit Issues?
If the lid warps during drying, lightly mist it and place a weighted board on top (with plastic in betwen) for a day to flatten the rim before firing.
Step 2: Sculpting the Cookie Lid
-
Cut the lid shape:
Roll a slightly thicker slab for the lid. Cut a circle that is slightly wider than your jar’s opening to create an overhang. -
Add the distinct flange:
On the underside of the lid, score and attach a ring of clay that fits *inside* the jar rim. This creates a flange to keep the lid from sliding off. -
Shape the dome:
Gently press the center of the lid from the underside or use a mold to give it a soft, domed curve, mimicking a puffy baked cookie. -
Create the knob:
Roll a small ball of clay and flatten the bottom to create the knob. It should look like a small bonbon or mini cookie. Attach this securely to the center of the lid. -
Texture the cookie edge:
Use a toothbrush or stiff brush to gently tap texture onto the very edge of the lid and the base of the knob, replicating a baked crumb texture.
Add Realism
Mix a tiny amount of grog or sand into the clay for the lid’s rim. When fired and unglazed, it feels exactly like a rough shortbread cookie texture.
Step 3: Decoration and Glazing
-
Bisque fire:
Allow the pieces to dry slowly and completely before loading them into the kiln for a bisque fire. -
Apply base color:
Paint the main body of the jar with a creamy white or transparent glaze. For the cookie parts (the rim of the lid and base of the knob), paint a thin line of tan underglaze to look like golden-brown dough. -
Frost the lid:
Apply 2-3 coats of light pink underglaze or glaze to the top of the lid and the knob, stopping just short of the ‘dough’ edge. Let the application look slightly thick like real icing. -
Pipe the swirls:
Using a fine brush or a slip trailer with white glaze, create soft, radial swipes or swirls coming from the center knob outwards. -
Sprinkle placement:
Dot small raised bumps of white and darker pink glaze across the lid surface. I call these ‘structural sprinkles’—make them distinct and slightly tactile. -
Detail the knob:
Add tiny white dots to the very top of the pink knob to mimic sugar pearls. -
Final Clear Coat:
If you used underglazes for color, apply a clear food-safe glaze over the entire lid and jar exterior. -
Glaze fire:
Fire the jar for the final time according to your clay and glaze temperature requirements.
Fill your new creation with treats and enjoy having a permanent cookie on display


Stamped “Cookies” Label Canister
This charming, minimalist cookie jar relies on the natural beauty of speckled clay and clean lines for a timeless look. The understated stamped styling makes it a perfect project for potters looking to practice lid fitting and precise lettering.
Step-by-Step
Materials
- Speckled stoneware clay (cream or buff firing)
- Pottery wheel
- Throwing tools (sponge, wire cutter, rib tools)
- Calipers
- Trimming tools (loop tools)
- Small alphabet stamp set
- Iron oxide wash or dark brown underglaze
- Clear or transparent matte glaze
- Small paintbrush
- Damp sponge
Step 1: Throwing the Canister Body
-
Center and open:
Begin by wedging about 3-4 pounds of speckled clay. Center it firmly on the wheel and open the mound to create a flat inside floor, leaving enough thickness at the base for trimming later. -
Establish the width:
Pull the floor out to your desired width. For a cookie jar, a 5 to 6-inch diameter base is standard so you can fit your hand inside easily. -
Pull the walls:
Pull the walls straight up to form a cylinder. Aim for an even thickness throughout the lift. The jar should be roughly 7-8 inches tall to accommodate plenty of treats. -
Shape the gallery:
At the rim, slightly compress and split the clay to create a gallery—the little shelf where the lid will sit. Measure the interior diameter of this gallery carefully with your calipers; you’ll need this exact measurement for the lid. -
Rib and smooth:
Use a smooth metal or rubber rib to clean up the outside walls. As you refine the shape, I like to gently press the rib to create subtle, organic horizontal ridges rather than smoothing it completely flat.
Warped Lid Woes?
If your lid wobbles after firing, apply a grinding paste to the gallery and twist the lid back and forth manually. This grinds the high spots down for a perfect, airtight seal.
Step 2: Shaping the Lid
-
Throw the lid:
Using a smaller lump of clay (about 1-1.5 lbs), throw the lid upside down (as a bowl shape) or right-side up depending on your preference. For this style, throwing it right-side up on a bat allows you to form the knob immediately. -
Measure closely:
Using your set calipers, ensure the flange of the lid matches the gallery specific to your jar body. It should fit snugly but not tight, remembering that glazes add thickness. -
Form the knob:
Pinch and smooth the clay at the center to create a simple, rounded knob. Keep the edges soft and comfortable to grip. -
Dry slowly:
Cut both pieces from the wheel and let them dry to a leather-hard state. It is crucial to dry them together (with the lid on the jar) once they are stiff enough to support weight, to ensure they shrink at the same rate.
Clean Lettering Tip
When stamping, place a thin sheet of plastic wrap over the clay before pressing the stamp. This prevents clay from getting stuck in the letters and creates softer, cleaner edges.
Step 3: Trimming and Stamping
-
Trim the foot:
Flip the jar body over on the wheel (using a chuck or adhering it to the wheel head) and trim the excess weight from the bottom, creating a clean foot ring. -
Refine the lid:
If the underside of the lid needs attention, flip it and trim away excess clay to lighten it properly. -
Mark lines:
While the jar is leather hard, you can manually enhance the horizontal lines. Spin the wheel slowly and hold a wooden modeling tool against the clay to create the two distinct grooves seen above and below the label area. -
Planning the text:
Identify the front of your jar between the two groove lines. Lightly mark the center point to ensure your text is balanced. -
Stamp the letters:
Using your small alphabet stamps, press the word ‘COOKIES’ into the clay. Support the wall from the inside with your other hand to prevent warping the cylinder shape as you press. -
Bisque fire:
Allow the piece to dry completely (bone dry) before loading it into the kiln for the bisque firing.
Step 4: Glazing and Finishing
-
Highlight the text:
Once bisqued, mix a small amount of iron oxide wash or dark brown underglaze. Paint it directly into the stamped letters. -
Wipe back:
Using a clean, damp sponge, gently wipe the surface of the clay. This removes the dark color from the high points but leaves it trapped inside the stamped letters for high contrast. -
Apply clear glaze:
Dip or brush the entire piece (inside and out) with a clear or transparent matte glaze. The transparency allows the natural speckles of the clay body to show through perfectly. -
Clean the distinct points:
Wipe the glaze off the foot ring and, most importantly, the gallery where the lid touches the jar. If glaze remains here, the lid will fuse shut during firing. -
Final fire:
Fire the jar to the maturity temperature of your clay (likely Cone 5 or 6). Once cool, test the lid fit and fill with cookies.
This classic jar will become a countertop staple, ready to be filled with your favorite baked goods


Ribbed Bakery Canister With Cookie Knob
Capture the charm of vintage stoneware with this hand-built clay canister featuring elegant vertical ribbing and a warm, milky glaze. The distinctive finial adds a touch of earthy contrast, making it a perfect centerpiece for holding your favorite homemade treats.
Detailed Instructions
Materials
- Stoneware clay body (white or buff)
- Pottery wheel (or slab roller for hand-building)
- Ribbing tool or serrated kidney scraper
- Wooden modeling tools
- Wire clay cutter
- Calipers
- Sponge
- Needle tool
- Scoring tool (or fork)
- Slip (clay and water slurry)
- Cream/Oatmeal reactive glaze
- Iron oxide wash or dark brown underglaze
- Kiln for firing
Step 1: Throwing the Cylinder Body
-
Center the clay:
Start with a substantial ball of wedged stoneware clay on your wheel head. Center it firmly, ensuring there are no wobbles before you begin creating the vessel. -
Open and pull:
Open the clay and gently pull the walls upward to create a tall, cylindrical shape. Aim for a slightly wider base that tapers very subtly toward the top, which creates a classic canister silhouette. -
Shape the shoulder:
Collar the top inch of the cylinder inward slightly to create a defined shoulder and a gallery where the lid will eventually sit. Keep the rim thick enough to support the lid. -
Create the gallery:
Using a wooden tool or your thumb, carefully press down into the rim to form a flange or ‘gallery’—this is the shelf the lid will rest on. -
Add the texture:
This is the crucial aesthetic step. While the wheel is rotating slowly, drag a serrated rib or a custom-notched tool vertically from the bottom to the shoulder to create the uniform ribbed pattern. I prefer to do this when the clay is slightly leather hard for cleaner lines. -
Measure for the lid:
Use calipers to measure the exact diameter of the gallery you created. Lock the calipers in place so you don’t lose this measurement.
Clean Ribs
After creating the ribbed texture, run a soft, slightly damp sponge vertically over the lines once. This softens any sharp burrs without erasing the definition.
Step 2: Crafting the Lid & Finial
-
Throw the lid base:
Using a smaller amount of clay, throw a flat, low dome. Use your caliper measurement to ensure the rim of this dome fits perfectly into the canister’s gallery. -
Match the ribbing:
Apply the same vertical texture to the surface of the lid dome, radiating from the center outward to the edge, so the lines visually connect with the jar body when placed on top. -
Shape the finial:
Throw a small, solid knob shape directly on the wheel, or hand-model a knob that resembles a chess pawn or a traditional finial. Give it a slightly wider base for stability. -
Attach the finial:
Once both pieces are leather hard, score the center of the lid and the bottom of the finial. Apply slip and press them firmly together, cleaning up any excess slip with a damp sponge.
Dual-Tone Magic
Try using a dark clay body and a semi-transparent white glaze. The dark clay will show through the glaze on the high points of the ribs for automatic contrast.
Step 3: Glazing and Firing
-
Bisque fire:
Once the piece is bone dry, load it into the kiln for a bisque firing to harden the clay and prepare it for glazing. -
Wax the contact points:
Apply wax resist to the gallery of the jar and the underside rim of the lid. This prevents the lid from fusing to the jar during the glaze firing. -
Apply the base glaze:
Dip the entire jar and lid into a cream or oatmeal-colored reactive glaze. This glaze breaks beautifully over texture, highlighting the ribs you carved. -
Accent the finial:
Carefully wipe the glaze off the finial and the very edge of the lid rim with a sponge. Apply an iron oxide wash or a dark brown underglaze to these exposed areas for that rich, toasted contrast. -
Final wipe down:
Check the bottom of the jar to ensure it is completely free of glaze so it doesn’t stick to the kiln shelf. -
Glaze fire:
Fire the piece to the temperature appropriate for your stoneware clay and glaze choice (typically Cone 5 or 6). Allow the kiln to cool completely before opening.
Place your finished jar on the counter and fill it with your favorite shortbread cookies for a cozy kitchen display

The Complete Guide to Pottery Troubleshooting
Uncover the most common ceramic mistakes—from cracking clay to failed glazes—and learn how to fix them fast.
Half-Dipped Chocolate Cookie Jar
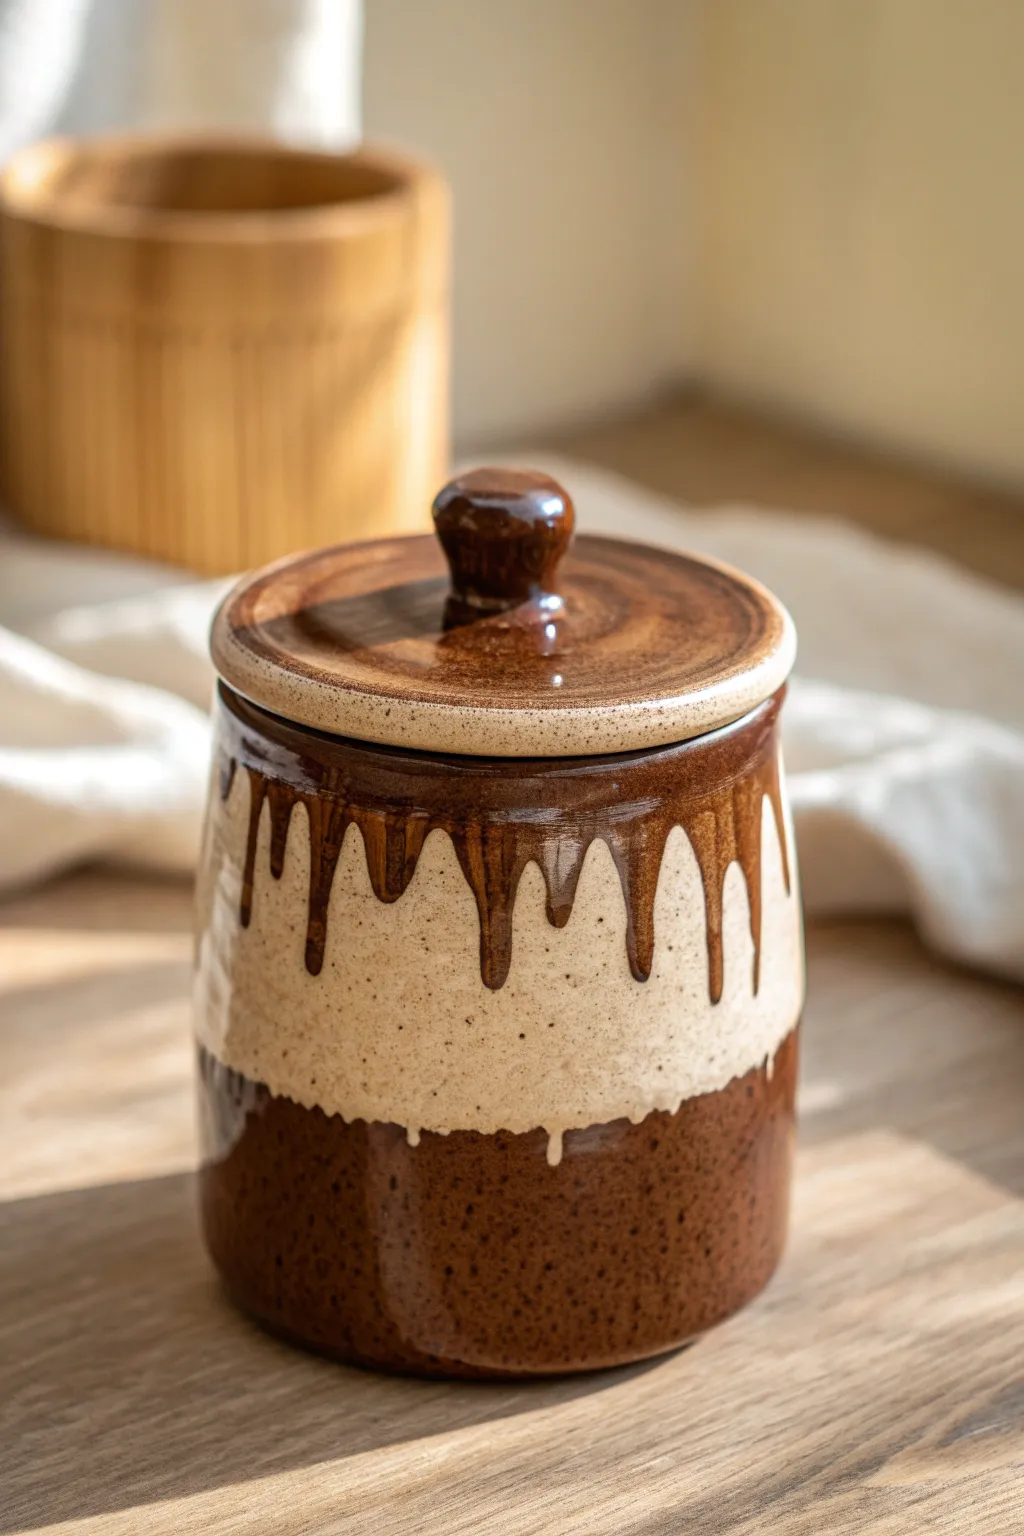
This charming jar mimics the look of a cookie dipped in rich chocolate, featuring a warm speckled beige body encased by dark brown glaze drips. The glossy finish creates an appetizing texture that’s perfect for storing sweet treats.
Step-by-Step
Materials
- Stoneware clay (speckled or buff)
- Pottery wheel
- Throwing tools (rib, sponge, wire cutter)
- Trimming tools
- Calipers
- Speckled oatmeal or cream glaze
- Glossy dark brown or tenmoku glaze
- Wax resist
- Kiln
- Soft fan brush
Step 1: Throwing the Form
-
Center and Open:
Start with about 3-4 lbs of wedged stoneware clay. Center it firmly on the wheel head and open the clay to create a flat internal floor, roughly 4-5 inches wide. -
Pull the Cylinder:
Begin pulling the walls upward. Keep the base slightly wider than the top for stability, aiming for a height of about 6-7 inches. Ensure the wall thickness is even from bottom to top. -
Shape the Shoulders:
Gently collar the rim inward to create a subtle shoulder, slightly narrowing the opening. Use a wooden rib to smooth the exterior profile, ensuring the sides are straight but soft. -
Refine the Rim:
Use a chamois or sponge to compress and round the rim. This is crucial for lid fit. Measure the inner diameter with calipers before cutting the pot off the wheel. -
Create the Lid:
Using a smaller ball of clay (about 1 lb), throw a flat lid. Measure against your caliper setting to ensure it will sit perfectly on the gallery or rim of your jar. -
Form the Knob:
Pull a small, rounded knob directly from the center of the lid while it’s still attached to the hump, or throw a separate knob and attach it later when leather hard.
Drip Control
If the dark glaze is too runny, it might fuse to the shelf. Test the glaze viscosity on a tile first, or stop your pour higher up the shoulder.
Step 2: Trimming and Bisque
-
Trim the Base:
Once leather hard, center the jar upside down on the wheel. Trim the bottom to create a clean foot ring. I like to smooth the transition between the foot and the wall with a soft rib. -
Fit the Lid:
Trim the lid’s underside to remove excess weight. Test the fit on the jar repeatedly; it should sit snugly without wobbling. -
Bisque Fire:
Allow both pieces to dry slowly and completely. Load them into the kiln for a bisque firing (usually Cone 04 or 06) to prepare them for glazing.
Carved Texture
Before bisque firing, use a carving tool to add vertical fluting to the beige section. The glaze will break beautifully over the texture.
Step 3: Glazing the “Dipped” Look
-
Apply Wax Resist:
Paint wax resist on the foot of the jar and the contact points where the lid touches the jar to prevent them from sticking together during firing. -
Glaze the Interior:
Pour the speckled oatmeal glaze inside the jar, swirl to coat evenly, and pour out the excess. Wipe any drips off the rim immediately. -
Base Coat Application:
Dip the entire exterior of the jar (holding it by the foot) into the speckled oatmeal glaze. Allow this base layer to dry completely until it’s powdery to the touch. -
Pour the “Chocolate” Top:
Using a ladle or cup, pour the thick dark brown glaze over the rim and shoulder of the jar. Let gravity do the work—allow the glaze to run down the sides naturally to create irregular drips. -
Glaze the Bottom Band:
Dip the bottom inch of the jar into the dark brown glaze to create the matching dark base, overlapping slightly with the beige if desired, but keeping a clean line is easier. -
Glaze the Lid:
Dip the entire lid (holding by the knob) into the dark brown glaze. If the glaze is thick, give it a gentle shake to even out the surface on the flat top. -
Cleanup:
Check the foot ring one last time. Even with wax resist, I always sponge the bottom clean to save my kiln shelves.
Step 4: Final Firing
-
Glaze Fire:
Fire the kiln to the maturation temperature of your clay and glaze (typically Cone 5 or 6 for stoneware). The dark glaze needs to melt fully to achieve that syrup-like gloss.
Once cooled, your jar is ready to be filled with your favorite homemade cookies
Cookie Crumble Texture All Over
This charming ceramic project features a warm, sandy-beige glaze speckled with iron spots that mimic the irresistible texture of cookie crumbs. The rounded, inviting form and snug-fitting lid make it the perfect vessel for storing your freshly baked treats.
Detailed Instructions
Materials
- Stoneware clay (buff or speckled)
- Pottery wheel
- Throwing sponge
- Needle tool
- Rib tool (wooden and metal)
- Wire cutter
- Trimming tools
- Calipers
- Speckled oatmeal or sandstone glaze
- Iron oxide wash (optional, for rim)
- Kiln
Step 1: Throwing the Body
-
Center the clay:
Start with about 3-4 pounds of well-wedged clay. Slam it onto the wheel head and center it using firm pressure and water. -
Open the form:
Press your thumbs into the center to open the clay, leaving a base about ½ inch thick. Pull the floor out to your desired width, compressing it well to prevent cracks. -
Pull the walls:
Slowly pull the walls up into a cylinder. On subsequent pulls, apply gentle pressure from the inside to belly out the form, creating that rounded, friendly jar shape. -
Refine the rim:
At the top, create a slightly thickened gallery (an internal ledge) where the lid will sit. Use a chamois to smooth the very top edge. -
Shape with a rib:
Use a flexible metal rib on the outside while pushing from the inside to perfect the curve and remove throwing lines if you want a smoother surface. -
Measure for the lid:
Use calipers to measure the exact diameter of the gallery you just created. This is crucial for a fitting lid.
Lid Rocking?
If the lid wobbles after firing, apply a dab of grinding paste (valve grinding compound) to the gallery and twist the lid back and forth to grind it into a perfect fit.
Step 2: Creating the Lid
-
Throw the lid:
Using a smaller ball of clay (about 1-1.5 lbs), throw a low, domed shape. Often, it’s easier to throw a lid upside down as a shallow bowl. -
Check the fit:
Using your set calipers, ensure the lid’s rim matches the gallery measurement. It’s better to be slightly larger and trim it down later than too small. -
Form the knob:
You can throw a knob directly onto the lid if throwing right-side up, or attach a hand-built knob later. For this jar, a simple, rounded button knob works best.
Step 3: Trimming and Assembly
-
Dry to leather hard:
Allow both pieces to dry until they are firm but can still be cut with a fingernail. -
Trim the jar:
Invert the jar on the wheel. Trim away excess clay from the bottom to create a defined foot ring that lifts the form slightly. -
Trim the lid:
Center the lid and trim the underside to remove weight. If you didn’t throw a knob, score and slip a small ball of clay onto the center now to fashion one. -
Final fit check:
Place the lid on the jar. If it’s tight, gently sand or trim the edge of the lid until it seats comfortably with a little wiggle room for glaze.
Add Texture
Mix granular ilmenite or coarse grog into your glaze bucket before dipping. This physically adds a rough, crumbly texture to the surface.
Step 4: Glazing and Firing
-
Bisque fire:
Fire the pieces to cone 04 (or your clay’s specific bisque temperature). -
Wax the contact points:
Apply wax resist to the gallery of the jar and the rim of the lid where they will touch. This prevents the lid from fusing shut. -
Glaze the interior:
Pour a food-safe liner glaze inside the jar, swirl to coat, and pour out the excess. -
Apply the exterior glaze:
Dip or spray the exterior with a speckled oatmeal or matte sandstone glaze. I find dipping ensures an even coat that highlights the speckles. -
Accent the rims:
Dip a brush into iron oxide wash or a darker brown glaze and gently run it along the rim of the jar and the edge of the lid for that toasted crust look. -
Glaze fire:
Fire to the maturation temperature of your clay and glaze (typically cone 5 or 6 for stoneware).
Now you have a beautiful, functional centerpiece for your kitchen counter that looks as sweet as the cookies inside

What Really Happens Inside the Kiln
Learn how time and temperature work together inside the kiln to transform clay into durable ceramic.
Oversized Fortune Cookie Jar

This whimsical storage vessel mimics the iconic shape of a folded fortune cookie on the lid, creating a clever and visually satisfying cookie jar. The speckled clay body and warm toasted edges give it a realistic, freshly baked appearance that’s perfect for hiding sweet treats.
Step-by-Step Tutorial
Materials
- Speckled stoneware clay body (cone 5/6 recommended)
- Pottery wheel (or supplies for coil building)
- Needle tool
- Rib tool (wooden or silicone)
- Scoring tool or serrated kidney
- Slip (clay slurry)
- Sponge
- Fettling knife
- Rolling pin and canvas (so clay doesn’t stick)
- Basic clear glaze
- Iron oxide wash or toasted finish underglaze
- Large paintbrush for glazing
Step 1: Forming the Base
-
Ideally, throw on the wheel:
Start with about 2-3 pounds of speckled clay on your pottery wheel. Center the clay and open it up to create a wide, rounded bowl shape. -
Shape the belly:
Pull the walls up and push them gently outward from the inside to create a nice, round belly for the jar. This roundness is key to mimicking the soft curves of the cookie lid. -
Create a gallery:
At the rim, use a wooden tool or your finger to press down and create a ‘gallery’—an internal ledge where the lid will eventually sit securely. -
Refine and trim:
Once thrown, smooth the outside with a rib tool to compress the clay and remove throwing distinct rings. I like using a metal rib here for a super smooth finish. Let it dry to leather-hard, then trim the foot.
Air Pocket Patrol
When folding the lid slab, you are creating hollow spaces. Poke a tiny, discreet pinhole in the underside of the hollow fold so heated air can escape during firing, preventing explosions.
Step 2: Sculpting the Fortune Cookie Lid
-
Roll the slab:
Roll out a slab of the same speckled clay to about 1/4 inch thickness. Use a template or bowl to cut a perfect circle that is slightly larger than the opening of your jar base. -
Check the fit:
Place this flat circle onto the gallery of your jar base to ensure the sizing is correct before you start folding. It should overhang slightly. -
Create the fold:
Gently lift opposite sides of the circle and bring them toward each other, but don’t let them touch yet. Press the center down slightly to create the characteristic ‘valley’ of a fortune cookie. -
Tuck the arms:
Fold the two raised sides backward, tucking one slightly inside the other to create that classic overlapping fortune cookie shape. This takes patience—move the clay slowly to prevent cracking. -
Secure the underside:
Flip the lid over. You will need to add a coil ring or a flange on the underside that fits inside the jar’s gallery to keep the lid from sliding off. -
Attach the flange:
Score the underside of the lid and your coil heavily. Add slip, attach the coil, and smooth it down so it looks seamless. Test the fit on the jar base immediately. -
Refine the curve:
With the flange attached, flip the lid back over. Use a damp sponge to smooth any stress cracks that formed during folding and ensure the ‘arms’ of the cookie look pillowy and soft.
Step 3: Surfacing and Glazing
-
Bisque fire:
Allow both pieces to dry completely (slow drying is best to prevent warping on the lid). Fire them to bisque temperature according to your clay body specs. -
Apply the ‘baked’ edge:
Mix a thin iron oxide wash or use a specialized ‘toasted’ unglaze. Apply this selectively with a sponge or brush to the rim of the jar and the sharp ridges of the folded cookie lid. -
Wipe back:
Using a slightly damp sponge, wipe back most of the oxide so it only stains the clay a warm, golden-brown color, rather than sitting on top like a dark paint. This creates that gradient, golden-baked look. -
Interior glazing:
Pour a food-safe clear or white liner glaze inside the jar base and swirl it around to coat completely. Pour out the excess. -
Exterior glazing:
Dip the exterior of the jar and the entire lid into a clear matte or satin glaze. This allows the beautiful speckles of the clay body to show through. -
Final wipe:
Clean the foot of the jar and the contact points where the lid touches the gallery with a sponge to ensure no glaze fuses the pieces together. -
Glaze fire:
Fire the kiln to the final maturation temperature (usually cone 5 or 6 for stoneware). Let cool completely before opening.
Customize the Fortune
Before glazing, slip a real paper fortune or a small clay tag with a stamped message into the fold of the lid. It adds a delightful interactive element.
Now you have a charming, handmade vessel ready to be filled with your favorite cookies
Gingerbread Cookie House Jar
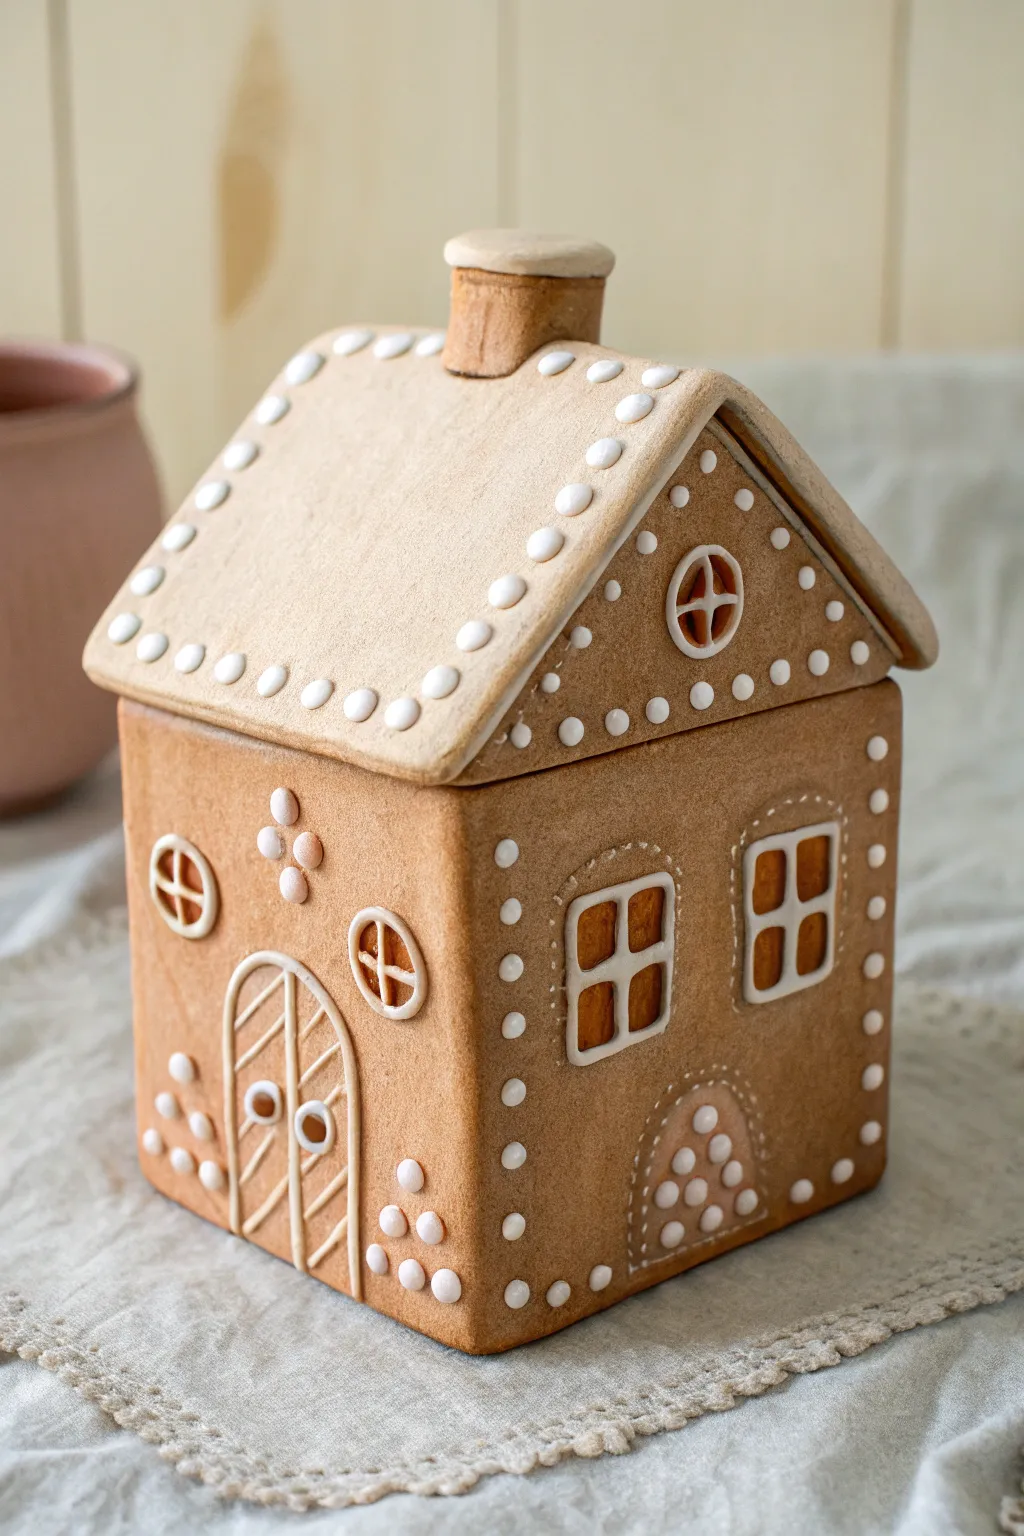
Capture the warmth of holiday baking with this delightful ceramic cookie jar that looks exactly like a freshly iced gingerbread house. With its toasty brown clay body and delicate white slip detailing, this functional vessel brings cozy charm to your kitchen counter all year round.
How-To Guide
Materials
- Stoneware clay (warm toasted brown or gingerbread color)
- White piping slip or underglaze in a fine-tip applicator bulb
- Rolling pin
- Canvas work surface
- Slab roller (optional)
- Sharp clay knife or scalpel (X-Acto)
- Ruler
- Cardboard or craft paper (for templates)
- Scoring tool (serrated rib)
- Slip (matching the clay body)
- Small round cutter and soft bristle brush
- Clear matte food-safe glaze
Step 1: Drafting and Slabs
-
Create your templates:
Before touching clay, sketch out your house dimensions on cardboard. You will need four walls (two square sides, two pentagonal gabled ends) and two roof rectangles. Ensure the roof pieces are slightly wider than the walls for overhang. -
Roll out the slabs:
Roll your gingerbread-colored stoneware clay into even slabs, approximately 1/4 to 3/8 inch thick. I find rolling on canvas prevents sticking and adds a nice texture to the bottom. -
Cut the components:
Lay your paper templates onto the leather-hard slabs and carefully cut out all walls, roof panels, and a square floor piece using your sharp knife. -
Dry to leather hard:
Let these flat pieces stiffen up until they can hold their shape without bending. This is crucial for structural integrity during assembly.
Step 2: Assembling the Structure
-
Bevel the edges:
Cut 45-degree angles on the vertical edges of your wall pieces where they will join. This creates stronger, cleaner corner joints throughout the jar. -
Join the walls:
Score the beveled edges aggressively and apply joining slip. Press the four walls together and onto the floor base to form the box of the house, smoothing the interior seams with a coil for reinforcement. -
Construct the lid:
The roof functions as the lid. Join the two roof panels together at the peak at a 90-degree angle. Add a small ‘flange’ or inner rim of clay underneath so the lid sits securely inside the jar opening without sliding off. -
Add the chimney:
Fabricate a small rectangular tube for the chimney. Cut the bottom at an angle that matches the roof pitch and attach it securely. -
Refine the surface:
Once assembled, smooth the exterior surfaces with a slightly damp sponge to remove any harsh fingerprints, giving it that baked goods texture.
Sticky Lid Syndrome?
If the lid fits too tightly after firing, use a diamond sanding pad under running water to gently grind down the inner flange until it rests comfortably.
Step 3: Decoration and ‘Icing’
-
Mark the windows:
Lightly sketch the locations for windows and doors using a needle tool. Create simple rectangular shapes for windows and an arched shape for the door and side mouse-hole. -
Roll small coils:
Roll extremely thin, spaghetti-like coils of the main clay body to create the window frames, mullions (the cross-bars), and the arched door frame. Attach these with a tiny amount of slip. -
Prepare the ‘icing’:
Fill a bulb applicator or squeeze bottle with thick white slip or white underglaze. Consistency is key here; it should flow like royal icing. -
Pipe the roof details:
Squeeze uniform dots of white slip along the roof edges and the ridge line to mimic piped sugar pearls. -
Detail the walls:
Pipe small dots along the gable edges and around the door arch. Add a decorative ‘flower’ pattern of dots above the main door. -
Add door features:
Pipe thin white lines diagonally on the door to look like wood planks, and add two distinct circular knobs. -
Create the side tunnel:
On the lower side of the house, gently impress a small arch for the decorative ‘mouse hole’ or cellar door, outlining it with white dots to match the front. -
Clean up:
Let the piping dry completely. Use a dry brush to gently sweep away any crumbs or sharp bits of white slip.
Make it Shine
For a ‘sugar-coated’ look, sprinkle a tiny bit of silica sand onto the wet glaze on the roof before firing to simulate sparkling sugar crystals.
Step 4: Finishing
-
Bisque fire:
Slowly dry the piece to prevent warping, then bisque fire according to your clay body’s specifications. -
Glaze application:
Apply a clear, food-safe matte glaze over the entire interior to make it washable. For the exterior, I prefer a very thin application to keep the clay texture visible, or you can leave the exterior unglazed if fully vitrified. -
Final firing:
Glaze fire the piece to the appropriate cone (likely Cone 5 or 6 for stoneware) to finish/seal the jar.
Fill your new ceramic house with treats and enjoy a piece of holiday cheer that lasts throughout the seasons

TRACK YOUR CERAMIC JOURNEY
Capture glaze tests, firing details, and creative progress—all in one simple printable. Make your projects easier to repeat and improve.
Animal Face Jar With Cookie Lid
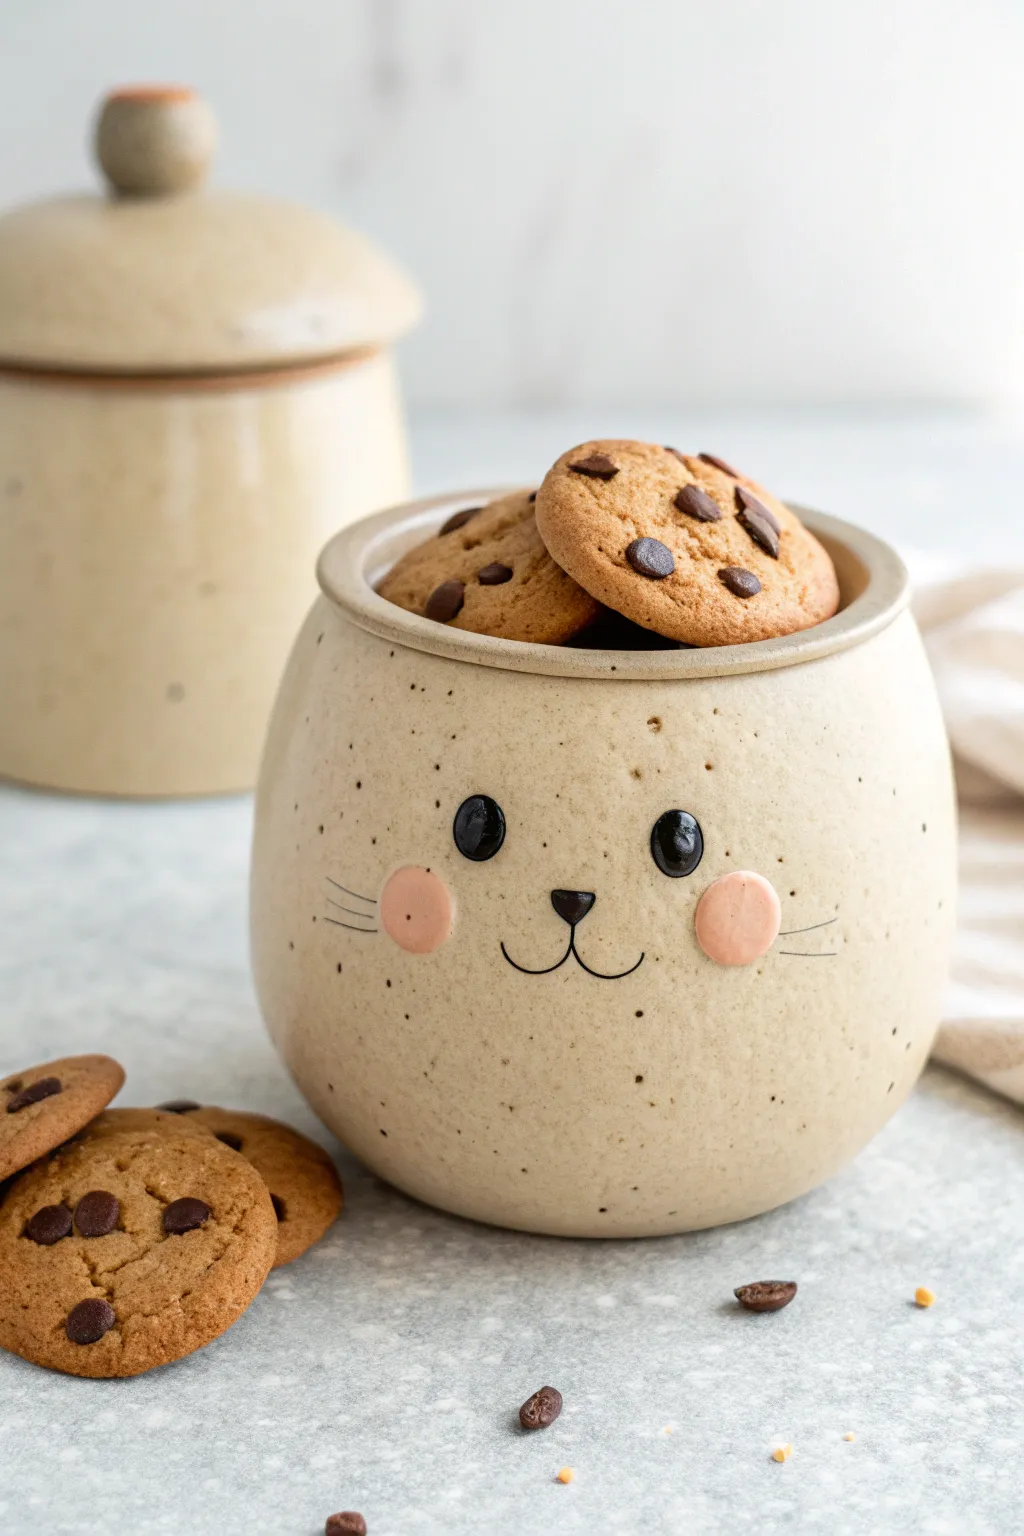
This adorable, round-bellied cookie jar brings a gentle smile to any kitchen with its minimalist animal face and warm, speckled glaze. Perfect for beginners and intermediate potters alike, this project combines simple wheel-throwing or coil-building techniques with charming surface decoration.
Detailed Instructions
Materials
- Speckled stoneware clay (mid-fire)
- Pottery wheel (or banding wheel for coil method)
- Rib tools (metal and wood)
- Needle tool
- Sponge
- Underglaze (Black and Pastel Pink)
- Small detail paintbrush
- Clear transparent glaze (food safe)
- Loop tool for trimming
- Calipers (optional but helpful)
Step 1: Forming the Body
-
Prepare the Clay:
Wedge about 3-4 pounds of speckled stoneware clay thoroughly to remove air bubbles. This heavy grogged clay will give us that beautiful natural texture later. -
Center and Open:
Center your clay on the wheel and open it up, leaving a floor about 1/2 inch thick to support the weight of the jar. -
Pull the Walls:
Pull the walls upwards, aiming for a cylinder first. Ensure the walls are even, roughly 1/4 inch thick throughout. -
Shape the Belly:
Using a rib tool on the inside, gently push the clay outward while supporting the outside to create a voluminous, rounded ‘belly’ shape. Narrow the neck slightly at the top to create a rim where the lid will sit. -
Create the Gallery:
At the rim, use a wooden tool or your thumb to press down and split the rim slightly, creating a ‘gallery’ or ledge for the lid to rest on. Keep this area precise so the lid fits snugly.
Lid Wobbles?
If the lid rattles, apply a small amount of turning paste (wetted grinding compound) to the gallery and twist the lid back and forth to grind a perfect seal.
Step 2: Creating the Lid
-
Measure the Opening:
Use calipers to measure the exact width of your jar’s gallery. This measurement is crucial for a fitting lid. -
Throw the Lid:
Using a smaller ball of clay (about 1 pound), throw a simple domed lid upside down. Ensure the flange matches your caliper measurements. I prefer to throw lids slightly wider and trim them down later for a perfect fit. -
Add a Knob:
Once the lid is leather hard, trim the top and attach a small, rounded knob of clay. Use the score and slip method to ensure it stays attached.
Step 3: Decorating the Face
-
Smooth the Surface:
When the main jar is leather hard, use a metal rib to burnish the surface slightly, smoothing out any throwing lines to create a clean ‘canvas’ for the face. -
Paint the Cheeks:
Using pastel pink underglaze, paint two soft circles for the rosy cheeks. Apply 2-3 coats to ensure the pink stands out against the speckled clay. -
Add Eyes and Nose:
With black underglaze and a fine detail brush, paint two solid oval eyes. Add a small triangular nose centered between them. -
Detail the Mouth and Whiskers:
Carefully paint a thin ‘w’ shape for the mouth extending from the nose. Add three very thin, short lines on either side of the cheeks for whiskers. Keep your hand steady and brace your pinky finger against the pot for stability. -
Add Highlights:
Once the black eye paint is dry, add a tiny dot of white underglaze (or scratch away a tiny dot to reveal the clay) to create a ‘sparkle’ in the eyes.
Pro Tip: Cheek Texture
For slightly raised cheeks like the image, add a small slip-trailed circle of clay before painting them pink, giving a tactile 3D effect.
Step 4: Glazing and Firing
-
Bisque Fire:
Load your bone-dry greenware into the kiln and bisque fire to cone 04. This hardens the clay and prepares it for glazing. -
Wax Resist:
Apply wax resist to the bottom of the jar and the contact points (the rim and the lid flange) to prevent them from fusing together during the glaze firing. -
Apply Clear Glaze:
Dip the entire jar and lid into a clear, food-safe glaze. A clear glaze is essential here to let the natural speckles of the clay body shine through. -
Clean Up:
Wipe away any glaze drips with a damp sponge, especially near the foot ring and gallery. -
Glaze Fire:
Fire the kiln to the maturity temperature of your clay (likely Cone 5 or 6 for stoneware). Allow the kiln to cool completely before unloading.
Fill your new friendly container with homemade treats and enjoy the sweet face greeting you every time you reach for a snack
Sleepy Bear Holding a Cookie Jar
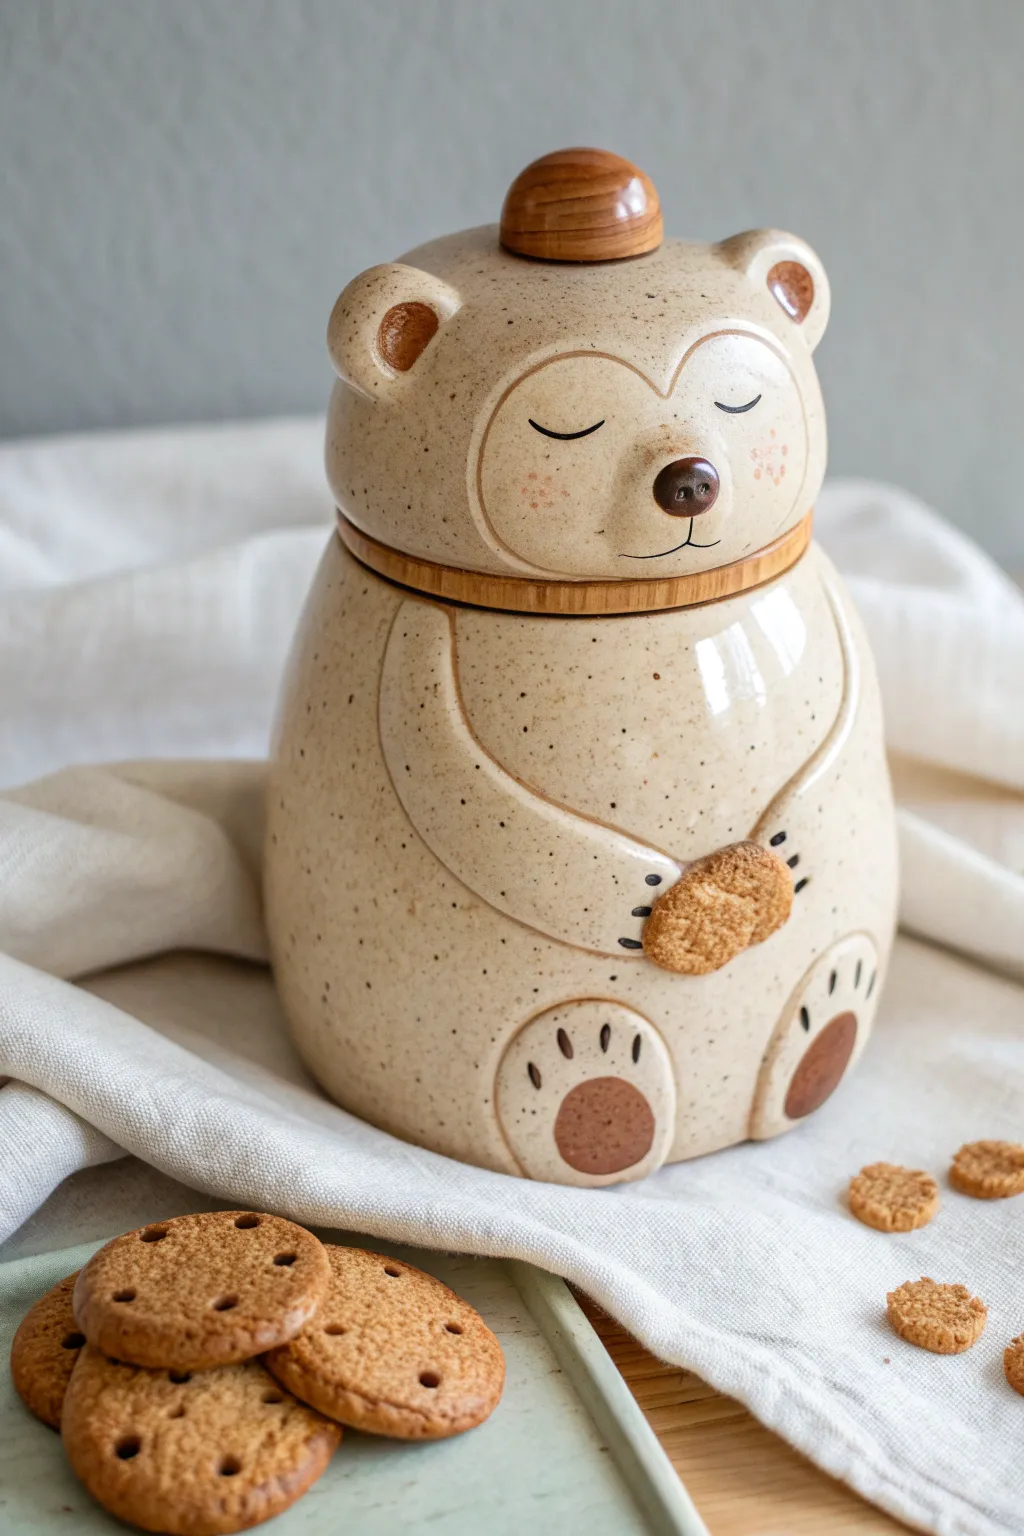
This adorable storage container features a slumbering bear tenderly clutching a little cookie, perfect for keeping your own treats safe. With its speckled cream glaze and warm timber accents, this ceramic piece balances functional design with sweet, cartoon-like charm.
Step-by-Step
Materials
- High-fire stoneware clay (speckled or plain buff)
- Fettling knife
- Pottery wheel (or materials for coil building)
- Sponge
- Loop tools for trimming
- Scoring tool and slip
- Wooden modeling tools
- Small wooden knob or finial
- Clear or translucent glaze (food safe)
- Underglazes: chocolate brown, black, soft pink
- Wax resist (for lid fit)
Step 1: Forming the Body and Lid
-
Throw or Build the Base:
Start by throwing a bulbous, pear-shaped cylinder on the wheel for the bear’s body. If you are hand-building, use thick coils to build up a rounded form, smoothing the interior and exterior walls as you go. -
Shape the Shoulders:
Collar in the clay near the top to create a distinct slope for the bear’s shoulders, leaving a wide enough opening for a hand to reach in for cookies later. -
Create the Gallery:
Use a wooden rib or tool to press a gallery (ledge) into the inside rim of the opening. This is where the lid will sit securely. -
Form the Lid:
Measure the opening of your gallery using calipers. Throw or hand-build a domed lid that fits perfectly. It needs to be slightly rounded on top to form the bear’s head. -
Attach the Knob:
Once the lid is leather hard, score and slip a small, round knob onto the very center top. Alternatively, you can throw this integral to the lid.
Sticky Lids?
Apply alumina hydrate or wax resist to the rim and gallery ledge during the glaze firing. This prevents the lid from fusing to the jar if the glaze runs slightly.
Step 2: Sculpting the Bear Details
-
Initial Smoothing:
When both pieces are leather hard, refine the shape with a metal kidney rib to ensure a smooth, rounded surface. -
Add the Ears:
Score and slip two small, thick semi-circles of clay onto the lid for ears. Use your thumb to gently press an indentation into the center of each ear. -
Sculpt the Arms:
Roll two tapered coils for the arms. Attach them starting from the shoulder area of the main body, curving them down and inward so the ‘paws’ meet at the belly. -
Create the Cookie:
Roll a small ball of clay and flatten it into a disc. Score and slip this between the two paws so the bear appears to be holding it tight. -
Texture the Cookie:
Use a needle tool or a rough sponge to stipple the surface of the clay cookie, giving it a realistic baked texture. -
Add the Feet:
Attach two flat, oval pads of clay near the bottom of the jar for the feet. Smooth the edges down so they integrate seamlessly with the body.
Make it Cozy
Wrap a strip of leather cord or light wood veneer around the neck of the jar where the lid meets the body to evoke a scarf or collar look.
Step 3: Surface Decoration and Glazing
-
Incise Facial Features:
On the lid, lightly carve the outline of the heart-shaped face mask using a needle tool. Carve two closed, curved eyes and a small smile. -
Refine the Nose:
Add a tiny ball of clay for the nose snout, smoothing it onto the face mask area, and carve the nose tip shape. -
Bisque Fire:
Let the piece dry slowly and completely before loading it into the kiln for a bisque fire (usually Cone 04). -
Underglaze Details:
Paint the nose, foot pads, and inner ears with a chocolate brown underglaze. Use a fine liner brush and black underglaze for the sleepy eyes and mouth. -
Apply Blush:
Dab a very watered-down pink underglaze on the cheeks for a rosy effect. I like to sponge this gently so it looks dusty and soft. -
Dip Glazing:
Dip the entire outside of the jar and lid into a clear or semi-transparent cream glaze. If using speckled clay, the specks will show through; if not, use a speckled glaze. -
Final Fire:
Fire the kiln to the maturity temperature of your clay and glaze (typically Cone 5 or 6). Once cool, add a small wooden ring or rubber seal between the lid and jar for an airtight fit.
Fill your bear’s belly with cookies and place it on the counter for a cozy kitchen companion
Milk-and-Cookies Duo Jar Set
This project creates a charming pair of wheel-thrown or hand-built ceramic canisters featuring a warm, speckled cream glaze and mixed-material lids. The aesthetic is rustic yet modern, perfect for a cozy kitchen counter setup.
Detailed Instructions
Materials
- Stoneware clay body (white or buff with grog)
- Pottery wheel (or slab roller for hand-building)
- Ribs (wooden and metal)
- Trimming tools
- Wooden lid inserts (pre-made or turned on a lathe)
- Matte cream glaze
- Speckled additives (granular manganese or iron oxide sand)
- Clear matte glaze (optional)
- Silicone seals for jars
- Bisque firing kiln
- Glaze firing kiln
Step 1: Throwing the Canister Bodies
-
Prepare the Clay:
Wedge roughly 3 pounds of clay for the large jar and 1.5 pounds for the smaller jar to ensure air bubbles are removed. -
Center and Open:
Center the larger clay ball on the wheel head and open it wide to establish the interior width of your canister base, keeping the floor flat. -
Pull the Cylinder:
Pull the walls straight up to create a tall, vertical cylinder. Aim for even thickness from bottom to top, avoiding a heavy bottom. -
Define the Rim:
Instead of thinning the rim completely, leave a slightly thickened gallery or a flat top edge that will eventually support the wooden lid mechanism. -
Smooth the Surface:
Use a metal rib on the exterior while the wheel spins to remove throwing lines and create that sleek, modern silhouette seen in the reference. -
Create the Smaller Jar:
Repeat the throwing process with the smaller ball of clay, scaling down the height while trying to keep the width relatively proportional to create a cohesive set. -
Throw the Ceramic Knob (Optional):
For the smaller jar’s mixed-material lid, throw a small, mushroom-shaped cap. This will be glued onto a wooden base later.
Clean Lines
Use a chamois cloth on the rim immediately after throwing. A perfectly smooth rim prevents chipping and ensures the wooden lid sits flush without wobble.
Step 2: Trimming and Assembly
-
Leather Hard Stage:
Allow the pieces to dry to a leather-hard state where they are firm enough to handle but can still be carved. -
Trim the Feet:
Invert the canisters on the wheel. Trim a clean, flat foot ring on each, mirroring the straight lines of the walls. -
Refine the Ceramic Lid Cap:
If you threw a ceramic top for the small jar, trim the underside so it acts as a handle, ensuring the connection point is flat. -
Bisque Fire:
Load the bone-dry greenware into the kiln and fire to cone 04 (or your clay’s specific bisque temperature).
Step 3: Glazing and Finishing
-
Prepare the Glaze:
Mix a matte cream glaze. To achieve the specific look in the photo, add a small percentage (around 0.5-1%) of granular manganese or iron spangles. -
Test the Speckle:
I always recommend doing a quick test tile first; you want distinct specks, not a muddy brown wash. -
Glaze the Interiors:
Pour glaze inside the canisters, roll it around to coat every surface, and pour out the excess immediately. -
Glaze the Exteriors:
Dip the exterior of the canisters into the glaze bucket. Hold for 3 seconds to ensure an opaque, even oat-colored coat. -
Wipe the Feet:
Use a damp sponge to meticulously clean the glaze off the bottom foot rings to prevent them from fusing to the kiln shelf. -
Glaze Fire:
Fire the pieces to maturity (likely cone 5 or 6 for stoneware). Allow the kiln to cool naturally. -
Fit the Wood Lids:
Once cool, measure the opening of your fired jars. Turn or purchase wooden lids that fit snugly into the gallery. -
Assemble the Small Lid:
For the small jar, use a strong epoxy to attach the glazed ceramic knob onto the center of the wooden disk. -
Attach Seals:
Slip silicone gaskets around the inner rim of the wooden lids to make the jars airtight for cookie freshness.
Warped Rims?
If your canister openings aren’t perfectly round after firing, use a rasp to gently sand the corresponding wooden lid to match the specific organic shape of the jar.
Now you have a stunning, bakery-worthy display ready to be filled with your favorite treats
Cookie Tin-Inspired Jar With Pattern Band
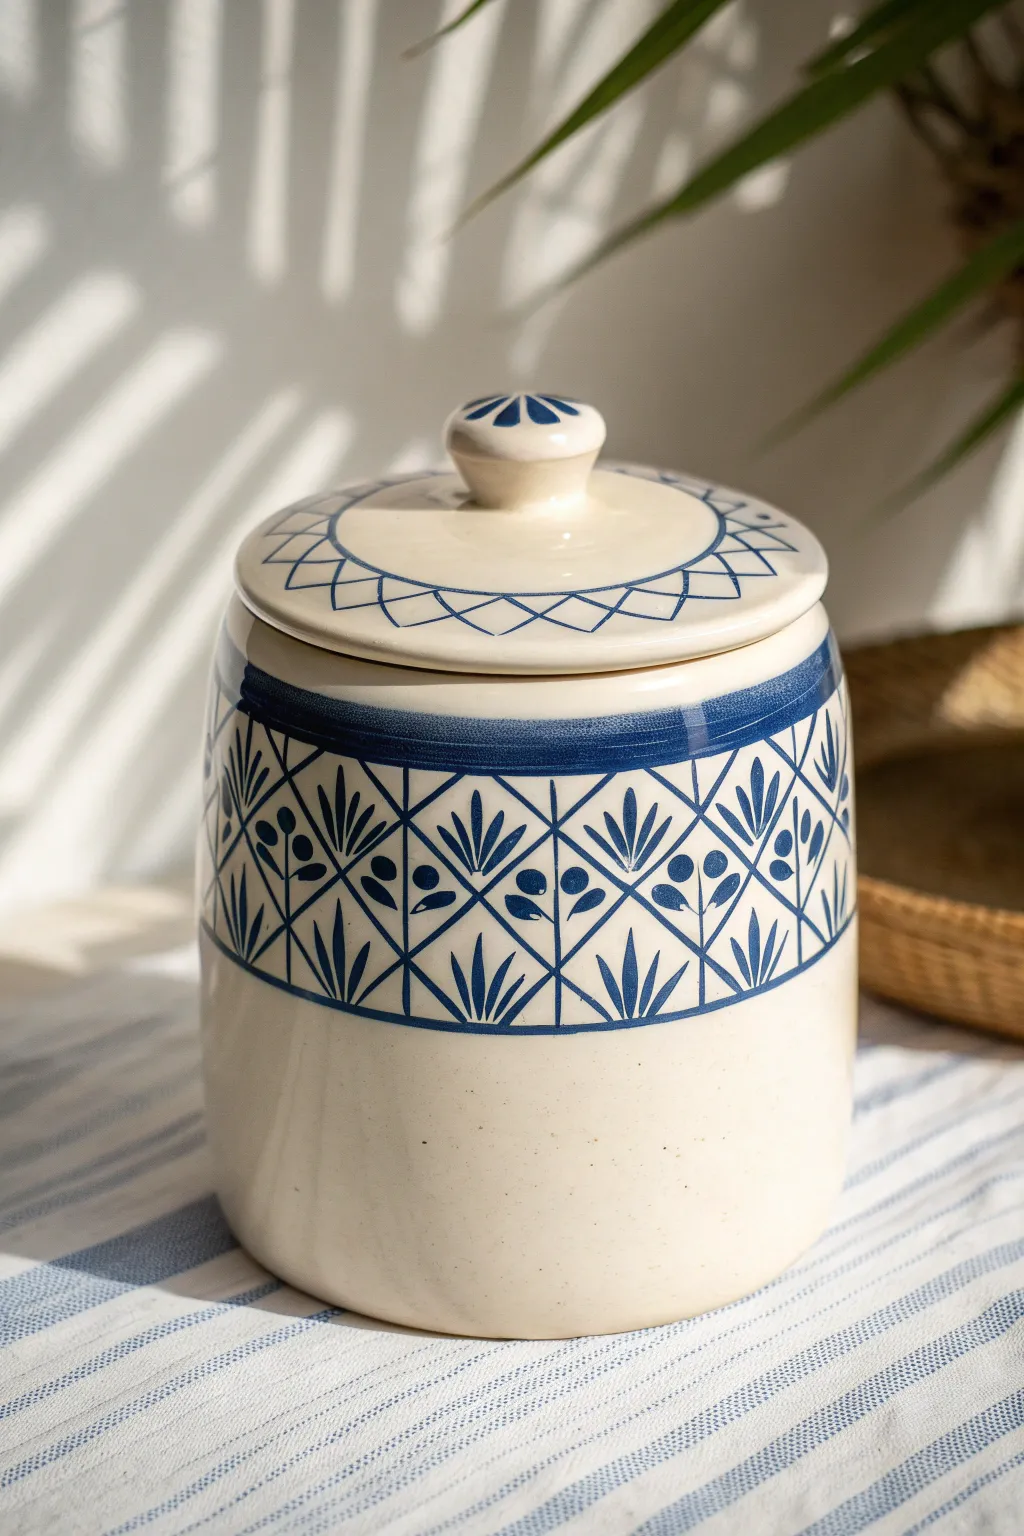
This elegant storage vessel mimics the charm of vintage blue-and-white pottery with a sleek, modern twist. The clean cream clay body provides a perfect canvas for a crisp, hand-painted geometric band featuring delicate fan leaves and berries.
Step-by-Step
Materials
- White stoneware or porcelain clay (approx. 4-5 lbs)
- Pottery wheel (or slab roller/coil tools for handbuilding)
- Rib tool (metal and rubber)
- Needle tool
- Trimming tools
- Cobalt blue underglaze
- Fine liner brush (size 0 or 00)
- Small round brush (size 2)
- Clear transparent glaze
- Pencil (for sketching on bisque)
- Sponge
- Ruler or measuring tape
Step 1: Throwing the Form
-
Center and open:
Begin with about 3-4 lbs of wedged white clay. Center it firmly on the wheel head and open the clay to create a flat internal floor about 4-5 inches wide. -
Pull the walls:
Pull the walls straight up into a cylinder. Aim for a height of roughly 6-7 inches. Keep the walls even, tapering slightly inward at the very top to create a gallery for the lid. -
Shape the gallery:
Using a rib or your fingers, split the rim to form a distinct gallery shelf where the lid will sit. Ensure this shelf is flat and smooth. -
Refine the curve:
Use a metal rib to smooth the exterior, creating a very subtle, gentle convex curve near the bottom before straightening out for the main body. -
Throw the lid:
With the remaining clay, throw a lid that fits your gallery measurement. Create a small, raised knob in the center, shaping it into a soft mushroom cap profile.
Step 2: Trimming and Prep
-
Dry to leather hard:
Allow both the jar and lid to dry slowly to a leather-hard state. This usually takes a day or two depending on humidity. -
Trim the base:
Secure the jar on the wheel and trim away excess weight from the bottom. Define the foot ring clearly so the jar sits flat. -
Refine the lid:
Trim the underside of the lid to remove bulk. Ensure the knob feels comfortable to grip. -
Smooth the surface:
Wipe down the entire piece with a damp sponge to remove any grog or rough spots. The surface needs to be pristine for the intricate painting.
Clean Lines Pro-Tip
If your hand is shaky, rest your pinky finger on the jar surface as a stabilizer while painting fine lines. Using a banding wheel to rotate the work into your brush helps creates smoother strokes.
Step 3: Bisque and Pattern Mapping
-
First firing:
Fire the greenware to cone 04 (bisque). Once cool, wipe off any kiln dust with a damp sponge. -
Mark the bands:
Place the jar on a banding wheel. Using a pencil, lightly mark horizontal lines to define the top and bottom of the decorative band. This band should sit on the upper third of the jar. -
Grid the design:
Within your horizontal lines, use a ruler to lightly pencil in a diamond grid pattern. The diamonds should connect point-to-point. -
Map the lid:
Mark a circle on the lid and divide the outer rim into triangular sections that match the grid style of the jar body.
Make It Count
Personalize the jar by stamping a word like “Cookies” or “Flour” on the side before the clay dries, then avoid painting over that specific area to leave a raised, unpainted label space.
Step 4: Painting the Design
-
Thicken the borders:
Load a round brush with cobalt blue underglaze. While spinning the banding wheel slowly, paint solid, thick blue bands at the top and bottom boundaries of your grid on the jar body. -
Paint the grid lines:
Switch to your fine liner brush. Carefully trace over your pencil grid lines with the blue underglaze. Keep your hand steady and the lines consistent in thickness. -
Add the botanical fans:
Inside every other diamond (or alternating top and bottom triangles), paint a stylized fan plant. Start with a central vertical stroke, then add two angled leaves on each side. -
Add the berries:
In the alternating sections, paint small, round berries on thin stems. I find that simple dots created by pressing the brush tip down work best here. -
Decorate the lid:
Repeat the geometric line work on the lid’s rim. Paint simple petal shapes on the knob to echo the floral theme. -
Glaze and fire:
Once the underglaze is completely dry, dip the entire piece in a clear transparent glaze. Wipe the foot ring clean and fire to the clay body’s maturity temperature (e.g., cone 5 or 6).
Fill your beautiful new jar with treats and display it proudly on your kitchen counter
Polka Dot “Sprinkle” Cookie Jar
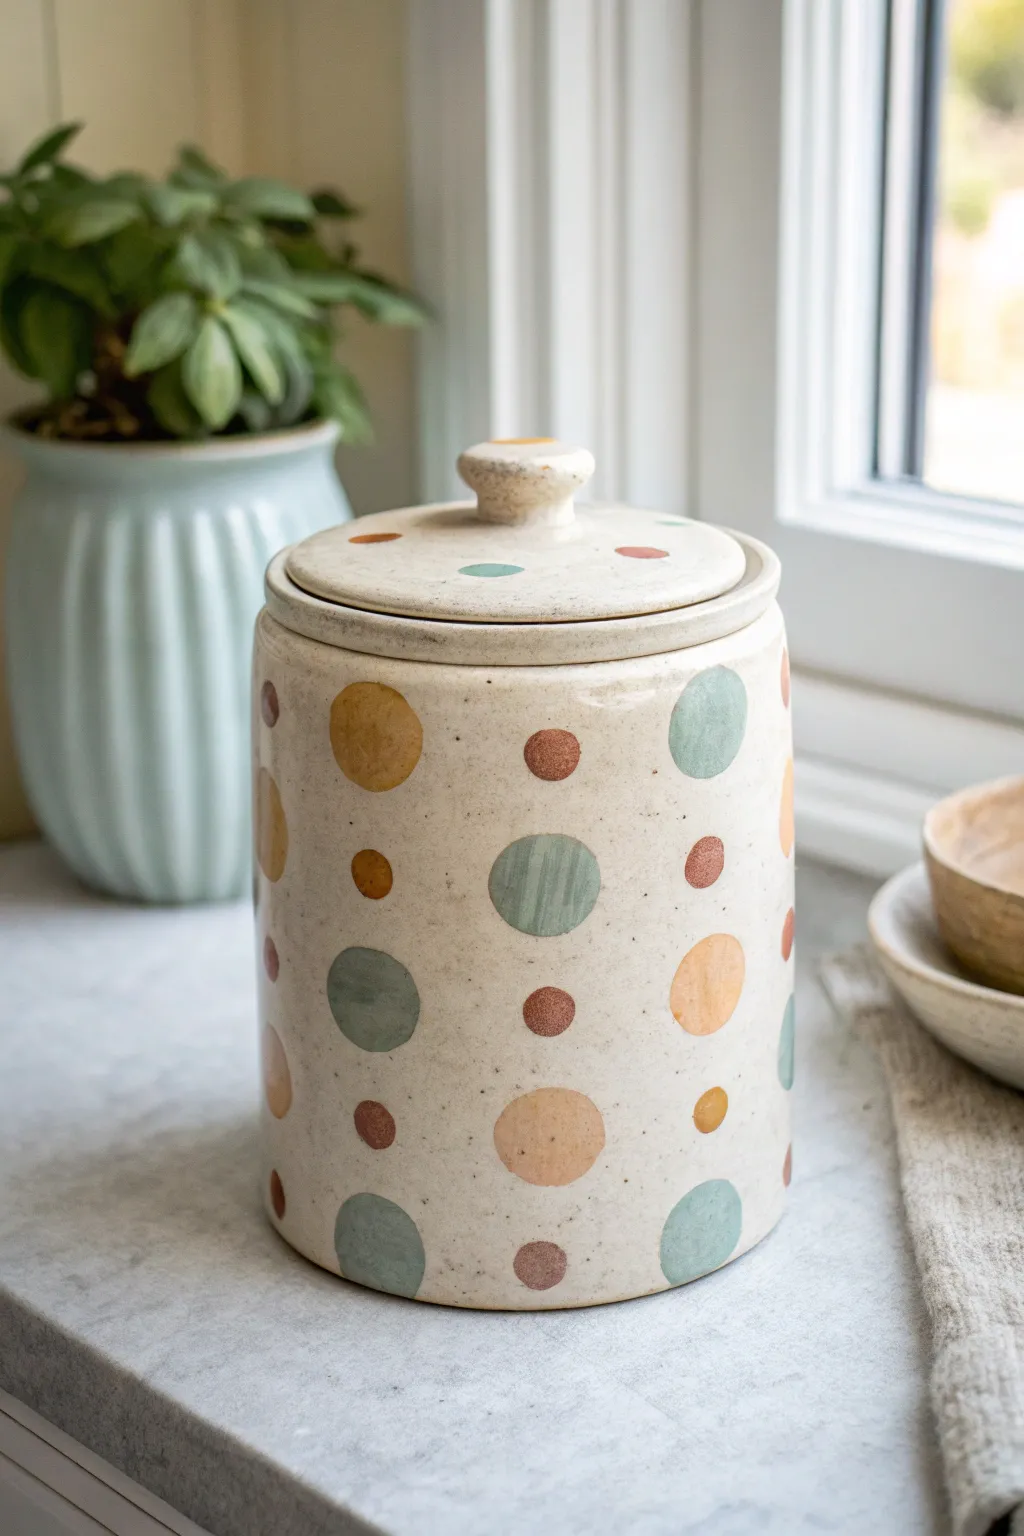
This charming, handmade cookie jar brings a playful yet sophisticated touch to any kitchen counter with its muted polka dots and delicate speckling. The warm, earthy tones of the glaze create a cozy, vintage feel that perfectly complements the sturdy stoneware form.
Step-by-Step Tutorial
Materials
- Stoneware clay body (approx. 3-4 lbs)
- Pottery wheel
- Throwing tools (sponge, rib, wire cutter)
- Trimming tools
- Calipers
- Underglazes (Muted Teal, Mustard Yellow, Rust Brown)
- Small round paintbrush
- Speckled cream or white matte glaze
- Kiln
Step 1: Throwing the Form
-
Center the clay:
Begin with about 2.5 to 3 lbs of wedged clay on the wheel. Center it firmly, creating a wide, stable base that will support the cylindrical shape of the jar. -
Open and pull the walls:
Open the centered clay and pull the walls straight up to form a cylinder. Aim for a height of about 6-7 inches, keeping the walls even—roughly ¼ inch thick throughout. -
Shape the rim:
Using a rib tool, smooth the sides to remove throwing lines. At the top rim, create a gallery—a small, recessed shelf on the inside edge where the lid will eventually sit. Measure the diameter of this gallery carefully with calipers before cutting the jar off the bat. -
Throw the lid:
Using the remaining roughly 1 lb of clay, throw the lid upside down or right-side up depending on your preference. Ensure the flange or outer edge matches the caliper measurement from your jar’s gallery for a snug fit. -
Create the knob:
While throwing the lid (if throwing right-side up), pull a small amount of clay from the center to form a sturdy, mushroom-shaped knob. If you threw the lid upside down, attach a knob later after trimming. -
Dry to leather hard:
Allow both the jar and the lid to dry slowly to a leather-hard state. This usually takes a day or two depending on humidity.
Step 2: Trimming and Underglazing
-
Trim the jar:
Place the jar back on the wheel, center it, and trim away excess weight from the bottom. Create a slight foot ring to give the piece a visual lift. -
Trim the lid:
Make sure the lid fits the gallery perfectly. Trim any heaviness distinctively around the rim so it sits flat and doesn’t wobble. -
Plan the pattern:
Before painting, I sometimes lightly mark the positions of the large dots with a pencil to ensure balanced spacing around the cylinder. -
Paint large dots:
Using your underglazes, paint circles in varying sizes. Alternate between the muted teal, mustard yellow, and rust colors. Don’t worry about perfect circles; a slightly organic shape adds character. -
Apply second coats:
Underglaze often requires 2-3 coats for opacity. Let each layer dry to the touch before applying the next coat to avoid streaking. -
Add the ‘sprinkles’:
Use the very tip of a small brush or a needle-tool end to dot tiny flecks of dark rust or brown in the negative spaces between the large polka dots. -
Decorate the lid:
Repeat the polka dot pattern on the top surface of the lid. Add a few dots of color to the knob to tie the design together. -
Bisque fire:
Load the bone-dry pieces into the kiln and fire to cone 04 (or your clay’s specific bisque temperature). This hardens the clay and sets the underglaze.
Clean Gallery Tip
Use a specialized ‘lid master’ caliper when measuring. It measures inside and outside dimensions simultaneously, ensuring your lid fits immediately.
Step 3: Glazing and Final Firing
-
Prep specifically:
Wipe the bisque-fired ware with a damp sponge to remove any dust. Wax resist the bottom foot of the jar and the contact points (where the lid touches the jar) to prevent them from fusing shut. -
Apply the overglaze:
Dip the entire jar and lid into a clear or semi-transparent speckled cream glaze. A matte finish works best here to soften the underglaze colors beneath without hiding them. -
Clean the distinct edges:
Double-check the gallery and lid flange. Wipe away any wayward glaze droplets on these contact points with a sponge. -
Glaze fire:
Fire the kiln to the maturity temperature of your clay and glaze (typically cone 5 or 6 for stoneware). Allow the kiln to cool completely before opening.
Sticky Lids?
If you’re worried about the lid fusing during the glaze firing, apply a wash of alumina hydrate to the unglazed gallery and lid flange as a barrier.
Now you have a functional piece of art ready to be filled with your favorite homemade cookies
Cookie Cutter Shape Lid Handles
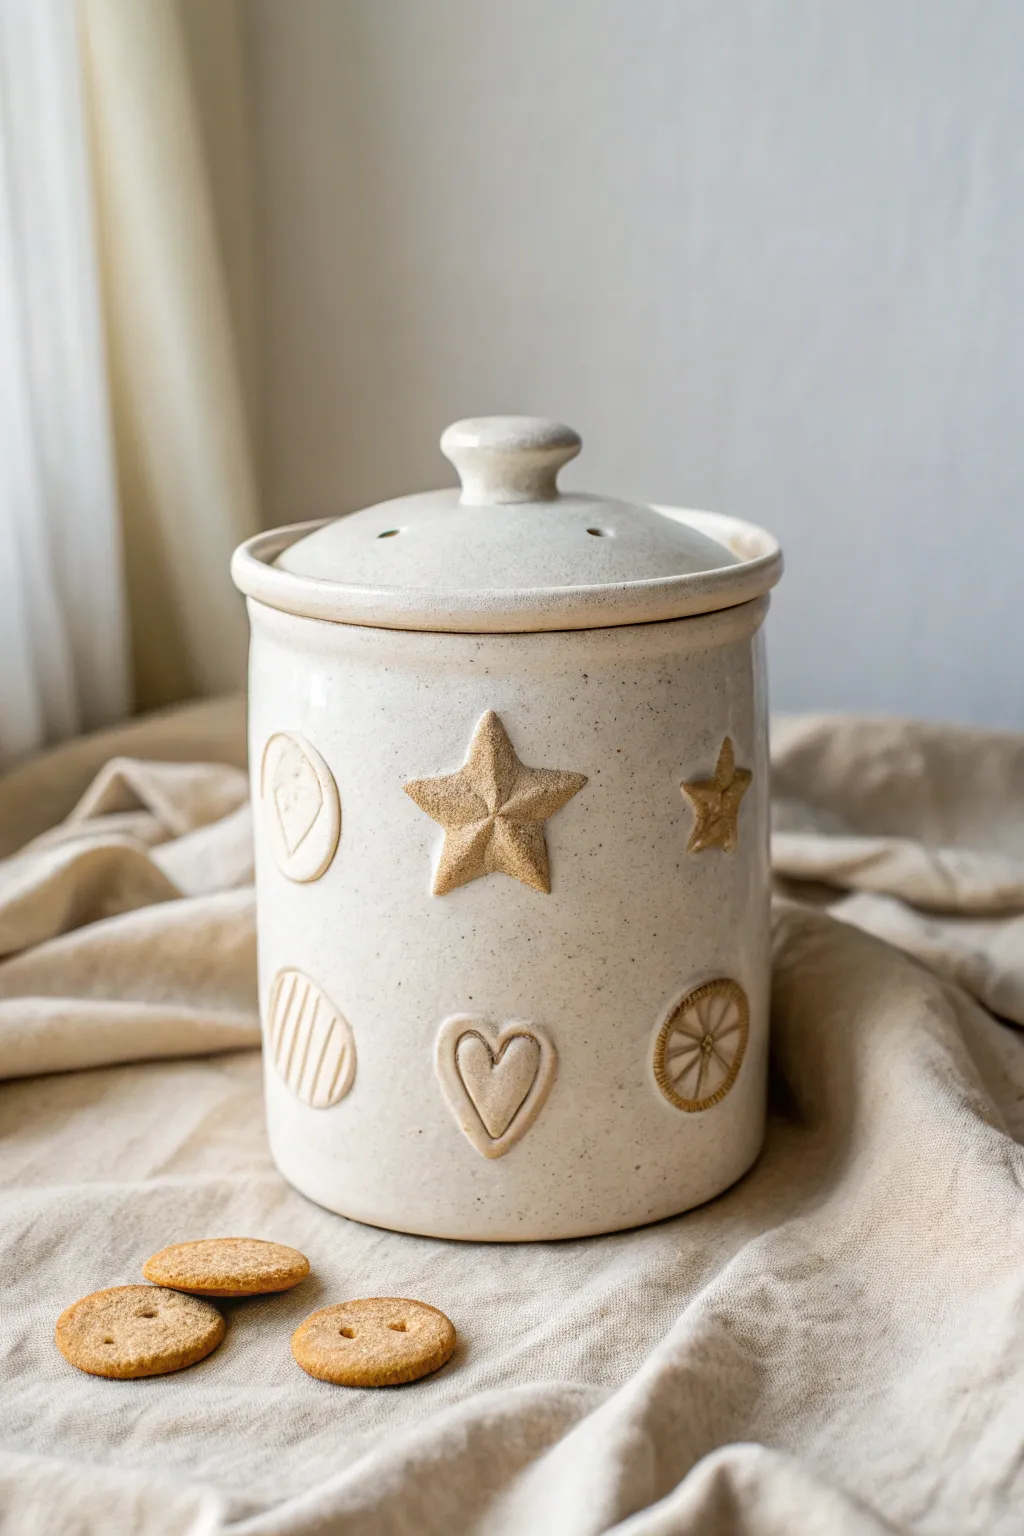
This rustic, speckled ceramic jar features whimsical relief designs created directly from your favorite baking tools. The subtle glazing and raw clay accents give it a cozy, farmhouse aesthetic perfect for storing your sweet treats.
Step-by-Step
Materials
- Speckled stoneware clay (approx. 5-7 lbs)
- Pottery wheel (or slab roller for handbuilding)
- Rib tools (metal and wood)
- Needle tool
- Wire cutter
- Sponge
- Set of small cookie cutters (stars, hearts, circles)
- Scoring tool (serrated rib)
- Slip (liquid clay)
- Calipers
- Clear or translucent white glaze
- Wax resist
- Kiln for firing
Step 1: Throwing or Building the Base
-
Prepare the Clay:
Begin by thoroughly wedging about 4-5 pounds of speckled stoneware clay to remove any air bubbles and ensure an even consistency. -
Center and Open:
Center your clay on the wheel head. Open the clay wide enough to create a substantial interior volume for cookies, aiming for a cylinder base width of about 6-7 inches. -
Pull the Walls:
Pull the walls up into a tall, straight cylinder. Aim for a height of about 8-9 inches. Keep the walls even, perhaps slightly thicker than a standard mug to support the added sprigs later. -
Shape the Gallery:
At the rim, carefully split the clay or compress inward to create a gallery (a small internal ledge) where the lid will sit. Use calipers to measure the diameter of this gallery for a perfect lid fit. -
Smooth and Trim:
Use a metal rib to smooth the exterior walls, removing any throwing lines if you prefer that clean, modern look shown in the image. Undercut the foot slightly with a wood knife.
Step 2: Creating the Lid
-
Throw the Lid:
Using the remaining clay, throw a lid on the wheel. Measure constantly with your calipers to match the gallery of your jar base. -
Form the Dome:
Shape the lid with a gentle upward dome. I like to keep the curve soft rather than steep. -
Add the Knob:
You can throw the knob directly onto the lid while it’s connected to the hump, or trim it later. Aim for a classic, rounded mushroom shape for a comfortable grip. -
Ventilation Holes:
Once the clay is leather hard, use a small hole punch or drill tool to poke two small steam vents near the knob. This is functional for firing and adds a nice detail.
Clean Edges Matter
When cutting your sprigs, lightly smooth the sharp cut edge with a damp finger before attaching. This prevents them from feeling sharp or jagged after the final firing.
Step 3: Decoration and Finishing
-
Roll a Slab:
Roll out a thin slab of the same speckled clay (approx. 1/8 inch thick). Compress it well on both sides with a rib. -
Cut the Shapes:
Use your cookie cutters (stars, hearts, circles) to punch shapes out of the slab. For the circle designs, lightly press textures inside them before attaching—try using a fork for stripes or a citrus reamer for the wheel pattern. -
Score and Slip:
Score the back of each cutout and the spot on the leather-hard jar where you want to place it. Apply a dab of slip to both surfaces. -
Attach Sprigs:
Press the shapes firmly onto the jar wall. Use your finger or a small modeling tool to seal the edges so they don’t pop off during firing. -
Initial Bisque Fire:
Let the jar dry slowly under plastic to ensure handles and sprigs dry at the same rate as the body. Bisque fire to cone 04 (or your clay’s specification). -
Wax Application:
This is crucial for the look: Apply wax resist carefully over the raised distinct shapes (stars, hearts, etc.) and the knob of the lid. This keeps them raw and unglazed. -
Glazing:
Dip the entire jar and lid into a glossy white or translucent cream glaze. The wax will repel the glaze from your decorative shapes. -
Cleanup:
Use a damp sponge to wipe any stray glaze droplets off the waxed areas to ensure clean, sharp edges on your stars and hearts. -
Final Firing:
Glaze fire to cone 5 or 6 (depending on your clay body). The heat will bring out the natural speckles within the clay, especially on the unglazed relief areas.
Make It a Set
Create a matching smaller jar for sugar and one for flour. Use different cookie cutter themes for each jar to distinguish contents without using text.
Fill your finished jar with homemade spiced cookies and display it proudly on your kitchen counter.
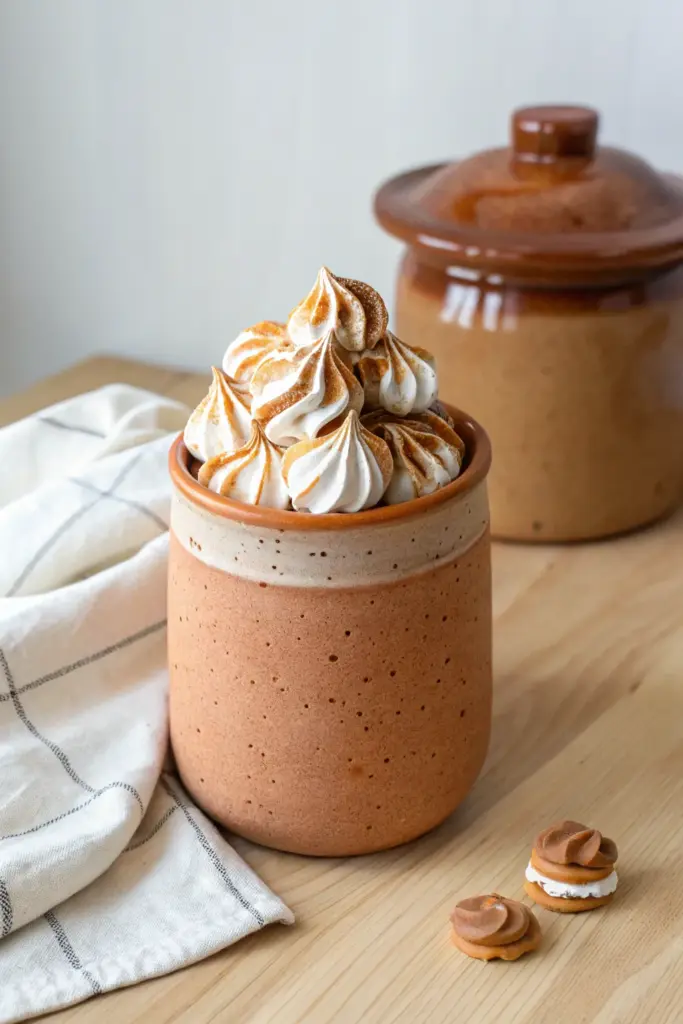
Over-the-Top Dessert Cookie Jar Lid
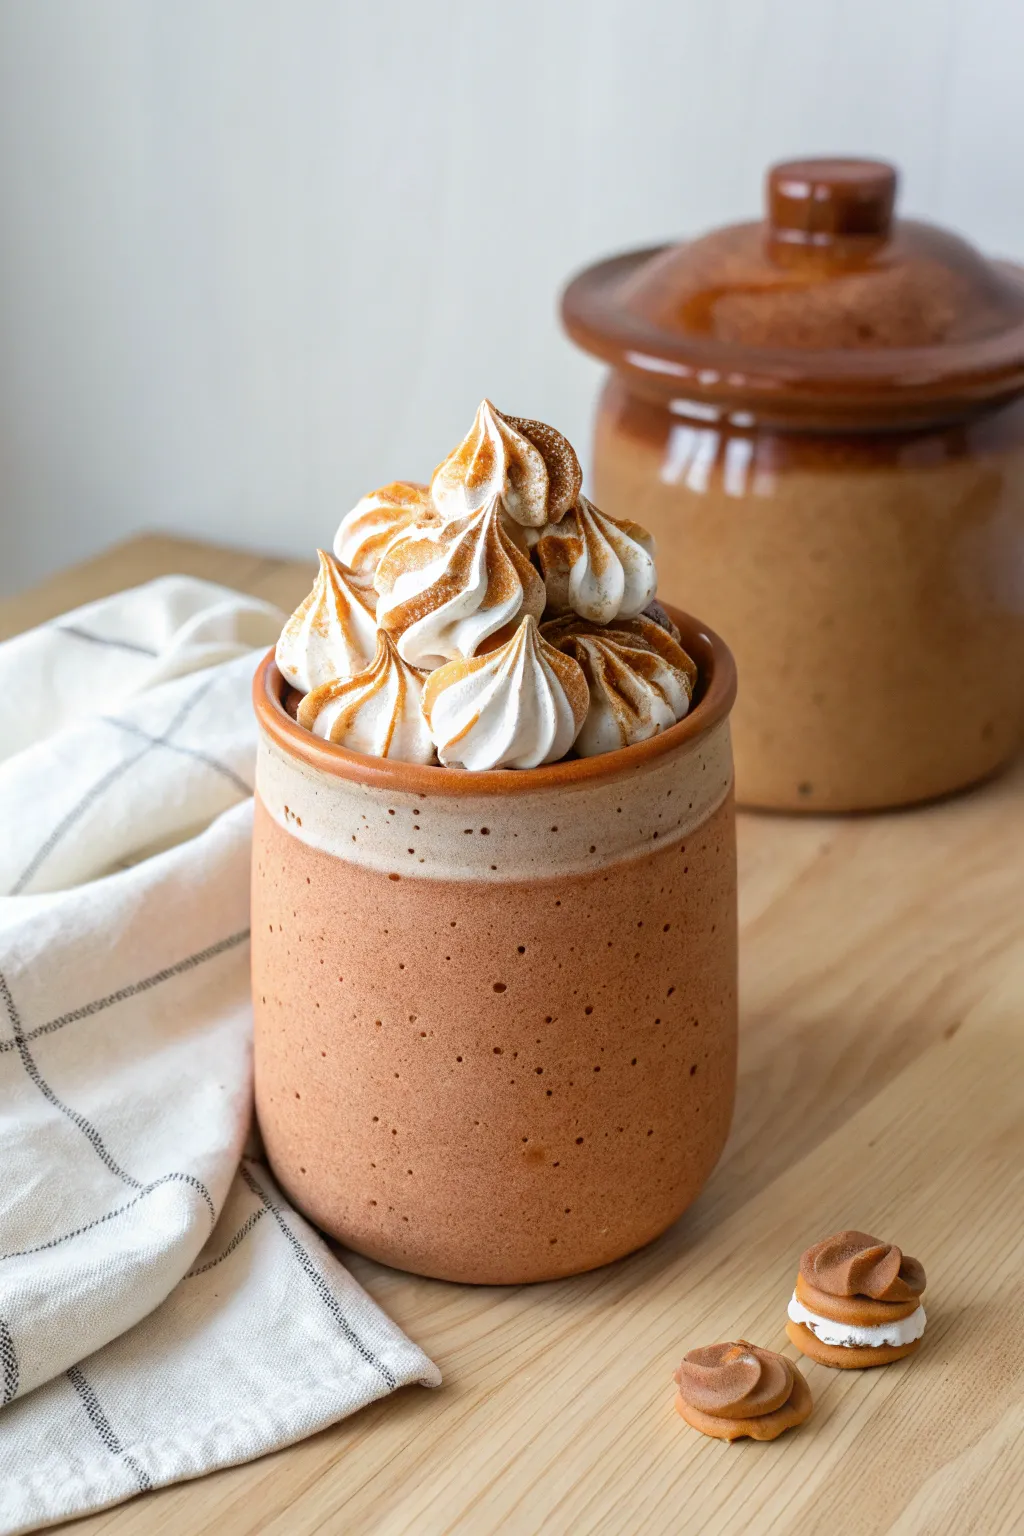
Transform a simple ceramic vessel into a sweet trompe-l’oeil masterpiece with this faux meringue cookie jar topper. By piping air-dry clay just like real frosting, you’ll create a permanent, dusting-of-cocoa dessert display that looks good enough to eat.
Step-by-Step Guide
Materials
- Small ceramic or terracotta jar (glazed or matte)
- White polymer clay (soft consistency) or lightweight air-dry clay (like creative paperclay)
- Piping bag with large star tip
- Liquid polymer clay (if using polymer)
- E6000 or strong craft glue
- Soft pastel chalks in cocoa brown and caramel colors
- Fluffy paintbrush
- Aluminum foil
- Masking tape
- Small craft knife
- Matte spray varnish
Step 1: Prepping the Base Structure
-
Clean the surface:
Begin by thoroughly cleaning the rim of your chosen ceramic jar with rubbing alcohol to remove any oils or dust. This ensures your clay structure adheres properly. -
Create a foil dome:
Crumple aluminum foil into a tight ball, shaping it into a dome that fits perfectly inside the mouth of the jar. It should bulge upwards significantly, acting as the support for your meringue pile. -
Secure the dome:
Use masking tape to secure the foil ball to a removable insert (like a thick cardboard circle cut to the jar’s diameter) or tape it loosely inside the jar rim if you want the lid to be permanently attached. I prefer creating a removable lid by building on a separate disc. -
Clay consistency check:
Prepare your clay. If using polymer clay, soften it using clay softener or baby oil until it has the consistency of unparalleled frosting. If using air-dry clay, add a tiny amount of water until it’s pipe-able but holds stiff peaks.
Clay Too Stiff?
If your polymer clay is impossible to pipe, mix in a few drops of liquid Sculpey or clay softener. It should feel like sticky toothpaste.
Step 2: Piping the Meringues
-
Load the piping bag:
Fit your piping bag with a large star tip. Spoon the softened clay mixture into the bag, pushing it down to remove air pockets. -
Practice piping:
Before committing to the jar, pipe a few test swirls on parchment paper. You want defined ridges that don’t slump. -
Base layer piping:
Pipe a ring of rosettes around the bottom edge of your foil dome. Squeeze firmly to build volume, then stop pressure and pull up quickly to create the classic meringue peak. -
Building upward:
Continue piping concentric circles of dollops, moving inward and upward. Overlap them slightly to hide the foil completely. -
The crowning peak:
Pipe one final, taller swirl at the very center top to complete the pyramid shape. -
Fill the gaps:
Inspect your work from all angles. If you see any foil peeking through, gently pipe smaller accent stars to plug the holes.
Pro Tip: Realistic Look
Don’t over-dust! Real dusted desserts have uneven coverage. Leave some patches bright white for high contrast.
Step 3: Adding the Cocoa Dust Effect
-
Prepare the pastels:
Take your brown and caramel soft pastel chalks. Scrape them with a craft knife to create a fine, powdery dust. -
First dusting:
While the clay is still wet (if air-dry) or uncured (if polymer), pick up the lighter caramel dust with a fluffy round brush. -
Applying the caramel:
Gently tap the brush over the peaks of the meringue. Don’t brush strokes; just let the powder fall naturally onto the ridges. -
Deepening the color:
Repeat the process with the darker cocoa brown powder. Focus this darker shade on the very tips of the peaks to mimic burnt sugar or dusted cinnamon. -
Spot shading:
Use a smaller brush to gently dab some brown powder into select crevices between the meringues for depth.
Step 4: Curing and Finishing
-
Drying or baking:
If using air-dry clay, let the project sit undisturbed for 24-48 hours. If using polymer clay, bake according to package directions (usually around 275°F/135°C for 15-20 minutes, depending on thickness). -
Cooling down:
Allow the piece to cool completely if baked. Hot clay is fragile and can crack if handled too soon. -
Sealing the work:
Spray the entire meringue top with a matte varnish. This sets the pastel powder so it won’t rub off later. -
Final assembly:
If you built the lid on a separate disc, use strong glue like E6000 to attach the bottom of the disc to the actual underside of your jar lid or cork stopper.
Now you have a charming, permanent dessert display that adds a touch of whimsy to any kitchen counter without the calories