Whenever I’m stuck on what to make, I grab a little lump of clay and let my hands do the brainstorming. Here are my favorite clay craft ideas—all approachable, fun, and totally doable without turning your kitchen into a full-blown ceramics lab.
Easy Trinket Dishes With Stamped Texture
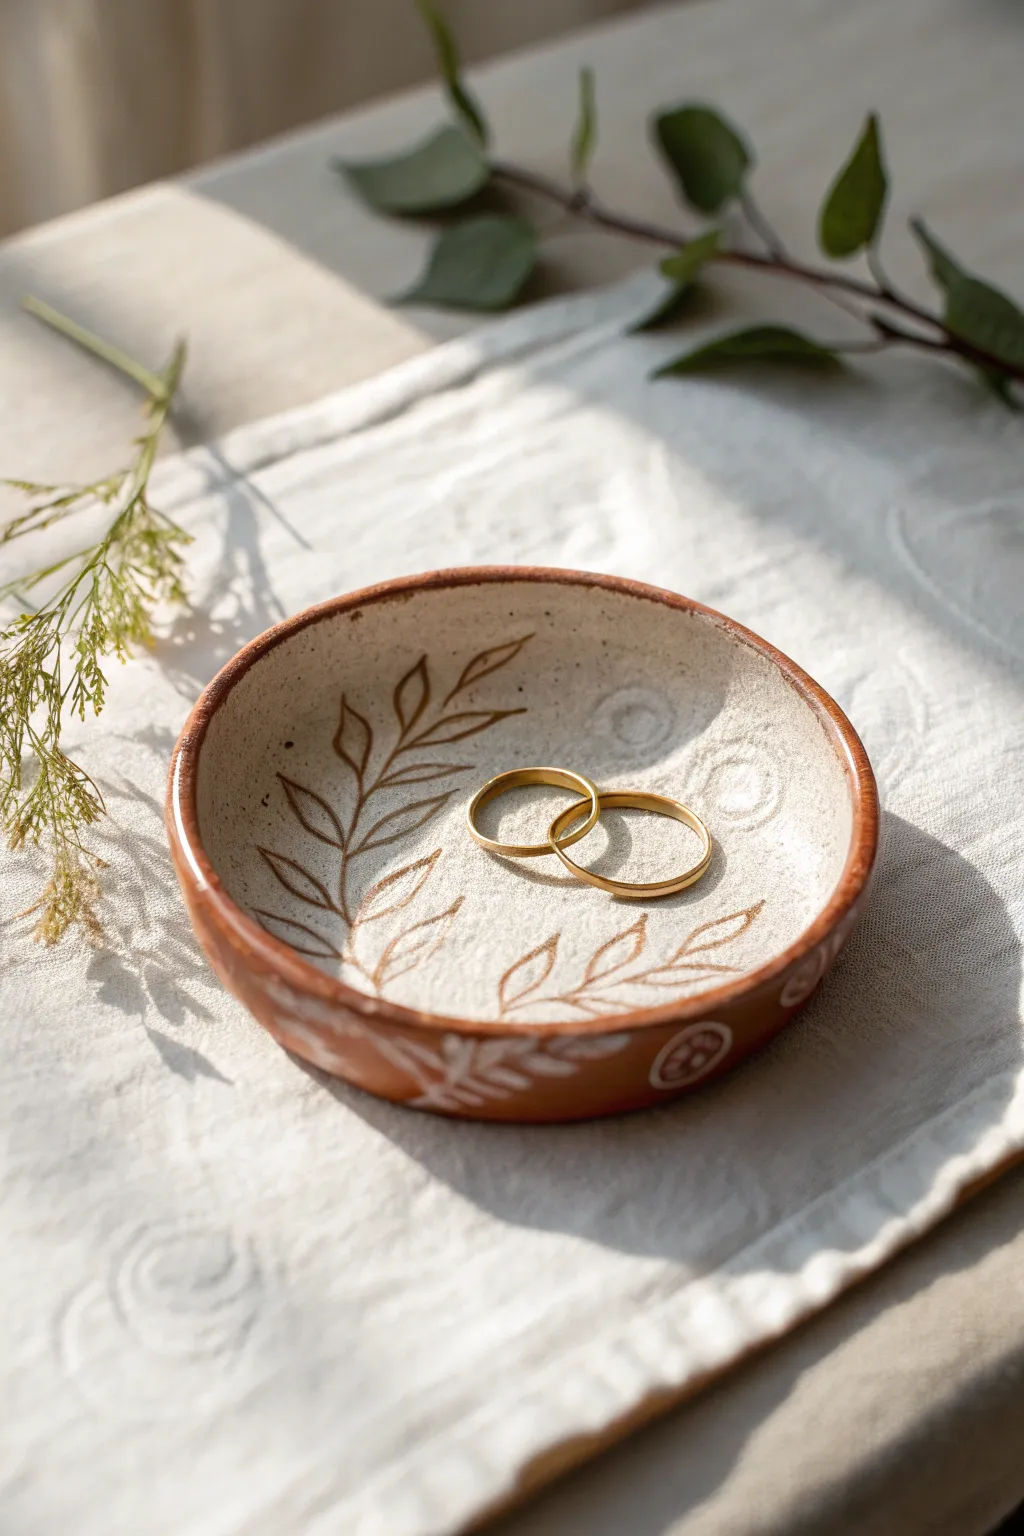
Create a stunning earthy home for your jewelry with this sgraffito-style clay dish. By layering a creamy slip over warm terracotta clay and carving away the design, you’ll achieve a beautiful etched botanical finish.
How-To Guide
Materials
- Terracotta air-dry clay or oven-bake polymer clay
- Rolling pin
- Circle template or bowl (approx. 4-5 inches diameter)
- Craft knife
- White clay slip or white heavy-body acrylic paint
- Wide, soft paintbrush
- Loop tool or needle tool for carving
- Small circular stamps (or improvised tools like pen caps)
- Sponge and water
- Fine-grit sandpaper
- Matte or satin sealant
Step 1: Forming the Dish
-
Prepare the clay slab:
Begin by kneading a generous handful of terracotta clay to warm it up and remove air bubbles. Flatten it onto a clean work surface and use a rolling pin to create an even slab about 1/4 inch thick. Rotate the clay occasionally to ensure it doesn’t stick. -
Cut the circle:
Place your circle template or a small bowl upside down onto the slab. Using a craft knife, carefully trace around the edge to cut out a perfect circle. -
Smooth the edges:
Dip your finger in a little water and run it along the cut edge of the clay circle. This smooths out any sharpness or crumbles from the cutting process. -
Shape the curvature:
Gently lift the clay circle and place it into a shallow bowl lined with plastic wrap, or simply curve the edges upward with your hands to create a dish shape. Tap the bottom gently so it sits flat on the table.
Clean Lines Pro-Tip
Keep a damp sponge nearby while carving. Wipe your carving tool tip frequently to prevent clay buildup, which ensures your leaf edges remain crisp and defined.
Step 2: Adding the White Layer
-
Apply the white coat:
If using air-dry clay, apply a coat of white liquid clay slip to the interior. If using polymer clay or painting later, you can skip this step and paint after baking, but applying slip while wet allows for authentic sgraffito. For this tutorial, we are assuming a ‘wet application’ technique. -
Let it firm up:
Allow the clay (and slip) to dry until it reaches a ‘leather-hard’ state. It should be firm to the touch but still cool and slightly damp, not bone dry. This is crucial for clean carving.
Step 3: Carving the Design
-
Plan your stems:
Using a needle tool, very lightly scratch a central curved line across the dish to mark where your main leaf stem will go. This guide line helps with spacing. -
Carve the leaves:
With a carving tool or loop tool, gently scrape away the white surface layer in leaf shapes. Vary the pressure: press harder at the base of the leaf and lighter at the tip to create a tapered look. -
Refine the details:
Go back and carve the central vein line through each leaf shape, revealing the terracotta tone underneath. Clean away any clay crumbs with a soft, dry brush as you work. -
Add texture stamps:
In the negative space around the leaves, press a small circular stamp or the cap of a pen into the clay. Don’t press too deep; just enough to create a subtle indented texture. -
Decorate the rim:
Add small dashes or leaves along the outer vertical rim of the dish using the same carving technique, connecting the design from the inside to the outside.
Fixing Mistakes
Carved a leaf in the wrong spot? Mix a tiny bit of water with your white clay scraps to make a paste, fill the gouge, smooth it over, let it dry slightly, and try again.
Step 4: Finishing Touches
-
Final drying:
Let the dish dry completely according to your clay package instructions. This usually takes 24-48 hours for air-dry clay. Airflow is key here. -
Sand lightly:
Once fully dry (and baked, if using oven clay), inspect the rim. If there are rough spots, rub them very gently with fine-grit sandpaper until smooth. -
Seal the piece:
Apply a clear matte or satin sealant to the entire dish to protect the clay and the paint. This also prevents moisture from jewelry or humidity from affecting the clay.
Now your lovely botanical dish is ready to hold your favorite rings and trinkets


Leaf-Imprint Catchall Bowls
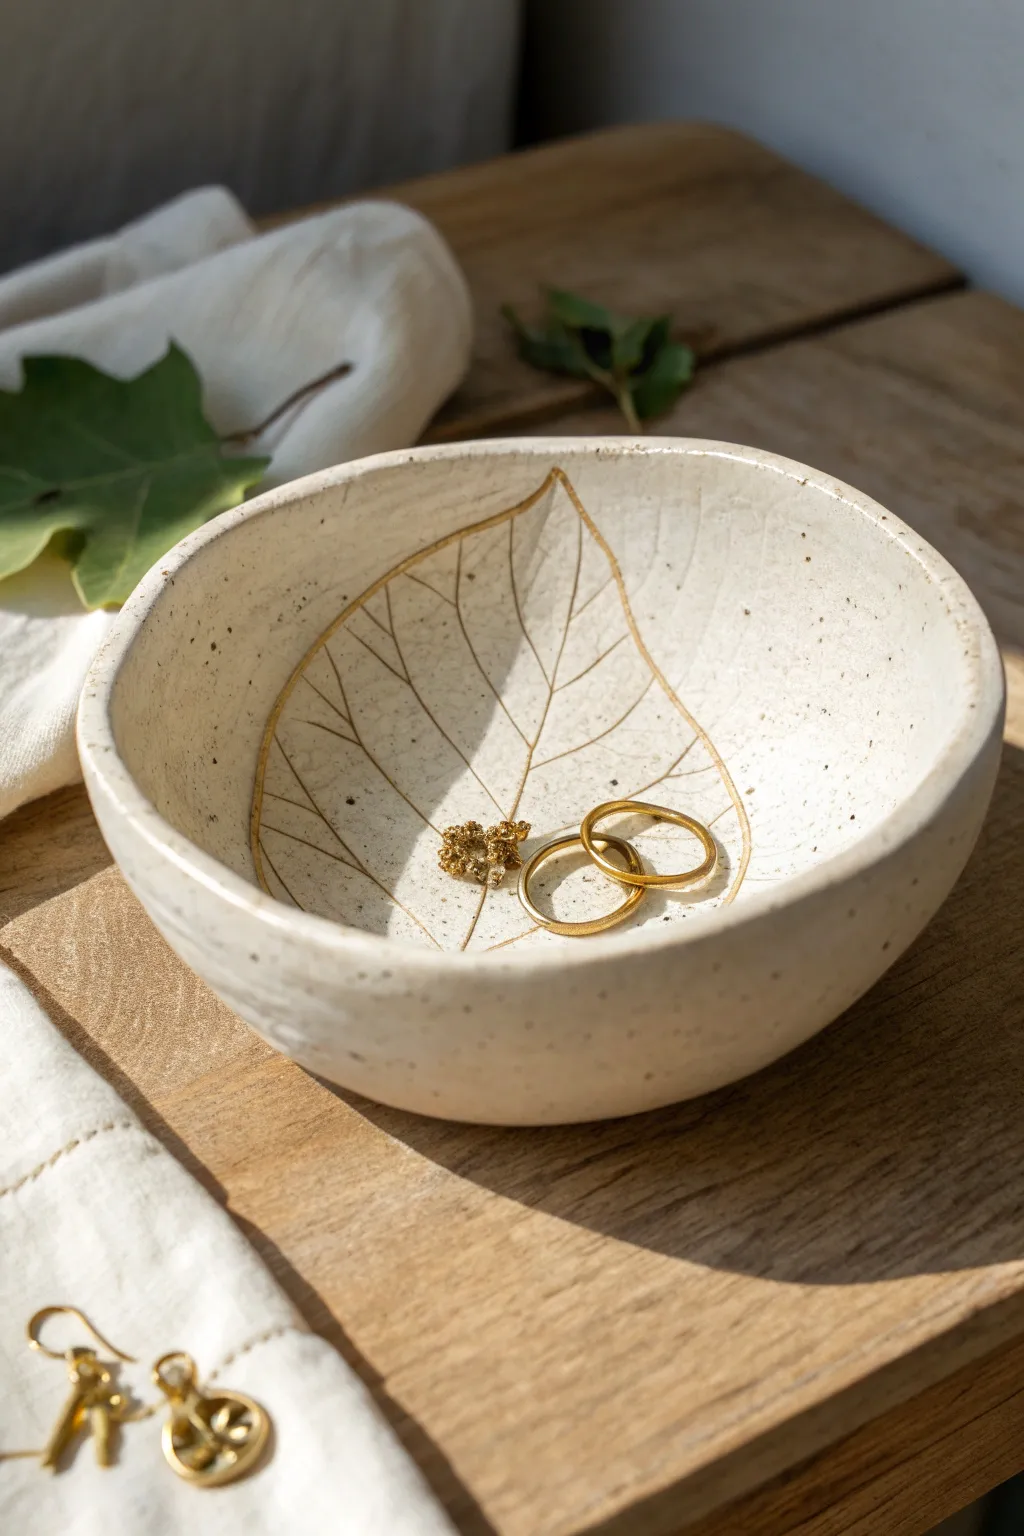
This elegant catchall bowl combines the rustic texture of speckled clay with the delicate sophistication of gold leafing. By pressing a real leaf into the clay surface, you’ll capture intricate veins and details that become a stunning focal point once highlighted with metallic luster.
Step-by-Step Guide
Materials
- White stoneware or polymer clay with speckles (granite effect)
- Small rolling pin
- Fresh leaf with prominent veins (like hydration or maple)
- Sharp craft knife or needle tool
- Small bowl (for shaping – use as a mold)
- Sponge and water
- Fine grit sandpaper
- Gold leaf liquid paint or gold luster
- Fine detail paintbrush
- Clear matte varnish or glaze
Step 1: Preparation and Rolling
-
Condition the Clay:
Begin by kneading your speckled clay until it is soft, pliable, and free of air bubbles. If using polymer clay, warm it in your hands; if using stoneware, wedge it thoroughly on a canvas surface. -
Roll the Slab:
Use your rolling pin to flatten the clay into a smooth, even slab about 1/4 inch thick. Aim for a consistent thickness to prevent cracking during drying or baking. -
Prepare the Leaf:
Select a leaf that is slightly smaller than your desired bowl size. Ensure it is fresh so it doesn’t crumble, and gently wipe away any dirt or debris. -
Position the Leaf:
Place the leaf vein-side down onto the center of your rolled clay slab. The vein side usually has more texture, which is crucial for a crisp impression. -
Create the Imprint:
Gently roll over the leaf with your rolling pin using firm, even pressure. Do this once or twice—avoid rolling back and forth too many times, as this can create a blurred or double image.
Step 2: Shaping and Refining
-
Remove the Leaf:
Carefully lift the stem and peel the leaf away from the clay to reveal the imprinted design. Take your time here to avoid marring the surface. -
Cut the Circle:
Place a circular template or bowl upside down over the imprint to guide your cut. Use a craft knife to cut a clean circle around the leaf design, leaving a pleasant border. -
Smooth the Edges:
Dip your finger or a small sponge in water and run it along the cut rim of the clay circle to soften any sharp angles or rough bits. -
Form the Bowl:
Lift your clay circle and gently drape it into your mold bowl to give it a curved shape. Press it lightly so it conforms to the curve, but be careful not to squash the leaf texture. -
Dry or Bake:
If using air-dry or stoneware clay, let it dry slowly in the mold until leather hard. If using polymer clay, bake it in the oven according to the manufacturer’s instructions while it sits inside an oven-safe glass bowl.
Clean Impressions Pro-Tip
If using sticky clay, lightly dust the leaf with cornstarch before pressing it down. This prevents the leaf from tearing when you peel it off.
Step 3: Finishing Touches
-
Sanding:
Once the piece is fully cured or dried (and fired, if using ceramic kiln clay), use fine grit sandpaper to gently smooth the rim again for a professional finish. -
Preparing the Gold:
Shake your liquid gold leaf or metallic luster well. Pour a tiny amount onto a palette or disposable lid. -
Painting the Outline:
Dip a very fine detail brush into the gold. I find it helpful to hold my breath for a second while tracing the main outline of the leaf shape to keep the line steady. -
Highlighting Veins:
Continue using the fine brush to trace the major interior veins of the leaf. You don’t need to paint every tiny line; highlighting the main arteries creates a beautiful, artistic effect. -
Sealing:
Allow the gold paint to dry completely. Finish the piece by applying a coat of clear matte varnish or glaze to protect the clay and the metallic design from tarnishing.
Level Up: Rim Details
Add an extra touch of luxury by painting the very rim of the bowl with the same gold luster to frame the entire piece.
Now you have a stunning, nature-inspired vessel perfect for holding your favorite rings or earrings near the bedside


Cute Animal Ring Holders
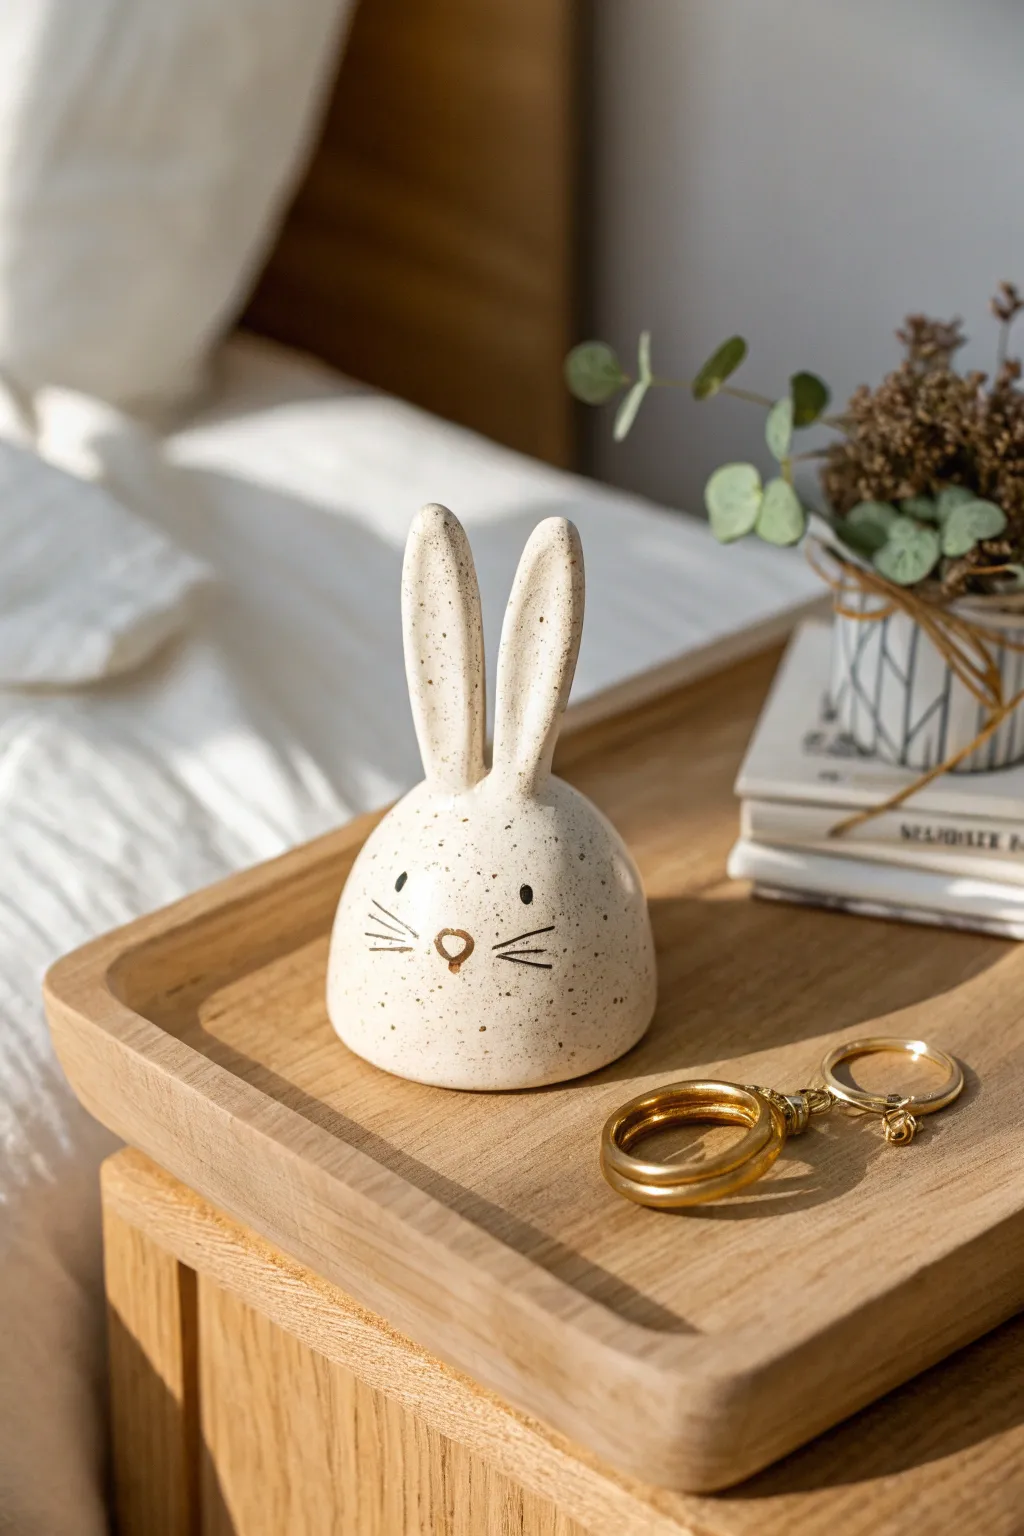
This charming, dome-shaped bunny brings a minimalist Scandinavian vibe to your bedside table while keeping your jewelry safe. With its speckled finish and sweet, simple face, it looks like high-end ceramic stoneware but can be easily crafted at home.
Step-by-Step
Materials
- Air-dry clay (white or cream)
- Acrylic paint (black and gold)
- Fine-point paintbrush (size 0 or 00)
- Old toothbrush
- Brown watercolor or diluted acrylic paint
- Rolling pin
- Small bowl with water
- Clay smoothing tool or sponge
- Matte varnish or sealant
Step 1: Shaping the Base
-
Form the Body:
Start with a ball of clay roughly the size of a tangerine. Roll it in your palms until smooth, removing any cracks. -
Create the Dome:
Gently press the ball onto your work surface to flatten the bottom. Shape the top into a smooth, rounded dome. It shouldn’t be perfectly spherical; aim for a slightly tapered, egg-like curve similar to the photo. -
Smooth the Surface:
Dip your finger in a little water and run it over the dome to eliminate imperfections. A smooth canvas is key for the faux-ceramic look later.
Uneven Splatter?
If the paint blobs instead of misting, your paint is too thick. Add water until it’s ink-like. If blobs happen, dab them immediately with a damp paper towel.
Step 2: Adding the Ears
-
Roll Conditions:
Take two smaller pieces of clay and roll them into elongated sausage shapes, about 2-3 inches long. -
Shape the Ears:
Refine the sausages so they are tapered at the top and slightly thicker at the bottom. Flatten them gently; they should look like long, soft petals. -
The Indentation:
Use a modeling tool or the handle of a paintbrush to press a long, shallow indentation down the center of each ear to give them depth. -
Attach to Body:
Score the bottom of the ears and the top of the dome where they will sit. Apply a dab of water or clay slip, then press the ears firmly in place, standing upright. -
Blend Seams:
Use a clay tool or your finger to smooth the clay from the base of the ears down onto the head. The transition needs to be seamless for stability.
Add Functionality
Before the clay dries, create a slight concave dish shape at the very top of the head between the ears to hold stud earrings alongside your rings.
Step 3: Details & Drying
-
Dry Completely:
Let your bunny sit undisturbed for 24-48 hours. It must be bone dry before painting. -
Sand Imperfections:
Once dry, use fine-grit sandpaper to gently buff away any fingerprints or bumps, creating a professional matte finish. -
Create the Speckles:
Mix a small amount of brown paint with water to make a thin wash. Dip an old toothbrush into the mixture. -
Splatter Technique:
Hold the toothbrush near the bunny and run your thumb across the bristles to flick tiny droplets onto the clay. I usually test this on paper first to control the spray density.
Step 4: Painting the Face
-
Draw the Eyes:
Using your finest brush and black acrylic paint, dab two small, solid ovals for eyes about halfway down the dome. -
Add the Nose:
Paint a small, inverted heart shape between the eyes using gold metallic paint for a touch of elegance. -
Whiskers:
With a steady hand and very little paint on your brush, draw three thin, straight lines radiating out from the nose area on each side. -
Seal the piece:
Finish with a coat of matte varnish to protect the clay and lock in the paint without making it look plasticky.
Now you have a sweet little guardian for your favorite rings that looks lovely on any dresser


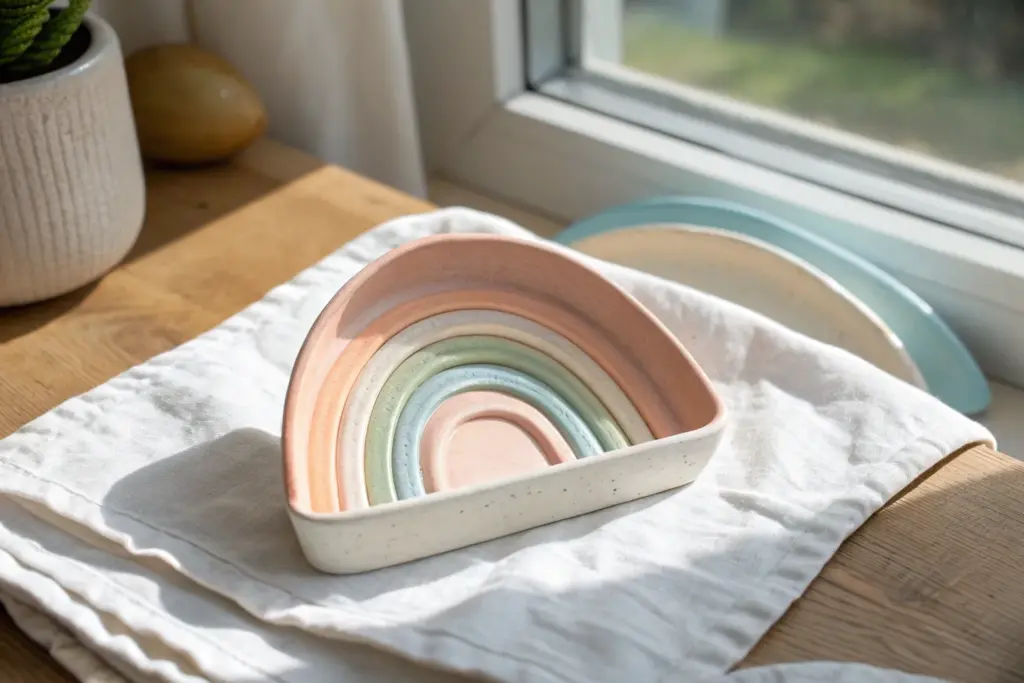
Polymer Clay Bead Bracelets and Necklaces

Capture the essence of nature with this beautifully matte polymer clay bracelet featuring a soothing palette of terracotta, sage, and cream. This project is perfect for beginners looking to create handcrafted jewelry with a professional, boutique finish.
Step-by-Step Tutorial
Materials
- Polymer clay (white, terracotta, teal, mustard yellow, sage green, dusty pink)
- Bead roller or acrylic sheet
- Pointed tool or toothpick
- Baking sheet and parchment paper
- Oven
- Fine-grit sandpaper (optional)
- Beading wire (approx. 10 inches)
- 2 Crimp beads
- 2 Crimp bead covers (silver)
- Wire guardians (optional but recommended)
- Silver lobster clasp
- Silver jump rings
- Silver chain extender
- Jewelry pliers (flat nose and cutting)
- 2 small silver bead caps (optional, for ends)
Step 1: Creating the Clay Palette
-
Condition the clay:
Begin by warming up your polymer clay in your hands. Knead each color separately until it is soft and pliable. This step is crucial prevents cracking later on. -
Mix custom shades:
To achieve the muted, earthy look from the photo, you may need to mix colors. Try adding a tiny pinch of brown or black to bright primary colors to desaturate them, or mix white into darker shades for a pastel effect. -
Portion the clay:
Roll your conditioned clay into small logs of equal thickness. Slice off equal-sized segments from each color log to ensure your beads will be uniform in size.
Fingerprint Free
Work with cornstarch on your fingers while rolling the raw clay. It prevents sticky fingerprints, makes the surface fascinatingly smooth, and washes off easily after baking.
Step 2: Forming the Beads
-
Roll spheres:
Take each clay segment and roll it between your palms to create a smooth ball. For perfectly identical sizes, I find using a bead roller tool is a huge help, but hand-rolling works just fine with patience. -
Pierce the holes:
Gently hold a clay sphere without squishing it. Using a toothpick or a dedicated piercing tool, slowly twist a hole through the center. Twist as you push to avoid distorting the round shape. -
Refine the shape:
After piercing, the exit hole might have a jagged edge. Gently smooth this down with your fingertip or roll the bead lightly again to restore the perfect sphere shape. -
Prepare for baking:
Arrange your raw beads on a baking sheet lined with parchment paper or a ceramic tile. Ensure they aren’t touching each other so they don’t fuse together.
Level Up: Texture
Before baking, gently roll your raw clay beads over a piece of coarse sandpaper or a textured sponge. This creates a stone-like pitted surface that looks amazing.
Step 3: Baking and Finishing
-
Bake the beads:
Bake the beads according to the manufacturer’s instructions on your clay package (usually around 275°F for 15-30 minutes). I recommend using an oven thermometer to ensure the temperature is accurate. -
Cool down:
Allow the beads to cool completely before handling. They are slightly soft when hot and harden fully as they cool. -
Sand for matte finish:
To get that soft, stone-like texture seen in the image, lightly buff each bead with fine-grit sandpaper. This removes fingerprints and adds a lovely matte quality.
Step 4: Assembling the Bracelet
-
Cut the wire:
Cut a piece of beading wire roughly 9 to 10 inches long. This gives you plenty of extra room to work with the clasps. -
Secure the first end:
Thread a crimp bead onto the wire, followed by a wire guardian (or loop directly through a jump ring). Loop the wire back through the crimp bead. -
Crimp the bead:
Use your flat nose pliers to squash the crimp bead flat, securing the loop. Cover this with a crimp cover for a polished silver ball look. -
String the beads:
Start threading your clay beads onto the wire. Follow the pattern in the image: alternate colors randomly but try to separate similar shades. Add a small silver bead cap at the very start and end of the strand for a metallic accent. -
Check the length:
Wrap the strand around your wrist to check the fit. Add or remove beads until it sits comfortably. -
Secure the second end:
Thread on your second crimp bead and wire guardian. Create a loop, pass the wire back through the crimp bead and the last few clay beads, pull tight, and flatten the crimp bead. -
Attach hardware:
Open a jump ring using two pairs of pliers (twist sideways, don’t pull apart). Attach the lobster clasp to one end loop and the chain extender to the other.
Enjoy wearing your new custom jewelry piece that matches perfectly with any casual outfit

The Complete Guide to Pottery Troubleshooting
Uncover the most common ceramic mistakes—from cracking clay to failed glazes—and learn how to fix them fast.
Mini Food Charms for Keychains
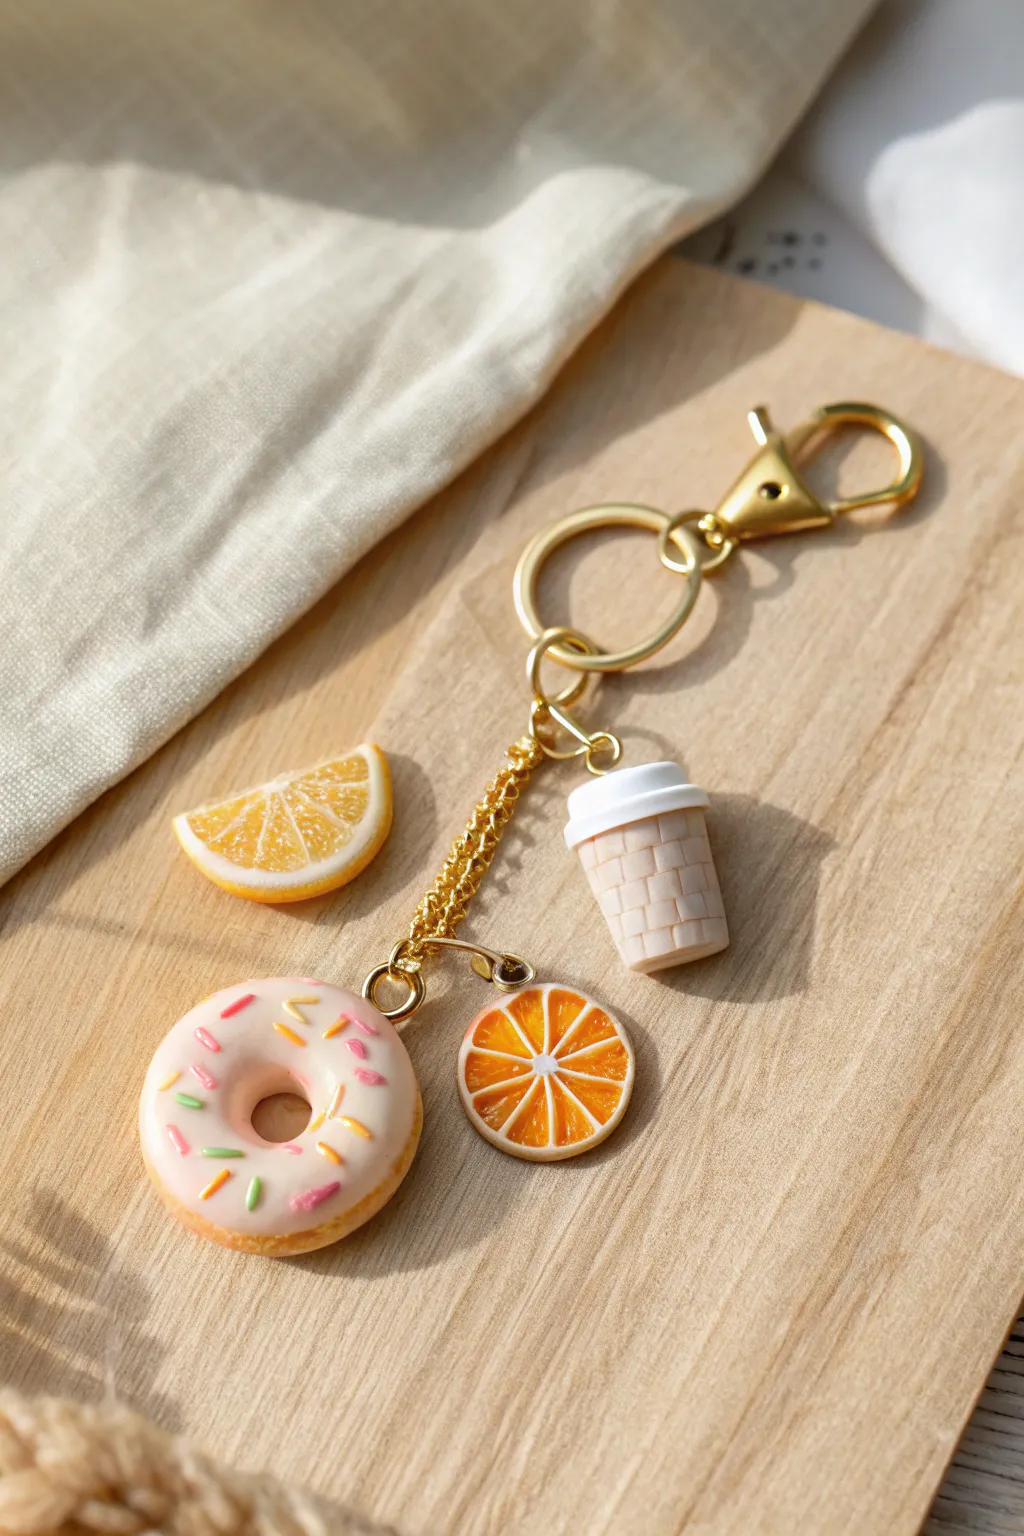
Carry the cozy vibes of a morning coffee run with this delightful set of polymer clay charms. Featuring a sprinkled donut, a fresh orange slice, and a tiny textured coffee cup, these miniature treats make a perfectly sweet addition to your keys or bag.
Step-by-Step Guide
Materials
- Polymer clay (white, beige/tan, translucent, pale pink, orange)
- Liquid polymer clay (Translucent and White)
- Gold finish keychain hardware (lobster clasp, split ring, chain, jump rings)
- Eye pins (gold)
- Texture tools (needle tool, toothbrush, blade)
- Soft pastels (brown, orange, yellow) and a soft brush
- Gloss glaze or UV resin
- Oven for baking
Step 1: Sculpting the Donut
-
Base Shape:
Mix beige clay with a tiny bit of white to get a dough color. Roll a small ball, flatten it slightly into a disc, and use a dotting tool or the back of a paintbrush to create the center hole. Soften the edges with your finger. -
Texturing:
Gently tap a toothbrush along the ‘equator’ of the donut (the sides) to create a realistic baked texture. -
Shading:
Scrape some brown and yellow soft pastel into a powder. With a dry soft brush, dust the textured areas to mimic a golden-brown bake. -
Glazing:
Mix liquid polymer clay with pale pink clay (or pink pigment) to create a thick icing consistency. Drizzle this onto the top of the donut, letting it curve naturally. -
Adding Sprinkles:
Roll extremely thin snakes of clay in various pastel colors (green, yellow, pink). Bake these separately first for 5 minutes, then chop them into tiny bits. Press these ‘sprinkles’ into the wet icing. -
Attaching Hardware:
Insert an eye pin into the side of the donut while the icing is still wet.
Sticky Situation?
If your clay gets too soft and fingerprints are showing, pop the pieces in the fridge for 10 minutes to firm up before detailing.
Step 2: Crafting the Orange Slice
-
Cane Center:
Create a translucent orange tone by mixing orange and translucent clay. Form a teardrop-shaped log. Wrap this log in a thin sheet of white clay. -
Assembling the Segments:
Cut the log into eight equal lengths. Arrange them in a circle so the points meet in the middle, forming the segments of the fruit. -
Creating the Rind:
Wrap the assembled circle in a thin sheet of white clay (the pith), followed by a slightly thicker sheet of textured orange clay (the skin). -
Slicing:
Roll the cane gently to bind it, then slice a thick, uniform disc. Insert an eye pin through the top edge. -
Surface Texture:
Use a needle tool to gently stipple the translucent segments, giving them a juicy, fibrous look.
Step 3: Making the Coffee Cup
-
Cup Body:
Shape a cylinder from beige clay, slightly tapered at the bottom. Flatten the top and bottom surfaces. -
Waffle Sleeve:
Roll a thin strip of the same beige clay. Use a blade to gently impress a grid or ‘waffle’ pattern into it. Wrap this strip around the middle of the cup. -
Lid Construction:
create a flat white disc slightly larger than the cup rim. Add a smaller, taller white disc on top for the drinking spout level. -
Assembly:
Press the lid firmly onto the cup body. Insert an eye pin through the center of the lid.
Make it Yours
Swap the coffee sleeve texture! Instead of a grid, try twisting two thin snakes of clay together to make a ‘woven’ cozy effect.
Step 4: Finishing Up
-
Baking:
Arranged all charms on a tile or baking sheet. Bake according to your clay manufacturer’s instructions (usually 275°F/130°C for 15-30 minutes). Let them cool completely. -
Sealing:
Apply a coat of gloss glaze or UV resin specifically to the ‘icing’ on the donut and the fruit segments of the orange to make them look wet and shiny. Leave the coffee cup matte. -
Assembly:
Use jump rings to attach each charm to the main chain of your gold keychain hardware. I like to stagger the lengths slightly so the charms cluster nicely.
Now you have a delicious set of accessories ready to brighten up your daily routine
Personalized Initial Tags and Keychains
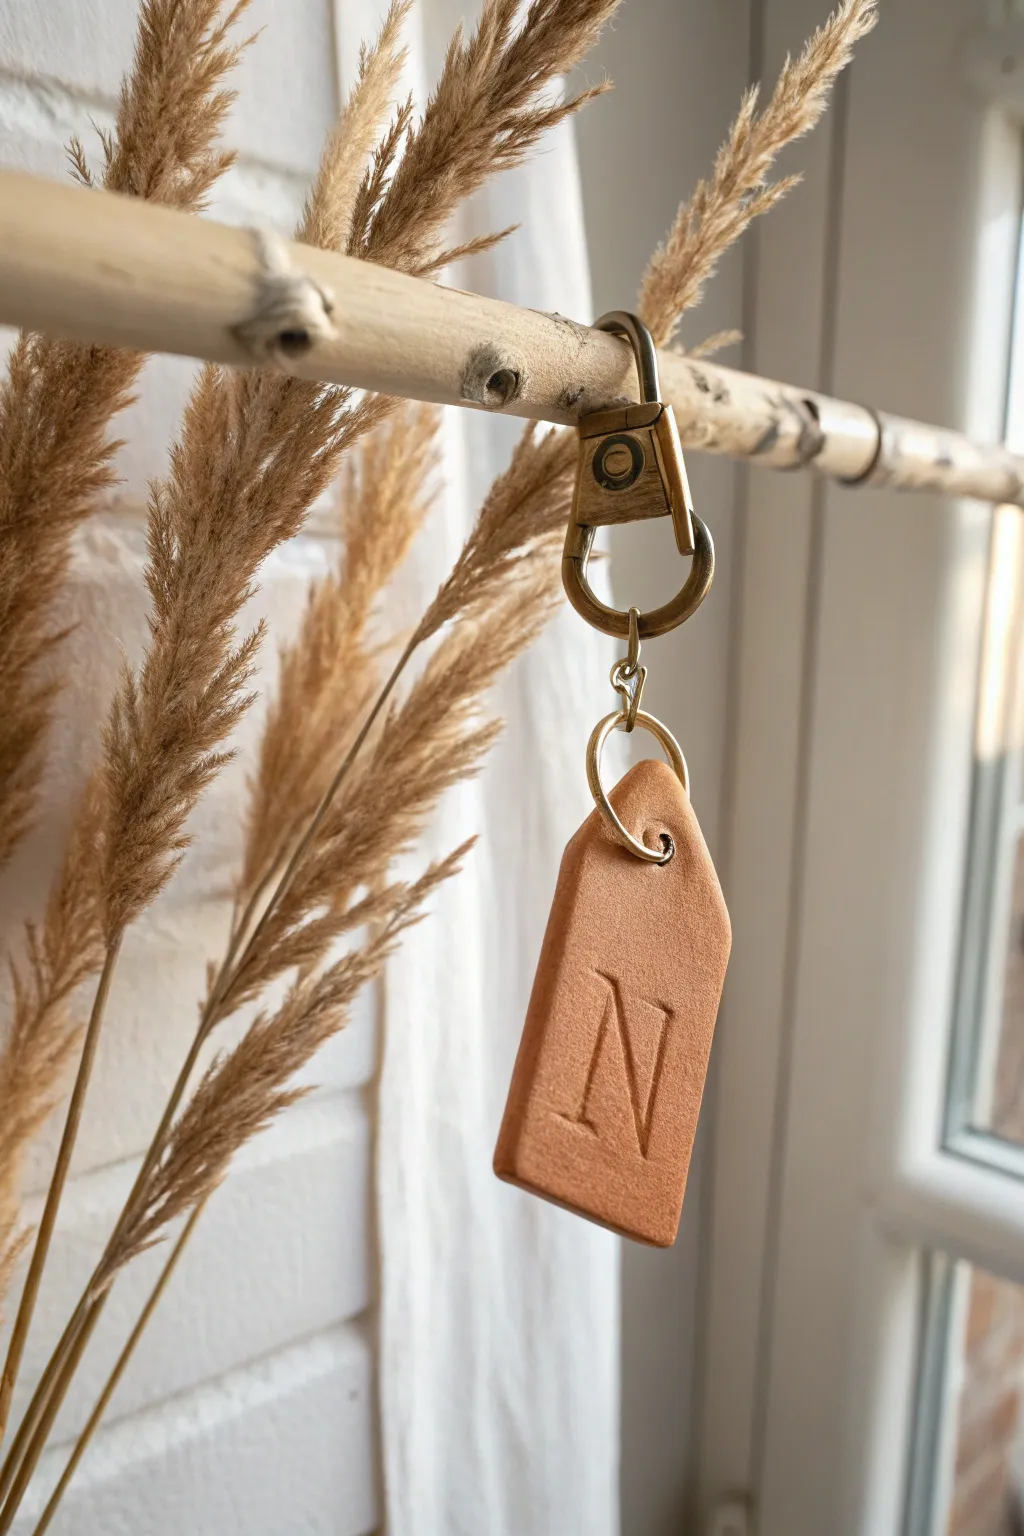
Create a sophisticated, minimalist accessory with this faux-terracotta clay keychain. Featuring a classic luggage tag shape and a deeply embossed initial, this project mimics the warm, earthy look of fired pottery or worn leather.
Step-by-Step Tutorial
Materials
- Polymer clay (terracotta or reddish-brown color)
- Acrylic roller or rolling pin
- Sharp crafting blade or X-Acto knife
- Parchment paper or a ceramic tile (work surface)
- Letter stamp set (large serif font)
- Small straw or circular clay cutter (approx. 3-4mm)
- Sandpaper (fine grit)
- Bronze or antique brass keychain clasp
- Two large jump rings (gold or bronze tone)
- Pliers (flat nose)
- Oven (for baking)
- Ruler
Step 1: Shaping the Clay Base
-
Condition and Roll:
Start by warming the terracotta polymer clay in your hands to condition it until soft and pliable. Roll it out on parchment paper or a tile to a uniform thickness of about 4mm—you want it sturdy enough to withstand jangling keys. -
Cut the Basic Rectangle:
Using your sharp blade and a ruler as a guide, cut a precise rectangle approximately 1.5 inches wide by 2.5 inches tall. Keep your cuts straight for a professional finish. -
Create the Angles:
To achieve the classic luggage tag silhouette, measure about 0.5 inches down from the top corners on both sides. Use your blade to slice off the top corners at an angle, creating a tapered top. -
Smooth the Edges:
Gently run your finger along the cut edges to soften the harsh sharpness left by the blade. This small detail makes the final piece look more finished and less like a raw cutout.
Stone Effect Tip
Mix a tiny pinch of black pepper or espresso grounds into the clay before rolling. This creates instant realistic speckles that look like real stone.
Step 2: Adding Details and Baking
-
Punch the Hole:
Use a small drinking straw or a tiny circular cutter to create a hole centered near the top of the tag. Ensure the hole is at least 3mm down from the edge so the clay doesn’t snap later. -
Stamp the Initial:
Take your large letter stamp—the ‘N’ here uses a serif font for a classic look—and position it in the lower center of the tag. Press firmly and evenly to create a deep, clear impression. -
Add Texture (Optional):
If you want that slightly stony, matte texture seen in the photo, gently tap the surface with an old toothbrush or a piece of crumpled aluminum foil. I find this helps hide fingerprints too. -
Final Inspection:
Check for any lint or dust on the surface. If you see an air bubble, gently pierce it with a needle and smooth it out. -
Bake:
Place the clay on a baking sheet lined with parchment paper. Bake according to your specific clay manufacturer’s instructions (usually around 275°F or 135°C for 30 minutes). Let it cool completely before handling.
Step 3: Assembly and Finishing
-
Sand for Perfection:
Once cool, use fine-grit sandpaper to lightly buff the edges and corners. This removes any tiny burrs and gives the tag a high-quality feel. -
Clean Up:
Wipe the tag with a damp cloth to remove any sanding dust. The matte finish of the clay should now be smooth to the touch. -
Open the Jump Ring:
Take one of your large jump rings. Use two pairs of pliers to twist it open sideways (never pull it apart outwards, as this weakens the metal). -
Attach the First Ring:
Thread the open jump ring through the hole you punched in the clay tag. Close the ring securely by twisting it back into place with the pliers. -
Attach the Clasp:
Open the second jump ring. Loop it through the first jump ring and loop the bottom of your keychain clasp onto it as well. -
Final Assembly:
Close the second jump ring tightly. Your tag should now swing freely from the clasp hardware.
Gilded Lettering
Before baking, brush a tiny amount of gold mica powder into the stamped letter groove to make the initial shine against the matte clay.
Clip your new custom tag onto your keys or a bag for an instant touch of handmade elegance


What Really Happens Inside the Kiln
Learn how time and temperature work together inside the kiln to transform clay into durable ceramic.
Coasters With Raised Dot and Bubble Patterns
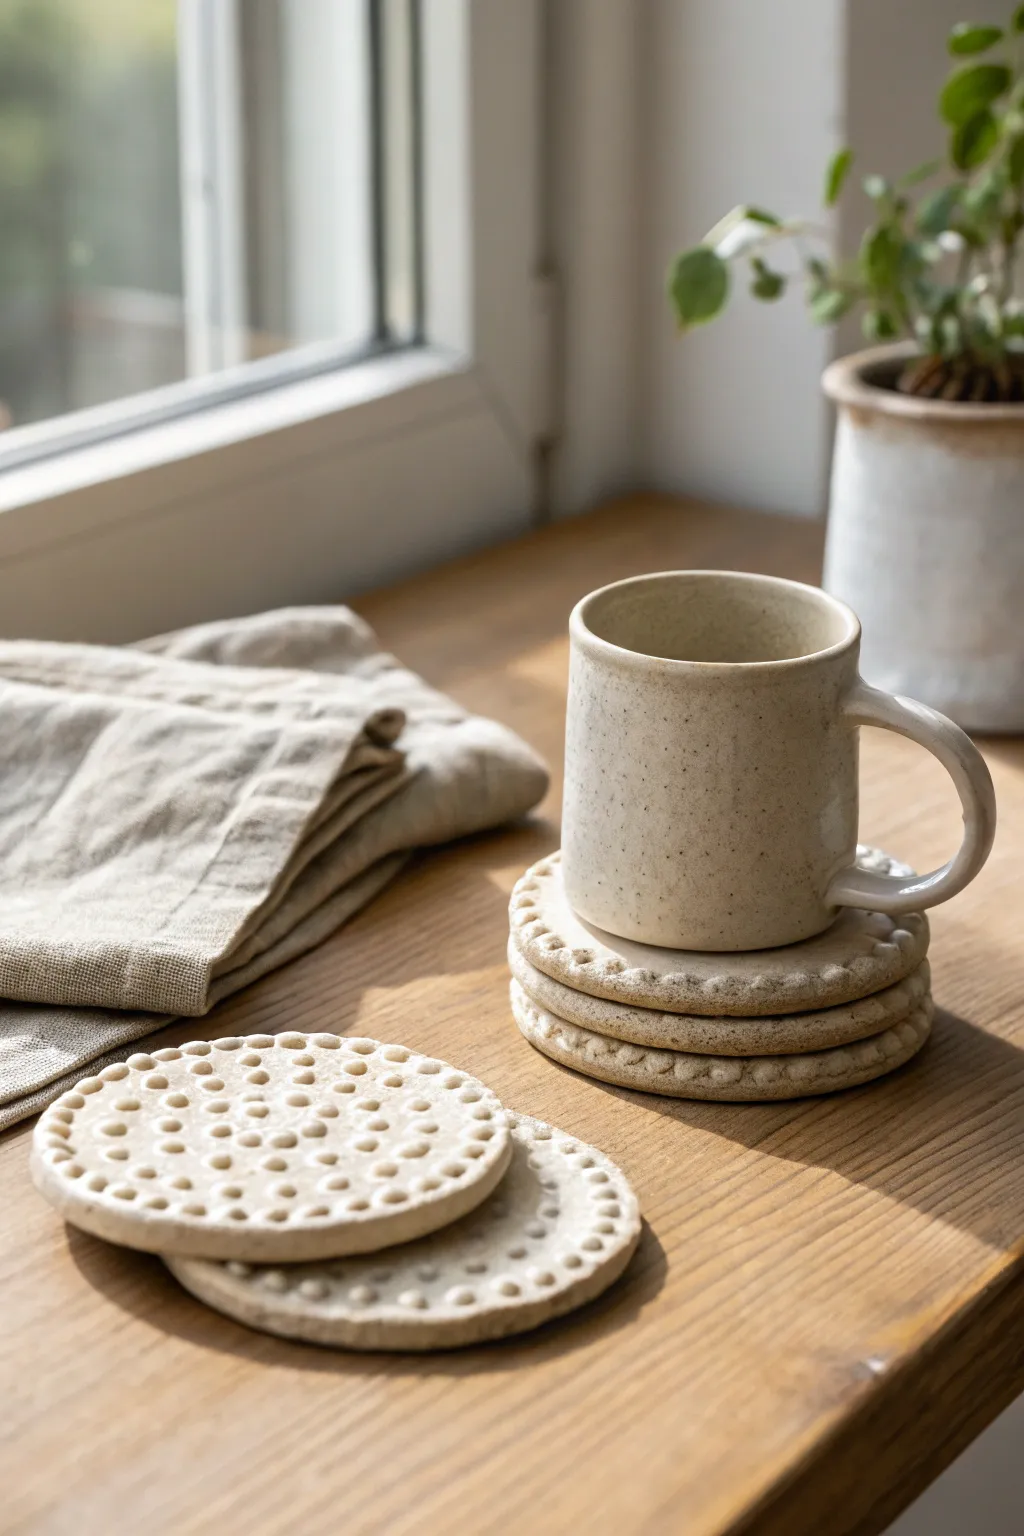
These charming coasters feature delightful raised patterns of dots and bubbles that add tactile interest and artisanal flair to your coffee table. The natural, unglazed look of the clay brings an earthy warmth to any setting.
Step-by-Step Guide
Materials
- White or speckled stoneware clay
- Rolling pin
- Canvas or cloth work surface
- Round cookie cutter (approx. 4 inches diameter)
- Slip (clay mixed with water)
- Scoring tool or needle tool
- Small sponge
- Small paintbrush
- Clear matte glaze (optional)
- Kiln (if using stoneware) or oven (if using polymer/oven-bake clay)
Step 1: Preparation & Base Creation
-
Prepare your workspace:
Lay down your canvas or cloth to prevent the clay from sticking to your table. If you are using stoneware clay, wedge it thoroughly to remove air bubbles. -
Roll out the slab:
Roll your clay out to an even thickness of about 1/4 inch. Using guide sticks on either side of your rolling pin can help ensure a uniform slab. -
smooth the surface:
Take a slightly damp sponge or a rib tool and gently smooth the surface of the clay slab to remove any canvas texture or imperfections. -
Cut the shapes:
Using your round cookie cutter, punch out as many circles as you need. If you don’t have a cutter, trace around a wide mug or bowl and cut with a needle tool. -
Refine the edges:
Once cut, run your finger or a damp sponge around the freshly cut edges to soften the sharp corners. This prevents chipping later.
Loose Dots?
If dots pop off after drying, you likely didn’t use enough slip or score deeply enough. For unfired clay, re-score and add vinegar to the slip for a stronger bond.
Step 2: Creating the Dot Pattern (Rim Style)
-
Roll tiny spheres:
For the coaster style seen under the mug, roll small, pea-sized balls of clay. Try to keep them consistent in size for a uniform look. -
Score the rim:
Using your needle tool, gently scratch (score) the surface around the very edge of your clay circle where the dots will sit. -
Attach the dots:
Dab a tiny amount of slip onto the scored area. Place your clay balls around the rim, pressing them down gently but firmly so they adhere without flattening completely. -
Blend lightly:
I like to use a small modeling tool to gently blend the underside of each dot into the base slightly, ensuring a strong bond that won’t pop off during firing.
Step 3: Creating the Bubble Pattern (Surface Style)
-
Prepare variable spheres:
For the surface-covering bubble pattern seen in the foreground, roll many small clay balls in slightly varying sizes. -
Score the surface:
Lightly score the entire top surface of the coaster base. Apply a thin layer of slip across the scored area. -
arrange the bubbles:
Start placing your clay balls onto the surface. arrange them in concentric circles or random clusters, leaving small gaps as seen in the reference image. -
Press and secure:
Once arranged, gently press down on each ball. You want them to flatten slightly at the bottom to grip the base, while maintaining their rounded top. -
Poke texture (optional):
To mimic the perforated look on some of the foreground coasters, use a small, round tool to gently press an indentation into the center of select dots.
Keep it Flat
Clay discs love to warp. Sandwich your drying coasters between two pieces of drywall or wooden boards (with newspaper) to weight them down while they dry.
Step 4: Drying & Finishing
-
Slow drying:
Place your finished coasters on a drying rack or a board covered with newspaper. Cover them loosely with plastic to let them dry slowly, which prevents warping. -
Flip occasionally:
During the drying process, carefully flip the coasters over once a day so air can circulate on both sides. -
Bisque fire:
Once bone dry, fire the pieces in a kiln to bisque temperature (usually Cone 06/04 for pottery clay). -
Glazing decision:
For the raw look in the photo, you can leave the clay unglazed if it is a vitrifying stoneware. Alternatively, apply a clear matte glaze to protect the surface from coffee stains. -
Final fire:
Fire the coasters again to the maturity temperature of your specific clay body.
Now you have a stunning set of textured coasters ready to hold your favorite warm beverage
Tiny Bud Vases and Magnet Vases
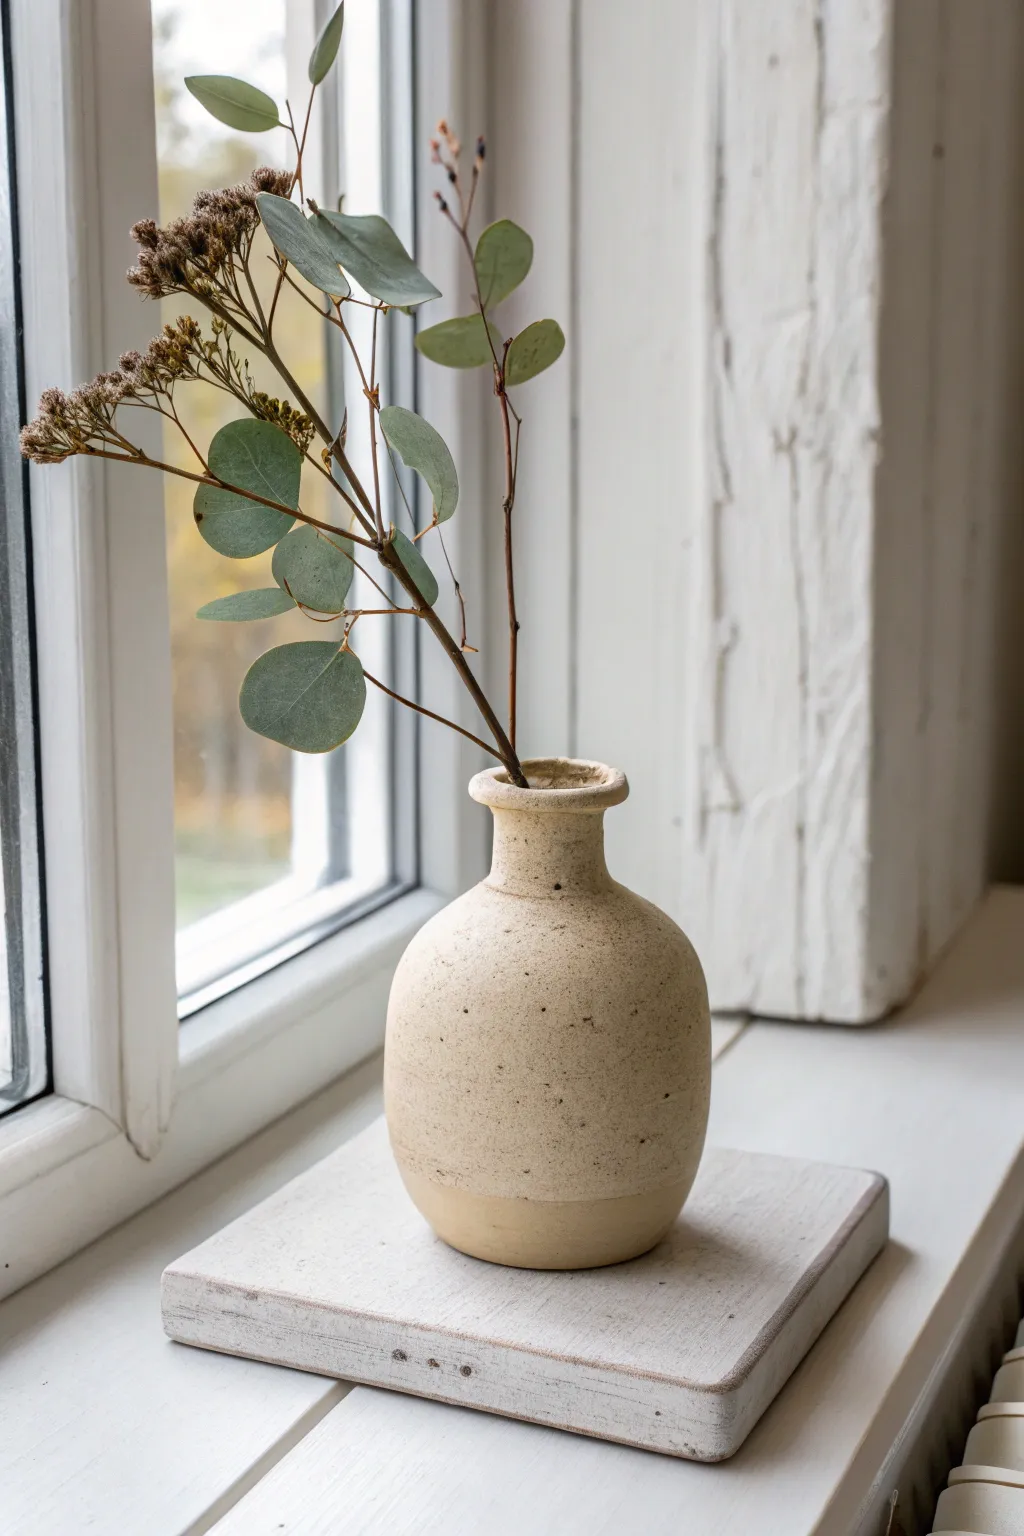
This charming, earthy bud vase features a bulbous base and a delicate neck, perfect for displaying a few dried stems on a windowsill. Its speckled, matte finish gives it a timeless, organic look that brings a touch of nature indoors.
Detailed Instructions
Materials
- Speckled stoneware clay (or beige polymer clay with faux speckles)
- Pottery wheel or wooden modeling tools for hand-building
- Sponge
- Wire cutter
- Needle tool
- Rolling pin (if hand-building)
- Matte cream glaze (if firing)
- Small wooden paddle (optional for shaping)
- Sandpaper (for polymer clay variant)
Step 1: Forming the Base
-
Prepare the clay:
Start by wedging a softball-sized amount of speckled clay to remove air bubbles. This ensures your vase won’t crack during firing or baking. If using polymer clay, condition it until soft and pliable. -
Establish the foundation:
If throwing on a wheel, center your clay firmly. If hand-building, pinch a ball of clay into a round hollow shape, aiming for a consistent wall thickness of about a quarter-inch. -
Shape the belly:
Gently push the walls outward from the inside to create a bulbous, round body. The widest point should be slightly below the middle of the vase to give it that grounded, stable look. -
Refine the curve:
Use a kidney tool or a smooth straight edge to smooth the exterior curve. I like to rotate the piece slowly to check that the roundness is symmetrical from all angles. -
Create the taper:
Begin narrowing the form as you move upward essentially collaring the clay in. Be gentle here; rushing this step can cause the clay to buckle or twist.
Clay Body Tip
Can’t find speckled clay? Knead fine iron oxide sand or dried coffee grounds into plain clay to mimic those lovely rustic spots.
Step 2: Shaping the Neck
-
Pull the neck:
Isolate the top portion of clay and pull it upward to create a narrow, vertical cylinder. This neck should be roughly one-third the height of the entire vase. -
Straighten the walls:
Use a damp sponge to smooth the neck walls, ensuring they are vertical and straight. This contrast with the round body is key to the silhouette. -
Form the rim:
At the very top, flare the clay out slightly and thicken it to create a rolled rim. This gives the vase a finished, professional appearance and adds visual weight to the opening. -
Define the transition:
Use a modeling tool to create a slight indentation or shadow line where the neck meets the body, emphasizing the separation of the two shapes.
Level Up: Rim details
Add a tiny drop of dark brown underglaze to the very top edge of the rim before the final glaze for a defined, vintage-style lip.
Step 3: Texturing and Finishing
-
Surface texture:
While the clay is leather-hard, lightly sponge the surface to bring out the grog or speckles in the clay body. You want a matte, natural texture, not a perfectly smooth polish. -
Create the two-tone effect:
Observe the bottom fifth of the vase in the photo. You can achieve this by leaving the bottom section completely unglazed later, or by slightly roughening the texture here with a stiff brush to mimic raw clay. -
Dry properly:
Allow the piece to dry slowly under plastic for a day, then fully uncovered until bone dry. Uneven drying might warp that delicate neck. -
Bisque fire:
Fire the piece in a kiln to bisque temperature (usually cone 04 or 06). If using polymer clay, bake according to the package instructions now. -
Glazing strategy:
Dip the top 80% of the vase into a matte cream or ‘oatmeal’ glaze. Hold it by the foot and dip quickly to ensure an even coat. -
Wipe the line:
Use a damp sponge to clean up the glaze line near the bottom, creating a sharp, clean transition between the glazed upper body and the raw clay foot. -
Final firing:
Glaze fire the piece to the maturity temperature of your clay (often Cone 5 or 6). This will flux the speckles, allowing them to bleed slightly through the cream glaze.
Once cooled, fill it with eucalyptus or dried wildflowers to complete the serene scandinavian aesthetic

TRACK YOUR CERAMIC JOURNEY
Capture glaze tests, firing details, and creative progress—all in one simple printable. Make your projects easier to repeat and improve.
Incense Holders With Carved Lines and Speckles
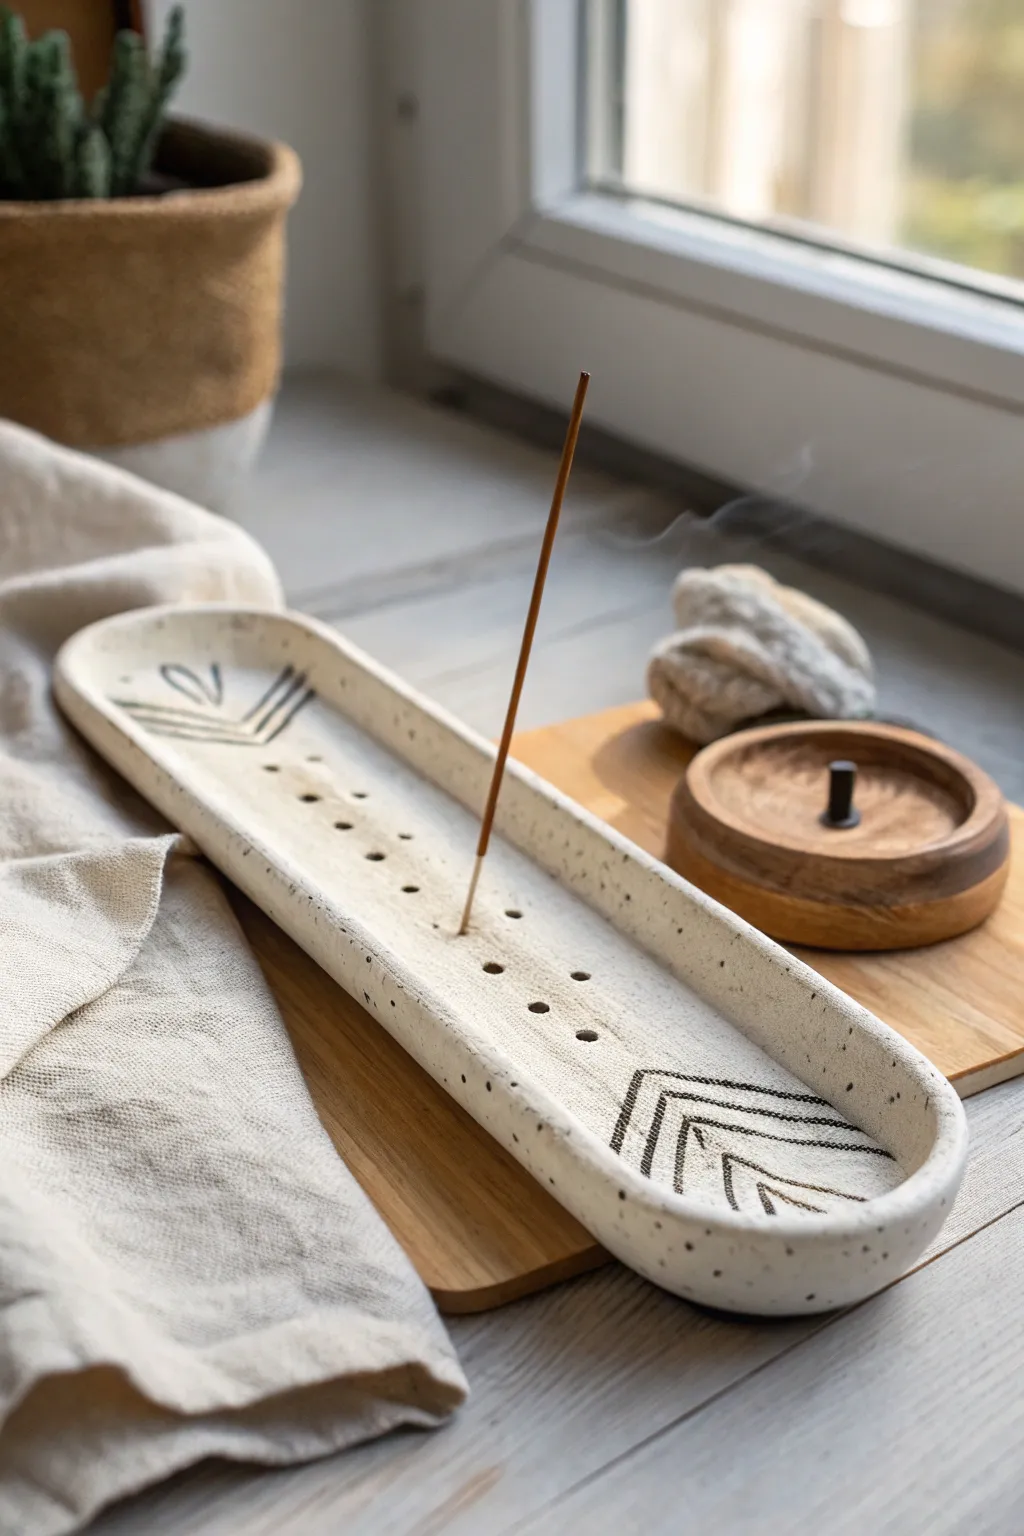
This elegant, canoe-shaped incense holder combines minimalist design with earthy textures, perfect for a calming corner of your home. The elongated form catches floating ash while the carved chevron details and subtle speckles add a touch of handcrafted artistry.
How-To Guide
Materials
- White or cream air-dry clay (or polymer clay)
- Speckle inclusions (fine black pepper, dried coffee grounds, or black clay shavings)
- Rolling pin
- Modeling tool or butter knife
- Needle tool or toothpick
- Small bowl or sandpaper
- Acrylic paint (black and cream)
- Fine detail paintbrush
- Matte varnish or sealant
Step 1: Shaping the Base
-
Prepare the Clay:
Start by conditioning your white clay until it is soft and malleable. To achieve the speckled look seen in the photo, knead in a tiny pinch of your chosen speckle material—I prefer using actual ground black pepper for a truly organic texture—until it is evenly distributed throughout the batch. -
Roll the Slab:
Roll the clay out into an even slab, approximately 1/4 inch thick. Aim for a long oval shape rather than a circle, as this will form the body of the holder. -
Cut the Shape:
Using a knife or cutting tool, slice a long, rounded rectangle or ‘surfboard’ shape from the slab. Smooth the cut edges with your finger and a little water to remove any sharpness. -
Form the Sides:
Gently curve the long edges of the clay upward to create shallow walls. Pinch the ends slightly to create a subtle taper, giving it that boat-like silhouette. -
Smooth the Interior:
Use a damp sponge or your finger to smooth the interior curve where the walls meet the base, ensuring there are no cracks or seams.
Step 2: Adding Details
-
Create the Central Ridge:
Instead of leaving the bottom completely flat, you can softly press a shallow groove down the center line if you wish, or keep it smooth. The most important part is piercing the holes. -
Pierce Incense Holes:
Using your needle tool or a bamboo skewer, poke a series of holes down the center of the holder. Make the central hole slightly larger and angled if you want the stick to stand vertically, or make a row of smaller holes for ventilation aesthetics. -
Wiggle for Fit:
Test the hole size with an actual incense stick while the clay is wet. Wiggle the tool slightly to ensure the hole won’t shrink too tight as the clay dries. -
Carve the Chevrons:
At both narrow ends of the holder, lightly sketch a chevron (V-shape) pattern with a needle tool. Once you are happy with the spacing, carve three or four nested V-lines deeper into the clay surface. -
Dry the Piece:
Set the holder aside to dry completely. If using air-dry clay, this might take 24-48 hours. Turn it occasionally to ensure even drying and prevent warping.
Uneven Walls?
If the sides keep flopping down while drying, prop them up with rolled-up balls of aluminum foil or paper towels until the clay stiffens enough to hold its shape.
Step 3: Finishing Touches
-
Sand Imperfections:
Once fully dry (and cured if baked), use fine-grit sandpaper to smooth out any rough edges on the rim or the exterior. -
Highlight the Carvings:
Mix a small amount of black acrylic paint with a drop of water to create a wash. Paint this into the carved chevron lines at the ends. -
Wipe Back Excess:
Immediately wipe the surface with a damp cloth or paper towel. The black paint will remain trapped in the carved grooves, creating a crisp, inlaid look, while the top surface remains clean. -
Enhance Speckles:
If your internal speckles aren’t showing through enough, you can flick a toothbrush loaded with watered-down black paint over the piece for added texture. -
Seal the Holder:
Apply a coat of matte varnish or sealant over the entire piece. This protects the clay from ash residue and makes it easier to wipe clean.
Catch The Ash
Before drying, test the angle of your incense stick hole. Ensure the stick creates an angle where the ash will fall directly into the ‘boat’ and not onto your table.
Now you have a serene, custom-made spot to burn your favorite scents and relax
Candle Holders in Simple Sculpted Shapes
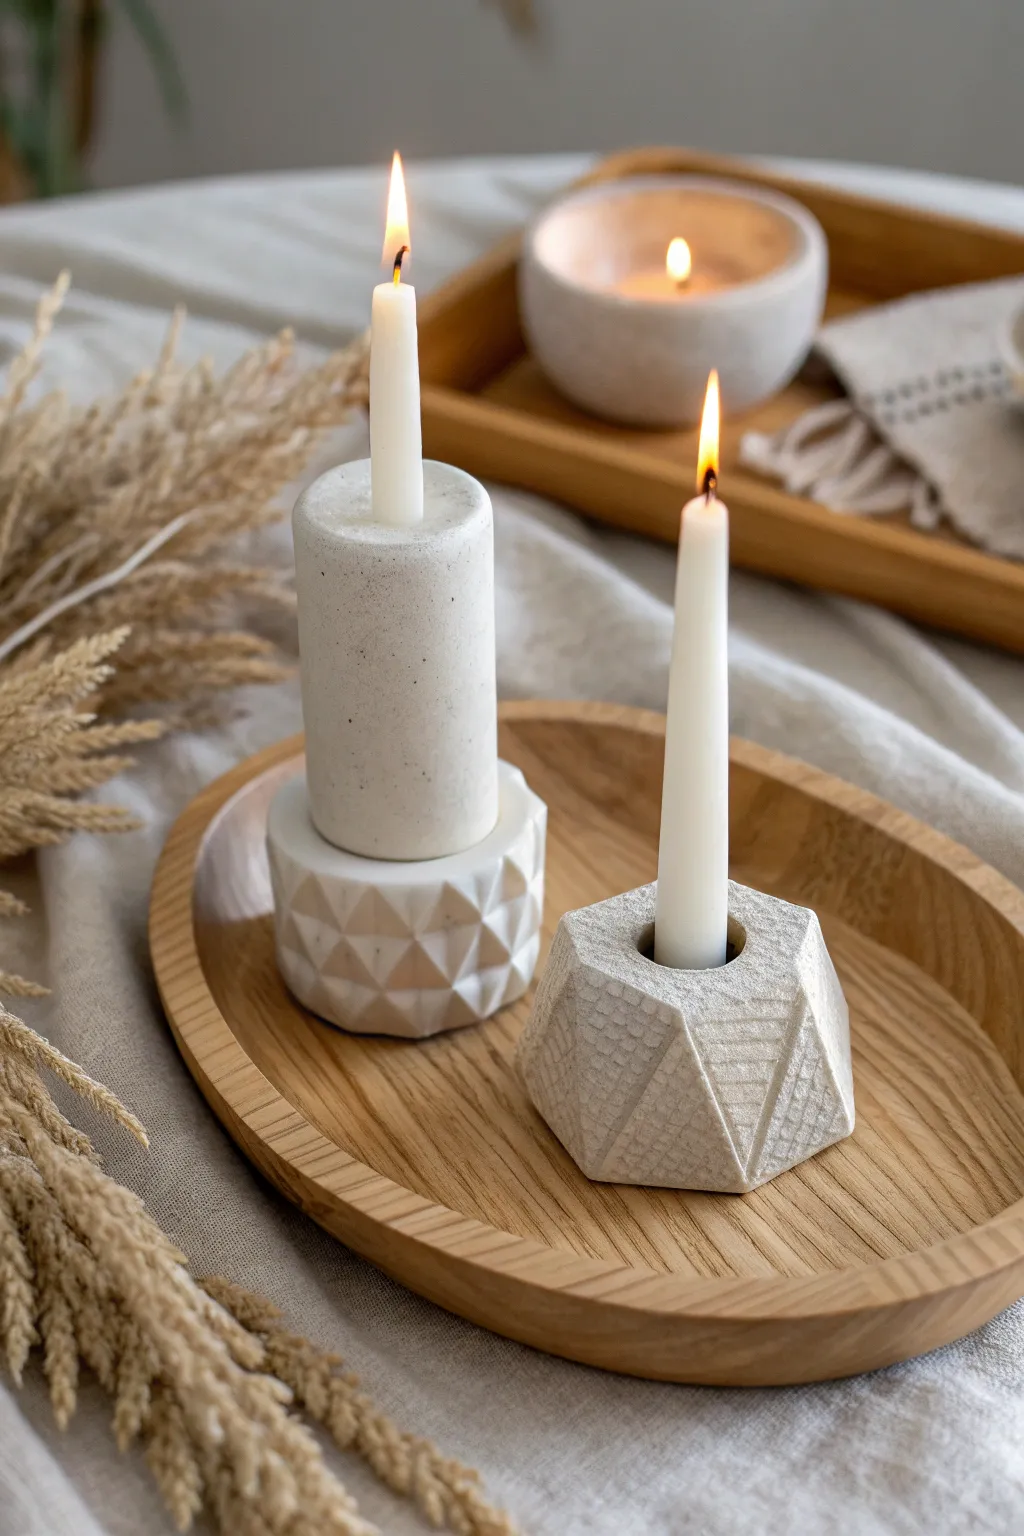
Bring modern sculptural elegance to your table with these textured, geometric candle holders. Their clean lines and speckled stone-effect finish create a sophisticated look that mimics high-end concrete decor.
Step-by-Step
Materials
- Air-dry clay or polymer clay (white or light gray)
- Speckled clay additive (e.g., ground pepper, dried tea leaves, or specialized clay grit)
- Rolling pin
- Craft knife or scalpel
- Ruler
- Candle (for sizing)
- Water and sponge (for smoothing)
- Sandpaper (fine grit)
- Matte varnish or sealant
- Parchment paper or craft mat
Step 1: Preparation & Mixing
-
Prepare the workspace:
Lay down parchment paper or a craft mat to protect your work surface and prevent the clay from sticking. -
Create the stone texture:
If your clay isn’t already speckled, knead in a small amount of ground black pepper or dried tea leaves. I find this creates a surprisingly realistic faux-stone finish without needing special paints. -
Condition the clay:
Knead the clay thoroughly until it is soft, pliable, and the speckles are evenly distributed throughout the batch.
Cracks Appearing?
If you see hairline cracks while drying, mix a tiny bit of fresh clay with water to make a paste and fill them in immediately. Smooth with a damp finger.
Step 2: Sculpting the Tall Cylinder Holder
-
Form the cylinder base:
Roll a portion of clay into a thick log, approximately 1.5 inches in diameter and 3 inches tall. Roll it on the table to ensure it is perfectly round and smooth. -
Create the candle well:
Insert your taper candle into the top of the cylinder to create a perfectly sized hole. Wiggle it slightly to ensure the fit isn’t too tight, as clay shrinks when drying. -
Flatten the ends:
Tap the top and bottom of the cylinder gently against your work surface to create flat, stable planes. -
Create the faceted base:
Form a second, wider disk of clay for the base (about 2.5 inches wide and 1 inch tall). Using your craft knife, slice off geometric angles around the perimeter to create a diamond-patterned texture. -
Join the pieces:
Score the bottom of the cylinder and the top of the faceted base. Add a dab of water (or slip) and press them firmly together, smoothing the seam if you want a unified look, or leaving it visible for a stacked effect.
Add Metallic Flair
After the matte sealer dries, use gold leaf or metallic paint to highlight just one or two facets on the geometric holder for a touch of luxury.
Step 3: Sculpting the Low Geometric Holder
-
Shape the block:
Start with a ball of clay and flatten it into a thick, hexagonal puck shape, roughly 2 inches tall. -
Carve the facets:
Use a sharp blade to slice away clay from the sides at varying angles. Aim for irregular triangular planes that catch the light differently. -
Add surface texture:
For the specific texture seen in the reference, gently press a piece of coarse linen or a textured sponge against some of the faceted sides to create a subtle grid pattern. -
Insert the candle hole:
Press your taper candle into the center of the geometric shape. Ensure it goes deep enough to hold the candle stable but not through the bottom. -
Refine edges:
Use your finger dipped in a little water to soften any extremely sharp edges while maintaining the geometric definition.
Step 4: Finishing Touches
-
Dry properly:
Allow the pieces to dry completely. For air-dry clay, turn them occasionally to ensure even drying, which usually takes 24-48 hours depending on thickness. -
Sand for smoothness:
Once fully dry, use fine-grit sandpaper to smooth out the top rim and any unwanted fingerprints. Be gentle to preserve your intentional facets. -
Seal the surface:
Apply a coat of matte varnish. This brings out the speckled texture and protects the clay from wax drips or soot markings.
Place these beautiful holders on a wooden tray to enjoy the serene, earthy atmosphere they create in your home
Desk Organizers With Pinch Pots and Compartments
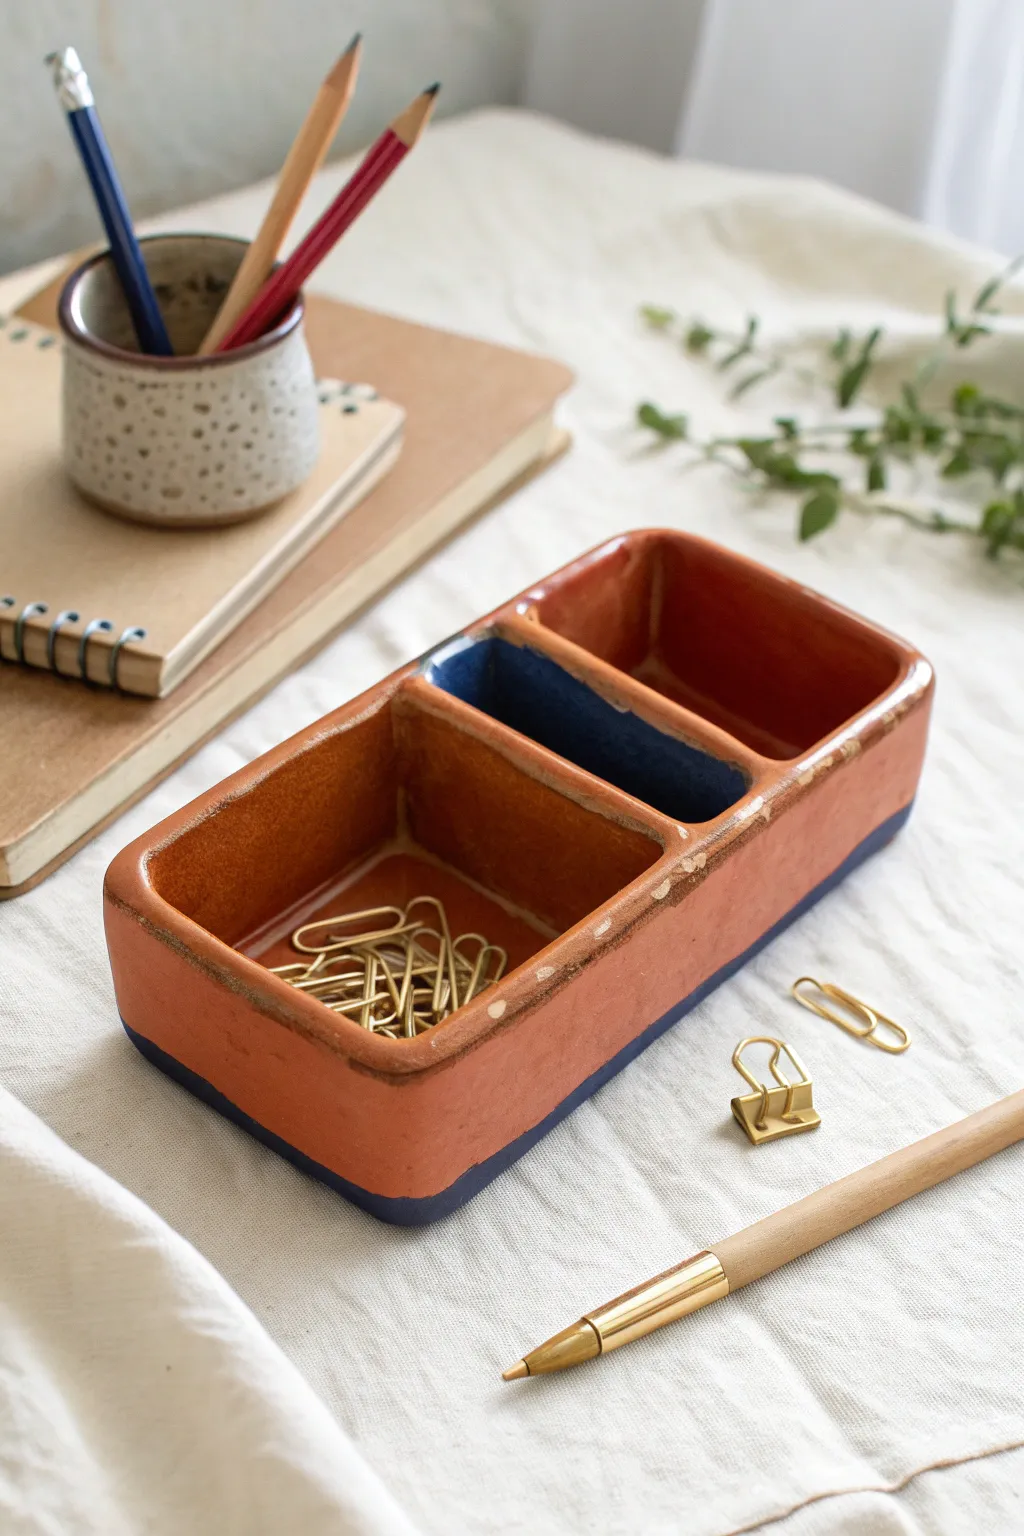
Bring earthy warmth to your workspace with this segmented desk tidy, featuring a classic terracotta finish and a striking navy blue accent. This hand-built clay project offers three distinct compartments perfect for sorting loose clips, erasers, and other small essentials.
Step-by-Step Tutorial
Materials
- Air-dry clay or kiln-fire clay (terracotta color recommended)
- Clay rolling pin
- Fettling knife or craft knife
- Ruler
- Slip (clay slurry) and scoring tool
- Small sponge
- Sandpaper (fine grit)
- Acrylic paints (glossy terracotta/orange-brown and dark navy blue)
- High-gloss varnish or sealant
- Paintbrushes (flat and detail)
Step 1: Constructing the Base and Walls
-
Roll the Slab:
Begin by rolling out a generous slab of clay to an even thickness of about 1/4 inch. Ensure the surface is smooth and free of air bubbles. -
Cut the Base:
Measure and cut a long rectangle for the base, approximately 8 inches long by 3 inches wide. Use your ruler to ensure the corners are 90 degrees. -
Cut the Exterior Walls:
Cut two long strips for the side walls (matching the length of the base) and two shorter strips for the end walls (matching the width). Keep the height around 1.5 to 2 inches. -
Score and Slip:
I like to take a moment here to thoroughly score (scratch) the edges of the base and the bottom of the wall strips. Apply a dab of clay slip to these roughened areas to act as glue. -
Attach the Walls:
Press the walls firmly onto the base. Blend the seams on both the inside and outside using a modeling tool or your finger to ensure a strong bond. -
Define the Corners:
Smooth out the corners where the walls meet, rounding them slightly to match the soft, handmade look of the reference piece.
Smooth Seams Secret
Use a damp paintbrush as a ‘magic eraser’ to smooth out hard-to-reach seams inside the small compartments while the clay is still wet.
Step 2: Adding Dividers and Refining
-
Cut Dividers:
From your remaining slab, cut two rectangular pieces that fit snugly inside the box to serve as dividers. These should correspond to the width of the interior. -
Position the Dividers:
Place one divider to create a square compartment at one end. Place the second divider about an inch away from the first to create the narrow middle slot. -
Secure the Dividers:
Score and slip the edges of the dividers and the interior walls where they will connect. Slide them into place and blend the clay at the seams so they are fully integrated. -
Soften the Edges:
Use a damp sponge to smooth the top rim of the organizer. Run your finger along this edge to create a soft, rounded lip rather than a sharp cut. -
Dry the Piece:
Allow the clay to dry completely. For air-dry clay, this may take 24-48 hours. If using kiln clay, fire it according to the manufacturer’s bisque schedule.
Make It Modular
Make multiple units at different wall heights. Push them together on your desk to create a sprawling landscape for your stationery.
Step 3: Painting and Glazing
-
Sand Imperfections:
Once fully dry (or bisque fired), lightly sand any rough patches on the surface with fine-grit sandpaper. -
Apply Base Color:
Paint the entire exterior and the inside of the two larger compartments with a glossy terracotta or orange-brown acrylic paint. You may need two coats for opaque coverage. -
Paint the Middle Well:
carefully paint the interior of the narrow middle compartment with a dark navy blue. Use a small detail brush to get clean lines in the corners. -
Add the Bottom Accent:
Paint a strip of the same dark navy blue along the very bottom edge of the exterior walls, creating a ‘dipped’ look that circles the base. -
Create a Distressed Look:
For a rustic touch, lightly sand the painted rim to reveal a bit of the raw clay underneath, simulating wear. -
Seal the Piece:
Finish by applying a high-gloss varnish over the entire piece. This mimics the look of fired ceramic glaze and protects the paint.
Once the varnish cures, fill your new organizer with clips and pens to instantly tidy your workspace
Wall Hangings With Cutout Shapes and Beads
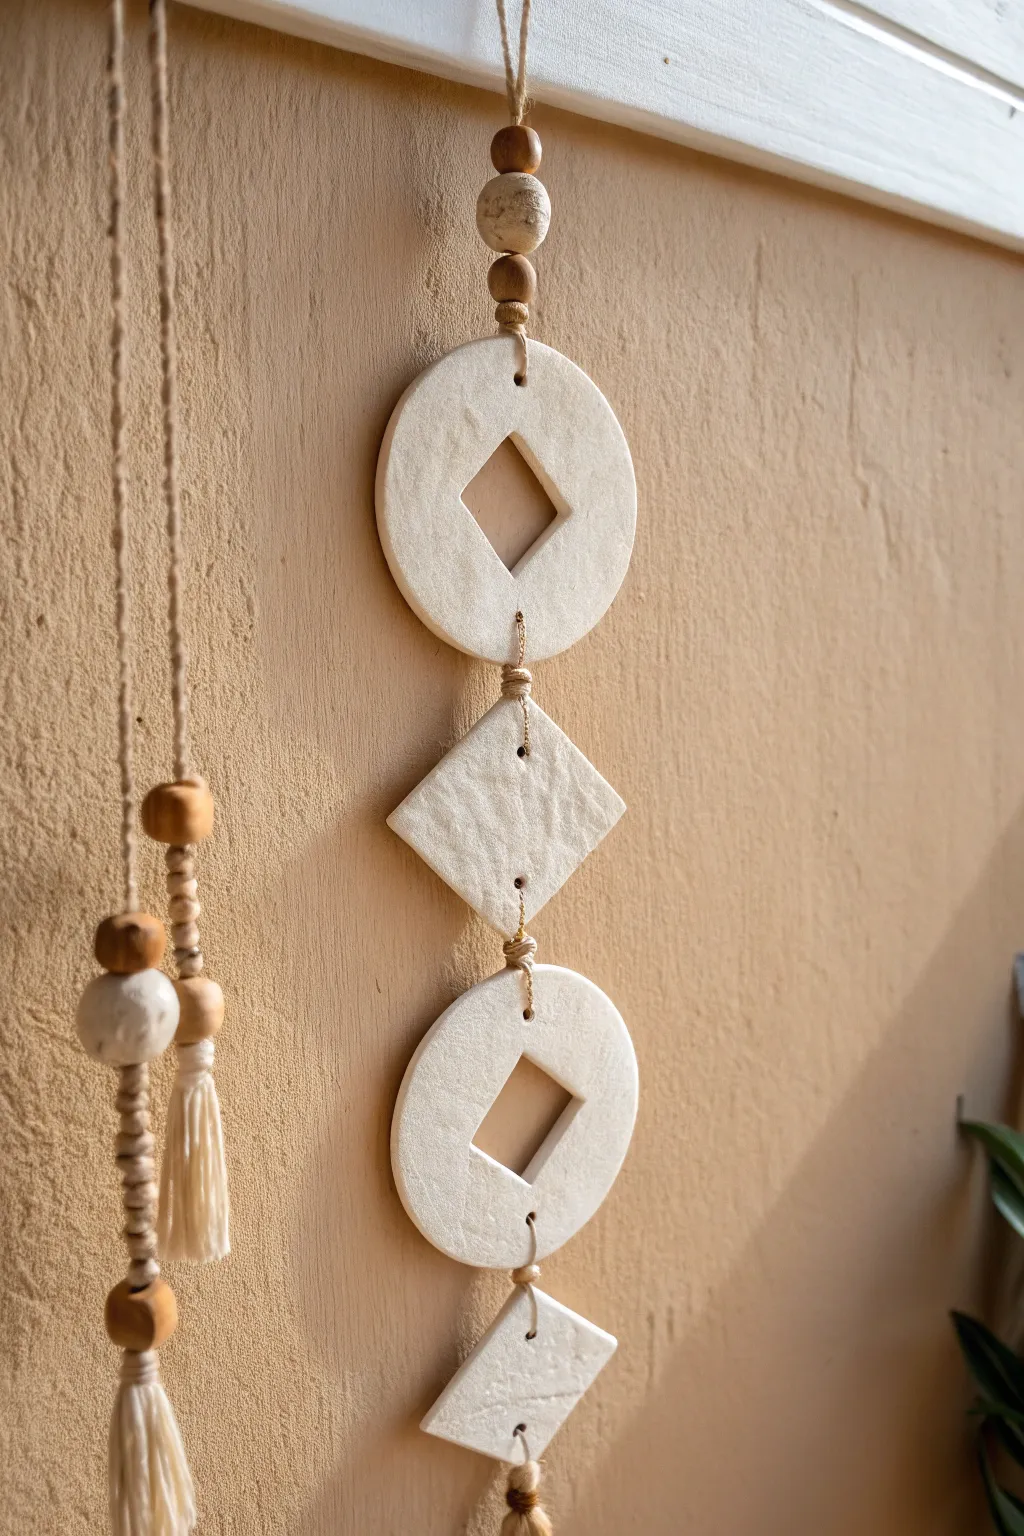
Bring an earthy, modern bohemian vibe to your space with this textured clay wall hanging. Featuring alternating circles and diamonds interspersed with natural wooden beads, this piece combines simple geometric forms for a strikingly elegant look.
Step-by-Step Guide
Materials
- Air-dry clay (white or off-white)
- Rolling pin
- Circular cookie cutter (approx. 3-4 inches)
- Small square cookie cutter (approx. 1 inch)
- Knife or clay cutting tool
- Wooden beads (varying sizes, natural finish)
- Jute twine or hemp cord
- Tapestry needle (large eye)
- Fine grit sandpaper
- Parchment paper or canvas mat
- Small straw or skewer (for making holes)
- Ruler
Step 1: Shaping the Clay Elements
-
Prepare your workspace:
Lay down parchment paper or a canvas mat to prevent the clay from sticking. Knead a generous amount of air-dry clay in your hands until it feels warm, pliable, and free of cracks. -
Roll out the slab:
Use your rolling pin to flatten the clay into an even slab. Aim for a thickness of about 1/4 inch (6mm). If you want that lovely organic texture seen in the photo, roll the clay on a textured fabric or gently press a crumpled paper towel onto the surface. -
Cut the circles:
Press your large circular cutter firmly into the clay slab to create two distinct circles. Lift the excess clay away from the edges before moving the circles to keep their shape perfect. -
Create the diamond cutouts:
Take your small square cutter and position it in the exact center of each circle. Rotate it 45 degrees so it looks like a diamond, then press down to remove the center. Save these small clay diamonds for another project or recycle them. -
Cut the diamond shapes:
Gather your remaining clay, re-roll it to the same thickness, and cut two diamond shapes. You can use a square cutter rotated diagonally or measure and cut them freehand with a knife or clay tool. They should fit visually between the size of the circle and the inner cutout. -
Pierce holes for hanging:
This is a critical step. Use a straw or skewer to poke holes at the top and bottom of every shape *except* the bottom-most diamond, which only needs a top hole. Ensure the holes are large enough for your twine to pass through easily once the clay shrinks slightly.
Warped Clay?
If your shapes start curling while drying, place a heavy book on top of them (use parchment paper in between) once they are semi-dry to flatten them back out.
Step 2: Refining and Drying
-
Smooth the edges:
Dip your finger in a little bit of water and run it gently along all cut edges of your shapes. This softens any sharp ridges left by the cutters and gives the piece a professional finish. -
Let it dry:
Place your shapes on a flat surface in a cool, dry area. To prevent warping, I usually flip the pieces over carefully halfway through the drying process. Let them cure for 24-48 hours until rock hard. -
Sand for perfection:
Once fully dry, take a piece of fine-grit sandpaper and lightly buff the edges and surface. This removes any fingerprints or rough spots. Wipe away the dust with a dry cloth.
Pro Tip: Surface Texture
To get the stone-like texture shown in the photo, gently press a piece of coarse sandpaper or a rough stone onto the wet clay surface before cutting your shapes.
Step 3: Assembly
-
Prepare the top loop:
Cut a long length of jute twine (about 3-4 feet to be safe). Fold it in half to create a loop at the top for hanging, and tie a secure overhand knot just below the loop. -
Thread the top beads:
Thread both tails of the twine through a tapestry needle. String on three wooden beads: a medium one, a large textured one, and another medium one, pushing them up against the top knot. -
Attach the first circle:
Tie a knot below the beads to hold them in place. Thread the twine through the top hole of your first clay circle (the one with the cutout). Decide how much gap you want, then tie a knot behind the clay or just loop it through to secure it. -
Create the bridge:
Pass the twine out through the bottom hole of the circle. Create a decorative wrapped knot section. To do this, wrap a separate small piece of twine around the main hanging cord several times and secure it, or simply tie a series of knots to create texture. -
Attach the middle diamond:
Thread the twine through the top hole of the solid diamond shape. Allow it to hang freely below the wrapped knot section, then thread out through the bottom hole. -
Add the second circle:
Repeat the decorative knotting process used above, then attach the second circle (with the cutout). Keep your spacing consistent so the piece looks balanced. -
Finish with the bottom diamond:
Attach the final solid diamond shape at the bottom. Tie a secure double knot underneath it cut the excess twine, or leave a short tasseled tail if you prefer.
Hang your new geometric creation near a window to catch the light and enjoy the serene, natural aesthetic it brings to your room
Mini Character Figurines Built From Basic Shapes
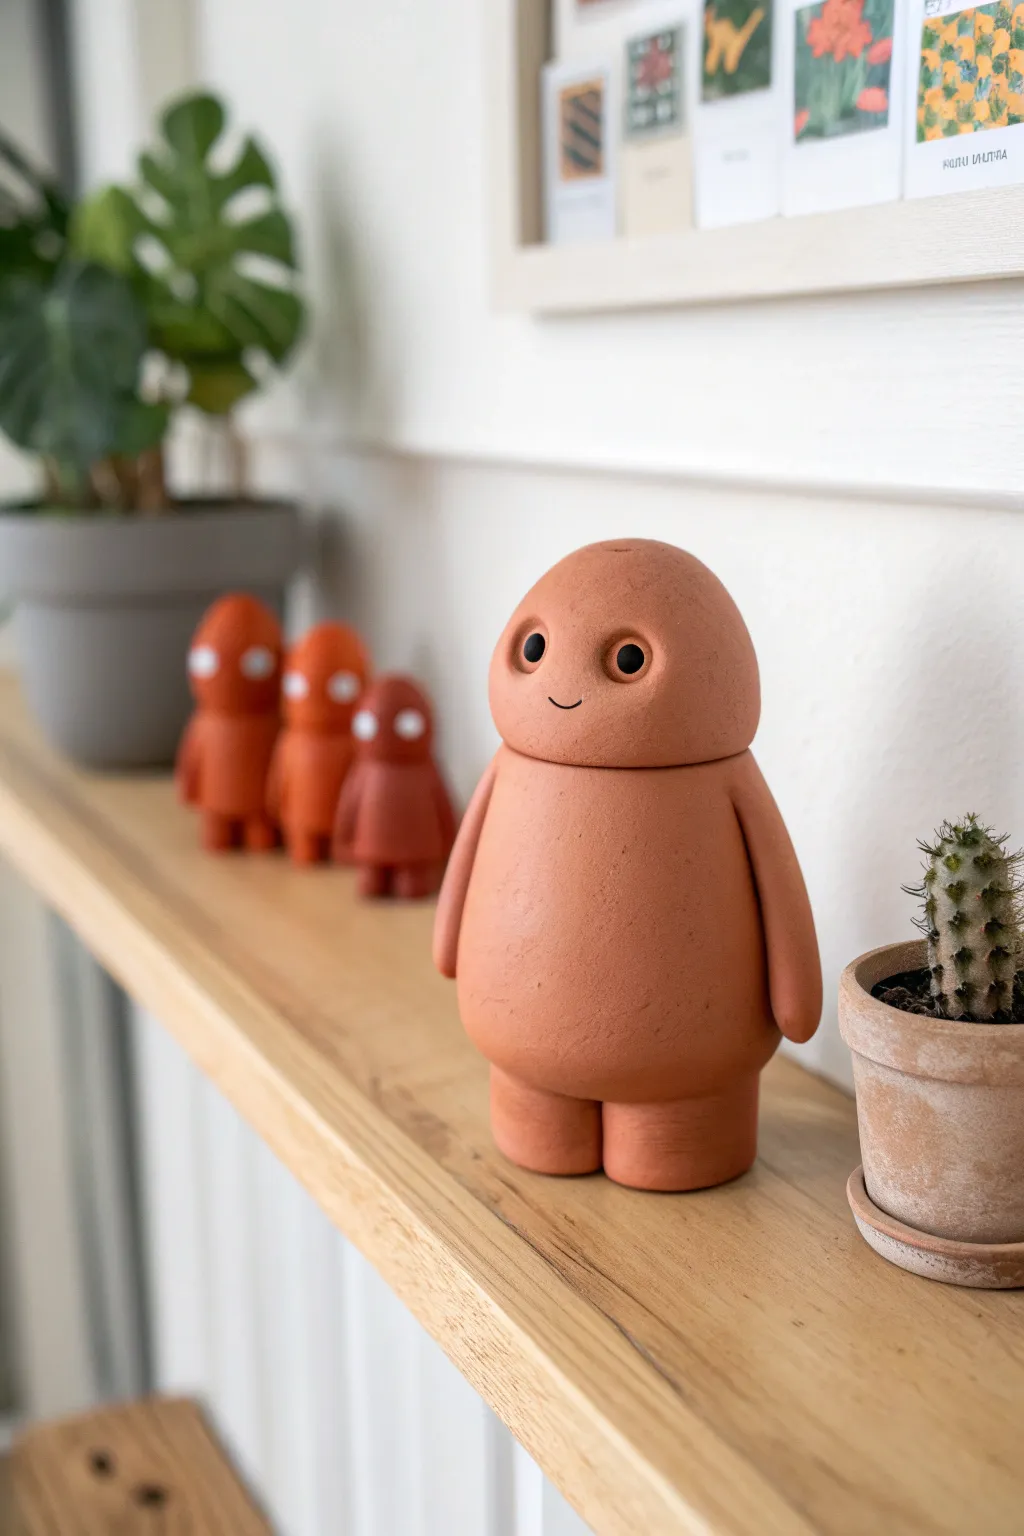
This charming, minimalist character brings a warm, earthy touch to any shelf with its smooth terracotta finish and sweet expression. By combining simple geometric forms—a sphere for the head and a rounded cylinder for the body—you will create a sturdy figurine that doubles as a delightful decor piece.
Step-by-Step
Materials
- Terracotta-colored polymer clay or air-dry clay (approx. 300-400g)
- Black acrylic paint
- Fine detail paintbrush (size 0 or 00)
- Clay carving tools or a craft knife
- Rolling pin or smooth cylinder
- Ball stylus tool (small)
- Water (for smoothing air-dry clay) or Clay Softener (for polymer)
- Fine-grit sandpaper (optional)
- Matte varnish (optional)
Step 1: Shaping the Body Base
-
Prepare the clay:
Begin by conditioning your terracotta clay until it is soft and pliable. If using air-dry clay, knead it briefly to remove air bubbles. -
Form the main torso:
Take a large portion of clay (about the size of a tennis ball) and roll it into a smooth sphere. Gently roll this on your work surface to elongate it slightly into a chubby oval or egg shape. -
Flatten the top:
Gently press the top of the oval against a flat surface to create a level plane. This is where the head will eventually rest. -
Create the legs:
Roll two smaller balls of clay, roughly walnut-sized. Flatten them slightly into thick discs or stout cylinders to serve as feet. -
Attach the legs:
Score the bottom of the torso and the tops of the leg pieces. Dampen the scored areas (or use liquid clay/slip) and press the legs firmly onto the body base. Blend the seams slightly for stability, but keep the definition visible.
Seamless Smoothness
Use a tiny amount of baby oil on your fingertips while smoothing polymer clay. It eliminates friction and erases fingerprints instantly.
Step 2: Creating the Head
-
Shape the head sphere:
Roll a new ball of clay that is slightly smaller than the torso width. Aim for a perfect dome shape. -
Check proportions:
Place the head ball onto the flat torso top to check the fit. The head should look like a seamless continuation of the body’s curve, creating a smooth silhouette. -
Refine the connection:
Flatten the bottom of the head sphere so it sits flush against the body’s top surface. If you want the head to be removable (like a jar lid), create a small recessed lip on the body and a corresponding rim on the head. -
Smooth the surfaces:
Dip your finger in a little water or oil and rub out any fingerprints or imperfections on both the head and body pieces until they are buttery smooth.
Step 3: Adding Details & Features
-
Form the arms:
Roll two long, thin clay snakes for the arms. They shouldn’t be too thick—think noodle-like but sturdy. -
Attach the arms:
Press these rolls vertically along the sides of the body. Blend the top of the arm into the shoulder area so it looks integrated, but leave the length of the arm raised from the surface for dimension. -
Sculpt the face:
Using a small ball stylus, gently press two indentations into the head piece where the eyes will go. I find marking the spots lightly with a pencil first helps get the symmetry right. -
Add the smile:
Use a needle tool or a very thin blade to press a tiny, curved smile into the clay just below the eye line. Keep it subtle and minimalist.
Make it a Jar
Before baking, hollow out the body and head pieces carefully. Add a coil on the inside of the head as a stopper to create a functional hidden stash jar.
Step 4: Finishing Touches
-
Final smoothing:
Do one last pass over the entire figure. Use a slightly damp sponge to buff away any tiny scratching or lint. -
Dry or bake:
Follow manufacturer instructions. Bake your polymer clay at the recommended temperature, or let your air-dry clay sit for 24-48 hours until fully hardened and light in color. -
Painting the eyes:
Once fully cured, dip a fine brush or the tip of a toothpick into black acrylic paint. Carefully fill the eye indentations you made earlier to bring the character to life. -
Refining the smile:
Run a very fine line of diluted black paint into the smile groove, wiping away any excess on the surface immediately so only the recessed line remains dark. -
Seal (Optional):
If you want to protect your new friend, apply a coat of matte varnish. Avoid glossy finishes to maintain that natural terracotta look.
Place your little clay guardian on a shelf near some greenery to complete the natural aesthetic
Patterned Canes and Sliced Tiles for Mosaic Looks
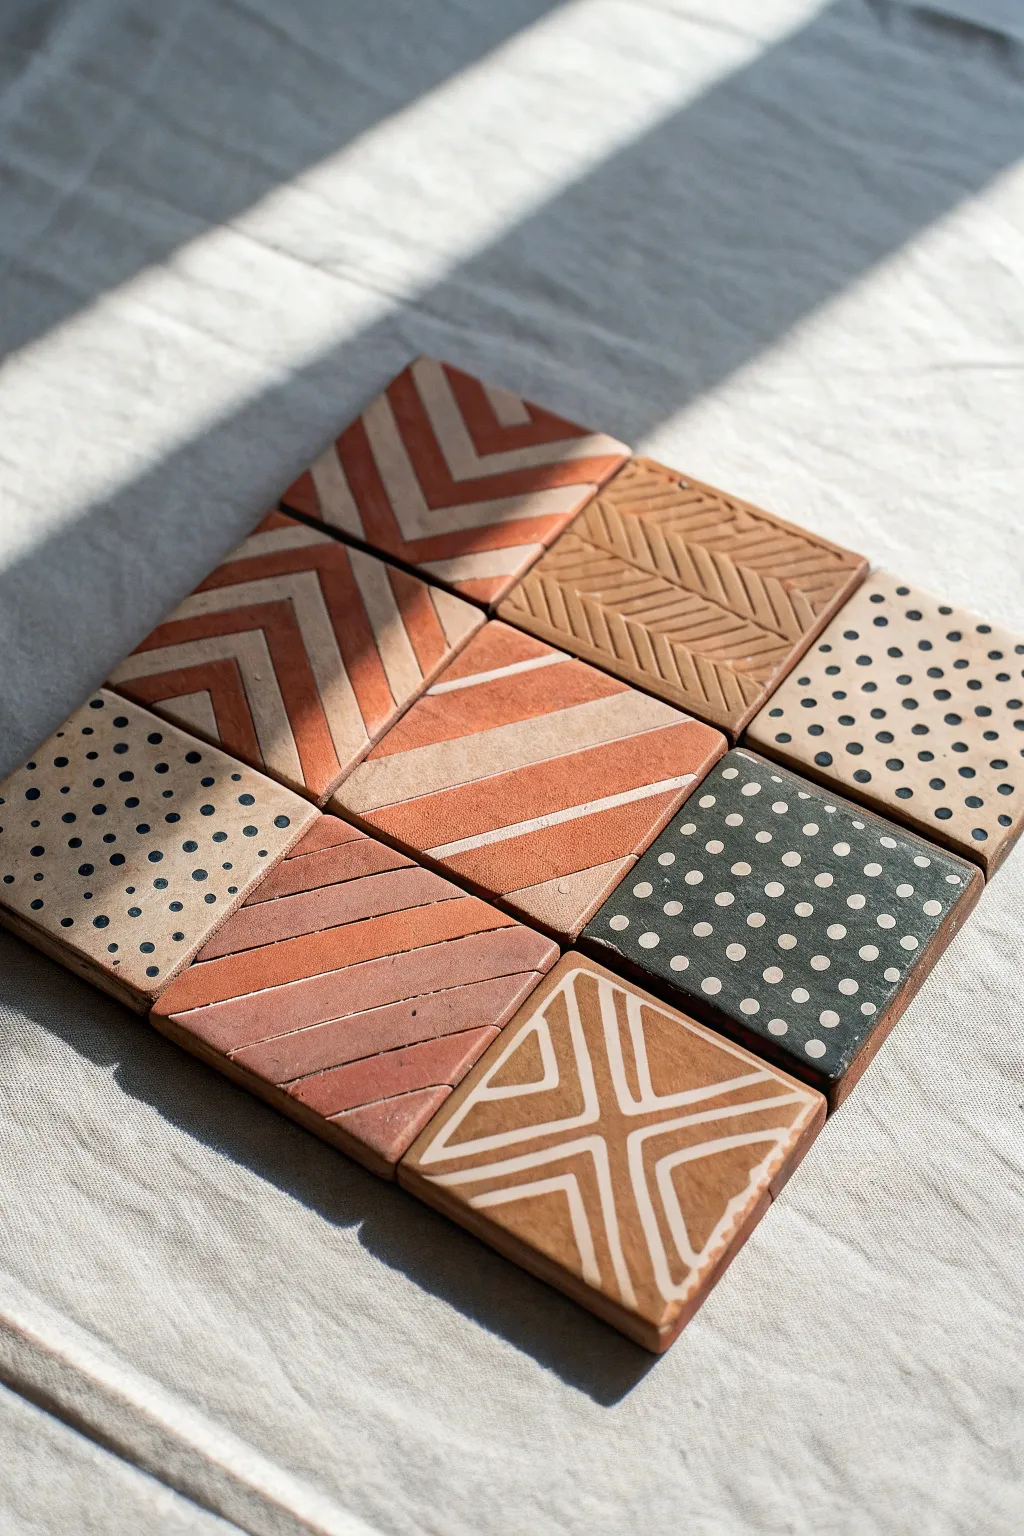
Recreate the charm of ceramic mosaics with these handcrafted polymer or air-dry clay tiles. Featuring a mix of inlaid stripes, incised textures, and dotted patterns, they come together to form a stylish, geometric display piece or coaster.
Step-by-Step Guide
Materials
- Terracotta-colored polymer clay
- Cream or white polymer clay
- Black polymer clay
- Rolling pin or pasta machine
- Square cookie cutter (approx. 1.5 inch)
- Craft blade or X-Acto knife
- Needle tool or toothpick
- Small round piping tip or straw (for dots)
- Ruler
- Baking sheet and parchment paper
- Sandpaper (fine grit)
- Matte varnish (optional)
Step 1: Base Preparation
-
Condition the Clay:
Begin by kneading your terracotta, cream, and black clay separately until they are soft and pliable. Warm clay mixes better and prevents cracking. -
Roll Flat Sheets:
Roll out the terracotta clay into a uniform sheet about 1/4 inch thick. Do same for the black and cream clay if you plan to use them as base colors for specific tiles. I find a pasta machine works best for getting perfectly even thickness. -
Cut the Squares:
Using your square cookie cutter, punch out nine squares. You will want a mix of base colors: mostly terracotta, one black, and one cream block to match the reference design.
Clean Cuts Pro Tip
Chill your clay sheet in the fridge for 10 minutes before cutting squares. Firm clay distorts much less under the cutter blade.
Step 2: Technique 1: Inlaid Stripes
-
Prepare Stripes:
Roll out a very thin sheet of cream clay. Use a ruler and craft knife to slice narrow, even strips. -
Apply Diagonal Patterns:
Take a terracotta square. Gently press the cream strips onto the surface in a diagonal or chevron pattern. Don’t worry about overhang yet. -
Flatten the Inlay:
Once the pattern is set, gently roll over the tile with your rolling pin. This pushes the cream strips flush into the terracotta base, creating a seamless surface. -
Trim Edges:
Use your craft blade to carefully trim away the excess strip lengths hanging off the sides of the square to restore the clean shape.
Magnetic Level Up
Glue small magnets to the back of each tile after baking to create a rearrangeable mosaic art set for your refrigerator door.
Step 3: Technique 2: Sgraffito & Incising
-
Create Texture:
For the textured terracotta tile, use a needle tool to gently score a herringbone pattern into the soft clay. Press deep enough to see shadow, but not through the tile. -
Carve the Star:
For the bottom-right tile design, lightly sketch an ‘X’ shape with a box border using your blade, then carefully carve out channels to reveal the clay underneath or fill these channels with thin coils of cream clay for an inlaid look.
Step 4: Technique 3: Polka Dots
-
Punching Dots:
For the spotted tiles, use a small piping tip or a straw to punch tiny circles out of a thin sheet of contrasting clay (black dots for cream tile, cream dots for black tile). -
Arranging the Pattern:
Place the dots in a grid pattern onto the base tile. Gently press them down so they adhere. -
Smoothing:
Cover the dotted tile with a piece of parchment paper and rub your finger or a roller over it in circular motions to ensure the dots are seamlessly embedded.
Step 5: Finishing
-
Final Shaping:
Before baking, give all squares a final check. If handling has warped them, gently nudge them back into perfect squares with the side of your blade. -
Bake:
Arrange the tiles on a parchment-lined baking sheet. Bake according to your polymer clay package instructions (typically 275°F for 15-30 minutes). -
Cool and Sand:
Allow the tiles to cool completely. If there are any rough edges or fingerprints, lightly sand the surface under running water to smooth them out. -
Seal:
Finish by applying a thin coat of matte varnish if you want extra durability, though bare clay has a wonderful natural stone look.
Now you have a stunning set of geometric tiles ready to be displayed together or used individually