Whenever I’m stuck on what to make, I default to clay creatures—they’re quick, playful, and you can get a ton of personality from just a few basic shapes. Here are my favorite clay creature ideas that start classic and easy, then ramp up into the delightfully weird stuff.
Chibi Clay Cat
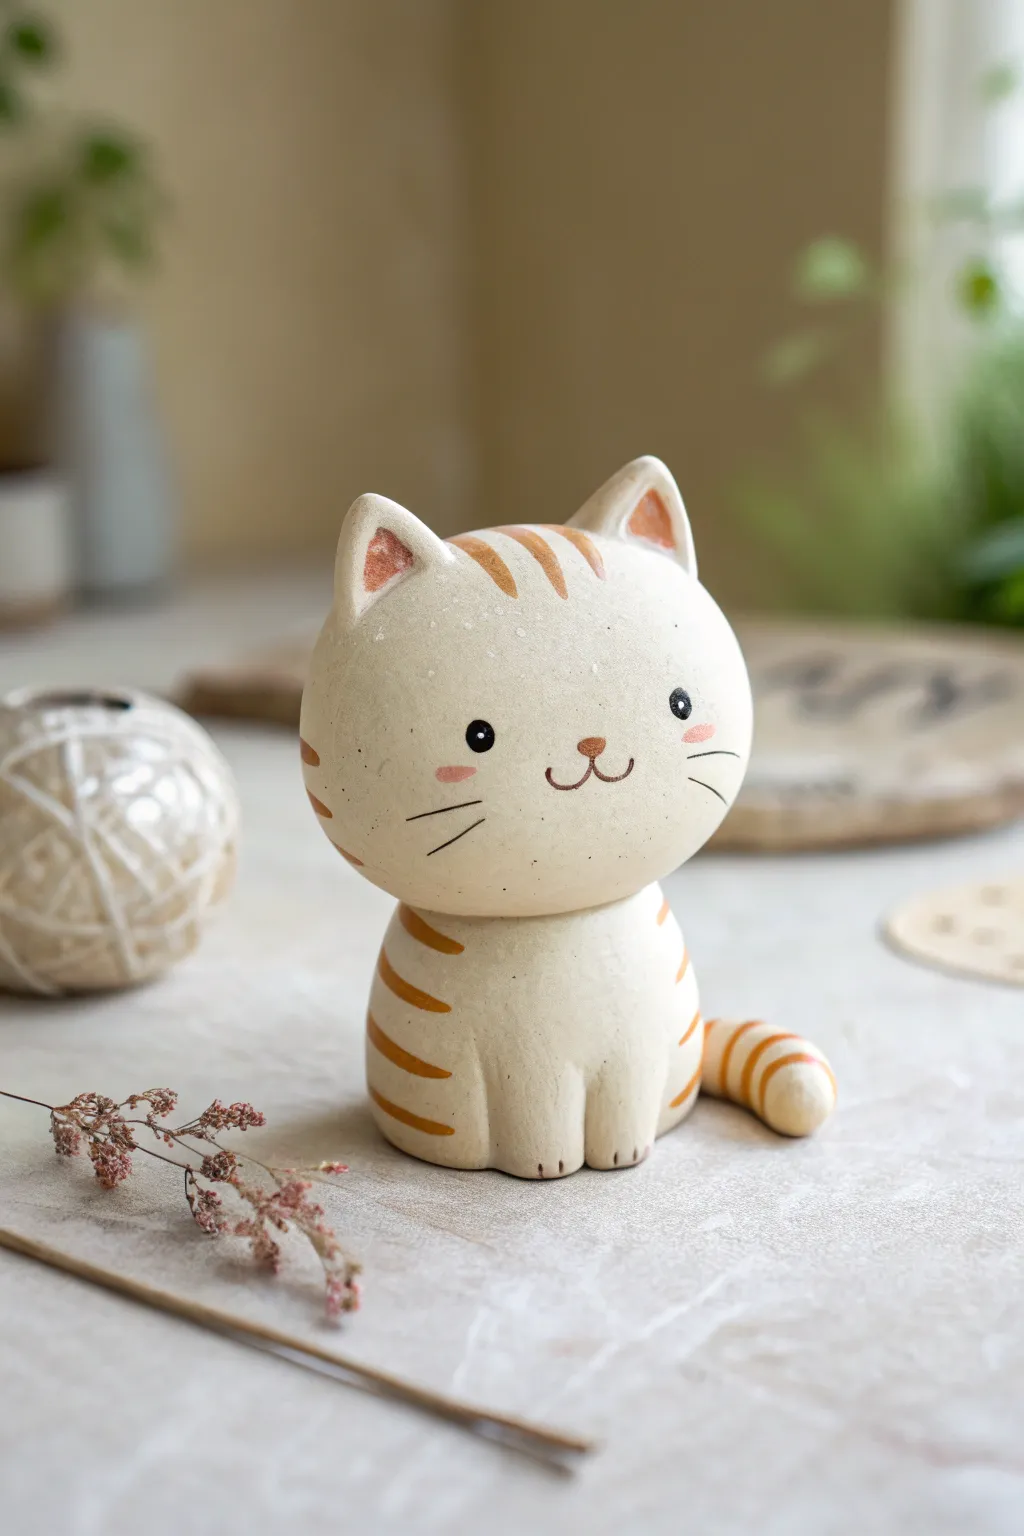
This adorable chibi cat features a soothing cream-colored body adorned with warm caramel stripes and a perfectly round head. Its minimalist face and distinct, chubby shape make it a delightful project for beginner potters or polymer clay enthusiasts alike.
Step-by-Step Guide
Materials
- Light cream or white polymer clay (or low-fire pottery clay)
- Caramel/terracotta colored clay (or acrylic paint)
- Black acrylic paint
- Pink chalk pastel or blush
- Pointed sculpting tool or needle tool
- Smoothing tool or sponge
- Ball tool (small)
- Fine detail paintbrush
- Matte varnish (optional)
Step 1: Sculpting the Base Form
-
Form the head:
Start with a large portion of your cream clay and roll it into a very smooth, slightly flattened sphere. It should be significantly larger than the body to achieve that classic ‘chibi’ proportion. -
Shape the body:
Roll a smaller ball of cream clay and gently shape it into a rounded gumdrop or dull cone shape. The bottom should be wide enough to verify the figure sits stably. -
Connect the pieces:
Press the head firmly onto the narrow top of the body. If you are using polymer clay, you can insert a small piece of wire or a toothpick between them for internal support; for ceramic clay, score and slip the joint well. -
Blend the neck:
Use a smoothing tool to gently blend the clay at the neck seam just slightly so it looks like one cohesive piece, but keep a distinct separation line to define the chubby head.
Step 2: Adding Features & Limbs
-
Create the ears:
Shape two small triangles of cream clay. Pinch them gently to curve them slightly, creating a concave inner ear shape. -
Attach the ears:
Place the ears on top of the head, spacing them widely apart. Smooth the back seams down into the head so they are securely attached. -
Define the paws:
At the front base of the body, use a needle tool to press two vertical lines near the center. This suggests front paws without needing to add extra clay. -
Sculpt the tail:
Roll a snake of cream clay that is thicker at one end and tapers to a rounded point. Attach the thick end to the lower back of the body, curling the tail around the side so it rests on the table surface.
Keep it Clean
Keep baby wipes handy! White clay picks up dust instantly. Clean your hands and tools before handling the light clay to keep it pristine.
Step 3: Applying the Stripes
-
Prepare the stripe color:
Take your caramel-colored clay and roll it into very thin, flat strips. If you plan to paint the stripes later instead, skip this phase. -
Apply head stripes:
Lay three short strips across the top of the forehead, between the ears. Gently press them flat so they are flush with the surface. -
Add cheek details:
Place two small, curved strips on each cheek area for the whisker markings. Ensure they follow the curve of the face. -
Stripe the body:
Add horizontal curved stripes to the sides of the body and the tail. I find it helps to taper the ends of the strips before applying them for a cleaner look. -
Inlay the ears:
Press a small triangle of caramel clay inside each ear cavity to add depth and color.
Make it a shaker
Hollow out the body before attaching the head and put a small ceramic bead inside. Now your kitty rattles when you shake it!
Step 4: Finishing Touches
-
Texture the surface:
For that rustic, stone-like texture seen in the photo, gently dab the entire surface with a toothbrush or a crumpled piece of aluminum foil. -
Bake or dry:
Follow the manufacturer’s instructions for your specific clay. If using pottery clay, this is where you would fire the piece. -
Paint facial features:
Once cool, use a fine brush with black paint to add two small dots for eyes and a small ‘w’ shape for the mouth. Keep the features centered and low on the face for extra cuteness. -
Add blush:
Dip a dry brush into pink chalk pastel dust (or use real blush) and gently dust small circles under the eyes to give the cat rosy cheeks. -
Varnish:
Finish with a matte varnish to protect the paint while maintaining the natural, earthen look of the figurine.
Now you have a charming little feline companion to sit on your desk and keep you company


Round-Belly Clay Puppy
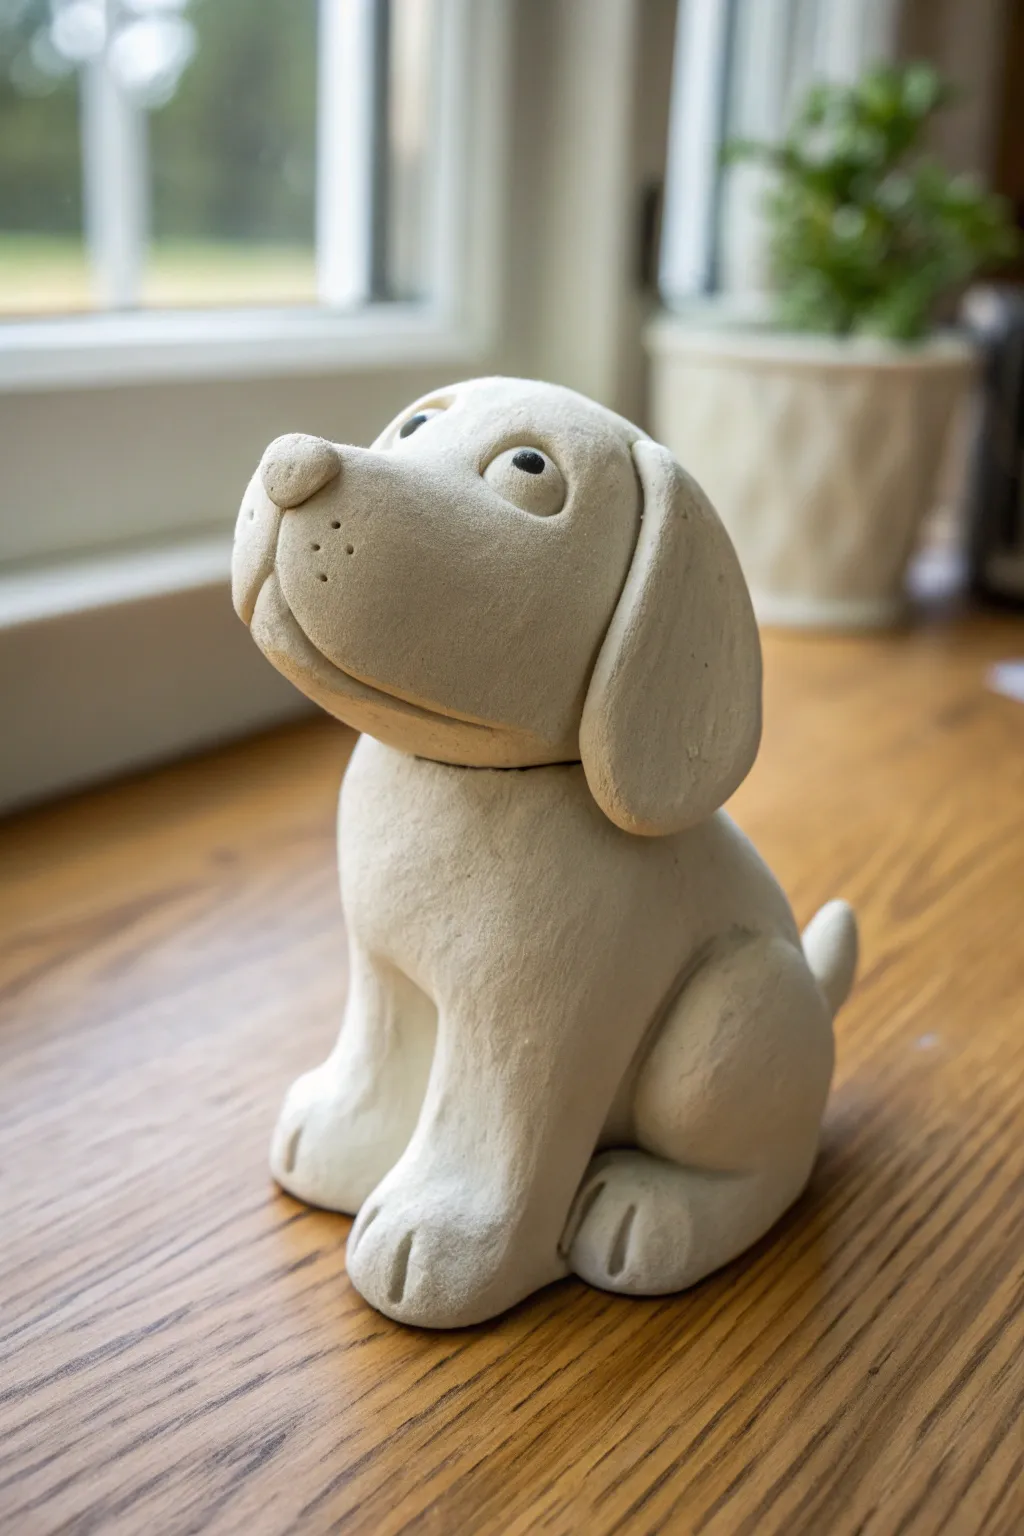
Capture the charm of man’s best friend with this adorable, sitting puppy sculpture. Featuring a distinctively round belly and an inquisitive, upward gaze, this unglazed clay project relies on simple shapes and smooth blending to create a heartwarming desk companion.
Step-by-Step
Materials
- White air-dry clay (or polymer clay)
- Clay carving tools (needle tool, modeling tool)
- Small bowl of water
- Aluminum foil
- Rolling pin
- Fine-grit sandpaper (optional)
- Black acrylic paint (for eyes)
- Small detail brush
Step 1: Forming the Base Structure
-
Create the core:
Crumple a piece of aluminum foil into a tight egg shape. This will act as the armature for the body, saving clay and reducing weight. The wider bottom of the egg will become the puppy’s sitting base. -
Wrap the body:
Roll out a thick slab of white clay. Wrap it completely around your foil egg, smoothing the seams together with a bit of water until you have a seamless, pear-shaped body. -
Shape the head:
Roll a solid ball of clay for the head, slightly smaller than the body. Flatten the bottom slightly where it will attach to the neck area. -
Attach head to body:
Score (scratch cross-hatch marks) the top of the body and the bottom of the head. Add a dab of water or slip, press them firmly together, and blend the clay at the neck seam so it’s completely smooth.
Keep the Head Up
If the heavy head starts to droop while wet, insert a toothpick through the body and into the head as internal support. You can leave it in permanently.
Step 2: Adding Key Features
-
Sculpt the snout:
Form a smaller, rounded oval of clay. Attach thi to the front of the face, positioning it slightly high so the dog looks like it’s gazing upward. -
Make the nose:
Roll a tiny triangle of clay with rounded corners. Press this onto the very tip of the snout. -
Create the smile:
Using a needle tool or knife, carefully slice a curved line under the snout to create the mouth. I like to curve the corners up slightly to ensure a happy expression. -
Add whisker details:
Use the very tip of your needle tool to poke three small holes on each side of the muzzle for whisker spots. -
Position the eyes:
Roll two small spheres of clay. Press them onto the face above the snout, spacing them fairly wide apart. Use a modeling tool to verify they are symmetrical. -
Create eyelids:
Roll two tiny snakes of clay and flatten them. Place these over the top half of the eye spheres to create heavy, sleepy, or loving eyelids.
Cracks Appearing?
If you see hairline cracks while drying, mix a tiny bit of fresh clay with water to make a paste (slip) and fill them in immediately. Smooth with a wet finger.
Step 3: Limbs and Ears
-
Form the front legs:
Roll two thick logs of clay. These should be slightly wider at the bottom for the paws. Attach them vertically to the front of the chest, blending the top seam into the body. -
Shape the hind legs:
Create two large teardrop shapes. Attach these to the sides of the hips, pressing them flat against the body to mimic the crouching thigh muscle of a sitting dog. -
Detail the paws:
Use a knife tool to press two indentations into the front of each paw to create toes. -
Make the ears:
Roll two tear-drop shapes and flatten them into pancakes. Attach the narrow point to the side of the head, allowing the wide part to flop down heavily against the cheek. -
Add the tail:
Roll a short, tapered cone of clay. Attach it to the lower back, curving it upward slightly so it’s visible.
Step 4: Finishing Touches
-
Smooth the surface:
Dip your finger in water and gently rub over the entire sculpture to erase fingerprints and harsh tool comms. The goal is a soft, matte finish. -
Dry thoroughly:
Let the sculpture dry completely. This can take 24-48 hours depending on humidity and thickness. -
Paint the pupils:
Once dry, use a fine tip brush to paint small black dots in the center of the eyes. Keep the rest of the dog unpainted for that classic ceramic look.
Place your loyal clay friend on a windowsill where the natural light can highlight its smooth curves


Tiny Bear Buddy
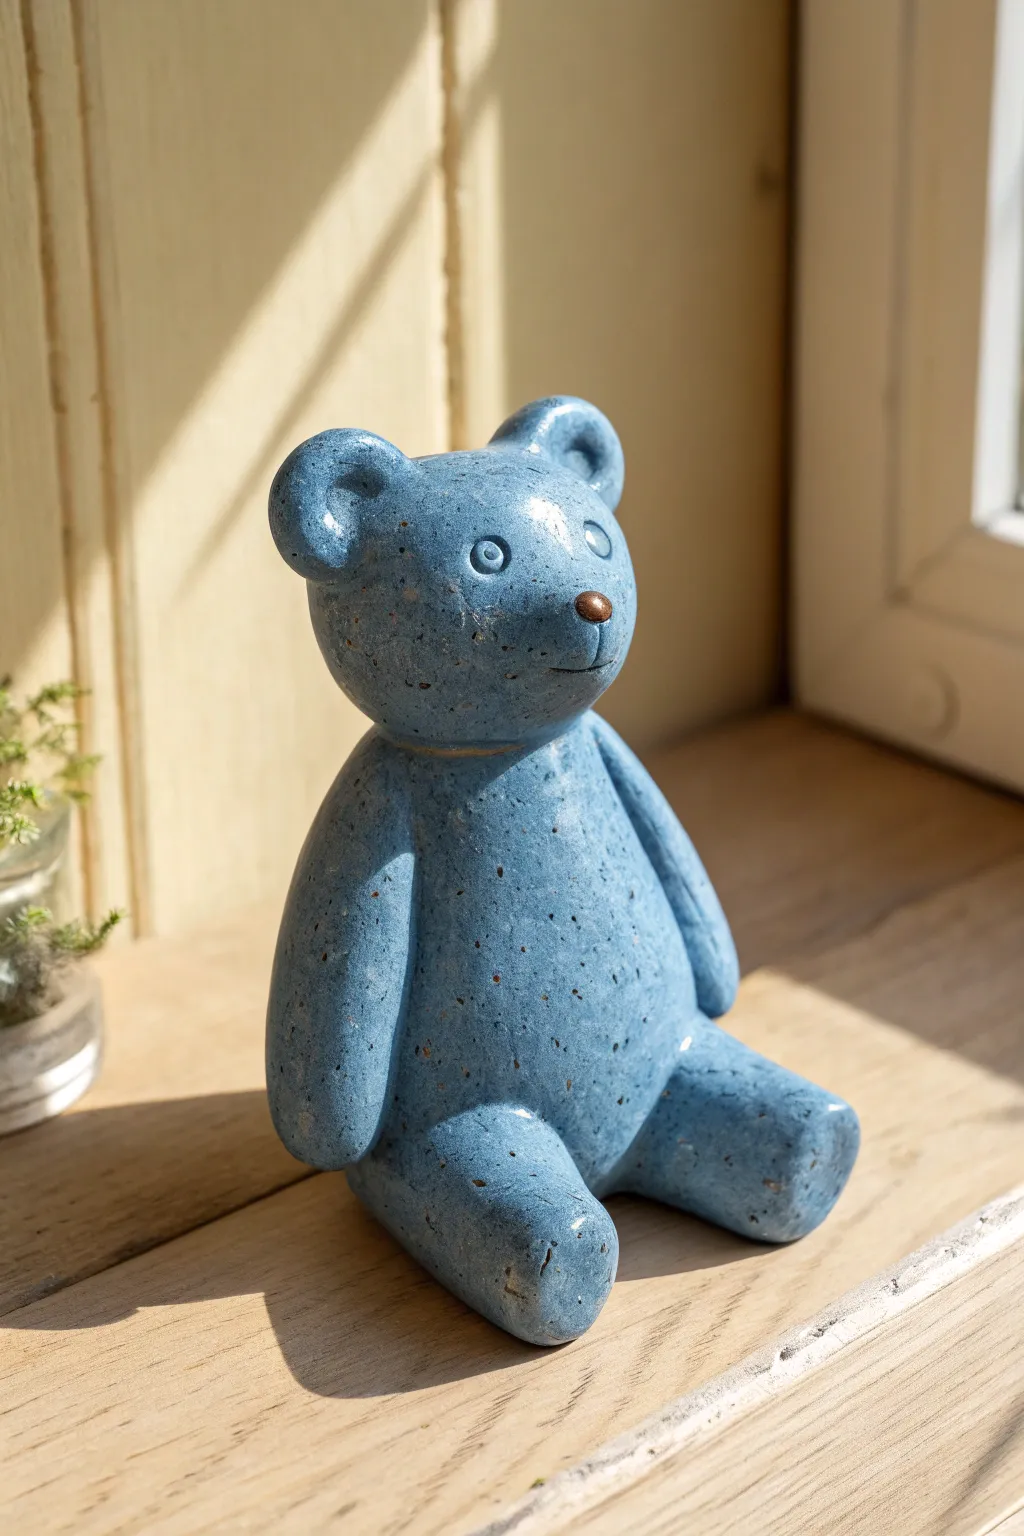
This charming little figurine captures the classic teddy bear silhouette with a sophisticated, faux-stone finish. Whether perched on a windowsill or tucked into a bookshelf, its speckled blue glaze and gentle expression bring a calm, handmade warmth to any space.
Step-by-Step
Materials
- Polymer clay or air-dry clay (white base recommended)
- Acrylic paints (baby blue, dark blue/grey, white, brown)
- Gloss varnish or glaze
- Sculpting tools (needle tool, smoothing tool)
- Old toothbrush or stiff bristle brush
- Aluminum foil (for armature)
- Fine grit sandpaper
Step 1: Forming the Body
-
Prepare the core:
Crumple a small piece of aluminum foil into a pear shape to serve as the core for the bear’s body. This saves clay and reduces drying or baking time. The base should be wider than the top. -
Cover the core:
Condition your clay until pliable. Flatten a sheet of clay and wrap it completely around the foil core, smoothing out any seams with your fingers or a smoothing tool so the surface is flawless. -
Shape the torso:
Gently refine the pear shape. The bottom should be rounded and stable so the bear sits upright without tipping over. Slightly flatten the chest area where the arms will attach.
Uneven Speckles?
If your paint splatter blobs are too big, test your flicking technique on a scrap piece of paper first. Keep the paint relatively thin, almost like milk consistency, for finer dots.
Step 2: Acting the Head & Limbs
-
Create the head:
Roll a ball of clay slightly smaller than the body. Press it gently onto the top of the torso. Blend the connection point by dragging clay downwards from the neck to the shoulders until secure. -
Sculpt the snout:
Form a small oval of clay and press it onto the lower center of the face. Smooth the edges so it integrates seamlessly into the head shape, protruding slightly. -
Add the ears:
Roll two small balls of clay and flatten them slightly. Press your thumb or a rounded tool into the center of each to create an indentation. Attach these to the top of the head, blending the back seams thoroughly. -
Form the legs:
Roll two thick logs of clay for the legs. Round off one end for the paw and taper the other end slightly where it joins the body. Attach them to the lower sides of the torso, angled forward as if the bear is sitting relaxed. -
Attach the arms:
Create two slightly smaller logs for the arms. Press them onto the sides of the shoulders, letting them hang naturally alongside the body. Smooth all join lines completely so the bear looks like a single solid piece.
Step 3: Refining Details
-
Define the eyes:
Use a small ball tool or the end of a paintbrush to press two shallow circular indentations for the eye sockets. Place a tiny flattened disc of clay inside each socket for the eyeball itself. -
Make the pupil:
Using a needle tool, poke a small hole in the center of each eye disc to create the pupil detail. -
Add the nose:
Roll a tiny triangle or oval of clay and press it onto the tip of the muzzle. I like to keep this distinctive and slightly raised. -
Carve the mouth:
Use a needle tool or knife to gently incise a simple curved line beneath the nose for a subtle smile. Keep the expression soft. -
Cure or Dry:
Follow the manufacturer instructions for your specific clay. If baking polymer clay, let it cool completely; if using air-dry clay, wait 24-48 hours until rock hard.
Make it Metallic
For a truly luxe look, swap the brown nose paint for liquid gold leaf or metallic bronze acrylic. It creates a stunning contrast against the matte blue stone effect.
Step 4: Faux Stone Finish
-
Base coat painting:
Paint the entire bear with an opaque layer of baby blue acrylic paint. You may need two coats for full coverage. Let dry completely. -
Add depth:
Mix a very watered-down dark blue or grey wash. Brush it over the bear and immediately wipe most of it off with a paper towel. This leaves pigment in the crevices (like the eyes and neck) to define the shapes. -
Create speckles:
Dip an old toothbrush into dark grey or black paint that has been slightly thinned. Hold it near the bear and flick the bristles with your thumb to spray fine speckles over the surface. Repeat with white paint for highlights. -
Paint the nose:
Carefully paint the nose a solid brown or copper color to make it stand out against the blue stone texture. -
Glossing:
Once all paint is bonedry, apply a heavy coat of high-gloss varnish. This mimics the look of fired ceramic glaze and protects the speckles.
Place your shiny new friend in a sunny spot to catch the light on its glossy finish


Panda-Inspired Forest Cub
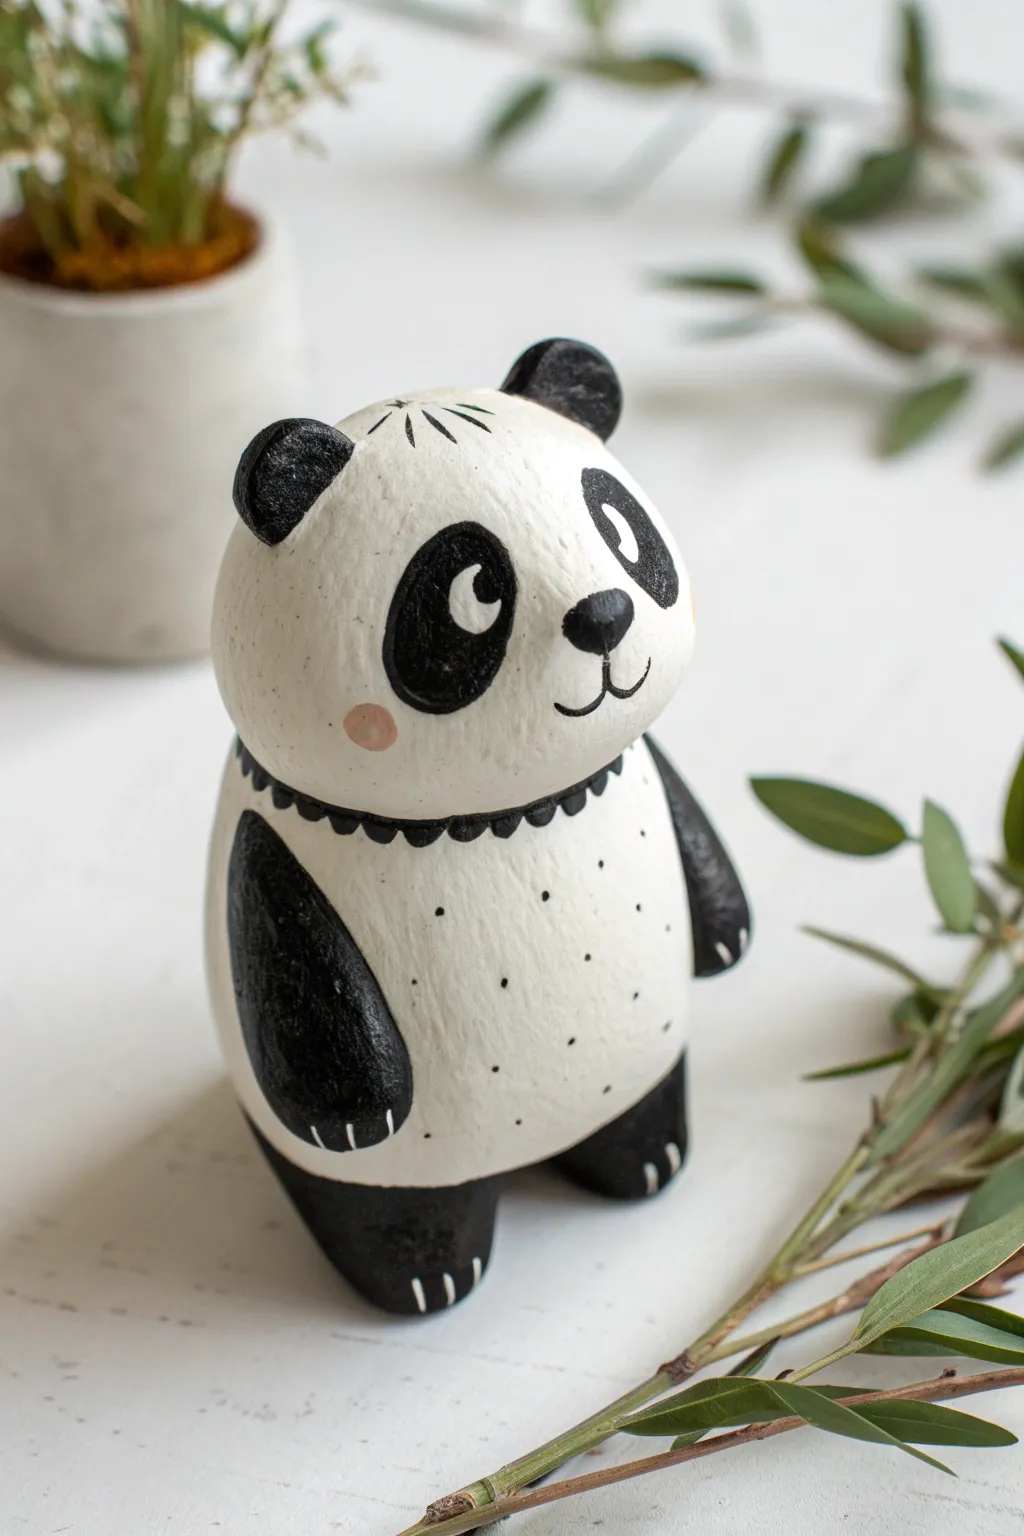
Embrace the charm of simple shapes with this folk-art style panda figurine, defined by its smooth, egg-shaped body and hand-painted details. This project focuses on minimalism and personality, turning a lump of clay into a sweet, polka-dotted forest friend perfect for shelf decor.
Detailed Instructions
Materials
- White smooth air-dry clay (approx. 200g)
- Acrylic paints (Titanium White, Mars Black, Soft Pink)
- Small round paintbrushes (sizes 0/1 and 4)
- Water and sponge for smoothing
- Sculpting tools (needle tool and smoothing tool)
- Fine-grit sandpaper (400 grit)
- Clear matte varnish or sealant
- Rolling pin (optional)
Step 1: Sculpting the Form
-
Condition the Clay:
Begin by kneading your air-dry clay thoroughly until it is warm, pliable, and free of air bubbles or cracks. -
Create the Core Body:
Roll a large ball of clay and then gently elongate it into a smooth egg shape about 3-4 inches tall. This will serve as both the head and torso. -
Flatten the Base:
Tap the wider bottom end of the egg shape firmly against your work surface. This creates a stable, flat base so the panda stands upright without wobbling. -
Attach the Ears:
Roll two small, pea-sized balls of clay. Slightly flatten them and score the top of the head where you want them to sit. Use a dab of water (slip) to attach them securely. -
Create the Legs:
Form two thick, short logs for the legs. Score and attach them to the bottom front of the body, blending the seams upward into the torso so they look like a continuous piece. -
Add the Arms:
Roll two slightly longer, teardrop-shaped pieces for the arms. Attach these to the sides of the body, curving them slightly forward to hug the belly. -
Refine the Surface:
Dip your finger or a damp sponge into water and gently rub the entire surface of the clay. Smooth out any fingerprints, bumps, or seam lines to create a flawless canvas. -
Dry Completely:
Allow the sculpture to air dry for 24-48 hours. Turn it occasionally to ensure the bottom dries evenly. The clay will turn opaque and feel lighter when fully dry.
Cracks appeared?
If hairline cracks form while drying, mix a small amount of clay with water to make a paste (slip). Fill the cracks, smooth over, and let dry again before sanding.
Step 2: Painting and Details
-
Sand for Perfection:
Once bone dry, lightly sand any remaining rough spots with fine-grit sandpaper. Wipe away all dust with a barely damp cloth. -
Base Coat:
Paint the entire panda with Titanium White acrylic paint. I usually apply two thin coats rather than one thick one to avoid brush strokes, letting it dry between layers. -
Paint the Limbs:
Using black paint and a medium brush like a size 4, paint the ears, arms, and legs. Create a clean, curved line where the black meets the white body. -
Add the Collar Detail:
Using a smaller brush, paint a scalloped or wavy black line around the ‘neck’ area to simulate a collar or ruff, separating the head visually from the body. -
Paint the Eye Patches:
Paint two large, slanted black ovals for the eye patches. They should dip slightly downward towards the cheeks for a sweet expression. -
Detail the Face:
Inside the black eye patches, add small white crescent shapes for eyes, and a tiny black dot for the pupil. Paint a small triangular nose and a simple anchor-shaped mouth. -
Add Decorative Dots:
Using your smallest brush or a toothpick, add tiny black polka dots across the white belly area for texture. -
Blush and Finishing Touches:
Mix a very pale pink and paint delicate circles on the cheeks. Add tiny white scratch marks (claws) on the black paws for extra detail. -
Seal the Work:
Once all paint is completely dry, apply a coat of matte varnish to protect the paint and give the figurine a unified finish.
Steady Hands
For the tiny belly dots, dip the non-brush end of a paintbrush into the black paint and stamp it onto the clay. This creates perfectly uniform circles every time.
Now you have a charming, hand-sculpted companion ready to bring a touch of the forest to your desk

The Complete Guide to Pottery Troubleshooting
Uncover the most common ceramic mistakes—from cracking clay to failed glazes—and learn how to fix them fast.
Pinch Pot Turtle
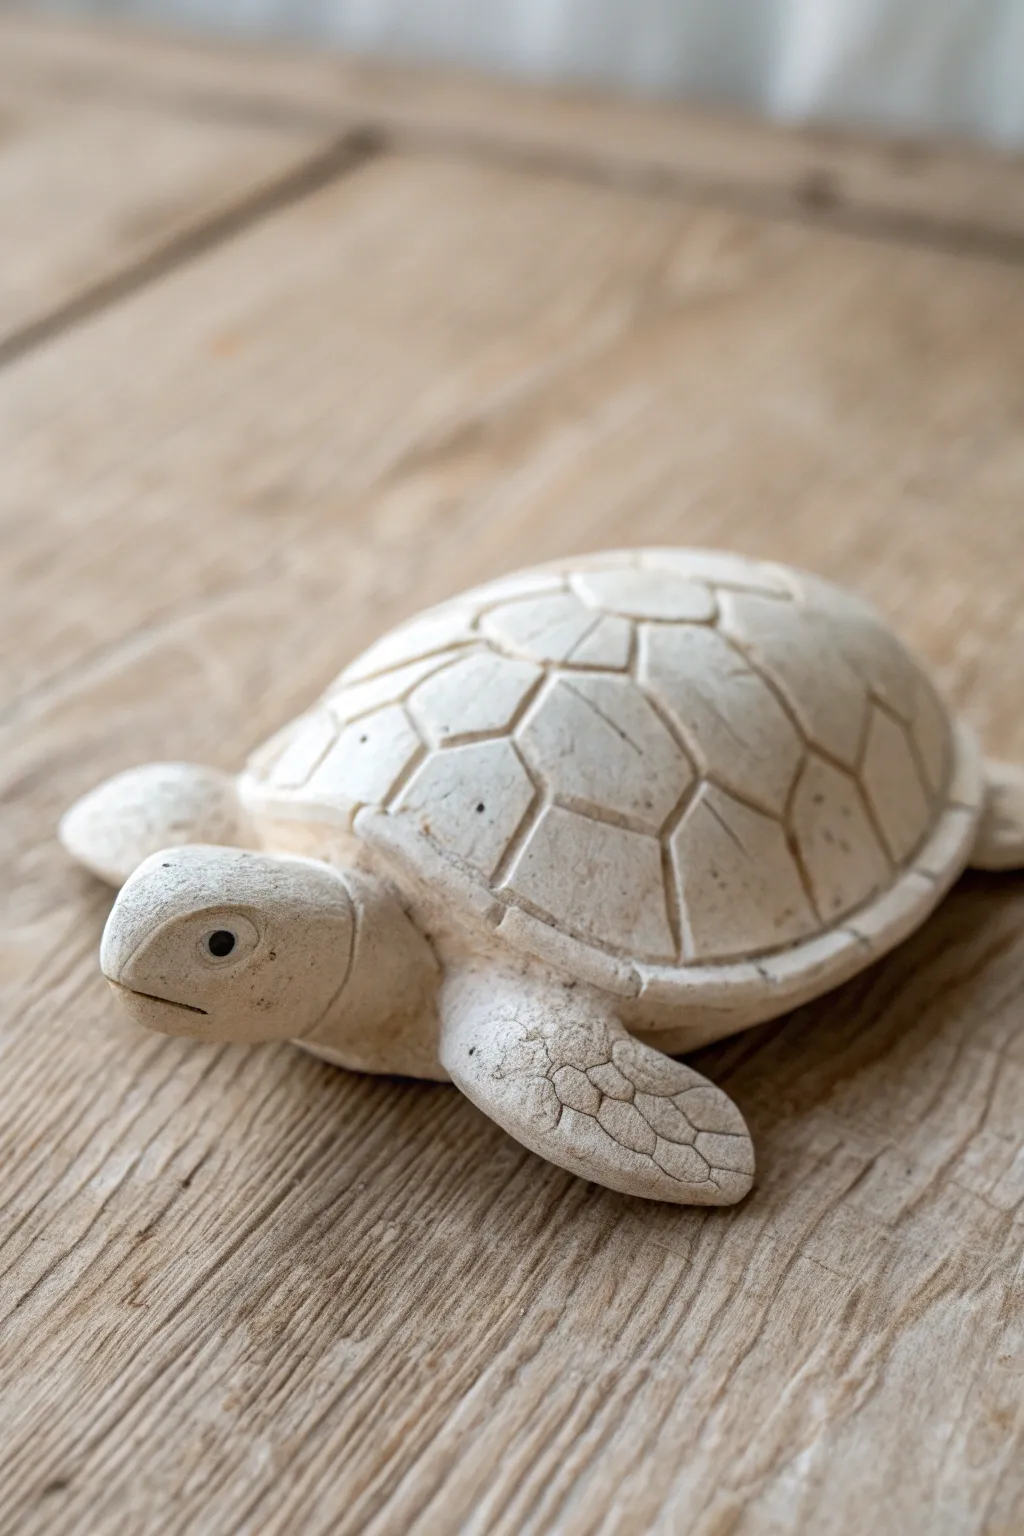
Learn to sculpt a serene and naturalistic turtle using the classic pinch pot method as your base. With its creamy, stone-like finish and carefully incised shell patterns, this decorative piece adds a charming touch of the coast to any shelf.
Step-by-Step
Materials
- Air-dry clay or white earthenware clay (approx. 1 lb)
- Small rolling pin
- Pointed sculpting tool or needle tool
- Loop tool (for hollowing if needed)
- Cup of water and slip (clay mixed with water)
- Sponge
- Scoring tool or old toothbrush
- Matte white or cream acrylic paint (optional, if using non-white clay)
- Very fine sandpaper
Step 1: Forming the Body Base
-
Roll the main sphere:
Start with a ball of clay roughly the size of a large orange. Roll it tightly between your palms or on your work surface to ensure there are no air bubbles or major cracks before you begin. -
Create the pinch pot:
Hold the sphere in one hand and push your thumb deep into the center. Gently pinch the clay between your thumb and fingers, rotating the ball as you go, to create a hollow bowl shape. This pinch pot will become the turtle’s shell. -
Shape the shell dome:
Place the open side of your pinch pot down on the table. Gently pat and smooth the top to create a nice, rounded dome shape. It shouldn’t be too peaked; aim for a gentle, sloping curve typical of sea turtles. -
Create the bottom plate:
Roll out a separate slab of clay about 1/4 inch thick. Place your pinch pot (shell) onto this slab and trace around it lightly. Cut out this oval shape; this will be the plastron, or underside of the turtle. -
Attach the shell:
Score the rim of your pinch pot and the outer edge of the bottom slab. Apply a generous amount of slip to both scored areas. Press the shell firmly onto the base plate to seal the air inside, which will help hold the shape while you work.
Step 2: Adding Appendages
-
Form the head:
Roll a smaller ball of clay into a thick, elongated teardrop shape for the head and neck. The rounded end should be sized proportionally to the shell’s opening area. -
Sculpt the face:
Isolate the snout area by gently pressing on the sides of the head. Use a small, rounded tool or the end of a paintbrush to indent eye sockets on either side, then place tiny balls of clay inside for the eyes, using a needle tool to add the pupil texture. -
Shape the flippers:
Creating the flippers is my favorite part because they give the turtle personality. Fashion four flattened, paddle-like shapes from clay. The front pair should be larger and slightly longer than the rear pair. -
Attach head and limbs:
Score and slip the attachment points on the body and the individual pieces. Firmly press the neck and flippers onto the underside of the shell edge. Use a modeling tool to blend the seams completely so the limbs look like they are growing out of the body, not just stuck on.
Clean Grooves
When carving the shell lines, small clay crumbs often accumulate. Wait until the clay is ‘leather hard’ (stiff but cool) to brush these away cleanly without smearing your design.
Step 3: Detailing and Refining
-
Smooth the surface:
Dip a sponge in a little water and wipe down the entire turtle. This removes fingerprints and creates that smooth, stone-like skin texture seen in the photo. -
Map the shell pattern:
Using a needle tool, lightly sketch the pattern on the shell. Start with a pentagon or hexagon in the very center top, then draw lines radiating out to create a ring of surrounding shapes. Finish with a border ring near the bottom edge. -
Carve the grooves:
Once you are happy with the sketch, retrace your lines with firmer pressure to create deep, defined grooves. This incision work mimics the scutes of a real tortoise shell. -
Texture the flippers:
Add subtle scale textures to the front flippers by pressing irregular, rounded shapes into the clay using a small loop tool or a coffee straw cut at an angle. -
Create the mouth:
Use a knife tool to slice a horizontal line for the mouth, curving it slightly downward at the edges for a natural expression. -
Final drying check:
poke a tiny, hidden hole in the bottom of the turtle to let air escape as the clay shrinks. Allow the piece to dry slowly under a loose plastic bag for the first day to prevent cracking. -
Finishing touches:
Once bone dry (and fired, if using kiln clay), you can lightly sand any rough edges. If using air-dry clay, apply a matte cream or off-white acrylic paint wash, wiping it back with a rag so paint stays in the grooves to accentuate the texture.
Stone Effect
Mix gritty sand or coffee grounds into your clay before sculpting. This creates a speckled, organic texture that looks like real stone once the piece is dry.
Now you have a charming, handcrafted turtle ready to bring a slow and steady calmness to your decor
Smiley Frog With Big Eyes
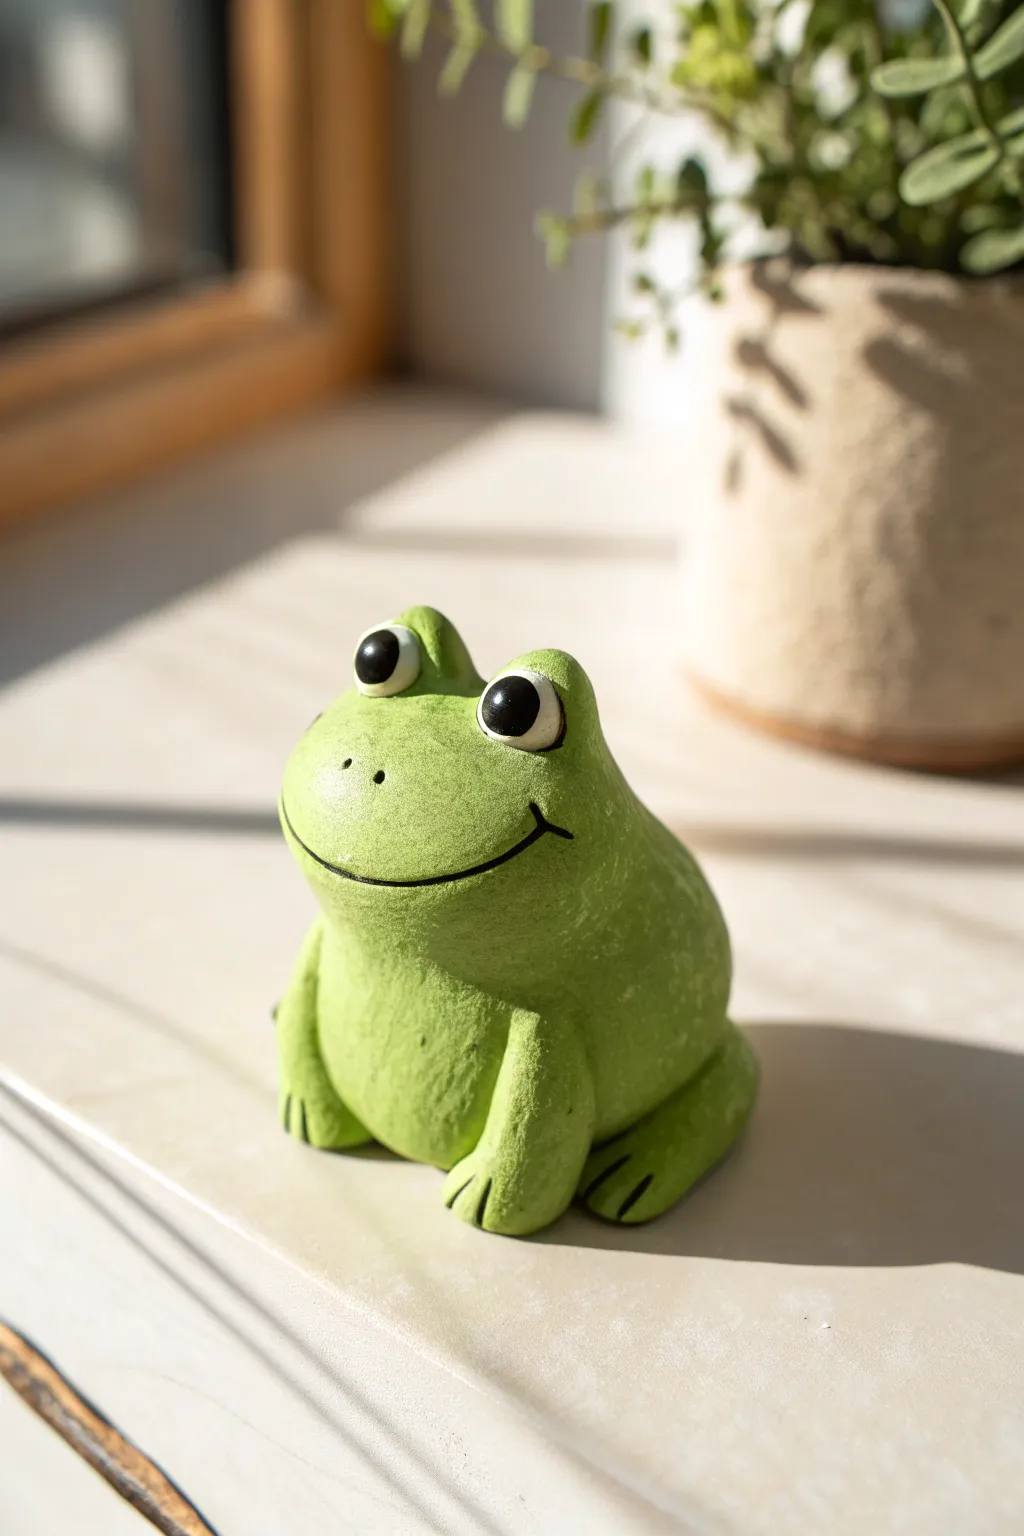
Brighten up your windowsill with this ultra-charming clay frog featuring expressive eyes and a contagious grin. The project uses simple sphere construction techniques and a layered painting method to give it a textured, earthy finish.
How-To Guide
Materials
- Air-dry clay or polymer clay (white or light grey)
- Acrylic paints: Bright green, olive green, black, white
- Basic sculpting tools (or a toothpick)
- Foil or paper for core armature (optional)
- Small artist brushes (flat and fine tip)
- Matte sealant or varnish
- Sponge or paper towel for texturing
Step 1: Shaping the Base
-
Form the main body:
Start with a large ball of clay roughly the size of a tangerine. Roll it smoothly between your palms until any cracks disappear. -
Shape the slouch:
Gently gently press the ball onto your work surface to create a flat bottom helps it sit securely. Mold the ball into a slightly rounded pyramid shape, keeping it chubby at the bottom and slightly narrower at the top for the head. -
Define the head:
Use your thumbs to smooth out the transition area so there is no distinct neck; the head should flow directly into the body like a cute blob.
Smoother blending
Use a damp paintbrush (water for air-dry, baby oil/mineral spirits for polymer) to erase fingerprints before drying.
Step 2: Legs and Features
-
Create the hind legs:
Roll two smaller balls of clay for the back legs. Flatten them slightly into ovals and attach them to the lower sides of the body. -
Add the feet:
Shape two additional small ovals for the feet. Press them firmly against the bottom of the leg ovals and blend the clay seams so they look like one piece. -
Define the toes:
Using a knife tool or toothpick, gently press two indentations into the front of each foot to create three simple toes. -
Form the front arms:
Roll two sausage shapes for the front arms. Attach them vertically to the front of the body so they look like they are propping the frog up. -
Blend the seams:
Use a little water (for air-dry clay) or baby oil (for polymer) to smooth the seams where the arms meet the body. Indent toes on these front paws just like you did for the back feet.
Cracks acting up?
If air-dry clay cracks while drying, fill the fissures with a ‘slip’ made of clay mixed with water, then sand smooth.
Step 3: Face Details
-
Make the eye sockets:
Press two small indentations on the very top of the head where you want the eyes to sit. -
Attach the eyes:
Roll two small, perfect spheres of clay. Place them into the indentations on top of the head. I find blending the clay slightly at the back of the eye helps them stay on securely. -
Carve the mouth:
Use a sculpting tool or the side of a credit card to press a wide, sweeping smile into the face. Make the line deep enough to hold paint later. -
Mark the nostrils:
Poke two tiny, shallow holes just above the smile line for the nostrils. -
Dry or bake:
Follow the instructions for your specific clay. Let air-dry clay sit for at least 24-48 hours, or bake your polymer clay as directed on the package.
Step 4: Painting and Finishing
-
Base coat:
Paint the entire frog (except the eyes) with a solid coat of bright green acrylic paint. Let this layer dry completely. -
Add texture:
Mix a little olive green with your original green. Using a sponge or crumpled paper towel, lightly dab this darker shade over the body to create a mottled, natural texture. -
Paint the eyes:
Carefully paint the eye spheres pure white. You may need two thin coats to get it fully opaque. -
Detail the face:
Using a very fine brush, paint the inside of the carved smile line black. Then, paint large black circles on the white eyes for pupils, placing them slightly inward to look cute. -
Highligts:
Add a tiny white dot reflecting light inside each black pupil to bring the character to life. -
Seal the work:
Once all paint is bone dry, coat the frog with a matte varnish to protect the surface and unify the finish.
Place your happy little amphibian near a plant pot for an instant mood booster


What Really Happens Inside the Kiln
Learn how time and temperature work together inside the kiln to transform clay into durable ceramic.
Easy Clay Penguin
This adorable little penguin is crafted from simple rounded shapes and features a sweet, rosy-cheeked expression. With its smooth matte finish and minimalist details, it makes for a charming desk companion or a festive winter decoration.
Detailed Instructions
Materials
- Black polymer clay
- White polymer clay
- Orange polymer clay
- Pink soft pastel chalk (or pink clay)
- Small ball tool or detail stylus
- Needle tool
- Oven for baking (as per clay instructions)
- Matte finish varnish (optional)
- Baby wipes (for cleaning hands)
Step 1: Shaping the Body
-
Form the base:
Start by taking a chunk of black clay and conditioning it until it is soft and pliable. Roll it into a smooth, slightly squashed sphere to create the penguin’s body. -
Flatten the base:
Gently tap the bottom of your sphere against your work surface. This creates a flat area so your penguin stands up straight without rolling away. -
Create the tummy:
Take a smaller piece of white clay and roll it into a ball, then flatten it into a thin oval or egg shape. This will be the iconic white belly. -
Attach the tummy:
Press the white oval onto the front of the black body piece, smoothing the edges gently with your finger so it integrates seamlessly without distorting the round shape. -
Detail the feathers:
Using a very small amount of black clay, roll three tiny, teardrop-shaped specks. Place them in an inverted triangle pattern on the upper part of the white belly to simulate chest feathers.
Clean Hands Tip
Black clay stains easily! Always wash your hands or use a wet wipe thoroughly before switching to white clay to keep the penguin’s tummy bright and clean.
Step 2: Creating the Head
-
Roll the head:
Roll another ball of black clay, slightly smaller than the body piece. Make sure it’s perfectly smooth before proceeding. -
Prepare the face mask:
Roll two small balls of white clay of equal size. Flatten them into discs and press them together side-by-side on the black head sphere to form the heart-shaped face area. -
Blend the face:
Use a smoothing tool or your finger to gently blend the seam where the two white circles meet, creating a continuous white mask for the eyes. -
Add the eyes:
Roll two tiny specks of black clay. Press them firmly into the center of each white face circle. I find using a small ball tool helps position them symmetrically before pressing down. -
Highlight the eyes:
For that spark of life, add a microscopic dot of white clay to the top right corner of each black eye pupil. -
Sculpt the beak:
Take a small bit of orange clay and roll it into a gentle oval. Press it horizontally right between the eyes, slightly overlapping the bottom of the white face mask. -
Blush the cheeks:
Scrape a little powder from a pink pastel chalk. Use your finger or a dry brush to gently dab pink rosy cheeks onto the outer edges of the white face mask.
Step 3: Assembly and Feet
-
Connect head and body:
Place the head securely on top of the body. If your clay is firm, you might want to insert a small piece of wire or a toothpick between the two parts for internal support. -
Make the feet:
Roll two small balls of orange clay. Flatten them slightly into thick discs to serve as the feet. -
Detail the toes:
Use a needle tool or the back of a knife to press two indentations into the front edge of each orange foot, creating the look of webbed toes. -
Attach the feet:
Slide the orange feet underneath the black body, positioning them so they poke out slightly towards the sides, giving the penguin a cute, waddling stance. -
Final inspection:
Give your penguin a once-over. Smooth out any accidental fingerprints with a tiny drop of baby oil or a light brush with a baby wipe. -
Bake:
Bake the figure according to your specific brand of polymer clay’s instructions (usually around 275°F or 130°C for 15-30 minutes). Let it cool completely.
Winter Accessories
Customize your penguin by sculpting a tiny scarf or a knit hat out of red or green clay to give him a cozy winter personality.
Enjoy your new frosty friend on your shelf or gift it to a penguin lover
Double-Pinch Pot Fish
Transform two simple mounds of clay into this charming, open-mouthed fish planter or sponge holder. With its textured scales and expressive fins, this unglazed piece showcases natural stoneware’s raw beauty while teaching fundamental hand-building skills.
Step-by-Step Tutorial
Materials
- Stoneware clay (smooth body preferred)
- Scoring tool (or fork)
- Slip (clay and water slurry)
- Loop tool or carving tool
- Wooden modeling tool
- Pin tool
- Sponge
- Small bowl of water
Step 1: Creating the Body Form
-
Pinch the halves:
Begin with two equal balls of clay, roughly the size of tennis balls. Press your thumb into the center of each and pinch the walls evenly while rotating the clay to form two hemispherical cups. -
Score and slip:
Rough up the rims of both pinch pots using your scoring tool or a fork. Apply a generous layer of slip to the scored areas to act as glue. -
Join the pots:
Press the two halves together firmly, ensuring the rims align. Smooth the seam on the outside with your thumb or a wooden rib until the join is completely invisible and the shape is an enclosed sphere. -
Shape the oval:
Gently paddle or roll the sphere on your work surface to elongate it slightly into an egg shape. This will become the fish’s body.
Trapped Air Warning
Before cutting the top opening, pop a tiny hole in the sphere immediately after joining the halves. This prevents the air inside from expanding and cracking the clay.
Step 2: Sculpting the Features
-
Cut the opening:
Decide which side is the top. Use a pin tool to trace and then cut out a large oval opening. Smooth the cut edge with a damp sponge. -
Form the mouth:
At the front end, add a small coil of clay for the upper lip and a slightly larger coil for the lower lip. Blend the back edges of these coils onto the body, leaving the front edges distinct to create an open pout. -
Create the eyes:
Roll two small balls of clay and flatten them slightly. Score and slip them onto the sides of the head. Use the handle of a paintbrush or a small loop tool to press an indentation into the center of each for the pupil. -
Add the dorsal fin:
Cut a triangular fin shape from a slab of clay. Score and slip it onto the rear top of the fish, just behind the main opening. -
Add the side fins:
Create two smaller, flat triangles for the pectoral fins. Attach these to the lower sides of the body to act as feet that will stabilize the fish so it doesn’t roll over. -
Secure the tail:
Fashion a larger, curved triangle for the tail. deeply scour the back of the fish body and the attachment point of the tail, then join them. I find adding a tiny coil around the seam helps reinforce this heavy piece.
Pro Tip: Balanced Base
Make sure the bottom fins are attached slightly spread out and flat on the bottom. Tap the fish gently on the table while the clay is soft to flatten the base for stability.
Step 3: Adding Texture and Detail
-
Outline the head:
Using a wooden modeling tool, draw a curved line behind the eyes and mouth to distinguish the head from the scaly body. Add a decorative row of small impressed dots along this line. -
Carve the scales:
Starting just behind the head line, use a small loop tool to carve ‘U’ shaped scales. Remove the clay in downward strokes to create relief texture. -
Layer the pattern:
Continue carving rows of scales all the way to the tail, offsetting each row like brickwork so the scales nestle between the ones in the previous row. -
Detail the fins:
Use a pin tool or knife to gently incise lines into the tail and dorsal fin, radiating outward to mimic the ribs of the fins. -
Refine the surface:
Once the clay is leather hard, go over any sharp burrs created by carving with a barely damp sponge. Do not over-smooth, or you will lose the crispness of the scales. -
Final drying:
Let the fish dry slowly under loose plastic for a day before uncovering it completely. This ensures the added fins don’t crack away from the body.
Once fired, this durable stoneware swimmer makes a perfect home for a succulent or a quirky catch-all dish

TRACK YOUR CERAMIC JOURNEY
Capture glaze tests, firing details, and creative progress—all in one simple printable. Make your projects easier to repeat and improve.
Owl With Textured Feathers
This charming owl sculpture pairs the raw warmth of unglazed clay with a creamy, speckled finish for a rustic Scandinavian feel. The simple form relies on clean lines and carefully carved textures to bring personality to its watchful expression.
Detailed Instructions
Materials
- Stoneware clay with grog (speckled or buff)
- Small carving tool or wire loop tool
- Pin tool or needle tool
- Sponge
- Brown underglaze or iron oxide wash
- Matte white or cream glaze (speckled optional)
- Slip (clay slurry)
- Soft bristle brush
- Wooden modeling tool
Step 1: Forming the Body
-
Create the base form:
Begin with a solid lump of clay, roughly the size of a grapefruit. Working the clay in your hands, shape it into an elongated egg shape that is slightly wider at the bottom for stability. -
Check stability:
Tap the bottom of the egg shape gently against your work surface to create a flat base so the owl stands up straight without wobbling. -
Refine the surface:
Smooth out any major lumps or finger marks using a damp sponge, aiming for a consistent, rounded contour. -
Hollow the form (optional):
If your owl is quite large (over 3 inches thick), slice the bottom off, hollow out the inside with a loop tool leaving half-inch walls, and score and slip the bottom back on. For smaller owls, solid is fine if you dry it very slowly.
Raw Clay Look
Does your clay body lack that rich toasty color? Before glazing, brush an iron oxide wash over the beak and feet, then wipe it back. This stains the clay a deeper brown.
Step 2: Sculpting Features
-
Define the facial disc:
Using a wooden modeling tool, gently press into the upper third of the body to define the heart-shaped facial disc. You want to create a slight ridge that separates the face from the head. -
Add the beak:
Roll a small, sharp cone of clay. Score the center of the face and the back of the beak, add a dab of slip, and press the beak firmly into place, curving it downward. -
Create the eyes:
Roll two small spheres for the eyes. Press them flat into the facial disc area. Use a sculpting tool or the back of a paintbrush to create a circular indentation in the center of each eye for the pupil. -
Define the wings:
Lightly sketch the outline of folded wings on the sides of the body using a needle tool. You don’t need to add extra clay; just delineating the area is enough.
Avoid Cracking
Solid clay sculptures thicker than 1 inch are prone to exploding in the kiln. If you aren’t hollowing it out, dry the owl extremely slowly over 1-2 weeks before firing.
Step 3: Texturing
-
Carve the chest feathers:
Using a small U-shaped loop tool or a carving gouge, remove small scoops of clay in a scalloped pattern across the owl’s chest. Keep these marks loose and somewhat irregular for a natural look. -
Detail the wings:
With a sharp needle tool or knife, carve long, vertical lines into the wing areas to suggest flight feathers. Make these lines deep enough to hold glaze later. -
Refine the eyes:
Use a damp brush to smooth just the edges of the added clay pieces (eyes and beak) so they look integrated but distinct. -
Add the feet:
In the final sculpting step, roll two small balls of clay, flatten them slightly, and press three notches into each to create toes. Slip and score these to the very bottom front edge of the owl so they peek out. -
Dry slowly:
Cover the owl loosely with plastic for a day or two to equalize moisture, then uncover and let it dry completely bone dry before the first firing (bisque).
Step 4: Glazing and Finishing
-
Bisque fire:
Fire the piece in a kiln to cone 04 (or your clay’s specific bisque temperature). -
Wax resist application:
Apply wax resist carefully to the beak, the eyes (specifically the iris area, leaving the pupil if you want it dark), the feet, and the long striped grooves on the wings. This keeps the raw clay color visible. -
Apply the glaze:
Dip the owl into a matte white or cream speckled glaze. I prefer dipping over brushing here to ensure the glaze pools nicely in the chest feather indentations. -
Clean up:
Use a damp sponge to wipe any glaze droplets off the waxed areas (beak, feet, eyes) and the very bottom of the piece to prevent it sticking to the kiln shelf. -
Enhance the eyes:
If you want the pupils black, dab a tiny dot of black underglaze into the center indentation of the eyes. -
Final Fire:
Fire the piece to the maturity temperature of your clay and glaze (typically cone 5 or 6 for stoneware).
Once cooled, place your owl near a window or shelf edge where its textured plumage can catch the light.
Elephant With Coil Trunk
Capture the joy of a playful elephant with this charming clay project featuring a raised trunk and happy, squinting eyes. The finished piece has a wonderful stone-like texture and soft gray hue that brings a touch of serenity to any shelf.
Step-by-Step
Materials
- Gray polymer clay or air-dry clay (approx. 200g)
- Black acrylic paint
- Fine-grit sandpaper or a stiff bristle brush
- Modeling tools (needle tool, ball stylus)
- Small paintbrush
- Aluminum foil (optional, for armature)
- Water (for smoothing if using air-dry clay)
Step 1: Shaping the Base and Body
-
Form the core:
Start by rolling a large ball of clay for the body. To save on clay and reduce weight, you can create a tight ball of aluminum foil first and cover it with a layer of clay about 1/4 inch thick. -
Create the pear shape:
Gently manipulate the ball into a pear shape, flattening the wider bottom so the elephant sits stably on your work surface. The narrower top part will become the neck area. -
Shape the legs:
Roll two thick logs of clay for the front legs. Attach them vertically to the front of the body, blending the clay upwards into the chest area so there are no visible seams. -
Add the hind legs:
Create two shorter, rounder mounds for the back legs. Attach these to the lower sides of the body, positioned as if the elephant is sitting on its haunches. Blend the edges smoothly into the main body. -
Detail the toes:
Using a small loop tool or a knife, carve three half-circle shapes at the bottom of each foot to represent toenails. Smooth the edges of these indentations so they look soft and rounded.
Stone Effect Secret
Mix a small amount of black pepper or fine sand into your clay before sculpting. This adds speckles and grit that make the finished piece look exactly like carved stone.
Step 2: Sculpting the Head and Features
-
Roll the head:
Roll a smaller ball of clay for the head. It should be proportional to the body but large enough to support the ears and trunk. -
Form the trunk:
Roll a tapered coil of clay. Attach the thicker end to the center of the face and blend it seamlessly. Extend the trunk upwards and curve the tip back slightly to give it a cheerful, trumpeting posture. -
Hollow the trunk tip:
Take a small ball tool or the end of a paintbrush handle and gently press into the very end of the raised trunk to create the nostril opening. -
Attach the head:
Place the head onto the neck area of the body. Blend the clay downwards around the entire circumference of the neck to secure it firmly. If the head is heavy, you might need a toothpick or wire inserted between the body and head for internal support. -
Shape the ears:
Flatten two balls of clay into large, rough teardrop or fan shapes. These should be generous in size. Gently cup them to give them a natural curvature. -
Attach the ears:
Press the ears onto the sides of the head. Blend the clay well at the attachment point behind the ear, but leave the front edges loose so they look like they’re flapping slightly.
Step 3: Adding Texture and Details
-
Carve the smile:
Using a needle tool, carve a small, curved line just under the trunk base to create a smiling mouth. I like to make the corners fairly deep to emphasize the expression. -
Mark the eyes:
Use a specialized curved tool or carefully press a fingernail into the clay to create two crescent-shaped indentations for the closed, happy eyes. -
Add trunk wrinkles:
Lightly score horizontal lines across the top of the trunk using a needle tool. These imitate the natural wrinkles of an elephant’s skin. -
Texture the surface:
To achieve the stone-like finish shown in the photo, gently tap the entire surface of the clay with a stiff bristle brush or a crumpled ball of aluminum foil. This removes fingerprints and adds a matte, earthy texture. -
Bake or dry:
Follow the manufacturer’s instructions for your specific clay. Bake in the oven for polymer clay, or let air-dry clay sit for 24-48 hours until fully hardened. -
Paint the details:
Once dry, use a very fine brush and black acrylic paint to carefully fill in the eye crescents. You can also lightly dry-brush white paint over the textured surface to highlight the stone effect.
Add a Water Feature
Create removable ‘water’ sprays for the trunk using stiff wire and clear resin or hot glue shaped into droplets splashing outward.
Place your finished elephant near a window to let the natural light highlight its charming texture and joyful pose
Snail With Swirled Shell
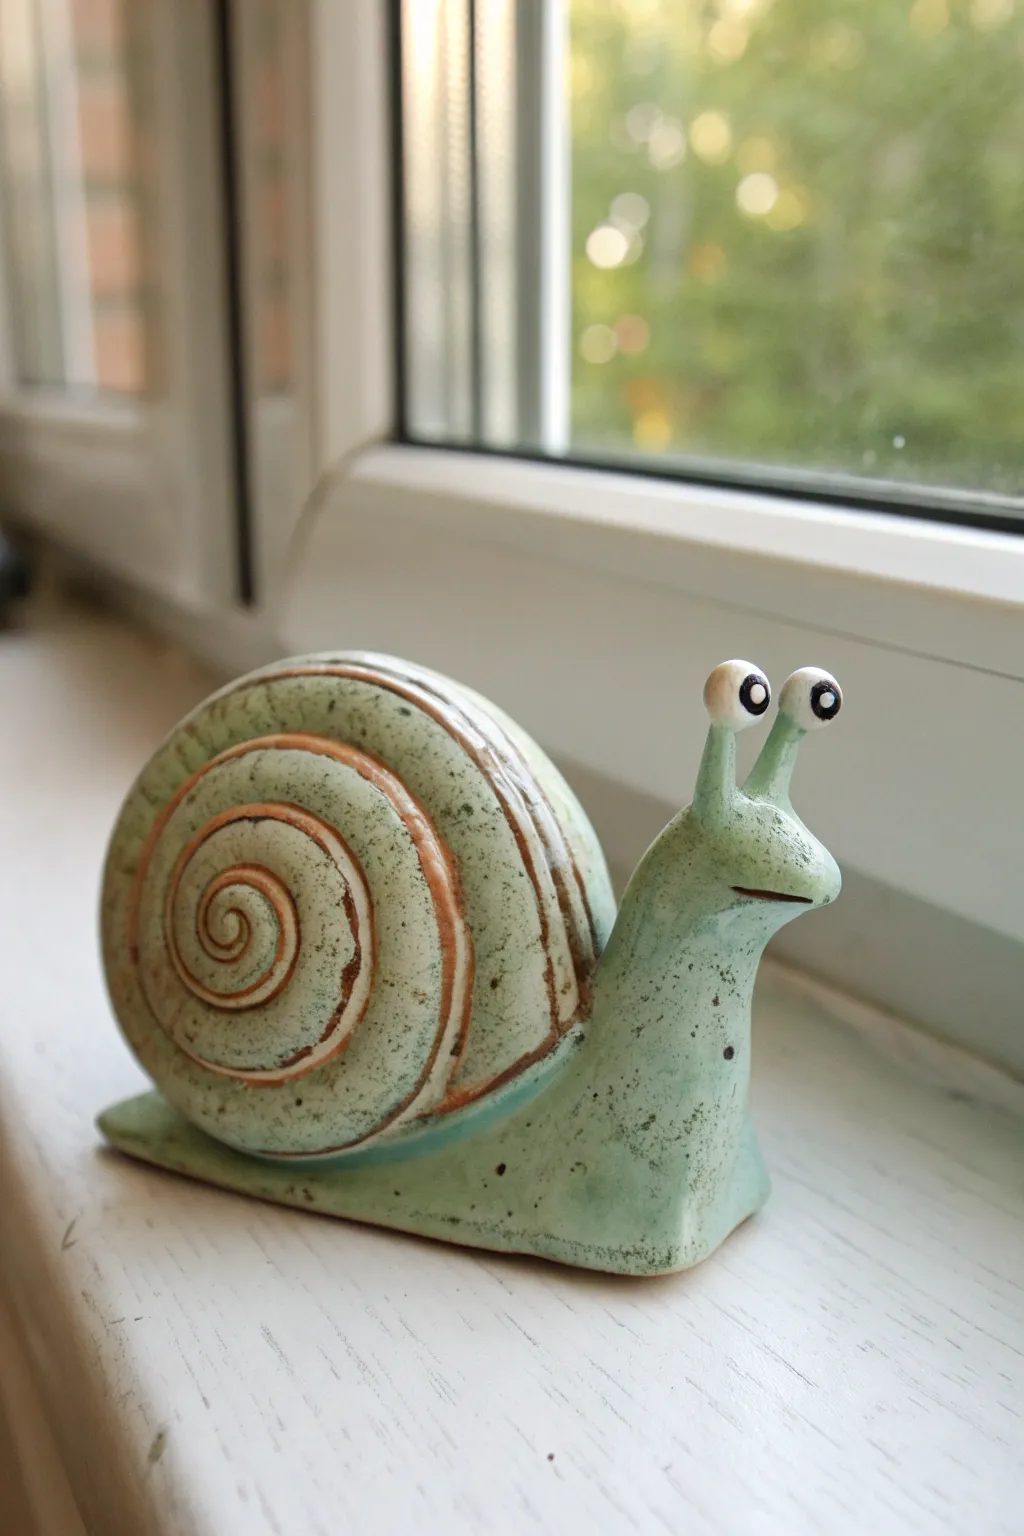
Sculpt a charming garden companion with this ceramic snail tutorial, featuring a distinctively swirled shell and expressive eye stalks. The finished piece showcases a beautiful pale green glaze with earthy brown accents that highlights the hand-carved spiral texture.
Detailed Instructions
Materials
- White or light-colored earthenware clay
- Pottery tools (needle tool, modeling tool, rib)
- Slip and scoring tool
- Rolling pin
- Sponge
- Underglazes (Dark Brown, White, Black)
- Celadon or translucent light green glaze
- Kiln (or air-dry clay alternatives for a non-fired version)
- Small paintbrushes
Step 1: Sculpting the Body
-
Form the base:
Start with a medium-sized ball of clay. Roll it into a thick sausage shape, tapering one end slightly for the tail and keeping the other end rounded for the head. -
Flatten the bottom:
Gently tap the shape onto your work surface to create a flat, stable bottom. The body should sit securely without wobbling. -
Shape the neck:
Pinch and smooth the clay upwards at the rounded end to define the neck and head area. The neck should curve gracefully upwards. -
Create the eyes:
Roll two small balls of clay for the eyes and two tiny cylinders for the stalks. Adjust the size until they look proportional to your snail’s head. -
Attach the eyes:
Score and slip the top of the head and the bottom of the eye stalks. Attach the stalks firmly, blending the clay downwards so there are no seams. Add the clay balls to the tops of the stalks using the same joining method. -
Detail the face:
Use a needle tool or a thin modeling tool to slice a horizontal line for the mouth. Gently curve it for a subtle smile.
Stay Smooth
Before attaching the shell, use a slightly damp sponge to smooth out any fingerprints on the body. It is much harder to clean up the snail’s “skin” once the bulky shell is attached.
Step 2: Creating the Shell
-
Roll a coil:
Roll a long, thick coil of clay. It should be thicker at one end and taper down gradually to the other. -
Coil the shell:
Starting from the thin end, roll the coil onto itself tightly to form a flat spiral disc. Keep winding until the shell is the desired size for your snail’s body. -
Refine the shape:
Smooth out the outer coils slightly with a rib tool so the shell looks like one solid, rounded mass rather than just a loose rope, but keep the spiral definition visible. -
Carve the spiral:
Take a carving tool and deepen the spiral line on both sides of the shell. I find that going over this line twice ensures it stays visible after glazing. -
Attach to the body:
Score the side of the snail’s body heavily and do the same to the bottom edge of the shell. Apply slip and press the shell firmly onto the creature’s back. -
Reinforce the joint:
Use a small coil of clay along the seam where the shell meets the body. Smooth this coil out completely to ensure the heavy shell won’t fall off during firing.
Step 3: Finishing and Glazing
-
Bisque fire:
Allow the clay to dry completely (bone dry) and then bisque fire it according to your clay body’s specifications. -
Accent the spiral:
Paint a dark brown underglaze into the deep carved spiral lines of the shell and the mouth line. Sponge away any excess from the raised surfaces so the color remains only in the crevices. -
Paint the eyes:
carefully paint the eyeballs white with underglaze. Once dry, add a small black dot for the pupil on each eye. -
Apply the main glaze:
Dip or brush the entire piece (except the bottom) with a translucent celadon or light green glaze. This type of glaze will pool slightly in textures, adding the speckled effect seen in the reference. -
Final fire:
Fire the piece again to the recommended temperature for your glaze.
Make it a Pair
Create a second, smaller snail to make a parent-child set. Vary the position of the eye stalks—maybe one is looking left—to give them distinct personalities interacting with each other.
Place your finished ceramic friend on a sunny windowsill where the light can catch the glossy green curves
Hedgehog With Easy Spikes
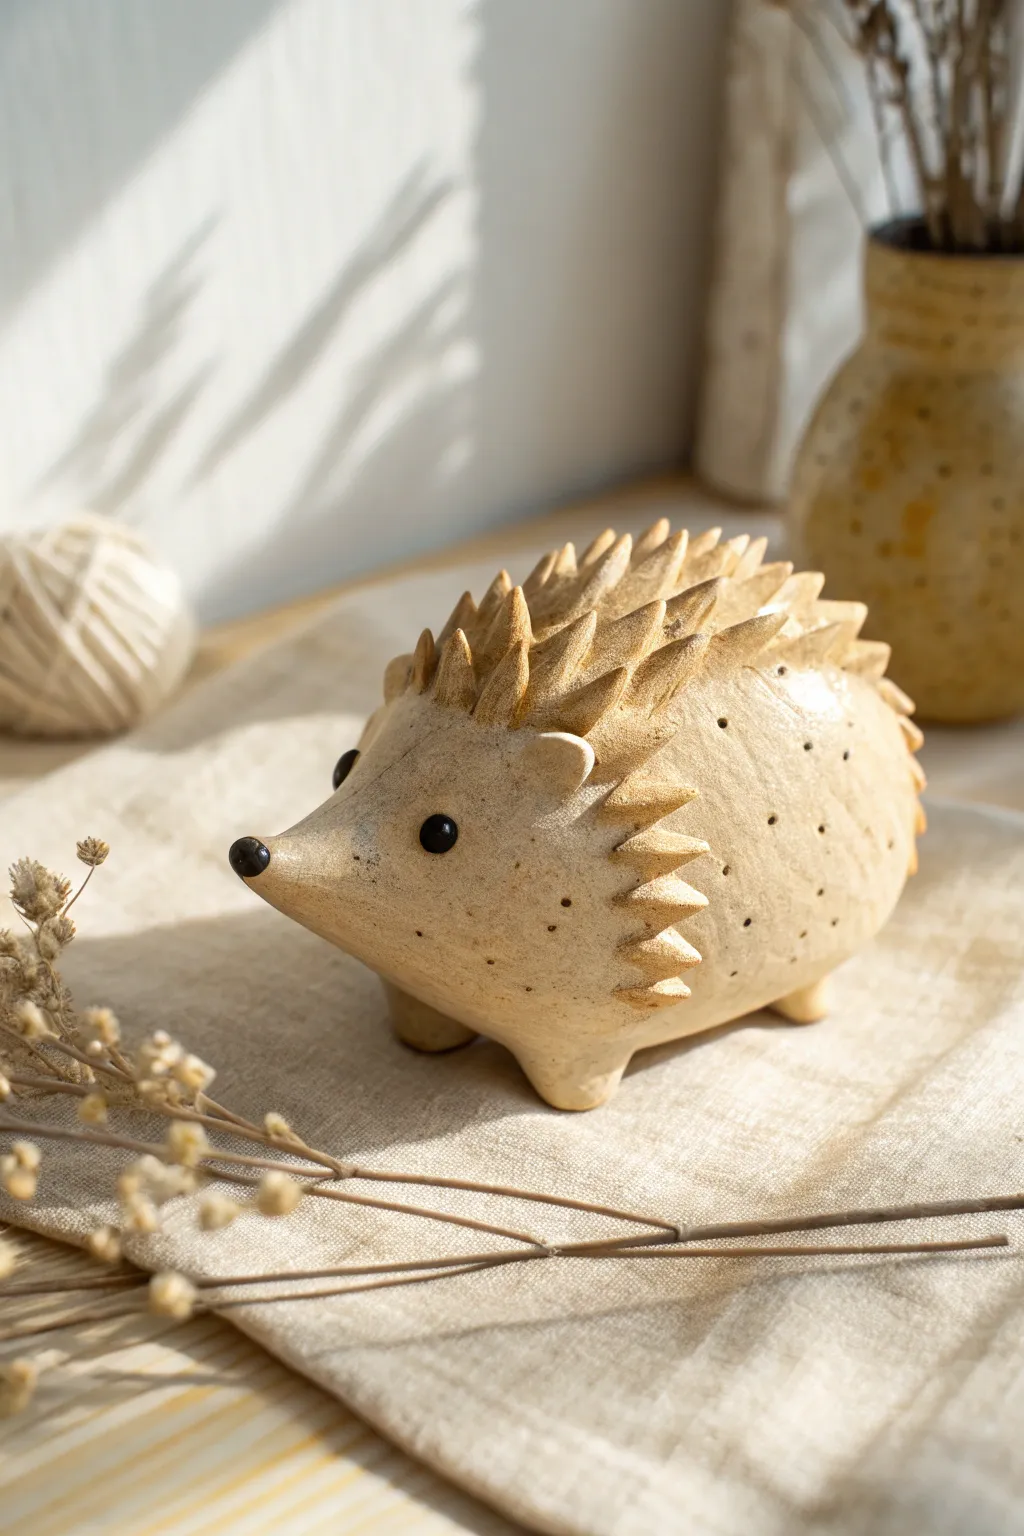
This charming little hedgehog combines smooth curves with satisfyingly sharp, geometric spikes for a modern take on a woodland classic. The warm, speckled finish gives it a rustic, handcrafted pottery feel that looks beautiful on any shelf.
Step-by-Step
Materials
- Air-dry clay or polymer clay (stone or beige color preferred)
- Small rolling pin
- Pointed sculpting tool or small knife
- Ball stylus tool (small)
- Small bowl of water (for smoothing)
- Acrylic paints (creamy beige, dark brown/black)
- Matte varnish or sealant
- Very fine paintbrush
- Old toothbrush (optional for speckling)
Step 1: Shaping the Base
-
Prepare the Body:
Start with a ball of clay roughly the size of a tennis ball. Roll it in your palms until smooth and free of major cracks. -
Form the Tear Drop:
Gently taper one side of the ball to create a large teardrop shape. This pointed end will become the hedgehog’s snout, while the rounded back stays full. -
Flatten the Bottom:
Press the teardrop shape firmly onto your work surface to create a flat base, ensuring the hedgehog sits stably without wobbling. -
Create the Snout Lift:
Using your thumb, gently push the pointed nose tip slightly upward to give the hedgehog an inquisitive, sniffing posture.
Spikes falling off?
If spikes detach while working, your clay might be too dry. Score both surfaces (scratch hatches) and add a drop of water or slip before pressing them together.
Step 2: Adding Feet and Ears
-
Make the Feet:
Roll four small marble-sized balls of clay. Attach these to the underside of the body using a little water or slip to secure them. -
Stand It Up:
Turn the hedgehog back onto its feet and press down gently so the legs fuse slightly with the body and sit flat. -
Form the Ears:
Pinch two small, flattened semi-circles of clay. Attach these just behind where the face slope ends and the rounded back begins. -
Secure the Ears:
Use a modeling tool to blend the back seam of the ears into the body so they don’t fall off during drying.
Level Up: Succulent Holder
Before adding spikes, hollow out the top center of the back to create a depression. Once fired or dried, it becomes a perfect tiny planter for an air plant.
Step 3: Sculpting the Spikes
-
Prepare Spike Cones:
Roll many small cones of clay between your fingers. You will need roughly 30-40 depending on the size of your base. -
Start at the Back:
Begin attaching the spikes at the very rear of the hedgehog. Score the base slightly and press the wide end of the cone onto the body. -
Blend the Seams:
Using your sculpting tool or finger, smooth the clay from the base of the spike downward onto the body to create a seamless transition. -
Layer Forward:
Continue adding rows of spikes, moving from the tail toward the head. Stagger the placement like bricks so there act no large gaps. -
Define the Face Line:
Stop adding spikes just behind the ears and above the forehead, leaving the snout area completely smooth. -
Detail the Face:
Add a tiny round ball for the nose tip and two very small flattened discs for the eyes. Press them gently into the clay.
Step 4: Finishing Touches
-
Add Texture Details:
Use a needle tool to poke tiny, random holes along the sides of the body where there are no spikes, mimicking a rough texture. -
Dry Completely:
Let the sculpture dry fully. I prefer to let this dry for at least 24-48 hours, especially given the thick body shape. -
Base Color:
If your clay isn’t already beige, paint the entire piece with a warm, sandy acrylic color. -
Paint Features:
Carefully paint the nose and eye bumps black. Use a fine brush to keep the edges crisp. -
Speckle Effect:
Dip an old toothbrush in watered-down brown paint and flick the bristles to create tiny speckles across the smooth body areas. -
Seal:
Finish with a coat of matte varnish to protect the clay and give it a finished, ceramic appearance.
Now you have a prickly little friend to keep your desk company
Mini Dino In Chibi Style

This adorable teal dinosaur features classic chibi proportions with a large, round head and stubby limbs that give it an irresistible charm. Its matte texture and soft cream accents create a sophisticated yet playful finish perfect for a desktop companion.
Detailed Instructions
Materials
- Polymer clay or air-dry clay (teal/blue-green)
- Polymer clay or air-dry clay (cream/beige)
- Black acrylic paint or clay (for eyes)
- White acrylic paint (for eye reflections)
- Basic sculpting tools (ball tool, needle tool)
- Aluminum foil (for armature)
- Strong craft glue or liquid clay
- Fine-grit sandpaper (optional)
- Matte varnish
Step 1: Creating the Base Body
-
Core construction:
Begin by firmly crumpling a piece of aluminum foil into a tight egg shape for the head and a smaller, slightly elongated oval for the body. This saves clay and reduces baking or drying time. -
Clay conditioning:
Take a large portion of your teal clay and knead it thoroughly until it is warm and pliable to prevent cracks. -
Head covering:
Flatten a sheet of teal clay and wrap it smoothly around the larger foil ball. Roll it gently between your palms to smooth out any seams until you have a perfect sphere. -
Body formation:
Repeat the process for the body armature. The body should be shaped like a teardrop or a pear, slightly wider at the bottom to help the figure stand. -
Connecting pieces:
Insert a toothpick or wire into the top of the body and push the head onto it. Use a dab of liquid clay or glue at the join for extra security. Smooth the neck seam lightly with a silicone tool, or leave a defined separation for a cute ‘toy’ look.
Smooth Operator
Use a brush dipped in baby oil (for polymer) or water (for air-dry) to smooth out fingerprints before adding the texture.
Step 2: Adding Limbs and Tail
-
Sculpting the legs:
Roll two thick logs of teal clay for the legs. They should be short and sturdy. Press them firmly against the bottom sides of the body and blend the clay upwards so they attach seamlessly. -
Making the arms:
Create two smaller tear-drop shapes for the arms. Attach these higher up on the body, angling them slightly forward as if the dino is reaching out. -
Forming the tail:
Roll a cone of teal clay. Attach the wider end to the lower back of the dinosaur, blending the seam thoroughly so the tail looks like an extension of the spine. Curve the tip slightly to the side for movement.
Step 3: Face and Belly Details
-
Belly patch:
Roll out a thin sheet of cream or beige clay. Cut an oval shape and press it gently onto the front of the body/tummy area. -
Belly texture:
I prefer using a needle tool here to poke tiny, shallow dots sporadically across the cream belly patch to add a nice tactile texture. -
Eye sockets:
Use a large ball tool to press two indentations into the face where the eyes will go. Place them relatively wide apart for maximum cuteness. -
Adding eyes:
Roll two small balls of black clay (or paint the sockets black later). Press them into the sockets, flattening them slightly so they aren’t bulging too much. -
Nostrils:
Using a smaller tool, poke two small vertical dashes near the bottom center of the face for nostrils.
Make it a Set
Make a trio of dinos in different pastel colors like lavender and mint green to create a full nursery display.
Step 4: Spikes and Finishing
-
Making spikes:
Roll a thin snake of cream clay. Cut it into small segments and shape each one into a slightly curved triangle. -
Attaching spikes:
Starting from the top of the head and working down to the tip of the tail, attach the spikes in a single row. Use a tiny bit of liquid clay/glue to ensure they bond. -
Surface texture:
Before curing, you can gently dab the teal skin with a stiff toothbrush or crumpled foil to remove fingerprints and create a stone-like matte texture. -
Curing:
Bake (for polymer) or dry (for air-dry) according to your manufacturer’s specific instructions. Let it cool completely. -
Highlights:
Dip a toothpick in white acrylic paint and add a single white dot to the upper right corner of each black eye to bring the character to life. -
Varnish:
Apply a coat of gloss varnish only to the black eyes for a wet look, and use a matte varnish on the rest of the body to protect it.
Once fully dry, place your new little dino on a shelf or desk where its friendly face can greet you every day
Axolotl With Frilly Gills
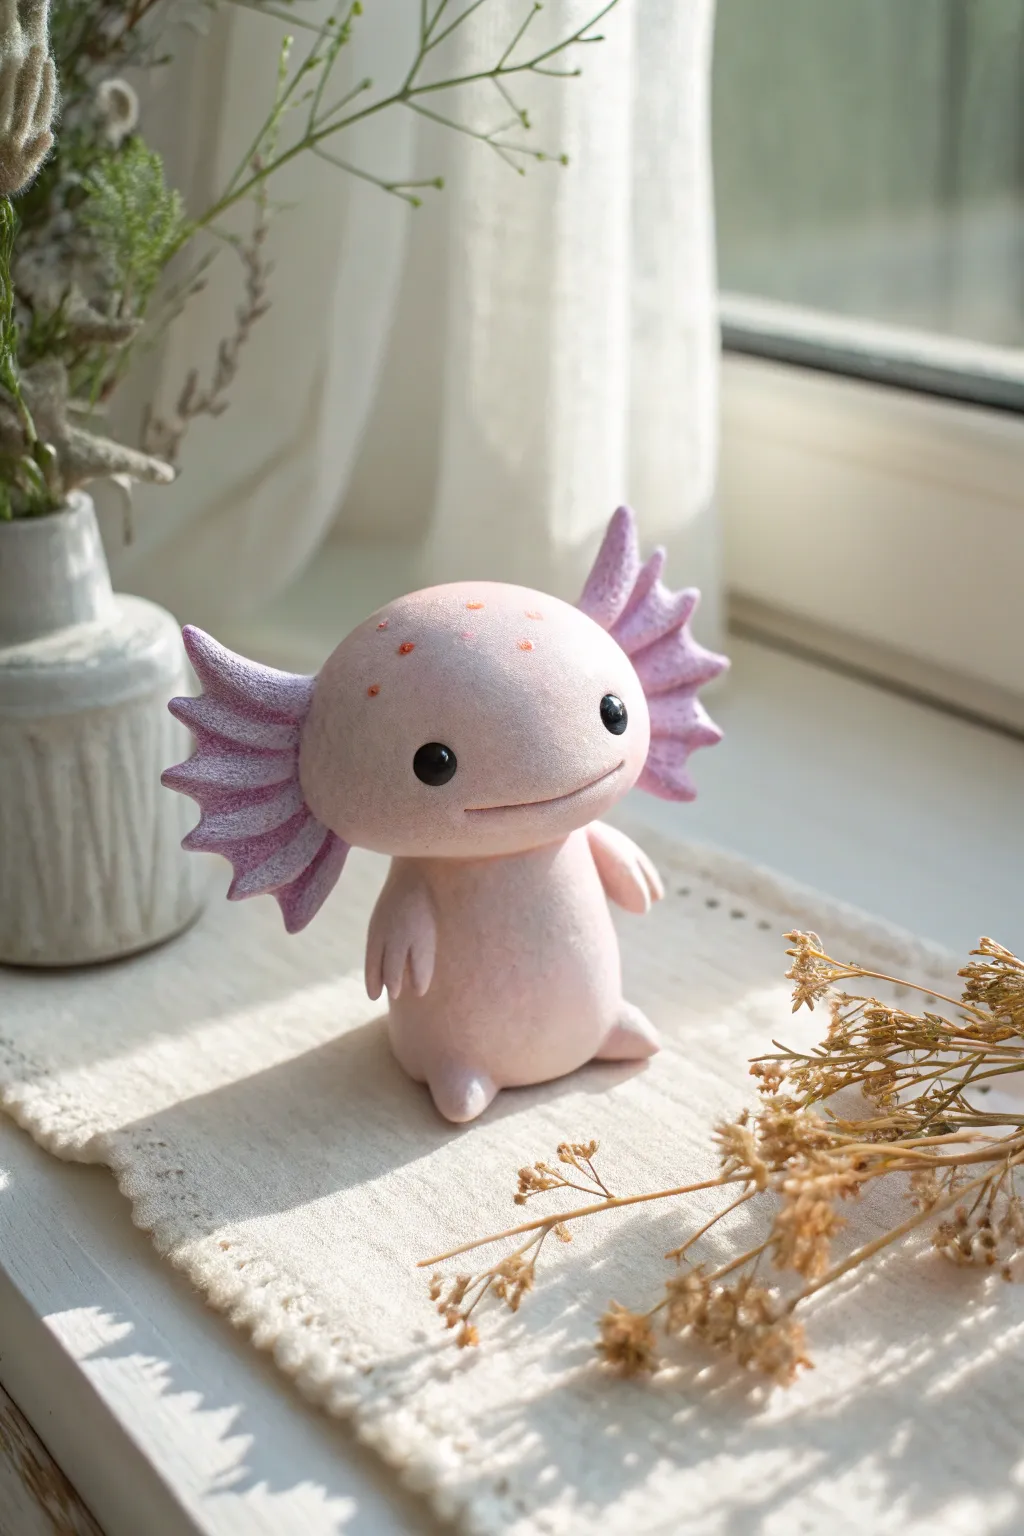
This incredibly charming figurine captures the gentle spirit of the axolotl with soft pink hues and a delightful textured finish. Standing upright with delicate frilly gills, it makes for a heartwarming desk companion or a sweet handmade gift.
Detailed Instructions
Materials
- Polymer clay (light pink/translucent warm pink)
- Aluminum foil (for armature)
- Sculpting tools (ball styluses, silicone shapers)
- Needle tool
- Soft floral wire (for gill support)
- Soft pastels (magenta, rose, orange)
- Black glass beads or clay for eyes
- Texturing brush (stiff bristle or toothbrush)
- Matte varnish or sealant
Step 1: Forming the Body
-
Prepare the core:
Crumple a small piece of aluminum foil into a pear shape, roughly 1.5 inches tall. This saves clay and keeps the figurine lightweight. -
Condition the clay:
Condition your light pink polymer clay until it is soft and pliable. If you want that semi-translucent look seen in the photo, mix a small amount of translucent clay into your solid pink. -
Cover the core:
Flatten a sheet of clay and wrap it smoothly around your foil armature. Roll it gently between your palms to erase any seams and create a smooth, rounded pear shape for the body. -
Create the head:
Roll a slightly flattened sphere for the head. It should be proportional to the body but definitely on the cute, oversized side. Attach it securely to the narrower top of the body, blending the neck seam carefully with a silicone tool. -
Add texture:
Before adding details, gently tap the entire surface of the clay with a stiff toothbrush or a texturing sponge. This creates the soft, skin-like matte texture visible in the reference.
Step 2: Sculpting Features
-
Shape the legs:
Roll two small logs for legs. Flatten the bottoms so the figurine stands stable. Attach them to the base of the body, blending the upper connection points so they look like they are emerging naturally. -
Create the arms:
Make two smaller logs for the arms. Use a needle tool to make two small indentations at the ends to suggest three simple fingers. -
Attach the arms:
Press the arms onto the sides of the body, angling them slightly outward. Blend the shoulders into the torso. -
Mark the mouth:
Use a needle tool or a thin blade to verify the position of the smile. Press a wide, gentle ‘U’ curve into the lower face, deepening the corners slightly for extra character. -
Insert the eyes:
Press two small indentations where the eyes will go. Insert small black glass beads for a glossy look, or use tiny balls of black clay. Position them wide apart for maximum cuteness.
Drooping Gills?
If the gills are sagging before baking, insert short pieces of floral wire into the head first, then slide the clay gills onto the wire for hidden internal structure.
Step 3: The Frilly Gills and Finishing
-
Cut the gill shapes:
Roll out a thin sheet of pink clay. Cut out six leaf-like shapes—three for the left side, three for the right. The top ones should be slightly larger than the bottom ones. -
Adding texture to gills:
Using your needle tool, gently score radiant lines from the center of each gill outward to mimic the feathery, frilly texture shown in the image. -
Pastel shading:
Shave some magenta and orange soft pastel into powder. Use a small dry brush to dust the outer edges and tips of the gills to create a purple-pink gradient. -
Attach the gills:
Carefully attach three gills to each side of the head, behind the cheek area. Blend the connection points at the back of the head so they seamlessly sprout from the skull. -
Face detailing:
Using a tiny brush and the orange pastel powder, dab a few faint freckles on the forehead and lightly dust the cheeks for a blush effect. -
Bake the piece:
Bake your axolotl according to your clay package instructions. I usually tent a piece of foil over light-colored clay to prevent scorching. -
Seal:
Once fully cooled, apply a matte varnish to protect the pastel shading, avoiding the eyes to keep them shiny.
Level Up: Aquatic Base
Create a small resin puddle base or use translucent blue clay for a stand. Embed tiny real pebbles or moss to make it look like your axolotl is standing in a riverbed.
This adorable amphibian is now ready to bring a touch of aquatic whimsy to your shelf
Silly Monster Pinch Pot Pal
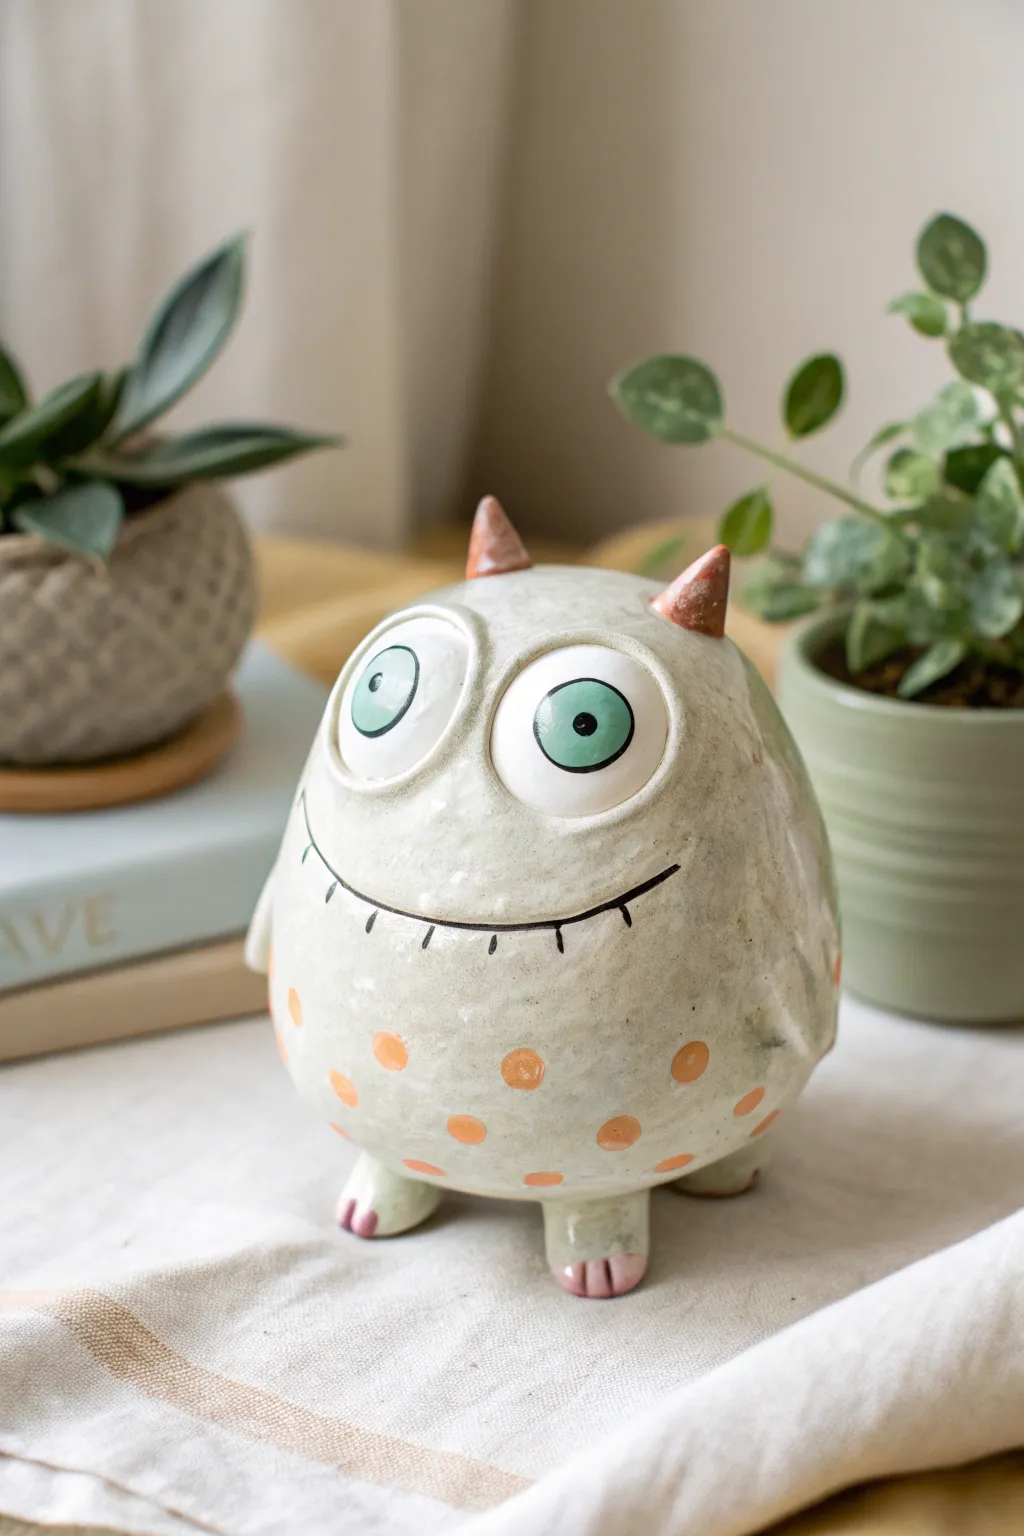
This delightful ceramic friend starts as a simple pinch pot and transforms into a personality-filled sculpture with a stitched smile and playful horns. With its glossy finish and cheerful orange polka dots, this little monster adds a touch of charm to any shelf or desk.
Step-by-Step Guide
Materials
- White earthenware or stoneware clay
- Potter’s needle tool
- Small loop tool
- Rib tool (rigid or flexible rubber)
- Slip (clay mixed with water)
- Scoring tool (or an old toothbrush)
- Ceramic glazes: Glossy White/Off-White, Black, Teal/Aqua, Orange, Pink
- Small paintbrushes (detail and medium)
- Sponge
Step 1: Forming the Body
-
Roll a sphere:
Start with a baseball-sized lump of wedged clay and roll it between your palms until you have a smooth, round ball. -
Create the pinch pot:
Hold the ball in one hand and push your thumb into the center, stopping about a half-inch from the bottom. Gently pinch and rotate the clay to open up the pot, aiming for even wall thickness. -
Close the form:
Instead of leaving the pot open, curve the top edges inward until they meet. Pinch the clay shut to trap air inside, creating a hollow egg shape. This trapped air gives the structure strength while you work. -
Refine the shape:
Paddle the shape gently with a wooden spoon or a flat rib tool to smooth the exterior and create that slightly tapered, egg-like silhouette. It should be wider at the bottom.
Step 2: Adding Personality
-
Sculpt the eyes:
Roll two small balls of clay and flatten them slightly into discs. Score and slip the back of each disc and attach them firmly to the upper third of the body, pressing the edges down so they blend seamlessly. -
Add dimension to the eyes:
Roll very thin coils of clay to create eyelids or frames around the eyes if you want extra depth, smoothing them into the main body. -
Form the horns:
Shape two small cones of clay for the horns. Score the spots on top of the head where you want them to sit, apply a dab of slip, and wiggle them into place until secure. -
Create the feet:
Make two thick, short clay stumps. Flatten the bottoms so the monster will stand up straight. Attach these to the underside of the body using the score and slip method. -
Add the claws:
I like to use a modeling tool to gently press indentations into the front of the feet to suggest three little toes or claws on each foot. -
Carve the mouth:
Use your needle tool to lightly sketch a wide, curved smile across the belly. Once you’re happy with the placement, carve the line a bit deeper. -
Stitch details:
Make small, perpendicular hatch marks along the smile line to create the signature ‘stitched’ look shown in the photo. -
Vent the piece:
This is crucial: poke a small, hidden hole (usually in the bottom between the feet) to release the trapped air, preventing the piece from exploding in the kiln.
Smoother Surfaces
For that ultra-smooth skin texture, burnish the leather-hard clay with the back of a spoon before it dries completely. This aligns the clay particles.
Step 3: Glazing and Finishing
-
Bisque fire:
Allow your monster to dry slowly and completely (bone dry) before firing it in a bisque kiln according to your clay’s temperature requirements. -
Base coat:
Apply 2-3 coats of a speckled white or off-white glossy glaze to the entire body, avoiding the very bottom of the feet. -
Paint the eyes:
Carefully paint the eyeballs white. Once dry, add large teal circles for irises and small black dots for pupils. A tiny dot of white in the black pupil adds a spark of life. -
Add the spots:
Using a round brush, dab cheerful orange polka dots around the bottom half of the body. Keep them loose and varied in size for an organic look. -
Detail the features:
Paint the horns a rusty orange-brown. Use a very fine liner brush with black glaze to carefully trace the smile line and the stitch marks. -
Color the toes:
Add a touch of pink glaze to the toes or claws for a soft finish. -
Final Fire:
Fire the piece a second time (glaze fire) to vitrify the clay and turn the glaze into a shiny, glass-like surface.
Turn it into a Bank
Cut a coin slot in the top (between the horns) and a larger hole with a stopper in the bottom before firing to turn your monster into a functional piggy bank.
Place your shiny new monster near a potted plant for instant companionship