If you can make a basic cup shape, you can make it unforgettable with a few playful 3D clay details and some satisfying texture. Here are my go-to clay cup ideas for turning a simple form into something that feels personal, cute, and totally doable.
Classic Slab-Built Cup With a Chunky Rim
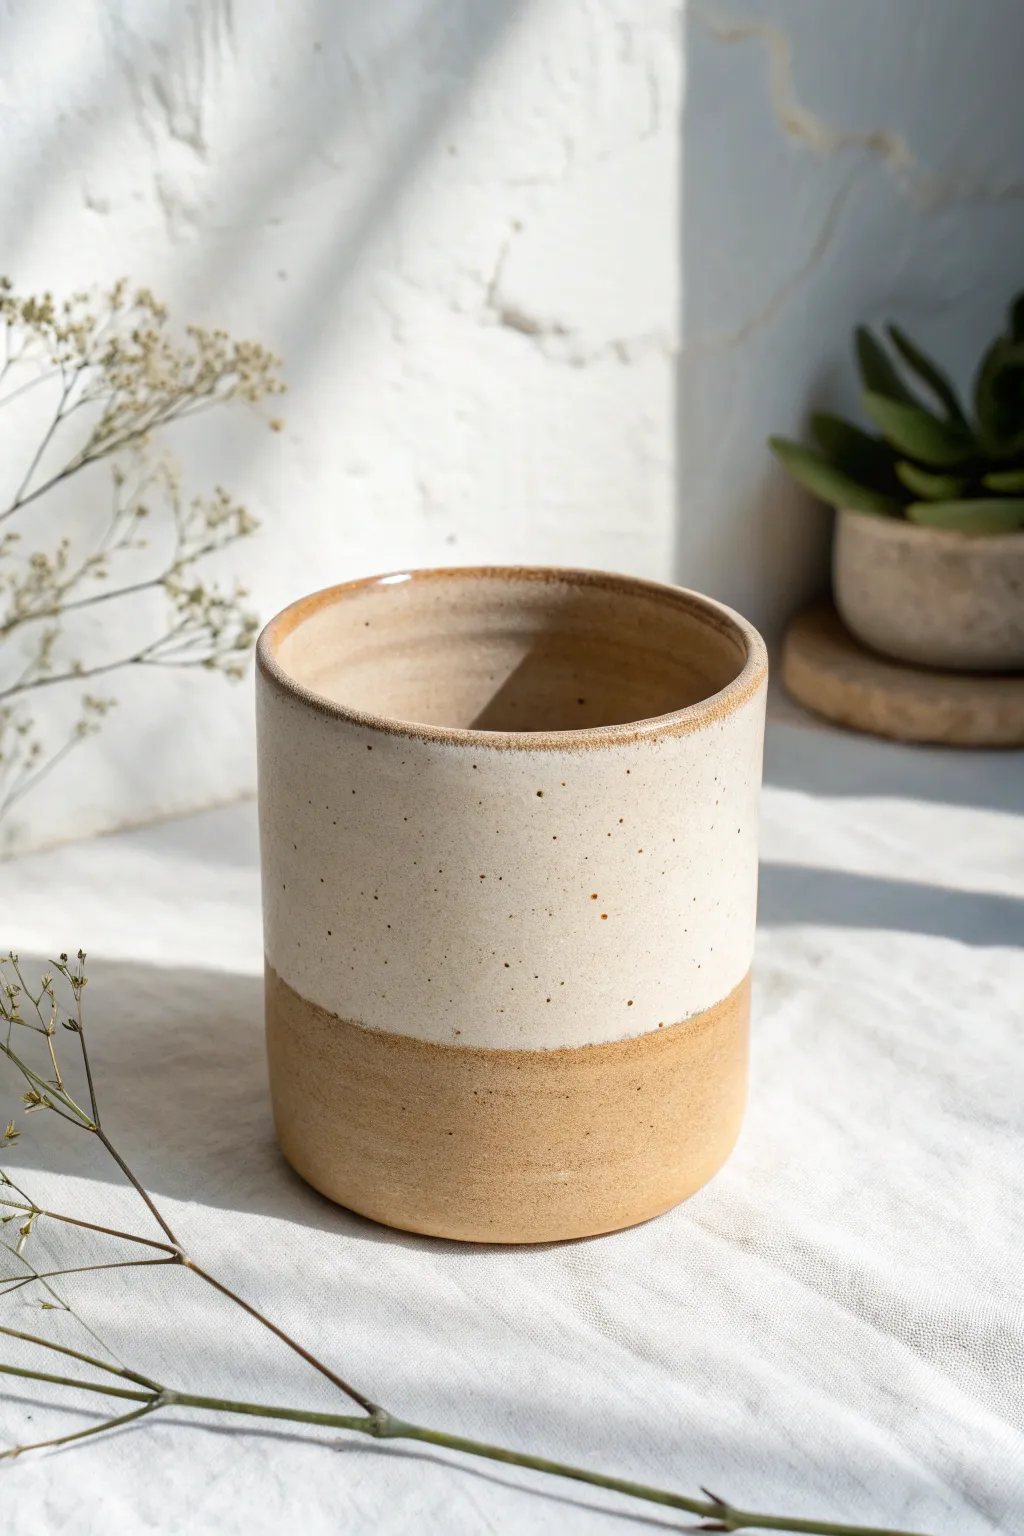
This minimalist, handle-free cup balances rustic charm with modern clean lines through its clever use of exposed raw clay and creamy glaze. The simple cylindrical form highlights the beautiful, toasted texture of the stoneware clay body while providing a cozy vessel for your morning brew.
Step-by-Step
Materials
- Speckled stoneware clay (mid-fire)
- Clay slab roller or rolling pin with guide sticks
- Cylindrical form or template (approx. 3-inch diameter)
- Fettling knife or needle tool
- Scoring tool (serrated rib)
- Slip (clay and water mixture)
- Wooden modeling tool
- Smooth rubber rib
- Sponge
- Creamy white speckle glaze (stoneware)
- Wax resist (optional but recommended)
Step 1: Preparing the Slab
-
Roll the clay:
Begin by rolling out a generous slab of speckled stoneware clay. Aim for a thickness of about 1/4 inch or slightly thicker if you prefer that substantial, chunky feel. -
Cut the rectangle:
Measure and cut a rectangular strip for the body. The length should equal the circumference of your desired circle base plus a tiny bit for overlap, and the height is up to you—usually around 4 to 5 inches for a standard tumbler. -
Create the base:
Cut a circle from the remaining slab to serve as the floor of your cup. Using a circular cookie cutter or tracing a lid ensures it’s perfectly round. -
Bevel the edges:
On your rectangular strip, cut 45-degree angles on the two short ends. Cut one bevel facing up and the other facing down so they will overlap seamlessly when wrapped.
Step 2: Assembling the Form
-
Score and slip:
Rough up the beveled edges of your rectangle and the outer edge of your circular base using a scoring tool. Apply a generous amount of slip to these textured areas. -
Form the cylinder:
Stand the rectangle up and curve it into a cylinder, pressing the beveled ends together firmly used a pinching motion. -
Smooth the seam:
Use a wooden tool to blend the clay across the vertical seam on both the inside and outside, erasing the join line completely. -
Attach the base:
Place the cylinder onto the scored circular base. Use your wooden tool to drag clay from the base up onto the wall to stitch them together. -
Reinforce the interior:
On the inside of the cup, gently run a rounded tool or your finger along the bottom seam where the wall meets the floor to ensure a watertight seal.
Seamless Smoothness
To fix a stubborn vertical seam, paddle the outside with a wooden spatula while holding a heavy object (like a smooth stone) against the inside for support.
Step 3: Refining and Drying
-
Shape the rim:
Dab a wet sponge along the top rim to smooth it out. Gently compress the rim with your fingers to slightly thicken and round it, giving it that comfortable ‘chunky’ feel. -
Smooth the exterior:
Take a flexible rubber rib and run it around the outside of the cup while supporting the wall from the inside. This removes fingerprints and creates a uniform curve. -
Slow drying:
Loosely cover the cup with plastic to let it dry slowly to the bone-dry stage. This prevents warping and cracking. -
Bisque fire:
Once completely dry, fire the piece in a kiln to cone 04 (or your clay body’s bisque temperature).
Level Up: Texture Contrast
Before assembling, lightly roll a canvas fabric over the bottom third of your clay slab. This adds tactile contrast against the smooth glazed upper section.
Step 4: Glazing
-
Clean the bisque:
Wipe the fired cup with a damp sponge to remove any kiln dust, which helps the glaze adhere properly. -
Apply wax resist:
Paint a line of wax resist around the cup, about one-third of the way up from the bottom. Paint everything below this line, including the very bottom feel, with wax. -
Dip the glaze:
While holding the cup by the waxed base, dip the top two-thirds into your creamy white speckle glaze. Hold it there for 3 seconds to get an even coat. -
Clean the line:
I usually double-check the transition line after dipping; wipe away any wayward drips on the waxed area with a sponge for a crisp, professional edge. -
Glaze fire:
Fire the cup again to the maturity temperature of your clay and glaze (typically cone 5 or 6 for stoneware).
Now you have a stunning, handcrafted vessel ready to hold your favorite warm beverage


Pinch-Pot Teacup With Soft Thumb Texture
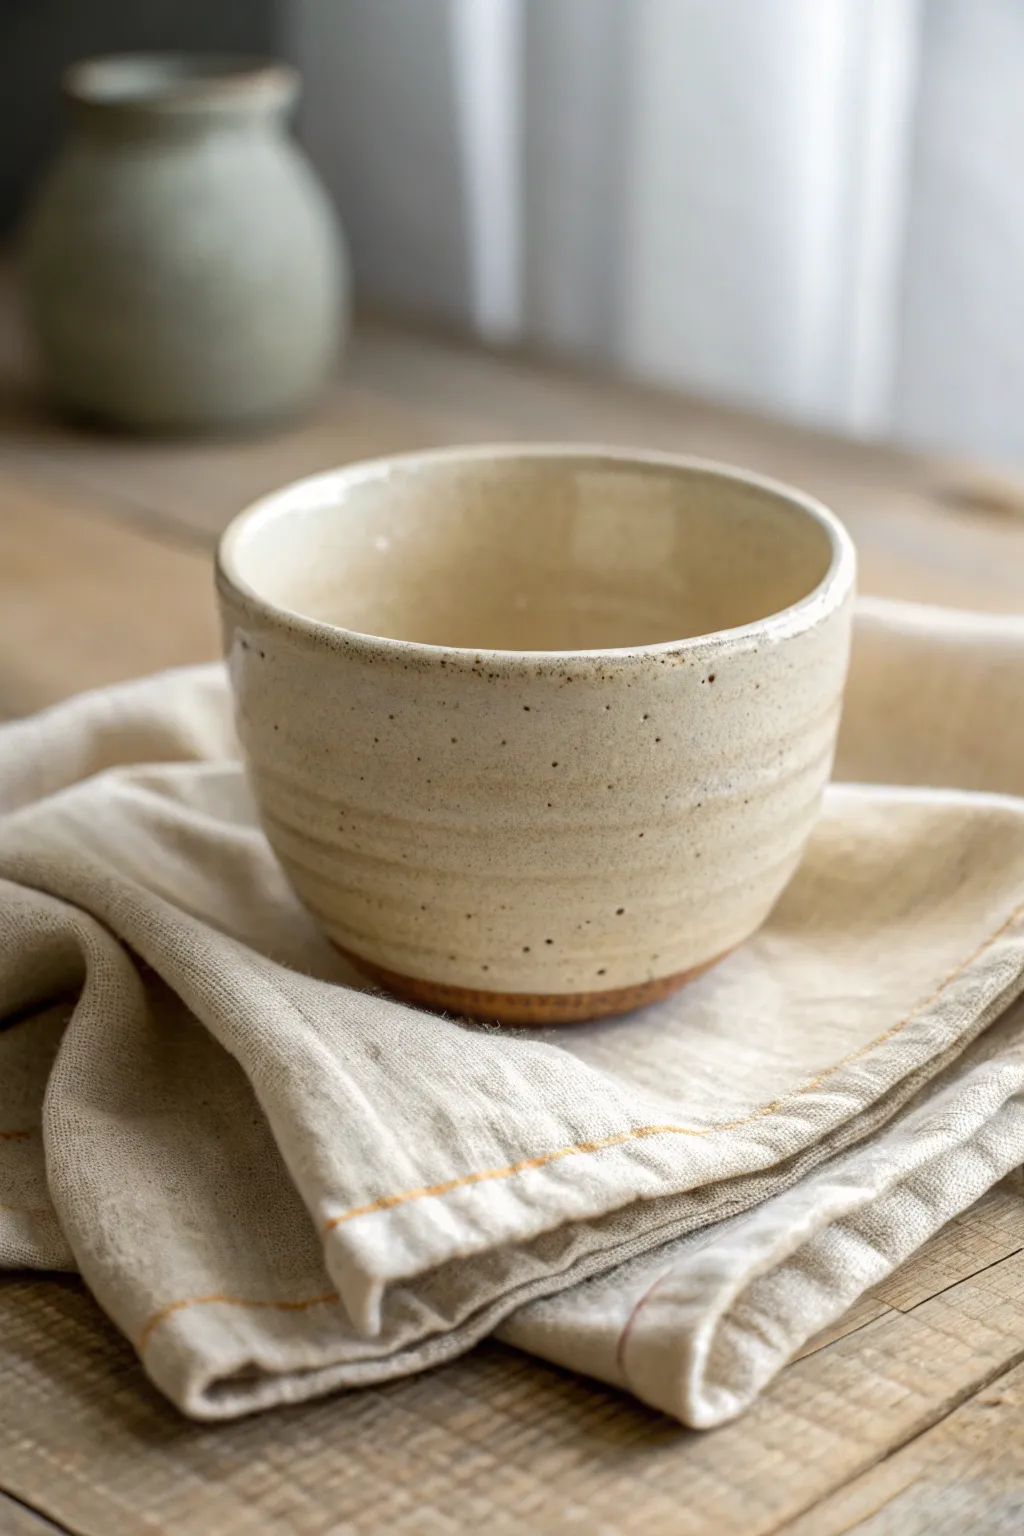
Embrace the beauty of imperfection with this lovely hand-built tea bowl. Relying on simple pinch and coil techniques, this cup features soft, horizontal ridges and a warm speckled glaze that highlights the raw clay body beneath.
Detailed Instructions
Materials
- Speckled stoneware clay (mid-fire)
- Water and slip in a small container
- Serrated rib tool or fork
- Wooden modeling tool
- Soft sponge
- Transparent or creamy matte glaze
- Pottery kiln
- Canvas work surface
Step 1: Forming the Base
-
Prepare the clay:
Start by wedging a ball of speckled stoneware clay about the size of a large orange. This removes air bubbles and ensures the clay particles are aligned. -
Open the pinch pot:
Hold the clay ball in your non-dominant hand. Press your thumb into the center, stopping about a half-inch from the bottom to leave enough thickness for the foot ring. -
Pinch the walls:
Gently rotate the ball while pinching the clay between your thumb and fingers. Work your way from the bottom up, thinning the walls evenly until you have a small bowl shape. -
Create the foot:
Flip the pot upside down. Use a wooden tool or your thumb to press a slight indentation into the center of the base, defining a subtle foot ring.
Iron Speckle Magic
To intensify the speckles, choose a clay with heavy iron pyrite or add granular manganese to your clay before wedging.
Step 2: Building Height and Texture
-
Roll a coil:
Roll out a separate piece of clay into a coil about the thickness of your pinky finger. -
Score and slip:
Rough up the rim of your pinch pot and one side of the coil with a serrated tool. Apply a dab of slip (clay water) to act as glue. -
Attach the coil:
Place the coil on the rim and gently press it down to adhere it. This adds the necessary height for a taller tea cup rather than a shallow bowl. -
Blend the seams:
Using your thumb, smear the clay from the coil down onto the pot body on the inside to seal the seam completely. -
Define the exterior ridges:
On the outside, don’t smooth the coil completely flat. Instead, I like to gently press and drag my thumb horizontally around the cup to emphasize the connection lines, creating those soft, organic ridges seen in the image. -
Shape the rim:
Use a damp sponge or a strip of chamois leather to compress and smooth the rim so it is comfortable for drinking.
Level Up: Liner Glaze
Glaze the inside with a glossy white for easy cleaning, but keep the outside matte cream for a tactile, stony contrast.
Step 3: Finishing and Firing
-
Dry slowly:
Loosely cover the cup with plastic and let it dry slowly to the leather-hard stage. This prevents warping. -
Trim if needed:
Once leather hard, you can use a trimming tool to tidy up the foot ring further, but keeping it slightly rustic maintains the charm. -
Bisque fire:
Allow the piece to become bone dry, then fire it in the kiln to bisque temperature (usually cone 04). -
Wax resist:
Apply wax resist to the bottom inch of the cup. This ensures the raw, toasted clay color remains visible at the base after the final firing. -
Glaze application:
Dip the cup into a creamy matte or semi-transparent glaze. Shake off the excess gently. -
Check the rim:
If the glaze looks too thick on the rim, wipe it back slightly with a sponge so the specks show through clearly. -
Glaze fire:
Fire the cup again to the maturity temperature of your clay (likely cone 5 or 6). This final firing brings out the iron speckles in the clay body.
Enjoy the warmth of your new handmade cup with your favorite morning brew


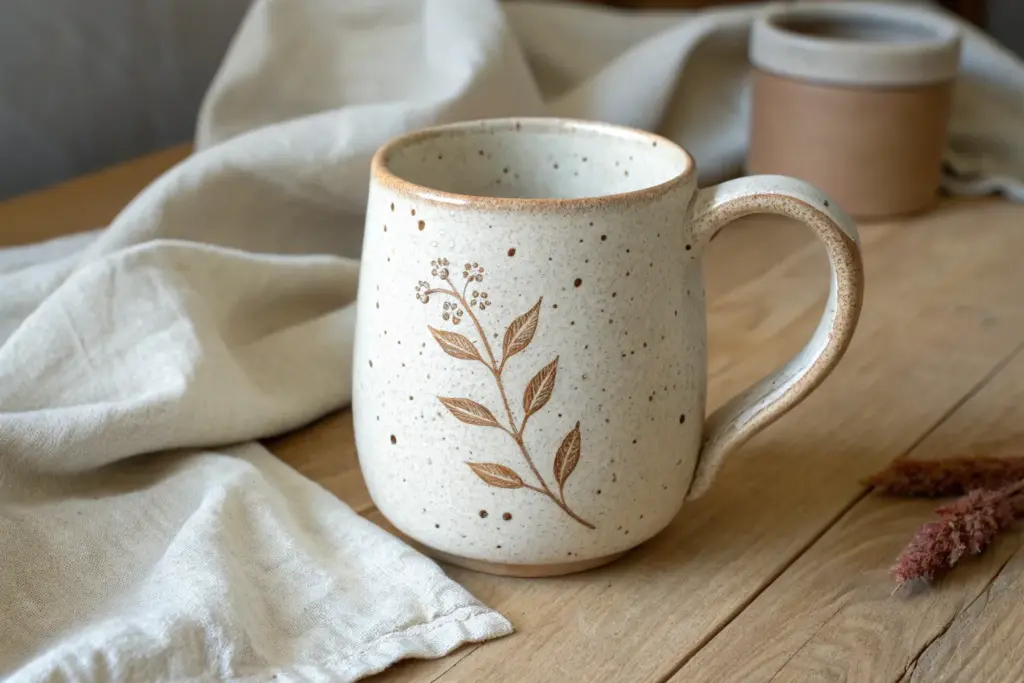
Daisy Appliqué Garden Cup
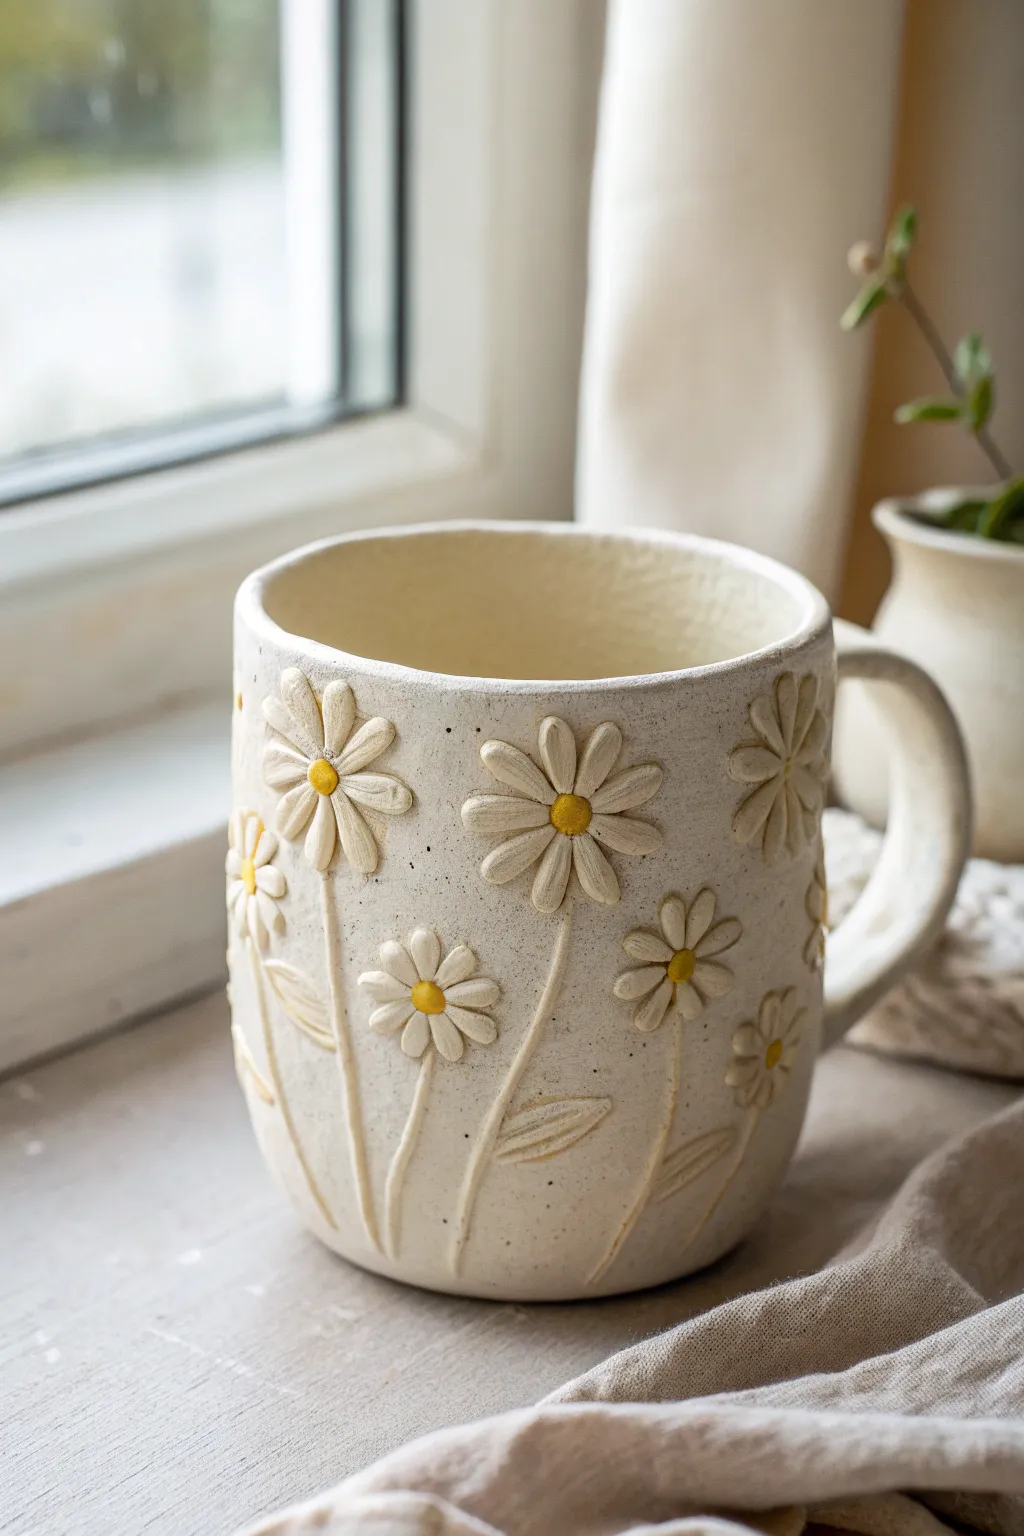
Bring a touch of perpetual spring to your morning routine with this charming, rustic mug featuring raised daisy motifs. The tactile flowers and earthy speckled clay create a delightful garden scene you can hold in your hands.
Step-by-Step Tutorial
Materials
- Speckled stoneware clay (mid-fire)
- Pottery wheel (or slab roller for hand-building)
- Needle tool
- Scoring tool (serrated rib)
- Slip (clay mixed with water)
- Small wooden modeling tool
- Sponge
- Underglaze (White and Yellow)
- Clear matte or satin glaze
- Small paintbrush
- Rolling pin
Step 1: Forming the Base
-
Throw or Build the Cup:
Begin by creating a simple cylindrical cup shape. You can throw this on the wheel for symmetry or build it using a slab method for a more organic feel. Aim for walls about 1/4 inch thick to support the added Appliqué. -
Smooth and Trim:
Once the cup is leather-hard, trim the bottom and smooth the surface with a damp sponge. The surface needs to be relatively clean so the flowers attach well. -
Form the Handle:
Pull a handle from a small lump of clay or roll a coil. Shape it into a comfortable ‘C’ or ear shape and attach it firmly using the score and slip method. Smooth the connection points seamlessly.
Petals Popping Off?
If petals detach as they dry, your clay was likely too dry when attaching. Always score thoroughly and ensure both the mug and the appliqué pieces have similar moisture content.
Step 2: Creating the Daisies
-
Roll Tiny Coils:
To make the flower stems, roll out very thin, delicate coils of clay. They should be just slightly thicker than a strand of spaghetti. -
Attach the Stems:
Score the cup surface lightly where you want your stems to grow. Paint on a little slip, then press your thin coils onto the cup, starting from the base and curving upwards naturally. -
Make the Petals:
Roll a small marble-sized ball of clay flat with a rolling pin to about 1/8 inch thickness. Use a needle tool to cut out small, elongated teardrop shapes for the petals. I usually make about 8-10 petals per flower. -
Score the Bloom Spots:
Decide where your flower heads will sit at the top of the stems. rough up these circular areas with your scoring tool and dab on some slip. -
Attach Petals:
Press the petals onto the scored area in a radial pattern. gently press the center of each petal down to secure it, leaving the edges slightly raised for dimension. -
Detail the Petals:
Use a small wooden tool to press a gentle indentation down the center of each petal, giving them a more realistic, organic look. -
Add the Centers:
Roll tiny balls of clay for the flower centers. Score the center of your petal ring, add a dot of slip, and press the ball firmly into the middle. -
Texture the Centers:
Lightly stipple the center clay ball with your needle tool or a coarse sponge to mimic the texture of pollen. -
Add Leaves:
Cut simple leaf shapes from your flattened clay slab. attach them near the base of the stems using score and slip, and use your needle tool to draw a center vein on each leaf.
Step 3: Glazing and Finishing
-
Bisque Fire:
Allow the mug to dry completely—this is crucial for appliqué work to prevent cracking. Fire the piece to cone 04 (or your clay’s bisque temperature). -
Apply Underglaze:
Once bisqued, paint the petals with two coats of white underglaze. carefully paint the center dots with a bright yellow underglaze. Wipe away any stray marks with a damp sponge. -
Wax Resist (Optional):
If you want the raw speckled clay to show through on the background, apply wax resist over the painted flowers and leaves. -
Clear Glaze:
Dip the entire mug into a clear matte or satin glaze. If you didn’t use wax resist, the clear glaze will seal the underglaze colors and the raw clay body together. -
Final Firing:
Fire the mug to the maturity temperature of your clay and glaze (typically cone 5 or 6 for stoneware). ensure no glaze is on the foot of the mug before loading the kiln.
Variation: Wildflower Meadow
Mix up the flower heights and sizes. Add tiny buds using just a single ball of clay to create a feeling of depth, as if some flowers are further away in a field.
Enjoy your morning coffee surrounded by a permanent, handcrafted spring garden


Cloud and Rainbow Relief Cup
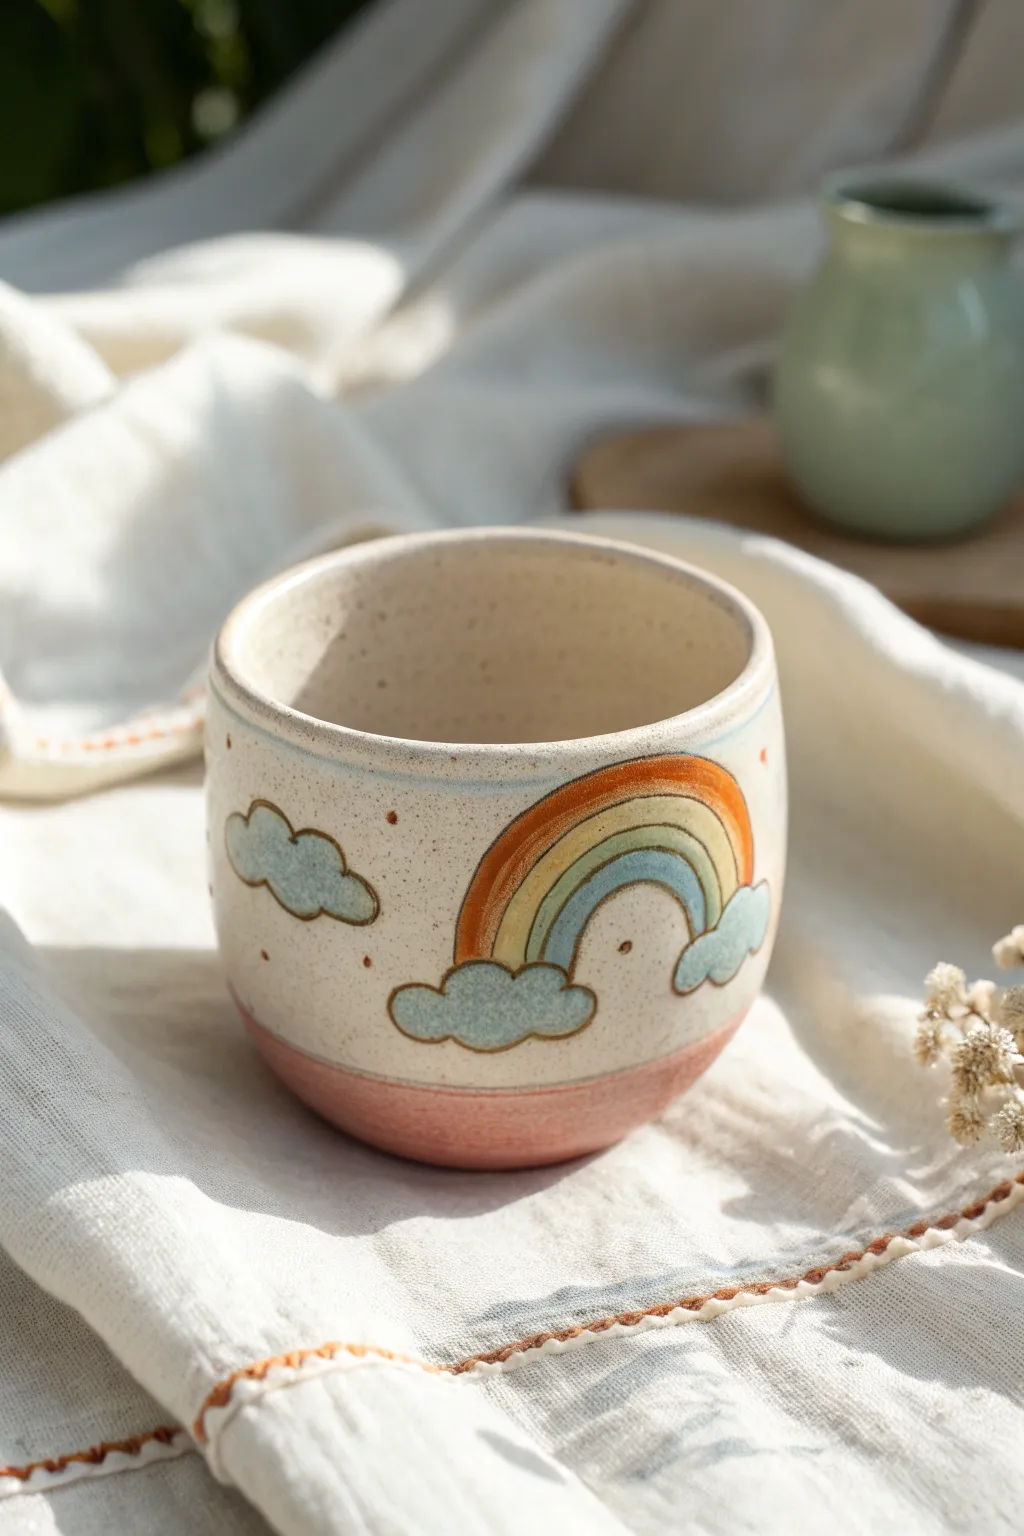
Brighten your mornings with this charming stoneware cup, featuring a hand-carved rainbow and fluffy cloud reliefs. The speckled clay body adds a rustic, earthy texture that perfectly complements the cheerful underglaze colors.
How-To Guide
Materials
- Speckled stoneware clay
- Rolling pin
- Pottery wheel (or slab roller for hand-building)
- Wooden modeling tool
- Needle tool
- Sponge
- Underglazes: Orange, Yellow, Light Blue, Pink
- Small fine-tip paintbrush
- Clear transparent glaze
- Carving loop tool (small)
- Kiln
Step 1: Forming the Vessel
-
Prepare the clay:
Start by wedging a pound of speckled stoneware clay to remove air bubbles. This specific clay gives that lovely spotted effect without needing extra painting steps later. -
Throw the base shape:
Center your clay on the wheel and throw a simple cylinder. Aim for a gently curved bottom and straight sides, keeping the walls about 1/4 inch thick to allow for carving later. -
Shape the rim:
Use a chamois or a wet sponge to round off the lip of the cup so it feels smooth against the mouth. I like to make the rim slightly thicker than the walls for visual balance. -
Trim the foot:
Once the piece is leather-hard, trim the bottom to create a clean, rounded foot ring. This defines the shape and reduces the weight.
Bleeding Colors?
If your rainbow stripes are bleeding into each other during glazing, let the underglaze dry for a full 24 hours before applying the clear coat, or gently dab the clear glaze on rather than brushing.
Step 2: Sketching and Carving
-
Sketch the design:
Lightly scratch your design into the leather-hard surface using a needle tool. Draw a large arc for the rainbow and two fluffy cloud shapes at the base of the arc. Add a standalone cloud on the side for balance. -
Carve the outlines:
Using a sharp needle tool or a very fine carving tool, incise the lines deeper. You want a distinct groove around the clouds and between the rainbow stripes. -
Build the relief:
Instead of just carving down, we want the design to pop. Carefully scrape away a tiny layer of clay from the background *around* your design, making the rainbow and clouds sit slightly raised. -
Smooth the edges:
Dip your finger or a small sponge in water and gently smooth any sharp burrs created during carving. The edges of the relief should be soft and rounded, not sharp. -
Add detail dots:
Use the blunt end of a small drill bit or a needle tool to press tiny decorative dots randomly into the background sky.
Pro Tip: Depth Control
When carving relief, work at the ‘leather hard’ stage. If the clay is too wet, it drags; too dry, it chips. The perfect texture feels like firm cheddar cheese.
Step 3: Painting and Glazing
-
Bisque fire:
Place your dry greenware into the kiln and bisque fire it to Cone 04. This prepares the piece for glazing. -
Paint the rainbow stripes:
Using a fine-tip brush, apply three coats of underglaze to the rainbow. Start with orange on the top arch, then yellow, then light blue on the inner arch. Let each coat dry before adding the next. -
Fill the clouds:
Paint the cloud shapes with three coats of light blue underglaze. Be careful to stay within your carved lines. -
Dip the base:
Mix a soft pink underglaze or a colored slip. Dip just the bottom half-inch of the cup into this color to create the pink band at the base. -
Wax resist (optional):
If you want the raw clay texture to remain unglazed on the bottom, apply wax resist to the foot ring. -
Apply clear glaze:
Once the underglaze is completely dry, dip the entire cup into a clear, transparent glaze. This will seal the clay and make the colors distinct and food-safe. -
Final wipe:
Wipe the foot ring clean with a damp sponge to ensure no glaze sticks to the kiln shelf. -
Final firing:
Fire the piece to the maturity temperature of your clay body (likely Cone 5 or 6 for stoneware). Allow the kiln to cool completely before removing your masterpiece.
Now you have a cheerful, customized mug ready for your favorite hot beverage

The Complete Guide to Pottery Troubleshooting
Uncover the most common ceramic mistakes—from cracking clay to failed glazes—and learn how to fix them fast.
Mushroom Cluster Cottage Cup
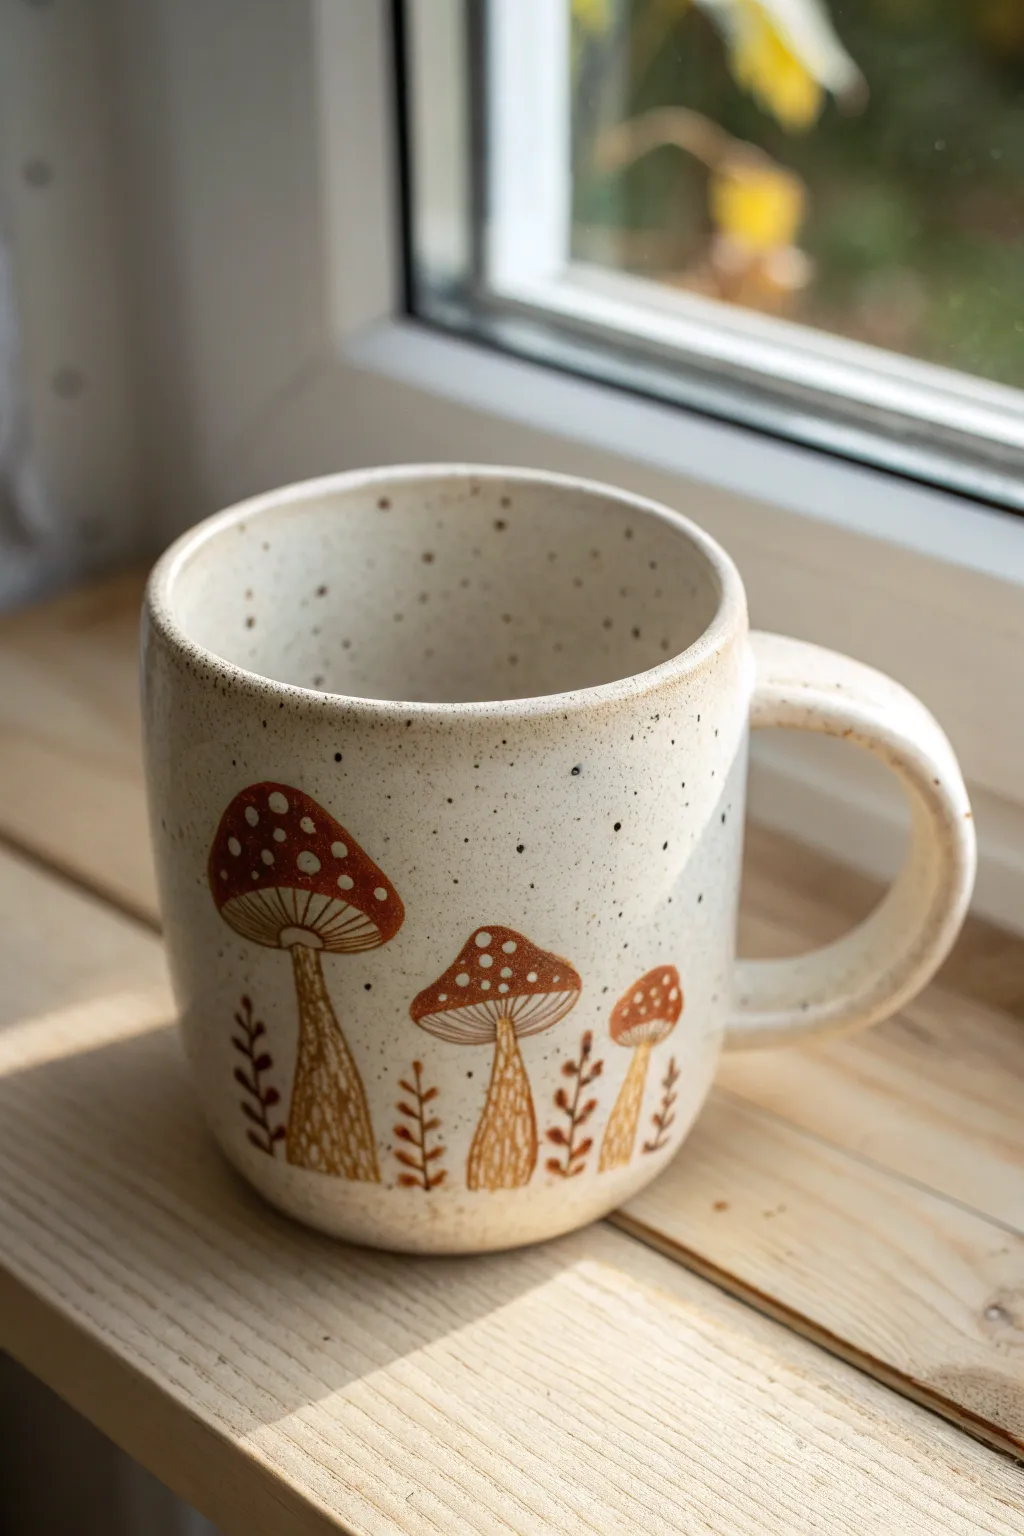
Bring a touch of the woodlands into your kitchen with this cozy, cottagecore-inspired mug project. Featuring a trio of rustic toadstools and delicate ferns on a speckled cream background, this cup is perfect for sipping tea on a rainy afternoon.
Detailed Instructions
Materials
- Stoneware clay (speckled or buff)
- Pottery wheel (or rolling pin for hand-building)
- Loop tool for trimming
- Sponge and water bucket
- Underglaze (Rust red, Burnt Orange, Dark Brown)
- Small liner brush (size 0 or 00)
- Clear matte or satin glaze
- Rib tool
- Kiln access
Step 1: Forming the Vessel
-
Throwing the cylinder:
Center about 1 lb of clay on the wheel and open it up. Pull the walls to create a straight-sided cylinder, aiming for a consistent thickness of about 1/4 inch. -
Shaping the profile:
Using a rib tool, gently belly out the bottom third of the cylinder slightly to give it a softer, more organic curve, keeping the rim straight and sturdy. -
Smoothing:
Compress the rim with a chamois or your finger to prevent chipping later. Run a sponge over the surface to reveal some of the grog if you are using speckled clay. -
Trimming:
Once the cup is leather hard, trim the bottom to create a clean foot ring. This lifts the design off the table and adds a professional finish. -
Pulling the handle:
Pull a strap handle from a separate lug of clay. It should be wide enough for a comfortable grip but proportional to your cup size. -
Attaching the handle:
Score and slip the attachment points on both the cup and the handle. Press the handle firmly onto the mug, smoothing the seams with a modeling tool or your finger to ensure a strong bond.
Step 2: Decorating the Surface
-
Sketching the layout:
Lightly trace three mushroom shapes of descending sizes onto the leather-hard clay using a needle tool or pencil. Don’t worry about faint lines; they will burn out in the kiln. -
Painting caps base:
Using your rust red underglaze, fill in the caps of the mushrooms. I find that applying two thin coats gives better coverage than one thick, globby coat. -
Adding stems:
Mix a diluted wash of burnt orange and brown underglaze. Paint the stems, tapering them slightly as they move upward toward the cap. -
Detailing the gills:
With a fine liner brush and dark brown underglaze, paint delicate lines under the caps to represent gills. Keep your hand steady and your touch light. -
Creating texture:
Use the same dark brown to add vertical, wavy lines on the stems for a bark-like texture. Let the lines be imperfect for a natural look. -
Adding the spots:
Dip the handle end of a small paintbrush or a dotting tool into white or cream underglaze (or leave the raw clay if it’s light enough) to create the iconic spots on the red mushroom caps. -
Painting foliage:
Using the burnt orange underglaze, paint simple fern-like fronds growing from the base of the mushrooms to frame the cluster. -
Speckling (Optional):
If your clay isn’t naturally speckled, flick a stiff toothbrush loaded with iron oxide wash or brown underglaze lightly over the surface.
Smudge Control
If you accidentally smear underglaze while painting the delicate gills, wait for it to dry completely, then gently scratch the mistake away with an X-Acto knife.
Step 3: Glazing and Firing
-
Bisque firing:
Once the mug is bone dry, load it into the kiln for a bisque fire (usually Cone 04) to harden the clay and set the underglaze. -
Applying clear glaze:
Dip the entire mug into a clear matte or satin glaze. A glossy glaze works too, but a satin finish enhances the rustic, earthy vibe of the mushrooms. -
Glaze firing:
Wipe the foot ring completely clean of glaze with a damp sponge. Fire the piece to maturity (Cone 5, 6, or 10 depending on your clay body).
Forest Floor Texture
Carve lightly into the raw clay on the mushroom stems before painting. The glaze will pool in these tiny grooves, adding tactile depth to the illustration.
Now you have a charming woodland vessel ready to hold your favorite warm beverage
Citrus Slice Sprig Cup
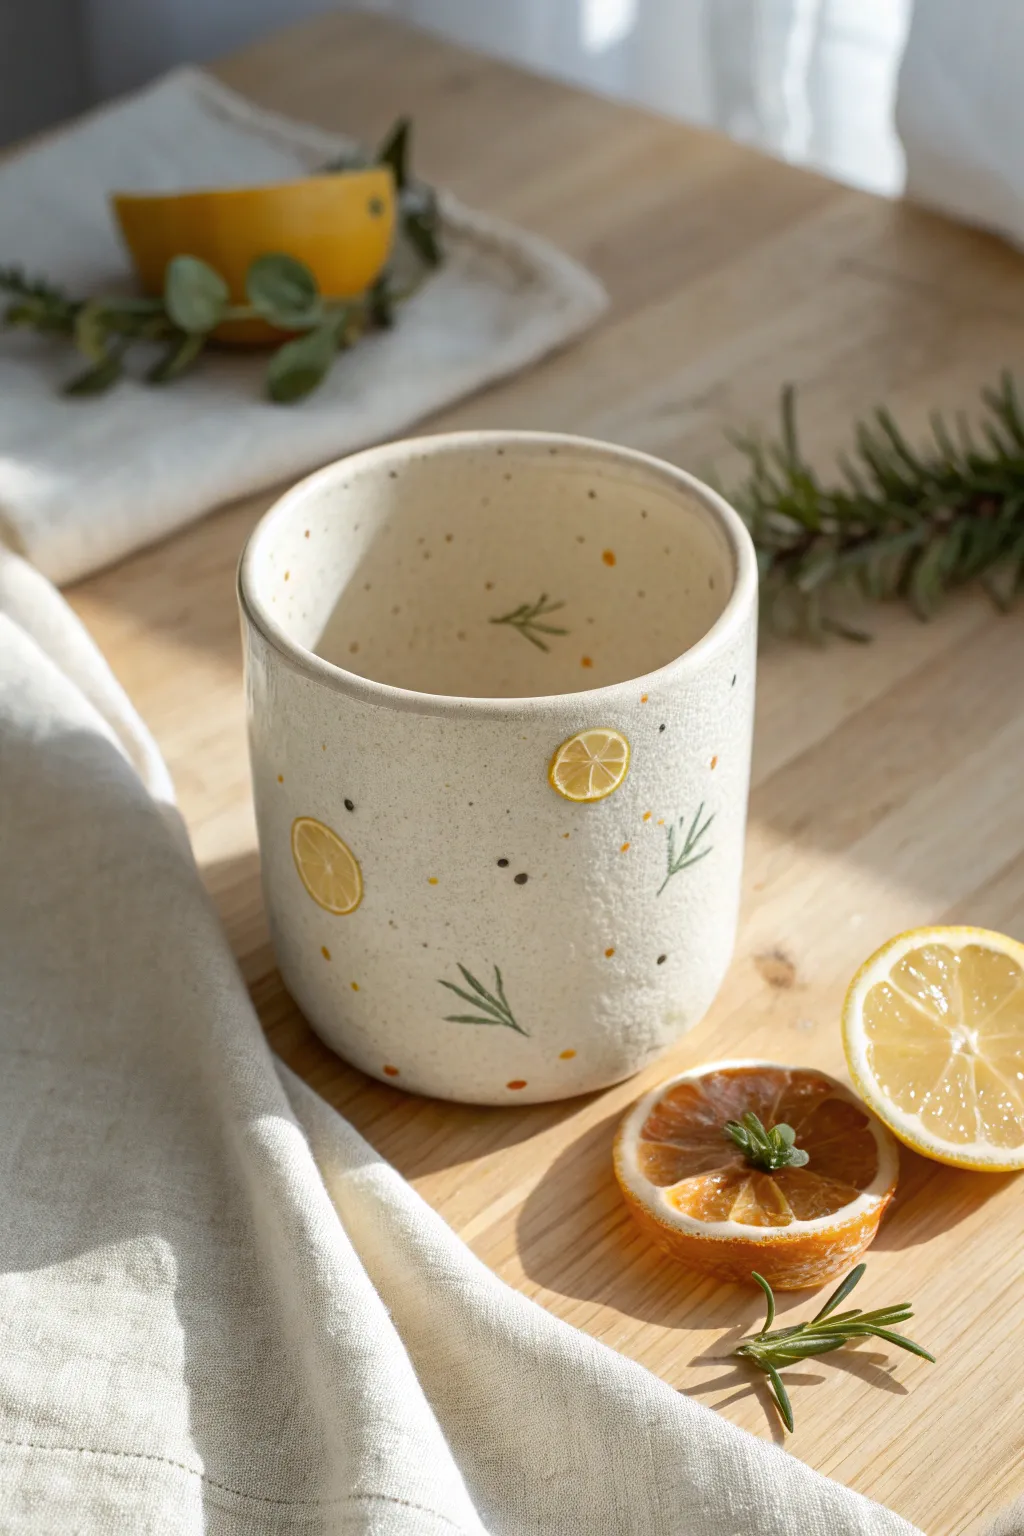
Bring a zest of freshness to your morning routine with this darling hand-built ceramic cup, featuring delicate lemon slices and sprigs of greenery. The natural speckled clay body provides a beautiful canvas for the whimsical, hand-painted citrus motifs.
How-To Guide
Materials
- Speckled Stoneware Clay (e.g., Laguna 60)
- Slab Roller or Rolling Pin
- Guide Strips (1/4 inch thick)
- Circular Clay Cutter or Template (approx. 4-inch base)
- Rectangular Template (for cup walls)
- Needle Tool
- Scoring Tool or Serrated Kidney
- Slip (clay slurry)
- Underglazes: Lemon Yellow, Leaf Green, Burnt Orange, Black
- Small Detail Brushes (Liner and Round #1)
- Clear Glaze (Zin-free prefered for underglaze stability)
- Sponge
- Pottery Wheel (optional, for trimming)
Step 1: Building the Form
-
Preparing the Slab:
Begin by wedging your speckled stoneware clay thoroughly to remove air bubbles. Using your rolling pin and guide strips, roll out a consistent slab about a quarter-inch thick. -
Cutting the Components:
Cut out the main wall of your cup using a rectangular template (roughly 12×4 inches depending on desired size) and a circle for the base. Use your needle tool for clean cuts. -
Beveling the Edges:
To ensure a seamless join, cut the short ends of your rectangular wall slab at a 45-degree angle. This creates more surface area for the join. -
Scoring and Slipping:
Score the beveled edges thoroughly and apply a generous amount of slip. Score the circumference of the circular base where the wall will attach. -
Assembling the Cylinder:
Stand the wall slab up and curve it around the base. Press the beveled ends together firmly to close the cylinder, smoothing the seam with your thumb or a wooden rib. -
Attaching the Base:
Place the cylinder onto the scored base. Use a modeling tool to blend the clay from the wall down onto the base on the outside, and from the base up onto the wall on the inside to seal it tight. -
Refining the Shape:
Smooth the lip of the cup with a damp sponge or piece of chamois leather. If the cup looks too perfectly cylindrical, you can gently paddle the sides for a more organic feel. -
Drying to Leather Hard:
Cover the piece loosely with plastic and let it dry slowly until it reaches a leather-hard state—firm enough to handle without deforming, but still cool to the touch.
Pro Tip: Clean Lines
For crisper lemon slices, use a sgraffito technique: paint a solid yellow circle, let it dry, then scratch away the dividing lines with a sharp needle tool to reveal the clay.
Step 2: Decoration & Glazing
-
Planning the Pattern:
Before painting, visualize the spacing. You want the lemons and sprigs to feel randomly scattered, not lined up in rows. -
Painting the Lemons:
Using the Lemon Yellow underglaze and a round brush, paint small solid circles. I find that doing two thin coats creates a more opaque, vibrant yellow than one thick glob. -
Adding Citrus Segments:
Once the yellow circles are dry, take a fine liner brush with a slightly thinned white underglaze (or just carve through the yellow carefully) to create the wheel-spoke segments of the lemon slices. -
Painting the Sprigs:
With Leaf Green underglaze and your liner brush, paint simple lines for stems. Add short, quick dashes coming off the stem to create the rosemary-like needles. -
Adding Detail Dots:
Dip the very tip of a small brush or a needle tool into Burnt Orange and Black underglazes. Dot these randomly in the empty spaces to fill the design and add pop. -
Interior Detail:
Don’t forget the inside; paint one small sprig or a few dots near the inner rim for a delightful surprise when drinking. -
Bisque Firing:
Load your bone-dry cup into the kiln and bisque fire it to Cone 04. This hardens the clay and prepares it for the final glaze. -
Glazing:
Wipe the bisque-fired cup with a damp sponge to remove dust. Dip the entire cup into a clear glaze to seal the clay and make the colors shine. -
Final Firing:
Fire the glazed cup to the maturation temperature of your specific clay body (typically Cone 5 or 6 for stoneware). Allow the kiln to cool completely before unloading.
Troubleshooting: Smearing
If your underglaze designs smear when you apply the clear overglaze, try dabbing the glaze on delicately with a fan brush rather than dipping the whole piece at once.
Enjoy sipping your favorite tea from this sunny, handmade creation


What Really Happens Inside the Kiln
Learn how time and temperature work together inside the kiln to transform clay into durable ceramic.
Strawberry Patch Textured Cup
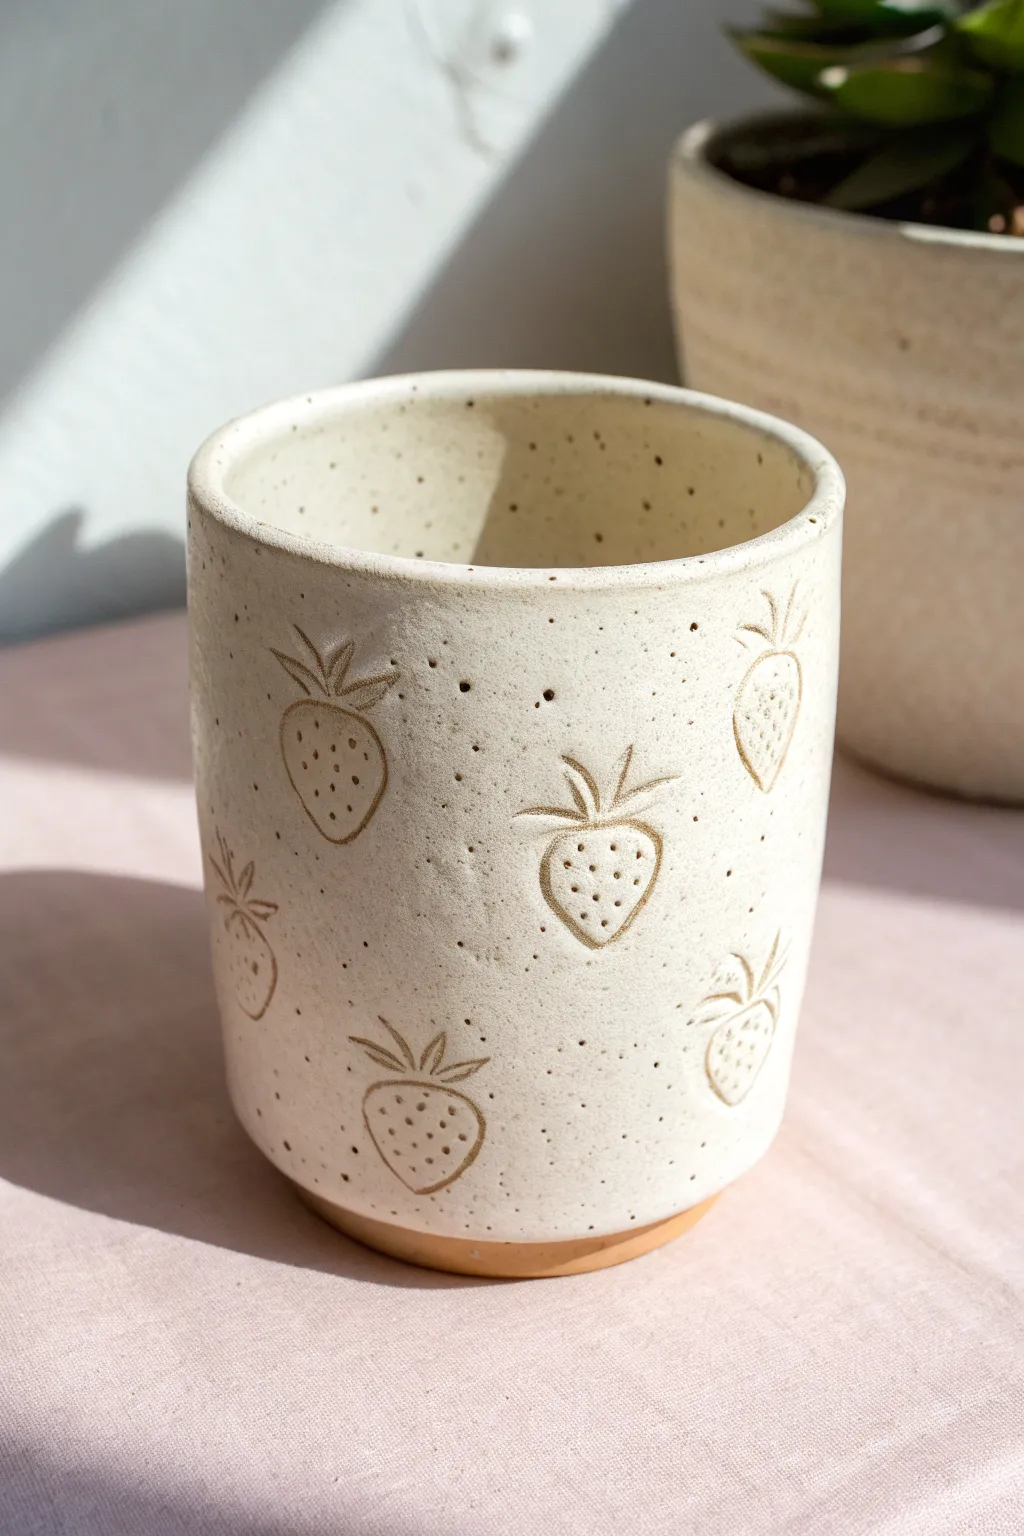
This charming ceramic cup captures the sweetness of summer with its delicate, hand-carved strawberry motifs set against a creamy, speckled glaze. The raw clay base adds a grounding, earthy touch that perfectly complements the whimsical fruit pattern.
Step-by-Step Tutorial
Materials
- Stoneware clay body (speckled buff recommended)
- Pottery wheel (or slab roller for hand-building)
- Small loop trimming tool
- Pin tool or needle tool
- Carving tool (small gouge or V-tip)
- Sponge
- Creamy matte white glaze (translucent enough to show clay specks)
- Clear wax resist
- Kiln
Step 1: Forming the Base
-
Prepare your clay:
Begin by wedging about 1 to 1.5 pounds of speckled stoneware clay. Ensure it is free of air bubbles to prevent issues during firing. -
Center and throw:
Center your clay on the pottery wheel. Open up the center and pull up the walls to create a simple cylinder shape, approximately 4 inches tall. Aim for straight, vertical walls rather than a tapered bowl shape. -
Define the rim:
Using a chamois or a wet sponge, smooth and round the rim of the cup. A slightly rounded rim is more comfortable for drinking and less prone to chipping. -
Dry to leather hard:
Wire the cup off the bat and let it dry slowly until it reaches a leather-hard state. It should be firm enough to handle without deforming but soft enough to carve easily.
Uneven Carving Lines?
If your tool drags or creates jagged edges, the clay is too dry. Mist it lightly with water, wrap it in plastic for an hour to rehydrate, and try again when it feels softer.
Step 2: Trimming and Carving
-
Trim the foot:
Place the cup upside down on the wheel center. Using a loop tool, trim the bottom to create a neat foot ring. I like to leave a distinct separation line where the glaze will stop later. -
Plan the pattern:
Lightly sketch the placement of your strawberries using a dull pencil or the back of a needle tool. Create a scattered, organic pattern rather than a perfect grid. -
Outline the berries:
Using a sharp needle tool or a fine carving tool, deeply incise the outline of the strawberry fruit bodies. Press firmly enough to create a groove that the glaze will break over. -
Carve the leaves:
Add three or four small leaves at the top of each berry. Use quick, confident strokes to give the leaves a pointed, lively appearance. -
Add texture seeds:
Press the tip of your needle tool or a very small round tool into the body of the strawberries to create the ‘seeds.’ Vary the pressure slightly so some are deeper than others. -
Clean up burrs:
Once the carving is complete, gently brush away any clay crumbs. If there are sharp burrs, smooth them lightly with a finger, but don’t scrub away your texture.
Use Iron Oxide
For higher contrast, brush red iron oxide wash into the carvings and wipe the surface clean with a sponge before glazing. This makes the strawberries pop dark brown.
Step 3: Glazing and Finishing
-
Bisque fire:
Load the bone-dry cup into the kiln and bisque fire it to Cone 04 (or your clay’s specific bisque temperature). -
Wax the foot:
Apply wax resist to the bottom foot ring and slightly up the side, creating a clean band of raw clay at the base. This matches the aesthetic in the photo. -
Prepare the glaze:
Stir your creamy white glaze thoroughly. You want a consistency similar to heavy cream to ensure it coats evenly but isn’t too thick to obscure the carving. -
Dip and coat:
Holding the cup by the waxed foot, dip it quickly into the glaze bucket. Hold it submerged for about 3 seconds, then pull it out and shake gently to remove drips. -
Reveal the texture:
As the glaze dries on the surface, check your strawberry carvings. If the glaze is too thick inside the lines, it might hide the design. -
Clean the lines (optional):
If needed, gently rub the carved areas with a clean, damp finger to thin the glaze slightly over the high points, helping the clay color break through during firing. -
Glaze fire:
Fire the cup to your clay’s maturity temperature (likely Cone 5 or 6 for stoneware). The glaze should melt and pool slightly in the textures, highlighting the strawberries. -
Sand the bottom:
After the final firing, use sandpaper or a diamond pad to smooth the unglazed foot ring, ensuring it won’t scratch table surfaces.
Enjoy your morning coffee or tea in a vessel that feels as sweet as it looks
Ice Cream Cone Appliqué Cup
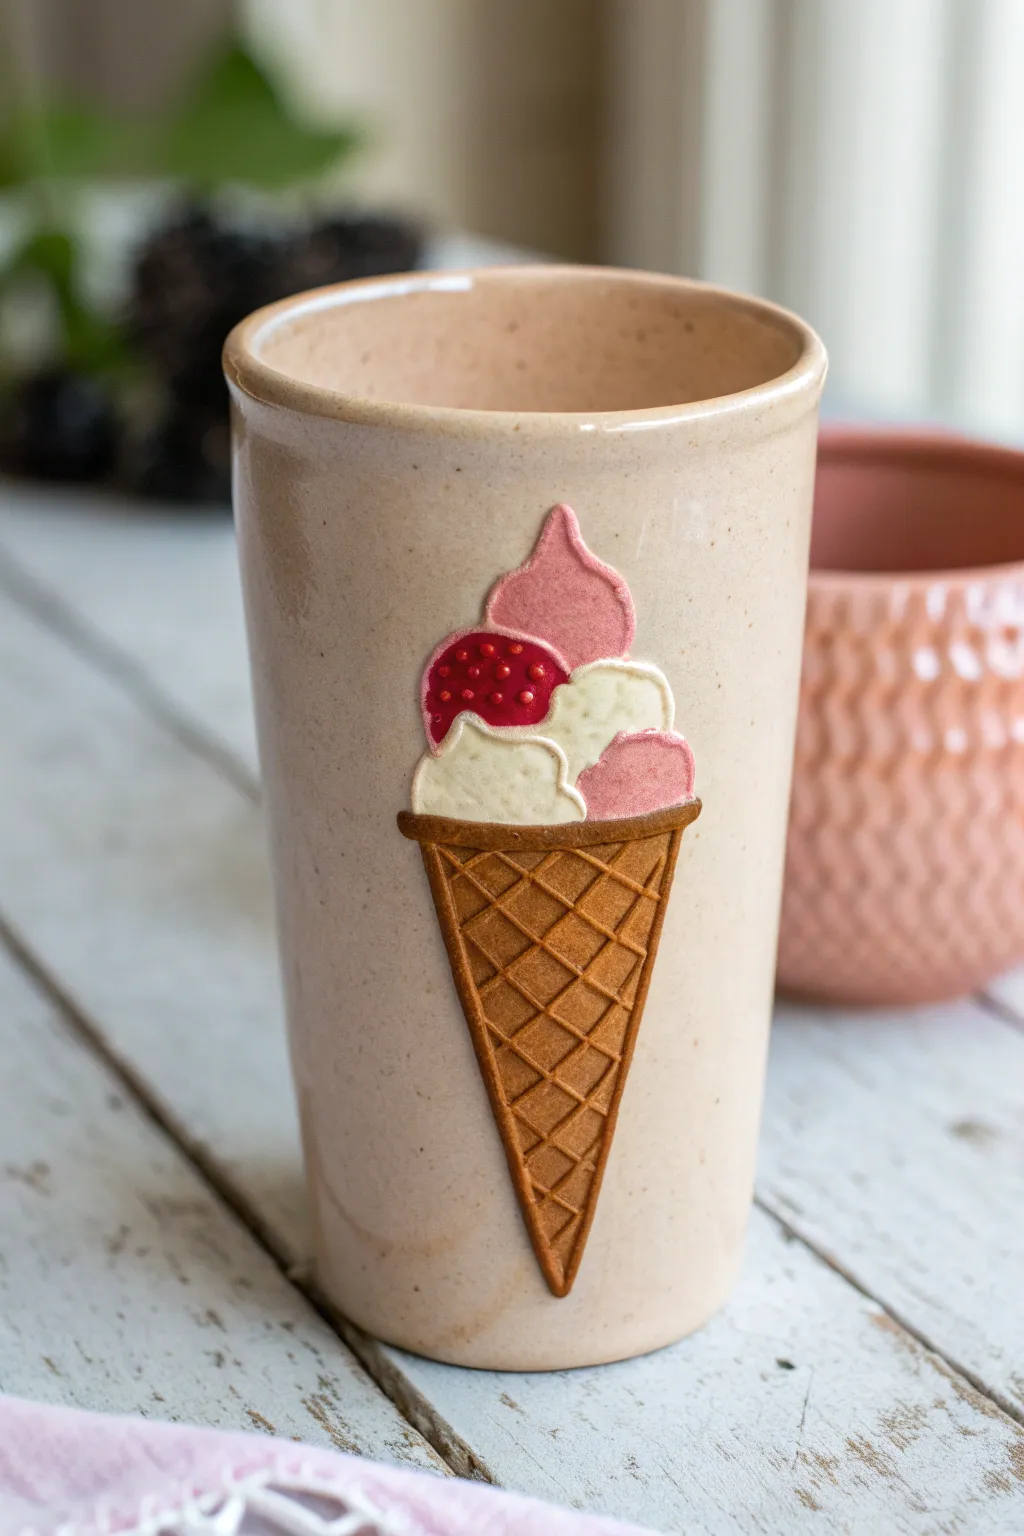
This charming ceramic tumbler features a whimsical ice cream cone appliqué that adds tactile delight to your morning routine. The raised relief design combines smooth scoops with a textured waffle cone for a piece that is as fun to hold as it is to look at.
Step-by-Step
Materials
- Light tan stoneware clay body
- Rolling pin
- Template for a tall tumbler (slab building)
- Scoring tool or needle tool
- Slip (made from your clay body)
- Fettling knife or X-Acto knife
- Small paintbrush for slip application
- Underglazes: White, Pastel Pink, Deep Red
- Clear glaze (food safe)
- Modeling tool with a grid/waffle texture or a ruler
- Smooth rib tool (wood or rubber)
- Small round piping tip or needle tool (for strawberry seeds)
Step 1: Building the Base Tumbler
-
Roll the Slab:
Begin by rolling out a smooth slab of your light tan clay about 1/4 inch thick. Compress the clay on both sides with a rib to prevent warping. -
Cut the Shape:
Using your tumbler template, cut out the main wall shape and a circular base. Be sure to cut the long edges of the wall at a 45-degree angle to create a seamless bevel joint. -
Form the Cylinder:
Score the beveled edges thoroughly and apply slip. Bring the edges together to form a cylinder, pressing firmly from the inside and outside to bond the seam. -
Attach the Base:
Score and slip the bottom edge of the cylinder and the circular base. Join them together, smoothing the clay upwards from the base to the wall to erase the seam. -
Refine the Rim:
Use a damp sponge or piece of chamois to round off the top rim of the cup so it will be comfortable to drink from. Let the cup stiffen slightly to leather-hard.
Clean Seams
For a truly invisible join on the appliqué, use a barely damp paintbrush to smooth the very edge where the appliqué meets the cup wall.
Step 2: Creating the Appliqué
-
Cut the Cone:
Roll a very thin scrap of clay (about 1/8 inch). Cut out a tall, narrow triangle shape for the cone body. -
Add Texture:
Before attaching, gently press a grid pattern into the triangle using a ruler edge or a specialized texture tool to mimic a waffle cone. Don’t press too hard; you just want the surface detail. -
Position and Attach Cone:
Score the back of the cone piece and the spot on the cup where it will sit. Apply slip and press the cone onto the tumbler, gently sealing the edges without flattening your waffle texture. -
Form the Scoops:
Hand-roll three small balls of clay and flatten them slightly into irregular, organic ‘scoop’ shapes. Arrange them on a table first to see how they nestle together—one base scoop, one side scoop, and a topper. -
Attach the Scoops:
Score and slip the area above the cone. Attach the scoops one by one, slightly overlapping the top of the cone and each other to create depth. -
Detail the Berry Scoop:
For the dark pink scoop shown in the image, use a needle tool to gently poke tiny indentations across the surface to resemble strawberry seeds. -
Refine Edges:
Use a small, damp brush to clean up any excess slip that may have oozed out from under the appliqué pieces. The connection should look clean and crisp.
Sweet Sprinkles
Make tiny ‘snakes’ of clay and attach them to the ice cream scoops before firing for 3D sprinkles, then paint them in rainbow colors.
Step 3: Glazing and Finishing
-
Bisque Fire:
Allow the mug to dry slowly and completely before bisque firing it to cone 04 (or your clay’s specification). -
Underglaze the Cone:
Apply a wash of diluted brown underglaze or iron oxide to the cone area, then wipe it back with a sponge. This leaves color in the grid lines to accentuate the waffle texture. -
Underglaze the Scoops:
Carefully paint the scoops. Use white for the vanilla, pastel pink for the strawberry, and a deep red for the seeded scoop. I find two to three coats give the most solid, opaque color. -
Dip in Clear:
Once the underglaze is dry, dip the entire tumbler into a clear, food-safe glaze. This will seal the clay and make the colors pop. -
Final Fire:
Fire the piece to maturity (Cone 5/6 for stoneware). Ensure the foot is wiped clean of glaze to prevent it sticking to the kiln shelf.
Enjoy sipping from your handcrafted creation that captures the joy of summer all year round

TRACK YOUR CERAMIC JOURNEY
Capture glaze tests, firing details, and creative progress—all in one simple printable. Make your projects easier to repeat and improve.
Leaf Vein Imprint Nature Cup
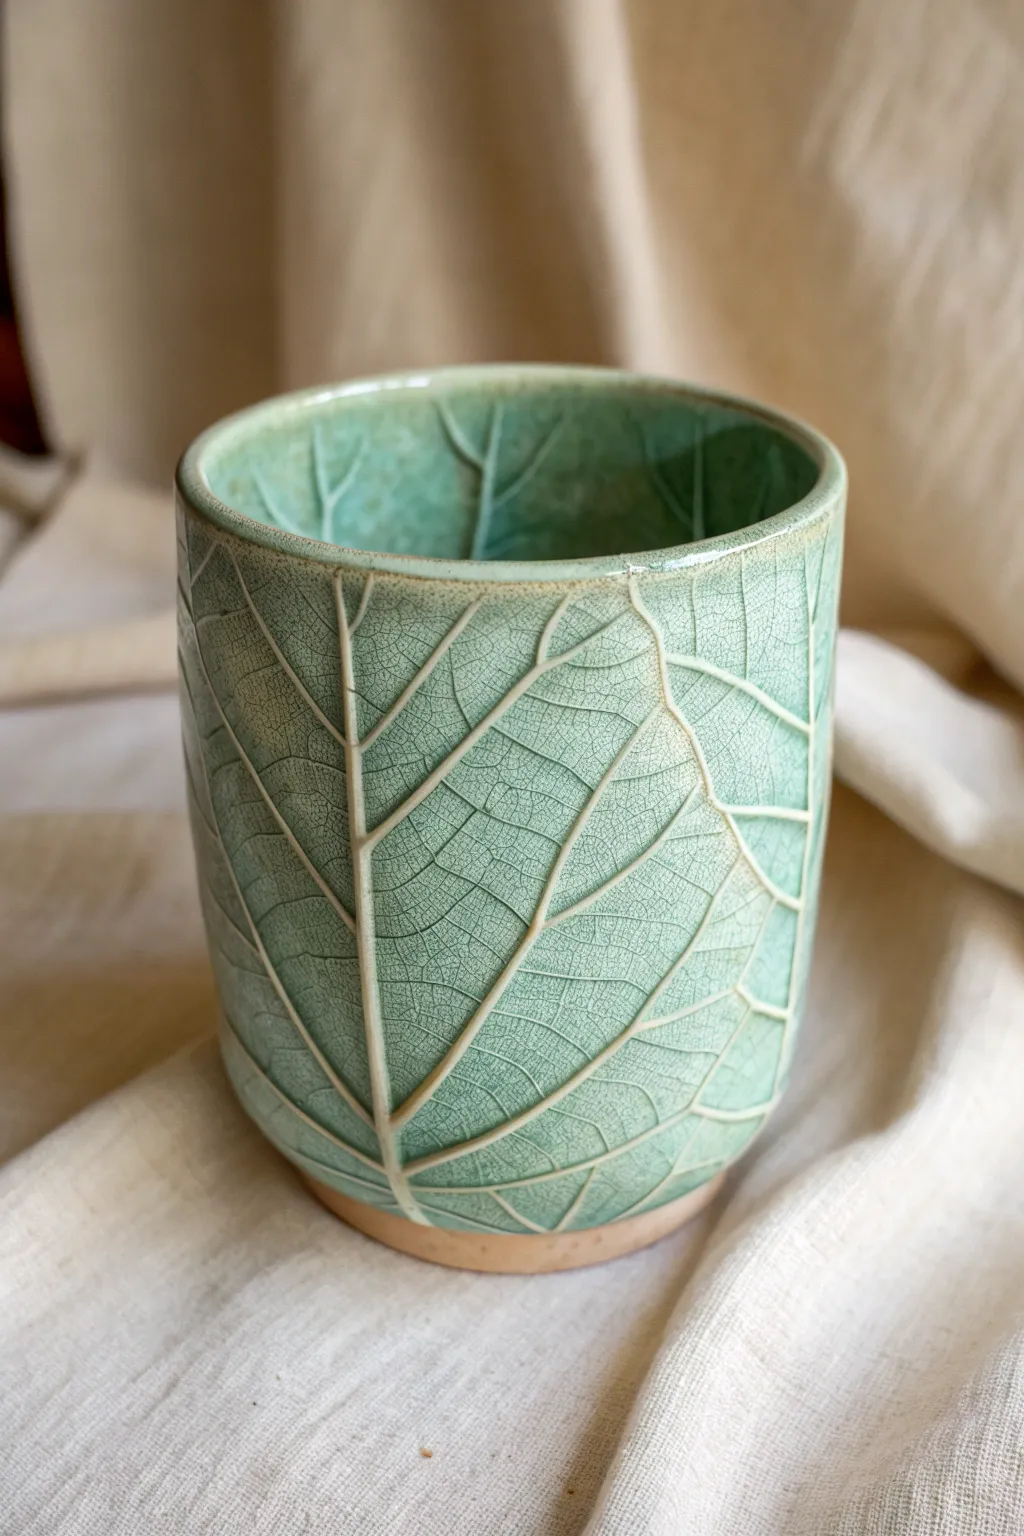
Bring the delicate intricacy of nature into your morning routine with this handcrafted ceramic cup featuring deep leaf vein impressions. The highlight of this piece is the stunning celadon crackle glaze that pools beautifully in the texture, contrasting against the warm, raw clay base.
Detailed Instructions
Materials
- Stoneware clay body (white or light buff)
- Fresh, large leaves with prominent veins (like fiddle leaf fig, hydrangea, or hosta)
- Rolling pin
- Canvas banding wheel or working surface
- Needle tool or fettling knife
- Rib tool (flexible metal or rubber)
- Scoring tool (serrated rib or needle tool)
- Slip (clay slurry)
- sponge
- Celadon crackle glaze (cone 6 or appropriate for your clay)
- Clear glaze (optional for interior)
- Kiln access
Step 1: Preparing the Slab
-
Roll out the clay:
Begin by wedgeing your stoneware clay to remove air bubbles. Roll it out into an even slab, approximately 1/4 inch thick. Aim for a long rectangular shape that will be tall enough for your desired cup height and long enough to wrap around the circumference. -
Smooth the surface:
Use a flexible rib tool to compress the clay slab on both sides. This aligns the clay particles to prevent cracking later and gives you a pristine canvas for the leaf impression. -
Placement of nature:
Select your leaves. Place them vein-side down onto the clay slab. Position them so the main veins run vertically, mimicking the upward growth of a plant, or arrange them creatively to cover the entire surface. -
Pressing the texture:
Gently roll your rolling pin over the leaves to press them firmly into the clay. You want the veins to leave a deep impression, so apply firm, even pressure without thinning the slab too much further. -
Reveal the pattern:
Carefully peel back the leaves to reveal the texture. If small bits of leaf stick, you can usually leave them to burn off during the bisque firing, or pick them out gently with a needle tool.
Vein Definition Tip
Use leaves with thick, woody spines like hydrangea or grape leaves. Soft leaves like spinach won’t leave a deep enough impression to catch the glaze properly.
Step 2: Forming the Cup
-
Cut to size:
Measure the height and length needed for your cup. Using a ruler and needle tool, cut a clean rectangle from the textured slab. Be mindful of where the vein patterns sit within your cut shape. -
Bevel the edges:
Cut a 45-degree angle (bevel) on the two short ends of your rectangle. One bevel should face up (textured side) and the other down (smooth side). This creates a stronger, seamless overlap joint. -
Form the cylinder:
Stand the slab up and carefully curl it into a cylinder, bringing the beveled edges together. I like to handle the clay gently here so I don’t smudge the beautiful vein details. -
Join the seam:
Score the beveled edges and apply slip. Press them firmly together. Support the wall from the inside with one hand while using a wooden tool or rib to smooth the seam on the outside. Try to blend the texture where the seam meets so the leaf pattern serves as a disguise. -
Add the base:
Roll a small piece of clay for the base. Place your cylinder on top and trace around it. Cut out the circle, score and slip the bottom edge of the cylinder and the edge of the base, and attach them. Smooth the connection.
Highlight the Crackle
After the final firing, rub black India ink or strong tea over the cooled surface and wipe it off. The dark liquid will settle into the glaze cracks, making the ‘crackle’ pop visually.
Step 3: Finishing and Glazing
-
Refine the rim:
Use a damp sponge or a piece of chamois leather to smooth the rim of the cup. It should be rounded and comfortable for drinking. -
Bisque fire:
Allow the cup to dry slowly and completely under loose plastic to prevent warping. Once bone dry, fire it in the kiln to the bisque temperature (usually Cone 04). -
Wax resist:
Apply wax resist to the bottom of the cup and slightly up the side (about 1/4 inch) if you want that exposed clay look shown in the image. This prevents glaze from sticking to the foot. -
Glaze application:
Dip the cup into a translucent celadon glaze. This type of glaze is crucial because it pools in the deep recesses of the veins, turning darker green, while breaking clear over the high points to highlight the texture. -
Interior glazing:
Pour glaze inside the cup, swirl to coat, and pour out the excess. You can use the same celadon or a compatible clear liner glaze. -
Wipe back (optional):
If your glaze is very opaque, you might want to gently wipe the raised surfaces with a damp sponge, leaving more glaze in the veins to accentuate the contrast. -
Final firing:
Fire the cup to the maturity temperature of your clay and glaze (typically Cone 5 or 6 for stoneware). Let the kiln cool completely before opening to reveal the crackle effect.
Enjoy sipping your favorite tea from a vessel that captures the permanent beauty of a fleeting leaf
Lace-Roll Texture Tumbler Cup
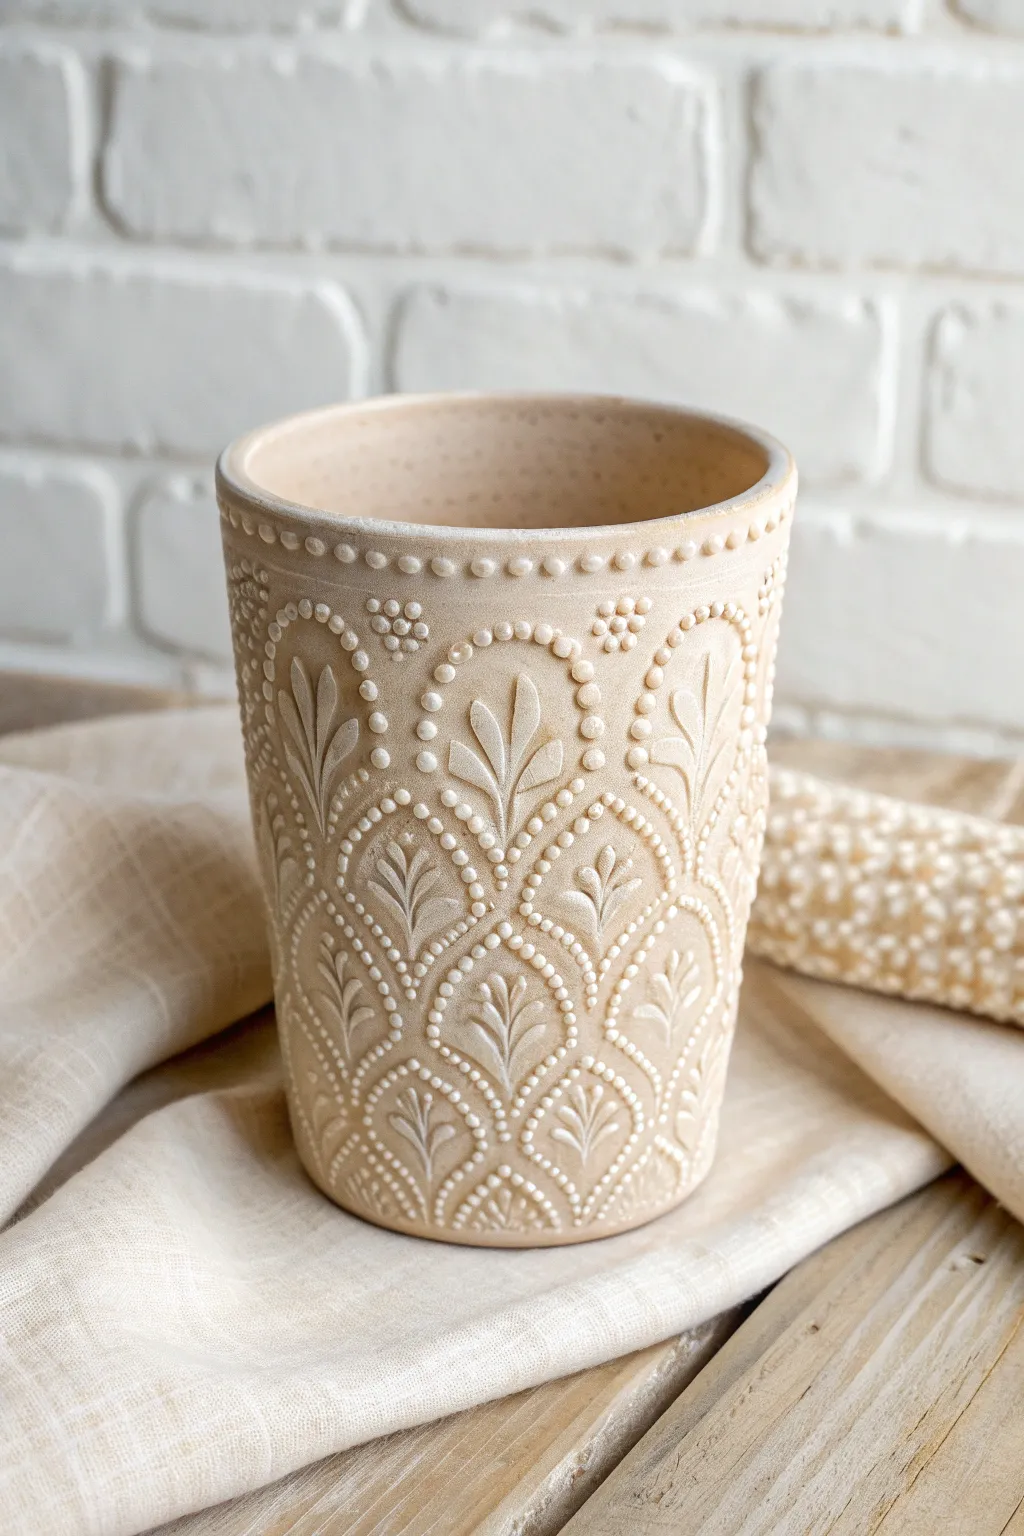
This elegant tumbler features a raised, intricate leaf and dot pattern that mimics the delicate texture of vintage lace or beadwork. The natural clay tone and soft matte finish give it a sophisticated, organic feel perfect for any kitchen collection.
Step-by-Step
Materials
- Stoneware or earthenware clay (buff or speckled)
- Rolling pin
- Tumbler template or paper pattern
- Slip (clay and vinegar mixture)
- Scoring tool or serrated rib
- Slip trailing bottle with fine metal tip
- Carving tools (loop tool and needle tool)
- Sponge
- Clear matte glaze or transparent satin glaze
- Paintbrush
- Kiln for firing
Step 1: Forming the Base
-
Roll the slab:
Begin by rolling out your clay slab to a uniform thickness of about 1/4 inch. Ensure the surface is smooth and free of air bubbles by compressing it with a rubber rib. -
Cut the shape:
Place your tumbler template onto the slab and carefully cut around it using a needle tool or fettling knife. You need a rectangular shape with slightly curved top and bottom edges to form a tapered cylinder. -
Bevelling edges:
Bevel the short vertical edges of your clay slab at opposite 45-degree angles. This ensures a seamless overlap when you roll the cylinder. -
Construct the cylinder:
Score the beveled edges thoroughly and apply slip. Bring the edges together to form a cylinder, pressing firmly from the inside and outside to seal the seam. -
Attach the base:
Roll a small circle for the base. Score and slip the bottom edge of your cylinder and the edge of the circle, then join them. Smooth the connection with a modeling tool so the seam disappears.
Slip Consistency
Sieve your slip through a fine mesh before putting it in the trailer. Even tiny clumps can clog the metal tip and ruin your smooth lines of dots.
Step 2: Creating the Texture
-
Map out the design:
Lightly trace your pattern onto the leather-hard cup using a pencil or dull needle tool. Draw rows of interlocking arches or scales to guide your slip trailing. -
Slip trail the dots:
Fill your slip trailer with a smooth, thick slip made from your clay body. Carefully squeeze rows of tiny, uniform dots along the arched lines you just traced. Keep your hand steady and maintain consistent pressure. -
Add rim details:
Along the very top rim of the cup, pipe a horizontal row of slightly larger dots to create a ‘pearl’ border effect. Add small clusters of dots between the arches for extra detail. -
Dry the slip:
Allow the slip dots to set up until they are no longer shiny but still firmly attached. This prevents smearing during the next steps.
Try Colored Slip
Mix a mason stain (like sage green or soft blue) into your trailing slip for a subtle two-tone effect where the raised dots pop against the raw clay body.
Step 3: Carving the Leaves
-
Carve the relief:
Inside each arched section, use a small loop tool or carving, tool to gently carve away the negative space, leaving a raised leaf shape in the center. You aren’t removing much clay, just defining the shape. -
Refine the leaves:
Use a needle tool or a very fine modeling tool to press details into the raised leaf shapes, such as a center vein or small side veins. I find this sharp detailing contrasts beautifully with the round slip dots. -
Smooth the interior:
Clean up the inside of the cup with a damp sponge to remove any crumbs or rough spots from the handling process. -
Slow drying:
Cover the piece loosely with plastic to let it dry very slowly. Because of the added slip texture, uneven drying can cause cracks.
Step 4: Firing and Finishing
-
Bisque fire:
Once bone dry, fire the piece to bisque temperature (usually cone 04) to prepare it for glazing. -
Apply wash (optional):
To highlight the texture, apply a thin iron oxide wash over the texture and sponge it off the high points. This will settle in the crevices. -
Glaze application:
Dip or brush on a clear matte or satin glaze. A glossy glaze might obscure the fine details, so a matte finish is preferred for this earthy look. -
Final fire:
Fire the cup to the maturity temperature of your clay (typically Cone 5 or 6 for stoneware).
Once cooled, your tactile tumbler is ready for a warm drink and admiration.
Carved Sgraffito Bands on a Clay Cup
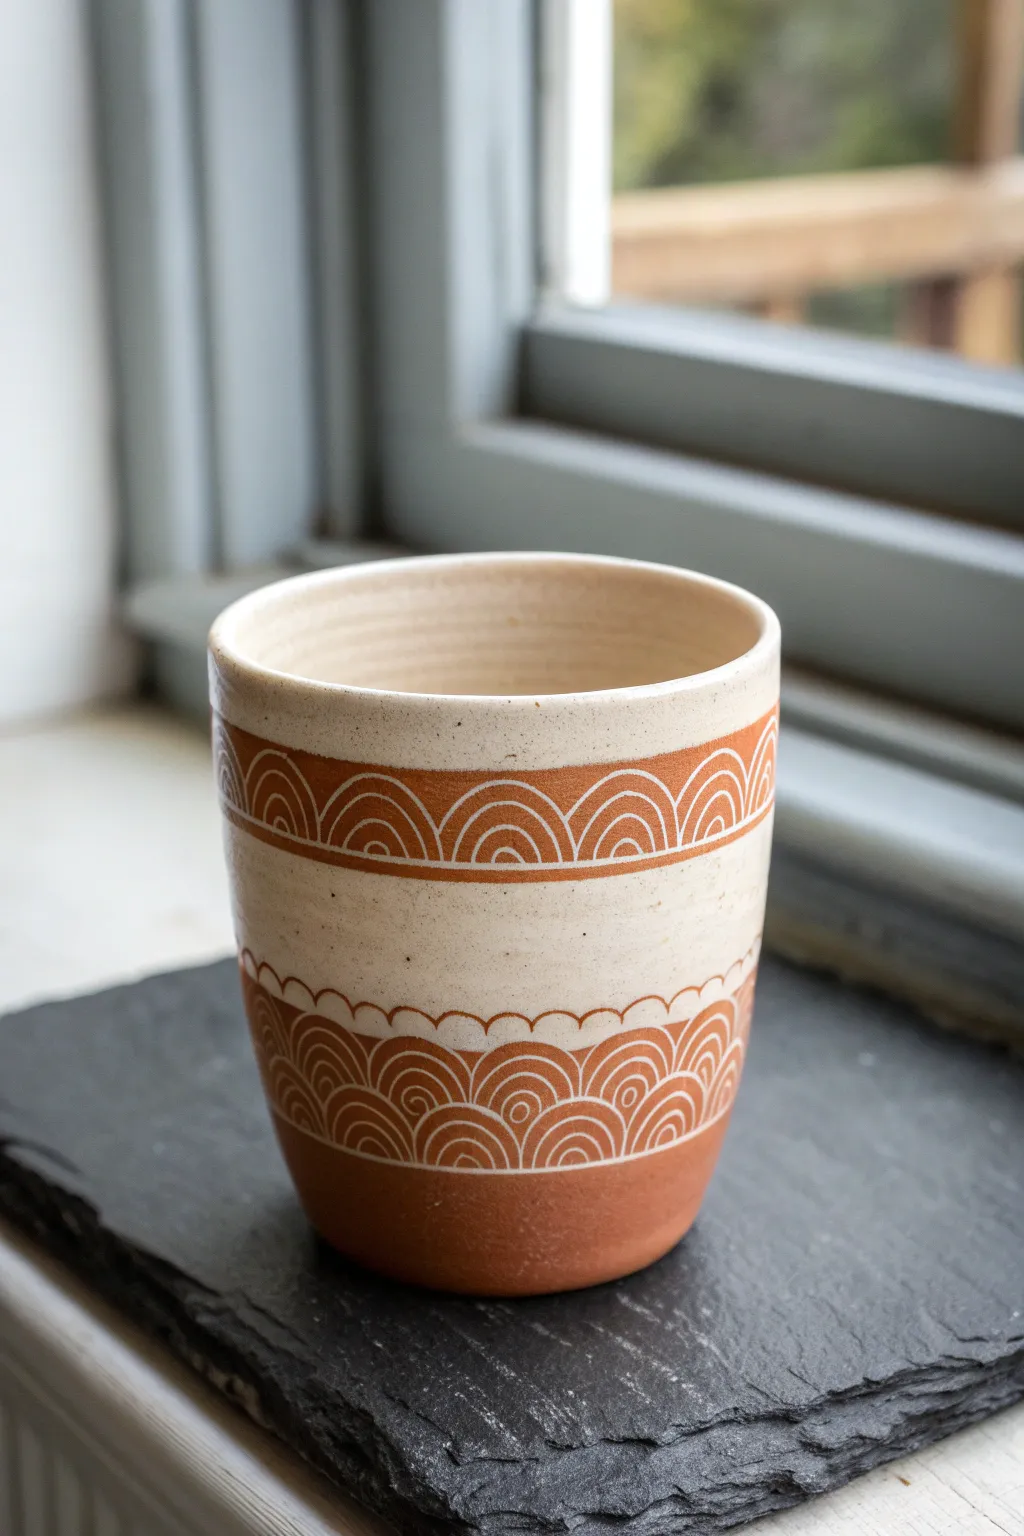
This elegant handmade cup combines the warmth of earthy red clay with clean, creamy slip decoration. The design features repetitive sgraffito-carved bands of scalloped rainbows, creating a beautiful contrast that feels both modern and rooted in traditional pottery techniques.
Step-by-Step Tutorial
Materials
- Red stoneware or terracotta throwing clay
- Pottery wheel
- Throwing tools (sponge, rib, wire cutter)
- White decorating slip or underglaze
- Small sgraffito loop tool or carving needle
- Banding wheel (for decorating)
- Clean-up sponge
- Sheer glaze (clear)
Step 1: Throwing and Shaping
-
Center the clay:
Start with a prepared ball of red stoneware clay on your wheel head. Center it effectively, ensuring there is no wobble before you begin opening. -
Open and pull walls:
Open the hole and begin pulling the walls up into a cylinder. Aim for a simple, handle-less tumbler shape with straight, slightly tapered sides. -
Refine the rim:
Compress the rim with a chamois or your sponge to ensure it is smooth and pleasant to drink from. -
Final shaping:
Use a smooth rib on the exterior to remove throwing lines and create a flat canvas for your carving later. Cut the pot from the bat but leave it to firm up to a leather-hard state.
Clean Lines
If slip chips while carving, the clay is too dry. Spritz lightly with water, wrap in plastic, and wait an hour before trying again.
Step 2: Slip Application
-
Check moisture level:
Wait until the cup is leather-hard—firm enough to handle without deforming, but cool to the touch. -
Apply the white slip:
Center your cup on a banding wheel. Using a soft, wide brush, apply a thick, even coat of white slip or underglaze. Cover the upper 3/4 of the cup, leaving the bottom quarter raw red clay. -
Let the slip set:
Allow the slip to dry just until it is no longer shiny and sticky. If you carve too soon, the lines will be messy; too late, and the slip will chip.
Step 3: Carving the Design
-
Define the upper band:
Spinning the banding wheel slowly, use your needle tool to lightly scratch two parallel horizontal lines near the rim to frame your first pattern band. -
Carve the top arches:
Inside the top band, use your carving tool to scrape away the white slip in a repeating rainbow arch pattern. I like to start with the center smallest arch and work outward for symmetry. -
Define the lower band:
Create a second set of parallel horizontal lines lower down on the cup, leaving a wide negative space of plain white slip between the two decorated sections. -
Carve the bottom arches:
Repeat the rainbow arch carving process on this lower band. Ensure you are carving deep enough to reveal the beautiful red clay body underneath. -
Add detail element:
Just above the lower band, carve a simple undulating scallop line to act as a decorative border. -
Clean up burrs:
Once the cup is bone dry, gently brush away any clay crumbs or sharp burrs with a soft, dry brush. Avoid using water here as it can smear the crisp lines.
Depth Precision
Use a specialized wire-loop sgraffito tool rather than a needle. It shaves off ribbons of clay for a cleaner, consistent line width.
Step 4: Firing and Glazing
-
Bisque fire:
Load the bone-dry cup into the kiln for a bisque firing. -
Apply clear glaze:
Once bisqued, dip the entire cup into a clear, transparent glaze. This seals the clay and makes the sgraffito contrast pop without obscuring the design. -
Final fire:
Fire the cup to the maturity temperature of your specific clay body and glaze.
Enjoy your morning coffee in a custom vessel that perfectly showcases the contrast between raw earth and refined design
Stamped Geometric Pattern Cup
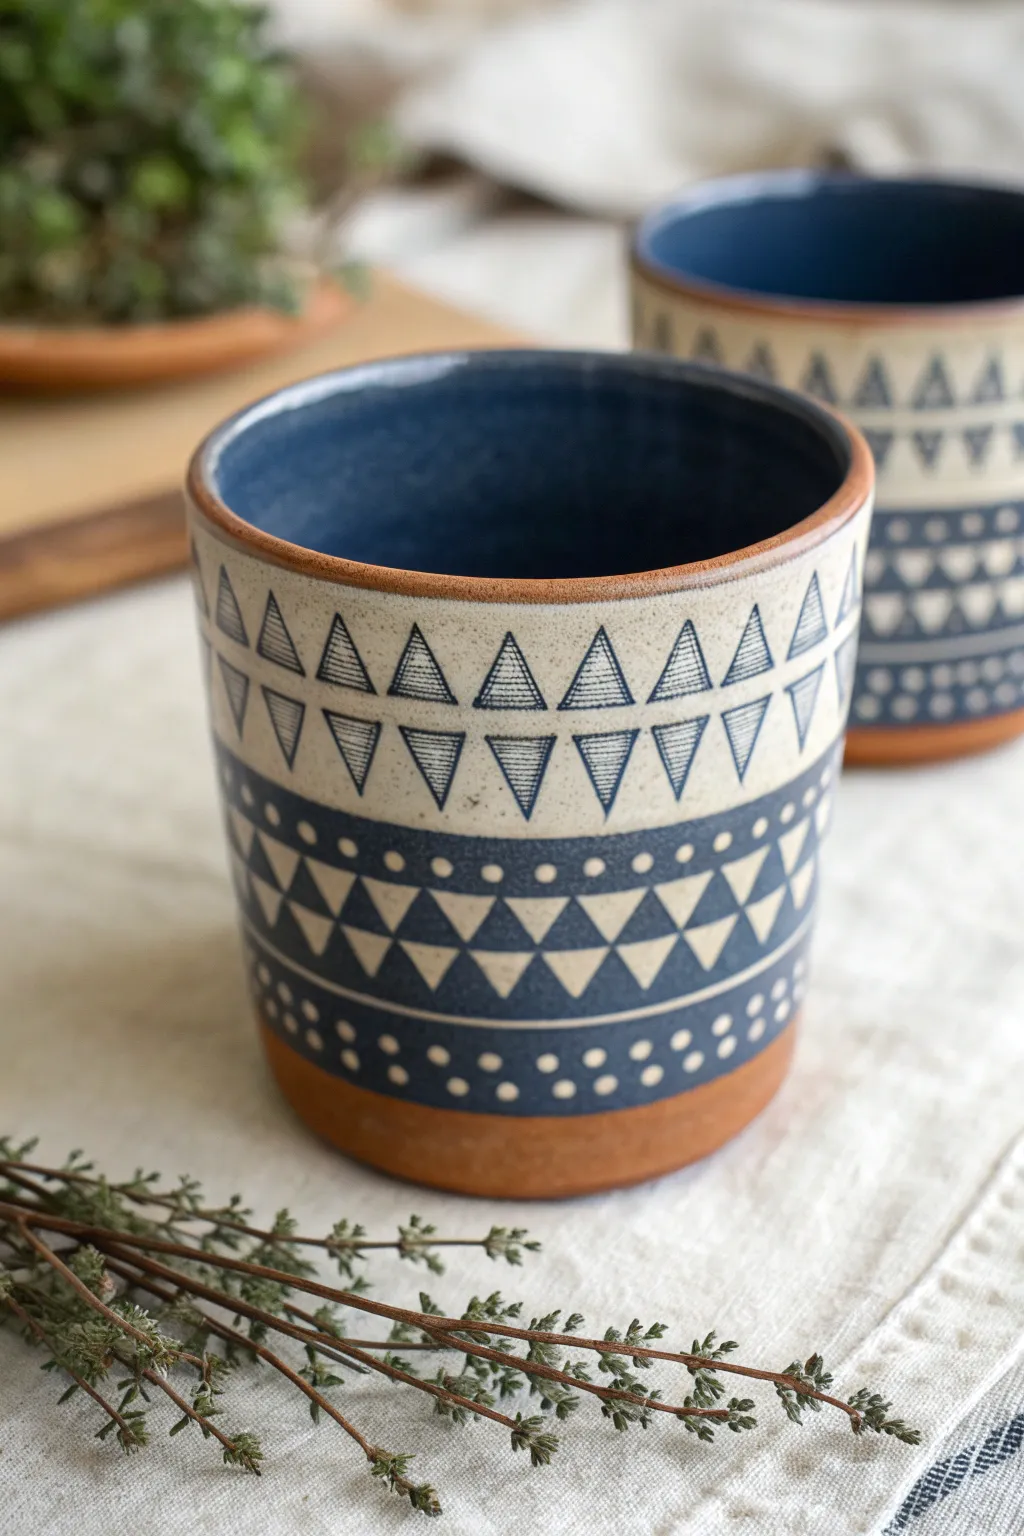
This project combines the rustic warmth of exposed terra cotta with the crisp precision of geometric patterns. The stunning contrast between the deep indigo glaze, the creamy sgraffito-style band, and the raw clay base makes for a truly professional-looking vessel that is satisfying to hold.
Detailed Instructions
Materials
- Red stoneware or terracotta clay body
- Pottery wheel (or materials for hand-building)
- Small triangular stamp (bisque or wood)
- Blue underglaze (preferably cobalt or navy)
- Cream or white matte glaze
- Wax resist emulsion
- Small liner brush
- Medium glaze brush
- Clear glaze (optional for interior)
- Sponge and bucket of water
- Needle tool or fettling knife
Step 1: Forming the Base
-
Throw the cylinder:
Begin by throwing a simple, straight-sided cylinder on the potter’s wheel. Aim for a wall thickness of about a quarter-inch to allow for stability during the stamping process later. -
Refine the lip:
Compress the rim with a chamois or your finger to make it smooth and rounded, ensuring a comfortable drinking experience. -
Dry to leather hard:
Allow the piece to dry until it reaches a firm leather-hard stage. It needs to be sturdy enough to handle but soft enough to accept some carving or stamping without cracking. -
Trim the foot:
Invert the cup on the wheel and trim the bottom, defining a clean foot ring. Smooth the transition from the foot to the wall with a rib.
Clean Lines Pro Tip
Use automotive detailing tape (1/8 inch) to mask off your horizontal bands before glazing. It creates much sharper separation lines than freehand painting or wax resist alone.
Step 2: Decoration & Glazing
-
Measure the bands:
Using a needle tool while the piece is slowly spinning, lightly score horizontal lines to demarcate where your different pattern zones will go. You need a top band for triangles and a bottom band for the darker design. -
Apply the cream band:
Paint a band of cream-colored underglaze or slip around the upper middle section of the cup. Apply 2-3 coats for full opacity, letting each coat dry slightly in between. -
Stamp the upper triangles:
Once the cream band is touch-dry (but not bone dry), use a triangular stamp or a liner brush with blue underglaze to create the row of upright triangles along the bottom edge of the cream band. -
Create the inverted triangles:
Directly above the first row, stamp or paint inverted triangles. If painting by hand, use a detail brush and steady hand to achieve the hatched lines inside the triangles as shown in the image. -
Bisque fire:
Allow the cup to dry completely, which usually takes a few days depending on humidity. Fire the piece in a bisque kiln to prepare it for the final glazing. -
Wax the exposed clay:
Apply wax resist to the very bottom inch of the cup (the raw clay area) and the cream-colored band you already decorated. This prevents the dark blue glaze from adhering to these spots. -
Glaze the interior:
Pour a deep blue glaze into the interior of the cup, swirl it to coat the entire inside surface, and pour out the excess immediately. -
Glaze the lower exterior:
Dip the bottom half of the cup into the blue glaze, or carefully brush it on. The wax resist on the bottom will keep the foot clean, but you want the blue to cover the section just below the cream band. -
Add lower details:
I like to wait for the blue glaze to dry to a powdery finish, then carefully scratch through it or paint over it with a wax resist to create the dots and triangles on the lower dark band. -
Clean the foot:
Use a damp sponge to wipe any stray glaze off the bottom foot ring and the waxed areas to ensure sharp, clean lines. -
Final firing:
Fire the cup to the maturity temperature of your clay and glaze (likely Cone 5 or 6). Allow the kiln to cool naturally before removing your finished piece.
Make It a Set
Instead of identical cups, vary the geometric band on each piece. Try a band of circles, squares, or diamonds on the cream section to create a cohesive but unique collection.
Enjoy your morning coffee in a custom vessel that feels as good as it looks
Oversized Twisted Coil Handle Cup
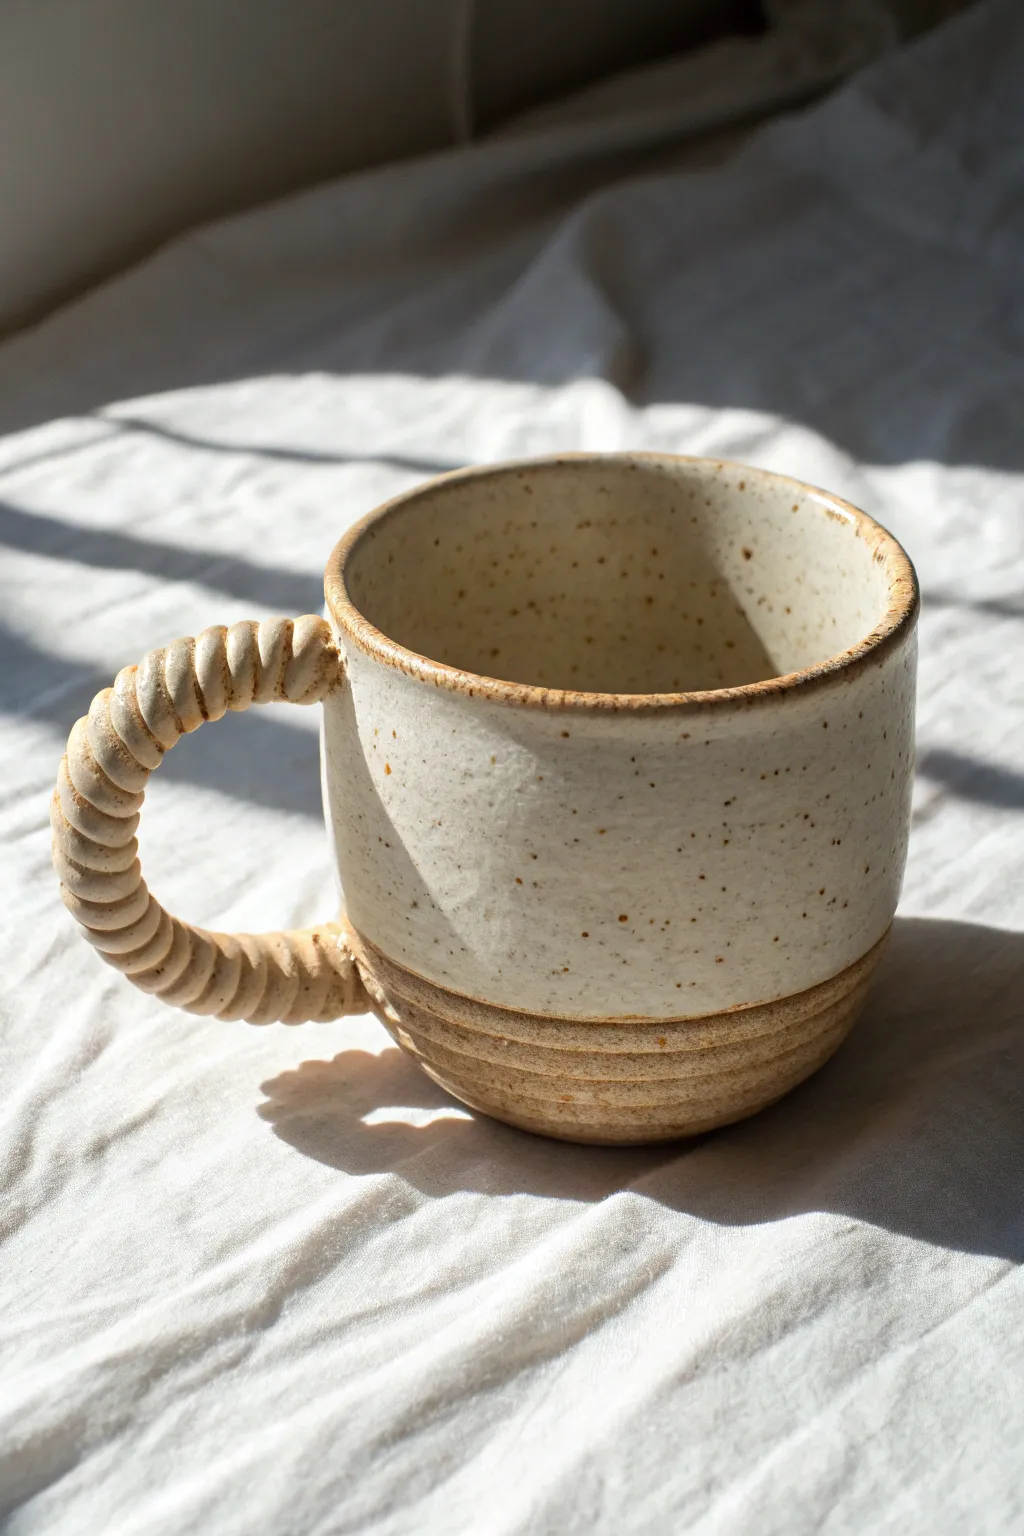
This charming ceramic mug combines rustic textures with a unique sculptural element. Featuring a raw, grooved base and a creamy speckled glaze, its standout feature is the oversized, twisted coil handle that adds both visual interest and a comfortable grip.
How-To Guide
Materials
- Speckled stoneware clay (mid-fire)
- Potter’s wheel
- Throwing tools (sponge, needle tool, rib)
- Wire cutter
- Trimming tools
- Serrated rib or scoring tool
- Slip
- Wooden modeling tool
- Creamy white speckle glaze
Step 1: Throwing the Body
-
Center the clay:
Start with a ball of well-wedged speckled stoneware clay on your wheel. Center it firmly, creating a wide, stable base that will eventually become the grooved bottom section. -
Open and pull:
Open the clay and pull up the walls to form a cylinder. Aim for a slightly wider base that tapers very subtly toward the rim, maintaining an even wall thickness. -
Define the base section:
Using a wooden rib or a modeling tool, gently press into the clay about one-third of the way up from the bottom to create a subtle demarcation line where the glaze will eventually stop. -
Create the grooves:
While the wheel is spinning slowly, use the rounded edge of a wooden tool or your finger to press three to four distinct horizontal grooves into the bottom third of the cup. These should be deep enough to be tactile but not compromise the wall’s integrity. -
Smooth the rim:
Compress the rim with a chamois or a damp sponge to ensure it is smooth and pleasant against the lips. Cut the pot from the bat with a wire tool.
Step 2: Crafting the Handle
-
Roll coils:
Once the mug body is leather-hard, roll out two long, even coils of clay on a table. They should be roughly the thickness of a pencil, as they will double in bulk when twisted. -
Twist the rope:
Lay the two coils side-by-side. Gently twist them around each other to create a tight rope pattern. I find rolling them together on the table with a flat palm helps keep them even. -
Shape the arch:
Cut a section of your twisted rope long enough for an oversized handle. Bend it into a generous ‘C’ shape and let it stiffen slightly so it holds its curve. -
Score and slip:
Score the attachment points on the mug body—one near the rim and one near the grooved base. Score the ends of the handle as well, and apply a generous amount of slip. -
Attach firmly:
Press the handle firmly onto the mug. Use a small wooden tool to smooth the clay at the connection points, blending the very ends of the rope into the body without losing the twisted definition.
Twist Tip
When rolling your two coils together, try twisting them in the opposite direction of the roll first. This creates tension that makes the ‘rope’ look tighter and more defined.
Step 3: Finishing and Glazing
-
Slow drying:
Cover the mug loosely with plastic to let the handle and body dry at the same rate. This prevents cracking at the connection points. -
Bisque fire:
Once bone dry, fire the piece to bisque temperature (usually Cone 04 or 06) to prepare it for glazing. -
Wax the base:
Apply wax resist to the bottom of the mug and up the sides to cover the entire grooved section. This ensures the raw clay texture remains visible. -
Dip into glaze:
Dip the mug into a creamy, speckled white glaze. The wax will repel the glaze from the bottom section, creating the clean line you see in the image. -
Clean up:
Wipe away any rogue glaze beaded on the waxed area with a damp sponge. -
Final firing:
Fire the mug to maturity (Cone 5 or 6 depending on your clay and glaze). The heat will melt the glaze into a smooth, glossy finish that contrasts beautifully with the matte, grooved base.
Make it Yours
Experiment with the number of strands! Try braiding three thinner coils instead of twisting two for a more intricate handle design.
Enjoy your morning coffee in a mug that feels as good to hold as it looks
Cat Face Cup With 3D Ears

This charming ceramic cup features a minimalist, sleepy cat face painted onto a warm, speckled stoneware base. Its slight taper and smooth finish make it perfect for cozy mornings or holding a small succulent.
Detailed Instructions
Materials
- Speckled stoneware clay (approx. 1 lb)
- Pottery wheel (or rolling pin for hand-building)
- Rib tool
- Sponge
- Wire cutter
- Needle tool
- Underglaze (Rust orange/terracotta)
- Underglaze pencil or fine liner brush (Black)
- Clear transparent glaze (food safe)
- Paintbrushes (small detail brush)
- Kiln
Step 1: Shaping the Vessel
-
Prepare the Clay:
Begin by thoroughly wedging your speckled stoneware clay to remove air bubbles and ensure even consistency. Form it into a rough ball about the size of a large orange. -
Center and Open:
Throw the clay onto the wheel head and center it. Open the clay up, creating a flat floor about 3 inches wide. Compress the floor with your fingers or a sponge to prevent cracking later. -
Pull the Walls:
Slowly pull up the walls of the cylinder. Aim for an even thickness of about 1/4 inch. As you pull, gently collar the clay inward slightly to create a very subtle curve that narrows just a tiny bit towards the rim. -
Refine the Shape:
Use a rib tool on the outside while supporting the inside with your hand to smooth the surface and define that gentle, rounded belly shape. The cup should look sturdy but elegant. -
Finish the Rim:
Take a small piece of chamois leather or a damp sponge and gently compress the rim to round it off smoothly. This ensures it feels comfortable against the lips. -
Wire Off:
Run a wire cutter underneath the pot to separate it from the wheel head. Let it dry to a leather-hard state before trimming.
Step 2: Trimming and Decorating
-
Trim the Foot:
Once leather-hard, center the cup upside down on the wheel. Trim away excess clay from the bottom create a clean foot ring or a smooth, flat bottom, depending on your preference. -
Wipe Down:
Use a barely damp sponge to wipe the surface smooth, removing any trimming marks or rough texture. This provides a clean canvas for the illustration. -
Sketch the Face:
Lightly sketch the placement of the ears, eyes, and nose with a regular pencil. The graphite will burn off in the kiln, so don’t worry about mistakes. -
Paint the Ears:
Using a small detail brush and rust-colored underglaze, fill in two triangles for the inner ears. I like to leave a small dot of unpainted clay in the center of the triangles for a cute, stylistic touch. -
Paint the Nose:
Paint a small, inverted triangle for the nose using the same rust underglaze. Keep it centered between the eyes. -
Draw the Details:
Use a black underglaze pencil or a very fine liner brush with black underglaze to draw the closed ‘sleeping’ eyes (two curved U-shapes), the small mouth, and three whiskers on each cheek. -
Add Decorative Dots:
To mimic the speckled clay texture even more, or just to add interest, you can flick a toothbrush with thinned underglaze lightly over the unpainted areas, or paint tiny random dots manually.
Smudge Alert
If using an underglaze pencil, be careful not to smear the lines when applying the clear glaze. Dabbing the glaze over the drawing first, rather than brushing, helps prompt clarity.
Step 3: Glazing and Firing
-
Bisque Fire:
Once the cup is bone dry, load it into the kiln for a bisque firing (usually Cone 04). This hardens the clay and prepares it for glaze. -
Apply Clear Glaze:
Dip the bisqued cup into a clear, glossy, food-safe glaze. Ensure the coating is even. Shake off any excess drips immediately. -
Wipe the Foot:
Crucially, wipe the bottom of the cup (and up the side about 1/4 inch) completely clean of glaze with a wax resist or wet sponge to prevent it from sticking to the kiln shelf. -
Glaze Fire:
Fire the cup again to the maturity temperature of your specific clay body and glaze (typically Cone 5 or 6 for stoneware). -
Cool and Sand:
Allow the kiln to cool completely before unloading. Check the bottom for any sharp burrs and sand them smooth with wet sandpaper if necessary.
Go 3D
Instead of just painting the ears, pinch small triangles of clay and score-and-slip them onto the rim before drying for true 3D ears that poke up from the cup edge.
Now fill your adorable new creation with coffee or tea and enjoy the cozy vibes.
Frog Hug Cup With Wraparound Arms
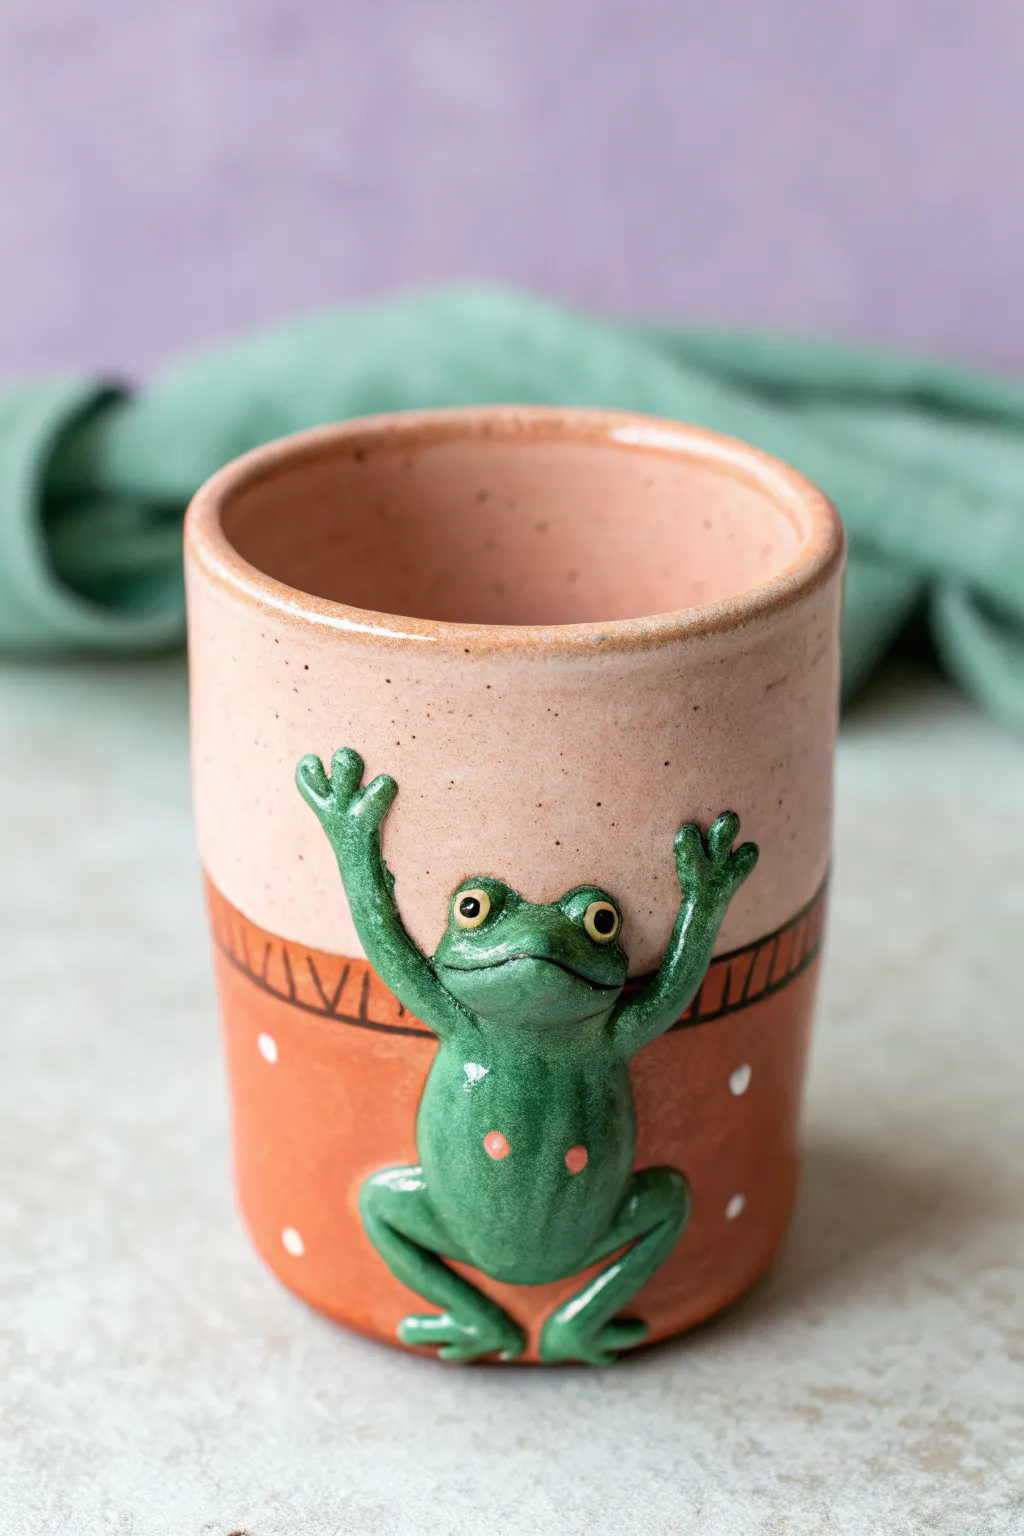
This charming ceramic project features a whimsical frog sculpture that seems to climb right up the side of a simple tumbler. With its tactile, protruding limbs and cheerful expression, this cup adds a playful touch of nature to your morning coffee routine.
Step-by-Step Tutorial
Materials
- Stoneware clay suitable for wheel or hand-building
- Pottery wheel (optional, for the base cup)
- Scoring tool or needle tool
- Slip (clay slurry)
- Modeling tools (wooden and metal)
- Sponge
- Underglazes: Dark Green, Light Green, Terra Cotta, Cream/Pink
- Clear transparent glaze
- Small liner brushes
- Fan brush
- Kiln
Step 1: Forming the Base Vessel
-
Create the cylinder:
Begin by throwing a simple, straight-sided cylinder on the potter’s wheel. If you prefer hand-building, roll out a slab and form a seamless tube, attaching a circular base. Aim for a wall thickness of about 1/4 inch so it’s sturdy enough to support the added weight. -
smooth the surface:
Once leather hard, trim the bottom and use a smooth metal rib to clean up the exterior walls. You want a nice, even canvas for your frog friend. -
Mark the position:
Lightly sketch the outline of where the frog’s body will sit using a needle tool. Center it vertically, leaving room for the arms to reach up and legs to crouch down.
Step 2: Sculpting the Frog
-
Shape the body:
Roll a small oval ball of clay for the frog’s main body. Flatten the back slightly so it sits flush against the cup. -
Attach the torso:
Score the marked area on the cup and the back of the frog body aggressively. Apply slip and press the body firmly onto the cup wall, smoothing the edges into the cup surface to ensure a strong bond. -
Create the limbs:
Roll four coils for the limbs. The arms should be longer and thinner, while the legs should be thicker at the ‘thigh’ and taper down. Position the arms reaching upward and the legs bent in a crouching frog pose. -
Attach and blend limbs:
Score and slip the attachment points for the limbs. Blend the clay from the shoulders and hips seamlessly into the main body using a modeling tool so it looks like one cohesive creature. -
Sculpt the hands and feet:
Flatten the ends of the coils to make the feet and hands. Use a needle tool or small knife to cut distinct toes and fingers, gently rounding the tips. -
Define the face:
Add small balls of clay for the eyes at the top of the head. Use a tool to carve a wide, happy smile and define the brow ridges. -
Slow drying:
Cover the piece loosely with plastic to dry very slowly. Because the frog adds thickness, drying too fast can cause cracks around the attachment points.
Crack Prevention
Add a tiny hole to the frog’s hollow body or build it solid. If solid, poke a hidden vent hole from the INSIDE of the cup into the thickest part of the frog to prevent explosions.
Step 3: Glazing and Decoration
-
Bisque fire:
Once bone dry, fire the piece to bisque temperatures (usually Cone 04) to prepare it for glazing. -
Base glazing:
Apply a speckled cream or pale pink glaze to the upper half of the cup interior and exterior. I usually dip the top half carefully or brush it on for control. -
Bottom section color:
Paint the bottom half of the cup with a terra cotta colored underglaze or glaze. Use a steady hand to create a clean horizontal line where it meets the cream color. -
Detailing the divide:
Using a fine liner brush and dark brown or black underglaze, paint a thin decorative band with vertical hatch marks separating the top and bottom colors. -
Painting the frog:
Coat the entire frog body in a rich, leafy green underglaze. Ensure you get into the crevices between the fingers and under the chin. -
Adding frog details:
Dot the eyes with yellow and add tiny black pupils. Add small pink or orange spots to the frog’s belly and back for texture. -
Polka dots:
Using the back of a paintbrush dipped in white underglaze, stamp small polka dots randomly across the terra cotta section. -
Clear coat and fire:
If you used underglazes for the frog and bottom section, apply a clear transparent glaze over the entire piece (except the bottom foot). Fire to the final maturity temperature of your clay body.
Level Up: Texture
Before glazing, gently stamp the clay of the upper cup section with a coarse sponge or texture mat to enhance the speckled look and add tactile contrast to the smooth frog.
Enjoy your morning beverage with a cheerful amphibian companion clinging to your mug
Mountain Relief Camp Cup
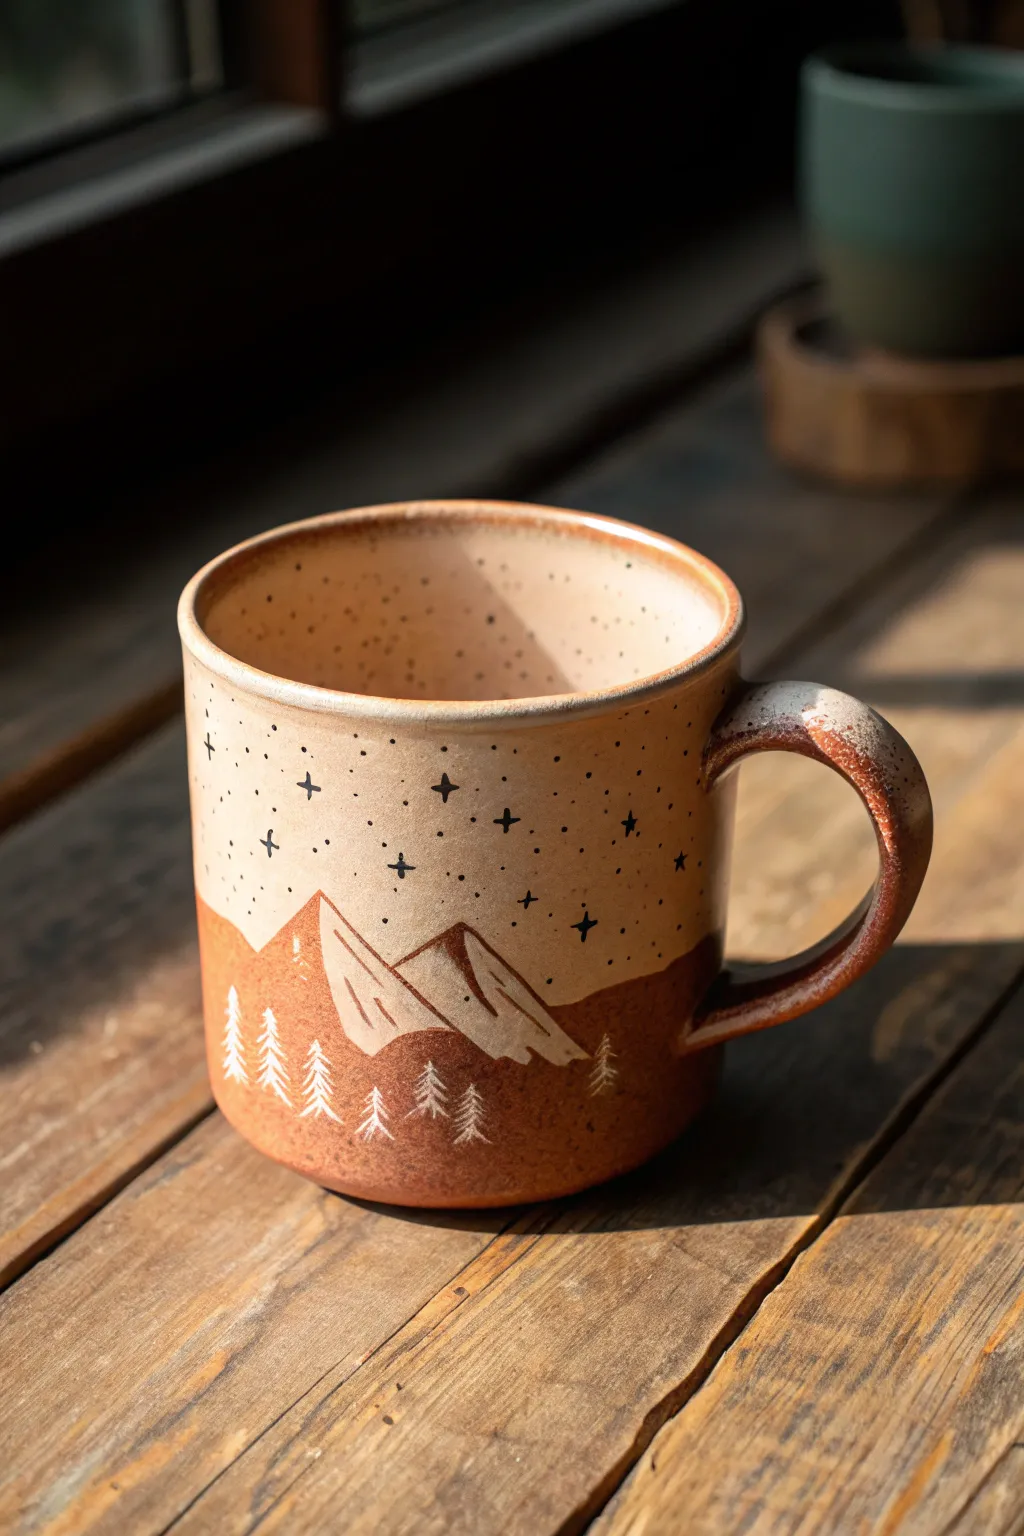
This charming ceramic mug brings the great outdoors to your morning coffee with its rustic two-tone finish and playful mountain scene. Using sgraffito techniques on soft clay, you’ll create textured evergreen trees and a starry sky that feels perfectly cozy.
Step-by-Step Guide
Materials
- Stoneware clay body (speckled buff recommended)
- Pottery wheel or slab-rolling equipment
- Engobes or underglazes (creamy beige and rust-brown)
- Needle tool or sgraffito loop tool
- Small fine-point liner brush
- Sponge
- Clear transparent glaze
- Rib tool
- Cutting wire
Step 1: Forming the Mug
-
Form the cylinder:
Begin by throwing a cylinder on the wheel with about 1 pound of speckled clay. Aim for straight walls and a flat bottom to mimic the camp cup style. Alternatively, hand-build a cylinder using a textured slab. -
Refine the rim:
While the wheel is spinning slowly, compress the rim with a chamois or your sponge to ensure it is smooth and pleasant to drink from. -
Trim the base:
Once leather-hard, trim the bottom of the mug to create a clean foot ring. This elevates the straight-sided form. -
Pull the handle:
Pull a medium-thick strap handle from a lug of clay. Let it set up briefly until it can hold an arch shape without collapsing. -
Attach the handle:
Score and slip the contact points on both the mug body and handle. Attach firmly, smoothing the seams for a seamless connection. I prefer a large, ear-shaped handle for that classic camp mug feel.
Blurred Lines?
If your sgraffito lines look messy or ragged, the clay might be too wet. Wait 30 minutes for it to stiffen slightly, which yields crisper carvings.
Step 2: Creating the Landscape
-
Apply base underglaze:
Paint the bottom third of the mug’s exterior with two coats of rust-brown underglaze. Make the top edge irregular to suggest rolling hills. -
Add the sky:
Paint the upper two-thirds with a creamy beige underglaze, slightly overlapping the brown section to blend the horizon line. -
Outline the mountains:
Using a contrasting dark underglaze or a fine brush, paint two large triangular mountain peaks intersecting the horizon line where the colors meet. -
Detail the peaks:
Fill the mountain shapes with the rust color, but leave jagged areas of the beige underglaze showing near the top to represent snowcaps. -
Sgraffito the trees:
Once the underglaze is dry to the touch but the clay is still leather hard, use your needle tool to scratch through the rust-colored base. Create rows of tiny pine trees by scratching a vertical line and small downward diagonal dashes. -
Carve the stars:
On the upper beige section, use the needle tool to gently poke small shallow holes for dots and scratch small crosses for twinkling stars. -
Ink the stars:
Take a very fine brush with black underglaze and carefully dab it into the star carvings you just made to make them pop against the light background.
Step 3: Glazing and Firing
-
Bisque fire:
Allow the mug to dry completely (bone dry) before loading it into the kiln for a bisque fire to cone 04. -
Wax the foot:
Apply wax resist to the bottom foot ring to prevent glaze from sticking to the kiln shelf. -
Interior glazing:
Pour clear glaze into the mug, swirl it around to coat the entire interior, and pour out the excess. -
Exterior glazing:
Dip the exterior of the mug quickly into a translucent or clear matte glaze. A satin finish works beautifully to preserve the rustic tactile quality. -
Final wipe down:
Use a damp sponge to clean any stray glaze droplets off the foot ring. -
Glaze fire:
Fire the mug to cone 6 (or the temperature appropriate for your specific clay body) to finish the piece.
Snowy Peaks
Mix a tiny bit of white underglaze onto the mountain tops before glazing to make the snow caps pop brighter against the speckled clay body.
Enjoy your warm beverage in a mug that captures the serene beauty of a mountain campsite
Message-in-Relief Clay Cup
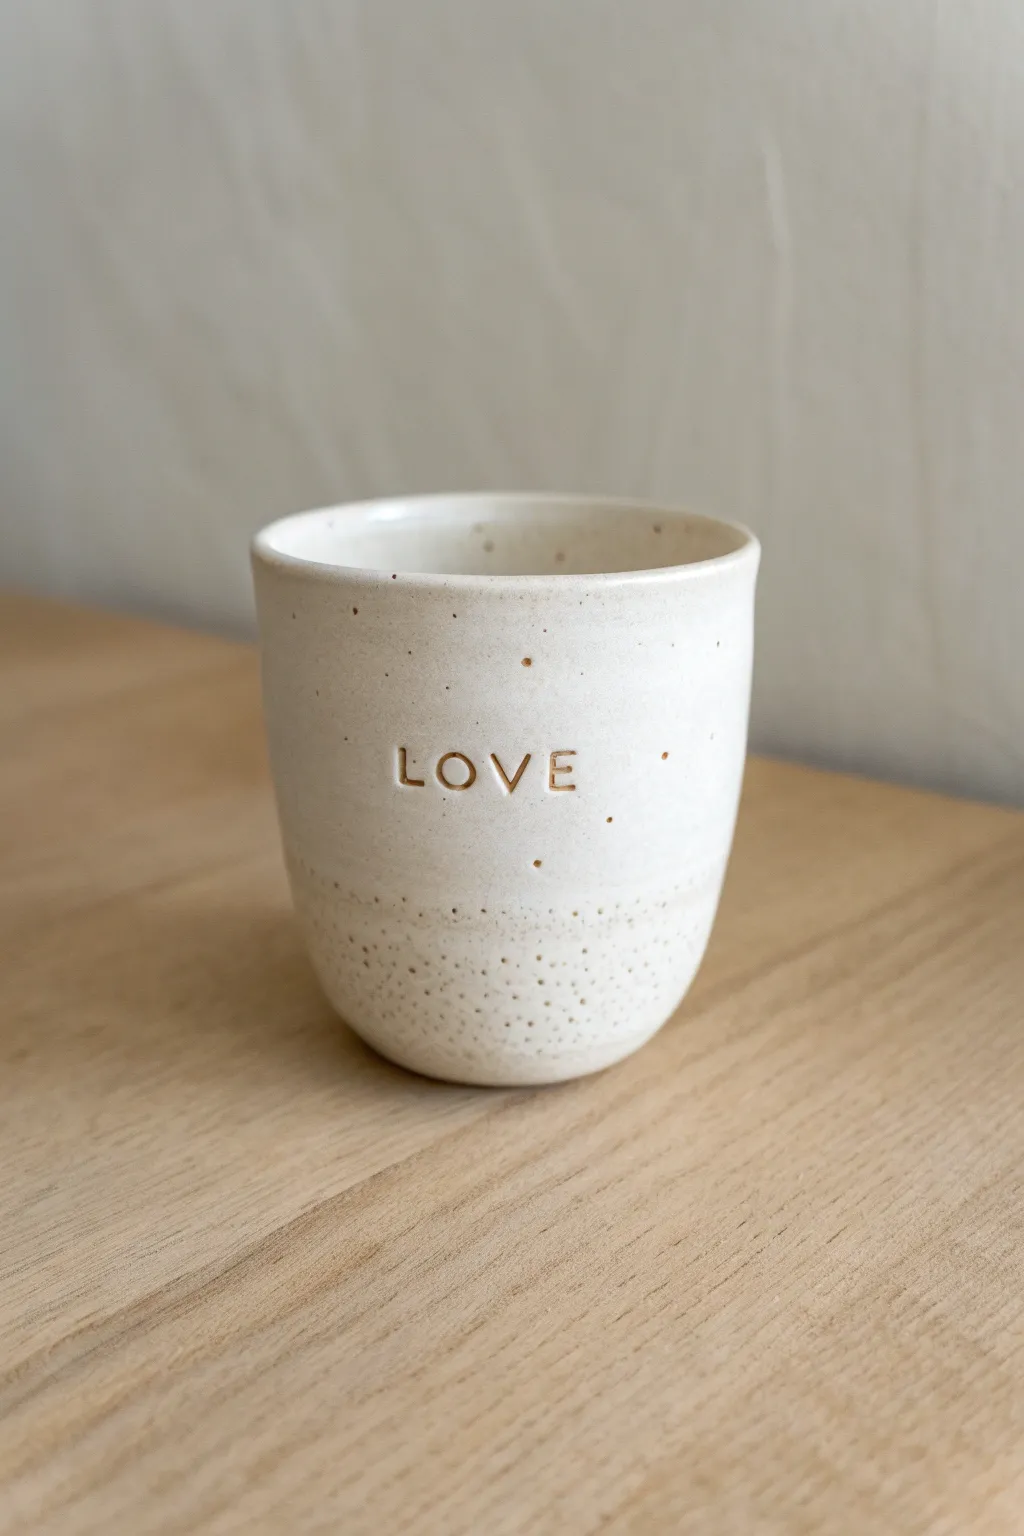
Create a heartfelt piece of functional art with this simple yet elegant stamped clay cup. Featuring a tactile speckled finish and a personalized message pressed deep into the surface, this project captures the charm of handmade modern ceramics.
Step-by-Step Tutorial
Materials
- White stoneware clay (speckled variety recommended)
- Letter stamp set (small sans-serif font)
- Small rolling pin
- Pottery needle tool or knife
- Rib tool (kidney scraper)
- Cup template or ruler
- Slip (liquid clay)
- Scoring tool or old fork
- Sponge
- Clear or white semi-matte glaze
- Kiln (or access to firing services)
Step 1: Preparing the Slab
-
Roll the clay:
Begin by wedging your speckled stoneware clay to remove air bubbles, then roll it out into a smooth slab about 1/4 inch thick. Try to keep the thickness consistent for even drying. -
Smooth surfaces:
Use a rib tool to compress the clay on both sides. This not only smooths the texture but aligns the clay particles, which helps prevent warping later. -
Cut the cup wall:
Using a template or ruler, cut a long rectangle that will serve as the walls of your cup. A standard size is roughly 10 inches long by 3.5 inches tall, but you can adjust based on your desired cup size. -
Stamp the message:
While the clay is flat, position your letter stamps in the center of the rectangle. Press ‘LOVE’ firmly into the clay. I find it helpful to hover the stamps first to ensure spacing is centered before committing to the impression. -
Cut the base:
Use a circular cutter or trace a circle onto the remaining slab to create the floor of your cup. Make sure the circumference matches the length of your rectangular wall.
Warped Walls?
If your cylinder keeps slumping into an oval, stuffing the inside with crumbled newspaper while it dries can help hold the perfect round shape.
Step 2: Assembling the Form
-
Score the edges:
Take your scoring tool and roughen up the short ends of the rectangular slab and the outer edge of the circular base. -
Apply slip:
Dab a generous amount of slip onto all scored areas. This acts as the glue that will bond your pieces together. -
Form the cylinder:
Carefully lift the rectangular slab and curve it into a cylinder, bringing the two short ends together. -
Seal the seam:
Press the overlapping ends together firmly. Smooth the seam inside and out with your finger or a tool so the join becomes invisible. -
Attach the base:
Place the cylinder on top of the scored circular base. Gently press down to connect them. -
Blend the bottom:
Use a modeling tool to drag a little clay from the wall down onto the base to lock them together, then smooth over the connection line with a damp sponge.
Step 3: Finishing Touches
-
Shape the rim:
Run a damp sponge or piece of chamois leather over the top rim to round it off. A sharp rim can be uncomfortable to drink from, so make sure it’s soft and curved. -
Clean the letters:
Check your ‘LOVE’ impression. If there are any jagged crumbs of clay inside the letters, gently pick them out with a needle tool. -
Enhance texturing:
To mimic the bottom texture in the photo, gently tap the lower third of the cup with a stiff bristle brush or a textured sponge to create a subtle pitted effect. -
Dry slowly:
Loosely cover the cup with plastic and let it dry slowly over a few days to the bone-dry stage. This prevents cracking. -
Bisque fire:
Fire the piece in a kiln to cone 04 (or your clay’s specific bisque temperature). -
Glaze application:
Dip the cup into a clear or white semi-matte glaze. The glaze should pool slightly in the stamped letters, highlighting them. -
Final fire:
Fire the cup again to the maturity temperature of your clay and glaze (usually cone 5 or 6 for stoneware).
Gold Inlay
After the final firing, paint liquid gold luster into the ‘LOVE’ letters and fire a third time for a luxurious, metallic typographic detail.
Enjoy your morning coffee in a vessel that reminds you of what matters most