Painting a clay cup is one of my favorite ways to turn an everyday sip into something that feels totally yours. Here are a bunch of clay cup painting ideas—from classic, easy patterns to artsy designs that look impressive without being fussy.
Classic Polka Dots All Over
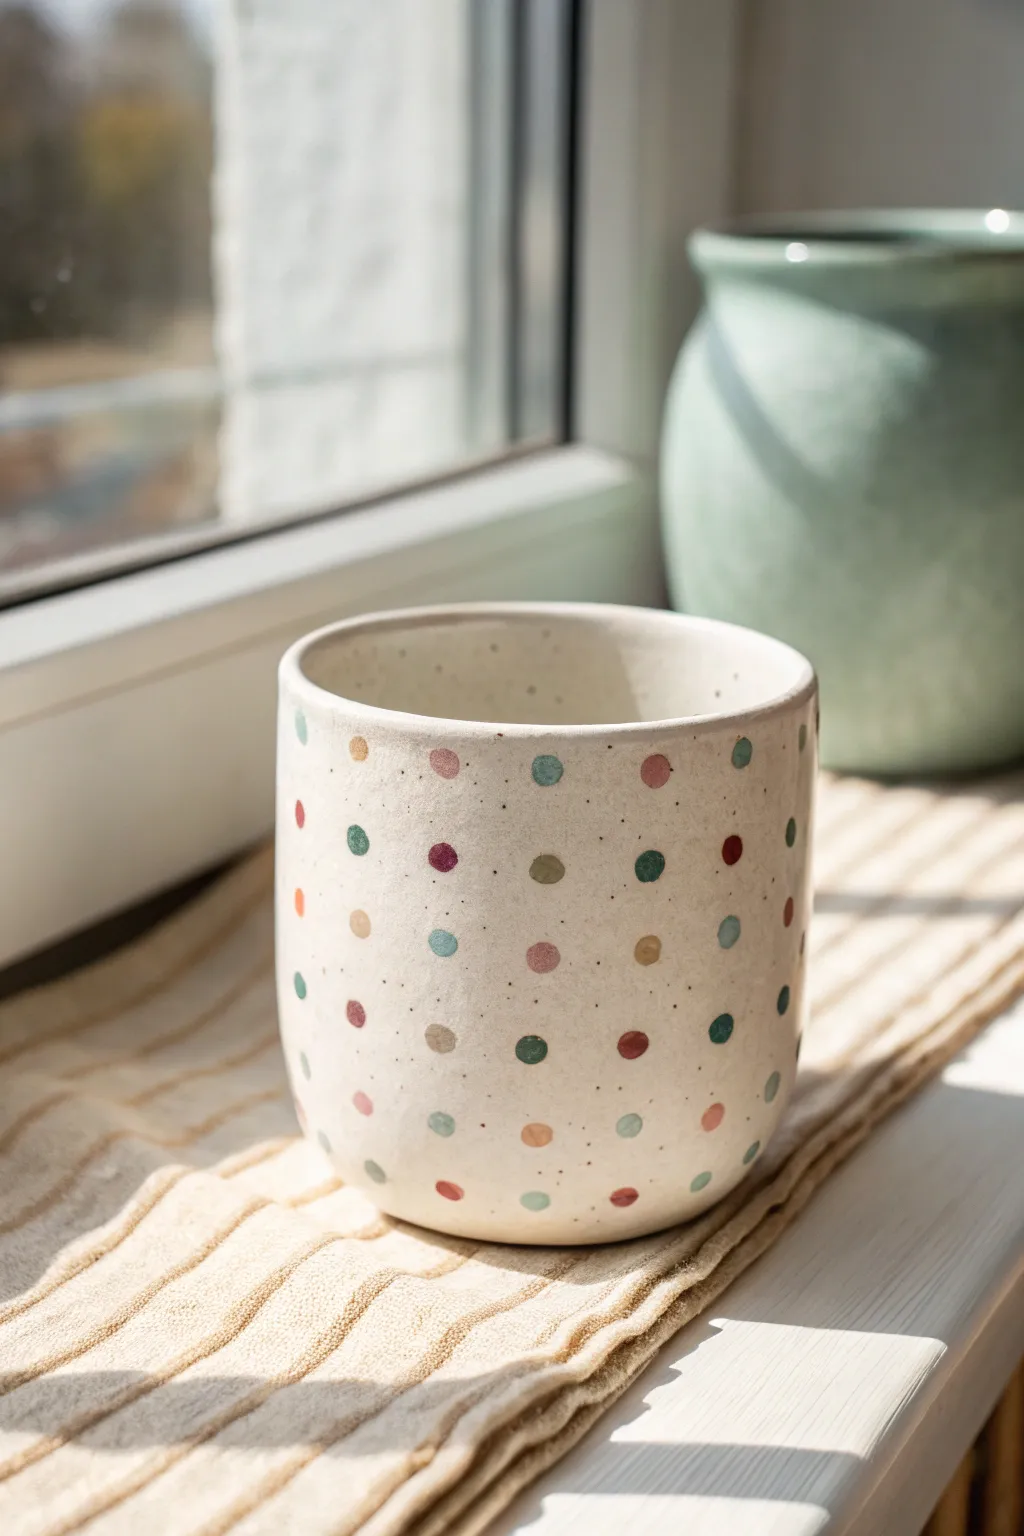
This charming design combines the rustic appeal of speckled ceramic with the playful joy of candy-colored polka dots. It’s a perfect beginner project that looks deceptively professional thanks to the subtle splatter technique and harmonious color palette.
Step-by-Step Guide
Materials
- Bisque-fired ceramic cup (rounded shape)
- Underglazes (muted red, teal, sage green, mustard yellow, navy blue, light pink)
- Clear transparent glaze
- Small round sponge dabbers or the back of a paintbrush
- Old toothbrush
- Water container
- Palette for mixing paint
- Soft fan brush (for clear glaze)
- Kiln (or access to a firing service)
Step 1: Preparation & Base
-
Clean Your Bisque:
Start by wiping your bisque-fired cup with a slightly damp sponge. This removes any kiln dust or oils from your hands that might repel the glaze. -
Mix the Base Coat:
If you want a creamy background instead of the raw white clay, mix a very dilute wash of a cream or off-white underglaze. It should be the consistency of skim milk. -
Apply the Base Wash:
Brush this thin wash over the entire exterior. I prefer to do this quickly so it soaks in unevenly, creating a more organic, natural clay look. -
Create the Speckles:
Dilute a small amount of dark brown or black underglaze with water until it’s very fluid. -
Splatter Technique:
Dip an old toothbrush into the dark mixture. pointing the bristles toward the cup, run your thumb across the bristles to flick tiny specks onto the surface. Rotate the cup to get even coverage. -
Let it Dry:
Allow the base wash and speckles to dry completely. The surface should feel chalky and room temperature to the touch.
Smudged Dots?
If a dot smears while handling, wait for it to fully dry. Then, gently scrape the mistake away with a craft knife or needle tool before reapplying.
Step 2: Painting Polka Dots
-
Prepare Your Palette:
Pour small coin-sized drops of your colorful underglazes onto your palette: muted red, teal, sage green, mustard, navy, and pink. -
Choose Your Tool:
Select a tool for the dots. The flat end of a brush handle works perfectly for small, consistent dots, while a small foam pouncer creates larger circles. -
Start with the Dominant Color:
Dip your tool into the teal underglaze. Press firmly onto the cup to create random dots, spacing them out generously. Leave plenty of room for other colors. -
Add the Second Color:
Wipe your tool clean, then switch to the muted red. Place these dots in the gaps, trying not to align them in perfect rows. -
Layer in Neutrals:
Using the mustard yellow or tan shade, add more dots. These neutral tones help balance the brighter colors and give the piece a vintage feel. -
Fill the Gaps:
Continue adding the remaining colors (sage green, navy, pink) one by one. Step back occasionally to ensure the distribution feels random but balanced. -
Check Density:
Look for large empty spaces. If a spot feels too empty, add a small dot of a color that isn’t already nearby. -
Clean Up Edges:
If any dots are too thick or have a raised peak in the center, gently tap them down with a clean, dry fingertip once the gloss has faded slightly.
Placement Pro Tip
Don’t arrange dots in a grid. Form imaginary triangles with same-colored dots across the surface to keep the eye moving and the pattern dynamic.
Step 3: Finishing & Firing
-
Dry Thoroughly:
Let all the underglaze dots dry completely. They should be matte and hard to the touch. -
Apply Clear Glaze:
Using a soft fan brush, apply 2-3 coats of clear transparent glaze over the entire cup (inside and out), letting each coat dry in between. -
Inspect Coverage:
Ensure no underglaze is exposed, as unglazed areas will remain rough after firing. -
Wipe the Foot:
Use a damp sponge to meticulously wipe all glaze off the bottom ring (foot) of the cup so it doesn’t stick to the kiln shelf. -
Final Fire:
Place the cup in the kiln for a glaze firing according to your clay and glaze specifications (usually Cone 5 or 6 for stoneware).
Once fired, fill your new favorite mug with coffee and enjoy the cheerful morning vibes.


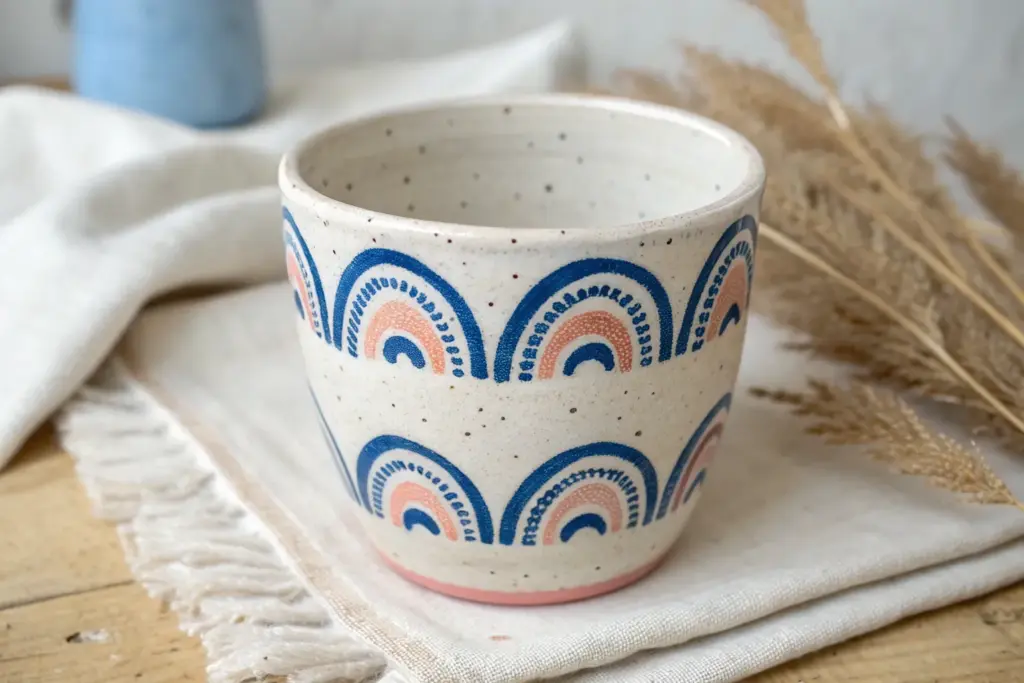
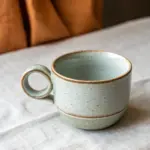
Simple Stripes and Bands
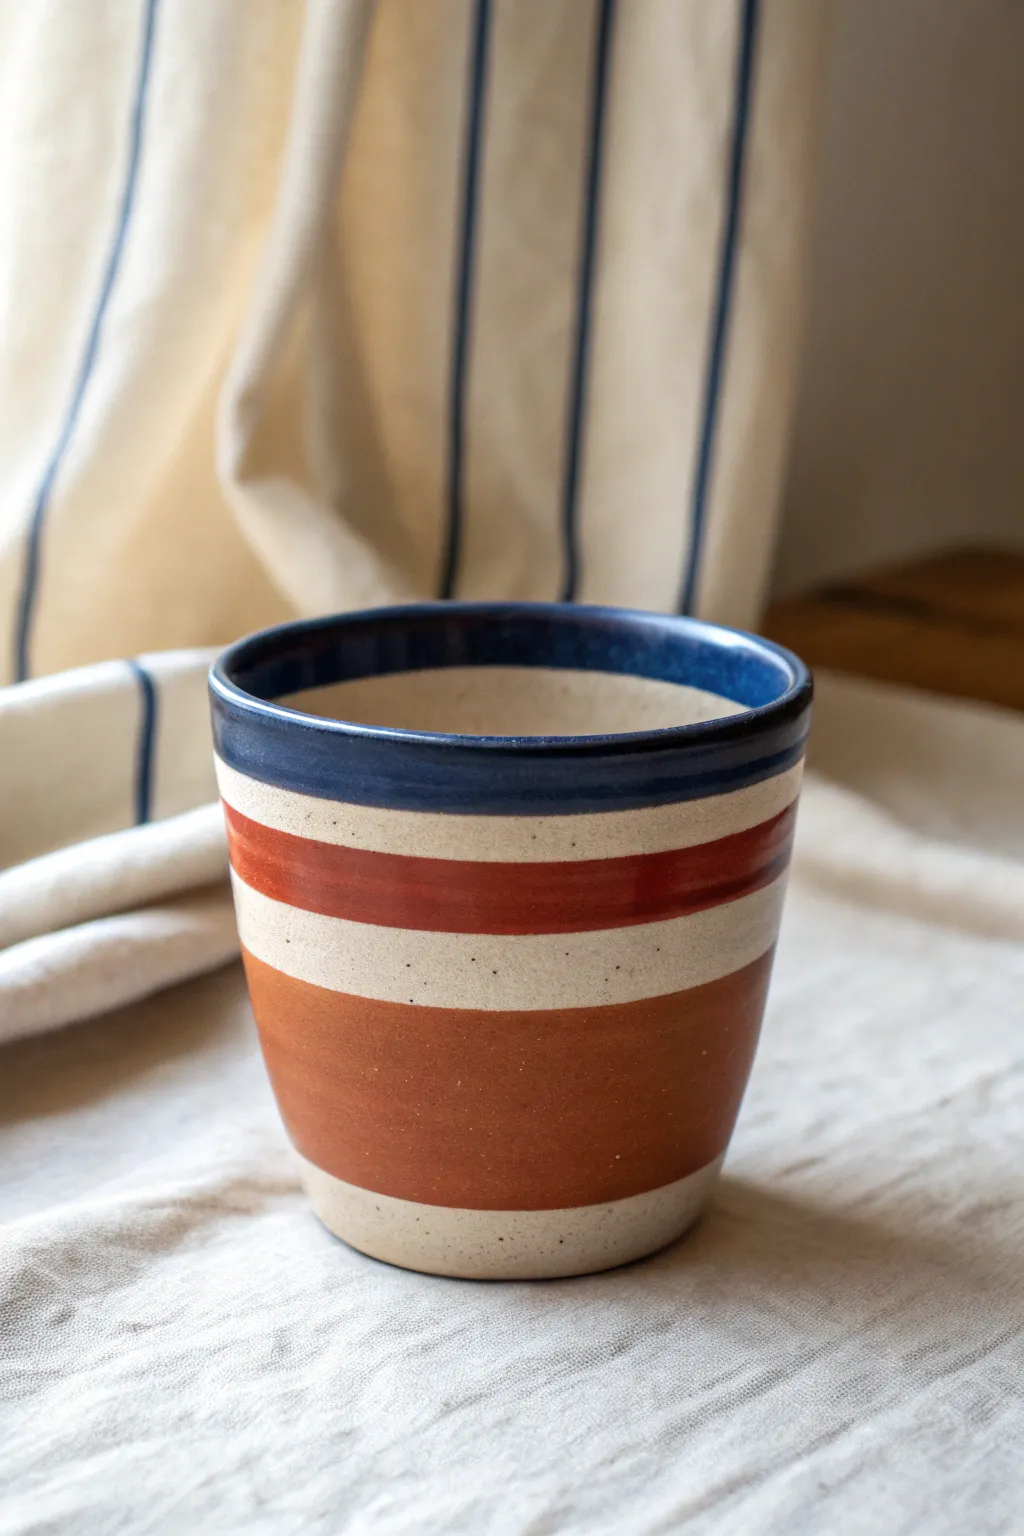
This project combines classic maritime vibes with warm, earthy tones for a cup that feels both modern and rustic. By utilizing the natural speckled finish of the clay as a negative space design element, you create a sophisticated layered look with minimal effort.
Step-by-Step Tutorial
Materials
- Bisque-fired ceramic cup (speckled clay body preferred)
- Underglazes: Navy Blue, Burnt Orange/Rust, Terracotta Brown
- Clear dipping glaze (transparent)
- Potter’s wheel or banding wheel
- Flat shader brush (medium width)
- Fine liner brush
- Clean sponge
- Bowl of water
Step 1: Preparation & Planning
-
Clean surface:
Begin by wiping down your bisque-fired cup with a slightly damp sponge. This removes any kiln dust or oils from your hands that might resist the underglaze. -
Center the piece:
Place your cup upside down or right-side up on the center of your banding wheel. Give the wheel a spin to ensure it is perfectly centered; this is crucial for straight bands. -
Visualize the spacing:
Look at the cup and mentally divide it. You will need space for a thick blue rim, a thin band of raw clay, a medium red stripe, another band of raw clay, and a wide brown bottom section.
Steady Hands Tip
Rest your painting arm on a stack of books or a jar roughly the same height as the cup. This creates a solid anchor for perfect straight lines.
Step 2: Painting the Bands
-
Load the brush:
Start with the Navy Blue underglaze. Load your flat shader brush generously so the color flows smoothly without dragging. -
Apply the rim band:
Spin the banding wheel at a steady, slow pace. Hold your brush hand steady against a support or your other hand, and gently touch the brush to the top rim, letting the wheel’s motion paint the stripe for you. Cover the very top lip and about half an inch down the outside. -
Refine the interior:
While the blue is still on the brush, bring the color just slightly over the inside rim for a finished look. -
Leave negative space:
Leave a gap of unpainted clay about 1/4 inch wide below the blue band. This reveals the beautiful speckled clay body. -
Paint the middle stripe:
Switch to the Burnt Orange underglaze. Using the same spinning technique, paint a band that is slightly thinner than the blue rim, roughly 3/8 of an inch thick. -
Check opacity:
If the first coat looks streaky, wait a minute for the sheen to disappear, then apply a second coat of orange while the wheel spins. -
Second negative space:
Leave a larger gap of raw clay this time—about half an inch. This variation in spacing adds visual interest to the stack of stripes. -
Apply the base band:
Load a larger brush with the Terracotta Brown underglaze. Paint the entire bottom section of the cup, starting from your new line down to about 1/4 inch from the very bottom foot. -
Clean the foot:
Use a damp sponge to wipe away any underglaze that may have strayed onto the very bottom resting foot of the cup to prevent sticking in the kiln.
Level It Up
Before glazing, use a carving tool to gently scratch thin sgraffito lines through the colored bands to reveal the white clay beneath for added texture.
Step 3: Finishing Touches
-
Dry thoroughly:
Let the underglazes dry completely. They should feel chalky and look matte before you proceed. -
Bisque fire (optional):
Depending on your specific underglaze instructions, you may need to do a bisque fire now to set the colors, or you can proceed directly to glazing if using a one-fire method. -
Clear glaze:
Dip the entire cup into a clear transparent glaze. Use a pair of dipping tongs to ensure an even coat inside and out. -
Clean the foot again:
I always double-check the foot ring after dipping. Wipe off every trace of clear glaze from the bottom where it touches the shelf. -
Final fire:
Fire the piece in the kiln according to the clay and glaze temperature specifications (usually Cone 5 or 6 for stoneware).
Enjoy your morning coffee in a cup that perfectly balances bold color with natural textures


Modern Color-Block Clay Cup
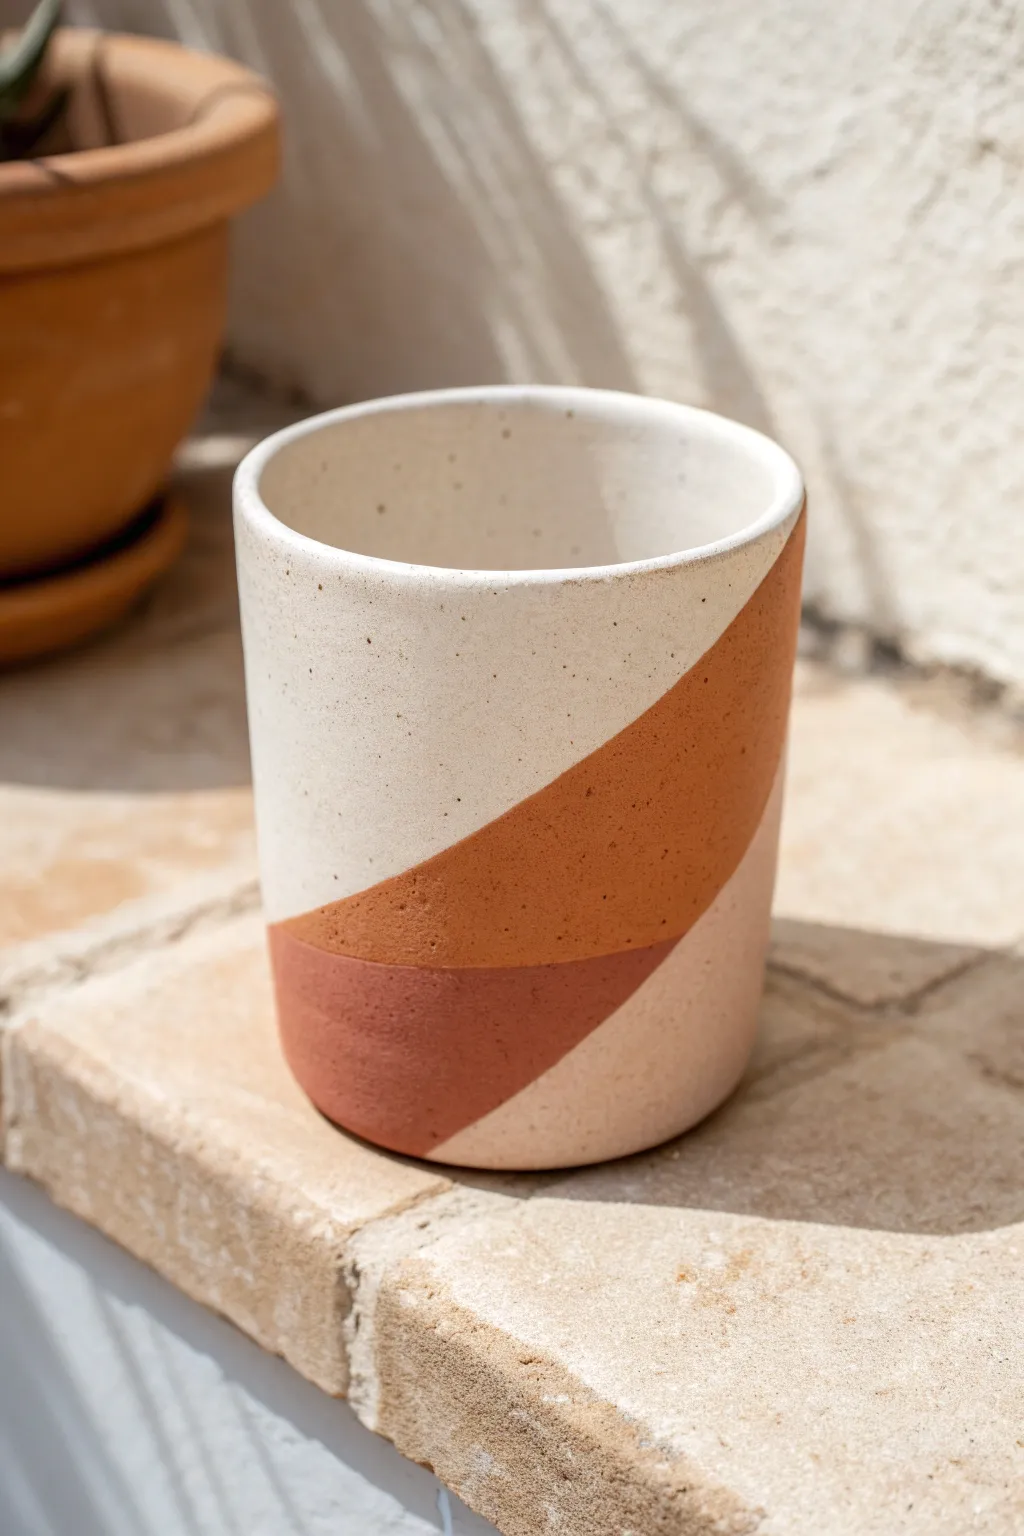
This project transforms a plain ceramic vessel into a modern art piece featuring warm, desert-inspired tones and crisp, geometric curves. The result is a clean, speckled finish that mimics the look of high-end studio pottery.
Step-by-Step
Materials
- Bisque-fired ceramic cup or plain white mug
- Ceramic glaze or acrylic paints (Terracotta, Dark Rust, and Speckled White)
- Painter’s tape or masking tape (flexible width)
- Small flat brush
- Medium round brush
- Pencil
- Clear sealant (if using acrylics) or Clear glaze (if firing)
Step 1: Preparation & Planning
-
Surface Prep:
Begin by wiping down your cup with a damp sponge or cloth to remove any dust or oils. This ensures your paint or glaze adheres perfectly to the surface. -
Drafting the Design:
Lightly sketch your design directly onto the cup using a pencil. For this look, draw two large, sloping curves that dissect the cup diagonally, creating three distinct sections. -
Refining Curves:
Step back and look at your pencil lines. The curves should feel organic and smooth, not jagged. Adjust the lines until the proportions look balanced to your eye.
Clean Lines
Paint bled under the tape? Wait for it to dry completely, then gently scrape the excess away with a craft knife or toothpick for a crisp edge.
Step 2: Blocking the Colors
-
Taping the Top Edge:
Using flexible painters tape, mask off the area above your highest pencil line. Press the tape edge down firmly with your fingernail to prevent any paint from bleeding underneath. -
First Color Application:
Load your flat brush with the Terracotta (medium orange-brown) paint. Apply this color to the large middle section of your design. -
Smoothing the Coat:
Brush in smooth, horizontal strokes. If the coverage looks streaky, let it dry for about 10 minutes and apply a second coat for opacity. -
Removing the First Tape:
While the paint is still slightly tacky but mostly dry, carefully peel away the tape at a 45-degree angle to reveal a sharp line. -
Taping the Lower Section:
Once the middle section is completely dry, apply fresh tape over the bottom edge of that Terracotta shape. This will protect your work while you paint the base. -
Applying the Dark Base:
Use the Dark Rust paint for the bottom-left section. Ensure you paint all the way to the bottom rim for a grounded look. -
Detailing the Base:
Remove the tape carefully. If any edges look rough, use a very fine liner brush with a tiny bit of paint to tidy them up freehand.
Raw Texture
Skip the top clear coat on the colored sections to leave the paint matte. This creates a tactile contrast against the smooth white glazed top.
Step 3: The Speckled Finish
-
White Background:
Paint the remaining large top section with a creamy white base color. I usually need two coats here to cover any raw clay marks. -
Creating Texture:
To achieve the speckled stone look, you can either use a specialty ‘speckled’ paint or create your own. To DIY it, dilute a tiny drop of brown or black paint with water. -
Splatter Technique:
Cover the colored sections with paper or tape to protect them. Load a stiff toothbrush with your diluted dark paint and run your thumb across the bristles to flick tiny specks onto the white area. -
Drying Time:
Allow the entire cup to cure fully. If using acrylics, wait at least 24 hours; if using glaze, follow your kiln firing schedule. -
Sealing the Work:
If you used acrylic paints, finish by applying a coat of clear, food-safe sealant (if intended for drinking) or a matte varnish. This protects the geometric lines from chipping over time.
Enjoy your morning coffee in a cup that feels effortlessly modern and uniquely yours


Tiny Hearts Scattered Like Confetti
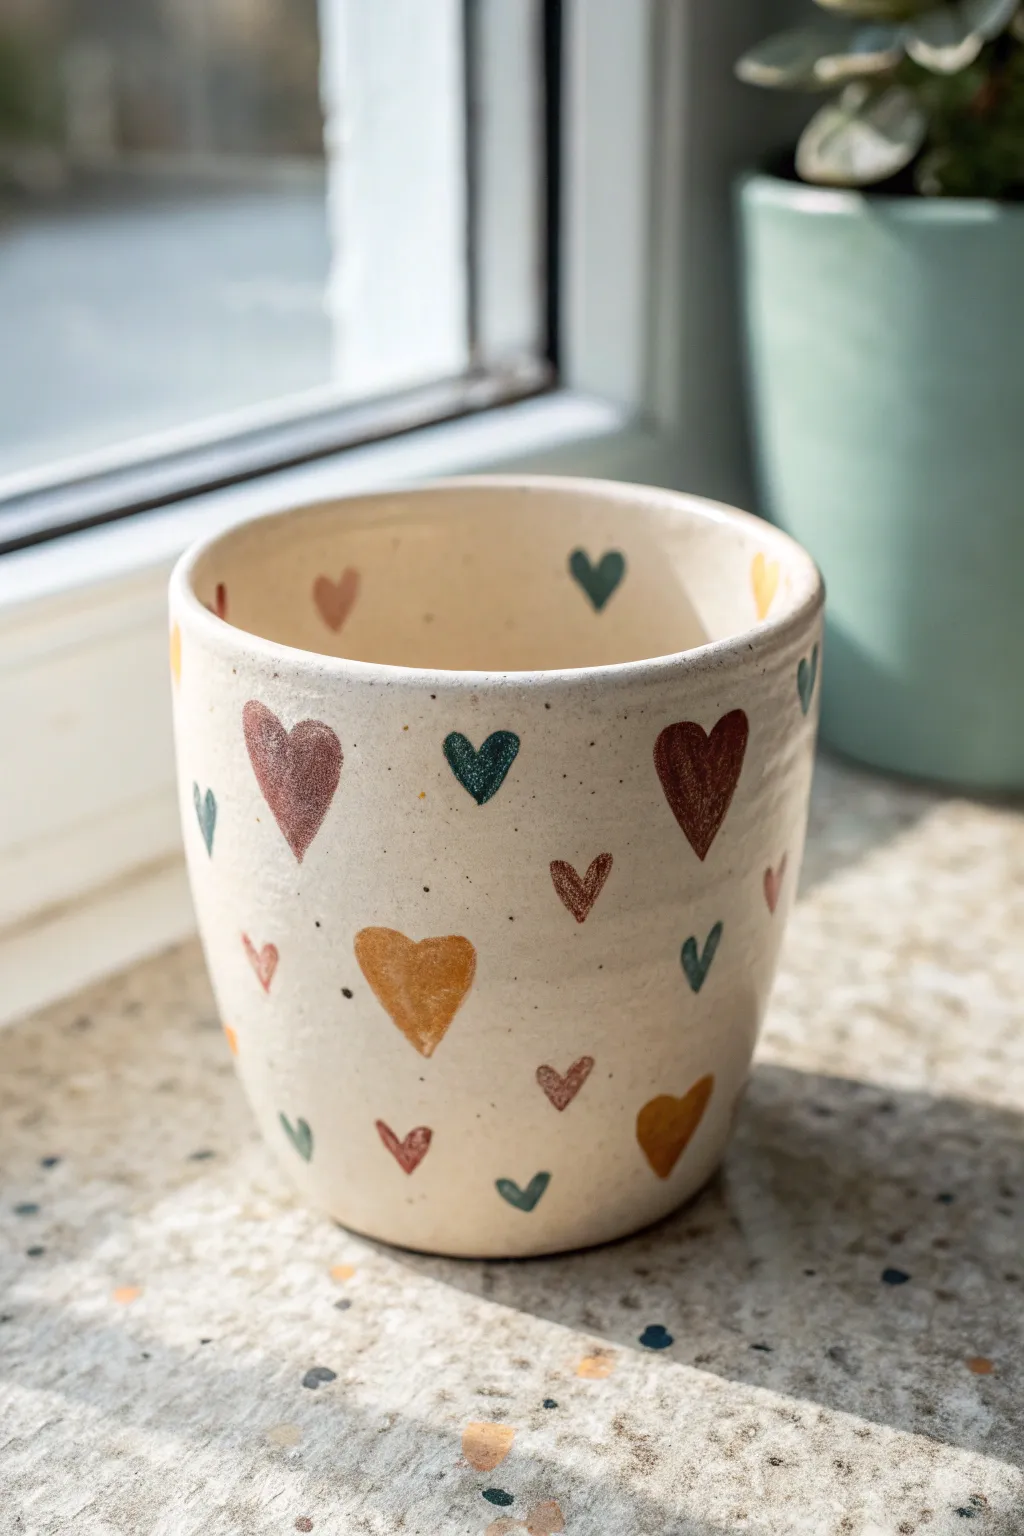
Transform a simple bisque cup into a heartwarming piece of pottery featuring a scattering of tiny, hand-painted hearts. The earthy color palette of terracotta, mustard, and teal gives this whimsical design a grounded, sophisticated feel perfect for your morning coffee.
Step-by-Step Tutorial
Materials
- Bisque-fired ceramic cup (smooth surface)
- Underglazes (terracotta/rust red, mustard yellow, dark teal, chocolate brown)
- Small round brushes (size 0 and 2)
- Clear dipping glaze (transparent)
- Dampsponge
- Pencil (optional)
- Clean water for rinsing brushes
- Palette or small dish for paints
Step 1: Preparation & Planning
-
Surface Prep:
Begin by wiping down your bisque cup with a slightly damp sponge. This removes any kiln dust or oils from your hands that might resist the glaze. -
Color Selection:
Pour a dime-sized amount of each underglaze color onto your palette. For this specific look, you want earthy, muted tones rather than bright primaries—think rust, mustard, and deep teal. -
Practice Strokes:
I like to practice painting a few hearts on a piece of paper first to get the shape right. Aim for a slightly elongated, hand-drawn look rather than perfect symmetry.
Fixing Smudges
If you accidentally smear a wet heart, let it dry completely. Once dry, gently sand the mistake away with sandpaper or scrape it off with an X-Acto knife.
Step 2: Painting the Hearts
-
Starting the Pattern:
Load your size 2 brush with the rusty red underglaze. Paint your first medium-sized heart near the rim of the cup. Use two simple strokes: one curve down from the left, one curve down from the right. -
Spacing Strategy:
Continue adding hearts of the same red color, rotating the cup as you go. Keep them randomly spaced—some high, some low—leaving plenty of empty cream space between them. -
Switching Colors:
Rinse your brush thoroughly and switch to the mustard yellow underglaze. Paint new hearts in the gaps, varying the size slightly. Make some small and some a bit larger. -
Adding Depth:
Bring in the dark teal color next. These cool-toned hearts add a beautiful contrast to the warm yellows and reds. Scatter them throughout the design. -
Tiny Accents:
Switch to your smallest brush (size 0) and the chocolate brown underglaze. Enhance the ‘confetti’ look by adding tiny brown hearts in the smallest open spaces. -
Inside Detail:
Don’t forget the interior! Paint two or three small hearts just inside the rim of the cup. This little surprise detail makes the piece feel finished and high-quality. -
Layering Up:
If your underglaze looks transparent or streaky, wait for the first coat to dry to the touch, then carefully apply a second coat directly over the existing hearts for solid coverage.
Speckled Clay Look
Use a speckled buff clay body or flick watered-down brown underglaze with a toothbrush over the finished cup before clear glazing for a vintage texture.
Step 3: Finishing Touches
-
Clean Up:
Check the unpainted areas for any stray smudges of color. If you find any, you can gently scratch them off with a needle tool or wipe them with a clean, damp sponge corner. -
Bisque Firing (Optional):
Depending on your specific underglaze instructions, you may need a second bisque firing to set the colors. If not, proceed directly to glazing. -
Glazing:
Using a pair of glazing tongs, dip the entire cup into a clear transparent glaze. Ensure the glaze covers every painted heart to protect the design and make it food safe. -
Wiping the Foot:
Immediately wipe the bottom (foot) of the cup with a sponge to remove all glaze. If you leave glaze here, the cup will stick to the kiln shelf during firing. -
Final Fire:
Place the cup in the kiln for the final glaze firing. This will turn the creamy bisque into a glossy, durable surface and make the colors pop.
Now you have a charming, handmade mug perfect for cozy mornings or gifting to a loved one

The Complete Guide to Pottery Troubleshooting
Uncover the most common ceramic mistakes—from cracking clay to failed glazes—and learn how to fix them fast.
Minimal Line Art Faces
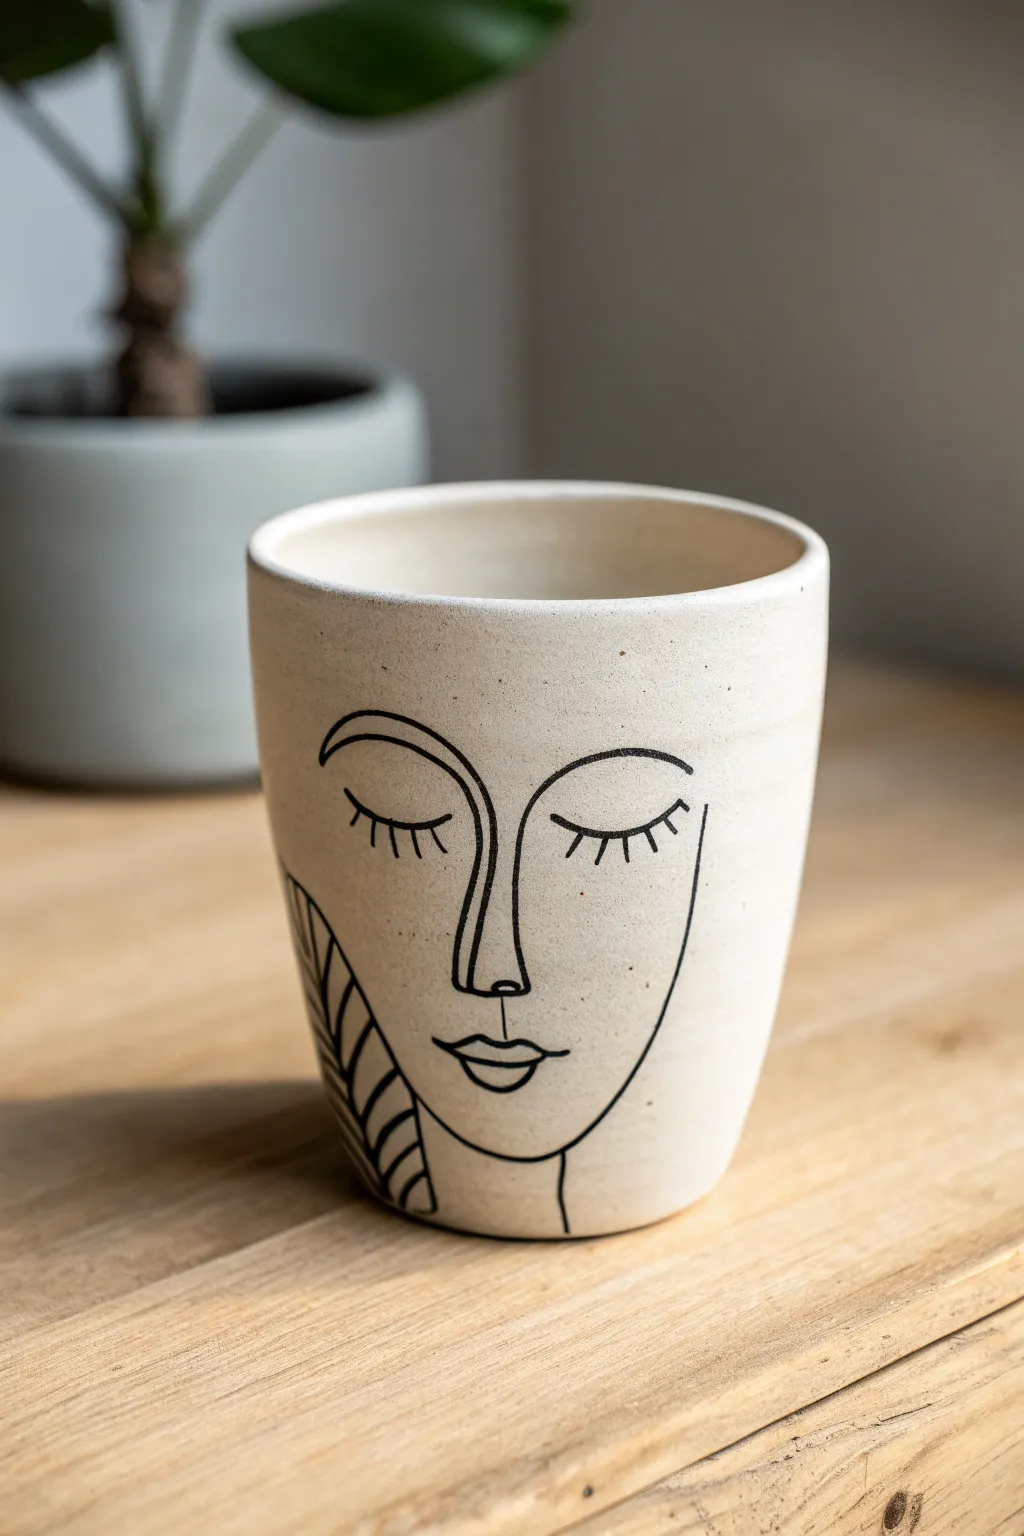
Embrace the beauty of simplicity with this elegant line art project that transforms a plain clay vessel into a piece of modern decor. The continuous-line style creates a serene, artistic expression that looks sophisticated yet requires only basic painting skills.
Step-by-Step
Materials
- Unfinished ceramic cup or bisque ware (cream/off-white)
- Black underglaze (if firing) or black acrylic paint (no-fire)
- Fine liner brush (size 0 or 00)
- Pencil (light graphite, HB or 2H)
- Eraser
- Clear glaze (if firing) or spray sealant (no-fire)
- Water cup
- Paper towels
Step 1: Preparation & Sketching
-
Clean surface:
Begin by wiping down your ceramic cup with a slightly damp sponge or cloth to remove any dust or oils, ensuring a clean canvas for your work. -
Center point:
Using a light pencil, mark a small dot or faint line roughly in the center of the cup’s face to guide where the nose bridge will be placed. -
Drafting the nose:
Sketch the nose first acting as your anchor; draw a long vertical line that curves slightly at the bottom for the nostril, continuing upward into where the eyebrow will start. -
Adding eyes:
Lightly sketch two closed eyelids on either side of the nose bridge, making them symmetrical arches. -
Lashes and brows:
Draw small vertical ticks for eyelashes and a single arched line above the left eye to connect with the nose line, creating that continuous-look brow. -
Mouth placement:
Position the lips just below the nose, sketching a simple upper and lower lip shape that connects to the chin line. -
Face outline:
Sketch a swooping line that starts from the brow, comes down the side of the face, and curves under the chin to define the jawline. -
Leaf motif:
On the left cheek area, draft a large leaf or fern shape that hugs the curve of the jawline.
Step 2: Painting & Sealing
-
Load the brush:
Dip your fine liner brush into the black paint or underglaze, thinning it slightly with a drop of water if the consistency is too thick to flow smoothly. -
Test stroke:
I always do a quick test line on a piece of paper or the bottom of the cup to ensure the paint flow is even and the line thickness is correct. -
Trace the nose:
Start painting over your pencil lines at the nose, using steady, confident pressure to keep the line width consistent. -
Paint the eyes:
Carefully trace the eyelid arches. Lift the brush straight up at the end of each stroke to keep the ends sharp. -
Delicate details:
Use just the very tip of your brush to flick the eyelashes downward; try to do this quickly to prevent shaky lines. -
Connect the face:
Paint the long line defining the side of the face and jaw. If you run out of paint, stop at a natural intersection point before reloading. -
Fill the leaf:
Outline the leaf shape and add the internal veins. The contrast of the organic leaf against the geometric face adds nice visual interest. -
Clean up:
Once the paint is fully dry to the touch, gently erase any visible pencil marks that didn’t get covered by the paint. -
Protective coat:
If using acrylics, spray the cup with a clear sealant in a well-ventilated area. If using underglaze, apply a clear dipping glaze and fire according to clay instructions.
Steady Hand Trick
Rest your pinky finger against the cup’s surface as you paint. This creates a pivot point and stabilizes your hand for smoother curves.
Wobbly Lines?
If a line goes astray, don’t wipe it while wet (it smears). Let it dry completely, then gently scrape the mistake off with a craft knife or toothpick.
Place your new minimalist masterpiece on a shelf to admire the calm vibe it brings to your space
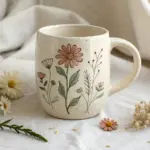
Dainty Wildflowers Around the Cup
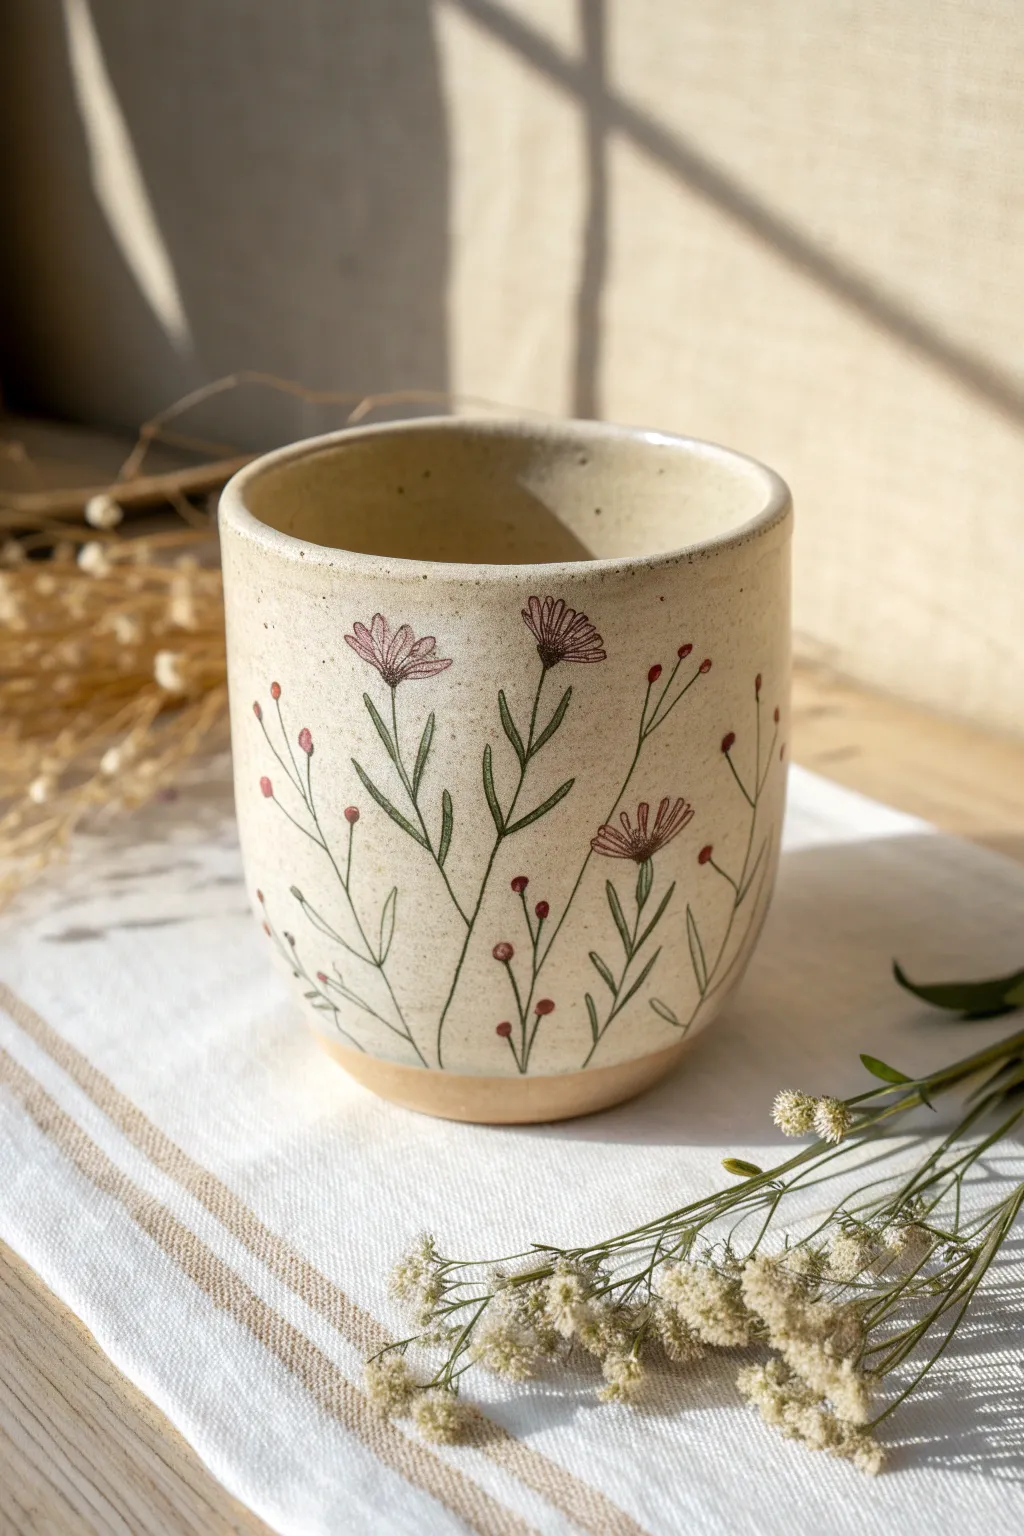
Capture the delicate beauty of a meadow with this simple yet elegant wildflower design on a speckled clay cup. The fine lines and subtle pops of berry red create a timeless, handcrafted look perfect for your morning tea ritual.
How-To Guide
Materials
- Bisque-fired ceramic cup (preferably speckled clay)
- Underglaze pencil (black or dark brown)
- Underglazes (Hunter Green, Dusty Pink, Berry Red)
- Very fine detail brush (00 or 000 size)
- Small round brush (size 2)
- Clear transparent glaze
- Sponge and water
- Kiln (or access to a pottery studio)
Step 1: Preparation & Sketching
-
Clean the surface:
Before starting, gently wipe your bisque-fired cup with a slightly damp sponge. This removes any dust or oils from handling that might repel the glaze. -
Plan your stems:
Using a very light touch with a regular pencil, softly mark where your main stems will rise from the base. Don’t worry about perfection; the graphite will burn off in the kiln. -
Sketch the main lines:
Take your black or dark brown underglaze pencil. Draw the primary vertical stems, varying their heights. Some should be tall for flowers, others shorter for berry clusters. -
Add delicate leaves:
Along the stems, sketch thin, elongated leaves. Keep the lines whispy and fluid, branching out at slight upward angles. -
Outline the blooms:
At the top of the taller stems, draw the simple shapes of the aster-like flowers. A small oval center with thin, radiating petals works best for this style.
Step 2: Adding Color
-
Prepare the green:
Pour a small amount of hunter green underglaze onto your palette. If it feels too thick, thin it slightly with a drop of water to help the brush glide. -
Fill the stems:
Using your 00 detail brush, carefully paint over your pencil lines on the stems and leaves. You don’t need to be perfectly opaque; a little translucency adds to the watercolor effect. -
Paint the petals:
Switch to dusty pink underglaze. With the tip of your brush, gently fill in the radiating petals. I find that starting from the center and flicking outward helps keep the tips sharp. -
Create the berries:
Dip a small round tool or the back of your paintbrush into the berry red underglaze. Dot small circles at the ends of the shorter stems to create the berry buds. -
Detail the buds:
Add smaller red dots floating near the main stems or intertwined with the leaves to fill any empty negative space. -
Darken the centers:
Once the pink petals are dry to the touch, add a tiny dot of dark brown underglaze or a darker mix of the pink to the center of each flower to give it depth.
Smudged Lines?
If underglaze pencil smudges, don’t wipe it! It will just spread. Instead, wait for the clear glaze firing; graphite burns off, but underglaze smudges stay.
Step 3: Finishing Touches
-
Clean up:
If you made any stray marks, now is the time to gently scratch them off with a needle tool or wipe them carefully with a damp cotton swab. -
Allow to dry:
Let the underglaze dry completely. It should look chalky and matte when it is ready for the next step. -
Apply clear glaze:
Dip the entire cup into a clear transparent glaze, or brush on three even coats if using a brushing glaze. This will seal your design and make the cup food safe. -
Wipe the foot:
Use a wet sponge to thoroughly clean the bottom of the cup (the foot ring) so it doesn’t stick to the kiln shelf. -
Final fire:
Fire the piece in the kiln according to the clay and glaze manufacturer’s instructions (usually cone 5 or 6 for stoneware).
Mix It Up
Try using a wax resist over the flowers before dipping in a contrasting colored glaze for a stunning ‘mishima’ style effect.
Enjoy your beautiful new mug with a warm drink and admire your handiwork


What Really Happens Inside the Kiln
Learn how time and temperature work together inside the kiln to transform clay into durable ceramic.
Bold Single Bloom Statement
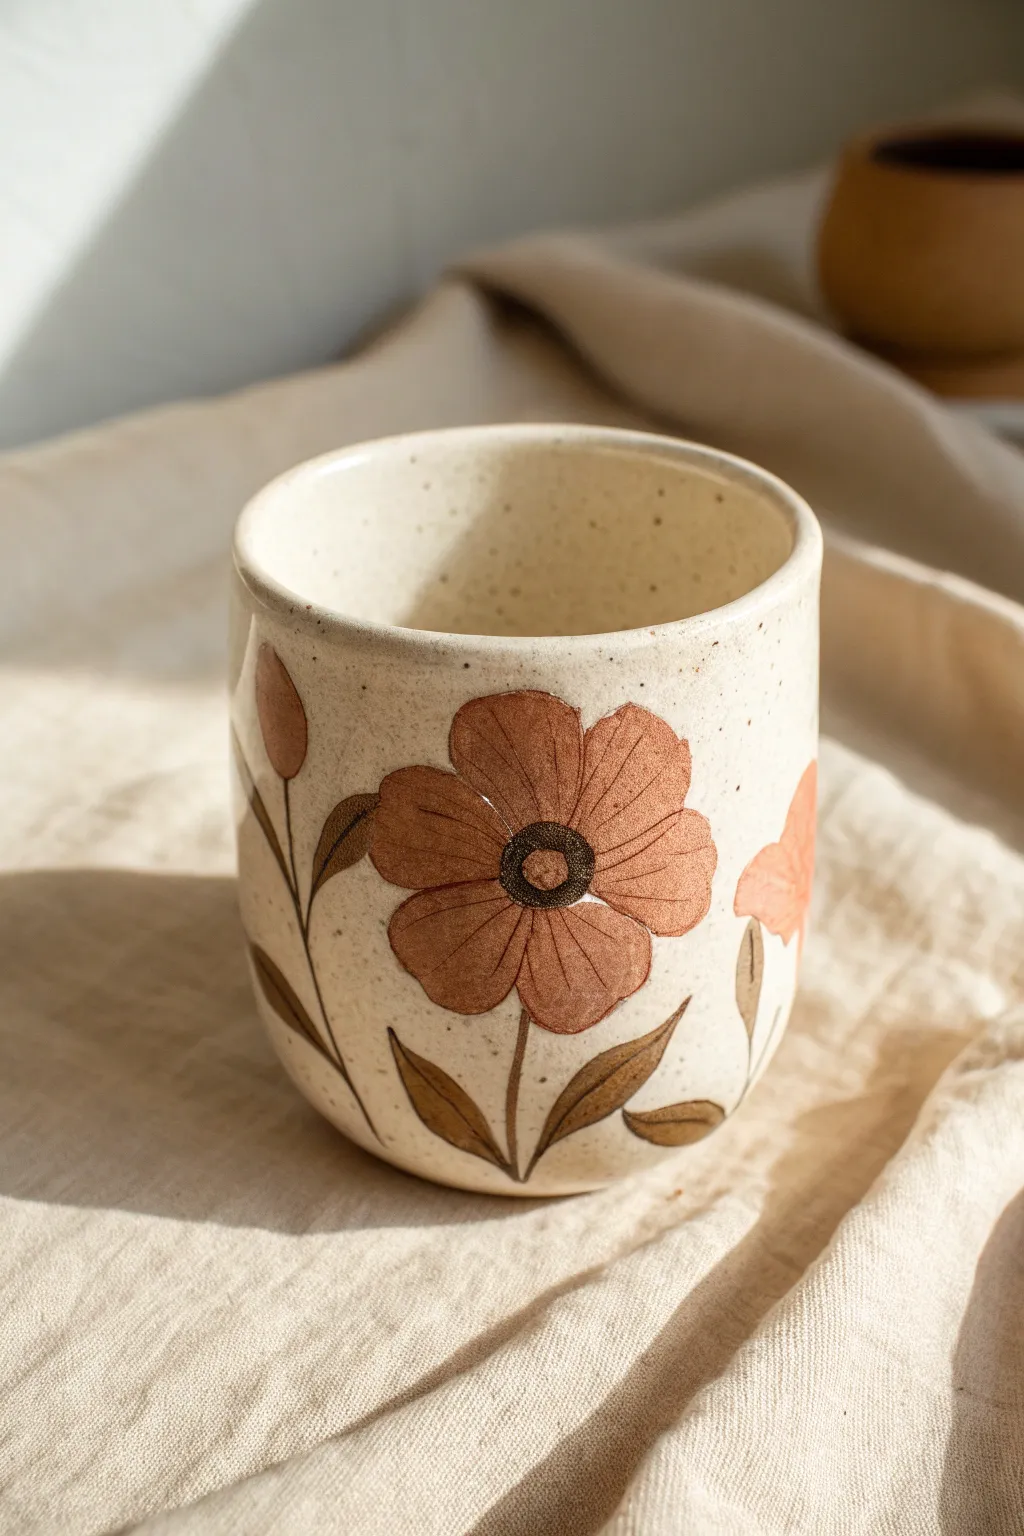
Embrace the warmth of earthy tones with this simple yet striking folk-art inspired design. This project focuses on painting a bold, centralized flower motif onto raw or bisque-fired clay, highlighting the natural beauty of the ceramic surface.
Step-by-Step Guide
Materials
- Bisque-fired ceramic cup (preferably speckled clay)
- Underglazes: Rust/Terracotta, Dark Brown/Black, Sage Green
- Small round brushes (sizes 2 and 4)
- Fine liner brush (size 0 or 00)
- Pencil
- Clear transparent glaze
- Sponge and water bowl
Step 1: Preparation and Sketching
-
Clean surface:
Wipe down your bisque cup with a slightly damp sponge to remove any kiln dust or oils from handling. -
Map the layout:
Using a pencil, lightly sketch a large circle in the center of the cup’s face to mark the main bloom’s location. -
Detail the petals:
Draw 5-6 broad, rounded petals around a central circle. Don’t worry about perfect symmetry; a hand-drawn look adds charm. -
Add stems and buds:
Sketch a curving stem extending downward from the flower. Add two smaller stems branching off to the sides—one for a closed bud and one for a leaf.
Smooth Operator
Add a drop of water or gum solution to your underglaze when doing the fine outline work. This helps the paint flow smoothly off the liner brush for crisp lines.
Step 2: Applying Color
-
Petal base coat:
Load a size 4 round brush with your rust or terracotta underglaze. Stick to this single hue for a cohesive look. -
Fill the petals:
Paint the petals carefully. I prefer to apply three thin coats rather than one thick one to ensure opacity without brushstrokes showing. -
Paint the bud:
Use the same rust color to fill in the rounded bud shape on the left stem. -
Center details:
Once the petals are dry to the touch, use a smaller brush to paint the flower’s center with a dark brown or soft black underglaze. -
Drying time:
Let these main block colors dry completely before moving to the next phase to prevent smudging.
Wax Resist Method
Apply wax resist over your finished flower painting before dipping the cup into a glaze. This keeps the design matte while the rest of the cup becomes glossy.
Step 3: Line Work and Definition
-
Enhance the center:
With the dark brown underglaze and a small brush, add a second, smaller circle inside the flower center for depth. -
Outline the bloom:
Switch to your fine liner brush. Dip it in the dark brown/black underglaze and carefully outline each petal. -
Add texture lines:
Using the liner brush, drawn thin, radiating lines from the center of the flower outward into each petal to mimic veins. -
Paint the greenery:
Mix a small amount of brown into your sage green underglaze to mute it. Use the size 2 brush to paint the leaves and stems. -
Define the stems:
Once the green is dry, maintain consistency by outlining the leaves and stems with your thin liner brush and dark underglaze.
Step 4: Finishing
-
Clean up:
Check for any stray underglaze marks on the raw clay background. Gently scratch them off with a needle tool or wipe with a damp Q-tip. -
Bisque fire (optional):
If your studio requires a bisque fire to set the underglaze before glazing, do so now. Otherwise, proceed to glazing. -
Apply clear glaze:
Dip or brush a clear, transparent glaze over the entire cup to seal the design and make it food-safe. -
Final wipe:
Wipe the foot of the cup clean with a sponge to ensure no glaze sticks to the kiln shelf. -
Final fire:
Fire the cup to the temperature appropriate for your specific clay body and glaze instructions.
Now you have a stunning, handcrafted mug ready for your morning coffee routine
Leafy Botanical Silhouettes
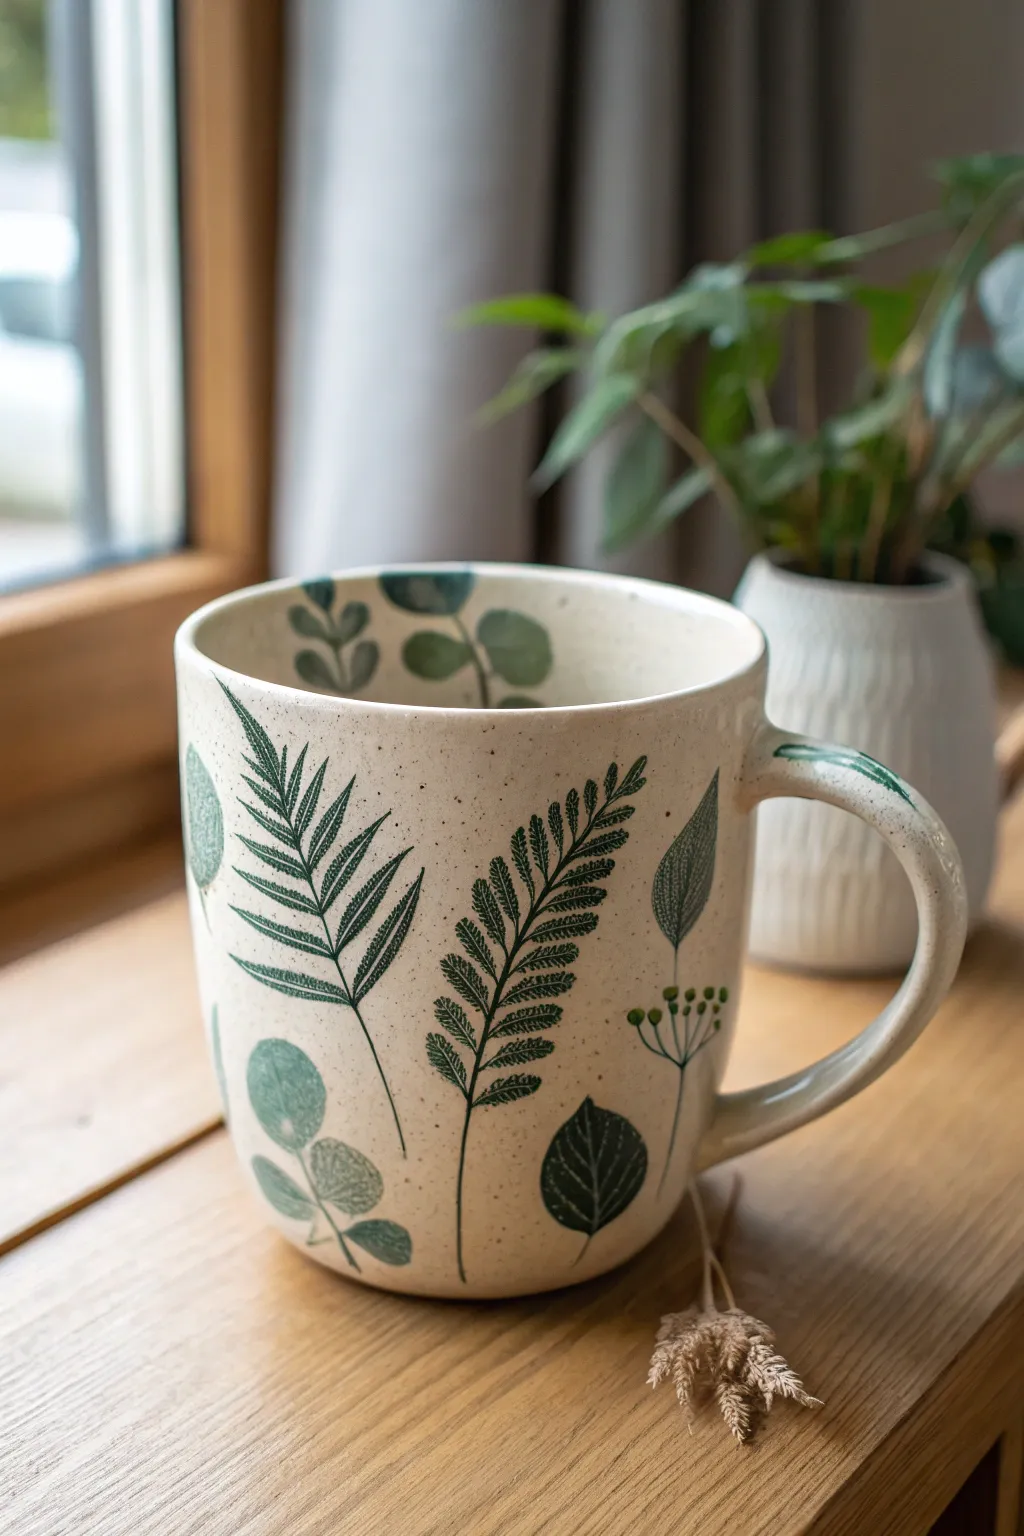
Bring the calming silence of a walk in the woods to your morning coffee with this botanical mug design. Featuring delicate fern fronds and round eucalyptus leaves stamped or painted in deep forest greens, this project captures the simple elegance of nature on speckled ceramic.
How-To Guide
Materials
- Bisque-fired ceramic mug (preferably speckled clay body)
- Underglaze (Dark Hunter Green, Sage Green, and Eucalyptus tones)
- Clear transparent glaze (food safe)
- Fine-point detail brush (size 0 or 00)
- Small round brush (size 2)
- Real pressed leaves (optional, for tracing)
- Pencil (light graphite)
- Palette or small tray for mixing
- Damp sponge
- Kiln (or access to a pottery firing service)
Step 1: Preparing the Canvas
-
Clean the Bisqueware:
Start with a speckled clay bisque mug. Wipe the entire surface gently with a damp sponge to remove any dust or oils from handling, which can repel the underglaze. -
Plan the Composition:
Visualize where your main stems will go. You want a natural, upward-growing flow. I find it helpful to lightly mark the bottom of the main stems with a pencil to ensure even spacing around the mug. -
Sketch the Spines:
Using a very light touch with a pencil, draw the central curved spines of your ferns and branches directly onto the bisque. The pencil marks will burn away in the kiln, leaving only your painted design.
Natural Stamping
For ultra-realism, paint underglaze directly onto a real fern leaf and press it gently onto the bisqueware like a stamp before hand-painting over it to refine the edges.
Step 2: Painting the Botanical Elements
-
Fern Fronds – The Spine:
Load your fine-point brush with Dark Hunter Green underglaze. Carefully trace over your pencil line for the main fern spine, keeping the line thin and tapering it off near the top. -
Fern Fronds – The Leaves:
Starting from the bottom of the fern spine, paint small, angled dashes outward on alternating sides. -
Refining the Fronds:
As you move up the spine, make the dashes progressively smaller and closer together. This mimics the natural growth pattern of fern leaves. -
Painting the Stemmed Leaves:
Switch to a slightly lighter Sage Green for contrast. Draw a long, thin stem rising from the base of the mug, curving gently away from the fern. -
Adding Leaf Shapes:
Along this new stem, use the size 2 round brush to press and lift, creating almond-shaped leaves associated with willow or ash trees. Leave a small gap between the leaf and the main stem, connecting them with a tiny painted line. -
Detailing the Veins:
Once the almond leaves are touch-dry, switch back to your finest brush and darker green underglaze. Paint a very delicate central vein through the middle of each leaf. -
Eucalyptus Accents:
In the open spaces near the bottom, paint rounded, coin-shaped leaves using a soft Eucalyptus green tone. These should look like they are overlapping slightly or clustering on short stems. -
Adding Texture:
For the round eucalyptus leaves, you can dab the wet underglaze gently with a dry brush or sponge to create a subtle, mottled texture like real foliage. -
Interior Details:
Don’t forget the inside rim! Paint a small sprig of eucalyptus or a tiny fern dropping down a few centimeters from the rim into the interior of the cup for a delightful hidden detail. -
Review and Touch Up:
Rotate the mug and check for any smudges or uneven lines. Use a clean, damp brush or a precision tool to gently scrape away any mistakes before the underglaze sets completely.
Speckled Effect
If you don’t have speckled clay, mix a small amount of iron oxide or black glaze grit into your clear glaze bucket to create faux speckles over the whole piece.
Step 3: Finishing and Firing
-
Bisque Fix (Optional):
If you are working on greenware instead of bisque, you would fire it now. Since we are working on bisque, ensure the underglaze is fully dry (at least 2 hours). -
Glazing Setup:
Stir your clear, food-safe transparent glaze thoroughly. You want a consistency similar to heavy cream to ensure it doesn’t cloud your intricate painting. -
Dipping the Interior:
Pour the clear glaze inside the mug, roll it around to coat the entire inner surface, and pour the excess out quickly. -
Dipping the Exterior:
Using glazing tongs, dip the entire mug into the clear glaze bucket. Hold it submerged for just 2-3 seconds, then lift it out and shake gently to remove drips. -
Cleaning the Foot:
Once the glaze is dry to the touch, wipe the bottom foot ring of the mug completely clean with a wet sponge. Any glaze left here will fuse the mug to the kiln shelf. -
Final Firing:
Fire the mug in the kiln according to the clay and glaze manufacturer’s instructions (usually Cone 5 or 6 for stoneware). This will seal the design and make the surface glossy and durable.
Enjoy your comforting cup of tea surrounded by your own hand-painted forest greenery

TRACK YOUR CERAMIC JOURNEY
Capture glaze tests, firing details, and creative progress—all in one simple printable. Make your projects easier to repeat and improve.
Geometric Triangles With Crisp Edges
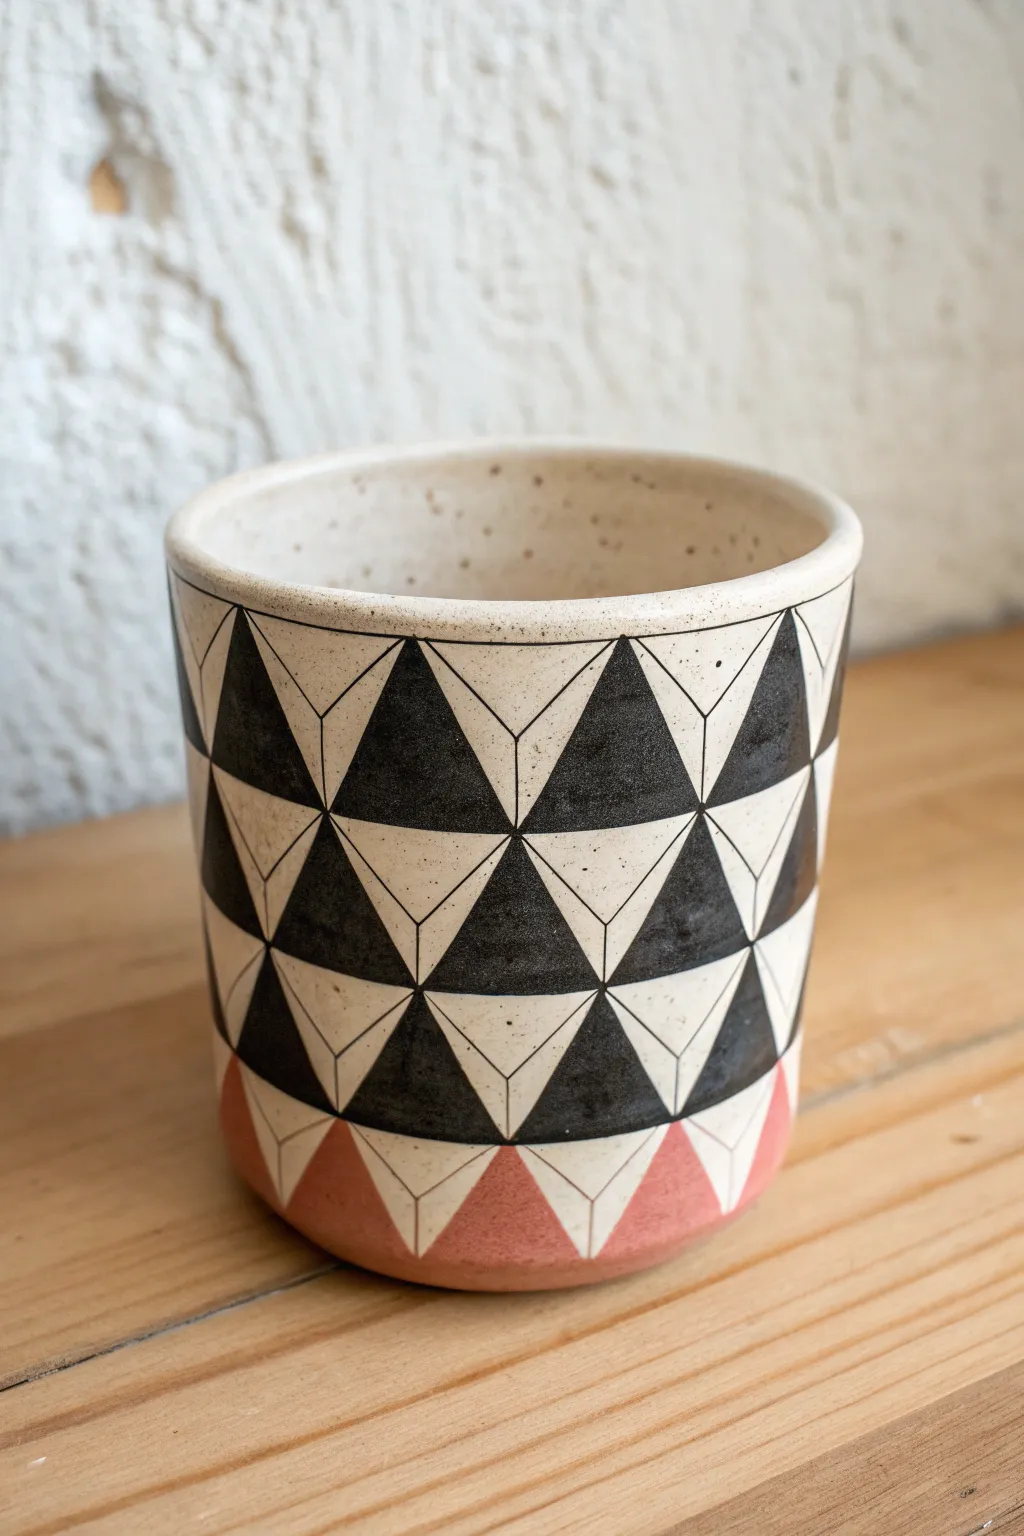
Achieve a modern, high-contrast look with this precise geometric design that plays with negative space and bold shapes. The combination of crisp black triangles, unglazed clay warmth, and delicate line work creates a striking optical pattern perfect for your morning brew.
Step-by-Step Guide
Materials
- Bisque-fired ceramic cup (cylindrical shape works best)
- Black underglaze
- Pink/terracotta underglaze
- Clear transparent glaze
- Fine liner brush (size 0 or 00)
- Small flat shader brush (size 4 or 6)
- Pencil (HB or lighter)
- Ruler or flexible measuring tape
- Paper strips (optional, for measuring)
- Clean water and sponge
Step 1: Planning and Grid
-
Clean surface:
Begin by wiping down your bisque piece with a damp sponge to remove any dust or kiln debris, which ensures your underglaze applies smoothly. -
Measure circumference:
Measure the circumference of your cup using a flexible tape or a strip of paper. You need a number divisible by an even integer (like 6 or 8) so the pattern meets perfectly at the back. -
Mark vertical guides:
Using your pencil, lightly mark the vertical lines around the rim based on your division calculation. Extend these marks slightly down the cup. -
Establish horizontal bands:
Draw three or four horizontal rings around the cup to create rows. Keep the height of each row consistent to ensure your triangles will be uniform. -
Draw the triangles:
Connect your points to form a grid of alternating triangles. In the top rows, draw triangles pointing up and down. Repeat this for the middle section. -
Define the internal geometry:
Inside the triangles that will remain unpainted (the ‘white’ ones), draw a smaller inner ‘V’ shape connecting the corners to the center point, creating a faceted look.
Step 2: Applying Color
-
Outline in black:
Load your fine liner brush with black underglaze. Carefully outline the main structural triangles, keeping your hand steady for crisp edges. -
Detail the facets:
With the same liner brush, trace the internal geometric lines you sketched inside the lighter triangles. These thin lines are crucial for the 3D effect. -
Fill the black triangles:
Switch to your flat shader brush. Fill in the alternating triangles with black underglaze. I find two coats usually gives the most opaque, solid coverage. -
Create the base border:
For the bottom row of triangles, switch to your pink or terracotta underglaze. Ideally, choose a color that mimics raw clay or adds a soft pop of warmth. -
Fill the accent triangles:
Paint the bottom-most triangles with the pink hue, maintaining the sharp points where they meet the black row above. -
Clean up edges:
If you went outside the lines, use a clean, damp stiff brush or a clay scratching tool to gently scrape away or wipe off the excess underglaze once it’s dry.
Wobbly Lines?
If your hand shakes, rest your pinky finger on the cup for stability. Alternatively, use thin automotive masking tape (pinstriping tape) to mask off the triangles before painting for razor-sharp edges.
Step 3: Finishing
-
Check for opacity:
Inspect your black and pink sections. If the clay body is showing through too much, dab on a tiny bit more underglaze to make the solids pop. -
Bisque fire (optional but recommended):
If your studio allows, fire the piece again to set the underglaze. This prevents smearing during the glazing process, especially with the black pigment. -
Apply clear glaze:
Dip or brush on a clear, transparent glaze over the entire exterior. This will seal the raw clay areas and make the black deep and glossy. -
Clean the foot:
Wipe the bottom of the cup clean with a sponge to ensure no glaze sticks to the kiln shelf. -
Final firing:
Fire the cup to the temperature appropriate for your specific clay and glaze combination.
Elevate It
For a luxury touch, use gold luster for the thin internal lines inside the white triangles. Apply the luster *after* the final glaze firing and re-fire at a lower cone (usually cone 018).
Enjoy the satisfying symmetry of your new geometric cup with your favorite hot drink
Sweet Ombre Gradient Wash
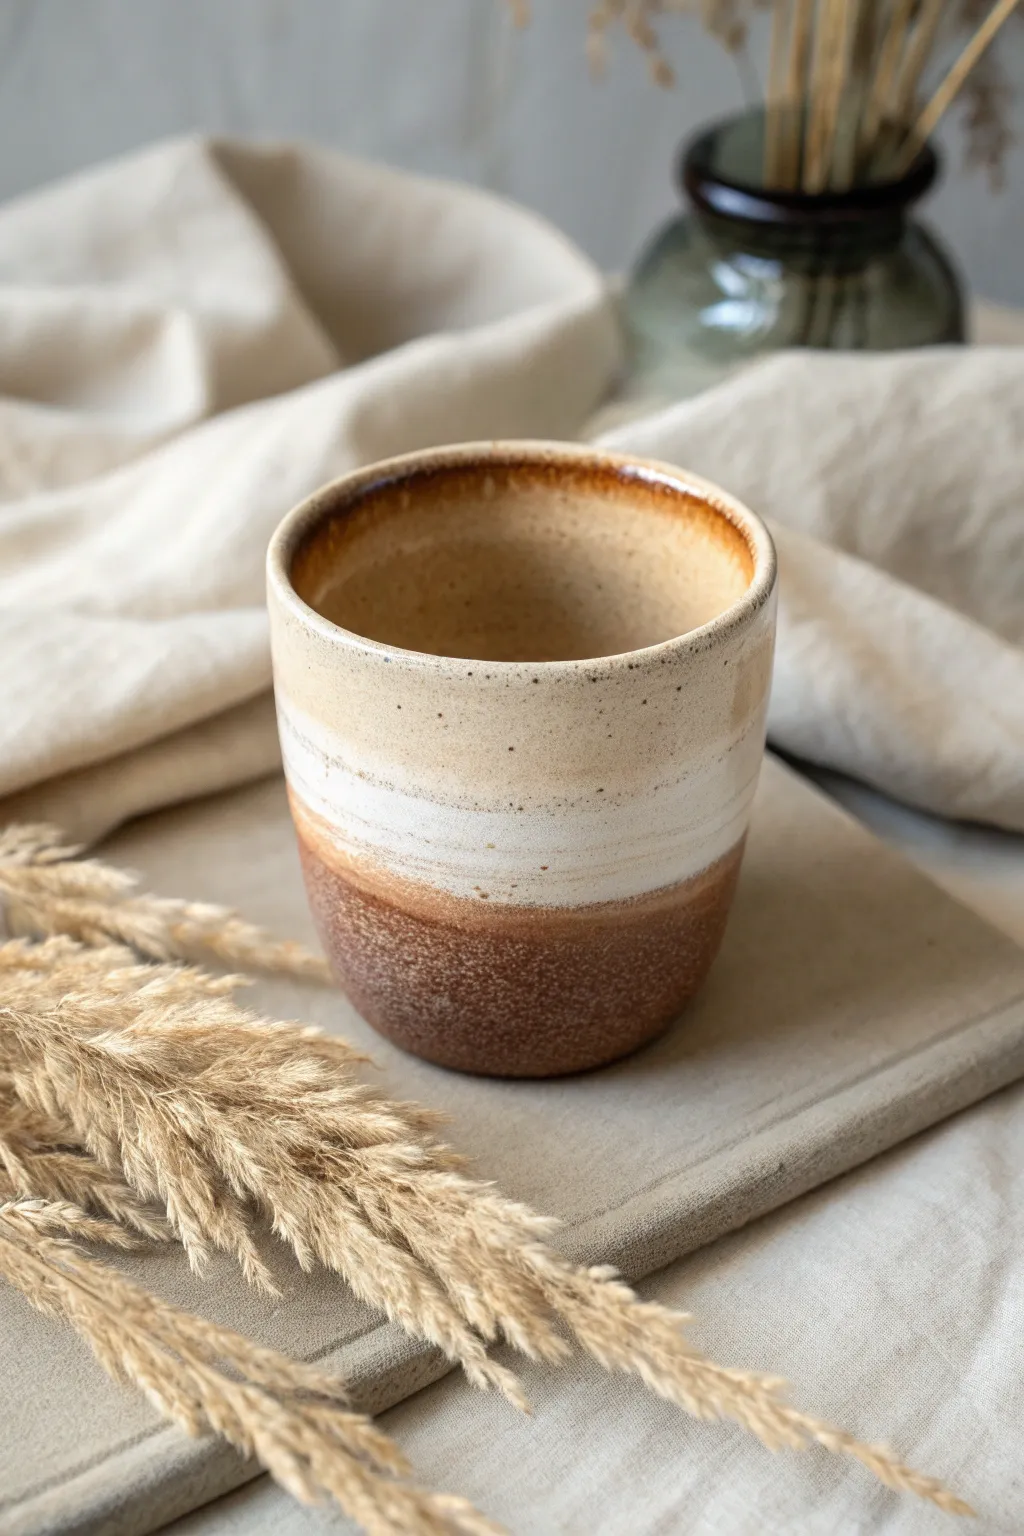
Achieve a stunning, natural look with this three-tone gradient wash technique that mimics layers of sediment or a desert landscape. This project uses reactive glazes to create organic transitions between a speckled cream, soft white, and deep russet brown.
Step-by-Step Guide
Materials
- Bisque-fired ceramic cup (wheel-thrown or hand-built)
- Speckled buff stoneware clay (if making from scratch) or bisque-ware
- Liquid wax resist
- Sponge or brush for wax
- Cream/Oatmeal speckle glaze (Cone 5/6)
- Opaque White glaze (Cone 5/6)
- Rust/Iron Red reactive glaze (Cone 5/6)
- Wide soft fan brush (hake brush)
- Clean bucket of water
- Sponge for cleanup
- Kiln (or access to a firing service)
Step 1: Preparation & Masking
-
Clean the bisque:
Before glazing, wipe down your bisque-fired cup with a slightly damp sponge. This removes any dust that might prevent the glaze from adhering properly. -
Wax the foot:
Dip a brush or sponge into your liquid wax resist and carefully apply it to the bottom of the cup and about 1/4 inch up the side. This ensures the glaze won’t fuse your cup to the kiln shelf. -
Dry the wax:
Allow the wax resist to dry completely, usually taking about 15-20 minutes depending on humidity. It should feel smooth and non-tacky to the touch.
Step 2: Interior & Base Coat
-
Mix the interior glaze:
Stir your Cream/Oatmeal speckle glaze thoroughly. I find that using an immersion blender or a whisk helps break up any clumps for a smoother application. -
Pour the interior:
Pour a generous amount of the cream glaze inside the cup. Rotate the cup quickly to coat the entire inner surface, then pour the excess back into your glaze bucket. -
Clean the rim:
If any drips landed on the outside rim during pouring, gently sponge them away now to keep a clean slate for the exterior design. -
Apply the first exterior band:
Using a wide fan brush, apply a coat of the same Cream/Oatmeal glaze to the top third of the cup’s exterior. Don’t worry about a perfectly straight line at the bottom yet.
Natural Texture
Use a clay body with iron speckles or grog. When fired, these impurities burn through the lighter glazes, adding authentic rustic character without extra painting.
Step 3: Creating the Ombre Gradient
-
Apply the white middle band:
Dip your clean fan brush into the Opaque White glaze. Paint the middle section of the cup, slightly overlapping the bottom edge of the cream glaze you just applied. -
Apply the rust bottom band:
Switch to a clean brush for the Rust/Iron Red glaze. Paint the bottom third of the cup, covering the area down to your wax line and slightly overlapping the white middle band. -
Blend the transitions:
While the glazes are still damp, use a very slightly moist brush to feather the overlapping areas horizontally. This encourages the colors to melt into each other during firing. -
Deepen the rust tone:
Apply a second coat of the Rust glaze solely to the bottom third. The thickness here will create that rich, textured cratering effect you see in the final piece. -
Add the rim detail:
Dip just the very tip of a small brush into the Rust glaze and run it lightly along the rim of the cup. This creates that beautiful dark burnt orange halo at the top. -
Second coat for the top:
Apply a second coat of Cream/Oatmeal glaze to the top section, being careful not to obscure your blended transition line too much. -
Check for drips:
Look closely at the wax line near the bottom. If any glaze has dripped onto the wax, wipe it off immediately with a damp sponge or fettling knife.
Drip Prevention
If your glazes are running too much during firing, apply them slightly thinner near the bottom, or add a ‘catcher’ ring of wax resist just above the foot.
Step 4: Firing
-
Final drying:
Let the glazes dry completely for at least 24 hours. The piece should be bone dry before entering the kiln to prevent steam issues. -
Load the kiln:
Place the cup on a kiln shelf. Ensure it isn’t touching any other pots, as the reactive glazes might bubble slightly during the process. -
Fire to Cone 6:
Fire the kiln to Cone 6 (approx. 2232°F / 1222°C). This temperature allows the stoneware to vitrify and the glazes to interact and flow, creating the ombre effect. -
Cool slowly:
Allow the kiln to cool naturally to room temperature before opening. Opening it too early can cause thermal shock and crack your beautiful new cup.
Once cooled, you will have a perfectly cozy vessel ready for your morning coffee or tea
Speckled Terrazzo-Inspired Dots
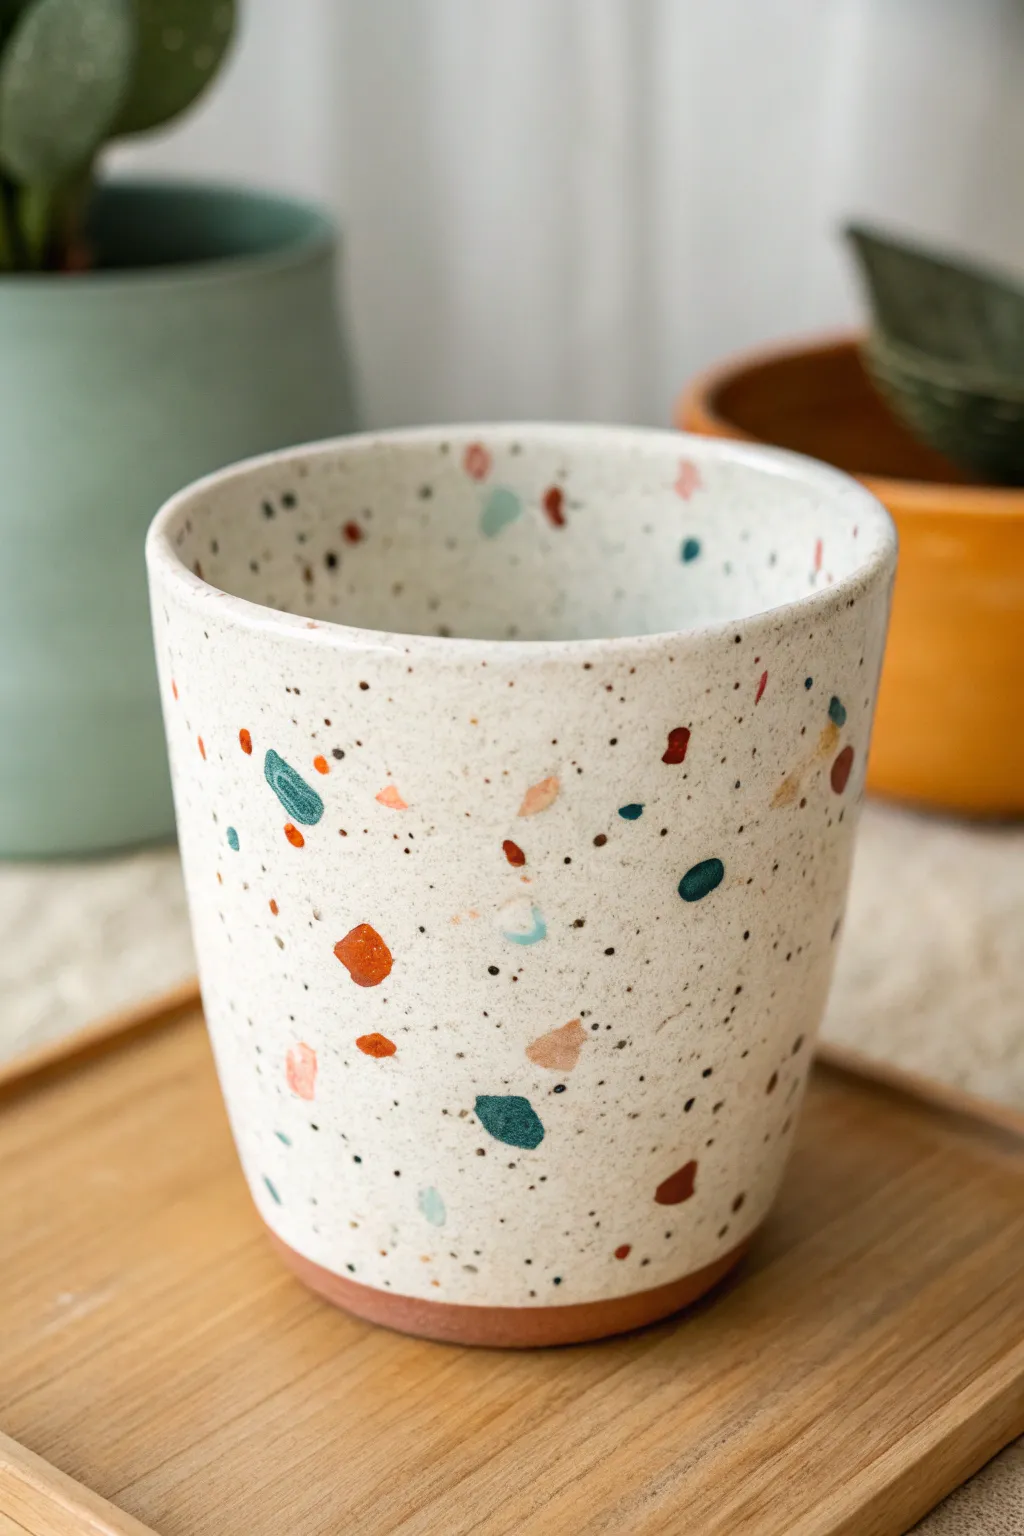
Capture the trendy, modern aesthetic of terrazzo stone with this surprisingly simple painting technique. By layering various sizes of colored specks and dots over a creamy base, you’ll transform a plain clay vessel into a chic piece of decor that looks authentically stone-like.
Step-by-Step Tutorial
Materials
- Bisque-fired ceramic cup or air-dry clay vessel
- Cream or off-white acrylic paint (matte finish)
- Acrylic paints in turquoise, terracotta orange, deep red, brown, and mustard yellow
- Small flat brush (size 2 or 4)
- Fine detail brush (size 0 or 00)
- Old toothbrush or stiff bristle brush
- Palette or wax paper
- Water cup and paper towels
- Matte clear sealant spray or varnish
Step 1: Base Coat Preparation
-
Clean surface:
Begin by wiping down your clay cup with a slightly damp cloth to remove any dust or oils. This ensures your paint adheres smoothly. -
Apply base color:
Using a larger soft brush, coat the entire outside of the cup with your cream or off-white paint. Don’t forget the inside rim, leaving the bottom unpainted if you want that exposed clay look. -
Add a second coat:
Let the first layer dry completely (about 15-20 minutes). Adding a second coat gives you a solid, opaque background which makes the colorful specks pop vividly later. -
Paint the rim:
Carefully paint the inside of the cup with the same cream color, extending down at least an inch or painting the entire interior for a finished look.
Stone Texture Trick
Mix a tiny pinch of baking soda into your base coat paint. This adds a subtle, gritty texture that makes the finished cup feel like real unpolished ceramic stone.
Step 2: Creating the ‘Chips’
-
Mix your palette:
Squeeze out small amounts of turquoise, terracotta, deep red, brown, and mustard yellow onto your palette. I like to keep these separate initially to avoid muddying the crisp colors. -
Paint large shapes:
Load your small flat brush with turquoise. Paint random, organic polygon shapes scattered around the cup. Think of these as the largest ‘stone chips’ in the terrazzo mix. -
Vary the colors:
Clean your brush and repeat the process with the terracotta orange, creating slightly smaller irregular blobs and shapes spaced out between the turquoise ones. -
Add deep accents:
Switch to the deep red paint. Add a few deliberate, smaller shapes. These darker tones ground the design and add depth to the faux-stone effect. -
Soften with pastels:
If you have a peach or light pink shade, add a few tiny, soft geometric shapes to fill in large gaps. These act as lighter mineral deposits in the visual texture. -
Review spacing:
Step back and look at the cup. The large shapes shouldn’t touch each other; aim for a balanced, airy distribution rather than a crowded pattern.
Metallic Upgrade
After the main colors dry, paint a few sporadic ‘chips’ using gold or copper leaf paint. This adds a luxury mineral vein look to your terrazzo pattern.
Step 3: The Speckle Effect
-
Prepare the splatter:
Dilute a small amount of dark brown paint with a few drops of water until it reaches an ink-like consistency. This is crucial for fine speckling. -
Load the tool:
Dip an old toothbrush or a stiff bristle brush into the watered-down brown paint. Tap off the excess on a paper towel first to prevent huge drips. -
Speckle the surface:
Hold the brush near the cup and run your thumb across the bristles to flick tiny spray dots onto the surface. Rotate the cup as you go to cover all sides evenly. -
Control the density:
Vary your distance from the cup; closer for dense clusters, further away for a light mist. This irregularity mimics real stone perfectly. -
Hand-paint details:
Use your fine detail brush (size 00) to manually add distinct tiny dots of black or dark grey in empty areas where the splatter didn’t reach. -
Check the rim:
Ensure the splatter effect continues over the rim and slightly inside the cup for a realistic cross-section appearance.
Step 4: Finishing Touches
-
Dry thoroughy:
Allow the cup to sit for at least an hour. The splatter layer can be surprisingly wet, and smudging it now would ruin the crisp effect. -
Clean up the base:
If you want the exposed clay look at the bottom, use a damp cloth or a piece of fine sandpaper to gently remove any stray paint marks from the unpainted base section. -
Seal the work:
Apply a coat of matte clear varnish or spray sealant. A matte finish is essential here—glossy finishes tend to make it look like plastic rather than stone.
Place your new faux-terrazzo cup on a wooden tray or near a plant to highlight those beautiful earthy tones
Short Quote in Handwritten Lettering
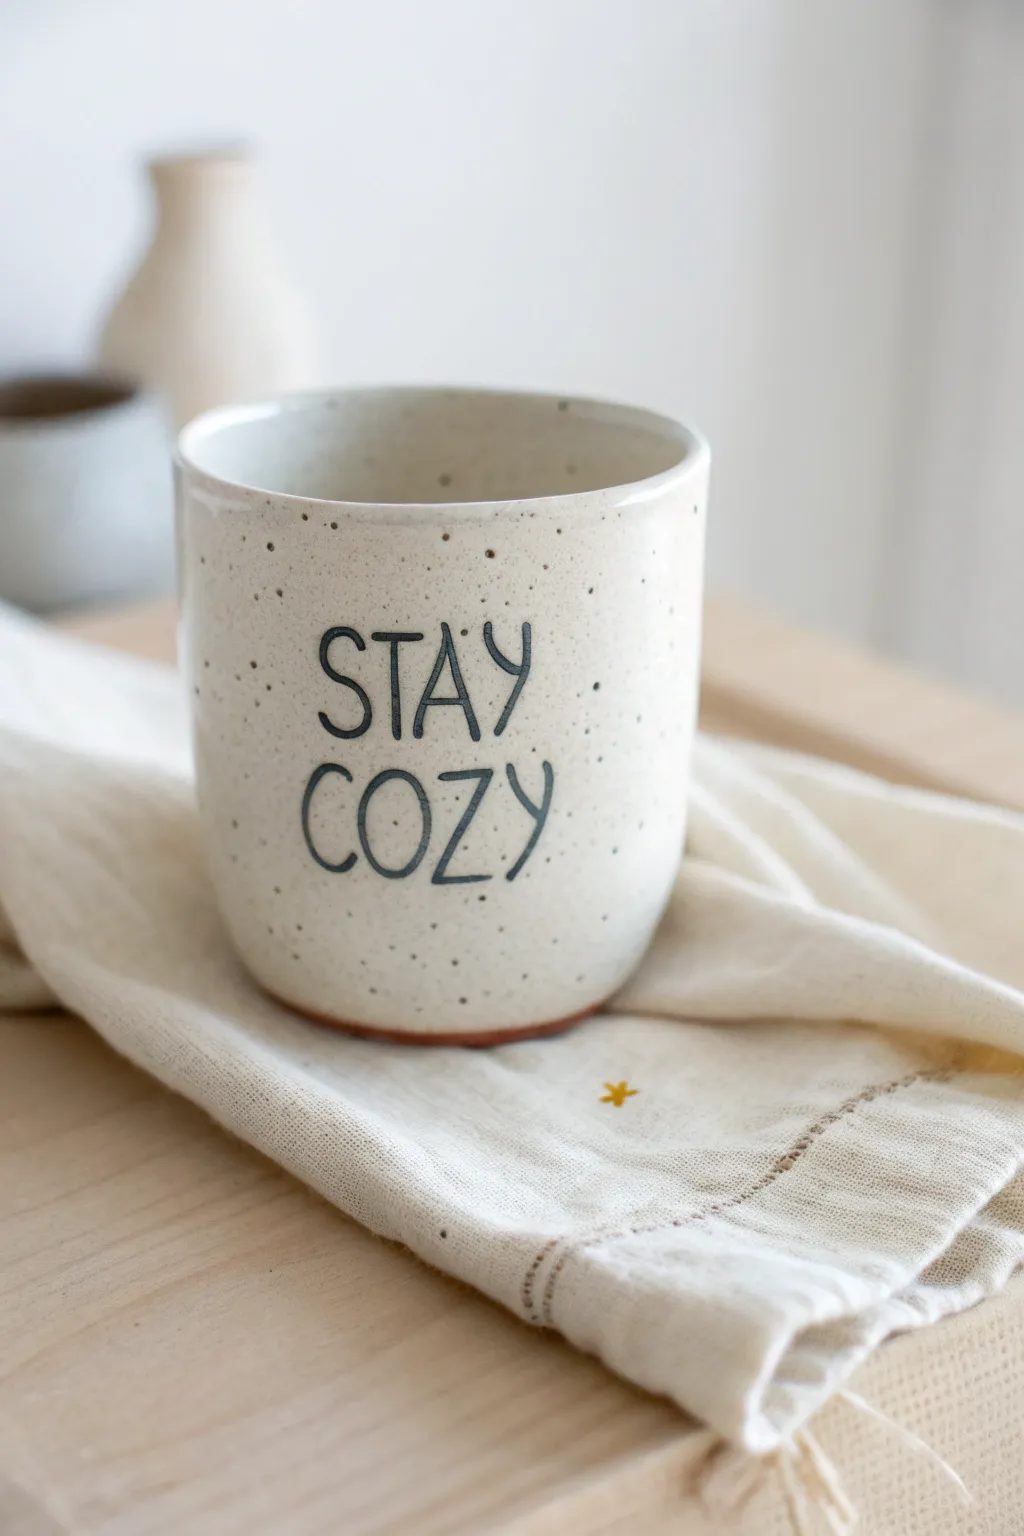
This project embraces the charming imperfection of handmade ceramics with a cozy, rustic aesthetic. You will create a creamy white mug featuring delicate speckles and simple, handwritten typography that feels warm and inviting.
Step-by-Step Guide
Materials
- Unfinished ceramic mug (bisque ware) or a plain white mug for overglazing
- Underglaze pencil (black or dark grey) or fine-tip porcelain marker
- Creamy white glaze (semi-opaque)
- Speckled clay slip or watered-down brown underglaze
- Stiff bristle brush (e.g., an old toothbrush)
- Small round brush (size 1 or 2)
- Clear glaze (if using bisque ware)
- Damp sponge
- Kiln (if using traditional ceramic glazes) or oven (if using porcelain markers)
Step 1: Preparation and Base Glaze
-
Clean surface:
Begin by wiping down your bisque mug with a damp sponge to remove any dust or oils that might resist the glaze. -
Apply base color:
Dip or brush on your creamy white glaze. For this specific look, you want a glaze that has a slight satin finish or a soft gloss, rather than a high-gloss shine. -
Check consistency:
Ensure the glaze application is even but doesn’t pool too thickly near the bottom rim, where the raw clay will be exposed. -
Leave a raw edge:
Wipe the bottom quarter-inch of the mug clean with your sponge to expose the terracotta or reddish clay body at the foot, creating that lovely contrast.
Smudged Letters?
If underglaze smears while applying clear glaze, use a fan brush and a ‘patting’ motion rather than dragging the brush. Spray glazing also solves this.
Step 2: Creating the Speckles
-
Prepare the speckle mix:
If your glaze doesn’t come pre-speckled, mix a small amount of dark brown underglaze or iron oxide wash with water until it’s fluid but not dripping wet. -
Test the spatter:
Before hitting the mug, I always test the spatter on a piece of paper to ensure the droplets aren’t too large. -
Apply speckles:
Dip a stiff bristle brush or toothbrush into the mixture. Hold it near the mug and run your thumb across the bristles to flick tiny droplets onto the surface. -
Rotate and repeat:
Turn the mug slowly while flicking to get even coverage. Aim for a random distribution—some areas can be denser than others. -
Clean up interior:
Create a clean finish by wiping away any rogue speckles that landed inside the rim if you want the interior pristine.
Add a Hidden Detail
Paint a tiny matching element, like a small yellow star or a miniature heart, on the inside bottom of the cup as a surprise for the drinker.
Step 3: Lettering
-
Plan the text:
Visualize where the words ‘STAY COZY’ will sit. They should be centered vertically on the face of the mug. -
Lightly sketch:
If you are nervous about freehanding, use a regular graphite pencil to lightly sketch the letters. The graphite will burn off in the kiln. -
Hand-lettering style:
Using your black underglaze pencil or a fine brush with black underglaze, draw the letters. Aim for a tall, narrow, sans-serif style with slightly uneven line weights to mimic handwriting. -
Refine the lines:
Go over the letters a second time if needed to darken the black, but keep the lines somewhat thin and delicate. -
Dry completely:
Let the underglaze or marker dry fully before moving to the final glazing step to avoid smudging your hard work.
Step 4: Finishing and Firing
-
Clear glaze application:
If your base white glaze isn’t self-sealing or glossy enough, apply a thin coat of clear transparent glaze over the entire piece (excluding the raw foot). -
Final wipe:
Check the bottom foot ring one last time to make sure no glaze is adhering to the bottom, which would stick to the kiln shelf. -
Fire the piece:
Place the mug in the kiln and fire according to your clay and glaze specifications (usually Cone 5 or 6 for stoneware). -
Cool down:
Allow the kiln to cool completely before removing the mug to prevent thermal shock and crazing.
Enjoy sipping your favorite warm beverage from your new, custom-lettered creation
Cozy Mushroom Cottagecore Scene
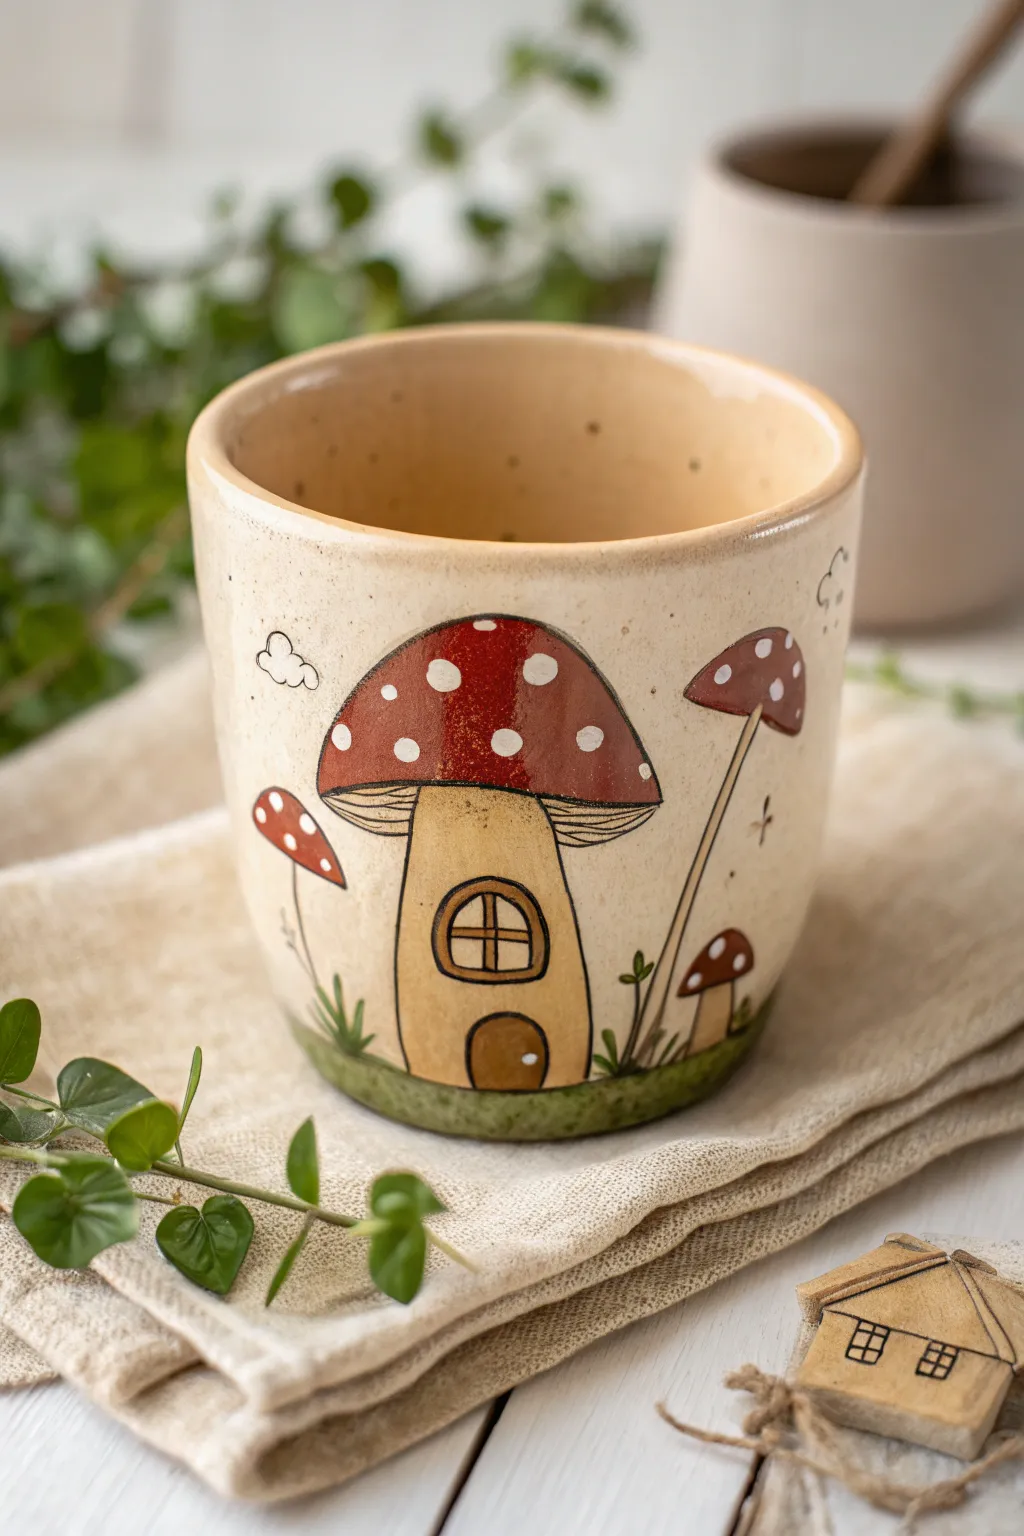
Transform a plain ceramic mug into a fairytale dwelling with this charming mushroom house design. Featuring warm earth tones and delicate linework, this cottagecore-inspired project brings a touch of storybook magic to your morning coffee routine.
Step-by-Step Guide
Materials
- Bisque-fired ceramic mug (or glazed mug if using oven-bake paints)
- Pencil for sketching
- Underglazes or ceramic paints: Cream/Beige, Deep Red, White, Olive Green, Brown
- Fine liner brush (size 0 or 00)
- Medium round brush (size 4 or 6)
- Black underglaze pencil or very fine detail brush with black paint
- Clear dipping or brush-on glaze
- Water cup and paper towels
- Sponge
Step 1: Preparation and Sketching
-
Clean surface:
Begin by wiping down your bisque mug with a damp sponge to remove any kiln dust or oils from your hands, ensuring a clean painting surface. -
Outline main shapes:
Using a pencil, lightly sketch the large central mushroom shape. Draw a wide, curved cap and a stout, thick stem. The pencil marks will burn off in the kiln, so don’t worry about being messy. -
Add secondary elements:
To the right of the main house, sketch a taller, thinner mushroom leaning slightly outward. Add a tiny mushroom near the base on the left side. -
Sketch details:
Draw a small arched door at the bottom of the main stem and a round window with a crosspane in the middle. Add some grass blades along the bottom edge.
Fixing Smudges
If you smear the black linework, don’t wipe it! Let it dry completely, then gently scratch the mistake away with a toothpick or craft knife before glazing.
Step 2: Painting the Base Colors
-
Paint the stems:
Dip your medium round brush into the cream or beige underglaze. Fill in the stem of the main mushroom house and the stems of the smaller mushrooms. Apply 2-3 coats for solid opacity. -
Fill the caps:
Switch to your deep red paint. Carefully fill in the large mushroom cap and the smaller auxiliary caps. I find that three thin coats work better than one thick coat to prevent trailing brushstrokes. -
Create the polka dots:
Once the red paint is dry to the touch, use the back end of a small paintbrush or a dotting tool dipped in white paint. Press gently to create random white spots on the red caps. -
Paint the ground:
Use the olive green paint to create a uneven, grassy base along the bottom rim of the cup, anchoring your mushrooms so they aren’t floating. -
Fill the door:
Paint the door shape with a medium brown color, giving it a wooden appearance. Let all base colors dry completely before moving to the next step.
Make it 3D
Before the bisque fire, add small coils of clay to the surface to make the mushroom cap and door frame actually pop out for a tactile relief effect.
Step 3: Linework and Finishing Touches
-
Outline the caps:
Using a very fine liner brush and black paint (or a black underglaze pencil), carefully trace the outline of the mushroom caps to define them. -
Add gill details:
Draw fine, curved lines underneath the main mushroom cap to represent the gills. These should fan out slightly from the stem. -
Define the architecture:
Outline the round window and the door. Add a tiny dot for the doorknob. These sharp lines give the illustration its storybook feel. -
Draw grassy textures:
Add short, quick upward strokes in black over the green base to simulate blades of grass. Add a few small leaf shapes nearby for variety. -
Atmospheric details:
In the empty background space, draw a few simple cloud outlines and tiny plus-signs to represent sparkles or distant stars. -
Spatter texture (Optional):
For a rustic look, dampen a toothbrush with diluted brown paint and flick it very lightly over the mug to create subtle speckles. -
Glaze application:
Once your design is bone dry, apply a coat of clear glaze over the entire exterior (and interior if unglazed) to seal the artwork and make it food safe. -
Final fire:
Fire the piece in the kiln according to the specific temperature requirements of your clay and glaze combination.
Now you have a cozy, handmade vessel perfect for enjoying warm beverages on a rainy afternoon
Abstract Brushstroke Swatches
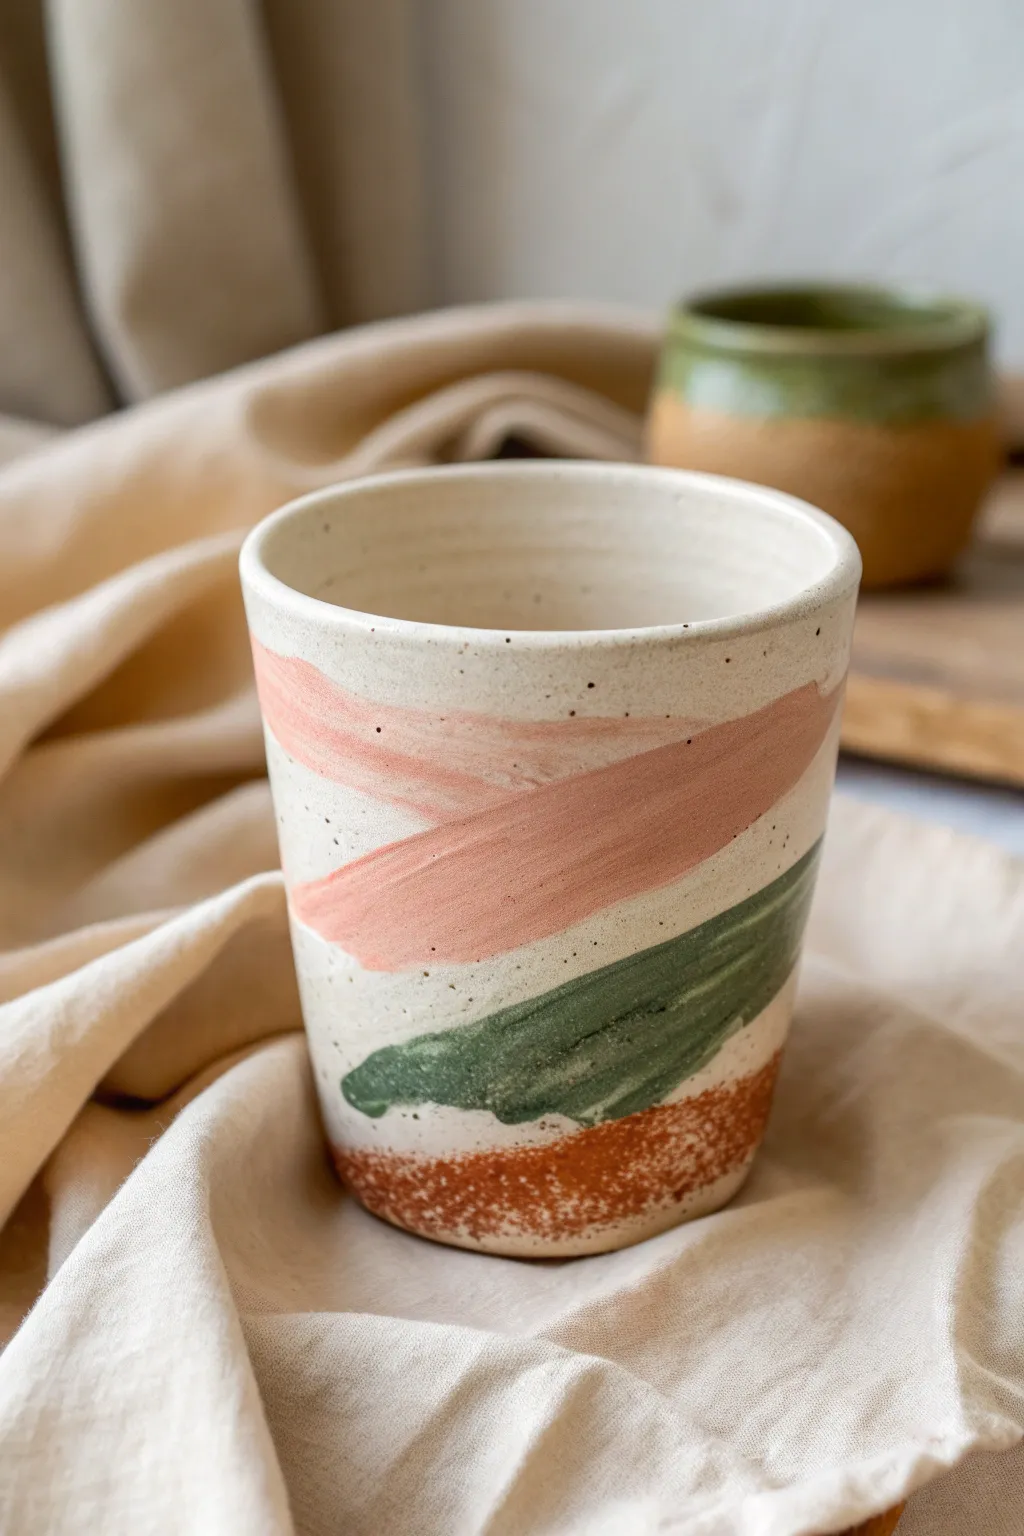
Embrace the beauty of imperfection with this breezy, abstract design that celebrates visible brushwork and earthy tones. The overlapping swatches of peach, sage, and rust create a calming, modern aesthetic perfect for brightening up your morning coffee routine.
Step-by-Step Tutorial
Materials
- Bisque-fired ceramic cup (smooth, straight-sided)
- Underglaze (Pastel Peach or Salmon Pink)
- Underglaze (Sage or Forest Green)
- Underglaze (Terra Cotta or Rust Orange)
- Speckled matte white glaze (or transparent glaze if using speckled clay)
- Flat shader brush (approx. 1 inch wide)
- Small round brush (for touch-ups)
- Clean sponge
- Water container
- Clear dipping glaze (optional, for finish)
Step 1: Preparation & Base
-
Clean the Surface:
Before applying any color, take a slightly damp sponge and wipe down your bisque-fired cup to remove dust and oils. This ensures your glaze adheres properly. -
Plan Your Composition:
Visualize three distinct zones for your swatches. You want a diagonal flow—starting high on the left with peach, moving down to the middle with green, and anchoring the bottom with rust. -
Apply the Base (Optional):
If your clay body isn’t naturally speckled white like the photo, apply two coats of a speckled matte white underglaze over the entire cup first. Let this dry completely until it’s chalky and cool to the touch.
Step 2: Layering the Swatches
-
Load the Brush:
Dip your flat shader brush into the peach underglaze. Don’t overload it; you want a ‘dry brush’ effect at the tail end of the stroke. -
First Stroke: Peach:
Starting near the top rim, pull the brush diagonally downwards across the upper third of the cup. Apply firm pressure at the start and lift gradually as you sweep across to create a feathery edge. -
Second Pass:
Go over the peach stroke one more time to deepen the opacity in the center, but leave those beautiful, transparent brush texture edges alone. -
Drying Time:
Wait about 5–10 minutes. The peach layer needs to be dry enough that the next color won’t muddy it where they might slightly overlap. -
Second Stroke: Sage:
Clean your brush thoroughly. Load it with the sage green underglaze. Position this stroke below the peach one, following a similar diagonal angle but slightly steeper. -
Creating Movement:
Sweep the green paint across the middle section. I usually like to let the very top edge of the green brush just barely kiss the bottom edge of the peach stroke for a cohesive look. -
Refining the Green:
If the green looks too thin, dab a little extra pigment in the middle of the swatch, keeping the ends jagged and organic. -
Third Stroke: Rust:
Clean the brush again. Load up the rust or terra cotta color. This stroke will anchor the design at the very bottom of the cup. -
Applying the Anchor:
Swipe the rust color horizontally along the bottom edge, allowing the brush bristles to create a textured, uneven top line that reaches up toward the green stroke. -
Texture Check:
The rust section in the image has a stippled texture. You can achieve this by dabbing the loaded brush vertically against the clay rather than just swiping it smoothness.
Muddy Colors?
If your overlapping colors are smearing together, the bottom layer wasn’t dry enough. Wait until the first color turns a lighter, chalky shade before applying the next layer.
Step 3: Finishing Touches
-
Clean the Rim:
Using a damp sponge, carefully wipe away any glaze that may have strayed onto the very top lip of the cup or the inside, keeping the interior clean. -
Final Dry:
Let the cup sit overnight or until bone dry. The underglazes should look matte and chalky. -
Clear Glazing:
Dip the entire cup into a clear transparent glaze (or matte clear, depending on your preference). This seals the underglaze design and makes it food safe. -
Firing:
Fire the piece in a kiln according to the clay and glaze manufacturer’s instructions (usually Cone 5 or 6 for stoneware).
Visible Brushstrokes
To get that painterly streaky look, use a stiff-bristled brush rather than a soft watercolor brush. The stiffer bristles will cut through the glaze to leave texture.
Once fired, you will have a stunning piece of functional art that brings an earthy warmth to your kitchen cabinet
Sgraffito-Style Scratch-Through Details
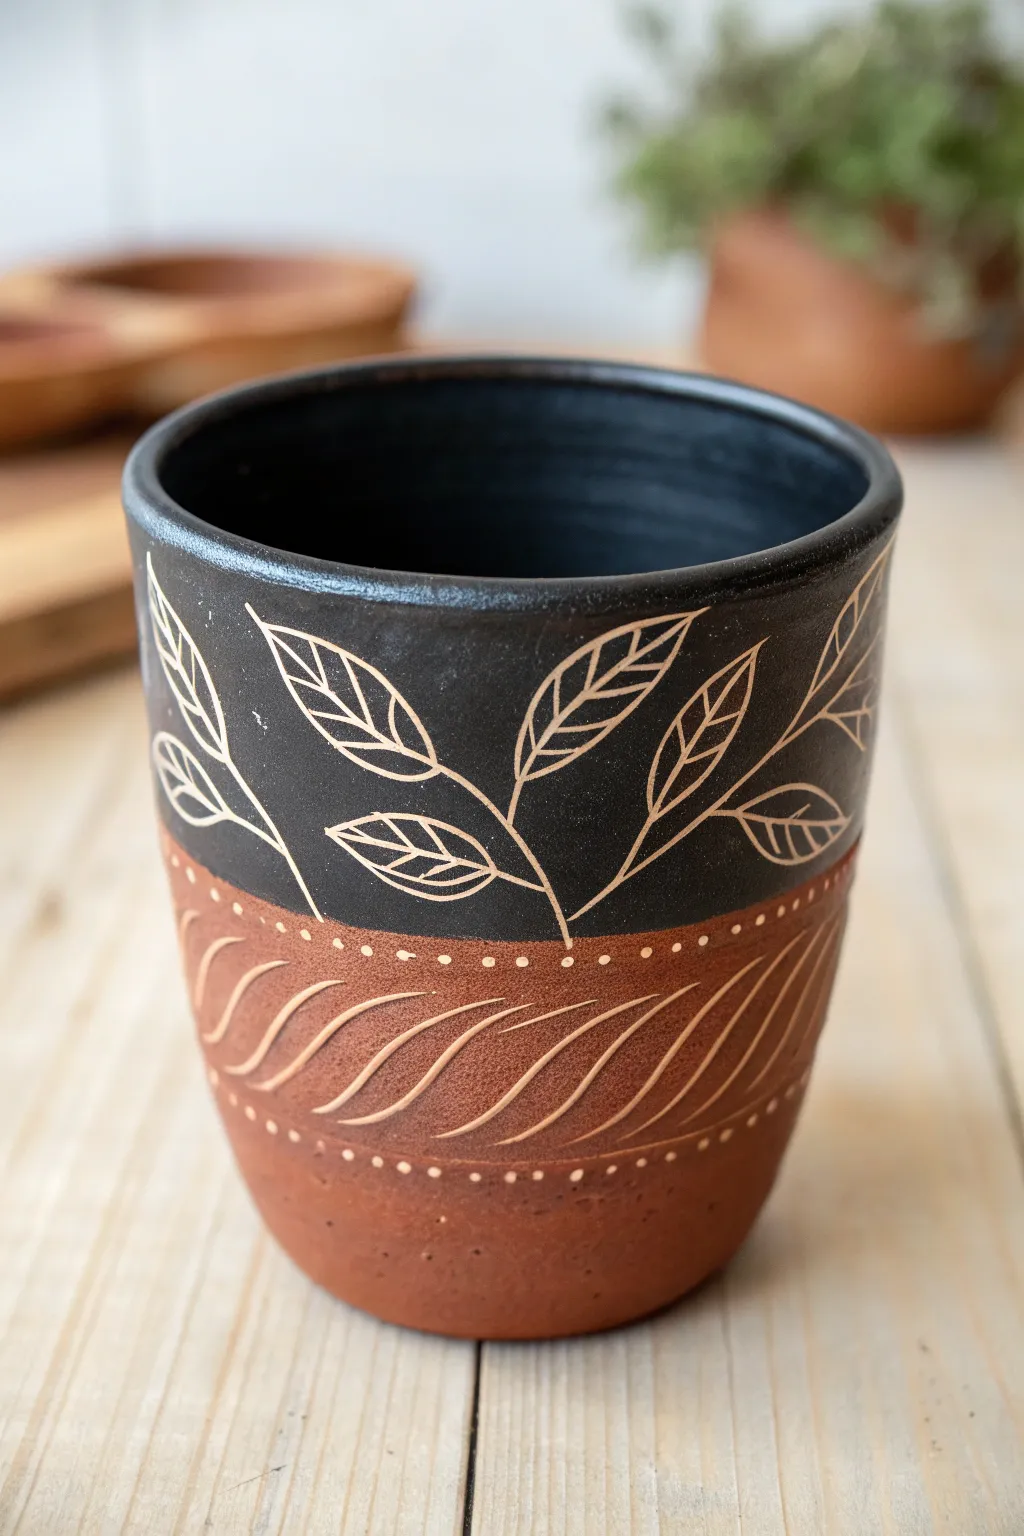
This earthy yet elegant project combines the stark contrast of black and terracotta with delicate organic lines. By layering slip or underglaze and carving partially through it, you’ll create a beautifully textured vessel that feels as good in the hand as it looks on the shelf.
How-To Guide
Materials
- Leather-hard clay cup (red stoneware or terracotta)
- Black underglaze or slip
- Soft fan brush or wide hake brush
- Sgraffito loop tool (small)
- Needle tool or fine point stylus
- Carving tool using a V-tip gauge
- Damp sponge
- Clear glaze (optional for finishing)
Step 1: Preparation and Underglazing
-
Check clay consistency:
Ensure your wheel-thrown or hand-built cup is at the perfect leather-hard stage. It should be firm enough to handle without warping but soft enough to carve into easily. -
Clean the surface:
Gently wipe the exterior with a barely damp sponge. This removes any dust or grog that might interfere with a smooth underglaze application. -
Mark the horizon line:
Decide where the black section will end. Using a needle tool while the cup spins on a banding wheel (or carefully by hand), lightly score a guide line around the circumference about halfway down the cup. -
Apply the first coat:
Using a soft fan brush, apply a smooth, even coat of black underglaze to the top half of the cup, stopping exactly at your scored line. Use long, horizontal strokes. -
Let it firm up:
Allow the first coat to lose its sheen. If the surface is still wet, the next layer might pick it up rather than covering it. -
Apply subsequent coats:
Apply 2-3 more coats of black underglaze to ensure total opacity. I prefer to alternate the direction of my brush strokes slightly to avoid streaks. -
Dry to leather hard:
Let the underglaze dry until the cup returns to a leather-hard state. It shouldn’t be bone dry, or the carving will be chippy and difficult.
Chipped Lines?
If the black underglaze is chipping off in chunks rather than carving smoothly, the clay is too dry. Mist it lightly and wrap in plastic for an hour to rehydrate.
Step 2: Carving the Design
-
Outline the stems:
Using a fine stylus or needle tool, lightly sketch the main stems of your leaves into the black area. Create flowing, organic curves that reach upward. -
Draw the leaf shapes:
Lightly outline the leaf shapes attached to your stems. Don’t worry about the interior veins yet; just focus on placement and balance. -
Carve the black outlines:
Switch to a small loop tool or sgraffito tool. Carve over your sketched lines, scratching away the black underglaze to reveal the red clay body beneath. Keep your pressure consistent. -
Add leaf details:
Inside each leaf outline, carve a central vein and delicate diagonal veins. These lines should be slightly thinner than the outline for visual variety. -
Clean up burrs:
As you carve, little clay crumbs (burrs) will accumulate. Brush them away gently with a soft, dry brush—don’t wipe with your finger or you might smudge the black.
Step 3: Creating the Lower Texture
-
Define the border:
Right below the black section, create a decorative border. Use your needle tool to poke a row of small, evenly spaced dots into the raw red clay. -
Add the lower border:
Repeat this dotting process further down the cup to create a bottom boundary for your carved band. This frames the textured area. -
Carve the swoops:
Using a V-tip carving tool, gouge curved, rhythmic lines between your two dotted borders. Press deeper in the middle of the stroke and release pressure at the end to create a tapered ‘leaf’ shape. -
Check the carving depth:
Ensure the depth of these clay carvings matches the visual weight of the black sgraffito section above. -
Final cleanup:
Once the cup is bone dry, use a stiff brush to remove any final stubborn crumbs from the carved grooves before bisque firing.
Sharper Contrast
For maximum pop, choose a white clay body and coat it with black slip, or use a dark chocolate clay with white slip. High contrast is key to sgraffito.
Enjoy the tactile satisfaction of holding your finished cup, feeling the difference between the smooth glaze and the raw carved clay textures