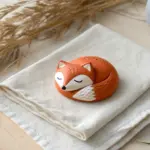
When I want a date night that feels cozy and creative, I reach for clay and a couple simple prompts. These clay date challenges are designed for lots of laughs, easy wins, and cute side-by-side results you’ll actually want to keep.
Chubby Octopus Duo Challenge
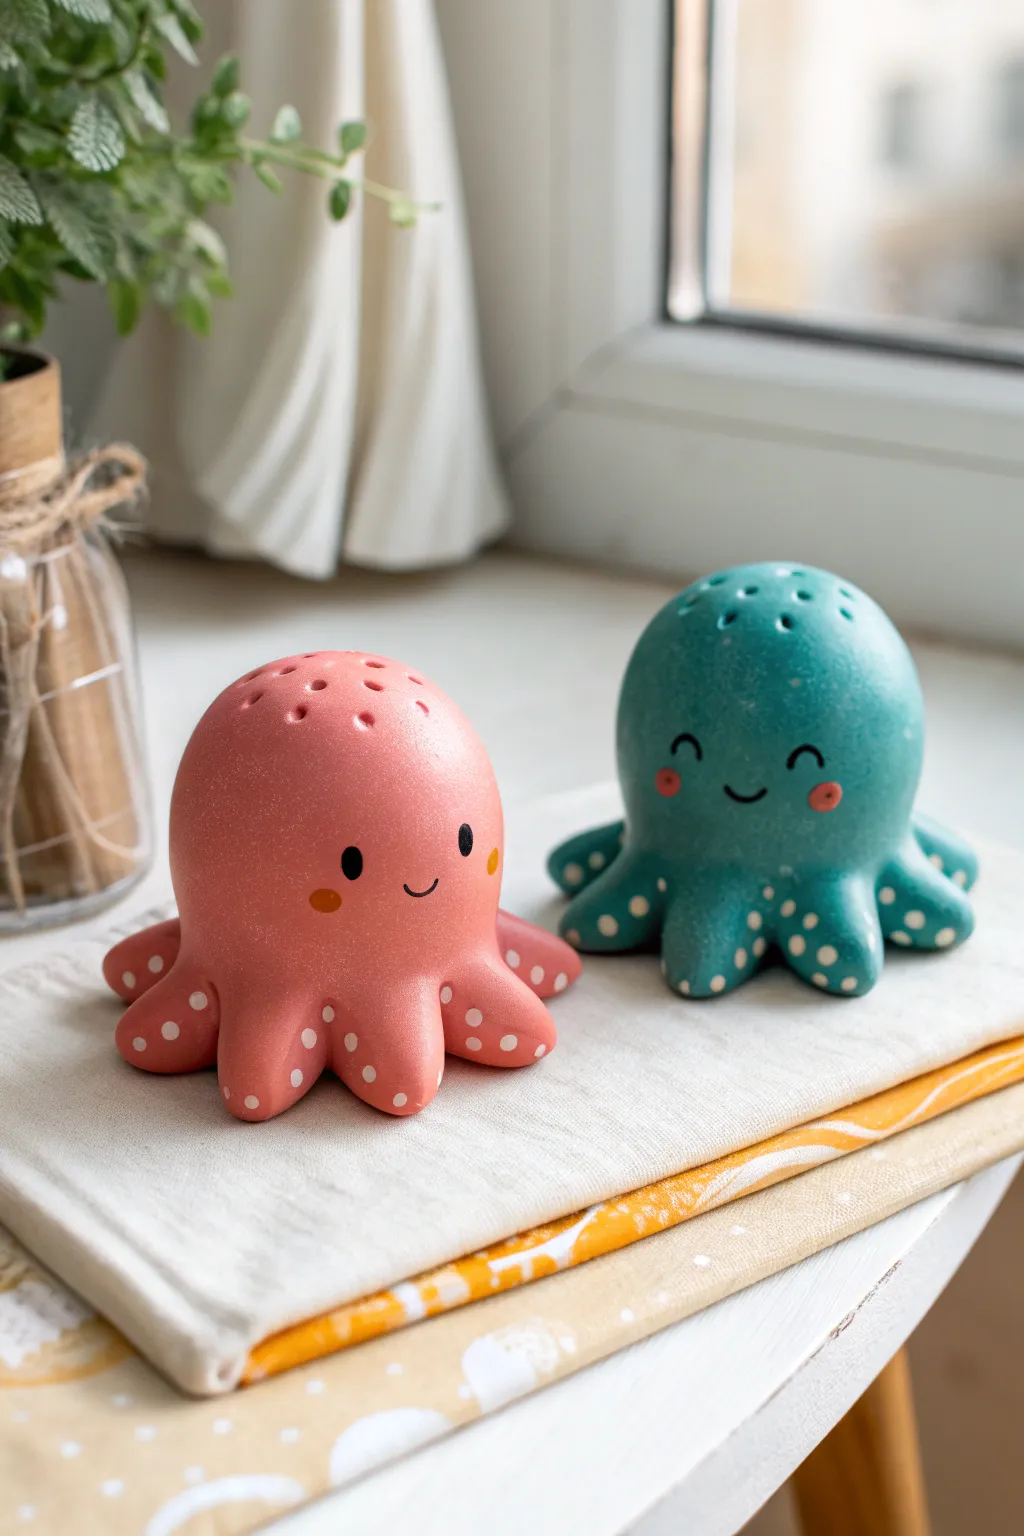
These adorable desktop companions feature a perfectly round, stylized body and eight stubby tentacles, radiating pure happiness. The pair showcases a smooth matte finish in complementary coral and teal, accented with sweet painted expressions and playful polka dots.
Step-by-Step
Materials
- White air-dry clay
- Acrylic paints (Coral Pink, Teal/Aquamarine, Black, White, Blush Pink)
- Fine-grit sandpaper
- Cup of water and sculpting sponge
- Needle tool or toothpick
- Ball stylus tool (various sizes)
- Small synthetic paintbrushes (flat and detail liner)
- Matte varnish or sealant
Step 1: Sculpting the Base Form
-
Prepare the clay:
Start by conditioning two balls of clay, each about the size of a tennis ball. Knead them thoroughly until the texture is uniform and free of cracks. -
Roll the main body:
Roll each piece into a smooth sphere. Gently flatten the bottom against your work surface to create a stable base, but keep the overall shape very rounded and dome-like. -
Form the tentacles:
Pinch the clay at the bottom edge of your dome to pull out eight small sections. You don’t need to add separate clay; pulling from the main mass ensures a stronger bond. -
Shape the ‘legs’:
Roll each pulled section into a small, stubby cone shape. Curve the very tips slightly upward to give them a dynamic, wiggling appearance. -
Smooth the seams:
Use a small amount of water and your finger or a sponge to blend the connection points between the tentacles and the body. The transition should be seamless and fluid. -
Create texture:
Using the large end of a ball stylus or the back of a paintbrush, gently impress small dimples around the perimeter of the head to create the decorative holes seen on top.
Step 2: Refining and Drying
-
Final smoothing:
Check the surface for any fingerprints. A slightly damp sponge wiped gently over the clay works wonders for achieving that porcelain-smooth look. -
Drying time:
Allow the figures to dry completely. For air-dry clay of this thickness, I recommend waiting at least 24 to 48 hours to ensure the core is solid. -
Sanding:
Once fully dry, lightly sand any rough spots or uneven bumps with fine-grit sandpaper. Wipe away all dust with a slightly damp cloth before moving to paint.
Cracks Appearing?
If small cracks form while drying, mix a tiny bit of fresh clay with water to make a paste (slip). Fill the crack, smooth it over, and let it dry again.
Step 3: Painting and Details
-
Base coat application:
Paint one octopus in a soft coral pink and the other in a deep teal. You will likely need two or three thin coats for opaque coverage, letting each coat dry in between. -
Painting the face:
Using your smallest detail brush and black paint, add two small oval eyes wide apart. For the mouth, paint a tiny ‘u’ shape right between the eyes. -
Adding blush:
Dip a Q-tip or a dry brush into a small amount of blush pink paint. Dab off the excess, then gently stamp rosy cheeks just below the outer corners of the eyes. -
Tentacle details:
Use a ball stylus dipped in white paint (or a lighter shade of your base color) to add the polka dots. Place these randomly on the tentacles, focusing on the tips and lower edges. -
Highlighting the eyes:
Add a tiny speck of white to the top corner of each black eye to bring the character to life. -
Sealing the work:
protect your handiwork with a layer of matte varnish. This seals the paint and gives the clay that professional, soft-touch finish.
Pro Tip: Consistent Dots
For perfect polka dots, use the back end of different sized drill bits or nails. Dip, dot, and wipe clean for uniform circles every time.
Set your cheerful duo on a windowsill or desk where their smiles can brighten your daily routine

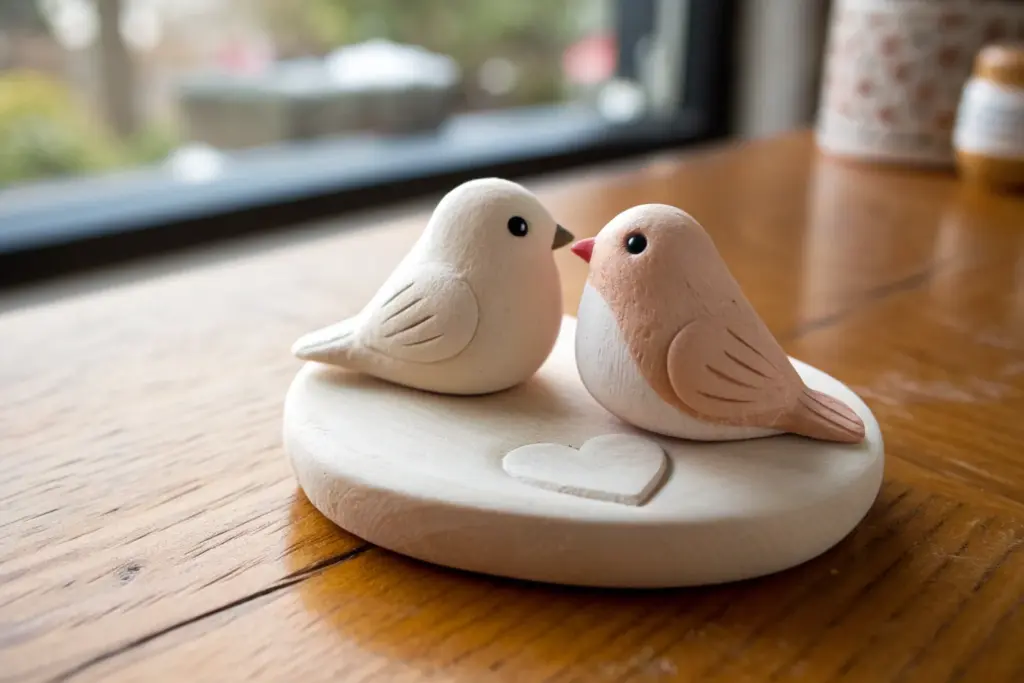
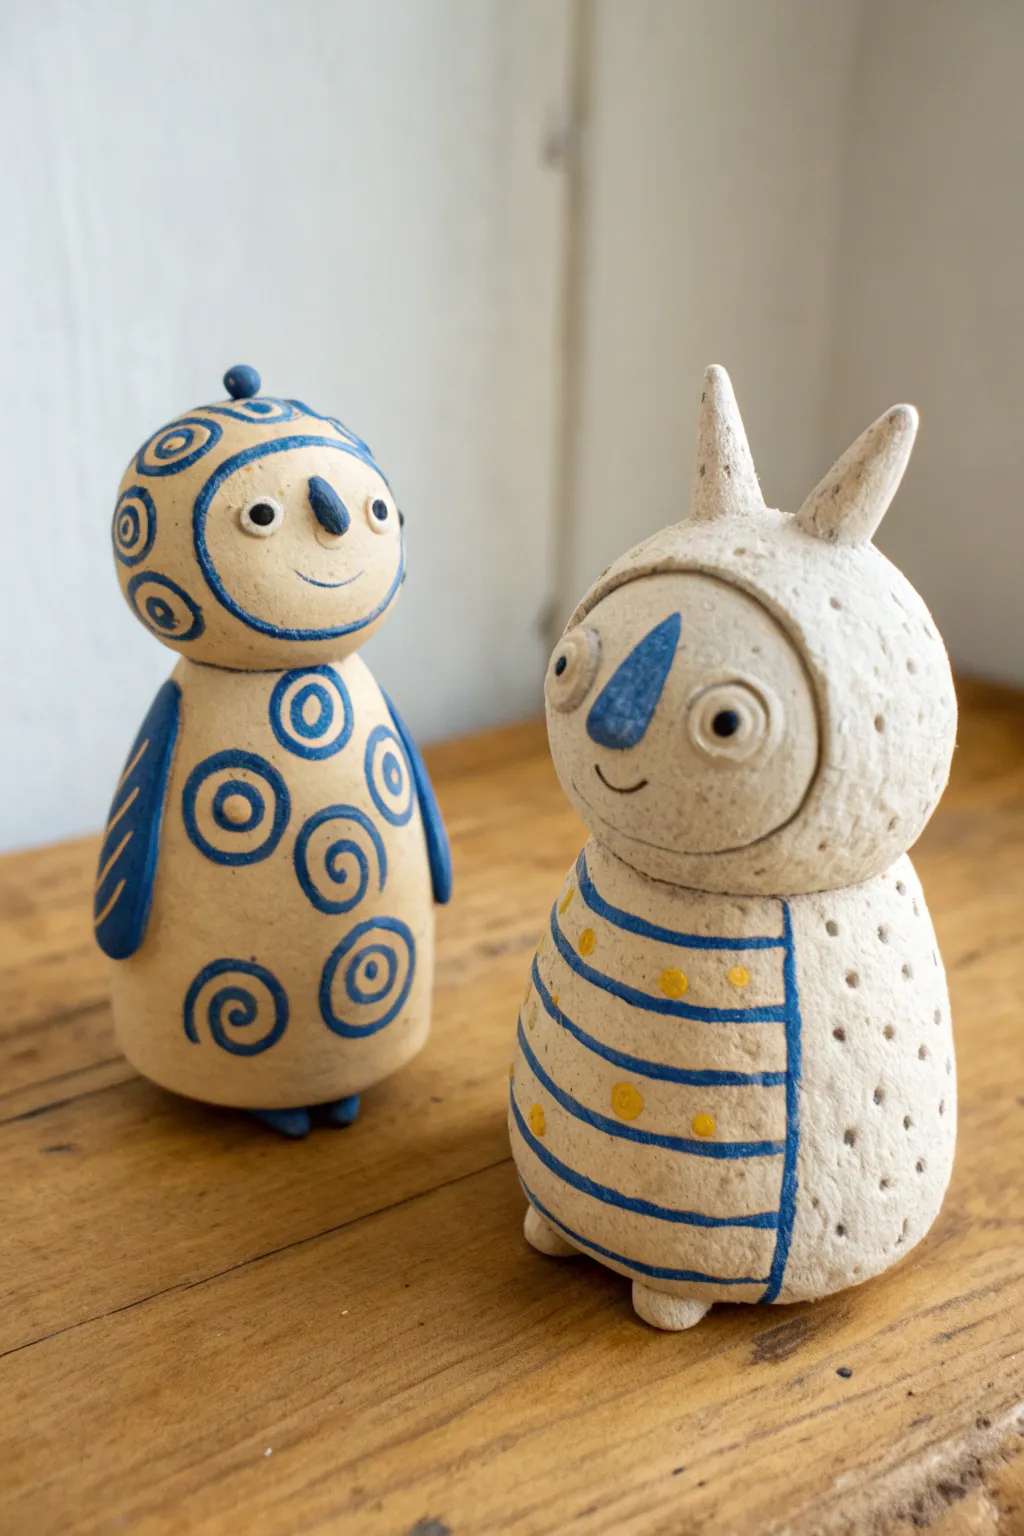
Tiny Animal Face-Off
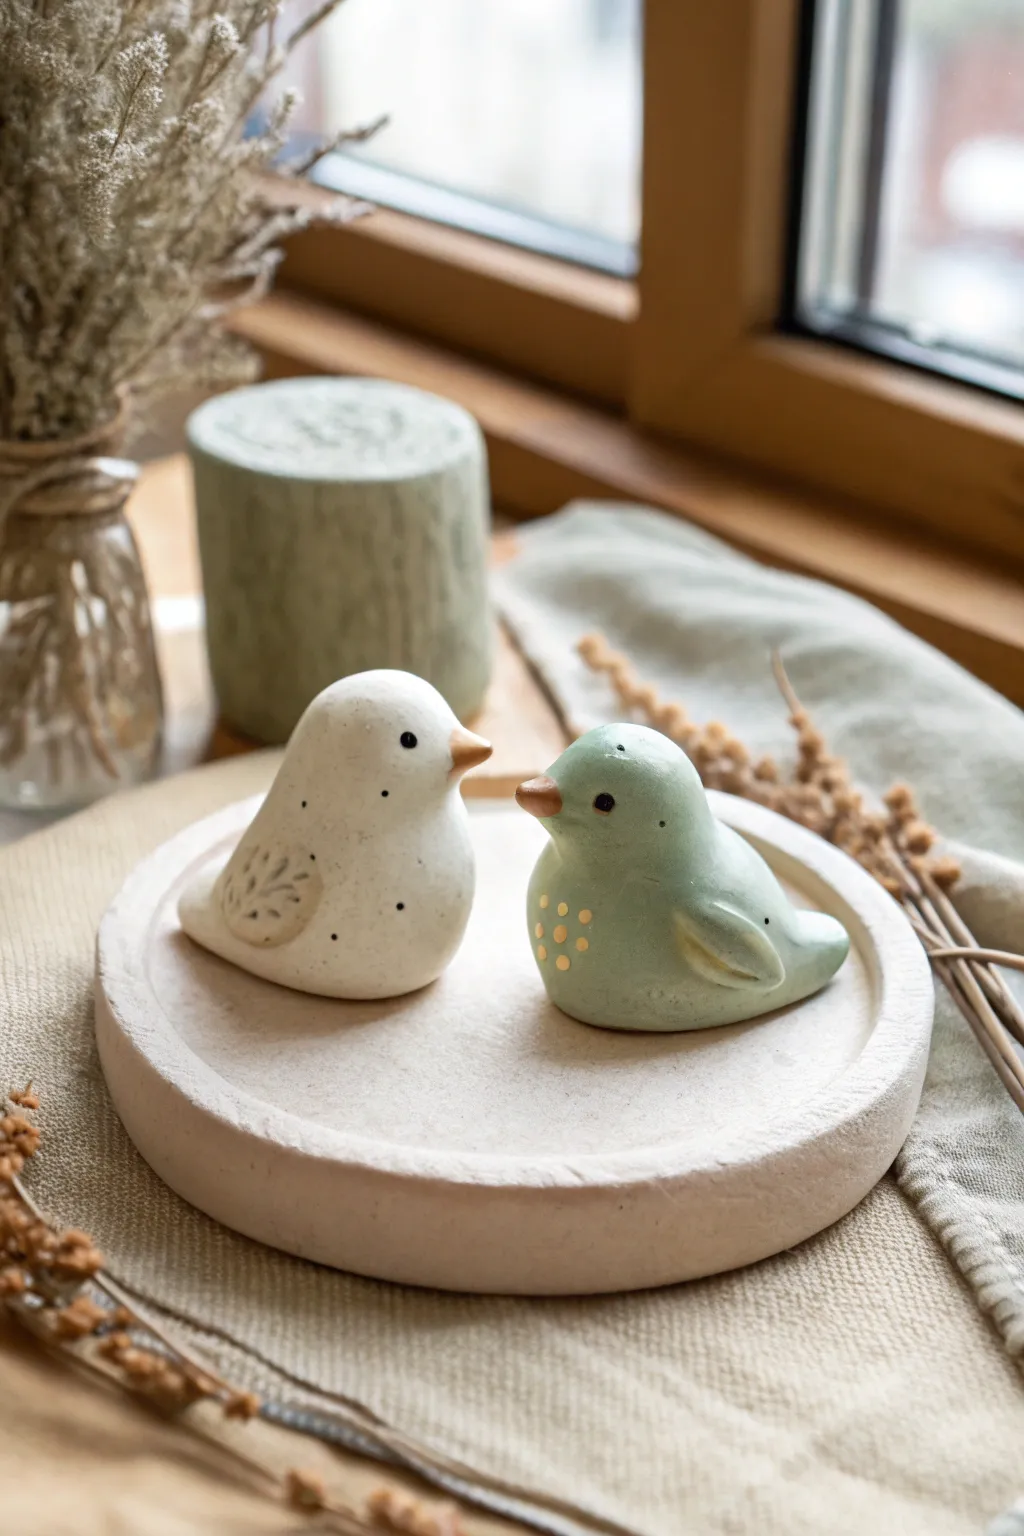
These charming, minimalist birds are the perfect beginner sculpting project, featuring soft curves and delicate dotted details. Their rounded forms and sweet expressions make them an adorable addition to any shelf or tabletop vignette.
Step-by-Step Guide
Materials
- Air-dry clay or polymer clay (white)
- Acrylic paints (creamy white, sage green, gold, black, burnt orange)
- Small paintbrush for base coats
- Fine detail brush (00 or 000 size)
- Dotting tool or toothpick
- Clay sculpting tools (smoother, needle tool)
- Water cup (for smoothing)
- Matte varnish/sealer
- Fine grit sandpaper
Step 1: Shaping the Forms
-
Prepare the clay:
Start with two equal lumps of clay, roughly the size of a golf ball or slightly larger. Knead the clay thoroughly until it is warm and pliable to prevent cracking later. -
Create the base shape:
Roll one lump into a smooth ball, then gently roll it against your work surface into a teardrop shape. This teardrop will become the body, with the wider end serving as the chest. -
Form the head:
Looking at the wider end of the teardrop, gently pinch and pull the clay upward to define a rounded head shape. Smooth the neck transition so there are no sharp creases, aiming for a chubby, continuous silhouette. -
Pinch the tail:
At the tapered back end of the body, gently flatten the point and curve it slightly upwards to distinctively create the tail feathers. -
Attach the beak:
Roll a very tiny cone of clay for the beak. Score the attachment point on the face and the back of the beak slightly, add a drop of water (or slip/clay glue), and press it firmly onto the face. -
Sculpt the wings:
Take two small balls of clay and flatten them into teardrop shapes. Attach one to each side of the body, creating a slight relief effect rather than carving them in. -
Refine and smooth:
Dip your finger in a little water and run it over the entire bird to erase fingerprints and smooth out any bumps. Repeat the entire sculpting process for the second bird. -
Texture details:
Using a needle tool, gently impress small curves or lines onto the wing areas to suggest feathers, but keep the pressure light. -
Dry completely:
Let your birds sit undisturbed for 24-48 hours. I find that turning them over halfway through the drying process helps the bottom dry evenly.
Step 2: Painting and Finishing
-
Sanding:
Once bone dry, use fine-grit sandpaper to gently buff away any rough patches or sharp edges, creating a surface that mimics smooth stoneware. -
Base coat – White Bird:
Paint the first bird entirely in a creamy off-white acrylic. You may need two coats for opaque coverage. -
Base coat – Green Bird:
Mix a soft sage green using green, white, and a touch of gray. Paint the second bird entirely and let both base coats dry completely. -
Paint the beaks:
Using your fine detail brush, carefully paint the beaks a warm, burnt orange or terracotta color. -
Add the eyes:
Dip the blunt end of a toothpick or a small dotting tool into black paint. Provide a single, confident dot on each side of the head for the eyes. -
Create speckles (White Bird):
Dilute a tiny amount of black or dark grey paint with water. Use an old toothbrush or stiff brush to flick very fine, subtle speckles over the white bird for a ceramic glaze effect. -
Detail the feathers (White Bird):
Using a slightly darker beige or grey, paint delicate U-shapes on the wing relief to highlight the sculpted feather texture. -
Add decorative dots (Green Bird):
Dip a toothpick into gold or yellow ochre paint. Apply a small cluster of dots on the chest area of the green bird. -
Seal the work:
Allow all paint to cure fully. Apply a coat of matte varnish over the entire surface to protect the paint and give the birds a professional finish.
Cracks happen!
If small cracks appear while drying, mix a tiny bit of fresh clay with water to make a paste (slip). Fill the crack, smooth it over, and let it dry again.
Make it a trio
Make a third, much smaller bird to create a little family grouping. Variation in height adds great visual interest to the final display.
Now you have a sweet pair of chirping friends to brighten up your desk or windowsill


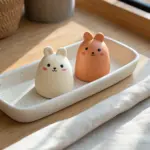
Five-Shapes-Only Challenge
Embrace the “Five-Shapes-Only” challenge by crafting these two delightful ceramic friends, characterized by their minimal forms and folk-art inspired surface designs. Using raw stoneware or air-dry clay, you’ll build simple body shapes and bring them to life with striking blue slip or underglaze patterns.
Step-by-Step Tutorial
Materials
- Light-colored stoneware clay (or air-dry clay)
- Blue underglaze or engobe (and yellow for dots)
- Scoring tool or old toothbrush
- Slip (clay mixed with water)
- Small styling tool or wooden skewer
- Fine-point paintbrush
- Loop tool for hollowing (optional)
- Rolling pin
- Sponge
Step 1: Shaping the Bodies
-
Form the basic spheres:
Start by rolling two balls of clay for the bodies. One should be slightly taller and cylindrical (for the swirled figure), and the other rounder and stouter (for the striped bunny). Smooth them perfectly with a damp sponge. -
Create the heads:
Roll two slightly smaller spheres for the heads. For the bunny figure, gently pinch and pull the clay upwards to tease out two distinct ear shapes directly from the head mass, keeping them thick enough to be sturdy. -
Flatten contact points:
Gently tap the bottom of the heads and the top of the bodies against your work surface to create flat areas where they will join. This ensures a stable connection. -
Hollow the forms (optional):
If you are firing these in a kiln and the solid clay is thicker than an inch, carefully slice the pieces in half, hollow out the insides with a loop tool, and score and slip them back together. If using air-dry clay, you can skip this.
Step 2: Assembly and Features
-
Attach heads to bodies:
Score (scratch hatching lines) onto the flattened contact points of both the head and body. Apply a generous dab of slip, press the pieces together firmly, and smooth the seam with a modeling tool so the neck transition looks intentional. -
Add the noses:
Shape two small, elongated teardrop shapes for noses. Score the center of each face and attach the noses, pressing them on securely. For the bunny, position a larger, triangular nose; for the swirled friend, a smaller, beak-like nose works best. -
Sculpt the arms:
For the swirled figure, roll two flat, teardrop-shaped slabs for wings or arms. Score and slip them onto the sides of the body, contouring them to hug the form closely. -
Add tiny feet:
Roll four tiny balls of clay for feet. Flatten them slightly and attach two to the bottom of each figure to give them a little lift and personality. -
Refine the surface:
Before painting, take a damp sponge and go over the entire surface of both figures to remove fingerprints and crate a smooth, matte canvas for your design.
Smooth Operator
Work a drop of vinegar into your smoothing water. It breaks down the clay particles slightly, making your slip act like super-glue and creating an ultra-smooth surface for painting.
Step 3: Decorative Painting
-
Outline the face:
Using a fine brush and blue underglaze, paint a circular outline around the face of the swirled figure (like a hood) and a simple curve under the chin for the bunny. -
Paint the swirl pattern:
On the taller figure, paint daring blue swirls. Start with a center dot and spiral outward. Create large swirls on the belly and smaller ones on the ‘hood’ around the face. -
Paint the stripe pattern:
For the bunny, paint horizontal blue bands across the tummy area. Leave the head and the sides/back dotted with tiny pin-pricks using a needle tool for texture. -
Add facial details:
Paint the noses solid blue. Use the tip of your smallest brush to dab two black or dark blue dots for eyes. Add a tiny, curved line for a smile on both characters. -
Apply yellow accents:
I like to wait for the blue lines to dry completely before adding the yellow dots between the stripes on the bunny. This prevents the colors from bleeding into each other. -
Dry and finish:
Allow the clay to dry slowly under loose plastic if using kiln-fire clay to prevent cracking. Once fired (or fully dried if air-dry), the raw clay texture contrasts beautifully with the painted designs.
Mix & Match Personalities
Try swapping the patterns! Put the stripes on the hooded figure or create a new texture by gently pressing a piece of lace or burlap into the soft clay before assembly.
Display your new duo on a sunny windowsill where their charming expressions can greet you every day


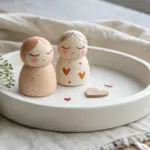
Swap Halfway Sculpture Challenge
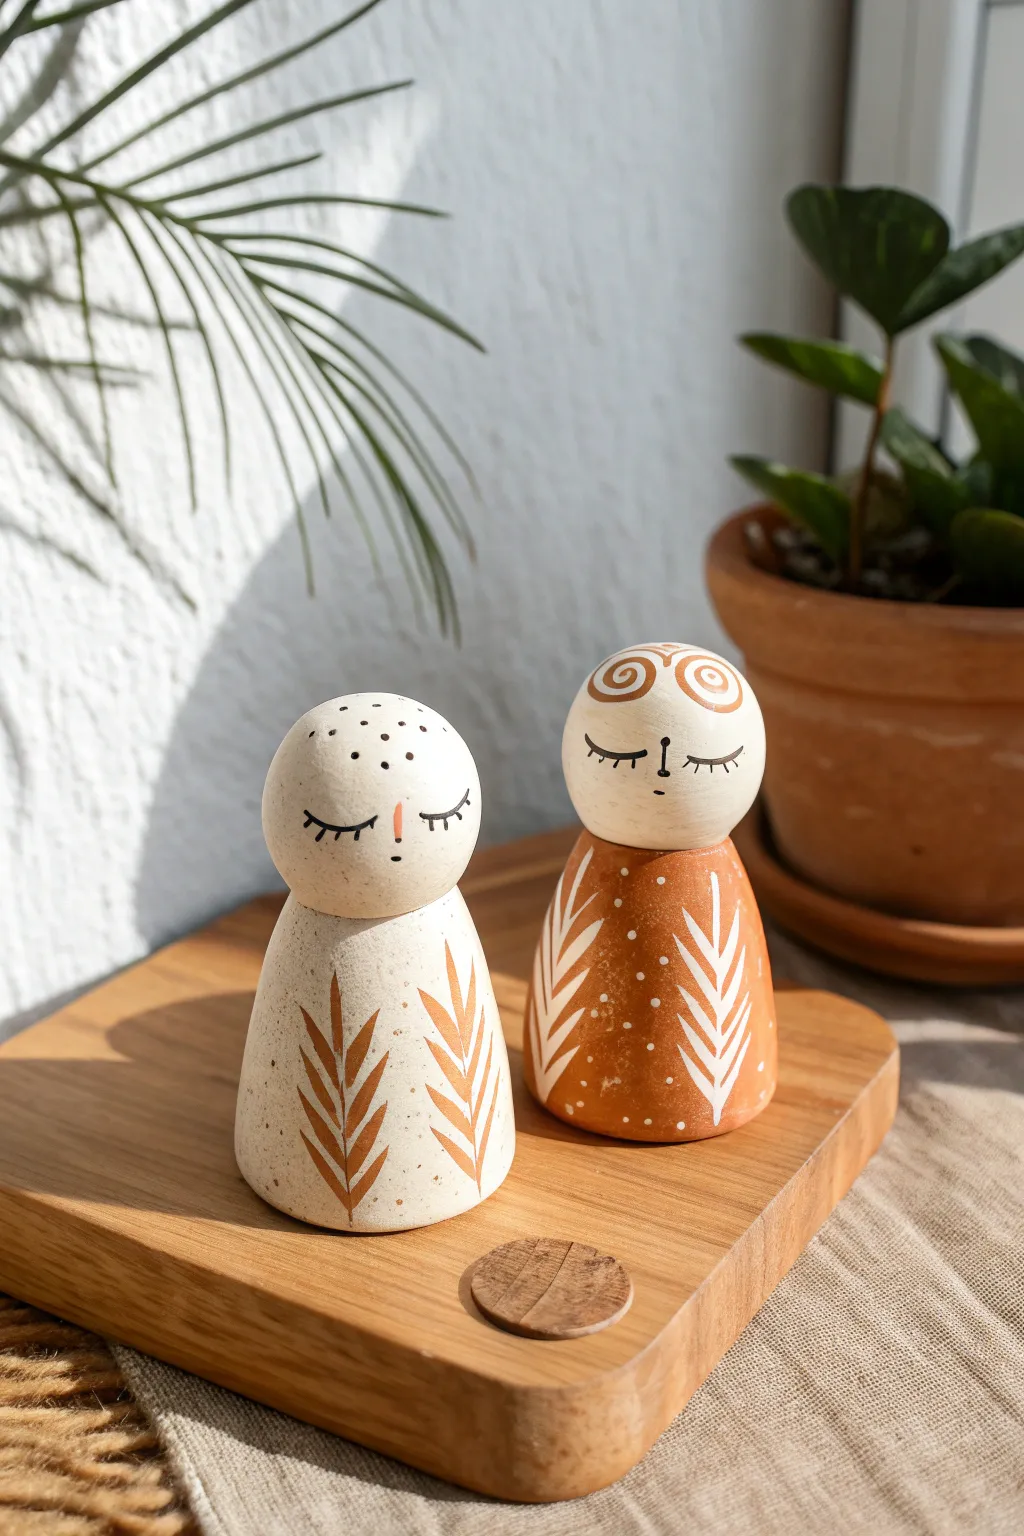
These serene, minimalist figurines combine the warmth of terracotta tones with delicate botanical illustrations for a modern bohemian aesthetic. With their peaceful closed eyes and organic leaf patterns, they make for a calming addition to any shelf or desk.
Step-by-Step
Materials
- Air-dry clay (white and terracotta colored) or polymer clay
- Rolling pin
- Sandpaper (fine grit)
- Small utility knife or clay cutting tool
- Acrylic paints (white, terracotta/rust, black)
- Fine detail paintbrushes (size 0 and 00)
- Small cup with water
- Matte finish sealant spray or varnish
- Palette or small plate for mixing
Step 1: Sculpting the Base Forms
-
Prepare your clay:
Begin by conditioning your clay. Knead it in your hands until it’s soft, pliable, and free of cracks. Divide the clay into four equal portions: two for the heads and two for the bodies. -
Roll spherical heads:
Take two portions of clay and roll them into smooth, perfect spheres about the size of a large bouncy ball. Ensure there are no seams or air pockets. -
Form the conical bodies:
Take the remaining two portions and roll them into thick cylinders. Gently taper one end of each cylinder by rolling it back and forth with slightly more pressure on one side, creating a cone shape with a flat bottom. -
Connect head to body:
Press the spherical heads onto the top of the conical bodies. If using air-dry clay, you can score the joining surfaces with a needle tool and add a drop of water (slip) to create a stronger bond. Blend the clay slightly at the neck seam if you want a continuous look, or leave the seam distinct as seen in the photo. -
Refining the shape:
Stand the figures on a flat surface to ensure they are stable. Gently tap the heads to flatten the very bottom of the sphere where it meets the neck, ensuring a secure fit. -
Drying or baking:
If using polymer clay, bake according to the package instructions. If using air-dry clay, let the figures dry completely for 24-48 hours. I find that rotating them occasionally helps them dry evenly.
Clean Lines Pro Tip
For steadier hands when painting fine details like eyelashes, anchor your pinky finger on the table or the sculpture’s base to stabilize your brush stroke.
Step 2: Painting & Decoration
-
Sand for smoothness:
Once fully dry or cured, use fine-grit sandpaper to buff away any fingerprints or rough spots, especially around the base and the top of the head. -
Base coat application:
Paint the first figure entirely in a creamy off-white. For the second figure, paint the head creamy off-white and the body in a warm terracotta or rust color. You may need 2-3 layers for opaque coverage. -
Painting the white leaves:
On the terracotta body, use a size 0 brush and white paint to create vertical leaf veins. Add small, angled dashes coming off the central vein to create a fern-like pattern. -
Painting the rust leaves:
On the white body, replicate the same fern pattern using the terracotta paint. Keep the leaves organic and flowing upward from the base. -
Adding texture details:
Dip the back end of your paintbrush (the handle) into paint to add small decorative dots. Add white dots to the terracotta body and tiny speckles to the white figure’s body and head for a ceramic effect. -
Drawing the faces:
Using your finest brush (00) and slightly watered-down black paint, carefully paint two downward curving arcs for closed eyes. Add small lashes if desired. -
Adding facial details:
Paint a simple vertical line and a dot for the nose. On one figure, you might add a small vertical dash of pink or orange for a nose highlight. Add decorative swirls or dots on the forehead for a whimsical touch. -
Sealing the work:
Allow the paint to dry completely. Finish by spraying or brushing on a matte sealant to protect your artwork and unify the finish.
Level Up: Texture
Instead of painting the speckles, mix actual sand or dried coffee grounds into your white paint before applying the base coat for a true stone-like texture.
Place your finished duo near a plant or window to enjoy their calm presence