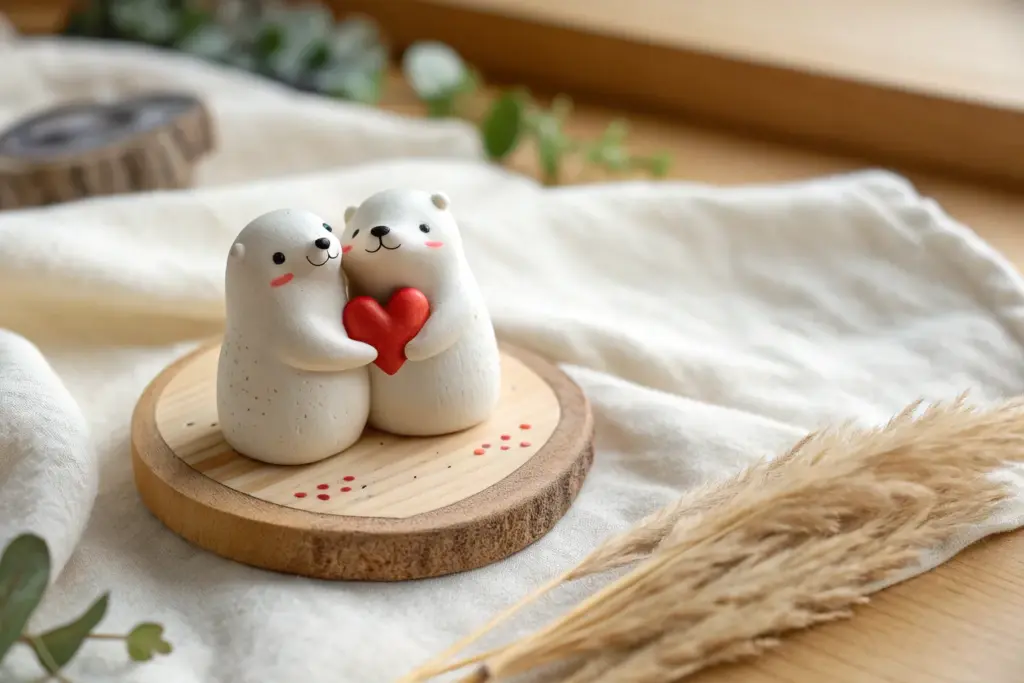
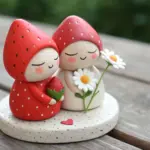
There’s something extra sweet about making a little clay mess together and turning it into a keepsake you’ll actually want to display. These clay date ideas for couples are all about easy wins, cute results, and that side-by-side “look what I made” magic.
Matching Mini Mugs Set
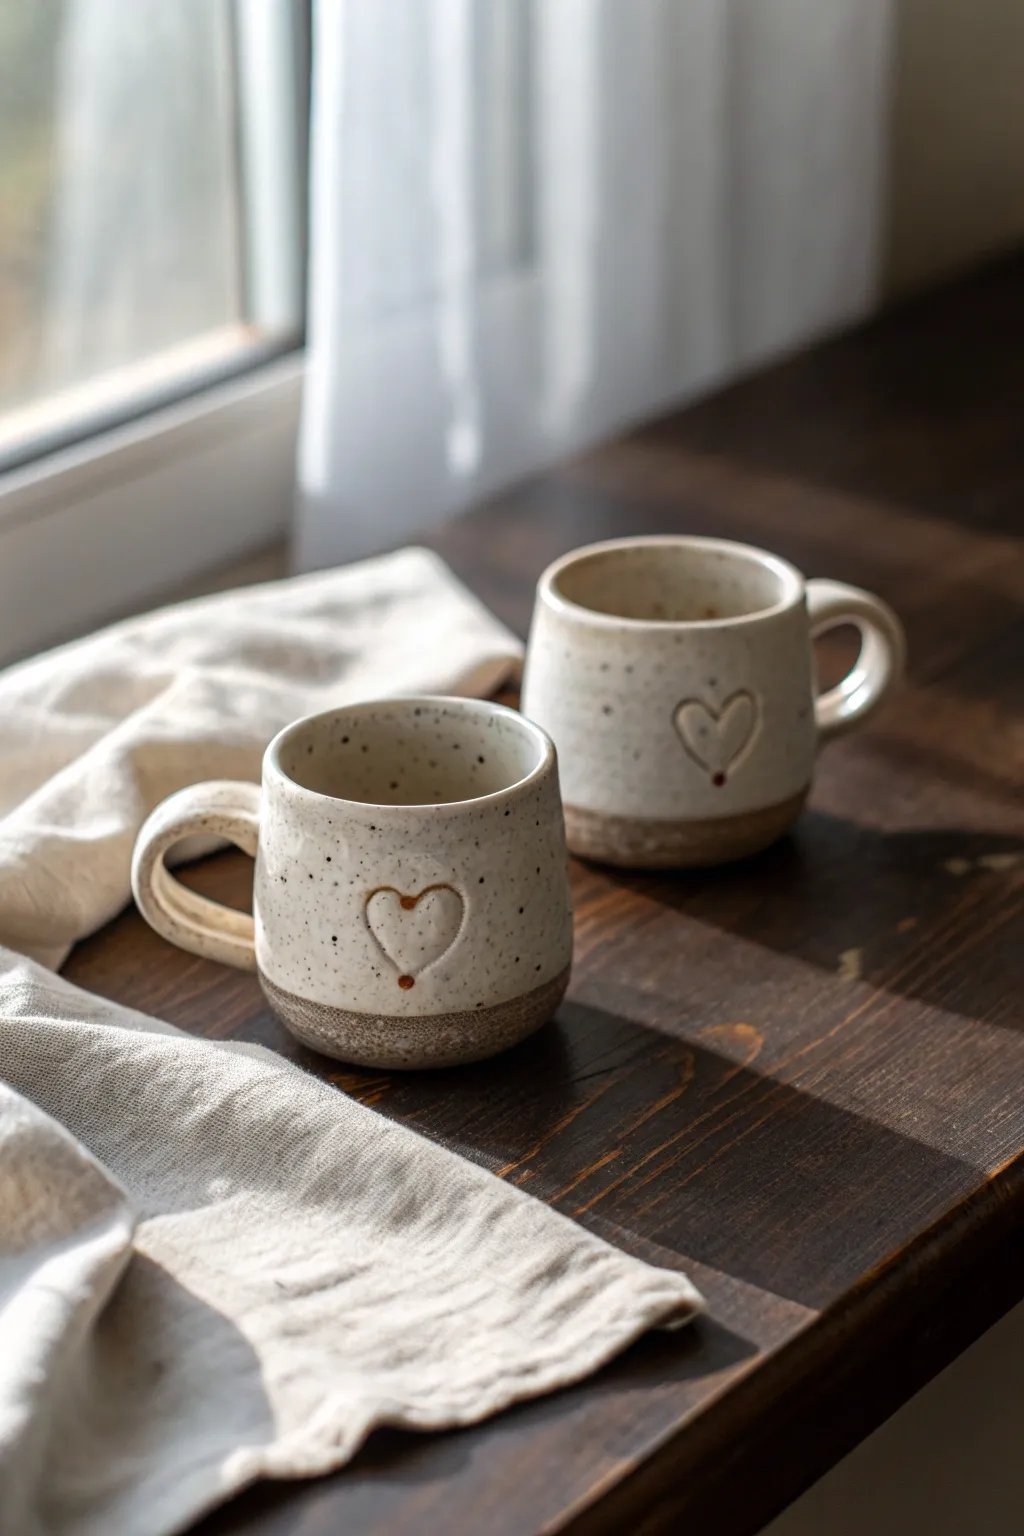
These charming, handheld mugs feature a rustic speckled finish and sweet indented hearts, making them the perfect symbol of togetherness. Their cozy, rounded shape and unglazed bases give them an earthy, handmade feel that begs to be held.
Step-by-Step Guide
Materials
- Speckled stoneware clay (mid-fire)
- Pottery wheel (or can be hand-built with pinch technique)
- Throwing sponge
- Wire cutter
- Rib tool (wooden and metal)
- Needle tool
- Loop tool for trimming
- Small heart-shaped cutter or wooden sculpting tool
- White or cream dipping glaze (glossy or satin)
- Scoring tool
- Slip (clay and water mixture)
- Kiln
Step 1: Throwing the Forms
-
Prepare Clay Balls:
Since these are matching mini mugs, start by weighing out two identical balls of speckled clay, approximately 350g each. Wedging the clay thoroughly is crucial to remove air bubbles. -
Center on the Wheel:
Secure the first ball of clay onto the wheel head. Use steady pressure and water to cone the clay up and down until it is perfectly centered and stable. -
Open the Clay:
Press your thumbs into the center to create the opening, leaving about a half-inch of thickness at the bottom for the foot. Pull the floor out to determine the width of your mug. -
Pull the Walls:
Using a wet sponge and steady hands, pull the clay upward to create the cylinder. Aim for a slightly tapered shape that is wider at the bottom and gently curves inward at the rim. -
Identify the Shape:
Use a rib tool on the outside as you push gently from the inside to create that rounded, belly-like profile seen in the photo. Keep the rim slightly thick for comfortable drinking. -
Refine the Rim:
Smooth the lip of the mug with a piece of chamois or your sponge to ensure it’s soft against the mouth. Use a wire cutter to slice under the mug and set it aside on a bat to stiffen slightly.
Step 2: Trimming and Handles
-
Trim the Foot:
Once the clay is leather-hard, center the mug upside down on the wheel. Use a loop tool to trim away excess weight from the bottom, creating a clean, defined foot ring that will remain unglazed. -
Pull the Handles:
Takes a small lug of clay and wet handle-pulling technique to create a smooth, curved strap. I prefer to pull a longer strip than needed so I can choose the best section. -
Attach the Handle:
Cut the strap to size. Score the mug surface and the handle ends, apply slip, and press firmly to attach. Create a ‘C’ shape that fits one or two fingers comfortably. -
Blend the Seams:
smooth the attachment points carefully with a small wooden tool or your thumb so the handle looks like it grew seamlessly out of the mug body.
Heart Shape Distortion
If the heart looks warped after pressing, support the mug wall from the inside with one hand while pressing the tool with the other to prevent the wall from collapsing.
Step 3: Detailing and Glazing
-
Create the Heart:
While the clay is still leather-hard, press a small heart-shaped cutter gently into the front of the mug. Alternatively, draw the heart with a needle tool and press inside the lines to create the relief. -
Smooth the Edges:
Use a damp paintbrush or finger to soften any sharp ridges created by the heart impression. This ensures glazed flows nicely over the detail later. -
Bisque Fire:
Allow the mugs to dry completely—this usually takes several days. Fire them in the kiln to bisque temperature (usually Cone 06 or 04). -
Wax the Bottom:
Apply wax resist to the bottom half-inch of the mug and the foot ring. This creates the distinct line between the raw speckled clay and the white glaze. -
Dip in Glaze:
Stir your white glaze thoroughly. Using dipping tongs or your fingers, dip the mug swiftly into the glaze, stopping right at the wax line. Shake off excess drops. -
Pop the Bubble:
Check the heart indentation. If glaze has pooled too thickly inside, carefully dab a little out so the shape remains crisp. -
Glaze Fire:
Place the mugs in the kiln for the final glaze firing (follow the temperature guide for your specific clay and glaze, typically Cone 5/6).
Add a Little Gold
For extra shine, apply a tiny dot of real gold luster luster to the bottom point of the heart after the glaze firing and refire at a low cone (018) for a metallic accent.
Once cooled, fill these sweet vessels with your favorite hot drink and enjoy a cozy moment together.


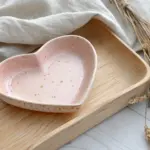
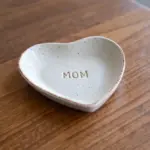
His-and-Hers Ring Dishes
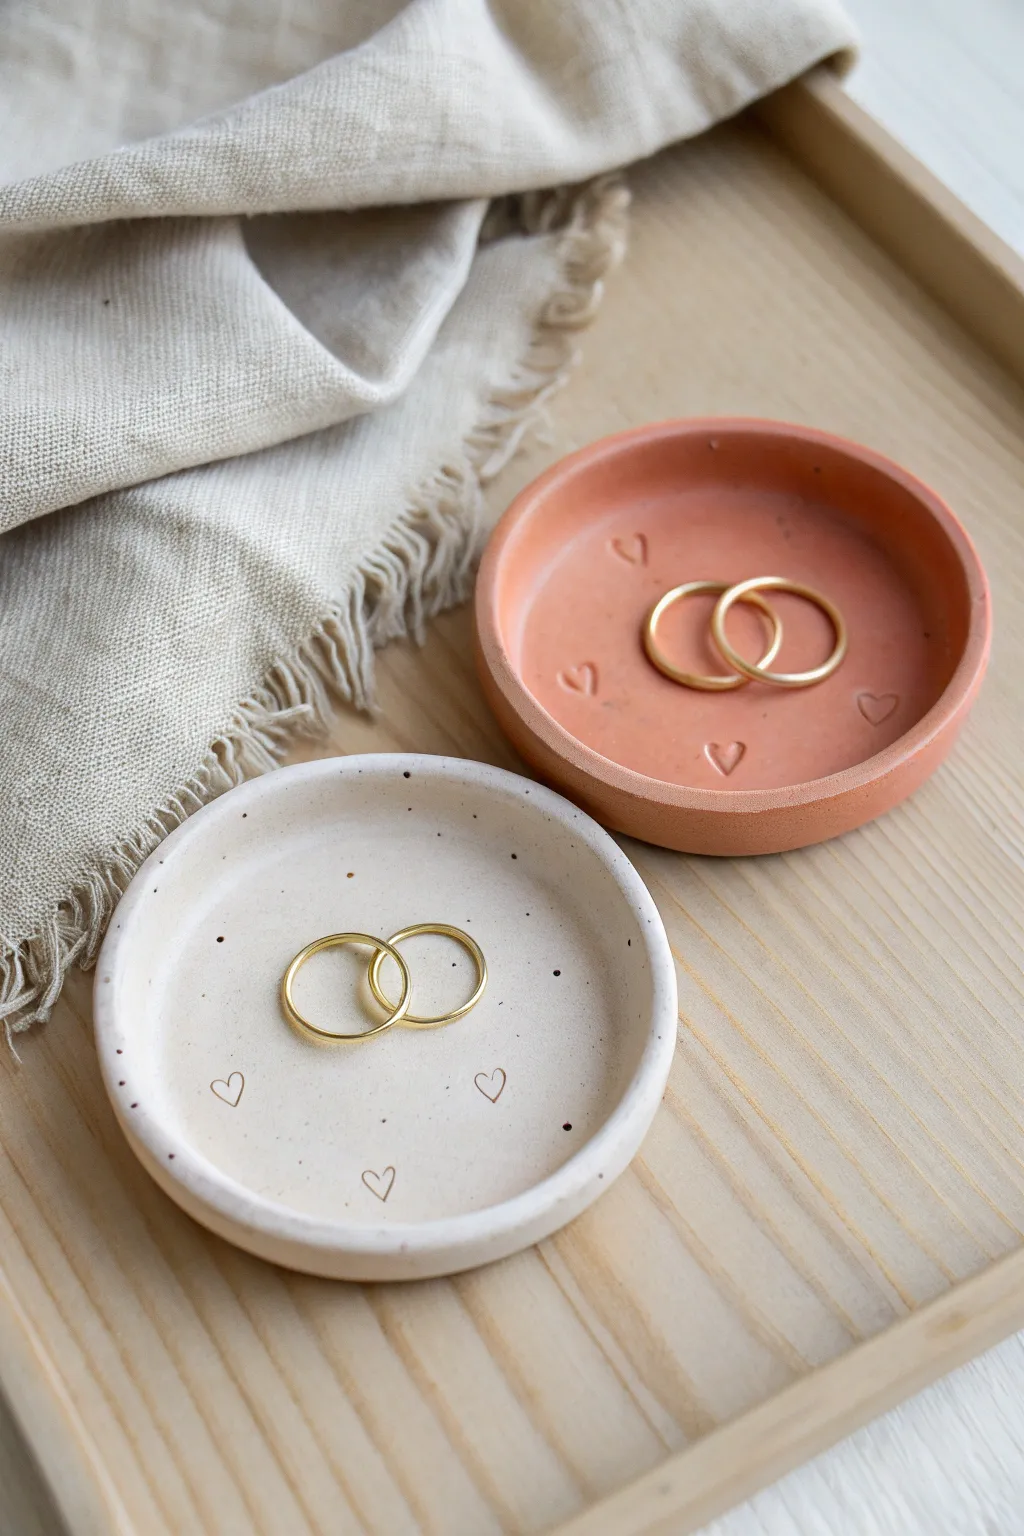
These complementary ring holders are the perfect sentimental project for a clay date, offering a minimalist home for your most precious jewelry. With their soft, matte finish and subtle heart imprints, they capture a sweet, handmade aesthetic that feels both modern and personal.
Step-by-Step
Materials
- Air-dry clay (white)
- Acrylic paint (terracotta/salmon and white)
- Fine grit sandpaper (220-400 grit)
- Rolling pin
- Circle cookie cutter or a bowl (approx. 4 inches)
- Small heart-shaped stamp or tool
- Small bowl of water
- Sponge
- Matte varnish or sealant
- Paintbrushes
- Old toothbrush (optional for speckling)
Step 1: Shaping the Clay
-
Prepare the workspace:
Lay down parchment paper or a canvas mat to prevent the clay from sticking to your table. Take a handful of air-dry clay and knead it well in your hands to warm it up and remove any large air bubbles. -
Roll out the slab:
Use your rolling pin to flatten the clay into an even slab. Aim for a thickness of about 1/4 inch; if it’s too thin, the dish will be fragile, but too thick can make it look clunky. -
Cut the circles:
Press your circle cutter or a small bowl firmly into the clay to cut out two identical circles. Peel away the excess clay from the edges so you are left with two nice, clean discs. -
Form the rim:
Gently pinch the outer edge of each circle upwards to create a raised rim. I like to slowly rotate the circle as I pinch, using my thumbs on the inside and fingers on the outside to smooth the wall as it rises. -
Smooth the edges:
Dip your finger into a small bowl of water and run it along the rim and the interior surface. This will erase any fingerprints, cracks, or uneven textures created during the pinching process.
Cracks happen
If small cracks appear while drying, mix a tiny bit of fresh clay with water to make a paste (slip). Fill the crack, smooth it over, and let it dry again.
Step 2: Adding Details
-
Stamp the hearts:
Take your small heart stamp and press it gently into the surface of the clay. Place three hearts randomly inside the dish for a minimalist look, or create a pattern around the rim depending on your preference. -
Refine the surface:
Do a final check for imperfections. If the stamping displaced any clay, lightly smooth around the hearts with a barely damp finger without erasing the impression. -
Drying time:
Set the dishes aside in a dry, safe place for 24-48 hours. Flip them over gently halfway through the drying process to ensure the bottom dries evenly and prevents warping. -
Sanding:
Once fully dry and hard, use fine-grit sandpaper to buff the edges and surface. Focus on the rim to make it perfectly round and smooth. -
Wipe down:
Use a dry cloth or a slightly damp sponge to remove all the sanding dust before you start painting.
Gold leaf luxe
Instead of paint, use liquid gold handling or gold leaf inside the heart stamps after the main color dries for a subtle metallic shimmer.
Step 3: Painting & Finishing
-
Mix colors:
For the terracotta dish, use a salmon or burnt orange acrylic paint. For the speckled dish, start with a creamy off-white base. -
Apply base coats:
Paint one dish entirely with the terracotta color and the other with the off-white. Apply two thin coats rather than one thick one for simpler, streak-free coverage. -
detail the hearts:
To make the heart impressions pop, you can leave them essentially the same color, or use a tiny brush to deepen the color inside the indentation slightly. -
Add speckles:
For the white dish, dip an old toothbrush into brown or black paint diluted with a drop of water. Run your thumb over the bristles to flick tiny specks of paint onto the surface. -
Paint the rim (optional):
If you want the subtle unfinished look seen in some pottery, you can leave the very bottom or the outer rim unpainted, or paint it a contrasting tone. -
Seal the deal:
Once the paint is completely dry, apply a coat of matte varnish. This protects the clay from moisture and jewelry scratches while maintaining that earthy, natural look.
Place these lovely custom dishes on your nightstand as a daily reminder of your creative time together
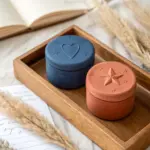
Paired Cozy Candle Holders
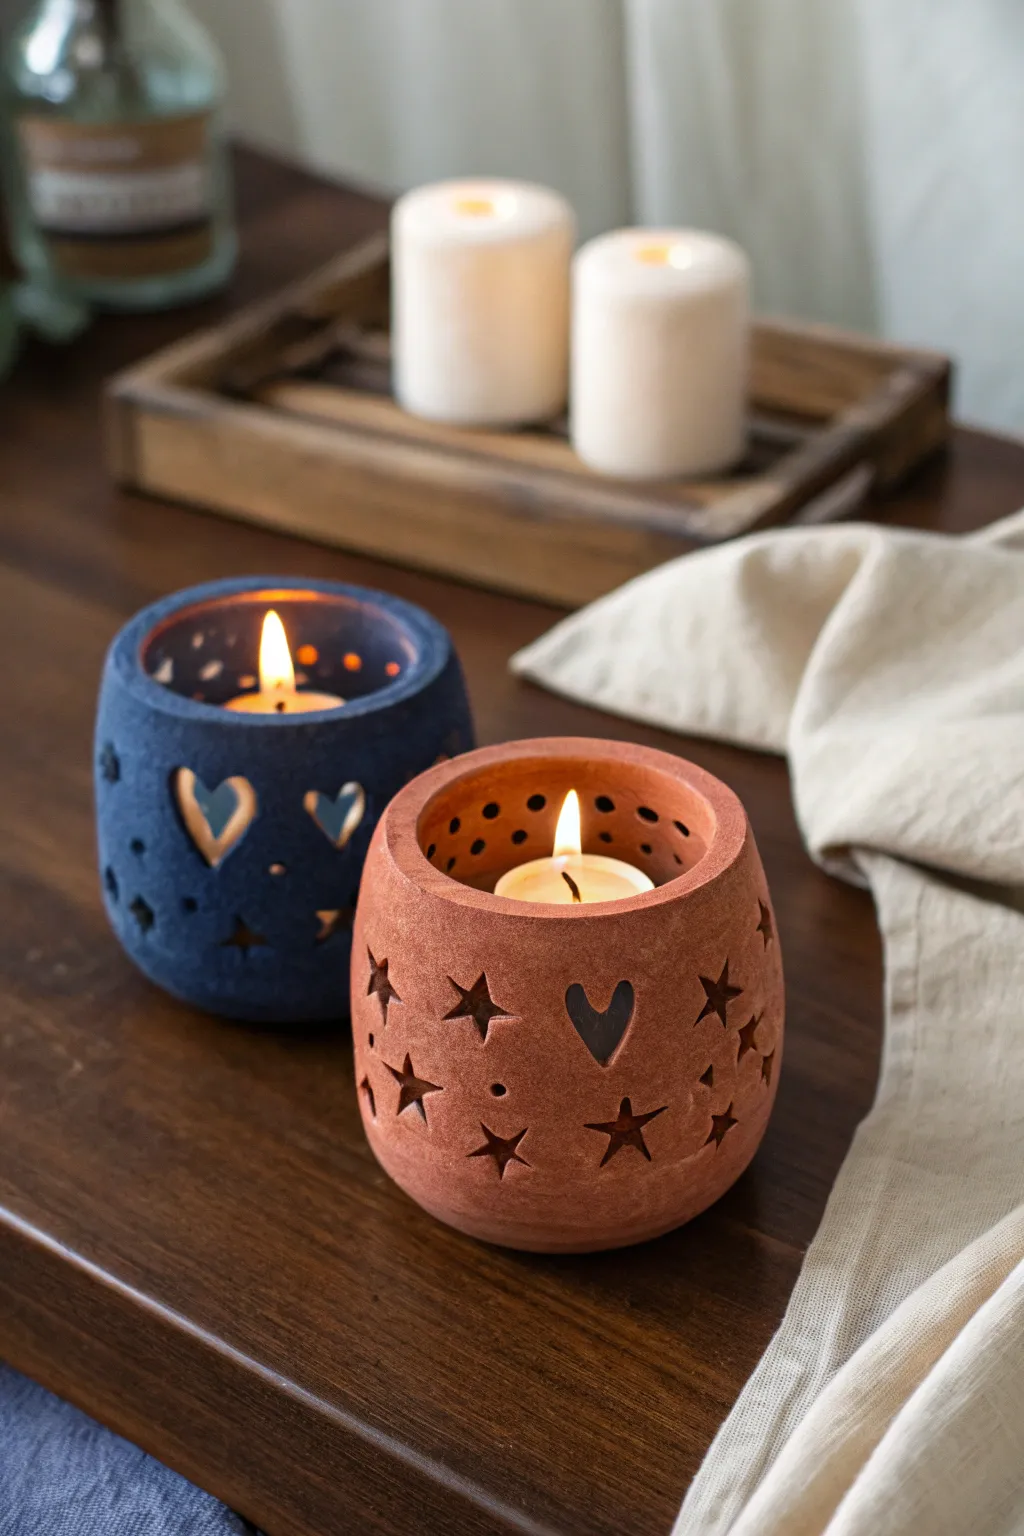
These charming clay lanterns are the perfect way to light up a cozy evening, featuring cut-out hearts and stars that cast playful shadows. With a rustic, matte texture and contrasting colors, they make a lovely paired set for any couple to create together.
Detailed Instructions
Materials
- Air-dry clay or kiln-fire earthenware clay
- Rolling pin
- Small cookie cutters (stars and hearts)
- Can or jar (for shaping mold)
- Pottery sponge
- Needle tool or toothpick
- Pottery rib (smooth, flexible tool)
- Sandpaper (fine grit)
- Acrylic paints (navy blue, terracotta)
- Matte sealant or varnish
- Tea lights
Step 1: Shaping the Base
-
Prepare the Clay:
Start by kneading your clay until it’s smooth and pliable. You want to remove any air bubbles, as these can cause cracks later. Divide the clay into two equal portions so you and your partner each have enough for a lantern. -
Roll the Slab:
Using a rolling pin, roll out each portion of clay into a flat, even slab about 1/4 inch thick. Aim for a long rectangular shape that is tall enough to hide a tea light and long enough to wrap around your chosen mold. -
Trim to Size:
Use a ruler and a needle tool to cut a clean rectangle from your slab. A good size is typically 4 inches high and roughly 10-12 inches long, but measure against your mold to be sure. -
Wrap the Form:
Gently lift your clay slab and wrap it around your can or jar mold. If you wrap regular paper around the jar first, it prevents sticking. Join the two ends of the clay together by scoring the edges (making hatch marks) and adding a little water or slip. -
Smooth the Seam:
Use your fingers or a pottery rib to blend the seam until it disappears completely. The outside should look like a continuous cylinder.
Step 2: Creating the Design
-
Shape the Curve:
While the clay is still on the mold or supporting itself, gently curve the top and bottom edges inward slightly with your fingers. This gives it that rounded, cozy ‘belly’ shape rather than a straight pipe look. -
Adding the Floor:
Roll a small separate circle of clay for the base. Place your cylinder on top of it, score the contact points, and blend the clay from the outside wall down onto the base to seal it shut. -
Punching Shapes:
When the clay is slightly leather-hard (firm but not dry), use your small cookie cutters to punch out hearts and stars. Support the wall from the inside with your hand while pushing the cutter through to prevent collapsing. -
Adding Details:
For smaller details like the tiny dots near the rim, use a straw or the back of a paintbrush to poke clean holes. I prefer to arrange these in random clusters for a starry sky effect. -
Smoothing Edges:
Dip a sponge in a little water and gently wipe all the cut edges of your stars and hearts. This softens the sharp lines and gives the piece a professional, finished look.
Clay Sagging?
If the walls sag while cutting holes, let the clay firm up to a ‘leather hard’ state for another 30 mins before cutting. It needs stiffness to hold the shape.
Step 3: Finishing Touches
-
Drying:
Let the lanterns dry completely. If using air-dry clay, this usually takes 24-48 hours. Keep them away from direct heat to prevent warping. -
Sanding:
Once fully dry, take fine-grit sandpaper and lightly buff the surface to remove any fingerprints or rough textures. -
Painting the Blue Lantern:
For the blue lantern, mix a deep navy acrylic paint with a tiny drop of black to get a rich, midnight tone. Apply two thin coats with a soft brush, letting the first coat dry before adding the second. -
Painting the Red Lantern:
For the terracotta lantern, use a burnt orange or rust-colored acrylic paint. You want a matte look, so avoid glossy paints. -
Distressing (Optional):
To mimic the stone-like texture in the photo, lightly sponge a tiny bit of lighter paint over the surface, or gently sand the paint in spots to let the clay show through. -
Sealing:
Finish both lanterns with a matte spray sealant. This protects the paint and keeps the finish looking natural and earthy.
Clean Cuts
Wait until the clay is partially dry before removing the cut-out shapes. If you pull them while wet, you might warp the surrounding circle.
Place your tea lights inside and enjoy the warm, romantic glow of your handmade creation
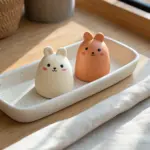


Complementary Critter Minis
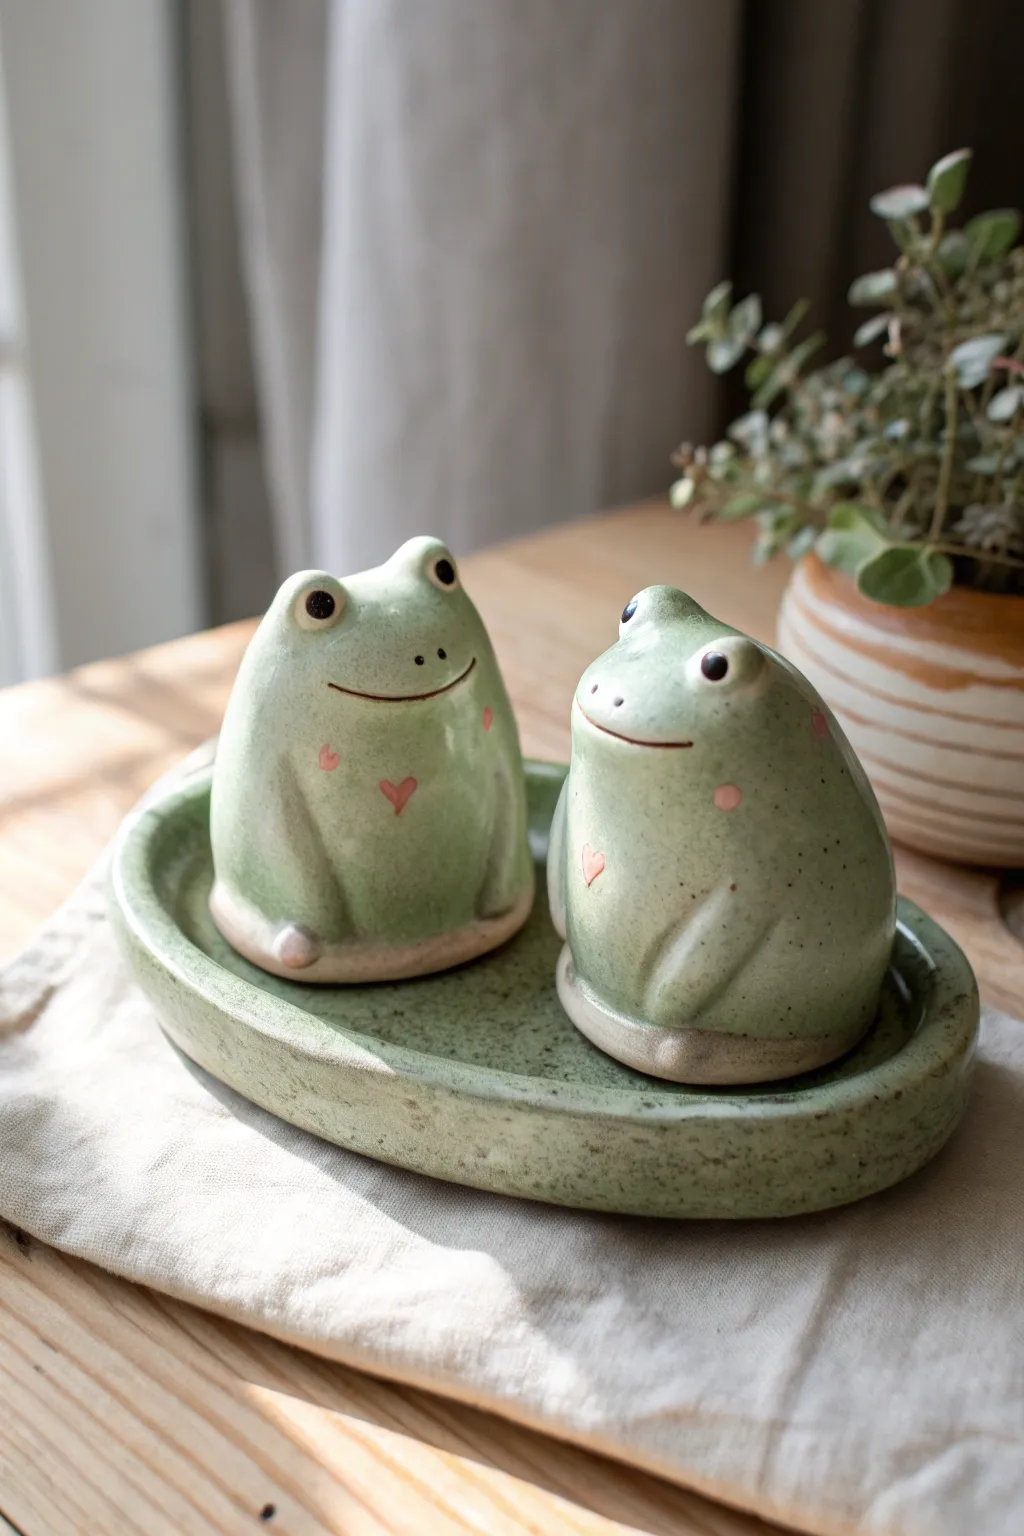
Create a charming pair of amphibian friends that doubles as a functional salt and pepper shaker set. These glossy, speckled green frogs with their sweet heart motifs sit perfectly on a custom-fitted tray, making them an adorable addition to any dining table.
How-To Guide
Materials
- White earthenware or stoneware clay
- Pottery tools (needle tool, sponge, rib)
- Small hole punch or drill bit (for shaker holes)
- Underglaze (Sage Green, Pink, Black)
- Clear glossy glaze
- Paintbrushes (soft round brush and fine detail brush)
- Rubber stoppers (for the bottom)
- Kiln access (or air-dry clay alternative with gloss varnish)
Step 1: Shaping the Bodies
-
Prepare the clay:
Start with two balls of clay roughly the size of a tangerine. Wedge them thoroughly to remove air bubbles, ensuring your little frogs won’t crack during firing. -
Form the base shapes:
Gently pinch and smooth each ball into a rounded cone shape with a wide, stable bottom. The shape should resemble a plump teardrop with the point smoothed down. -
Hollow the forms:
Turn the shapes over and carefully hollow them out using a loop tool or your thumbs, creating a pinch pot structure. Leave the walls about a quarter-inch thick so they are sturdy but not too heavy. -
Refine the surface:
Use a damp sponge or a flexible rib tool to smooth the exterior walls until they are perfectly rounded and free of fingerprints. -
Add the eye bumps:
Create two small balls of clay for each frog and score and slip them onto the top of the head area. Smooth the seams completely so the eyes look like natural bumps in the frog’s silhouette. -
Sculpt the arms:
Roll two small coils for arms. Attach them to the sides of the body, pressing them in so they look like they are resting on the belly. I find blending the clay downwards makes the limbs look more integrated. -
Create the fill hole:
On the bottom of each frog, cut a clean, round hole sized to fit your rubber stoppers. Test the fit now while the clay is still workable.
Clean The Holes
Glaze loves to pool in small shaker holes. Use a tiny drill bit or a needle tool to gently clear any glaze from the holes just before firing to ensure they don’t seal shut.
Step 2: Making the Tray
-
Roll the slab:
Roll out a slab of clay about a quarter-inch thick. Place your two frogs on it to estimate the size needed for an oval tray that comfortably holds both. -
Cut the oval:
Cut an oval shape around the frogs, leaving about half an inch of border. Remove the frogs and smooth the cut edges. -
Form the rim:
Gently lift the edges of the oval slab to create a slight rim. You can roll a thin coil and attach it to the edge to build up a thicker, more defined lip if desired.
Step 3: Details & Glazing
-
Add shaker holes:
Using a small drill bit or needle tool, poke holes near the eyes. Typically, do two holes for pepper and three for salt so you can tell them apart. -
Bisque fire:
Let all pieces dry slowly and completely before bisque firing them in the kiln according to your clay’s specifications. -
Apply base color:
Apply 2-3 coats of a sage green underglaze to the frogs and the tray. To get the speckled look, you can lightly flick a toothbrush loaded with darker green or brown diluted underglaze over the pieces. -
Paint facial features:
Use a fine liner brush and black underglaze to paint small round pupils on the eye bumps. Add a thin, curved line for the mouth and two tiny dots for nostrils. -
Paint heart details:
With pink underglaze, paint small hearts on the chests or cheeks of the frogs. This is where I like to add a personalized touch by varying the heart placement on each frog. -
Glaze and fire:
Once the underglaze is dry, dip or brush all pieces with a clear glossy glaze. Be careful not to clog the shaker holes. Fire the pieces again for the final glaze firing. -
Final assembly:
Once cooled, insert the rubber stoppers into the bottom holes. Fill with salt and pepper and set them on their matching tray.
Mix & Match Personalities
Give each frog a unique expression! Paint one with winking eyes or an open mouth, or sculpt a tiny bowtie or flower crown on one to distinguish the salt from the pepper.
Place your finished amphibian pair on the table to add a dash of whimsy to your next meal

The Complete Guide to Pottery Troubleshooting
Uncover the most common ceramic mistakes—from cracking clay to failed glazes—and learn how to fix them fast.
Tiny Lovebird Figurines
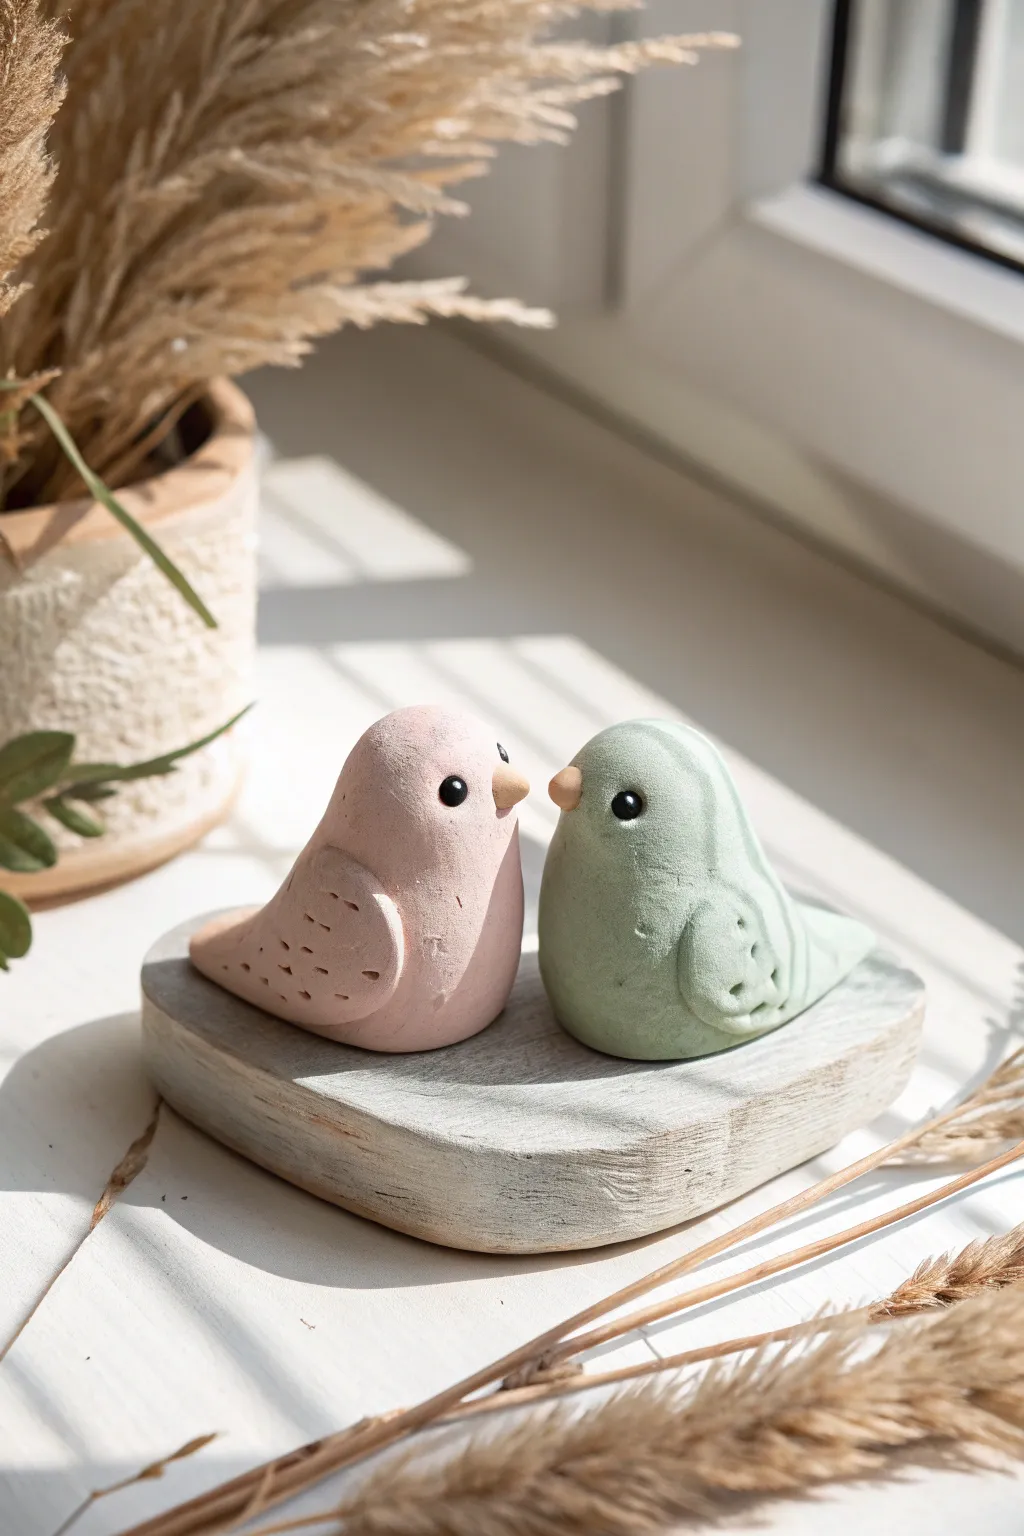
Create a charming keepsake of your connection with these minimalist clay bird figurines. The soft, matte finish and simple shapes make them an approachable project for beginners that still looks professional.
Step-by-Step
Materials
- Polymer clay (pale pink, sage green, beige/gold)
- Small glass beads or black clay for eyes
- Sculpting tools (needle tool, small ball stylus)
- Foil or scrap clay for armature (optional)
- Small wooden slab or driftwood for display
- Sandpaper (fine grit)
- Optional: Texture sponge
Step 1: Shaping the Bodies
-
Prepare the clay:
Start by conditioning your pale pink and sage green clay until it is soft and malleable. If the colors are too bright, mix in a tiny bit of white or translucent clay to mute them. -
Form the basic spheres:
Roll two equal-sized balls of clay, roughly the size of a golf ball or slightly smaller. Roll them between your palms until they are perfectly smooth and crack-free. -
Create the teardrop shape:
Gently pinch and pull one side of each sphere to create a tapered tail. You want a fat, rounded teardrop shape rather than a long, thin one. -
Define the head:
Using your thumb and forefinger, slightly gently squeeze the wider end of the teardrop to distinguish a head area, keeping the transition to the body very subtle and organic. -
Flatten the base:
Tap the bottom of each bird firmly against your work surface so they sit flat and stable without tipping over.
Smooth Operator
To get that ultra-matte finish, lightly buff the baked clay with #0000 steel wool. It removes shine without scratching.
Step 2: Wings and Details
-
Form the wings:
Create flattened teardrop shapes from the same colored clay, smaller than the body. Press these onto the sides of the birds, blending the front edge smoothly into the body while leaving the back edge slightly raised. -
Add texture:
Use a needle tool or toothpick to press small, shallow dashes into the wing area and tail to mimic feathers. Keep the pattern random but directional, flowing toward the tail. -
Sculpt the beaks:
Roll extremely tiny cones of beige or gold clay. Press these gently onto the face area. I like to use a tiny dot of liquid clay here to ensure they stick permanently. -
Insert the eyes:
Use a ball stylus to make small indentations for the eyes. Press in small black glass beads, or roll tiny balls of black clay and insert them into the sockets. -
Refine the surface:
Before baking, examine the clay for fingerprints. Smudge them out gently with your finger or use a bit of baby oil on a brush to smooth the surface completely.
Magnetize It
Instead of gluing them to wood, embed strong rare-earth magnets into the bottoms pre-bake for adorable fridge decor.
Step 3: Display Base
-
Prepare the perch:
While your birds are baking according to package instructions, prepare your wooden base. A slice of driftwood or a painted wooden heart works perfectly. -
Clean the wood:
Lightly sand the wooden piece to remove any rough splinters, giving it a weathered, soft look similar to the photo. -
Finish the birds:
Once baked and fully cooled, you can lightly sand the bottom of the birds if they aren’t sitting perfectly flush. -
Assemble carefully:
Apply a strong adhesive, like E6000 or super glue gel, to the bottom of the birds. -
Final placement:
Press the birds onto the wooden base, angling them slightly toward each other as if they are sharing a secret.
Set your finished sculpture near a window where the natural light can highlight the soft textures
Mix-and-Match Mushroom Couple

Create an adorable duo of smiley-faced mushrooms that perfectly complement each other with their varied heights and colorful caps. These charming figures feature a textured wood-grain stalk and classic white-dotted tops, making them a sweet keepsake from your creative date night.
Step-by-Step Tutorial
Materials
- Air-dry clay or polymer clay (white or beige)
- Acrylic paints (terracotta/rust red, sage green, white, black, beige/tan)
- Fine grit sandpaper
- Sculpting tools (needle tool or toothpick, ball stylus)
- Small paintbrushes (flat and fine liner)
- Cup of water and paper towels
- Matte varnish or sealant
Step 1: Sculpting the Shapes
-
Divide the Clay:
Start by sectioning your clay into four parts: two larger portions for the stalks and two slightly smaller portions for the caps. Make one stalk noticeably shorter and stouter than the other to create the cute size difference seen in the photo. -
Shape the Stalks:
Roll the stalk portions into smooth cylinders. Gently flatten the bottom of each cylinder on your work surface so they stand upright securely. Round off the tops slightly where the cap will eventually sit. -
Form the Caps:
Take the remaining clay portions and roll them into balls. Press your thumb into the center of each ball and pinch around the edges to form a dome shape, creating a hollow underneath large enough to fit over the stalk tops. -
Test the Fit:
Place the caps onto their respective stalks to check proportions. The caps should look slightly oversized and charming. Adjust the shapes if needed, but keep the pieces separate for now to make texturing easier.
Texturing Tip
When carving lines into the stalk, twist your tool slightly as you drag it down. This creates a rougher, more organic bark look rather than perfect straight lines.
Step 2: Adding Texture and Detail
-
Texture the Stalks:
Using a needle tool or toothpick, scratch vertical, slightly wavy lines up and down the sides of both stalks. This mimics a wood-grain or bark texture. Vary the pressure to create depth and interest. -
Smooth the Caps:
Dip your finger in a little water (if using air-dry clay) or baby oil (if using polymer) and ensure the top surfaces of the caps are perfectly smooth, removing any fingerprints. -
Join the Parts:
Score the top of the stalk and the underside of the cap with cross-hatching marks. Add a dab of water or liquid clay (depending on your material) and press the pieces firmly together. Smooth the seam underneath so they are fused as one solid unit. -
Dry or Bake:
Follow the instructions for your specific clay type. If baking polymer clay, support the caps with a little foil so they don’t droop in the oven. If air-drying, let them sit for 24-48 hours until fully hard.
Make Them Magnetic
Before the clay dries, press a strong neodymium magnet into the back of the stalk. Now your cute mushroom couple can hold up photos on the fridge together.
Step 3: Painting and Personality
-
Base Coat the Stalks:
Mix a light beige or tan color and paint the entire stalk area. I like to dilute the paint slightly so it sinks into the textured grooves we made earlier. -
Dry and Highlight:
Once the beige is dry, lightly dry-brush a slightly lighter cream color over the raised textures of the stalk to emphasize the wood-grain effect. -
Paint the Caps:
Paint the taller mushroom’s cap with a warm terracotta or rust-red acrylic. Paint the shorter mushroom using a soft sage green. Apply two coats if necessary for solid, opaque coverage. -
Add the Dots:
Using a small round brush or the back of a paintbrush handle, dot white circles randomly over the colored caps. Vary the sizes slightly, but keep them generally round and playful. -
Paint the Eyes:
Using your finest detail brush or a black paint pen, carefully draw two small oval eyes on the upper part of each stalk. Add a tiny white dot inside the black ovals to give them a spark of life. -
Add the Smiles:
Paint a very thin, small ‘U’ shape between the eyes for the smile. On the green mushroom, place the smile slightly to the side for a quirky look. -
Rosy Cheeks:
Mix a very watery pink paint. Dip a Q-tip or a soft rounded brush into it, dab off the excess on a paper towel, and gently press pink circles onto the ‘cheeks’ right next to the smiles. -
Seal the Project:
Once all paint requires is completely dry, apply a coat of matte varnish. This removes the plastic shine of acrylics and protects that lovely texture you created.
Place your finished mushroom couple on a windowsill or shelf where they can smile back at you every day


What Really Happens Inside the Kiln
Learn how time and temperature work together inside the kiln to transform clay into durable ceramic.
Couple Initial Letter Charms
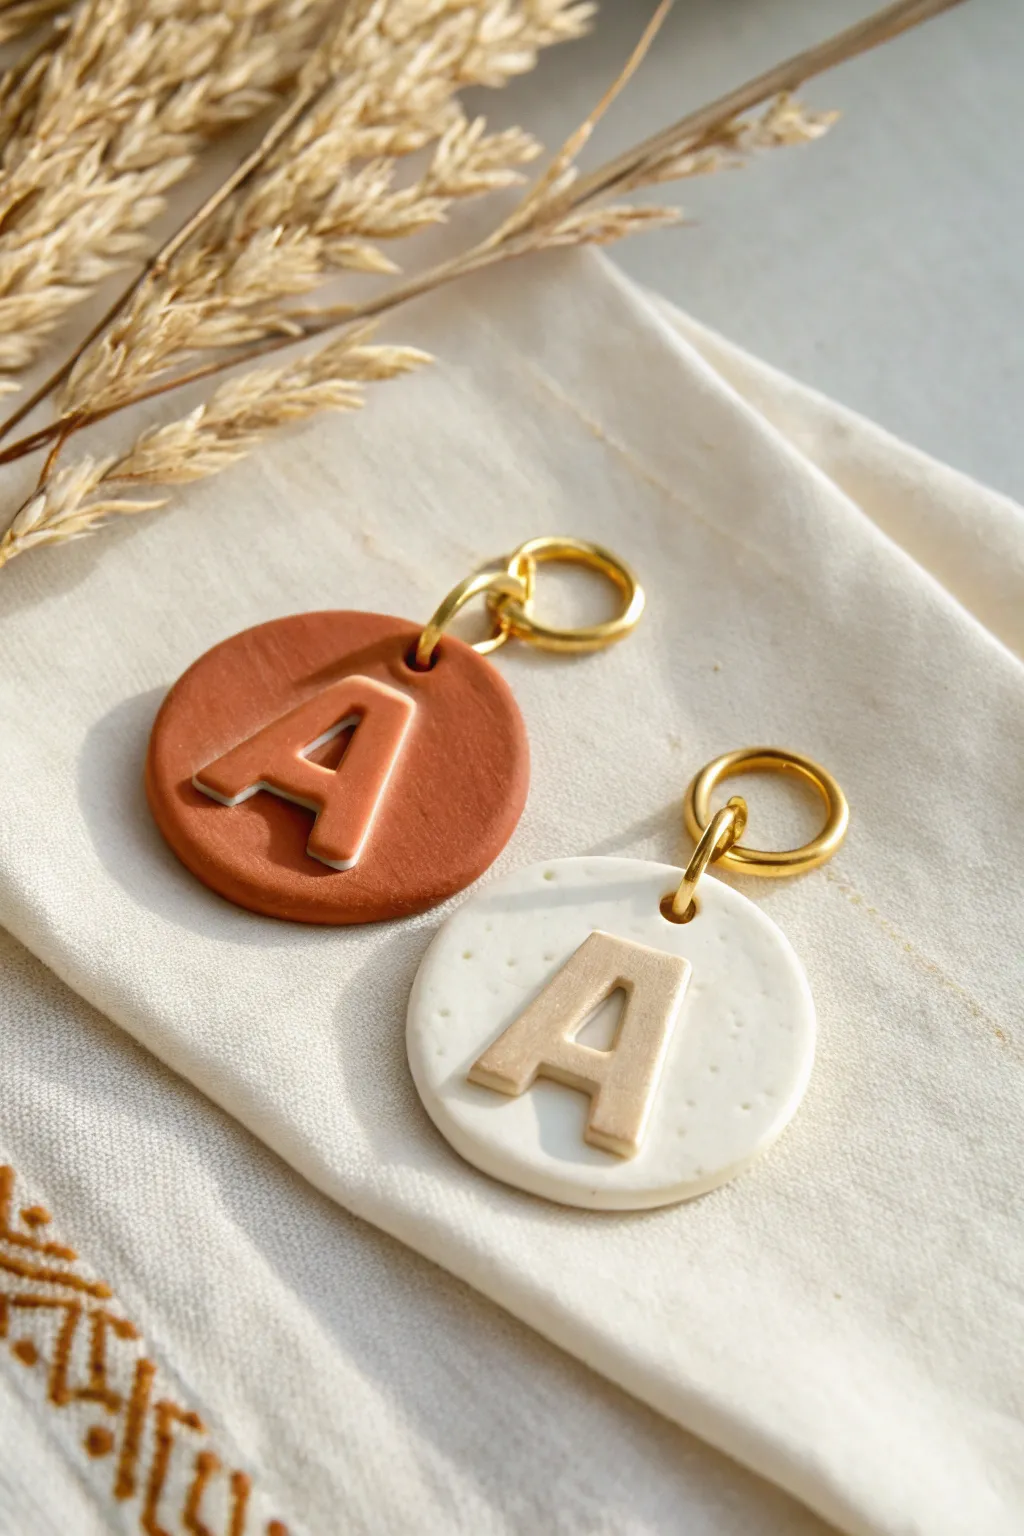
Capture your connection with these chic, minimalist letter charms, perfect for turning a crafting date into a lasting keepsake. Using contrasting clay tones and simple layering, you’ll create professional-looking pendants that celebrate your initials in style.
Step-by-Step
Materials
- Polymer clay (terracotta, white, and beige/tan colors)
- Small circular clay cutter (approx. 1 inch)
- Miniature alphabet fondant or clay cutters
- Acrylic rolling pin
- Small jump rings (gold finish)
- Large connector rings (gold finish)
- Jewelry pliers
- Needle tool or toothpick
- Baking sheet with parchment paper
- Gloss glaze (optional)
- Fine grit sandpaper
Step 1: Preparing the Base
-
Condition the clay:
Start by warming the terracotta and white polymer clay in your hands separately. Knead each one until it is soft, pliable, and free of cracks. -
Roll out the slabs:
Using your acrylic rolling pin, flatten both colors of clay onto a clean work surface. Aim for a thickness of about 1/8 inch (3mm) for a sturdy base. -
Cut the circles:
Press your circular cutter firmly into the clay sheets to create your pendant bases. Gently lift the circles and smooth any rough edges with your fingertip. -
Add texture (optional):
For the white charm seen in the photo, you can add a subtle speckle. Take a needle tool and gently poke tiny, random dots across the surface, or mix in a tiny pinch of black pepper or black sand before rolling it out. -
Create the hole:
Use a needle tool or a small straw to punch a hole near the top edge of each circle. Make sure the hole is large enough to fit your jump rings later.
Fixing Fingerprints
Did you accidentally leave a fingerprint on the surface? Before baking, lightly brush the clay with a tiny bit of baby oil or cornstarch to smooth it out instantly.
Step 2: Designing the Initials
-
Prepare the letter clay:
Roll out a small amount of contrasting clay—beige for the white base, and a lighter cream or white for the terracotta base. These should be rolled slightly thinner than your base pieces. -
Cut the letters:
Use your miniature alphabet cutters to punch out the initial ‘A’ (or whichever letter you choose). If the clay gets stuck in the cutter, a gentle tap or a push with a soft brush handle helps release it. -
Attach the letters:
Place the cut-out letter onto the center of the corresponding base circle. I like to press it down very gently to ensure it adheres without distorting the shape. -
Refine the edges:
If your letter edges look a bit sharp or rough, smooth them carefully with a silicone tool or a light touch of your finger. -
Final inspection:
Check the jump ring holes one last time to ensure the handling process didn’t close them up. Re-poke if necessary.
Step 3: Baking and Assembly
-
Bake the pieces:
Arrange your charms on a parchment-lined baking sheet. Bake according to your polymer clay package instructions—usually around 275°F (135°C) for 15-30 minutes. -
Cool down:
Let the pieces cool completely on the baking sheet. They are fragile when hot but will harden as they return to room temperature. -
Sand for smoothness:
Once cool, inspect the edges. If there are any fingerprints or rough spots, wet-sand them gently with fine-grit sandpaper for a professional finish. -
Open the jump rings:
Using two pairs of pliers, twist your small gold jump rings open sideways (never pull them apart outward). -
Attach the hardware:
Thread the open jump ring through the hole in the clay charm. -
Add the large ring:
Before closing the small jump ring, loop the larger gold connector ring onto it. -
Secure the closure:
Twist the small jump ring back into place so the ends meet flush, securing the charm to the larger ring.
Level Up: Initial Outline
Make the letters pop by rolling a tiny ‘snake’ of white clay and wrapping it around the base of the letter before baking for a cool 3D outlined effect.
Now you have a matching set of custom charms ready to be gifted or worn on a necklace or keychain
Two-Piece “Puzzle Heart” Tokens
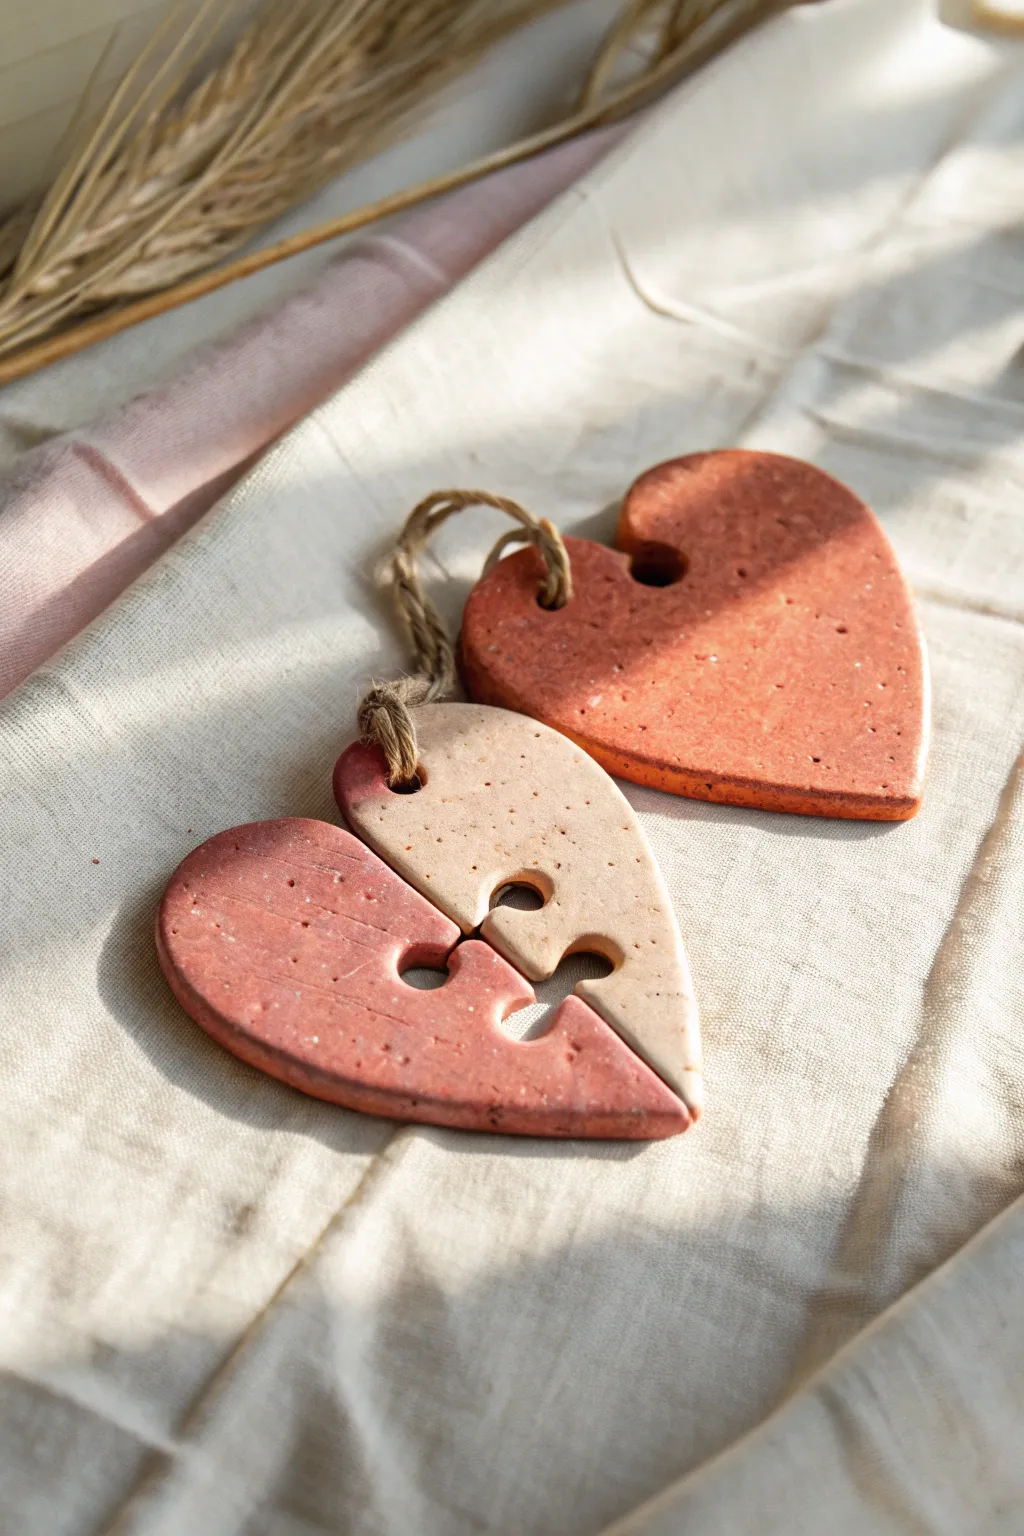
These charming clay tokens symbolize connection, featuring a single heart split into two distinct, interlocking puzzle pieces that fit perfectly together. With their rustic, speckled texture and warm terracotta tones, they make a thoughtful keepsake to share with a partner or best friend.
How-To Guide
Materials
- Terracotta air-dry clay (or oven-bake polymer clay in terracotta)
- White or beige air-dry clay (for the two-tone effect)
- Rolling pin
- Heart-shaped cookie cutter (approx. 3-4 inches wide)
- Needle tool or X-Acto knife
- Paper template (optional for the puzzle line)
- Straw or small circular cutter (for the hanging holes)
- Fine-grit sandpaper
- Jute twine or rustic string
- Clear matte varnish or sealant
- Bowl of water (for smoothing)
- Parchment paper or work mat
Step 1: Preparation & Rolling
-
Prepare the workspace:
Lay down parchment paper or a canvas mat to prevent the clay from sticking to your table. Clean your hands thoroughly so you don’t transfer dust to the clay. -
Condition the clay:
Take a generous handful of the terracotta clay and knead it until it’s soft and pliable. This warms up the material and reduces the risk of cracking later. -
Roll the slab:
Use your rolling pin to flatten the clay into an even slab. Aim for a thickness of about 1/4 inch (6mm)—too thin and it might break; too thick and it will take ages to dry. -
Create the two-tone effect (Optional: for the puzzle heart):
If recreating the two-tone heart shown, roll a smaller piece of beige clay adjacent to a piece of terracotta clay. Overlap their edges slightly and roll over the seam until they merge into a single, smooth slab.
Fixing a Warped Heart
If your clay heart curls while drying, slightly dampen the concave side with a sponge and place it under a heavy book overnight to flatten it back out.
Step 2: Cutting & Shaping
-
Cut the heart shape:
Press your heart-shaped cookie cutter firmly into the clay slab. If doing the two-tone version, position the cutter so the seam runs diagonally through the heart. -
Lift and smooth:
Carefully remove the excess clay from around the heart. Dip your finger in a little water and gently smooth the edges of the cut shape to remove any sharp burrs. -
Design the puzzle line:
Using a needle tool, lightly sketch a curved line down the center of the heart. Add a classic puzzle ‘knob’ indentation on one side and a protrusion on the other. -
Cut the puzzle pieces:
Once satisfied with the line, use your knife or needle tool to cut all the way through the clay along your sketched path. Separate the two halves gently. -
Refine the puzzle edges:
The cut edges will be rough. Use a water-dampened finger or a soft brush to smooth the internal curves where the pieces interlock so they look finished, not jagged. -
Create hanging holes:
Use a straw or a small circular cutter to punch a hole at the top of each heart half. Position the hole about 1/4 inch from the edge to ensure the clay is strong enough to hold the string.
Step 3: Texturing & Drying
-
Add speckled texture:
To mimic the speckled stoneware look in the photo, you can flick a stiff toothbrush with diluted brown acrylic paint over the wet clay, or press coarse sand/ground coffee gently into the surface. -
Initial drying phase:
Place the pieces on a clean sheet of parchment paper. I like to let this dry away from direct sunlight to prevent warping. -
Flip for even drying:
After about 12 hours, flip the pieces over. This ensures the bottom side dries at the same rate as the top, keeping the pieces flat. -
Wait for full cure:
Allow the clay to dry completely according to the package instructions (usually 24-48 hours for air-dry clay). The clay will lighten in color and feel hard.
Pro Tip: Perfect Fit
Don’t separate the puzzle pieces immediately. Let them dry for an hour touching each other so they shrink together, maintaining that perfect interlocking gap.
Step 4: Finishing Touches
-
Sand imperfections:
Once fully dry, take fine-grit sandpaper and gently buff the edges. Pay special attention to the puzzle connection points to ensure they still fit together smoothly. -
Seal the tokens:
Apply a thin coat of clear matte varnish or sealant to protect the clay and deepen the terracotta color. Let this coat dry completely. -
Prepare the twine:
Cut two lengths of jute twine, each about 6 inches long. Fold each piece in half to create a loop. -
Attach the string:
Thread the folded loop through the hole in the clay heart from front to back. Pull the tails of the twine through the loop and tighten gently to create a cow hitch knot.
Now you have a set of handcrafted matching tokens that celebrate how well the two of you fit together.

TRACK YOUR CERAMIC JOURNEY
Capture glaze tests, firing details, and creative progress—all in one simple printable. Make your projects easier to repeat and improve.
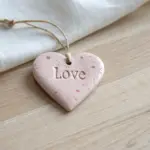
Mini Memory Ornament Set
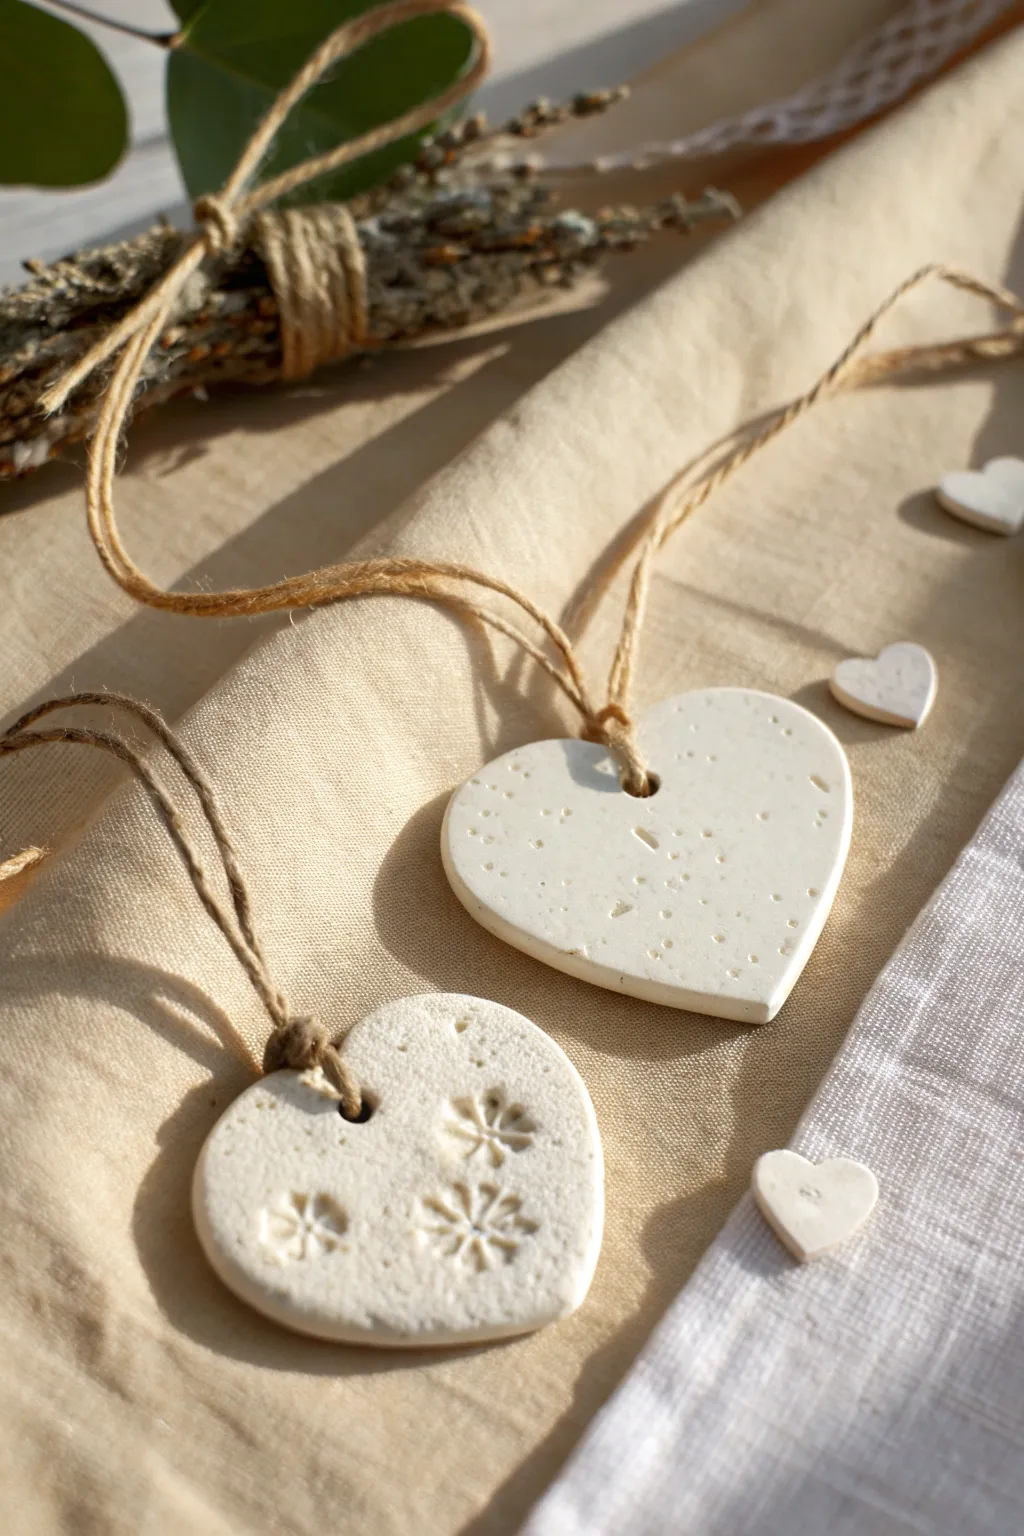
Create a lasting keepsake with these charming white clay hearts, perfect for capturing a cozy crafting moment together. With their rustic twine hangers and delicate imprinted details, they make heartfelt gifts or memorable additions to your home décor.
Step-by-Step
Materials
- Air-dry clay (white) or polymer clay
- Rolling pin
- Heart-shaped cookie cutters (large and mini sizes)
- Jute twine or hemp cord
- Textured stamps or found objects (like lace or dried flowers)
- Straw or skewer (for poking holes)
- Fine-grit sandpaper
- Parchment paper or craft mat
- Scissors
Step 1: Preparation & Rolling
-
Prepare your workspace:
Lay down a piece of parchment paper or a smooth craft mat. This prevents the clay from sticking to your table and picking up unwanted dust. -
Condition the clay:
Take a handful of white air-dry clay and knead it in your hands until it feels soft, warm, and pliable. This helps prevent cracks later. -
Roll it out:
Place the clay on your mat and use the rolling pin to flatten it. Aim for an even thickness of about 1/4 inch (6mm) to ensure the ornaments are sturdy but not too heavy. -
Check surface texture:
Inspect the surface for air bubbles. If you see any, gently prick them with a needle and smooth over with your finger.
Cracked edges?
If you notice tiny cracks forming while the clay dries, mix a small amount of fresh clay with water to make a paste and fill them in gently.
Step 2: Cutting & Texturing
-
Add texture (optional):
For the patterned heart, gently press a stamp, piece of lace, or even the end of a detailed marker into the clay surface before cutting. Don’t press all the way through; just create a surface impression. -
Cut the shapes:
Press your large heart-shaped cookie cutter firmly into the clay. Give it a tiny wiggle to ensure a clean cut, then lift it away. -
Create mini accents:
Use the leftover clay scraps to cut out tiny miniature hearts. These make adorable confetti or extra tags for gifts. -
Smooth the edges:
Dip your finger in a little bit of water and gently run it along the cut edges of the hearts to remove any jagged bits or burrs.
Scented Clay
Knead a drop of essential oil, like lavender or sweet orange, into the clay before rolling to make your ornaments smell wonderful.
Step 3: Finishing Touches
-
Punch the hole:
Use a drinking straw or a skewer to poke a hole near the top center of each large heart. Make sure the hole is big enough for your twine to pass through later. -
Drying time:
Place the hearts on a flat surface lined with parchment paper. Let them air dry for 24-48 hours. I find flipping them over halfway through helps them dry evenly and stay flat. -
Sand for perfection:
Once fully dry and hard, take a piece of fine-grit sandpaper and lightly buff the edges and surface to achieve a smooth, professional matte finish. -
Prepare the twine:
Cut a length of jute twine, approximately 8-10 inches long, for each ornament. -
Attach the hanger:
Fold the twine in half to create a loop. Push the folded end through the hole in the heart from front to back. -
Secure the loop:
Pull the loose ends of the twine through the loop you just pushed through the hole and pull tight to create a lark’s head knot. -
Tie it off:
Knot the two open ends of the twine together at the top to complete the hanger.
Hang your finished hearts on a branch or wrap them as gifts to share a piece of your creativity with others
Couple Handprint Coaster Tiles
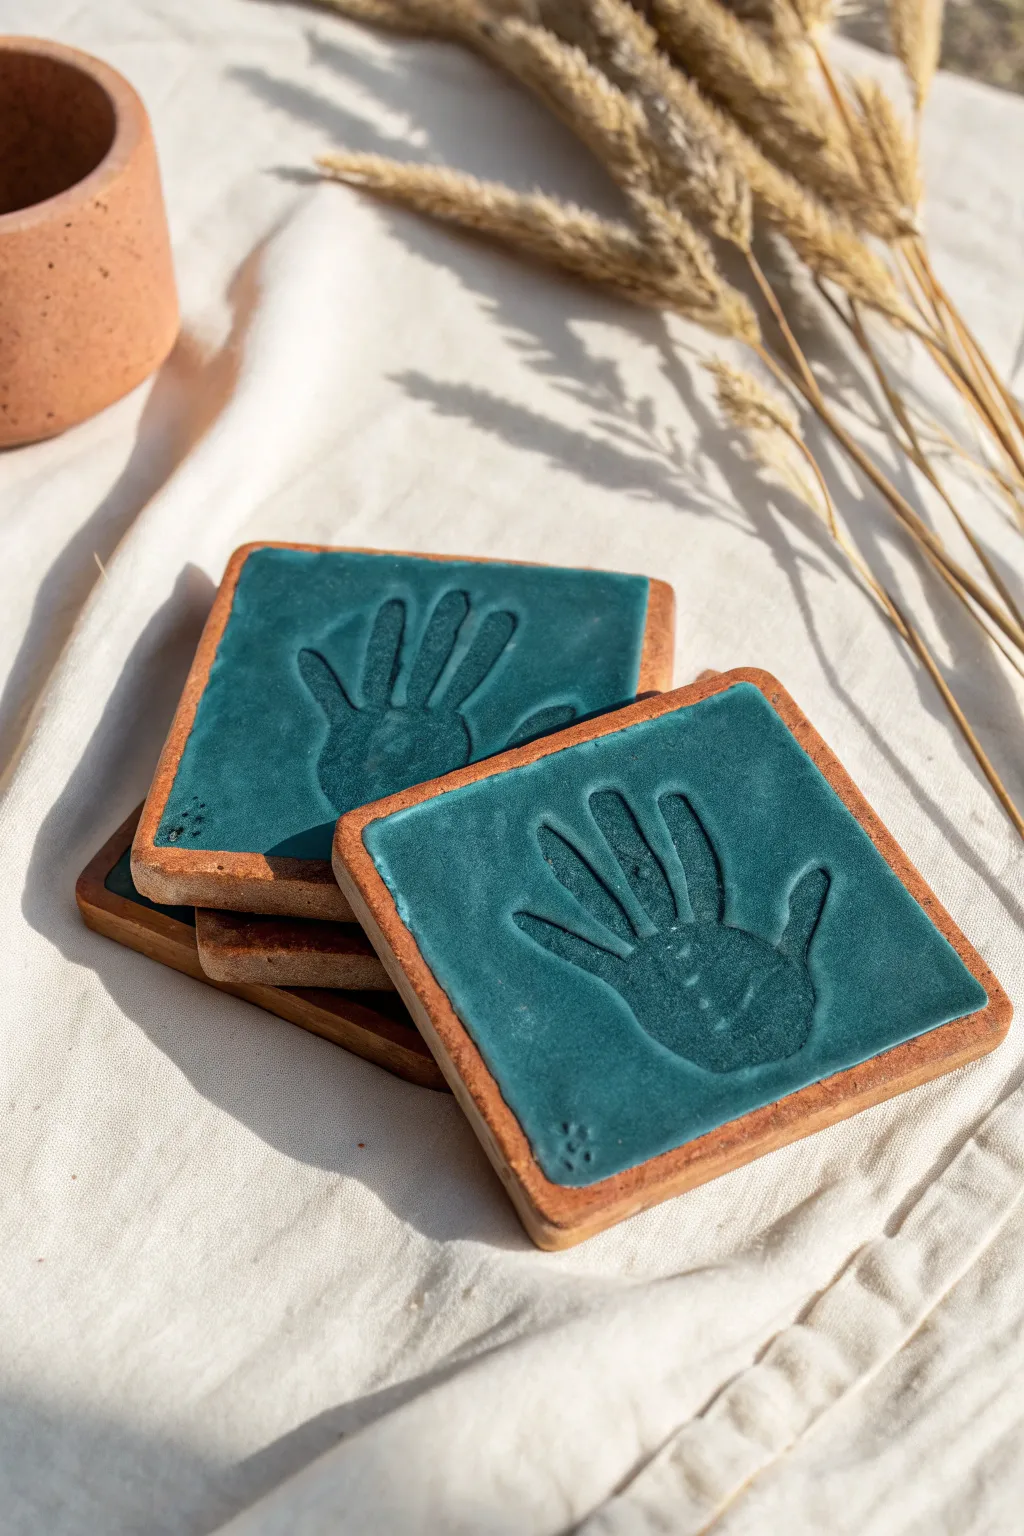
Immortalize your connection with these rustic-chic coasters featuring debossed handprints set against a striking teal glaze. The exposed terracotta edges give them a warm, earthy frame that perfectly complements the cool tones of the center.
How-To Guide
Materials
- Terracotta or earthenware clay (low fire)
- Rolling pin
- Two wooden guide strips (approx. 1/4 inch thick)
- Square cookie cutter (approx. 4-5 inches) or a ruler and needle tool
- Smoothing sponge
- Bowl of water
- Teal or deep turquoise ceramic glaze (low fire)
- Medium flat paintbrush
- Wax resist (optional)
- Kiln access (or use air-dry clay and acrylic paint alternatives for a no-fire version)
Step 1: Shaping the Clay Base
-
Prepare your clay:
Start by wedging your terracotta clay thoroughly to remove air bubbles. This ensures your coasters won’t crack during firing. -
Set up guides:
Place your wooden guide strips on either side of your clay ball on a canvas or cloth surface. These will help you roll a perfectly even slab. -
Roll out the slab:
Using your rolling pin, roll the clay out until the pin rests flat on both guide strips, creating a uniform thickness ideal for coasters. -
Cut the squares:
Press your square cutter firmly into the clay. If you don’t have a cutter large enough to fit a handprint, measure a 4-5 inch square with a ruler and cut cleanly with a needle tool. -
Smooth the edges:
Dip your finger or a sponge lightly in water and run it along the cut edges to soften any sharp corners or burrs left by the cutting tool.
Clean Lines Tip
Use painter’s tape to mask off the border before glazing. Peel it off while the glaze is still slightly damp for a crisp, straight edge.
Step 2: Impression & Details
-
Position the hand:
Because adult hands are larger than coasters, decide which part of the hand you want to feature. The image shows the palm and lower fingers, omitting the fingertips to fit the square. -
Press firmly:
Lay the hand onto the clay square. Press down firmly and evenly across the palm and fingers to create a deep, clear impression. -
Lift carefully:
Peel the hand away slowly from one side to the other to avoid distorting the clay or sucking it up with suction. -
Refine the print:
Use a slightly damp sponge to gently smooth out any rough skin textures or fingernail marks inside the impression if you prefer a cleaner look. -
Add decorative holes (optional):
If you see faint dots in the corners like in the photo, you can create these small textural elements using the head of a pin or a small stylus tool. -
Dry slowly:
Place the tiles on a ware board and cover them loosely with plastic. Let them dry slowly over several days to the ‘bone dry’ stage to prevent warping. -
Bisque fire:
Once fully dry, fire the greenware in a kiln according to your clay’s bisque schedule (usually Cone 04).
Step 3: Glazing & Finishing
-
Clean the bisque:
Wipe the fired bisque tiles with a damp sponge to remove any kiln dust, which can prevent glaze from adhering. -
Define the border:
To achieve the raw clay edge shown in the photo, apply wax resist carefully around the perimeter of the top face, about 1/4 inch wide. Alternatively, just be very precise with your brush. -
Apply the glaze:
Load your flat brush with teal glaze. Paint the interior square, covering the handprint impression thoroughly. I find dabbing the glaze into the deeper parts of the handprint ensures full coverage. -
Layer up:
Let the first coat dry, then apply a second and possibly third coat depending on the glaze’s opacity. You want a rich, solid color. -
Clean the edges:
If any glaze strayed onto the border or sides, wipe it away cleanly with a damp sponge so the raw terracotta frames the color beautifully. -
Final fire:
Fire the glazed coasters in the kiln again, this time following the glaze manufacturer’s temperature guidelines.
Make It a Set
Create a set of four coasters where each tile features a different part of the hand or different family members’ prints.
Enjoy your beautiful, functional art pieces that serve as a permanent reminder of your bond
Two-Part “Map Heart” Keepsake
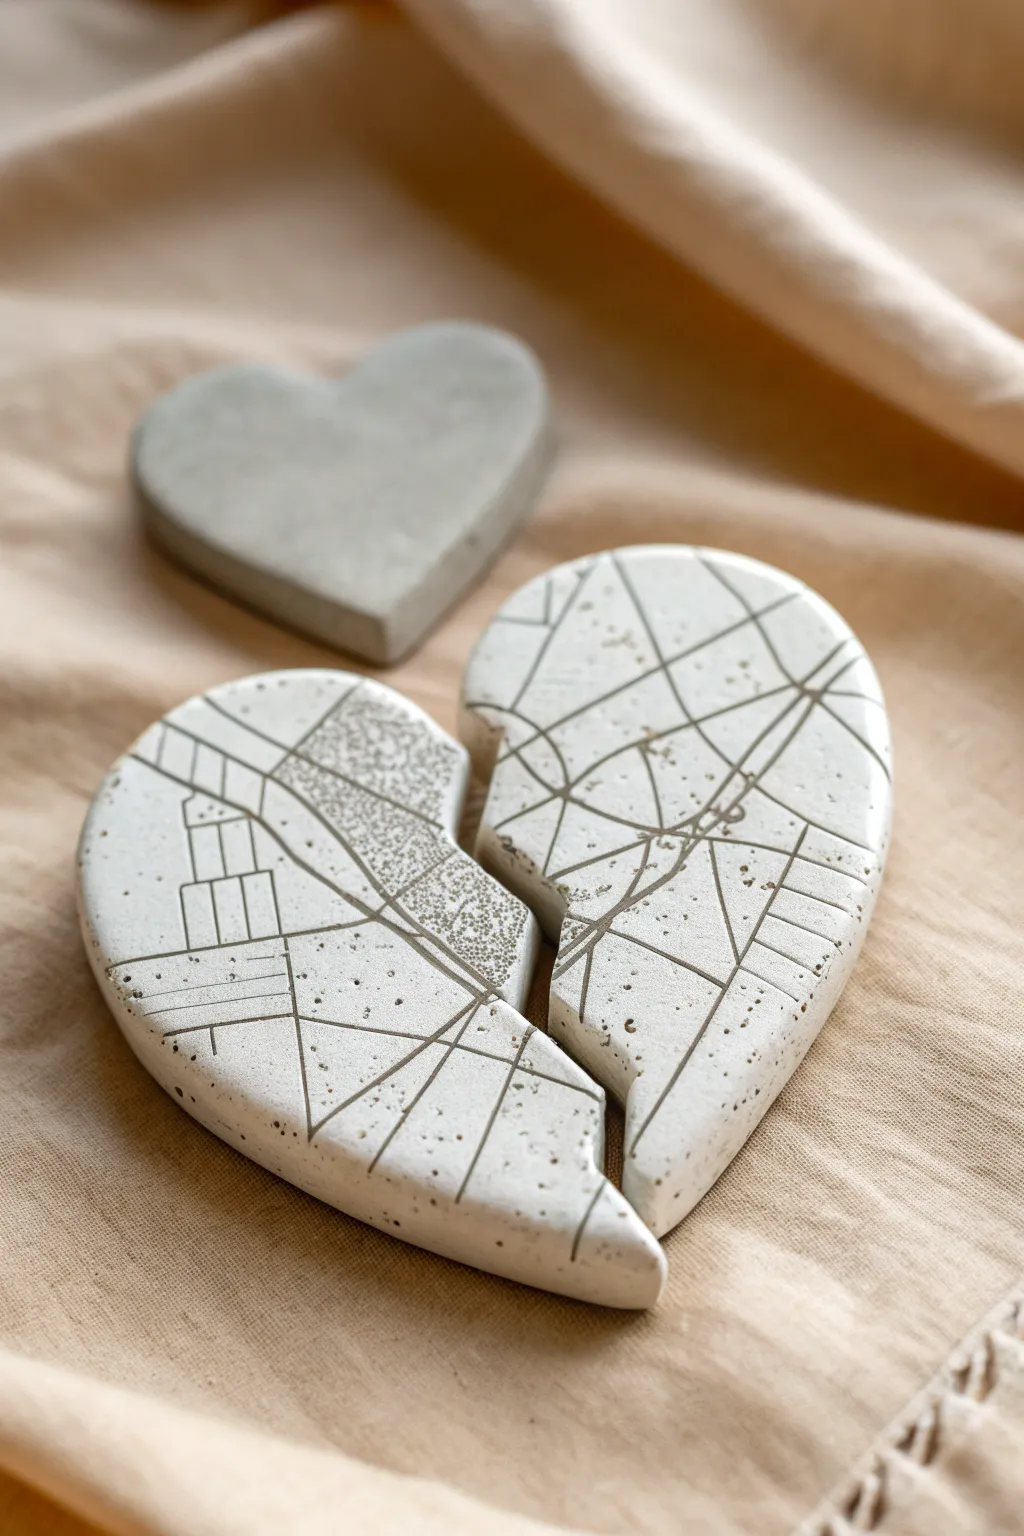
Celebrate a special location or bridge the distance in a relationship with this modern, geometric two-piece heart. Using air-dry clay or white concrete, you’ll create a tactile map design that physically breaks into two shareable halves.
Step-by-Step Tutorial
Materials
- White spreadable air-dry clay or fine casting cement
- Rolling pin
- Heart-shaped cookie cutter (approx. 4-5 inches wide)
- X-Acto knife or sharp crafting scalpel
- Needle tool or toothpick
- Fine-grit sandpaper (220-400 grit)
- Parchment paper or silicone mat
- Small bowl of water
- Printed map of a significant location (sized to your heart)
Step 1: Shaping the Base
-
Prepare your workspace:
Lay down parchment paper or a silicone mat to prevent sticking. If you are using air-dry clay, knead a handful until it’s pliable and warm. If using casting cement, mix according to package directions to a pourable but thick consistency. -
Roll the slab:
Roll your clay out to a uniform thickness of about 1/4 to 1/2 inch. You want it substantial enough to not crack easily, but not so thick it takes forever to dry. Try to keep the surface as smooth as possible. -
Cut the heart shape:
Press your heart-shaped cutter firmly into the clay slab. If you don’t have a cutter large enough, trace a paper template with your knife. Remove the excess clay from around the shape. -
Smooth the edges:
Dip your finger in a little water and gently run it along the cut edges of the heart to soften any sharp ridges or loose clay crumbs. A polished edge makes the final piece look much more professional.
Clean Lines Hack
If your carved lines look messy, wait until the clay is ‘leather hard’ (stiff but cool) to carve. The tool will cut cleaner ribbons rather than dragging mushy clay.
Step 2: Mapping and Splitting
-
Create the split:
Using your X-Acto knife, make a clean, jagged cut down the center of the heart to separate it into two pieces. Avoid a straight line; a zigzag or lightning bolt pattern mimics a natural break and helps the pieces ‘lock’ together visually. -
Separate slightly:
Gently nudge the two halves apart by just a millimeter or two so they aren’t touching. This ensures they dry as separate entities and don’t fuse back together. -
Transfer the map design:
Place your printed map over the damp clay heart. Using a dull pencil or a stylus, trace the major roads and city blocks firmly enough to leave a light indentation on the clay below. -
Carve the lines:
Remove the paper pattern. Use your needle tool or the tip of your knife to deepen and widen the traced lines. Vary your pressure: represent major highways with deeper grooves and side streets with lighter scratches. -
Add texture:
For blocks of buildings or parks, use the point of your needle tool to stipple tiny dots into specific sections. This contrast between smooth lines and textured areas adds beautiful visual interest. -
Clean up the engraving:
Carving often pushes up tiny ridges of clay. Wait about 30 minutes for the clay to stiffen slightly, then gently brush a soft, dry finger or brush over the surface to knock down these burrs without erasing your lines.
Warping Woes?
If the heart edges curl up while drying, gently weigh the center down with a small bag of rice during the first few hours of the drying process.
Step 3: Finishing Touches
-
Slow drying:
Let the pieces dry undisturbed for 24-48 hours. I prefer to flip them over halfway through the process to ensure the bottom dries evenly and prevents warping. -
Initial sanding:
Once bone dry, take your fine-grit sandpaper and lightly sand the edges and the flat surface. This removes any final roughness and gives the piece that stone-like matte finish. -
Refine the break:
Pay special attention to the inner edges where the heart split. Sand these lightly so they remain distinctive but aren’t sharp to the touch. -
Dust off debris:
Wipe the hearts down with a barely damp cloth or a dry paintbrush to remove all sanding dust. -
Seal (optional):
If you want to protect the white finish, apply a thin layer of matte varnish. However, leaving it raw maintains the lovely texture shown in the photo.
Now you have a sentimental puzzle piece to share with someone special
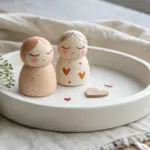
Blindfold Swap Sculpt Challenge
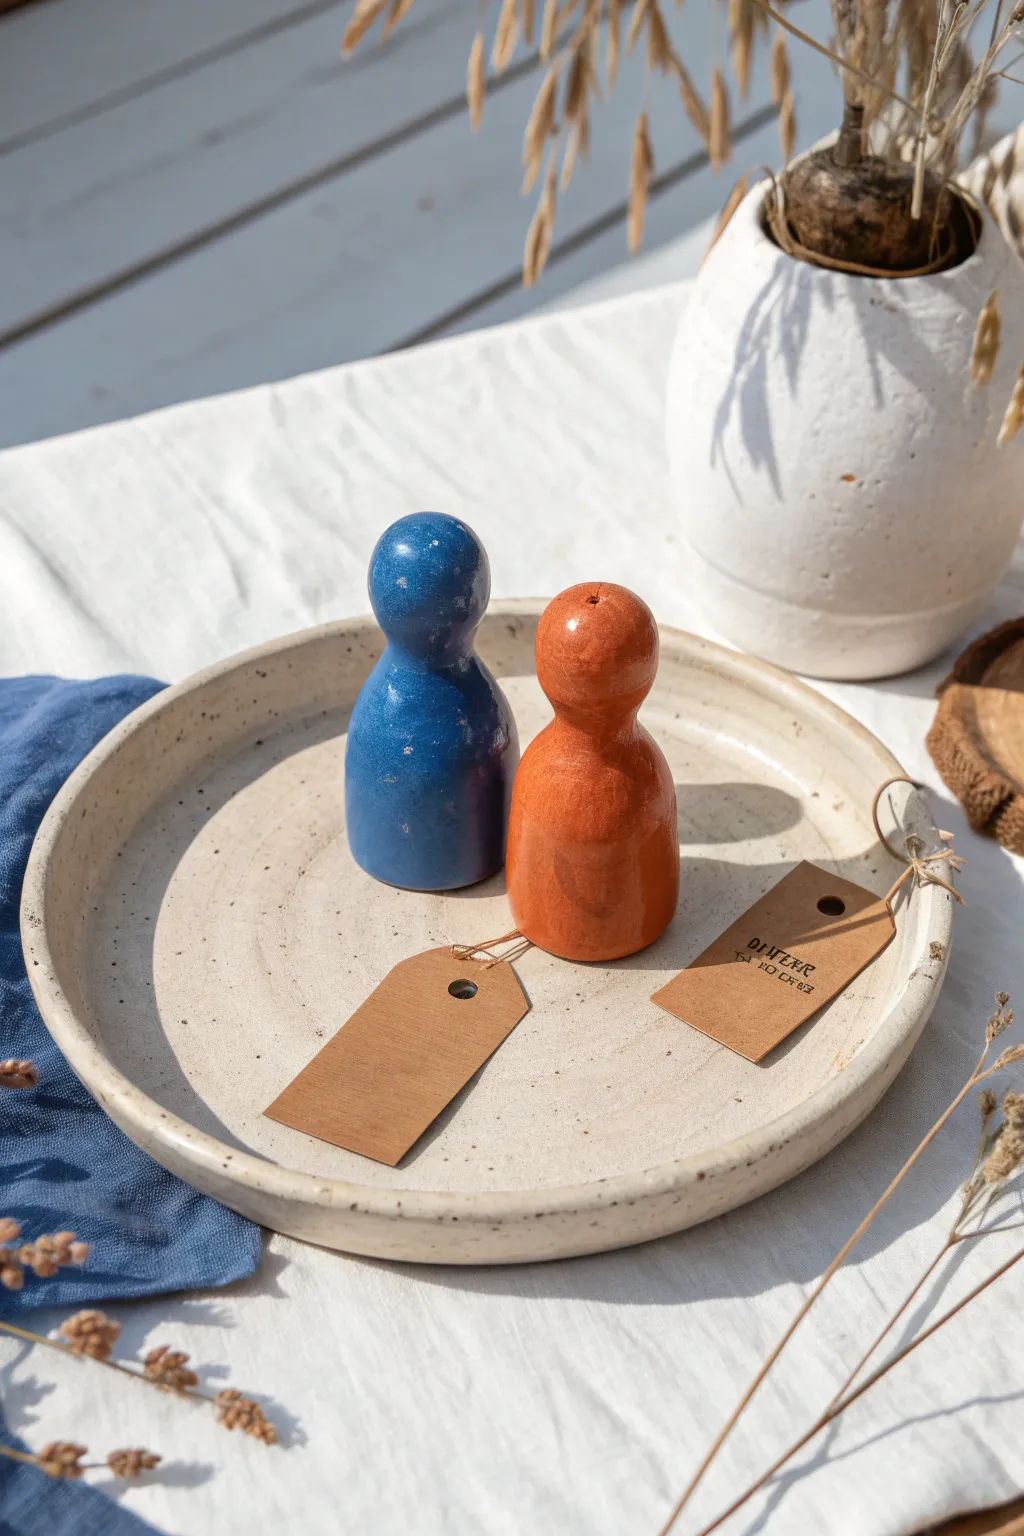
Embrace the fun of imperfection with these minimalist clay pawn figures, designed to be sculpted with your eyes closed before swapping and painting them. The result is a charmingly rustic pair of abstract statues with a smooth, glazed finish in contrasting earthy blue and terracotta tones.
How-To Guide
Materials
- Air-dry clay or polymer clay (white or terracotta)
- Water (for smoothing)
- Sponge or small towel
- Acrylic paints (deep blue, terracotta orange)
- High-gloss varnish or Mod Podge
- Paintbrushes (medium flat and small detail)
- Fine-grit sandpaper (optional)
- Small cardstock tags and twine (optional for gifting)
Step 1: The Blind Sculpt
-
Prepare your clay:
Since this is a challenge, start by cutting two equal chunks of clay, roughly the size of a lemon. Knead them until soft and pliable so they are ready for shaping the moment the blindfolds go on. -
Blindfold and begin:
Put on your blindfolds. The goal is to create a simple ‘peg doll’ shape—a round head distinct from a cylindrical, tapered body. Trust your hands to feel the proportions rather than seeing them. -
Form the base:
Roll the larger portion of clay into a thick cylinder. Gently taper the top part inward to create a neck area, while flattening the bottom against the table so it stands firmly. -
Shape the head:
Roll the remaining smaller portion of clay into a smooth sphere. Attach this to the neck you formed on the body piece. You might need to press firmly to blend the clay together at the seam. -
Smooth the surface:
Dip your finger in a little bit of water and run it over the entire figure to smooth out fingerprints and cracks. Rely entirely on texture and touch to find the rough patches. -
The Reveal:
Remove your blindfolds and admire the quirky, unique shapes you’ve both created. Swap figures with your partner—you will now be finishing and painting each other’s creation.
Seamless Connection
To prevent heads from falling off, insert a tooth-pick halfway into the body before adding the head. This acts as an internal spine for stability.
Step 2: Refining and Painting
-
Refining the form:
Now that you can see, use a damp sponge to smooth out any major structural issues or deep cracks on the figure you received. I like to keep the odd lumps and bumps as they tell the story of the blindfold challenge. -
Drying time:
Let the clay dry completely according to the package instructions. Air-dry clay usually takes 24-48 hours; if using oven-bake polymer clay, bake it now. -
Sand for texture:
Once fully dry, you can lightly sand the surface with fine-grit sandpaper if you want a cleaner look, or leave it raw for that handmade ceramic feel. -
Base coat application:
Choose your colors. Brush a solid coat of deep blue onto one figure and a warm terracotta orange onto the other. Don’t worry about perfect coverage on the first pass. -
Second coat:
Apply a second layer of paint to ensure the colors are rich and opaque. A slightly thicker application helps hide brushstrokes and mimics a ceramic glaze. -
Adding the faux-glaze:
Once the paint is bone dry, apply a coat of high-gloss varnish or Mod Podge. This is crucial for achieving that shiny, fired-ceramic look seen in the photo. -
Final drying:
Set the figures aside on a non-stick surface to cure completely. Ensure they aren’t touching each other so the gloss doesn’t stick. -
Attach the tags:
If you are gifting these back to each other or displaying them as a memory, write the date or a small note on a kraft paper tag and tie it loosely around the base or set it alongside your new sculptures.
Cracks While Drying?
Air-dry clay shrinks. If cracks appear, mix a tiny bit of fresh clay with water to make a paste and fill the gaps before painting.
Now you have a lasting memento of your blindfold challenge that looks surprisingly chic on a shelf