Whenever someone tells me they want a cozy, low-pressure date night at home, I always point them toward clay. It’s hands-on, a little messy in the best way, and somehow makes even the silliest little sculptures feel weirdly romantic.
Matching Pinch Pots
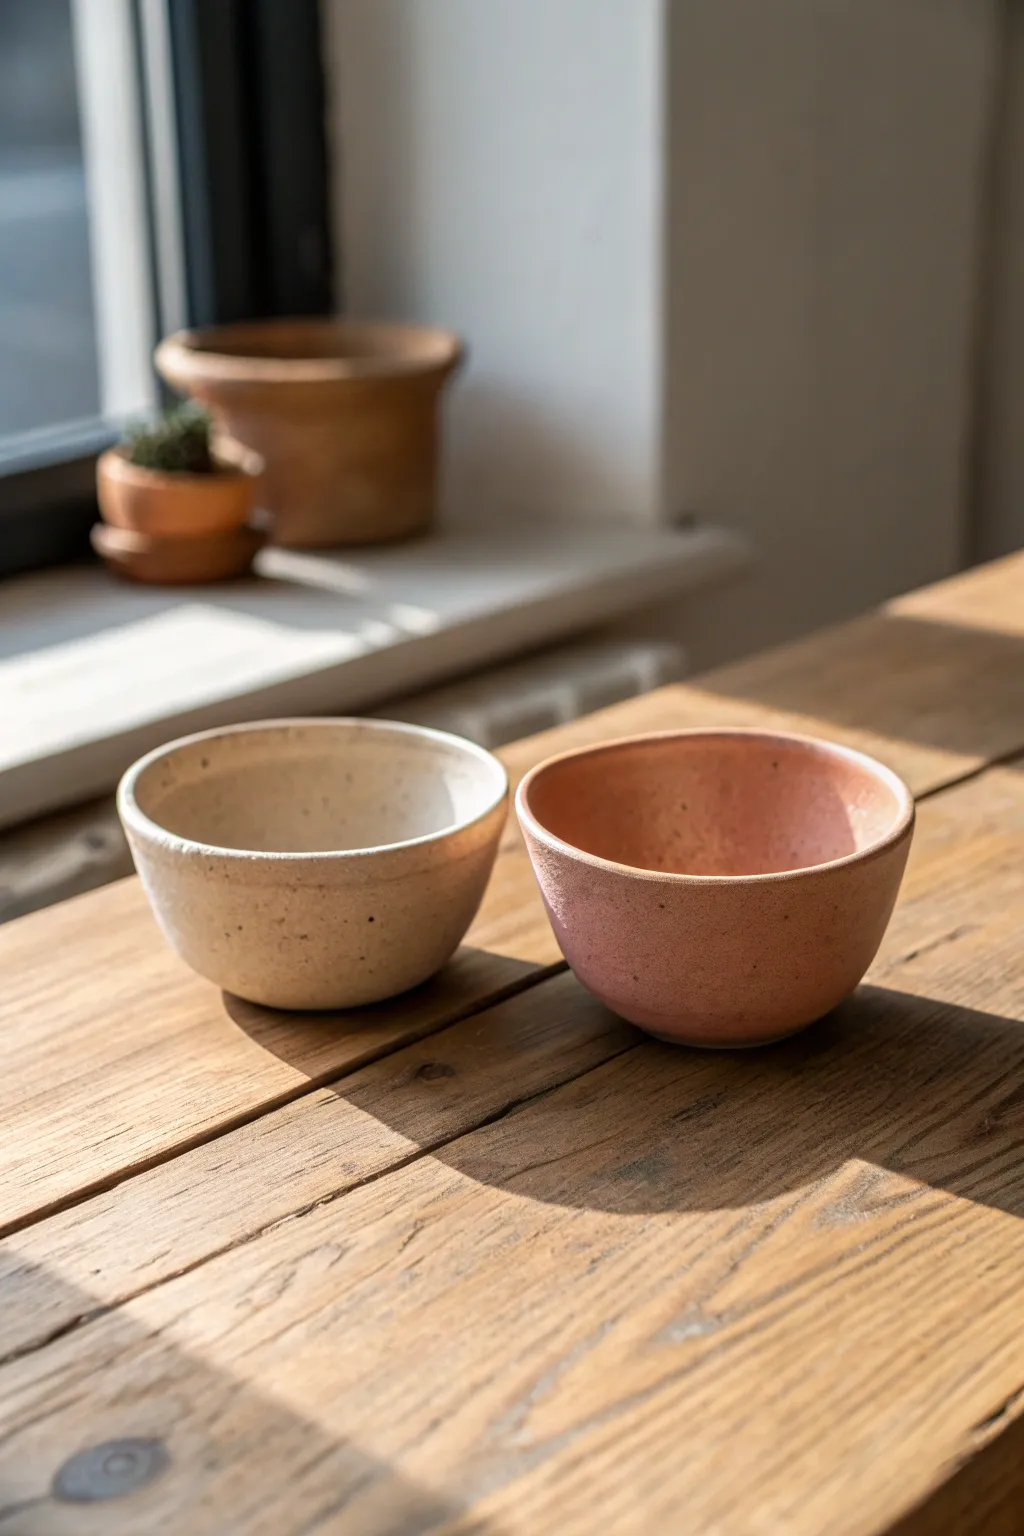
Embrace the simple charm of hand-building with these matching yet distinct artisan pinch pots. Their organic shape and soft, speckled glaze finish make them perfect for morning espresso or holding small trinkets.
How-To Guide
Materials
- Stoneware clay (one light body, one red or terracotta body)
- Small bowl of water
- Synthetic sponge
- Rib tool (wood or rubber)
- Fettling knife or needle tool
- Clear matte glaze
- Kiln access (or use air-dry clay with sealant for a decorative version)
Step 1: Forming the Base
-
Prepare the clay:
Begin by separating your clay into two equal balls, roughly the size of a tennis ball. Pat them aggressively between your hands to compress the clay particles and create a smooth, round sphere. -
Create the opening:
Hold the clay ball in your non-dominant hand. With your dominant hand, press your thumb firmly into the center of the sphere, stopping about a half-inch from the bottom to ensure a sturdy base. -
Start pinching:
Using your thumb on the inside and fingers on the outside, gently pinch the clay wall. Rotate the ball slightly with each pinch to ensure even thickness all the way around. -
Build the height:
Continue the rhythmic pinching motion, working your way from the thick base up toward the rim. Aim for a consistent wall thickness of about a quarter-inch. -
Shape the curve:
As the walls rise, gently press outward with your thumb to create a wider, open bowl shape rather than a tall cylinder. I like to cup the outside with my palm to support the curve.
Step 2: Refining and Smoothing
-
Level the rim:
Set the pot on the table to check for balance. If the rim is very uneven, use a needle tool to trim high spots, or simply tap the rim gently with a flat wooden paddle to level it. -
Smooth the interior:
Take a slightly damp sponge and wipe the inside of the bowl to remove finger marks. Be careful not to use too much water, which can weaken the clay structure. -
Refine the exterior:
Use a rubber rib tool to scrape and compress the outside walls. This removes large fingerprints and creates that smooth, professional artisan look while keeping the organic silhouette. -
Clean the foot:
Flip the pot over and use your thumb to smooth the bottom edge. If desired, press a small concave indentation into the center of the base for stability. -
Final shaping check:
Do one last visual inspection. Gently nudge any areas that look lopsided until the bowls feel like a cohesive pair.
Pro Tip: Thickness Check
Not sure if the walls are even? Use a needle tool to poke through the wall near the base. Check the depth, then smooth over the tiny hole immediately.
Step 3: Drying and Glazing
-
Slow drying:
Loosely cover the pots with plastic for a day to let the moisture equalize, then uncover them to dry completely until bone dry. -
Bisque firing:
If using ceramic clay, fire the pieces in a kiln to bisque temperature (usually Cone 04) to prepare them for glazing. -
Identify clay bodies:
Remember that the color variance in the photo comes from the clay body itself—one light, one terracotta—showing through a translucent glaze. -
Apply glaze:
Dip both pots into a clear matte glaze or a white glaze with iron speckles. Shake off excess glaze and wipe the bottoms clean with a sponge. -
Glaze firing:
Fire the pots a second time to the glaze temperature appropriate for your clay (often Cone 5 or 6) to vitrify the clay and melt the glaze.
Troubleshooting: Cracking Rims
If the rim starts cracking while you pinch, your clay is too dry. Dip your fingers in water (sparingly) and compress the rim downwards to heal the cracks.
Now you have a beautiful set of matching vessels that serve as a lasting memory of your creative evening together


His-and-Hers Trinket Dishes
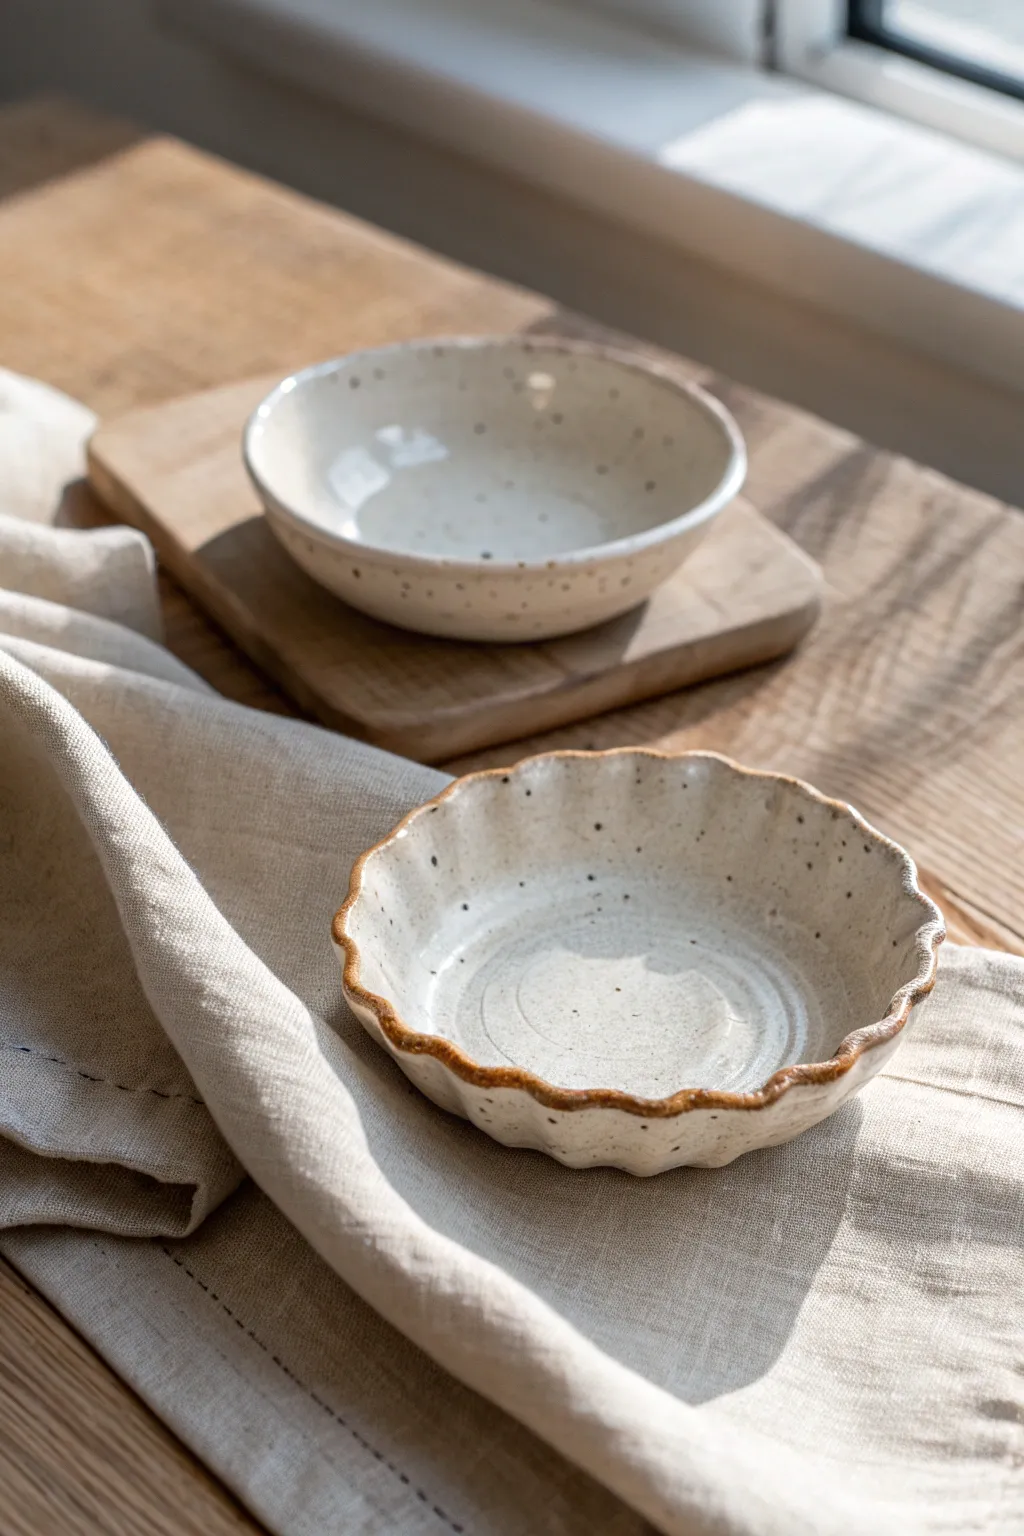
These charming his-and-hers trinket dishes combine a rustic speckled finish with organic shapes, perfect for holding jewelry or keys. One dish features a smooth, classic rim while the other boasts a delicate fluted edge, creating a complementary pair that feels handmade and grounded.
Step-by-Step
Materials
- Speckled buff stoneware clay
- Rolling pin
- Canvas mat or cloth (to prevent sticking)
- Small sponge
- Needle tool or fettling knife
- Rib tool (wooden or silicone)
- Small bowl (to use as a slump mold)
- Modeling tool or finger for fluting
- Glossy white glaze (translucent enough to show speckles)
- Iron oxide wash or brown underglaze (for the rim)
- Paintbrush
Step 1: Shaping the Clay
-
Wedge the clay:
Begin by wedging your speckled buff clay thoroughly to remove air bubbles and ensure an even consistency, which is crucial for preventing cracks during firing. -
Roll out the slab:
Place the clay on your canvas mat and use the rolling pin to create a slab about 1/4 inch thick. Rotate the clay periodically to ensure an even thickness. -
Smooth the surface:
Take your rib tool and gently compress the surface of the slab on both sides. This aligns the clay particles and creates a smooth canvas for your dishes. -
Cut the circles:
Place your bowl guide or a circular template onto the slab and cut around it using a needle tool. You will need two circles of roughly the same size for this set. -
Smooth the edges:
Dip your finger or a small sponge in water and run it along the cut edges of your clay circles to round them off and remove any sharp burrs.
Uneven Drying?
If your rims are drying faster than the centers, loosely drape a piece of plastic wrap over the rims while the centers firm up. This prevents warping.
Step 2: Forming the Dishes
-
Form the simple dish:
Take the first clay circle and gently press it into your slump mold bowl. Use the sponge to press it firmly against the mold’s curve, smoothing out the interior. -
Refine the simple rim:
While in the mold, ensure the rim is even. I like to use a damp chamois strip here to get that perfectly rounded lip. -
Form the fluted dish:
Place the second circle into a similar slump mold. Press it down just like the first one to establish the base concave shape. -
Create the heavy fluting:
Using your thumb and forefinger, gently pinch the rim at regular intervals to create a wavy pattern. Push outward with one finger while supporting the clay on either side to exaggerate the curves. -
Add texture inside:
If you want the visible throwing rings look shown in the photo, place the dish on a banding wheel and use a jagged modeling tool to lightly score concentric circles into the interior bottom. -
Dry slowly:
Let both dishes dry in the molds until they are leather-hard. This helps them retain their curved shape without slumping when you remove them.
Stamp It
Before the clay dries, impress a small stamp, initials, or the date into the underside of the dish to commemorate your date night creation.
Step 3: Glazing and Finishing
-
Bisque fire:
Once bone dry, fire the pieces in a kiln to bisque temperature (usually cone 04 or 06 depending on your clay body). -
Apply the oxide rim:
For the fluted dish, dip a small brush into iron oxide wash or brown underglaze and carefully paint the very edge of the wavy rim to highlight the fluting. -
Glaze application:
Dip the entire dish into a glossy white glaze. If the glaze is opaque, thin it slightly so the natural speckles of the clay body can show through. -
Clean the foot:
Use a wet sponge to wipe away valid glaze from the bottom of the dishes to prevent them from sticking to the kiln shelf. -
Glaze fire:
Fire the pieces again to the maturity temperature of your clay and glaze (often cone 5 or 6 for stoneware).
Place your finished dishes on a bedside table or entryway console to enjoy their organic beauty every day


Mini Ring Dish Hearts
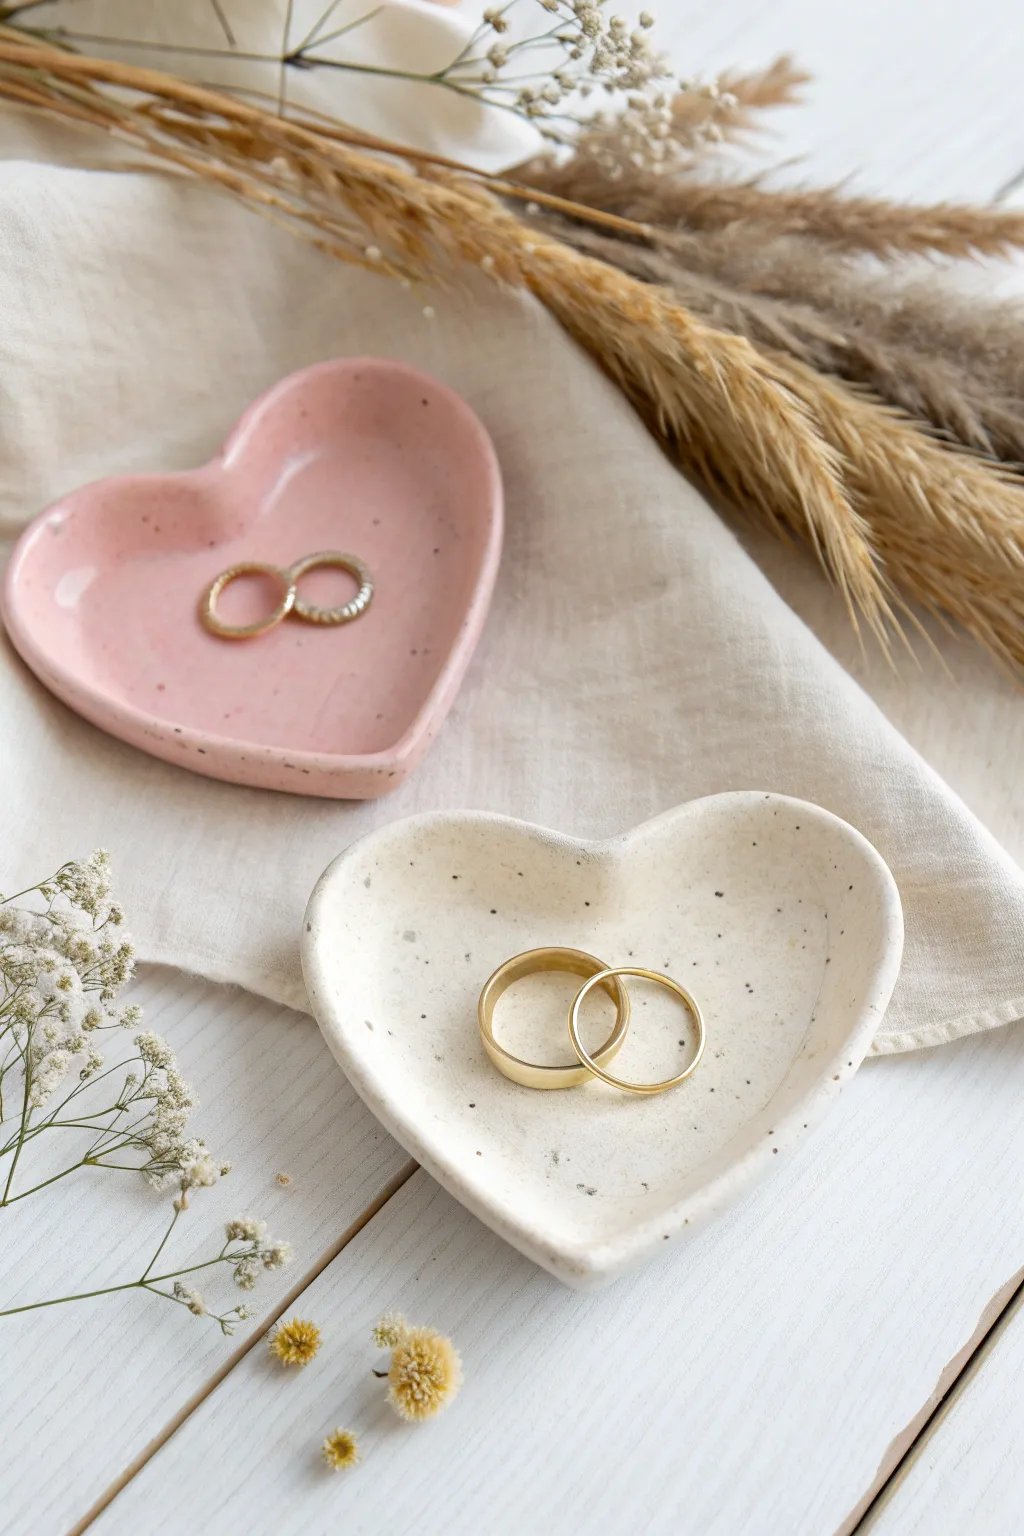
These charming, palm-sized trinket dishes feature a sweet heart shape with a gentle, hand-molded rim. Their soft pink and cream tones, combined with a lovely speckled finish, make them perfect for safeguarding your favorite rings.
Detailed Instructions
Materials
- Speckled stoneware clay (white and pink tinted) or polymer clay with granite effect
- Rolling pin
- Heart-shaped cookie cutter (approx. 3-4 inches)
- Small bowl of water
- Sponge
- Needle tool or toothpick
- Basic pottery tools (rib tool is helpful)
- Clear glaze (if using kiln clay) or glossy varnish (if using polymer)
Step 1: Shaping the Base
-
Prepare the clay:
Begin by wedging your clay to remove air bubbles. You’ll need two small balls of clay—one for the pink dish and one for the white. If using polymer clay, condition it in your hands until it’s pliable. -
Roll it out:
Use your rolling pin to flatten the first ball of clay into an even slab. Aim for a thickness of about 1/4 inch or roughly 6mm. I like to rotate the clay after each roll to keep the thickness consistent. -
Cut the shape:
Press your heart-shaped cookie cutter firmly into the slab. Wiggle it slightly to ensure a clean cut, then remove the excess clay from around the shape before lifting the cutter. -
Smooth the edges:
Dip your finger into a little water and gently run it along the cut edge of the heart to soften any sharp corners left by the cutter. This makes the finished rim feel much more professional.
Rim Cracks?
If tiny cracks appear while bending the rim, your clay might be too dry. Dab a tiny amount of water (or clay softener) on the crack and smooth it over immediately with your finger.
Step 2: Forming the Dish
-
Lift the edges:
Place the clay heart in the palm of your hand. Gently curl your fingers upward to slightly cup the clay, naturally encouraging the edges to rise. -
Pinch the rim:
Using your thumb and forefinger, gently pinch around the perimeter of the heart to define the rim. You want a shallow, curved wall that rises about half an inch. -
Refine the V-shape:
Pay special attention to the dip at the top of the heart and the point at the bottom. Use a damp sponge to smooth these areas so they don’t crack as the clay dries. -
Check symmetry:
Set the dish down on a flat surface to ensure it sits level. If it wobbles, gently press the center down from the inside to flatten the bottom. -
Repeat for the second heart:
Repeat the entire process with your second color of clay to create the companion dish.
Step 3: Finishing Touches
-
Dry partially:
Allow the clay to dry until it is leather-hard. This usually takes a few hours depending on humidity. -
Smooth imperfections:
Once firm, use a slightly damp sponge to do a final pass over the surface, erasing any fingerprints or uneven spots. -
Harden the clay:
For polymer clay, bake according to package instructions. For pottery clay, allow it to dry completely to the bone-dry stage before bisque firing in a kiln. -
Add speckles (optional):
If your clay didn’t have speckles built-in, you can flick a toothbrush loaded with diluted brown or black paint over the surface. -
Seal surface:
Apply a clear, food-safe glaze and fire again for pottery, or coat with a glossy varnish for polymer clay to achieve that ceramic shine.
Stamp It
Before the clay dries, use small letter stamps to press initials or a date into the center of the heart for a personalized anniversary gift.
Set these lovely dishes on your bedside table or vanity to hold your most precious jewelry pieces


Couple Mug-Shaped Pencil Cups
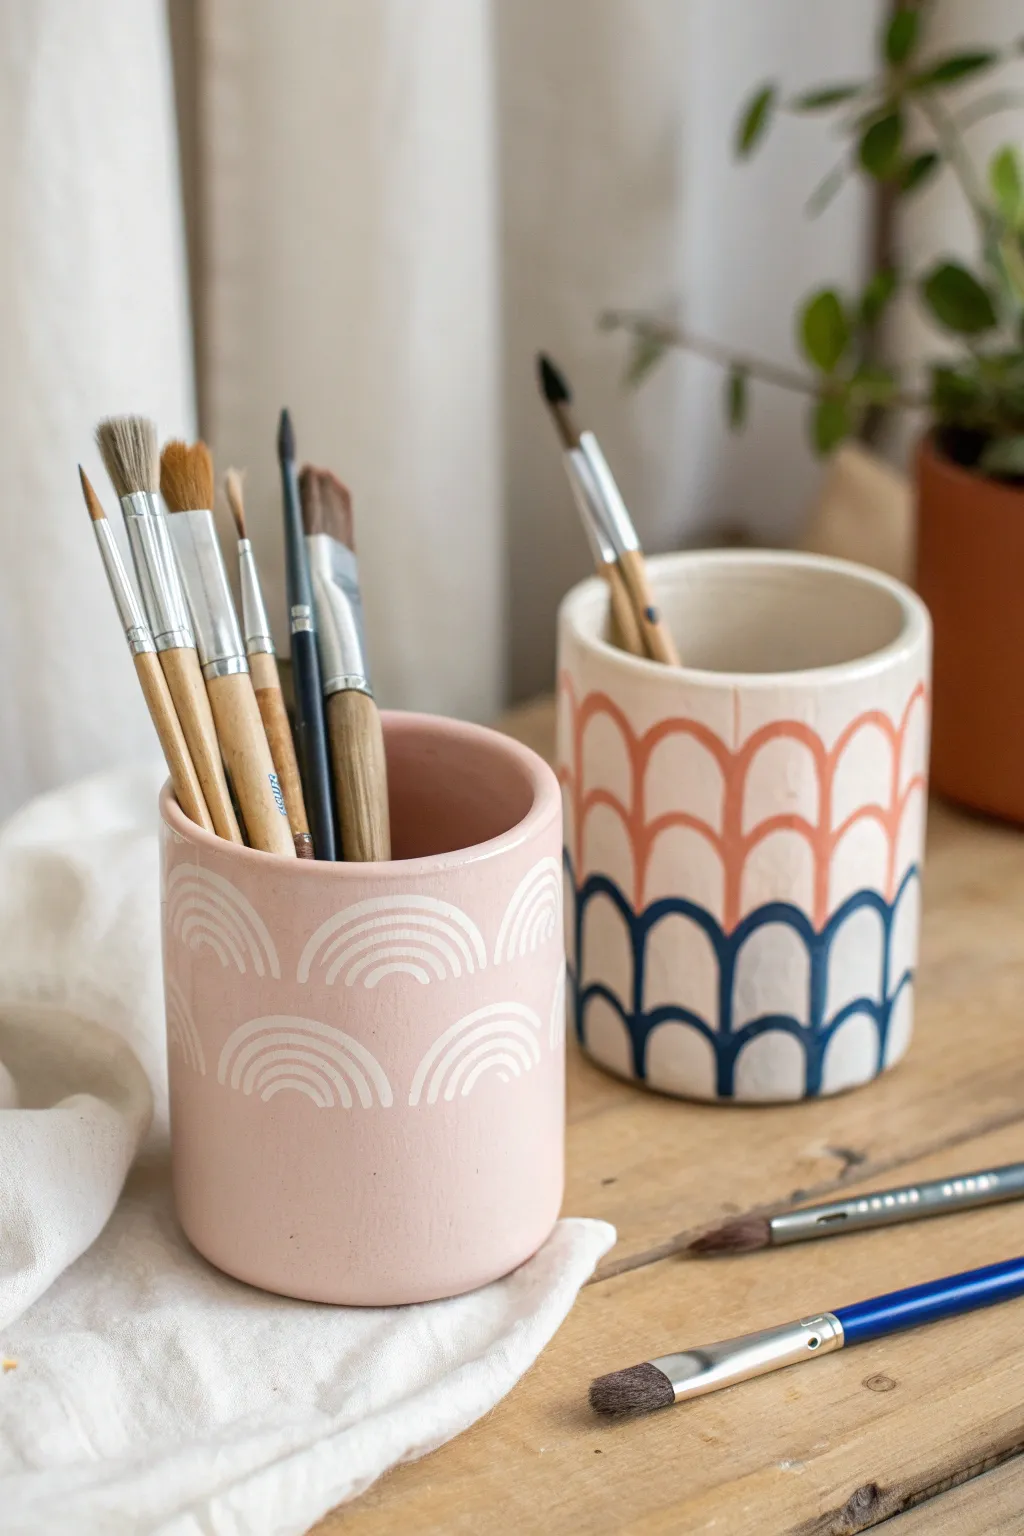
These charming, hand-painted vessels add a touch of modern bohemian style to any creative workspace. With their soft matte finish and playful arch patterns, they make the perfect functional decor piece for organizing your favorite brushes and tools.
Step-by-Step
Materials
- Air-dry clay or stoneware clay (white or cream)
- Clay rolling pin
- Fettling knife or craft knife
- Cylindrical form (like a sturdy cardboard tube or PVC pipe)
- Slip (clay and water mixture)
- Scoring tool or old fork
- Sponge
- Matte acrylic paints (blush pink, terracotta, navy blue, white)
- Fine-tipped liner brush
- Flat shader brush
- Matte sealant or varnish
Step 1: Building the Form
-
Roll the Slab:
Begin by rolling out your clay on a canvas or cloth surface to prevent sticking. You want a consistent thickness of about 1/4 inch across the entire slab. -
Measure and Cut:
Using a ruler, measure a rectangle that is roughly 4-5 inches tall and long enough to wrap completely around your chosen cylindrical form with a tiny bit of overlap. Cut this out with your knife. -
Form the Cylinder:
Carefully wrap the clay rectangle around your tube form. Where the ends meet, score (scratch) both touching surfaces and apply a dab of slip. -
Seal the Seam:
Press the scored ends together firmly. Use your thumb or a modeling tool to smudge the clay across the seam line, blending it until the join is completely invisible. -
Create the Base:
Roll out a small separate piece of clay. Place your cylinder on top of it and trace around the bottom gently, then cut slightly outside that line to create a base circle. -
Attach the Base:
Score and slip the bottom edge of the cylinder and the outer edge of the base circle. Press them together, smoothing the clay upwards from the base onto the wall to secure it. -
Smooth the Rim:
Using a slightly damp sponge, run it around the top rim of the cup to soften any sharp angles. I find this creates a much more professional, finished look than leaving raw cut edges. -
Allow to Dry:
Let the clay dry completely. For air-dry clay, this usually takes 24-48 hours. If using kiln-fire clay, fire to bisque at this stage.
Step 2: Painting the Design
-
Apply Base Color:
For the pink cup, paint the entire exterior with a matte blush pink acrylic. For the white cup, apply a warm cream or off-white base coat. Let dry and apply a second coat for opacity. -
Draft the Arches:
Lightly sketch your scallop pattern with a pencil. For the white cup, draw three horizontal rows of connecting arches. For the pink cup, plan for floating rainbows. -
Paint Navy Arches:
On the white cup, use a liner brush and navy blue paint to outline the bottom row of scalloped arches. Keep your hand steady and pressure consistent for an even line. -
Add Terracotta Arches:
Moving up to the middle and top rows of the white cup, outline the scallops in a warm terracotta or rust orange color. -
Paint White Rainbows:
On the pink cup, create the rainbow motif using white paint. Start with the smallest inner arch and paint three concentric arches outwards to form each rainbow. -
Clean Up Lines:
If any lines look shaky, wait for them to dry completely, then use your base color to carefully paint over and neaten the edges. -
Seal the Project:
Once all paint is fully cured, apply a coat of matte sealant. This protects the finish from scuffs and dust without adding unwanted shine.
Smooth Operator
Before painting, lightly sand your dried clay with fine-grit sandpaper (wear a mask!) to remove any bumps or fingerprints for a flawless surface.
Make It a Set
Make a matching third deeper cup to hold longer items like knitting needles, or a shallow dish for paperclips using the same arch pattern.
Enjoy styling your desk with your beautiful handmade ceramics

The Complete Guide to Pottery Troubleshooting
Uncover the most common ceramic mistakes—from cracking clay to failed glazes—and learn how to fix them fast.
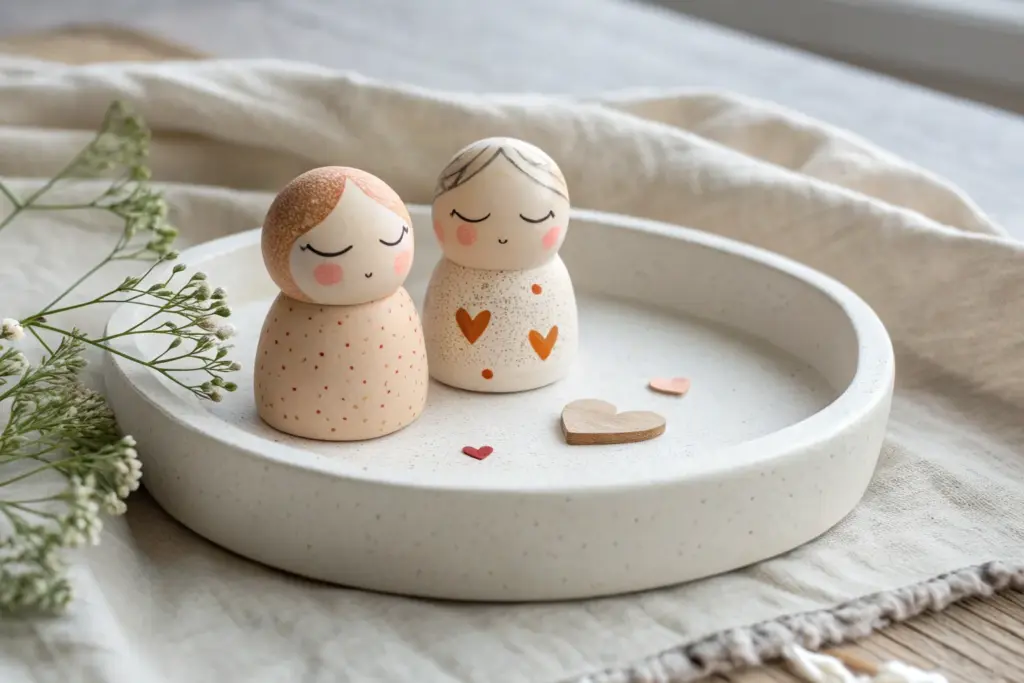
Cute Blob Couple Figurines
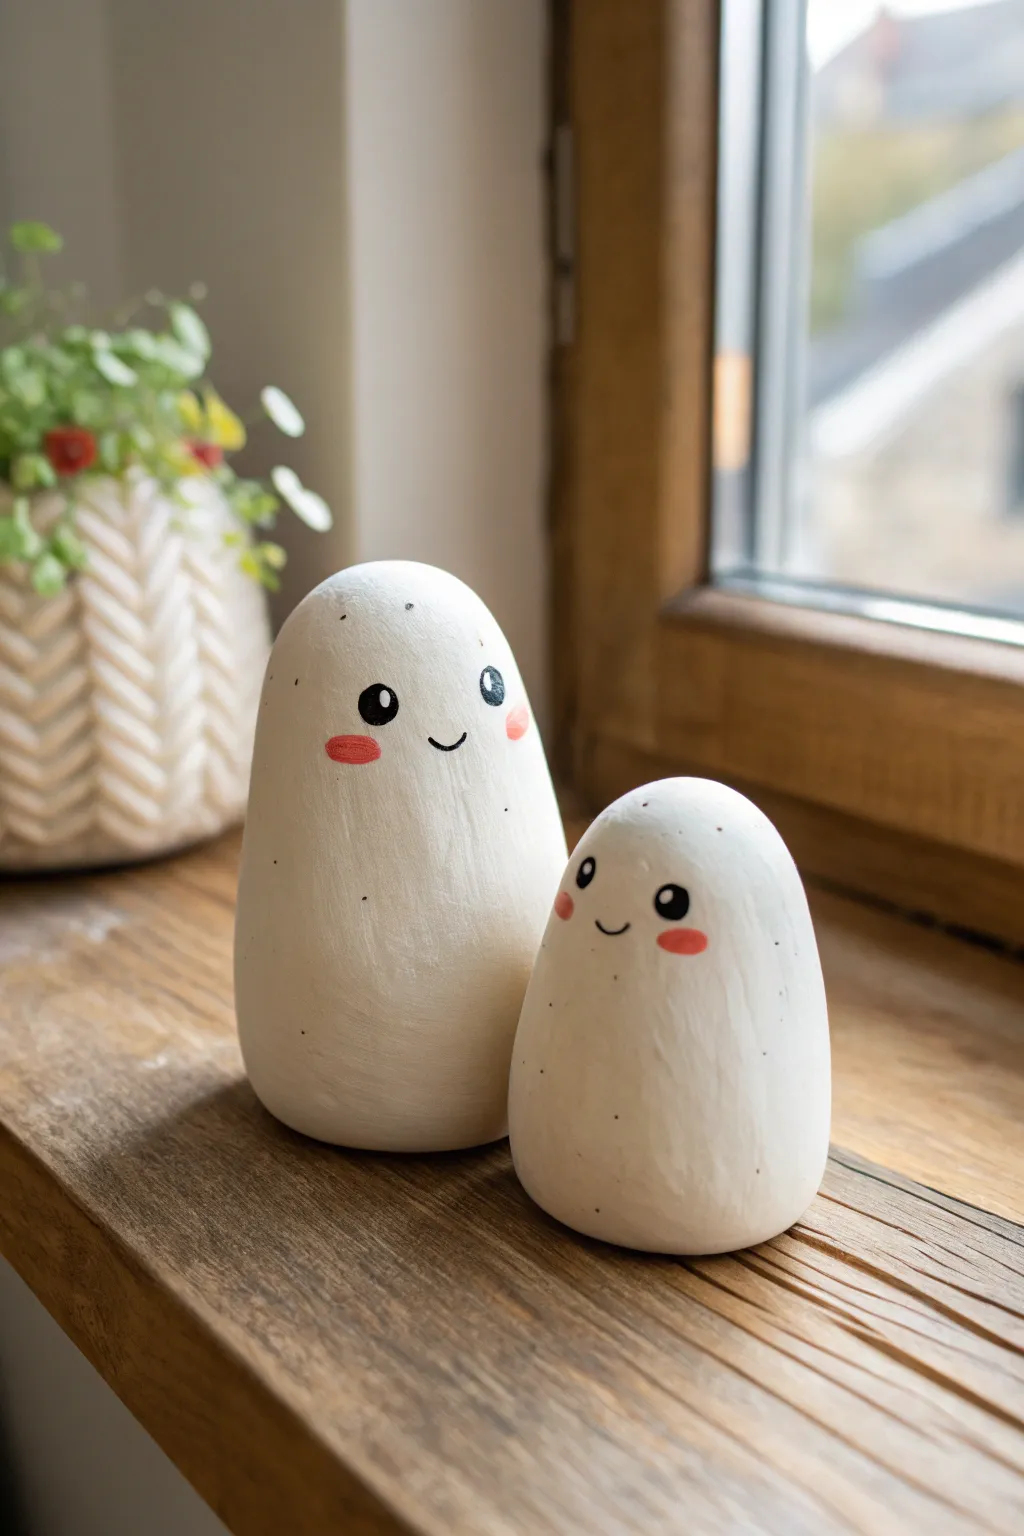
These utterly adorable blob figurines are the perfect low-stress project to tackle together, resulting in charming décor that looks great on a windowsill. Their simple, organic shapes and minimalist painted faces make them impossible to mess up and endlessly delightful to look at.
Detailed Instructions
Materials
- Air-dry clay (white)
- Small bowl of water
- Fine-grit sandpaper (220 grit or higher)
- Acrylic paint (black, soft pink/coral)
- Fine detail paintbrush (size 0 or 00)
- Matte sealant or varnish (spray or brush-on)
- Paper towels
- Smooth working surface (e.g., placemat or wax paper)
Step 1: Shaping the Bodies
-
Condition the clay:
Start by taking two lumps of air-dry clay, one slightly larger than the other. Knead them warm in your hands for a few minutes until the clay is pliable and free of cracks. -
Form the base shapes:
Roll each lump into a smooth ball first, then gently elongate them into rounded, egg-like shapes. The bottom should be slightly wider than the top to give them a sturdy seat. -
Create a stable bottom:
Tap the bottom of each figurine firmly against your table to flatten specific spots. Ensure they stand upright on their own without wobbling; lean them slightly if you want them to look like they are interacting. -
Smooth the surface:
Dip your finger in a tiny bit of water and run it over the entire surface of the clay. This ‘slip’ will help smooth out fingerprints and minor imperfections, giving that polished stone look. -
Refine the silhouette:
Gently gently squeeze the top section of the ‘head’ to taper it just a bit more, keeping the overall form very soft and organic. Avoid sharp angles; the goal is a friendly blob shape. -
Initial drying phase:
Set your figures aside in a safe spot to dry. Depending on humidity and clay thickness, this usually takes 24 to 48 hours. Turn them upside down halfway through so the bottoms dry completely.
Cracks Appearing?
If small cracks form while drying, mix a tiny bit of fresh clay with water to make a paste. Fill the crack, smooth it over with your finger, and let it dry again.
Step 2: Sanding and Refining
-
Check for dryness:
Ensure the clay is bone dry—it should feel room temperature, not cool to the touch. If it feels cold, let it dry longer. -
Sand for texture:
Take your fine-grit sandpaper and gently buff the entire surface. We want to remove any lingering fingerprints or bumps, aiming for a texture that looks like smooth, tumbled river stone. -
Dust off debris:
Use a dry paintbrush or a soft cloth to wipe away all the clay dust. The surface needs to be totally clean before any paint touches it. -
Add subtle speckling (optional):
To mimic the stone look in the photo, you can flick a tiny bit of watered-down grey or brown paint off a toothbrush onto the bodies, or use a needle tool to create tiny decorative pockmarks, though plain white is also lovely.
Make It a Set
Create a whole family by making tiny baby blobs or a pet blob. You can also paint seasonal accessories like tiny scarves or holding a heart for variety.
Step 3: Painting the Faces
-
Draft the placement:
Lightly mark where the eyes and mouth will go using a pencil. Place the features slightly lower on the shape to maximize the ‘cute’ factor. -
Paint the eyes:
Using your smallest detail brush and black acrylic paint, create two solid black circles. Make them fairly large and spaced somewhat wide apart. -
Add the highlights:
Wait for the black paint to be fully dry. Then, use the tip of a toothpick or the very end of your brush handle dipped in white paint (or leave the white clay showing if you are careful) to add a tiny white dot in the upper corner of each eye. This ‘catchlight’ brings them to life. -
Paint the smile:
Draw a small, thin ‘U’ shape between the eyes for the mouth. Keep the line weight delicate; I find steadying my hand against the table helps with these fine lines. -
Add rosy cheeks:
Dip your brush into soft coral or pink paint and wipe almost all of it off onto a paper towel until the brush is nearly dry. Gently dab small oval blushes just under the outer corners of the eyes. -
Protect your work:
Once the paint is completely cured, apply a coat of matte varnish. This seals the clay and protects those delicate painted faces from moisture and dust over time.
Set your new little friends on a shelf where they can smile at you every day
Tiny Animal Pair Sculpt-Off
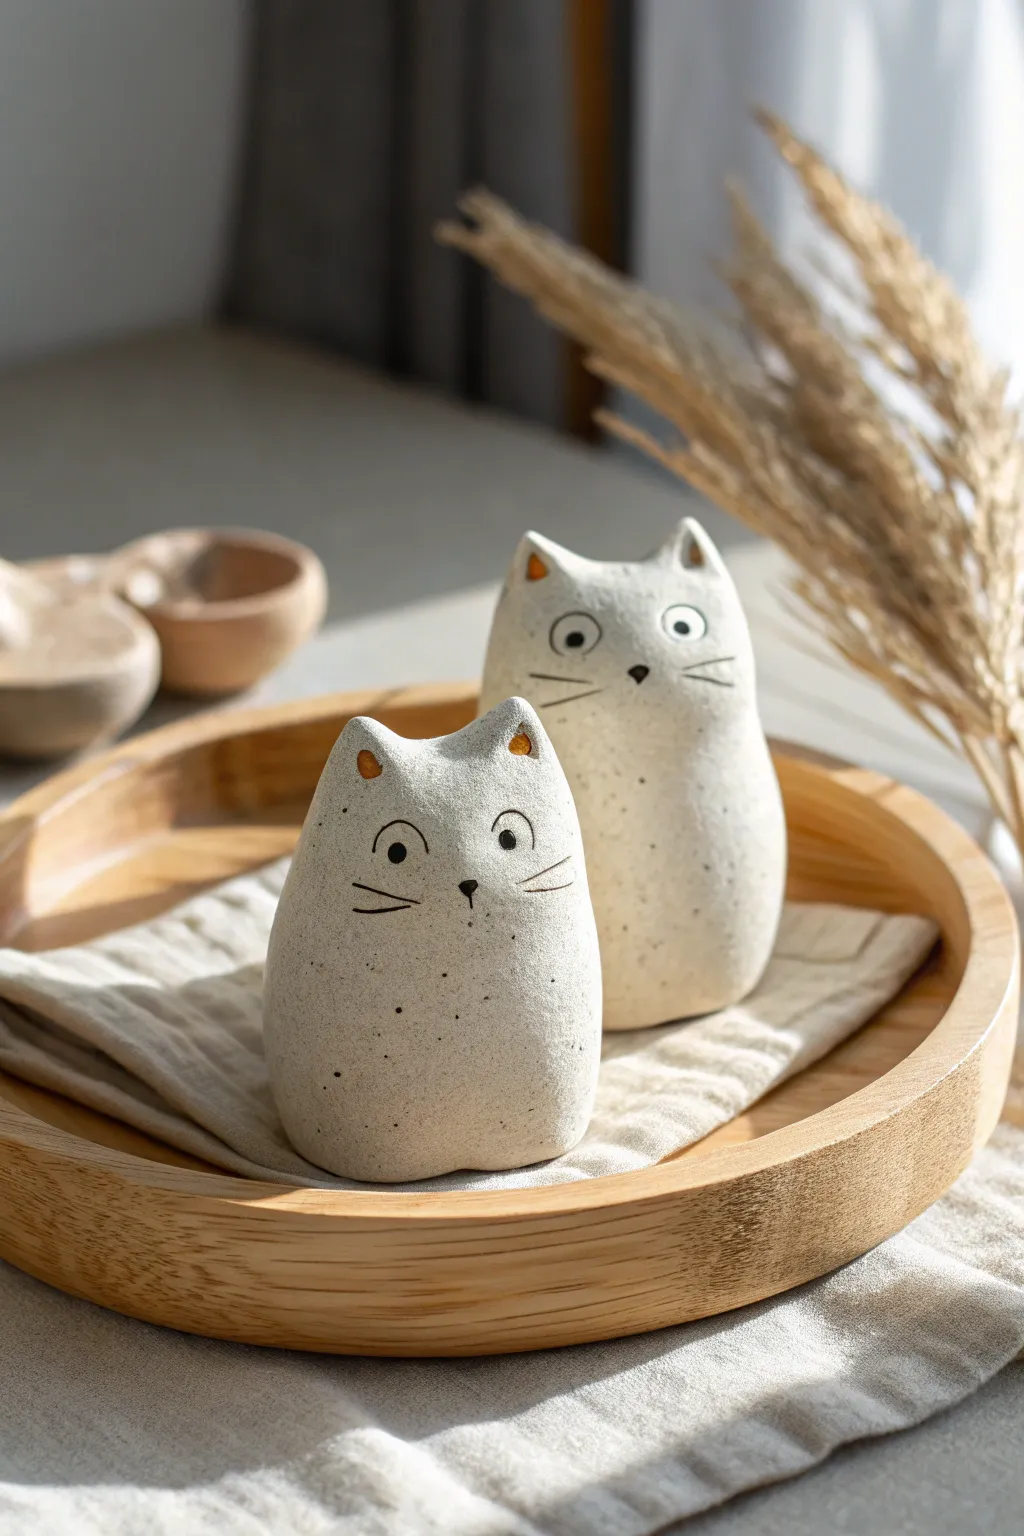
Create a charming pair of modern, stylized kitties that double as adorable decor pieces. These figures feature a delightful speckled stoneware look with simple, hand-painted expressions that bring out their distinct personalities.
Step-by-Step
Materials
- Stone-effect polymer clay (granite or sandstone)
- Black acrylic paint
- Burnt orange acrylic paint
- Fine detail paintbrush (size 0 or 00)
- Clay modeling tools (smoother and needle tool)
- Aluminum foil (for core)
- Matte varnish
- Sandpaper (fine grit)
Step 1: Shaping the Bodies
-
Create the core:
Crumple a small piece of aluminum foil into a tight, elongated egg shape. This saves clay and keeps the figurine lightweight. -
Prepare the clay:
Condition your speckled clay until it is soft and pliable. Roll it into a smooth ball approximately the size of a large plum. -
Cover the armature:
Flatten your clay slightly and wrap it completely around the foil core. Ensure the clay layer is even, about 1/4 inch thick all around. -
Refine the form:
Roll the clay form gently on your work surface to smooth it out. Gently taper the top part slightly narrower than the bottom to create a pear-like silhouette. -
Create a stable base:
Tap the bottom of the figure firmly against the table to flatten it so the cat stands upright without wobbling.
Uneven Standing?
If your cat wobbles after baking, adhere a piece of fine-grit sandpaper to the table and rub the base of the cat in a circular motion until perfectly flat.
Step 2: Sculpting the Features
-
Pinch the ears:
At the very top of the head, use your thumb and forefinger to gently pinch up two small triangles of clay to form the ears. -
Refine ear shape:
Use a smoothing tool to blend the base of the ears back into the head so they look seamless, rather than attached separately. Keep the tips slightly rounded. -
Indent the ears:
Press the rounded end of a small tool or the back of a paintbrush into the front of each ear triangle to create the inner ear cavity. -
Smooth the surface:
Check the entire piece for fingerprints. I find that lightly brushing the clay with a little baby oil at this stage helps achieve a professional, stone-like finish. -
Second figure:
Repeat the entire process for the second cat, perhaps making it slightly taller or wider to give them individual character. -
Bake:
Bake the figures according to your clay package instructions (usually 275°F/135°C for 15-30 minutes). Let them cool completely.
Step 3: Painting and Finishing
-
Paint the eyes:
Using a fine detail brush and black acrylic paint, create circles for the eyes. For a quirky look, paint a small black dot in the center of a larger white circle, or just simple black dots. -
Add nose and mouth:
Paint a tiny, inverted triangle for the nose just between and below the eyes. Draw a simple vertical line down from the nose for the mouth. -
Draw whiskers:
With a steady hand, paint three very thin, short lines on each cheek. Keep these delicate and slightly angled. -
Color the ears:
Dip your brush into the burnt orange paint and carefully fill inside the ear indentations you created earlier. -
Simulate texture (optional):
If your clay wasn’t pre-speckled, you can flick a toothbrush loaded with watered-down grey or brown paint across the surface to mimic stone. -
Seal the work:
Once the paint is fully dry, apply a coat of matte varnish to protect the surface without making it glossy.
Weighted Bottoms
For a sturdier feel, wrap a large metal washer or a small stone inside the foil core near the bottom. This lowers the center of gravity and prevents tipping.
Set your new feline friends on a shelf or windowsill to enjoy their quiet companionship


What Really Happens Inside the Kiln
Learn how time and temperature work together inside the kiln to transform clay into durable ceramic.
Food Pun Clay Charms
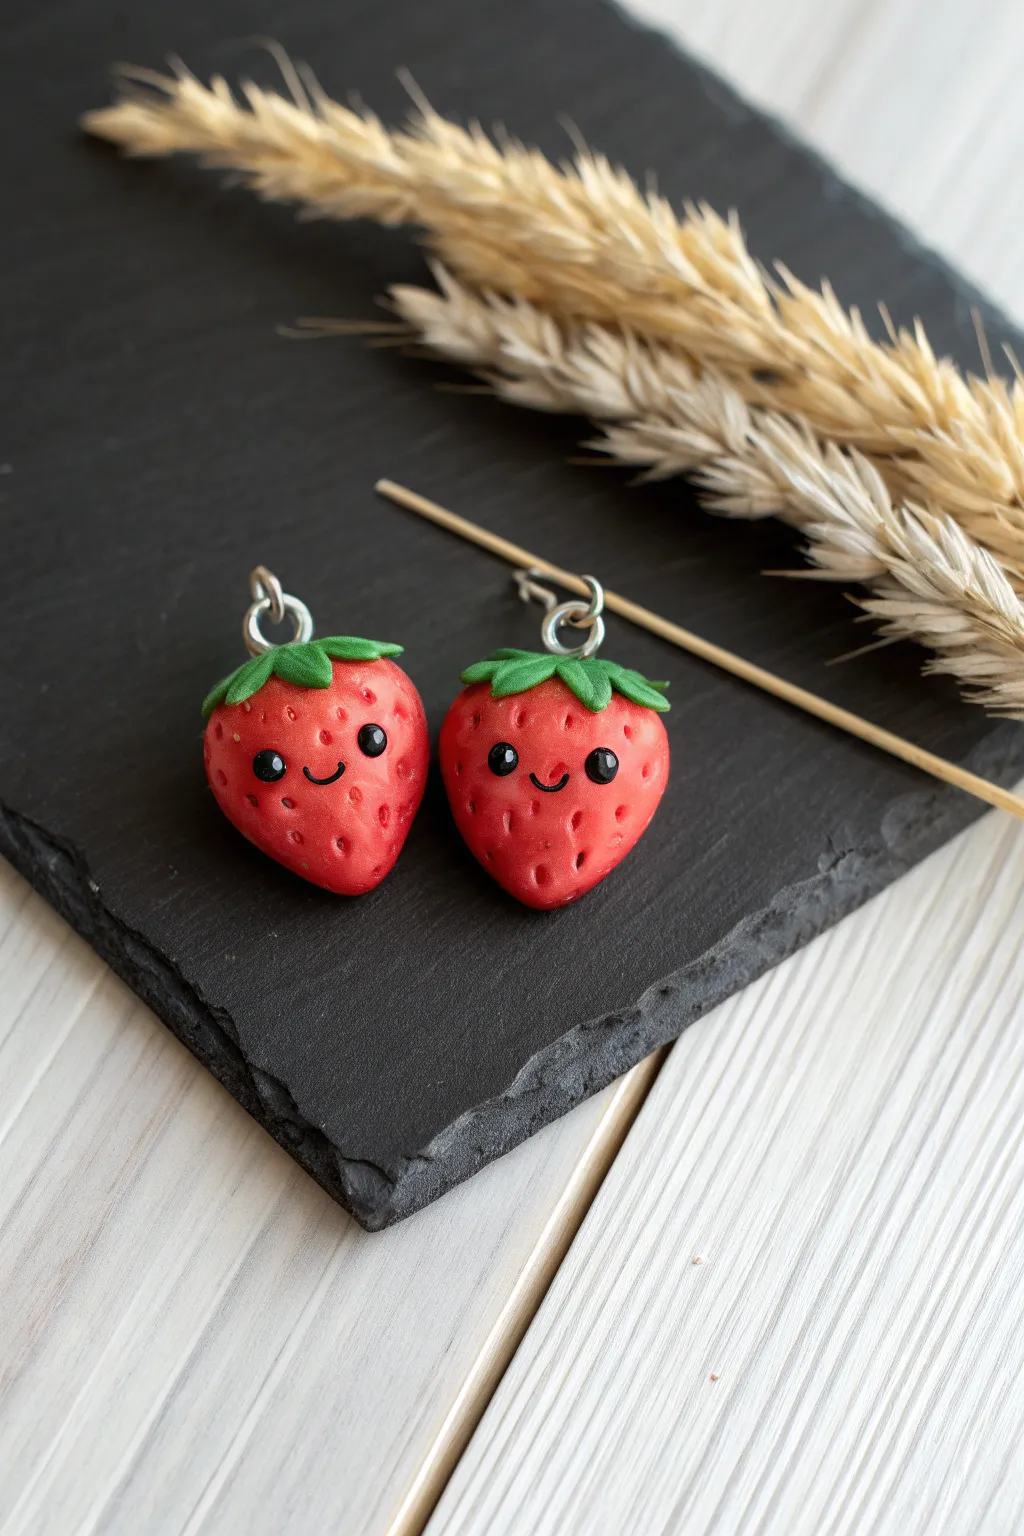
Create an adorable pair of smiling strawberries for you and your partner or best friend. These bite-sized polymer clay charms feature tiny friendly faces and realistic textures that make them irresistible accessories.
Detailed Instructions
Materials
- Red polymer clay
- Green polymer clay
- Black polymer clay
- Needle tool or toothpick
- Small dotting tool or ball stylus
- Translucent liquid polymer clay (optional)
- Eye pins (silver tone)
- Gloss glaze or polyurethane varnish
- Fine detail paintbrush
- Oven for baking
Step 1: Shaping the Base
-
Condition the clay:
Start by warming up your red polymer clay in your hands, kneading it until it is soft, pliable, and free of cracks. -
Form the strawberry shape:
Roll two equal-sized balls of red clay, approximately the size of a hazelnut or slightly larger depending on your preference. Gently pinch and roll one end of each ball between your fingers to create a tapered bottom, forming a rounded cone or teardrop shape. -
Flatten slightly:
Press the shapes very gently onto your work surface so they aren’t perfectly round; this helps the face detail sit better and prevents them from rolling around.
Keep it Clean
Red and green pigments stain fingers easily. Use baby wipes to clean your hands thoroughly before handling the white or black clay to avoid smudging colors.
Step 2: Adding Texture and Leaves
-
Texture the surface:
Using a needle tool or a toothpick, gently poke small, random indentations all over the red surface to mimic strawberry seeds. Leave a small clear smooth area in the center relative to the ‘front’ for the face. -
Create the leaves:
Condition a small amount of green clay. Flatten it into a thin pancake and use a craft knife or needle tool to cut out a small star-like shape with five or six points. -
Attach the greenery:
Place the green star shape on the top (wide end) of your strawberry. Gently press the points of the leaves down so they hug the red curve. -
Refine the leaves:
Use your needle tool to press lightly into the center of each leaf point, creating a central vein and helping adhere the green clay to the red. -
Insert the hardware:
Take a silver eye pin and trim it if the stem is too long. Insert it straight down through the center of the green leaves into the body of the strawberry.
Step 3: The Kawaii Face
-
Make eye sockets:
In the smooth area you left earlier, use a small ball stylus or the rounded end of a paintbrush to press two shallow divots where the eyes will go. -
Add the eyes:
Roll two minuscule balls of black clay. I find it helpful to pick these up with the tip of a needle tool and place them into the divots, pressing gently to secure them. -
Create the smile:
Roll a microscopic snake of black clay—as thin as a thread. Cut a tiny U-shape segment. -
Place the mouth:
Carefully position the tiny black thread between and slightly below the eyes in a U-shape. Press it gently into the clay so it doesn’t fall off. -
Add the highlight:
Using white acrylic paint after baking or a speck of white clay now, add a tiny white dot to the upper corner of each black eye for that sparkling ‘kawaii’ look.
Dust Magnets
If you see lint or fingerprints on your unbaked clay, dip a Q-tip in a tiny bit of rubbing alcohol or baby oil and gently brush over the imperfection.
Step 4: Baking and Finishing
-
Bake carefully:
Place your charms on a ceramic tile or baking sheet lined with parchment paper. Bake according to your brand of clay’s specific instructions (usually 275°F/130°C for 15-30 minutes). -
Cool down:
Allow the strawberries to cool completely inside the oven or on a cooling rack before handling them, as warm clay is fragile. -
Secure the pin:
If the eye pin feels loose after baking, pull it out, add a dab of superglue, and slide it back in. -
Glaze for shine:
Apply a coat of gloss glaze or polyurethane varnish to the entire berry. This makes the fruit look juicy and protects the tiny face details.
Now you have a charming set of berries ready to be turned into earrings or matching keychains
Inside-Joke Keychains
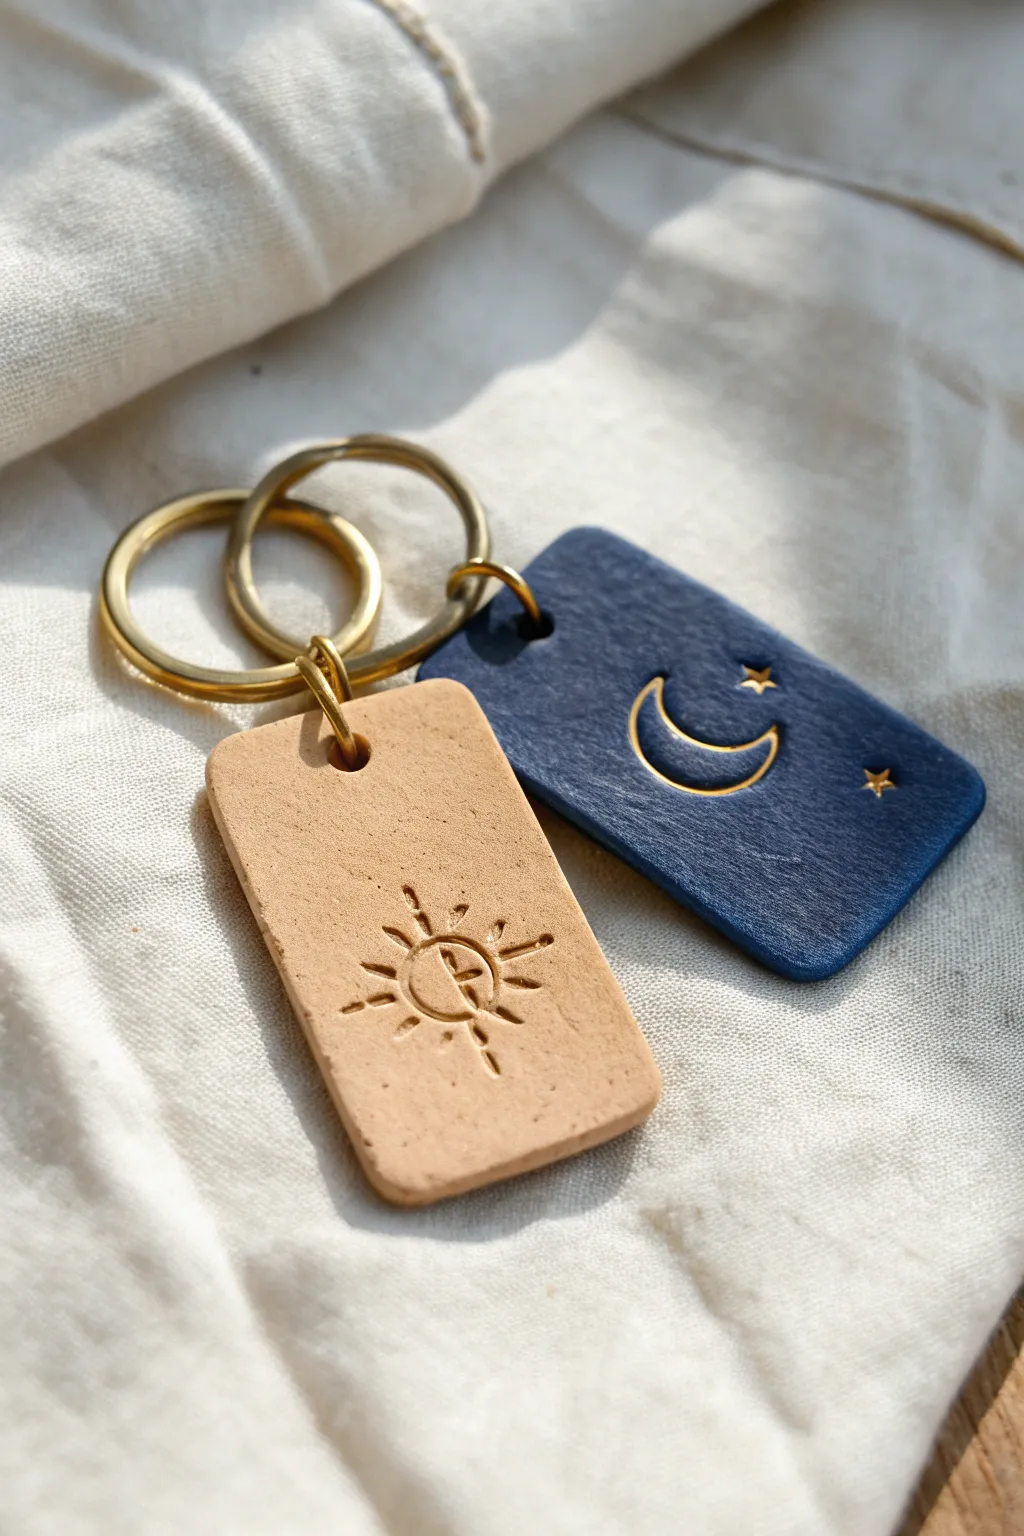
These complementary keychains feature celestial motifs pressed into polymer clay, creating a matching set perfect for sharing. The minimalist sun and moon designs are highlighted with metallic gold paint for a subtle yet elegant shimmer against the matte clay finish.
Step-by-Step Tutorial
Materials
- Polymer clay (tan/beige and navy blue)
- Acrylic rolling pin
- Rectangle clay cutter (approx. 1.5 x 2.5 inches)
- Small jump rings (gold or brass finish)
- Large split keyrings (gold or brass finish)
- Needle tool or toothpick
- Small circular cutter or straw (for hanging hole)
- Sun and moon clay stamps or embossing tools
- Gold acrylic paint
- Fine-point paintbrush
- Piece of parchment paper
- Baking sheet
- Jewelry pliers
- Fine-grit sandpaper (optional)
- Gloss varnish (optional)
Step 1: Shaping the Base
-
Condition the clay:
Start by warming up your clay blocks in your hands. Knead both the tan and navy blue clay separately until they are soft, pliable, and free of any air bubbles. -
Roll it out:
Place the tan clay on a flat surface or a piece of parchment paper. Roll it out to an even thickness of about 1/4 inch or 4mm. I like to keep it slightly thick so the keychain feels substantial. -
Repeat for the second color:
Clean your roller or wipe it down to prevent color transfer, then roll out the navy blue clay to the exact same thickness. -
Cut the rectangles:
Using your rectangle cutter, punch out one shape from each color. If you don’t have a cutter, you can meticulously cut a rectangle using a craft knife and a ruler for straight edges. -
Smooth the edges:
Gently run your finger along the cut edges of the rectangles to soften any sharp corners or clay burrs left by the cutter. -
Create the hole:
Use a small circular cutter, a straw, or the blunt end of a paintbrush to punch a hole near the top center of each rectangle. Ensure the hole is wide enough for your jump ring but not too close to the edge.
Step 2: Designing and Detailing
-
Imprint the sun:
Take the tan clay rectangle. Using a stamp or by carefully freehanding with a needle tool, press a sun design into the center. Make deep indentations for the rays and the central circle so the paint will catch later. -
Imprint the moon:
On the blue rectangle, press or carve a crescent moon shape and a few small stars. If carving by hand, gently scrape away small amounts of clay to create a clean groove. -
Check for imperfections:
Look closely at your impressed designs. Use a rubber shaping tool relative or your finger to smooth out any tiny bits of clay that may have lifted during the carving process. -
Bake the pieces:
Transfer the clay pieces onto a parchment-lined baking sheet. Bake according to your brand’s specific package instructions (usually around 275°F for 15-30 minutes). -
Cool down:
Remove the tray from the oven and let the pieces cool completely. The clay will be slightly soft when hot but hardens fully as it returns to room temperature.
Clean Lines Only
Before baking, use a cotton swab dipped in rubbing alcohol to gently smooth away fingerprints or lint on the surface of your clay for a flawless finish.
Step 3: Finishing Touches
-
Apply the gold:
Dip a fine-point paintbrush into metallic gold acrylic paint. Carefully fill in the grooves of the sun, moon, and stars you created earlier. -
Clean up overflow:
If you get paint outside the lines, quickly wipe the surface with a damp paper towel or baby wipe before it dries, leaving the paint only inside the indented design. -
Let it dry:
Allow the paint to dry completely. If you want extra durability, you can apply a thin coat of matte or gloss varnish over the entire piece, though leaving it raw gives it a nice earthy texture. -
Prepare the hardware:
Using two pairs of jewelry pliers, twist a jump ring open sideways (never pull it apart). -
Assemble the keychains:
Thread the open jump ring through the hole in the clay, then loop the large split keyring onto the jump ring. Close the jump ring securely by twisting it back into place. -
Final polish:
Give the edges one last check; if they feel rough, very gently buff them with fine-grit sandpaper for a professional finish.
Make It Personal
Stamp initials or a significant date on the back of the keychain before baking to turn this into a truly custom anniversary or friendship token.
Attach your keys and enjoy carrying a little piece of art with you everywhere you go

TRACK YOUR CERAMIC JOURNEY
Capture glaze tests, firing details, and creative progress—all in one simple printable. Make your projects easier to repeat and improve.
Fridge Magnet Mini Portraits

These charming little portrait magnets bring a wholesome, handcrafted touch to your kitchen decor with their simple lines and warm earth tones. They feature smooth, round faces topped with textured clay hair and finished with delicately painted minimalist expressions.
Step-by-Step Guide
Materials
- White or beige air-dry clay (or polymer clay)
- Terracotta or brown colored air-dry clay (for hair)
- Small round cookie cutter (approx. 1.5 – 2 inches)
- Rolling pin
- Parchment paper
- Modeling tool or toothpick
- Water in a small cup
- Fine grit sandpaper
- Fine tip black marker or acrylic paint pen
- Peach or light pink acrylic paint
- Small round paintbrush
- Strong round craft magnets
- Strong craft glue (E6000 or similar)
- Matte varnish or sealant spray
Step 1: Shaping the Faces
-
Condition the clay:
Start by warming up a chunk of your white or beige clay in your hands, kneading it until it is soft, pliable, and free of cracks. -
Roll the base:
Roll the clay out on parchment paper to an even thickness of about 1/4 inch. Try to keep the surface as smooth as possible. -
Cut the circles:
Use your round cookie cutter to punch out perfect circles for the heads. Gently tap the clay out of the cutter if it sticks. -
Smooth the edges:
Dip your finger in a tiny bit of water and run it around the cut edge of each circle to get rid of any sharpness or ragged bits.
Step 2: Adding the Hair
-
Prepare hair clay:
Take a smaller amount of the terracotta or brown clay. Roll it out slightly thinner than your face circles. -
Cut hair shapes:
Use the same circle cutter to cut a round shape, then use a knife or the cutter’s edge to slice off a section that looks like a hairline—think curved bangs or a side sweep. -
Attach the hair:
Score the back of the hair piece and the top of the face piece with a toothpick (make scratch marks). Add a tiny dab of water or liquid clay as ‘glue’ and press the hair firmly onto the top of the face circle. -
Create texture:
For the curly hair look, take a needle tool or toothpick and prick the surface repeatedly to create a stippled texture. For straight hair, gently drag the tool to create grooved lines. -
Dry thoroughly:
Let your clay pieces dry completely according to the package instructions. This usually takes 24-48 hours for air-dry clay. Flip them occasionally so they dry evenly.
Hair Texture Hack
Instead of a toothpick, dab a crumpled ball of aluminum foil against the wet clay hair. It creates an instant, uniform curly texture in seconds.
Step 3: Painting & Finishing
-
Sand for smoothness:
Once fully dry, lightly sand the face area if there are any bumps or fingerprints. Wipe away the dust with a barely damp cloth. -
Draw the features:
Using a fine-tip black marker or paint pen, carefully draw the face. Keep it simple: two closed arcs for sleeping eyes, a small ‘L’ shape for the nose, and a tiny curve for the smile. -
Add rosy cheeks:
Dip a small brush into your peach or pink paint, then dab most of it off onto a paper towel until the brush is almost dry. I find this dry-brush technique gives the softest cheek effect. -
Apply cheeks:
Gently stipple two small circles of color onto the cheeks. The texture of the clay might show through slightly, which adds to the charm. -
Seal the work:
Apply a coat of matte varnish or spray sealant to protect the clay and prevent the marker from smudging over time. -
Attach the magnet:
Turn the face over and apply a generous dollop of strong craft glue to the center of the back. -
Final cure:
Press the magnet into the glue and let it sit undisturbed for several hours until the bond is completely secure.
Preventing Warping
If your flat circles start curling up as they dry, place a light book over them (with parchment paper in between) once they are semi-dry to keep them flat.
Now your fridge has a little extra personality with these adorable, friendly faces greeting you every time you reach for a snack
Matching Jewelry in Clay
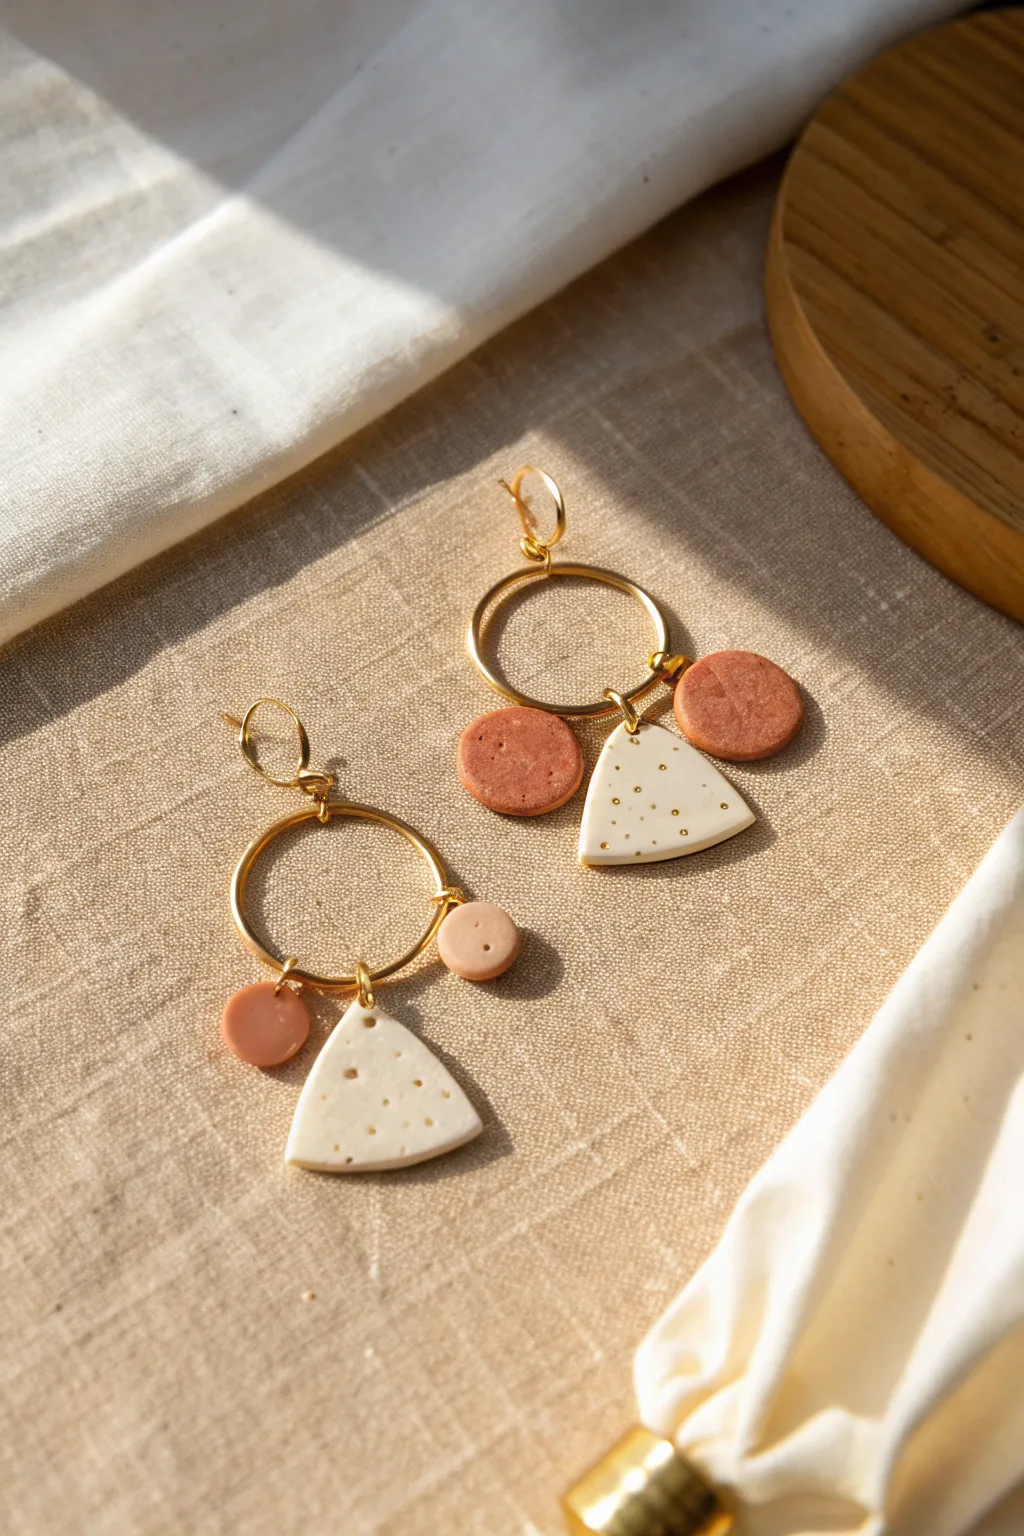
Create a stunning pair of statement earrings with a modern, geometric flair using warm terracotta and cream tones. These dangling beauties combine sleek gold hoops with textured clay charms for a sophisticated yet handmade look perfect for a romantic crafting session.
Step-by-Step Tutorial
Materials
- Polymer clay (terracotta/rust orange and cream/white)
- Gold-colored hoop findings (approx. 25-30mm diameter)
- Small gold jump rings (4-6mm)
- Earring wires or studs
- Rolling pin or pasta machine
- Small circle cutters (approx. 10mm)
- Small triangle cutter or craft knife
- Needle tool or cocktail stick
- Gold acrylic paint or gold leaf pen
- Gloss glaze or resin (optional)
- Jewelry pliers (round nose and flat nose)
- Baking sheet and parchment paper
- Sandpaper (fine grit)
Step 1: Shaping the Clay Elements
-
Condition the Clay:
Begin by warming up your terracotta and cream polymer clay in your hands until it becomes soft and pliable, which prevents cracking later. -
Roll Out Sheets:
Roll both colors of clay into even sheets, aiming for a thickness of about 3mm—thick enough to be sturdy but light enough to wear comfortably. -
Cut the Circles:
Using your small circle cutter, punch out four circles from the terracotta clay. If you want a slight variation like the photo, you can make two slightly smaller circles for one pair. -
Cut the Triangles:
From the cream clay, cut out two soft triangle shapes using a cutter or freehand with a craft knife; round the corners slightly with your fingertip for a softer look. -
Add Texture Details:
Take your needle tool and gently press tiny, random dots into the surface of the cream triangles to create a speckled, porous texture. -
Pierce the Holes:
Carefully poke holes near the top of all clay pieces for the jump rings. For the triangles, visualize where they will hang and center the hole at the top point.
Step 2: Baking and Decorating
-
Bake the Pieces:
Arrange your clay charms on a parchment-lined baking sheet and bake according to your manufacturer’s instructions, usually around 275°F (130°C) for 15-30 minutes. -
Cool and Sand:
Let the pieces cool completely before handling. If there are any rough potential edges, use fine-grit sandpaper to gently smooth them out. -
Apply Gold Accents:
Using a tiny brush or gold leaf pen, dab small flecks of gold into some of the indented dots on the cream triangles to give them a subtle sparkle. -
Seal (Optional):
If you prefer a shiny finish or want to protect the gold paint, apply a thin layer of gloss glaze or UV resin to the pieces and let them cure.
Uneven Surfaces?
If your clay has fingerprints before baking, lightly brush a tiny amount of baby oil or cornstarch over the surface to smooth it out instantly.
Step 3: Assembly
-
Open Jump Rings:
Use your two pairs of pliers to twist open your jump rings sideways—never pull them apart, as this weakens the metal. -
Attach Charms to Hoops:
Slide a terracotta circle, then the cream triangle, and finally the second terracotta circle onto the bottom portion of the large gold hoop. -
Secure with Jump Rings:
I find it easiest to use a small jump ring to connect each clay piece to the hoop so they dangle freely rather than sliding them directly onto the wire. -
Balance the Design:
Ensure the triangle sits in the center with a terracotta circle on either side for a balanced, symmetrical composition. -
Add Earring Hooks:
Attach an earring hook or stud post to the very top of the large gold hoop using another small jump ring. -
Final Check:
Hold the earrings up to check that all jump rings are closed tightly and the charms face forward correctly.
Make It Marble
Twist translucent and white clay together before rolling out your cream sheet to create a faux-stone quartz effect for the triangles.
Enjoy wearing your handcrafted, elegant earrings on your next night out
Split Heart Catchall Dish
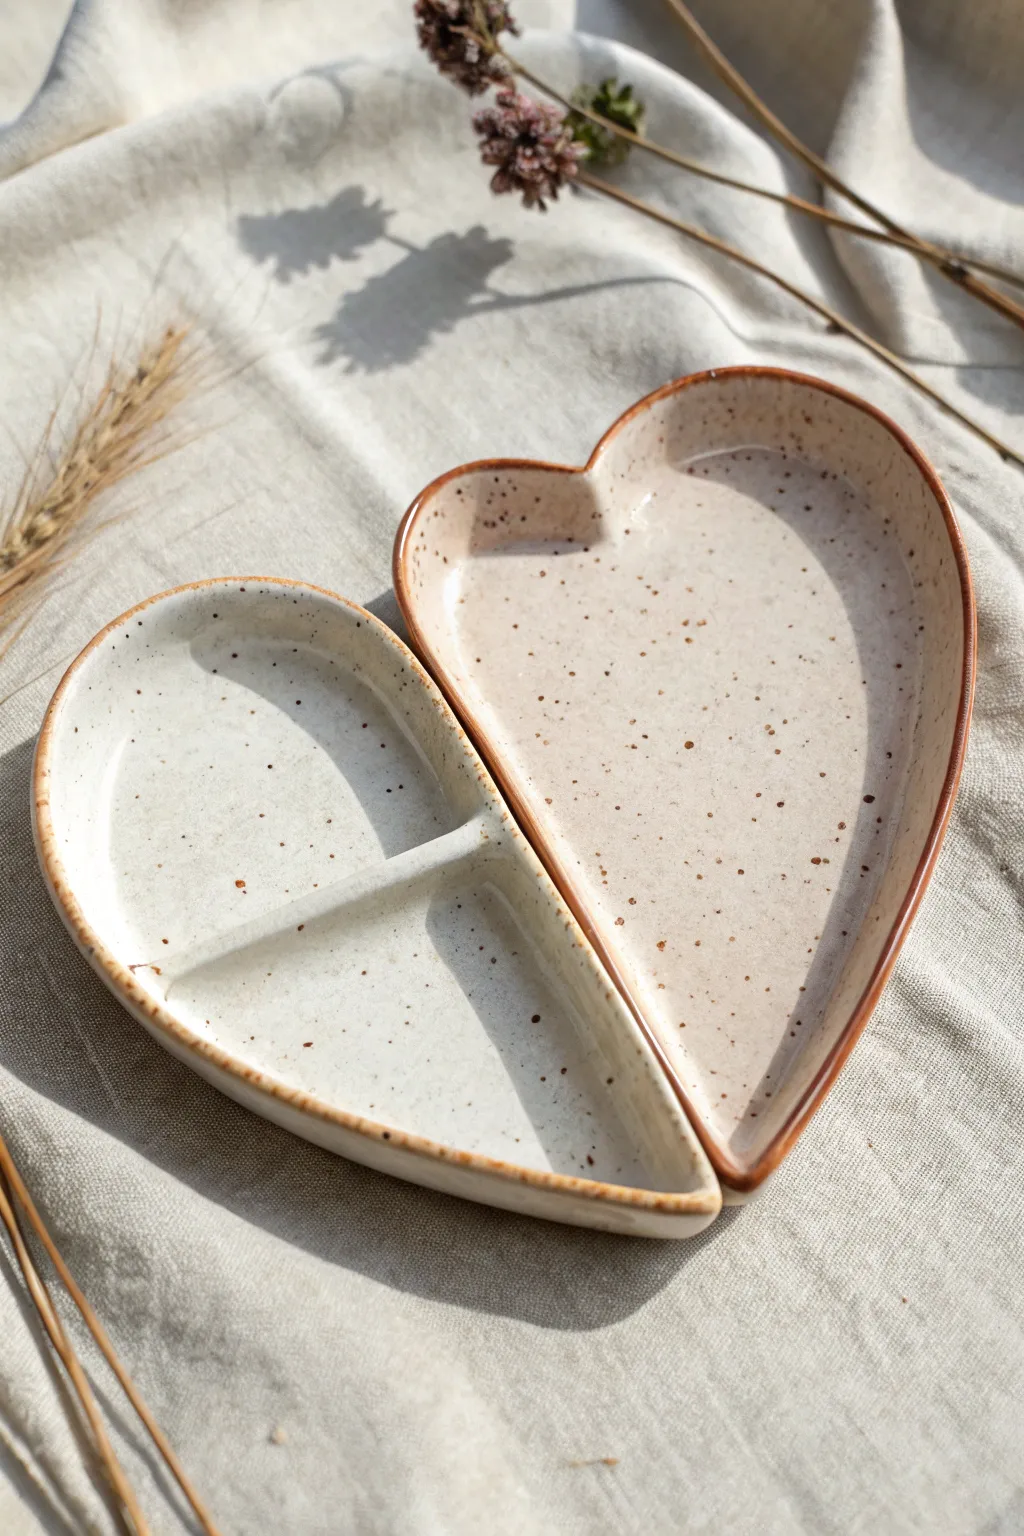
Create a symbol of your connection with this clever nesting heart dish set. The two halves fit together perfectly but function separately, featuring a warm speckled glaze and a charming split design that makes it ideal for organizing jewelry or desk trinkets.
How-To Guide
Materials
- White or light-colored stoneware clay (smooth)
- Rolling pin
- Heart-shaped template (paper or cardstock)
- Fettling knife or craft knife
- Needle tool
- Sponge
- Rib tool (wooden or silicone)
- Creamy white speckled glaze (commercial pint or dipped)
- Iron oxide wash or brown underglaze (for the rim)
- Small fine-tipped brush
- Small bowl of water
- Scoring tool (or fork)
Step 1: Shaping the Clay Base
-
Roll the slab:
Begin by rolling out your stoneware clay to a uniform thickness of about 1/4 inch. Smooth the surface with a rib tool to remove any canvas texture or rolling marks. -
Cut the heart shape:
Place your heart template onto the clay slab. Using a needle tool, trace around the perimeter cleanly to cut out the main shape, then gently lift away the excess clay. -
Split the heart:
Draw a curved line down the center of the heart to create the two halves. Instead of a straight cut, give it a slight ‘S’ curve or an organic wave so the pieces look like puzzle parts. Cut completely through with your fettling knife. -
Prepare the coils:
Roll out several long, even coils of clay, approximately the thickness of a pencil. These will become the walls of your dishes.
Step 2: Building the Walls
-
Score and slip:
Take the right half of the heart base first. Score the outer edges of the base and the underside of your coil. Apply a small amount of water or slip to the scored areas. -
Attach the rim:
Press the coil firmly onto the perimeter of the base. Gently pinch the coil to the base to bond them, smoothing the clay upward on the outside and downward on the inside with your thumb. -
Refine the connection:
Use a wooden modeling tool or your finger to blend the seam where the coil meets the floor of the dish so it disappears completely. The transition should be seamless. -
Build the left half:
Repeat the scoring and coil-building process for the left side of the heart. Ensure the coils follow the unique curve of your center cut closely. -
Check the fit:
Carefully slide the two built halves together on your work surface to ensure they still nestle correctly. If the walls are touching or warping, gently reshape them while the clay is plastic.
Shrinkage Check
Clay shrinks! If you want the two halves to fit perfectly after firing, dry them together (with a paper strip between the cut) so they warp in unison.
Step 3: Adding the Divider
-
Create the partition:
For the multi-section dish (usually the left side), measure the width across the middle. Cut a short strip of clay or roll a small coil to fit this span. -
Install the wall:
Score the interior walls and the floor where this divider will sit. Place the strip in, blending the clay thoroughly into the side walls and the bottom so it is structurally sound. -
Smoothing:
Run a damp sponge over all rims and edges to soften them. I prefer to spend extra time here to make sure the rim looks rounded and comfortable to the touch.
Pro Tip: Better Speckles
If you don’t have speckled clay, mix a teaspoon of granular ilmenite into your white glaze. It creates those beautiful faux-iron spots artificially.
Step 4: Glazing and Finishing
-
Bisque fire:
Allow the greenware to dry slowly under plastic for a day, then uncovered until bone dry. Fire to cone 04 (or your clay’s specific bisque temperature). -
Apply base glaze:
Dip or brush your creamy white speckled glaze onto the bisqueware. If brushing, apply 2-3 even coats, letting each dry slightly in between. Wipe the bottoms clean with a sponge. -
Rim detail:
Using a fine brush and iron oxide wash (or a thinned brown underglaze), carefully paint a thin line along the very top edge of the rim. This creates that lovely vintage-style contrast. -
Final wipe:
Check the dividing wall and ensure no glaze has pooled too thickly, which could cause crawling. Clean up any drips on the outer walls. -
Glaze fire:
Place the pieces in the kiln, ensuring they are not touching each other. Fire to cone 5/6 (mid-range) or according to your specific clay and glaze instructions to reveal the speckles.
Once cooled, nestle the pieces together to admire how your two unique halves create a perfect whole
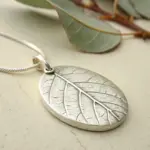
Handprint or Fingerprint Keepsakes
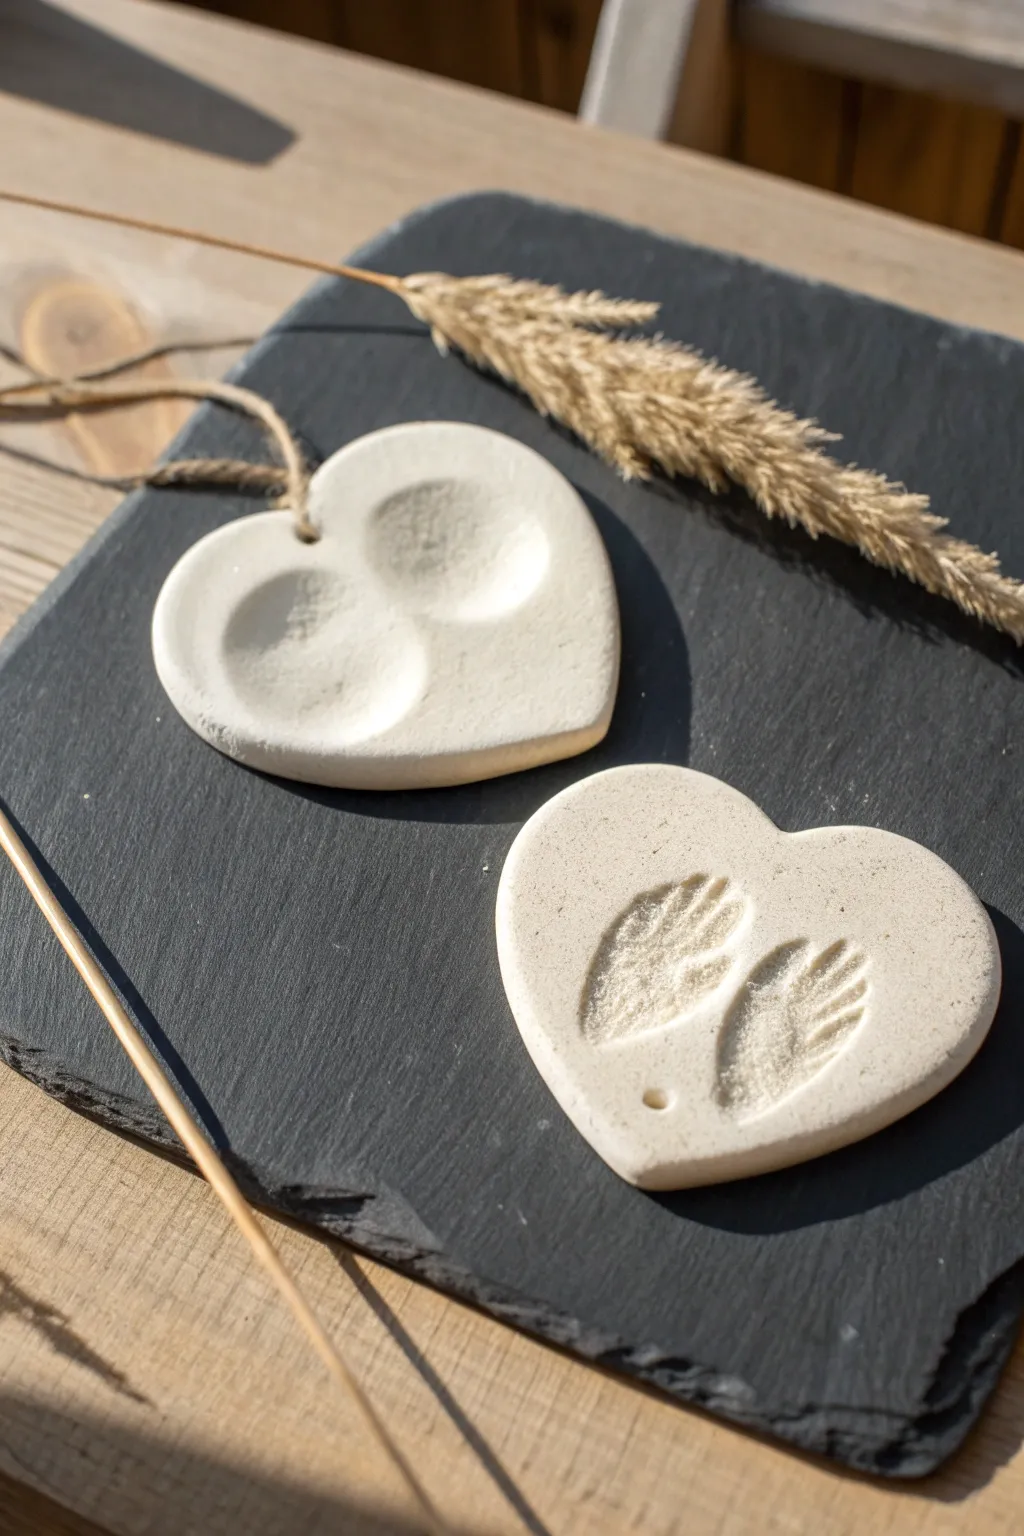
Capture a moment in time with these elegant, minimalist heart ornaments featuring personal touches. Whether you choose to impress your fingerprints side-by-side or use natural botanical elements, the result is a smooth, white ceramic-style keepsake perfect for hanging.
How-To Guide
Materials
- White spreadable air-dry clay or polymer clay
- Rolling pin
- Heart-shaped cookie cutter (medium size)
- Parchment paper or a silicone craft mat
- Small bowl of water
- Straw or skewer (for creating holes)
- Fine-grit sandpaper (optional)
- Fresh or dried botanical sprigs (like wheat or pine)
- Jute twine or ribbon for hanging
Step 1: Preparation & Shaping
-
Condition the Clay:
Start by taking a handful of your white clay and kneading it in your hands. You want it to be warm and pliable, removing any air bubbles to prevent cracks later. -
Prepare the Surface:
Lay down a sheet of parchment paper or a silicone mat. This prevents sticking and makes it easier to lift the delicate shapes later. -
Roll the Slab:
Using your rolling pin, roll the clay out into an even slab. Aim for a thickness of about 1/4 inch (6mm)—too thin and it might crack, too thick and it takes ages to dry. -
Cut the Hearts:
Press your heart-shaped cookie cutter firmly into the clay slab. Make two separate hearts if you want to try both styles shown in the image. -
Clean the Edges:
Gently lift the clay hearts. Dip your finger in a little water and smooth out any rough edges left by the cutter to ensure a polished look.
Fixing Cracks
If small hairline cracks appear while drying, mix a tiny bit of fresh clay with water to make a paste and smooth it into the cracks, then let dry again.
Step 2: Creating the Impressions
-
Style 1: The Fingerprint Heart:
For the first design, place the heart on a flat surface. Decide where you want the indentations. -
Press the Thumbs:
Together with your partner, press your thumbs firmly into the center of the heart. You can angle them slightly toward each other to mimic a heart shape within the heart. -
Smooth the Rim:
If the clay bulged out slightly around your thumbprints, gently tap it back down with a wet fingertip to keep the surface level. -
Style 2: The Botanical Heart:
For the second heart, select two small sprigs of your chosen dried plant or wheat. -
Arrange the Botanicals:
Lay the sprigs gently on top of the fresh clay heart in your desired arrangement. -
Roll the Impression:
Take your rolling pin and gently roll distinctively over the sprigs just once to press them into the clay surface. Don’t press too hard, just enough to leave texture. -
Reveal the Texture:
Carefully peel the sprigs away using tweezers or your fingernails to reveal the imprinted design.
Step 3: Finishing Touches
-
Make the Hanging Hole:
Using a straw or a skewer, poke a hole near the top center or bottom point of the heart. Make sure the hole goes all the way through and is wide enough for your twine. -
Dry Time:
Place the hearts on a wire rack or leave them on parchment paper to dry. I find flipping them over gently halfway through the drying process helps keep them flat. -
Sand for Perfection:
Once fully dry (usually 24-48 hours depending on clay type), use fine-grit sandpaper to buff away any remaining sharp edges or fingerprints on the rim. -
Add the Hanging Loop:
Cut a length of jute twine. Thread it through the hole you created and tie a secure knot to form a loop.
Add Subtle Color
Before removing the botanical sprigs, dust them lightly with gold or copper mica powder. When you peel the plant away, the veins will sparkle.
Now you have a timeless set of clay hearts to remember your creative evening together
Mini Planter Buddies
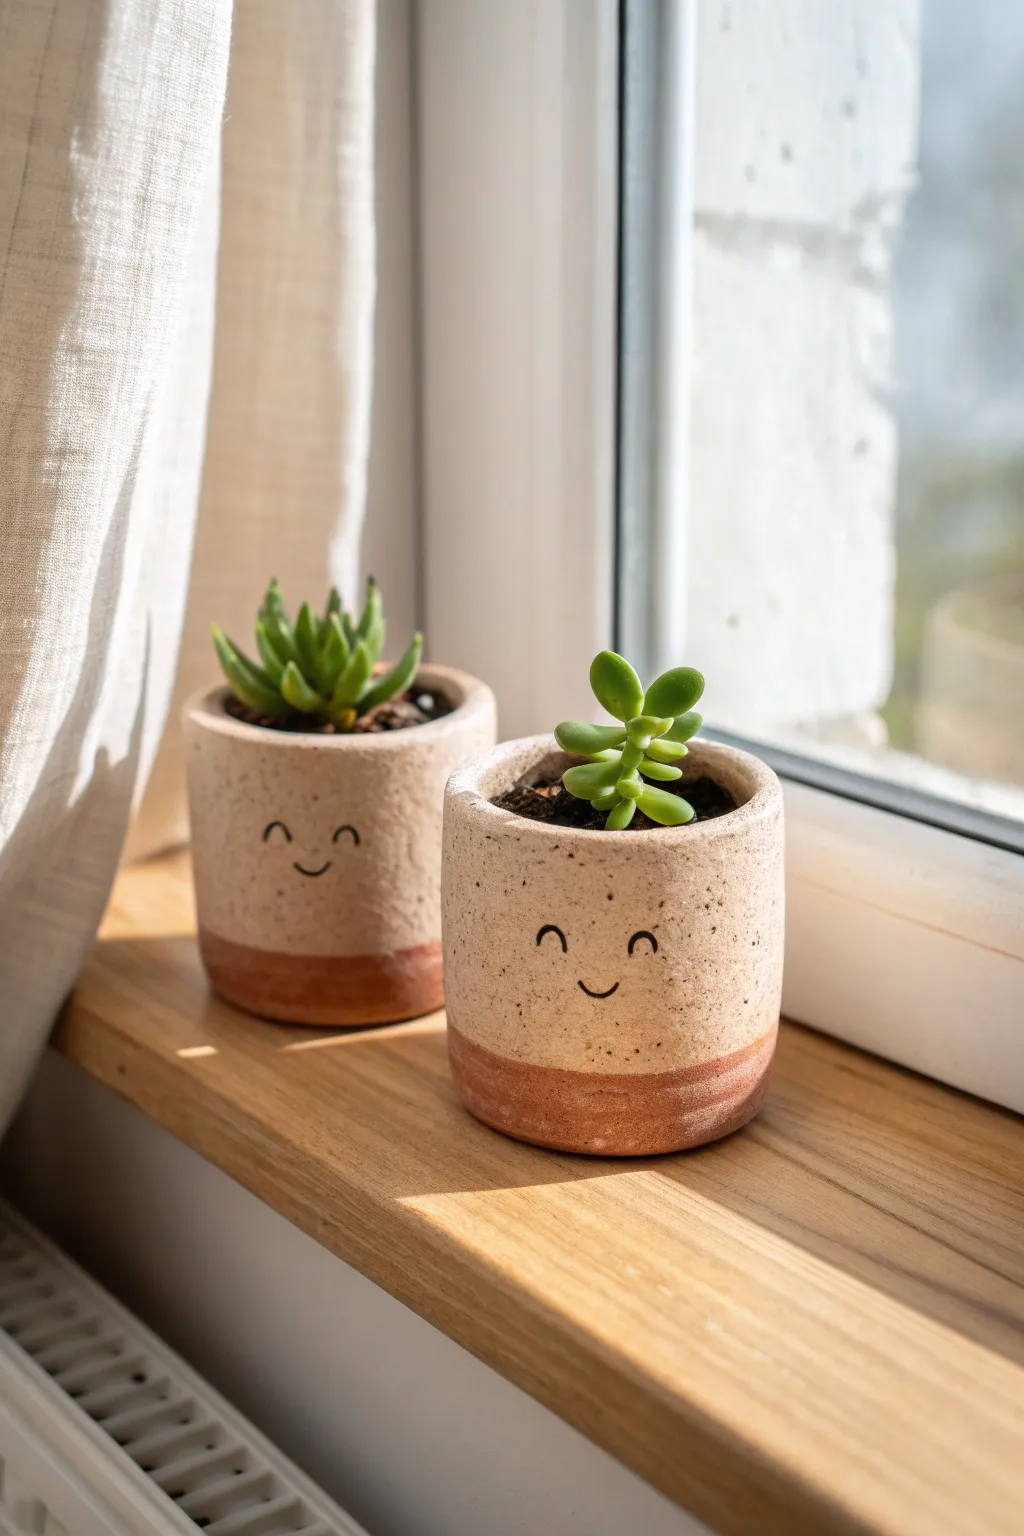
These adorable twin planters bring a cheerful touch to any windowsill with their speckled stoneware look and sweet hand-drawn smiles. Perfect for a cozy crafting date, they are simple enough for beginners but charming enough to house your favorite tiny succulents.
How-To Guide
Materials
- Air-dry clay (white or light grey)
- Small rolling pin
- Clay knife or craft knife
- Cylindrical form (like a small jar or sturdy cardboard tube, ~2.5 inches diameter)
- Small bowl of water
- Sponge
- Sandpaper (fine grit)
- Acrylic paints: Cream/Beige, Terracotta/Burnt Sienna, Dark Brown
- Stiff bristle brush (e.g., an old toothbrush)
- Medium flat paintbrush
- Fine detail brush or black paint marker
- Matte spray varnish or sealant
- Plastic wrap
Step 1: Forming the Pots
-
Prep your workspace:
Lay down a clean mat or parchment paper. Take a chunk of air-dry clay roughly the size of a tennis ball for each pot. -
Roll the base slab:
Roll out half the clay to about 1/4 inch thickness. Use your cylindrical form to trace two circles for the bases and cut them out with your knife. -
Create the walls:
Roll out the remaining clay into a long rectangular strip, maintaining that same 1/4 inch thickness. Measure the circumference of your base to know exactly how long this strip needs to be. -
Cut to size:
Trim the strip into a clean rectangle. The height should be about 2.5 to 3 inches tall. -
Wrap the form:
Wrap your cylindrical form in plastic wrap to prevent sticking. Carefully wrap the clay strip around the form so the ends meet. -
Join the seam:
Score (scratch) the edges where the clay meets, apply a little water, and press them together. Smooth the seam with your finger or a tool until it’s invisible. -
Attach the base:
Score the bottom edge of your cylinder wall and the outer edge of your circular base. Add a dab of water and press the cylinder onto the base. -
Blend and smooth:
Use your thumb or a modeling tool to blend the clay from the walls down into the base so it becomes one solid piece. Smooth out any fingerprints with a slightly damp sponge. -
Make drainage (optional):
If you plan to plant directly inside, poke a hole in the center of the bottom using a straw or tool. Let the pots dry completely for 24-48 hours.
Step 2: Painting and Finishing
-
Sand imperfections:
Once fully bone dry, gently sand any rough edges, especially around the rim, to get that smooth, manufactured look. -
Base coat:
Paint the entire outside of the pot with a creamy beige acrylic paint. You may need two coats for full opacity. -
Create the dipped look:
Mix a terracotta or burnt sienna color. Paint the bottom third of the pot with this color to mimic a raw clay base. Keep the line relatively straight but soft. -
Speckle effect:
Dilute a tiny drop of dark brown paint with water. Dip a stiff brush or toothbrush into it, then run your thumb across the bristles to flick tiny specks onto the creamy upper section. -
Draw the face:
Using a very fine brush or a black paint marker, draw two small arched eyes and a simple U-shaped smile on the upper beige section. Keep the spacing wide for a cute ‘kawaii’ look. -
Seal the work:
I always recommend sealing air-dry clay to protect it from moisture. Apply two coats of matte spray varnish inside and out. -
Plant headings:
Once the sealer is cured, add a small layer of gravel for drainage and nestle your small succulents inside.
Cracking Up?
If small cracks appear while drying, don’t panic. Mix a tiny bit of fresh clay with water to make a paste (slip) and fill the cracks, then sand smooth once dry.
Pro Sealing Tip
Since air-dry clay dissolves in water, use a plastic nursery pot inside your clay creation rather than planting directly to ensure it lasts forever.
Now you have a pair of smiling companions ready to brighten up your view
“Guess What I Made” Challenge
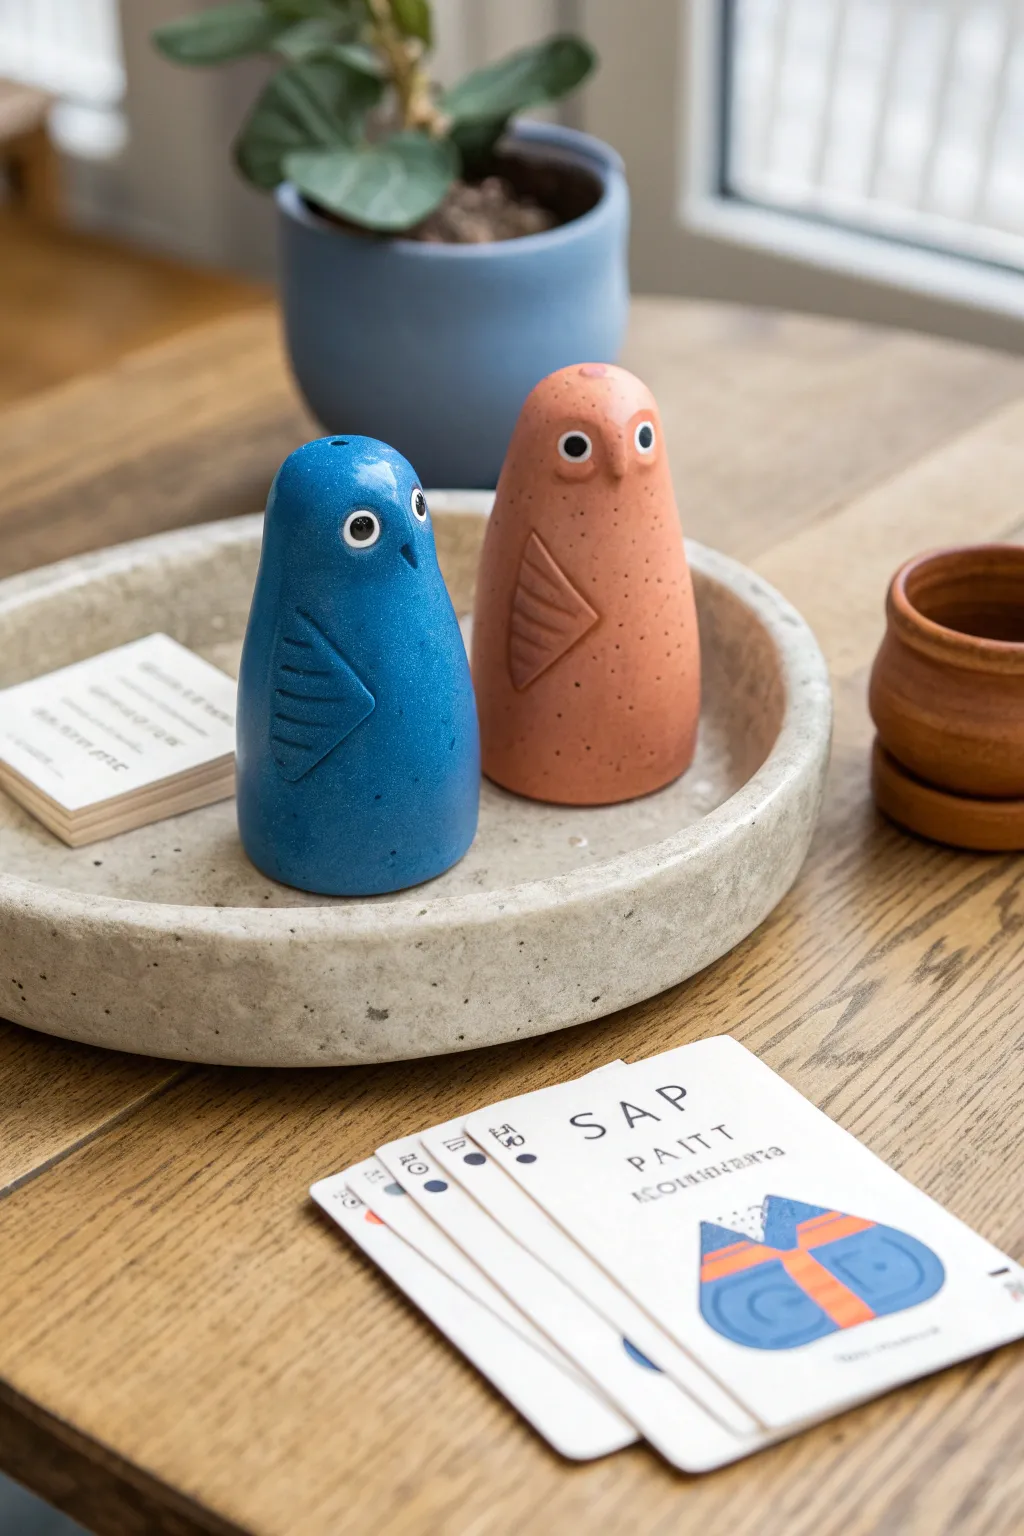
These charming, cone-shaped birds rely on simple geometry and clean lines for their modern appeal. With their smooth, speckled finish and minimal detailing, they make for a sweet, stylized addition to any tabletop or shelf.
Step-by-Step
Materials
- Polymer clay (terracotta or orange)
- Polymer clay (mid-tone blue)
- Small amount of white and black clay (for eyes)
- Basic clay sculpting tools
- Rolling pin
- Texture sponge or toothbrush
- Fimo gloss varnish (optional)
- Needle tool
- Small round cutter or straw
Step 1: Shaping the Bodies
-
Condition the clay:
Start by kneading your blue and terracotta clays separately until they are soft, pliable, and free of cracks. This ensures a smooth finish later on. -
Form the base cone:
Roll each color into a smooth ball about the size of a plum, then gently roll it against your work surface with your palm to elongate one end, creating a sturdy, rounded cone shape. -
Refine the silhouette:
Tap the bottom of the cone on the table to flatten it so the bird stands upright independently. Gently round off the top of the cone to create the head area. -
Smooth the surface:
Use your thumb or a smoothing tool to erase any fingerprints. I find lightly dipping my finger in a tiny bit of baby oil helps achieve that perfect, sleek finish. -
Add speckle texture:
To mimic the stone-like look in the photo, gently tap a toothbrush or a texture sponge over the surface. Don’t press too hard; you just want a subtle, porous effect.
Step 2: Sculpting the Details
-
Create the wings:
Roll out a small slab of matching clay (blue for the blue bird, terracotta for the other) to about 3mm thickness. -
Cut the wing shapes:
Cut out two curved, semi-circular triangles for the wings. They should look almost like shark fins or curved wedges. -
Attach the wings:
Press one wing firmly onto the side of the body. Blend the seam where the wing meets the body slightly if needed, but keeping a defined edge looks nice too. -
Detail the feathers:
Using a needle tool or a dull knife, press three horizontal lines into the wing to suggest feathers. Keep the lines parallel for a graphic look. -
Form the beak:
Pinch a very tiny amount of the body-color clay into a small triangle. Press this onto the ‘face’ area, slightly lower than where the eyes will go, and smooth it seamlessly into the head.
Leaning Tower of Birdie?
If your cone sags while working, the clay is too warm. Insert a crumpled ball of aluminum foil as a core to reduce weight and strengthen the structure.
Step 3: The Eyes and Finishing
-
Make the eye sockets:
Use the rounded end of a paintbrush or a ball stylus to press two shallow indentations into the head where the eyes will sit. -
Create the whites:
Roll tiny balls of white clay and flatten them slightly. Press these into the indentations you just made. -
Add the pupils:
Roll even tinier balls of black clay and press them into the center of the white circles. This high-contrast look gives them their alert expression. -
Final check:
Look at the bird from all angles to ensure symmetry. If the clay has warmed up too much and the bird is leaning, pop it in the fridge for 10 minutes to firm up. -
Bake the project:
Preheat your oven according to the manufacturer’s instructions on your specific brand of clay (usually around 230°F – 275°F or 110°C – 135°C). -
Cool down:
Bake for the recommended time (usually 15-30 minutes per 1/4 inch thickness). Let them cool completely in the oven with the door cracked to prevent cracking. -
Optional glaze:
If you want a shinier look like glazed ceramic, apply a coat of gloss varnish specifically made for polymer clay.
Faux Stone Hack
Mix clean, dry coffee grounds or black pepper into your clay before sculpting. It creates an authentic ‘speckled pottery’ effect without painting.
Place your duo on a windowsill or centerpiece tray to enjoy your handcrafted art
Mystery Bag Clay Swap
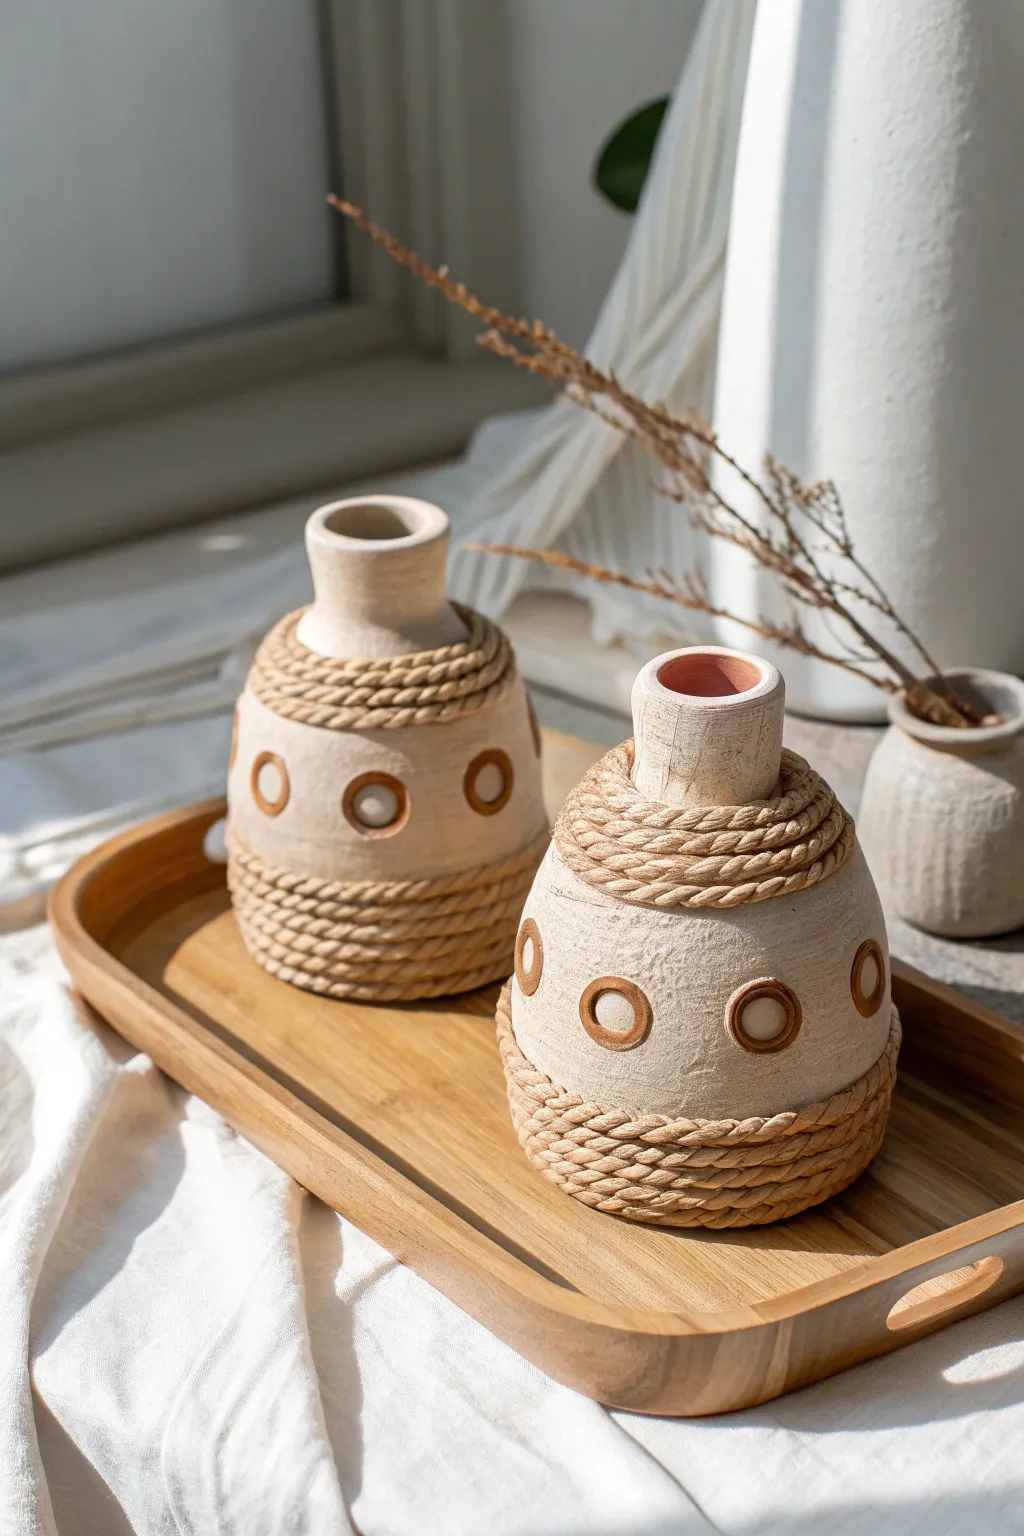
These charming, earthy vases combine natural texture with geometric simplicity for a perfect bohemian accent. The mystery bag twist encourages you to combine basic pottery techniques with unexpected textural elements like jute rope.
Step-by-Step Guide
Materials
- Air-dry clay or kiln-fire stoneware clay (white or light beige)
- Small rolling pin
- Pottery needle tool or knife
- Scoring tool (or an old toothbrush)
- Slip (clay mixed with water)
- Twisted jute rope or thick twine (approx. 5mm thickness)
- Small circle cutters (two sizes) or bottle caps
- Sponge and water bucket
- Wooden sculpting tool
- Strong craft glue (e.g., E6000) or hot glue gun
Step 1: Forming the Vase Base
-
Prepare your clay:
Start by kneading your clay to remove air bubbles. Take a ball of clay roughly the size of a large orange and separate it into two portions: one larger piece for the body and a smaller piece for the neck. -
Pinch pot method:
Take the larger ball and press your thumb into the center, but not all the way through. Gently pinch and turn the clay to open up a hollow vessel shape, aiming for walls about 1/4 inch thick. Keep the base slightly wider than the top. -
Create the neck:
Roll the smaller piece of clay into a thick coil or cylinder. Ensure the diameter matches the opening of your pinch pot base so they will fit together flush. -
Attach the pieces:
Score the top rim of the base and the bottom rim of the neck cylinder with your needle tool. Apply slip to both scored areas and press firmly to join them. Smooth the seam on the outside and inside with a wooden tool until the join is invisible. -
Refine the shape:
Gently tap the base on your work surface to flatten it slightly for stability. Use a damp sponge to smooth out fingerprints, but don’t worry about being too perfect—the rough texture adds character.
Clean Seams
When joining clay coils or parts, use the back of a spoon to smooth the seam. This compresses the clay particles better than your finger, reducing cracking risk.
Step 2: Adding Decorative Details
-
Plan the rope channels (optional):
If you want the rope to sit flush, you can gently press a length of rope into the wet clay at the base and shoulder to create a subtle indentation guide, then remove it. Otherwise, proceed to the next step. -
Create the ring accents:
Roll out a small slab of clay to about 1/8 inch thickness. Use your larger circle cutter to cut out four to five circles. -
Cut the centers:
Use the smaller circle cutter (or a straw) to remove the centers of your clay circles, creating flat rings. -
Attach the rings:
Score and slip the back of each ring and the corresponding spot on the vase’s belly. Press them onto the vase, spacing them evenly around the circumference. -
Texturize the surface:
Tap the exterior of the vase with a stiff bristle brush or a crumpled ball of foil to give it that stone-like, aged finish. Avoid texturizing the smooth rings for contrast. -
Dry the vessel:
Allow the clay to dry completely according to package instructions. If using kiln clay, fire it now. If using air-dry clay, wait until it is bone dry and light in color.
Step 3: Applying the Rope & Finishing
-
Paint or glaze (optional):
If your clay isn’t naturally the color you want, apply a matte acrylic paint in a warm off-white or sandy beige tone now. -
Wrap the base:
Apply a line of strong glue around the very bottom edge of the vase. Press the start of your jute rope into the glue and wrap it around the base horizontally. -
Continue coiling:
Continue gluing and coiling the rope upward for about 3-4 rows, creating a textured ‘boot’ for the vase. Cut the rope at an angle and tuck the end flush against the previous coil. -
Wrap the shoulder:
Repeat the process at the top of the vase body, just where it transitions into the neck. Wrap 2-3 coils of rope here to accentuate the shape. -
Clean up:
Trim any stray fibers from the rope with scissors. If painting the rings a contrasting color (like the terracotta tone in the image), use a small detailed brush to carefully paint inside the rings now.
Natural Stain
Make a strong coffee or tea wash and brush it over dry air-dry clay before sealing. It settles into the textures for an instant antique, earthy look.
Now arrange your dried stems in these tactile beauties and enjoy the warm, organic vibe you’ve created.