I’m always amazed how a little air-dry clay or polymer clay can turn into the kind of home decor you actually want to leave out. Here are my favorite clay decoration ideas—starting with the classics and easing into more playful, studio-style twists.
Minimal Ring Dish
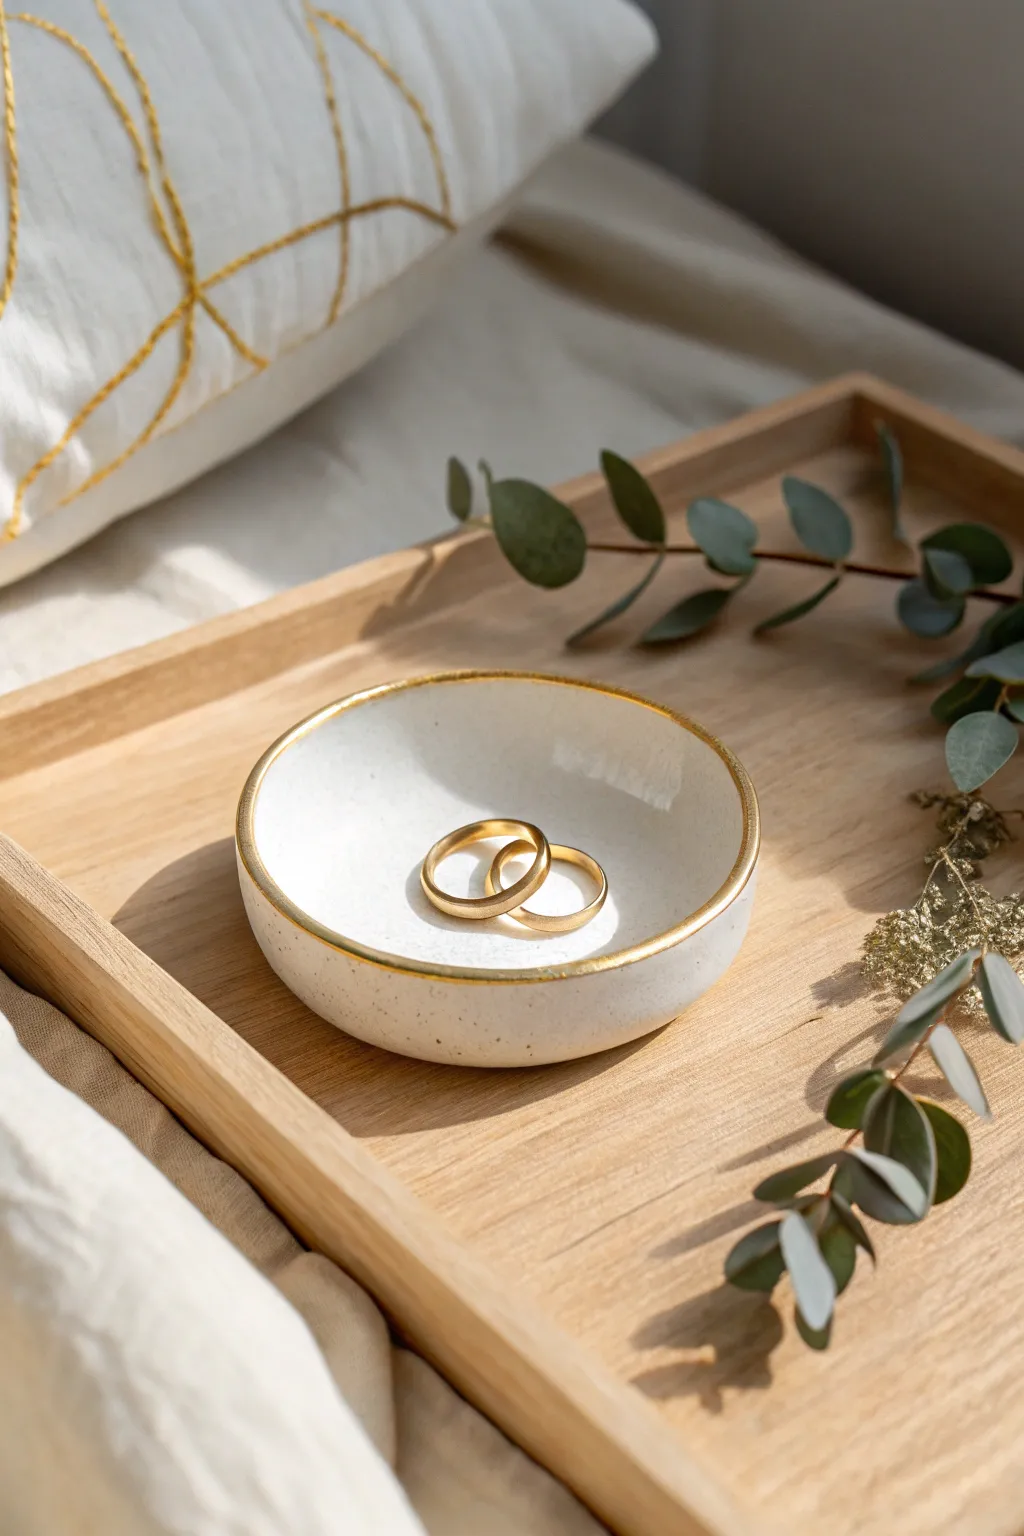
This elegant little dish combines the rustic charm of speckled clay with a luxurious touch of metallic gold. It is the perfect size for keeping your most precious rings safe and adds a minimalist aesthetic to any bedside table.
Step-by-Step Tutorial
Materials
- White polymer clay (can use speckled clay or mix inclusions)
- Black pepper or dried vanilla bean specks (if making custom speckles)
- Rolling pin or acrylic roller
- Round cookie cutter (approx. 3-4 inches)
- Small glass bowl or ramekin (oven-safe)
- Fine grit sandpaper (400-600 grit)
- Gold liquid leaf or gold gilding paint
- Small fine-point paintbrush
- Gloss glaze (optional)
Step 1: Preparing the Clay Base
-
Condition the clay:
Begin by warming the white polymer clay in your hands. Knead it thoroughly until it is soft, pliable, and free of any air bubbles. -
Add the speckles:
If you aren’t using pre-speckled clay, flatten your white clay and sprinkle a tiny pinch of coarse black pepper or scraped vanilla bean seeds onto it. Fold the clay over and knead repeatedly until the specks are evenly distributed throughout the batch. -
Roll it out:
Place the clay on a smooth work surface or silicone mat. Use your acrylic roller to flatten the clay to an even thickness of about 1/4 inch. Avoid going too thin, as you want the dish to feel substantial. -
Cut the circle:
Position your round cookie cutter over the smoothest section of the rolled clay. Press down firmly to cut a clean circle. Peel away the excess clay from the outside. -
Smooth the edges:
Gently lift the clay circle. Dip your finger in a little bit of water (or cornstarch for polymer clay) and run it along the cut edge to soften any sharp ridges left by the cutter.
Don’t Trap Air
When placing your clay circle over the upturned bowl, gently press from the center outward. This pushes out air pockets that could cause bubbles during baking.
Step 2: Shaping and Baking
-
Form the curve:
Take your small oven-safe bowl or ramekin and turn it upside down. Carefully drape your clay circle over the bottom of the bowl. Gravity will naturally help it take a gentle, curved shape. -
Refine the shape:
Press the clay very lightly against the bowl’s surface to ensure it sits evenly. Make sure the rim isn’t wavy unless you want an organic look. -
Bake the clay:
Place the bowl with the clay on it onto a baking sheet. Bake according to your specific clay package instructions (usually 275°F/135°C for 15-30 minutes per 1/4 inch of thickness). -
Cool down:
Once baked, remove the tray from the oven and let the clay cool completely before trying to pop it off the glass bowl. I usually wait at least an hour to prevent any cracking. -
Sand for perfection:
Once cool, use fine-grit sandpaper to gently buff the edges and surface. This removes any fingerprints or uneven spots, giving you a professional ceramic-like finish. -
Clean surface:
Wipe the dish down with a damp cloth to remove any sanding dust. The surface needs to be completely clean for the paint to adhere properly.
Make it Personal
Before baking, use a small alphabet stamp set to impress initials or a special date into the center of the dish for a customized engagement gift.
Step 3: Adding the Gold Detail
-
Prepare the gold paint:
Shake your liquid gold leaf or gilding paint well. Pour a tiny amount onto a palette or scrap piece of paper. -
Load the brush:
Dip your fine-point brush into the gold. You want the brush saturated but not dripping. -
Paint the rim:
Hold the brush perpendicular to the rim of the dish. Gently glide the bristles along the very top edge. The goal is a thin, slightly uneven organic line that catches the light. -
Check for gaps:
Rotate the dish slowly as you paint to ensure you’ve covered the entire circumference. Touch up any spots where the white clay shows through the gold. -
Let it dry:
Allow the gold paint to dry completely. Liquid leaf usually dries very quickly, but give it about 30 minutes to be safe. -
Seal the dish:
If you plan to use this for jewelry that might tarnish or scratch the clay, apply a thin coat of gloss glaze over the inside of the dish (avoiding the gold rim if the glaze interaction is unknown) to protect it.
Place your favorite rings inside and enjoy the simple elegance of your handmade creation


Pinch-Pot Trinket Bowl
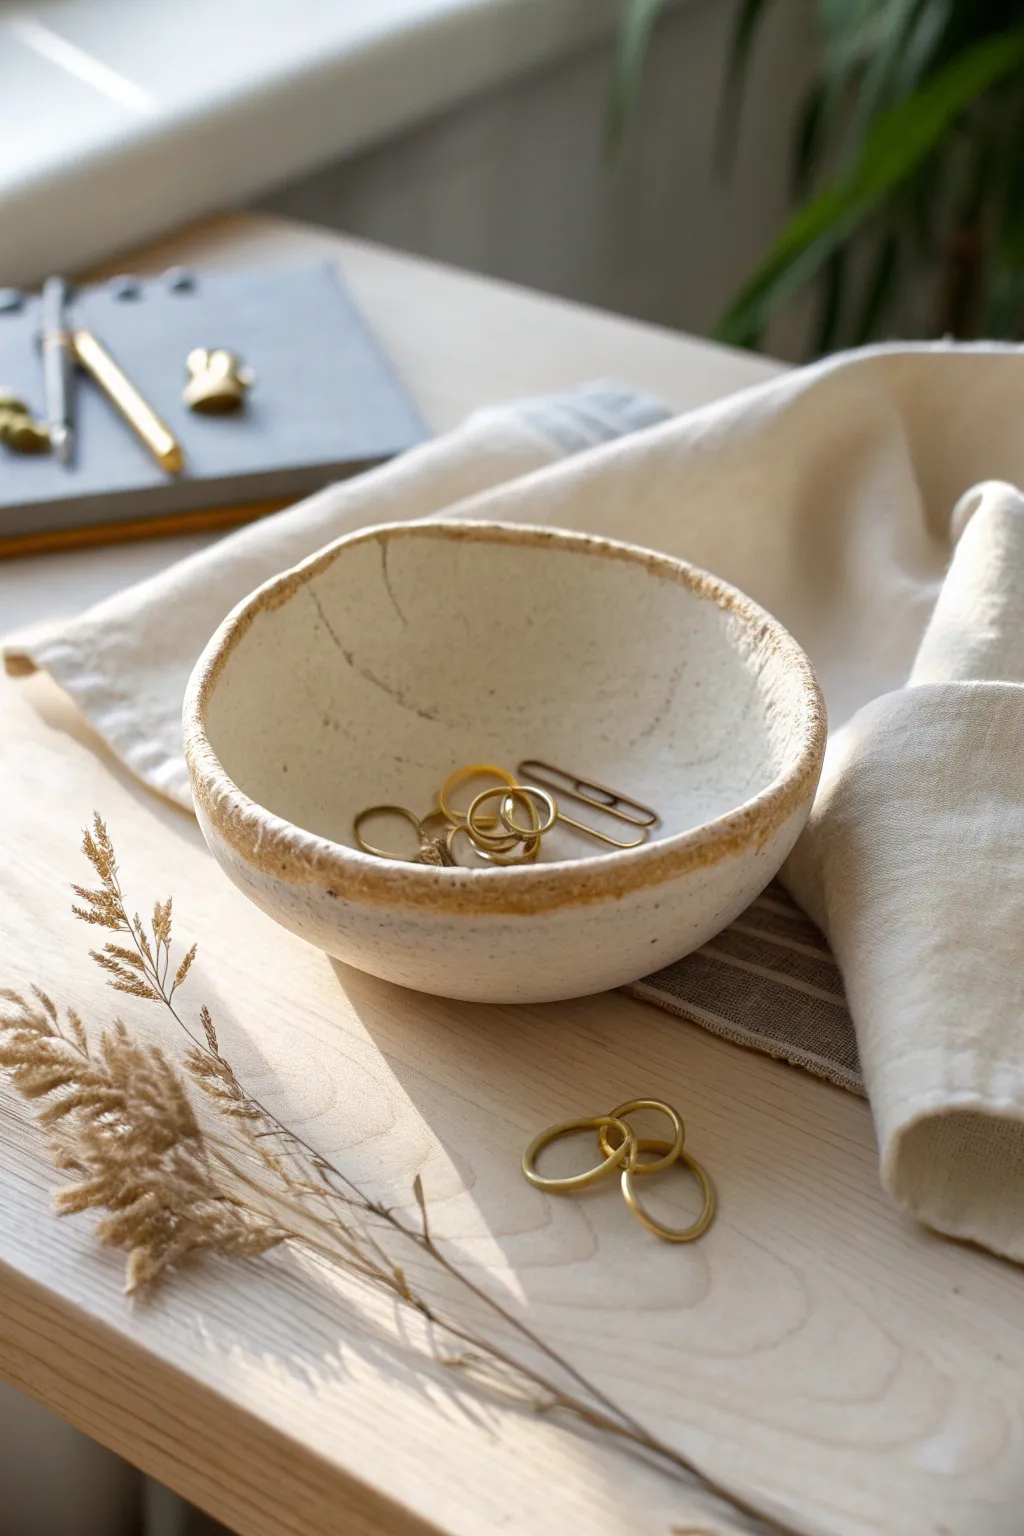
Embrace the imperfect beauty of hand-built ceramics with this charming pinch-pot trinket bowl. Its organic shape, raw edges, and golden-hued rim make it a lovely catch-all for your jewelry or small desk treasures.
How-To Guide
Materials
- White or cream speckled stoneware clay
- Water in a small cup
- Sponge
- Potter’s needle tool or wooden skewer
- Rolling pin (optional)
- Small paintbrush
- Iron oxide wash or diluted brown underglaze
- Matte white or clear glaze (optional)
- Kiln access (or oven-bake clay alternative)
Step 1: Forming the Base
-
Prepare your clay ball:
Start with a ball of clay roughly the size of a tangerine. Pat it back and forth between your hands to compact it and ensure there are no trapped air bubbles inside. -
Create the opening:
Hold the ball in your non-dominant palm. Press your thumb gently into the center of the ball, pushing down until you are about a half-inch from the bottom. Be careful not to push all the way through. -
Begin pinching:
Using your thumb on the inside and fingers on the outside, gently pinch the clay wall. Rotate the ball slightly after each pinch to ensure even thickness around the entire circumference. -
Widen the form:
Continue pinching from the bottom upwards, gradually thinning the walls. As you work your way up, angle your pinching outwards slightly to create a wide, open bowl shape rather than a tall cup. -
Refine the thickness:
Aim for a uniform wall thickness of about 1/4 inch. Feel the walls with your fingers; if you find a thick spot, give it a little extra pinch to distribute the clay.
Rim Aesthetics
Don’t overwork the rim with water. Keeping it slightly dry while shaping helps maintain that rough, organic ‘torn’ texture that gives the piece character.
Step 2: Shaping and Texturing
-
Flatten the bottom:
Place the bowl onto your work surface and gently press down on the inside center. This creates a stable flat foot so your bowl won’t wobble. -
Shape the rim:
Instead of smoothing the rim perfectly, allow it to remain slightly uneven and organic. You can gently tap the rim with a wooden paddle or your palm to level it slightly without losing that handmade character. -
Add surface texture:
To mimic the cracks and lines seen in the image, you can lightly score the inside surface with a needle tool or the edge of a credit card. Don’t cut deep; just scratch the surface for visual interest. -
Smooth the interior:
Dampen a small sponge and wipe the interior of the bowl. This softens the scratch marks and compress the clay particles, making the surface pleasant to touch. -
Dry to leather hard:
Let the bowl sit uncovered for a few hours until it is ‘leather hard’—firm enough to hold its shape perfectly but still cool to the touch and slightly workable.
Cracking Issues?
If you see large cracks forming on the rim while pinching, your clay might be too dry. Smooth a drop of water over the crack immediately to reseal the clay.
Step 3: Finishing Touches
-
Clean up the foot:
Flip the bowl over. If the bottom edge feels sharp or rough, smooth it down with your damp finger or the sponge. I prefer to round this edge slightly so it doesn’t scratch any tabletops. -
Apply the rim accent:
Dip a small paintbrush into your iron oxide wash or brown underglaze. Run the brush along the very edge of the rim, allowing the color to bleed slightly down the inner and outer walls. -
Enhance texturing:
If you want the interior subtle cracks to stand out, wipe a very diluted wash of the oxide over the inside, then immediately sponge it off. The dark pigment will stick in the crevices. -
Bisque firing:
Once the clay is bone dry (completely white and room temperature), fire it in a kiln to bisque temperature (usually Cone 04 or 06 depending on your clay). -
Glazing (Optional):
For a sealed finish, dip the bisqued bowl into a clear matte glaze. Wipe the bottom foot clean with a wax resist or sponge so it doesn’t stick to the kiln shelf. -
Final firing:
Fire the piece again to the maturity temperature of your clay (e.g., Cone 5/6 for stoneware). Once cool, your bowl is ready to hold your favorite rings.
Place this little vessel on your nightstand or desk and enjoy the earthy warmth it brings to your space


Stamped Letter Catchall Tray
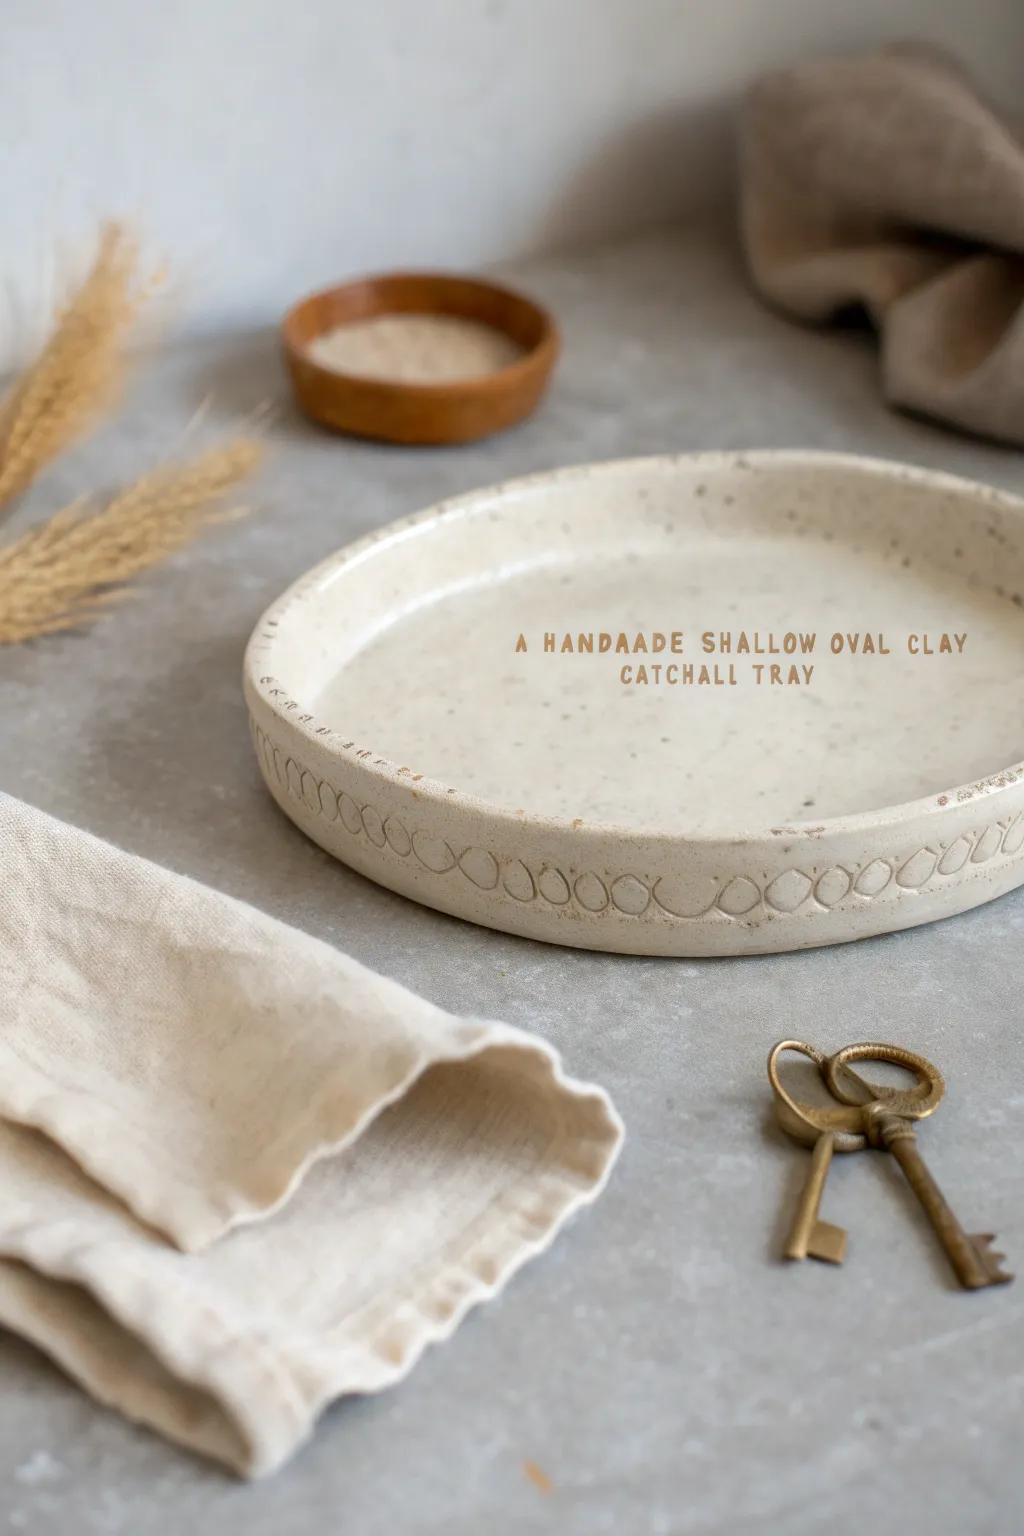
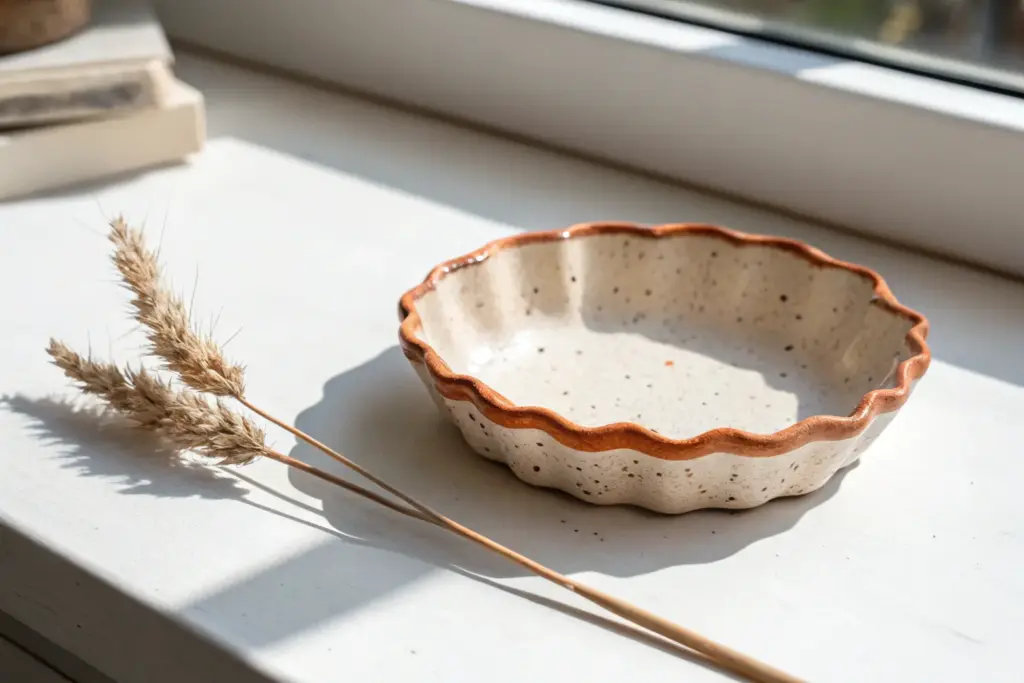
Bring rustic elegance to your entryway table with this handmade shallow oval tray, featuring a charming repeating scalloped pattern along the rim. The creamy, speckled finish gives it a professional stoneware look that is perfect for holding keys, jewelry, or coins.
Step-by-Step Guide
Materials
- White polymer clay with speckles (or faux granite effect clay)
- Non-stick rolling pin
- Parchment paper or clay mat
- Oval template (paper or cardstock)
- Clay knife or craft blade
- Small circular cutter or a cylinder object (like a marker cap)
- Sponge or sanding block
- Glossy clay varnish or glaze
- Soft paintbrush
- Oven for baking
Step 1: Base Construction
-
Condition the clay:
Start by taking a generous amount of your speckled clay and kneading it in your hands until it becomes soft, pliable, and warm. -
Roll the slab:
Place the clay on parchment paper and use your rolling pin to roll it out to a uniform thickness of about 1/4 inch. Ensure it is perfectly flat with no air bubbles. -
Cut the oval base:
Lay your oval paper template onto the rolled clay. Using your craft knife, carefully trace around the template to cut out the base shape. -
Prepare the side strips:
Gather the remaining scrap clay, re-roll it into a long snake, and then roll it flat into a long ribbon. This strip should be about 3/4 inch tall and long enough to wrap around the entire circumference of your oval base. -
Cut the ribbon:
Trim the edges of your long clay ribbon so they are straight and clean using a ruler and your knife.
Step 2: Assembly and Patterning
-
Attach the wall:
Place the long strip of clay on top of the oval base, aligning the outer edges. Gently press them together. -
Smooth the seams:
On the inside of the tray, use your finger or a clay tool to smudge the clay from the wall down onto the base to fuse them. Repeat this process on the outside seam so the join is invisible. -
Refine the shape:
Once the wall is attached, go around the perimeter and gently pinch or pat the walls to ensure they are standing straight up and maintain an even thickness. -
Create the stamp tool:
Find a small circular object, like a marker cap, pen lid, or small cookie cutter. You only need the bottom half of the circle to create the scallop. -
Stamp the pattern:
Starting at one end, press your circular tool gently into the damp clay on the exterior wall to create a semi-circle indentation. I find it helps to support the wall from the inside with my fingers while pressing. -
Complete the motif:
Continue pressing the tool directly next to the previous mark, linking them together to form a continuous chain of scallops all the way around the tray. -
Clean the rim:
If the stamping process distorted the top rim, gently run your finger along the top edge to flatten and smooth it back out. -
Texturizing touch:
To enhance the ‘stoneware’ feel, you can lightly tap the surface with a textured sponge or crumpled aluminum foil, avoiding the stamped area.
Seamless Join
Cut the ends of your wall strip at a 45-degree angle where they meet. This overlap creates a much stronger bond and a cleaner visual seam than butt-jointing nice flat ends.
Step 3: Finishing
-
Bake the tray:
Transfer the parchment paper with the tray to a baking sheet. Bake according to your specific clay manufacturer’s instructions (usually around 275°F for 15-30 minutes). -
Cool down:
Let the tray cool completely in the oven with the door cracked open to prevent any thermal shock or cracking. -
Sand edges:
Once cool and hard, use a fine-grit sanding block to gently smooth any sharp edges on the rim or the seams. -
Apply glaze:
Brush a thin coat of glossy varnish or glaze over the entire piece to seal the clay and give it that fired ceramic shine. -
Dry:
Allow the glaze to dry fully in a dust-free area before using your new catchall.
Sagging Walls?
If the clay walls won’t stand up straight while working, create a temporary support structure by placing a balled-up piece of paper or foil in the center until the clay firms up.
Place your finished tray near the door for a functional piece of art that catches everyone’s eye


Leaf-Imprint Ornaments
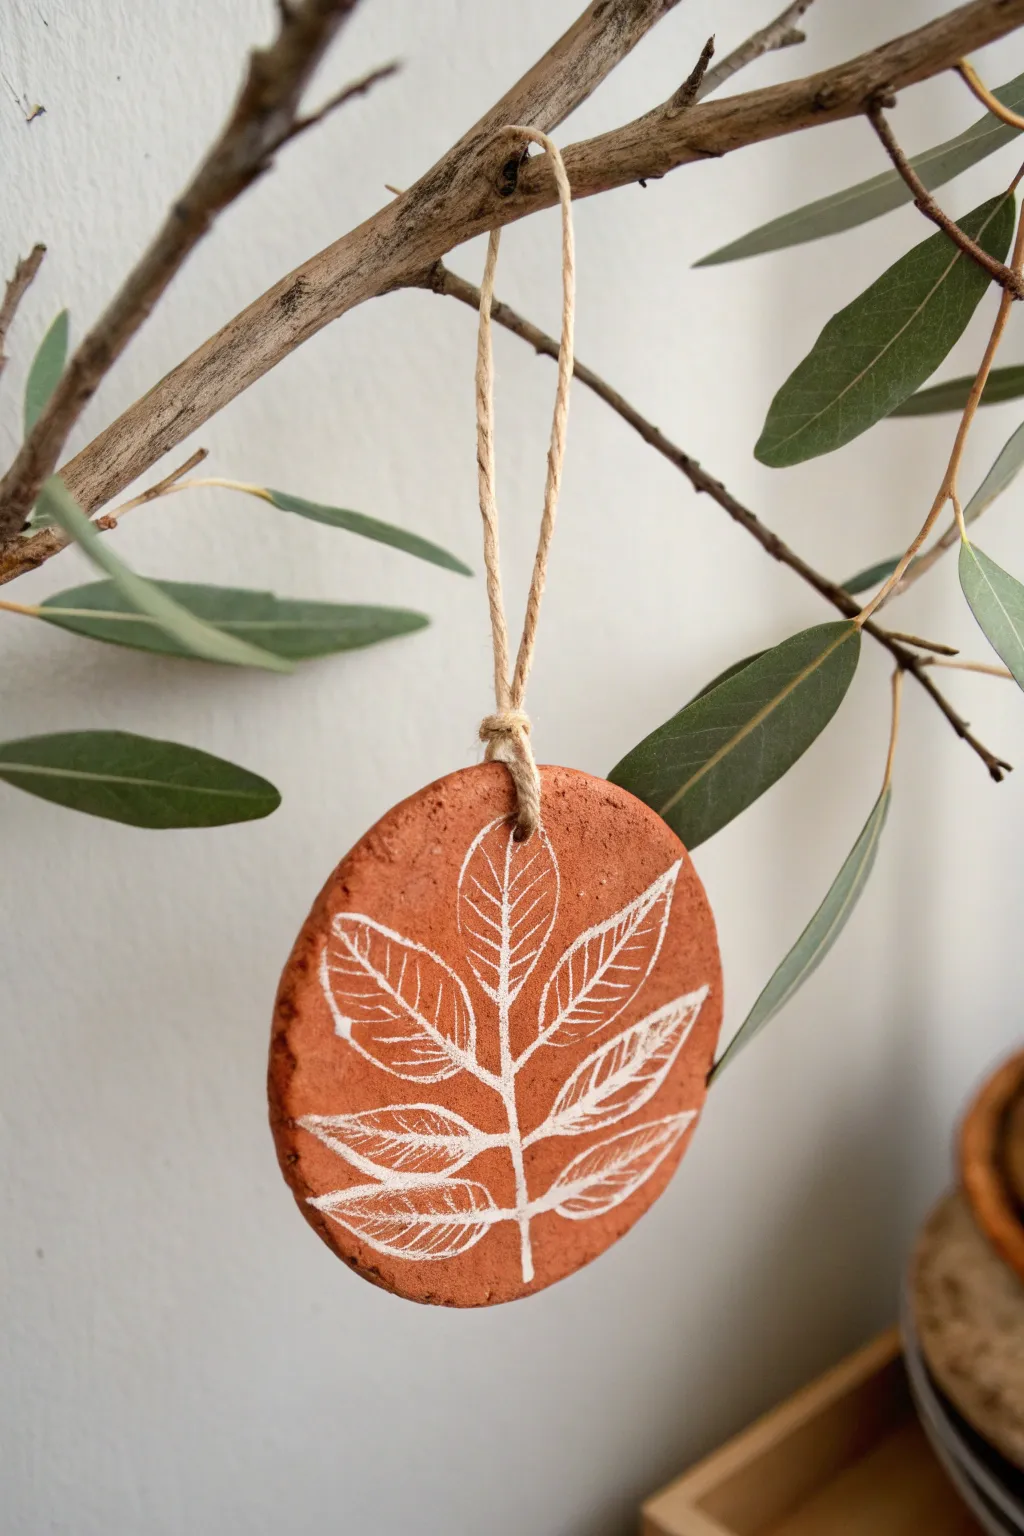
Capture the simple beauty of nature with these rustic terracotta clay ornaments featuring delicate white leaf motifs. The contrast between the warm, earthy clay and the crisp white line work creates a modern yet timeless decoration perfect for hanging on branches.
Step-by-Step
Materials
- Terracotta-colored air-dry clay (or polymer clay)
- Circular cookie cutter (approx. 3-4 inches)
- Rolling pin
- Parchment paper or smooth work mat
- Fine white paint marker (acrylic based) or white acrylic paint with a detail brush
- Drinking straw or small circular punch
- Natural jute twine
- Fine-grit sandpaper (optional)
- Clear matte varnish (optional)
Step 1: Shaping the Base
-
Prepare your workspace:
Lay down a sheet of parchment paper or a smooth work mat to prevent the clay from sticking to your table. Take a handful of terracotta air-dry clay and knead it in your hands for a minute to warm it up and make it pliable. -
Roll the slab:
Use your rolling pin to flatten the clay into an even slab. Aim for a thickness of about 1/4 inch (6mm). If it’s too thin, it might crack; too thick, and it will be heavy. -
Cut the shape:
Press your circular cookie cutter firmly into the clay to cut out a perfect circle. Gently wiggle it slightly before lifting to ensure a clean cut. -
Smooth the edges:
Dip your finger in a tiny bit of water and run it along the cut edge of the circle to smooth out any roughness or loose bits of clay. -
Create the hanging hole:
Take a drinking straw and press it into the clay near the top edge of the circle (about 1/2 inch down) to punch out a hole for the string. Twist the straw as you pull it out to remove the core cleanly.
Pro Tip
For a ‘scribed’ look without paint, use a needle tool to scratch the leaf design into the clay while it is still wet, then fill the grooves with white paint after drying.
Step 2: Drying and Refining
-
Initial drying phase:
Place your clay circle on a flat surface to dry. I find that flipping it over gently every few hours helps it dry evenly and prevents the edges from curling up. -
Full cure:
Allow the ornament to dry completely according to the package instructions. This usually takes 24 to 48 hours for air-dry clay. It will turn a lighter shade when fully dry. -
Sand for smoothness:
Once fully hard, check the edges again. If there are any sharp points or irregularities, lightly buff them away with fine-grit sandpaper until the perimeter feels smooth to the touch. -
Dust off:
Wipe the surface with a dry cloth or a soft brush to remove any clay dust. The surface needs to be perfectly clean for the white design to adhere properly.
Level Up
Mix cinnamon or nutmeg into your air-dry clay while kneading. It creates a subtle speckled texture and makes your ornaments smell amazing for the holidays.
Step 3: Designing the Leaf
-
Plan the stem:
Using your white paint marker, draw a single vertical line starting from the bottom almost to the top. This acts as the central vein or stem of your leaf design. -
Draw the leaf outline:
Starting just above the stem’s base, draw the first pair of leaflets extending outward. Keep the shapes simple—pointed ovals work best for this botanical look. -
Complete the foliage:
Continue adding pairs of leaflets moving up the stem, making each pair slightly smaller than the one below it. Finish with a singular, smaller leaf at the very tip of the stem. -
Add texture details:
Inside each leaf shape, draw delicate diagonal lines to represent the veins. Don’t worry about perfect spacing; the hand-drawn quality adds to the charm. -
Let the paint set:
Allow the white paint to dry completely. If you feel the white isn’t opaque enough against the dark clay, careful trace over your lines a second time once the first layer is dry. -
Seal (Optional):
If you want extra durability, apply a thin coat of clear matte varnish over the front and back. This seals the clay and protects the paint.
Step 4: Finishing Touches
-
Prepare the hanger:
Cut a piece of natural jute twine roughly 8 to 10 inches long. -
Thread the loop:
Fold the twine in half and push the looped end through the hole in the ornament from the front to the back. -
Secure the knot:
Pass the loose ends of the twine through the loop and pull tight to create a lark’s head knot that sits flush against the clay. -
Tie it off:
Tie the two loose ends of the twine together in a simple overhand knot at the top to create the hanging loop.
Hang your new ornament on a eucalyptus branch or a holiday tree to enjoy the natural elegance you have created

The Complete Guide to Pottery Troubleshooting
Uncover the most common ceramic mistakes—from cracking clay to failed glazes—and learn how to fix them fast.
Botanical Texture Tags
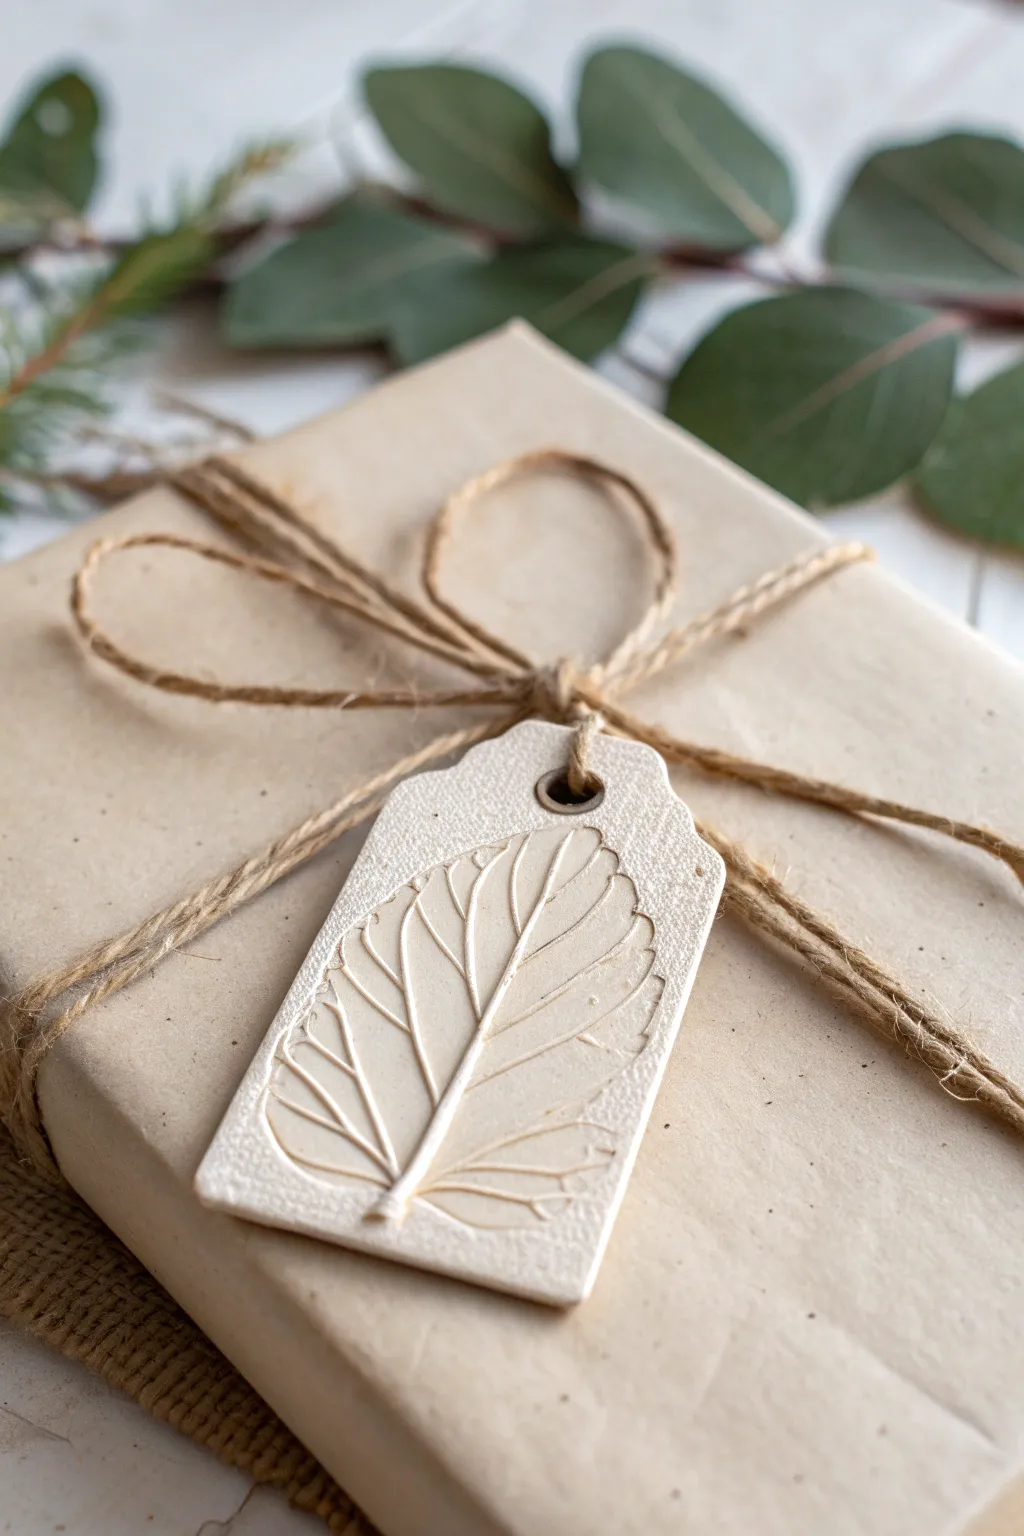
Elevate your gift wrapping with these elegant, handcrafted tags that capture the delicate details of nature. Using simple white clay and real botanical specimens, you can create sophisticated, textured accents that serve as a beautiful keepsake long after the gift is opened.
How-To Guide
Materials
- White air-dry clay (or polymer clay)
- Fresh leaves with prominent veins (e.g., hydrangea, mint, or sage)
- Rolling pin or smooth glass jar
- Parchment paper or non-stick craft mat
- sharp craft knife or rectangular clay cutter
- Straw or small circular cutter (for the hole)
- Fine-grit sandpaper (optional)
- Bronze or gold eyelets (optional)
- Eyelet setting tool (if using eyelets)
- Clear matte varnish (optional)
- Jute twine for tying
Step 1: Preparation and Rolling
-
Prepare your workspace:
Set up a clean, flat surface covered with parchment paper. This prevents the clay from sticking and ensures a smooth back for your tag. -
Condition the clay:
Take a handful of white air-dry clay and knead it gently in your hands until it becomes soft, pliable, and free of cracks. I find that warming it up with your hands really helps prevent tearing later. -
Roll out the slab:
Place the clay ball on your parchment paper and use a rolling pin to flatten it. Aim for an even thickness of about 3-4mm (roughly 1/8 inch). If it’s too thin, it might crack; too thick, and it will be heavy.
Pro Tip: Contrast
After drying, lightly brush a diluted darker acrylic paint (a ‘wash’) over the veins and wipe the surface immediately. Paint stays in the grooves, making the texture pop.
Step 2: Creating the Botanical Impression
-
Select your leaf:
Choose a fresh leaf that isn’t too dry or brittle. Turn it over so the underside—where the veins are most prominent and raised—is facing down towards the clay. -
Position the leaf:
Gently place the leaf onto your rolled clay slab. Press it down lightly with your fingers first to ensure it doesn’t shift. -
Roll the impression:
Take your rolling pin and roll firmly over the leaf once. Apply steady, even pressure to push the veins deep into the clay surface without thinning the slab too much. -
Reveal the texture:
carefully lift the leaf stem and peel it away from the clay. Do this slowly to ensure no plant matter is left behind, revealing the beautiful skeletal structure imprinted in the white surface.
Step 3: Cutting and Finishing
-
Cut the shape:
Using a sharp craft knife, freehand cut a rectangle around the leaf print. You can trim the top corners at an angle to create a traditional tag shape, or use a shaped cookie cutter if you prefer precision. -
Create the hanging hole:
While the clay is still wet, use a plastic straw or a small circular tool to punch a hole at the top center of the tag. Make sure it’s not too close to the edge to prevent breakage. -
Smooth the edges:
Dip your finger in a tiny bit of water and run it along the cut edges of the tag to smooth out any sharpness or roughness left by the knife. -
Drying time:
Transfer the parchment paper with the tag to a flat, safe spot. Let the clay air dry for 24-48 hours. Flip the tag over halfway through the drying process to prevent curling. -
Sand and refining:
Once fully dry and hard, inspect the edges. If there are any rough spots, gently buff them away with fine-grit sandpaper for a professional finish. -
Add the hardware:
Place a metal eyelet into the hole you created earlier. Use an eyelet setting tool to secure it in place. This adds a polished look and reinforces the clay where the string will pull.
Level Up: Scented Tags
Add a few drops of essential oil into the clay while kneading it during the first step. The porous clay holds the scent, making your gift smell amazing.
Step 4: Styling the Gift
-
Seal the tag:
For longevity, brush on a thin layer of clear matte varnish. This protects the porous clay from moisture and dirt without making it look plasticky. -
Attach the twine:
Cut a length of natural jute twine. Thread it through the eyelet and secure it to your wrapped gift with a simple knot or bow.
Enjoy the simple elegance of your handmade botanical tags as they add a special touch to your thoughtful gifts
Simple Clay Coasters
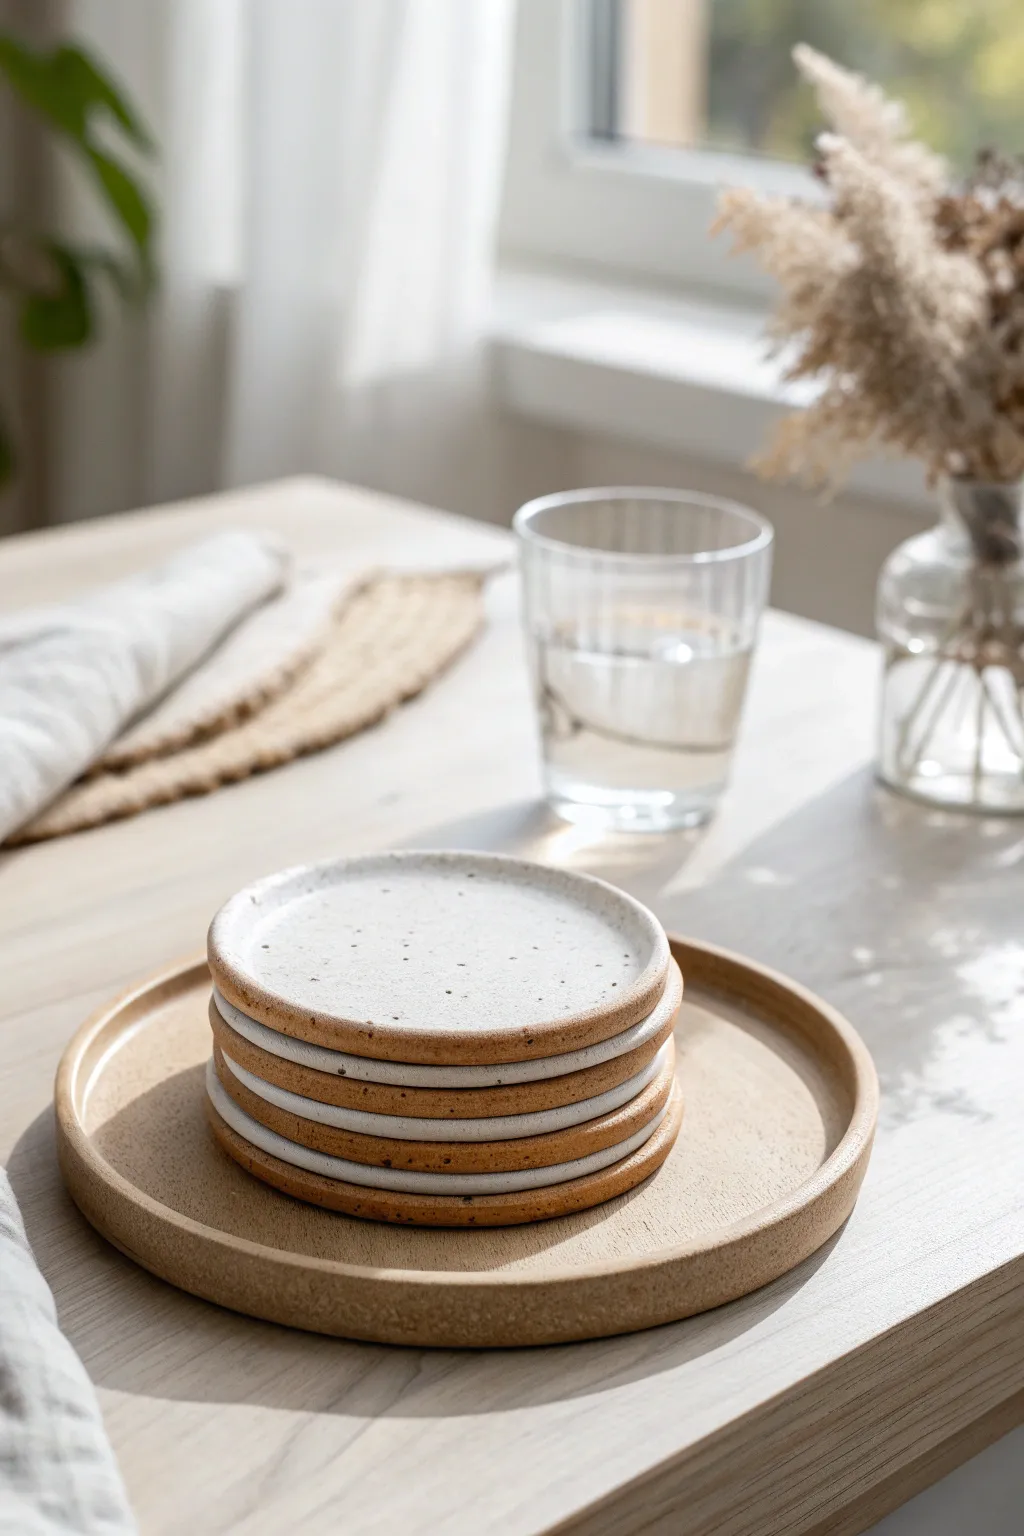
These minimalist coasters combine the warmth of raw earth tones with a clean, speckled white finish for a modern Scandinavian look. Their slightly raised rim not only adds a professional touch but also keeps condensation contained, making them as practical as they are beautiful.
Step-by-Step
Materials
- Speckled buff or terracotta polymer clay (or air-dry clay)
- White or cream acrylic paint (matte finish)
- Black acrylic paint (for speckles)
- Circular cookie cutter (approx. 3.5 – 4 inches)
- Rolling pin
- Parchment paper
- Toothbrush or splatter brush
- Fine-grit sandpaper
- Matte varnish or sealant
- Small flat paintbrush
- Sponge
Step 1: Shaping the Base
-
Prepare the clay:
Begin by conditioning your clay thoroughly until it is soft and pliable. If you are using polymer clay, warm it in your hands to prevent cracking. -
Roll out the slab:
Place the clay between two sheets of parchment paper. Roll it out to an even thickness of about 1/4 inch (6mm). Ensure the surface is perfectly smooth. -
Cut the circles:
Using your circular cookie cutter, press firmly into the clay to cut out your coaster shapes. Create as many as you need for a set—usually four to six. -
Smooth the edges:
Gently lift the circles and use your finger dipped in a little water (for air-dry clay) or baby oil (for polymer clay) to smooth out any rough edges left by the cutter. -
Create the rim:
To get that slight lip shown in the photo, gently press your thumb around the inner circumference of the circle, about 1/8 inch from the edge. This depresses the center slightly while leaving the rim raised. -
Refine the shape:
Go back around the outer edge and gently tap it against your work surface to ensure the coaster remains perfectly circular after handling.
Smooth Rim Trick
Use the back of a spoon to burnish the rim while the clay is leather-hard. This compresses the clay and makes it extra durable.
Step 2: Hardening and Refining
-
Cure or dry:
If using polymer clay, bake according to the package instructions (usually 275°F/135°C for 15-30 minutes). If using air-dry clay, let them sit for 24-48 hours until fully hardened, flipping them halfway through. -
Sand for smoothness:
Once fully cured and cooled, take a piece of fine-grit sandpaper and lightly buff the edges and surface. You want to remove any fingerprints or imperfections. -
Dust off:
Wipe the coasters down with a slightly damp cloth or sponge to remove all sanding dust before you start painting.
Step 3: Applying the Speckled Finish
-
Paint the top surface:
Using a flat brush, apply a coat of white or cream paint to the top face of the coaster only. Leave the rim and sides unpainted to reveal the natural clay color underneath. -
Second coat:
Let the first layer dry completely, then apply a second coat for opaque coverage. I find that two thin coats adhere better than one thick, gloppy one. -
Clean the edges:
If any white paint slipped onto the rim or sides, wipe it away quickly with a damp cloth or cotton swab before it dries. -
Prepare the speckle mix:
Dilute a tiny drop of black paint with water until it is very runny, almost ink-like in consistency. -
Splatter effect:
Dip an old toothbrush into the watery black paint. hold it over the coasters and run your thumb across the bristles to flick tiny speckles onto the white surface. -
Control the density:
Practice on a piece of paper first to get the speckle size right. You want fine, scattered dots rather than big blobs. -
Seal the deal:
Once the paint is totally dry, apply a layer of matte varnish over the entire coaster. This protects the finish from moisture and gives it that finished ceramic feel.
Faux Glaze Effect
For a glossy ceramic look, use a high-gloss resin or heavy gloss varnish on the white section only, leaving the rim matte.
Stack your new coasters on a wooden tray or table and enjoy the clean, handcrafted vibe they bring to your space


What Really Happens Inside the Kiln
Learn how time and temperature work together inside the kiln to transform clay into durable ceramic.
Bubble Texture Coasters
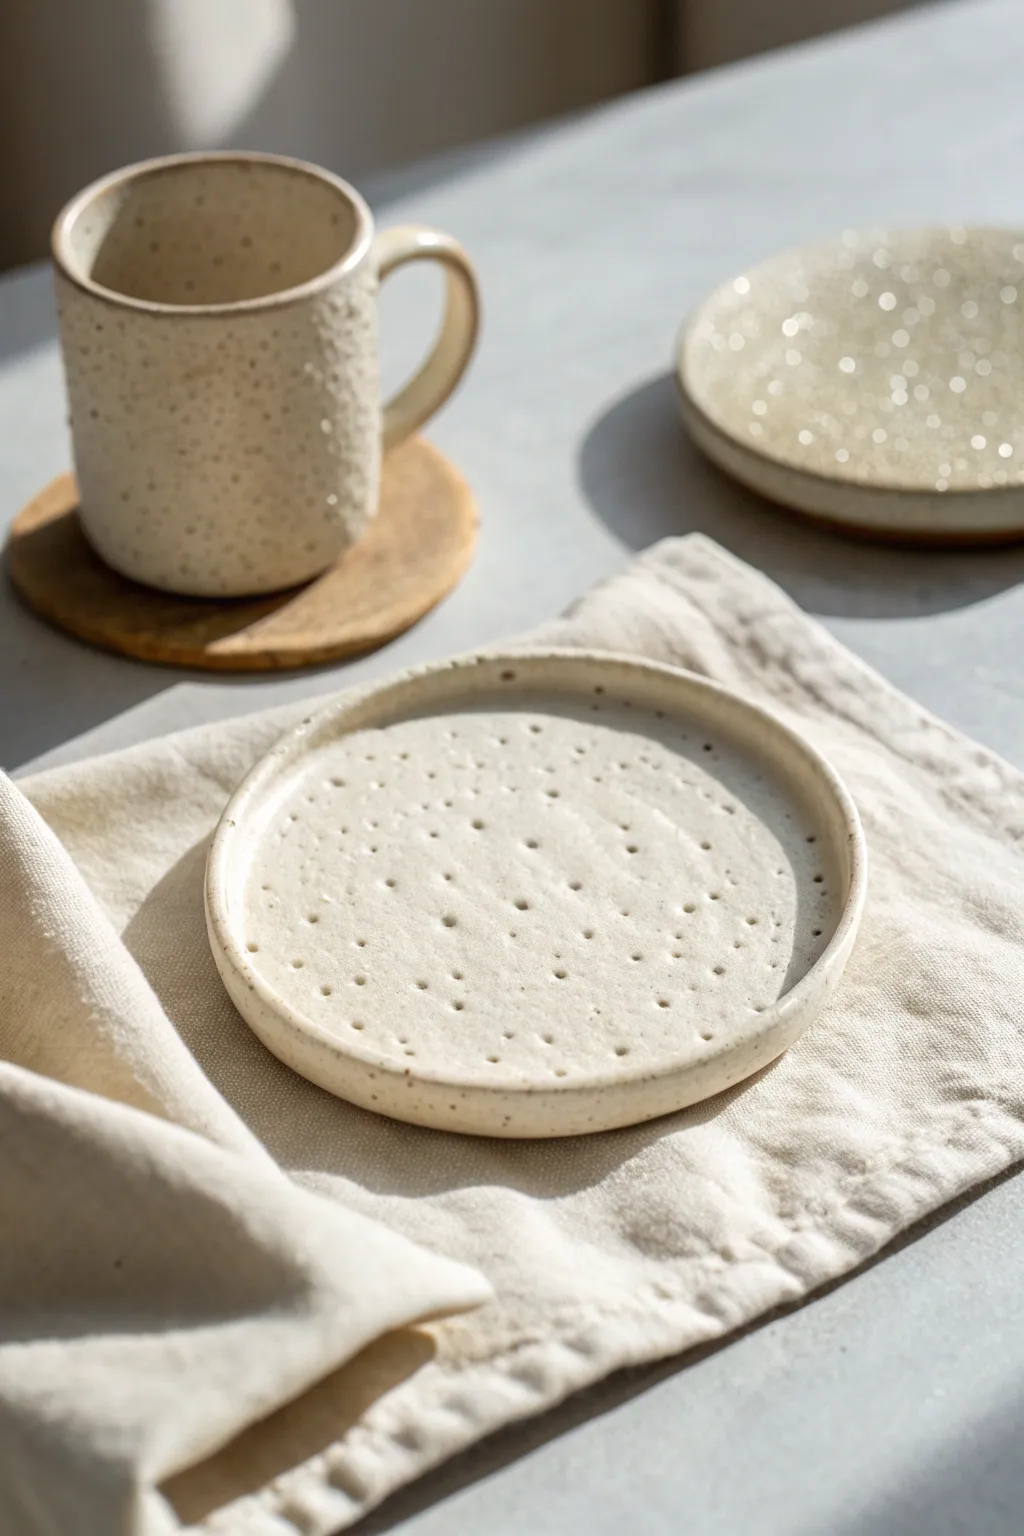
Achieve a high-end ceramic studio look without needing a pottery wheel using this simple textural technique. These speckled coasters feature organic indentations that catch the light and add a tactile, modern finish to your coffee table decor.
Step-by-Step Guide
Materials
- Air-dry clay (stone or white color)
- Acrylic rolling pin
- Circle cookie cutter (approx. 4 inches) or a bowl to trace
- Speckled acrylic paint (brown/black specks) or an old toothbrush for splattering
- Gloss or satin varnish (waterproof sealant)
- Sandpaper (fine grit)
- Small bowl of water
- Various blunt tools for texturing (end of a paintbrush, knitting needle, dull pencil)
- Canvas or parchment paper to work on
Step 1: Shaping the Base
-
Prepare the clay:
Begin by taking a handful of air-dry clay and kneading it in your hands to warm it up. This conditioning step makes the clay more pliable and less prone to cracking later on. -
Roll it out:
Place your clay on a piece of canvas or parchment paper to prevent sticking. Using your acrylic rolling pin, roll the clay out to an even thickness of about 1/4 inch. -
Check for bubbles:
Before cutting, inspect the surface for any unwanted air pockets or uneven textural lumps and smooth them out with a damp finger. -
Cut the shape:
Press your circle cutter firmly into the clay. If you don’t have a cutter, place a small bowl upside down on the clay and carefully trace around it with a craft knife. -
Refine the edges:
Dip your finger in a little water and run it along the cut edge of the circle. This smooths out any sharpness or drag marks left by the cutter. -
Create the rim:
Use your thumb to gently press the center of the circle while slightly pinching the outer edge upwards. You want to create a very subtle lip, giving it that handmade plate aesthetic.
Step 2: Texturing and Finishing
-
Create the bubbled texture:
Select your blunt tools. I like to use the rounded end of a paintbrush handle. Press the tool gently into the clay’s surface to create small craters. -
Vary the sizes:
Switch between tool sizes—perhaps use a knitting needle for smaller holes and a pen cap for larger ones. Random, organic placement looks much better than perfect rows. -
Keep the center flat:
While texturing, try to keep the very center relatively flat so your mug will sit stably, or ensure the indentations are deep enough that they don’t create jagged peaks. -
Let it dry completely:
Place the coaster on a wire rack to ensure air circulation on both sides. Let it dry for at least 24 to 48 hours until it is bone dry and lighter in color. -
Sand for smoothness:
Once fully dry, take a piece of fine-grit sandpaper and very gently buff the edges and surface. This removes any sharp burrs created during the texturing process. -
Create the speckled effect:
If your clay wasn’t pre-speckled, dilute a tiny bit of brownish-black acrylic paint with water. Dip an old toothbrush in it and flick the bristles to spray fine mist-like dots over the coaster. -
Seal the surface:
Apply a coat of waterproof satin or gloss varnish. This is crucial for coasters as it protects the clay from condensation drips. -
Apply a second coat:
Allow the first layer of varnish to dry according to the bottle instructions, then apply a second coat to ensure durability. -
Add a protective backing:
Glue a circle of cork or felt to the bottom of the dry coaster. This prevents the textured clay from scratching your furniture.
Texturing Tip
For a truly organic “bubble” look, press your tool in and give it a tiny circular wiggle before pulling it out. This softens the crater edge.
Color Wash
Before sealing, apply a very diluted wash of tan or cream acrylic paint. Wipe it back immediately with a rag so the color only stays inside the texturing.
Enjoy your beautiful new stoneware-inspired coasters with your next warm cup of coffee
Beaded Edge Dishes
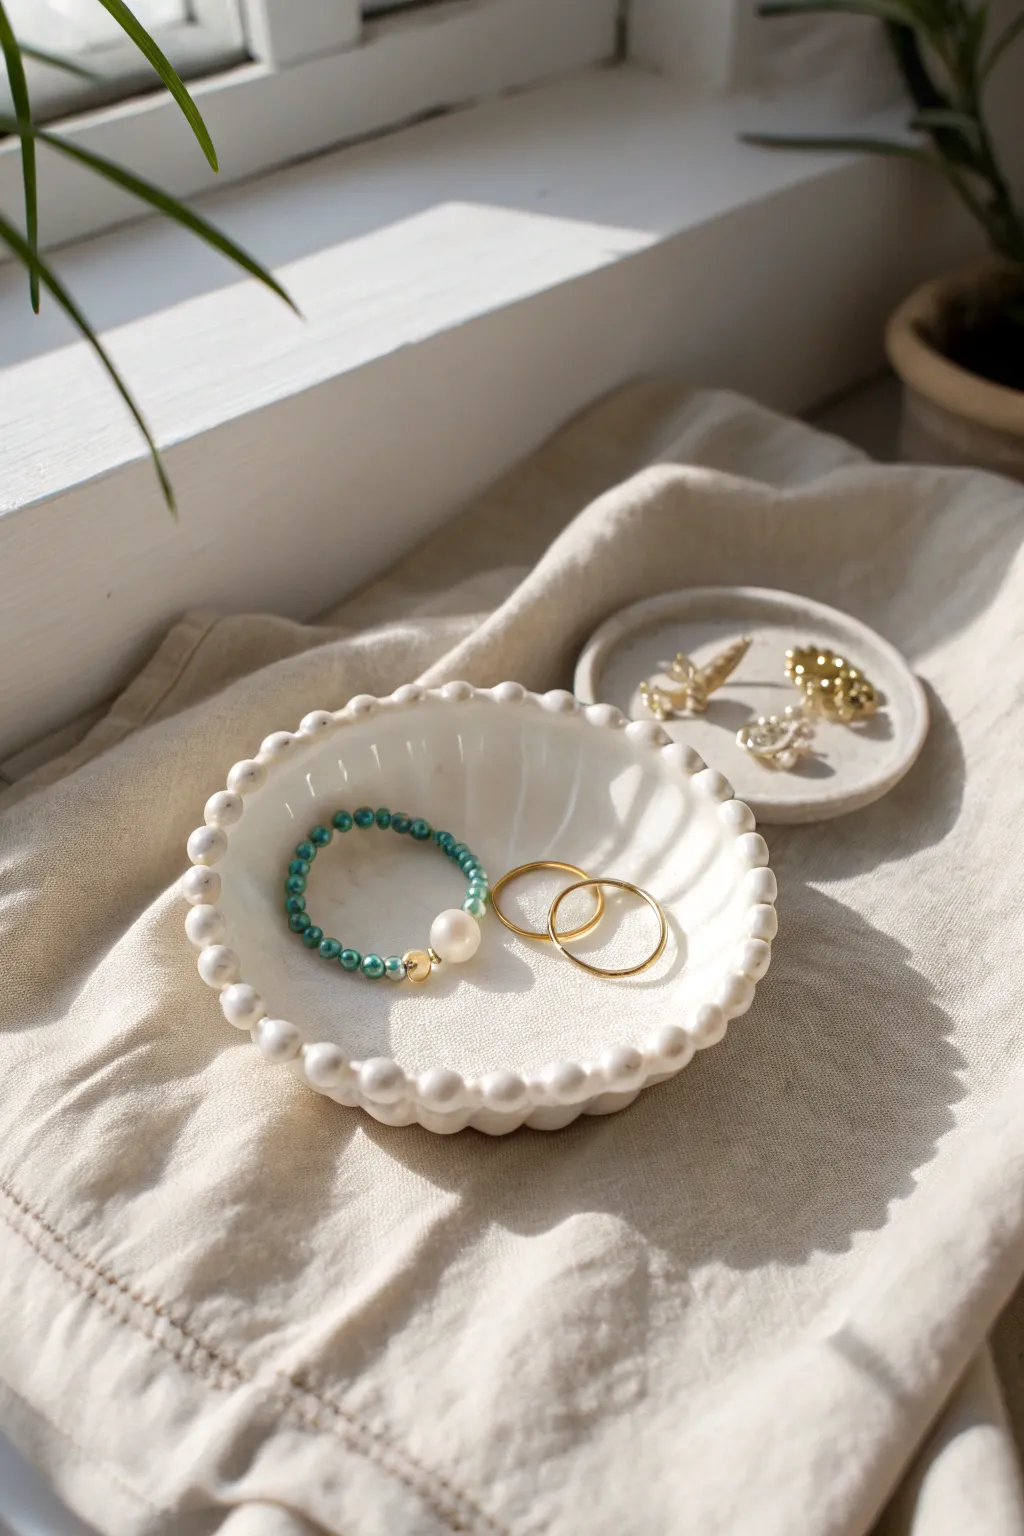
This elegant little dish features a delicate rim that looks like a string of pearls, adding a touch of vintage charm to your bedside table or vanity. Its glossy white finish makes it perfect for showcasing colorful gemstone rings or gold bands.
Step-by-Step Tutorial
Materials
- White polymer clay or air-dry clay
- Rolling pin or acrylic roller
- Round cookie cutter (approx. 3-4 inches)
- Small bowl or curved form (for shaping)
- Clay smoothing tool or sponge
- High-gloss glaze or varnish
- Soft paintbrush
- Sandpaper (fine grit)
- Parchment paper
Step 1: Forming the Base
-
Condition the clay:
Start by warming up a chunk of white clay in your hands. Knead it thoroughly until it is soft, pliable, and free of any air bubbles. -
Roll it out:
Place the clay on a sheet of parchment paper. Use your rolling pin to flatten it into an even slab, aiming for a thickness of about 1/4 inch. -
Cut the circle:
Press your round cookie cutter firmly into the clay slab. Remove the excess clay from around the cutter, then lift the cutter away to reveal a perfect circle. -
Shape the curve:
Gently lift the clay circle and center it inside your small bowl or over a curved form. Press lightly so it takes on a shallow concave shape, but don’t press so hard that it sticks permanently.
Consistent Sizes
To get perfectly even beads, roll a long snake of clay first, then slice it into equal segments before rolling each one into a ball.
Step 2: Creating the Beaded Rim
-
Roll small spheres:
Take the excess clay you set aside earlier and pinch off small, equal-sized pieces. Roll these between your palms to create tiny spheres—you’ll need roughly 25-30 depending on the size of your dish. -
Check sizing:
Before attaching, line a few spheres up against the edge of your dish to ensure they are the scale you want. They should look like large pearls sitting on the rim. -
Score the edge:
Using a needle tool or toothpick, gently scratch rough marks along the very top edge of your clay bowl. This texture helps the beads adhere better. -
Attach the first bead:
Dab a tiny amount of water (for air-dry clay) or liquid clay (for polymer) onto the scored area. Press the first clay sphere gently onto the rim. -
Complete the circle:
Continue adding spheres one by one, pressing them gently against their neighbor and down onto the rim. I find it helpful to wiggle them slightly to bond the clay. -
Blend the underside:
Carefully flip the bowl over or look underneath the rim. Use a smoothing tool to gently smudge the bottom of each bead into the main bowl to secure them structurally without ruining the round top shape.
Luxurious Accents
Paint the rim of beads with liquid gold leaf after the white glaze dries to give the dish a high-end, gilded jewelry store look.
Step 3: Finishing Touches
-
Smooth imperfections:
Dip your finger or a sponge in a little water and run it over the inside surface of the bowl to smooth out fingerprints. -
Dry or bake:
If using air-dry clay, let it sit in a cool, dry place for 24-48 hours. If using polymer clay, bake it according to the package instructions (usually 275°F for 15-30 minutes). -
Release the form:
Once fully cured or dried, gently pop the clay dish out of the shaping bowl. -
Sand edges:
Check the underside edge where you cut the circle. If it feels sharp, use fine-grit sandpaper to soften it. -
Apply the glaze:
Using a soft brush, apply a generous coat of high-gloss varnish to the entire piece. Make sure to get into the crevices between the pearl beads. -
Second coat:
Allow the first coat to dry, then apply a second layer for that ceramic-like shine shown in the photo.
Now you have a chic, handmade spot to keep your favorite rings safe

TRACK YOUR CERAMIC JOURNEY
Capture glaze tests, firing details, and creative progress—all in one simple printable. Make your projects easier to repeat and improve.
Mini Bud Vase Trio
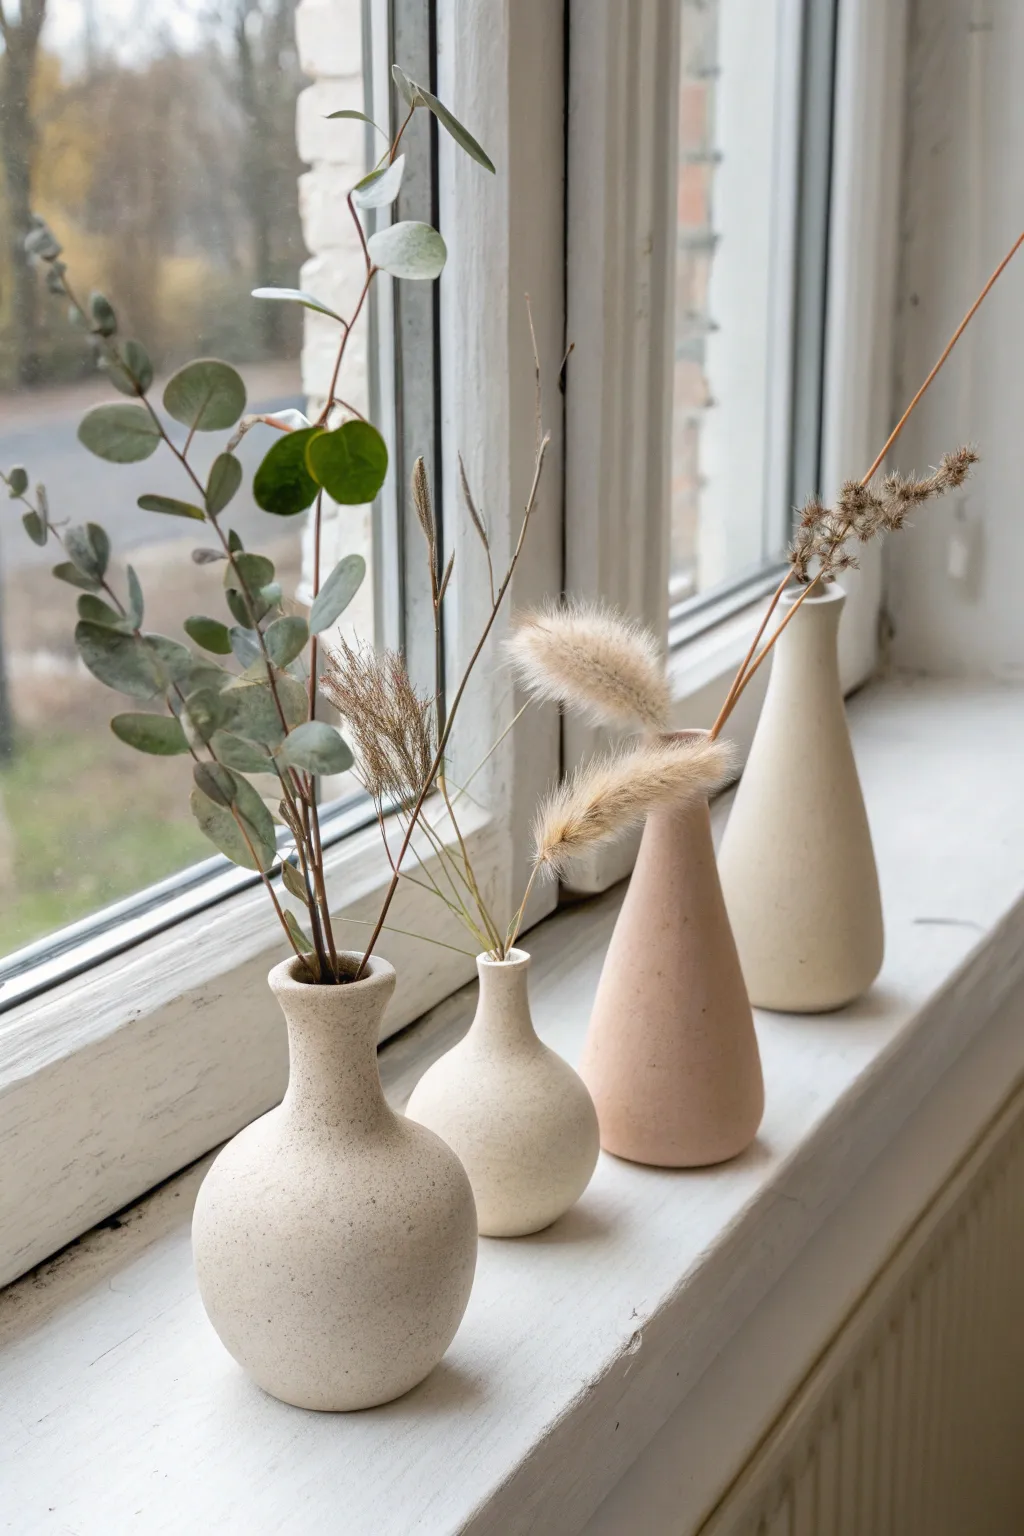
Bring an organic, minimalist touch to your windowsill with this set of textured bud vases that mimic the look of speckled stoneware. Using air-dry clay and a special painting technique, you can craft these sculptural forms perfect for displaying delicate dried stems.
How-To Guide
Materials
- Air-dry clay (white or natural)
- Small rolling pin
- Clay sculpting tools (sponge, needle tool, rib tool)
- Small bowl of water
- Fine-grit sandpaper (220 grit)
- Acrylic paint (warm white/cream, beige, dusty pink)
- Baking soda
- Old toothbrush or bristle brush
- Matte spray varnish or sealant
- Dark brown or black acrylic paint (for speckles)
Step 1: Sculpting the Forms
-
Prepare your workspace:
Lay down a canvas mat or wax paper to prevent sticking. Take a fist-sized ball of clay and condition it by kneading until it’s pliable and smooth. -
Form the base:
For the rounder vases, roll the clay into a smooth sphere. For the taller vase, roll it into a thick cylinder. Gently tap the bottom of each shape onto your work surface to create a flat, stable base. -
Create the opening:
Use your thumb or a thick dowel to press a hole into the center of the shape, stopping about half an inch from the bottom. Don’t make the walls too thin; these vases look best with a bit of visual weight. -
Pinch the neck:
With the hole established, gently pinch around the top opening to pull the clay upwards. Rotate the vase constantly in your hand to keep it symmetrical. This is where you define the silhouette—create a narrow neck that flares slightly at the rim for the classic bottle shape. -
Shape the bodies:
For the bulbous vases, smooth the main body with a wet sponge to emphasize the roundness. For the conical vase, use a flat rib tool or a ruler to ensure the sides are straight and taper evenly upward. -
Smooth the surface:
Dip your finger in water and run it over the entire surface to erase any fingerprints or cracks. I like to really take my time here to ensure the transition from the neck to the body is seamless. -
Initial drying:
Set the vases aside to dry completely. This usually takes 24-48 hours depending on humidity. Rotate them occasionally so the bottoms dry evenly. -
Sand for perfection:
Once fully dry and hard, use fine-grit sandpaper to buff away any bumps or rough spots. Wipe away all clay dust with a slightly damp cloth.
Step 2: Creating the Faux-Stone Finish
-
Mix the textured paint:
To achieve that gritty, ceramic look, mix your acrylic paint with baking soda. Aim for a ratio of roughly 1 part baking soda to 2 parts paint. The mixture should be thick and fluffy. -
Apply the base coat:
Brush the baking soda mixture onto the vases. Use a dabbing or stippling motion rather than long strokes to build up texture. Paint three of them creamy white and one in dusty pink. -
Let it cure:
Allow the textured paint to dry completely. It will dry to a very matte, chalky finish. -
Create the speckle mix:
Water down a tiny amount of dark brown paint until it has an inky consistency. -
Splatter technique:
Dip an old toothbrush into the watery brown paint. Hold it near the vases and run your thumb across the bristles to flick tiny specks onto the surface. Test on a piece of paper first to control the spray. -
Seal the work:
Once the speckles are dry, lightly mist the vases with a matte spray varnish. This protects the textured paint without adding unwanted shine. -
Style carefully:
Since air-dry clay isn’t waterproof, these are for dry arrangements only. Insert dried eucalyptus, bunny tails, or grasses to complete the look.
Pro Tip: Weight it Down
If your dried stems make the vase top-heavy, drop a few small pebbles or dry beans into the bottom of the dried vessel before arranging. This adds stability.
Level Up: Two-Tone Texture
Create an ombré effect by mixing two shades of the baking soda paint. Dab the darker color at the bottom and the lighter color at the top, blending them while wet.
Now you have a stunning custom set ready to display your favorite dried botanicals
Abstract Painted Vase Shapes
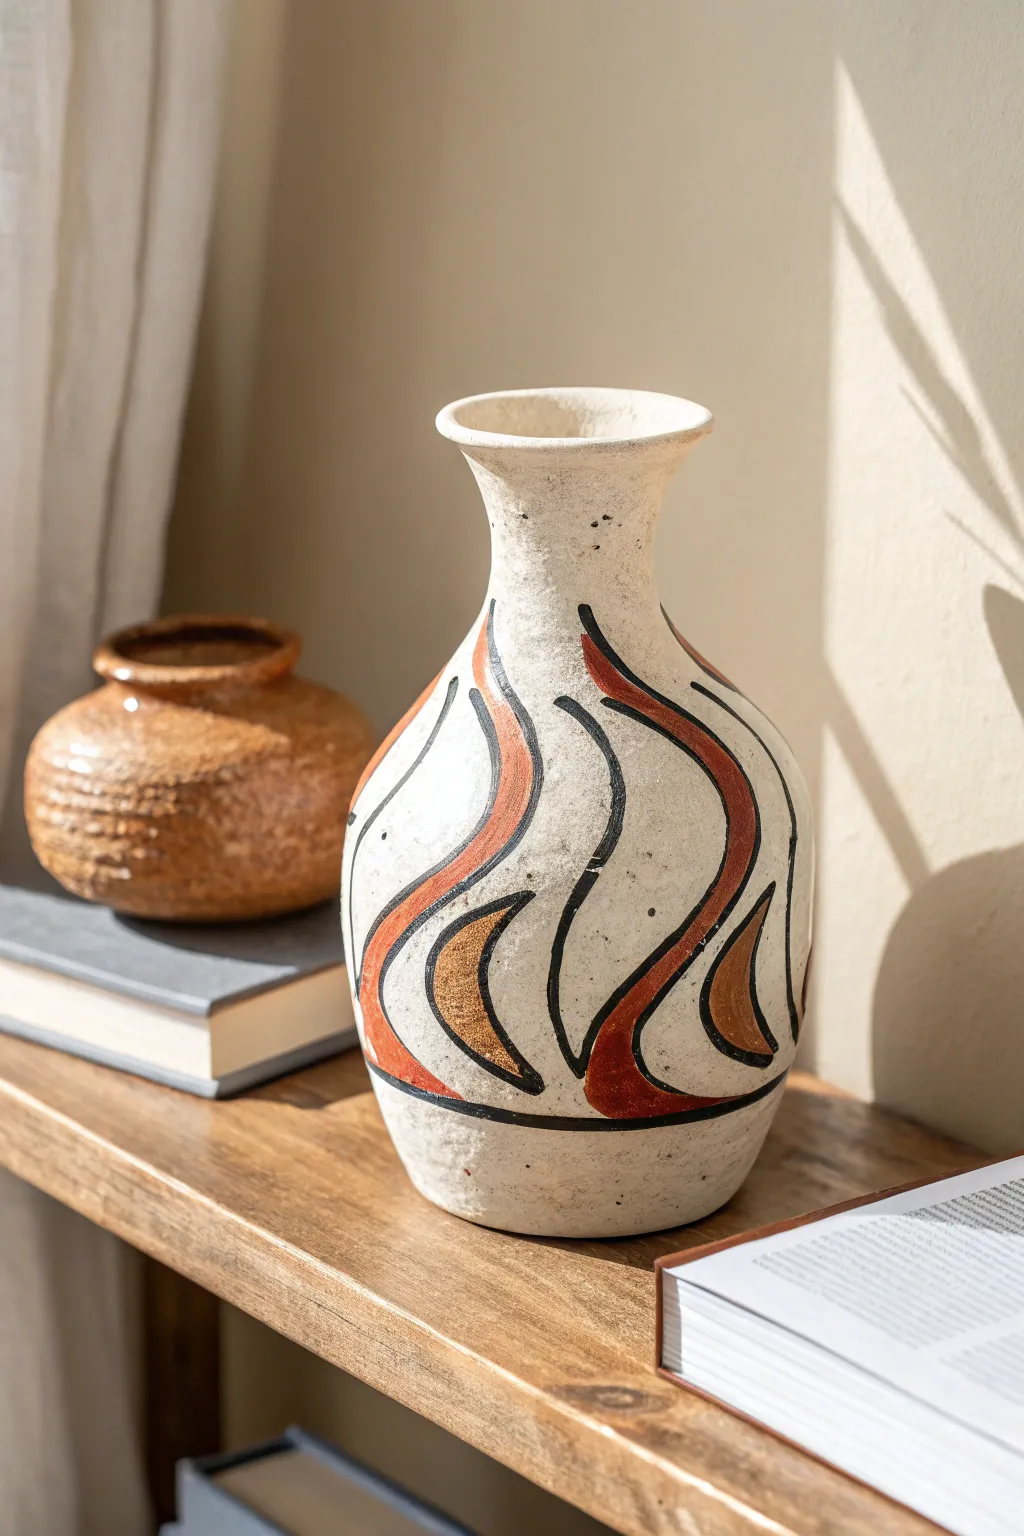
Bring warmth and modern artistry to your shelf with this striking hand-painted vase project. The organic, flame-like waves in terracotta and ochre tones dance across a textured white surface, creating a piece that feels both ancient and contemporary.
Detailed Instructions
Materials
- Bisque ceramic vase (bottle shape)
- White or cream textured spray paint (stone effect)
- Acrylic paints: Black, Burnt Orange, Yellow Ochre
- Fine liner paintbrush (size 0 or 1)
- Medium round paintbrush (size 4 or 6)
- Pencil
- Matte clear sealant spray
Step 1: Preparing the Base
-
Clean surface:
Begin by wiping down your ceramic vase with a damp cloth to remove any dust or oils. Let it dry completely before starting. -
Apply base texture:
Take your vase to a well-ventilated area. Apply a coat of stone-effect spray paint in a cream or off-white shade. This mimics the raw, speckled pottery texture seen in the original piece. -
Paint coverage:
If the first coat looks patchy, wait 15 minutes and apply a second light coat. Ensure even coverage from the neck down to the base. -
Dry thoroughly:
Allow the base coat to cure fully according to the can’s instructions—usually at least 24 hours—so your brush painting won’t lift the texture.
Steady Hands
Rest your pinky finger against the vase surface while painting the fine black outlines. It acts as a stabilizer, preventing shaky lines on the curved surface.
Step 2: Sketching the Design
-
Plan the waves:
Lightly sketch your design onto the vase using a pencil. You want fluid, vertical S-curves that taper at the top and bottom, resembling abstract flames or sea grass. -
Vary the sizes:
Alternate between long, tall curves that reach up the neck and shorter, stouter curves near the belly of the vase. -
Create the bottom border:
Draw a horizontal line circling the vase about an inch or two from the bottom edge to serve as a grounding border for your pattern.
Faux-Ceramic Texture
Mix baking soda into your base white acrylic paint before applying it. This creates a gritty, plaster-like texture without needing specialty spray paint.
Step 3: Painting the Colors
-
Mix the terracotta:
Squeeze out your Burnt Orange acrylic. If it feels too bright, touch in a microscopic dot of black or brown to muddy it slightly for that earthy clay look. -
Fill the large waves:
Using your medium round brush, fill in the majority of your drawn shapes with the terracotta color. Leave some shapes empty for the secondary color. -
Paint the accents:
Switch to your Yellow Ochre paint. Fill in the remaining smaller shapes. I find this two-tone approach adds nice depth compared to a single color. -
Second coat:
Acrylics can be translucent. Once the first layer is dry to the touch, apply a second coat to make the colors opaque and bold.
Step 4: Outlining and Detail
-
Prepare black paint:
For the outlines, ensure your black acrylic has a fluid consistency. You might need to add a drop of water so it flows smoothly off a liner brush. -
Outline curves:
Carefully trace the edges of your colored shapes with the fine liner brush. Keep a steady hand, but don’t worry if the line thickness varies slightly—it adds to the hand-painted charm. -
Add standalone lines:
Paint a few free-floating curved black lines in the negative spaces between your colored shapes to balance the composition. -
Paint the bottom ring:
Trace over your pencil line at the bottom to create the solid black ring encircling the base. -
Speckle effect (Optional):
If your base spray paint didn’t have enough texture, dilute a tiny bit of black paint and flick it off an old toothbrush onto the vase for extra speckles.
Step 5: Finishing Up
-
Erase guidelines:
Check closely for any visible pencil marks. If the paint is fully dry, you can very gently erase them. -
Seal the work:
To protect your design from scratches or fading, apply a final coat of clear matte sealant spray over the entire exterior. -
Final cure:
Let the vase sit undisturbed for another 24 hours before filling it with dried stems or placing it on your shelf.
Now you have a stunning, organic centerpiece that looks like it came straight from an artisan pottery studio
Tealight Holders With Cutouts
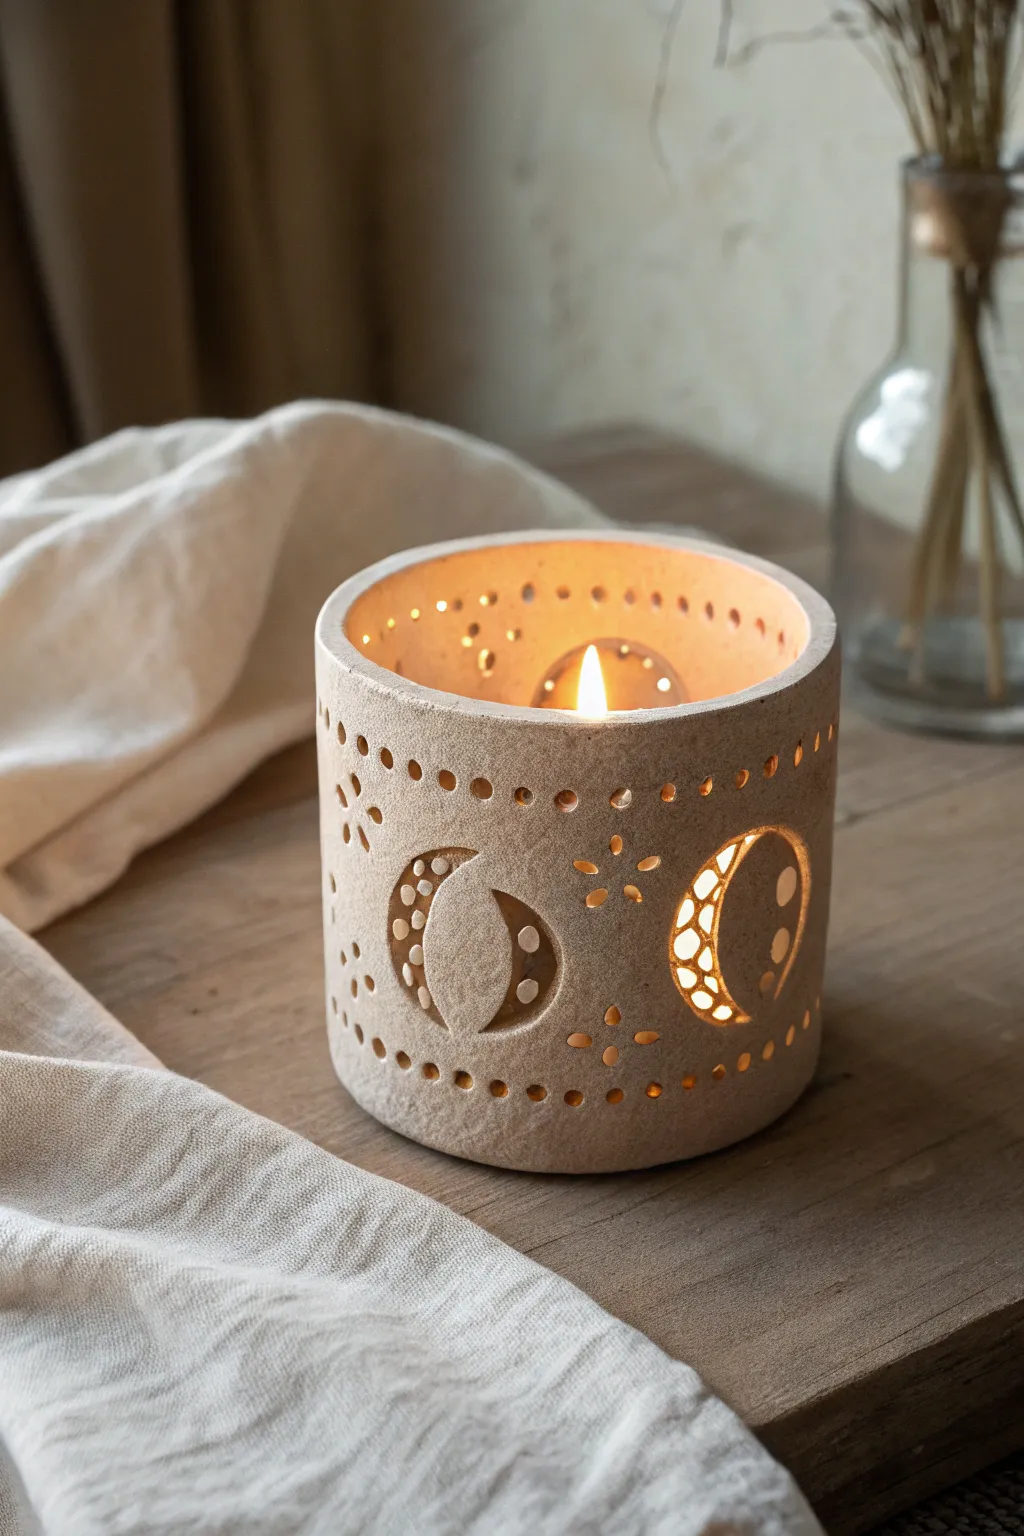
Bring a touch of cosmic magic to your home with this handcrafted clay lantern featuring moon and star motifs. The pierced design allows candlelight to dance through the cutouts, casting beautiful shadows while the textured beige finish adds a rustic, earthy charm.
How-To Guide
Materials
- Air-dry clay (stone or granite effect preferred) or polymer clay in beige
- Rolling pin
- Circle cookie cutter (approx. 3-4 inches diameter) for the base
- X-acto knife or craft scalpel
- Drinking straw (standard size)
- Small cocktail stick or needle tool
- Cylindrical mold (like a large glass jar or rolling pin wrapped in parchment)
- Small moon-shaped cookie cutter (optional, can freehand)
- Sandpaper (fine grit)
- Slip (clay mixed with water) for joining
- Tea light candle
Step 1: Preparing the Slab
-
Roll the clay:
Begin by conditioning your clay until it’s pliable. Roll it out into a long rectangular slab, approximately 1/4 inch thick. Aim for a consistent thickness to ensure the walls stand straight. -
Cut to size:
Measure the circumference of your cylindrical mold. Cut the clay slab into a rectangle that is long enough to wrap around the mold with a slight overlap, and about 4-5 inches tall. -
Texture the surface:
The example piece has a lovely sandy texture. If using smooth clay, you can gently dab the surface with a stiff-bristled toothbrush or a crumpled ball of aluminum foil to create subtle pitting.
Slumping Walls?
If your clay is too soft and the walls won’t stand up, let the flat slab sit for 15-20 minutes after rolling but before cutting. This allows it to firm up slightly (leather hard) and hold its shape.
Step 2: Creating the Cutouts
-
Draft the design:
Before bending the clay, lightly trace your celestial pattern onto the flat slab using a needle tool. Mark locations for crescent moons, small stars, and decorative border dots. -
Cut the moons:
Use an X-acto knife to carefully carve out the crescent moon shapes. For the intricate ‘negative space’ circles inside the moon shapes shown in the image, use a small straw or tube tool to punch holes within the moon silhouette. -
Add the stars:
Carve small four-pointed stars or simple crosses for star shapes. Ensure the lines go all the way through the slab. -
Detail the borders:
Using a standard drinking straw, punch a row of circular holes along the top and bottom edges of the rectangle to create the perforated border design seen in the photo. -
Refine edges:
Gently smooth the raw edges of every cutout with your finger or a slightly damp brush to remove any sharp burrs left by the tools.
Step 3: Assembly
-
Prepare the base:
Roll out a separate piece of clay and cut a circle that matches the diameter of your cylindrical mold. This will correspond to the glowing bottom of the lantern. -
Wrap the cylinder:
Carefully lift your decorated slab and wrap it around your parchment-lined cylindrical mold. I find it helpful to stand the mold upright for this step. -
Join the seam:
Score (scratch) the overlapping edges of the slab, apply a little water or slip, and press them firmly together to close the cylinder. Smooth the seam line until it’s invisible. -
Attach the base:
Score the bottom edge of the cylinder wall and the outer rim of your circular base. Press the cylinder onto the base. Use a modeling tool to blend the clay on the inside and outside for a secure bond.
Clean Cuts Pro Tip
Dip your cutting tools and straws into a bit of cornstarch or baby oil before piercing the clay. This acts as a lubricant and prevents the clay from sticking or dragging, giving you crisp cutouts.
Step 4: Finishing Touches
-
Initial drying:
Allow the clay to stiffen slightly on the mold for about an hour before gently sliding the mold out. If you leave it too long, cracking can occur as the clay shrinks. -
Correct shapes:
Once the mold is removed, check if the cylinder has slumped. Gently nudge it back into a perfect circle if needed. -
Full dry:
Let the piece dry completely according to your clay manufacturer’s instructions. For air-dry clay, turn it upside down halfway through the process to ensure the base dries evenly. -
Sanding:
Once bone dry, take fine-grit sandpaper and lightly sand the top rim to make it perfectly level. Smooth out any rough patches on the exterior. -
Clean up:
Wipe away any clay dust with a slightly damp cloth or a dry brush.
Place a tea light inside and watch the stars twinkle on your walls
Stacked Candlestick Holders
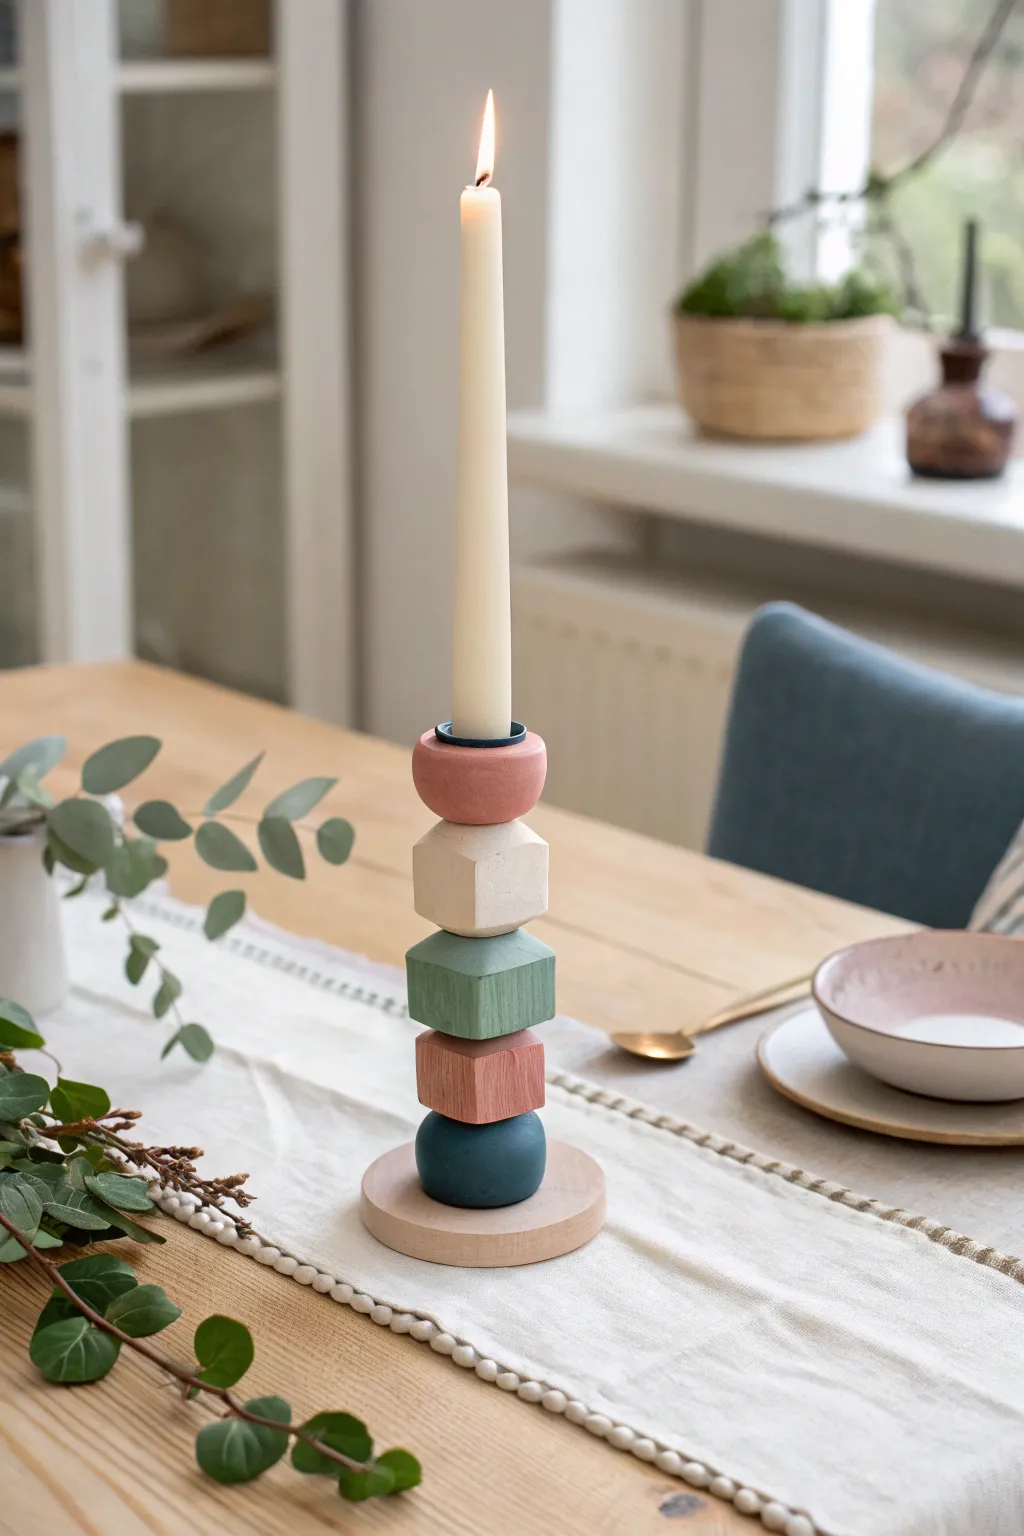
Elevate your table setting with this sculptural candlestick holder that balances playfulness and modern design. By stacking custom clay shapes in a soothing palette of teal, pink, and cream, you’ll create a functional art piece perfect for holding a classic taper candle.
Step-by-Step
Materials
- Air-dry clay or polymer clay (white)
- Wooden dowel (sized to fit candle base)
- Round wooden disc base (approx. 4 inches diameter)
- Acrylic paints (Teal, Dusky Pink, Cream/Off-White, Dark Blue)
- Paintbrushes (flat and detail)
- Craft knife or clay slicing blade
- Rolling pin
- Sandpaper (fine grit)
- Strong craft glue or wood glue
- Copper pipe coupler or metal candle cup insert (optional but recommended for safety)
- Ruler
- Parchement paper or silicone mat
Step 1: Shaping the Geometric Beads
-
Condition the Clay:
Begin by kneading your clay until it is soft, pliable, and free of cracks. If you are using polymer clay, the warmth of your hands will make it easier to work with. -
Form the Base Bead:
Roll a ball of clay roughly 1.5 inches in diameter for the bottom bead. Gently flatten the bottom so it sits flush, but keep the top rounded like a sphere. -
Create the Cubes:
Shape two distinct cubes. Use your craft knife to slice clean, sharp edges from a block of clay. One should be slightly larger (approx. inch wide) and one smaller for visual variety. -
Mold the Faceted Shape:
For the middle accent bead, start with a cube and slice off the corners at an angle to create a geometric, faceted look. -
Sculpt the Top Cup:
Create a flattened sphere for the top piece. Press your candle (or the metal candle cup) into the center to create a deep indentation that will hold the taper securely. -
Create the Holes for Stacking:
Before the clay hardens, carefully pierce a vertical hole through the center of every bead using a skewer or a thin dowel. Ensure the hole is straight so your tower doesn’t lean. -
Dry or Bake:
If using air-dry clay, let the pieces sit for 24-48 hours until fully white and hard. For polymer clay, bake according to the manufacturer’s temperature instructions.
Wobbly Stack?
If your beads don’t sit flat against each other, use a small file or sandpaper to level the top and bottom surfaces of each hardened bead before gluing them.
Step 2: Painting and Assembly
-
Sand for Smoothness:
Once hardened, lightly sand the surfaces of your geometric shapes. Pay special attention to the flat sides of the cubes to ensure they are crisp. -
Paint the Base Bead:
apply a deep, dark teal or petrol blue to the bottom spherical bead. You may need two coats for full opacity. -
Apply the Pink Tones:
Paint the bottom cube and the top cup-shaped bead in a soft, dusky pink shade. Painting these separate shapes the same color ties the design together. -
Add the Greens and Creams:
Paint the faceted middle bead a muted seafoam green and the second cube a creamy off-white. Let all paint dry completely. -
Prepare the Base:
Take your wooden disc base and sand it if necessary. You can leave it natural wood or apply a clear matte varnish for protection. -
Insert the Dowel:
Glue a wooden dowel into the center of your wooden base. It should be tall enough to support all the beads but short enough that it doesn’t poke out the top. -
Stack and Glue:
Apply a dab of strong glue between each bead as you slide them onto the dowel: Dark Blue Sphere, Pink Cube, Green Faceted Bead, Cream Cube, and finally the Pink Top Cup. -
Secure the Candle Cup:
If you are using a metal insert for safety, glue it into the indentation of the top pink bead now. This protects the clay from heat. -
Final Touches:
Inspect the stack for any paint chips or glue seep-out. Touch up paint where needed and wipe away potential glue residue immediately.
Textured Terrazzo
Mix small contrasting colored chips of clay into your white clay base before shaping. Sand heavily after drying to reveal a chic, stone-like terrazzo pattern.
Place your favorite taper candle inside and enjoy the warm glow of your handmade centerpiece
Photo Or Note Holders
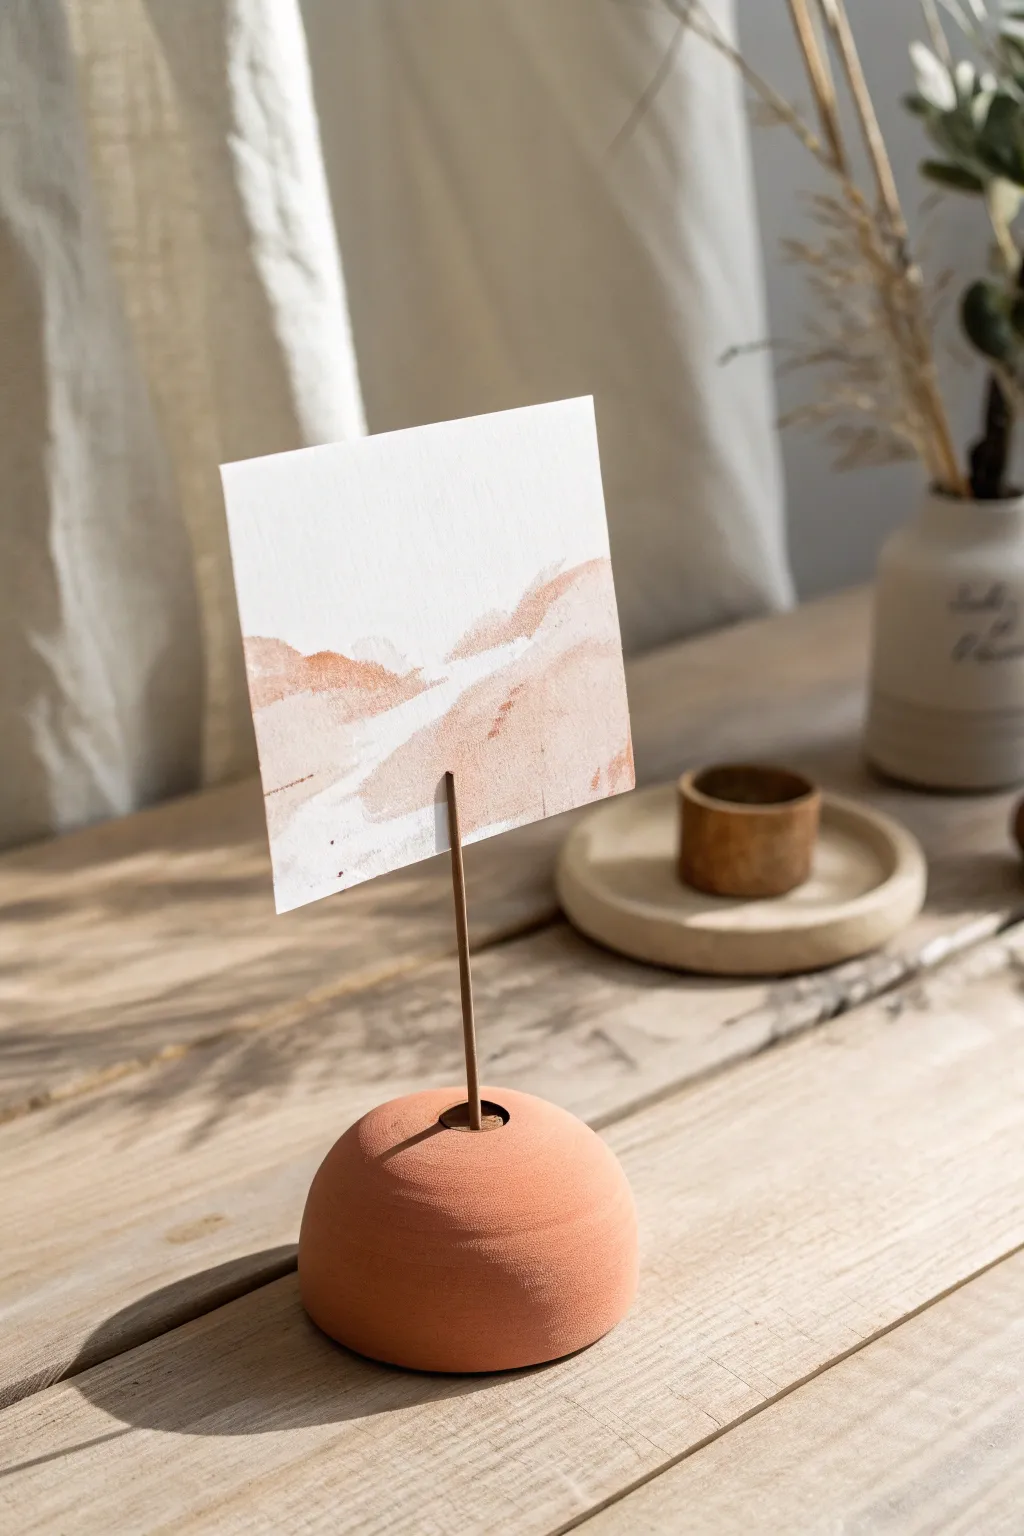
Bring an earthy, minimalist touch to your desk with this simple terracotta dome photo holder. Its warm clay tones and clean lines create the perfect understated display for your favorite polaroids, watercolor swatches, or daily affirmations.
Step-by-Step Guide
Materials
- Air-dry clay (terracotta color)
- Rigid floral wire or brass rod (12-14 gauge)
- Wire cutters
- Rolling pin
- Small bowl relative to desired dome size (for shaping)
- Fine-grit sandpaper (220 grit)
- Clear matte varnish (optional)
- Watercolor paper
- Earth-tone watercolor paints
Step 1: Shaping the Base
-
Prepare the Clay:
Start with a ball of terracotta air-dry clay roughly the size of a tangerine. Knead it in your hands for a minute to warm it up and ensure there are no air bubbles trapped inside. -
Form the Dome:
Roll the clay into a perfect sphere between your palms. Once smooth, press it gently onto your work surface to flatten the bottom, creating a solid half-sphere or dome shape. -
Refine the Surface:
Dip your finger in a little water and smooth out any fingerprints or small cracks on the surface of the dome. You want a consistent, stone-like curve. -
Cut the Wire:
Using your wire cutters, snip a piece of rigid wire or brass rod to your desired height. About 6 to 8 inches is usually perfect for a standard desk holder. -
Create the Split:
If you are using a thicker brass rod, use a small hacksaw to create a vertical slit about half an inch down one end. If using crafting wire, you can create a tight coil loop at the top instead to hold the paper. -
Insert the Stem:
While the clay is still wet, insert the non-split end of your wire directly into the center of the dome’s top. Push it down about halfway into the base for stability. -
Secure the Connection:
Gently pinch the clay around the entry point of the wire to ensure it hugs the metal tightly. I like to rotate the wire slightly as I push it in to help it seat securely.
Wobbly Wire?
If the wire feels loose after drying, pull it out, add a dab of superglue to the end, and reinsert it into the hole. Hold for 30 seconds.
Step 2: Finishing Touches
-
Allow to Dry:
Let the clay dry completely. This usually takes 24-48 hours depending on humidity. Flip the dome on its side occasionally so the bottom dries evenly. -
Sand Smooth:
Once fully dry, take your fine-grit sandpaper and lightly sand the surface of the dome. Focus on any uneven spots or rough texture left from handling. -
Clean Up:
Wipe away the clay dust with a slightly damp cloth or a soft brush to reveal the rich terracotta color underneath. -
Seal (Optional):
For a finished look, apply a thin coat of clear matte varnish. This protects the clay from moisture and deepens the color slightly without making it glossy.
Step 3: Creating the Artwork
-
Cut the Paper:
Cut a square piece of watercolor paper, roughly 4×4 inches. The texture of cold-press paper adds a nice artisanal feel. -
Mix Earthy Tones:
On your palette, mix a diluted wash of burnt sienna, yellow ochre, and a touch of rusty red to match the clay base. -
Paint Abstract Shapes:
Using a wet brush, paint organic, rolling hill shapes across the bottom third of the paper. Let the watery pigment pool slightly to create natural texture. -
Layering:
Once the first layer is damp but not dry, drop in slightly darker pigment along the ‘ridge lines’ of your painted hills to create depth and shadow. -
Assemble:
Slide your dried painting into the slit or coil of your wire holder. Adjust the angle so it catches the light beautifully.
Texture Trick
Before the clay dries, gently blot the surface with a piece of rough linen or canvas to give the dome a unique, stone-like texture.
Enjoy the serene, handcrafted vibe this little stand adds to your workspace
Hanging Clay Planter Cones

Bring a touch of geometric charm to your window with this handmade clay cone planter featuring rustic twine suspension. The earthy terracotta tones combined with crisp white accents create a warm, modern look perfect for trailing succulents.
How-To Guide
Materials
- Air-dry clay (terra cotta color) or polymer clay
- Rolling pin
- Cone template (paper or cardstock)
- Craft knife or clay cutting tool
- Slip (water mixed with clay scraps) or liquid clay adhesive
- Small wooden skewer or straw
- White acrylic paint
- Painter’s tape or masking tape
- Natural jute twine
- Fine-grit sandpaper
- Clear matte sealant (waterproof)
- Small trailing plant (like String of Hearts or Peperomia)
Step 1: Forming the Cone
-
Prepare the template:
Create a paper template in the shape of a wide fan or a sector of a circle. The radius of your circle will determine the final height of your cone, so aim for about 8-10 inches for a medium-sized planter. -
Roll the clay:
Take a large chunk of your terra cotta clay and condition it by kneading until pliable. Roll it out on a flat, non-stick surface to a uniform thickness of about 1/4 inch. -
Cut the shape:
Place your paper template onto the rolled clay. Using your craft knife, carefully trace around the template to cut out the fan shape. -
Score and slip:
Score the straight edges of your clay fan using a needle tool or knife to create texture. Apply slip (a slurry of clay and water) to these rough edges to act as glue. -
Shape the cone:
Gently lift the clay and curve it around until the scored edges meet. Press them together firmly from the inside and outside to seal the seam. -
Smooth the seam:
Use your fingers or a smoothing tool to blend the clay over the seam until it is invisible. I like to use a slightly damp sponge here to really perfect the surface. -
Refine the rim:
Inspect the top rim of your cone. If it’s uneven, trim it gently with your knife or smooth it out with wet fingers for a finished look. -
Create hanging holes:
Using a straw or a wooden skewer, punch three evenly spaced holes about half an inch below the rim. Make sure the holes are large enough for your twine to pass through later.
Step 2: Finishing and Decorating
-
Dry thoroughly:
Allow the clay to dry completely according to the package instructions. This usually takes 24-48 hours for air-dry clay; flip it occasionally for even drying. -
Sand imperfections:
Once bone dry (and before baking if using polymer), lightly sand any rough spots or sharp edges with fine-grit sandpaper. -
Tape the design:
To recreate the geometric design, apply painter’s tape to the cone. Tape off the top section to keep it natural, then tape off triangle shapes on the lower section. -
Apply paint:
Paint the exposed geometric areas on the lower half with white acrylic paint. You may need two coats for opaque coverage. -
Reveal the pattern:
Carefully peel away the tape while the paint is still slightly tacky to ensure crisp, clean lines. -
Seal the planter:
Apply a coat of waterproof sealant to the inside and outside of the cone. This is crucial for air-dry clay to prevent it from dissolving when you water your plant.
Smooth Seams
For a truly invisible seam, roll a tiny ‘snake’ of clay and press it into the join from the inside, then smooth it flat. This reinforces the structure.
Step 3: Assembly
-
Cut the twine:
Cut three equal lengths of jute twine, each about 30 inches long (or longer if you have high ceilings). -
Thread and knot:
Pass one end of a twine piece through a hole in the planter, threading from the outside in. Tie a sturdy double knot on the inside so the twine cannot pull back through. -
Repeat for all holes:
Repeat the threading and knotting process for the remaining two holes. Test the strength slightly to ensure the knots hold. -
Join the hanger:
Gather all three loose ends of twine at the top. Adjust the planter to ensure it hangs level, then tie all three strands together in a strong overhead knot. -
Add your plant:
Place a small nursery pot directly inside, or add a little soil and your lush trailing plant, adjusting the leaves to cascade over the side.
Color Block Magic
Swap the white paint for gold leaf or a strip of metallic copper paint to give your rustic planter a glamorous, high-end upgrade.
Hang your new creation in a sunny window and enjoy the play of light on the geometric details
Geometric Wall Hanging Tiles
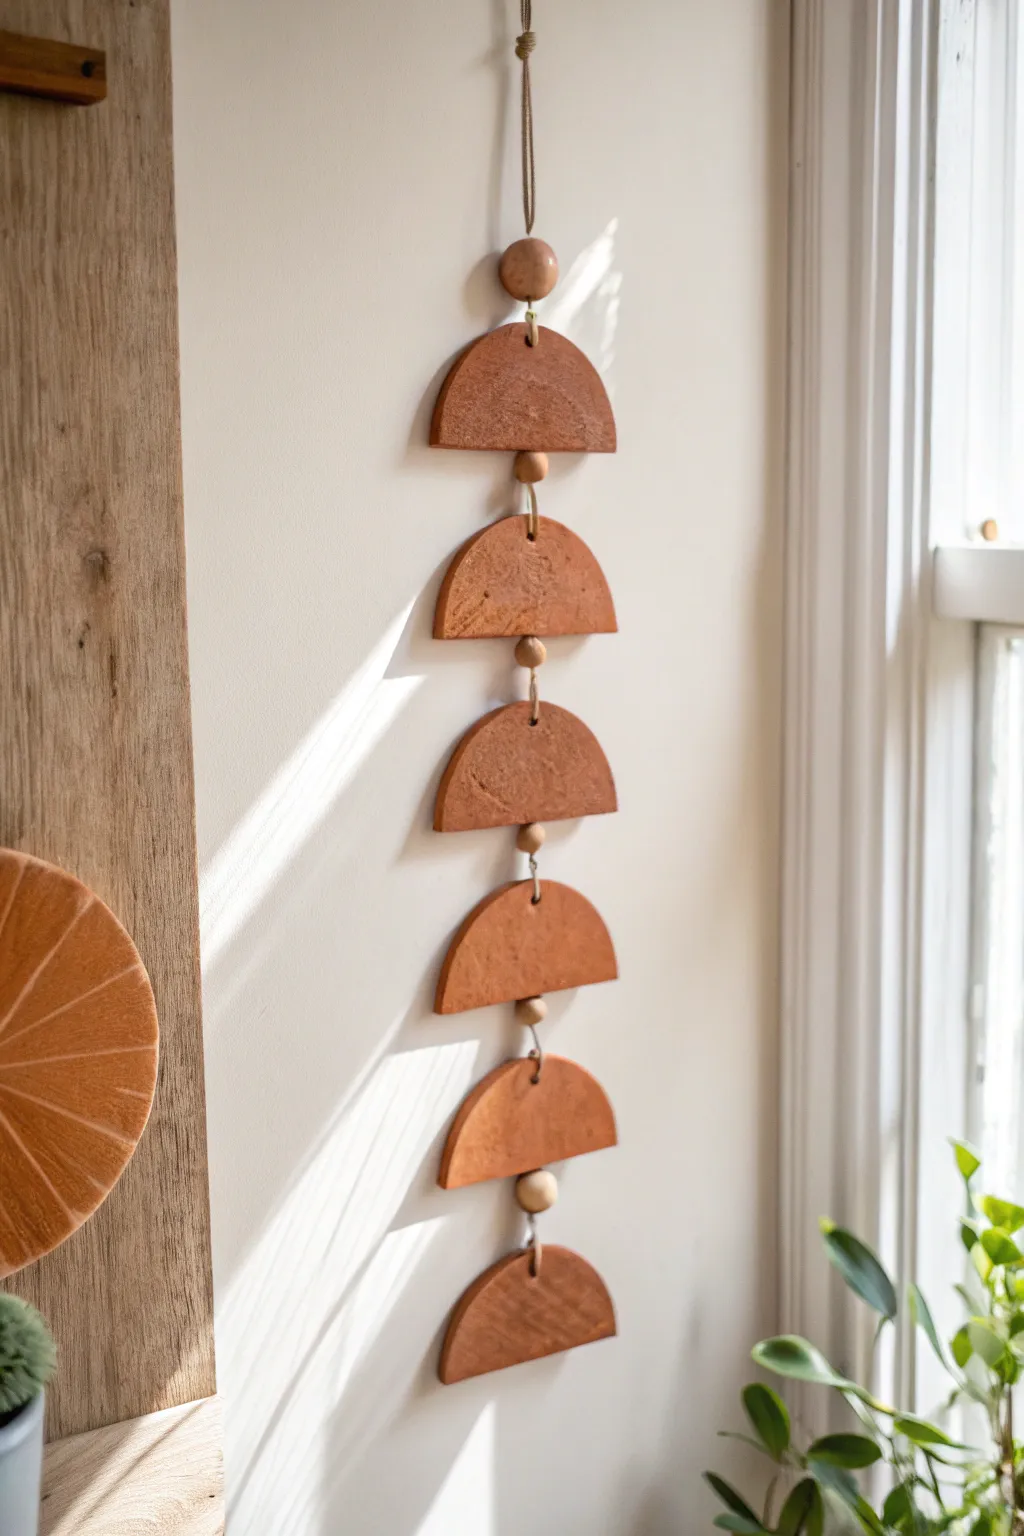
Bring earthy warmth to your walls with this vertical hanging of geometric semicircles. Reminiscent of moon phases or simple abstract art, the rich terracotta tones and natural wood beads create a perfect blend of modern and rustic style.
Step-by-Step Tutorial
Materials
- Terracotta air-dry clay or polymer clay (approx. 1 lb)
- Rolling pin
- Circle cookie cutter (approx. 3-4 inches diameter) or a glass
- Sharp craft knife or clay slicer
- Wooden dowel or straw (for piercing holes)
- Sandpaper (fine grit)
- Natural jute twine or hemp cord
- 6 small wooden beads (natural finish)
- 1 large wooden bead (for the top)
- Ruler
- Parchment paper or craft mat
Step 1: Shaping the Clay Tiles
-
Condition the clay:
Begin by kneading your terracotta clay until it’s soft, pliable, and free of air bubbles. If using polymer clay, this warms it up; for air-dry clay, it ensures smooth consistency. -
Roll out the slab:
Place the clay on parchment paper or a craft mat. Roll it out evenly to a thickness of about 1/4 inch. Try to keep the thickness consistent so the pieces hang straight later. -
Cut the circles:
Use your circle cutter or a glass rim to press three perfect circles into the clay slab. If you need more clay, re-roll the scraps and cut again until you have three full circles. -
Halve the shapes:
Using a sharp craft knife and a ruler as a guide, slice each circle exactly in half. You will need 6 semicircles total for the design shown in the image. -
Pierce the holes:
While the clay is still wet, use a wooden dowel or straw to poke holes for the string. You need two holes in every piece: one centered at the top of the curve, and one centered on the flat bottom edge. -
Smooth the edges:
Dip your finger in a little water (for air-dry clay) or use baby oil (for polymer) to gently smooth any rough edges around the cuts and holes. -
Dry or bake:
Follow the manufacturer’s instructions for your specific clay. Air-dry clay typically needs 24-48 hours to cure fully, while polymer clay needs to be baked in an oven at the specified temperature. -
Sand for finish:
Once fully cured and hard, gently sand the edges with fine-grit sandpaper to remove any burrs or sharp spots, giving the pieces a professional, stone-like look.
Uneven Drying?
If using air-dry clay, tiles might curl as they dry. To prevent this, flip them over gently every few hours during the drying process, or dry them under a light book placed on parchment paper.
Step 2: Assembling the Hanging
-
Prepare the cord:
Cut a length of jute twine or hemp cord approximately 4 feet long. Fold it in half to create a doubled strand, which adds strength and visual texture. -
Create the top loop:
Tie a knot at the folded end to create a hanging loop. Thread the large wooden bead onto both strands and slide it down to the knot. -
Attach the first tile:
Thread the two loose ends of the twine through the top hole of your first semicircle. Guide the twine down the back of the tile and out through the bottom hole. -
Add a spacer bead:
Slide one small wooden bead onto both strands of twine. Push it up so it sits snugly against the bottom flat edge of the first clay tile. -
Secure the spacing:
Tie a simple overhand knot immediately after the small bead. This prevents the next tile from sliding up and maintains a consistent gap between your geometric shapes. -
Repeat the pattern:
Thread the next semicircle on, entering through the top curved edge and exiting the flat bottom. Add a bead, then tie a knot. I usually check the spacing against a ruler here to keep everything uniform. -
Continue the chain:
Repeat this process for all remaining four tiles. Ensure each semicircle is facing the same direction, with the curve at the top and the flat edge at the bottom. -
Final bead layout:
After the last (sixth) semicircle is threaded, you don’t necessarily need a bead at the very bottom, but you can add one if you prefer the look. The image shows the final tile hanging free at the bottom edge. -
Secure the end:
Tie a sturdy double knot on the backside of the very last tile, tight against the bottom hole so it’s hidden. Trim any excess twine.
Add Subtle Texture
Before the clay dries, gently press a piece of canvas or linen fabric into the surface with a rolling pin. This gives the terracotta a gorgeous, authentic stone-like texture.
Hang your new geometric art piece near a window to catch the shifting daylight and enjoy the natural vibe it adds to your room
Moon Phase Garland
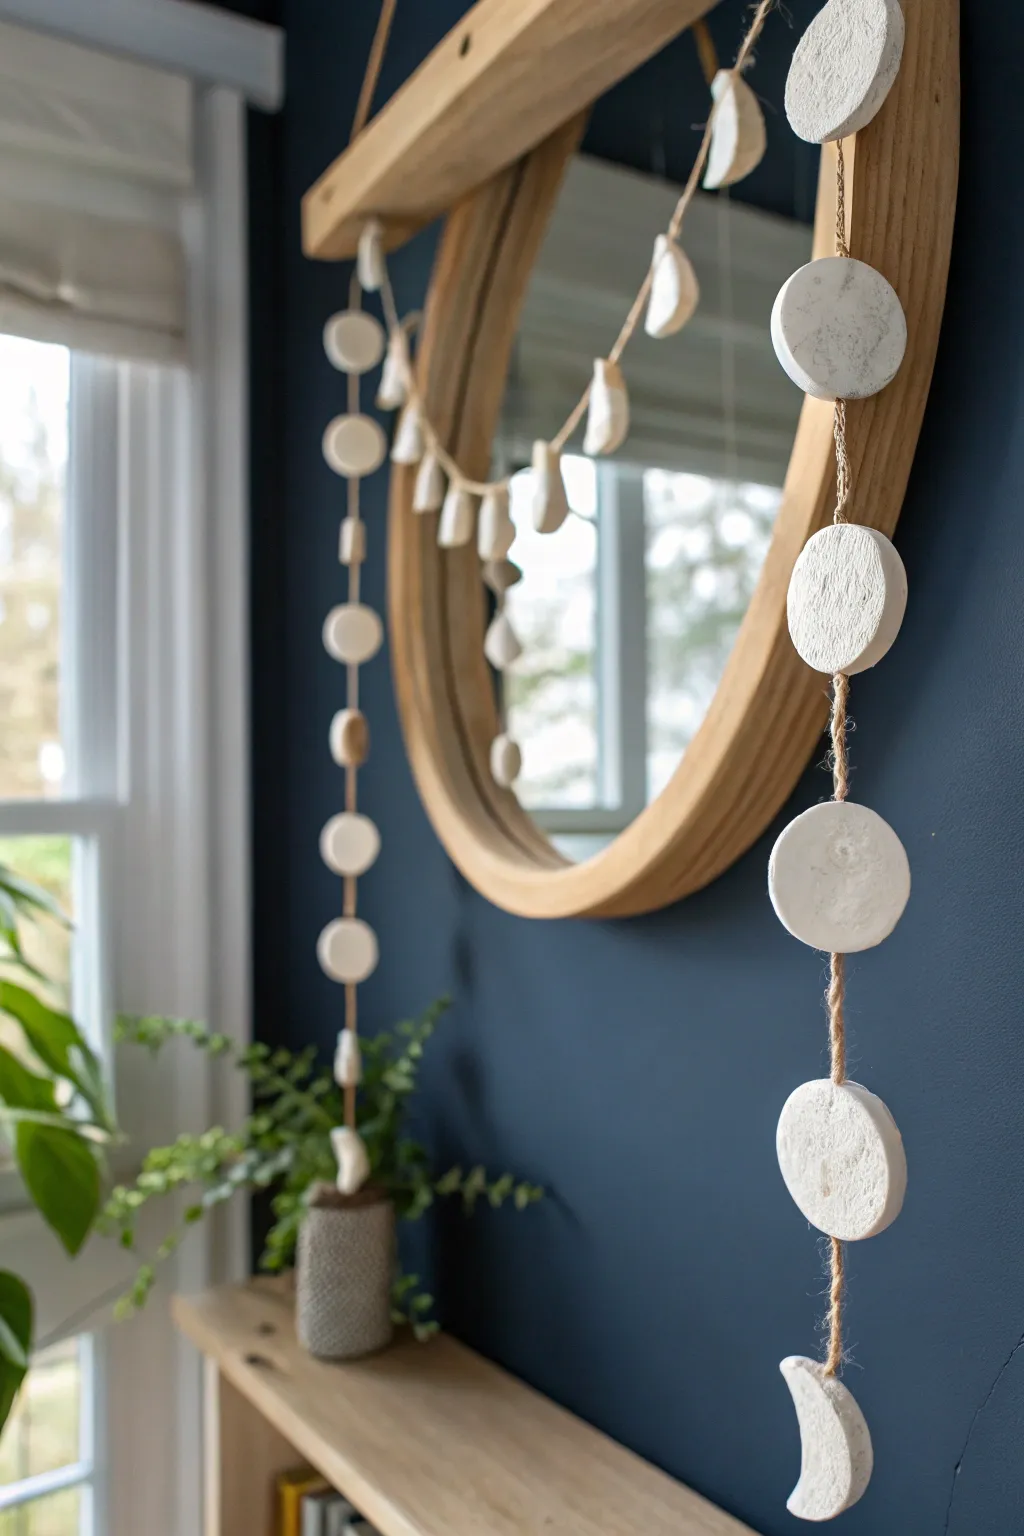
Bring the calming energy of the lunar cycle into your home with this simple yet striking wall hanging. Using textured white clay and natural twine, this project creates a beautiful organic accent that looks lovely draped over a mirror or hanging solo on a dark wall.
Step-by-Step Guide
Materials
- White polymer clay or air-dry clay (approx. 1 lb)
- Rolling pin or smooth glass bottle
- Round cookie cutter (approx. 2-2.5 inches)
- Small straw or toothpick (for piercing holes)
- Natural jute twine
- Sandpaper (fine grit)
- Parchment paper or craft mat
- Scissors
- Water (if using air-dry clay)
- Texture sponge (optional)
Step 1: Shaping the Moons
-
Prepare your workspace:
Lay down a piece of parchment paper or a silicone craft mat on a flat surface to prevent sticking. -
Condition the clay:
Knead a large chunk of your white clay until it is soft, pliable, and free of cracks. Warm clay is much easier to work with. -
Roll out the slab:
Use your rolling pin to flatten the clay to an even thickness of about 1/4 inch. If you want a uniform look, place two wooden rulers on either side of the clay to guide the rolling pin. -
Optional texturing:
If you prefer the slightly pitted, stone-like texture seen in the photo, gently press a dry sponge or crumpled aluminum foil onto the clay surface before cutting. -
Cut the full moons:
Using your round cookie cutter, stamp out several full circles. For the specific garland shown, you will need at least 5-7 full circles. -
Create crescent shapes:
Stamp out a full circle, then offset the cutter slightly over that same circle and cut again to slice away a crescent shape. Repeat this to create several waxing and waning crescents. -
Smooth the edges:
Dip your finger in a little water (for air-dry clay) or baby oil (for polymer) and gently run it along the cut edges to smooth out any sharpness or jagged bits.
Clean Edges Trick
Place a sheet of plastic wrap over the clay before using your cookie cutter. This creates a soft, rounded bevel on the edge of the clay so you won’t have to sand as much later.
Step 2: Piercing and Curing
-
Make the stringing holes:
While the clay is still wet, use a straw or toothpick to poke a hole through the center of the diameter of each circle. The hole needs to be big enough for your jute twine to pass through. -
Check hole placement:
Make sure the hole goes through the ‘side’ edge of the disc so the moon faces forward when strung, rather than through the face of the moon. This is crucial for the vertical hanging style shown. -
Dry or bake:
If using polymer clay, bake according to the package instructions (usually 275°F for 15-30 minutes). If using air-dry clay, let the pieces sit in a dry spot for 24-48 hours until completely hard. -
Sand for perfection:
Once fully cured, use fine-grit sandpaper to buff away any remaining fingerprints or rough spots on the edges.
Holes Too Small?
If your twine won’t fit through the dry clay holes, wrap a small piece of sandpaper around a thin wire or toothpick and gently file the inside of the hole until it widens.
Step 3: Assembly
-
Measure the twine:
Cut a long length of natural jute twine. It’s better to cut it too long (about 5-6 feet) and trim it later than to be too short. -
Create the anchor knot:
Tie a sturdy knot at the very bottom end of your twine. You might want to double or triple knot this so the bottom moon doesn’t slip off. -
String the first piece:
Thread the bottom-most moon (usually a crescent or full moon) onto the twine and let it rest on the bottom knot. -
Create spacing knots:
Determine how far apart you want your moons (about 2-3 inches looks balanced). Tie a simple overhand knot at that position on the twine. -
Thread the next moon:
Slide the next clay piece down until it hits that new knot. The knot will sit inside or just below the hole, holding the moon in place. -
Continue the pattern:
Repeat the knotting and threading process, working your way up the garland. I find it helpful to lay the whole arrangement on the floor first to ensure the moon phases are in the correct order. -
Final loop:
Once all moons are attached, tie a loop at the top of the twine for hanging.
Hang your lunar creation near a window to catch the shifting light throughout the day
Terrazzo-Style Speckled Decor
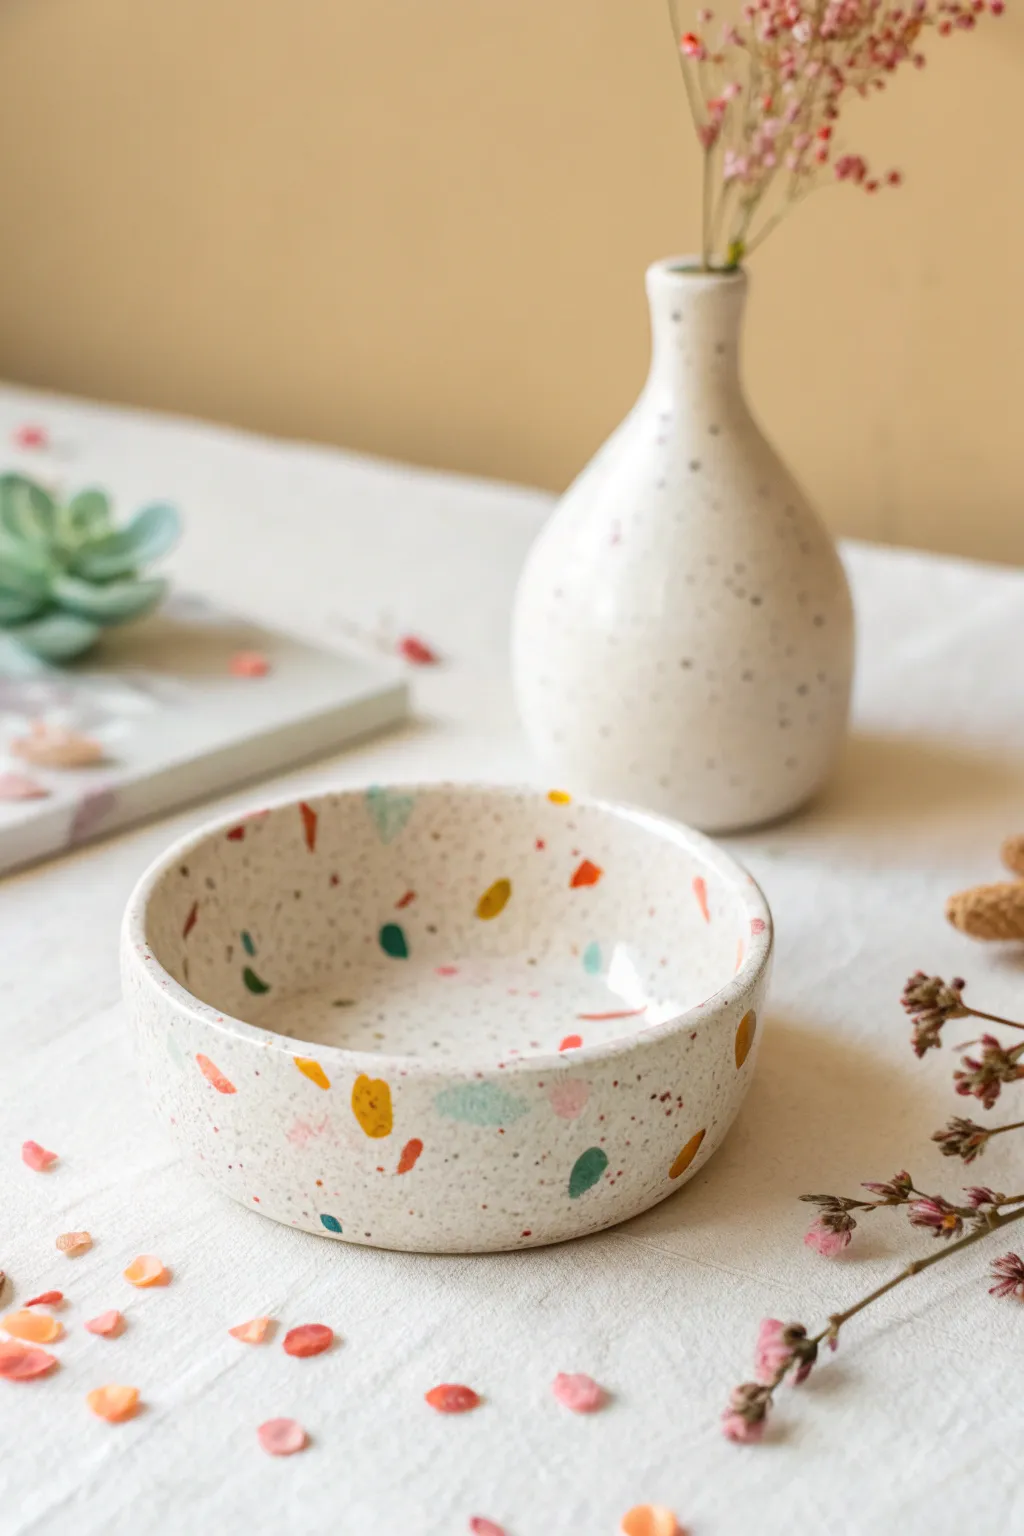
Achieve the high-end look of traditional terrazzo without the weight or cost of concrete. This project uses colorful polymer clay chips embedded into a white base to create a trendy, speckled nesting bowl perfect for holding jewelry or trinkets.
How-To Guide
Materials
- White or cream polymer clay (1 block, 2oz)
- Small amounts of polymer clay in accent colors (mustard yellow, teal, coral, peach)
- Black liquid clay or acrylic paint
- Rolling pin or acrylic roller
- Craft knife or tissue blade
- Oven-safe bowl (for use as a mold)
- Cornstarch (for release)
- Sandpaper (various grits from 400 to 1000)
- Gloss or matte polyurethane varnish brush
Step 1: Creating the Chips
-
Condition the accents:
Start by conditioning your small bits of colored clay. Warm each color up in your hands until it is pliable and soft. -
Roll thin sheets:
Roll each colored piece out as thinly as possible. You want these paper-thin because they will be the colorful chips in your terrazzo mix. -
Bake the sheets:
Place these thin colored sheets on a baking tray and bake them according to the package instructions, usually for about 10-15 minutes. They need to be fully cured and hard. -
Cool and crumble:
Once the sheets have cooled completely, break them up. I like to chop them irregularly with a craft blade to get that authentic, random shard look. -
Create fine specks:
For the tiny black specks seen in the photo, either chop cured black clay into dust-like particles or save this step for painting later.
Clean Cuts Matter
When cutting your clay chips, vary the sizes dramatically. Mixing large chunks with tiny powder-like crumbs creates a much more realistic stone effect.
Step 2: Forming the Bowl Base
-
Condition the base:
Take your large block of white or cream clay and condition it thoroughly until it’s smooth and crack-free. -
Roll the slab:
Roll the white clay out into a thick slab, approximately 1/4 inch thick. This ensures the bowl will be sturdy. -
Embed the chips:
Scatter your pre-baked colored chips onto the white slab. Press them gently into the surface with your fingers. -
Roll to integrate:
Use your acrylic roller to roll over the slab again. This forces the hard chips into the soft white clay and smooths the surface back out. -
Flip and repeat:
Flip the slab over and repeat the chip-scattering and rolling process on the other side so your bowl is beautiful inside and out.
Go Translucent
Mix a small amount of translucent clay into your white base. After baking, this adds depth and makes the faux stone look strikingly real.
Step 3: Shaping and Refining
-
Cut the circle:
Find a bowl or round cutter slightly larger than your desired finished size. Use it as a template to cut a perfect circle from your speckled slab. -
Prepare the mold:
Dust the outside of your oven-safe glass or metal bowl with a little cornstarch. This acts as a release agent so the clay doesn’t stick. -
Drape the clay:
Carefully drape your clay circle over the bottom of the upside-down bowl. Gently press the clay down the sides to take the shape of the mold. -
Smooth the shape:
Use your fingers to smooth out any air bubbles trapped between the clay and the bowl, ensuring the rim is even. -
Final Bake:
Place the bowl (with the clay still on it) into the oven. Bake according to the clay manufacturer’s instructions, typically 275°F (130°C) for 30 minutes.
Step 4: Finishing Touches
-
De-mold and cool:
Let everything cool completely before popping your clay piece off the mold. It should come off easily thanks to the cornstarch. -
Sand for smoothness:
Wet-sand the bowl under running water. Start with 400 grit to reveal the sharp edges of the colored chips, then move to 1000 grit for a silky feel. -
Add micro-specks:
If you didn’t add black chips earlier, use an old toothbrush to flick tiny droplets of diluted black acrylic paint onto the surface for extra texture. -
Seal the piece:
Apply a thin coat of polyurethane varnish to protect the surface and make the colors pop. Let it dry fully before using.
Now you have a chic, modern vessel ready to display on your coffee table or dresser
Magnetic Mini Vase Buds
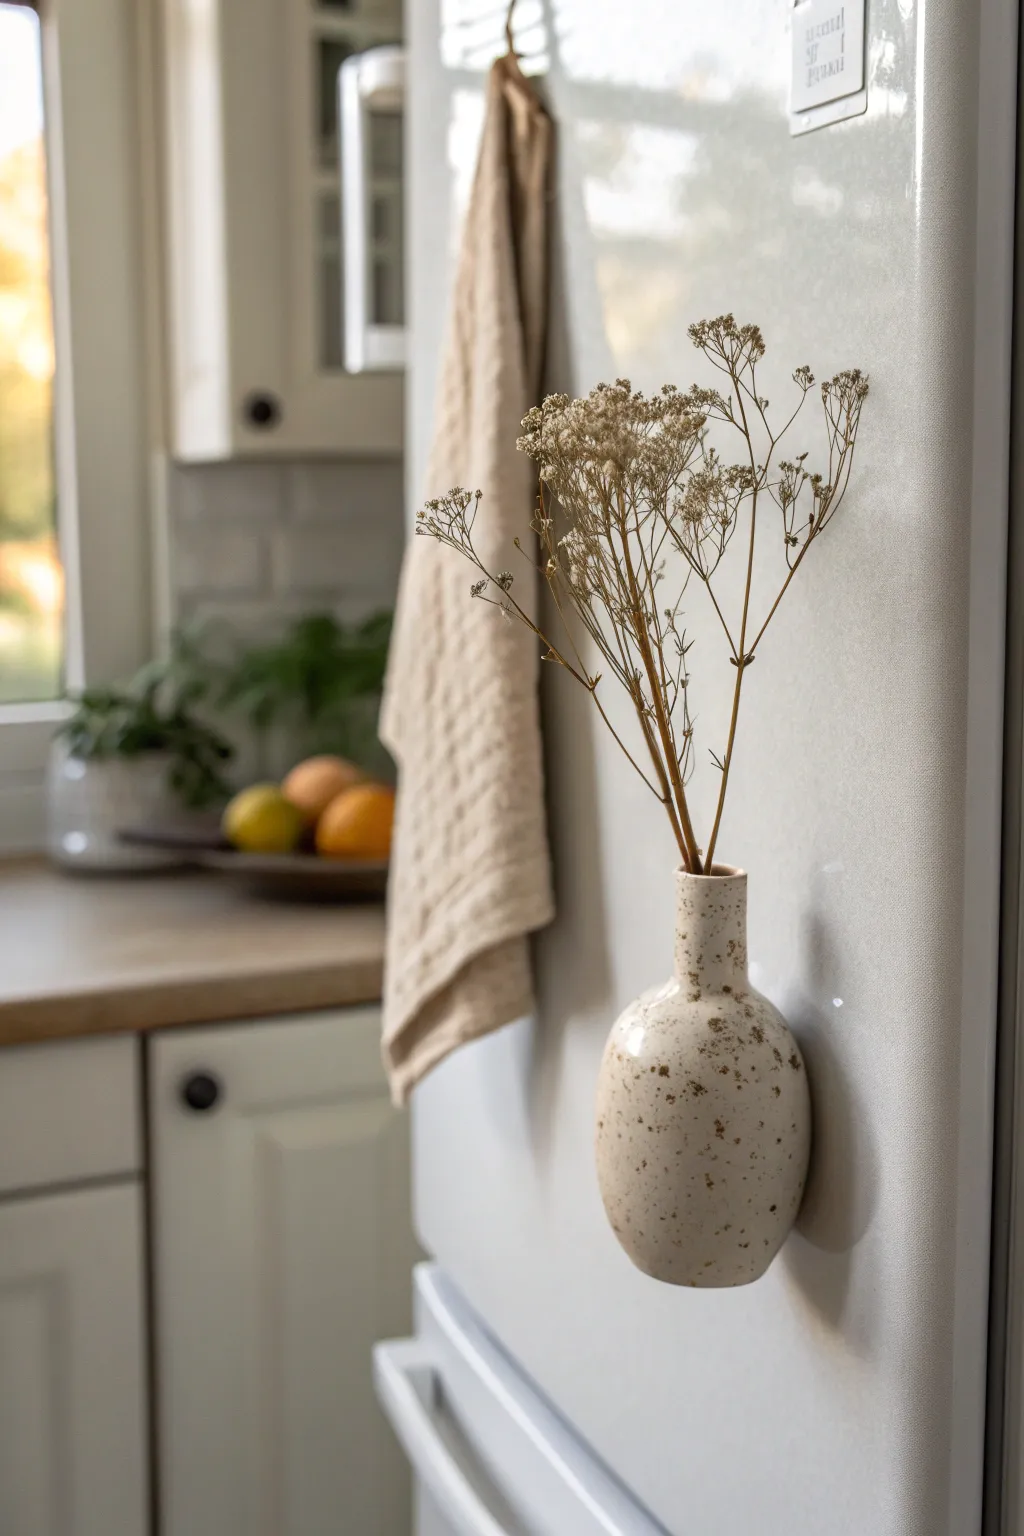
Bring a touch of minimal, farmhouse charm to your kitchen appliances with this clever magnetic bud vase. Mimicking the look of speckled stoneware, this lightweight clay project turns your refrigerator door into a vertical display for dried botanicals.
Detailed Instructions
Materials
- White polymer clay (approx. 2oz)
- Strong neodymium disc magnets (2-3, roughly 10mm)
- Acrylic rolling pin
- Sculpting tools (needle tool, ball stylus)
- Aluminum foil
- Cornstarch (for release)
- Liquid polymer clay (or reliable super glue)
- Cream or off-white acrylic paint
- Brown acrylic paint
- Old toothbrush
- Gloss or satin polyurethane varnish
- Fine-grit sandpaper (400 grit)
Step 1: Shaping the Form
-
Prepare the core:
Crumple a small piece of aluminum foil into a rough teardrop or bulb shape. This saves clay and keeps the vase lightweight, which is crucial for a magnetic project. -
Condition the clay:
Warm up your white polymer clay by kneading it in your hands until it is soft and pliable. If it feels sticky, dust your hands lightly with cornstarch. -
Roll the sheet:
Use your acrylic rolling pin to flatten the clay into a sheet about 1/4 inch thick. Make sure it’s large enough to wrap entirely around your foil core. -
Encapsulate the foil:
Place the foil core in the center of the sheet and wrap the clay around it. Pinch the seams together firmly to seal the foil inside, ensuring no air is trapped. -
Smooth the seams:
Roll the clay ball between your palms to smooth out all join lines. Gently tap the bottom against your work surface to create a slight flat base, even though it will hanging vertically. -
Sculpt the neck:
Pinch and gently pull the top of the clay form upwards to create a narrow neck. You want a distinct bottle shape, so smooth the transition where the neck meets the wider body. -
Create the opening:
Insert a needle tool or the handle of a small paintbrush into the top of the neck to create the hole for your flowers. Wiggle it gently to widen it, ensuring it goes deep enough to hold stems securely. -
Flatten the back:
Lay the vase on its side and press it gently against the table to create a flat back surface. This flat plane is essential for the magnet to sit flush against the fridge.
Sliding Down?
If the vase slides down the fridge door, the magnets are too weak or recesssed too deep. Glue a thin disc of felt or rubber over the back to add friction without adding distance.
Step 2: Embedding the Magnets
-
Position the magnets:
On the flat back side, press your neodymium magnets into the clay to make indentations. I typically use two magnets aligned vertically for better stability. -
Secure with adhesive:
Remove the magnets, add a drop of liquid polymer clay (Bake & Bond) into the indentations, and press the magnets back in so they are flush with the surface. Smooth a tiny bit of fresh clay over the edges of the magnets to lock them in. -
Refine the surface:
Do a final once-over with your finger or a smoothing tool to remove fingerprints. A drop of baby oil can help achieve a glass-smooth finish. -
Bake the piece:
Bake the vase according to the clay package instructions (usually 275°F/135°C for 15-30 minutes). Use an oven thermometer to ensure correct temperature. -
Cool and sand:
Allow the vase to cool completely. If there are any rough spots, wet-sand them gently with 400-grit sandpaper under running water.
Speckle Pro Tip
Before splattering your actual vase, practice flicking the toothbrush on a scrap piece of paper. This lets you gauge how much pressure creates the perfect size droplets.
Step 3: The Faux-Ceramic Finish
-
Base coat application:
Paint the entire vase with the cream or off-white acrylic paint. You may need two coats to get a solid, opaque ceramic look. -
Prepare the speckle:
Dilute a small mount of brown acrylic paint with water until it is very fluid, roughly the consistency of ink. -
Splatter technique:
Dip an old toothbrush into the watered-down brown paint. Hold it near the vase and run your thumb across the bristles to flick tiny specks onto the surface. -
Control the density:
Rotate the vase to ensure even coverage. Go lightly at first; you can always add more speckles, but you can’t take them away. -
Seal the deal:
Once the paint is totally dry, apply a coat of gloss or satin polyurethane varnish. This gives it that fired glaze appearance and protects the paint from scratching. -
Arrangement:
Once the varnish is cured, stick the vase to your fridge and arrange a small bundle of dried flowers, like baby’s breath or dried grasses, inside.
Now you have a charming piece of functional art ready to brighten up your kitchen space
Handmade Clay Knobs and Pulls
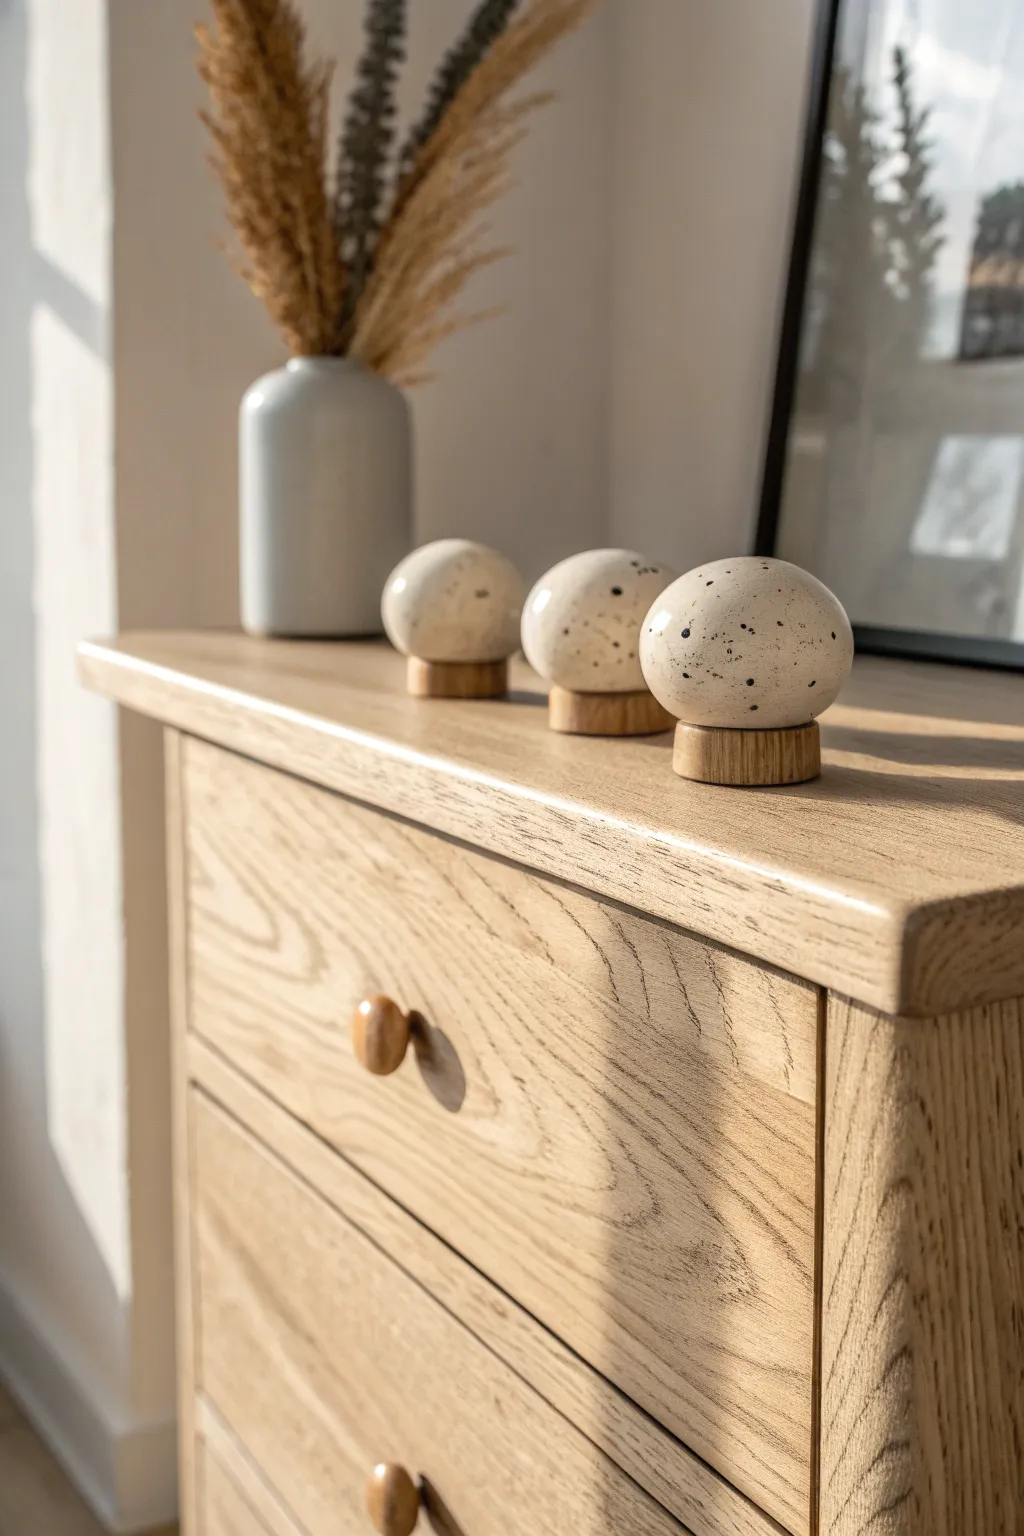
Transform your furniture with these sophisticated, nature-inspired knobs that mimic the look of speckled eggs. The combination of creamy polymer clay and natural wood bases creates a calming, organic aesthetic perfect for any modern rustic or Scandinavian interior.
How-To Guide
Materials
- White polymer clay (approx. 2oz per knob)
- Beige or transluscent polymer clay (for mixing)
- Black acrylic paint
- Old toothbrush or stiff bristle brush
- Wooden dowel (1-inch diameter) or pre-cut wooden discs
- Strong two-part epoxy glue
- Threaded inserts and screws (drawer hardware kit)
- Fine-grit sandpaper (400 and 800 grit)
- Matte spray varnish
- Drill with bits matching your hardware
- Sharp blade
- Oven
Step 1: Preparing the Clay Body
-
Mix the base color:
Begin by conditioning the white polymer clay until it is soft and pliable. To achieve the natural off-white eggshell color seen in the photo, mix in a very small amount of beige or translucent clay. -
Shape the rough form:
Divide your clay into equal portions, one for each knob you plan to make. Roll each portion into a smooth ball between your palms to remove any initial seams. -
Refine the shape:
Gently shape the sphere into a slightly flattened, organic dome. You want it to look like the top half of a bird’s egg—rounded on top but flat on the bottom where it will attach to the wood. -
Check sizing:
Place your clay dome onto your wooden dowel or disc to ensure the proportions look correct. The clay should overhang the wood slightly for a mushroom-cap effect. -
Smooth imperfections:
Use a light touch with your fingertips to smooth out any fingerprints. I find a tiny drop of baby oil helps create a glass-smooth surface before baking.
Uneven Splatter?
If your paint speckles look too clustered or smeary, wipe the raw clay clean with a baby wipe immediately and try again. Distance is key—hold the brush 6 inches away.
Step 2: Adding the Speckles
-
Prepare the splatter paint:
Dilute a small dollop of black acrylic paint with water until it reaches an ink-like consistency. It needs to be fluid enough to fly off bristles but opaque enough to show up. -
Test the splatter:
Dip an old toothbrush into the paint and run your thumb across the bristles over a scrap piece of paper first. Practice controlling the size of the droplets. -
Apply the pattern:
Flick the paint onto your unbaked clay domes. Aim for a random distribution with a mix of tiny mist-like dots and a few larger, distinct spots to mimic a natural eggshell pattern. -
Let the paint dry:
Allow the acrylic splatter to dry completely on the raw clay. This usually takes about 10-15 minutes. -
Bake the clay:
Bake the pieces according to your polymer clay package instructions (usually around 275°F/135°C for 30 minutes). Use an oven thermometer to ensure accuracy.
Level Up: Stone Texture
Mix dried used coffee grounds or cracked black pepper directly into the clay body before shaping. This adds real physical texture and depth beneath the painted speckles.
Step 3: Wood Base & Assembly
-
Prepare wooden bases:
If using a dowel, saw off 0.5-inch slices to create the bases. Sand the edges of your wooden discs until they are smooth and touchably soft. -
Drill the hardware hole:
Find the exact center of each wooden disc. Drill a hole through the center sized to fit your threaded insert or screw. -
Install the insert:
Screw the threaded insert into the wooden base. This ensures your knob will attach securely to the furniture later without stripping the wood. -
Seal the clay:
Once the clay domes are cool, lightly sand the bottom surface to give it ‘tooth’ for the glue. Spray the top speckled surface with a matte varnish to protect the paint. -
Glue components together:
Mix a small amount of two-part epoxy. Apply it to the top of the wooden base and press the clay dome firmly onto it, centering carefully. -
Cure the handle:
Let the epoxy cure undisturbed for at least 24 hours. The bond needs to be extremely strong to withstand the pulling force of opening a heavy drawer. -
Final installation:
Attach your new knobs to your dresser using the screws from the inside of the drawer, tightening until the wooden base sits flush against the furniture front.
Now you have a unique set of custom hardware that brings a gentle, organic touch to your living space