When you’re staring at a lump of clay and waiting for inspiration to hit, a simple, cute design idea is the fastest way to get your hands moving. These clay design ideas are the kind I love to make (and teach) because they’re beginner-friendly, small-scale, and actually useful once they’re done.
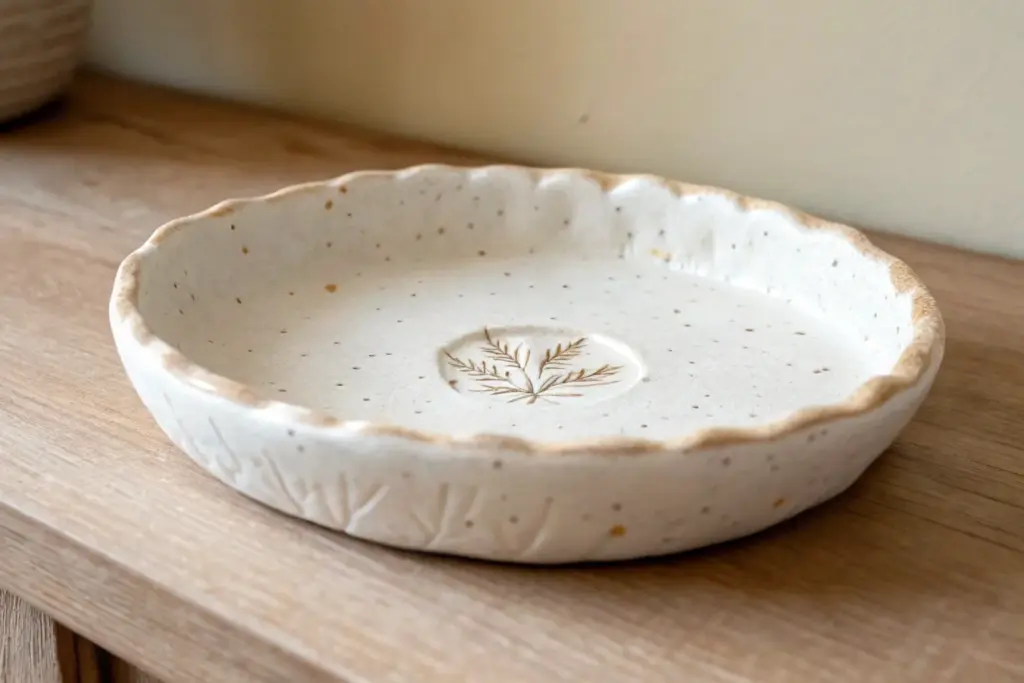
Minimalist Ring Cone Holder
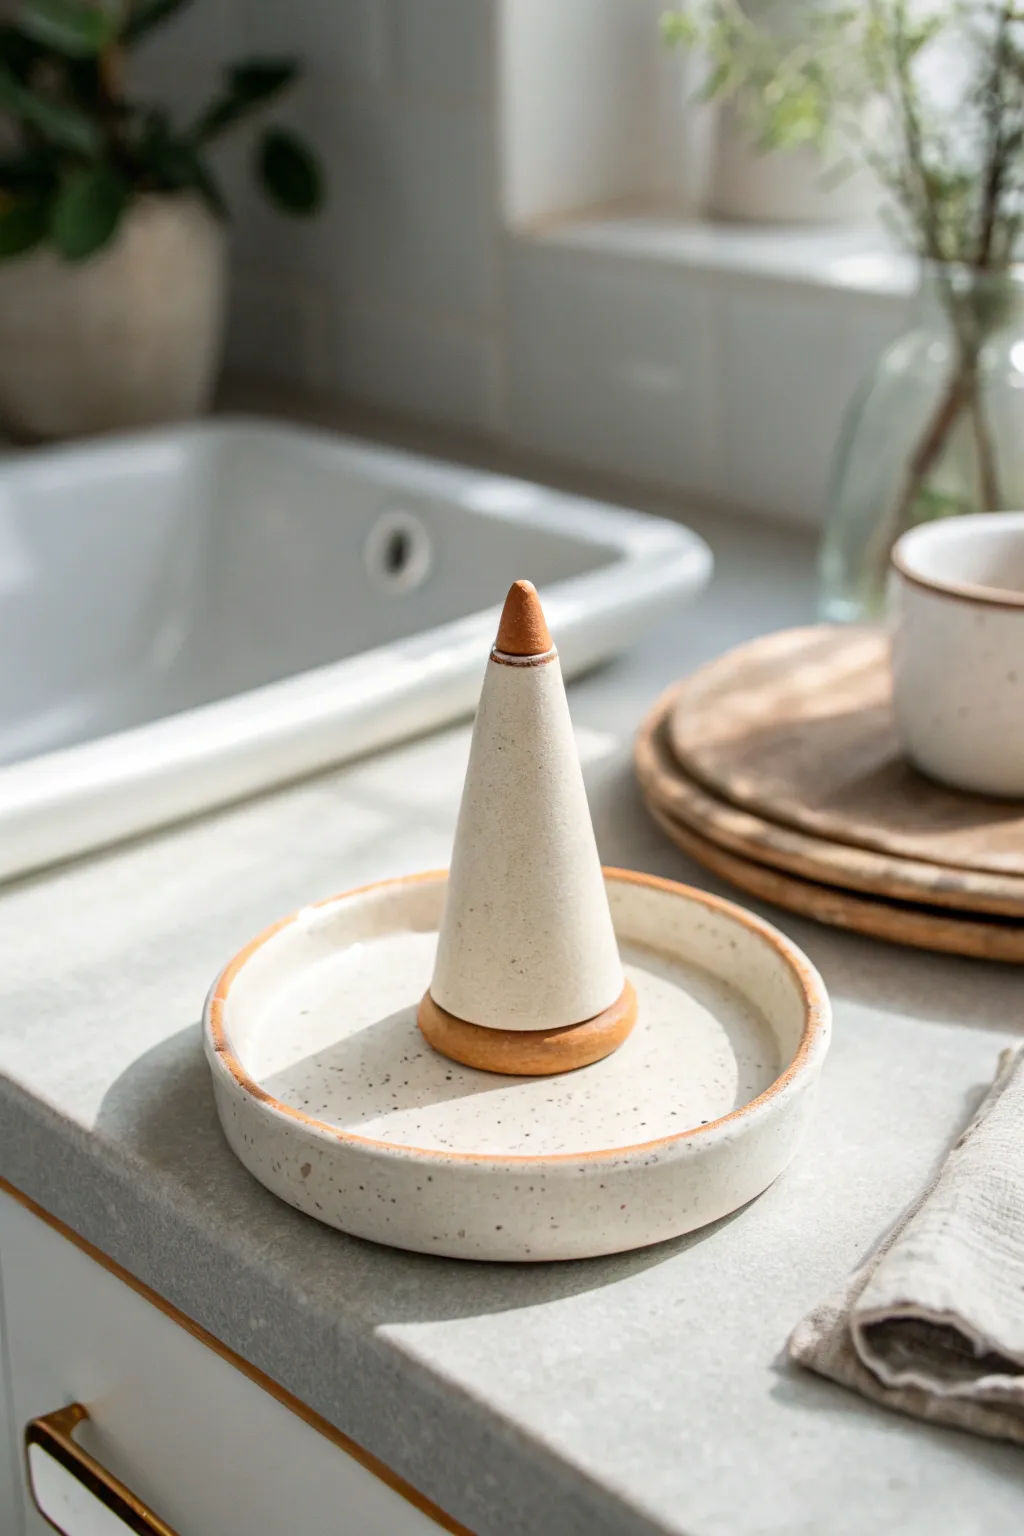
This minimalist ring holder combines functional simplicity with an earthy, organic aesthetic, featuring a speckled cream glaze and raw clay accents. The design consists of a shallow catch-all dish perfect for earrings and a central cone to keep rings organized and on display.
Step-by-Step
Materials
- White stoneware clay with speckles (or standard white clay)
- Terracotta or red stoneware clay (for contrast accents)
- Clay roller or rolling pin
- Circle cutter (approx. 4-5 inches)
- Fettling knife or needle tool
- Scoring tool and slip
- Smoothing sponge
- Clear or speckled cream glaze
- Small paintbrush for glazing
- Wax resist (optional)
Step 1: Forming the Base Dish
-
Roll the slab:
Begin by rolling out your white speckled clay to an even thickness of about 1/4 inch. Ensure the surface is smooth and free of air bubbles. -
Cut the circle:
Use your circle cutter or a template to cut a perfect round base. This will act as the catch-all tray for smaller jewelry items like studs or delicate chains. -
Create the rim coil:
Roll a thin, even coil of clay. This can be made from the same white clay or, for a subtle variation, you could mix in a tiny bit of the red clay, though the image suggests the rim is glazed white clay with an exposed edge. -
Attach the rim:
Score the outer edge of your circular base and brush on a little slip. Gently press the coil onto the edge to create a raised barrier. -
Blend the rim:
Using your thumb or a modeling tool, blend the inside of the coil seamless into the base. I like to keep the outside edge slightly rounded but distinct.
Clean Lines
For the sharpest transition between clay bodies, wipe the exposed terracotta areas with a damp sponge right after glazing to remove any haze.
Step 2: Sculpting the Cone
-
Roll the main cone:
Take a lump of the white clay and roll it into a taller cone shape. It should taper smoothly from a wider base to a narrow top. Aim for a height of about 3 inches. -
Refine the shape:
Roll the cone on your work surface gently to smooth out any finger marks and ensure it is perfectly round and symmetrical. -
Create the contrast base:
Roll a small ball of the terracotta/red clay and flatten it into a small disc, slightly wider than the base of your white cone. -
Add the contrast tip:
Take a tiny amount of the terracotta clay and fashion a small point. Slice the very tip off your white cone and attach this red clay point using the score and slip method.
Step 3: Assembly & Finishing
-
Attach base to cone:
Score the bottom of the white cone and the top of the terracotta disc. Slip and press them together firmly. -
Center the assembly:
Find the exact center of your dish. Score both the dish surface and the bottom of the terracotta disc. -
Secure the cone:
Press the cone assembly onto the dish. Use a small tool to clean up any excess slip that squeezes out, ensuring a crisp transition between the red clay base and the white dish. -
Dry slowly:
Loosely cover the piece with plastic to let it dry slowly. This prevents the rim or the cone connection from cracking due to uneven shrinkage. -
Bisque fire:
Once bone dry, fire the piece to the appropriate cone for your clay (usually cone 04 or 06).
Height Variation
Make a set of three with cones of varying heights and widths to create a sculptural landscape on your dresser.
Step 4: Glazing
-
Wax resist application:
Apply wax resist carefully to the terracotta tip, the terracotta base ring, and the very top edge of the dish rim. This keeps those areas raw and unglazed. -
Apply the glaze:
Dip or brush a coat of speckled cream or clear matte glaze over the entire white portion of the piece. The wax will repel the glaze from your accent areas. -
Clean up:
Sponge off any stray droplets of glaze that may be sitting on top of the waxed areas to ensure a clean, crisp line. -
Final smooth:
Check the underside of the dish to ensure no glaze is on the bottom, which would fuse it to the kiln shelf. -
Glaze fire:
Fire the piece again to the final maturity temperature of your clay and glaze (often cone 5 or 6 for stoneware).
Place this lovely organizer on your vanity or kitchen sill to keep your treasures safe and stylishly displayed


Sweet Trinket Dish With Scalloped Edge

This delicate trinket dish combines a soft, blush-pink glaze with charming speckles and a wavy scalloped rim. It’s the perfect size for holding your favorite rings or small treasures, adding a touch of handmade elegance to any dresser.
Step-by-Step Tutorial
Materials
- Polymer clay (white or translucent)
- Acrylic rolling pin
- Circular clay cutter (approx. 4 inches) or a bowl to trace
- Acrylic paints (pastel pink, black, dark brown)
- Small paintbrush or toothbrush for speckling
- Gloss glaze or varnish for polymer clay
- Soft paintbrush for glazing
- Small bowl or curved baking form (oven-safe)
- Cornstarch or baby powder (release agent)
- Modeling tool or finger for shaping
Step 1: Preparing the Base
-
Condition the Clay:
Begin by warming the polymer clay in your hands, kneading it thoroughly until it is soft, pliable, and free of any air bubbles. -
Roll it Out:
Use your acrylic rolling pin to flatten the clay into an even sheet. Aim for a thickness of about 1/4 inch so the dish feels substantial but not chunky. -
Cut the Circle:
Press your circular cutter firmly into the clay sheet to create a perfect circle. If you don’t have a cutter, place a small bowl upside down on the clay and trace around it with a craft knife. -
Smooth the Edges:
Gently run your finger dipped in a little cornstarch around the cut edge to smooth out any sharpness or burrs left by the cutter.
Step 2: Forming the Scallops
-
Create the Waves:
To make the scalloped edge, gently push the clay inward with your finger at regular intervals around the rim. -
Refine the Shape:
Pinch the sections between your pushes slightly to emphasize the outward curve. Move around the circle until you have a consistent wavy pattern. -
Pre-Shape the Dish:
Lift the clay circle and gently cup it in your palm to begin forming the bowl shape. -
Support the Form:
Place the clay onto your oven-safe curved form or upside-down bowl. Ensure the scalloped edges are resting naturally and retain their wavy appearance.
Natural Speckle Hack
Mix dried coffee grounds or cracked black pepper directly into the raw clay before rolling. This creates permanent, embedded speckles that won’t rub off.
Step 3: Baking and Decorating
-
Bake the Clay:
Bake the dish according to the manufacturer’s instructions on your clay package. Let it cool completely before removing it from the form. -
Apply Base Color:
Mix a soft, uneven wash of pastel pink acrylic paint. You want a slightly translucent, organic look rather than a solid, heavy coat. -
Paint the Surface:
Brush the pink wash over the entire dish. I often dab the paint with a paper towel while it’s wet to create that subtle texture seen in the photo. -
Create the Speckles:
Dilute a small amount of dark brown or black acrylic paint with water. Dip a toothbrush or stiff brush into the mixture. -
Splatter Technique:
Hold the brush over the dish and run your thumb across the bristles to flick tiny droplets of paint onto the surface. Practice on paper first to control the spray. -
Let it Dry:
Allow the paint layers to dry completely. This is crucial to prevent smudging during the glazing process.
Uneven Scallops?
If the waves look irregular, use a large marker cap as a guide. Press the side of the cap gently into the edge at intervals to create uniform indentations.
Step 4: Finishing Touches
-
Seal the Dish:
Apply a thin, even coat of gloss glaze or varnish. This mimics the look of ceramic glaze and protects the paint. -
Check for Pools:
Watch for glaze pooling in the bottom of the dish or in the scalloped crevices. Brush away excess accumulation immediately. -
Final Cure:
Let the glaze cure fully according to the bottle instructions, usually for 24 hours, before placing jewelry inside.
Now you have a charming, handmade vessel ready to keep your daily jewelry safe and organized


Chunky Coil Bowl With Simple Texture
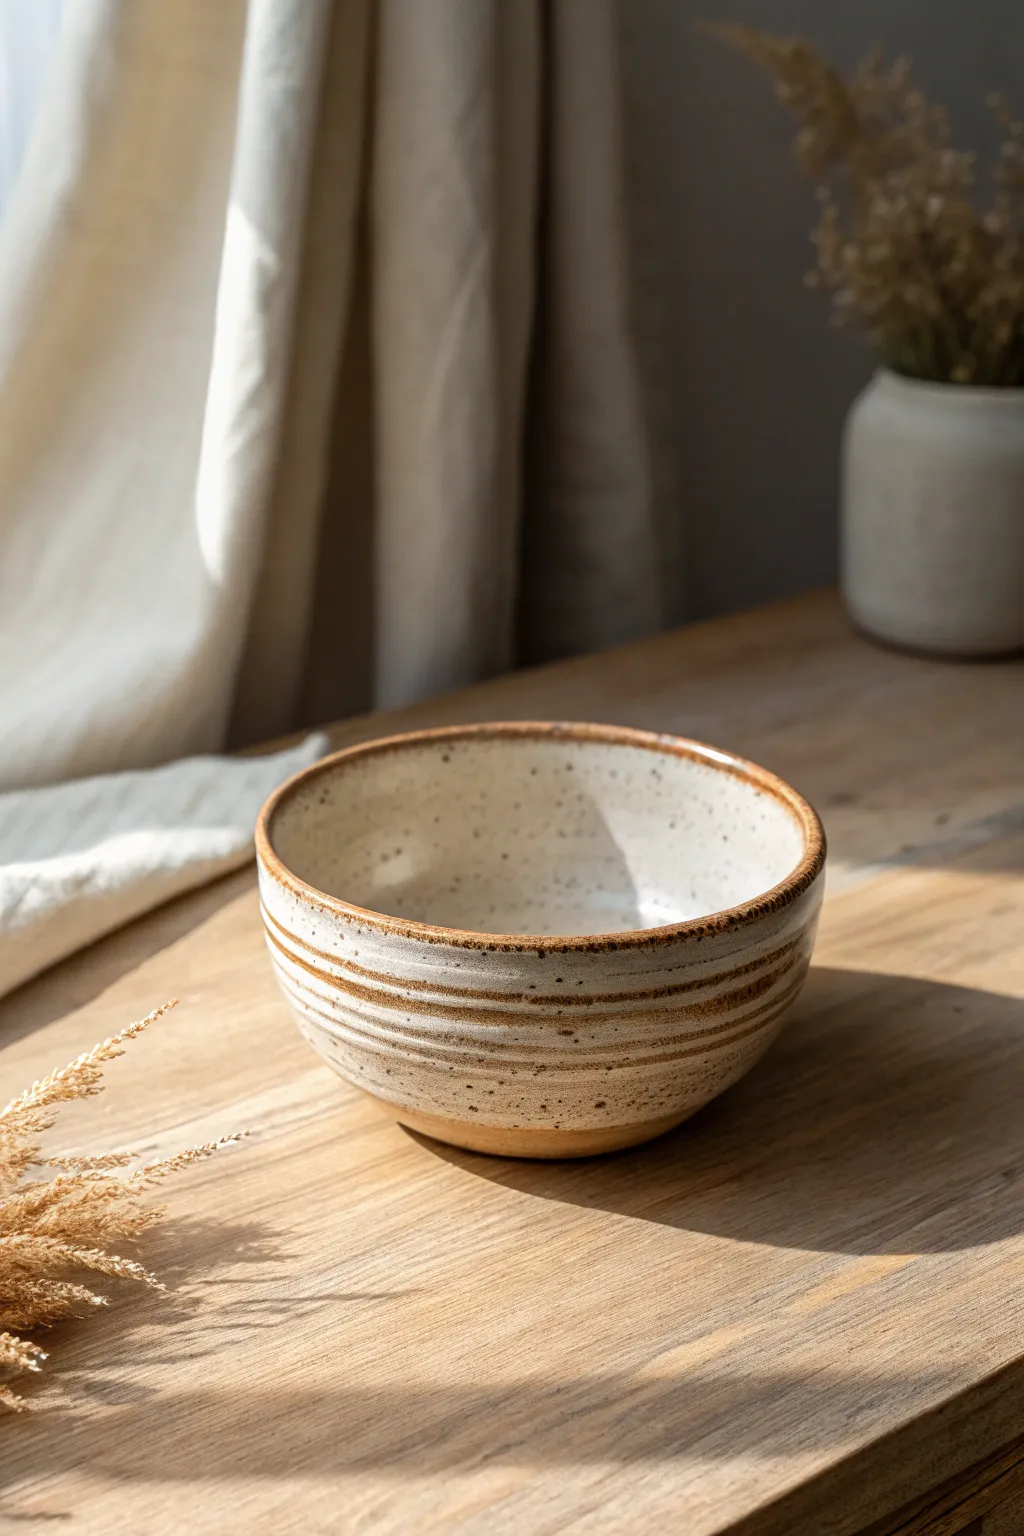
Embrace the organic feel of hand-building with this sturdy coil bowl, featuring distinct horizontal ridges and a warm, earthy finish. The speckled cream glaze contrasts beautifully with the raw clay rim, creating a piece that feels both rustic and refined.
Step-by-Step Guide
Materials
- Stoneware clay (speckled or buff)
- Pottery wheel or banding wheel
- Rolling pin and guide strips (optional)
- Wooden modeling tool
- Metal rib kidney
- Serrated rib tool
- Sponge
- Creamy white speckled glaze
- Iron oxide wash (optional)
- Kiln
Step 1: Building the Form
-
Prepare the Base:
Start by rolling out a slab of clay about 1/4 to 3/8 inch thick. Cut a perfect circle roughly 4 inches in diameter for the base of your bowl. -
Create Coils:
Roll out several snake-like coils of clay. Aim for a thickness similar to your pinky finger to ensure the walls remain chunky but manageable. -
Score and Slip:
Score the outer edge of your base circle using a serrated rib or needle tool, then brush on a little slip (clay and water mixture). -
Attach First Coil:
Lay your first coil onto the scored edge. Press it firmly down to attach it to the base, blending the clay downwards on the inside of the bowl only. -
Stack Upwards:
Continue adding coils one by one, scoring and slipping between each layer. As you stack, slightly angle the coils outward to widen the bowl’s shape. -
Blend the Interior:
After every 2-3 coils, stop to smooth the inside walls completely. Drag the clay from the upper coil down into the lower one with a wooden tool or your thumb to create a seamless interior surface.
Seamless Interior
Use a flexible metal rib on the inside while the clay is soft. Bend the rib to match the curve of the bowl and scrape upward to remove all coil textures.
Step 2: Refining and Texturing
-
Consolidate the Shape:
Once you reach the desired height, use your hands to gently cup the exterior and shape the curve while supporting the wall from the inside. -
Smooth the Rim:
Run a damp sponge or piece of chamois leather over the top rim to compress the clay and round it off, preventing sharp edges. -
Define the Ridges:
Instead of smoothing the outside, use a wooden modeling tool to actually accentuate the seams between coils. Deepen the grooves slightly to create those distinct horizontal lines seen in the photo. -
Dry Slowly:
Cover the bowl loosely with plastic and let it dry slowly to the leather-hard stage. This prevents warping. -
Trimming the Foot:
Flip the leather-hard bowl over. If you have a banding wheel, center the bowl and use a loop tool to carve a shallow foot ring into the base. -
Bisque Fire:
Allow the bowl to dry completely (bone dry) before loading it into the kiln for the first bisque firing.
Step 3: Glazing and Finishing
-
Wax the Foot:
Apply wax resist to the bottom foot ring to prevent glaze from sticking to the kiln shelf. -
Apply Oxide Wash (Optional):
To get those dark brown stripes, brush a thin iron oxide wash into the exterior grooves and wipe the surface back with a sponge, leaving darkness only in the recesses. -
Wax the Rim:
Carefully paint a line of wax resist along the top rim of the bowl if you want that raw, unglazed clay band shown in the image. -
Dip Glaze:
Dip the entire bowl into a bucket of creamy white speckled glaze. Hold it there for 3-5 seconds to get an even coat. -
Clean Up:
Once the glaze is dry on the pot, wipe away any drips from the waxed rim or the foot ring with a damp sponge. -
Glaze Fire:
Fire the bowl a second time to the temperature required by your specific clay and glaze body (usually Cone 5 or 6 for stoneware).
Level Up: Dual Textures
Try paddling the exterior gently with a flat wooden paddle before drying. This flattens the round coils slightly for a faceted, geometric look.
Enjoy using your new handmade bowl for morning cereal or serving warm soups.


One-Brush Toothbrush Holder Creature
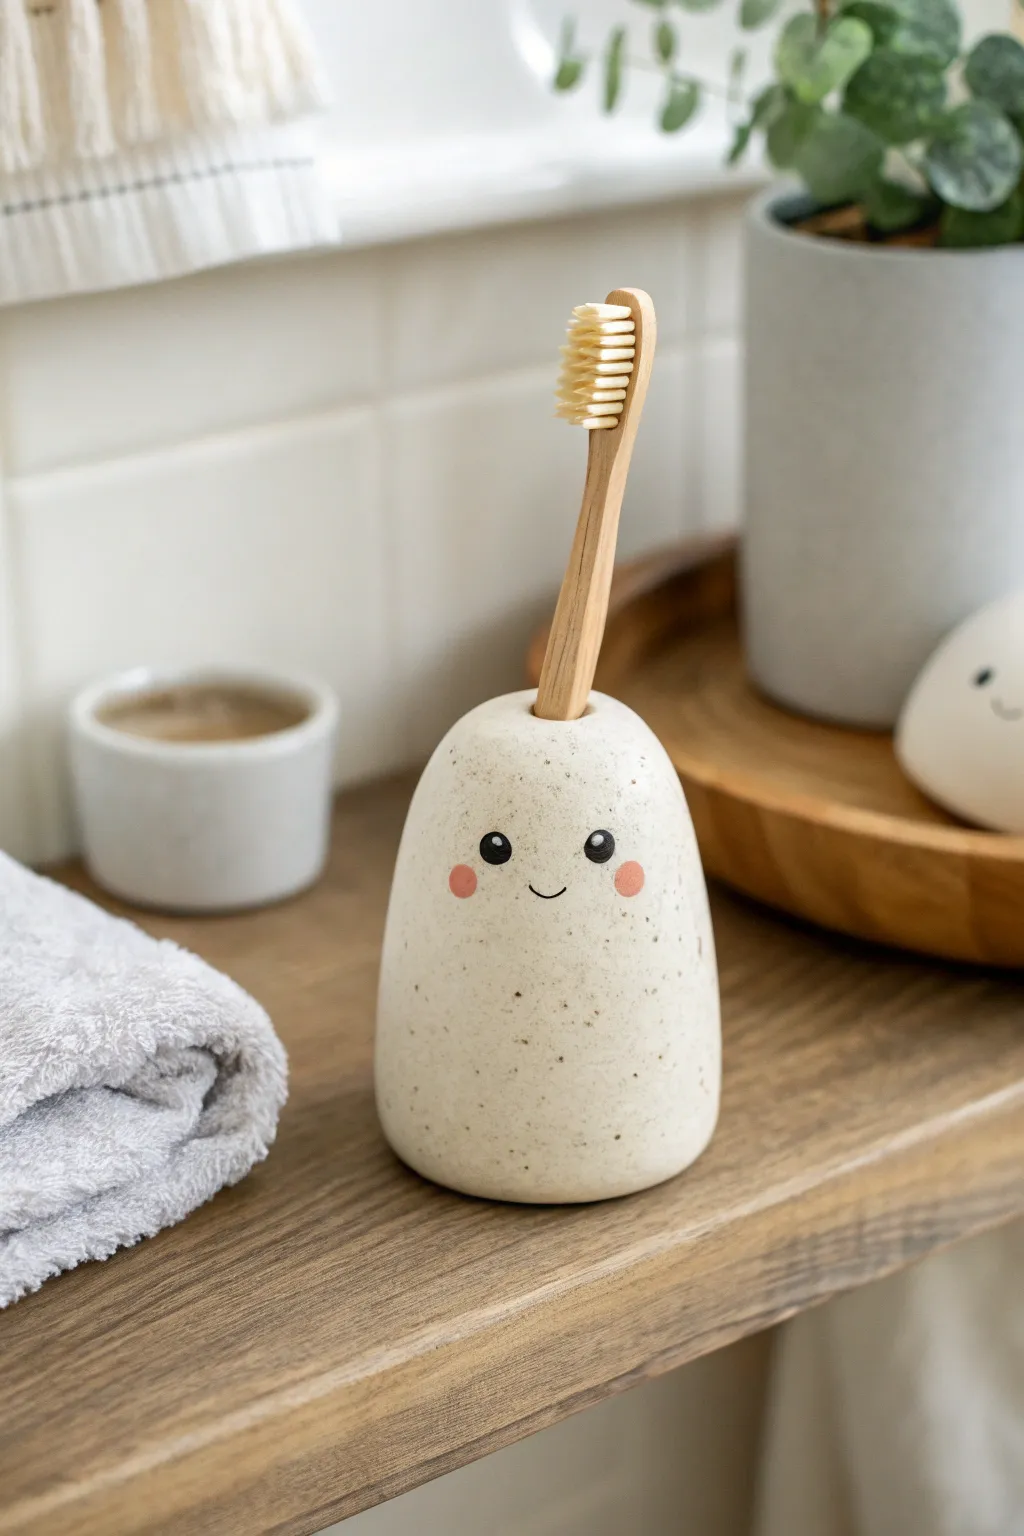
Brighten up your morning routine with this adorable, minimalist toothbrush holder that looks like a friendly little spirit. Its speckled, stone-like finish and simple painted face give it a charming personality while keeping your counter organized.
Step-by-Step
Materials
- White stoneware or polymer clay (oven-bake)
- Speckled clay additive or black pepper (if using polymer)
- Standard toothbrush (for sizing)
- Modeling tools (or a chopstick)
- Acrylic paints (black and light pink)
- Fine detail paintbrush
- Clear waterproof varnish or glaze
- Sandpaper (fine grit)
- Rolling pin
Step 1: Shaping the Creature
-
Prepare the Clay:
Begin by conditioning your clay until it is soft and pliable. If you want that lovely speckled look shown in the photo but only have plain white polymer clay, knead in a small pinch of cracked black pepper or dried used coffee grounds now. -
Form the Base:
Roll a ball of clay about the size of a large tangerine. It needs to be heavy enough to counterbalance the weight of a toothbrush, so don’t make it too small. -
Create the Dome Shape:
Gently shape the ball into a rounded cone or gumdrop shape. Flatten the bottom against your work surface so it sits completely stable without wobbling. -
Smooth the Sides:
Using your palms, smooth the sides of the dome upward. You want a distinct taper toward the top, but keep the peak rounded, not sharp. -
Create the Holder Hole:
Take your actual toothbrush (or a tool of similar diameter) and press the handle straight down into the center of the dome’s top. Push it deep enough to support the brush, about two-thirds of the way down. -
Widen the Tolerance:
Wiggle the handle slightly to make the hole just a hair wider than the brush. Clay shrinks slightly (especially ceramic clay), so you need a little extra room for a comfortable fit. -
Refine the Opening:
Remove the brush and smooth the edges of the opening with your fingertip or a damp sponge to remove any sharp ridges. -
Final Surface Smoothing:
Look over the entire piece for fingerprints. I like to dip my finger in a tiny bit of water (or baby oil for polymer) and gently buff the surface until it looks seamless.
Unstable Base?
If the holder tips over when you put a brush in, the base isn’t wide enough. Add a flat disk of clay to the bottom to create a wider footprint before baking.
Step 2: Finishing and Decorating
-
Bake or Fire:
If using polymer clay, bake according to the package instructions (usually 275°F for 15-30 minutes). If using ceramic clay, proceed with your kiln firing schedule. -
Cool Down:
Allow the piece to cool completely. It must be room temperature before we add any painted details. -
Light Sanding:
If there are any rough spots on the bottom or near the opening, gently scuff them away with fine-grit sandpaper. -
Mix the Eye Color:
Squeeze out a tiny dot of black acrylic paint. You want a solid, opaque black for those expressive eyes. -
Paint the Eyes:
Using your smallest detail brush, paint two small circles about halfway down the body. Space them wide apart to get that cute ‘kawaii’ look. -
Add the Glint:
Once the black is dry, use a toothpick to place a microscopic dot of white paint in the upper right corner of each black eye. This reflection brings the character to life. -
Draw the Smile:
Paint a tiny, shallow ‘U’ shape right between the eyes. Keep it thin and delicate. -
Add Rosy Cheeks:
Mix a soft pastel pink. Paint two small circles slightly lower and wider than the eyes to create blushing cheeks. -
Seal the Deal:
Since this will live in a bathroom, apply 2-3 coats of waterproof varnish or glaze. Pay special attention to coating the inside of the hole to prevent moisture damage.
Clean Lines Pro Tip
For perfectly round painted cheeks and eyes, don’t use a brush. Dip the flat end of a drill bit or the back of a paintbrush handle into the paint and stamp it on.
Pop your favorite toothbrush into its new home and enjoy that cheerful smile every time you brush your teeth

The Complete Guide to Pottery Troubleshooting
Uncover the most common ceramic mistakes—from cracking clay to failed glazes—and learn how to fix them fast.
Tiny Magnet Bud Vase for Mini Flowers
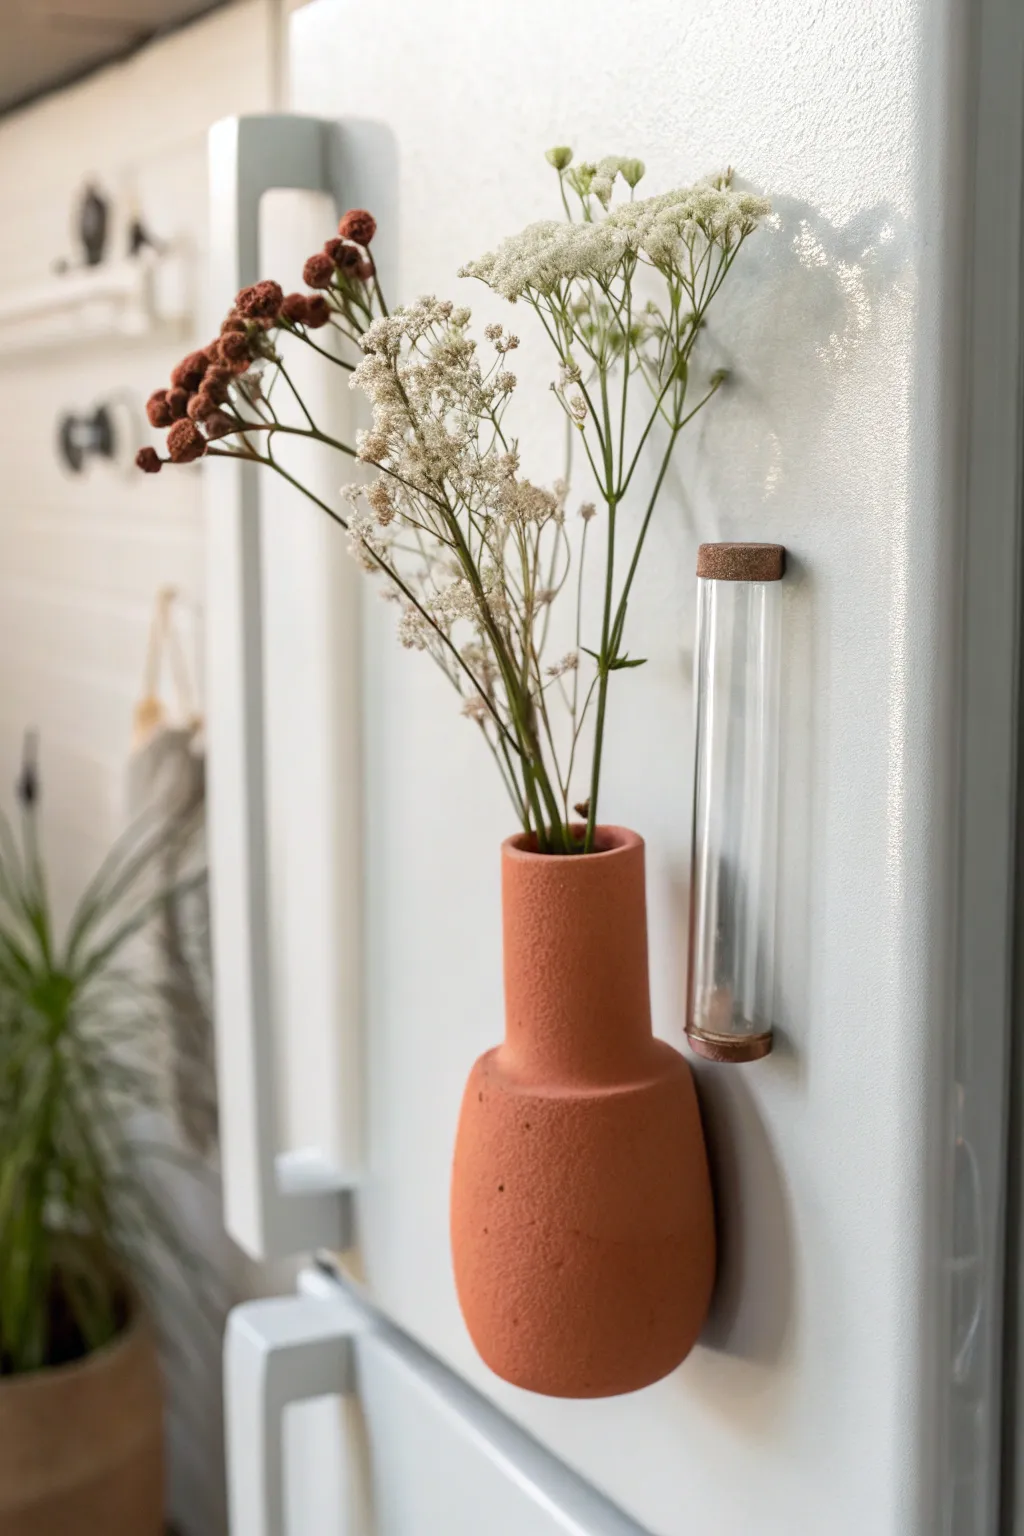
Bring a touch of earthy charm to your kitchen with this clever magnetic bud vase that turns your refrigerator into a living gallery wall. Molded to look like classic terracotta pottery, this half-round vessel is perfectly sized for dried blooms and adheres securely to magnetic surfaces.
Step-by-Step Guide
Materials
- Terracotta-colored polymer clay (or air-dry clay + acrylic paint)
- Strong neodymium magnets (2-3 small discs)
- Rolling pin or smooth glass bottle
- sharp craft knife or clay blade
- Small round cookie cutter or bottle cap (approx 1 inch)
- Medium round cutter (approx 2 inches)
- Liquid clay adhesive or strong super glue
- Sandpaper (fine grit)
- Texturing sponge or toothbrush (optional)
- Matte varnish (optional)
Step 1: Shaping the Base Component
-
Condition the clay:
Start by warming the terracotta polymer clay in your hands, kneading it until it is soft and pliable to prevent cracking later. -
Create the main body:
Roll a ball of clay about the size of a golf ball into a smooth, thick logs. Flatten slightly so it becomes an oval shape. -
Form the half-round shape:
Since this vase needs to sit flush against the fridge, press the back of your clay shape against a flat surface. You want a distinct ‘D’ profile when viewed from above—flat back, rounded front. -
Refine the body:
Use your fingers to smooth the main bulbous part of the vase. It should taper slightly towards the top where the neck will attach.
Step 2: Constructing the Neck
-
Roll the neck piece:
Take a smaller amount of clay and roll it into a cylinder. This will be the neck of the vase. -
Flatten the back:
Just like the body, press the cylinder against your work surface to flatten one side completely. This ensures the magnet has a straight surface to grip. -
Hollow out the vessel:
Using the handle of a paintbrush or a small modeling tool, carefully bore a hole down through the neck and into the body. Ensure the hole is deep enough to hold stems but doesn’t pierce the walls. -
Join the pieces:
Score the top of the body and the bottom of the neck with your craft knife. Apply a tiny drop of liquid clay or water (if using air-dry) and press them firmly together. -
Blend the seams:
Use a modeling tool or your finger to smooth the clay where the neck meets the body, creating a seamless transition. I like to dampen my finger slightly to get a really smooth join.
Sliding down?
If the magnets aren’t strong enough for the clay’s weight, glue a strip of non-slip rubber shelf liner to the back or add a third magnet near the bottom.
Step 3: Texture and Finishing
-
Add texture:
To mimic the gritty look of real terracotta, gently dab the surface with a coarse sponge or an old toothbrush. Avoid the flat back. -
Embed the magnets:
On the flat back side, press your neodymium magnets into the clay until they are flush with the surface. If using polymer clay, you can bake them in; if using air-dry, make an indentation now and glue them in later. -
Refine the rim:
Check the opening at the top. If it’s misshapen, insert your tool again and gently rotate to create a perfect circle. -
Bake or dry:
Follow the manufacturer’s instructions for your specific clay. For polymer clay, bake on a tile or parchment paper. For air-dry, let it sit for 24-48 hours. -
Secure magnets:
If you removed the magnets before baking or drying, use strong super glue to fix them into the indentations you made earlier. -
Final sanding:
Once fully cured, lightly sand any rough edges or fingerprints, particularly around the rim and the back corners. -
Seal (Optional):
If you want to protect the finish, apply a coat of matte varnish. This keeps the clay looking like raw earth while protecting it from moisture.
Make it Waterproof
Coat the inside of the vase with two layers of resin or waterproof varnish. This lets you use fresh flowers with water instead of just dried bouquets.
Fill your mini vase with whimsical dried flowers and admire your new magnetic masterpiece
Flower Coasters With Pressed-Petal Shapes
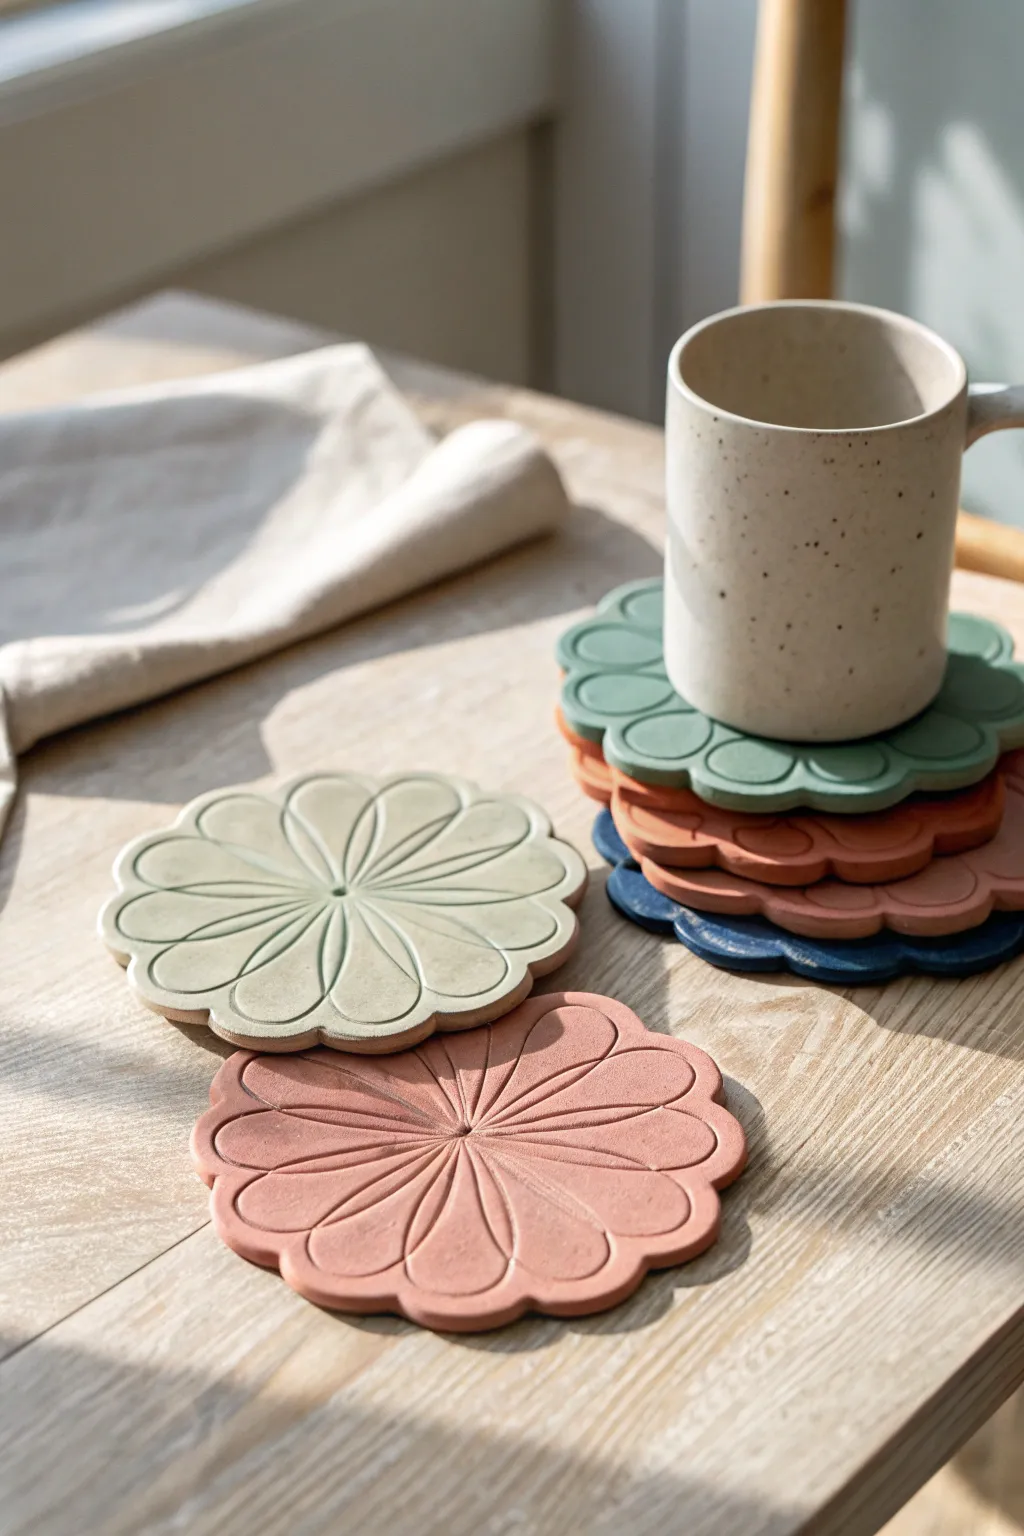
Bring the softness of a garden into your living space with these understated, flower-shaped coasters. Featuring a velvety matte finish and gentle pressed-petal grooves, they are as lovely to touch as they are to look at.
How-To Guide
Materials
- Polymer clay (muted earth tones: sage green, terracotta, cream, navy)
- Acrylic rolling pin
- Parchment paper or clay mat
- Large flower cookie cutter (approx. 4 inches wide)
- Modeling tool with a small rounded tip or a blunt tapestry needle
- Medium-grit sandpaper (400-600 grit)
- Oven and baking sheet
- Clear matte varnish (optional)
Step 1: Preparation & Shaping
-
Condition the clay:
Begin by warming the polymer clay in your hands, kneading it thoroughly until it is soft and pliable. This prevents cracking later on. -
Roll out the slab:
Place the clay between two sheets of parchment paper. Roll it out evenly until it is about 1/4 inch thick. You want it substantial enough to protect surfaces but not too chunky. -
Cut the shape:
Position your large flower-shaped cutter over the smoothest part of the clay slab. Press down firmly and wiggle slightly to ensure a clean cut. -
Smooth the edges:
Remove the excess clay and carefully lift your flower shape. I like to run a finger dipped in a tiny bit of water or cornstarch along the cut edges to smooth out any sharpness.
Step 2: Detailing the Design
-
Mark the center:
Locate the precise center of your flower shape. Gently press the rounded tip of your modeling tool into this spot to create a small indentation. -
Draw the primary petals:
Using your blunt tool, draw a straight line from the center indentation out to the recessed curve between two outer petal scallops. -
Complete the segmentation:
Repeat this process for every indentation around the perimeter, essentially dividing the flower into pizza-slice segments. -
Create the petal curves:
Inside each segment, draw a long, teardrop-shaped loop. Start near the center point, curve out towards the widest part of the petal scallop, and curve back to the center. -
Refine the lines:
Go over your lines a second time with slightly more pressure to deepen the grooves, ensuring the design will remain visible after baking. -
Check surface flatness:
Sometimes detailing can warp the clay. Gently pat the surface with your flat palm to ensure the coaster is still perfectly level.
Consistent Thickness
Use two stacks of playing cards or wooden guide sticks on either side of your rolling pin. This guarantees your clay slab is perfectly even.
Step 3: Finishing
-
Bake the coasters:
Place your coasters on a parchment-lined baking sheet. Bake according to your specific clay package instructions (usually around 275°F or 135°C for 15-30 minutes). -
Cool down:
Allow the coasters to cool completely on the baking sheet to ensure they harden flat. -
Sand for texture:
Once cool, lightly sand the surface and edges with medium-grit sandpaper. This mimics the stone-like texture seen in the photo. -
Clean up dust:
Wipe the coasters down with a damp cloth to remove any sanding residue. -
Seal (Optional):
If you want extra protection against coffee stains, apply a thin coat of clear matte varnish, though leaving them raw preserves the earthy texture.
Terrazzo Effect
Mix tiny chopped bits of contrasting clay colors into your base slab before rolling to create a trendy speckled granite or terrazzo look.
Stack your set of coasters on the coffee table for a functional piece of handmade art to enjoy with your morning brew


What Really Happens Inside the Kiln
Learn how time and temperature work together inside the kiln to transform clay into durable ceramic.
Easy Face Pinch Pot Desk Cup
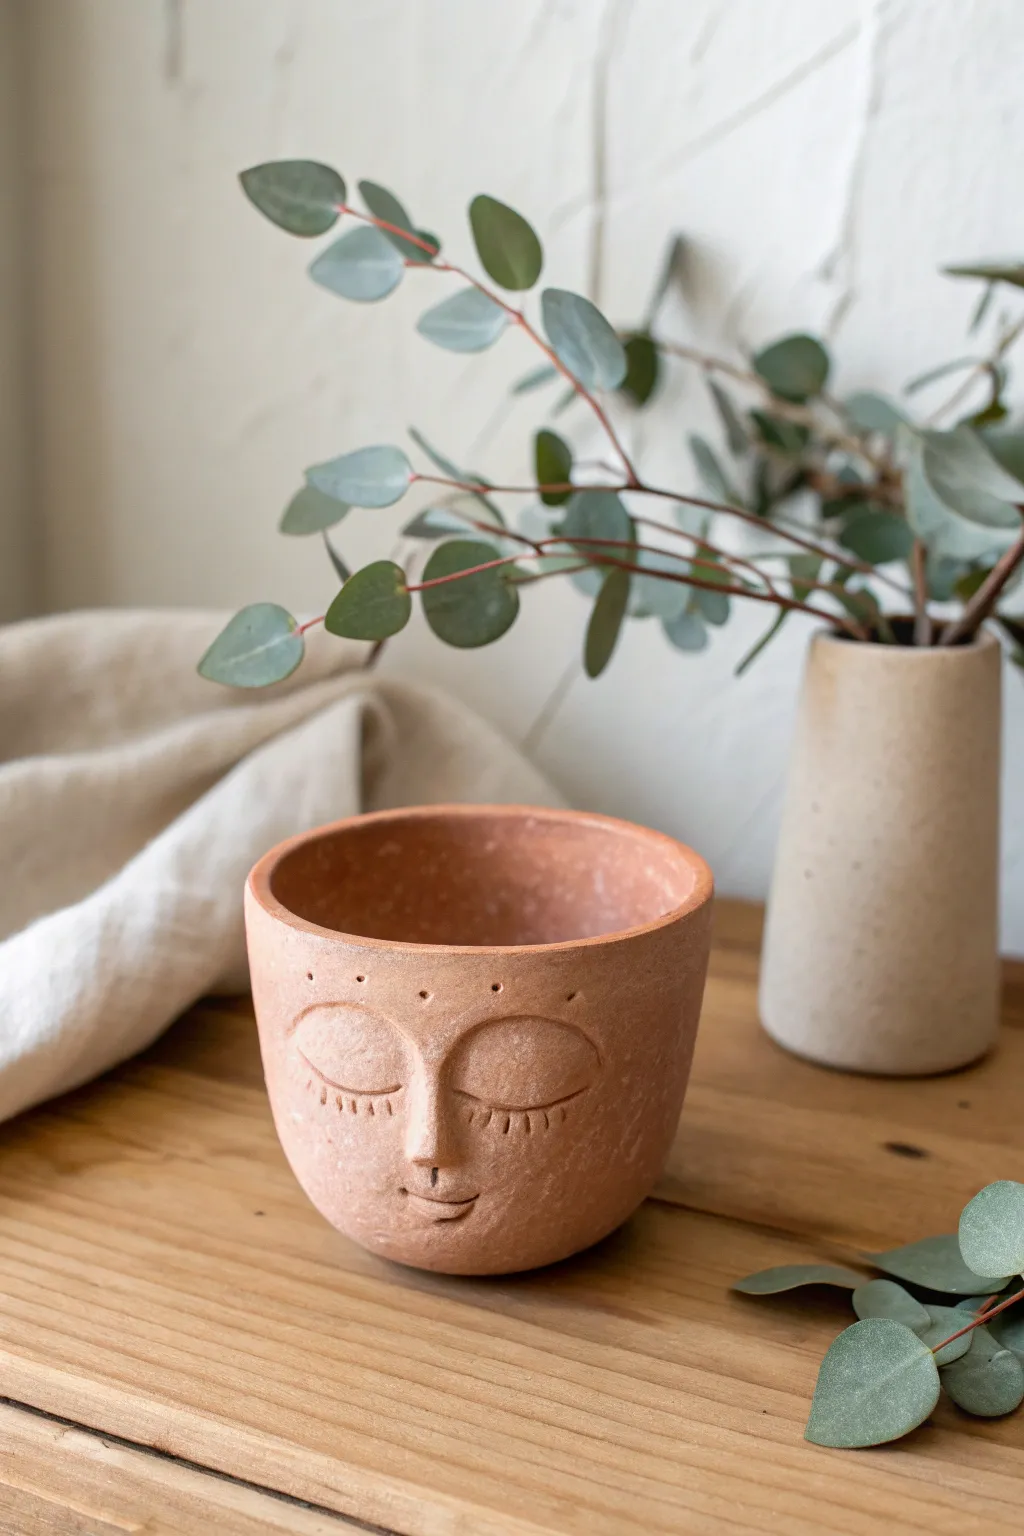
Create a calming presence for your desk with this simple yet expressive terracotta pinch pot. The gentle, sleeping face adds a touch of personality to an otherwise minimalist vessel, perfect for holding succulents or pens.
Step-by-Step Tutorial
Materials
- Terracotta-colored air-dry clay or kiln-fire clay
- Small cup of water
- Needle tool or toothpick
- Small loop tool (optional)
- Smoothing sponge
- Rolling pin
- Clear matte sealant (if using air-dry clay)
Step 1: Forming the Base
-
Prepare the clay:
Start with a ball of clay roughly the size of a large orange. Wedge it well to remove air bubbles and ensure a consistent texture throughout. -
Create the pinch pot:
Push your thumb into the center of the ball, leaving about a half-inch of thickness at the bottom. Gently pinch and rotate the clay between your thumb and fingers to thin out the walls. -
Shape the cylinder:
Gradually pull the clay upwards as you pinch to create a cylindrical cup shape rather than a wide bowl. Aim for an even wall thickness of about 1/4 inch. -
Flatten the bottom:
Tap the pot gently on your work surface to create a flat, stable base. Check that the pot stands level without wobbling. -
Refine the rim:
Use your fingers or a sponge to level the top rim. It doesn’t need to be mechanically perfect; a slightly organic edge adds to the handmade charm.
Step 2: Sculpting the Face
-
Position the nose:
Roll a small, small teardrop or triangle of clay for the nose. Score the back of this piece and the spot on the pot where you want the face to be centered. -
Attach the nose:
Add a dab of water or slip to the scored area and press the nose firmly onto the pot. Use your thumb to blend the edges of the nose smoothly into the surrounding clay so it looks seamless. -
Refine the nose shape:
Gently pinch the bridge of the attached nose to define it, ensuring it has a slight protrusion but remains soft and rounded. -
Outline the eyes:
Using a needle tool or toothpick, lightly sketch two large semi-circles for the sleeping eyelids. Positioning them symmetrically on either side of the nose bridge is key. -
Carve the eyelids:
Deepen the lines of the semi-circles to create the look of closed eyelids. You can gently press the clay down just under the line to make the eyelid area appear slightly raised. -
Add the lashes:
Below each eyelid curve, press small, vertical indentations using your needle tool or a small flat tool to create the look of eyelashes. Keep them short and evenly spaced. -
Define the mouth:
Mark a small, gentle curve for the mouth below the nose. I like to add a tiny vertical tick at one end to suggest a subtle smile. -
Add decorative Details:
Poke a series of small, shallow holes above the eyebrows or around the forehead area to create a decorative, crown-like pattern.
Smooth Surface Textures
For that matte, stone-like texture shown in the photo, sponge the clay with a damp natural sea sponge just before it becomes leather hard.
Step 3: Finishing Touches
-
Smooth the surface:
Dip your sponge in water and wring it out almost completely. Gently wipe the entire surface of the pot to remove fingerprints and soften any harsh carving lines. -
Slow drying:
Let the pot dry slowly away from direct sunlight or heat sources. If using air-dry clay, this usually takes 24-48 hours depending on humidity. -
Sanding (optional):
Once fully dry, you can lightly sand any rough spots with fine-grit sandpaper for a smoother finish. -
Seal or fire:
If using kiln clay, fire according to instructions. For air-dry clay, apply a coat of matte clear sealant to protect the finish and deepen the terracotta color.
Make It a Planter
If you plan to use this for a real plant, don’t forget to punch a drainage hole in the bottom center before the clay dries.
Enjoy the peaceful vibe this little face pot brings to your workspace
Soft-Tone Beaded-Rim Dishes
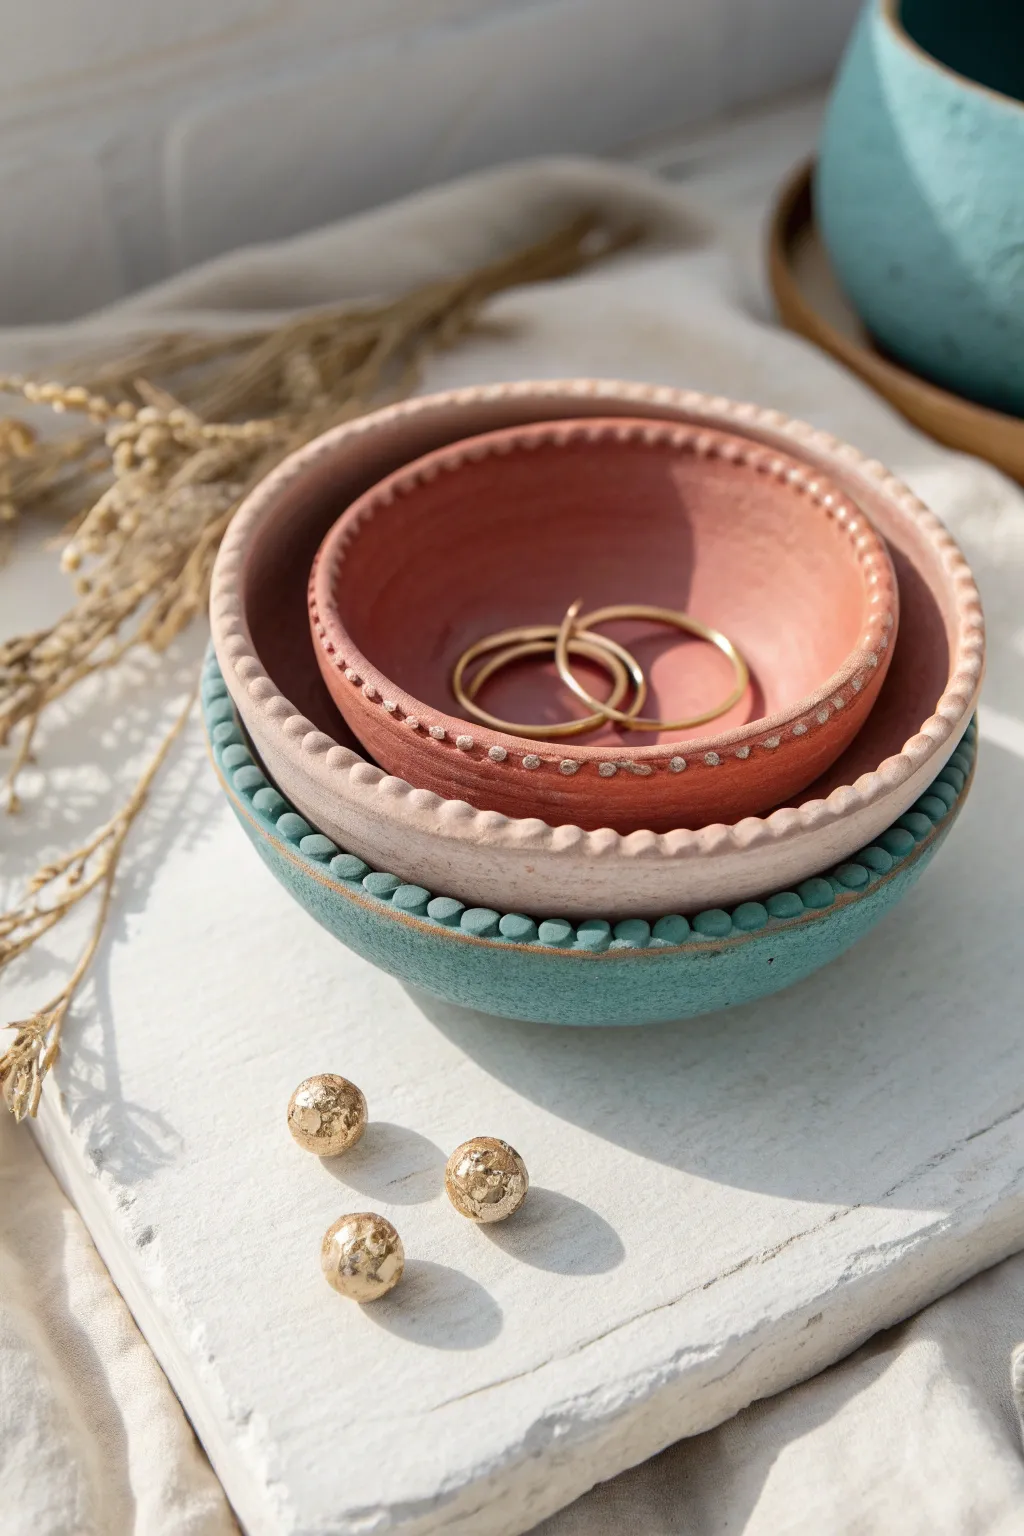
These charming nested dishes combine rustic textures with soft, earthy pastels to create the perfect home for your favorite jewelry. With their delicate beaded rims and matte, distressed finish, they bring a touch of bohemian elegance to any vanity.
Step-by-Step Guide
Materials
- Air-dry clay (white or terracotta)
- Acrylic rolling pin
- Circle templates or bowls (approx. 3″, 4″, and 5″ diameters)
- Craft knife or clay needle tool
- Small bowl of water
- Sponge
- Acrylic paints (Teal, Dusty Rose, Pale Sand, Antique Gold)
- Small stiff-bristle paintbrushes
- Fine-grit sandpaper (220 grit)
- Textured fabric or canvas (optional for texture)
- Matte spray varnish
Step 1: Shaping the Base Clay
-
Preparing the clay slab:
Begin by kneading a fist-sized ball of air-dry clay until it is pliable and warm. Roll it out on a flat surface to an even thickness of about 1/4 inch. If you want a subtle texture on the bottom, roll the clay out on a piece of canvas fabric. -
Cutting the circles:
Place your bowl templates onto the rolled slab. Use your craft knife or needle tool to cut out three circles of graduating sizes (roughly 3, 4, and 5 inches in diameter). Peel away the excess clay. -
Smoothing the edges:
Dip your finger into a little water and run it gently along the cut edge of each circle to smooth out any sharpness or jagged bits left by the knife. -
Forming the bowl shape:
Gently lift each clay circle and drape it inside a slightly larger bowl to help it hold a curved shape while drying. Alternatively, you can simply curve the edges upward with your hands to create a shallow dish form.
Cracked While Drying?
Surface cracks happen if clay dries too fast. Patch them by mixing a tiny bit of clay with water to make a paste (slip) and filling the crack, then smooth over.
Step 2: Adding the Beaded Detail
-
Rolling clay coils:
Roll small snakes of fresh clay, roughly 1/8 inch thick. These need to be long enough to encircle the rim of each dish. -
Attaching the rim:
Score the top edge of your dish with a needle tool and dampen it slightly. Lay the clay coil along the rim, pressing gently to adhere it securely without squashing the round shape too much. -
Creating the beads:
Using a modeling tool or the handle of a small paintbrush, press indentations into the coil at regular intervals. This separates the coil visually into small, bead-like segments. work your way around the entire circumference. -
Refining the beads:
I find it helpful to go back over each ‘bead’ with a damp finger or a small sponge to round them off individually, ensuring they look distinct and uniform. -
Applying inner texture:
For the smallest red dish, use a needle tool to poke tiny decorative dots into the center of each bead for extra detail, mimicking the style seen in the reference image. -
Air drying:
Set the dishes aside in a safe, dry place. Allow them to dry completely for 24 to 48 hours, turning them over occasionally to ensure the bottoms dry evenly.
Step 3: Painting and Distressing
-
Initial sanding:
Once fully dry, lightly sand any rough spots or sharp edges with fine-grit sandpaper. Wipe away the dust with a barely damp cloth. -
Base coating:
Paint the largest bowl with a matte teal, the middle with a pale sand color, and the smallest with a warm dusty rose. Apply two thin coats for opaque coverage, letting the paint dry between layers. -
Adding the distressed effect:
To achieve that rustic look, mix a tiny amount of water into white or light grey paint. Dip a dry, stiff brush into this mix, offload most of the paint on a paper towel, and dry-brush over the textured surface and beaded rim. -
Applying gold highlights:
Take a small detail brush and your antique gold paint. Very lightly dab gold onto the tops of the beads and the inner rim. The goal is a subtle shimmer, not a solid gold line. -
Creating wear and tear:
Once the paint is fully dry, take your sandpaper again and very gently scuff the raised areas of the beads and the rim. This reveals a bit of the raw clay underneath, enhancing the aged aesthetic. -
Sealing the work:
Finish by spraying the dishes with a matte varnish. This seals the porous clay and protects the paint without making the finish look glossy or plastic.
Pro Tip: Consistent Beads
Instead of a continuous coil, try rolling tiny individual balls of clay and attaching them one by one to the rim for perfectly distinct, high-relief beading.
Now you have a stunning set of handcrafted dishes ready to cradle your rings and trinkets with effortless style

TRACK YOUR CERAMIC JOURNEY
Capture glaze tests, firing details, and creative progress—all in one simple printable. Make your projects easier to repeat and improve.
Incense Holder With a Curvy, Wavy Base
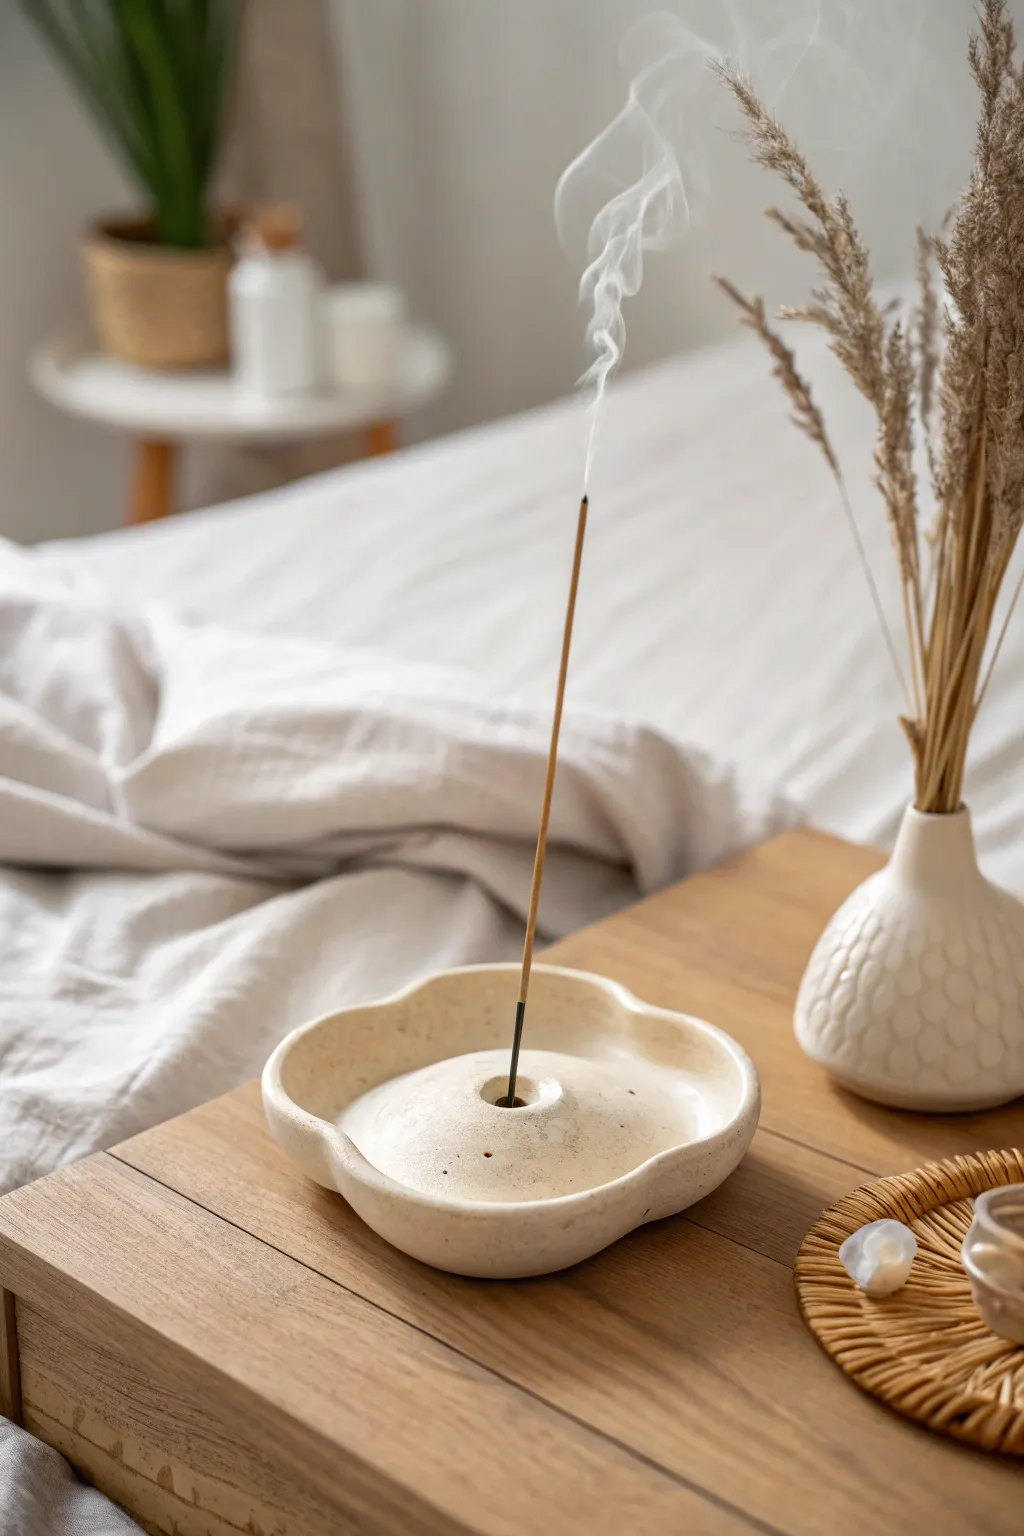
This elegant incense holder features a gentle, five-petaled shape with a raised central dome to catch falling ash effortlessly. Its speckled, matte cream finish adds a natural, earthy touch that complements any serene living space.
Detailed Instructions
Materials
- Air-dry clay (white or cream)
- Small rolling pin
- Rolling guides or wooden slats (approx. 1/4 inch thick)
- Cookie cutter (flower shape) or a paper template and needle tool
- Small bowl of water
- Sponge
- Incense stick (for sizing)
- Paintbrush
- Fine-grit sandpaper
- Acrylic paint (cream/off-white)
- Speckle medium or brown paint and a stiff brush
- Matte varnish
Step 1: Shaping the Base
-
Prepare the Clay:
Begin by wedging a ball of air-dry clay to remove any air bubbles. You want a smooth consistency that won’t crack easily when shaped. -
Roll out the Slab:
Place your clay between two rolling guides to ensure an even thickness. Roll the clay out into a smooth slab, roughly 1/4 inch thick. -
Cut the Flower Shape:
Use a large flower-shaped cookie cutter (about 4-5 inches wide) to punch out your base form. Alternatively, lightly trace a five-petal flower template onto the clay and carefully cut it out with a needle tool. -
Smooth the Edges:
Dip your finger in a little water and run it along the cut edges of the flower to smooth out any sharpness or roughness from the cutting process. -
Form the Curve:
Gently lift the edges of the petals upwards to create a shallow bowl shape. You can rest the clay form inside a small bowl lined with plastic wrap to help it hold its curved shape while you work on the next part.
Step 2: Creating the Center
-
Make the Dome:
Roll a smaller ball of clay, roughly the size of a walnut. Flatten the bottom slightly so it sits stable, creating a smooth, rounded mound. -
Score and Slip:
Use your needle tool to scratch cross-hatch marks (scoring) on the bottom of the dome and the center of your flower bowl. Dab a little water or liquid clay (slip) on both scored areas. -
Attach the Dome:
Press the dome firmly into the center of the bowl. Use a modeling tool to blend the edges of the dome into the base of the bowl so the seam disappears completely. -
Create the Incense Hole:
Take your incense stick (or a tool of similar diameter) and press it straight down into the center of the dome. I prefer to wiggle it slightly to ensure the hole is just wide enough for the stick to stand straight without leaning too much. -
Final Smoothing:
Use a damp sponge to wipe over the entire piece, erasing any fingerprints and ensuring the transition between the dome and the bowl is fluid and organic. -
Dry:
Allow the piece to dry completely. This usually takes 24-48 hours depending on humidity. Flip it gently halfway through to ensure the bottom dries evenly.
Clean Hole Trick
Insert the incense stick again briefly when the clay is leather-hard (semi-dry) to ensure the hole hasn’t shrunk too much during drying.
Step 3: Finishing Touches
-
Sand Imperfections:
Once fully dry, use fine-grit sandpaper to gently smooth any rough spots, particularly around the rim of the petals. -
Base Coat:
Paint the entire holder with a cream or off-white acrylic paint. Apply two thin coats for opaque coverage, letting the first dry before applying the second. -
Add Speckles:
To mimic the ceramic look in the photo, dilute a tiny amount of brown paint with water. Dip a stiff-bristled brush or an old toothbrush into the mixture and flick the bristles with your thumb to spray fine speckles over the dish. -
Seal the piece:
Protect your work with a coat of matte varnish. This will seal the paint and make it easier to wipe away ash later.
Stone Effect
Mix dried tea leaves or coffee grounds directly into the wet clay before rolling to create varied texture and natural speckles without painting.
Now you have a serene spot to burn your favorite scents and relax
Stackable Desk Organizer Tray With Sections
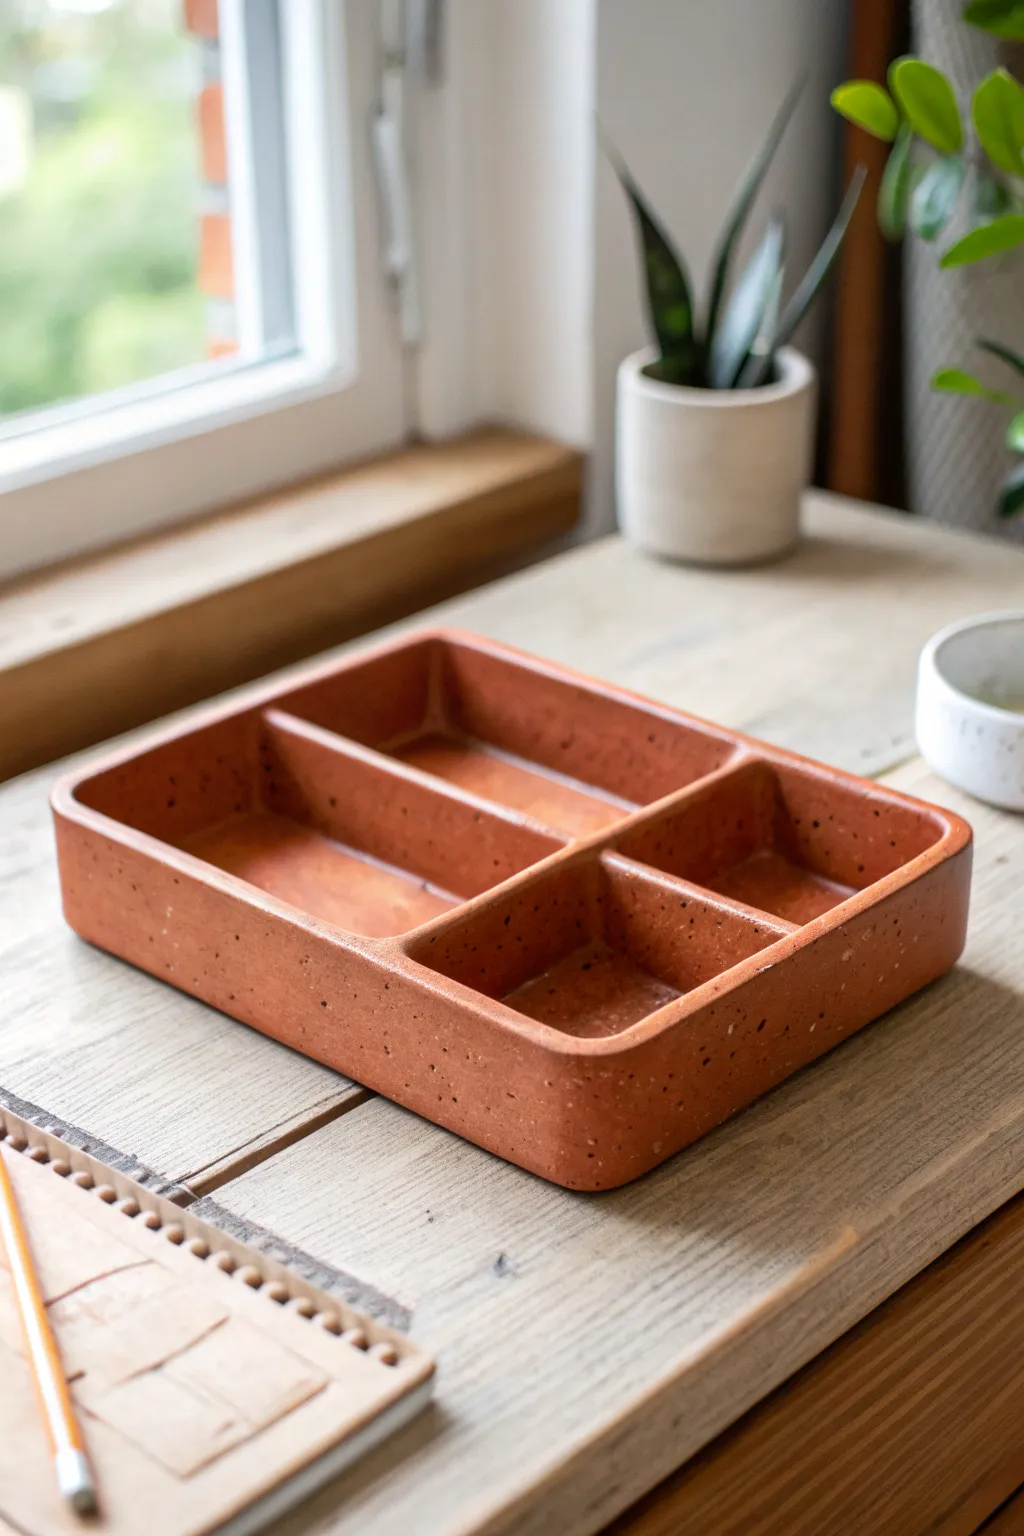
Bring earthy warmth to your workspace with this minimalistic three-compartment organizer. Mimicking the look of speckled terracotta or cast concrete, this sturdy tray offers a designated home for everything from paperclips to sticky notes.
Detailed Instructions
Materials
- Air-dry clay (terracotta color) or polymer clay
- Rolling pin
- Ruler
- Craft knife or clay slicer
- Slip (water mixed with clay bits) or liquid clay
- Fine-grit sandpaper
- Acrylic rolling guides (approx. 5mm thick)
- Small sponge
- Coffee grounds or black pepper (for faux speckling, optional)
- Matte sealant or varnish
Step 1: Preparation & Base Construction
-
Prepare the clay:
Begin by conditioning your clay. If you want to achieve the speckled texture seen in the photo, knead in a small teaspoon of dry used coffee grounds or cracked black pepper. This adds instant organic character. -
Roll the slab:
Place your clay between two 5mm rolling guides to ensure even thickness. Roll out a large, smooth slab that is at least 8 inches by 5 inches. -
Cut the base:
Using your ruler and craft knife, measure and cut a precise rectangle for the base. A size of about 7 inches by 4.5 inches works well for a desktop. -
Cut the wall strips:
From the remaining clay slab, cut long strips for the outer walls. These should be the same height, roughly 1 inch tall. You will also need strips for the internal dividers.
Clean Cuts Pro Tip
Chill your clay slab in the fridge for 10 minutes before cutting. The firmer clay resists dragging under the knife, giving you perfectly crisp, architectural edges.
Step 2: Assembling the Walls
-
Score the edges:
Use a needle tool or knife to scratch cross-hatched lines along the outer perimeter of your base rectangle. Do the same on one long edge of your wall strips. -
Apply slip:
Dab a little clay slip (or liquid clay if using polymer) onto the scored areas to act as glue. -
Attach the outer frame:
Press the wall strips onto the base. Join the corners by pressing the clay together firmly. I like to cut the corners at a 45-degree angle for a cleaner mitred join, but a butt join works too. -
Smooth the seams:
Roll a very thin ‘snake’ of clay and press it into the inside seam where the wall meets the floor. Smooth this out with your finger or a modeling tool to reinforce the bond. -
Refine the outside:
On the exterior, use a flat modeling tool or an old credit card to scrape and smooth the vertical seams so the walls look like one continuous piece.
Step 3: Adding Compartments & Finishing
-
Measure the dividers:
Decide where you want your compartments. For the look in the photo, create one long divider running lengthwise, then a shorter one splitting one side in half. -
Install the long divider:
Cut a strip to fit the interior length. Score and slip the ends and the bottom edge, then press it firmly into place. Ensure it is perfectly vertical. -
Create the smaller sections:
Insert the final shorter perpendicular strip to create the two square compartments. Smooth all internal seams with a small tool or your finger. -
Round the edges:
Take a slightly damp sponge and run it gently over the top rim of the organizer. This softens the sharp cut edges and gives it that professional, cast-stone look. -
Initial drying:
Let the piece dry slowly away from direct heat to prevent warping. If you are using polymer clay, bake according to the package instructions now. -
Sanding:
Once fully dry or cured, use fine-grit sandpaper to remove any fingerprints or rough textures on the flat surfaces. -
Sealing:
Apply a coat of matte varnish or sealant. This protects the porous surface from ink stains and dust while maintaining the natural, earthy aesthetic.
Warping Fix
If the base curls up while air-drying, place a heavy book on top of it (sandwiching the clay between parchment paper) once it’s ‘leather hard’ to flatten it out.
Now you have a stylish spot to organize your essentials
Playful Alphabet Ornaments for Gifts
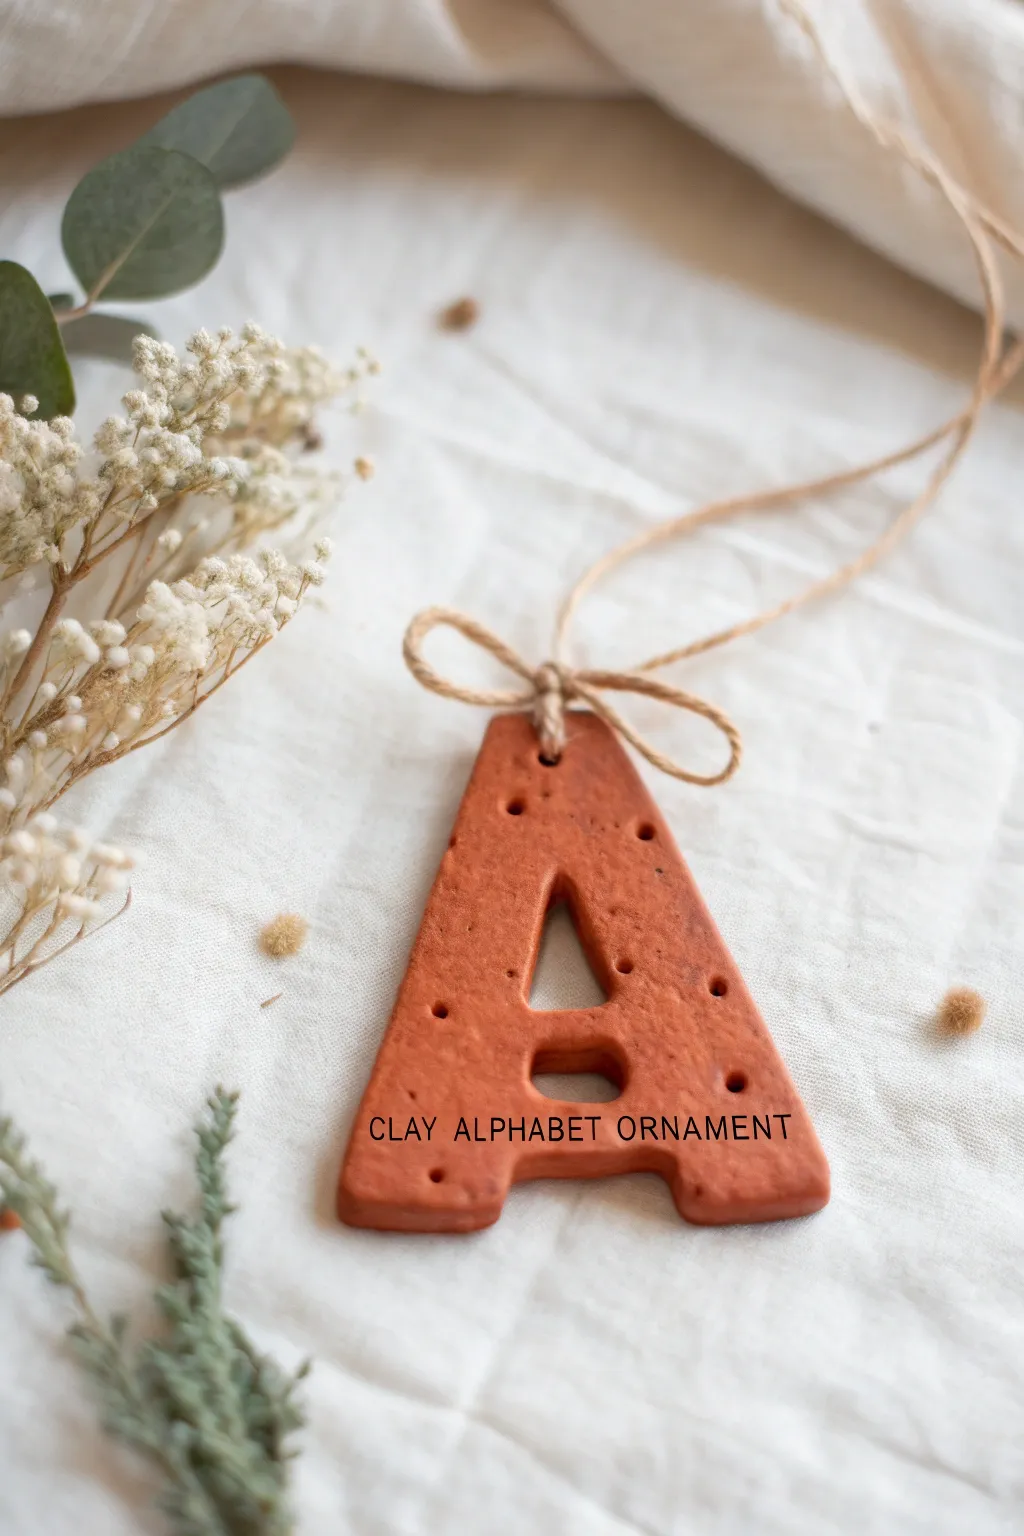
Create personalized holiday accents or gift tags with these charmingly rustic alphabet ornaments. The warm terracotta tone and simple dot texture give them a modern yet handmade feel perfect for any season.
Step-by-Step Tutorial
Materials
- Terracotta-colored air-dry clay (or polymer clay)
- Alphabet cookie cutters
- Rolling pin
- Parchment paper or silicone mat
- Small wooden skewer or toothpick
- Alphabet rubber stamp set (small font)
- Jute twine
- Fine-grit sandpaper (optional)
- Clear matte varnish (optional)
Step 1: Preparation & Cutting
-
Condition the clay:
Begin by kneading a manageable chunk of terracotta clay in your hands. You want it to be pliable and warm, removing any air bubbles that might cause cracks later. -
Roll it out:
Place the clay on a sheet of parchment paper. Roll it out evenly to a thickness of about 1/4 inch (6mm). If you want perfect uniformity, place two magazines or guide sticks of equal height on either side of the clay as you roll. -
Cut the shapes:
Press your alphabet cookie cutter firmly into the clay. Give it a tiny wiggle to ensure it cuts all the way through, then lift straight up. -
Clean the edges:
Carefully remove the excess clay from around the letter. If the edges of your letter look rough, dip your finger in a little water and gently smooth them down.
Fixing Cracks
If small hairline cracks appear while drying, mix a tiny bit of fresh clay with water to make a paste and smooth it into the crack with your finger.
Step 2: Adding Texture & Details
-
Create the hanging hole:
Using the blunt end of a skewer or a straw, punch a hole at the top center of the letter. Make sure the hole isn’t too close to the edge to prevent tearing. -
Add dot texture:
Take your skewer or a small dotting tool and gently press random indentations into the surface. Scatter them naturally rather than in a grid pattern for an organic look. -
Personalize with stamps:
If you wish to add a name or phrase like the example, lightly press your small alphabet stamps into the lower portion of the letter. Don’t press too deep; a shallow impression looks elegant. -
Check for warping:
Give the entire piece a final visual check to ensure it hasn’t bent out of shape during the detailing process.
Step 3: Drying & Finishing
-
Let it dry:
Place the letters on a clean, flat surface to dry. I prefer to flip them over halfway through the drying process—usually after 24 hours—to ensure the bottom side dries evenly and stays flat. -
Wait patiently:
Allow fully 24-48 hours for air-dry clay (or bake according to package instructions if using polymer). -
Sand imperfections:
Once bone dry, you can run a piece of fine-grit sandpaper gently over the edges if any sharp burrs remain. -
Seal the surface (Optional):
For longevity, brush on a thin coat of matte varnish. This deepens the terracotta color slightly and protects it from moisture. -
Cut the twine:
Cut a length of jute twine, approximately 10 inches long. -
Thread the loop:
Fold the twine in half and push the looped end through the hole in the ornament from front to back. -
Secure the hanger:
Pass the loose ends of the twine through the loop and pull tight to create a lark’s head knot. -
Tie the bow:
Just above the ornament creates a simple, small bow with the twine strands, trimming the ends to your desired length.
Stamp Clarity
Dust your rubber stamps with a tiny bit of cornstarch or flour before pressing them into the clay. This prevents them from sticking and ruining the letters.
Now you have a set of custom, earthy ornaments ready to personalize your gift wrapping or tree
Minimal Torso Vase for Dried Stems
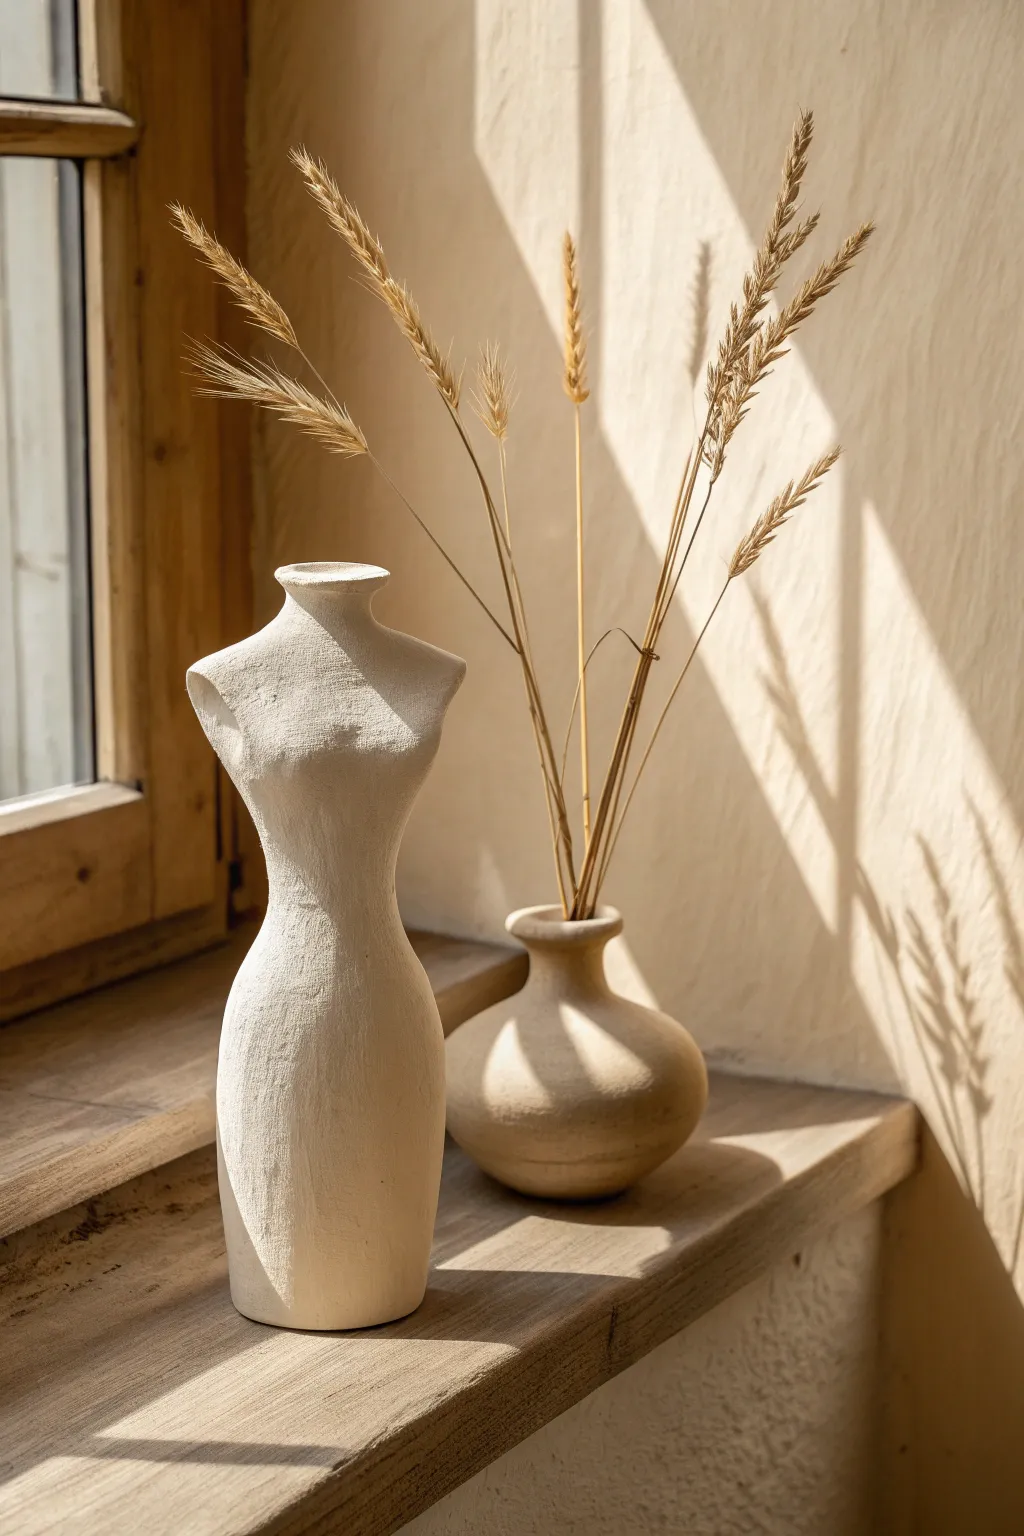
Capture the elegance of the human form with this sculptural vase project, perfect for displaying lightweight dried botanicals. Its raw, textured finish and gentle curves bring a sophisticated, organic touch to any windowsill or shelf.
Step-by-Step
Materials
- Air-dry clay (white or cream)
- Small rolling pin
- Aluminum foil
- Masking tape
- Sculpting loop tool
- Sponge
- Water cup
- Needle tool
- Small plastic bottle or tube (for internal armature)
- Fine-grit sandpaper
- Matte sealant (optional)
Step 1: Building the Core
-
Prepare the armature:
Start by finding a slim plastic bottle or a cardboard tube about the height you want the torso to be. This will serve as the neck of the vase and structural support. -
Bulk up the form:
crumple aluminum foil into two rounded shapes for the bust and hips. Tape these securely onto your tube armature to create the basic hourglass silhouette of a torso. -
Tape for texture:
Wrap the entire foil structure tightly with masking tape. This smooths out sharp foil edges and gives the clay a better surface to grip onto.
Cracks Appearing?
Mix a tiny amount of fresh clay with water to make a paste (slip). Fill the cracks with this mixture and smooth over. It acts like spackle for your sculpture.
Step 2: Applying the Clay
-
Roll out slabs:
Roll your air-dry clay into a consistent slab, roughly 1/4 inch thick. I find checking the thickness frequently prevents weak spots later. -
Wrap the form:
Cut sections of the clay slab and drape them over your armature. Press firmly so the clay adheres to the tape layer beneath. -
Blend the seams:
Where clay pieces meet, use your thumb or a wooden tool to smudge the edges together until the join is invisible. Add a little water if the clay feels dry. -
Refine the neck:
Leave the top of your tube open. Mold the clay up to the rim to form a clean, narrow neck, smoothing it over the lip of the internal structure.
Faux Stone Effect
Mix grainy baking soda into acrylic paint (white or beige) and dab it onto the dried vase. It creates a believable limestone texture.
Step 3: Sculpting the Silhouette
-
Define the waist:
With wet hands, gently squeeze and smooth the clay at the center to emphasize the curve of the waist. -
Shape the bust:
Add small additional pads of clay to the upper section to build volume for the chest. Smooth these down into the main body so there are no harsh lines. -
Carve the shoulders:
Use a knife or cutting tool to slice the arm areas cleanly. This project uses a ‘sliced’ shoulder look rather than sculpted arms, so keep these cuts vertical and flat. -
Smooth the surface:
Dip your sponge in water and wring it out well. Drag it over the entire piece to remove fingerprints and unify the surface texture. -
Check symmetry:
Rotate the vase slowly. look for any lopsidedness in the hips or shoulders and gently push the clay to correct the balance.
Step 4: Finishing Touches
-
Initial drying:
Let the piece sit for about hour until it is leather-hard. It should handle touching without deforming. -
Texture refinement:
If you want that grainy, stone-like look seen in the photo, gently dab the surface with a coarse sponge or a crumpled ball of foil while the clay is still slightly pliable. -
Full cure:
Allow the sculpture to dry completely for 24-48 hours. Keep it away from direct heat sources to prevent cracking. -
Sand and soften:
Once bone dry, use fine-grit sandpaper to soften any sharp edges on the neck rim or the shoulder cuts. Wipe away the dust with a damp cloth. -
Seal (Optional):
For longevity, apply a matte sealant. Note that unless you used a waterproof vessel inside, this vase is best for dried stems only.
Now you have a stunning, modern art piece ready to hold your favorite dried wheat or decorative grasses