If you’ve ever wanted to build a whole tiny world with your hands, a clay diorama is the sweetest way to do it. I love how you can tell a full story in a small space—just textured terrain, a few mini details, and your imagination doing the rest.
Classic Shoebox Forest Scene
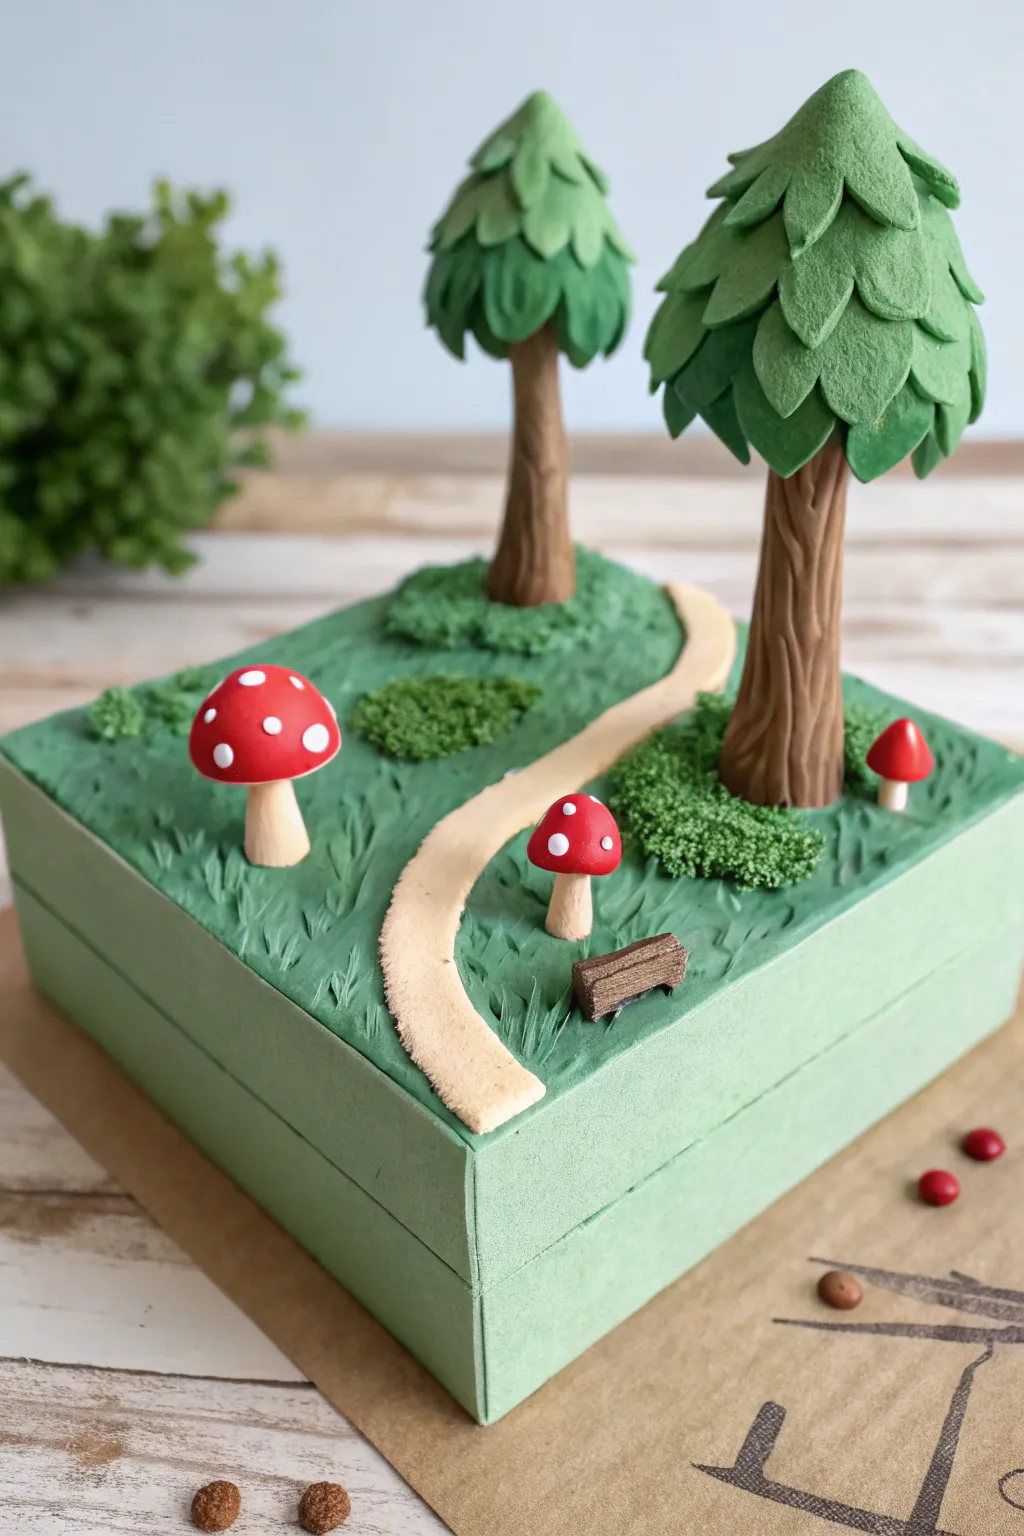
Transform a simple box into an enchanting woodland path using polymer clay and textured paper. This structured diorama features stylized evergreen trees, a winding dirt trail, and vibrant red toadstools for a delightful pop of color.
Detailed Instructions
Materials
- Square shoebox or gift box (approx. 6-8 inches)
- Green textured cardstock or scrapbook paper (grass texture)
- Polymer clay (brown, shades of green, red, white, beige)
- PVA glue or tacky glue
- Craft knife or scalpel
- Rolling pin
- Clay texture tool or toothpick
- Soft moss or green flocking powder
- Small loose beads or clay scraps (for detail)
Step 1: Base Construction
-
Prepare the box base:
Start with a sturdy square shoebox or lid as your base. Measure the outer sides and cut strips of the green textured cardstock to cover them completely, adhering them with PVA glue for a clean, finished look. -
Create the grassy terrain:
Cut a square of the same green textured paper to fit the top surface of the box. Before gluing it down, consider lightly crumpling it or scoring it to add dimension, then glue it securely to the top. -
Simulate grass blades:
Using a craft knife, gently lift small ‘V’ shapes or slits across the top surface of the paper to mimic tufts of grass poking upwards. This simple trick adds immediate realism to flat paper.
Step 2: Sculpting the Trees
-
Form the tree trunks:
Roll brown polymer clay into two tapered cylinders, one slightly taller than the other. Use a toothpick or clay tool to carve deep vertical grooves along the length of each trunk to simulate rough bark texture. -
Shape the foliage base:
For the tree canopy, form a cone shape out of green clay. This will act as the structure that holds the leaves. -
Create leaf layers:
Flatten small pieces of green clay into teardrop shapes. Starting at the bottom of the cone, overlap these teardrops in rows, working your way up to the tip to create a shingled, leafy pine look. -
Dry or bake:
If using oven-bake clay, bake the trunks and tree tops separately according to package directions. If using air-dry, let them set until rigid before assembling. -
Assemble the trees:
Once hardened, use a dab of strong glue to attach the leafy canopy to the top of the trunk.
Pro Tip: Hidden Wires
Insert a toothpick or wire armature inside the tree trunks before adding the bark texture. This prevents the tall trees from drooping while the clay cures.
Step 3: The Path and Details
-
Lay the pathway:
Roll out a thin strip of beige clay. Cut it into a winding, S-shaped path that stretches from corner to corner. Press it gently onto the box surface. -
Texture the path:
I like to dab the surface of the path with an old toothbrush or sandpaper to give it a gritty, dirt-like finish rather than leaving it smooth. -
Sculpt small logs:
Create a tiny, rectangular log shape from brown clay. Use your texture tool to add wood grain and place it near the path as a resting bench. -
Make the mushrooms:
Roll small balls of red clay for the caps and white clay for stems and dots. Flatten tiny white distinct circles onto the red caps before baking or drying.
Troubleshooting: Paper Bubbles
If the paper bubbles when gluing it to the box, use a brayer or the side of a ruler to smooth it out from the center toward the edges immediately after applying glue.
Step 4: Final Assembly
-
Position the trees:
Glue the finished trees onto opposite corners of the diorama. For extra stability, you can push a toothpick into the base of the trunk and through the box lid. -
Add mossy accents:
Apply small patches of glue around the base of the trees and sprinkle green flocking powder or attach small bits of craft moss to ground them into the scene. -
Plant the mushrooms:
Glue the toadstools at varying heights around the scene, grouping a large and small one together for a natural look. -
Final touches:
Scatter a few tiny brown clay crumbs or beads on the table next to your diorama as ‘fallen seeds’ to extend the scene beyond the box.
Now you have a charming miniature forest slice perfect for bookshelf decor


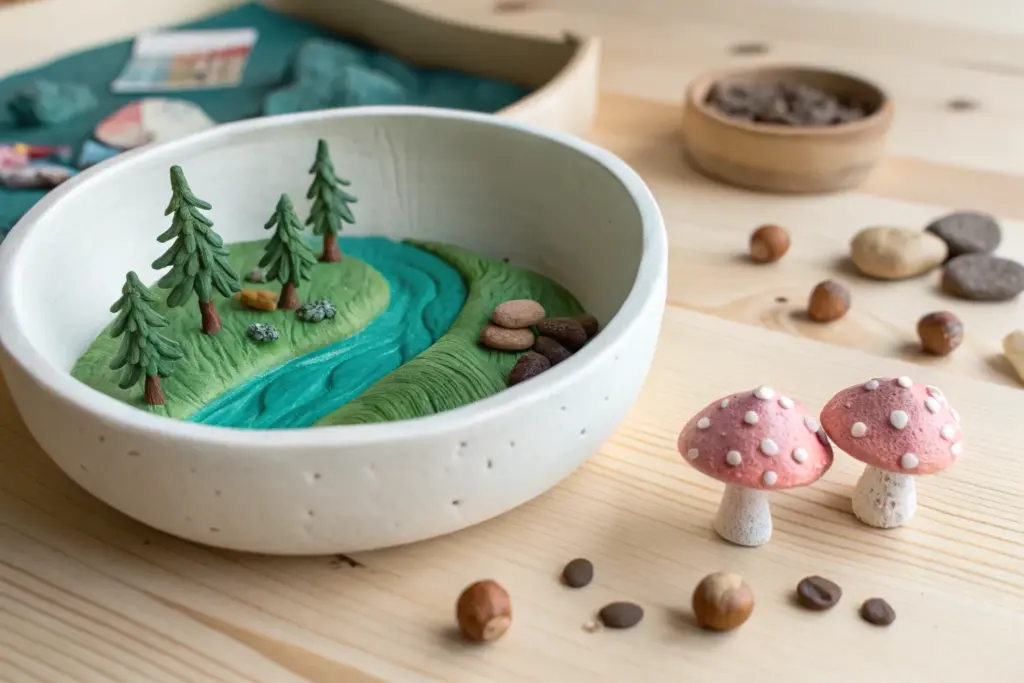
Mountain River and Water Cycle Diorama
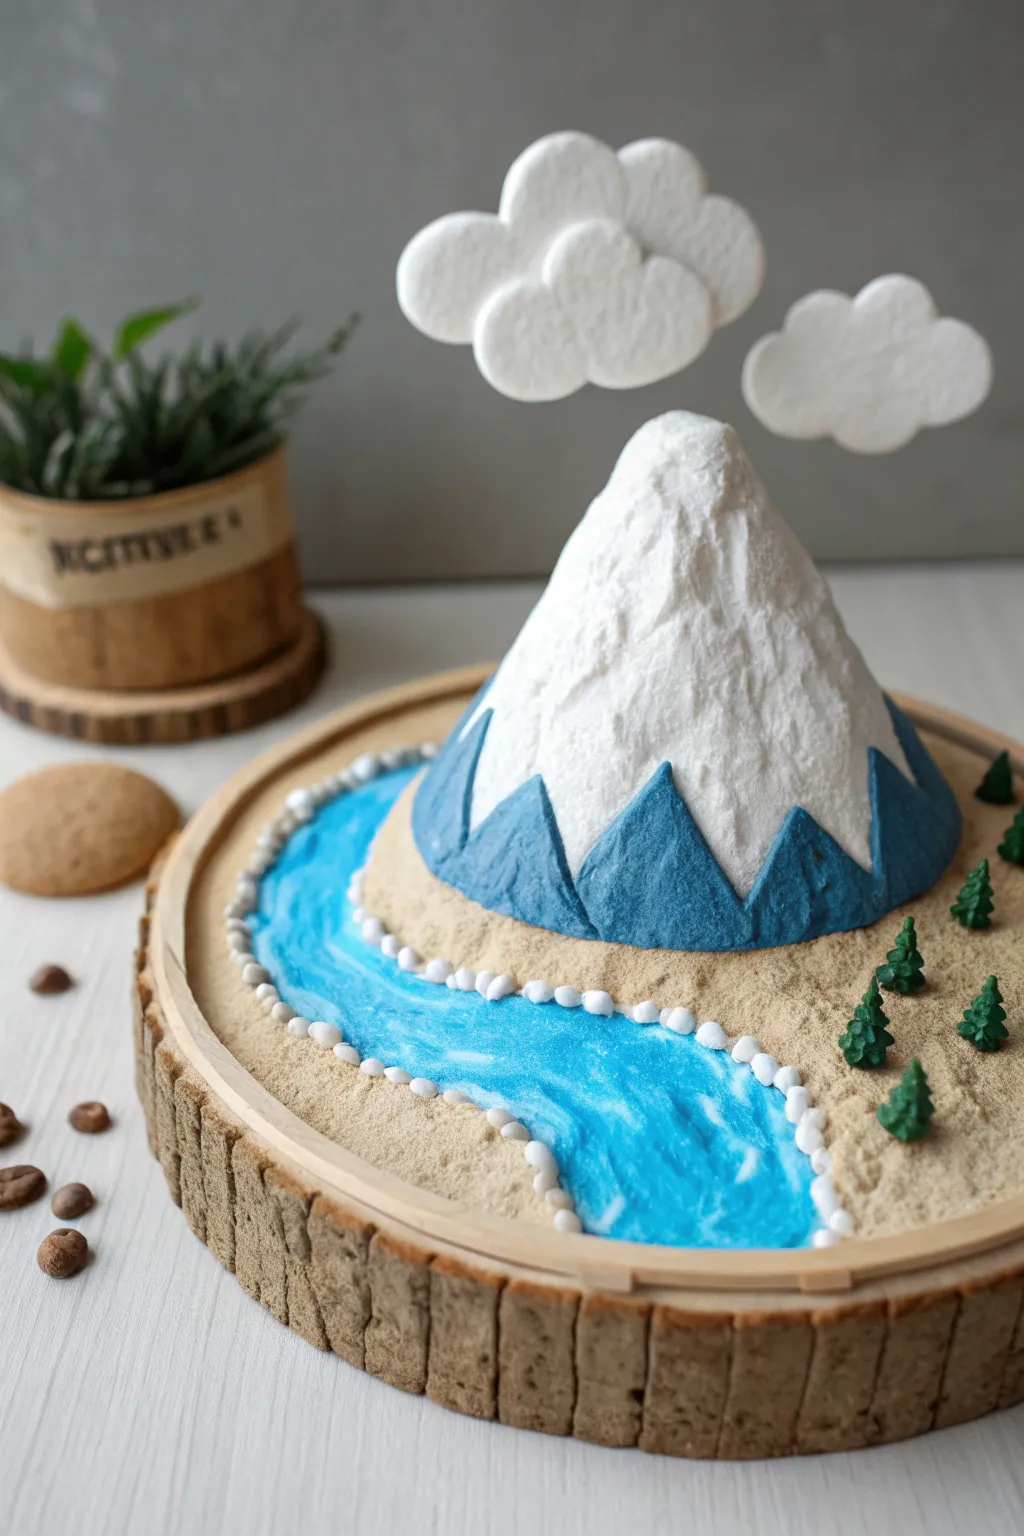
This charming nature scene captures a pristine mountain landscape contained within a circular wooden frame. Featuring a prominent snowy peak, a winding blue river, and floating clouds, it creates a peaceful, stylized miniature world.
Step-by-Step Tutorial
Materials
- Large wooden embroidery hoop or shallow circular wooden tray (approx. 8-10 inches)
- Air-dry clay (white)
- Acrylic paints (White, sky blue, dark blue, forest green, tan/beige)
- Modeling paste or thick texture medium
- Fine sand or sawdust
- PVA glue (white craft glue)
- Thick gauge craft wire (white or silver)
- Small clay sculpting tools
- Paintbrushes (flat shader, fine detail)
- Small foam balls or aluminum foil (for mountain core)
- Rolling pin
Step 1: Base Construction
-
Prepare the Frame:
Select a sturdy wooden base. If you are using a shallow wooden tray, it is ready to go. If using an embroidery hoop, glue a piece of sturdy cardboard or thin wood to the bottom to create a solid floor. -
Texture the Rim:
Create the rustic outer edge shown in the image by rolling small rectangular blocks of brown-tinted clay (or paint them brown later). Press these vertically around the outside perimeter of your base to resemble rough-hewn stone or wood blocks. -
Establish the Ground:
Fill the bottom of the tray with a thin, even layer of air-dry clay. Use a rolling pin to flatten it, ensuring it reaches the edges of your textured rim.
Pro Tip: Floating Clouds
Use clear acrylic rods instead of wire to mount the clouds. It makes the supports nearly invisible, enhancing the magical floating illusion.
Step 2: Sculpting the Landscape
-
Build the Mountain Core:
To save weight and clay, crumple aluminum foil into a cone shape or use a styrofoam cone as the mountain’s core. Glue this structure towards the back center of your base. -
Cover the Mountain:
Roll out a sheet of white air-dry clay and drape it over your core. Smooth the clay down at the base to blend it seamlessly into the ground layer. -
Add Mountain Texture:
Using a palette knife or sculpting tool, drag vertical grooves down the sides of the mountain to mimic steep, rocky ridges and crevices. -
Sculpt the Riverbed:
Before the ground clay dries, carve a shallow, winding channel starting from the base of the mountain and flowing to the front edge of the frame. This will be your river. -
Create the River Rocks:
Roll tiny balls of white clay—about the size of peppercorns. Press these gently along the banks of your river channel to act as a rocky border.
Troubleshooting: Cracking Clay
If the clay pulls away from the wooden rim as it shrinks while drying, fill the gaps with a mixture of wet clay and white glue, then smooth over.
Step 3: Painting and Texturing
-
Paint the Water:
Once the clay is dry, paint the river channel a bright sky blue. While the blue is wet, streak in a little white paint to create the look of rushing water currents. -
Apply the Terrain Texture:
Coat the flat ground areas (excluding the mountain and river) with generous PVA glue. Sprinkle fine sand or sawdust over the glue to create a realistic grainy earth texture. Shake off the excess once dry. -
Detail the Mountain:
Paint the lower third of the mountain in a geometric, jagged pattern using denim blue paint to represent shadows or lower rock faces. Leave the upper portion stark white for the snowcap. -
Enhance the Snow:
I like to dab a thick layer of white modeling paste or heavy body acrylics onto the very peak of the mountain to give the snow extra dimension and fluffiness.
Step 4: Finishing Touches
-
Make the Trees:
Form small cones out of green clay. Using fine scissors or a needle tool, snip into the clay starting from the bottom and working up to create pine needle textures. -
Plant the Forest:
Glue your pine trees in clusters on the sandy banks on the right side of the river. -
Create Clouds:
Roll three or four balls of white clay and press them together flat to form puffy cloud shapes. Texture the surface by stippling with a stiff bristled brush. -
Suspend the Sky:
Cut lengths of stiff white wire. Insert one end into the bottom of a cloud and the other into the hidden back side of the mountain or the back rim of the base, so the clouds appear to float above the peak.
Display your miniature mountain scene on a sunny shelf where the light can cast shadows through the floating clouds


Island and Lagoon Mini Scene
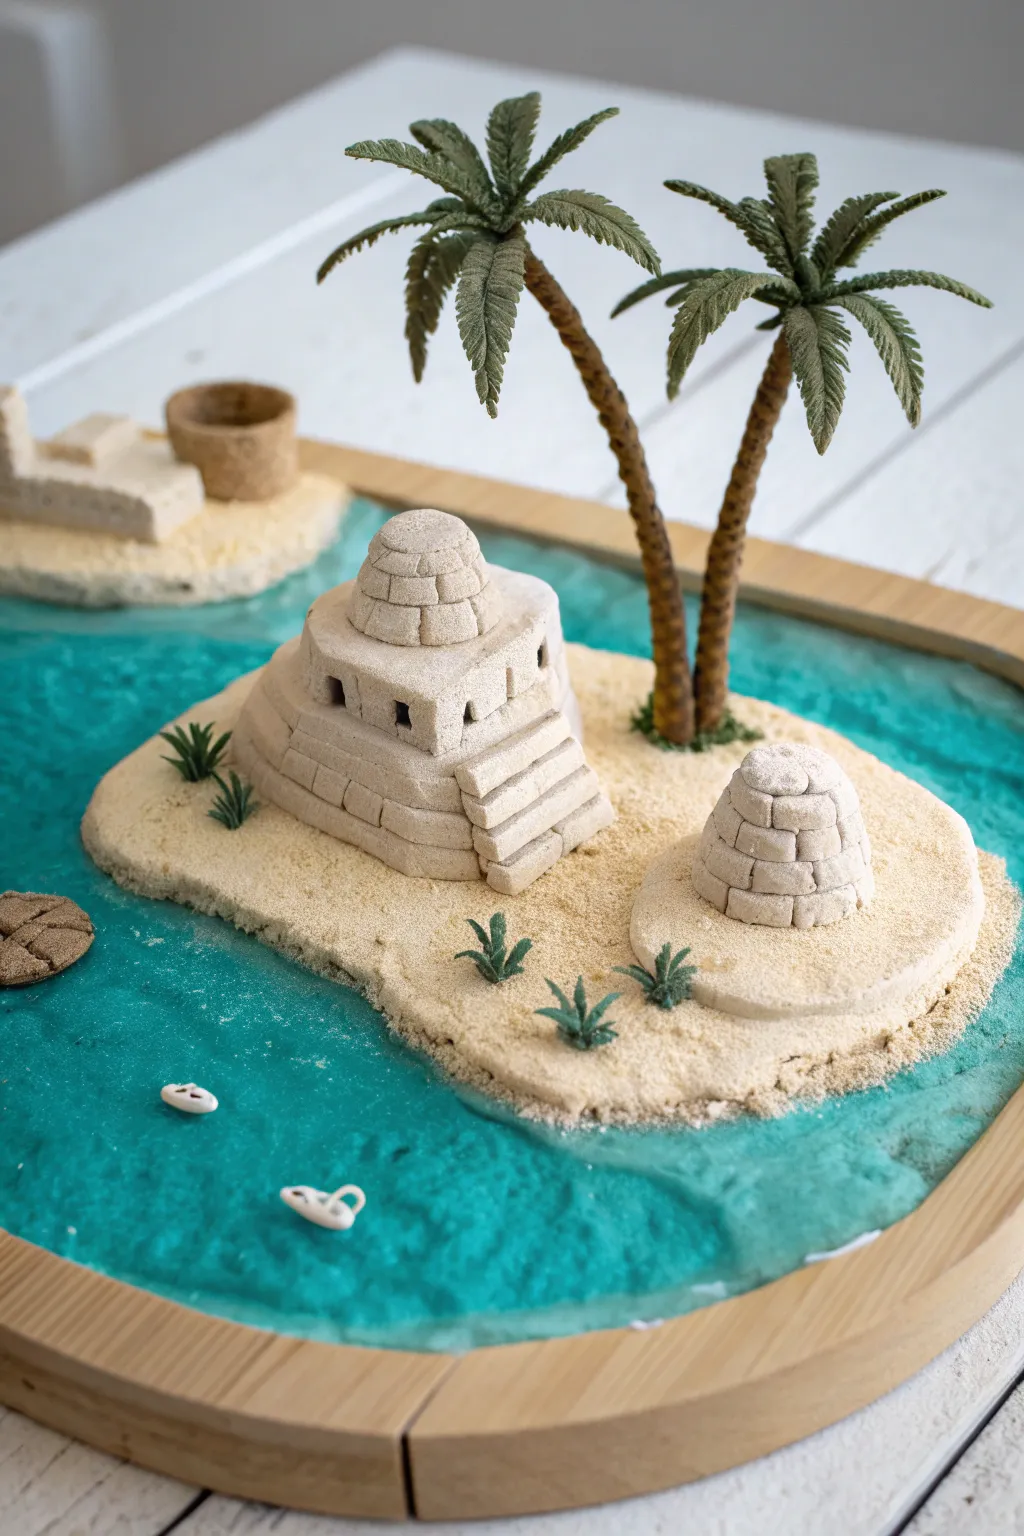
This serene desktop escape features a brilliant turquoise lagoon surrounding sandy islands topped with mysterious ancient ruins. Combining the textures of kinetic sand with the glossy finish of resin ensures a durable yet playful scene that’s perfect for display.
Detailed Instructions
Materials
- Shallow wooden tray or frame (oval or rounded rectangle)
- Epoxy resin (2-part kit)
- Turquoise alcohol ink or resin dye
- Light tan modeling clay or kinetic sand mixed with PVA glue
- Fine craft sand (beige)
- Miniature plastic palm trees
- Sculpting tools (knife, needle tool)
- Tiny seashells
- Disposable mixing cups and stir sticks
- Gloves and protective mat
- Small faux succulent tufts
Step 1: Base and Water Pour
-
Prepare the tray:
Clean your wooden tray thoroughly to ensure no dust interferes with the resin. If the wood is porous, seal the bottom with a thin layer of Mod Podge or clear glue and let it dry completely. -
Mix the resin:
In a disposable cup, mix your two-part epoxy resin according to the manufacturer’s instructions. Stir slowly to minimize bubbles. -
Tint the lagoon:
Add just one or two drops of turquoise alcohol ink to the resin. You want a translucent, watery blue, not an opaque paint look. Stir gently until the color is uniform. -
Pour the water layer:
Pour the tinted resin into the tray. Fills it about halfway up the rim, creating a shallow pool. Use a lighter or heat gun quickly over the surface to pop any rising bubbles. -
Cure time:
Allow the resin to cure fully on a level surface. This usually takes 24 hours depending on your brand, so be patient before moving to the land phase.
Clean Water Tip
Cover your resin pour with a cardboard box while it cures. This prevents dust, pet hair, or lint from settling into your glossy ‘water’ surface.
Step 2: Forming the Islands
-
Create clay bases:
Take your light tan clay and shape two flat, organic island shapes. One should be larger for the main ruin, and a smaller one for the secondary structure. -
Adhere the islands:
Once the resin is hard, glue these clay bases directly onto the resin surface. Position them off-center for a more natural composition. -
Texture with sand:
Brush a layer of white glue over the clay islands and sprinkle fine craft sand over them. Press the sand down gently so the island looks like a real beach rather than smooth clay.
Make it Kinetic
Instead of hard clay, use actual kinetic sand for the islands! It holds shape well but can be squished and re-sculpted for an interactive desk toy.
Step 3: Building the Structures
-
Sculpt the main pyramid base:
Form a square tiered base using the tan clay. Create steps leading up one side using a flat sculpting tool or knife edge to keep the lines sharp. -
Add the dome:
Roll a small ball of clay and flatten the bottom. Place it on top of the tiered base. Use a needle tool to carve a grid pattern into it, mimicking stone blocks. -
Carve details:
Cut small square windows into the upper tier of the pyramid base to give it depth and architectural interest. -
Sculpt the secondary hut:
On the smaller part of the island, form a simple beehive-shaped dome. Carve lines horizontally and vertically to create the look of stacked stone bricks. -
Apply sandy texture:
To match the grainy texture in the photo, lightly dab the wet clay structures with a stiff brush or press a tiny amount of loose sand into the surface before it dries.
Step 4: Vegetation and Details
-
Plant the palms:
While the clay of the main island is still slightly soft (or using a dab of glue if dry), press the trunks of the plastic palm trees into the sand between the structures. -
Install shrubs:
Take the small green succulent tufts and push them into the sand around the base of the ruins. Grouping them in odd numbers, like threes, looks most natural. -
Place the shells:
Using tweezers, glue two or three tiny white shells onto the surface of the resin ‘water’ near the shoreline to simulate floating objects or sea life. -
Final touches:
Check for any loose sand on the resin water and brush it away gently. I prefer to add a final matte varnish spray to the sand areas to lock everything in place.
Now you have a peaceful slice of paradise right on your desktop to admire whenever you need a mental vacation


Garden Corner With Mini Bridge

Transport yourself to a peaceful mindset with this detailed diorama featuring a charming arched bridge over a crystalline blue stream. This project combines clay modeling, resin work, and miniature styling to create a serene garden corner perfect for display.
Step-by-Step Tutorial
Materials
- Polymer clay (beige/tan, white, terracotta/brown)
- Two-part epoxy resin
- Transparent blue resin dye or alcohol ink
- Miniature wooden or faux-wood plastic bridge
- Artificial moss (flock or preserved lichen)
- Small pebbles (smooth river stones)
- Miniature artificial flowers (daisiess, pink blooms)
- Liquid clay or strong craft glue
- Rolling pin and clay sculpting tools
- Rectangular or oval wooden base (approx. 6×9 inches)
- Textured tool (toothbrush or stiff brush)
- Potted faux plant (optional, for background)
- Gloss varnish
Step 1: Base and Riverbed Construction
-
Prepare the foundation:
Begin with your wooden base. Roll out a sheet of beige or tan polymer clay relatively thin, about 1/4 inch. Lay this over your base to create the ground layer, pressing it firmly to adhere. -
Carve the river channel:
Use a sculpting tool to carve out a meandering river path down the center of the base. It doesn’t need to be perfectly straight; a slight curve looks more natural. Remove the clay from this channel so the wood is visible or line it with a very thin layer of blue-tinted clay for depth. -
Create the stone edging:
Roll a long, thin cylinder of beige clay. Cut it into small, uniform rectangular blocks to mimic paving stones. Carefully line the entire edge of your riverbank with these blocks, pressing them gently into the ground clay so they stick. -
Texture the ground:
Take a stiff brush or a crumpled ball of foil and gently press it into the clay areas outside the river and stones. This texturing removes the ‘plastic’ look and mimics sandy earth or soil. -
Bake the base:
Once you are happy with the layout, bake the clay-covered base according to the manufacturer’s instructions (usually 275°F for 15-20 minutes). Let it cool completely before moving to the next phase.
Step 2: Pouring the Resin Water
-
Mix the resin:
In a disposable cup, mix your two-part epoxy resin slowly to avoid creating too many air bubbles. I find distinct measuring lines crucial here—accuracy ensures it cures hard. -
Tint the water:
Add just a tiny drop of transparent blue dye or alcohol ink. You want a crystalline, tropical blue, not an opaque navy, so go easy on the color. -
Embed river stones:
Before pouring, place a few larger white river stones and smaller pebbles directly into the dry riverbed channel. They should sit where the water breaks around them. -
The pour:
Carefully pour the blue resin into the channel. Fill it until it’s just below the top of your stone edging. If bubbles appear, pop them gently with a lighter or a pin. Set the project on a perfectly level surface to cure for 24 hours.
Sticky Situation?
If your resin leaks out of the riverbed, wait for it to cure partially until it’s gummy, then trim the excess away with a sharp craft knife before it hardens fully.
Step 3: Landscaping and Assembly
-
Install the bridge:
Once the resin is hard, position your miniature bridge. It should span the river at an angle. Use superglue or a strong craft adhesive on the feet of the bridge to secure it to the ‘ground’ area. -
Apply the mossy banks:
Apply craft glue generously to the clay ground areas on either side of the river. Press distinct patches of dark green artificial moss or flocking onto the glue. Vary the thickness to create mounds. -
Add floral details:
Select your miniature daisies and pink flowers. Snip their stems short and use tweezers to dip the ends in glue, then nestle them into the mossy mounds, clustering them for a wilder look. -
Create a succulent patch:
On the left bank (near the bridge entrance), glue down a larger rock. Next to it, attach a miniature faux succulent or sculpted clay agave plant to balance the height of the flowers on the opposite side. -
Final ripples:
To make the water look like it’s flowing, use a little clear gloss gel or UV resin on the surface of the cured blue resin. Drag a toothpick through it to create ripples, especially around the white foundation stones. -
Clean and polish:
Wipe the edges of your brickwork with a damp cloth to remove any stray glue or moss fibers. If desired, brush a matte varnish over the ‘stone’ bricks to seal everything.
Pro Tip: Realistic Water
Add a few tiny pinches of iridescent white glitter into your resin mix. It mimics the sparkle of sunlight hitting moving water without looking overly crafty.
Place your finished garden corner on your desk for a permanent view of nature

The Complete Guide to Pottery Troubleshooting
Uncover the most common ceramic mistakes—from cracking clay to failed glazes—and learn how to fix them fast.
Jungle Habitat With Layered Plants
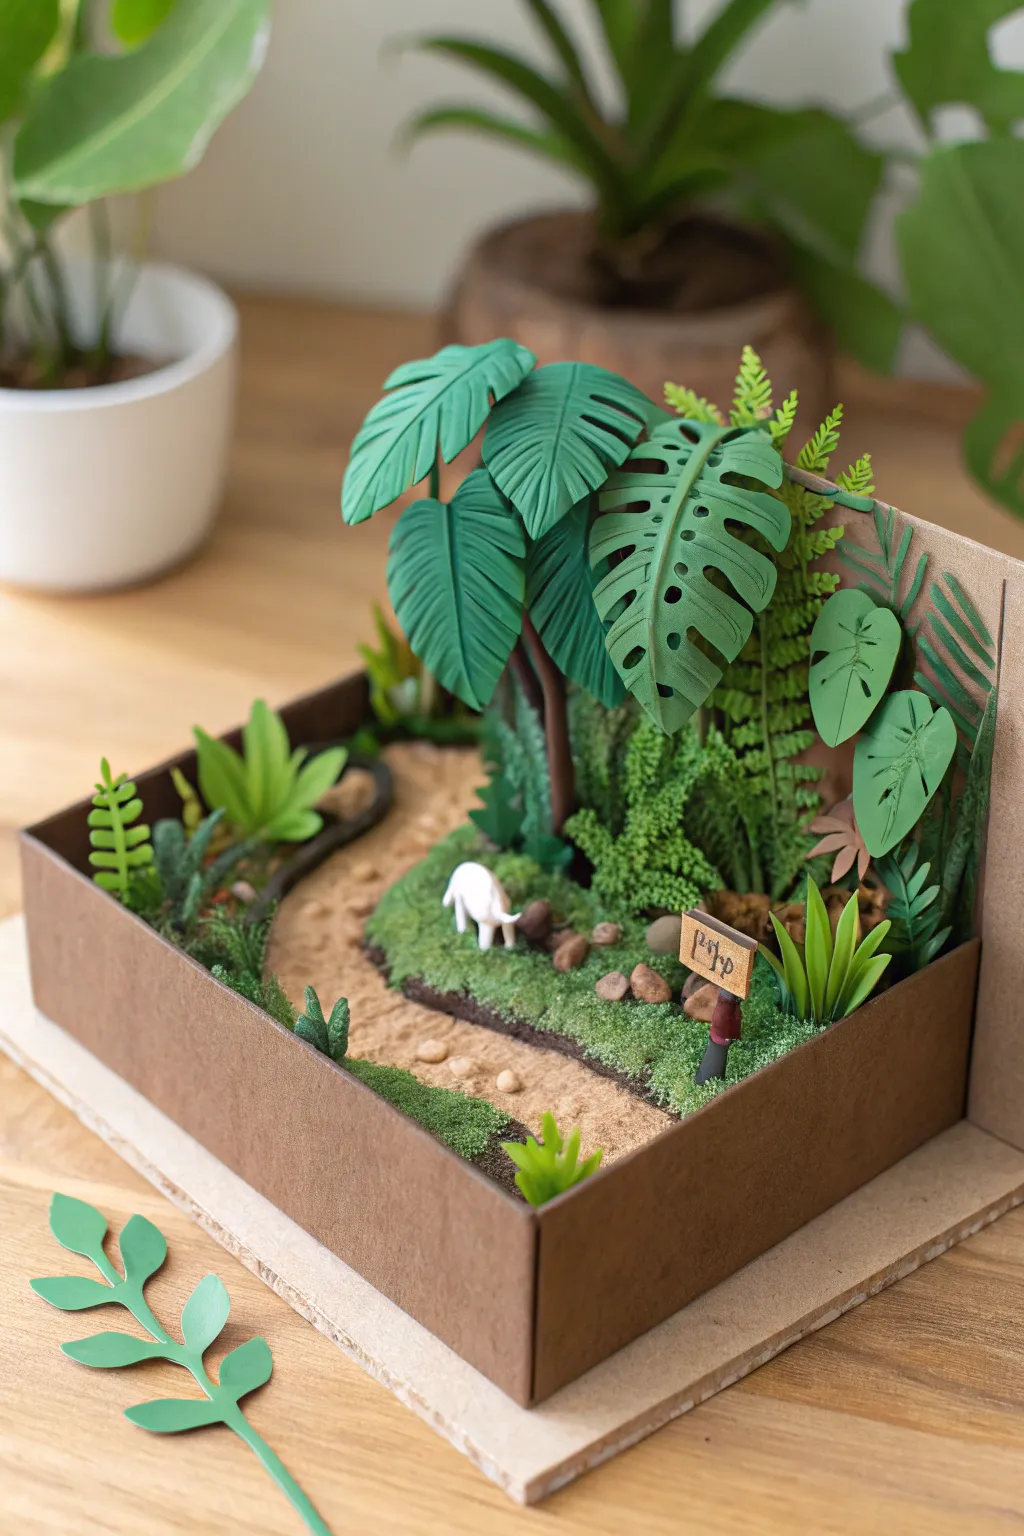
Transform a simple cardboard base into a lush, thriving ecosystem with this mixed-media diorama. By combining textured clay work with precise papercraft, you’ll build a layered jungle habitat featuring a winding sandy path and towering monstera leaves.
Step-by-Step Guide
Materials
- Small square cardboard box (shallow)
- Thick cardboard or balsa wood for backing
- Polymer clay (green, brown, white, tan/sand)
- Green cardstock (various shades)
- Textured moss or flocking powder
- PVA glue or tacky glue
- Acrylic paints (brown, grey)
- Sand or fine grit
- Wire cutters and thin floral wire
- Modeling tools (or toothpicks/skewers)
- Scissors and X-ACTO knife
Step 1: Building the Base Structure
-
Prepare the box framework:
Begin by cutting down a small cardboard box so the front and sides are low (about 2-3 inches high). Leave the back completely open. -
Add the backdrop:
Cut a piece of thick cardboard or balsa wood that extends significantly higher than the box rim. Glue this securely to the back of your box base to support the tall foliage later. -
Create the terrain foundation:
Line the bottom of the box with a thin layer of brown polymer clay or air-dry clay to create an uneven, natural ground surface. Don’t worry about smoothness; texture is good here.
Step 2: Landscaping the Jungle Floor
-
Carve the winding path:
While the base clay is still pliable, press a winding channel from the front left corner towards the center. This will be your sandy trail. -
Apply the sandy texture:
Spread a layer of glue into the path channel and sprinkle real sand or tan-colored clay crumbs over it. Press them down firmly to ensure they adhere. -
Establish the grassy zones:
Cover the raised areas on either side of the path with green textured flocking or moss. I like to use a mix of light and dark greens to simulate natural light filtering through the canopy. -
Add rocks and pebbles:
Roll tiny balls of brown and grey clay to form rocks. Press these along the edges of the path and near the future plant sites to define the landscape boundaries.
Pro Tip: Wire Supports
For the taller monstera plants, insert a thin floral wire inside the clay trunk before baking. This prevents drooping and lets you bend the tree slightly.
Step 3: Crafting the Foliage
-
Form the tree trunks:
Roll thick snakes of dark brown clay to act as tree trunks. Press them vertically against the back wall, ensuring they flare slightly at the bottom for stability. -
Sculpt monstera leaves:
Flatten balls of green clay into teardrop shapes. Use a needle tool or X-ACTO knife to cut out the characteristic notches and holes. Creating slight variations in size adds realism. -
Texture the leaves:
Gently score vein lines onto your clay leaves using a dull sculpting tool. Curve the edges slightly so they aren’t perfectly flat. -
Create the fern layer:
Cut intricate fern shapes from green cardstock implies a nice material contrast. Alternatively, you can sculpt these from clay by making thin, feather-like strips. -
Assemble the canopy:
Attach the monstera leaves to the top of your brown trunks. Layer them so they overlap, creating a dense, jungle feel. -
Plant low-lying shrubs:
Place small clusters of pointed clay leaves or paper cutouts near the front corners. This adds depth and frames the scene nicely.
Level Up: Water Features
Use clear UV resin or glossy varnish over a painted blue patch to create a small jungle pool or puddle next to the winding path.
Step 4: Details and Wildlife
-
Sculpt the inhabitant:
Using white clay, sculpt a small, four-legged animal. Keep the shape simple—a rounded body, four small legs, and a head grazing downwards. -
Make the wooden sign:
Roll a small rectangle of tan clay and scratch a wood grain texture into it. Attach it to a thin clay post. -
Add lettering:
Paint or etch a small name or symbol onto your sign using a fine-point tool or black paint wash to make it look weathered. -
Final assembly:
Place the animal on the grassy patch and plant the signpost near the front right corner. Check all glued elements and touch up any loose sand.
Your miniature jungle habitat is now complete and ready to display on a shelf or desk
Desert Canyon and Cactus Scene
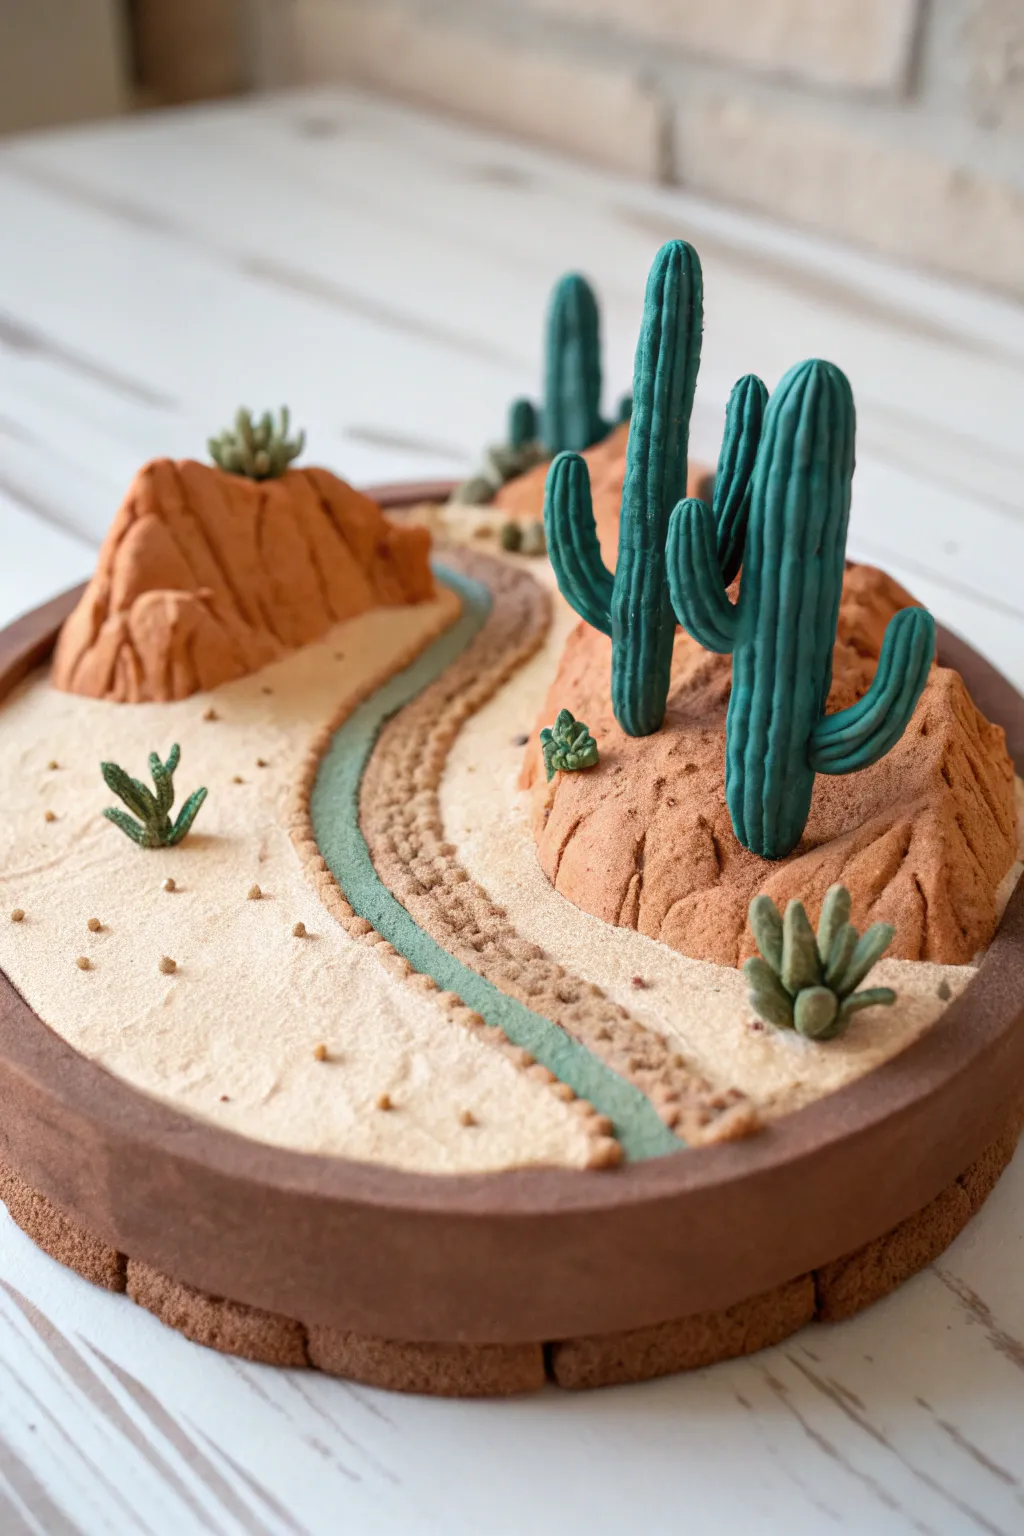
Capture the stark beauty of the American Southwest with this vibrant clay diorama. Featuring towering saguaros and rusty red rock formations set within a rounded base, this project balances stylized forms with rich, sandy textures.
Detailed Instructions
Materials
- Polymer clay (terracotta/rust orange, light beige/sand, deep teal/green, light sage green, chocolate brown)
- Round clay base or wooden coaster
- Sculpting tools (needle tool, ball stylus)
- Texturing tool (stiff brush, toothbrush, or sandpaper)
- Small rolling pin
- Liquid polymer clay or craft glue
- Texture sheet or fine grit sandpaper (optional)
Step 1: Base and Terrain Formation
-
Prepare the Foundation:
Begin by rolling out chocolate brown clay into a thick, even snake. Wrap this around the circumference of your round base to create a containment wall, smoothing the seam where the ends meet. Texture the outside to look like rough stone or earth. -
Lay the Sandy Ground:
Roll a flat sheet of light beige clay to fit inside your brown border. This forms the desert floor. Press it firmly into the base, ensuring it sits flush against the brown walls. -
Carve the Riverbed:
Using a knife or sculpting tool, carefully incise a winding, S-shaped path through the center of the beige clay. Remove this strip of clay to create a shallow channel for your river. -
Fill the River:
Mix a small amount of teal into your beige clay or use a light sage green to create a muted water color. Roll a snake of this clay, flatten it slightly, and press it into the channel you just carved. -
Texture the Sand:
Take a stiff toothbrush or a ball of crumpled aluminum foil and firmly tap the entire beige surface. This stippling action creates a realistic, gritty sand texture. -
Add River Rocks:
Roll tiny spheres of brown and dark beige clay. Press these into the ‘banks’ of your river to simulate pebbles and rugged edging.
Needle Tool Trick
When texturing the cactus ribbing, dip your needle tool in water or cornstarch first. This prevents the clay from dragging and keeps your vertical lines crisp and clean.
Step 2: Sculpting the Landscape
-
Shape the Canyon Rocks:
Using the terracotta orange clay, form two distinct mounds. One should be larger and craggier, placed on the right side, and a smaller mound on the left. Shape them to look like eroded sandstone. -
Refine Rock Details:
Use a needle tool or knife to carve deep vertical fissures and cracks into the orange mounds. Texture the surface by pressing a real rock or coarse sandpaper against the clay to avoid smooth fingerprints. -
Secure the Formations:
Use a dab of liquid polymer clay or score the bottom of your rocks to adhere them securely to the beige base.
Add Realism
After baking, dry brush a little white acrylic paint onto the cactus spines and light brown powder into the rock crevices to highlight the textures instantly.
Step 3: Flora and Finishing Touches
-
Form the Saguaro Trunks:
Roll varying lengths of deep teal clay into cylinders for the main cactus trunks. Make sure they are proportionate to your rock formations. -
Add Cactus Arms:
Create L-shaped bends from smaller cylinders of teal clay. Attach these to the main trunks, smoothing the connection points so they look seamless. -
Detail the Cacti:
Use a needle tool to drag vertical lines down the entire length of the cactus trunks and arms. This mimics the ribbed structure of a saguaro. -
Plant the Cacti:
Gently press your finished cacti into the large orange rock mound. You may need to insert a small piece of wire inside the clay for stability if the cacti are tall. -
Create Small Agaves:
Form tiny teardrop shapes from sage green clay. Cluster three or four together, pointing upward, to create small agave or aloe plants. -
Place the Vegetation:
Position your agave clusters near the riverbank and on top of the smaller rock formation for visual balance. -
Scatter Pebbles:
Create very tiny balls of leftover orange and brown clay. scatter these randomly across the sandy areas to act as loose stones and debris. -
Final Bake:
Bake the entire piece according to your polymer clay manufacturer’s instructions, usually at 275°F (135°C) for about 30 minutes per quarter-inch of thickness.
Now you have a permanent slice of desert tranquility to display on your desk or shelf


What Really Happens Inside the Kiln
Learn how time and temperature work together inside the kiln to transform clay into durable ceramic.
Arctic Ice Floe Diorama
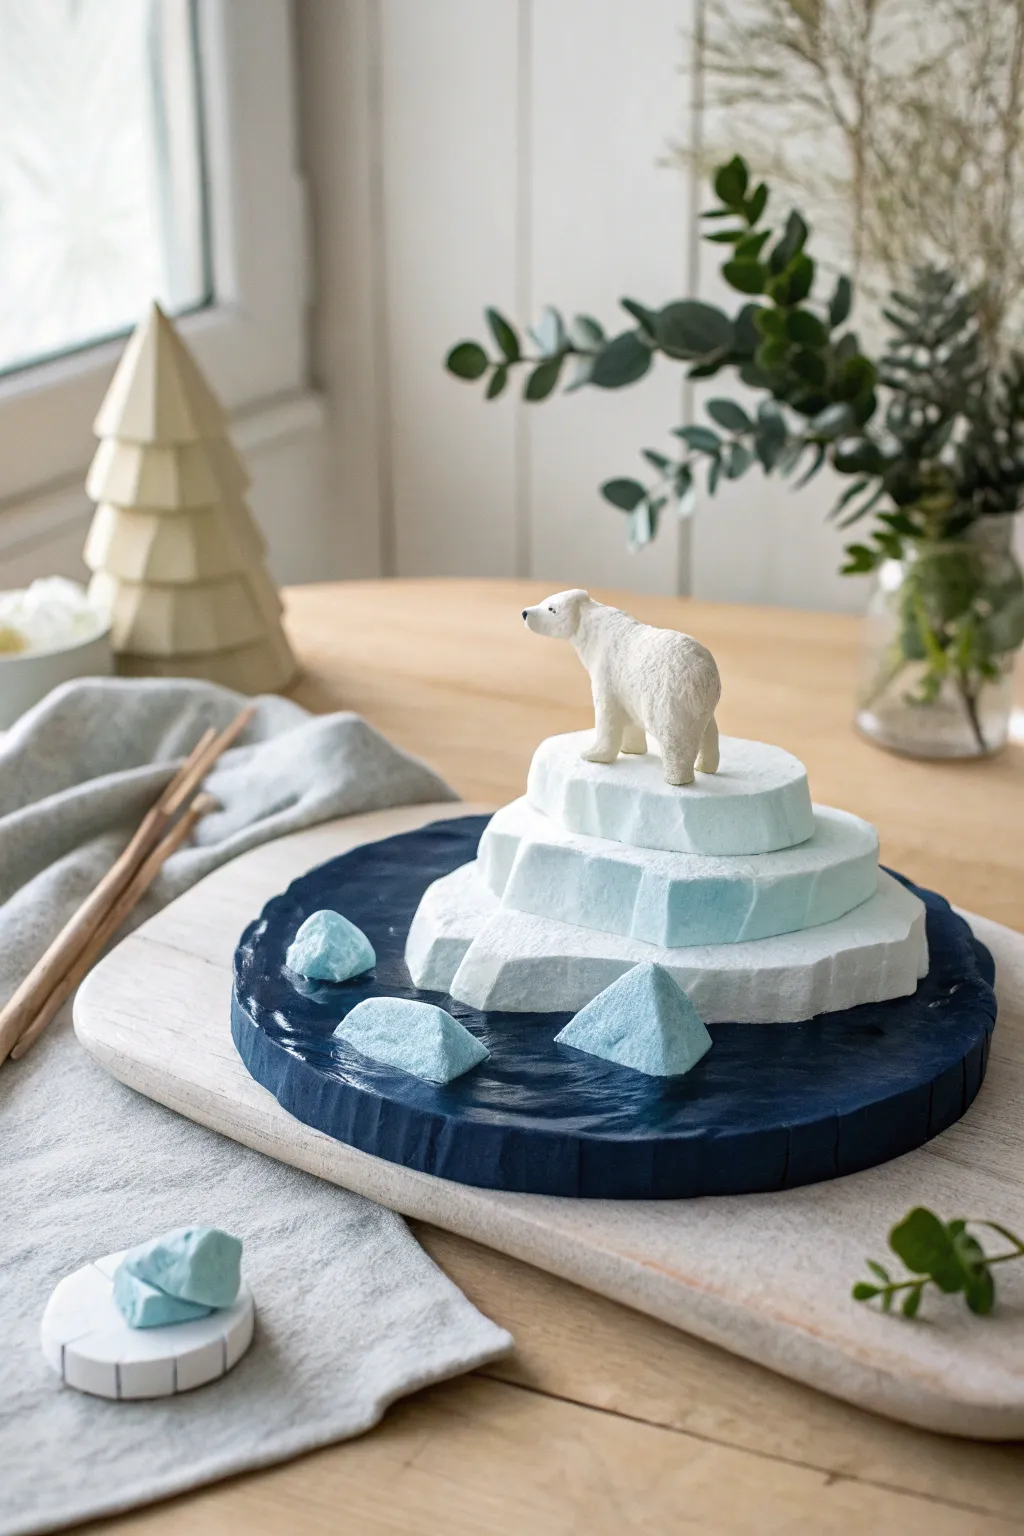
Capture the pristine beauty of the Arctic with this minimalist clay diorama featuring a solitary polar bear atop layered ice. The deep blue water contrasts beautifully with the textured white clay, creating a serene and frosty atmosphere perfect for winter decor.
How-To Guide
Materials
- Air-dry clay or polymer clay (White)
- Acrylic paints (Deep Navy Blue, Teal, White)
- Circular wooden base or heavy cardboard (approx. 8-10 inches)
- Sculpting tools (knife, needle tool)
- Sandpaper (fine grit)
- Rolling pin
- Clear varnish or gloss glaze (optional for water effect)
- Foil or masking tape (for armature)
- Flat paintbrush and detail brush
Step 1: Creating the Arctic Ocean Base
-
Prepare the Base:
Start with a sturdy circular base. If using wood, sand it lightly. If using cardboard, layer two pieces together for stability and glue them securely. -
Sculpt the Water Layer:
Roll out a thick slab of clay to cover the entire top surface of your base. It should be roughly 1/4 inch thick to allow for texturing. Press the clay firmly onto the base, smoothing the edges down the sides to create a finished rim. -
Add Wave Texture:
While the clay is still soft, use a sculpting tool or the back of a spoon to create gentle ripples and waves. Don’t overwork it; you want the surface to look like calm, cold water, not a storm. I like to keep the center flatter where the iceberg will sit.
Cracking Issues?
If gaps appear between iceberg layers as the clay shrinks, fill them with a mix of white glue and clay dust (or ‘slip’) before painting to seal the seams seamlessly.
Step 2: Forming the Iceberg
-
Build the Tiers:
Create three distinct slabs of white clay, each smaller than the last. These don’t need to be perfect circles; irregular, jagged edges look more like natural ice formations. -
Create Blocky Edges:
Use a sharp craft knife to cut the edges of your clay slabs at angles. You want flat, planar sides that mimic the way ice shears off. Keep the cuts clean and sharp rather than rounded. -
Stack the Structure:
Stack the three layers centered on top of your water base. Press them gently together to bond the clay. If using air-dry clay, a dab of water between layers acts as glue. -
Make Floating Ice Chunks:
Use leftover clay scraps to form 3-4 smaller, angular ‘rocks’ of ice. Shape them like miniature versions of the main iceberg with sharp, flat facets. Place these randomly in the ‘water’ surrounding the main berg.
Realistic Ice Texture
Before the clay hardens, press a crumpled ball of aluminum foil gently against the vertical sides of your iceberg tiers to instantly create realistic, jagged ice textures.
Step 3: Sculpting the Polar Bear
-
Form the Body:
Roll a small cylinder of clay for the bear’s torso. Gently pull one end to elongate the neck and create a rounded shape for the head. Keep the sculpting somewhat stylized and smooth to match the image’s aesthetic. -
Add Legs:
Attach four small logs of clay for legs. Blend the seams smoothly into the body using a modeling tool so the bear looks like one cohesive piece. -
Final Bear Details:
Pinch two tiny triangles for ears. Use a needle tool to create a subtle texture on the fur if desired, though a smooth finish works well here too. Poke a tiny hole for the nose eye placement. -
Dry Completely:
Allow the entire assembly to dry according to your clay’s instructions. Air-dry clay usually takes 24-48 hours for a piece this thick.
Step 4: Painting and Finishing
-
Paint the Deep Ocean:
Paint the water base with a deep navy blue acrylic. Apply a second coat if needed for full opacity, ensuring you get into all the textured crevices. -
Add Icy Tones:
For the iceberg and floating chunks, mix a very pale teal wash (mostly water, a drop of teal, and white). Brush this lightly over the white clay, focusing on the vertical ‘sheared’ sides to enhance the icy look. -
Highlight the Ice:
Once the wash is dry, dry-brush pure white paint over the top surfaces and sharp edges of the iceberg. This emphasizes the frost and separates the layers visually. -
Detail the Bear:
Paint the bear a warm cream or off-white to distinguish it from the bright white ice. Use a fine-tip brush or a black marker to add a tiny dot for the nose and eyes. -
Assemble for Display:
If you sculpted the bear separately, glue it to the top tier of the iceberg now. Finally, you can add a coat of gloss varnish just to the dark blue water area to make it look wet and reflective.
Now you have a serene slice of the arctic to display on your shelf, bringing a cool calmness to your room.
Farmyard Mini Landscape
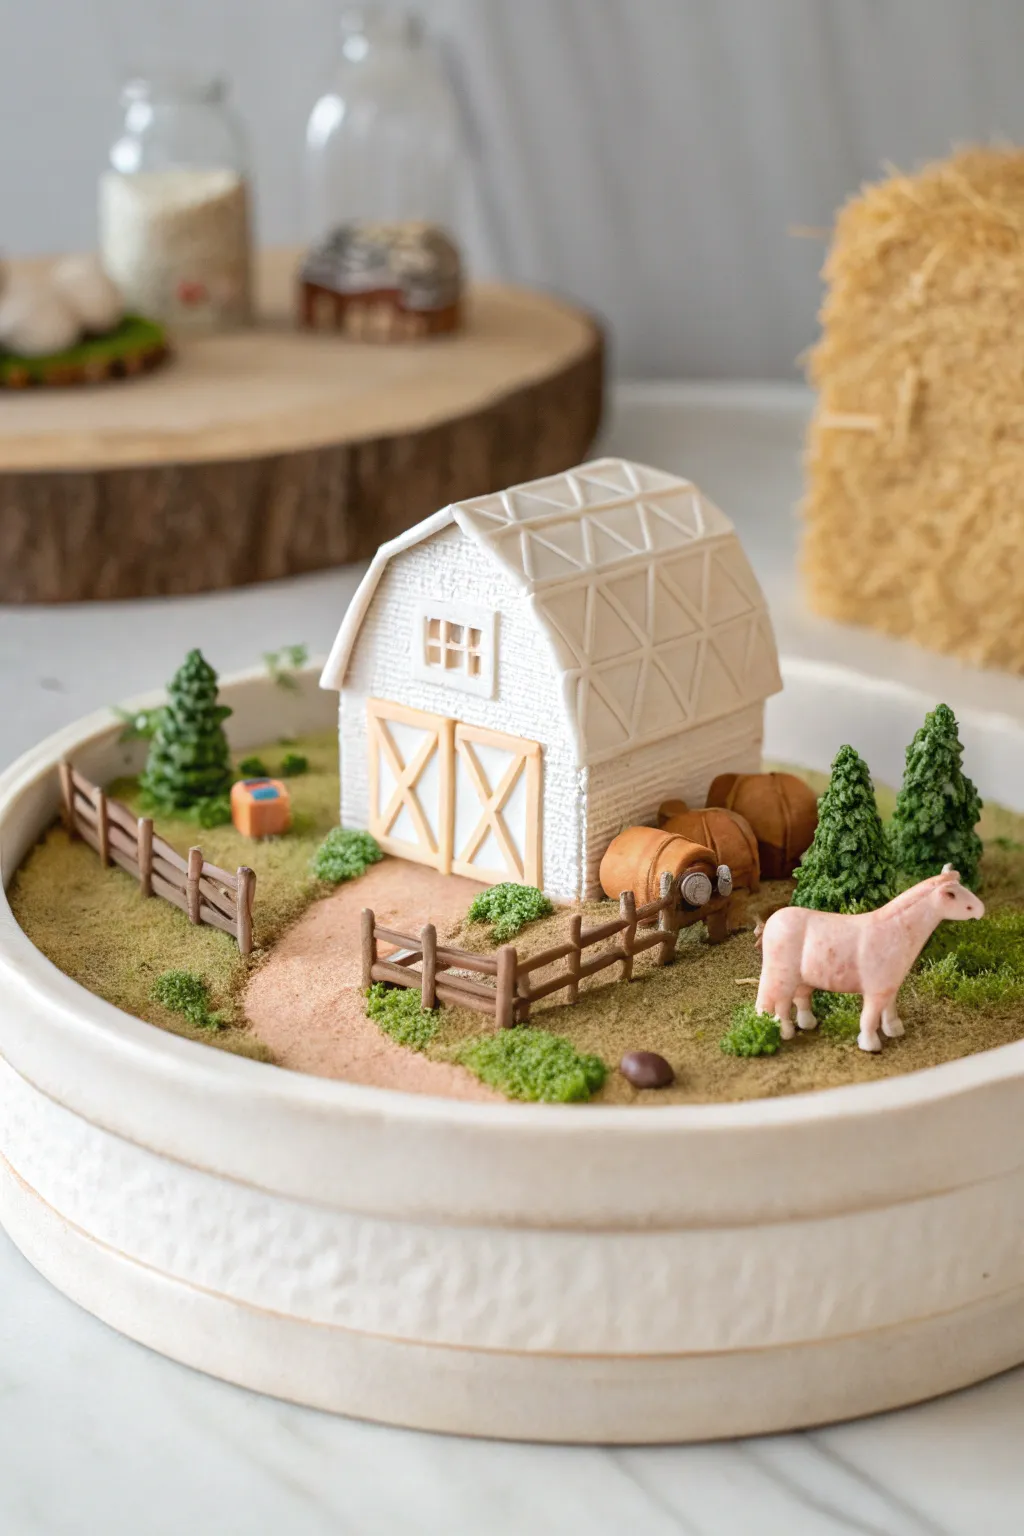
Transform a simple shallow dish into a captivating rural scene with this polymer clay farmyard diorama. Featuring a textured white barn and flocked greenery, this miniature landscape brings a touch of pastoral charm to any shelf.
Detailed Instructions
Materials
- Shallow ceramic bowl or glazed plant saucer (white)
- White, brown, and pink polymer clay
- Aluminum foil
- Liquid clay (bake and bond)
- Texture tools (needle tool, small blade)
- Acrylic paints (brown, white, green)
- Miniature landscaping flocking (green and brown)
- Fine sand or tan decorative sand
- Craft glue or scenic cement
- Rolling pin or pasta machine
Step 1: Constructing the Barn
-
Shape the core:
Create a solid cube from crumpled aluminum foil to save clay and reduce weight. This will serve as the armature for the main barn structure. -
Cover the walls:
Roll out a sheet of white polymer clay. Measure your foil cube and cut panels for the four walls. Press these onto the foil, smoothing the seams at the corners so the foil is completely hidden. -
Add texture:
Use a needle tool or stiff brush to scratch horizontal lines or a wood grain pattern into the white clay walls before the clay hardens. -
Build the roof:
Form a second, smaller foil shape for the gambrel roof (barn style). Cover this with white clay. Using a blade, gently score a geometric diamond or cross-hatch pattern across the roof surface to mimic shingles or metal panels. -
Detail the facade:
Cut a small square of white clay for the window frame and attach it high on the front gable. Outline a four-pane window inside. Create the barn doors using thin strips of tan or light brown clay in an ‘X’ brace pattern and press them onto the front wall.
Texturing Tip
Use a real stone or a crumpled ball of aluminum foil to impress texture into the ground clay before baking. This prevents the terrain from looking too smooth and artificial.
Step 2: Creating the Landscape Base
-
Prepare the terrain:
Fill the bottom of your ceramic bowl with a layer of scrap clay or air-dry clay to create an uneven, natural ground level. Leave a sunken channel where you want the path to go. -
Lay the path:
Add a thin layer of tan clay for the winding path. Texture it by pressing a piece of sandpaper or a rough stone against it. -
Define the grass areas:
Cover the remaining ground areas with a thin sheet of olive or brown clay. This acts as a base color for your flocking later. -
Position the structure:
Press the finished barn firmly into the clay base at the back center of the bowl. Use a little liquid clay to ensure a strong bond.
Step 3: Sculpting the Accessories
-
Make the fence:
Roll thin snakes of brown clay. Cut them into short posts and longer rails. Assemble small fence sections on your work surface first, pressing the rails onto the posts, then stand them up on the landscape. -
Sculpt the animal:
Using pinkish-tan clay, shape a simple quadruped body. It doesn’t need to be anatomically perfect; a stylized shape works well. Add tiny legs and ears, then place it near the front right. -
Create hay bales:
Roll small cylinders of tan clay. Slightly flatten the bottoms so they sit stable. Group two or three together near the side of the barn. -
Form the trees:
Shape cones from dark green clay. Use small scissors to snip into the clay from the top down, pulling the tips outward to create pine needle texture. -
Baking time:
Place the entire bowl (ensure a ceramic bowl is oven-safe) into the oven. Bake according to your polymer clay manufacturer’s instructions, usually around 275°F (130°C) for 15-30 minutes.
Level Up: Water Feature
Carve out a small pond area in the base. Paint the bottom blue, add small rocks, and fill it with UV resin or gloss varnish for a realistic water effect.
Step 4: Bringing it to Life
-
Add grassy texture:
Once cool, brush craft glue over the ‘grass’ areas of the clay base. Sprinkle green flocking powder or fine turf over the glue. Press down gently and shake off excess. -
Path details:
Brush a thin line of glue along the path and sprinkle fine tan sand to create a realistic dirt road texture. -
Shrubbery:
Glue small clumps of coarse green sponge or moss around the base of the barn and fence posts to simulate bushes. -
Final touches:
If the barn looks too pristine, use a dry brush with a tiny amount of brown paint to weather the corners and roof lines.
Display your charming farm scene on a coffee table or windowsill to enjoy a little piece of country life every day

TRACK YOUR CERAMIC JOURNEY
Capture glaze tests, firing details, and creative progress—all in one simple printable. Make your projects easier to repeat and improve.
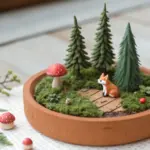
Fairy Glade With Mushrooms
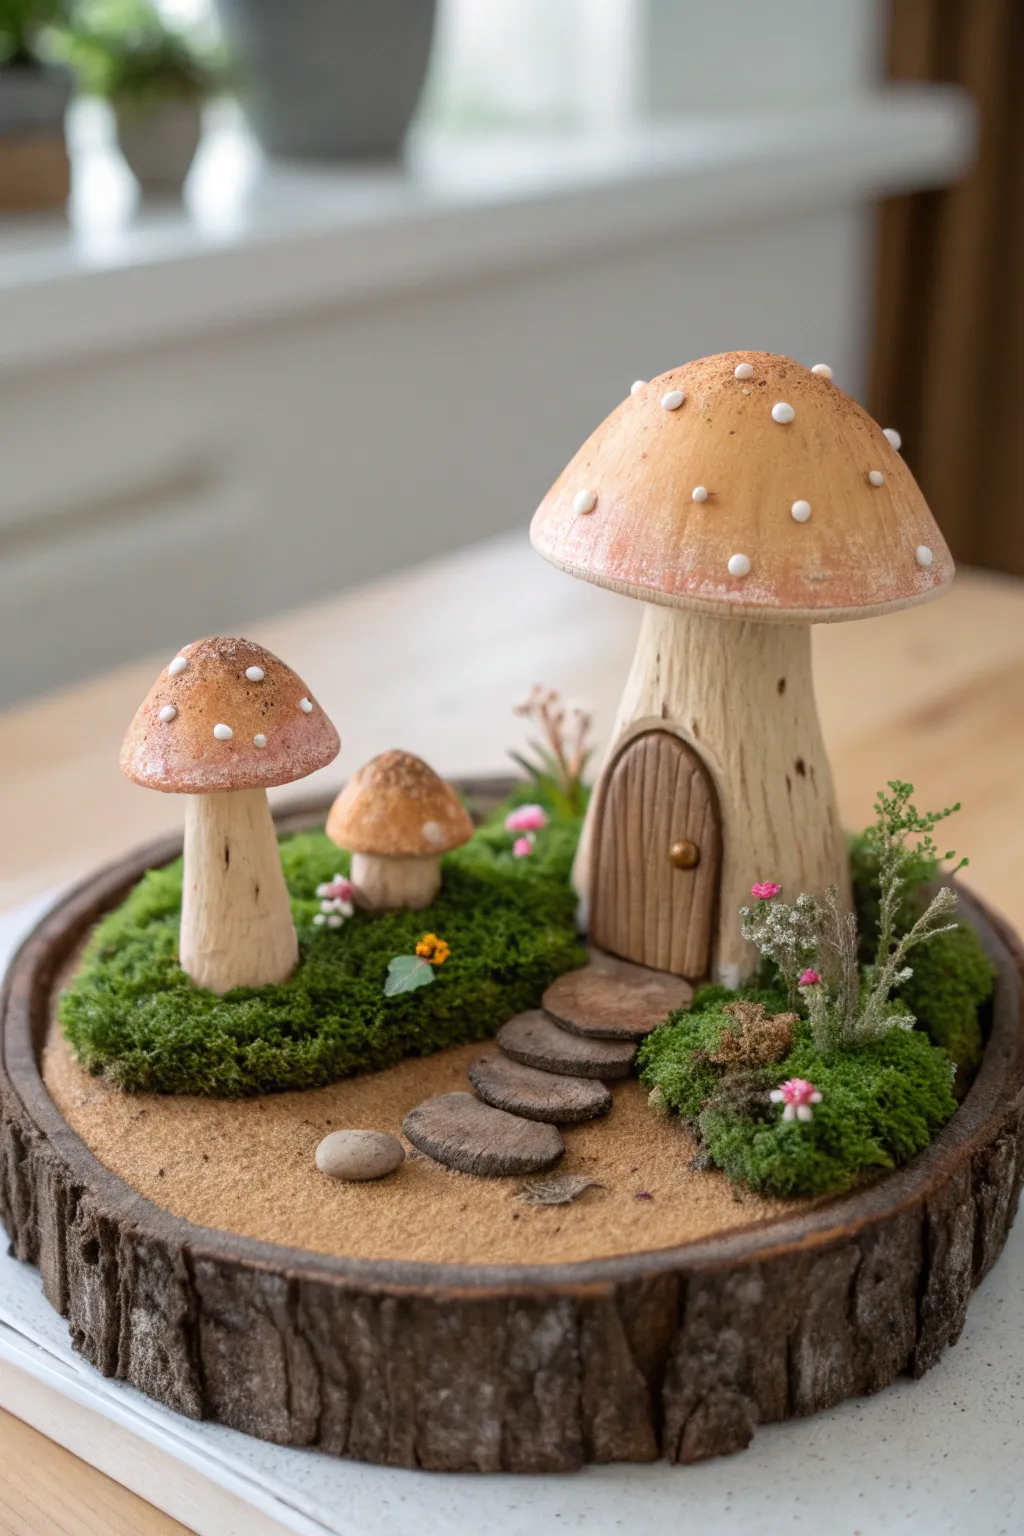
Bring a touch of magic to your desk with this charming miniature scene featuring a cozy mushroom home and its smaller companions nestled on a rustic wood slice. The combination of textured clay, soft moss, and earthy tones creates a peaceful fairy glade that looks like it was lifted straight from a storybook.
How-To Guide
Materials
- Thick wood slice (approx. 6-8 inches diameter) with bark edge
- Air-dry clay or polymer clay (white/neutral)
- Paving sand or fine tan craft sand
- Preserved moss (Reindeer or cushion moss)
- Acrylic paints (Cream, tan, warm brown, white, brick red)
- Small dried flowers or miniature faux floral stems
- Sculpting tools (needle tool, ball stylus)
- Tacky glue or strong craft adhesive
- Matte finish sealant spray
- Thin wire or toothpicks (for armature)
- Small pebble
Step 1: Base Preparation
-
Prep the wood:
Begin with a clean, dry wood slice that has a nice, thick bark rim. Ensure the surface is relatively flat; if it’s rough, give it a quick sanding to help the glue adhere better later on. -
Create the sandy ground:
Brush a layer of tacky glue over the flat top surface of the wood slice, avoiding the bark rim. Sprinkle fine paving sand or tan craft sand over the glue until fully covered. Press it down gently and shake off the excess once the glue grabs hold.
Step 2: Sculpting the Mushrooms
-
Form the main stalk:
Roll a thick cylinder of clay for the large mushroom house stem. Thicken the base slightly so it stands firmly. Use a needle tool to scratch vertical lines up the stalk to mimic natural mushroom gills and texture. -
Shape the cap:
Create a smooth dome shape for the roof. It should be slightly wider than the stalk. Press the underside gently to make a concave area where it will sit on the stem. Add tiny clay balls to the top surface for the distinctive spots. -
Add the door:
Roll a small oval of clay and flatten it. Use a knife tool to score vertical wood grain lines. Attach a tiny ball for a doorknob, then press this door assembly onto the base of the main stalk. -
Sculpt companion mushrooms:
Create two smaller mushrooms using the same technique but with simpler, rounder caps. The medium one needs spots, while the smallest can remain plain or textured. -
Create stepping stones:
Flatten small balls of clay into irregular discs to serve as the path. You’ll need about 4-5 pieces, graduating slightly in size. -
Drying time:
Allow all your clay pieces to dry completely according to the package instructions. I find waiting overnight ensures they are rock hard and ready for paint.
Make it Sparkle
Mix a tiny pinch of ultra-fine iridescent glitter into your white paint for the mushroom spots. It gives a subtle, magical shimmer without being overpowering.
Step 3: Painting & Assembly
-
Base coat the stems:
Paint the mushroom stalks with a creamy off-white. Once dry, wash over them with a very watered-down light brown paint, wiping it back with a paper towel so the dark color stays only in the textured crevices. -
Paint the caps:
Mix a warm, muted orange-brown for the caps. Sponge it on for a natural, speckled look rather than a solid plastic finish. Paint the raised spots pure white. -
Detail the door:
Paint the door a medium brown and the doorknob gold or brass. Paint the stepping stones a dark slate grey or brown. -
Secure the structures:
Glue the large mushroom house to the right side of the base and the two smaller mushrooms to the left. Arrange the stepping stones leading from the center to the door and glue them down. -
Adding greenery:
Apply dabs of glue around the base of the mushrooms. Press clumps of preserved green moss into the glue, building it up to create soft mounds. -
Floral details:
Snip tiny pieces of dried flowers or faux stems. Dip the ends in glue and tuck them into the moss beds to look like wildflowers growing in the glade. -
Final touches:
Place a small, real pebble near the path for organic variety. If desired, lightly dust the tops of the mushrooms with a dry brush and a tiny bit of white paint to soften the colors.
Clumped Sand Fix
If your sand layer looks patchy or glue seeps through, let it dry fully, then dab fresh glue only on the bald spots and sprinkle a second layer of sand.
Place your finished glade on a shelf where it can catch the light and spark a little daydreaming
Dragon Cave Treasure Scene
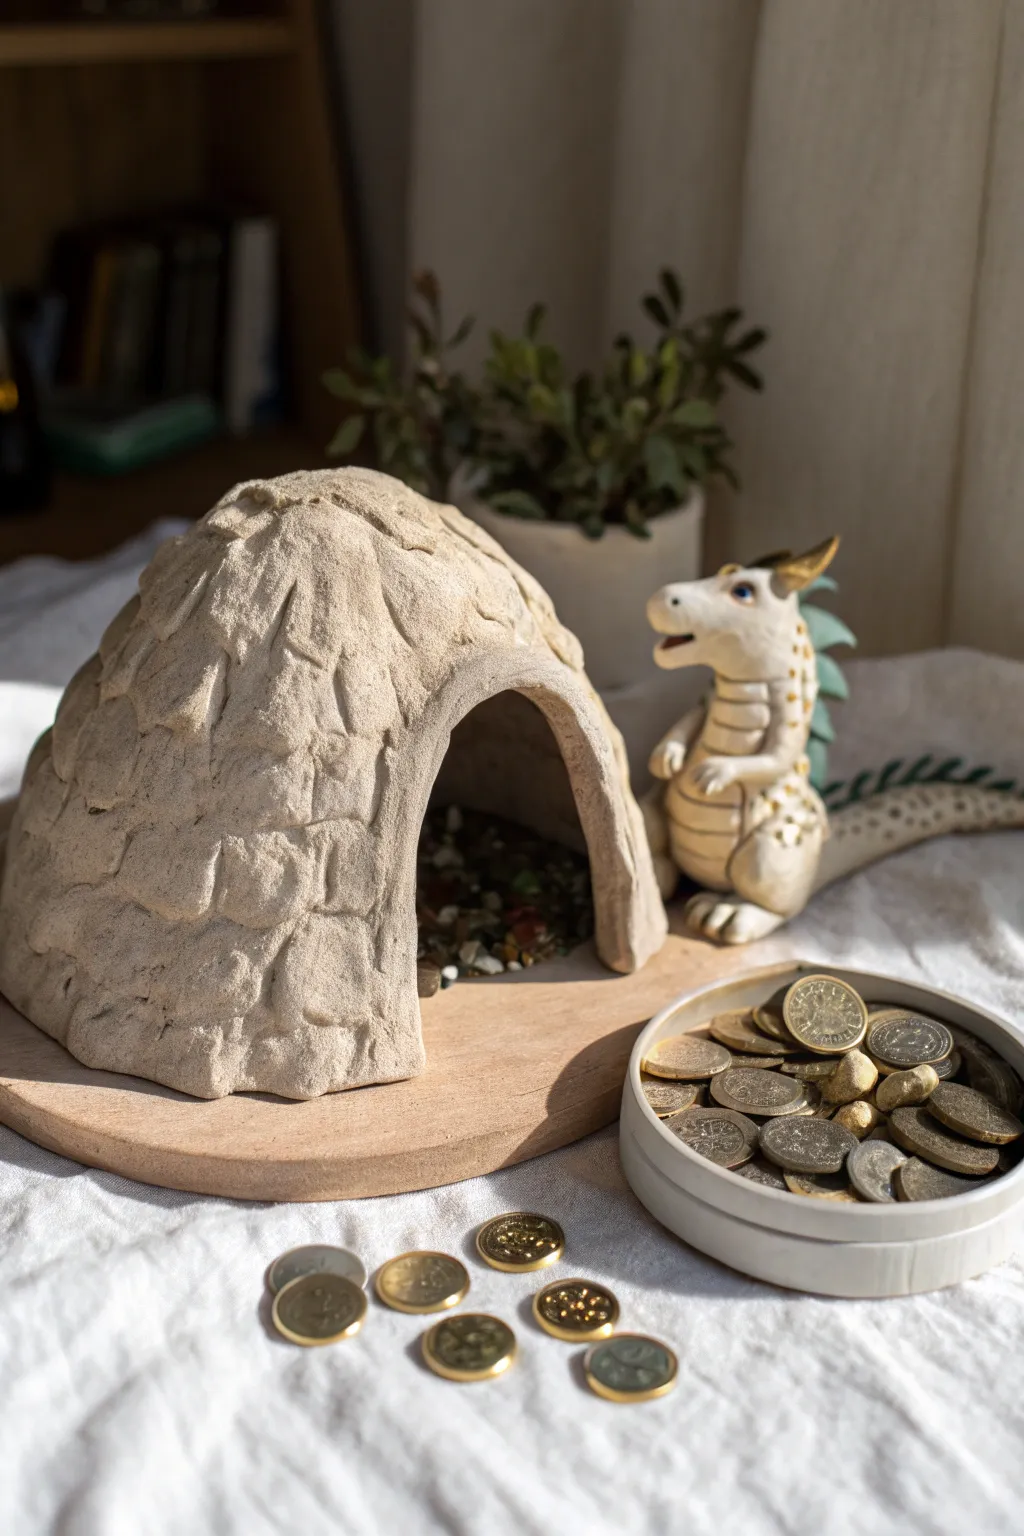
Create a whimsical treasure scene featuring a textured clay cave and a guardian dragon figurine. This project combines sculpting a rocky hideout with setting the stage for a tiny, gold-loving mythical creature.
Step-by-Step
Materials
- Air-dry clay (stone or grey color)
- Round wooden base or coaster
- Sculpting tools (needle tool, loop tool)
- Texture tool or crumpled foil
- Small toy dragon figurine
- Acrylic paints (cream, beige, brown)
- Paintbrushes (flat shader and detail brush)
- Small bowl or lid for coins
- Assorted coins (play money or real currency)
- Decorative gravel or aquarium chips (for inside cave)
- Water cup
Step 1: Sculpting the Cave
-
Form the base:
Start by rolling a large ball of air-dry clay. Flatten the bottom against your work surface to create a stable foundation that is slightly wider than it is tall. -
Hollow the interior:
Use a loop tool or your thumbs to carefully hollow out the inside of the mound, creating a dome shape. Keep the walls about half an inch thick to support the structure. -
Create the entrance:
Cut an arched doorway into the front of the dome. Smooth the cut edges with a bit of water on your finger to create a seamless, rounded opening. -
Build the texture layer:
Roll small, irregular balls of clay and flatten them slightly. Press these onto the exterior of the dome, starting from the bottom and overlapping them upwards to mimic rough stone masonry or dragon scales. -
Refine the stonework:
Use a sculpting tool to deepen the crevices between the flattened clay pieces, defining individual stones. I like to press crumpled foil gently against the surface to add a realistic, pitted rock texture. -
Form the archway:
Roll a thin snake of clay and flatten it. Drape this over the doorway arch to create a distinct frame, blending the edges into the surrounding stonework. -
Initial drying:
Allow the cave to dry for at least 24-48 hours. Place it in a cool, dry spot away from direct heat to prevent cracking.
Texture Trick
Press the bristle end of an old toothbrush into wet clay to create a pitted, ancient stone surface instantly.
Step 2: Painting and Assembly
-
Base coat:
Once fully dry, paint the entire exterior with a cream or light beige acrylic paint. Let this base coat dry completely. -
Apply a wash:
Mix a small amount of brown paint with water to create a thin wash. Brush this over the textured surface, letting it seep into the cracks between the stones to add depth. -
Dry brush highlights:
Dip a dry brush into a very light stone color or white paint. Wipe off most of the paint, then gently whisk it over the raised surfaces to highlight the texture. -
Prepare the base:
While the paint dries, ensure your wooden base is clean. You can engage the dragon figurine now to check spacing. -
Fill the treasure hoard:
Place the cave on the wooden base. Fill the floor inside the cave with colorful decorative gravel or small glass chips to simulate a horde of gems. -
Position the guardian:
Set your dragon figurine to the side of the cave entrance, angling it as if it is proudly guarding its home. -
Arrange the loot bowl:
Fill a small shallow bowl or container lid with an assortment of coins. Stack them haphazardly to look like overflowing plunder. -
Scattered riches:
Scatter a few loose coins on the surface in front of the bowl and near the cave entrance to tie the scene together visually.
Glow Up
Hide a small battery-operated LED tea light inside the cave behind the gems to make the treasure hoard glow from within.
Now you have a charming little fantasy scene perfect for guarding your bookshelf
Space Crater Alien Landscape
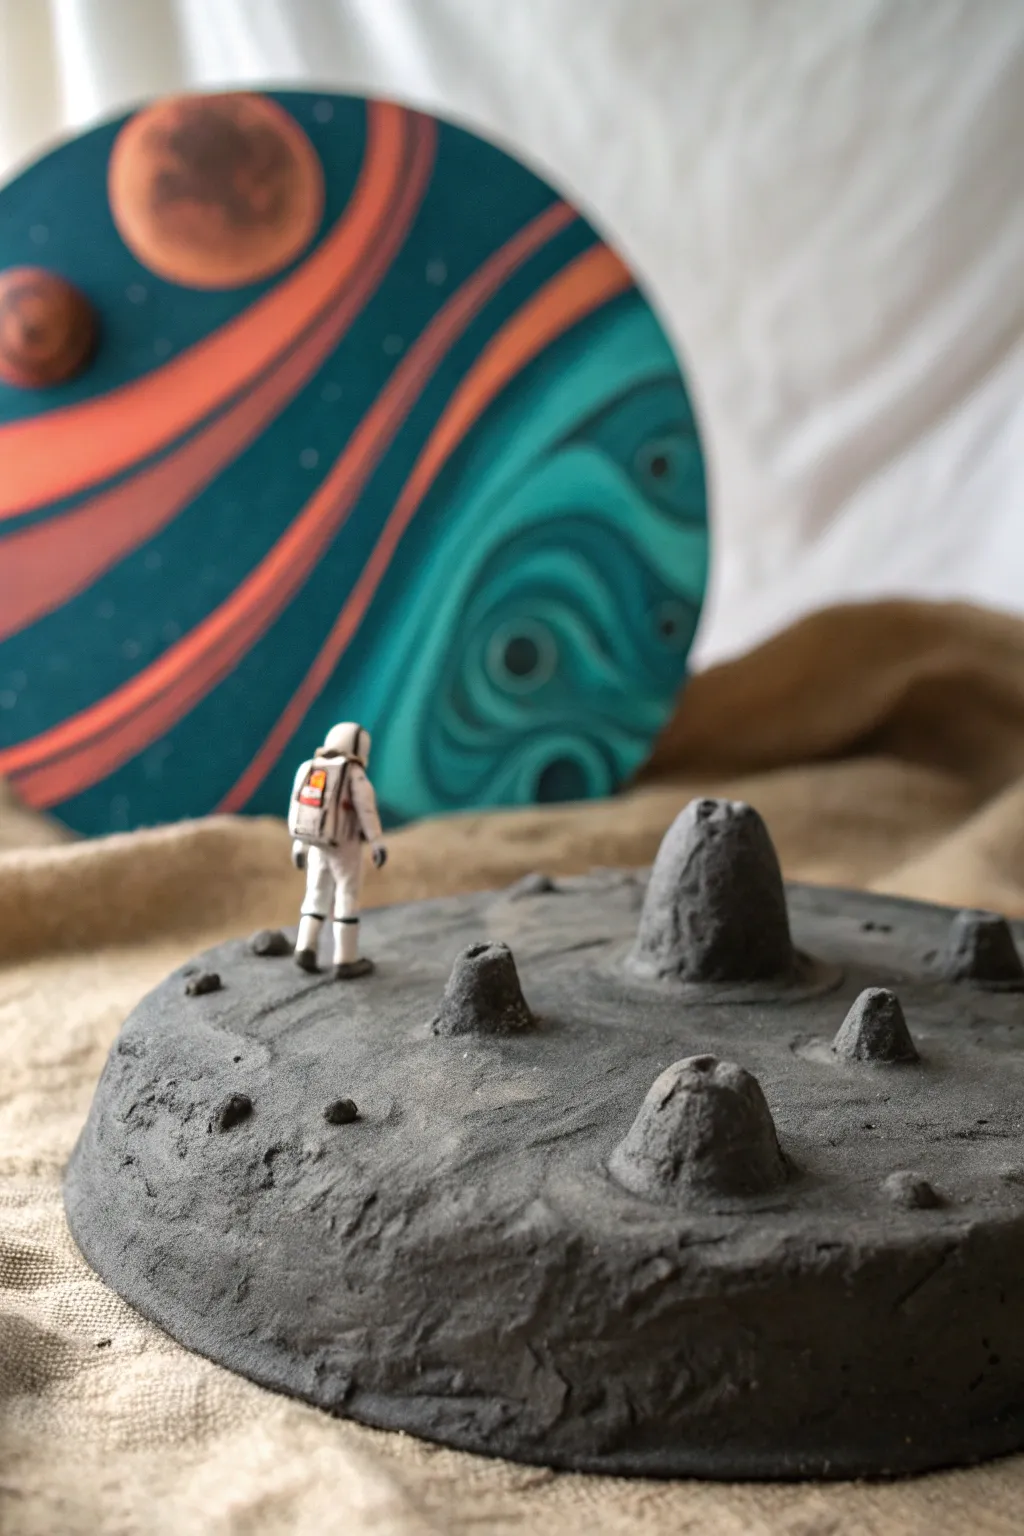
Transport yourself to a distant galaxy with this tactile clay diorama featuring a textured lunar surface and a vibrant, swirling planetary backdrop. This project combines sculpting and painting techniques to create a striking 3D scene perfect for displaying your favorite miniature astronaut.
Step-by-Step
Materials
- Air-dry clay or polymer clay (grey and white)
- Round cardboard or wood base (approx. 6 inches diameter)
- Round cardboard or wood disc (approx. 8-10 inches diameter) for the background
- Acrylic paints (black, grey, white, orange, teal, dark blue)
- Paintbrushes (flat brush for backgrounds, fine tip for details)
- Sculpting tools or a toothpick
- Aluminum foil
- Miniature astronaut figurine (scale model)
- Texture tool (like a crumpled foil ball or sandpaper)
- Hot glue gun or strong craft glue
- Matte sealant spray (optional)
Step 1: Sculpting the Lunar Surface
-
Prepare the base:
Start by taking your smaller round base. If you are using a smooth material like wood, you might want to lightly sand it first to help the clay adhere. -
Bulking with foil:
To save on clay and keep the base lightweight, crumple a sheet of aluminum foil into a flattened disc shape that covers most of your base. Glue this down securely. -
Layering the clay:
Roll out a slab of grey air-dry clay to about a quarter-inch thickness. Drape this over your foil base, pressing it down firmly around the edges to create a solid, rock-like slab. -
Texturing the ground:
While the clay is still soft, take a ball of crumpled aluminum foil or a rough rock from your garden and press it repeatedly into the surface. This creates realistic, uneven moon terrain. -
Forming craters:
Roll small snakes of clay and form them into rings of varying sizes. Place these rings onto the surface to mark where your craters will be. -
Blending the craters:
Using a modeling tool or your fingers, blend the bottom outer edges of the rings into the main surface. Then, push the centers down slightly to create the hollow depression. -
Adding details:
Scatter a few tiny, irregular lumps of clay around the craters to simulate ejected rocks and debris. Let the entire base dry completely according to your clay’s instructions—usually 24 hours.
Step 2: Painting the Foreground
-
Base coat:
Once dry, paint the entire moon surface with a coat of dark grey acrylic paint. Ensure you get the paint into every divot and texture mark. -
Dry brushing:
Load a flat brush with light grey or off-white paint, then wipe almost all of it off on a paper towel. Lightly sweep the dry brush over the raised textures and crater rims to highlight them. -
Deepening shadows:
Mix a watery wash of black paint and apply it carefully inside the deepest parts of the craters, then dab away excess with a paper towel. This adds depth instantly.
Cracked Craters?
If your air-dry clay shrinks and cracks around the craters as it dries, mix a small amount of fresh clay with water to make a paste (slip) and fill in the gaps.
Step 3: Creating the Alien Backdrop
-
Preparing the canvas:
Take your larger round disc. Paint the entire surface a deep teal or dark blue as a base color and let it dry. -
Drafting the design:
Lightly sketch your planetary rings and swirls with a pencil. Aim for sweeping curves that suggest a giant gas giant planet. -
Painting the stripes:
Paint broad, sweeping stripes using bright orange and terra cotta tones. Allow the brushstrokes to be slightly visible to mimic atmospheric bands. -
Adding swirls:
In the teal sections, paint lighter turquoise swirls and concentric circles to represent storms, similar to Jupiter’s Great Red Spot but in cool tones. -
Adding moons:
Paint or glue small semi-circles of reddish-brown clay onto the background disc to represent distant moons orbiting the planet. -
Final assembly:
Once everything is dry, position your astronaut figurine. Use a tiny dot of super glue on the boots to secure them permanently to the lunar surface.
Starry Night
Flick white paint from an old toothbrush gently over the painted backdrop and the dark edges of the moon base to create a distant field of stars.
Place your finished diorama against a neutral cloth backdrop to complete the atmospheric look
Haunted Swamp With Foggy Water
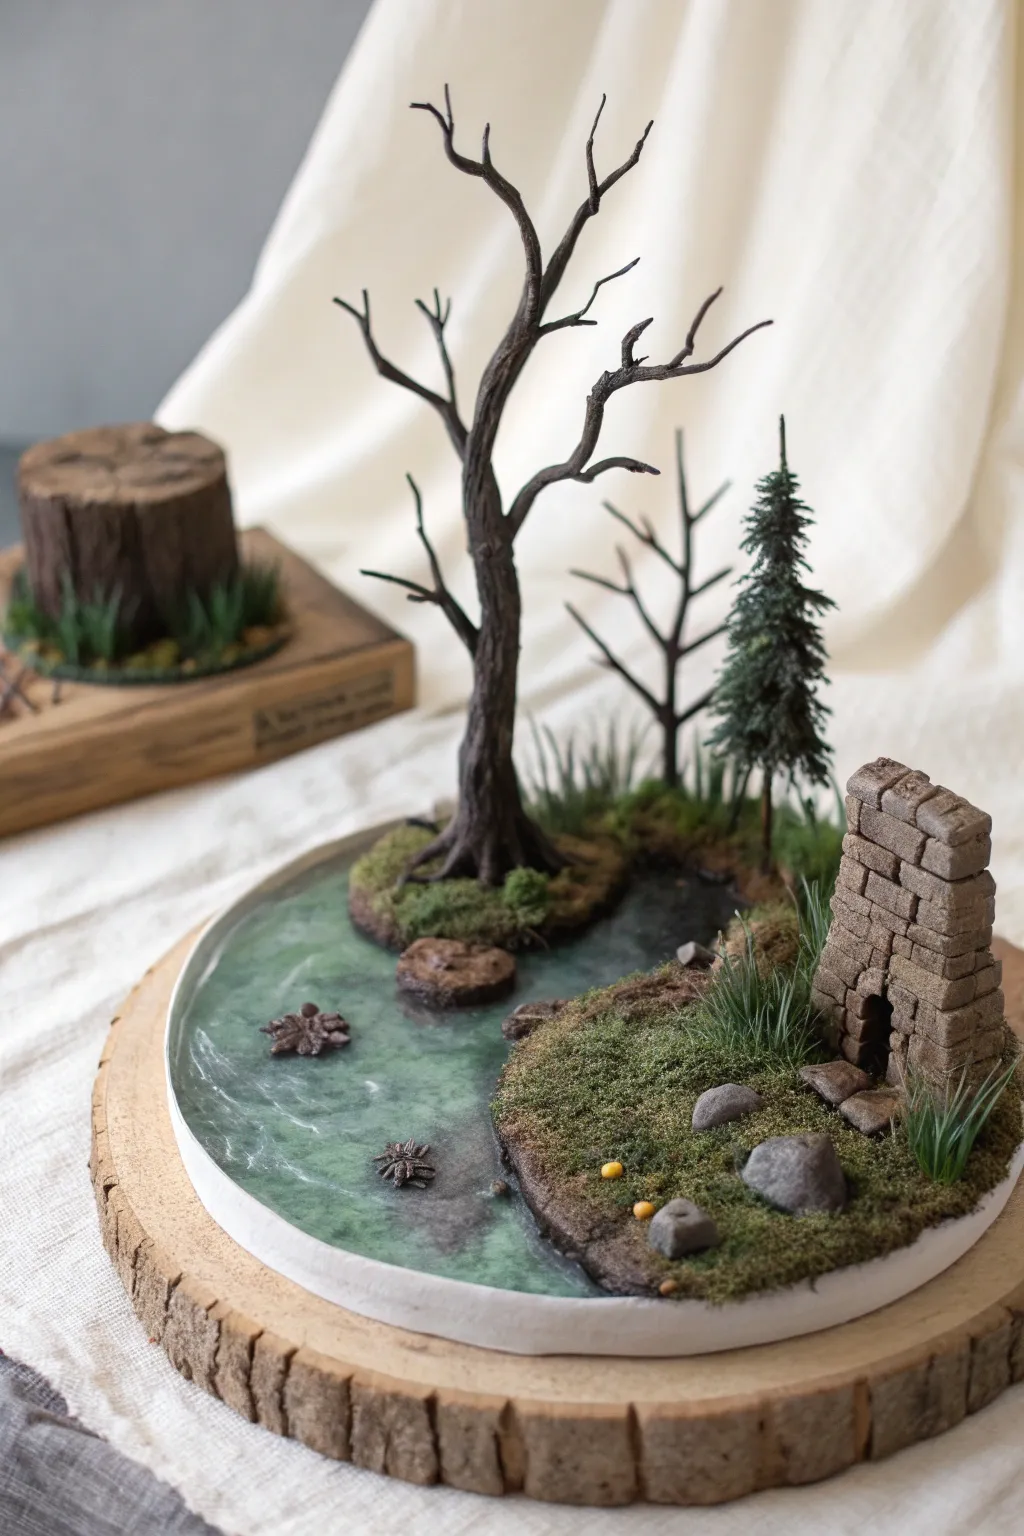
Capture the moody atmosphere of a haunted wetland with this detailed clay and resin diorama. Featuring twisted bare trees, crumbling stone ruins, and a unique foggy water effect, this project sits perfectly atop a rustic wood slice base.
Step-by-Step Tutorial
Materials
- Air-dry clay (grey and brown/terracotta)
- Epoxy resin (2-part system)
- White alcohol ink or white acrylic paint
- Oval ceramic or plastic base mold (shallow)
- Large rugged wood slice
- Wire armature (floral wire)
- Modeling tools (or toothpicks)
- Acrylic paints (black, grey, brown, green)
- Static grass and clump foliage
- Small pebbles and dried star anise (for debris)
- Clear drying craft glue
- Fine-tipped paintbrush
Step 1: Sculpting the Landscape
-
Base Construction:
Start by defining your land masses within your oval shallow mold or tray. Use brown air-dry clay to build up two distinct islands—one smaller one on the left for the tree, and a larger kidney-bean shape on the right for the ruin. -
Texturing the Ground:
While the clay is soft, press a real rock or a ball of aluminum foil into the surface to create an uneven, earthy texture. Embed a few small pebbles near the edges where the ‘water’ will touch. -
Building the Ruin Walls:
Roll out a slab of grey clay about 1/4 inch thick. Cut it into small rectangles to simulate stone bricks. Stack these ‘bricks’ on the right island to form a crumbling corner tower, leaving a small arched gap at the bottom. -
Weathering the Stones:
Use a needle tool or knife to scratch cracks and pitting into the stone bricks. Adding these imperfections now makes the final painting look much more realistic. -
Creating the Skeleton Tree:
For the large dead tree, twist several lengths of floral wire together to form a trunk and branching roots. Wrap the wire armature in brown clay, extending the clay out into thin, spindly branches. -
Adding Bark Texture:
Drag a stiff-bristled brush or a needle tool vertically up the tree trunk to mimic rough bark. Ensure the roots flare out at the bottom to grip the island securely.
Pro Tip: Floating Spiders
For the spooky floating debris seen in the water, use dried star anise painted brown. Embedded in the resin, their shape perfectly mimics floating giant spider creatures.
Step 2: Painting and Assembly
-
Base Painting:
Once the clay is fully dry (usually 24 hours), paint the ground dark brown. Paint the stone ruins a base coat of medium grey, and the tree a dark, desaturated brown. -
Washing and Dry Brushing:
Apply a watered-down black paint wash over the stones to fill the crevices. After it dries, lightly dry-brush a light grey or beige over the raised edges to highlight the texture. -
Applying Vegetation:
apply craft glue to the flat areas of the islands. Sprinkle static grass and press small pieces of green clump foliage around the base of the tree and the ruins to simulate mossy overgrowth. -
Planting the Trees:
Glue the large bare tree onto the left island. If you have a miniature pine tree (model railroad style) or want to make a second smaller bare tree, attach it to the background of the right island. -
Adding Debris:
Scrap pieces of wood or small dried botanicals like star anise make excellent swamp debris. Glue a few into the area that will become the riverbed.
Step 3: Pouring the Swamp Water
-
Sealing the Base:
Before pouring resin, ensure the clay edges of your islands are sealed with a thin layer of glue or Mod Podge to prevent air bubbles from escaping the porous clay. -
Mixing the Resin:
Mix your two-part epoxy resin according to the package instructions. Tint it slightly with a tiny drop of teal or green ink—you want it transparent but swampy. -
First Pour:
Pour the resin into the negative space between the islands until it is about halfway up the island banks. Let this layer cure until it is tacky but not fully hard. -
Creating the Fog Effect:
Mix a fresh, small batch of resin and swirl in a few drops of white alcohol ink. Don’t mix it completely; you want wisps. I like to gently pour this over the first layer to create ‘currents’ of fog. -
Surface Ripples:
As the resin begins to set (usually after 30-45 minutes), use a toothpick to drag through the surface creates subtle ripples, especially around the submerged debris. -
Final Mounting:
Once the resin is rock hard (24-48 hours), carefully demold the entire piece. Use strong adhesive to mount the finished oval diorama onto the center of your large wood slice.
Troubleshooting: Leaky Mold
If using a makeshift mold, secure edges with hot glue before pouring resin. If resin seeps out, let it cure, then sand the edges smooth before mounting on the wood.
Place your haunted swamp on a shelf where the light can catch the foggy water effects for maximum spooky impact
Erupting Volcano Cross-Section
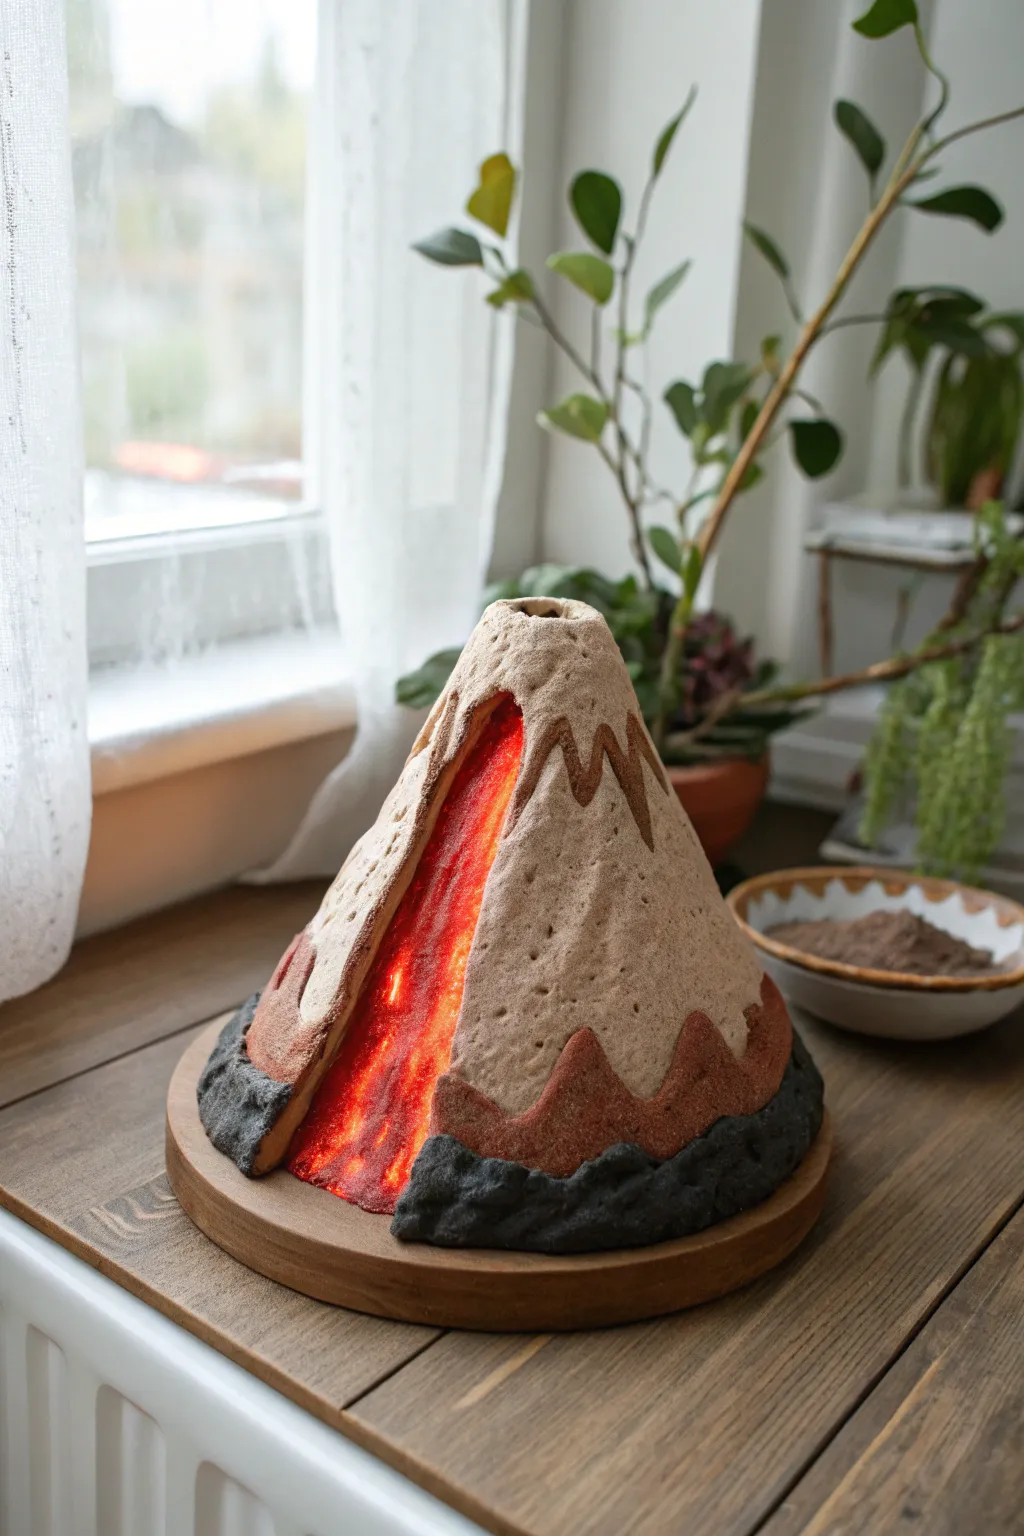
This striking sculptural piece captures the raw power of nature with a distinctive cutaway effect, revealing a glowing vein of magma beneath a textured, ash-gray exterior. The project combines sculpting techniques with translucent layering to create a surprisingly realistic geologic model perfect for display.
Step-by-Step
Materials
- Air-dry clay (stone gray or beige)
- Wooden circular base (approx. 8-10 inches)
- Aluminum foil
- Hot glue gun and extra glue sticks
- Acrylic paints (red, orange, yellow, dark brown, black)
- Translucent red and orange glass paint or alcohol inks
- Texture tools (stiff bristle brush, sponge)
- A sculpted sculpting knife
- Matte sealant spray
- Gloss varnish
Step 1: Building the Core Structure
-
Prepare the Base:
Begin with your circular wooden base. Sand it lightly if it feels rough, ensuring a clean surface for adhesion. -
Form the Armature:
Crumple aluminum foil into a cone shape to create the bulk of the volcano’s interior. This saves clay and keeps the sculpture lightweight. -
Secure the Cone:
Hot glue the foil cone securely to the center of the wooden base, making sure it is stable and won’t wobble. -
Carve the Lava Channel:
Press a deep, vertical indentation into one side of the foil cone. This trench will eventually house the magma flow, so ensure it runs from the crater down to the base.
Cracking Clay?
If the clay cracks while drying, fill the fissures with a mix of fresh clay and water (slip), then smooth over. Cracks can actually add realism here
Step 2: Sculpting the Exterior
-
Apply the Base Layer:
Roll out slabs of air-dry clay to about 1/4 inch thickness. drape/mold these over the foil armature, smoothing the seams where the clay pieces join. -
Define the Slopes:
Shape the clay to follow the cone structure, but intentionally leave the lava channel area somewhat recessed and exposed. -
Add Rocky Texture:
Using a stiff bristle brush or a crumpled ball of foil, firmly tap the surface of the wet clay. I find this creates that perfect porous, igneous rock texture. -
Sculpt the Base Rocks:
Add extra chunks of clay around the bottom perimeter to simulate a ring of jagged, cooled lava rocks. Use a knife to give them sharp, irregular angles. -
Create the Crater:
Mold the top opening of the volcano, smoothing the rim so it looks naturally weathered rather than perfectly circular. -
Dry the Structure:
Allow the clay to dry completely. Depending on humidity and thickness, this might take 24–48 hours.
Light It Up
Before layering the hot glue lava, embed a string of battery-operated red fairy lights into the channel for a real illuminating glow effect
Step 3: Painting and Detailing
-
Base Coating:
Paint the entire exterior clay surface with a stone-gray or sandy-beige acrylic paint. Let this base coat dry fully. -
Darkening the Base:
Paint the ring of rocks at the bottom with a dark charcoal mix to distinguish the cooled lava flow from the mountain slopes. -
Painting the Lava Channel:
Paint the recessed channel white first to maximize brightness, then layer bright yellow and orange acrylics as a background for the magma. -
Detailing the Slopes:
Use a dry-brushing technique with dark brown paint to add Jagged ‘V’ shapes or zig-zags down the sides, simulating old erosion patterns. -
Speckling the Surface:
Flick a toothbrush loaded with watered-down brown paint over the mountain to add tiny, realistic mineral speckles.
Step 4: Creating the Magma Effect
-
Filling the Magma Flow:
Fill the painted lava channel with generous amounts of hot glue. Apply it in uneven, dribbling layers to mimic flowing liquid. -
Tinting the Lava:
While slightly warm or after cooling, paint over the glue with translucent red and orange glass paints. The transparency allows light to reflect through the glue layers. -
Final Vernish:
Apply a coat of high-gloss varnish only to the lava section to make it look wet and molten. Use a matte spray for the rest of the rocky surface.
Place your creation in a sunny spot to see that translucent lava channel really shine