When I need a low-pressure creative win, I reach for clay dough because you can shape something adorable in minutes and keep tweaking it until it feels right. Here are my favorite clay dough ideas—the classic crowd-pleasers first, then the fun weird ones that always spark fresh play.
Cookie-Cutter Clay Dough Ornaments
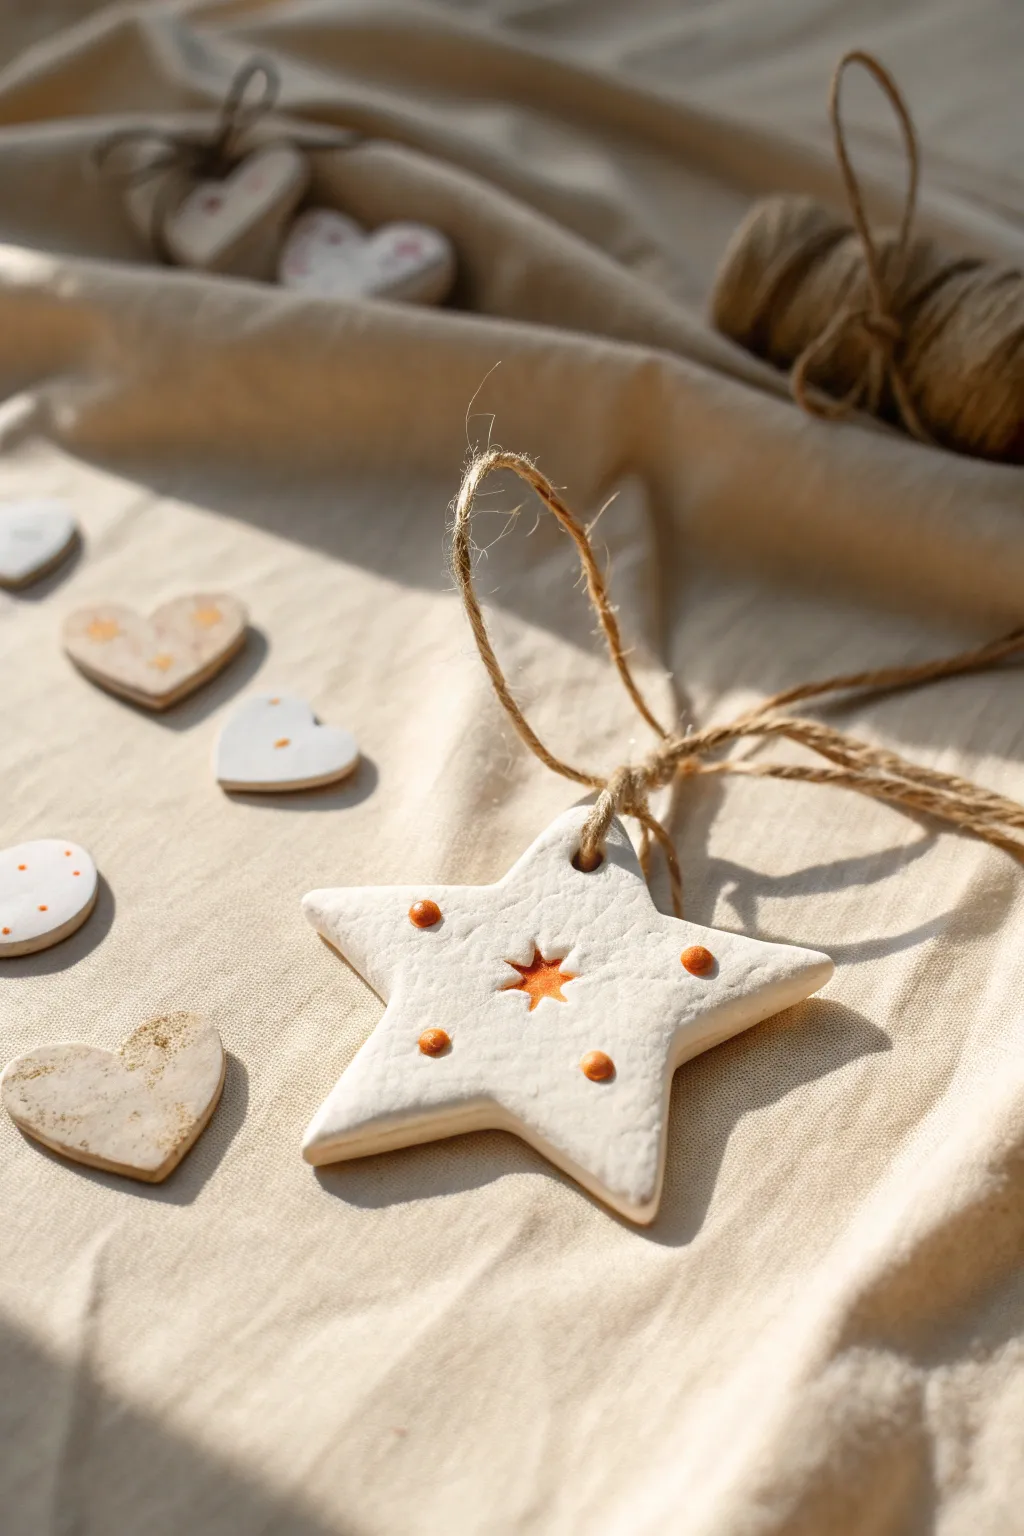
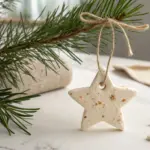
Capture the cozy charm of handmade décor with these simple yet striking star ornaments. Featuring a smooth white clay base and delicate orange accents, they make perfect additions to holiday trees or rustic gift wrapping.
Step-by-Step
Materials
- Air-dry clay or white polymer clay
- Star-shaped cookie cutter
- Small heart-shaped cookie cutter (optional for variations)
- Baking paper or non-stick silicone mat
- Rolling pin
- Straw or toothpick (for creating the hole)
- Small sculpting tool or toothpick (for the center design)
- Orange acrylic paint
- Fine detail paintbrush
- Jute twine or hemp cord
- Sandpaper (fine grit)
- Matte varnish (optional)
Step 1: Shaping the Clay
-
Prepare your workspace:
Lay down your silicone mat or a sheet of baking paper to prevent sticking. Take a manageable chunk of clay and knead it until it is soft, pliable, and warm. -
Roll it out:
Using your rolling pin, flatten the clay to an even thickness of about 1/4 inch (6mm). If you want a more substantial feel, go slightly thicker, but try to keep it uniform so it dries evenly. -
Cut the star shape:
Press your star-shaped cookie cutter firmly into the clay. Give it a tiny wiggle to ensure clean edges before lifting it away. Use your fingers to gently smooth any rough bits on the edges. -
Create the hanging hole:
While the clay is still wet, use a straw or a toothpick to punch a hole near the top point of the star. Make sure the hole is large enough for your twine to pass through later. -
Impress the center detail:
Find the exact center of the star. Using a small sculpting tool or the end of a paintbrush, gently press a small, star-shaped indentation into the surface. Don’t go all the way through; you just want a relief pattern. -
Add texture marks:
Take a toothpick and make very small, shallow indentations where you plan to place the colored dots later—one on each arm of the star. This gives the paint a little recessed area to sit in.
Step 2: Drying and Refining
-
Initial drying:
Place your cutouts on a flat surface lined with baking paper. Let them air dry away from direct heat sources. I find flipping them over gently after about 12 hours helps prevent curling. -
Sand edges:
Once completely hard and dry (usually 24-48 hours depending on clay type), take your fine-grit sandpaper and lightly buff the edges to make them buttery smooth. Wipe away any dust with a barely damp cloth.
Smooth Surface Secret
Use a tiny amount of water on your fingertip to smooth out cracks or fingerprints on the raw clay before drying. It saves sanding time later.
Step 3: Decorating and Finishing
-
Paint the center star:
Dip your fine paintbrush into the orange acrylic paint. Carefully fill in the impressed star shape in the center. You want the color to flood the depression slightly for a neat finish. -
Add the dot accents:
Using the tip of your brush handle or a dotting tool, dab a perfect circle of orange paint onto the five points of the star, using the shallow indentations you made earlier as a guide. -
Paint the side dots:
For extra detail, add a dot of orange paint in the inner corners of the star (the ‘armpits’ between points) if you want to match the complex detailing of traditional folk art styles. -
Let the paint cure:
Allow the acrylic paint to dry completely. This usually happens quickly, but give it an hour to be safe so you don’t smudge your work. -
Optional sealing:
If these will be handled often, apply a thin coat of matte varnish over the top to protect the white clay from dirt and fingerprints. -
Measure the twine:
Cut a length of jute twine or hemp cord, approximately 8-10 inches loong, depending on how low you want the ornament to hang. -
Thread the hanger:
Pass the twine through the hole at the top of the star. Bring the ends together. -
Knot and secure:
Tie a secure knot near the ends of the twine. Alternatively, you can loop the twine through itself (lark’s head knot) at the ornament hole and tie the loose ends at the top.
Scented Dough Twist
Use a salt dough recipe mixed with cinnamon or ginger instead of clay. The ornaments will smell amazing and naturally have a warm, tan color.
Hang your finished stars on a branch or string them together for a festive garland that feels homegrown and heartfelt


Easy Clay Dough Animal Faces
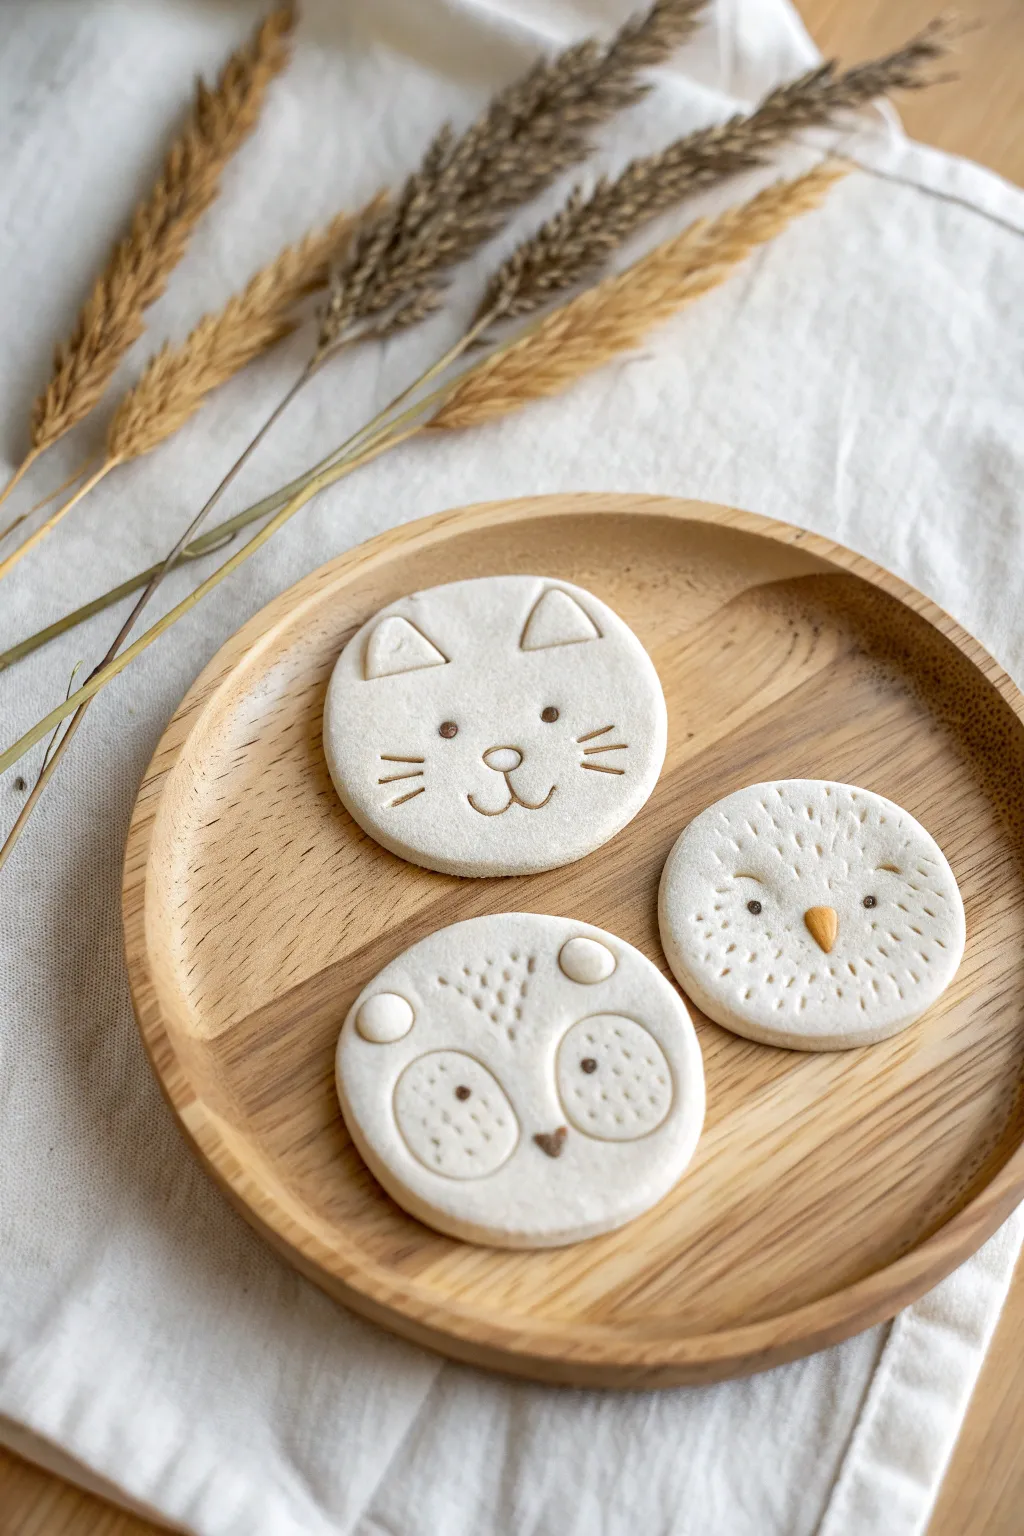
These charming clay discs feature minimalist animal faces stamped and sculpted into smooth white dough. The clean lines and subtle earthy details make them perfect for Scandinavian-style decor or sweet handmade gifts.
Detailed Instructions
Materials
- White air-dry clay or salt dough
- Rolling pin
- Round cookie cutter (approx. 3 inches)
- Parchment paper
- Modeling tools or a dull knife
- Small straw or toothpick
- Brown and orange acrylic paint
- Fine-point paintbrush
- Small bowl of water
- Fine grit sandpaper (optional)
Step 1: Preparing the Bases
-
Roll out the dough:
Begin by kneading your white clay until it is soft and pliable. Roll it out on a piece of parchment paper to an even thickness of about 1/4 inch. -
Cut the shapes:
Press your round cookie cutter firmly into the clay to create three distinct circles. Remove the excess clay from around the circles. -
Smooth the edges:
Dip your finger in a little water and gently run it around the circumference of each circle to soften any sharp edges left by the cutter.
Step 2: Sculpting the Cat
-
Add the ears:
Form two tiny triangles of fresh clay. Lightly wet the back of each and press them near the top edge of the first circle. Use a tool to impress a smaller triangle inside each for depth. -
Impress facial features:
Using a needle tool or toothpick, gently scratch three whiskers on each cheek. Carve a small ‘u’ shape for the mouth and an inverted triangle for the nose.
Clean Lines Trick
To get super clean indentation lines without clay burrs, place a piece of plastic wrap over the clay before pressing your tools into it.
Step 3: Creating the Owl
-
Texture the feathers:
For the owl, take a toothpick and press short, repetitive dashes all over the surface of the clay circle to mimic fluffy feathers. -
Add the beak:
Roll a very small cone of clay. Attach it to the center of the face with a dab of water, pressing it down slightly so it adheres well. -
Define the eyes:
Use the back of a paintbrush or a small ball tool to make two symmetrical indentations where the eyes will go.
Turn Them Into Magnets
Hot glue strong neodymium magnets to the back of each dried animal to create an adorable set of refrigerator magnets.
Step 4: Forming the Fox
-
Shape the ears:
Create two small balls of clay and flatten them slightly. Attach these to the top of the third circle for rounded ears. -
Outline the face:
Use a modeling tool to deeply impress two large arches or circles around the eye area, giving the fox its signature facial mask. -
Add texture:
Within those mask circles, use your toothpick to add small stippled dots for texture. -
Make the nose:
Attach a tiny triangle of clay at the bottom point between the eyes for the nose.
Step 5: Finishing and Painting
-
Let them dry:
Allow the clay pieces to dry completely according to package instructions. This usually takes 24-48 hours. I suggest flipping them halfway through for even drying. -
Sand imperfections:
Once hardened, you can lightly sand the edges with fine-grit sandpaper if you want a perfectly smooth finish. -
Paint the eyes:
Dip the tip of a toothpick or a very fine brush into brown acrylic paint. Carefully dot two eyes onto the cat and the fox. -
Detail the beak and noses:
Paint the owl’s beak a muted orange-yellow. Use brown paint for the fox’s nose and the cat’s nose. -
Highlight features:
For the owl, add two tiny brown dots for eyes amidst the textured feathers. For the cat, lightly trace the mouth line with watered-down brown paint for soft definition.
Display your woodland friends on a plate or shelf to bring a touch of nature indoors


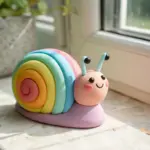
Clay Dough Monsters With Loose Parts
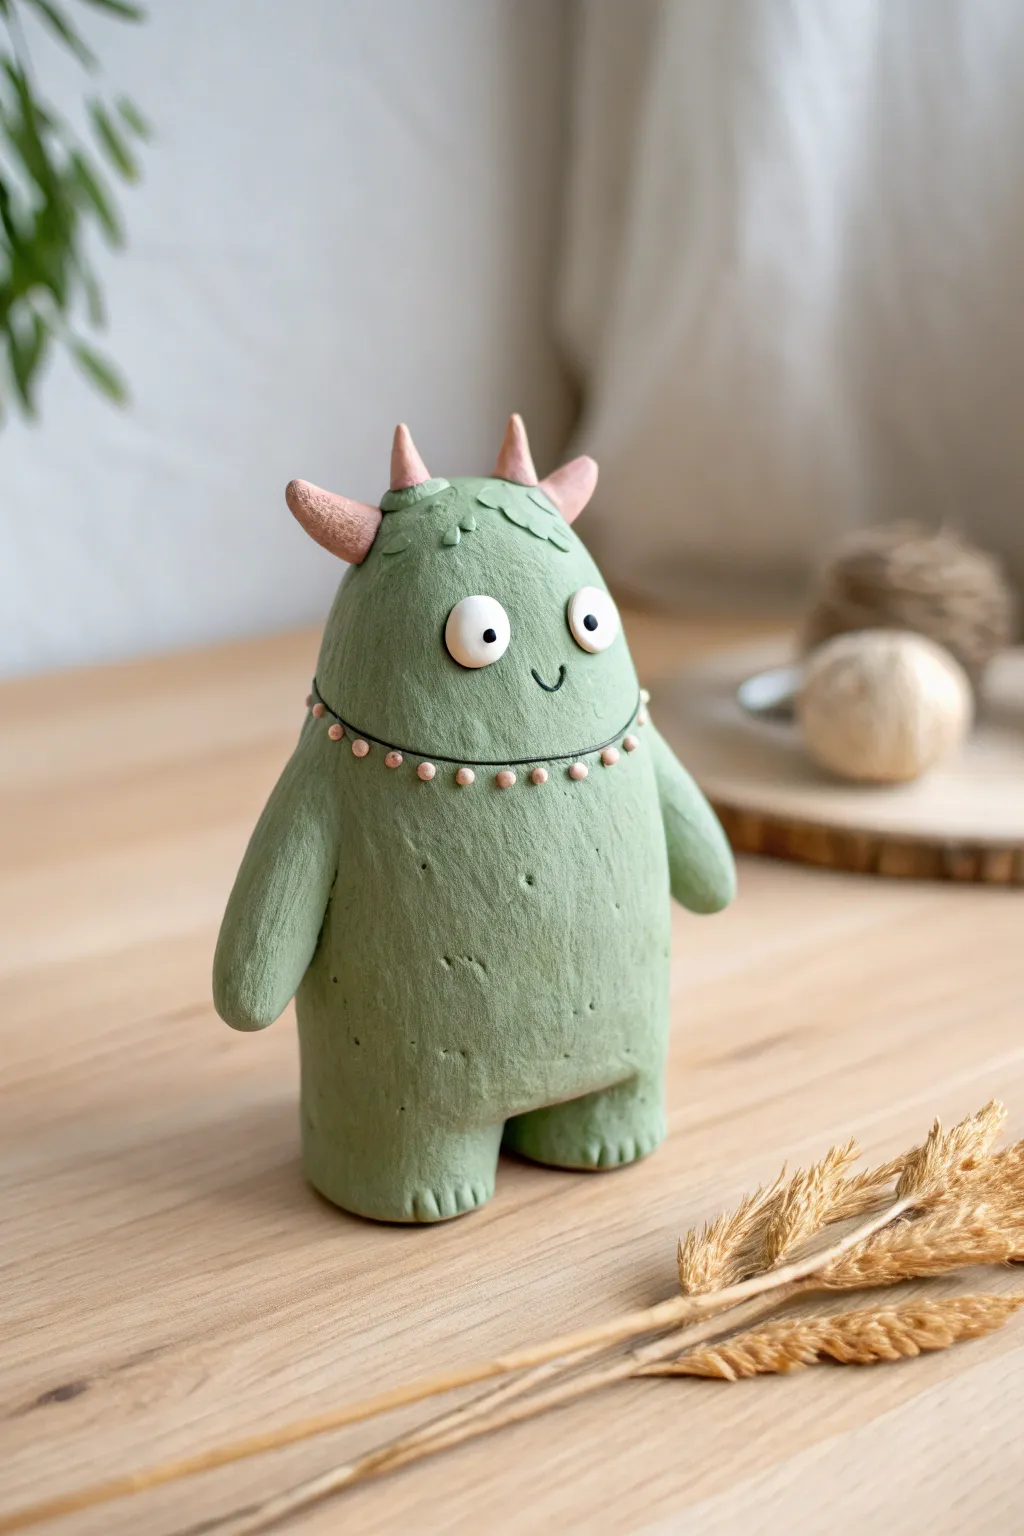
This adorable clay monster features a textured sage green body, stubby little limbs, and a crown of soft pink horns. With its wide-set eyes and charming smile, this figurine makes a whimsical desk companion or shelf decoration.
How-To Guide
Materials
- Air-dry clay or polymer clay (white and green, or paintable)
- Acrylic paints: Sage green, pale pink, white, black
- Sculpting tools (needle tool, small ball tool)
- Small paintbrush
- Water cup (for smoothing)
- Aluminum foil (optional, for armature)
- Matte playful varnish (optional)
Step 1: Shaping the Base
-
Prepare the clay:
Begin by conditioning your clay until it is soft and pliable. If you are using white clay, you can mix in green pigment now or paint it later; for this tutorial, we assume painting later for that matte, textured look. -
Form the main body:
Roll a large handful of clay into a smooth ball, then gently roll it into a thick, squat cylinder. Taper the top slightly to form a domed head shape. -
Add texture:
Instead of smoothing the surface perfectly, use a stiff brush or a crumpled ball of aluminum foil to gently tap texture all over the body. This gives it that organic, stone-like appearance. -
Create the legs:
At the bottom of the cylinder, use your thumb to press an indentation in the center, separating the base into two wide, sturdy legs. Refine the shape so the creature stands flat and stable. -
Detail the toes:
Using a needle tool or knife, press small vertical lines into the front of each foot to create three little toes.
Cracking Clay?
If you see cracks forming as the clay dries, mix a tiny bit of fresh clay with water to make a paste (slip) and fill in the gaps while it’s still damp.
Step 2: Adding Features
-
Attach the arms:
Roll two sausage shapes of clay for the arms. Attach them to the sides of the body, blending the clay at the shoulder joint so they look seamless. Curve them slightly forward. -
sculpt the horns:
Create four small cones from clay. Position these on top of the head in a rough circle or row. Press them down firmly and blend the base slightly with a small tool to secure them. -
Make the necklace detail:
Roll a very thin snake or thread of clay. Wrap this around the upper chest area like a necklace. It should dip slightly in the front. -
Add decorative dots:
Roll tiny, uniform spheres of clay—about the size of a pinhead. Press these onto the necklace line you just created, spacing them evenly apart. -
Create the eyes:
Roll two flat discs of white clay. Press them onto the face, spacing them somewhat wide apart for a cute expression. Add tiny clay pupils or save this for painting.
Step 3: Finishing Touches
-
Carve the mouth:
Use a needle tool to etch a small, simple ‘U’ shape smile right between the eyes. -
Dry the sculpture:
Let your monster dry completely according to your clay’s instructions. If using oven-bake clay, bake it now. -
Base coat painting:
Paint the entire body (avoiding horns, eyes, and the necklace dots if possible) with a sage green acrylic paint. Apply two thin coats for opaque coverage. -
Paint the details:
Paint the horns and the decorative dots on the necklace a soft pale pink. Use a fine detail brush to keep the edges crisp. -
Finish the face:
Paint the eyes bright white if they got messy. Add a small black dot for the pupil in the center of each eye. If you carved the mouth, you can darken the crease with watered-down black paint. -
Highlighting and sealing:
I prefer to lightly dry-brush a lighter green on the textured areas to make them pop. Finally, seal with a matte varnish to protect your work.
Make it a planter
Hollow out the top of the monster’s head before drying to turn this sculpture into an adorable mini-pot for a succulent or air plant.
Now you have a delightfully grumpy-but-cute creature to guard your desk


Alphabet Clay Dough Letter Tiles
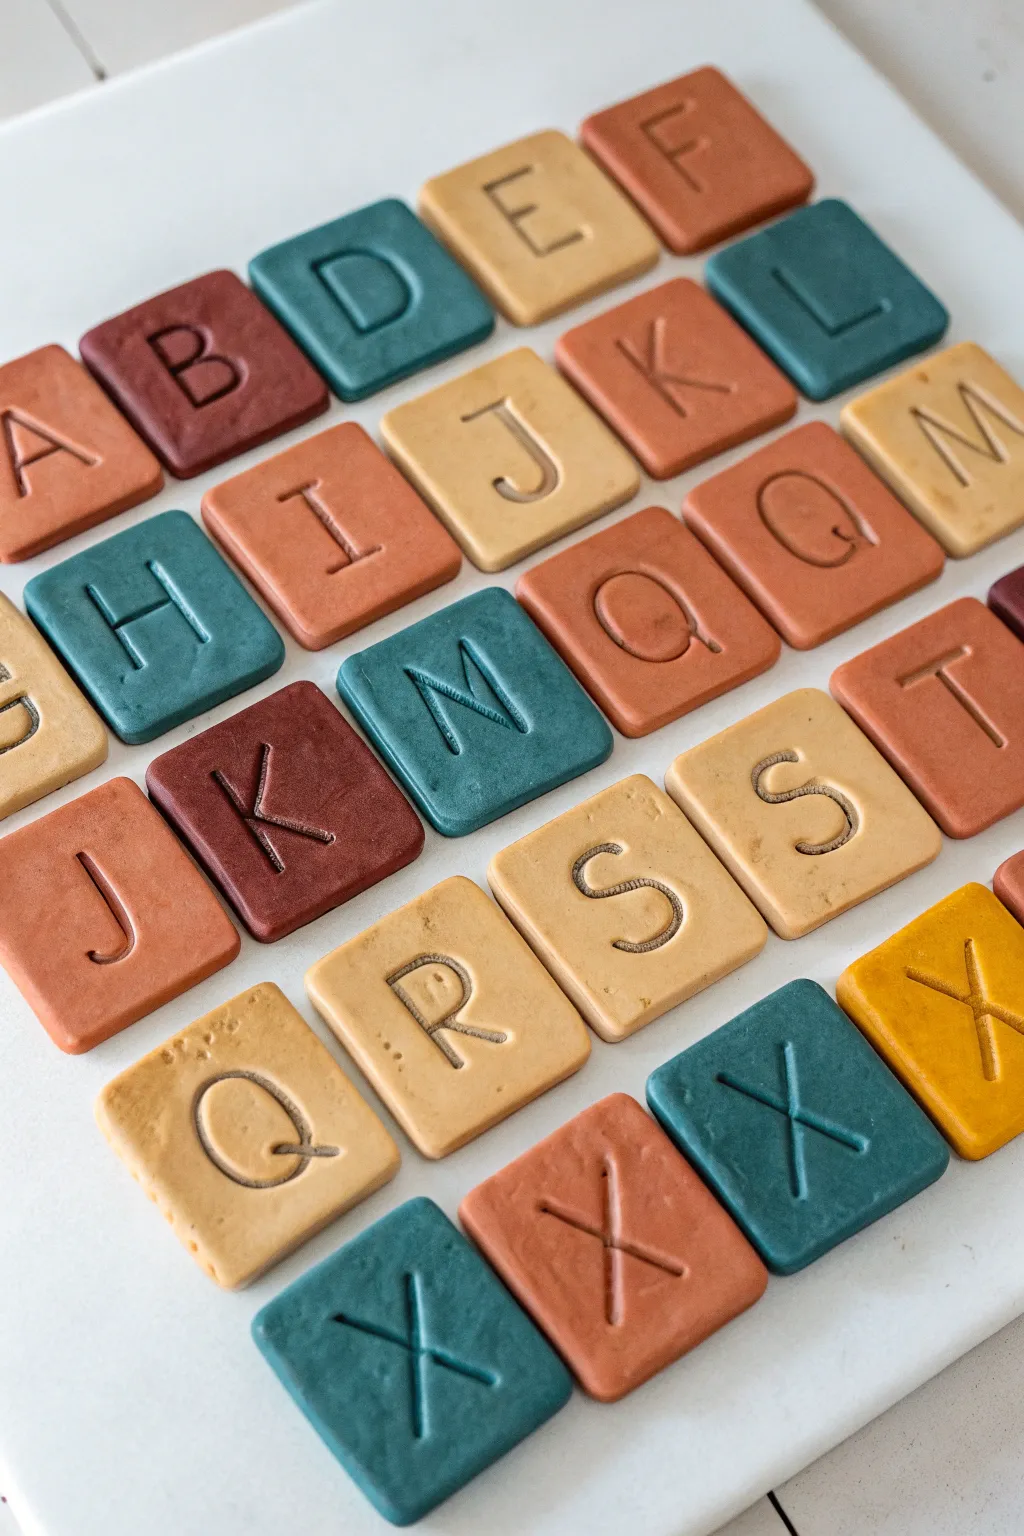
Create a charming set of tactile learning tools with these earthy, stamped alphabet tiles. The matte, slightly textured finish and muted color palette give them a timeless, heirloom quality perfect for play or display.
Step-by-Step Guide
Materials
- Polymer clay or air-dry clay (terracotta, teal, mustard, beige)
- Small square cookie cutter (approx. 1.5 – 2 inches)
- Letter stamps or embossing set
- Rolling pin
- Parchment paper or silicone mat
- Fine-grit sandpaper (optional)
- Acrylic rolling guides or two wooden rulers (for even thickness)
- Baking sheet (if using polymer clay)
Step 1: Preparation & Mixing
-
Condition the Clay:
Begin by warming up your clay in your hands. Knead each color separately until it is soft, pliable, and free of cracks. If you are mixing custom shades to match the earthy tones in the photo, combine your colors now. -
Prepare the Surface:
Lay down parchment paper or a silicone baking mat on a flat work surface. This prevents the clay from sticking and ensures a smooth underside for your tiles. -
Roll to Thickness:
Place your rolling guides or rulers on either side of your clay ball to ensure uniform thickness. Roll the clay out until it is smooth and even, aiming for about 1/4 inch thick. This sturdiness is key for durability.
Step 2: Cutting & Stamping
-
Cut the Squares:
Press your square cutter firmly into the rolled clay. Try to fit as many squares as possible close together to minimize waste. Lift the cutter straight up to keep the edges clean. -
Remove Excess Clay:
Gently peel away the excess clay from around the squares, leaving the cut tiles on the mat. I usually save these scraps to re-roll later for the next batch of letters. -
Smooth the Edges:
Dip your finger in a tiny bit of water (or baby oil for polymer clay) and gently run it along the cut edges of each square to soften any sharpness or cutting burrs. -
Position the Stamp:
Select your letter stamp. Center it visually over the first square. You don’t need to measure perfectly; a little variation adds to the handmade charm. -
Impress the Letter:
Press the stamp straight down with firm, even pressure. You want a deep impression that is clearly readable but doesn’t push all the way through to the mat. -
Release and Repeat:
Wiggle the stamp very slightly if it sticks, then lift straight up. Repeat this process for every letter of the alphabet, alternating clay colors to create a pleasing mix.
Fixing Sticky Stamps
If the clay sticks to your letter stamp, lightly dust the stamp face with cornstarch or dip it in water before pressing it into the clay.
Step 3: Finishing
-
Bake or Dry:
If using polymer clay, transfer the parchment paper to a baking sheet and bake according to the manufacturer’s instructions (usually 275°F for 15-30 minutes). If using air-dry clay, leave them in a cool, dry place for 24-48 hours. -
Cool Down:
Allow the tiles to cool completely on the baking sheet to prevent warping. They will harden fully as they return to room temperature. -
Sand Edges:
Once fully cured, inspect the edges. If there are any rough spots, lightly buff them with fine-grit sandpaper for a professional, smooth feel. -
Final Wipe:
Wipe the tiles with a slightly damp cloth to remove any sanding dust. -
Optional Sealing:
For extra protection, you can brush on a thin layer of matte varnish, though leaving them raw preserves the natural, stony texture shown in the example.
Magnetic Makeover
Glue small, strong round magnets to the back of each finished tile to turn this learning set into playful fridge decor.
Enjoy arranging your beautiful new alphabet set and watching the little wordsmiths in your life explore them

The Complete Guide to Pottery Troubleshooting
Uncover the most common ceramic mistakes—from cracking clay to failed glazes—and learn how to fix them fast.
Mini Fairy Doors for Imaginative Play
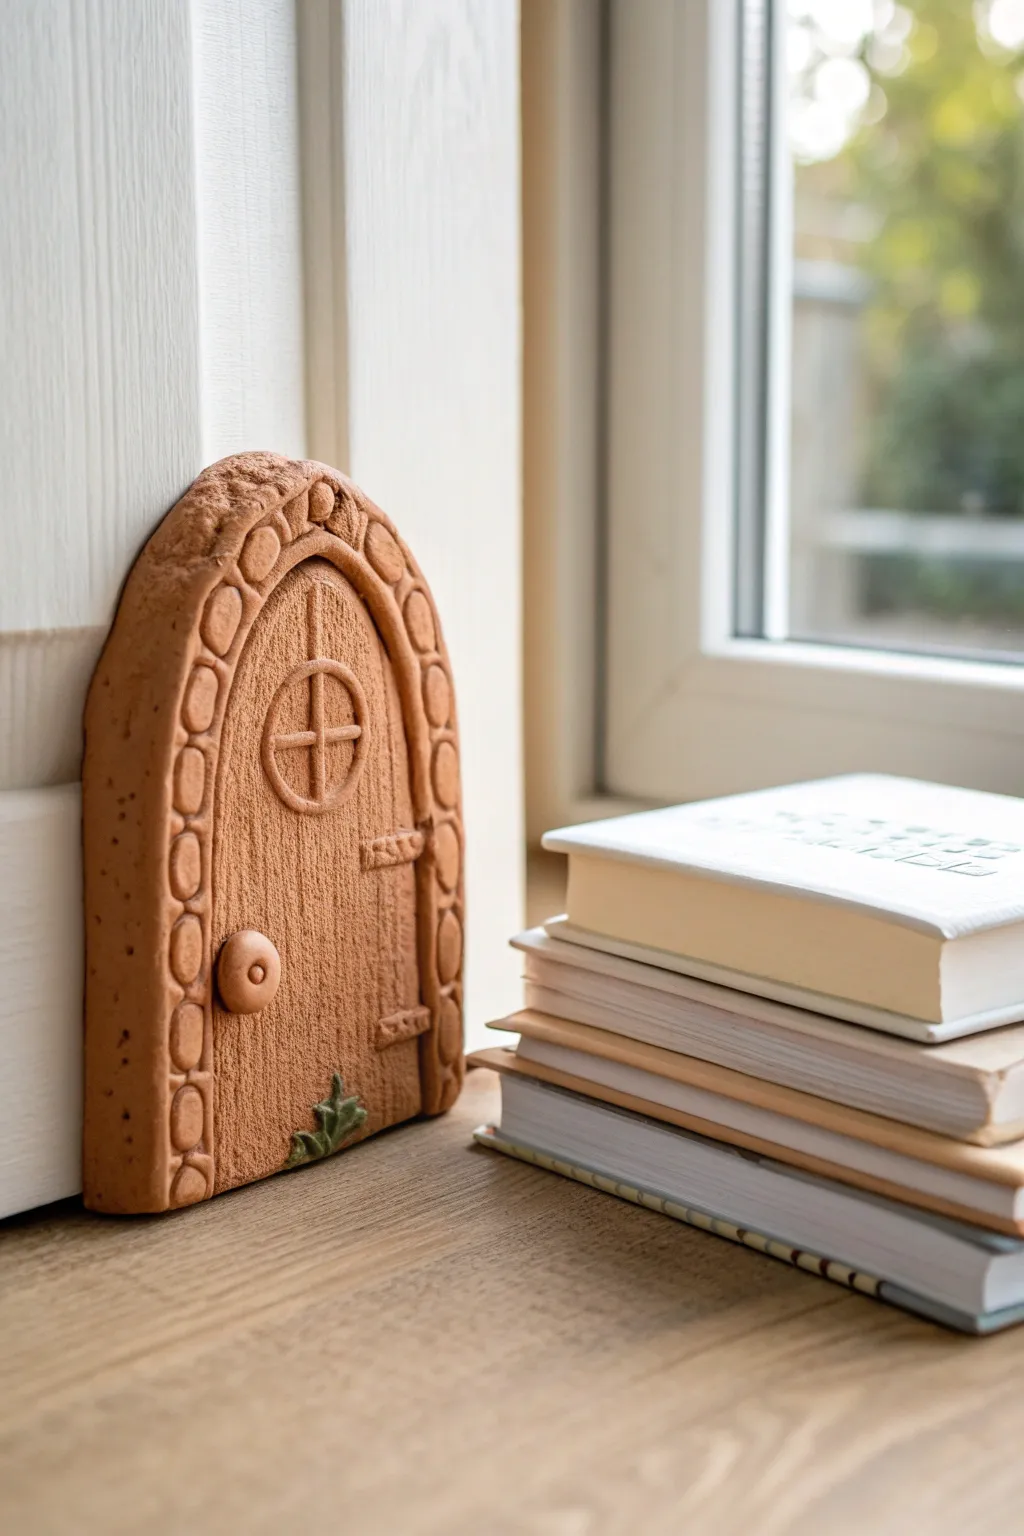
Transform simple clay into a whimsical portal for magical creatures with this textured fairy door project. Its warm, terracotta finish mimics the look of a gingerbread cookie, complete with a stone archway and charming rustic details.
Step-by-Step Tutorial
Materials
- Terracotta-colored air-dry clay (or polymer clay)
- Small amount of green clay (for the leaf detail)
- Rolling pin
- Clay knife or craft blade
- Needle tool or toothpick
- Ball stylus tool
- Small circle cutter (approx. 1 inch)
- Textured sponge or sandpaper (for stone texture)
- Clear matte varnish (optional)
Step 1: Base and Door Structure
-
Roll the Slab:
Begin by conditioning your terracotta clay until it is pliable. Roll it out into an even slab, approximately 1/4 to 1/2 inch thick, ensuring it’s sturdy enough to stand upright once dry. -
Cut the Arch Shape:
Use a knife to cut out a tall arch shape. I like to freehand this to give it a slightly organic feel, but you can also make a paper template first to ensure symmetry. -
Define the Frame:
Lightly trace a smaller arch inside the main shape, leaving about a 1/2 inch border all the way around. This border will become your stone archway. -
Create Wood Texture:
Focusing on the inner door panel, use your needle tool or knife to gently score vertical lines. Vary the pressure to simulate natural wood grain.
Cracks while drying?
If using air-dry clay, small cracks may appear. Mix a tiny bit of fresh clay with water to make a paste and fill in the cracks, then smooth over.
Step 2: Adding the Details
-
Make the Stone Arch:
Using a blunt tool or the back of a knife, press indentations into the outer border to divide it into individual ‘stones.’ Keep the shapes slightly irregular. -
Texture the Stones:
Gently dab the stone border with a textured sponge or piece of coarse sandpaper. This creates a pitted, realistic rock surface that contrasts nicely with the smooth wood grain. -
Create the Window:
Roll a small coil of clay and form a circle in the upper center of the door. Use your needle tool to add a cross inside the circle for window panes. -
Add the Hinges:
Form two tiny rectangles of clay. Press them onto the right side of the door frame, spaced evenly apart. Use a needle tool to add tiny scratch marks for metal texture. -
Attach the Doorknob:
Roll a small ball of clay and flatten it slightly. Press it firmly onto the left side of the door. Use a small dotting tool to make a tiny indentation in the center of the knob. -
Sculpt the Sprout:
Take a very small pinch of green clay. Shape it into three tiny teardrops and press them together at the bottom center of the door to create a little sprout growing from the threshold.
Step 3: Refining and Drying
-
Smooth Edges:
Dip your finger in a little water and run it along the outer edges of the entire piece to soften any sharp cuts from the initial shaping. -
Deepen Details:
Before the clay sets, go back over your wood grain and stone dividing lines to ensure they are deep enough to remain visible after drying. -
Initial Drying:
Lay the door flat on a piece of parchment paper. If using air-dry clay, let it sit for 24-48 hours away from direct heat to prevent cracking. -
Finishing Touch:
Once fully dry, you can leave it natural for a matte, cookie-like appearance or apply a thin coat of matte varnish to protect it from moisture.
Pro Tip: Realistic Stone
After texturing the stone arch, lightly dust it with a tiny bit of flour or cornstarch before it dries to enhance that dusty, ancient stone look.
Set your finished door against a baseboard or bookshelf to invite a little magic into your home