When I’m dreaming up clay earring ideas, I always start with shapes and color combos that feel fun to wear but still totally doable at the kitchen table. Here are my go-to design directions—from classic crowd-pleasers to the artsy “wait, you made those?” styles.
Classic Arch Dangles
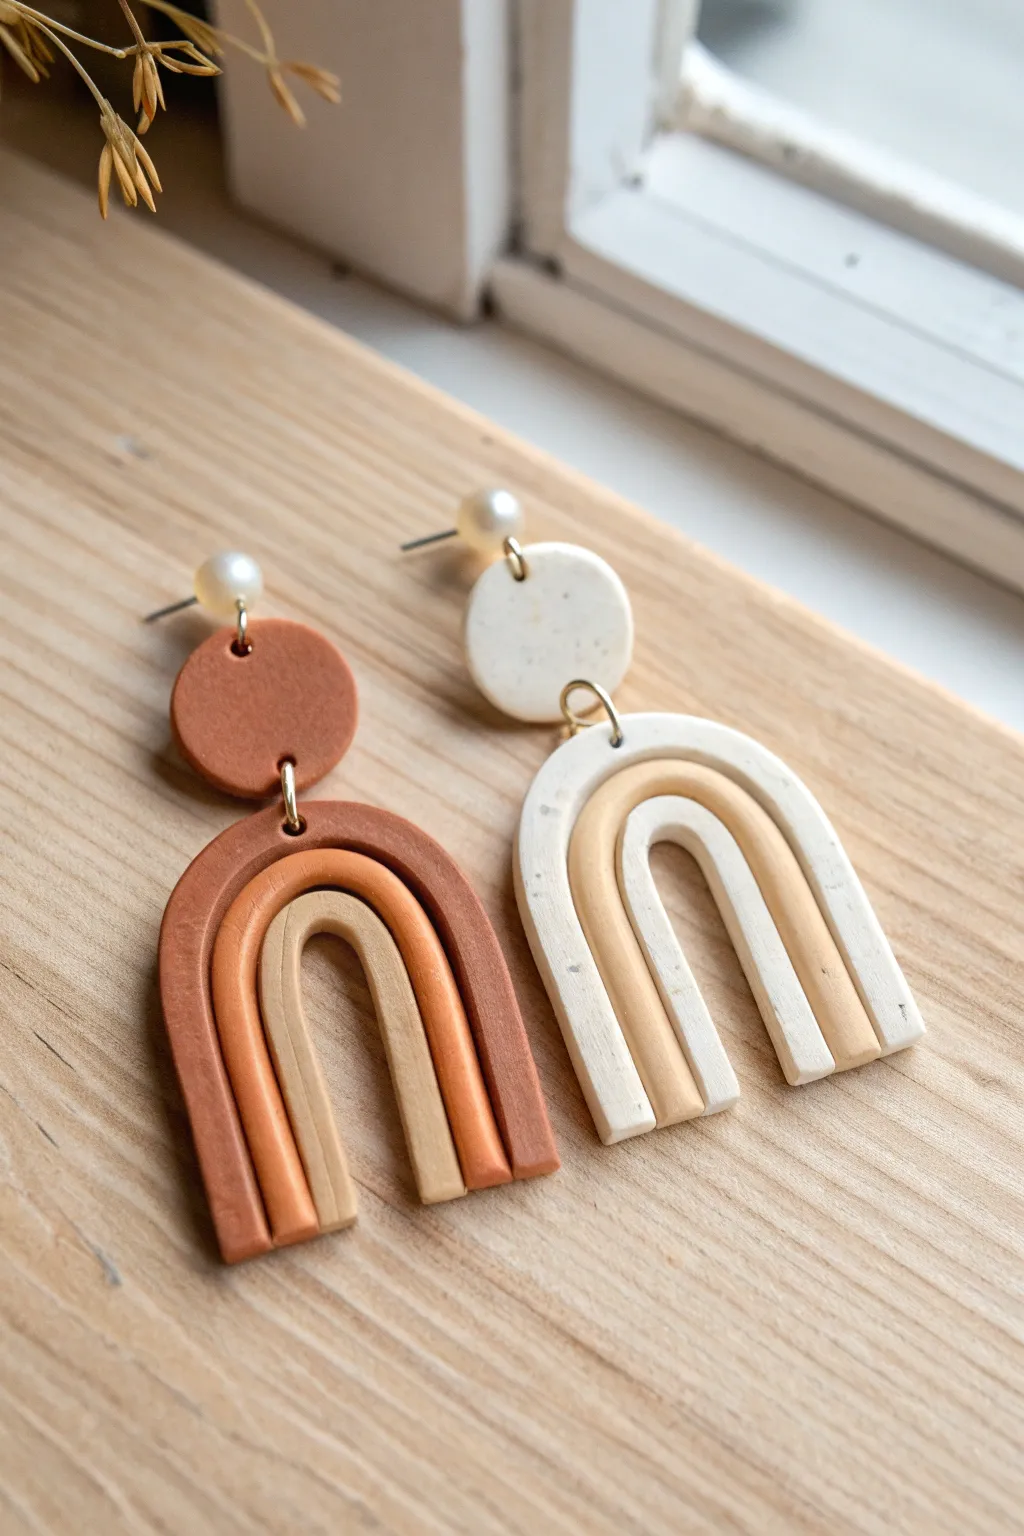
These handmade polymer clay earrings feature a trendy triple-arch shape in soothing earth tones and speckled whites, finished with a delicate pearl accent. Their textural look and modern design make them a perfect statement piece that feels both organic and refined.
How-To Guide
Materials
- Polymer clay (Terracotta, Ochre/Mustard, Beige, White, and Granite/Speckled White)
- Acrylic rolling pin or pasta machine
- Tissue blade or X-Acto knife
- Clay extruder (essential for even arches) with semi-circle or square disc
- Small circle cutters (approx. 10mm and 15mm)
- Small pearl beads (4-6mm)
- Earring posts and backs
- Jump rings (gold tone, approx. 6-8mm)
- Hand drill or pin vibe
- Jewelry pliers (flat nose and round nose)
- Ceramic tile or glass baking sheet
- Super glue or liquid clay
- Oven
Step 1: Preparing the Clay
-
Conditioning:
Start by thoroughly conditioning your polymer clay blocks. Warm the clay in your hands and roll it until it’s pliable and free of cracks. -
Mixing Colors:
For the terracotta earring, you’ll need three distinct shades: a deep rust brown, a medium caramel, and a light sandy beige. You can mix raw sienna into white clay to customize your gradients. -
Speckled Effect:
For the white earring, use a pre-made ‘granite’ or speckled white clay for the outer arch. Alternatively, mix a tiny amount of black pepper or black glitter into white clay for a DIY speckled look. -
Sheet Rolling:
Roll out a small portion of the clay you intend to use for the top stud circles to a thickness of about 3mm. Keep the rest ready for the extruder.
Step 2: Forming the Arches
-
Extruding Strips:
This is the secret to perfect arches: load your clay into an extruder fitted with a rectangle or large semi-circle disc. Extrude long, even ‘snakes’ of clay in each of your chosen colors. -
Cutting Lengths:
Cut your extruded strips into shorter segments. You will need three strips per earring: a long outer strip, a medium middle strip, and a short inner strip. -
Bending the Inner Arch:
Take the shortest strip (the lightest color for the terracotta set, or the white strip for the speckled set) and gently bend it into a tight U-shape. Place this on your ceramic tile. -
Layering the Middle:
Take the medium-colored strip and gently mold it over the first arch. Press them together lightly along the sides so they adhere without smashing the rounded profile. -
Adding the Outer Arch:
Finally, drape the longest strip over the previous two. I find gently nudging the sides inward helps eliminate any gaps between the layers. -
Trimming the Base:
Once your three layers are secure, take your tissue blade and make a clean, straight cut across the bottom of the arch legs so they are perfectly flush.
Gaps in your arch layers?
Apply a tiny amount of liquid polymer clay (like Sculpey Bake & Bond) between the strips before bending them together. This acts as a mortar and fuses them fused during baking.
Step 3: Creating the Tops
-
Cutting Circles:
Using your rolled-out sheet from earlier, cut out two circles (approx. 10-15mm) using your circle cutter. These will be the connection points for the posts. -
Texturing (Optional):
If you want the textured look seen on the white pair, gently press a piece of sandpaper or a toothbrush bristles onto the surface of the white circle. -
Piercing Holes:
Before baking, use a needle tool or toothpick to poke a hole near the bottom edge of the circle and the top center of the arch. Make sure the hole is big enough for your jump rings.
Clean Cuts Pro Tip
Chill your clay in the fridge or freezer for 10 minutes prior to cutting the bottom straight. Firm clay distorts less under the blade pressure, giving you a sharper edge.
Step 4: Finishing Up
-
Baking:
Bake the clay pieces according to the manufacturer’s instructions (usually 275°F/135°C for 30 minutes). Let them cool completely in the oven to prevent cracking. -
Adding Pearls:
Glue a small pearl bead to the front of the metal earring post, or thread a pearl onto a headpin if you prefer a dangle style. For the style in the photo, glue the pearl post securely to the back top edge of the clay circle. -
Assembly:
Use pliers to open a jump ring. Thread it through the hole in the clay arch and the hole in the clay circle, then close the ring securely. -
Final Polish:
Check your edges. If there are any rough spots from the cutting blade, gently sand them with high-grit sandpaper for a professional finish.
Enjoy styling your new earthy accessories with your favorite cozy outfits


Two-Tier Circle Drops
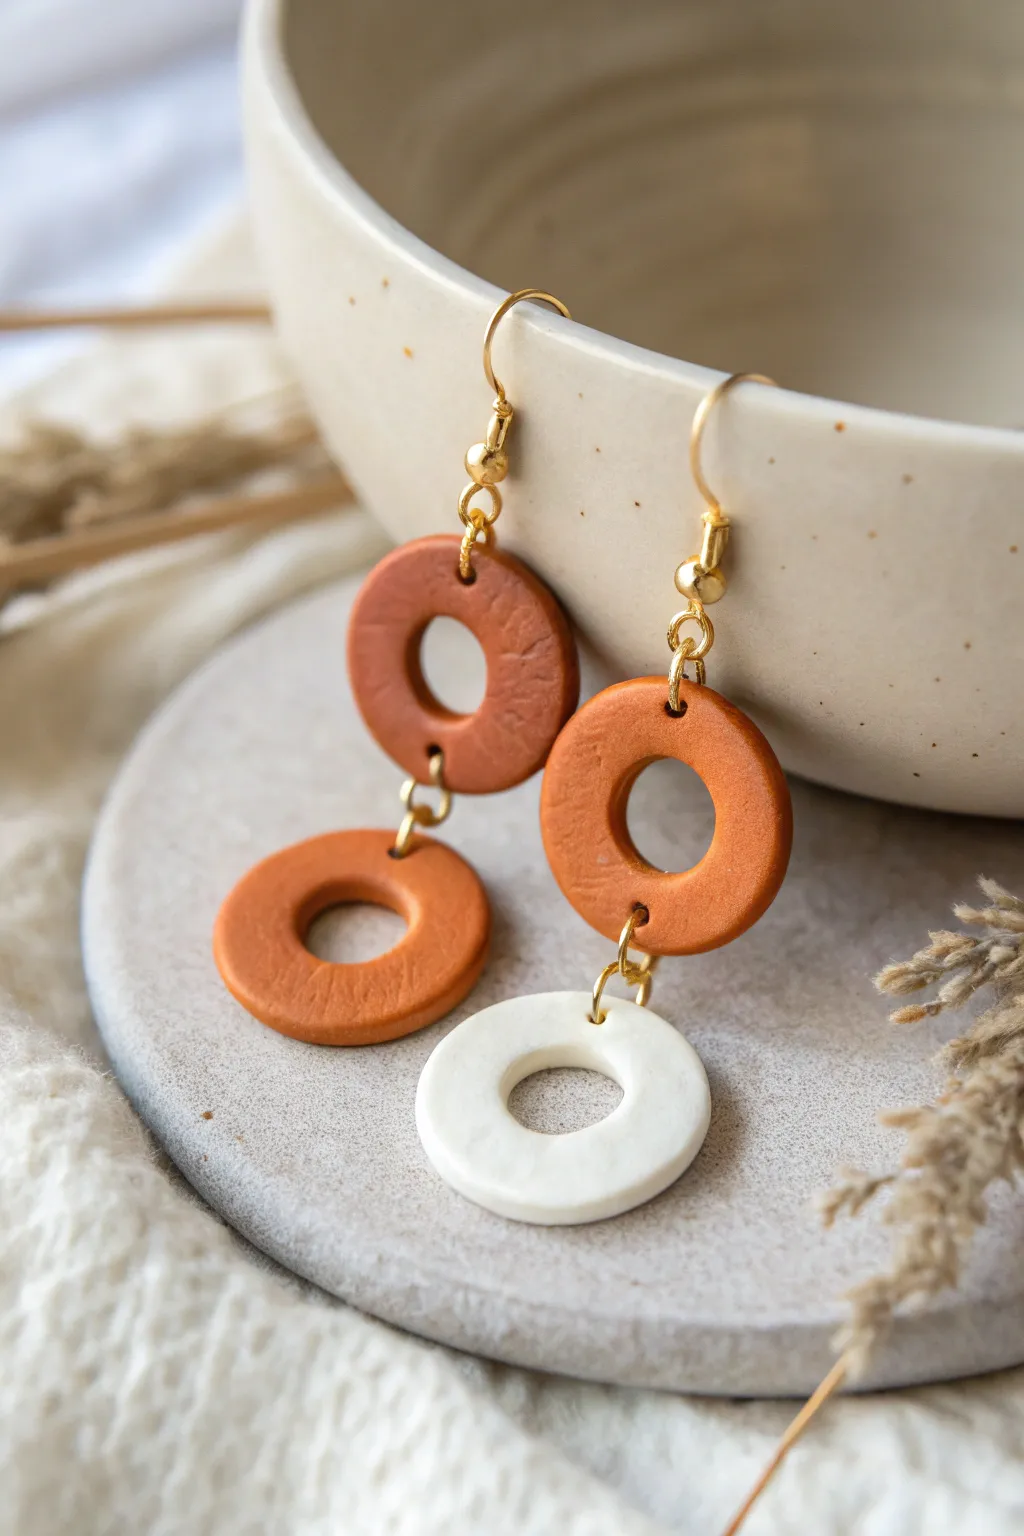
These charming polymer clay earrings combine earthy terracotta tones with creamy white accents for a rustic, minimalist look. The asymmetrical color blocking—one solid pair of loops and one mixed pair—adds a modern twist to a classic two-tier drop silhouette.
Step-by-Step Tutorial
Materials
- Polymer clay (terracotta/burnt orange and white/cream colors)
- Small circle cutters (approx. 15mm-20mm diameter)
- Mini circle cutter (approx. 5mm-8mm for the inner cutout)
- Acrylic rolling pin
- Parchment paper or ceramic tile (work surface)
- Needle tool or toothpick
- Gold-colored jump rings (6-8mm)
- Gold-colored earring hooks (fishhook style)
- Jewelry pliers (two pairs recommended)
- Fine-grit sandpaper (optional, for edges)
Step 1: Shaping the Clay Components
-
Condition the Clay:
Begin by warming up the terracotta-colored clay in your hands, kneading it until it is soft and pliable. Do the same separately for the white clay to prevent color transfer. -
Roll Out the Sheets:
Using your acrylic roller, flatten the clay inter sheets that are approximately 3mm thick. It’s helpful to use depth guides or playing cards stacked on either side to ensure an even thickness across the whole slab. -
Cut the Main Circles:
Cut out your main shapes using the larger circle cutter. You will need three terracotta circles and one white circle to match the specific asymmetry shown in the example. -
Create the Centers:
Position your mini circle cutter exactly in the center of each large circle to punch out the middle, creating a donut or washer shape. Take your time to eyeball the center point for a balanced look. -
Add Texture (Optional):
For that organic, stone-like feel seen in the photo, gently tap the surface of the clay with a clean toothbrush or crumpled foil. I like to keep this subtle just to break up the perfectly smooth surface. -
Create Connection Holes:
Using a needle tool, poke a hole at the very top and very bottom of the two top circles (terracotta). For the bottom hanging circles (one terracotta, one white), poke only a single hole at the top. -
Smooth the Edges:
Before baking, gently run your finger dipped in a little cornstarch or water along the cut edges to soften any sharp ridges or cutter marks.
Fixing Off-Center Holes
If your donut hole isn’t perfectly centered, gently stretch the clay while it’s raw to adjust the shape, or use the cutter again to trim the wider side slightly.
Step 2: Baking and Assembly
-
Bake the Clay:
Arrange your four donut shapes on a tile or parchment-lined baking sheet. Bake according to your brand’s specific package instructions (usually around 275°F/135°C for 15-30 minutes). -
Cool Down:
Allow the pieces to cool completely inside the oven or on the counter. If they are still warm, they might be slightly flexible and prone to warping during handling. -
Sand for Perfection:
If there are any rough spots or fingerprints left after baking, briefly sand the edges under running water with fine-grit sandpaper for a professional matte finish. -
Open Jump Rings:
Using two pairs of pliers, twist your gold jump rings open sideways (never pull them apart outward) to preserve their circular shape. -
Connect the Tiers:
Take a terracotta top piece and loop an open jump ring through its bottom hole and the top hole of the matching bottom terracotta piece. Close the jump ring securely. Repeat for the mixed-color pair. -
Attach Earring Hooks:
Open the small loop at the base of your gold earring hook. Slide it through the top hole of the upper clay circle. -
Secure the Findings:
Gently squeeze the hook’s loop closed with pliers. Ensure the loop is tight enough that the clay piece won’t slip off during wear. -
Final Check:
Hold both earrings up to ensure they hang at the same length and that all jump rings are fully closed.
Enhance the Stone Look
Mix black pepper or dried tea leaves into your clay before rolling it out. This adds a beautiful speckled granite effect that mimics real stoneware pottery.
Now you have a stylish, lightweight pair of earrings perfect for everyday wear


Color-Blocked Rectangles
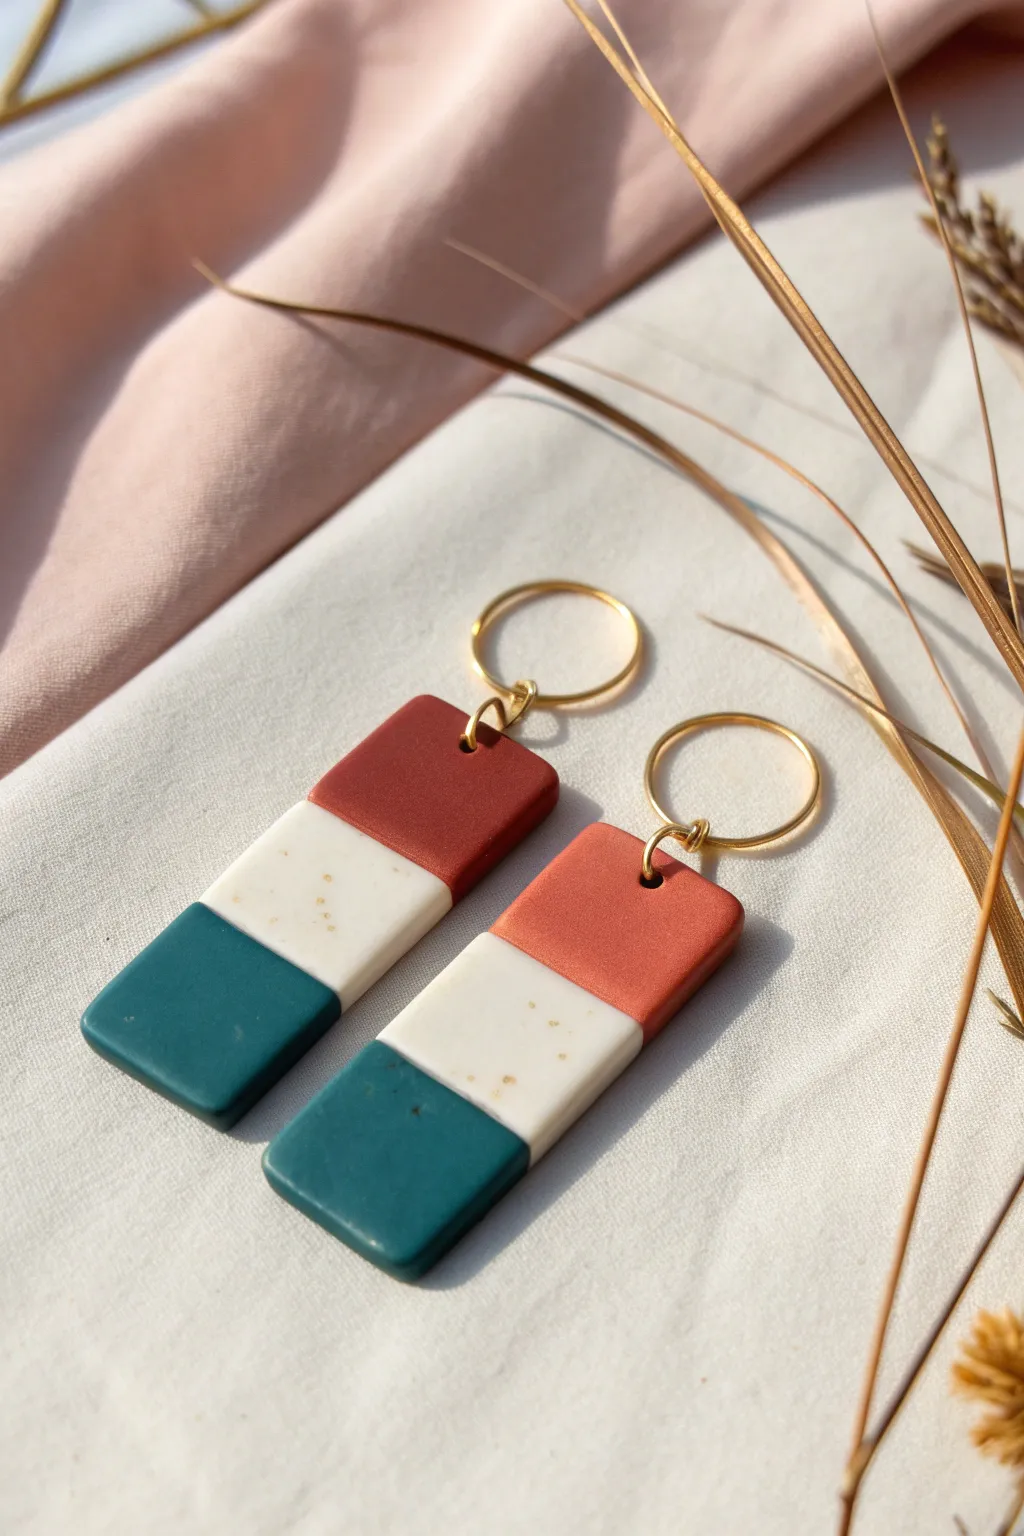
Achieve a sophisticated, minimalist look with these geometric color-blocked earrings featuring a stunning palette of rust, speckled cream, and deep teal. Their clean lines and matte finish make them a versatile accessory that looks professionally crafted yet is surprisingly simple to assemble at home.
Step-by-Step Guide
Materials
- Polymer clay (Rust/Terracotta color)
- Polymer clay (White or Ecru)
- Polymer clay (Deep Teal/Dark Green)
- Fine gold glitter or black pepper (for speckling)
- Acrylic rolling pin or pasta machine
- sharp tissue blade or rigid clay slicer
- Small circle cutter (25mm or similar) or gold hoop findings
- Gold jump rings (6-8mm)
- Earring posts or hooks (if not using hoops directly)
- Hand drill or pin vibe with small bit
- Fine grit sandpaper (400-1000 grit)
- Parchment paper or ceramic tile
Step 1: Preparing the Clay Palette
-
Condition the colors:
Begin by thoroughly kneading your rust, white, and teal clays separately. You want them warm and pliable to prevent cracking later. -
Create the speckled effect:
Take your conditioned white or ecru clay. To get that subtle stone look, sprinkle in a tiny pinch of gold glitter or even coarse black pepper. Fold the clay over and roll it repeatedly until the specks are evenly distributed. -
Roll out slabs:
Roll each of the three colors into sheets of equal thickness. I prefer using the thickest setting on a pasta machine (around 3-4mm) so the earrings feel substantial without being heavy. -
Trim straight edges:
Using your rigid tissue blade, cut a long, straight edge on each of your three clay sheets. This clean edge is crucial for the next step where we join them.
Straight Cuts Only
Chill your clay slab in the fridge for 10 minutes before cutting shapes. Cold clay is firmer and distorts less under the blade, keeping your lines crisp.
Step 2: Assembling the Block
-
Join the seams:
Lay the clay sheets on your work surface. Press the straight edge of the rust clay against the top of the speckled white, and the teal against the bottom of the white, creating a striped pattern. -
Heal the joins:
Place a piece of parchment paper over your striped slab. Gently use your roller or a burnishing tool to smooth over the seams. You want the clays to bond, but try not to distort the straight lines. -
Check the back:
Flip the slab over carefully. If the seams on the back aren’t fully connected, gently smudge the clay across the join line with your finger to reinforce the structure.
Step 3: Cutting and Baking
-
Cut the rectangles:
Use your tissue blade to slice two identical vertical rectangles from your striped slab. Ensure each rectangle captures equal portions of the rust, white, and teal sections. -
Refine the shape:
If the corners look too sharp or dragged down from cutting, gently pat them back into a clean rectangular shape with your fingertip. -
Create the hole:
Using a toothpick or a small straw, punch a hole centrally in the top rust section. Make sure it’s not too close to the edge to prevent breakage. -
Bake carefully:
Transfer the pieces to a ceramic tile or baking sheet lined with parchment. Bake according to your clay manufacturer’s instructions, usually around 275°F (135°C) for 30-45 minutes. -
Cool down:
Allow the pieces to cool completely in the oven or on the counter before handling. Warm clay is fragile.
Uneven Seams?
If your color joins separate after baking, reinforce the back with liquid polymer clay or UV resin for an invisible fix that restores strength.
Step 4: Finishing Touches
-
Sand the edges:
Once cool, dip your sandpaper in water and gently sand the edges of the rectangles to remove any fingerprints or rough cutting marks. -
Buff surface (optional):
For a super matte finish like the photo, lightly sand the face of the clay as well, moving in small circular motions. -
Clean up:
Wash the sanded pieces with a little soapy water to remove dust residue and pat dry with a lint-free cloth. -
Attach findings:
Open a gold jump ring using two pairs of pliers (twist, don’t pull apart). Thread it through the clay hole and attach your gold hoop finding. -
Final check:
Ensure the jump ring is closed tightly so there is no gap for the hoop to slip out of.
You now have a chic pair of handmade statement earrings ready to wear or gift.


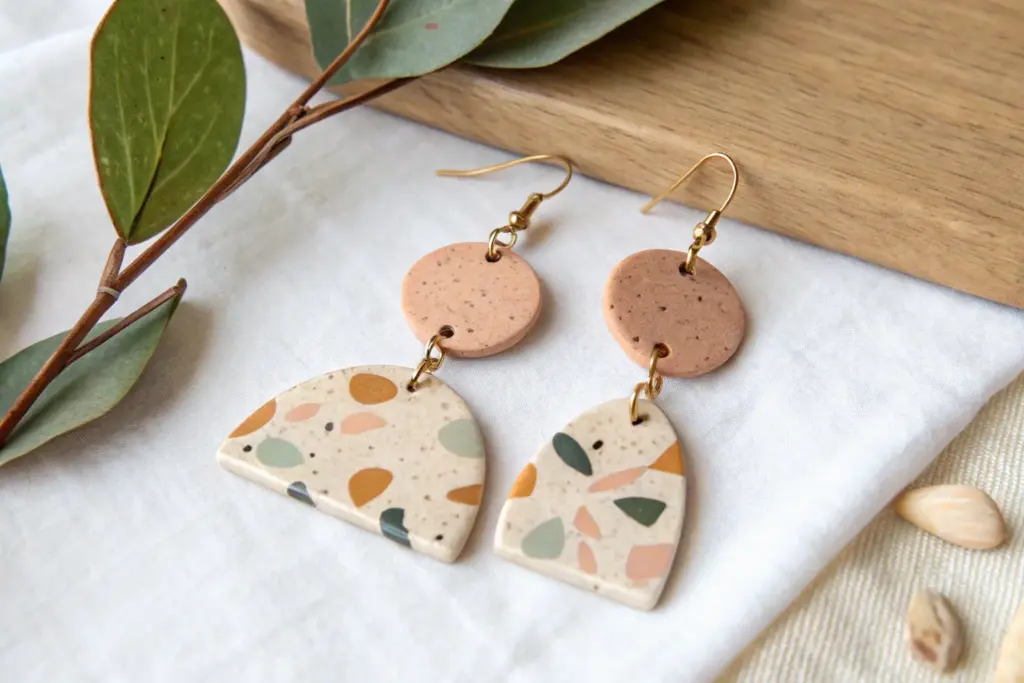
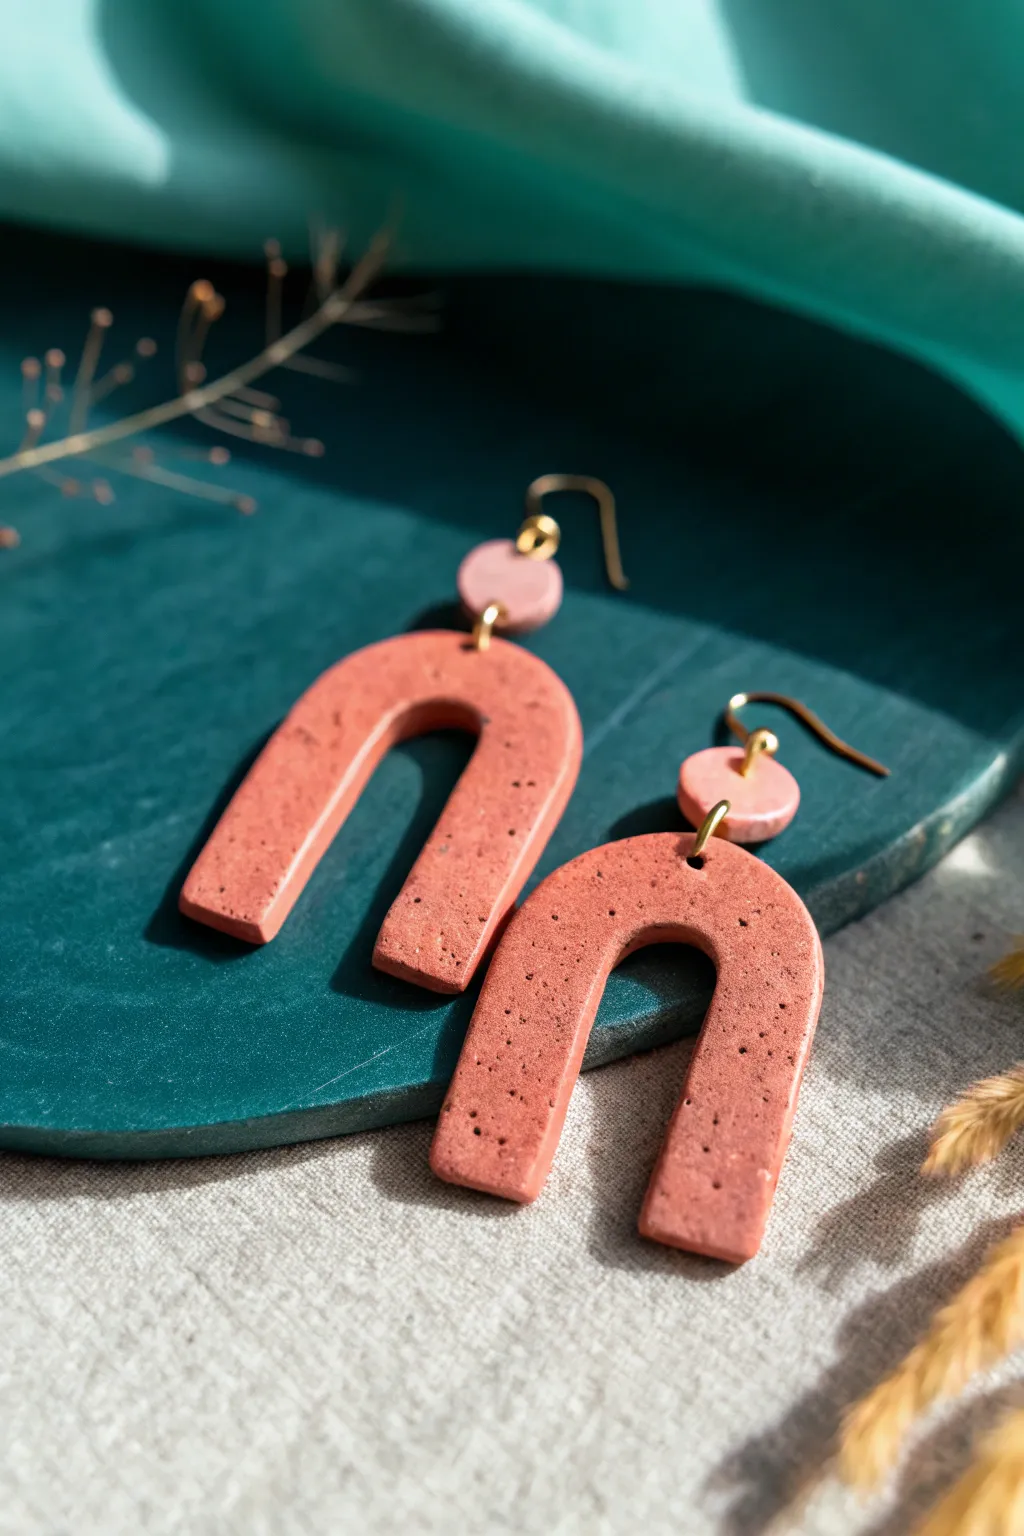
Terrazzo Speckle Statement Shapes
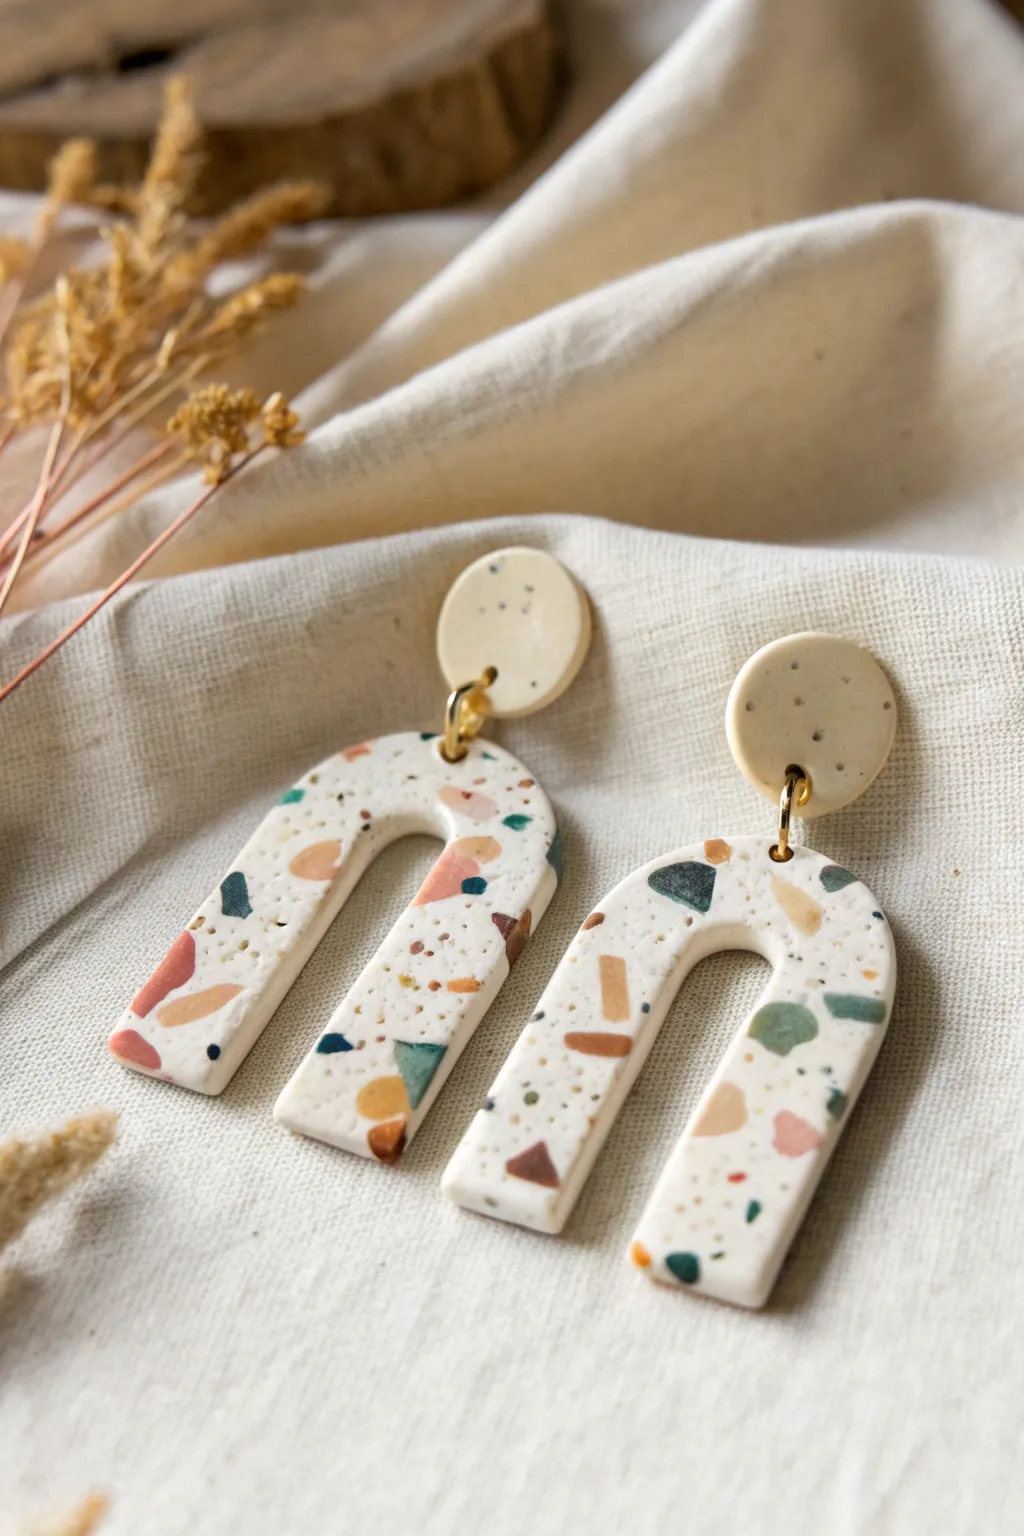
These statement earrings feature a classic U-shaped arch and a playful terrazzo pattern that mimics the look of stone. The scattered chips of muted terracotta, green, and mustard create a sophisticated yet earthy palette perfect for everyday wear.
Step-by-Step
Materials
- White or cream polymer clay (base)
- Small amounts of colored polymer clay (terracotta, sage green, emerald green, mustard yellow, brown)
- Black pepper or faux granite fine glitter (optional for speckles)
- Acrylic rolling pin
- U-shape clay cutter (approx. 1.5 – 2 inches)
- Small circle clay cutter (approx. 0.5 inch)
- Tissue blade or X-Acto knife
- Gold jump rings (6mm or 7mm)
- Earring posts and backs
- Superglue or UV resin
- Gloss varnish (optional)
- Parchment paper or ceramic tile
- Small handheld drill or pin vise
- Jewelry pliers
Step 1: Prepping the Chips
-
Create color sheets:
Begin by conditioning your colored clays (terracotta, greens, mustard, brown). Roll each color out very thinly, almost like paper. The thinner these sheets are, the better they will integrate into the base later. -
Bake the thin sheets:
Place these thin sheets on your baking tile and bake them for roughly 10-15 minutes at the manufacturer’s recommended temperature. Let them cool completely until hard. -
Chop into terrazzo:
Once cooled, use your tissue blade to chop the baked colored sheets into irregular, tiny fragments. Aim for a mix of sizes—some like coarse sand, others like small geometric shards.
Baking Tip for Flatness
To ensure your arches stay perfectly flat while baking, place a piece of parchment paper on top of the cut shapes and weigh them down with a second ceramic tile.
Step 2: Creating the Slab
-
Condition base clay:
Take your block of white or cream clay and condition it thoroughly until it is soft and malleable. Roll it into a thick slab, about 3-4mm thick. -
Add texture:
To mimic the black speckles seen in the photo, you can sprinkle a tiny pinch of ground black pepper or specialized granite-effect glitter onto the white slab. -
Apply the chips:
Scatter your chopped colored clay fragments over the white slab. Be random with placement, ensuring some areas have clusters of color while others remain sparse for balance. -
Embed the pattern:
Place a sheet of parchment paper over the slab to prevent sticking. Use your acrylic roller to firmly press the colored chips down so they are flush with the surface of the white clay. -
Smooth the surface:
Roll over the slab repeatedly in different directions. You want the surface to differ as little as possible in height between the base and the chips. The slab should end up roughly 2.5mm to 3mm thick.
Handling “Smears”
If your colored chips smear into the white base while rolling, your clay was too warm. Pop the slab in the fridge for 10 minutes before rolling again to get crisp lines.
Step 3: Cutting and Baking
-
Cut the shapes:
Press your U-shape cutter firmly into the most visually interesting parts of the slab. Cut two arches. Then, use the small circle cutter to cut two circles for the stud tops. -
Clean edges:
Gently lift the shapes. If there are any ragged edges, smooth them carefully with your fingertip. I find a tiny bit of cornstarch on my finger helps glide over the clay without leaving prints. -
Poke holes:
Use a needle tool or toothpick to create a hole at the top center of each U-shape and at the bottom edge of each circle. Ensure the hole is large enough for your jump rings. -
Final Bake:
Arrange your pieces on a ceramic tile lined with clean paper. Bake for roughly 45–60 minutes at the temperature specified on your clay package (usually around 275°F/130°C).
Step 4: Assembly
-
Sand and buff:
Once fully cooled, use fine-grit wet sandpaper to smooth the edges and the surface if desired. This reveals the sharp geometric edges of the terrazzo chips even clearly. -
Attach posts:
Apply a small dot of superglue to the back of the circular pieces and attach the earring posts. Let them dry completely. -
Connect the pieces:
Using two pairs of jewelry pliers, twist open a jump ring. Thread it through the hole in the circle stud and the hole in the U-arch, then twist it closed to secure the movement.
Enjoy styling these versatile terrazzo arches with your favorite neutral outfits

The Complete Guide to Pottery Troubleshooting
Uncover the most common ceramic mistakes—from cracking clay to failed glazes—and learn how to fix them fast.
Marbled Swirl Drops

Achieve an effortless, sophisticated look with these teardrop earrings that blend warm terracotta and cool sage tones. The fluid, agate-like spiral adds a touch of modern art to your jewelry collection while remaining wonderfully lightweight.
Step-by-Step Tutorial
Materials
- Polymer clay in speckled cream (or beige)
- Polymer clay in terracotta (rust orange)
- Polymer clay in sage green (or muted teal)
- Clay roller or pasta machine
- Teardrop clay cutters
- X-acto knife or tissue blade
- Hand drill or small clay piercing tool
- Gold fishhook earring wires
- Gold jump rings (6-7mm)
- Jewelry pliers (flat nose and round nose)
- Fine-grit sandpaper (optional)
- Oven
Step 1: Creating the Marble Slab
-
Condition the clay:
Start by kneading each color of polymer clay—speckled cream, terracotta, and sage—until they are soft, pliable, and free of cracks. -
Form logs:
Roll each color into a cylindrical log shape. Since the base is mostly cream, make that log about twice as thick as the terracotta and sage logs. -
Combine the colors:
Gather the three logs and twist them together into one large rope. Fold the rope in half and twist again to begin merging the colors. -
Roll and fold:
Roll the twisted rope into a smooth snake, then fold it over and roll again. Repeat this simple twist-and-roll process until you see pleasing streaks of color. -
Create a block:
Squish your marbled rope into a rectangular block shape rather than a snake. This prepares it for more controlled patterning. -
Swirl the pattern:
Gently twist the block slightly to curve the distinct lines of color inside, aiming for that sweeping, organic flow seen in the final piece. -
Sheet the clay:
Using an acrylic roller or a pasta machine on a medium setting, flatten the block into a slab. For this project, a thickness of about 3mm works beautifully. -
Check the design:
inspect your slab. If the marble pattern is too chunky, you can fold it once more and roll it out again, but be careful not to over-mix, or the colors will turn muddy.
Muddy Colors?
Stop mixing sooner than you think! Over-rolling blends distinct lines into a single brown hue. If the slab looks muddy, stop immediately and cut from the clearest sections.
Step 2: Cutting and Baking
-
Select your cutting area:
Hover your teardrop cutter over different parts of the slab to find the most attractive swirls. Look for areas where the terracotta and sage sweep dramatically through the cream. -
Cut the shapes:
Firmly press the cutter into the clay. Give it a tiny wiggle to ensure it cuts all the way through to your work surface, then lift cleanly. -
Smooth the edges:
Before baking, gently run your finger along the cut edges of the teardrops to soften any sharp ridges left by the cutter. -
Pierce holes:
Use a needle tool or toothpick to poke a small hole at the very top point of each teardrop. Ensure the hole is large enough for your jump ring to fit through. -
Bake the clay:
Place your pieces on a ceramic tile or baking sheet lined with parchment paper. Bake according to the manufacturer’s instructions for your specific brand of clay, usually around 275°F (135°C). -
Cool down:
Allow the earrings to cool completely inside the oven or on the tray before handling them to prevent warping.
Step 3: Assembly & Finishing
-
Sand edges (optional):
If you notice any rough spots after baking, lightly sand the edges with fine-grit sandpaper for a professional finish. -
Open the jump ring:
Using two pairs of pliers, twist a gold jump ring open sideways (never pull it apart outwards) to preserve its circular shape. -
Attach the hardware:
Slide the open jump ring through the hole in the clay piece, then loop the fishhook earring wire onto the ring. -
Close the ring:
use your pliers to twist the jump ring back into a closed position, ensuring the ends meet perfectly flush so the wire doesn’t slip out. -
Repeat:
Attach the hardware to the second earring to complete the pair.
Make It Shine
After baking, apply a very thin layer of UV resin or glossy water-based glaze to make the colors pop and give the clay a ceramic-like finish.
Now you have a stunning pair of custom-marbled earrings ready to wear or gift
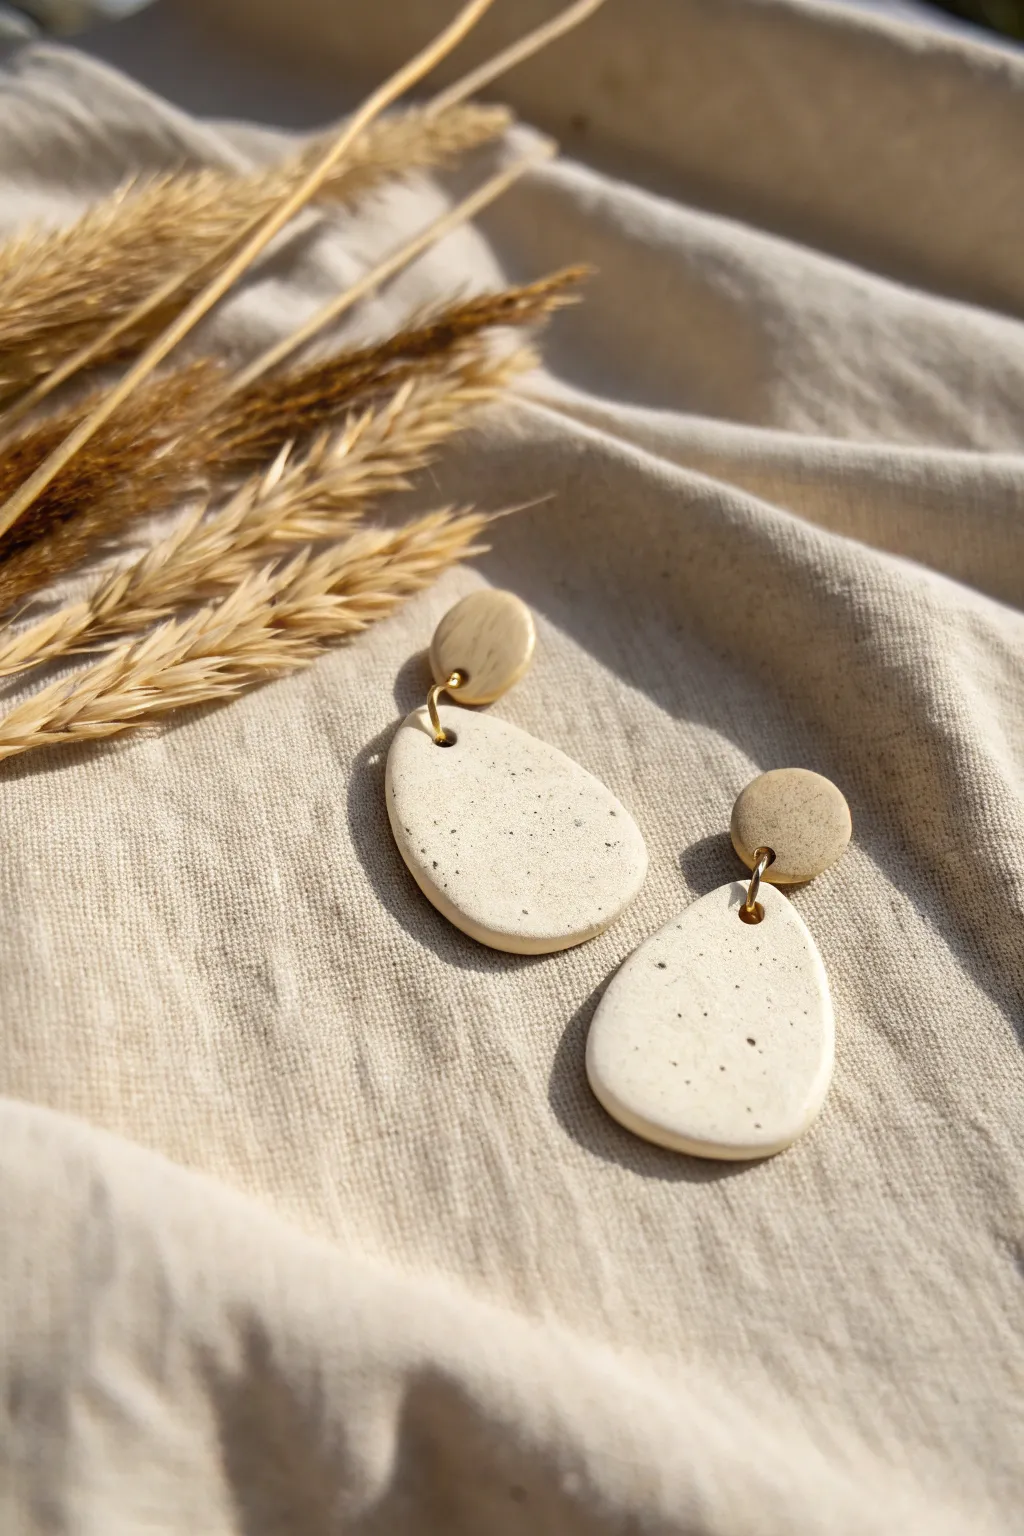
Abstract Organic Blob Earrings

These warm, earthy earrings feature soft, organic shapes that mimic the natural imperfection of river stones. Using speckled terracotta polymer clay, you’ll create a simple yet elegant two-part design with a calming, tactile finish.
Detailed Instructions
Materials
- Terracotta or rust-colored polymer clay (preferably with granite/speckles)
- Small circle clay cutter (approx. 1 cm)
- Acrylic rolling pin or pasta machine
- Detail needle tool or toothpick
- Smooth work surface (ceramic tile or glass)
- jump rings (gold, 6mm)
- Earring posts and backs
- Jewelry pliers (flat nose and round nose)
- Super glue or liquid polymer clay (for attaching posts)
- Fine grit sandpaper (optional)
Step 1: Conditioning and Shaping
-
Condition the Clay:
Begin by warming the terracotta clay in your hands. Knead and fold it repeatedly until it becomes pliable and soft, which prevents cracking later. -
Roll the Sheet:
Roll your conditioned clay into a slab about 3mm thick. Aim for an even thickness throughout for a professional look. -
Cut the Top Studs:
Use your small circle cutter to punch out two identical circles. These will serve as the top stud portion of the earring. -
Shape the Blobs:
Cut two larger pieces of clay for the bottom drops. Instead of a cutter, use your fingers to gently mold them into organic, soft triangular shapes. -
Refine the Edges:
Gently tap the edges of your organic shapes with your fingertip to round them off. You want to eliminate sharp cut lines so they look like worn stones. -
Match the Pairs:
Place your two organic drops side by side. Adjust their shapes slightly so they look like sisters, not twins—similar in visual weight but not identical. -
Pierce the Top Holes:
Using your needle tool, poke a hole near the bottom edge of the circular studs. Make sure the hole is big enough for your jump ring. -
Pierce the Bottom Holes:
Make a corresponding hole at the very top point of your organic blob shapes. Ensure you leave enough clay margin so the hole doesn’t tear. -
Smooth Imperfections:
Do a final check for fingerprints. I like to lightly buff the surface with a tiny bit of cornstarch on my finger to smooth everything out before baking.
Step 2: Baking and Assembly
-
Bake the Pieces:
Place your clay pieces on a ceramic tile or baking sheet. Bake according to your specific clay brand’s package instructions (usually around 275°F/130°C for 15-30 minutes). -
Cool Down:
Allow the pieces to cool completely inside the oven or on a wire rack. Don’t handle them while hot as they are still slightly flexible. -
Sand the Edges:
If there are any rough spots, use fine-grit sandpaper to gently buff the edges under running water for a polished finish. -
Attach the Posts:
Apply a small dot of strong super glue or liquid clay to the back of the circular studs. Press the earring post into the glue and let it cure fully. -
Open Jump Rings:
Use two pairs of pliers to twist a jump ring open. Always twist laterally (front to back) rather than pulling the ends apart to maintain the circle shape. -
Connect the Pieces:
Thread the open jump ring through the hole in the organic drop and then through the hole in the stud. -
Close the Ring:
Twist the jump ring closed securely with your pliers, ensuring the gap is completely shut so the drop doesn’t slip off. -
Final Polish:
Wipe the finished earrings with a soft cloth to remove any dust or sanding residue, revealing that beautiful matte terracotta texture.
Fingerprint Freedom
To avoid fingerprints on your smooth clay, use a light dusting of cornstarch on your fingertips while shaping, or wear latex finger cots.
Add Gold Leaf
Before baking, press tiny flecks of gold leaf onto the terracotta surface. The metallic shine contrasts beautifully with the matte, earthy clay.
Enjoy wearing these understated, nature-inspired pieces that add a warm touch to any outfit


What Really Happens Inside the Kiln
Learn how time and temperature work together inside the kiln to transform clay into durable ceramic.
Hoop Charms With Clay Discs
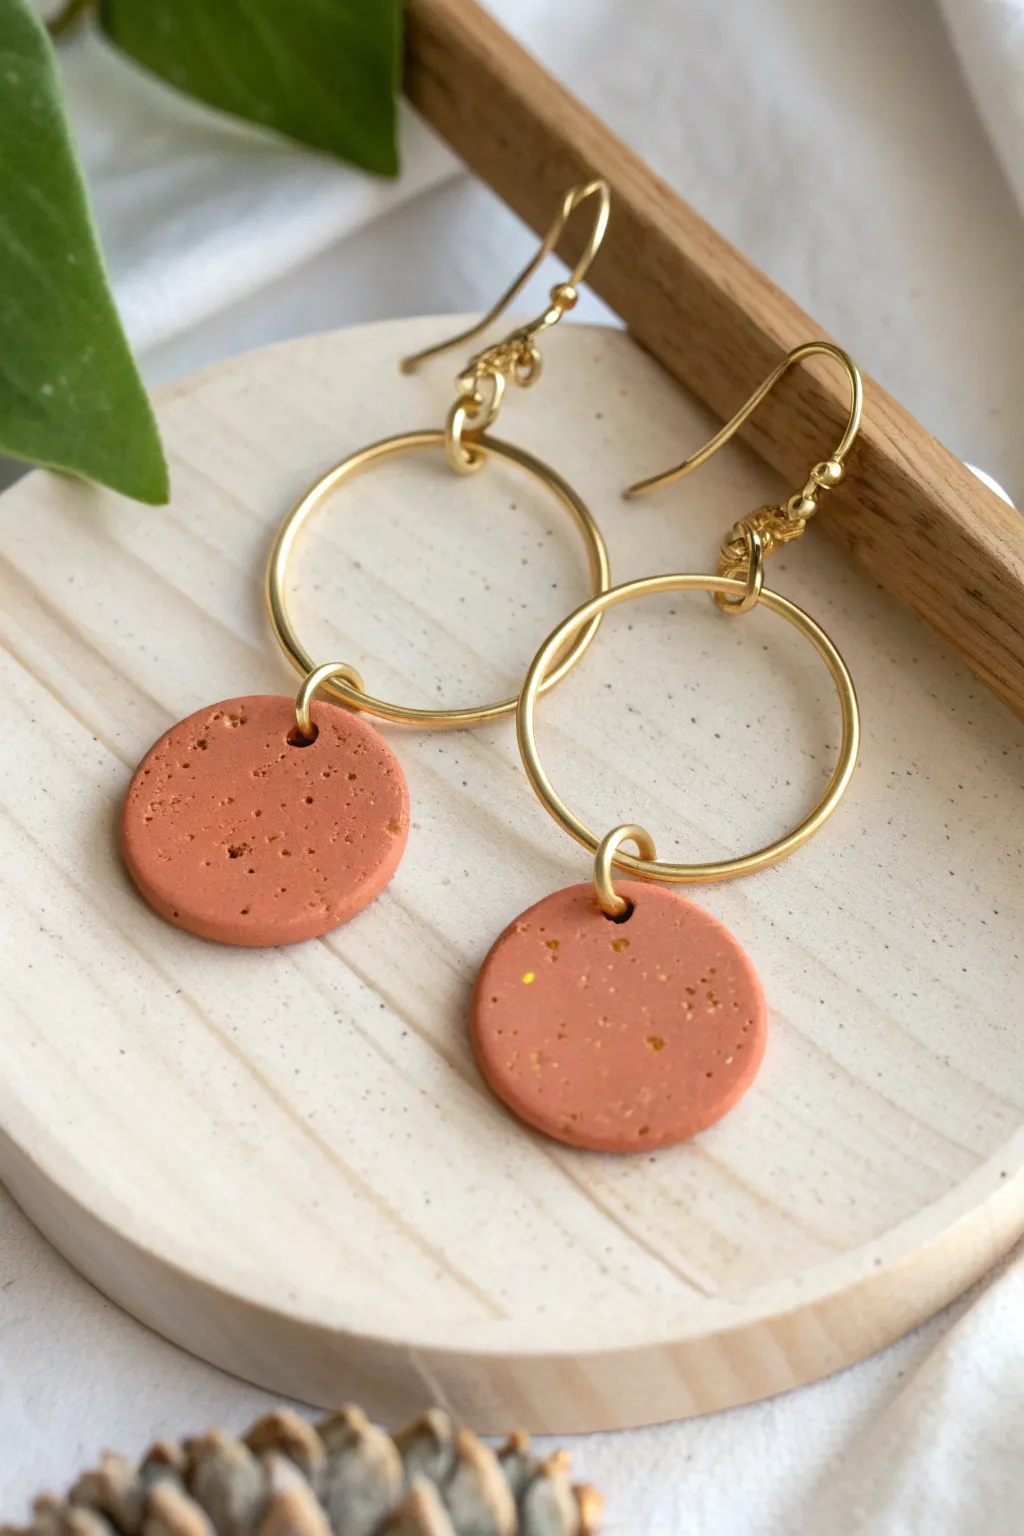
These minimalist earrings combine the warmth of terracotta with the elegance of gold hardware for a chic, bohemian look. The simple disc shape makes this a perfect beginner project, highlighting the beautiful texture and color of the clay itself.
Step-by-Step
Materials
- Terracotta or rust-colored polymer clay (like Premo or Fimo)
- Black pepper or dried coffee grounds (optional for texture)
- Small circle clay cutter (approx. 15mm-20mm)
- Clay roller or pasta machine
- Ceramic tile or baking sheet
- Parchment paper
- Two 25mm gold craft hoops (with top loops)
- Two gold earring hooks (French hook style)
- Four large gold jump rings (approx. 6mm-8mm)
- Two pairs of jewelry pliers
- Hand drill or pin vibe
- Fine grit sandpaper (optional)
Step 1: Preparing the Clay
-
Condition the clay:
Begin by warming the terracotta clay in your hands. Knead and fold it repeatedly until it is soft, pliable, and free of any air bubbles. -
Add texture (optional):
If your clay is solid color and you want that speckled stone look shown in the photo, sprinkle a tiny pinch of coarse black pepper or dried used coffee grounds into the clay. Knead it thoroughly to distribute the speckles evenly. -
Roll out a slab:
Using an acrylic roller or a pasta machine on a medium setting, roll the clay out into an even slab. Aim for a thickness of about 3mm—thick enough to be sturdy but light enough to dangle comfortably.
Clean Edges Trick
Before baking, dip your clay cutter into a little cornstarch or water. This acts as a release agent and prevents the clay from sticking, giving you much cleaner edges with less sanding needed later.
Step 2: Cutting and Baking
-
Cut the discs:
Place your small circle cutter onto the clay slab. Press down firmly and give it a little wiggle before lifting to ensure a clean cut. You will need two identical discs. -
Smooth the edges:
Gently lift the raw clay discs and use your fingertip to lightly smooth any sharp edges created by the cutter. I like to tap the sides gently to round them off just a bit for a more finished look. -
Create holes:
Before baking, use a toothpick or a small needle tool to pierce a hole near the top edge of each disc. Ensure the hole is large enough to fit your thick jump rings. -
Bake the pieces:
Arrange your discs on a ceramic tile or baking sheet lined with parchment paper. Bake according to your specific clay manufacturer’s instructions—usually around 275°F (135°C) for 30 minutes. -
Cool down:
Once the timer goes off, turn off the oven but leave the door slightly ajar. Let the clay cool completely inside the oven or on the counter before handling to prevent warping.
Level Up: Gold Leaf
Before baking, press tiny flakes of gold leaf onto the raw clay surface. The metallic flecks will catch the light and perfectly coordinate with the gold hardware hooks.
Step 3: Assembly
-
Inspect the holes:
Check the holes you made earlier. If they shrunk during baking, use a small hand drill or pin vise to carefully widen them so the jump rings move freely. -
Open the jump rings:
Using two pairs of pliers, grip a large gold jump ring on either side of the split. Twist one hand away from you and the other towards you to open the ring without distorting its circle shape. -
Connect the clay to the hoop:
Slide the open jump ring through the hole in your terracotta disc. Then, loop the jump ring around the bottom wire of the sleek gold hoop component. -
Close the ring:
Use your pliers to twist the jump ring back into a closed position, ensuring the ends meet perfectly flush so the charm doesn’t slip off. -
Attach the ear wire:
Open the small loop at the bottom of your fishhook ear wire using the same twisting motion. Slide it onto the top loop of the gold hoop component. -
Final secure:
Close the ear wire loop securely. Repeat the entire assembly process for the second earring.
Wear your new creations with a casual updo to really show off that classic geometric shape
Textured Line Earrings With Ribbed Stripes
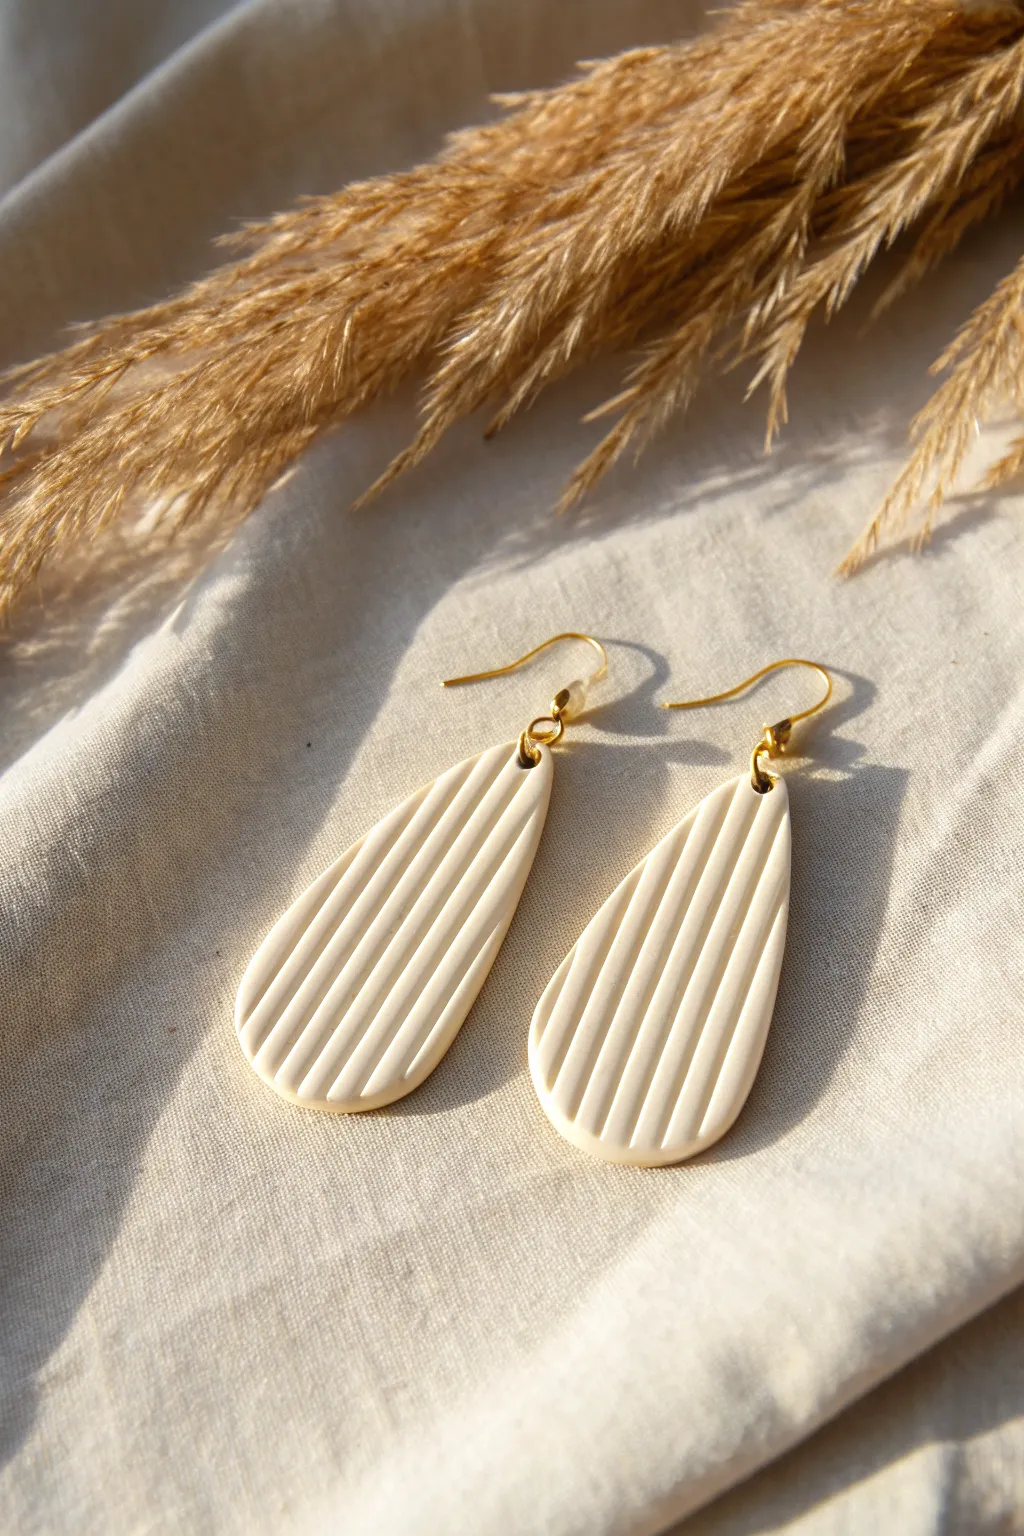
Embrace minimalist elegance with these vertically ribbed teardrop earrings. The clean lines and soft cream hue create a sophisticated texture that mimics high-end ceramic jewelry, perfect for elevating a casual linen outfit.
How-To Guide
Materials
- Polymer clay (white mixed with a tiny bit of yellow/brown for cream, or pre-colored beige)
- Acrylic rolling pin or pasta machine
- Teardrop shape clay cutter (medium to large)
- Texture sheet with vertical lines OR a rigid blade/clay sculpting tool for manual lines
- Cornstarch or baby powder (as a release agent)
- Ceramic tile or glass work surface
- Hand drill or needle tool
- 400-1000 grit sandpaper (optional)
- Gold earring hooks
- Gold jump rings (6mm or 7mm)
- Jewelry pliers (flat nose and round nose)
- Oven thermometer
Step 1: Preparing the Clay Slab
-
Condition the Clay:
Start by warming the polymer clay in your hands, kneading it thoroughly until it is soft, pliable, and free of air bubbles. For that perfect creamy beige shown in the photo, I like to mix white clay with just a pinhead amount of translucent and yellow ochre. -
Roll the Slab:
Using your acrylic roller or pasta machine on a medium setting (approx. 3mm thick), roll the clay into a smooth, even sheet. Ensure the thickness is consistent, as this prevents warping in the oven. -
Anchor the Clay:
Place your rolled slab onto your ceramic tile or working glass. Gently press it down so it adheres slightly; this prevents the clay from lifting up when you apply the texture in the next phase.
Step 2: Texturing and Cutting
-
Apply Release Agent:
Lightly dust the surface of your clay with a small amount of cornstarch or baby powder. This step is crucial to prevent your texture tool from sticking and dragging the clay. -
Create the Ribbed Texture:
If using a ribbed texture sheet, press it firmly and evenly into the clay slab. If creating the lines manually (which gives that organic look), use the dull side of a rigid blade or a sculpting tool to press parallel indentations vertically down the slab. Aim for deep, distinct grooves. -
Position the Cutter:
Take your teardrop cutter and hover over the textured slab. Align the cutter so the ribbed lines run perfectly vertical from the tip of the teardrop to the base. -
Cut the Shapes:
Press the cutter firmly down through the clay. Wiggle it very slightly before lifting to ensure a clean separation. Cut out two identical teardrop shapes. -
Smooth the Edges:
Gently lift the excess clay away from your cut shapes. Using your fingertip dipped in a little cornstarch, very gently smooth the cut edges of the teardrops to remove any sharp overhangs without distorting the ribbed pattern. -
Pierce the Hole:
Use a needle tool or toothpick to create a hole at the very top point of the teardrop. Make sure the hole is large enough for your jump ring but not so close to the edge that it creates a weak spot.
Uneven Lines?
If manually texturing, use a ruler simply as a visual guide next to your blade, but don’t press the ruler into the clay itself to avoid unwanted marks.
Step 3: Baking and Assembly
-
Bake:
Place the tile with your clay pieces directly into a preheated oven. Bake according to the manufacturer’s instructions for your specific brand of clay (usually 275°F/130°C for 30 minutes). Use an oven thermometer to ensure accuracy. -
Cool Down:
Once baked, turn off the oven and let the pieces cool partially inside to prevent thermal shock. Remove and let them reach room temperature completely before handling. -
Sand (Optional):
If there are any rough spots on the sides or back, lightly wet-sand them with high-grit sandpaper. Avoid sanding the textured front face to preserve the crisp ribbing. -
Open the Jump Ring:
Using two pairs of pliers, grip a gold jump ring. Twist one hand away from you and the other toward you to open the ring sideways (never pull it apart outwards). -
Connect Earring Hook:
Slide the open jump ring through the hole in the clay piece, and then thread on the loop of the gold earring hook. Ensure the hook is facing the correct direction so the textured side faces forward. -
Close the Ring:
Using your pliers, twist the jump ring back into a closed position until the ends meet perfectly with a satisfying click. -
Final Check:
Repeat the assembly for the second earring and double-check that both hooks are secure and facing the right way.
Straight Cutters
Dip your teardrop cutter into cornstarch before cutting. This helps the clay release instantly from the metal, keeping your ribbed edges sharp and undistorted.
You now have a chic pair of textured statement earrings that rival anything found in a boutique shop

TRACK YOUR CERAMIC JOURNEY
Capture glaze tests, firing details, and creative progress—all in one simple printable. Make your projects easier to repeat and improve.
Leaf-Imprint Botanical Dangles

Capture the delicate beauty of nature with these sophisticated leaf-shaped earrings featuring subtle veining and a smooth, stone-like finish. The design alternates between a creamy porcelain white and a soft sage green, perfect for an understated earth-tone aesthetic.
Detailed Instructions
Materials
- White polymer clay
- Green polymer clay (sage or olive tone)
- Leaf-shaped clay cutter (medium size)
- Acrylic roller
- Texture sheet with leaf veining or a needle tool/X-Acto knife
- Cornstarch or baby powder (release agent)
- Gold acrylic paint (for the edges)
- Small detail paintbrush
- 2 Gold earring hooks (fishhook style)
- 4 Gold jump rings (roughly 4-6mm)
- Needle nose pliers
- Hand drill or large needle (for piercing holes)
- Oven and baking sheet
- Fine-grit sandpaper (optional)
- Gloss or matte varnish (optional)
Step 1: Clay Preparation & Shaping
-
Condition the white clay:
Start by warming the white polymer clay in your hands, kneading it until it is soft, pliable, and free of any air bubbles. -
Roll the slab:
Using your acrylic roller, flatten the white clay into an even slab. Aim for a thickness of about 3mm—thick enough to be sturdy but light enough for comfortable wear. -
Apply texture:
If you have a leaf-vein texture sheet or stamp, lightly dust the clay with cornstarch to prevent sticking, then press the texture firmly into the slab. Alternatively, you can hand-draw the veins later. -
Cut the shape:
Firmly press your leaf-shaped cutter into the textured white clay. Wiggle it slightly to ensure a clean cut, then lift the cutter away. -
Repeat for green clay:
Clean your roller and work surface, then repeat the conditioning, rolling, and cutting process with your sage green clay to create the second earring. -
Detailing the veins:
If you are hand-carving textures instead of stamping, use a needle tool or the back of an X-Acto knife now to gently score a central vein line and branching diagonal veins. Don’t cut all the way through; just create indentations. -
Softening edges:
Gently rub the edges of your raw clay leaves with your finger to smooth out any sharp ridges left by the cutter. -
Piercing the hole:
Use a needle tool or toothpick to poke a small hole at the top of each leaf stem. Make sure the hole is large enough for your jump rings.
Sticky Situation?
If clay sticks to your texture mat or cutter, dust the clay surface lightly with cornstarch or dip your cutter in water before pressing down.
Step 2: Baking & Finishing
-
Baking:
Place your clay leaves on a parchment-lined baking sheet. Bake according to your brand’s package instructions (usually around 275°F or 130°C for 15-30 minutes). -
Cooling down:
Allow the clay to cool completely inside the oven or on a wire rack before handling, as hot clay is fragile. -
Sanding imperfections:
Once cool, inspect the edges. If there are any rough spots, gently buff them away with fine-grit sandpaper for a professional finish. -
Painting the edges:
Dip a fine detail brush into gold acrylic paint. Carefully paint closely along the rim of the leaf, adding a metallic border that frames the shape beautifully. -
Adding metallic wash (optional):
For an antique look, I sometimes dilute a tiny drop of brown paint and brush it into the deep vein grooves, quickly wiping the surface clean so the color stays only in the crevices. -
Sealing:
If you want extra durability or shine, apply a thin layer of matte or gloss varnish to the clay surface and let it dry completely.
Natural Texture
Instead of a generic tool, press a real leaf with prominent veins (like sage or hydrangeas) into the clay to create an authentic organic imprint.
Step 3: Assembly
-
Opening jump rings:
Use your pliers to twist a jump ring open. Always twist the ends away from each other (like opening a gate) rather than pulling them apart, to maintain the circle shape. -
Attaching components:
Slide the open jump ring through the hole in your clay leaf, then loop the earring hook onto the ring. -
Closing the loop:
Use the pliers to twist the jump ring back into a closed position, ensuring the gap is tight so the hook doesn’t slip out. -
Final check:
Repeat for the second earring and double-check that both fasteners are secure and facing the correct direction.
Now you have a stunning, nature-inspired accessory ready to wear or gift to a plant-loving friend
Negative-Space Cutout Arches
These lightweight earrings combine earthy terracotta tones with a modern, elongated arch shape for a look that is both organic and architectural. The subtle speckling adds texture and depth, making them look like polished stone while retaining the comfort of polymer clay.
Step-by-Step Guide
Materials
- Terracotta or warm reddish-brown polymer clay
- Translucent polymer clay
- Coarse black pepper or dried ground coffee (for speckling)
- Small round clay cutter (approx. 8mm)
- U-shaped arch cutter (elongated/tall style)
- Acrylic rolling pin
- Pasta machine (optional)
- Hand drill or pin vibe
- Jump rings (gold finish)
- Earring hooks (gold finish)
- Jewelry pliers
- Baking sheet
- Cardstock or parchment paper
Step 1: Clay Preparation
-
Conditioning the clay:
Start by warming the terracotta clay in your hands to make it pliable. Roll and fold it repeatedly until it is soft and conditioned. -
Creating the speckled effect:
To achieve the stone-like texture, mix a small pinch of coarse black pepper or dried coffee grounds into your conditioned clay. Fold the clay over the granules and knead until they are evenly distributed. -
Lightening the tone (optional):
If your main color feels too dense, mix in a very small amount of translucent clay. This helps mimic the slight depth found in natural stone. -
Rolling out the slab:
Roll your clay out into an even slab, aiming for a thickness of about 3mm. A pasta machine on a medium setting works best for uniformity, but careful use of an acrylic roller works too.
Step 2: Cutting and Shaping
-
Cutting the main arches:
Press your tall, elongated U-shaped cutter firmly into the clay slab. Wiggle it very slightly to separate the clay from the cutting surface before lifting. -
Cutting the connector studs:
Use the small round cutter to punch out two circles from the same slab. These will serve as the top connector pieces that sit against the earlobe. -
Refining edges:
Gently smooth the cut edges with your fingertip to remove any sharp ridges left by the cutters. You can dips your finger in a little cornstarch to prevent fingerprints. -
Making the holes:
Using a needle tool or toothpick, carefully poke a hole at the very top center of each arch and at the bottom center of each round stud. Ensure the hole is large enough for your jump rings.
Clean Cuts Pro Tip
Place a piece of cling film (plastic wrap) over your clay slab before cutting shapes. This creates a lovely beveled, rounded edge so you have less sanding to do later.
Step 3: Baking and Assembly
-
Baking:
Place your clay pieces on a baking sheet lined with parchment paper or cardstock. Bake according to your specific brand’s instructions (usually 275°F/135°C for 30 minutes). -
Cooling:
Let the pieces cool completely on the baking sheet. Moving them while warm can warp the shape. -
Sanding (optional):
If there are any rough spots on the edges, lightly sand them with fine-grit sandpaper under running water for a polished finish. -
Opening the jump rings:
Use two pairs of pliers to twist a jump ring open. Always twist clear ends away from each other (forward/backward) rather than pulling them apart, to maintain the circle shape. -
Connecting the pieces:
Thread the open jump ring through the hole in the main arch and the hole in the round stud. Close the jump ring securely using the twisting motion. -
Attaching the ear wire:
Open the loop on your earring hook. Thread it through the top hole of the round stud piece (making sure the front of the earring faces the right way). -
Final check:
Close the ear wire loop securely. Give the earrings a gentle shake to ensure all connections are tight and the movement is fluid.
Troubleshooting Bubbles
If you see air bubbles after baking, don’t panic. Use a craft knife to shave the bubble off, fill it with a tiny bit of liquid clay, and re-bake for 5-10 minutes.
Once assembled, these beautiful terracotta arches are ready to add a warm, artistic touch to your daily wardrobe
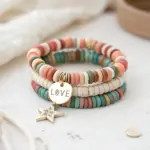
Dainty Charm Clusters With Tiny Clay Shapes
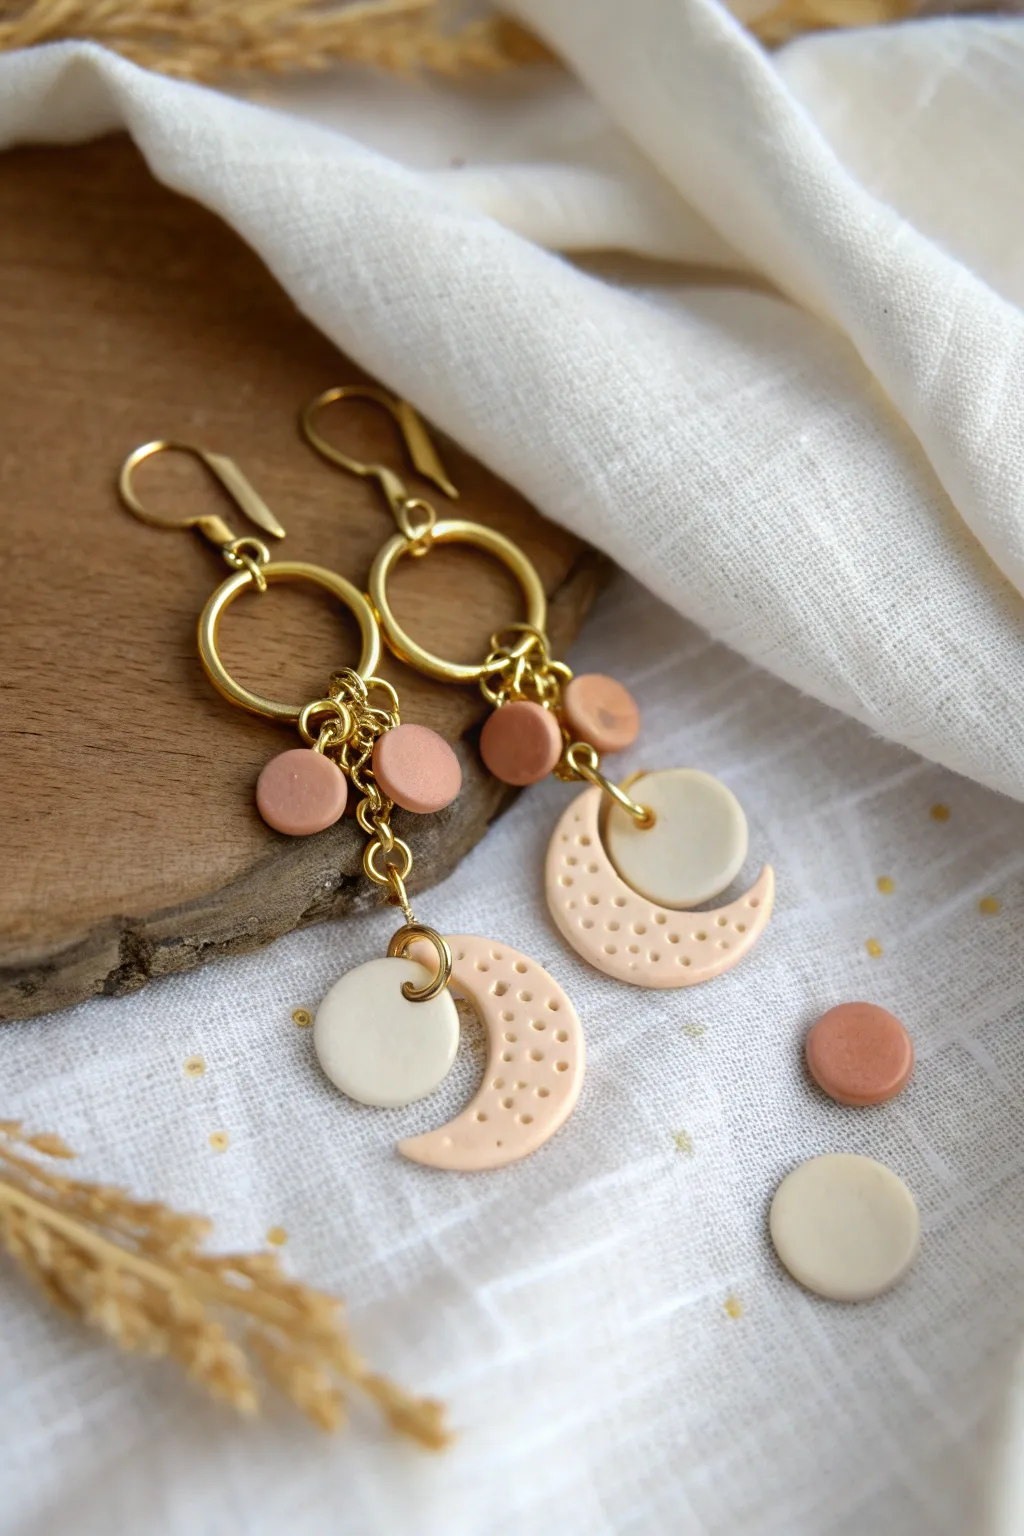
These delightfully dainty earrings combine celestial motifs with warm, earthy tones for a sophisticated bohemian look. The cluster of tiny clay charms dangling from gold hoops creates movement and texture that pairs perfectly with casual or dressy styles.
How-To Guide
Materials
- Polymer clay in terracotta (dark peach), cream, and light peach
- Gold-tone earring hooks (french wires)
- 2 large gold jump rings or connector hoops (approx. 20-25mm)
- Gold-tone chain (small link)
- Small gold jump rings (4-6mm)
- Clay roller or pasta machine
- Small circle cutters (approx. 5-7mm)
- Moon cutter or small oval cutter to modify
- Needle tool or toothpick
- Pliers (round nose and flat nose)
- Baking sheet and parchment paper
- Oven
Step 1: Shaping the Clay Elements
-
Condition the clay:
Begin by kneading your three colors of polymer clay separately until they are soft, pliable, and free of air bubbles. Clean your hands or tools between colors to avoid staining the lighter shades. -
Roll out slabs:
Roll each color into a thin, even sheet, approximately 2-3mm thick. I find using a pasta machine on a thick setting ensures everything is perfectly uniform which helps the earrings hang straight. -
Cut the circles:
Using your smallest circle cutter, punch out 4 circles from the terracotta clay and 2 circles from the cream clay. These will be the accent charms. -
Create the moons:
Use a moon-shaped cutter on the light peach clay to create two crescents. If you don’t have a specific cutter, you can cut a circle, then offset the cutter slightly and cut again to slice out a crescent shape. -
Add texture:
With the blunt end of a needle tool or a small dotting tool, gently press rows of tiny indentations into the surface of the peach moons. Don’t press all the way through; just create a surface pattern. -
Pierce holes:
Use a needle tool or toothpick to poke holes in all pieces. The circles need holes near the edge. The moons need a hole at the very top tip of the crescent. Ensure the holes are large enough for your jump rings.
Step 2: Baking and Assembly
-
Bake the pieces:
Arrange your clay pieces on a parchment-lined baking sheet. Bake according to your specific clay brand’s instructions (usually 275°F/135°C for 15-30 minutes). Let them cool completely before handling. -
Prepare the chains:
Cut four short lengths of gold chain using your wire cutters. You’ll need two slightly shorter pieces (approx. 0.5 inch) and two slightly longer pieces (approx. 0.75 inch) for a staggered look. -
Attach circle charms:
Using small jump rings, attach one terracotta circle to the end of each short chain segment. You will have four total chains with charms when finished. -
Prepare the main focal point:
Open a small jump ring and thread it through the hole in the textured moon and the hole in the cream circle. Connect these directly to the bottom of the longest piece of chain so they dangle together. -
Assemble the cluster:
Open the large 25mm gold hoop connector. Slide on the chains in a balanced pattern: short terracotta chain, long moon/cream chain, short terracotta chain. This creates the cluster effect. -
Secure the jump rings:
Use two pairs of pliers to twist the large connector ring closed, ensuring the seam is tight so the fine chains don’t slip out. -
Add the ear wire:
Open the loop on your earring hook. Attach it to the top of the large gold hoop connector. Ensure the hook faces the correct direction so the textured side of the moon faces forward. -
Repeat for the second earring:
Follow the same assembly steps for the second earring, ensuring your chain lengths match the first one for symmetry.
Uneven Dots?
If your texture dots look messy, try wrapping your needle tool in a thin layer of cling film before pressing. This softens the edges for a smoother look.
Drilling Tip
For cleaner holes, bake the pieces without holes first, then use a small hand drill or pin vise to drill them after baking. This prevents distortion.
Now you have a stunning set of textured, dangling earrings ready to wear or gift.
Faux Stone Looks Like Granite and Quartz

Achieve the sophisticated look of polished river stones without the heavy weight using polymer clay. These earrings combine a speckled granite effect with a translucent, swirled quartz look for an elegant, earthy accessory.
Step-by-Step
Materials
- White polymer clay
- Translucent polymer clay
- Black acrylic paint
- Gold leaf flakes or gold paint (optional)
- Black pepper (coarse and fine ground)
- Dried oregano or tea leaves (optional for green speckles)
- Clay roller or pasta machine
- Circle clay cutter (approx. 15mm)
- Teardrop clay cutter (approx. 30mm)
- Hand drill or needle tool
- Sandpaper (various grits from 400 to 1000)
- UV resin or glossy polyurethane varnish
- 4 Gold jump rings
- 2 Gold fishhook earring wires
- Jewelry pliers
- Ceramic tile for baking
Step 1: Mixing the Faux Granite
-
Prepare the Base:
Start by conditioning a block of white polymer clay until it is soft and malleable. Flatten it into a pancake shape. -
Add Texture Elements:
Sprinkle a generous pinch of coarse black pepper onto the clay. For more dimension, I like to add a tiny pinch of dried herbs or fine black glitter to mimic natural mineral inclusions. -
Incorporate the ‘Inclusions’:
Fold the clay over the spices and roll it out. Repeat this folding and rolling process until the speckles are evenly distributed throughout the white base. -
Create the Quartz Variant:
For the second stone look, mix equal parts translucent clay with white clay. Add a very small amount of gold leaf flakes or a tiny smear of gold paint. -
Marbling Effect:
Twist the translucent mixture just enough to create streaks—don’t overmix, or you’ll lose the vein-like marble effect.
Pepper Burning?
If your black pepper inclusions are burning or browning during baking, tent your tray with aluminum foil or lower the oven temp by 10 degrees and bake longer.
Step 2: Cutting and Baking
-
Roll out the Slabs:
Roll both your granite and quartz mixtures to a uniform thickness, roughly 3mm or setting 1 on most pasta machines. -
Cut the Circles:
Using your circle cutter, punch out two pieces from the granite mixture. These will form the top connector pieces. -
Cut the Teardrops:
Use the teardrop cutter to punch out two shapes. You can make both from the sparkly quartz mix, or mix and match like the image (one granite teardrop, one quartz teardrop) for an asymmetrical look. -
Smooth the Edges:
Gently rub your finger along the cut edges of the raw clay to smooth out any sharp ridges left by the cutters. -
Create Holes:
Use a needle tool to pierce a hole near the top of the teardrops and near the bottom edge of the circles. If using circles as studs, you don’t need a top hole; if they are dangles, add a top hole. -
Bake:
Place pieces on a ceramic tile and bake according to your clay package instructions (usually 275°F/135°C for 30 minutes). Let them cool completely.
Level Up: Geode Crack
Before baking, slice a jagged line through the teardrop and fill the gap with liquid clay mixed with gold glitter for a stunning ‘gold vein’ geode effect.
Step 3: Finishing and Assembly
-
Sanding:
Once cool, wet sand the edges and surfaces starting with 400 grit sandpaper and working up to 1000 grit for a silky smooth finish. -
Buffing:
Rub the pieces vigorously with a soft denim cloth or a buffing wheel to bring out a natural stone sheen. -
Sealing (Optional):
For a wet-stone look, apply a thin layer of UV resin or gloss varnish. Cure or dry completely. This makes the translucency pop. -
Connect Components:
Using two pairs of pliers, twist open a jump ring. Thread it through the top hole of a teardrop and the bottom hole of a circle piece, then close the ring securely. -
Attach Ear Wires:
Open the loop on your fishhook ear wire. Slide it onto the top hole of the circle component (or use a second jump ring if needed for orientation) and close the loop. -
Final Check:
Double-check that all jump rings are fully closed so your faux stones don’t slip off while wearing.
Now you have a stunning set of nature-inspired earrings that look heavy but feel light as air
Soft Ombre Gradient Tabs
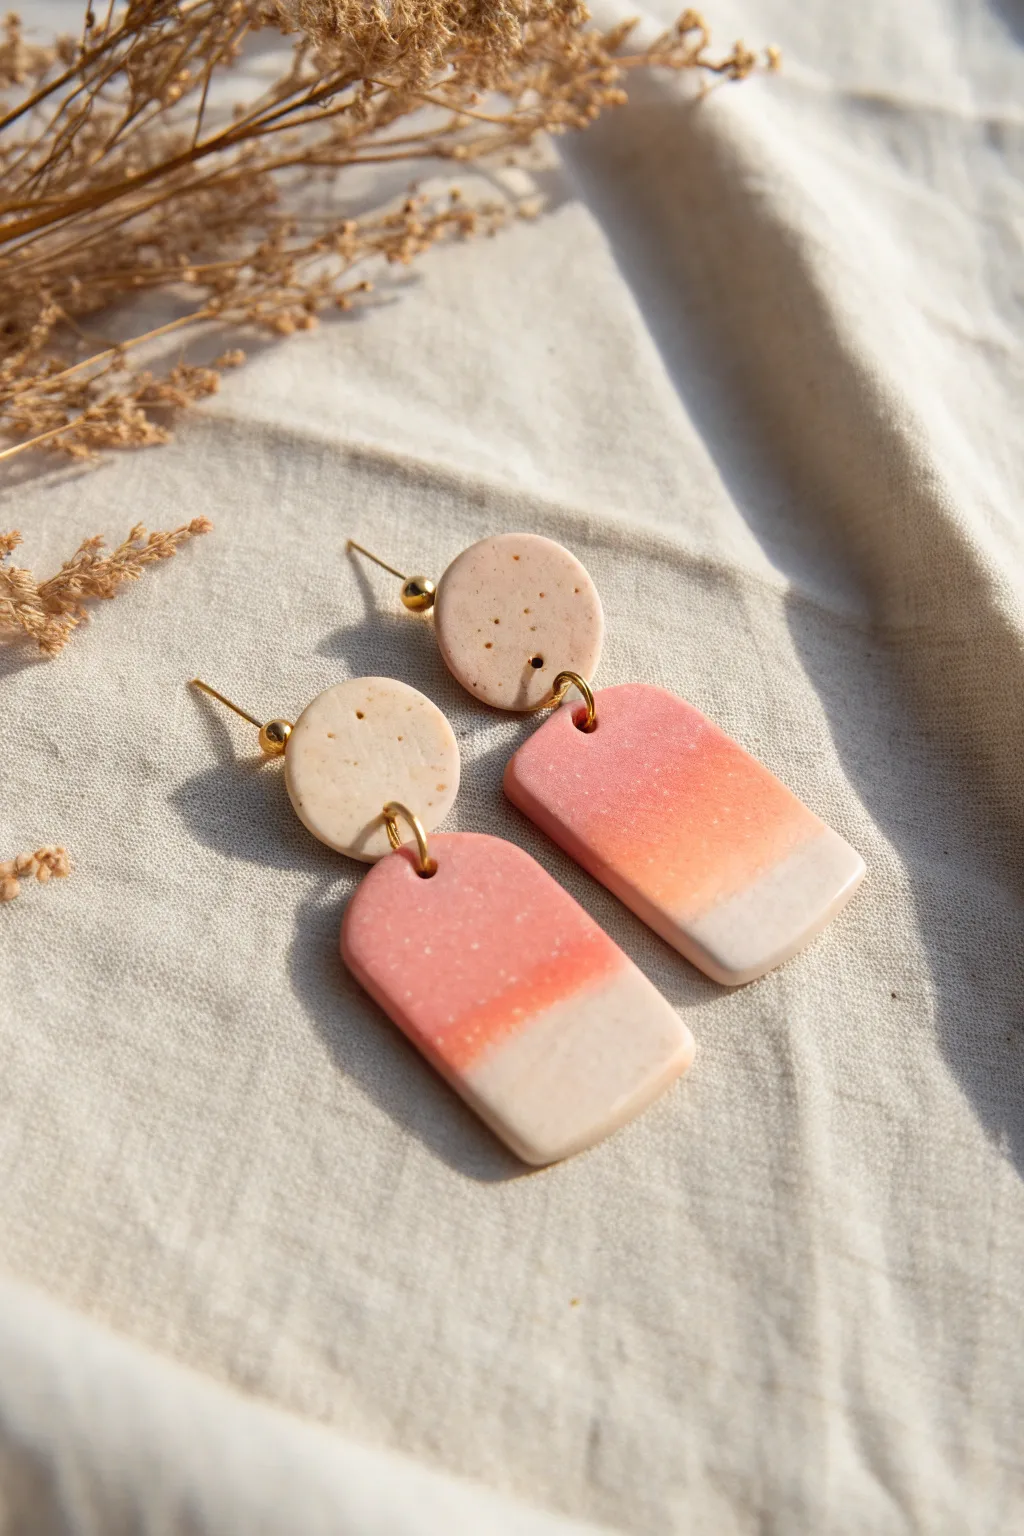
Capture the soft hues of a fading sunset with these elegant polymer clay earrings. The smooth gradient transitions from a warm coral pink to a creamy white, accented by a subtle speckled texture for an organic, modern finish.
Step-by-Step Tutorial
Materials
- Polymer clay (coral/salmon pink)
- Polymer clay (white or cream)
- Polymer clay (translucent or granite effect for speckling)
- Acrylic rolling pin or pasta machine
- Tissue blade or sharp clay knife
- Small circle cutter (approx. 10mm)
- Rectangle arch or tab cutter (approx. 20mm x 30mm)
- Two gold ball-post stud findings
- Four gold jump rings (4-6mm)
- Two pairs of jewelry pliers
- Hand drill or pin vibe with small bit
- Fine grit sandpaper (400-1000 grit)
- Ceramic tile or baking sheet
- Oven
Step 1: Creating the Ombre Blend
-
Condition the Clay:
Begin by thoroughly conditioning your pink and white clays separately until they are soft and pliable. I also like to mix a tiny pinch of black pepper or granite-effect clay into both colors to achieve that subtle speckled look seen in the photo. -
Prepare Triangles:
Roll both colors into sheets of equal thickness. Cut a right-angled triangle from the pink clay and an identical triangle from the white clay. -
Form a Rectangle:
Fit the two triangles together to form a rectangle, pressing the diagonal seam gently so they stick together. -
The Skinner Blend Fold:
Fold the rectangle in half, bottom to top, so the colors match up (pink on pink, white on white). Pass this through your pasta machine on the widest setting. -
Repeat and Refine:
Fold the clay again in the same direction—always color to color—and pass it through the machine. Repeat this process about 15-20 times. You will see the center line blur into a smooth gradient. -
Sheet the Gradient:
Once the transition is seamless, verify the sheet thickness is around 3mm. Lay it flat on your work tile to prevent distortion when cutting.
Step 2: Cutting and Baking
-
Cut the Base Rectangle:
Using your rectangular cutter, position it over the gradient so the darkest pink is at the top and the white is at the bottom. Press down firmly to cut two identical shapes. -
Smooth the Edges:
Before lifting the cutter away, gently rub your finger over the top edge of the clay to smooth it slightly; this saves sanding time later. -
Cut the Top Studs:
For the circular tops, you can use the leftover gradient or plain cream clay derived from the lighter end of your blend. Cut two circles using your small round cutter. -
Texture Check:
Inspect the surface for any lint or fingerprints. If necessary, gently wipe the surface with a bit of baby oil or acetone on a cotton swab. -
Piercing Holes:
Using a needle tool or toothpick, create a hole near the top center of each rectangle and the bottom center of each circle. Ensure the hole is large enough for your jump rings. -
Baking:
Bake the pieces according to your specific clay brand’s instructions (usually 275°F/135°C depending on brand). I recommend tenting them with foil to prevent scorching the white sections.
Gradient Not Blending?
If your gradient looks striped rather than smooth, you likely haven’t folded and rolled enough times. Keep going! It often takes 20+ passes to get a perfect blur.
Step 3: Finishing Assembly
-
Sanding:
Once cooled, wet sand the edges of your pieces with fine-grit sandpaper to remove any sharp burrs or imperfections. -
Drilling (Optional):
If your pre-baking holes closed up slightly, re-drill them carefully using a hand drill. -
Attaching Jump Rings:
Open a jump ring by twisting it sideways with two pliers. Thread it through the hole in the rectangular piece and the corresponding hole in the circular stud piece. -
Closing:
Close the jump ring securely by twisting it back into place, ensuring the gap is completely shut so the pieces don’t slip out. -
Glue the Posts:
Turn the circular studs over. Apply a strong jewelry glue (like E6000 or super glue gel) to the flat pad of your earring post and press it firmly onto the back of the clay circle. -
Final Set:
Allow the glue to cure fully (usually 24 hours for best strength) before wearing your new creation.
Clean Edges Trick
Place a sheet of plastic cling wrap over the clay before pressing your cutters down. This creates a deeply rounded, ‘domed’ edge that looks professional and needs less sanding.
Now you have a stunning pair of earrings that look like a capture of the evening sky, ready to wear or gift.
Stamped Pattern Earrings With a Painted Highlight

These stunning arch earrings combine a deep midnight blue with elegant gold detailing for a look that is both modern and bohemian. The intricate line work mimics the rays of a sun or the veins of a leaf, creating a sophisticated accessory perfect for any occasion.
How-To Guide
Materials
- Navy blue polymer clay
- Gold acrylic paint or gold mica powder paste
- U-shaped or arch clay cutters (approx. 1.5 – 2 inches)
- Acrylic rolling pin
- Depth guides or playing cards (approx. 3mm thickness)
- Fine detail paintbrush (size 0 or 00)
- Needle tool or sharp X-Acto knife
- Texture sheet or fine carving tool (optional for indented lines)
- Clay oven or toaster oven
- Jewelry drill or hand drill (1mm bit)
- 4 Gold jump rings (5-6mm)
- 2 Gold fishhook ear wires
- Piece of parchment paper or ceramic tile
Step 1: Preparing the Clay Base
-
Condition the Clay:
Start by warming the navy blue polymer clay in your hands. Knead and roll it repeatedly until it is soft, pliable, and free of air bubbles. Properly conditioned clay is less likely to crack during baking. -
Roll to Thickness:
Place your clay on a flat working surface like a ceramic tile. Use your acrylic roller and depth guides to roll the clay into a smooth slab that is roughly 3mm thick. -
Cut the shapes:
Press your U-shaped cutter firmly into the clay slab. Wiggle it slightly to ensure a clean cut, then lift. Repeat this to create the second earring shape. -
Smooth the Edges:
Gently lift your cut shapes. Dip your finger in a tiny bit of water or cornstarch and rub the edges of the clay to smooth out any rough spots or fingerprints left by the cutter.
Clean Lines Hack
Use ‘sgraffito’ style: Bake the blue clay first, paint the surface gold, let it dry, then scratch the design through the paint to reveal the blue underneath.
Step 2: Creating the Design
-
Plan the Pattern:
The design features a central curved line following the arch, with radiating lines (like sun rays) on the top curve and fern-like patterns on the legs. Lightly sketch this with a needle tool if you aren’t confident freehanding. -
Carve the Lines:
Using a needle tool or a very sharp, fine carving tool, gently etch the design into the raw clay. You want to create shallow grooves for the paint to sit in later, not cut all the way through. -
Clean the Surface:
If carving created any tiny burrs or crumbs of clay along the lines, gently brush them away with a soft brush or smooth them down carefully with your finger. -
Create Hole for Hardware:
Use a needle tool or small straw to poke a hole at the very top center of the arch. Ensure the hole is large enough for your jump ring but not too close to the edge.
Make it Sparkle
Dust the raw clay lightly with gold mica powder before carving the lines. The powder will stick to surface but the carved lines will be dark—an inverted effect!
Step 3: Baking and Painting
-
Bake the Pieces:
Transfer your clay pieces on a tile or parchment-lined tray to the oven. Bake according to the manufacturer’s instructions for your specific brand of clay (usually 275°F/135°C for 30 minutes). -
Cool Down:
Once baked, turn off the oven and let the pieces cool completely before handling. I usually leave the oven door slightly ajar to let them cool slowly. -
Apply Gold Paint:
Dip your fine detail brush into the gold acrylic paint. Carefully paint along the grooves you carved earlier. Alternatively, cover the area with paint and quickly wipe the surface with a damp cloth, leaving paint only in the recesses. -
Touch Ups:
If any gold paint strayed outside the lines, use a cotton swab dipped in rubbing alcohol or water to clean up the edges for a precise finish. -
Seal (Optional):
If you want extra durability for the paint, apply a very thin layer of matte or satin glaze over the surface, though unglazed clay has a beautiful natural texture.
Step 4: Assembly
-
Open Jump Rings:
Using two pairs of jewelry pliers, twist (don’t pull) your jump rings open. -
Attach Hardware:
Slide the open jump ring through the hole you made in the clay arch. Before closing it, add the loop of the fishhook ear wire. -
Close and Secure:
Twist the jump ring closed so the gap is perfectly flush. Repeat for the second earring.
Wear your navy and gold creations proudly as a sophisticated statement piece for your next outing
Air-Dry Clay Earrings With a Chalky, Rustic Look
These lightweight drop earrings mimic the organic beauty of speckled river pebbles with a soft, chalky finish. The neutral cream tone and subtle black flecks create an earthy, minimalist accessory perfect for everyday wear.
Detailed Instructions
Materials
- White or cream-colored polymer clay (or air-dry clay)
- Black pepper or dried coffee grounds (for speckling)
- Clay rolling pin or acrylic roller
- Circle clay cutter (approx. 1cm)
- Teardrop clay cutter (approx. 3-4cm)
- Parchment paper or ceramic tile
- Hand drill or toothpick
- Fine-grit sandpaper (400 to 1000 grit)
- 4 Gold jump rings (5-6mm)
- 2 Flat-pad earring posts
- Jewelry adhesive (E6000 or strong super glue)
- Needle nose pliers
- Matte varnish (optional)
Step 1: Preparing the Clay Body
-
Condition the base:
Begin by taking a block of your white or cream clay and kneading it thoroughly in your hands. You want it warm and pliable so that it won’t crack when you shape it. -
Add the texture:
Flatten the clay slightly and sprinkle a small pinch of ground black pepper or dried coffee grounds into the center. Fold the clay over itself to trap the particles inside. -
Mix until uniform:
Continue kneading and folding the clay to distribute the ‘specks’ evenly throughout the batch. Stop when you have a random, organic distribution that resembles natural stone. -
Roll it out:
Place your clay on a sheet of parchment paper or a smooth tile. Using your roller, flatten the clay to an even thickness of about 3mm or 1/8 inch. I find using depth guides helpful here to keep the surface perfectly level.
Natural Speckle Hack
Don’t have pepper? You can shave little bits of black or brown baked clay into your raw white clay. It creates cleaner specks that won’t bleed color during baking.
Step 2: Cutting and Curing
-
Cut the top circles:
Use your small circle cutter to punch out two identical shapes. These will be the stud portion of the earring that sits on the lobe. -
Cut the teardrops:
Use the larger teardrop cutter for the bottom pieces. If you want a more organic feel like the photo, you can gently stretch or manipulate the teardrop shape with your fingers after cutting to make it slightly irregular. -
Smooth the edges:
Dip your finger in a tiny bit of water (for air-dry clay) or baby oil (for polymer clay) and gently run it along the cut edges of each piece to soften any sharp corners. -
Create holes:
Using a toothpick or a small needle tool, pierce a hole at the very top of each teardrop shape. Ensure the hole is large enough for your jump ring but not too close to the edge to prevent breakage. -
Pierce the studs:
Pierce a corresponding hole at the *bottom* of each circular piece. Wiggle the tool slightly to ensure a clean opening. -
Bake or Dry:
If using polymer clay, bake according to the package instructions (usually 275°F/135°C for 15-30 minutes). If using air-dry clay, let the pieces sit undisturbed in a cool, dry place for 24-48 hours until completely hard.
Make it Granite
Mix translucent clay into your white base (about a 1:1 ratio). When baked, this creates a stunning depth that looks just like real quartz or polished granite stone.
Step 3: Assembly and Finishing
-
Sand for smoothness:
Once fully cured and cooled, take your fine-grit sandpaper and buff the surfaces and edges. This step is crucial for achieving that ultra-smooth, matte stone look. -
Clean the dust:
Wipe the pieces down with a slightly damp cloth or a baby wipe to remove any sanding residue. Let them dry completely. -
Attach the posts:
Flip the circular stud pieces over to the back side. Apply a small dot of strong jewelry adhesive to the flat pad of the earring post and press it firmly onto the top half of the circle (avoiding the hole). -
Let the glue set:
Allow the glue to cure fully according to the manufacturer’s time, usually several hours, to ensure the post doesn’t pop off later. -
Open the jump rings:
Using two pairs of pliers, twist a gold jump ring open sideways (never pull it apart outward, as this weakens the metal geometry). -
Connect the pieces:
Loop the open jump ring through the hole in the teardrop and the hole in the circle stud. Close the ring securely by twisting it back into place until the ends meet perfectly. -
Optional matte seal:
If you want extra protection without adding shine, brush on a very thin layer of matte varnish, or simply leave the clay raw for a truly rustic texture.
Enjoy styling these versatile, minimalist earrings with your favorite casual outfits
Mismatched Pair Earrings That Still Feel Like a Set

These elegant polymer clay earrings combine warm terracotta tones with creamy, stone-like textures for a sophisticated accessory. The simple geometric shapes—a circle stud and a soft arch—create a balanced, modern look perfect for everyday wear.
Step-by-Step Tutorial
Materials
- Polymer clay (Terracotta/Burnt Orange)
- Polymer clay (White)
- Black pepper or dried coffee grounds (for speckling)
- Acrylic rolling pin
- Clay cutter: Small Circle (approx. 10-12mm)
- Clay cutter: Arch/U-shape (approx. 30mm height)
- Needle tool or toothpick
- 2 Gold jump rings (6mm or 8mm)
- 2 Gold earring hooks
- Jewelry pliers (flat nose and round nose)
- Parchment paper or ceramic tile (for baking)
- Fine grit sandpaper (optional)
Step 1: Preparing the Speckled Stone Clay
-
Condition the white clay:
Start by kneading the white polymer clay in your hands until it becomes soft, pliable, and easy to work with. -
Add texture materials:
To achieve that faux-stone look, sprinkle a very small pinch of ground black pepper or used loose coffee grounds onto the flattened white clay. -
Incorporate the speckles:
Fold the clay over the speckles and knead it thoroughly. Continue folding and rolling until the particles are evenly distributed throughout the white base. -
Roll out the slab:
Using your acrylic rolling pin, roll the speckled clay out on a smooth surface to an even thickness, aiming for about 3mm or 1/8 inch.
Step 2: Creating the Terracotta Components
-
Condition the orange clay:
Take a portion of your terracotta or burnt orange clay and condition it by kneading until smooth. -
Roll the second slab:
Roll this orange clay out separately. Try to match the thickness of your white slab so the finished earrings hang evenly.
Sticky Situation?
If your clay sticks to the table or cutter, lightly dust the surface with cornstarch or dip your cutters into water before pressing down.
Step 3: Cutting and Piercing
-
Cut the arches:
Press your U-shaped cutter firmly into the speckled white clay slab. Wiggle it slightly to ensure a clean cut, then lift. Cut two identical arches. -
Cut the circles:
Using the small circle cutter, punch out two circles from the terracotta clay slab. -
Smooth the edges:
Before baking, gently run your finger along the cut edges of all four pieces to smooth down any rough clay burrs. -
Pierce holes in the arches:
Use your needle tool to carefully poke a hole at the very top center of each U-shaped arch. Ensure the hole is large enough for your jump ring. -
Pierce holes in the circles:
You will need two holes in each terracotta circle: one at the very top (for the hook) and one at the very bottom (to connect to the arch).
Make it Shine
Gloss makes colors pop! Once baked and cooled, coat the terracotta circles with a thin layer of UV resin or water-based polyurethane varnish.
Step 4: Baking and Assembly
-
Bake the pieces:
Place your clay shapes on a ceramic tile or baking sheet lined with parchment paper. Bake according to your specific clay brand’s package instructions (usually around 275°F/135°C for 15–30 minutes). -
Cool down:
Allow the pieces to cool completely before handling them. I always let them sit for at least an hour to ensure they harden fully. -
Open the jump rings:
Using two pairs of pliers, twist a jump ring open sideways (never pull it apart outwards). -
Connect the shapes:
Thread the open jump ring through the top hole of the speckled arch and the bottom hole of the terracotta circle. Close the ring securely. -
Attach the hooks:
Open the loop at the bottom of your earring hook using your pliers. Slide it through the top hole of the terracotta circle. -
Secure the hook:
Close the hook loop tightly with your pliers. Repeat the assembly process for the second earring.
Enjoy wearing your handcrafted, earth-toned dangles with your favorite neutral outfit
3D Ruffle and Wavy Edge Statement Dangles
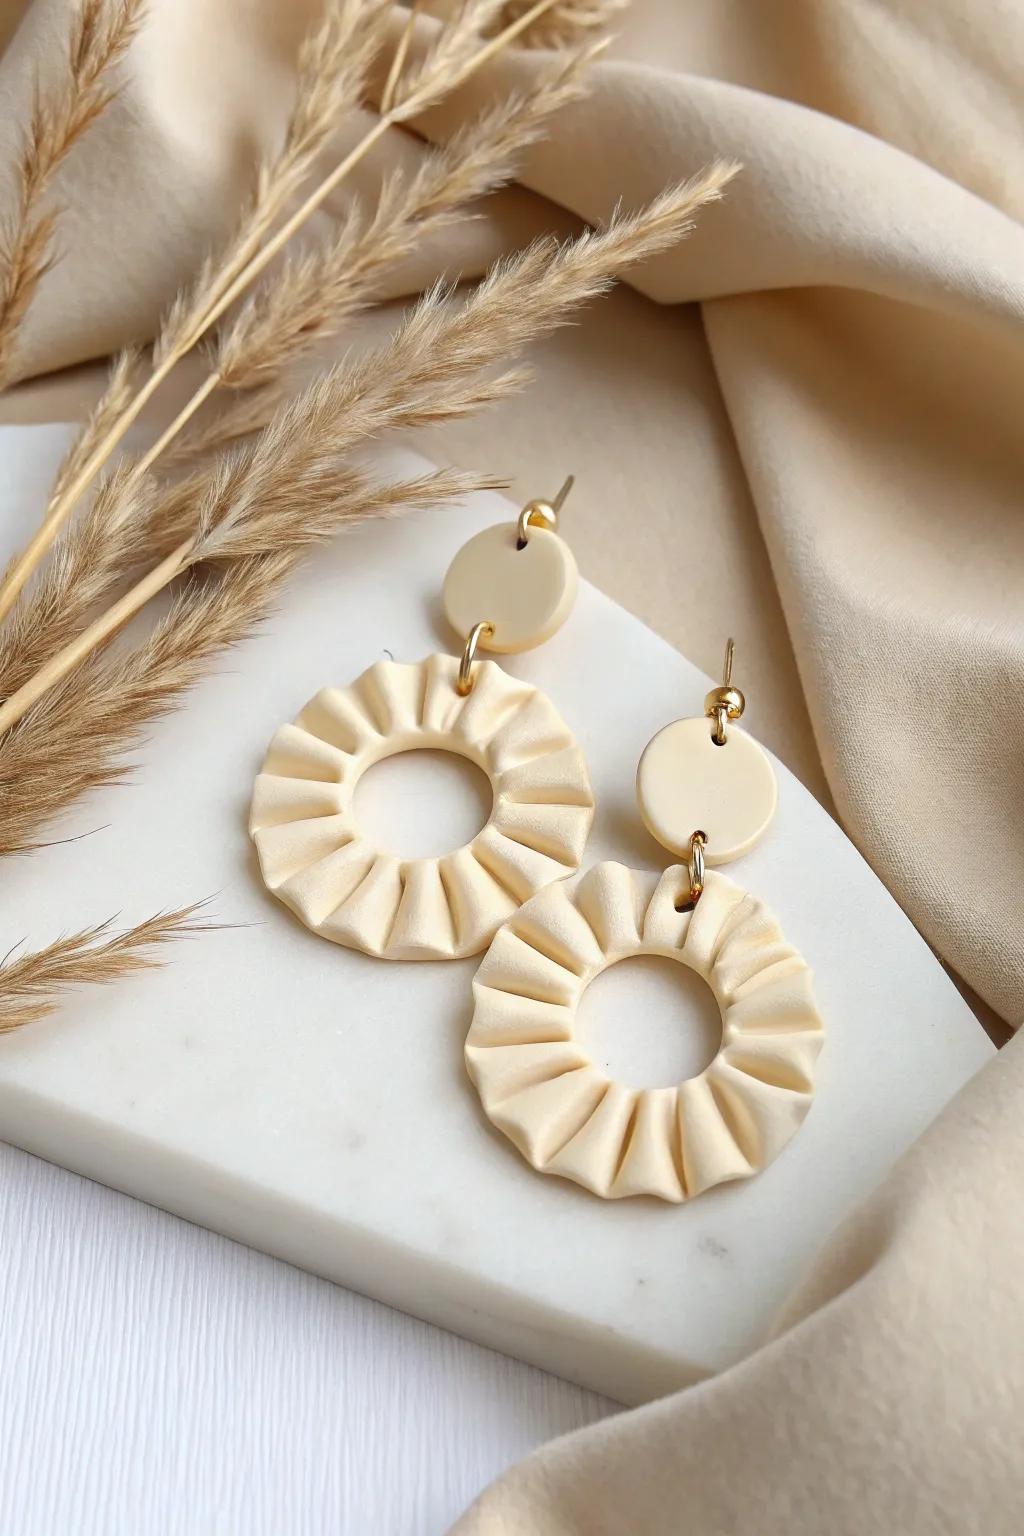
These elegant polymer clay earrings feature a stunning 3D ruffled texture that mimics the soft folds of pleated fabric. The monochromatic cream palette keeps them sophisticated, while the sculptural waves add intricate visual interest without adding weight.
How-To Guide
Materials
- Polymer clay (cream, beige, or ecru)
- Acrylic rolling pin or pasta machine
- Circle cutters (various sizes: approx. 10mm for studs, 40mm and 20mm for hoops)
- Needle tool or toothpick
- Ceramic tile or glass work surface
- Earring posts and backs (gold)
- Jump rings (gold, approx. 6-8mm)
- Pliers (round nose and flat nose)
- Hand drill or pin vibe
- Super glue or liquid polymer clay (optional for securing posts)
- Cornstarch or baby powder (as a release agent)
Step 1: Conditioning and Cutting
-
Condition the Clay:
Begin by warming your cream-colored polymer clay in your hands. Knead and roll it repeatedly until it is soft, pliable, and free of air bubbles or cracks. This is crucial for preventing the clay from tearing during the folding process. -
Roll Out Sheets:
Using your acrylic roller or pasta machine on a medium setting (around 2-3mm thickness), create a smooth, even sheet of clay. Ensure there is no dust or lint on your surface. -
Cut the Top Studs:
Use your smallest circle cutter (approx. 10mm) to punch out two clean circles. These will become the top pieces that sit on the earlobe. Set them aside on your baking tile. -
Prepare the Hoop Base:
Roll a second sheet of clay slightly thinner than the studs. Use a large cutter (approx. 40mm) to cut a circle, then use a smaller cutter (approx. 20mm) in the exact center to remove the middle, creating a flat donut shape. Make two of these.
Flattening Ruffles?
If your ruffles keep collapsing while you work, your clay might be too warm. Pop the clay in the fridge for 5-10 minutes to firm it up before attempting the folding technique again.
Step 2: Creating the Ruffles
-
Prepare the Ribbon Strip:
Roll a long, thin strip of clay. This needs to be slightly thinner than your base donut so it folds easily. Cut the strip so it is approximately the same width as the ring of your donut base (about 10mm wide). -
Begin Folding:
Place one of your flat donut rings on your work surface. Take the end of your clay strip and press it gently onto the ring. Using a needle tool or your fingers, lift the strip slightly to create a small ‘hump’ or wave, then press the valley down onto the base. -
Continue the Ruffle Pattern:
Repeat this up-and-down motion around the entire circumference of the ring. Aim for consistent spacing between each ripple to create that uniform, pleated look. -
Secure the Folds:
As you press the ‘valleys’ of the ruffles down onto the base ring, ensure they bond well. You can use the side of a needle tool to gently reinforce the connection between the ruffled strip and the base ring without squashing the texture. -
Join the Ends:
When you circle back to the start, trim any excess strip carefully. Blend the final edge with the starting edge so the seam is hidden within a fold. Repeat the entire ruffling process for the second earring. -
Smooth the Edges:
Gently run your finger or a smoothing tool along the outer and inner details of the hoop to soften any harsh cut marks, ensuring the ruffle looks continuous and organic.
Step 3: Baking and Assembly
-
Pierce Holes:
Before baking, use a needle tool to carefully poke a hole at the top of each ruffled hoop and at the bottom edge of each stud circle. Alternatively, you can drill these after baking for cleaner lines, which is often my preference for thick pieces. -
Bake:
Place all pieces on a ceramic tile and bake according to your clay manufacturer’s instructions (typically 275°F/135°C for 30 minutes). Tent with foil if you are worried about the light cream color scorching. -
Cool and Sand (Optional):
Let the pieces cool completely. If there are rough edges on the back or sides, lightly sand them with fine-grit sandpaper, then wipe clean with a damp cloth. -
Attach Earring Posts:
Flip the small stud circles over. Apply a tiny dot of super glue (or use liquid clay and rebake) to attach the flat pad of the earring post to the back near the top edge. -
Connect the Pieces:
Open a gold jump ring using two pairs of pliers. Thread it through the hole in the ruffled hoop and the hole in the stud. Close the jump ring securely so there is no gap. -
Final Check:
Double-check that all jump rings are closed tight and the posts are secure. Your statement ruffle earrings are now ready to wear.
Add Golden Accents
After baking, brush a tiny amount of gold leaf or metallic paint specifically onto the raised ridges of the ruffles. This highlights the 3D texture and adds a luxe finish.
Enjoy styling these versatile hoops that bridge the gap between modern sculpture and classic accessory design
Mini Scenic Earrings With Tiny Painted Details
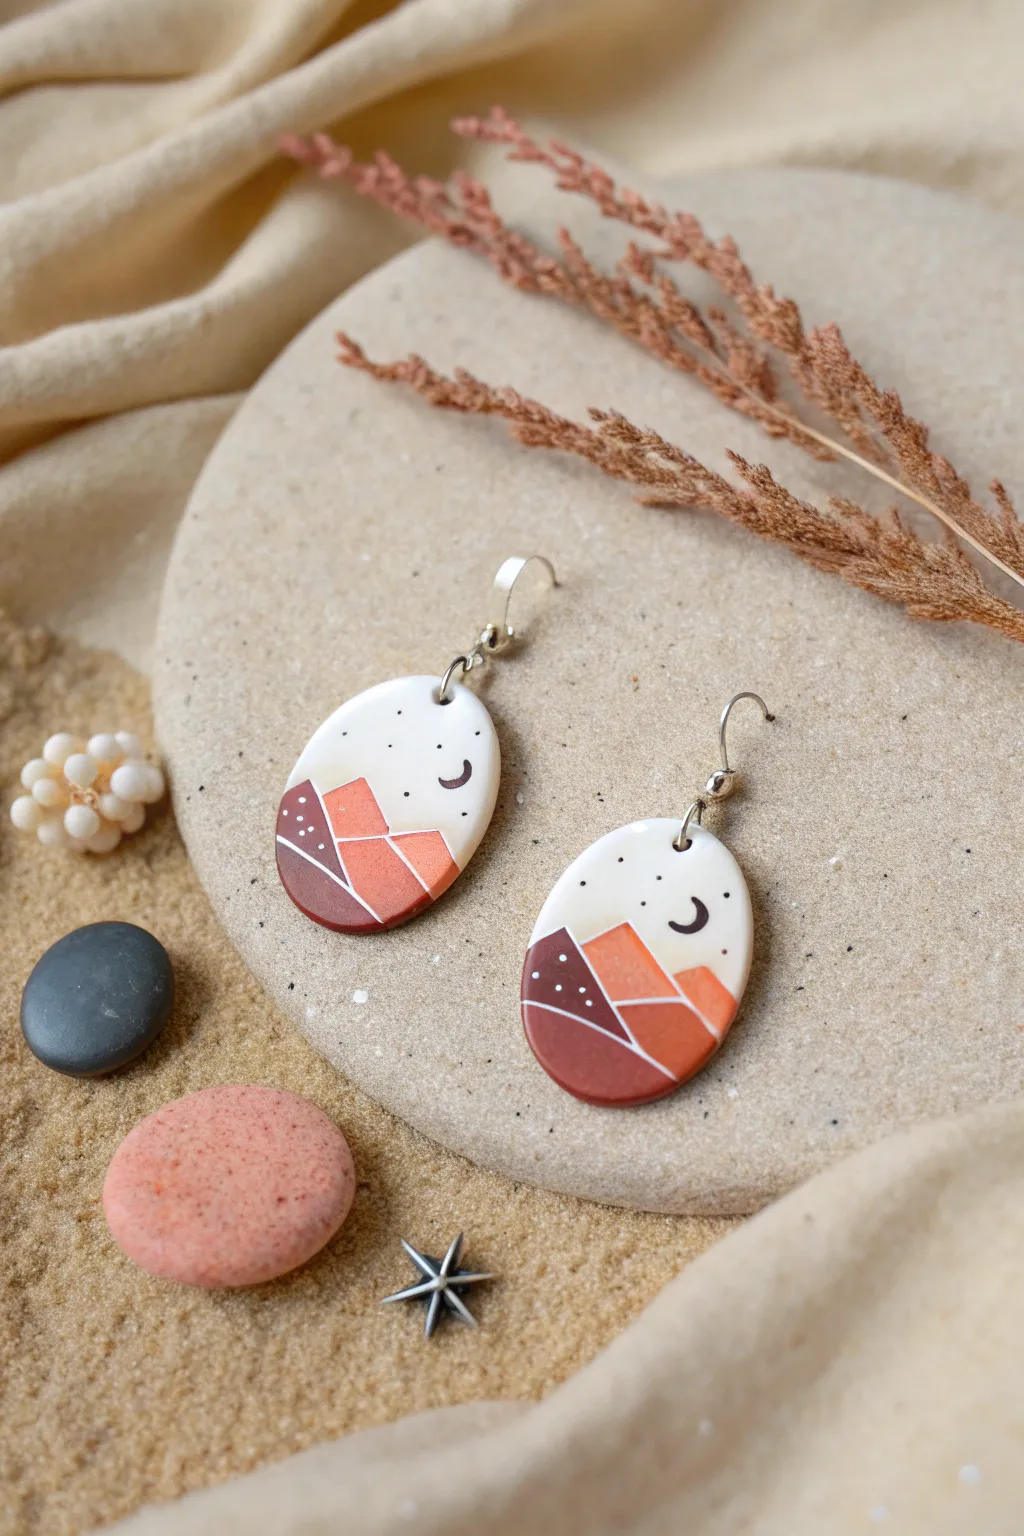
Capture the serenity of a desert evening with these stylized oval clay earrings. Featuring a layered geometric mountain range, a crescent moon, and twinkling stars on a creamy background, these scenic accessories are like wearing tiny pieces of art.
Step-by-Step Guide
Materials
- Polymer clay (White or light vanilla, terracotta/burnt orange, deep reddish-brown)
- Clay roller or pasta machine
- Oval clay cutter (medium size)
- Craft knife or scalpel blade
- Parchment paper or ceramic tile (for baking)
- Black acrylic paint
- White acrylic paint
- Fine detail paintbrush (000 size) or dotting tool
- Sandpaper (fine grit)
- Hand drill or dremel tool (1mm bit)
- Jewelry pliers
- Jump rings and silver earring hooks
- Gloss or matte varnish (optional)
Step 1: Creating the Base & Landscape
-
Condition the base clay:
Start by thoroughly conditioning your white or light vanilla clay until it’s soft and pliable. Roll it out into a smooth, even sheet approximately 3mm thick. -
Cut the ovals:
Using your medium-sized oval cutter, punch out two identical shapes. If the clay sticks to the cutter, dip the rim in cornstarch before cutting. -
Prepare the mountain colors:
Roll out thin sheets of your terracotta and deep reddish-brown clay. These should be much thinner than your base, almost like paper thickness. -
Cut the foreground mountains:
Using your craft knife, cut jagged, geometric triangular shapes from the deep reddish-brown clay. Place these at the bottom left of each oval, gently pressing them onto the base so they adhere. -
Add the mid-ground peaks:
Cut slightly lighter or different shapes from the terracotta clay. Layer these slightly behind or next to the dark mountains to create depth and perspective in your scene. -
Create the white detailing:
To mimic snow-caps or separation lines, cut ultra-thin strips or tiny triangles of white clay. Carefully place these along the ridges of your dark mountains for contrast. -
Smooth the surface:
Once your landscape layout is complete, cover the earrings with a piece of parchment paper and gently roll over the surface. This helps embed the mountain layers into the base so they become one flat surface.
Smooth Seams Tip
When rolling parchment over your layered mountains, use a circular motion with your finger first. This blends the seams better than a roller, preventing air bubbles from getting trapped.
Step 2: Baking & Painting Details
-
Bake the pieces:
Place your clay ovals on a ceramic tile or baking sheet. Bake according to the manufacturer’s instructions for your specific brand of clay (usually around 275°F/130°C for 30 minutes). -
Cool and sand:
Allow the pieces to cool completely. If there are any rough edges on the sides of the oval, gently smooth them out with fine-grit sandpaper. -
Paint the moon:
Using a very fine brush and black acrylic paint, carefully paint a small crescent moon in the upper right quadrant of the sky area. -
Add the stars:
Switch to your smallest dotting tool or a toothpick. Dip it lightly in black paint and create tiny scattered dots across the sky to represent distant stars. -
Add highlights:
For extra dimension, you can add tiny white dots on the dark brown mountain section, mimicking textures or distant lights. -
Seal the design (Optional):
To protect the paint from scratching off over time, apply a thin coat of matte or gloss varnish over the front of the earrings. Let this dry completely.
Step 3: Assembly
-
Drill the holes:
Use a hand drill or dremel with a small bit to carefully create a hole at the very top center of each oval. Place the hole about 2-3mm from the edge to prevent breakage. -
Attach hardware:
Twist open a jump ring using your pliers. Thread it through the drilled hole, then add your earring hook before twisting the ring closed securely.
Make It 3D
Instead of rolling the mountains flat into the base, leave them slightly raised for a textured terrain effect. Just ensure they are firmly adhered so they don’t pop off after baking.
Enjoy the calm vibe of your new desert landscape earrings every time you wear them