A clay extruder is basically my shortcut to clean lines, repeatable shapes, and textures that would take forever to roll by hand. If you’ve got one sitting around, these clay extruder ideas will help you turn simple extrusions into jewelry, pottery details, and bold sculptural builds.
Uniform Mug and Pitcher Handles

This project features a beautifully minimalist mug crafted from speckled stoneware clay, highlighting the clean, uniform look achievable with extruded handles. The creamy glaze breaks gently over the iron speckles and unglazed rim, creating a cozy, tactile piece perfect for your morning routine.
Step-by-Step Guide
Materials
- Speckled Stoneware Clay (mid-fire)
- Clay Extruder with large oval die
- Rolling pin and canvas or Slab Roller
- Cylindrical form or mug template
- Pottery knife or needle tool
- Serrated rib and scoring tool
- Slip (made from the same clay body)
- Cream/White breaking glaze (mid-fire)
- Sponge and water
- Kiln
Step 1: Forming the Mug Body
-
Roll out the slab:
Begin by wedging your speckled stoneware clay thoroughly to remove air bubbles. Roll out a consistent slab about 1/4 inch thick using a slab roller or rolling pin with guide sticks. -
Cut the body rectangle:
Using a ruler and your pottery knife, cut a clean rectangle from the slab. A size of roughly 10 inches by 4.5 inches works well for a standard mug, but feel free to adjust based on your shrinkage rate. -
Bevel the edges:
For a strong, seamless join, bevel the short ends of your rectangle at opposite 45-degree angles. This increases surface area for the connection. -
Construct the cylinder:
Score the beveled edges aggressively and apply slip. Wrap the slab around your cylindrical form or simply by hand, overlapping the beveled edges. -
Seal the seam:
Press the seam firmly together. Support the inside with one hand while using a rib on the outside to compress and smooth the join until it disappears. -
Attach the base:
Place your cylinder on a fresh piece of slab. Score and slip the bottom edge of the cylinder and the slab underneath. Press down firmly to seal. -
Trim the excess:
Cut away the extra slab clay around the base of the mug. Use a modeling tool handle or your finger to smooth the connection between the wall and the floor on the outside. -
Refine the rim:
Use a damp sponge or chamois to smooth and round the rim of the mug. This is crucial for mouth-feel later on.
Handle Cracks?
If hairline cracks appear at the join during drying, your clay moisture levels were likely mismatched. Wrap the join tightly in plastic allowing moisture to equalize overnight, then burnish it smooth.
Step 2: Extruding and Attaching the Handle
-
Prepare the extruder:
Load your clay extruder with well-wedged clay. Select a die shape that produces a flattened oval or ‘D’ shape, which is comfortable to hold. -
Extrude the coil:
Apply steady pressure to extrude a long, uniform coil. Catch it gently as it comes out so it doesn’t stretch or deform. -
Shape the curve:
Cut a section of the extruded coil, slightly longer than needed. While the clay is fresh, gently bend it into a ‘C’ or ear shape and set it down to firm up to leather-hard consistency. -
Trim for attachment:
Once the handle holds its shape but is still flexible, hold it up to the leather-hard mug body. Mark where it touches, then trim the ends of the handle at an angle to match the curve of the mug wall. -
Score and slip:
Vigorously score the attachment points on the mug and the cut ends of the handle. Apply a generous amount of slip to both. -
Secure the handle:
Press the handle firmly onto the mug body. Wiggle it slightly to lock the clay platelets together. -
Clean the connection:
Use a small brush or modeling tool to wipe away excess slip. Smooth the join so the handle looks like it grew out of the mug, rather than just being stuck on.
Step 3: Details and Glazing
-
Expose the raw clay:
Before the mug dries completely, I often use a damp sponge to wipe the bottom 1/4 inch of the exterior wall clean, creating a distinct unglazed ‘foot’ visual. -
Bisque fire:
Allow the mug to dry slowly and evenly to prevent cracking. Once bone dry, bisque fire it to Cone 04 (or your clay’s specific bisque temperature). -
Wax resist application:
Apply wax resist to the bottom of the mug and up the side wall about 1/4 to 1/2 inch to create the exposed raw clay band seen in the photo. Also, carefully wax the very top rim if you want that raw clay lip detail. -
Glazing:
Dip the mug into a cream or off-white breaking glaze. The iron speckles in the clay will bleed through during firing, creating the texture. -
Glaze firing:
Fire the mug to maturity (likely Cone 5 or 6 depending on your stoneware). Let the kiln cool completely before unloading to avoid thermal shock.
Level Up: Tip Dip
Dip just the very top rim of the mug in a contrasting glaze (like a floating blue) for a ‘double-dip’ effect that melts beautifully over the cream base.
Enjoy the warmth of your handmade speckled mug with your favorite hot beverage


Fast Coil-Built Planter Walls
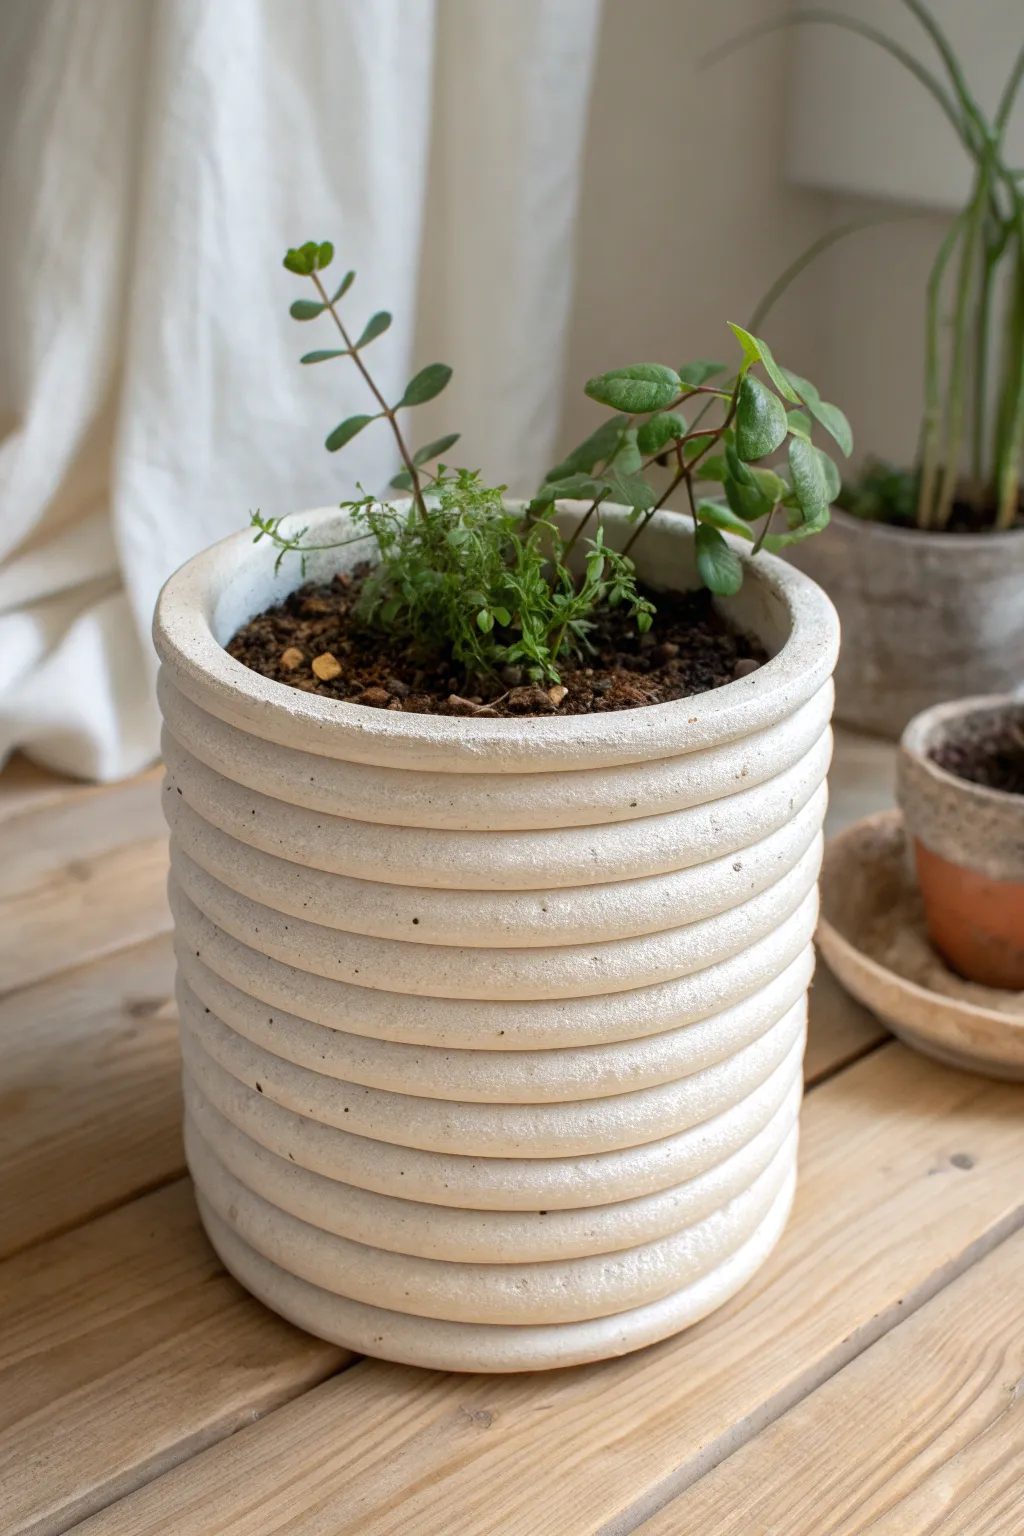
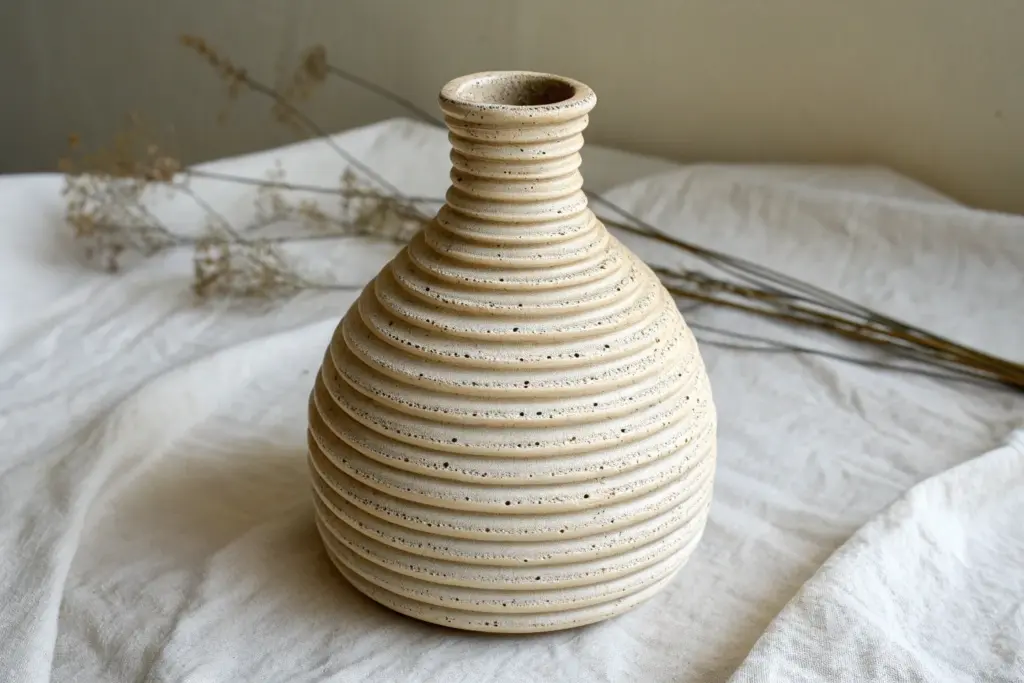
This project transforms simple extruded clay coils into a modern, textured vessel that mimics the look of a beehive or stacked rings. The clean, horizontal lines create a satisfying rhythm, while the matte white finish keeps the focus on the sculptural form.
Step-by-Step
Materials
- Stoneware or earthenware clay (white)
- Clay extruder with a circular die (approx. 1/2 to 3/4 inch diameter)
- Potter’s wheel or turntable (banding wheel)
- Scoring tool or serrated rib
- Slip (clay and water slurry)
- Wooden modeling tool or blending stick
- Flat, sturdy base board (bat)
- Sponge
- Cutting wire
- Needle tool
Step 1: Preparation & Base
-
Prepare the Clay:
Begin by thoroughly wedging your clay to remove any air bubbles. Since you will be extruding, ensure the clay is soft and pliable but not sticky. -
Roll the Base Slab:
Roll out a flat slab of clay for the base, approximately 1/2 inch thick. Place this on your banding wheel or bat. -
Cut the Circle:
Use a needle tool to cut a perfect circle for the floor of your pot. I find a 6-inch diameter works well for a medium desktop planter like the one shown. -
Set Up the Extruder:
Load your clay into the extruder barrel. Select a simple circle die. For the chunky look in the photo, aim for a coil thickness around 3/4 of an inch.
Keep it Straight
Use a ruler or set square held vertically against the side of the pot while you build. This acts as a visual guide to ensure your cylinder walls aren’t leaning outward.
Step 2: Extruding & Building
-
Extrude Long Coils:
Pull the lever on your extruder to produce long, uniform ropes of clay. Try to make them long enough to circle the base at least once without breaking. -
Score the Base:
Thoroughly score the outer perimeter of your circular base plate and apply a generous amount of slip. -
Lay the First Coil:
Gently place the first coil onto the scored edge. Cut the ends where they meet at a diagonal angle to increase the surface area for joining. -
Secure the First Layer:
Use a wooden modeling tool to blend the inside of the coil down onto the base floor. This interior seal is crucial so the bottom doesn’t detach later. -
Stacking Upwards:
Score and slip the top of the first coil. Lay the second coil directly on top, ensuring the ends join at a different spot than the first layer to avoid creating a weak vertical seam.
Step 3: Refining & Finishing
-
Continue Stacking:
Repeat the stacking process. Score, slip, and stack each layer. As you build, double-check that the walls remain vertical and aren’t flaring out or caving in. -
Interior Smoothing:
Every 3 or 4 layers, pause to smooth the *interior* seams together. Drag the clay from the upper coil down to the one below it on the inside only. This keeps the pot watertight without ruining the exterior texture. -
Adjusting the Shape:
If the cylinder starts to warp, gently tap it with a flat wooden paddle while rotating the wheel to realign the coils. -
Finishing the Rim:
Once you reach the desired height, cut the final coil. Use a damp sponge to softly round over the top lip so it matches the roundness of the other coils. -
Exterior Clean Up:
Inspect the outside. The charm of this pot is the visible separation between coils, but you want them to be secure. Gently press them together if any gaps look too wide, but don’t smudge the distinct lines. -
Drying:
Loosely cover the pot with plastic for the first 24 hours to let the moisture equalise, preventing the coils from cracking apart as they shrink. -
Drainage Hole:
Once leather hard, flip the pot over and use a hole cutter to create a drainage hole in the center of the base. -
Bisque Fire:
Fire the piece to bisque temperature once fully bone dry. -
Glazing:
To achieve the look in the photo, apply a matte white glaze. Use a spray gun if available to get into the deep grooves without pooling, or brush carefully. -
Final Firing:
Glaze fire the piece according to your clay and glaze specifications.
Ombré Glazing
Instead of solid white, dip the bottom third in a dark grey glaze, the middle in light grey, and leave the top white for a stunning gradient effect on the ridges.
Now you have a structured, architectural home for your favorite green herbs.


Textured Beads Wrapped With Extruded Coils
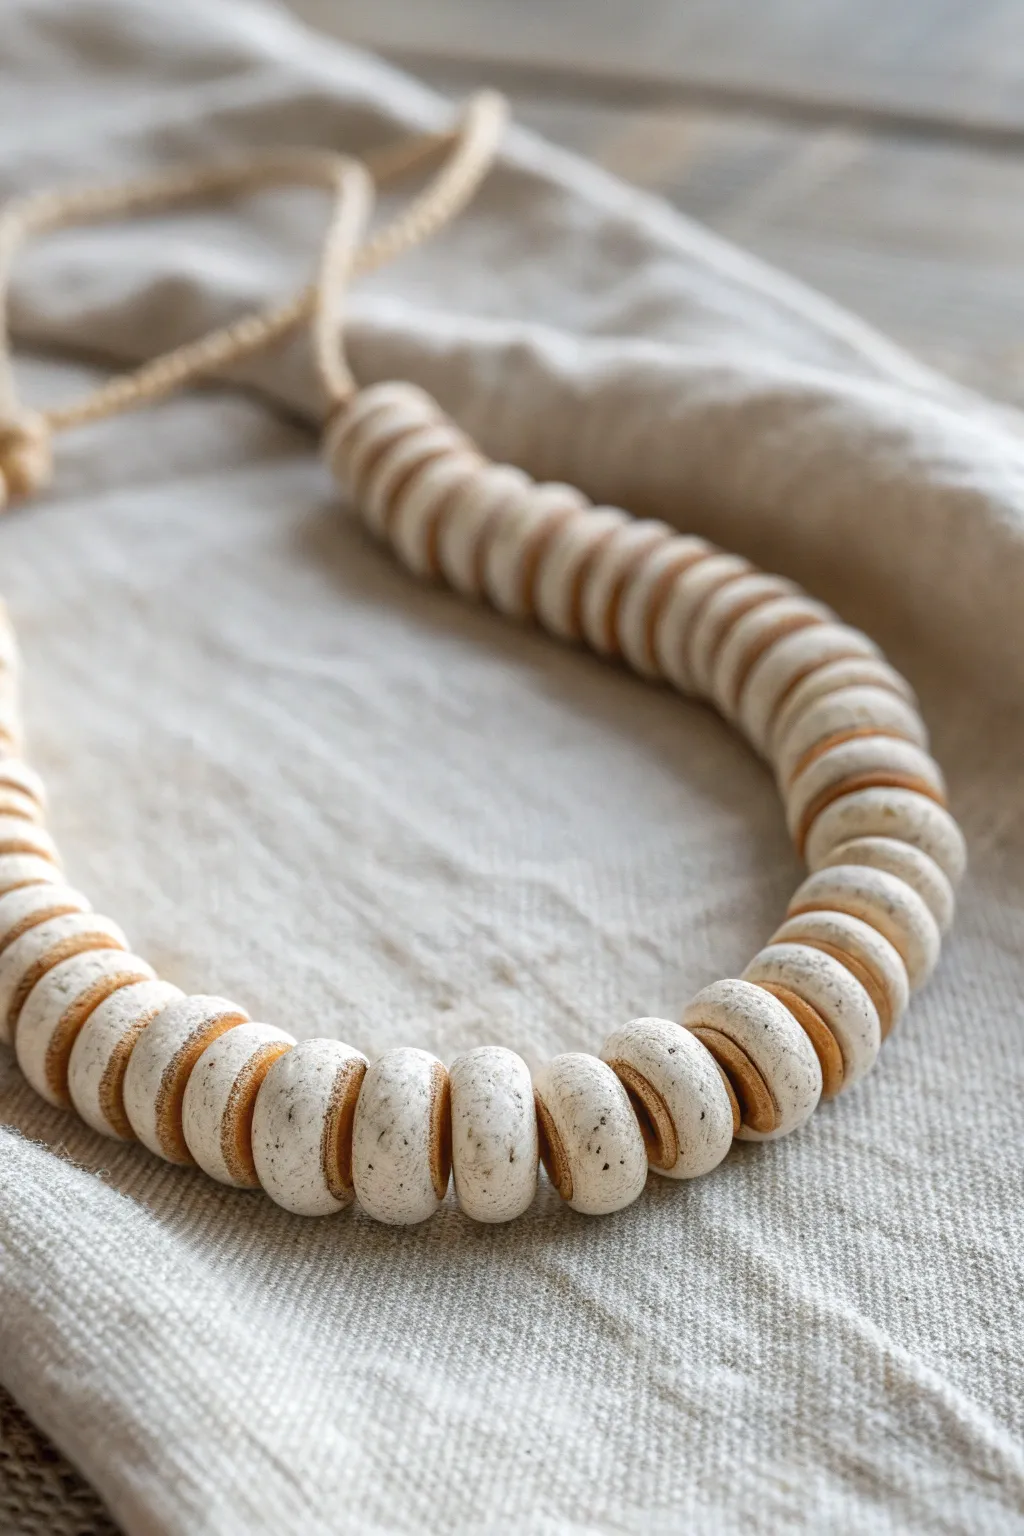
This project combines the rustic charm of speckled stone with the precision of extruded clay to create chunky, textured beads. The result is a striking statement necklace with a natural, primitive aesthetic that pairs perfectly with linen and neutral tones.
Step-by-Step
Materials
- White or cream polymer clay
- Light brown or tan polymer clay
- Black pepper or dried tea leaves (for speckling)
- Clay extruder with a small round disc
- Clay roller or pasta machine
- Circular cutter (approx. 1 inch)
- Modeling tool or knitting needle (for piercing)
- Bead reamer tool (optional)
- Waxed cotton cord or suede lace
- Oven (for baking polymer clay)
Step 1: Preparing the Speckled Clay Base
-
Mix the Speckles:
Begin by conditioning the white or cream polymer clay until it is soft and pliable. Flatten it out and sprinkle a small amount of coarsely ground black pepper or dried tea leaves onto the surface. -
Incorporate the Texture:
Fold the clay over the inclusions and knead thoroughly. Continue folding and rolling until the specks are evenly distributed throughout the batch, mimicking the look of natural white granite. -
Form the Bead Cores:
Roll your speckled clay into a thick log, approximately 1 inch in diameter. Slice this log into equal segments, with each slice being about 1/2 inch thick. -
Shape the Rounds:
Take each slice and gently roll the edges between your palms to round them off. You want a shape that is like a flattened sphere or a thick donut, rather than a sharp-edged cylinder. -
Create the Holes:
Use a modeling tool or a knitting needle to pierce a hole through the center of each bead. Rotate the tool as you push through to prevent distorting the bead’s shape. -
Smooth the Edges:
Check the entry and exit points of the hole. Smooth down any clay that may have mushroomed out during piercing to ensure a clean, flat surface for proper stacking.
Coil Won’t Stick?
If the extruded strip keeps falling off the base bead, apply a tiny dab of liquid polymer clay or ‘Bake and Bond’ to the groove before wrapping the coil.
Step 2: Adding the Extruded Detail
-
Prepare the Accent Clay:
Condition the light brown or tan clay. This color should provide a warm contrast to the cool white stone effect. -
Extrude the Coils:
Load the tan clay into your clay extruder fitted with a small round disc. Squeeze out a long, continuous strand of clay spaghetti. -
Wrap the Beads:
Take one of your unbaked speckled beads. Carefully wrap a piece of the extruded tan coil around the exact middle of the bead’s outer rim. -
Secure the Seam:
Cut the coil so the ends meet cleanly without overlapping. Gently press the seam together and smooth it with your finger or a tool so the join is invisible. -
Embed the Coil:
Gently roll the entire bead on your work surface one more time. Apply just enough pressure to embed the tan coil slightly into the white clay so it feels integral rather than just stuck on top. -
Add Texture (Optional):
If you want an even more weathered look, lightly tap the surface of the beads with a coarse sandpaper or a toothbrush to remove any fingerprints and add porosity.
Step 3: Baking and Assembly
-
Bake the Beads:
Arrange your beads on a baking sheet lined with parchment paper or cardstock. Bake according to the manufacturer’s instructions for your specific brand of clay, usually around 275°F (130°C) for 30 minutes per 1/4 inch of thickness. -
Cool Down:
Allow the beads to cool completely in the oven before handling them. This helps prevent cracking due to thermal shock. -
Ream the Holes:
I usually double-check the bead holes after baking. If they shrank or have burrs, use a bead reamer or a small drill bit to clean them out for easy stringing. -
String the Necklace:
Thread your finished beads onto a durable waxed cotton cord or suede lace. The friction of the textured clay usually keeps them in place nicely without needing knots between them. -
Finish the Ends:
Tie a secure adjustable knot at the ends of the cord, or attach a simple clasp if you prefer a fixed length.
Try a Faux-Ceramic Glaze
After baking, lightly brush a watered-down brown acrylic paint over the beads and wipe it off immediately. The paint will stay in the crevices for an aged look.
Now you have a stunning, organic-looking necklace that looks like it came straight from a ceramic studio


Hollow Tube Building for Modern Vases
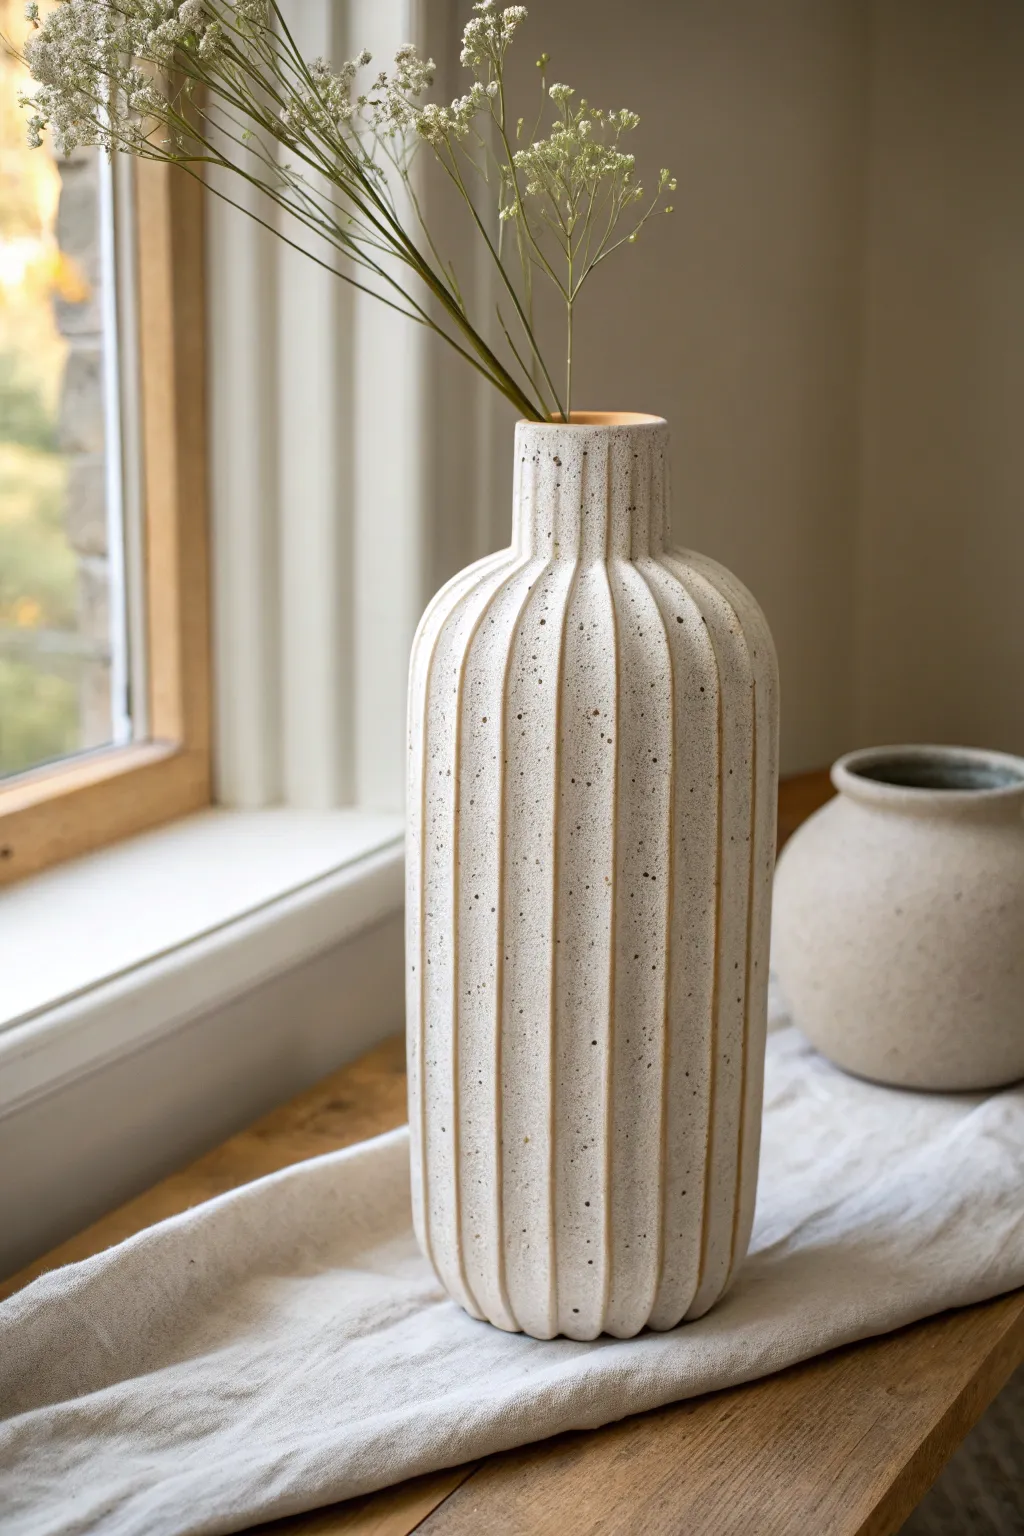
This elegant vase combines the structural simplicity of a cylinder with the textural interest of vertical fluting. The speckled clay body and matte glaze give it a contemporary, organic feel perfect for displaying dried botanicals.
Detailed Instructions
Materials
- Speckled stoneware clay (mid-fire)
- Clay extruder with 3-inch hollow circle die
- Clay extruder with small half-round or D-shaped die
- Score and slip tool (needle tool or serrated rib)
- Wooden modeling tool
- Sponge
- Wire cutter
- Fettling knife
- Matte cream or white glaze
- Rolling pin and canvas (for the base)
Step 1: Forming the Core
-
Extrude the main cylinder:
Prepare your speckled clay by wedging it thoroughly to remove air pockets. Load your extruder with the 3-inch hollow circle die and press out a tube approximately 10-12 inches long. Aim for a consistent speed to keep the walls straight. -
Cut and stand:
Use your wire cutter to slice the tube cleanly from the extruder. Stand the tube upright on a ware board. If the top or bottom edges are uneven, trim them now with a fettling knife so the cylinder sits perfectly flush. -
Shape the neck:
While the clay is still plastic but firm enough to hold shape, gently collar the top 2 inches of the cylinder. Moisten your hands slightly and squeeze inward, rotating the piece slowly to narrow the neck to about 1.5 inches in diameter. -
Create the base:
Roll out a small slab of the same clay to about a 1/4 inch thickness. Place your cylinder on top and trace around the bottom edge. -
Attach the bottom:
Score the bottom edge of your cylinder and the perimeter of your cut slab base. Apply slip generous to both surfaces, press them together firmly, and smooth the seam with a wooden tool until the join is invisible.
Step 2: Adding the Fluting
-
Extrude the ribs:
Switch your extruder die to a small half-round or D-shape profile. Extrude several long strips of clay—you will need enough to cover the entire circumference of the vase. -
Prepare the cylinder surface:
Using a ruler, lightly mark vertical guidelines around your cylinder to ensure your spacing will be even. I find it helpful to mark the four cardinal points first, then fill in the gaps. -
Score the attachment paths:
Run your serrated rib or needle tool vertically down the cylinder along your guidelines where each rib will sit. Apply a thin layer of slip to these scored lines. -
Attach the vertical ribs:
Take a strip of your half-round extrusion and press the flat side onto the scored line. Start from the very bottom and run it all the way up the neck to the rim. -
Trim the excess:
Once a rib is attached, trim it flush with the rim and the base using your fettling knife. Repeat this process around the entire vase, leaving a small gap (about 1/8 to 1/4 inch) between each rib to reveal the underlying cylinder. -
Refine the seams:
Use a small, damp sponge or a soft brush to clean up any excess slip that squeezed out between the ribs. Be gentle to avoid flattening the rounded profile of the fluting.
Rib Detachment?
If ribs pop off during drying, you likely trapped air or didn’t score deep enough. Use vinegar on your scoring tool next time to break down the surface for a stronger bond.
Step 3: Finishing and Glazing
-
Slow drying:
Because of the varying thicknesses created by the added ribs, cover the vase loosely with plastic to dry slowly. This prevents the ribs from cracking away from the core. -
Bisque fire:
Once bone dry, fire the piece to bisque temperature (typically Cone 04 or 06) to prepare it for glazing. -
Apply wax resist:
Wax the bottom of the vase and up the side about 1/16th of an inch to prevent glaze from running onto your kiln shelf. -
Glaze application:
Dip the vase into a matte cream or white glaze. A matte finish is crucial here as it allows the speckled clay body to show through without being obscured by high gloss reflections. -
Final firing:
Fire the vase to the maturation temperature of your specific clay and glaze combination (likely Cone 5 or 6). Allow the kiln to cool naturally before unloading.
Make it Ombré
Mix a mason stain into the clay used for the ribs, but not the core cylinder. As you attach them, the color contrast will highlight the architectural structure even more.
Fill your finished vase with dried wildflowers or tall grasses to compliment the vertical lines

What Really Happens Inside the Kiln
Learn how time and temperature work together inside the kiln to transform clay into durable ceramic.
Freeform Extrusion Sculptures With Twists and Folds
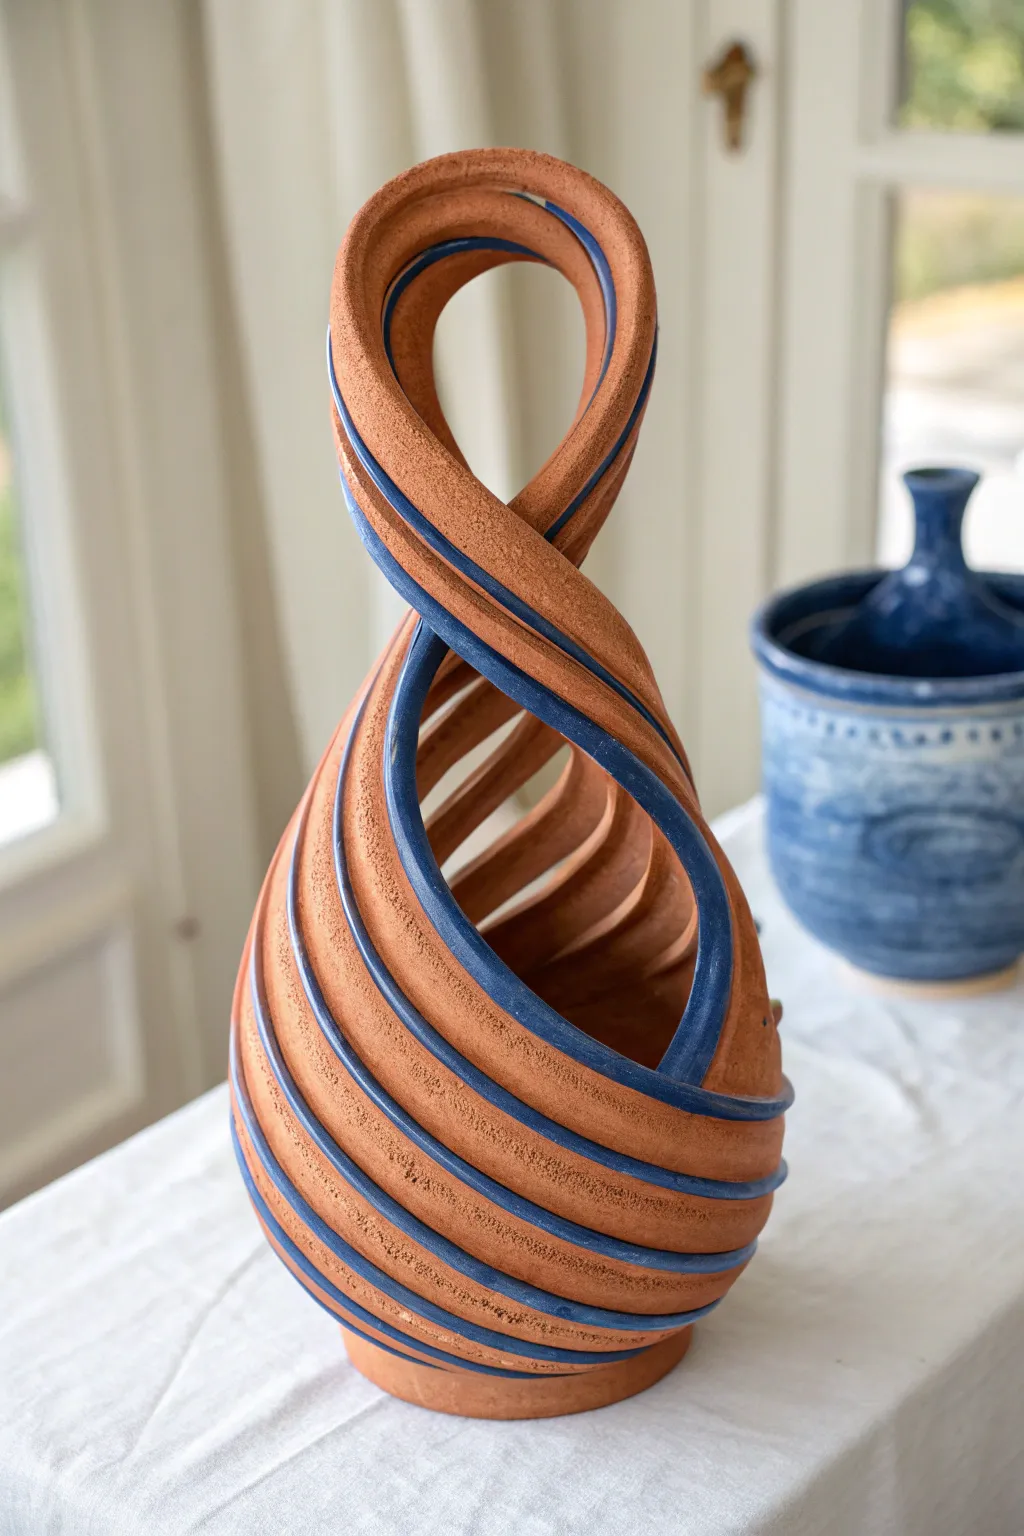
This captivating sculptural vessel showcases the incredible potential of a clay extruder, transforming a simple hollow tube into an elegant, twisted form. The contrast between raw, earthy terracotta and the vibrant blue inlay highlights the dynamic movement of the spiral, creating a piece that looks complex but relies on a straightforward technique.
Detailed Instructions
Materials
- Stoneware clay (terracotta color recommended)
- Clay extruder (wall-mounted or handheld)
- Hollow circular die (approx. 2-3 inch diameter)
- Blue underglaze or slip
- Fine slip trailer or brush
- Needle tool
- Scoring tool
- Sponge
- Cutting wire
- Kiln
Step 1: Extruding and Forming
-
Prepare the clay:
Begin by thoroughly wedging your terracotta clay to remove air bubbles. The clay needs to be slightly softer than throwing consistency so it moves through the extruder smoothly without cracking on the edges. -
Load the extruder:
Pack the barrel of your extruder tightly with the prepared clay. Attach the hollow circular die. Ensure the die includes the internal bridge piece that allows the tube to remain hollow. -
Extrude the tube:
Pull the lever to extrude a long, consistent tube of clay. Aim for a length of about 18-24 inches. Support the clay as it emerges so it doesn’t deform or stretch under its own weight. -
Create the twist:
While the clay is still fresh and plastic, gently grasp both ends of the tube. Slowly twist the clay in opposite directions to create the spiral fluting effect visible in the reference image. -
Form the loop:
Carefully bend the twisted tube into a teardrop or figure-eight loop shape. Bring the two ends together at the bottom to form the base, and let the top loop remain open and airy. -
Join the base:
Score and slip the contact points where the two ends meet at the bottom. Press them firmly together. You may need to add a slab base or coil to reinforce this connection and ensure the sculpture stands upright. -
Refine the shape:
Adjust the curve of the loop while the clay is soft. Ensure the negative space in the center is balanced and the twist looks continuous.
Step 2: Detailing and Surface Treatment
-
Dry slowly:
Cover the piece loosely with plastic and let it dry very slowly to the leather-hard stage. This is crucial for preventing cracks in the twisted areas. -
Clean the surface:
Once leather hard, use a damp sponge to smooth any rough edges or extruder marks you wish to remove, but be careful not to diminish the natural texture created by the twisting action. -
Apply the inlay:
Using a slip trailer or a fine brush, carefully apply the blue underglaze into the deep spiral grooves created by the twist. This emphasizes the helical structure. -
Clean up the lines:
If the underglaze spills over the ridges, wait for it to dry slightly, then carefully scrape or sponge the raised areas to reveal the raw terracotta clay again, leaving crisp blue lines in the recesses. -
Bisque fire:
Fire the piece in the kiln to bisque temperature (usually Cone 04 or 06). Load it carefully to avoid putting stress on the loop.
Twist Timing
Twist the extrusion immediately after it comes out of the die. If you wait even 10 minutes, the clay memory sets in, and twisting will cause unsightly surface cracks.
Step 3: Finishing and Glazing
-
Apply clear glaze (optional):
For a functional finish, you can dip or spray the piece with a clear matte or glossy glaze. Alternatively, leave the exterior unglazed to maintain the tactile, earthy quality of the clay. -
Glaze the interior:
If you intend to use this effectively as a vase, pour clear glaze inside the hollow tube sections to make them watertight. -
Final firing:
Fire the piece to the final maturity temperature of your clay body (likely Cone 5/6 or Cone 10). -
Inspect the base:
After firing, check the base for any roughness. Sand it smooth with wet-dry sandpaper or a diamond pad so it sits perfectly flat on a table.
Double Twist Variation
Try extruding two thinner tubes and braiding them together before joining the ends. This creates a more complex, woven aesthetic while maintaining the open form.
Now you have a dynamic, spiraling sculpture that beautifully captures the movement of clay