There’s just something irresistible about sculpting a tiny clay fairy house—it’s like building a whole story in miniature. If you’re craving that cozy, whimsical vibe, these ideas will give you plenty of playful directions to take your next little fairy dwelling.
Classic Cottage With Wood-Grain Door
This charming fairy retreat combines a textured chalk-white facade with deeply detailed faux-wood elements for a cozy, rustic look. Its simplicity allows the intricate grain of the door and the ribbed roof to really shine as the focal points.
Step-by-Step Tutorial
Materials
- Air-dry clay or polymer clay (white)
- Rolling pin
- Aluminum foil (for armature)
- Clay sculpting tools (needle tool, ball stylus)
- Texture tool or toothbrush
- Acrylic paints (Warm White, Burnt Umber, Raw Sienna, Black, Grey)
- Fine detail paintbrushes
- Craft knife
- Water cup (for smoothing)
- Matte varnish
Step 1: Building the Structure
-
Form the armature:
Create a solid cylinder shape using crumpled aluminum foil to save on clay and provide internal support. Make the top slightly domed. This should be slightly smaller than your desired final house size. -
Sheet the clay:
Roll out a slab of white clay to about 1/4 inch thickness. Wrap this around your foil cylinder, trimming the excess and smoothing the seam where the edges meet with a wet finger. -
Shape the roof base:
Form a second piece of foil into a wide cone shape for the roof. Cover this with a separate sheet of clay, smoothing it down. -
Connect the pieces:
Score the top of the house walls and the underside of the roof rim. Add a dab of water or liquid clay (if using polymer) and gently press the roof onto the cylinder, blending the clay underneath to secure it. -
Texture the walls:
Using a stiff brush, a crumpled ball of foil, or a texture tool, gently dab the white walls to remove fingerprints and give it a stucco-like, organic surface.
Step 2: Sculpting the Details
-
Draft the door shape:
Roll out a small slab of clay and cut an arch shape for the door. Ensure it is sized proportionally to the house. -
Add wood grain:
Use a needle tool to score vertical lines into the door clay to simulate wooden planks. Add tiny knot holes and varying line depths for realism. I find varying the pressure creates the most natural look. -
Create the door frame:
Roll a thin snake of clay and flatten it slightly. Arrange this around the door arch. Use a knife to mark horizontal segments, making it look like stone blocks arching over the entrance. -
Sculpt the window:
Form a smaller arch shape for the window. Add a frame similar to the door, then create a ‘plus’ sign from thin clay strips for the window panes. -
Attach the features:
Score the back of the door and window, add slip/water, and press them firmly onto the house body. -
Roof texture:
Using a modeling tool, drag vertical lines from the top of the roof peak down to the rim edge. Make these deep and somewhat irregular to mimic thatch or heavy fabric. -
Add the finial:
Roll a tiny cylinder of clay and attach it to the very peak of the roof. Score vertical lines into it to match the ‘wood’ aesthetic of the door. -
Final hardware:
Roll a tiny ball of clay for the doorknob and attach it. Roll a very thin string of clay for the bottom hinge strap, adding tiny indentations for ‘nails’.
Clean Lines Pro-Tip
Before attaching the door, let the clay firm up slightly for 15 minutes. This prevents you from squishing your detailed wood textures when pressing it onto the curved wall.
Step 3: Painting and Finishing
-
Base coat:
Once dry (or baked), paint the entire house body and roof with a creamy Warm White acrylic. Several thin coats are better than one thick one. -
Paint the wood:
Mix Raw Sienna and Burnt Umber. Paint the door, window frame, roof finial, and window panes. While the paint is wet, wipe some away with a rag to let the clay texture show through. -
Stone details:
Carefully paint the arched door frame with a wash of Burnt Umber to distinguish it from the inner wood. You want this to look like darker, aged timber or brown stone. -
Hardware accents:
Paint the doorknob and the hinge strap with a matte Grey or Black. A tiny dot of white on the knob can simulate a shine. -
Sealing:
Protect your work with a coat of matte varnish to preserve the ‘chalky’ finish while protecting the paint.
Level Up: Mossy Bottom
Mix dried tea leaves or dedicated flocking powder with PVA glue and dab it around the very base of the cottage to simulate years of moss growth.
Place your new cottage on a slice of wood or amongst some stones to complete the scene


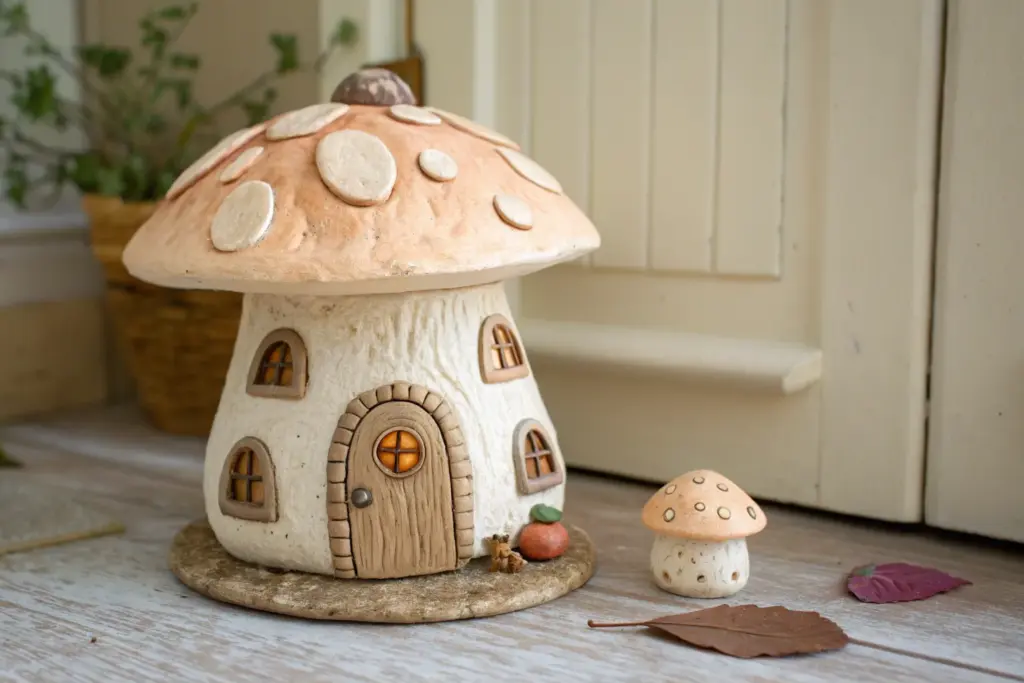
Mushroom Cap Roof Fairy House
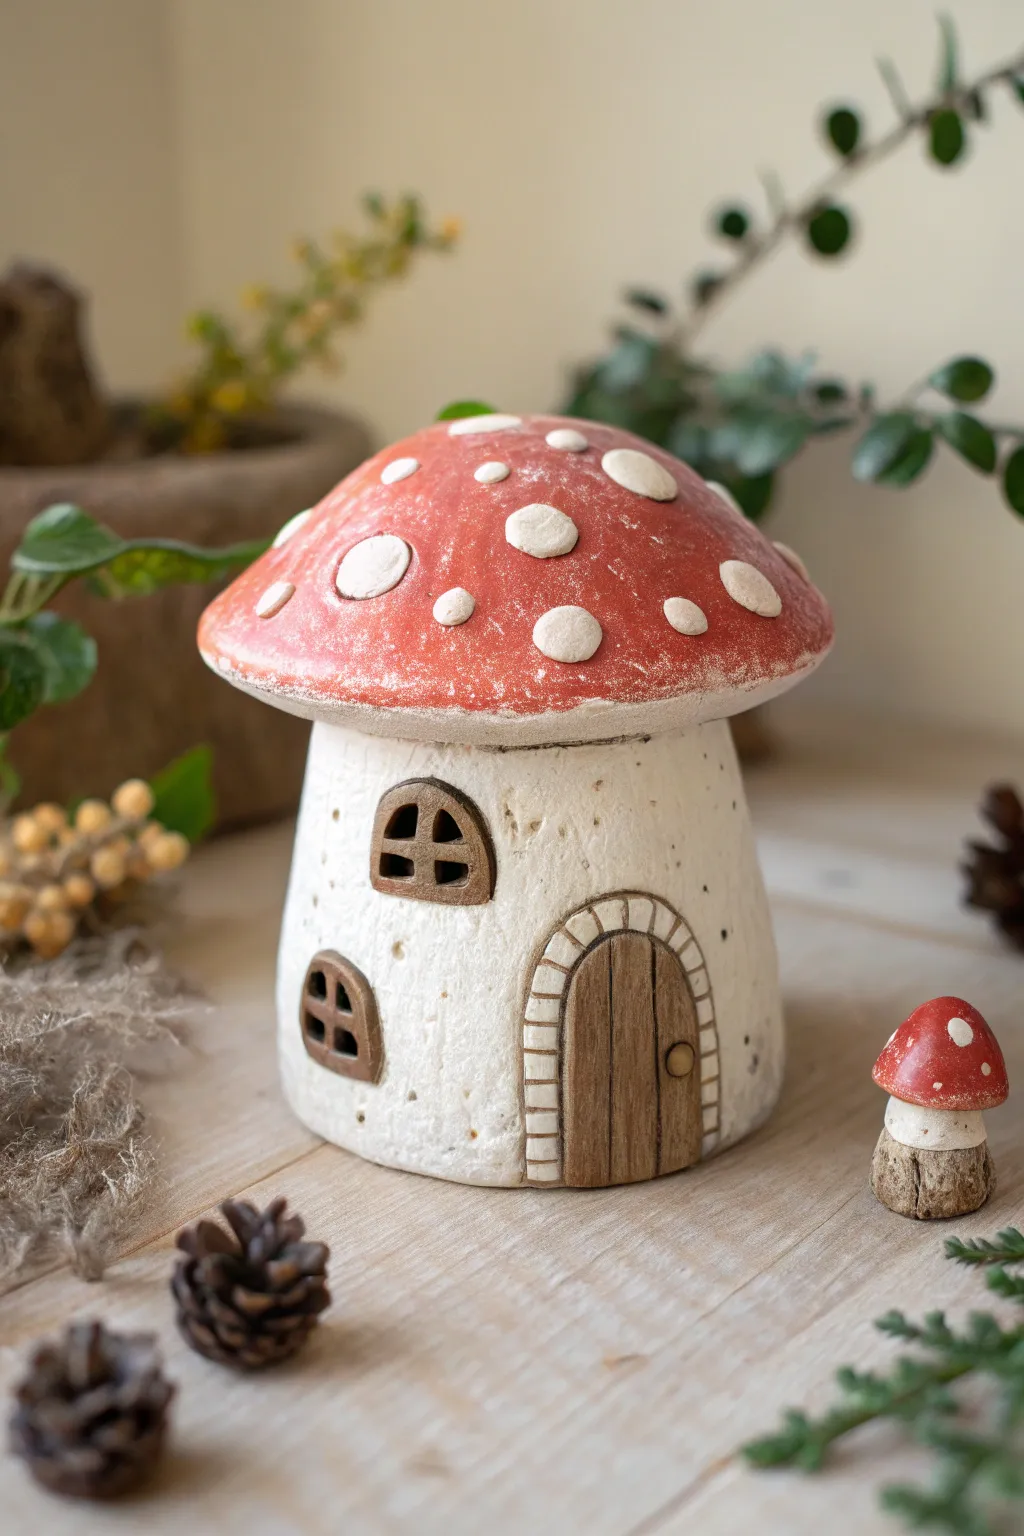
Bring a touch of woodland whimsy to your garden or shelf with this delightful clay mushroom house. Featuring a textured white stalk, a classic red-capped roof, and charming wooden door details, this project perfectly captures the essence of fairytales.
Step-by-Step Guide
Materials
- White air-dry clay or polymer clay (approx. 500g)
- Acrylic rolling pin
- Clay sculpting tools (needle tool, ball stylus)
- Foil or styrofoam ball (for the armature)
- Acrylic paints (Red, White, Cream/Off-White, Brown, Dark Brown, Black)
- Paintbrushes (flat brush, fine detail brush, stiff bristle brush)
- Texture sponge or stiff brush
- Craft knife
- Water cup (for smoothing)
- Matte varnish or sealant
Step 1: Sculpting the Base
-
Form the armature:
Begin by crumbling aluminum foil into a cylinder shape that flares out slightly at the bottom to create a stable base for your mushroom stalk. If you prefer a lighter house, you can use a cardboard tube cut to size. -
Roll out the clay:
Roll out a slab of white clay to about 1/4 inch thickness. Ensure it is large enough to wrap completely around your foil cylinder with a little overlap. -
Wrap the stalk:
Gently wrap the clay slab around the foil armature. Join the seam by scoring both edges (scratching them up), adding a dab of water or slip, and blending the clay together until the line disappears. -
Create texture:
Use a texture sponge, a stiff toothbrush, or a crumpled ball of foil to gently pat the entire surface of the stalk. This gives it that organic, porous stone look rather than being perfectly smooth.
Cracks happen?
If you see hairline cracks while drying, don’t panic! Create a ‘slurry’ using a tiny bit of fresh clay mixed with water, and fill the cracks like spackle before painting.
Step 2: Adding Architectural Details
-
Cut the openings:
Decide where you want your door and windows. Use a needle tool to lightly outline two small arched windows and one larger arched doorway. -
Sculpt the door:
Roll a small oval of clay and flatten it to fit inside your door outline. Use a craft knife to score vertical lines to mimic wood planks. -
Add the door frame:
Roll a thin snake of clay and flatten it slightly. Arrange it in an arch around the door. Use your knife to press perpendicular lines into this strip to create individual ‘stone’ bricks. -
Install the windows:
Create small D-shapes of clay for the windows. Press them into the outlined spots. Use tiny strips of clay to create a cross shape on top of each for the windowpanes. -
Add a doorknob:
Roll a tiny ball of clay and attach it to the right side of the door for a handle. -
Define the texture features:
Use a small ball tool to poke random, gentle indentations around the stalk to enhance the weathered, natural appearance.
Step 3: Forming the Mushroom Cap
-
Shape the roof armature:
Form a dome shape using foil that is wider than your base stalk. It should look like a flattened bowl. -
Cover the roof:
Roll out another slab of clay and drape it over your dome armature. Trim the excess edges, smoothing them underneath to create a clean rim. -
Add the spots:
Roll various sizes of small clay balls and flatten them into discs. Press these randomly onto the roof dome. I find varying the sizes makes it look more natural. -
Join and dry:
Place the roof onto the stalk. You can join them permanently with slip, or leave them separate if you want the roof to be removable (like a jar). Allow the piece to dry completely according to package instructions.
Make it glow
Leave the roof removable and hollow out the stalk’s center more thoroughly. Place a battery-operated LED tea light inside to illuminate the windows at night.
Step 4: Painting and Finishing
-
Base coat the stalk:
Paint the stalk a creamy off-white. While the paint is still wet, you can wipe some away with a rag to let the clay texture show through. -
Paint the roof:
Paint the main part of the mushroom cap a vibrant, earthy red. Careful around the spots—paint them white, or leave them raw if your clay is white. -
Detail the wood:
Paint the door and window frames brown. Use a watered-down dark brown wash over the door to settle into the grooves, highlighting the wood grain effect. -
Weathering finish:
Dry brush a little bit of white paint over the red roof to give it a dusty, chalky look. This softens the red and makes it look sun-bleached. -
Seal the piece:
Once all paint is fully dry, apply a coat of matte varnish to protect your fairy house from moisture and dust.
Place your finished mushroom house among some potted plants or moss to complete the enchanting scene


Leaf Roof Fairy House
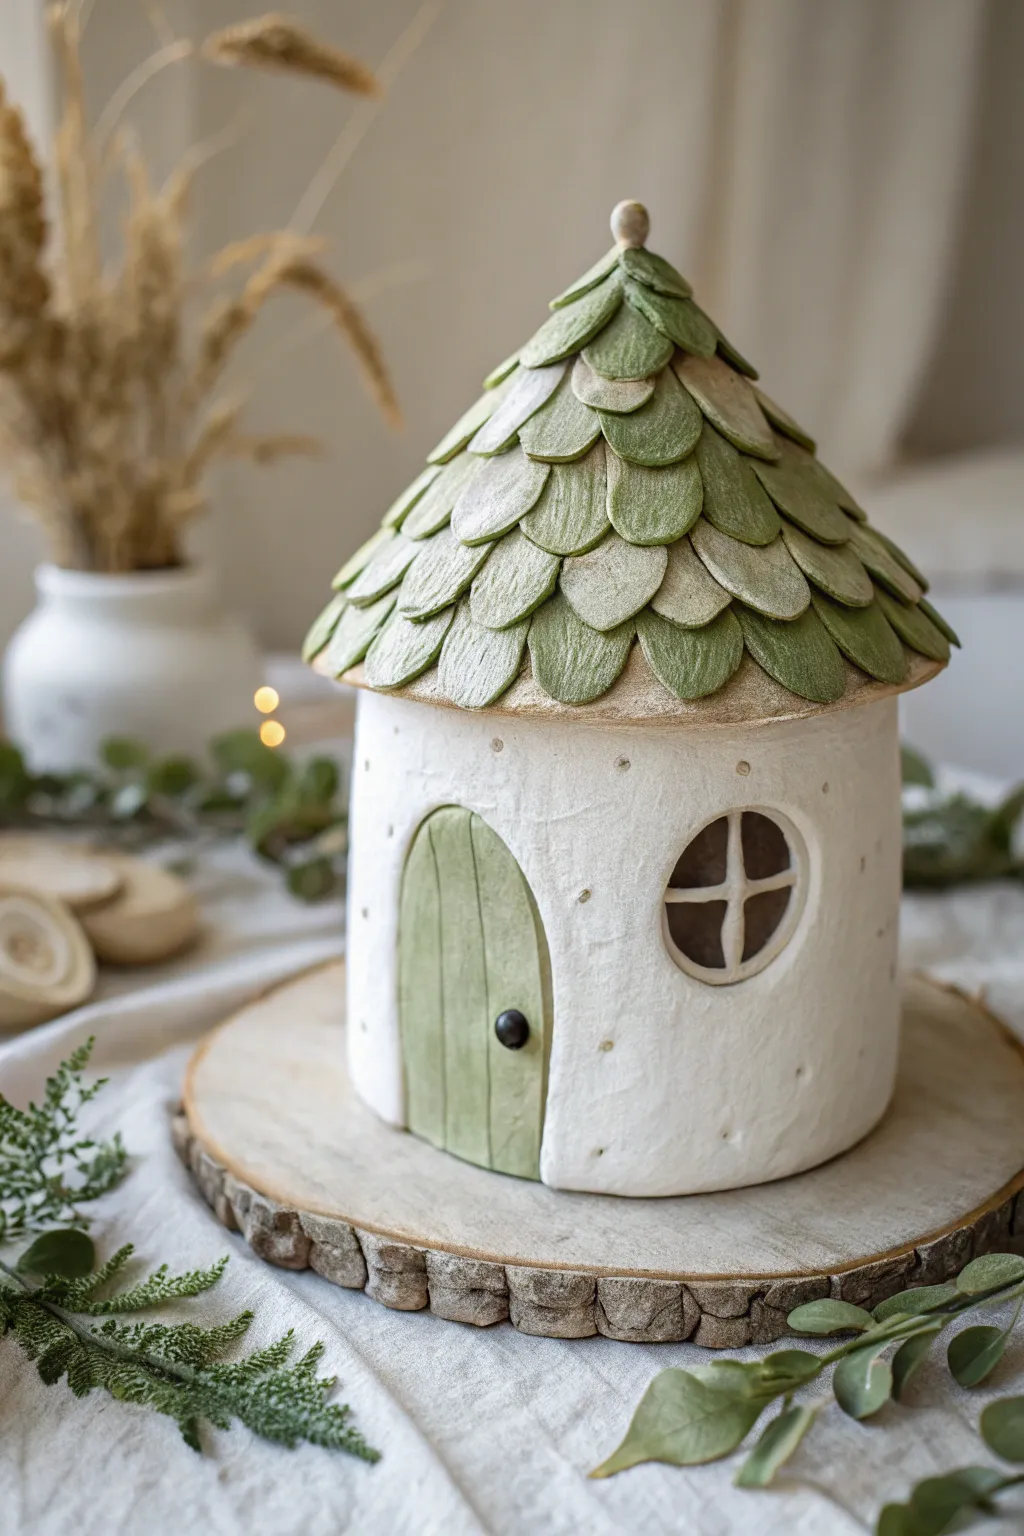
This enchanting fairy dwelling features a textured white base topped with a charming roof made of individually sculpted green clay leaves. Its simple arched door and round window give it a welcoming, magical feel perfect for any indoor garden or shelf display.
Step-by-Step Tutorial
Materials
- Air-dry clay (white)
- Acrylic paints (olive green, forest green, warm white, beige, brown)
- Rolling pin
- Leaf-shaped cutter (small/medium) or craft knife
- Sculpting tools (needle tool, ball tool)
- Cardboard or foil (for armature)
- Water and slip (clay glue)
- Small paintbrushes (flat and detail)
- Matte varnish
- Circular wooden slice (for base)
Step 1: Building the Structure
-
Prepare the base form:
Create a cylindrical core using a crumpled ball of aluminum foil or a cardboard tube cut to size. This armature will save clay and keep the house lightweight. -
Roll the main walls:
Roll out a slab of white air-dry clay to about 1/4 inch thickness. Ensure it’s long enough to wrap completely around your armature. -
Wrap and seal:
Wrap the clay slab around your form, trimming any excess overlap. Score and add a bit of water (slip) where the edges meet, smoothing the seam with your finger until it disappears. -
Add texture:
Gently dab a crumpled piece of aluminum foil or a stiff bristle brush all over the wet clay walls to create a stucco-like texture. -
Create the roof cone:
Form a cone shape out of cardboard or scrunched foil that fits perfectly atop your cylinder walls. This will support the weight of the clay leaves.
Natural Texture
Before attaching the roof leaves, gently press a real leaf onto each clay piece to transfer authentic vein patterns for extra realism.
Step 2: Sculpting Details
-
Cut the door opening:
Using a needle tool, lightly trace an arched doorway shape on the front. You don’t need to cut it out completely; just create an indented area where the door will sit. -
Form the door:
Roll a small piece of clay into a flat arched shape that fits your traced area. Use a knife to scribe vertical lines for wood planks. -
Shape the window:
Create a small circular indent for the window. Roll thin snakes of clay to form the ‘plus sign’ windowpane dividers and place them inside the circle. -
Fabricate the roof leaves:
Roll out more clay and use a leaf cutter or craft knife to make many tear-drop shapes. I find it helpful to make about 20% more than I think I need. -
Apply the shingles:
Starting at the bottom rim of the roof cone, attach the clay leaves row by row using slip, slightly overlapping each upper row over the one below it. -
Shape the peak:
Once you reach the top, pinch the final leaves together to form a tidy point or add a tiny clay ball finial to cap it off. -
Add tiny details:
Press small indentations or ‘rivet’ marks around the door frame and walls using a small ball tool for extra whimsy.
Cracking Clay?
If cracks appear while drying, mix a tiny bit of fresh clay with water to make a paste and fill the cracks, then smooth with a damp finger.
Step 3: Painting and Finishing
-
Base coat the walls:
Once fully dry (24-48 hours), paint the walls a soft, warm white. If the clay is already white, a light wash of beige can bring out the texture. -
Paint the roof:
Mix olive and forest green acrylics. Paint the leaf shingles, blending the colors slightly so some leaves are lighter than others for a natural look. -
Detail the door:
Paint the door a muted sage green. Add a tiny black bead or a dot of black paint for the doorknob. -
Darken the window:
Carefully paint the spaces between the window panes with dark brown or black to simulate depth. -
Highlight the edges:
Use a dry brush technique with a tiny amount of pale beige or white paint to brush over the edges of the roof leaves and the wall texture. -
Mount on base:
Glue the finished house onto the wooden slice base using strong craft glue. -
Seal the project:
Apply a coat of matte varnish to protect the paint and give the house a unified, finished sheen.
Now your charming little cottage is ready to welcome its first fairy resident


Cobblestone Path Fairy House Base

Transport yourself to a tiny forest world with this charming clay fairy house, featuring a textured stone-effect path and a cozy shingled roof. The natural earth tones and meticulous miniature detailing make this a perfect centerpiece for a shelf or indoor garden.
Step-by-Step
Materials
- Air-dry clay (white/grey)
- Small round wooden base or thick cardboard
- Acrylic paints (browns, greys, cream, earthy green)
- Small paintbrushes (detail and flat)
- Textured rolling pin or real stone for impressing
- Sculpting tools (needle tool, small spatula)
- Dried moss
- Artificial miniature plants/flowers
- Gorilla glue or strong craft glue
- Matte varnish spray
Step 1: Base and Structure
-
Prepare the Foundation:
Start by rolling out a thick, flat disc of clay slightly smaller than your wooden base. Press this firmly onto the base to create the ground layer where your house and path will sit. -
Form the House Core:
Shape a large ball of clay into a cylinder with slightly rounded sides. This will be the main body of the house. Hollow out the center carefully to reduce weight and prevent cracking as it dries. -
Create Texture:
Roll a crumpled ball of aluminum foil or a real rough stone gently over the surface of the house walls. This imitates the look of rough stucco or stone plaster. -
Attach the Walls:
Score the bottom of your house cylinder and the center of the base where it will sit. Add a dab of water or slip (liquid clay) to join them securely, blending the edges at the bottom.
Step 2: Doors, Windows, and Roof
-
Sculpt the Door Frame:
Roll small balls of grey-tinted clay and flatten them into irregular stones. Arrange these in an arch shape on the front of the house to create the stone door surround. -
Add the Door:
Cut a small arch shape from rolled-out clay for the wooden door. Use a needle tool to etch vertical lines for wood grain and deeper horizontal lines for planks. Place this inside your stone arch. -
Window Details:
Repeat the process for the windows: create smaller arched frames with clay ‘wood’ inserts. Don’t forget to add tiny clay strips for the window panes. -
Build the Roof Structure:
Fashion a cone shape from foil or thick paper to support the roof. Cover this form with a layer of clay, smoothing it out to create the underlying roof shape. -
Apply Shingles:
For the roof tiles, pinch off small pieces of reddish-brown clay and flatten them into teardrop or scale shapes. Starting at the bottom rim of the roof, overlap them row by row, working your way up to the peak. -
Dormer Window:
Create a tiny separate window assembly with a mini roof. Attach this carefully to the main roof slope while the clay is still pliable, blending the seams underneath the shingles. -
Chimney Topper:
Roll a small coil and attach it to the very tip of the roof for a chimney or decorative spire. I find using a little slip here ensures it doesn’t pop off later.
Cracking Clay?
If minor cracks appear while drying, mix a tiny bit of fresh clay with water to make a paste. Fill the cracks, smooth with a damp finger, and let dry again.
Step 3: The Cobblestone Path
-
Lay the Main Stones:
Roll many tiny balls of white or light grey clay. Flatten them slightly to make pebble shapes. Press these one by one into the soft base clay, creating a winding path that starts wide at the edge and leads to the door. -
Add Steps:
Create 3-4 flat, oval slabs of clay. Stack them in a staggered formation leading up to the door to create stone steps. Use a tool to texture the edges so they look like cut stone. -
Landscape Rocks:
Form larger, smooth ‘boulders’ from grey clay. Place a few near the house foundation and along the non-path areas to creating natural groupings.
Real Stone Texture
Press a real textured rock or piece of sandpaper into your wet clay ‘boulders’ and steps before they dry. It creates hyper-realistic pitting instantly.
Step 4: Finishing Touches
-
Let it Dry:
Allow the entire structure to dry completely. This usually takes 24-48 hours depending on humidity. Don’t rush this step or cracks may appear. -
Paint Wash:
Once dry, apply a watered-down brown acrylic wash over the cobblestones and wipe away the excess with a paper towel. This settles into the crevices, making the individual stones pop. -
Detail Painting:
Paint the door and window frames with a warm wood tone. Add tiny black or dark grey dots for door handles and hinges. -
Adding Vegetation:
Apply craft glue to the ‘dirt’ areas of the base (where there are no stones). Press dried moss firmly into the glue. Glue small artificial plant sprigs or tiny paper flowers near the house walls for a garden effect. -
Seal the Work:
Finish with a light coat of matte varnish spray to protect the paint and clay from moisture and dust.
Now you have a magical little abode ready for its fairy occupants to move in

The Complete Guide to Pottery Troubleshooting
Uncover the most common ceramic mistakes—from cracking clay to failed glazes—and learn how to fix them fast.
Curved Chimney Storybook Fairy House
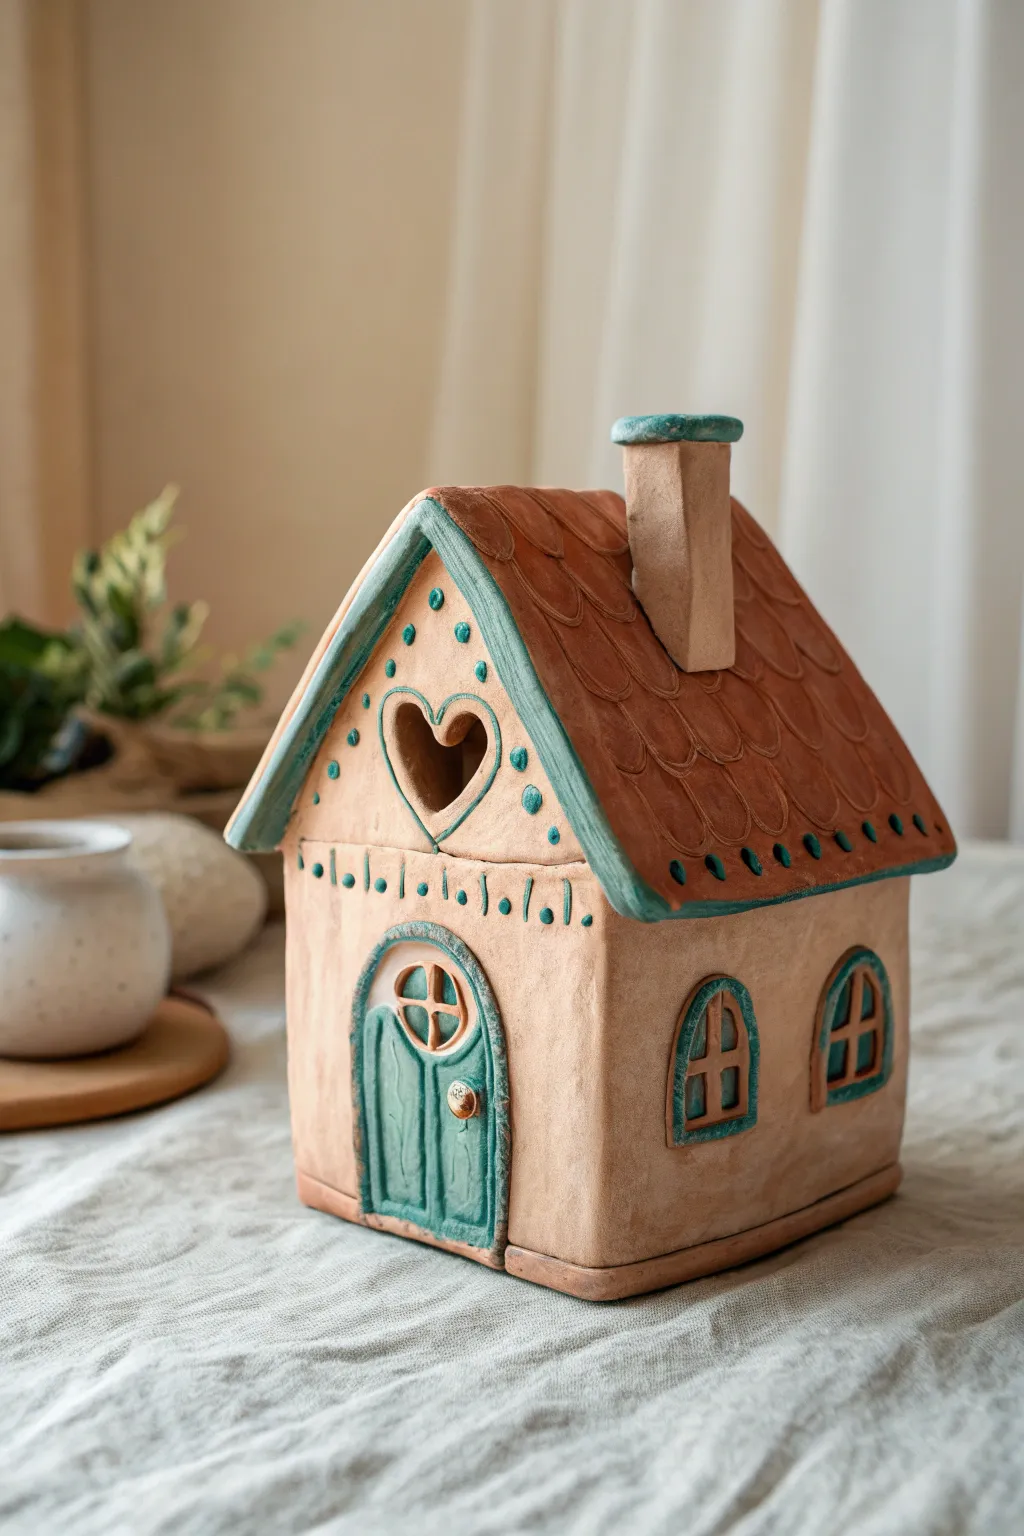
Bring a touch of magic to your garden or shelf with this delightful clay fairy house, featuring a cozy scalloped roof and a heart-shaped attic window. The beautiful contrast between the warm terracotta clay and the soft teal patina glaze gives it a timeless, storybook charm.
Step-by-Step Guide
Materials
- Earthenware or air-dry clay (terracotta color recommended)
- Clay slab roller or rolling pin
- Fettling knife or craft knife
- Clay slip and scoring tool
- Small heart-shaped cookie cutter
- Teal or turquoise underglaze (or acrylic paint if using air-dry clay)
- Small round paintbrush
- Sponge
- Template paper and scissors
Step 1: Constructing the Base
-
Roll the slabs:
Begin by rolling out your clay to a consistent thickness, roughly 1/4 inch. Creating even slabs is crucial for structural integrity, so take your time here. You will need enough clay for four rectangular walls and two roof panels. -
Cut the walls:
Using a simple paper template, cut out two square side walls and two peaked walls (squares with triangles on top for the gables). Ensure the side walls match the height of the square portion of your peaked walls. -
Create the cutouts:
While the walls are lying flat, carve out two arched windows on one side wall. On the front peaked wall, gently press the heart cutter into the center of the triangle area to remove the clay. At the base, carve an arched doorway opening. -
Assemble the structure:
Score the edges of your walls and apply a generous amount of slip. Stand the walls up and press the scored edges together to form a box. Reinforce the inside seams with a small coil of clay, smoothing it out with your finger. -
Add the roof slabs:
Cut two rectangular slabs for the roof. Score and slip the top angled edges of the peaked walls. Carefully place the roof slabs on top, creating a classic A-frame. Allow them to overhang the walls slightly for eaves.
Sagging Roof?
If the roof slabs start to sag inward during assembly, temporarily stuff the inside of the house with crumpled newspaper or paper towels to support the clay until it stiffens up.
Step 2: Adding Details & Texture
-
Sculpt the shingles:
Instead of individual tiles, we will carve the texture. Use a rounded modeling tool or the back of a paintbrush to impress ‘U’ shapes across the roof slabs, layering them like fish scales from bottom to top. -
Craft the chimney:
Form a small rectangular tube of clay. Cut the bottom at an angle to match the slope of your roof. Score, slip, and attach it to one side of the roof, smoothing the seam so it looks integrated. -
Add the roof trim:
Roll thin coils of clay and flatten them slightly. Attach these strips to the front and back edges of the roof to create a distinct border or bargeboard. This frames the shingles beautifully. -
Shape the door and frames:
Roll a thicker slab for the door and cut it to fit inside your arched opening. Sculpt subtle vertical grooves for wood texture and add a tiny ball of clay for a doorknob. Create thin coils to outline the windows and the doorframe. -
Refine the surface:
Use a damp sponge to smooth any rough edges on the main walls, but maintain the slightly uneven, handmade texture. Use a needle tool to poke decorative dots along the roof trim and around the heart cutout.
Go For Glow
Cut a large hole in the bottom of the house before assembly. This allows you to place the finished house over a battery-operated tea light, making the windows and heart glow safely.
Step 3: Finishing Touches
-
Dry properly:
Allow the house to dry slowly under loose plastic for a day or two to prevent warping, then uncover it to dry completely. If firing involves a kiln, follow your clay’s specific firing schedule now. -
Apply the teal accent:
Once bisque fired (or fully dry if using air-dry clay), paint the roof trim, the door, the window frames, and the decorative dots with your teal color. I like to water down the paint slightly to let it settle into the recesses. -
Add the patina effect:
For the roof shingles and main walls, you can apply a very diluted wash of brown or oxide to highlight the textures, wiping away the excess with a sponge so color remains only in the carved lines. -
Seal the piece:
If using air-dry clay, finish with a matte varnish to protect your work. If using ceramic glazes, apply a clear matte glaze if desired and fire for the final time.
Enjoy the cozy atmosphere your handcrafted cottage adds to your home display
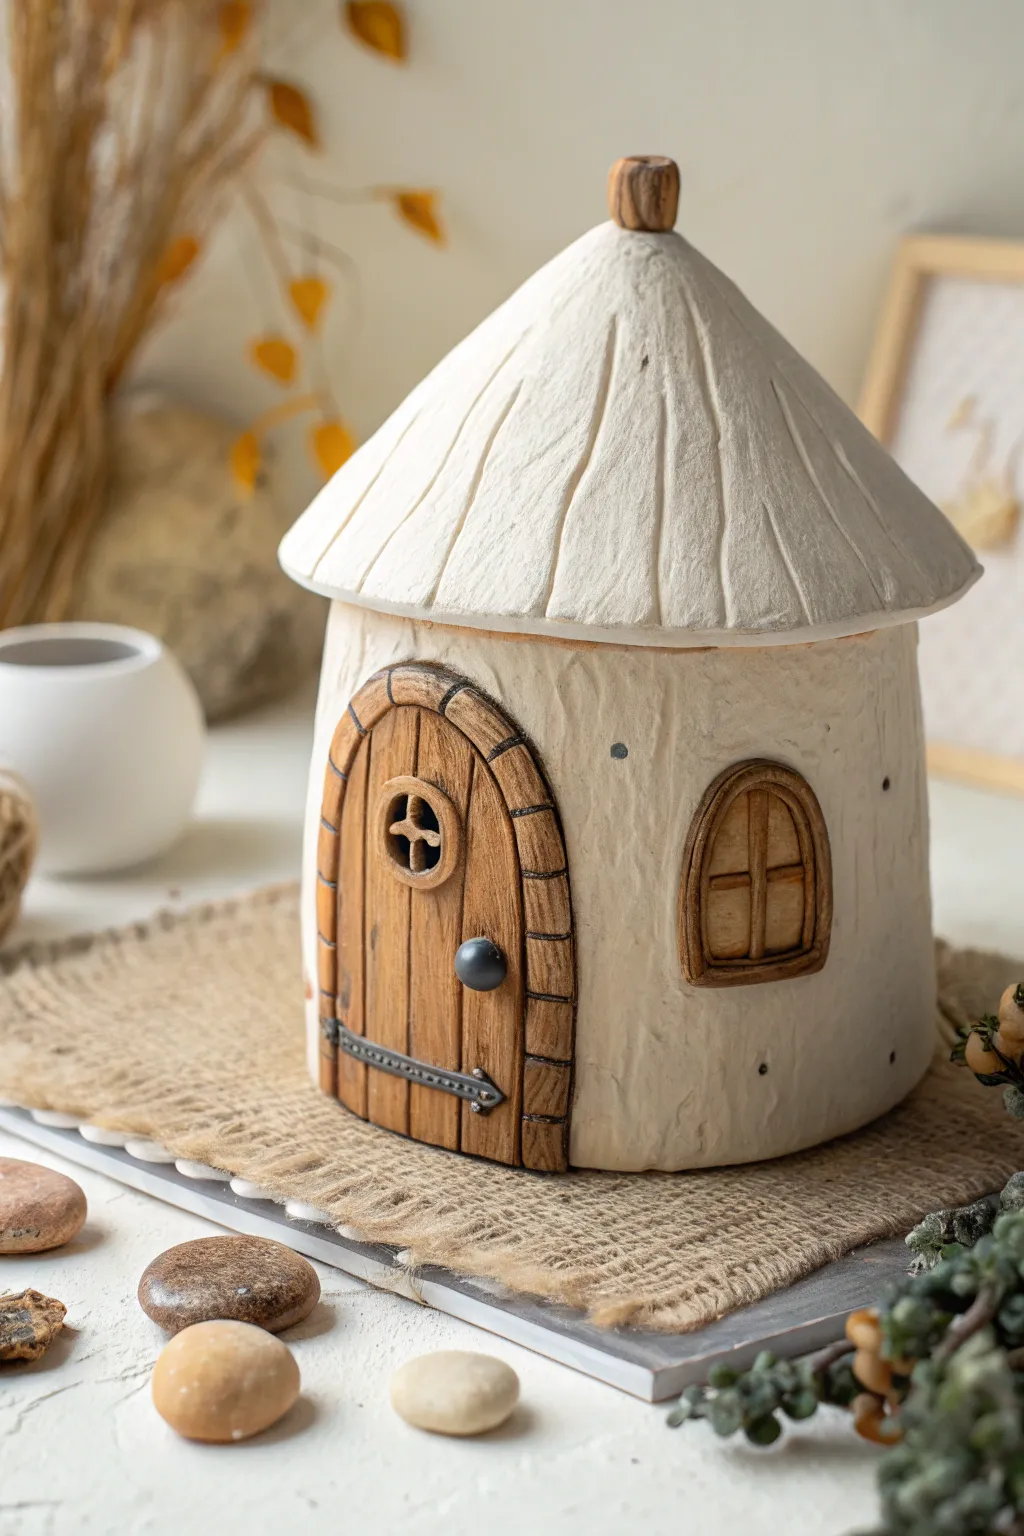
Round Windows and Arched Door Fairy House
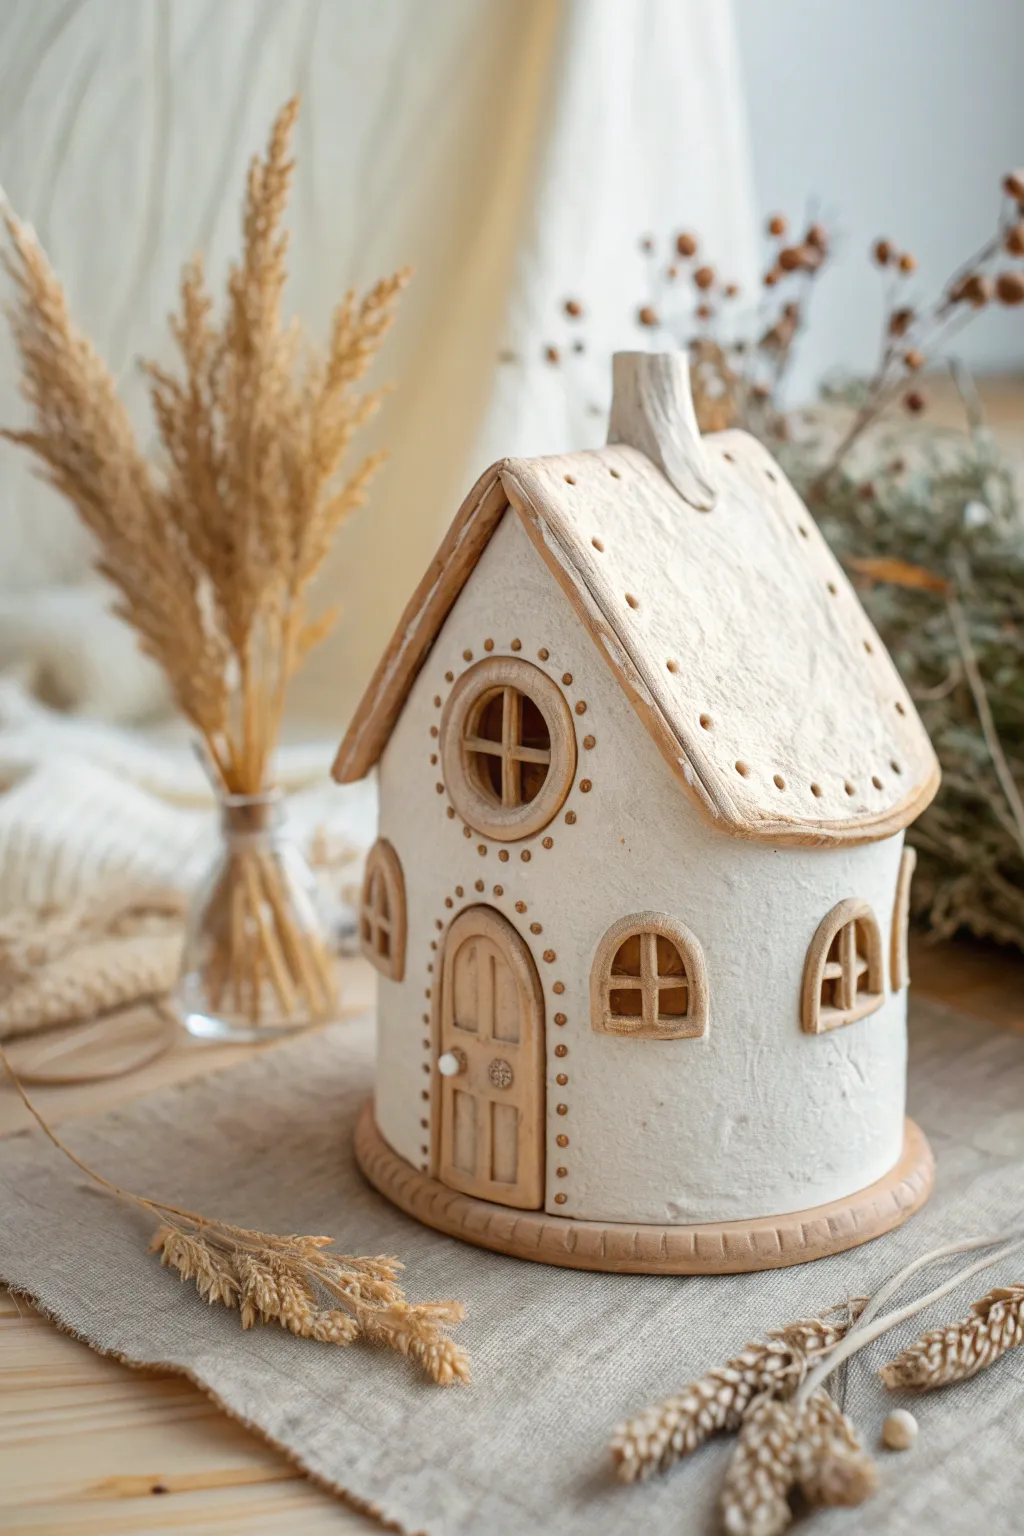
This charming fairy dwelling features a unique textured white façade contrasted with natural clay accents around the windows and roof. With its inviting arched doorway and perfectly round attic window, this piece brings a cozy, storybook feel to any display.
Step-by-Step Tutorial
Materials
- Air-dry clay (white and terracotta/natural colors)
- Rolling pin
- Cardboard or plastic tube (for the structural base)
- Craft knife or clay tools
- Texture tools (sponge or stiff brush)
- Water and slip (clay glue)
- Acrylic paints (optional, if using only white clay)
- Matte varnish
Step 1: Building the Structure
-
Prepare the base form:
Start by finding a sturdy cylindrical form to wrap your clay around. A cardboard tube or a plastic bottle with the top cut off works perfectly as an armature. -
Roll out the walls:
Roll out a slab of white air-dry clay to about 1/4 inch thickness. Measure the circumference of your base form and cut a rectangle large enough to wrap completely around it. -
Wrap the walls:
Carefully drape the clay slab around your form. Join the seam by scoring the edges, adding a little water or slip, and smoothing the clay together until the line disappears. -
Texture the surface:
Before the clay hardens, create the stucco-like texture. I like to gently dab the entire surface with a dry sponge or a ball of crumpled aluminum foil to roughen it up.
Structure Secret
To keep the roof from sagging while it dries, stuff the inside of the house with crumpled paper towels or newspaper until the clay hardens.
Step 2: Adding the Roof
-
Form the roof slab:
Roll out a slab of natural-colored clay (or white clay you plan to paint later). Keep it slightly thicker than the walls for stability. -
Cut the roof shape:
Cut a large rectangle that will fold over the top of the house to create an A-frame. Test difference sizes to ensure you have a nice overhang on the eaves. -
Attach the roof:
Score the top rim of your house walls. Place the roof slab on top, gently bending it into an inverted ‘V’ shape. You may need to create triangular gable wall pieces to fill the gaps under the roof peak on the front and back. -
Detail the edges:
Smooth the edges of the roof to soften them. Using a needle tool, poke a row of decorative dots along the bottom edge of the roof. -
Create the chimney:
Fashion a slightly curved, rustic chimney from a scrap of white clay and attached it near the peak of the roof.
Let There Be Light
Cut out the clay behind the windows before they dry. This allows you to place a small battery-operated tea light inside for a warm glow.
Step 3: Windows and Door
-
Create the door frame:
Roll a thin snake of natural-colored clay. Shape it into an arch and press it onto the front of the house to define the door frame. -
Sculpt the door:
Fill the arch with a flattened piece of natural clay. Use a knife tool to carve vertical lines for wood planks and add a tiny ball of white clay for the doorknob. -
Add the attic window:
For the signature round window, make a ring of natural clay and attach it high up in the gable triangle. Add thin strips of clay inside to create a cross-pane design. -
Construct side windows:
Make small arched frames for the lower windows using the same method as the door. Attach them symmetrically on either side of the door. -
Embellish the trim:
Using a small dotting tool or the end of a paintbrush, press tiny indentations into the natural clay frames around the door and attic window for extra detail.
Step 4: Finishing Touches
-
Add the base:
Place the house on a slightly larger disc of natural clay. Press the house down firmly and add a textured rim around the bottom edge, using a knife to mark vertical lines. -
Dry thoroughly:
Allow the project to dry slowly away from direct heat to prevent cracking. This usually takes 24-48 hours depending on humidity. -
Refine the colors:
If you used all white clay, paint the roof, door, base, and window frames with a diluted light brown or beige acrylic paint to mimic the natural clay look. -
Seal the work:
Once fully dry (and painted, if applicable), apply a coat of matte varnish to protect the surface and seal the texture.
Place your rustic cottage among dried flowers or on a bookshelf for an instant touch of magic


What Really Happens Inside the Kiln
Learn how time and temperature work together inside the kiln to transform clay into durable ceramic.
Mini Fairy House With Hanging Sign
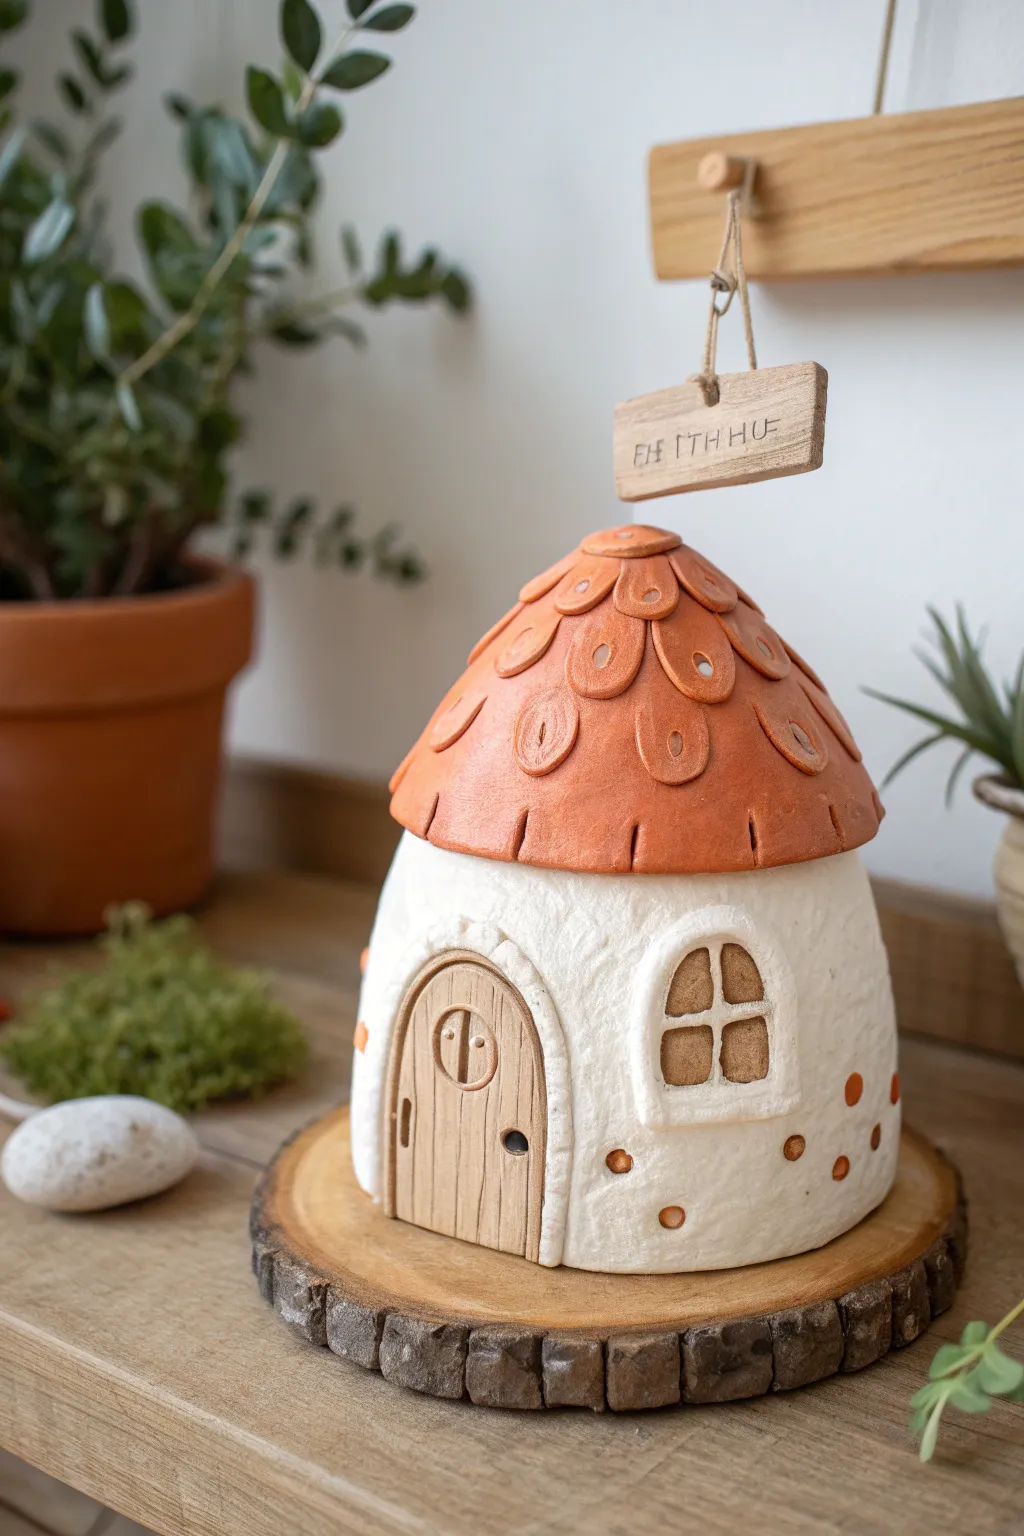
This adorable little dwelling features a textured white base, an earthy orange scale roof, and a charming hanging sign that welcomes magical visitors. Sitting atop a faux-wood slice base, it brings a cozy, woodland feel to any fairy garden display.
How-To Guide
Materials
- White air-dry clay or polymer clay
- Terracotta or orange-colored clay
- Light brown/tan clay
- Dark brown acrylic paint (for antiquing)
- Black acrylic paint
- Sculpting tool set (needle tool, ball tool, knife)
- Rolling pin
- Aluminum foil (for armature)
- Texture sponge or toothbrush
- Thin crafting wire or jute twine
- Strong craft glue
Step 1: Creating the Base and Walls
-
Form the armature:
Crumple a ball of aluminum foil into a slightly tapered cylinder shape to serve as the core. This saves clay and keeps the structure light. -
Roll out the white clay:
Roll your white clay into a sheet about 1/4 inch thick. Make sure it’s large enough to wrap entirely around your foil armature. -
Wrap the walls:
Drape the white clay sheet over the foil, smoothing the seams together at the back so the surface appears seamless. -
Add texture:
Before the clay hardens, firmly press a texture sponge or a clean toothbrush over the entire white surface to give it a stucco-like, organic finish. -
Indent door and window:
Use your thumb or a large ball tool to gently press indentations where the door and window will eventually go.
Cracking Clay?
If your air-dry clay develops hairline cracks while drying, mix a tiny bit of fresh clay with water to make a paste (slip) and smooth it into the cracks.
Step 2: Roof and Shingles
-
Shape the roof base:
Create a flattened cone shape from foil or scrap clay that fits atop your white base. -
Prepare the roof clay:
Roll out a sheet of terracotta or orange clay. Drape this over your roof cone and trim the excess edges so it sits like a cap. -
Create the shingles:
Roll small balls of the same orange clay and flatten them into teardrop shapes. I find pressing them with my thumb creates the perfect organic petal shape. -
Attach the shingles:
Starting at the bottom edge of the roof, press the shingles on in overlapping rows, working your way up to the peak. -
Detail the shingles:
Use a needle tool or small loop tool to impress an oval or circle into the center of each shingle for extra decorative flair. -
Define the eaves:
Use a knife tool to score vertical lines along the bottom rim of the roof to define the sections. -
Assemble the structure:
If using air-dry clay, score and slip the contact points before pressing the roof onto the white base. For polymer, a little liquid clay helps them bond.
Pro Tip: Realistic Wood
After scoring wood grain lines on the door and base, brush a very diluted dark brown acrylic paint over them and wipe off the excess to highlight the texture.
Step 3: Doors, Windows, and Details
-
Make the door:
Cut an arch shape from flattened light brown clay. Use a needle tool to score vertical wood grain lines into it. -
Add door hardware:
Roll tiny ropes of clay for the door frame and attach them. Add a small ball for the handle and a tiny circle for a window or knocker detailing. -
Construct the window:
Create a smaller arched frame from white clay. Place a smooth piece of brown clay inside for the ‘glass’ and lay tiny clay strips across it to form window panes. -
Add polka dots:
Press tiny flat circles of orange clay randomly around the lower half of the white walls for a playful mushroom effect. -
Make the hanging sign:
Fashion a small rectangle from light brown clay. While soft, scratch pseudo-runic letters or a name into it using a needle tool. -
Rig the sign:
Poke two holes in the top of the sign and insert a small loop of wire or twine into the very top peak of the roof. Once dry/baked, maintain the suspension with thread or glue the sign under a wire ‘hook’. -
Create the base:
Roll a thick slab of brown clay into a circle larger than the house. Score the edges to look like rough tree bark and place the house in the center.
Once specific paints dry, your enchanted little cottage is ready to be the centerpiece of a mossy garden display
Wavy Shingle Roof Fairy House
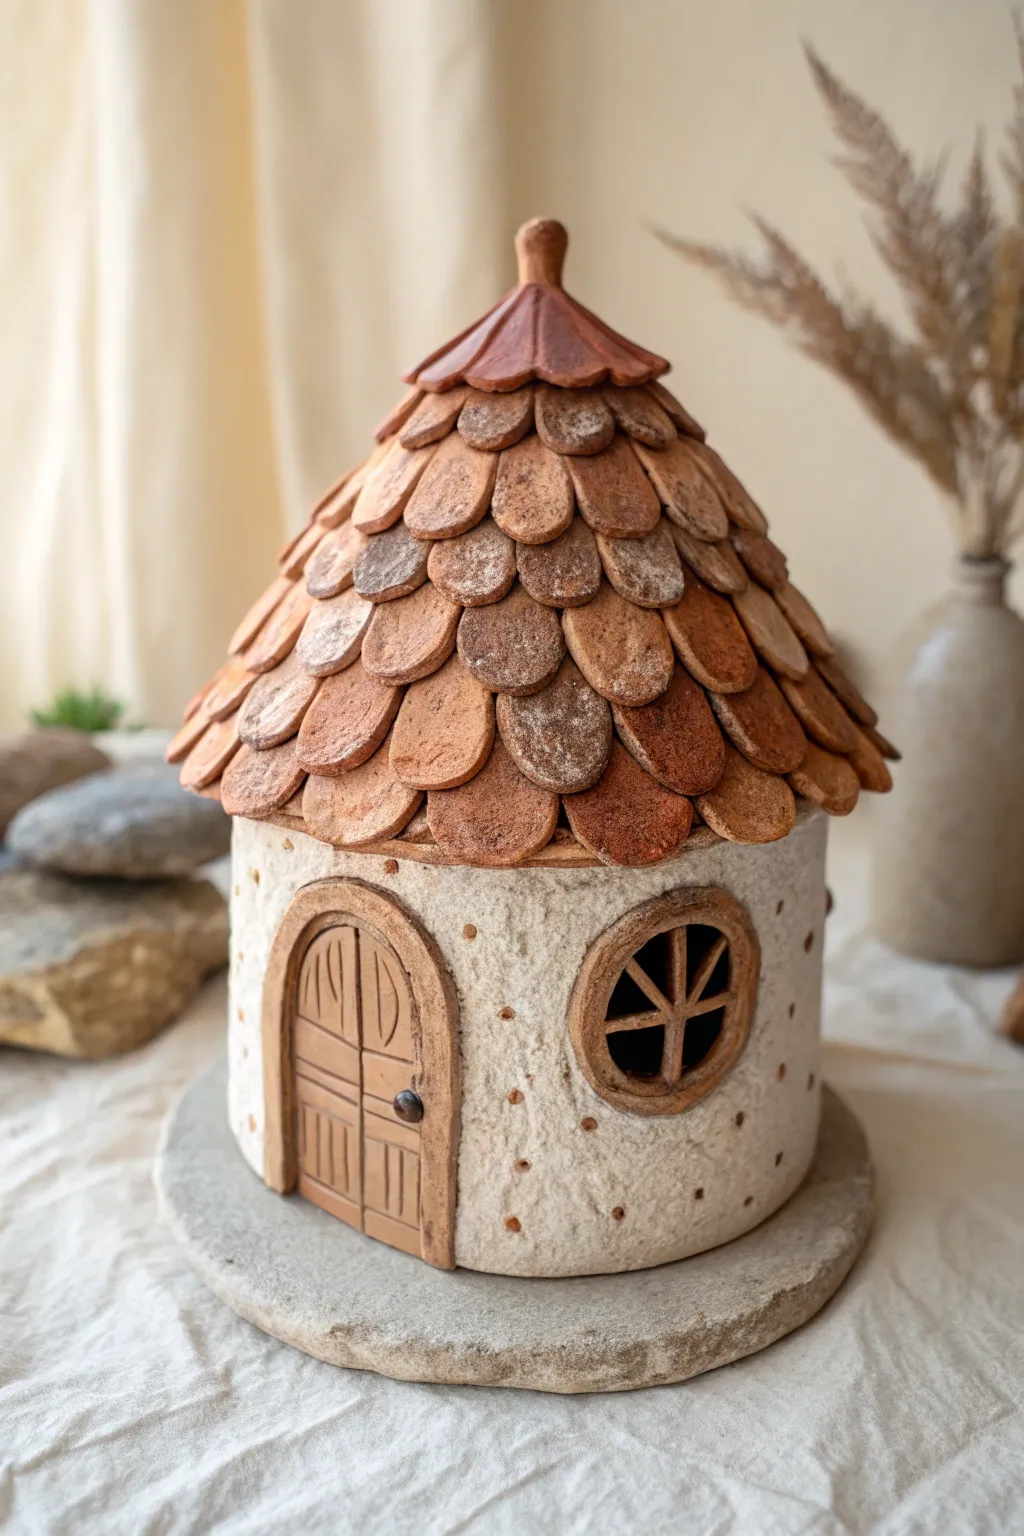
Embrace the whimsical textures of this woodland-inspired fairy cottage, featuring a distinctive roof lush with overlapping clay shingles. The combination of a gritty, stucco-like body and warm terracotta tones makes this piece feel like it grew right out of the forest floor.
Step-by-Step Tutorial
Materials
- Stoneware clay or durable air-dry clay (white/cream and terracotta/brown)
- Rolling pin
- Circle cutter or cookie cutter (approx. 1 inch)
- Needle tool or fettling knife
- Slip (liquid clay) and scoring tool
- Texturing tools (stiff brush or toothbrush)
- Small dowel or sculpting tool
- Water spritzer
- Optional: Flat stone slab for the base
Step 1: Forming the Base Structure
-
Prepare the foundation:
Begin by rolling out a circular slab of clay for the floor, about 1/4 inch thick. If you want the house permanently attached to a stone base like the photo, you can form your clay directly onto a clean, dry flat stone, or create a faux-stone clay slab. -
Construct the walls:
Roll out a large slab of cream-colored clay for the walls. Cut a long rectangle, roughly 4-5 inches high. Wrap this rectangle into a cylinder that fits the circumference of your floor base. -
Join the seams:
Score the edges where the cylinder meets the floor and where the wall ends meet. Apply slip generously and press firmly to join. Smooth the vertical seam inside and out so it disappears completely. -
Add texture to the walls:
Before the clay hardens, use a stiffer bristled brush or a crumpled ball of aluminum foil to tap all over the exterior walls. This creates that lovely, rough stucco effect seen in the reference image.
Natural Variation
Don’t aim for perfect uniformity with your shingles. Slightly varying the thickness and pressing harder on some edges gives the roof that charming, hand-hewn timber look.
Step 2: Creating Doors and Windows
-
Cut the openings:
Using a needle tool, carefully cut out an arched space for the door and a circular hole for the window. Save the clay you remove to help size the frames. -
Sculpt the door frame:
Roll a snake of brown or terracotta clay and flatten it slightly. Score and slip it around the door opening to create a raised arch frame. -
Detail the door:
Roll a flat slab of brown clay to fit inside the door frame. Use a needle tool to draw vertical planks and a horizontal cross-beam. Add a tiny ball of dark clay for the doorknob. -
Craft the window:
Create a thick ring of brown clay for the window frame and attach it around the circular opening. I like to smooth the edges so they look worn and rustic rather than sharp. -
Add window panes:
Roll very thin coils of clay to create a cross shape inside the window. Attach these carefully to the inside edge of the window frame.
Cozy Illumination
Before the clay hardens, cut a large hole in the bottom of the base. This allows you to place the finished house over an LED tea light, making the windows glow warmly at night.
Step 3: Building the Shingled Roof
-
Create the roof support:
Form a cone shape out of cardstock or aluminum foil to act as a temporary armature. Place this gently on top of your cylinder walls to support the clay roof while you build it. -
Form the base cone:
Roll a large slab of brown clay and drape it over your armature to form the basic conical roof shape. Trim the bottom edge so it overhangs the walls slightly. -
Make the shingles:
Roll out a slab of terracotta or brown clay. Use a small circle cutter to punch out numerous discs. Gently flatten each disc into an oval shape to create the ‘beaver tail’ shingle look. -
Apply the first row:
Start at the very bottom edge of the roof cone. Score and slip the back of each shingle and press them onto the roof, allowing them to hang slightly over the edge. -
Layer the shingles:
Work your way up the roof in rows. Overlap the shingles significantly so the row above covers the gap between the two shingles below it. -
Vary the tones:
To achieve the varied look in the photo, lightly dust some shingles with white clay powder or use slightly different shades of brown clay for a weathered appearance. -
Cap the roof:
When you reach the peak, create a small, pinched cone of clay to cover the tips of the final row of shingles. Add a small decorative knob at the very top.
Step 4: Final Details
-
Add decorative dots:
Roll tiny, pin-head sized balls of brown clay. Press these gently into the white stucco walls in a random pattern for extra visual interest. -
Clean up:
Check all your joins. If you are using ceramic clay, poke a hidden hole in the bottom or behind the door to allow air to escape during firing to prevent explosions. -
Dry and finish:
Allow the piece to dry slowly under loose plastic to prevent warping. Once dry (or fired, if using ceramic clay), you can accentuate textures with a light wash of dark acrylic paint, wiping it back to leave color only in the crevices.
Place your finished house in a garden corner or on a shelf to invite a little magic into your home

TRACK YOUR CERAMIC JOURNEY
Capture glaze tests, firing details, and creative progress—all in one simple printable. Make your projects easier to repeat and improve.
Fairy House With Tiny Staircase
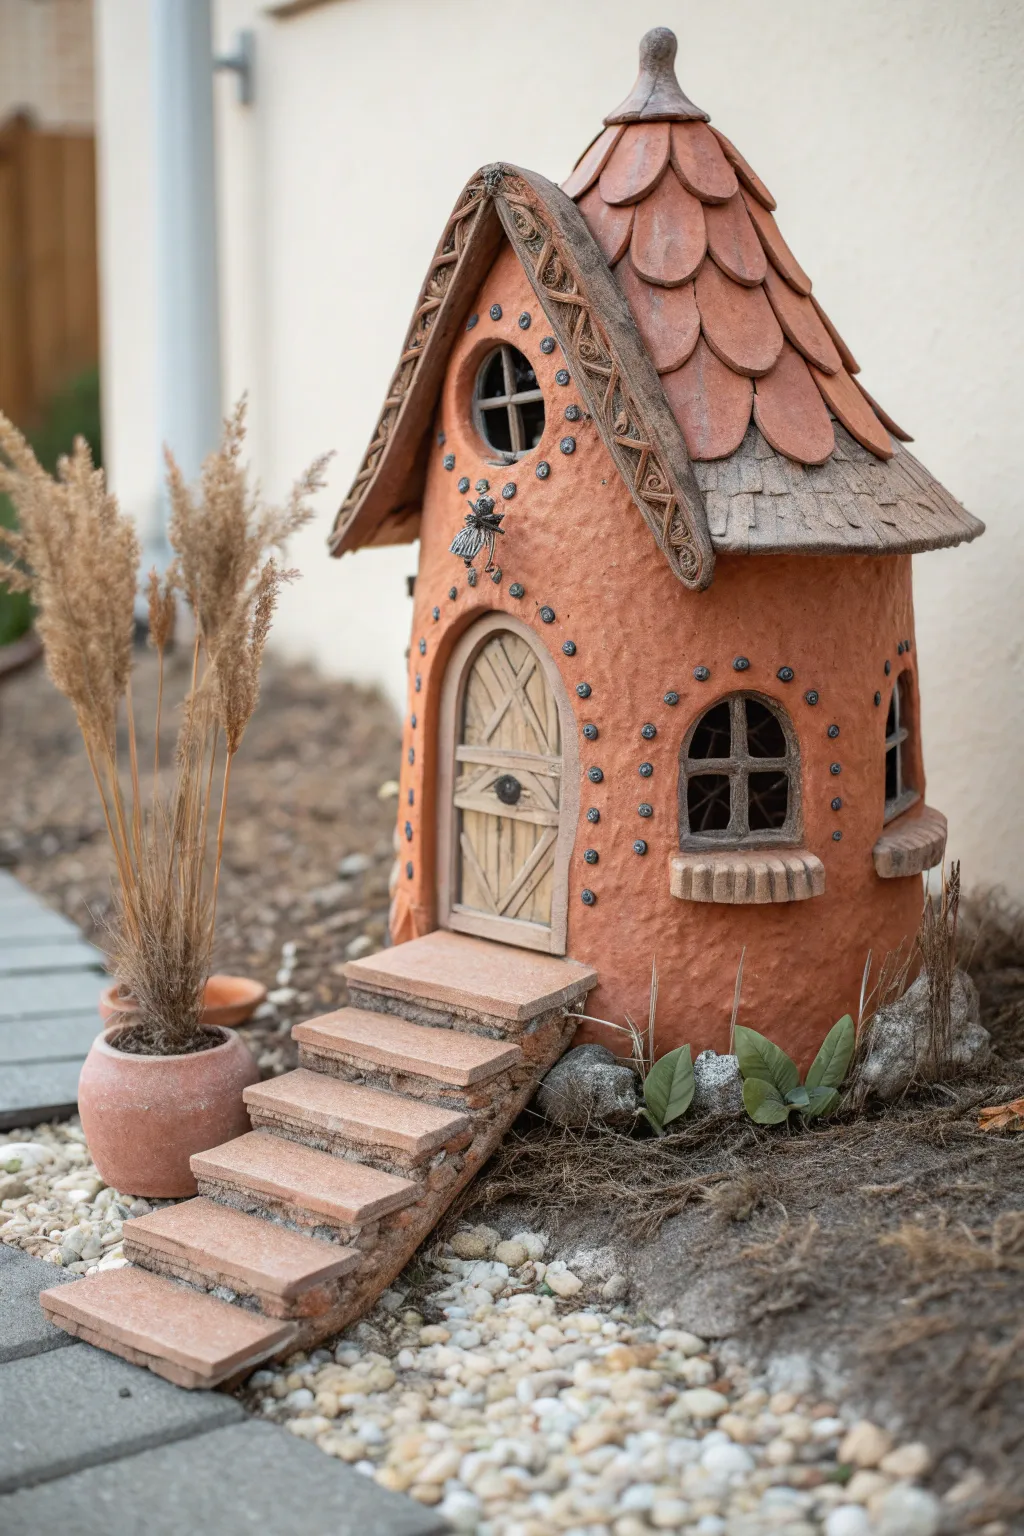
Transport your garden to a magical realm with this charming terracotta-style fairy house, featuring a distinctively tall, leafy roof and a grand entrance staircase. The textured walls and rustic wooden door details give it an ancient, lived-in feel perfect for nestled corners.
Step-by-Step
Materials
- Terracotta-colored polymer clay (approx. 1lb)
- Dark grey polymer clay or acrylic paint
- Aluminum foil (for armature)
- Glass jar or cardboard tube (for core structure)
- Clay sculpting tools (needle tool, ball stylus)
- Rolling pin
- Craft knife
- Texture sponge or stiff brush
- Small black beads or seeds (for rivets)
- Liquid clay or bake and bond
- Acrylic paints (black, brown, cream)
- Matte outdoor varnish
Step 1: Building the Base Structure
-
Prepare the Armature:
Begin by covering your glass jar or cardboard tube with a crumpled layer of aluminum foil to bulk out the shape. Create a conical shape at the top for the main roof and a smaller triangular wedge on the side for the dormer roof. -
Condition the Clay:
Knead your terracotta polymer clay until it is soft and pliable. Roll out a large sheet, approximately 1/4 inch thick, and wrap it around the cylindrical part of your armature to form the house walls. -
Texture the Walls:
Before the clay hardens or is baked, press a coarse sponge or a stiff-bristled brush against the entire surface of the walls to create a stucco-like, rough texture. -
Cut Openings:
Use your craft knife to carefully cut out an arched doorway at the front and arched window openings on the sides. Save the clay you remove for later details.
Step 2: Roofing and Architectural Details
-
Construct the Roof Cone:
Cover the foil cone top with a smooth sheet of terracotta clay. It doesn’t need to be perfect as it will be covered in tiles. -
Create Leaf Tiles:
Roll out thin sheets of clay and cut dozens of scale or leaf shapes. Starting at the bottom edge of the roof, overlap these tiles row by row, working your way up to the peak. -
Form the Spire:
At the very top of the roof, fashion a small, decorative finial or knob to cap off the tile work neatly. -
Add the Dormer Roof:
Cover the side triangular foil wedge with clay. Instead of tiles, texture the edges to look like rough-hewn timber beams using a needle tool, and cover the slope with a flat sheet of clay textured like wood grain. -
Sculpt the Staircase Base:
Using foil, form a ramp shape leading to the door. Cover this ramp with a layer of clay. -
Lay the Steps:
Create individual rectangular slabs for each step. Stack them onto the ramp, ensuring each tread has a slight overhang. I find texturing the edges of these steps with a rock gives them a realistic stone look.
Cracking Clay?
If you notice cracks appearing while sculpting, dip your finger in a little baby oil or clay softener and smooth them out immediately before baking to ensure structural integrity.
Step 3: Finer Details and Decoration
-
Install the Door:
Roll a slab of clay to fit inside the door arch. Score deep vertical lines to mimic wooden planks and add diagonal cross-bracing details with thin strips of clay. -
Window Panes:
Roll very thin snakes of dark grey clay (or paint them later) to create the grid-like mullions inside the window openings, placing them in a cross pattern. -
Window Sills:
Add small, rectangular blocks of clay beneath each window to serve as sills. Score vertical lines into them to mimic brick or stone support. -
Add Rivet Details:
To create the decorative pattern around the door and windows, press small black beads or tiny balls of dark clay into the walls, following the arch shapes. -
The Bee Decoration:
If desired, sculpt a tiny bee or bug using scrap clay and attach it above the door for a touch of whimsy.
Light It Up
Before baking, cut a hole in the bottom of the structure. This allows you to place an LED tea light underneath, making the windows glow warmly in the evening.
Step 4: Finishing and Sealing
-
Bake:
Bake the entire structure in your oven according to the manufacturer’s instructions for your specific brand of polymer clay (usually 275°F for 15-30 minutes). -
Apply a Wash:
Once cool, mix a small amount of black or dark brown acrylic paint with water. Brush it over the entire house and immediately wipe it off with a rag. This ‘antiquing’ process will let dark paint settle into the crevices of the texture. -
Varnish:
Protect your masterpiece from the elements by applying two coats of matte outdoor varnish, paying special attention to the base and roof.
Now you have a rustic haven ready to welcome tiny visitors to your garden path
Pebble-Pressed Roof Tile Fairy House
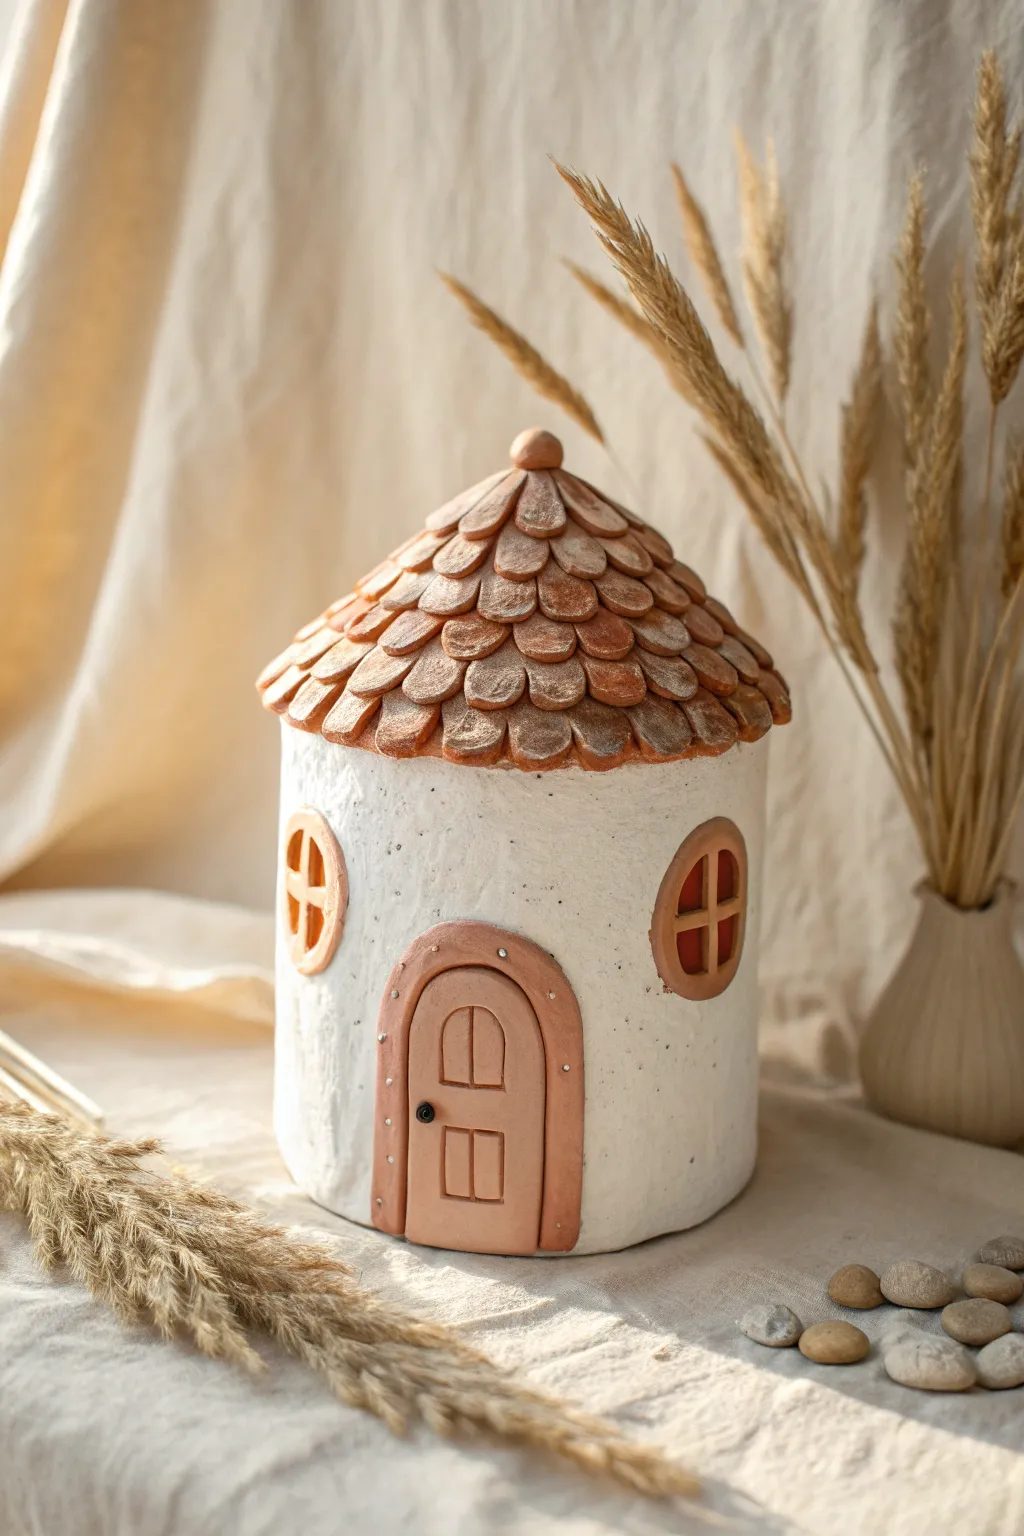
Create a cozy, rustic dwelling for your garden fairies with this charming clay project. Featuring a textured white façade and a distinctive roof made of layered, pebble-like shingles, this heavy, sturdy piece feels like it was built from the earth itself.
Detailed Instructions
Materials
- Air-dry clay (white)
- Air-dry clay (terracotta or reddish-brown)
- Straight-sided jar or cylinder (canning jar works well)
- Mod Podge or PVA glue
- Rolling pin
- Texture tool (toothbrush or crumpled foil)
- Clay knife or scalpel
- Small round cutter (approx. 1 inch)
- Acrylic paints (white, brown, black)
- Paintbrushes (flat brush and fine detail brush)
- Matte sealant spray
Step 1: Constructing the Base
-
Prepare the core:
Begin by selecting a sturdy cylindrical object to act as your armature. A glass canning jar is ideal because it’s heavy and smooth. Clean the outside surface thoroughly so the clay adheres initially but can still be worked on. -
Wrap the walls:
Roll out a slab of white air-dry clay to about 1/4 inch thickness. Cut a rectangular strip that is tall enough to cover the jar and wide enough to wrap around it fully. -
Secure the seam:
Wrap the clay strip around the jar. Where the edges meet, score the clay (scratch cross-hatch marks), add a dab of water or slip, and press the edges together firmly to create a seamless cylinder. -
Texture the surface:
To achieve that rough, stucco-like appearance seen in the photo, take a stiff toothbrush or a ball of crumpled aluminum foil and tap it repeatedly all over the wet white clay. Create a consistent, pitted texture.
Jar Removal Tip
If you want the house to be hollow for an LED tealight, wrap the glass jar in parchment paper before adding clay. Once the clay is leather-hard, the jar slips out easily.
Step 2: Adding Doors and Windows
-
Create the door frame:
Roll out a small amount of terracotta-colored clay. Cut an arched shape for the door. Then, roll a thin snake of clay and flatten it slightly to create the raised door surround, attaching it to the arch with a little water. -
Detail the door:
Using a clay knife, gently press lines into the door to mimic wooden planks. Add relief details like rectangular panels if desired. Attach this entire assembly to the front of your white cylinder, blending the back edges slightly so it sticks. -
Add windows:
Form two small circles of terracotta clay for the windows. Press them onto the sides of the house. Roll very thin snakes of clay to create the cross-mullions and press them into the center of the window circles. -
Add window frames:
Wrap a slightly thicker flattened snake of terracotta clay around each window to create a protruding frame, matching the style of the door surround. -
Hardware details:
Use a tiny ball of black clay or a small bead to create a doorknob. You can also use a needle tool to poke tiny holes around the door frame to simulate nails or rivets.
Step 3: Roofing the House
-
Form the roof support:
Fashion a cone shape out of aluminum foil or cardboard that fits perfectly on top of your cylinder. Cover this cone with a thin layer of terracotta clay to give the shingles a base to stick to. -
Create individual shingles:
Roll out a sheet of terracotta clay. Using a small round cutter or your fingers, create dozens of small, flat tear-drop or oval shapes. These will be your ‘pebble’ tiles. -
Apply the first row:
Starting at the very bottom edge of the roof cone, attach a row of shingles using a bit of water. Let them overhang the edge slightly. -
Layer the tiles:
Work your way up the roof, overlapping each new row over the one below it. Offset the tiles (like bricks) so the gaps are covered. I find it helpful to press the center of each tile slightly to make them look naturally weathered. -
Cap the peak:
Once you reach the top, roll a small ball of terracotta clay and place it at the very peak to cover the final seams where the top shingles meet.
Level Up: Mossy Details
Glue tiny bits of dried green moss into the crevices between the roof tiles or along the base of the house to make it look like an ancient, overgrown cottage.
Step 4: Finishing Touches
-
Dry thoroughly:
Allow the entire structure to dry completely. This heavy project may take 24-48 hours depending on humidity. Don’t rush this step or cracks may appear. -
Whitewash the walls:
Once dry, if the white clay has grayed or looks dull, brush a coat of white acrylic paint over the textured walls to brighten them up. -
Antique the roof:
To get that dusty, aged look on the tiles, mix a watery wash of white or light beige paint. Brush it over the terracotta roof and immediately wipe most of it off with a rag, leaving paint only in the textured crevices. -
Deepen the shadows:
Paint the inner sections of the window panes dark brown or black to create depth, making it look like a dark interior. -
Seal the project:
Finish with a matte spray sealant to protect your fairy house from moisture, especially if it will be placed outdoors in a sheltered spot.
Place your sturdy little cottage among some dried flowers or pebbles to complete the enchanting scene
Fairy House With Hidden Keyhole Door
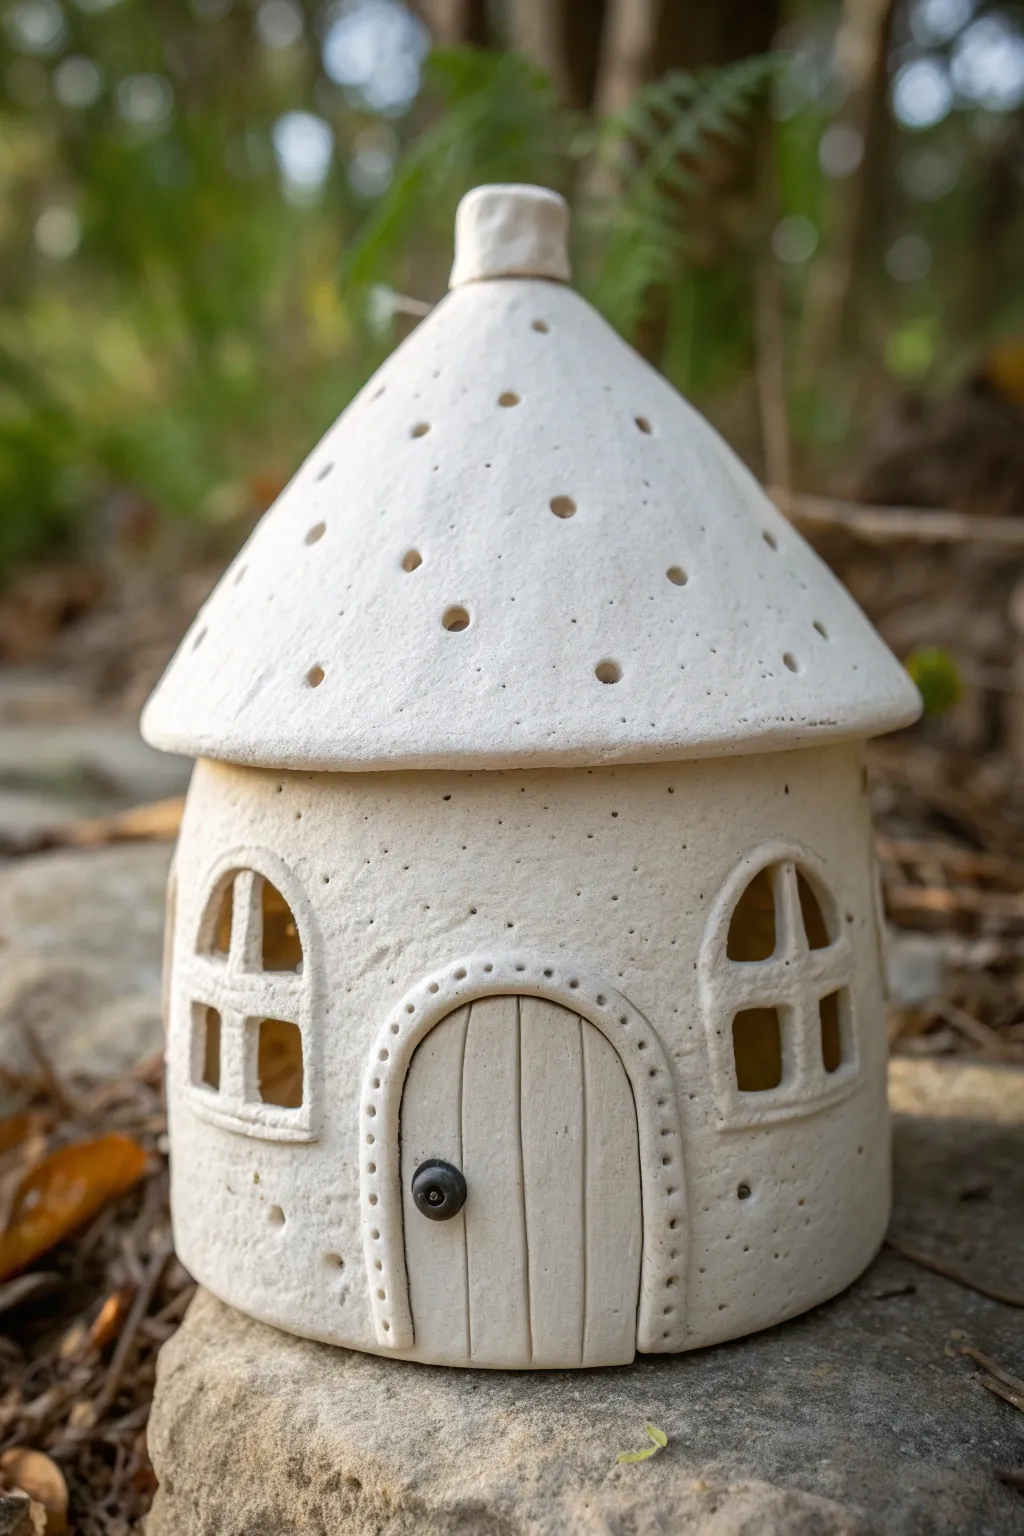
This charming, rustic fairy dwelling features a unique speckled clay finish and a whimsical conical roof dotted with tiny light holes. Its standout feature is the arched wooden-style door, complete with a tiny faux keyhole, inviting imaginary creatures to unlock its secrets.
Step-by-Step Tutorial
Materials
- White polymer clay or air-dry clay (stone effect or speckled clay works best)
- Rolling pin
- Circle cutters (large for base, smaller for windows)
- Craft knife or scalpel
- Modeling tools (needle tool, ball stylus)
- Small black bead or black clay for the doorknob
- Toothbrush or stiff bristle brush for texturing
- Aluminum foil for armature
- Water or slip (if using air-dry clay)
- Oven (if using polymer clay)
Step 1: Shaping the Base
-
Prepare the clay:
Begin by conditioning your clay until it is pliable. Roll out a slab approximately 1/4 inch thick. You want it substantial enough to hold its shape but not too heavy. -
Cut the walls:
Cut a long rectangular strip from your slab. The height of the strip will determine the height of your cottage walls. Check that the edges are straight and clean. -
Form the cylinder:
Wrap the rectangular strip around a foil core or a temporary cylindrical form to create the round body of the house. Join the seam by smoothing the clay together with your fingers or a modeling tool until the join is invisible. -
Create the texture:
Before cutting windows, gently tap the entire exterior surface with a toothbrush or a stiff brush. This stippling creates a realistic, stony texture that gives the house its aged look.
Slumping Walls?
If your walls start to sag while working, keep a ball of aluminum foil or a cardboard tube inside the structure as a support until the clay begins to firm up or is baked.
Step 2: Windows and Door
-
Cut window openings:
Use a small circle cutter or a craft knife to cut out arched window shapes on opposite sides of the house. Save the cut-out pieces; you won’t need them, but they are good for testing textures. -
Add window frames:
Roll thin snakes of clay. Carefully outline the arched window openings with these snakes to create frames. Add a cross shape inside each window for the panes, blending the edges into the frame. -
Form the door opening:
Cut an arched doorway opening at the front. It should be slightly larger than the windows. -
Make the door:
Roll a slab slightly thinner than the walls and cut out a door shape that fits snugly into the archway. Use a needle tool to score vertical lines down the door to mimic wooden planks. -
Install the door frame:
Create a decorative arch around the door using a thicker snake of clay. Use a needle tool or small ball stylus to poke evenly spaced holes along this frame for a studded detail. -
Add the doorknob:
Press a tiny black bead or a small ball of black clay into the door to serve as the handle. I like to press it in firmly so it creates a small indentation around itself.
Step 3: The Roof and Finishing Touches
-
Shape the roof cone:
Fashion a cone shape from aluminum foil to support the roof. Roll out a circle of clay and drape it over your foil cone, smoothing it down. -
Texture the roof:
Just like the walls, texture the roof surface with a toothbrush. This unifies the look of the cottage. -
Pierce light holes:
Using a needle tool or a small skewer, poke random holes all over the roof. These will let light shine through if you place an LED tea light inside later. -
Add the chimney top:
Form a small cylinder or button of clay and attach it to the very tip of the roof cone to cap it off neatly. -
Attach roof to base:
Place the roof onto the cylinder base. You can either leave it removable to easily insert a light or score and slip (or blend) the clay to permanently attach it. -
Final inspection:
Check all seams and smooth away any fingerprints. Ensure the door is securely seated and the window panes remain straight. -
Curing or drying:
If using polymer clay, bake according to the manufacturer’s instructions. For air-dry clay, leave it in a cool, dry place for 24-48 hours until fully hard.
Make it Glow
Leave the roof unattached so you can lift it off. Place a battery-operated LED tea light inside to make the windows and roof holes glow warmly in the evening.
Place your finished cottage in a garden nook or on a bookshelf to add a touch of quiet magic to your home
Stacked Fairy House Village Tower
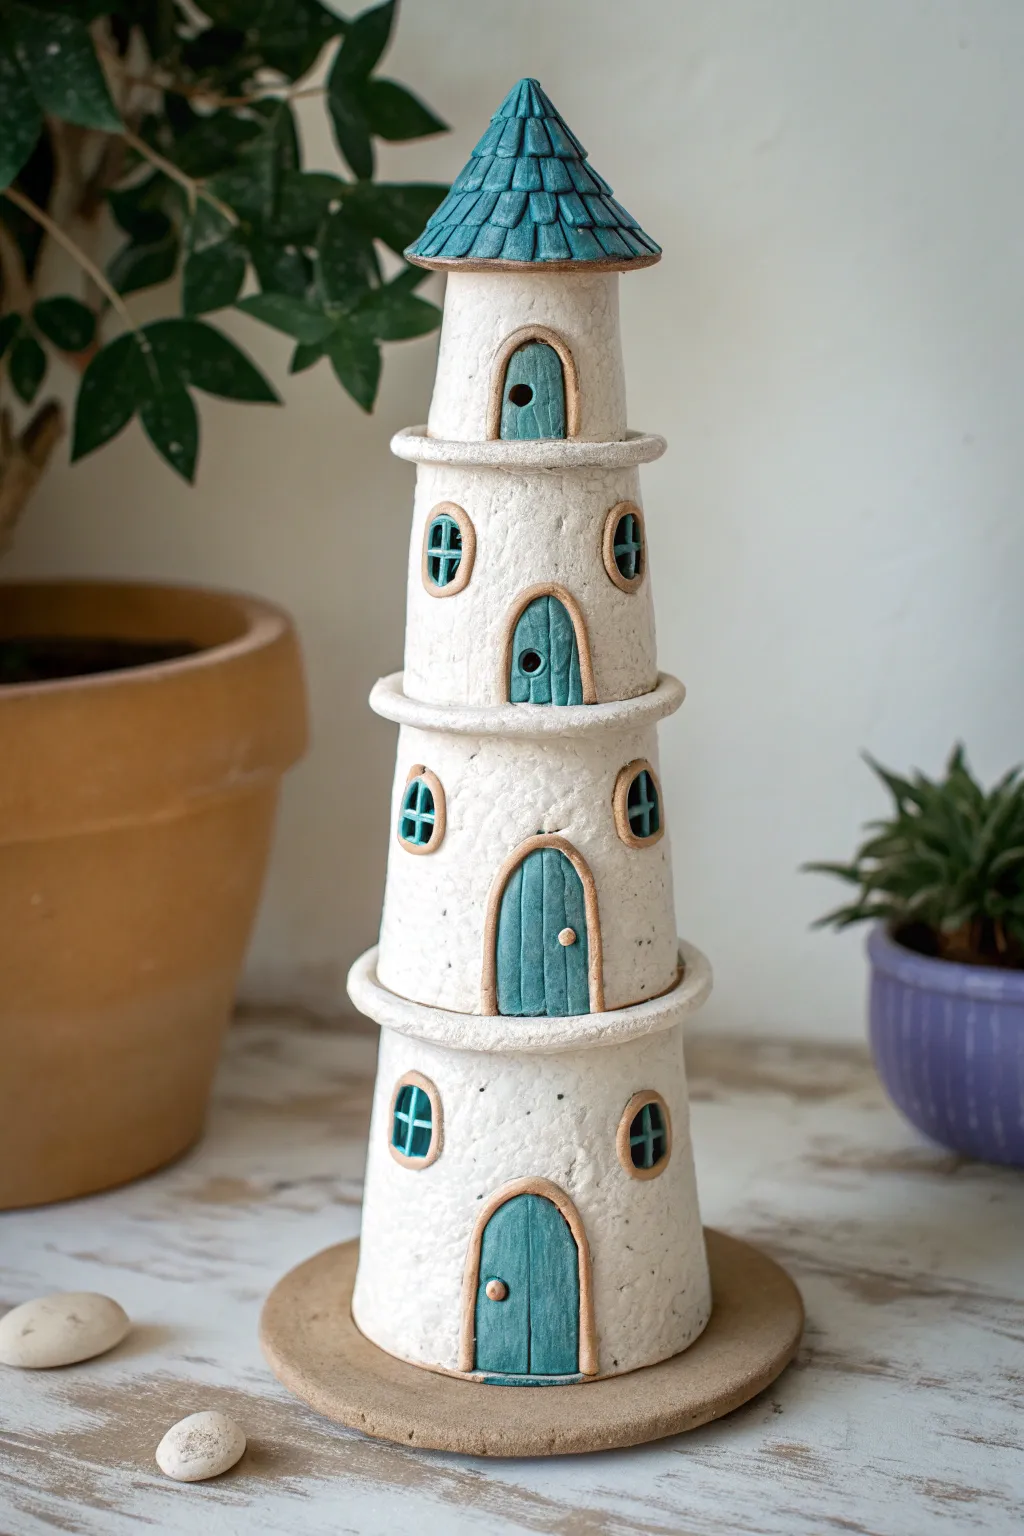
This whimsical four-tiered tower brings a touch of seaside charm to your fairy garden using simple stacking techniques and a textured finish. The striking contrast between the white stucco-like walls and the deep teal roof creates an eye-catching centerpiece for any miniature display.
How-To Guide
Materials
- White stoneware clay or sturdy air-dry clay (approx. 2-3 lbs)
- Teal underglaze or acrylic paint (if using air-dry clay)
- Transparent matte glaze (for ceramic version)
- Circle clay cutter or needle tool
- Rolling pin and canvas mat
- Conical forms (like paper cups or cardstock cones) for support
- Scoring tool and slip
- Rough-bristled brush or sponge for texturing
- Small detail knife
Step 1: Forming the Tiered Structure
-
Prepare the conical forms:
You will need four tapered cylinders that decrease in size. You can use varying sizes of disposable paper cups as molds, or create your own forms by rolling cardstock into truncated cones and taping them securely. -
Roll out slabs:
Roll out your clay to a consistent 1/4-inch thickness. Ensure the clay is smooth but has enough structure to stand up. -
Wrap the forms:
Cut templates based on your forms, then cut the clay slabs to match. Wrap the clay around each form, overlapping the vertical seam slightly. Score and slip the seam, then blend it until invisible. -
Create the floor discs:
For each tier to stack properly, cut out clay circles that are slightly wider than the top of each cylinder. These will act as the separation rims between floors. -
Assemble the rims:
Attach a clay circle to the narrower top of each of the bottom three cylinders. Score and slip effectively here. Smooth the connection on the underside, but leave the overhang visible to create that distinct ‘lip’ between levels.
Seamless Stacking
To ensure stability without glue, score a small recessed ring into the top of each ‘floor’ disc so the tier above it sits inside a groove rather than just resting on top.
Step 2: Sculpting the Top and Details
-
Form the roof cone:
For the fourth and final tier, fashion a pointed cone shape for the roof instead for a flat top. It should sit flush on the smallest cylinder. -
Carve roof shingles:
Using a small loop tool or knife, carve overlapping U-shapes or rectangles into the roof cone to mimic slate shingles. Work from the bottom up towards the point. -
Cut doors and windows:
On each tier, use a sharp knife to cut out arched doorways and small circular or arched windows. Vary the placement slightly for character, but keep them roughly aligned vertically. -
Add door frames:
Roll very thin coils of clay. Outline every door and window with these coils to create a protruding frame. I like to flatten these slightly with my thumb to ensure they adhere well. -
Insert doors:
Roll small slabs of clay and cut them to fit inside your door frames. Texture these with vertical lines to look like wood planks and press a tiny ball of clay on as a doorknob.
Slumping Walls?
If your cylinders are sagging, the clay is too wet. Let the slabs stiffen on the canvas for 20 minutes before wrapping, or leave the paper forms inside until the clay is leather hard.
Step 3: Texturing and Finishing
-
Apply wall texture:
The charm of this piece is the rough, stucco look. Take a stiff-bristled brush or a rough sponge and dab the white walls firmly. Avoid the smooth door frames and the roof. -
Stack and dry (Ceramic):
If firing, stack the pieces loosely to ensure fit, but separate them for the initial bisque fire. If using air-dry clay, glue the tiers together now using clay slip or PVA glue before drying. -
Painting the roof and doors:
Once bisque fired (or fully dry for air-dry clay), apply deep teal underglaze or paint to the roof shingles, all doors, and the window interiors. Be careful to stay inside the frames. -
Accenting the trim:
Leave the door frames and the horizontal rims between tiers unpainted (raw clay color) or paint them a warm beige to simulate stone or wood trim. -
White wash (Optional):
If your clay body isn’t naturally white, apply a white matte underglaze or acrylic paint to the textured walls, wiping it back slightly to enhance the depth of the texture. -
Final assembly:
After your final glaze firing (or clear acrylic sealing), stack the sections permanently. You can use a strong epoxy for ceramic or wood glue for air-dry clay to bond the levels.
Place your completed tower on a flat stone or a bed of moss to welcome the fairies home