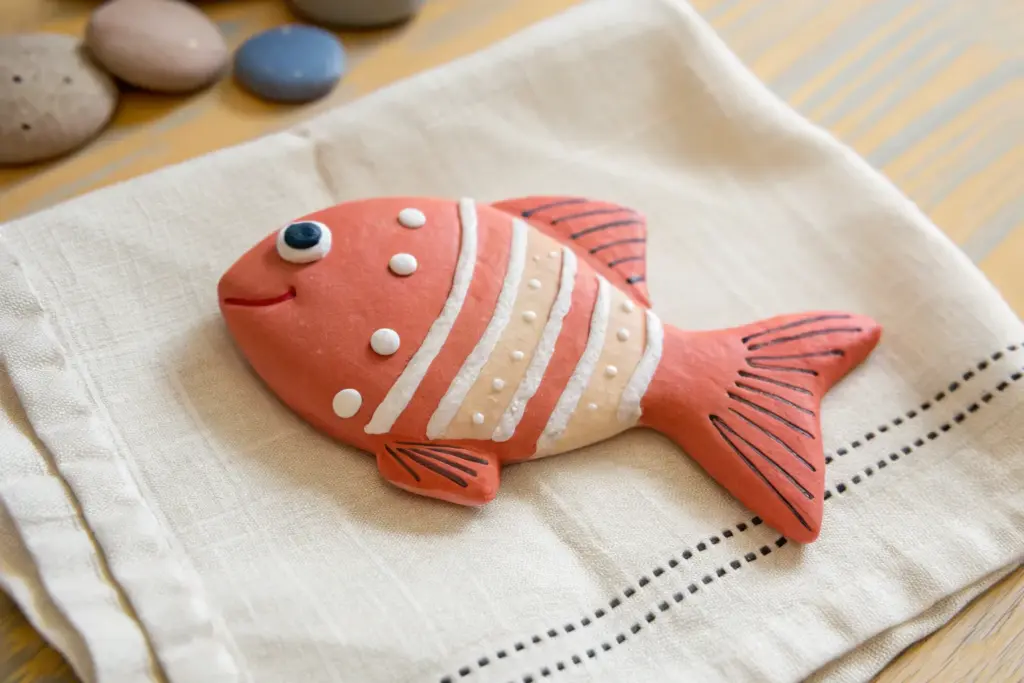
If you’re in a fishy-clay mood, you’re in the right place—there are so many ways to shape a little finned friend with just a few simple moves. Here are my favorite clay fish ideas, starting with the classic go-tos and sliding into the playful, unexpected stuff.
Pinch-Pot Fish With Open Mouth
This charming ceramic fish owes its playful personality to a wide, open mouth and vibrant, candy-colored scales. Built from basic pinch pots, it’s a fantastic project for practicing texture, attachments, and layering glaze colors.
How-To Guide
Materials
- Earthenware or stoneware clay body
- Score and slip tool (or serrated rib and water/vinegar mix)
- Wooden modeling tool
- Needle tool
- Fettling knife
- Rolling pin
- Underglazes (Light Blue, Pink, Yellow, Orange)
- Clear transparent glaze
- Paintbrushes (soft bristle for glazing)
- Small sponge
Step 1: Forming the Body
-
Make pinch pots:
Start by rolling two equal-sized balls of clay, roughly the size of large oranges. Press your thumb into the center of each and pinch the walls evenly while rotating to create two deep pinch pot bowls. -
Join the pots:
Wait until the clay stiffens slightly to a soft leather-hard stage. Score the rims of both bowls heavily and apply slip. Press them firmly together to create a closed hollow sphere, trapping air inside to support the shape. -
Shape the fish:
Gently paddle or roll the sphere on your work surface to elongate it into a football or oval shape. Taper one end slightly for the tail area. -
Create the mouth:
On the wider front end, cut a circular hole for the mouth. Roll a thick coil of clay and attach it around this opening to create a prominent, doughnut-like lip. Smooth the inside seam so it transitions seamlessly into the body.
Air Pressure Tip
Before completely closing your pinch pot sphere, remember to poke a tiny hidden pinhole (perhaps near the tail) to let hot air escape in the kiln and prevent explosions.
Step 2: Adding Details
-
Form the fins:
Roll out a slab of clay about 1/4 inch thick. Cut out shapes for the dorsal fin (top), two pectoral fins (sides), and the tail fin. The tail should have a distinct fork shape. -
Attach the appendages:
Score and slip the attachment points on the body and the fins. Press the fins firmly onto the body. For the dorsal and tail fins, use a small coil to reinforce the seam, smoothing it down with a wooden tool. -
Sculpt the eyes:
Roll two small balls of clay and flatten them slightly into discs. Attach these to the sides of the head. Add a tiny coil around each eye to create an eyelid rim. -
Add fin texture:
Use a needle tool or fettling knife to lightly carve radiating lines into all the fins to mimic spines and webbing. -
Create the scales:
This is the most time-consuming but rewarding part. Roll many small balls of clay and flatten them into thumb-print discs. Starting from the tail and working forward, attach these overlapping scales using slip, covering the body up to the head/gill line.
Uneven Drying?
If the fins are drying faster than the thick body, wrap them loosely in small strips of slightly damp plastic or paper towel while you work on the scales.
Step 3: Surface Decoration
-
Bisque fire:
Allow the fish to dry slowly under plastic to prevent cracking, then fully dry before bisque firing it in the kiln according to your clay body’s specifications. -
Apply base colors:
Paint the head and the base of the scales with a light blue underglaze. I find applying two to three coats gives the most solid coverage. -
Detail the scales and mouth:
Paint the raised scale discs with a warm yellow. Paint the lips and the rim of the ‘gills’ (where the scales meet the head) with a soft pink. Use orange for the tail and dorsal fin. -
Highlight the fins:
Paint the side fins blue, then carefully highlight the carved ridges with yellow to make the texture pop. -
Define the eyes:
Paint the eyeball yellow (or orange) and add a solid black pupil in the center for focus. -
Add decorative dots:
Using the back end of a paintbrush, dot yellow spots onto the blue head area and yellow dots onto the pink lips for extra texture. -
Glaze and fire:
Once the underglaze is dry, apply a coat of clear transparent glaze over the entire piece. Fire the fish a second time to the appropriate glaze temperature for a glossy finish.
Place your finished fish in a garden nook or on a sunny shelf to enjoy its bright, cheerful expression
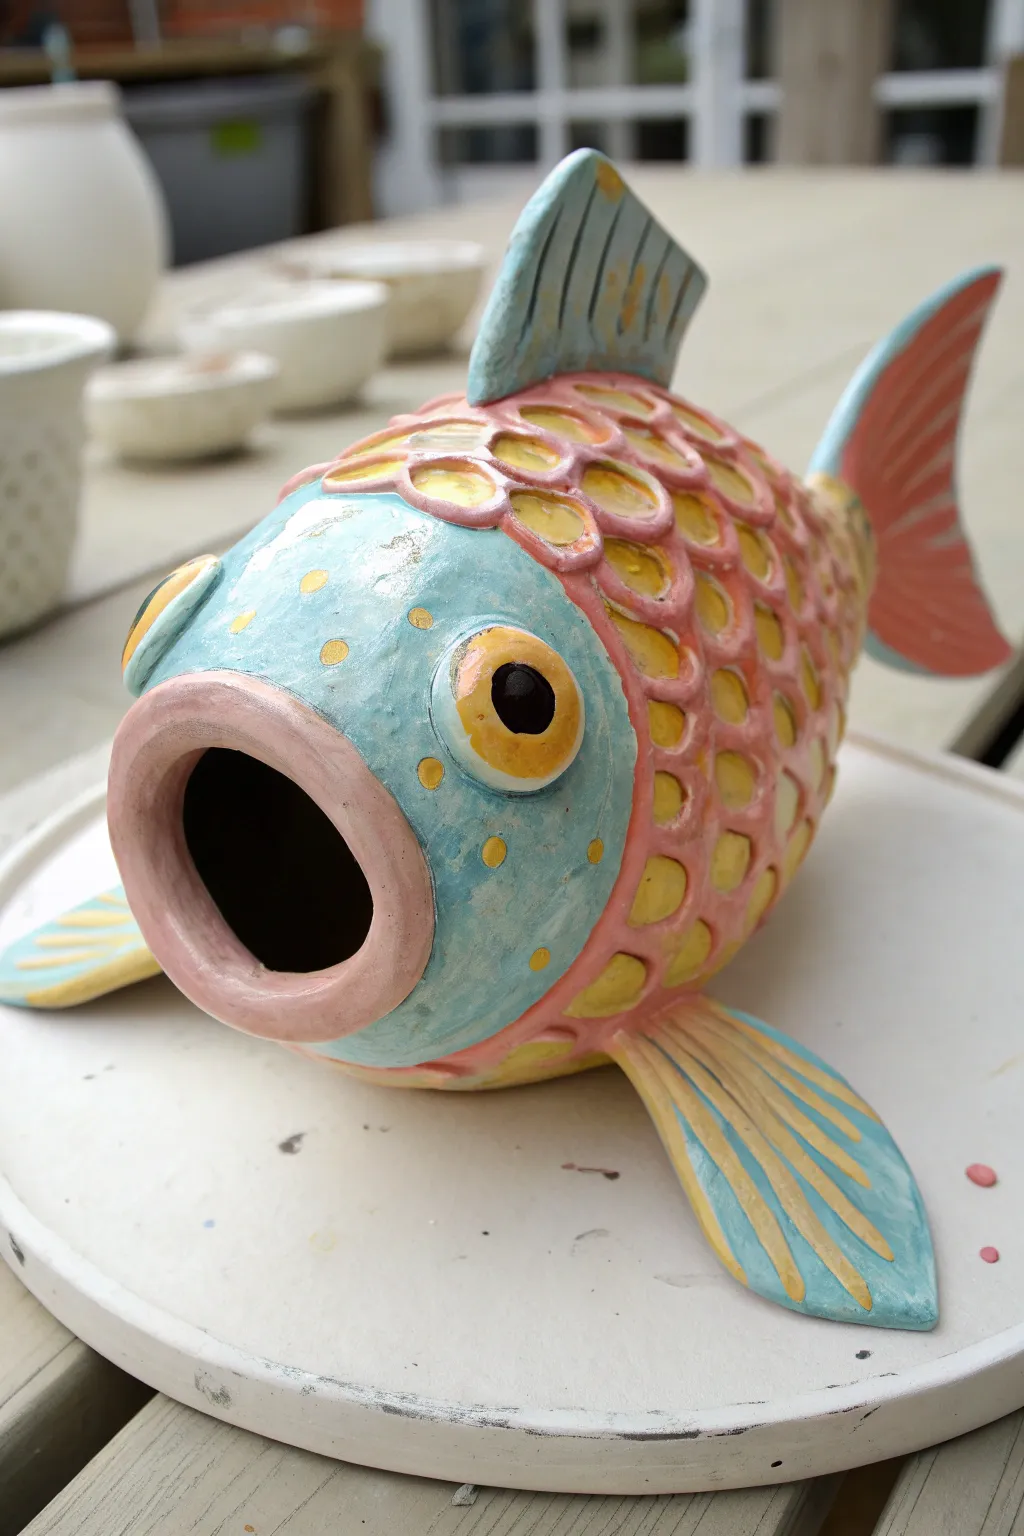
Simple Chubby Fish Figurine
This tutorial guides you through creating a delightfully plump fish figurine with a distinctive stoneware look. Using a grey-green clay body and warm brown accents, you will craft a textured friend full of personality and charm to sit on your shelf.
Detailed Instructions
Materials
- Stoneware clay (grey or speckled buff)
- Small rolling pin
- Fettling knife or needle tool
- Loop tool for carving
- Small ball tool
- Underglaze (celadon green or similar semi-transparent)
- Oxide wash (iron oxide or brown underglaze)
- Clear glaze (optional, for gloss)
- Sponge
- Scoring tool or old toothbrush
- Slip (clay mixed with water)
Step 1: Shaping the Body
-
Prepare the Clay:
Begin with a ball of clay about the size of a large orange. Wedge it thoroughly to remove air bubbles, then pat it into a smooth, oval lump. -
Form the Torso:
Gently taper one end slightly for the face and the other end more significantly for the tail section. The body should remain quite round and plump in the middle. -
Flatten the Base:
Tap the belly of the fish onto your work surface to create a small flat spot. This ensures your figurine will stand upright without rolling over. -
Refine the Surface:
Use a damp sponge or a rubber rib to smooth out any fingerprints or bumps on the main body before adding details. I find taking extra time here saves sanding later.
Hollow it Out
For a fish this chubby, consider hollowing the body like a pinch pot before sealing it. Just remember to prick a tiny hidden air hole so it doesn’t explode in the kiln
Step 2: Adding Fins and Tail
-
Create the Top Fin:
Roll a small coil of clay and flatten it into a triangle. Score and slip the top ridge of the fish, then attach the fin, smoothing the seams downward so it looks integrated. -
Form the Tail:
Fashion a larger, curved triangle for the tail fin. Score and slip the tapered end of the body and attach the tail, blending the clay well to ensure a strong bond. -
Attach Side Fins:
Make two small, fan-shaped fins for the pectoral area. Attach these low on the sides, slightly behind where the head will be defined. -
Add Texture to Fins:
Using a needle tool or knife, gently press parallel lines into the dorsal fin, tail, and side fins to simulate rigidity and rays.
Scale Variations
Swap the U-shaped carving tool for the end of a drinking straw or a small piping tip. Pressing these into the clay creates perfect, uniform circular scales
Step 3: Carving Details
-
Define the Head:
Use a modeling tool to verify the curve behind the gills. Carve a deep, curved line separating the head from the scaley body. -
Sculpt the Mouth:
Cut a small, slightly upturned slit at the very front for the mouth. Gently press the lower lip down a tiny bit to give it a pouty expression. -
Carve the Scales:
Take a loop tool or a U-shaped carving gouge. Press it gently into the body clay in a repeating pattern to create rows of crescent-shaped scales. -
Create the Eyes:
Roll two small balls of white clay (or the same body clay). Press them into the sockets, then add a tiny dot of dark clay or a pupil indentation in the center.
Step 4: Finishing and Coloring
-
Initial Drying:
Allow the piece to dry slowly to the leather-hard stage. This prevents cracking, especially where the fins attach. -
Apply Base Color:
Apply a wash of celadon green or blue-grey slip/underglaze over the entire body. Wipe it back slightly with a sponge so it settles more heavily in the carvings and textures. -
Accent the Textures:
Use a thin brush to apply an iron oxide wash or brown underglaze specifically into the scale carvings, fin lines, and around the gill curve. -
Highlight the Scales:
Dip a small sponge in clean water and wipe the surface of the scales again, revealing the localized clay color while leaving the dark oxide in the deepest recesses. -
Final Polish:
If you want a glossy eye, add a dab of shiny clear glaze just to the eyeball before the final firing.
Once fired, place your serene aquatic friend on a sunny windowsill where the light can catch the textured scales


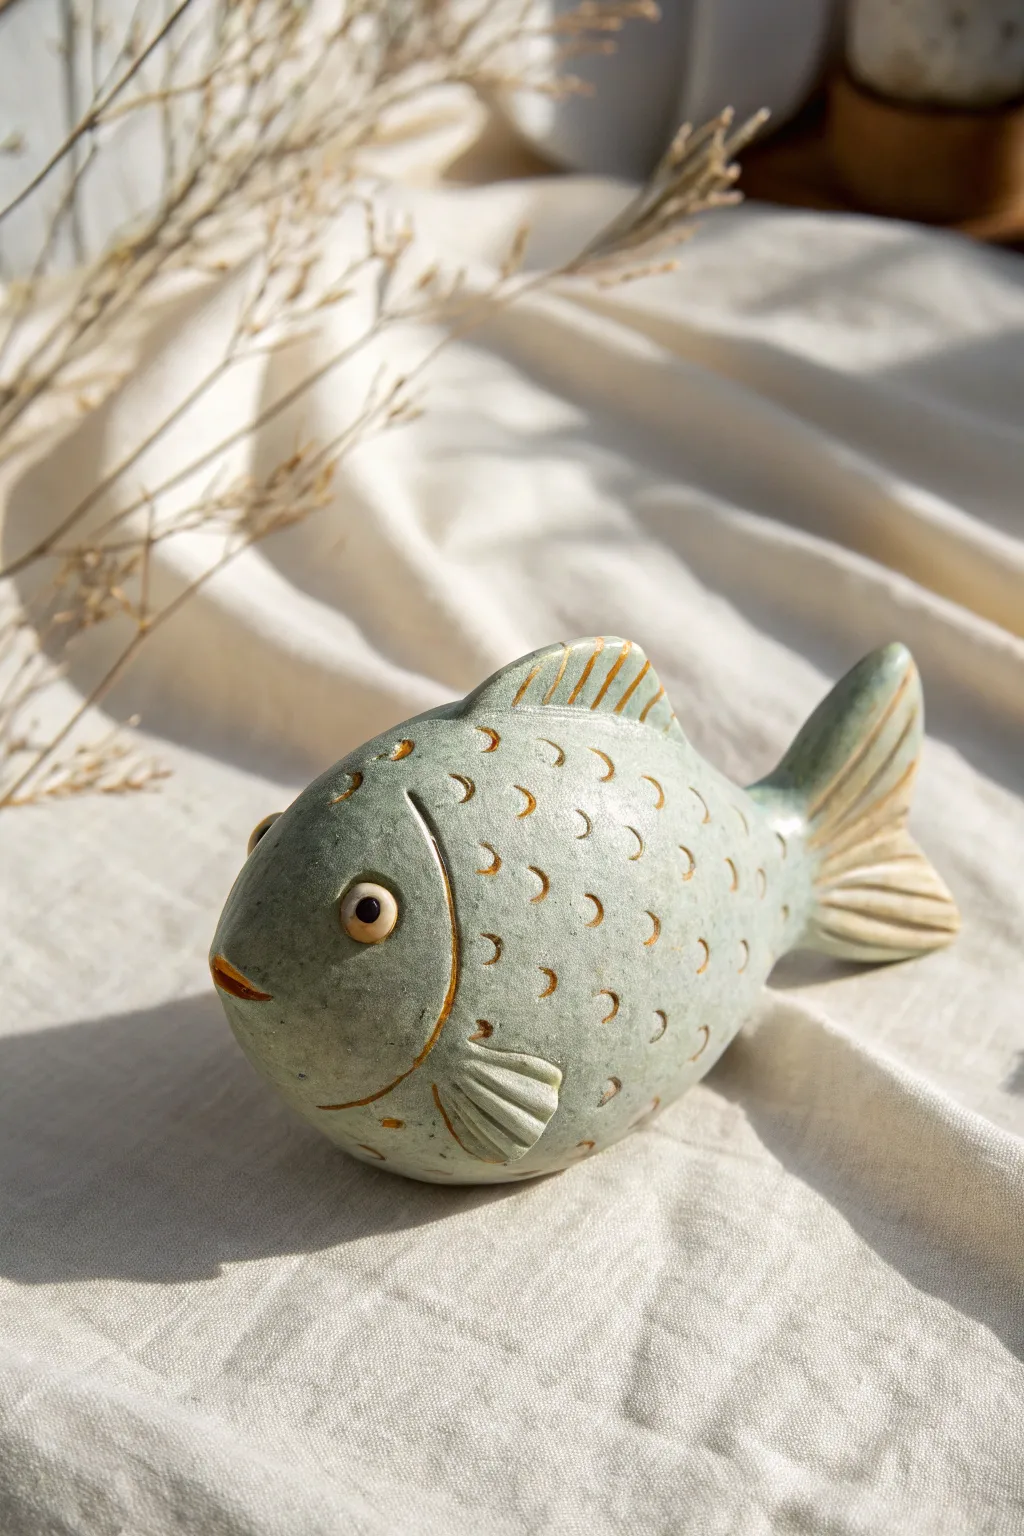
Textured Scale Fish Using Stamped Pattern
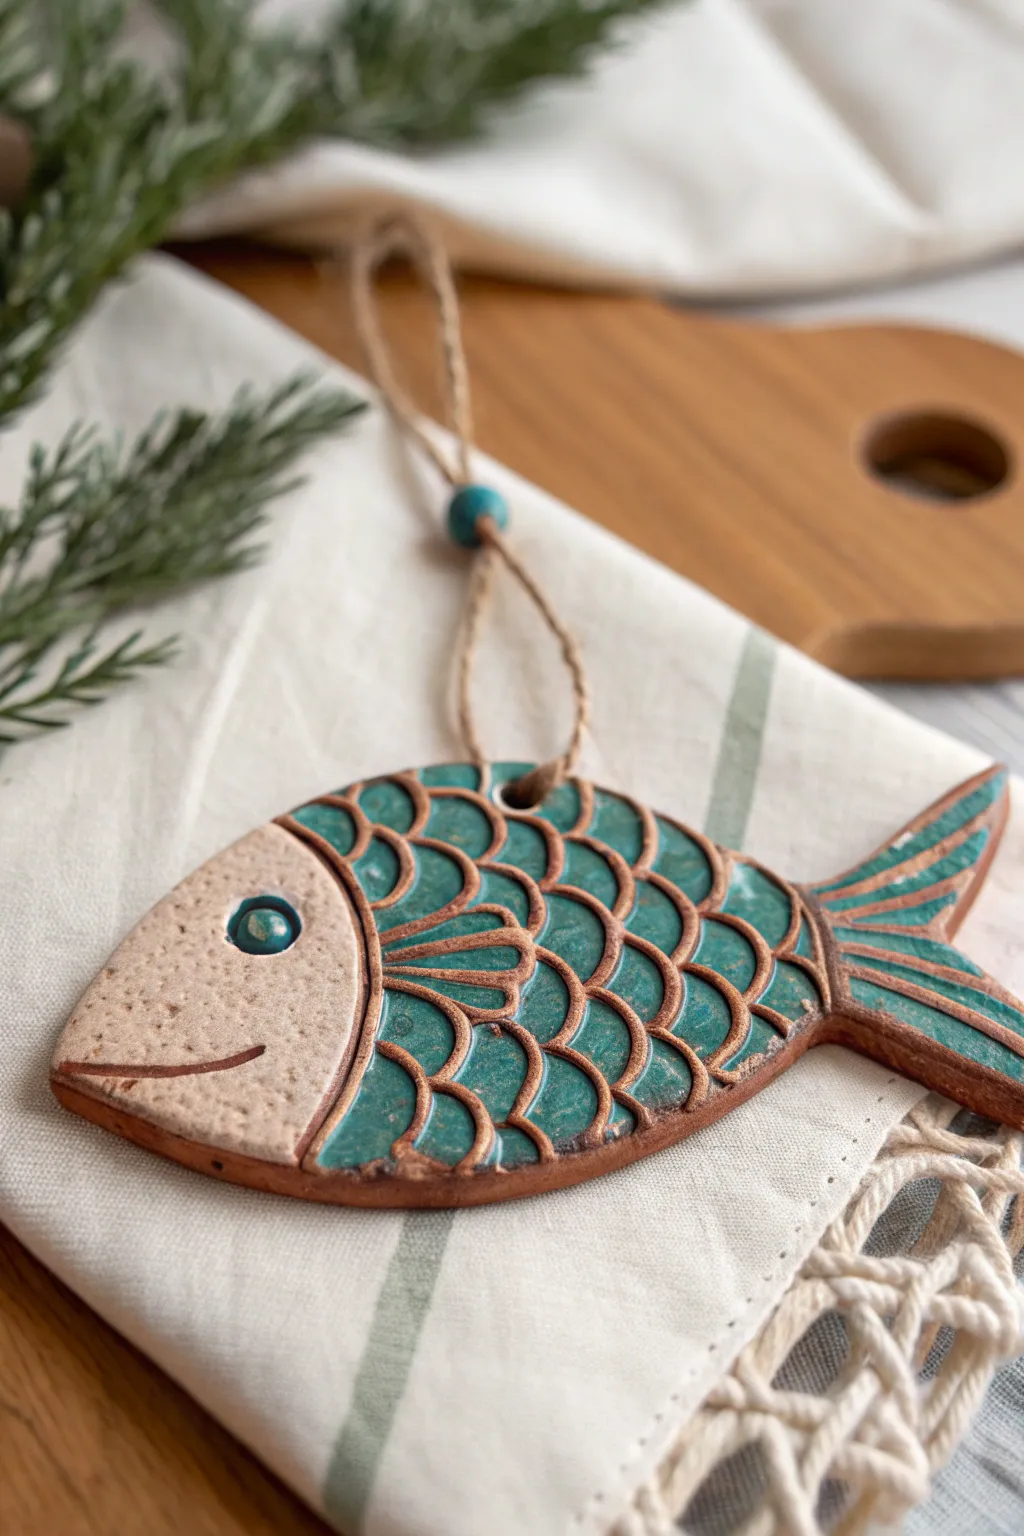
This charming ceramic fish ornament combines the rustic warmth of natural terracotta with the vibrancy of turquoise glaze. The distinctive scale pattern is created using a simple stamping technique that reveals the rich clay body underneath.
Step-by-Step
Materials
- Terracotta or brown stoneware clay
- Rolling pin
- Paring knife or needle tool
- Round cookie cutter or specialized U-shaped clay tool (for scales)
- Small straw or hole punch tool
- Turquoise ceramic glaze (low-fire or high-fire depending on clay)
- Small round paintbrush
- Clear wax resist (optional but helpful)
- Jute twine
- Small wooden or ceramic bead (turquoise)
- Sponge and water bucket
- Canvas mat or cloth for rolling
Step 1: Shaping the Clay
-
Roll out the slab:
Begin by rolling out your terracotta clay on a canvas mat until it is an even thickness, approximately 1/4 inch thick. Ensuring uniform thickness prevents warping during the drying process. -
Cut the outline:
Using a needle tool or sharp paring knife, freehand cut a simple fish silhouette. Aim for an oval body that tapers into a forked tail. Smooth the raw edges with a slightly damp finger or sponge to remove loose clay bits. -
Create the hanging hole:
Use a straw or a small circular cutter to punch a hole at the top center of the fish’s back. This needs to be large enough for your twine to pass through after the clay shrinks during firing.
Step 2: Stamping and Texture
-
Define the head:
Use your needle tool to lightly incise a curved line separating the head from the body. This creates a distinct zone that will remain unglazed later. -
Add facial details:
Press a small hollow circle tool into the head area for the eye, and carve a simple curved smile line near the bottom front. -
Stamp the side fin:
Draw or stamp a teardrop-shaped fin just behind the head line. Add internal lines to the fin for texture, radiating from the connection point outward. -
Stamp the scales:
Starting from the back of the head and moving toward the tail, press a U-shaped tool or the edge of a small round cutter into the clay to create overlapping rows of scales. Press firmly enough to create deep ridges. -
Detail the tail:
Carve long, linear stripes along the tail fin to mimic the bone structure of the fin. These channels will hold the glaze beautifully. -
Initial Drying:
Allow the clay to dry slowly to a leather-hard state. I find that covering it loosely with plastic for the first day prevents the tail from drying too fast and cracking. -
Bisque Fire:
Once fully bone dry, fire the piece in a kiln to bisque temperature (usually cone 04) according to your clay’s specifications.
Clean Lines Pro Tip
For the sharpest exposed clay lines, wipe the surface with a barely-damp sponge *after* glazing but before firing. This ‘wipe-back’ technique makes the texture pop.
Step 3: Glazing and Finishing
-
Wax the lines:
For the crispest result, apply liquid wax resist carefully to the raised ridges of the scales, the head section, and the outlines of the fins. This prevents glaze from sticking to the lines. -
Apply the glaze:
Using a small brush, dab a thick coat of turquoise glaze into the recessed scale areas and tail grooves. The glaze should pool inside the stamped textures. -
Glaze the eye:
Add a tiny drop of the same turquoise glaze inside the stamped circle of the eye for a pop of color. -
Wipe back excess:
If you didn’t use wax resist, wait for the glaze to dry slightly, then use a damp sponge to gently wipe the surface. This removes glaze from the high points (ridges) while leaving color in the depressions. -
Glaze Fire:
Fire the piece again to the maturation temperature of your specific glaze. -
Assembly:
Cut a length of natural jute twine, approximately 10 inches long. Fold it in half and thread the loop through a small decorative bead. -
Attach the hanger:
Feed the twine ends through the hole in the fish, tie a secure knot, and pull the knot tight against the top edge. Slide the bead down to rest near the knot.
Glaze Running?
If your glaze runs over the scale lines during firing, you likely applied it too thickly. Thin your glaze slightly with water or apply thinner coats next time.
Hang your finished fish near a window or on a branch to let the light catch those colorful scales


Layered Disc Scales for a 3D Look
This charming sculpture features a rustic two-toned design, combining warm terracotta scales with smooth cream accents for the head and fins. The deep, overlapping scale texture creates a wonderfully tactile 3D effect that brings the character to life.
Detailed Instructions
Materials
- Terracotta colored polymer clay (or earthenware)
- White or cream colored polymer clay
- Small circle cutter (approx. 1/2 inch)
- Aluminum foil (for armature)
- Clay sculpting tools (needle tool, modeling tool)
- Rolling pin or pasta machine
- Flexible blade or craft knife
- Baking sheet and parchment paper
- Oven (if using polymer clay)
Step 1: Forming the Core
-
Create the armature:
Begin by crumpling a piece of aluminum foil into a tight, elongated oval shape. This will serve as the lightweight core of the fish’s body and save you from using too much clay. -
Cover with base clay:
Roll out a sheet of the terracotta clay to a medium thickness. Wrap this sheet entirely around your foil armature, smoothing the seams together until you have a solid, egg-like clay form. -
Shape the body:
Gently gently roll and press the clay-covered form to taper it slightly towards the back end where the tail will attach. Ensure the surface is relatively smooth so the scales will adhere properly.
Step 2: Sculpting the Head and Fins
-
Form the head:
Take a generous ball of cream-colored clay and shape it into a rounded cone. Press this firmly onto the front of the terracotta body to create the fish’s face, blending the seam underneath where it won’t be seen. -
Define the face shape:
Smooth the cream clay back towards the body, creating a curved transition line. Use your thumb to create a subtle indentation for the mouth area. -
Add the eye:
Roll a small ball of cream clay, flatten it slightly, and press it onto the side of the head. Use a small ball tool or the end of a paintbrush to make a deep indentation in the center specifically for the pupil. -
Carve the mouth:
Using a needle tool or knife, slice a horizontal line into the front of the face for the mouth, giving it a slight upward curve for a friendly expression. -
Create the dorsal fin:
Shape a piece of cream clay into a rounded triangle. Press it onto the top center of the fish’s back. Use a modeling tool to score vertical lines into the fin for texture. -
Make the side fin:
Form a smaller, flat semi-circle from cream clay. Attach this to the side of the body, just behind the head junction. Add three or four indented lines radiating outward for detail. -
Attach the tail:
Sculpt a larger piece of cream clay into a forked tail shape. Attach this firmly to the tapered back end of the body, blending the clay to secure it. Texture it with long, flowing lines.
Scales won’t stick?
If using dry or firm clay, the scales might fall off. Brush a tiny amount of liquid polymer bond (or slip for ceramic clay) on the back of each disc before pressing it onto the body.
Step 3: Applying the Scales
-
Prepare the scales:
Roll out a thin sheet of terracotta clay. Use your small circle cutter to punch out numerous small discs. You will need quite a few to cover the body. -
Start at the tail:
Begin applying the circles at the very back of the fish, right where the tail connects. Place a row of circles so they slightly overlap the tail connection point. -
Layer the rows:
Place the next row of clay circles in front of the first, positioning each new scale so it covers the gap between the two scales behind it. This offset pattern creates the classic fish scale look. -
Work forward:
Continue this overlapping process, row by row, moving towards the head. I find it helps to press the top edge of each circle down firmly, leaving the bottom edge slightly lifted for dimension. -
Detail the head connection:
When you reach the cream-colored head, carefully trim or shape the final row of terracotta scales so they neatly hug the curve of the face. -
Refine the texture:
Once all scales are placed, gently inspect the fish. If any scales look too flat, use a tool to slightly lift their edges again to emphasize the shadow lines.
Pro Tip: Consistent Thickness
Use playing cards or acrylic spacers on either side of your roller when making the sheet for scales. This ensures every single scale is exactly the same thickness for a uniform look.
Step 4: Finishing
-
Smooth fingerprints:
Dip your finger in a tiny bit of baby oil (for polymer clay) or water (for earthen clay) and very gently smooth out any fingerprints on the cream sections. -
Bake or dry:
Follow the manufacturer’s instructions for your specific clay. Place the fish on a parchment-lined baking sheet and bake or let air dry completely.
Now you have a wonderful aquatic friend ready to display on a shelf or desk

The Complete Guide to Pottery Troubleshooting
Uncover the most common ceramic mistakes—from cracking clay to failed glazes—and learn how to fix them fast.
Tropical Reef Fish Color Blocking
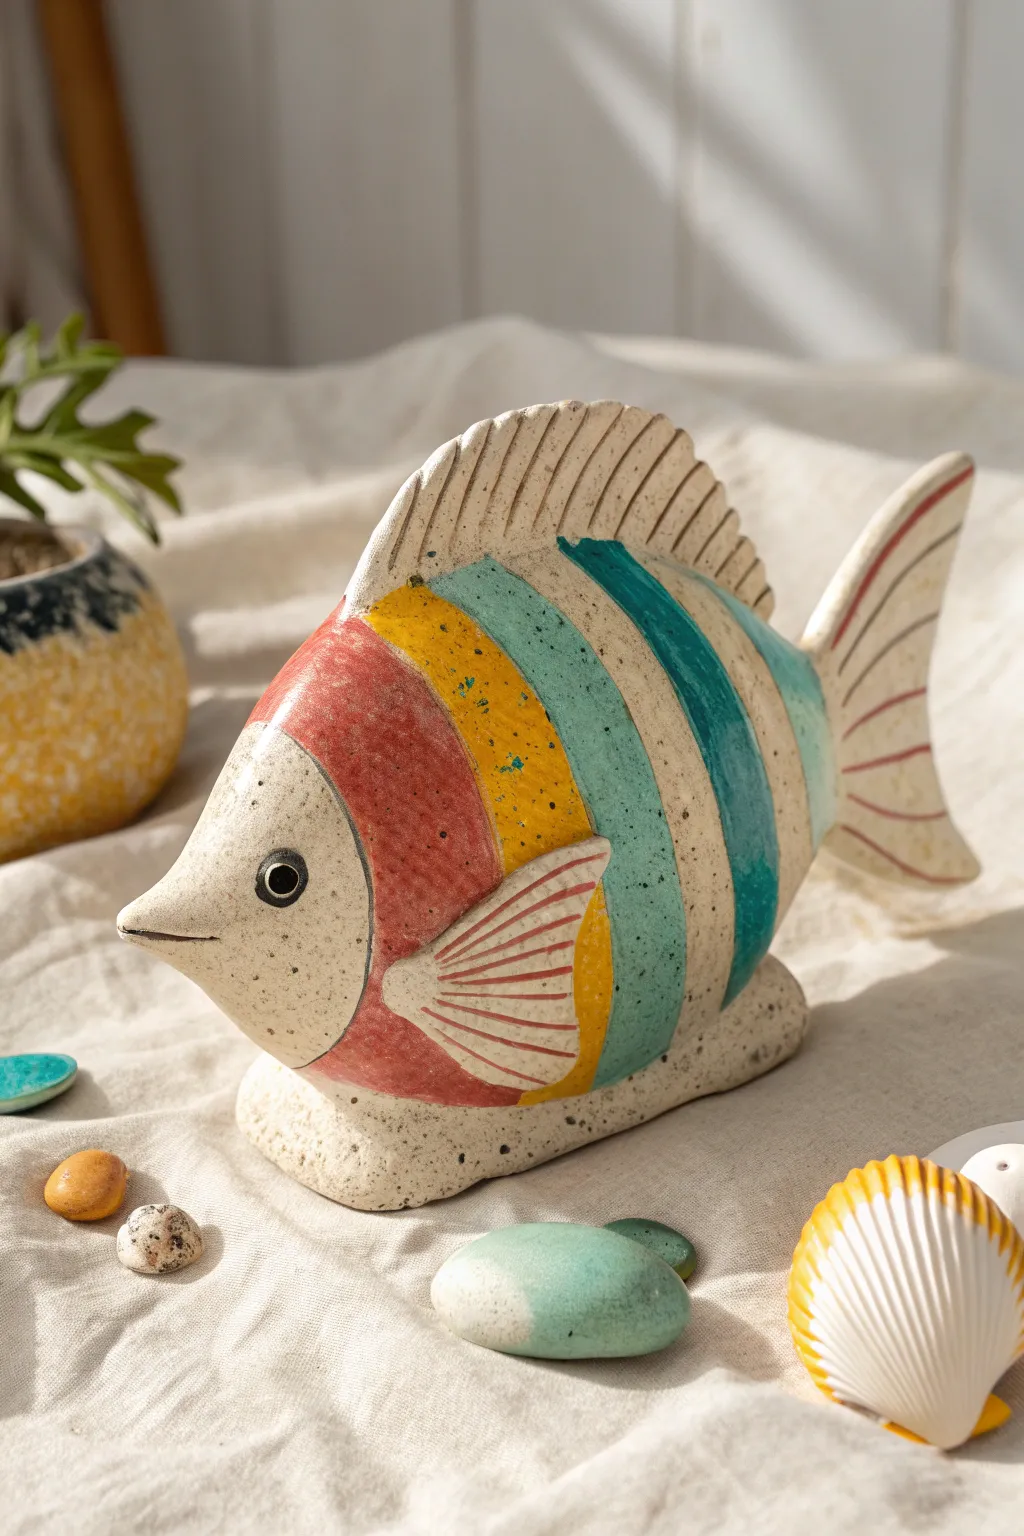
Brighten up your shelf with this cheerful ceramic fish that combines rustic speckled clay with bold, tropical stripes. The clean, geometric color blocking creates a modern look while retaining the charm of hand-built pottery.
How-To Guide
Materials
- Speckled stoneware clay (approx. 2-3 lbs)
- Rolling pin and guide strips (canvas or slats)
- Fettling knife or craft knife
- Underglazes: Red, Saffron Yellow, Teal, Dark Blue, Black
- Clear transparent glaze (cone 5/6 or suitable for your clay)
- Slip and scoring tool (serrated rib)
- Needle tool
- Loop tool (for hollowing, if building thick)
- Sponge and water
- Paintbrushes (flat shader for stripes, fine liner for details)
- Kiln (or access to firing services)
Step 1: Sculpting the Form
-
Wedge the clay:
Begin by thoroughly wedging your speckled clay to remove air bubbles and ensure consistency. Form it into a smooth, oval-shaped loaf. -
Shape the body:
Gently manipulate the oval loaf into a rounded fish shape. Flatten the bottom slightly so the fish sits stable without rolling. -
Extrude the top fin:
Pinch the clay along the top ridge to pull up a dorsal fin. It should rise gradually from the head and taper off towards the tail. -
Form the tail:
At the rear of the body, flatten the clay vertically and pinch it outwards to create a flared tail shape. Ensure the connection point remains thick enough to prevent cracking. -
Refine the surface:
Use a damp sponge or your fingers to smooth out any bumps on the body. The goal is a clean, continuous canvas for your stripes later. -
Add side fins:
Roll out a small slab of clay (about 1/4 inch thick) and cut out two rounded triangular shapes for the pectoral fins. Attach them to the lower sides using the score-and-slip method. -
Define the face:
Use your thumb to lightly press an indentation where the head meets the body, distinguishing the face area. Use a needle tool to cut a simple horizontal line for the mouth.
Step 2: Detailing and Texture
-
Carve fin details:
Using a needle tool or a dull pencil, press deep, straight lines into the dorsal (top) fin and the tail to mimic rays. Repeat this pattern on the side pectoral fins. -
Sculpt the eye:
Roll a very small ball of clay and attach it firmly to the face for the eye. Press the center in slightly to create a pupil socket. -
Mark color zones:
Very lightly sketch vertical curved lines along the body with a needle tool. These will act as guides for where your colored stripes will go, ensuring the spacing is pleasing before you commit to painting.
Clean Lines Tip
Use automotive pinstriping tape or weak masking tape to mask off your stripes before painting. This creates perfectly sharp edges between colors.
Step 3: Painting and Finishing
-
Bisque fire:
Allow the piece to dry slowly and completely (bone dry) before loading it into the kiln for a bisque firing. -
Clean the bisque:
Once fired, wipe the piece down with a damp sponge to remove any dust that could prevent the glaze from adhering. -
Paint the red stripe:
Using a flat shader brush, apply three coats of red underglaze to the wide section just behind the gills. Let each coat dry to the touch before adding the next. -
Apply yellow and teal:
Move down the body, painting the next stripe yellow, followed by a teal stripe. Keep your edges crisp, leaving a thin line of raw speckled clay exposed between colors if you like the separated look. -
Add the blue accent:
Paint the final stripe in a dark blue underglaze. For the fins and tail, stick to thin red lines within the carved grooves, or leave them mostly bare to highlight the clay body. -
Detail the eye:
I prefer using a fine liner brush to paint the eye solid black, giving the fish a bold, focused expression. -
Clear glaze:
Dip or brush a clear transparent glaze over the entire fish, except for the flat bottom. This seals the underglaze and makes the speckled clay pop. -
Final firing:
Fire the piece again to the maturation temperature of your clay and glaze (typically cone 5 or 6 for stoneware).
Go Matte
Skip the clear glaze and leave the raw clay body unglazed on the non-painted sections for a beautiful textural contrast between rough clay and smooth color.
Place your finished fish near a sunny window where the glossy glaze can catch the light
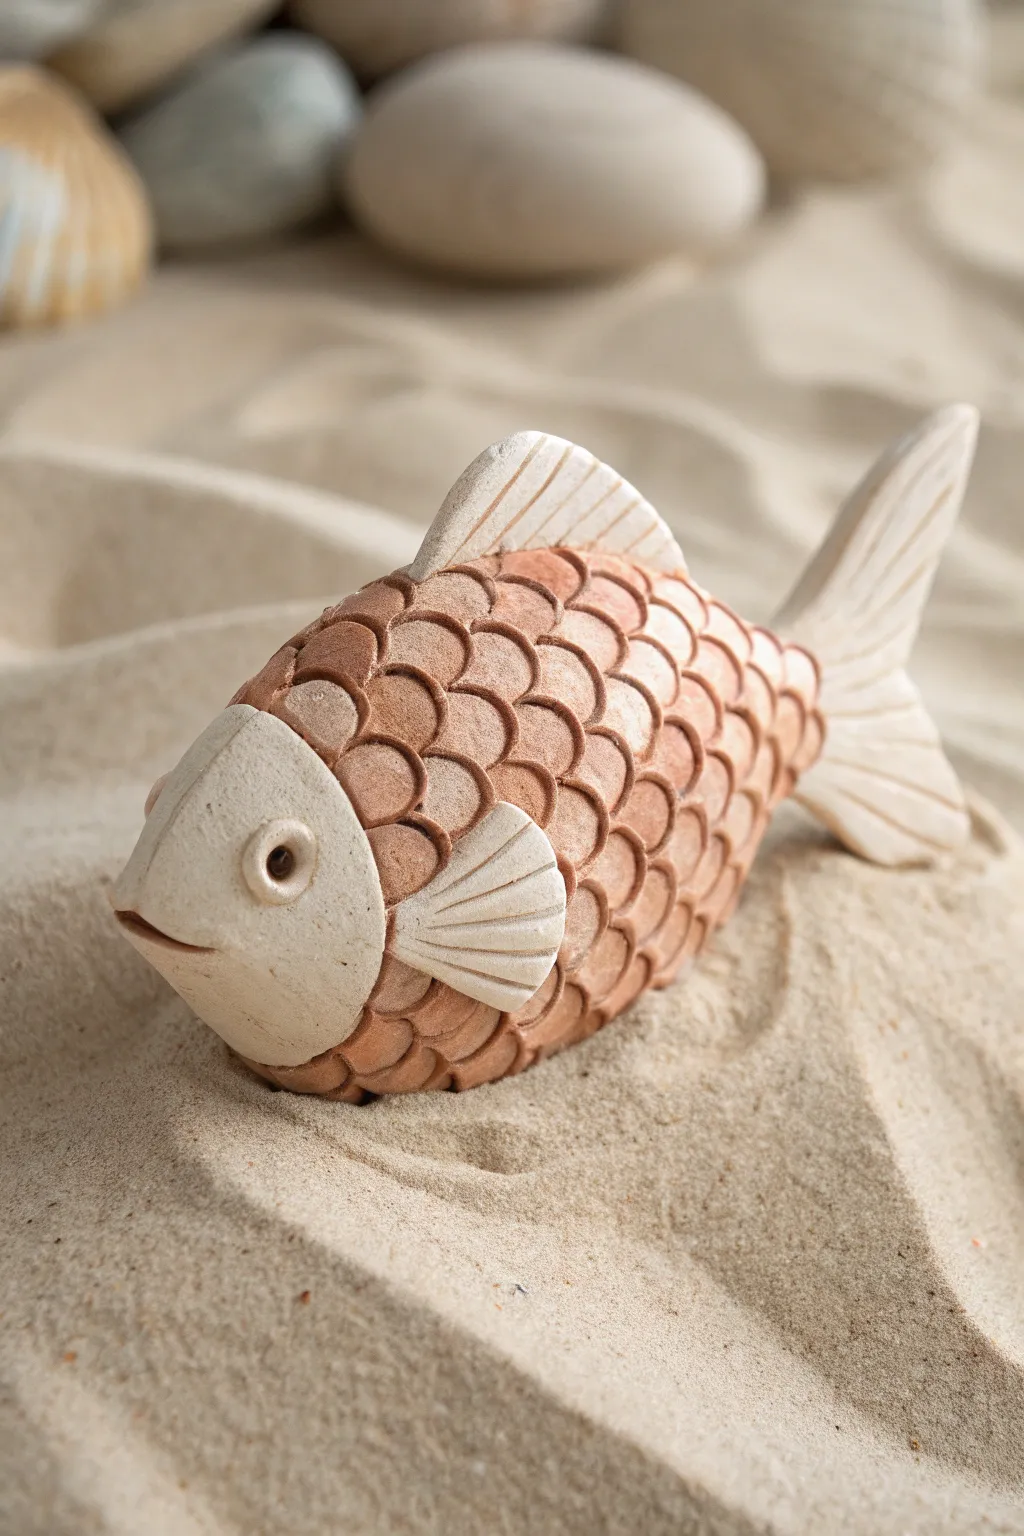
Striped Fish With Carved Fin Lines

This rustic, stylized clay fish captures the ease of seaside living with its simple form and striking terracotta-colored carved lines. The off-white finish combined with raw, inlaid detail gives it the look of a vintage artifact found on a sandy shore.
Step-by-Step
Materials
- White or speckled stoneware clay (about 1 lb)
- Terracotta colored underglaze or slip
- Rolling pin
- Needle tool
- Loop tool or small carving gouge
- Sponge
- Wooden modeling tool (flat edge)
- Slip and scoring tool
- Clear matte glaze (optional)
- Thin paintbrush
Step 1: Shaping the Form
-
Prepare the Clay:
Begin by wedging your white clay thoroughly to remove any air bubbles. Form it into a smooth, thick oval log shape. -
Flatten the Body:
Gently press the oval log onto a canvas-covered board. Use your palm to flatten it slightly so it is wider in the middle and tapers towards the ends, creating a standard fish silhouette roughly 1 to 1.5 inches thick. -
Refine the Profile:
Use a wooden modeling tool or your fingers to smooth the rounded belly and the top curve. The shape should be organic and not perfectly symmetrical. -
Form the Tail:
Pinch the clay at the back end to create the tail fin. Gently pull the clay outward and flatten it slightly, creating a fork shape by pressing in the center with your thumb. -
Attach the Dorsal Fin:
Take a small scrap of clay and shape a triangular fin. Score both the top of the fish and the base of the triangle, add a little slip, and press firmly to attach it. Smooth the seams until invisible. -
Define the Mouth:
Using a knife tool or the edge of your wooden rib, cut a small horizontal slit at the front nose of the fish to create a slight mouth opening. -
Smooth the Surface:
Wipe the entire sculpture down with a slightly damp sponge. You want to remove fingerprints but keep the slightly textured, natural look of the clay.
Messy Lines?
If underglaze smears onto the white body, don’t wipe it while wet! Let it dry completely, then gently sand it off with fine-grit sandpaper for a crisp edge.
Step 2: Carving and Detailing
-
Plan the Eye:
Use a needle tool to lightly mark an eye placement near the front. Once positioned correctly, carve a small circular recess. Add a tiny ball of clay inside for the pupil. -
Sketch the Gill Line:
Lightly trace a curved line behind the eye to represent the gill cover. -
Initial Carving:
Using a U-shaped loop tool or gouge, carve deep, consistent grooves into the body. Start vertical in the middle and curve slightly as you move toward the tail, following the body’s contour. -
Detailing the Fins:
Carry these carved lines onto the dorsal fin and the tail fin, making shorter strokes that fan outward. -
Refine the Grooves:
Go back over your distinct carved lines to ensure they are deep enough to hold color but have clean edges. Remove any clay burrs (little crumbs) gently with a soft brush. -
Slow Drying:
Let the fish dry slowly under loose plastic until it reaches a leather-hard state. This is crucial so the inlaid color doesn’t smudge.
Hollow it Out
To reduce weight and prevent explosions in the kiln, hollow out the fish from the bottom once it’s leather hard, leaving walls about 1/2 inch thick.
Step 3: Inlay and Finishing
-
Applying Underglaze:
Using a thin brush, carefully paint terracotta-colored underglaze directly into the carved grooves and the pupil of the eye. I like to be fairly precise here to minimize cleanup later. -
Clean Up Edges:
If any color spilled onto the main white body, wait for it to dry completely, then gently scrape it away with a clean metal rib or a slightly damp sponge. -
Defining the Eye:
Paint the rim of the eye socket with the same terracotta color to make the pupil pop. -
Bisque Fire:
Once bone dry, fire the piece to bisque temperature (usually cone 04). -
Applying Glaze (Optional):
For a raw finish like the photo, leave the main body unglazed. If you want durability, apply a clear matte glaze over the entire piece, wiping the foot clean. -
Final Fire:
Fire the piece again to the maturation temperature of your specific clay body.
Now you have a charming coastal decoration that brings a touch of the ocean to your shelf


What Really Happens Inside the Kiln
Learn how time and temperature work together inside the kiln to transform clay into durable ceramic.
Polka Dot Pattern Fish as Mini Decor
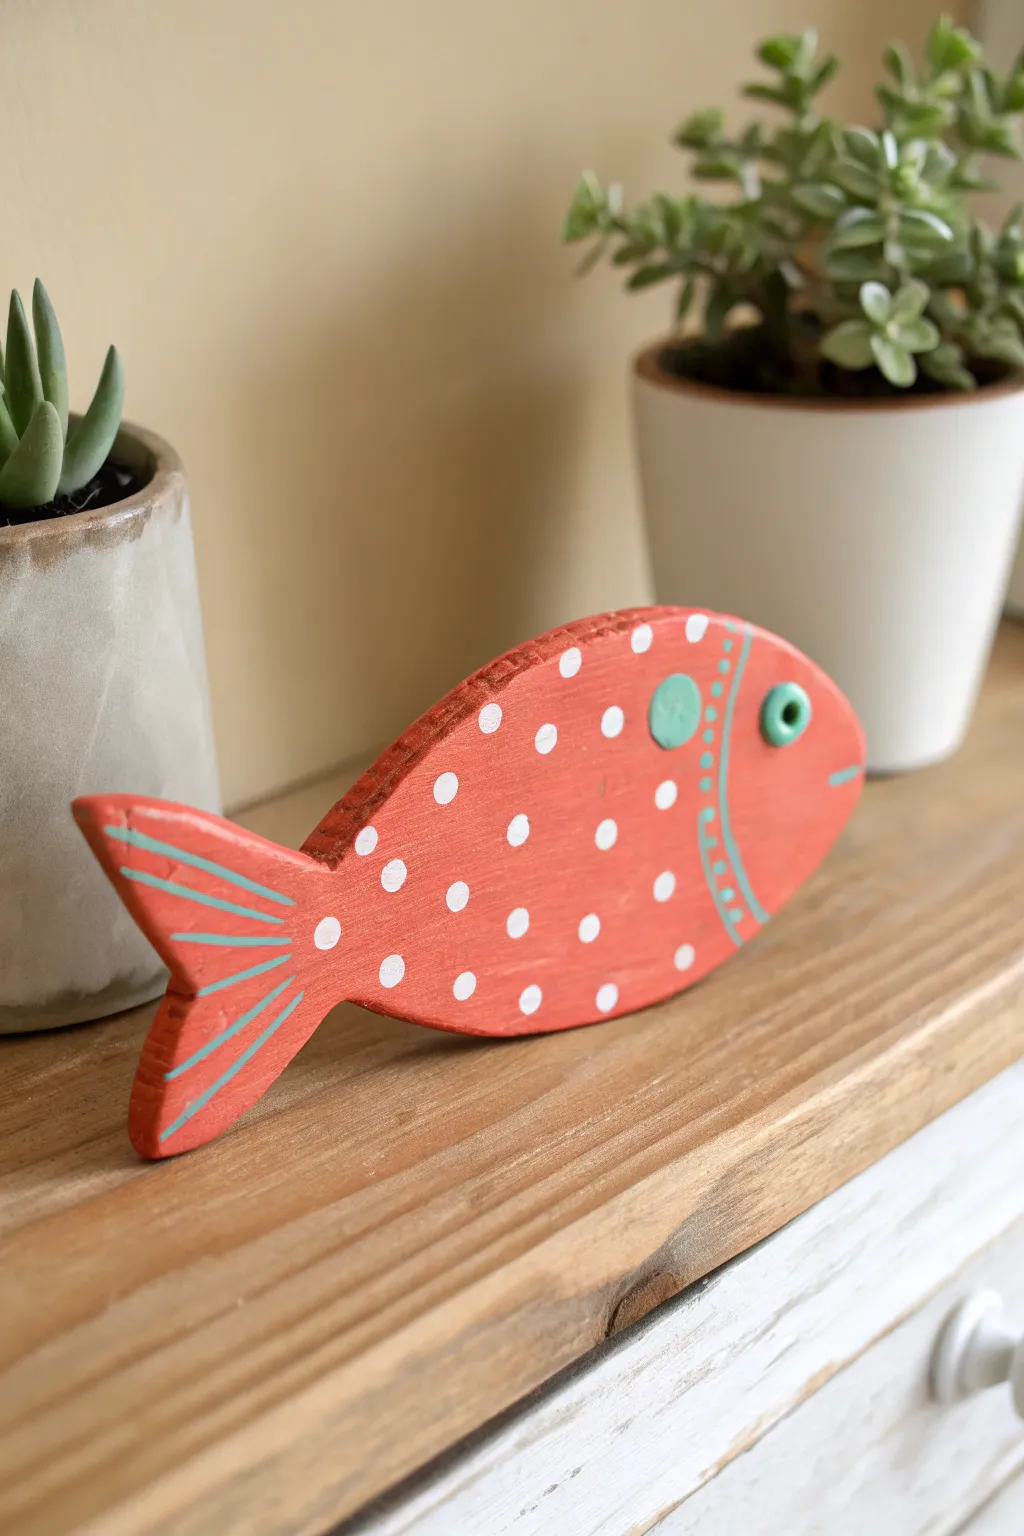
Brighten up any shelf or mantel with this adorable terracotta-style fish sculpture featuring a playful polka dot pattern. The combination of warm coral tones and cool teal accents gives it a lovely, rustic coastal charm that’s surprisingly easy to replicate.
Detailed Instructions
Materials
- Air-dry clay (terracotta color preferred for authenticity, or white)
- Rolling pin
- Fish-shaped template (paper or cardstock)
- Craft knife or clay cutter
- Sandpaper (fine grit)
- Acrylic paints: Coral/Salmon, White, Teal/Turquoise, Black
- Paintbrushes: Medium flat brush, fine liner brush
- Dotting tool or the back of a paintbrush
- Small bead or button (optional for the eye)
- Matte sealant or varnish
Step 1: Shaping the Fish
-
Prepare your clay:
Start by kneading a generous chunk of air-dry clay to warm it up and remove air bubbles. This ensures a smooth surface without internal cracks. -
Roll out the slab:
Roll the clay out to a thickness of about 1/2 inch to 3/4 inch. Making it fairly thick is crucial so the fish can stand upright on its own once dry. -
Cut the shape:
Place your fish template onto the clay. Use a craft knife to cut cleanly around the outline, defining a simple oval body and a forked tail. -
Create the flat base:
Carefully pick up your clay fish and gently tap the bottom edge (the belly) against your work surface to flatten it significantly. Test that it balances upright securely. -
Add surface details:
If you want a dimensional eye, press a small ring of clay or a washer into the head area to creature an impression, or attach a small clay ball and flatten it slightly. -
Smooth the edges:
Dip your finger in a little water and run it along all the cut edges to soften them. You want to remove any sharp angles from cutting. -
Dry thoroughly:
Let the fish dry completely. Since it is thick, this might take 24-48 hours. Rotate it occasionally so the bottom dries too.
Balance Check
If your fish struggles to stand, embed a heavy washer or coin into the bottom edge of the wet clay to lower the center of gravity.
Step 2: Painting and Patterning
-
Sand imperfections:
Once bone dry, lightly sand any rough spots or fingerprints with fine-grit sandpaper, wiping away the dust with a damp cloth afterward. -
Base coat:
Paint the entire fish with a warm coral or salmon acrylic paint. I find that applying two thin coats gives a much smoother finish than one thick one. -
Define the head:
Using a fine liner brush and teal paint, draw a curved line separating the head from the body. Add a second parallel line right next to it. -
Paint the cheek:
Paint a solid teal circle on the ‘cheek’ area of the fish, just behind the eye placement. -
Detail the head dots:
Inside the two curved teal lines you just painted, use a very small dotting tool to add a row of tiny teal dots for texture. -
Paint the tail stripes:
Use your liner brush and the same teal paint to create long, thin stripes following the shape of the tail fins. -
Add the polka dots:
Dip a larger dotting tool (or the handle end of a paintbrush) into white paint. Stamp random, evenly spaced polka dots across the body. -
Finish the eye:
Paint the eye area teal with a distinct black dot in the center. If you used a bead/button, glue it in place now. -
Seal the work:
Protect your paint job with a coat of matte varnish. This removes the chalky feel of the clay and brings out the vibrancy of the coral color.
Fixing Cracks
Tiny cracks while drying are normal for thick clay. Mix a tiny bit of fresh clay with water to make a paste and fill them in easily.
Place your cheerful new fish among some potted succulents or on a window sill to enjoy that pop of color every day
School of Tiny Fish Wall Relief
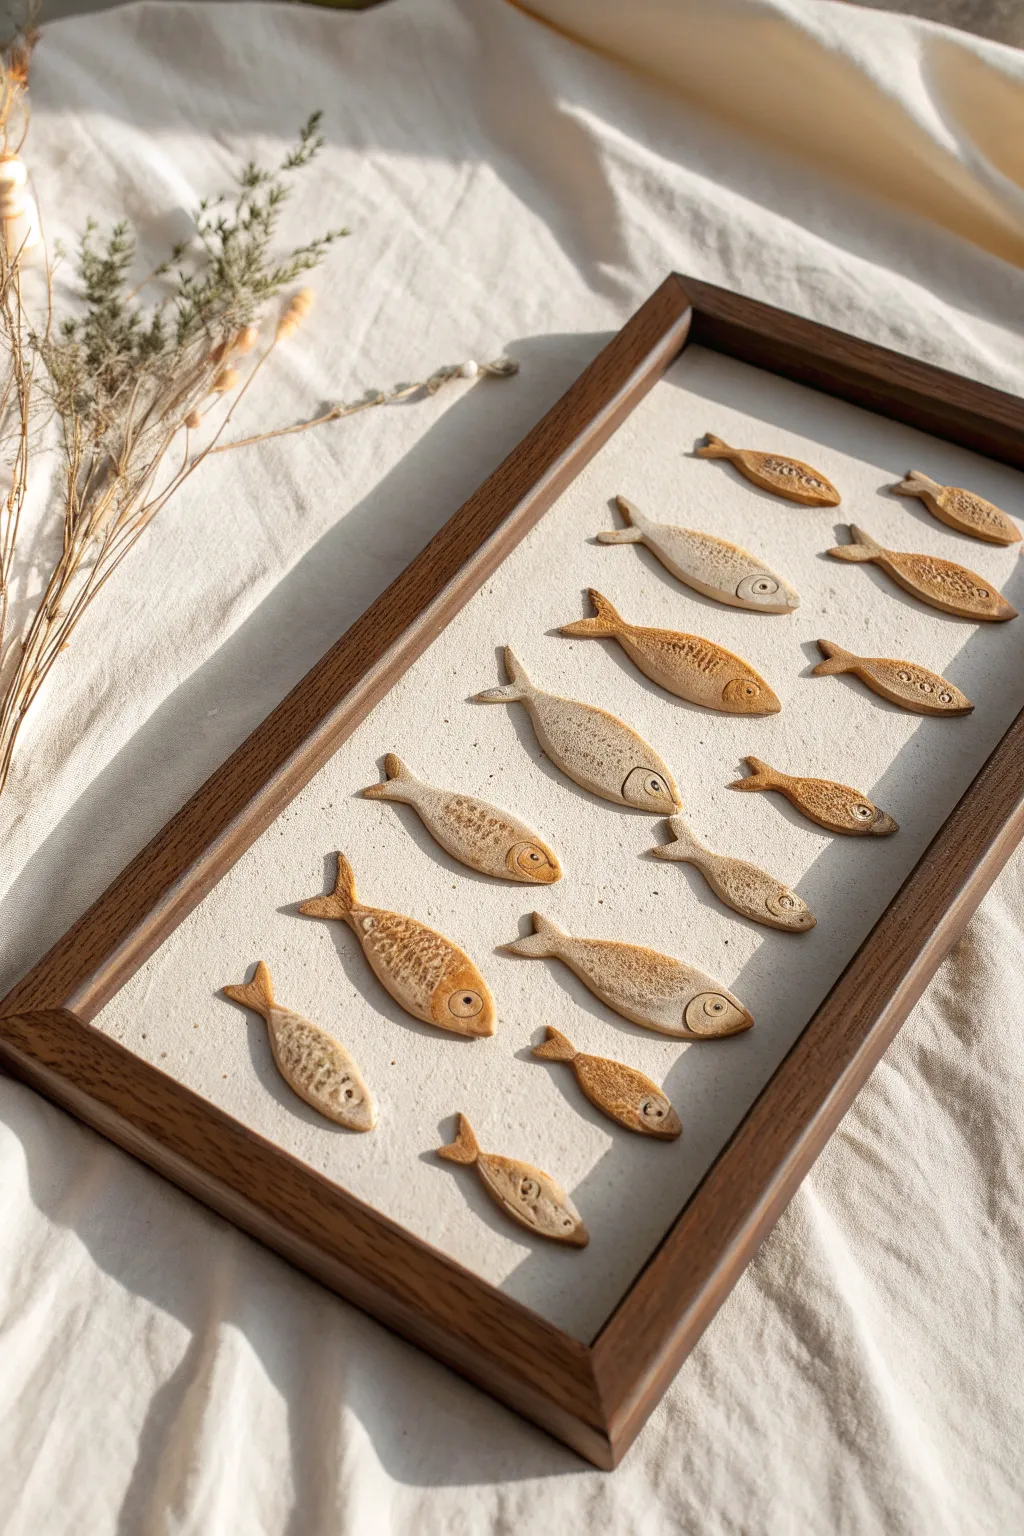
Bring the calming movement of the ocean into your home with this minimalist relief art featuring a school of tiny, hand-sculpted fish. The natural clay tones and subtle textures create an organic, rustic look that fits perfectly in a wooden shadow box.
Step-by-Step Tutorial
Materials
- Air-dry clay (white or light terracotta)
- Modeling tools or a small knife
- Texturing tools (combs, burlap, needle tools)
- Rolling pin
- Watercolors or diluted acrylic paints (browns and ochres)
- Fine paintbrush
- Shadow box frame (wood finish)
- Thick textured cardstock or linen fabric
- Strong craft glue or hot glue gun
- Mounting board or foam core (to back the fabric)
- Sandpaper (fine grit)
Step 1: Sculpting the School
-
Condition the clay:
Begin by kneading your air-dry clay until it is soft, pliable, and free of cracks. -
Roll it out:
Roll the clay onto a flat surface to a thickness of about 1/4 inch (6mm). If you want variety, roll some sections slightly thinner. -
Cut the shapes:
Using a small knife or designated clay tool, freehand cut simple fish silhouettes. Aim for variety in size, ranging from tiny fry to larger, 2-inch fish. -
Smooth the edges:
Dip your finger in a little water and gently run it along the cut edges of each fish to soften any sharp angles or burrs left by the knife. -
pinch the tails:
Gently pinch the tail section of each fish to give it a slightly raised, dimensional look distinct from the body.
Natural Impressions
For organic textures, press real items into the clay before cutting the shapes. Dried leaves, seashells, or rough stones create beautiful, unpredictable patterns.
Step 2: Adding Texture & Detail
-
Create scale textures:
While the clay is still soft, press different textures into the bodies. You can use a bit of burlap for a netted look, a comb for parallel lines, or the tip of a small tube for circles. -
Define the face:
Use a needle tool or knife to gently score a curved line separating the head from the body. -
Add the eyes:
Press a small, hollow circle tool (like a straw or pen cap) into the head area to create the eye. Use a needle tool to add a tiny dot in the center for the pupil. -
Let them dry:
Place all your fish on a flat board lined with parchment paper. Allow them to dry completely—usually 24 to 48 hours depending on humidity. Turning them over halfway through helps them dry evenly.
Step 3: Finishing & Assembly
-
Sand the imperfections:
Once bone-dry, use fine-grit sandpaper to briefly smooth any rough spots on the edges, being careful not to sand away your texture. -
Apply a wash:
Mix a very watery wash of brown or ochre paint. Brushing this over the textured areas allows the pigment to settle into the grooves while wiping the surface keeps the high points light. -
Highlight tails:
I like to add a slightly darker shade to the very tips of the tails or heads on just a few fish to create visual depth. -
Prepare the background:
Cut your textured cardstock or linen to fit the inside of your shadow box frame. Mount it securely to the backing board. -
Plan the layout:
Arrange the dry fish on the background before gluing. Create a flow by having them all swimming in one general direction, but tilt individual fish slightly up or down to mimic natural movement. -
Glue in place:
Apply a dab of strong craft glue to the back of each fish and press it firmly onto the background. -
Frame it:
Once the glue is set, place the backing into the wooden frame and secure it.
Depth Perception
Use foam adhesive pads of varying thicknesses instead of glue. This lifts some fish higher off the background than others, creating actual shadows.
Hang your framed school of fish in a well-lit spot to let the shadows play across the textured surfaces

TRACK YOUR CERAMIC JOURNEY
Capture glaze tests, firing details, and creative progress—all in one simple printable. Make your projects easier to repeat and improve.
Fish Magnet Set for the Fridge
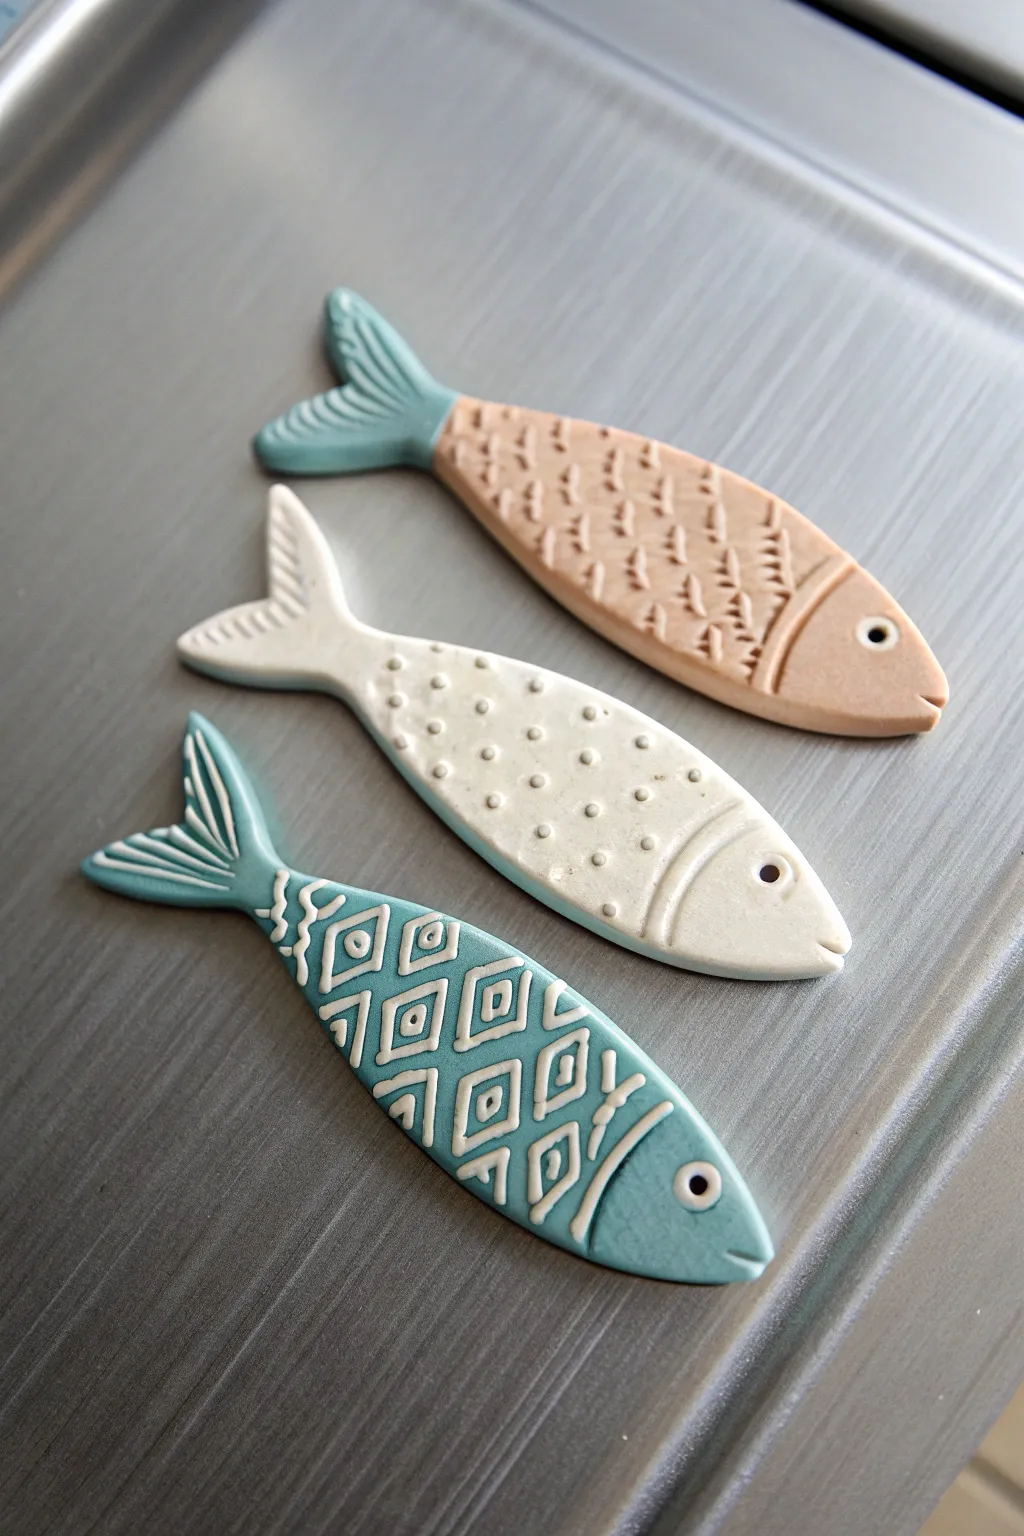
Create a charming set of aquatic magnets using polymer clay and simple texturing tools. This project features three distinct fish designs—a two-toned textured fish, a spotted white swimmer, and a patterned blue beauty—perfect for adding a splash of coastal style to your refrigerator.
Step-by-Step
Materials
- Polymer clay (Teal Blue, Salmon/Peach, White)
- Acrylic rolling pin
- Fish-shaped cookie cutter (optional) or craft knife/printed template
- Needle tool or toothpick
- Small ball stylus tool
- Texture stamps or found objects (for scale patterns)
- White acrylic paint (for highlighting patterns)
- Small paintbrush or paper towel
- Strong round magnets
- Super glue (E6000 or gel cyanoacrylate)
- Oven for baking clay
Step 1: Shaping the Base Forms
-
Condition the clay:
Begin by kneading your white, teal, and peach clay blocks separately until they are soft, pliable, and free of cracks. -
Roll out the slabs:
Using your acrylic rolling pin, flatten the clay to a uniform thickness of about 1/4 inch (6mm). Make sure the surface is smooth. -
Cut the fish shapes:
Use a fish-shaped cutter to punch out three shapes. If you don’t have a cutter, sketch a simple fish silhouette on paper, cut it out, place it on the clay, and trace around it with a craft knife. -
Smooth the edges:
Gently run your finger around the cut edges of each fish to soften any sharp corners left by the blade or cutter.
Fixing Crumbly Clay
If your clay cracks while rolling, it’s too dry. Mix in a tiny drop of baby oil or clay softener and knead thoroughly until it’s smooth and stretchy again.
Step 2: Detailing the Salmon Fish
-
Create the two-tone body:
For the top fish, you’ll need to join two clay colors. Slice the tail off a teal fish and the body off a salmon fish using a wavy cut line. -
Join the seams:
Press the teal tail and the salmon body together. Gently rub the seam with your finger or a smoothing tool so they bond securely. -
Add scale texture:
Press a small V-shaped tool or the tip of a detailing tool repeatedly across the salmon body to create rows of little triangular indentations resembling scales. -
Detail the tail:
Use a needle tool to drag lines from the base of the tail outward to the tips, mimicking fin rays. -
Define the face:
Gently press a curved line near the front to separate the head, then poke a small hole for the eye using a needle tool.
Level Up: Glossy Eyes
After baking, add a tiny drop of UV resin or glossy varnish into the eye holes. It gives the fish a realistic ‘wet’ look and makes the eyes pop.
Step 3: Detailing the White Fish
-
Create the spots:
Taking your plain white fish shape, use a small ball stylus tool to press random indentations all over the body, avoiding the head and tail area. -
Vary dot depths:
I like to vary the pressure slightly so some dots are deeper than others, giving the surface a more organic, bubbly texture. -
Mark the gills:
Press the edge of a spoon or a curved tool to create a deep, smooth arc defining the gill line. -
Finish the eye and tail:
Add the eye hole and use the needle tool to score etched lines on the tail fin.
Step 4: Detailing the Blue Patterned Fish
-
Carve the geometric pattern:
On the full teal fish, use a very fine needle tool to carve a diamond or lattice pattern across the main body. -
Deepen the lines:
Go over your lines a second time to ensure they are deep enough to hold paint later. Add small squares inside the diamonds for extra detail. -
Texture the fins:
Carve deeper, bolder lines on the tail fin to differentiate it from the delicate body pattern.
Step 5: Baking and Finishing
-
Bake the clay:
Place all three fish on a parchment-lined baking sheet. Bake according to your clay manufacturer’s instructions (usually around 275°F/135°C for 15-30 minutes). -
Cool down:
Let the fish cool completely before handling them; the clay hardens fully as it returns to room temperature. -
Highlight with paint:
For the blue diamond fish, brush white acrylic paint over the textured area. Before it dries, wipe the surface with a paper towel, leaving white paint only in the carved crevices. -
Attach the magnets:
Flip the fish over. Apply a dab of strong super glue to the back of each fish and press a round magnet firmly into the glue. -
Final cure:
Allow the glue to cure fully (usually 24 hours) before placing your new art on the fridge.
Now you have a custom school of fish to brighten up your kitchen organization
Fish Pendant or Keychain Charm
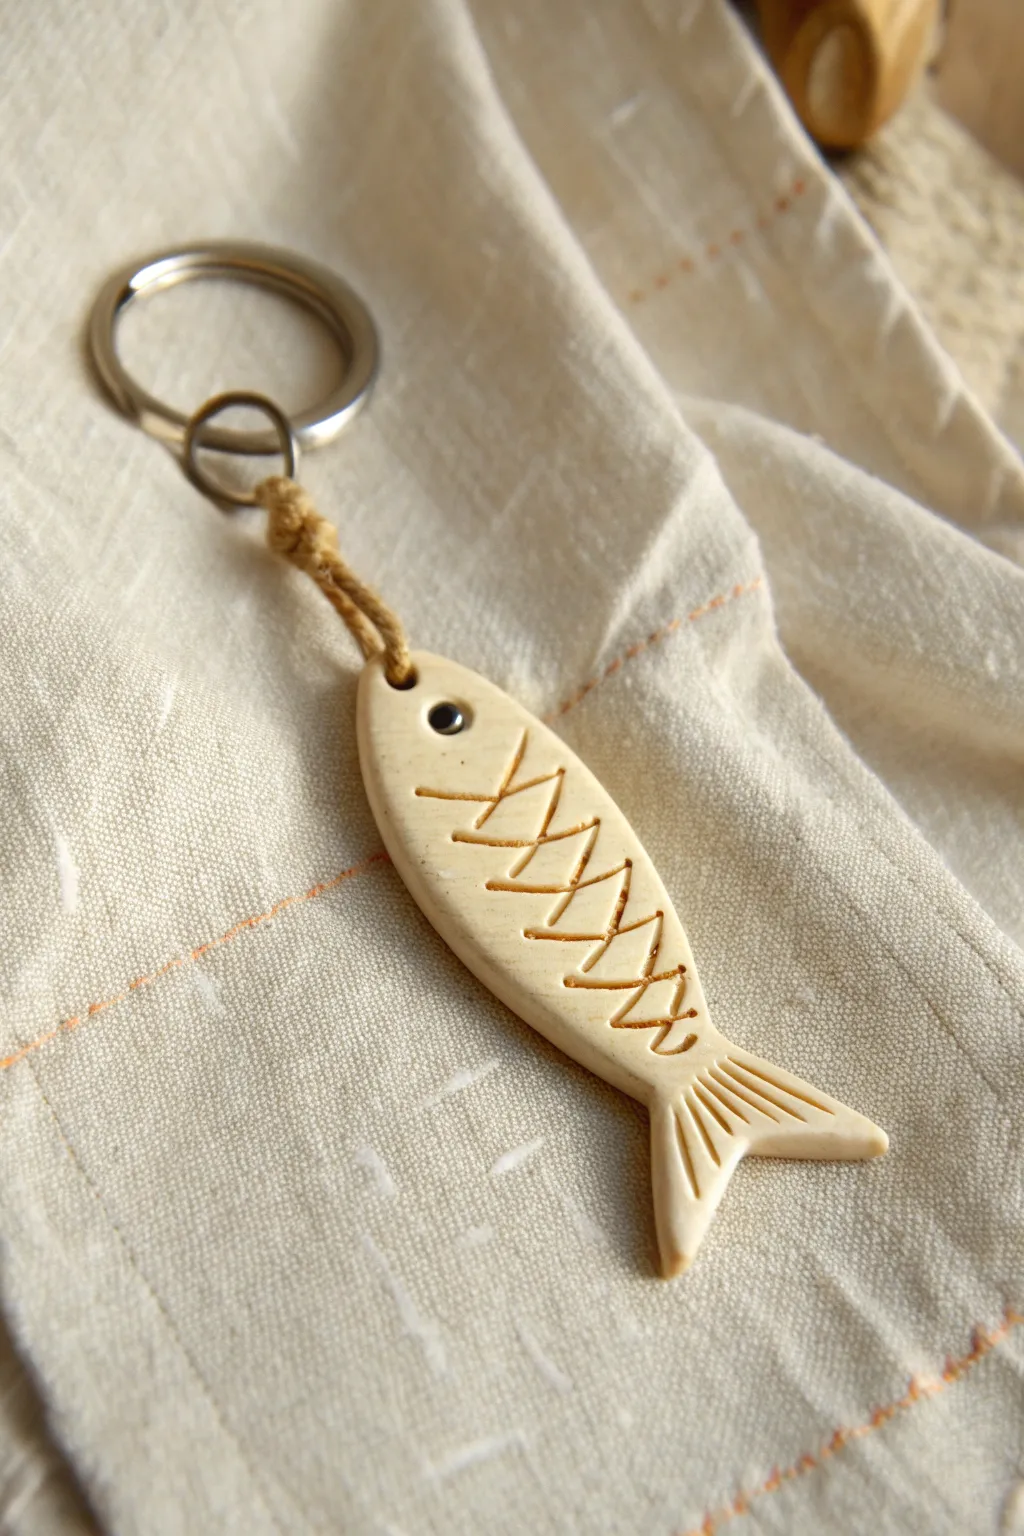
This minimalist fish charm mimics the look of carved bone or driftwood, perfect for a rustic and natural accessory. With simple carving techniques and a bit of antique finishing, you can transform plain clay into a timeless keepsake.
Step-by-Step Guide
Materials
- White or beige polymer clay (or air-dry clay)
- Rolling pin or pasta machine
- Fish-shaped cookie cutter (optional) or craft knife
- Pointed sculpting tool or toothpick
- Small eye pin
- Brown acrylic paint
- Paper towel or wet wipe
- Metal split ring keychain
- Small jump ring
- Hemp cord or jute twine
- Black glass bead or small ball of black clay
- Oven (if using polymer clay)
Step 1: Shaping the Fish Body
-
Condition the clay:
Start by warming a chunk of beige or off-white clay in your hands until it becomes soft and pliable. -
Roll the slab:
Roll the clay out onto a smooth work surface to a thickness of about 1/4 inch (6mm). You want it substantial enough to be durable. -
Cut the shape:
Use a craft knife to freehand a streamlined fish shape, tapered at both ends with a wider middle. Alternatively, use a long oval cutter and modify the tail end. -
Refine the edges:
Use your fingertip or a smoothing tool to gently round over the cut edges of the clay so the fish looks smooth and worn, rather than sharp. -
Cut the tail:
At the narrower end, make a V-shaped cut to define the tail fins. Gently separate the two points of the tail to accentuate the shape.
Smooth Operator
Before baking, lightly brush the clay with a tiny amount of baby oil (for polymer) or water (for air-dry) to remove fingerprints.
Step 2: Adding Details & Texture
-
Create the eye socket:
Near the rounded head of the fish, press a small divot into the clay where the eye will go. -
Insert the eye:
Press a tiny black glass bead into the divot. If you don’t have beads, a tiny ball of black clay works perfectly too. -
Carve the skeleton:
Using a pointed tool or needle, carve a zig-zag line down the center of the body. Start behind the head and stop before the tail. -
Deepen the lines:
Go over your zig-zag lines a second time to ensure the grooves are deep enough to hold paint later. -
Detail the tail:
Carve three or four simple straight lines radiating outward on the tail fin to simulate texture. -
Add the hole:
Use a straw or a tool to poke a hole through the very top of the fish’s nose area for the cord. Make sure the hole is big enough for your twine.
Color Variations
Try using terracotta or grey clay for a different stone-like effect, then swap the brown wash for black or white paint.
Step 3: Finishing & Assembly
-
Bake or dry:
Follow your clay manufacturer’s instructions to bake (for polymer) or air-dry the piece until it is completely hard. -
Apply the antique wash:
Dilute a small amount of brown acrylic paint with water. Brush this wash over the entire fish, ensuring it gets into the carved grooves. -
Wipe away excess:
Immediately wipe the surface with a paper towel. Leave the paint inside the zig-zags and tail lines to make the details pop. -
Coat the rim (optional):
I sometimes lightly rub a bit of leftover paint along the outer edge of the fish to give it a weathered border. -
Seal:
Apply a matte varnish to protect the paint and clay, giving it a smooth, finished feel. -
Attach the cord:
Cut a short length of hemp cord. Loop it through the hole in the fish’s nose. -
Secure the knot:
Tie a secure overhand knot near the clay, then attach the other end to the metal jump ring on your keychain hardware.
This charming little fish is durable enough for daily use and makes a wonderful handmade gift for nature lovers
Koi-Inspired Fish With Flowing Tail

Capture the graceful movement of a koi fish with this detailed clay sculpture, featuring a flowing tail and delicate orange markings. The finished piece has a subtle texture and a soft sheen that mimics the wet scales of a real fish.
Step-by-Step Tutorial
Materials
- White air-dry clay or polymer clay
- Orange acrylic paint
- Gloss varnish or glaze
- Basic clay tools (needle tool, ball stylus)
- Small rolling pin
- Aluminum foil (for armature)
- Small scissors
- Fine-grit sandpaper
- Paintbrushes (detail and flat)
Step 1: Shaping the Body
-
Form the armature:
Crumple a piece of aluminum foil into an elongated teardrop shape to serve as the core of the fish. Curve the tail end slightly upwards and to the side to create a sense of movement. -
Cover with clay:
Roll out a sheet of white clay to about 1/4 inch thickness. Wrap the clay completely around your foil armature, smoothing the seams together with your fingers or a little water until the surface is seamless. -
Refine the shape:
Gently taper the head into a rounded snoot and elongate the tail section, blending the clay smoothly down the length of the body.
Step 2: Fins and Details
-
Create the dorsal fin:
Flatten a small coil of clay into a long, thin strip. Attach this along the spine of the fish, blending the bottom edge into the body. Use a needle tool to press vertical lines into the fin for ribbing texture. -
Add the tail fin:
Shape a larger, flattened piece of clay into a fan shape. Attach it to the tapered end of the body, curving it upwards to match the flow. Use your thumb to thin the edges for a delicate, fluttering look. -
Attach pectoral fins:
Create two smaller fan shapes for the side fins. Press them onto the sides of the body just behind the head area, angling them slightly backwards. -
Form the mouth and whiskers:
Use a ball tool to create a small indentation for the mouth. Roll two very tiny, thin snakes of clay for the whiskers (barbels) and attach them carefully to the corners of the mouth. -
Sculpt the eyes:
Press a small ball stylus into the sides of the head to make eye sockets. Insert a tiny ball of clay into each socket, smoothing the edges slightly.
Cracking Clay?
If you see small cracks forming while air-dry clay cures, mix a tiny bit of fresh clay with water to make a paste (slip) and fill them in before painting.
Step 3: Texturing and Finishing
-
Texture the scales:
Using a small U-shaped tool (like the end of a straw or a specialized clay tool), press gently into the clay body to create a scale pattern. Start from the tail and work your way forward to the head, overlapping the impressions slightly. -
Refine fin details:
I like to go back over the fins with a needle tool, carving deep, flowing lines to emphasize the soft tissue between the spines. -
Allow to dry:
Let the sculpture dry completely. For air-dry clay, this usually takes 24-48 hours depending on thickness. If using polymer clay, bake according to the package instructions. -
Sand imperfections:
Once fully cured or dry, use fine-grit sandpaper to gently smooth out any rough fingerprints on the head or fin edges, being careful not to sand away your scale texture. -
Paint the markings:
Dilute your orange acrylic paint slightly with water. Paint organic, cloud-like patches along the spine and sides, allowing the color to settle slightly into the scale crevices for depth. -
Detail the fins:
Dry brush a little orange paint lightly along the ridges of the fins and tail to highlight the texture, keeping the recessed areas white. -
Paint the eyes:
Paint the center of the clay eyes black, leaving a tiny white dot for a reflection highlight. -
Apply varnish:
Finish the piece by brushing on a coat of gloss varnish. This protects the paint and gives the fish a realistic, wet appearance.
Golden Touch
For an elegant variant, use metallic gold paint for the scales instead of orange, or mix gold powder into your varnish for a subtle shimmer.
Place your beautiful koi on a shelf or desk where its peaceful motion can be admired
Anglerfish With a Cute Twist
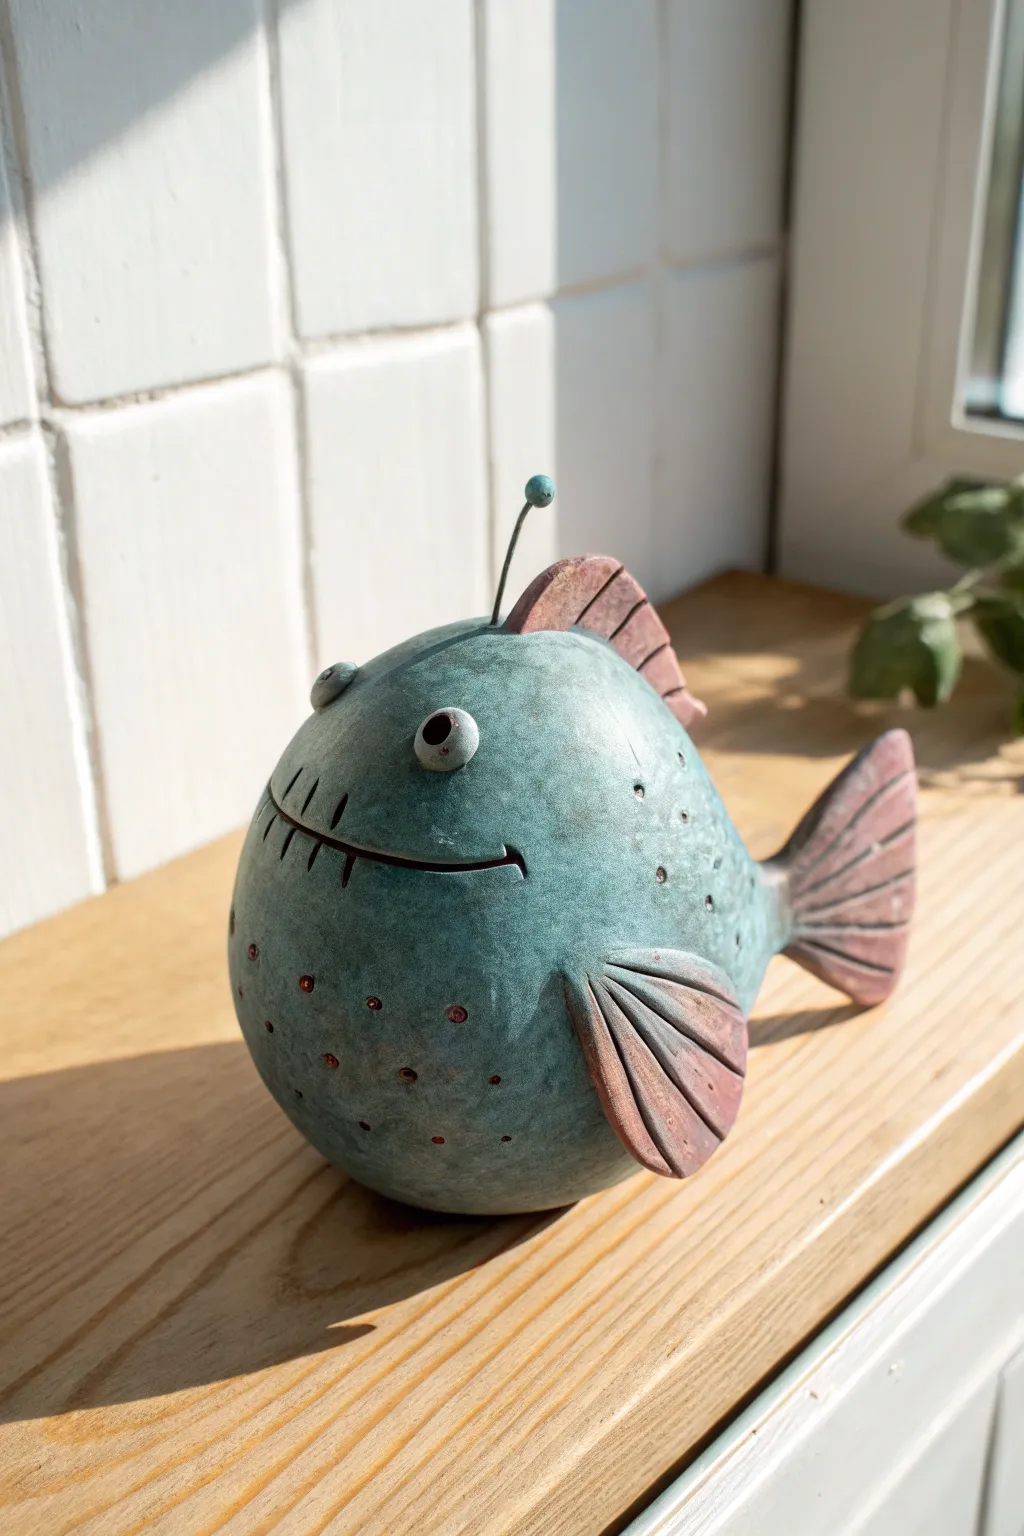
Transform a simple ball of clay into this charmingly rotund character, featuring a signature angler antenna and a playful grin. The textured, blue-green finish gives it earthy appeal, making it a perfect quirky accent for your shelf.
How-To Guide
Materials
- Earthenware or stoneware clay (white or light grey)
- Pottery tools (needle tool, rib tool, loop tool)
- Underglaze (teal/blue-green, dusty pink/red, dark brown)
- Clear matte glaze (optional)
- Score and slip mixture
- Small brushes
- Thin wire or metal rod (for the antenna)
Step 1: Forming the Body
-
Pinch Pot Base:
Start by forming two equal-sized pinch pots. Smooth the interiors as much as possible to ensure even walls. -
Join the Halves:
Score the rims of both pinch pots thoroughly and apply slip. Press them together firmly to create a hollow sphere. -
Smooth the Seam:
Using a rib tool or your thumb, work the clay across the seam until the join is invisible and the ball is perfectly round. Paddle gently if needed to refine the shape. -
Air Hole:
Use a needle tool to poke a discreet hole in the bottom. This allows expanding air to escape during firing so your fish doesn’t explode.
Clean Seams
Keep a small sponge handy when attaching fins. Wiping the join immediately smooths the transition and prevents messy slip marks from drying hard.
Step 2: Sculpting Features
-
Cutting the Mouth:
Visualize where you want the face. Use a needle tool to slice a long, curved horizontal line for the mouth, cutting about halfway into the clay wall thickness. -
Adding Teeth:
Along the mouth line, make small vertical incisions to represent cartoonish teeth. I find pressing slightly harder on the vertical lines gives them more definition. -
Creating Eyes:
Roll two small balls of clay. Score and slip them onto the upper front of the face. Use a small modeling tool to indent the pupils deeply. -
Sculpting fins:
Roll out a slab of clay about 1/4 inch thick. Cut out a dorsal fin shape (top), a tail fin, and two pectoral fins (sides). -
Detailing Fins:
Use a modeling tool to carve deep grooves into each fin to simulate rays or spines. The texture should look somewhat like a leaf. -
Attaching Appendages:
Score and slip the attachment points on the body and the fins. Press them on firmly, smoothing the clay at the base to secure the bond.
Glow Up
Use glow-in-the-dark acrylic paint on the tiny ball at the end of the antenna after the final firing for a true deep-sea anglerfish effect
Step 3: Texture and Antenna
-
Adding Pores:
On the lower half of the body, use a small round tool or the back of a paintbrush to stamp a pattern of small indentations for a textured belly. -
Insert Antenna:
Insert a small piece of heat-resistant wire (like Nichrome) or a thin clay coil into the top of the head. Add a tiny ball of clay to the tip for the ‘lure’. -
Drying:
Let the piece dry slowly under plastic for a day, then uncover until bone dry. Bisque fire according to your clay’s instructions.
Step 4: Painting and Finishing
-
Base Color:
Apply a teal or blue-green underglaze to the entire body, avoiding the fins. You can sponge it on for a slightly uneven, organic look. -
Coloring Fins:
Paint the fins with a dusty pink or muted red underglaze. Allow the color to seep into the grooves you carved earlier. -
Antique Wash:
Mix a dark brown or black underglaze with water. Brush it over the entire piece, getting into the mouth, teeth lines, and fin grooves. -
Wipe Back:
Using a damp sponge, gently wipe away the excess dark wash from the high points. This leaves the dark color in the crevices, highlighting the texture and expression. -
Dot Accents:
Use a fine brush to dab small red dots into the center of the belly indentations you stamped earlier. -
Final Fire:
Fire the piece again. If you prefer a matte rough finish like the photo, leave it unglazed, or apply a very thin matte clear glaze before firing.
Place your finished fish on a sunny windowsill where the shadows can play across its textured surface
Marbled Clay Fish Body With Solid Fins
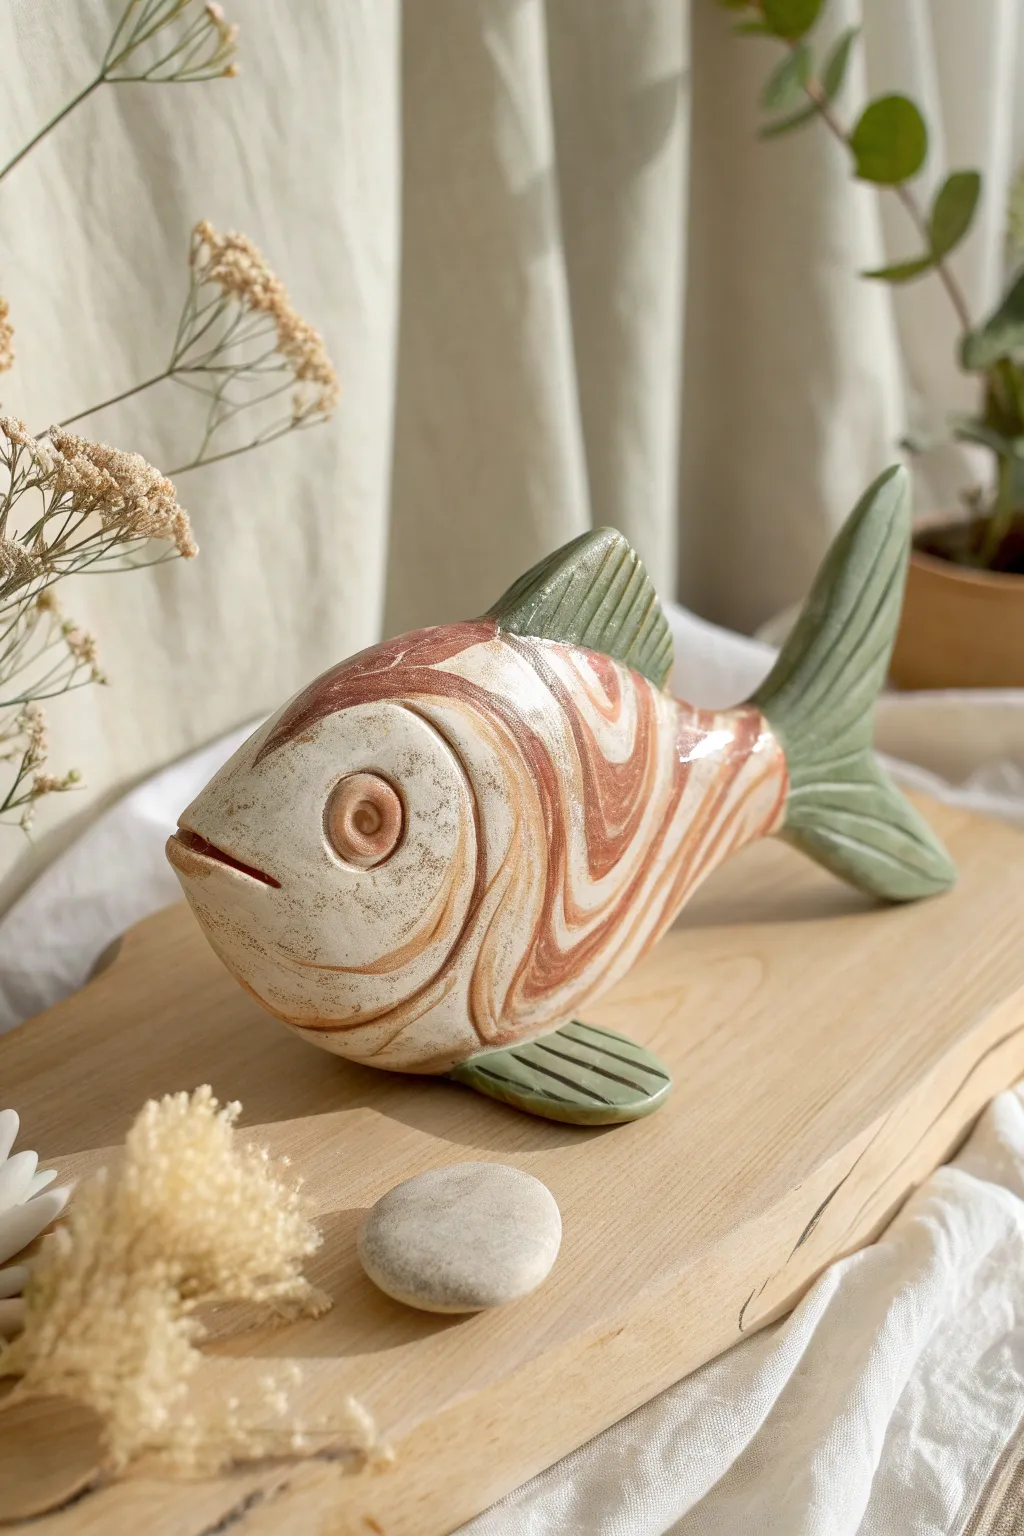
This project combines two different clay bodies to create a stunning, organic marbled effect that mimics the natural patterns found in stone or wood grain. The result is a whimsical fish sculpture featuring a warm, terra-cotta swirling body contrasted by solid, sage-green fins.
Step-by-Step Guide
Materials
- White stoneware clay
- Red earthenware or terra-cotta clay
- Green underglaze or mason stain (sage green)
- Small amount of clay for fins (stained green)
- Needle tool
- Scoring tool or serrated rib
- Slip (liquid clay)
- Wooden modeling tool
- Sponge
- Rolling pin
- Newspaper or paper armature
- Clear glaze
Step 1: Preparing the Marbled Clay
-
Condition the Clays:
Start by wedging both your white stoneware and red earthenware clays separately. You want them to be a similar consistency—soft but firm enough to hold shape. -
Stack and Twist:
Create thick logs of both clays. Stack them together, twisting them like a candy cane. Fold the twisted log in half and twist again. Repeat this folding and twisting process 3-4 times, but be careful not to over-blend, or the distinct stripes will turn into a muddy mix. -
Roll the Slab:
Take your twisted clay log and gently flatten it. Using a rolling pin, roll it out into a slab about 1/4 inch thick. You should see beautiful, distinct swirls of red and white emerging.
Marbling Mastery
Stop mixing sooner than you think! If you knead too much, the clay will turn a solid pinkish-brown. You want distinct ribbons of color.
Step 2: Forming the Body
-
Create an Armature:
To keep the fish hollow and lightweight, crumple a sheet of newspaper into an elongated oval shape. This will serve as the internal support while you build. -
Wrap the Form:
Drape your marbled slab over the paper form. Gently smooth the clay around the paper, cutting away excess clay with a needle tool where the seams meet. -
Seal the Seams:
Score the edges of the slab where they meet, apply a little slip, and press firmly to join. Smooth the join line with your finger or a rib so the marbling isn’t interrupted too harshly. -
Shape the Profile:
With the paper still inside, gently paddle or press the clay to refine the fish shape. Taper one end slightly for the tail and blunt the other end for the head.
Step 3: Adding Details
-
Define the Head:
Use a wooden modeling tool to press a curved gill line into the clay, separating the head area from the body. Because of the marbling, you don’t need to add extra clay here—just deeply incise the line. -
Sculpt the Eye:
Roll a small ball of marbled clay and flatten it onto the head area (score and slip first). Use a smaller tool to press a pupil into the center, creating a classic ‘bullseye’ look. -
Carve the Mouth:
Cut a horizontal slit at the front of the face for the mouth. Gently press the clay inward on the bottom lip to give the fish a slight pout.
Fin Adhesion Fix
If fins are heavy and droop while wet, prop them up with small sponges or folded cardboard until the clay stiffens enough to support its own weight.
Step 4: Attaching Solid Fins
-
Prepare the Green Clay:
Take your designated white clay and knead in a sage green mason stain until fully incorporated, or use a pre-tinted green slip later. For this specific look, I prefer shaping fins from solid green-tinted clay for a cleaner contrast. -
Shape the Dorsal Fin:
Form a triangular wedge for the top fin. Use a needle tool to score vertical lines along the side to mimic the fin’s ribbed texture. -
Form the Tail and Pectoral Fins:
Sculpt a large, forked shape for the tail and two smaller, flat teardrops for the lower pectoral fins. Texture these with lines similar to the dorsal fin. -
Attach the Fins:
Score the attachment points on the fish body deeply. Apply slip liberally and press the fins into place. The tail should cap off the tapered end of the body. -
Smooth Connections:
Use a small modeling tool to blend the clay at the seams where the green fins meet the marbled body, ensuring a strong bond so they don’t pop off during firing.
Step 5: Drying and Finishing
-
Vent the Piece:
This is crucial: poke a small, hidden hole (usually on the belly/bottom) to allow air to escape from the hollow newspaper core during firing. -
Slow Dry:
Loosely cover the fish with plastic to let it dry slowly. This prevents the fins, which are thinner, from drying faster than the body and cracking. -
Bisque Fire:
Once bone dry, fire the piece to bisque temperature (usually Cone 04). -
Glaze:
Dip or brush the entire piece in a clear transparent glaze. This will make the red and white clay colors pop and give the piece a glossy, wet sheen. -
Final Fire:
Fire again to the maturity temperature of your clay body (likely Cone 5/6 for stoneware).
Once fired, the glossy finish and unique marbling will give your fish a lively, swimming appearance perfect for any shelf
Fish Wind Chime or Hanging Mobile Pieces
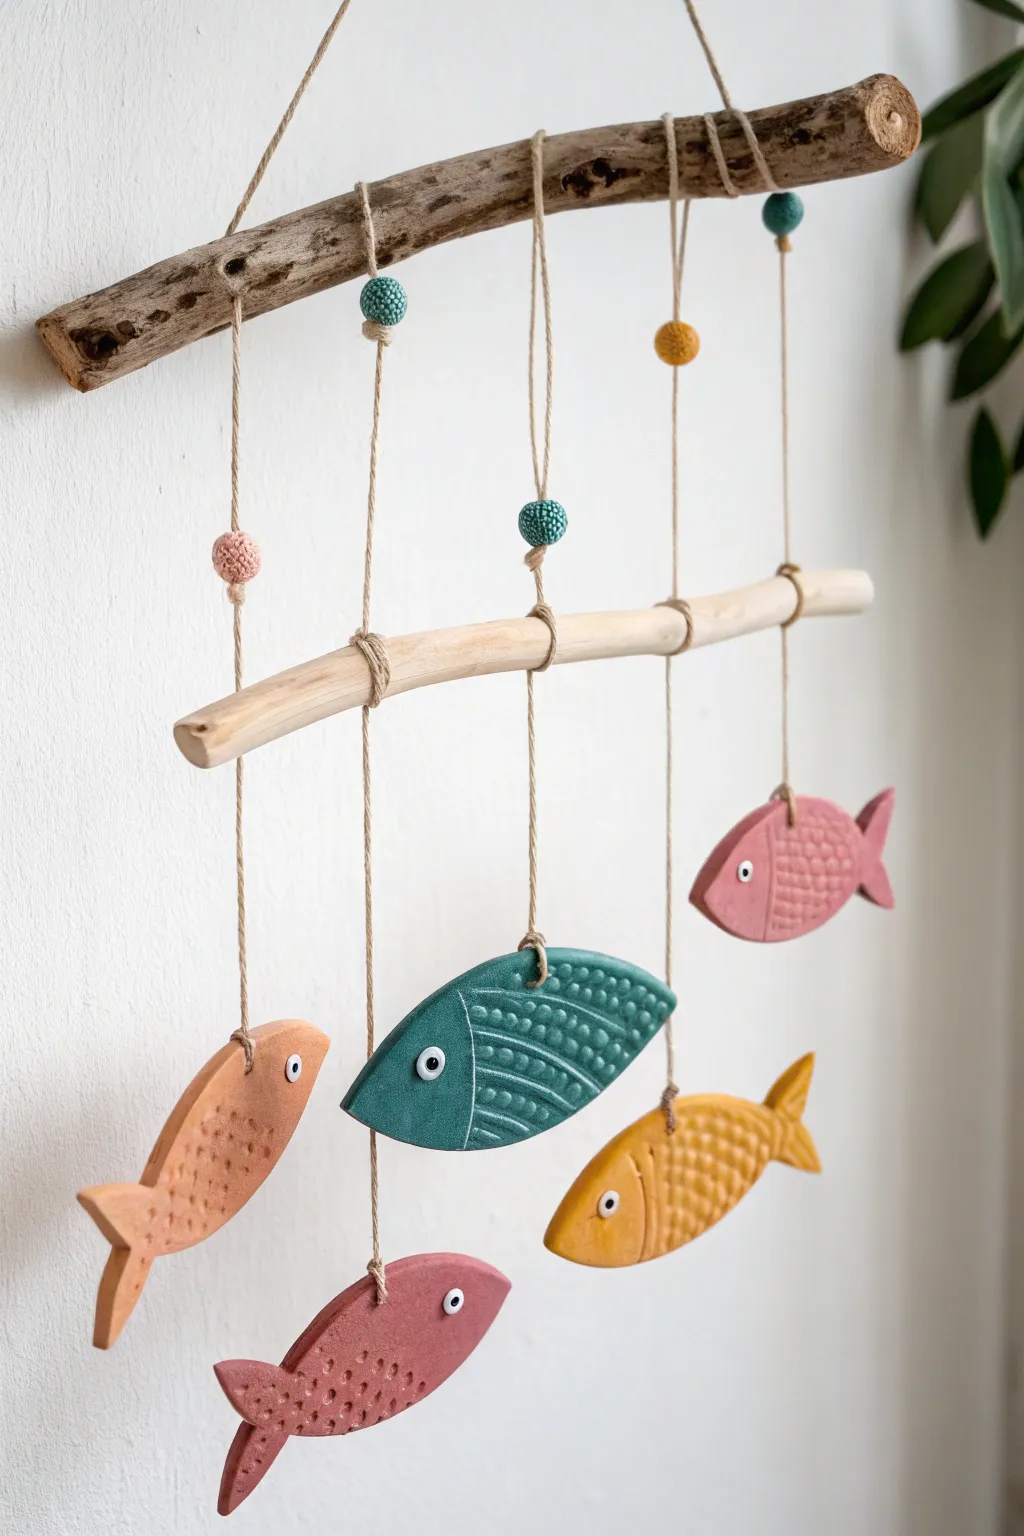
Bring a touch of coastal charm into your home with this layered hanging mobile featuring colorful, hand-sculpted clay fish. Suspended from weathered driftwood branches and accented with crochet-covered beads, these textured swimmers create a relaxing visual rhythm.
Detailed Instructions
Materials
- Air-dry clay or polymer clay (white or terracotta)
- Two pieces of driftwood (one larger/darker, one smaller/lighter)
- Acrylic paints (teal, mustard yellow, dusty pink, terracotta)
- Small googly eyes (or white and black paint for eyes)
- Jute twine
- Texturing tools (combs, straws, lace, or clay stamps)
- Rolling pin
- Fish-shaped cookie cutter (optional, or a knife for freehand)
- Needle tool or skewer
- Crochet-covered beads (in coordinating colors)
- Matte sealant or varnish
- Strong craft glue
Step 1: Sculpting the Shoal
-
Roll out the clay:
Begin by conditioning your clay until it is soft and pliable. Roll it out on a non-stick surface to a uniform thickness of about 1/4 inch. -
Cut the shapes:
Using a cookie cutter or a sharp knife, cut out five distinct fish shapes. Aim for simple, stylized silhouettes with prominent tail fins. -
Add texture:
While the clay is still wet, press textures into the body of the fish. Use a comb or tool to create vertical lines for gills near the head area. -
Create scales:
For the scales, press dot indentations into the body using the end of a paintbrush, or use a piece of lace or a specialized clay stamp to create grid patterns. Vary the texture on each fish for visual interest. -
Define the fins:
Use a needle tool to gently score lines onto the tail fins, indicating movement and structure. -
Make hanging holes:
Crucially, poke a hole through the top dorsal area of each fish using a skewer. Make sure the hole is wide enough for your jute twine to pass through easily. -
Dry the clay:
Allow the clay pieces to dry completely according to the package instructions. If using air-dry clay, flip them occasionally to prevent curling.
Texturing Tip
Use household items for unique scales! The textured handle of a spoon, mesh fruit bags, or even the cap of a marker can create amazing scale patterns when pressed into wet clay.
Step 2: Painting and Details
-
Apply base colors:
Paint each fish a solid color using acrylics. For this look, choose a palette of deep teal, mustard yellow, dusty pink, and warm terracotta. -
Highlight the texture:
Once the base coat is dry, I sometimes like to lightly dry-brush a slightly lighter shade over the textured are as to make the scales pop. -
Seal the fish:
Apply a coat of matte varnish or sealant to protect the paint and give the fish a professional finish. -
Add eyes:
Glue small googly eyes onto the fish heads. Alternatively, you can paint a white circle with a small black dot in the center for a more rustic look.
Step 3: Assembly
-
Prepare the driftwood:
Clean your driftwood pieces. Tie a long piece of jute twine to both ends of the larger, top branch to create the main hanger. -
Connect the branches:
Cut two lengths of twine. Tie them securely to the top branch, thread a decorative bead (like the crochet ones shown) onto each, and tie the other ends to the smaller, lower branch to suspend it horizontally. -
String the fish:
Cut five lengths of twine for the fish. Thread a piece through the hole in each fish and knot it securely. -
Arrange the composition:
Tie the fish to the mobile at varying heights. Attach three fish to the lower, lighter branch and two fish directly to the top, darker branch. This staggered arrangement balances the weight visually. -
Secure knots:
Once you are happy with the length and position of each hanging piece, apply a tiny dot of glue to the knots on the driftwood to prevent them from slipping. -
Trim excess twine:
Snip off any loose tail ends of the jute twine for a clean, finished appearance.
Problem: Curling Clay
If your fish warp while air-drying, place a light book or flat board on top of them once they are leather-hard (mostly dry but cool to the touch) to keep them perfectly flat.
Hang your mobile near a window or in a breezy corner and enjoy the calming movement of your handcrafted school of fish