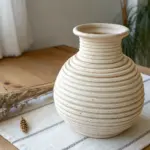
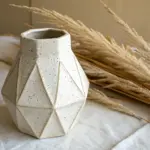
A plain terra cotta flower pot is basically a blank canvas, and I love how fast it can turn into real décor with just a little paint and texture. Here are my favorite clay flower pot ideas—starting with the classics and ending with a few playful twists that always make people stop and look twice.
Classic Painted Terra Cotta Color Blocks
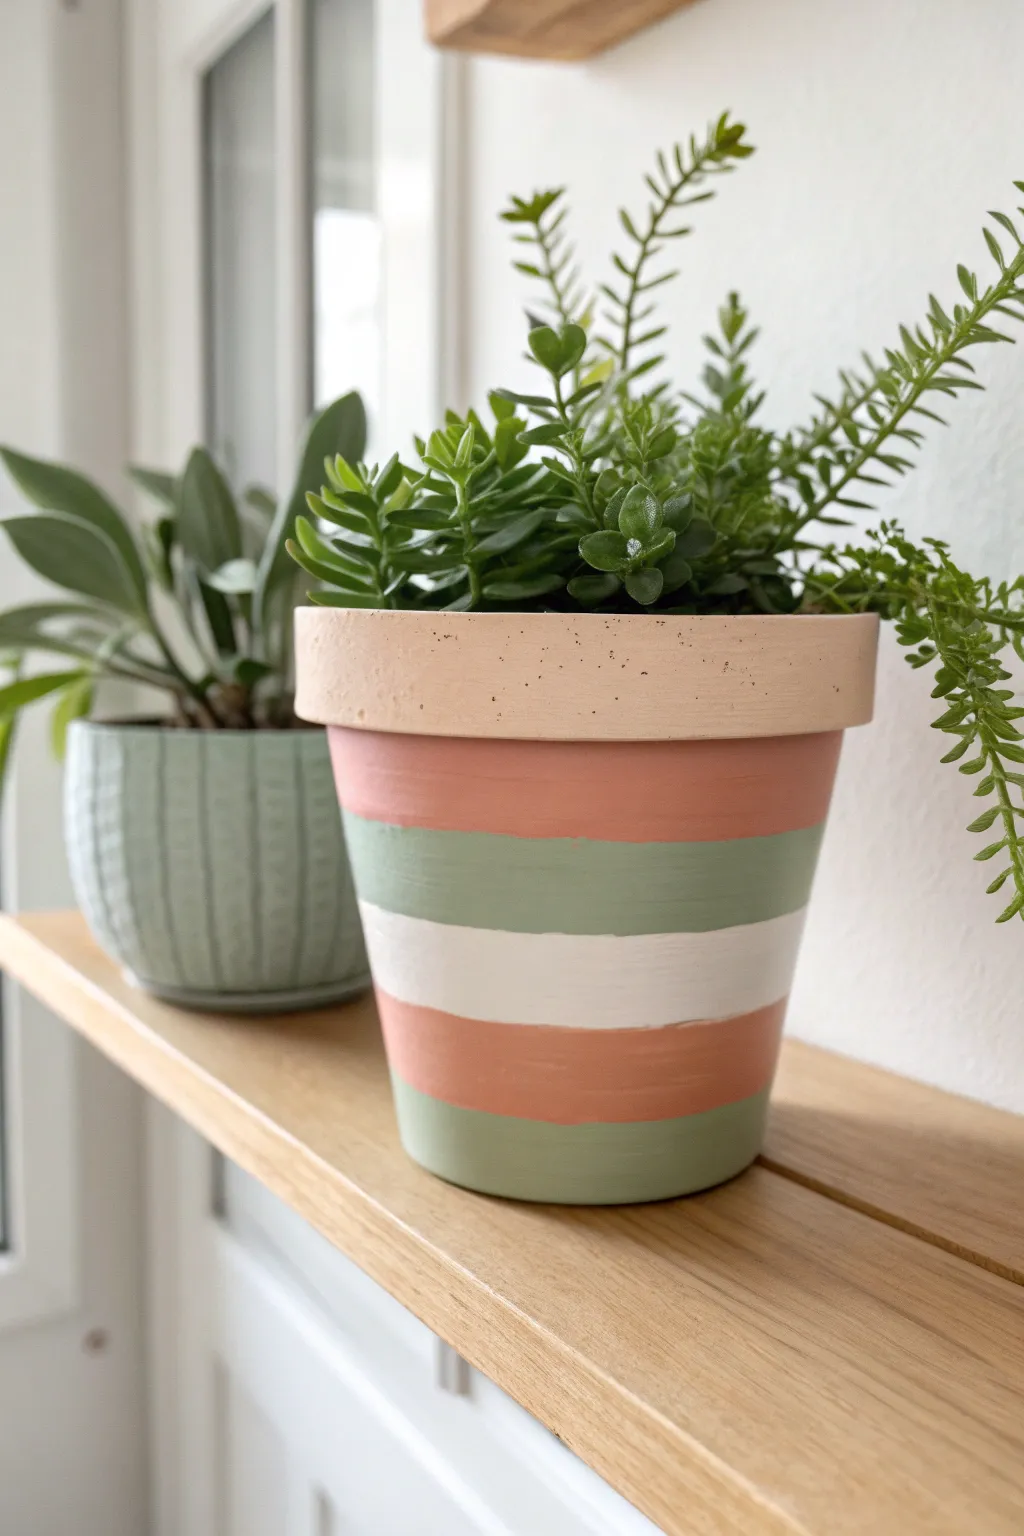
Transform a plain terra cotta pot into a charming home for your succulents with this muted, earthy stripe design. The soft palette of sage green, creamy white, and coral pink creates a relaxing, modern look that fits perfectly on any wooden shelf.
Step-by-Step Tutorial
Materials
- Terra cotta pot (standard azalea shape)
- Acrylic craft paint: Coral or muted peach
- Acrylic craft paint: Sage green
- Acrylic craft paint: Cream or warm white
- Acrylic craft paint: Beige or tan
- Flat paintbrush (medium width, approx. 1/2 inch)
- Small round detail brush or old toothbrush
- Painter’s tape (optional, for crisp lines)
- Palette or paper plate
- Clear matte acrylic sealer spray
Step 1: Preparation & Base
-
Clean surface:
Begin with a clean, dry terra cotta pot. Wipe away any dust or debris with a damp cloth and let it dry completely to ensure the paint adheres well. -
Rim base coat:
Paint the rim of the pot with a beige or tan acrylic paint that mimics a lighter, cleaner version of the natural clay. This creates a neutral header for your colorful stripes. -
Speckle effect:
To give the rim a stony, textured look, dip a stiff brush or old toothbrush into a tiny amount of black or dark brown paint. Flick the bristles with your thumb to create fine speckles across the beige rim.
Uneven Charm
Don’t stress over wobbly lines! The beauty of this project is its hand-painted softness. If you make a big mistake, simply let it dry and paint over it.
Step 2: Painting the Stripes
-
First stripe positioning:
The first stripe sits directly under the rim. Load your flat brush with the coral or peach paint. Paint a horizontal band about an inch wide right up against the bottom edge of the rim. -
Freehand technique:
For a rustic, handmade feel like the reference photo, freehand the lines rather than using tape. Don’t worry if the edges aren’t perfectly straight; it adds to the organic charm. -
Second stripe:
Clean your brush thoroughly. Below the coral band, paint a stripe of sage green of roughly the same width. Try to keep the paint application smooth, but visible brushstrokes are okay. -
Center stripe:
The middle stripe is a creamy white. Paint this band below the green one. This high-contrast section helps break up the colors and adds brightness to the design. -
Repeating the pattern:
Below the white stripe, return to your coral/peach color. Paint another band, mirroring the top section. -
Final bottom stripe:
Finish the painting phase with a final band of sage green at the very bottom of the pot. Ensure this line meets the base cleanly.
Textured Finish
Mix a teaspoon of baking soda into your acrylic paints before applying. This creates a trendy, gritty ceramic texture that rivals expensive boutique planters.
Step 3: Finishing Touches
-
Touch ups:
Step back and look at your stripes. If the coverage looks thin in places, go back and add a second coat to any color that seems translucent. -
Edge refinement:
If any lines merged too much for your liking, use a small detail brush with the appropriate color to tidy up the transitions between stripes. -
Drying time:
Let the pot sit undisturbed for at least an hour or until the paint is completely dry to the touch. -
Sealing:
Take the pot to a well-ventilated area. Spray the entire exterior with a clear matte sealant. This protects the paint from water damage when you water your plants. -
Final cure:
Allow the sealer to cure fully according to the can’s instructions—usually 24 hours—before planting.
Once dry, pot your favorite trailing greenery to complete this serene display


Simple Stenciled Botanical Motifs

Transform a plain terra cotta pot into a charming home for your succulents with delicate, hand-painted botanical designs. The contrast of crisp white acrylic against the warm earth tones of the clay creates a fresh, modern rustic look that brightens any windowsill.
Step-by-Step
Materials
- Standard terra cotta pot (approx. 4-6 inches)
- White acrylic craft paint (matte finish)
- Small round detail brush (size 1 or 2)
- Pencil (HB or lighter)
- Paper plate or palette
- Cotton swabs
- Small cup of water
- Paper towels
- Clear matte acrylic sealer spray
Step 1: Preparation and Planning
-
Clean surface:
Begin by wiping down your terra cotta pot with a damp cloth to remove any dust or loose clay particles. Let it dry completely before you start, as moisture can prevent the paint from adhering properly. -
Sketch rim guide:
Using a pencil, lightly sketch a horizontal line around the center of the pot’s top rim. This will serve as the spine for your upper vine pattern. -
Mark vertical guides:
On the main body of the pot, lightly mark 4-6 vertical lines spaced evenly apart. These lines will be the stems for the large upward-growing leaves. -
Sketch bottom border:
Draw another horizontal line near the bottom edge of the pot to guide the lower vine border, mirroring the one on the rim.
Clean Lines Trick
If you struggle with shaky hands, rest your pinky finger on the pot surface as an anchor while you paint the delicate leaves.
Step 2: Painting the Rim
-
Load brush:
Squeeze a small amount of white acrylic paint onto your palette. Dip your detail brush in, ensuring the tip is coated but not dripping. -
Paint vine spine:
Trace over your pencil line on the rim with a thin stroke of white paint. I find it helps to rotate the pot on the table rather than moving my hand too much. -
Add first leaves:
Starting at one point on the vine, paint small, teardrop-shaped leaves angled upwards. Press the brush down gently and lift up as you pull away to create a tapered point. -
Complete the pattern:
Continue painting pairs of leaves along the entire length of the vine spine on the rim. Try to keep the spacing consistent, but embrace small irregularities for a hand-painted feel.
Go Botanical
Try mixing a tiny drop of sage green into your white paint for a softer, more organic look that still pops against the terra cotta.
Step 3: Painting the Main Body
-
Paint vertical stems:
move to the main body and trace your vertical pencil guides with a steady hand to create the main stems of the large fern-like plants. -
Form base leaves:
Starting at the bottom of a stem, paint leaves branching out to the left and right. These lower leaves should be slightly larger than those at the top. -
Build upward:
Work your way up the stem, making the leaves slightly smaller as you reach the tip. The leaves should angle upward, creating a V-shape. -
Repeat around pot:
Rotate the pot and repeat this process for each of the vertical stems you sketched earlier until the main body is covered in foliage.
Step 4: Finishing Details
-
Paint bottom border:
Similar to the rim, paint over the bottom pencil line to create the lower vine spine. -
Add bottom leaves:
Paint small leaves along this bottom spine. You can make these slightly smaller than the rim leaves if space is tight. -
Cleanup Edges:
Inspect your work. If any paint lines look too transparent, carefully add a second coat once the first is dry. Use a damp cotton swab to quickly wipe away any fresh mistakes. -
Allow to dry:
Let the pot sit undisturbed for at least 1-2 hours until the paint is fully hard to the touch. -
Seal the design:
Take the pot to a well-ventilated area and apply a light coat of clear matte sealer spray. This protects your artwork from water damage when you water your plant.
Once dry, pot your favorite succulent and enjoy your custom hand-painted creation


Decoupage Floral Wrap on a Clay Pot
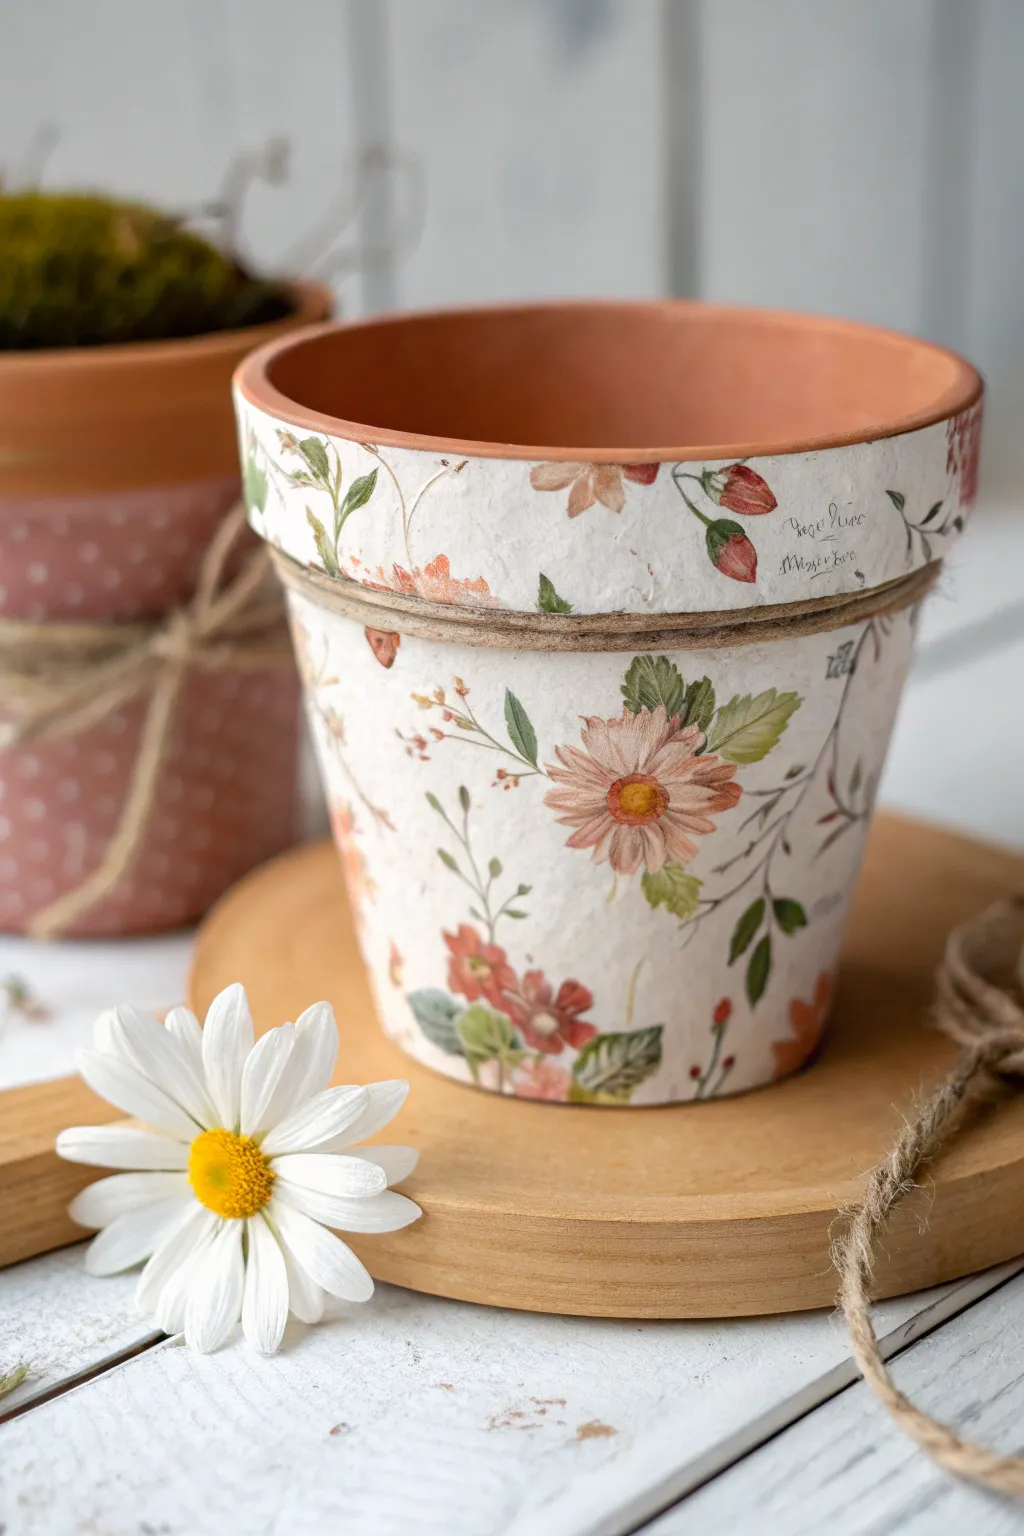
Transform a simple terracotta vessel into a charming, vintage-inspired planter with delicate floral motifs on a textured cream background. This decoupage project creates a soft, weathered look that perfectly complements fresh blooms or dried herbs.
How-To Guide
Materials
- Standard terracotta pot (cleaned)
- White acrylic paint or gesso
- Cream or off-white acrylic paint
- Floral paper napkins or decoupage rice paper
- Mod Podge (Matte finish)
- Small foam brush
- Soft synthetic bristle brush
- Scissors
- Jute twine
- Hot glue gun or strong craft glue
- Water-based matte varnish (optional)
- Fine-grit sandpaper (220 grit)
Step 1: Base Preparation
-
Surface Cleaning:
Begin by thoroughly wiping down your terracotta pot with a damp cloth to remove any dust or oils. Let it dry completely so the paint adheres properly. -
Priming the Pot:
Apply a base coat of white acrylic paint or gesso to the exterior of the pot, including the rim and just inside the top edge. This white base ensures your floral colors will pop later. -
Creating the Background:
Once the primer is dry, sponge or brush on a layer of cream or warm off-white acrylic paint. You don’t need perfect coverage; a slightly uneven application adds to the rustic feel. -
Texturing (Optional):
For a more tactile, vintage paper look, you can dab the wet cream paint with a crumpled paper towel to create a subtle texture before it dries.
Wrinkle Rescue
If stubborn wrinkles appear in your paper, dampen your finger slightly and gently smooth them out. If they dry in place, lightly sand them down before the final varnish coat.
Step 2: Decoupage Application
-
Preparing the Paper:
While the pot dries, prepare your decorative paper. If using napkins, separate the plies until you are left with only the single, printed top layer. -
Tearing the Motifs:
Instead of cutting with scissors, carefully tear around the floral designs with your fingers. The torn, feathered edges will blend much more seamlessly into the background paint than straight cut lines. -
Planning the Layout:
Dry-fit your torn pieces against the pot to plan your arrangement. I find it helpful to place larger blooms first and fill gaps with smaller leaves or buds. -
Applying Adhesive:
Apply a thin layer of Mod Podge to a small section of the pot where your first flower will go. -
Placing the Paper:
Gently lay the paper motif onto the wet adhesive. Start from the center of the image and lightly smooth it outward to release trapped air. -
Sealing the Image:
Dip your soft brush in Mod Podge and gently sweep over the top of the paper, working from the center out. Be delicate to avoid tearing the wet paper. -
Filling the Rim:
Don’t forget the rim; wrap paper sections over the edge or place specific small motifs on the flat band of the rim for a continuous look. -
Complete Coverage:
Continue adding floral pieces until you are happy with the density. It’s okay to have some cream background showing through, as it mimics hand-painted porcelain.
Step 3: Finishing Touches
-
Drying Time:
Allow the pot to dry completely for at least 1-2 hours. The surface should be hard and not tacky to the touch. -
Protective Coat:
Apply a final coat of Mod Podge or a water-based matte varnish over the entire exterior to seal the work against moisture. -
Wrapping the Twine:
Take a length of jute twine and wrap it two or three times around the crease where the rim meets the body of the pot. -
Securing the Twine:
Use a tiny dot of hot glue or strong craft glue to secure the ends of the twine in the back, keeping the wrap tight and neat. -
Weathering (Optional):
If the pot looks too ‘new,’ lightly sand some edges with fine-grit sandpaper to reveal a bit of the terracotta underneath for an aged effect.
Crackled Effect
Apply a crackle medium between your white primer and cream topcoat. The cream paint will separate as it dries, revealing the white underneath for an antique finish.
Now you have a beautifully custom vessel ready to showcase your favorite indoor plant


Two-Tone Color-Dipped Flower Pot
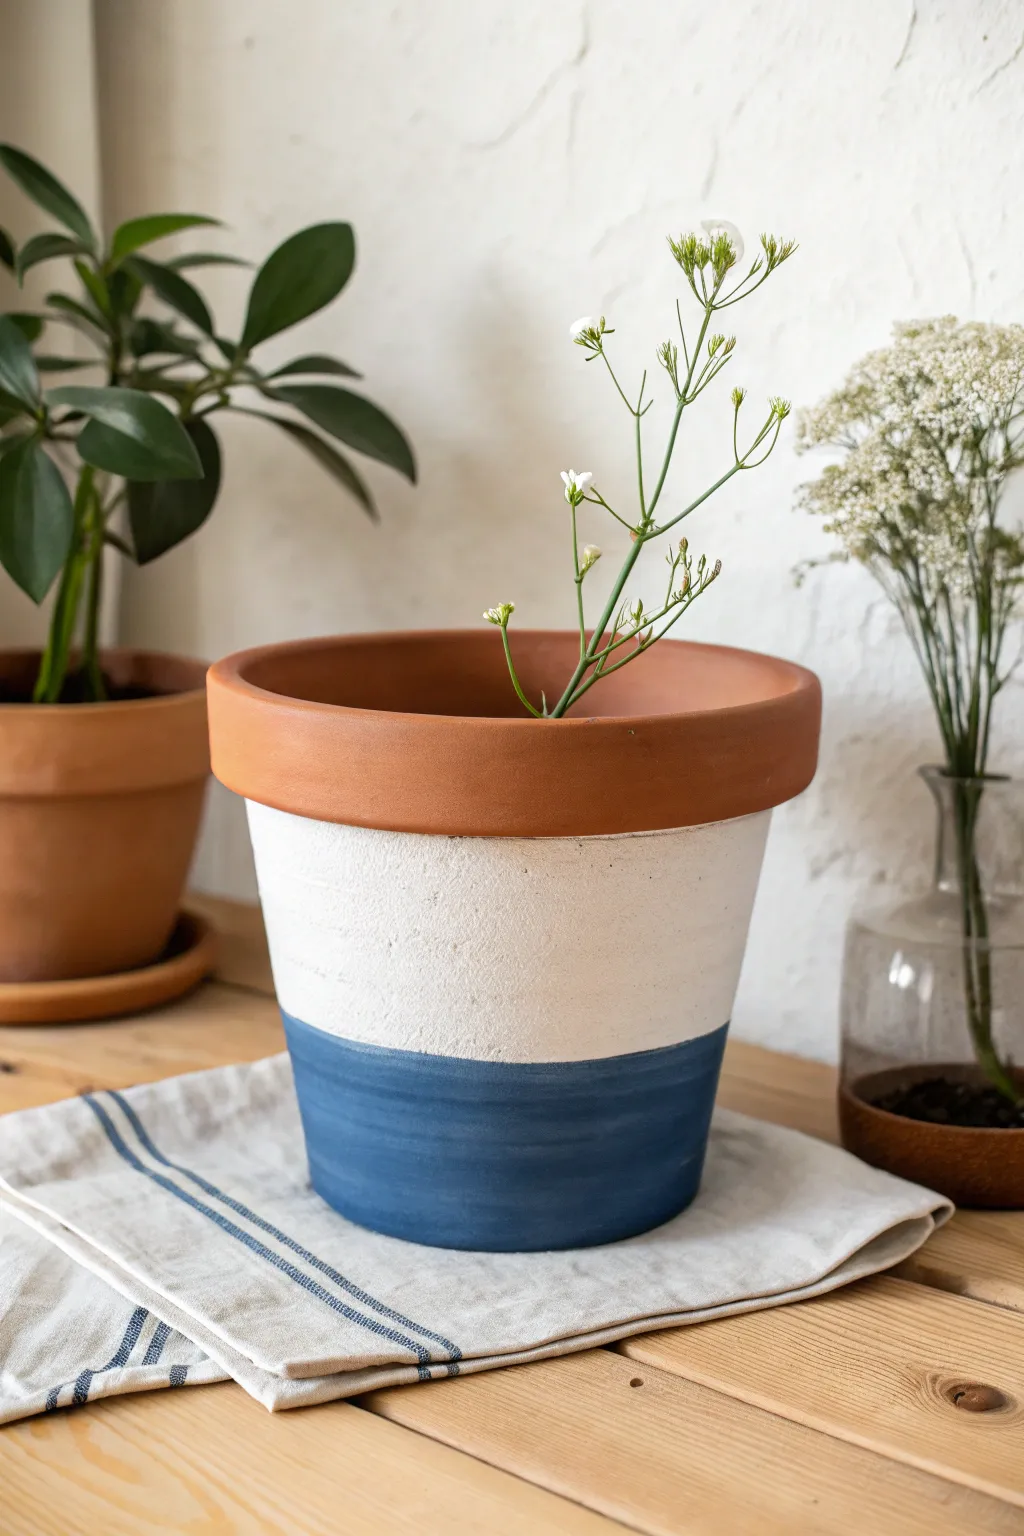
Transform a plain terracotta vessel into a coastal-inspired centerpiece with crisp, clean lines and contrasting textures. The combination of natural clay, matte white, and deep ocean blue creates a timeless look that brightens any windowsill.
Detailed Instructions
Materials
- Standard terracotta pot (medium size)
- White acrylic paint (matte finish)
- Navy blue acrylic paint
- Painter’s tape or masking tape (medium width)
- Flat paintbrush (1-inch width)
- Small foam brush
- Mod Podge or matte clear sealer
- Old newspaper or drop cloth
- Sandpaper (fine grit, 220)
- Damp cloth
Step 1: Preparation
-
Clean surface:
Begin by removing any stickers or price tags from your terracotta pot. Use warm water and a scrub brush to ensure all residue is gone, then let it dry completely until it’s room temperature to the touch. -
Smooth imperfections:
Lightly sand the exterior of the pot with 220-grit sandpaper. This knocks down any large bumps in the clay and gives the paint a better surface to grip. -
Wipe down:
Run a damp cloth over the entire surface to remove the terracotta dust created by sanding. -
Seal the interior:
Apply a thin coat of clear sealer or Mod Podge to the inside of the pot. This prevents moisture from seeping through the porous clay and bubbling specifically behind your future paint layers.
Bleeding Lines?
If paint seeped under your tape, wait for it to dry fully. Then, gently scrape the excess off with a craft knife or use a small brush with the background color to tidy the line.
Step 2: Creating the White Band
-
Define the top edge:
Place a ring of painter’s tape just below the rim of the pot. Press the tape edge down firmly, running your fingernail along it to ensure a tight seal against the clay. -
First white coat:
Load your flat brush with white acrylic paint. Apply the paint below the tape line, covering about two-thirds of the pot’s body. Don’t worry about the bottom edge being perfect yet. -
Texture technique:
For that slightly rustic, textured look seen in the photo, dab the wet white paint gently with a dry foam brush or a paper towel rather than smoothing it perfectly. -
Dry and repeat:
Allow the first coat to dry for roughly 20 minutes. Apply a second coat of white to ensure the terracotta orange doesn’t show through, maintaining that textured application. -
Full cure:
Let the white section dry completely for at least an hour. It must be fully hardened before we tape over it.
Step 3: Adding the Navy Base
-
Tape the separation:
Apply a fresh strip of painter’s tape horizontally across the white painted section. Measure carefully to ensure the line is straight all the way around; this determines where the blue meets the white. -
Seal the tape:
I find it helpful to brush a tiny amount of white paint over the edge of this new tape line. This seals the gap, so if any paint bleeds under, it will be white-on-white and invisible. -
Apply navy paint:
Using a clean brush, paint the bottom third of the pot with the navy blue acrylic. Paint horizontally, following the curve of the pot to create subtle brushstroke texture. -
Cover the bottom:
Continue the blue paint underneath to cover the visible bottom edge of the pot, but you can leave the very center of the base unpainted for drainage. -
Second blue coat:
Once the first blue layer is tacky but dry, apply a second coat for a rich, opaque finish.
Add Weathered texture
For a vintage look, lightly sand the painted sections after they dry. Focus on the transition line between blue and white to soften the stark contrast.
Step 4: Finishing Touches
-
Peel carefully:
While the blue paint is still slightly damp, slowly peel off the lower tape strip at a 45-degree angle. This helps prevent the paint from chipping as you remove the mask. -
Remove top tape:
Remove the initial tape strip near the rim to reveal the clean terracotta band at the top. -
Touch ups:
If any paint lines are jagged, use a very small detail brush and a tiny bit of paint to correct the edge. -
Protective coat:
Once all paint is fully cured (overnight is best), apply a matte clear sealer over the painted sections to protect against water drips and scratches.
Now you have a chic, custom planter ready to house your favorite seedlings or herbs

The Complete Guide to Pottery Troubleshooting
Uncover the most common ceramic mistakes—from cracking clay to failed glazes—and learn how to fix them fast.
Ombre Gradient Painted Clay Pot
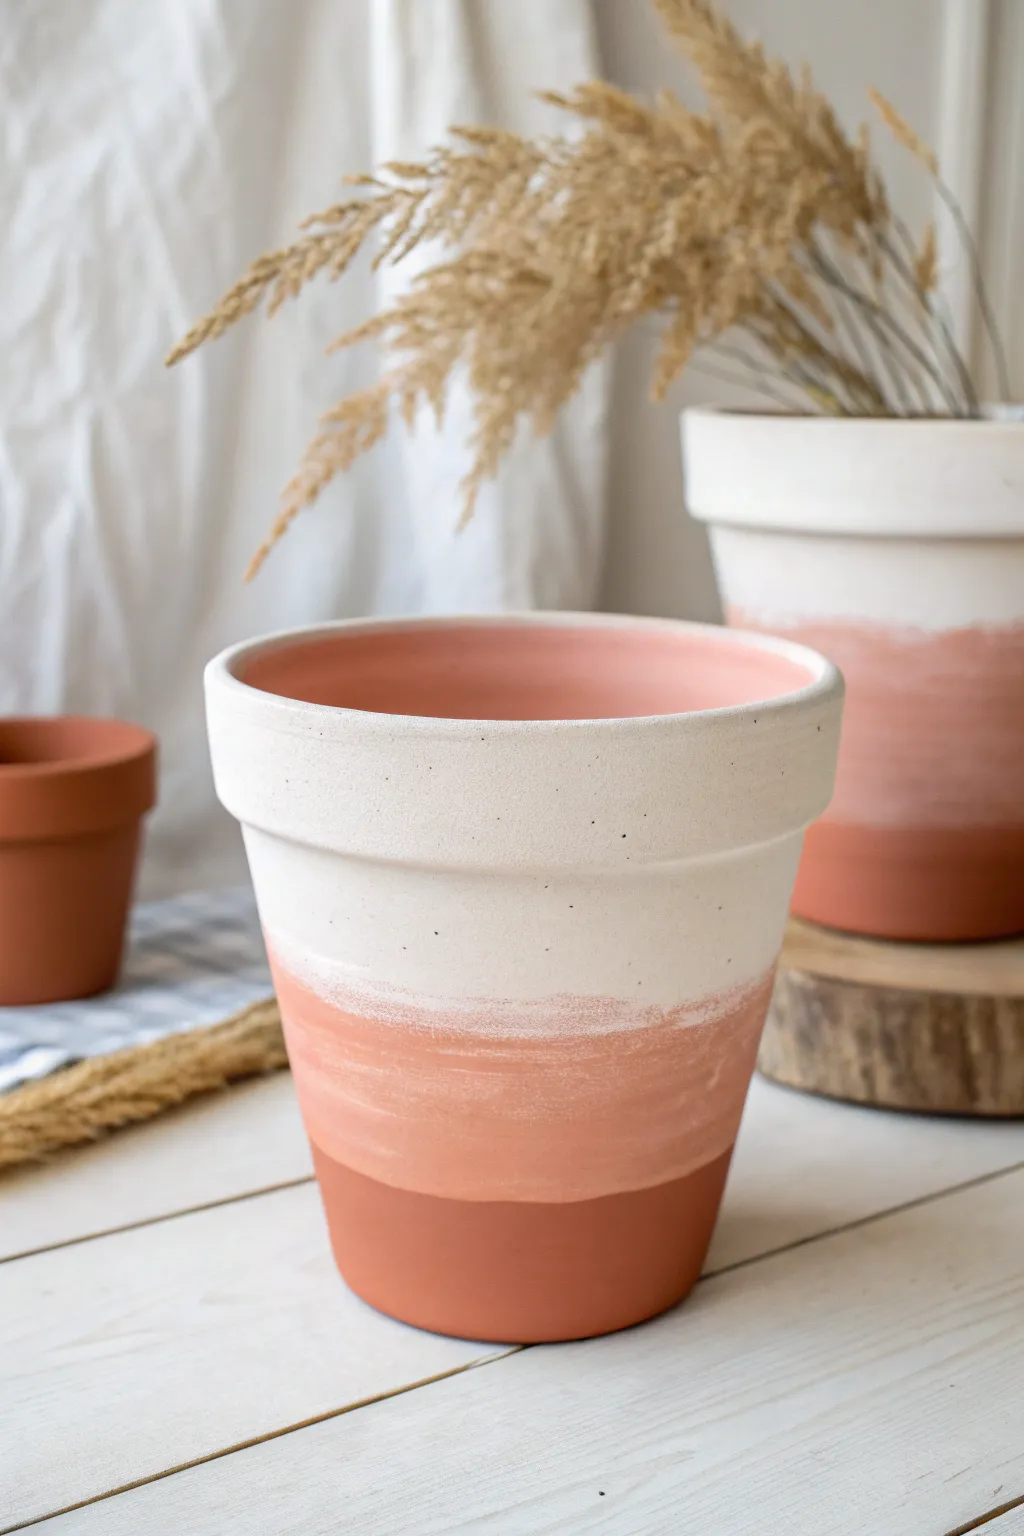
Transform a plain terra cotta pot into a modern piece of decor with this soft, sunset-inspired gradient. The technique blends opaque white into the natural clay tone for a beautiful, dusty rose ombre effect that looks effortlessly chic.
Step-by-Step
Materials
- Terra cotta pot (clean and dry)
- White acrylic paint (matte finish)
- Terra cotta or Burnt Sienna acrylic paint (optional, for enhancing the base)
- Wide flat paintbrush (synthetic bristles work best)
- Small mixing tray or paper plate
- Paper towels
- Water cup
- Clear matte acrylic sealer spray
Step 1: Preparation & Base Coat
-
Clean surface:
Ensure your clay pot is completely free of dust and stickers. Wipe it down with a damp cloth and let it dry fully before painting, as moisture can affect adhesion. -
Paint the rim:
Load your wide brush with pure white acrylic paint. Start by painting the top rim of the pot, focusing on the exterior and the very top edge. -
Paint inside rim:
Extend the white paint down inside the pot about two inches. Since soil will cover the bottom, you only need to paint the visible upper section for a finished look. -
First upper layer:
Paint the upper third of the pot’s exterior with a solid, opaque coat of white. Use horizontal strokes to keep the texture consistent with the pot’s shape.
Natural Texture
Don’t aim for a perfectly smooth plastic look. Letting the brush bristles create slight horizontal streaks adds to the rustic, handmade charm of the gradient.
Step 2: Creating the Ombre Blend
-
Mix the mid-tone:
On your palette, mix a generous amount of white paint with a tiny drop of water to thin it slightly. If your pot is very pale, you might want to mix in a speck of terra cotta paint to create a transition color, though the natural clay often does the work for you. -
Apply the transition:
While the top white layer is still slightly tacky but not wet, apply your thinned white paint to the middle third of the pot. -
Dry brush technique:
Wipe most of the paint off your brush onto a paper towel until it’s almost dry. I find this ‘dry brush’ method gives the best control for the next step. -
Blend downward:
Gently drag the dry brush from the solid white section down into the unpainted clay section. Use light, feathery vertical strokes or soft horizontal swipes to blur the hard line. -
Feather the edge:
Continue feathering the paint downwards, allowing the natural clay color to show through more and more as you move toward the bottom. -
Enhance the gradient:
If the transition looks too harsh, dip your brush in a tiny bit of water and lightly go over the boundary area to soften the paint and merge the tones. -
Bottom edge:
Leave the bottom third of the pot completely unpainted. The raw terra cotta provides the darkest tone of your ombre gradient. -
Review and refine:
Step back and look at the pot. Add a touch more white to the upper transition area if you need a smoother fade, stippling lightly with the brush if necessary.
Step 3: Finishing Touches
-
Check opacity:
Once the first layers are dry, check the top white section. If the clay color is bleeding through too much, apply a second coat of pure white just to the top rim and upper band for crisp contrast. -
Dry time:
Let the pot sit for at least an hour or two until the paint is completely dry to the touch. -
Sealing:
Take the pot to a well-ventilated area. Spray a light, even coat of matte clear acrylic sealer over the entire exterior. -
Why seal?:
This sealing step is crucial because clay is porous and will absorb water from the soil, which can cause the paint to bubble or peel over time.
Speckled Effect
Once dry, load a toothbrush with diluted black or brown paint and flick it over the pot for a trendy speckled ceramic finish.
Fill your new ombre pot with dried grasses or a lush green succulent to complete the warm, aesthetic vibe
Easy Marbled Swirl Flower Pot Finish
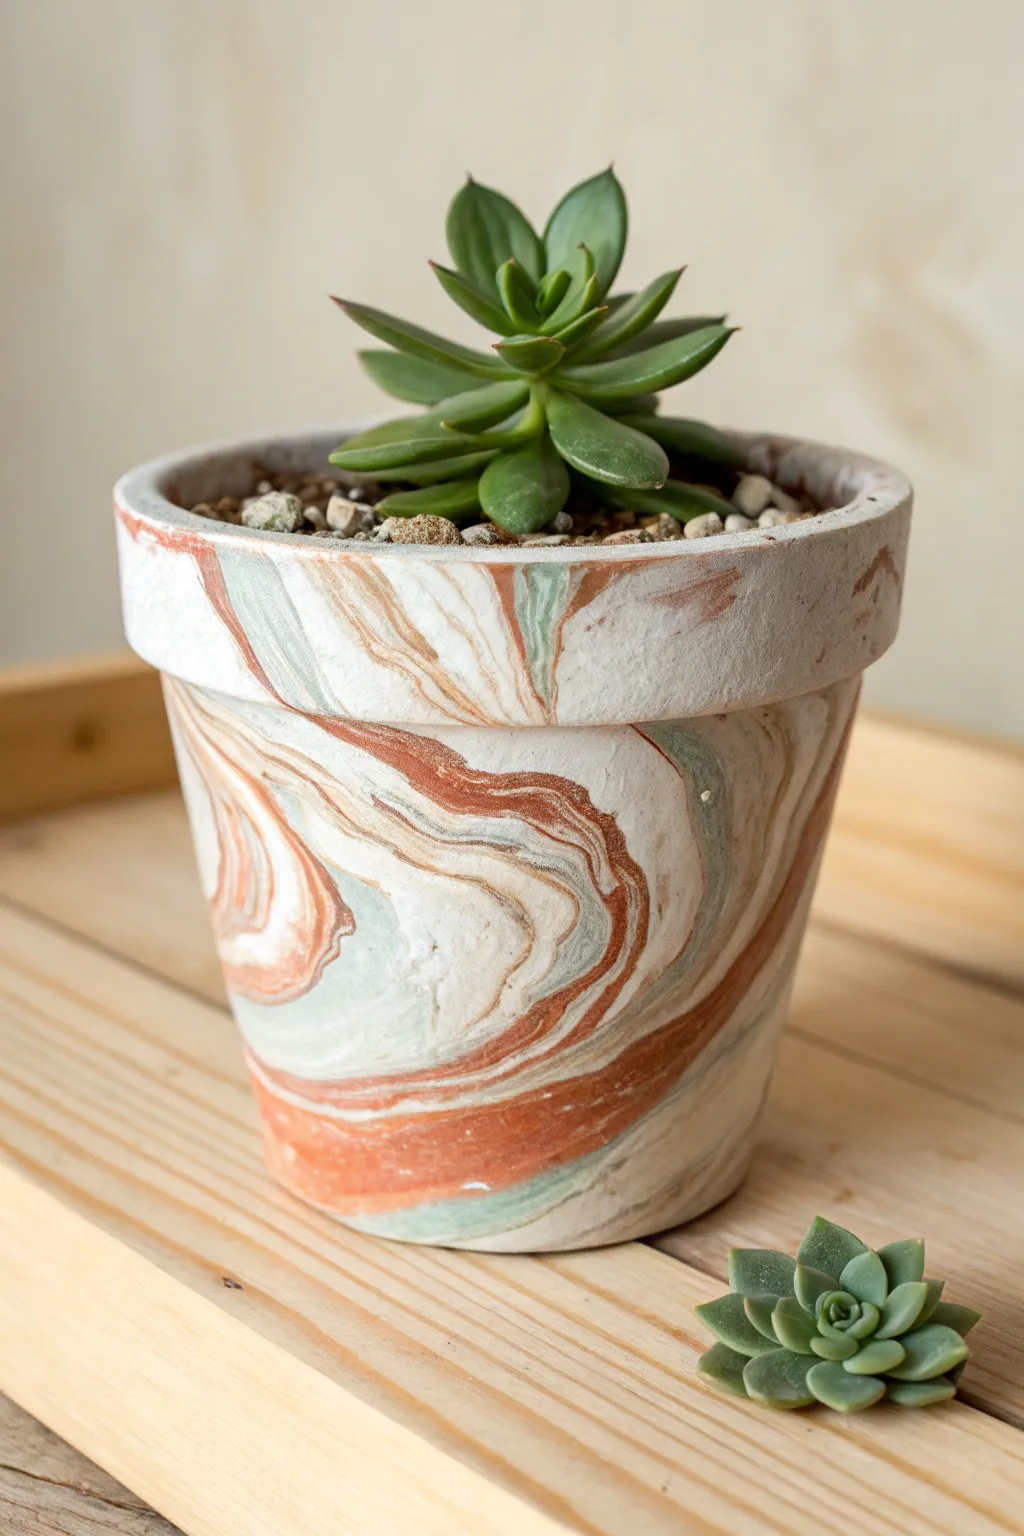
Transform a basic terracotta pot into a chic, artisanal planter using a simple acrylic pour technique. This method creates organic swirls of sage green, terracotta orange, and crisp white that look like natural stone.
How-To Guide
Materials
- Terracotta pot (clean and dry)
- White acrylic paint (matte finish)
- Sage green acrylic paint
- Terracotta orange or burnt sienna acrylic paint
- Pouring medium
- Disposable cups (3 small, 1 medium)
- Craft sticks for stirring
- Painter’s tape
- Cardboard box or drop cloth
- Clear matte sealant spray
Step 1: Preparation
-
Clean surface:
Ensure your terracotta pot is completely free of dust and debris. If it’s an old pot, scrub it well and let it dry thoroughly for at least 24 hours to prevent moisture from ruining the paint adhesion. -
Tape interior:
Place a strip of painter’s tape along the inside rim of the pot. This keeps the inside clean and ensures the soil won’t rest directly against the paint later. -
Cover drainage hole:
Flip the pot upside down and place a small piece of tape over the drainage hole from the outside. This prevents paint from dripping through and pooling on the inside bottom. -
Set up workspace:
Place a cardboard box or a significant amount of drop cloth on your work surface. Locate something to elevate the pot on, like a large soup can or a stable jar, so the rim doesn’t touch the table when upside down.
Paint Too Thick?
If the paint isn’t flowing down the sides, add a few drops of water or more pouring medium to your mixture. It needs to be fluid enough to drip freely.
Step 2: Mixing the Paints
-
First mix:
In separate small cups, mix each acrylic paint color with pouring medium. A standard ratio is often 1 part paint to 1 part medium, but check your specific medium’s bottle for instructions. -
Check consistency:
Stir until the mixture has the consistency of warm honey. It should flow off your stick in a continuous stream without breaking too quickly. -
Layering the cup:
Take your medium-sized empty cup. Pour a generous amount of white paint into the bottom as your base. -
Add colors:
Slowly pour a bit of the terracotta orange on top of the white, then the sage green. Do not stir them. Repeat this layering process—white, orange, green—until the cup is about half full.
Step 3: Creating the Marble Effect
-
Position the pot:
Place your terracotta pot upside down on the elevating object (can or jar) in the center of your protected workspace. -
The pour:
Start pouring the paint mixture onto the center of the pot’s base (which is currently facing up). Pour slowly and move the cup slightly in a circular motion to help distribute the colors. -
Guide the flow:
As the paint cascades down the sides, gravity will create the marble pattern. If you see bare spots, you can gently tilt the pot (carefully!) or use a craft stick to guide the drip, though I find letting it flow naturally looks best. -
Check the rim:
Ensure the paint flows all the way off the rim of the pot. You want the drips to clear the edge so you don’t get lumps when it dries. -
Pop bubbles:
Inspect the surface for tiny air bubbles. If you see them, gently blow on them or use a toothpick to pop them before the paint begins to skin over.
Pro Tip: Clean Lines
Before the paint fully dries, run a craft stick under the rim (while upside down) to catch heavy drips. This saves you from sanding bumps off the rim later.
Step 4: Finishing Touches
-
Pattern drying:
Let the pot sit undisturbed for at least 24 hours. The thick layers of poured paint take much longer to cure than a standard brush coat. Resist the urge to touch it. -
Remove tape:
Once the paint is dry to the touch, carefully remove the tape from the drainage hole and the inner rim. -
Seal the design:
Take the pot to a well-ventilated area and spray it with a clear matte sealant. This protects the paint from water damage when you water your plants and gives it that smooth, finished look seen in the photo. -
Re-potting:
Fill with cactus soil and your favorite succulent, adding a few decorative pebbles on top to complement the swirling earth tones of your new pot.
Now you have a stunning, one-of-a-kind planter ready to display your favorite greenery


What Really Happens Inside the Kiln
Learn how time and temperature work together inside the kiln to transform clay into durable ceramic.
Speckled Faux-Glaze Look on Clay
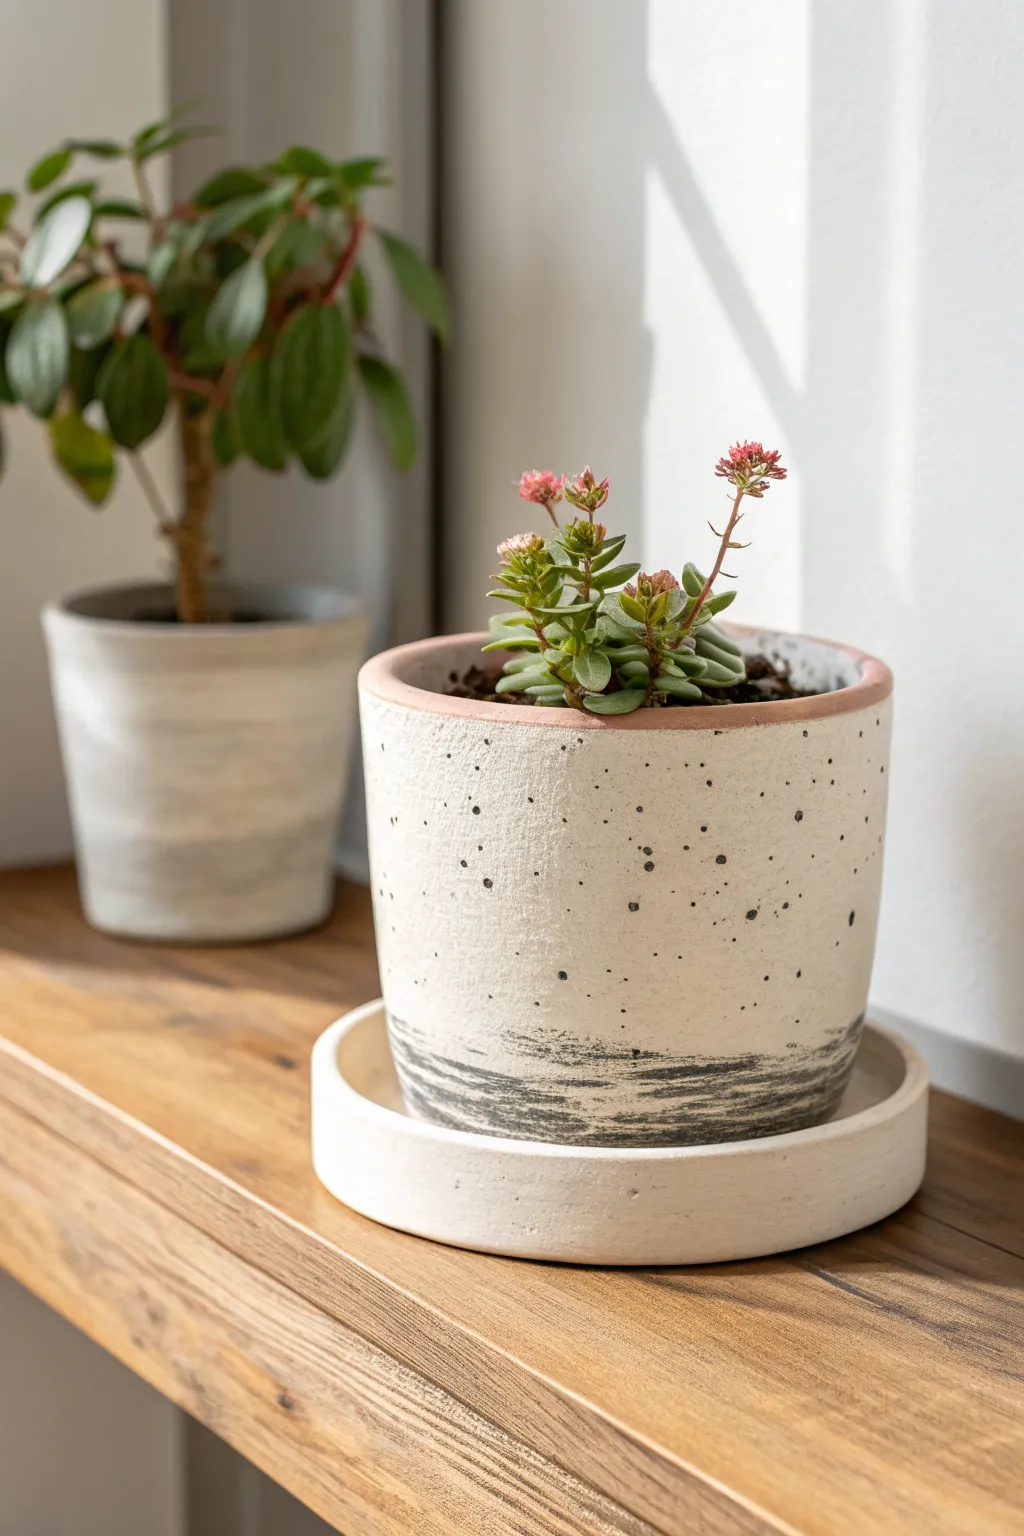
Transform a plain terra cotta pot into a modern, high-end planter that mimics the look of speckled stoneware pottery. This simple painting technique uses layers and splatters to achieve a realistic ceramic finish without a kiln.
Detailed Instructions
Materials
- Terra cotta pot with matching saucer
- White or cream matte acrylic paint (chalk paint works great for texture)
- Black or dark grey acrylic paint
- Medium flat paintbrush
- Old toothbrush or stiff bristle brush
- Paper plate or palette
- Water cup
- Cardboard box or drop cloth (for splatter protection)
- Sealant spray (matte finish)
- Sandpaper (optional)
Step 1: Base Preparation
-
Clean the surface:
Begin by wiping down your terra cotta pot and saucer with a damp cloth to remove any dust or debris. If you are reusing an old pot, scrub it thoroughly and let it dry completely. -
Tape the rim (optional):
If you want to keep the very top rim of terra cotta exposed like in the photo, apply a strip of masking tape or painter’s tape around the inner top edge. Alternatively, you can paint it freehand for a more organic look. -
Mix your base color:
Pour a generous amount of your cream or white paint onto your palette. If you want a warmer look, mix in a tiny drop of tan or yellow oxide.
Step 2: Creating the Stone Texture
-
Apply the first coat:
Using your flat brush, paint the entire exterior of the pot and both sides of the saucer. Don’t worry about perfect smoothness; some brush strokes add to the hand-thrown pottery aesthetic. -
Let it dry:
Allow this initial coat to dry for about 15-20 minutes. Terra cotta absorbs moisture quickly, so the first layer usually dries fast. -
Add a second coat:
Apply a second layer of your base color to ensure solid opacity. You want the terra cotta color to be completely hidden except for the rim. -
Revisit the rim:
Carefully paint up to the rim. If you didn’t tape it, just create a clean line where the glaze would naturally stop, leaving that sliver of raw clay visible at the top edge. -
Dry completely:
Set both pieces aside until they are bone dry to the touch.
Splatter Control
If you accidentally create a huge blob instead of a speckle, quickly dab it gently with a dry paper towel to lift it, or just paint over it with your base color once dry.
Step 3: The Speckle Effect
-
Prepare the splatter paint:
Squeeze a small amount of black paint onto your palette. Add a few drops of water to thin it down until it has an ink-like consistency. -
Set up your station:
Place your pot inside a large cardboard box or over a wide drop cloth. The splatter step can get messy. -
Load the tool:
Dip just the tips of your old toothbrush or stiff bristle brush into the watered-down black paint. -
Test the splatter:
Before hitting the pot, test your technique on a piece of scrap paper. Run your thumb across the bristles to flick the paint forward. Adjust the distance to change the dot size. -
Apply the speckles:
Flick the paint onto the pot, rotating it slowly to get even coverage. Aim for a random distribution of small and medium dots. -
Don’t forget the saucer:
Repeat the splatter process on the outer rim of the saucer to match the pot. -
Let dots dry:
Wait for the speckles to dry completely. Since the paint is thin, this should take 10-15 minutes.
Make It Glossy
For a ‘freshly glazed’ ceramic look instead of matte stone, swap the matte sealant for a high-gloss spray lacquer as your final step.
Step 4: The Grey Wash Base
-
Mix a grey wash:
Take your black paint and mix it with a fair amount of water to create a very sheer, watery grey wash. You want this to be translucent. -
Apply the bottom wash:
Dip your wide flat brush into the grey wash. Starting at the very bottom edge of the pot, drag the brush horizontally around the base. -
Feather the edge:
I like to use a clean, slightly damp brush to feather the top edge of this grey band upwards, creating a faded, uneven transition rather than a hard line. -
Create texture lines:
While the wash is still wet, drag a mostly dry brush horizontally through the grey area to lift some paint and create those streaky, weathered lines seen in the image.
Step 5: Final Steps
-
Final drying time:
Let the entire project sit for at least an hour to ensure all layers are cured. -
Seal the deal:
Finish by spraying the pot and saucer with a clear matte sealant. This protects your faux-finish from water damage when you water your plants.
Place your favorite succulent inside and enjoy the handcrafted ceramic aesthetic you’ve created for pennies
Stamped Texture Bands Around the Pot
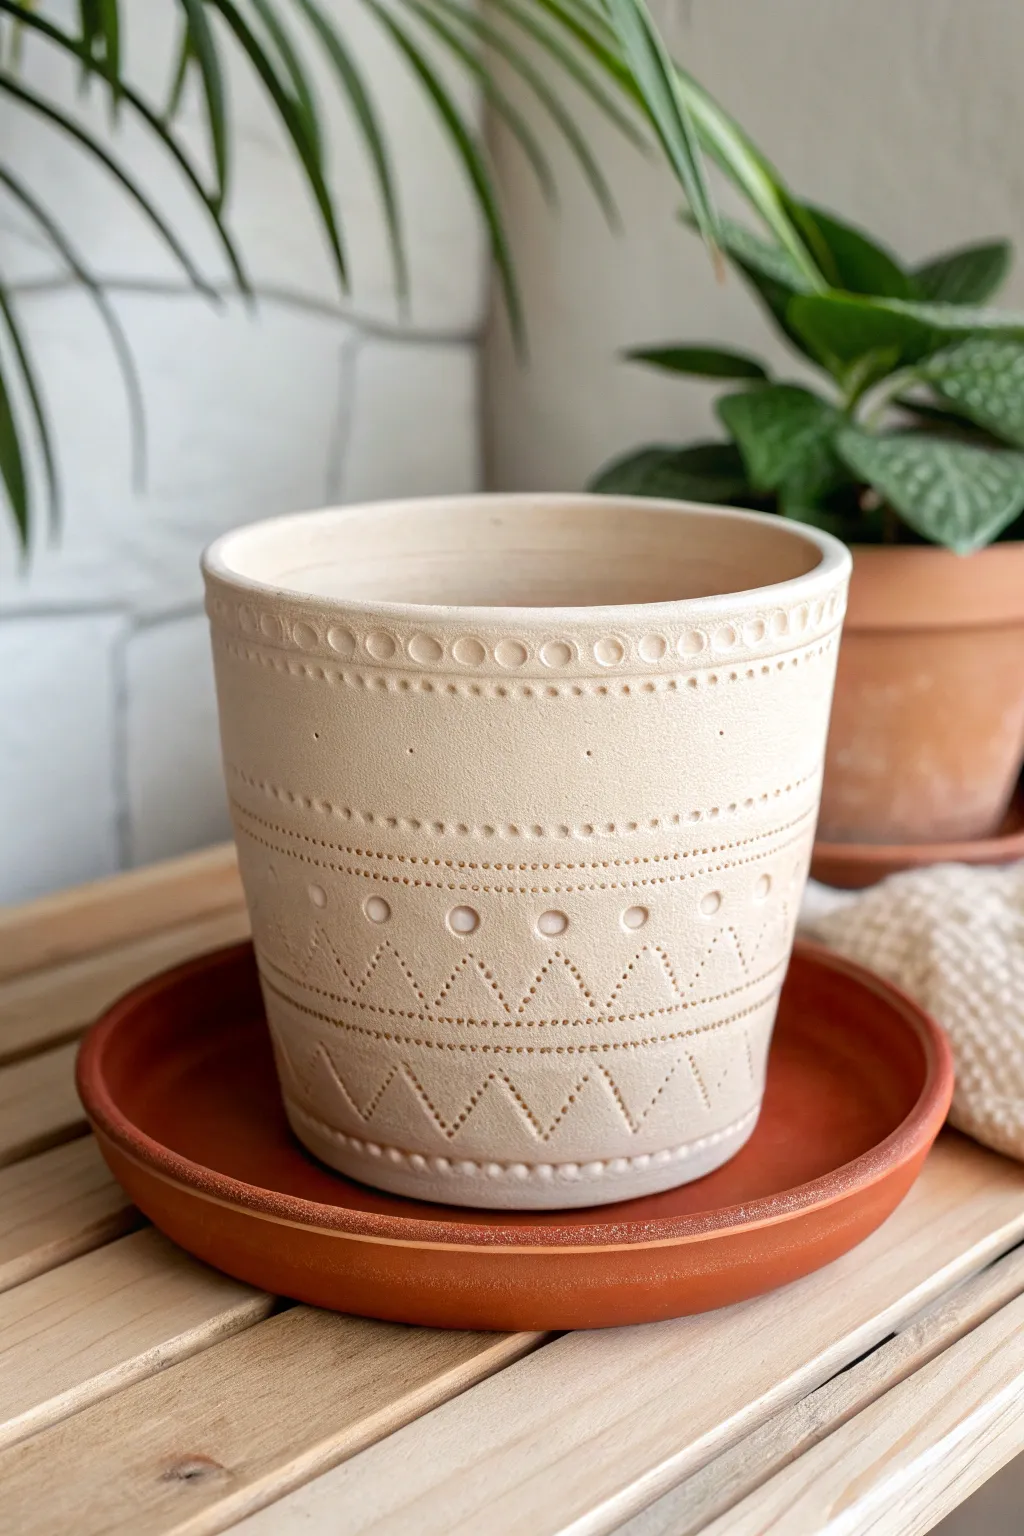
Transform a plain clay pot into a textured masterpiece with this elegant banded design. Using simple tools to create repetitive geometric patterns, you’ll achieve a sophisticated, handcrafted look that perfectly complements minimalist or bohemian decor.
How-To Guide
Materials
- Unfinished terracotta pot (clean and dry)
- Cream or beige matte acrylic craft paint
- Paintbrushes (medium flat brush for base, small detail brush)
- Small circular stamps or found objects (pen caps, straw ends)
- Toothpick or skewer (for tiny dots)
- Pottery carving tool or small flathead screwdriver (optional)
- Reddish-brown acrylic paint (for the saucer)
- Clear matte sealer spray
- Pencil
- Ruler or measuring tape
Step 1: Base Preparation
-
Clean surface:
Begin by wiping down your terracotta pot with a damp cloth to remove any dust or debris. Let it dry completely. -
Apply base coat:
Paint the entire exterior of the pot with your cream or beige matte acrylic paint. You want a solid, opaque coverage. -
Dry and repeat:
Allow the first coat to dry fully. Apply a second coat if the terracotta color is still showing through, ensuring a smooth, even finish. -
Saucer contrast:
While the main pot dries, paint the separate saucer with a warm reddish-brown acrylic paint to mimic the look of natural glazed terracotta, or leave it natural if you prefer.
Uneven Spacing?
If your pattern doesn’t meet perfectly at the back, don’t panic. Gently smudge the final inch of the pattern with a damp brush to blend it, or turn that side to the back.
Step 2: Planning the Pattern
-
Mark banding lines:
Using a pencil and ruler, lightly mark horizontal guidelines around the circumference of the pot. These will help keep your pattern bands straight. -
Define the zones:
Create distinct zones: a top rim band, a wide upper band, a middle decorative strip, and a lower zigzag section. Vary the distances to create visual interest.
Stone Effect
Mix baking soda into your beige base paint before applying. This creates a gritty, stone-like texture that makes the stamped patterns look like carved plaster.
Step 3: Creating Texture
-
Top rim circles:
Dip the open end of a pen cap or a small circular stamp into the beige paint (or a slightly darker shade for subtle contrast). Firmly press a row of circles just below the pot’s rim. -
Dotted border:
Using the blunt end of a skewer or a stylistic dotting tool, press a row of small, tight dots immediately below your circle band to frame it. -
Upper spacing:
Leave a wide section of the upper pot relatively smooth or textured very lightly with tiny, sparse pin-pricks for a ‘stone’ effect. -
Middle dashed line:
Create a separating band in the middle using a toothpick to press small dashes or dots in a straight horizontal line around the pot. -
Central circles:
Repeat the circle stamping motif below regular intervals. I find spacing them out slightly more than the top rim creates a nice rhythm.
Step 4: The Zigzag Feature
-
Sketch the zigzag:
Lightly sketch a zigzag pattern around the lower third of the pot with a pencil to ensure the peaks and valleys meet evenly. -
Double dotted alignment:
Follow your pencil lines with a specific pattern: create the zigzag using double rows of tiny dots. Use a fine-tip tool or toothpick dipped in paint. -
Enhance vertical depth:
To mimic an engraved look, you can gently scratch the paint surface connecting the dots with a pottery tool or sharp skewer, revealing just a hint of the clay texture underneath. -
Bottom border:
Finish the design with a final row of larger stamped circles or heavy dots near the very bottom edge of the pot to ground the design.
Step 5: Finishing Touches
-
Erase guides:
Once the paint is absolutely dry, gently erase any visible pencil guidelines. -
Add faux texture:
If the pot looks too flat, lightly sponge a very diluted darker beige wash over the textured areas and wipe it back immediately. This settles into the indentations. -
Seal the work:
Spray the entire pot with a clear matte sealer. This protects your painted design from water damage and UV fading.
Place your favorite green plant inside and enjoy the custom, artisan feel of your new planter

TRACK YOUR CERAMIC JOURNEY
Capture glaze tests, firing details, and creative progress—all in one simple printable. Make your projects easier to repeat and improve.
Carved Sgraffito Floral Lines on Terra Cotta
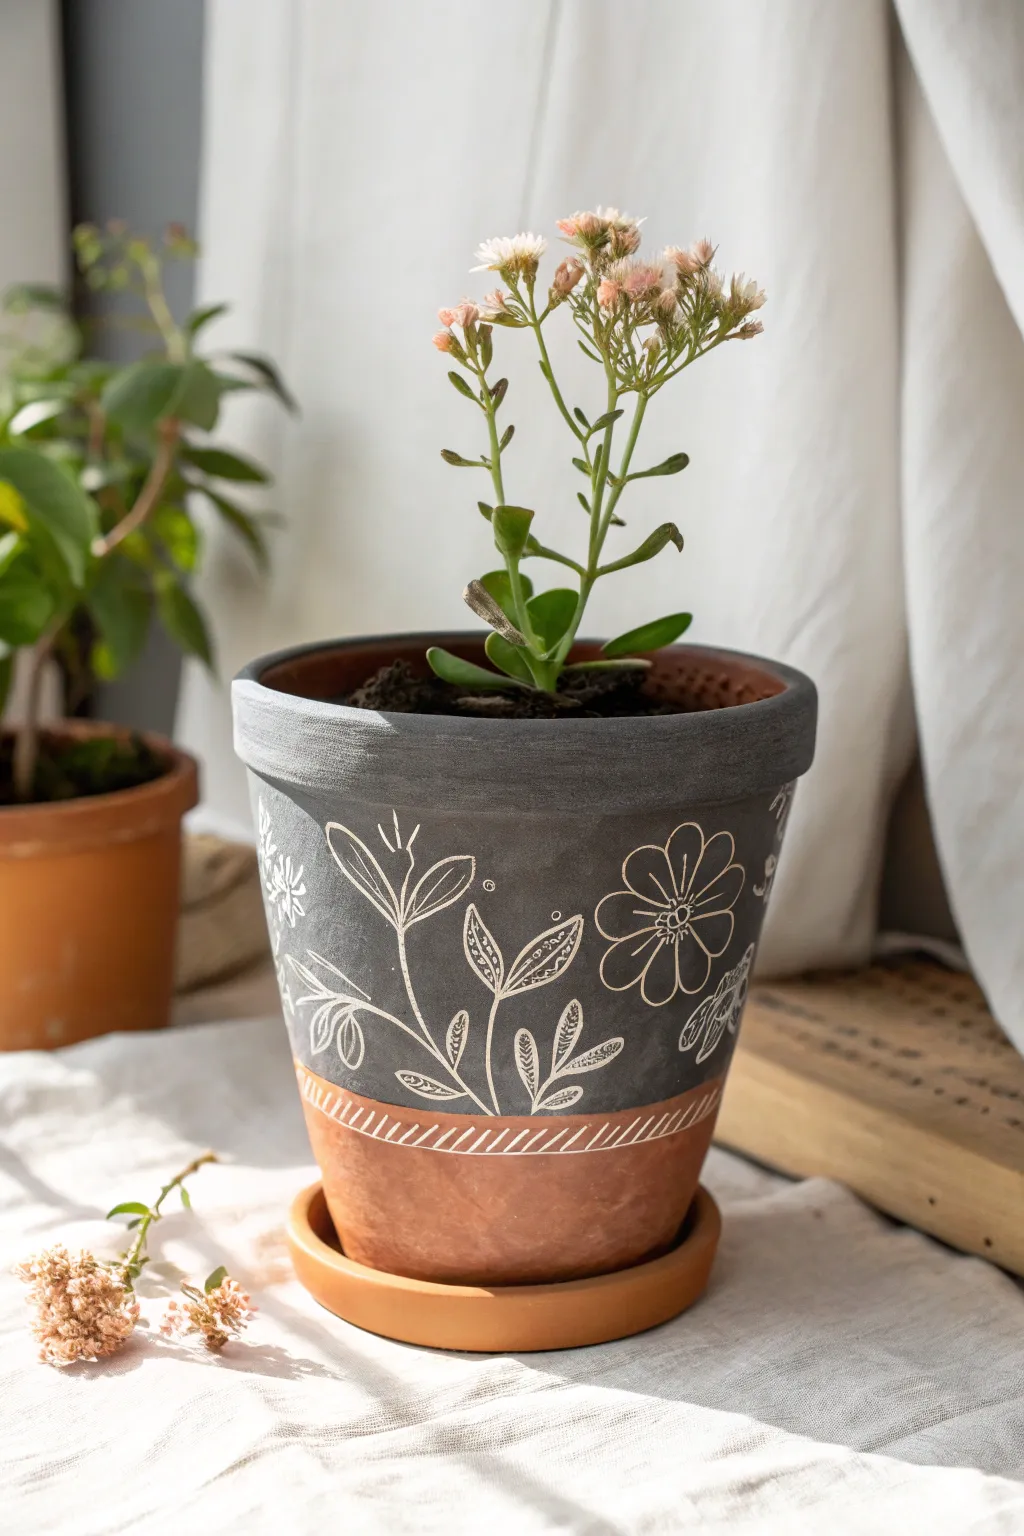
This elegant project transforms a basic terra cotta planter into a sophisticated piece of decor by combining matte charcoal textures with delicate carved lines. Using a faux-sgraffito technique, you’ll scratch away paint to reveal the warm clay beneath, creating striking high-contrast floral illustrations.
Step-by-Step Guide
Materials
- Standard terra cotta pot (approx. 6-8 inch)
- Terra cotta saucer
- Matte black or dark charcoal acrylic paint
- Medium flat paintbrush
- Painter’s tape or masking tape
- White gel pen or white chalk pencil (for sketching)
- Sgraffito tool, sharp nail, or sturdy metal stylus
- White acrylic paint or paint pen (optional, for highlights)
- Clear matte sealant spray
Step 1: Preparing the Base
-
Clean surface:
Begin by wiping down your terra cotta pot with a damp cloth to remove any dust or warehouse grit. Let it dry completely so the tape adheres properly. -
Mask the border:
Decide where you want your painted section to end. For the look in the photo, place a ring of painter’s tape around the pot about one-third of the way up from the bottom. Press the tape edge down firmly to prevent paint bleed. -
Apply base coat:
Using a flat brush, apply your dark charcoal or matte black acrylic paint to the top two-thirds of the pot, covering everything above the tape line. Don’t forget to paint the inner rim for a polished look. -
Second coat:
Once the first layer is dry to the touch, apply a second coat to ensure opaque, solid coverage. You want a distinct contrast against the lighter clay. -
Remove tape:
Carefully peel away the painter’s tape while the second coat is still slightly tacky to get the cleanest possible line. If any paint bled under, gently scrape it away with a craft knife.
Don’t Carve Too Deep
You only need to scratch the surface paint layer, not gouge the clay itself. If the paint is chipping, it might be too thick; try sanding lightly first.
Step 2: Designing the Florals
-
Sketch lightly:
Before carving, sketch your floral design lightly onto the black paint using a white chalk pencil. Focus on simple shapes: a large five-petal flower on the right, and rising leafy stems on the left. -
Carving the main stems:
Using your sharp carving tool or stylus, firmly scratch through the black paint along your sketched lines. Apply enough pressure to reveal the terra cotta color underneath. -
Detailing the flower:
Outline the five petals of the main flower. In the center, scratch a small circle and add tiny dots around it for texture. -
Adding leaves:
Carve the leaf outlines attached to your stems. I like to vary the leaf shapes slightly—some simple ovals, others with pointed tips—to keep the design feeling organic. -
Leaf veins:
Inside the larger leaves, scratch delicate patterns. You can use simple straight lines for veins, or small stippled dots for a more intricate texture like the leaves shown in the center.
Try Reverse Colors
Paint the bottom third white and leave the top natural, or paint the whole pot cream and carve to reveal the darker clay for a subtle, monochromatic look.
Step 3: Adding Accents & Finishing
-
Enhancing with white:
To make the design pop even more, or if your scratching didn’t reveal enough contrast, retrace a few of your carved lines with a very fine white paint pen or gel pen. This mimics the raw clay look but adds brightness. -
Create the border:
Where the black paint meets the raw clay, use your carving tool or a white pen to create a decorative band. Draw diagonal hatch marks all the way around the circumference. -
Top border line:
Add a solid horizontal line just above your diagonal hatching to frame the pattern neatly. -
Clean up dust:
Take a dry, soft brush and sweep away any paint dust or crumbs created during the scratching process. -
Seal the work:
Spray the entire pot (inside and out) with a clear matte sealant. This protects your paint from water damage and keeps the clay porous enough for plant health. -
Pot your plant:
Once the sealant is fully cured, fill the pot with soil and add your favorite succulent or leafy plant to complete picture.
Now you have a custom planter that brings an artisan touch to your windowsill garden
Raised Clay Daisy Appliqués on a Pot
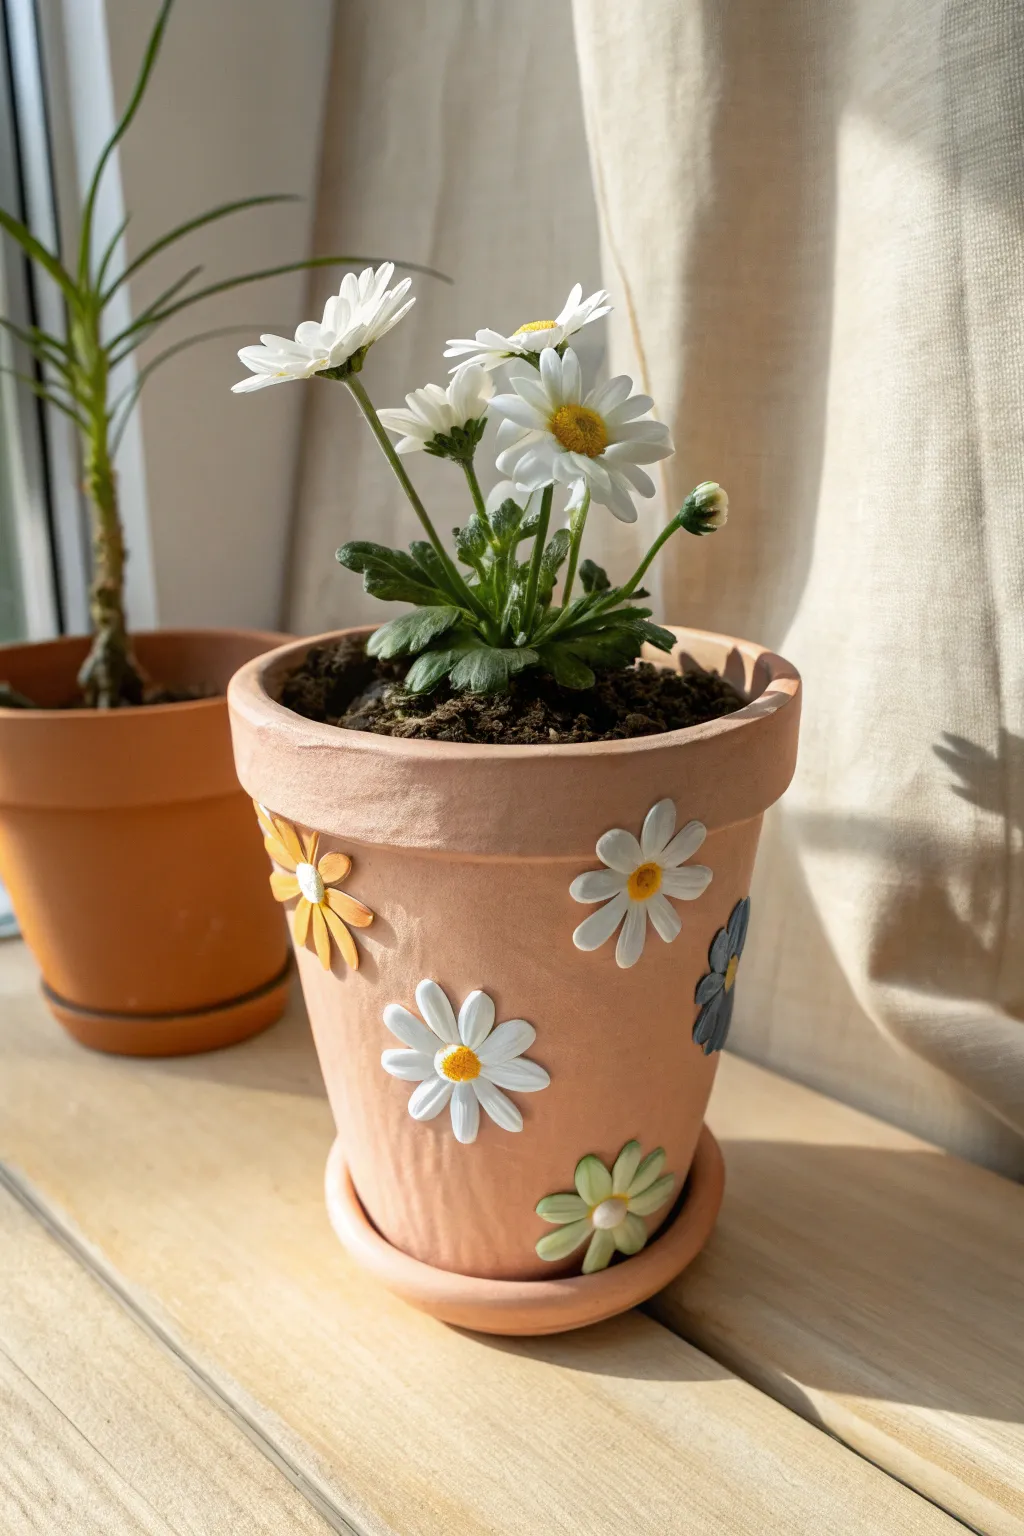
Transform a plain terra cotta pot into a charming, tactile garden accent with raised clay daisy appliqués. This project creates a whimsical 3D effect where the flowers seem to be blooming right out of the clay surface, adding depth and personality to your indoor garden.
Step-by-Step Tutorial
Materials
- Unsealed terra cotta pot (standard 6-inch size)
- Terra cotta saucer
- Air-dry modeling clay (white)
- Rolling pin or smooth glass jar
- Small daisy-shaped cookie cutter (approx. 1.5 inches)
- Modeling tools or a dull knife
- Acrylic paints (white, yellow, orange-yellow, light sage green, dusty blue)
- Fine-grit sandpaper
- Strong craft glue (like E6000) or heavy-duty ceramic adhesive
- Small round paintbrushes (sizes 2 and 4)
- Clear matte acrylic sealer spray
- Small cup of water
- Parchment paper
Step 1: Creating the Clay Appliqués
-
Prepare the workspace:
Lay down a sheet of parchment paper on a flat surface to prevent the clay from sticking while you work. -
Condition the clay:
Take a handful of white air-dry clay and knead it in your hands until it becomes warm, soft, and pliable. This prevents cracks later. -
Roll out the clay:
Using a small rolling pin, roll the clay out to an even thickness of about 1/8 to 1/4 inch. You want it thick enough to have dimension but not so heavy it falls off the pot. -
Cut the shapes:
Press your daisy cutter into the clay to create approximately 6-8 flower shapes. If you don’t have a cutter, you can hand-cut petal shapes with a dull knife. -
Smooth the edges:
Dip your finger in a tiny bit of water and gently run it along the cut edges of each petal to smooth out any roughness from the cutter. -
Add detail:
Use a modeling tool or the back of a butter knife to gently press a central line indentation into each petal for realistic texture. -
Create the centers:
Roll small balls of clay roughly the size of a pea. Flatten them slightly and press one into the center of each flower using a drop of water to help it adhere. -
Texture the centers:
Take a toothpick or a rough sponge and stipple the surface of the center dots to give them a fuzzy, pollen-like texture. -
Shape the curve:
This is crucial: gently drape the wet clay flowers onto the side of the terracotta pot (or a spare one of the same size) while they dry. This ensures they dry with the correct curvature to fit the pot later. -
Dry completely:
Allow the clay pieces to dry fully according to the package instructions, usually 24-48 hours. I prefer to let them sit an extra day just to be safe.
Step 2: Painting and Assembly
-
Sand the flowers:
Once dry, lightly sand any rough edges on the clay flowers with fine-grit sandpaper for a professional finish. -
Paint the petals:
Paint the petals of most flowers pure white. For variety, paint a few petals in soft yellow or a muted blue-grey, as seen in the inspiration photo. -
Paint the centers:
Use a golden yellow-orange mix for the flower centers. Dab the paint on rather than brushing it to maintain that stippled texture you created earlier. -
Paint the green accents:
If you want a green flower (like the bottom one in the image), mix white with a tiny dot of sage green for a soft, pastel look, keeping the center white or soft yellow. -
Plan placement:
Hold the dry flowers against the pot to find an arrangement you like. Scattering them randomly looks more natural than placing them in rigid rows. -
Glue the appliqué:
Apply a generous dab of heavy-duty adhesive to the back of a flower and press it firmly onto the pot. Hold it for 30-60 seconds until it grabs. -
Finish assembly:
Continue gluing all flowers around the pot, leaving enough space between them for the terracotta background to show through. -
Seal the work:
Once the glue is fully cured, take the pot outside and spray the entire exterior with a clear matte acrylic sealer to protect the clay and paint from moisture.
Curve Control
Don’t dry appliqués flat! They must dry on the curved surface of a spare pot or jar with the same diameter so they sit flush against the rounded terracotta.
Pastel Petals
Mix a tiny drop of brown into your yellow and blue paints. This ‘dulls’ the color slightly, giving you that trendy, earthy boho look instead of bright primary colors.
Now you have a beautifully textured planter ready to house your favorite blooms
Mini Pinch-Pot Planters for Tiny Blooms
This project transforms standard polymer or air-dry clay into a trendy, speckled planter with a soft coral hue. The organic shape and minimalist black splatter give it a modern, artisanal feel perfect for showcasing tiny succulents.
Step-by-Step
Materials
- Polymer clay (white and terracotta mix) or coral air-dry clay
- Rolling pin
- Craft knife or clay cutter
- Small bowl of water (if using air-dry clay)
- Black acrylic paint
- Old toothbrush or stiff bristle brush
- Matte varnish or sealant (waterproof)
- Fine-grit sandpaper (optional)
- Wax paper or craft mat
Step 1: Shaping the Clay
-
Prepare your clay color:
If you aren’t using pre-colored clay, knead white and terracotta polymer clay together until you achieve a uniform soft coral or salmon pink shade. Aim for a warm, earthy tone rather than a neon pink. -
Form a ball:
Roll a chunk of clay about the size of a golf ball (or slightly larger) into a smooth sphere between your palms. -
Begin the pinch pot:
Hold the ball in one hand and gently press your thumb into the center, stopping about a half-inch from the bottom to ensure a sturdy base. -
Pinch the walls:
I find it helpful to rotate the ball slowly while pinching the clay between your thumb and fingers. Work your way from the bottom up, thinning the walls evenly as you go. -
Refine the shape:
Gently tap the base against your work surface to flatten it so the pot sits level. Use your fingers to smooth out any deep fingerprints. -
Level the rim:
Use a craft knife to carefully trim the top rim to be relatively flat, or simply smooth it with a wet finger for a more organic look. The walls should stand straight up with a very slight outward curve. -
Add drainage (optional):
If you plan to plant directly inside, use a straw or tool to poke a small hole in the center of the bottom. -
Cure or dry:
Bake your polymer clay according to the package instructions, or let air-dry clay sit for 24-48 hours until fully hardened and light in color.
Uneven Splatter?
If you accidentally get a large blob of paint, wait for it to dry, gently sand it off, and re-splatter that area. Don’t wipe it while wet as it will smear.
Step 2: Finishing Touches
-
Sand for smoothness:
Once hardened, gently rub a fine-grit sandpaper over the rim or any rough exterior bumps to create a professional finish. -
Prepare the splatter paint:
Squeeze a small amount of black acrylic paint onto a palette and thin it slightly with a drop or two of water. It needs to be fluid enough to flick easily. -
Test your technique:
Dip an old toothbrush into the thinned paint. run your thumb across the bristles over a scrap piece of paper to test the splatter’s density. -
Apply the speckles:
Hold the brush near the pot and flick the bristles to create tiny black speckles all over the exterior. Rotate the pot to get even coverage. -
Control the pattern:
Vary your distance; closer flicks create larger spots, while distance creates a fine mist. Aim for a randomized, natural stone look. -
Let the paint dry:
Allow the black speckles to dry completely, which should only take about 15 minutes. -
Seal the interior:
Apply two coats of waterproof varnish or sealant to the inside of the pot to protect the clay from moisture damage during watering. -
Seal the exterior:
Finish with a coat of matte varnish on the outside to lock in the paint specks without making the pot too shiny.
Create a Set
Make a trio of pots in varying heights but keep the same diameter. Use slightly different clay shades (terra cotta, beige, coral) for a cohesive gradient look.
Once sealed and dry, fill your new speckled pot with gritty soil and a tiny succulent to complete the look
Cute Face Flower Pot With Blush Details
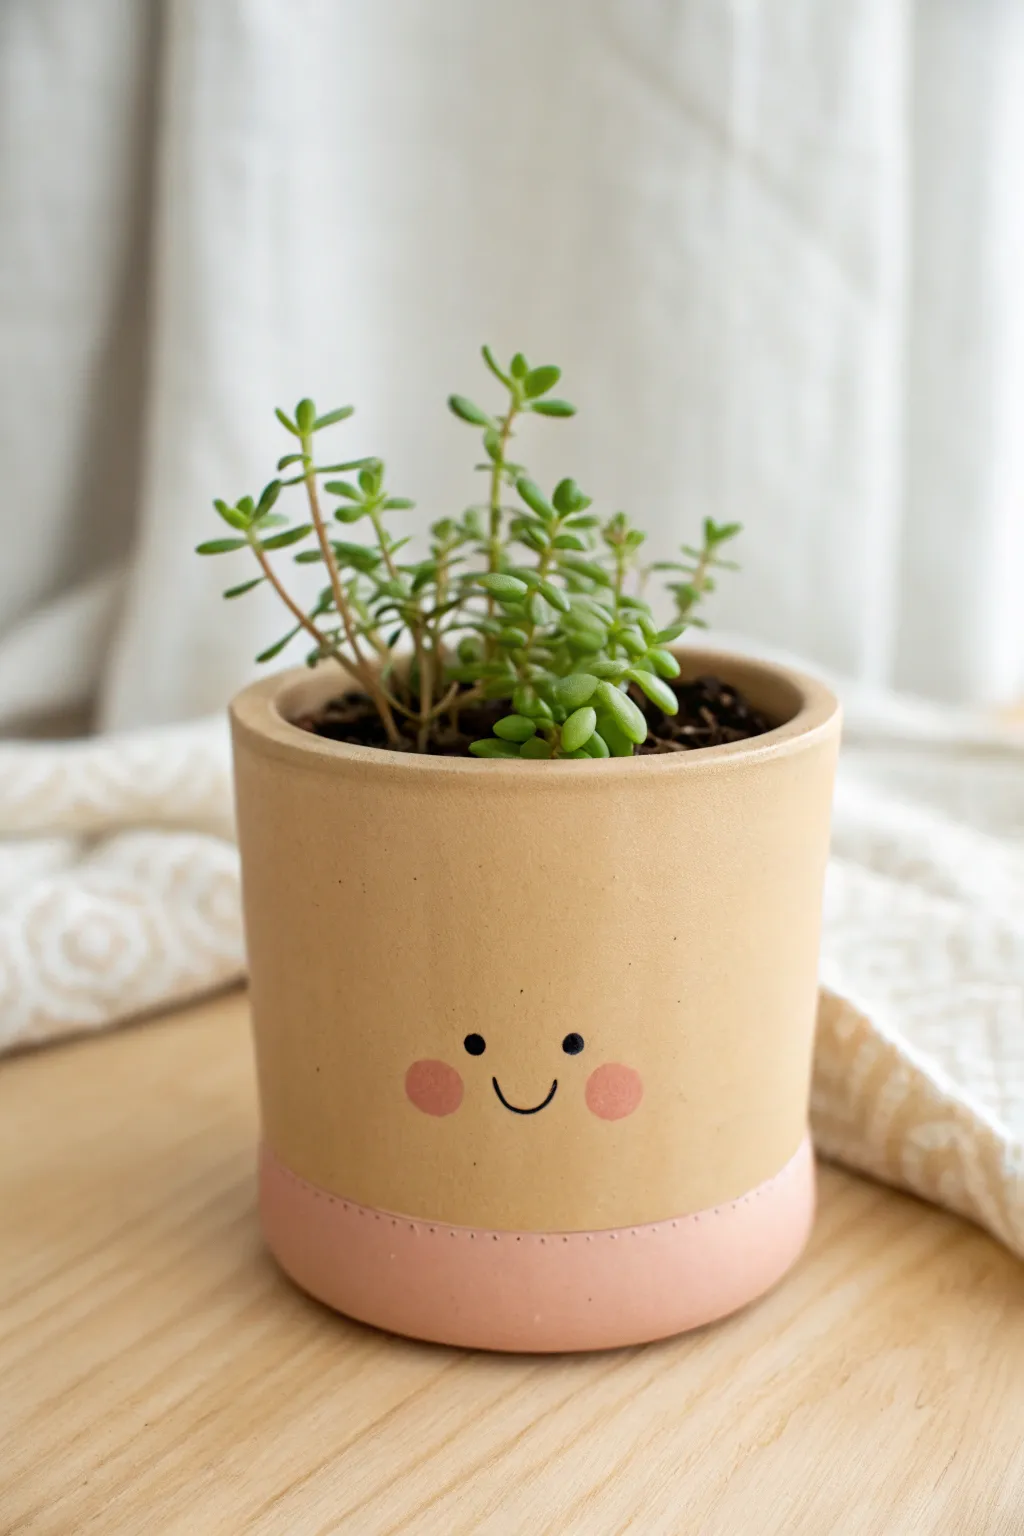
Bring a touch of sweetness to your succulent collection with this adorable blushing face planter. The two-tone design combines natural clay tones with a soft pink base for a modern, cheerful look that brightens any windowsill.
How-To Guide
Materials
- Cylindrical ceramic or terracotta pot
- Sandpaper (fine grit)
- Painter’s tape
- Soft pink acrylic paint
- Black acrylic paint or paint pen
- Small round sponge brush or dotting tool
- Fine detail paintbrush (size 0 or 00)
- Medium flat paintbrush
- Matte clear sealant spray
Step 1: Preparation & Base
-
Clean and prep:
Start by ensuring your pot is completely clean and dry. If there are any rough bumps on the surface, gently sand them down with fine-grit sandpaper and wipe away the dust. -
Mark the paint line:
Measure about 1 to 1.5 inches up from the bottom of the pot. Apply a strip of painter’s tape horizontally around the entire circumference. Press the tape edge firmly to prevent paint bleed. -
Paint the bottom band:
Using your medium flat brush and soft pink acrylic paint, fill in the area below the tape. Apply smooth, horizontal strokes. -
Apply a second coat:
Allow the first coat to dry for about 15 minutes. If the clay underneath is still showing through, apply a second coat of pink for solid opacity. -
Remove the tape:
While the second coat is still slightly tacky but mostly dry, carefully peel off the painter’s tape at a 45-degree angle to reveal a crisp line.
Stamp Perfection
Use the eraser end of a fresh pencil dipped in paint to create perfectly uniform circular cheeks every time.
Step 2: Creating the Face
-
Position the face:
Identify the ‘front’ of your pot. Lightly mark where you want the eyes and mouth to go with a pencil if you’re nervous about freehanding. -
Paint the eyes:
Dip the handle end of a paintbrush or a specialized dotting tool into black paint. Press gently onto the pot to create two small, perfectly round eyes spaced about an inch apart. -
Add the smile:
Using a fine detail brush or a black paint pen, draw a small, thin ‘U’ shape between and slightly below the eyes. Keep the line steady and thin for a delicate look. -
Dot the cheeks:
Dip a small round sponge brush or a larger dowel end into the same soft pink paint you used for the base. Dab off excess paint on a paper towel first. -
Stamp the blush:
Gently press the sponge or tool onto the pot surface just outside and below each eye. I like to rotate the tool slightly as I lift it to ensure a nice round circle. -
Clean up edges:
If your blush circles aren’t perfectly opaque, wait for them to dry and carefully dab a second layer of pink right on top.
Step 3: Finishing Touches
-
Add detailed dots:
For a subtle texture like the original image, use a needle or very fine point to add tiny dots along the top edge of the pink base line, though this is optional. -
Let it cure:
Allow the entire pot to dry completely for at least 24 hours to ensure the paint has fully set. -
Seal the artwork:
In a well-ventilated area, spray a light, even coat of matte clear sealant over the entire exterior. This protects the face from water damage when you water your plant. -
Pot your plant:
Once the sealer is dry, fill your new pot with soil and add your favorite succulent or small plant.
Bleeding Lines?
If paint seeped under the tape, wait for it to dry fully, then gently scrape the excess away with a craft knife or toothpick.
Now you have a charming little companion ready to hold your favorite green friend
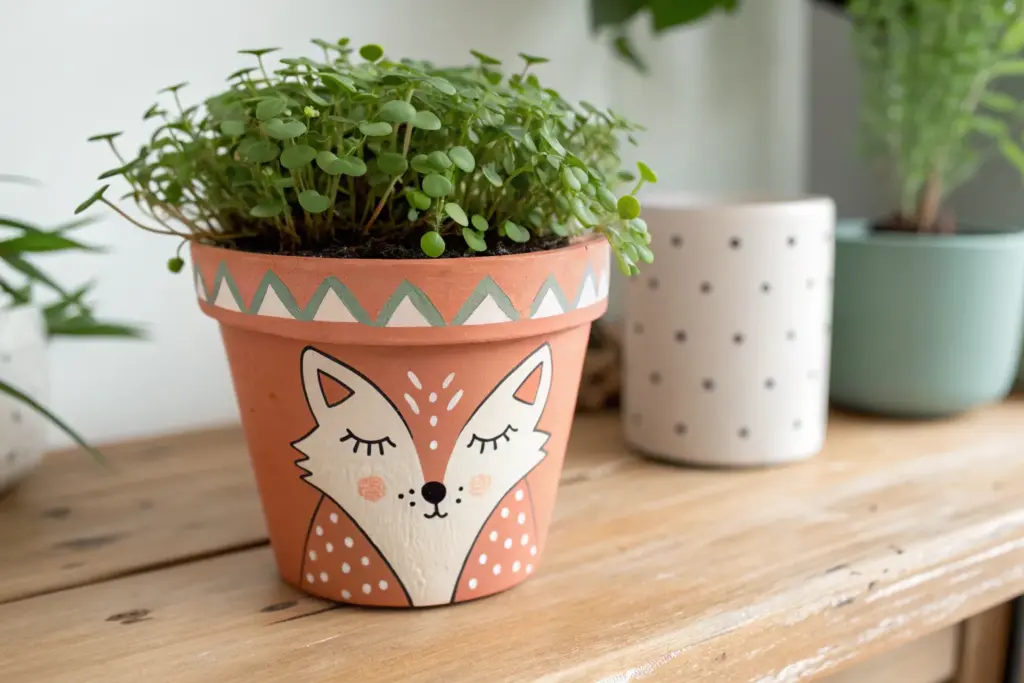
Animal Character Clay Flower Pots
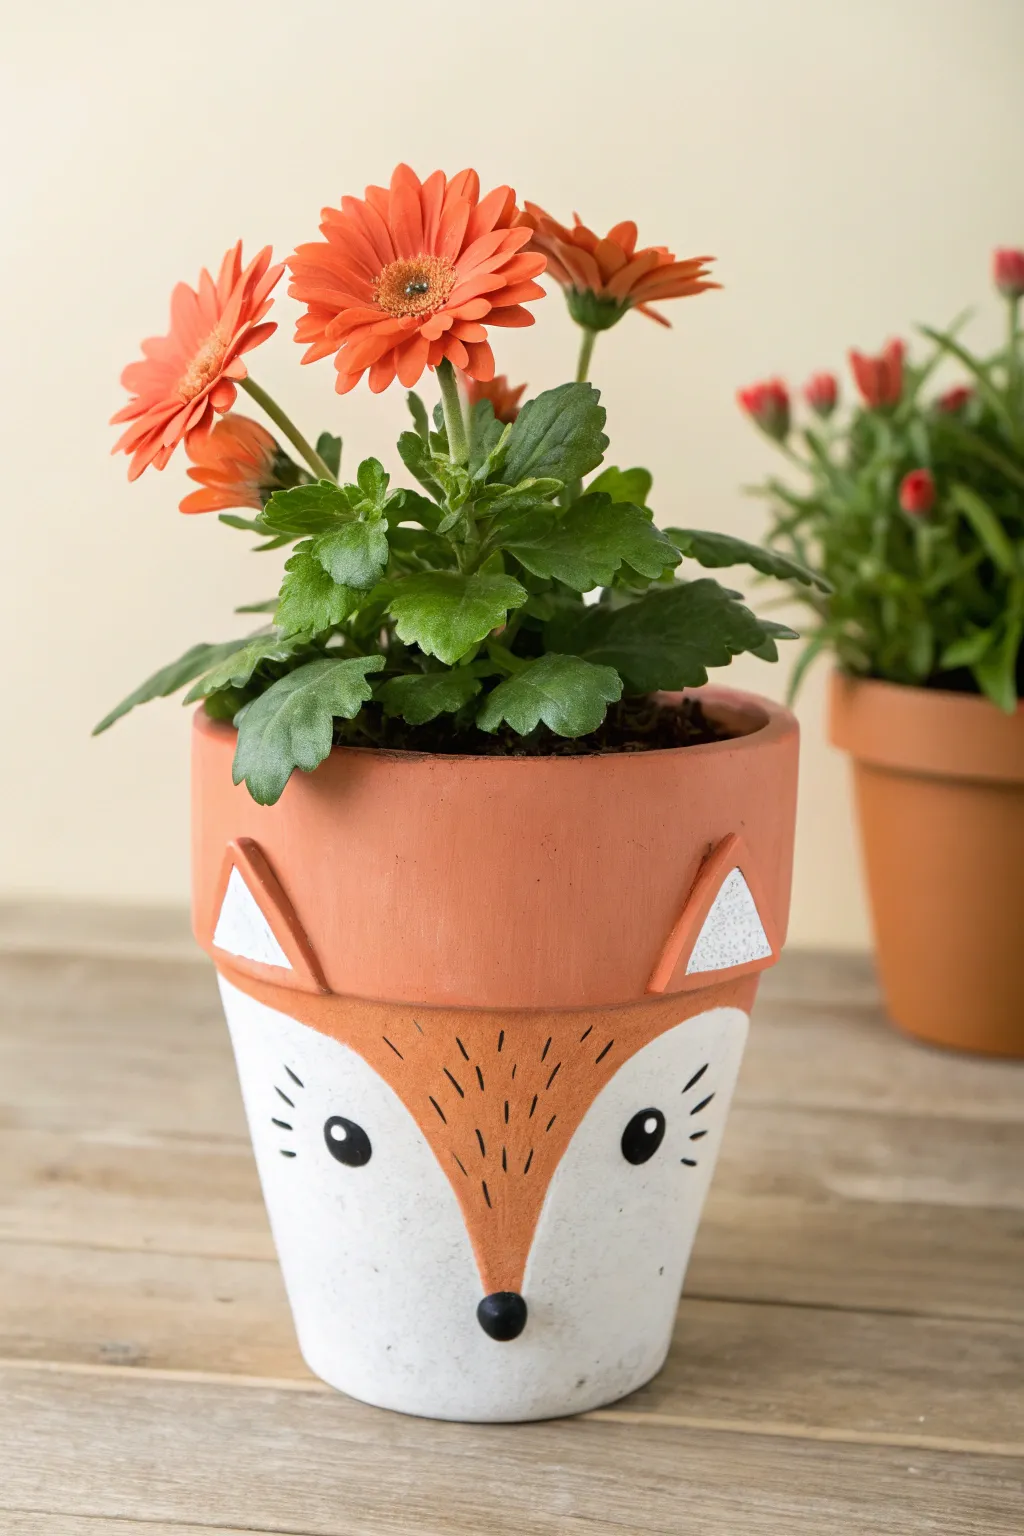
Transform a standard terracotta pot into an adorable woodland creature with this clever fox design. Using simple geometric shapes and a dash of paint, you’ll create a charming character planter that perfectly complements orange blooms.
Step-by-Step Tutorial
Materials
- Standard terracotta flower pot (4-6 inch diameter)
- Acrylic craft paint: White, Burnt Orange/Terracotta, Black
- Air-dry clay or polymer clay (small amount)
- Strong craft glue (E6000 or similar)
- Small black bead or mini pom-pom (for nose)
- Flat paintbrush (medium)
- Fine detail paintbrush or black paint marker
- Pencil
- Sealer spray (matte or satin finish)
- Scissors and cardstock (optional for templates)
Step 1: Sculpting and Prepping
-
Clean the surface:
Begin by wiping down your terracotta pot with a damp cloth to remove any dust or debris. Let it dry completely so the paint adheres properly. -
Shape the ears:
Take a small amount of air-dry or polymer clay and roll it out flat via a rolling pin or smooth jar. Cut two isosceles triangles about 1.5 inches tall to serve as the fox’s ears. -
Attach the ears:
While the clay is still pliable, press the triangles onto the rim of the pot to check the curve. If using bakeable polymer clay, bake according to package instructions now. If using air-dry clay, glue them directly to the rim and let them cure fully before painting.
Paint Blotchy?
Terracotta is porous and drinks paint. If white looks streaky, apply a base coat of gesso or white primer first. This seals the clay and makes top colors pop.
Step 2: Painting the Base Design
-
Sketch the face:
Lightly draw the outline of the fox’s face directly onto the pot using a pencil. You want a deep ‘V’ shape starting from the rim and narrowing down toward the bottom center for the nose bridge. -
Define the cheeks:
Curve the lines upwards from the bottom point of the ‘V’ toward the sides of the pot to create the rounded white cheek areas. -
Paint the cheeks:
Using your flat brush, fill in the bottom rounded sections with white acrylic paint. Apply 2-3 thin coats for opaque coverage, allowing paint to dry between layers. -
Paint the nose bridge:
Paint the central ‘V’ shape using the burnt orange or terracotta color. Blend this slightly at the top rim if you want the natural pot color to show through, or paint it solid for a bolder look. -
Enhance the ears:
Paint the clay ears orange to match the face. Once dry, paint a smaller white triangle inside each ear to create depth.
Step 3: Adding Details
-
Draw the eyes:
Position the eyes in the white cheek area, just outside the orange ‘V’. I find it helpful to make small pencil dots first to ensure they are level. -
Paint the eyes:
Using a fine detail brush or a black paint pen, create solid black circles for the eyes. Add three small lashes to the outer corner of each eye. -
Add eye highlights:
Dip the non-brush end of a paintbrush into white paint and dot a tiny reflection highlight onto the upper right side of each black eye pupil. -
Create fur texture:
With a very fine brush or thin marker, add small, dashed black lines inside the orange ‘V’ section to mimic fur texture. -
Attach the nose:
Glue the small black bead or pom-pom to the very bottom point of the orange ‘V’ where it meets the white section.
Make it a Family
Use different sized pots to create a fox family. Try a grey palette for a wolf, or browns for a bear using rounded ears instead of triangles.
Step 4: Finishing Up
-
Seal the pot:
Once all paint is totally dry, spray the entire exterior with a clear matte or satin sealer. This protects your artwork from water damage when watering your plant. -
Plant your flowers:
Fill the pot with soil and add orange flowers, like gerbera daisies or marigolds, to complete the monochromatic look.
Now your clever little fox is ready to bring a touch of whimsy to your windowsill or garden shelf
Fruit-Inspired Painted Flower Pots
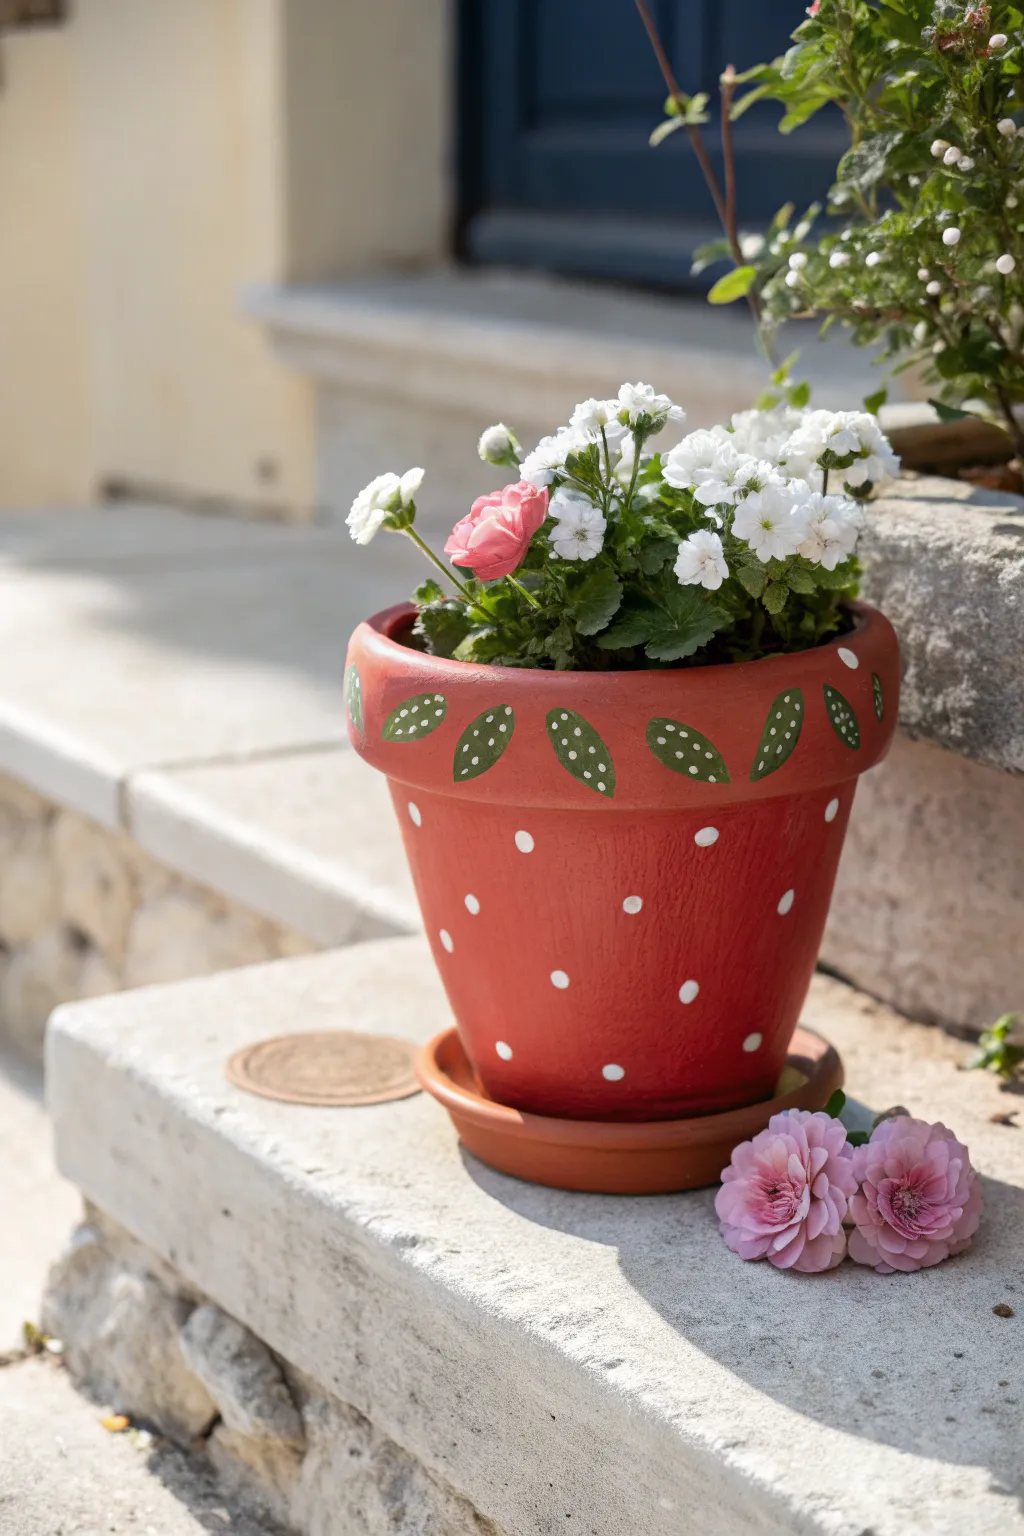
Transform a plain terra cotta pot into a delightful summer treat with this strawberry-inspired design. The vivid red base, dotted with playful white seeds and crowned with painted green leaves, creates a fresh and cheerful home for your favorite blooms.
Step-by-Step
Materials
- Terra cotta pot with matching saucer
- Red acrylic paint (bright berry shade)
- Leaf green acrylic paint
- White acrylic paint
- Flat paintbrush (approx. 1 inch)
- Small round detail brush (size 2 or 4)
- Small filbert brush or round brush (for leaves)
- Pencil
- Water cup and palette
- Clear acrylic sealer spray (matte or gloss)
- Paper towels
Step 1: Base Preparation
-
Clean the surface:
Begin by wiping down your terra cotta pot and saucer with a damp cloth to remove any warehouse dust or oils. Let it dry completely before starting. -
Paint the red base layer:
Load your large flat brush with the bright red acrylic paint. Apply a smooth, even coat over the entire exterior of the pot, stopping just under the top rim lip. -
Paint the rim:
Continue painting the red color up and over the rim. We want a cohesive background for the leaves later, though some artists leave the rim unpainted—I prefer the full red coverage for a bolder look. -
Paint the saucer:
While the pot dries, paint the outer edge and top rim of the saucer with the same red shade. -
Apply a second coat:
Terra cotta is porous and often soaks up the first layer. Once the first coat is dry to the touch, apply a second coat of red to ensure a solid, opaque finish.
Seed Spacing Trick
Use a pencil eraser dipped in paint for perfectly uniform dots. For teardrop seeds, press a round brush down and flick upward slightly.
Step 2: Adding the Seeds
-
Load the detail brush:
Dip the tip of your small round detail brush into white acrylic paint. You want enough paint to create a solid dot but not so much that it drips. -
Create the first row:
Start near the bottom of the pot. Gently press the brush tip against the surface to create small, uniform polka dots. Space them about 2 inches apart. -
Stagger the pattern:
Move up to create the next row of dots. Position each new dot so it sits roughly in between the two dots below it, creating a diagonal or staggered pattern. -
Complete the seeds:
Continue staggered rows of dots until you reach just under the rim of the pot. Aim for randomness rather than perfection to mimic natural seed placement. -
Add rim accents:
Optionally, add a few tiny white dots scattered on the rim itself, interspersed between where the leaves will go.
Berry Patch Set
Paint a set of three pots in different sizes. Make one a raspberry using magenta paint, and another a blueberry using deep blue.
Step 3: Painting the Leaves
-
Sketch the leaf shapes:
Lightly use a pencil to draw simple oval leaf shapes around the thick rim of the pot. Draw them angled diagonally, as if they are wrapping around the pot. -
Fill in the green:
Using your filbert or medium round brush, fill in these oval shapes with leaf green paint. You may need two coats if the red base shows through too strongly. -
Add leaf details:
Once the green is dry, take your finest detail brush and the white paint again. carefully dab tiny dots inside the green leaves to mimic veins or texture. -
Refine the edges:
If the edges of your leaves look messy, you can carefully touch up the red background around them with your small brush.
Step 4: Final Steps
-
Let it cure:
Allow all paint layers to dry completely, preferably overnight, to ensure the moisture has evaporated from the clay. -
Seal the pot:
Take the pot and saucer outside or to a well-ventilated area. Spray the exterior with a clear acrylic sealer. This protects your hard work from water damage and fading. -
Plant:
Once the sealer is dry, pot your chosen white or pink flowers directly inside to complete the look.
Place your charming strawberry pot on a sunny porch step to welcome guests with a pop of color