A plain clay pot is basically a blank canvas, and a little paint can turn it into something you’ll actually want to display. These clay flower pot painting ideas are the kind of projects I love because they look special, but they still feel totally doable in one relaxed studio session.
Classic Stripes in Fresh Colors
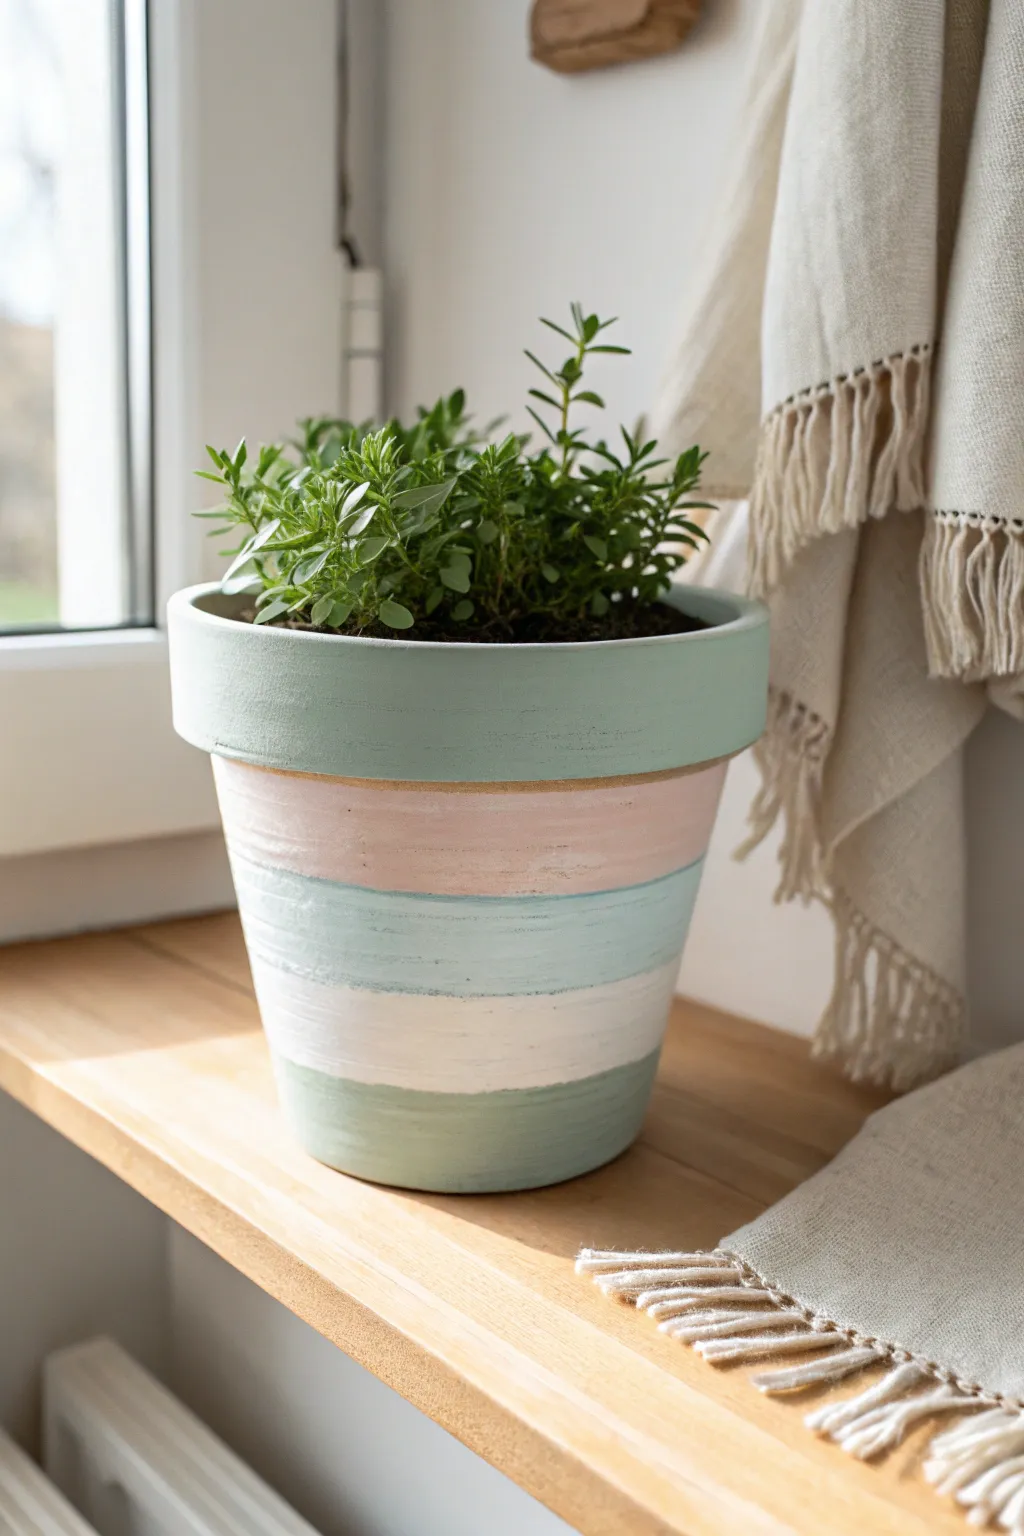
Bring a breath of fresh air to your windowsill with this charmingly rustic striped planter. Featuring soft bands of mint green, pale pink, and white, this project transforms a standard terracotta pot into a modern home for your favorite herbs or succulents.
Step-by-Step Guide
Materials
- Standard terracotta pot (approx. 6-inch diameter)
- Acrylic craft paints: Mint Green, Pale Pink, White
- Flat paintbrush (1-inch width)
- Small round paintbrush (for touch-ups)
- Painter’s tape (optional, for crisper lines)
- Matte clear sealant spray
- Paper plate or palette
- Cup of water and paper towels
Step 1: Preparation and Base
-
Clean the Surface:
Before you begin painting, ensure your terracotta pot is completely clean and dry. Wipe it down with a damp cloth to remove any dust or debris, then let it air dry for about 15 minutes. -
Paint the Rim:
Start by dipping your flat brush into the Mint Green paint. Apply a generous coat to the thick upper rim of the pot. -
Cover the Rim Edge:
Don’t forget the top edge and the very inner lip of the rim; painting just inside the top creates a finished look even when the pot is filled with soil. -
Let the Rim Dry:
Allow the green rim to dry to the touch, which usually takes about 20 minutes with acrylics. This prevents smudging when you work on the lower sections.
Step 2: Creating the Stripes
-
Visualize the Sections:
Look at the main body of the pot below the rim. Mentally divide this space into four roughly equal horizontal sections. -
Apply the Pink Band:
Load your flat brush with Pale Pink paint. Paint the first stripe directly underneath the rim. I like to freehand this for a slightly organic look, but you can use painter’s tape if you prefer rigorous straight lines. -
Create the First Green Stripe:
Clean your brush thoroughly. Paint a Mint Green stripe immediately below the pink one. Try to keep the width similar to the pink band above it. -
Add the White Accent:
Rinse the brush again and switch to White paint. Apply the third stripe below the green one. The white band adds a crisp brightness that separates the pastel tones beautifully. -
Finish the Base:
For the final bottom section, return to the Mint Green paint. Cover the remaining area down to the base of the pot. -
Refine the Edges:
Go back with a smaller brush to touch up where the colors meet. You can leave a tiny sliver of exposed terracotta between stripes for a rustic feel, or overlap them slightly for full coverage.
Paint Peeling?
Terracotta is porous and absorbs moisture from soil, pushing paint off from the inside out. Always seal the INTERIOR of the pot with a waterproof sealer before planting to stop this
Step 3: Finishing Touches
-
Apply Second Coats:
Once the first layer is dry, assess the opacity. The white and pale pink often need a second coat to look solid and vibrant against the clay background. -
Dry Completely:
Set the pot aside in a warm, dry area for at least an hour to ensure all paint layers are fully cured. -
Seal the Project:
Take the pot to a well-ventilated area. Spray the entire exterior (and the inner rim) with a matte clear sealant. This step is crucial to protect the paint from water damage when you water your plant. -
Plant Your Greenery:
Once the sealant is dry and no longer smells of fumes, add your potting soil and favorite plant to complete the look.
Distressed Look
For a vintage vibe, wait until the paint is fully dry, then lightly sand the raised areas of the pot with fine-grit sandpaper to reveal specks of the terracotta clay underneath
Enjoy the soft splash of color this custom planter adds to your space


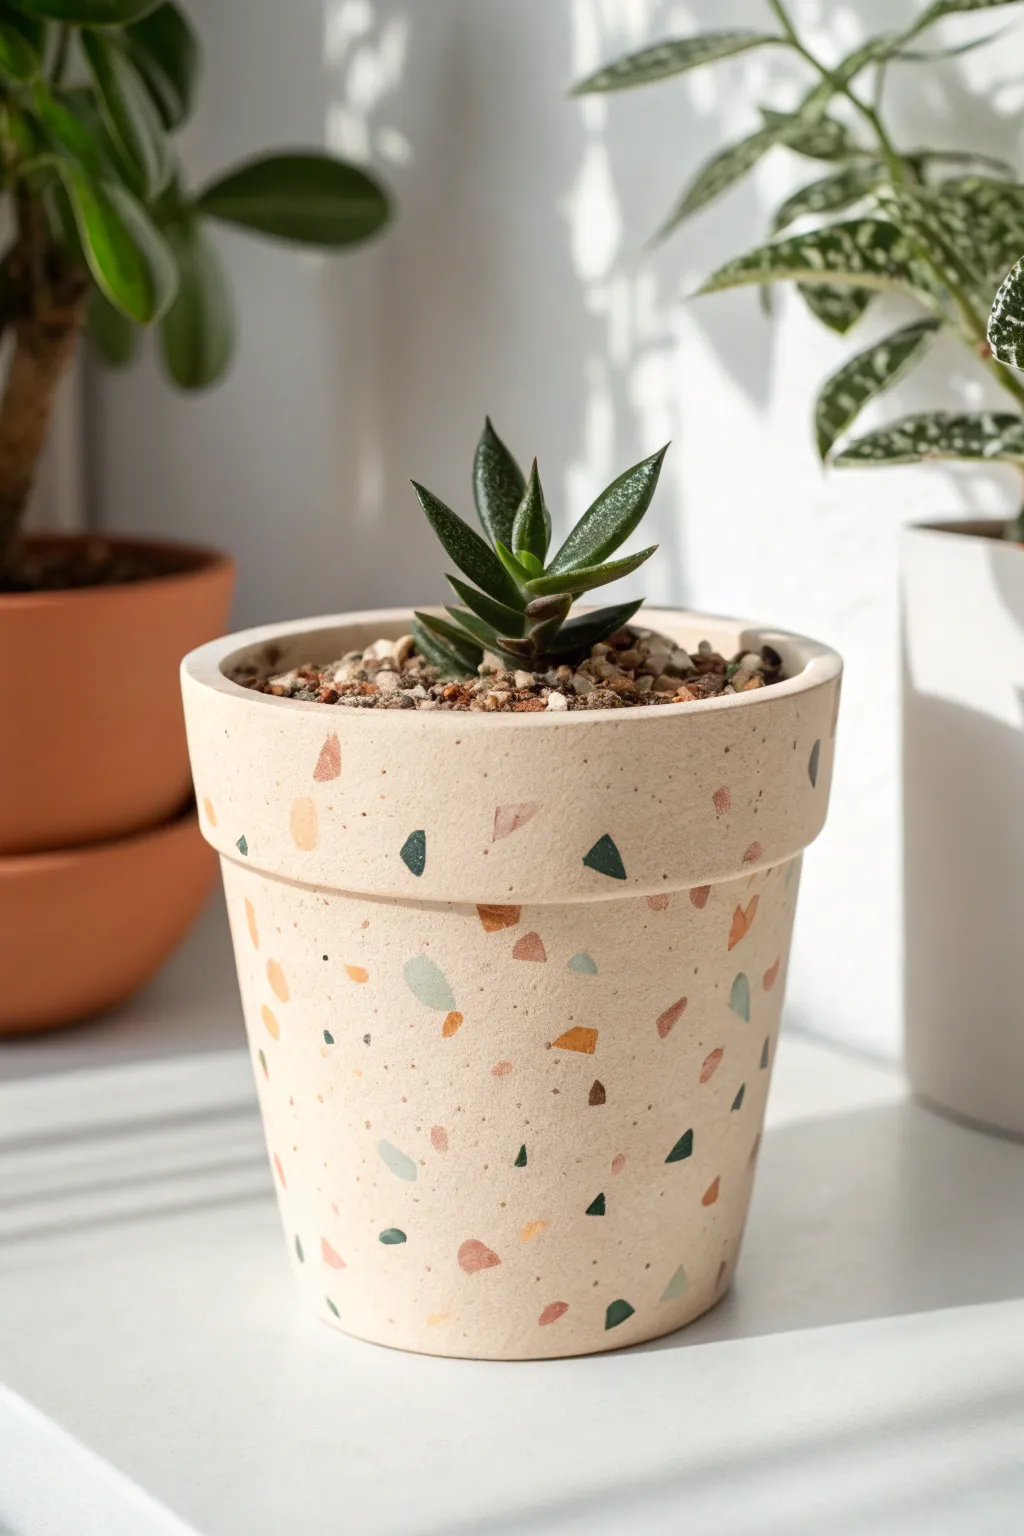
Easy Polka Dots and Confetti Spots
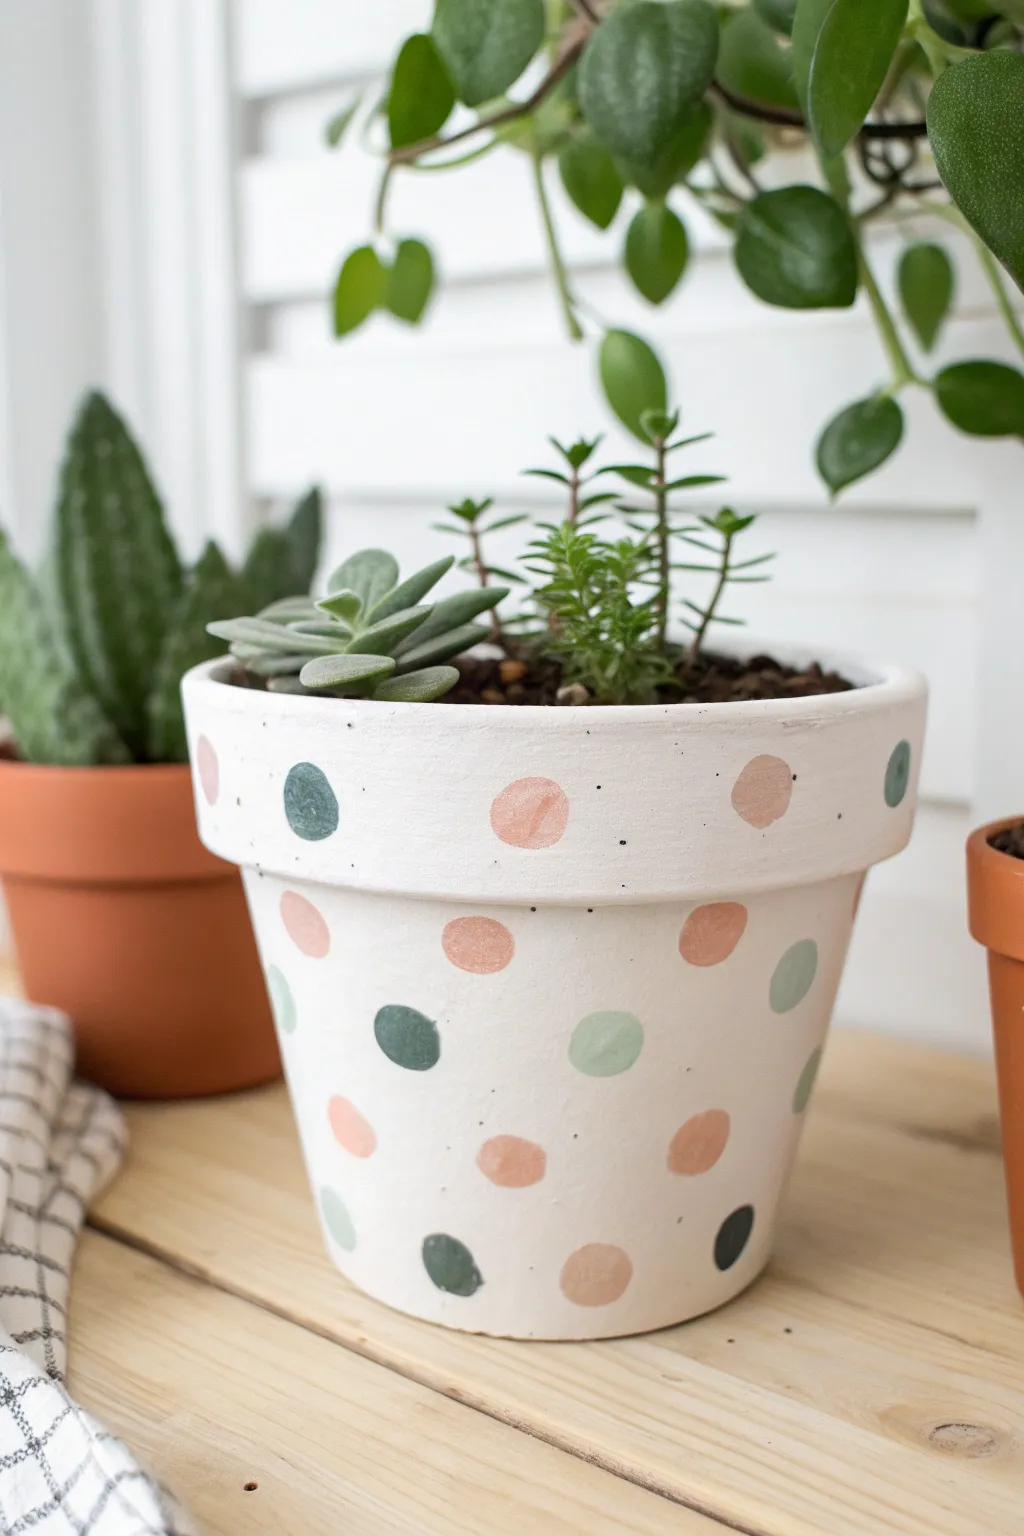
Transform a standard terracotta planter into a chic home for your succulents with this muted, modern design. The combination of soft pastels and scattered speckles creates a playful yet sophisticated look that fits perfectly in any bright, airy space.
Step-by-Step
Materials
- Terracotta pot (standard size)
- White acrylic craft paint (matte finish)
- Acrylic craft paints in: peach/salmon, dark teal/forest green, and light mint green
- Foam sponge brush (1-inch width)
- Round foam pouncers (assorted sizes: small, medium, large)
- Small detail paintbrush or old toothbrush
- Paper plate or palette
- Clear matte sealer spray or Mod Podge
- Water cup and paper towels
Step 1: Preparing the Base
-
Clean the surface:
Before you begin painting, wipe down your terracotta pot with a damp cloth to remove any dust or loose clay particles. Let it dry completely for the best paint adhesion. -
Apply the first coat:
Squeeze a generous amount of white matte acrylic paint onto your palette. Using the foam sponge brush, apply a smooth, even base coat over the entire exterior of the pot, including the top rim. -
Paint the inner rim:
Don’t forget to paint the inside of the rim, going down about an inch or two where the soil line will be. This ensures no orange clay shows through once your plant is potted. -
Second coat application:
Once the first layer is dry to the touch (usually 15-20 minutes), apply a second coat of white. Terracotta is porous and likes to soak up paint, so a second layer creates that solid, opaque finish seen in the photo.
Step 2: Creating the Polka Dots
-
Prepare your colors:
Pour dime-sized puddles of your accent colors—peach/salmon, dark teal, and light mint green—onto your paper plate. -
Load the pouncer:
Dip your medium-sized foam pouncer into the peach paint first. dab it lightly on a clean part of the plate to remove excess paint; this prevents globs and ensures a crisp circle. -
Stamp the main dots:
Press the pouncer firmly onto the pot to create your first few dots. I like to scatter them randomly, making sure to place some on the rim and some on the body of the pot. -
Switch colors:
Using a fresh pouncer (or the same one washed and thoroughly dried), repeat the process with the dark teal paint. Place these dots in the empty spaces between your peach circles. -
Add variety:
Grab a slightly smaller pouncer for the light mint green paint. Stamp these smaller circles in the remaining gaps to create visual interest and size variation. -
Check the spacing:
Step back and look at your pattern. If any areas look too empty, add another dot. It’s okay if some dots run off the edge of the rim or the bottom; it makes the pattern look more natural. -
Touch up edges:
If any of your circles are slightly imperfect or sheer, you can use a small detail brush to carefully fill them in or smooth out the edges while the paint is still wet.
Uneven Circles?
If your foam pouncer is sliding and creating smudged circles, try twisting the pouncer gently back and forth as you press it down, rather than just pushing straight in.
Step 3: The Confetti Speckle Finish
-
Mix the splatter paint:
Take a tiny bit of black or very dark grey paint and water it down slightly on your palette until it has an inky consistency. -
Test your splatter:
Dip a stiff-bristled brush or an old toothbrush into the watered-down paint. Practice flicking the bristles with your thumb over a piece of scrap paper until you get fine, confetti-like specks. -
Apply the speckles:
Holding the brush about 6-8 inches away from the pot, gently flick the bristles to spray tiny specks over the white background and the colored dots. Go lightly—you want a subtle texture, not big blobs. -
Let it cure:
Allow the entire pot to dry for at least an hour or two. The speckles need to be completely dry before sealing so they don’t smear. -
Seal the deal:
To protect your design from water damage when watering your plants, spray the pot with a clear matte sealer or brush on a coat of Mod Podge. This locks in the design and makes the finish durable.
Level Up: Metallic Pop
Add a touch of glam by replacing one of the pastel colors with a metallic gold or copper paint. The shimmer will catch the light beautifully against the matte white base.
Now you have a delightfully spotted container ready to showcase your favorite greenery


Simple Hand-Painted Flowers
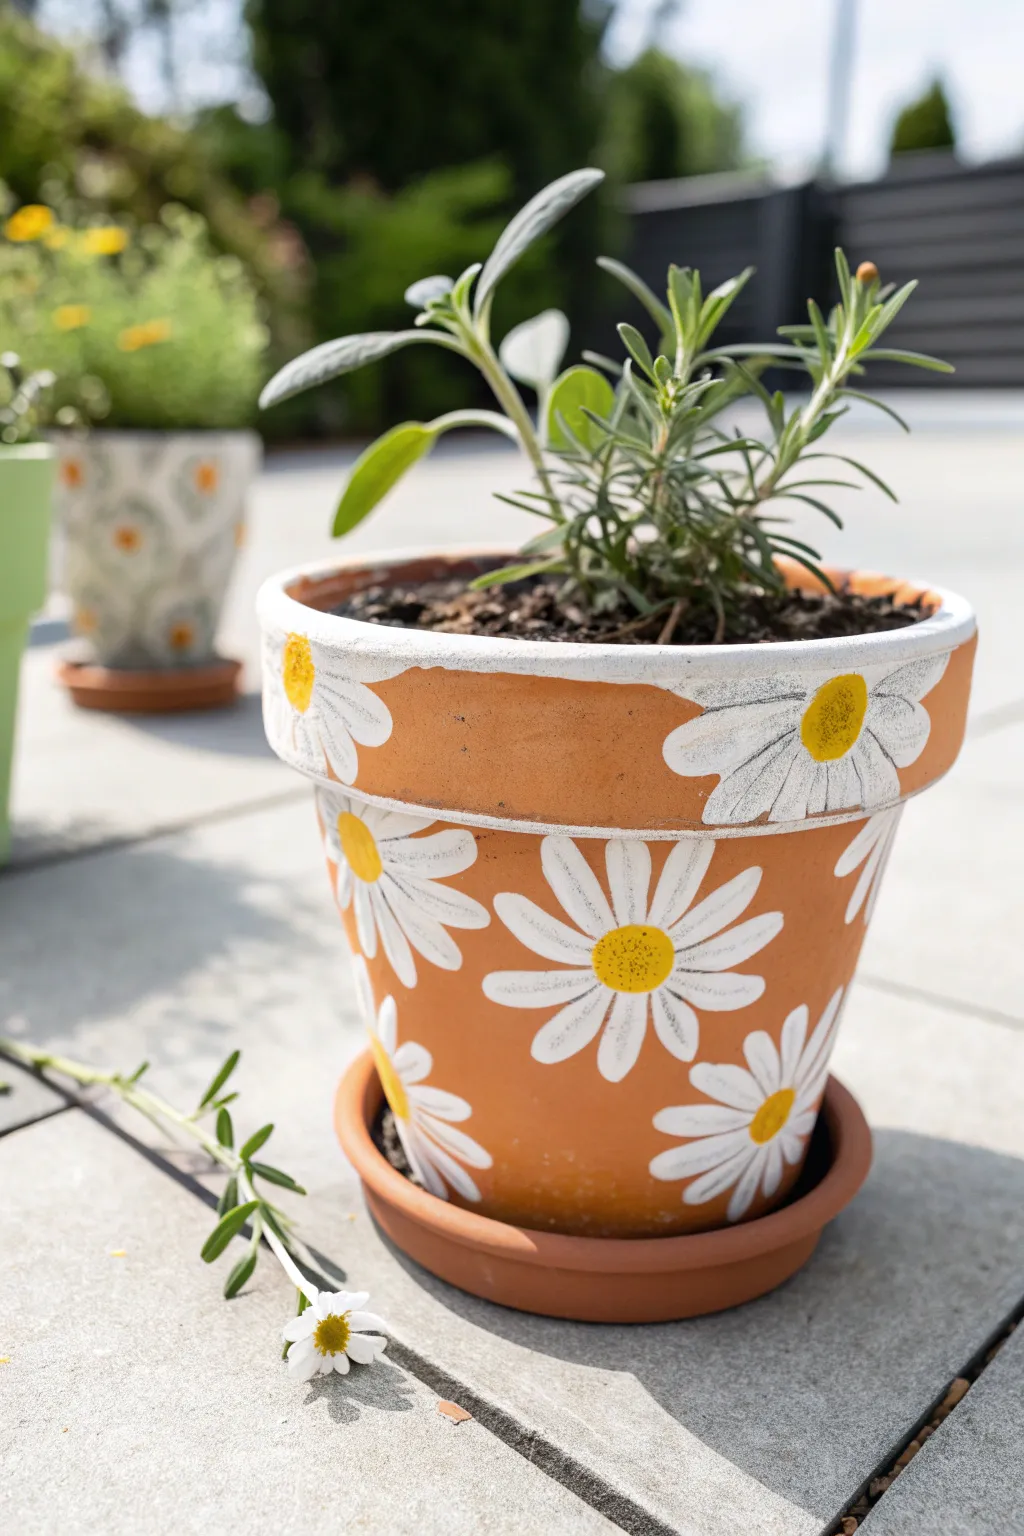
Brighten up your garden or windowsill with this delightful terracotta pot adorned with hand-painted daisies. The stark white petals against the warm clay background create a classic, wholesome look that feels instantly summery.
Step-by-Step Tutorial
Materials
- Terracotta flower pot with saucer
- White outdoor acrylic paint
- Sunflower yellow outdoor acrylic paint
- Medium round paintbrush (size 6 or 8)
- Small liner paintbrush (size 0 or 1)
- Small sponge brush (optional)
- Pencil
- Paper plate or palette
- Water cup and paper towels
- Clear acrylic sealer spray (matte or satin)
- Potting soil and herbs (like rosemary or sage)
Step 1: Preparing the Canvas
-
Clean the surface:
Before you even touch a paintbrush, ensure your terracotta pot is completely clean. Wipe it down with a damp cloth to remove any dust or loose clay particles. -
Dry thoroughly:
Let the pot air dry completely. If the clay is damp, the paint won’t adhere properly and might peel later on. -
Plan your layout:
Take a pencil and very lightly sketch open circles where you want your flower centers to be. Stagger them around the main body of the pot so they aren’t in a perfect grid. -
Mark the rim:
Don’t forget the thick rim of the pot. Sketch a few half-daisies peeking up from the bottom edge of the rim for a nice wrap-around effect.
Paint Soaking In?
If the terracotta absorbs the paint too fast, making it dull, apply a base coat of clear acrylic sealer or white primer to the raw clay before you start painting your design.
Step 2: Painting the Petals
-
Load your white paint:
Squeeze a generous amount of white outdoor acrylic paint onto your palette. Outdoor paint is crucial here as it withstands moisture better than standard craft acrylics. -
Start the first petal:
Using your medium round brush, press down near one of your pencil-marked centers and pull outward to create a teardrop shape. -
Complete the flower:
Continue painting petals all the way around the center point. Don’t worry about them being identical; natural variation makes the daisies look more charming. -
Paint the rim flowers:
Move up to the rim and paint the partial flowers. Since the surface is curved, I find it helpful to hold the pot in my lap to steady my hand while painting these angles. -
Fill the empty spaces:
Look for larger gaps between your main flowers. Add partial petals peeking in from the bottom or sides to make the pattern feel full and abundant. -
Apply a second coat:
Terracotta is very porous and soaks up paint quickly. Once the first layer is dry to the touch, go over every white petal again to make the white pop against the orange clay. -
Add texture lines:
Switch to your small liner brush. Dip it lightly in the white paint and add tiny, feathery strokes inside the petals for a bit of texture, if you like a more detailed look.
Pro Tip: Define the Petals
To make the white petals stand out sharply, use a very fine liner brush with watered-down grey paint to outline just one side of each petal for a subtle shadow effect.
Step 3: Adding the Centers
-
Prepare the yellow:
Clean your medium brush thoroughly or switch to a fresh one. Load it up with the bright sunflower yellow paint. -
Paint the centers:
Dab a solid yellow circle right in the middle of each petal cluster. Make sure the white paint underneath is fully dry so the colors don’t smear together. -
Stipple for texture:
To make the center look like pollen, use a stippling motion—dab the brush tip up and down rapidly—rather than smooth strokes. This adds a lovely, slightly raised texture. -
Let it cure:
Allow the entire pot to dry for at least 24 hours. The paint needs to fully bond with the clay before you expose it to soil and water.
Step 4: Finishing Up
-
Erase pencil marks:
Check for any visible pencil lines that weren’t covered by paint. Use a clean eraser to gently rub them away. -
Seal the deal:
Take the pot outside or to a well-ventilated area. Spray the entire exterior (and the saucer) with a clear acrylic sealer. This protects your artwork from fading and water damage. -
Double protection:
I usually do a second light coat of sealer after the first one dries, just to be safe. It really extends the life of the design. -
Plant your greens:
Once the sealer creates a hard shell, fill your pot with soil and add your favorite herbs, like the rosemary shown here.
Your sunny new planter is ready to add a touch of warmth to your patio or balcony


Two-Tone Color Block Pots
Transform a simple cylindrical planter into a sleek, modern decor piece with this high-contrast color block design. By combining a deep navy blue with a speckled cream base, you can mimic the sophisticated look of dipped ceramic glaze for a fraction of the cost.
Step-by-Step Guide
Materials
- Cylindrical terracotta or ceramic pot
- Multi-surface acrylic paint (Navy Blue)
- Multi-surface acrylic paint (Cream or Off-White)
- Dark brown or black acrylic paint (for speckles)
- Painter’s tape or washi tape
- Flat paintbrush (medium width)
- Small stiff-bristled brush or old toothbrush
- Matte clear sealant spray
- Palette or small dish
- Newspaper or drop cloth
Step 1: Base Preparation
-
Clean the Pot:
Before you begin painting, ensure your pot is thoroughly clean and dry. Wipe it down with a damp cloth to remove any dust or oils that might prevent the paint from adhering properly. -
Paint the Base Coat:
Start by painting the entire exterior of the pot with your cream or off-white acrylic paint. This will serve as the bottom color and ensure the navy layer on top has a solid foundation. -
Apply Second Layer:
Once the first coat is dry to the touch, apply a second coat of the cream paint. This ensures full opacity so no terracotta color shows through. Let this dry completely for at least an hour.
Bleeding Lines?
If paint bleeds under the tape, wait for it to dry. Then, lay a piece of tape over the blue part and paint over the mistake with the cream color to sharpen the edge.
Step 2: Creating the Speckled Effect
-
Prepare Speckle Paint:
Mix a tiny amount of water into a drop of dark brown or black paint on your palette. You want a somewhat fluid consistency, like ink, but not dripping wet. -
Test the Splatter:
Dip an old toothbrush or stiff brush into the thinned paint. Before hitting the pot, run your thumb across the bristles over a piece of scrap paper to test the size of the droplets. -
Apply Speckles:
Gently flick the paint onto the cream-painted pot. Aim for a sparse, random pattern to mimic natural stoneware clay. Don’t overdo it; less is more for this look. -
Let Dry Accurately:
Allow the speckles to dry completely. Since the dots are small, this usually takes about 20-30 minutes, but check to ensure they won’t smear during tapin.
Step 3: Color Blocking
-
Mark the Dividing Line:
Decide where you want your color split. For this design, aim for a line slightly above the halfway point. You can make a faint pencil mark to guide you. -
Apply Painter’s Tape:
Wrap your painter’s tape around the pot at your desired height. Press down firmly along the bottom edge of the tape to create a tight seal—this is critical for a crisp line. -
Paint the Top Section:
Using a flat brush, apply the navy blue paint to the area above the tape. Brush horizontally, following the curve of the pot to minimize visible brushstrokes. -
Refine the Rim:
Don’t forget to paint the top rim of the pot and just an inch or so inside the top edge for a polished, professional finish. -
Apply Second Blue Coat:
Let the first blue coat dry slightly, then apply a second coat for deep, rich coverage. I find two thin coats are always smoother than one thick, gloopy one. -
Horizontal Strokes:
For the final pass on the blue section, use long, continuous horizontal strokes around the pot to give it that spun-ceramic texture visible in the photo.
Pro Sealing Tip
Apply a thin layer of the cream base paint over the tape edge before painting the blue. This seals the gap, ensuring the heavy blue paint can’t seep underneath.
Step 4: Finishing Touches
-
Remove the Tape:
While the blue paint is still slightly tacky (not fully dry), carefully peel off the painter’s tape at a 45-degree angle. This prevents the dry paint from chipping. -
Touch Up Edges:
If any blue paint bled under the tape, use a tiny detailed brush and a bit of your cream paint to carefully correct the line once everything is dry. -
Seal the Project:
Take the pot to a well-ventilated area and spray it with a clear matte sealant. This protects the paint from water damage and UV fading. -
Final Cure:
Allow the sealant to cure for 24 hours before adding soil and plants to ensure the finish is durable and ready for moisture.
Now you have a stunning faux-ceramic planter ready to showcase your favorite greenery

The Complete Guide to Pottery Troubleshooting
Uncover the most common ceramic mistakes—from cracking clay to failed glazes—and learn how to fix them fast.
Dipped Rim for a Quick Upgrade
This project creates a striking modern-rustic look by combining the raw warmth of terracotta with a rich, matte forest green. The hand-painted edge mimics a dipped effect without the mess, offering a clean yet organic contrast that highlights your favorite herbs.
Step-by-Step Tutorial
Materials
- Small terracotta pot
- Deep forest green acrylic craft paint (matte finish)
- Wide flat paintbrush (approx. 1 inch)
- Small round detail brush
- Pencil
- Painter’s tape (optional)
- Clean rag or paper towel
- Small container for paint
- Clear matte sealer spray (optional)
Step 1: Preparation
-
Clean the surface:
Begin by wiping down your terracotta pot with a damp cloth to remove any dust or sticker residue. The clay is very porous, so ensuring it is completely dry before painting is crucial for good adhesion. -
Mark your line:
Decide how much of the raw clay base you want to leave exposed. For this specific look, aim to leave the bottom third unpainted. Lightly sketch a guideline around the circumference with a pencil. -
Keep it organic:
Don’t worry about making the pencil line perfectly straight. The charm of this ‘dipped’ style comes from a slightly wavy, hand-painted edge rather than a rigid, taped-off line.
Terracotta Thirst
Terracotta soaks up paint instantly. slightly dampen your brush with water before loading paint to help it glide smoother.
Step 2: Painting the Base Coat
-
Load your brush:
Pour a generous amount of forest green acrylic paint into your container. Load up your wide flat brush, ensuring the bristles are coated but not dripping. -
Paint the rim:
Start by painting the very top rim of the pot. Work your way around the inside edge just about an inch down, so the terracotta doesn’t show when the soil is added. -
Cover the main body:
Using long, vertical strokes, paint downwards from the rim towards your pencil line. I like to apply a slightly thicker coat here to cover the bright orange tone of the clay effectively. -
create the edge:
As you approach your pencil mark near the bottom, slow down. Use the edge of your brush to carefully trace along the line. Since we want that dipped look, allow the line to have natural, subtle variations rather than being razor-sharp. -
Check for gaps:
Rotate the pot and look for any missed spots or streaks in the green section. The terracotta absorbs paint quickly, so you might see the clay peeking through as it starts to dry.
Textured Twist
Mix a teaspoon of baking soda into your green paint before applying. This creates a trendy, ceramic-like texture for a tactile finish.
Step 3: Refining and Finish
-
Let it dry:
Allow the first coat to dry completely. This usually takes about 20-30 minutes because the clay wicks the moisture away rapidly. -
Apply a second coat:
Apply a second layer of green paint over the entire painted section. This deepens the color to that rich forest hue and ensures a solid, opaque finish. -
Refine the border:
If the bottom edge looks too messy, switch to your small round detail brush. Carefully smooth out any major bumps in the line to keep the aesthetic clean but handmade. -
Paint the bottom (optional):
Leave the very bottom of the pot unpainted to allow for drainage and airflow, which is healthier for the plant roots. -
Seal the deal:
Once fully dry, you can lightly spray the painted area with a clear matte sealer. This isn’t strictly necessary, but it helps protect the paint from water stains when you water your plant. -
Plant and display:
After the sealer has cured, pot your plant directly into the soil. The contrast between the deep green paint and fresh rosemary or greenery makes for a beautiful display.
Place your newly painted pot on a sunny windowsill and enjoy the modern splash of color it adds to your space
Ombre Fade From Light to Dark
Embrace the natural warmth of terracotta with this minimalist ombre design that looks like it’s been kissed by the desert sun. This project uses the raw clay color itself as the darkest shade, blending seamlessly into a soft white center for a modern, earthy aesthetic.
Step-by-Step Guide
Materials
- Terracotta pot (cleaned and dried)
- White acrylic craft paint
- Small mixing cup or palette
- Water used for blending
- Flat paintbrush (approx. 1 inch width)
- Paper towels or rag
- Sponge dabber (optional for blending)
- Clear matte sealer spray
Step 1: Preparation
-
Clean the surface:
Before starting, ensure your terracotta pot is completely free of dust or sticker residue. Wipe it down with a damp cloth and let it dry fully. -
Prepare your palette:
Squeeze a moderate amount of white acrylic paint onto your palette. Have a cup of water ready nearby, as water is the secret ingredient for this watercolor-glazing effect.
Wet Sponge Technique
Keep a slightly damp artist’s sponge handy. If your paint dries too fast, lightly dabbing the area can reactivate the acrylic for smoother blending.
Step 2: Painting the Ombre
-
Load the brush:
Dip your dry flat brush into the white paint. You want a medium amount of paint—not dripping wet, but enough to cover a band around the pot. -
Paint the center band:
Apply the solid white paint directly to the middle section of the pot. Aim to cover the center third of the pot’s height, creating a solid, opaque band of white. -
Initial dilution:
Dip your brush into the water cup without cleaning the paint off first. Tap it on a paper towel once to remove excess drips. -
Blend upwards:
Starting at the top edge of your white band, brush upwards toward the rim. The water on your brush will thin the paint, making it more translucent as you move higher. -
Feather the top edge:
Continue painting upward until the white fades out completely before hitting the rim. I like to use quick, light strokes here to prevent distinct lines. -
Refresh the brush:
Rinse your brush slightly or wipe it clean, then pick up just a tiny bit of fresh white paint mixed with a drop of water. -
Blend downwards:
Now, work on the bottom edge of the white band. overlap your brushstrokes with the solid white and drag the paint downward toward the base. -
Create the fade:
As you move lower, add more water to your brush to thin the pigment out. The goal is to have the white disappear into the raw clay color before you reach the very bottom lip. -
Correcting harsh lines:
If you see a hard line where the paint stops, dampen a sponge or a clean brush and gently dab along that line to smudge it into the clay. -
Dry and assess:
Let the first layer dry for about 10 minutes. Acrylics often dry darker or more transparent than they appear when wet. -
Intensify the center:
If you want the middle band to be brighter, paint a second coat of solid white right in the center, repeating the blending process slightly at the edges.
Color Wash Twist
Instead of leaving the top and bottom raw, mix a tiny drop of orange or peach into the white for a warm monochromatic fade.
Step 3: Finishing Touches
-
Clean the rim and base:
If any stray white paint got onto the top rim or the saucer area where you wanted raw clay, use a damp paper towel to wipe it away immediately. -
Final drying time:
Allow the pot to sit for at least an hour to ensure all moisture has evaporated from the porous clay. -
Seal the design:
Take the pot to a well-ventilated area. Apply a light coat of clear matte sealer spray over the entire exterior to protect the paint from water damage when you water your plants.
Your new ombre pot is ready to add a soft, artistic touch to your windowsill garden


What Really Happens Inside the Kiln
Learn how time and temperature work together inside the kiln to transform clay into durable ceramic.
Chalkboard Label Pots for Herbs
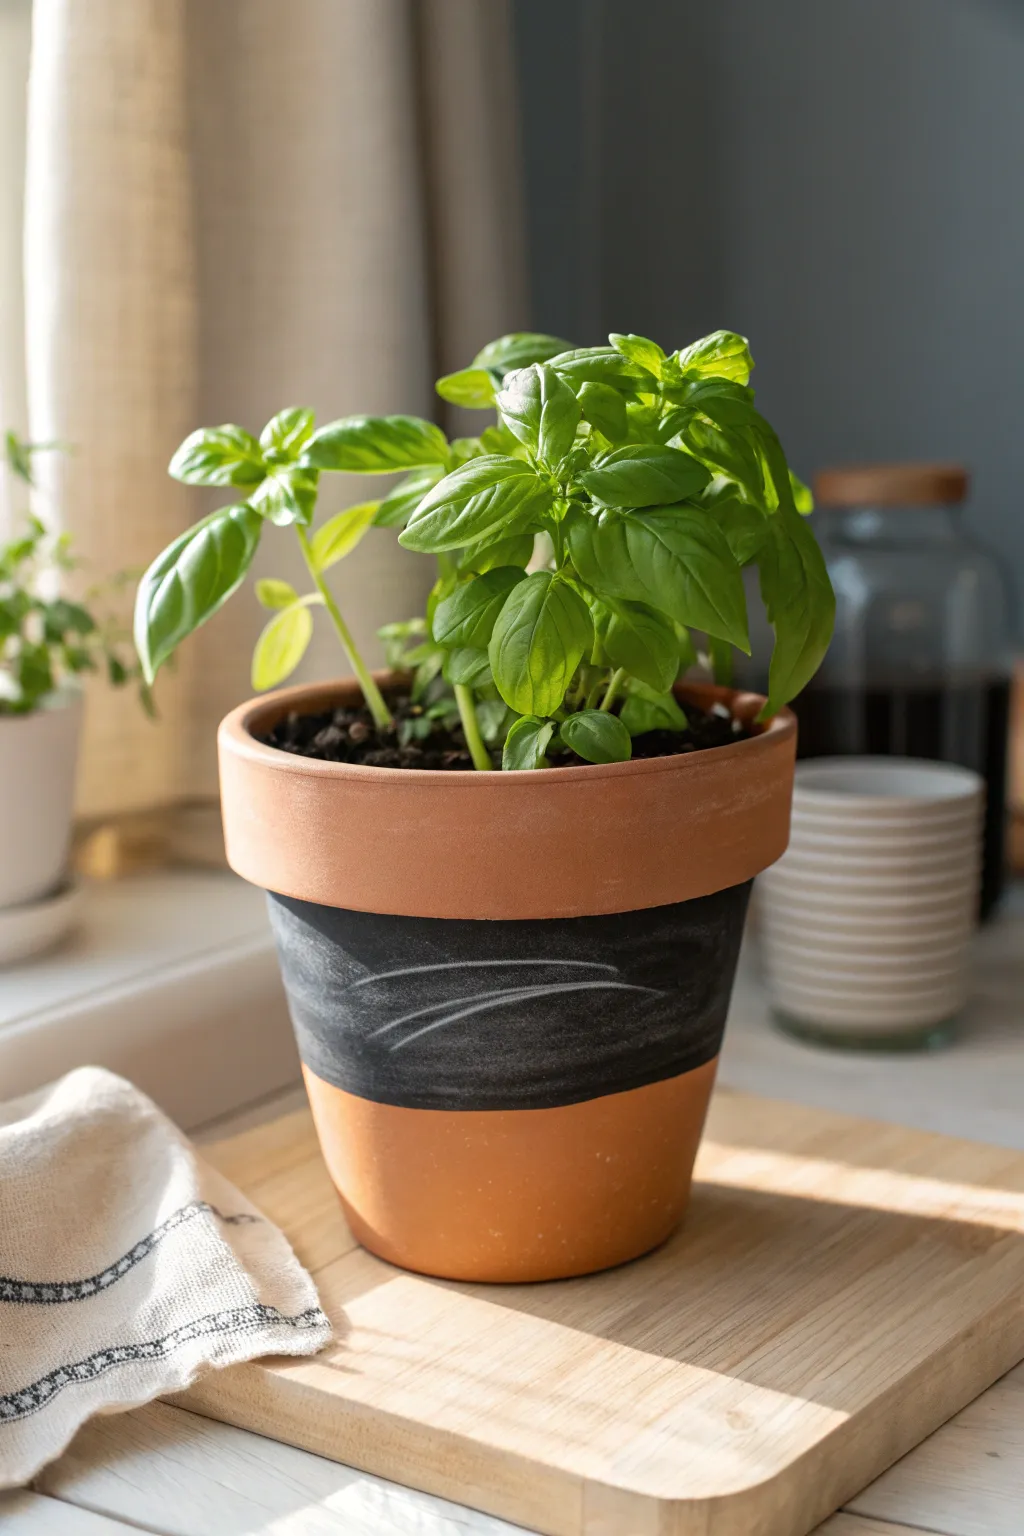
Bring a touch of farmhouse utility to your indoor herb garden with this simple yet striking chalkboard band design. The contrast between the matte black slate texture and the warm terracotta creates the perfect canvas for identifying your favorite herbs.
How-To Guide
Materials
- Standard terracotta pot (approx. 6 inch)
- Painter’s tape or masking tape (1 inch width)
- Chalkboard paint (black)
- Small foam brush or flat synthetic bristle brush
- White chalk stick
- Damp cloth or paper towel
- Newspaper or drop cloth
- Measuring tape (optional)
Step 1: Preparation and Taping
-
Clean surface:
Begin by wiping down your terracotta pot with a damp cloth to remove any dust or manufacturing residue. The surface needs to be completely dry before painting, or the tape won’t stick. -
Plan the band:
Visualize where you want your chalkboard strip to sit. In the project image, the band occupies the central third of the pot’s body, leaving the rim and the base exposed. -
Tape the top line:
Apply a strip of painter’s tape horizontally around the pot, positioned just below the rim. Press the edges down firmly with your thumbnail to prevent paint bleed. -
Tape the bottom line:
Apply a second strip of painter’s tape around the lower portion of the pot, creating a gap of about 2 to 3 inches between the two tape lines. This gap will become your painting surface. -
Check alignment:
Rotate the pot to ensure your tape lines look reasonably straight. Since terracotta pots are tapered, the tape might curve slightly; just adjust it so the painting area looks even to the eye.
Step 2: Painting
-
Stir the paint:
Open your chalkboard paint and stir it thoroughly. The slate particles settle at the bottom, so proper mixing is crucial for that signature matte finish. -
Apply first coat:
Using a foam brush, apply a smooth, even layer of black chalkboard paint between the tape lines. Brush horizontally, following the curve of the pot. -
Let it dry:
Allow the first coat to dry accordingly to the manufacturer’s instructions, usually about an hour. It may look patchy at this stage, but that is normal. -
Apply second coat:
Apply a second coat of paint to ensure full opacity. I usually paint this layer in vertical strokes initially to fill the terracotta texture, then finish with a light horizontal sweep to smooth it out. -
Remove tape:
While the second coat is still slightly tacky (not fully wet, but not bone dry), carefully peel back the painter’s tape at a 45-degree angle. This helps ensure a crisp line without chipping the paint.
Chalk Tip
Sharpen your chalk stick with a large pencil sharpener specifically for the drawing step. A pointed tip makes those swooping decorative lines much cleaner.
Step 3: Curing and Styling
-
Full cure:
Let the pot sit undisturbed for at least 24 hours. Chalkboard paint needs to harden completely before you can write on it. -
Season the surface:
Once cured, take a piece of chalk and rub the side of it over the entire painted black band. Wipe it off with a dry tissue. This ‘seasons’ the surface so your first design doesn’t burn a permanent ghost image into the paint. -
Add texture:
To recreate the dusty look from the photo, lightly smudge a bit of chalk residue across the black band using your finger or a dry cloth. It gives it that lived-in, rustic vibe immediately. -
Draw the swoops:
Using the tip of your white chalk, draw two simple, curved lines starting from the left and sweeping toward the right. Vary the pressure to make the lines taper slightly at the ends. -
Plant:
Pot your favorite herb, like basil or parsley, ensuring you fill it with fresh soil.
Level Up
Instead of abstract lines, practice faux calligraphy to write the herb name. Wet the chalk tip slightly before writing for a brighter, bolder white line.
Now you have a stylish, functional home for your herbs that looks great on any windowsill
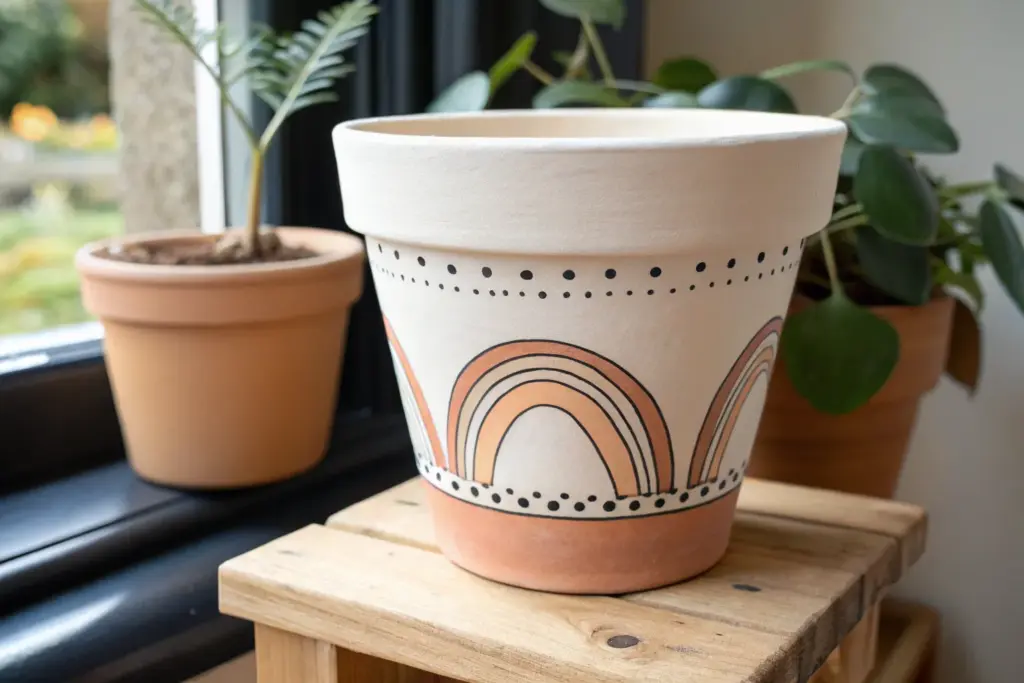
Geometric Triangles and Zigzags
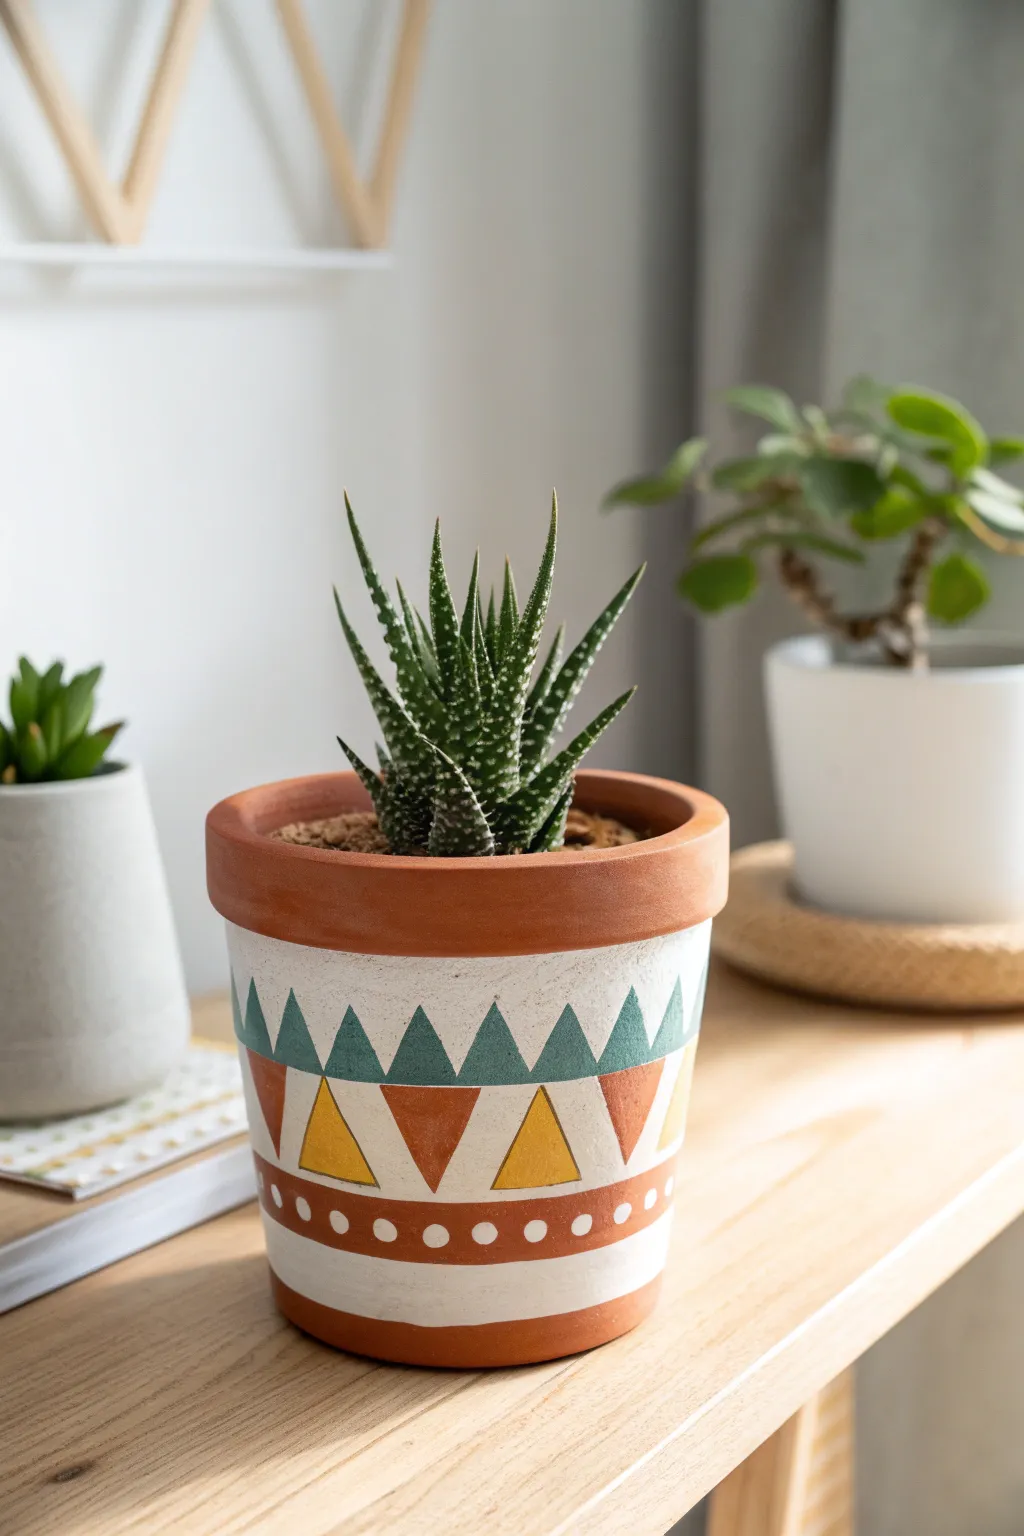
Transform a plain terracotta pot into a modern, desert-inspired accent piece using crisp geometric shapes and warm earth tones. This design combines teal green, mustard yellow, and burnt orange triangles with a clean white background for a look that is both structured and inviting.
Step-by-Step
Materials
- Clean terracotta pot (standard size)
- White acrylic craft paint (flat or eggshell finish)
- Teal green acrylic paint
- Burnt orange or terracotta-colored acrylic paint
- Mustard yellow acrylic paint
- Painter’s tape or masking tape (narrow width is helpful)
- Small flat shader brush
- Detail round brush (size 1 or 2)
- Pencil
- Ruler or flexible measuring tape
- Cotton swabs (Q-tips)
- Clear acrylic sealer spray (matte or satin)
- Paper plate or palette
Step 1: Preparation and Base Coat
-
Clean surface:
Begin by wiping down your terracotta pot with a damp cloth to remove any dust or debris. Let it dry completely so the paint adheres properly. -
Define the painting area:
You want to keep the rim and the very bottom rim of the pot unpainted to maintain that classic clay look. Place a strip of painter’s tape just below the top rim, ensuring it is level all the way around. -
Paint the white band:
Using a flat shader brush, apply white acrylic paint to the main body of the pot below your tape line. Stop the white paint about an inch from the bottom edge of the pot to leave a terracotta stripe exposed there as well. -
Apply second coat:
White paint often looks streaky on terracotta. Let the first coat dry for about 15-20 minutes, then apply a second or third coat until you have a solid, opaque white background.
Crisp Lines Secret
For ultra-sharp triangles, apply thin strips of washi tape along your pencil lines. Paint over the tape edge with white first to seal it, then add color.
Step 2: Drafting the Design
-
Measure the circumference:
Once the white base is bone dry, use a flexible measuring tape to find the circumference of the pot’s middle section. -
Mark vertical guides:
Divide that circumference number by the number of triangles you want (looks like about 8-10 pairs here). Make tiny pencil marks along your painted area to guide where the points of your triangles will sit. -
Draw the zig-zag line:
Lightly sketch a horizontal line through the center of your white band. From this center line, sketch triangles pointing up and triangles pointing down, creating a zig-zag pattern. -
Sketch the lower band:
About half an inch above the bottom edge of your white paint, draw two parallel horizontal lines to create the space for the dot pattern.
Step 3: Painting the Geometrics
-
Paint top triangles:
Load your flat brush with teal green paint. Carefully fill in every other upward-pointing triangle along the top row of your zig-zag. -
Fill remaining top triangles:
For the alternating top triangles (the ones pointing down between the green ones), leave them white or touch them up with white paint if your pencil lines are messy. -
Start the bottom triangles:
Switch to your burnt orange paint. Fill in the downward-pointing triangles on the bottom half of the zig-zag pattern. Skip every other one. -
Add yellow accents:
Using the mustard yellow paint, fill in the remaining downward-pointing triangles in that bottom row. I find a smaller brush helps keep these corners sharp. -
Paint the bottom stripe:
Using the burnt orange paint again, fill in the band defined by your horizontal pencil lines near the bottom of the white section.
Uneven Spacing?
It’s hard to divide a tapered pot perfectly. If your triangles don’t meet up perfectly at the back, just paint that section solid teal or orange as a ‘back seam’.
Step 4: Details and Finishing
-
Add the dots:
Dip the end of a cotton swab or the handle end of a paintbrush into white paint. Carefully stamp dots along the center of the orange band you just painted. -
Initial cleanup:
Peel off the painter’s tape from the top rim while the paint is still slightly tacky to avoid pulling up dried chips. -
Refine edges:
Use your detail round brush with a tiny bit of white paint to clean up any messy edges on your triangles or stripes. -
Erase guidelines:
If any pencil marks are still visible in the unpainted white areas, gently erase them once the paint is 100% dry. -
Seal the pot:
Take the pot to a well-ventilated area and spray it with a clear acrylic sealer. This protects the design from water damage when you water your plant.
Now your custom geometric planter is ready to be filled with your favorite succulent or cactus.

TRACK YOUR CERAMIC JOURNEY
Capture glaze tests, firing details, and creative progress—all in one simple printable. Make your projects easier to repeat and improve.
Tape-Resist Patterns With Clean Lines
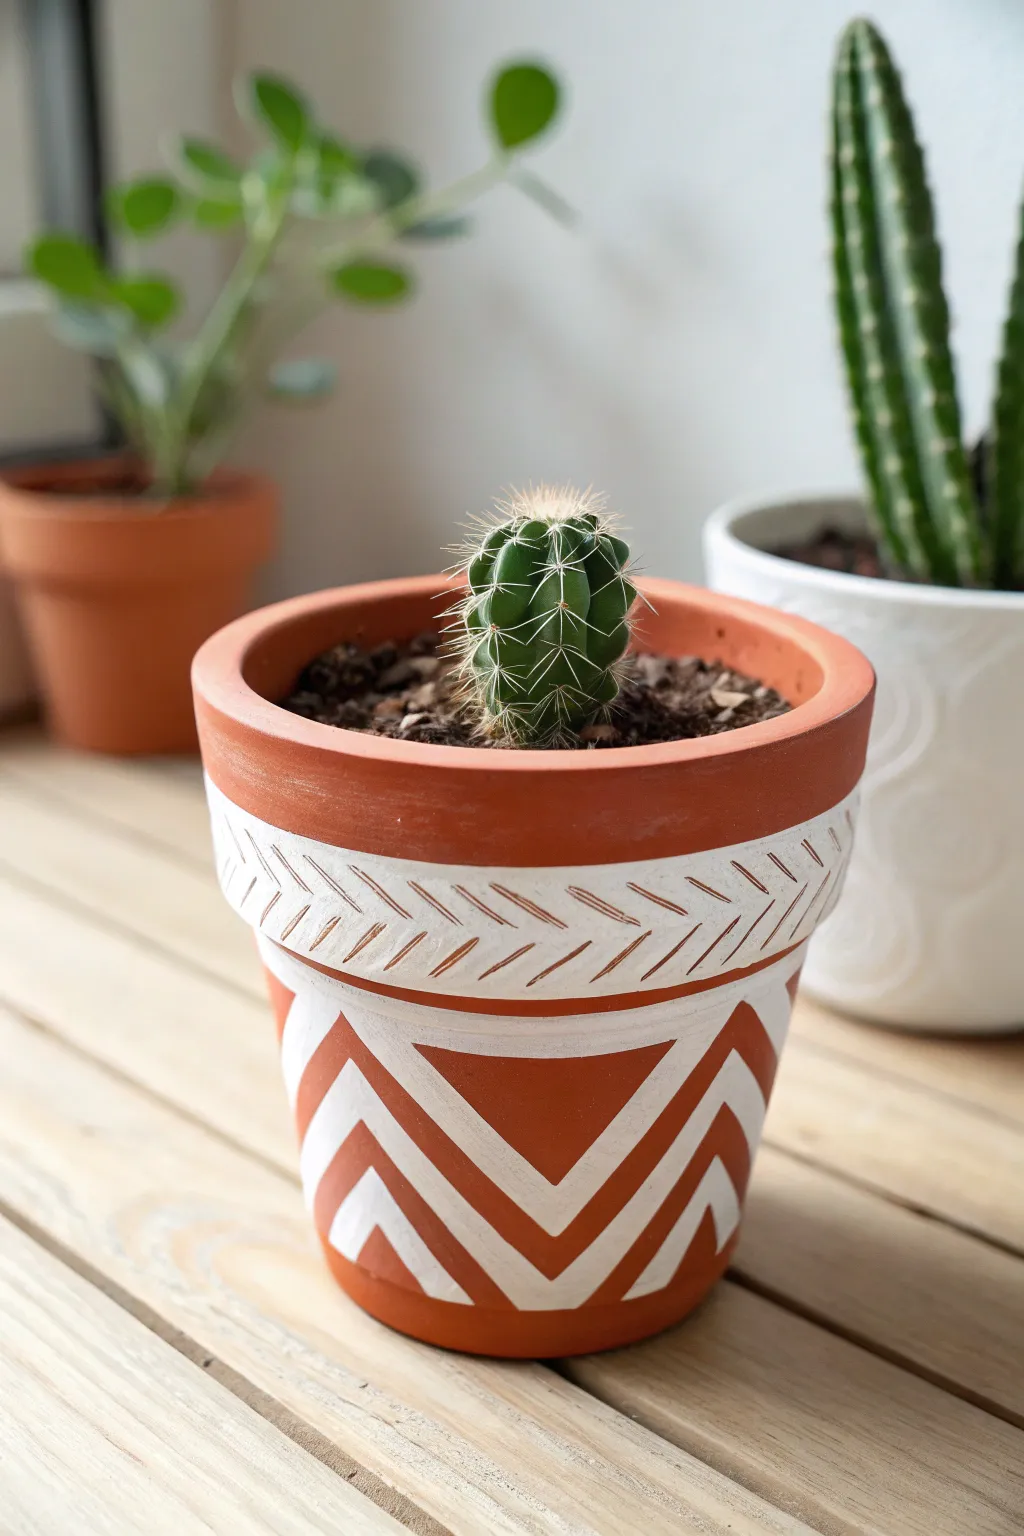
Transform a plain terracotta vessel into a modern, bohemian planter using simple masking techniques and crisp white paint. The contrasting geometric lines and patterns create a striking visual that pops against the warm clay background.
How-To Guide
Materials
- Terracotta pot (clean and dry)
- White acrylic craft paint
- Painter’s tape or wash tape (various widths)
- Foam sponge brush or flat paintbrush
- Small detail brush
- Pencil
- Scissors or craft knife
- Clear matte sealer spray
Step 1: Preparation and Top Pattern
-
Clean the surface:
Ensure your terracotta pot is completely free of dust and dirt. Wipe it down with a damp cloth and let it dry fully, as tape won’t stick well to damp clay. -
Define the upper band:
Using a wide strip of painter’s tape, mask off the very top rim of the pot if you want to keep it natural terracotta. Measure about 1.5 inches down from the rim and place another ring of tape around the pot. -
Paint the white band:
Fill in the space between your tape lines with white acrylic paint. You may need two coats for opaque coverage. Let this dry completely before moving to the next step. -
Add texture details:
Once the white band is dry, use a small detail brush dipped in a tiny amount of terracotta-colored paint (or scratch away wet paint if you prefer) to create the diagonal ‘herringbone’ hash marks inside the white band. Alternatively, simply paint these lines over the white with a color that matches the clay.
Crisp Line Secret
Apply a thin layer of the *base* color (or clear matte medium) over the tape edges first. This seals the gap so your white top coat won’t bleed underneath.
Step 2: Creating the Chevron Design
-
Mark the center points:
To ensure your chevrons are even, lightly mark four or five equidistant points around the circumference of the pot using a pencil just below your white band. -
Tape the first V-shape:
Cut strips of painter’s tape. Place two strips meeting at a point near the bottom of the pot, creating a large ‘V’ shape directly under one of your pencil marks. Press the edges down firmly. -
Create parallel lines:
Place a second set of tape strips parallel to the first ‘V’, leaving a gap of about half an inch. This gap will become a painted white stripe. -
Repeat the pattern:
Continue creating these parallel ‘V’ shapes around the entire pot. The negative space (the exposed clay) is where the paint will go. -
Seal the tape edges:
I always take a moment here to rub my fingernail specifically along the edges of the tape. This burnishing step is crucial to prevent paint from bleeding under the tape. -
Nest the triangles:
Inside the large main ‘V’ shapes, use smaller pieces of tape to create a smaller, nested triangle near the bottom, pointing downward. This creates the intricate geometric look seen in the photo.
Step 3: Painting and Finishing
-
Apply the first coat:
Using a foam brush or flat brush, dab white paint onto the exposed clay areas between your tape lines. Use an up-and-down dabbing motion rather than side-to-side sweeping to avoid pushing paint under the tape. -
Let it dry:
Allow the first coat to dry to the touch, usually about 15-20 minutes. -
Apply second coat:
Apply a second layer of white paint to ensure bright, solid coverage without streaks. -
Remove tape carefully:
This is the most satisfying part. While the paint is still slightly tacky (not fully cured), slowly peel back the painter’s tape at a 45-degree angle to reveal your crisp lines. -
Touch up edges:
If any paint bled through, use a damp Q-tip or a small knife to gently scrape away the excess while it’s fresh. Or, use a tiny brush with terracotta paint to conceal errors. -
Protect the art:
Take the pot to a well-ventilated area and apply a light coat of clear matte sealer spray. This protects the acrylic paint from moisture when you water your plant.
Go Monochromatic
Try painting the base pot a deep charcoal or forest green before applying tape, then use gold metallic paint for the geometric lines for a luxe look.
Once sealed and dry, your custom planter is ready to house your favorite cactus or succulent
Watercolor Wash That Lets Clay Show
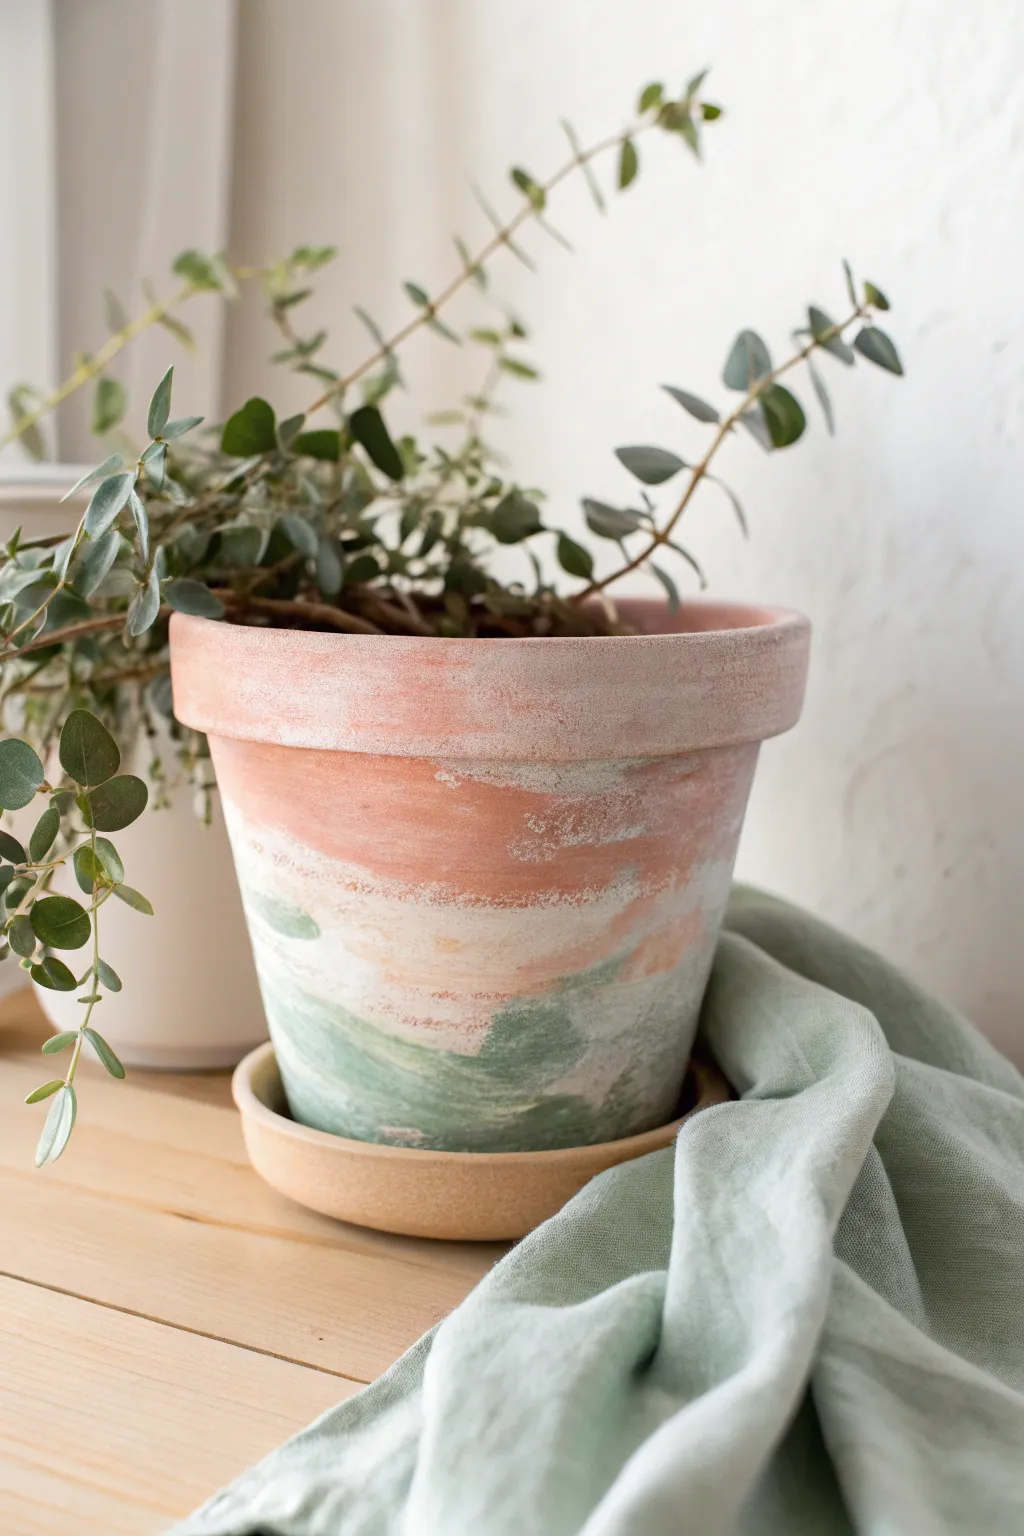
Embrace the natural beauty of terracotta by adding a dreamy, chalky wash of colors that looks like a watercolor painting on clay. This technique layers soft whites, earthy pinks, and mossy greens while letting the raw pot peek through for an organic, aged aesthetic.
Step-by-Step Tutorial
Materials
- Unsealed terracotta pot
- Matching terracotta saucer
- White acrylic paint (matte finish)
- Warm peach or terra-cotta pink acrylic paint
- Sage or mossy green acrylic paint
- Water container
- Paper towels or cotton rags
- Wide flat paintbrush (synthetic bristles work well)
- Small mixing palette or plastic plate
- Spray matte sealant (optional)
Step 1: Preparing the Base
-
Clean the surface:
Ensure your terracotta pot is completely free of dust and stickers. Wipe it down with a damp cloth and let it dry fully before starting. -
Create a whitewash:
Mix a dollop of white acrylic paint with water in a 1:1 ratio. You want a consistency that is milky—thin enough to be translucent but thick enough to hold pigment. -
Apply the first wash:
Dip your wide brush into the whitewash and apply it messily around the middle of the pot. -
Feather the edges:
Before the paint dries, drag the brush lightly upward toward the rim and downward toward the base, letting the white fade out so the raw clay remains visible at the extreme top and bottom. -
Blot for texture:
While the paint is still damp, take a crumpled paper towel and blot patches of the white paint. This lifts some pigment to reveal the clay texture and creates that weathered, cloudy look. -
Let it dry:
Allow this base layer to dry completely. Terracotta absorbs moisture quickly, so this should only take about 10-15 minutes.
Step 2: Layering Colors
-
Mix the peach wash:
Prepare your peach or pink paint by diluting it with water, similar to the whitewash. I like to keep this mixture slightly thicker than the white for better color payoff. -
Apply the middle band:
Brush the peach wash over the upper-middle section of the pot, overlapping significantly with the white layer you already created. -
Blend naturally:
Use a clean, damp brush or a rag to smudge the edges of the peach paint, softening any harsh lines where it meets the raw clay rim or the white sections below. -
Create the greenery:
Mix your sage green paint with just a little water. This layer can remain more opaque to simulate moss growth near the bottom. -
Paint the base:
Apply the green paint to the lower third of the pot using upward, sweeping strokes that mimic the growth of grass or moss. -
Overlap colors:
Bring the green up into the white and peach areas. Don’t aim for perfection; let the green mix slightly with the layers underneath to create new, muddy tones.
Wet-Rag Eraser
Since terracotta is porous, paint sets fast. Keep a soaking wet rag nearby. If a stroke is too dark, wipe it immediately to ‘erase’ it back to a soft stain.
Step 3: Distressing and Finishing
-
Add dry-brush details:
Dip a dry brush into a tiny amount of undiluted white paint. Wipe most of it off on a paper towel until almost nothing remains on the brush. -
Highlight the texture:
Lightly drag this dry brush horizontally across the transition areas between colors. This highlights the grit of the clay and unifies the three colors. -
Soften with a rag:
If any color looks too bold or solid, dampen a rag and firmly wipe that area to remove paint and expose more of the terracotta grain. -
Address the saucer:
For the saucer, leave it mostly raw to ground the design. You can add a very faint whitewash to the rim just to tie it to the main pot. -
Final drying time:
Let the entire pot sit for at least an hour to ensure all moisture has evaporated from the clay pores. -
Seal the work (Optional):
If the pot will live outdoors, spray it with a clear matte sealer. For indoor plants, leaving it unsealed preserves that lovely chalky texture best.
Add Faux Age
Mix a tiny drop of brown paint into your green wash. Painting this muddy mix into the crevices under the rim creates a believable ‘vintage garden’ patina.
Now you have a softly colored vessel ready to complement your favorite houseplant
Speckled Terrazzo-Inspired Splatter
Transform a simple terracotta pot into a trendy, modern decor piece with this surprisingly satisfying terrazzo-inspired technique. By mimicking the look of scattered stone chips using varied paint shapes, you create a sophisticated yet playful textured effect.
Detailed Instructions
Materials
- Clean terracotta pot
- Acrylic craft paint (Cream/Beige base)
- Acrylic craft paints (Deep green, muted orange/terracotta, light sage, dark teal/grey)
- Flat paintbrush (medium width)
- Small round detail brush (size 1 or 2)
- Toothbrush (optional for fine splatter)
- Paper plate or palette
- Matte clear sealant spray
Step 1: Base Preparation
-
Clean the surface:
Before dipping your brush, wipe down the terracotta pot with a damp cloth to remove any clay dust or debris. Let it dry completely so the paint adheres properly. -
Mix the base color:
Create a warm, neutral base by mixing a cream or light beige acrylic paint. I like to add a tiny drop of brown to vanilla white to get that natural stone look. -
Apply the first coat:
Using your medium flat brush, paint the entire exterior of the pot, including the rim and just inside the top edge. -
Let it dry:
Allow the first coat to dry for about 20-30 minutes. Terracotta is porous and soaks up paint quickly, so a second coat is almost always necessary. -
Apply the second coat:
Paint a second layer of your cream base to ensure opaque, even coverage. If you see brush strokes, use a cross-hatch motion to blend them out.
Shape Variety
Avoid perfect shapes. Real terrazzo is crushed stone, so make your painted ‘chips’ look jagged, irregular, and random for the most convincing effect.
Step 2: Creating the Terrazzo Shapes
-
Plan your palette:
Squeeze dime-sized amounts of your accent colors onto the palette: deep green, muted orange, light sage, and dark teal. The goal is an earthy, organic mix. -
Paint large shards:
Starting with the deep green, use the small round brush to paint random, angled geometric shapes. Think of them as broken shards of tile—triangles, diamonds, and irregular polygons. -
Distribute the first color:
Scatter these green shapes sparsely around the pot. Don’t crowd them; terrazzo relies on negative space. -
Add the second color:
Clean your brush and switch to the muted orange/terracotta shade. Paint similar shard-like shapes, placing some near the green ones but avoiding touching them. -
Layer in softer tones:
Using the light sage paint, add more shapes. Try making some of these slightly rounder or softer to vary the ‘stone’ textures. -
Fill the gaps:
Take the dark teal or grey paint and fill in larger empty spaces with additional geometric fragments, ensuring the pattern wraps seamlessly around the rim.
Step 3: The Speckle Effect
-
Create tiny chips:
To mimic the smaller grit in real terrazzo, use the very tip of your small brush to dot tiny flecks of all four colors in the open cream spaces. -
Mix a watery wash:
Dilute a small amount of dark grey or brown paint with water until it has an inky consistency. -
Flick the paint:
Dip an old toothbrush or a stiff bristled brush into the watery mix. Hold it near the pot and run your thumb across the bristles to spray a fine mist of speckles over the entire surface. -
Control the spray:
Rotate the pot as you splatter to ensure even coverage. This fine mist ties the larger shapes together and creates depth. -
Seal the deal:
Once all paint is perfectly dry (give it at least an hour), take the pot outside and spray it with a matte clear coat to protect your work from water and soil.
Metallic Pop
Add a touch of luxury by including a fifth paint color: gold leaf or metallic copper. Paint a few small shards with this metallic accent for a subtle sparkle.
Now your pot is ready to house a cute succulent and bring a dash of artistic flair to your windowsill
Stencil-Style Motifs for Consistent Results
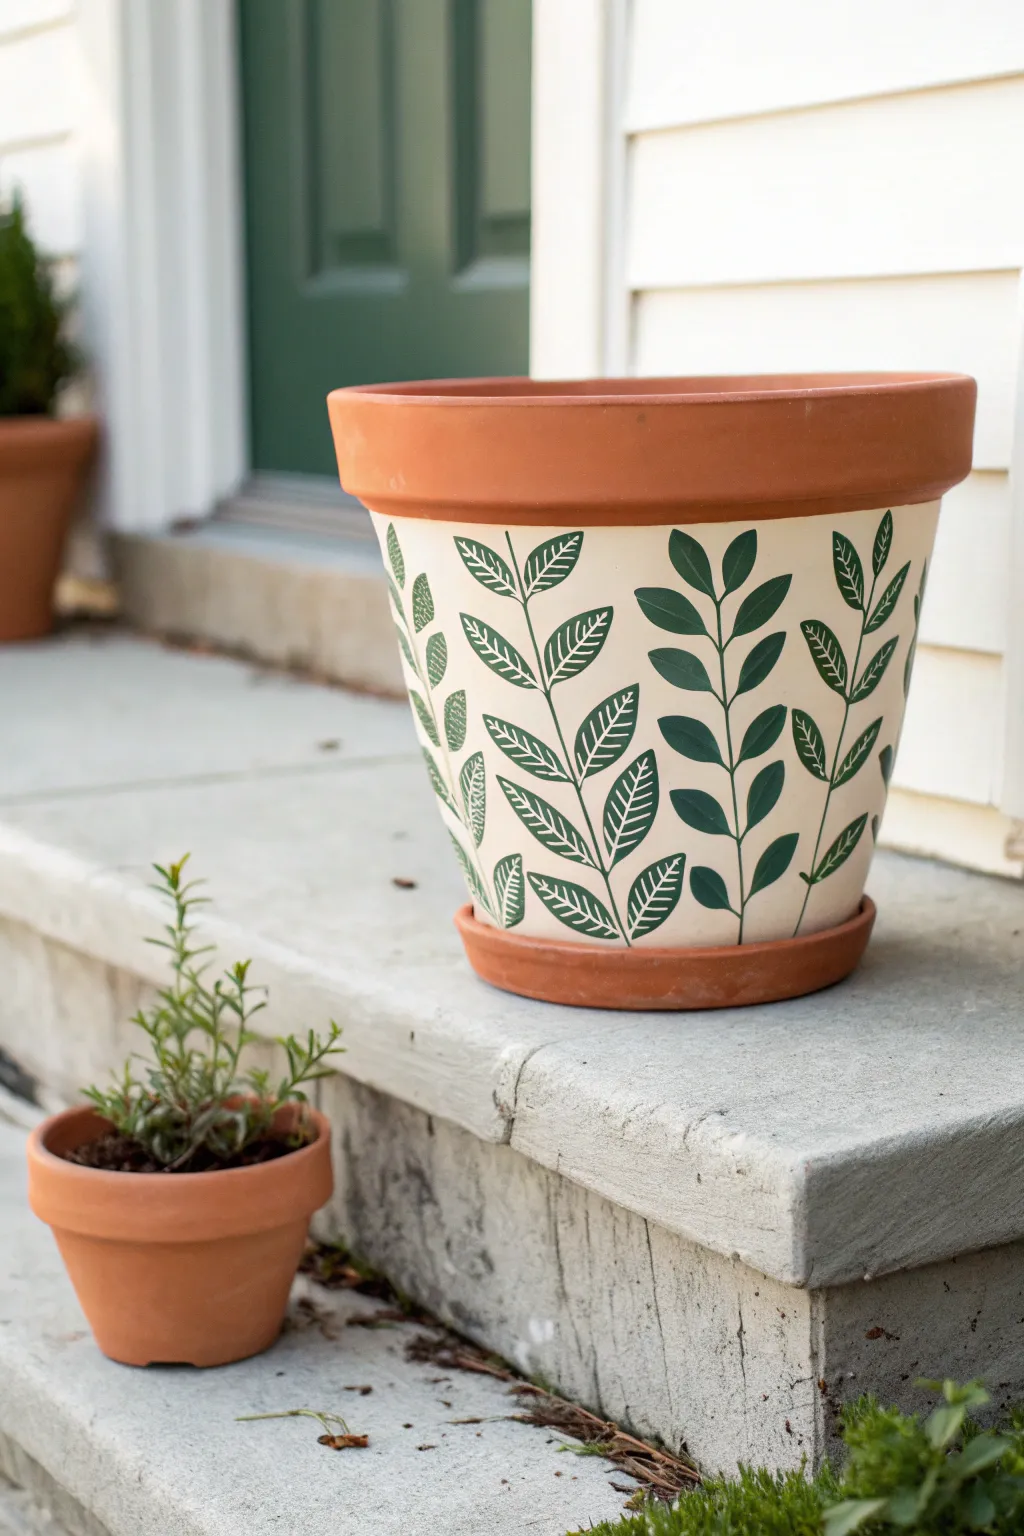
Achieve a high-end botanical look on a budget by combining the classic warmth of terracotta with crisp, modern foliage designs. This project uses a clever mix of solid and skeletal leaf patterns to create visual depth that mimics expensive ceramic glazes.
How-To Guide
Materials
- Terracotta pot with saucer (8-10 inch recommended)
- Cream or off-white acrylic craft paint (outdoor/multi-surface)
- Deep forest green acrylic craft paint
- Painter’s tape or masking tape
- Flat paintbrush (1-inch width)
- Fine liner or detail paintbrush (size 0 or 1)
- Small round paintbrush (size 2 or 4)
- Pencil
- Cardstock or stiff paper (for making a template)
- Scissors
- Clear acrylic sealer (matte or satin finish)
Step 1: Preparation & Base Coat
-
Clean the pot surface:
Ensure your terracotta pot is completely clean and dry. Wipe it down with a damp cloth to remove any dust or loose clay particles, then let it air dry for at least an hour to ensure paint adhesion. -
Protect the rim:
Apply a strip of painter’s tape just below the heavy rim of the pot. Press the edges down firmly to prevent paint from bleeding underneath, as we want to keep that classic terracotta rim exposed. -
Establish the background:
Using the 1-inch flat brush, apply a coat of cream or off-white acrylic paint to the body of the pot below the tape line. Use horizontal strokes for a smooth finish. -
Apply a second coat:
Once the first layer is dry (about 20-30 minutes), apply a second coat of the cream paint. If the terracotta color is still showing through strongly, I find a third thin coat is better than one thick, gloppy one. -
Remove tape and dry:
Carefully peel off the painter’s tape while the final coat is still slightly tacky to get a crisp edge. Allow the base coat to cure fully for at least 2 hours before drawing on it.
Paint Bleeding?
If green paint bleeds into the cream, let it dry completely. Then, use a small flat brush with the cream paint to ‘cut in’ and cover the mistake. Don’t wipe wet paint.
Step 2: Drafting the Design
-
Create a leaf template:
Sketch a simple, single leaf shape (an elongated oval with pointed ends) onto a piece of cardstock and cut it out. This will ensure your leaves remain uniform in size throughout the pattern. -
Mark the stems:
Using a pencil, lightly draw curving vertical lines spaced evenly around the pot. These will serve as the central stems for your vines. Try to vary their height slightly for a natural look. -
Trace the leaves:
Using your cardstock template, trace leaf shapes in pairs along your pencil stems. Aim for an alternating pattern where leaves angle slightly upward.
Step 3: Painting the Foliage
-
Paint the solid stems:
Load your fine liner brush with deep forest green paint. Carefully trace over your pencil stem lines. Start from the bottom and flick slightly upward at the tip for a tapered effect. -
Fill the solid leaves:
Choose specific vines to be ‘solid’ (fully colored in). Use the small round brush to fill in these leaf outlines with solid green paint. Work from the center of the leaf outward to keep the edges neat. -
Outline the skeletal leaves:
For the remaining vines, use the fine liner brush to trace only the outline of the leaf shapes. Do not fill them in. This contrasting style is key to the intricate look. -
Add veins to skeletal leaves:
Inside the outlined leaves, paint a thin central vein line and small diagonal veins branching off it. Keep your touch very light here; you want delicate lines, not heavy stripes. -
Clean up edges:
Check your work for any uneven lines. You can use a tiny bit of the cream base paint to ‘erase’ or tidy up any green smudges once the green paint is dry.
Mix Up the Motif
Try alternating colours for the skeletal leaves! A lighter sage green or even a metallic gold for the outlined leaves adds a beautiful, sophisticated dimension.
Step 4: Finishing Touches
-
Erase pencil marks:
Once you are absolutely certain the green paint is 100% dry, gently use a clean eraser to remove any visible pencil lines from your initial sketching. -
Seal the artwork:
Apply a coat of clear acrylic sealer over the painted section. This is crucial for terracotta, as moisture from the soil can bubble the paint from the inside out without a sealer. -
Optional saucer detail:
Leave the saucer natural, or if you prefer a cohesive look, paint just the inside rim of the saucer to match the cream background.
Pop in your favorite herb or succulent and enjoy your handcrafted accent piece
Faux Aged Patina Look
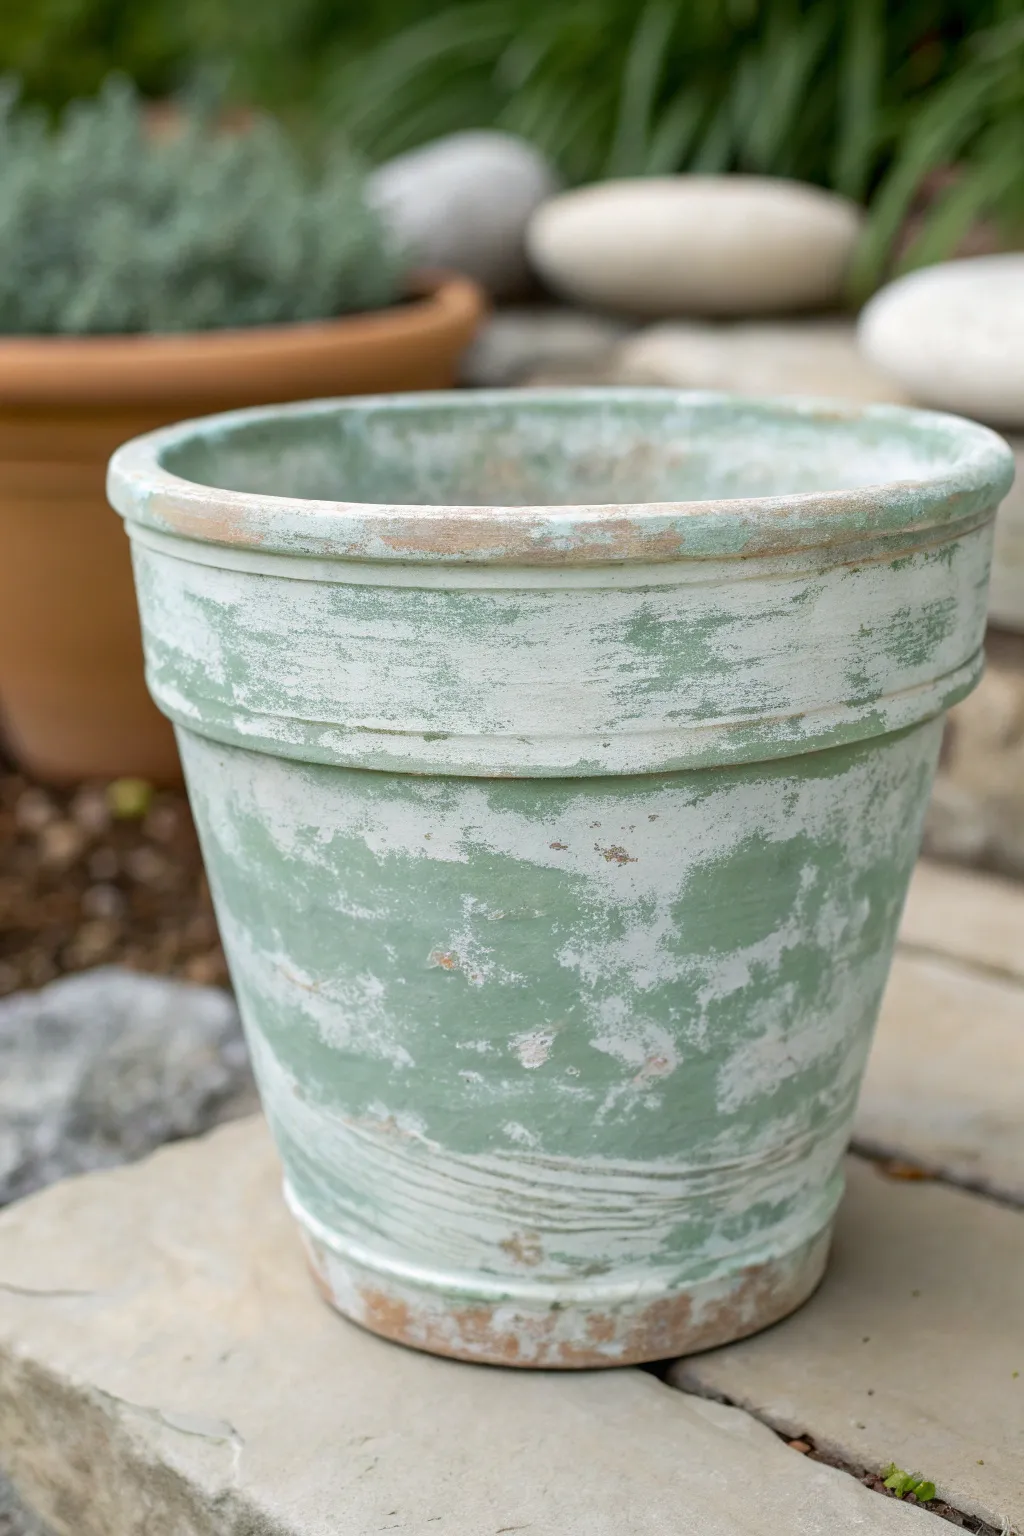
Transform a brand-new orange clay pot into a garden relic that looks like it has weathered decades of sunshine and rain. This technique layers chalky greens and whites over terracotta to create a convincing, crusted patina finish that adds instant character to any plant display.
Step-by-Step Guide
Materials
- Standard terracotta pot
- Sage green chalk paint or matte acrylic paint
- White chalk paint or matte acrylic paint
- Medium grit sandpaper (around 120-150 grit)
- Chip brush or old bristle brush
- Paper towels or lint-free rags
- Water cup for thinning paint
- Mixing palette or paper plate
- Clear matte sealer spray (optional)
Step 1: Preparation and Base Coat
-
Clean surface:
Begin by wiping down your terracotta pot with a damp cloth to remove any dust or sticker residue. Let it dry completely so the paint adheres properly. -
Mix the green wash:
Squeeze a dollop of sage green chalk paint onto your palette. Mix in a small amount of water—about a 2:1 ratio of paint to water—to create a slightly thinner consistency that isn’t quite a wash but isn’t full heavy body paint. -
Apply the green layer:
Using a chip brush, apply the green paint all over the exterior of the pot. Don’t worry about perfect coverage; a patchy application actually helps the final aged look. -
Paint the rim:
Extend the green paint over the rim and down the inside of the pot just deep enough to cover what will be visible above the soil line. -
First drying phase:
Allow this green base coat to dry until it is touch-dry. Chalk paint dries quickly, so this should only take about 15-20 minutes.
Wet Distressing
Instead of sanding, wipe the painted pot with a wet rag just as the paint starts to dry. This removes paint more naturally, revealing the clay without scratch marks.
Step 2: Creating the Patina Texture
-
Prepare the white dry-brush:
Put a small amount of white paint on your palette. Do not add water this time. Load a very small amount onto your dry bristle brush. -
Offload excess paint:
Brush the bristles vigorously onto a paper towel or scrap cardboard until almost no paint is coming off. The brush should feel nearly dry. -
Dry brush highlights:
Lightly drag the brush horizontally across the pot’s surface, focusing on the raised bands under the rim. The white paint should catch on the texture of the clay, creating a dusty, calcium-deposit look. -
Build random patches:
Use a stippling motion (dabbing the brush straight down) to create cloudier patches of white in random areas on the body of the pot. This simulates uneven weathering. -
Soften the look:
While the white paint is still slightly tacky, use a damp cloth to gently smudge some of the harsher white lines, blending them into the green background for a more organic appearance.
Mossy Accents
Dab glue in random spots and press real dry soil or craft moss dust into the paint while wet for a textured, garden-fresh unearthed look.
Step 3: Distressing and Finishing
-
Sand for exposure:
once all paint is completely dry, take your medium grit sandpaper and gently sand areas of the pot. Focus on the rim, the raised bands, and the base. -
Reveal the clay:
Sand firmly enough to remove both paint layers in spots, revealing the raw terracotta orange underneath. This contrast is crucial for the ‘chipped’ effect. -
Create horizontal streaks:
I like to gently drag the sandpaper horizontally around the curved body of the pot to create faint scratch marks that mimic years of cleaning and wear. -
Dust off:
Use a dry, clean brush or a cloth to sweep away all the sanding dust. You should now see a mix of green, white, and raw clay. -
Evaluate the finish:
Step back and look at your pot. If it looks too painted, sand a bit more. If you sanded too much, you can dab a tiny bit of green back on with your finger. -
Optional sealing:
If this pot will live outdoors, spray it heavily with a clear matte sealer. For indoor use, you can leave it unsealed to preserve the ultra-matte, chalky texture.
Your pot now carries the charm of an ancient garden relic, ready to house your favorite herbs or blooms.
Celestial Night Sky With Starbursts
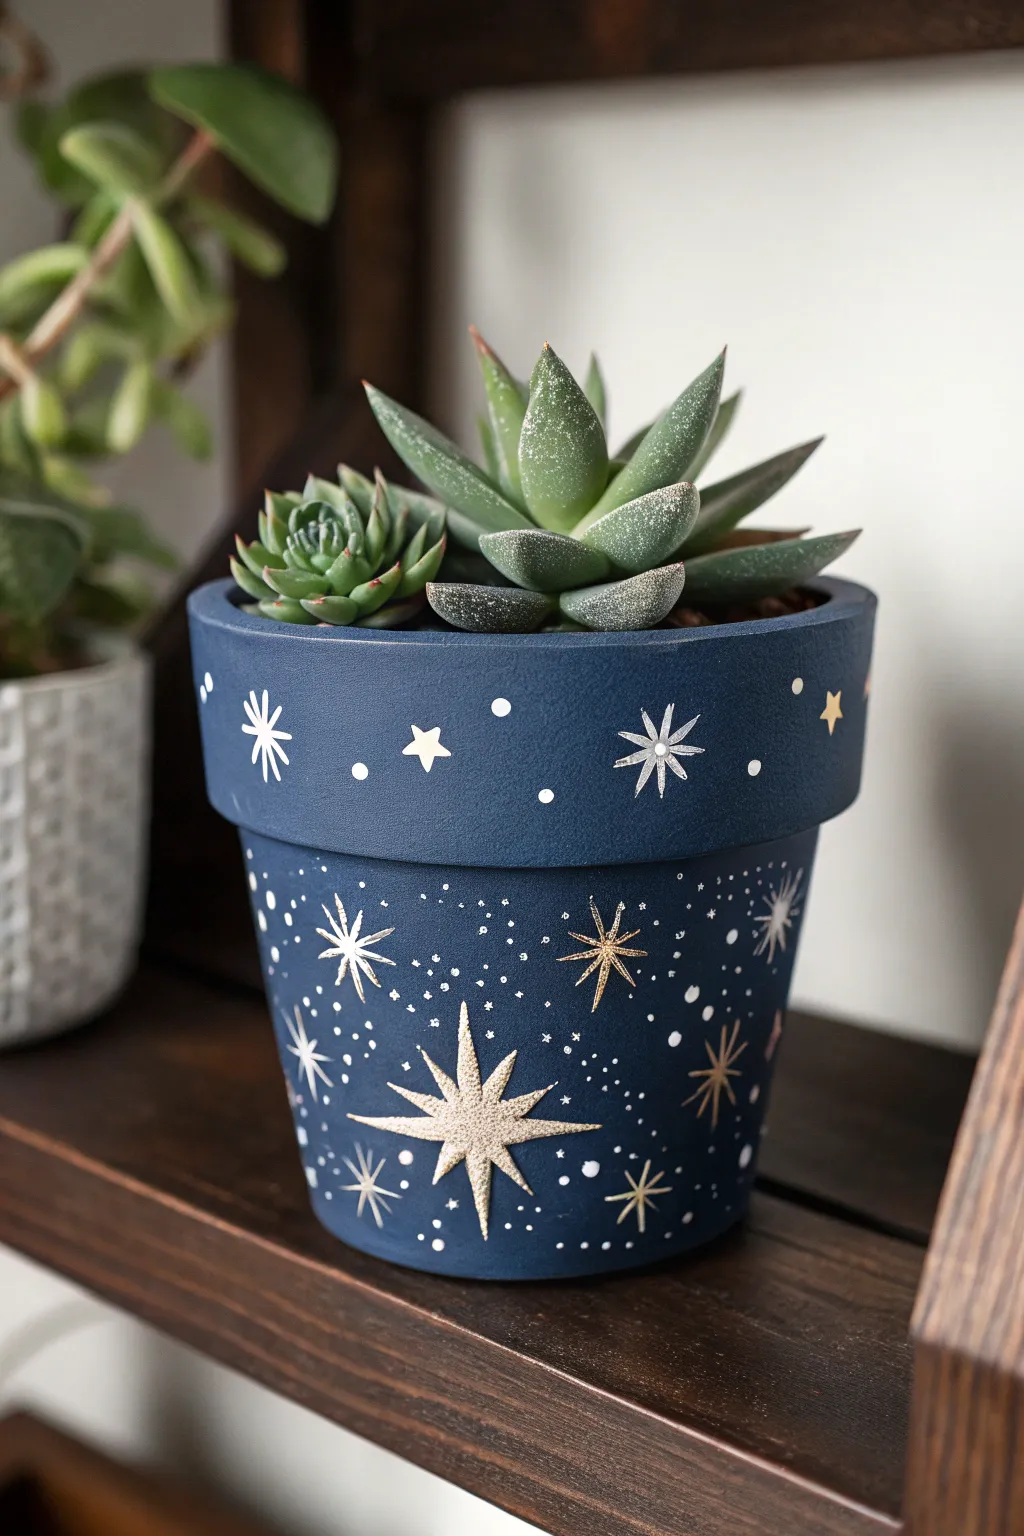
Bring the cosmos into your home with this stunning deep blue planter that mimics a dreamy night sky. The large, bold starbursts paired with delicate speckles create a magical, sophisticated look for your favorite succulents.
How-To Guide
Materials
- Terracotta clay pot (standard size)
- Deep navy blue matte acrylic paint
- Metallic acrylic paints (gold and champagne/silver)
- White or cream acrylic paint
- Wide flat paintbrush
- Fine liner brush (size 0 or 00)
- Small round brush (size 2)
- Toothpick (optional)
- Clear matte sealant spray
- Small cup of water
- Paper towels
Step 1: Preparation & Base Coat
-
Clean the surface:
Begin by ensuring your terracotta pot is clean, dry, and free of any dust. A quick wipe with a slightly damp cloth usually does the trick. -
Apply the first base layer:
Using your wide flat paintbrush, apply a generous coat of deep navy blue matte acrylic paint. Cover the entire exterior, including the rim. -
Paint inside the rim:
Don’t forget to paint the inner top inch of the pot so that the terracotta color doesn’t peek through once the soil is added. -
Let it dry completely:
Allow the first coat to dry for at least 20-30 minutes. Terracotta is porous and will soak up the first layer quickly. -
Apply the second coat:
Add a second layer of navy blue to ensure an opaque, rich finish with no streaks. -
Ensure a matte finish:
Wait for this base layer to cure fully before starting the details. A bone-dry surface prevents the metallic paints from blending perfectly into the background.
Step 2: Painting the Starbursts
-
Position the main stars:
Using your fine liner brush loaded with champagne or light gold metallic paint, map out where your largest starbursts will go. Place one large focal star on the lower body of the pot. -
Draft the star shape:
Draw a simple vertical line crossed by a horizontal line to form a ‘plus’ sign. Then, draw a smaller ‘X’ shape through the center. -
Thicken the large rays:
Go back over the vertical and horizontal lines of your main star, tapering them so they are thicker in the center and sharp at the tips. -
Add secondary stars:
Repeat this process with slightly smaller starbursts scattered around the bottom section and a few on the rim. Vary the sizes to keep the composition dynamic. -
Highlight with white:
I find that mixing a tiny dot of white into the metallic paint for the centers of the stars makes them pop against the dark blue. -
Create variation:
Paint a few distinct starbursts using a brighter silver or white on the rim to create visual interest and contrast with the gold tones. -
Add simple stars:
Fill in some gaps with simple 5-point stars using a gold or yellow-tinted metallic paint. These don’t need to be perfect; a stylized look works well here.
Wobbly Lines?
If your starburst points aren’t sharp, wait for the paint to dry. Then, use a small brush with the navy base color to ‘erase’ and reshape the edges of the star.
Step 3: Adding Cosmic Details
-
Create the milky way dust:
Dip the tip of a toothpick or the very end of your finest brush into white paint. -
Dot the surface:
Gently stipple tiny dots in clusters around the larger stars. These represent distant stars and cosmic dust. -
Vary dot sizes:
Make some dots slightly larger than others by using a small round brush tip for the bigger ‘planets’ and the toothpick for the fine dust. -
Check the spacing:
Step back and look at the pot. Ensure the rim has enough simple white dots and small crosses to balance the ornate bottom section. -
Seal the artwork:
Once all paint is completely dry (give it a few hours), take the pot to a well-ventilated area and apply a clear matte sealant spray to protect your work from water damage.
Add Dimension
Add tiny self-adhesive rhinestones to the center of your biggest stars for a 3D sparkle that catches the light beautifully on a sunny windowsill.
Once the sealant is dry, pot your favorite succulents and enjoy this serene piece of decor.
Cute Bug Themes for Garden Pots
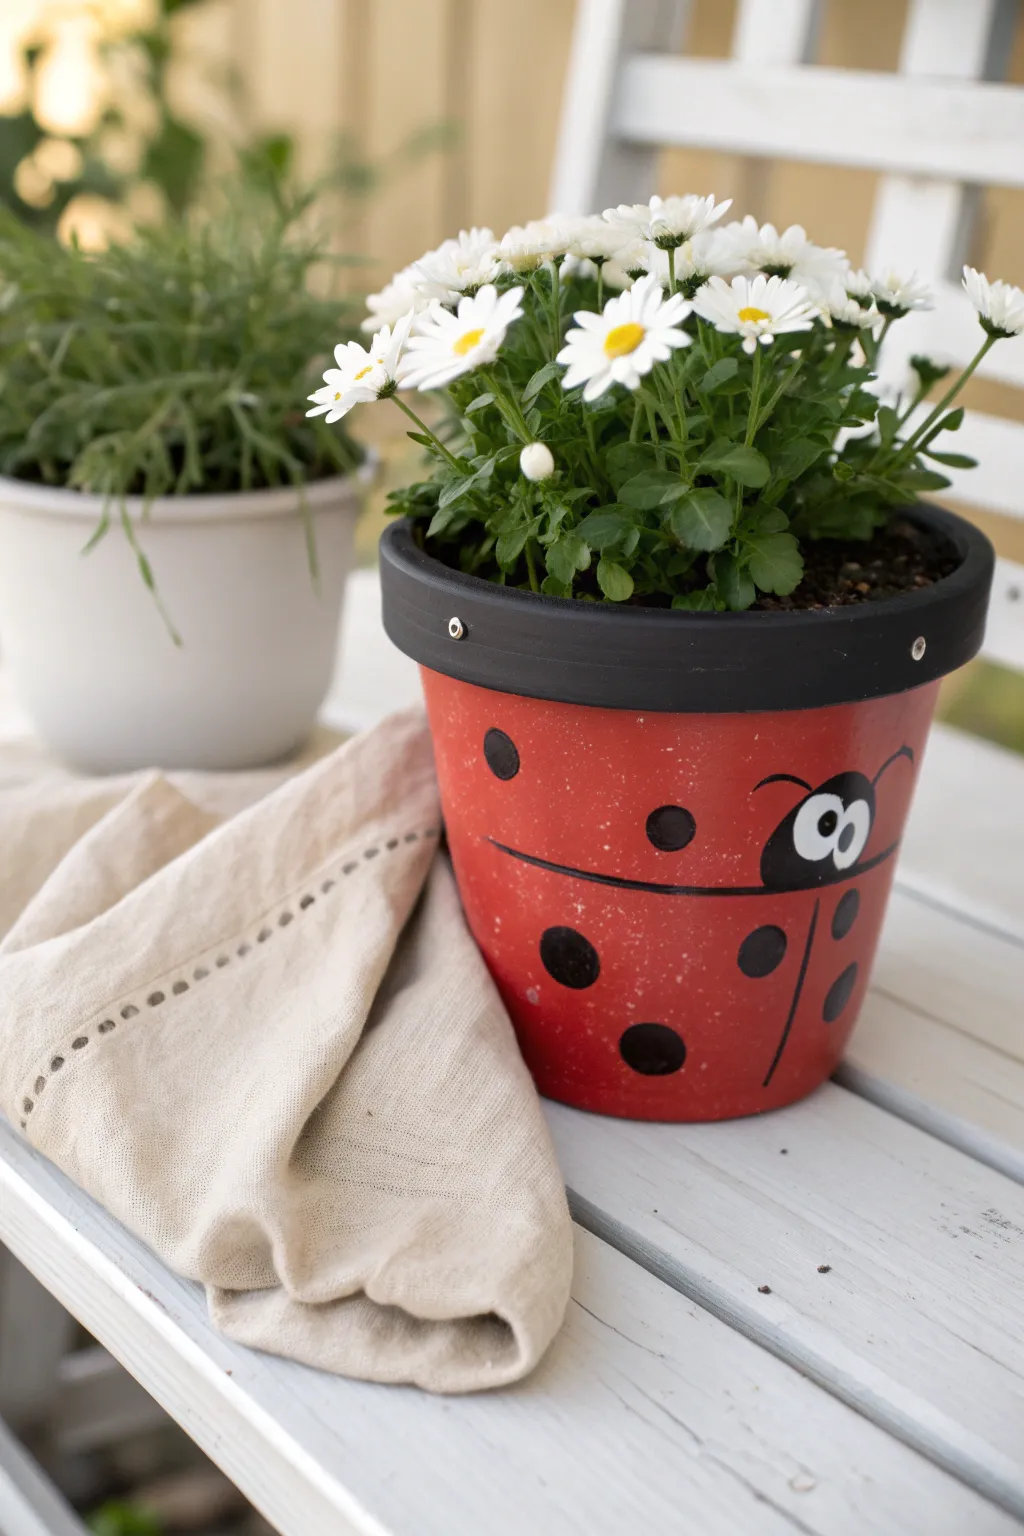
Transform a plain terracotta pot into this cheerful ladybug character that’s guaranteed to bring a smile to your garden or porch. With its bold red body, playful black spots, and curious little eyes, this project is a perfect beginner-friendly way to add personality to your potted blooms.
Step-by-Step Tutorial
Materials
- Standard terracotta pot (size of your choice)
- Wide black rubber band (optional, for rim)
- Small silver screws or upholstery tacks (optional, for rim)
- Acrylic craft paint: Bright Red, Black, White
- Clear outdoor sealant spray (matte or satin)
- Foam sponge brushes
- Small round detail brush
- Medium flat brush
- Pencil
- Painter’s tape or masking tape
- Water cup and paper towels
Step 1: Preparation and Base Coat
-
Clean and Dry:
Start by thoroughly wiping down your terracotta pot with a damp cloth to remove any dust or loose clay particles. Let it dry completely, as moisture will keep the paint from adhering properly. -
Seal the Inside:
Apply a coat of sealant or clear acrylic spray to the *inside* of the pot first. This prevents moisture from the soil from seeping through the clay and bubbling your beautiful paint job later. -
Tape the Rim:
Use painter’s tape to mask off the top rim of the pot. We want a clean line here because the rim will be treated differently than the body. -
Apply Red Base:
Load a foam sponge brush with bright red acrylic paint. Apply a smooth, even coat all around the body of the pot below the taped rim. -
Add a Second Coat:
Allow the first red layer to dry for about 20-30 minutes. Apply a second coat to ensure the terracotta color doesn’t peek through, giving you a vibrant, solid red base.
Step 2: Creating the Character
-
Remove Tape:
Once the red paint is fully dry, carefully peel off the painter’s tape from the rim. -
Paint the Stripe:
Using a small detail brush and black paint, draw a thin horizontal line across the middle of the red section. This divides the ladybug’s wings. -
Add the Vertical Line:
Find the center of your horizontal line and paint a vertical line extending downward to the bottom of the pot. This creates the separation between the left and right wings. -
Sketch the Spots:
Lightly use a pencil to mark where you want your ladybug spots to go. I find random placement looks more natural than a perfect grid. -
Paint the Spots:
Dip a round sponge brush or use your medium flat brush to fill in the penciled circles with black paint. Make them solid and opaque. -
Outline the Face:
Near the top of the red section, spanning across the horizontal line, paint a semi-circle shape in black. This will become the ladybug’s head. -
Add Antennae:
Using your finest detail brush, paint two thin, curved lines coming off the top of the black head shape.
Perfect Circle Trick
Struggling to paint perfect lush circles for the spots? Use a round foam pouncer or the flat end of a wine cork dipped in black paint as a stamp.
Step 3: Finishing Touches
-
Paint the Eyes:
Once the black head shape is dry, dip the handle end of a paintbrush into white paint. Dot two white circles onto the black area to create eyes. -
Pupils:
After the white dots dry, use a toothpick or a tiny brush to add small black dots inside them for the pupils. Placing them slightly off-center gives the bug a cute, goofy expression. -
Prepare the Rim:
Paint the entire rim solid black using your foam brush. Alternatively, for the specific look in the photo, stick a wide black rubber band around the rim instead of painting it. -
Add Hardware Accents:
If you used the rubber band method or painted it black, enhance the industrial look by pressing small silver thumb tacks or screwing tiny silver screws into the rim at even intervals. -
Final Seal:
Take the pot outside and spray the entire exterior with a clear outdoor sealant. This protects your hard work from sun fading and rain. -
Plant:
Fill with potting soil and your favorite white daisies or greenery to complete the look.
Paint Peeling?
If paint peels off the clay when you remove the tape, the pot might have been too dusty. Sand the spot lightly, wipe clean, and touch up with fresh paint.
Enjoy your charming new garden friend as it brightens up your patio
Fruit-Inspired Pots for Playful Color
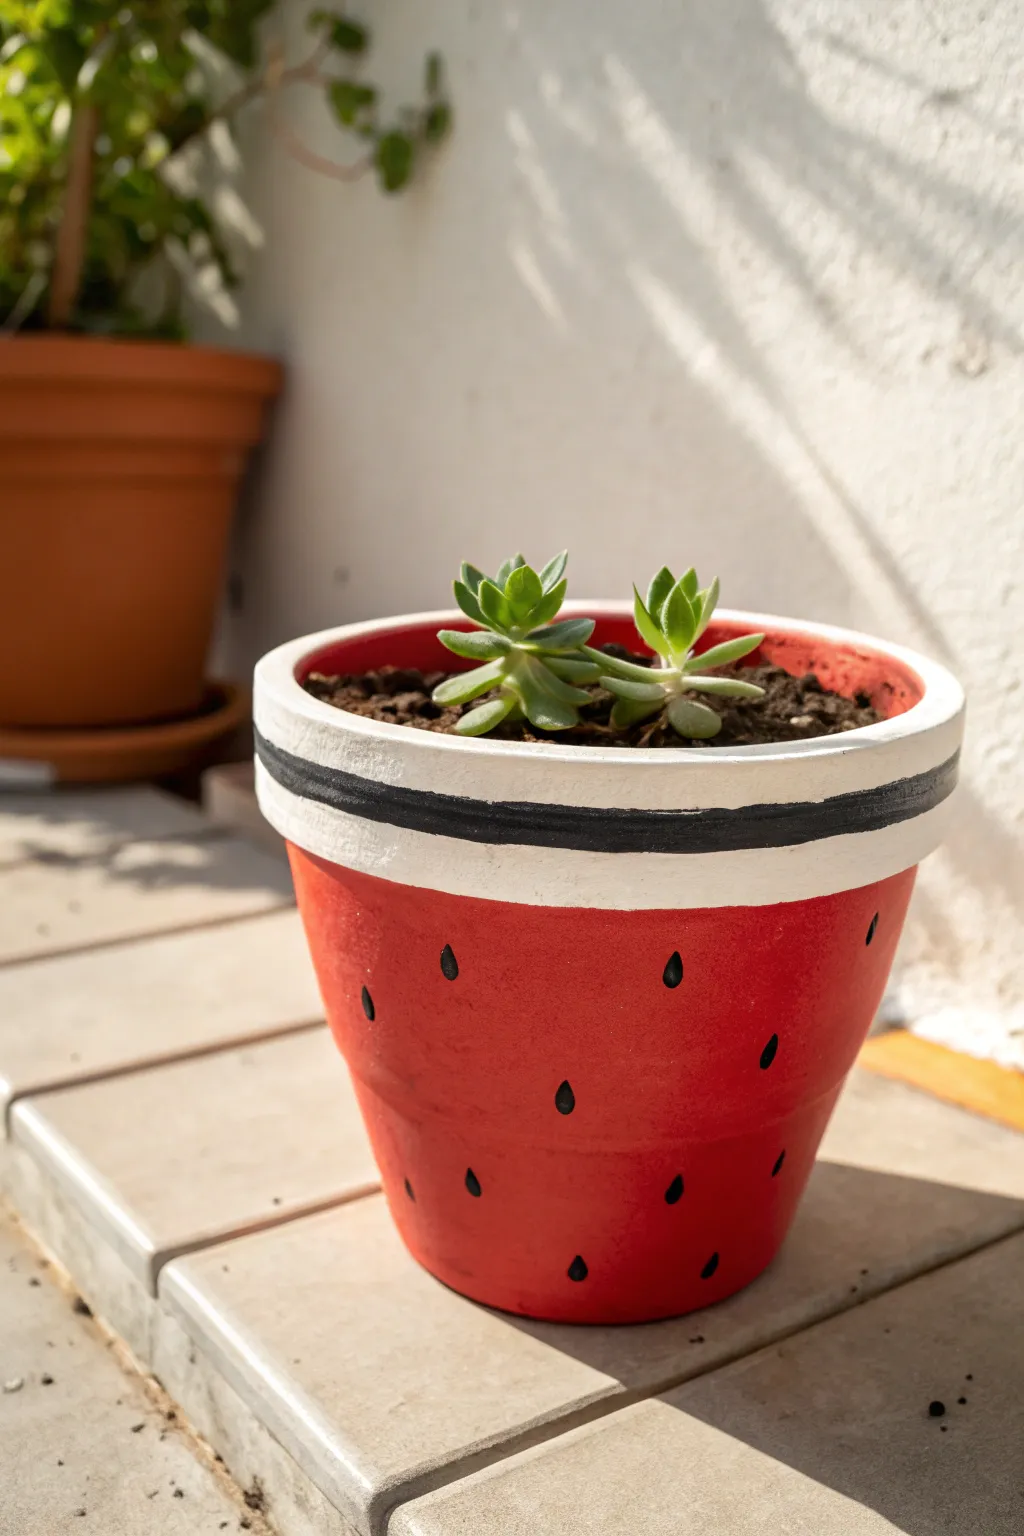
Transform a plain terracotta pot into a refreshing slice of summer with this cheerful watermelon design. The bold red base contrasting against the crisp white rim and playful black seeds makes for an eye-catching home for your favorite succulents.
Step-by-Step Guide
Materials
- Small or medium terracotta pot
- Acrylic paints: Bright red, white, and black
- Flat paintbrushes (medium and small)
- Fine-point detail brush
- Pencil
- Acrylic sealer or clear coat spray
- Water cup and paper towels
- Painter’s tape (optional)
Step 1: Base Preparation
-
Clean surface:
Before you begin painting, ensure your terracotta pot is clean, dry, and free of dust. A quick wipe with a damp cloth followed by thorough drying works well. -
Seal the inside:
If you plan to plant directly into the pot, apply a coat of sealer to the inside to prevent moisture from seeping through and bubbling your paint later. -
Base coat the rim:
Start by painting the upper rim of the pot with white acrylic paint. You don’t need to be perfectly neat at the bottom edge of the rim yet, but make sure the top edge and inner lip are covered. -
Let it dry:
Allow the white paint to dry completely. Terracotta absorbs paint quickly, so you might need a second coat of white to get a solid, opaque finish.
Uneven Lines?
If painting the black stripe freehand is too difficult, place two strips of painter’s tape around the rim, leaving a small gap between them to paint perfectly straight.
Step 2: Painting the Fruit
-
Apple the red base:
Using a medium flat brush, paint the entire body of the pot (below the rim) with bright red acrylic paint. This represents the juicy watermelon flesh. -
Create a clean line:
Carefully paint up to the bottom edge of the rim. I like to use a slightly smaller brush here to get a crisp line where the red meets the white rim. -
Double check coverage:
Red pigments can sometimes be translucent. Apply a second coat of red if the terracotta color is still peeking through, then let it dry fully. -
Paint the inner rim:
For a cohesive look, paint the very top flat edge of the pot and just a centimeter inside the top with red paint. This mimics the inside of the fruit.
Go 3D
Mix a tiny amount of baking soda into your red paint to give the watermelon ‘flesh’ a slightly textured, realistic grainy appearance before sealing.
Step 3: Detailing the Rind
-
Sketch the dividing line:
Once the base colors are dry, use a pencil to lightly mark where the black stripe on the rim will go. It should sit right in the middle of the white band. -
Paint the black stripe:
Using a small flat brush or a steady hand with a detail brush, paint a continuous black horizontal line around the center of the white rim. -
Thicken the line:
Go over the black line again if needed to make it solid and opaque. This line separates the ‘rind’ from the inner white pith. -
Correct mistakes:
If your black line wobbles, wait for it to dry completely, then touch up the edges with your white paint to square it off again.
Step 4: Adding Seeds & Finishing
-
Plan seed placement:
visualize a scattered pattern for the seeds on the red section. You want them distributed randomly but somewhat evenly around the pot. -
Paint the seeds:
Dip a fine-point detail brush into black paint. Press the brush down gently and lift up quickly to create a teardrop shape. -
Vary the direction:
Make sure the pointed end of the teardrop faces upward. Keep the seeds relatively small and delicate compared to the pot size. -
Dry thoroughly:
Let all paint layers cure for at least a few hours or overnight to ensure hardness. -
Seal the exterior:
Apply a clear acrylic sealer or spray varnish over the entire painted surface. This protects the design from water damage and fading. -
Plant:
Once the sealer is dry, fill the pot with succulent soil and add your favorite small green plants to complete the look.
Now you have a juicy splash of color ready to brighten up any windowsill or desk
Funny Face Pots With Hair-Like Plants
Transform a plain pot into a peaceful, whimsical character with just a few simple strokes. This adorable sleeping face design pairs perfectly with a trailing plant to create the illusion of flowing green locks, adding a touch of charm to any windowsill.
Step-by-Step Tutorial
Materials
- Medium-sized ceramic or terracotta pot
- Matte white acrylic paint or spray paint
- Black paint marker (fine point)
- Pink acrylic paint (soft blush tone)
- Small round sponge dabber or round paint brush
- Wide flat paintbrush
- Sealer (matte or satin finish)
- Pencil
- Trailing plant (like string of hearts or creeping jenny)
Step 1: Preparing the Base
-
Clean the pot:
Start with a clean, dry pot. If you are reusing an old terracotta pot, scrub it thoroughly to remove any dirt or mineral deposits and let it dry completely. -
Apply the base coat:
Using your wide flat brush, apply a coat of matte white acrylic paint to the entire exterior of the pot. Don’t forget the top rim, as this will be visible even with the plant inside. -
Let it dry:
Allow the first coat to dry fully. This usually takes about 20-30 minutes depending on your paint thickness. -
Second coat:
Apply a second coat of white paint to ensure solid, opaque coverage where the terracotta color doesn’t peek through. I like to brush in the opposite direction of the first coat for a smoother finish. -
Dry completely:
Let the pot sit until bone dry. It is crucial the surface is not tacky before you start drawing the face.
Step 2: Designing the Face
-
Sketch the features:
Lightly sketch the sleeping face using a pencil. Draw two downward curves for the eyes about halfway down the pot, and a small upward curve for the smile centered below them. -
Add the cheeks:
Lightly mark circular guides for where the rosy cheeks will go, positioned slightly outside and below the eyes. -
Painting the cheeks:
Dip your round sponge dabber or a small round brush into the soft pink paint. Dab off excess paint on a paper towel first to ensure a soft, textured look rather than a thick blob. -
Apply cheek color:
Gently press the sponge or brush onto your marked cheek spots. Use a stippling motion to create a soft, slightly imperfect circle that looks like natural blush. -
Dry the pink:
Wait for the pink paint to dry completely so your hand doesn’t smudge it while drawing the black lines.
Uneven Cheeks?
If one cheek circle ends up larger than the other, don’t worry. Dip a small brush in your white base paint and carefully paint around the edge to ‘erase’ and reshape the pink area.
Step 3: Adding Details and Finishing
-
Trace the eyes:
Using the fine-point black paint marker, carefully trace over your pencil lines for the closed eyelids. Move slowly to keep the line steady. -
Add eyelashes:
Draw three small, angled lines extending downward from each eyelid curve to create the lashes. Keep them short and spaced evenly. -
Draw the smile:
Trace the small centered smile line with the black marker. Keep the stroke simple and fluid. -
Erase guidelines:
Once the marker ink is 100% dry, gently erase any visible pencil marks remaining around the face. -
seal the artwork:
Apply a layer of clear matte or satin sealer over the painted area. This protects the face from water damage when you water your plant. -
Plant and style:
Pot your trailing plant inside. Arrange the vines to cascade down the sides, framing the face like wild, beautiful hair.
Use a Stencil
For perfectly symmetrical eyes, cut a simple curve shape out of a piece of cardstock and trace it for both eyelids before using the marker.
Your charming new planter is ready to bring a serene vibe to your favorite sunny corner
Drip and Pour Paint for Bold Drama
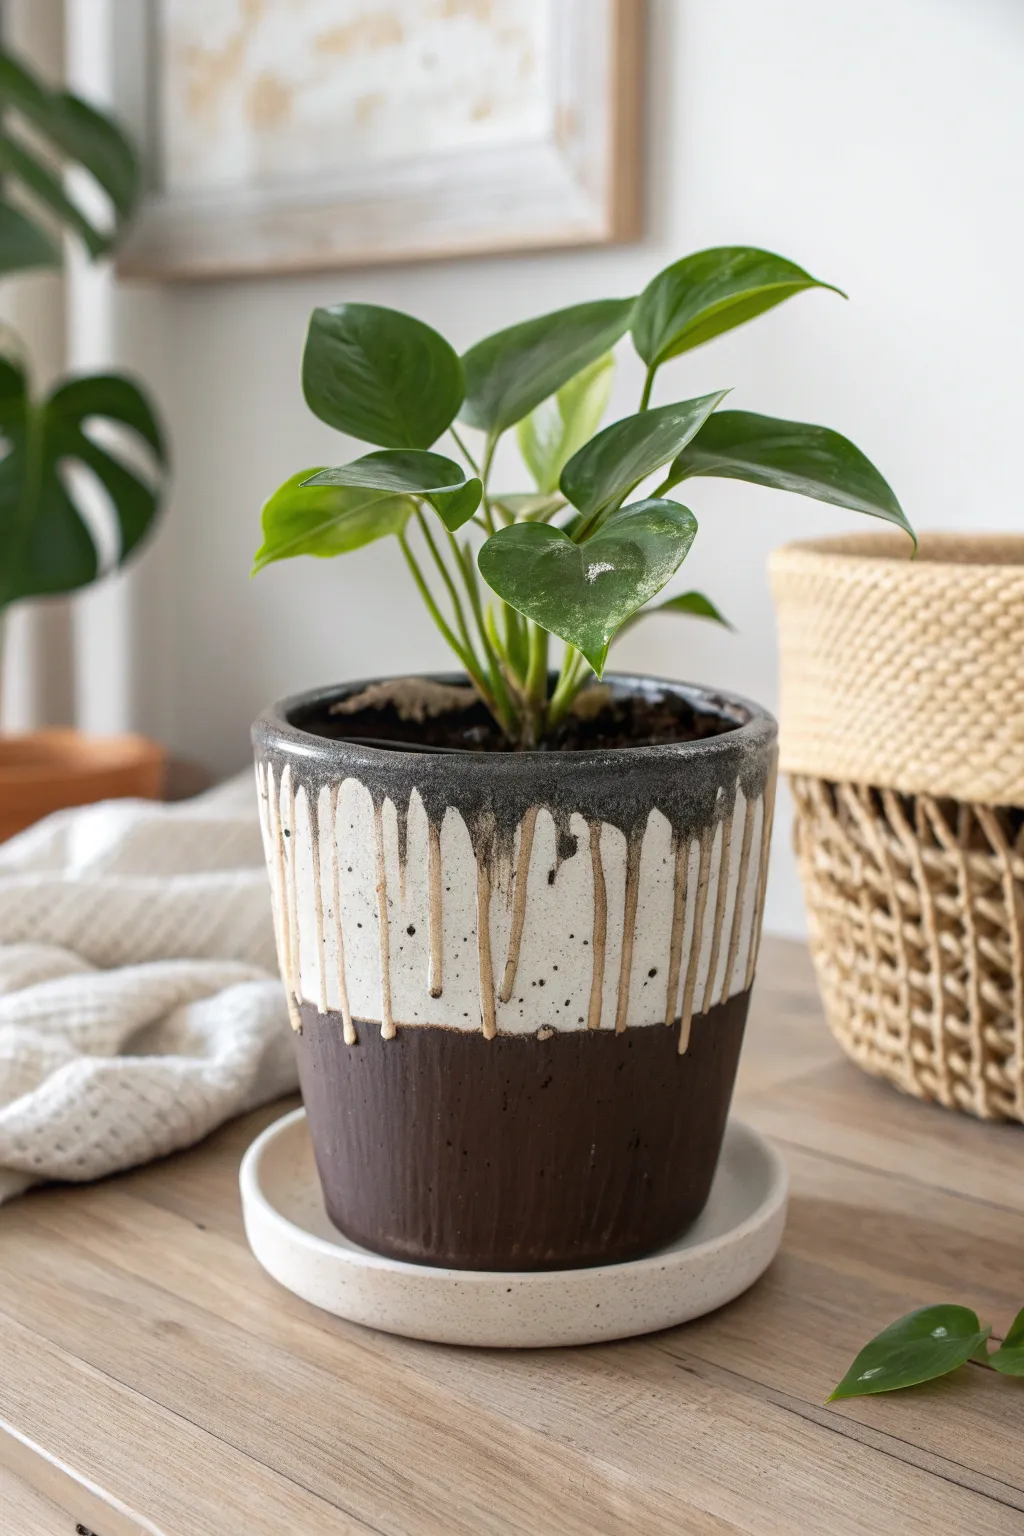
Embrace a delicious aesthetic with this high-contrast planter that mimics the look of thick, speckled glaze dripping over dark stoneware. This technique combines matte and gloss finishes to create a striking, organic texture that turns a simple terracotta pot into a modern statement piece.
Detailed Instructions
Materials
- Terracotta pot with saucer
- Espresso brown acrylic paint (matte finish)
- Cream or antique white acrylic paint (heavy body or regular mixed with pouring medium)
- Deep charcoal or black acrylic paint
- Floetrol or acrylic pouring medium
- Paintbrushes (medium flat brush and small detail brush)
- Pipette, syringe, or squeeze bottle
- Masking tape
- Clear matte sealant spray
- Sandpaper (fine grit)
- Water and paper towels
Step 1: Preparation and Base Coat
-
Clean the pot:
Start by ensuring your terracotta pot is completely clean and dry. If there are any rough stickers or residue, give them a quick sand with fine-grit sandpaper to smooth the surface. -
Seal the interior:
Since terracotta is porous, seal the inside with a clear acrylic spray or a coat of waterproof sealer. This prevents moisture from seeping through and bubbling your exterior paint later on. -
Paint the base color:
Using your medium flat brush, apply the espresso brown acrylic paint to the exterior of the pot. Cover the bottom two-thirds completely, leaving the top rim area bare for now. -
Apply second coat:
Let the first coat dry for about 20 minutes. Apply a second coat of the espresso brown to ensure solid, opaque coverage without brushstrokes. Extend this color slightly underneath the bottom curve so no orange clay shows. -
Create the rim base:
Paint the top rim and the upper inner lip with the charcoal or black paint. Don’t worry about a perfect line where it meets the brown; the drip layer will hide the transition.
Step 2: Creating the Drip Effect
-
Mix your drip medium:
This is the crucial part. Mix your cream/white paint with a pouring medium (like Floetrol) or a little water. You want a consistency like heavy cream—fluid enough to run, but thick enough to hold a 3D shape. -
Add texture specs (optional):
To mimic the ceramic look in the photo, add tiny speckles to your white mixture. I like to flick a tiny bit of brown or black paint into the cup and barely stir it, or use a suspended particulate medium. -
Load the applicator:
Fill your squeeze bottle, syringe, or pipette with the cream mixture. A squeeze bottle gives you the most control for long drips. -
Apply the rim anchor:
Paint a thick band of the cream mixture around the top portion of the pot, just below the black rim. Use a brush to smooth this band so it acts as a reservoir for your drips. -
Start the drips:
Starting from that white band, squeeze a bead of paint and let gravity pull it down over the brown base. Vary the amount of paint you release to create drips of different lengths. -
Control the flow:
If a drip is moving too fast, tilt the pot upside down momentarily to slow it. Create a random pattern—some drips should stop halfway, others can reach near the bottom. -
Define the upper rim:
While the cream paint is wet, go back to the top black rim. Use a small brush to carefully drag a little of the black paint down into the very top of the cream section, creating that dark, melted glaze transition seen in the inspiration photo. -
Add detail spots:
Dip a toothbrush or stiff brush into diluted black paint and gently splatter tiny specks onto the wet cream paint for that authentic stoned-ware pottery look. -
Dry completely:
Let the pot sit undisturbed for at least 24 hours. Because the drip layer is thick, it will take much longer to dry than standard brushing.
Gravity Control
Test your drip consistency on a spare piece of cardboard first. Vertical cardboard mimics the pot’s side best. If it runs too fast, add more paint; if too slow, add medium.
Step 3: Finishing Touches
-
Paint the saucer:
While the pot dries, paint the saucer. The photo shows a matching cream saucer. Paint it solid cream, optionally adding the same speckling technique used on the pot’s body. -
Check texture:
Once the drips are fully dry, lightly run your hand over them. If there are any sharp peaks where the paint pulled away, gently sand them down. -
Apply matte varnish:
Spray the entire exterior with a matte clear coat. This unifies the sheen and protects the paint from water damage. -
Plant:
Pot your favorite green plant directly into the finished vessel.
Drips merging together?
If your vertical lines are blurring into one giant blob, space your initial pour spots further apart. You can also wait 5 minutes between drips so the previous one sets slightly.
Now you have a stunning faux-glazed planter that looks like it came straight from a pottery wheel