
If you’ve got a little clay and a spooky mood, you’re already halfway to the cutest (or creepiest) little clay ghosts. I’m sharing my favorite ghost figurine ideas that are simple enough for a cozy craft night, but still look like you put real love into them.
Mini Ghost Family Set
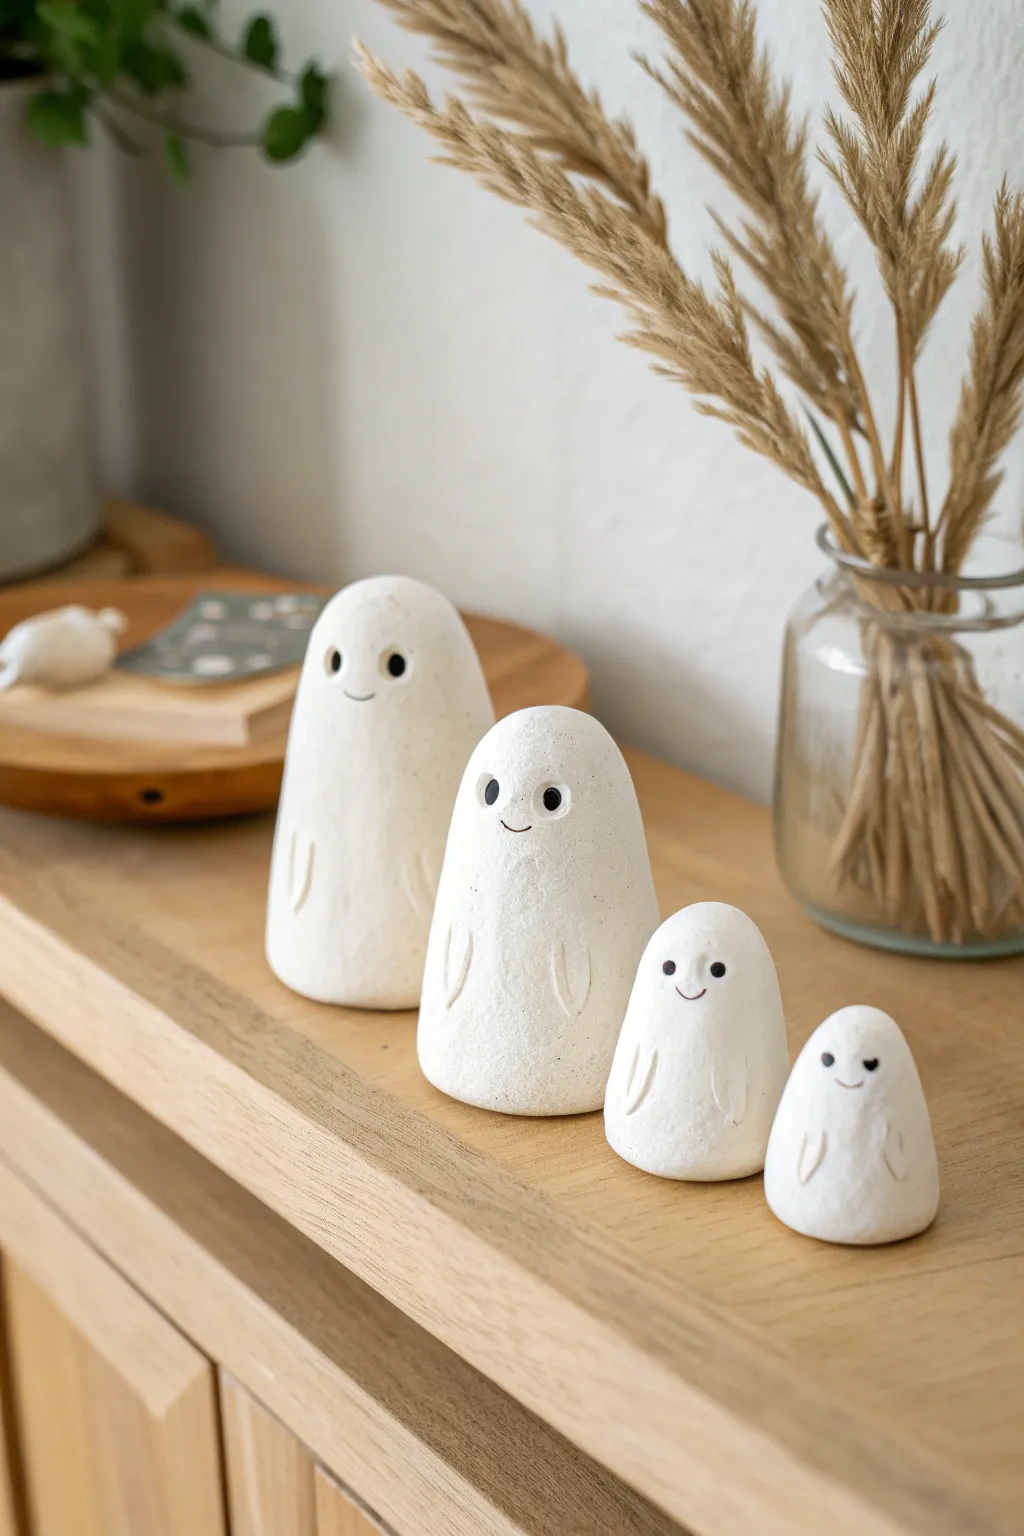
Create a charming, spooky-sweet atmosphere with this family of four minimalist ghosts, ranging from a tall guardian to a tiny baby spook. These figures feature a soft, stone-like matte finish and simple etched details for arms, making them a subtle yet festive addition to your autumn decor.
Detailed Instructions
Materials
- White polymer clay (approx. 200g)
- Foil (for bulking the larger shapes)
- Needle tool or toothpick
- Ball stylus tool (small)
- Black acrylic paint
- Fine detail paintbrush (size 000)
- Sandpaper or old toothbrush (for texture)
- Oven baking sheet and parchment paper
Step 1: Shaping the Bodies
-
Prepare the foil cores:
To save clay and ensure even baking, crunch aluminum foil into four cones of descending sizes. The largest should be about 3 inches tall, and the smallest about 1 inch. -
Condition the clay:
Knead your white polymer clay until it is soft and pliable. Warm hands make this much easier. -
Cover the largest ghost:
Flatten a sheet of clay and drape it over your largest foil cone. Smooth it down the sides to remove any seams. -
Refine the shape:
Roll the clay-covered form gently on your work surface to create a smooth, rounded dome shape at the top and a wider base for stability. -
Repeat for the family:
Repeat the covering process for the medium, small, and baby ghost forms, ensuring each one gets slightly smaller to create that ‘nesting doll’ visual effect. -
Flatten the bases:
Press each ghost firmly onto your work surface to ensure they sit perfectly flat and won’t wobble.
Natural Stone Look
For a speckled effect, mix a tiny pinch of black pepper or dried used coffee grounds into the white clay before rolling it out.
Step 2: Adding Texture & Details
-
Add stone texture:
Instead of leaving them perfectly smooth, gently tap the surface of the clay with an old toothbrush or a crumpled ball of aluminum foil. This gives that matte, stone-like finish seen in the photo. -
Mark the eye sockets:
Using a small ball stylus, press two indentations where the eyes will go. Place them somewhat wide apart for a cute look. -
Etch the mouth:
Use a needle tool to gently carve a small, curved smile just below the eyes. -
Sculpt the arms:
Using the needle tool again, carve two vertical curved lines on the lower half of the body to suggest arms tucked against their sides. I like to keep these lines subtle rather than deep grooves. -
Smooth the edges:
Run your finger lightly over the carved arm lines and mouth to soften any sharp ridges created by the tools.
Wobbly Ghosts?
If the base isn’t flat after baking, simply rub the bottom of the ghost against a sheet of rough sandpaper until it stands straight.
Step 3: Finishing Touches
-
Bake the clay:
Place your ghost family on a parchment-lined baking sheet. Bake according to your clay package instructions (usually 275°F/135°C for 15-30 minutes per 1/4 inch thickness). -
Cool completely:
Let the ghosts cool down fully before handling. The clay hardens as it cools. -
Paint the eyes:
Dip a fine detail brush into black acrylic paint. Carefully fill in the indented eye sockets. -
Paint the smile:
Using the very tip of your brush and minimal paint, trace the carved smile line with a thin stroke of black. -
Dry and display:
Allow the paint to dry completely before arranging your little ghost family on a shelf or mantle.
Arranged together, these handmade figures create a serene and spooky vignette perfect for the season


Tea Light Ghost Luminary
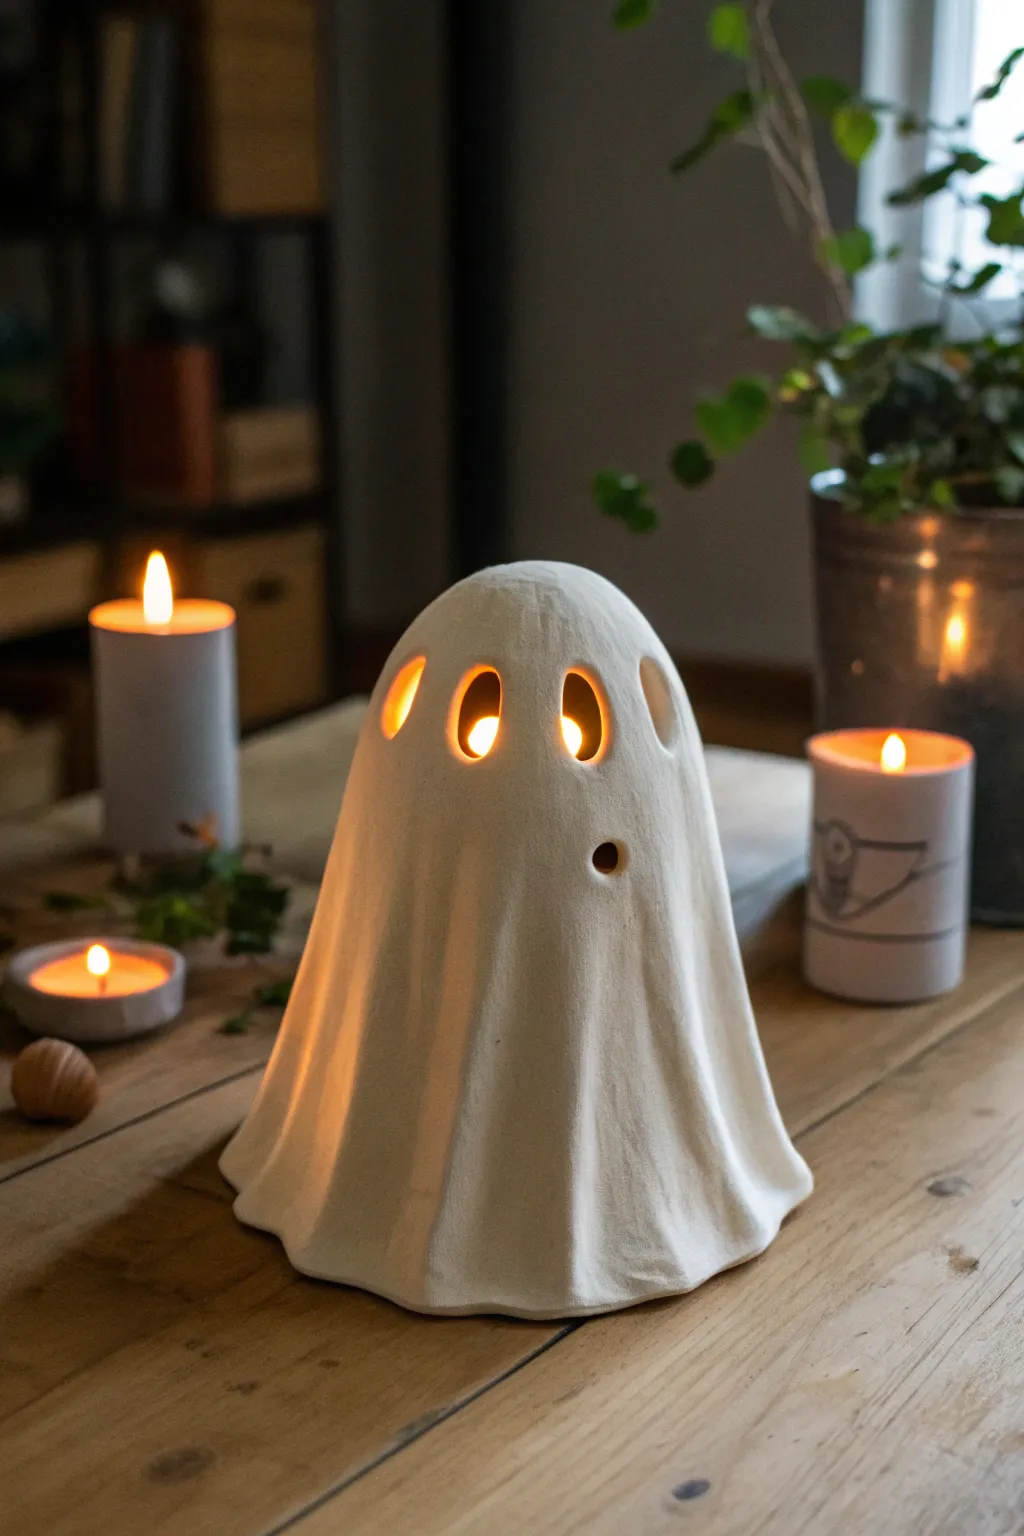
Bring a touch of friendly haunting to your home with this ceramic ghost luminary. Its gently draped form and classic cut-out eyes create a warm, inviting glow perfect for cozy autumn evenings.
Step-by-Step Guide
Materials
- White air-dry clay or polymer clay (approx. 1-2 lbs)
- Rolling pin
- Parchment paper or canvas work mat
- Ball of aluminium foil or a styrofoam cone (for armature)
- Plastic wrap (cling film)
- Clay knife or fettling knife
- Small circular clay cutter or a straw
- Modelling spoon or smoothing tool
- Bowl of water (for smoothing)
- Fine-grit sandpaper
- Battery-operated tea light
Step 1: Preparing the Form
-
Create the armature:
Begin by crumpling aluminum foil into a large, sturdy cone shape with a rounded top. This will be the support structure that gives your ghost its height and shape. -
Cover the form:
Wrap your foil cone completely in plastic wrap. This step is crucial because it ensures the clay won’t stick to the foil when you need to remove the ghost later.
Keep it Clean
White clay picks up lint instantly. Wipe your work surface, rolling pin, and hands with a wet wipe before starting to keep your ghost pristine.
Step 2: Shaping the Clay
-
Roll out the slab:
Take a large chunk of your white clay and knead it until soft. Roll it out into a large, even circle on your parchment paper, aiming for about 1/4 inch thickness. -
Check the size:
Hold your armature over the rolled slab to ensure the circle is wide enough to drape completely over the form with plenty of excess at the bottom. -
Great draping:
Pick up the clay circle gently and center it over the top of your foil cone. Let the gravity pull the sides down naturally. -
Form the folds:
Using your fingers, gently guide the clay to create vertical folds that mimic the look of a hanging sheet. Arrange the folds so they flare out slightly at the base. -
Smooth the surface:
Dip your finger in a little water and run it over the clay to smooth out any fingerprints or cracks that appeared during the draping process. -
Trim the hem:
Using your clay knife, cut a wavy line around the bottom edge of the ghost. You want it to look organic and fluid, not perfectly straight.
Step 3: Adding Details
-
Map the face:
Lightly mark where you want the eyes and mouth to go. For this classic look, place the eyes somewhat high up on the rounded head. -
Cut the eyes:
Use a small oval cutter or carefully use your knife to remove the clay for the eyes. Oval shapes give a slightly more mournful, ghostly expression than perfect circles. -
Refine the edges:
Dip a small brush or your pinky finger in water and smooth the raw edges inside the eye cutouts so they look polished, not jagged. -
Add the mouth:
Create a small, round mouth hole lower down and off-center. A standard drinking straw is often the perfect tool to punch out a clean, circular mouth. -
Initial drying:
Allow the clay to firm up on the armature for a few hours. I like to wait until it’s leather-hard—firm to the touch but not fully dry. -
Remove armature:
Gently lift the ghost and carefully pull out the foil and plastic wrap form from underneath. Do this slowly to avoid warping the shape.
Textured Terror
Before draping, gently press a piece of lace or open-weave burlap into the clay slab to give your ghost a subtle, antique fabric texture.
Step 4: Finishing Touches
-
Smooth the interior:
Now that the inside is accessible, use a damp sponge to smooth out any rough texture left by the plastic wrap. -
Full cure:
Set the ghost aside in a dry area. Follow your clay package instructions for full drying times, which can take 24-48 hours for air-dry clay. -
Sand imperfections:
Once bone dry, take your fine-grit sandpaper and gently buff away any remaining uneven spots on the surface for a matte, porcelain-like finish. -
Dust off:
Wipe the entire piece down with a slightly damp cloth or a soft brush to remove the sanding dust. -
Light it up:
Place a battery-operated tea light or LED candle on a table and set your finished ghost over it to see it glow.
Watch the flickering light dance through the eyes of your new creation and enjoy the spooky ambiance


Cute Ghost With Blushing Cheeks
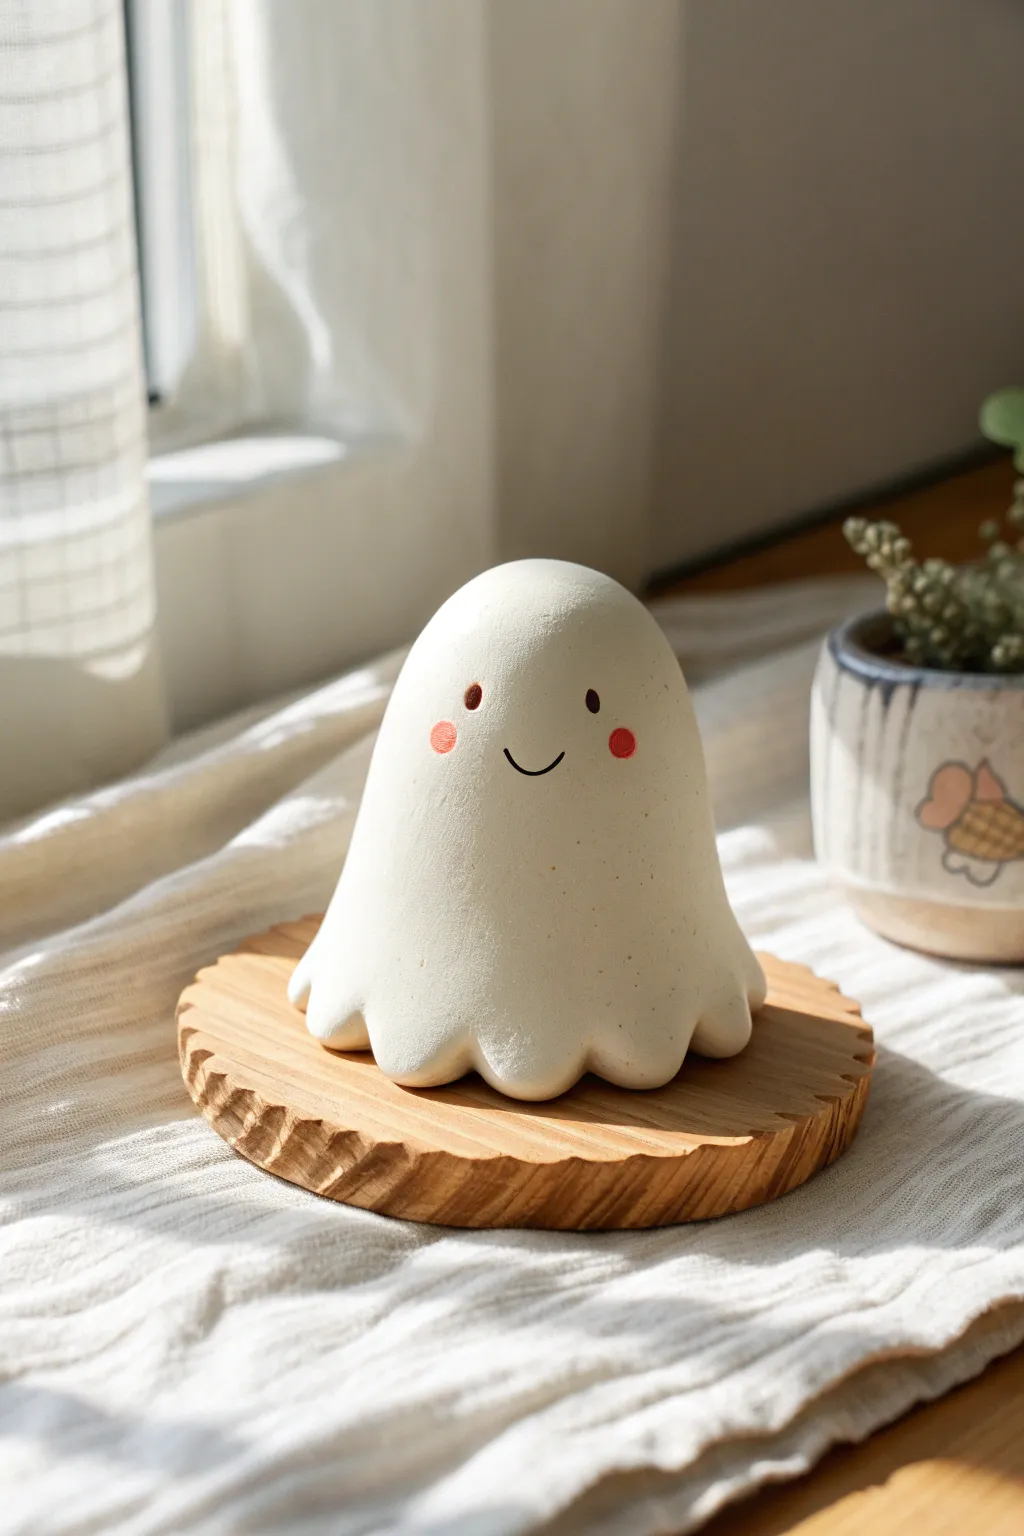
This endearing little ghost features a smooth, matte finish and a sweet, simple expression that instantly charms. With its soft curves and rosy cheeks, it makes for a delightful desk companion or a gentle Halloween decoration.
Detailed Instructions
Materials
- White polymer clay or air-dry clay
- Rolling pin
- Basic sculpting tools (silicone shapers or a butter knife)
- Small ball tool or toothpick
- Fine-grit sandpaper (400-600 grit)
- Black acrylic paint
- Pink or coral acrylic paint
- Very fine detail paintbrush
- Matte varnish or sealant (optional)
- Aluminum foil (for armature)
Step 1: Shaping the Ghost Body
-
Condition the Clay:
Begin by warming up your white clay in your hands. Knead it thoroughly until it is soft, pliable, and free of cracks. -
Form the Core:
Create a small ball of aluminum foil about the size of a golf ball. Compressing foil into a core saves clay and helps the piece bake or dry evenly. -
Create a Sheet:
Roll out a slab of white clay to about 1/4 inch thickness. You want it thick enough to hold its shape but thin enough to drape naturally. -
Drape the Form:
Drape the clay sheet over your foil ball. Smooth the clay down the sides, gently pulling and stretching it to create a tall, rounded dome shape. -
Define the Height:
Extend the clay downwards past the foil core to create the ghost’s ‘skirt’. Aim for a slightly taller, egg-like silhouette rather than a perfect sphere. -
Sculpt the Waves:
At the bottom edge, use your thumb and forefinger to pinch the clay into a wavy, scalloped pattern. I find pushing gently from the inside out creates softer folds. -
Refine the Silhouette:
Smooth out any fingerprints or join lines. The surface should be seamless and the dome shape consistent from all angles. -
Check Stability:
Press the ghost gently onto your work surface to flatten the very bottom edges slightly, ensuring it stands upright without wobbling.
Step 2: Surface Finishing
-
Initial Smoothing:
Use a little bit of water (for air-dry clay) or baby oil (for polymer clay) on your finger to buff out any remaining imperfections before hardening. -
Cure the Clay:
Bake the polymer clay according to package instructions or let your air-dry clay sit for 24-48 hours until fully hard. -
Sanding:
Once hardened, take your fine-grit sandpaper and gently sand the surface. This step is crucial for achieving that powdery, soft matte look seen in the photo. -
Dust Off:
Wipe the figurine down with a slightly damp cloth to remove all clay dust. The surface must be perfectly clean for the paint to adhere neatly.
Cracks Appearing?
If air-dry clay cracks while drying, mix a tiny bit of fresh clay with water to make a paste (slip). Fill the cracks, let dry, and sand smooth.
Step 3: Painting the Face
-
Locate the Features:
Visualize where the face will go. The eyes should be set slightly wide apart on the upper half of the curve to maximize cuteness. -
Paint the Eyes:
Dip the end of a toothpick or a small ball tool into black acrylic paint. Dot two small, oval-shaped eyes onto the face. -
Draw the Smile:
Using your finest detail brush, paint a thin, shallow curve between the eyes. Keep the line delicate; a heavy hand can change the expression entirely. -
Add the Blush:
Mix a soft coral or pink paint. Using a dry brush technique or a cotton swab, dab two round circles on the cheeks just outside the smile line. -
Seal (Optional):
If you want to protect your work, apply a layer of matte varnish. Avoid glossy finishes to maintain the soft, ceramic ghost aesthetic.
Make it Glow
Use glow-in-the-dark polymer clay instead of standard white. During the day it looks classic, but at night your ghost becomes a spectral beacon.
Set your new little friend on a windowsill or shelf and enjoy its quiet, friendly presence


Spooky Ghost With Long Weepy Eyes

This charmingly minimalist ghost features elegant vertical folds and a shocked expression that’s more sweet than scary. The speckled clay body gives it a modern, organic ceramic look perfect for upscale Halloween decor.
How-To Guide
Materials
- Speckled stoneware clay (or white polymer clay mixed with cracked pepper/sand)
- Rolling pin
- Canvas mat or non-stick surface
- Conical form or crumpled aluminum foil cone
- Needle tool
- Small circular clay cutter or drinking straw
- Modeling tool or smooth wooden stick
- Potter’s sponge
- Kiln (if using stoneware) or Oven (if using polymer)
Step 1: Forming the Body
-
Prepare the Clay:
Begin by wedging your speckled clay thoroughly to remove air bubbles. If you are using polymer clay, condition it until it is soft and pliable, then mix in fine black pepper or glitter if you want to mimic the stoneware look. -
Roll the Slab:
Roll out a slab of clay to a uniform thickness, aiming for about 1/4 inch. Ensure the slab is large enough to wrap around your forming tool. -
Cut the Shape:
Using your needle tool, cut a large semi-circle or a wide wedge shape from the slab. This will become the cone of the ghost’s body. -
Form the Cone:
Wrap the clay slab around your cone form or aluminum foil armature. Bring the two straight edges together to form a seam. -
Seal the Seam:
Score the edges where they meet (scratching the surface), add a little water or slip, and press firmly together. Smooth the seam inside and out until it completely disappears.
Step 2: Sculpting the Details
-
Round the Head:
Gently gently pat and smooth the top of the cone to create a pleasingly rounded, domed head shape rather than a sharp point. -
Create Folds:
Using a modeling tool or your fingers, press vertical indentations starting from about midway down the body to the base. This mimics the look of a draped sheet. -
Refine the Drapes:
Pinch the clay between the indentations to accentuate the raised folds. I like to twist the bottom edge slightly outward to give the ghost a sense of movement. -
Position the Face:
Mark the spots for the eyes and mouth lightly with your needle tool. The eyes should be slightly higher up on the curve of the head. -
Cut the Eyes:
Use a small circular cutter or the end of a straw to punch out two vertical oval eyes. Smooth the inner edges of the holes with a damp finger. -
Cut the Mouth:
Cut a larger, elongated oval for the mouth. It should look like a long ‘O’ shape to give that surprised wail expression. -
Smooth the Edges:
Take a slightly damp potter’s sponge (or a baby wipe for polymer) and smooth the cut edges of the face holes so they look soft and finished, not sharp.
Natural Speckles
To fake the stoneware look with polymer clay, mix in ground black pepper or dried tea leaves. It creates instant organic texture.
Step 3: Finishing Touches
-
Level the Base:
Set the ghost upright on a flat surface. Trim any uneven areas at the bottom so it sits perfectly flat without wobbling. -
Final Smoothing:
Go over the entire surface with your damp sponge to remove fingerprints and refine the speckled texture. -
Dry:
Allow the clay to dry to a leather-hard state (if ceramic) or prepare for baking (if polymer). If using a foil armature inside polymer clay, you can bake it with the foil inside. -
Fire or Bake:
Fire the piece in a kiln according to your clay’s specific firing schedule, or bake the polymer clay in your home oven following package directions. -
Optional Glaze:
If using ceramic clay, apply a clear matte glaze and fire a second time to protect the surface while keeping the natural speckled look visible.
Slumping Issues?
If the ghost sags while creating folds, keep the internal paper or foil armature inside until the clay is leather-hard or fully baked.
Place a small LED tealight underneath to watch your ghost glow warmly in the dark

The Complete Guide to Pottery Troubleshooting
Uncover the most common ceramic mistakes—from cracking clay to failed glazes—and learn how to fix them fast.
Ghost With a Bow Tie or Collar
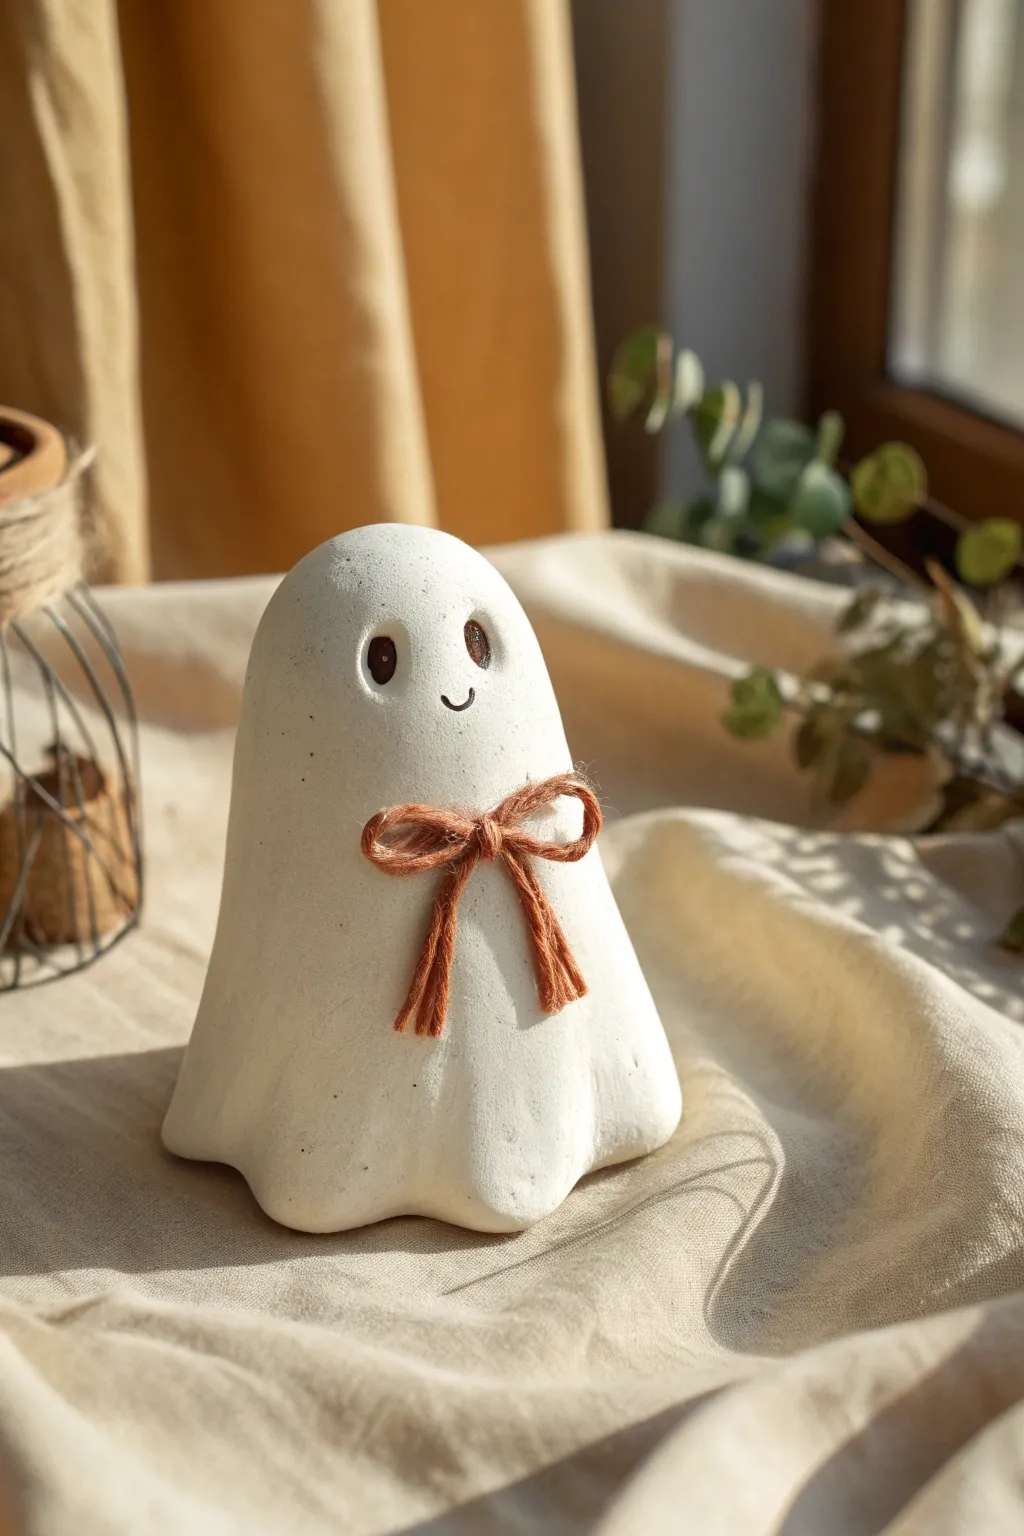
This charming little spirit captures the essence of cozy autumn décor with its minimalist shape and rustic bow tie accessories. The stone-like texture and sweet smile make it a delightful addition to any shelf, proving that ghosts can be cute rather than scary.
Detailed Instructions
Materials
- Air-dry clay (white or stone finish)
- Small rolling pin
- Aluminum foil
- Modeling tools (or a toothpick and spoon)
- Small bowl of water
- Burnt orange twine or yarn
- Craft glue or hot glue gun
- Fine-grit sandpaper
- Black acrylic paint (optional for eyes)
- Clear matte varnish (optional)
Step 1: Shaping the Form
-
Create the armature:
Crumple a piece of aluminum foil into a cone-like shape with a rounded top. This will serve as the inner support for your ghost, saving clay and reducing drying time. -
Prepare the clay:
Take a handful of air-dry clay and knead it until it’s pliable and warm. If you are using plain white clay and want the speckled look from the photo, you can knead in a tiny pinch of black pepper or dried tea leaves. -
Roll out a slab:
Roll the clay into a flat, circular slab about 1/4 inch thickness. Ensure it’s large enough to drape completely over your foil armature. -
Drape the sheet:
Gently lift the clay slab and place it over the foil cone. Let gravity do most of the work as the sides fall down. -
Form the folds:
Using your fingers, gently pinch and guide the bottom edges of the clay into soft, wavy folds to mimic a sheet dragging on the ground. Press the clay slightly against the foil to secure the shape. -
Smooth the surface:
Dip your finger in a little water and run it over the ghost’s head and body to remove any fingerprints or cracks. You want a nice, smooth matte finish.
Step 2: Adding Personality
-
Mark eye placement:
Decide where the face should go. Use a decorative pin or toothpick to lightly mark two dots for the eyes to ensure they are level. -
Create the eye sockets:
Using a rounded modeling tool or the back end of a small paintbrush, press firmly into the clay at your marked spots to create deep, oval indentations. I prefer to wiggle the tool slightly to widen the shape. -
Carve the smile:
Use a needle tool or toothpick to carefully carve a small, U-shaped mouth just below and between the eyes. Keep the stroke shallow for a subtle, friendly expression. -
Darken the features:
If you want high contrast like the photo, dip a fine brush in black acrylic paint and carefully fill inside the eye indentations and the smile line. Alternatively, let the natural shadows of the indentations do the work. -
Let it dry:
Place the ghost in a safe, dry spot away from direct sunlight. Allow it to cure fully for 24 to 48 hours, depending on your clay’s instructions.
Natural Speckles
To get that stone-like texture without painting, mix used (dried) coffee grounds into white clay before rolling. It adds organic specs instantly.
Step 3: Finishing Touches
-
Sand for perfection:
Once fully dry, lightly gently buff any rough edges, especially around the bottom folds, using fine-grit sandpaper. -
Tie the bow:
Cut a piece of burnt orange twine or yarn, approximately 6 inches long. Tie it into a small, neat bow, trimming the tails so they are even. -
Attach the accessory:
Place a small dot of craft glue (or hot glue for a quicker bond) on the chest of the ghost, centered below the smile. Press the knot of the bow firmly into the glue. -
Seal the piece:
For longevity, brush on a coat of clear matte varnish. This will protect the clay from moisture without making it look too shiny or plastic.
Cracking Clay?
If you see hairline cracks appearing while drying, mix a tiny bit of clay with water to make a paste (‘slip’) and smooth it over the fissures.
Now your friendly ghost is ready to haunt your home with nothing but good vibes
Glow-in-the-Dark Ghost
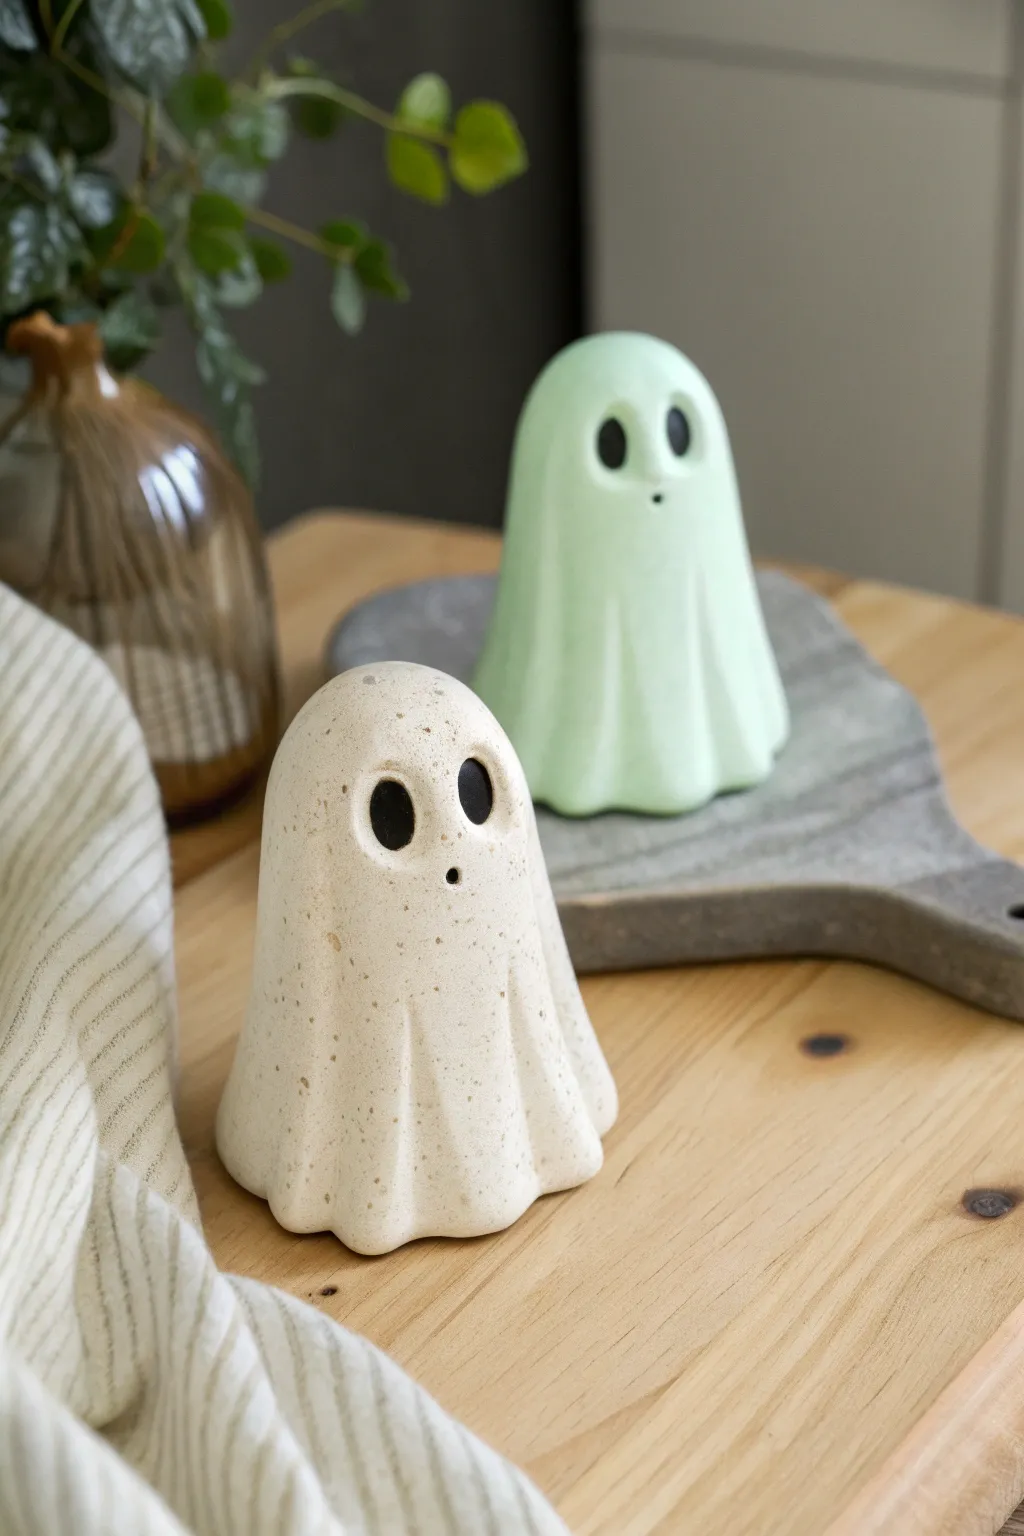
These charming minimalist spirits add a touch of modern whimsy to your Halloween decor with their smooth, draped forms. One features a natural speckled stone finish while the other hides a surprising glow-in-the-dark secret for when the lights go out.
Step-by-Step Tutorial
Materials
- Polymer clay (white, translucent, and glow-in-the-dark)
- Faux granite polymer clay or coarse black pepper (for speckles)
- Black acrylic paint
- Small dotting tool or toothpick
- Rolling pin
- Aluminum foil
- X-Acto knife or clay blade
- Smooth work surface (ceramic tile or glass)
- Oven (for baking)
- Matte varnish (optional)
- Fine sandpaper
Step 1: Forming the base
-
Create the armature:
Start by balling up a piece of aluminum foil into a cone shape with a rounded top. This will be the support structure for your ghost and helps save clay. -
Prepare the glow clay:
For the green ghost, condition your glow-in-the-dark polymer clay by kneading it until it’s warm and pliable. If you want a softer pastel green like the photo, mix in a tiny amount of regular mint or white clay. -
Prepare the speckled clay:
For the beige ghost, take white or ecru clay. To get that stone effect, I like to mix in pre-made ‘granite’ effect clay, or knead in actual coarse black pepper flakes until evenly distributed. -
Roll out the slab:
Roll your chosen clay into a circle about 1/4 inch thick. It doesn’t need to be perfectly round, as organic edges look more natural for fabric folds.
Clean Clay Pro-Tip
Keep separate baby wipes nearby. Clean your hands thoroughly between handling the speckled clay and the pristine glow clay to avoid cross-contamination.
Step 2: Draping the shape
-
Drape over the form:
Gently lift your clay circle and center it over the top of your foil cone armature. Let gravity help pull the sides down. -
Create the folds:
Using your fingers, gently pinch and guide the clay to create deep, vertical folds at the bottom. The clay should flare out slightly at the base like a sheet. -
Smooth the surface:
Once the swooping folds are established, lightly glide your finger over the top dome to ensure it is perfectly round and smooth. Remove any fingerprints. -
Trim the hem:
If the bottom is uneven, use your blade to trim the excess clay at the base so the ghost sits flat and stable.
Level Up: Hat Trick
Before baking, sculpt a tiny witch hat or hold a miniature clay pumpkin in the ghost’s folds to give them extra personality for the holiday season.
Step 3: Adding the playful face
-
Mark the eyes:
Decide where the face should go. Use a dotting tool to gently impress two oval shapes for eyes and a tiny circle for the mouth. -
Deepen the sockets:
Press slightly deeper into the clay to create actual sockets. This physical depth makes painting easier and adds dimension to the final piece. -
Bake the clay:
Place your ghosts on a baking sheet or ceramic tile. Bake according to your specific clay package instructions (usually 275°F for 15-30 minutes). -
Cool down:
Let the ghosts cool completely inside the oven with the door cracked. This prevents cracking from thermal shock.
Step 4: Finishing touches
-
Remove the foil:
Carefully carefully dig out the foil armature from underneath using a tool, or simply leave it in if the ghost feels sturdy enough. -
Sand for smoothness:
If there are any rough fingerprints or lint, lightly wet-sand the surface with fine-grit sandpaper for a professional matte finish. -
Paint the eyes:
Using a fine detail brush or a toothpick, fill the indented eye and mouth sockets with matte black acrylic paint. -
Clean up edges:
If paint strays outside the lines, quickly wipe it away with a damp Q-tip before it dries. Crisp edges are key for this minimalist look. -
Apply varnish:
To seal the paint and protect the surface, apply a thin coat of matte varnish. Avoid glossy finishes to keep that natural stone look.
Now engage the lights and watch your spooky new friends come to life in the dark


What Really Happens Inside the Kiln
Learn how time and temperature work together inside the kiln to transform clay into durable ceramic.
Textured Lace-Imprint Ghost

This charming little phantom brings a touch of nature to your spooky decor with its delicate, embossed leaf patterns. The unpainted, matte white finish gives it a modern, minimalist look that highlights the beautiful texture imprinted directly into the clay.
Detailed Instructions
Materials
- White polymer clay or air-dry clay
- Small rolling pin
- Fresh or faux leaves with prominent veins (fern, mint, or sage work well)
- Small ball tool or wooden skewer
- Cone-shaped form (optional, foil or paper)
- Small craft knife
- Sandpaper (fine grit)
- Clay varnish (optional, matte)
Step 1: Preparing the Clay
-
Condition the Clay:
Begin by kneading your white clay until it is soft, pliable, and free of cracks. Warm clay will take the impression much better. -
Roll out a Slab:
Use your rolling pin to flatten the clay into a circle. Aim for a thickness of about 1/4 inch—not too thin, or the leaves might poke through. -
Smooth the Surface:
Gently run your finger over the clay slab to remove any fingerprints or imperfections before you start texturing.
Step 2: Creating the Texture
-
Select Your Leaves:
Choose small leaves with thick, raised veins on the underside. I find that stiffer leaves create crisper impressions than soft, wilted ones. -
Arrange the Pattern:
Place the leaves vein-side down onto your clay circle. Arrange them randomly, overlapping slightly near the edges, but leave some negative space. -
Embed the texture:
Gently roll over the leaves with your rolling pin. Apply firm, even pressure to push the veins deep into the clay. -
Revealing the Design:
Carefully peel the leaves away from the clay one by one to reveal the intricate fossil-like impressions left behind.
Leaves Sticking?
If fresh leaves stick to the clay, lightly dust the underside of each leaf with cornstarch or baby powder before rolling them in.
Step 3: Shaping the Ghost
-
Create a Support:
Make a small cone shape out of aluminum foil or paper to act as an armature. This will help the ghost hold its shape while draping. -
Drape the Clay:
Lift your textured clay circle and gently drape it over the support form. The center of the circle should sit at the top of the cone. -
Form the Folds:
Let the clay fall naturally around the base. Use your fingers to gently guide the edges into wavy folds, creating that classic flowing sheet look. -
Refine the Hem:
If the bottom edges are too long or uneven, trim them slightly with a craft knife or soften the edges with your finger.
Antique Wash
After baking, apply a watered-down brown acrylic wash and wipe it away immediately. The paint will stay in the leaf veins for contrast.
Step 4: Details and Finishing
-
Mark the Face:
Decide where the face should be. Use a needle tool to lightly mark three dots for the eyes and mouth. -
Open the Eyes:
Using a small ball tool or the end of a paintbrush, gently press into the marked spots to create deep, dark hollows for the eyes. -
Open the Mouth:
Create a slightly smaller hollow for the mouth, placed just below and between the eyes for a cute, surprised expression. -
Remove the Support:
If using polymer clay, bake vertically with the foil inside. If using air-dry clay, let it firm up for an hour, then carefully remove the support to help the inside dry. -
Final Cure or Dry:
Bake or dry the ghost according to your specific clay manufacturer’s instructions. -
Sanding:
Once fully cured and cooled, inspect the bottom edge. Use fine-grit sandpaper to smooth out any rough spots on the base. -
Sealing (Optional):
If you want to protect the surface, apply a very thin coat of matte varnish, though leaving it raw preserves the stone-like texture best.
Place your textured clay friend on a windowsill where the natural light can catch distinct leaf impressions
Ghost With a Little Lantern
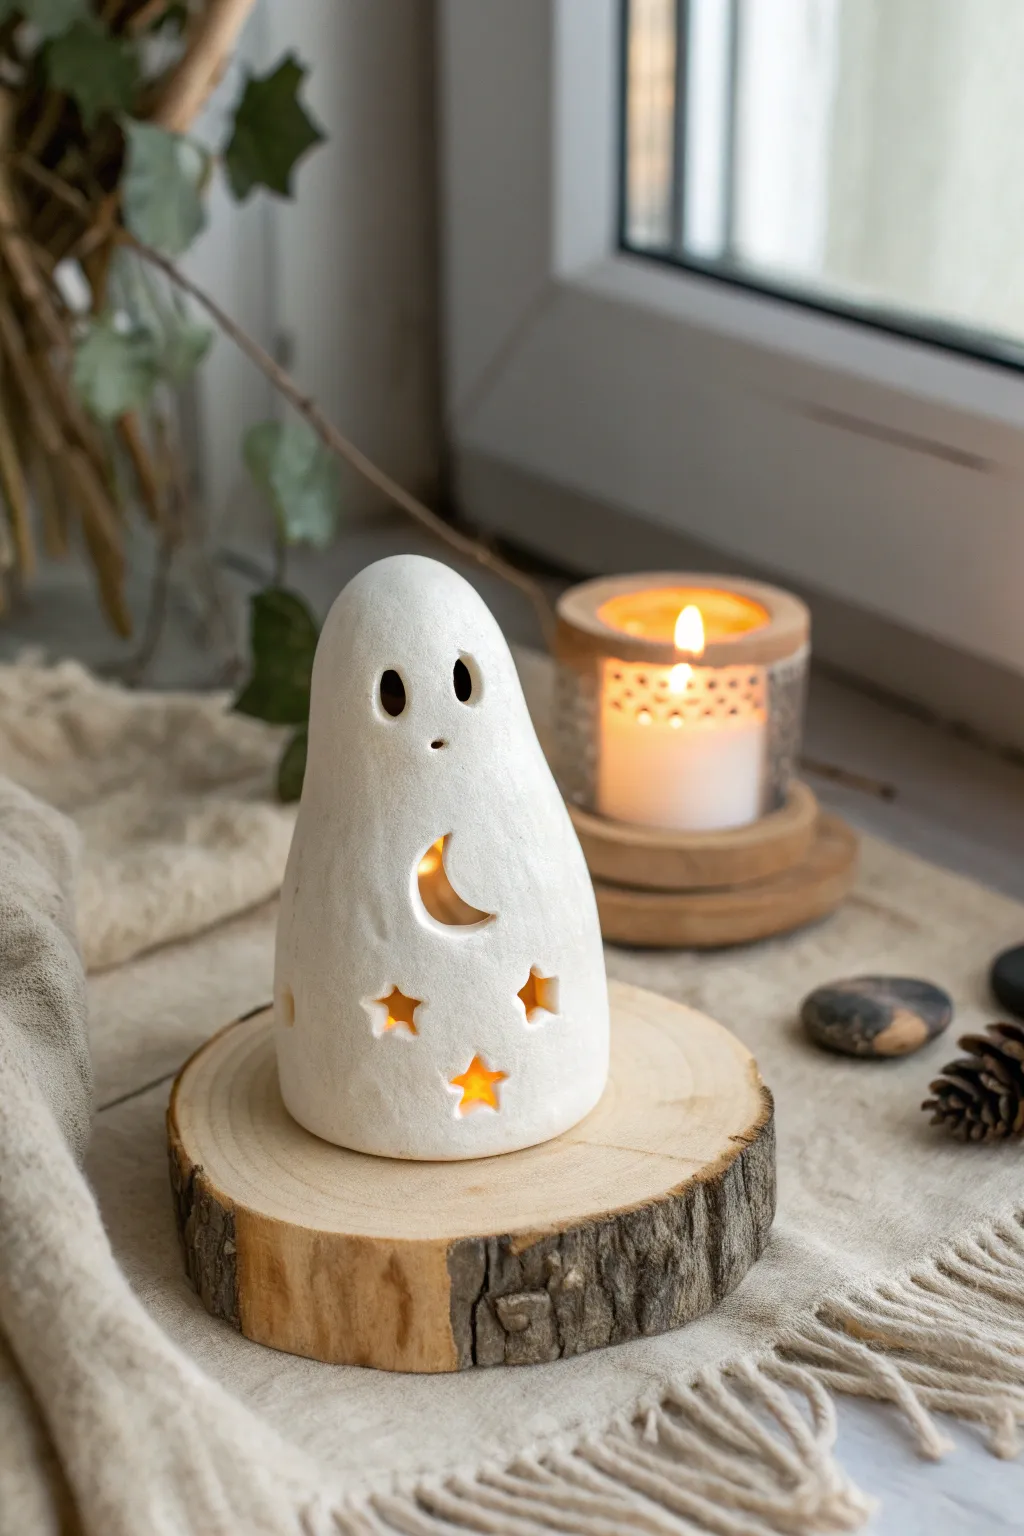
This charming ghost figurine adds a warm, whimsical glow to your autumn decor with its intricate moon and star cutouts. The textured white clay finish gives it a rustic, handcrafted feel that looks beautiful day or night.
Step-by-Step Guide
Materials
- Air-dry clay (white) or polymer clay
- Rolling pin
- Small craft knife or X-Acto knife
- Clay sculpting tools (specifically a small circular cutter/straw and star/moon mini-cutters)
- Small bowl or aluminum foil (for armature/shape support)
- Water and sponge (for smoothing)
- Fine-grit sandpaper
- LED tea light
- Matte white acrylic paint (optional, if using non-white clay)
- Matte spray sealant
Step 1: Forming the Base Shape
-
Condition the Clay:
Start by taking a generous handful of white clay and kneading it thoroughly until it is soft, pliable, and free of cracks. This ensures the structure will be strong once dried. -
Roll a Slab:
Roll the clay out into a thick, even slab, approximately 1/4 inch thick. You want it sturdy enough to stand but thin enough to cut easily. -
Create a Cone Form:
To get that tall, draped ghost shape, you’ll need a temporary support. You can scrunch aluminum foil into a tall, rounded cone shape or use a small cone form. -
Drape and Shape:
Gently drape your clay slab over the foil form. Use your hands to smooth the clay downward, creating the ghost’s body. -
Refine the Silhouette:
Trim any excess clay at the bottom with your craft knife so the ghost sits flat. Shape the top into a seamlessly rounded dome for the head without any sharp points. -
Texture the Surface:
The ghost in the photo has a lovely, slightly pitted texture rather than being perfectly smooth. Gently pat the surface with a coarse sponge or a crumpled ball of aluminum foil to impress a subtle texture.
Clean Cuts
Dip your craft knife or cutters in a tiny bit of water (or cornstarch/flour) before slicing the clay. This prevents sticking and keeps your star points sharp.
Step 2: Carving the Details
-
Mark the Features:
Before cutting, use a needle tool to lightly sketch where the eyes, moon, and stars will go. Place the crescent moon centrally on the chest and scatter stars near the base. -
Cut the Eyes:
Use a small oval cutter or your craft knife to carefully remove the clay for the two tall, oval eyes. Smooth the inner edges with a damp brush or finger. -
Carve the Moon:
Carefully cut out the crescent moon shape in the center. I find twisting the blade slightly as you cut helps prevent the clay from dragging. -
Punch the Stars:
Use a mini star cutter or the very tip of your knife to cut out the three star shapes near the bottom hem of the ghost. Keep the points sharp. -
Add a Tiny Mouth:
Using a very small tool or the end of a paintbrush, create a tiny, simple indentation for the mouth right between the eyes.
Step 3: Finishing Touches
-
Remove the Support:
Once the clay has stiffened slightly (leather hard) but isn’t fully dry, carefully remove the foil or cone support from underneath so the inside can dry properly. -
Dry Completely:
Let the ghost dry according to your clay package instructions. This usually takes 24-48 hours. Turn it occasionally to ensure even airflow. -
Sand Imperfections:
Once bone dry, take fine-grit sandpaper and gently sand the bottom edge to ensure it sits perfectly flat. Lightly sand any rough edges inside the cutouts. -
Seal or Paint:
If you want a brilliant white finish, apply a coat of matte white acrylic paint. Once dry, mist with a matte sealant to protect the clay from humidity. -
Light It Up:
Place a battery-operated LED tea light underneath your finished ghost to illuminate the celestial shapes.
Rustic Display
To match the photo perfectly, glue a small wood slice to the bottom of the ghost as a permanent base, leaving an opening for the tea light switch underneath.
Now you have an adorable, softly glowing companion to brighten up your autumn evenings.

TRACK YOUR CERAMIC JOURNEY
Capture glaze tests, firing details, and creative progress—all in one simple printable. Make your projects easier to repeat and improve.
Stacked Totem of Tiny Ghosts
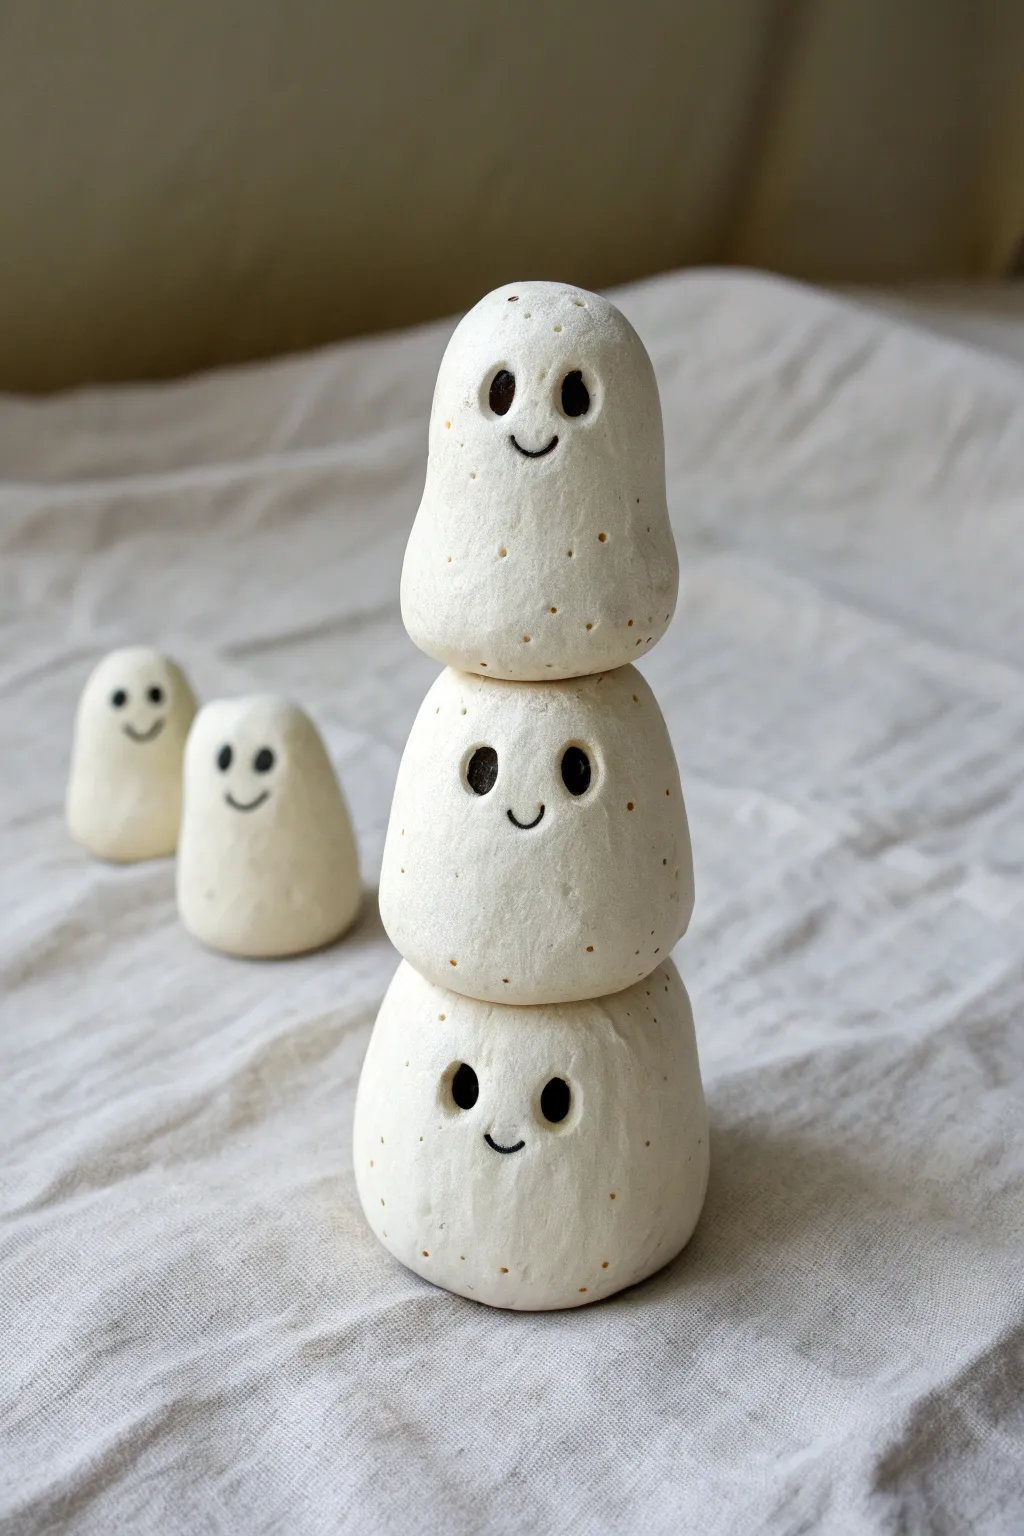
Create a whimsical little tower of spectral friends with this stacked ghost totem project. These smooth, pear-shaped figures feature adorable hollowed-out eyes and a gentle textured finish that gives them a wonderfully organic, handmade feel.
Step-by-Step
Materials
- White polymer clay (or air-dry clay)
- Small ball stylus tool
- Medium ball stylus tool
- Fine-point needle tool
- Black acrylic paint
- Fine detail paintbrush (size 0 or 00)
- Clean, stiff-bristled toothbrush (for texturing)
- Aluminum foil (optional, for armature)
- Potter’s needle or toothpick
Step 1: Shaping the Trio
-
Condition the clay:
Begin by thoroughly conditioning your white clay until it is soft, pliable, and free of cracks. Warm clay is much easier to smooth later on. -
Portion the pieces:
Divide your clay into three distinct balls. Aim for a slightly graduated size difference: make the base ball the largest, the middle one slightly smaller, and the top one the smallest for stability. -
Form the base ghost:
Take the largest ball and roll it into a smooth sphere. Gently roll one end against your work surface to create a slight teardrop shape, but keep the bottom wide and flat so it stands securely. -
Flatten the top:
Press gently on the top of this base ghost to create a small, flat plateau. This provides a secure resting place for the next ghost in the stack. -
Shape the middle ghost:
Roll the second ball into a similar rounded teardrop shape. Since this one sits in the middle, flatten both the bottom (to sit on the base) and the top (to hold the final ghost). -
Create the topper:
Shape the smallest ball into a teardrop. Flatten only the bottom of this one, keeping the head pleasantly rounded. -
Test the fit:
Stack the three pieces temporarily to check the balance. Adjust the flattened areas if the tower leans too much to one side.
Help, it’s leaning!
If your stack keeps tipping, insert a toothpick or wire through the center of all three ghosts while the clay is wet to act as an internal spine.
Step 2: Adding Personality
-
Hollow the eye sockets:
Take your medium ball stylus and press firmly into the ‘face’ area to create deep eye sockets. I like to space them slightly wide apart for a friendlier look. Don’t worry about the black color yet; just create the depth. -
Refine the eye shape:
Use the smaller ball stylus to deepen the center of the sockets, making them look like dark, cavernous hollows rather than just surface dots. -
Carve the smiles:
Using a needle tool or the very tip of a craft knife, carefully carve a small, simple ‘U’ shape between the eyes for the mouth. Keep the line thin and delicate. -
Detail the background ghosts:
If you are making the accompanying single ghosts, repeat the shaping and face-carving process for two additional standalone figures. -
Add surface texture:
Gently tap a clean, stiff toothbrush or a texturing sponge over the surface of the clay. This removes fingerprints and adds a stone-like or marshmallowy matte texture. -
Add speckles (optional):
For the speckled look seen in the photo, you can prick tiny, random shallow holes with a needle tool over the bodies, or use clay that already has speckles mixed in.
Pro Tip: Eye Depth
The ‘void’ look comes from shadows. Make the eye sockets deeper than you think necessary so the black paint has a physical hollow to rest in.
Step 3: Assembly & Finishing
-
Permanent stacking:
If using polymer clay, adding a tiny drop of liquid clay or ‘Bake & Bond’ between the layers will fuse them permanently. For air-dry clay, score the touching surfaces and use a dab of water or slip. -
Cure or dry:
Bake your polymer clay ghosts according to the package directions (usually 275°F/135°C for 15-30 minutes). If using air-dry clay, let them sit undisturbed for 24-48 hours. -
Paint the eyes:
Once fully cool or dry, dilute a small amount of black acrylic paint with water. Use your fine detail brush to fill in the hollowed eye sockets, letting the darkness pool at the bottom. -
Define the mouth:
Use the very tip of your brush (or a fine-tip black marker) to trace the carved smile line, giving them their happy expressions. -
Matte finish:
To protect the paint without adding unnatural shine, seal the ghosts with a matte varnish spray.
Display your totems on a shelf or desk for a spirited little decoration that is more cute than spooky