When I’m brainstorming clay gift ideas for men, I always start with pieces he’ll genuinely use—something functional, sturdy, and not too fussy. Here are my favorite options, from classic everyday essentials to hobby-inspired ideas that feel personal without trying too hard.
Rustic Coffee Mug With a Thick Handle
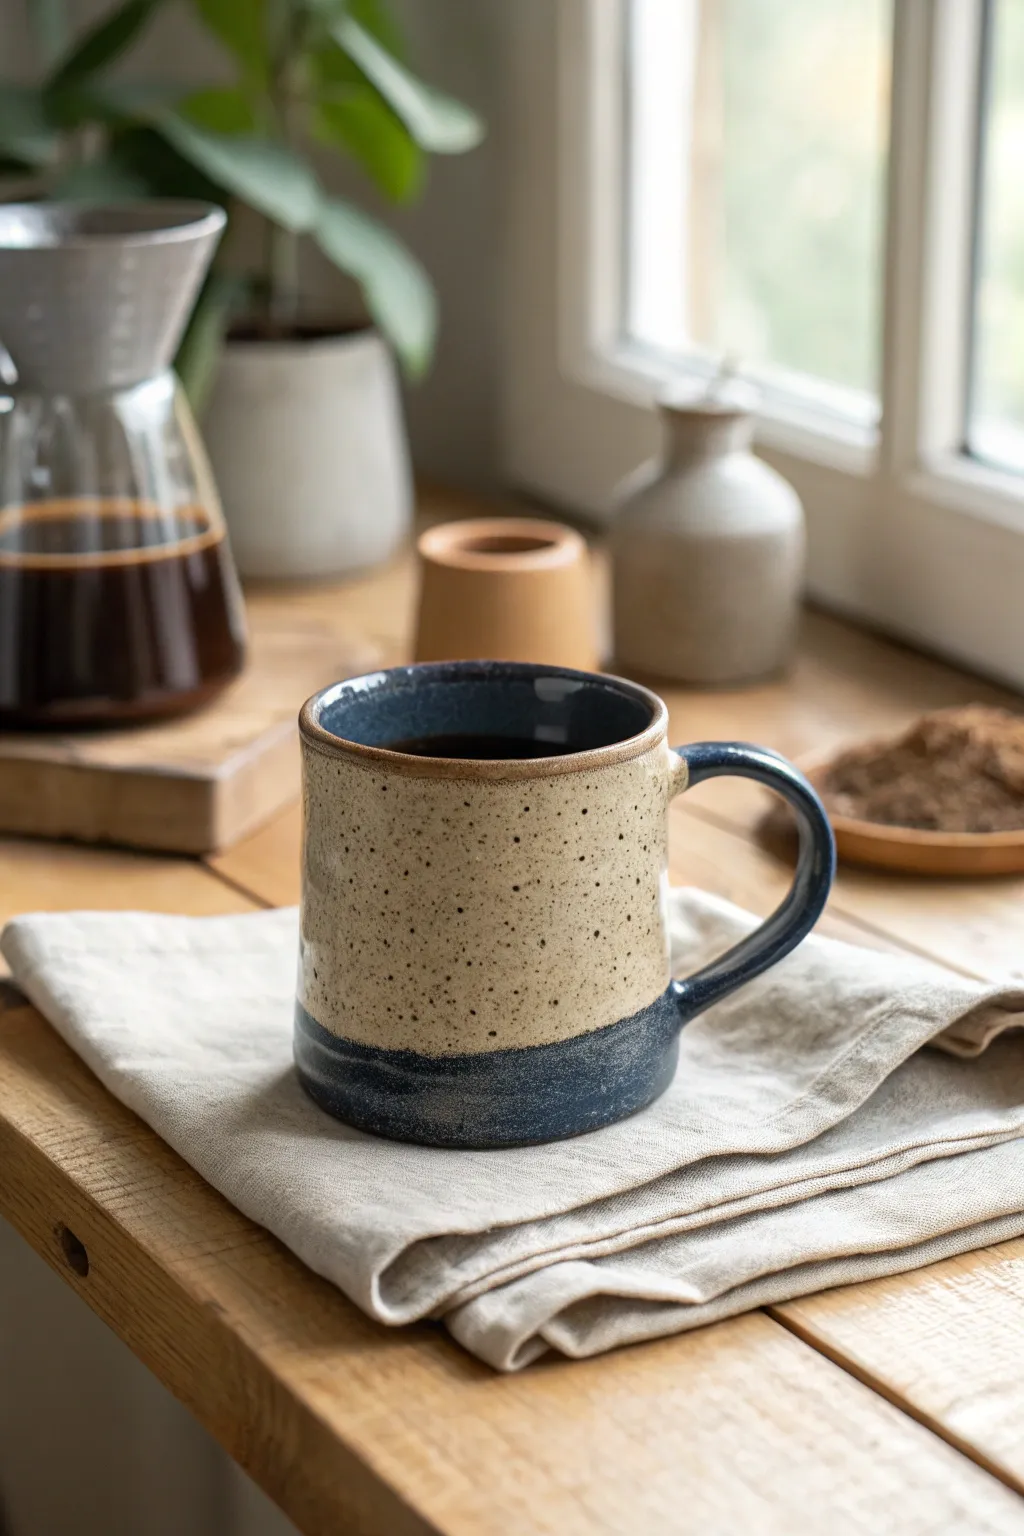
This handsome mug combines the earthy warmth of speckled clay with a deep, moody blue glaze for a piece that feels both rugged and refined. Its generous size and sturdy handle make it the perfect everyday vessel for morning coffee.
How-To Guide
Materials
- Speckled stoneware clay (approx. 1-1.5 lbs)
- Pottery wheel
- Throwing tools (sponge, needle tool, wire cutter, ribs)
- Trimming tools
- Water bucket
- Scoring tool or fork
- Slip (clay and water slurry)
- Dark blue dipping glaze
- Clear or light tan matte glaze (optional, if clay body isn’t self-glazing)
- Wax resist
- Kiln
Step 1: Throwing the Body
-
Prepare the Clay:
Begin by thoroughly wedging about 1 to 1.5 pounds of speckled stoneware clay to remove air bubbles and align the particles. -
Center on the Wheel:
Slam the clay onto the wheel head and use water and firm pressure to center it perfectly. A wider base provides the rustic stability we’re aiming for here. -
Open and Pull:
Open the clay and gently pull up the walls to form a cylinder. Aim for a height of about 4-5 inches, keeping the walls relatively straight but slightly tapered inward at the top to hold heat. -
Shape the Rim:
Compress the rim with a chamois or your sponge to ensure it is smooth and pleasant against the lips. A slight outward flare can be nice, but this design keeps it fairly upright. -
Refine the Surface:
Run a metal or wooden rib up the exterior while the wheel is spinning slowly to remove throwing lines and smooth the surface, highlighting the natural speckles once fired. -
Cut and Dry:
Wire cut the pot from the wheel head and set it aside on a ware board until it reaches a leather-hard state.
Step 2: Adding the Handle
-
Pull a Handle:
Using a fresh lug of clay and plenty of water, pull a strap of clay. For this specific look, keep the handle fairly thick and sturdy, not delicate. -
Shape the Curve:
Allow the pulled strap to set up slightly, then curve it into a ‘C’ shape that comfortably fits three fingers. -
Trim the Body:
Once leather-hard, place your mug body back on the wheel (centered upside down) and trim away excess weight from the bottom, creating a clean foot ring. -
Score and Slip:
Score the attachment points on both the mug body and the handle ends. Apply a generous amount of slip to both surfaces. -
Attach and Smooth:
Firmly press the handle onto the mug. Use a modeling tool or your finger to smooth the seams completely so the handle looks like it grew out of the mug.
Cracked Handle?
Handles often dry faster than the body, causing cracks. Wrap the joined handle in plastic or wax the join while drying to equalize moisture loss.
Step 3: Glazing and Firing
-
Bisque Fire:
Once the mug is bone dry, load it into the kiln for a bisque firing (usually Cone 04) to prepare it for glazing. -
Clean the Bisque:
Wipe the fired piece with a damp sponge to remove any dust that might prevent the glaze from adhering properly. -
Glaze the Interior:
Pour the dark blue glaze inside the mug, roll it around to coat the entire interior surface, and pour out the excess. -
Dip the Rim and Handle:
Hold the mug by the base and dip just the top rim and the handle into the dark blue glaze. I find rotating it slightly while dipping helps get even coverage on the handle. -
Dip the Bottom:
Hold the mug by the top (where the glaze is dry) or use glazing tongs to dip the bottom third of the mug into the dark blue glaze creating that distinct band at the base. -
Expose the Speckles:
Leave the middle section bare if your clay body vitrifies nicely—the bare clay provides the tan speckled look. If your clay is porous, apply a clear matte glaze to the middle band. -
Clean the Foot:
Use a sponge or wax resist to ensure absolutely no glaze is on the bottom of the foot ring, or it will fuse to your kiln shelf. -
Final Fire:
Fire the mug to the temperature recommended for your stoneware clay and glaze combo (typically Cone 5 or 6). Let the kiln cool completely before opening.
Personalize It
Before the clay dries, stamp a small maker’s mark or initials into the exposed raw clay section near the bottom glaze line for a custom touch.
Now you have a durable, handcrafted mug ready to be filled with your favorite hot beverage


Geometric Coaster Set in Earth Tones
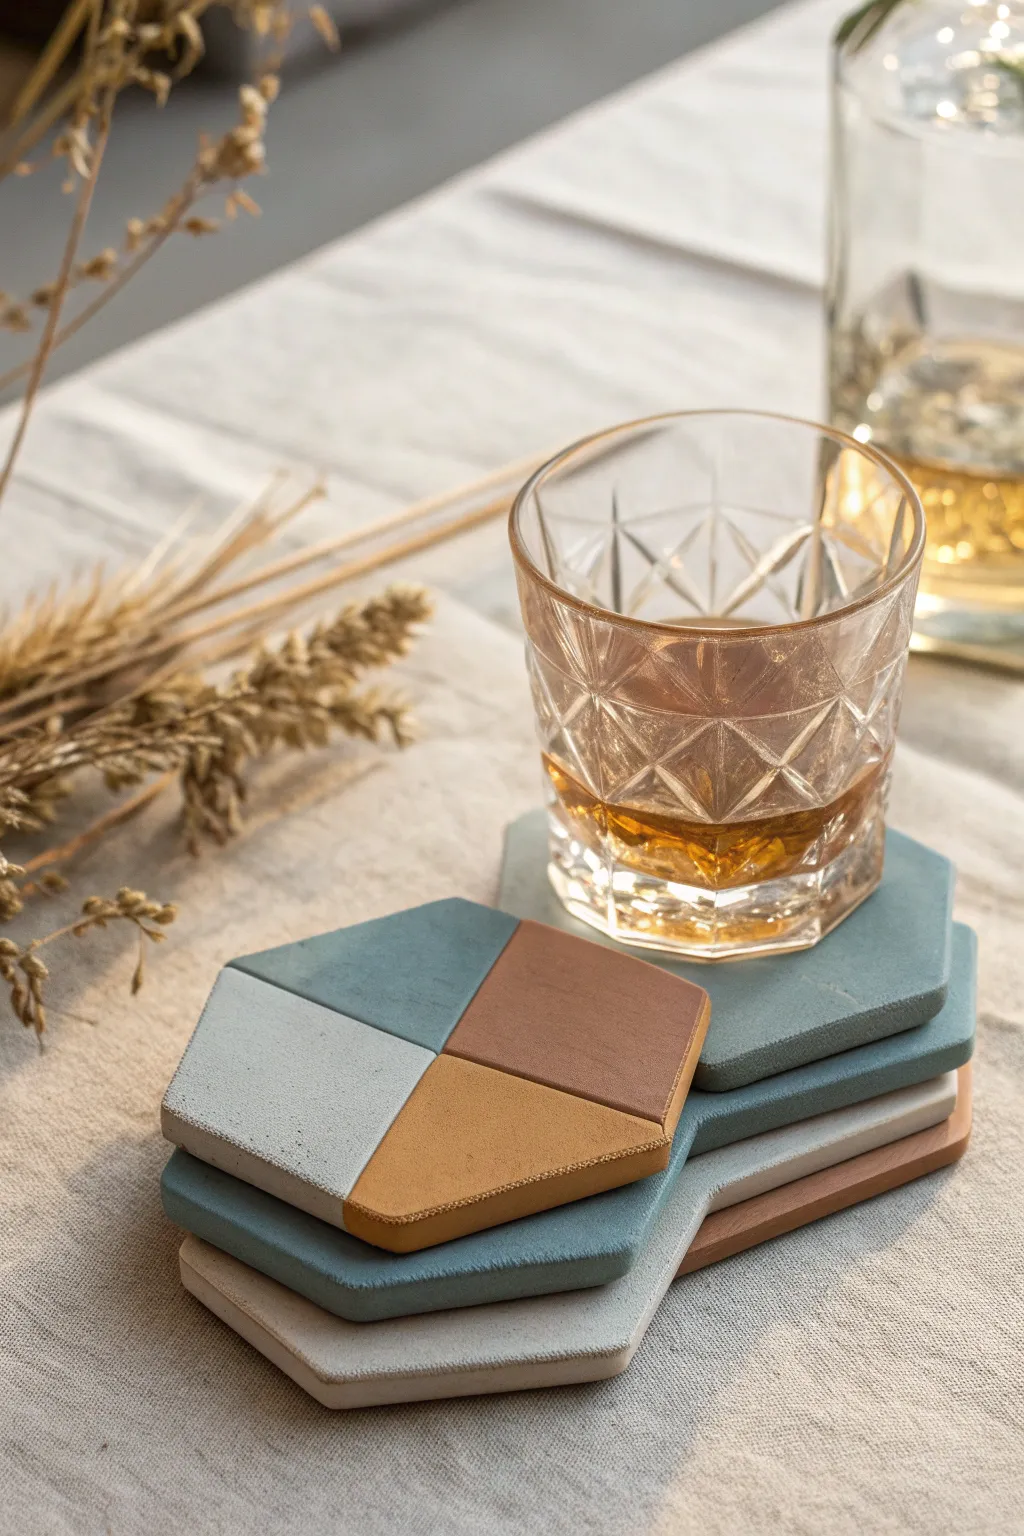
Elevate your coffee table with this set of modern, geometric coasters featuring a sophisticated earth-tone palette. The clean hexagonal shapes and blocked color design create a professional-looking finish that makes a perfect handmade gift.
Detailed Instructions
Materials
- Polymer clay (colors: slate blue, terracotta, mustard yellow, white/beige)
- Hexagon cookie cutters (approx. 4 inches wide)
- Acrylic rolling pin or pasta machine
- Flexible craft knife or tissue blade
- Parchment paper or ceramic tile
- Fine-grit sandpaper (400 to 1000 grit)
- Ruler
- Oven and baking sheet
Step 1: Planning and Mixing
-
Condition the Clay:
Begin by conditioning each block of clay separately. Warm the clay in your hands and knead it until it becomes soft and pliable. This prevents cracking later. -
Create Custom Shades:
For that muted, earthy look shown in the photo, you might need to mix colors. Simply blend a bit of white into your slate blue for softness, or mix brown into orange for a terracotta hue. -
Roll Out Slabs:
Roll each color into a sheet approximately 1/4 inch thick. A pasta machine is ideal for uniform thickness, but an acrylic roller with depth guides works well too.
Clean Cuts Only
Chill your rolled clay sheets in the fridge for 10 minutes before cutting. Cold clay resists dragging and deforming, giving you much sharper geometric lines.
Step 2: Creating the Geometric Pattern
-
Cut Basic Shapes:
Using your hexagon cutter, practice a few test cuts. For the solid-colored coasters, simply stamp out the full hexagon shape. -
Slice Segments:
For the multi-colored coaster, take your rolled-out sheets of blue, white, terracotta, and mustard. Use your ruler and craft blade to cut precise geometric segments—trapezoids or rhombus shapes—that will fit together to form a hexagon. -
Assemble the Puzzle:
On a piece of parchment paper, gently press your cut color segments together. Make sure the edges touch flush without overlapping. -
Fuse the Seams:
Cover the assembled shape with a fresh piece of parchment paper. Roll over it gently with your rolling pin to bond the seams together and level the surface. -
Final Cut:
Once your patterned sheet is fused, position your hexagon cutter over the design to capture the geometric intersection perfectly. Press down firmly to cut the final coaster shape.
Step 3: Refining and Baking
-
Smooth the Edges:
Gently lift the raw clay coaster. Run your finger dipped in a little cornstarch or water along the edges to smooth out any harsh cutting lines. -
Prepare for Baking:
Place your coasters on a ceramic tile or baking sheet lined with parchment. I prefer to bake them on a tile to ensure the bottoms stay perfectly flat. -
Bake:
Bake according to your specific clay brand’s instructions (usually 275°F for 15-30 minutes per 1/4 inch of thickness). Do not increase the temperature to speed it up. -
Cool Down:
Allow the coasters to cool completely in the oven with the door cracked, or remove and let sit on a flat surface until room temperature.
Terrazzo Twist
Save your scrap clay cuttings! Chop them into tiny irregular bits and press them into a white clay base to create a matching terrazzo-style coaster for the set.
Step 4: Finishing Touches
-
Sanding:
Once fully cooled, wet-sand the edges and surface using fine-grit sandpaper. Dip the paper in water and sand in circular motions for a silky, matte finish. -
Buffing:
Dry the coaster and buff it vigorously with a soft denim cloth or a piece of felt to bring out a subtle, natural sheen without making it glossy. -
Add Protection:
For extra durability against moisture, you can add a very thin layer of matte polymer clay varnish, though wet-sanding usually provides a sufficient finish. -
Backing (Optional):
Glue a thin sheet of cork or adhesive felt cut to the same hexagon shape on the bottom to protect your furniture surfaces from scratches.
Stack your finished coasters and wrap them with twine for a gift that looks professionally designed


Desk Catch-All Dish for Coins and Earbuds
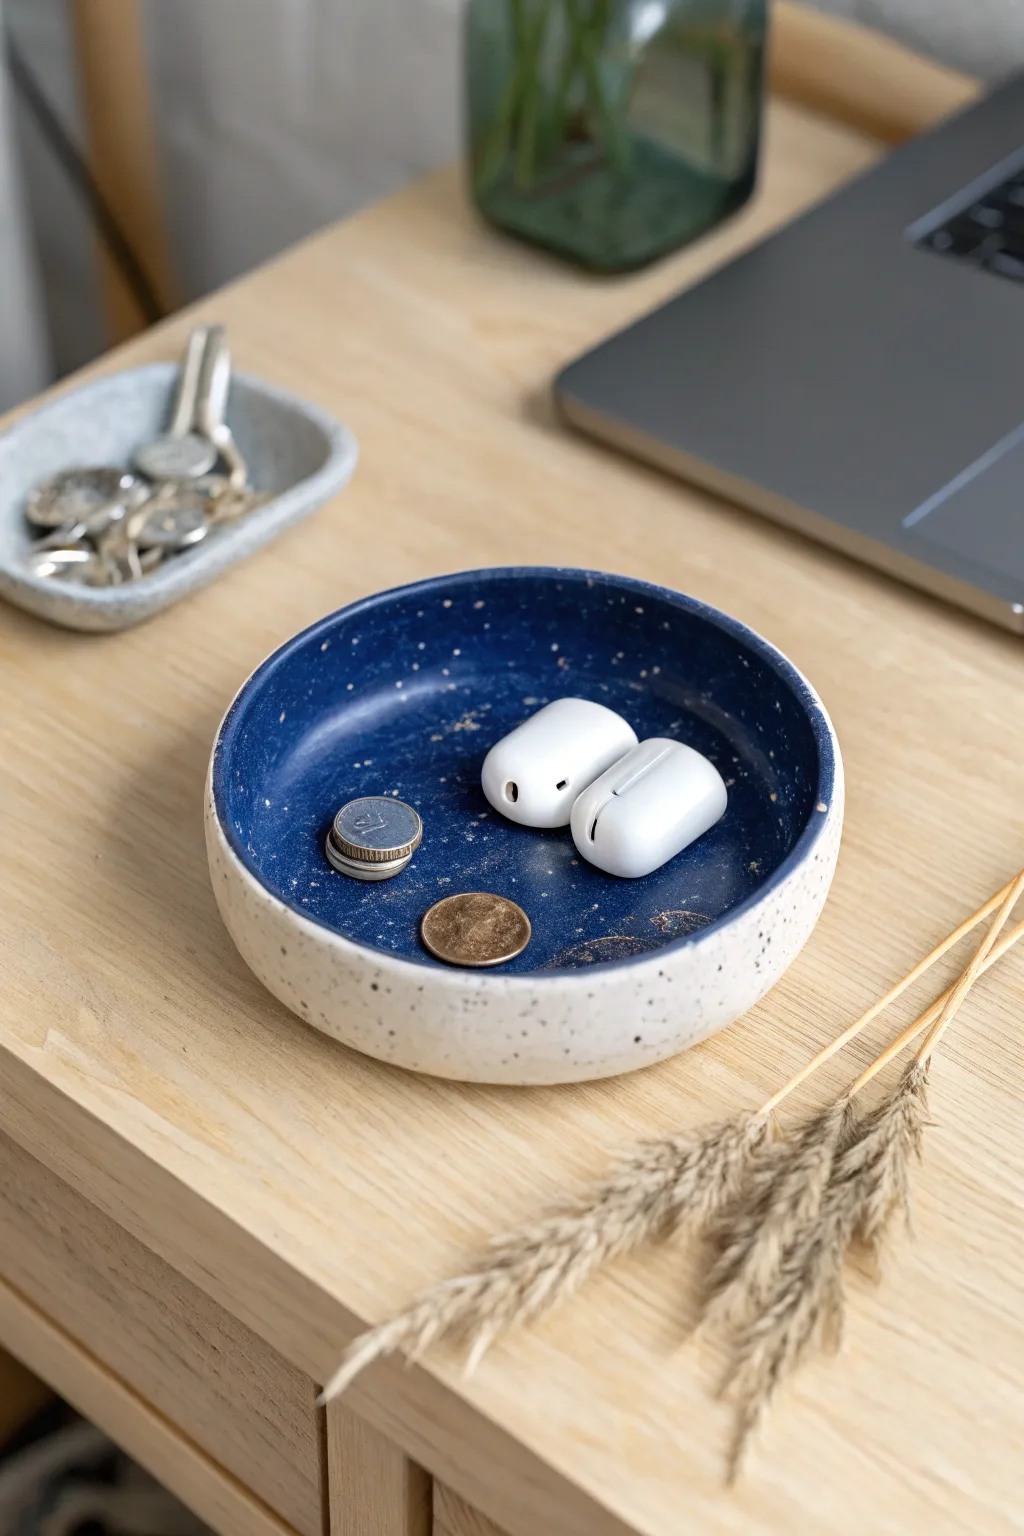
This sophisticated desk accessory combines a creamy, speckled exterior with a deep, galaxy-like blue interior. It’s the perfect size for corraling loose change, earbuds, and keys, adding a touch of modern craftsmanship to any workspace.
Step-by-Step Tutorial
Materials
- Air-dry clay (white) or polymer clay
- Rolling pin
- Circle template or bowl (approx. 4-5 inches diameter)
- Craft knife
- Sandpaper (fine grit)
- Acrylic paint: Navy Blue, Cream/Off-White, Black
- Metallic Gold paint
- Paintbrushes (flat shader and old toothbrush)
- Gloss varnish or sealant
- Small bowl for molding (to shape the clay)
Step 1: Shaping the Clay Base
-
Condition the clay:
Start by kneading a handful of your air-dry or polymer clay until it is soft, pliable, and free of cracks. Warm clay is much easier to work with. -
Roll out the slab:
Using your rolling pin, flatten the clay into an even slab about 1/4 inch thick. Try to maintain a uniform thickness so the dish dries evenly. -
Cut the circle:
Place your circle template or an overturned bowl onto the clay slab. Use your craft knife to trace around the edge, cutting out a perfect circle. -
Smooth the edges:
Dip your finger in a little water (for air-dry clay) or baby oil (for polymer) and run it along the cut edge to soften any sharp corners or roughness. -
Form the shape:
Gently lift your clay circle and drape it into your molding bowl to give it a slight curve. Press it gently to ensure it takes the shape, but don’t thin it out too much. -
Create the rim:
If you want a vertical rim like in the photo, gently press the edges of the clay upward against the sides of the mold rather than just letting it slope.
Rim Cracking?
If you see small cracks forming on the rim while drying, smooth a small amount of clay straight into the crack with a wet finger (air-dry) or bake and fill with clay softner (polymer).
Step 2: Drying and Refining
-
Let it dry:
Allow the clay to dry completely according to the package instructions. For air-dry clay, this usually takes 24-48 hours; for polymer, bake as directed. -
Unmold carefully:
Once fully cured or dry, pop the clay form out of the mold. It should be rigid and hold its shape perfectly. -
Sand for smoothness:
Take your fine-grit sandpaper and gently buff the entire surface. Pay special attention to the rim to ensure it feels smooth to the touch. -
Wipe it down:
Use a slightly damp cloth or paper towel to remove all the sanding dust. A clean surface is crucial for the paint to adhere properly.
Step 3: Painting the Finish
-
Paint the exterior:
Apply two coats of cream or off-white acrylic paint to the outside and bottom of the dish. Let the first coat dry fully before adding the second for opaque coverage. -
Paint the interior:
Switch to your navy blue paint and cover the entire inside of the dish. Carry the blue color just over the top lip of the rim for a clean, finished look. -
Create the exterior speckles:
Dilute a tiny drop of black paint with water. Load an old toothbrush, hold it near the cream exterior, and use your thumb to flick the bristles, spraying fine black specks. -
Create the interior galaxy:
I like to use a different brush for the gold to keep it bright. Repeat the splatter technique inside the blue bowl using metallic gold paint to create a starry effect. -
Add gold accents:
If you want distinct gold spots rather than just spray, use the end of a paintbrush handle to dot a few larger metallic circles inside. -
Seal the project:
Once all paint is bone dry, apply a coat of gloss varnish over the entire dish. This protects the finish from chipping and gives it a professional ceramic look.
Level Up: Leather Base
Glue a circular cutout of felt or faux leather to the bottom of the dish after sealing. This prevents scratching your desk surface and adds a luxury feel.
Place this handsome dish on a desk or nightstand to keep small essentials organized in style


Sleek Business Card Holder With Clean Lines
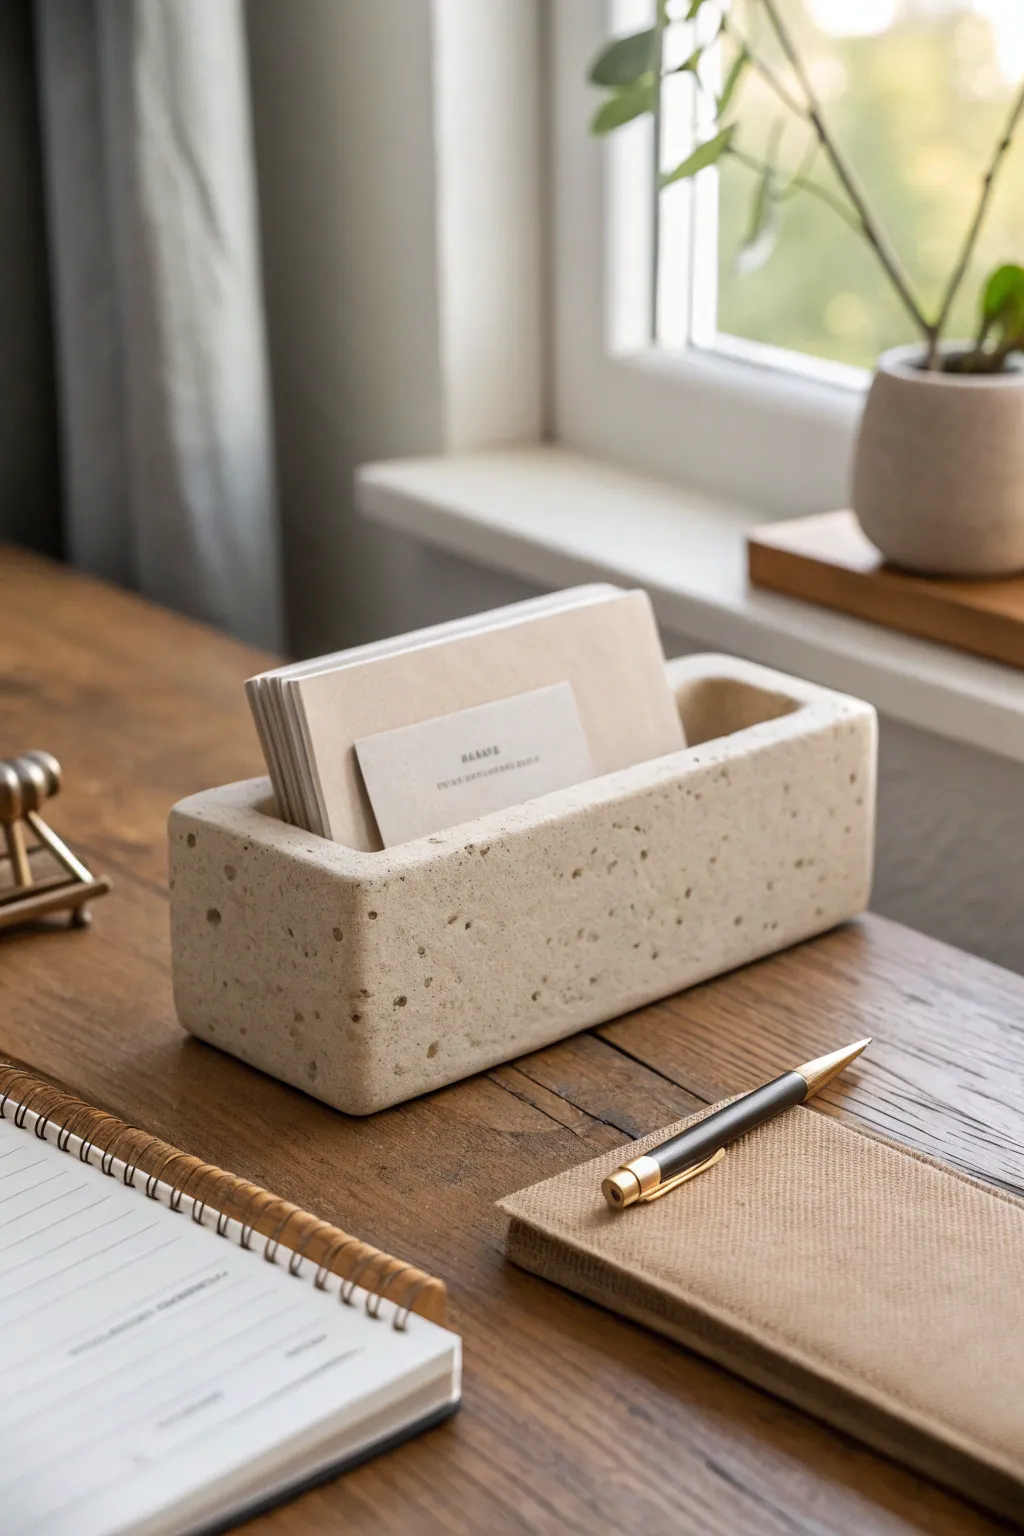
This minimalist desk accessory mimics the sophisticated look of travertine stone using ordinary polymer or air-dry clay. Its speckled, pitted texture and clean rectangular form make it a perfect, masculine addition to any modern workspace.
Step-by-Step
Materials
- Stone-effect polymer clay (e.g., ‘Granite’ or ‘Sand’ finish)
- White or beige polymer clay (for mixing)
- Medium-grit sandpaper
- Coarse salt or stiff toothbrush (for texturing)
- Rolling pin or clay machine
- Cardboard or stiff paper (for template)
- Craft knife or scalpel
- Ruler
- Parchment paper
- Oven (if using polymer clay)
Step 1: Preparation and Form
-
Blend your clay color:
Begin by conditioning your stone-effect clay. If the speckled effect is too dark, mix in some plain beige or white clay until you achieve a light, sandy limestone hue. You want a color that feels natural and warm. -
Roll out the slab:
Roll your conditioned clay into a thick, even slab, approximately 1/4 inch (6mm) thick. A consistent thickness is crucial for the sleek, professional look of the final piece. -
Create a rectangular mold:
Instead of building freehand, create a simple open box form using stiff cardboard. The internal dimensions should act as a guide for your clay, ensuring 90-degree corners. -
Cut the base and walls:
Using your craft knife and a ruler, cut a long rectangular base and four wall pieces. The side walls should be long and low, while the end pieces complete the rectangle. -
Assemble the box:
Join the walls to the base. Score the edges where they meet to roughen them, add a drop of liquid clay (or slip if using air-dry), and press them firmly together. -
Smooth the seams:
This is the most critical structural step. Use your finger or a clay tool to smooth the seams inside and out until the joins are invisible and the walls are joined seamlessly.
Natural Texture
Don’t overthink the salt placement. The beauty of travertine lies in its irregularity. A mix of kosher salt and regular table salt creates varied hole sizes.
Step 2: Texturing and Refining
-
Shape the corners:
Gently rub the sharp corners with your finger warmth to round them off slightly. The reference piece has a soft, tumbled stone look rather than razor-sharp industrial edges. -
Add the travertine texture:
To mimic the porous nature of travertine, press coarse salt granules into the exterior surfaces of the clay. Press them in randomly—some clustered, some isolated. -
Enhance surface details:
I like to take a stiff toothbrush or a crumpled ball of aluminum foil and lightly tap the surface between the salt granules to remove any plastic-looking smoothness. -
Final shape check:
During texturing, the walls might have bowed slightly. Use your ruler to gently push them back into straight, parallel alignment. -
Bake or dry:
If using polymer clay, bake according to the package directions (usually 275°F/135°C for 30 minutes per 1/4 inch). If using air-dry clay, let it dry for 24-48 hours.
Step 3: Finishing Touches
-
Remove the salt:
Once the piece is fully cured and cooled (or dry), submerge it in warm water. The salt crystals will dissolve, leaving behind natural-looking pits and craters. -
Sand the surfaces:
Using medium-grit sandpaper, sanding the flat surfaces of the holder. You want to knock down any high ridges created by the texturing process to create a flat, matte stone finish. -
Wash and dry:
Rinse off any sanding dust and let the piece dry completely. The wet clay will look darker, so wait for it to dry to see the true stone color. -
Seal (Optional):
To keep the matte look, use a deeply matte varnish or simply buff with a heavy cloth. Avoid glossy finishes, as they will ruin the natural stone illusion.
Weighted Feel
Before sealing the bottom, embed a few metal washers or weights into the base clay layer. This gives the holder a heavy, premium feel.
Place this on a wooden desk to instantly add an element of organized, architectural calm to the workspace

The Complete Guide to Pottery Troubleshooting
Uncover the most common ceramic mistakes—from cracking clay to failed glazes—and learn how to fix them fast.
Shaving Set Tray and Soap Dish
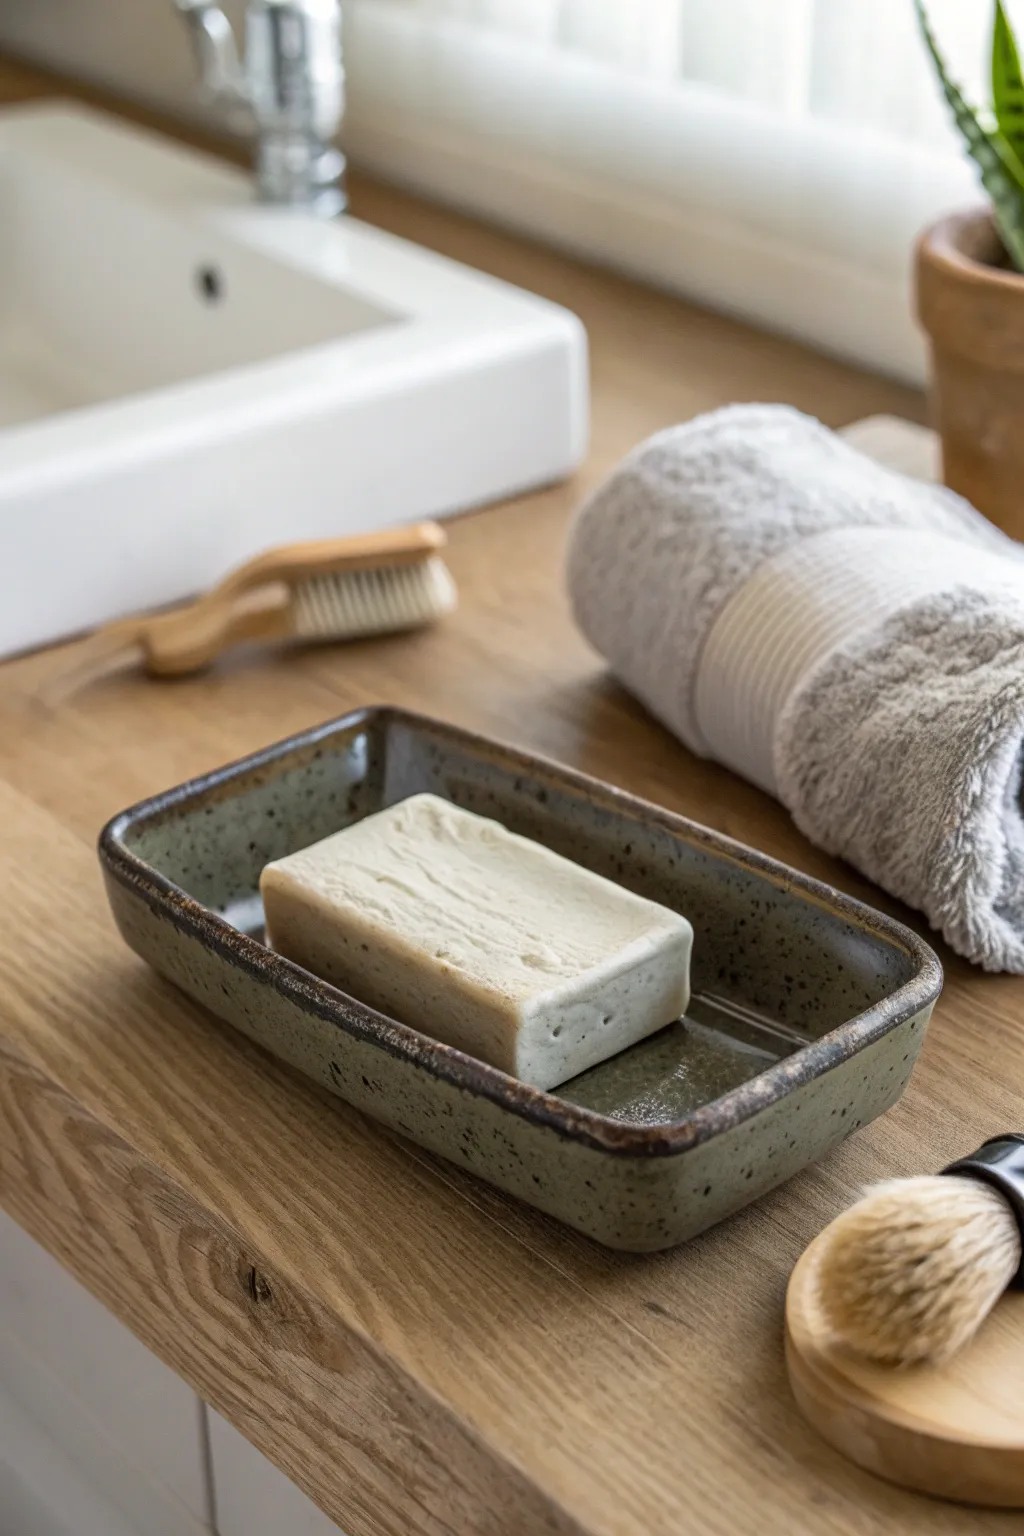
For the man who appreciates practical simplicity, this handcrafted soap tray makes a thoughtful addition to a shaving routine. The speckled stoneware and muted mossy green glaze give it a rugged, natural aesthetic that looks handsome on any bathroom counter.
How-To Guide
Materials
- Speckled stoneware clay (mid-fire)
- Wooden rolling pin
- Canvas work surface or mat
- Needle tool
- Wooden modeling tool or chamois
- Rectangular template (cardboard or plastic)
- Sponge
- Fettling knife
- Potter’s rib (rubber or wood)
- Moss green mid-fire glaze (semi-gloss or satin)
- Kiln for firing
Step 1: Forming the Slab
-
Prepare the Clay:
Begin with a fist-sized ball of speckled stoneware clay. Wedge it thoroughly on your canvas surface to remove any air bubbles and ensure the particles are aligned for strength. -
Roll the Slab:
Place the clay on the canvas and use the rolling pin to flatten it. Aim for a consistent thickness of about 1/4 inch (6mm). Turn the clay periodically to ensure it doesn’t stick and stretches evenly. -
Smooth the Surface:
Take a rubber potter’s rib and gently compress the surface of the slab on both sides. This aligns the clay platelets, prevents warping later, and creates that smooth finish we want for the soap. -
Cut the Shape:
Place your rectangular template (roughly 4×6 inches is a good standard size) onto the slab. Using your needle tool, trace around the template to cut out the base shape.
Drainage Matters
To keep the soap from getting mushy, you can add slightly raised ridges of clay to the interior bottom before drying. This lifts the soap up, allowing air to circulate underneath.
Step 2: Building the Rim
-
Measure the Perimeter:
Using the leftover scraps from your slab, roll out long coils or strips of clay. These should be slightly thicker than the base, perhaps 3/8 inch thick. -
Score the Edges:
Using a serrated rib or needle tool, rough up the outer edge of your rectangular base where the walls will attach. Do the same to the bottom edge of your clay strips. -
Apply Slip:
Dab a small amount of slip (liquid clay) or water onto the scored areas. This acts as the glue for your joinery. -
Attach the Walls:
Press the clay strips onto the edge of the base to form the walls. Overlap the ends slightly where they meet, score and slip the join, and blend them together seamlessly. -
Reinforce the Inside Seam:
Use a wooden modeling tool to drag a small amount of clay from the wall down onto the floor of the dish, smoothing the transition so there is no sharp angle where dirt can collect. -
Shape the Rim:
Gently pinch the walls to your desired height—about 1 inch is sufficient for a soap dish. I like to slightly taper the rim inwards just a hair to give it a more contained look. -
Refine the Corners:
Use your fingers or a damp sponge to round off the sharp corners of the rectangle. This gives the piece that soft, approachable feel seen in the example.
Make it a Set
Create a matching shaving brush handle or a small tumbler for the razor using the same clay body and glaze for a complete, high-end gift set.
Step 3: Finishing and Glazing
-
Slow Drying:
Cover the piece loosely with plastic and let it dry slowly to the leather-hard stage. This prevents the flat bottom from warping or bowing upwards. -
Smooth the Rim:
Once leather hard, take a slightly damp chamois or sponge and run it over the rim one last time to ensure it is perfectly comfortable to the touch. -
Bisque Fire:
Load the bone-dry tray into the kiln and bisque fire it according to your clay body’s specifications (usually Cone 04 or 06). -
Wax the Bottom:
After the bisque firing, apply wax resist to the bottom of the tray to prevent glaze from sticking to the kiln shelf. -
Apply Glaze:
Dip the tray into a moss green glaze. Hold it under for about 3 seconds to get a nice even coat. Shake off excess drips as you pull it out. -
Rim Detail:
For the darker rim effect shown in the image, you can gently wipe away a thin layer of the green glaze on just the very edge, allowing the speckled clay body to break through during firing. -
Glaze Fire:
Fire the piece to the glaze’s maturity temperature (likely Cone 5 or 6 for mid-fire stoneware). Let the kiln cool naturally before unloading.
Once cooled, this durable tray is ready to bring a touch of earthy elegance to the morning routine
Salt Cellar or Pinch Bowl Set for Cooking
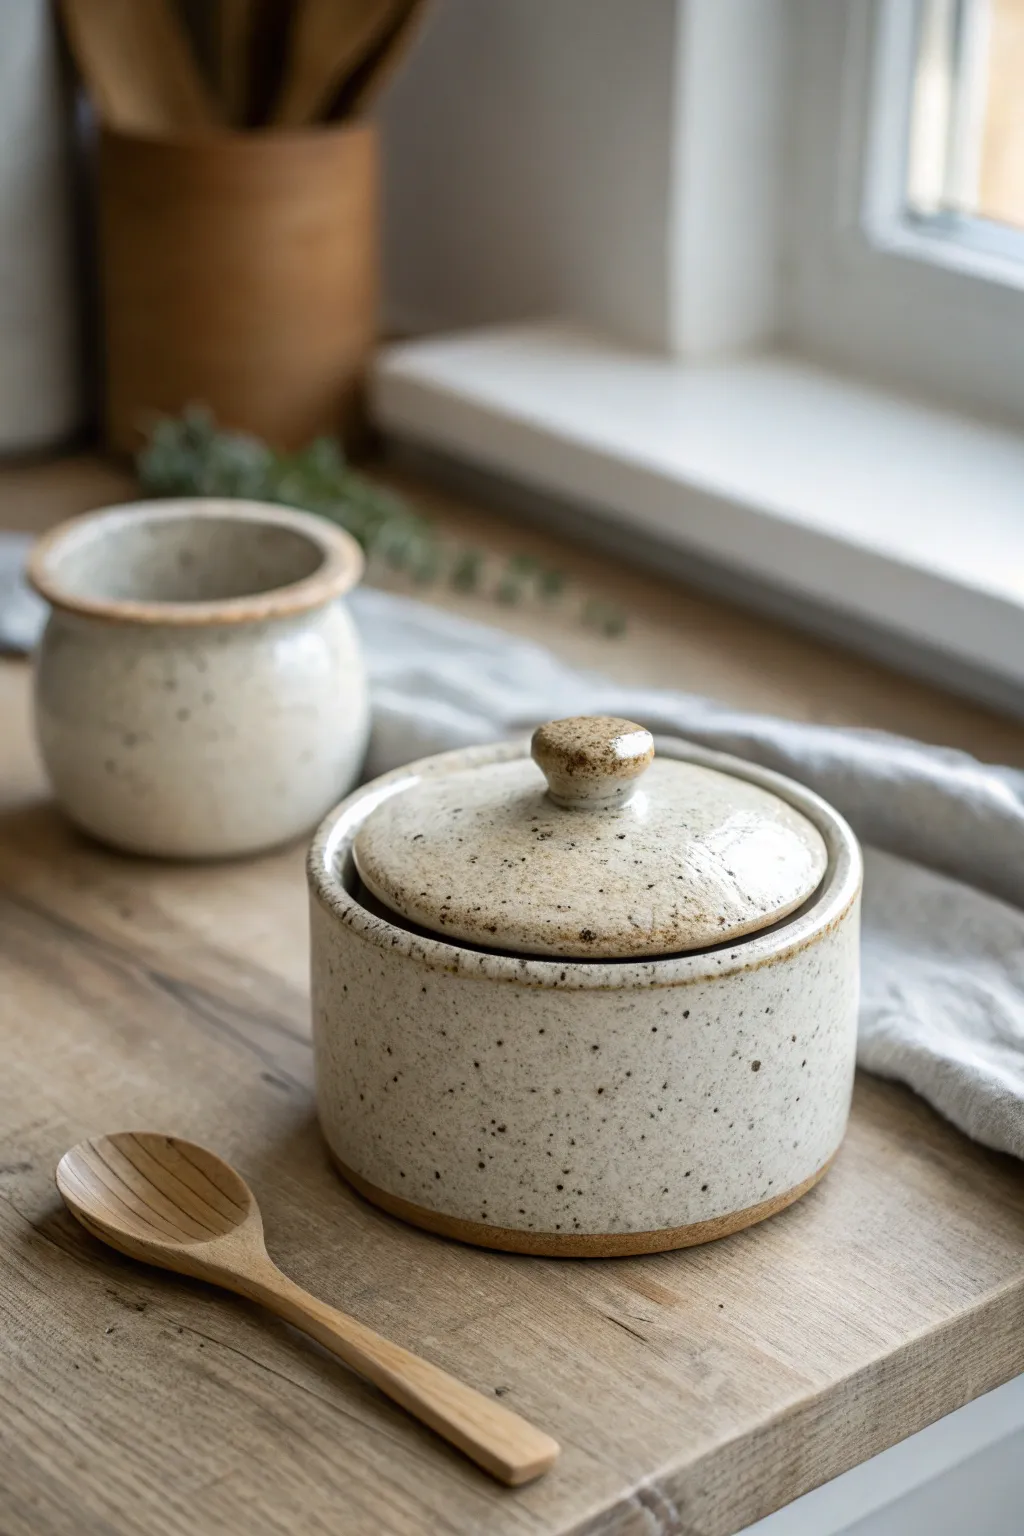
This rustic, functional salt cellar set combines a clean cylindrical form with a warm, speckled finish that feels right at home in any kitchen. The lidded jar keeps sea salt fresh, while the matching pinch pot adds versatility to the cook’s workspace.
Step-by-Step Guide
Materials
- Speckled clay body (stoneware)
- Potter’s wheel
- Throwing tools (sponge, wooden rib, wire cutter)
- Trimming tools
- Calipers
- Clear or translucent white glaze
- Kiln
- Needle tool
- Water bucket and sponge
Step 1: Throwing the Main Body
-
Center the clay:
Start with about 1-1.5 lbs of speckled clay. Wedge it thoroughly to remove air bubbles, then slam it onto the center of the wheel head. Cone up and down until the clay is perfectly centered. -
Open and widen:
Drill your thumb into the center, stopping about 1/4 inch from the bat. Pull the clay outward to create a flat base that is roughly 3-4 inches wide. -
Pull the walls:
Slowly pull the walls straight up. Aim for a consistent thickness of about 1/4 inch. The form should be purely cylindrical, so keep your hands steady and vertical. -
Create the gallery:
At the rim, slightly thicken the clay and use a wooden tool or your thumb to press a small indentation or ‘gallery’ on the inside edge. This is where the lid will sit. -
Smooth and refine:
Run a wooden rib along the outside to remove throwing lines and ensure the wall is perfectly straight. Chamfer the bottom edge slightly with a wooden knife. -
Measure matching dimensions:
Use calipers to measure the exact diameter of the gallery (the seating area). Lock the calipers at this size; you will need this measurement for the lid.
Wobbly Lid Fix
If your lid rocks after firing, use a circular motion to grind the lid against the pot with a dab of grinding paste. This creates a perfect, airtight seal.
Step 2: Creating the Lid and Pinch Pot
-
Throw the lid off the hump:
Using a larger mound of clay, center just the top portion. Flatten a disc of clay that matches your caliper measurement exactly. -
Shape the knob:
While shaping the lid, leave a small nub in the center. Pinch and refine this into a simple, rounded knob that is easy to grip. -
Refine the lid fit:
Ensure the underside of the lid has a small flange that will fit inside the gallery of the pot. Check your measurements frequently. -
Cut off the lid:
Use a needle tool or wire to cut the lid from the hump. Set it aside on a ware board to stiffen. -
Make the pinch pot:
With the remaining clay (or a fresh 0.5 lb ball), throw a small, open vessel. Curve the walls inward slightly at the top to mimic the salt cellar’s aesthetic, but keep it open without a gallery.
Step 3: Trimming and Finishing
-
Dry to leather hard:
Allow all pieces to dry until they are firm but still cool to the touch (leather hard). This usually takes a day unless you use a heat gun. -
Trim the bases:
Invert the main cellar and the pinch pot onto the wheel. Secure them with clay lugs. Trim away excess weight from the bottom and create a defined foot ring for a professional look. -
Check the fit:
Place the lid onto the cellar. If it’s too tight, you can sand or lightly trim the clay now, but be careful not to warp it. I like to do this final check before bisque firing. -
Bisque fire:
Load the bone-dry greenware into the kiln and fire to cone 04 (or your clay’s specific bisque temperature). -
Glaze application:
Once cool, wipe pieces with a damp sponge. Dip or pour a clear or semi-opaque white glaze over the pieces. Wipe the foot rings clean with a sponge so they don’t stick to the kiln shelf. -
Glze firing:
Fire the pieces to maturity (likely cone 5/6 for stoneware). The heat will draw out the iron speckles in the clay, creating that beautiful organic texture through the glaze.
Add a Spoon Slot
Before the clay dries, cut a small U-shape out of the rim or the lid edge. This allows a small wooden spoon to stay inside the jar while covered.
Once cooled, fill with your favorite flaky sea salt and enjoy the tactile satisfaction of cooking with handmade ceramics


What Really Happens Inside the Kiln
Learn how time and temperature work together inside the kiln to transform clay into durable ceramic.
Concrete-Look Succulent Planter for His Desk
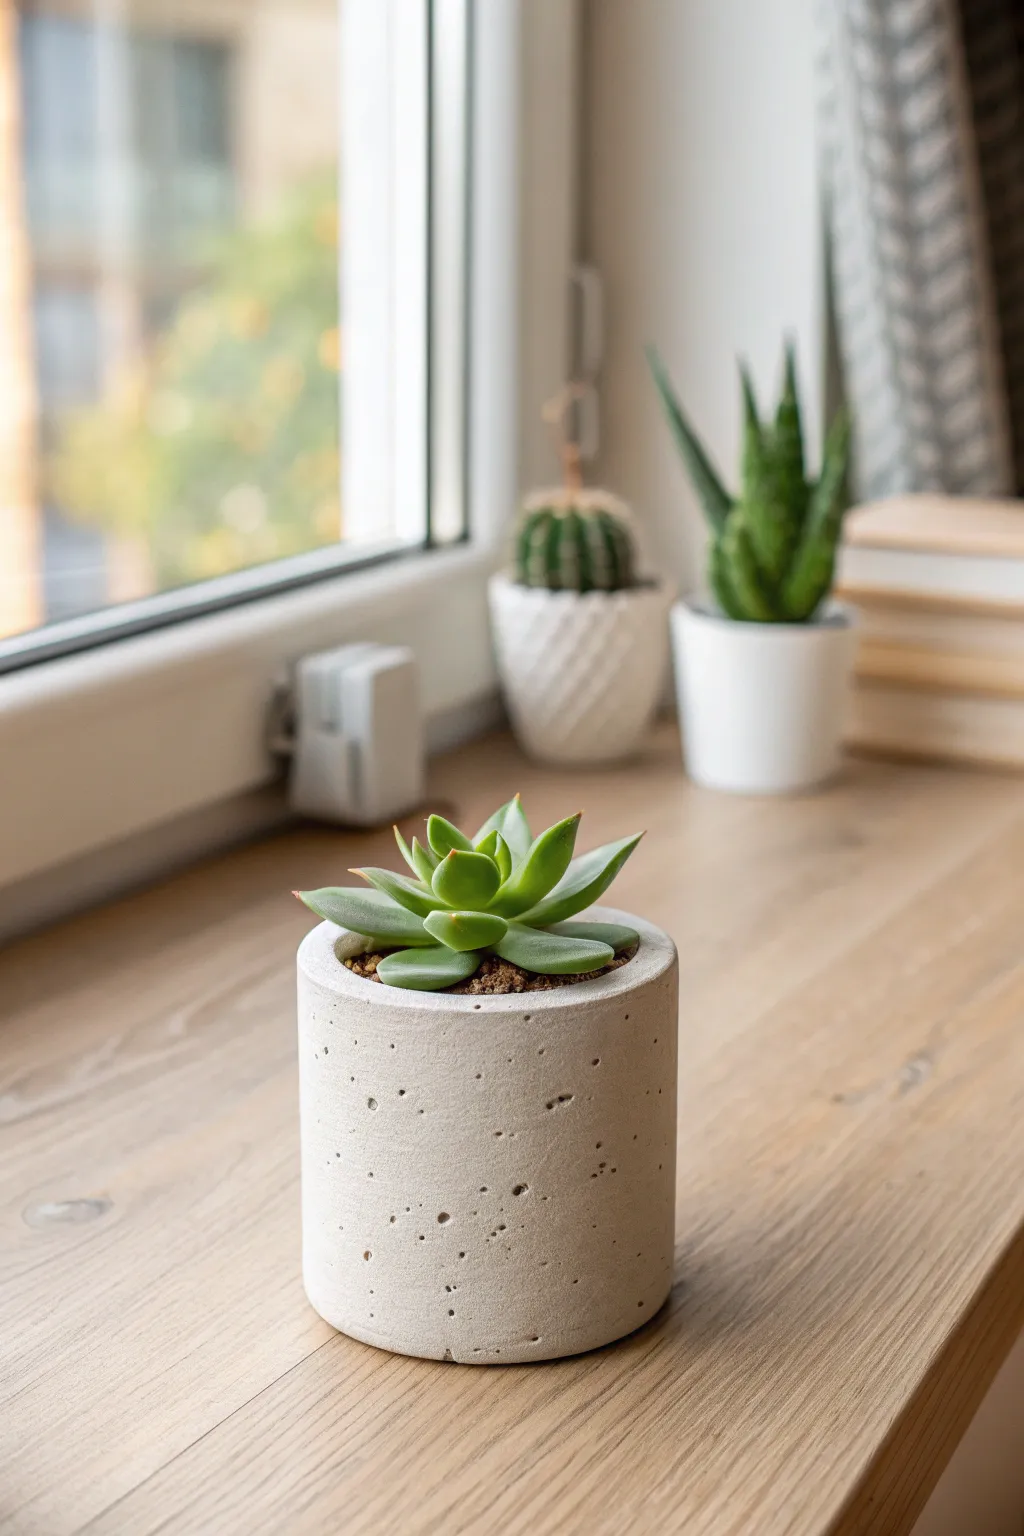
This project creates a perfect minimalistic desk accessory that combines the rugged appeal of concrete with the versatility of polymer clay. While it mimics the weight and texture of poured cement, the pockmarked finish is actually a clever textural trick you can achieve right on your kitchen table.
Step-by-Step Tutorial
Materials
- Light grey polymer clay (e.g., granite or concrete effect)
- Translucent liquid polymer clay
- Coarse sandpaper or a stiff wire brush
- Toothbrush or stipple sponge
- Needle tool or toothpick
- Rolling pin
- Circular cookie cutters (two sizes)
- Small succulent plant
- Potting soil and decorative rocks
Step 1: Prepare the Clay Base
-
Condition the Cold Grey:
Start by conditioning your light grey polymer clay until it is soft and malleable. If you have a granite-effect clay, mix it with a bit of plain white clay to lighten the tone to mimic dry concrete. -
Roll the Base Slab:
Roll out a portion of the clay to a thick slab, approximately 1/4 inch thick. This will form the sturdy bottom of your pot. -
Cut the Base:
Use your larger circular cutter to punch out a perfect circle for the base. Set this aside on a baking tile or parchment paper.
Fixing Smooth Spots
If you accidentally smudge the texture while moving the pot to the oven, dab the area with a stiff toothbrush immediately before baking to restore the grit.
Step 2: Construct the Cylinder
-
Form the Walls:
Roll out a long, rectangular strip of clay, maintaining that same 1/4 inch thickness. The length needs to be slightly longer than the circumference of your base circle. -
Trim to Size:
Use a straight blade to trim the top and bottom edges of the strip so they are perfectly parallel. The height should be about 3 inches. -
Attach to Base:
Wrap the strip around the base circle. I like to apply a tiny amount of translucent liquid clay to the edge of the base to act as ‘glue’ before pressing the wall against it. -
Seal the Seam:
Where the two ends of the wall meet, cut through both layers at an angle to create a seamless join. Smooth the seam with your finger or a clay tool until it disappears completely. -
Blend the Bottom:
Turn the pot over slightly and firmly blend the clay from the walls down onto the base to ensure a watertight seal. Roll a smooth tool inside to reinforce the inner seam as well.
Level Up: Color Wash
After baking, apply a very watery wash of black acrylic paint and wipe it off immediately. The dark paint will stay in the pits, adding depth.
Step 3: Create the Concrete Texture
-
Rough the Surface:
This is the most crucial step for realism. Gently roll a stiff wire brush or dab a coarse stipple sponge over the entire exterior. You want to remove the ‘perfect’ smoothness of the polymer clay. -
Add Air Pockets:
Use a needle tool or toothpick to dig out small, irregular holes. Group some together and leave other areas sparse to mimic the air bubbles found in poured concrete. -
Deepen the Texture:
Press a crumpled ball of aluminum foil against various spots on the surface to add subtle, organic indentations. -
Refine the Rim:
Don’t forget the top edge. Tap it with your toothbrush or sponge so the rim looks cast rather than cut.
Step 4: Finish and Plant
-
Bake:
Bake the pot according to the clay manufacturer’s instructions. Usually, this is around 275°F (130°C) for 30-45 minutes depending on thickness. -
Cool and Sand:
Once fully cooled, lightly sand the exterior with coarse sandpaper. This white ‘dusting’ effect enhances the dry concrete look. -
Seal (Optional):
If you plan to use real soil, brush a layer of water-based polyurethane varnish on the inside of the pot to protect the clay from moisture. -
Add Greenery:
Fill the pot with suitable cactus soil mixture and nestle your small succulent into the center. -
Top Dressing:
Finish by sprinkling small decorative rocks or soil around the base of the plant to cover the roots.
Place this handsome little pot on a desk or shelf to add a touch of modern greenery to any workspace
Workbench Hardware Tray for Screws and Bits
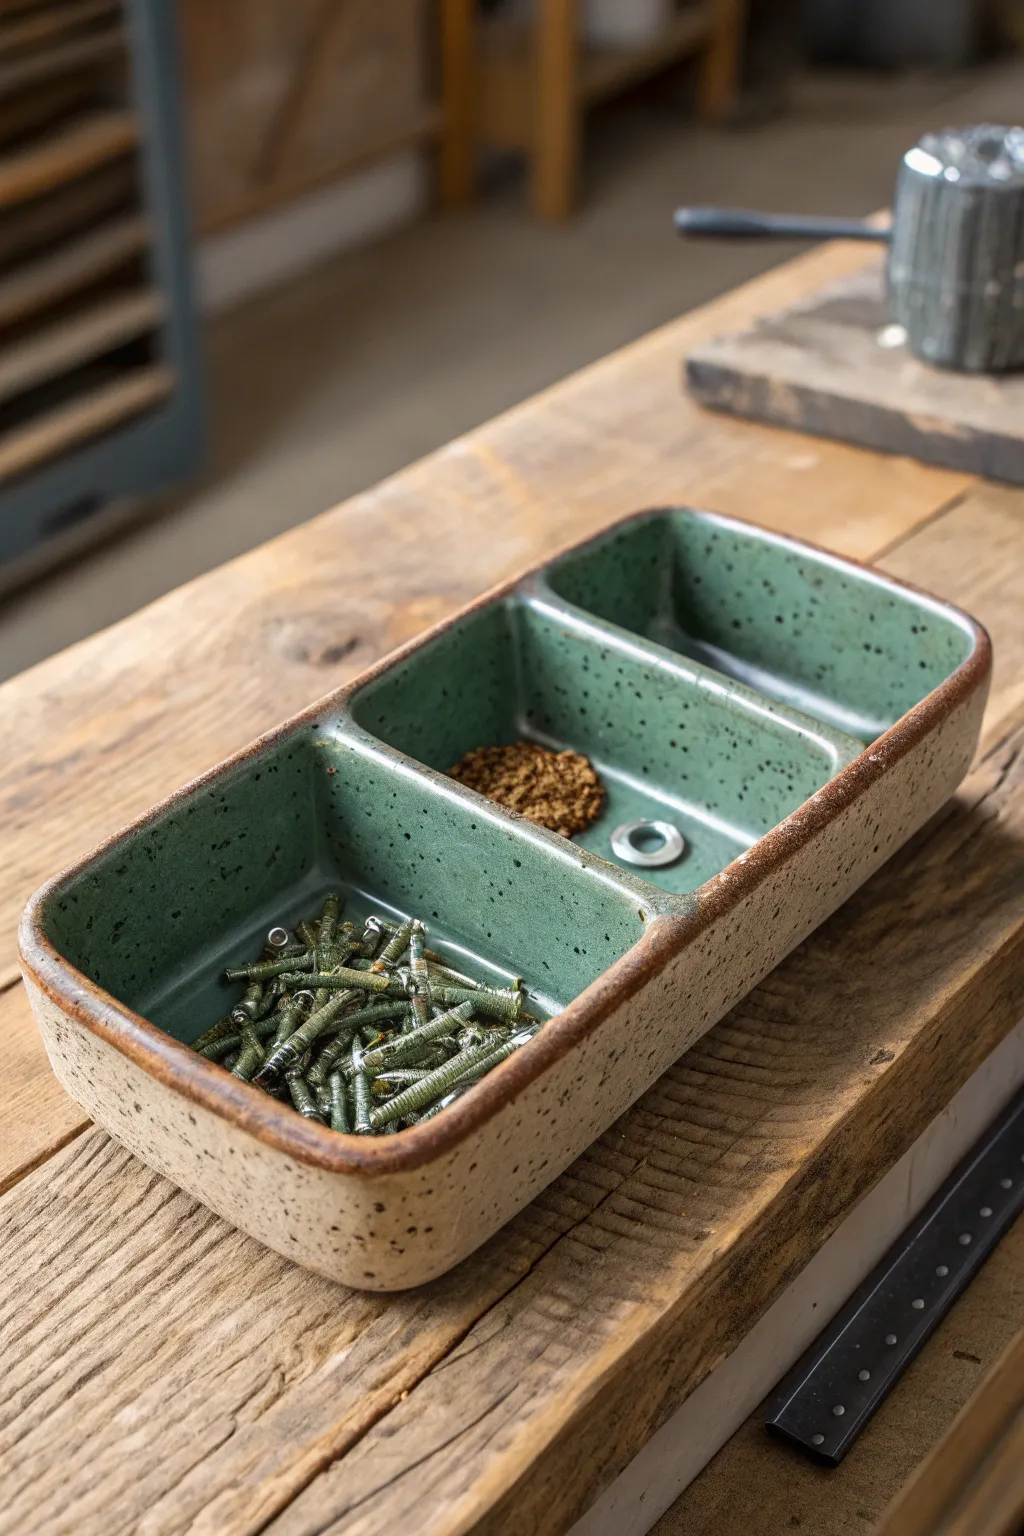
This rugged, three-compartment stoneware tray is the perfect addition to any workbench, blending industrial utility with artisanal charm. Its speckled green glaze and raw clay exterior give it a handsome, earthy look that feels right at home among sawdust and tools.
How-To Guide
Materials
- Stoneware clay body (speckled or buff)
- Rolling pin
- Canvas work surface
- Hardwood guides or slat sticks (approx. 1/4 inch thick)
- Fettling knife
- Ruler
- Scoring tool (serrated rib or needle tool)
- Slip (clay and water slurry)
- Sponge
- Speckled green glaze (cone 5/6)
- Wax resist
- Kiln access
Step 1: Slab Building the Form
-
Roll the slab:
Begin by wedging your stoneware clay thoroughly to remove air bubbles. Place it on your canvas and roll it out into a large, even slab using the wooden guides to ensure a consistent thickness of about 1/4 inch. -
Cut the base:
Using a ruler and fettling knife, measure and cut a long rectangle for the base. A good size for a hardware tray is approximately 10 inches long by 4 inches wide. -
Cut the walls:
Measure the perimeter of your base to determine the length needed for the side walls. Cut long strips of clay that are roughly 2 inches tall. You will also need two shorter strips for the interior dividers. -
Let it firm up:
Allow your cut pieces to sit until they reach a soft leather-hard stage. I find this usually takes about 30-60 minutes depending on humidity; they should be stiff enough to stand up but flexible enough to bend without cracking. -
Score and slip the base:
Rough up the outer edges of the base slab where the walls will attach using your scoring tool. Apply a generous amount of slip to these scored areas. -
Attach the walls:
Score and slip the bottom edge of your wall strips. Press them firmly onto the base. If your strip isn’t long enough to go all the way around, join multiple strips by beveling the ends at a 45-degree angle for a seamless connection. -
Reinforce the seams:
Roll a very thin coil of clay and press it into the interior corner where the wall meets the floor. Smooth this coil down with a modeling tool or your finger to strengthen the bond. -
Add dividers:
Measure the inside width of your tray. Cut your divider strips to fit heavily snugly. Score and slip the contact points on the interior walls and floor, then slide the dividers into place to create three equal compartments.
Warped Walls?
If walls bow inward while drying, place a foam block or crumpled newspaper inside the compartments to support the shape until the clay stiffens.
Step 2: Refining and Detail
-
Smooth the rims:
Run a damp sponge or a piece of chamois leather over the top rims of the walls and dividers. You want a slightly rounded, soft edge that won’t chip easily when rummaging for screws. -
Refine the exterior:
Use a metal rib to scrape the exterior walls smooth, removing any canvas texture or fingerprints. This gives the raw clay a clean, professional finish. -
Dry slowly:
Cover the tray loosely with plastic to let it dry slowly for the first day, ensuring the dividers don’t pull away from the walls as the clay shrinks. Then, uncover and let it dry completely to the bone-dry stage. -
Bisque fire:
Load the bone-dry tray into the kiln and fire to cone 04 (or your clay body’s bisque temperature).
Make it Magnetic
Before the clay dries, embed strong rare-earth magnets into the underside of the base. Cover with a thin clay slab so it holds screws magically.
Step 3: Glazing and Finishing
-
Clean the bisque:
Once cool, wipe the entire piece down with a damp sponge to remove any kiln dust that might interfere with glaze adhesion. -
Wax the exterior:
Apply wax resist to the entire outer surface and the bottom of the tray. We want the exterior to remain raw, textured clay to contrast with the smooth interior. -
Pour the glaze:
Select a speckled green glaze. Pour the glaze into one compartment, slosh it around to coat the walls and floor, and pour the excess into the next compartment. Repeat until all three sections are coated. -
Clean the rim:
Use a damp sponge to carefully wipe any glaze drips off the top rim. I like to leave just the faintest line of glaze on the top rounded edge, but keep the vertical outer walls clean. -
Final fire:
Fire the tray to the maturity temperature of your clay and glaze (typically cone 5 or 6 for stoneware). Allow the kiln to cool naturally before removing your new hardware organizer.
Once cooled, fill the compartments with assorted hardware and gift it to the handy person in your life

TRACK YOUR CERAMIC JOURNEY
Capture glaze tests, firing details, and creative progress—all in one simple printable. Make your projects easier to repeat and improve.
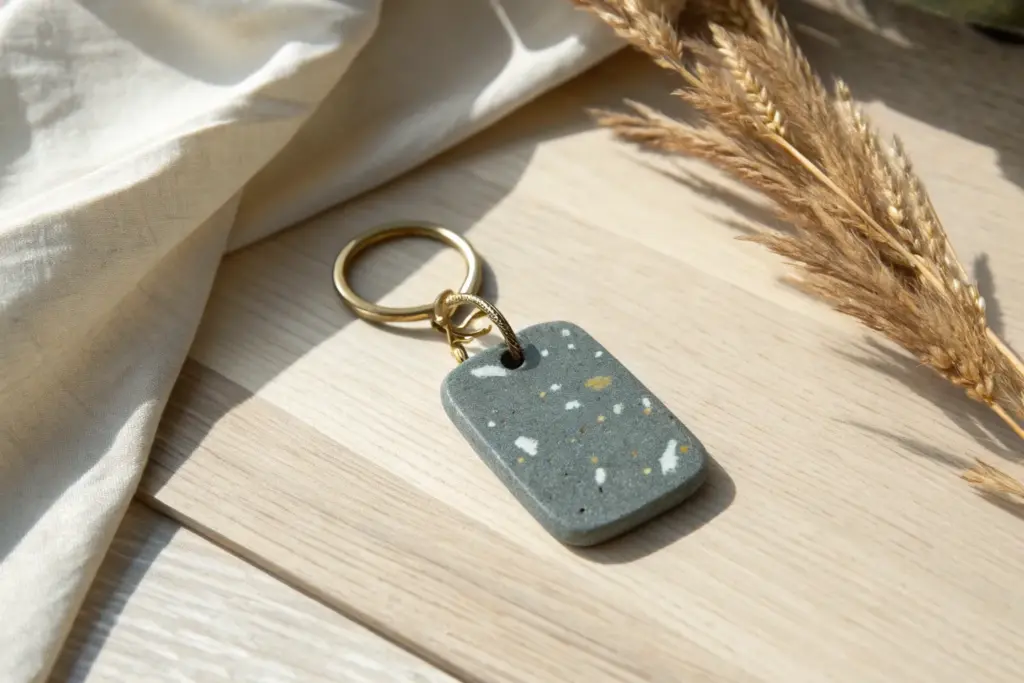
Wall-Mounted Key Hook With a Clay Backplate
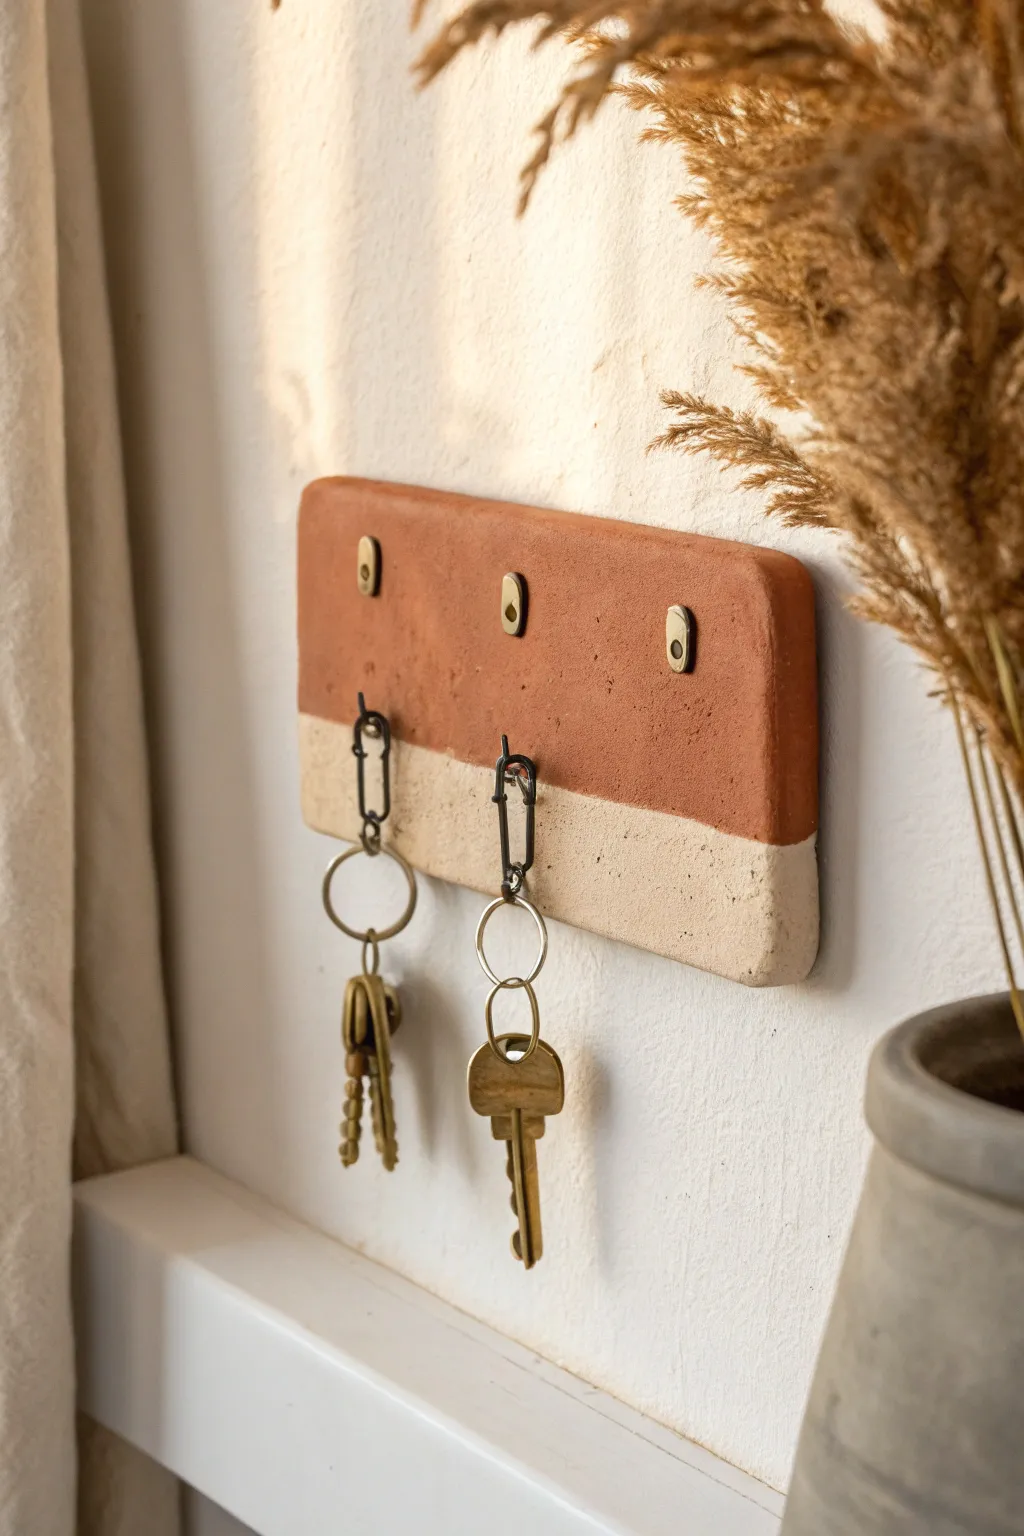
This minimalist wall-mounted key holder combines the warmth of terracotta with modern lines. Its dual-tone design and simple hardware create a functional piece of art that keeps everyday carry essentials organized and accessible.
Step-by-Step Tutorial
Materials
- Air-dry clay or polymer clay (terracotta color)
- Air-dry clay or polymer clay (off-white/stone color)
- Rolling pin
- Sharp blade or clay knife
- Ruler
- Sandpaper (fine grit)
- 2 small black S-hooks or screw-in hooks
- Strong craft glue (e.g., E6000) or epoxy
- 3 brass finish screw caps or washers
- Wall mounting hardware (screws/anchors)
- Drill with masonry bit (optional, for mounting holes)
- Clear matte sealant spray
Step 1: Shaping the Base
-
Condition the clay:
Start by kneading both your terracotta and off-white clay separately until they are soft, pliable, and free of cracks. Warm clay is much easier to work with and less prone to tearing. -
Create the two blocks:
Form a rectangular block with the terracotta clay for the top section (roughly 2/3 of the total height) and a smaller block with the white clay for the bottom section. -
Join the seams:
Press the two blocks together firmly along their long edge. Use your fingers or a smoothing tool to smear the clay across the seam on both the front and back to create a strong mechanical bond. -
Roll out the slab:
Place the joined clay on a flat surface. Using a rolling pin, roll the slab out to a uniform thickness of about 1/2 inch. Roll parallel to the seam first to keep the line straight, then gently across. -
Trim to size:
Use a ruler and a sharp blade to cut a clean, perfect rectangle. The finished dimensions should be approximately 6 inches wide by 3 inches tall, but you can adjust this to fit your space. -
Smooth the edges:
Dip your finger in a little bit of water and run it along the cut edges to soften any sharpness. I like to gently tap the corners to round them ever so slightly for a more organic look.
Step 2: Adding Hardware Details
-
Mark mounting holes:
Using your ruler, mark three evenly spaced points along the upper terracotta section where the mounting screws will eventually go. Ensure they are level. -
Create mounting holes:
Use a straw or a small circular cutter to punch holes at your marked points. Make sure these holes are slightly larger than the screws you intend to use for mounting. -
Embed the brass caps (optional styling):
If your brass caps are decorative overlays rather than functional screw heads, gently press them into the soft clay over the holes now to create an impression, then remove them before drying. If they are functional screw covers, skip this. -
Create hook placements:
For the key hooks, you have two options. If using screw-in hooks, make small pilot holes in the bottom (white) section. If using the wire style shown, you will need to drill small holes later or embed wire loops now. -
Texture the surface:
If you want the rustic stone look seen in the photo, gently press a piece of coarse sandpaper or a stiff brush against the clay surface to add subtle pitting and texture.
Fixing Cracks
If you spot hairline cracks as the clay dries, make a ‘slurry’ paste by mixing a tiny bit of fresh clay with water. Smooth this into the cracks and let it dry again before sanding.
Step 3: Finishing and Assembly
-
Dry the piece:
Place the clay slab on a wire rack to dry. If using air-dry clay, let it cure for 24-48 hours, flipping occasionally to prevent warping. If using polymer clay, bake according to the package instructions. -
Sand for perfection:
Once fully cured, use fine-grit sandpaper to smooth out any rough edges or unevenness on the sides. Be careful not to sand away your surface texture. -
Apply sealant:
Spray the entire piece with a clear matte sealant. This protects the clay from moisture and dirt, which is especially important for the white section. -
Install the hooks:
Insert your metal hooks into the bottom section. If you made pilot holes, screw them in carefully or glue wire loops into drilled holes using strong epoxy for a secure hold. -
Mount to the wall:
Place the plaque on the wall. Insert screws through the top three holes (and through your brass washers/caps) and secure it tightly to the wall anchors.
Level Up: Magnetic Hold
Instead of visible hooks, embed strong neodymium magnets into the back of the bottom section before drying. Your keys will magically stick to the clay without any visible hardware.
Now you have a stylish and sturdy spot to drop your keys immediately upon walking through the door
Fishing-Inspired Trinket Dish With a Simple Fish Motif

Simple, rustic, and charming, this speckle-finish trinket dish features a primitive fish illustration that feels both modern and timeless. It’s the perfect catch-all for keys, coins, or fishing lures, making it an ideal handmade gift for the angler in your life.
Detailed Instructions
Materials
- White or cream stoneware clay (speckled clay body recommended)
- Small rolling pin
- Circle clay cutter or a bowl to trace (approx. 5-6 inches)
- Pottery sponge
- Fettling knife or needle tool
- Sheet of canvas or heavy fabric (for rolling)
- Brown underglaze
- Fine detail brush (liner or script liner)
- Clear transparent glaze
- Porous wooden board for drying
- Kiln (or access to a firing service)
Step 1: Forming the Dish
-
Roll the slab:
Start by wedging a ball of speckled stoneware clay to remove any air bubbles. Roll it out on your canvas sheet into an even slab, aiming for a consistent thickness of about 1/4 inch. -
Cut the circle:
Place your circle cutter or a bowl template onto the slab. Using your needle tool or knife, cut vertically around the template to create a perfect clay disc. -
Smooth the clay rib:
Gently compress the clay surface with a damp sponge or a soft rib tool. This smooths out the canvas texture and prepares the surface for painting later. -
Shape the rim:
To create the dish shape, gently lift the edges of the circle. Pinch using your thumb and forefinger to create a vertical rim about 1/2 to 3/4 inch high. Work your way around the circle multiple times to ensure the wall height is even. -
Refine the lip:
Dip your finger in a little water and run it along the top edge of the rim (the lip). I find this step crucial for making the piece feel finished—you want a rounded, soft edge rather than a sharp, cut one. -
Dry to leather hard:
Place the formed dish on a wooden board. Let it dry slowly until it reaches the leather-hard stage, where it is stiff but still cool to the touch.
Step 2: Illustrating the Fish
-
Plan the design:
Before painting, lightly sketch your fish outline directly onto the clay with a dull pencil or a needle tool. Don’t worry about graphite marks; they will burn off in the kiln. -
Outline the body:
Load your fine detail brush with brown underglaze. Paint the main oval body of the fish first, using a steady hand to create a continuous line. -
Add the head details:
Paint a curved line to separate the head from the body. Add a small circle for the eye with a tiny dot in the center for the pupil. -
Paint the scales:
Using the tip of your brush, paint rows of small ‘U’ shapes across the body to represent scales. Allow them to follow the curve of the fish’s body for a natural look. -
Add fins and tail:
Paint the dorsal fin on top and the tail fin at the back. Fill these shapes with fine lines to mimic the texture of the fins. -
Highlight the rim:
To frame the illustration, use the side of your brush or a small sponge to dab a thin line of brown underglaze along the very top edge of the dish’s rim. -
Bisque fire:
Allow the piece to dry completely until it is bone dry. Fire it in the kiln to a bisque temperature (usually cone 04).
Smudged Lines?
If you smear the underglaze while painting, let it dry completely. Once dry, gently scrape the mistake away with a sharp blade or sanding tool before repainting.
Step 3: Glazing and Finishing
-
Apply clear glaze:
Once the bisque firing is complete, wipe the dish down with a damp sponge to remove dust. A dip or brush-on application of clear transparent glaze works best here to let the speckles and drawing shine through. -
Clean the foot:
Use a damp sponge to meticulously wipe any glaze off the bottom of the dish so it doesn’t stick to the kiln shelf. -
Final firing:
Fire the piece a second time to the maturation temperature of your specific clay and glaze (typically cone 5 or 6 for stoneware).
Pro Tip: Rustic Texture
Use a clay body with heavy grog or manganese speckles. The natural spots that appear after firing add immense character without extra painting.
Once cooled, this catch-all is ready to hole keys, coins, or keepsakes with meaningful rustic style
Custom Topographic Map Desk Tray
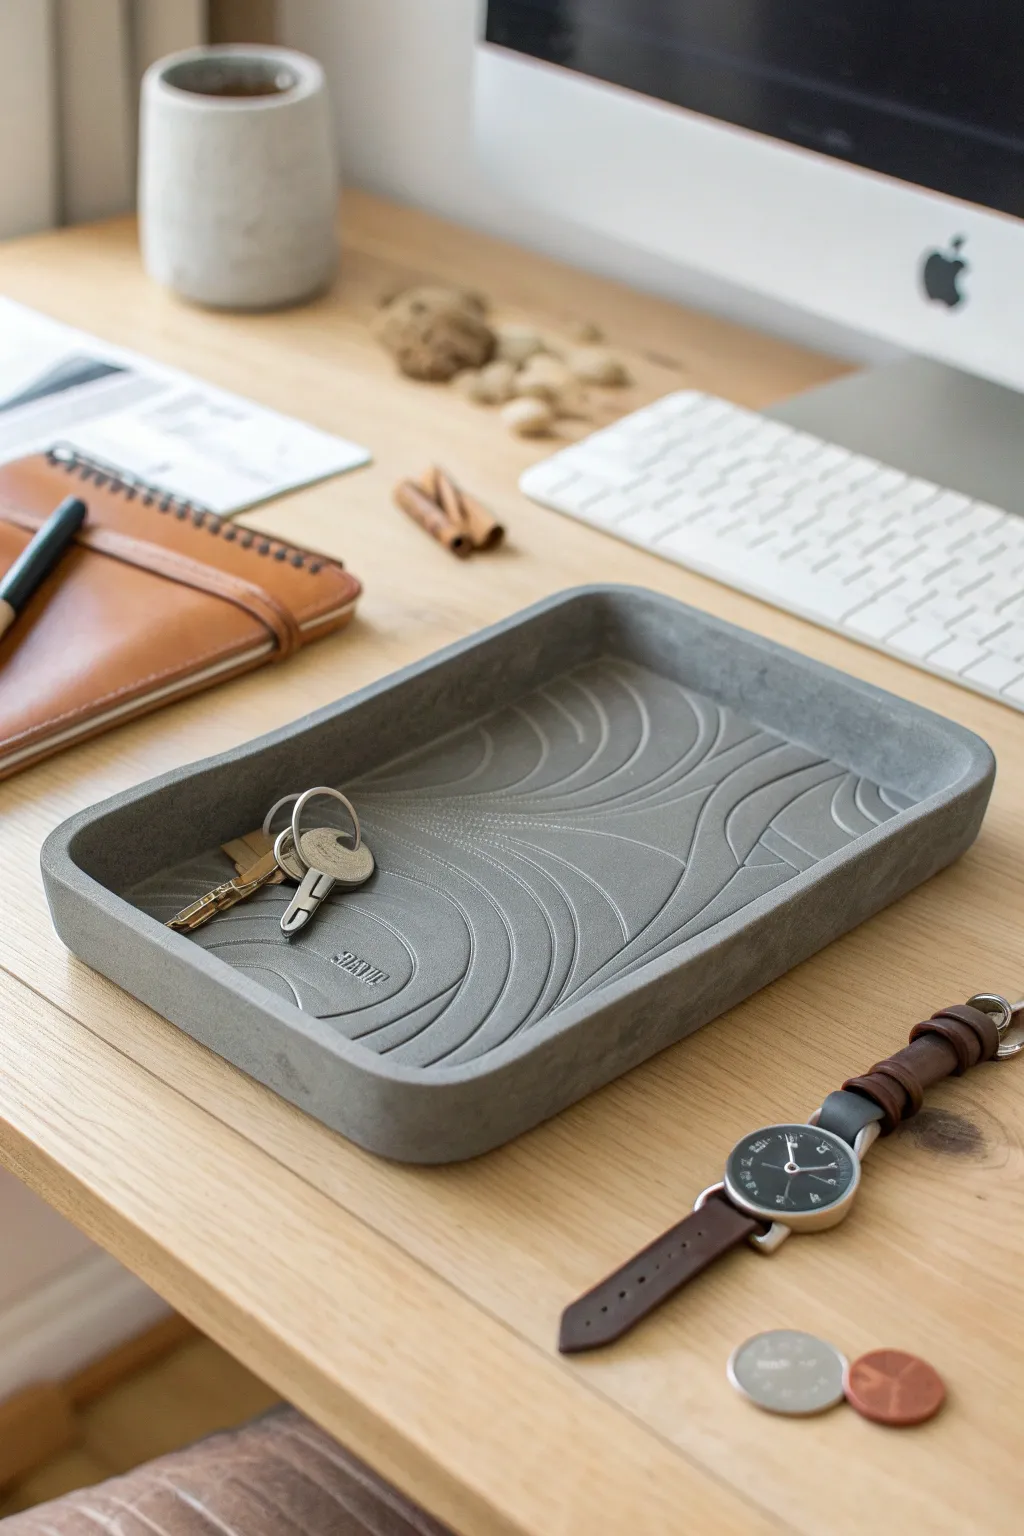
This sophisticated desk tray features a subtle, debossed topographic pattern that adds a modern, architectural feel to any workspace. Crafted to mimic the look of poured concrete using accessible clay, it’s a functional piece that keeps keys and coins organized with distinctive style.
Detailed Instructions
Materials
- Air-dry clay (grey or concrete-colored)
- Rectangular rolling pin
- Sharp crafting knife or scalpel
- Carving tools (specifically a small loop tool or V-gouge)
- Sandpaper (medium and fine grit)
- Small bowl of water
- Ruler
- Acrylic sealant (matte)
- Topographic map printout (optional reference)
- Rolling guides or wooden slats (approx. 5mm thick)
Step 1: Preparation and Base Construction
-
Prepare your workspace:
Lay down a non-stick surface or a canvas cloth to work on. Since grey air-dry clay can stain, I like to keep a damp cloth nearby for quick hand cleaning. -
Roll out the slab:
Take a large chunk of clay and knead it briefly to remove air bubbles. Place it between your rolling guides and roll it out into a smooth, even slab about 5mm thick. Ensure it’s large enough for your tray base and walls. -
Cut the base shape:
Using a ruler and your craft knife, cut a clean rectangle for the base. For the rounded corners seen in the photo, use a small jar lid or coin as a template to gently trim the four sharp corners into smooth curves. -
Create the walls:
Re-roll remaining clay into long strips, also 5mm thick. Cut these strips to be slightly taller than you want the final lip to be—about 2-3cm is usually good. These will form the walls of the tray. -
Attach the walls:
Score the outer edge of your base and the bottom edge of your clay strips with a needle tool. Apply a little water or slip (clay mixed with water) to the scored areas. -
Blend the seams:
Press the strips onto the base perimeter. Use a modeling tool or your finger to firmly smudge the clay from the wall down onto the base on both the inside and outside, ensuring a seamless, single-piece look. -
Refine the shape:
Smooth out the join lines with a little water. gently tap the tray against the table surface to settle the clay and ensure the bottom is perfectly flat.
Warping Woes?
If the base starts curling up as it dries, gently flip the tray over and place a light book on the center (on a flat surface) to weigh it down while it finishes drying.
Step 2: Detailing the Topography
-
Sketch the design:
While the clay is still leather-hard (firm but not dry), very lightly scratch your topographic lines into the surface using a needle tool. You can freehand organic, wave-like curves that mimic elevation lines. -
Carve the valleys:
Using a small U-shaped loop tool or a V-gouge, carefully carve along your sketched lines. Vary the depth slightly to create shadow and dimension, but don’t go too deep or you’ll weaken the base. -
Clean the edges:
As you carve, small crumbs of clay will form. Use a soft, dry brush to sweep these away rather than wiping with your hand, which might smudge your crisp lines. -
Imprint details (optional):
If you want to add a personalized touch like the logo in the image, use a letter stamp set to press a name or date into one of the ‘islands’ created by your topo lines. -
Final smooth:
Dip your finger in water and run it very gently over the rim of the tray to round it off and remove any sharp edges left from cutting.
Level Up: Color Pop
Mix a tiny amount of black or dark grey acrylic paint into your sealant for the final coat to deepen the ‘concrete’ color and make the carved lines stand out more.
Step 3: Finishing Touches
-
Slow drying:
Place the tray away from direct heat or sunlight. Cover it loosely with plastic wrap for the first 24 hours to prevent the edges from drying faster than the center, which causes curling. -
Sanding:
Once fully bone dry (usually 48-72 hours), use medium grit sandpaper to level the top rim. Switch to fine grit to smooth the entire surface, paying attention to the transition between the floor and the wall. -
Sealing:
Apply a coat of matte acrylic sealant. This protects the clay from moisture and enhances the concrete-like color without adding an artificial sheen. -
Add surface protection:
Stick small felt pads or cork circles to the underside of the tray corners to protect the desk surface it will eventually sit on.
This rugged yet refined tray makes a perfect catch-all for daily essentials and will look handsome on any desk