I’m always amazed how a simple hat, beard, and round nose can turn into a whole little character in clay gnome form. Here are my favorite clay gnome ideas—starting with the classic looks and easing into the fun, quirky twists once you’ve got the basics down.
Classic No-Face Standing Gnome
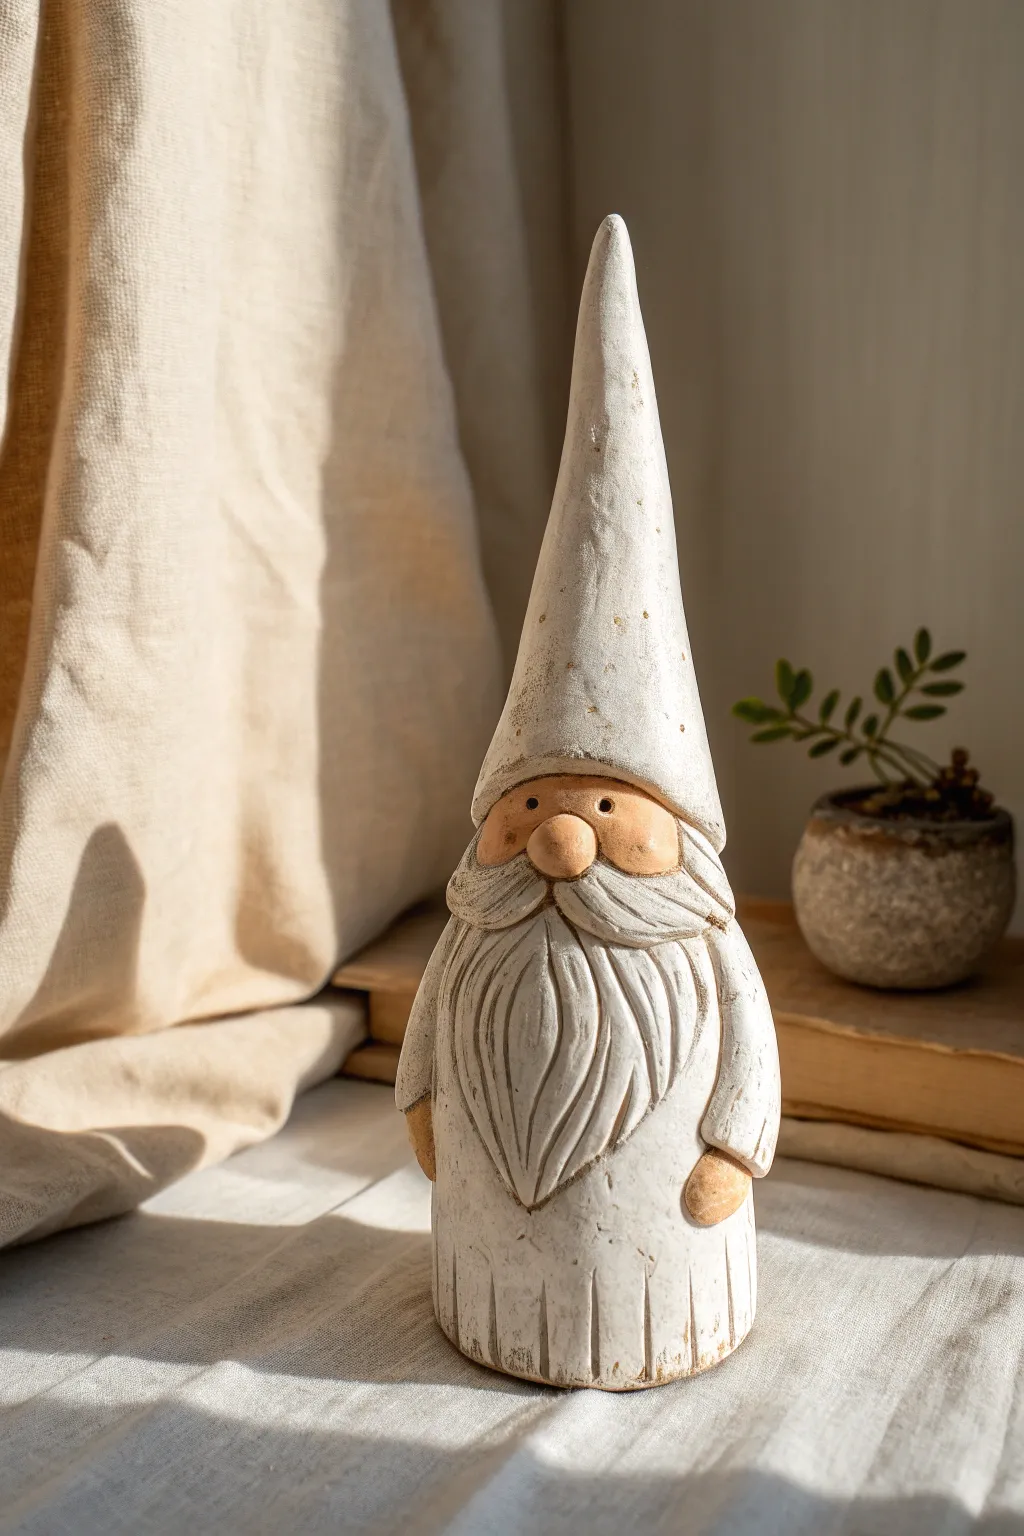
This elegant, elongated gnome features a rustic white finish that beautifully captures natural light and shadows. With its seamless hat-to-body design and detailed beard texture, this piece brings a charming, handcrafted touch to any shelf or mantel.
Detailed Instructions
Materials
- Air-dry clay or polymer clay (white or neutral color)
- Clay rolling pin
- Aluminum foil (for armature core)
- Clay sculpting tools (needle tool, small loop tool)
- Water and a small sponge (for smoothing)
- Acrylic paint (warm white/cream, light peach/flesh tone, burnt umber/brown)
- Paintbrushes (flat shader and heavy-grit stencil brush)
- Matte spray sealant
Step 1: Forming the Core Structure
-
Create a Foil Armature:
Begin by crumpling aluminum foil into a tall, slender cone shape. The base should be roughly 2-3 inches wide, tapering up to a very fine point for the hat. This saves clay and keeps the figurine lightweight. -
Preparing the Clay Slab:
Roll out a large slab of clay to an even thickness of about 1/4 inch. Ensure the slab is large enough to wrap entirely around your foil cone. -
Wrapping the Cone:
Drape the clay sheet over the foil cone. Gently press it against the foil to adhere, trimming away excess clay at the bottom and along the vertical seam. -
Smoothing the Seams:
Using a little water on your finger, blend the vertical seam until it disappears completely. Flatten the bottom so the gnome stands sturdily on its own.
Sculptor’s Secret
Before drying, gently rub the smooth parts of the clay with a damp piece of denim. This burnishes the surface, creating a pro-level finish.
Step 2: Sculpting the Features
-
Marking the Hat Line:
About halfway down the form, use a needle tool to lightly score a horizontal line that curves slightly upward in the center. This marks the brim of the hat. -
Adding the Nose:
Roll a small ball of clay and press it firmly just underneath the center of the hat brim line. Use a blending tool to smooth the back edges of the nose into the face area, but keep the front round and distinct. -
Defining the Face and Cheeks:
Add two very small, flattened pads of clay on either side of the nose for cheeks, blending them smoothly into the main body so they look like a natural swelling of the form. -
Building the Beard Volume:
Roll a teardrop shape of clay, flatten it, and attach it directly under the nose. This is the central part of the beard. Add two sweeping, wing-like shapes of clay to either side to create the mustache area. -
Texturing the Hair:
Using a needle tool or a fine loop tool, carve deep, flowing vertical lines into the beard clay. Start near the nose and sweep downward to mimic hair strands. Make sure the lines vary in depth for realism. -
Refining the Hat:
Add a thin strip of clay along the previously scored hat brim line to create a slight overhang. Smooth the top edge into the hat body, but leave the bottom edge sharp to cast a shadow over the face. -
Adding Hands:
Roll two small, bean-sized balls of clay. Attach them low on the body, peeking out from under the beard area, to represent hands tucked into a robe. -
Creating Robe Texture:
Carve vertical, straight lines into the bottom inch of the gnome’s body to simulate the folds of a heavy robe or tunic hem.
Make it Sparkle
Mix fine glitter into your white paint or dust it over the wet sealant for a frosted, wintry look that catches candlelight.
Step 3: Finishing and Painting
-
Drying Time:
Allow the clay to dry completely according to package instructions. For a piece this thick, it may take 24-48 hours. Rotate it occasionally for even air exposure. -
Base Coat:
Paint the entire gnome with a coat of warm white or cream acrylic paint. I find that doing two thin coats provides better coverage than one thick one. -
Painting the Skin:
Mix a light peach or flesh tone and carefully paint the nose, cheeks, and hands. Keep the edges clean where the skin meets the white beard or hat. -
Applying an Antique Wash:
Dilute burnt umber brown paint with water until it is very runny. Brush this wash liberally over the beard texture and the robe hem lines. -
Wiping Back:
Immediately wipe the brown wash away with a damp paper towel or sponge. The dark color will stay in the deep crevices of the carving, highlighting the texture, while the high points remain white. -
Distressing the Hat:
Using a nearly dry stiff brush with a tiny amount of brown paint, stipple or tap random spots on the hat to create a weathered, stony speckle effect. -
Final Seal:
Once all paint is fully dry, spray the entire piece with a matte sealant to protect the finish and unify the sheen.
Place your finished gnome near a window where the light can play across the textured beard and tall hat


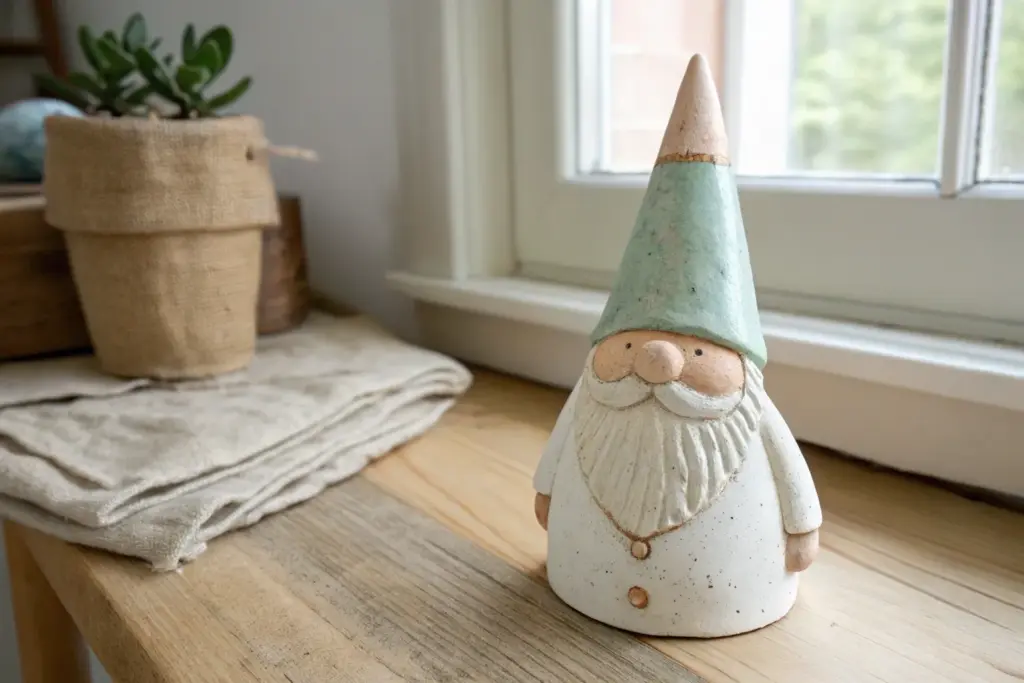
Chubby Body Gnome With a Wide Brim Hat
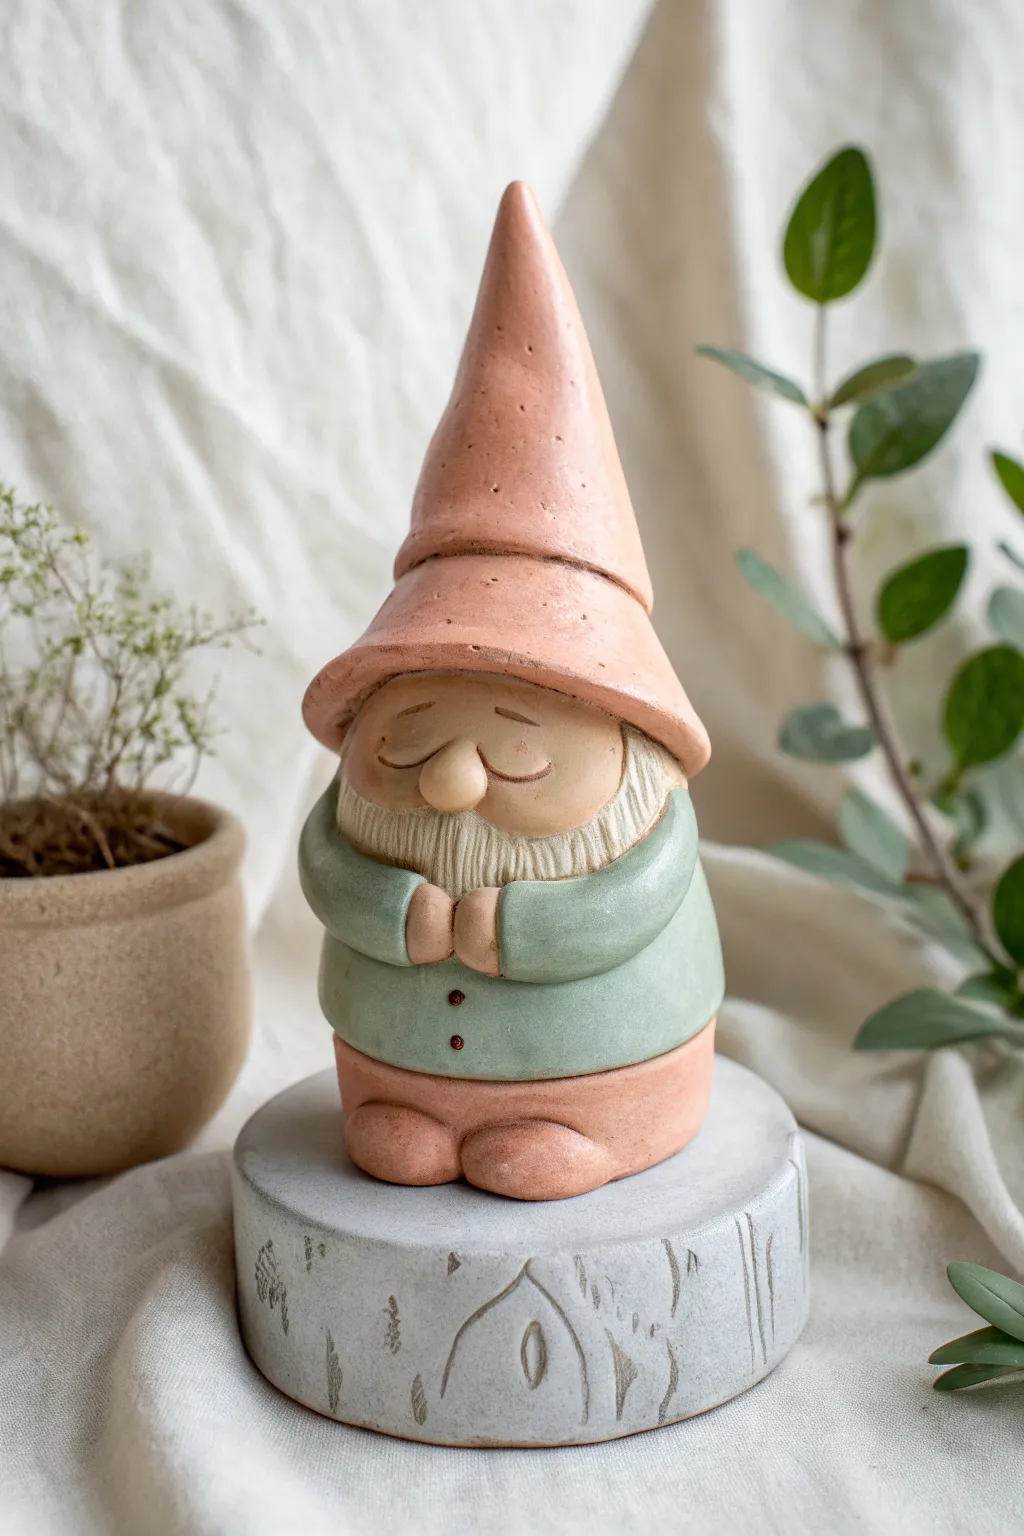
This charming, peaceful gnome features a distinctively chubby profile, a tall, slightly textured hat, and a serene, closed-eye expression. His simple, muted color palette of terracotta, sage green, and cream gives him a timeless, earthy look perfect for any shelf or planter.
Step-by-Step Tutorial
Materials
- Polymer clay or air-dry clay (terracotta color, sage green, cream/white)
- Aluminum foil (for armature)
- Clay sculpting tools (needle tool, ball stylus, rubber shaper)
- Rolling pin
- Acrylic paints (if using white clay and painting later)
- Matte varnish or sealant
- Texture sponge or stiff brush
- Small wooden base (optional)
- Strong adhesive (if attaching to a base)
Step 1: Forming the Core Structure
-
Create the foil armature:
Begin by crumpling aluminum foil into a squat, egg-like shape for the body and a separate cone shape for the hat. This reduces weight and saves clay. The body core should be about the size of a tangerine. -
Establish the legs:
Roll two balls of terracotta-colored clay and flatten them slightly into oval shapes. Place them side-by-side to serve as the gnome’s feet. -
Build the lower body:
Flatten a disk of terracotta clay and place it over the feet to create the pants or bottom tunic layer. Press gently to adhere them together without losing the distinct roundness of the shoes. -
Wrap the torso:
Cover the foil body armature with a sheet of sage green clay. Smooth out any seams and gently press this green form onto the terracotta base you just created, ensuring he sits securely.
Hat Slumping?
If the clay hat cone starts to bend or slump during sculpting, insert a toothpick or crumpled wire into the center of the body and head to act as an internal spine for support.
Step 2: Adding Details and Features
-
Sculpt the arms:
Roll two thick snakes of sage green clay for arms. Attach them starting from the sides of the body, curving them inward so the hands will meet at the center. -
Form the hands:
Create two small balls of skin-tone or terracotta clay. Press them into the ends of the sleeves and mold them together so the fingers look interlaced or resting against each other in a prayer position. -
Add tunic details:
Using a needle tool, lightly score a vertical line down the center of his chest to mimic a coat opening. Press two tiny balls of dark clay (or paint them later) into the lower chest area for buttons. -
Create the face base:
Roll a smooth ball of skin-tone clay and flatten it onto the top of the body. This will be the face, so ensure the surface is clean and fingerprint-free. -
Add the nose:
Roll a small sphere of skin-tone clay and place it perfectly centrally on the face. I find pressing it down just slightly helps it look like a natural part of the face rather than stuck on. -
Texture the beard:
Apply a flattened sheet of cream or white clay under the nose, draping it over the hands. Use a needle tool to scratch vertical, wavy lines to simulate hair texture, creating a flowing beard.
Seamless Smoothness
Before baking or drying, dip your finger in a tiny bit of baby oil (for polymer) or water (for air-dry) and run it over the clay to instantly remove fingerprints.
Step 3: The Hat and Finishing Touches
-
Prepare the hat cone:
Cover your cone-shaped foil armature with terracotta-colored clay. Roll it smooth, but feel free to leave minor imperfections for an organic, handmade feel. -
Create the brim:
Roll a thick snake of terracotta clay and wrap it around the base of the cone. Blend the top edge of the snake into the cone, but leave the bottom edge distinct and slightly flared to act as the brim. -
Position the hat:
Place the hat onto the head, pulling the brim down slightly over the top of the nose and eyes. The hat should look like it’s resting heavily and cozily on him. -
Sculpt the expression:
Use a needle tool or a very fine blade to incise two curved ‘U’ shapes for closed eyes. Keep the lines delicate to maintain a serene expression. -
Refine textures:
Using a texture sponge or a stiff brush, gently tap the surface of the hat and coat to remove fingerprints and add a subtle, stone-like texture. -
Bake or dry:
Follow the specific instructions for your clay type. If baking polymer clay, support the hat with extra foil if it seems unsteady.
Step 4: Final Polish
-
Apply a wash (optional):
If you want an aged look, dilute some brown acrylic paint with water and brush it over the textured areas, then wipe it off immediately with a paper towel. This highlights the beard and hat crevices. -
Seal the piece:
Once fully dry or cured, coat the gnome in a matte varnish. Avoid glossy finishes to maintain the natural, earthy aesthetic shown in the photo.
Place your new little guardian on a stack of books or a faux-wood stand to complete the tranquil vibe


Slouchy Hat Gnome With Gentle Folds
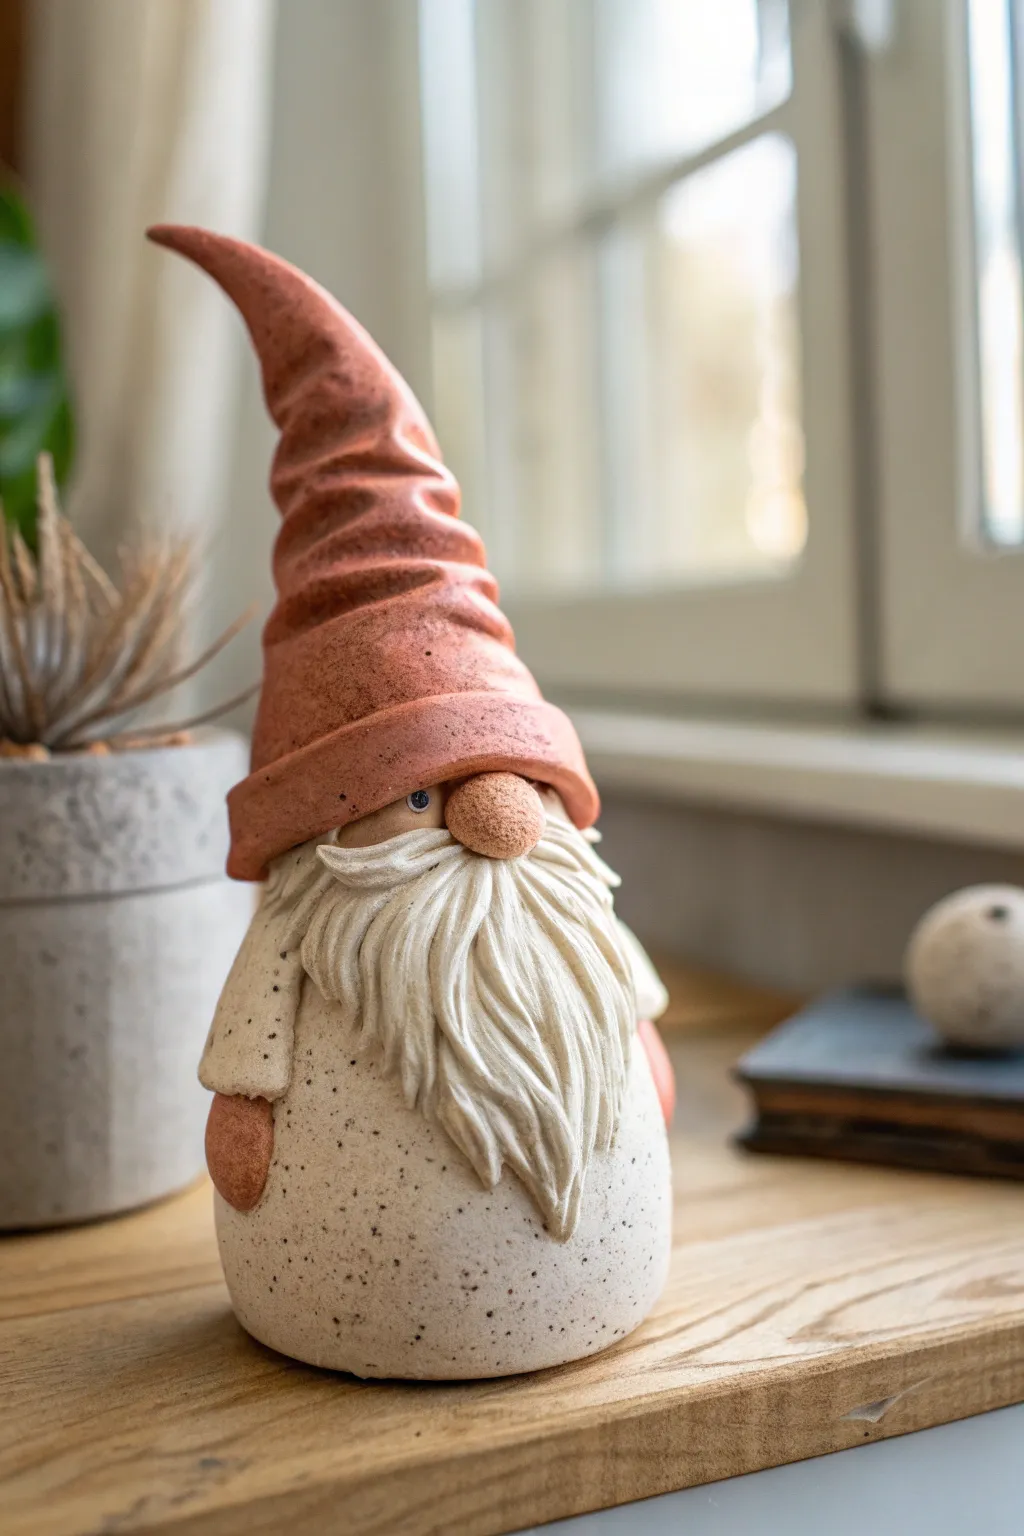
This charming ceramic gnome features a beautifully textured slouchy hat with soft folds and a speckled, creamy body that adds rustic warmth to any shelf. The focus here is on creating organic shapes and distinct textures, from the smooth, spotted body to the deeply grooved beard and rippled hat.
How-To Guide
Materials
- White or cream-colored polymer clay or air-dry clay (for body and beard)
- Terracotta or reddish-brown clay (for hat, nose, and hands)
- Black speckled clay or black pepper/sand (to mix into white clay for speckles)
- Sculpting tools (needle tool, small ball tool, texturing brush)
- Acrylic rolling pin
- Aluminum foil (for armature core)
- Clay adhesive or ‘score and slip’ slurry (if using air-dry clay)
- Small paintbrush (for texture or smoothing)
- Oven (if using polymer clay) or sealant (if using air-dry)
Step 1: Forming the Base
-
Prepare the speckled clay:
Start by conditioning your white or cream clay. To achieve the speckled look shown in the photo, kneading in a small amount of black pepper, black sand, or pre-mixed speckled clay works wonders. Roll it until the speckles are evenly distributed. -
Create the core armature:
Crumple a piece of aluminum foil into a cone shape with a rounded bottom. This saves clay and keeps the figurine lightweight. Make sure the bottom is flat so your gnome stands securely. -
Cover the body:
Roll out a sheet of your speckled clay to about 1/4 inch thickness. Wrap this around the foil cone, smoothing the seams together at the back. Roll the entire form gently on your work surface to ensure it creates a smooth, rounded cone shape.
Hat Sagging Too Much?
If the tall hat droops before baking, insert a piece of bent craft wire inside the cone to act as an internal spine, or prop it up with crumpled tissue.
Step 2: Sculpting the Head and Beard
-
Define the face area:
Toward the top third of the cone, gently press a small indentation where the face will sit. Add a small, flat disk of skin-tone or plain cream clay here if you want a distinct face color, though often the beard covers most of it. -
Shape the beard foundation:
Take a lump of plain white or cream clay (you can skip the speckles here for contrast) and flatten it into a teardrop shape. Attach this to the front of the body, just below where the hat brim will go. -
Texturize the beard:
Using a needle tool or a fine sculpting rake, carve deep, flowing lines into the beard clay. Start from the top center and curve the strokes outward and downward, twisting the ends slightly to mimic the wavy hair shown in the reference. -
Attach the nose:
Roll a small ball of the terracotta-colored clay. Press it gently right in the center top of the beard foundtation. Texture it slightly with a sponge or brush to give it a porous, skin-like look. -
Add the eyes:
Just above the nose and partially hidden by where the hat will sit, make two tiny indentations. Insert miniscule balls of black clay or paint them in later for the peeking eyes.
Step 3: Crafting the Slouchy Hat
-
Roll the hat cone:
Using the terracotta clay, form a long, slender cone. It should be tall enough to slouch over significantly. -
Hollow the base:
Use your thumb or a large ball tool to hollow out the wide end of the cone so it fits snugly over the top of the body and eyes. -
Create the slouchy folds:
This is the signature step. Gently compress the cone downwards while twisting it slightly. Use your fingers to pinch and accentuate the horizontal folds that form, creating that ‘accordion’ look. I find it helpful to support the inside of the hat with a tool handle while pinching the outside. -
Curve the tip:
Pull the very tip of the hat sideways or backwards to give it a whimsical curve. It shouldn’t stand perfectly straight. -
Attach the hat:
Place the hat onto the head, pulling the brim down low so it rests just on top of the nose and covers the tops of the eyes. Blend the seam at the back if desired, or leave it as a separate piece visual.
Make it Seasonal
Swap the terracotta color for deep forest green or bright red to change the season, or press a real leaf texture into the hat clay before folding it.
Step 4: Final Details
-
Sculpt the arms:
Create two small sausage shapes from the speckled body clay for sleeves. Attach them to the sides of the body, angled slightly backward. -
Add hands:
Form two small, rounded mittens or balls from the terracotta clay and attach them to the end of the sleeves. They should look tucked against the body. -
Refine textures:
Go over the hat with a coarse sponge to give it a slightly rough, earthenware texture. Ensure the body remains smooth to contrast with the beard and hat. -
Bake or Dry:
Follow the instructions for your specific clay type. If baking polymer clay, propping the hat tip with a bit of foil/tissue helps it hold its shape in the oven. -
Antique finish (Optional):
Once cured/dry, you can apply a very watered-down brown acrylic wash over the hat and beard. Wipe it off immediately with a damp cloth; this leaves dark pigment in the deep crevices, enhancing the folds and hair texture.
Place your finished gnome near a window or plant to let those earthy textures really shine in the natural light


Spiral Beard Gnome for Easy Texture
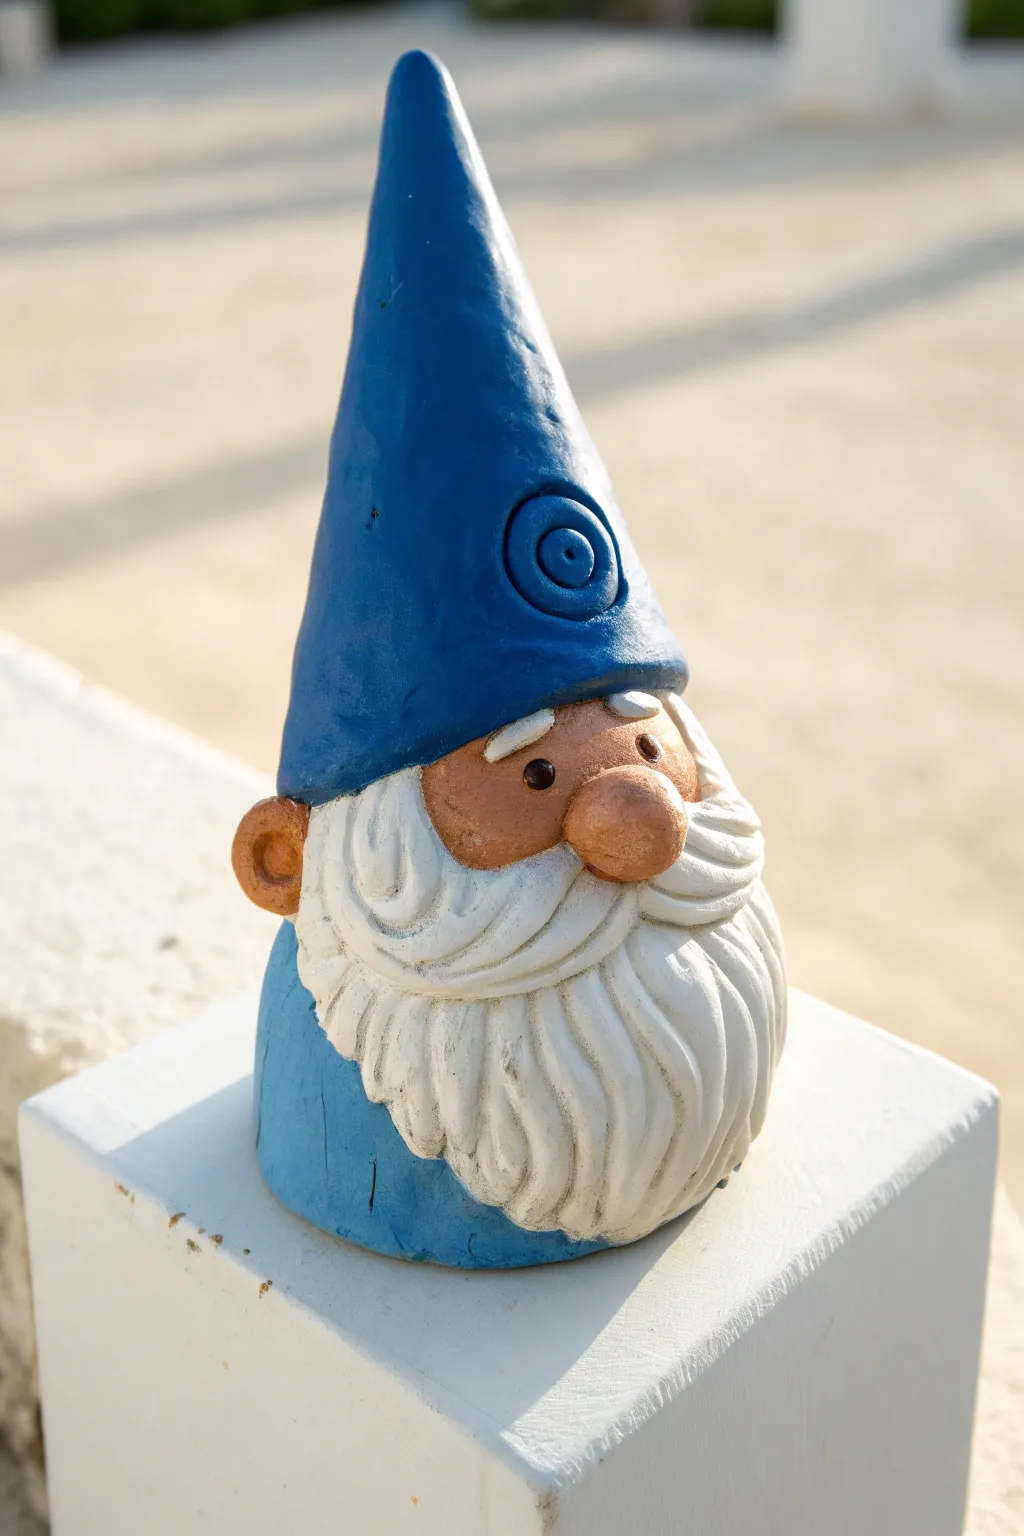
This charming garden companion features bold, simplified shapes and a delightfully textured beard that’s surprisingly easy to sculpt. His tall, blue conical hat with its signature spiral emblem adds a touch of mystical flair to any planter or shelf.
Detailed Instructions
Materials
- Polymer clay or air-dry clay (white/neutral base)
- Acrylic paints (Royal Blue, Burnt Sienna, White, black)
- Sculpting tools (needle tool, loop tool, smoothing tool)
- Rolling pin
- Aluminum foil (for armature)
- Small paintbrushes (flat and detail liner)
- Matte varnish or sealant
Step 1: Building the Base Form
-
Create the core:
Start by scrunching aluminum foil into a cone shape. This saves clay and keeps the figurine lightweight. Compressing it tightly ensures a solid foundation. -
Cover the cone:
Roll out a sheet of your base clay to about 1/4 inch thickness. Wrap this around your foil armature, smoothing the seams together to create a seamless, tall cone shape. -
Shape the face area:
About halfway down the cone, gently press an indentation where the face will emerge from under the hat, distinguishing the hat section from the body.
Cracks in the beard?
If air-dry clay cracks while drying, mix a small amount of fresh clay with water to create a paste (slip) and fill in the cracks, then smooth over.
Step 2: Sculpting the Gnome’s Features
-
Add the nose:
Roll a small ball of clay for the nose. Attach it firmly to the center of the face area; I like to score the back of it slightly to help it stick better. -
Form the beard foundation:
Take a thicker piece of clay and shape it into a bib-like form. wraparound the bottom of the cone, tucked right under the nose. -
Texture the beard:
This is the signature step. Using a rounded loop tool or a wooden sculpting stick, carve deep, sweeping curves into the beard clay. Start from the cheeks and sweep downward and inward to create flow. -
Ensure beard volume:
Make sure the beard wraps fully around the sides, creating a fluffy appearance. Add smaller snakes of clay on top if you need more volume before carving. -
Create the mustache:
Add two small, teardrop-shaped pieces of clay right under the nose, blending them into the beard for a seamless mustache. -
Add the ears:
Shape two small C-shaped ears and attach them to the sides of the head. Use a ball tool to press a small indentation into the center of each ear. -
Define the hat brim:
Add a thin strip of clay around the base of the hat section to create a brim that slightly oversteps the forehead and ears. -
Sculpt the hat spiral:
Roll a tiny coil of clay into a spiral or ‘snail’ shape. Attach this emblem prominently to the front of the hat, blending the edges lightly so it looks embossed.
Smoother skin tone
Sand the face area gently with fine-grit sandpaper after the clay dries but before painting. This ensures the skin looks soft compared to the textured beard.
Step 3: Painting and Finishing
-
Base coat the skin:
Once the clay is fully cured or dry, mix Burnt Sienna with plenty of White to get a warm, tanned skin tone. Paint the nose, cheeks, and ears. -
Paint the hat:
Apply a solid coat of Royal Blue to the entire hat section and the base body color (the shirt area visible at the bottom). Let it dry and apply a second coat for opacity. -
Whiten the beard:
Paint the beard and eyebrows pure White. You might need to use a smaller brush to get paint deep into those sculpted grooves without hitting the skin tone. -
Detail the eyes:
Use the handle end of a paintbrush dipped in black paint to stamp two simple dot eyes. Add tiny white reflections once dry for life. -
Highlighting:
Dry brush a tiny bit of white paint over the blue spiral on the hat to make the raised texture pop. -
Seal the piece:
Protect your gnome from the elements with a coat of matte varnish. This unifies the finish and separates the textures visually.
Place your new friend in a sunny spot to watch over your plants

The Complete Guide to Pottery Troubleshooting
Uncover the most common ceramic mistakes—from cracking clay to failed glazes—and learn how to fix them fast.
Line-Textured Beard Gnome With a Clean Silhouette
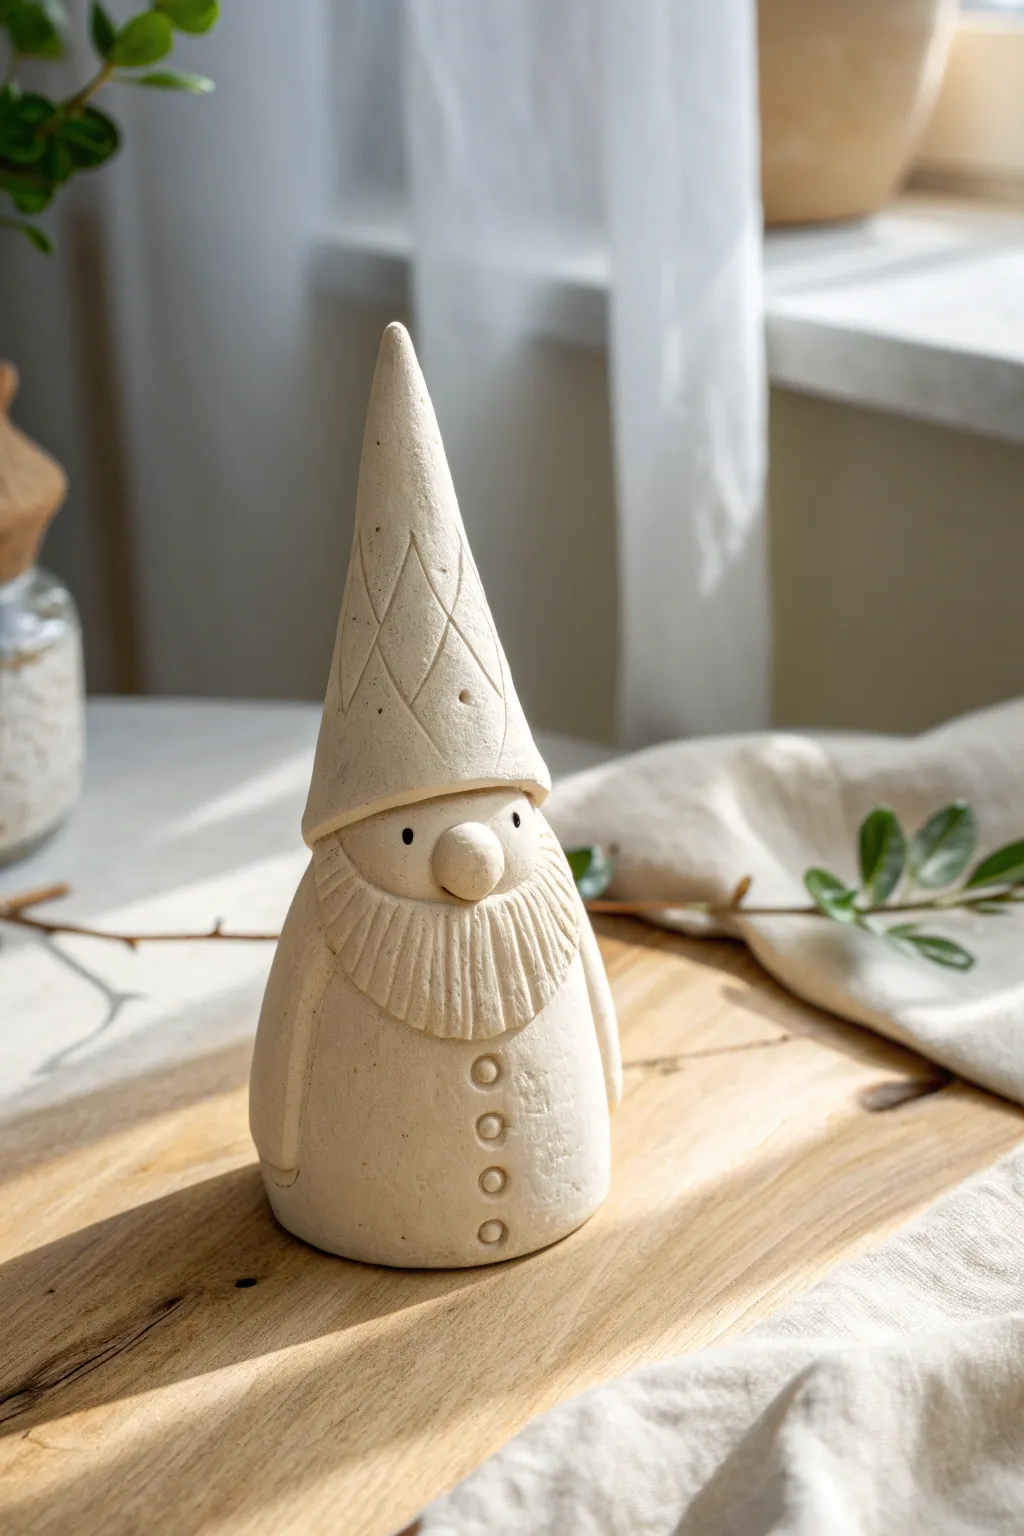
Embrace the beauty of simplicity with this clean-lined gnome sculpture that focuses on geometric shapes and subtle textures. The unglazed finish and precise carvings give it a modern, Scandinavian feel perfect for a minimalist holiday display.
Step-by-Step
Materials
- White or light beige air-dry clay (or polymer clay)
- Rolling pin
- Pointed sculpting tool or toothpick
- Small round clay cutter or straw
- Knife or clay blade
- Small bowl with water (for smoothing)
- Acrylic paint in black (optional, for eyes)
- Fine grit sandpaper
Step 1: Forming the Base Structure
-
Shape the Body:
Start by rolling a ball of clay roughly the size of a tangerine. Gently roll it on your work surface to elongate it into a cylinder that is slightly wider at the bottom for stability. -
Smooth the Base:
Tap the bottom of the cylinder firmly against the table to create a flat base. Use a wet finger to smooth out any cracks or fingerprints on the body’s surface. -
Create the Head Connection:
Slightly taper the top of your cylinder where the hat and nose will eventually sit. This doesn’t need to be perfect, as it will be covered, but it helps the upper pieces bond securely.
Clean Lines Pro-Tip
When carving the diamond pattern on the hat, let the clay dry for about 15-20 minutes first. Slightly firmer clay allows for cleaner cuts without dragging or mushing the shape.
Step 2: Crafting the Beard and Buttons
-
Form the Beard Shape:
Roll out a small slab of clay, about 1/4 inch thick. Cut out a semi-circle shape that matches the width of your gnome’s body. -
Attach the Beard:
Score the back of the beard piece and the upper front of the body cylinder. Apply a dab of water (or liquid clay if using polymer) and press the beard firmly into place. -
Texture the Beard:
Using your pointed tool or a toothpick, carefully drag vertical lines from the top of the beard down to the bottom edge. Keep the lines close together to mimic hair strands. -
Add Button Details:
Roll four very tiny balls of clay. Flatten them slightly and press them vertically down the front center of the body, below the beard. -
Refine Buttons:
Use the tip of a small round tool or the end of a paintbrush handle to create a small indentation in the center of each button for a tailored look.
Step 3: Sculpting the Hat and Face
-
Roll the Nose:
Form a small, smooth ball of clay for the nose. Position it directly in the center of the top edge of the beard. -
Secure the Nose:
Press the nose on firmly, blending the back slightly into the body clay so it doesn’t fall off during drying. -
Create the Hat Cone:
Roll a larger cone shape for the hat. It should be tall and slender. Hollow out the base of the cone slightly with your thumb to fit over the top of the body. -
Position the Hat:
Place the hat on top of the body cylinder. Pull the front rim down so it rests just on top of the nose, covering the top edge of the beard. -
Blend the Seams:
At the back of the gnome, smooth the clay from the hat down onto the body so they become one solid unit. Leave the front rim distinct. -
Carve the Hat Pattern:
Using your knife or sculpting tool, lightly carve diagonal lines across the hat surface. Then, carve diagonal lines in the opposite direction to create a diamond cross-hatch pattern. -
Final Smoothing:
Dip your finger in a little water and gently go over the smooth areas of the body and hat (avoiding your textured areas) to remove any final lint or fingerprints.
Cracking Issues?
If you see small cracks forming as your air-dry clay hardens, don’t panic. Mix a tiny bit of fresh clay with water to make a paste and fill the cracks, then smooth it over.
Step 4: Finishing Touches
-
Dry Completely:
Allow the gnome to dry thoroughly. For air-dry clay, this usually takes 24-48 hours. If using polymer clay, bake according to the package instructions. -
Sand for Perfection:
Once fully cured, use fine-grit sandpaper to buff out any rough spots on the smooth sections of the coat. -
Add Eyes:
Dip the tip of a toothpick into black acrylic paint. Carefully dot two tiny eyes on the smooth space between the hat brim and the beard on either side of the nose.
Place your finished gnome on a wooden board or shelf to enjoy its calming, handcrafted presence
Knit-Look Hat Gnome With Ribbed Details
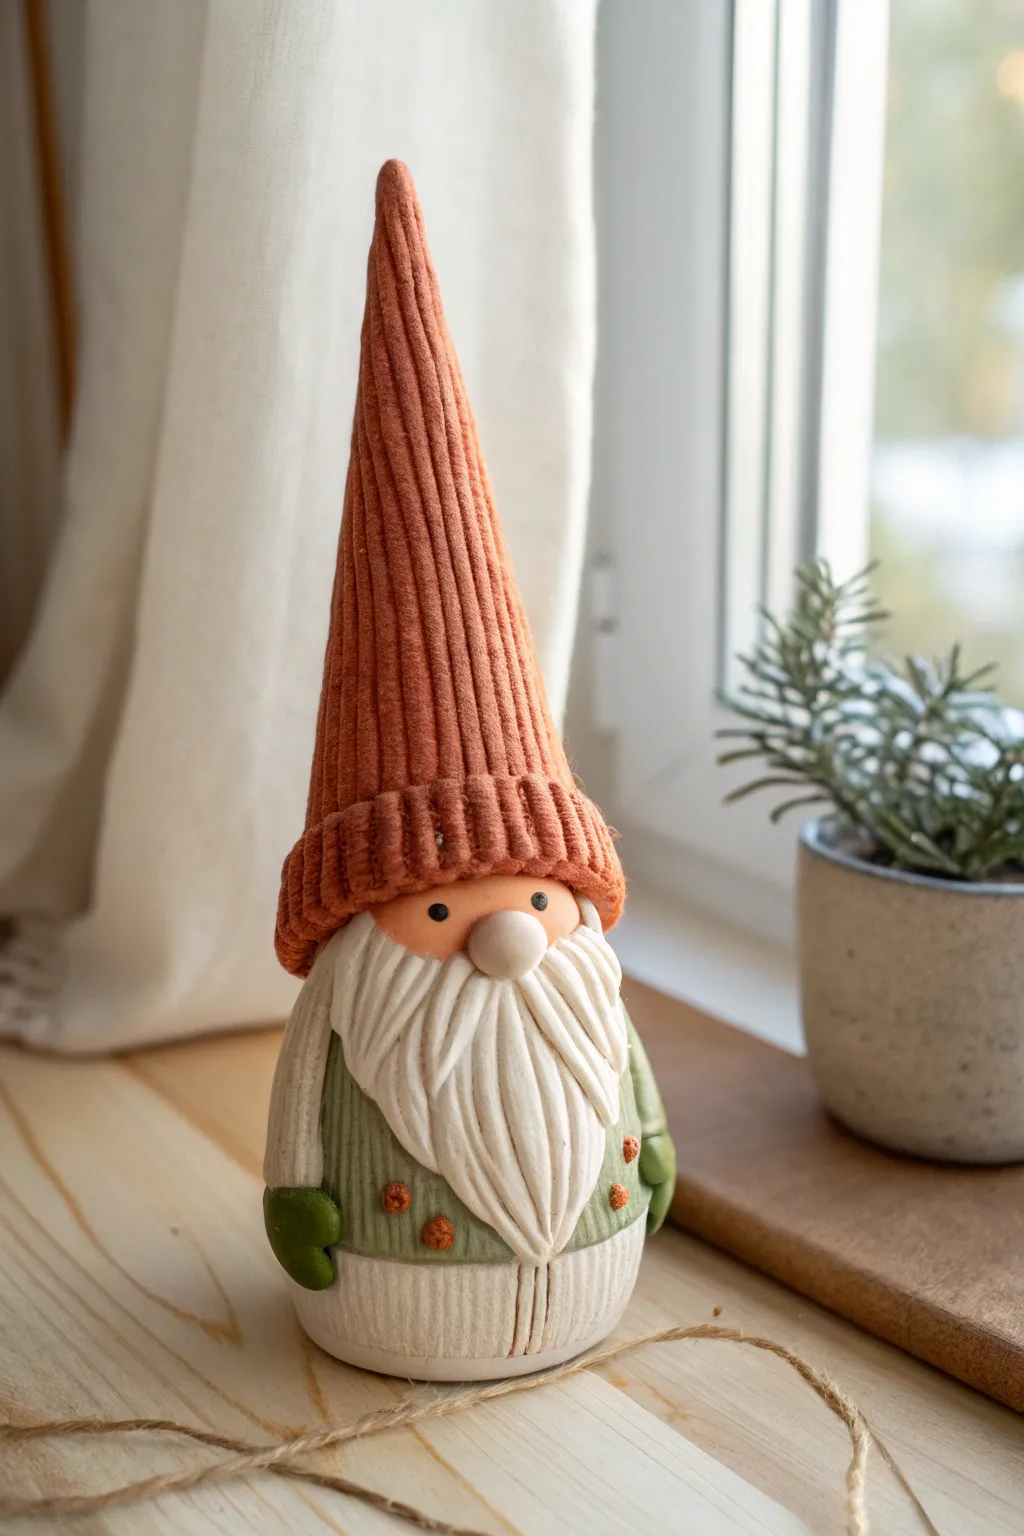
Capture the warmth of winter knits in clay form with this adorable gnome featuring a realistic ribbed hat and textured sweater. The secret lies in simple carving techniques that transform smooth clay into what looks like soft, woven yarn, perfect for a cozy windowsill display.
Step-by-Step Guide
Materials
- Polymer clay (terracotta/orange, sage green, white/cream, skin tone, dark green)
- Aluminum foil (for armature)
- Basic sculpting tools (needle tool, ball stylus)
- Flexible clay blade or craft knife
- Texture tools (e.g., a toothbrush or stiff bristle brush)
- Small rolling pin
- Black acrylic paint or tiny black beads (for eyes)
- Oven for baking
Step 1: Forming the Base & Body
-
Build the armature:
Start by crumpling aluminum foil into a cone shape. This saves clay and keeps the figurine lightweight. Make sure the bottom is flat so your gnome stands securely. -
Add the bottom layer:
Roll out a sheet of cream or white clay. Wrap a strip around the very bottom edge of your foil cone to create the pants or bottom of the tunic. -
Create the ribbed texture:
Using a needle tool or a dull knife, gently score vertical lines all around this cream band to mimic a ribbed fabric texture. -
Dress the gnome:
Roll out a sheet of sage green clay for the sweater. Wrap this around the cone, slightly overlapping the cream bottom layer so it looks like a sweater worn over pants. -
Texture the sweater:
Before adding details, texture the green clay. I find gently pressing a toothbrush against the clay gives it a lovely, fuzzy wool appearance. Then, use your needle tool to score vertical lines for a knit effect.
Fixing Smudged Textures
If your knit texture gets flattened while you work, pop the piece in the fridge for 10 minutes. The firmer clay is easier to re-carve without distorting the overall shape.
Step 2: Sculpting the Head & Hat
-
Add the head:
Roll a smooth ball of skin-tone clay. Press it firmly onto the top of the green sweater body, slightly flattening the connection point so it sticks well. -
Form the hat cone:
Shape a long cone of terracotta or rust-orange clay. It should be tall and slender. Place this securely on top of the head, pulling it down slightly at the back and sides. -
Make the hat brim:
Roll a thick snake of the same orange clay. Flatten it slightly into a rectangular strip and wrap it around the base of the hat, covering the seam where the hat meets the head. -
Create the signature ribbing:
This is the crucial step for the ‘knit’ look. Use a sculpting tool or the back of a knife to press deep, vertical indentations all the way up the hat cone and around the brim. The lines should be close together and parallel. -
Refine the knit:
For extra realism, create tiny horizontal ticks within the vertical channels on the brim, mimicking the purl stitches of a rib knit.
Step 3: Face & Details
-
Adding the beard:
Create several teardrop shapes from white clay. Flatten them slightly and attach them starting under the nose area, layering them outwards to cover the chest. -
Texturing the beard:
Use a needle tool to drag lines through the white teardrops, following the curve of the clay to look like flowing hair. -
The nose:
Roll a small ball of skin-tone clay and press it right in the center, overlapping the top of the beard and the bottom of the hat brim. -
The eyes:
Use a ball stylus to make two small indents for eyes. You can either insert tiny black beads now or wait to paint them after baking. -
Sculpting arms and mittens:
Roll two small logs of green clay for arms and attach them to the sides. Add small mittens using dark green clay, shaping them simply with a separate thumb section. -
Decorative buttons:
Roll tiny balls of orange clay and press them onto the sweater. Poke four tiny holes in each to resemble buttons. -
Final inspection:
Check your textures. If you smudged any ‘knit’ lines while handling the gnome, gently re-score them now before baking. -
Bake and finish:
Bake the gnome according to your clay package’s instructions (usually 275°F/135°C for 15-30 minutes). Once cool, paint the eyes black if you haven’t used beads.
Add a Pom-Pom
Make a textured ball of white clay and attach it to the very tip of the hat. Use a needle tool to rough it up thoroughly so it looks like a fluffy yarn pom-pom.
Now you have a charming little companion that brings a handmade warmth to your home decor


What Really Happens Inside the Kiln
Learn how time and temperature work together inside the kiln to transform clay into durable ceramic.
Pom-Pom Hat Gnome With Extra Whimsy

Create a serene winter friend with a wonderfully textured hat and a peaceful expression. This handcrafted clay gnome features an unglazed, speckled finish that gives it a rustic, organic charm perfect for cozy décor.
Step-by-Step Tutorial
Materials
- White speckled clay (stoneware or polymer clay with granite effect)
- Pottery tools (needle tool, modeling tool)
- Rolling pin
- Bubble wrap or textured fabric (for hat texture)
- Cone-shaped form (paper or foil)
- Slip and score tool (if using water-based clay)
- Small round cutter or straw (for buttons)
- Clear matte varnish (optional)
Step 1: Creating the Base Body
-
Form the core:
Start with a golf-ball-sized lump of speckled clay. Roll it into a smooth ball in your palms to remove any cracks. -
Shape the robe:
Gently taper the top of the ball to create a rounded cone shape. The bottom should be wide and flat so the gnome stands securely on your work surface. -
Add arm details:
Roll two small sausage shapes for arms. Attach them to the sides of the body, blending the clay at the shoulder area so they look like part of the robe. -
Create hands:
Form two tiny balls for hands and press them gently into the ends of the sleeves. Use a modeling tool to create a slight indentation for a cuff effect. -
Button up:
Roll three tiny spheres of clay. Press them vertically down the center of the belly to create the coat buttons, flattening them slightly.
Step 2: Crafting the Textured Hat
-
Prepare the texture:
Roll out a slab of clay to about 1/4 inch thickness. Place a piece of bubble wrap or coarse textured fabric over it and roll firmly again to imprint a deep, nubby pattern. -
Cut the hat shape:
Cut a triangle from your textured slab. The base matches the circumference of the gnome’s head, and the height determines how tall and slouchy the hat will be. -
Form the cone:
Wrap the textured triangle into a cone shape, carefully joining the seam at the back. Try to preserve the texture while smoothing the inside of the seam. -
Attach the brim:
Roll a thick, smooth band of clay (untextured) and wrap it around the base of the hat cone to create the wide, folded-up brim. -
Top it off:
Add a small ball of clay to the very tip of the hat to mimic a pom-pom.
Crack Prevention
If using air-dry clay, cracks happen if drying is too fast. Loosely drape a plastic bag over the gnome for the first 24 hours to slow evaporation.
Step 3: Face and Assembly
-
Mount the hat:
Place the hat onto the body. If the hat is heavy, use a small foil core inside for support until it dries. Angle it slightly back so the face area is visible. -
Sculpt the beard:
Add a flat, spade-shaped piece of clay under the hat brim for the beard base. Use a needle tool to carve deep, flowing lines to simulate hair strands. -
Refine beard layers:
I like to add vary thin, individual clay snakes on top of the base beard layer to give it extra volume and flow. -
Face features:
Roll a smooth, beige-tinted ball of clay (or use the base clay) for the nose and place it just under the hat brim, nesting it into the beard. -
Create the eyes:
Using a very fine needle tool or a crescent-shaped cutters, press two U-shapes into the clay just above the nose to create sleepy, closed eyes. -
Final texture check:
Use a toothbrush or stippling brush to gently tap the white coat body, giving it a porous, fabric-like texture that contrasts with the smooth nose. -
Dry and fire:
Let the gnome dry slowly away from direct drafts. Once bone dry, fire according to your clay’s instructions (or bake if using polymer).
Texture Trick
No fancy tools? A crumpled ball of aluminum foil rolled lightly over the surface creates a perfect woolen texture for the hat or coat.
Place your finished gnome on a wooden slice or mantelpiece to enjoy its calming presence
Flat-Back Gnome Ornament for Hanging
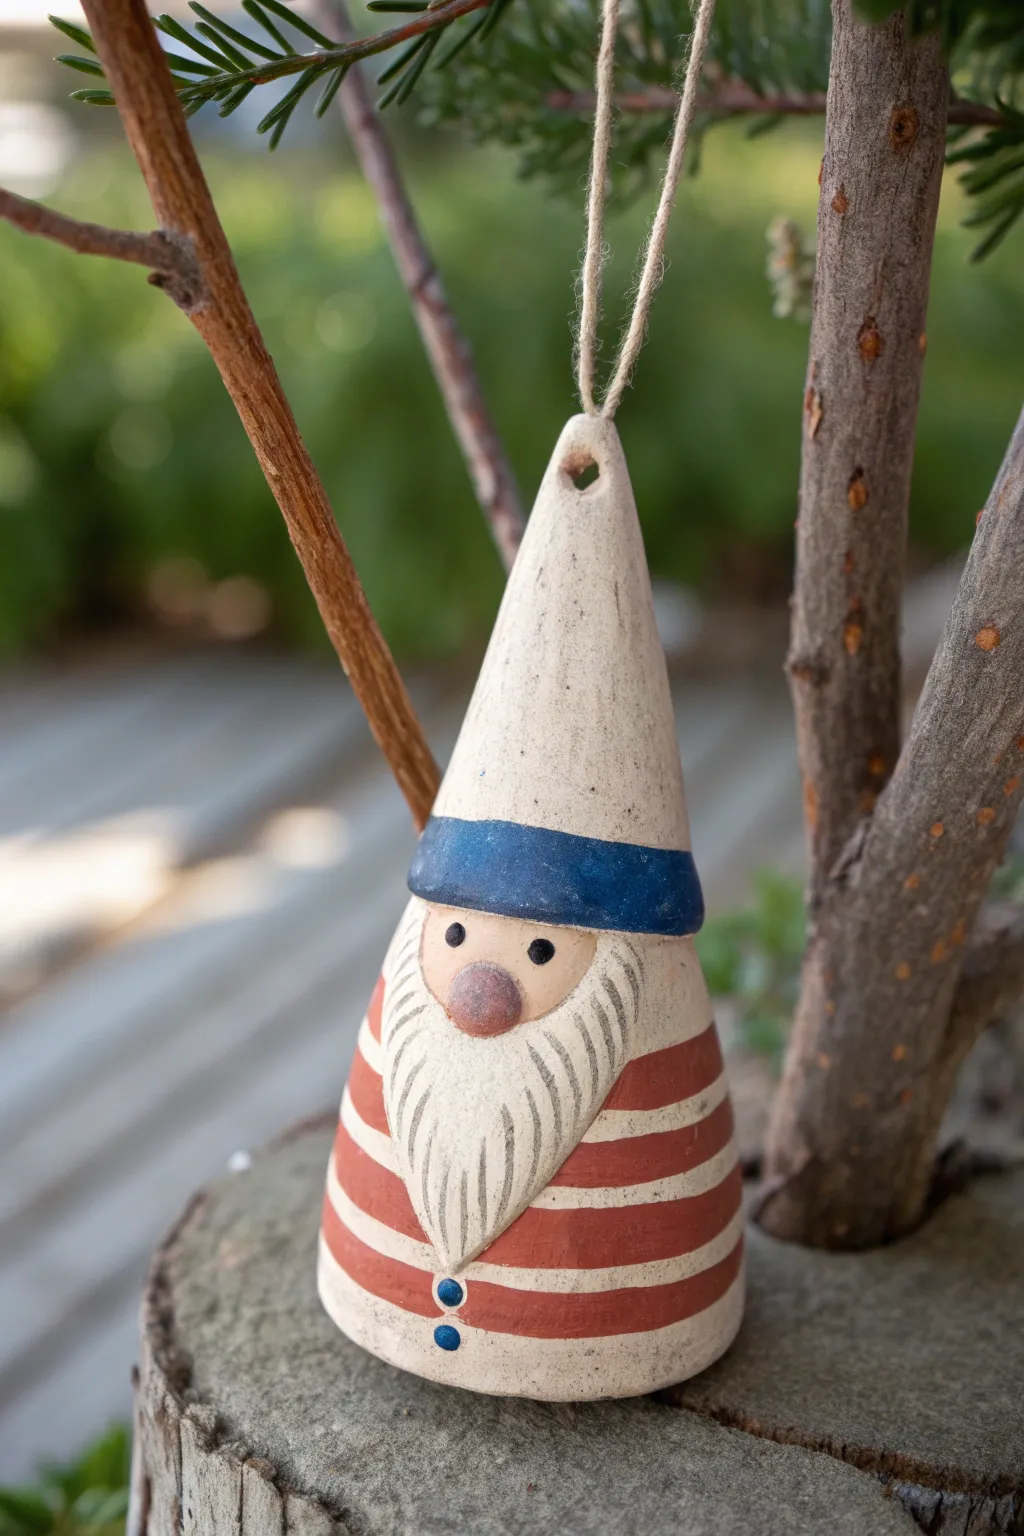
This nautical-themed gnome brings a touch of seaside charm to your garden or holiday tree. With his crisp red striped shirt and textured beard, this clay project is a delightful exercise in simple shaping and careful painting.
Detailed Instructions
Materials
- White air-dry clay or polymer clay (oven-bake)
- Clay rolling pin
- Pointed clay sculpting tool or toothpick
- Small circle cutter (optional)
- Acrylic paints (red, navy blue, white, peach/flesh tone)
- Fine detail paintbrush
- Flat shader paintbrush
- Clear matte or satin varnish
- Jute twine for hanging
- Water cup and paper towels
Step 1: Sculpting the Base Form
-
Form the Cone:
Start with a ball of white clay about the size of a golf ball. Roll it into a smooth cone shape approximately 3 to 4 inches tall. The base should be slightly rounded but flat enough to stand temporarily. -
Flatten the Back:
Gently press the cone against your work surface to flatten the back side slightly. This ensures the ornament hangs nicely without spinning too wildly. -
Create the Hanger Hole:
Use a skewer or tool to pierce a hole through the very top tip of the hat. Make sure the hole is large enough for your jute twine to pass through later, keeping in mind clay shrinks slightly when drying.
Fixing Cracks
If you see small cracks as your air-dry clay cures, mix a tiny bit of fresh clay with water to make a paste (slip) and smooth it into the cracks with your finger.
Step 2: Adding Details
-
Sculpt the Hat Rim:
Roll a very thin snake of clay and flatten it into a ribbon. Wrap this around the cone about halfway down to define where the hat ends and the face begins. Blend the top edge of this ribbon into the hat for a seamless look. -
Form the Nose:
Roll a small pea-sized ball of clay. Press it firmly onto the face area directly below the hat rim. Blend the back edges of the nose into the main cone so it doesn’t fall off. -
Shape the Beard:
Take a flat, triangular piece of clay and attach it below the nose, covering the upper chest area. Smooth the edges onto the body. -
Texture the Beard:
Using your pointed tool or a toothpick, draw vertical lines into the beard clay to simulate hair. Curve the lines slightly outward from the center for a natural flow. I find that varying the depth of these lines adds great visual interest.
Level Up: Antiquing
Mix a tiny drop of brown paint with water to make a wash. Brush it over the dried beard and wipe it off quickly to leave darkness in the crevices for instant depth.
Step 3: Finishing and Painting
-
Dry or Bake:
Follow the manufacturer’s instructions for your specific clay. If using air-dry clay, let it sit for 24-48 hours until fully hard and white. If using polymer, bake at the recommended temperature. -
Base Coat the Hat:
Paint the top cone section (the hat) with an off-white or creamy white color. It’s okay if it looks slightly rustic; that fits the style. -
Paint the Hat Band:
Carefully paint the raised rim of the hat with navy blue acrylic paint. -
Add Skin Tone:
Paint the small area between the hat rim and the beard, as well as the round nose, with a flesh-toned peach mix. -
Paint the Beard:
Paint the textured beard area with white or an ivory tone. You might need two coats to get into the grooves. -
Create the Striped Shirt:
The body below the beard is the shirt. Paint wide horizontal stripes using red paint, leaving white clay exposed for the alternate stripes. A flat brush works best for getting clean lines here. -
Add the Buttons:
Dip the back end of your paintbrush in navy blue paint to dot two small buttons down the visible front center of the shirt, just below the beard. -
Paint the Eyes:
Use the finest point of your brush or a toothpick to add two small black dots for eyes just above the nose. -
Seal and String:
Once dry, coat the entire piece with a matte or satin varnish to protect the paint. Finally, thread a piece of jute twine through the top hole and knot it for hanging.
Hang your new nautical gnome on a sturdy branch or display him on a seasonal wreath to enjoy his cheerful company

TRACK YOUR CERAMIC JOURNEY
Capture glaze tests, firing details, and creative progress—all in one simple printable. Make your projects easier to repeat and improve.
Mini Gnome Charms in Polymer Clay
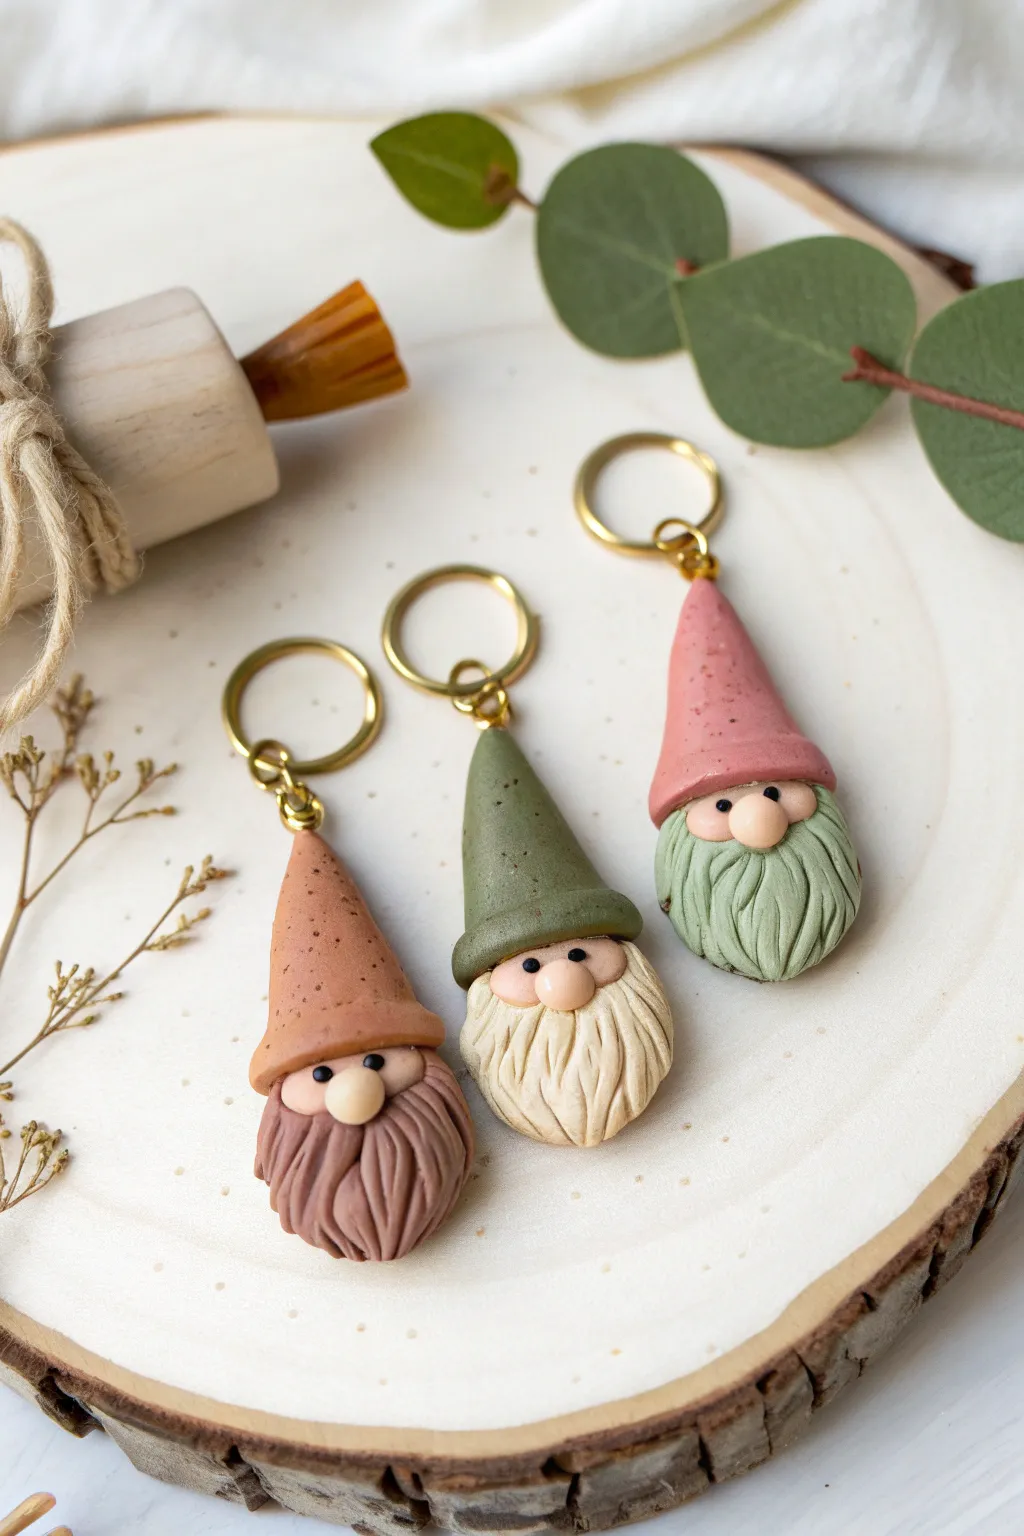
These adorable mini gnome charms feature earthy color palettes and a delightful speckle texture that gives them a rustic feel. Perfect for keychains or stitch markers, these little guardians combine simple shapes with detailed beard textures for a professional-looking finish.
Step-by-Step
Materials
- Polymer clay in muted tones (terracotta, olive green, dusty pink, cream, brown, sage)
- Small amount of flesh-tone clay
- Small amount of black clay
- Ground black pepper or faux granite clay (for speckling)
- Dotting tool or small ball stylus
- Needle tool or X-Acto knife
- Gold screw eye pins
- Gold jump rings
- Ceramic tile or baking surface
- Gloss glaze (optional)
Step 1: Prepping and Speckling
-
Condition the Clay:
Begin by thoroughly conditioning your chosen colors of polymer clay until they are soft and pliable. You’ll need three pairs of colors for the hats and beards, plus flesh tone specifically for the noses. -
Create the Speckled Effect:
To achieve the stone-like texture seen in the photo, take your hat colors (terracotta, olive, pink) and mix in a very small pinch of ground black pepper or use specialized ‘granite’ effect clay. Kneed it in until the speckles are evenly distributed. -
Form the Base:
Roll a dime-sized ball of scrap clay or the same color as the beard to act as the hidden core of the gnome’s head. This provides structural support.
Step 2: Sculpting the Components
-
Shape the Beards:
Roll your beard color (brown, cream, or sage) into a ball, then slightly flatten it into a thick teardrop shape. Press this onto the bottom front of your base core. -
Texturizing the Beard:
Using a needle tool, draw deep, flowing lines into the beard clay. Start from where the nose will sit and curve outward, creating the look of thick, luscious hair. Vary the depth of the lines for realism. -
Add the Nose:
Roll a small, pea-sized ball of flesh-toned clay. Place it centrally at the top of the beard section, ensuring it sits securely. Gently press it down so it adheres without losing its roundness. -
Create the Hat Cone:
Take your speckled hat color and roll it into a cone shape. The base should be wide enough to cover the top of the head and slightly overhang the nose. -
Hollow the Hat:
Use your thumb or a large ball tool to create a hollow indentation in the bottom of the cone. This helps it sit snugly over the round head base. -
Attach the Hat:
Place the hat onto the head, pulling the brim down low so it touches the top of the nose. The hat should look like it’s resting heavily on the gnome’s face. -
Refine the Brim:
Smooth the seam where the hat meets the back of the head. In the front, gently press the brim just above the nose to create a soft, rounded edge.
Fixing Fingerprints
Before baking, brush the clay lightly with a little baby oil or cornstarch. This smoothes out accidental fingerprints and removes lint for a clean finish.
Step 3: Finishing Details
-
Insert Eye Pins:
Take a gold screw eye pin. If the stem is too long, trim it with wire cutters. Screw or push it vertically into the very top tip of the hat. -
Secure the Hardware:
I find it helpful to remove the pin, add a tiny dab of liquid clay or Bake & Bond to the threads, and re-insert it to ensure it won’t pull out after baking. -
Add the Eyes:
Roll two infinitesimally small balls of black clay. Use a needle tool to pick them up and place them on either side of the nose, tucked right under the hat brim. -
Baking:
Place your gnomes on a ceramic tile. Bake according to your polymer clay package instructions (usually 275°F/135°C for 15-30 minutes, depending on thickness). -
Cooling:
Let the charms cool completely in the oven with the door slightly ajar. This prevents thermal shock and makes the clay more durable. -
Assembly:
Once cool, use pliers to open a large gold jump ring. Thread it through the eye pin at the top of the hat and attach your keyring hardware before closing the ring securely.
Seasonal Switch-Up
Change the color palette for holidays! Try red hats and white beards for Christmas, or pastel purples and greens for a spring garden gnome version.
Now you have a charming set of gnomes ready to guard your keys or decorate a bag
Coordinated Gnome Family Set in Two Sizes
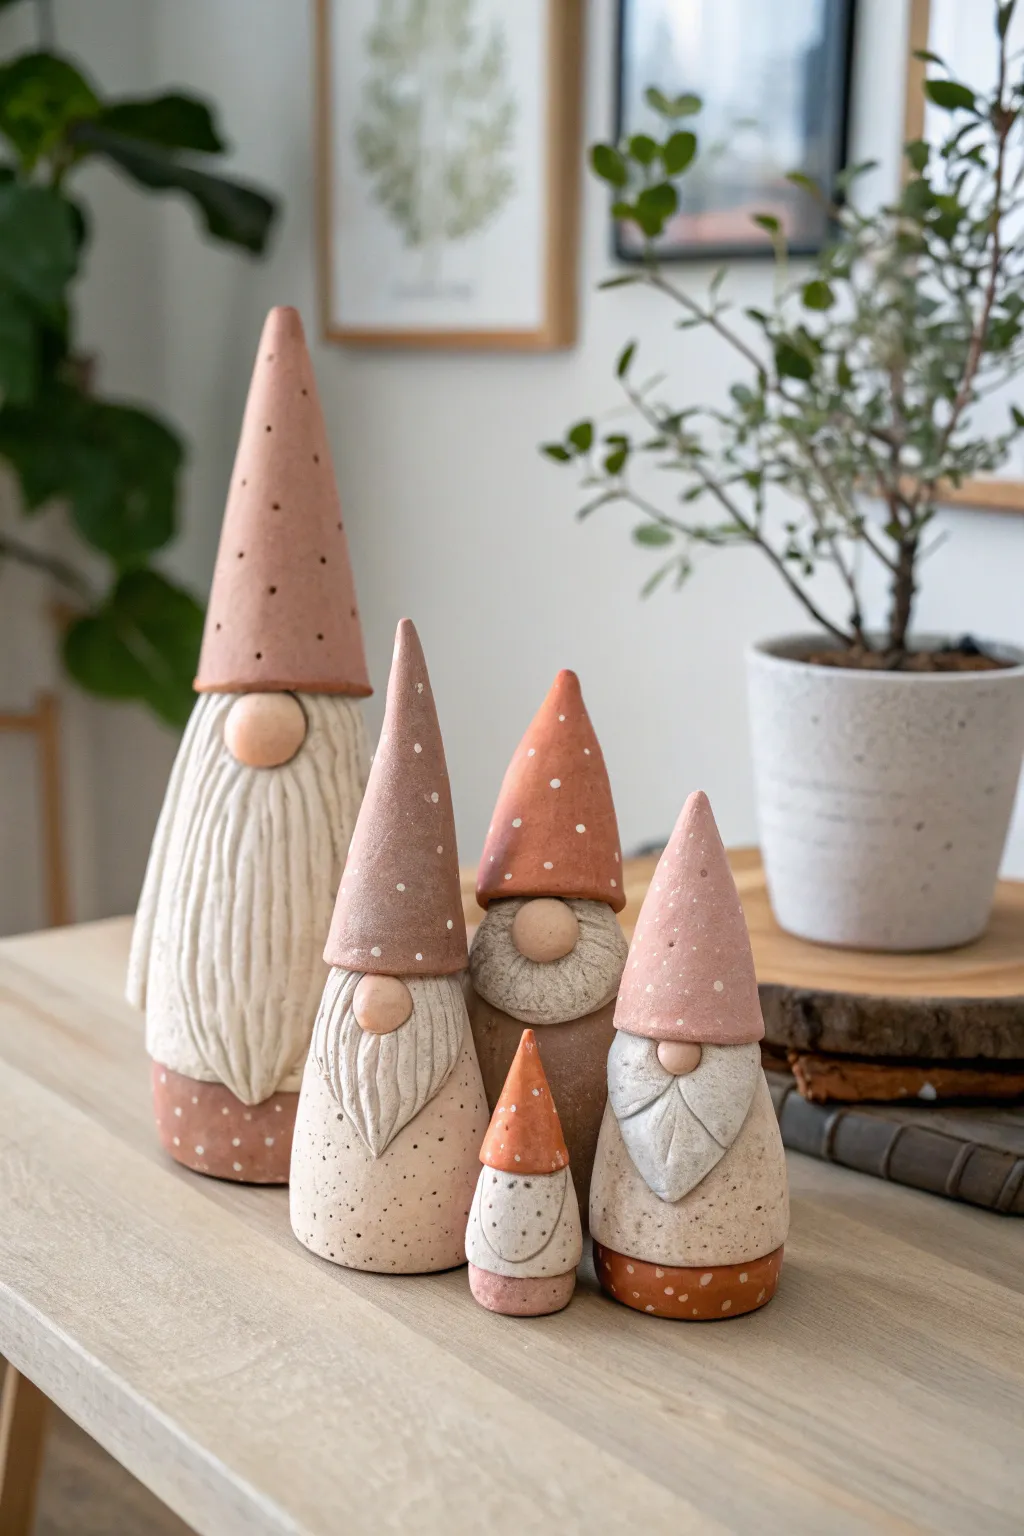
Bring a touch of Scandinavian charm to your home with this coordinated family of clay gnomes. Featuring earthy terracotta tones, speckled stone textures, and varying heights, this set creates a cohesive and heartwarming display perfect for shelves or mantles.
Step-by-Step Guide
Materials
- Air-dry clay (terracotta color)
- Air-dry clay (stone/granite color or white mixed with speckles)
- Flesh-toned clay (small amount for noses)
- Rolling pin
- Clay knife or craft blade
- Texture tools (needle tool, comb tool, or stiff brush)
- A cone form or cardboard cone (optional, for support)
- White acrylic paint (for dots)
- Fine-point paintbrush or dotting tool
- Water and sponge (for smoothing)
- Matte varnish (optional)
Step 1: Forming the Base Structure
-
Prepare your clay sizes:
Begin by portioning your clay to create five distinct sizes, ranging from a large patriarch figure to a tiny baby gnome. You’ll want roughly double the amount of clay for the largest gnome compared to the medium ones. -
Shape the bodies:
Roll the stone-colored or white speckled clay into balls, then gently flatten the bottoms so they stand upright. For the taller gnomes, shape the body into a tapered cylinder; for the smaller ones, a simple rounded mound works best. -
Create the hats:
Using the terracotta-colored clay, roll out cones that correspond to the size of each body. The hats should be tall and pointy. Hollow out the base of each cone slightly with your thumb so it can sit securely over the body piece later. -
Dry fit the pieces:
Place the hats onto the bodies to check proportions. The hat should cover the top third of the body shape. Make adjustments now while the clay is still pliable.
Natural Speckle Hack
Mix used dried coffee grounds or black pepper into your white clay before sculpting to achieve that authentic stone-speckled pottery look without painting.
Step 2: Sculpting the Details
-
Add the beards:
Roll out a thin sheet of white or stone-colored clay. Cut triangular or U-shaped pieces for the beards. Attach these to the front of the body, just where the hat brim will sit. -
Texture the facial hair:
Use a needle tool or a clay comb to press vertical lines into the beard clay. Vary the pressure to create deep grooves that mimic flowing hair. I like to curve the lines slightly at the bottom for a more natural look. -
Attach the noses:
Roll small balls of flesh-toned clay. Press one firmly onto the center top of each beard. Ensure the top of the nose is positioned so the hat brim will just rest on it. -
Assemble the hats:
Score the clay surfaces (make small scratches) where the hat meets the body and apply a dab of water or liquid clay. Press the terracotta hats firmly onto the bodies, pulling the brim down until it touches the top of the nose.
Cracking Issues?
If cracks appear while drying, fill them immediately with a slurry made of clay and water (slip). Smooth it over with a damp finger and let it dry slowly.
Step 3: Adding Character & Finishing
-
Refine the shapes:
Smooth out any fingerprints on the hats and bodies using a slightly damp sponge. This gives that professional, matte ceramic finish seen in the photo. -
Poke ventilation holes:
If you are using kiln-fire clay, remember to poke a small hole in the bottom of each piece for air escape. For air-dry clay, this isn’t strictly necessary, but helps with even drying. -
Adding the tiny gnome details:
For the smallest gnome, the beard might just be a small textured patch. Keep the details simpler here so it doesn’t look cluttered. -
Let them dry:
Allow your gnome family to dry completely. This can take 24-48 hours depending on humidity and the thickness of your clay. -
Paint the dots:
Once dry, dip a fine dotting tool or toothpick into white acrylic paint. Add tiny, random speckles to the terracotta hats to mimic a glazed effect. You can also add speckles to the body bases if you used plain white clay instead of pre-speckled clay. -
Seal the work:
Finish by applying a coat of matte varnish. This protects the paint and deepens the natural clay colors without making them glossy.
Arranging your finished family together creates a charming narrative scene right on your table
Valentine Heart Hat Gnome
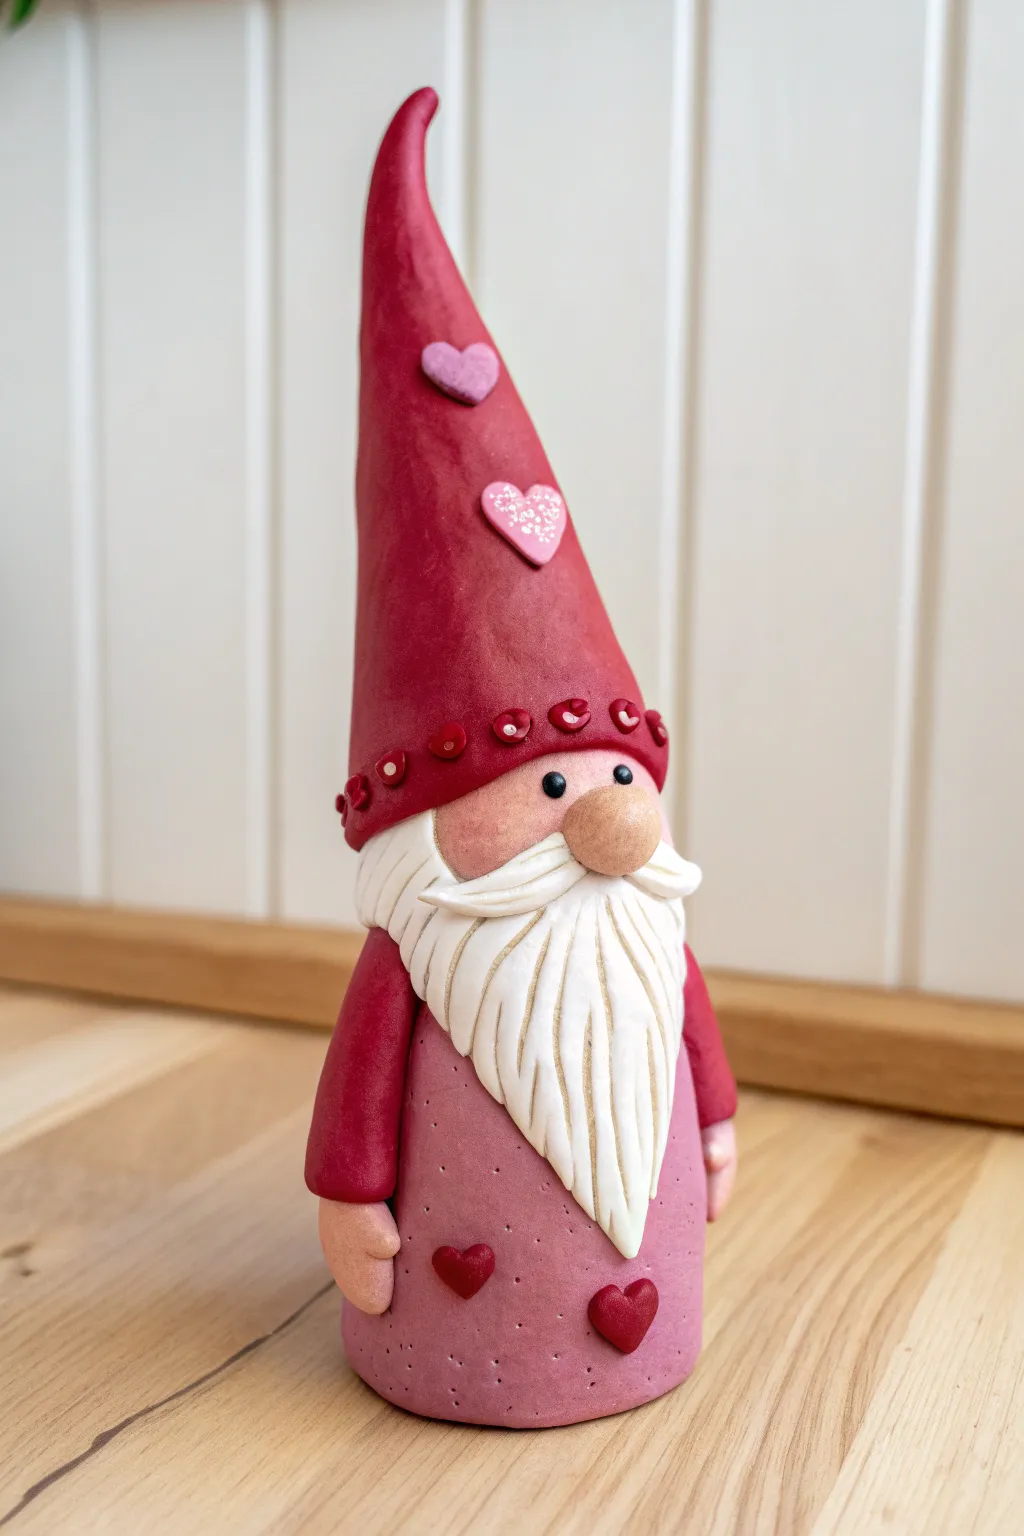
This charming figure features a towering red hat adorned with sweet hearts, perfect for Valentine’s gifting or seasonal decor. With his textured pink tunic and flowing white beard, this little guy is sure to bring a smile to anyone’s face.
Detailed Instructions
Materials
- Polymer clay (Red, Light Pink, White, Flesh Tone/Beige)
- Black clay (tiny amount for eyes) or black acrylic paint
- Rolling pin or clay machine
- Clay sculpting tools (needle tool, small ball tool)
- Hobby knife
- Aluminum foil (for core structure)
- Gloss glaze (optional)
Step 1: Forming the Base & Body
-
Build the core:
Start by crunching a piece of aluminum foil into a cone shape. This saves clay and keeps the figurine lightweight. The cone should be roughly 2-3 inches tall. -
Prepare the tunic clay:
Condition a block of light pink polymer clay until it is soft and pliable. Roll it into a flat sheet about 1/4 inch thick. -
Wrap the body:
Wrap the pink sheet around the base of your foil cone to create the tunic. Smooth the seam at the back with your finger or a sculpting tool until it disappears. -
Shape the base:
Ensure the bottom is flat so the gnome stands securely. You can gently press the figure onto your work surface to leveling it. -
Add texture:
Using a needle tool, gently poke small, random dots all over the pink tunic to give it a fabric-like texture.
Fixing Fingerprints
Before baking, lightly brush the clay with a little baby oil or cornstarch. This smooths out accidental fingerprints and dust specks for a professional finish.
Step 2: Creating the Head & Beard
-
Shape the head:
Roll a ball of flesh-tone clay and press it onto the top of the pink body section. Flatten the front slightly where the face will be. -
Form the beard base:
Take white clay and flatten it into a rough, elongated triangle or teardrop shape. This will be the main part of the beard. -
Attach the beard:
Press the white shape onto the face area, wrapping the top corners slightly around the sides. The bottom point should extend down over the pink tunic. -
Detail the beard hair:
Use a needle tool or knife tool to carve deep, vertical grooves into the white clay, mimicking flowing hair strands. -
Add the mustache:
Roll two small teardrops of white clay. Attach them horizontally above the beard, twisting the outer tips upward slightly for a whimsical look. -
Place the nose:
Roll a round ball of flesh-tone clay. I like to make this slightly oversized for cuteness. Press it firmly into the center of the mustache.
Sparkle Finish
Mix just a pinch of fine glitter into the pink heart on the hat before attaching it, or paint the finished hearts with glitter glue after baking.
Step 3: The Hat & Details
-
Create the hat cone:
Roll a large piece of red clay into a long, tall cone. Hollow out the base slightly with your thumb so it fits over the head. -
Position the hat:
Place the red cone onto the head, pulling it down snugly so the brim touches the top of the nose. Curve the tip of the hat slightly to the side for character. -
Adding the brim decoration:
Roll a thin snake of red clay and wrap it around the brim of the hat. Press small indentations into it with a ball tool to create a patterned border. -
Attach the arms:
Roll two cylinders of red clay for sleeves and attach them to the sides of the body. Add small balls of flesh-tone clay at the ends for hands. -
Make the eyes:
Roll two tiny specks of black clay and press them into the face above the nose. Alternatively, poke two holes and insert black beads. -
Decorate with hearts:
Cut or mold small heart shapes from pink and red clay. Press two onto the hat and a few near the bottom of the tunic. -
Bake:
Bake the gnome according to your clay package instructions (usually 275°F/135°C for 15-30 minutes). Let it cool completely before handling.
Once cooled, your little Valentine gnome is ready to spread love from your shelf or mantle
Winter Gnome With Snowy Speckles and a Tall Hat
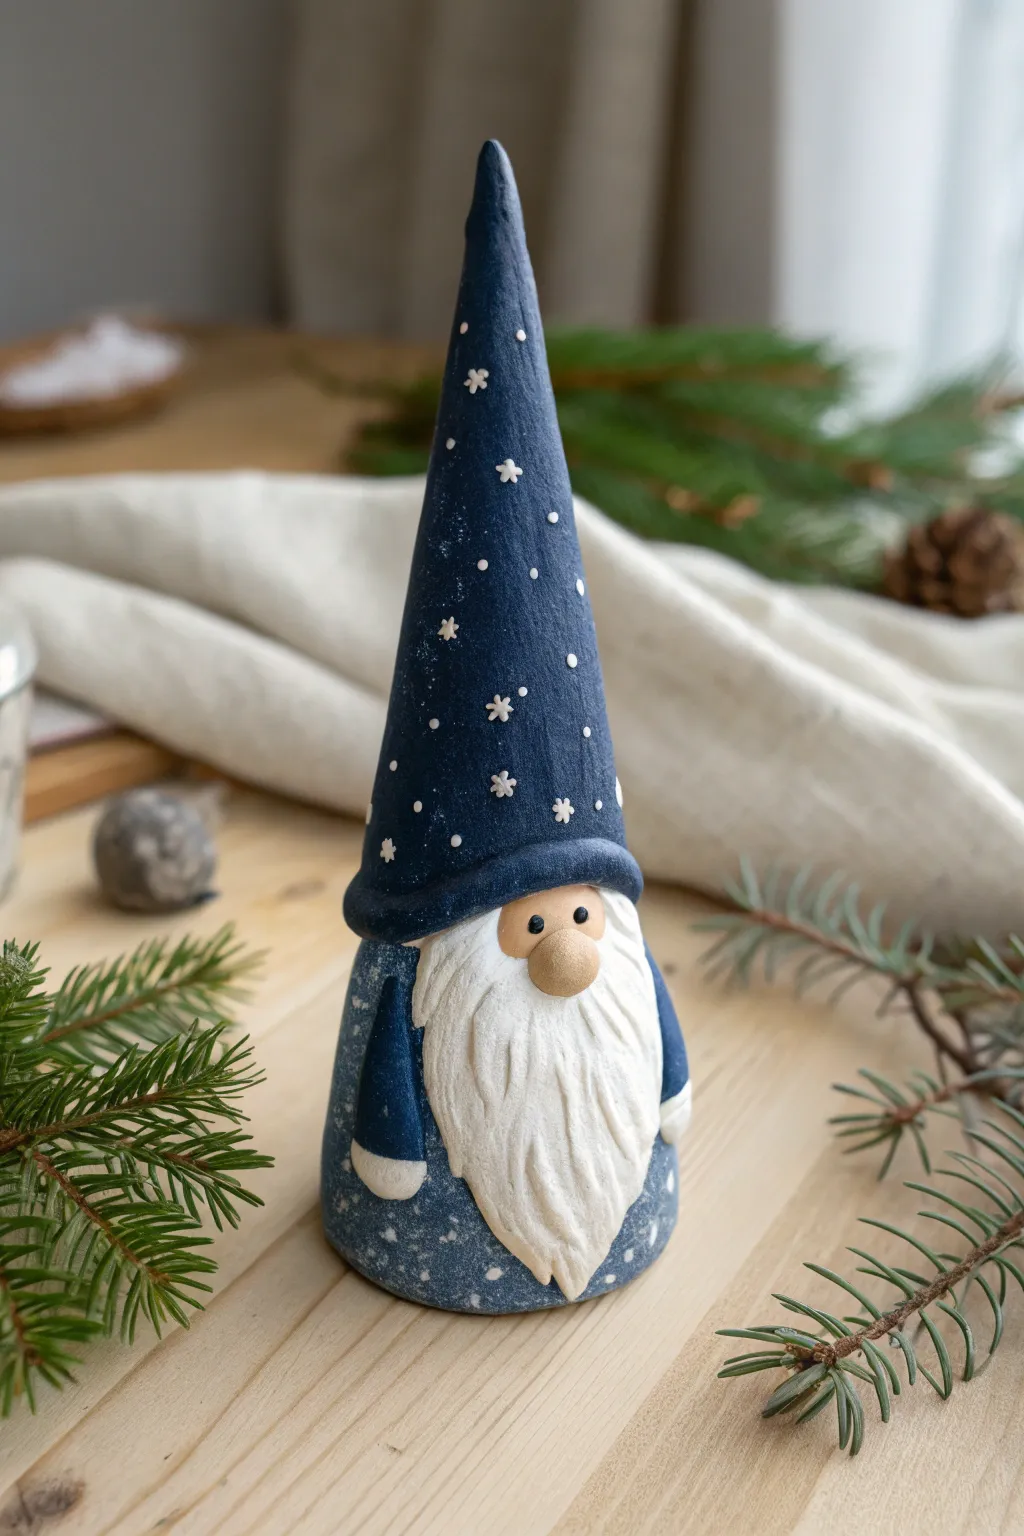
Capture the magic of a snowy evening with this charming clay gnome featuring a tall, speckled hat reminiscent of a winter night sky. Its deep blue tones and delicate snowflake details make it a perfect seasonal decoration or holiday gift.
Step-by-Step Guide
Materials
- Polymer clay (white, beige/flesh tone, dark blue)
- Acrylic paint (white)
- Small paintbrush or toothpick
- Aluminum foil
- Needle tool or toothpick for texturing
- Ball stylus tool
- Oven for baking (if using polymer clay)
- Smoothing tool or your finger
Step 1: Forming the Base Structure
-
Create the core:
Begin by scrunching a piece of aluminum foil into a cone shape. This will be the armature for the gnome, saving clay and reducing baking time. Aim for a cone about 3-4 inches tall. -
Cover the body:
Condition a block of dark blue clay until soft. Roll it into a flat sheet about 1/4 inch thick. Wrap this sheet around the bottom third of your foil cone to create the gnome’s coat, smoothing the seam at the back. -
Shape the hat:
Take a larger portion of dark blue clay and form a tall, slender cone. Hollow out the bottom slightly so it fits snugly over the top of the foil armature, overlapping the top edge of the body coat. -
Blend the seams:
Gently press and smooth the clay where the hat meets the body if you want a seamless look, though leaving a slight overhang for the hat brim creates a nice separation.
Slumping Hat?
If the tall hat droops while you are working, insert a toothpick or wire into the foil base that sticks up into the tip of the hat for internal support.
Step 2: Adding Facial Features
-
Position the nose:
Roll a small ball of beige or flesh-toned clay. Place this right below the brim of the hat, centered on the front of the figure. Press specifically on the back of the ball so it adheres well but keeps its round shape. -
Sculpt the beard:
Flatten a teardrop shape of white clay. Attach this below the nose, covering the front of the blue coat. The top of the beard should tuck slightly under the nose. -
Texture the beard:
Using a needle tool or toothpick, draw vertical, wavy lines into the white clay to mimic hair strands. Start from under the nose and pull the tool down towards the tip of the beard. -
Create the rim:
Roll a snake of dark blue clay, flatten it slightly, and wrap it around the base of the hat cone just above the nose. This creates a distinct brim. -
Eye details:
Use a small ball tool to make tiny indentations above the nose for eyes. Fill these with tiny specks of black clay, or paint them on after baking.
Pro Texture Tip
Before baking, gently roll a piece of sandpaper or a toothbrush over the blue hat clay. This adds a felt-like fabric texture that looks amazing once painted.
Step 3: Arms and Final Details
-
Form the arms:
Roll two small sausages of dark blue clay for the arms. Attach them to the sides of the body, starting from under the beard and curving slightly downward. -
Add mittens:
Attach tiny balls of white clay to the ends of the blue arms to represent mittens or cuffs, blending the clay where they join. -
Baking:
Bake the figure according to your polymer clay package instructions. Usually, this is around 275°F (130°C) for 15-30 minutes depending on thickness. Let it cool completely.
Step 4: Painting and Finishing
-
Paint the stars:
Once cool, dip a toothpick or a very fine brush into white acrylic paint. Carefully paint tiny asterisks (*) on the hat to look like snowflakes or stars. -
Add speckles:
Dot random small spots of white paint between the stars on the hat and sparsely on the blue body coat to create a snowy effect. -
Highlight the texture:
I like to dry-brush a tiny amount of white paint over the blue hat brim and the arm cuffs to give them a frosty, textured appearance. -
Sealing:
If desired, apply a matte varnish to protect the paint and give the clay a unified finish.
Now you have a whimsical winter guardian ready to watch over your shelf
Garden Gnome With Leaf Hat and Tiny Flower Accent
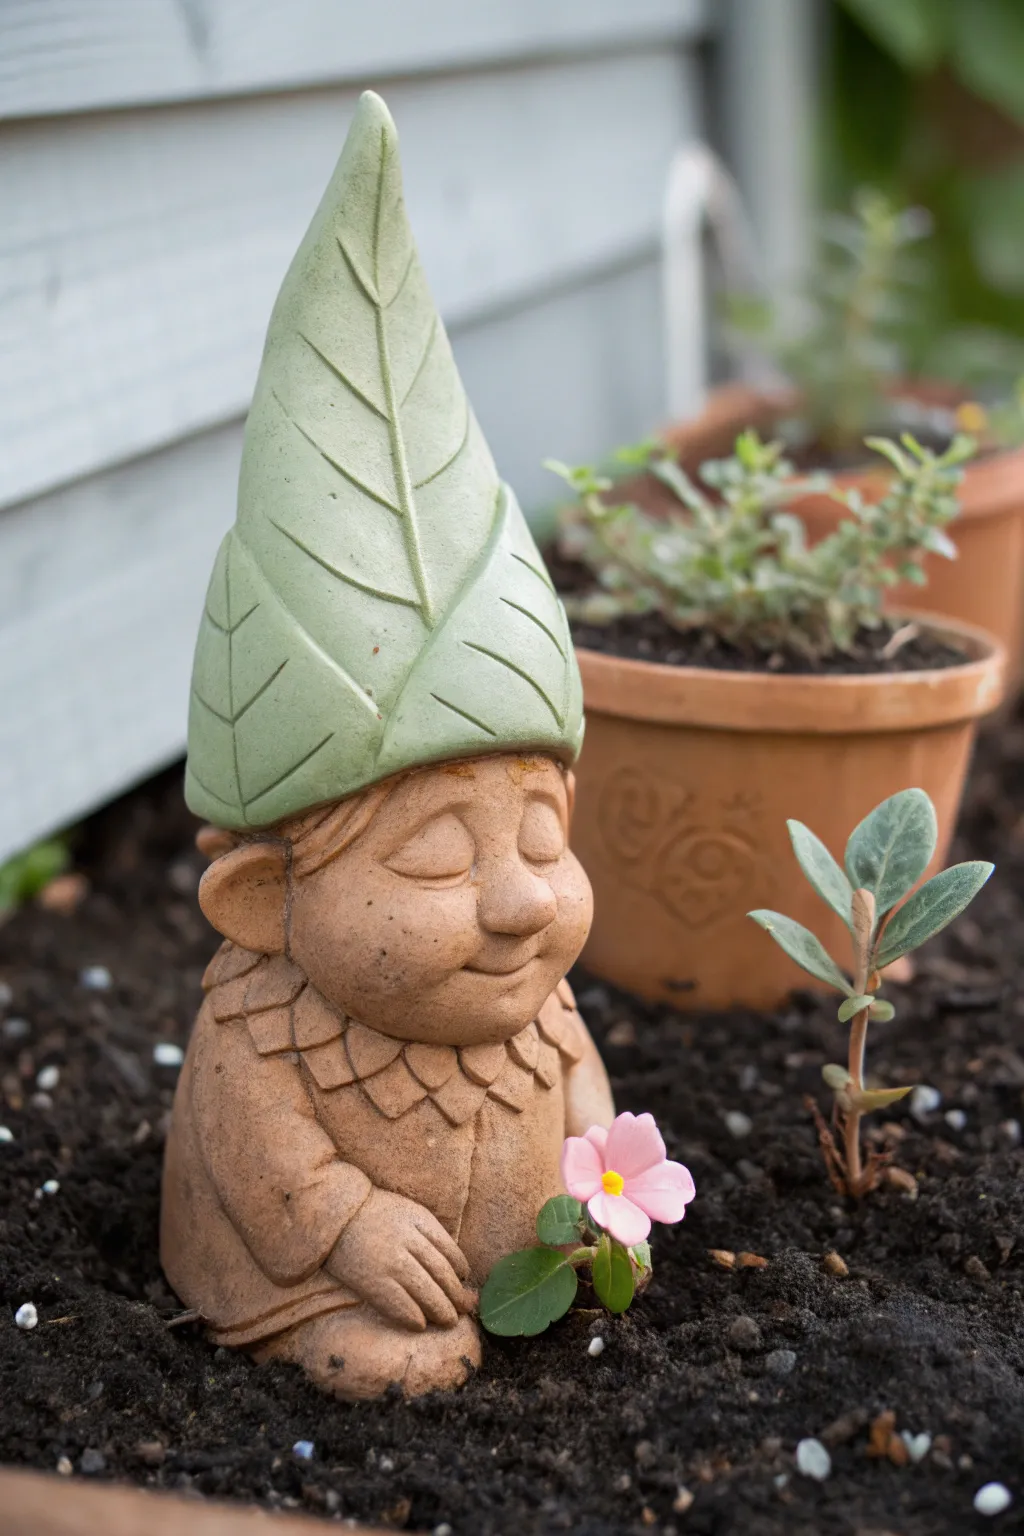
Bring a sense of calm to your flowerbeds with this peaceful, terracotta-style sleeping gnome. Featuring a tall, textured leaf hat and a sweet floral accent, this project captures the gentle spirit of the garden using simple sculpting techniques.
Step-by-Step
Materials
- Terracotta-colored polymer clay (or air-dry clay)
- Light sage green polymer clay (or paint)
- Small amount of pink and yellow clay (for the flower)
- Green floral wire or thin craft wire
- Sculpting tools (needle tool, ball stylus, rubber shaper)
- Acrylic roller
- Texture sponge or stiff brush
- Wire cutters
- Aluminum foil (for armature)
- Oven (if using polymer clay)
Step 1: Sculpting the Base Body
-
Create the core:
Crumple a piece of aluminum foil into a stout pear shape. This will serve as the armature for the gnome’s body and head, saving clay and reducing weight. -
Cover with clay:
Roll out a sheet of terracotta clay and wrap it fully around your foil core. Smooth the seams until you have a seamless, singular shape that tapers slightly at the neck area. -
Shape the robe:
Using a rubber shaping tool, define the bottom hem of the robe. Add a vertical indentation down the center of the chest to suggest the opening of the coat. -
Add texture:
Gently press a texture sponge or a stiff-bristled brush over the robe area to give it a slightly rough, stone-like appearance rather than leaving it perfectly smooth.
Stone Texture Trick
To make the clay look like aged garden stone, lightly dab the raw surface with a crumpled ball of aluminum foil before baking to create random pitting.
Step 2: Face and Features
-
Form the head shape:
Ensure the top of your clay pear is rounded for the head. Add a small extra ball of clay to the front for the face if needed to build volume. -
Sculpt the nose:
Roll a small ball of terracotta clay and press it into the center of the face. Blend the edges smoothly into the cheeks to create a cute, button nose. -
Create sleeping eyes:
Using a needle tool or small loop tool, carve two crescent shapes for the closed eyelids. Smooth the ridges so they look like relaxed skin folds. -
Add the mouth:
Carve a gentle, curved line for a smile. I like to use a small ball stylus to deepen the corners of the mouth slightly, which enhances the peaceful expression. -
Attach the ears:
Shape two small teardrops of clay. Press them onto the sides of the head and use a tool to create the inner ear cavity, blending the back edges onto the head.
Weathered Finish
After baking, apply a diluted wash of dark brown acrylic paint. Wipe it off immediately with a rag, leaving paint only in the crevices to fake antiquity.
Step 3: The Leaf Hat
-
Form the hat cone:
Roll a cone of sage green clay tall enough to cover the top of the head. Hollow out the bottom so it fits snugly over the gnome’s skull. -
Carve vein details:
Using a needle tool, score a deep vertical line from the tip to the brim. Add angled lines branching off this center vein to mimic the structure involving a large folded leaf. -
Fit the hat:
Place the hat onto the head. Gently press the brim down so it sits just above the eyebrows and ears, blending the clay where they meet if you want a seamless look, or leaving an overlap for realism. -
Add a leafy collar:
Create small triangles of terracotta clay. Layer them around the neck like a collar of leaves or petals, texturing them slightly to match the robe.
Step 4: Arms and Accessories
-
Shape the arms:
Roll two sausage shapes of terracotta clay. Attach them to the sides of the body, bending them at the elbow so the hands rest on the belly. -
Detail the hands:
Flatten the ends of the arms slightly and use a knife tool to cut grooves for fingers. Gently curve the fingers so they look relaxed. -
Make the flower:
Form five tiny teardrops of pink clay for petals and press them together. Add a minuscule yellow dot in the center. -
Attach the flower:
Cut a short piece of green wire. Insert one end into the flower and the other into the gnome’s hand or the ground near the base, securing it with a touch of liquid clay. -
Bake or Dry:
Follow the manufacturer’s instructions for your specific clay type to bake or cure the sculpture. Once cool, you can brush on a matte varnish to protect it outdoors.
Place your sleeping gnome in a quiet corner of a planter and enjoy the peaceful vibe it brings to your garden
Mushroom-Cap Gnome With Spots
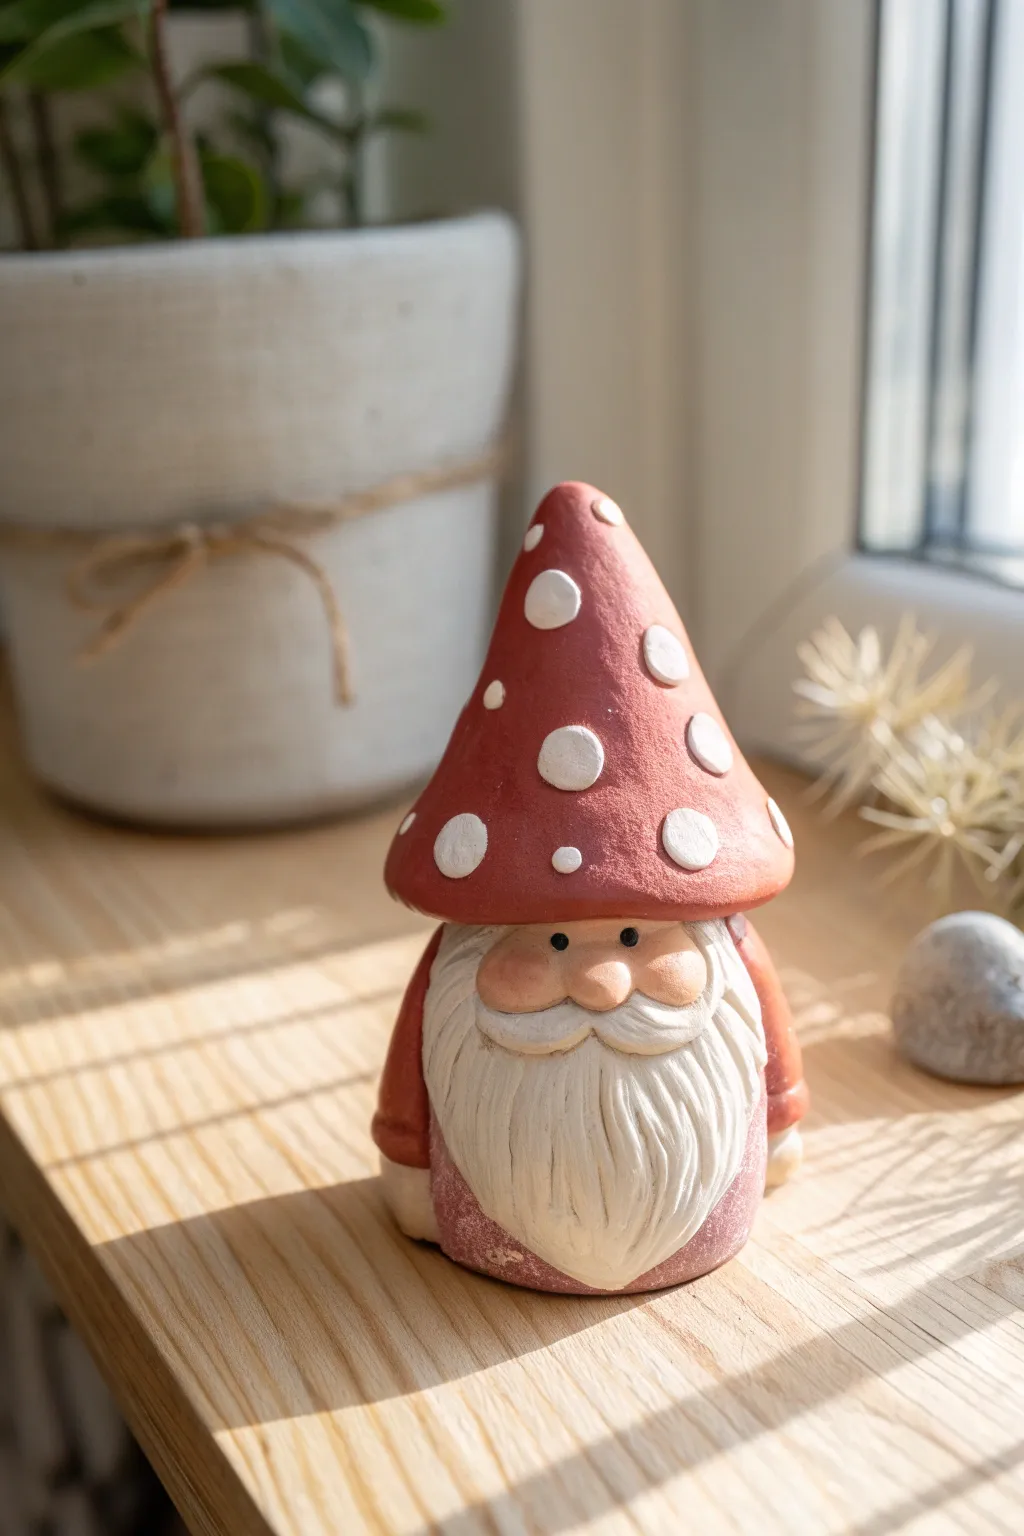
This whimsical little garden friend features a charming mushroom cap hat dotted with classic white spots and a sweetly textured beard. Sitting atop a pinkish base, his friendly round nose and rosy cheeks make him a delightful addition to any windowsill or planter.
Step-by-Step Tutorial
Materials
- Polymer clay (red, white, flesh tone, dusty pink/mauve, black)
- Aluminum foil (for armature)
- Clay sculpting tools (needle tool, ball stylus)
- Rolling pin or pasta machine
- Baking sheet and parchment paper
- Oven (for curing)
- Hobby knife
- Small stiff-bristled brush (for texturing)
Step 1: Building the Base & Body
-
Form the core:
Begin by crumpling a piece of aluminum foil into a cone-like shape with a rounded bottom. This will serve as the armature for the gnome’s body and hat, saving clay and reducing weight. -
Cover the body:
Condition some dusty pink or mauve clay until it’s pliable. Roll it into a sheet and wrap it around the bottom portion of your foil armature to create the gnome’s tunic. Smooth the seams at the back with your fingers. -
Add the arms:
Roll two small sausage shapes from the pink clay for arms. Attach them to the sides of the body, curving them slightly forward so they rest naturally. Add tiny balls of flesh-toned clay at the ends for hands.
Step 2: Creating the Face & Beard
-
Shape the face:
Flatten a small oval of flesh-toned clay and press it onto the upper front part of the body, just above the tunic line. -
Sculpt the beard base:
Take a piece of white clay and shape it into a tear-drop or bib shape. Attach this directly under the face area, covering the top of the pink tunic. -
Add beard texture:
I like to use a needle tool or a sharp clay knife to draw deep, flowing vertical lines into the white clay. Curve the lines slightly outward as you go down to mimic the flow of hair. -
Form the mustache:
Create two small, flattened teardrops of white clay. Position them horizontally just under where the nose will go, flaring out to the sides like a mustache. Texture these with your needle tool as well. -
Add the nose:
Roll a smooth, medium-sized ball of flesh-toned clay. Press this firmly into the center of the face, slightly overlapping the top of the mustache. -
Create the cheeks:
Add two smaller flattened circles of flesh-toned clay on either side of the nose. Gently blend the edges into the face base so they look like chubby cheeks. -
Give him eyes:
Use a small ball tool to make two small indents above the nose. Place tiny beads of black clay into these sockets for eyes.
Clean Clay Tip
Work with the darkest colors last or wash your hands and tools between colors. Red clay loves to stain white clay, so sculpt the beard first to keep it pristine.
Step 3: The Mushroom Hat
-
Shape the cap:
Roll a large cone of red clay. Hollow out the bottom slightly with your thumb so it fits snugly over the top of the foil armature and the gnome’s forehead. Pull the rim down slightly so it rests just above the eyes. -
Add the spots:
Roll several small balls of white clay in varying sizes. Flatten them into thin discs and press them randomly all over the red hat. -
Texture the spots:
To make the spots look integrated rather than just stuck on, roll over them gently with a rolling pin or smooth them with your finger until they are flush with the red surface. -
Refine the surface:
If you want a rustic, believable look like the example, gently tap a stiff-bristled brush or toothbrush over the red clay to give it a porous, stone-like texture.
Metallic Shine
For a magical twist, brush a tiny amount of gold mica powder onto the white spots of the mushroom cap before baking to make them shimmer in the sunlight.
Step 4: Finishing Touches
-
Blush the cheeks:
Before baking, you can gently brush a tiny amount of pink pastel dust or thinned acrylic paint onto the nose and cheeks for a rosy glow. -
Check stability:
Ensure the bottom of the gnome is perfectly flat by tapping the figure gently onto your work surface. -
Bake the project:
Bake the gnome according to your specific polymer clay manufacturer’s instructions (usually around 275°F or 130°C for 15-30 minutes). -
Cool and display:
Let the gnome cool completely in the oven before moving him to prevent cracking.
Place your new spotted friend near a sunny window or nestled among your potted plants to watch over your garden