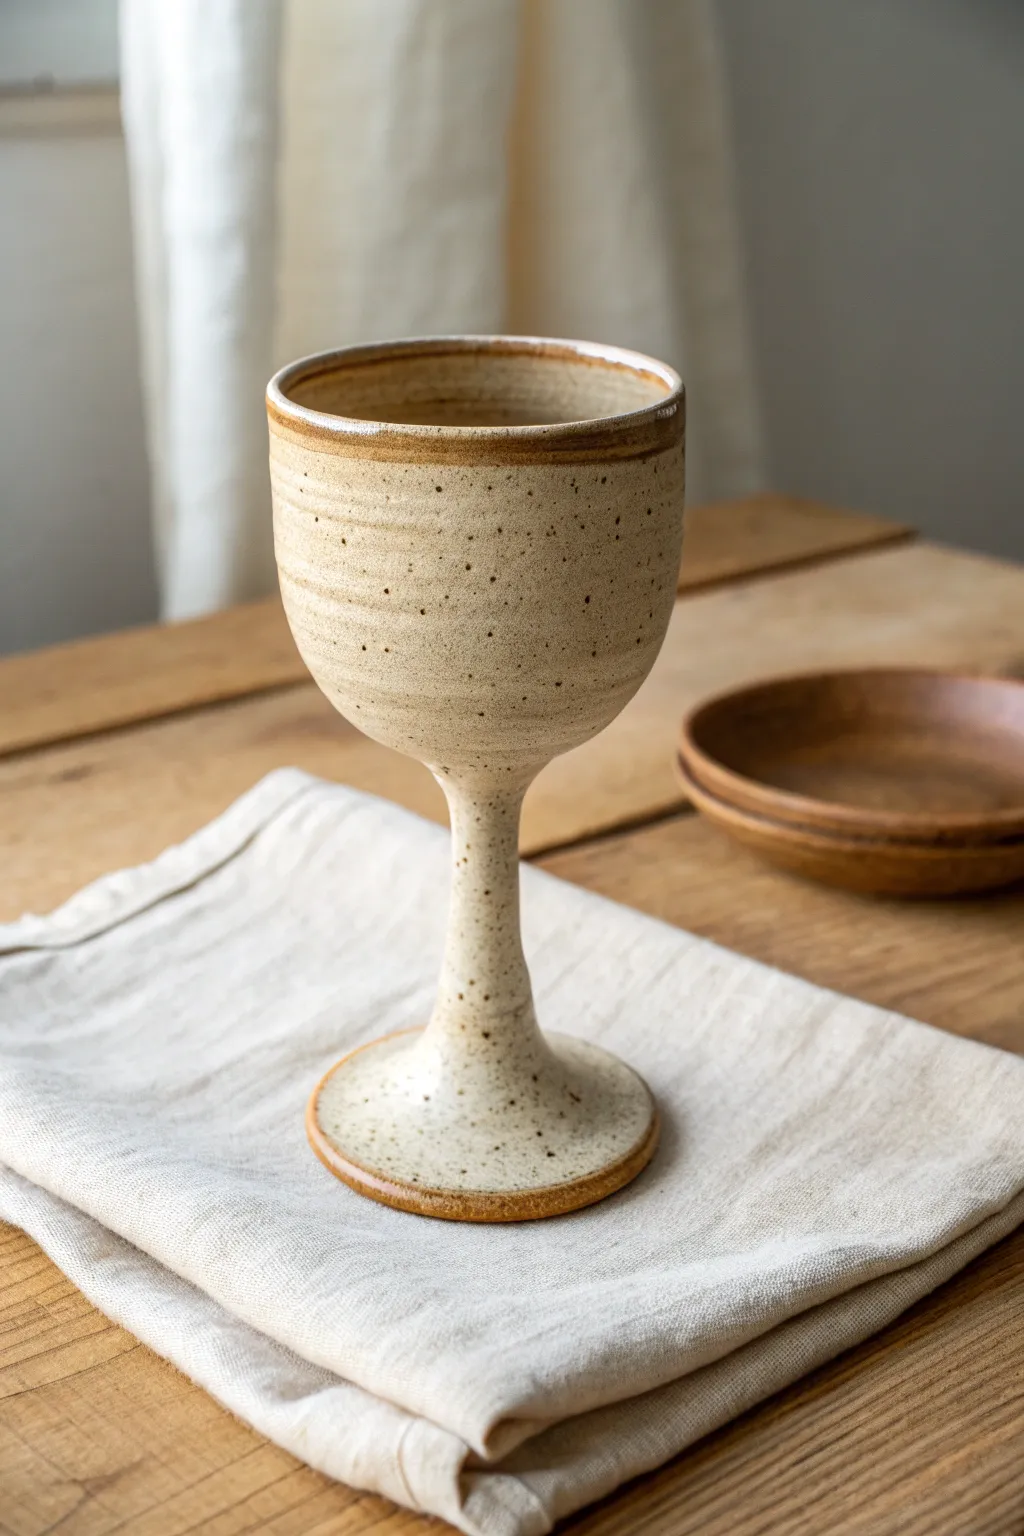
If you’ve ever made a cup and thought, “This needs a little drama,” a clay goblet is the perfect next project. I love goblets because you can keep them super functional or go full-on sculptural with the stem, foot, and surface.
Classic Wheel-Thrown Goblet
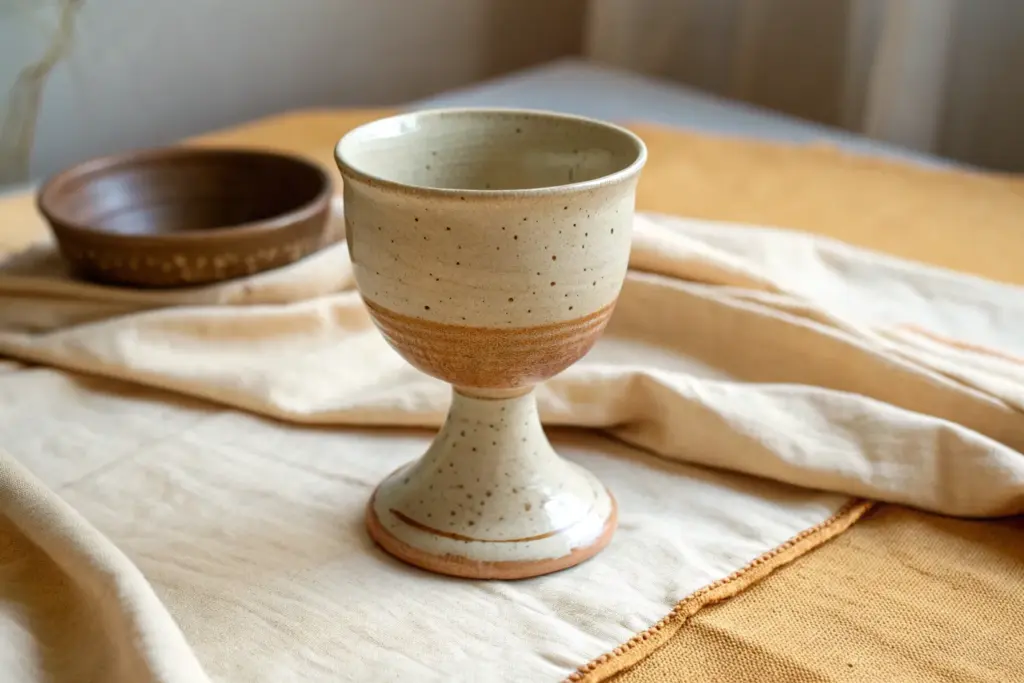
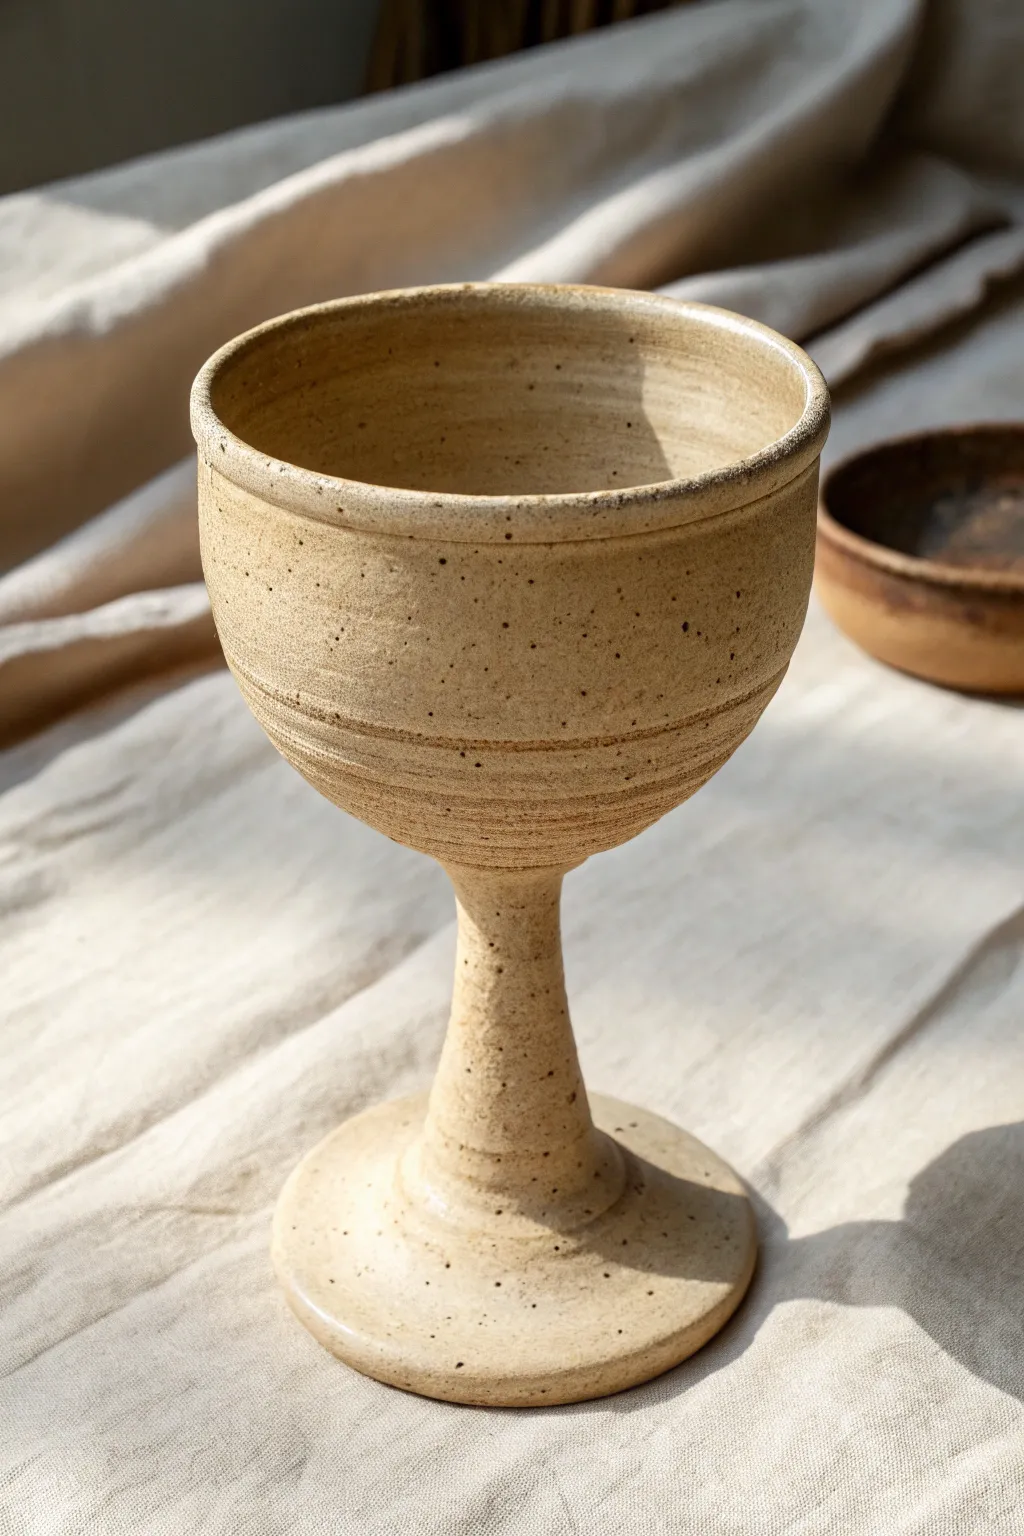
This project captures the essence of classic stoneware with a wheel-thrown goblet that features a smooth, creamy glaze and distinct earthy banding. The sturdy stem and flared bowl make it both a functional drinking vessel and a striking decorative piece for your table.
Step-by-Step Guide
Materials
- Stoneware clay body (speckled buff recommended)
- Pottery wheel
- Throwing tools (sponge, needle tool, wooden rib, wire tool)
- Trimming tools
- Calipers (optional but helpful)
- Cream/Oatmeal colored glossy glaze
- Iron oxide wash or dark brown underglaze
- Wax resist
- Small paintbrush
Step 1: Throwing the Bowl
-
Center the clay:
Start with a ball of clay about the size of a large orange (approx. 1-1.5 lbs). Center it firmly on the wheel head, ensuring it feels stable and doesn’t wobble. -
Open the form:
Drill your thumb into the center to open the clay, leaving about a half-inch of thickness at the bottom. This extra thickness is crucial later for trimming a foot to connect to the stem. -
Pull the walls:
Gently pull the walls upward into a cylinder first. Keep your pulls steady and consistent to maintain even wall thickness. -
Shape the curve:
Using a wooden rib on the inside and your fingers on the outside, belly out the form slightly to create a gentle, rounded ‘U’ shape. The rim should flair out ever so slightly. -
Refine the rim:
Compress the rim with a chamois or your finger to make it smooth and pleasant for drinking. -
Cut and set aside:
Wire the bowl off the wheel head, but don’t lift it yet if it feels flimsy. Slide it onto a ware board and let it firm up to leather-hard.
Wobbly Globlet?
If the goblet leans during assembly, use a spirit level on the rim immediately after joining. Gently nudge it true before the slip sets.
Step 2: Throwing the Stem
-
Center a smaller amount:
Use a taller, narrower lump of clay (about 1 lb) for the stem. Center it into a tall cone shape rather than a flat puck. -
Open and rise:
Open the clay only slightly at the top—just enough to create a cup shape that will eventually cradle the bowl. Pull the rest of the clay up into a solid column. -
Form the base:
Leave the bottom wide and flared to create a stable foot. This counterbalances the weight of the liquid in the bowl. -
Shape the details:
Using a modeling tool or fingernail, press in grooved lines near the base of the stem while the wheel spins slowly. This mimics the banding seen in the reference photo. -
Measure the connection:
Use calipers to check that the top of your stem matches the width of the bottom of your bowl.
Step 3: Assembly & Finishing
-
Trim the pieces:
Once both pieces are leather-hard, trim the bottom of the bowl into a rounded curve that fits the cup shape of the stem. -
Score and slip:
Aggressively score (scratch) the top of the stem and the bottom of the bowl. Apply a generous amount of slip to both connection points. -
Join the parts:
Press the bowl firmly onto the stem. I prefer to do this back on the wheel, spinning slowly to ensure everything is perfectly centered. -
Clean the distinct line:
Use a sponge or modeling tool to clean up the seam, but leave a slight definition ring where they meet—creates a nice visual break. -
Apply decorative bands:
While spinning the assembled goblet slowly, use a tool to incise two parallel lines around the upper section of the bowl and two around the lower belly.
Rustic Texture Upgrade
Add 1% granular ilmenite to your cream glaze. This creates tiny dark speckles that engage with the iron oxide bands for a vintage pottery look.
Step 4: Glazing
-
Apply oxide wash:
After bisque firing, paint iron oxide wash or dark brown underglaze into the incised lines on the bowl and the grooves on the stem base. Wipe away the excess with a damp sponge, leaving color only in the recesses. -
Wax the foot:
Apply wax resist to the very bottom of the foot to prevent it from sticking to the kiln shelf. -
Dip in base glaze:
Dip the entire goblet into a cream or oatmeal stoneware glaze. The glaze should cover the oxide lines but remain translucent enough for the dark stripes to show through after firing. -
Fire:
Fire the piece to cone 6 (or whatever temperature your clay and glaze require) in an electric kiln.
Once cooled, your sturdy chalice is ready to hold your favorite beverage.


Cup-and-Stem Two-Part Assembly
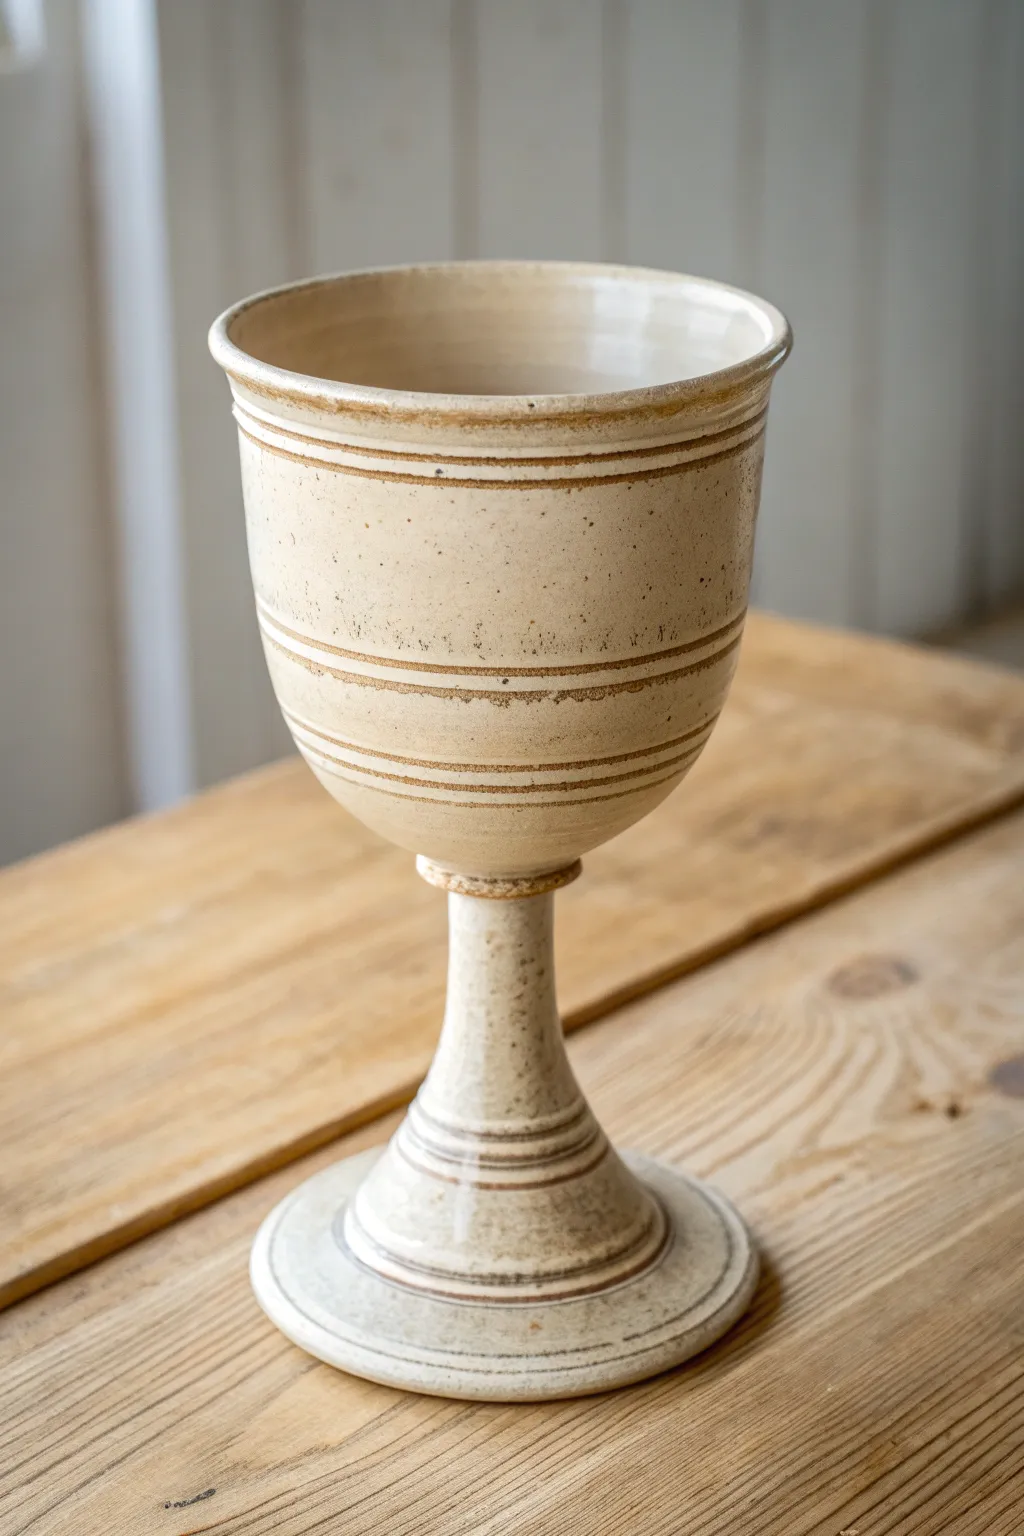
This project explores the technique of creating a chalice by throwing two separate pieces—a cup and a stem—and joining them for a seamless, elegant form. The result is a classic, speckled stoneware goblet that feels substantial in the hand and looks timeless on any table.
Detailed Instructions
Materials
- Speckled buff stoneware clay (approx. 2 lbs)
- Pottery wheel
- Throwing tools (sponge, needle tool, ribs, flavor wire)
- Calipers
- Trimming tools (loop tool)
- Scoring tool or serrated rib
- Slip
- Satin matte white or clear glaze
- Kiln
Step 1: Throwing the Cup
-
Center the clay:
Start with about 1 pound of speckled clay. Secure it to the wheel head and center it thoroughly, ensuring a stable base for the cup form. -
Open and pull:
Open the mound to a depth of about 3 inches, leaving a slightly thicker floor than usual to accommodate later trimming. Pull the walls up into a simple cylinder. -
Shape the bowl:
Using a rib on the inside and your fingers on the outside, gently belly out the cylinder into a ‘U’ shape. Leave the rim slightly flared for comfortable drinking. -
Measure the base:
Before removing it from the wheel, use calipers to measure the width of the cup’s base. This measurement is crucial for matching the stem later. -
Refine the surface:
Run a soft sponge up the exterior to smooth rough spots, but don’t smooth away all the throwing lines—those ridges add great character to the final glaze. -
Cut and set aside:
Wire the cup off the wheel and set it on a ware board to stiffen to leather hard.
Step 2: Throwing the Stem
-
Center the second lump:
Take the remaining pound of clay and center it. For the stem, create a narrower, taller cone shape initially rather than a low puck. -
Open the stem:
Open the clay all the way down to the wheel head (creating a donut), or leave a solid floor if you prefer a heavy base. I prefer throwing it hollow for lighter weight. -
Shape the pedestal:
Pull the clay upward, keeping the top section narrow (the neck) and flaring the bottom outward to create a distinct foot. This provides stability for the goblet. -
Match the measurements:
Using your set calipers, check the top rim of the stem. It must match the width of the cup’s base exactly. -
Clean up the rim:
Compress the top rim of the stem with a chamois to ensure a flat, wide surface for joining. -
Dry partially:
Wire off the stem and let it dry until it matches the leather-hard consistency of the cup.
Seam Security
After joining, add a tiny coil of clay right at the seam where the cup meets the stem. Blend it up and down for extra reinforcement against cracking.
Step 3: Assembly and Finishing
-
Trim the cup:
Place the cup upside down on the wheel (using a chuck or adhering it to the wheel head). Trim the bottom into a smooth curve that matches the visual flow of the stem. -
Score surfaces:
Score the bottom center of the cup and the top rim of the stem aggressively with a serrated tool. Apply a generous amount of slip to both areas. -
Join the pieces:
Press the stem firmly onto the overturned cup. Give it a slight wiggle to lock the clay particles together. -
Blend the seam:
While the wheel is spinning slowly, use a modeling tool or your finger to smooth the clay at the join seam. The goal is to make it look like one continuous piece of clay. -
Re-center if needed:
Sometimes the stem can get slightly off-center during joining. Use a metal rib to gently true up the stem profile while it spins. -
Final drying:
Wrap the join area with plastic for a day to equalize moisture content before letting the whole piece dry slowly completely. -
Glazing:
Bisque fire the piece. Dip or pour a satin matte white glaze over the entire form. The iron speckles from the clay body will burn through during the final firing, creating that rustic texture.
Add a Texture Band
Use a chatter tool on the lower part of the cup bowl before assembly to add a band of rhythmic texture that contrasts with the smooth stem.
Enjoy using your new handcrafted goblet for your next special occasion dinner


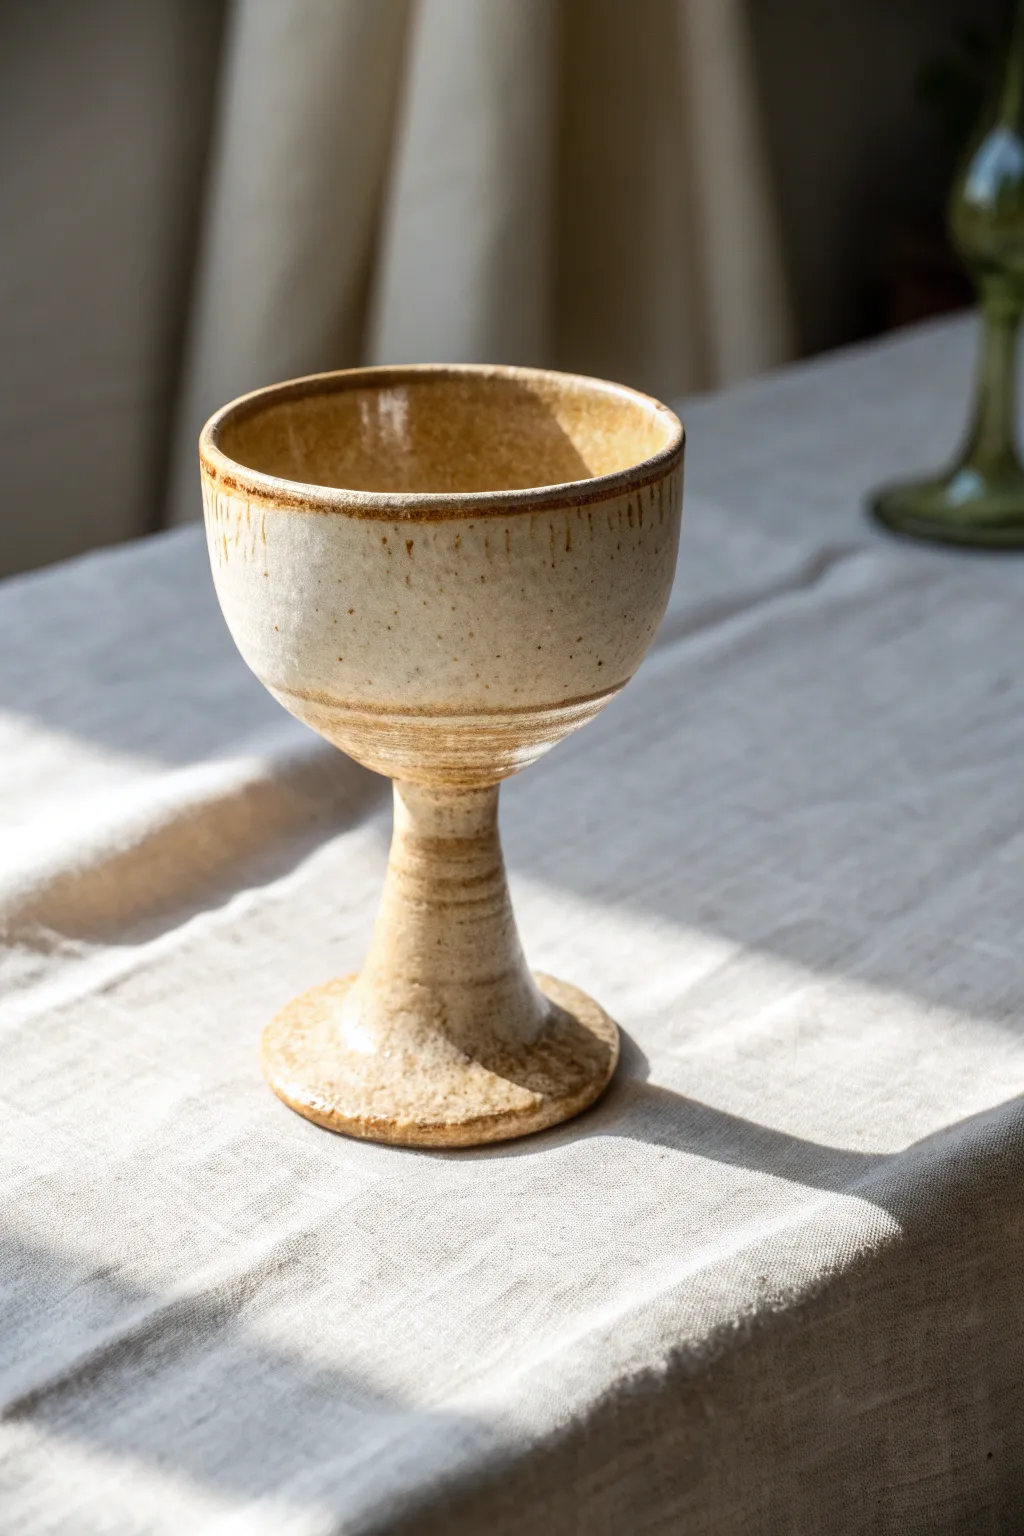
Flared Rim Wine Goblet Shape
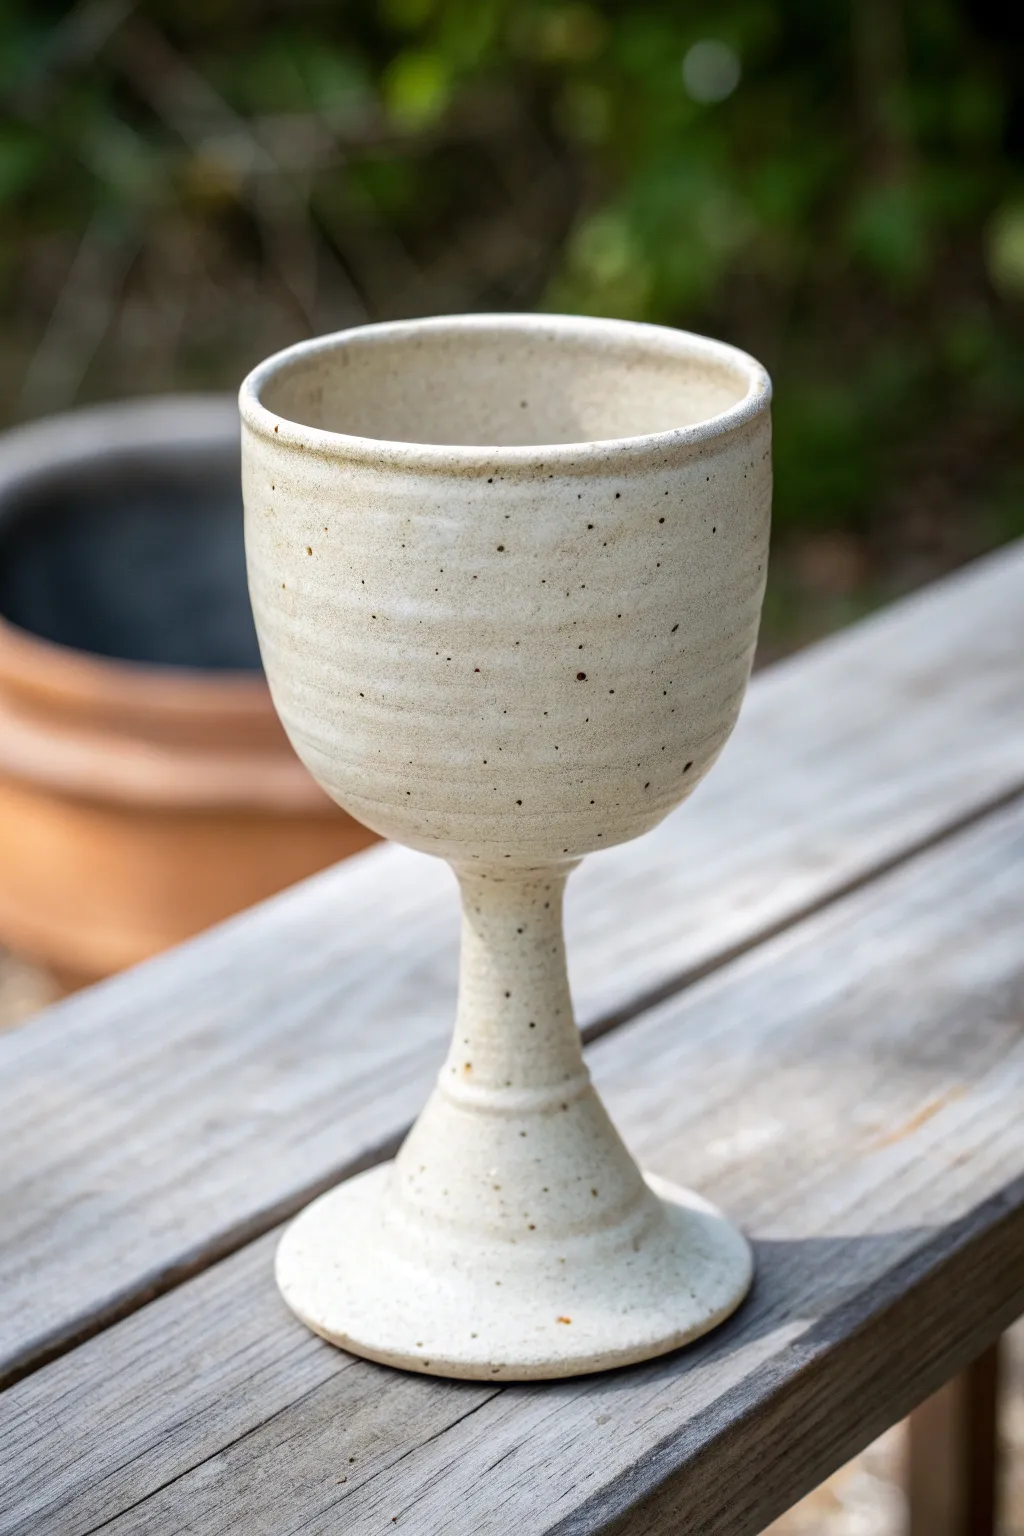
This elegant yet earthy wine goblet combines a classic flared rim silhouette with a warm, speckled cream glaze. The distinct separation between the cup, stem, and foot creates a timeless piece perfect for serving wine or simply displaying as a standalone ceramic work.
Step-by-Step Guide
Materials
- Stoneware clay (speckled or buff)
- Pottery wheel
- Throwing tools (sponge, needle tool, ribs)
- Wire cutter
- Trimming tools
- Cream/Oatmeal speckled glaze
- Iron oxide wash or dark brown underglaze
- Kiln
- Wax resist (optional)
Step 1: Throwing the Form
-
Center the clay:
Start with about 1.5 to 2 pounds of well-wedged speckled stoneware clay. Center it firmly on the wheel head, ensuring it is perfectly balanced to avoid wobbles later. -
Create the stem base:
Instead of opening the clay all the way to the bat, leave a significantly thick column of clay at the bottom. This reserve of clay will become your stem and foot later. -
Open the cup:
Open only the top portion of your clay mound to form the cup. Pull the walls upward and thin them out, aiming for a consistent thickness. -
Shape the cup profile:
Use a rib tool on the exterior to create a gentle, rounded curve at the bottom of the cup, transitioning into vertical walls. I like to flare the rim slightly outward at the very top for a comfortable drinking edge. -
Form the stem:
Using your fingers and a moist sponge, squeeze the thick clay beneath the cup to form a narrow stem. Choke the clay in gradually, ensuring it remains centered and supports the weight of the cup above. -
Define the foot:
Leave a flared disk of clay at the very bottom of the stem to act as the foot. Use a wooden tool to clean up the transition between the stem and the foot, creating a sharp, intentional line. -
Refine surface texture:
While the wheel is spinning slowly, run a metal rib or a soft sponge over the exterior to impart subtle throwing lines, which will catch the glaze later. Cut the piece from the wheel with a wire tool.
Wobbly Stem Fix
If the goblet wobbles while throwing the stem, you likely opened the cup too deep. Leave more clay at the base next time to support the torque of the wheel.
Step 2: Trimming and Assembly
-
Dry to leather hard:
Allow the goblet to dry slowly until it reaches a leather-hard state. This is crucial for goblets; if the stem is too soft, it will collapse during trimming. -
Secure for trimming:
Place the goblet upside down on a glimmer or inside a chuck. Center it perfectly. If using lugs of clay to hold it, be gentle on the fragile rim. -
Trim the foot ring:
Carve away excess weight from the underside of the foot. Create a defined foot ring so the goblet stands stable and proud. Clean up the curve where the underside of the cup meets the stem if needed. -
Smooth edges:
Run a damp sponge over any sharp trimming lines or rough patches to soften the clay before the final drying stage.
Glaze Break Effect
To enhance the rim’s toasted look, make sure the underlying clay body has some iron content, or layer a ‘breaking’ glaze that thins out over sharp edges.
Step 3: Glazing and Firing
-
Bisque fire:
Once bone dry, fire the piece in a bisque kiln to prepare it for glazing. -
Wax the foot:
Apply wax resist to the very bottom of the foot ring to prevent glaze from fusing the goblet to the kiln shelf. -
Apply the main glaze:
Dip the entire goblet into a cream or oatmeal-colored speckled glaze. Ensure an even coat. Shake off excess gently to prevent thick drips. -
clean the rim and foot:
Use a damp sponge to wipe the glaze back slightly from the rim edge and the outer edge of the foot. This exposes the raw clay body. -
Accent the edges:
Take a small brush and apply a thin band of iron oxide wash or a dark brown underglaze to the exposed rim and the edge of the foot. This creates the toasted, rustic border seen in the image. -
Final wipe:
Inspect the stem area carefully. If the glaze is too thick near the base of the cup, wipe a little away so it doesn’t run down the stem during firing. -
Glaze fire:
Fire the goblet to the temperature required by your clay and glaze (likely Cone 5 or 6 for stoneware). Allow the kiln to cool completely before removing.
Once cooled, fill your handmade chalice with your favorite vintage and enjoy the weight of your craftsmanship.


Thin Lip for a Comfy Sip
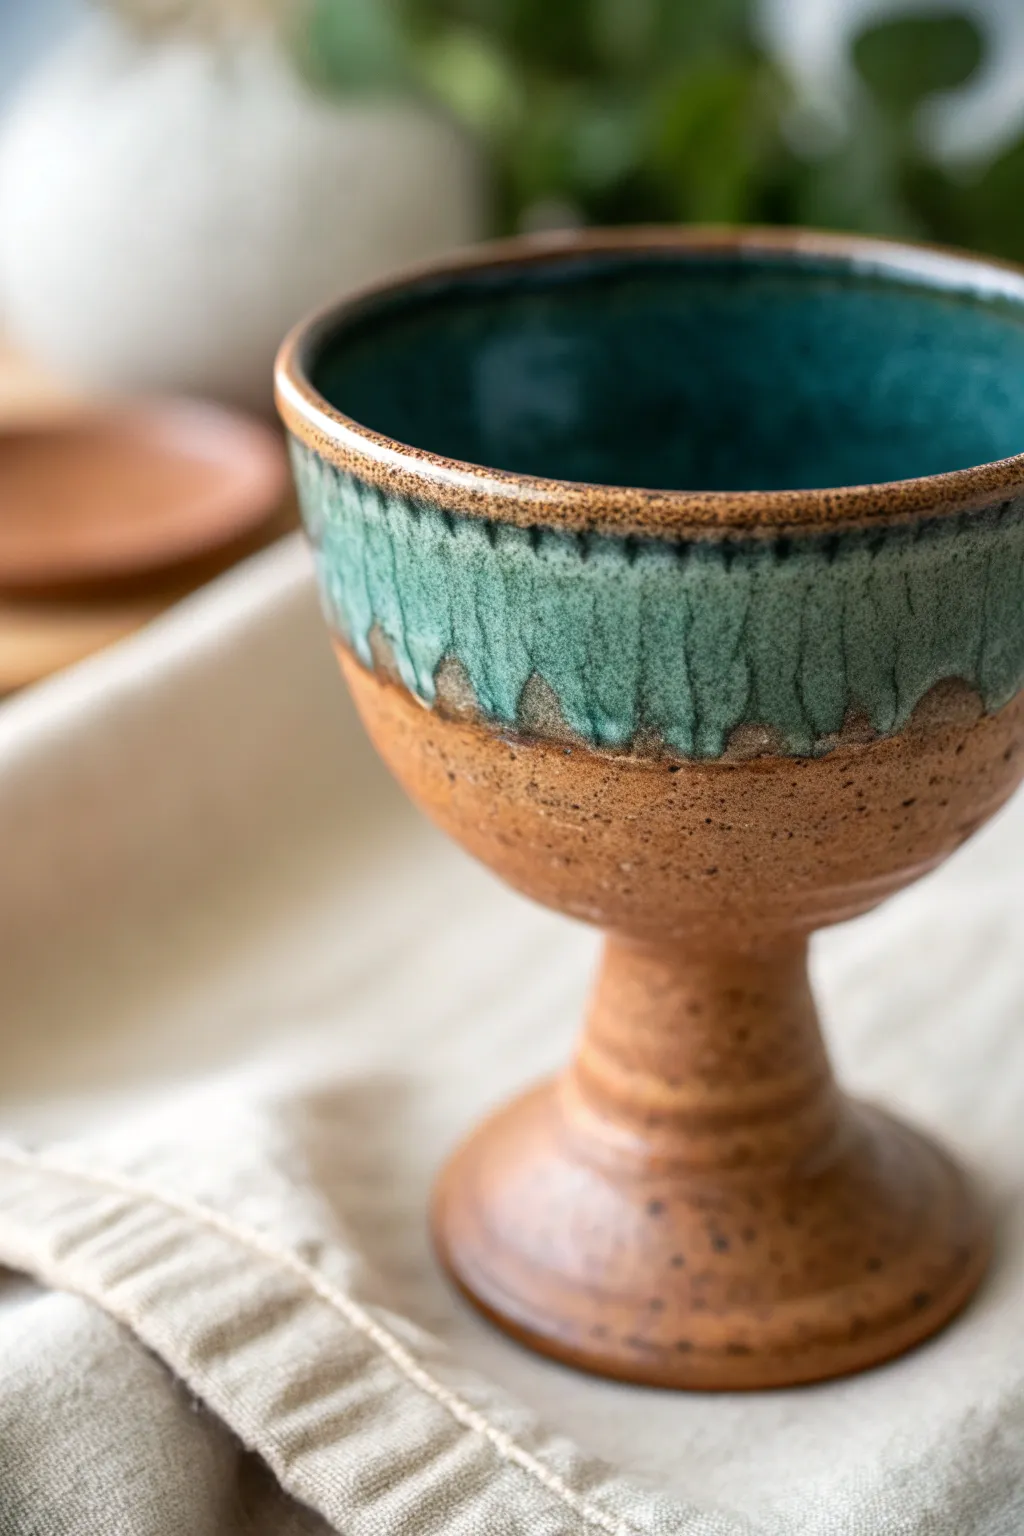
This handmade ceramic goblet combines earthy, speckled stoneware with a cascading teal glaze that mimics ocean foam rolling onto sand. Its carefully thrown shape features a comfortable, slightly tapered lip designed for the perfect sipping experience.
How-To Guide
Materials
- Speckled brown stoneware clay (approx. 1.5 lbs)
- Potter’s wheel
- Throwing sponge
- Wooden throwing ribs
- Metal kidney rib
- Wire cutter
- Needle tool
- Loop trimming tools
- Teal/Green reactive glaze (cone 5/6 suggested)
- Small glaze sponge or brush
- Calipers (optional)
Step 1: Throwing the Form (One Piece Method)
-
Wedge and Center:
Begin by thoroughly wedging your clay to remove air bubbles. Slam the ball onto the wheel head and center it into a tall, narrow cone rather than a flat puck, as we need height for the stem. -
Open High:
Instead of opening all the way to the bat, stop about 1.5 to 2 inches from the bottom. This thick base will eventually become the stem and foot of your goblet. -
Pull the Cup Wall:
Pull the upper section of the clay into a U-shaped bowl. Keep the walls even, but leave the rim slightly thicker for now to allow for shaping later. -
Shape the Stem:
Using your fingertips and a wet sponge, gently squeeze the thick clay beneath the bowl section to define the stem. Compress inwards to create a waist, leaving a flare at the very bottom for the foot. -
Refine the Lip:
For that crucial ‘comfy sip,’ compress the rim with a chamois or your sponge. I like to gently taper the very edge outward just a hair, so it feels thin against the mouth without being sharp. -
Cut and Dry:
Run your wire tool under the base. Let the piece dry to a leather-hard state, usually overnight under loose plastic.
Uneven Drips?
If the glaze runs too much and hits the shelf, use a ‘cookie’ (a flat piece of scrap clay with kiln wash) under your pot during firing to catch accidents.
Step 2: Trimming and Refining
-
Center for Trimming:
Once leather hard, invert the goblet onto a foam bat or use a chuck to hold it upside down securely on the wheel. Center it perfectly. -
Define the Foot Ring:
Use a sharp loop tool to carve out the underside of the foot, creating a defined ring. This reduces weight and adds stability. -
Clean the Stem:
Shave away excess clay from the stem area to make it elegant and ensure the transition from cup to stem is smooth. Follow the natural curve you established while throwing. -
Smooth the Surface:
Burnish the unglazed areas (the stem and foot) with a smooth metal rib or the back of a spoon to heighten the speckled texture of the raw clay.
Two-Tone Magic
Layer a flux-heavy glaze like ‘Oatmeal’ over the teal at the rim. The interaction creates stronger chemical reactions and more dramatic movement.
Step 3: Glazing and Firing
-
Bisque Fire:
Fire the bone-dry goblet in a bisque kiln (usually Cone 04) to prepare it for glazing. -
Wax the Bottom:
Apply wax resist to the foot ring and the bottom inch of the stem to protect the kiln shelves and create a neat glaze line. -
Pour the Interior:
Pour your teal glaze inside the cup, swirl it to coat the entire inner surface, and pour out the excess immediately. -
Dip the Rim:
Hold the goblet by the foot and dip the top half into the glaze bucket. Hold it there for 3 seconds to get a good thickness. -
Create the Drip Effect:
To encourage the beautiful drips seen in the photo, add a second, heavy application of glaze just along the very rim using a brush or sponge. The extra volume will run down during firing. -
Final Fire:
Fire to the maturity temperature of your clay and glaze (typically Cone 5 or 6 for stoneware). Let it cool completely before removing.
Now fill your beautiful new vessel with your favorite drink and enjoy the feel of that perfectly crafted rim

The Complete Guide to Pottery Troubleshooting
Uncover the most common ceramic mistakes—from cracking clay to failed glazes—and learn how to fix them fast.
Rounded Bell Bowl Goblet
This project captures the essence of earthy drinkware with a sturdy, speckled clay goblet. Featuring a rounded bell-shaped bowl and subtle throwing lines, this piece is a perfect introduction to throwing taller, stemmed forms.
Detailed Instructions
Materials
- Speckled stoneware clay (approx. 1.5 – 2 lbs)
- Pottery wheel
- Bucket of water and throwing sponge
- Wooden throwing ribs
- Pin tool
- Wire cutter
- Chamois leather strip
- Trimming tools
- Clear or light amber matte glaze (food safe)
Step 1: Throwing the Form
-
Center the Clay:
Begin by firmly slamming your ball of speckled stoneware clay onto the center of the wheel head. Use water and steady pressure to cone the clay up and down until it is perfectly centered and running smooth. -
Separate the Mass:
Instead of opening the entire mound, envision the division between the bowl and the stem. Use your fingers to press into the side of the mound about halfway down, constricting the clay to define where the stem will begin, leaving a thick knob of clay on top for the bowl. -
Open the Bowl:
Carefully plunge your thumbs into the center of the top knob to open the interior of the cup. Leave the floor slightly thicker than a standard mug, as you will need that material to transition into the solid stem below. -
Pull the Walls:
Gently pull the clay of the top section upwards to create the walls of the goblet. Aim for a slightly flared, rounded bell shape rather than a straight cylinder. I find keeping the rim slightly thicker at this stage helps maintain the roundness. -
Shape the Belly:
Place a rounded wooden rib against the inside of the bowl. Apply gentle outward pressure while supporting the outside with your sponge, creating that voluminous curve. Leave the distinct throwing ridges near the base of the bowl for texture. -
Refine the Rim:
Once the bowl shape is set, compress the rim with a strip of chamois leather to ensure it is smooth and pleasant for drinking. -
Shape the Stem:
Move your attention to the clay below the bowl. Using the side of your finger or a wooden tool, shave away excess clay to create a tapered neck that flows seamlessly from the bottom of the bowl. -
Form the Foot:
At the very bottom, flatten the remaining clay into a sturdy disc to act as the foot. Ensure it is wide enough to support the weight of the liquid-filled bowl without tipping. -
Wire Off:
Run a wire tool under the base of the goblet to separate it from the wheel head. Carefully slide it onto a ware board and let it dry to a leather-hard state.
Keep it Steady
When throwing tall stems, stability is key. Leave the stem slightly thicker than you think necessary while throwing, then trim away the excess weight later.
Step 2: Trimming and Finishing
-
Center for Trimming:
Invert the leather-hard goblet onto the wheel head. You may need to use a chuck (a thick cylinder of clay) to hold the goblet upside down without damaging the delicate rim. -
Secure the Piece:
Unless using a friction chuck, secure the setup with small coils of clay. Ensure the piece is spinning perfectly on center. -
Trim the Stem Profile:
Use a sharp trimming tool to refine the curve of the stem, removing excess weight. Follow the exterior line you established while throwing, making the stem look elegant but strong. -
Detail the Foot Ring:
Carve a shallow recessed ring into the bottom of the foot spread. This reduces weight and ensures the goblet sits flat on a table without rocking. -
Smooth the Surface:
Before removing the piece, use a damp sponge or a smooth rib to burnish the trimmed areas. This integrates the trimmed clay texture with the thrown clay texture. -
Bisque Fire:
Once the goblet is bone dry, fire the piece in a kiln to bisque temperature (usually cone 04 or 06) to prepare it for glazing. -
Glaze Application:
Dip or brush a transparent or light amber matte glaze over the entire piece. Using a clear glaze allows the natural speckles of the clay body to remain the star of the show. -
Glaze Firing:
Wipe the foot ring completely clean of glaze to prevent sticking to the kiln shelf. Fire the goblet to the final maturity temperature for your specific clay body (typically cone 5 or 6).
Dual Texture Design
Partially glaze the goblet. Dip only the top bowl portion in a satin white glaze but leave the stem and foot as bare, raw clay for a beautiful tactile contrast.
Now you have a timeless vessel ready to elevate your next dinner gathering with handmade charm
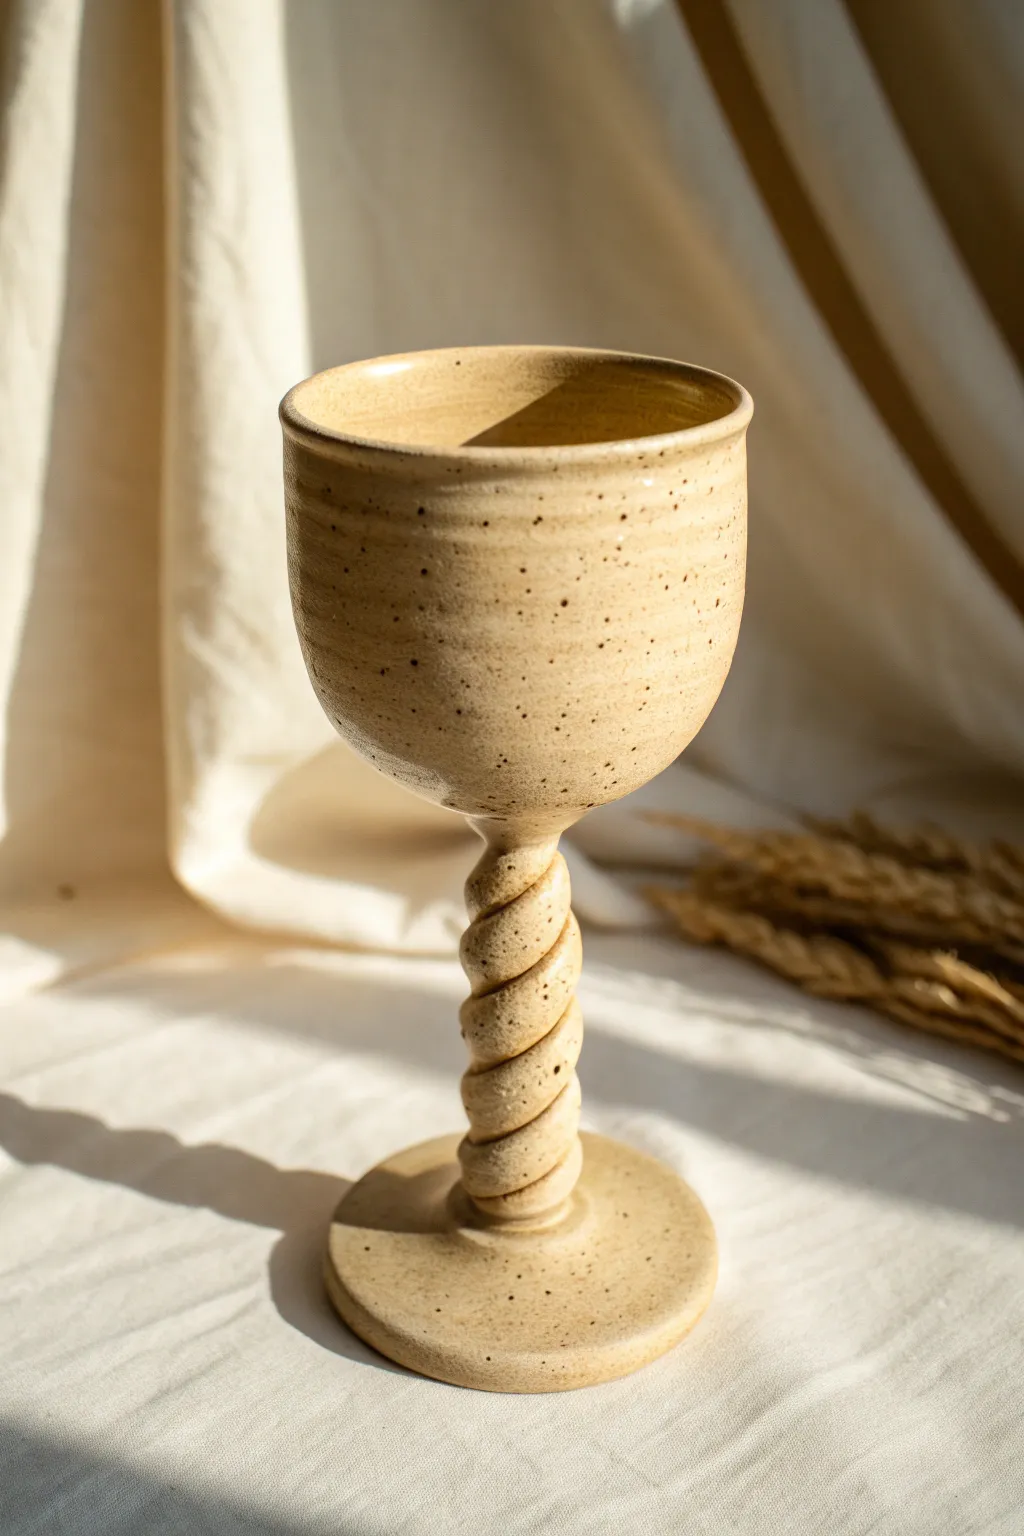
Spiral Carved Stem Texture
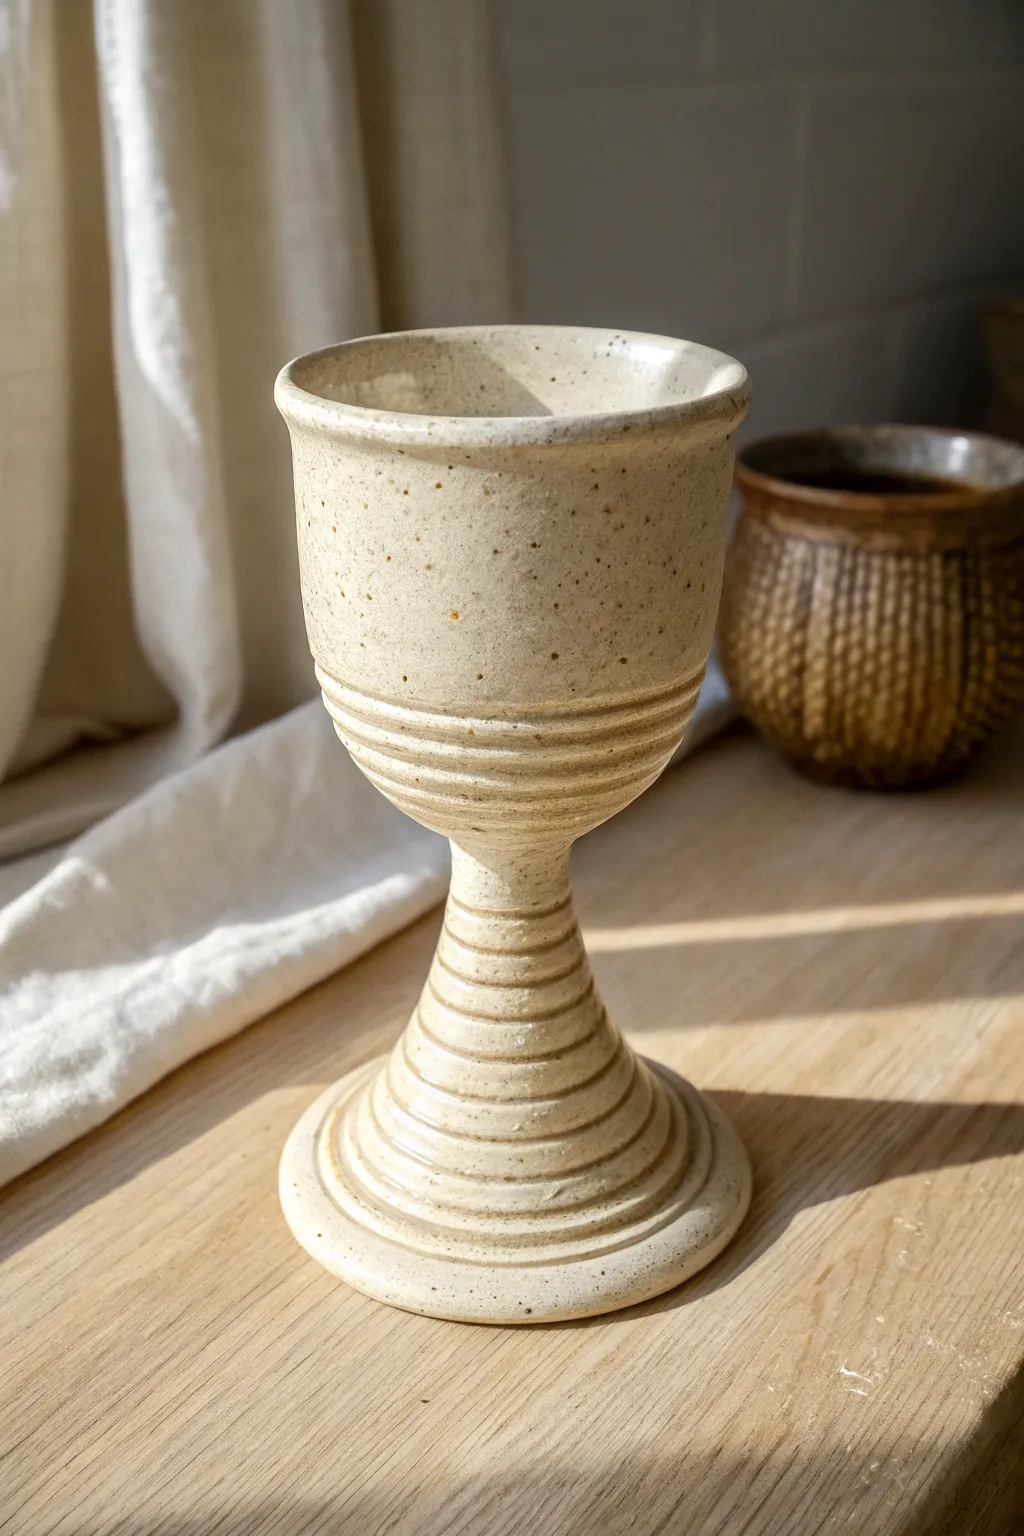
This elegant goblet features a warm, speckled stoneware clay body and a distinctive spiraled texture that runs from the base up through the stem. The form balances a wide, stable foot with a softly flared cup, making it both beautiful and functional for your favorite beverages.
Step-by-Step Guide
Materials
- Speckled stoneware clay (approx. 1.5 – 2 lbs)
- Pottery wheel
- Medium throwing sponge
- Wooden modeling tool or chamois
- Wire clay cutter
- Metal rib
- Pin tool
- Small loop tool or pear-shaped trimming tool
- Bat for the wheel
- Glaze (transparent or light cream)
Step 1: Throwing the Form
-
Prepare the Clay:
Begin by thoroughly wedging your speckled stoneware clay to remove air bubbles and ensure an even consistency. -
Center the Clay:
Slam the ball of clay onto the center of your wheel bat. Using water and steady pressure, cone the clay up and down until it is perfectly centered. -
Open the Clay:
Open the centered mound, but leave a significant amount of clay at the bottom—much more than you would for a mug. You need this thickness to pull up the stem later. -
Establish the Base:
Compress the floor of the inside of the cup. Then, begin collaring the clay below the cup section to distinguish the mass that will become the stem. -
Pull the Cup:
Pull the walls of the upper section to form the cup. Aim for a gentle taper that flares slightly at the rim. Keep the walls even, but don’t go too thin yet. -
Form the Stem:
Using the thick clay left at the bottom, squeeze and pull the clay upwards to create a solid stem. I find it easiest to use the crook of my index finger to shape the transition from cup to stem. -
Flare the Foot:
At the very bottom of the stem, leave a wide disk of clay. Flatten and shape this into a sturdy foot that mirrors the width of the cup’s rim for visual balance. -
Refine the Silhouette:
Use a metal rib to smooth the exterior of the cup and stem, removing throwing lines and refining the curve where the cup meets the stem.
Wobble Worries?
If the stem starts twisting or wobbling while pulling, the clay is too soft or you are pushing too hard. Use a heat gun to stiffen the stem slightly before continuing.
Step 2: Creating the Spiral Texture
-
Begin the Spiral:
While the wheel is spinning at a slow-medium speed, take a rounded wooden modeling tool or the curved end of a loop tool. -
Carve the Base:
Start at the outer edge of the foot. Press the tool gently into the clay and slowly move it inward and upward as the wheel turns to create a continuous spiraling groove. -
move Up the Stem:
Continue this steady movement up the stem. Maintain consistent pressure to ensure the ridges are uniform in depth. -
Transition to the Cup:
Carry the spiral texture past the top of the stem and onto the bottom third of the cup itself. Smoothly release pressure to fade the spiral out as you reach the middle of the cup. -
Clean the Ridges:
Run a damp sponge very lightly over the textured area to soften any sharp burrs created by the tool without erasing the distinct ridges. -
Finish the Rim:
Use a piece of chamois leather or a damp sponge to compress and smooth the drinking rim, ensuring it is rounded and comfortable. -
Wire Off:
Tautly pull your wire cutter underneath the foot to separate the goblet from the bat.
Step 3: Drying and Glazing
-
Slow Drying:
Cover the goblet loosely with plastic. Goblets are prone to warping if the stem dries faster than the cup, so let it dry slowly and evenly. -
Bisque Fire:
Once bone dry, fire the piece to bisque temperature (usually cone 04 or 06, depending on your clay body). -
Glaze Application:
Dip the bisque-fired goblet into a transparent or semi-opaque cream glaze. This type of glaze will pool slightly in the spiral grooves, highlighting the texture nicely. -
Wipe the Foot:
Carefully wipe any glaze off the bottom of the foot with a wax resist or a damp sponge to prevent it from sticking to the kiln shelf. -
Final Fire:
Glaze fire the piece to the maturity temperature of your stoneware clay (typically cone 5-6 or cone 10).
Two-Piece Method
Struggling to throw tall? Throw the cup and the stem/foot as two separate pieces. Join them when leather hard by scoring and slipping for easier height control.
Once fired, you will have a stunning, tactile vessel ready for your next feast


What Really Happens Inside the Kiln
Learn how time and temperature work together inside the kiln to transform clay into durable ceramic.
Ribbed Throwing Lines as Design
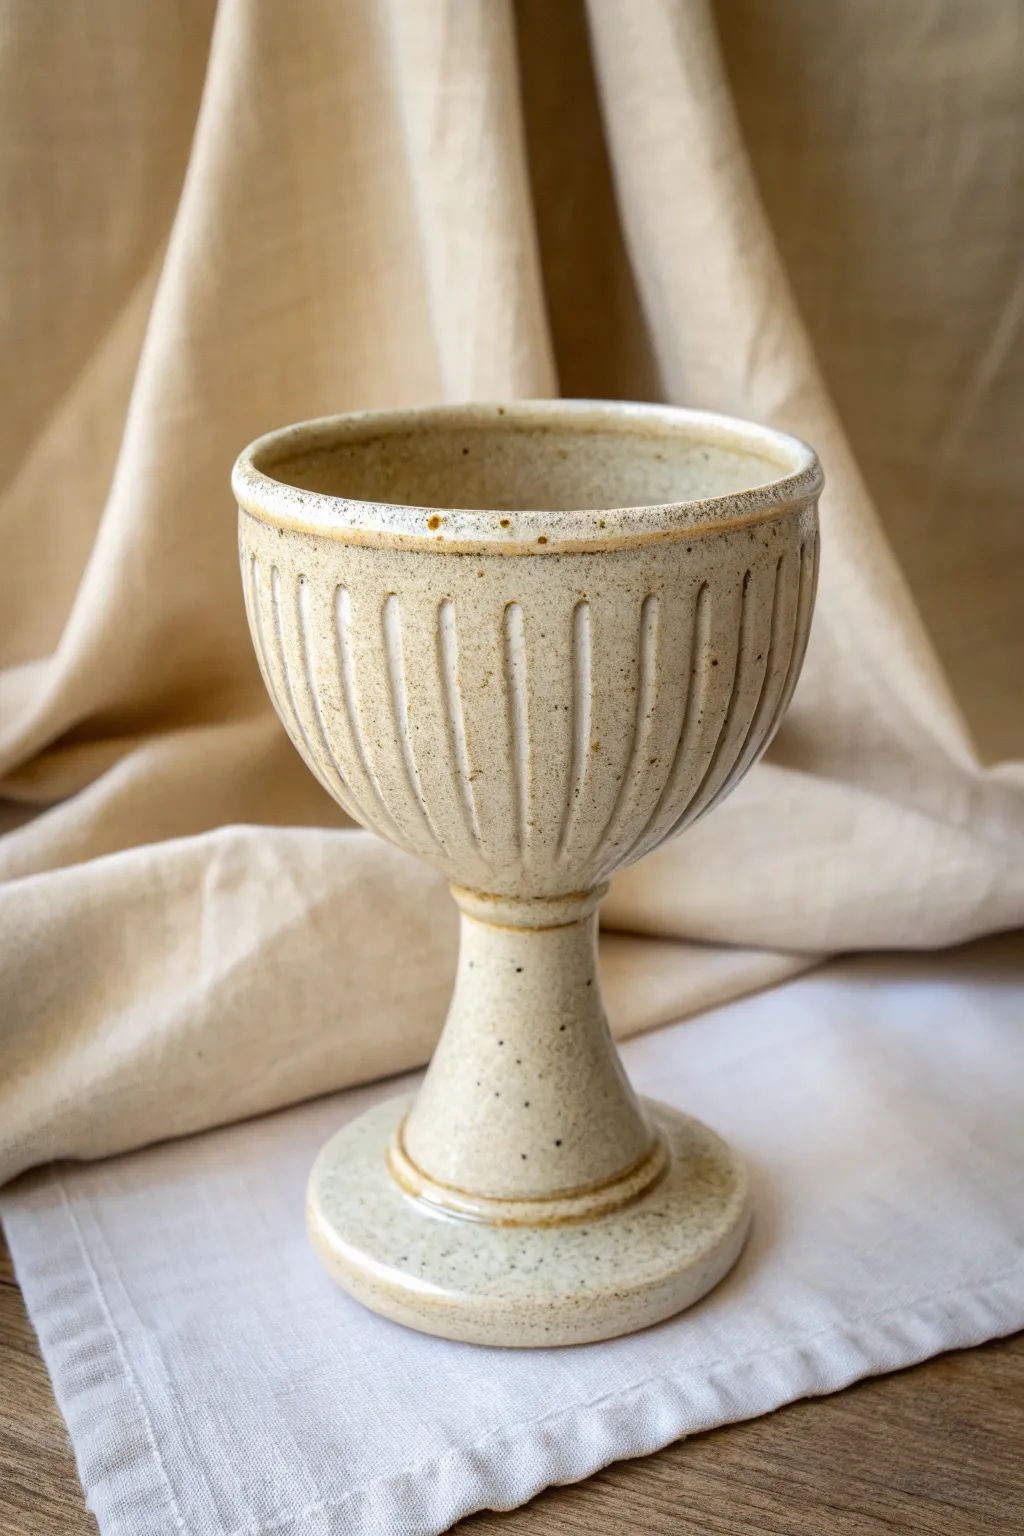
This project transforms a simple wheel-thrown chalice into a textural delight using precise vertical ribbing. The speckled stoneware clay body, highlighted by a subtle clear glaze, creates a rustic yet elegant vessel perfect for special occasions.
Step-by-Step Tutorial
Materials
- Speckled stoneware clay (approx. 2 lbs)
- Potter’s wheel
- Throwing sponges
- Wire cutter
- Needle tool
- Trimming tools (loop tool)
- Small U-shaped carving tool or fluting tool
- Rib tool (metal or wood)
- Scoring tool (serrated rib)
- Slip (clay slurry)
- Clear or transparent satin glaze
- Kiln
Step 1: Throwing the Components
-
Prepare your clay:
Begin by wedging your speckled stoneware clay thoroughly to remove air bubbles. Divide the clay into two balls: a larger one for the cup (about 1.25 lbs) and a smaller one for the stem and foot (about 0.75 lbs). -
Center the cup clay:
Secure the larger ball onto the wheel head. Use steady pressure and water to center the clay perfectly; any wobble now will make carving difficult later. -
Open and pull the cup:
Open the clay and pull up the walls to create a deep, U-shaped bowl. Aim for a slightly thicker wall than usual (about 1/4 inch) to allow depth for the carving stage. -
Shape the rim:
Refine the rim with a chamois or sponge, slightly thickening it for durability. This creates a comfortable drinking edge and a visual border for the carving. -
Throw the stem and foot:
Center the smaller clay ball. Throw a solid stem that flares out into a circular foot at the bottom. The top of the stem should match the width of the bottom of your cup bowl. -
Create a gallery:
On the top of the thrown stem, gently depress the center to create a small socket or ‘gallery’ that will help fit the cup bowl securely later.
Step 2: Assembly and Carving
-
Dry to leather hard:
Allow both pieces to dry slowly to a leather-hard state. They should be firm enough to handle without deforming but soft enough to carve and score. -
Trim the components:
Place the cup upside down on the wheel (secured with lugs) and trim the bottom into a smooth curve. Trim the underside of the foot to create a shallow recess. -
Score and slip:
Identify the connection points: the bottom center of the cup and the top of the stem. Score both surfaces aggressively with a serrated tool and apply a generous amount of slip. -
Join the pieces:
Press the cup firmly onto the stem. Check for straightness by spinning the wheel slowly. Clean up the seam with a modeling tool or sponge to ensure a smooth transition. -
Mark vertical guides:
Using a needle tool, lightly mark vertical lines around the cup bowl to space out your fluting evenly. I find aiming for even spacing by eye gives it a more organic feel, but you can measure if you prefer precision. -
Carve the flutes:
Using a U-shaped carving tool, drag vertical lines from just below the rim down to the base of the cup bowl. Apply consistent pressure to create grooves of uniform depth, stopping just before the joined seam. -
Detail the transition:
Carve a single horizontal line or groove around the top of the stem, just below where it joins the cup. This visual break separates the textured bowl from the smooth stem. -
Refine the edges:
Once the carving crumbs are barely dry, gently brush them away with a soft brush. Use a damp sponge to soften any sharp ridges created by the carving tool.
Keep it clean
Wait until the clay is bone dry before removing the little burrs left from carving. They will crumble off cleanly with a stiff brush, whereas wet clay will just smear back into the grooves.
Step 3: Finishing
-
Bisque fire:
Let the goblet dry completely, covered loosely to ensure the join dries at the same rate as the rest. Fire to cone 04 (or your clay’s specific bisque temperature). -
Glaze application:
Dip the entire piece into a clear or transparent satin glaze. This specific look relies on the glaze breaking over the carved ridges and revealing the speckles in the clay body. -
Wipe the foot:
Carefully sponge off any glaze from the very bottom of the foot ring to prevent it from sticking to the kiln shelf. -
Final firing:
Fire the piece to maturity (likely cone 5 or 6 for stoneware). Allow the kiln to cool naturally before removing your finished chalice.
Go Medieval
To enhance the antique chalice look, brush iron oxide wash into the carved grooves and sponge it off the high points before applying the clear glaze. This adds dramatic depth.
Enjoy using your custom goblet for your morning juice or evening wine, knowing you crafted every curve by hand
Fluted Bowl and Petal Rim
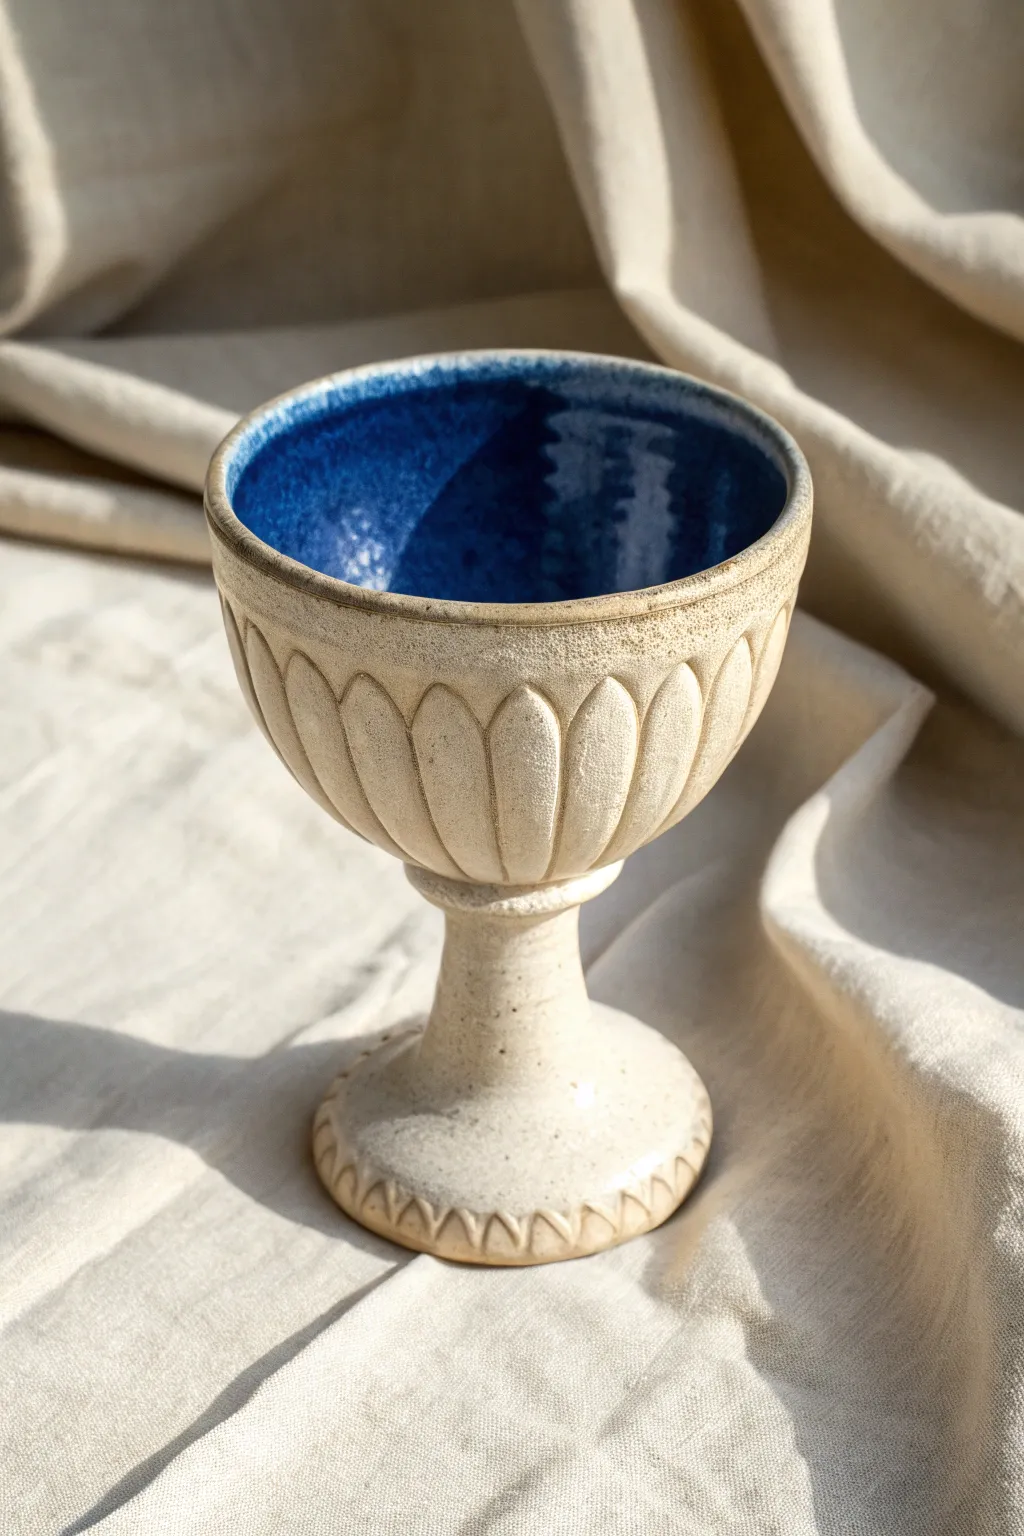
This elegant goblet combines the raw, tactile warmth of unglazed stoneware with a stunning, deep blue glossy interior. The distinct fluted carving on the bowl mimics flower petals, creating a timeless piece that feels as good in the hand as it looks on the shelf.
Step-by-Step
Materials
- Stoneware clay (smooth or lightly grogged)
- Pottery wheel
- Throwing tools (sponge, wire, wooden ribs)
- Loop carving tools (small and medium)
- Needle tool
- Deep blue glossy glaze
- Wax resist
- Soft brush
- Calipers (optional)
Step 1: Throwing the Form
-
Prepare the clay:
Start with a ball of well-wedged clay, roughly 1.5 to 2 pounds. Center it firmly on the wheel head, ensuring it feels stable before opening. -
Open the vessel:
Open the clay down the center, leaving enough thickness at the base (about 1.5 inches) to later trim into a stem and foot. Unlike a bowl, you need significant mass at the bottom. -
Pull the walls:
Pull the walls up into a softly rounded cup shape. Aim for a curve that mimics a tulip bulb—wider at the belly and slightly gathered at the rim. Keep the walls even, but leave them slightly thicker than a standard mug to accommodate deep carving later. -
Refine the rim:
Using a chamois or a damp sponge, compress the rim to make it smooth and rounded, which is crucial for comfortable drinking. -
Establish the stem base:
Using a wooden rib or your fingers, define the transition point where the cup meets the stem area at the bottom. I find it helpful to undercut this area slightly while throwing to mark where the trim will begin.
Uneven Wall Thickness
If you carve through the wall while fluting, your clay walls were likely too thin. Keep the bowl slightly thicker than usual (approx. 1/4 inch or more) if you plan to carve deeply.
Step 2: Trimming and Shaping
-
Leather hard stage:
Allow the piece to dry to a leather-hard state. The clay should be firm enough to hold its shape when inverted but soft enough to carve easily. -
Secure for trimming:
Center the goblet upside down on the wheel head. Secure it with clay lugs or a gripping chuck if you have one. -
Define the stem:
Use a sharp trimming tool to remove excess clay from the base, sculpting a graceful stem. Create a smooth curve that flows from the bottom of the cup bowl down into a wider, stable foot. -
Refine the foot:
Trim a clear definition for the foot ring. The base needs to be wide enough to prevent tipping, so check the proportions frequently as you work. -
Smooth the surface:
Before taking it off the wheel, use a smooth metal rib to burnish the exterior slightly, removing any grog marks and preparing the canvas for carving.
Step 3: Carving the Flutes
-
Section the bowl:
Lightly mark vertical guidelines around the bowl to space out your petals evenly. You can eyeball this or use a decorator’s wheel. -
Carve the petals:
Using a medium loop tool, carve vertical flutes starting from just below the rim and dragging downward toward the stem. Vary the pressure: start light, press deeper in the middle of the stroke, and lift off as you reach the bottom to create a tapered ‘petal’ shape. -
Detail the ridges:
Ensure distinct ridges remain between each carved section. Use a damp sponge to gently soften any sharp burrs left by the tool, but don’t erase the crisp lines. -
Carve the foot:
Repeat a smaller version of this pattern on the foot ring. Use a smaller loop tool to create tiny triangular notches or flutes around the base, mirroring the design of the bowl.
Pro Tip: Consistent Flutes
Count your strokes! If you use three downward strokes to carve one petal, use exactly three for every petal. Rhythm and repetition are key to a professional look.
Step 4: Glazing and Finishing
-
Bisque fire:
Once bone dry, bisque fire the goblet according to your clay body’s specifications (usually Cone 04 or 06). -
Wax the exterior:
Apply wax resist to the entire exterior of the goblet, including the rim and the foot. We want the outside to remain raw, showcasing the clay’s texture. -
Pour the interior:
Pour a glossy deep blue glaze into the cup. Swirl it carefully to coat the entire interior surface evenly, then pour out the excess. Check the rim to ensure a clean line where the glaze meets the unglazed exterior. -
Clean up splashes:
Use a damp sponge to wipe away any stray droplets of glaze that may have beaded up on the waxed exterior. -
Final firing:
Glaze fire the piece to maturity (e.g., Cone 6 or 10). The heat will vitrify the bare clay and turn the interior into a liquid-looking pool of blue. -
Sand the foot:
After firing, lightly sand the bottom of the foot with wet-dry sandpaper to ensure it won’t scratch your table.
Now you have a stunning chalice ready for your favorite vintage or simply to act as a centerpiece on your mantle

TRACK YOUR CERAMIC JOURNEY
Capture glaze tests, firing details, and creative progress—all in one simple printable. Make your projects easier to repeat and improve.
Two-Tone Glaze to Split Bowl and Stem
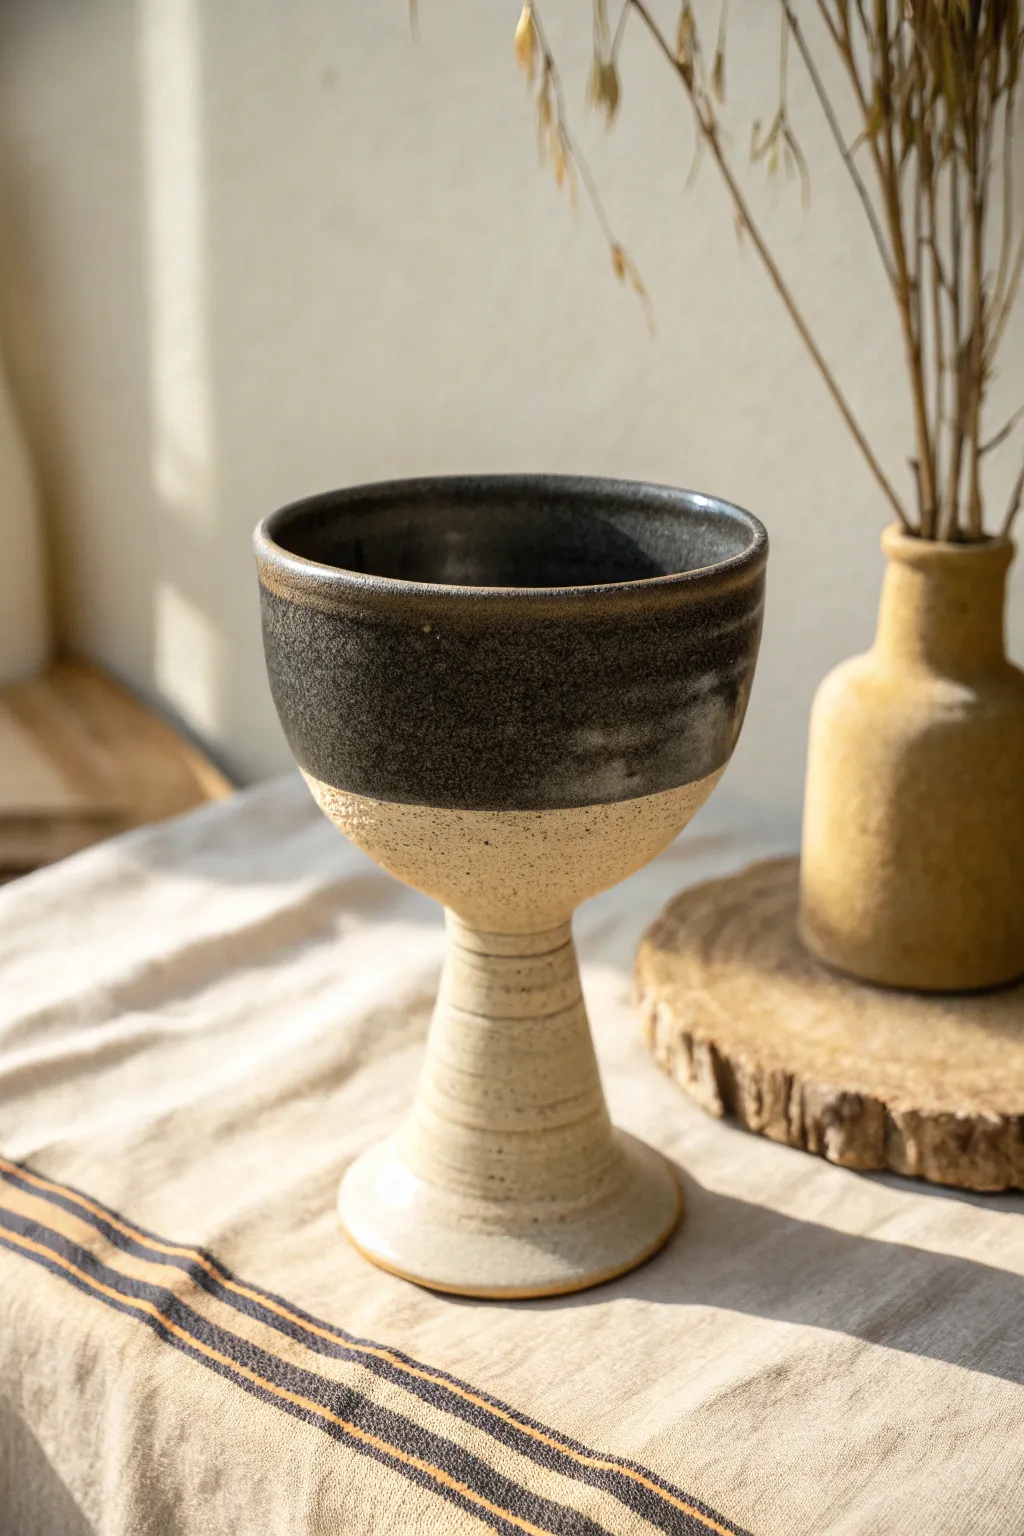
This striking goblet balances rustic charm with modern lines by using a clever glazing technique to separate the bowl from the stem. The contrast between the dark, semi-gloss upper half and the raw, speckled clay body below highlights the architectural shape of the piece.
Detailed Instructions
Materials
- Speckled stoneware clay (approx. 1.5 – 2 lbs)
- Pottery wheel
- Throwing sponges and bucket
- Rib tools (wooden and metal)
- Wire cutter
- Needle tool
- Trimming tools (loops and pear-shaped)
- Black semi-gloss glaze
Step 1: Throwing the Form
-
Center the clay:
Start with a well-wedged ball of speckled stoneware. Center it firmly on the wheel head, ensuring it is slightly taller than it is wide to prepare for the goblet height. -
Open and pull the cylinder:
Open the clay centered, but leave a significant amount of clay at the base—much thicker than a standard mug—to account for the stem. Pull the walls up into a tall, narrow cylinder. -
Shape the bowl:
From the midpoint upwards, gently belly out the clay to form the cup section. Keep the rim slightly tapered in to maintain a modern silhouette. -
Define the stem:
Using a wooden rib or your fingers, collar in the clay below the bowl section. You are aiming for a solid, thick stem that flares out at the very bottom into a foot. -
Refine the connection:
Use a rib to create a distinct transition point where the bowl meets the stem. This sharp angle is crucial for the two-tone aesthetic later. -
Smooth the surface:
Run a metal rib over the exterior of the bowl and stem to remove throwing rings where you want smoothness, but I sometimes like to leave faint rings on the stem for texture. -
Cut and dry:
Wire the piece off the bat and let it dry to leather-hard consistency. This usually takes a day or two depending on humidity.
Clean lines tip
For a razor-sharp glaze line, wrap masking tape around the stem before dipping. Peel it off as soon as the glaze is dry but before firing.
Step 2: Trimming and Ribbing
-
Secure for trimming:
Invert the leather-hard goblet into a chuck or center it on the wheel head using clay lugs to hold it steady. -
Trim the foot:
Carve underneath the flared base to create a defined foot ring. This reduces weight and gives the piece a professional lift. -
Carve the stem:
Use a small loop tool to refine the stem’s waist. You want it narrow enough to be elegant but sturdy enough to support the bowl. -
Add detail lines:
While spinning slowly, use the corner of a trimming tool to incise subtle horizontal rings around the stem, mimicking the look in the reference image. -
Bisque fire:
Once fully bone dry, load the goblet into the kiln for a bisque firing (usually cone 04 or 06).
Make it a set
Create varying heights by throwing the stems longer or shorter. A cluster of goblets at different elevations looks stunning on a dinner table.
Step 3: Glazing and Finishing
-
Wax the foot:
Apply wax resist to the very bottom of the foot ring to prevent glaze from allowing the pot to stick to the kiln shelf. -
Prepare the glaze:
Stir your black semi-gloss glaze thoroughly. If it’s too thick, dip results will be uneven; it should have the consistency of heavy cream. -
Dip the interior:
Pour glaze inside the bowl, swirl it quickly to coat the entire inner surface, and pour it out immediately. -
Dip the exterior:
Hold the goblet securely by the foot. Invert it and dip the bowl section straight down into the glaze bucket. -
Stop at the waist:
Submerge only until the glaze line hits the ‘waist’ where the bowl meets the stem. Hold for three seconds and lift straight up. -
Clean the line:
Once the glaze is dry on the surface, use a damp sponge to tidy up the glaze line if it dripped, ensuring a crisp separation between the dark top and bare clay bottom. -
Final Fire:
Fire the piece to maturity (Cone 6 or 10, depending on your clay body specifications) to vitrify the stoneware.
Now you have a stunning, architectural goblet ready for your favorite beverage
Matte Stem, Glossy Bowl Contrast
This handmade ceramic goblet combines earthy elegance with a delightful textural contrast. The piece features a creamy, speckled stoneware body with a unique glaze application that highlights the rim and interior while leaving the stem beautifully matte and tactile.
Step-by-Step
Materials
- Speckled buff stoneware clay (approx. 1.5 – 2 lbs)
- Potter’s wheel
- Throwing sponge
- Bucket of water
- Wire cutter
- Pin tool
- Wood or metal rib tools
- Loop trimming tools
- Warm amber/honey transparent glaze
- Matte white or ‘oatmeal’ glaze
- Wax resist emulsion
- Sponge for waxing
- Kiln (bisque and glaze firing capability)
Step 1: Throwing the Form
-
Center the clay:
Start by wedging your speckled buff clay to remove air bubbles. Secure it to the wheel head and center it using strong, consistent pressure. You want a medium-sized mound, taller than it is wide, ready to be opened. -
Open and pull the cylinder:
Open the clay down the center, leaving about a half-inch of thickness at the bottom for the foot. Carefully pull up the walls to create a tall, thick cylinder. Don’t go too thin yet; you need clay to shape the stem. -
Define the stem and bowl:
About halfway up the cylinder, use a rib or your fingers to press inward, creating a ‘waist’ that separates the soon-to-be bowl from the stem. Leave the clay below this waist thick and solid to support the weight. -
Shape the bowl:
Now, focus on the top half. Gently belly out the form from the inside, pulling the rim outward slightly to create a welcoming, open shape. Keep the rim rounded and smooth for comfortable drinking. -
Refine the stem:
Work on the bottom half. Use a wood rib to compress and shape the stem into a graceful pedestal that flares out at the very bottom for stability. I like to leave faint throwing lines here for texture. -
Cut and dry:
Once satisfied with the silhouette, use your wire cutter to slice the goblet from the wheel head. Carefully lift it—using pot lifters if necessary—and set it aside to dry until it reaches a leather-hard state.
Step 2: Trimming and Bisquing
-
Center for trimming:
Once leather hard, invert the goblet onto the wheel head. Secure it with small clay lugs or a chuck if the rim is delicate. Ensure it is perfectly centered to avoid wobbling. -
Trim the foot:
Use a sharp loop tool to carve away excess weight from the base. Create a defined foot ring and clean up the curve where the stem meets the base, mirroring the elegance of the bowl above. -
Smooth the surface:
After trimming, run a damp sponge or a smooth rib over the exterior to remove any sharp grog or rough patches, but preserve those subtle throwing rings if you want that handmade feel. -
Bisque fire:
Allow the piece to dry completely to the bone-dry stage. Load it into the kiln and fire to Cone 04 (or your clay body’s bisque temperature). This hardens the clay for glazing.
Uneven Glaze Drips?
If the rim glaze runs too much, your second dip was too heavy. Try holding the rim in the final glaze for only 1-2 seconds, or slightly thin your accent glaze with water.
Step 3: Glazing Implementation
-
Clean the bisque:
Wipe the bisque-fired goblet with a damp sponge to remove any kiln dust. This ensures the glaze adheres properly without crawling. -
Wax the stem bottom:
Apply wax resist to the bottom contact ring of the foot and up the stem slightly if you plan for the very bottom to be bare clay. Let the wax dry completely. -
Glaze the interior:
Pour your glossy amber/honey glaze into the bowl of the goblet. Swirl it quickly to coat the entire interior surface and pour the excess back out. Wipe any drips off the rim immediately. -
Glaze the exterior bowl:
Dip just the bowl portion (top half) into a matte ‘oatmeal’ or creamy white glaze. You want this to cover the exterior of the cup but stop right where the bowl meets the stem. -
Create the rim detail:
Dip the very top rim (about 1/4 inch) back into the amber glaze. This creates that beautiful glossy contrast line seen in the image, allowing the darker glaze to interact with the lighter matte glaze. -
Wash the stem:
For the stem, apply a very thin wash of the amber glaze diluted with water, or leave it largely bare to show off the raw clay speckles. In the reference, the stem has a sheer, glossy warmth different from the bowl. -
Final wipe:
Check the foot ring one last time to ensure no glaze is on the bottom where it touches the kiln shelf. Clean up any unwanted drips on the stem. -
Final Firing:
Load the goblet into the kiln for the glaze firing (typically Cone 5 or 6 depending on your clay/glaze). Once fired and cooled, sand the bottom lightly if needed to protect table surfaces.
Pro Tip: Throwing Tall
When pulling the stem, choke the clay in gradually. Moving too fast or pressing too hard can twist the clay, causing the thin stem to collapse under the bowl’s weight.
Enjoy using your custom chalice for everything from morning juice to evening wine, admiring the interplay of matte and gloss textures
Stamped Band Around the Goblet Bowl
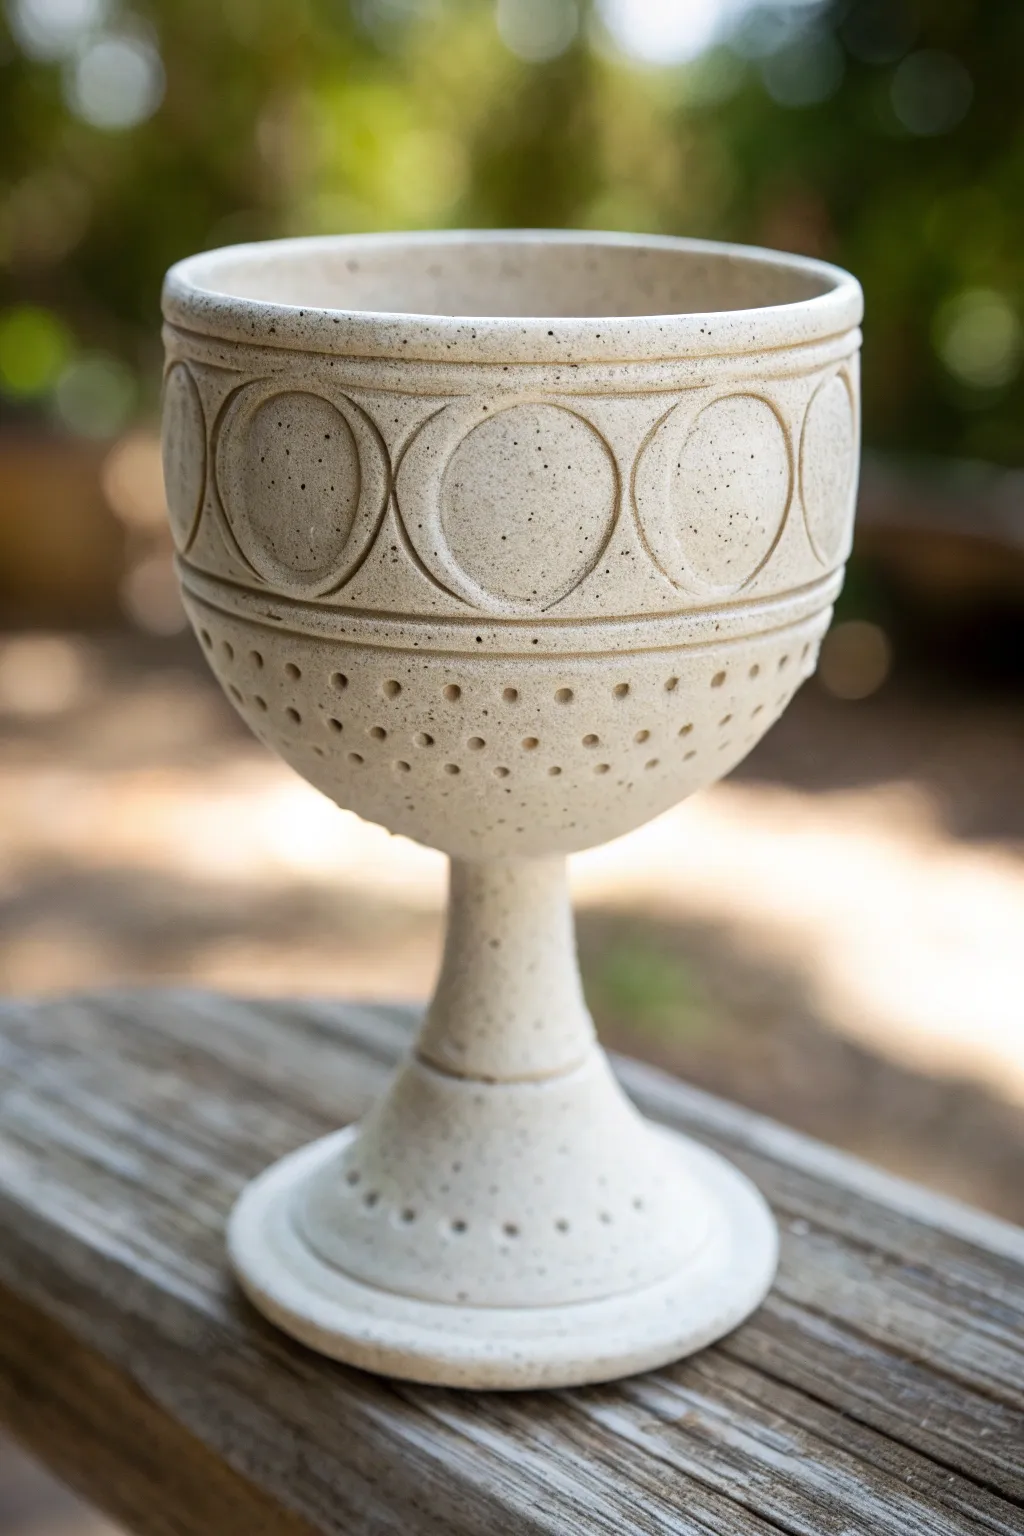
This project combines wheel-throwing techniques with surface stamping to create a rustic, ritual-style chalice. The speckled clay body highlights the deep relief of the circular motif, while the rhythmic dotted texture adds a tactile finish to the base and foot.
Detailed Instructions
Materials
- Speckled stoneware clay (approx. 2 lbs)
- Pottery wheel
- Throwing tools (sponge, water bucket, needle tool, wire tool)
- Ribs (metal and wooden)
- Small circular cookie cutter or large round cap (approx. 1.5-inch diameter)
- Drill bit, small hole punch tool, or blunt wooden skewer
- Trimming tools
- Clear matte or satin glaze
- Kiln
Step 1: Throwing the Form
-
Center the clay:
Start with two balls of clay: a larger one (about 1.25 lbs) for the bowl and a smaller one (about 0.75 lbs) for the stem and foot, unless you prefer throwing off the hump or throwing as one piece. For this tutorial, we will throw it as one piece for stability. Center your single large lump of clay firmly on the wheel head. -
Open and pull the stem:
Open the centered clay, leaving a very thick floor—this creates the mass for the stem. Begin pulling the walls upward, primarily working the clay inward to form a tall, thick column. -
Shape the bowl:
Once you have your column, use your fingers to open the top section into a bowl shape. Leave the rim slightly thickened for durability. Keep the stem section underneath thick enough to support the weight of the bowl. -
Define the stem and foot:
Use a wooden rib or your fingers to squeeze and shape the stem, creating a smooth transition from the bowl down to a flared foot. Compress the rim of the foot against the bat to prevent S-cracks. -
Dry to leather hard:
Cut the goblet from the bat with a wire tool and let it dry slowly to a sturdy leather-hard stage. It needs to be firm enough to handle the pressure of stamping without warping.
Step 2: Carving and Texturing
-
Trim the piece:
Place the leather-hard goblet back on the wheel (using a chuck or foam bat) to trim away excess weight from the foot and refine the curve of the bowl. -
Define the band area:
While spinning the wheel slowly, use a needle tool or a sharp sculpting tool to incise two parallel horizontal lines around the upper portion of the bowl. This creates the ‘lane’ where your circles will go. -
Stamp the circles:
Using a small circular cutter or a plastic cap, press deeply into the clay between your two incised lines. Space them so they almost touch or slightly overlap. Support the inside of the wall with your hand to prevent the bowl from deforming under pressure. -
Add the dotted texture:
Beneath the main band, create rows of small indentations. Use a blunt tool like the back of a drill bit or a specialized hole punch tool. Press these in a grid pattern, wrapping around the lower curve of the bowl. -
Texture the foot:
Repeat the dotted pattern on the flared foot of the goblet to visually balance the design. -
Smooth the edges:
Once the texturing is done, use a damp sponge or finger to gently soften any sharp burrs created by the stamping tools.
Warped Walls?
If the bowl deforms while stamping circles, you are pressing too hard without internal support. Hold a rhythmic, firm hand inside the bowl exactly opposite where you stamp.
Step 3: Firing and Glazing
-
Bisque fire:
Allow the goblet to dry completely (bone dry). Fire it to Cone 04 (or your clay body’s bisque temperature). -
Glaze preparation:
Wipe the bisqued piece with a damp sponge to remove dust. Mix your clear matte glaze thoroughly. -
Apply glaze:
Dip the goblet into the clear glaze, or pour the glaze inside the bowl and dip the outside to the rim. I prefer a dip for an even coat over the texture. -
Wipe the foot:
Ensure the bottom of the foot is completely free of glaze so it doesn’t stick to the kiln shelf. -
Final firing:
Fire the piece to maturity (Cone 5/6 or Cone 10, depending on your stoneware). The clear glaze will reveal the natural speckles of the clay.
Circle Symmetry
Mark your cardinal points (North, South, East, West) first with faint ticks. This helps space the large circles evenly so you don’t end up with an awkward gap at the end.
Once cooled, your durable stoneware goblet is ready for your favorite drink or to be displayed as a rustic centerpiece
Sgraffito Patterned Goblet Surface
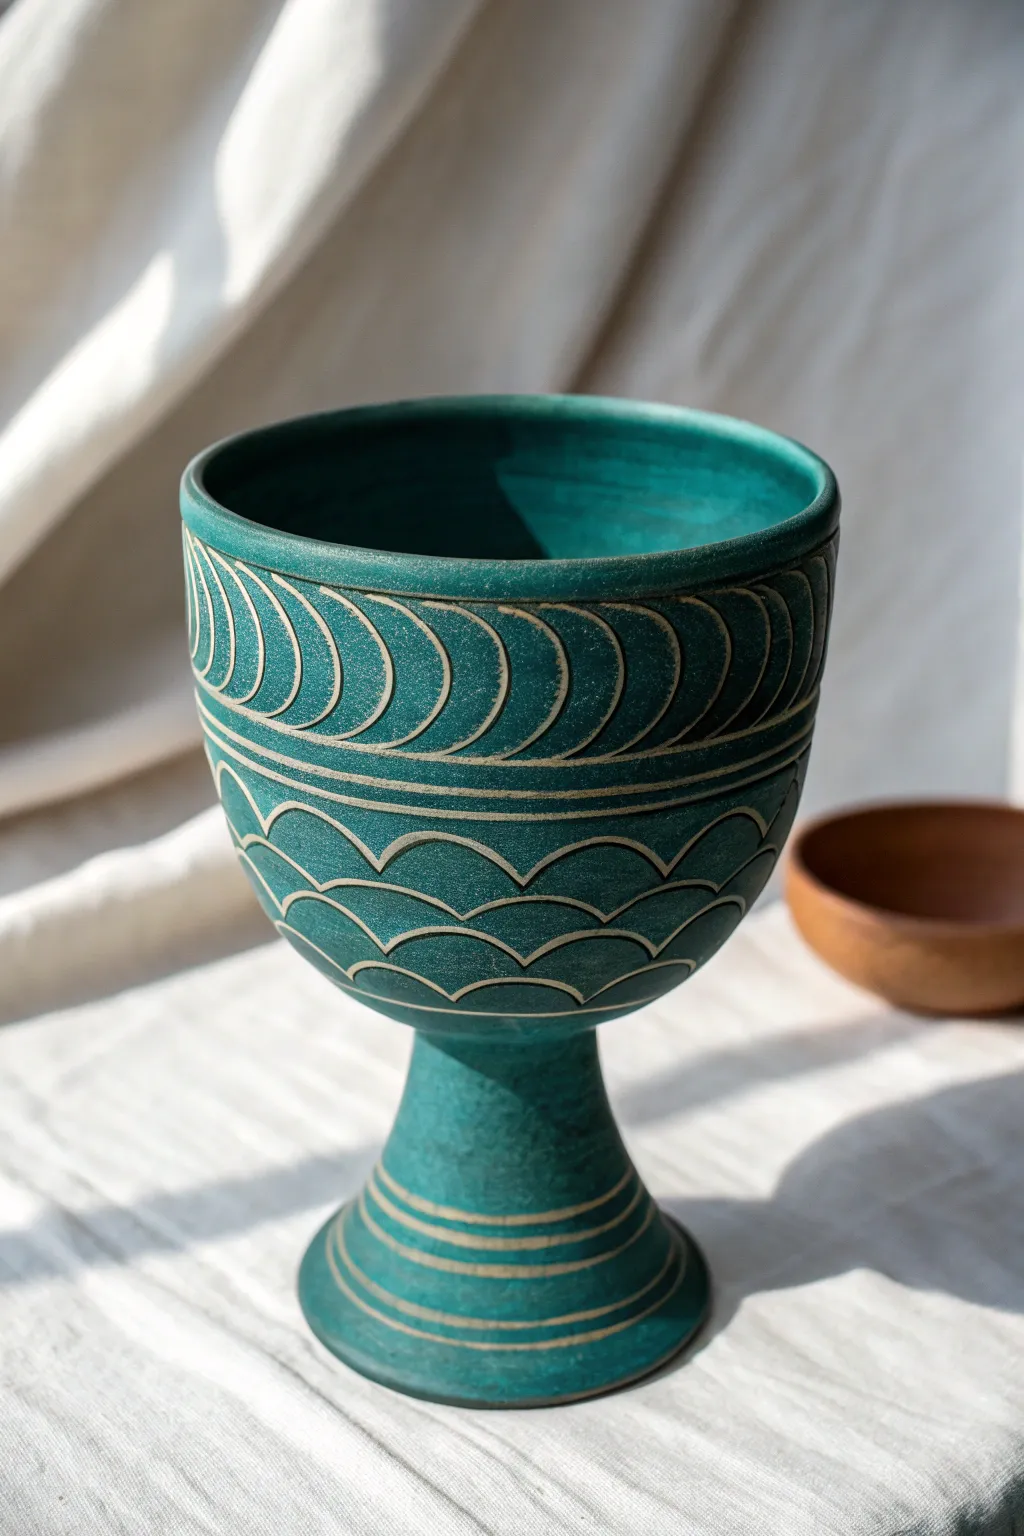
This striking goblet project combines wheel-throwing techniques with the satisfying art of sgraffito carving. The design features repeating arches and concentric bands carved through a rich teal underglaze to reveal the warm, sandy clay body beneath.
Step-by-Step Guide
Materials
- Stoneware clay (buff or white)
- Pottery wheel
- Throwing tools (rib, sponge, wire)
- Trimming tools
- Teal or deep green underglaze
- Soft fan brush
- Sgraffito loop tool (small)
- Carving needle tool
- Clear transparent glaze
- Kiln
Step 1: Forming the Goblet
-
Throw the cup section:
Begin with about 1 lb of clay centered on the wheel. Open the form and pull the walls up into a deep, U-shaped cup, keeping the rim slightly tapered inward for elegance. -
Refine the profile:
Use a smooth kidney rib to compress the outside walls and remove throwing rings, creating a blank canvas for your carving later. Cut the cup off the bat and set aside to firm up. -
Throw the stem and foot:
With a slightly smaller ball of clay (approx. 0.75 lb), throw a tall, sturdy pedestal shape. Flare the bottom out for a stable foot and leave the top column thick enough to support the cup. -
Join the parts:
Once both pieces are leather hard—firm enough to handle but not dry—score and slip the bottom of the cup and the top of the stem. Press them firmly together, smoothing the seam until the join is invisible. -
Trim the foot:
Place the assembled goblet upside down on a chuck or foam bat. Trim the underside of the foot to create a clean, recessed ring.
Keep it Clean
Don’t broaden your lines by sponging the piece after carving. If you made mistakes, cover them with underglaze, let dry, and re-carve.
Step 2: Applying Surface Color
-
Check moisture level:
Ensure the goblet is at a perfect leather-hard stage. If it’s too wet, the tool will drag; too dry, and the clay will chip. -
Apply underglaze:
Using a soft fan brush, apply 3 solid coats of deep teal underglaze to the entire exterior. I like to let the underglaze lose its sheen completely between coats to ensure even coverage. -
Dry to the touch:
Allow the final coat of underglaze to dry until it is no longer tacky but the clay underneath still retains moisture.
Step 3: Carving the Sgraffito Design
-
Mark horizontal bands:
Place the goblet back on a banding wheel. Using a needle tool, lightly etch horizontal guidelines to separate the sections: the top rim band, the central band, the main bowl, and the foot. -
Carve the top arches:
In the top band, use a small loop tool to carve a row of repeating semi-circles or ‘C’ shapes. Carve away the negative space inside the curves, leaving thin lines of teal between the carved areas. -
Add detail lines:
Inside the arches you just carved, use a finer point tool to etch parallel curved lines that mimic the shape of the main arch, adding texture. -
Define the separation lines:
Carve two parallel horizontal lines around the waist of the cup, separating the top arch pattern from the lower scallop pattern. -
Carve the lower scallops:
On the bottom half of the cup, carve repeating scallop shapes that look like fish scales or rolling hills. These are simple line carvings rather than full relief removal. -
Detail the scallops:
Add a second, larger scallop line directly above each initial curve to create a double-line effect for each row. -
Decorate the foot:
On the flared foot of the goblet, carve a series of simple horizontal concentric rings, varying the spacing slightly for visual interest. -
Clean up burrs:
Once the carving is bone dry, lightly brush the surface with a soft bristle brush or a finger to flick away any clay crumbs or sharp burrs left from carving.
Color Contrast
Try using a black clay body with white slip (or vice versa) for a dramatically high-contrast, graphic look.
Step 4: Firing and Finishing
-
Bisque fire:
Load the bone-dry goblet into the kiln and bisque fire to cone 04 (or your clay’s specific bisque temperature). -
Glaze application:
Dip or brush a clear, transparent glaze over the entire piece. This will make the teal pop and seal the exposed clay lines. -
Final firing:
Glaze fire the piece to the maturity temperature of your clay body (typically cone 5 or 6 for stoneware).
Enjoy using your custom chalice for special occasions or simply as a beautiful display piece on your shelf
Mishima-Inlay Linework on a Goblet
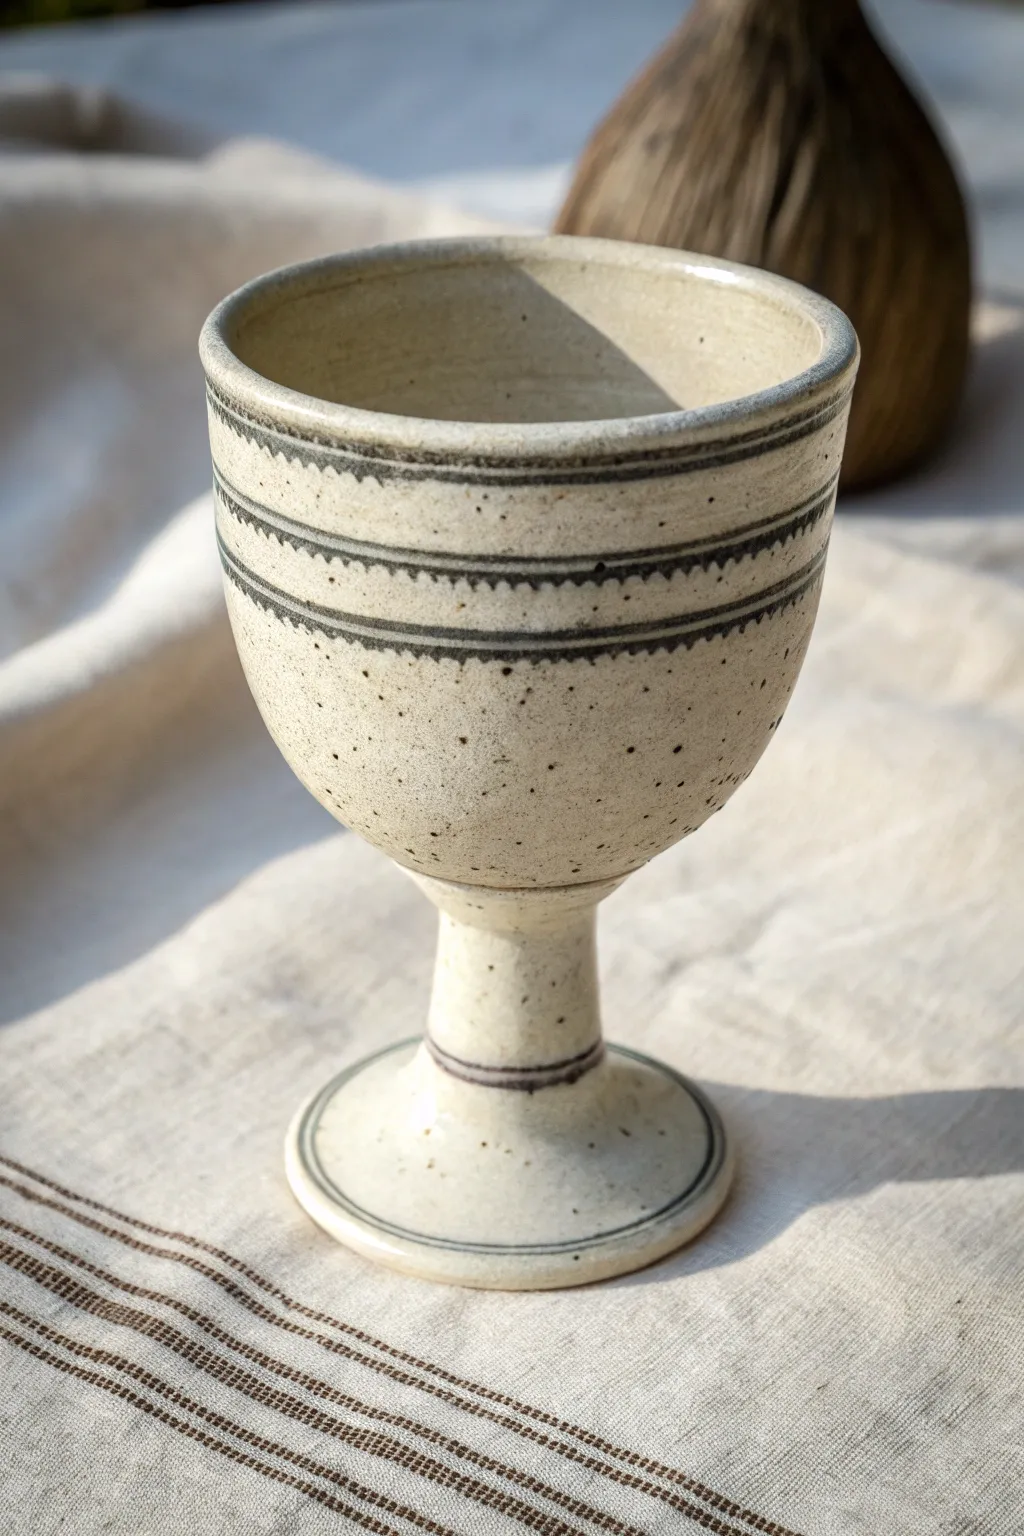
This elegant goblet combines the warmth of speckled clay with the precision of mishima inlay. The dark, contrasting lines create a rhythmic geometric pattern that elevates the simple wheel-thrown form into a sophisticated drinking vessel.
Step-by-Step
Materials
- Speckled stoneware clay (mid-range cone 5-6)
- Black underglaze or black slip
- Clear glossy glaze
- Pottery wheel and bat
- Throwing tools (sponge, rib, wire cutter)
- Needle tool
- Mishima tool or exacto knife
- Loop tool for trimming
- Wax resist (optional)
- Clean sponge and bucket
Step 1: Throwing the Form
-
Center and open:
Start with about 1.5 to 2 pounds of well-wedged speckled clay. Center it firmly on the wheel, then open the clay down to the bat, leaving enough thickness at the bottom for the stem (about 1.5 inches). -
Establish the stem and cup:
Begin by pulling up a cylinder, but choke in the lower third significantly to create a thick stem. Leave the top two-thirds wider to form the cup of the goblet. -
Refine the shape:
Use a rib to smooth the curve of the cup, giving it a gentle, rounded belly that tapers slightly inward at the rim. Ensure the transition from cup to stem is fluid, not angular. -
Define the foot:
At the base of the stem, flare the clay out to create a stable foot. Compress the rim of the foot with your finger or a chamois to prevent cracking. -
Dry to leather hard:
Cut the goblet off the bat and let it dry slowly until it reaches a sturdy leather-hard stage. This stiffness is crucial for crisp carving.
Smudged Lines?
If scraping smears the black slip, your underglaze is still too wet or your clay is too soft. Let the piece dry longer before attempting to scrape again.
Step 2: Carving the Lines
-
Mark the bands:
Place the goblet back on the center of the wheel (or use a banding wheel). While spinning slowly, lightly hold a needle tool against the surface to scribe the horizontal guidelines where your bands will go—two near the rim, two lower down on the cup, and one on the stem. -
Carve the straight channels:
Using a sharp mishima tool or exacto knife, carve into the scribe lines to create shallow channels. Aim for a depth of about 1-2mm. Carve parallel sets of lines to create the borders for your patterns. -
Add the scallop detail:
Between the two sets of parallel lines on the cup, carefully carve a zig-zag or scalloped line. I find it helpful to mark dots first to keep the spacing even before connecting them with cuts. -
Add foot details:
Carve a final single ring around the narrowest part of the stem and another near the base of the foot to visually ground the piece. -
Clean the burrs:
Once all carving is complete, gently brush away any large crumbs of clay, but don’t smooth it with water yet, as you want the edges sharp for the inlay.
Step 3: Inlay and Finishing
-
Apply the underglaze:
Generously paint black underglaze or slip over all the carved areas. Don’t worry about staying in the lines; you want the liquid to fill every crevice completely. -
Let it firm up:
Allow the underglaze to dry until it is no longer shiny and tack-free to the touch. -
Scrape the excess:
Using a sharp metal rib or a loop tool held at a shallow angle, carefully scrape away the surface layer of underglaze. This reveals the clean clay body while leaving the black pigment trapped inside your carved lines. -
Wipe clean:
Follow up with a slightly damp sponge to remove any remaining hazy residue, ensuring the speckled clay looks bright and clean against the dark lines. -
Bisque fire:
Once bone dry, fire the piece to bisque temperature (usually cone 04). -
Glaze and final fire:
Dip the entire goblet into a clear glossy glaze. This will seal the clay, make it food safe, and enhance the contrast of the mishima lines and the clay’s natural speckles. Fire to maturity (cone 5 or 6).
Master the Scallop
For uneven scalloped lines, make a stiff paper template of the wave pattern. Hold it against the pot and trace lightly with a needle before carving deep.
Enjoy using your custom goblet for special occasions or simply displaying it to show off your refined linework skills
Faceted Goblet for Modern Angles
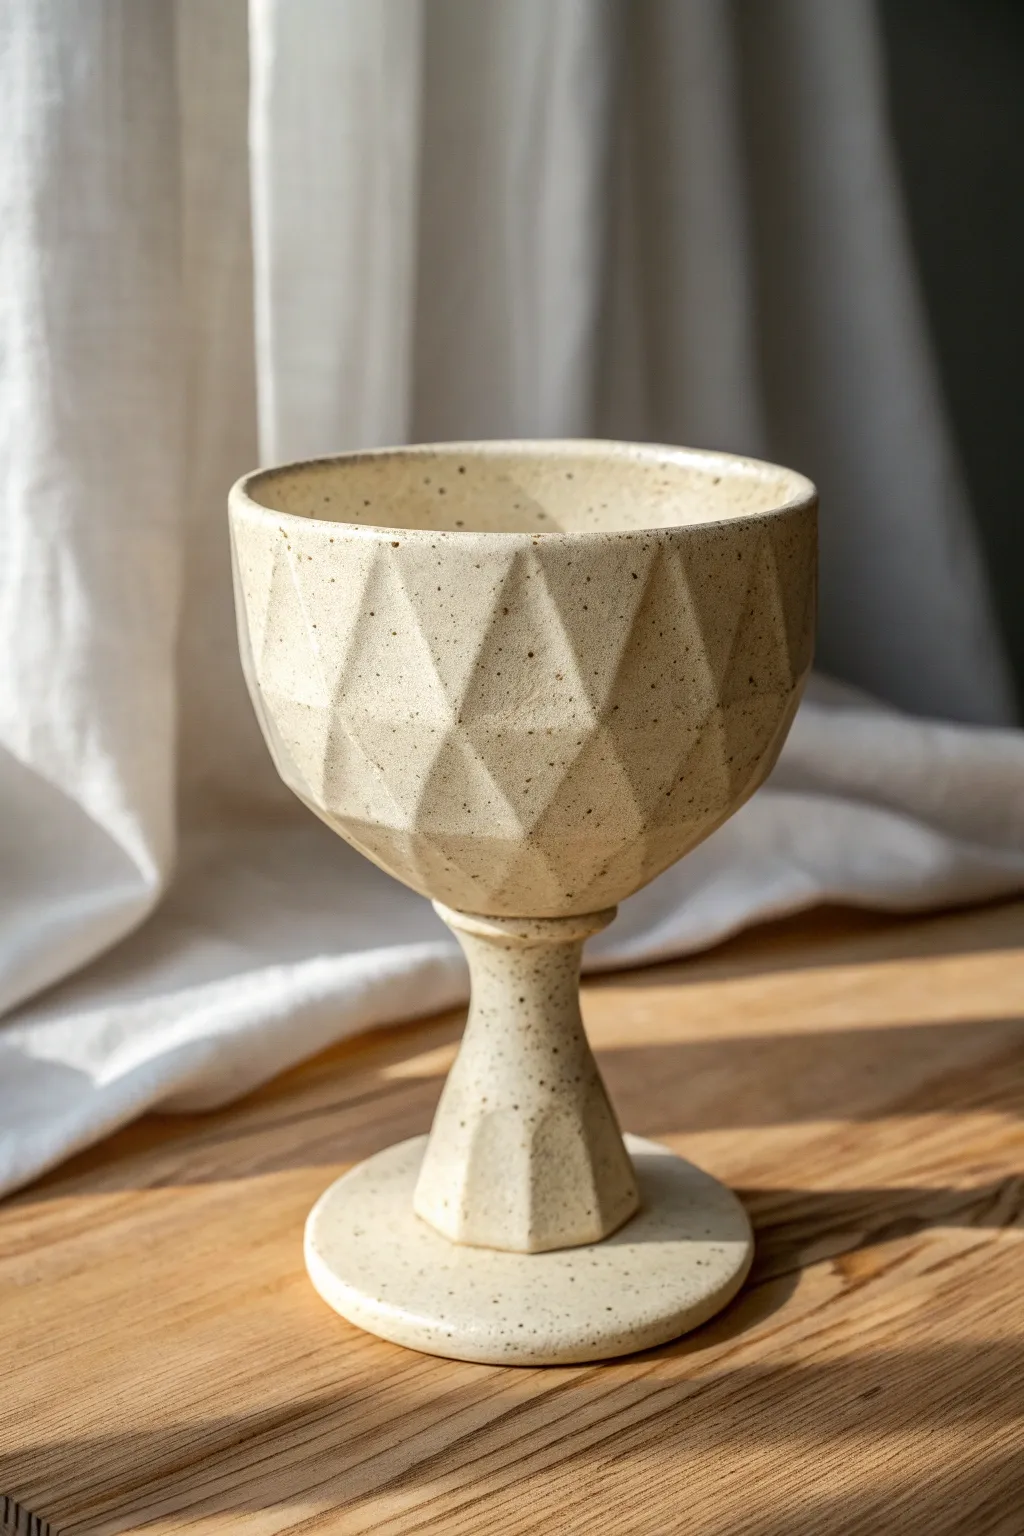
This striking ceramic goblet combines rustic speckled clay with modern geometric precision. The faceted surface catches the light beautifully, creating a functional vessel that feels simultaneously ancient and contemporary.
How-To Guide
Materials
- Speckled buff stoneware clay (or a clay body with grog/manganese speckles)
- Pottery wheel (optional, can be hand-built)
- Needle tool
- Wire cutter
- Fettling knife or X-Acto blade
- Surform tool (cheese grater tool)
- Metal kidney scraper
- Sponge
- Clear matte or satin glaze
- Kiln
- Scoring tool or fork
- Slip
- Bat
- Wooden modeling tool with a flat edge
Step 1: Forming the Chalice & Stem
-
Prepare the Clay:
Begin by wedging about 1.5 to 2 pounds of speckled stoneware clay to remove air bubbles. Since this project involves carving, a slightly stiffer clay body is helpful, so wedging well is key. -
throw the Bowl:
Center your clay on the wheel and open it up into a V-shape. Keep the walls thick—this is crucial because you will be carving away material later. Aim for walls about 1/2 inch thick. -
Shape the Curve:
Pull the walls up into a gentle curve, keeping the rim slightly narrower than the belly of the cup. Don’t refine the shape too much, as the facets will define the final silhouette. Cut it off the bat and set aside. -
Throw the Stem and Foot:
With a smaller ball of clay (about 1 pound), center and throw a thick, solid cylinder that flares at the bottom into a wide, flat disk for the foot. Keep the stem column thick enough to withstand carving. -
Dry to Leather Hard:
Allow both pieces to dry slowly to a sturdy leather-hard stage. The clay needs to be firm enough to slice cleanly without warping, but not so dry that it cracks.
Clean Cuts Pro-Tip
For the sharpest facets, use a cheese cutter wire or a very taut harp tool instead of a knife. The wire slices through leather-hard clay without drag marks.
Step 2: Carving the Geometry
-
Mark Guidelines:
Lightly trace a grid around the circumference of the bowl using your needle tool. I like to mark three horizontal bands to help stagger the triangle pattern. -
Slice the First Facets (Bowl):
Using a sharp fettling knife or wire tool, slice flat planes into the clay. Start with the top row, cutting downward triangles. Use confident, single strokes for the smoothest finish. -
Create the Diamond Pattern:
Move to the middle section and cut upward-pointing triangles that meet the points of the previous row. This interlocking creates the diamond-like, faceted texture seen in the image. -
Refine the Bottom Curve:
Continue faceting towards the base of the cup, tapering the cuts so they transition smoothly into where the stem will attach. -
Facet the Stem:
Take your separate stem piece and carve long, vertical facets down the column. Extend these cuts onto the top of the foot to echo the geometric theme. -
Smooth the Edges:
Once carved, run a barely damp sponge over the sharpest ridges. You want to soften them just enough so they aren’t dangerous to hold, but keep that crisp look.
Step 3: Assembly and Finishing
-
Score and Slip:
Turn the bowl upside down. Score the bottom of the bowl and the top of the stem heavily. Apply a generous amount of slip to both surfaces. -
Attach the Stem:
Press the stem firmly onto the bowl. Give it a slight wiggle to lock the clay particles together. Check alignment from all sides to ensure the goblet stands straight. -
Reinforce the Join:
Use a small coil of clay around the seam where the stem meets the bowl. Blend it smooth with a wooden modeling tool. -
Carve the Join Transition:
To make the join invisible, carev small facets over the area you just blended, ensuring the geometric pattern flows uninterrupted from cup to stem. -
Bisque Fire:
Allow the goblet to dry completely. This may take longer than usual due to the varying thickness. Bisque fire to cone 04 (or your clay’s specific temperature). -
Glaze Application:
Dip the entire piece into a clear matte or clear satin glaze. A glossy glaze often hides texture, while a matte finish highlights the sharp angles and the clay’s natural speckles. -
Final Firing:
Glaze fire the piece to maturity (likely cone 5 or 6 for stoneware). Ensure the foot is wiped clean of glaze to prevent it from fusing to the kiln shelf.
Level Up: Color Wash
Before the final glaze, apply a black iron oxide wash and wipe it back with a sponge. The dark oxide will remain in the deep recesses, emphasizing the geometry.
Enjoy sipping from your architectural masterpiece, appreciating how those carved angles fit perfectly in your hand
Twisted Stem Goblet for Movement
This handmade ceramic goblet features a warm, speckled beige finish and a captivating twisted stem that draws the eye upward. The combination of a substantial, rounded bowl and an intricately spiraled stem creates a piece that feels both grounded and elegant.
Step-by-Step Guide
Materials
- Speckled stoneware clay
- Pottery wheel
- Throwing bats
- Wire cutter
- Needle tool
- Rib tool (wooden or silicone)
- Sponge
- Score and slip tool
- Clear glaze (food safe)
Step 1: Throwing the Components
-
Prepare the clay:
Begin by wedging your speckled stoneware clay thoroughly to remove air bubbles. Since this is a composite piece, divide your clay into three balls: one medium ball for the bowl (about 1 lb) and two smaller balls for the base and stem. -
Throw the bowl:
Center the medium ball on the wheel. Open the clay and pull the walls up and slightly outward to create a rounded, U-shaped cup. Keep the rim slightly thickened for durability. -
Refine the bowl profile:
Use a rib tool to smooth the outside curve, ensuring it is slightly wider at the top than the bottom, but maintaining a gentle, organic swell. Cut it from the bat with a wire tool. -
Throw the base:
Center a small ball of clay (about 0.5 lb) and throw a flat, wide disc. This will be the foot of the goblet. Ensure it is distinct and flat, similar to a plate, with a slight rise in the center to accept the stem. -
Throw a thick cylinder for the stem:
Using the remaining clay, throw a thick, solid cylinder or ‘chuck’ of clay. It needs to be tall enough to become the stem but thick enough to withstand twisting later without collapsing. -
Dry to leather hard:
Set all three components (bowl, base, and stem cylinder) aside. Let them dry slowly until they reach a leather-hard state where they are firm enough to handle without deforming.
Stem Stability Tip
Make the stem slightly thicker than you think you need. Clay shrinks during firing, and a too-thin stem can warp under the weight of the bowl.
Step 2: Creating the Twist
-
Extruding or rolling the stem:
Ideally, for the twisted effect seen here, roll a thick coil of clay. Alternatively, if you threw a cylinder, you can now carve into it. However, the most effective method for this look is to take two thick coils of leather-hard clay and gently twist them around each other to form a rope-like spiral. -
Refining the spiral:
Once twisted, gently roll the spiraled clay on a canvas surface to smooth the connection points slightly while maintaining the deep grooves. Cut the stem to your desired height, ensuring the top and bottom faces are flat. -
Score surfaces:
Take your leather-hard bowl and base. Score the bottom center of the bowl and the top center of the base aggressively with a needle tool or serrated rib. -
Score the stem:
Score both the top and bottom flat surfaces of your twisted stem piece. Apply a generous amount of slip to all scored areas.
Add Color Accents
Instead of clear glaze, use a translucent amber or celadon glaze. It will pool darker in the twisted crevices, highlighting the spiral texture even more.
Step 3: Assembly and Finishing
-
Attach the stem to the base:
Press the twisted stem firmly onto the center of the base disc. Wiggle it slightly to ensure a tight bond. Clean up any excess slip that oozes out with a damp brush. -
Attach the bowl:
Invert the bowl and place it onto the top of the twisted stem. Check your alignment from multiple angles to ensure the goblet isn’t leaning. I find using a banding wheel helpful here to spin the piece slowly while checking verticality. -
Smooth the connections:
Use a small modeling tool to blend the clay slightly at the connection points for strength, but be careful not to flatten the beautiful twist texture. -
Bisque fire:
Allow the fully assembled goblet to dry very slowly under loose plastic to prevent the stem from cracking away from the bowl or base due to shrinkage rates. Once bone dry, bisque fire the piece. -
Glazing:
Apply a clear, glossy glaze to the entire piece. The clear glaze will seal the clay for functionality while allowing the natural speckles of the stoneware to remain the star of the show. -
Final firing:
Fire the goblet to the maturity temperature of your clay body (likely Cone 6 or 10).
Now you have a stunning, sculptural drinking vessel ready for your next gathering
Vine-Wrapped Goblet With Leaf Sprigs
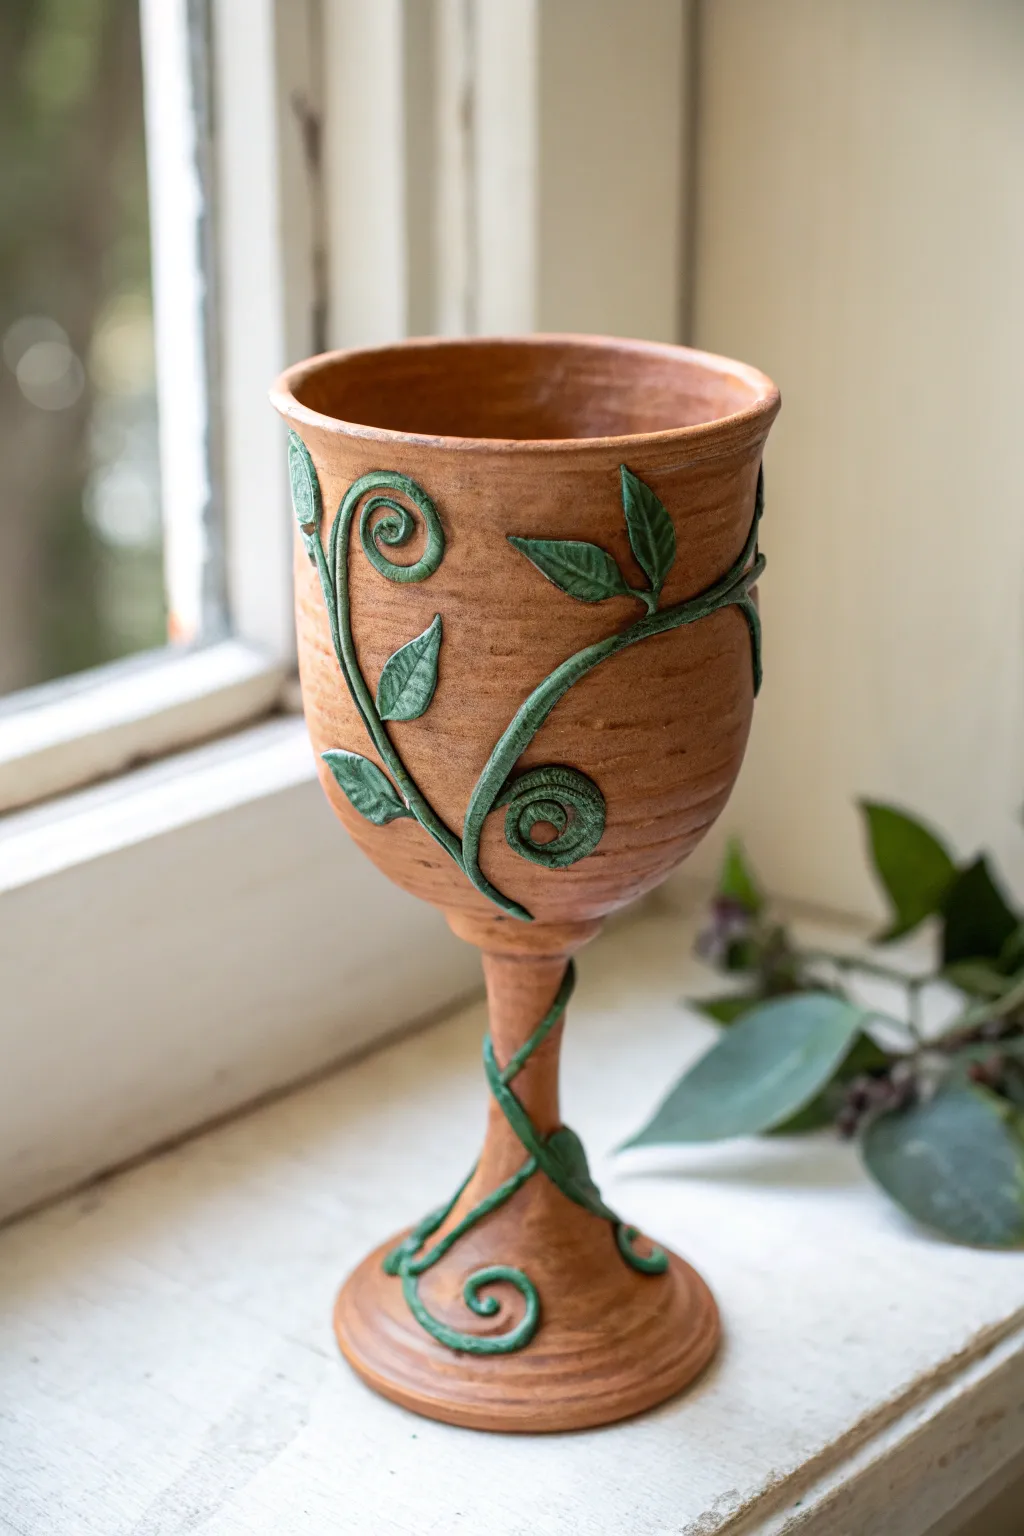
Bring a touch of nature to your table with this earthy, handmade goblet featuring raised vine and leaf details. The rustic terracotta color combined with the green sculpted foliage creates a beautiful, organic aesthetic perfect for Renaissance faire enthusiasts or nature lovers.
Step-by-Step Tutorial
Materials
- Terracotta-colored pottery clay (low-fire or stoneware)
- Green underglaze or colored clay slip
- Pottery wheel (or coil/slab building materials if hand-building)
- Needle tool
- Scoring rib or serrated tool
- Slip (clay slurry)
- Small paintbrush
- Sponge
- Wire cutter
- Clear matte or satin glaze
- Rolling pin (for the vines)
Step 1: Forming the Goblet Base
-
Center and open the clay:
Begin with a well-wedged ball of clay on the wheel. Center it firmly and open the vessel, leaving a thick enough floor to support the stem later. -
Throw the cup section:
Pull the walls up to create a deep, U-shaped cup. Flare the rim slightly outward for a comfortable drinking edge and ensure the walls are even. -
Form the stem:
You can throw the goblet in one piece by nurturing a thick column of clay at the base, or throw the cup and stem separately to join later. For this distinct shape, throwing them separately often gives more control. -
Shape the foot:
If throwing separately, create a sturdy, flared base for the stem. It needs to be wide enough to keep the potentially top-heavy goblet stable. -
Join the pieces:
Once both the cup and stem/base are leather-hard, score the connection points aggressively and apply slip. Press them firmly together, smoothing the seam so it is invisible.
Vine Variation Tip
Vary the thickness of your vine coils. Making the vine thicker at the base and tapering it thinner as it climbs the cup creates a much more realistic, organic growth look.
Step 2: Sculpting the Vines
-
Roll small coils:
Take a small amount of fresh clay and roll it into very thin, even coils on a flat surface. These will become your main vine stems. -
Map the path:
Lightly trace a curving path on the leather-hard goblet with a needle tool. I like to have the vine start at the base and wrap upwards around the cup. -
Attach the main vine:
Score along your traced line and apply a little slip. Gently press the thin coil onto the path, twisting it slightly to look organic rather than perfectly round. -
Create spiral terminals:
At the ends of your vines or branching points, curl the clay coil into a tight flat spiral. -
Add secondary branches:
Attach smaller, shorter coils branching off the main stem, ensuring they flow in the same growth direction.
Step 3: Adding Leaves and Detail
-
Shape the leaves:
Flatten tiny balls of clay into teardrop shapes. Pinch the ends to make them sharp and press them slightly to give them a natural curve. -
Attach the foliage:
Score and slip the spots where you want leaves—usually near the spirals or branching points. Press the leaves on securely. -
Add veining texture:
Using a needle tool or a small knife, gently impress a center vein and smaller side veins into each leaf carefully so you don’t flatten the sculpted form. -
Smooth the connections:
Use a damp paintbrush to clean up any excess slip around the vines and leaves, ensuring the transition from the relief to the goblet body is clean.
Cracking Adornments?
If vines crack away while drying, the goblet was likely too dry when you attached them. Wrap the finished piece tightly in plastic for 2 days to equalize moisture before unmasking.
Step 4: Finishing and Glazing
-
Bisque fire:
Allow the goblet to dry completely (bone dry) before firing it in the kiln to a bisque temperature. -
Apply green underglaze:
Carefully paint the raised vines and leaves with a dark green underglaze. Being precise here really makes the design pop against the bare clay. -
Wipe back (optional):
If you get green on the main cup, wipe it away with a damp sponge. You can also lightly wipe the leaves to let some clay color show through for an antique look. -
Clear glaze:
Dip or brush a clear matte or satin glaze over the entire piece, or just the interior (and lip) if you want the outside to remain raw and textured. -
Final firing:
Fire the piece again to the maturation temperature of your specific clay body and glaze.
This ornate goblet is now ready to hold your favorite beverage at your next feast or quiet evening in
Tentacle Stem Fantasy Goblet
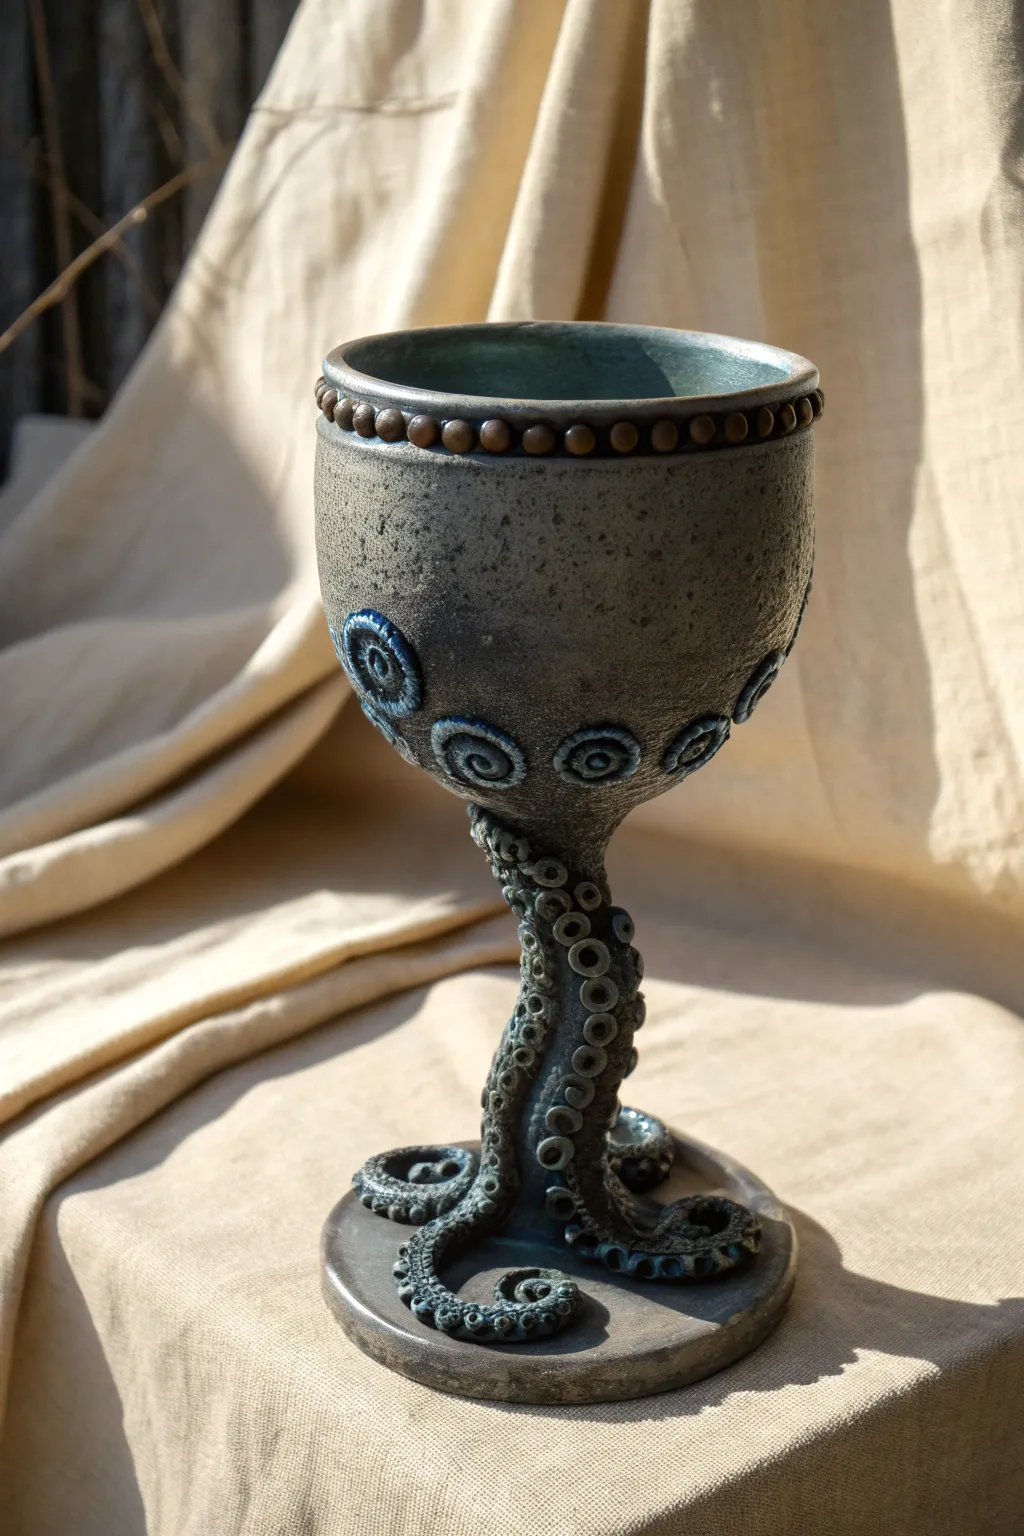
Summon the mysteries of the deep with this striking fantasy goblet, featuring a textured grey bowl supported by twisting, sucker-studded tentacles. The contrast between the organic, writhing stem and the structured bowl creates a captivating piece perfect for any sea-faring campaign or gothic collection.
Step-by-Step Guide
Materials
- Stoneware clay (grey or speckled)
- Pottery wheel (optional, can be hand-built)
- Rib tool
- Pin tool
- Sponge
- Slip and scoring tool
- Small loop tool or ball stylus (for suckers)
- Underglaze (dark teal or ocean blue)
- Clear glaze or matte finish glaze
- Kiln
Step 1: Forming the Foundations
-
Throw or Build the Bowl:
Begin by creating the cup portion. If throwing on a wheel, center about 1 lb of clay and pull a simple, deep U-shaped bowl. If hand-building, use coil techniques to build up the walls, smoothing them perfectly with a rib. -
Create the Base Disc:
Fashion a flat, thick disc of clay (about 0.5 inches thick) slightly wider than the bottom of your bowl. This will serve as the anchor for the tentacles. -
Refine the Rim:
While the bowl is leather hard, trim away excess weight. Roll a very thin coil of clay and attach it just below the lip using slip and score marks to create slight definition. -
Add the Beaded Rim:
Roll tiny spheres of clay, aiming for uniformity. Score the defined area below the rim and attach these beads in a tight row all the way around, pressing them gently to secure without flattening them.
Stem Collapse?
If the clay is too soft, the heavy bowl will crush the tentacles. Let the bowl and tentacles stiffen to a firm leather-hard state before assembly to ensure structural integrity.
Step 2: Sculpting the Tentacle Stem
-
Roll Tapered Coils:
Roll out 3 to 4 thick coils of clay that taper to a point at one end. These should be thick enough to support the weight of the bowl once dry. -
Arrange the Central Column:
Group the thicker ends of the coils together vertically to form the main stem pillar. Twist them slightly around each other to imply movement and strength. -
Attach to Base and Bowl:
Score and slip the top of the tentacle cluster heavily, then attach the bowl. Repeat for the bottom, attaching it to the base disc. Smooth the connection points thoroughly so no seams will crack open later. -
Shape the Ends:
Take the tapered, loose ends of the coils at the bottom and curl them artistically onto the base disc, allowing some to spill over the edge for a dynamic look. -
Add Texture:
Using a pin tool or small texturing brush, stipple the ‘skin’ of the tentacles slightly to differentiate the texture from the smooth bowl.
Abyssal Glow
Use a reactive glaze on the suckers that breaks over texture. A rutile blue or floating blue glaze can create stunning variations that look like bioluminescence.
Step 3: Detailing and Decoration
-
Create Sucker Discs:
Roll many small balls of clay. Flatten them slightly and attach them in rows along the twisting tentacles. -
Impress the Suckers:
Use a small ball tool or the end of a paintbrush to press an indentation into the center of each sucker disc. I find rotating the tool slightly as you press creates a cleaner edge. -
Sculpt Bowl Spirals:
Roll small, thin coils and curl them into flat spirals. Attach four to six of these evenly around the lower curve of the bowl using the slip and score method. -
Dry Slowly:
Cover the goblet loosely with plastic. Because the stem varies in thickness compared to the bowl, it needs to dry very slowly over several days to prevent warping. -
Bisque Fire:
Once bone dry, fire the piece to bisque temperature (usually cone 04/06 depending on your clay body).
Step 4: Glazing
-
Apply Underglaze:
Paint the spirals, the sucker centers, and the beaded rim with a dark teal or blue underglaze. Wipe away any excess that gets on the main body with a damp sponge. -
Wipe Back Technique:
If you want to highlight the texture, apply a wash of black or dark grey underglaze over the whole piece, then sponge it off, leaving the dark color only in the crevices and textures. -
Glaze Interior:
Pour a food-safe glossy glaze (like the dark teal seen inside the rim) into the bowl, swirl to coat, and pour out the excess. -
Final Glaze and Fire:
Apply a clear satin or matte glaze over the exterior to seal the clay while keeping the stony look. Fire to the maturity temperature of your clay (likely Cone 5/6).
Once fired, you’ll have a sturdy, sculptural vessel ready to hold your favorite drink during your next game night