If you’ve ever tried sculpting a hand in clay, you know it’s equal parts satisfying and slightly intimidating—in the best way. Here are my favorite clay hand sculpture ideas to help you practice anatomy, play with gesture, and sprinkle in a little surreal magic.
Realistic Open Palm Study
Capture the nuanced anatomy of the human hand with this realistic open palm study. This project focuses on balance, proportion, and the subtle textures of skin lines to create a striking, standalone sculpture.
Step-by-Step Tutorial
Materials
- Stoneware or earthenware clay (no grog or fine grog)
- Small wooden sculpting tools
- Pin tool or needle tool
- Loop tool for refining
- Sponge
- Water spray bottle
- Canvas board or banding wheel
- Reference photos of hands (or your own hand)
Step 1: Forming the Core Structure
-
Prepare the base:
Start with a solid cylinder of clay roughly the width of a wrist. Flatten the bottom firmly against your work surface so the sculpture will stand independently without wobbling. -
Shape the palm block:
Add a flattened, rectangular slab of clay to the top of the wrist cylinder to represent the palm. Blend the clay downwards into the wrist so there are no seams. -
Establish the thumb joint:
Attach a triangular wedge of clay to the side of the palm block for the thenar eminence (the fleshy muscle at the base of the thumb). -
Create finger coils:
Roll out four coils of clay for the fingers and one shorter, thicker coil for the thumb. Ensure they are slightly longer than needed to account for compression later. -
Attach the digits:
Score and slip the contact points, then firmly attach the four fingers to the top of the palm and the thumb to the side wedge. Smooth the connections thoroughly.
Step 2: Refining Anatomy
-
Define the knuckles:
Mark the location of the knuckles on each finger. Gently pinch the clay at these points to create subtle bulges, and press in slightly between them to suggest segments. -
Indicate finger length:
Trim the fingertips to get the heights correct—remember the middle finger is tallest, followed by the ring, index, and pinky. Round off the tips for a natural look. -
Carve the palm padding:
Add small pads of clay to the palm right below where the fingers join the hand. I find this really helps mimic the fleshy ‘mounts’ of the palm. -
Detail the thumb:
Bend the thumb slightly outward and define the knuckle. Ensure the base of the thumb connects smoothly into the heavy muscle of the palm. -
Smooth the back of the hand:
Turn the sculpture (or walk around it) to smooth the back of the hand. You can subtly suggest tendons leading from the wrist to the fingers using a modeling tool.
Use Yourself as Reference
Don’t guess the anatomy! Keep your own non-dominant hand posed next to the sculpture. Constantly checking your own proportions is the best way to spot errors.
Step 3: Texturing and Finishing
-
Carve the lifelines:
Using a sharp wooden tool or pin tool, carve the major lines of the palm: the heart line, head line, and life line. Keep the lines deeper in the center and tapered at the ends. -
Add secondary creases:
Lightly etch small, chaotic creases where the thumb meets the palm and at the wrist bend. Don’t make them too uniform; irregularity makes it look real. -
Refine the finger segments:
Carve the horizontal wrinkles on the inside of the fingers at the joints. Usually, there are two or three fine lines per joint. -
Texture the skin:
Create a subtle skin texture by lightly pressing a coarse sponge or even a piece of fabric against the surface, then softening it with a brush. -
Final smoothing:
Check the silhouette from all angles. Use a slightly damp sponge to soften any sharp carving marks, particularly around the palm lines, so they look like folds rather than cuts. -
Hollow the base:
Once the clay is leather hard, carefully hollow out the wrist from the bottom up to reduce weight and prevent cracking during firing.
Try a Hollow Build
Instead of solid sculpting, try building the hand using coil or slab techniques from the start. This makes the piece lighter and speeds up the drying process.
Allow the piece to dry slowly under plastic to ensure the fragile fingers don’t crack before firing


Peace Sign Gesture Hand
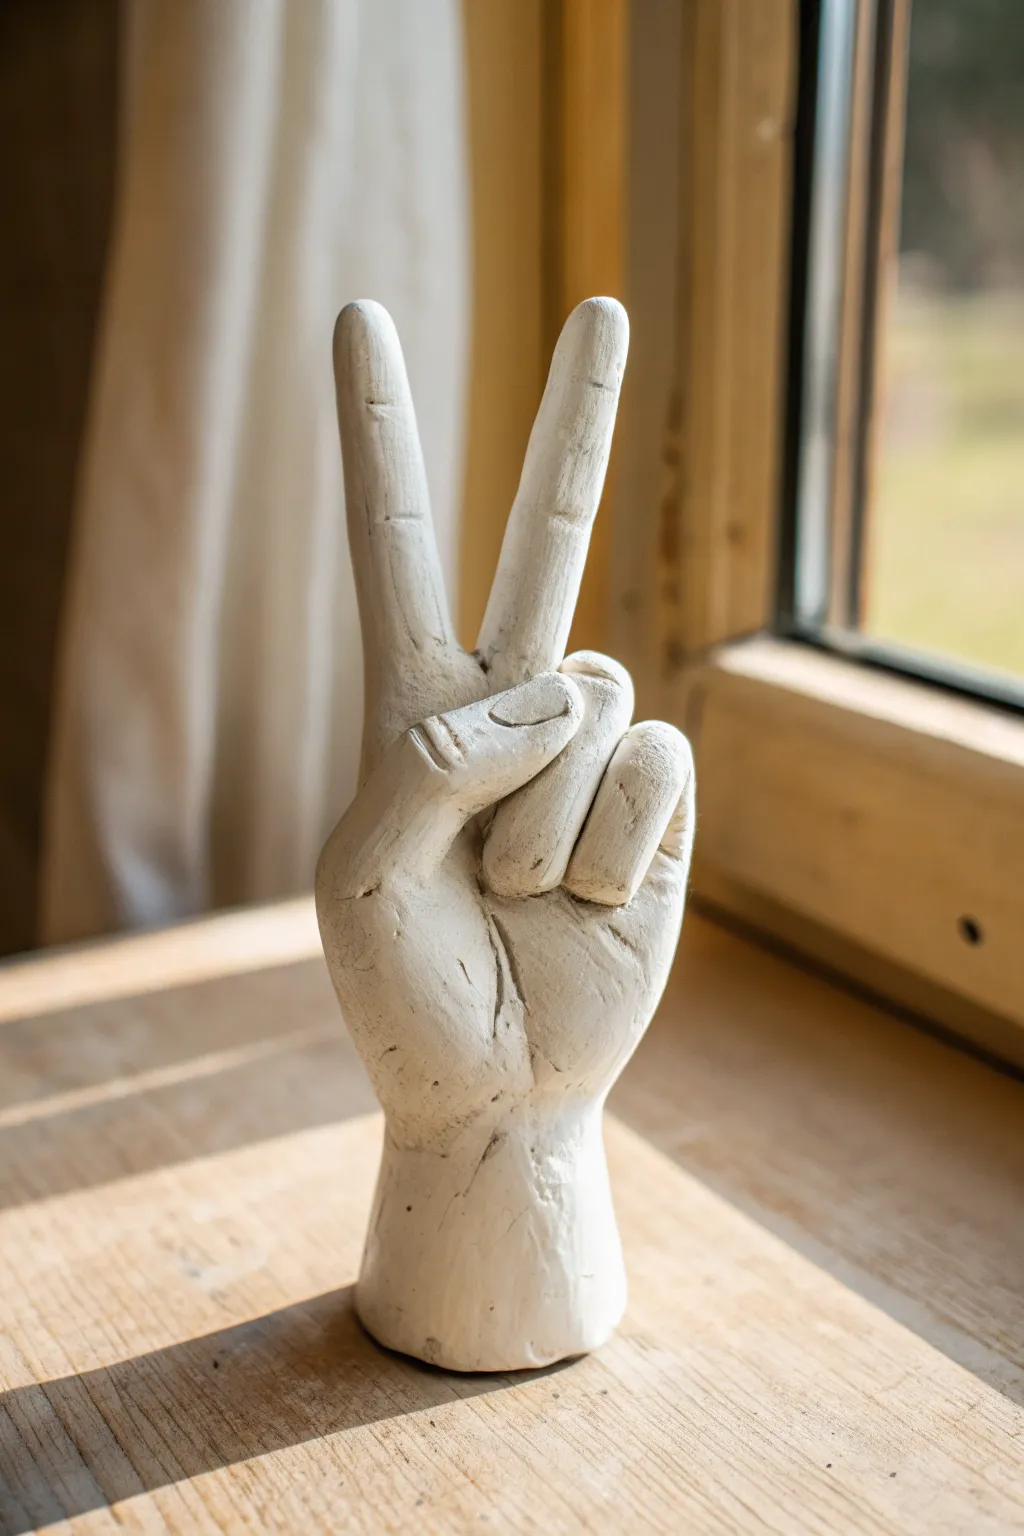
Capture a universal symbol of harmony with this rustic, handcrafted clay peace sign sculpture. The finished piece features a charmingly rough texture and a matte white finish that looks perfect on a sunlit windowsill or bookshelf.
Detailed Instructions
Materials
- Air-dry clay (white) or polymer clay
- Basic sculpting tools (loop tool, needle tool)
- Small rolling pin
- Wooden dowel or thick wire (for internal support)
- Aluminum foil
- Cup of water and sponge
- Fine-grit sandpaper
- Matte white acrylic paint (optional, if clay isn’t white)
- Clear matte varnish
Step 1: Building the Armature & Base
-
Prepare the core:
Begin by crumpling aluminum foil into a rough cylinder shape for the wrist and base. This saves clay and reduces drying time. -
Add finger supports:
Cut two pieces of wire or use thin wooden dowels for the index and middle fingers. Insert them securely into the top of your foil cylinder. -
Shape the palm foil:
Pack a bit more foil around the base of the wires to form the bulk of the palm, creating a solid foundation for the clay. -
Cover with clay:
Roll out a slab of white clay about 1/4 inch thick. Wrap it entirely around the foil base and wrist, smoothing the seams together with a bit of water.
Use Reference Photos
Take a photo of your own hand making the peace sign from different angles. Using a real-life reference helps immensely with proportions and knuckle placement.
Step 2: Sculpting the Hand
-
Form the extended fingers:
Take two coils of clay and slide them over the wire supports for the index and middle fingers. Squeeze and shape them so they taper slightly toward the tips. -
Blend the joins:
Use a modeling tool or your thumb to drag the clay from the fingers down into the palm, ensuring a seamless connection. I personally like to use a damp sponge here to smooth things out. -
Add the folded fingers:
Form two shorter sausages of clay for the ring and pinky fingers. Curl them inward so they rest against the palm. -
Position the thumb:
Create a thumb shape and attach it so it crosses over the folded ring and pinky fingers. This ‘locking’ gesture is key to a natural-looking peace sign. -
Detailing the fingernails:
Use a small loop tool or a spatula to lightly press indentation outlines for the fingernails on the extended fingers and the thumb. -
Adding skin folds:
Score horizontal lines across the knuckles and where the thumb bends. Don’t smooth these out perfectly; the texture adds realism.
Step 3: Refining and Finishing
-
Texturizing the surface:
Instead of polishing the clay perfectly smooth, leave some of your tool marks or add subtle scratches to mimic the plaster-like texture seen in the photo. -
Final shaping check:
Look at the sculpture from all sides. Ensure the V-shape is distinct and the wrist stands flat on the table. -
Drying time:
Allow the sculpture to dry completely. For air-dry clay of this thickness, this may take 48 to 72 hours. Rotate it occasionally so the bottom dries too. -
Sanding:
Once bone dry, use fine-grit sandpaper to knock off any sharp burrs or overly rough patches, but keep the overall organic feel. -
Painting (Optional):
If your clay isn’t bright white, apply two coats of matte white acrylic paint. -
Applying texture wash:
To enhance the details, dilute a tiny drop of grey paint in water and wash it over the cracks and knuckles, then wipe the surface clean immediately. -
Sealing:
Finish the piece with a coat of clear matte varnish to protect the surface without making it shiny.
Try a Stone Effect
Mix a small amount of sand or dried coffee grounds into your white paint before applying. This creates a gritty, faux-stone finish that looks ancient.
Place your completed sculpture near a window to let the natural light highlight the handmade textures


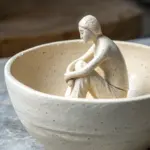
Cupped Hands Trinket Bowl
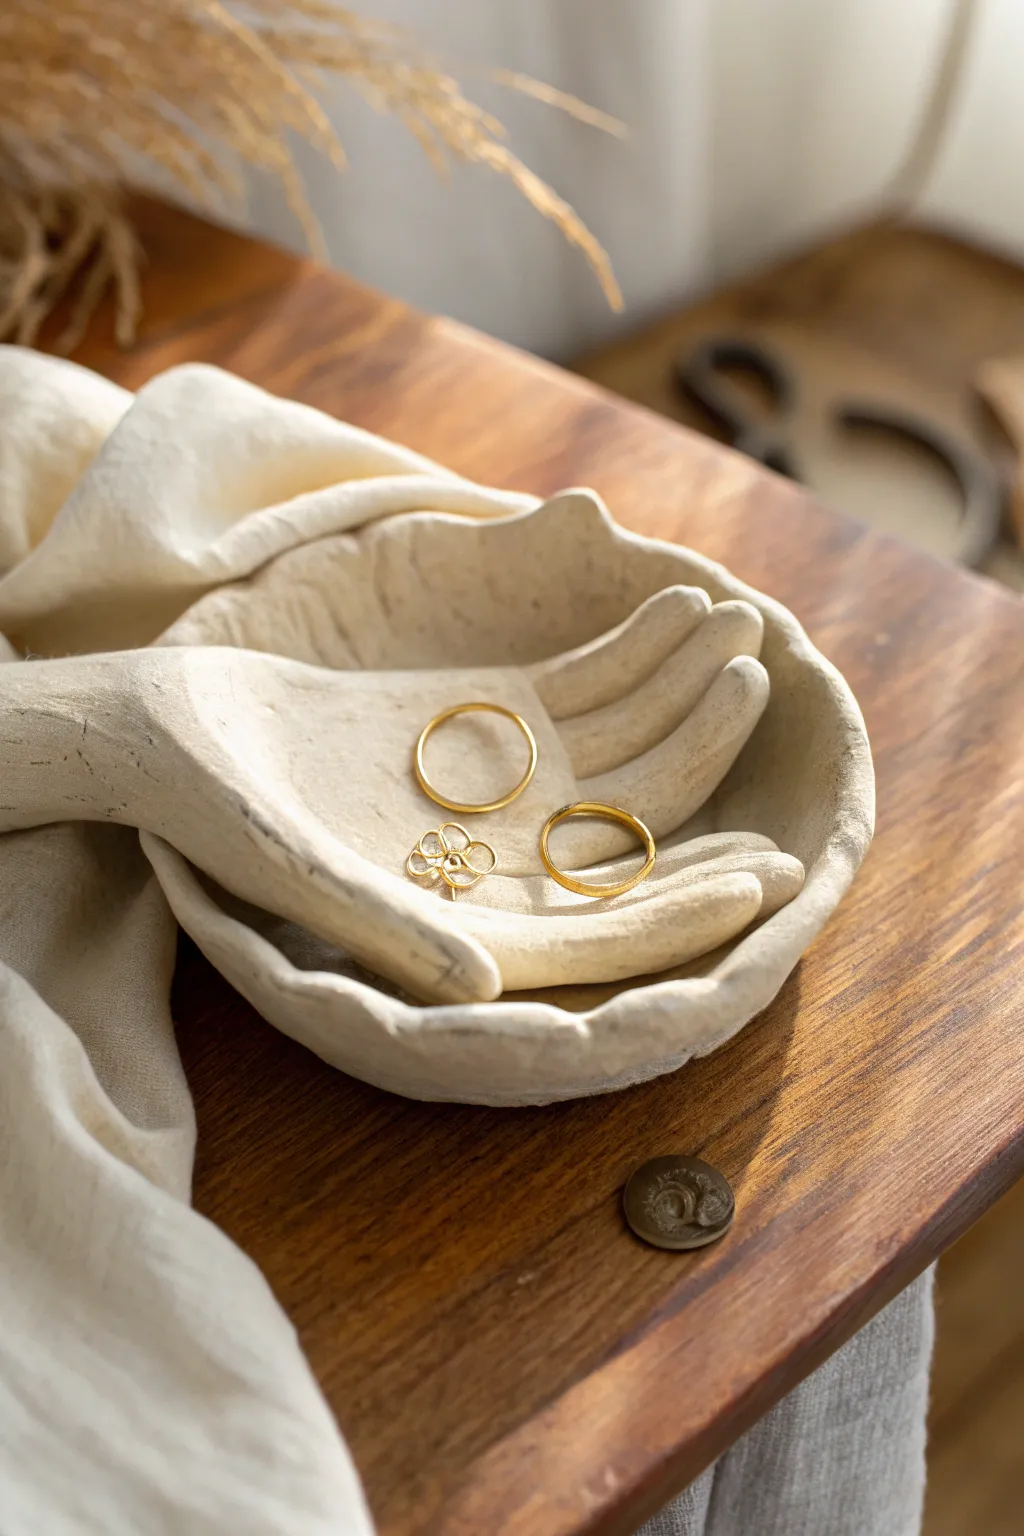
This tender sculpture captures the simple elegance of two hands cupped together, creating a safe harbor for your most treasured rings and trinkets. With its textured, matte cream finish, it brings a serene and artisanal touch to any vanity or bedside table.
How-To Guide
Materials
- Air-dry clay (white or cream)
- Small rolling pin
- Modeling tools (or a toothpick and spoon)
- Small bowl (for shaping)
- Parchment paper
- Cup of water
- Sponge
- Fine-grit sandpaper
- Acrylic paint (cream/off-white)
- Matte sealant/varnish
Step 1: Sculpting the Base Form
-
Prepare your clay:
Cut a substantial block of air-dry clay and knead it well to remove air bubbles. You want a smooth, pliable consistency before starting. -
Roll out a slab:
Roll the clay onto a sheet of parchment paper until it’s about 1/4 inch thick. It needs to be thick enough to support the fingers without drooping. -
Trace or freehand the shape:
Lightly sketch two hand shapes side-by-side on the clay slab. The pinky fingers should be touching or slightly overlapping to create the ‘cupped’ connection point. -
Cut the outline:
Use a knife tool to carefully cut out your double-hand shape. Smooth the raw edges immediately with a damp finger to remove any jagged bits.
Cracking Up?
Tiny cracks usually mean the clay dried unevenly or too fast. Mix a small amount of fresh clay with water to make a ‘slip’ paste, fill the cracks, smooth it over, and let it dry slowly again.
Step 2: Shaping and Refining
-
Establish the curve:
Gently lift your clay slab and drape it inside a small bowl lined with plastic wrap or parchment paper. This bowl acts as a mold to give the hands their deep, cupped curve. -
Define the fingers:
Use your fingers to gently curve the clay digits upward, mimicking the natural arch of relaxed fingers. Ensure the connection between the two hands at the pinky side is seamless and strong. -
Detail the palms:
With a damp sponge or your thumb, smooth the center ‘palm’ area. Press gently to deepen the center where the jewelry will eventually rest. -
Add gentle texture:
Instead of smoothing it perfectly, lightly dab the surface with a textured sponge or crumpled foil. The reference image has a lovely organic, slightly stony texture rather than a plastic-smooth finish. -
Refine the edges:
Check the fingertips and wrist area. Round off any sharp angles so the sculpture feels soft to the touch. -
Initial drying phase:
Let the piece sit in the bowl mold for at least 24 hours. Don’t rush this; removing it too early can cause the curve to flatten.
Make it Luxe
For a stunning contrast, paint just the rim of the bowl or the fingertips with metallic gold leaf paint after the cream base is dry. It adds a sophisticated pop to the neutral clay.
Step 3: Finishing Touches
-
Remove and flip:
Once the top feels leather-hard, carefully turn the piece over (removing the bowl) so the underside can dry completely. This usually takes another 24-48 hours. -
Sand for softness:
When bone dry, use fine-grit sandpaper to gently smooth any rough patches on the rim or underside, but maintain that organic surface texture you created earlier. -
Apply the base coat:
Mix a warm cream or off-white acrylic paint. Apply a thin, even coat over the entire sculpture, working it into the textures. -
Create depth (optional):
If I want it to look more like the photo, I dilute a slightly darker beige paint with water and brush it on, then immediately wipe it back with a rag. This leaves color in the crevices. -
Seal the piece:
Finish with a matte varnish or sealant. This protects the clay from moisture and jewelry scratches without making it look glossy or artificial.
Place your finished sculpture in a spot with soft light and enjoy the simple beauty of your handmade creation
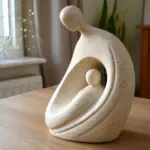


Hand Ring Holder Stand
This elegant ring holder mimics the look of high-end speckled ceramics with a sculpted hand mounted on a sturdy base. It serves as both a functional jewelry organizer and a stunning piece of sculptural decor for your vanity.
Detailed Instructions
Materials
- White air-dry clay or polymer clay
- Wire armature thick gauge (aluminum works well)
- Wire cutters and pliers
- Rolling pin
- Clay sculpting tools (needle tool, smoothing tool)
- Speckled tan or brown acrylic paint (for faux finish)
- Beige/Cream acrylic paint
- Old toothbrush or stiff bristle brush
- Clear gloss or satin varnish
- Sandpaper (fine grit)
- Small bowl or circle cutter (for the base)
- Water (for smoothing)
Step 1: Forming the Armature
-
Create the wire skeleton:
Cut five lengths of wire for the fingers and one thicker piece for the wrist and arm. Twist the bottom ends of the finger wires together with the arm wire to create a basic hand shape. -
Secure firmly:
Ensure the twisted wrist area is tight so the fingers don’t wiggle loosely later. Leave a length of wire extending from the bottom to anchor into the base. -
Curve the fingers:
Before adding clay, gently pose the wire fingers into a natural, slightly open grasping position similar to the photo.
Step 2: Sculpting the Hand
-
Bulk out the form:
Roll small snakes of clay and wrap them around each wire finger. Use a larger lump of clay to cover the palm and wrist area. -
Blend the seams:
Using a smoothing tool or your finger dipped slightly in water, blend the clay snakes together until the seams disappear and the skin looks continuous. -
Refine the fingers:
Shape the individual fingers, tapering them slightly at the ends. I find it helpful to look at my own hand for reference on proportion and knuckle placement. -
Detailing the nails:
Use a small crafting spatula or needle tool to gently press in the outline of fingernails at the tip of each finger. -
Create the wrist column:
Smooth the clay down the wrist to create a cylindrical column base for the hand, ensuring it is thick enough to support the weight.
Cracking at joints?
If cracks appear at the wrist while drying, fill them immediately with a slurry of clay and water (slip), then smooth over.
Step 3: Creating the Base
-
Cut the base:
Roll out a slab of clay to about 1/4 inch thickness. Use a circle cutter or trace around a bowl to cut a perfect circle for the stand’s tray. -
Shape the rim:
Gently curve the edges of the circle upward to create a slight lip, turning it into a shallow dish. -
Connect the components:
Insert the exposed wire from your hand sculpture into the center of the base. Press the clay of the wrist firmly onto the base. -
Reinforce the joint:
Roll a thin coil of clay and wrap it around the seam where the wrist meets the base. Blend it smoothly upwards and downwards to secure the bond.
Level Up: Real Stone Look
Mix actual dried coffee grounds or cracked pepper into your clay before sculpting to create authentic texture inside the material itself.
Step 4: Finishing and Faux Glaze
-
Dry completely:
Allow the sculpture to dry fully according to your clay manufacturer’s instructions. This usually takes 24-48 hours for air-dry clay. -
Sand for smoothness:
Once dry, gently sand any rough fingerprints or bumps using fine-grit sandpaper until the surface feels like smooth bisqueware. -
Base coat:
Paint the entire sculpture with a creamy beige or off-white acrylic paint. Apply two coats for opacity. -
Create the speckles:
Dilute a small amount of tan or brown paint with water. Dip an old toothbrush into it and flick the bristles with your thumb to spray fine speckles over the hand. -
Seal the piece:
Finish with a coat of high-gloss or satin varnish. This mimics the look of fired ceramic glaze and protects your rings from scratching the paint.
Now you have a chic, modern display to keep your favorite rings safe and accessible

The Complete Guide to Pottery Troubleshooting
Uncover the most common ceramic mistakes—from cracking clay to failed glazes—and learn how to fix them fast.
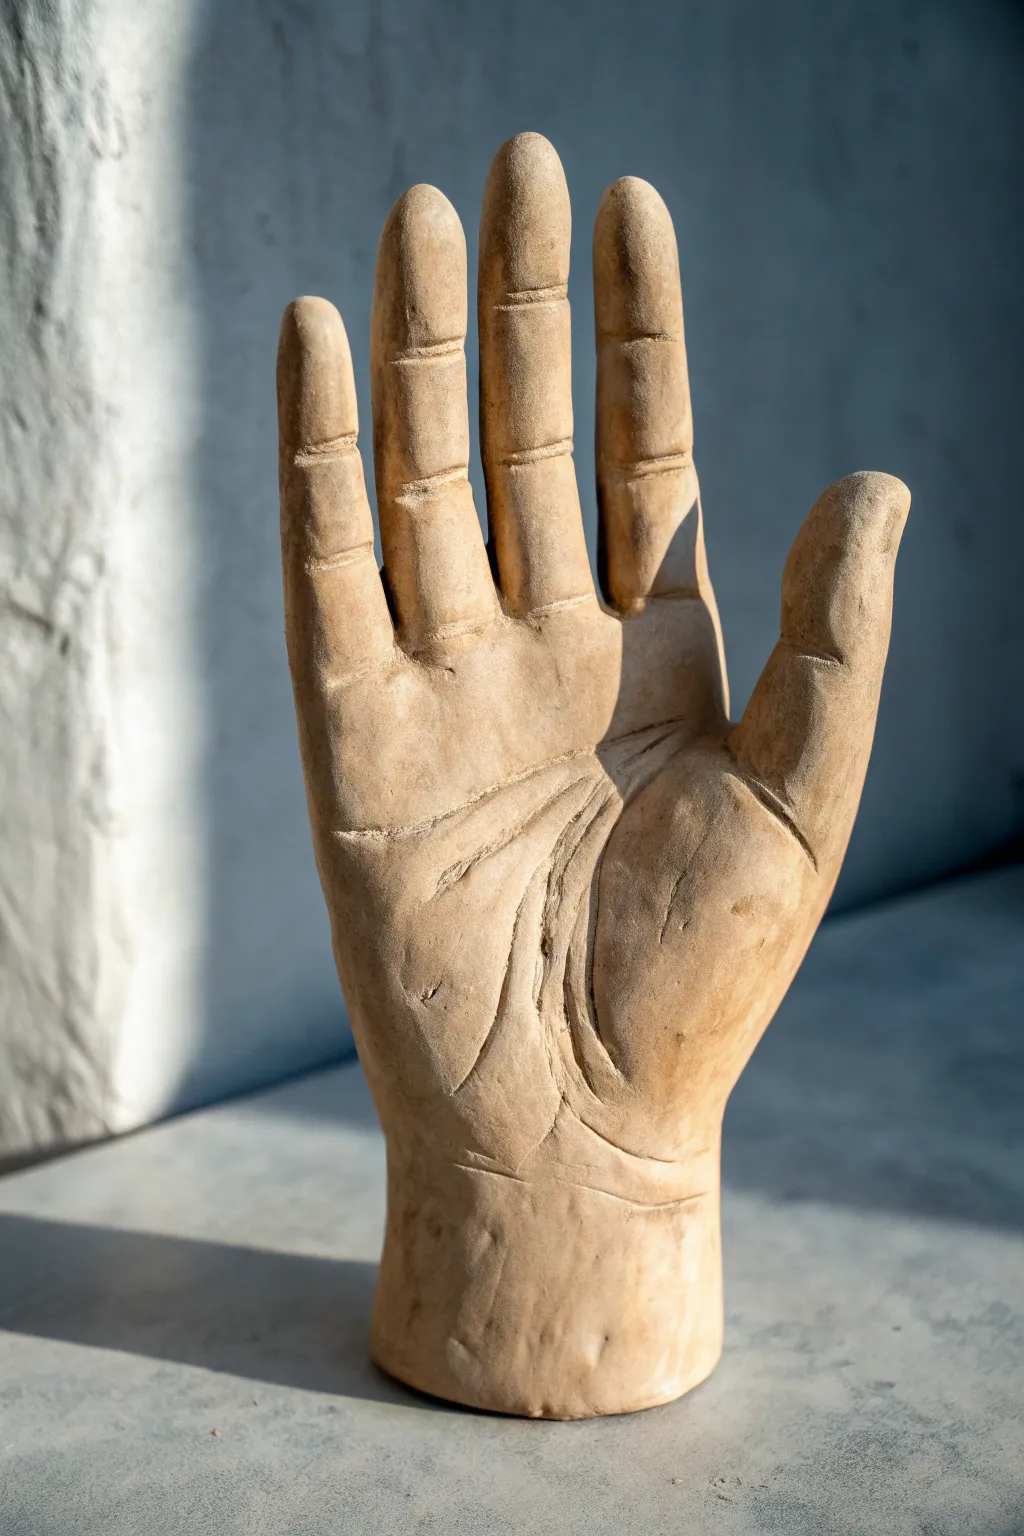
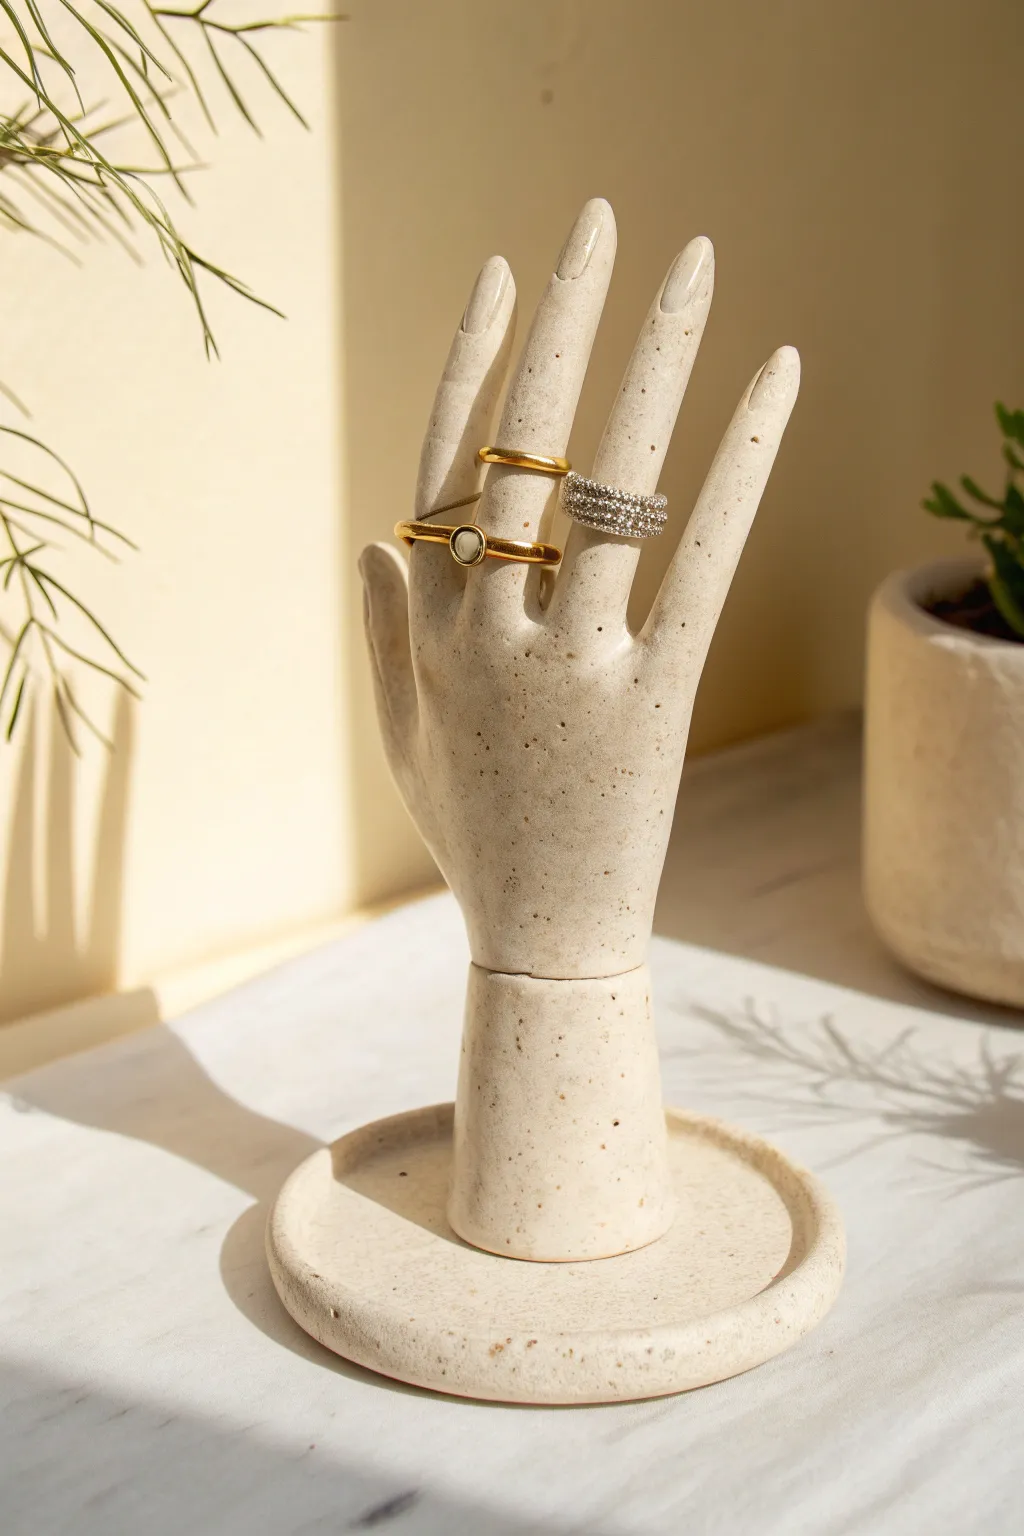
Hand Holding a Small Sphere
This elegant sculpture features a gently cupped hand cradling a smooth sphere, rendered in a textured, stone-like finish that catches the light beautifully. It serves as striking minimalist decor or a thoughtful ring holder for a vanity.
How-To Guide
Materials
- Stone-effect air-dry clay (or sandy-colored polymer clay)
- Small polystyrene ball (optional core)
- Basic sculpting tools (needle tool, loop tool)
- Smoothing sponge
- Water slip (clay mixed with water)
- Wooden board or work mat
- Aluminum foil
- Wire armature (optional for stronger fingers)
- Fine grit sandpaper
Step 1: Forming the Base Structure
-
Prepare the Clay:
Begin by conditioning your clay. If using air-dry clay, knead it thoroughly to remove air bubbles. You want a consistency that is pliable but firm enough to hold its own weight. -
Shape the Palm:
Roll a large ball of clay roughly the size of a tangerine. Flatten it slightly into a thick oval shape to form the main body of the palm. -
Draft the Fingers:
Using a knife or wire cutter, mark the positions for four fingers and a thumb on your oval. It helps to look at your own hand as a reference for proportion. -
Extrude the Digits:
Pull the clay out from the palm to form rough cylinders for the fingers. Alternatively, roll four coils and attach them firmly to the palm using scoring and slip to ensure a seamless bond.
Fixing Cracks
If hairline cracks appear while drying, mix a tiny amount of clay with water into a thick paste (slip) and fill the cracks. Smooth over with a damp finger immediately.
Step 2: Detailing and Shaping
-
Position the Hand:
Gently curve the palm and fingers upward to create a ‘cup’ shape. To keep this shape while working, rest the back of the clay hand on a crumpled ball of aluminum foil or a small bowl. -
Refine Finger Shapes:
Smooth out the cylinders. Fingers aren’t perfect tubes; vary the thickness slightly at the joints (knuckles) to make them look organic. -
Add Knuckle Details:
Use a needle tool or a small knife to carve shallow horizontal lines across the fingers where the joints would bend. Keep these lines somewhat raw to match the stone aesthetic. -
Sculpt the Thumb:
Attached the thumb lower on the side of the palm. Angle it outwards and upwards, ensuring the muscle at the base of the thumb (the thenar eminence) is fleshy and rounded. -
Create the Nail Beds:
Press a small loop tool or the back of a spoon gently into the tips of the fingers to suggest fingernails without carving them too sharply. -
Check the Curve:
Place your sphere (or a temporary ball of foil) into the palm to test the fit. Adjust the fingers so they gently cradle the object without gripping it too tightly.
Step 3: Creating the Sphere
-
Roll the Orb:
Take a separate piece of clay and roll it between your palms. Use the table surface for final rolling to ensure it is perfectly spherical. -
Texture the Surface:
If you want the pitted texture seen in the photo, gently tap the surface of the sphere (and the hand) with a stiff-bristled toothbrush or a crumpled ball of foil. -
Positioning:
You can choose to adhere the sphere permanently with slip now, or leave it separate so the hand can hold different objects later. I prefer to leave it loose for versatility.
Make it Functional
Make the sphere removable and hollow out the center. It creates a secret hiding spot for a ring or small keepsake while maintaining the sculpture’s look.
Step 4: Finishing Touches
-
Smooth Transition Areas:
Dip a sponge in water and gently wipe down the entire sculpture. This blends any harsh tool marks and enhances the stone-like quality. -
Final Texturing:
Before the clay dries, check for any areas that look too ‘plastic.’ Use a dry brush to stipple typical skin texture or stone grit across the back of the hand. -
Drying Process:
Let the sculpture dry slowly away from direct heat to prevent cracking. If using air-dry clay, turn it occasionally so the bottom dries evenly. -
Sanding:
Once bone dry, take fine-grit sandpaper to any sharp edges, particularly around the fingertips or the base, to soften the look.
Place your finished sculpture near a window where shadows can play across the textured surface
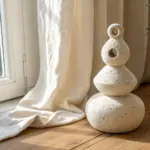
Interlaced Fingers Mini Sculpture
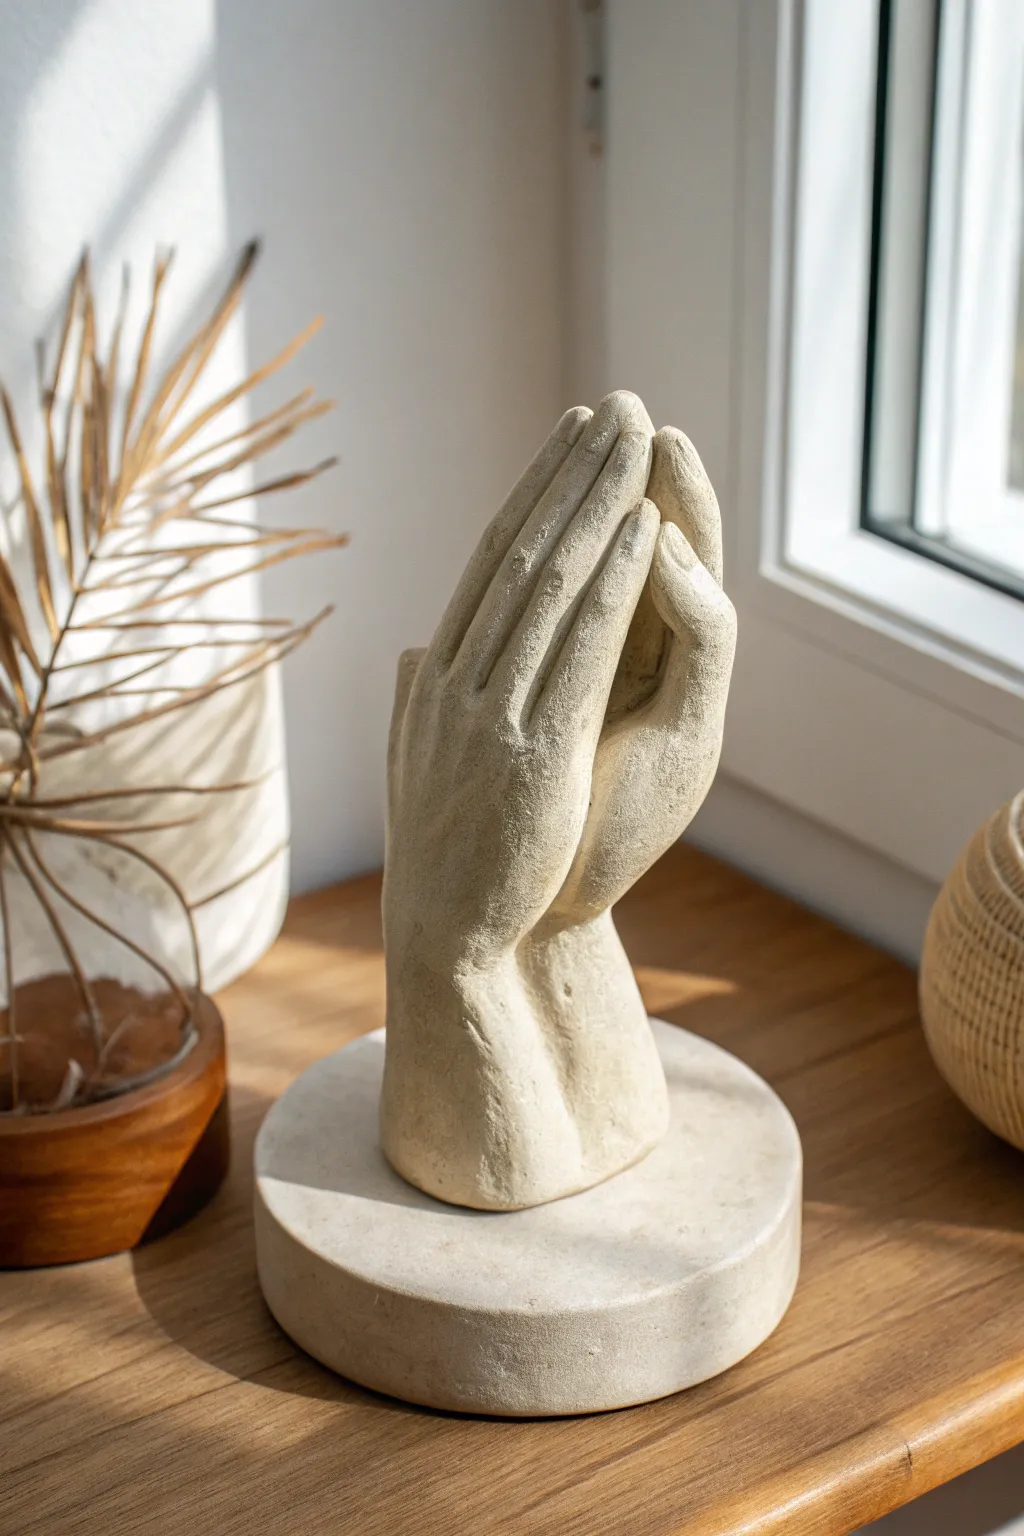
Capture a moment of serenity with this elegant sculpture featuring two hands gently clasped together in a vertical prayer position. With its textured, stone-like finish and sturdy circular base, this piece makes a peaceful addition to any modern bookshelf or windowsill.
How-To Guide
Materials
- Air-dry clay (stone or grey color preferred)
- Circular wooden base or heavy cardboard disc (approx. 5-6 inches)
- Aluminum foil
- Masking tape
- Sculpting heavy wire or armature wire
- Basic clay tools (knife, needle tool, smoothing sponge)
- Water in a small cup
- Slip (clay mixed with water)
- Rolling pin
- Texturing tool (stiff bristle brush or toothbrush)
Step 1: Building the Armature
-
Form the core:
Begin by crumpling aluminum foil into an elongated oval shape that roughly resembles the negative space between two cupped hands. This will save clay and keep the sculpture light. -
Create the wrist support:
Twist two lengths of heavy wire together and insert them vertically into your foil core, leaving a few inches sticking out the bottom to anchor into your base later. -
Shape the fingers:
Cut five shorter pieces of wire for each hand (ten total). Tape these securely to the top of your foil core, bending them slightly inward to mimic the curve of fingers meeting at the tips. -
Anchor to the base:
Attach your vertical wire support to the center of your circular base. If using wood, drill a hole and glue the wire in; if using cardboard, tape it heavily to ensure it stands upright without wobbling.
Cracking at the joints?
If fingers crack at the base while drying, mix a thick paste of clay and vinegar (instead of water). Fill the cracks with this ‘magic mud’ and smooth over; it bonds stronger than water slip.
Step 2: Rough Sculpting
-
Cover the base:
Roll out a slab of clay about 1/4 inch thick. Lay this over your circular base, smoothing the edges down to create a clean, stone-plinth look. I like to texture this early so I don’t smudge it later. -
Bulk out the wrists:
Taking large chunks of clay, begin packing them around the bottom wire support to form the two wrists rising from the base. Use slip to join the clay securely to the foundation. -
Form the palms:
Add flattened patties of clay to the sides of the foil core to build up the palms. Smooth the seams where the palms meet the wrists to create a continuous flow. -
Wrap the fingers:
Roll ten small coils of clay. Carefully wrap or sandwich each finger wire with clay, blending it down into the palm area. Don’t worry about perfect details yet; just get the basic volume established.
Pro Tip: Realistic Anatomy
Look at your own hands in a mirror while sculpting! Observing how the skin folds at the thumb webbing and how knuckles align will instantly make your sculpture look more professional.
Step 3: Refining and Detailing
-
Interlace and position:
While the clay is still pliable, press the fingers together. Ensure the thumbs are positioned on the side facing the viewer (or as desired) and the fingers of one hand rest gently against the back of the other in a natural prayer pose. -
Define the knuckles:
Add tiny balls of clay to the finger joints and blend them in to create the subtle protrusion of knuckles. Remember that the middle finger is the longest and the pinky the shortest. -
Sculpt fingernails:
Use a specialized small loop tool or the tip of a knife to outline the nail beds. Press gently to create the cuticle area, keeping the nails short and neutral. -
Refine the tendons:
On the back of the hands, use a modeling tool to carve shallow valleys between the metacarpal bones, suggesting the tendons under the skin. -
Smooth the wrists:
Check the transition from the hands to the circular base. Add a little extra clay here if needed to make the hands look like they are emerging solidly from the stone, rather than just floating.
Step 4: Finishing Touches
-
Add stone texture:
To achieve the aged stone look from the image, take a stiff-bristled brush or an old toothbrush and firmly stipple the entire surface of the damp clay. This removes the ‘plastic’ look of smooth clay. -
Soften the texture:
Lightly pat the textured areas with a barely damp sponge. This knocks down any sharp clay crumbs but leaves the beautiful pitted surface intact. -
Check symmetry:
Rotate your sculpture slowly. Ensure the hands look balanced from all angles and that the prayer peak is centered over the base. -
Slow drying:
Loosely cover the sculpture with a plastic bag for the first 24 hours to prevent cracking. After that, remove the bag and let it air dry completely, which may take several days depending on thickness.
Place your finished sculpture in a spot with natural light to highlight the beautiful stone texturing you created


What Really Happens Inside the Kiln
Learn how time and temperature work together inside the kiln to transform clay into durable ceramic.
Clasped Hands Pair Sculpture
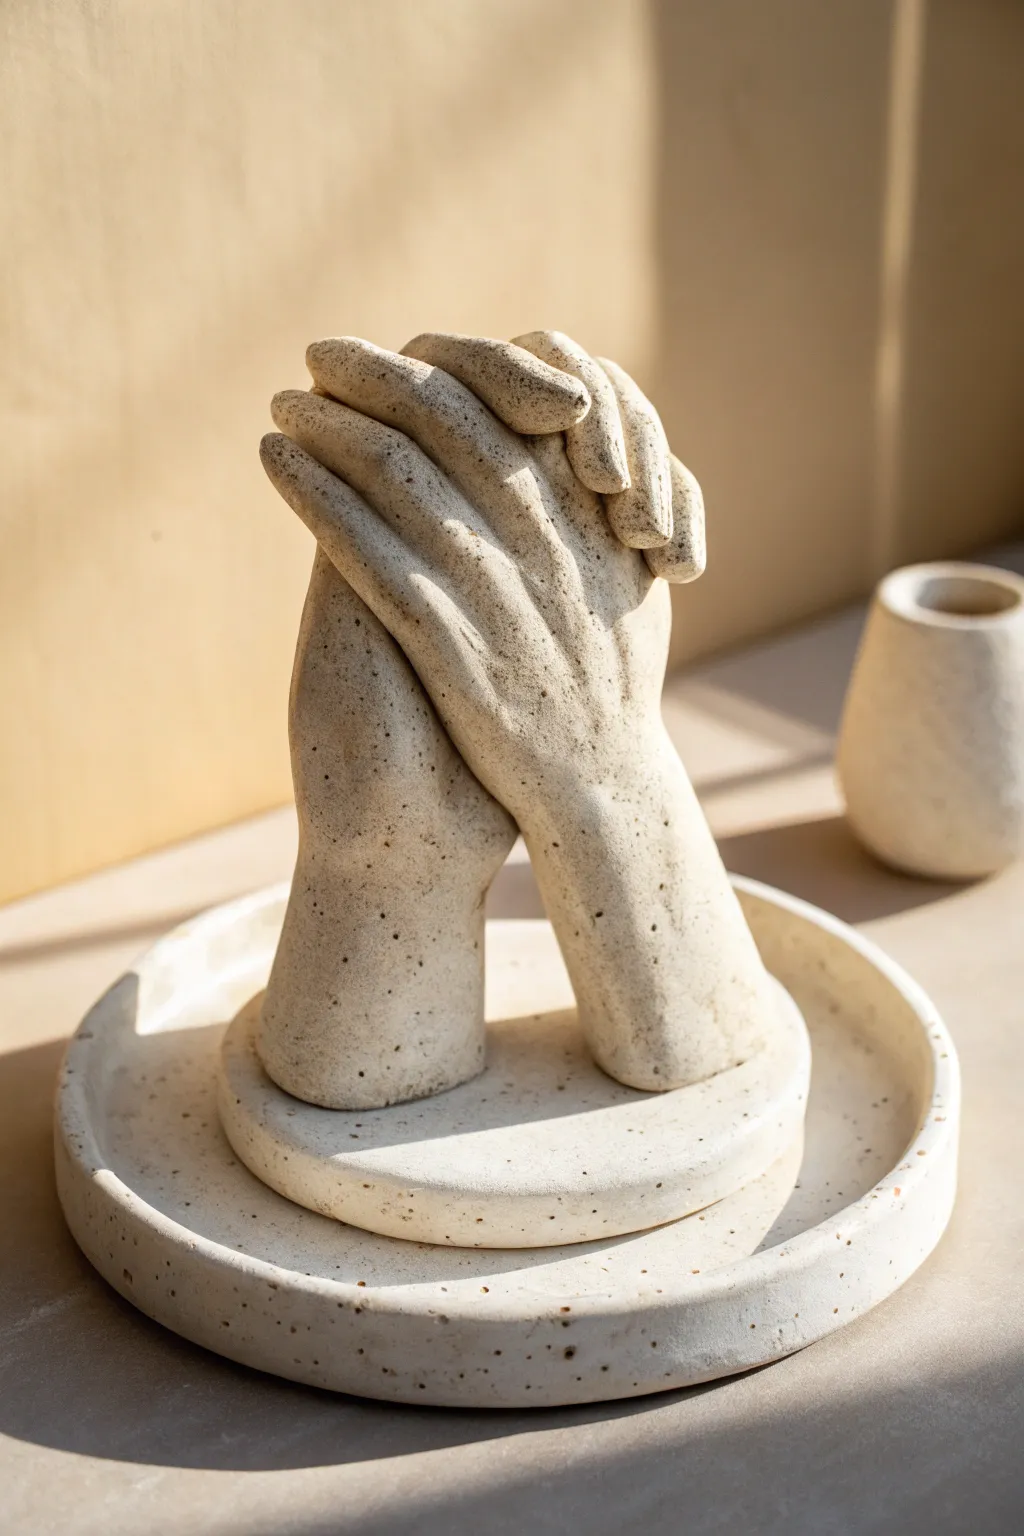
This elegant sculpture captures the quiet intimacy of two hands clasped together, rendered in a beautiful speckled clay that mimics natural stone. The textured finish and organic forms create a soothing, minimalist piece perfect for displaying on a console or shelf.
Step-by-Step Guide
Materials
- Speckled stoneware clay (or air-dry clay with added sand/speckles)
- Clay carving tools (loop tool, needle tool)
- Kidney scraper (smooth rib)
- Sponge
- Water
- Rolling pin
- Knife or cutting wire
- Slip (clay slurry for joining)
- Two circular cookie cutters or templates (different sizes)
Step 1: Forming the Base Structure
-
Roll the base slabs:
Begin by rolling out a thick slab of clay, roughly 1/2 inch thick of even consistency. Use your larger circular cutter or template to cut out the bottom tray, and the smaller one for the raised dais the hands will rest on. -
Shape the tray lip:
For the bottom tray, gently pull up the edges of the circle to create a shallow rim. Smooth the edge with a damp sponge to remove any sharpness, giving it that soft, organic look seen in the photo. -
Prepare the wrist columns:
Roll two thick cylinders of clay, approximately the width of a wrist. These need to be substantial enough to support the weight of the hand structure above. Flatten the bottoms so they stand vertically. -
Rough out the palms:
At the top of each cylinder, flatten and flare the clay slightly to form the basic wedge shape of a palm. Don’t worry about fingers yet; focus on getting the volume and angle correct so the two palms can face each other.
Step 2: Sculpting the Hands
-
Merge the forms:
Score and slip the contact points where the two wrist columns will touch or lean against each other. Press them together firmly to ensure structural integrity before adding detailed features. -
Block out the fingers:
Add slabs of clay to the top of the palm wedges to represent the fingers. Instead of individual sausages, I find it easier to attach a solid block first and carve the separation later, or attach thick strips for the main finger masses. -
Interlace the grip:
Position the clay strips so the fingers of one hand wrap over the back of the other. The image shows the upper hand’s fingers curling over the knuckles of the lower hand. Model this overlap carefully. -
Define the thumbs:
Add small clay coils to represent the thumbs tucked along the side. In this pose, the thumbs are subtle, resting flush against the side of the index fingers. -
Refine the finger shapes:
Use a modeling tool to round off the tops of the fingers and distinct knuckles. Defined fingernails aren’t necessary for this rustic style; just suggest the shape of the nail bed with gentle pressure. -
Smooth the wrists:
Blend the clay from the palms down into the wrist columns. Ensure there is a seamless transition, mimicking the natural anatomy of the forearm.
Anatomy Hack
Take a photo of your own hands clasped in this position from multiple angles. Using a real-life reference is far better than guessing how knuckles bend.
Step 3: Assembly and Finishing
-
Attach to the dais:
Score and slip the bottom of your wrist columns and the center of the smaller circular base. Press the sculpture firmly onto this raised platform. -
Secure the dais to the tray:
Now attach the smaller base (with the hands) onto the center of the larger tray. This double-layer base adds height and framing to the piece. -
Add surface texture:
If your clay isn’t naturally speckled, you can gently press coarse sand or grog into the surface now. Use a slightly damp sponge to wipe away tool marks, leaving a matte, stone-like finish. -
Check angles:
Rotate the sculpture and look from all sides. Ensure the hands look clasped tight and not floating apart. Fill any unintended gaps with small bits of soft clay. -
Final smoothing:
Run a soft kidney rib or a chamois over the entire piece to compress the clay surface. This removes fingerprints and unifies the texture. -
Slow drying:
Loosely cover the sculpture with plastic to let it dry very slowly. This is crucial for hand sculptures, as fingers dry much faster than wrists and can crack.
Use it as a Vase
Hollow out the space between the palms before sealing them up to create a small opening at the top, perfect for holding dried flower stems.
Once fired or fully cured, display your sculpture in nice lighting to highlight the beautiful interlaced forms
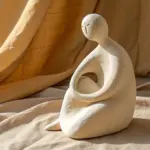
Minimal Smooth Stylized Hand
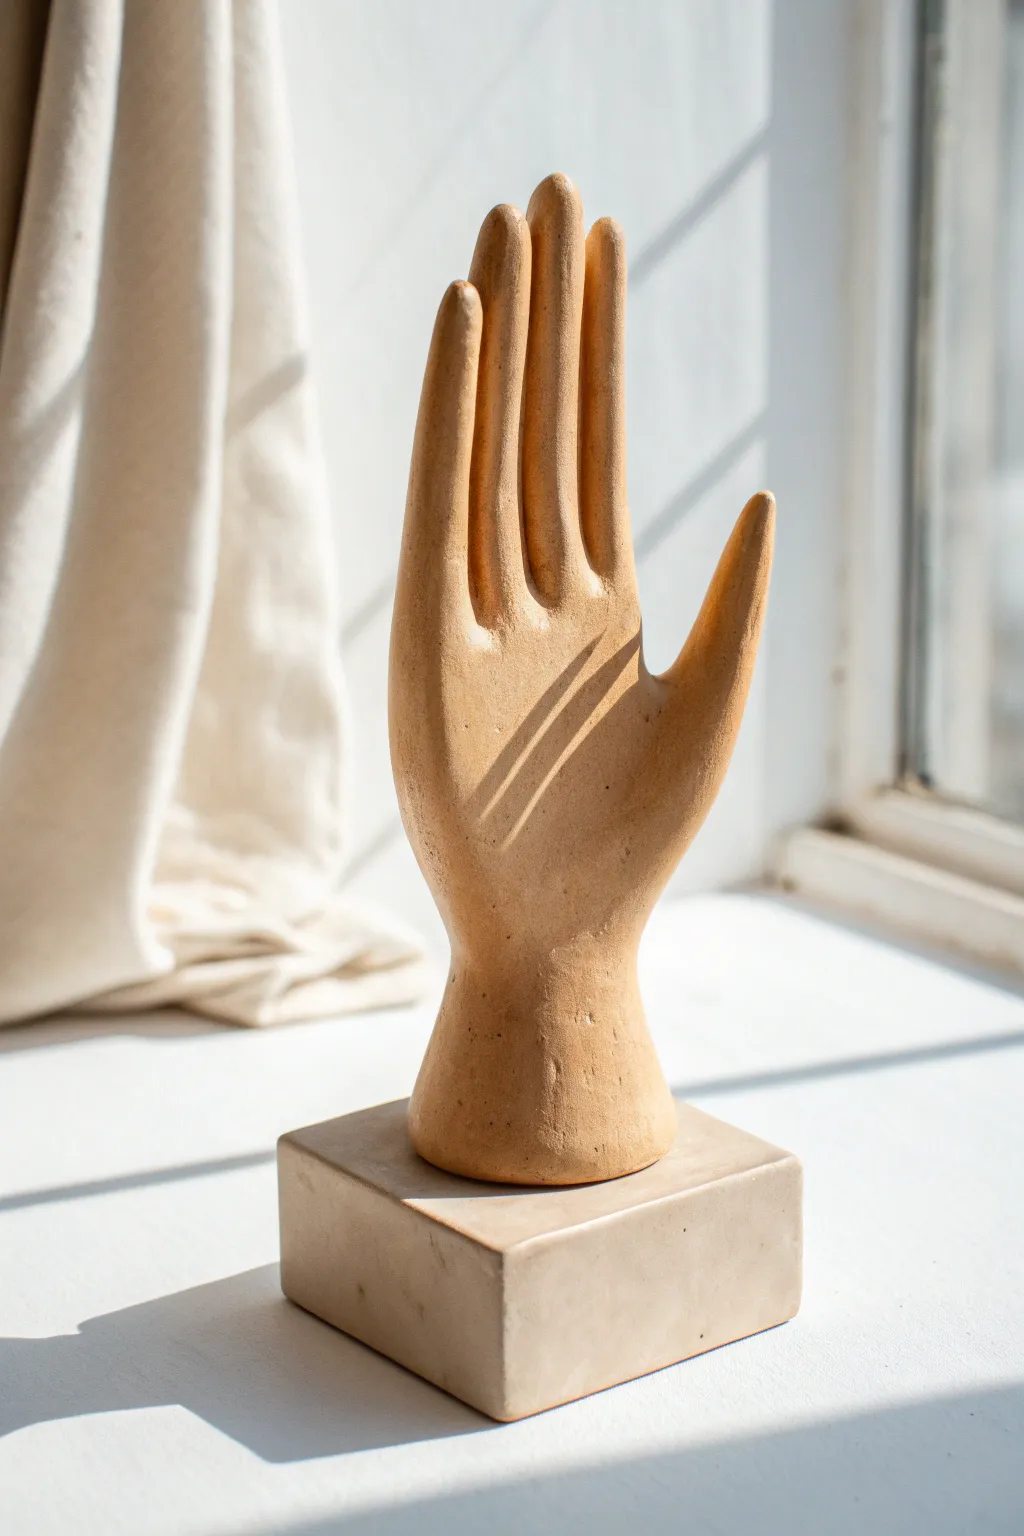
Capture the elegance of mid-century design with this smooth, stylized hand sculpture mounted on a simple block base. The piece features elongated fingers and a warm, matte finish that brings a serene, artistic touch to any shelf or windowsill.
Step-by-Step Guide
Materials
- Warm-toned stoneware clay or terracotta air-dry clay
- Square wooden block or pre-made concrete cube for the base
- Rolling pin
- Needle tool or fettling knife
- Slip and score tool
- Sponge
- Modeling tools (wooden or metal)
- Strong epoxy glue
- Fine-grit sandpaper
- Clear matte varnish (optional)
Step 1: Prepping the Base Form
-
Roll a Coil:
Begin by rolling a thick, sturdy cylinder of clay about 1.5 inches in diameter for the wrist and palm area. Smooth it out so it stands upright securely. -
Flatten the Palm:
Gently press the upper two-thirds of the cylinder to flatten it, creating the basic shovel shape of the palm while keeping the wrist rounded and substantial. -
Shape the Wrist Flare:
Use your thumbs to gently flare the bottom of the wrist slightly outward. This creates a more organic transition where it will eventually meet the base.
Use a Dummy Base
While sculpting, build the hand on a small piece of cardboard or wood that you can rotate. This keeps you from touching the wet clay constantly and warping the shape.
Step 2: Sculpting the Fingers
-
Outline the Fingers:
Using your needle tool, lightly sketch vertical lines on the flattened palm to mark the widths of the four fingers. Remember to keep them slender and elongated for that stylized look. -
Separate the Digits:
Cut along your sketched lines to separate the clay. Remove the excess clay triangles between the fingers to create space, but don’t worry about perfect smoothness yet. -
Add the Thumb:
Create a separate, tapered coil for the thumb. Score the side of the palm and the base of the thumb, add slip, and firmly attach it, angling it outward expressively. -
Elongate and Refine:
Gently pull and roll each individual finger to lengthen them. I find that wetting my fingertips slightly helps glide over the clay without creating drag marks. -
Round the Tips:
Smooth the tips of the fingers into soft, rounded points. Avoid sharp angles; the goal is a fluid, continuous line.
Try a Stone Effect
Mix dried coffee grounds or fine grit into your air-dry clay before sculpting. When you sand the finished piece, it will reveal a beautiful speckled, granite-like texture.
Step 3: Smoothing and Finishing
-
Blend Connections:
Use a wooden modeling tool to seamlessly blend the thumb joint into the palm until the seam is invisible. -
Refine the Surface:
Take a slightly damp sponge and wipe down the entire hand. This removes fingerprints and softens any harsh cuts made earlier. -
Check the Silhouette:
Rotate the sculpture and look at it from all angles. Ensure the fingers have a gentle, natural curve backward or forward rather than being perfectly straight and stiff. -
Let it Dry:
Allow the clay to dry completely according to your material’s instructions. If using kiln-fire clay, fire it to bisque now. -
Sand for Smoothness:
Once dry (or fired), use fine-grit sandpaper to gently buff the surface. This is crucial for achieving that ultra-minimalist, stone-like texture. -
Seal or Glaze:
Apply a clear matte varnish or leave the clay raw if it’s terracotta for a natural look. Avoid high-gloss finishes to maintain the modern aesthetic.
Step 4: Mounting
-
Prepare the Plinth:
Take your square block base. Ensure the top surface is clean and level so the hand will sit flat. -
Glue in Place:
Apply a generous amount of strong epoxy glue to the bottom of the clay wrist. -
Final Set:
Press the sculpture firmly onto the center of the block and hold it for a minute to ensure a strong bond. Let the glue cure fully before moving.
Place your sculpture near a window to let the shadows play across the elongated fingers

TRACK YOUR CERAMIC JOURNEY
Capture glaze tests, firing details, and creative progress—all in one simple printable. Make your projects easier to repeat and improve.
Elongated Fingers Statement Hand
This elegant sculpture captures the grace of an extended hand with elongated fingers and a raw, textured finish. The speckled stoneware clay adds an organic, earthy feel, making it a perfect functional jewelry holder or a standalone statement piece.
How-To Guide
Materials
- Speckled buff stoneware clay (or similar high-fire clay)
- Pottery wheel (helpful but optional, can be coil built)
- Wooden modeling tools
- Metal kidney rib
- Needle tool
- Score and slip tool
- Sponge
- Cutting wire
- Rolling pin
- Clear matte glaze (optional)
Step 1: Base and Arm Construction
-
The Solid Foundation:
Start by rolling out a ½-inch thick slab of speckled clay. Cut out a perfect circle, approximately 4-5 inches in diameter, to serve as the sturdy base plate. Smooth the edges with a damp sponge. -
Forming the Wrist:
Take a larger lump of clay and roll it into a thick, tall cylinder. This will be the forearm and wrist. If you are hand-building, you can hollow out the center slightly to reduce weight, but keep the walls thick for support: aim for at least ¾-inch thickness. -
Creating the Taper:
Gently taper the clay cylinder towards the middle, creating a narrow wrist that flares out slightly again where the palm will begin. This subtle curve is crucial for the elegant silhouette. -
Connecting to the Base:
Score the center of your circular slab and the bottom of your wrist cylinder aggressively. Apply slip generously to both surfaces. -
Sealing the Seam:
Press the wrist firmly onto the base. Use a modeling tool to obscure the seam completely, dragging clay from the arm down onto the base, then smoothing it back out so the transition looks seamless.
Crack Prevention
Fingers prone to cracking? Wrap just the fingers in small strips of slightly damp paper towel, then cover the whole piece in plastic. This keeps thinner parts from drying faster than the palm.
Step 2: Sculpting the Hand
-
Flattening the Palm:
At the top of your cylinder, gently flatten the clay to create the basic paddle shape of a palm. It should naturally flow from the wrist without a sharp angle. -
Mapping the Digits:
Visualize where the fingers will separate. Lightly sketch lines with a needle tool to divide the clay into four finger sections and a thumb section, ensuring the finger sections are longer than typical proportions for that stylized look. -
Roughing Out Fingers:
Use a wire tool or knife to cut away the excess clay between the fingers. You will be left with blocky, rectangular finger shapes. Don’t worry about roundness yet. -
Extending the Length:
Gently pull and roll each individual finger between your thumb and forefinger to elongate them. I always work slowly here to avoid cracking the clay at the knuckles. -
Refining the Thumb:
Pull the thumb out and slightly away from the palm, curving it gently inward. The transition from the wrist to the thumb pad should be smooth and fleshy. -
Curving the Fingers:
Position the fingers in a graceful, slightly upright curl. The tips should reach upward rather than grasping inward completely.
Make it Functional
Before drying, ensure the fingers are spread enough to hold rings. You can also puncture small holes in the ear-lobes or base to hold stud earrings.
Step 3: Detailing and Finishing
-
Palm Lines:
Use a sharp trimming tool to carve deep, deliberate lines across the palm. These shouldn’t be realistic wrinkles, but rather stylized creases that emphasize the sculpture’s form. -
Smoothing the Surface:
Use a damp sponge to wipe down the entire piece. This exposes the ‘speckles’ (sand or grog) in the clay body and softens any sharp cutting marks on the fingers. -
Texturing:
For that raw stone look, lightly pat the surface with a rough wooden paddle or a stiff brush to create micro-pores and imperfections. -
Final Adjustments:
Step back and check the balance. If the fingers look too heavy, carefully trim a bit more clay from the sides of the fingertips. -
Drying:
Cover the hand loosely with plastic for at least 3-4 days to let it dry slowly. Uneven drying forces on the thin fingers can cause them to snap off. -
Bisque Fire:
Fire the piece to bisque temperature (usually cone 04). Since the clay is naturally decorative, you can leave it unglazed, or apply a very thin matte clear coat before the final firing.
Place your finished sculpture on a console table or vanity where the light can catch the subtle textures of the stoneware clay
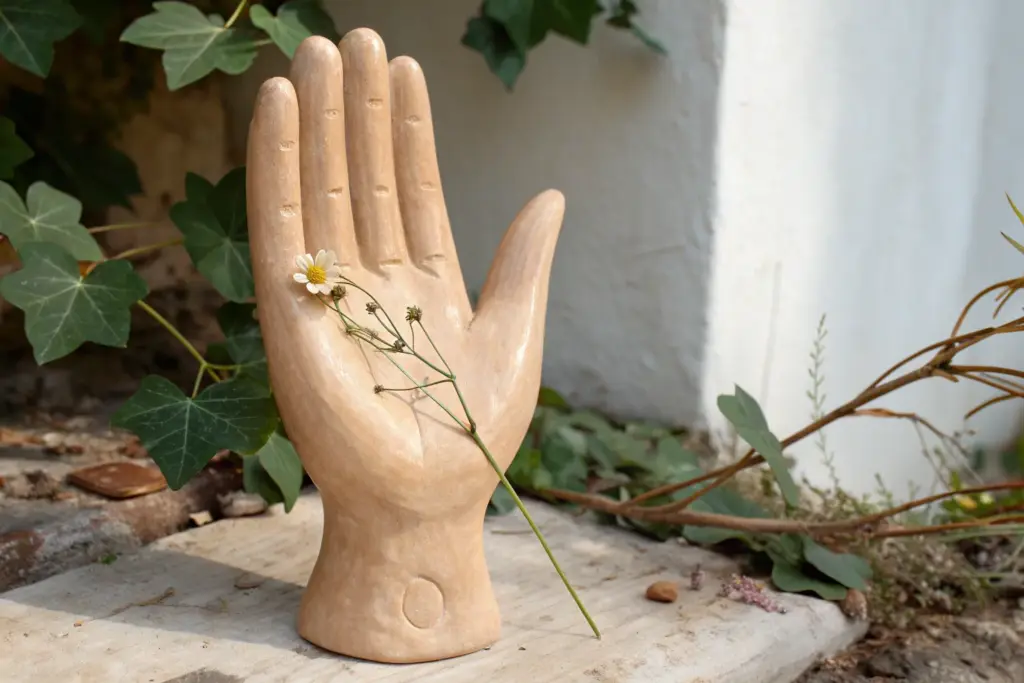
Flowers Blooming From the Palm
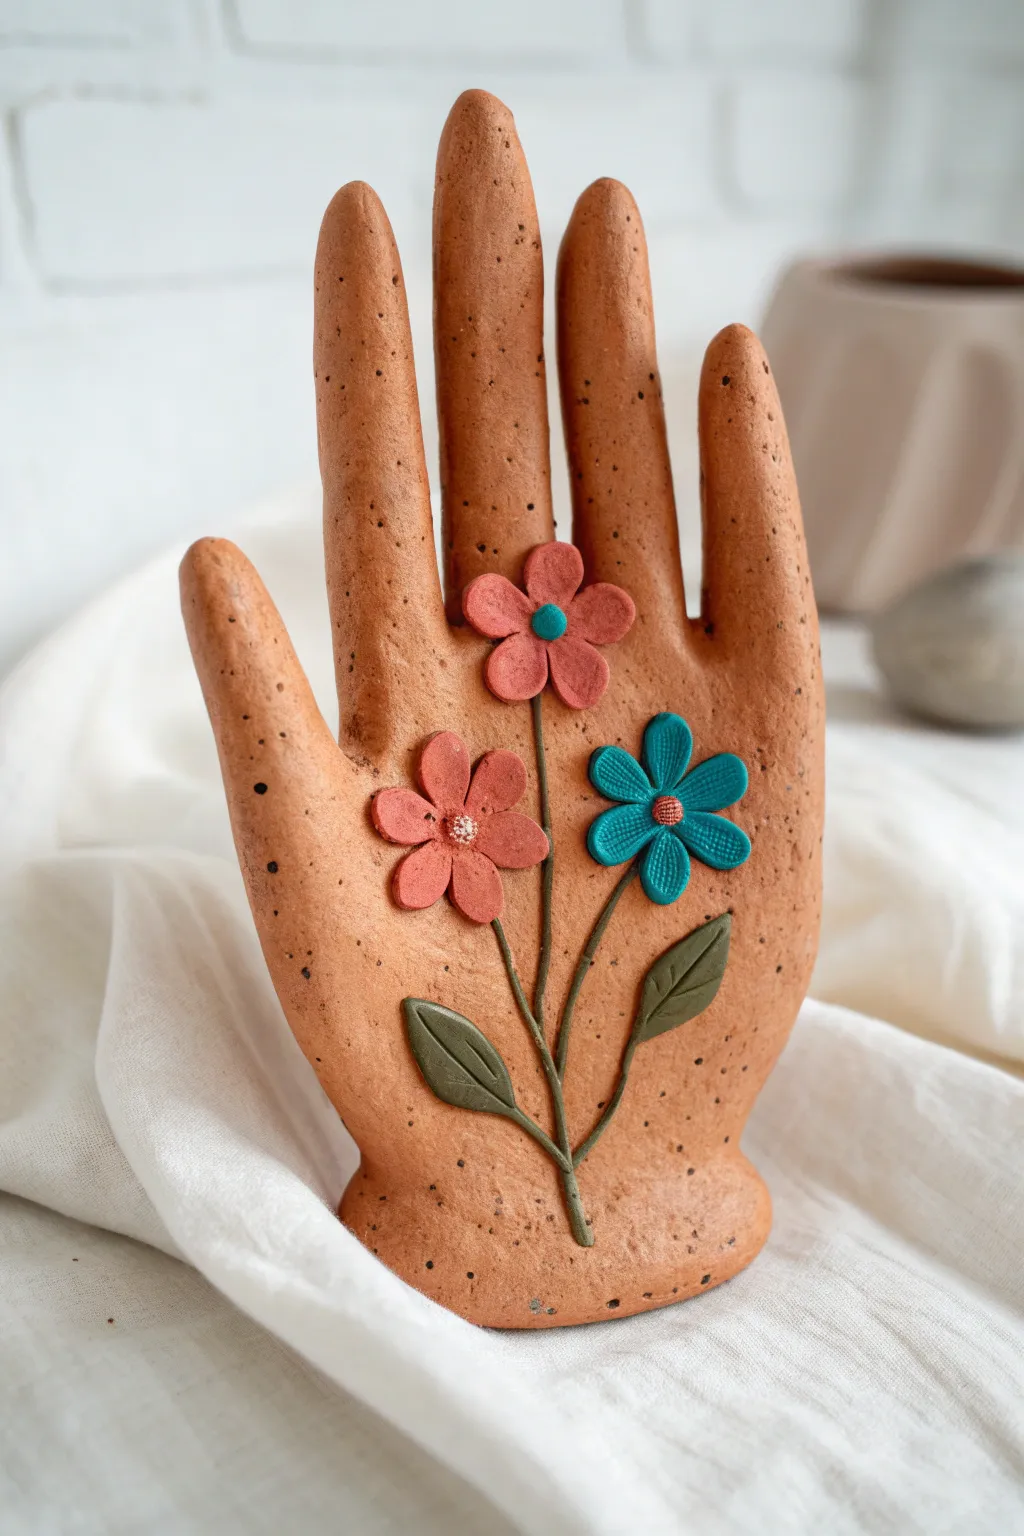
This charming project transforms a simple hand-shaped form into a miniature garden bed, featuring stylized clay flowers emerging from the palm. The speckled, terracotta-toned clay base gives it an earthy, organic feel, beautifully contrasting with the pastel pink and teal blooms.
Detailed Instructions
Materials
- Speckled polymer clay (terracotta or tan with granite effect)
- Pink polymer clay (salmon or coral shade)
- Teal/blue polymer clay
- Green polymer clay (muted olive tone)
- Aluminum foil (for armature)
- Sculpting tools (needle tool, ball stylus)
- Rolling pin or pasta machine
- Clay adhesive or liquid polymer clay (Bake & Bond)
- Oven and baking tray
- Parchment paper
Step 1: Sculpting the Hand Base
-
Form the armature:
Crumple aluminum foil into a rough, elongated oval shape to act as the core for the palm. This saves clay and helps the sculpture stand upright. -
Sheet the base clay:
Condition your speckled terracotta clay until pliable, then roll it into a thick sheet, roughly 1/4 inch thick. -
Cover the core:
Wrap the clay sheet around your foil core, smoothing the seams until you have a solid, palm-shaped lump with a flat base for stability. -
Create the fingers:
Roll five cylinders of clay for the fingers. Make the middle finger the longest, and the pinky the shortest and thinnest. -
Attach the fingers:
Press the fingers onto the top of the palm base. Use a modeling tool to blend the clay downwards, ensuring a seamless transition where the fingers join the hand. -
Shape the thumb:
Attach the final cylinder lower on the side for the thumb, blending it smoothly into the palm mass. -
Refine the form:
Smooth the entire surface with your fingers or a little bit of baby oil to remove fingerprints. Ensure the fingers are upright and slightly separated.
Step 2: Creating the Floral Details
-
Make the stems:
Roll very thin snakes of olive green clay. Gently press three stems onto the palm, curving them naturally so they originate from a single point near the wrist. -
Form the leaves:
Shape two small teardrops from green clay. Flatten them slightly and attach them near the base of the stems. -
Detail the leaves:
Use a needle tool or craft knife to gently impress a central vein down the middle of each leaf. -
Create flower petals:
For the pink flowers, create five small teardrop shapes per flower. For the teal flower, make slightly narrower teardrops. Flatten them gently. -
Assemble the blooms:
Arrange the petals in a circle at the top of each stem. I find it easiest to place them directly onto the hand surface, pressing lightly to adhere. -
Add texture to petals:
Using a needle tool, press a single line down the center of each pink petal. For the teal petals, press multiple fine lines for a ribbed texture. -
Add the centers:
Roll tiny balls of contrasting clay (teal for pink flowers, pink for the teal flower). Press them into the center of each flower. -
Texture the centers:
Stipple the tiny center balls with a needle tool or toothbrush to give them a pollen-like texture.
Sticky Situation?
If your clay gets too soft and sticky while you work, pop it in the fridge for 10 minutes. This firms it up, making the fingers easier to position without drooping.
Step 3: Finishing Touches
-
Final inspection:
Check the sculpture from all angles to ensure the base is stable and no fingerprints remain on the smooth areas. -
Bake:
Place the sculpture on parchment paper and bake according to your polymer clay package instructions (usually 275°F for 15-30 minutes per 1/4 inch of thickness). -
Cool:
Allow the piece to cool completely in the oven before moving it to prevent cracking.
Pro Tip
Mix black pepper or dried coffee grounds into regular orange clay if you can’t find pre-speckled clay. This creates that convincing faux-stone pottery look perfectly.
Now you have a whimsical piece of decor ready to hold your rings or simply brighten up a shelf
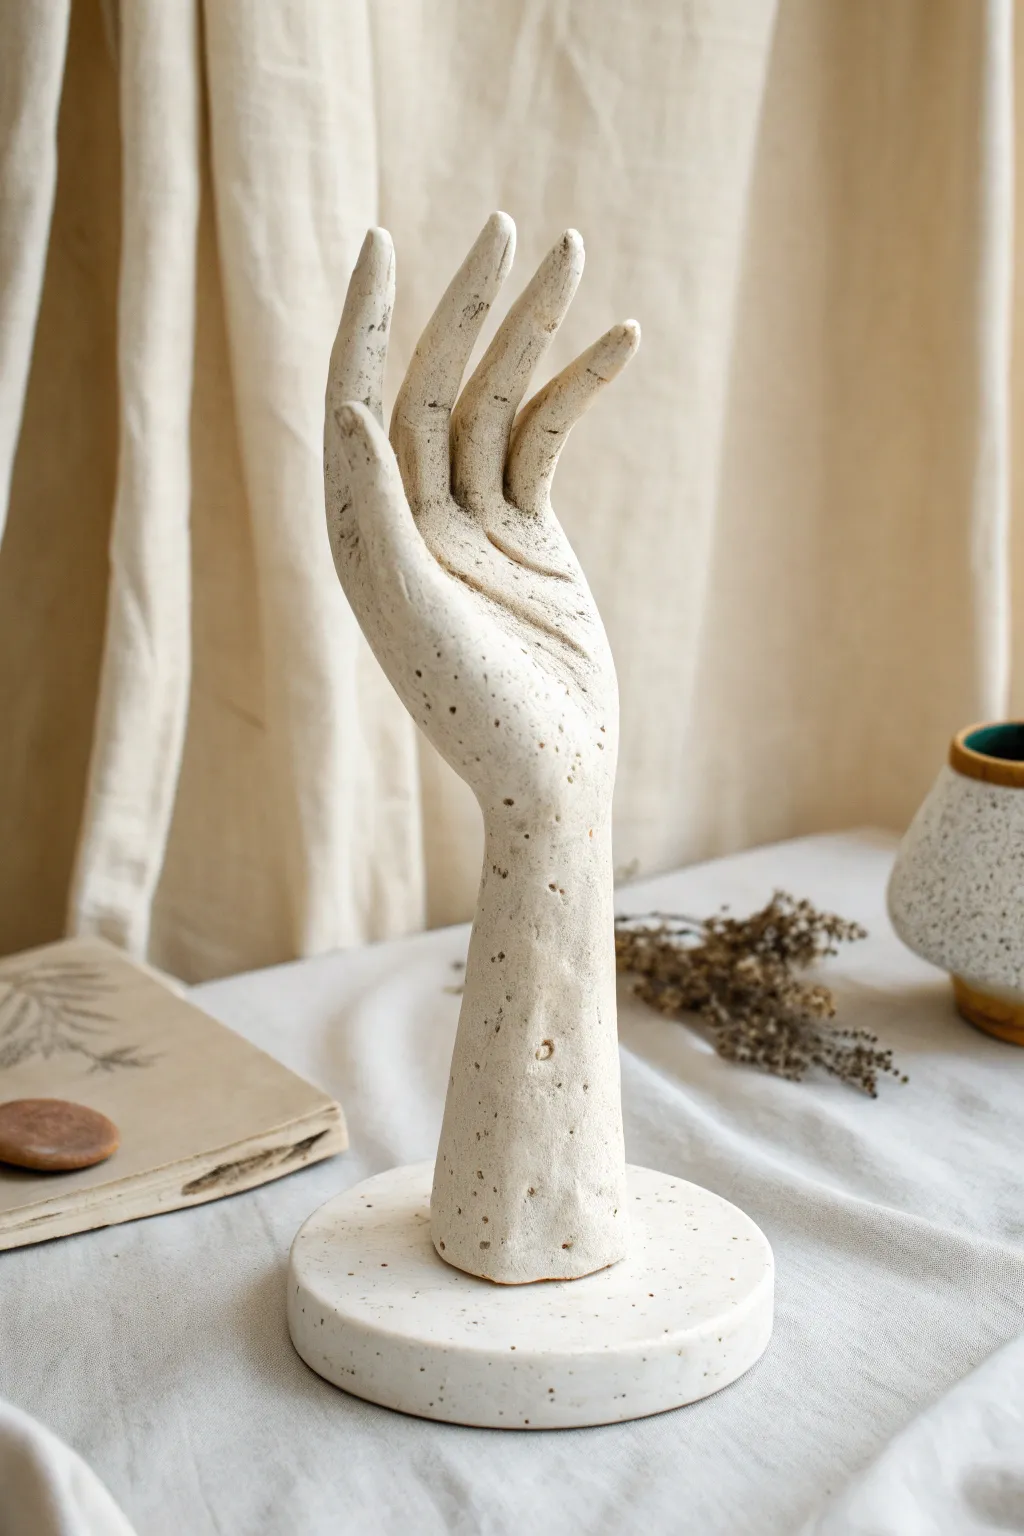
Rooted Wrist Standing Base

Capture the elegance of the human form with this freestanding hand sculpture that blends realism with a textured, grounded aesthetic. The distinct ‘rooted’ wrist base gives this piece a statuesque quality, perfect for displaying on a windowsill or shelf.
How-To Guide
Materials
- Light-colored stoneware or air-dry clay (approx. 2-3 lbs)
- Thick wooden dowel or armature wire
- Wooden base or scrap wood block
- Sculpting tools (needle tool, loop tool, wooden shapers)
- Rolling pin
- Slip (clay slurry)
- Scoring tool or old toothbrush
- Sponge
- Rough sandpaper or texture sponge
Step 1: Building the Armature & Base
-
Prepare the internal support:
Begin by securing a thick dowel or sturdy armature wire into a temporary wooden base block. This vertical support should be slightly shorter than the final height of the wrist and palm to ensure stability while you work. -
Form the wrist core:
Wrap clay firmly around the dowel to create a thick cylinder. This will become the wrist and forearm section. Ensure it flares out slightly at the bottom to create that sturdy, ‘rooted’ look shown in the image. -
Shape the palm block:
Add a large, flattened block of clay to the top of your wrist cylinder. Smooth the connection point downwards so the transition is seamless. This block should be roughly the shape of a mitten without the thumb yet.
Crack Control
If hairline cracks appear at the finger joints during drying, mix a small amount of clay with vinegar to make a paste and fill them in immediately.
Step 2: Sculpting the Hand
-
Add the thumb:
Roll a thick coil of clay for the thumb. Score and apply slip to the side of the palm block, then press the thumb into place. Blend the clay thoroughly, paying attention to the muscle pad at the base of the thumb. -
Divide the fingers:
Visualize the four fingers on the top block. I find it helpful to lightly sketch lines before cutting. Use a needle tool or wire cutter to slice the block into four distinct sections. -
Elongate and shape:
Gently pull and roll each individual finger to extend them. Smooth the edges so they are rounded, not square. Remember that the middle finger is usually the longest, and the pinky the shortest. -
Refine the pose:
Separate the fingers slightly as they dry to prevent them from sticking together. Position them in a relaxed, open gesture, with the thumb pulling slightly away from the palm.
Step 3: Detailing and Texturing
-
Carve the palm lines:
Using a small loop tool or a wooden modeling tool, carve deep, sweeping lines across the palm. The image features prominent, stylized lines—don’t be afraid to make them deep and expressive. -
Add wrist definition:
Look at your own wrist for reference. Add subtle indentations on the sides where the bones would protrude slightly, and ensure the forearm tapers correctly into the hand. -
Create surface texture:
Instead of smoothing everything perfectly, dab the surface with a coarse sponge or even a crumpled ball of aluminum foil. This mimics the stone-like, porous texture seen in the reference. -
Distress the forearm:
Use a needle tool to create small, random vertical scratches and divots along the forearm area. This enhances the organic, weathered appearance of the piece. -
Refine the fingernails:
Press a small, U-shaped tool (or the end of a straw) gently into the tips of the fingers to suggest nail beds. Keep this subtle; the sculpture relies more on form than hyper-realistic detail.
Jewelry Stand
Before drying, curve the fingers slightly more upward to create hooks. This turns your sculpture into a functional and artistic ring and necklace holder.
Step 4: Finishing Touches
-
Check stability:
Before the clay hardens completely, ensure the base is flat and the wrist is perfectly vertical. If it leans, gently correct it now. -
Drying phase:
Let the sculpture dry slowly under a loose plastic bag for the first 24 hours to prevent cracking, especially where the fingers join the palm. -
Final sanding:
Once bone dry (or cured, if using air-dry clay), use sandpaper to soften any sharp ridges, but leave the intended texture intact. -
Color wash (optional):
If your clay is too white or uniform, apply a very watered-down wash of brown or beige acrylic paint, then wipe it off immediately. The pigment will stay in the palm lines and texture divots.
Place your finished sculpture near a window to let the natural light highlight the deep textures and palm lines you created
Geometric Faceted Hand Sculpture

This striking geometric sculpture transforms the organic soft curves of a human hand into a modern, sharp-edged masterpiece. The speckled finish mimics the look of industrial concrete or stone, making it a perfect statement piece for minimalist decor.
Step-by-Step Guide
Materials
- Air-dry clay (stone or white color) or polymer clay
- Cardstock or thick paper (for the template)
- Pencil and ruler
- Precision craft knife (X-Acto)
- Small rolling pin
- Modelling tools (especially a flat-edged smoother)
- Rough sandpaper or a texture sponge
- Slip (clay mixed with water)
- Optional: Speckled clay paint or black pepper mixed into clay for the stone effect
Step 1: Planning and Preparation
-
Design your template:
Before touching clay, sketch a hand silhouette on cardstock. Use a ruler to draw straight lines creating triangles and polygons inside the hand shape to map out your ‘low-poly’ facets. -
Create the base armature:
Ideally, crumble aluminum foil into a rough hand shape somewhat smaller than your final sculpture. This saves clay and reduces weight. -
Prepare the clay:
Condition your clay by kneading it until pliable. If you want that speckled stone look shown in the image and aren’t using pre-speckled clay, knead in a small amount of coarse black pepper or dry coffee grounds.
Step 2: Shaping the Basic Form
-
Roll out the slab:
Roll your clay out to a thickness of about 1/4 inch. It needs to be thick enough to hold sharp edges without collapsing. -
Cover the armature:
Wrap your foil armature with the clay slab. Smooth the seams together using water or slip to ensure a solid, unified base form. -
Define the fingers:
Roughly separate the clay into the five digits. Don’t worry about details like knuckles or fingernails; just get the general length and positioning right. -
Establish the pose:
Position the hand upright on its wrist base. Arrange the fingers straight up, with the thumb extended outward, mimicking the ‘stop’ or ‘high-five’ gesture.
Keep it Sharp
To get ultra-crisp edges between facets, let the clay firm up to a ‘leather hard’ state before doing your final knife cuts. Soft clay tends to drag and blur edges.
Step 3: Carving the Facets
-
Start the faceting process:
Using your sharp craft knife, begin slicing thin planes off the surface of the clay. Start with the palm area, cutting angled, triangular sections to remove the rounded curves. -
Sharpen the fingers:
Move up to the fingers. Instead of round cylinders, shave the sides to create rectangular or hexagonal cross-sections. The fingers should look blocky rather than organic. -
Deepen the creases:
Carve distinctive V-grooves at the base of the fingers and across the palm where the hand naturally folds. I find that exaggerating these cuts really sells the geometric effect by creating deeper shadows. -
Shape the wrist:
Sculpt the base into a polygonal pedestal. Ensure the bottom is perfectly flat so the sculpture stands securely. -
Smooth the planes:
Use a flat modeling tool or your fingers dipped in water to smooth the surface of each individual facet. The goal is flat planes, not rounded lumps. -
Refine the edges:
Go back over the ridges where your facets meet. Pinch them gently or use your knife to ensure the transition between planes is a crisp, sharp line.
Metallic Accent
Paint just the recessed ‘cracks’ or the sharpest ridges with gold liquid leaf. The contrast against the faux stone turns the sculpture into a luxury object.
Step 4: Finishing Touches
-
Check symmetry:
Rotate the piece and look for any areas that still look too organic or round. Slice away closer to the core form if necessary. -
Initial drying phase:
Let the clay dry until it is leather-hard. It should represent the final shape but still have a little bit of moisture. -
Surface texturing:
For that matte, stone-like quality, lightly tap the leather-hard surfaces with a rough sponge or very coarse sandpaper. This removes the tooling shine. -
Final drying:
Allow the piece to dry completely according to package instructions. This usually takes 24-48 hours for air-dry clay. -
Sanding and sealing:
Once fully cured, use fine-grit sandpaper to sharpen any edges that dulled during drying. Finish with a matte sealant to protect the ‘stone’ surface without adding gloss.
Place your geometric hand near a window where the changing daylight will dance across the facets you’ve created