Whenever I need a quick, satisfying project, I reach for clay hearts—they’re simple, sweet, and you can take them in a hundred different directions. Here are my favorite clay heart ideas that work beautifully with air-dry clay, polymer clay, or traditional ceramic clay.
Classic Hanging Heart Ornaments
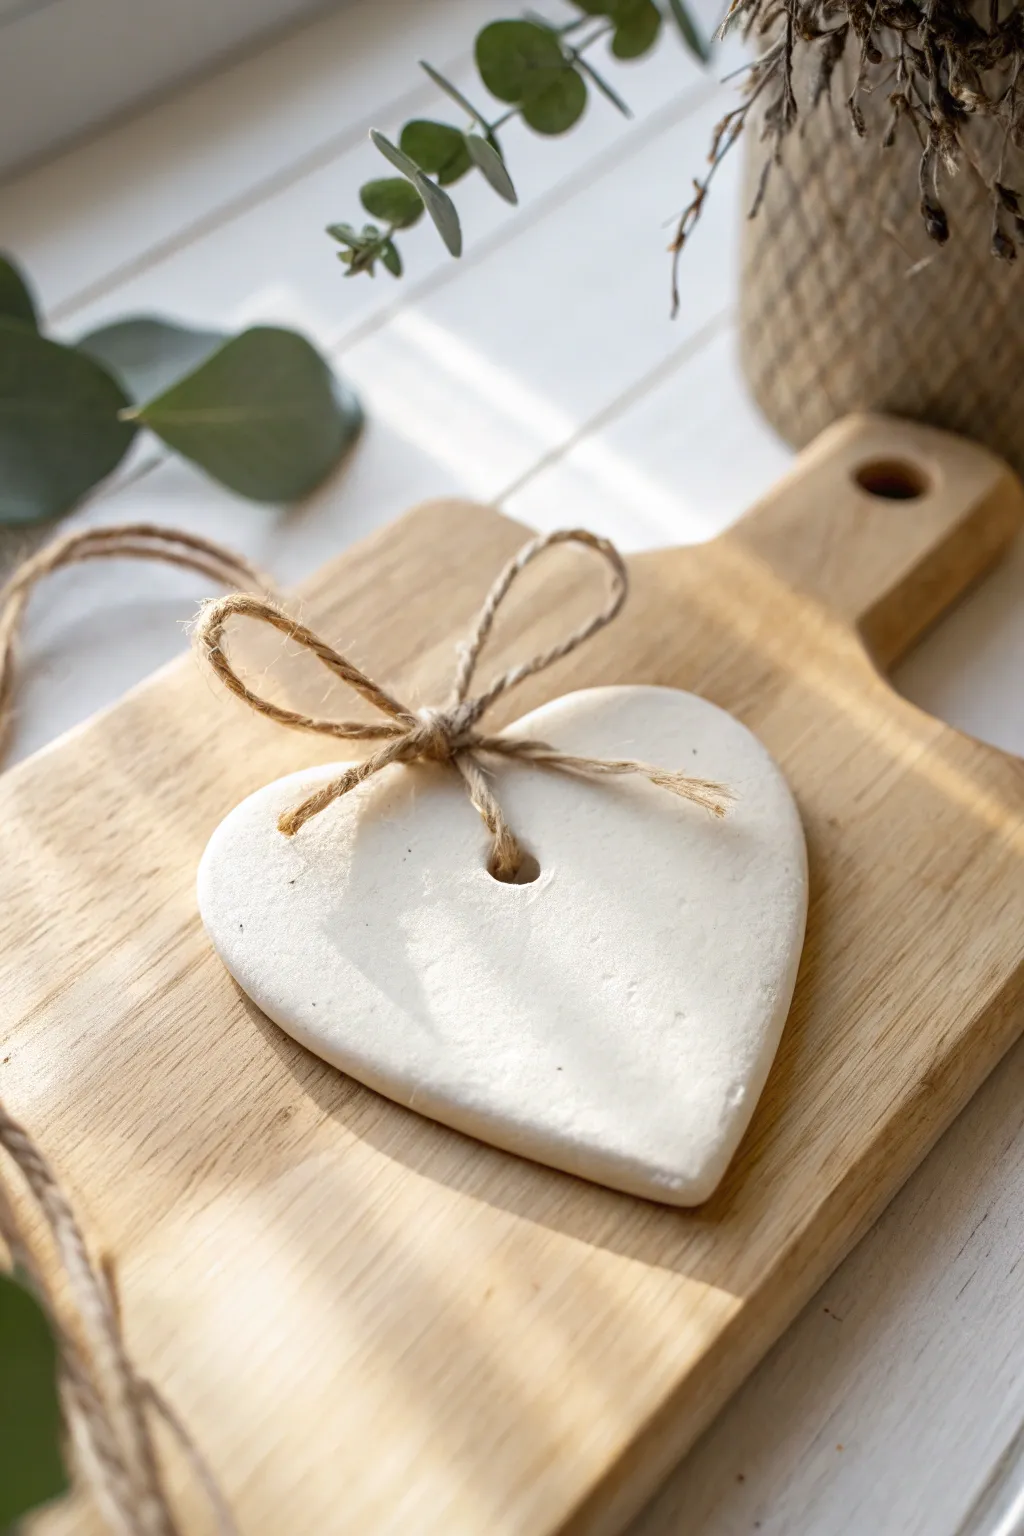
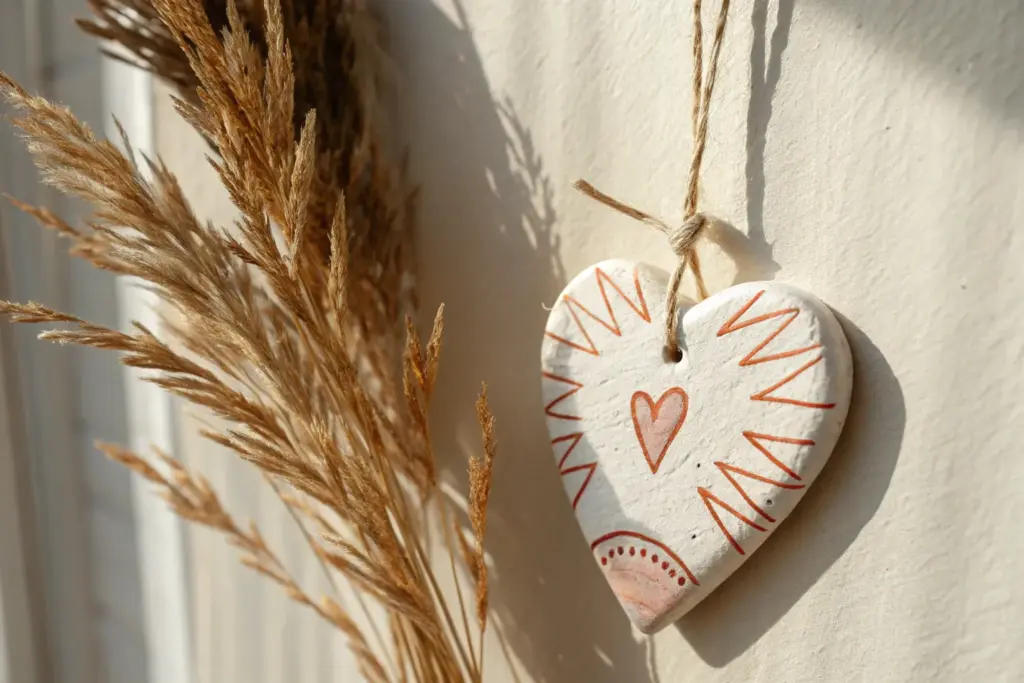
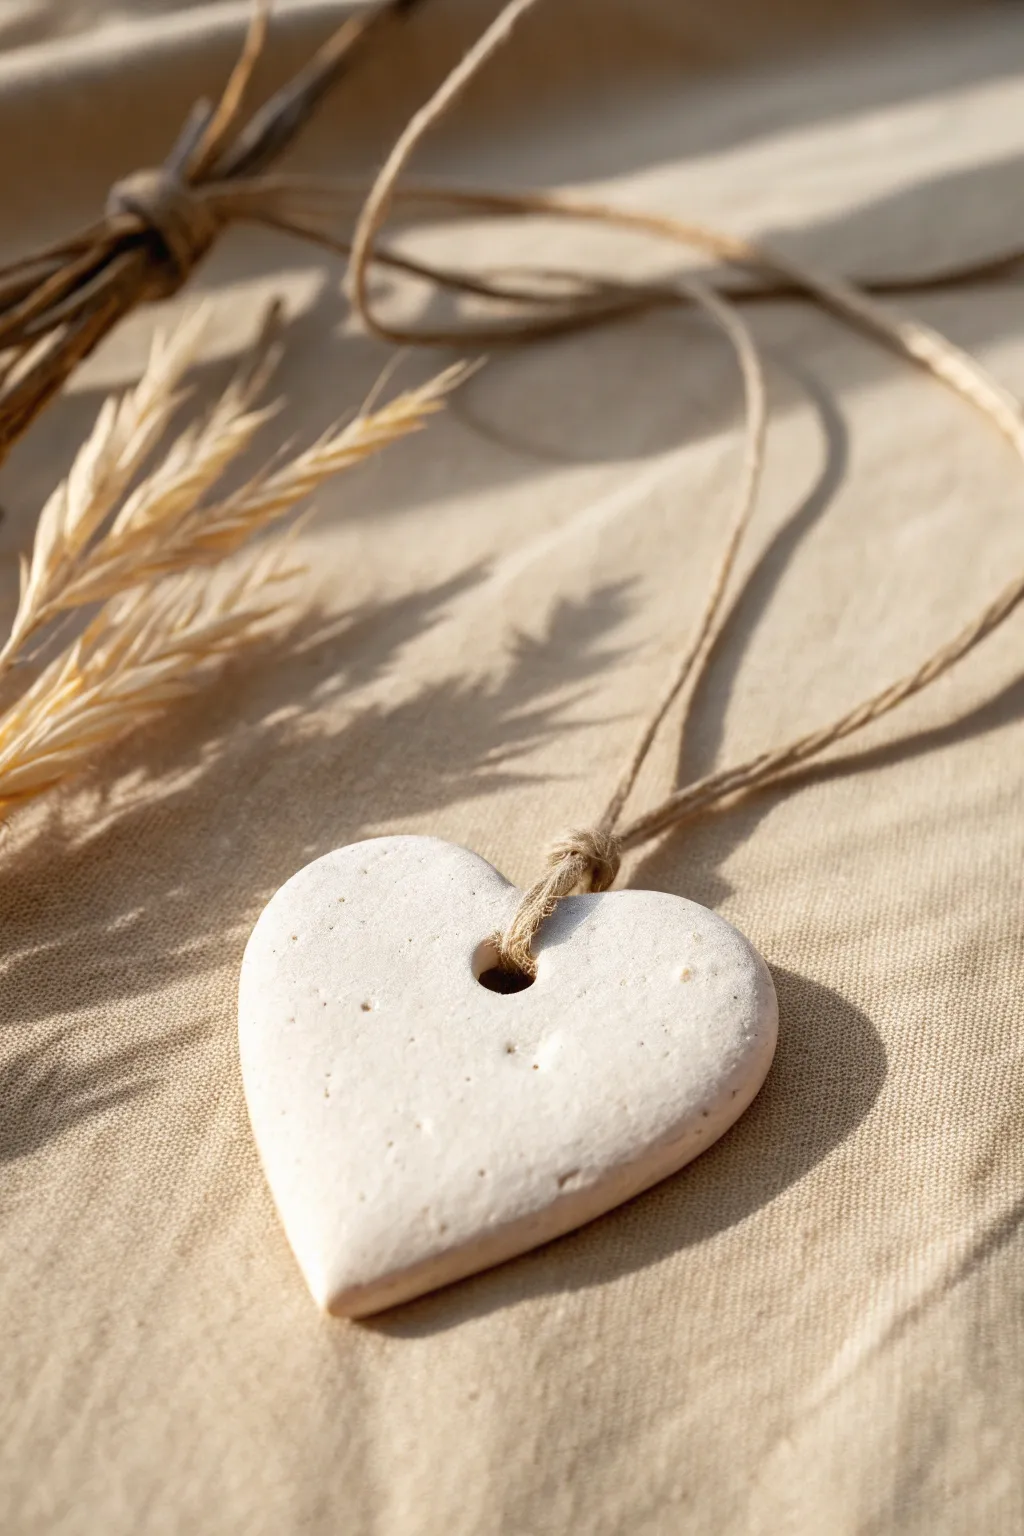
Embrace simplicity with this minimalist white clay heart, perfect for farmhouse decor or thoughtful gift tags. Its smooth, matte finish and natural twine accent create a timeless look that is beautifully understated.
How-To Guide
Materials
- White specialized air-dry clay (or homemade salt dough)
- Roller or rolling pin
- Heart-shaped cookie cutter (approx. 3-4 inches wide)
- Parchment paper or non-stick silicone mat
- Wooden skewer, chopstick, or drinking straw
- Fine-grit sandpaper (400 grit or higher)
- Natural jute twine
- Small bowl of water
- Spray matte sealant (optional)
Step 1: Shaping the Clay
-
Prepare your workspace:
Lay down your parchment paper or silicone mat on a flat, stable surface to prevent sticking. -
Condition the clay:
Take a handful of air-dry clay and knead it in your hands until it feels warm and pliable, eliminating any initial cracking. -
Roll out the slab:
Place the clay on your mat and roll it out evenly. Aim for a thickness of about 1/4 inch (approx. 6mm) so the final ornament is sturdy but not too heavy. -
Cut the shape:
Press your heart-shaped cookie cutter firmly into the clay. Give it a tiny wiggle before lifting to ensure a clean cut. -
Smooth the edges:
Carefully peel away the excess clay. Dip your finger in a little water and gently run it around the cut edge of the heart to smooth out any roughness from the cutter. -
Create the hole:
Using a skewer or straw, punch a hole centered near the top of the heart spread. Make sure the hole isn’t too close to the edge to prevent breakage later. -
Final smoothing:
Check the surface for any fingerprints. I like to lightly dampen a fingertip and brush over the surface one last time for a flawless finish.
Step 2: Drying and Refining
-
Air drying phase:
Let the heart dry flat on the parchment paper. Flip it over carefully after about 12 hours so the bottom side can dry evenly. -
Check for dryness:
Allow 24-48 hours total drying time. The clay should turn a stark, chalky white and feel hard to the touch with no cool, damp spots. -
Sand for perfection:
Take your fine-grit sandpaper and very gently buff the edges and surface. Use circular motions to soften any sharp ridges or bumps. -
Clean dust:
Wipe the ornament with a dry, soft cloth or a clean paintbrush to remove all the sanding dust. -
Seal (optional):
If you want extra durability, lightly mist the heart with a matte spray sealant. Lay it flat and spray from about 10 inches away.
Cracking Up?
If small hairline cracks appear while drying, don’t panic. Mix a tiny bit of fresh wet clay with water to make a paste and smooth it into the cracks, then let dry again.
Step 3: Finishing Touches
-
Cut the twine:
Cut a piece of natural jute twine, approximately 10-12 inches long. -
Thread the hole:
Fold the twine in half if you want a loop, or thread a single strand through the hole from front to back. -
Tie the bow:
Bring the ends together and tie a simple shoelace bow right at the base of the hole, ensuring the knot sits securely against the clay. -
Adjust the loops:
Pull the loops of the bow until they are small and perky, roughly matching the proportions shown in the photo. -
Trim the tails:
Snip the ends of the twine at an angle to prevent fraying, leaving them short enough to not obscure the heart shape.
Make It Yours
Before the clay dries, press a stamp, lace, or dried flowers into the surface to create a debossed texture while keeping the monochromatic look.
Hang your handcrafted heart or use it as a stunning gift topper to spread a little handmade love


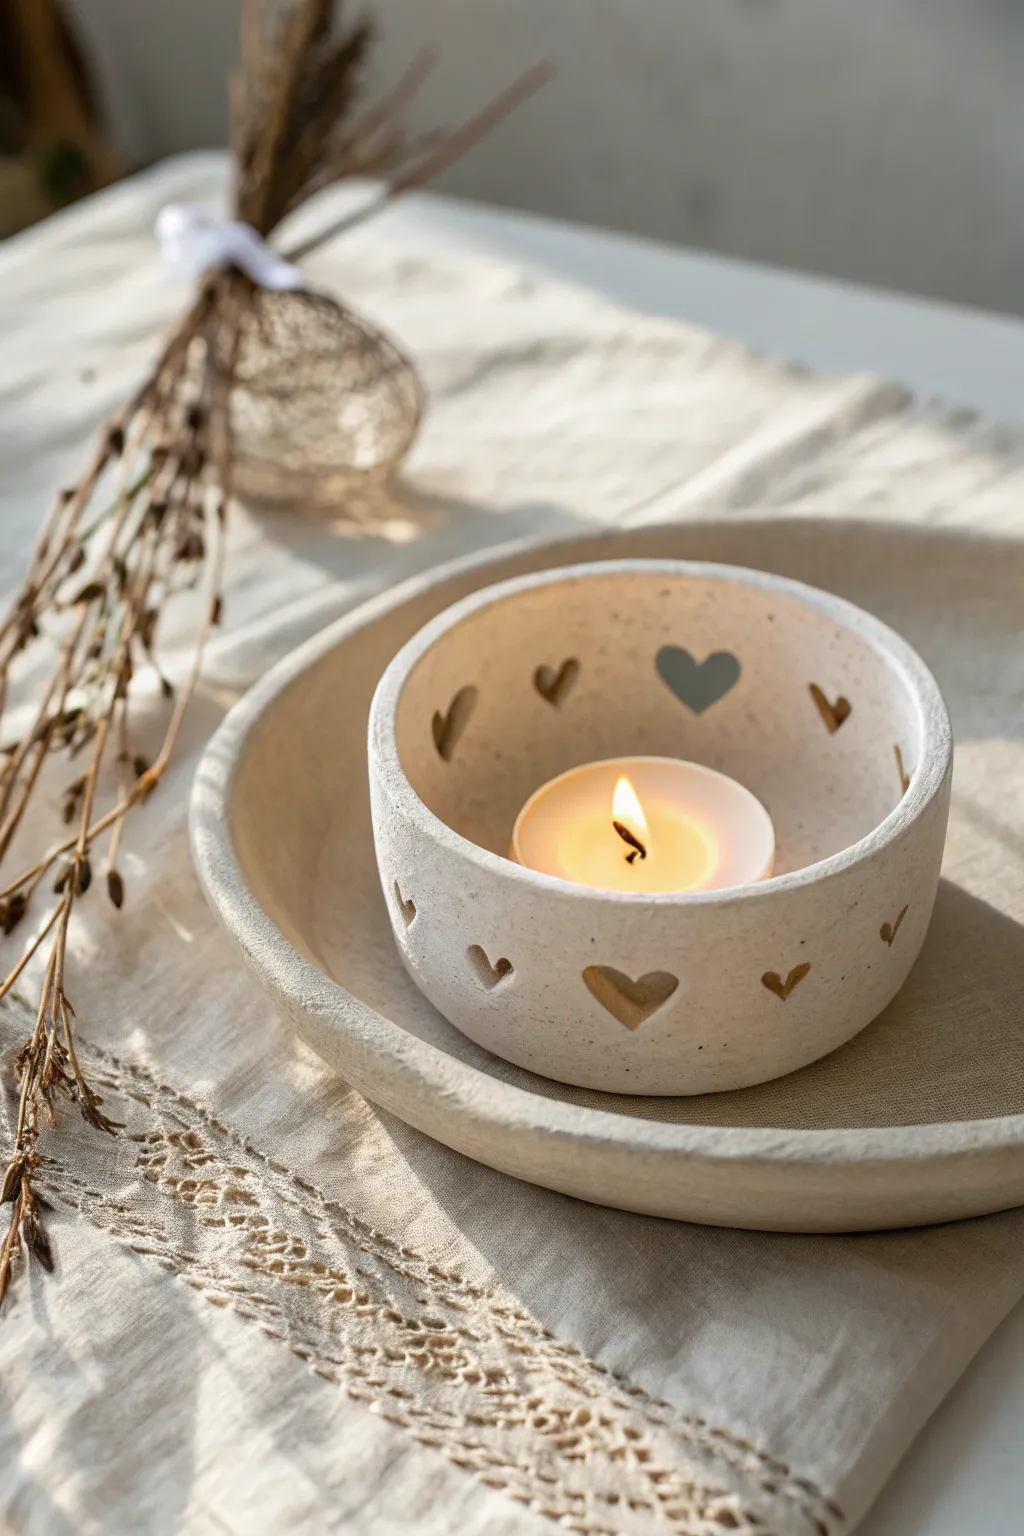
Heart-Shaped Trinket Dish
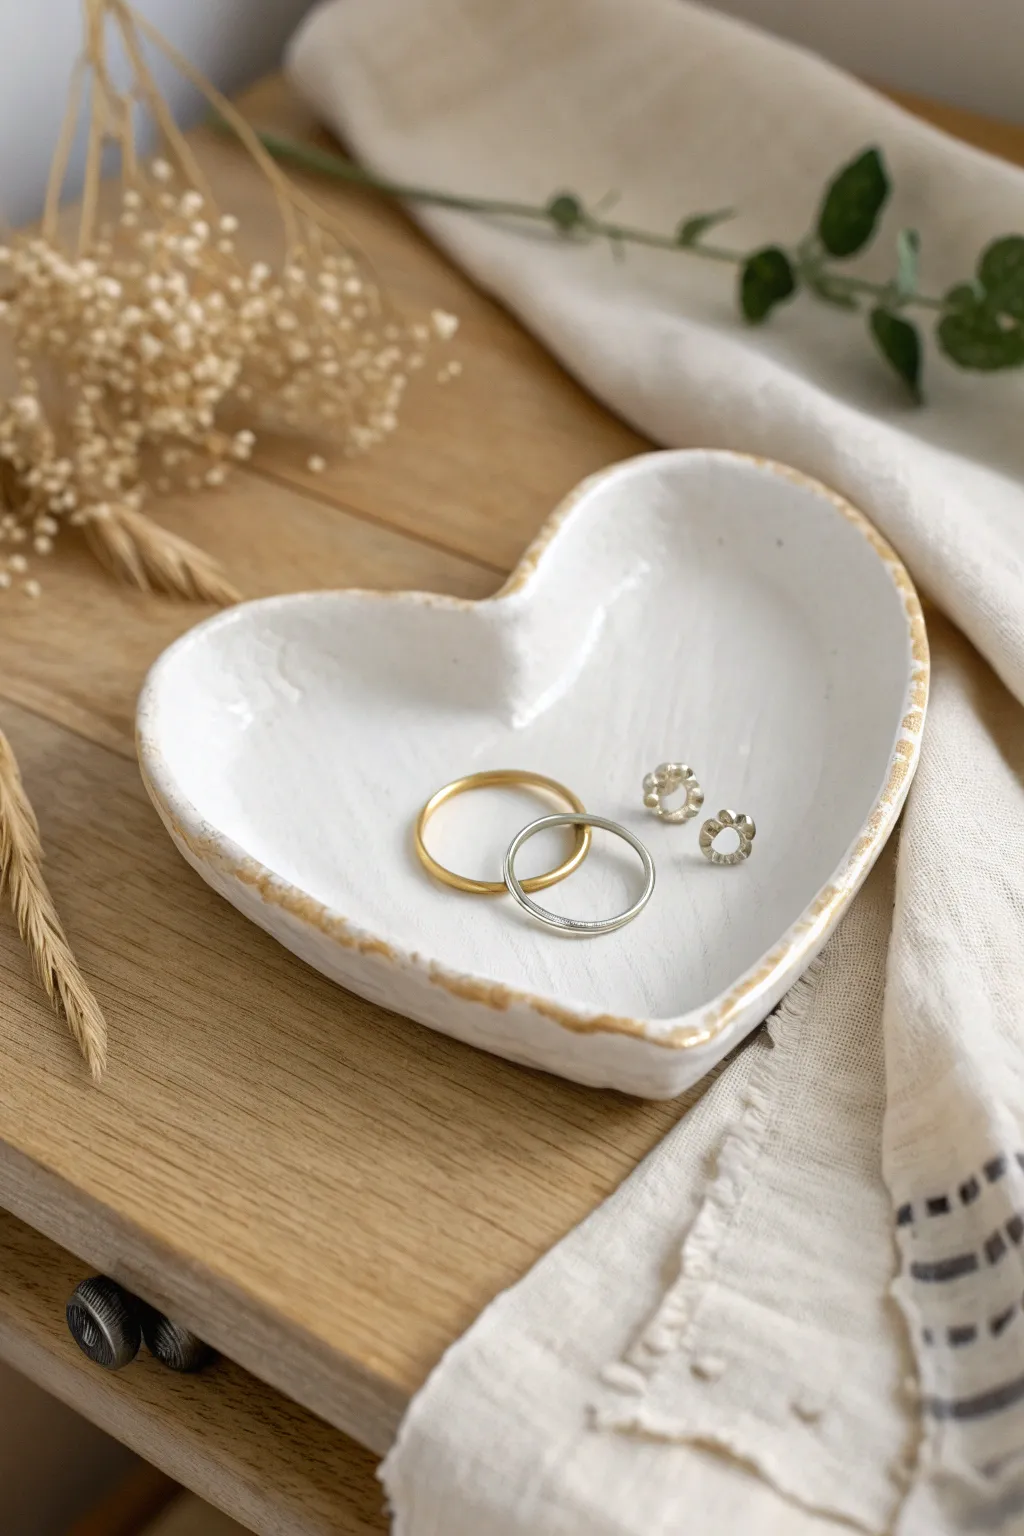
This charming, handmade trinket dish features a soft, organic heart shape with a touch of elegance thanks to its gilded rim. It’s the perfect size for holding your everyday rings and studs, blending rustic texture with a clean, glossy finish.
Step-by-Step
Materials
- White air-dry clay (or polymer clay)
- Rolling pin
- Heart-shaped cookie cutter (large) or paper template and craft knife
- Small bowl or sponge for shaping
- Fine-grit sandpaper (400 grit)
- White acrylic paint (optional, for opaque coverage)
- High-gloss varnish or sealant
- Gold leaf paint or metallic liquid gold
- Small, fine paintbrush
- Cup of water and bowl of water (for smoothing)
- Parchment paper or work mat
Step 1: Shaping the Clay
-
Condition the clay:
Begin by taking a handful of white air-dry clay. Knead it in your warm hands for a minute or two until it is soft, pliable, and free of any lumps or dry spots. -
Roll out a slab:
Place the clay on a sheet of parchment paper. Use your rolling pin to flatten it into an even slab, aiming for a thickness of about 1/4 inch (approx. 5-7mm). -
Cut the heart shape:
Press a large heart-shaped cookie cutter firmly into the clay. If you don’t have a cutter, place a paper heart template on the slab and carefully trace around it with a craft knife or needle tool. -
Soften the edges:
Dip your finger into a little water and gently run it along the cut edges of the clay heart. This removes sharp corners and gives it that soft, handmade look seen in the photo. -
Create the curvature:
To form the dish shape, gently lift the edges of the heart upwards with your fingers. Alternatively, you can drape the clay heart inside a shallow bowl to help it hold a curved form while drying. -
Add texture (optional):
If you want the subtle interior texture seen in the photo, lightly press a piece of canvas or a textured sponge against the inside surface before it dries completely.
Step 2: Drying and Refining
-
Let it dry:
Set the dish aside in a safe, dry place. Allow it to air dry for at least 24-48 hours. I find turning it over halfway through the drying process helps the bottom dry evenly. -
Check for dryness:
The clay should feel hard room temperature to the touch, not cool. If it feels cold, it still contains moisture and needs more time. -
Sand the surface:
Once fully dry, take your fine-grit sandpaper and gently sand any rough spots on the rim or the underside. Wipe away the dust with a slightly damp tack cloth or paper towel.
Smooth Operator
Use a baby wipe or a damp sponge to smooth the clay while it’s wet. This reduces the amount of sanding you’ll need to do later significantly.
Step 3: Painting and Finishing
-
Apply a white base coat:
For a bright, clean white finish like the example, apply a layer or two of white acrylic paint. Let the paint dry completely between coats. -
Seal the dish:
Apply a coat of high-gloss varnish to the entire surface. This gives the dish its ceramic-like shine and protects the clay from moisture. -
Let the varnish cure:
Allow the varnish to dry fully according to the bottle’s instructions—usually a few hours—before moving to the metallic step. -
Paint the gold rim:
Dip a fine paintbrush into your liquid gold leaf or metallic paint. Carefully paint along the very top edge of the rim. -
Feather the gold:
Don’t worry about a perfect line. Dab the brush slightly irregularly along the rim to mimic the rustic, organic look in the image. -
Final drying time:
Let the gold paint dry completely. If you used a solvent-based liquid gold, ensure you wash your brush in the appropriate cleaner immediately.
Cracking Up?
If small cracks appear as the clay dries, make a ‘slip’ paste by mixing a little clay with water. Fill the cracks, smooth it over, and let it dry again.
Now your elegant little dish is ready to keep your favorite jewelry safe and accessible


Stamped Name Heart Gift Tags
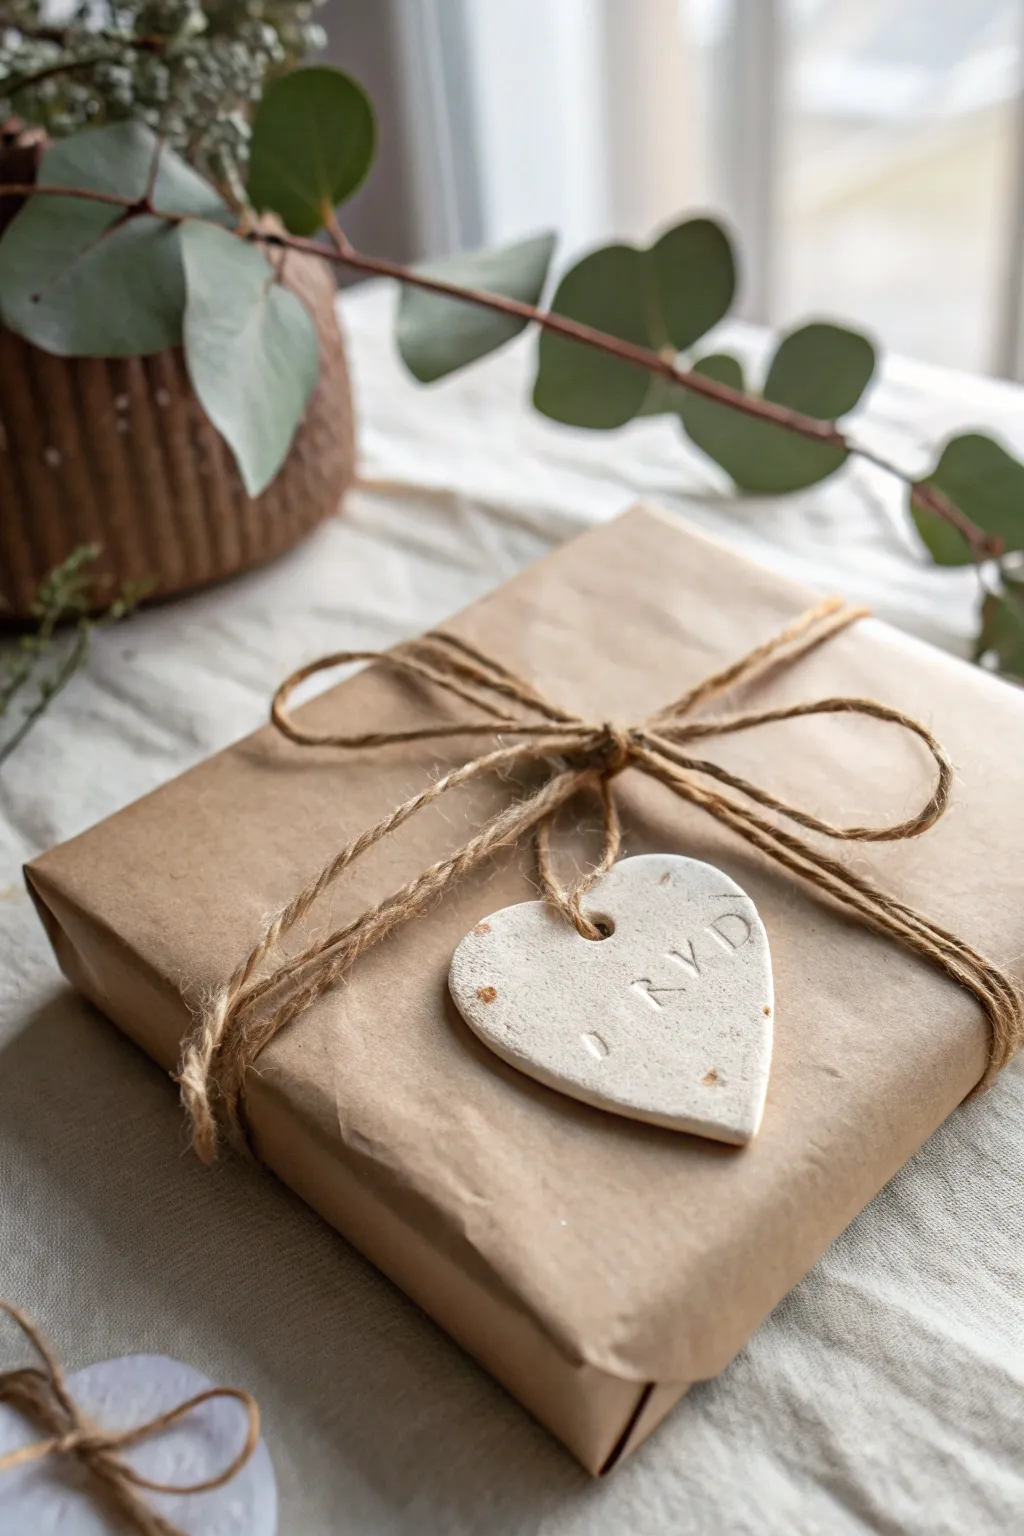
Add a beautifully personalized touch to your gifts with these rustic clay tags, featuring stamped lettering and a natural, speckled finish. This simple project transforms plain wrapping into something memorable and keepsakes-worthy.
How-To Guide
Materials
- White or light grey air-dry clay (or polymer clay)
- Heart-shaped cookie cutter (medium size)
- Alphabet stamp set
- Rolling pin
- Parchment paper or non-stick mat
- Straw or skewer (for hole punching)
- Fine-grit sandpaper (optional)
- Dark brown acrylic paint or antiquing medium
- Paper towel or rag
- Jute twine
- Scissors
Step 1: Shaping the Clay Base
-
Prepare your surface:
Lay down a sheet of parchment paper or a silicone non-stick mat on a flat workspace to prevent the clay from sticking. -
Condition the clay:
Take a handful of your air-dry clay and knead it in your hands for a minute until it feels soft, pliable, and free of cracks. -
Roll it out:
Use a rolling pin to flatten the clay. Aim for a thickness of about 1/4 inch (approx. 5-6mm) to ensure the tag is sturdy but not too heavy. -
Cut the heart:
Press your heart-shaped cookie cutter firmly into the rolled clay. Wiggle it slightly side-to-side before lifting to get a clean cut. -
Smooth the edges:
Dip your finger in a tiny bit of water and gently run it along the cut edges of the heart to smooth out any roughness left by the cutter.
Stamp Clean Release
Is clay sticking to your letter stamps? Lightly dust the stamp faces with cornstarch or dip them in baby powder before pressing into the clay.
Step 2: Stamping and Customizing
-
Plan your spacing:
Before stamping, gently hover your letter stamps over the clay heart to gauge the spacing for your name or initials. -
Imprint the letters:
Press the alphabet stamps straight down into the center of the heart. Apply firm, even pressure, but don’t push so hard that you distort the heart’s shape. -
Create the hanging hole:
Use a drinking straw or a smooth skewer to punch a hole at the top center of the heart. Twist the straw as you pull it out for a clean hole. -
Add rustic texture (optional):
If you want that slightly weathered look seen in the photo, you can lightly tap the surface with a crumpled ball of foil or coarse sandpaper before drying.
Step 3: Drying and Finishing
-
Let it dry:
Place the heart on a flat surface to dry completely. Depending on the clay brand and humidity, this usually takes 24-48 hours. I like to flip it over halfway through so both sides dry evenly. -
Sand imperfections:
Once fully hard, use fine-grit sandpaper to briefly buff away any sharp burrs on the edges or around the hole. -
Create the speckled effect:
To mimic the aged speckles in the image, dilute a tiny drop of dark brown acrylic paint with water. Dip a toothbrush in it and flick the bristles to spatter tiny dots onto the heart. -
Highlight the letters:
Brush a wash of watered-down brown paint over the stamped letters, then immediately wipe the surface with a damp paper towel. The dark color will remain in the deep impressions, making the text pop.
Scented Tags
Add a few drops of essential oil (like cinnamon or pine) to the clay while kneading. The tag will act as a diffuser and scent the gift.
Step 4: Assembly
-
Cut the twine:
Measure a length of jute twine long enough to wrap around your gift box plus extra for the bow. -
Thread the tag:
Pass one end of the twine through the hole in your dried clay heart. -
Center the tag:
Slide the heart to the middle of the twine strand so it will sit squarely on top of the package. -
Wrap and tie:
Wrap the twine around your kraft-paper-covered gift, securing it with a simple knot first to hold the tag in place. -
Finish with a bow:
Tie a classic bow on top of the tag, adjusting the loops to be fairly large and floppy for that relaxed, natural aesthetic.
Once tied onto your package, this charming handmade tag creates a warm, thoughtful presentation that feels just as special as the gift inside


Lace-Impressed Heart Keepsakes
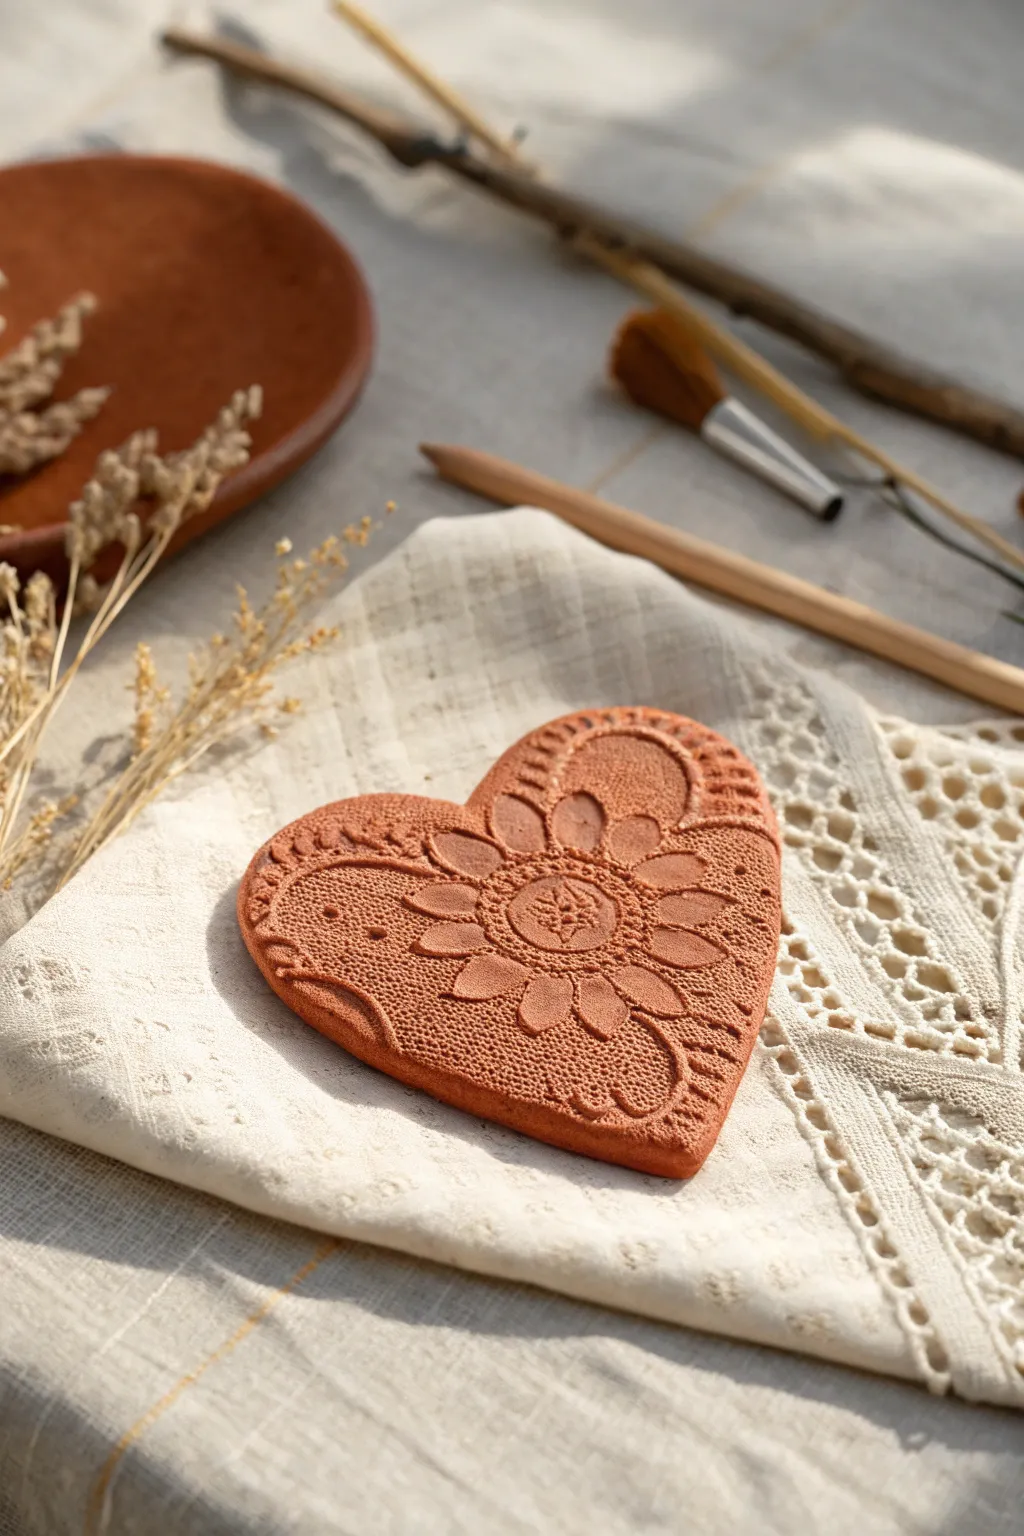
Capture the timeless elegance of vintage lace in warm, earthy tones with this simple yet stunning clay project. The deep terracotta hue combined with delicate floral textures creates a rustic keepsake perfect for gifting or displaying.
Detailed Instructions
Materials
- Terracotta air-dry clay (or oven-bake polymer clay in a terracotta color)
- Heart-shaped cookie cutter (approx. 4-5 inches)
- Rolling pin
- Parchment paper or a canvas work mat
- Vintage lace doily or a textured lace stamp
- Small wooden sculpting tool or toothpick
- Fine-grit sandpaper (optional)
- Matte spray varnish (optional)
Step 1: Preparation and Rolling
-
Condition the Clay:
Begin by taking a handful of terracotta clay and kneading it in your hands. You want it to be warm, pliable, and free of any air bubbles. If you are using air-dry clay, a splash of water can help smooth it out. -
Set Up Your Workspace:
Lay down a sheet of parchment paper or a canvas mat. This prevents the clay from sticking to your table and makes it easier to move the project later. -
Roll Out the Slab:
Place your clay ball in the center of the mat. Using your rolling pin, roll the clay out evenly. Aim for a thickness of about 1/4 inch (6mm)—too thin and it might crack; too thick and it won’t look delicate. -
Check for Imperfections:
Inspect the surface for any little bumps or cracks. Smooth these out gently with a slightly damp fingertip before moving to the texturing phase.
Sticky Situation?
If the clay sticks to your lace doily, lightly dust the clay surface with cornstarch or baby powder before laying down the lace. This acts as a release agent for a clean peel.
Step 2: Creating the Texture
-
Position the Lace:
Take your lace doily or textured mat and lay it carefully over the rolled clay. I like to position the lace so a specific floral motif—like the sunflower shape in the image—will land right in the center of the heart. -
Make the Impression:
Take the rolling pin again and roll firmly over the lace. You need enough pressure to push the fabric pattern deep into the clay, but not so much that you distort the slab’s thickness significantly. -
Peek and Adjust:
Gently lift one corner of the lace to check the depth of the impression. If the pattern looks faint, lay it back down exactly where it was and press harder with your fingers or a small roller. -
Reveal the Pattern:
Slowly peel the lace away from the clay. Do this carefully to avoid dragging the clay and blurring the crisp lines of the texture.
Make It Rustic
After baking or drying, dilute some white acrylic paint with water and brush it over the texture. Quickly wipe it off with a rag, leaving white paint only in the deep crevices.
Step 3: Cutting and Refining
-
Cut the Heart Shape:
Position your heart-shaped cutter over the textured area. Frame the central flower motif so it sits nicely in the middle, then press down firmly to cut through the clay. -
Remove Excess Clay:
Peel away the excess clay from the outside of the cutter first. Save these scraps in an airtight bag for future projects. -
Lift and Smooth:
Gently lift the cut heart. Run your finger along the edges to smooth down any sharp ridges left by the cutter. You can use a tiny bit of water to blend the seams if the edge looks rough. -
Add Border Details:
Using a small wooden sculpting tool or a blunt toothpick, verify the border details. If the lace pattern fades near the edge, you can gently re-etch those lines to make the border look intentional and finished. -
Create a Hanging Hole (Optional):
If you plan to hang this ornament, use a straw or tool to poke a clean hole near the top center V of the heart.
Step 4: Drying and Finishing
-
Drying Phase:
Place the clay heart on a flat, clean surface to dry. If using air-dry clay, let it sit for 24-48 hours away from direct heat to prevent warping. Turn it over halfway through to ensure the back dries evenly. -
Baking (If Polymer):
If using oven-bake clay, follow the manufacturer’s instructions for temperature and timing, typically baking on a flat ceramic tile or baking sheet. -
Sanding:
Once fully dry/cooled, use fine-grit sandpaper to buff away any tiny imperfections on the edges for a professional look. -
Seal beauty:
To protect the texture and deepen the terracotta color slightly, apply a light coat of matte spray varnish. This step is optional but helps with longevity.
Display your textured heart on a shelf or string it up to add a warm, handmade touch to your decor

The Complete Guide to Pottery Troubleshooting
Uncover the most common ceramic mistakes—from cracking clay to failed glazes—and learn how to fix them fast.
Botanical Pressed Flower Hearts
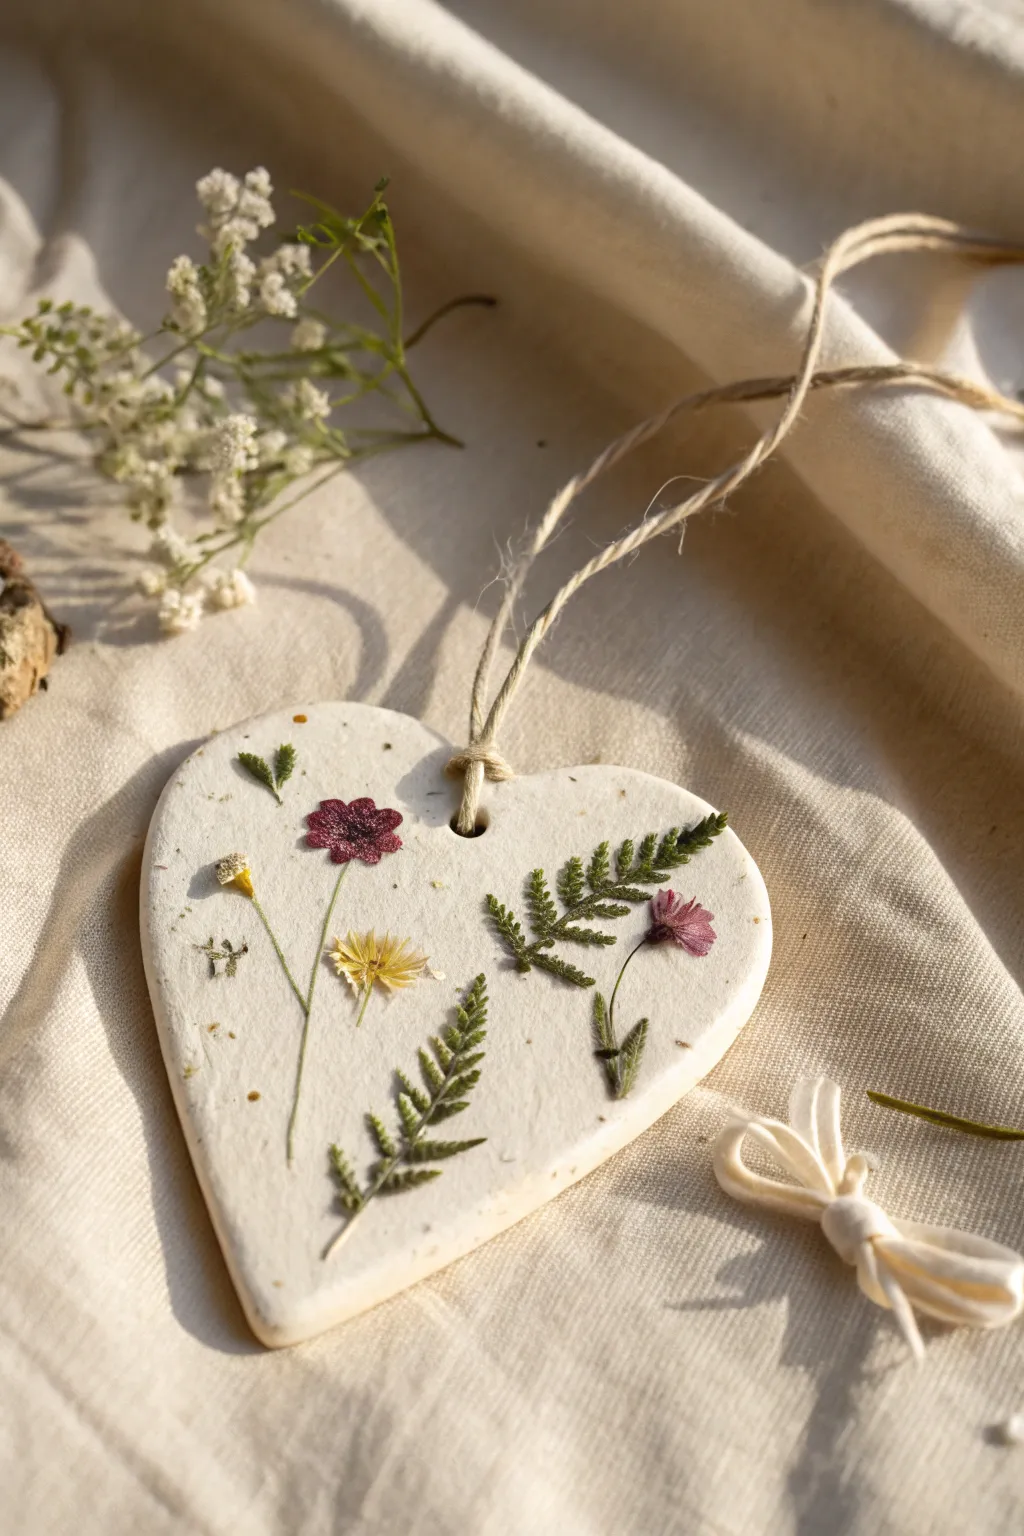
Capture the delicate beauty of nature with this elegant heart ornament, featuring real pressed ferns and tiny wildflowers embedded directly into white clay. This project combines rustic charm with botanical precision, creating a lovely keepsake or gift that freezes a moment of the garden in time.
How-To Guide
Materials
- White air-dry clay (or homemade salt dough)
- Heart-shaped cookie cutter (approx. 3-4 inches wide)
- Small rolling pin
- Parchment paper or wax paper
- Pressed dried flowers (ferns, tiny cosmos, buttercups)
- Small straw or skewer (for hole punching)
- Natural twine or jute string
- Mod Podge or clear matte craft varnish
- Soft paintbrush
- Tweezers (optional, for placement)
- Fine grit sandpaper
Step 1: Preparation & Rolling
-
Prepare your workspace:
Lay down a sheet of parchment paper on a flat surface to prevent sticking. Select your dried botanicals ahead of time so you aren’t rushing once the clay is rolled out. -
Condition the clay:
Take a handful of white air-dry clay and knead it in your hands for a minute until it feels soft, warm, and pliable. This prevents cracking later on. -
Roll out the slab:
Place the clay on the parchment paper and use your rolling pin to create an even slab. Aim for a thickness of about 1/4 inch—thick enough to be sturdy but thin enough to look delicate. -
Smooth the surface:
Inspect the clay for any air bubbles or textures from the rolling pin. Gently smooth the surface with a slightly damp finger if needed to create a pristine canvas.
Clay curling up while drying?
Air-dry clay tends to warp as moisture evaporates unevenly. Place a heavy book on top of the heart once it is half-dry (touch dry) to force it to finish drying perfectly flat.
Step 2: Botanical Composition
-
Plan your arrangement:
Before pressing anything into the clay, lightly hover your dried flowers over the surface to visualize the design. I like to start with the largest fern piece as an anchor and build around it. -
Place the greenery:
Gently lay your pressed fern fronds onto the clay. In the reference image, the ferns curve naturally to follow the shape of the heart. -
Add floral accents:
Position the small blooms—like the burgundy cosmos and yellow buttercups—among the ferns. Use tweezers if the stems are particularly fragile. -
Embed the botanicals:
Once you are happy with the arrangement, place a clean piece of parchment paper directly over the flowers. Use the rolling pin to gently roll over the stack once carefully. This presses the flowers flush into the clay without damaging them with your fingers. -
Reveal the design:
Slowly peel back the top parchment paper to reveal your embedded design. The flowers should now be sitting flush with the surface of the clay.
Add a vintage tint
For an antique look, mix a tiny drop of brown acrylic paint into your varnish or water down some coffee and lightly brush it over the dried clay before sealing for an aged, sepia tone.
Step 3: Cutting & Finishing
-
Cut the shape:
Position your heart-shaped cookie cutter over the design, ensuring the botanical arrangement is centered nicely. Press down firmly and lift the cutter straight up. -
Refine the edges:
Carefully pull away the excess clay from the outside of the heart. If the edges are jagged, dip your finger in a tiny bit of water and run it along the rim to smooth it out. -
Create the hanging hole:
Use a straw or a skewer to punch a hole at the top center of the heart, right in the ‘V’ dip. Twist the straw slightly as you pull it out to get a clean hole. -
Let it dry completely:
Leave the heart on the parchment paper to dry in a cool, dry place. Depending on your humidity and clay type, this usually takes 24 to 48 hours. Flip it over gently halfway through so the back dries evenly.
Step 4: Sealing & Stringing
-
Sand imperfections:
Once bone dry, use fine-grit sandpaper to buff away any rough spots on the edges of the heart. -
Seal the artwork:
Apply a thin coat of matte Mod Podge or varnish over the front. This protects the dried flowers from humidity and fading while keeping the clay looking natural. -
Add the twine:
Cut a 10-inch length of natural twine. Fold it in half, push the loop through the hole from front to back, and pull the tails through the loop to secure it with a lark’s head knot. -
Final trim:
Tie the loose ends of the twine together at the top and trim any excess string.
Hang your botanical heart in a window or on a handle to enjoy a touch of nature indoors all year round
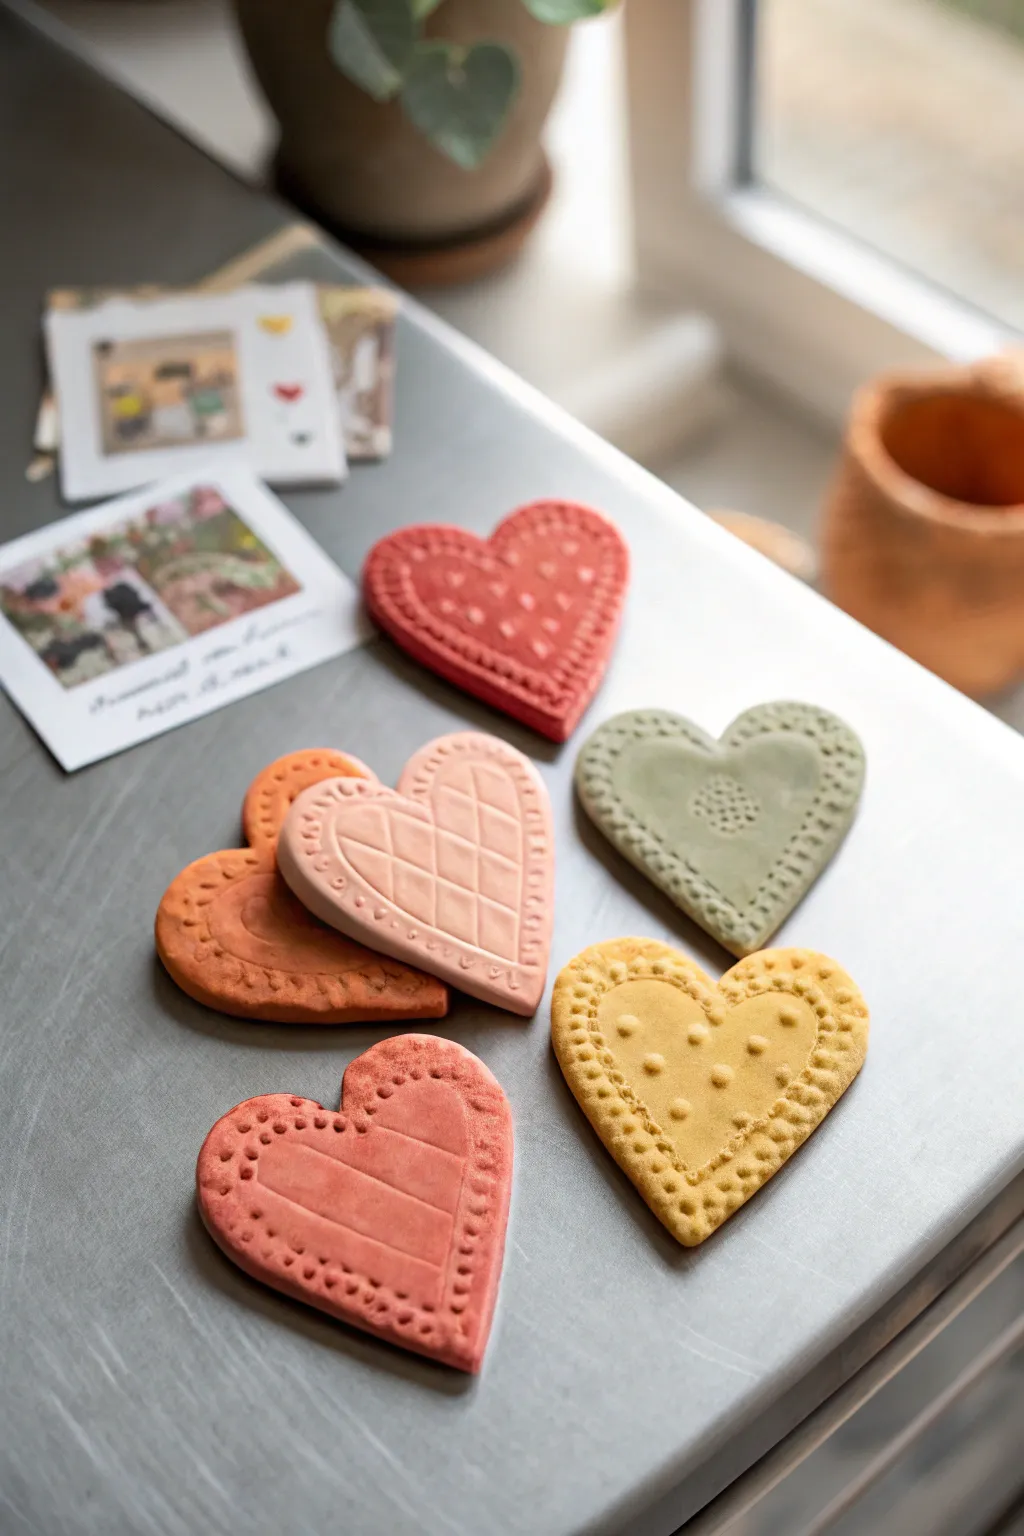
Raised Pattern Hearts With Stencils
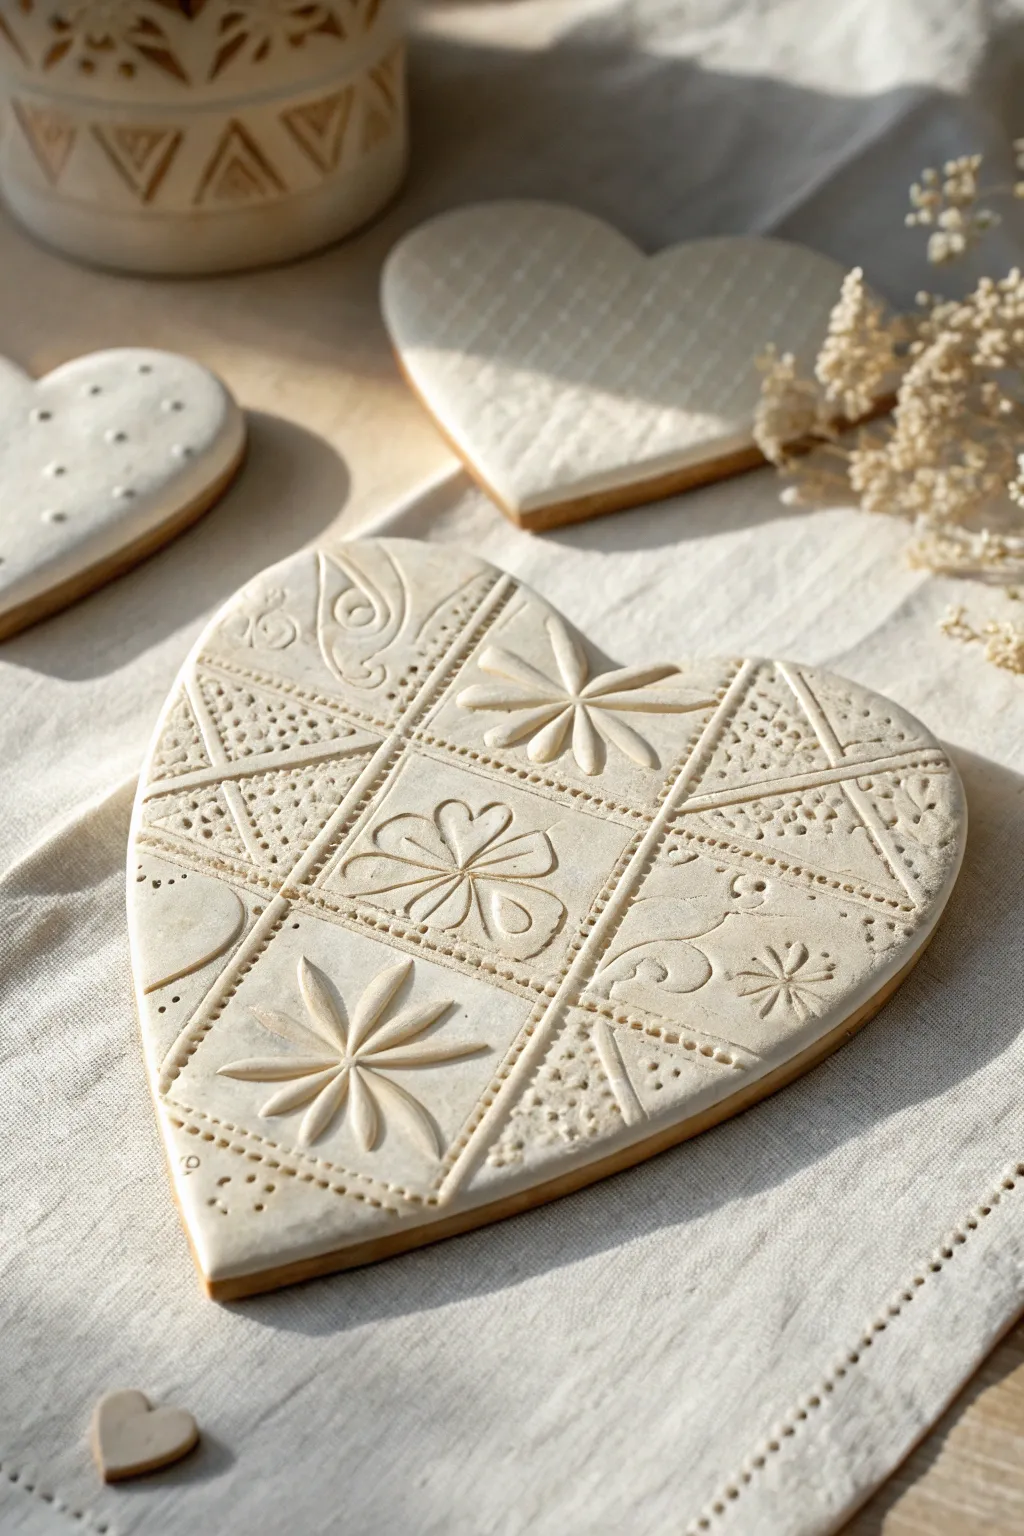
Capture the charm of vintage patchwork quilts in this elegant clay project. By combining simple geometric cutters and textured stamps, you can build a stunningly detailed heart that looks deceptively complex but comes together piece by piece.
Step-by-Step
Materials
- White polymer clay or air-dry clay (smooth texture)
- Medium-sized heart cookie cutter
- Large heart template (paper or cardstock)
- Grid texture sheet or ruler
- Small geometric clay cutters (teardrops, small hearts, diamonds)
- Needle tool or toothpick
- Acrylic rolling pin
- Parchment paper or baking mat
- Sandpaper (fine grit)
- Clear matte varnish (optional)
Step 1: Preparation & Base
-
Condition the Clay:
Begin by thoroughly kneading your white clay until it is soft, pliable, and free of any air bubbles. If using polymer clay, warmth from your hands is key here. -
Roll the Slab:
Roll out the clay on a piece of parchment paper to a uniform thickness of about 1/4 inch. It needs to be thick enough to hold the deep impressions we are about to make without warping. -
Cut the Shape:
Place your large heart template onto the clay slab use a craft knife or needle tool to trace and cut out the main heart shape. Smooth the raw edges gently with your fingertip and a little water or clay softener.
Sticky Situation?
If your tools are pulling the clay up as you lift them, dust the clay surface very lightly with cornstarch or dip your tools in water before pressing.
Step 2: Creating the Grid
-
Mark the Sections:
Using a long ruler, lightly press into the clay to create a grid pattern across the heart. You can angle these lines to create diamond shapes or keep them straight for squares, but press gently—these are just guide lines. -
Define the Borders:
Now, deepen those grid lines using a specialized stitching tool or by rolling a textured wheel along the lines to mimic a sewn seam. Alternatively, poke tiny, evenly spaced holes along the lines with a needle tool for a hand-stitched look.
Make it Organic
Don’t aim for machine perfection. Slight variations in the depth of your impressions actually enhance the hand-stitched, folk-art aesthetic.
Step 3: Embossing the Pattern
-
Plan the Patchwork:
Visualise which pattern will go in each grid square. Alternating between floral motifs, dot work, and geometric lines creates that classic sampler quilt aesthetic. -
Create Raised Florals:
For the floral squares, press a teardrop-shaped cutter gently into the clay to create petals. Don’t cut all the way through; just impress the shape deeply. -
Add Centers:
Use a small ball tool or the head of a pin to press a center dot into your flower shapes, connecting the teardrop petals. -
Stipple Texture:
Select a few grid sections to fill with texture. Use a dull pencil point or small dotting tool to fill triangular sections with dense, tiny dots. This contrast makes the smooth areas pop. -
Swirl Details:
In the remaining open squares, freehand simple swirls or paisley shapes using a needle tool. Keep the pressure consistent so the lines are clean. -
Refine the Edges:
Check the outer perimeter of the heart again. If the handling has distorted the shape, gently nudge it back into place and smooth any fingerprints.
Step 4: Finishing
-
Dry or Bake:
If using polymer clay, bake according to the package instructions on a flat tile to prevent curling. For air-dry clay, leave it in a cool, dry place for 24-48 hours, flipping it occasionally. -
Sanding:
Once fully cured and hard, take a piece of fine-grit sandpaper and lightly buff the surface. I find this removes any sharp burrs from the tool impressions and gives the piece a professional, stone-like feel. -
Seal (Optional):
To protect the white surface from dust over time, apply a very thin coat of matte varnish. Avoid glossy finishes, as the matte look mimics the texture of fabric or unglazed ceramic best.
Display your textured heart on a shelf or attach a ribbon to the back for a beautiful wall hanging


What Really Happens Inside the Kiln
Learn how time and temperature work together inside the kiln to transform clay into durable ceramic.
Mini Heart Garland Strand
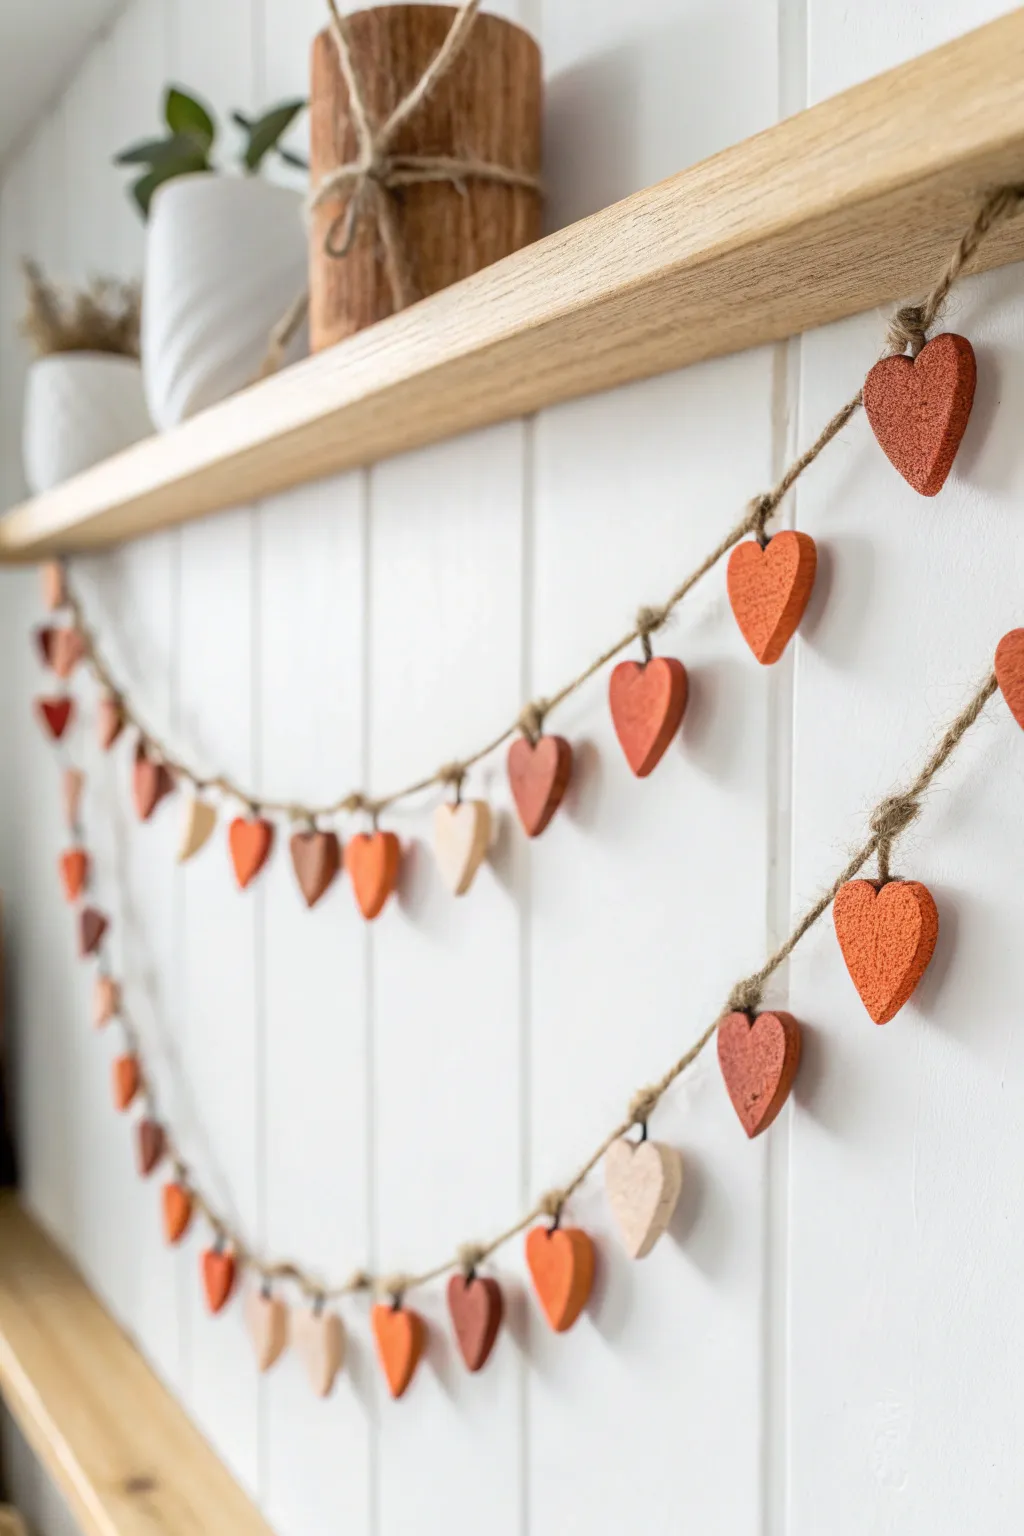
These charming, terracotta-toned heart garlands add a warm, handmade touch to any mantel or shelf. The slightly imperfect, matte finish of the clay hearts strung on natural jute creates a perfect balance of rustic elegance and seasonal cheer.
Step-by-Step
Materials
- Air-dry clay (terra cotta and white)
- Small heart-shaped cookie cutter (approx. 1-1.5 inches)
- Rolling pin
- Parchment paper or non-stick craft mat
- Jute twine (thin to medium thickness)
- Needle tool, toothpick, or skewer
- Fine-grit sandpaper (optional)
- Acrylic paints (burnt orange, rust, cream, beige)
- Matte sealant spray or Mod Podge (matte)
- Small paintbrushes
- Scissors
Step 1: Shaping the Clay Hearts
-
Prepare your workspace:
Lay down a sheet of parchment paper or a non-stick craft mat to protect your work surface and prevent the clay from sticking. -
Mix your clay tones:
If you want the natural marbled look seen in the photo, take a chunk of terracotta clay and a smaller chunk of white clay. Twist and fold them together just a few times—don’t overmix—until you have a nice streakiness. -
Roll out the slab:
Use your rolling pin to flatten the clay to an even thickness. Since these are small hearts, aim for about 1/4 inch thick to ensure they are durable but not too heavy. -
Cut the shapes:
Press your heart-shaped cookie cutter firmly into the clay slab. Create as many hearts as you need for your desired garland length; wiggle the cutter slightly before lifting to release the edges clean. -
Smooth the edges:
Dip your finger in a little bit of water and gently run it along the cut edges of each heart to smooth out any roughness or stray clay bits. -
Create the holes:
While the clay is still wet, use a needle tool or skewer to poke a hole horizontally through the top lobes of the heart. Ensure the hole is wide enough for your jute twine to pass through later. -
Let them dry:
Place the hearts on a wire rack or leave them on parchment paper to dry completely. This usually takes 24-48 hours depending on humidity; turn them over halfway through so both sides dry evenly.
Needle Tool Trick
Can’t get the twine through? Instead of a horizontal hole, poke a vertical hole from top to bottom before drying. Just add a knot below the heart to hold it.
Step 2: Painting and Finishing
-
Sand imperfections:
Once bone dry, check your hearts for any sharp points. I like to lightly buff the edges with fine-grit sandpaper for a really professional, smooth finish. -
Mix custom paint colors:
To match the reference image, mix acrylic paints to create a palette of warm earth tones: deep rust, soft terracotta, creamy beige, and a muted pumpkin orange. -
Paint the hearts:
Apply the paint in thin, even coats. Some hearts can be left the natural clay color, while others get painted. Paint both sides so the garland looks good from any angle. -
Create texture:
For that stone-like texture seen in the photo, try dabbing the wet paint with a dry sponge or paper towel rather than brushing it on smoothly. -
Seal the surface:
To protect the clay and prevent chalkiness, apply a coat of matte sealant or matte Mod Podge. Avoid gloss finishes to maintain the rustic aesthetic.
Clay Cracking?
Cracks often happen if clay dries too fast. Keep them away from direct heat sources or vents while drying, and cover loosely with plastic wrap for the first 12 hours.
Step 3: Assembly
-
Measure the twine:
Cut a length of jute twine roughly 1-2 feet longer than your desired garland span to account for the drape and hanging loops. -
Tie the hanging loops:
Create a simple overhand knot loop at one end of the twine so you can easily hang the finished piece. -
String the first heart:
Thread the twine through the hole of your first heart. If the jute frays, wrap a tiny piece of tape around the end to make a stiff ‘needle’. -
Secure with knots:
Tie a small, discreet knot in the twine right above the heart. This keeps the heart in place and prevents them all from sliding to the center of the garland. -
Continue spacing:
Measure about 3-4 inches from your first knot, tie a new knot, add the next heart, and secure it. Repeat this pattern, alternating colors randomly for an organic look. -
Final adjustment:
Once all hearts are strung, tie a finishing loop at the other end. Gently twist the hearts so they all face forward when the garland hangs.
Now you have a beautiful, earthy decoration that brings a sweet warmth to your home year-round
Layered Color-Block Heart Plaque
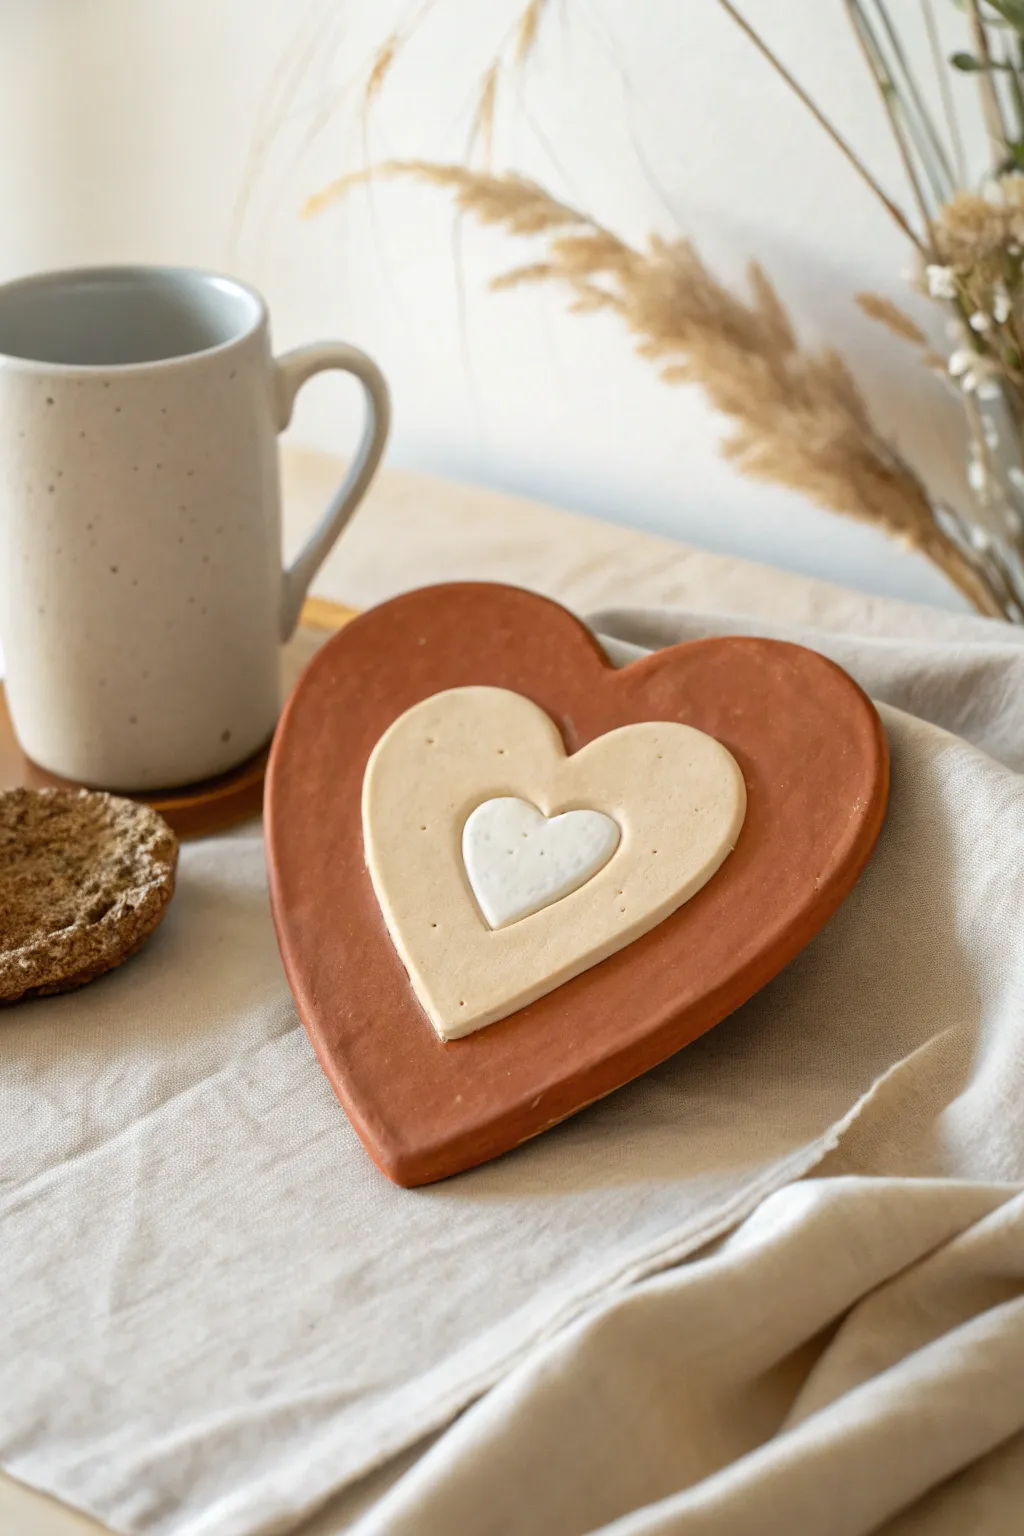
Embrace the earthy warmth of clay with this simple yet striking stacked heart plaque. Featuring three distinct layers in gradients of terracotta, cream, and white, this piece creates a lovely dimensional effect perfect for a coffee table or wall accent.
Step-by-Step Tutorial
Materials
- Air-dry clay (terracotta color)
- Air-dry clay (white)
- Acrylic paint (beige or cream) – optional if mixing clay
- Rolling pin
- Parchment paper or craft mat
- Heart-shaped cookie cutters (3 sizes: large, medium, small)
- Small cup of water
- Sandpaper (fine grit)
- Clear matte varnish or sealant
- Sponge or craft knife
Step 1: Preparing the Clay Colors
-
Condition the base clay:
Start with a large chunk of the terracotta-colored clay. Knead it in your hands until it is warm, pliable, and free of any air bubbles. -
Create the middle shade:
For the middle creamy-beige heart, you can either use a pre-colored beige clay or mix a small amount of the terracotta clay into a larger ball of white clay. Knead until the color is completely uniform and streak-free. -
Prepare the center:
Take a small amount of pure white clay for the tiniest heart and condition it just like the others until soft.
Clean Cuts Only
If your clay sticks to the cookie cutter, dip the cutter in a little cornstarch or water before pressing it down. This acts as a release agent for perfect edges.
Step 2: Rolling and Cutting
-
Roll out the base:
Place the terracotta clay on parchment paper. Use your rolling pin to flatten it to an even thickness of about 1/4 inch (6mm). Try to keep the surface smooth. -
Cut the large heart:
Press your largest heart-shaped cutter firmly into the rolled terracotta clay. Wiggle it slightly to ensure a clean cut, then remove the excess clay around the edges. -
Smooth the edges:
Check the edges of your large heart. If they look rough, dip your finger in a little water and gently run it along the rim to soften any sharp lines. -
Roll the middle layer:
Repeat the rolling process with your beige/cream clay mixture. You can roll this layer slightly thinner than the base if you prefer less bulk, or keep it consistent. -
Cut the medium heart:
Use the medium-sized cutter to stamp out the second layer. Again, smooth the edges with a slightly damp fingertip. -
Cut the center heart:
Roll out the white clay and cut your smallest heart shape. This one is delicate, so careful handling is key to keep its shape.
Make It Hangable
Before drying, use a straw to poke a hole near the top of the largest heart. Thread with twine or leather cord after painting for a beautiful wall hanging.
Step 3: Assembly and Finishing
-
Score the surfaces:
To help the layers stick, take a craft knife or a toothpick and lightly scratch (score) the center of the large heart and the back of the medium heart. -
Apply slip or water:
Dab a tiny drop of water or liquid clay slip onto the scratched area of the large terracotta heart. -
Attach the middle layer:
Center the beige heart on top of the terracotta one. Press down gently but firmly to bond them without distorting the shapes. -
Attach the top layer:
Repeat the scoring and wetting process between the beige heart and the small white heart. Press the white heart into the very center. -
Add detail:
If you look closely at the inspiration, there are faint pin-pricks possibly from air bubbles or texture; you can replicate this by gently tapping the surface with a coarse sponge or a toothbrush for an organic look. -
Dry thoroughly:
Let the assembled piece dry on a flat surface for 24-48 hours. I usually flip mine over halfway through drying so the bottom gets air too. -
Sand imperfections:
Once fully hard, take your fine-grit sandpaper and lightly buff any rough spots on the edges. -
Seal the piece:
Apply a thin coat of clear matte varnish to protect the clay while maintaining that natural, earthy finish.
Now you have a charming piece of decor that brings a warm, minimalist touch to your space

TRACK YOUR CERAMIC JOURNEY
Capture glaze tests, firing details, and creative progress—all in one simple printable. Make your projects easier to repeat and improve.
Tiny Clay Heart Buttons
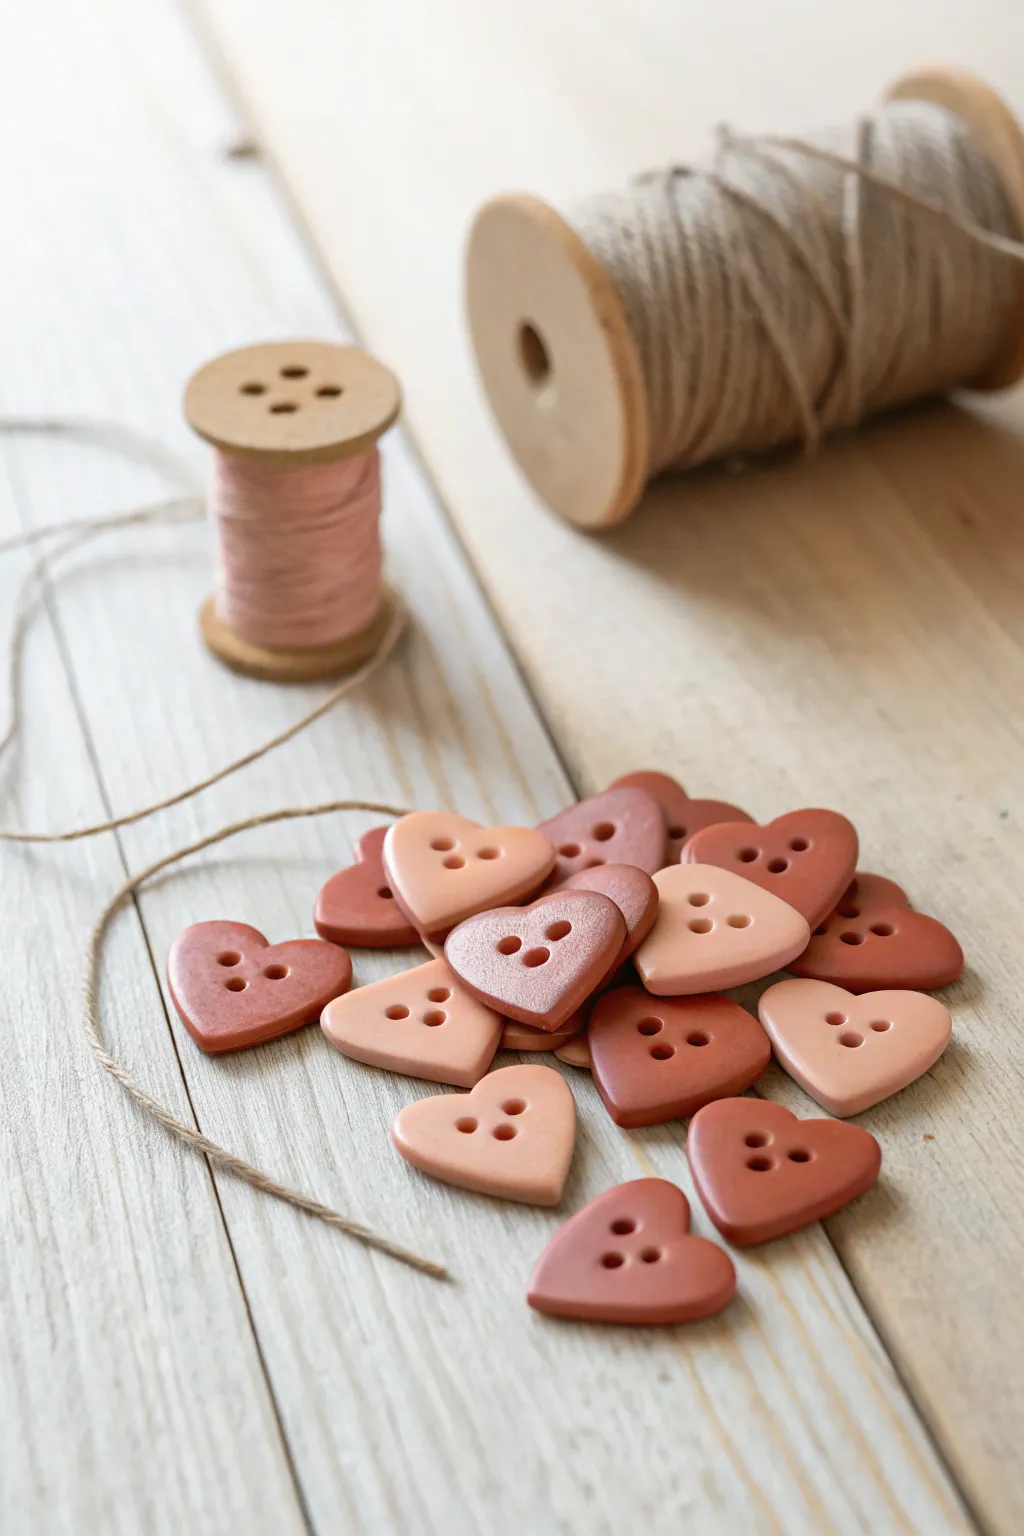
These charming little heart-shaped buttons add a handmade touch to any garment or craft project, featuring a warm palette of terracotta, blush, and peach tones. Their smooth finish and rustic shape give them an artisanal quality that looks wonderful paired with natural fibers like linen or wool.
Step-by-Step Guide
Materials
- Polymer clay (terracotta, beige, pink, white)
- Acrylic rolling pin or pasta machine
- Small heart-shaped cutter (approx. 0.5 – 0.75 inch)
- Parchment paper or ceramic tile
- Toothpick or 2mm circular detail tool
- Fine-grit sandpaper (400 and 800 grit)
- Matte polymer clay varnish (optional)
- Soft brush
Step 1: Preparing and Mixing the Clay
-
Condition the clay:
Start by warming up your polymer clay in your hands. Knead each color block separately until it becomes soft, pliable, and free of cracks. -
Create custom shades:
To achieve the varied palette shown in the photo, mix your colors. Combine terracotta with a little white for a muted brick red, and mix pink with beige for a soft, dusty rose. -
Roll out the slab:
Place your conditioned clay on a piece of parchment paper. Use your acrylic roller or pasta machine to roll the clay out to a uniform thickness, aiming for about 3mm (1/8 inch) so the buttons are sturdy but not bulky.
Clean Cut Tip
Place a piece of cling wrap over the clay before using your cutter. This creates a lovely, rounded ‘pillow’ edge on the heart instead of a sharp, flat cut.
Step 2: Shaping the Buttons
-
Cut the hearts:
Press your small heart-shaped cutter firmly into the clay slab. Lift the cutter straight up to ensure clean edges, repeating until you have cut as many shapes as needed. -
Smooth the edges:
Gently pick up each clay heart. Use your fingertip to lightly tap and smooth the cut edges, softening any sharpness from the cutter so the finished button won’t snag on fabric. -
Mark hole placement:
Before piercing, use the tip of a toothpick to make two tiny indents in the center of the heart to mark exactly where your buttonholes will go. Ensure they are centered and horizontally aligned. -
Pierce the holes:
Using a toothpick or a small circular tool, press straight down through the marked spots to create the holes. Wiggle the tool slightly in a circular motion to widen the opening enough for a needle and thread. -
Check the underside:
Flip the heart over and inspect the back. Often, piercing creates a small exit bump; gently smooth this flat with your finger so the button sits flush against fabric.
Step 3: Baking and Finishing
-
Prepare for baking:
Arrange your raw clay hearts on a ceramic tile or a baking sheet lined with clean parchment paper, ensuring they aren’t touching each other. -
Bake the buttons:
Bake the clay according to the manufacturer’s specific instructions (usually around 275°F or 135°C for 15-30 minutes). I find covering the tray with foil helps prevent scorching on lighter colors. -
Cool completely:
Once baked, remove the tray from the oven and let the buttons cool completely. Do not handle them while hot, as polymer clay is fragile until it has fully set. -
Sand for smoothness:
Using 400-grit sandpaper, gently wet-sand the edges and surface of each button under a trickle of water to remove any fingerprints or texture. Finish with 800-grit for a satin-smooth feel. -
Clean the holes:
Double-check the buttonholes after sanding. If any clay dust is stuck inside, use a clean toothpick or needle to clear the passage. -
Seal (Optional):
If you want extra durability, apply a very thin layer of matte varnish with a soft brush. Let it dry completely before using the buttons.
Sticky Situation?
If the clay sticks to your cutter, dip the cutter into cornstarch or water before pressing it into the clay to ensure a quick and clean release.
Sew these darling accents onto cardigans or pouches for an instant upgrade
Heart Magnets for Notes and Photos
These charming, dusty-toned heart magnets bring a touch of handmade warmth to any refrigerator or magnetic board. Featuring intricate surface patterns created with simple tools, they are perfect for holding up cherished photos and notes.
Step-by-Step Tutorial
Materials
- Air-dry clay (white or terracotta)
- Acrylic paints (dusty pink, sage green, mustard yellow, burnt orange, terracotta)
- Small magnets (round ceramic or neodymium)
- Strong craft glue (E6000 or similar)
- Rolling pin
- Heart-shaped cookie cutters (various sizes)
- Texture tools (toothpicks, skewers, lace, or stamps)
- Fine-grit sandpaper
- Matte varnish or sealant
- Parchment paper
Step 1: Shaping and Texturing
-
Prepare the clay:
Begin by kneading a portion of air-dry clay until it is soft, pliable, and free of cracks. If the clay feels too dry, wet your fingers slightly and work moisture back into it. -
Roll it out:
Place the clay on a sheet of parchment paper to prevent sticking. Use a rolling pin to flatten the clay to an even thickness of about 1/4 inch (6mm). You want them thick enough to be sturdy but not so heavy they slide down the fridge. -
Cut the shapes:
Press your heart-shaped cookie cutters firmly into the clay. Lift the cutter and gently remove the excess clay from around the shapes before lifting the hearts themselves. -
Smooth the edges:
Dip your finger in a little water and run it along the cut edges of each heart to soften any sharp ridges left by the cutter. -
Add dotted borders:
For the dotted designs, take a toothpick or a small dull skewer. Gently press a series of dots around the perimeter of the heart, keeping the spacing consistent. Vary the pressure to create deeper or shallower impressions. -
Create linear patterns:
Use the side of a credit card or a clay knife to gently press grid lines or horizontal stripes into the surface of other hearts. Don’t cut all the way through; just press deep enough to leave a visible texture. -
Impress center details:
For the floral-style center seen on the green heart, press a small circular object into the middle, then use a toothpick to poke holes inside that circle to mimic seeds or pollen. -
Dry completely:
Lay the finished hearts on a flat surface lined with fresh parchment paper. Let them air dry for 24-48 hours. Flip them over halfway through the drying process to ensure the backs dry evenly and prevent curling.
Preventing Curled Edges
If your clay hearts curl upward while drying, place a heavy book over them (with parchment paper in between) once they are semi-dry to flatten them back out.
Step 2: Painting and Finishing
-
Sand imperfections:
Once fully dry and hard, lightly sand the edges with fine-grit sandpaper if there are any rough spots remaining. -
Mix your palette:
Prepare your acrylic paints. To achieve the dusty, earthy look shown in the example, mix a tiny dot of brown or grey into your primary colors (pink, yellow, green) to desaturate them. -
Apply base coat:
Paint the entire surface of each heart. I find using a fairly stiff brush helps push the paint into the recessed texture marks. -
Enhance texture:
If the texture gets lost under the paint, you can lightly wipe the surface with a damp paper towel while the paint is still wet, leaving more pigment in the grooves and less on the high points. -
Let paint cure:
Allow the paint to dry completely. This usually takes about 20-30 minutes for acrylics. -
Seal the surface:
Apply a coat of matte varnish or sealant. This protects the clay from moisture and gives the magnets a finished professional look without making them too shiny. -
Attach the magnet:
Turn the hearts over. Apply a dab of strong craft glue to the back center of each heart and press a magnet firmly into the glue. -
Final cure:
Let the glue set according to the manufacturer’s instructions (usually 24 hours for full strength) before placing them on your fridge.
Instant Texture Tools
Look around your kitchen for texture tools. The ends of piping tips, textured drinking glasses, or fork tines make incredible patterns pressed into clay.
Now you have a beautiful set of custom magnets ready to display your favorite memories
Heart Ring Holder Stand
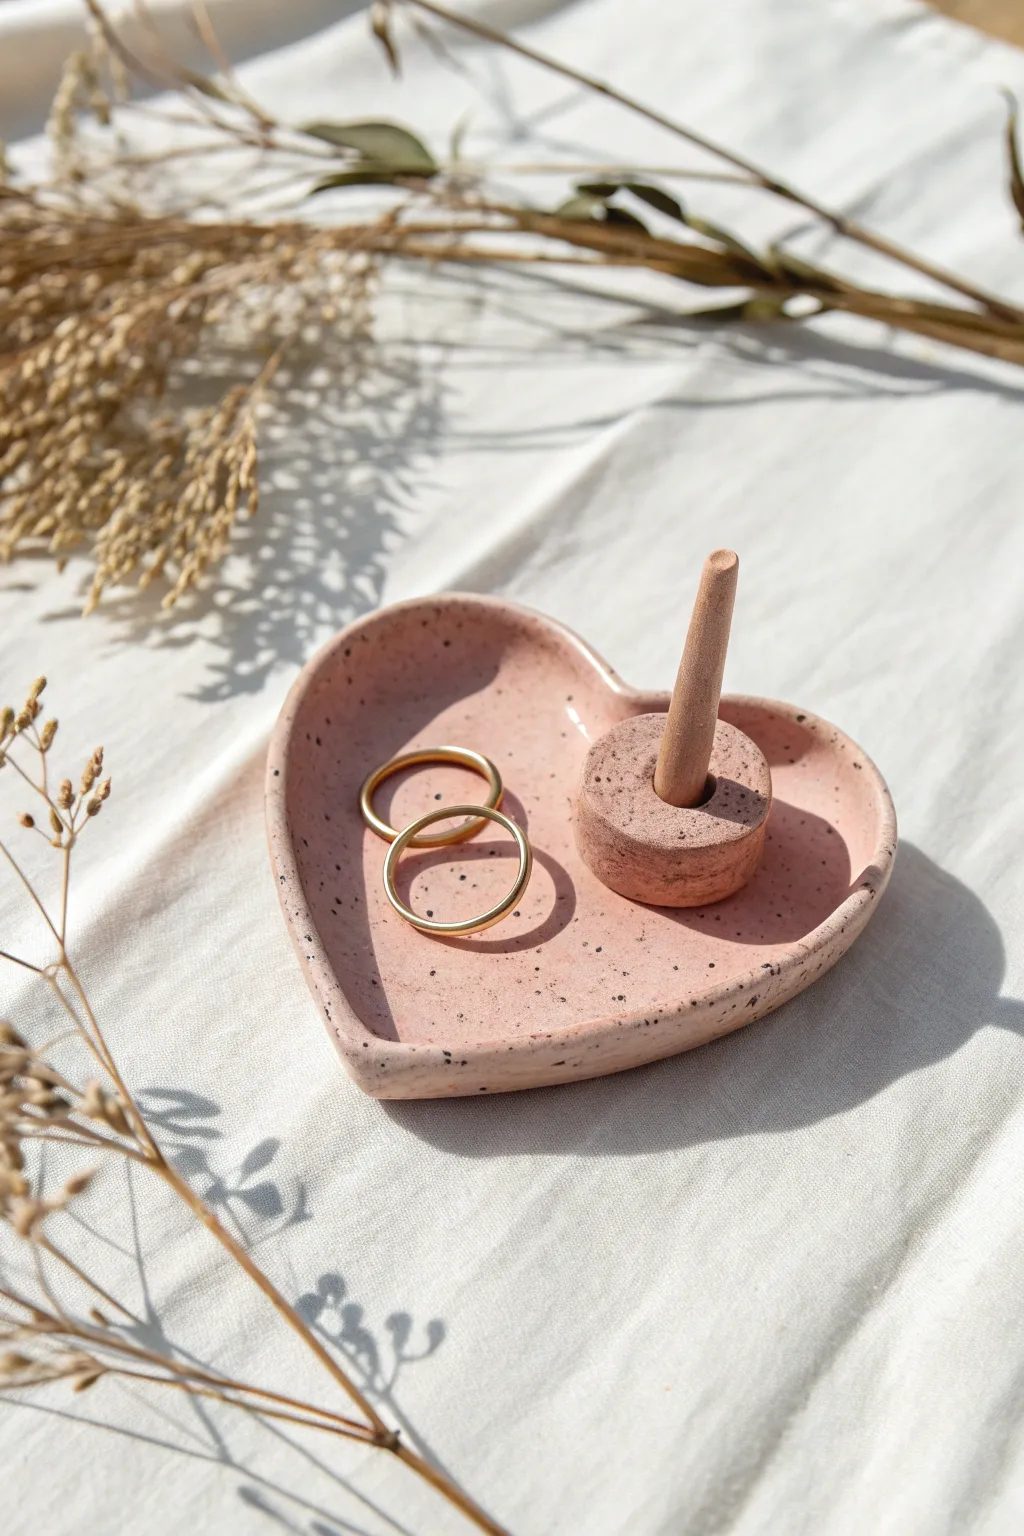
This charming, dusty pink ring dish combines modern speckled clay with a functional design for your favorite trinkets. The heart-shaped base features gently curved edges, while the sturdy center post keeps your rings secure and beautifully displayed.
Detailed Instructions
Materials
- Polymer clay (dusty pink or terracotta color)
- Black pepper or dried coffee grounds (for speckles)
- Rolling pin or acrylic roller
- Heart-shaped cookie cutter (large)
- Craft knife or scalpel
- Small circle cutter
- Sandpaper (fine grit)
- Oven for baking (if using polymer clay)
- Gloss or matte varnish (optional)
Step 1: Preparing the Clay
-
Condition the clay:
Begin by kneading your polymer clay until it is soft and pliable. If you are mixing colors to achieve a custom pink, blend them thoroughly now until no streaks remain. -
Add texture:
To create the speckled stone effect seen in the photo, sprinkle a small amount of coarse black pepper or dried coffee grounds onto your flattened clay. Fold the clay over and knead it again to distribute the specks evenly throughout the block. -
Roll it out:
Roll the clay out on a smooth surface until it is about 1/4 inch thick. Aim for an even thickness so the dish sits flat. I like to use depth guides or playing cards on either side of the roller to ensure it’s perfectly level.
Clean Cuts
Place a piece of plastic wrap over the clay before using your cookie cutter. This creates a beautifully rounded, ‘domed’ edge rather than a sharp, flat cut.
Step 2: Shaping the Base
-
Cut the heart:
Press your large heart-shaped cutter firmly into the rolled clay. If you don’t have a cutter, you can print a heart template on paper, lay it over the clay, and carefully trace around it with a craft knife. -
Smooth the edges:
Gently run your finger along the cut edge of the heart to soften any sharpness left by the cutter. This gives the piece a more finished, ceramic look. -
create the curve:
Pick up the clay heart and gently pinch the edges upward all around the perimeter. You want to create a slight lip or bowl shape so small items won’t roll off. -
Refine the shape:
Place the curved heart back onto your baking surface. Press the center down very lightly to ensure the bottom is flat and stable, while maintaining the lifted edges.
Step 3: Creating the Ring Post
-
Make the post base:
Roll out a small scrap of clay a bit thicker than the base, about 3/8 inch. Use a small circle cutter (about 1 inch diameter) to punch out a round pedestal. -
Shape the cone:
Take a small ball of clay and roll it into a snake, focusing pressure on one side to create a tapered cone shape. It should look like a ring sizer mandrel—thicker at the bottom and thinner at the top. -
Trim the cone:
Cut the bottom of your tapered cone straight across so it stands vertically. Check the height against your base to ensure it looks balanced. -
Assemble the post:
Score the top center of the round pedestal and the bottom of the cone with a needle tool or toothpick. Add a drop of liquid clay or bake-and-bond adhesive, then press the cone firmly onto the pedestal. -
Blend the seam:
Use a silicone tool or your finger to smooth the seam where the cone meets the round pedestal, making it look like one continuous piece.
Gold Rim Upgrade
After baking, paint the very edge of the heart rim with liquid gold leaf or metallic acrylic paint for a chic, high-end jewelry store finish.
Step 4: Assembly and Finishing
-
Attach to base:
Position your ring post assembly onto the heart dish. It usually looks best slightly off-center or nestled near the dip of the heart. Score both contact surfaces, apply liquid clay, and press down gently. -
Final smooth:
Do a final check for fingerprints. You can lightly brush the clay with a little baby oil or cornstarch to smooth out any unwanted marks before baking. -
Bake:
Bake the piece according to your clay package instructions. Usually, this means low heat (around 275°F or 130°C) for 15-30 minutes depending on thickness. -
Cool down:
Allow the piece to cool completely in the oven before removing it. This helps prevent cracking from thermal shock. -
Sand and finish:
Once cool, use fine-grit sandpaper to gently buff any rough edges on the rim or bottom. If you prefer a shiny look, apply a thin coat of glaze; otherwise, leave it matte for that natural stone aesthetic.
Now you have a sweet, handmade spot to keep your treasures safe and organized
Simple Heart Pendant Necklace
Embrace the beauty of simplicity with this charmingly rustic heart pendant crafted from air-dry clay. Its speckled, stone-like texture and natural jute cord create an organic look perfect for everyday wear or whimsical decor.
Step-by-Step
Materials
- White air-dry clay (or polymer clay with a stone finish)
- Rolling pin or smooth glass jar
- Heart-shaped cookie cutter (approx. 2-3 inches)
- Drinking straw or small circular cutter
- Fine-grit sandpaper
- Jute twine or hemp cord
- Parchment paper or baking mat
- Soft sponge (optional for smoothing)
- Matte sealant (optional)
Step 1: Shaping the Clay
-
Prepare your workspace:
Lay down a sheet of parchment paper or a silicone baking mat to prevent the clay from sticking to your table. This also makes transferring the delicate shape easier later. -
Condition the clay:
Take a handful of white air-dry clay and knead it in your hands for a minute until it is soft, pliable, and free of cracks. Warming it up prevents crumbling. -
Roll out the slab:
Place the ball of clay on your mat and gently roll it out using a rolling pin. Aim for an even thickness of about 1/4 inch (6mm). Don’t make it too thin, or it might be brittle. -
Cut the heart shape:
Position your heart-shaped cookie cutter on the smoothest part of the clay slab. Press down firmly and evenly, giving it a tiny wiggle to ensure a clean cut before lifting the cutter away. -
Smooth the edges:
Dip your finger in a tiny bit of water and run it gently along the cut edges of the heart to soften any sharp ridges left by the cutter. You want a rounded, pebble-like feel. -
Create the hole:
Using a drinking straw or a small circular cutter, punch a hole near the top center of the heart, right in the ‘V’ dip. Twist the straw slightly as you pull it out to remove the clay core cleanly.
Step 2: Texturing and Drying
-
Add subtle texture:
To achieve the rustic look seen in the photo, lightly press a piece of coarse fabric, sandpaper, or even a clean toothbrush onto the surface. You just want tiny indentations, not a deep pattern. -
Check the back:
Carefully lift the heart to ensure it isn’t stuck. If the back looks rough, smooth it quickly with a damp finger so it lays flat against your chest or wall. -
Begin the drying process:
Leave the heart on the parchment paper in a safe, dry place away from direct heat sources. If you are using air-dry clay, allow it to sit undisturbed for at least 24 hours. -
Flip for even drying:
I usually like to flip the piece over halfway through the drying time—around the 12-hour mark—to prevent the edges from curling upward as moisture evaporates. -
Sanding imperfections:
Once the clay is completely bone dry and hard, take a piece of fine-grit sandpaper and very gently buff the edges and surface. Focus on smoothing out any fingerprints or sharp burrs near the hole. -
Seal (Optional):
For longevity, brush on a thin layer of matte varnish. This keeps the look natural but protects the white clay from oils or dirt.
Cracks Appearing?
If you see tiny fissures as the clay dries, mix a small amount of fresh clay with water to make a paste and fill them in, then sand smooth once dry.
Step 3: Stringing
-
Prepare the cord:
Cut a length of natural jute twine or hemp cord. A 30-inch piece is usually sufficient for a necklace that slips over the head, but you can adjust based on preference. -
Thread the pendant:
Fold the twine in half to find the center loop. Push this loop through the hole in the heart from the front to the back. -
Secure with a lark’s head knot:
Pull the two loose tail ends of the twine through the loop you just pushed through the hole. Pull tight so the twine cinches securely at the top of the heart. -
Add a decorative knot:
Tie a simple overhand knot with both strands right above the lark’s head knot. This adds a bit of bulk and rustic charm, mimicking the style in the image. -
Finish the necklace:
Tie the two loose ends of the twine together at your desired length using a sturdy square knot, trim any excess, and your natural clay pendant is ready to wear.
Make it Scented
Since terracotta and air-dry clays are porous, add a drop of essential oil to the back of the finished pendant to use it as a personal diffuser.
Enjoy the organic elegance of your handmade pendant, a perfect little token of affection or style
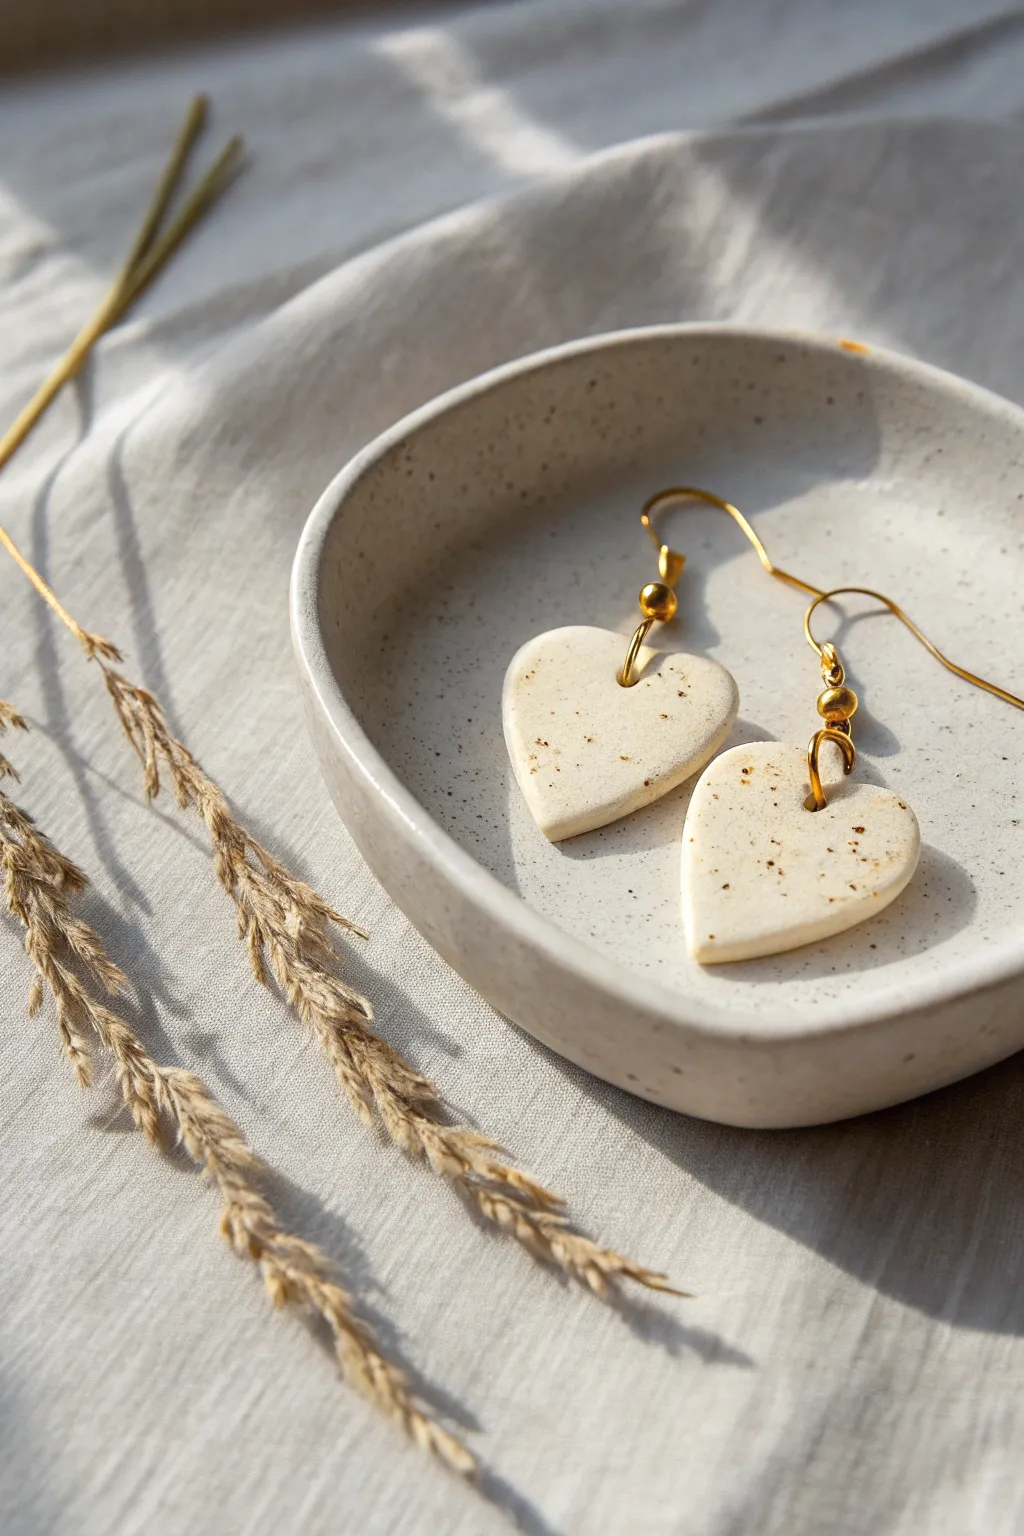
Dainty Heart Dangle Earrings
These elegant dangle earrings feature soft, cream-colored clay hearts with delicate brown speckling that mimics the look of natural stoneware or rustic pottery. Suspended from gold hooks, they offer a dainty yet earthy accessory perfect for everyday wear.
Step-by-Step Guide
Materials
- White or cream polymer clay
- Brown polymer clay (very small amount) or translucent clay mixed with brown acrylic paint
- Rolling pin or pasta machine
- Small heart-shaped clay cutter (approx. 1 inch)
- Needle tool or toothpick
- Gloss or matte glaze (optional)
- Gold earring hooks (fishhook style)
- Gold jump rings (6mm or 7mm)
- Gold crimp beads or small spacer beads
- Jewelry pliers (round nose and flat nose)
- Ceramic tile or baking sheet
- Fine grit sandpaper (wet/dry)
Step 1: Preparing the Speckled Clay
-
Condition the base clay:
Start by conditioning your white or cream polymer clay until it is soft and pliable. Warm it in your hands and roll it into a smooth ball to ensure there are no air bubbles. -
Create the ‘pepper’:
Take a tiny amount of brown clay—you need surprisingly little for this effect. Finely chop or grate this brown clay into tiny, dust-like particles. If you want a more organic look, vary the size of the crumbs slightly. -
Mix to create speckles:
Sprinkle the brown crumbs over your flattened white clay. Fold the clay over itself and roll it out, then fold again. Repeat this process until the brown specks are distributed evenly throughout the white clay without blending into a solid color. -
Roll the slab:
Roll your speckled clay out to a uniform thickness, aiming for about 3mm to 4mm. I like to use depth guides or playing cards on either side of the rolling pin to ensure the slab is perfectly level.
Natural Speckle Trick
Instead of brown clay, try mixing real cracked black pepper or dried coffee grounds into the white clay. It creates an authentic, organic texture that looks just like ceramic stoneware.
Step 2: Shaping and Baking
-
Cut the shapes:
Press your small heart-shaped cutter firmly into the clay slab. Wiggle it slightly to ensure a clean cut, then lift the cutter. Repeat for as many earrings as you plan to make. -
Smooth the edges:
Gently lift the hearts. Use your fingertip to lightly smooth the raw edges where the cutter might have left a ridge, softening the silhouette. -
Pierce the holes:
Using a needle tool or a toothpick, carefully poke a hole at the top center of each heart. Make sure the hole is large enough to accommodate your jump rings later, keeping in mind the clay won’t shrink significantly. -
Bake the pieces:
Place your clay hearts on a ceramic tile or a parchment-lined baking sheet. Bake according to the manufacturer’s instructions for your specific brand of clay—usually around 275°F (135°C) for 30 minutes. -
Cool and finish:
Allow the pieces to cool completely in the oven or on the tray. Once hard, you can lightly sand any rough spots on the edges with fine-grit wet sandpaper for a professional finish. -
Seal (Optional):
If you prefer a glossy pottery look, brush on a thin layer of polymer clay glaze. For a natural matte stone look like the photo, you can skip this step.
Level Up: Texture
Before cutting the heart shapes, gently press a piece of coarse sandpaper or a rough stone onto the clay surface to give the ‘ceramic’ a realistic, tactile stone finish.
Step 3: Assembly
-
Prepare the findings:
Layout your gold earring hooks, jump rings, and the small gold spacer beads. -
Open the jump rings:
Using two pairs of pliers, twist a jump ring open sideways (never pull the ends apart outward, as this weakens the metal). -
Connect the clay:
Slide the open jump ring through the hole you pierced in the clay heart. -
Add the bead accent:
Before closing the ring or adding the hook, thread a small gold spacer bead onto the jump ring so it sits on top of the heart. -
Attach the hook:
Slide the loop of the earring hook onto the jump ring as well. Ensure the hook is facing the correct direction relative to the front of the heart. -
Close the ring:
Using your pliers, twist the jump ring back into a closed position, ensuring the ends meet perfectly flush so the components don’t slip out. -
Repeat:
Repeat the assembly process for the second earring to complete the pair.
Now you have a pair of timeless, handmade earrings ready to gift or wear.
Initial Heart Keychain Charm
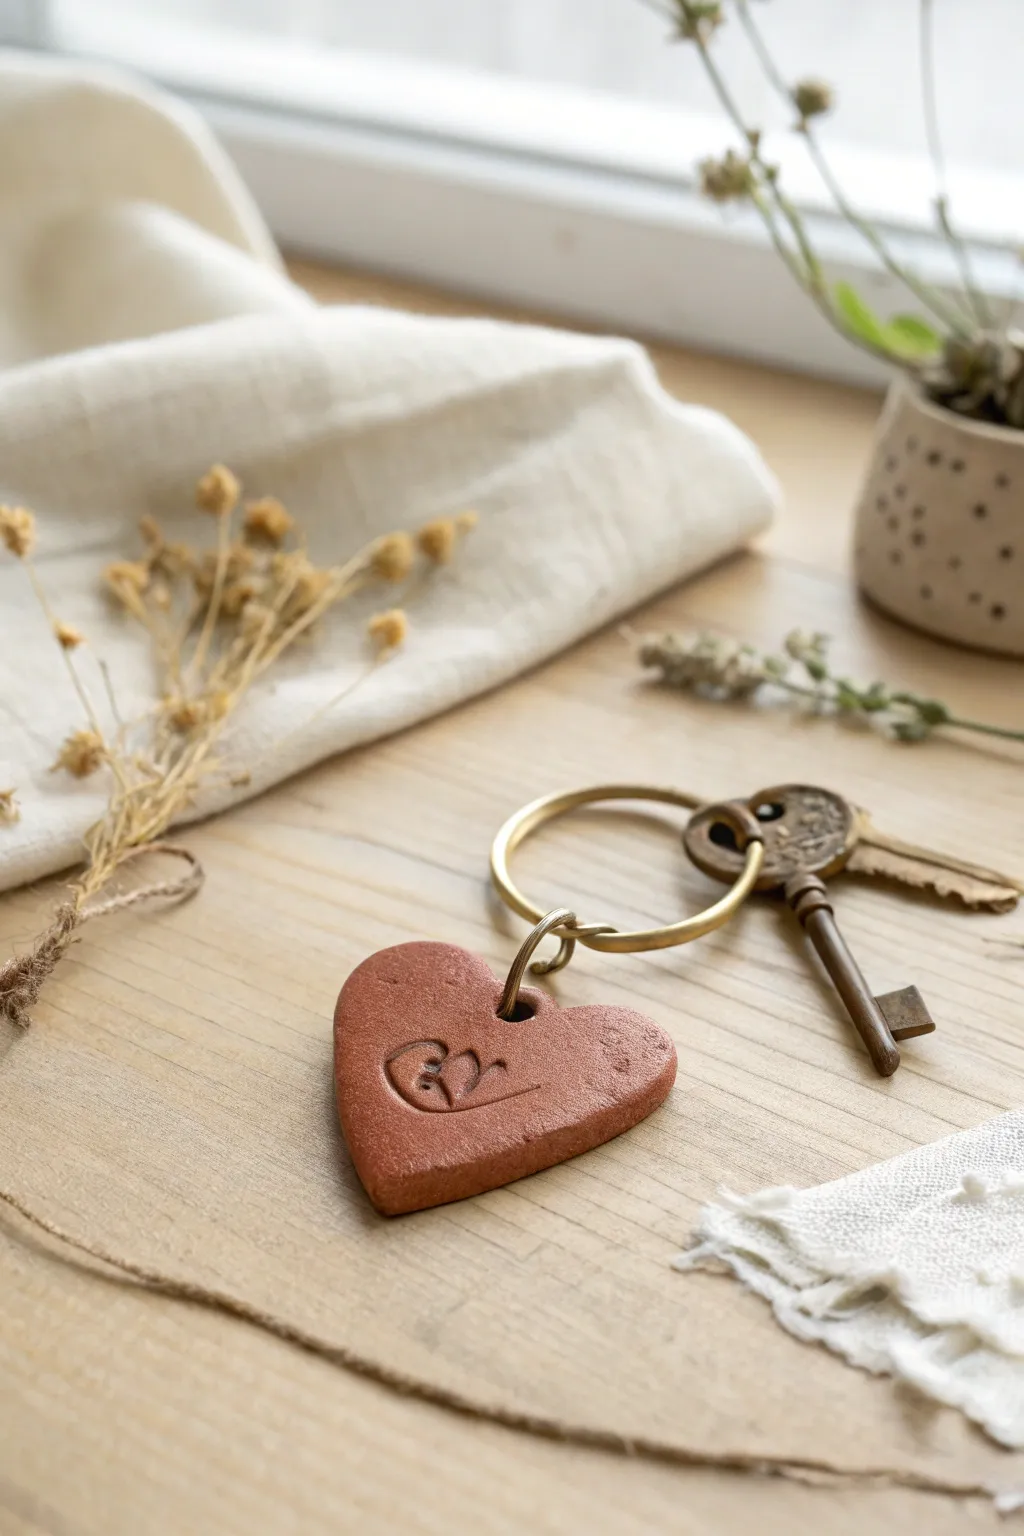
Create a meaningful and earthy keepsake with this simple clay heart keychain project. The warm terracotta tones and personalized initial make it a perfect gift or a charming addition to your own key ring.
How-To Guide
Materials
- Terracotta-colored polymer clay (or air-dry clay)
- Heart-shaped cookie cutter (approx. 2 inches)
- Small letter stamps (metal or rubber)
- Rolling pin or smooth glass jar
- Parchment paper or baking mat
- Straw or cocktail stick for creating the hole
- Fine-grit sandpaper (optional)
- Brass jump ring (small)
- Brass keychain ring
- Needle-nose pliers
- Oven (if using polymer clay)
Step 1: Prepping and Shaping the Clay
-
Condition the clay:
Start by working a small ball of terracotta clay in your hands. Knead it until it feels warm, pliable, and free of cracks. This ensures a smooth finish later on. -
Roll it out:
Place the clay onto a piece of parchment paper to prevent sticking. Use your rolling pin to flatten the clay to an even thickness of about 1/4 inch (6mm). Avoid going too thin, as keychains need to be durable. -
Cut the heart shape:
Position your heart-shaped cookie cutter over the rolled clay. Press down firmly and evenly to cut out the heart. Give it a tiny wiggle before lifting the cutter to ensure clean edges. -
Smooth the edges:
Gently lift away the excess clay. If the edges of your heart are slightly sharp or ragged, use your fingertip dipped in a tiny bit of water (for air dry) or baby oil (for polymer) to smooth them down gently.
Step 2: Adding Details
-
Create the hanging hole:
Before the clay hardens, create a hole for the jump ring. I find a drinking straw works perfectly for a clean, round hole, but you can also wiggle a cocktail stick to create the opening. Place it slightly off-center near the top lobe of the heart. -
Prepare your stamp:
Select the letter stamp you wish to use. Check it against a scrap piece of clay first to ensure it’s facing the right direction. -
Stamp the initial:
Press the stamp firmly into the center of the heart. Apply even pressure so the impression is deep enough to be visible but doesn’t distort the back of the clay. Rock it slightly if needed. -
Check surface texture:
Look closely at the surface. If you want that slightly rustic, stone-like texture seen in the photo, you can gently tap the surface with a crumpled piece of aluminum foil or a stiff-bristled toothbrush.
Clean Imprints
Dust your letter stamp lightly with cornstarch or baby powder before pressing into the clay. This acts as a release agent and prevents the clay from sticking inside the stamp grooves.
Step 3: Curing and Finishing
-
Bake or dry:
If using polymer clay, bake according to the package instructions (usually around 275°F/135°C for 15-30 minutes). If using air-dry clay, let it sit undisturbed in a dry spot for 24-48 hours until fully hardened. -
Cool down:
Allow the heart to cool completely before handling. It will be slightly fragile while warm. -
Sand edges (optional):
Once hard, inspect the edges again. If any rough spots remain, use a piece of fine-grit sandpaper to buff them smooth for a professional feel. -
Open the jump ring:
Using your needle-nose pliers, grip the small brass jump ring. Twist the ends away from each other (front to back, not pulling apart sideways) to open the loop. -
Attach to the heart:
Thread the open jump ring through the hole you created in the clay heart. -
Connect the key ring:
Before closing the jump ring, slide the larger brass keychain ring onto it. Alternatively, you can attach the jump ring to the heart first, close it, and then thread that onto the split ring. -
Secure the closure:
Use the pliers to twist the jump ring ends back together until they are flush. Ensure there is no gap where the clay or ring could slip out. -
Final inspection:
Give the heart a gentle tug to make sure the hardware is secure. Your personalized charm is now ready to hold your keys.
Distorted Shape?
If the heart warped while lifting it off the work surface, don’t restart. Just gently reshape it with your fingers, or bake it directly on the tile or parchment paper you worked on.
Now you have a durable, personalized accessory that adds a touch of handmade warmth to your daily routine
Heart Wall Tile Set
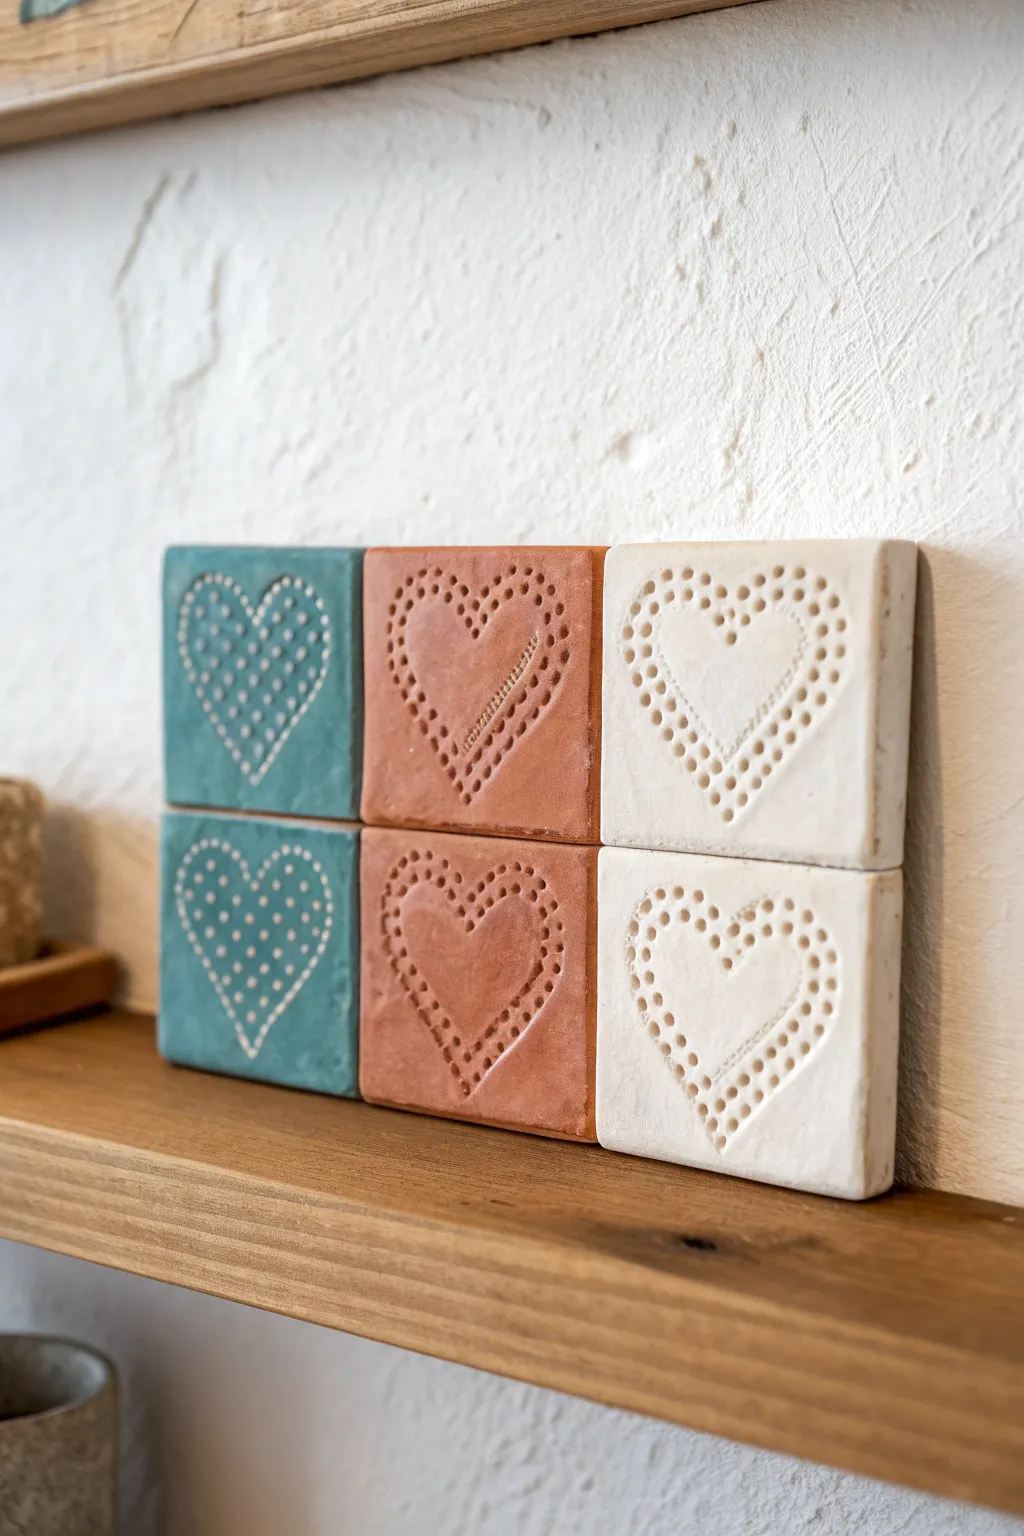
These charming, rustic tiles bring a subtle touch of warmth to any shelf or wall with their simple dotted heart motifs. By creating a matching set in earthy tones, you can achieve a custom geometric display that feels both modern and handcrafted.
Detailed Instructions
Materials
- Air-dry clay (white and terracotta colored) or polymer clay
- Rolling pin
- Square cookie cutter (approx. 3-4 inches) or ruler and craft knife
- Wooden skewer or small dotting tool
- Teal acrylic paint (matte finish)
- Small paintbrush
- Fine-grit sandpaper
- Small heart template or paper cutout
- Matte spray varnish
Step 1: Shaping the Tiles
-
Prepare your clay:
Begin by kneading your air-dry clay until it is smooth and pliable. You will need enough white clay for four tiles (two to keep white, two to paint) and terracotta clay for the middle two tiles. -
Roll it flat:
Roll out a slab of clay to a consistent thickness, roughly 1/4 inch. Using guide sticks on either side of your roller helps ensure the surface is perfectly even. -
Cut the squares:
Using a square cookie cutter or a ruler and craft knife, cut out six identical squares. If the edges are jagged, smooth them gently with a damp finger. -
Refine the edges:
Tap each side of the square gently against your work surface to ensure they are straight and the corners are crisp.
Step 2: Creating the Design
-
Position the template:
Lightly place a paper heart cutout in the center of your first fresh clay tile. Do not press it down; it is just a visual guide. -
Mark the outline:
Using a wooden skewer or dotting tool, gently press a series of dots into the clay following the perimeter of your paper heart template. -
Fill the shape:
Remove the template. Carefully continue creating rows of dots inside the initial outline until the entire heart shape is filled with a uniform stippled texture. -
Repeat the process:
Repeat the dotting technique for all six tiles. Since this is handmade, slight variations in the heart shape add character, so don’t worry about perfection. -
Initial drying:
Place the tiles on a wire rack or a sheet of baking paper to dry. Check the package instructions for drying times, typically 24-48 hours depending on thickness. -
Prevent warping:
I like to flip the tiles over halfway through the drying process to ensure air circulates evenly and prevents the corners from curling up.
Clean Dots Trick
If your skewer pulls up clay when making dots, dip the tip in a little bit of water (or oil for polymer clay) before piercing the surface.
Step 3: Finishing Touches
-
Sand edges:
Once fully dry and hard, use fine-grit sandpaper to smooth out any rough edges or sharp corners on the tiles. -
Paint the teal tiles:
Take two of the white clay tiles. Apply a coat of matte teal acrylic paint to the front and sides. -
Reveal the dots:
While the paint is wet, check if it has pooled in the dots. If so, gently dab them or blow lightly to ensure the texture remains visible. -
Apply a second coat:
Let the first layer dry completely, then apply a second coat of teal paint for rich, opaque coverage. -
Seal the set:
To protect the surface and unify the finish, spray all six tiles—painted, terracotta, and white—with a light coat of matte varnish. -
Arrange and display:
Once the varnish is dry, stack or mount your tiles in a grid pattern on a shelf or attach wall mounting strips to the back for hanging.
Warped Tiles?
If your clay tiles curled while drying, lightly dampen the concave side with a sponge and place them under a heavy book overnight to flatten them out.
This simple technique results in a lovely textured set that looks beautiful grouped together on a mantle
Tealight Dish With Heart Cutout
This charming tealight holder features delicate heart cutouts that cast a warm, romantic glow when lit. Crafted from simple white clay with a natural, matte finish, it makes a serene centerpiece or a sweet handmade gift.
Step-by-Step Tutorial
Materials
- White modeling clay (air-dry or oven-bake)
- Rolling pin
- Circle cookie cutter (approx. 4-inch diameter for base)
- Small heart-shaped cutter (approx. 0.5-inch)
- Craft knife or scalpel
- Small bowl or cup (to use as a mold)
- Sponge and water
- Sandpaper (fine grit)
- Tealight candle
Step 1: Preparing the Clay Base
-
Condition the Clay:
Begin by kneading your white modeling clay until it is soft, pliable, and free of air bubbles. This ensures a smooth surface without cracks later on. -
Roll the Slab:
Roll out the clay on a flat surface to an even thickness of about 1/4 inch. If you want a more consistent height, place wooden guide sticks on either side of your roller. -
Cut the Circle:
Using your large circle cutter or a bowl as a template, cut out a circular base. This will function as the bottom of your tealight holder. -
Create the Wall Strip:
From the remaining rolled clay, cut a long rectangular strip. The height should be about 2-3 inches, and the length must be slightly longer than the circumference of your circular base.
Step 2: Designing the Hearts
-
Mark Heart Positions:
Lay the rectangular clay strip flat. Lightly impress the heart cutter along the length of the strip to space out your design before cutting all the way through. -
Cut Out the Hearts:
Press the small heart cutter firmly through the clay strip at regular intervals. I like to keep them slightly above the center line so the candle flame shines directly through them. -
Clean Edges:
Carefully remove the heart-shaped clay pieces. Use a damp finger or a small tool to smooth any rough edges inside the cutouts.
Slumping Walls?
If the clay walls won’t stand up straight, they are too wet or thin. Let the rolled strip air dry for 15-20 minutes before attaching it to the base to add structural stiffness.
Step 3: Construction and Refining
-
Score and Slip:
If using traditional clay, score (scratch) the outer edge of the circle base and the bottom edge of your strip. Apply a little water or slip (liquid clay) to act as glue. -
Attach the Wall:
Wrap the rectangular strip around the circular base, standing it upright. Gently press the scored edges together to form the cup shape. -
Seal the Seam:
Where the two ends of the wall meet, cut through both layers at an angle for a clean join. Blend the clay together using a modeling tool or your fingers until the seam disappears. -
Shape with a Mold:
To ensure a perfect circle, you can gently place your clay cylinder inside or around a similarly sized bowl or cup lined with plastic wrap while it firms up. -
Smooth the Rim:
Run a damp sponge along the top rim of the holder to round off any sharp edges created during cutting. -
Refine the Surface:
Wipe the entire exterior with a slightly damp sponge to remove fingerprints and achieve that matte, natural stone look.
Matching Tray Set
Use extra clay to slump a larger circle over a curved bowl mold. This creates the shallow, matching catch-all dish shown underneath the tealight holder in the photo.
Step 4: Finishing Up
-
Dry or Bake:
Follow the instructions for your specific clay. Air-dry clay usually needs 24-48 hours, while polymer or oven-bake clay will need to be baked at the specified temperature. -
Sand for Smoothness:
Once fully cured and hard, use fine-grit sandpaper to gently buff away any remaining imperfections or sharp spots, paying attention to the heart cutouts. -
Optional Sealing:
If you want the piece to be water-resistant or have a slight sheen, apply a matte varnish. Otherwise, leave raw for the rustic texture shown in the image. -
Add the Light:
Place a standard tealight inside your finished holder and enjoy the pattern it casts.
Enjoy the peaceful ambiance your new handmade heart luminary brings to the room
Marbled Swirl Heart Cabochons

Capture the elegance of natural stone with these mesmerizing marbled heart cabochons. Using simple polymer clay techniques, you’ll create stunning swirls of white, rust, and peach that look professionally crafted yet are wonderfully easy to make.
How-To Guide
Materials
- Polymer clay (White, Translucent White, Rust/Terracotta, Peach/Beige)
- Clean ceramic or glass work surface
- Rolling pin or pasta machine
- Heart-shaped clay cutters (various sizes)
- X-acto knife or tissue blade
- Gloss glaze or UV resin (optional for shine)
- Fine-grit sandpaper (400-1000 grit)
- Baking sheet with parchment paper
- Oven
Step 1: Color Preparation
-
Condition the white clay:
Start by taking a generous amount of white polymer clay. Knead it thoroughly in your hands until it becomes soft, warm, and pliable to prevent cracks later. -
Prepare accent colors:
Condition smaller amounts of your accent colors: rust (or terracotta) and peach. I also like to mix a little translucent clay into the white for a more depth-filled, stone-like appearance. -
Create snakes:
Roll each color into long, thin snakes. You’ll want the white snake to be the thickest, as it acts as the base color, while the colored snakes should be thinner.
Step 2: Creating the Marble Effect
-
Twist the strands:
Gather your clay snakes together and twist them into one large rope. The more you twist, the finer the lines of color will become. -
Fold and roll:
Fold the twisted rope in half and roll it out again. Repeat this folding and twisting process 2–3 times, but be careful not to over-mix, otherwise, the colors will turn muddy. -
Form a ball:
Once you are happy with the striations, roll the entire rope into a smooth ball. You should see interesting veins of color wrapping around the sphere. -
Flatten the slab:
Using your rolling pin or pasta machine, flatten the ball into a slab about 1/4 inch thick. This thickness gives the final cabochon a nice, domed feel.
Muddy Colors?
If your colors turn brown or gray instead of distinct swirls, you have over-mixed clay. Stop twisting as soon as streaks appear visible.
Step 3: Shaping and Refining
-
Select your pattern:
Look closely at your flattened slab. Identify the areas with the most beautiful swirls and positioning your heart cutter over that specific spot. -
Cut the shapes:
Press the cutter firmly down into the clay. Give it a tiny wiggle before lifting to ensure a clean cut. -
Smooth the edges:
Gently lift the heart from the work surface. Use your finger to softly smooth the sharp bottom edges created by the cutter, creating a pillowy, rounded look. -
Adjust the surface:
If you see any fingerprints, lightly buff them away with a drop of baby oil or by gently rolling a piece of parchment paper over the top.
Make it Sparkle
Mix a tiny pinch of gold mica powder or gold leaf flakes into the translucent clay for a subtle, luxurious shimmer within the stone veins.
Step 4: Baking and Finishing
-
Bake the clay:
Place your hearts on a parchment-lined baking sheet. Bake according to your specific brand of clay’s instructions (usually around 275°F/135°C for 15–30 minutes). -
Cool down:
Allow the hearts to cool completely on the baking sheet to ensure they harden properly. -
Sand for smoothness:
Once cool, dip the heart in water and use wet/dry sandpaper to smooth any rough edges or bumps on the back. -
Add a glossy finish:
To achieve the high-shine look in the photo, apply a thin coat of gloss glaze or UV resin. Cure or dry completely.
Now you have a set of elegant hearts ready to be turned into jewelry or decorative magnets
Anatomical Heart Sculpture (Beginner-Friendly)
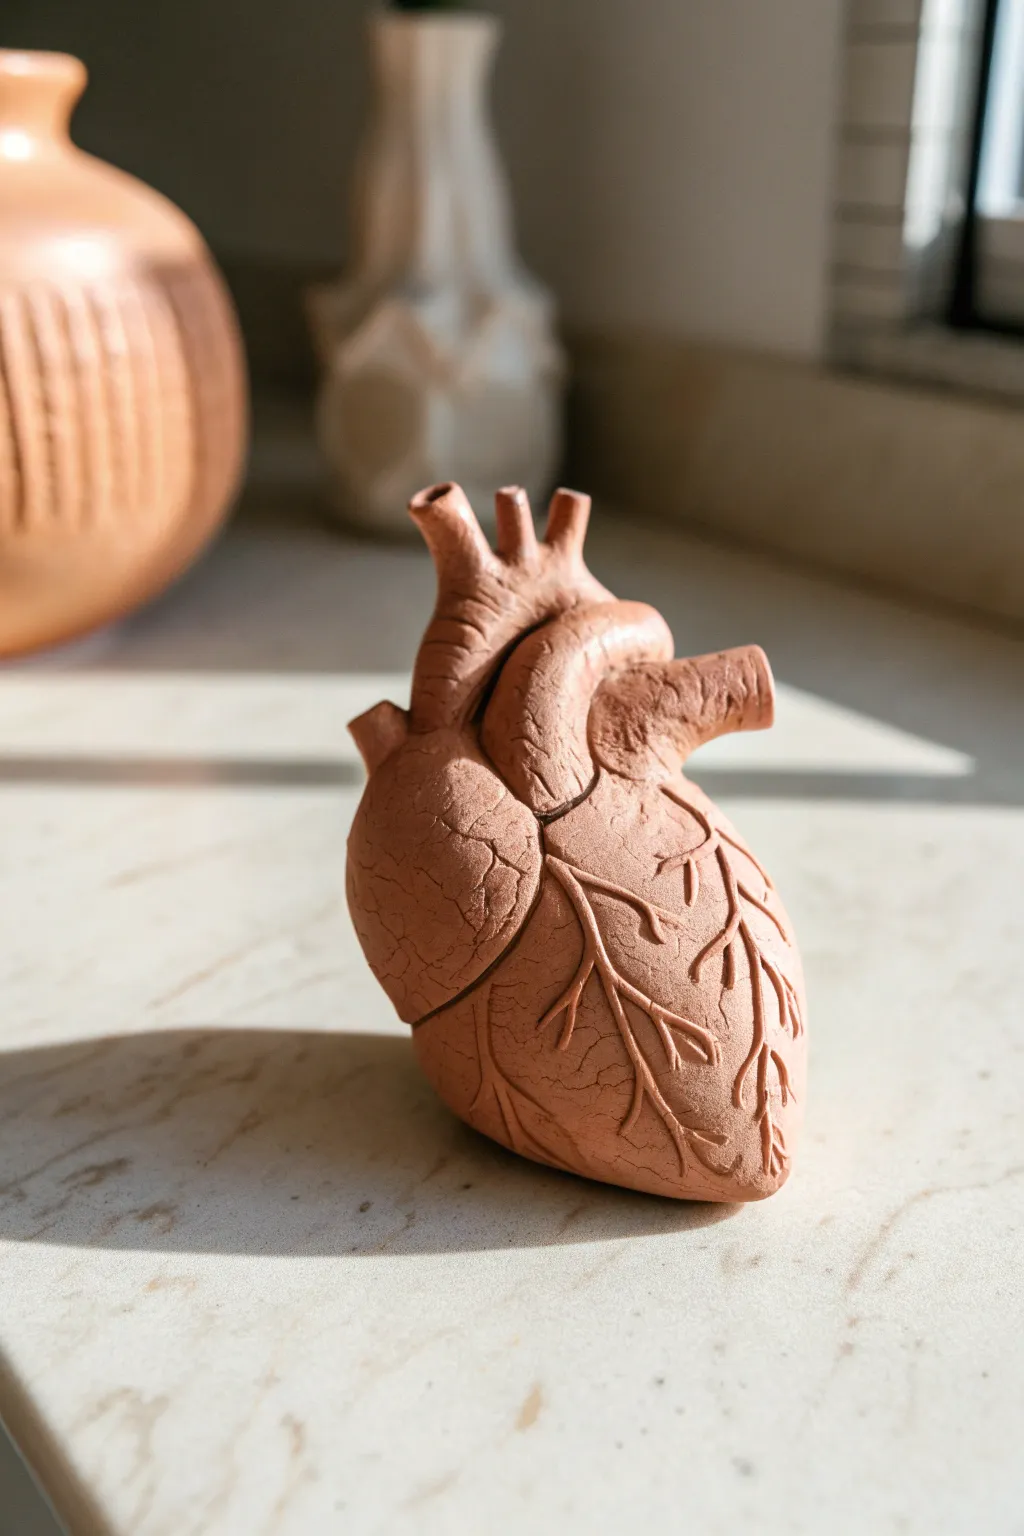
Move beyond traditional heart shapes with this striking anatomical sculpture that balances realism with an approachable, rustic style. The finished piece features a warm, terracotta hue and intentional texturing that gives it the look of an ancient medical artifact.
Step-by-Step Tutorial
Materials
- Terracotta-colored air-dry clay (or polymer clay)
- Small carving tools or a detailing needle
- Loop tool (for smoothing and shaping)
- Water and a small sponge (for smoothing)
- Rolling pin
- Aluminum foil (for armature)
- Acrylic paints (burnt sienna, dark brown) – optional for shading
Step 1: Forming the Core
-
Build the armature:
Start by crumpling a sheet of aluminum foil into a tight ball, then squeeze it into a rough, tapered oval shape—slightly wider at the top and pointy at the bottom. This saves clay and keeps the sculpture lightweight. -
Cover with clay:
Roll out a slab of your terracotta clay to about 1/4 inch thickness. Wrap this slab entirely around your foil core, pressing the seams together firmly so no foil is visible. -
Smooth the base form:
Using wet fingers or a damp sponge, smooth out the seams and surface. Don’t worry about perfection; a little bumpiness adds to the organic anatomical look. -
Define the chambers:
Use a modeling tool or your thumb to gently press a shallow groove diagonally across the front of the heart. This separates the ventricles and gives the heart its characteristic muscular definition.
Fixing Cracks
If structural cracks appear while drying (bigger than the decorative ones), fill them with a “slip” made of clay mixed with a little water/vinegar.
Step 2: Adding the Vessels
-
Create the aorta:
Roll a thick coil of clay. Attach it to the top center of the heart, arching it slightly over the front left side. Blend the clay at the attachment point using a small tool so it looks like it grows out of the main body. -
Shape the openings:
Use the back of a paintbrush or a rounded tool to create the hollow opening at the top of the aorta. You want it to look like a tube, not a solid stick. -
Add secondary vessels:
Roll three smaller, shorter coils. Attach these vertically at the very top of the heart, next to the aorta arch. These represent the superior vena cava and pulmonary veins. -
Add side inlets:
Attach a small, distinct tube-like projection on the upper right side (the left atrium area). Smooth the seams thoroughly to ensure they don’t pop off during drying.
Step 3: Detailing and Texture
-
Carve the main arteries:
Using a needle tool or sharp sculpting stick, draw a deep, branching line starting from the diagonal groove you made earlier. This is the main coronary artery. -
Branch out the veins:
From that main central line, carve smaller, jagged lines branching outward like lightning bolts or tree roots. Vary the pressure: press harder for thick veins and lighter for the capillaries. -
Add surface texture:
Take a stiff bristle brush or a crumpled ball of foil and lightly tap it over patches of the heart’s surface. This breaks up the smooth plastic look of the clay. -
Create subtle cracking:
I like to let the clay sitting for about 15 minutes to stiffen slightly, then gently squeeze the form. This encourages tiny, natural micro-cracks to appear on the surface, enhancing that artifacts vibe. -
Refine the edges:
Check the openings of your tubes again. If they got squished during detailing, re-open them with your round tool.
Level Up: Gold Fill
Make it Kintsugi-inspired! After the piece is fully dry, paint inside the carved vein lines with metallic gold liquid leaf or acrylic paint.
Step 4: Finishing
-
Drying:
Allow the sculpture to dry completely. For air-dry clay, this usually takes 24-48 hours depending on thickness. Prop it up against something heavy so it dries upright. -
Optional wash:
If you want more depth, mix a tiny bit of dark brown acrylic paint with lots of water. Brush it over the sculpture and immediately wipe it off with a rag, leaving dark pigment only in the carved veins.
Place your anatomical heart on a shelf or desk for a conversation piece that celebrates biology with artistic flair