If you’re craving big clay ideas, I’m right there with you—there’s something so satisfying about making pieces that take up real space. Here are my favorite ways to go big, from large-scale builds to playful projects with big mouths that actually hold stuff.
Big Coil-Built Floor Vase
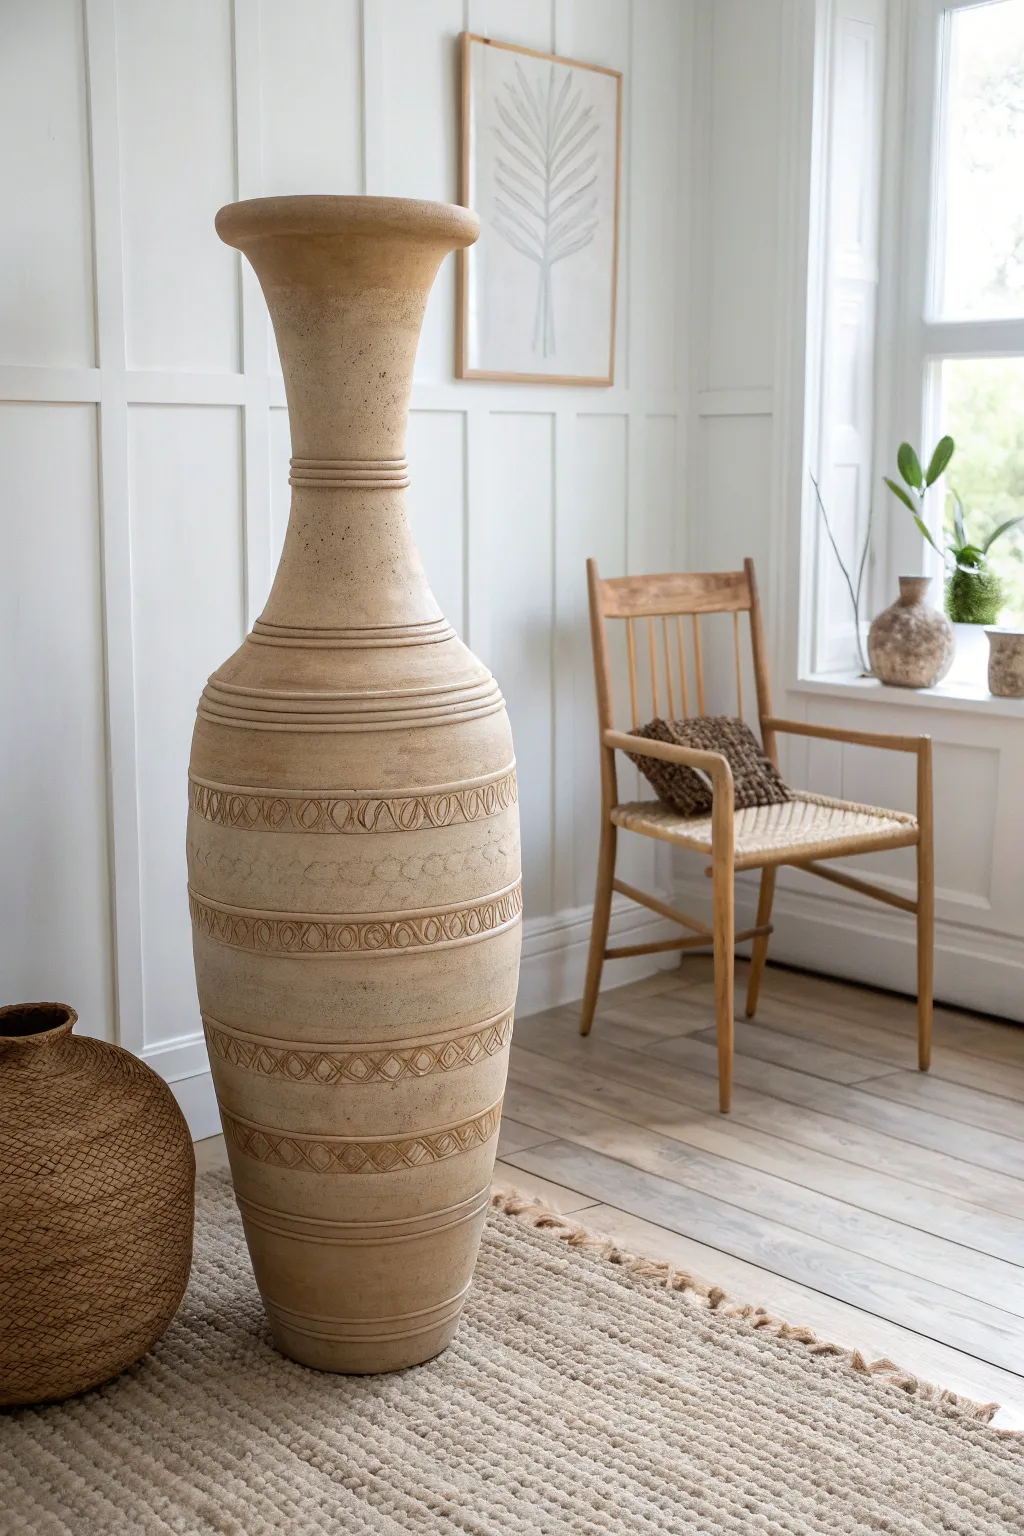
Make a bold statement with this impressive, oversized floor vase, heavily inspired by ancient amphora shapes but with a modern geometric twist. Its warm, sandy texture and stacked decorative bands create a rhythm that draws the eye upward, making it the perfect focal point for any corner.
Step-by-Step Guide
Materials
- High-grog stoneware clay (approx. 25-30 lbs)
- Heavy-duty banding wheel
- Large wooden bat
- Thick wooden dowel or rolling pin
- Rib tools (serrated and smooth metal)
- Needle tool
- Loop tool for carving
- Carving stamps or small loop tools for detailing
- Spray bottle with water
- Plastic sheeting for slow drying
- Sponge
Step 1: Building the Foundation
-
Prepare the base slab:
Start by rolling out a thick slab of clay, roughly 1/2 inch thick, to serve as the floor of the vase. Cut a perfect circle about 8-10 inches in diameter and place it securely on your wooden bat atop the banding wheel. -
Roll colossal coils:
Roll out several thick coils of clay, aiming for the thickness of a large carrot. Score and slip the outer edge of your base thoroughly to ensure a strong connection for the first layer. -
Establish the foot:
Attach the first two coils to build a vertical wall about 3 inches high. Smooth the coils together on both the inside and outside using a rib tool, compressing the clay downwards to prevent cracking. -
Begin the outward curve:
As you add the next set of coils, place each one slightly to the outside of the one below it. This will start the gentle outward swell of the vase body. Go slowly; building too far out too fast can cause the walls to slump.
Slumping Walls?
If the clay starts to wobble or sag, stop immediately. Use a heat gun or blow dryer on the lower walls to firm them up before adding more weight.
Step 2: Growing the Form
-
Reach the belly:
Continue coiling outward until you reach the widest point of the vase, which should be roughly 14-16 inches high. I like to step back frequently to check the symmetry of the silhouette as the wheel spins. -
Stiffen the walls:
Once you reach the belly, pause and let the clay firm up to a soft leather-hard state. Cover the rim with plastic so it stays moist for attachment, but allow the lower walls to dry enough to support the weight above. -
Taper inward:
Begin placing your coils slightly toward the inside of the previous layer. This creates the shoulder of the vase. Smooth the walls impeccably as you go, as it will be hard to reach inside later. -
Construct the neck:
When the opening narrows to about 5-6 inches, build vertically again to create the long, elegant neck. This section should be straight and tall, roughly 8-10 inches in height. -
Flare the rim:
For the final touch, flare the last few coils dramatically outward to create the wide, trumpet-like mouth of the vessel. Use a wet chamois cloth to compress and smooth the rim so it is pleasant to the touch.
Step 3: Carving and Detailing
-
Define the bands:
Using a needle tool while slowly spinning the banding wheel, lightly score horizontal lines around the body of the vase to mark where your decorative sections will go. Create bands of varying heights for visual interest. -
Add relief coils:
Roll very thin ‘spaghetti’ coils and attach them over your scored lines with slip. Smooth them down to create raised ridges that separate the decorative zones. -
Carve the diamonds:
In the wider bands, use a loop tool to carve repeating geometric patterns. For the look in the image, carve a row of connected diamonds or X-shapes, removing clay to create shadow and depth. -
Detail the ovals:
In the narrower bands, use a small, curved loop tool or a U-shaped stamp to press or carve repeating oval motifs. Keep the spacing tight and consistent. -
Texturize the surface:
To mimic the sandy, aged-pottery look, tap a stiff-bristled brush or a serrated rib gently over the smooth areas between the carved bands. This adds a stone-like grain to the finish. -
Slow drying process:
Cover the entire vase loosely with plastic. Because the bottom is much drier than the rim, you must dry it very slowly over 1-2 weeks to equalize the moisture and prevent S-cracks on the bottom. -
Bisque fire:
Once bone dry, bisque fire the vase to Cone 04. This will make it durable enough to handle for glazing or staining. -
Finish the surface:
Apply a wash of red iron oxide mixed with water, then sponge it off so the color remains only in the carved crevices. Follow with a matte, sandy-beige glaze to achieve that natural, earth-toned aesthetic.
Dual-Tone Effect
For more contrast, use a dark clay body for the build, then brush a white slip over the surface before carving to reveal the dark clay underneath.
Place your finished masterpiece in a well-lit corner where the changing daylight can highlight the beautiful carved textures.


Oversized Slab Serving Platter
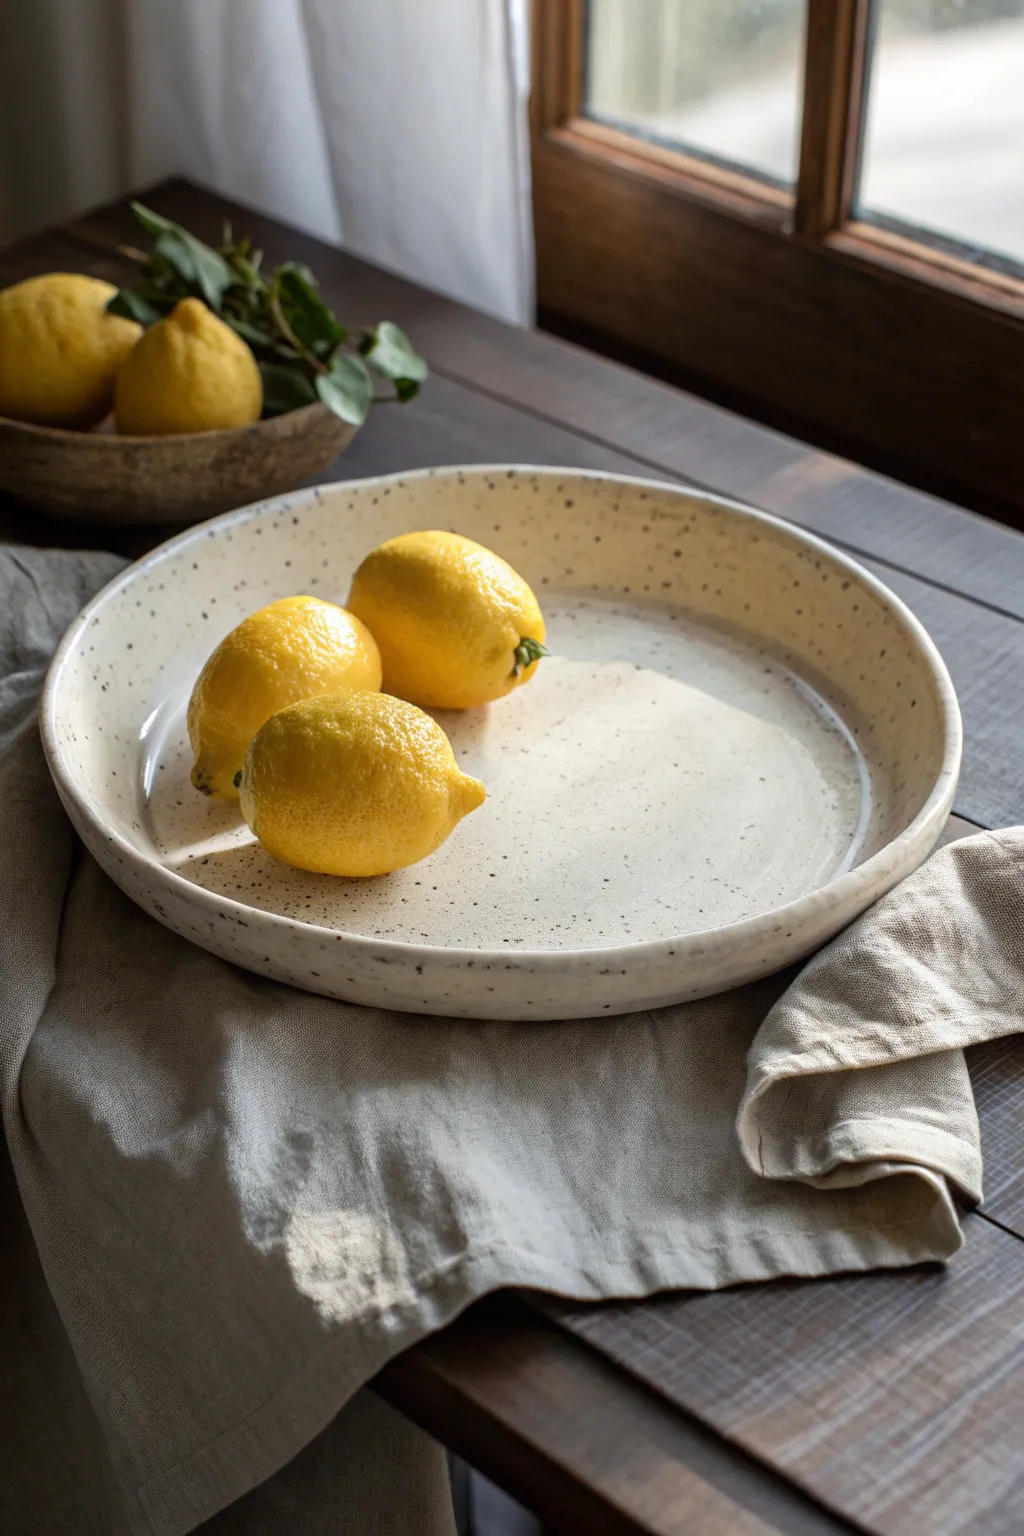
Embrace the beauty of handmade imperfection with this grand, rimmed serving platter. Featuring a naturally speckled cream glaze and a gently organic lip, this slab-built piece makes a stunning centerpiece for any table.
Detailed Instructions
Materials
- Speckled stoneware clay (mid-fire)
- Large rolling pin or slab roller
- Canvas mat or slab mat
- Needle tool
- Large circular template (cardboard or an existing tray)
- Ribs (metal and soft rubber)
- Scoring tool or serrated rib
- Slip
- Sponge
- Wooden modeling tool
- Clear or translucent white matte glaze
Step 1: Rolling and Cutting
-
Prepare the slab:
Begin by wedging a substantial amount of speckled stoneware clay to remove air bubbles. Flatten it onto your canvas mat. -
Roll to thickness:
Roll the clay out into a large, even slab. Aim for a thickness of about 3/8 of an inch (roughly 1 cm) to ensure the large base remains sturdy during firing. -
Compress the clay:
Using a soft rubber rib, compress the clay surface on both sides. This aligns the clay particles, reducing the chance of warping, and smooths out the canvas texture. -
Trace the base:
Place your large circular template onto the slab. Using your needle tool, cut cleanly around the template to form the base of your platter.
Uneven Drying Fix
To prevent base cracks, dry this on a wire rack or place a piece of drywall underneath. This lets air reach the center bottom so it dries at the same rate as the rim.
Step 2: Forming the Rim
-
Cut the rim strip:
From the remaining slab (re-roll if necessary), cut a long strip of clay. It should be approximately 1.5 to 2 inches tall to match the height seen in the photo. -
Score the connection points:
Thoroughly score the outer edge of your circular base top and the bottom edge of your clay strip. -
Apply slip:
Generously apply slip to the scored areas on the base. I find using a bit more slip here helps create a really solid bond for such a large piece. -
Attach the wall:
Place the strip onto the base edge to form the vertical wall. If the strip isn’t long enough to go all the way around, add a second piece, scoring and slipping the vertical seams together. -
Reinforce the seam:
Use a wooden modeling tool to blend the clay from the wall down onto the base on the inside. Repeat this on the outside, blending the base up into the wall. -
Add a coil:
Roll a very thin coil of clay and press it into the interior corner where the wall meets the floor. Smooth it completely with your finger to reinforce this stress point. -
Smooth the join:
Run a damp sponge along the interior and exterior seams to remove join marks and create a continuous surface.
Step 3: Refining and Drying
-
Soften the rim:
Gently run a damp sponge or chamois over the top edge of the rim. You want to soften any sharp angles, giving it that organic, handmade look. -
Warp slightly (optional):
If you want the slightly distinct, organic shape shown in the photo, gently push the rim inward or outward at random points while the clay is still plastic. -
Slow drying:
Cover the rim loosely with plastic while leaving the center exposed for a day. Uneven drying is the enemy of large platters like this. -
Bisque fire:
Once bone dry, bisque fire the piece to the recommended cone for your specific clay body.
Raw Edge Accent
For a rustic contrast, leave the very top lip of the rim unglazed. The exposed, toasted raw clay creates a beautiful frame for the glossy interior surface.
Step 4: Glazing
-
Wipe down:
Wipe the bisque-ware with a damp sponge to remove any dust that might resist the glaze. -
Pour the interior:
Pour a translucent white or clear matte glaze into the center of the platter, swirl it to coat the bottom and inner walls, and pour out the excess. -
Glaze the exterior:
Brush or spray the exterior walls with the same glaze. Keep the application engaged but relatively thin so the iron speckles from the clay body can burn through. -
Wipe the foot:
Clean the bottom of the platter thoroughly with a sponge to prevent it sticking to the kiln shelf. -
Final firing:
Glaze fire to maturity (likely Cone 5 or 6). The heat will draw the dark speckles out through the lighter glaze.
Now you have a durable, custom serving piece ready for your next large gathering


Extra-Large Planter Bowl
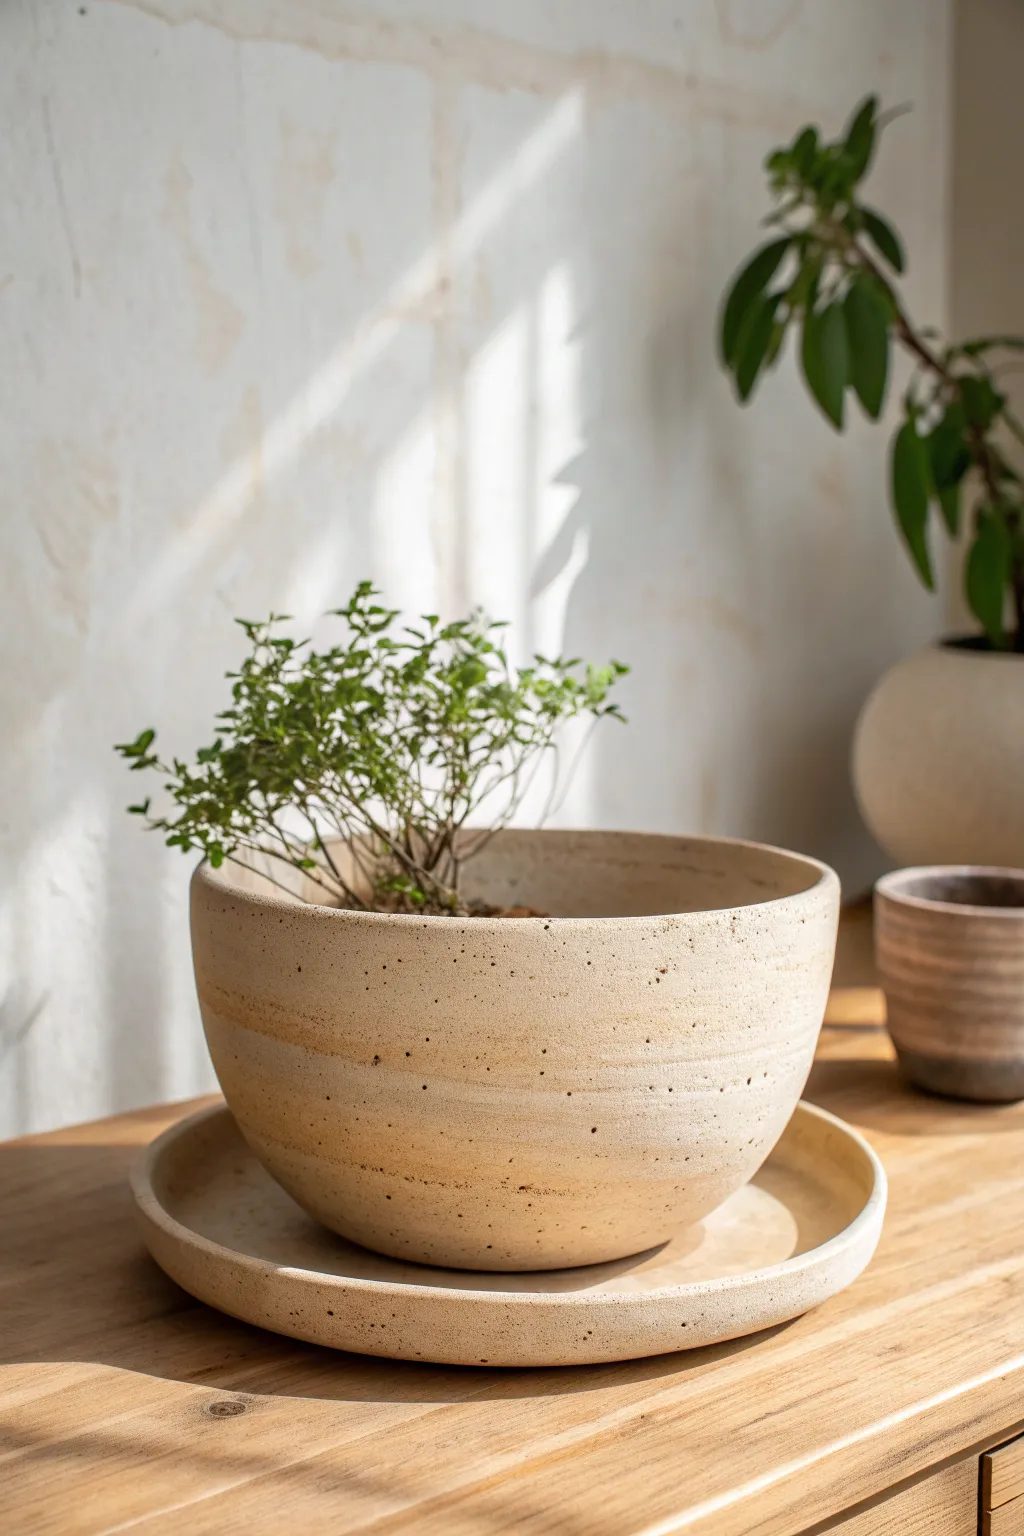
Embrace organic minimalism with this substantial, low-profile planter bowl featuring a matching saucer. The speckled, sandy clay body evokes natural stone, making it a perfect, grounding centerpiece for your indoor garden.
Step-by-Step
Materials
- Speckled sandstone or buff stoneware clay (approx. 8–10 lbs)
- Pottery wheel (or coil building supplies)
- Large circular bat (14-inch minimum)
- Wooden throwing ribs
- Metal kidney rib
- Needle tool
- Wire cutter
- Sponge
- Chamois leather strip
- Loop trimming tools
- Clear matte glaze (optional)
- Kiln
Step 1: Throwing the Bowl
-
Prepare the Clay:
Begin by thoroughly wedging about 6 to 7 pounds of your speckled clay. You want to ensure there are absolutely no air bubbles, as this is a large form that needs structural integrity. -
Center the Mass:
Secure the clay to a clean, dry bat on your wheel head. Use considerable force and speed to center this large amount of clay, coning it up and down twice to align the particles. -
Open Wide:
Open the mound, but aim for width rather than depth. Create a floor that is roughly 8 to 9 inches wide before you start pulling up the walls, leaving a floor thickness of about half an inch. -
Pull the Walls:
Slow the wheel down slightly. Perform your first pull, bringing the clay up into a thick, low cylinder. For a bowl this size, leave the walls slightly thicker at the bottom for support. -
Shape the Curve:
Using a wooden rib on the inside and your hand on the outside, gently push the belly of the bowl outward. Create a continuous, smooth curve from the base to the rim. -
Refine the Rim:
Compress the rim with a chamois strip to ensure it is smooth and resistant to chipping. Keep the rim distinct but not sharp. -
Surface Texture:
While the wheel is spinning slowly, hold a metal rib against the exterior to remove throwing lines if you prefer the smooth, stone-like look in the photo. Alternatively, leave subtle rings for texture. -
Wire Off:
Run a wire cutter underneath the pot to separate it from the bat, but do not lift it yet. set the bat aside to let the clay dry to leather-hard.
Collapsing Walls?
If the bowl walls start to flop outward while throwing, use a heat gun or propane torch to slightly stiffen the clay on the lower walls before continuing to shape the upper curve.
Step 2: Creating the Saucer
-
Throw the Base:
With the remaining clay (approx. 2–3 lbs), center a low, flat puck shape on a fresh bat. This will become the saucer. -
Open and Flatten:
Open the clay all the way down to the bat or leave a very thin layer. You want a wide, flat disk that is at least 1.5 inches wider than the foot of your bowl. -
Lift the Lip:
Gently pull up a short, vertical rim about one inch high. Flare it slightly outward to match the curve of the bowl’s aesthetic. -
Clean the Edge:
Use a sponge to smooth the rim of the saucer, ensuring it is rounded and inviting.
Step 3: Trimming and Finishing
-
Check Dryness:
Wait until both pieces are leather-hard—firm enough to handle without warping but soft enough to carve. -
Trim the Bowl Foot:
Invert the bowl onto the wheel (using a foam bat or clay lugs to secure it). Use a sharp loop tool to trim the excess weight from the bottom curve. -
Define the Foot Ring:
Carve out a distinct foot ring. This lifts the form visually and physically helps it sit flat on the saucer. -
Add Drainage:
Turn the bowl right-side up and use a hole punch tool or drill bit to create a central drainage hole. I usually smooth the edges of the hole with a fingertip to prevent sharp jagged bits. -
Trim the Saucer:
Invert the saucer and trim the bottom flat. You can carve a very shallow foot or leave it flat-bottomed, depending on your preference. -
Bisque Fire:
Once bone dry, fire both pieces in a bisque kiln to prepare them for glazing. -
Glazing:
To achieve the look in the image, leave the exterior raw to show off the speckled clay body. Pour a clear matte glaze inside the saucer and the interior of the bowl for waterproofing. -
Final Fire:
Fire the kiln to the maturation temperature of your specific clay body (likely Cone 5 or 6 for stoneware).
Level Up: Oxide Wash
Wipe a diluted iron oxide wash over the raw exterior before the final firing. It will settle into the grog and speckles, enhancing that natural, warm, toasted sandstone effect.
Enjoy the calm, grounded atmosphere this piece brings to your space


Big Pinch Pot Fruit Bowl
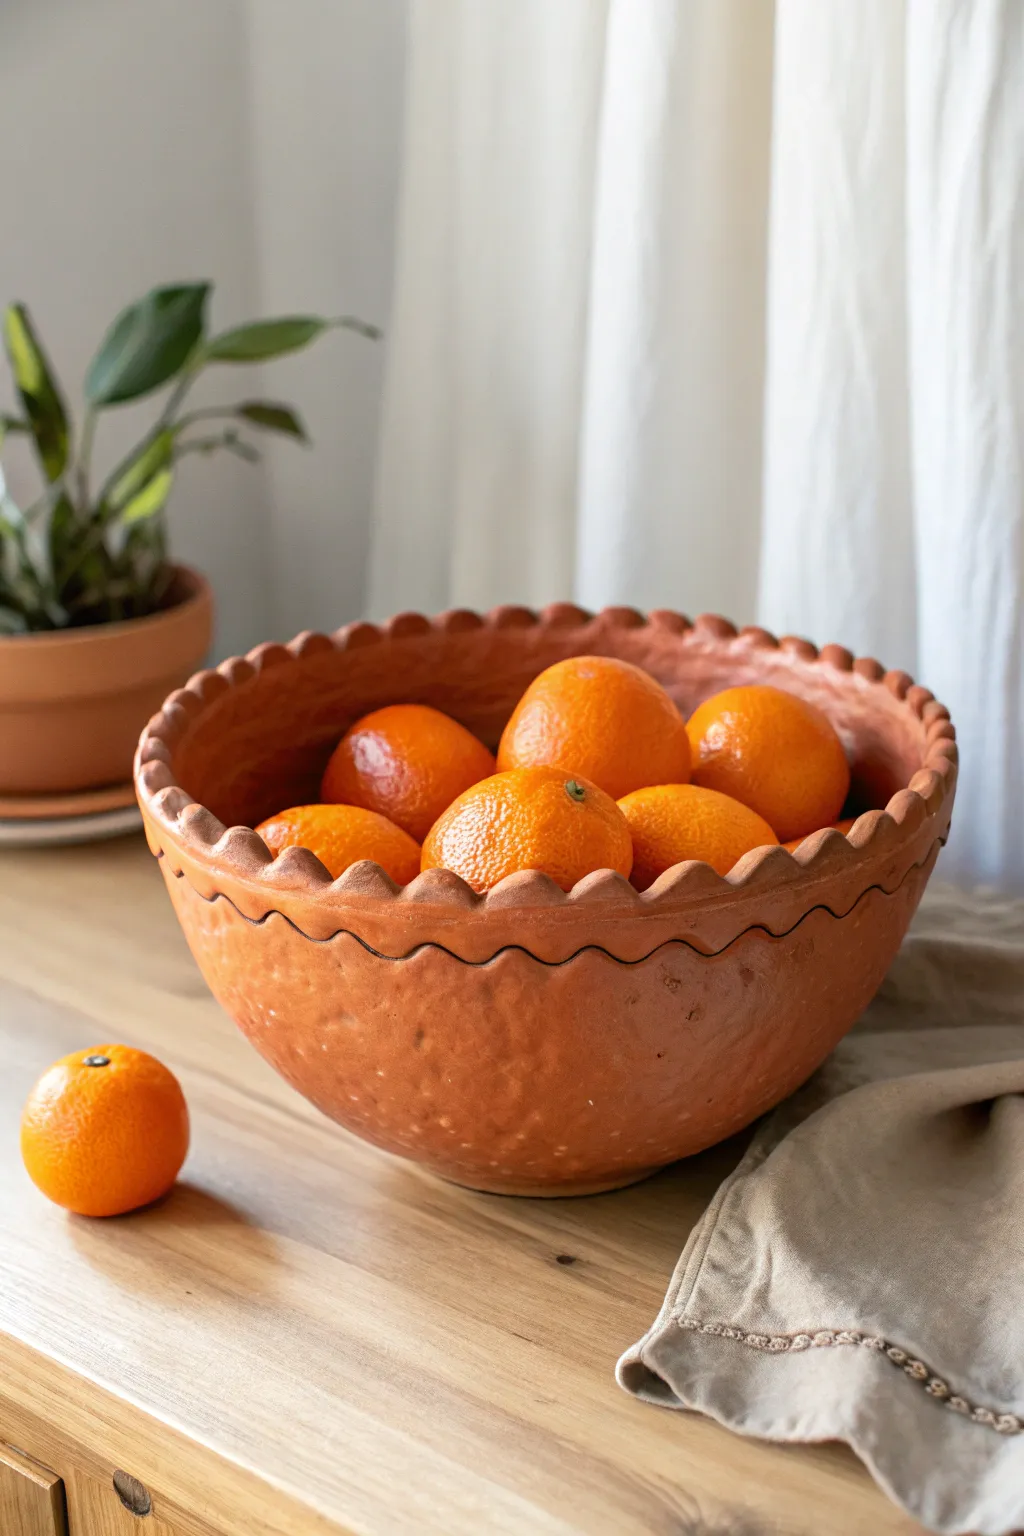
This rustic, oversized fruit bowl brings a charming Mediterranean feel to any kitchen counter with its warm clay tones and distinctive scalloped rim. Its generous size is perfect for holding a week’s worth of oranges, while the handmade texture adds authentic artisanal character.
Step-by-Step Tutorial
Materials
- Terracotta air-dry clay or earthenware firing clay (approx. 3-4 kg)
- Small bowl of water
- Rolling pin
- Canvas mat or wooden board
- Scoring tool or old fork
- Metal rib or old credit card
- Wooden sculpting tool (rounded end)
- Sponge
- Plastic wrap (optional)
Step 1: Forming the Base
-
Prepare the Clay:
Start by wedging your clay thoroughly to remove any air bubbles. Form it into a large, smooth ball roughly the size of a cantaloupe. -
Open the Center:
Push your thumb deep into the center of the ball, stopping about an inch from the bottom. This initial hole is the foundation of your pinch pot. -
Pinch the Walls:
Using your thumb on the inside and fingers on the outside, begin pinching the clay walls. Rotate the clay slowly as you pinch, working from the bottom up to maintain even thickness. -
Expand the Width:
Focus on pinching outward rather than just upward to create a wide, open bowl shape. Aim for a wall thickness of about 1/2 inch to support the large size.
Step 2: Refining Shape and Texture
-
Smooth the Surface:
Once you have the general shape, use a metal rib to compress the walls. Scrape upward on the exterior to smooth out deep fingerprints, but don’t over-polish; the subtle texture gives it character. -
Shape the Interior:
Use a damp sponge to smooth the interior floor and walls. Check for any thin spots by gently feeling the wall thickness and add small bits of clay if needed. -
Create the Rim Coil:
Roll out a thick coil of clay, about the thickness of your thumb. This will be added to the rim to give us extra material for the decorative edge. -
Attach the Coil:
Score the top edge of your bowl and the coil. Apply a little water or slip, place the coil on top, and meld it seamlessly onto the rim using your thumb to smooth the join downward.
Rim Cracking?
If the rim cracks while you shape the scallops, your clay is too dry. Mist it with water, wrap it in plastic for 20 mins to rehydrate, then try shaping again.
Step 3: Creating the Decorative Details
-
Level the Rim:
Before sculpting, ensure the rim is roughly level. You can use a needle tool to trim it while slowly rotating the bowl on a banding wheel or lazy susan if you have one. -
Mark the Scallops:
Use your thumb to gently press indentations into the top of the rim at even intervals. I like to mark North, South, East, and West first to ensure symmetry, then fill in the gaps. -
Sculpt the Waves:
Deepen the indentations with your thumb while using your pointer finger to pull up the clay between them, creating high points. This creates that wavy, scalloped effect. -
Add the Decorative Line:
About an inch below the rim on the exterior, use a rounded wooden tool to draw a wavy line that mirrors the scalloped pattern above. Press firmly enough to make a distinct groove. -
Texture the Surface:
Use the back of a spoon or a rounded stone to gently tap the exterior surface below the wavy line. This creates a hammered, dimpled texture that mimics beaten copper or rustic pottery. -
Refine Edges:
Go back over the scalloped rim with a slightly damp sponge to soften any sharp edges. A rounded, soft rim is more durable and comfortable to handle. -
Final Drying:
Let the bowl dry slowly. Cover the rim loosely with plastic wrap for the first day to prevent it from drying faster than the thick base, which can cause cracking.
Add a Glaze
After firing (or drying if using air-dry clay), apply a matte terracotta-colored varnish or a clear food-safe glaze to enhance the rich, earthy color.
Now you have a stunning centerpiece ready to be filled with your favorite seasonal fruits

The Complete Guide to Pottery Troubleshooting
Uncover the most common ceramic mistakes—from cracking clay to failed glazes—and learn how to fix them fast.
Large Wall Relief Tile Panel
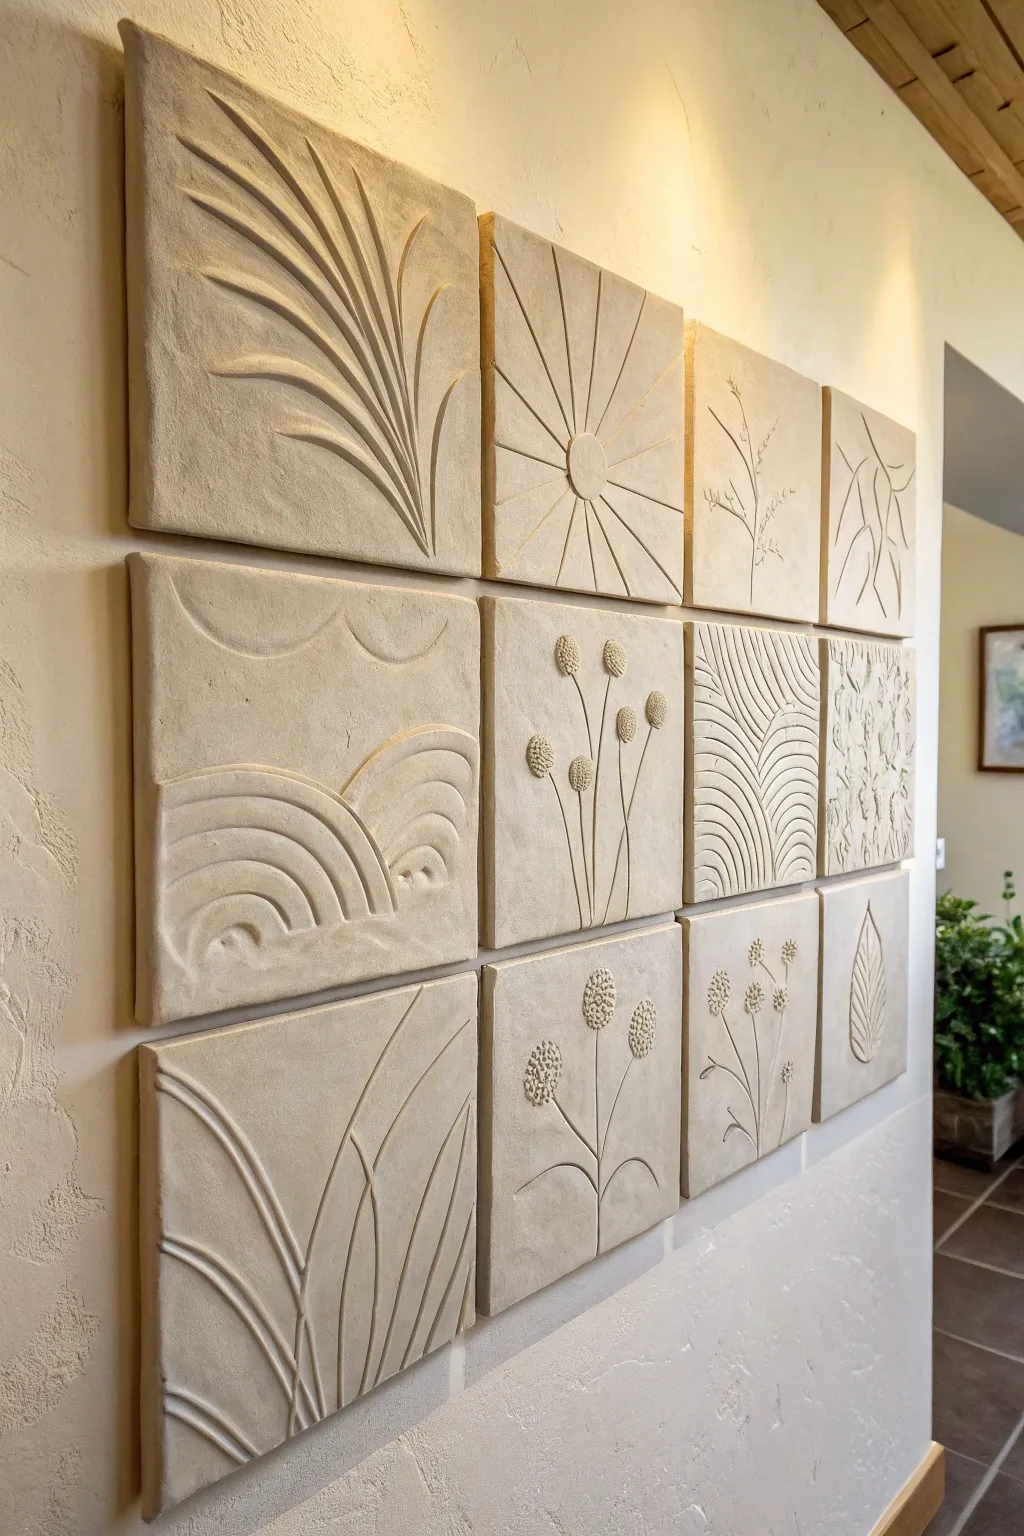
Transform a blank wall into a gallery of texture with this large-scale ceramic installation. By carving simple, nature-inspired motifs into uniform clay slabs, you create a cohesive yet visually diverse panel that celebrates organic forms in a modern, monochromatic palette.
Detailed Instructions
Materials
- High-grog stoneware clay (light/buff color)
- Wooden rolling pin
- Canvas/cloth mats for rolling
- Two long wooden slats (approx. 3/4 inch thick) for thickness guides
- Paper templates (10×10 inch squares)
- Fettling knife or craft knife
- Loop tools (various sizes for carving)
- Needle tool
- Serrated rib tool
- Rubber kidney rib
- Sponge
- Heavy-duty construction adhesive or mounting hardware (french cleats recommended for weight)
Step 1: Slab Preparation
-
Wedging and Setup:
Begin by thoroughly wedging your clay to remove air bubbles, which is crucial for tiles of this thickness. Set up your workspace with canvas mats to prevent sticking. -
Rolling Even Slabs:
Place your wooden guide slats on either side of the clay. Roll the clay out until the rolling pin rides on the slats; this ensures every tile is exactly the same thickness, which makes mounting much easier later. -
Compressing the Surface:
Before cutting, run a rubber kidney rib firmly over the surface of the slab. This aligns the clay particles and creates a smooth, finished ‘canvas’ for your carving. -
Cutting the Grid:
Lay your paper templates onto the slab. Using a needle tool handled vertically, trace the squares lightly, then cut through cleanly with a fettling knife, creating as many 10×10 inch (or your preferred size) tiles as needed. -
Drying to Leather Hard:
Place the cut tiles between pieces of drywall or on a wire rack covered loosely with plastic. Monitor them closely until they reach a ‘leather hard’ state—stiff enough to hold shape but soft enough to carve easily.
Pro Tip: Warping Defense
Flip your tiles over every day during the initial drying phase. This exposes both sides to air equally, which is the single best way to ensure your squares stay flat and don’t curl at the corners.
Step 2: Carving the Motifs
-
Sketching Designs:
Using a needle tool with very light pressure, sketch your botanical designs directly onto the leather-hard clay. Aim for variety: large palm leaves, radial sunbursts, and delicate seed pods. -
Carving Deep Reliefs:
For the bold designs like the palm fronds or arches, use a larger loop tool. Scoop out clay to create depth, angling the tool to create beveled edges that will catch the light. -
Creating Fine Details:
Switch to a smaller wire loop tool or a textured stamp for the seed heads and thin stems. I find that varying the depth of the cut helps separate foreground elements from the background. -
Smoothing Edges:
After carving, use a slightly damp sponge or your fingertip to soften any sharp burrs left by the tools. Don’t over-wet the clay, or you’ll lose the crispness of the design. -
Adding Texture (Optional):
If you want the background to feel more organic, gently dab the negative space with a dry sponge or stipple it with a stiff brush to contrast with the smooth raised motifs.
Troubleshooting: Cracks
If small hairline cracks appear while carving, your clay is getting too dry. Mist it lightly with water and cover it with plastic for an hour to rehydrate the surface before you continue working.
Step 3: Drying, Firing and Mounting
-
Slow Drying:
Sandwich the finished tiles between drywall boards or stack them with paper in between, weighting down the top. Drying them very slowly over 1-2 weeks is the only way to prevent warping. -
Bisque Firing:
Once bone dry, bisque fire the tiles to the appropriate cone for your clay body (usually Cone 04 or 06). -
Glazing or Staining:
For the look in the photo, skip a glossy glaze. Apply a matte wash or leave the raw clay body if it’s a nice color. If glazing, spray a thin layer of matte stoneware glaze to maintain the texture. -
Final Firing:
Fire the tiles to maturity. Ensure they are placed flat on the kiln shelves to ensure they stay perfectly planar. -
Planning the Layout:
Lay the finished tiles on the floor to visualize the grid. Rearrange them to balance heavy designs (like the arches) with lighter ones (like the twigs). -
Mounting:
For permanent installation, use construction adhesive to adhere them directly to the wall. For a removable option, epoxy a french cleat or heavy-duty hanging hardware to the back of each tile.
Step back and admire how the light plays across the different textures of your handcrafted wall feature
Big Textured Tray for Coffee Table
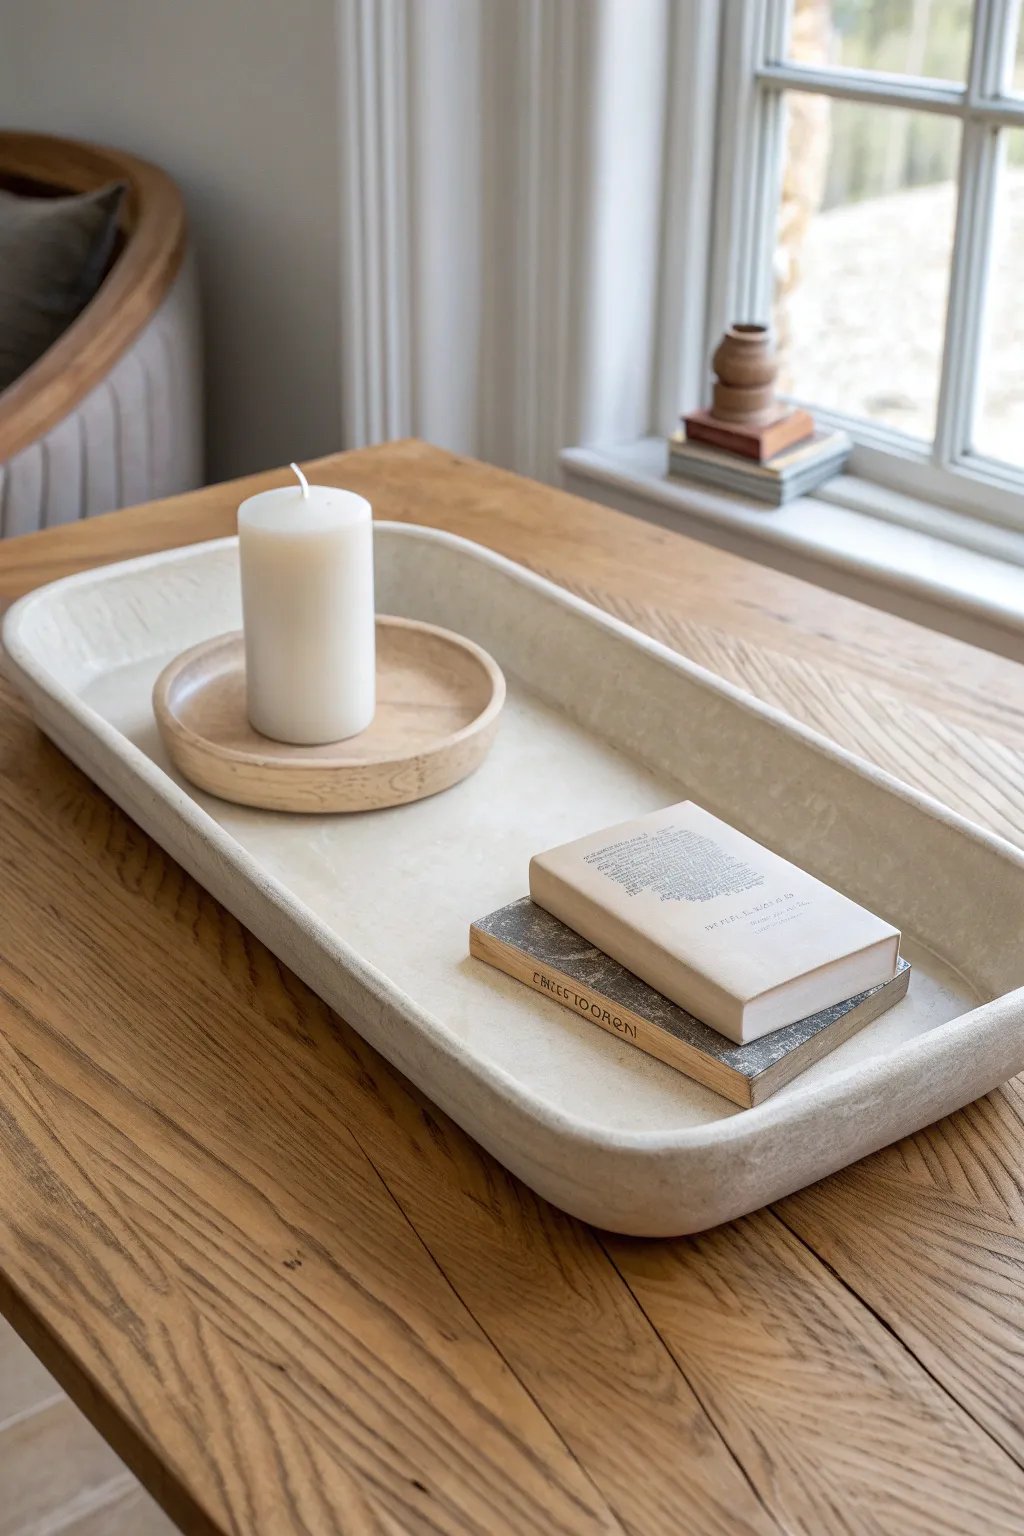
Create a statement centerpiece with this substantial, minimalist tray that combines modern form with organic texture. Its generous size and soft, matte finish make it the perfect vessel for styling candles, books, and decorative accents.
Step-by-Step
Materials
- Air-dry clay (approximately 2-3 kg, white or stone color)
- Large rolling pin
- Canvas mat or large wooden board (for rolling)
- Ruler
- Craft knife or clay wire cutter
- Cardboard (for creating a template)
- Sponge
- Water
- Sandpaper (medium and fine grit)
- Acrylic sealant or matte varnish
- Slip (clay mixed with water into a paste)
Step 1: Preparation and Base Construction
-
Create a template:
Decide on the dimensions for your tray—the one in the image looks to be about 12×20 inches. Cut a piece of cardboard to this size, rounding the corners slightly with scissors to mimic the soft shape shown. -
Condition the clay:
Take a large portion of your air-dry clay and knead it thoroughly on your canvas mat until it is warm and pliable. This prevents cracking later on. -
Roll the base slab:
Roll out the clay to a consistent thickness of about 1/2 inch. I find using guide sticks on either side of the clay helps keep the rolling pin level. -
Cut the shape:
Place your cardboard template onto the rolled slab. Using your craft knife held vertically, carefully trace around the template to cut out the base of your tray. -
Smooth the edges:
Dip your finger in a little water and run it along the cut edges of the base to soften any sharp angles left by the knife.
Prevent Warping
Large flat clay pieces love to warp. Place a wooden board on top of the tray base (lightly weighted) during the first 12 hours of drying to keep it perfectly flat.
Step 2: Building the Walls
-
Prepare the coils:
Roll out long, thick snakes (coils) of clay, roughly 3/4 inch in diameter. You will need enough length to go around the entire perimeter of your base. -
Score and slip:
Using a fork or scoring tool, scratch up the top edge of your base slab and the underside of your coil. Apply a generous amount of slip to the scratched areas. -
Attach the wall:
Firmly press the coil onto the edge of the base. If the coil isn’t long enough, join a second one by scoring and slipping the ends together seamlessly. -
Blend the seams:
Using your thumb or a modeling tool, drag clay from the coil down onto the base on the inside, and from the base up onto the coil on the outside. This mechanical bond is crucial for strength.
Step 3: Shaping and Refining
-
Build height (optional):
If you want a deeper tray like the one pictured, add a second coil on top of the first using the same score-and-slip method, blending the seams thoroughly. -
Shape the walls:
Use a smooth, straight edge (like a ribs tool or a ruler) to gently flatten the sides of the walls while supporting them from the opposite side with your hand. Aim for a slight outward slope. -
Texture the surface:
To achieve that stone-like finish, take a damp sponge and dab it all over the surface. Do not smooth it perfectly; leave slight unevenness and sponge marks to create organic character. -
Refine the rim:
Gently run a damp sponge along the top rim to round it off. It shouldn’t be sharp; it needs to look soft and worn.
Cracks Appearing?
Don’t panic! Mix bone-dry clay crumbs with a little white glue and water to make a paste. Fill the crack, let it dry, and sand it smooth before sealing.
Step 4: Drying and Finishing
-
Slow drying:
Loosely cover the tray with a plastic bag. Let it dry slowly away from direct heat or sunlight for 24-48 hours. Slow drying prevents warping. -
Uncover and finish drying:
Remove the plastic and let the tray dry completely. This can take another 2-3 days depending on humidity. The tray will turn a lighter color and feel room temperature, not cold, when dry. -
Sanding:
Once fully dry, use medium-grit sandpaper to knock down any large bumps, then switch to fine-grit for a smooth but textured feel. Wear a dust mask for this part. -
Seal the piece:
Apply two coats of a matte acrylic varnish or sealant. This won’t make it food safe, but it protects the clay from moisture and dust.
Now you have a stunning, architectural piece ready to anchor your coffee table styling


What Really Happens Inside the Kiln
Learn how time and temperature work together inside the kiln to transform clay into durable ceramic.
Big Statement Candleholder Cluster
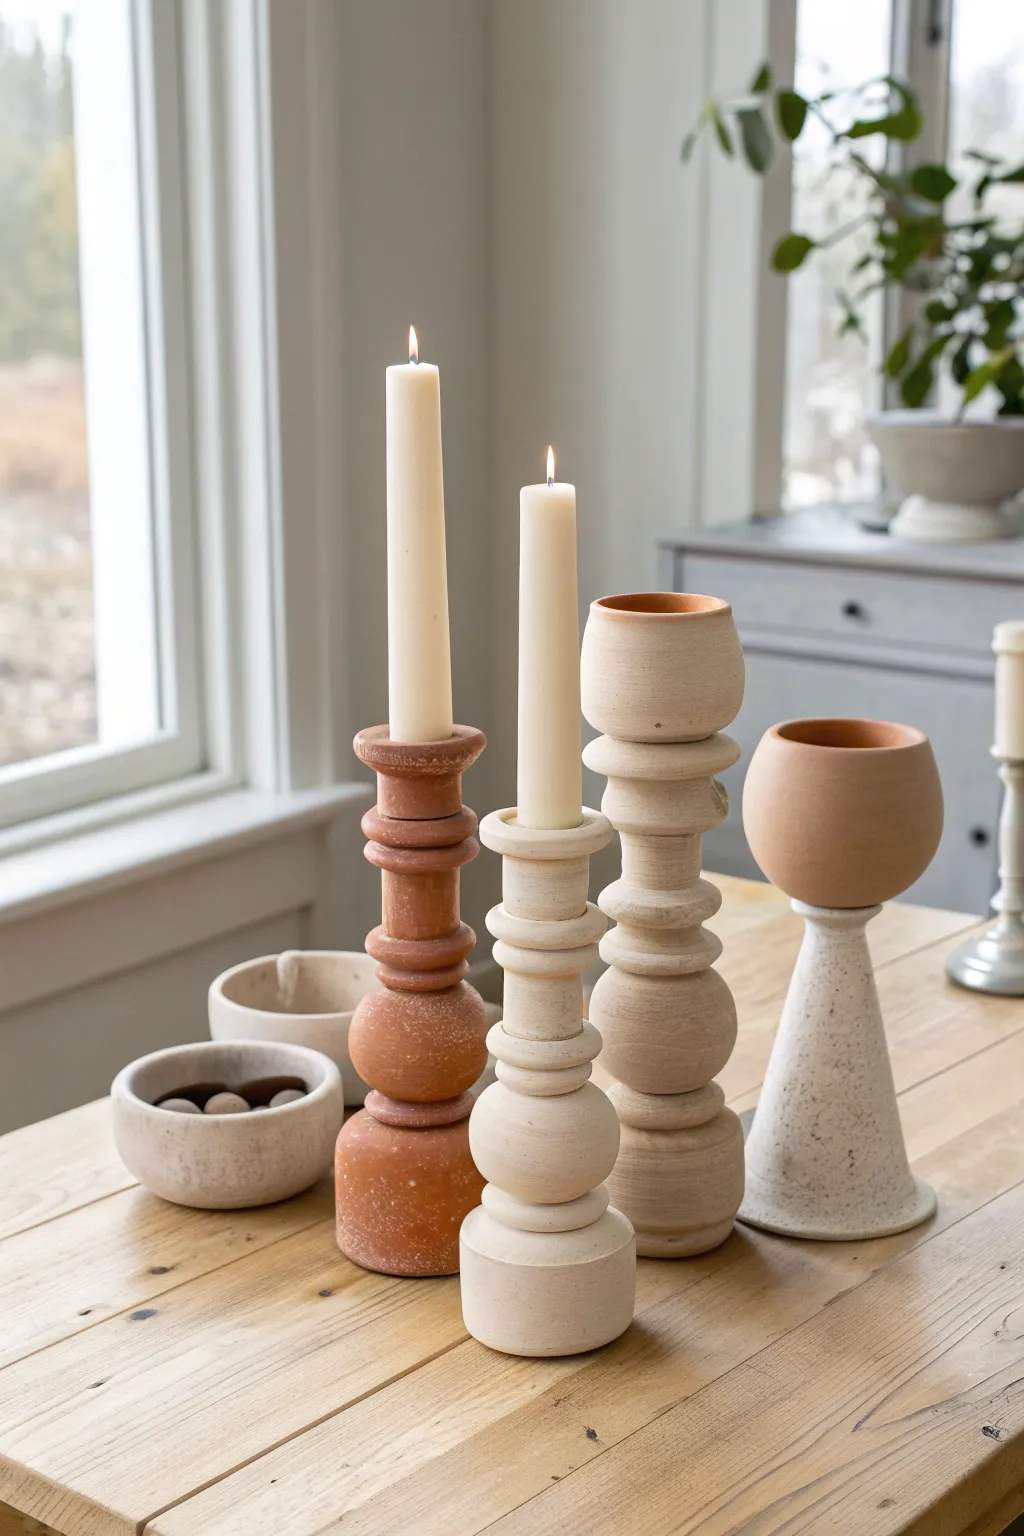
Bring an architectural touch to your table with this cluster of tall, totem-style candleholders. Using air-dry or polymer clay, you’ll build striking statement pieces by stacking varying geometric forms to create height and visual interest.
Detailed Instructions
Materials
- Air-dry clay (terra cotta and stone/white colors)
- Acrylic rolling pin
- Circle cutters (various sizes)
- Modeling tools or a blunt knife
- Slip (clay mixed with water) or liquid clay adhesive
- Sponge and fine-grit sandpaper
- Candle for sizing (taper and pillar)
- Strong craft glue (optional for final assembly)
- Wire armature or dowel (for internal support)
Step 1: Preparation & Base Forms
-
Plan your totems:
Sketch out three distinct designs on paper first. Aim for variety in height and shape, mixing spheres, flattened discs, and cylinders to create a cohesive but non-identical trio. -
Condition the clay:
Knead your clay thoroughly until it is pliable and warm. If you are using color-specific clays like terracotta or stone-look, keep them on separate work surfaces to avoid cross-contamination. -
Form the bases:
Start with the bottom most element for each holder. Roll sturdy cylinders or thick discs about 3-4 inches wide to ensure stability. Flatten the bottoms completely against your table so they don’t wobble. -
Insert the core support:
For these taller structures, I always recommend inserting a wooden dowel or strong wire vertically into the center of your wet base. This will act as a spine for stacking the subsequent shapes.
Cracks while drying?
If hairline cracks appear during drying, mix a small paste of clay and vinegar (for air-dry) or slip. Fill the crack, smooth it over, and cover with plastic to dry very slowly again.
Step 2: Sculpting the Geometric Tiers
-
Create spherical elements:
Roll balls of clay in your hands for the rounded tiers. To get that flattened ‘bead’ look seen in the red holder, gently press the ball between your palms or a flat board. -
Cut the discs:
Roll out a slab of clay about 1/2 inch thick. Use circle cutters or a jar rim to cut perfect discs. These act as connectors or ‘spacers’ between the larger bulbous shapes. -
Shape the cups:
For the top pieces that hold the candles, form a cylinder (for tapers) or a wide bowl shape (for pillars). Press your actual candle into the soft clay to create the perfect socket size, then wiggle it slightly to allow for shrinkage. -
Make the conical stand:
For the speckled holder, roll a flat slab and cut a large semicircle. Curl this around to form a cone shape, carefully smoothing the vertical seam with a little water until it disappears.
Faux Stone Finish
Mix dried tea leaves, coarse sand, or black pepper into white clay before sculpting to effortlessly achieve the speckled, granite-like texture shown in the cone holder.
Step 3: Assembly & Refining
-
Stack the layers:
Begin threading your clay shapes onto the central dowel. Apply a generous amount of slip (or liquid clay) between every single layer to act as glue. -
Blend the seams:
Where two pieces meet, like a disc and a sphere, use a modeling tool to gently drag clay across the seam if you want a fused look, or simply press firmly for a distinct, stacked appearance. -
Smooth the surfaces:
Dip a sponge in water and wipe down the entire sculpture. This smooths out fingerprints and gives that matte, stoneware finish seen in the photo. -
Dry slowly:
Let the pieces dry away from direct heat or sunlight. Drape a loose plastic bag over them for the first 24 hours to prevent cracks caused by uneven drying.
Step 4: Final Touches
-
Sand for perfection:
Once bone dry, take your fine-grit sandpaper and gently buff away any remaining rough spots, focusing on the rims and bottom edges. -
Seal the piece:
Apply a matte geometric varnish or sealant to protect the clay from soot or wax drips without making it look plasticky.
Place your new sculptural set on a mantle or dining table to enjoy the warm glow of your handiwork
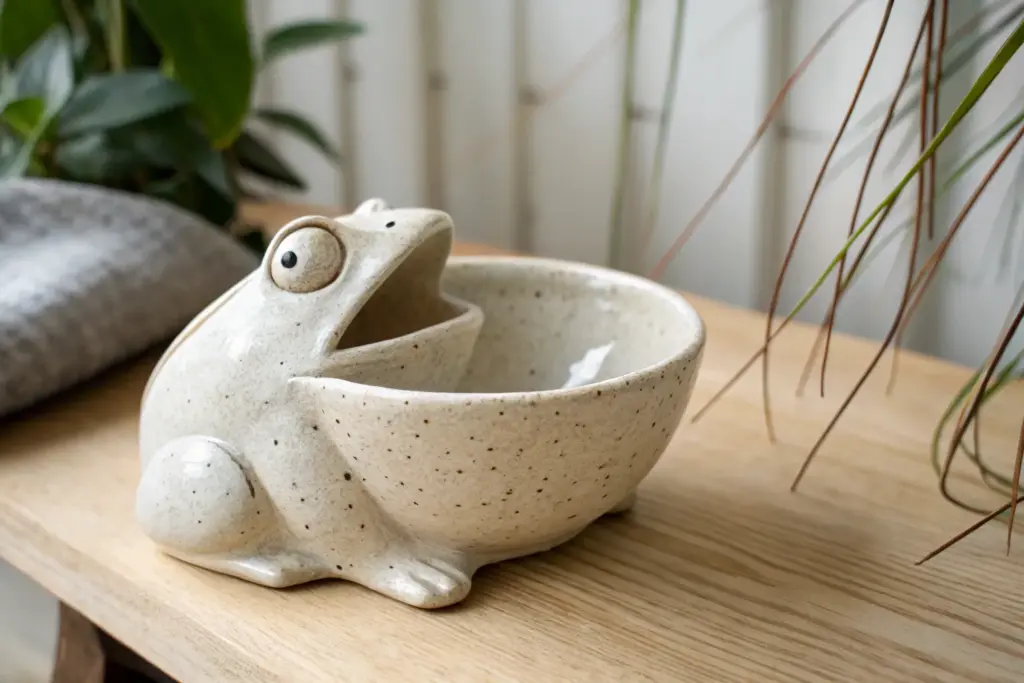
Big-Mouth Frog Sponge Holder
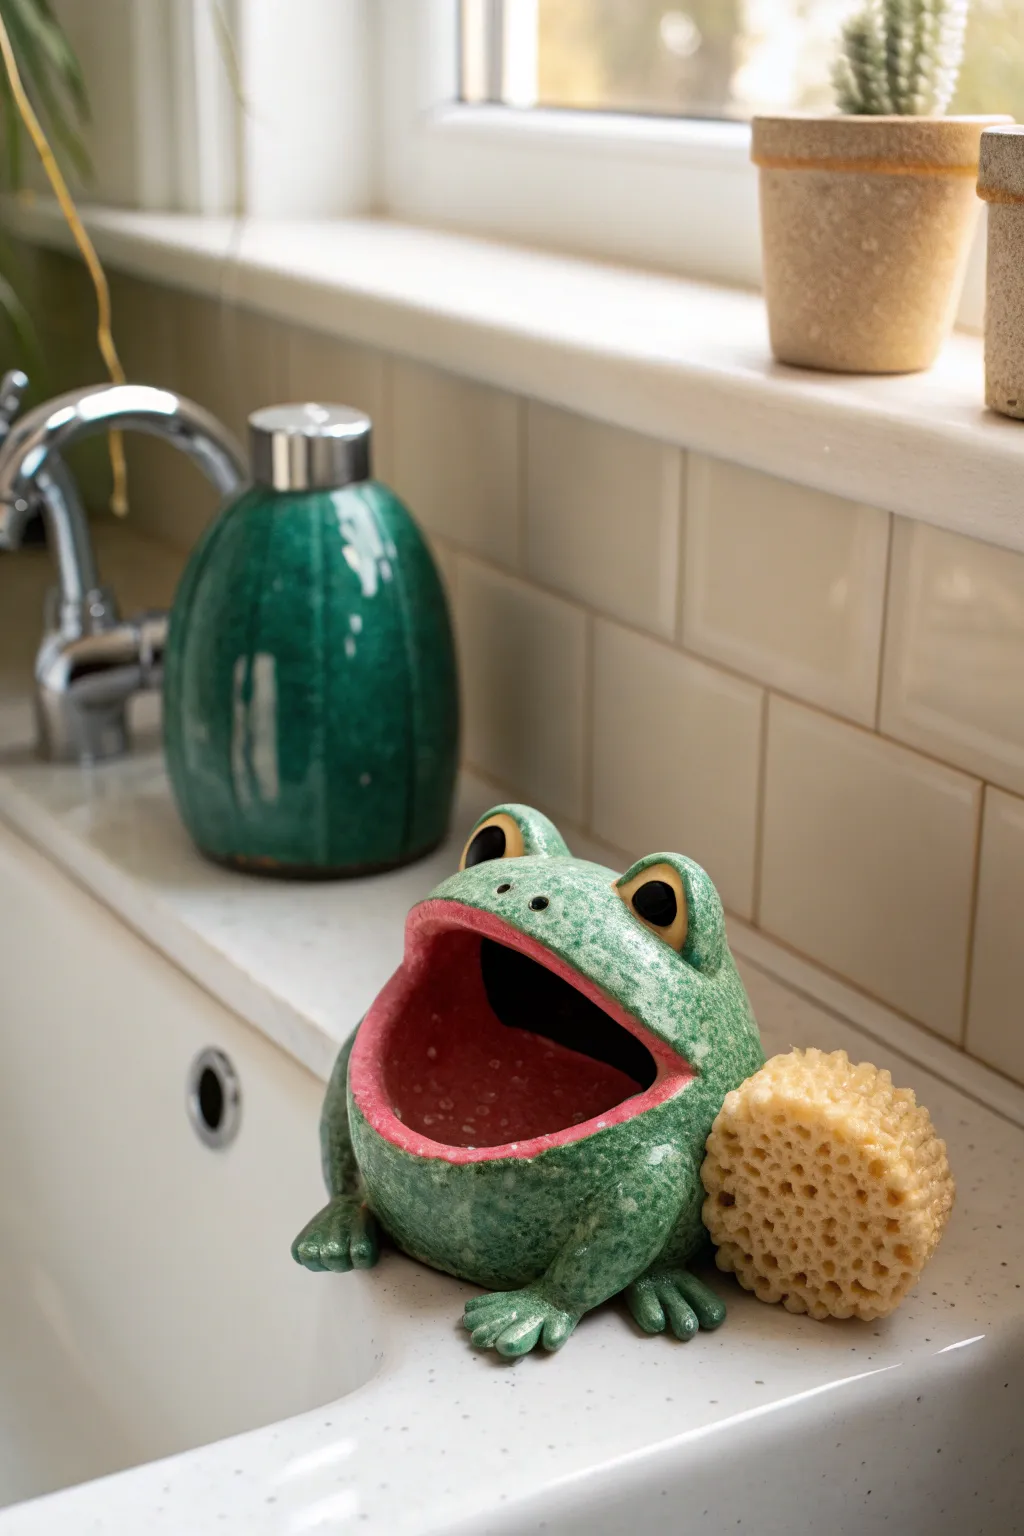
Bring a splash of pond-side whimsy to your kitchen sink with this charming, wide-mouthed frog. Sculpted from clay with a generous opening perfect for clutching your scrubby sponge, his speckled green skin and bright pink grin make dish duty just a little more cheerful.
How-To Guide
Materials
- Earthenware or stoneware clay (white or light-colored)
- Pottery tools (needle tool, rib tool, modeling tool)
- Slip and scoring tool
- Rolling pin
- Underglazes (Speckled Green, Bright Pink, Black, Yellow/Gold)
- Clear glaze (glossy)
- Sponge and water
- Kiln access
Step 1: Forming the Body
-
Start with two pinch pots:
Begin by taking two balls of clay roughly the size of a tennis ball. Press your thumb into the center of each and pinch the walls evenly to create two matching bowl shapes. -
Join the pots:
Score the rims of both pinch pots thoroughly and apply slip. Press the rims together firmly to form a hollow sphere, trapping air inside to help it hold its shape. -
Shape the oval:
Gently paddle or roll the sphere on your work surface to elongate it slightly into a horizontal oval shape, which will become the frog’s main body. -
Cut the mouth:
Using your needle tool, cut a large, wide smile into the front of the body. Don’t be shy—this needs to be big enough to hold a sponge! Remove the cut-out clay. -
Widen and smooth:
Gently pull the lower lip forward to create a bit of a shelf. Smooth the cut edges of the mouth with a damp sponge so they are rounded and comfortable to touch. -
Form the interior:
Since the mouth is open, the inside is visible. Use a modeling tool or your fingers to smooth the interior seam where the two pinch pots joined.
Sponge Sizing Tip
Before drying, test the mouth size with a dry sponge. Remember that clay shrinks about 10-12% during firing, so make the opening slightly larger than you think you need.
Step 2: Adding Features
-
Create the eyes:
Roll two smaller balls of clay for the eyes. Score and slip the top of the head, then attach these balls firmly. Press your thumb gently into the front of each ball to create a slight socket. -
Refine the eye ridge:
Roll two small coils of clay and wrap them over the top of the eyes to create defined eyelids or brow ridges. Blend the clay downward into the head for a seamless look. -
Add limbs:
Roll four thick coils for the legs. Attach two to the sides (bent at the knee) and two smaller ones at the front. Flatten the ends slightly to form feet. -
Detail the toes:
Use a knife or needle tool to cut notches into the flattened feet, separating them into three adorable frog toes. Smooth the cut edges. -
Texturing:
I like to use a stiff bristle brush or a textured sponge to gently dab the green skin areas, giving the frog a slightly warty, realistic texture before the clay dries. -
Bisque fire:
Allow the frog to dry slowly is critical to prevent cracking. Once bone dry, fire the piece to bisque temperature (usually Cone 04).
Step 3: Glazing and Finishing
-
Apply base color:
Paint the exterior skin with three coats of a speckled green underglaze. The speckles add wonderful dimension to the finished piece. -
Paint the mouth:
Carefully paint the entire interior of the mouth and the lips with a bright, coral-pink underglaze. This contrast makes the frog really pop. -
Detail the eyes:
Paint the eye sockets yellow or gold. Once dry, add a large black pupil in the center. A tiny white dot highlight in the pupil brings him to life. -
Final coat and fire:
Once the underglaze is dry, dip or brush the entire piece with a clear glossy glaze. Fire again to the clay body’s maturity temperature (often Cone 5 or 6).
Lily Pad Base
Instead of separate feet, sculpt a flat, round lily pad slab as a base. Attach the frog body directly to it for extra stability and a fun scenic element.
Now you have a helpful little amphibian friend ready to keep your sink area tidy and organized

TRACK YOUR CERAMIC JOURNEY
Capture glaze tests, firing details, and creative progress—all in one simple printable. Make your projects easier to repeat and improve.
Big-Mouth Fish Scrubby Caddy
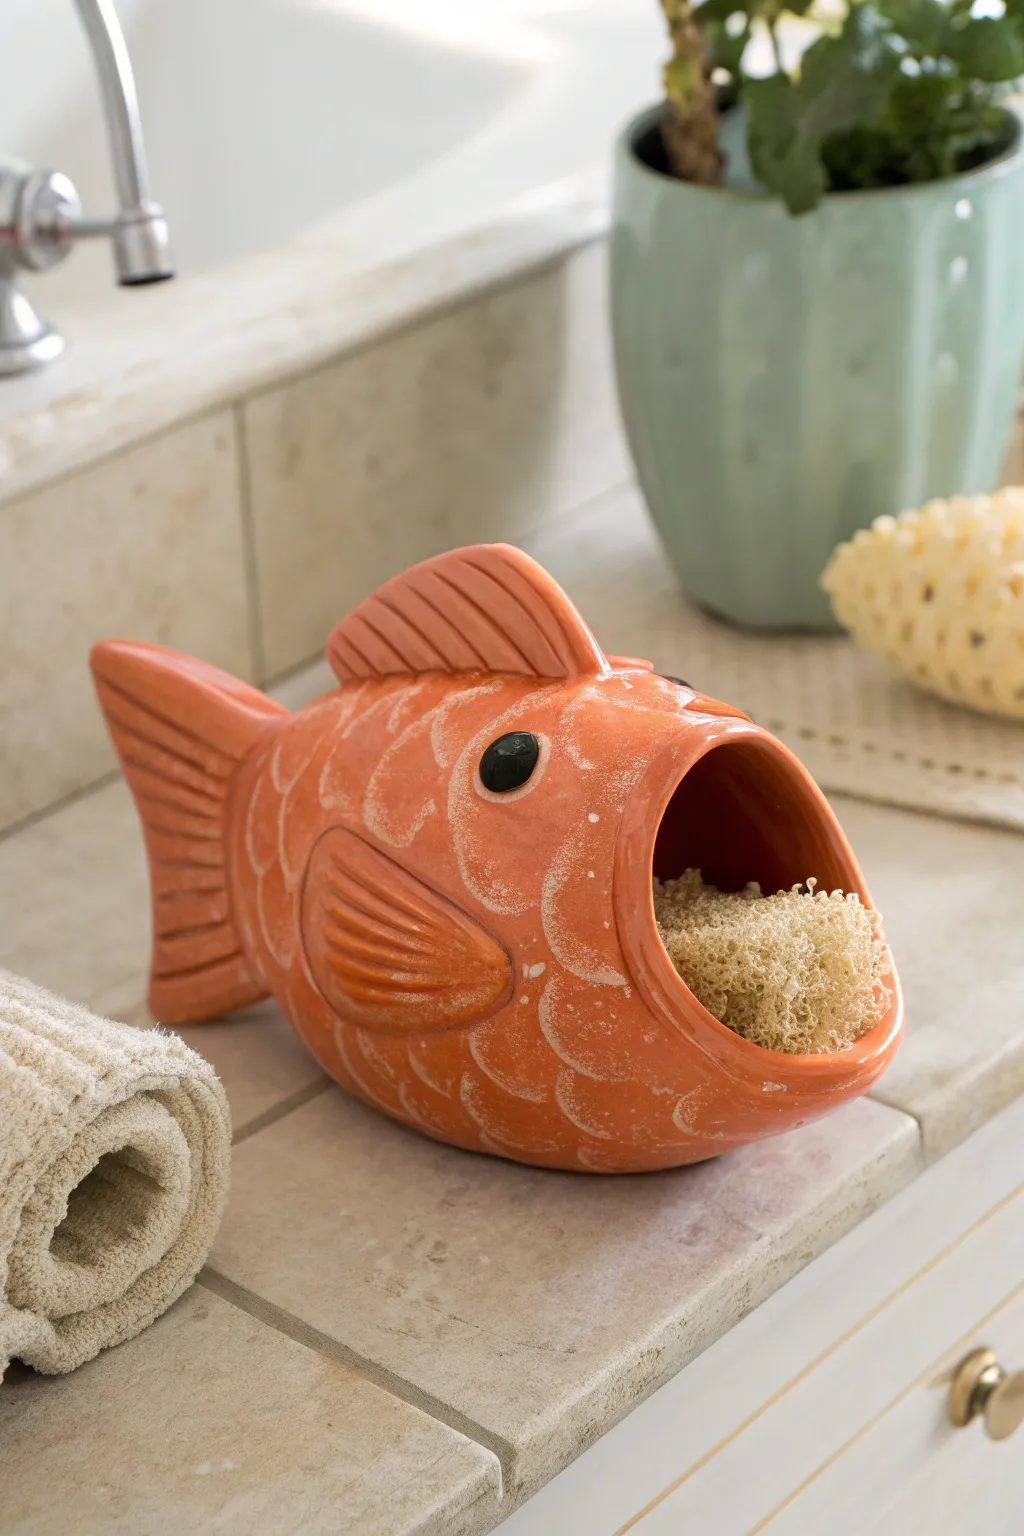
Add a splash of aquatic charm to your sink side with this whimsical, wide-mouthed fish caddy. Modeled with distinct scales and a rustic terracotta finish, this functional sculpture is designed to keep your scrubbing sponge high and dry.
Step-by-Step Tutorial
Materials
- Earthenware or stoneware clay (approx. 2-3 lbs)
- Pottery wheel (optional, can be hand-built)
- Rib tool (wooden or silicone)
- Needle tool
- Loop tool for carving
- Slip and scoring tool (or fork)
- Underglaze (bright orange/terracotta)
- Glossy clear glaze
- Black underglaze (for details)
- Sponge
- Kiln
Step 1: Forming the Body
-
Throw or Build the Base:
Start by creating a closed form. If throwing on the wheel, throw a hollow cylinder, collar it in to close the top completely, and refine it into an elongated egg shape. If hand-building, pinch two deep pinch pots and join them together securely. -
Orient the Fish:
Turn the egg shape on its side. This horizontal orientation will be your fish’s body. Gently flatten the bottom just slightly so it sits stable on a table without rolling away. -
Open the Mouth:
Decide which end is the front. Using a needle tool, cut a large, circular opening at an upward angle. This ‘gulping’ mouth needs to be wide enough to easily insert and remove a pot scrubber. -
Smooth the Lips:
Use a damp chamois or your fingers to round out the cut edge of the mouth. You want this rim somewhat thick and sturdy to resist chipping during daily use.
Step 2: Sculpting Details
-
Shape the Tail:
At the rear of the fish, pinch the clay to flatten it vertically. You can add a small slab if needed, but pulling the existing clay usually works best. Cut a ‘V’ notch to define the tail fins and use a modeling tool to press in vertical striations. -
Add the Dorsal Fin:
Roll a thick coil or cut a small slab triangle. Score and slip the top center of the fish’s back, then attach the fin. Smooth the connection seams completely so it looks like it grew from the body. -
Attach Side Fins:
Create two teardrop-shaped slabs for the pectoral fins. Attach these to the sides of the body using the score-and-slip method. I like to angle them slightly backwards to suggest movement. -
Refine Fin Textures:
Using a wooden knife or needle tool, draw deep lines into the dorsal and side fins to mimic the ribs of the fin structure. -
Create the Eyes:
Roll two small balls of clay and flatten them slightly.Attach them on either side of the head area, positioned somewhat high up. Press the center gently to create a socket appearance.
Mouth Slumping?
If the mouth opening sags while the clay is soft, loosely crumple a ball of newspaper and stuff it inside the fish to support the shape until it stiffens to leather-hard.
Step 3: Texture and Surface Decoration
-
Carve the Scales:
Using a loop tool or a U-shaped wire tool, carve scalloped scale patterns into the body. Start from the tail and work your way forward toward the head, layering them like roof shingles. -
Clean Up Lines:
Once the clay is leather hard, go over your carving lines with a soft brush to remove any sharp clay burrs or crumbs. -
Bisque Fire:
Allow the piece to dry slowly and completely to prevent cracking, then fire it to bisque temperature (usually cone 04) based on your clay body’s specifications.
Drainage Hole
Add a small hole near the bottom of the mouth/belly area before firing. This lets excess water from the sponge drip out into the sink, keeping the holder cleaner.
Step 4: Glazing
-
Apply Base Color:
Brush 2-3 coats of an orange or terracotta-colored underglaze over the entire exterior. For a rustic look, you can wipe it back slightly with a damp sponge so the color stays darker in the carved scale recesses. -
Detail the Eye:
Carefully paint the raised pupil of the eye with a dot of black underglaze to bring the fish to life. -
Glaze the Interior:
Pour a glossy clear glaze inside the mouth and swish it around to coat the entire interior. This is crucial for waterproofing the area where the wet sponge will sit. -
Final Glaze and Fire:
Apply a clear glaze over the exterior if you want a fully shiny fish, or leave the outside matte for contrast. Fire the piece again to the glaze temperature appropriate for your materials.
Place your favorite natural sea sponge in the mouth and enjoy your helpful little countertop companion
Big-Mouth Monster Catch-All Cup
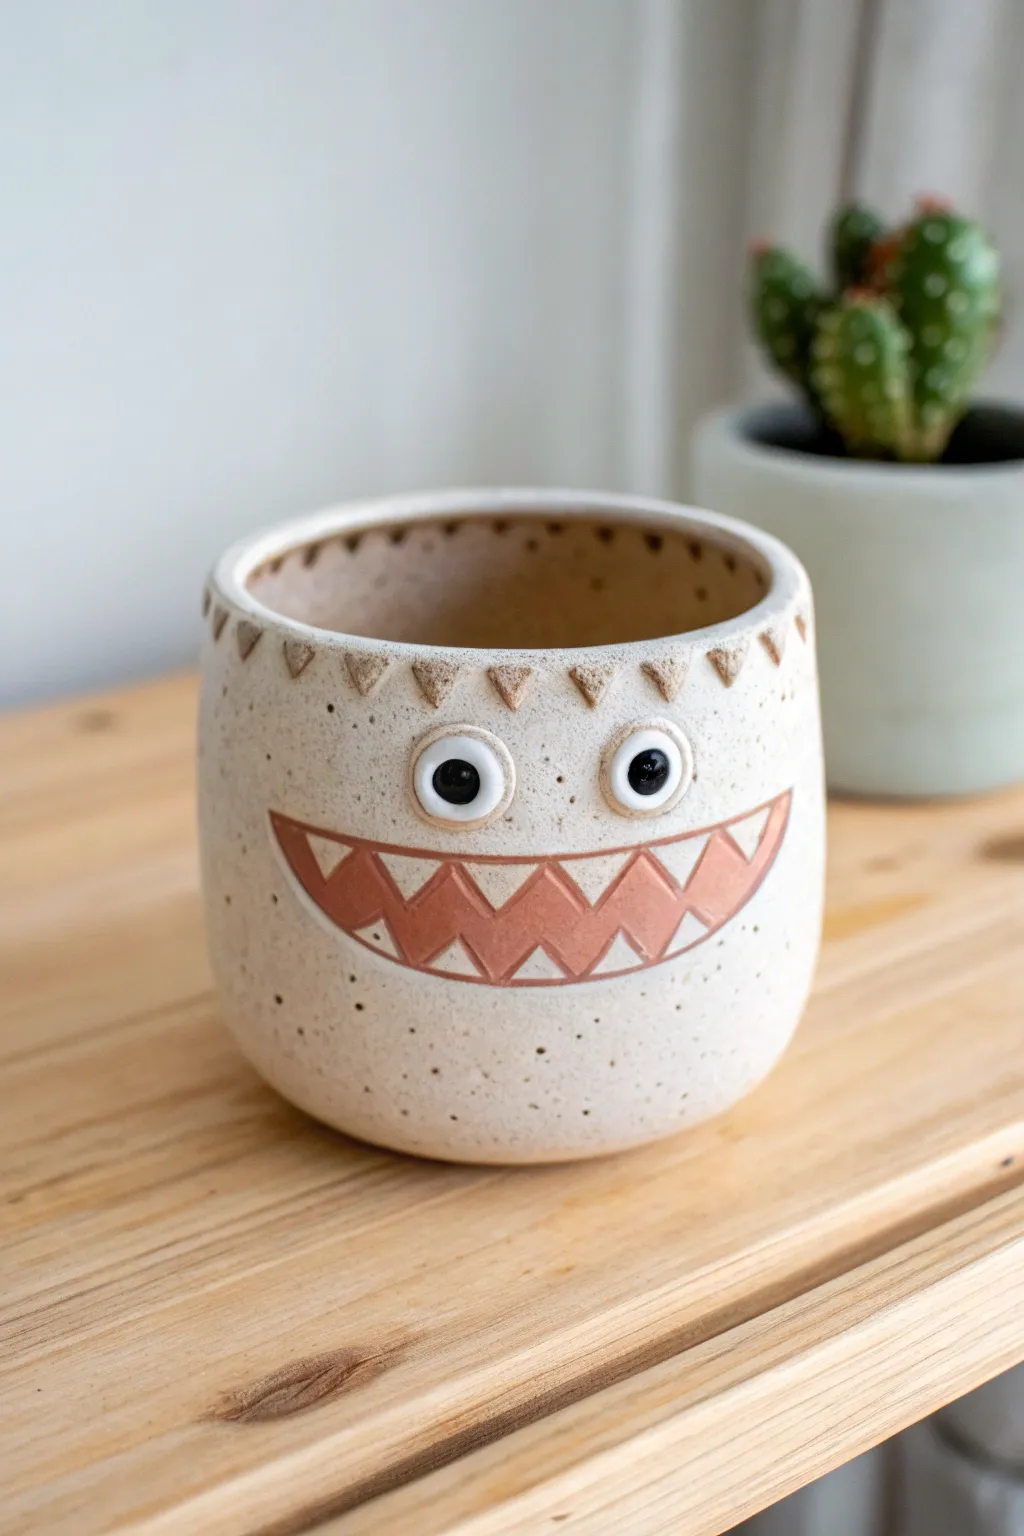
Add some playful personality to your desk or windowsill with this goofy, big-mouthed monster pot. Featuring a wide, toothed grin, googly eyes, and a speckled cream finish, this charming catch-all is perfect for holding pens or small succulents.
How-To Guide
Materials
- White or speckled stoneware clay
- Rolling pin
- Pottery knife or needle tool
- Slip and scoring tool
- Small round cookie cutter (for eyes)
- Underglaze (Red/Terracotta and Black)
- Clear or speckled cream glaze
- Small detail paintbrush
- Sponge
- Kiln (or access to a firing service)
Step 1: Forming the Vessel
-
Roll the slab:
Begin by rolling out a slab of white stoneware clay to an even thickness of about 1/4 inch. If you want that natural speckled look throughout, choose a clay body that already has speckles, or we can add them later with glaze. -
Cut the base and walls:
Cut a rectangular strip for the walls (approx. 4 inches tall by 10 inches long) and a circle for the base that matches the circumference of your cylinder. -
Assemble the cylinder:
Score the short edges of your rectangular slab and apply slip. Bring the edges together to form a cylinder, pressing the seam firmly and smoothing it inside and out so it disappears. -
Attach the base:
Score and slip the bottom edge of the cylinder and the outer edge of your circular base. Press them together firmly. I like to run a wooden modeling tool along the bottom seam to ensure a watertight seal. -
Curving the form:
Once the cylinder is attached, gently cup your hands around the middle and bottom of the pot. Push slightly from the inside to round out the belly of the cup, giving it a softer, more organic curve rather than straight vertical walls.
Step 2: Adding the Monster Features
-
Carve the mouth outline:
Using a needle tool, lightly sketch a wide, crescent-shaped smile about halfway down the pot. Make sure it stretches almost edge to edge for that ‘big mouth’ look. -
Define the teeth:
Inside the smile outline, sketch a zigzag line creating sharp triangular teeth on both the top and bottom jaw. -
Sgraffito the mouth:
Carefully carve out the clay slightly around the teeth if you want relief, or simply prepare the surface to receive underglaze later. The lines should be crisp and deliberate. -
Create the eyes:
Roll two small balls of clay and flatten them into discs, or use a small round cutter for perfect circles. Score and slip the back of these eyes and attach them just above the smile. -
Add pupils:
Roll two tiny specific balls for pupils and attach them to the center of the whites, or simply use a tool to create a small indentation where the black pupil will be painted. -
Add rim details:
Create a decorative border along the top rim by pressing a small triangular tool or the corner of a ruler into the clay to make a pattern of downward-pointing triangles.
Clean Lines
If underglaze bleeds onto the teeth, wait for it to dry completely. Then, gently scratch the mistake off with a needle tool for a crisp edge.
Step 3: Glazing and Finishing
-
Bisque fire:
Allow your monster to dry slowly and completely before firing it in a bisque kiln to prepare it for glazing. -
Paint the mouth:
Using a reddish-brown or terracotta underglaze, carefully paint the negative space inside the mouth (between the teeth). Leave the teeth unpainted so the raw clay color shows through. -
Detail the eyes:
Paint the pupils of the eyes carefully with black underglaze. Keep your hand steady to avoid smudging onto the white part of the eye. -
Rim accents:
Take a small amount of the terracotta underglaze and dilute it slightly. Brush this into the triangular indentations near the rim, then wipe the surface back with a damp sponge so the color remains only in the recessed triangles. -
Apply main glaze:
Dip or brush the entire pot (avoiding the painted mouth area if possible, or using a clear glaze over everything) in a speckled cream glaze. If you used speckled clay, a transparent glaze works best. -
Final wipe:
Ensure the bottom of the pot is wiped clean of any glaze to prevent it from sticking to the kiln shelf. -
Glaze fire:
Fire the piece again to the temperature required by your specific clay and glaze combination.
Plant Perks
If you plan to use this for a cactus like in the photo, add a drainage hole in the center of the base during the assembly phase before firing.
Now your little monster is ready to guard your treasures with a smile
Chunky Big Cactus Decor Set
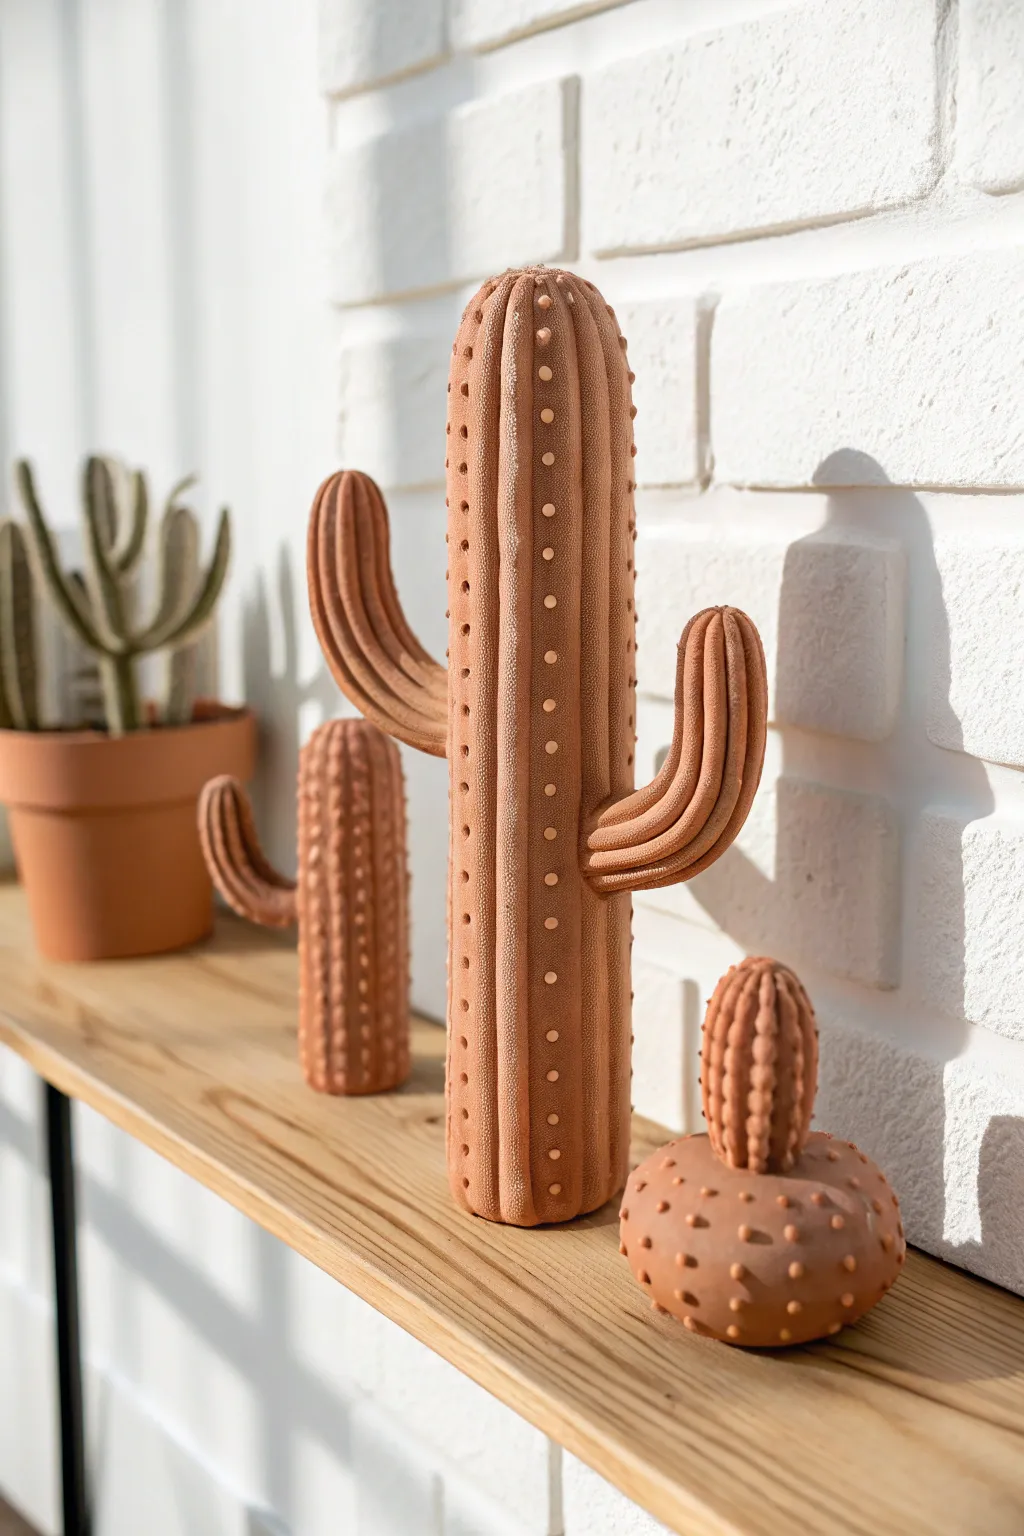
Bring the warmth of the desert inside with these stylized clay cactus sculptures, featuring a rich terracotta finish and satisfyingly chunky textures. This project creates a trio of durable, waterless botanicals that look stunning grouped together on a mantle or shelf.
Step-by-Step Guide
Materials
- Air-dry clay (terracotta color preferred) or polymer clay
- Aluminum foil (for armature)
- Masking tape
- Rolling pin
- Modeling tools (or a butter knife and toothpick)
- Small cup of water (for smoothing)
- Sponge
- Acrylic paint (burnt sienna, burnt orange, off-white)
- Matte varnish spray
Step 1: Building the Armature
-
Shape the core:
Crumple aluminum foil into a tight cylinder for the main body of the cactus. Aim for a height of about 8-10 inches for the tall one and 3 inches for the round one. -
Create the arms:
For the tall cactus, roll smaller foil logs for the arms. Bend them into an ‘L’ shape to mimic that classic saguaro look. -
Secure the structure:
Use masking tape to wrap the entire foil structure. This smooths out the sharp crinkles and gives the clay something sticky to grab onto. -
Attach the limbs:
Tape the foil arms securely to the main body. Ensure the joints are tight so they don’t droop later.
Cracks Appearing?
If hairline cracks form while drying, simply mix a small amount of fresh clay with water to make a paste and fill them in before painting.
Step 2: Sculpting the Clay
-
Prepare sheets:
Roll your clay out into a flat sheet, roughly 1/4 inch thick. It needs to be substantial enough to hold texture without tearing. -
Cover the form:
Wrap the clay sheet around your foil armature. Use your thumbs to smudge the seams together until the foil is completely hidden. -
Smooth the surface:
Dip your finger or a slightly damp sponge in water and run it over the clay to remove fingerprints and bumps. -
Add the ribs:
Roll thin, long snakes of clay. Press these vertically down the length of the cactus body and arms to create the raised ribs. I find spacing them about half an inch apart looks best. -
Blend the ribs:
Use a modeling tool or the back of a spoon to gently blend the edges of the ribs into the main body, so they look organic rather than stuck on.
Make it a Lamp
Build the clay form around a plastic LED candle or hollow out the bottom to place over a battery light for a glowing nightlight version.
Step 3: Adding Texture & Details
-
Create the areoles:
Using the back of a small paintbrush or a rounded tool, press small indentations along the spine of every other rib. -
Make the dots:
Roll tiny, uniform balls of clay—hundreds of them if possible. These will be the decorative ‘spikes’. -
Attach the details:
Press one tiny clay ball into each indentation or flat along the ribs. Use a tiny dab of water or slip (clay mixed with water) as glue if the clay is too dry. -
Texturize the skin:
Gently tap a clean, dry sponge over the areas between the ribs to give the ‘skin’ of the cactus a sandy, porous texture. -
Dry thoroughly:
Let the sculptures dry completely. For air-dry clay of this thickness, this might take 48 to 72 hours. Rotate them occasionally for even airflow.
Step 4: Painting & Finishing
-
Base coat:
Paint the entire sculpture with a warm terracotta acrylic paint. If you used colored clay, you can skip this step, but painting helps even out the tone. -
Highlighting:
Dry brush a lighter peach or off-white color lightly over the raised ribs and the tiny dots. This makes the texture pop visually. -
Seal the work:
Finish with a spray of matte varnish. This protects the clay from humidity and gives it a professional, finished ceramic look.
Place your new sculptural garden on a windowsill to enjoy desert vibes all year round
Large Coil-Built Animal Sculpture
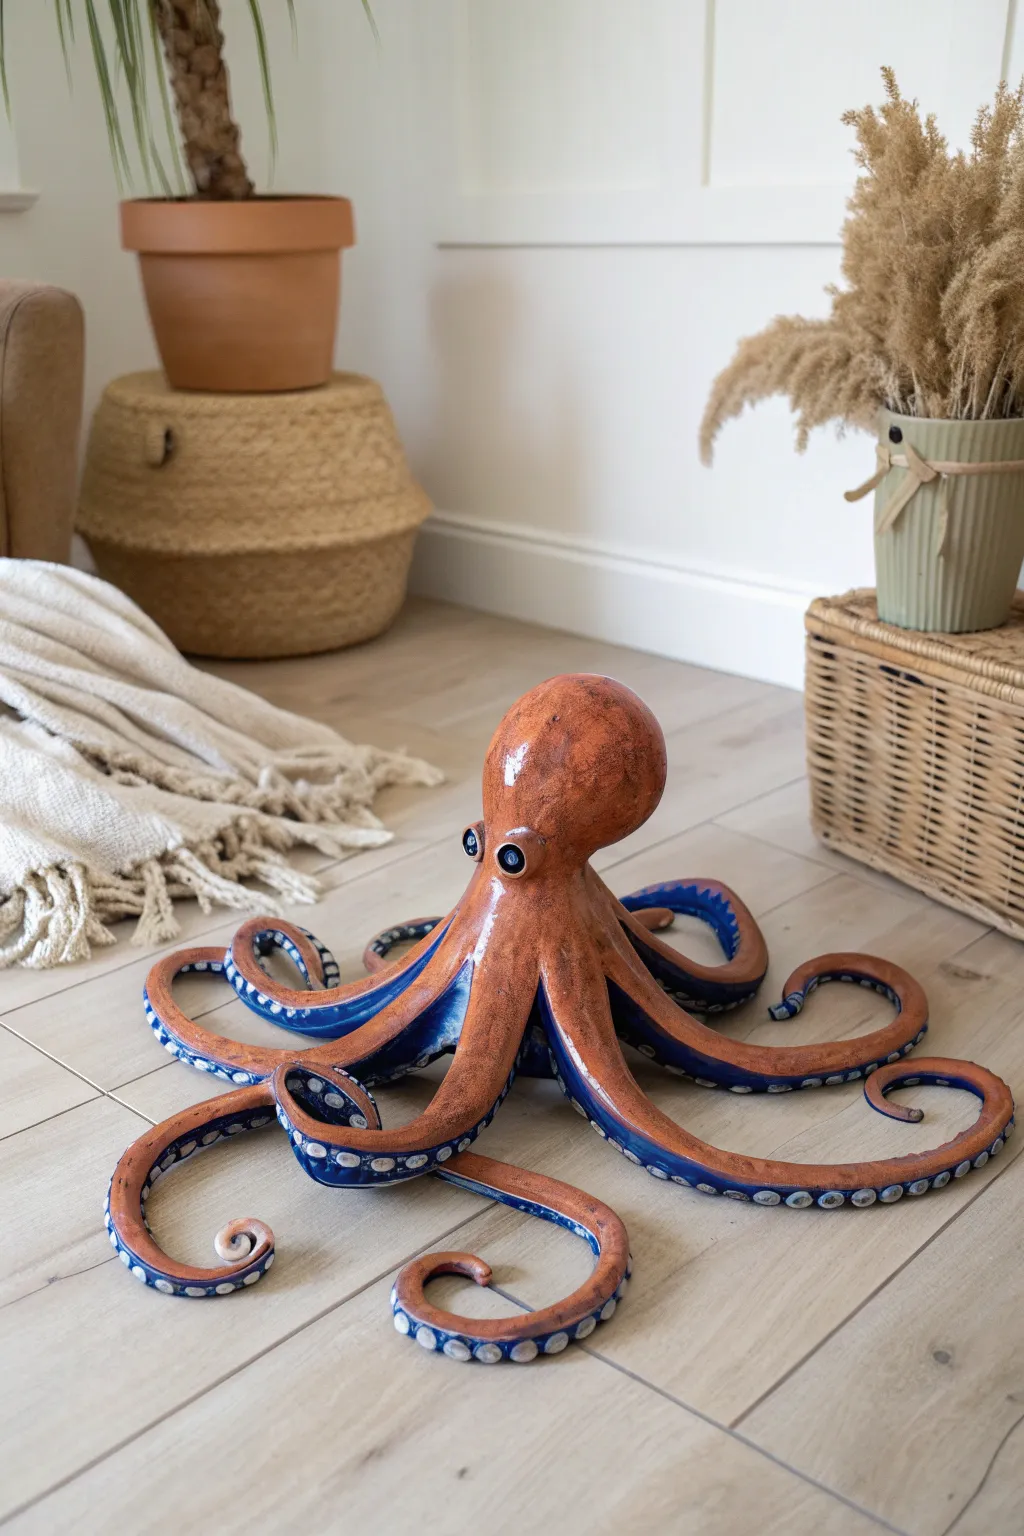
Bring the ocean floor to your living room with this striking ceramic octopus sculpture. Characterized by its glossy, mottled rust-orange skin and contrasting deep blue underside studded with suckers, this project is a fantastic challenge for coil-building enthusiasts.
Detailed Instructions
Materials
- Stoneware clay (smooth body recommended)
- Pottery wheel (optional, for the head/mantle) or banding wheel
- Rolling pin or slab roller
- Modeling tools (wooden ribs, needle tool)
- Serrated rib or scoring tool
- Slip
- Loop tools for hollowing
- Sponges
- Underglazes (Rust/Orange, Deep Blue, White, Black)
- Clear glossy glaze
- Kiln
Step 1: Forming the Mantle (Head)
-
Start the base shape:
Begin by forming a large pinch pot or coil-building a hollow bulbous shape for the octopus’s mantle (head). You can use a banding wheel to keep the shape symmetrical as you build upwards. -
Closing the form:
Continue coiling inward to create a rounded top, like a large egg. Smooth the coils thoroughly on both the inside and outside to ensure structural integrity. -
Refining the silhouette:
Use a flexible metal or rubber rib to smooth the exterior, creating that distinctive streamlined look. I like to paddle the clay gently while it’s soft to correct any lumpy areas. -
Adding the eyes:
Fashion two protruding mounds on either side of the head for the eyes. Score and slip them securely onto the mantle, blending the seams so they emerge naturally from the skin.
Support Those Arms
While working wet, place sponges or crumpled newspaper under raised tentacles. This prevents gravity from flattening your dynamic poses while the clay stiffens.
Step 2: Creating the Tentacles
-
Roll out thick coils:
Roll out eight long, tapering coils of clay. Make them varying lengths and thicknesses to mimic the natural movement of tentacles. -
Flattening the underside:
Gently press down on one side of each coil to create a slightly flattened surface; this will become the underside where the suckers attach. -
Positioning the legs:
Arrange the tentacles in a star-like pattern on your work board. Determine the pose now—curl some ends upward and twist others for a dynamic, flowing appearance. -
Attaching the head:
Score and slip the center point where the tentacles meet, then lower the hollow head onto this junction. Blend the clay from the head down into the legs for a seamless transition.
Step 3: Detailing and Texturing
-
Sculpting the suckers:
Roll hundreds of tiny balls of clay. Press each one firmly onto the flattened undersides of the tentacles, using a small tool to indent the center of each ball to create the ‘cup’ shape. -
Refining the tips:
Pay special attention to the very tips of the tentacles. Gently curl them upward or sideways to give the sculpture a sense of motion and life. -
Drying slowly:
Cover the sculpture with plastic, allowing it to dry very slowly over several days. Retouch any small cracks that appear during the leather-hard stage. -
Bisque firing:
Once bone dry, fire the piece to bisque temperature (usually Cone 06 or 04).
Cracking at Joints
If cracks appear where legs meet the body during drying, compress the clay with a damp wooden tool and add a tiny coil of paper clay to fill and reinforce the gap.
Step 4: Glazing and Finishing
-
Painting the underside:
Apply 3 coats of deep royal blue underglaze to the underside of the tentacles and the suckers. -
Detailing the suckers:
Carefully paint the rim of each sucker with white underglaze to make them pop against the blue background. -
Coloring the body:
Apply a rust-orange underglaze to the entire top surface of the octopus. I suggest sponging on a slightly darker brown in patches to create a mottled, realistic skin texture. -
Eye details:
Paint the eyes using white, black, and a touch of the blue for the iris to give the creature a soulful gaze. -
Final glaze and fire:
Once the underglaze is dry, coat the entire piece in a clear glossy glaze to simulate a wet look. Fire to the final temperature suitable for your clay body.
Place your finished cephalopod on the floor or a low table to let it command the room with its stunning oceanic presence
Garden-Size Mushroom House
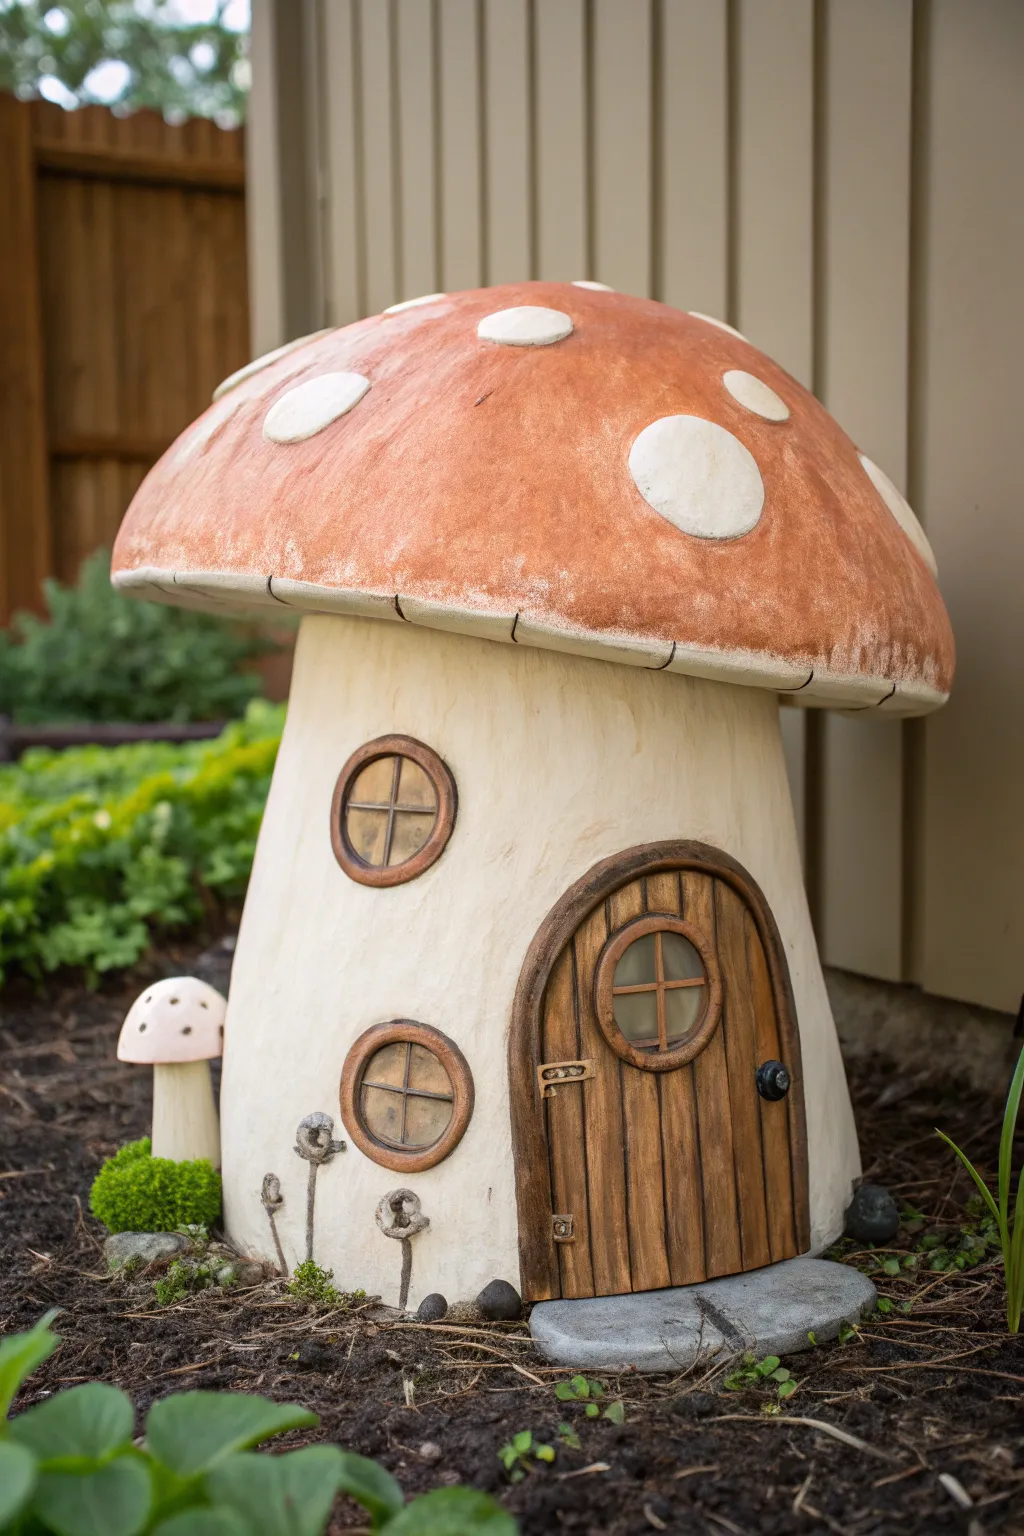
Transform your outdoor space with this massive, fairytale-inspired mushroom house, featuring a textured terracotta-hued cap and charming rustic details. The sturdy, wide stalk and thick walls make it a durable garden centerpiece that looks like it grew straight out of a storybook.
Step-by-Step Tutorial
Materials
- High-grog stoneware clay (25-30 lbs)
- Wide rolling pin
- Large plastic bowl or exercise ball (for cap mold)
- PVC pipe or cardboard tube (4-5 inch diameter) for inner support
- Scoring tool and slip
- Fettling knife
- Modelling tools (wooden and loop)
- Terra sigillata or white underglaze
- Terracotta or rust-colored underglaze
- Dark brown oxide wash
- Clear matte outdoor glaze (optional)
- Cardboard for templates
- Heavy-duty kiln
Step 1: Constructing the Base Stalk
-
Prepare the slab foundation:
Roll out a large, heavy slab of clay about 3/4 inch thick. This structure needs to be sturdy to support the heavy cap, so don’t go too thin. Cut a circle roughly 8-10 inches in diameter for the floor base. -
Form the tube core:
Using a cardboard tube wrapped in newspaper (so it doesn’t stick) as a temporary armature, wrap a large slab around it to create the main stalk cylinder. Score and slip the seam aggressively to ensure it doesn’t split during firing. -
Shape the unique flare:
The stalk in the reference isn’t a perfect cylinder; it flares slightly at the bottom and tapers near the neck. Use your hands to paddle the clay gently outward at the base, merging it onto your floor slab with a strong coil seal. -
Add surface texture:
Before the clay dries too much, drag a serrated kidney rib or a stiff brush vertically up the stalk by hand. This creates faint striations that mimic organic growth or painted wood grain.
Step 2: Sculpting the Mushroom Cap
-
Mold the cap shape:
Drape a very large slab (again, 3/4 inch thick) over a plastic bowl or a specialized plaster hump mold to get that perfect dome. Let it stiffen until it’s leather hard and can hold its own weight. -
Create the underside gills:
Flip the dome over carefully. While not fully visible in the final photo, adding a rim or ‘skirt’ on the underside edge helps the cap sit securely on the stalk. Score the underside center where it will eventually join the stalk. -
Refine the rim:
The rim of the mushroom cap has distinct segments. Use a fettling knife to make shallow cuts around the perimeter, then smooth the edges so they look like soft, rounded segments rather than sharp cuts. -
Attach the heavy cap:
This is the critical structural moment. Score and slip the top of the stalk and the corresponding underside of the cap. Place the cap on top, wiggling it slightly to lock the clay together. Reach inside (if possible via the top before fully sealing, or via a cut-out door) to reinforce the internal seam with a coil.
Slumping Cap?
If your mushroom cap sags while joining, stuff the inside with crumpled newspaper or plastic bags. Leave them in until the clay is bone dry to provide internal support during the critical drying phase.
Step 3: Architectural Details
-
Carve the door frame:
Roll a thick coil of clay and flatten it slightly to create the arched door frame. Attach this to the front of the stalk. Use a modeling tool to carve deep wood-grain grooves into the ‘wood’ of the door itself. -
Install the window frames:
Create circular frames—one larger, one smaller—using coils. Attach them above the door and off to the side. Roll tiny ‘snakes’ of clay to create the cross-mullions inside the windows. -
Add hardware details:
Fashion tiny balls of clay for the doorknob and small rectangles for the hinges. Attach them securely with slip; these small bits are prone to popping off if not adhered well. -
Plant decorative sprouts:
Roll thin stems and small bulbous tops to create the tiny decorative shoots growing near the base. I usually attach these last so I don’t accidentally knock them off while working on the roof. -
Refine the spots:
Roll thin slabs of clay and cut out irregular circles and ovals. Slip and score these onto the roof dome to create the iconic mushroom spots. Be sure to press down the edges so they don’t curl up while drying.
Venting is Vital
Ensure you poke a hidden pinhole in the hollow cap, door frame, and stalk interior to let expanding air escape in the kiln. Trapped air pockets can cause your beautiful sculpture to explode.
Step 4: Glazing and Finishing
-
Apply base colors:
Once bisque fired, paint the stalk with a creamy white underglaze or a terra sigillata for a smooth, natural finish. Leave the door and window frames bare for now. -
Staining the wood:
Apply a dark brown oxide wash or underglaze to the door and window frames. Wipe it back with a damp sponge so the color stays in the deep wood-grain grooves, highlighting the texture. -
Painting the cap:
Sponge on a rust-colored or terracotta underglaze over the mushroom cap, avoiding the raised white spots (or paint the spots white afterward). A sponge application gives that mottled, natural variations seen in the photo. -
Weathering the edges:
Lightly brush the rim of the cap and the bottom of the stalk with a diluted brown wash to simulate dirt and weathering. -
Make the stone step:
Glaze the separate flat slab piece (the doorstep) with a grey stone-textured glaze. Having this as a separate piece makes installation easier on uneven ground.
Place your finished house in a mossy corner of the garden to delight visitors and local fairies alike
Big Mirror Frame With Clay Relief
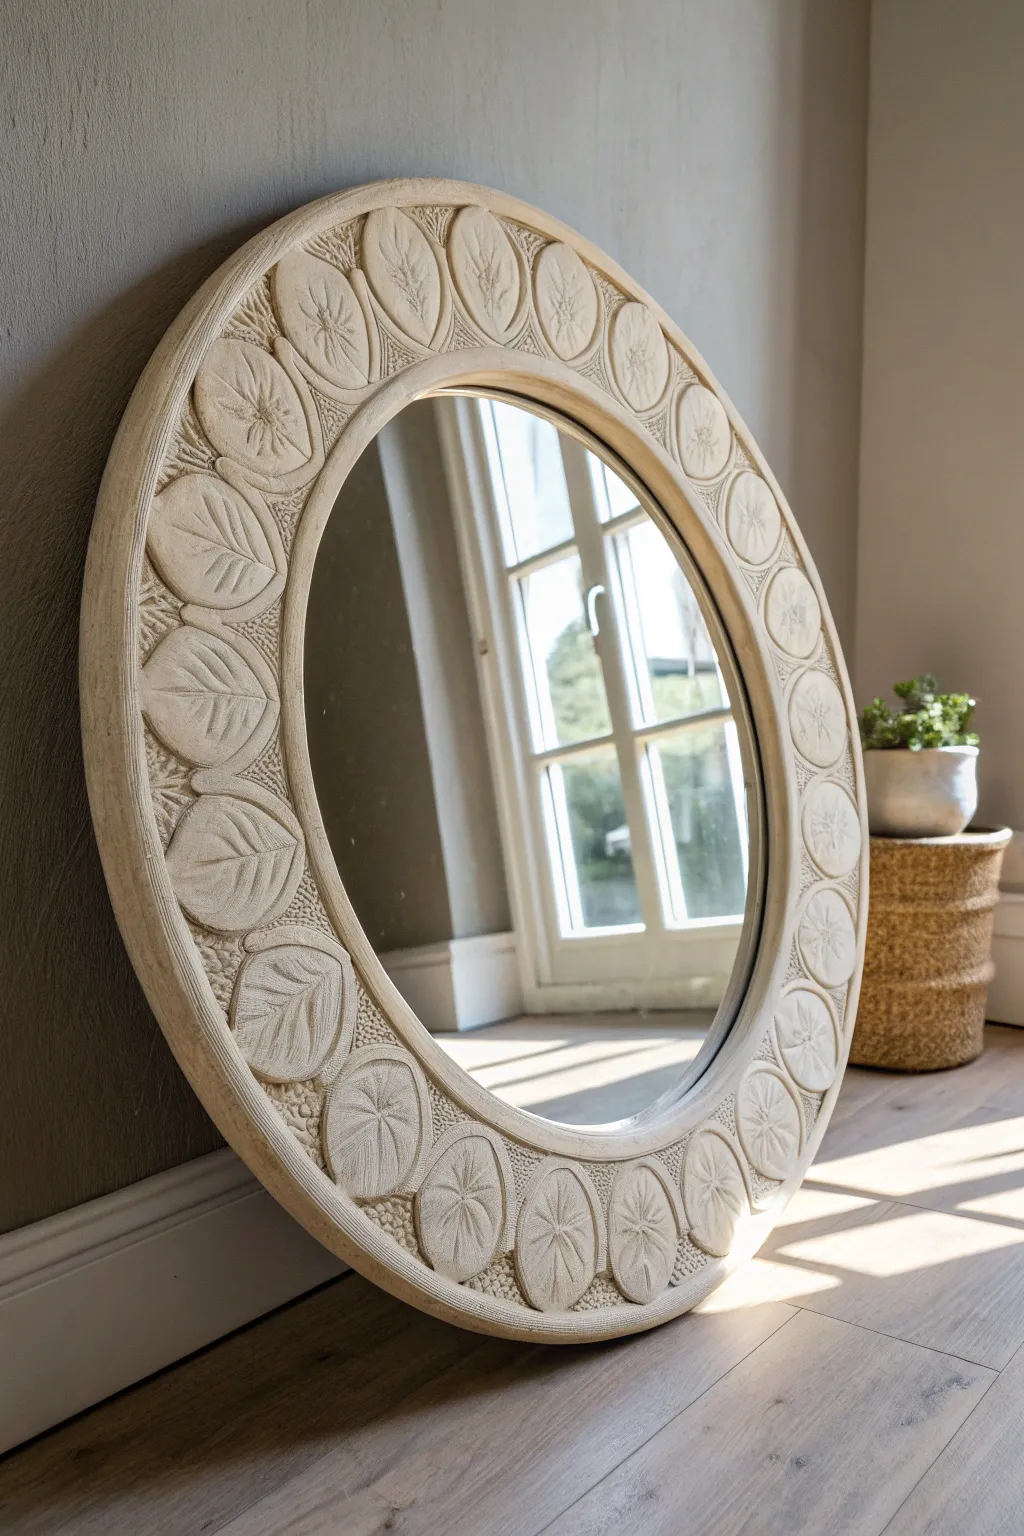
Transform a plain round mirror into a stunning architectural statement piece using air-dry clay and relief techniques. The finished frame mimics the look of carved sandstone with its organic leaf and floral motifs set against a textured pebble background.
Step-by-Step
Materials
- Large round mirror (frame-less or with a flat, wide existing frame)
- Air-dry clay (white or stone color), approx. 2-3kg depending on size
- Strong construction adhesive (like Liquid Nails)
- MDF or plywood backing board (cut into a ring)
- Rolling pin
- Clay carving tools (needle tool, loop tool)
- Texture tools (stiff bristle brush, sponge, or crumpled foil)
- Sandpaper (fine grit)
- Acrylic sealer or matte varnish
- Water spray bottle
- Compass or string and pencil
Step 1: Base Preparation
-
Prepare the substrate:
If you are starting from scratch, cut a wide ring from MDF or plywood. The inner diameter should slightly overlap your mirror glass, and the width should be substantial (at least 4-5 inches) to accommodate the design. -
Prime the surface:
Apply a coat of primer or diluted white glue to the wood surface. This seals the wood and helps the clay adhere better, preventing it from drying out too quickly from the back. -
Create the clay bed:
Roll out a large amount of air-dry clay to a uniform thickness of about 1/2 inch. You may need to do this in sections. Lay these sheets onto your wooden ring, smoothing the seams together with a bit of water until you have a seamless clay surface covering the entire frame.
Step 2: Sculpting the Design
-
Mark the layout:
Using a compass or a light touch with a needle tool, lightly scribe two concentric circles to define the inner and outer borders. Then, divide the middle space into equal oval sections where your medallions will go. -
Form the rim borders:
Roll thin coils of clay and attach them to the inner and outer edges of your frame. Flatten them slightly and smooth them into the base layer to create a raised, finished rim. -
Shape the medallions:
I prefer to roll out fresh clay and cut distinct oval shapes using a template. Adhere these ovals onto the base lay within your marked sections using the score-and-slip method (scratching both surfaces and applying a clay-water slurry). -
Carve the leaf motifs:
On alternating ovals, use a needle tool to carve a central vein and branching side veins to create a simple leaf design. Press gently to create depth without cutting all the way through. -
add the floral starbursts:
On the remaining ovals, carve a central point and radiate distinct lines outward to create a starburst or flower impression. Deepen the lines with a modeling tool for shadows.
Keep Clay Workable
Keep a spray bottle of water nearby. Mist your clay lightly every 10-15 minutes to prevent the surface from skinning over while you are still carving the details.
Step 3: Texturing and Refining
-
Create background texture:
In the negative spaces between the oval medallions, press a stiff-bristled brush, a rough stone, or a ball of crumpled aluminum foil into the clay. This creates the ‘pebbled’ look that contrasts with the smooth leaves. -
Define the edges:
Go back around each oval medallion with a small modeling tool to ensure the edges are crisp and separated from the textured background. -
Smooth the high points:
Dip your finger in a little water and very gently smooth the tops of the leaves and floral motifs to remove any sharp burrs from carving. -
Controlled drying:
Cover the frame loosely with plastic wrap. Let it dry slowly over 2-3 days. Drying too fast can cause cracking. Remove the plastic for the final day of drying.
Level Up: Faux Stone
Mix dried tea leaves or sand into your clay before rolling it out. This embedded texture creates an incredibly realistic sandstone or granite appearance once dry.
Step 4: Finishing Touches
-
Sand imperfections:
Once bone dry, use fine-grit sandpaper to gently smooth the outer rim and the highest points of the relief. Wipe away dust with a dry brush. -
Apply a wash:
Mix a tiny amount of beige or warm grey acrylic paint with water. Brush this wash over the entire piece and immediately wipe it back with a rag. The color will settle into the textures and carvings, enhancing the 3D effect. -
Seal the work:
Apply two coats of a matte spray varnish or acrylic sealer. This protects the clay from humidity and gives it a finished, stone-like sheen. -
Mount the mirror:
Flip the frame over and attach the mirror glass to the back using strong construction adhesive or mirror clips. Allow the adhesive to cure fully before hanging.
Hang your new mirror in an entryway or living room where the light can catch the relief work wonderfully
Large Lamp Base With Bold Form
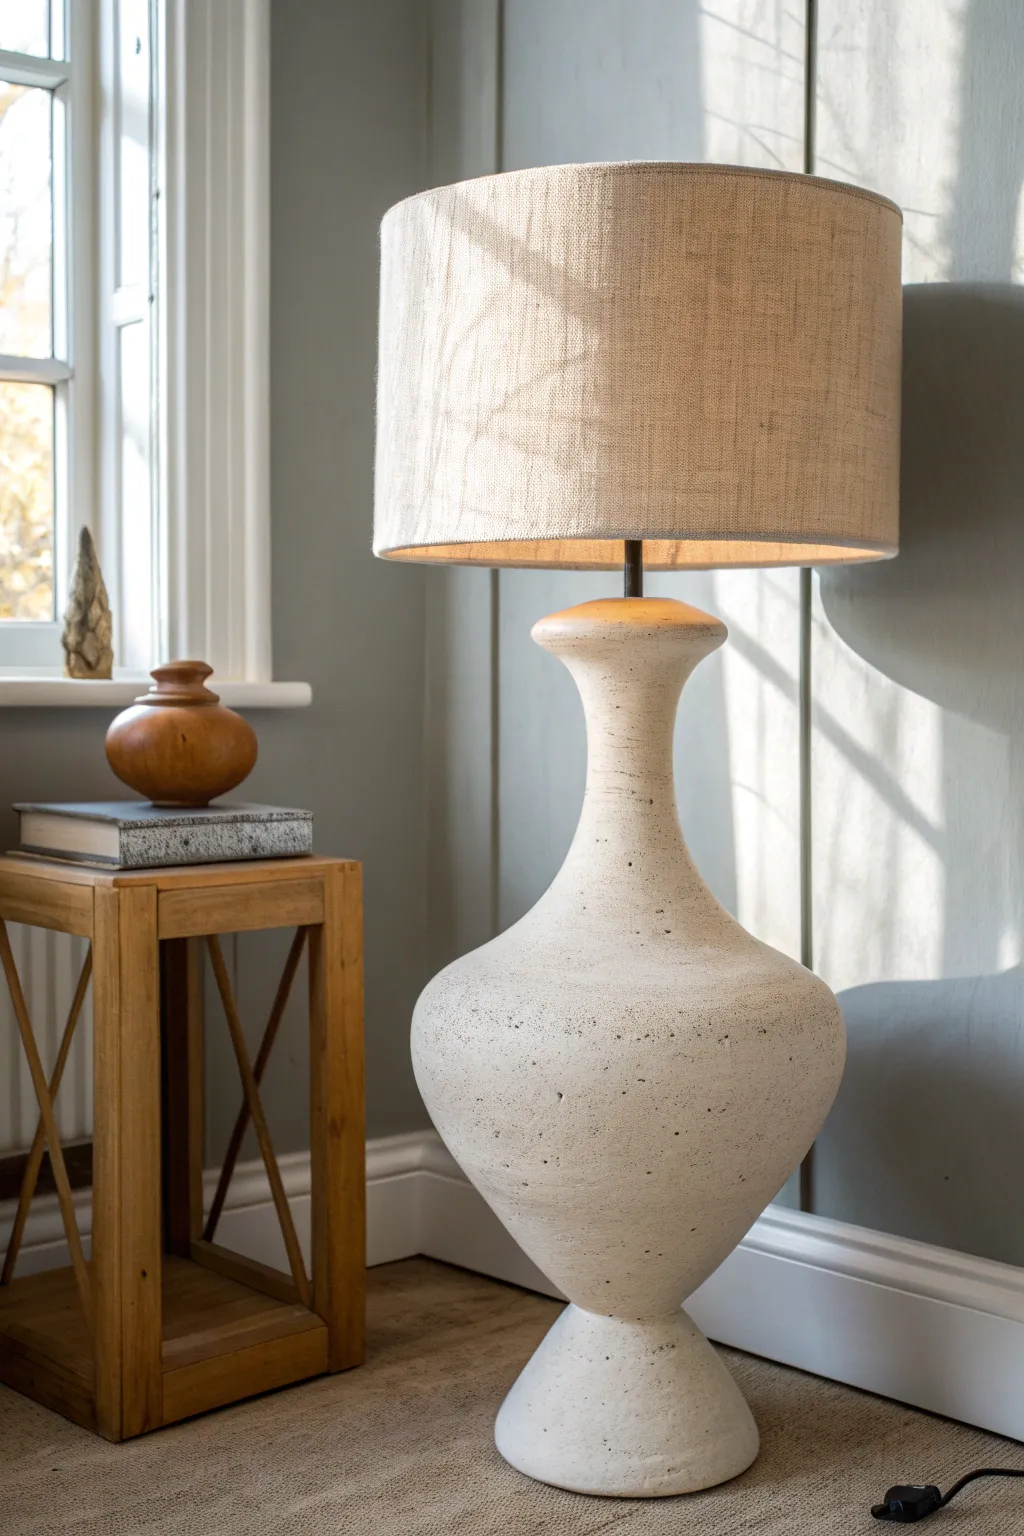
This striking floor lamp features a curvaceous, organic silhouette that mimics the look of high-end travertine or limestone. Its substantial form and textured finish make it a grounding statement piece for any living space.
Detailed Instructions
Materials
- Large amount of air-dry clay or white stoneware clay (approx. 10-15kg)
- PVC pipe (approx. 2-inch diameter, cut to desired lamp height)
- Sturdy wooden base board (for stability during building)
- Lamp kit (harp, socket, cord)
- Aluminum foil and newspaper
- Masking tape
- Coil building tools (scoring tool, serrated rib)
- Sponge and water bucket
- Large rolling pin
- Natural sponge or stiff bristle brush (for texture)
- White acrylic paint mixed with sand (optional faux stone finish)
- Clear matte sealer
Step 1: Building the Armature
-
Prepare the core:
Secure your PVC pipe vertically to the center of your wooden work board. This pipe will serve as the internal channel for the electrical cord and provide crucial structural support for the heavy clay. -
Bulk up the form:
Crumple large balls of newspaper and tape them firmly around the PVC pipe to create the bulk of the shape. Focus on building a wide belly in the lower third and tapering gently upwards towards the neck. -
Refine the silhouette:
Wrap the newspaper form entirely in aluminum foil. This helps smooth out the lumps and prevents the clay from drawing moisture out of the paper later on.
Step 2: Constructing the Base Form
-
Roll out a slab:
Roll out a thick slab of clay, about 1/2 inch thick, to create the very bottom foot of the lamp. Cut a hole in the center for the cord to exit and place it over the pipe. -
Start coiling:
Begin creating thick coils of clay, roughly the thickness of a sausage. Score and slip the base slab, then attach your first ring of clay. -
Build upwards:
Continue stacking coils up the form. Because this is a large piece, I like to blend the coils together on both the inside and outside after every three rows to ensure structural integrity. -
Shape the belly:
As you reach the widest part of your newspaper armature, gently stretch the clay outward. Use a rib tool to smooth the exterior walls as you go, ensuring a consistent wall thickness. -
Taper the neck:
When you reach the upper section, begin laying the coils slightly inward to narrow the form towards the neck. Be careful not to trap air pockets between the clay and the armature. -
Form the rim:
At the very top, flare the clay out slightly to create a finished lip where the bulb socket will eventually sit. Ensure it sits flush against the PVC pipe exit.
Slumping Shapes
If the clay starts sagging under its own weight, stop building. Use a heat gun or hair dryer on the lower section to stiffen it up before adding more height.
Step 3: Refining and Texturing
-
Smooth the surface:
Wait until the clay is leather-hard. Use a serrated metal rib to scrape away major undulating bumps and refine the final curves of the silhouette. -
Add faux-stone texture:
To achieve the pitted travertine look, use a stiff bristle brush or a rock to gently stipple the surface. You can also press coarse salt into the surface and brush it away later. -
Create distinct pitting:
Use the end of a small paintbrush or a needle tool to create random, deeper pockmarks that mimic natural stone erosion, concentrating them slightly more on the wider belly.
Stone Effect
Mix dried tea leaves or used coffee grounds into air-dry clay before rolling coils. When dry, these speckles create a convincing organic stone appearance.
Step 4: Finishing and Assembly
-
Dry slowly:
Loosely cover the entire piece with plastic sheeting. Allow it to dry very slowly over 1-2 weeks to prevent cracking, which is common with large forms. -
Fire or seal:
If using kiln-fire clay, bisque fire it now. If using air-dry clay, ensure it is bone dry before sealing. -
Paint (Optional):
If your clay body isn’t the desired off-white color, sponge on a mixture of white paint mixed with a little fine sand for a gritty, matte finish. -
Seal the surface:
Apply two coats of a dead-flat matte varnish. This protects the finish without adding an artificial shine. -
Wiring same lamp:
Thread your lamp cord through the central PVC pipe. Connect the socket at the top according to the manufacturer’s instructions, ensuring the hardware covers the top rim of the PVC. -
Final touches:
Glue a piece of felt to the bottom of the base to protect your floor, then attach your shade harp and shade.
Once the shade is on, you will have a sculptural masterpiece that anchors the entire room
Giant Monogram Letter Sculpture
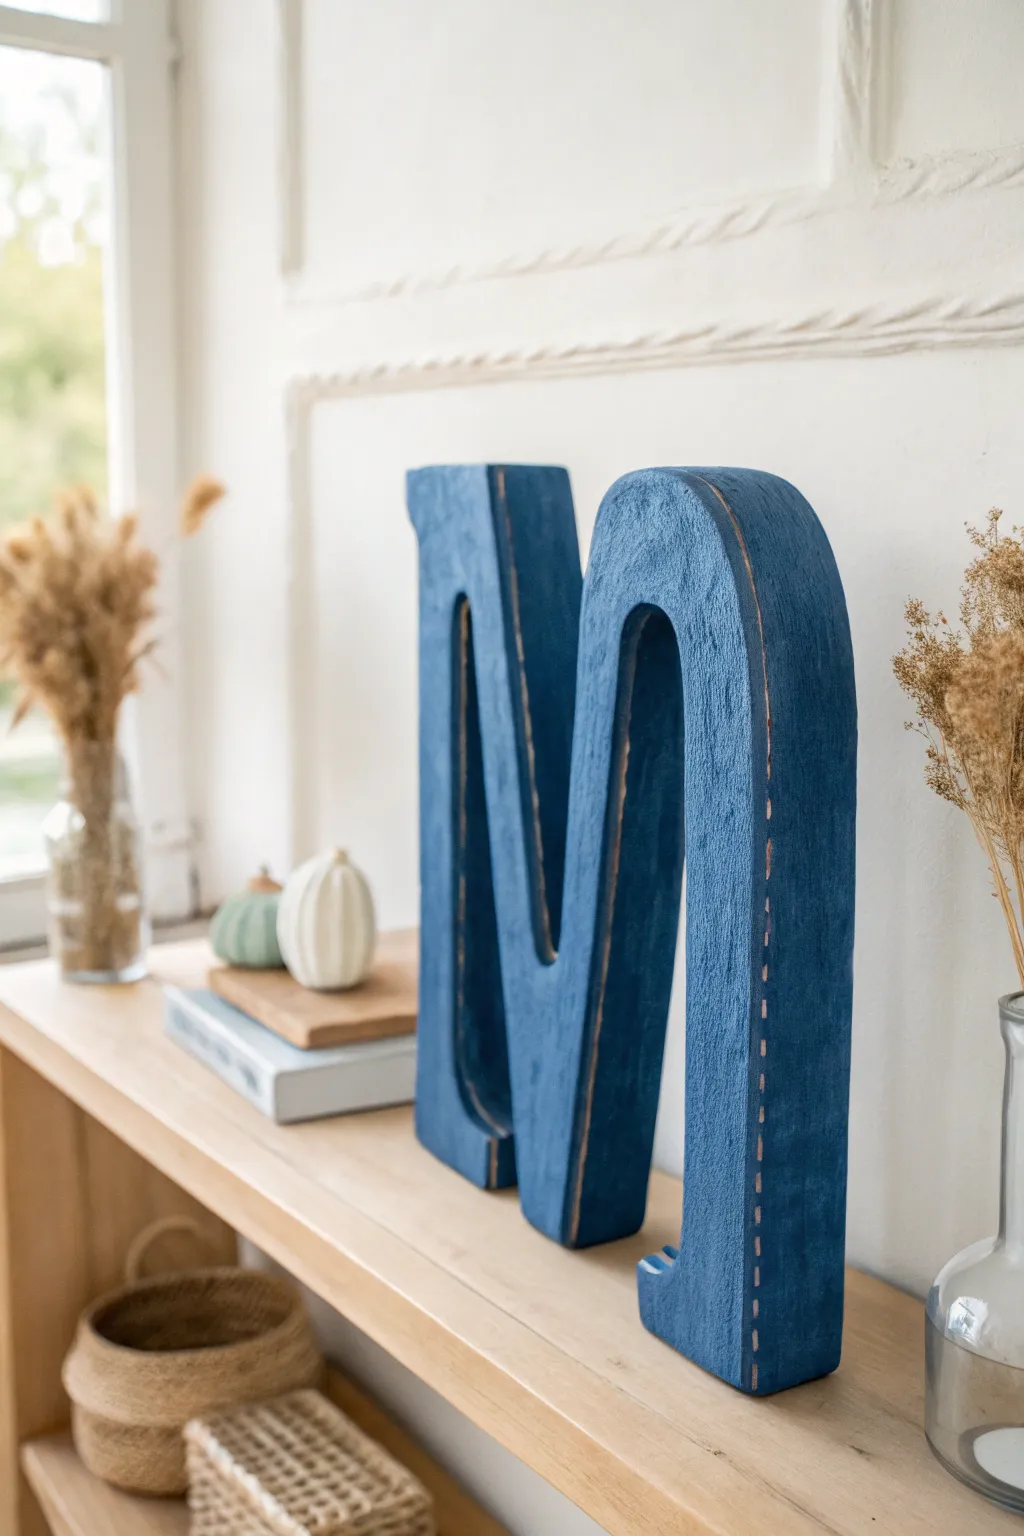
Make a bold statement on your mantle or bookshelf with this oversized monogram sculpture, featuring a rich azure finish and distressed edges. While it looks like heavy painted wood, this piece is actually constructed from lightweight materials and covered in a textured clay layer for that high-end artisanal look.
How-To Guide
Materials
- Large cardboard sheets (double-walled preferred)
- Air-dry clay (white or grey, approx. 2-3 lbs)
- Masking tape or gummed paper tape
- Craft knife and cutting mat
- Ruler or straight edge
- PVA glue or Mod Podge
- Acrylic paint (Deep Azure/Navy Blue)
- Fine-grit sandpaper (220 grit)
- Rolling pin
- Water and a small bowl
- Wide flat paintbrush
- Hot glue gun and glue sticks
Step 1: Building the Armature
-
Draft the template:
Begin by sketching your chosen letter onto a large piece of paper or directly onto the cardboard to create a template. For stability, aim for a blocky font like Impact or Arial Black, making the letter at least 12 inches tall. -
Cut the faces:
Using your template, trace and cut out two identical versions of your letter from the cardboard. These will serve as the front and back faces of your sculpture. -
Cut the side strips:
Measure the depth you want for your letter (about 2-3 inches is ideal). Cut long strips of cardboard to this width. Ensure the corrugation runs vertically across the strip so it bends easily around curves. -
Assemble the structure:
Using the hot glue gun, attach the cardboard strips along the edge of the first letter cutout. Work slowly, bending the cardboard to follow the curves. Reinforce the inside corners with extra glue. -
Close the form:
Place the second letter cutout on top of the strip walls, sandwiching the structure closed. Glue it in place securely, checking that the edges align perfectly. -
Tape the seams:
Cover all the raw cardboard edges and seams with masking tape. This seals the form and prevents the wet clay from warping the cardboard later.
Step 2: Applying the Clay
-
Prepare the surface:
Brush a thin layer of diluted PVA glue over the entire masked cardboard form. This helps the clay adhere better to the tape. -
Roll out the clay:
Take a chunk of air-dry clay and roll it out into a flat sheet, roughly 1/4 inch thick. I find it helpful to roll it out on a textured mat if you want extra surface interest, though smooth works fine too. -
Cover the front:
Apply the clay sheet to the front face of the letter. Trim the excess with a craft knife, leaving just a tiny bit of overhang. -
Cover the sides:
Roll out long strips of clay for the sides and inside curves. Press these firmly onto the cardboard, blending the seams where the side clay meets the front face using a wet finger. -
Smooth and refine:
Dip your fingers in water and smooth out any visible joins or fingerprints. For this specific rustic look, don’t make it perfectly glass-smooth; leave some slight undulations. -
Let it cure:
Allow the sculpture to dry completely. This usually takes 24-48 hours depending on humidity. Rotate the letter occasionally so all sides get airflow.
Use Internal Supports
For very large letters (over 18″), glue clean soup cans or cardboard tubes inside the hollow structure before closing it up. This prevents the face from caving in.
Step 3: Finishing and Painting
-
Sand the edges:
Once fully dry, lightly sand the sharp corners and edges. You actually want to expose a bit of the texture here to mimic the distressed wood look seen in the photo. -
Apply base coat:
Paint the entire sculpture with your deep navy acrylic paint. Use a stiff brush to work the paint into any small pits or textures in the clay. -
Add a second coat:
Apply a second layer of paint for opaque coverage. Let this dry completely. -
Distress the edges:
Take your sandpaper again and gently sand along the rigid vertical edges of the letter. Remove just enough paint to reveal the white/grey clay underneath, creating that ‘stitch-like’ worn effect. -
Seal the piece:
Finish with a matte creative varnish to protect the paint and clay from dust without adding unwanted shine.
Fixing Clay Cracks
If cracks appear while drying, don’t panic. Mix a small amount of fresh clay with water to make a paste (slip) and fill the cracks. Let dry and sand smooth.
Place your finished monogram on a sturdy shelf and enjoy the modern yet handcrafted vibe it brings to your space
Oversized Lidded Cookie Jar
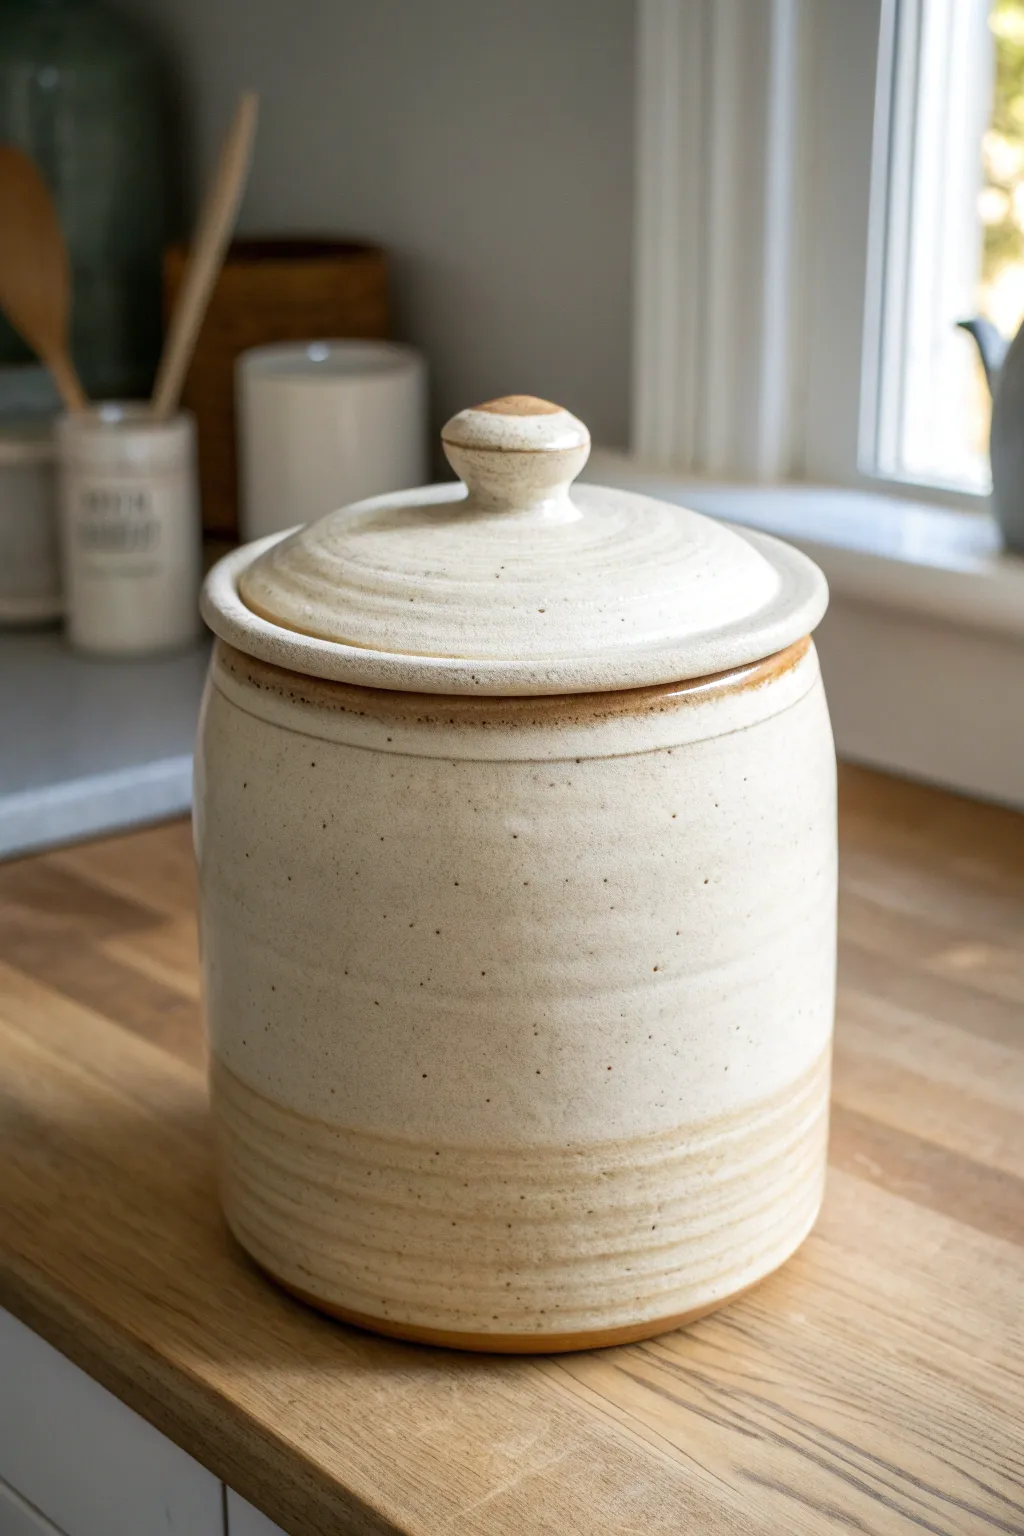
This substantial lidded jar combines functional volume with a cozy, rustic aesthetic, perfect for storing large batches of cookies. With its speckled cream glaze and gentle throwing lines, it brings a warm, handmade charm to any kitchen counter.
Detailed Instructions
Materials
- Stoneware clay (speckled or buff preferably), approx. 6-8 lbs
- Potter’s wheel
- Throwing sponge
- Pin tool
- Wire cutter
- Pottery ribs (wood and metal)
- Calipers
- Trimming tools (loop tool and pear-shaped trimmer)
- Speckled cream or oatmeal glaze
- Wax resist
- Kiln
Step 1: Throwing the Main Body
-
Center the mass:
Start with about 5-6 pounds of well-wedged clay. Secure it to the wheel head and center it using strong, steady pressure to handle the larger volume. -
Open the floor:
Open the clay down to a floor thickness of about half an inch. Compress the floor thoroughly with your sponge or a wooden rib to prevent S-cracks during firing. -
Establish the width:
Pull the floor out to your desired width, keeping in mind that the clay will shrink. A 6-7 inch wide base is a solid foundation for a large cookie jar. -
Pull the walls:
Begin pulling the walls upward. For a jar this size, make 3-4 steady pulls, focusing on keeping the wall thickness even from bottom to top. Aim for a straight cylinder shape initially. -
Shape the belly:
Using a rib on the inside and one hand on the outside, gently push the walls outward to create a slight curve, but keep the overall profile vertical and stately. -
Create the gallery:
At the rim, slightly thicken the clay and use your thumb or the corner of a wooden rib to split the rim. Press down the inner section to create a shelf (gallery) that the lid will sit on. Ensure this shelf is flat and smooth. -
Refine the surface:
Use a metal rib to smooth the sides, but leave the lower third slightly textured to retain the throwing lines, which adds character to the glaze later. -
Measure immediately:
Use your calipers to measure the exact diameter of the gallery seating area (not the outer rim) while the clay is still wet.
Shrinkage Math
Clay shrinks! If you want a specific finished size, throw the wet clay about 12-14% larger than the desired final dimensions.
Step 2: Creating the Lid
-
Throw the lid:
Using about 1-1.5 pounds of clay, center a low mound. Open it gently, leaving enough clay in the center for a knob. -
Match the measurements:
Flatten the outer rim of your mound to match the measurement you took with the calipers. In my experience, throwing the lid slightly wider is safer, as you can trim it down later. -
Form the knob:
Pull up the central lump of clay into a comfortable knob shape. Use your fingers to create a slight undercut for easy gripping. -
Refine the dome:
Ensure the curve of the lid flows smoothly from the rim up to the knob. Use a sponge to smooth any sharp transitions.
Rim Dynamics
Use a contrasting iron wash or a darker glaze just on the junction where the lid meets the jar to highlight the craftsmanship and create visual separation.
Step 3: Trimming and Finishing
-
Check the fit:
Once both pieces are leather hard, carefully test the lid on the jar. If it’s too wide, trim the lid’s flange carefully until it seats perfectly. -
Trim the jar base:
Flip the jar body over (using a chuck or clay lugs to secure it) and trim the bottom. Define the foot ring clearly and remove excess weight from the lower walls. -
Accentuate the textue:
While trimming, you can use a tool to gently emphasize the horizontal lines near the base if they aren’t distinct enough. -
Bisque fire:
Allow both pieces to dry slowly and completely before loading them for a standard bisque firing.
Step 4: Glazing
-
Wax the contact points:
Apply wax resist carefully to the gallery shelf on the jar and the underside flange of the lid where they will touch. Also, wax the foot ring of the jar. -
Apply the glaze:
Pour a speckled cream or oatmeal glaze inside the jar first, swirl to coat, and pour out. Then, dip or pour the glaze over the outside. Do the same for the lid. -
Create the two-tone effect:
If you want the base to look darker or distinct as shown in the image, wipe back the glaze near the bottom inch with a damp sponge, leaving just a thin wash or the raw clay body exposed. -
Final fire:
Fire the jar to the maturity temperature of your clay and glaze (likely Cone 6 or 10).
Imagine filling this heirloom-quality piece with your favorite homemade cookies—it’s sure to become the center of attention in your kitchen.
Modular Big Stacking Sculpture Blocks
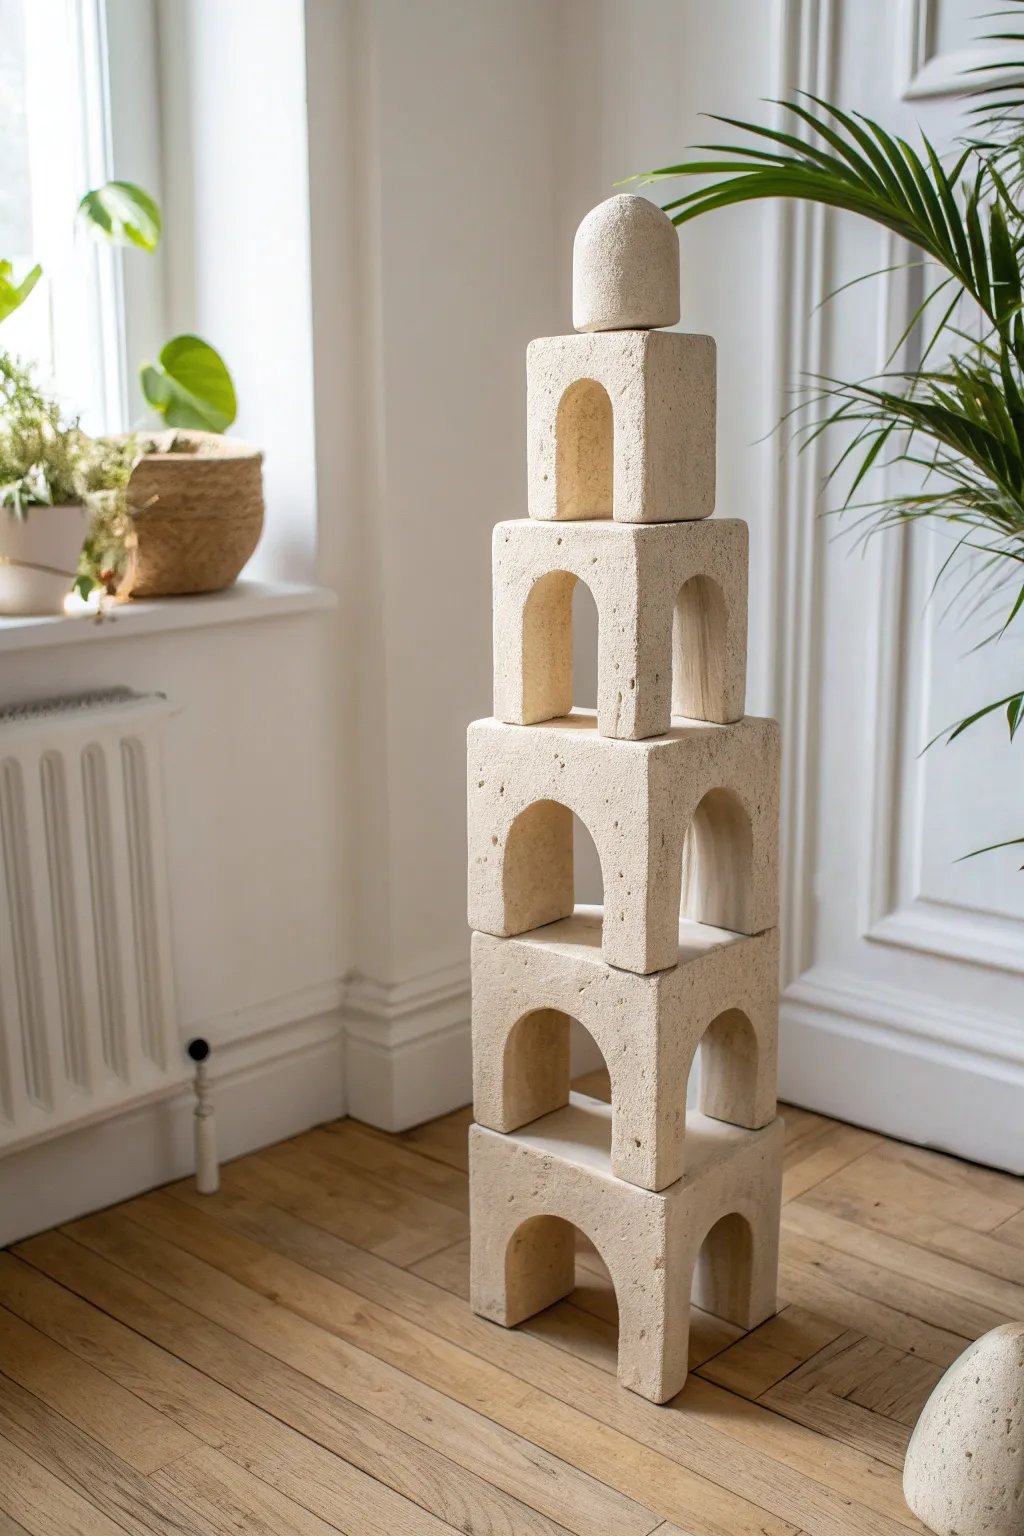
Create a striking piece of interactive decor with these minimalist, modular stacking blocks that mimic the texture and weight of carved limestone. This project uses grogged clay to build sturdy, architectural forms with varying arch designs, perfect for arranging into endless sculptural towers.
Step-by-Step Guide
Materials
- High-grog stoneware clay (buff or speckled)
- Wooden slat molds or thick cardboard templates
- Fettling knife
- Potter’s needle tool
- Metal rib scraper
- Serrated kidney tool
- Wooden paddle
- Ruler
- Sponge
- Clear matte glaze (optional)
- Kiln access
Step 1: Designing the Modules
-
Plan your dimensions:
Before touching clay, sketch out your block sizes. To achieve the pyramid taper seen in the photo, you will need pairs of blocks in graduating sizes. A good starting point is 6-inch cubes for the base, scaling down by and inch for each subsequent level. -
Create templates:
Cut sturdy cardboard templates for the faces of your cubes. You will need square templates for the tops and bottoms, and rectangular templates for the sides. Crucially, cut out the arch shapes from the side wall templates now to ensure uniformity later.
Step 2: Slab Construction
-
Roll out slabs:
Roll your clay into large, even slabs approximately 3/8-inch thick. Using guide sticks or a slab roller ensures the walls have consistent thickness, which is vital for structural integrity during firing. -
Cut the components:
Place your cardboard templates onto the leather-hard slabs. Using a needle tool held vertically, cut out the walls, tops, and bottoms. Don’t discard the clay from the arch cutouts; these can be recycled or used for the domed topper. -
Leather hard drying:
Let the cut pieces firm up until they are ‘leather hard’—stiff enough to hold their shape but soft enough to join. If they are too floppy, your arches will sag. -
Score and slip:
Deeply score the edges of all pieces where they will connect using a serrated tool. Apply a generous amount of clay slip (liquid clay) to the scored areas. -
Assemble the walls:
Join the four walls of your first block together to form a hollow, open-ended box. Reinforce the interior corners by pressing a thin coil of clay into the seam and smoothing it flush. -
Attach top and bottom:
Attach the top and bottom slabs to close the form. Paddle the outside gently with a wooden paddle to compress the seams and sharpen the 90-degree angles.
Sagging Arches?
If the arch roof sags during assembly, prop it up with wads of newspaper or foam inside the block. Leave this support in until the clay is bone dry; paper burns out safely in the kiln.
Step 3: Refining the Details
-
Carving the arches:
Since we assembled the box with the arch holes already cut, we now need to ‘wall’ the inside of the arch so the block doesn’t look hollow. Roll a strip of clay slightly wider than the block’s depth. -
Insert arch walls:
Carefully insert the clay strip into the cutout arch. Score and slip the edges where it meets the front and back face. Smooth this internal curve meticulously so it looks like a solid block of stone. -
Texture the surface:
To mimic the sandy limestone look, I like to sponge the surface with a slightly damp, coarse sponge. You can also lightly drag a serrated kidney tool over the flat surfaces to add directional grain. -
Create the dome topper:
For the crowning piece, form a solid ball of clay and paddle it into a cube, then gently round off the top half. Hollow it out from the bottom if it’s thicker than 1 inch to prevent explosion in the kiln. -
Final drying slow-down:
Cover your finished blocks loosely with plastic for at least 3-4 days. Because of the internal walls and varying thickness, slow drying is essential to prevent warping.
Level Up: Color Variation
Mix different amounts of red iron oxide or mason stains into your clay body for each block layer. This creates a subtle gradient effect, shifting from warm beige to sandy pink as the tower rises.
Step 4: Firing and Finishing
-
Bisque fire:
Fire the pieces to Cone 04 (or your clay’s specific bisque temperature). Ensure they aren’t touching in the kiln. -
Glazing decision:
For the raw stone look shown, leave the exterior unglazed. If you want protection from dust, apply a very thin coat of matte clear glaze, or simply use a masonry sealer after the final firing. -
High fire:
Fire to the clay’s maturity temperature (e.g., Cone 6 or 10). This vitrifies the clay, making it strong and durable for stacking. -
Sand the bottoms:
Once cool, use high-grit sandpaper or a sanding block on the bottom of each piece. This ensures they sit perfectly flat and don’t wobble when stacked high.
Arrange your finished architectural forms on a mantle or tablescape and enjoy the tactile satisfaction of reordering your sculpture.