If you’re in the mood to make something instantly cute, a clay duck is one of my favorite quick wins. These ideas stick to simple shapes but still give you tons of personality to play with—beaks, wings, waddly feet, and all.
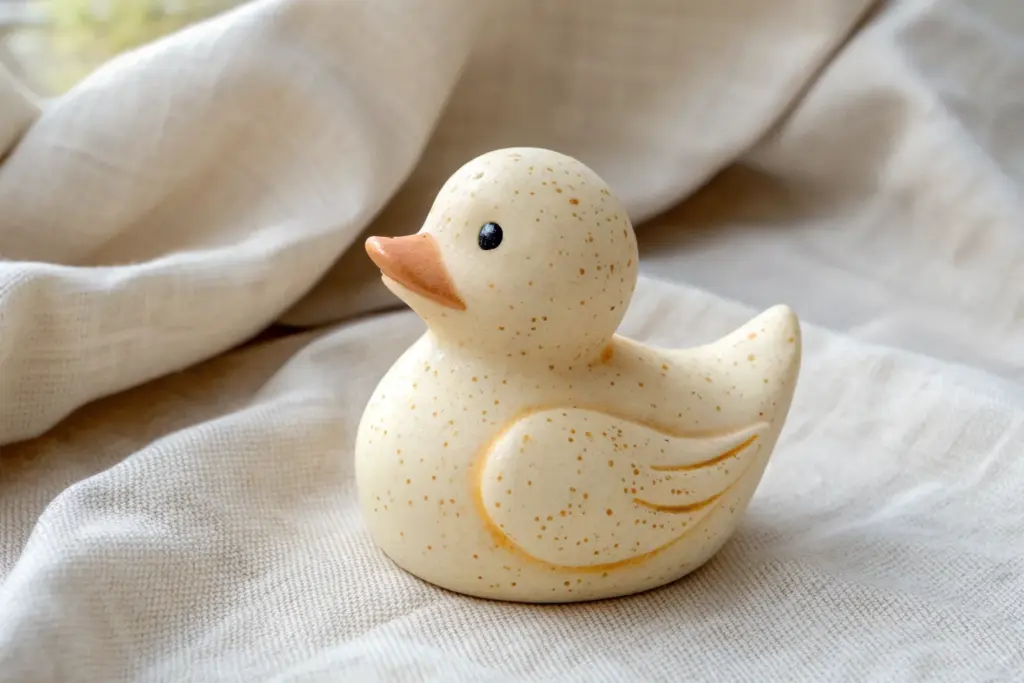
Classic Rubber Duck Figurine
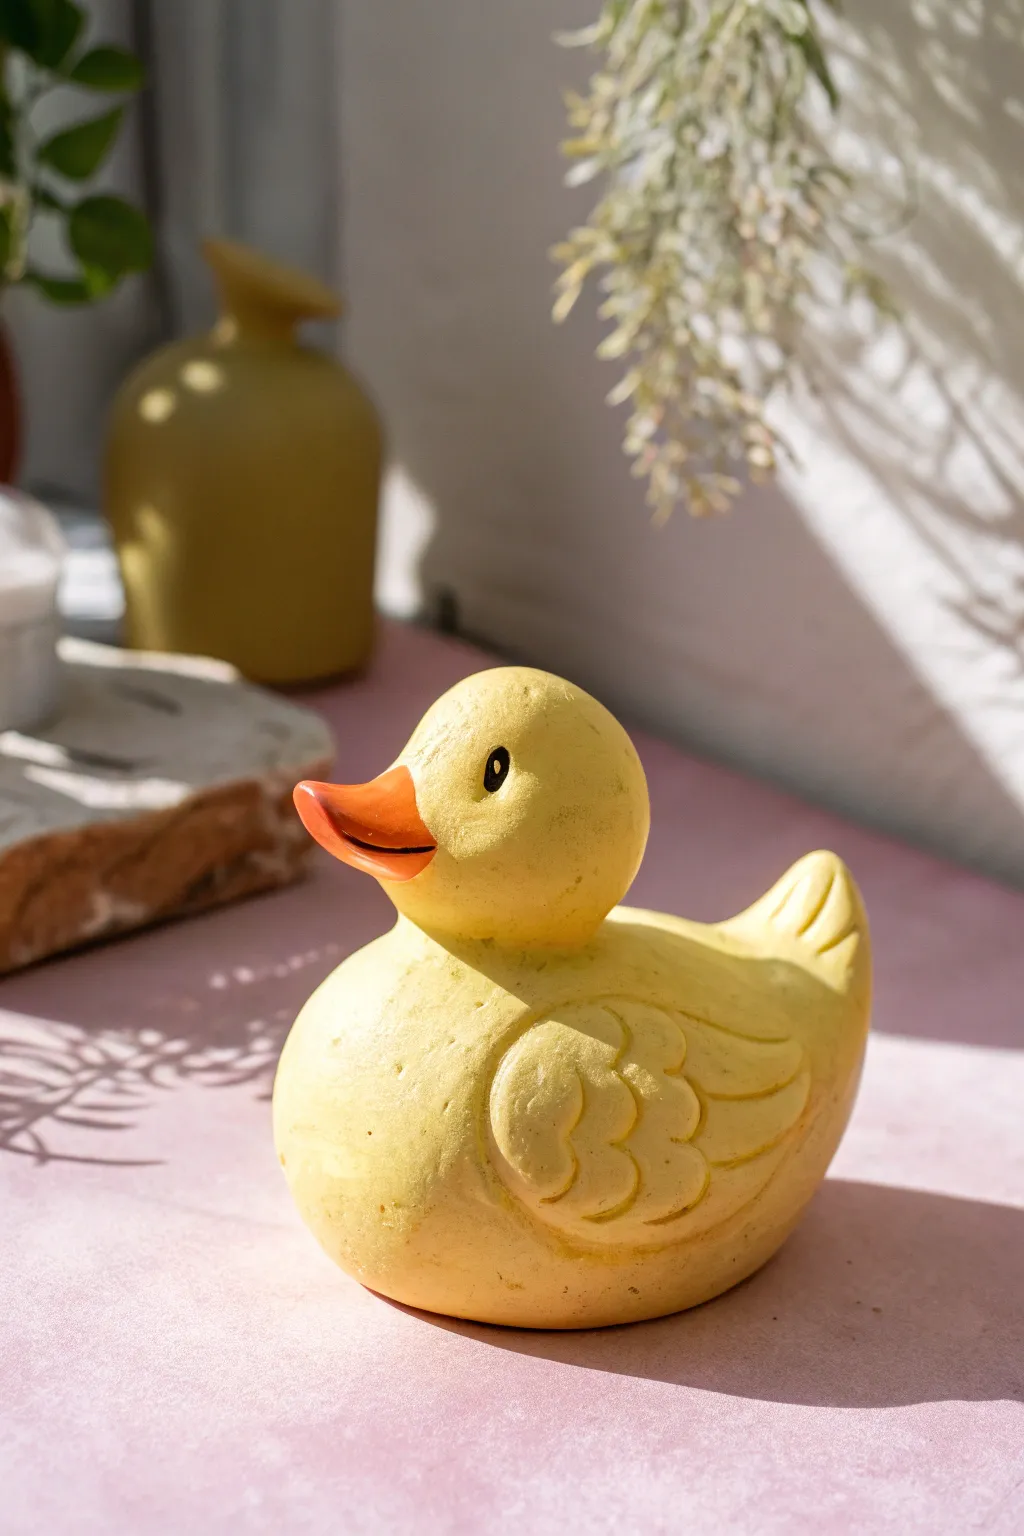
Transform a simple lump of clay into this nostalgic icon, featuring a warm yellow finish and adorable sculpted wing details. This stationary version of the classic bath toy brings a touch of whimsy to any shelf without needing a drop of water.
How-To Guide
Materials
- Air-dry clay or polymer clay (white or pre-colored yellow)
- Acrylic paints: Bright yellow, warm orange, black, and white
- Sculpting tools: Needle tool, curved modeling tool, small ball stylus
- Aluminum foil (for armature)
- Fine grit sandpaper (220-400 grit)
- Matte varnish or sealant
- Small synthetic brushes (flat and detail round)
Step 1: Forming the Base
-
Core construction:
Begin by crumpling a small amount of aluminum foil into a teardrop shape for the body and a smaller sphere for the head. This saves clay and keeps the figurine lightweight. -
Wrapping the body:
Flatten a sheet of your clay to about 1/4 inch thickness. Wrap it completely around the foil teardrop, smoothing the seams together until you have a seamless, organic shape that sits flat on your work surface. -
Shaping the head:
Cover the foil sphere with clay similarly. Gently press it onto the wider (front) end of the body teardrop. -
Blending the join:
Use your thumb or a modeling tool to drag clay from the neck down to the body and from the body up to the neck. Smooth this connection until the head looks naturally fused to the torso, not just resting on top. -
Tail feather pinch:
At the rear of the body, gently pinch the clay upwards to form the classic upturned tail. Use a needle tool to press two or three vertical indentations into the tail to suggest feathers.
Cracks happen
If you see cracks forming as air-dry clay cures, don’t panic. Mix a tiny bit of fresh clay with water to make a ‘slip’ paste and fill the cracks, then sand smooth once dry.
Step 2: Sculpting the Details
-
Adding the beak:
Form a small, flattened triangle of clay. Press it onto the center of the face, smoothing the edges onto the head. -
Refining the beak shape:
Use a knife tool to gently slice horizontally into the beak to create the mouth opening. Add small dimples at the corners for a slight smile. -
Wing placement:
Roll two identical flat oval shapes for the wings. Press one firmly onto each side of the body. -
Feather texture:
Using a curved tool or the cap of a pen, press three distinct ‘U’ shapes into the bottom edge of the wing to create the scalloped feather look shown in the photo. Add a few curved lines above these for upper wing detail. -
Eye sockets:
Use a small ball tool to press shallow indentations where the eyes will go. This helps with painting later and adds dimension. -
Drying or baking:
If using polymer clay, bake according to package instructions. If using air-dry clay, allow it to dry completely for 24-48 hours.
Make it float
Want a bath-safe version? Skip the wire/foil armature inside and sculpt entirely from polymer clay. Bake it, test buoyancy, and seal securely with waterproof marine varnish.
Step 3: Finishing Touches
-
Sanding:
Once hardened, gently sand any rough fingerprints or uneven spots with fine-grit sandpaper to achieve that smooth, toy-like finish. -
Base coat:
Paint the entire duck with two coats of bright yellow acrylic paint. I find that letting the first coat dry fully prevents brushstrokes from lifting. -
Painting the details:
Fill the beak carefully with a warm orange paint. For the eyes, distinct black ovals are key. -
Adding the spark:
Dip the very tip of a toothpick into white paint and place a tiny dot near the top of each black eye oval. This ‘catchlight’ brings the character to life. -
Weathering (optional):
To match the reference photo’s textured look, dry-brush a tiny amount of lighter yellow or cream over the raised areas of the wings. -
Sealing:
Finish with a coat of matte varnish to protect your work and give it a unified sheen.
Now you have a charming, handmade keepsake that captures all the nostalgia of childhood bath time.


Kawaii Duckling With Big Eyes

Create your own irresistibly cute duckling figurine with enormous, glossy eyes and a sunny yellow finish. This project features simple shapes combined with careful detailing to achieve that classic kawaii aesthetic perfect for spring decorations.
Detailed Instructions
Materials
- Yellow polymer clay (soft consistency)
- Orange polymer clay
- Black polymer clay
- White polymer clay (tiny amount)
- Pink soft pastels or blush powder
- UV resin or glossy varnish
- Needle tool or toothpick
- Ball tool (various sizes)
- Small blending tool or silicone shaper
- Soft paintbrush
- Cutter or blade
Step 1: Shaping the Base
-
Conditioning:
Begin by thoroughly conditioning your yellow clay until it is warm and pliable. This prevents cracks from forming later. -
Head formation:
Roll a large ball of yellow clay into a smooth sphere for the head. Gently press down slightly on the top to flatten it just a tiny bit, creating a softer, rounder shape rather than a perfect circle. -
Body mechanics:
Create a slightly smaller, teardrop-shaped piece of yellow clay for the body. Flatten the wide bottom so the duckling can sit stably. -
Assembly:
Press the head firmly onto the pointed top of the teardrop body. You can use a small piece of toothpick or wire inside as an armature to keep the head secure if the clay feels too soft.
Sticky Situation?
If your clay gets too soft and fingerprints are showing, pop the figurine in the fridge for 10 minutes. Cold clay holds detail better and smooths out easier.
Step 2: Facial Features
-
Eye sockets:
Using a large ball tool, press two deep, symmetrical indentations into the face area. These sockets should be quite large to accommodate the signature big eyes. -
Creating the eyes:
Roll two balls of black clay that fit perfectly into the sockets you just made. Press them in gently so they are flush with the yellow skin, rounding them slightly outward. -
Highlighting:
Roll two tiny specks of white clay. Place them in the upper right corner of each black eye to create a lively sparkle. -
Beak basics:
Take a small amount of orange clay and shape it into a flattened oval or rounded diamond shape. -
Beak placement:
Attach the orange clay between and slightly below the eyes. Use a needle tool to press a horizontal line across the center to separate the upper and lower beak. -
Cheeky details:
To get those sweet rosy cheeks, take your pink soft pastel and scrape a little dust off. I gently brush this powder onto the cheeks below the eyes using a soft, dry paintbrush. -
Extra cheek accents:
For the specific look in the photo, add three tiny dots of pink clay on the left cheek area over the blush for extra dimension.
Step 3: Body Details & Finishing
-
Wings:
Shape two small, flattened teardrops of yellow clay for the wings. Attach one to each side of the body, pressing the top edge into the shoulder area to blend it seamlessly. -
Feather texture:
Using a needle tool or a small curved tool, gently press ‘U’ shaped indentations all over the belly and chest area. Stagger these marks to mimic the look of fluffy down feathers. -
Tuft of hair:
Add a tiny triangle of yellow clay to the very top of the head and curve it slightly for a cute feather tuft. -
Feet:
Create two small triangular wedges of orange clay. Use a blade to make two notches in each for toes, then press these flat under the body so they poke out slightly. -
Powder effect:
To mimic the dusting seen in the image, you can lightly brush white pastel powder or cornstarch over the top of the head and back before baking. -
Baking:
Bake your duckling according to the instructions on your specific brand of polymer clay. -
The glossy gaze:
Once cooled, carefully apply a drop of UV resin or high-gloss varnish only to the black parts of the eyes and the beak. Cure or let dry to achieve that wet, glass-like look.
Eye Popping Secrets
For the most realistic kawaii eyes, use UV resin to dome over the black clay. The domed effect magnifies the highlight and adds incredible depth.
Now you have a charming little companion ready to brighten up any desk or shelf with its adorable gaze


Minimalist White Goose Buddy
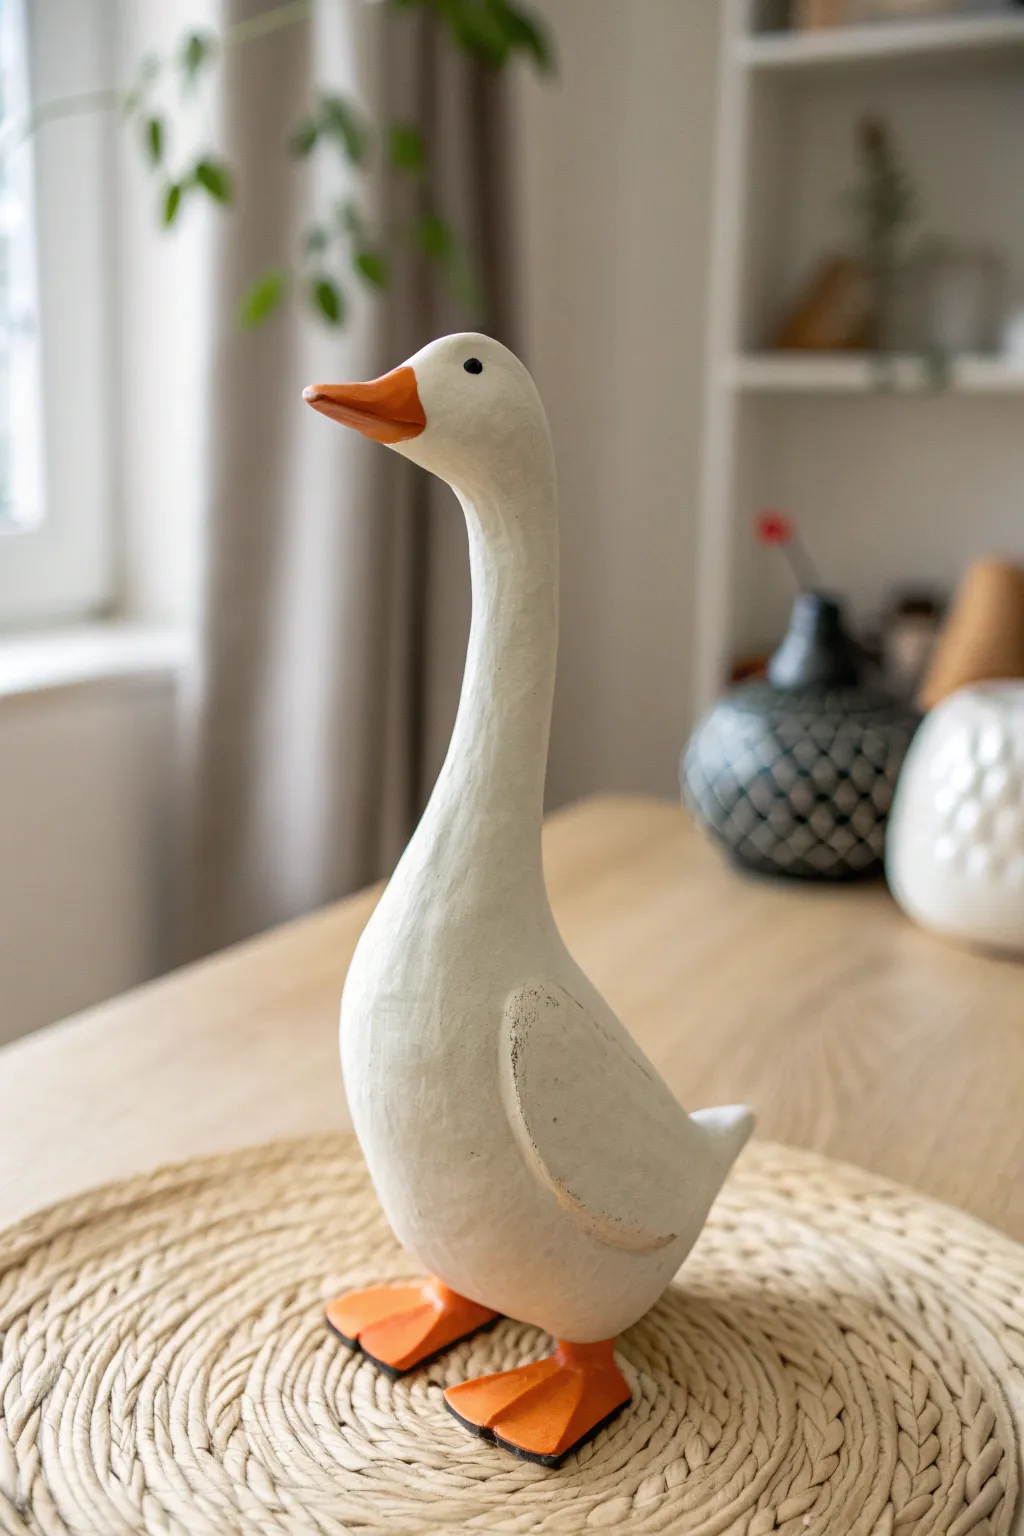
Create a delightful minimalist goose companion that brings a touch of farmhouse charm to any shelf. This project focuses on simple organic shapes and a textured, faux-wood finish that gives the piece its handmade character.
Step-by-Step Guide
Materials
- Air-dry clay (white or grey)
- Aluminum foil
- Wire (16-18 gauge for armature)
- Sculpting tools (needle tool, modeling tool)
- Acrylic paints (Titanium White, Burnt Orange, Black)
- Paintbrushes (flat shader, fine detail)
- Fine-grit sandpaper
- Matte varnish or sealant
- Water cup
Step 1: Building the Core
-
Form the armature:
Cut a piece of wire about 10 inches long. Bend it into an ‘S’ shape for the neck and body, leaving two prongs pointing down at the bottom where the legs will attach. This internal skeleton prevents the long neck from drooping. -
Bulk out the body:
Crumple aluminum foil firmly around the lower part of the wire to create an egg-shaped core for the body. This saves clay and reduces drying time. -
Bulk the neck:
Wrap a thinner layer of foil around the neck wire, tapering it as you go up towards the head area. Ensure the foil is packed tight so the clay adheres well.
Unsteady Bird?
If your goose keeps tipping over, glue the finished clay feet onto a heavy washer or coin, then paint over the base to camouflage it.
Step 2: Sculpting the Form
-
Apply the base clay:
Roll out a sheet of air-dry clay to about 1/4 inch thickness. Wrap the clay around your foil body, smoothing the seams together with a bit of water. -
Shape the neck:
Add a separate coil of clay around the neck foil. Merge it seamlessly into the body clay using your thumb or a modeling tool, pulling the clay downward to create a strong join. -
Define the head:
At the top of the neck, shape a smooth, rounded bulb for the head. It should flow naturally from the neck without a sharp separation. -
Refine the silhouette:
Stand the figure up (prop it if needed) and smooth the entire surface. We want a streamlined look, so use a wet finger to erase lumpy fingerprints. -
Add the beak:
Form a small triangular cone of clay. Attach it to the front of the face, scoring both surfaces first and using a dab of water (slip) to glue it. Smooth the transition so it looks like it grows out of the face. -
create the wings:
Roll two teardrop shapes of clay and flatten them slightly. Attach one to each side of the body. I find that pressing the edges down firmly but leaving the center slightly raised gives it a nice volume. -
Sculpt the feet:
Make two flat, triangular shapes for the webbed feet. Press the wire leg prongs into these feet (adding fresh clay if needed to secure them) so the goose can stand independently. -
Add texture:
Before the clay dries, use a stiff brush or a textured sponge to lightly pat the surface. This mimics the slightly rough, carved-wood texture seen in the photo.
Carved Wood Look
For a ‘faux wood’ effect, apply the white paint slightly unevenly, letting brush strokes show in the direction feathers would grow.
Step 3: Finishing Touches
-
Dry completely:
Let the sculpture dry for at least 24-48 hours. It should feel room temperature to the touch, not cold. -
Sand imperfections:
Use fine-grit sandpaper to gently smooth any sharp jagged bits, but don’t over-sand; leave some of that lovely texture we added. -
Paint the body:
Coat the entire bird (except the beak and feet) with Titanium White acrylic. You might need two coats for opaque coverage. Mixing a tiny drop of beige into the white can make it look more natural. -
Paint the accents:
Paint the beak and feet with Burnt Orange. If the orange is too bright, tone it down with a speck of brown. -
Add the eyes:
Using the handle end of a small paintbrush or a dotting tool, dab two tiny black dots for the eyes. Placement is key—keep them relatively high on the head for that inquisitive look. -
Distress the finish:
Once the paint is dry, use a very dry brush with a tiny amount of grey or beige paint to lightly whisk over the textured areas, especially around the wing edges, to enhance the rustic feel. -
Seal the work:
Finish with a coat of matte varnish to protect the paint and give it a unified sheen.
Now you have a serene little companion ready to watch over your desk or shelf


Simple Mallard Duck Color-Block Sculpt
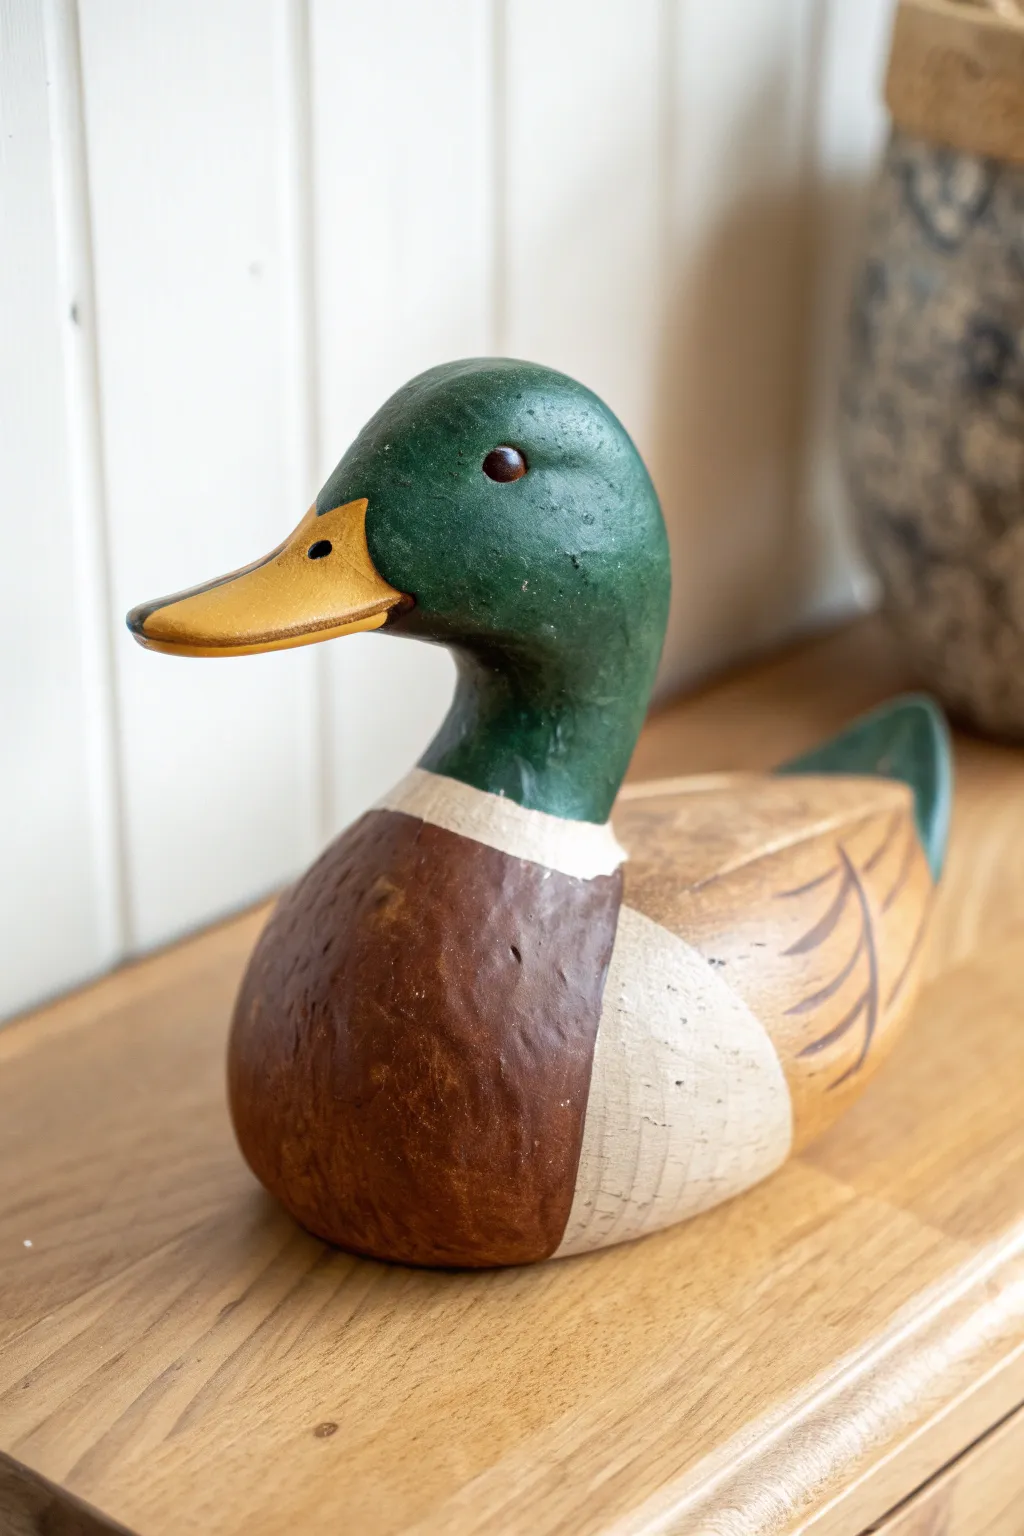
This project captures the classic charm of a wooden duck decoy but reimagines it using air-dry clay for an accessible, stylized finish. You will create a smooth, color-blocked mallard that highlights clean lines and simple painted details for a rustic yet modern home accent.
How-To Guide
Materials
- High-quality air-dry clay (white or terracotta)
- Small rolling pin
- Sculpting tools (wire loop tool, needle tool)
- Water in a small cup
- Sponge or fine-grit sandpaper
- Acrylic paints: Hunter Green, Burnt Sienna, Mustard Yellow, Cream/Off-White
- Paintbrushes: Flat shader brush and a fine liner brush
- Satin or matte varnish
Step 1: Shaping the Base Form
-
Create the core body:
Begin with a large handful of well-conditioned clay. Roll it into an elongated oval shape, similar to a potato, tapering slightly more at the tail end. -
Form the breast:
Push the front of your oval upwards to create a swelled chest area. You want the bottom to remain flat so the duck sits stably on a shelf. -
Add the neck and head:
Role a separate ball of clay for the head and a thick cylinder for the neck. Join the cylinder to the front top of the body, blending the clay seams downward until completely smooth. -
Refine the head shape:
Attach the head ball to the neck. Use your thumb to smooth the transition, ensuring the back of the neck flows seamlessly into the back of the head. -
Sculpt the bill:
Form a small, flattened triangle of clay. Attach this to the front of the face, blending the seams carefully. Gently curve the top of the bill slightly downward for that classic mallard profile.
Smooth Seams
For invisible joints between the head and body, score the clay surfaces with a needle tool and apply a little water (slip) before pressing them together.
Step 2: Refining and Drying
-
Define the wings:
Instead of carving deep detailed feathers, use a modeling tool to gently press an outline of folded wings onto the sides of the back. Keep the relief shallow to mimic the smooth wooden look. -
Shape the tail:
Pinch the rear of the duck into a slight upward point. I like to flatten the sides of the tail a bit to enhance the blocky, carved aesthetic. -
Smoothing texture:
Dip a sponge in a little water and wipe down the entire sculpture. This removes fingerprints and gives that sanded-wood appearance. -
Add eye details:
Use the rounded end of a paintbrush handle to press shallow indentations where the eyes will go. This makes painting them easier later. -
Dry thoroughly:
Allow the clay to dry completely. Depending on thickness, this may take 24-48 hours. Turn it over halfway through to ensure the bottom dries. -
Sanding:
Once bone dry, use fine-grit sandpaper to buff away any remaining roughness, paying special attention to the beak and tail edges.
Faux Wood Grain
Mix a tiny drop of glaze medium into your tan body paint. Brush it on and wipe slightly with a rag to create streaky, realistic wood-like texture.
Step 3: Painting the Design
-
Base coat:
Paint the middle/back section of the body with a diluted wash of Burnt Sienna or a tan color to simulate natural wood grain. Let this dry. -
The green head:
Paint the entire head and neck with opaque Hunter Green. Stop abruptly at the base of the neck to create a hard line. -
The chest block:
Apply the Burnt Sienna heavily to the chest area, creating a solid block of color that meets the lighter ‘wood’ back in a curved line. -
The white ring:
Using off-white or cream paint, carefully add the signature neck ring between the green head and brown chest. Also paint the side patch on the wing area as shown in the inspiration. -
Beak and tail:
Paint the beak Mustard Yellow and the tail tip a matching Hunter Green. Add a tiny black dot inside the eye indentation for distinct character. -
Feather accents:
With your finest liner brush and dark brown paint, add loose, V-shaped strokes on the back ‘wood’ section to suggest wing feathers without full detail. -
Seal:
Finish with a coat of satin varnish to protect the paint and give the piece a soft, polished sheen.
Place your finished mallard on a mantle or bookshelf to enjoy a touch of rustic nature indoors

The Complete Guide to Pottery Troubleshooting
Uncover the most common ceramic mistakes—from cracking clay to failed glazes—and learn how to fix them fast.
Tiny Duck Family Set
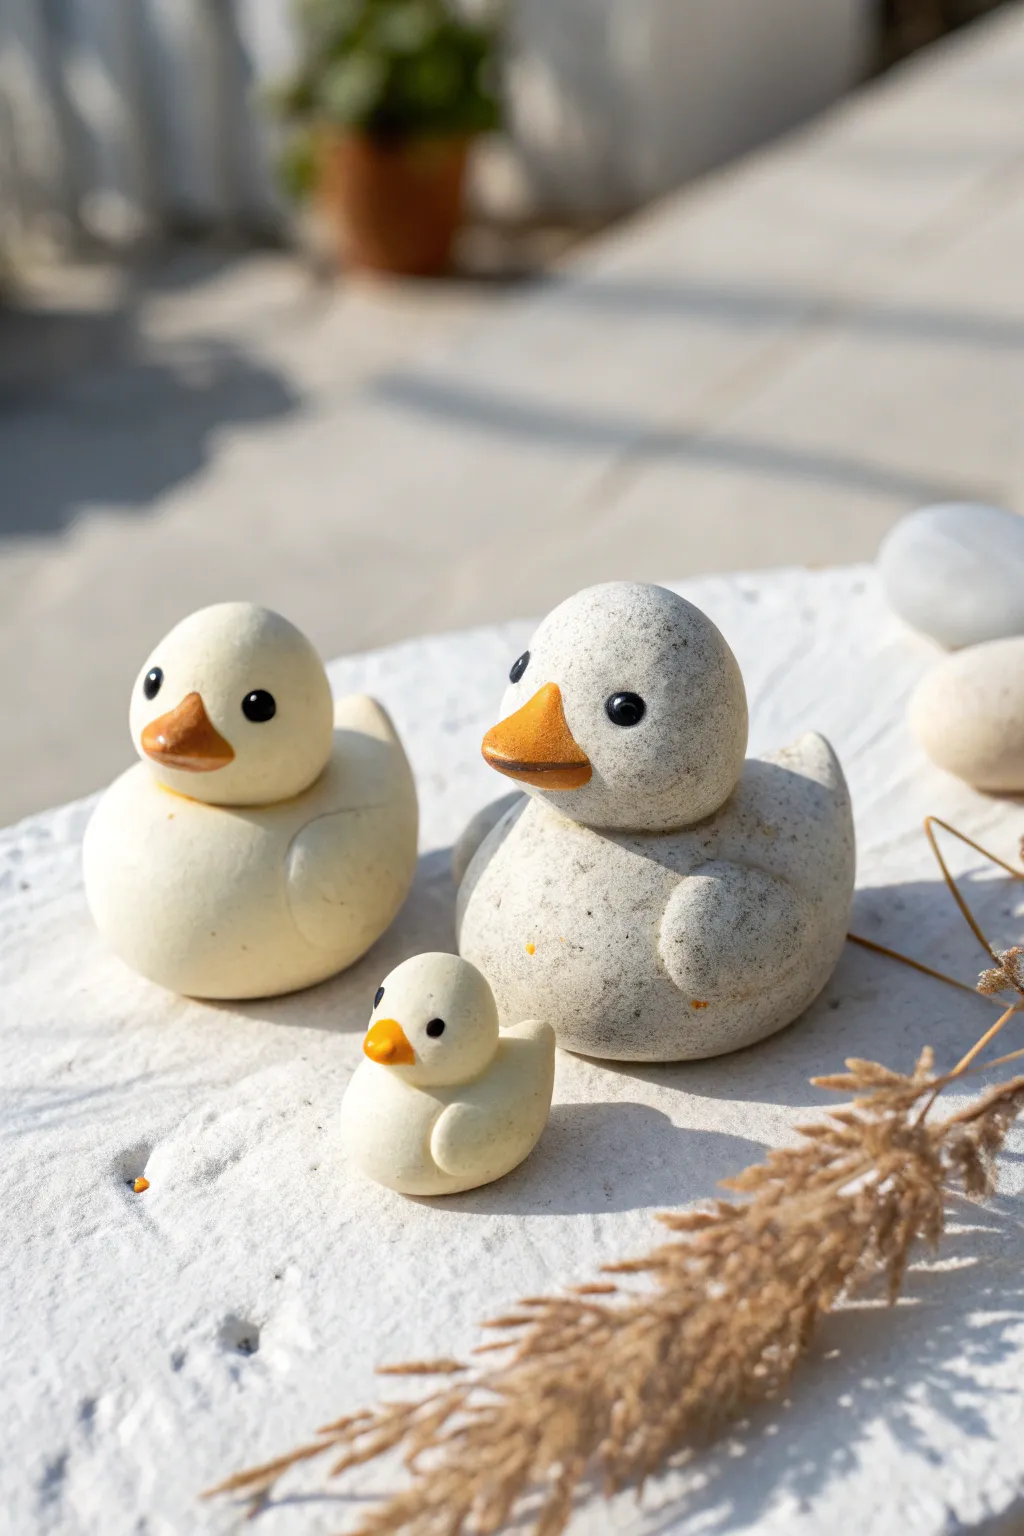
Create a charming family of ducks featuring varied textures, from smooth cream to speckled stone. This project focuses on simple shapes and subtle glazing techniques to bring these adorable, minimalist figures to life.
Step-by-Step Tutorial
Materials
- White polymer clay or air-dry clay
- Granite-effect clay (or black pepper to mix in)
- Orange acrylic paint
- Black acrylic paint
- White acrylic paint
- High-gloss varnish (optional for beak/eyes)
- Matte varnish (for body)
- Modeling tools (ball styluses)
- Fine detail paintbrush
- Sandpaper (fine grit)
Step 1: Sculpting the Large Ducks
-
Prepare the clay bodies:
Start by conditioning your white clay until it is soft and pliable. Roll two golf-ball-sized spheres for the bodies of the parent ducks. -
Create the stone effect:
For the speckled gray duck, either use pre-mixed granite-effect clay or take a portion of white clay and knead in a small amount of black pepper or fine black glitter to mimic stone specks. -
Shape the teardrops:
Gently roll one side of each sphere to create a fat teardrop shape. The wider end will be the chest, and the tapered end will become the tail. -
Form the heads:
Roll two slightly smaller spheres for the heads. Attach them firmly to the top front of the body pieces. If using air-dry clay, score the surfaces and add a dab of water for a secure bond. -
Blend the necks:
Use your thumb or a modeling tool to smooth the clay where the head meets the body, blending the seam while keeping a distinct neck indentation. -
Lift the tails:
Pinch the tapered tail end slightly and curve it upward to give the ducks a perky, swimming posture.
Stone Texture Trick
If you don’t have granite clay, mixing dried used coffee grounds or ground black pepper into white clay creates a fantastic, natural speckled stone look.
Step 2: Adding the Duckling & Details
-
Sculpt the baby duck:
Repeat the body and head process on a much smaller scale using the plain white clay. The baby should be about one-third the size of the adults. -
Indicate the wings:
Roll small, flattened ovals of clay. Press these onto the sides of each duck body to suggest folded wings, blending the edges so they look integral to the shape rather than stuck on. -
Attach the beaks:
Take tiny amounts of clay and form triangular cone shapes. Press these onto the center of each face, slightly flattening the top to create a bill shape.
Make It a Scene
Mount the finished ducks onto a piece of driftwood or a flat river stone to create a permanent display base that enhances the natural aesthetic.
Step 3: Finishing and Painting
-
Cure or dry:
Allow the clay to dry completely (for air-dry) or bake according to the manufacturer’s package instructions (for polymer clay). -
Smooth the surface:
Once hardened, use fine-grit sandpaper to gently smooth out any fingerprints or rough bumps, particularly on the white ducks. -
Paint the beaks:
Using a fine brush, paint the beaks a warm, pumpkin orange. You might need two coats for opaque coverage. -
Dot the eyes:
Dip the back end of a paintbrush or a ball tool into black paint. Dot the eyes onto the sides of the head. I find placing them slightly wide apart makes them look cuter. -
Add eye highlights:
For the stone-textured duck, add a tiny pin-prick of white paint inside the black eye dot to give it a spark of life. -
Seal the piece:
Apply a matte varnish over the bodies to protect the surface. Finally, add a touch of gloss varnish just to the beaks and eyes for a contrasting shine.
Now your little family is ready to waddle onto a shelf or brighten up a desk with their peaceful charm.
Mini Duck Charm Pendant
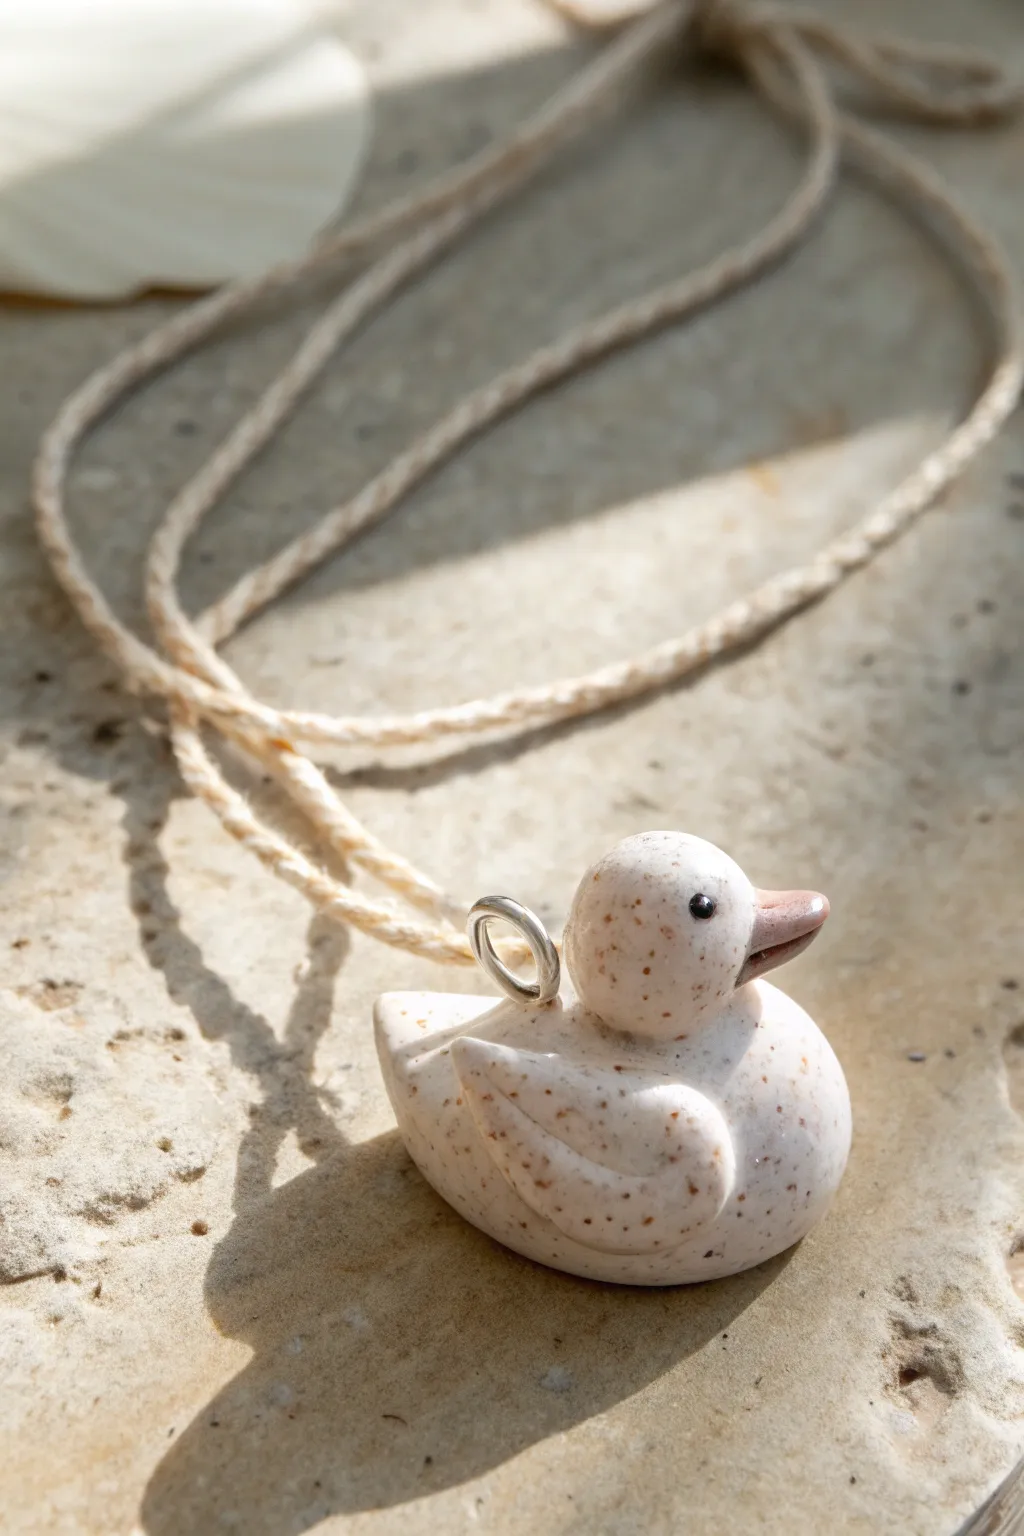
Create a charming companion with this speckled duck pendant, featuring a smooth, glossy finish and a minimalist design suitable for everyday wear. This little clay bird hangs perfectly on a simple cord, making it a sweet handmade gift or a quirky addition to your jewelry collection.
Step-by-Step
Materials
- Polymer clay (white or translucent white, preferably ‘granite’ or ‘speckled’ style, or plain white mixed with ground pepper/spices)
- Small amount of pink or terracotta clay (for beak)
- Black acrylic paint or a tiny ball of black clay (for eyes)
- Glossy polymer clay glaze or UV resin
- Metal jump ring (approx. 6mm)
- Needle tool or toothpick
- Silicon sculpting tools (optional)
- Sandpaper (fine grit)
- Oven for baking
- Waxed cord or chain for hanging
Step 1: Shaping the Body
-
Prepare the Clay:
Start with your speckled clay. If you don’t have pre-speckled clay, knead a tiny pinch of ground black pepper or dried vanilla bean specks into white polymer clay until evenly distributed. This gives it that organic, stone-like look. -
Form the Base:
Roll a medium-sized ball of clay (about the size of a large grape) into a smooth sphere. Gently elongate one side slightly to create an oval shape; this will be the duck’s body. -
Create the Head:
Roll a smaller ball of clay, roughly one-third the size of the body. Place it on the front upper part of the body oval. Gently smudge the clay downward at the connection point to blend the neck seamlessly while keeping the head distinct. -
Slight Pinch:
At the rear of the body oval, gently pinch the clay upward to form a small, pointed tail. Smooth out any fingerprints.
Step 2: Wings and Details
-
Make the Wings:
Roll two small, equal-sized tear-drop shapes. Flatten them slightly between your fingers to create the wing profiles. -
Attach the Wings:
Press one wing onto each side of the duck’s body. The rounded end should face forward, and the pointed end should angle up toward the tail. -
Add Texture:
Using a silicon tool or your finger, blend the top edge of the wing into the body so it looks attached, but leave the bottom and back edges raised slightly for dimension. -
Form the Beak:
Take a tiny amount of pink or terracotta clay and roll it into a small cone. Flatten it slightly to make it look like a bill rather than a nose. -
Attach the Beak:
Press the beak onto the front of the head. Use your needle tool to carefully scribe a small line across the beak to suggest a mouth opening. -
Insert Hardware:
Before baking, take your metal jump ring. Insert it firmly into the center of the duck’s back. I like to twist it slightly as I push it in to help the clay grip the metal. -
Secure the Ring (Optional):
If the ring feels loose, you can add a tiny snakeskin-thin strip of speckled clay over the base of the ring where it enters the back, blending it down to lock the metal in place.
Loose Jump Ring?
If the metal ring comes loose after baking, pull it out, add a drop of superglue or E6000 to the stem, and push it back into the hole for a permanent hold.
Step 3: Finishing Touches
-
Bake:
Place your duck on a baking tile or parchment paper. Bake according to your specific clay manufacturer’s instructions (usually 275°F/130°C for 15-30 minutes). -
Cool Down:
Let the piece cool completely. It will be slightly soft when hot but hardens as it cools. -
Add the Eyes:
Dip the very tip of a needle tool or toothpick into black acrylic paint. Dot two tiny eyes onto the face. Let the paint dry completely. -
Glaze:
Apply a coat of glossy polymer clay glaze or UV resin over the entire duck. This creates the ceramic-like shine and protects the paint and the speckles. -
Cure the Glaze:
Allow the glaze to air dry or cure under a UV lamp if using resin. Ensure it is not tacky before handling. -
String It Up:
Thread a simple natural or waxed cord through the jump ring to complete the necklace.
Level Up: Color Shift
Mix just a speck of translucent clay into your main batch. This gives the duck a faux-stone depth, making it look more like polished river rock than plastic.
Your little speckled duck is now ready to float along with you wherever you go


What Really Happens Inside the Kiln
Learn how time and temperature work together inside the kiln to transform clay into durable ceramic.
Cute Duck Stud Earrings
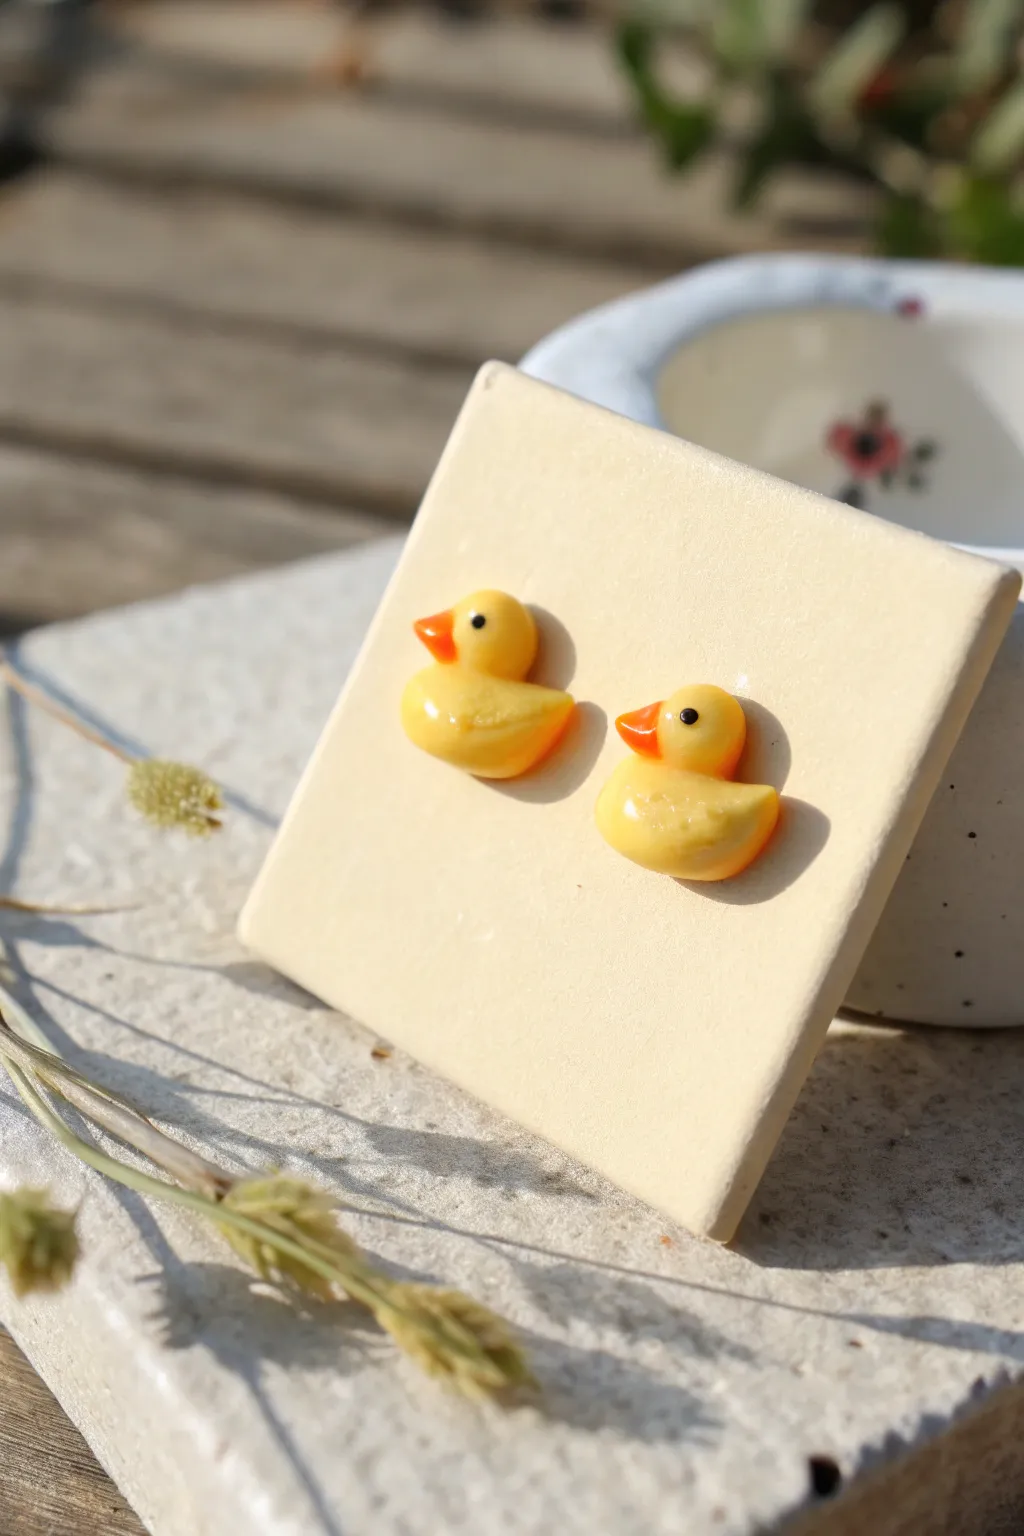
Tiny, nostalgic, and irresistibly cute, these miniature rubber duck earrings are a perfect afternoon project. Modeled from polymer clay with careful attention to their classic silhouette, these studs add a splash of playful charm to any outfit.
How-To Guide
Materials
- Bright yellow polymer clay
- Orange polymer clay
- Black acrylic paint
- Fine-tipped dotting tool or toothpick
- Gloss glaze or UV resin
- Flat stud earring posts (stainless steel or surgical steel)
- Strong craft adhesive (e.g., E6000)
- Clay sculpting tools (needle tool, small ball tool)
- Clean ceramic tile or baking sheet
Step 1: Sculpting the Body
-
Conditioning the Clay:
Begin by thoroughly conditioning your yellow polymer clay. Warm it in your hands and knead it until it’s soft, pliable, and free of cracks to ensure a smooth finish. -
Sizing the Portions:
Pinch off two equal-sized balls of yellow clay, roughly the size of a small pea. Roll them in your palms to verify they are matched in volume so your earrings will be symmetrical. -
Forming the Base:
Take one yellow ball and gently flatten the bottom against your work surface. Pinch one end slightly to create an elongated teardrop shape; the wider end will become the chest and the pointed end the tail. -
Flipping the Tail:
Using your fingertip, gently curl the pointed tail end upward. Smooth the transition so the curve looks natural and fluid, just like a classic bathtub duck. -
Creating the Head:
Roll two smaller balls of yellow clay for the heads. Attach one to the front, wider part of the body, blending the clay at the neck seam slightly with a sculpting tool so it doesn’t look like a snowman. -
Adding Wings:
Flatten two tiny teardrops of yellow clay. Press one onto the side of each duck body, ensuring the pointed end faces backward toward the tail, to simulate folded wings.
Clean Clay Trick
Yellow clay picks up dust easily. Wipe your hands and tools with a baby wipe or rubbing alcohol before handling the yellow clay to keep it pristine.
Step 2: Adding Details & Baking
-
Shaping the Bills:
Condition a very small amount of orange clay. Roll two tiny cones and flatten them slightly to create the bill shape. -
Attaching the Beaks:
Carefully press the wide end of the orange cone onto the center of the duck’s face. If the clay is dry, a tiny dab of liquid clay can help it stick, though gentle pressure usually suffices. -
Indenting the Eyes:
Use a small ball tool or the tip of a toothpick to make microscopic indentations where the eyes will go. This helps guide your paint later and adds dimension. -
Baking:
Place your ducks on a ceramic tile or parchment-lined baking sheet. Bake according to your brand of clay’s instructions (usually around 275°F/135°C for 15-20 minutes depending on thickness). -
Cooling Down:
Allow the pieces to cool completely before moving to the next step. I prefer to let them sit in the oven as it cools to prevent cracking from thermal shock.
Add Clear Bubbles
Glue tiny clear glass microbeads around the base of the post or on the duck’s back to simulate water droplets or soap bubbles.
Step 3: Finishing Touches
-
Painting the Eyes:
Dip a fine needle tool or toothpick into black acrylic paint. Carefully touch it to the indented eye sockets to create tiny, crisp black dots. -
Sealing with Gloss:
Once the paint is dry, coat the entire clay surface with a high-gloss glaze or a thin layer of UV resin to replicate that wet, rubbery look. -
Curing the Resin:
If using UV resin, cure under a UV lamp for 2-3 minutes until hard and tack-free. If using air-dry glaze, allow it to set fully overnight. -
Attaching Posts:
Flip the ducks over. Apply a dab of strong adhesive (like E6000) to the flat pad of your earring post and press it firmly onto the back of the duck. -
Final Set:
Allow the glue to cure for at least 24 hours to ensure a durable bond before wearing your new aquatic accessories.
Enjoy wearing your charming little ducks, guaranteed to float a little joy into your day
Duck Magnet With Waddly Feet

This charming little duck brings a splash of whimsy to your kitchen with its dangling, wobbly orange feet. Using simple polymer clay shapes and a bit of string, you can create a teal feathered friend that looks ready to hop right off the fridge.
Step-by-Step Tutorial
Materials
- Teal or dark green polymer clay
- Orange polymer clay
- Black polymer clay
- White or light grey polymer clay (tiny amount)
- Clay sculpting tools (needle tool, ball stylus)
- Orange embroidery floss or thin cord
- Strong craft glue (E6000 or super glue)
- Round ceramic or ferrite magnet
- Eye pin or small wire loop (optional)
- Rolling pin (acrylic)
Step 1: Sculpting the Body
-
Mix your base color:
Start by conditioning your teal clay until it is soft and pliable. If the green is too bright, mix in a tiny speck of black to deepen the tone. -
Form the head and torso:
Roll a medium-sized ball for the body and a slightly smaller ball for the head. Flatten the body piece gently into an teardrop shape with a rounded bottom. -
Connect the pieces:
Press the head onto the narrower top of the teardrop body. Use your thumb or a smoothing tool to blend the clay at the neck seam so it becomes one solid unit. -
Flatten for the magnet:
Gently press the entire duck shape against your work surface. You want the back to be perfectly flat so the magnet adheres well later. -
Create the wing:
Roll a smaller piece of teal clay into a flattened teardrop shape. Press this onto the side of the body, pointing the pointy end toward the tail. -
Add wing details:
Using a needle tool or a small knife, gently press curved lines into the wing clay to simulate layers of feathers.
Sticky Situation?
If your clay gets too soft and fingerprints are showing, pop the sculpture in the freezer for 5 minutes. The cold firms it up, making it easier to smooth out imperfections.
Step 2: Adding Features
-
Shape the beak:
Take a small amount of orange clay and shape it into a rounded triangle. Press this onto the front of the face, slightly lower than the center. -
Define the mouth:
Use your needle tool to carefully press a horizontal line into the side of the beak to separate the upper and lower bill. -
Make the eye white:
Roll a tiny ball of white clay and flatten it significantly to create the eye base. Place this on the head above the beak. -
Add the pupil:
Roll a slightly smaller ball of black clay and press it into the center of the white circle. Add a microscopic dot of white on top for that ‘sparkle’ reflection. -
Prepare leg holes:
I prefer to do this before baking: use a toothpick to poke two vertical holes approximately 5mm deep into the bottom of the duck’s body where the legs will attach.
Make It Glossy
After baking and cooling, brush a thin layer of polyurethane gloss varnish over the beak and feet to make them look wet, while leaving the feathers matte.
Step 3: Feet and Assembly
-
Sculpt the feet:
Create two flat triangles from orange clay. Use your knife tool to impress two lines into the wide end of each triangle to create webbed toes. -
Create leg attachments:
Poke a hole through the top (narrow end) of each foot using your needle tool. Ensure the hole is wide enough for your cord to pass through. -
Bake the clay:
Place the body and the two feet on a parchment-lined baking sheet. Bake according to your clay manufacturer’s instructions (usually 275°F for 15-30 minutes). -
Attach the cord:
Once cool, cut two short lengths of orange cord. Glue one end of each cord into the holes you made in the body. -
Connect the feet:
Thread the loose ends of the cords through the holes in the orange feet. Tie a knot underneath each foot to secure them, or glue the cord into the foot hole directly. -
Add the magnet:
Use strong craft glue to attach a round magnet to the flat back of the duck’s body. Let it cure fully before sticking it to your fridge.
Now you have a cheerful companion to hold up your grocery lists and photos

TRACK YOUR CERAMIC JOURNEY
Capture glaze tests, firing details, and creative progress—all in one simple printable. Make your projects easier to repeat and improve.
Duck Ring Dish With Beak Rim
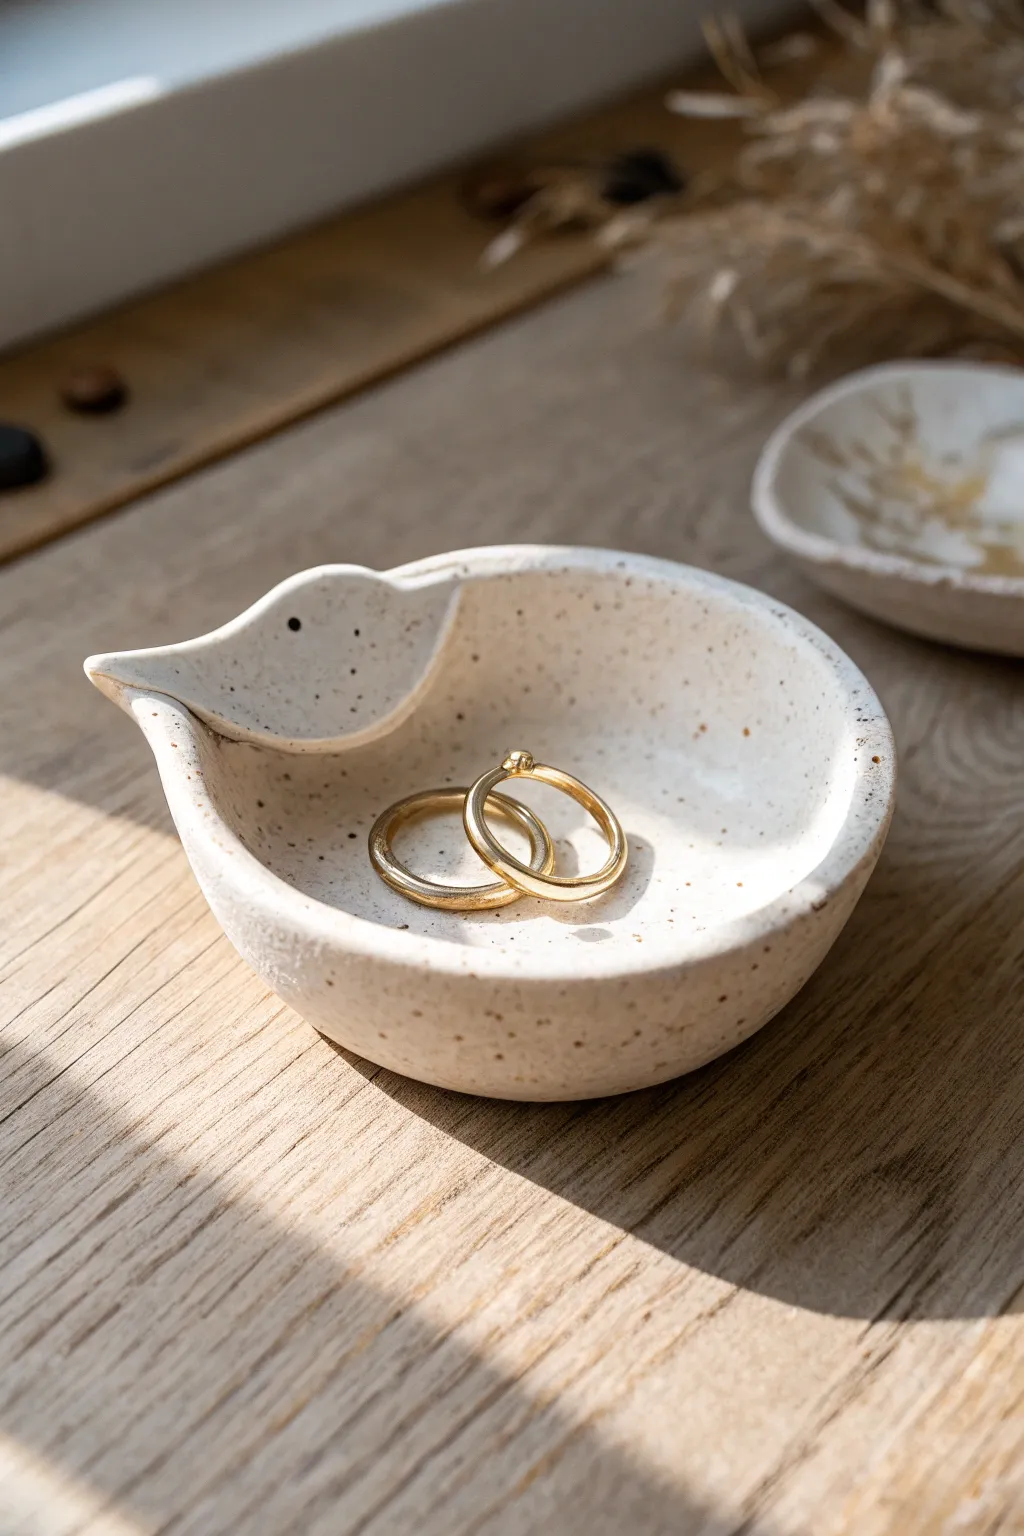
This charming little ring dish incorporates a subtle duck motif into its rim, creating a sweet resting spot for your jewelry. With its speckled clay body and organic, handmade curves, it balances minimalist design with playful character.
Detailed Instructions
Materials
- Speckled stoneware clay (or white clay mixed with speckles)
- Pottery wheel (or can be adapted for hand-building)
- Rib tool
- Needle tool
- Sponge
- Clear or white transparent glaze
- Kiln
- Cleanup tool or fettling knife
- Wire cutter
Step 1: Shaping the Dish
-
Prepare the clay:
Start by wedging a small ball of speckled stoneware clay, roughly the size of a tangerine. Ensure there are no air bubbles, as this compact shape needs structural integrity. -
Center on the wheel:
Throw the ball of clay onto the wheel head and center it firmly. Since this is a small piece, you won’t need much water—just enough to keep your hands gliding smoothly. -
Open the form:
Open the centered clay to create a wide, shallow bowl shape. Aim for a floor that is slightly thicker than usual to allow for later trimming or smoothing. -
Pull the walls:
Gently pull the walls upward and outward to form a classic small bowl curve. Keep the rim fairly thick and rounded, rather than sharp, to match the cozy aesthetic of the duck. -
Smooth the interior:
Use a rib tool to compress the inside curve, removing throwing lines to create that creamy, smooth surface seen in the reference photo. -
Alter the rim:
While the clay is still plastic but holding its shape, stop the wheel. Locate the spot where you want the duck’s head to be. -
Fold the head:
Gently push a section of the rim inward from the outside, while simultaneously pinching the clay excess to form a triangular protrusion. This fold creates the head shape without needing to attach a separate piece. -
Refine the beak:
Using your fingertips, pinch the very tip of that protrusion to sharpen it slightly into a beak shape, ensuring it points slightly upward.
Step 2: Detailing and Finishing
-
Add the eye:
Take a needle tool or a small drill bit tool and gently press a small indentation into the side of the head bump to create the eye. Don’t poke all the way through; just make a clean divot. -
Cut off the wheel:
Run a wire cutter underneath the bowl to separate it from the wheel head. -
Dry to leather hard:
Allow the piece to dry slowly until it reaches a leather-hard state. I find covering it loosely with plastic helps the rim and base dry at the same rate. -
Trim the foot:
Turn the bowl over (you may need a chuck or a foam bat since the rim is uneven) and trim a clean, rounded foot ring. This elevates the bowl and gives it a finished look. -
Smooth the edges:
Run a barely damp sponge over the rim and the beak area to soften any sharp angles created during the folding process. -
Bisque fire:
Once bone dry, load the piece into the kiln for a bisque firing (usually to Cone 04 or 06, depending on your clay body). -
Apply glaze:
Dip the entire piece into a transparent or semi-transparent white glaze. This allows the natural speckles of the clay body to show through, which is key to the speckled eggshell look. -
Wipe the foot:
Clean the glaze off the bottom foot ring with a sponge to prevent it from sticking to the kiln shelf. -
Final firing:
Fire the piece to maturity (Cone 5 or 6 for most stoneware). Ensure the kiln has good ventilation if your clay has lots of manganese speckles.
Don’t Over-Wet
When pinching the rim to make the duck head, ensure your fingers are dry. Too much water will make the thin rim collapse or crack as you fold it over.
Wing Details
Use a carving tool to gently etch faint ‘wing’ lines on the exterior or interior sides of the bowl for extra texture before the clay dries fully.
Place your favorite gold rings inside for a lovely contrast against the speckled white finish
Duck Spoon Rest With Wing Details
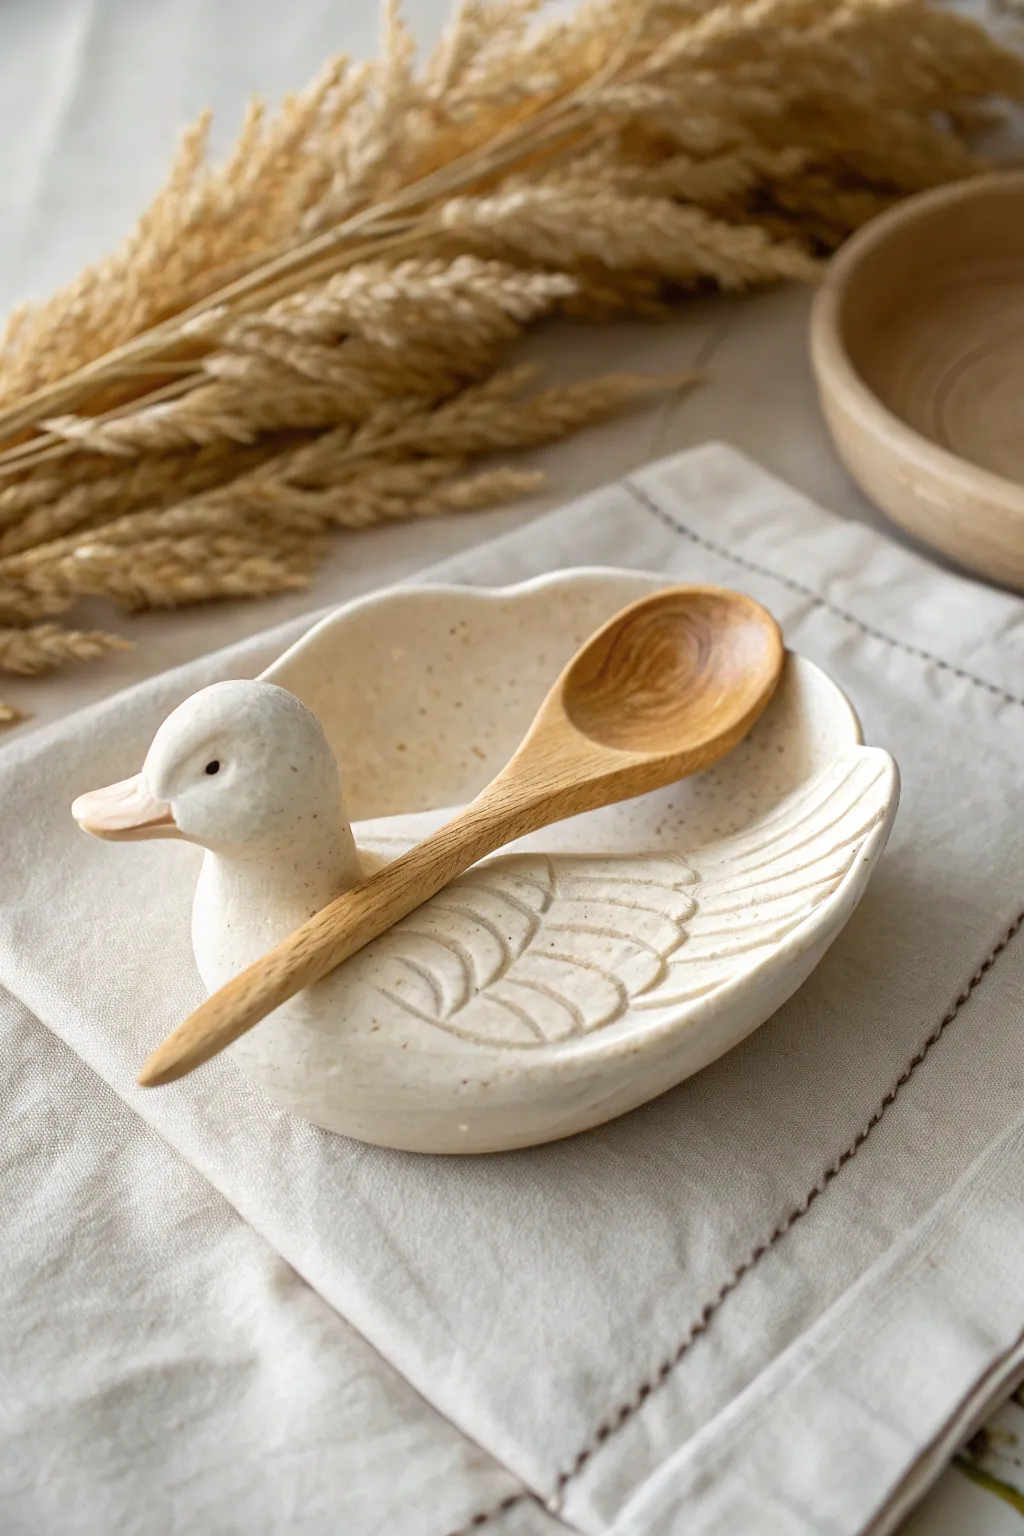
This charming spoon rest combines functional kitchenware with whimsical sculpture, featuring a gentle duck shape with carved wing feathers. Its shallow dish holds your cooking spoon perfectly, while the sculpted head adds a sweet personality to your countertop.
How-To Guide
Materials
- White stoneware or air-dry clay
- Rolling pin
- Guide sticks (approx. 1/4 inch thick)
- Needle tool or fettling knife
- Loop tool or rib
- Small sponge
- Slip (clay slurry)
- Scoring tool or old toothbrush
- Modeling tool with a tapered tip
- Clear or white speckled glaze (if firing) or acrylic paint and varnish (if air-drying)
Step 1: Forming the Body
-
Prepare the slab:
Begin by wedging your clay to remove air bubbles. Place your guide sticks on either side of the clay and roll it out into an even slab, approximately 1/4 inch thick. This thickness ensures durability without being too heavy. -
Cut the oval shape:
Using a needle tool, cut out a large oval shape. This will form the main body of the duck. I like to make mine about 6-7 inches long to comfortably fit a standard wooden spoon. -
Shape the dish:
Gently lift the edges of the oval slab with your fingers to create a shallow curve. You can press the center down softly into a foam pad or simply cup it in your hands to create the depression where the spoon will sit. -
Smooth the rim:
Use a damp sponge to compress and round over the cut edges of the slab. Sharp edges can chip easily later, so take time to make them nice and smooth.
Step 2: Sculpting the Head
-
Roll a ball:
Take a separate piece of clay and roll it into a ball about the size of a walnut or ping pong ball for the head. -
Pinch the beak:
Gently pinch one side of the ball to pull out a beak shape. Flatten it slightly so it looks like a duck bill rather than a pointed bird beak. Smooth the transition between the bill and the forehead. -
Define the neck:
Shape the bottom of the ball into a slight taper to imply a neck, creating a surface that will attach to the body. -
Attach the head:
Decide where the head will sit on the rim of your oval base. Score both the rim and the bottom of the neck thoroughly with a scoring tool. Apply slip to both scored areas. -
Secure the join:
Press the head firmly onto the rim. Use a modeling tool to smudge the clay from the neck down onto the body, blending the seam until it is completely invisible. This connection must be strong to support the head.
Head Drooping?
If the head feels too heavy and droops while the clay is wet, prop it up with a small piece of sponge or a wad of paper towel until the clay stiffens.
Step 3: Adding Details
-
Carve the wing outline:
On the side of the body opposite the head, use a needle tool to lightly sketch the outline of a folded wing. It should follow the curve of the dish. -
Define the feathers:
Using a tapered modeling tool or a small loop tool, carve shallow grooves to represent the individual feathers. Create rows of ‘U’ shapes or elongated curves, overlapping them slightly like roof shingles. -
Refine the texture:
Soften the sharp ridges of your carving with a damp finger or brush. The goal is a soft, organic look rather than sharp, mechanical lines. -
Add facial features:
Use a small, round tool to press indentations for the eyes. If you want more detail, you can add tiny balls of clay for the eyeballs, or simply leave the indentation for a stylized look. -
Final smoothing:
Go over the entire piece with a barely damp sponge to remove any fingerprints or crumbs of clay. Ensure the bottom is flat so it won’t rock on the counter.
Make it a Set
Create a smaller version to use as a tea bag rest, or a larger version to use as a serving platter for crackers.
Step 4: Finishing
-
Dry slowly:
Loosely cover the duck with plastic to let it dry slowly over a few days. This prevents the head from cracking at the neck joint due to uneven drying. -
Bisque fire:
If using ceramic clay, fire the piece to bisque temperature (usually cone 04) once it is bone dry. -
Glaze application:
Dip or brush your piece with a glossy white glaze. A ‘speckled’ clay body or glaze works beautifully to mimic the texture in the photo. Avoid getting glaze on the very bottom. -
Final fire:
Fire the piece again to the maturation temperature of your glaze and clay.
Your finished duck spoon rest is now ready to bring a touch of farmhouse charm to your cooking routine
Floating Duck Tea Light Holder
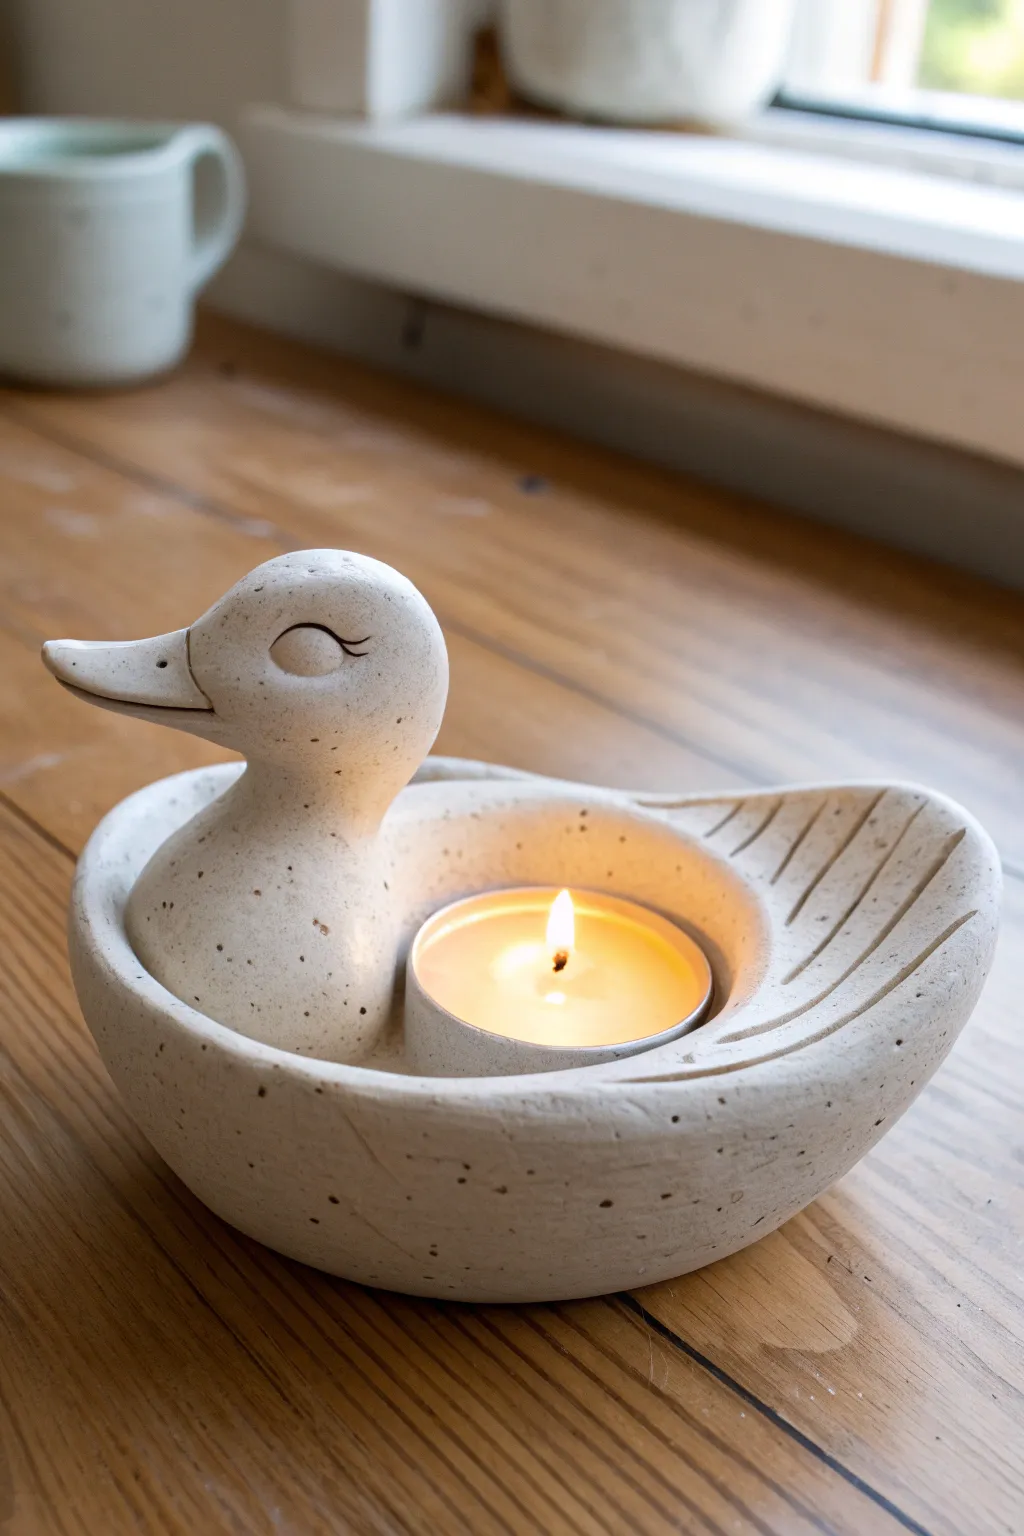
Create a charming, serene duck sculpture that doubles as a functional tea light holder. With its speckled stone-like finish and gentle curves, this piece adds a calming, natural touch to any tabletop or window sill.
Step-by-Step Tutorial
Materials
- Air-dry clay (white or stone-colored) or polymer clay
- Standard tea light candle (for sizing)
- Small bowl of water
- Sculpting tools (needle tool, modeling tool)
- Fine-grit sandpaper
- Acrylic paints (cream/off-white, dark brown/black)
- Old toothbrush
- Matte spray sealant
- Rolling pin
Step 1: Sculpting the Base
-
Prepare the Clay:
Start by conditioning a generous handful of clay until it’s smooth and pliable. Divide it roughly into two portions: a larger one for the body/boat shape and a smaller one for the head and neck. -
Form the Body:
Take the larger portion and roll it into a thick oval. Press your thumb into the center to begin hollowing it out, creating a boat-like shape that will serve as the duck’s body. -
Shape the Candle Well:
Use a tea light candle (metal casing only) to press a perfect circle into the center of the body. Widen the hole slightly around the edges of the casing to account for clay shrinkage as it dries. -
Refine the Walls:
Pinch and smooth the clay walls around the candle well. The back of the ‘boat’ should taper upwards slightly to suggest a tail. -
Create the Wing Details:
Using a needle tool or knife, gently carve shallow, parallel curved lines into the tail section to mimic folded wing feathers. Keep the lines soft and organic.
Pro Tip: Weight it Down
Before the clay dries, press a large coin or washer into the bottom of the base. This lowers the center of gravity, making the duck stable so it won’t tip over easily.
Step 2: Adding the Head
-
Sculpt the Head Shape:
Take the remaining clay ball and roll it into a teardrop shape. Bend the thicker end slightly to form the head and pull the thinner end to create a neck. -
Form the Beak:
Pinch the front of the head to pull out a beak shape. Flatten it slightly and use a knife tool to slice horizontally, creating the mouth line. -
Attach to Body:
Score (scratch hatch marks) the bottom of the neck and the front attachment point on the body. Apply a little water or slip (liquid clay) to both scored areas. -
Blend the Seams:
Press the neck firmly onto the body. Use a modeling tool or your finger to smoothing the clay downwards, blending the neck into the body until the seam completely disappears. -
Carve the Eyes:
Use a U-shaped gouge or a needle tool to carve two simple, sleeping eye curves. Add small eyelash details if desired for a peaceful expression.
Step 3: Finishing Touches
-
Final Smoothing:
I like to dip my finger in water and run it over the entire surface now to remove fingerprints and tiny bumps before drying. -
Dry Time:
Let the sculpture dry completely. For air-dry clay, this usually takes 24–48 hours depending on thickness. Ensure it feels room temperature to the touch, not cool. -
Sanding:
Once fully cured, use fine-grit sandpaper to gently buff the surface for a refined, pottery-like smoothness. -
Base Coat:
Paint the entire duck with a cream or off-white acrylic paint. You may need two thin coats for opaque coverage. -
Speckling Technique:
Mix a small amount of dark brown paint with water to make it inky. Dip an old toothbrush into it and run your thumb across the bristles to flick tiny specks onto the duck. -
Seal the piece:
Finish with a clear matte spray sealant to protect the paint and give it that non-glossy, stone texture appearance.
Level Up: Essential Oils
Use porous terracotta clay instead of air-dry. Leave the inside of the tail unsealed so you can drip essential oils onto it, turning the sculpture into a passive diffuser.
Place your finished duck in a cozy spot and enjoy the warm glow of candlelight reflecting off its curved form
Duck Planter Pinch Pot
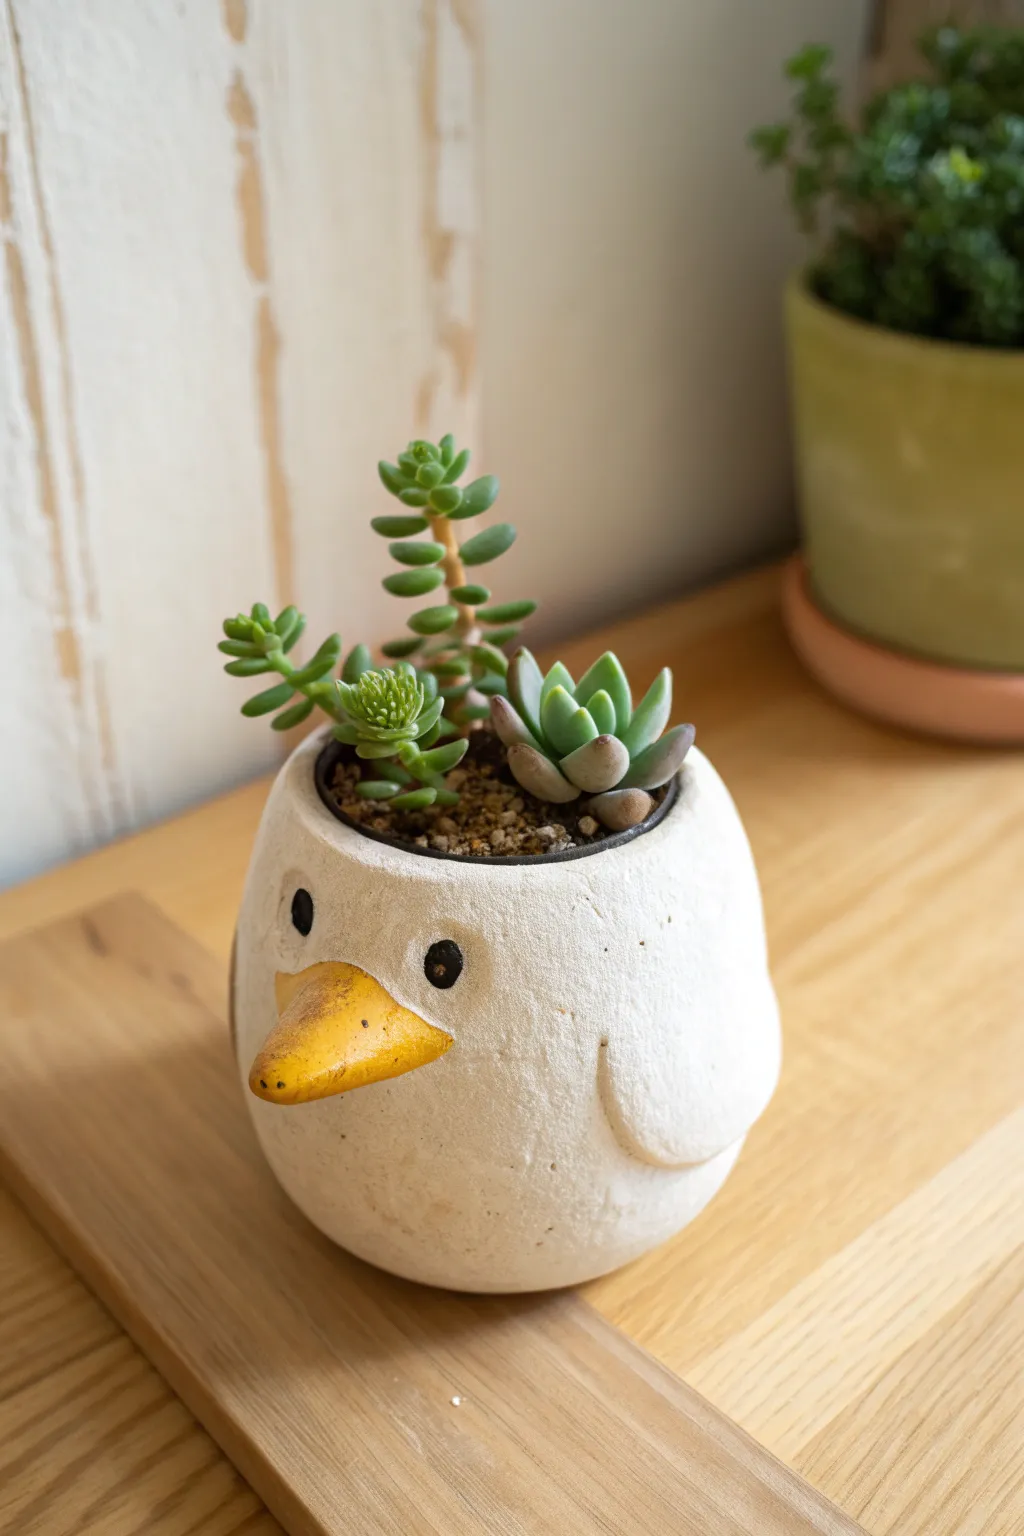
This adorable duck-shaped planter adds a touch of whimsy to any succulent collection with its round, textured body and bright yellow beak. Created using basic pinch pot techniques, this project results in a chunky, minimalist character perfect for holding small plants.
How-To Guide
Materials
- Air-dry clay or polymer clay (white)
- Small cup of water (for smoothing)
- Clay sculpting tools (needle tool, modeling tool)
- Acrylic paints (bright yellow, black)
- Fine-grit sandpaper
- Clear matte varnish or sealant
- Small paintbrushes
- Succulents and potting soil
Step 1: Forming the Base
-
Prepare the Clay:
Start with a ball of clay roughly the size of a tennis ball. Knead it well until it is soft, pliable, and free of air bubbles or cracks. -
Start the Pinch Pot:
Hold the ball in one hand and press your thumb into the center, stopping about a half-inch from the bottom to ensure a sturdy base. -
Shape the Walls:
Gently pinch the clay between your thumb and fingers, rotating the ball as you work. Aim for walls that are slightly thicker than usual, about 1/4 inch, to maintain that chubby, rounded look. -
Round the Form:
Instead of flaring the rim out like a bowl, gently curve the upper walls inward slightly to create a more enclosed, spherical shape. Tap the bottom gently on your table to flatten it so the duck sits upright. -
Check the Rim:
Smooth the top rim with a wet finger. It doesn’t need to be perfectly level; a slight organic unevenness adds to the handmade charm.
Cracking Clay?
Cracks often happen if clay dries too fast. If using air-dry clay, repair cracks with a paste of clay and water, then cover the pot with a loose plastic bag to slow down the remaining drying time.
Step 2: Adding Details
-
Create the Beak:
Roll a small piece of clay into a cone shape. Slightly flatten the wider end where it will attach to the face, and round off the tip so it isn’t sharp. -
Attach the Beak:
Score the attachment point on the pot and the back of the beak with a needle tool. Apply a dab of water (or slip) and press the beak firmly onto the front center of the pot. -
Blend the Seams:
Use a small modeling tool or your finger to smooth the clay from the beak onto the main body, ensuring a seamless transition. I like to leave the beak sticking out quite prominently. -
Form the Wings:
Flatten two small balls of clay into teardrop shapes. These should be subtle, slightly raised reliefs rather than large appendages. -
Attach the Wings:
Score and slip the sides of the pot. Press the wings on, blending the edges into the body so they look like they are folded against the duck’s side. -
Add Texture:
Take a rough sponge or a stiff brush and gently dab the entire surface of the white clay (avoiding the beak) to give it a stone-like, matte texture. -
Drainage Hole:
If you plan to plant directly inside, use a straw or tool to poke a drainage hole in the very bottom center. -
Drying:
Let the piece dry completely. For air-dry clay, this might take 24-48 hours depending on thickness. Rotate it occasionally for even drying.
Make it a Family
Create a whole flock by making two or three smaller versions using the same technique. Vary the beak angles slightly—one pointing up, one straight, one down—to give them individual personalities.
Step 3: Finishing Touches
-
Sand for Smoothness:
Once bone dry, lightly sand any sharp ridges or rough fingerprints, particularly around the rim, but try to preserve the stone texture you added. -
Paint the Beak:
Paint the beak with bright yellow acrylic paint. You may need two coats for full opacity. Add two tiny brown or black dots on the top of the beak for nostrils. -
Paint the Eyes:
Using a small detail brush or the end of a toothpick, dab two solid black circles just above the beak for the eyes. -
Seal the Pot:
Coat the entire planter, inside and out, with a matte varnish. This is crucial for waterproofing if you are using real plants. -
Planting:
Fill with succulent potting mix and arrange your small succulents, like sedum or small echeveria, to complete the look.
Now you have a charming little companion ready to brighten up your desk or windowsill
Duck Trinket Box With Lid
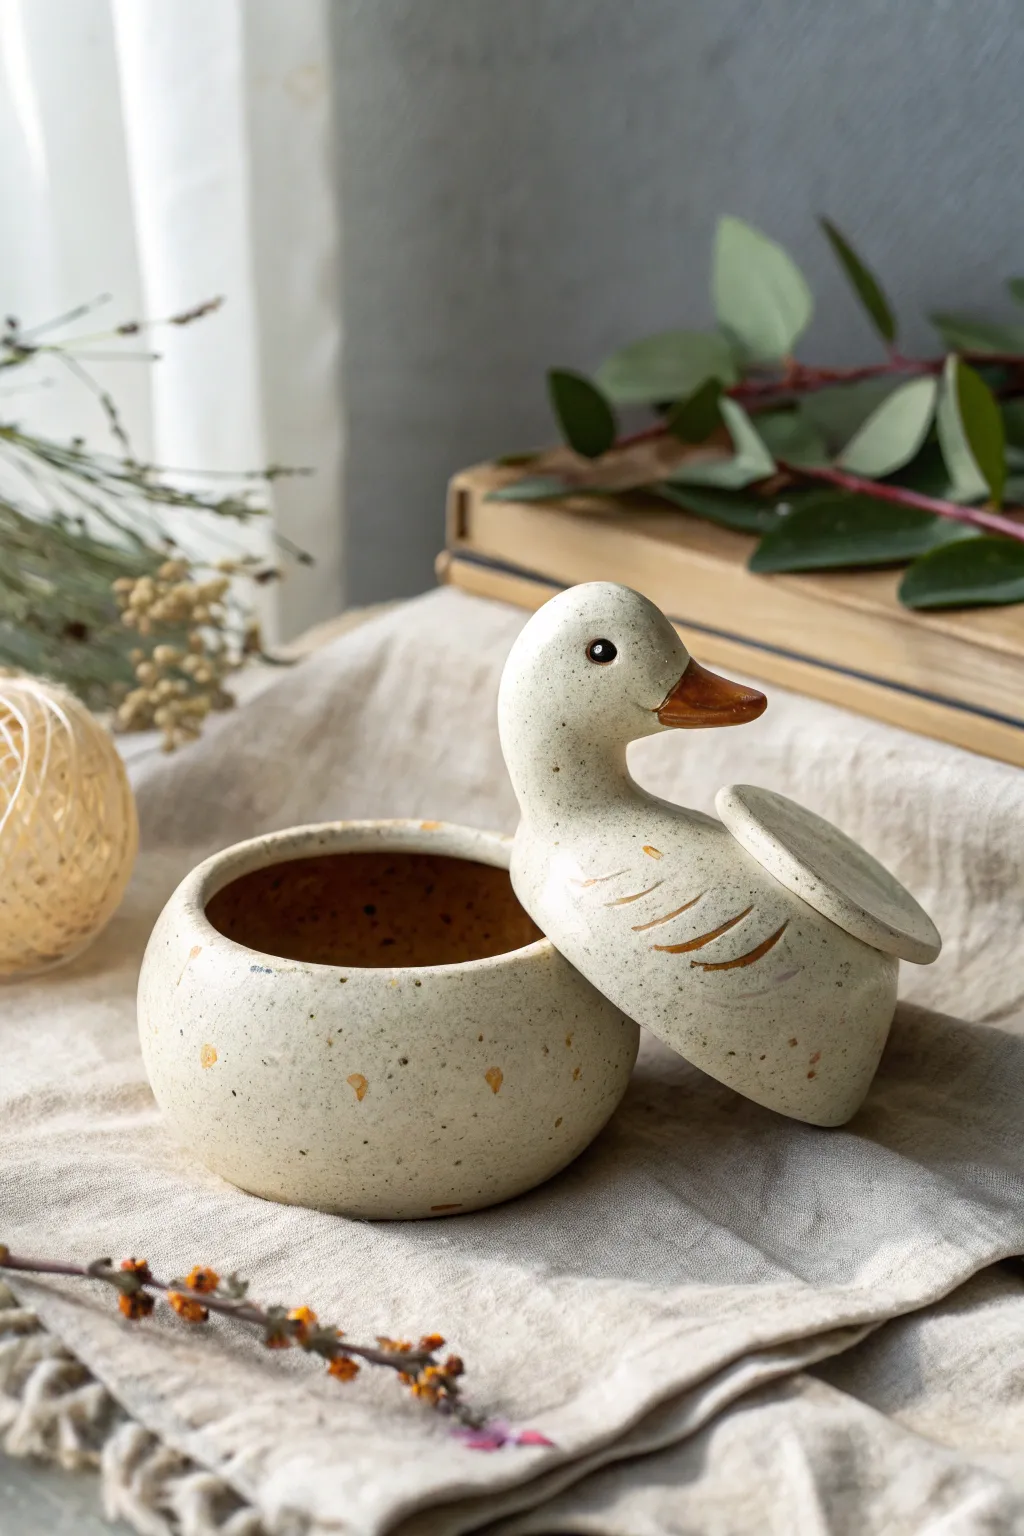
This charming two-piece trinket box features a rounded base and a lid sculpted into a sweet duck character, complete with a jaunty tail and beak. The speckled glaze finish gives it a rustic, handmade pottery feel that blends beautifully with nature-inspired decor.
Step-by-Step
Materials
- Light-colored stoneware clay or polymer clay (w/ speckled effect)
- Pinch pot tools (rib, needle tool)
- Scoring tool or serrated rib
- Slip (clay glue) or liquid polymer clay
- Underglaze (orange/rust for beak)
- Glaze (clear or milky white with speckles)
- Small sculpting tools
- Sponge
- Rolling pin
Step 1: Forming the Base
-
Prepare the Clay:
Start with a ball of clay roughly the size of a tennis ball. Knead it well to remove air bubbles and ensure it is pliable. -
Pinch the Pot:
Insert your thumb into the center of the ball and gently pinch the walls while rotating the clay. Aim for a consistent thickness of about 1/4 inch all around. -
Shape the Bowl:
Widen the opening slightly but keep the top rim narrower than the belly of the pot to create that pleasing rounded shape. Tap the bottom gently on your table to flatten it so it sits stable. -
Refine the Rim:
Use a damp sponge or a soft rib tool to smooth the rim of the bowl. It needs to be level so the lid will sit flush later.
Wobbly Lid Syndrome?
If the lid rocks back and forth, the rim isn’t level. Place a piece of sandpaper on a flat table and gently rub the rim against it in a circular motion to even it out.
Step 2: Sculpting the Duck Lid
-
Measure the Opening:
Take a new piece of clay and flatten it slightly. Cut a circle that is slightly larger than the opening of your base pot. -
Create the Flange:
On the underside of your lid circle, add a smaller coil or ring of clay. This ‘flange’ should fit inside the bowl rim to keep the lid from sliding off. -
Form the Duck Body:
Add a mound of clay to the top of the lid to form the duck’s upper back. Smooth this down onto the lid surface so no seams are visible. -
Sculpt the Head and Neck:
Roll a thick coil for the neck and a rounded shape for the head. Attach the neck to the body mound using the score-and-slip method (scratching both surfaces and adding water/slip). -
Shape the Beak:
Pinch a small amount of clay into a triangular bill shape and attach it to the face. Gently curve it upward for a happy expression. -
Add the Tail:
At the back of the lid, form a flat, rounded tail piece. Attach it at an upward angle, blending the clay smoothly into the body. -
Detailing the Wings:
Use a needle tool or small loop tool to carve three or four curved lines on the side of the body to suggest folded wing feathers.
Step 3: Finishing Touches
-
Smooth the Surfaces:
Go over the entire duck with a slightly damp sponge to remove fingerprints and harsh tool marks. The surface should look soft and organic. -
Add Eyes:
Using the back of a small paintbrush or dotting tool, press small indentations for the eyes. -
Bisque Fire / Bake:
If using ceramic clay, dry slowly and bisque fire. If using polymer clay, bake according to the package instructions. -
Add Color:
Paint the beak with a rust-orange underglaze or acrylic paint. Carefully paint a tiny black dot inside the eye indentations. -
Glazing:
Apply a speckled cream or milky white glaze (or a gloss varnish with brown flecks for polymer clay) over the entire piece, avoiding the flange where the lid touches the base. -
Final Fire / Seal:
Fire the piece again to set the glaze, or let your varnish cure completely if using polymer.
Natural Speckles
Don’t have speckled clay? Flick a toothbrush loaded with watered-down brown iron oxide or acrylic paint over the piece before the final clear coat.
Now you have a delightful little spot to hide your treasures
Duck Mug With Beak Accent
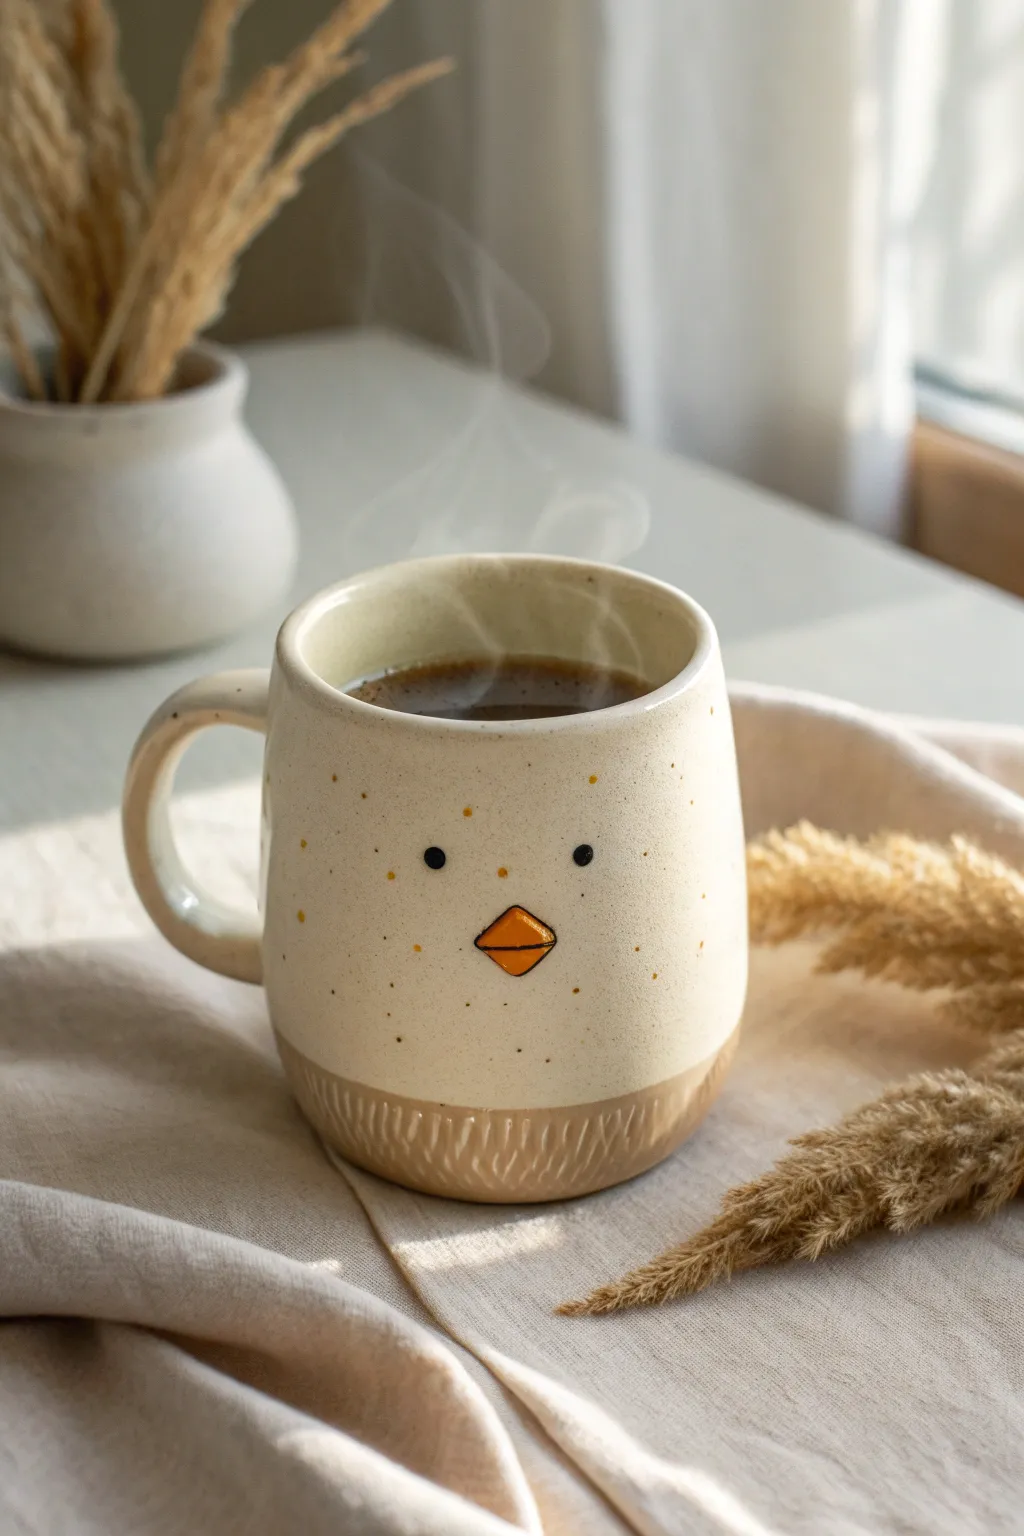
Start your day with a smile using this adorable, speckled duck-themed mug. This project combines a classic cylinder form with charming, minimalist facial features and a textured raw clay base for a tactile finish.
How-To Guide
Materials
- Light colored stoneware clay (preferably speckled or buff)
- Pottery wheel (or rolling pin for hand-building)
- Needle tool
- Rib tool (metal and rubber)
- Loop trimming tool
- Carving tool or sgraffito tool
- Underglaze (Black and Orange)
- Clear glaze or Transparent matte glaze
- Small detail paintbrush
- Sponge
Step 1: Throwing or Building the Body
-
Prepare the Clay:
Wedge about 1 to 1.5 lbs of clay thoroughly to remove air bubbles. This amount ensures a nice, sturdy mug wall. -
Center and Open:
Center your clay on the wheel head. Open the center and pull the floor out to your desired width, remembering to compress the bottom well to prevent cracking. -
Pull the Walls:
Pull the walls up into a cylinder. Aim for a slightly rounded shape—a ‘belly’ in the middle creates a cuter, more bird-like silhouette than a straight cylinder. -
Refine the Rim:
Use a chamois or a piece of plastic to smooth and round the rim. This is crucial for comfortable drinking later. -
Dry to Leather Hard:
Wire the mug off the wheel and let it dry slowly until it reaches a leather-hard state. It should be firm enough to handle without deforming.
Uneven Eyes?
Use a paper template to mark eye placement before painting. Poke tiny guide holes with a needle tool first to ensure symmetry.
Step 2: Trimming and Texturing
-
Trim the Foot:
Place the mug upside down on the wheel. Trim away excess weight from the bottom, defining a clear separation line about a half-inch up from the base. -
Add Base Texture:
While the clay is still leather hard, use a carving tool to create short, vertical hash marks around that bottom half-inch section. I find varying the pressure slightly gives it a more organic, nest-like look. -
Pull a Handle:
Pull a strap of clay for the handle. Allow it to set up briefly until it can hold an arch shape. -
Attach the Handle:
Score and slip the attachment points on both the mug and the handle. Press the handle firmly onto the side, smoothing the connection points with a modeling tool or your finger.
Step 3: Adding the Face
-
Make the Beak:
Roll a very tiny ball of clay and pinch it into a triangular pyramid shape. This will be the 3D beak. -
Attach the Beak:
Score the center of the mug face and the back of the beak. Apply slip and press the beak on securely. Use a needle tool to define the top edge for a sharp look. -
Paint the Beak:
Using a small detail brush, paint the beak with bright orange underglaze. Apply 2-3 coats for opacity. -
Outline the Beak:
Carefully outline the orange triangle with a very thin line of black underglaze to make it pop. -
Add the Eyes:
Dip the back end of a paintbrush or a drill bit into black underglaze. Dot two eyes symmetrically above and to the sides of the beak. -
Add Speckles (Optional):
If your clay isn’t naturally speckled, flick a toothbrush loaded with thinned brown underglaze or iron oxide over the surface for that eggshell effect.
Pro Tip: Beak Bond
Since the beak is small, score the attachment area deeply. A tiny coil of soft clay blended around the beak base ensures it won’t pop off.
Step 4: Glazing and Firing
-
Bisque Fire:
Place the bone-dry mug into the kiln for a bisque firing (usually Cone 04). -
Wax the Bottom:
Apply wax resist to the textured bottom section and the foot ring. We want this area to remain raw clay to contrast with the smooth upper body. -
Apply Glaze:
Dip the mug into a clear or semi-transparent creamy white glaze. The transparency allows the clay’s natural speckles (or the ones you added) to show through. -
Clean Up:
Sponge off any glaze drips from the waxed bottom section to ensure a clean line. -
Glaze Fire:
Fire the mug to maturity (Cone 5 or 6 depending on your clay body).
Once cooled, fill your new feathered friend with hot coffee and enjoy the cozy vibes
Duck Soap Dish With Drain Holes
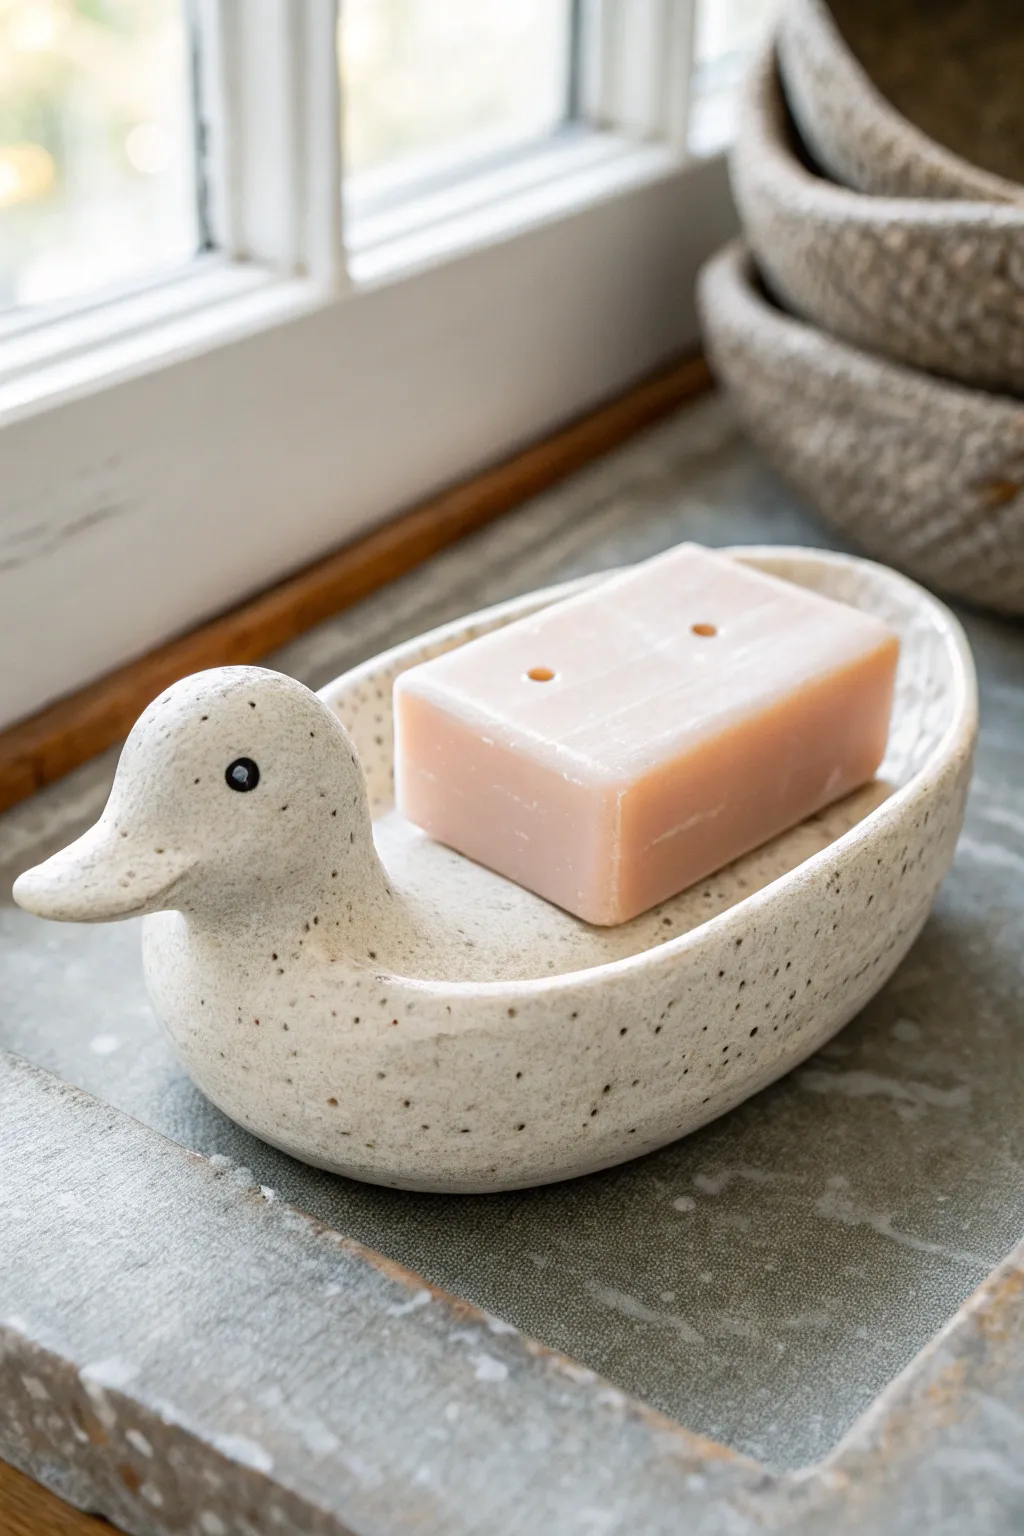
Bring a touch of farmhouse whimsy to your sink with this sculpted duck soap dish. Crafted from speckled stoneware, its gentle curves and simple features create an adorable resting spot for your favorite bar of soap.
Detailed Instructions
Materials
- Speckled cream stoneware clay (e.g., laguna speckled buff)
- Pottery wire cutter
- Rolling pin and guide sticks (approx. 1/4 inch)
- Needle tool
- Pony roller (optional)
- Scoring tool or serrated rib
- Slip (clay and water mixture)
- Small wooden modeling tool
- Sponge
- Black underglaze
- Clear transparent glaze
- Kiln (or access to firing services)
Step 1: Forming the Body
-
Roll the Pinch Pot Base:
Start with a ball of clay roughly the size of a large orange. Hold it in your palm and press your thumb into the center, pinching and turning to open up a wide, shallow bowl shape. -
Elongate into an Oval:
Instead of keeping the pinch pot perfectly round, gently squeeze opposite sides to elongate it into an oval boat shape. This will be the body of the duck where the soap sits. -
Flatten the Bottom:
Tap the bottom of your oval pinch pot on your work surface to create a flat, stable base so the duck won’t wobble on the counter. -
Refine the Rim:
Use your fingers or a damp sponge to smooth the rim of the dish. You want the walls to curve slightly inward to hold the soap, but remain open enough for easy access.
Uneven Drying?
Since the neck is solid and the body is thin, dry very slowly under plastic for 3-4 days. This prevents the neck from cracking away from the body.
Step 2: Sculpting the Head and Neck
-
Shape the Neck:
Take a separate smaller lump of clay and roll it into a thick, slightly tapered cylinder. Bend it gently to create the curve where the neck meets the head. -
Form the Head:
At the top of your cylinder, shape a rounded bulb for the head. Pinch the front of this bulb and pull gently to create a rounded, flat beak. -
Prepare for Attachment:
Decide which end of the boat is the front. Score the top rim of that end heavily. Score the bottom of your neck piece as well. -
Attach the Head:
Apply slip to both scored areas and press the neck firmly onto the rim. I like to wiggle it slightly to ensure a tight bond between the pieces. -
Blend the Seams:
Using a wooden modeling tool or your thumb, drag clay from the neck down onto the body, and from the body up onto the neck. Smooth this area completely until the seam is invisible.
Keep it Steady
Before drying, place the duck on a flat board and verify it doesn’t rock. If it does, tap the base firmly on the table again to flatten it out.
Step 3: Details & Finishing
-
Create the Beak:
Refine the beak shape by smoothing it with a wet finger. Use a needle tool to impress a tiny line on each side for the smile. -
Add the Eyes:
Roll two minuscule balls of clay. Press them flat onto the sides of the head. Alternatively, you can just paint these later, but a slightly raised eye adds character. -
Smooth the Surface:
Wipe the entire piece down with a damp potter’s sponge. This exposes the grit in the speckled clay and removes any fingerprints. -
Add Drainage Holes:
This is crucial for a soap dish. Use a small hole punch tool or a straw to create 2-3 holes in the center of the body so water can drain away. -
Slow Dry:
Cover the duck loosely with plastic and let it dry slowly to the leather-hard stage, then uncover to let it become bone dry. -
Bisque Fire:
Fire the piece to cone 04 (or your clay’s specific bisque temperature). -
Glaze the Eyes:
Using a fine detail brush, paint a precise dot of black underglaze onto the eye area. -
Dip in Clear Glaze:
Dip the entire piece into a clear transparent glaze. This finishes the surface while letting the natural speckles of the clay show through. -
Final Fire:
Fire the glazed piece to cone 5/6 (or your clay’s maturation temperature) to finish.
Once fired, place this charming duck by your kitchen window and enjoy a cleaner, drier bar of soap
Mini Pond Diorama With Duck
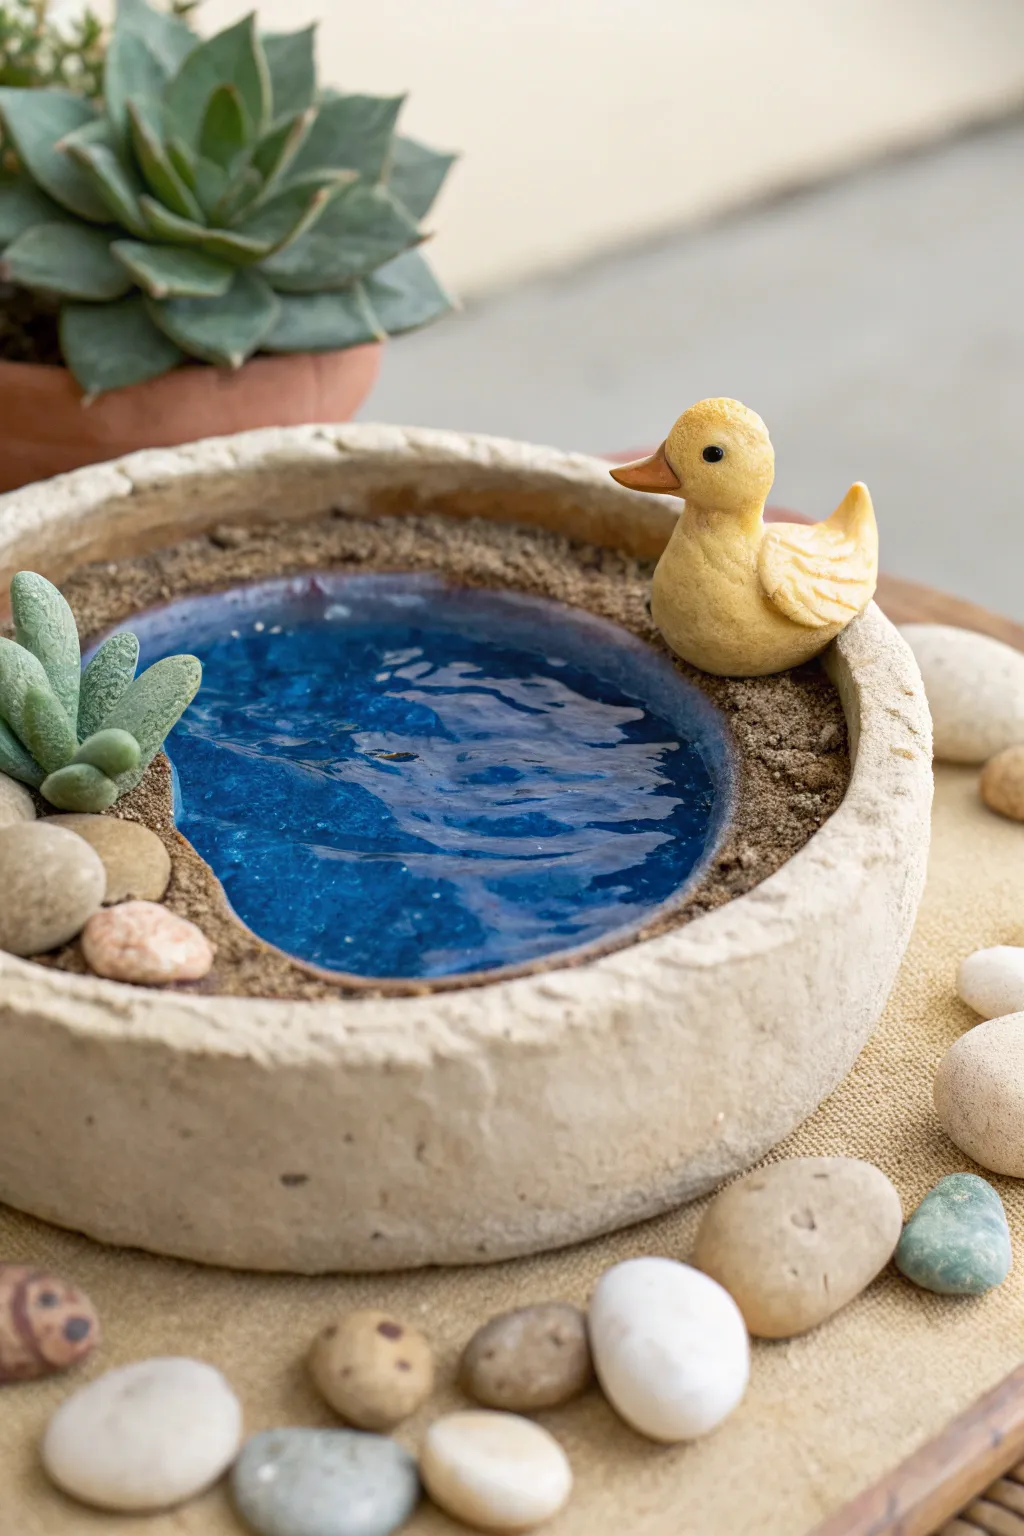
Bring a touch of whimsical nature indoors with this adorable miniature pond scene featuring a cheerful yellow duck. This project combines clay sculpting with resin pouring to create a realistic water effect in a rustic, handmade vessel.
Step-by-Step Guide
Materials
- Air-dry clay or polymer clay (stone color and white/yellow)
- Acrylic paints (yellow, orange, black)
- Two-part epoxy resin
- Blue alcohol ink or resin dye
- Sand or fine dirt
- Small pebbles and river rocks
- Faux succulent sprig (or very small real one)
- Sculpting tools (needle tool, small ball stylus)
- Mod Podge or craft glue
- Fine-grit sandpaper
- Mixing cup and stir stick for resin
- Matte varnish (optional)
Step 1: Sculpting the Vessel
-
Form the Base:
Start with a large ball of stone-colored clay. Press your thumbs into the center and pinch outwards to create a shallow, wide bowl shape. Aim for a rustic look, so don’t worry about making the edges perfectly smooth. -
Create the Pond Bed:
Flatten the interior bottom of the bowl. Create a secondary, smaller rim inside the bowl to delineate where the water will go, leaving a shelf around the edge for the ‘shoreline.’ Rough up the exterior texture with a crumpled ball of foil or a stiff brush. -
Dry the Base:
Allow the clay vessel to dry completely according to the package instructions. If using polymer clay, bake it now. For air-dry clay, wait 24-48 hours until fully hard.
Sticky Situation?
If your resin is still tacky after 24 hours, it wasn’t mixed at an exact 1:1 ratio. You can sometimes save it by carefully brushing on a thin layer of UV resin and curing with a UV lamp.
Step 2: Creating the Duck
-
Shape the Body:
While the base dries, take a small amount of clay (pre-dyed yellow or white to be painted later). Roll a teardrop shape for the body and curve the narrow end slightly upward for the tail. -
Add the Head:
Roll a smaller sphere for the head and attach it to the front of the body. Blend the clay at the neck seam slightly for stability. -
Detail the Features:
Form a tiny orange triangle for the beak and press it onto the face. Use a needle tool to gently etch feather lines onto the wings and tail. Bake or dry the duck alongside the base. -
Paint the Duck:
Once dry, paint the duck yellow if you used white clay. Add tiny black dots for eyes and ensure the beak is a vibrant orange. Let the paint dry completely.
Step 3: Adding the Water
-
Seal the Pond Area:
Before pouring resin, brush a thin layer of Mod Podge or white glue into the center depression of your clay bowl to seal the pores. This prevents air bubbles from rising out of the clay. -
Mix the Resin:
In a disposable cup, mix equal parts of your two-part epoxy resin. Stir slowly for at least 3 minutes to avoid whipping bubbles into the mixture. -
Tint the Resin:
Add a single drop of blue alcohol ink to the resin. Keep it translucent; you want to see the bottom of the pond. -
Pour the Pond:
Carefully pour the blue resin into the center depression of the bowl. Fill it almost to the inner rim you created earlier. -
Create Ripples:
I like to wait about 20-30 minutes for the resin to thicken slightly, then drag a toothpick across the surface to create subtle ripples that mimic water movement. Let the resin cure for 24 hours.
Pro Tip: Depth effect
Paint the bottom of the pond depression a dark blue or black before pouring the resin. This creates the illusion of deep water even if the resin layer is actually quite shallow.
Step 4: Landscaping & Assembly
-
Apply the Shoreline:
Once the resin is hard, brush glue onto the clay shelf surrounding the water. Sprinkle fine sand or dirt over the glue to create earthy texture. -
Position the Duck:
Glue your painted duck onto the sandy rim, positioning it so it looks like it’s about to jump into the water. -
Plant the Succulent:
Glue a small faux succulent sprig on the opposite side of the pond to balance the composition. Use a dab of hot glue for a quicker hold if needed. -
Place Pebbles:
Arrange a few small, smooth pebbles around the succulent and near the duck to break up the sandy texture. -
Final Touches:
Inspect the piece for any loose sand. You can brush a final layer of matte varnish over the clay exterior to protect it, but avoid getting varnish on the shiny resin water.
Now you have a serene little desk companion to keep you company while you work
Duck on Lily Pad Mini Scene
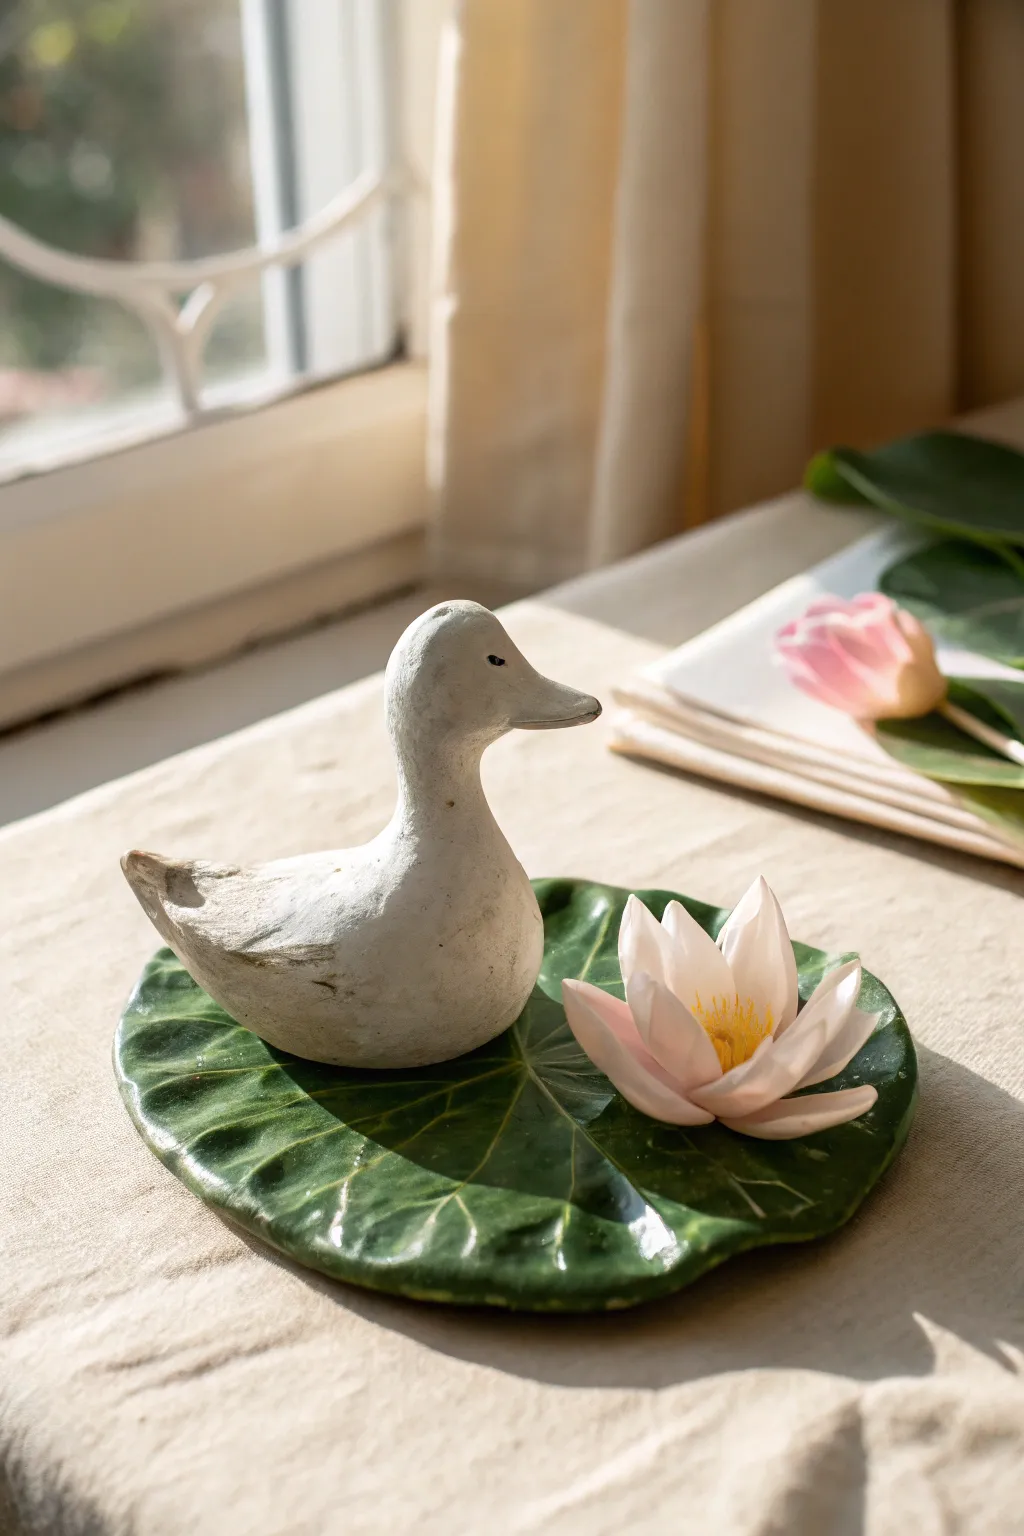
Capture the serenity of a pond scene with this charming clay project featuring a stark white duck resting atop a glossy green lily pad. The high-contrast textures between the matte duck and the brilliantly glazed leaf create a sophisticated yet playful decorative piece.
Detailed Instructions
Materials
- White sculpture clay or air-dry clay
- Pottery tools (needle tool, modeling tool, sponge)
- Rolling pin
- Slip (clay slurry)
- Underglaze (dark green, light green, pink, yellow)
- High-gloss clear glaze
- Matte finish sealant (optional, for air-dry clay)
- Kiln (if using ceramic clay) or oven (if polymer)
Step 1: Sculpting the Lily Pad Base
-
Roll the slab:
Begin by rolling out a medium-sized ball of clay into a flat, uneven circle about 1/4 inch thick. Don’t worry about making it perfectly round; organic shapes look more natural. -
Shape the leaf:
Use a needle tool or knife to cut a ‘V’ notch into one side of the circle, creating the classic lily pad silhouette. -
Texture the surface:
Lightly score radial veins extending from the center of the pad to the edges using a modeling tool. Press gently to create realistic depressions without cutting through the clay. -
Curve the edges:
Gently lift and pinch the edges of the lily pad upwards to give it a slight cupped shape, mimicking how a leaf sits on water.
Vein Definition Tip
Use a darker green underglaze inside the scored veins of the lily pad before applying the top coat of translucent green glaze for incredible depth.
Step 2: Creating the Duck
-
Form the body:
Shape a smooth, oval lump of clay for the duck’s body, tapering it slightly at the rear to suggest a tail. -
Shape the neck and head:
Roll a smaller coil for the neck and attach a round ball for the head. Blend the seams seamlessly using your thumb or a smoothing tool so it looks like one solid piece. -
Add the beak:
Pinch a tiny amount of clay into a flattened triangle and attach it to the face. Smooth the connection point well. -
Refine the tail:
Pinch the tail end of the body upwards slightly to create a perky, uplifted shape. -
Detail the feathers:
Use a wooden tool to gently press wing outlines onto the side of the body. Texture the wings slightly to suggest feathers, but keep the rest of the duck relatively smooth.
Step 3: Crafting the Water Lily
-
Make the petals:
Roll tiny balls of clay and flatten them into teardrop shapes. You will need about 8-10 petals of varying sizes. -
Assemble the flower:
Start with a small center base and attach the petals in a spiral, starting with the smallest in the middle and layering larger ones outside. -
Create the center:
Use a needle tool to scratch the very center of the flower to create a textured pistil area.
Make It Functional
Slightly increase the size of the lily pad and use the empty space next to the duck as a ring dish or a spot to rest tea bags.
Step 4: Assembly and Firing
-
Attach components:
Score the bottom of the duck and the flower, as well as the spots on the lily pad where they will sit. Apply slip and press them firmly onto the pad. -
Initial drying:
Allow the entire assembly to dry slowly under plastic to prevent warping, especially the thin edges of the lily pad. -
Bisque fire:
Once bone dry, fire the piece in the kiln to bisque temperature according to your clay’s specifications.
Step 5: Glazing and Finishing
-
Glaze the leaf:
Apply a deep green glaze to the entire lily pad surface. Ensure it pools slightly in the vein depressions to accentuate the texture. -
Glaze the flower:
Paint the petals with a soft pink glaze and dab a bright yellow glaze into the textured center. -
Detail the duck:
For increased contrast, I prefer to leave the duck unglazed or use a matte white underglaze. Simply add a tiny dot of black glaze for the eye. -
Final fire:
Fire the piece again for the glaze setting. The green leaf should come out high-gloss, contrasting beautifully with the matte duck.
Place your finished sculpture near a sunny window where the light can catch the glossy green curves
Bread-Loving Goose Gag Sculpture

Sculpt your own charming waterfowl companion with a rustic, speckled finish and a humorous side of toast. This project results in a delightful display piece featuring a stretching white goose eyeing its crunchy breakfast.
Step-by-Step Guide
Materials
- Air-dry modeling clay or polymer clay (white)
- Aluminum foil
- Armature wire (heavy gauge)
- Wooden dowels or strong wire (for legs)
- Modeling tools (smoothing tool, needle tool)
- Acrylic paints (Titanium White, Raw Umber, Yellow Ochre, Burnt Sienna)
- Matte varnish or sealant
- Fine grit sandpaper
- Old toothbrush (for speckling)
- Wood scraps or balsa wood (for the toast/bowl)
Step 1: Building the Form
-
Construct the armature:
Begin by twisting strong armature wire into a basic skeleton shape: a loop for the body, a long neck curve, and extensions for where the legs will go. Depending on your clay weight, you might need to secure this to a temporary wooden base. -
Foil bulking:
Crumple aluminum foil tightly around the wire frame to build up the bulk of the goose’s body and the long neck. Aim for a teardrop shape for the body and a tapering cylinder for the neck. -
Initial clay layer:
Roll your clay into sheets and cover the foil armature completely. Smooth the seams where the clay sheets join using a little water or slip if you are using air-dry clay. -
Refining the shape:
Add more clay to round out the belly and create the distinctive S-curve of the neck. The neck should transition smoothly into the head without a sharp break.
Step 2: Sculpting Details
-
Adding the wings:
Shape two flattened teardrop pieces of clay for the wings. Press them onto the sides of the body, blending the front edges seamlessly while leaving the back feathers slightly raised. -
Feather texture:
Use a modeling tool to carve large, stylized flight feathers into the wing shapes. Keep the lines soft and slightly rounded rather than sharp and mechanical. -
Beak and face:
Form a conical beak and attach it to the face, carefully blending the join. Use a knife tool to separate the upper and lower beak slightly, giving the goose a cheerful, open-mouthed expression. -
Legs and feet:
Sculpt flat, webbed feet from clay. Insert your leg dowels or wire into the feet and the body, then cover the leg shafts with a thin layer of clay to thicken them. Ensure the goose stands balanced before the clay hardens. -
Surface texture:
Before the clay fully cures, gently tap the entire surface with a stiff bristle brush or a ball of textured foil. This creates the stone-like, slightly rough finish seen in the original piece. -
Drying:
Allow the clay to dry completely according to the package instructions. Air-dry clay may take 24-48 hours depending on thickness.
Don’t Rush the Neck
For long necks, let the armature and core clay dry for a few hours before adding the heavy outer layers. This prevents the neck from sagging due to wet clay weight.
Step 3: Painting & Accessories
-
Base coat:
Paint the entire goose with a creamy off-white or titanium white acrylic. I find that two thin coats usually provide better coverage than one thick one. -
Antiquing wash:
Mix a very watery wash of Raw Umber. Brush it over the textured wings and body, then immediately wipe most of it off with a rag. This leaves dark pigment in the crevices, highlighting the feather details. -
Beak and feet:
Paint the beak and feet with a muted Yellow Ochre mixed with a touch of Burnt Sienna to keep it natural and earthy, avoiding bright cartoonish orange. -
The speckled effect:
Dilute some brown paint with water. Dip an old toothbrush into the mixture and run your thumb across the bristles to flick tiny specks of paint across the goose’s neck and back for that organic, eggshell look. -
Eyes:
Paint small, simple black circles for the eyes. Add a tiny white highlight dot to bring the expression to life. -
Sculpting the toast:
Shape small triangles of clay (or carve scrap wood) to look like toast slices. Use a texture tool to roughen the surface like bread crumbs. -
Painting the toast:
Paint the ‘bread’ a light tan and the edges a darker brown to simulate the crust. Dry brush the center with a golden yellow to suggest toasty warmth. -
Sealing:
Finish the entire project with a spray of matte varnish to protect the paint and unify the sheen.
Cracked Clay Fix
If hairline cracks appear while air-dry clay cures, mix a small amount of fresh clay with water to make a paste (slip) and fill the cracks, then sand smooth once dry.
Place your hungry goose next to its bowl of toast and enjoy the charming country vibe it brings to your shelf
Duck Footprint Stamp For Texture
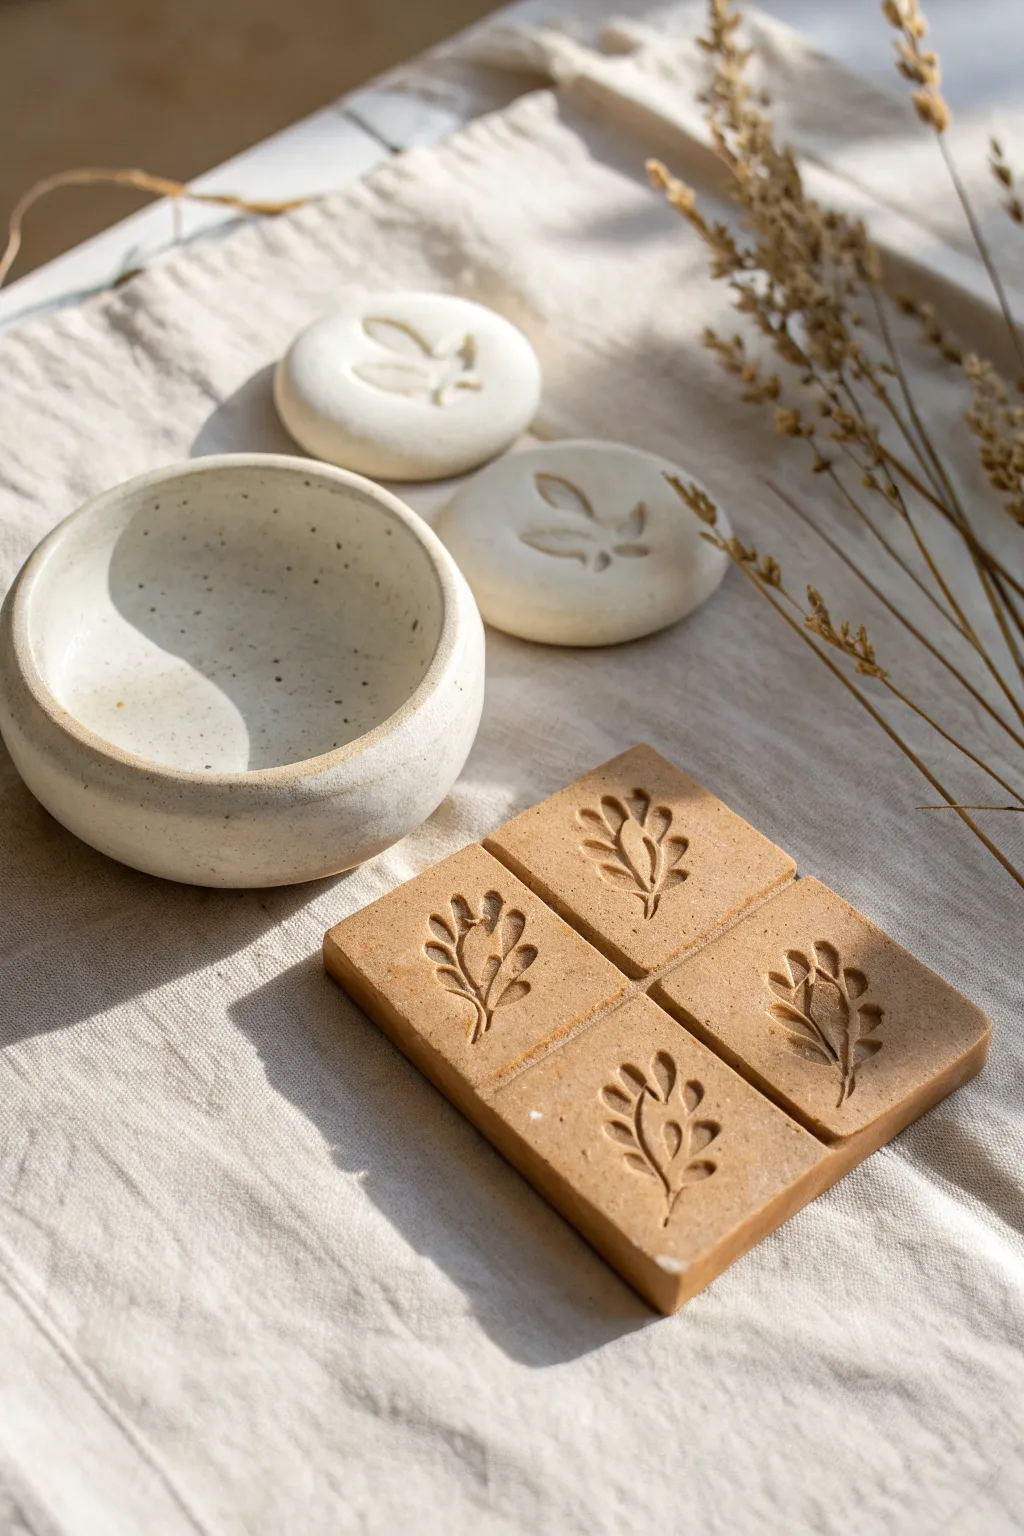
Create a serene collection of nature-inspired clay pieces, including stamped tiles, smooth pebbles, and a simple pinch pot. The interplay between the speckled white clay and the earthy terracotta tones gives this set a beautifully organic and grounded aesthetic.
Step-by-Step
Materials
- White stoneware clay (with speckles preferred)
- Terracotta or brown stoneware clay
- Rolling pin
- Two wooden guide strips (approx. 1/4 inch thick)
- Circular cookie cutter or jar lid
- Square cookie cutter
- Small floral or leaf stamps (or real pressed leaves/stems)
- Potter’s needle tool or knife
- Sponge
- Bowl of water
- Clear matte glaze (optional)
- Kiln (if using stoneware) or air-dry sealant (if using air-dry clay)
Step 1: Preparation & Stamping Stones
-
Prepare the workspace:
Begin by laying down a piece of canvas or a wooden board to prevent sticking. Ensure your white clay is wedged well to remove air bubbles before starting. -
Shape the pebbles:
Take small walnut-sized balls of white clay and roll them between your palms until they form smooth spheres. -
Flatten into discs:
Gently press each sphere down with the palm of your hand to create a thick, rounded disc shape reminiscent of a river stone. -
Apply the stamp:
Press your chosen leaf stamp firmly into the center of each white disc. Rock it slightly to ensure the entire design transfers, then lift straight up. -
Smooth the edges:
Dip your finger in a little water and run it around the perimeter of the stone to soften any harsh edges or cracks that formed during flattening.
Stamp Stuck?
If your stamp pulls the clay up, dust the stamp surface lightly with cornstarch (for clay) or plastic wrap between the stamp and clay for a softer, stick-free impression.
Step 2: Creating the Terracotta Tiles
-
Roll out the brown clay:
Switch to your terracotta clay. Place the wooden guide strips on either side of a clay slab and roll over them with your rolling pin to achieve a perfectly even thickness. -
Cut the squares:
Use a square cookie cutter to punch out four identical shapes. I find it helpful to wiggle the cutter slightly before lifting to release the clay cleanly. -
Group the tiles:
Arrange the four squares close together in a 2×2 grid formation. This mimics a larger tiled surface and looks great for presentation. -
Stamp the design:
Press a larger, more intricate branch or leaf stamp into the center of each square. Try to align them so the stem direction feels balanced across the set. -
Refine the surface:
Use a damp sponge to lightly pat the surface, smoothing out the texture of the clay without erasing the deep impression of the stamp.
Level Up: Color Wash
For the terracotta tiles, dilute some white acrylic paint or white underglaze and brush it into the stamped grooves, then wipe the surface clean to highlight the design.
Step 3: Forming the Pinch Pot
-
Start the pinch pot:
Take a larger ball of the speckled white clay, roughly the size of a tennis ball. Push your thumb into the center, stopping about half an inch from the bottom. -
Pinch the walls:
Slowly rotate the ball in one hand while pinching the clay between your thumb and fingers with the other. work from the bottom upwards to thin the walls evenly. -
Shape the rim:
Gently tap the rim of the bowl against your work surface to flatten it slightly if desired, or keep it rounded for a softer look. Use a damp sponge to smooth the lip specifically. -
Refine the shape:
If the bowl becomes too wide, gently compress the rim inwards with cupped hands to bring it back to a rounder, more enclosed form.
Step 4: Final Touches & Drying
-
Initial drying:
Place all your pieces on a clean board. Cover them loosely with plastic wrap for the first 24 hours to ensure slow, even drying and prevent warping. -
Sand edges (Bone Dry):
Once the clay is ‘bone dry’ and chalky to the touch, use a dry sanding sponge (outside or with a mask) to gently rub away any sharp burrs on the edges. -
Firing or sealing:
If using kiln-fire clay, bisque fire the pieces now. If using air-dry clay, allow them to fully cure for 48-72 hours. -
Glazing (Optional):
For the kiln method, apply a clear matte glaze to the inside of the bowl for functionality, leaving the outside raw to show off the speckles. The tiles and stones look best unglazed or with a very thin matte wash.
Arrange your finished collection on a soft linen cloth to emphasize the warm, natural textures you have created.
Abstract Duck Totem Sculpture
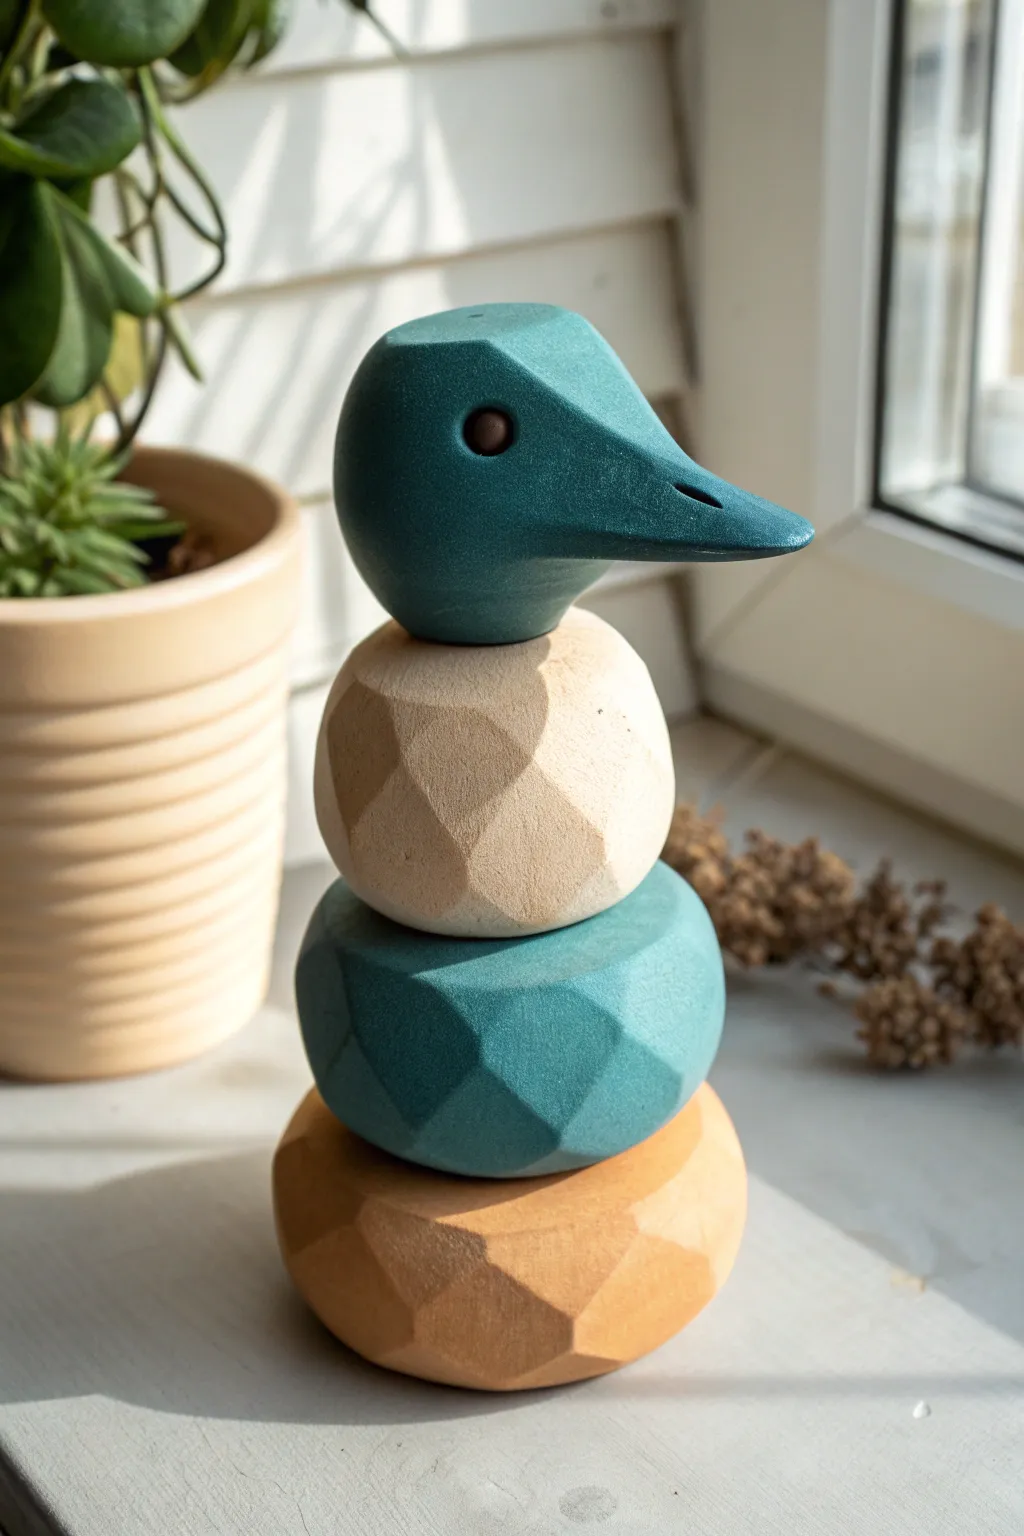
This charming, modular duck sculpture brings a modern, faceted aesthetic to your shelf decor. With its deep teal accents and natural wood-tone segments, it offers a sophisticated take on classic animal totems.
Detailed Instructions
Materials
- Air-dry clay (e.g., DAS or creative paper clay)
- Sculpting tools (knife, smoothing tool)
- Sandpaper (medium and fine grit)
- Acrylic paints (deep teal green, beige, ochre, white, burnt sienna)
- Paintbrushes (flat and fine detail)
- Matte varnish or sealant
- Wooden dowel or stiff wire (for internal structure)
- Ruler or calipers
Step 1: Shaping the Segments
-
Prepare the clay:
Begin by conditioning four balls of air-dry clay. You will need a large amount for the base, slightly less for the body segments, and a final amount for the head. -
Form the base:
Shape the largest ball into a thick, flattened wheel or donut shape. This will be the foundational piece, so ensure it is wide enough to support the stack. -
Create the body pieces:
Form two slightly smaller spheres for the middle sections. Gently flatten the top and bottom of each sphere so they will stack securely without rolling. -
Sculpt the head:
Shape the final piece into a smooth oval, then pinch and pull the clay forward to create a beak. Keep the lines simple and sleek. -
Facet the surfaces:
While the clay is leather-hard but not fully dry, use a sharp craft knife or sculpting tool to slice off small planes from the surface. This creates the signature geometric, faceted look. -
Refine the beak:
Carve the beak edges to be sharp and defined. Use a small tool to press in slight indentations for the nostrils. -
Create the stacking holes:
Using your dowel or wire as a guide, bore a vertical hole through the center of the bottom three pieces and half-way into the bottom of the head piece. This ensures perfect alignment later. -
Dry the components:
Allow all four pieces to dry completely for at least 24-48 hours. I find flipping them occasionally helps them dry evenly.
Uneven Stacking?
If the pieces wobble when stacked, use sandpaper on a flat surface and rub the bottom of the wobbly piece against it in a circular motion to level it.
Step 2: Finishing and Assembly
-
Sand for texture:
Once bone dry, lightly sand the flat planes you carved. Don’t over-sand; you want to maintain those crisp geometric edges while removing rough clay burrs. -
Mix the teal paint:
Mix a deep teal using green, blue, and a touch of black. Apply this opaque coat to the head piece and the second piece from the bottom. -
Paint the wood tones:
For the remaining two pieces (base and neck), mix beige, white, and a drop of ochre. Apply a base coat and let it dry. -
Add wood grain effects:
Dilute some burnt sienna paint with water to make a wash. Lightly brush this over the beige pieces in varied directions to simulate a subtle wooden texture. -
Paint the eye:
Using a fine detail brush and dark brown or black paint, carefully add a small circle for the eye on the head piece. A tiny dot of white can add life. -
Seal the work:
Apply a coat of matte varnish to all pieces. This protects the paint and unifies the sheen, making the clay look more like painted wood. -
Assemble the stack:
Insert your dowel or wire into the base. Thread the teal body piece, then the beige neck piece, and finally cap it with the head.
Make it Interactive
Don’t glue the pieces to the central dowel! Leave them loose so you can rotate the head or rearrange the colored segments whenever you want a change.
Place your completed totem near a window or plant to let the natural light highlight those beautiful geometric facets