When I’m planning clay ideas for art class, I want projects that teach real skills but still feel fun and totally doable in a classroom. Here are my go-to lesson ideas—starting with the classics every student should try, then moving into more creative spins that spark big imagination.
Pinch Pot Animal Friends
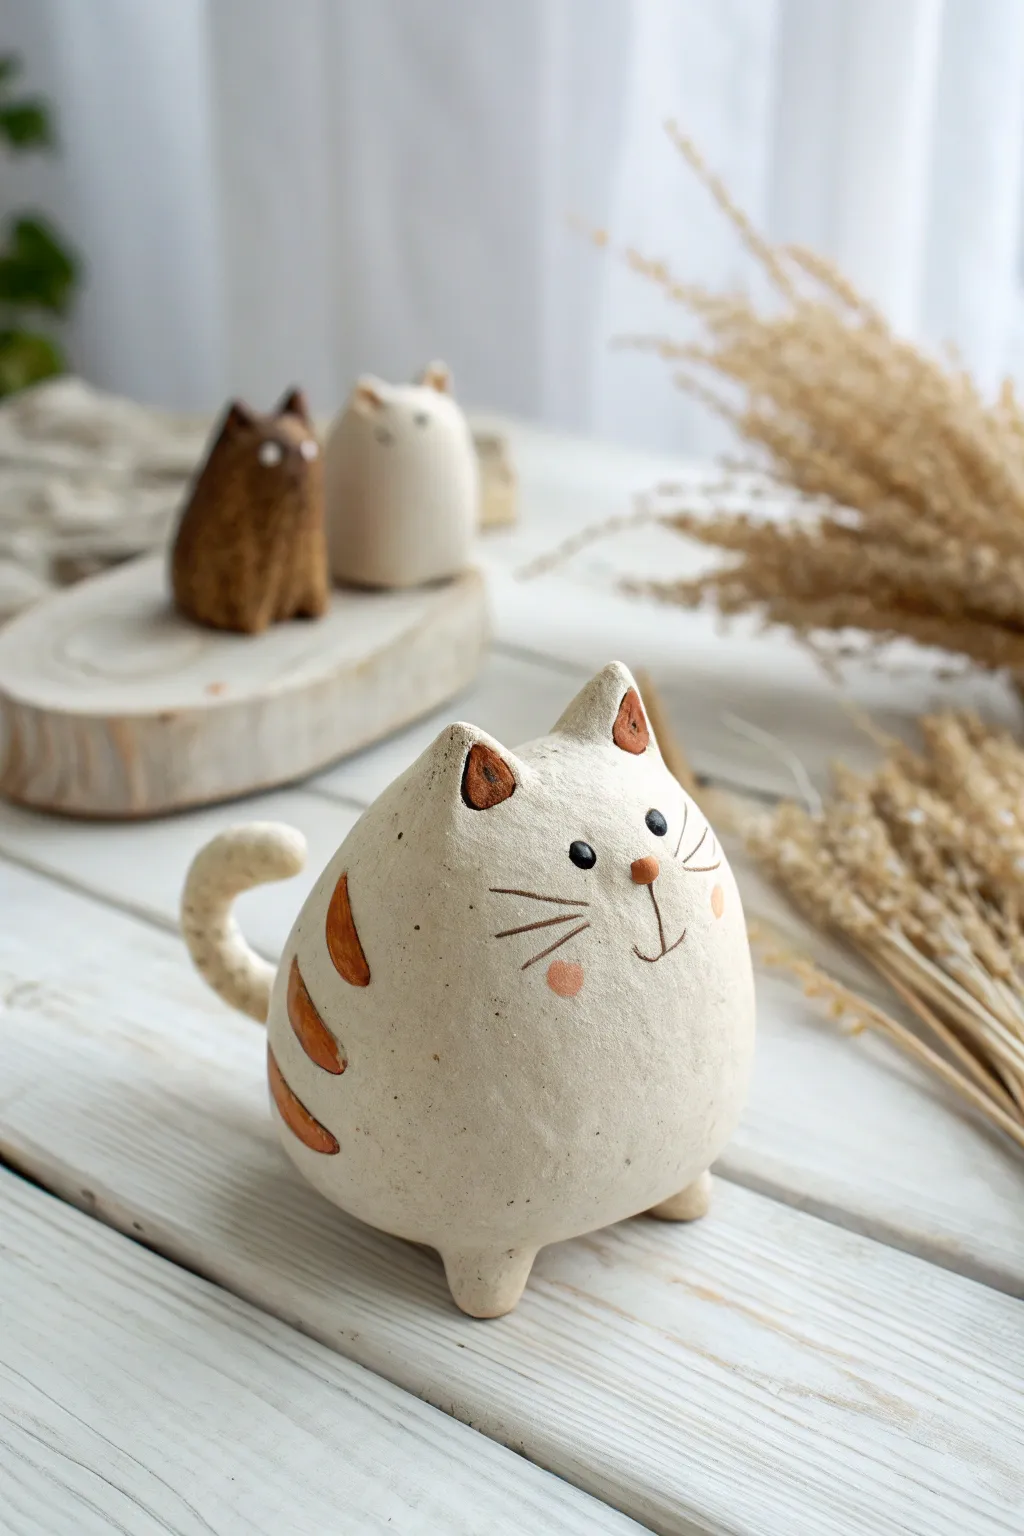
This delightful pinch pot project transforms a simple sphere of clay into a rotund, lovable cat with minimalist whiskers and charming orange tabby markings. Its textured, earthy finish gives it a warm, handmade feel that’s perfect for a shelf buddy or a paperweight.
Step-by-Step
Materials
- White or light smooth stoneware clay
- Ceramic slip (clay and water slurry)
- Scoring tool or needle tool
- Small wooden modeling tool
- Fine-point paintbrush
- Underglaze (Orange/Terra Cotta, Black, Pink)
- Matte transparent glaze (optional)
- Sponge
Step 1: Forming the Body
-
Prepare the Clay:
Start with a ball of clay roughly the size of a large orange. Wedge it well to remove any air bubbles, ensuring the clay is smooth and pliable. -
Create the Pinch Pot:
Push your thumb into the center of the ball, stopping about half an inch from the bottom. Gently pinch and rotate the clay between your thumb and fingers to open up the hollow form. -
Close the Sphere:
Once the walls are an even thickness, gently curve the top edges inward until they meet. Score the edges, add a dab of slip, and seal the hole completely to trap air inside, forming a hollow closed sphere. -
Shape the Drop:
Gently paddle the sphere on your work surface to flatten the bottom so it sits securely. Then, using your hands, gently taper the top of the sphere just slightly to create a subtle teardrop shape for the head area.
Air Trap Safety
Don’t forget the air vent hole! Since this is a closed hollow form, trapped air will expand in the kiln and burst the cat without a small exit point on the bottom.
Step 2: Adding Features
-
Form the Ears:
Roll two small marble-sized balls of clay. Pinch them into triangular points. Score the bottom of the ears and the attachment points on the head, apply slip, and press them firmly into place. -
Blend the Seams:
Use a wooden tool or your finger to smooth the clay from the ear down onto the head so the seam disappears completely. I find a slightly damp finger works best for the final smoothing here. -
Make the Tail:
Roll a coil of clay that tapers slightly at the end. Curl it into a loose ‘C’ shape or question mark shape. -
Attach the Tail:
Score and slip the thicker end of the tail and attach it to the lower back side of the body. Blend the clay well to ensure it won’t break off during firing. -
Create Tiny Feet:
Form two very small nubs or cone shapes for the front paws. Attach these to the bottom front of the body, blending them so the cat looks like it is standing on tiny tiptoes. -
Refine the Surface:
Briefly smooth the entire surface with a damp sponge to remove fingerprints, but keep the natural, slightly rough texture of the clay visible.
Step 3: Surface Decoration
-
Poke an Air Hole:
Use a needle tool to poke a hidden hole in the bottom of the piece. This is crucial for allowing expanding air to escape during firing so the piece doesn’t explode. -
Sculpt the Nose:
Roll a tiny, lentil-sized ball of clay. Attach it to the center of the face with slip, pressing it flat to form a cute button nose. -
Paint the Stripes:
Using a fine brush and orange or terra cotta underglaze, paint oval shapes on the sides of the body to mimic tabby stripes. Add triangular patches inside the ears as well. -
Add Facial Details:
Paint the nose with the same orange underglaze. Use a tiny dot of pink underglaze for blush on the cheeks. -
Draw the Face:
With a very fine liner brush and black underglaze, paint two small bead-like eyes. Paint delicate whiskers and a small anchor shape for the mouth descending from the nose. -
Scratch Texture (Optional):
If you want the whiskers to have depth, you can lightly scratch through the clay with a needle tool before painting the black lines into the grooves. -
Final Surface Check:
Check your painted lines. If you make a mistake with underglaze, you can often gently scratch it off once dry and try again.
Personality Plus
Change the position of the pupils to alter the cat’s expression. Looking up makes it hopeful, while looking sideways makes it look mischievous or distracted.
Step 4: Firing
-
Bisque Fire:
Allow the clay to bone dry completely (slowly, over a few days). Fire it to bisque temperature (usually cone 04). -
Glaze (Optional):
Apply a coat of clear matte glaze if you want to seal the piece, or leave it bare for an organic, textured look. Fire again to the clay’s maturity temperature.
Place your little clay friend on your desk or windowsill to enjoy its calming presence


Coil Bowls With Bold Rims
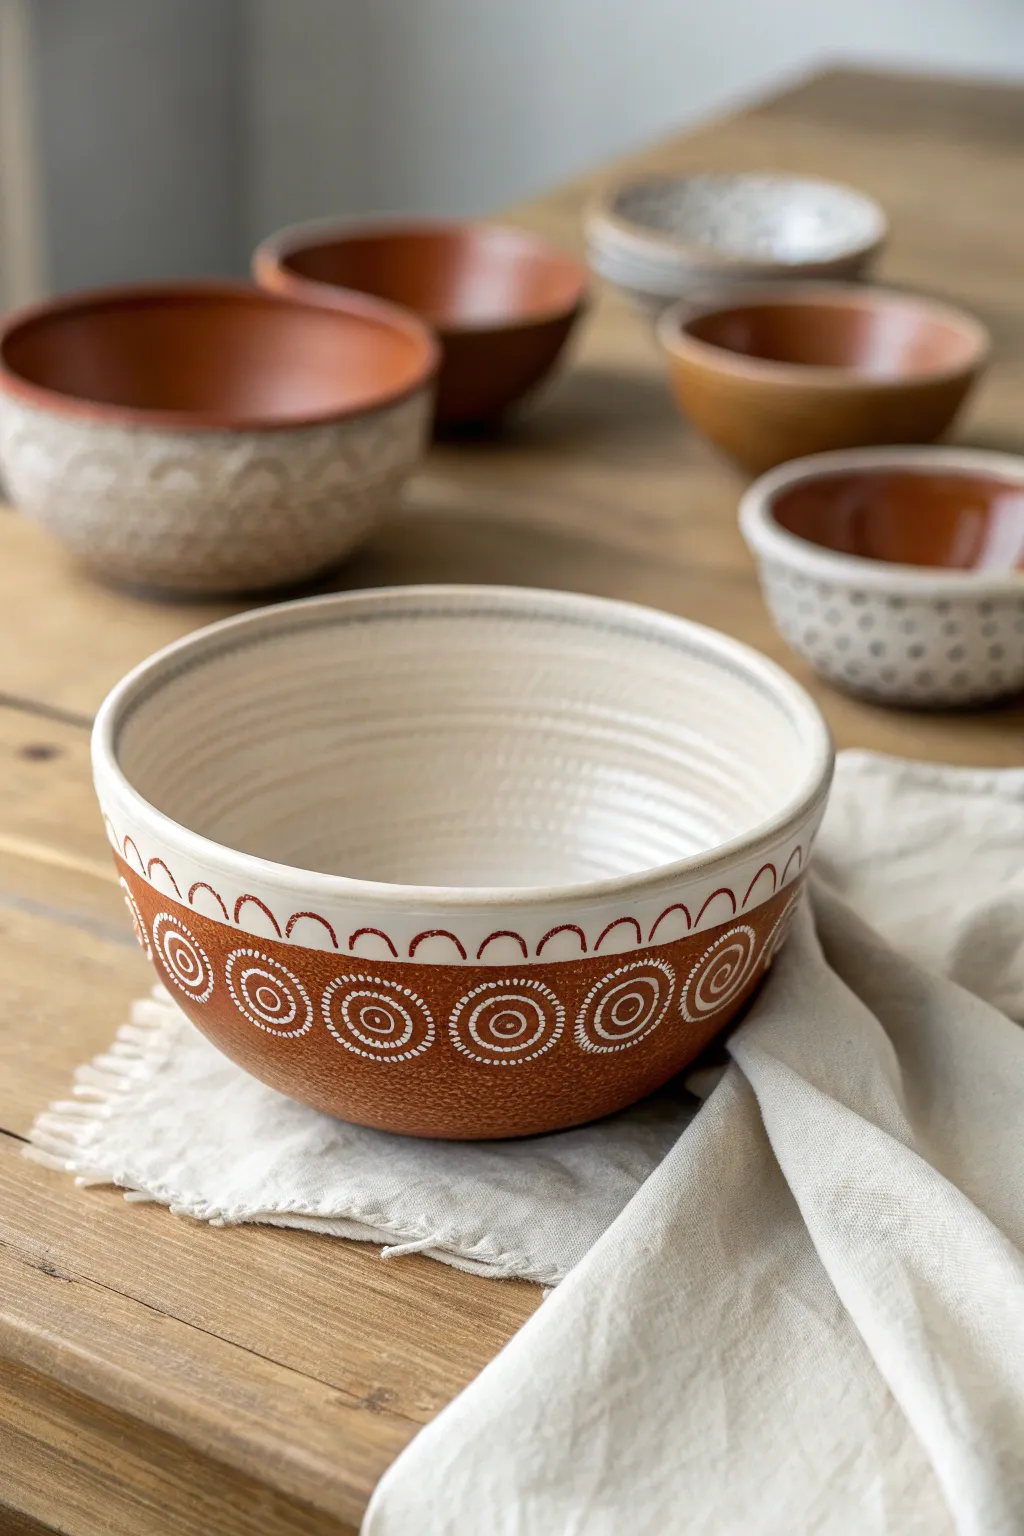
This project combines traditional hand-building techniques with striking sgraffito decoration to create a beautiful two-tone vessel. You will build a sturdy clay form and then carve away colored slip to reveal a repeating spiral and scalloped pattern that highlights the natural clay warmth beneath.
How-To Guide
Materials
- Red earthenware or terracotta clay
- White underglaze or slip
- Rolling pin and guide sticks
- Bowl mold or slump mold (plaster or plastic)
- Sponge
- Needle tool or sgraffito loop tool
- Soft rib tool (rubber or silicone)
- Potter’s wheel or banding wheel (optional but helpful)
- Clear transparent glaze
- Kiln
Step 1: Forming the Bowl
-
Prepare the slab:
Begin by rolling out your red earthenware clay into an even slab, approximately 1/4 inch thick. Use guide sticks on either side of your rolling pin to ensure consistent thickness throughout. -
Slump the clay:
Drape your clay slab over your chosen bowl mold. If you are using a non-porous mold like plastic, place a layer of plastic wrap or newspaper between the clay and the mold to prevent sticking. -
Secure the shape:
Gently press the clay onto the mold, working from the center bottom up towards the rim. Use a soft rubber rib to smooth out the surface and compress the clay particles. -
Refine the rim:
Trim the excess clay from the edge using a needle tool. You can create a thicker, slightly rounded rim by gently compressing the edge with a damp sponge or piece of chamois leather. -
Add texture (optional):
The interior of the example bowl has subtle horizontal throwing lines. You can mimic this on a slab bowl by placing the mold on a banding wheel and gently pressing a rib into the interior while spinning. -
Leather hard stage:
Allow the bowl to dry slowly until it reaches the leather-hard stage. It should be firm enough to hold its shape perfectly but still cool to the touch and able to be carved.
Step 2: Applying Slip and Decorating
-
Define the design area:
Using a needle tool and a steady hand (or a banding wheel), specific where the decoration will stop. The example features a white interior that spills slightly over the rim. -
Apply white underglaze:
Paint 2-3 coats of white underglaze or slip on the *interior* of the bowl. Carry this white color over the rim and down the outside just about a quarter-inch to create that crisp top edge. -
Coat the exterior band:
Mask off the bottom portion of the bowl if desired, or simply paint freehand. Apply a band of white underglaze around the middle section of the exterior where the spirals will go. Let this dry until it’s no longer tacky to the touch. -
Wait for moisture balance:
This is crucial: wait until the applied slip is slightly firm but not bone dry. I find the carving works best when the underglaze doesn’t smear but peels away cleanly. -
Carve the scalloped rim:
Using your loop tool, carve through the white slip on the exterior just below the rim. Create a continuous line of half-circles (scallops) that arch upwards. -
Outline the pattern:
Below the scalloped border, use your needle tool to lightly scratch in the circles for your main pattern to ensure proper spacing before committing to deep carving. -
Execute the sgraffito:
Use a small wire loop tool to carve away the white slip in a spiral pattern. Start from the center of each circle and spiral outward, revealing the red clay body underneath. -
Add detail dots:
Use the very tip of a needle tool or a small drill bit to create the ring of tiny dots surrounding each spiral. -
Double check the texture:
If the exposed terracotta looks rough or has ‘burrs’ from carving, wait until the bowl is bone dry and lightly brush it with a stiff paintbrush to knock off the crumbs.
Clean Lines
If your carving tool is dragging or tearing the clay rather than cutting smoothly, the clay is too soft. Let it dry for another hour before continuing.
Step 3: Firing and Glazing
-
Bisque fire:
Once the bowl is bone dry, fire it to cone 04 (or your clay’s specific bisque temperature). -
Clear glaze application:
Dip or brush a clear, transparent glaze over the entire piece. This will make the white pop and deepen the rich brown-red tone of the earthenware. -
Final firing:
Fire the piece a second time to the glaze maturity temperature.
Slip Styling
Try reversing the colors! Use a white stoneware clay body and paint the design band with black or dark blue underglaze for a high-contrast modern look.
Place your finished bowl on a simple linen cloth to let the rustic warmth of the clay shine


Slab-Built Trinket Dishes
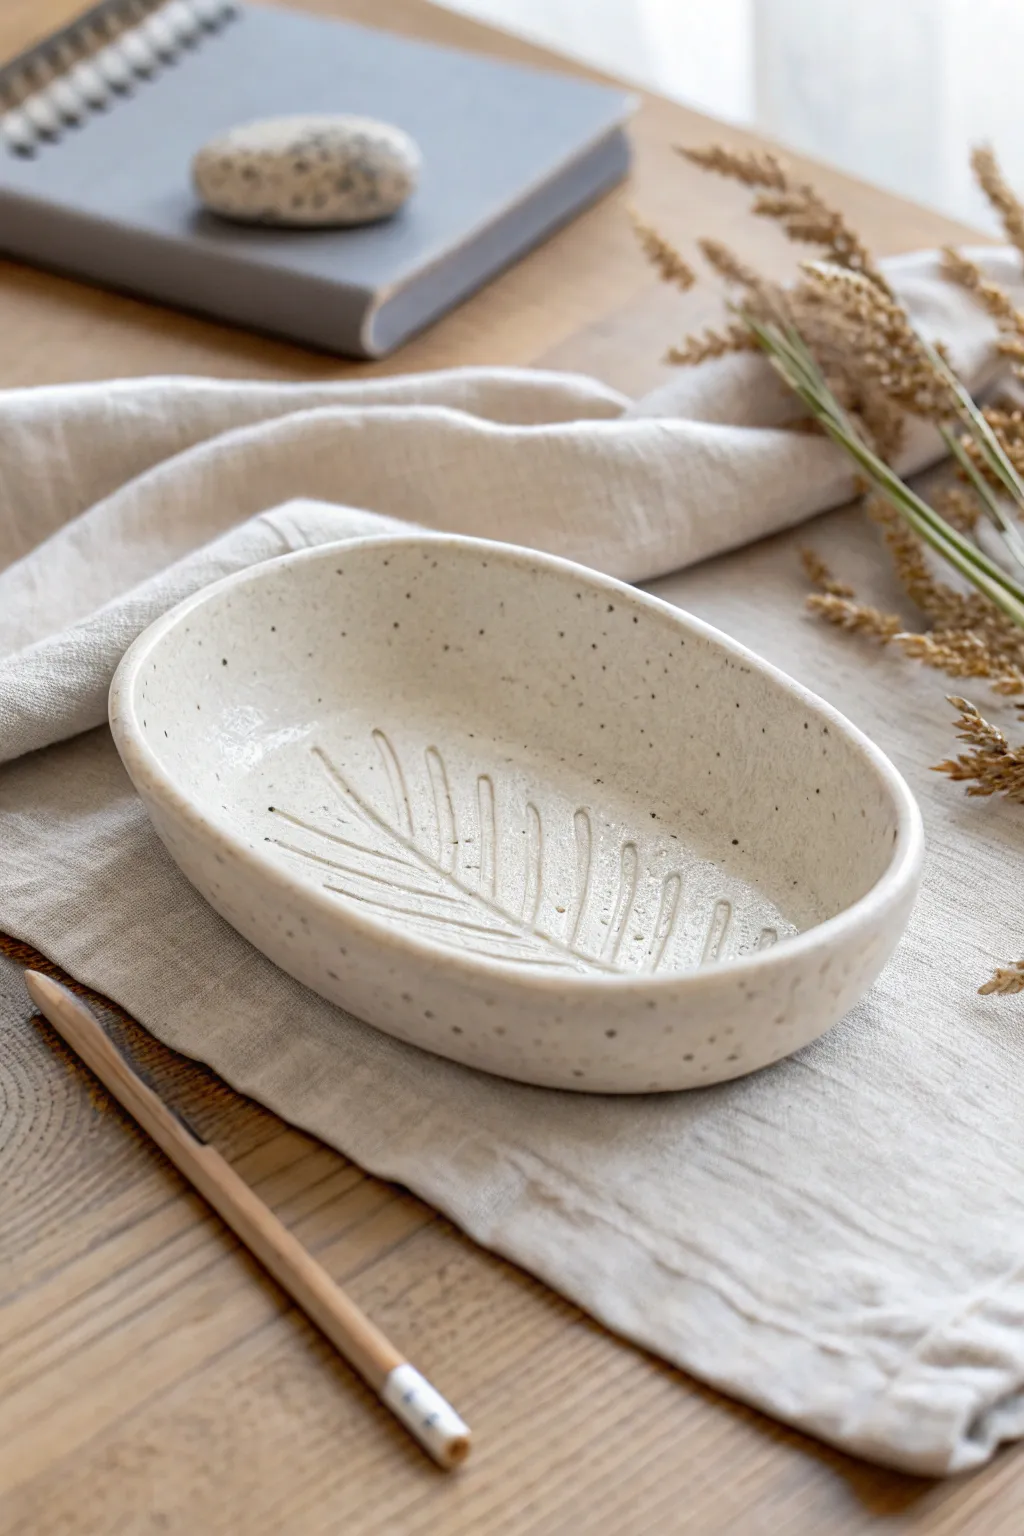
Embrace the organic feel of hand-built pottery with this charming, oval-shaped trinket dish. Featuring a subtle leaf vein carving and a sandy, speckled finish, it’s the perfect size for holding jewelry or desk supplies.
Step-by-Step
Materials
- Speckled cream stoneware clay (or white clay with added grog)
- Rolling pin
- Canvas mat or cloth
- Oval paper template
- Needle tool or fettling knife
- Rib tool (soft kidney)
- Carving loop tool or wooden modeling tool
- Sponge
- Clear or transparent decorative glaze
- Paintbrush
Step 1: Planning & Rolling
-
Prepare the workspace:
Set up your canvas mat to prevent the clay from sticking to your table. If you don’t have canvas, an old pillowcase or heavy denim fabric works well. -
Wedge the clay:
Ideally, use a speckled clay body to get that natural ‘cookies and cream’ look. Wedge a grapefruit-sized ball of clay thoroughly to remove air bubbles and ensure consistency. -
Roll the slab:
Using your rolling pin, flatten the clay ball into a slab. Aim for an even thickness of about 1/4 inch (6mm). Rotate the clay periodically as you roll to keep the shape relatively circular. -
Compress the slab:
Take your rib tool and gently drag it across the surface of the slab on both sides. This compression aligns the clay particles, reducing the chance of warping later.
Warping Woes?
If your oval shape warps into a wonky circle during firing, it likely wasn’t compressed enough. Use a rib tool firmly on both sides of the slab before cutting.
Step 2: Shaping & Forming
-
Cut the oval:
Place your oval paper template onto the slab. Trace the outline with a needle tool, holding the tool upright to get a straight edge, and remove the excess clay. -
Soften the edges:
Dampen a small sponge and run it gently along the cut rim. This rounds off the sharp angles left by the knife and gives the piece that soft, handmade quality. -
Form the curve:
Move the oval slab onto a piece of foam or hold it cupped in your palm. Gently press the center downwards while lifting the edges to create a shallow bowl shape. -
Refine the shape:
Work your way around the rim, pinching slightly to establish the final wall height. The walls should rise gently rather than vertically. -
Smooth the interior:
Use the soft rib tool inside the curve to ensure the transition from the base to the wall is seamless and smooth.
Make It Glossy
For a striking contrast, fill the carved leaf veins with a dark underglaze (like deep green or black) and wipe away the excess on top before applying a clear gloss glaze.
Step 3: Carving & Finishing
-
Let it stiffen:
Allow the shaped dish to dry to a ‘leather-hard’ state. It should be firm enough to hold its shape but soft enough to carve into without chipping. -
Sketch the design:
Lightly scratch the central spine of a leaf pattern down the middle of the dish using a needle tool. Keep the pressure very light so you can smooth it out if you make a mistake. -
Carve the veins:
Using a loop tool or a wooden modeling tool, carve deeper grooves for the leaf veins branching out from the center spine. Vary the length of the lines for a natural look. -
Clean the burrs:
Carving often leaves little crumbs of clay (burrs). Wait until they are fully dry to brush them off, or carefully smooth them down with a slightly damp finger. -
Dry slowly:
Cover the dish loosely with plastic and let it dry slowly over several days to prevent cracking. -
Bisque fire:
Once bone dry, fire the piece in a kiln to bisque temperature (usually Cone 04 or 06). -
Apply glaze:
Brush a clear or milky transparent glaze over the entire piece. If you didn’t use speckled clay, apply a glaze that has speckles suspended in it. -
Wipe the foot:
Use a damp sponge to wipe any glaze off the very bottom of the dish so it doesn’t fuse to the kiln shelf. -
Create relief (optional):
If the glaze is thick, I sometimes wipe the carved areas slightly with a sponge to let the clay body show through more clearly in the recesses. -
Final firing:
Fire the piece again to the maturity temperature of your clay and glaze (often Cone 5 or 6 for stoneware).
Place your finished dish on a desk or bedside table to add a touch of handcrafted serenity to your space


Texture Tiles With Found Patterns
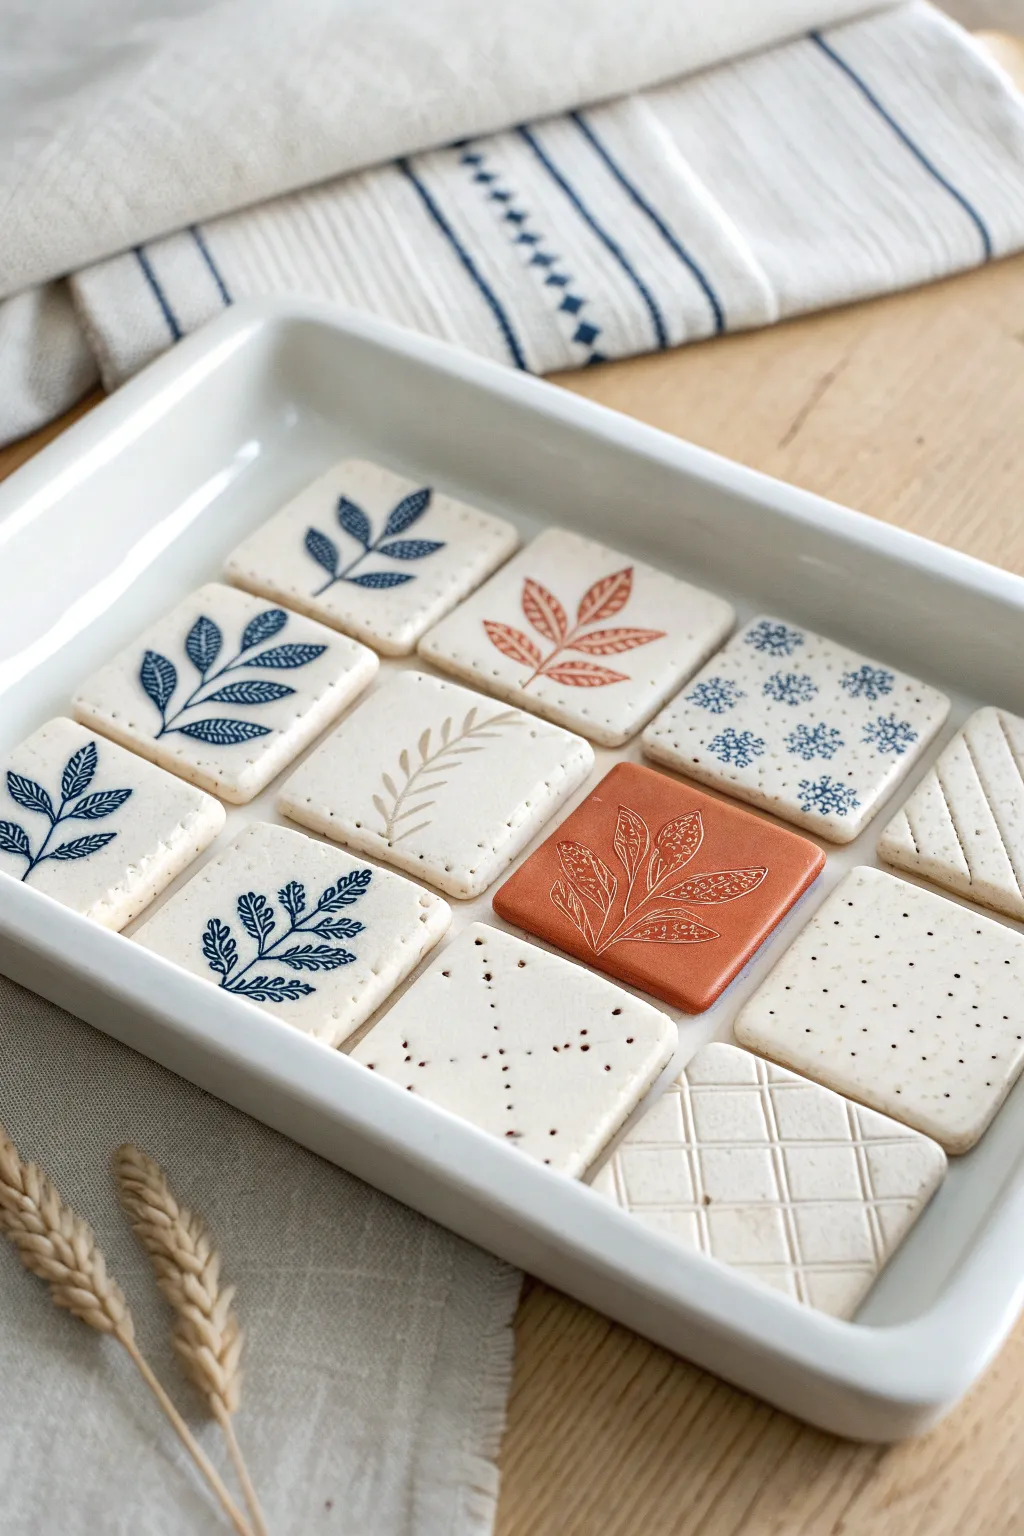
These elegant clay tiles combine simple geometric shapes with organic botanical motifs for a clean, modern aesthetic. By pressing leaves and found objects into polymer or air-dry clay, you can capture intricate details that are highlighted with soft washes of color.
Step-by-Step Guide
Materials
- White classic polymer clay (or air-dry clay)
- Terra cotta colored polymer clay
- Rolling pin or acrylic roller
- Square clay cutter (approx. 2 inches)
- Fresh or dried leaves with strong veins
- Found objects for texture (mesh, lace, stamps)
- Needle tool or toothpick
- Acrylic paints (Navy Blue, Burned Orange)
- Fine detail paintbrush
- Parchment paper or work mat
- Oven (if using polymer clay)
Step 1: Preparation & Rolling
-
Condition the clay:
Start by kneading the white polymer clay in your hands until it becomes soft, pliable, and free of cracks. If you are using air-dry clay, knead it briefly to ensure consistent texture. -
Roll out a slab:
Place the clay on a sheet of parchment paper. Use your acrylic roller to flatten the clay into an even slab, aiming for a thickness of about 1/4 inch (6mm). Consistency is key for uniform tiles. -
Smooth the surface:
Run your finger or a slightly damp sponge over the surface of the clay slab to remove any fingerprints or imperfections before texturing. -
Prepare the terra cotta accent:
Repeat the conditioning and rolling process with a small amount of terra cotta colored clay to create one or two accent tiles for color variation.
Step 2: Texturing & Cutting
-
Leaf impressions:
Select a leaf with prominent veins. Place it vein-side down onto the white clay slab. Gently roll over the leaf with the acrylic roller to press it firmly into the clay without distorting the slab’s thickness. -
Remove the botanical:
Carefully peel the leaf away to reveal the intricate impression. If a piece of the leaf sticks, use tweezers to gently lift it out. -
Geometric textures:
On other sections of the clay, experiment with found objects. Press a piece of mesh or lace to create a grid pattern, or use a stamp to create snowflake-like motifs. -
Cut the squares:
Position your square cutter over the textured areas to frame the design perfectly. Press down firmly to cut the tile. I prefer to leave a little negative space around the leaf prints for a balanced look. -
Add pierced details:
For a ‘cracker’ look, use a needle tool or a toothpick to poke small, evenly spaced holes around the edges of some tiles, or create patterns like diagonal lines of dots. -
Refine edges:
Gently smooth the cut edges of each square with your finger to remove any sharp burrs left by the cutter.
Sticky Situation?
If your clay sticks to the table or roller, dust the surface lightly with cornstarch or baby powder before rolling. It acts as a release agent and creates a smoother matte texture.
Step 3: Curing & Finishing
-
Bake or dry:
If using polymer clay, transfer the parchment paper with the tiles to a baking sheet. Bake according to the manufacturer’s instructions (usually 275°F/135°C for 15-30 minutes per 1/4 inch). If using air-dry clay, let them dry for 24-48 hours. -
Cool down:
Allow the tiles to cool exclusively inside the oven or completely flatter on a rack to prevent warping. -
Highlighting with paint:
Once cool, dip a fine brush into navy blue acrylic paint. Carefully paint inside the indented lines of the leaf impressions on the white tiles. -
Clean up excess:
Immediately wipe the surface with a barely damp paper towel. This technique leaves paint inside the crevices while cleaning the raised surface, making the pattern pop. -
Detailing the accent tile:
For the terra cotta tile, use a white paint wash or a white gel pen to trace the impressed lines, creating a striking reversed contrast. -
Seal the tiles:
Finish by applying a thin layer of matte varnish to protect the surface and the paint details, giving the tiles a professional, ceramic-like sheen.
Create a Set
Glue strong round magnets to the back of your finished tiles to turn them into a stunning refrigerator set, or glue cork backing to the bottom to create functional, absorbent coasters.
Arranging your finished tiles in a shallow dish makes for a beautiful display of your handmade textures

The Complete Guide to Pottery Troubleshooting
Uncover the most common ceramic mistakes—from cracking clay to failed glazes—and learn how to fix them fast.
Leaf Print Nature Medallions
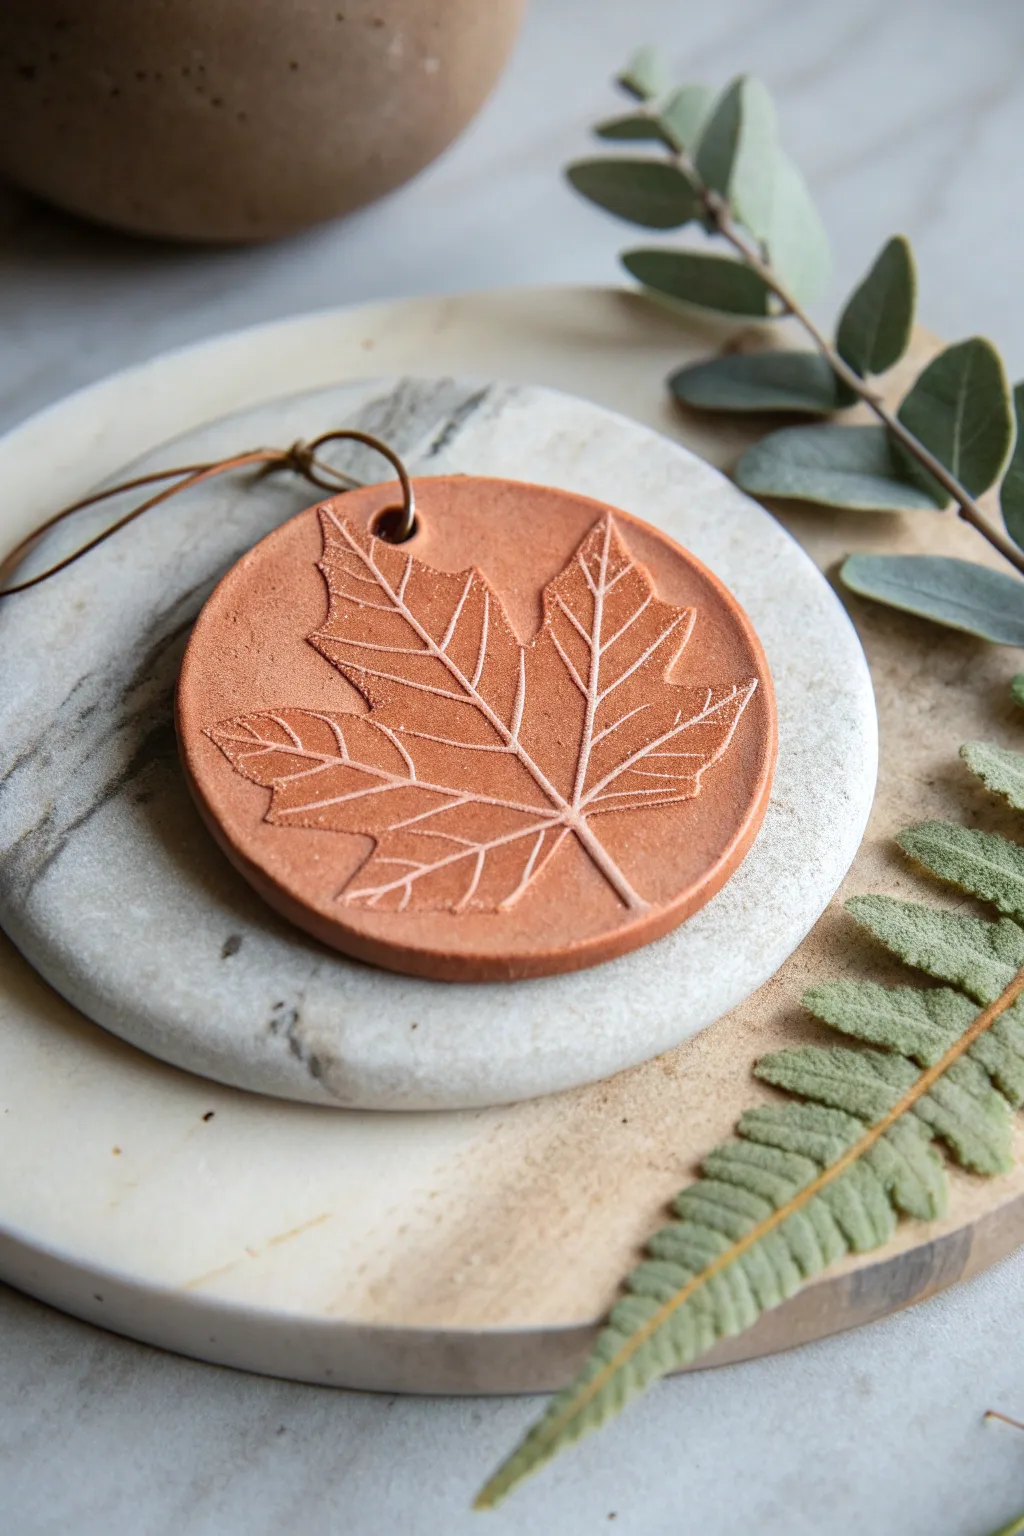
Capture the intricate beauty of the forest floor with these rustic nature-inspired medallions. Using terra cotta clay and a simple leaf impression technique, you’ll create a timeless ornament that highlights organic textures and warm earthen tones.
How-To Guide
Materials
- Terra cotta air-dry clay or polymer clay
- Fresh maple leaf (or other prominent vein leaves)
- Rolling pin
- Round cookie cutter (approx. 3-4 inches)
- Parchment paper or wax paper
- Drinking straw or small circular tool
- Leather cord or twine
- Fine-grit sandpaper
- Clear matte acrylic sealer (optional)
Step 1: Preparing the Clay Base
-
Condition the terra cotta:
Begin by taking a handful of terra cotta clay and kneading it in your hands until it becomes warm and pliable. This conditioning step prevents cracks from forming later. -
Roll out the slab:
Place your clay onto a sheet of parchment paper to prevent sticking. Using a rolling pin, flatten the clay into an even slab that is approximately 1/4 inch thick. Try to keep the thickness uniform so the medallion dries evenly. -
Smooth the surface:
Inspect the surface for any fingerprints or imperfections. Dip your finger in a tiny bit of water and gently smooth out the clay surface until it is pristine.
Step 2: Creating the Leaf Impression
-
Select and place your leaf:
Choose a fresh leaf with sturdy, prominent veins. Place the leaf onto the center of your clay slab with the vein side facing down into the clay. -
Roll the impression:
Gently run your rolling pin over the leaf once or twice. applies firm, even pressure to embed the veins deeply without distorting the overall thickness of the slab too much. -
Remove the leaf:
Find the stem of the leaf and carefully peel it away from the clay. Do this slowly to ensure no leaf debris is left behind in the intricate grooves.
Sticky Leaf Syndrome?
If the leaf sticks to the clay and tears, lightly dust the leaf’s underside with cornstarch before pressing. This acts as a release agent for detailed prints.
Step 3: Cutting and Refining
-
Cut the circle:
Position your round cookie cutter over the leaf print, centering the design nicely within the circle. Press down firmly to cut the shape. -
Remove excess clay:
Peel away the excess scrap clay from the outside of the cutter before lifting the cutter itself. This keeps the circle’s edge clean. -
Soften the edges:
Once the shape is free, use a fingertip moistened with water to gently run around the circumference, softening the sharp angle left by the cookie cutter. -
Create the hanging hole:
Use a drinking straw to punch a clean hole near the top of the medallion. I usually position this slightly off-center near the leaf stem for a natural look. Twist the straw as you pull it out to get a clean cut.
Level Up: Color Wash
Mix a tiny drop of white paint with water to create a milky wash. Brush it over the textured leaf area and wipe immediately with a rag to make the veins pop white.
Step 4: Finishing Touches
-
Let it dry:
Allow the clay to dry according to the package instructions. For air-dry clay, flip the medallion over halfway through the drying process (after about 12 hours) to prevent curling. -
Sand imperfections:
Once fully cured and hard, check the edges for any roughness. Use a piece of fine-grit sandpaper to lightly buff the rim until it feels smooth to the touch. -
Highlight the veins (optional):
If you want the white veins to pop more, you can dry-brush a tiny amount of diluted white acrylic paint into the grooves and wipe the surface clean, though the natural shadow often provides enough contrast. -
Add a protective coat:
To preserve the rich terra cotta color, you may apply a thin layer of matte acrylic sealer. This is especially helpful if you plan to hang the ornament outdoors. -
String it up:
Thread a piece of leather cord or rustic twine through the hole. Tie a simple knot to create a loop for hanging.
Hang your finished medallion near a window or on a holiday tree to enjoy a permanent piece of nature’s artwork
Coil Picture Frames
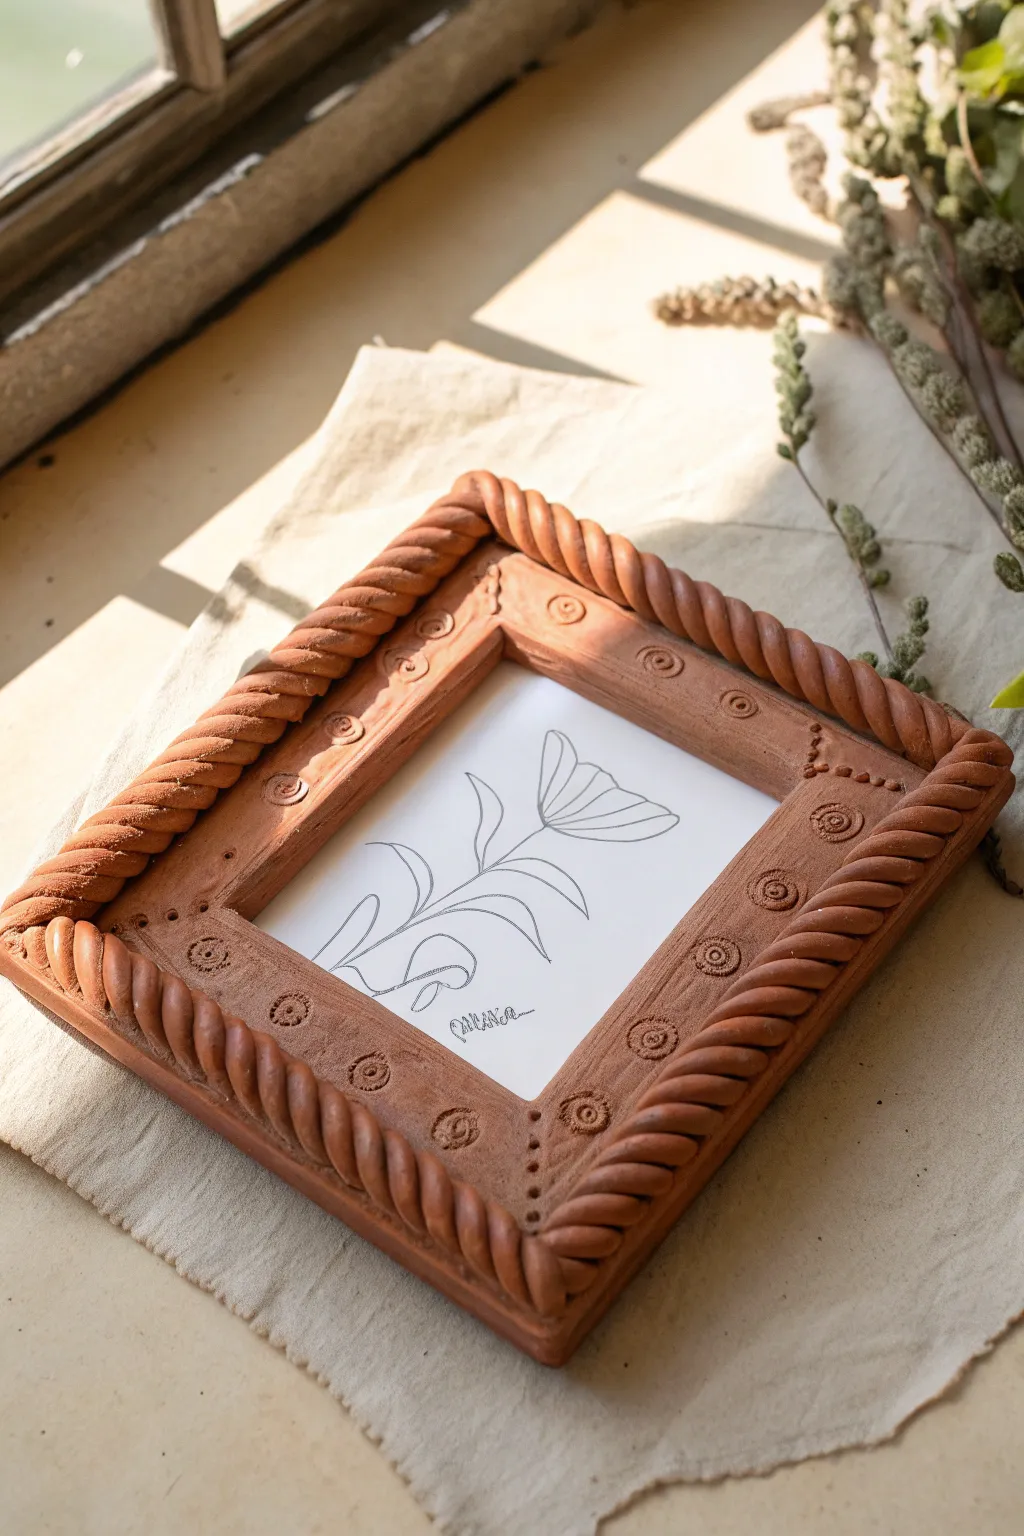
Celebrate the rustic charm of earthenware with this coil-rimmed picture frame. The warm, terracotta-toned clay and stamped details give it a timeless, handcrafted feel that frames simple line drawings beautifully.
Step-by-Step Guide
Materials
- Terracotta air-dry clay or earthenware ceramic clay
- Rolling pin
- Clay knife or fettling knife
- Canvas mat or work surface
- Guide strips or slats (approx. 1/4 inch thick)
- Small circular stamps (can use pen caps, marker ends, or clay tools)
- Needle tool
- Slip (clay and water slurry) or water for joining
- Ruler
- Small paintbrush (for smoothing)
- Cardboard template (optional, for frame size)
Step 1: Creating the Base
-
Prepare the clay:
Begin by wedging a large ball of terracotta clay to remove any air bubbles. This ensures your frame won’t crack during drying or firing. -
Roll the slab:
Place your clay between two guide strips on your canvas mat. Roll the clay out into a smooth, even slab about 1/4 inch thick. The guides help keep the thickness consistent. -
Cut the frame shape:
Using a ruler and knife, cut out a large rectangle for the outer edge of your frame. Decide on the width of your frame border—about 1.5 to 2 inches works well—and cut out the inner rectangle to create the window. -
Smooth the edges:
Dip your finger or a slightly damp paintbrush into water and gently run it along the cut edges of the slab to soften any sharp angles or burrs left by the knife.
Clean Stamps
To keep your stamped impressions crisp, dip your stamping tool into a little cornstarch or vegetable oil before pressing it into the clay. This stops the tool from sticking and pulling up the clay.
Step 2: The Twisted Coil Border
-
Roll long coils:
Roll out two long, even snakes of clay. They need to be slightly longer than the perimeter of your frame. Try to keep them about the thickness of a pencil or slighty thicker. -
Twist the coils:
Lay the two clay snakes side-by-side. Gently pinch them together at one end, then carefully twist them over one another all the way down to create a rope effect. -
Score the attachment area:
Use your needle tool to scratch up the outer perimeter of your flat frame base where the coil will sit. Do the same to the underside of your twisted rope. -
Attach the border:
Apply a generous amount of slip or water to the scored areas. Lay the twisted rope onto the frame edge. I usually press down firmly but gently to ensure a good bond without flattening the twist. -
Trim corners:
When you reach the corners, you can cut the coil at a 45-degree angle to make a neat mitered joint, or simply curve it around depending on the look you want. Smooth the joins where the coil ends meet.
Double Twist
Create a more complex border by using three thinner coils to create a braid instead of a two-strand twist. This adds intricate detail while using the same attachment technique.
Step 3: Decorative Details
-
Plan the pattern:
Looking at the flat space between the window and the coil, visualize where you want your stamps. The example uses a repeating pattern of spirals and dots. -
Stamp circles:
Using a small circular tool (like the end of a marker or a specialized clay stamp), press circular indentations into the flat clay at regular intervals. -
Add texture:
Inside the stamped circles, use a smaller tool or needle to create spiral designs or concentric rings. Between the main circles, add smaller dots or pin-pricks for variety. -
Corner details:
Consider adding a different element at the corners, such as a cluster of three small dots or a slight variation in the pattern to anchor the design. -
Final smoothing check:
Look over the entire piece. Use a damp brush to smooth away any crumbs of clay that were created during the stamping process.
Step 4: Finishing
-
Dry slowly:
Place the frame on a flat board to dry. Cover it loosely with plastic for the first day to prevent the corners from curling up as they dry unevenly. -
Fire or seal:
If using ceramic clay, bisque fire and glaze as desired (though raw terracotta looks lovely). If using air-dry clay, seal with a matte acrylic varnish once fully dry. -
Add the artwork:
Once finished, tape your favorite line drawing or photo to the back of the frame securely.
Display your finished frame on a shelf where the natural light can catch the texture of the coils.


What Really Happens Inside the Kiln
Learn how time and temperature work together inside the kiln to transform clay into durable ceramic.
Slab Fish With Pattern Play
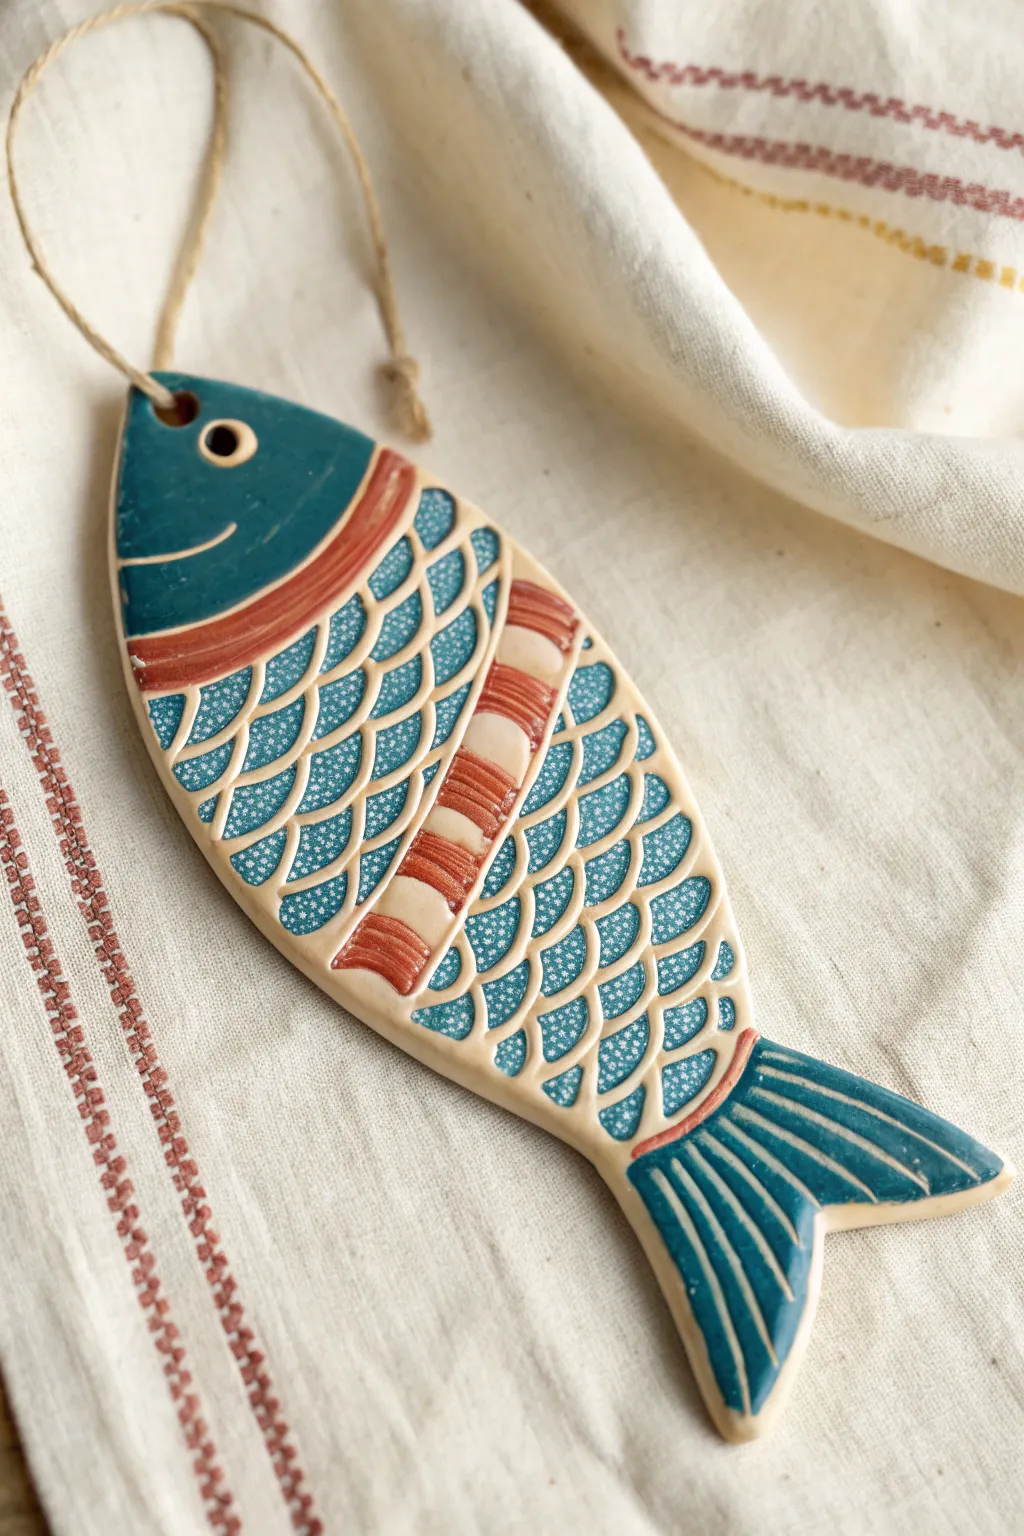
This charming ceramic fish combines simple slab-building techniques with vibrant underglaze decoration to create a whimsical wall hanging or ornament. The piece features a stylized aquatic shape adorned with textured scales and bold color blocking in teal and rust red.
Detailed Instructions
Materials
- Earthenware or stoneware clay body (white recommended)
- Rolling pin and guide sticks (about 1/4 inch thick)
- Fish template (paper or cardstock)
- Needle tool or fettling knife
- Small loop tool or carving tool
- Sponge and water
- Underglazes (Teal/Deep Blue, Rust Red/Terracotta, White)
- Small detail brushes
- Clear transparent glaze
- Length of twine or hemp cord
Step 1: Planning and Slab Construction
-
Prepare your template:
Sketch a simple, elongated fish shape on cardstock. Include a curved head section, a long body, and a clearly defined tail fin. Cut this shape out to use as your guide. -
Roll out the slab:
Using a rolling pin and guide sticks, roll out a slice of clay to a uniform thickness of approximately 1/4 inch. Ensure the slab is large enough to fit your template. -
Cut the shape:
Place your paper template onto the smooth clay slab. Trace around the perimeter with a needle tool, holding the tool vertical to get clean, straight edges. Remove the excess clay. -
Smooth the edges:
Dip a small sponge in water and wring it out deeply so it’s just damp. Gently run it along the cut edges of your fish to round them off and remove any sharp crumbs of clay. -
Add the hanging hole:
Using a straw or a small hole cutter, punch a clean hole through the top of the fish’s head, leaving enough clay margin above the hole for strength.
Clean Lines Tip
Use “wax resist” on the raised lines between the scales before painting the blue sections. The glaze will bead off the lines, keeping the separation crisp and clean.
Step 2: Designing the Details
-
Define the head:
Use a needle tool to lightly incense a curved line separating the head from the body. Add a small smile line. -
Create the eye:
Press a small hollow circle into the head area using the back of a pen or a small loop tool, then add a tiny ball of clay in the center for the pupil, scoring and slipping to attach it securely. -
Carve the body zones:
Lightly sketch the layout for the body decoration. You need a curved band near the head, a central stripe running lengthwise, and the scale sections. Carve shallow channels to separate these distinct zones. -
Scoring the scales:
For the scales, incise a series of overlapping captivating ‘U’ shapes. They should look like a classic fish scale pattern. Make these lines deep enough to hold glaze later but not so deep they weaken the slab.
Texture Twist
Before cutting your fish shape, roll the clay slab onto a piece of lace or burlap. This will give the entire surface a subtle, tactile background before you even start carving.
Step 3: Adding Color and Pattern
-
Bisque fire preparation:
Allow the clay to dry slowly to the bone-dry stage. Once completely dry, fire the piece to bisque temperature (usually cone 04) so it is ready for glazing. -
Paint the solid areas:
I prefer to start with the solid colors. Apply 2-3 coats of deep teal underglaze to the head and the tail fin. Paint the curved band near the neck and the central stripe with a rust-red or terra cotta underglaze. -
Fill the scales:
Carefully paint inside the scale shapes with a lighter blue or the same teal underglaze used on the head. You can leave the carved lines between scales unpainted (showing the raw clay) for contrast. -
Apply the ‘snow’ pattern:
Once the blue scale sections are dry to the touch, use a very fine brush or a toothpick to dot tiny specks of white underglaze over the blue areas to create the speckled texture seen in the image. -
Detail the stripes:
On the central red stripe, paint thin horizontal lines of white or cream underglaze to break up the solid color and add visual interest. -
Final clear glaze:
Once all underglazes are completely dry, apply a coat of clear transparent glaze over the entire front of the fish. This will seal the design and make the colors pop. -
Final firing:
Load the kiln for a glaze firing according to your clay and glaze instructions (typically cone 05 or 06). Ensure the glazed side does not touch the kiln shelf or use stilts. -
String it up:
After the kiln has cooled and the piece is removed, thread a loop of natural twine or hemp cord through the hole in the head and knot it securely.
Hang your colorful catch in a sunny window or group several together for a complete school of art
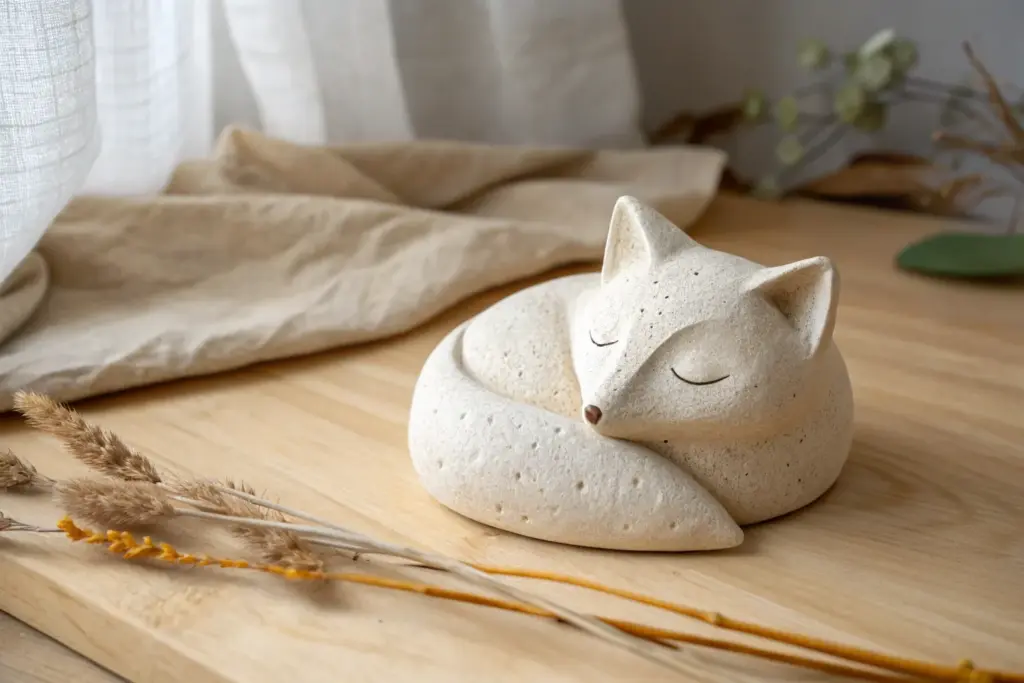
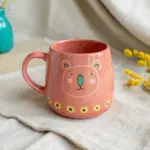
Face Pinch Pot Planters
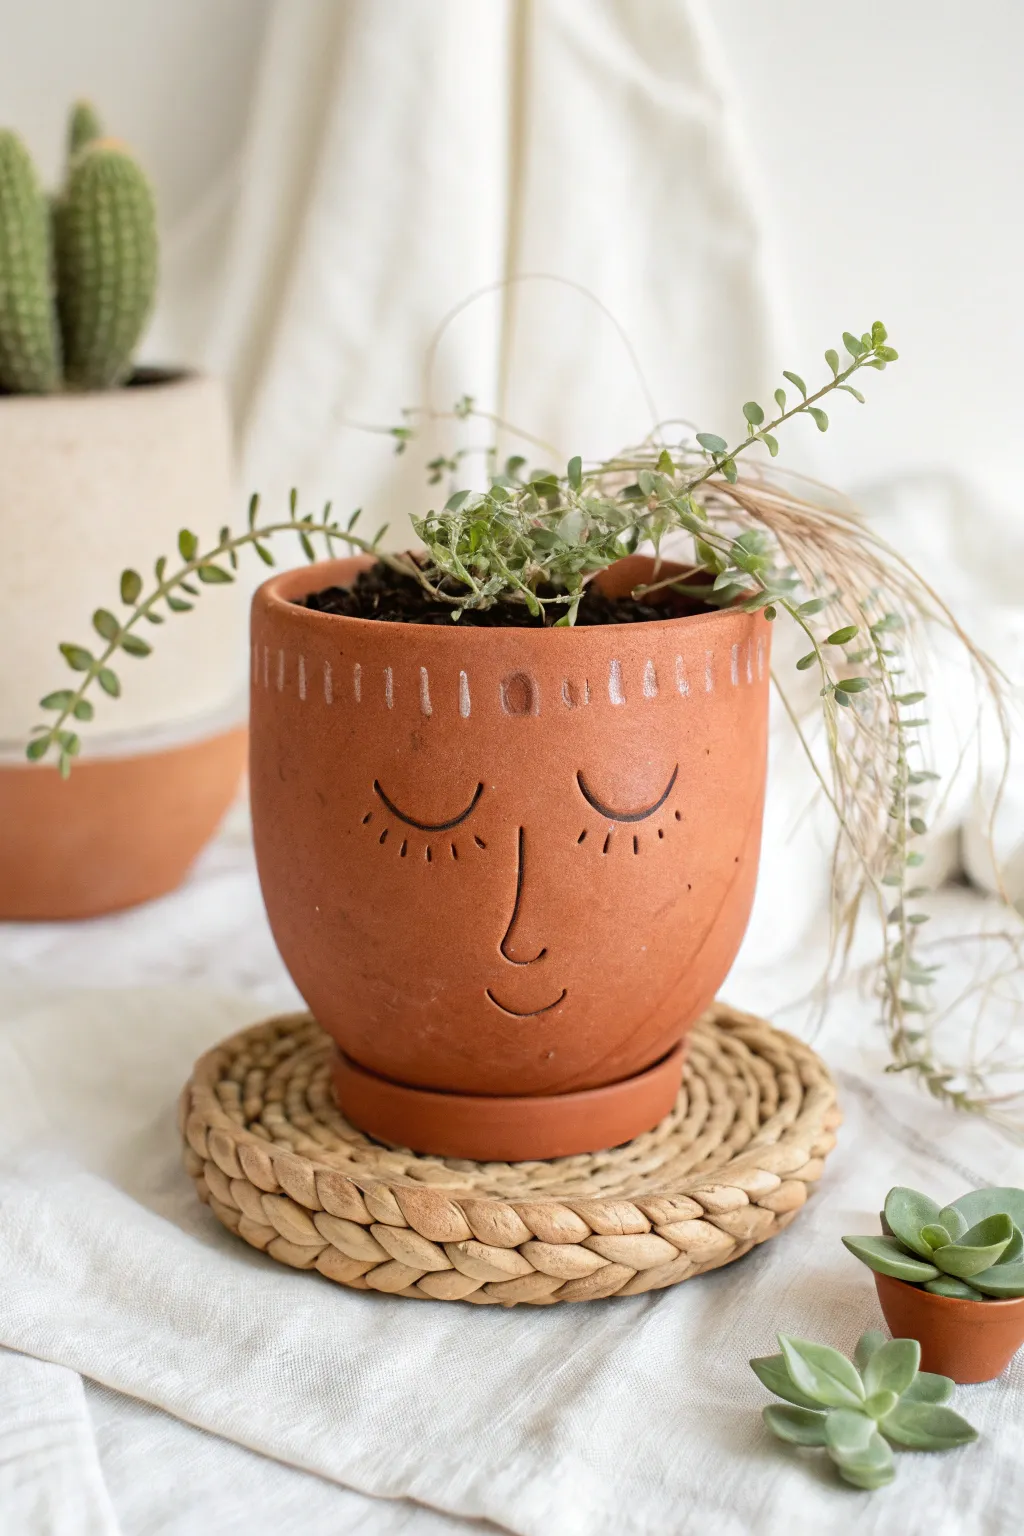
Brighten any windowsill with this charming terracotta pinch pot featuring a peaceful, sleeping face. The simple line work and warm clay tones create a minimalist boho aesthetic that perfectly houses trailing succulents or herbs.
How-To Guide
Materials
- Terracotta air-dry clay or kiln-fire clay
- Basic clay tool set (needle tool, loop tool)
- Small sponge
- Water in a small cup
- Rolling pin (optional)
- White acrylic paint or underglaze
- Fine detail paintbrush
- Clay wire cutter
Step 1: Forming the Base
-
Start with a sphere:
Begin by taking a substantial chunk of terracotta clay, roughly the size of a large grapefruit. Roll it firmly between your palms or against your work surface until you have a smooth, round ball without major cracks. -
Open the pot:
Hold the sphere in one hand and press your thumb into the center. Push down until you are about a half-inch from the bottom—be careful not to poke all the way through. -
Pinch the walls:
Using a rhythmic pinching motion with your thumb inside and fingers outside, begin to thin the walls. Rotate the clay constantly as you pinch to ensure an even thickness. -
Shape the cylinder:
As the pot opens up, guide the clay upwards rather than just outwards. You want to create a slightly tall, U-shaped cup rather than a flat bowl. Aim for walls that are about 1/4 inch thick. -
Flat bottom check:
Once you are happy with the height, gently tap the bottom of the pot against the table to create a flat, stable base so it won’t wobble. -
Smooth the rim:
Use a slightly damp sponge to compress and smooth the top rim. I like to make sure there are no sharp edges here, as this is visually important for the finished look. -
Refine the surface:
Run a metal rib or a damp sponge over the exterior walls to remove fingerprints and create a smooth canvas for the facial features.
Cracks while pinching?
If the rim starts splitting while you pinch, your clay might be too dry. Dip your fingers in water and smooth the cracks immediately, compressing the clay back together.
Step 2: Creating the Face
-
Sketch lightly:
Before committing to deep lines, use a wooden skewer or needle tool to very lightly scratch your design onto the clay. Mark the center for the nose and the placement of the eyes. -
Carve the eyes:
Using a needle tool, press firmly to create two downward-curving semicircles for the closed eyelids. Make the lines bold and intentional. -
Add eyelashes:
radiating from the center of the eyelids, press small, short lines into the clay to represent lashes. Three or four dashes per eye is usually plenty for this stylized look. -
Sculpt the nose:
Unlike the carved eyes, the nose is a continuous line drawing. Carve a long ‘L’ shape starting between the eyes and dipping down. -
Add the mouth:
Just under the nose line, carve a small, simple upward curve for a subtle smile. -
Carve the decorative rim:
Around the top edge of the pot, press a series of vertical dashes. Spacing doesn’t need to be mathematically perfect; a handmade rhythm looks better. -
Detail the rim pattern:
Between several vertical dashes, add occasional small circles or dots to break up the pattern and add interest to the headband area. -
Clean up crumbs:
Wait for the clay to stiffen slightly, then brush away any little crumbs of clay created by the carving tools.
Make it hang
Before the clay dries, poke two holes on opposite sides near the rim. After firing, thread twine or leather cord through to turn this into a hanging planter.
Step 3: Finishing Touches
-
Create a saucer:
Take a smaller ball of remaining clay and flatten it into a pancake. Curve the edges up slightly to create a simple saucer that fits the bottom of your pot. -
Add drainage (optional):
If you plan to plant directly into the pot, use a straw or tool to punch a hole in the bottom center for water drainage. -
Dry and fire:
Allow the clay to dry slowly (covered loosely with plastic) for several days. Once bone dry, fire the piece according to your clay’s instructions. -
Highlight with white:
Once fired (or fully dry if using air-dry clay), take a fine detail brush with white paint. Carefully fill in the decorative dashes and dots along the top rim to make them pop against the terracotta.
Fill your new creation with soil and your favorite trailing plant to complete the hairstyle

TRACK YOUR CERAMIC JOURNEY
Capture glaze tests, firing details, and creative progress—all in one simple printable. Make your projects easier to repeat and improve.
Mini Monster Thumb Pots
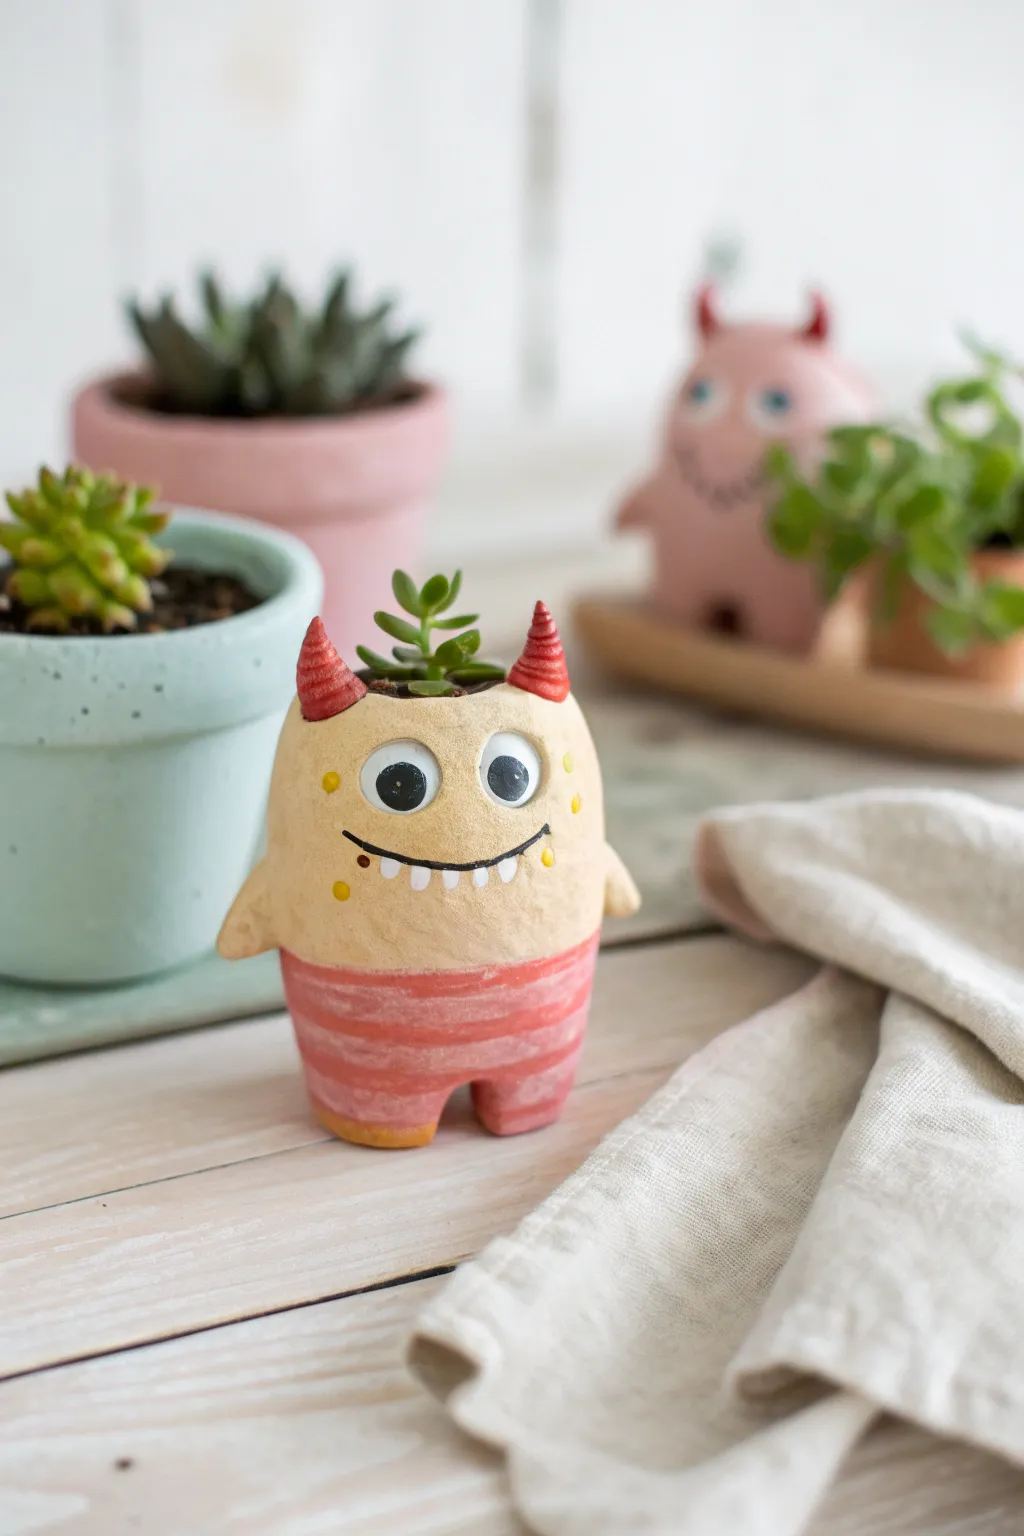
These adorable little monster planters are brimming with personality and are surprisingly easy to make. Using simple pinch pot techniques and some acrylic paint, you’ll create a quirky, friendly creature perfect for holding a tiny succulent.
Detailed Instructions
Materials
- Air-dry clay (or polymer clay)
- Small bowl with water (for smoothing)
- Clay tools (or a toothpick)
- Acrylic paints (Cream, Pink, White, Black, Yellow)
- Fine detail paintbrush
- Medium paintbrush
- Clear matte varnish (optional)
Step 1: Shaping the Base
-
Start with a sphere:
Begin by rolling a lump of clay about the size of a golf ball or slightly larger into a smooth, even sphere. -
Form the pinch pot:
Push your thumb into the center of the ball, stopping before you breakthrough the bottom. Gently pinch and turn the clay between your thumb and fingers to open up the pot. -
Elongate the shape:
Instead of keeping it perfectly round, gently squeeze the sides to create an oval, pill-like shape. This forms the monster’s body. -
Thicken the rim:
Tap the top rim gently against your work surface or smooth it with a wet finger to ensure it’s flat and thick enough to be sturdy.
Hollow Legs Trick
To make the pot lighter and dry faster, push a pencil up into the legs from the bottom to create a hollow cavity before attaching them.
Step 2: Adding Features
-
Create the legs:
Roll two small, stubby cylinders of clay. Score the bottom of the body and the top of the legs, add a drop of water, and press them firmly onto the base. -
Blend the seams:
Using a clay tool or your finger, drag clay from the legs up onto the body to remove the seam, making it look like one solid piece. -
Add the arms:
Shape two tiny teardrops of clay. Flatten the wider end slightly and attach them to the sides of the body, pointing downwards. -
Sculpt the horns:
Roll two small cones for the horns. Attach them to the top of the head near the rim. I like to curve them slightly outward for extra character. -
Detail the horns:
Using a needle tool or toothpick, gently press horizontal rings around the horns to give them a ribbed texture. -
Smooth everything out:
Dip your finger in a little water and go over the entire surface to erase fingerprints and smooth out any rough textures before drying. -
Let it dry:
Allow the clay to dry completely according to package instructions. For air-dry clay, this usually takes 24-48 hours.
Expression Mix-Up
Change the character instantly by altering the eye shape. Try one big eye and one small eye, or sleepy half-closed eyelids for a bored monster.
Step 3: Painting the Monster
-
Base coat the top:
Paint the upper two-thirds of the monster with a creamy beige or light yellow acrylic paint. -
Paint the pants:
Paint the bottom third, including the legs, with a soft pink color to create the creature’s ‘pants’. -
Add stripes:
Once the pink base is dry, use a slightly darker red or dark pink to paint horizontal stripes across the pants area. -
Paint the horns:
Carefully paint the horns a vibrant red to match the stripes on the pants. -
The eyes:
Paint two large white circles for eyes. Wait for them to dry, then add large black pupils, looking slightly off-center for a goofy expression. -
Add the smile:
Using a very fine brush and black paint, draw a curved line for the mouth just below the eyes. -
Teeth and freckles:
Paint tiny white triangles hanging from the mouth line for teeth. Finally, dot on some yellow freckles on the cheeks and body. -
Seal it:
If you plan to put a real plant inside, coat the inside and outside with a clear varnish to protect it from moisture.
Now your little monster is ready to guard a small succulent on your windowsill
Story Scene Relief Tiles
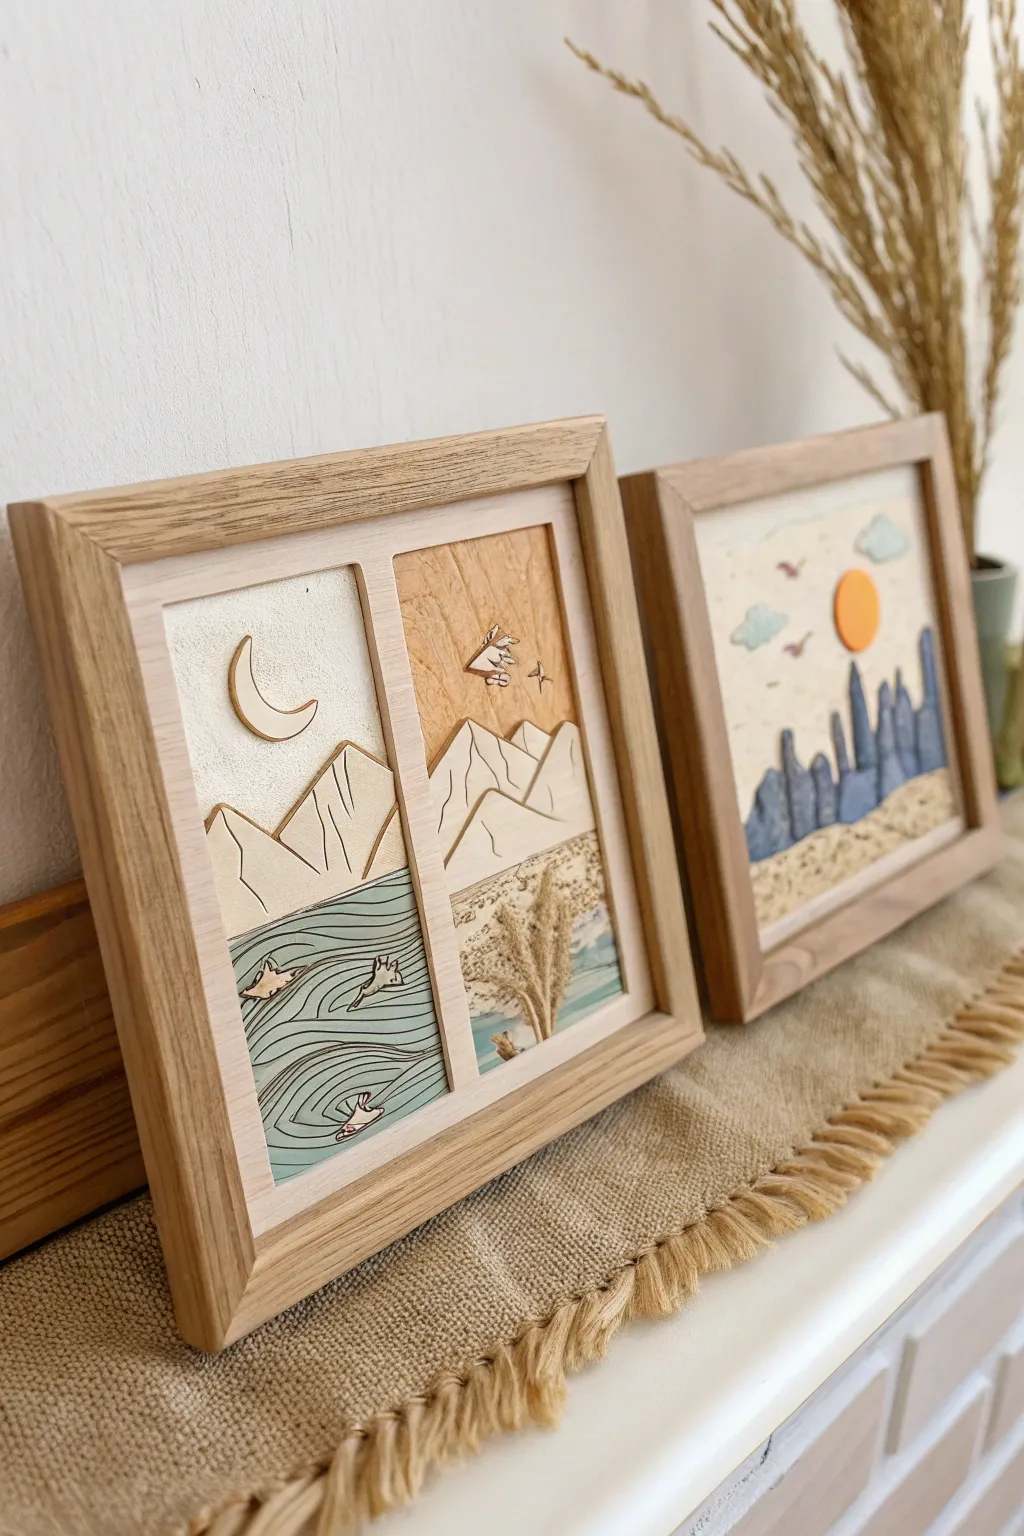
Capture the beauty of day and night with these textured split-panel clay reliefs. This project combines simple carving, layering, and painting techniques to create a sophisticated nature scene that looks beautiful in a wooden shadow box.
Step-by-Step Tutorial
Materials
- Air-dry clay (white or terracotta)
- Wooden shadow box frame (square)
- Rolling pin
- Clay carving tools (needle tool, small loop tool)
- X-Acto knife or clay blade
- Acrylic paints (Muted teal, sand, cream, white)
- Fine grit sandpaper
- Wood glue or strong craft glue
- Small flat brush and detail brush
- Cardboard or foam core (for backing)
- Dried florals (optional, for texture)
Step 1: Planning & Base Creation
-
Measure your frame:
Begin by removing the backing from your shadow box frame. Measure the interior dimensions carefully, as your clay tiles need to fit snugly inside. -
Sketch the split design:
On a piece of paper the same size as your frame backing, draw a vertical line down the center. Sketch a mountain range that flows across both sides, but change the sky and foreground elements: add a crescent moon and ocean waves on the left, and a desert sun with textured sand on the right. -
Roll the slabs:
Roll out your air-dry clay to an even thickness of about 1/4 inch. If you are making the split design, you will need two rectangular slabs that fit side-by-side within your frame measurements. -
Cut to size:
Using your paper sketch as a template, cut the clay slabs to the precise rectangular dimensions. Use a ruler to ensure the edges are perfectly straight so they will align well in the frame.
Keep it Flat
Clay slabs love to warp. Flip your tiles over every few hours during the drying process to ensure even airflow and perfectly flat tiles.
Step 2: Adding Relief Details
-
Carve the mountains:
Lightly trace your mountain outlines onto the clay. Use a needle tool to incise the lines deeper. To create the layered relief look, gently carve away a thin layer of clay from the ‘sky’ area behind the mountains, making the peaks pop forward. -
Sculpt the ocean waves:
On the left panel, use a loop tool or the rounded end of a paintbrush to press flowing, wavy lines into the lower section. Vary the pressure to create depth in the water currents. -
Add texture to the desert:
On the right panel’s lower section, texture the clay to look like sand. You can do this by stiffly stippling with a stiff bristle brush or pressing rough sandpaper into the wet clay. -
Create the celestial elements:
Roll a small, thin scrap of clay. Cut out a crescent moon shape and a small circle for the sun. Attach these to the sky areas using a tiny bit of water and scoring (scratching up the surfaces) to ensure they stick. -
Dry properly:
Place your clay tiles on a flat wire rack to dry. To prevent curling, place a lightweight board on top of them for the first few hours. Let them dry completely, which usually takes 24-48 hours depending on humidity.
Go Glossy
Apply a clear gloss varnish only to the water section of the left panel. The shine will contrast beautifully with the matte desert sand.
Step 3: Finishing & Assembly
-
Sand the edges:
Once fully dry, use fine-grit sandpaper to smooth any rough edges or sharp points on your carvings. Be gentle with the raised elements. -
Base coat painting:
Paint the sky sections with a cream or off-white acrylic paint. I like to water the paint down slightly for the first coat so it soaks into the porous clay. -
Painting the ocean:
Mix a muted teal or sage green color. Paint the wave section on the left panel. After the base teal dries, use a fine brush to highlight the tops of the wave ridges with a lighter mint color or white. -
Painting the desert:
Use a warm beige or sandstone color for the right panel’s foreground. You can add a darker wash (paint mixed with lots of water) into the textured crevices to emphasize the ‘sandy’ look. -
Highlighting the mountains:
Paint the mountains a neutral stone or pale brown. To make the relief stand out, define the edges of the mountains with a very thin line of darker brown paint. -
Adding mixed media touches:
For the desert side, apply a tiny dot of glue and attach a small sprig of dried grass or floral to simulate a desert bush. This mixed-media element creates a wonderful 3D effect. -
Preparing the background:
Cut a piece of cardboard or foam core to fit your frame. Glue your painted clay tiles onto this backing board, leaving a small gap between them if you want a divider, or pushing them flush together. -
Framing:
Insert the mounted artwork into the shadow box frame. Ensure the glass is removed if the relief is too thick, or keep the glass if there is enough depth. -
Mounting the divider:
If your frame didn’t come with a divider, you can cut a thin strip of balsa wood, stain it to match the frame, and glue it directly between the two clay panels for a clean separation.
Hang your diptych on a wall that gets good natural light to let the relief shadows change throughout the day
Clay Whistles With Character
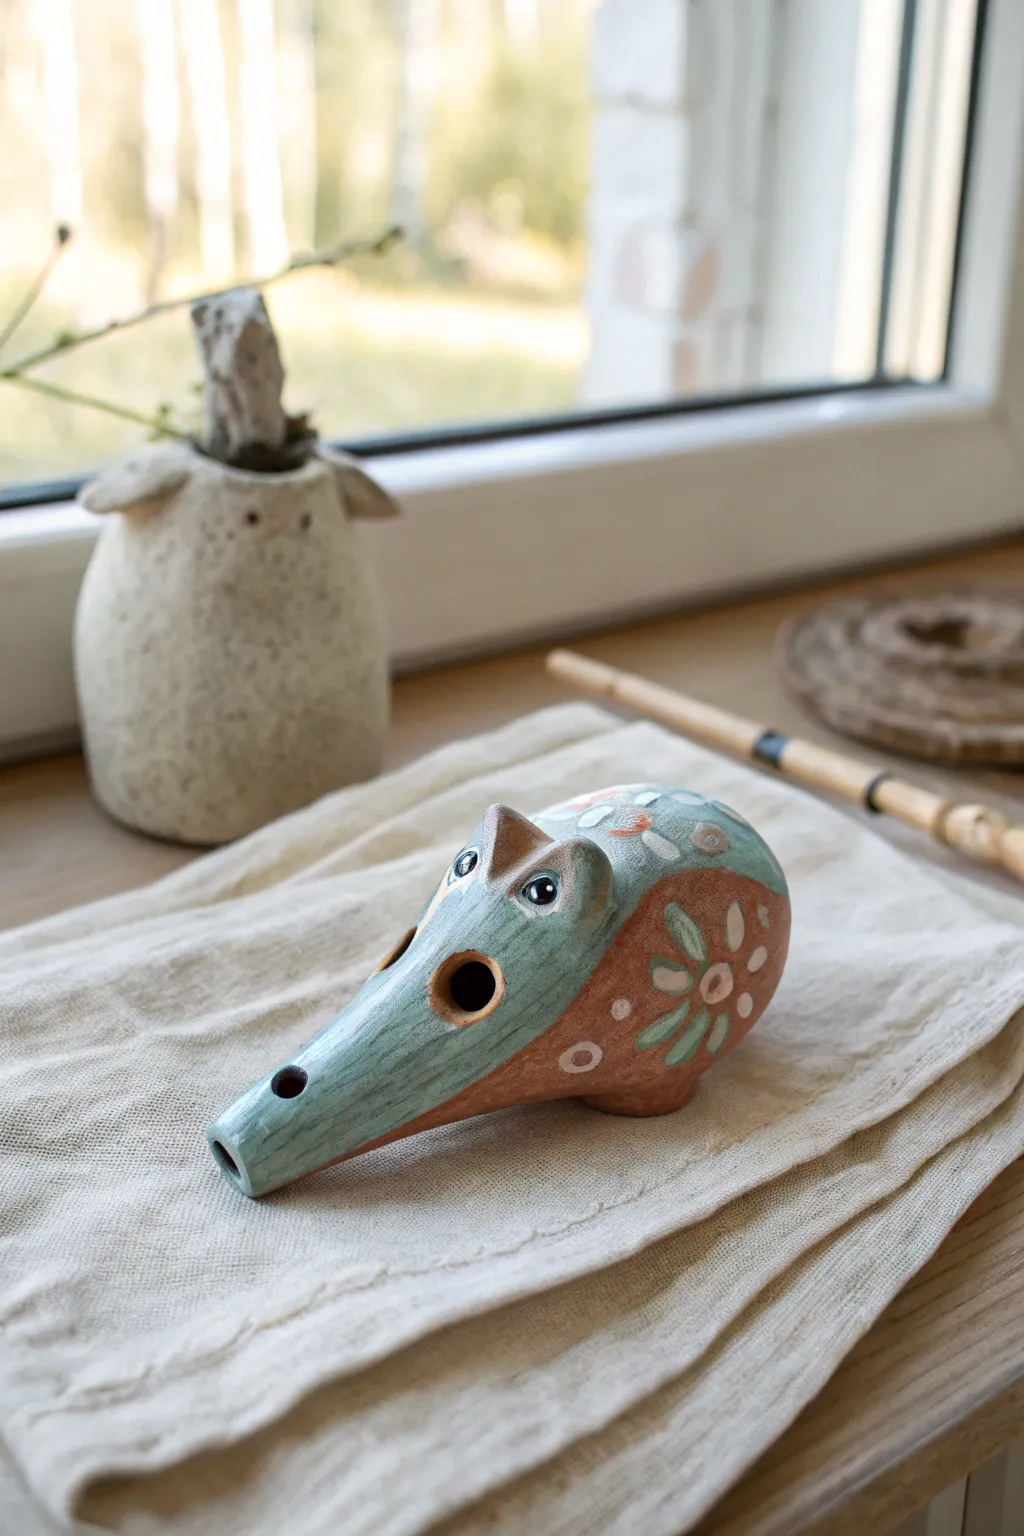
Transform a simple pinch pot into a delightful, functional musical instrument with this animal-shaped clay whistle project. The finished piece features a softly rounded body, a long snout for blowing, and charming folk-art style painted details in earthy teals and browns.
Step-by-Step Tutorial
Materials
- Low-fire white earthenware clay or stoneware
- Popsicle stick or wooden modeling tool
- Needle tool
- Slip (clay mixed with water)
- Underglazes (teal, rust/terracotta, white, black)
- Small paintbrushes (fine tip and medium round)
- Clear glaze (optional)
- Water cup and sponge
Step 1: Forming the Hollow Body
-
Create a Pinch Pot:
Start with a ball of clay roughly the size of a tangerine. Insert your thumb into the center and gently pinch the walls while rotating the ball to create a uniform cup shape. -
Close the Form:
Gently gently curve the rim of your pinch pot inward until the edges meet. Score and slip the edges, then smooth them together to trap air inside, creating a hollow enclosed sphere. -
Shape the Creature:
Roll the hollow sphere on your work surface to elongate it slightly into an egg shape. Gently tap the bottom on the table to create a flat base so your creature will sit upright without rolling.
Silent Whistle?
If it won’t whistle, the bevel edge is likely dull or misaligned. Re-sharpen the 45-degree angle and slide a stick through the mouthpiece to ensure it points exactly at the splitting edge.
Step 2: Creating the Whistle Mechanism
-
Form the Mouthpiece:
Add a thick coil or cone of clay to one end of the egg to form the long snout. Blend this seamlessly into the body. Create a rectangular channel through this snout using your popsicle stick; this will be the airway. -
Make the Fipple Hole:
On the underside of the snout (or the top, depending on your creature’s orientation), cut a small box-shaped hole where the snout meets the body. The wall here needs to be cut at a sharp 45-degree angle (the bevel) facing the mouthpiece. -
Clear and Test:
Ensure the airway from the mouthpiece directs air straight onto the sharp edge of your bevel. This splitting of the air is what creates the sound. Give it a gentle test blow; if it hisses but doesn’t whistle, adjust the angle of the bevel slightly. -
Add Finger Holes:
Once you have a working sound, carefully pierce two or three small round holes on the side or top of the body to change the pitch. Test each note as you go.
Step 3: Adding Character Details
-
Sculpt the Features:
Add two small triangles of clay near the top of the ‘head’ area for ears. Slip and score them in place. Use the back of a paintbrush to create slight indentations for eye sockets. -
Smooth the Surface:
Take a slightly damp sponge and wipe down the entire piece to remove fingerprints and harsh tool marks. We want a smooth canvas for painting later. -
Dry to Leather Hard:
Let the piece dry slowly until it is leather hard—firm but still cold to the touch. This stage is perfect for underglazing.
Level Up: Tuning
Want specific notes? Make the sound chamber larger for deeper tones. You can tune the finger holes by starting small and gradually widening them until you hit the desired pitch.
Step 4: Painting and Finishing
-
Base Color – Head:
Paint the snout and head area (up to the shoulders) with a watered-down teal or sage green underglaze. Let the brushstrokes follow the curve of the snout. -
Base Color – Body:
Apply a warm rust or terracotta underglaze to the rear of the body. You can leave the clay raw in some areas if you like the natural look, but solid coverage makes the flowers pop. -
Painting the Eye Details:
Use a fine-tip brush and white underglaze to paint oval eyes. Once dry, add a black pupil and a tiny white highlight dot to bring the creature to life. -
Floral Decoration:
Using the teal color again, paint petal shapes in a circular pattern on the rust-colored body section. Add a center dot in a contrasting color like white or pale pink. -
Adding Texture with Dots:
Fill empty spaces on the back and head with small white or light pink circles and dots. This folk-art stippling adds a lovely texture without adding clay weight. -
Firing:
Let the piece dry completely (bone dry). Bisque fire it according to your clay’s instructions. If you want a shiny finish, apply a clear glaze and fire a second time, or leave it matte for a rustic feel.
Now you have a charming little creature that sings a tune whenever you wish to play
Hanging Clay Bells
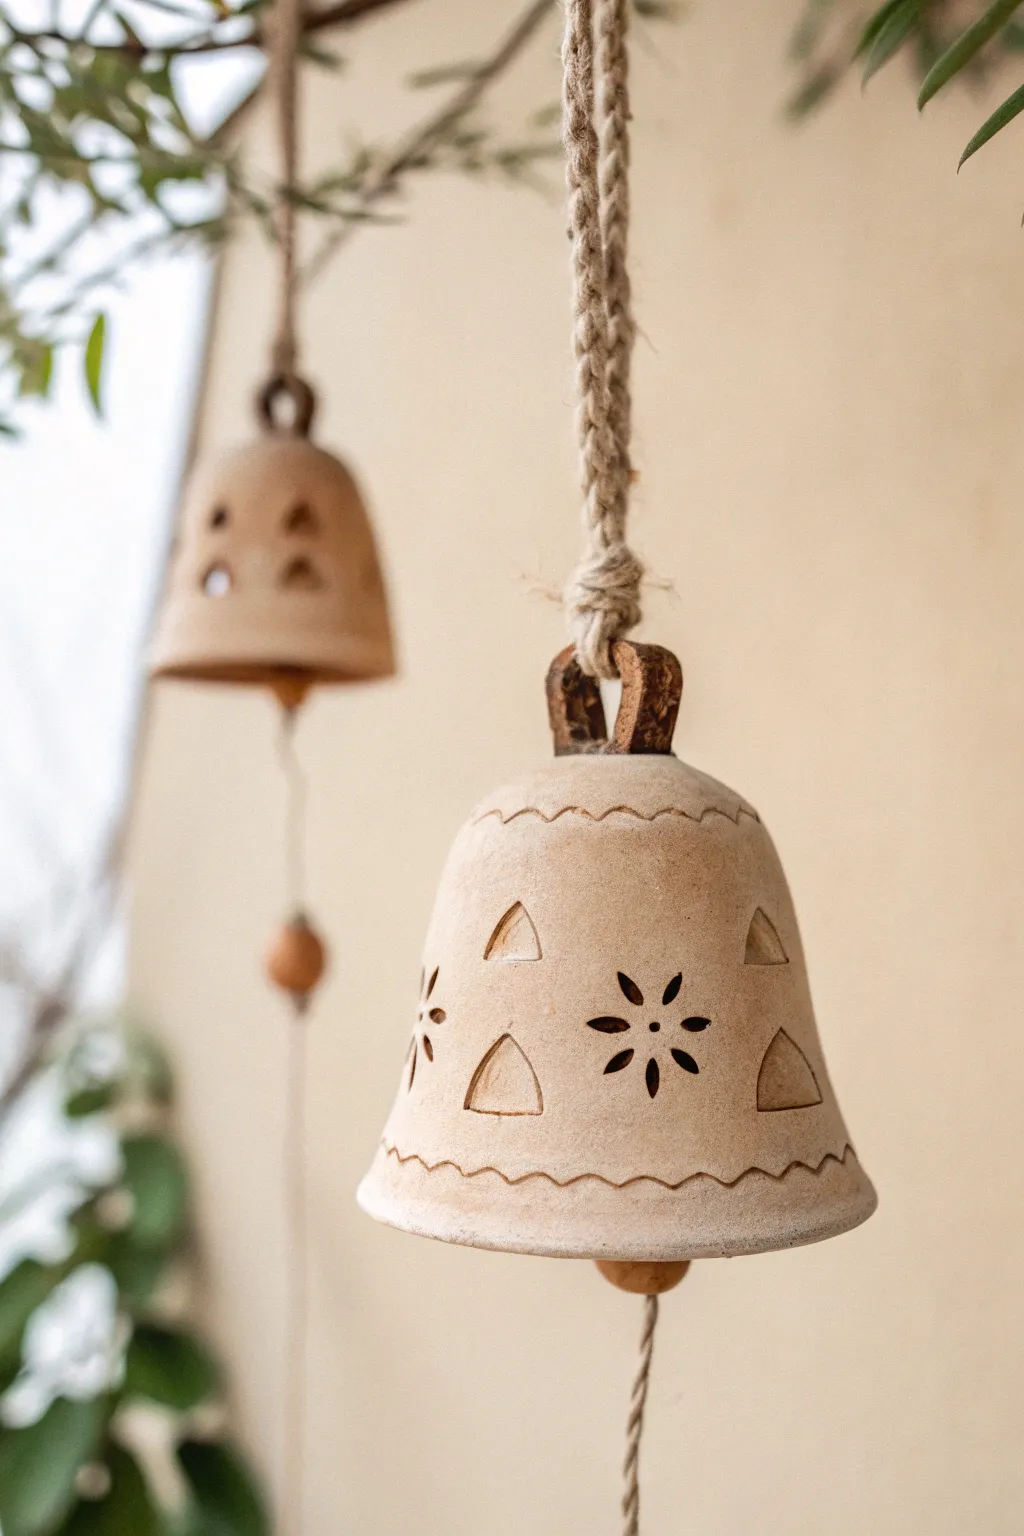
These charming hanging bells bring a touch of earthy elegance to any patio or garden space. Crafted from natural clay with delicate cut-outs and strung on sturdy jute, they offer both visual texture and a gentle, clinking sound in the breeze.
Detailed Instructions
Materials
- Light-colored stoneware or earthenware clay
- Rolling pin and guide strips (approx. 1/4 inch thick)
- Small bowl or cup (for molding form)
- Fettling knife or needle tool
- Triangle clay cutter (small)
- Flower stamp or carving tool
- Plastic wrap
- Sponge and water
- Thick jute rope or hemp twine
- Large wooden beads (2 per bell)
- Kiln for firing (or oven if using oven-bake clay)
Step 1: Forming the Bell Body
-
Prepare the workspace:
Begin by wedging your clay thoroughly to remove air bubbles, then lay out a canvas cloth to prevent sticking. -
Roll the slab:
Use your rolling pin and guide strips to roll out an even slab of clay, aiming for about 1/4 inch thickness so the bells aren’t too heavy. -
Cut the circle:
Place your bowl upside down on the clay slab and cut around the rim with a needle tool to create a large circle. -
Drape the form:
Cover your bowl or cup form with plastic wrap to ensure easy removal later. Looking at the photo, a slightly tapered cup shape works best. -
Shape the clay:
Gently drape your clay circle over the mold. Smooth it down the sides with your hands, compressing the clay against the form to create the bell shape. -
Refine the rim:
Use a fettling knife to trim the bottom edge (the rim) of the bell so it is even and level. -
Create the loop handle:
Roll a small coil of clay. Form it into a ‘U’ shape and attach it firmly to the top center of the bell using the score and slip method. This needs to be strong enough to hold the bell’s weight.
Cracking at the handle?
Handles often crack as clay shrinks. Drape a small piece of plastic over just the handle while drying to slow down moisture loss and equalize drying speed.
Step 2: Decorating and Designing
-
Leather hard stage:
Allow the clay to dry slightly to a ‘leather hard’ state. It should be firm enough to handle without warping but soft enough to carve. -
Add detail lines:
Using a needle tool, gently scribe a wavy line around the circumference near the top and bottom rims for a decorative border. -
Cut geometric shapes:
Use a small triangle cutter to punch out shapes in alternating rows. I find it helpful to lightly mark the positions first to ensure even spacing. -
Stamp the focal point:
In the center open space between your triangle rows, stamp or carve a simple six-petal flower design using a needle tool or small geometric stamps. -
Smooth the edges:
Take a slightly damp sponge and run it over all cut edges and rims to remove any sharp burrs or crumbs of clay.
Make it melodic
Experiment with different bell sizes and wall thicknesses. Thinner walls and higher firing temperatures usually produce a clearer, higher-pitched ring.
Step 3: Firing and Assembly
-
First drying:
Let the bells dry completely on a rack. They must be bone dry before heat is applied. -
Fire the clay:
Bisque fire the bells in a kiln according to your clay’s specifications. The example shows unglazed clay, so a single high firing works well for durability. -
Prepare the clapper:
Cut a length of jute rope. Tie a large knot at the very bottom and thread on a wooden bead; this will be the clapper that hits the bell walls. -
Tie the knot:
Make another knot in the rope a few inches above the bead. The distance between this knot and the bead determines how low the clapper hangs. -
Thread the assembly:
Thread the top of the rope through the inside of the bell and out through the clay loop handle on top. -
Hang it up:
Secure the rope with a final sturdy knot on the outside or braid the remaining rope to create a hanging loop.
Hang your new handcrafted bells where the wind can reach them and enjoy their earthy charm
Fairy House Mini Lanterns
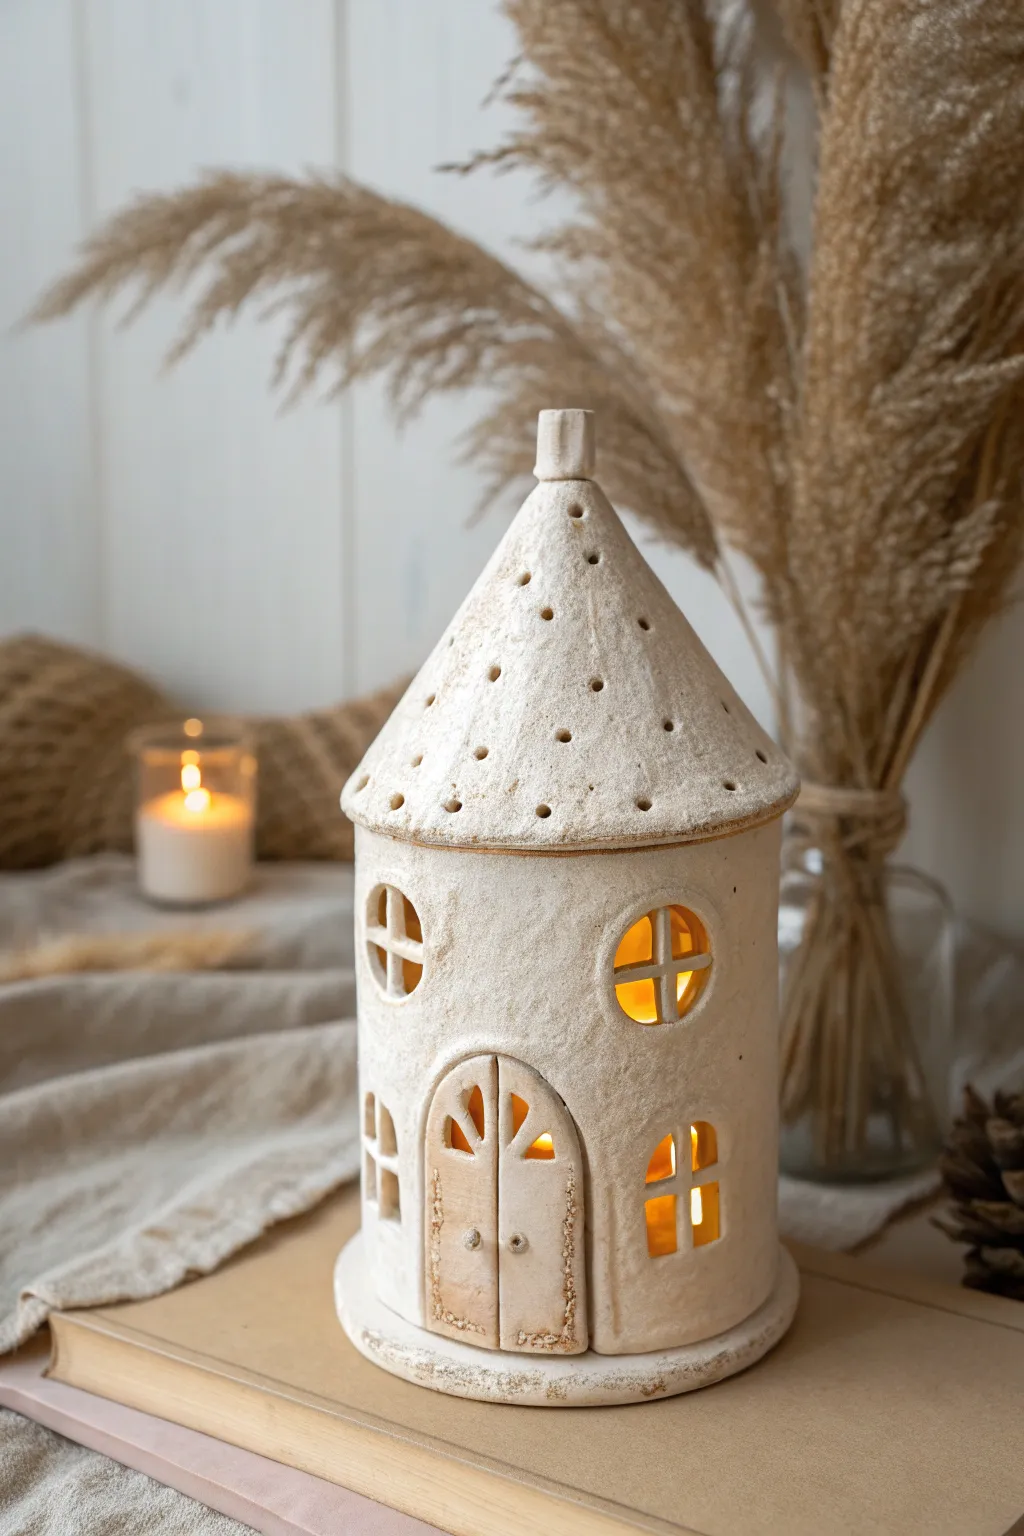
Bring a touch of magic to your space with this enchanting ceramic fairy house lantern. Featuring arched windows, a pointy textured roof, and a warm glow from within, this project teaches slab building basics with lovely detailed cutouts.
Step-by-Step Tutorial
Materials
- White stoneware or earthenware clay (approx. 2-3 lbs)
- Rolling pin
- Canvas mat or cloth for rolling
- Needle tool or fettling knife
- Circle cutter set (or small caps)
- Slip and scoring tool (or serated rib)
- Rectangle paper template (for body)
- Semi-circle paper template (for roof)
- Sponge
- Tea light or LED candle
Step 1: Building the House Body
-
Prepare the Slabs:
Begin by rolling out your clay into an even slab, approximately 1/4 inch thick. Use guide sticks if you have them to ensure uniform thickness, which helps prevent uneven drying later. -
Cut the Base and Walls:
Using your rectangular template, cut out the main wall of the house. Also, cut two circles: one slightly larger than your intended house diameter for the base plate, and a plain circle that will fit perfectly underneath the wall cylinder. -
Texture the Walls:
Before assembling, you can gently dab the surface of the clay slab with a coarse sponge or a crumpled piece of texture fabric to mimic the stucco-like stone finish seen in the photo. -
Form the Cylinder:
Carefully curve your rectangular slab into a cylinder. Score and slip the vertical seam thoroughly, pressing the edges together firmly. Smooth the seam inside and out so it disappears. -
Attach the Base:
Score and slip the bottom edge of your cylinder and attach it to the exact-fit circular base. Then, place this entire structure onto the slightly larger base plate, securing it well to create that nice flanged bottom edge.
Roof Slumping?
If the cone shape sags while working, crumple a ball of newspaper and stuff it inside the roof cavity for support. Leave it there until the clay is leather hard.
Step 2: Adding the Roof
-
Cut the Roof Cone:
Roll a second slab for the roof. Using a large semi-circle template (like a Pac-Man shape), cut out your roof piece. Texture this slab similarly to the body. -
Assemble the Cone:
Bring the straight edges of the semi-circle together to form a cone shape. Score and slip the seam securely. Test the fit on top of your cylinder body to ensure it sits slightly wider than the walls. -
Create the Chimney:
Roll a very small coil or cylinder of clay. Attach this to the very peak of the roof cone, blending the clay downward to secure it. -
Add Ventilation Holes:
Using a small needle tool or a narrow straw, poke a series of decorative holes all over the roof surface. I find these holes essential not just for style, but to let heat escape if using a real flame. -
Attach Roof to Body:
Score the top rim of the house body and the underside of the roof. Press them together gently. You can add a thin coil of clay at the join line to create the decorative separation seen in the image.
Step 3: Carving Details
-
Outline the Windows:
Let the clay leather-harden slightly so it’s sturdy. Lightly trace two circles on the upper level and two arched windows on the lower level using a needle tool. -
Cut the Openings:
Carefully slice out the negative space for the windows. Leave the cross-bars intact for the round windows to create the pane effect. -
Refine the Frames:
Smooth the cut edges with a damp brush or fingertip to remove any sharp burrs or crumbs of clay. -
Door Detail:
Roll a small, thin slab and cut out an arch shape for the door frame. Score and attach this over the bottom opening. Add small clay balls for doorknobs and carve vertical lines for wood texture. -
Final Surface Treatment:
Once fully dry, bisque fire the piece. For the finish shown, apply a matte white glaze or a white slip that allows the texture of the clay to show through, then wipe it back slightly on the edges before the final firing.
Clean Cuts Pro Tip
When cutting out the window panes, wait until the clay is ‘leather hard’ (firm like cheese). Wet clay drags and deforms; firmer clay cuts cleanly.
Enjoy the gentle flickering light casting shadows through your new handmade creation
Collaborative Clay Tile Mural
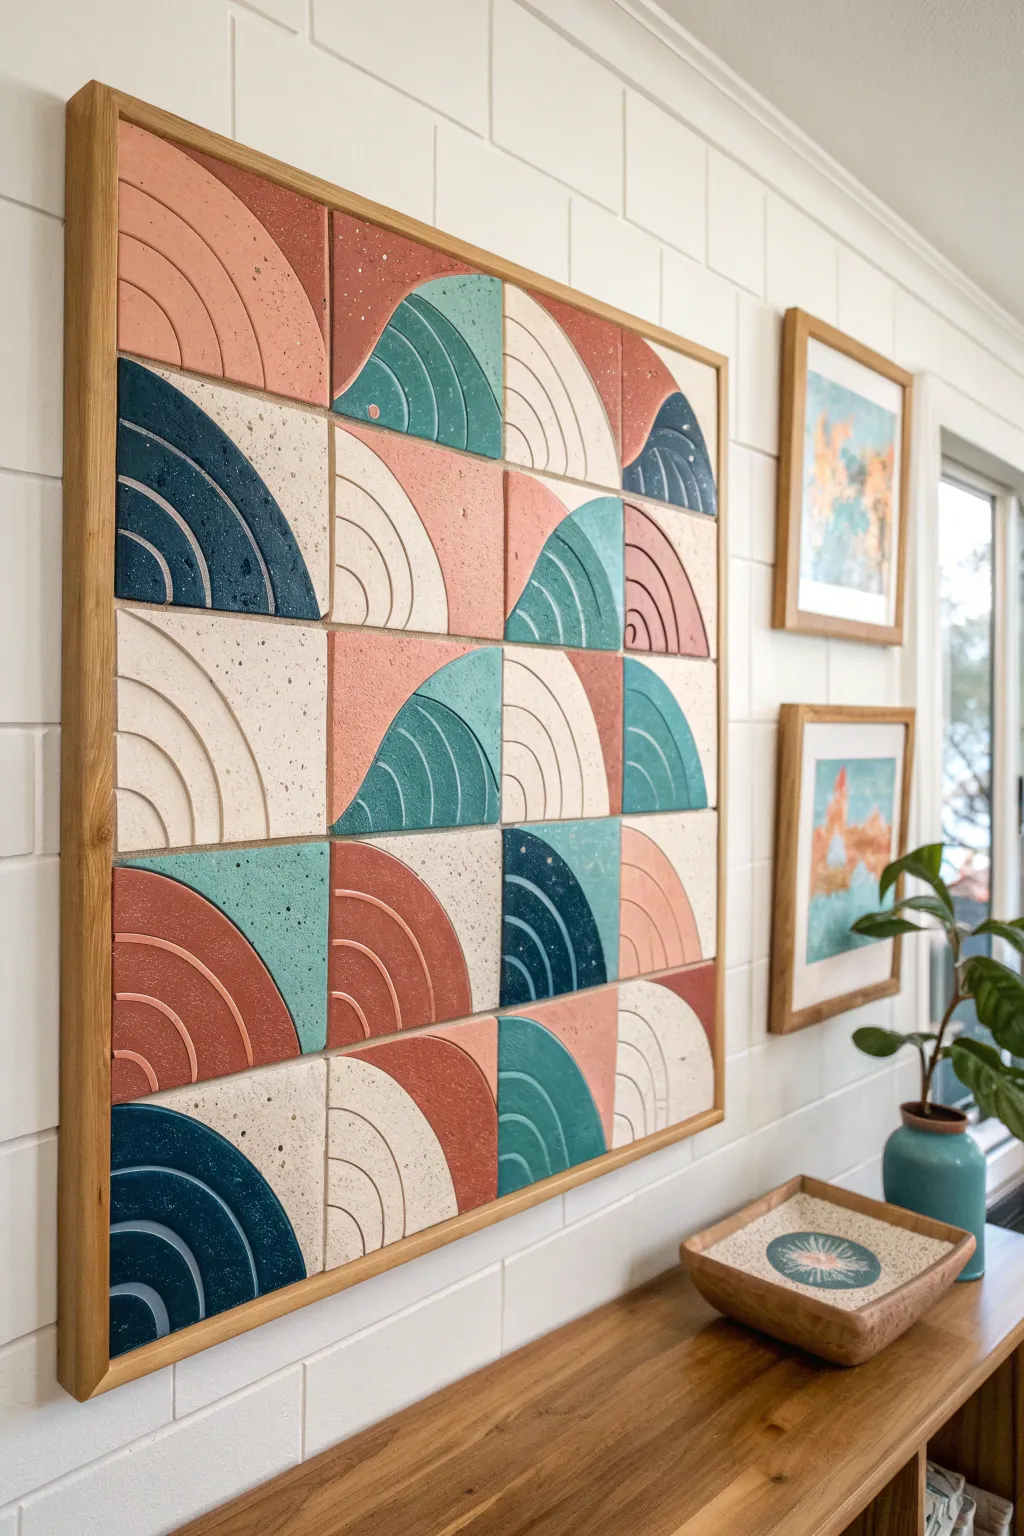
This stunning collaborative mural brings together individual square tiles to create a cohesive, modern geometric statement piece. With its earthy palette, speckled texture, and rhythmic arch motifs, this project is perfect for teaching texture, color theory, and collective design.
Detailed Instructions
Materials
- White or light-colored earthenware clay (low-fire)
- Square tile cutters or templates (approx. 4×4 or 6×6 inches)
- Rolling pin and guide strips (wood slats)
- Pottery needle tool or fettling knife
- Large round cookie cutters or circle templates (various sizes)
- Underglazes (terracotta, teal, navy/deep blue, cream, light pink)
- Speckled clay additive or black underglaze for splatter effect
- Clear matte or satin glaze
- Wooden framing slats (oak or pine)
- Tile adhesive or heavy-duty construction glue
- Backing board (plywood cut to size)
Step 1: Planning & Tile Preparation
-
Map out the grid:
Begin by deciding on the final dimensions of your mural. For the design shown, you will need a grid of 5 tiles wide by 6 tiles high. Sketch grid options on paper first to balance the colors and arch directions before touching the clay. -
Roll out slabs:
Roll out large slabs of clay using guide strips to ensure an even thickness, ideally around 3/8 to 1/2 inch. Consistent thickness is crucial for tiles so they dry flat and don’t warp. -
Cut the squares:
Using a square tile cutter or a sturdy template, cut out thirty square tiles. Smooth the edges of each square with a damp sponge or finger to remove any sharp burrs left by the cutting tool. -
Draft the arches:
Lightly trace a quarter-circle arc onto each tile using a needle tool. Vary the starting corners: some arches should start from the bottom-left, others from the top-right, etc., to create the dynamic, rotating pattern seen in the example.
Warping Prevention
Flip your drying tiles over every 12 hours. Drying both sides evenly is the absolute best way to ensure they stay perfectly flat for the final mounting.
Step 2: Creating Texture & Relief
-
Carve the relief lines:
Use a carving tool or a loop tool to dig out the curved lines of the arches. The goal is to create deep grooves that define the concentric rainbow shapes. Keep the depth consistent but don’t cut all the way through. -
Apply speckling:
To achieve that beautiful stone-like finish, flick a toothbrush loaded with slightly watered-down black or brown underglaze over the wet clay. Alternatively, if you used a speckled clay body, you can skip this step as the speckles will appear after firing. -
Slow drying process:
I like to sandwich the tiles between pieces of drywall or place proper weights on the corners while they dry. This minimizes curling at the edges, which is the biggest enemy of flat tile work. -
Bisque fire:
Once bone dry, load the kiln carefully. Bisque fire the tiles to Cone 04 (or according to your clay body specs) to prepare them for glazing.
Texture Twist
Before carving, press textured fabrics or burlap into selected sections of the damp clay to add a tactile contrast between the smooth arches and the background.
Step 3: Glazing & Assembly
-
Select your palette:
Mix your underglazes to match the muted aesthetic: a warm terracotta, a dusty teal, a deep midnight blue, a soft blush pink, and a creamy off-white. -
Paint the color blocks:
Apply the underglaze in sections. Notice how the design splits: the background of the tile is one color (often speckled cream), and the arch shape acts as the color block, or vice versa. Use masking tape for crisp straight lines if you have a steady hand. -
Detail the grooves:
Ensure the carved grooves are thoroughly coated. If you want high contrast, you can wipe back the surface slightly so the grooves remain darker, or simply paint them solidly with the main color. -
Final firing:
Apply a clear satin or matte glaze over the entire face of the tiles to seal them and enhance the colors without making them too glossy. Fire to the final glaze temperature. -
Prepare the frame:
Cut a piece of plywood to the exact dimensions of your arranged tiles plus a small allowance for the frame. Construct a simple box frame around the plywood edge using 1×2 inch lumber, staining it a warm honey oak color. -
Perform a dry fit:
Lay out all the fired tiles inside your frame without glue first. Rearrange them until the distribution of colors and arc directions feels balanced and ‘random’ in a pleasing way. -
Adhere the tiles:
Lift one tile at a time and apply a generous dollop of heavy-duty construction adhesive or tile mastic. Press it firmly onto the plywood backing. Continue until the grid is filled, ensuring no gaps remain between the squares.
Hang your collective masterpiece in a well-lit area to let the relief shadows play across the surface throughout the day
Faux Artifacts and Stamp Seals
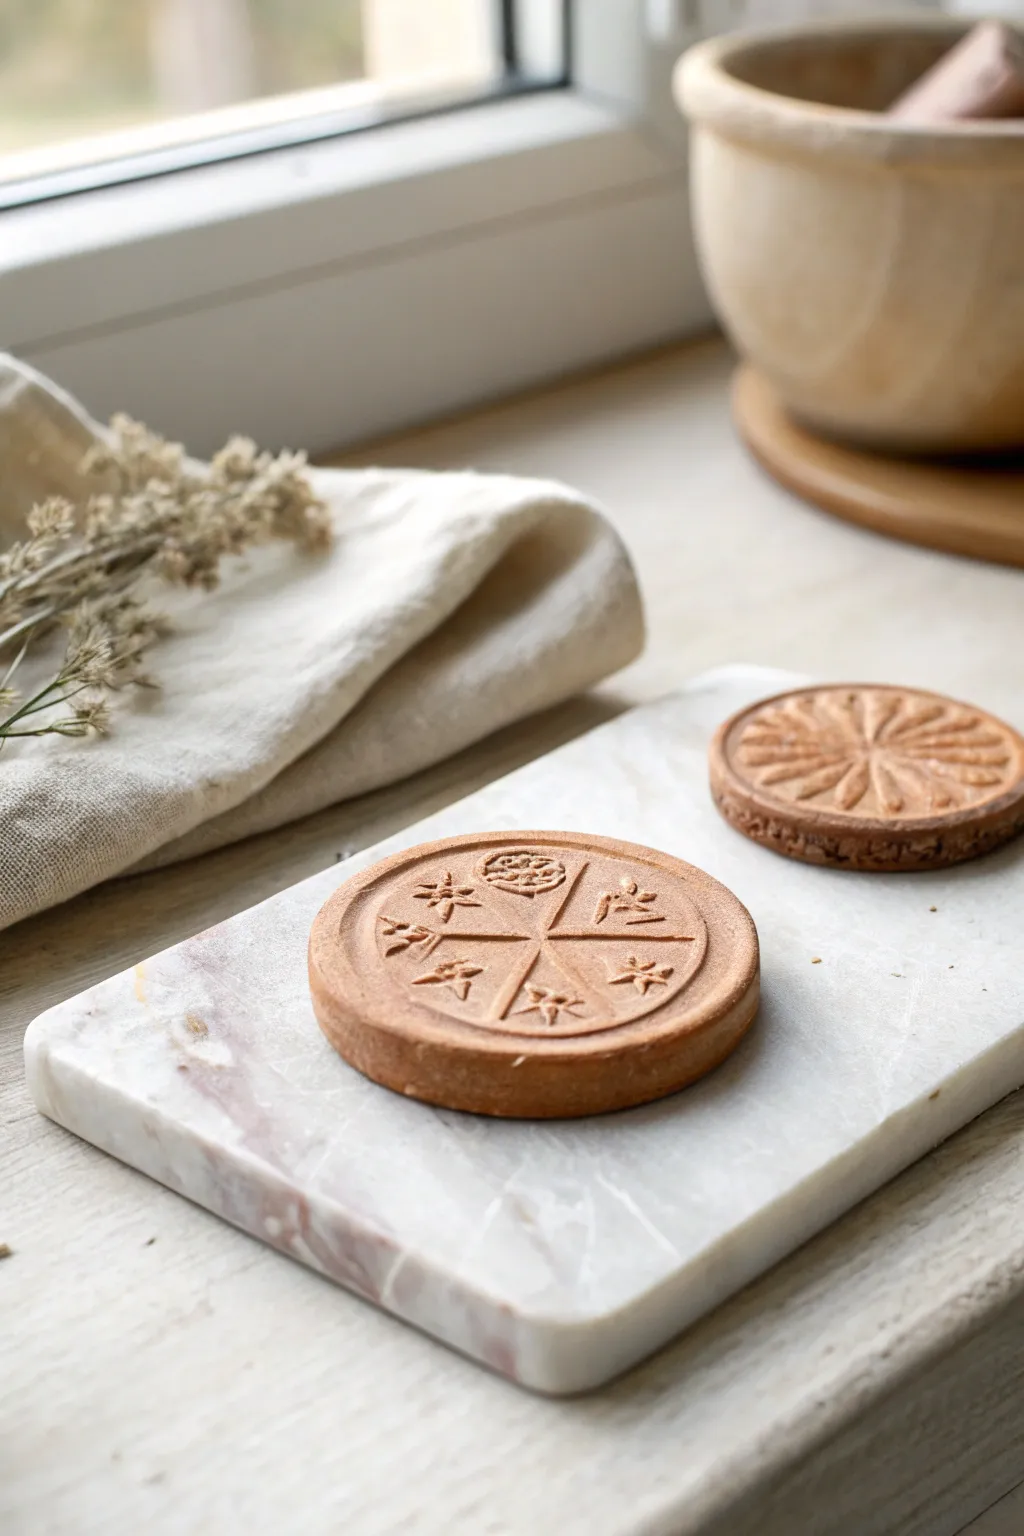
Transport your art class to an ancient marketplace with these convincing faux artifacts. These stamp seals mimic the look of historical relics with their earthy terracotta tones and intricate, symbolic relief patterns.
Step-by-Step
Materials
- Air-dry clay (terracotta or reddish-brown)
- Circular cookie cutter (3-4 inches diameter)
- Rolling pin
- Parchment paper or canvas mat
- Sculpting tools (needle tool, small loop tool)
- Wooden skewers or toothpicks
- Water in a small cup
- Fine grit sandpaper (optional)
- Acrylic paint (burnt umber, raw sienna) for antiquing
- Dry brush or sponge
Step 1: Preparation and Shaping
-
Prepare the workspace:
Lay down parchment paper or a canvas mat on your work surface to prevent the clay from sticking. This also helps you rotate the piece easily without deforming it. -
Condition the clay:
Take a handful of terracotta air-dry clay and knead it thoroughly until it is warm, soft, and pliable. This prevents cracks from forming later. -
Roll the slab:
Use your rolling pin to flatten the clay into an even slab. Aim for a thickness of about 1/4 to 1/2 inch to give it substantial weight, like a real stone table. -
Cut the base shape:
Press your circular cookie cutter firmly into the clay slab. Wiggle it slightly to ensure a clean cut, then remove the excess clay from around the circle before lifting the cutter. -
Smooth the edges:
Dip your finger in a little bit of water and run it along the cut edge of the circle. Smooth out any sharpness or burrs left by the cutter so the edge looks worn and hand-formed.
Stamp Master Tip
Instead of carving, you can create ‘stamps’ from baked polymer clay or hard vegetables (like potatoes) to press repetitive patterns into the wet clay quickly.
Step 2: Carving the Design
-
Plan the layout:
For the geometric design shown in the foreground seal, use a needle tool to faintly sketch a cross or ‘X’ across the surface to divide the circle into quadrants. -
Deepen the dividers:
Go back over your dividing lines with a slightly thicker tool or the side of a skewer, pressing deeper to create distinct sections. I find pressing straight down rather than dragging creates a cleaner channel. -
Add rim details:
Using a small loop tool or the back of a paintbrush, press a circular border just inside the outer edge. This frames your design nicely. -
Create relief symbols:
In the center of each quadrant, press or carve small symbols. The example features star-like shapes and floral motifs. Use the tip of a toothpick to indent the centers of stars or leaves. -
Texture the background:
If you want the background to look rougher than the raised symbols, gently tap the negative space with a stiff-bristled brush or the textured end of a tool. -
Refine the sun design (optional):
If recreating the second seal in the background, sketch a central point and radiate lines outward to the edge. Carve deep grooves between the ‘rays’ to make them pop.
Step 3: Finishing and Aging
-
dry slowly:
Place your finished seals on a wire rack or leave them on parchment paper away from direct heat. Flip them over carefully after a few hours to ensure even drying and prevent curling. -
Sand imperfections:
Once the clay is bone dry (usually 24-48 hours), use fine-grit sandpaper to gently buff away any unwanted sharp ridges or clay crumbs. -
Create an antique wash:
Mix a small amount of burnt umber acrylic paint with water until it has a watery, ink-like consistency. -
Apply the wash:
Brush the watery paint over the entire seal, ensuring it gets into all the deep crevices and carved lines. -
Wipe back:
Immediately use a paper towel or rag to wipe the paint off the raised surface areas. The dark paint will remain in the recessed lines, highlighting your design. -
Dry brush highlights:
For a final dusty look, take a dry brush with a tiny amount of lighter clay-colored paint (raw sienna) and lightly skim it over the highest points.
Fixing Cracks
If small cracks appear while drying, mix a tiny bit of clay with water to make a paste (slip) and fill the crack. Smooth it over with your finger.
Display your collection of ancient seals on a stone slab or in a wooden bowl for a truly museum-worthy presentation