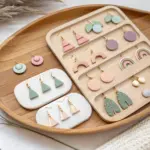
If you’re making clay gifts for your boyfriend, the sweet spot is always something personal enough to feel like “you,” but practical enough that he’ll actually use it. Here are my favorite clay ideas for boyfriend gifts—ranging from classic sentimental keepsakes to a few unexpected, studio-fun surprises.
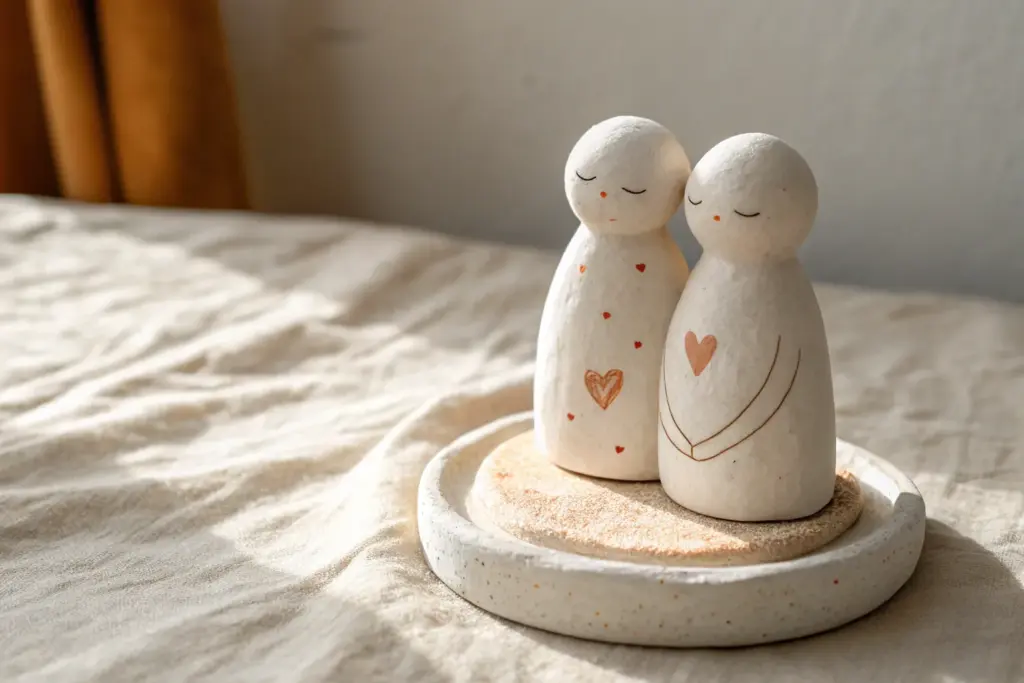
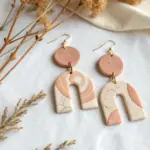
Heart Split Matching Keychains
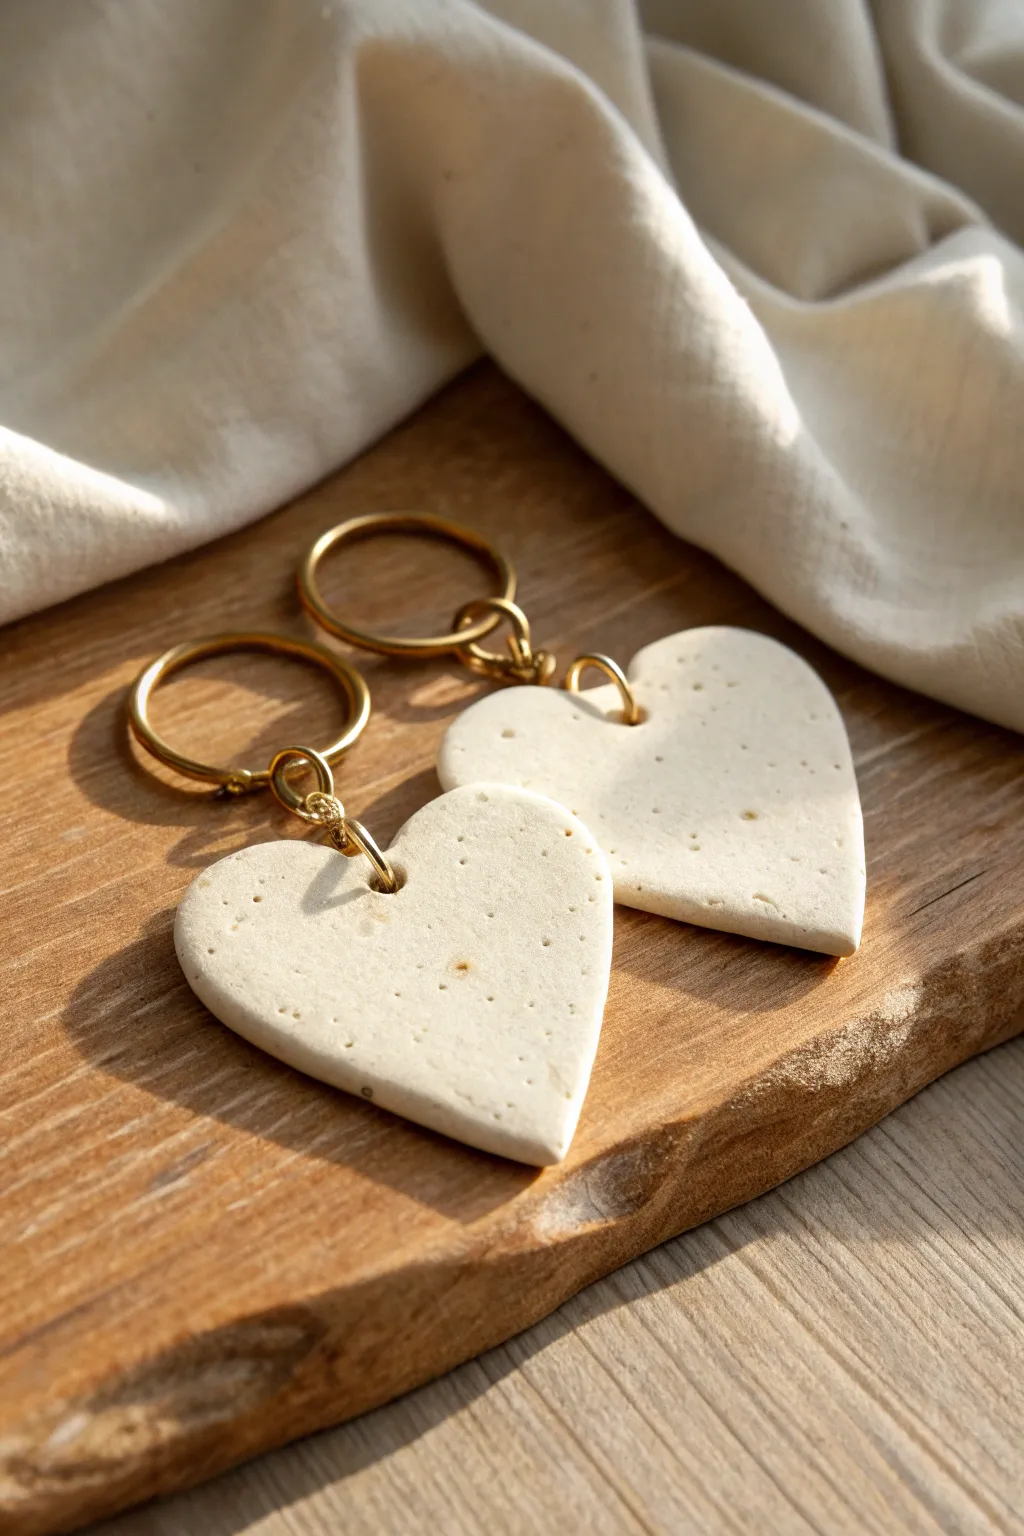
Create a meaningful token of connection with these rustic, speckled clay keychains. The simple heart shapes and gold hardware give them a timeless, handcrafted look perfect for sharing with someone special.
Step-by-Step Guide
Materials
- White polymer clay (approx. 2oz)
- Black pepper or dried coffee grounds (for speckling)
- Rolling pin or acrylic roller
- Heart-shaped cookie cutter (medium size)
- X-Acto knife or clay slicing blade
- Small round piping tip or straw (for hole punching)
- Sandpaper (fine grit, 400-600)
- 2 Gold keyrings with chain extenders
- 4 Gold jump rings (6-8mm)
- Jewelry pliers (flat nose and needle nose)
- Baking sheet with parchment paper
- Oven (if using polymer clay)
Step 1: Preparing the Clay
-
Condition the clay:
Begin by warming the white polymer clay in your hands. Knead and fold it repeatedly until it becomes soft, pliable, and free of cracks or air bubbles. -
Add the speckles:
Flatten the conditioned clay slightly and sprinkle a pinch of ground black pepper or very fine dried coffee grounds onto the surface. Fold the clay over to trap the speckles inside. -
Mix thoroughly:
Continue kneading the clay to distribute the speckles evenly throughout the mixture. You want a consistent ‘granite’ look, so keep folding until no large clumps of pepper remain. -
Roll it out:
Using your acrylic roller or rolling pin, roll the clay out into a slab. Aim for a thickness of about 1/4 inch (6mm) to ensure the keychains are sturdy enough for daily use.
Uneven Edges?
If your clay edges look rough after cutting, dip your finger in a tiny bit of cornstarch or water (for air-dry clay) and gently run it along the rim to smooth it out before baking.
Step 2: Shaping the Hearts
-
Cut the shapes:
Press your heart-shaped cutter firmly into the clay slab. Depending on the size of your cutter, you may need to re-roll scraps to get two perfect hearts. -
Smooth the edges:
Gently lift the clay hearts. Run your finger lightly along the cut edges to smooth down any sharp ridges or loose bits left by the cutter. -
Add texture (optional):
For a more organic look like the photo, I sometimes tap the surface lightly with a toothbrush or crumpled foil, though leaving it smooth is perfectly fine too. -
Punch the holes:
Using a small straw or the tip of a piping nozzle, punch a hole near the top of one lobe on each heart. Ensure the hole is not too close to the edge to prevent tearing later.
Step 3: Baking and Finishing
-
Prepare for baking:
Place the clay hearts onto a baking sheet lined with parchment paper. Check one last time for any lint or fingerprints and smooth them away. -
Bake the clay:
Bake according to your clay package instructions (typically 275°F/135°C for 15-30 minutes per 1/4 inch of thickness). Let them cool completely on the tray before handling. -
Sand for smoothness:
Once cool, use fine-grit sandpaper to buff the edges and surface. This removes any fingerprints and gives the piece a professional, matte finish reminiscent of stone. -
Rinse and dry:
Rinse the hearts under cool water to remove sanding dust and dry them thoroughly with a lint-free cloth.
Stone Effect
To make the ‘stone’ look more realistic, mix a tiny dot of translucent clay into your white base. It adds depth and makes the faux-granite finish look less like plastic.
Step 4: Assembly
-
Open the jump rings:
Using two pairs of pliers, twist your jump rings open sideways (never pull them apart outward) to preserve their circle shape. -
Attach the first ring:
Thread an open jump ring through the hole in the clay heart. Before closing it, loop a second jump ring onto it. -
Connect the keychain:
Attach the keychain hardware to the second jump ring. Close both jump rings tightly using your pliers, ensuring the gap is completely flush so nothing slips off. -
Repeat:
Repeat the assembly process for the second heart so you have a matching pair ready to be gifted.
Wrap one of these hearts for your partner and keep the other on your own keys as a reminder of your bond


Mini Couple Figurines in a Frame
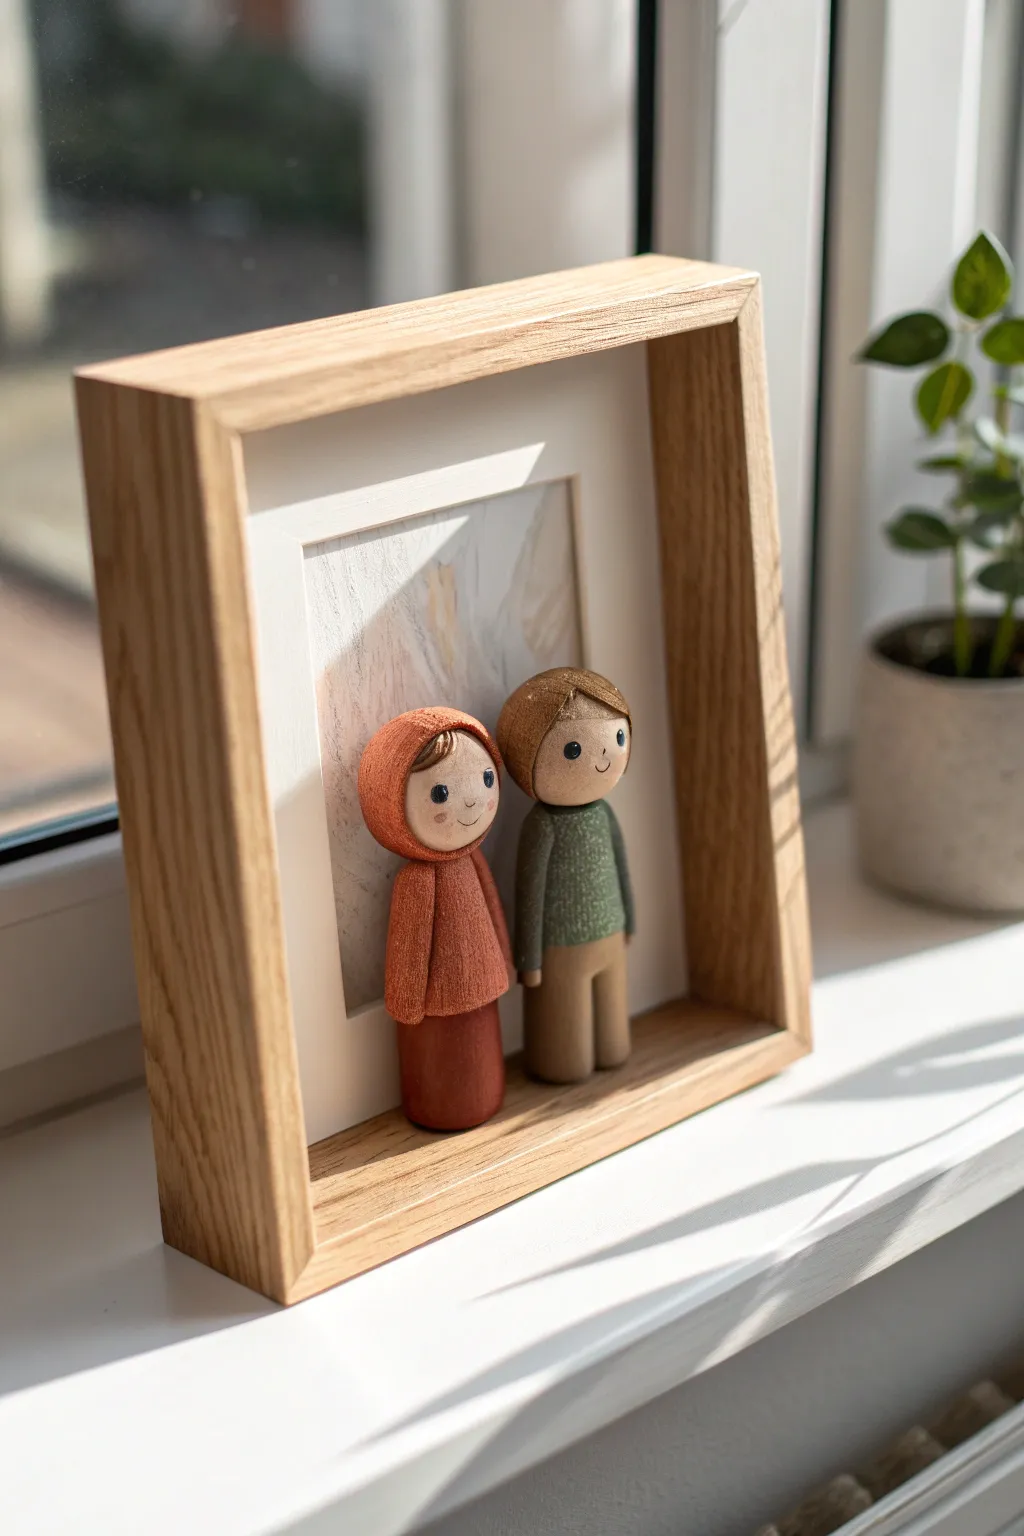
Capture your relationship in miniature with this sweet shadow box display. These stylized clay figures have a charming, textured finish that mimics fabric, creating a cozy and personalized keepsake perfect for a thoughtful gift.
Detailed Instructions
Materials
- Polymer clay (terracotta/burnt orange, olive green, beige, brown)
- Deep wooden shadow box frame (approx. 6×8 inches)
- Small piece of heavy cardstock or watercolor paper (for background)
- Texturing tool (old toothbrush or stiff bristle brush)
- Acrylic paints (black, white, blush pink)
- Fine detail paintbrush or dotting tool
- Aluminum foil (for armature)
- Strong craft glue or epoxy
- Rolling pin or clay machine
- Sculpting tools (needle tool, smoothing tool)
Step 1: Forming the Figures
-
Create the core:
Start by crumpling two small pieces of aluminum foil into tight cylinders. These will be the cores for your bodies, saving clay and reducing baking time. Make one slightly taller than the other if desired. -
Wrap the bodies:
Sheet your burnt orange and olive green clay to a medium thickness. Wrap the orange clay around the smaller foil cylinder and the green around the larger one, smoothing the seams completely so they look like solid cylinders. -
Add the legs:
For the taller figure, form two small logs of beige or light brown clay. Press them gently beneath the green torso to create pants, blending the clay where the two colors meet. -
Sculpt the heads:
Roll two smooth spheres of beige skin-tone clay. Attach these firmly to the tops of the bodies. You can use a small piece of wire or a toothpick inserted between the head and body for extra stability.
Step 2: Adding Details & Texture
-
Hood and hair:
For the figure in orange, roll a flat sheet of orange clay and drape it over the head to form a hood, smoothing it down the back and sides to merge with the body. For the other figure, sculpt a simple brown clay ‘helmet’ shape for hair. -
Sleeves and arms:
Roll small clay sausages for arms in their respective clothing colors. Attach them to the sides of the bodies. For the orange figure, blend the shoulders seamlessly to look like a cloak. -
Texture the clothing:
This is crucial for the cozy look shown in the photo. Take an old toothbrush or a stiff stippling brush and gently tap it all over the clothing areas (orange hood/body and green sweater). This mimics a felt or knit fabric texture. -
Refine the hair:
Use a needle tool or knife to gently press lines into the brown hair cap to suggest strands and direction. -
Bake the clay:
Place your figures on a baking sheet or ceramic tile. Bake according to your specific polymer clay manufacturer’s instructions (usually around 275°F/130°C for 15-30 minutes). Let them cool completely.
Clean Texture Tip
Before adding the fabric texture with your brush, dust the clay lightly with cornstarch. This prevents the brush bristles from sticking to the raw clay and pulling it up.
Step 3: Painting & Assembly
-
Paint the faces:
Using a very fine dotting tool or the end of a toothpick dipped in black acrylic paint, add two small eyes to each face. They should be wide-set for a cute look. -
Add blushes:
Mix a tiny amount of pink paint with water to make a very sheer wash. Dab this lightly onto the cheeks for a rosy glow. -
Draw the smiles:
With your finest brush or a specialized black crafting pen, draw a tiny, simple curved line for the mouth perfectly centered between the cheeks. -
Prepare the background:
Cut your heavy cardstock or watercolor paper to fit the inner mount of your frame. You can leave it plain white or paint a very subtle abstract wash of grey and beige as seen in the inspiration image. -
Mount the backing:
Insert the background paper into the frame and secure the back panel. -
Glue the figures:
Apply a strong epoxy or heavy-duty craft glue to the bottom of the figures. Position them carefully on the bottom ledge of the wooden frame, rather than gluing them to the paper backing itself. -
Final clean up:
I always do a final check for any stray glue strands or dust on the glass before closing everything up. Ensure the figures are standing straight while the glue sets.
Uneven Standing?
If figures wobble after baking, rub the bottoms against a piece of medium-grit sandpaper placed on a flat surface until they are perfectly flat and stand solidly.
Now you have a timeless, handcrafted portrait that celebrates your bond in a unique and artistic way

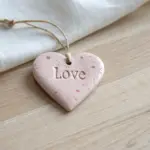

Love Note Wall Plaque
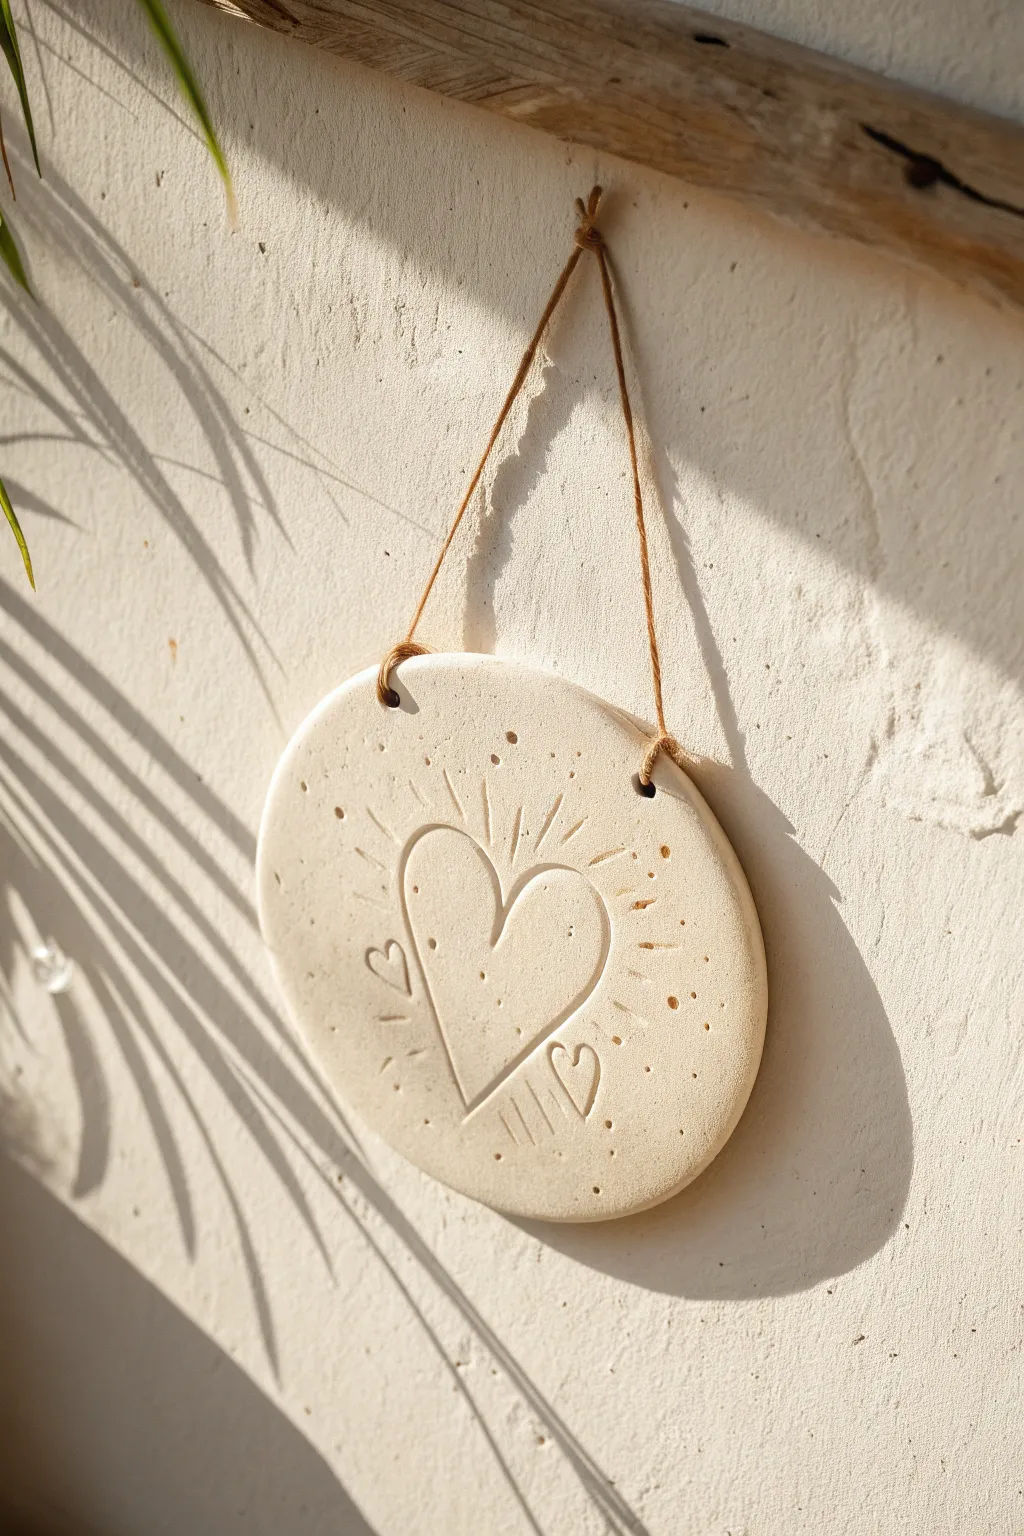
Capture a simple sentiment with this rustic, sun-drenched wall plaque made from air-dry clay. Its creamy, speckled texture and hand-carved hearts create a charming, organic piece of decor that’s perfect for gifting to your partner.
How-To Guide
Materials
- White or cream air-dry clay (stone effect optional)
- Rolling pin
- Circle cutter or a small bowl (approx. 4-5 inches diameter)
- Clay carving tools or a wooden skewer
- Sandpaper (fine grit)
- Twine or jute cord
- Straw or pen casing (for making holes)
- Small sponge or water
- Clear matte sealant (optional)
Step 1: Shaping the Base
-
Prepare the Clay:
Begin by kneading a ball of air-dry clay until it is soft, pliable, and free of cracks. If you want that speckled look shown in the photo but only have plain white clay, you can knead in some dried tea leaves or sand before rolling. -
Roll the Slab:
Roll the clay out on a smooth surface to an even thickness of about 1/4 inch. Making it too thin might cause it to curl while drying, so keep it substantial. -
Cut the Circle:
Place your circle cutter or an upturned bowl onto the clay slab. Press down firmly to cut a clean circle, then peel away the excess clay from the edges. -
Smooth the Edges:
Dip your finger in a little water and run it along the cut edge of the circle. This smooths out any sharpness or rough bits left by the cutter. -
Create Hanging Holes:
Using a straw or the casing of a pen, punch two small holes near the top of the circle. Space them about 2 inches apart to ensure the plaque hangs evenly.
Fixing Cracks
If small cracks appear while drying, mix a tiny amount of fresh clay with water to make a paste (slip). Rub this into the cracks and smooth it over with your finger.
Step 2: Carving the Design
-
Outline the Main Heart:
With a needle tool or skewer, very lightly sketch the outline of a large heart in the center. Don’t press deep yet; just mark where you want it to go. -
Carve the Grooves:
Once happy with the placement, go over your sketch with a carving tool to deepen the lines. Use a U-shaped tool if you have one to create that scooped-out look, or simply press firmly with a dull pencil. -
Clean the Furrows:
As you carve, small crumbs of clay will accumulate in the grooves. Gently brush these away with a soft paintbrush or your finger so the lines stay crisp. -
Add Small Hearts:
Carve two smaller, whimsical hearts on either side of the main heart. Keep them simple and slightly asymmetrical to enhance the handmade feel. -
Radiating Lines:
Add short, straight lines radiating outward from the top of the main heart, resembling sun rays. Vary their lengths slightly for a natural look. -
Texture with Dots:
Using the point of your tool, poke random shallow dots scattered across the surface. Focus them around the hearts to add visual interest without overcrowding the design.
Golden Glow
After the clay is dry, mix gold acrylic paint with a tiny bit of water and carefully paint inside the carved heart grooves for a luxurious, gilded finish.
Step 3: Finishing Touches
-
Initial Drying:
Place the plaque on a flat board to dry. I find that flipping it over gently after about 6 hours helps it dry evenly and prevents warping. -
Sanding:
Wait 24-48 hours until the clay is bone dry and hard. Gently sand the edges and the surface with fine-grit sandpaper to remove any unwanted ridges or fingerprints. -
Dusting Off:
Wipe the plaque down with a dry cloth to remove all proper sanding dust before proceeding. -
Sealing:
To protect your work, apply a thin coat of clear matte sealant. This helps preserve the raw look of the clay while protecting it from moisture. -
Stringing:
Cut a length of jute twine or cord. Thread the ends through the holes from the front to the back. -
Knotting:
Tie a secure knot on each end of the twine at the back of the plaque. Pull tight to ensure the knots are larger than the holes.
Hang this sweet creation in a sunny spot where the light can catch the texture


Gaming Charm Set for His Keys
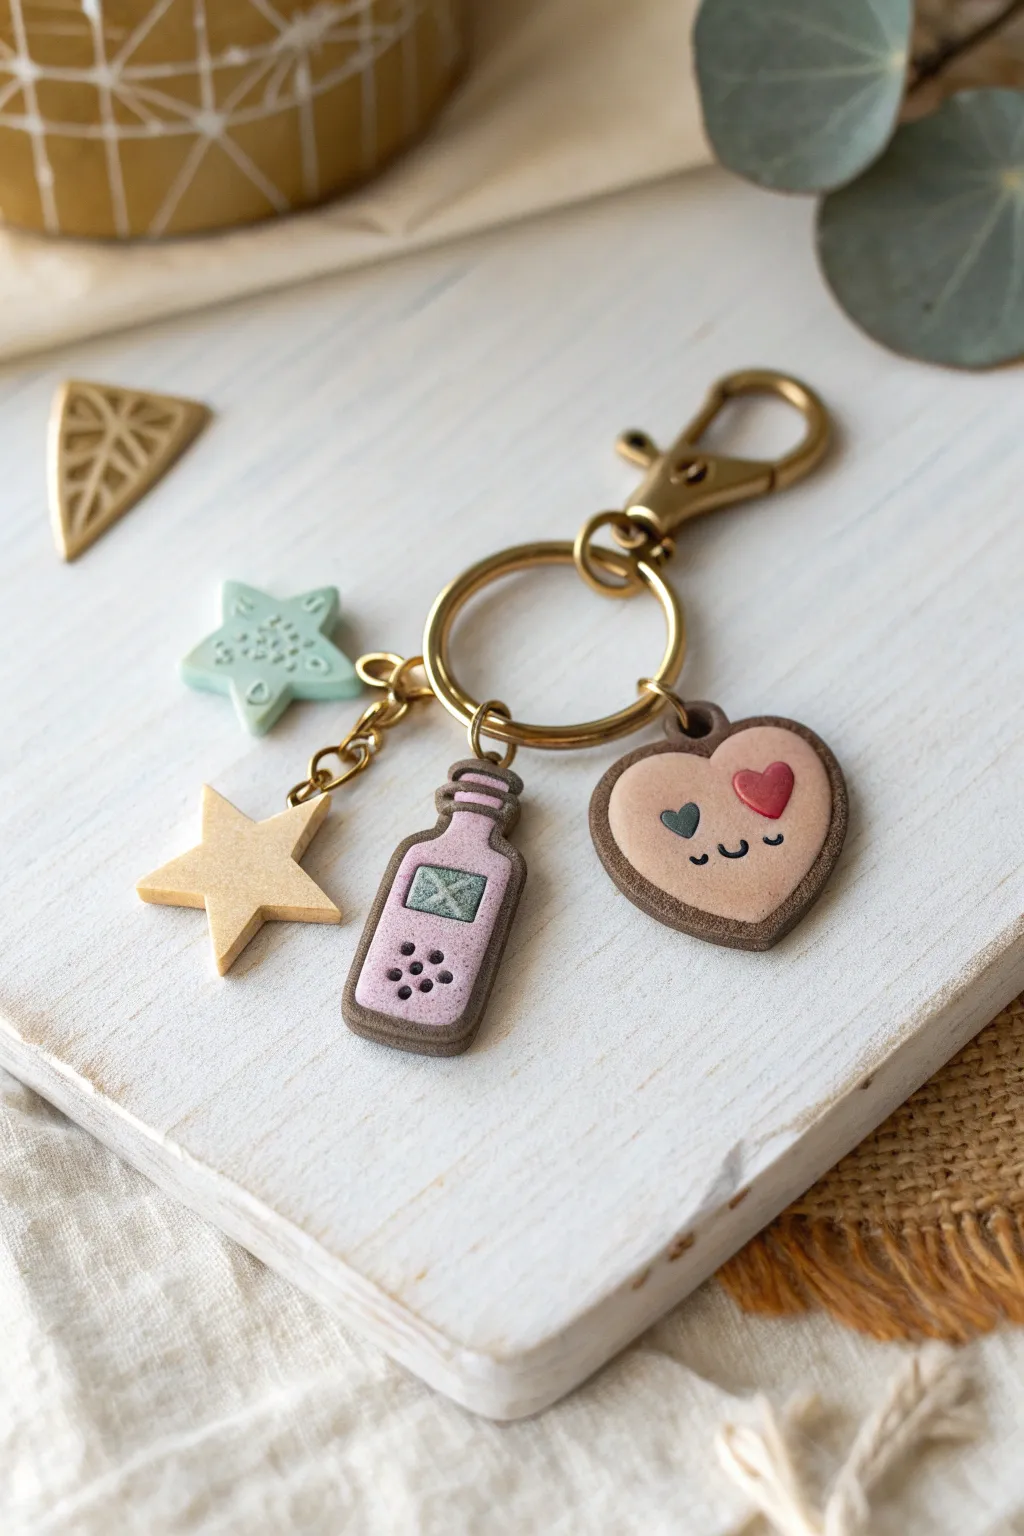
Surprise your player two with this adorable, nostalgic keychain set featuring a winking heart, a tiny gaming potion bottle, and celestial accents. This polymer clay project combines charm with a touch of retro gaming aesthetic, making it the perfect sentimental gift for his keys.
Step-by-Step
Materials
- Polymer clay (beige/tan, pastel pink, mint green, gold/mustard, dark brown, red, dark green)
- Clay roller or pasta machine
- Precision craft knife or clay blade
- Small heart cutter (optional)
- Small star cutter
- Dotting tool or ball stylus
- Needle tool
- Gold keychain hardware (large ring, lobster clasp, jump rings)
- Pliers (round nose and flat nose)
- Oven for baking
- Liquid polymer clay (optional, for bonding)
Step 1: Sculpting the Retro Heart
-
Base shape:
Condition and roll out a sheet of beige clay to about 3-4mm thickness. Use a heart cutter or a hobby knife to cut out a smooth, rounded heart shape. -
Add the border:
Roll a very thin snake of dark brown clay. Carefully wrap this around the entire perimeter of the beige heart, gently pressing to adhere it without flattening the coil too much. -
Create the face:
For the winking eye and mouth, roll incredibly thin threads of dark brown clay. Curve one into a ‘U’ shape for the open eye and the mouth, and place them gently using a needle tool. -
Cheek details:
Form a tiny red heart for one cheek and a tiny dark green heart for the winking eye/cheek accent. Position them on the face and press very lightly to secure. -
Add hardware loop:
Insert a small jump ring or create a clay loop at the top of the heart before baking, or poke a hole through the top using a needle tool.
Smudge Patrol
To remove fingerprints before baking, lightly brush the raw clay with a little cornstarch or baby oil. This smooths the surface without altering the shape.
Step 2: Crafting the Potion Bottle
-
Bottle body:
Roll out pastel pink clay and cut a rectangle with rounded corners. Cut a smaller, narrower rectangle for the neck and attach it to the top. -
Outer framing:
Similar to the heart, roll a thin snake of dark brown clay. Wrap it around the entire outline of the bottle shape to create a cartoonish, defined border. -
Screen detail:
Cut a tiny square of mint green clay. Use your needle tool to impress an ‘X’ shape into it, mimicking a pixelated screen or sparkle, and place it on the upper half of the bottle. -
Control buttons:
Use a dotting tool to impress four small holes in a diamond pattern on the lower half of the pink bottle, giving it that classic controller vibe. -
Bottle cap:
Add a small horizontal strip of dark brown clay near the top of the neck to simulate the bottle’s rim or cap threads. -
Pierce the top:
Use your needle tool to make a hole through the top neck of the bottle so it can be hung later.
Level Up: Glossy Finish
After baking, apply a coat of UV resin or polyurethane gloss glaze to the ‘screen’ of the bottle and the red heart cheek for a realistic, shiny glass effect.
Step 3: Forming the Stars
-
Mint star:
Roll out mint green clay. Use a small star cutter to create a shape. This one needs texture, so use a clean toothbrush or needle tool to stipple the surface gently. -
Gold star:
Roll out gold or mustard-colored clay and cut a second star. Keep this surface smooth for contrast. -
Drill holes:
Poke a hole near the top point of both stars using your needle tool to accommodate the jump rings.
Step 4: Baking and Assembly
-
Bake:
Place all charms on a tile or parchment-lined baking sheet. Bake according to your polymer clay package instructions (usually 275°F/135°C for 15-30 minutes). -
Cool down:
I usually let the pieces cool completely inside the oven with the door open to prevent cracking from thermal shock. -
Prepare chain:
Cut a short length of small chain links for the stars. This staggered length adds visual interest when hanging. -
Connect stars:
Using pliers, open a jump ring, thread it through the mint star and the bottom of the chain, and close it. Attach the gold star to a slightly higher link on the same chain. -
Connect main charms:
Attach the heart and the potion bottle directly to the large main keyring using individual jump rings. -
Final assembly:
Attach the top of the star chain to the main keyring. Finally, attach the lobster clasp to the top of the keyring structure.
Your custom gaming charm set is now ready to add a personal touch to his everyday carry

The Complete Guide to Pottery Troubleshooting
Uncover the most common ceramic mistakes—from cracking clay to failed glazes—and learn how to fix them fast.
Mini Pizza Slice “You Complete Me”

This adorable dual keychain set features a realistic polymer clay pizza slice and a complementary wooden heart, perfect for sharing with your significant other. The textured cheese and tiny toppings make the pizza look good enough to eat, while the simple message adds a sweet, personal touch.
Detailed Instructions
Materials
- Polymer clay (white/translucent mix, terracotta/brown for crust, red, green, black)
- Wooden heart shape (pre-cut with hole)
- Acrylic paint (brown, burnt umber)
- Liquid polymer clay (optional, for sauce)
- Keychains with jump rings and screw eye pins
- Pliers and wire cutters
- Needle tool or toothpick
- Toothbrush (for texturing)
- Fine-grit sandpaper
- Gloss glaze or varnish
- Dotting tool or small ball styling tool
- Paintbrush (very fine)
- Rolling pin or pasta machine
Step 1: Sculpting the Pizza Slice
-
Mix the dough color:
Start by mixing white polymer clay with a tiny amount of ochre or beige to create a light dough color. Roll this out into a thick sheet, about 1/4 inch thick. -
Create the crust base:
Cut a triangle shape for your slice. For the crust edge, roll a separate snake of clay in a slightly darker terracotta shade and attach it to the wide end of the triangle. Blend the seam underneath so it looks like one piece. -
Add texture:
Use an old toothbrush to gently tap the surface of the crust and the bottom of the slice. This creates a realistic baked bread texture rather than smooth plastic. -
Shade the crust:
Before adding toppings, I like to use soft pastels or a light wash of brown acrylic paint to shade the crust rim, giving it that ‘oven-baked’ golden look. -
Prepare the cheese:
Mix white clay with a translucent clay to make the cheese. Roll it out thinly and tear the edges slightly before placing it on the slice, leaving the crust exposed. Press it down so it looks melted. -
Make the sauce:
If you want visible sauce peeking through, mix red clay with some liquid clay (or use red acrylic paint) and dab it near the edges of the cheese.
Hardware Help
If the eye pin feels loose after baking, pull it out, add a dab of superglue to the shaft, and re-insert it firmly into the hole for a permanent bond.
Step 2: Adding Toppings
-
Create pepperoni slices:
Roll a very thin snake of specific red-brown clay mixture. Slice tiny discs. Use a needle tool to poke small indentations in the surface of each pepperoni for texture. -
Make the olives:
Roll tiny balls of black or dark grey clay. Press them flat and use a small straw or tool to punch a hole in the center, creating the olive ring shape. -
Sculpt the basil leaf:
Take a tiny piece of green clay, flatten it into a teardrop shape, and use a needle tool to impress a central vein down the middle. Gently curve the leaf so it doesn’t lie perfectly flat. -
Assemble the toppings:
Arrange your pepperoni, olives, and basil leaf on the cheese. Press them in gently so they bond with the cheese layer. -
Add extra cheese chunks:
Chop up tiny bits of your cheese-colored clay and sprinkle them around the empty spaces to look like shredded mozzarella. -
Insert hardware:
Carefully screw an eye pin into the top center of the crust. If the clay is soft enough, you can just push it in; otherwise, twist gently.
Level Up
Create a stronger concept by cutting a triangle out of the wooden heart that perfectly matches the size of the clay pizza slice you made.
Step 3: Finishing Touches
-
Bake the clay:
Bake your pizza slice according to your polymer clay package instructions (usually 275°F/135°C for 15-30 minutes). Let it cool completely. -
Prepare the wooden heart:
Take your pre-cut wooden heart. Sand the edges lightly if they feel rough. Ensure there is a hole drilled at the top for the keychain. -
Add the text:
Using a very fine brush and dark brown acrylic paint (or a wood burning tool if you have one), carefully write ‘YOU Complete ME’ with ‘Complete’ stacked in the middle. Keep the lettering whimsical and hand-written. -
Glaze the pizza:
Once the pizza is cool, apply a coat of gloss glaze to the toppings and cheese to make them look greasy and delicious. Leave the crust matte for contrast. -
Attach the hardware:
Use pliers to open the jump rings on your keychain findings. Attach one ring to the eye pin in the pizza and another to the hole in the wooden heart. -
Secure everything:
Close the jump rings tightly with your pliers to ensure the charms won’t fall off during daily use.
Now you have a charming set of keychains to keep or gift to your favorite pizza lover
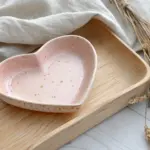
Couple Animal Totem Trinket Dish
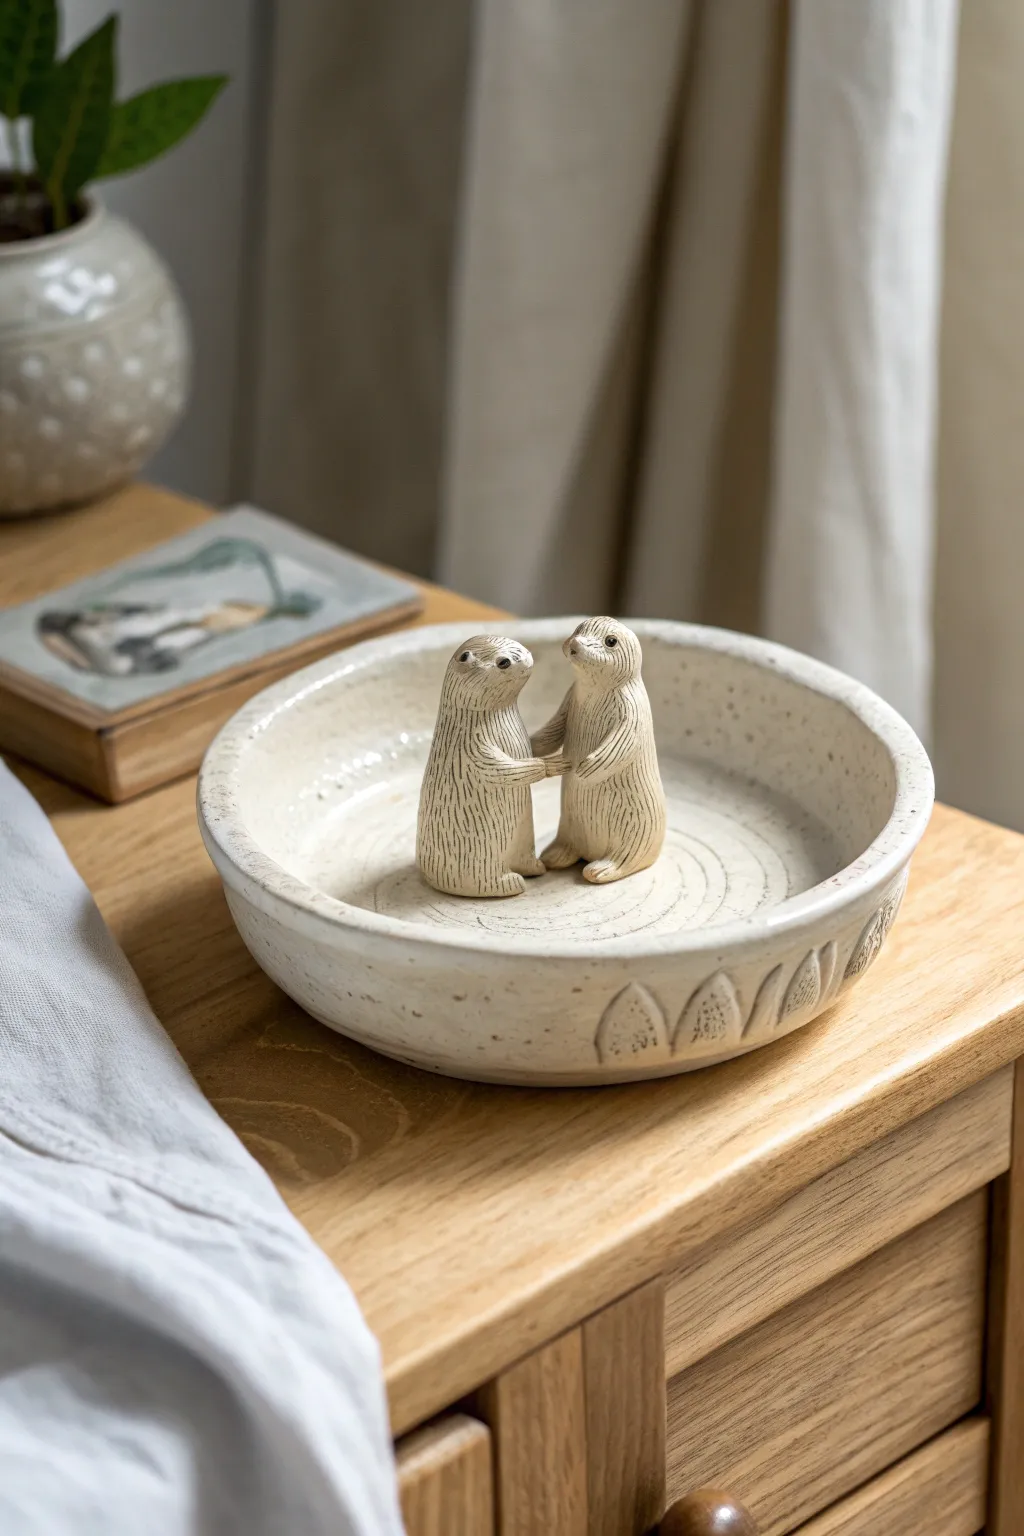
This adorable trinket dish features two otters holding paws, symbolizing connection and partnership. The piece combines a functional catch-all bowl with a sculptural centerpiece, finished in a speckled cream glaze that highlights the hand-carved textures.
Step-by-Step Tutorial
Materials
- Speckled buff stoneware clay
- Pottery wheel (optional, can be hand-built)
- Rib tool
- Needle tool
- Scoring tool or serrated kidney
- Slip (clay and water mixture)
- Small carving tool or sgraffito tool
- Modeling tool (wood or plastic)
- Clear or transparent cream glaze
- Kiln
Step 1: Forming the Base Dish
-
Creating the bowl form:
Begin with a ball of speckled clay approximately the size of a large orange. You can either throw a shallow, flat-bottomed bowl on the wheel or form a pinch pot, flattening the bottom and pulling the walls up evenly to about 1.5 inches high. -
Refining the rim:
If wheel-thrown, trim the rim so it is slightly thick and rounded. If hand-building, use a damp sponge to smooth the lip of the bowl, ensuring it is even all the way around. -
Adding interior texture:
While the clay is still soft, use a trimming tool or a stiff brush to create a subtle spiral texture on the interior floor of the bowl, starting from the center and working outward. This mimics ripples in water. -
Sculpting the exterior details:
On the lower exterior edge of the bowl, use a small loop tool or carving tool to carve repeating geometric leaf or petal shapes. Press gently to create relief without piercing through the wall.
Step 2: Sculpting the Otters
-
Forming the bodies:
Roll two small cylinders of clay, roughly 2 inches tall. Narrow them slightly at the top to create the neck and head area, giving them a pear-like silhouette. -
Shaping the heads:
Gently pinch the top of each cylinder to form a snout. Use your thumbs to define the eye sockets and shape small, rounded ears on the sides of the head. -
Texturing the fur:
Using a needle tool or a very fine carving tool, scratch vertical lines down the length of both bodies to simulate wet fur texture. Leave the faces relatively smooth for better definition. -
Adding tails:
Roll two small tapered coils for tails. Score and slip them onto the back bottom of each otter, curving them slightly to help stabilize the figures so they stand securely.
Fur Texture Tip
Vary the pressure on your needle tool when drawing the fur. Deeper lines will catch more glaze and create darker contrast, making the otters look more realistic.
Step 3: Assembly and Finishing
-
Positioning the pair:
Place the two otters in the center of the bowl to test their spacing. They should be facing each other, close enough that their arms can reach. -
Attaching to the base:
Score the bottom of the otters and the center of the bowl thoroughly. Apply slip, press the otters firmly into place, and smooth the seam where their feet meet the bowl floor. -
Creating the arms:
Roll small coils for arms. Attach them so they reach out and touch the other otter’s paws. You want them to look like they are holding hands or supporting each other. -
Defining the facial features:
Use a needle tool to poke small holes for eyes and nostrils. I find that keeping the faces simple adds to their charm and avoids them looking too cartoonish. -
Drying slowly:
Cover the piece loosely with plastic to let it dry very slowly. This is crucial because the thick figures dry slower than the thin bowl, and rushing this can cause cracks at the join. -
Bisque firing:
Once bone dry, fire the piece in the kiln to bisque temperature (usually cone 04). -
Glazing:
Dip the entire piece in a clear or transparent cream glaze. Wipe the foot of the bowl clean with a damp sponge. -
Final firing:
Fire again to the maturity temperature of your clay and glaze (typically cone 5 or 6 for stoneware). The glaze should break over the textures, highlighting the fur and carving.
Make it Personal
Carve initials or a special date into the spiral on the floor of the bowl before attaching the otters for a hidden, romantic customized detail.
This sweet handmade dish serves as a daily reminder of your bond every time he sets down his keys


What Really Happens Inside the Kiln
Learn how time and temperature work together inside the kiln to transform clay into durable ceramic.
Two-Piece “LO” and “VE” Desk Decor
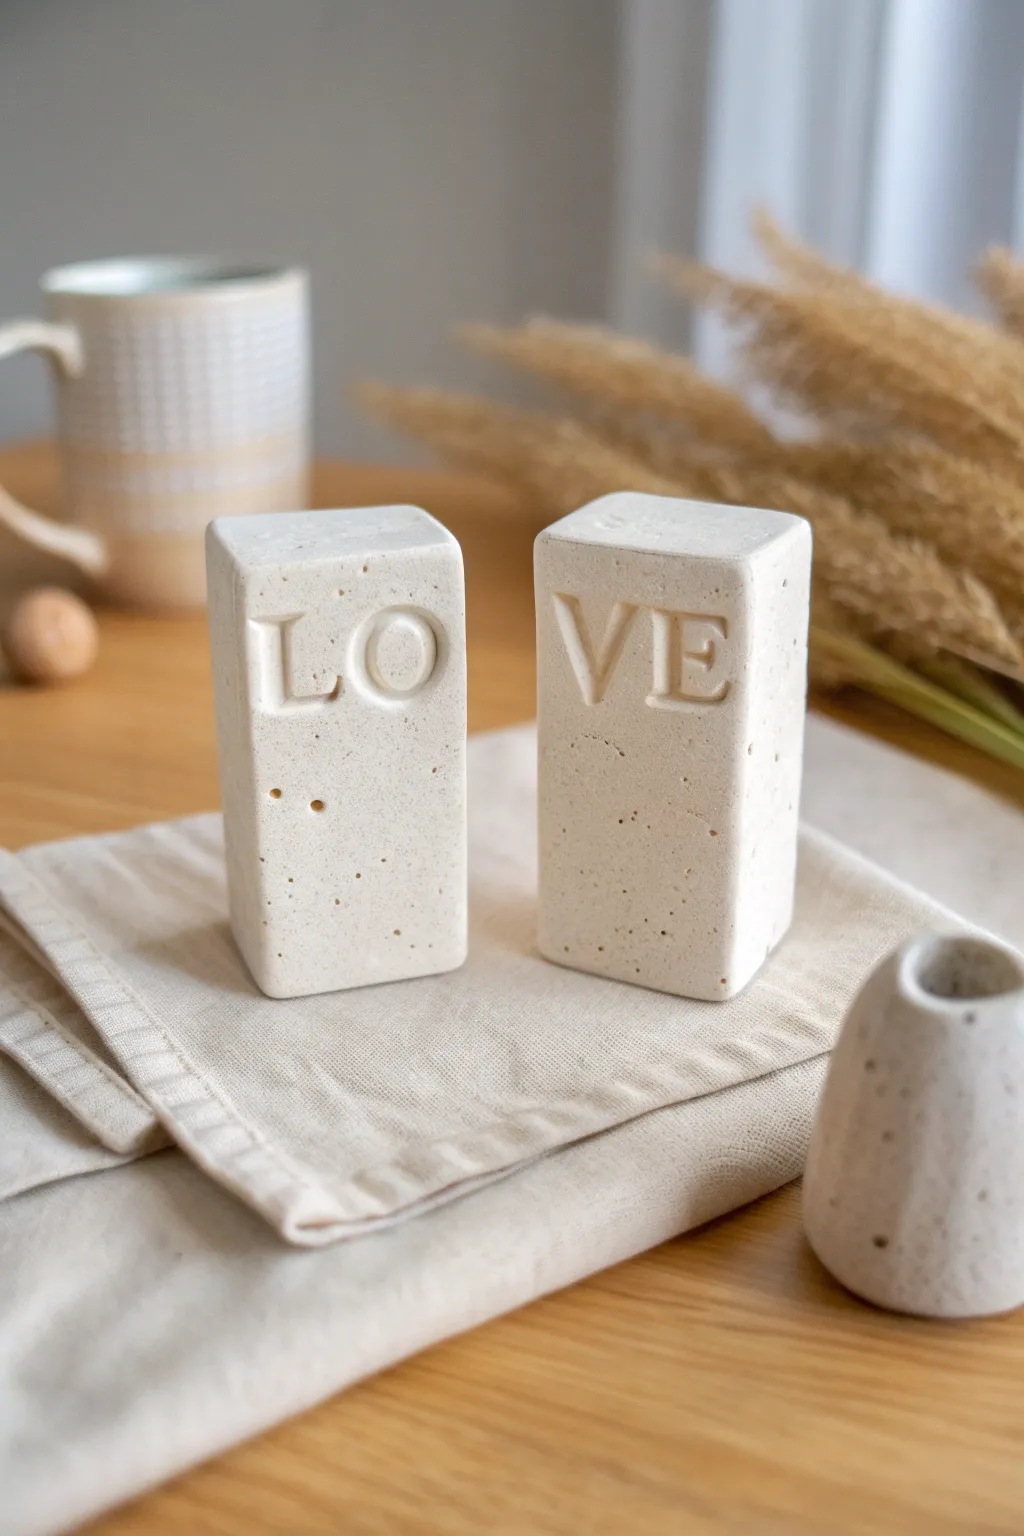
Create a modern, industrial-chic desk accessory that spells out your affection in a subtle way. These two sturdy blocks feature a faux-stone finish and deeply impressed lettering, making them a perfect, understated romantic gift.
Detailed Instructions
Materials
- Air-dry clay (white or light grey)
- Black pepper or dried coffee grounds (for speckling)
- Ruler or straight edge
- Rolling pin
- Sharp craft knife
- Alphabet stamp set (large serif font)
- Fine-grit sandpaper (220-400 grit)
- Matte clear sealant spray
- Small bowl of water
- Smooth work surface
Step 1: Preparing the Clay
-
Condition the Clay:
Begin by kneading a large handful of air-dry clay to warm it up. While kneading, sprinkle in a pinch of coarse black pepper or dried coffee grounds. Fold the clay over repeatedly to distribute these specks evenly throughout the mass, creating that natural stone look. -
Shape the Base:
Roll or press the clay into a thick, rectangular log. You want this to be quite substantial, roughly 1.5 to 2 inches square for stability. Tap the log against your table to flatten the sides. -
Slice into Blocks:
Using a ruler to measure, cut the long log into two identical pillars with your craft knife. Aim for a height of about 3 to 4 inches for each block so they have a nice vertical presence. -
Refine the Edges:
Dip your finger in a little water and smooth out any rough cut lines. Gently tap each block on the table again to ensure the tops and bottoms are perfectly flat and the corners are crisp, not rounded.
Sticky Stamps?
If clay sticks inside your letter stamps, lightly dust the stamp face with cornstarch or brush it with a tiny bit of mineral oil before pressing it into the wet clay.
Step 2: Adding the Typography
-
Position the First Stamps:
Take your ‘L’ and ‘O’ stamps. align them visually on the upper half of the first block. You want them centered horizontally but sitting near the top edge for that modern typographic feel. -
Impress the letters:
Press the stamps firmly and evenly into the clay. Rock them ever so slightly to ensure the serif edges catch, then pull straight back to avoid dragging the clay. -
Repeat for the Second Block:
Repeat the process with the ‘V’ and ‘E’ stamps on the second block. Place the two blocks side-by-side briefly to ensure the text height aligns perfectly across both pieces. -
clean Up Impressions:
If the stamping pushed up small ridges of clay around the letters, gently smooth them down with a damp fingertip or a soft rubber tool without distorting the letter shape.
Level Up: Concrete Look
For a darker industrial vibe, mix a drop of black acrylic paint into the wet clay along with the pepper. Don’t mix fully—leave streaks specifically for a marbled effect.
Step 3: Finishing Touches
-
Drying Phase:
Set the blocks upright on a drying rack or a sheet of parchment paper. Let them dry completely for 24-48 hours. I find flipping them onto their sides halfway through helps the bottom dry thoroughly. -
Sanding:
Once bone dry, take your fine-grit sandpaper and lightly sand the surfaces. This will expose more of the speckled inclusions and soften the sharpest exterior edges just a touch for a finished look. -
Dust and Seal:
Wipe away all clay dust with a dry cloth. Take the blocks to a well-ventilated area and apply a light coat of matte clear sealant. This protects the ‘stone’ finish and keeps the speckles in place.
Place these on a desk or shelf for a solid reminder of your bond