When boys get their hands in clay, you can lean into projects that feel like toys, treasures, and creatures—stuff they’ll actually want to keep playing with. Here are my go-to clay ideas for boys that balance simple shapes with big personality and lots of room for imagination.
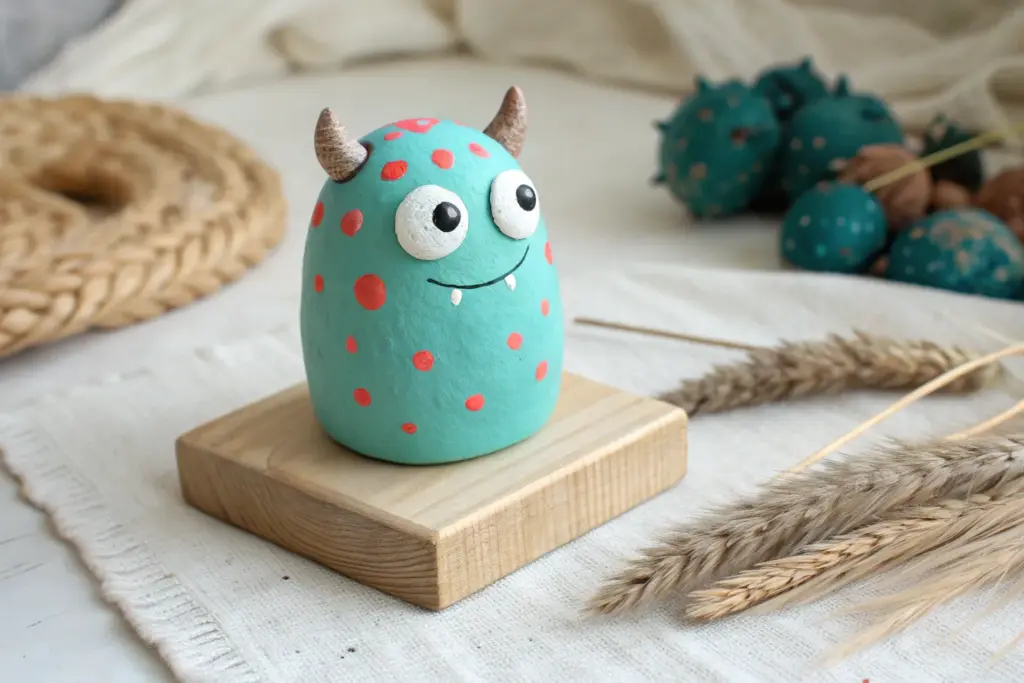
Monster Mouth Pinch Pot

This goofy green monster isn’t just a fun sculpture; it serves as a functional ‘keeper’ for loose change, cool rocks, or other small treasures. With its wide, toothy grin and surprised expression, it adds a playful pop of color to any windowsill.
Step-by-Step
Materials
- Air-dry clay (white or terracotta)
- Acrylic paints (bright green, white, black, dark brown)
- Small rolling pin
- Clay carving tools or a plastic knife
- Small cup of water (for smoothing)
- Paintbrushes (flat shader and fine detail)
- Matte or satin varnish/sealant
- Two small wooden dowels or twigs (optional for horns)
Step 1: Forming the Body
-
Prepare the clay:
Start with a ball of clay roughly the size of a grapefruit. Knead it well with your hands to warm it up and remove any air bubbles, which helps prevent cracks later. -
Create the base pinch pot:
Push your thumb into the center of the ball, but not all the way through to the bottom. Pinch the clay between your thumb and fingers, rotating the ball as you go to widen the opening. -
Shape the monster:
Instead of keeping it a perfect bowl, gently squeeze the sides to elongate the shape slightly upwards, making it look more like an egg or a rounded triangle. -
Form the mouth:
Turn the pot on its side so the opening faces forward. Use your fingers to smooth the rim, pulling the bottom lip forward a tiny bit to create a deep cavern for holding treasures.
Slip & Score
Always scratch up the clay surface (score) and add water (slip) before attaching parts like eyes or teeth. This acts like glue and stops pieces from popping off as they dry.
Step 2: Adding Features
-
Make the teeth:
Roll tiny balls of clay, about the size of peas. You will need about 10-12 for the top row and another 10-12 for the bottom row. -
Attach the teeth:
Score the inside of the lips (scratch hatching lines) and dab a little water there. Press the tiny clay balls firmly onto the upper and lower rims to create the teeth. -
Smooth the teeth:
Gently gently flatten the tops of the teeth so they aren’t perfect spheres, blending the back of each tooth slightly into the gum line for a stronger hold. -
Create the horns:
Roll two small cylinder shapes for horns. Alternatively, you can press small wooden pegs or twig pieces into the top of the head for a mixed-media look. -
Attach the horns:
Score and slip the top of the head where the horns will go. Press them on firmly. I find using a little extra water here helps blend the seam so it looks like one solid piece. -
Final smoothing:
Dip your finger in water and run it over the entire outside surface of the monster to remove any fingerprints or cracks. Let the piece dry completely (24-48 hours).
Step 3: Painting and Finishing
-
Base coat:
Once dry, paint the entire exterior and the inside of the mouth with a bright, leafy green acrylic paint. You may need two coats for opaque coverage. -
Paint the teeth:
Carefully paint each individual tooth white. A small, flat brush works best here to avoid getting white on the green gums. -
Paint the horns:
If you made clay horns, paint them a dark brown or tan color to simulate wood or bone. -
Add the eyes:
Paint two large white circles directly above the mouth. Let the white dry completely before proceeding. -
Define the eyes:
Outline the white circles with thin black paint. Add a small black dot in the center of each for the pupil. -
Seal the project:
Allow all paint to dry fully. Apply a coat of matte or satin varnish to protect the paint from chipping when coins are tossed inside.
Make it Glow
Use glow-in-the-dark acrylic paint for the eyes and teeth. The monster will look deceptively normal during the day but will have a spooky glowing grin at night.
Now your monster mouth is ready to gobble up spare change and keep your desk tidy


Robot Desk Buddy Sculpture

This charming, blocky robot sculpture adds a futuristic yet handmade touch to any desk setup. With its faux-metallic finish and colorful button details, it’s a perfect beginner sculpture project that looks surprisingly sophisticated when complete.
Detailed Instructions
Materials
- Polymer clay (white or grey base)
- Acrylic paints (Silver/Gunmetal, Red, Teal, Orange)
- Sculpting tools (needle tool, small ball stylus)
- A small piece of thick armature wire or a cut paperclip
- Aluminum foil (for the core)
- Modeling knife
- Paintbrushes (small detail and flat shader)
- Gloss varnish (optional)
Step 1: Sculpting the Head & Body
-
Core construction:
Start by balling up two small pieces of aluminum foil, shaping one into a cube (about 1 inch) and one into a slightly taller rectangular prism. This saves clay and keeps the figure light. -
Wrapping the head:
Roll out a sheet of your base clay to about 3mm thickness. Carefully wrap the foil cube, smoothing the seams with your thumb until you have a perfect, seamless cube for the head. -
Forming the torso:
Repeat the process for the rectangular body piece, ensuring the edges are slightly rounded but still distinctively robotic. -
Connecting pieces:
Insert a small piece of wire or a toothpick into the top center of the torso. Push the head onto this support to join them securely, leaving a tiny gap to suggest a neck mechanism.
Smooth & Clean
Before baking, use a brush dipped in a little baby oil (for polymer clay) or water (for air-dry clay) to smooth out fingerprints for a truly manufactured look.
Step 2: Adding Robot Features
-
Face detailing:
Roll two small balls of clay and flatten them slightly for eyes; press them onto the face. Use a needle tool or knife to indent a small rectangular mouth area below them. -
The teeth:
Roll three tiny ‘tic-tac’ shapes of clay and press them vertically into the mouth indentation to create the robot’s grill-like teeth. -
Ear button:
Create a disk shape slightly larger than the eyes. Press this onto the side of the head, then add a smaller, raised button shape in the center of the disk. -
Torso buttons:
Fashion four small, pill-shaped or square buttons. Arranging them in a grid on the chest, I like to press them in firmly so they don’t pop off later. -
Antenna assembly:
Taken a small snippet of wire or a pin, insert it into the top of the head. Add a tiny ball of clay to the very tip and a small cone shape at the base where it meets the head.
Step 3: Limbs & Feet
-
Shoulder pads:
Make two half-circles or thick crescents of clay. Attach these to the upper sides of the torso to act as shoulder joints. -
Arms:
Roll two simple logs of clay for arms. Attach them under the shoulder pads, letting them hang straight down. Use a knife to score a line halfway down for the ‘elbow’ joint. -
Creating feet:
Form two thick, rectangular blocks for the feet. Place the body onto these feet, pressing down gently to bond them. Ensure the robot stands stable on a flat surface. -
Baking or drying:
Follow the instructions for your specific clay. If using polymer clay, bake at the recommended temperature (usually 275°F/130°C) for about 30 minutes. Let it cool completely.
Glow Up
Paint the eyes and chest buttons with glow-in-the-dark acrylic paint so your robotic friend watches over your desk at night.
Step 4: Painting the Metallic Finish
-
Base coat:
Paint the entire robot with a metallic silver or gunmetal grey acrylic paint. You may need two coats for full opacity. -
Weathering wash:
Mix a tiny drop of black paint with water. Brush this over the silver, then immediately wipe the surface with a paper towel. The dark paint will stay in the crevices, making the robot look aged. -
Color details:
Carefully paint the eyes teal, the ear button red, and the chest buttons in alternating red, teal, and orange. Use your smallest brush here. -
Finishing touches:
Add a tiny white dot to each eye for a reflection ‘sparkle’. Paint the antenna tip silver if it wasn’t already covered. -
Sealing:
Once dry, apply a coat of gloss varnish to the eyes and buttons to make them look like glass or plastic, leaving the body matte or satin.
Now you have a sturdy little desk companion ready to handle any heavy lifting.


Race Car Pencil Holder

Rev up your desk organization with this charming race car pencil holder. This project combines slab building with relief sculpting to create a functional piece that looks like a vintage toy, featuring rustic unglazed clay accents and pop-of-color details.
How-To Guide
Materials
- Red earthenware or terracotta clay
- Rolling pin
- Clay knife or needle tool
- Slip and score tool (or a fork)
- Small circular cutters (or bottle caps)
- Teal or turquoise underglaze
- Small detail brushes
- Clear matte glaze (optional)
- Ruler
- Canvas mat or work surface
Step 1: Building the Cylinder
-
Roll the slab:
Start by rolling out a medium-sized slab of clay to an even thickness, about 1/4 inch. Ensure it’s smooth and free of air bubbles. -
Cut the rectangle:
Measure and cut a rectangle approximately 4 inches tall and 9 inches long. This will form the body of your pencil holder. -
Form the tube:
Wrap the rectangle around a cylindrical form (like a soda can wrapped in paper) or simply curve it by hand to create a tube. Overlap the edges slightly. -
Join the seam:
Score the overlapping edges thoroughly, apply slip, and press firmly to join. Smooth the seam inside and out so it disappears. -
Add the base:
Place your cylinder on a fresh piece of rolled clay. Trace around the bottom, cut out the circle, and attach it to the cylinder base using the slip and score method.
Weight Watcher
Wait for final assembly until the cylinder is leather hard. If the cup wall is too soft, the weight of the solid car sculpture will cause the cylinder to sag or warp.
Step 2: Sculpting the Car
-
Shape the car body:
Take a lump of clay and shape it into a fastback car silhouette—think of a half-oval shape that is flatter at the front and rounder at the back. It should cover the lower half of your cylinder’s front. -
Hollow it out:
To prevent explosions in the kiln and reduce weight, gently hollow out the back of the car form where it will attach to the cup. -
Attach the body:
Score the front of your cylinder and the back of your car form aggressively. apply slip, and press the car firmly onto the cup. Blend the edges of the car into the cup body using a modeling tool. -
Add wheel arches:
Roll small coils and outline the wheel wells, blending them onto the car body to create raised fenders. -
Create wheels:
Roll four thick buttons of clay. Attach two to the visible side of the car. Use a small tool to poke hole patterns into them for ‘hubcaps’. -
Carve details:
Using a needle tool, carve in door lines, the front hood vents, and the bumper shape. Define the windows by pressing the clay in slightly to create a recessed area.
Step 3: Decoration & Finishing
-
Carve the rim pattern:
Near the top rim of the cylinder, carve two parallel horizontal lines around the circumference. Between these lines, carve a repeating leaf or chevron pattern. -
Clean up:
Smooth away any rough crumbs of clay with a slightly damp sponge, but leave the texture somewhat rustic. -
Bisque fire:
Allow the piece to dry slowly and completely before bisque firing to cone 04. -
Apply accent color:
Paint teal underglaze onto the wheels, the windows, the headlight areas, and the background of the rim pattern. Wipe back any excess with a sponge if you want a weathered look. -
Highlighting:
Fill the carved lines on the rim pattern with the teal color to make the design pop, leaving the raised leaf shapes the natural clay color. -
Final White Touches:
I like to use a tiny bit of white underglaze for the front bumper smile and window outlines to add contrast. -
Final glaze fire:
Apply a clear matte glaze if desired, or leave the terracotta bare for a tactile finish, then fire to the clay’s maturity temperature.
License To Create
Personalize the vehicle! Instead of a generic bumper, carve a small rectangle on the back or front and stamp the recipient’s initials or birth year as a license plate.
This sturdy little vehicle is now ready to park on a desk and keep supplies organized


Rocket Ship Coin Bank
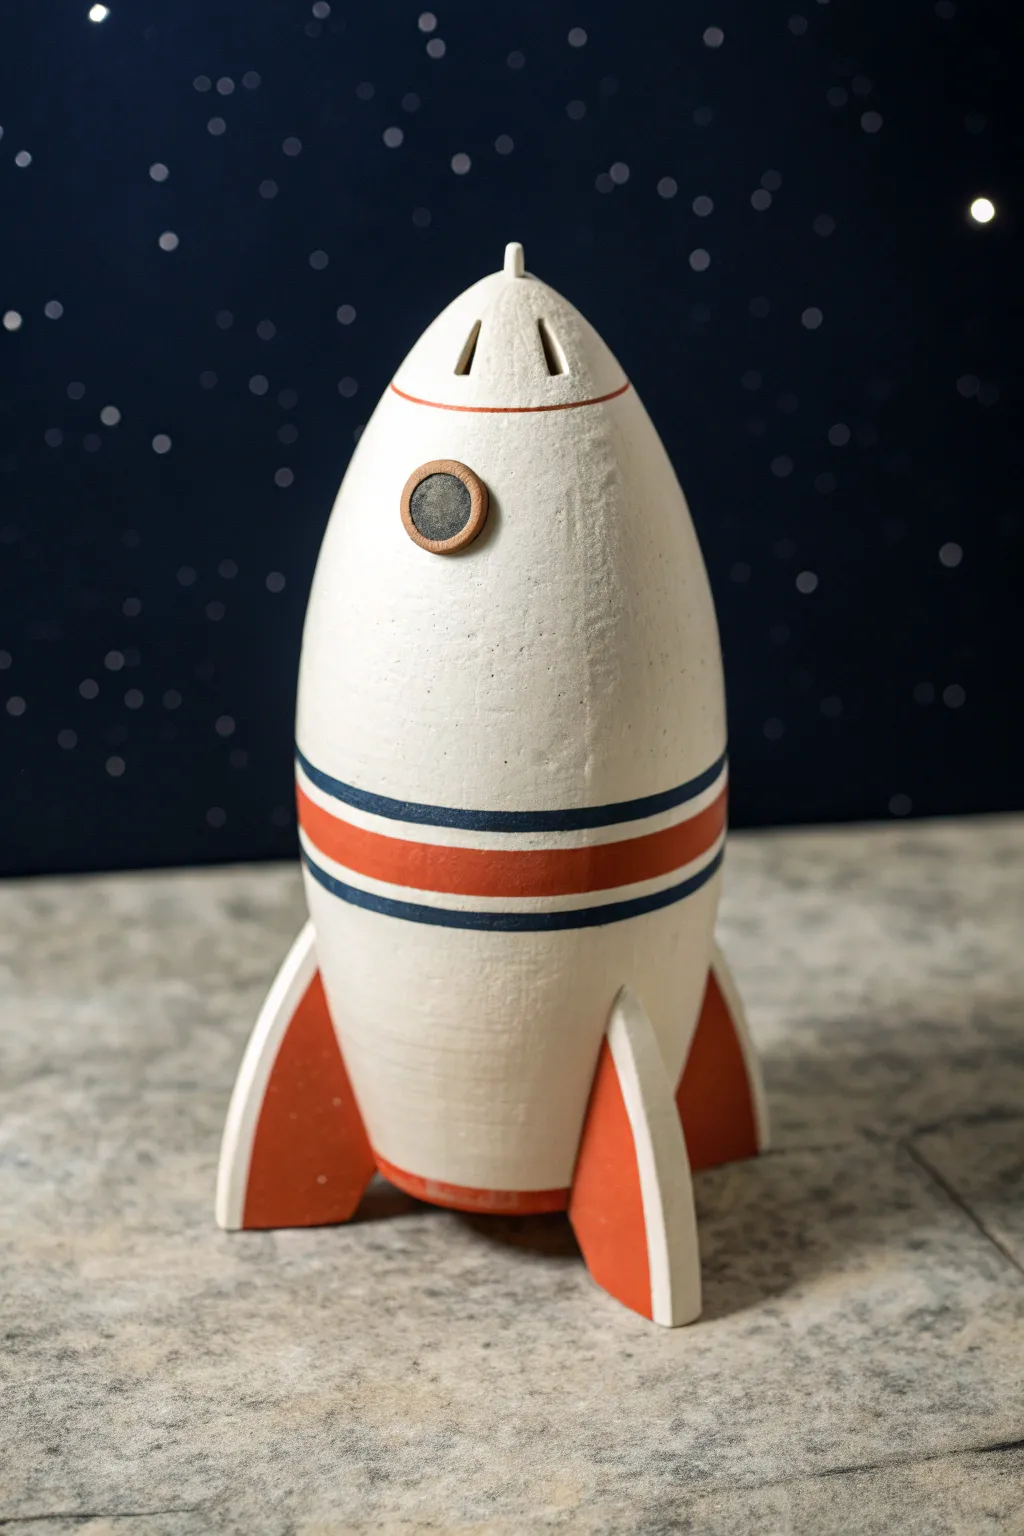
Blast off into savings with this classic, retro-style rocket ship bank that looks like it flew straight out of a 1950s sci-fi comic. With its sturdy tripod fins and clean, geometric stripes, this project is perfect for teaching pottery basics like coil building or using molds.
Step-by-Step
Materials
- White earthenware or stoneware clay (approx. 2-3 lbs)
- Rolling pin and guide sticks
- Cardboard or poster board (for templates)
- Fettling knife or X-Acto tool
- Slip and scoring tool
- Rib tool (flexible metal or rubber)
- Small circle cutter (approx. 1 inch)
- Underglazes (Bright Orange-Red, Navy Blue, Black)
- Clear transparent glaze
- Paintbrushes (flat shader and fine liner)
- Sponge
Step 1: Forming the Fuselage
-
Create the main body:
Start by forming the main cylinder of the rocket. You can wheel-throw a closed cylinder that tapers at the top, or for hand-building, roll out a slab of clay about 1/4 inch thick. Wrap the slab around a cylindrical form (like a mailing tube covered in newspaper) to create a tall tube. -
Shape the nose cone:
If hand-building, create a cone shape from a separate slab and attach it to the top of your cylinder. Ideally, gently pinch and smooth the clay inward at the top of your cylinder to close it into a rounded point, resembling a bullet shape. -
Smooth the surface:
Using a rib tool, smooth the entire exterior surface. Compressed clay is stronger and provides a better canvas for your retro stripes later. Ensure the seam where you joined the slab is completely invisible. -
Add the coin slot:
Near the top of the nose cone, use a fettling knife to carefully cut two small rectangular slots. I find it helpful to measure your largest coin first to ensure the slot is wide enough before the clay shrinks in the kiln. -
Add the tiny finial:
Roll a very small, short coil of clay and attach it to the very tip of the nose cone using slip and scoring. Round it off to create a little button-like antenna on top.
Step 2: Attaching Fins and Details
-
Cut the fin templates:
Draw a template on cardstock for the fins. They should be triangular but with a slight curve on the outer edge, resembling a shark fin. Cut three identical fins from a clay slab that is slightly thicker than the body slab for stability. -
Attach the fins:
Score the bottom section of your rocket body in three equidistant places. Apply slip and firmly attach the fins. Use a small coil of clay along the seam where the fin meets the body to reinforce the joint, smoothing it out with your finger. -
Check balance:
Stand the rocket up on a flat board. Adjust the fins slightly while the clay is soft to ensure the rocket stands perfectly vertical and doesn’t wobble. -
Create the window:
Roll a small ball of clay and flatten it into a thick disc, or use a small circle cutter. Attach this “porthole” to the upper third of the rocket body. Press the center in slightly to create a rim. -
Dry slowly:
Cover the rocket loosely with plastic. Let it dry very slowly to prevent the fins from warping or cracking away from the body. Once bone dry, bisque fire the piece to cone 04.
Clean Lines Hack
Struggling with wobbly stripes? Use automotive striping tape or thin masking tape on the bisque ware to mask off your lines before painting. Peel it off before glazing.
Step 3: Decoration and Glazing
-
Clean the bisque:
Wipe the bisque-fired rocket with a damp sponge to remove any dust, which can prevent glaze from adhering properly. -
Paint the base coat:
Paint the fins and the very bottom rim of the rocket with three coats of Bright Orange-Red underglaze. Let each coat dry before applying the next. -
Stripe the body:
Using a banding wheel if you have one, paint a thick band of the same Orange-Red around the lower middle of the rocket body. Slow and steady rotation is key here. -
Add accent stripes:
Using a fine liner brush and Navy Blue underglaze, paint thin stripes bordering the top and bottom of the thick red band. Add another thin red line near the top of the nose cone just below the coin slots. -
Detail the window:
Paint the rim of the porthole window with the Orange-Red underglaze. Paint the center circle with Black underglaze to simulate dark glass. -
Apply clear glaze:
Once the underglaze designs are completely dry, dip the entire rocket into a clear transparent glaze or brush on two coats. Avoid glazing the very bottom of the fins where they touch the kiln shelf. -
Final Fire:
Fire the rocket again to the maturity temperature of your clay and glaze (typically cone 05 or 06 for earthenware).
Glow Up
Mix a small amount of glow-in-the-dark pigment into your clear glaze, or use a specialized glow-in-the-dark glaze on the window and stars for a night-light effect.
Once cooled, your stellar creation is ready to safeguard savings for the next big adventure

The Complete Guide to Pottery Troubleshooting
Uncover the most common ceramic mistakes—from cracking clay to failed glazes—and learn how to fix them fast.
Goofy Alien Mini Figures
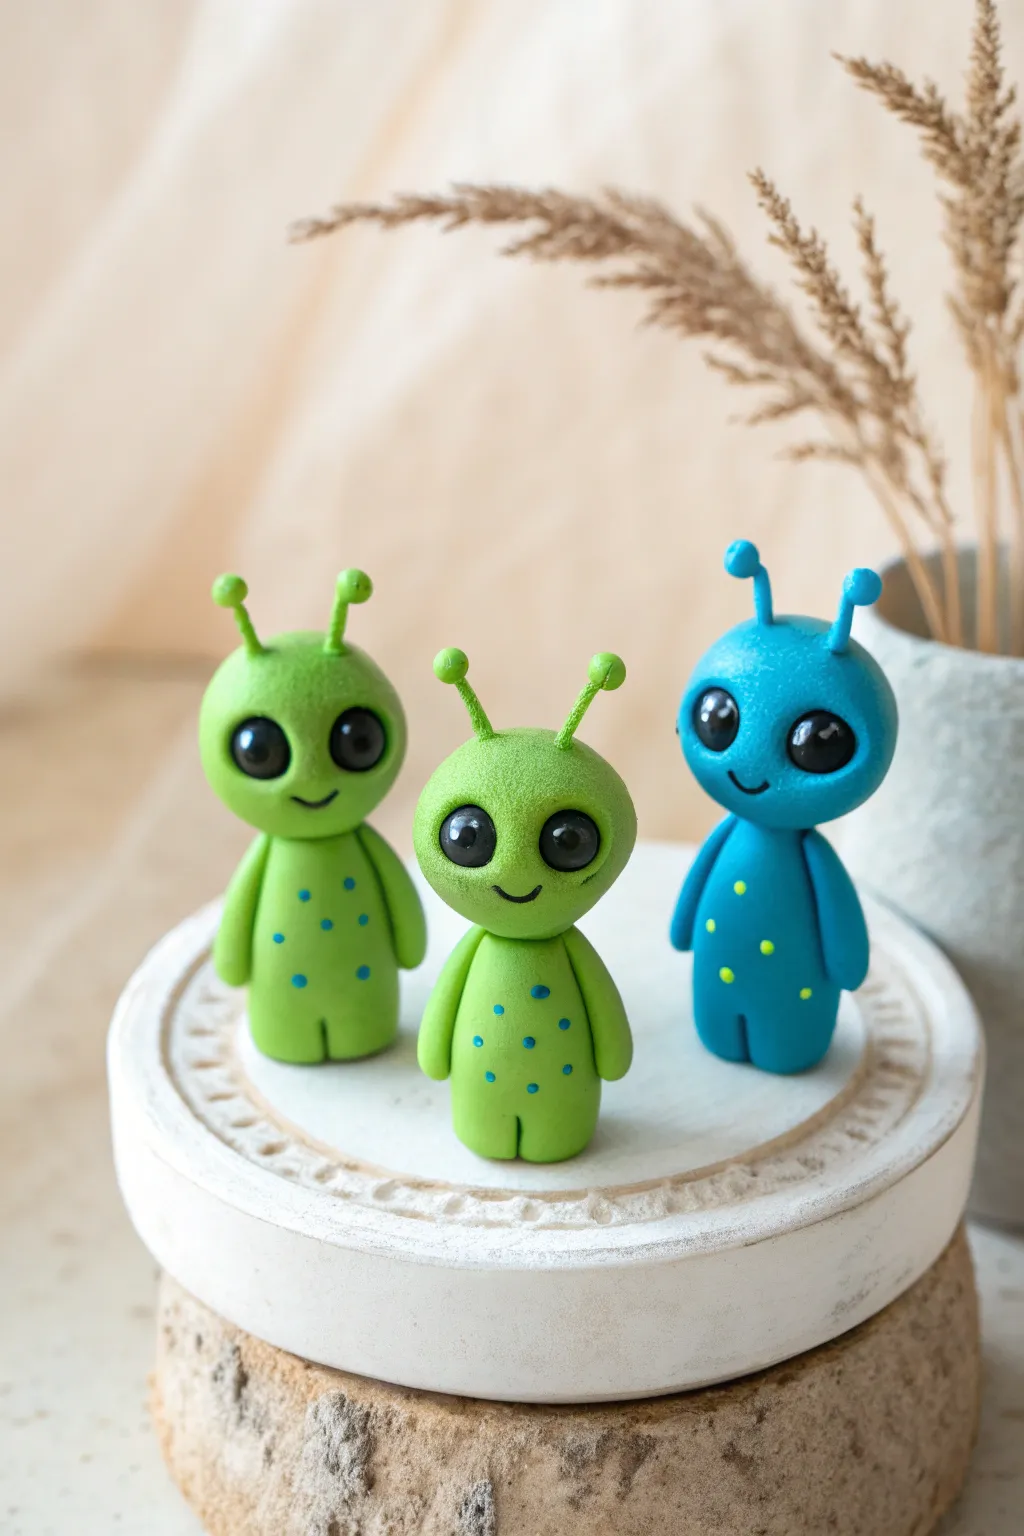
These adorable goofy alien figures are perfect for little hands to sculpt and display. With their oversized eyes, wiggly antennae, and vibrant spotted bodies, this trio brings a splash of cosmic fun to any shelf.
Detailed Instructions
Materials
- Polymer clay (Bright Green, Teal Blue, Black, Yellow)
- Small ball tool or round-tipped embossing tool
- Pointed clay tool or toothpick
- Rolling pin or smooth round marker
- Baking sheet with parchment paper
- Clay glaze or gloss varnish (optional)
- Small soft brush
Step 1: Shaping the Bodies
-
Create the base:
Start by conditioning your green or blue clay until it’s soft and pliable. Roll a walnut-sized amount into a smooth ball, then gently roll it back and forth on your work surface to create a short, thick cylinder shape for the alien’s torso. -
Form the legs:
Stand the cylinder upright. Using a sculpting tool or the side of a credit card, make a vertical indentation at the bottom front center of the cylinder. This suggests two legs without needing to attach them separately. -
Head proportions:
Roll a second ball of clay for the head. It should be slightly larger and wider than the body to give it that classic ‘grey alien’ silhouette, but rounder and friendlier. Slightly flatten the bottom so it sits securely. -
Attach head and body:
Press the head gently onto the neck area of the body. If the clay isn’t sticking well, you can insert a small piece of toothpick or wire between the two pieces to act as an internal armature for stability.
Droopy Antennae?
If the antennae keep flopping over, cut tiny pieces of wire or sewing pins to put inside the stalks as support before baking. This keeps them perky.
Step 2: Adding the Features
-
Make the eyes:
Roll two small balls of black clay. These should be fairly large relative to the face to achieve that cute, soulful look. Flatten them slightly between your fingers into thick discs. -
Position the eyes:
Press the black discs firmly onto the face, spacing them wide apart. I like to press them in just enough so they bulge slightly but don’t look like they are falling off. -
Add highlights:
For that spark of life, take the tiniest speck of white or light grey clay and press it onto the upper right corner of each black eye. This simple reflection makes a huge difference. -
Sculpt the smile:
Use a curved clay tool or the edge of a small spoon to impress a small, simple smile right between the eyes. Keep it subtle and centered. -
Form the arms:
Roll two small logs of matching body-color clay for arms. Attach them vertically to the sides of the torso. Gently blend the shoulder area into the body so they don’t look like stuck-on sausages.
Glow Up
Swap the regular colored clay for Glow-in-the-Dark polymer clay for the bodies or spots. They will look amazing when the lights go out at night.
Step 3: Antennae and Details
-
Create antennae stalks:
Roll two very thin, short snakes of the body color clay. These can be delicate, so handle with care. -
Add the tips:
Roll two tiny balls of the same color and attach them to the tops of your thin stalks. This gives the antennae their classic cartoon shape. -
Attach antennae:
Press the antennae onto the top of the head. You can lean them slightly outward for a jauntier look. Use a smoothing tool to blend the base of the stalk into the head. -
Make body dots:
Roll tiny micro-balls of a contrasting color (blue for the green alien, yellow for the blue alien). You’ll need about 6-8 per figure. -
Decorate the torso:
Press these contrasting dots randomly onto the alien’s tummy area. Flatten them so they become flush with the body surface rather than sticking out like bumps. -
Baking time:
Place your aliens on a parchment-lined baking sheet. Bake according to your brand of polymer clay instructions (usually around 275°F/135°C for 15-30 minutes). Let them cool completely before handling. -
Final shine:
Once cool, brush a layer of gloss varnish over the black eyes to make them look wet and shiny, contrasting nicely with the matte body.
Arrange your little green (and blue) men together for a fun extraterrestrial scene
Sports Ball Paperweights
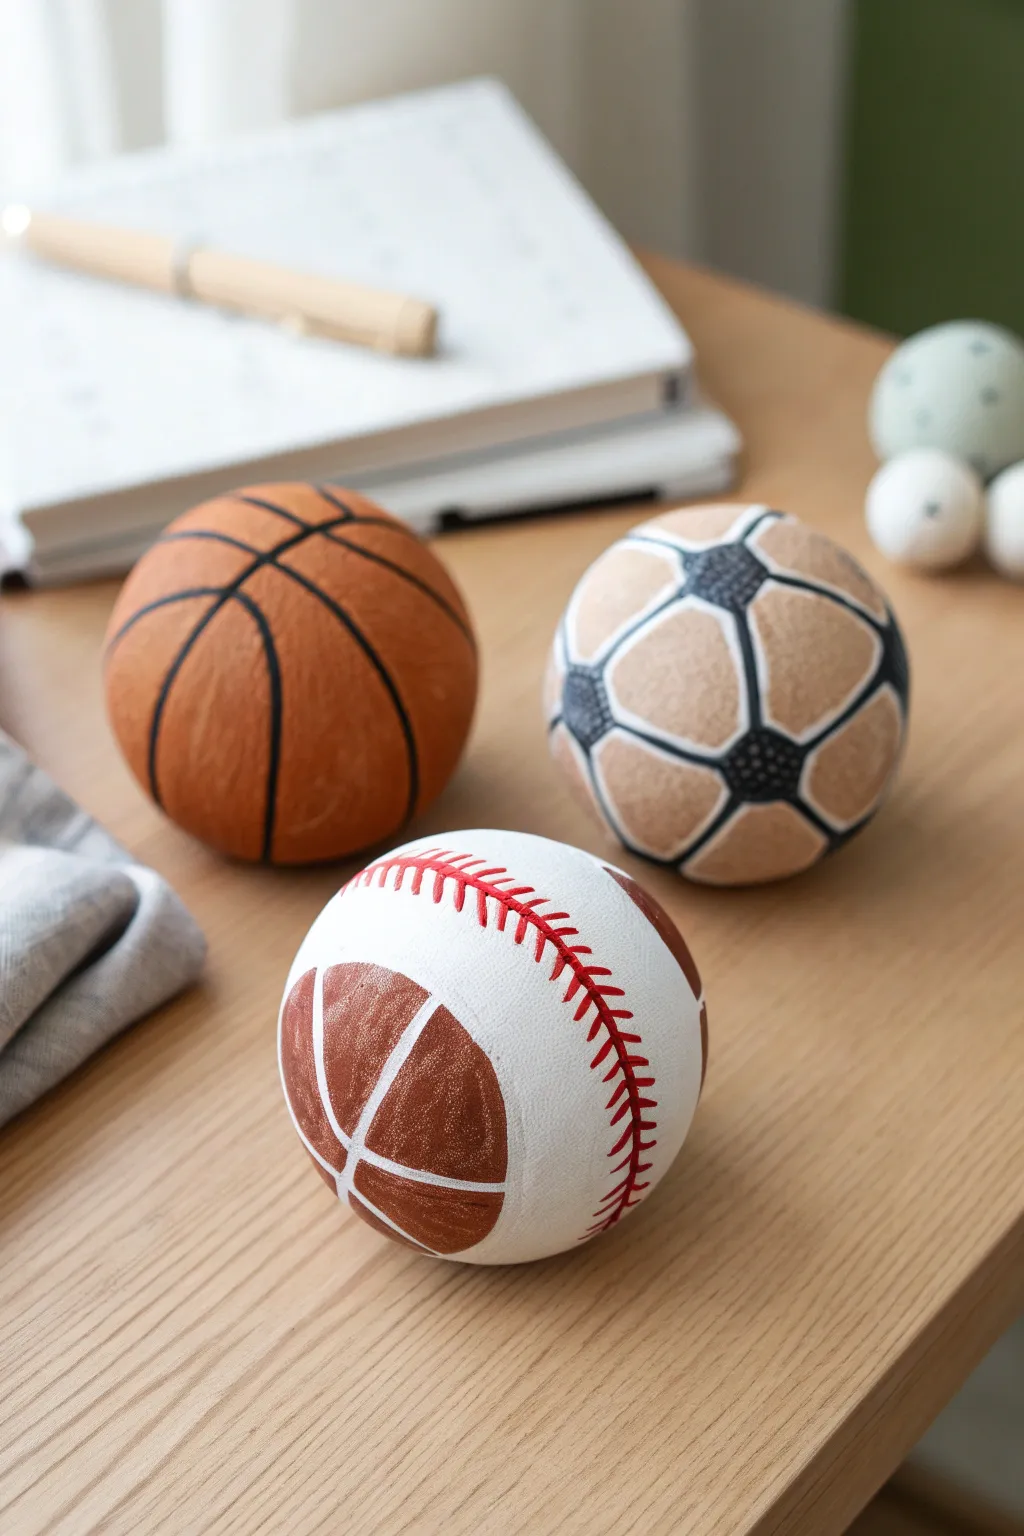
These solid, weighty paperweights bring the fun of the field right to your desk, featuring a classic basketball, a stylized soccer ball, and a unique baseball-football hybrid design. Using air-dry clay and acrylics, you can sculpt these durable spheres to keep your papers organized in sporty style.
Step-by-Step Tutorial
Materials
- White air-dry clay (or polymer clay)
- Acrylic paints: Orange, Tan/Beige, White, Black, Red, Brown
- Fine detail paintbrushes (size 0 or 00 for lines)
- Medium flat paintbrush
- Pencil for sketching
- Clear matte varnish or sealant
- Bowl of water (for smoothing clay)
- Fine-grit sandpaper
- Palette or paper plate
Step 1: Sculpting the Base
-
Condition the Clay:
Begin by grabbing three equal-sized chunks of air-dry clay. Knead each piece thoroughly in your hands until it becomes pliable and warm, removing any air bubbles that might cause cracks later. -
Form the Spheres:
Roll each piece of clay between your palms or against a flat surface to create a perfect sphere. Aim for a size roughly comparable to a tennis ball or slightly smaller. -
Smooth the Surface:
Dip your finger in a little bit of water and gently rub it over the surface of each clay ball to smooth out any fingerprints or creases. You want a seamless, matte finish. -
Dry Completely:
Set your three spheres aside to dry. Depending on the brand and thickness, this can takes 24-48 hours. rotate them occasionally so the bottom doesn’t stay flat. -
Sand for Perfection:
Once fully cured and hard, use fine-grit sandpaper to gently buff away any remaining lumps or uneven spots, ensuring a professional, round surface for painting.
Keep it Rolling
To prevent your heavy clay balls from developing a distinct flat spot while drying, rest them on a soft sponge or a small nest of crumpled plastic wrap.
Step 2: Painting the Basketball
-
Base Coat:
Paint the entire first sphere with a rich orange acrylic paint. You may need two coats to get solid coverage, letting the first layer dry before applying the second. -
Sketch the Lines:
Lightly sketch the curved lines of a basketball using a pencil. Draw one horizontal line, one vertical line intersecting it, and the distinct curved sine-wave lines on the sides. -
Detailing:
Using your finest brush and black paint, carefully trace over your pencil lines. Keep your hand steady and try to keep the line thickness consistent.
Step 3: Painting the Soccer Ball
-
Base Color:
Mix a warm beige or tan color and paint the entire second sphere. This gives it a vintage, leather-like appearance compared to bright white. -
Grid Design:
Visualize a pentagon pattern. Lightly sketch a central pentagon, then surround it with hexagons. Continue this pattern around the ball. -
Filling the Sections:
Paint the central pentagon and alternating sections with a very dark grey or soft black. I like to stipple the paint slightly here to mimic texture. -
Outline:
Use white or a very pale cream paint to outline the shapes, creating the thick piping effect seen on soccer balls.
Textured Touch
Before the clay dries, gently press a piece of sandpaper or a rough stone against the surface to create a realistic bumpy texture for the basketball.
Step 4: Painting the Hybrid Ball
-
Primary Color:
Paint the third sphere completely white. This serves as the background for the baseball stitching and the brown patches. -
Adding Football Patches:
Paint two large, curved oval shapes on opposite sides of the ball using brown paint. Outline these patches with white lines to define the segments. -
Stitching Line:
Paint a long, thick curved red line that wraps around the white portion of the ball, connecting the spaces between the brown patches. -
The Threads:
Using a very fine brush, paint small red V-shapes or dashes along the red line to replicate the classic stitching of a baseball.
Step 5: Finishing Touches
-
Seal the Work:
Once all paint is completely dry, apply a coat of clear matte varnish. This protects the paint from chipping and gives the clay a finished, store-bought look. -
Final Cure:
Let the varnish cure according to the bottle instructions before using them as paperweights.
Place these on your desk to hold down your homework or drawings with a fun, athletic flair


What Really Happens Inside the Kiln
Learn how time and temperature work together inside the kiln to transform clay into durable ceramic.
Lizard or Snake Coil Sculpture
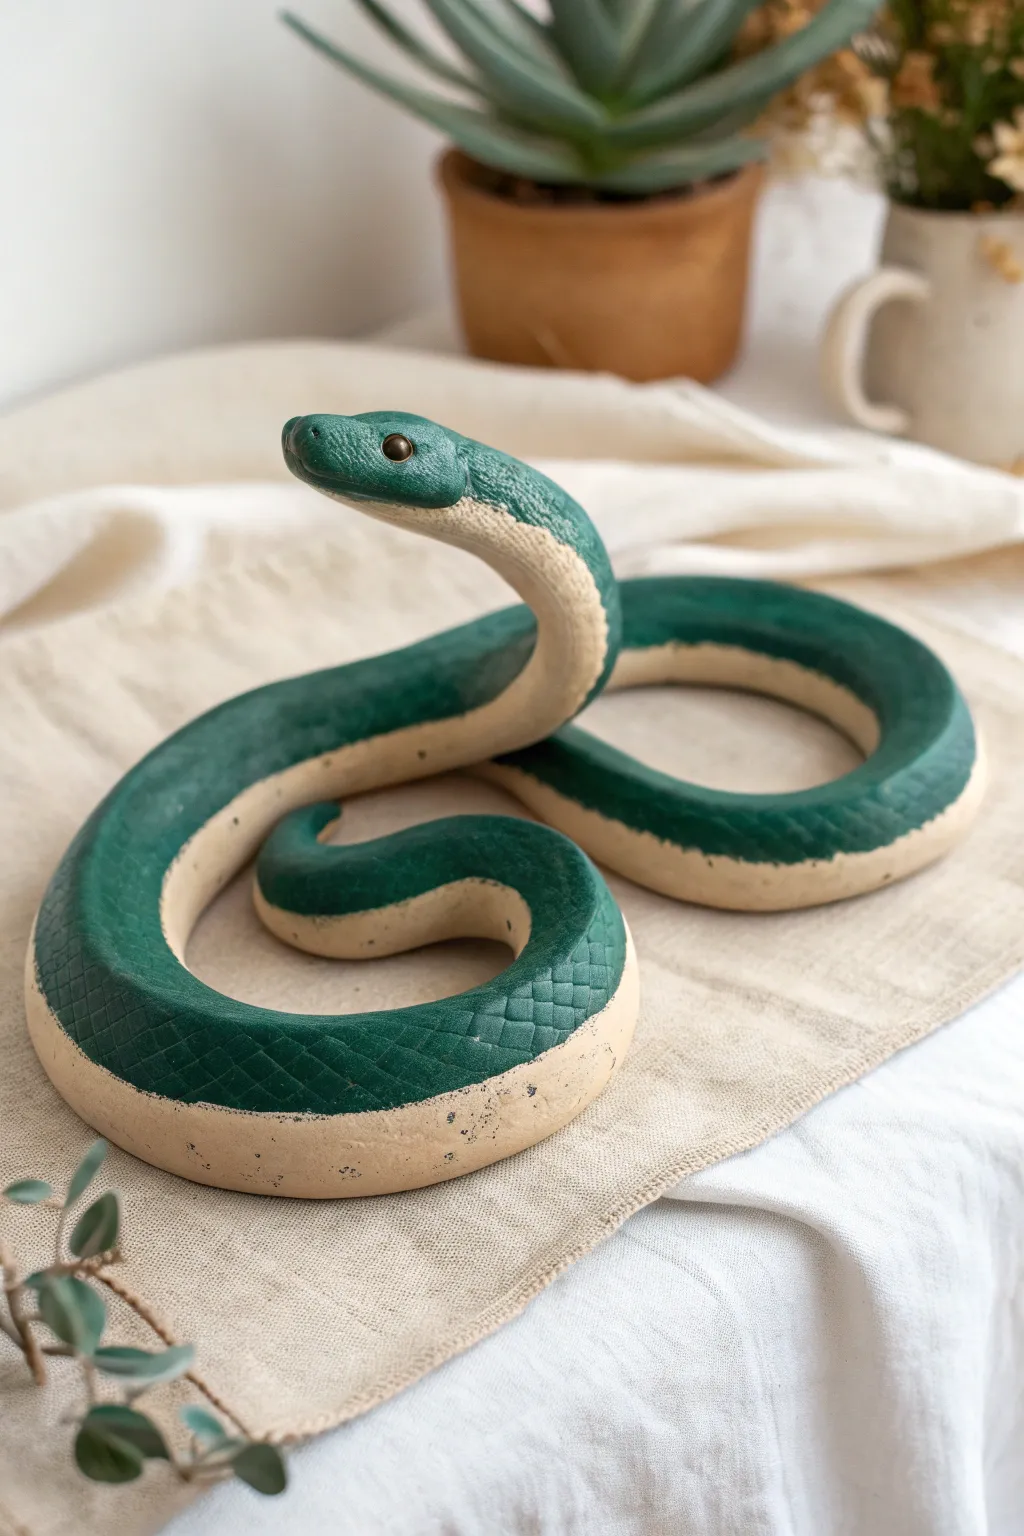
Slither into the world of pottery with this striking two-toned snake sculpture that looks ready to strike or say hello. With its realistic scale texture and raised head, this project teaches excellent coiling and surface decoration techniques.
How-To Guide
Materials
- Air-dry clay or polymer clay (white or beige base)
- Acrylic paints (forest green, cream/beige, black)
- Small glass beads or rounded clay balls for eyes
- Wire armature (optional, for neck support)
- Clay carving tools (needle tool checkering tool or mesh)
- Rolling pin
- Water and sponge (for smoothing)
- Paintbrushes (flat and fine detail)
- Matte or satin varnish
Step 1: Forming the Body
-
Roll the main coil:
Start with a large lump of clay and roll it into a long, thick sausage shape. Aim for a tapered look where the tail end gets gradually thinner while the head end remains thick. -
Insert support wire:
If you want the head to stand up high like the photo, cut a length of sturdy wire and carefully feed it through the center of the head section of your clay coil before bending. -
Shape the coil:
Lay the clay down and gently curve it into an ‘S’ shape or a loose spiral. Ensure the base is flat against your work surface so it sits stably. -
Raise the head:
Bend the thickest part of the coil upwards to create the rearing neck. Smooth out any wrinkles that form at the bend using a bit of water. -
Sculpt the head:
Pinch the tip of the raised end to form a distinct head shape. It should be slightly wider than the neck, similar to a diamond or oval properties.
Step 2: Adding Texture and Details
-
Define the belly line:
Use a modeling tool to lightly score a continuous line running along the side of the snake, spanning from the neck all the way to the tail. This separates the green top from the cream belly. -
Smooth the belly:
Keep the area below your scored line perfectly smooth. Use a damp sponge or finger to buff away any fingerprints. -
Create scale texture:
For the top half, press a scale pattern into the wet clay. You can use a dedicated mesh tool, the end of a small straw, or cross-hatch manually with a needle tool. -
Refine the scales:
I find it helpful to gently pat the textured area afterwards to knock down any sharp ridges, making the snake look more skin-like. -
Add the eyes:
Press two small indentations into the sides of the head. Insert glass beads or small balls of clay securely into these sockets. -
Dry the sculpture:
Allow the clay to dry completely according to the package instructions. Turn it occasionally if possible to let air reach the bottom.
Scale Shortcut
Instead of carving every scale, roll your clay coil over a piece of mesh onion bag or tulle fabric before shaping it to instantly imprint a reptilian skin texture.
Step 3: Painting and Finishing
-
Base coat the belly:
Paint the entire bottom section and the lower sides with a warm cream or beige acrylic paint. You may need two coats for opaque coverage. -
Paint the top scales:
Apply a rich forest green paint to the textured upper section. Use a fairly dry brush to help the paint catch the texture, or paint solidly and wipe back slightly. -
Refine the division:
Use a small brush to tidy up the line where the green meets the cream. It doesn’t have to be a straight line; a slightly wavy, organic border looks natural. -
Add weathering:
Dilute a tiny bit of black or dark brown paint with water. Flick or stipple this wash lightly over the cream belly to create realistic speckling and dirt. -
Seal the piece:
Once all paint is dry, coat the snake in a matte varnish to protect the finish. If you used clay eyes, add a dot of gloss varnish to them for a wet look.
Drooping Head?
If the head keeps sagging while the clay is wet, prop it up with a crumbled ball of aluminum foil or a cardboard tube until the clay stiffens enough to hold its own weight.
Now you have a charming reptilian friend to guard your desk or bookshelf
Mythical Creature Finger Puppets
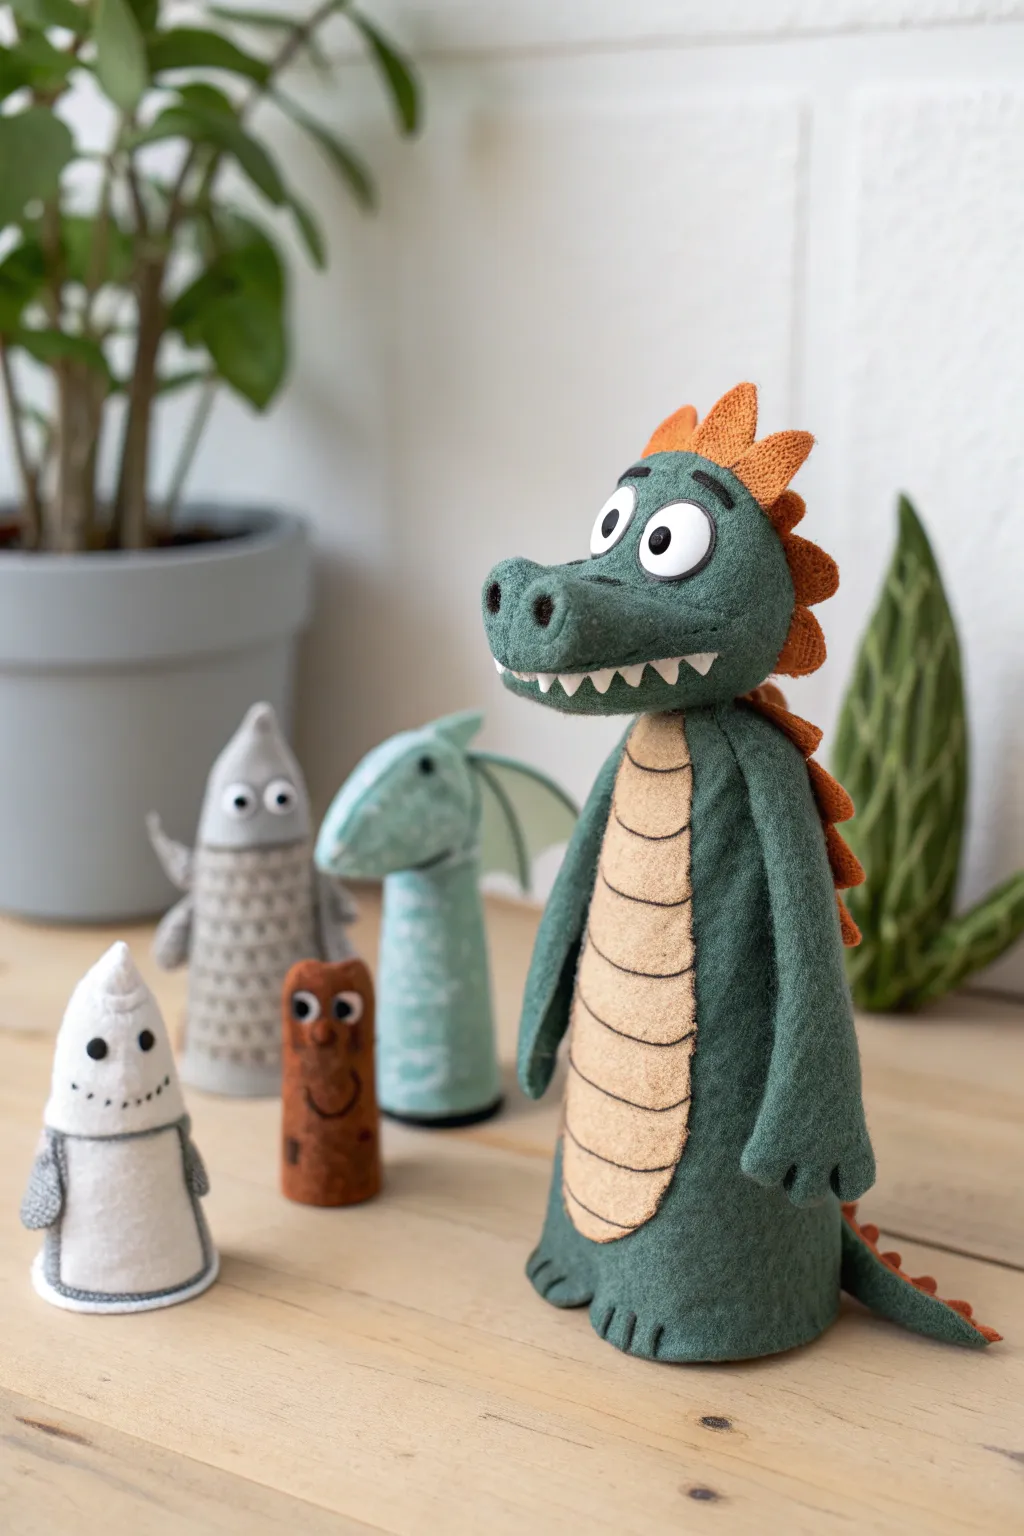
These charming mythical creatures bring storytime to life with their soft textures and animated expressions. While the main attraction is a sturdy, detailed green dragon, his smaller companions—including a ghost and a tree spirit—can be whipped up quickly to complete the cast.
How-To Guide
Materials
- Green felt (dark and light shades)
- Contrasting felt scraps (white, grey, orange, brown, light blue)
- Fabric glue or hot glue gun
- Embroidery floss (black, white, green)
- Sewing needle
- Polyester stuffing
- Scissors
- Cardstock or thin cardboard for patterns
- Black fabric marker or fine-point beads for eyes
Step 1: Designing the Base Bodies
-
Create the main pattern:
Cut a rectangle of cardstock roughly 4 inches wide by 6 inches tall for the main dragon body. Roll it into a cylinder to test the fit on a finger, tapering slightly at the top, then unroll it to use as your template. -
Cut the dragon body:
Trace your large template onto the dark green felt. Cut two identical pieces if you plan to sew seams up the sides, or one wide piece to roll and glue at the back. I prefer sewing for a cleaner edge. -
Cut the smaller puppets:
For the ghost, grey monster, and brown log figure, cut simpler, smaller arch shapes (about 3 inches tall) from white, grey, and brown felt respectively.
Step 2: Assembling the Dragon
-
Sew the body tube:
Stitch the sides of your green dragon body together using a blanket stitch or running stitch in matching green thread. Leave the bottom open for a finger. -
Construct the head:
Cut two profile shapes for the dragon’s head from green felt—make sure to include a distinct snout. Stitch the top and snout edges together, leaving the neck area open. -
Stuff and attach:
Lightly fill the head with polyester stuffing to give it 3D volume. Align the neck opening with the top of the body tube and stitch firmly in place using a whip stitch. -
Add the belly:
Cut an oval from light tan felt. Draw horizontal lines across it with a brown marker or stitch them with brown floss for a segmented look. Glue this to the front of the body. -
Create the arms:
Cut four arm shapes from green felt. Stitch pairs together for thickness, then attach them to the sides of the body, just below the neck seam. -
Attach the feet and tail:
Cut small U-shapes for feet with embroidered claw marks. Sew a triangular tail piece, stuff it lightly, and attach it to the lower back of the body so it curves outward.
Floppy Head Fix
If the dragon’s head is too heavy and flops over, insert a small rolled tube of cardstock or a popsicle stick inside the neck area to act as a sturdy internal spine.
Step 3: Adding Dragon Details
-
Form the eyes:
Cut two white ovals for eyes and adhere them to the head. Add small black beads or circles of black felt for pupils to create a focused gaze. -
Add the spikes:
Cut a long strip of orange felt with a zig-zag edge. Glue or sew this down the center back of the dragon’s head and spine for his fiery crest. -
Give him a smile:
Cut a thin strip of white felt with tiny triangles for teeth. Glue this under the snout edge to create a friendly, toothy grin.
Texture Time
Use pinking shears when cutting the dragon’s back spikes or the ghost’s bottom edge. This instantly adds professional-looking texture without tedious snips.
Step 4: Crafting the Companions
-
Assemble the ghost:
Sew your white arch shape into a tube. Add small black felt circles for eyes and stitch a jagged, dashed mouth line using black embroidery floss. -
Create the grey monster:
Sew the grey body tube. Cut small triangular tabs for ears/horns and stitch them to the sides. Use a fabric marker to draw a scaly pattern on his belly. -
Build the log spirit:
After sewing the brown tube, add a simple face. Use googly eyes or felt circles, and stitch a curved mouth. The irregular top edge gives it a woody appearance. -
Make the blue dragon:
Create a smaller version of the main dragon head in light blue felt. Attach it to a simple blue body tube and add small triangle wings to the back.
Now your mythical cast is ready to perform epic adventures right at your fingertips