Whenever I’m making something for a friend, I love choosing projects that come in matching pieces—the kind that only really makes sense when you both have one. These clay ideas for friends are all about tiny keepsakes that feel personal, giftable, and connected in that best-friend way.
Avocado Half Charms
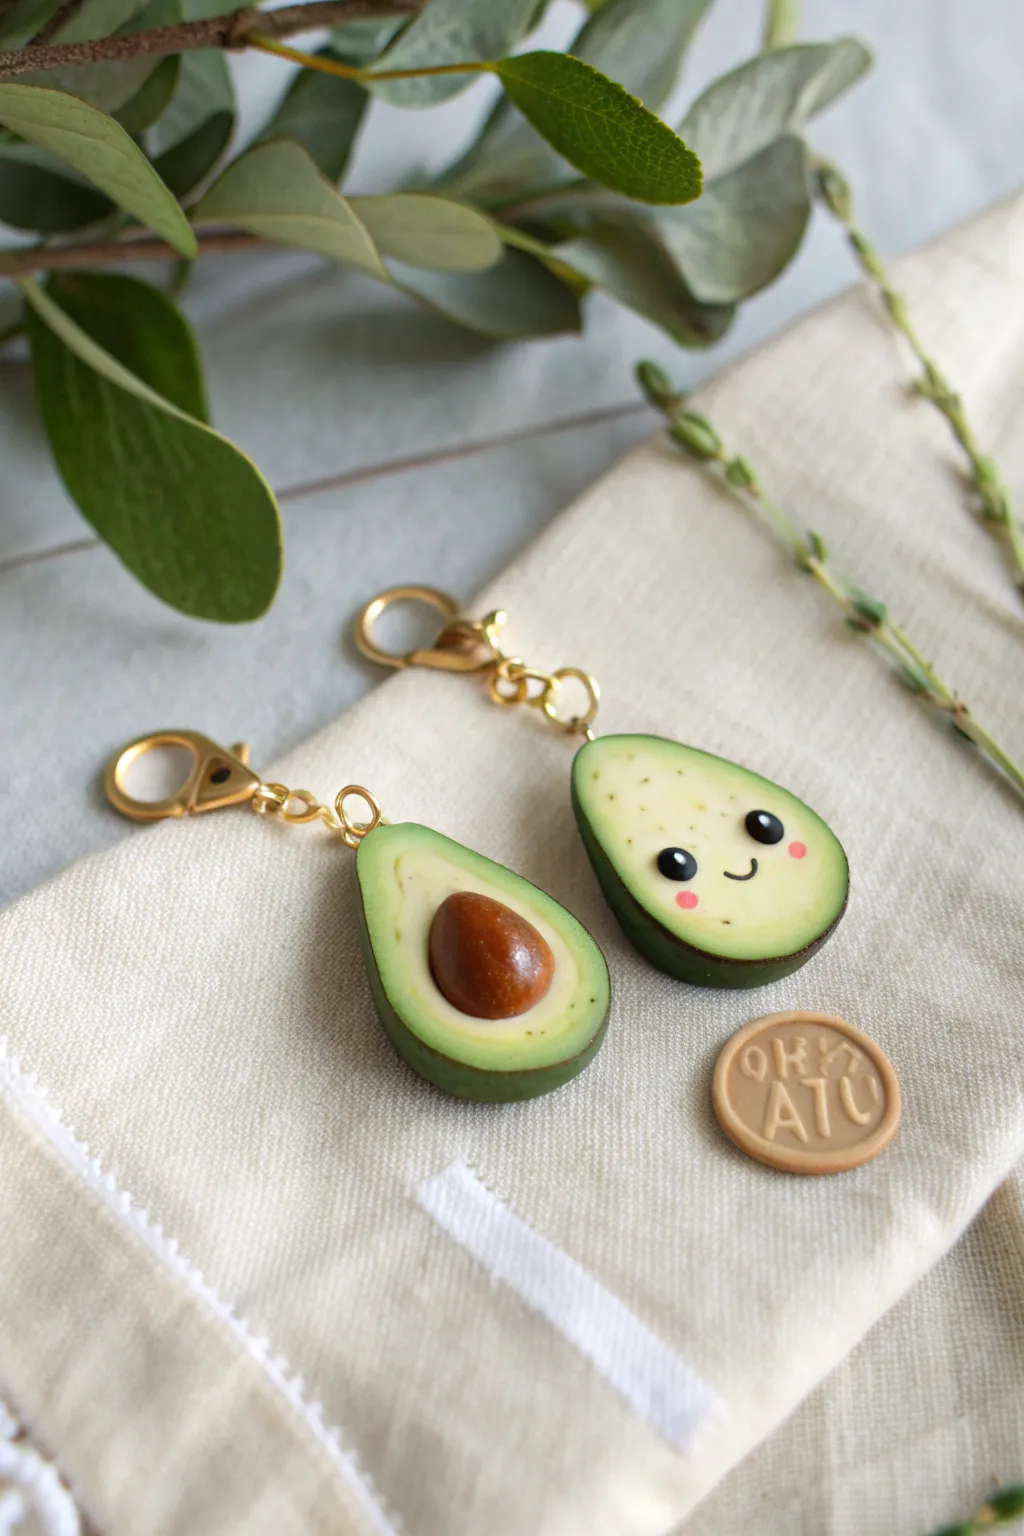
Celebrate friendship with this adorable pair of matching charms featuring two halves of a perfect avocado. One side cradles the pit while the other sports a cheerful face, making them the ultimate keepsake to share with your best pal.
Step-by-Step Tutorial
Materials
- Polymer clay: translucent, dark green, light green, light yellow, brown, black, pink
- Rolling pin or pasta machine
- Scalpel or craft knife
- Needle tool or toothpick
- Ball stylus tool
- Sandpaper or nail buffer
- Soft pastel chalks (brown/orange)
- Small soft brush
- Gold screw eye pins (2)
- Lobster clasp keychains (2)
- Matte varnish or glaze
- Oven
Step 1: Mixing Creating the Avocado Flesh
-
Mix the Base Color:
Start by conditioning your clay. Mix translucent clay with a very small amount of light yellow and light green to create a realistic, milky avocado flesh tone. It should look slightly pale. -
Form the Teardrops:
Split the mixed clay into two equal portions. Roll each into a smooth ball, then pinch one end slightly to form a teardrop shape. -
Flatten and Shape:
Gently press the teardrops onto your work surface to flatten them. They should be about 5-6mm thick. Refine the edges with your fingers so they match perfectly in size.
Step 2: Adding the Skin and Pit
-
Prepare the Skin:
Roll out a thin sheet of dark green clay. You can use a pasta machine on a thin setting or roll it manually until it’s about 1mm thick. -
Wrap the Avocados:
Cut a long strip of the dark green clay. Carefully wrap this strip around the perimeter of each avocado half, smoothing the seam where the ends meet. Trim away any excess. -
Texture the Interior:
Using an old toothbrush or a stiff bristled brush, gently tap the surface of the light green flesh to give it a realistic, slightly bumpy avocado texture. -
Create the Pit Indent:
On one of the halves (the ‘face’ half), use a large ball tool or your thumb to press a shallow indentation where the pit would have been. -
SCULPT THE PIT:
For the other half, mix brown clay with a touch of translucent to create the pit. Roll a ball and press it firmly into the center of the teardrop shape.
Dirty Clay Blues?
Keep light clay pristine by cleaning hands and surfaces with baby wipes or rubbing alcohol between colors, especially after handling the black clay.
Step 3: Detailing and Shading
-
Shade the Edges:
Scrape some brown and dark green soft pastel chalk into a fine powder. Using a small dry brush, gently dust the outer edges of the pale flesh on both halves to create a ripe gradient effect. -
Add Speckles:
I like to take a needle tool or toothpick and create tiny, random pricks in the flesh area. Fill these tiny holes with minuscule crumbs of brown clay to mimic natural imperfections. -
Insert Hardware:
Carefully screw a gold eye pin into the top center of each avocado half. Ensure it goes deep enough into the clay for a secure hold.
Heart in the Middle
Make the pit heart-shaped instead of round! Sculpt the brown clay into a heart before pressing it in for an extra cute and loving detail.
Step 4: The Kawaii Face
-
Place the Eyes:
On the half without the pit, roll two tiny balls of black clay. Press them onto the lower, wider part of the avocado to create eyes. -
Add the Smile:
Roll an incredibly thin snake of black clay. Cut a tiny u-shaped section and place it between the eyes to form a sweet smile. -
Rosy Cheeks:
Roll two minuscule balls of pink clay. Flatten them gently under each eye to give the character a blushing look. -
Add Highlights:
For that spark of life, add a microscopic dot of white clay or white acrylic paint (after baking) to the corner of each black eye.
Step 5: Baking and Assembly
-
Bake:
Bake the pieces in a preheated oven according to your polymer clay manufacturer’s instructions, usually around 230°F to 275°F (110°C – 135°C) for 30 minutes. -
Cool and Finish:
Let the charms cool completely inside the oven to prevent cracking. Once cool, brush a coat of matte varnish over the pieces to protect the pastels and paint. -
Attach Hardware:
Open the jump ring on your lobster clasp keychain using pliers. Loop it through the eye pin on the avocado and close securely.
Now you have a charming set ready to gift to your other half


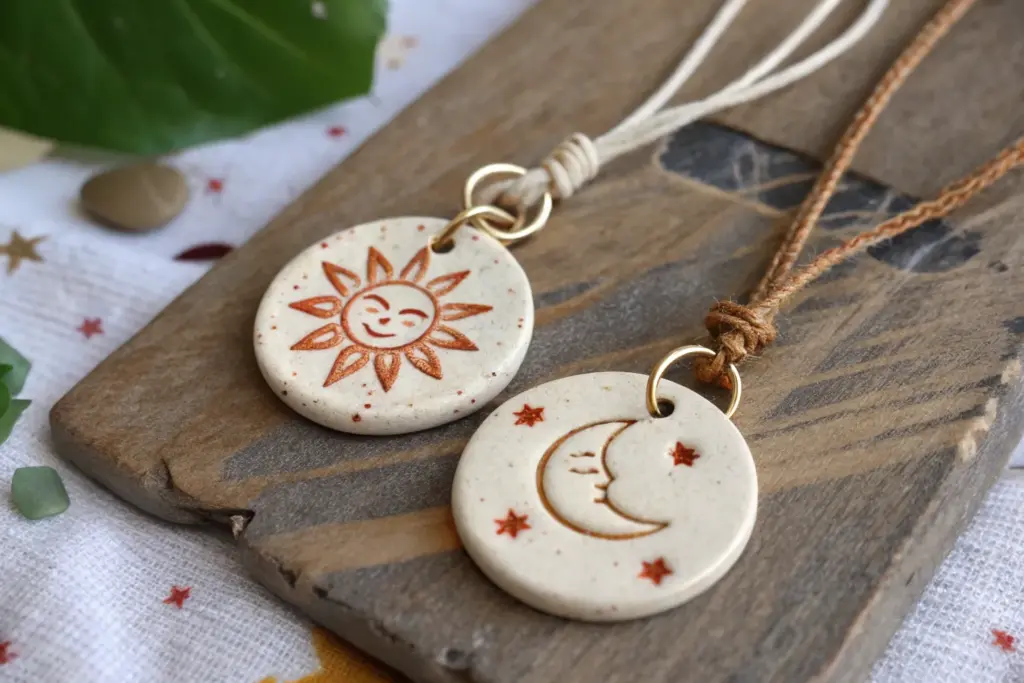
Sun and Moon Pendant Pair
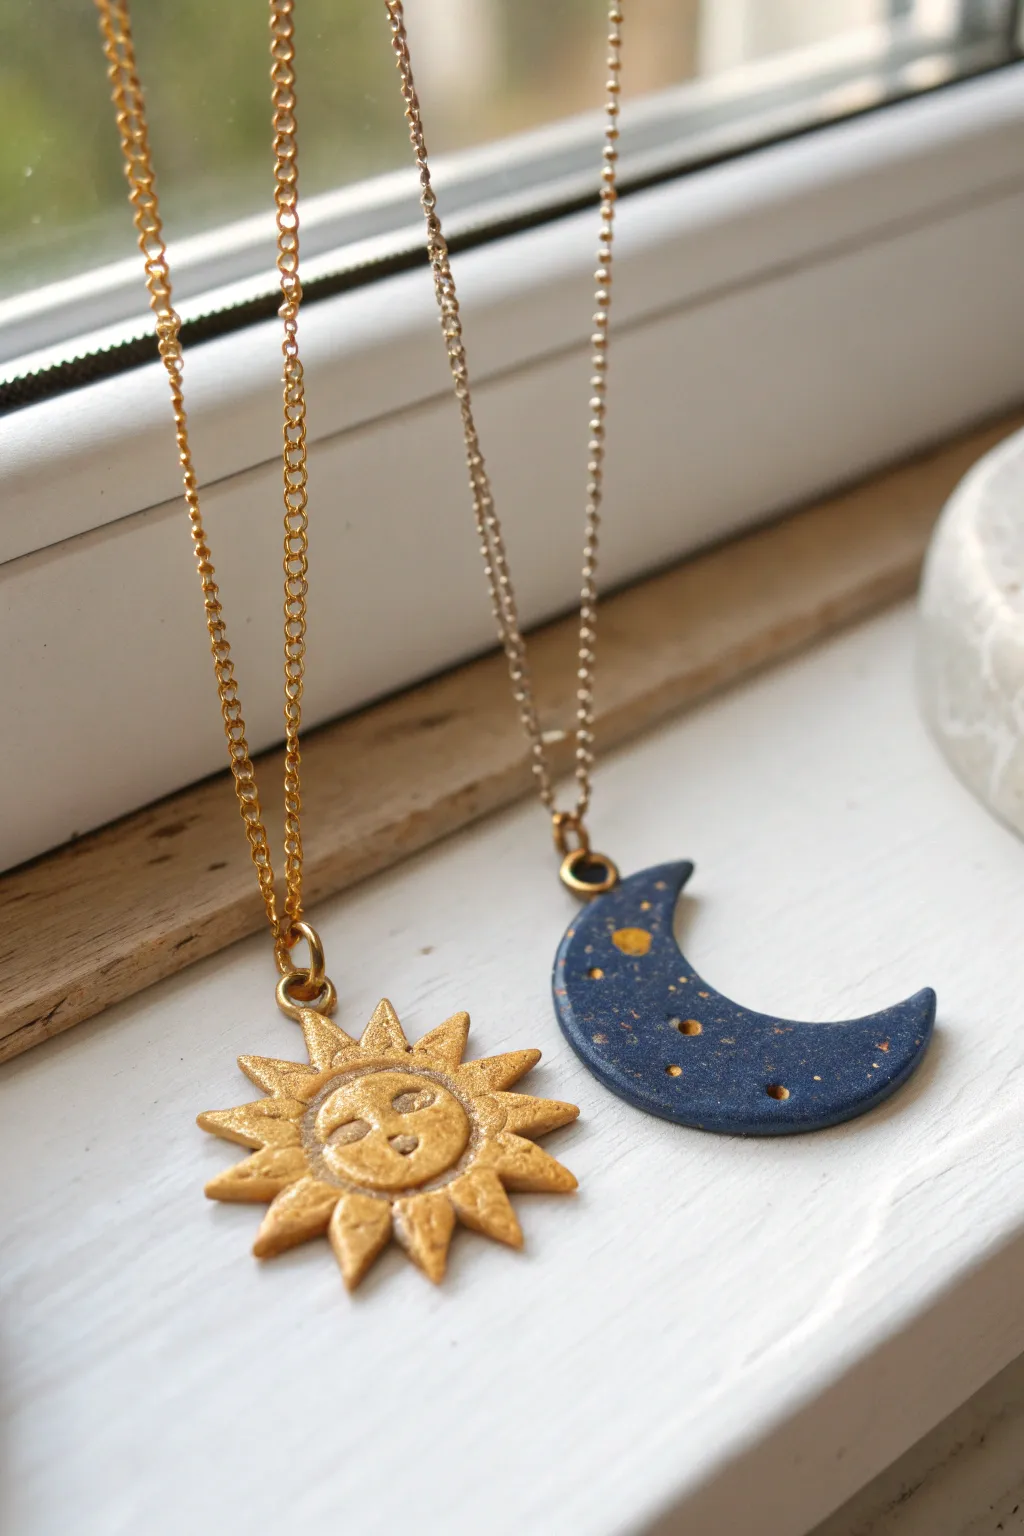
Celebrate your friendship with this charming sun and moon duo, perfect for sharing. The golden sun features a gentle smiling face with radiating beams, while the midnight blue crescent moon sparkles with starry details and crater textures.
Step-by-Step Guide
Materials
- Polymer clay (Gold/metallic yellow)
- Polymer clay (Deep midnight blue)
- Metallic gold acrylic paint
- Small eye pins (gold tone)
- Gold necklace chains (2)
- Jump rings (gold tone)
- Needle tool or toothpick
- X-Acto knife or clay blade
- Small round cutter (approx. 1 inch)
- Rolling pin (acrylic or glass)
- Ball tool (small)
- Small paintbrush
- Gloss glaze (optional)
Step 1: Sculpting the Golden Sun
-
Condition the gold clay:
Begin by kneading the metallic gold clay in your hands until it becomes soft and pliable. This warmth prevents cracking later on. -
Form the base circle:
Roll a small ball of gold clay and flatten it slightly. Use your small round cutter to stamp out a perfect circle for the sun’s face. -
Create the sun’s rays:
Roll out a separate thin sheet of gold clay. Use your X-Acto knife to cut out several small, pointed triangles. You will need roughly 10-12 triangles depending on the size of your circle. -
Attach the rays:
Gently press the wide base of each triangle onto the back edge of your sun circle. Work your way around the perimeter until the entire sun is surrounded by rays. Smooth the seams on the back with your finger or a tool. -
Add facial features:
Using a needle tool or toothpick, gently imprint two closed, curved eyes and a small, smiling mouth onto the center circle. I like to keep the expression simple and serene. -
Add the sun’s nose:
Roll a tiny speck of clay into a ball and press it in the center of the face for a nose, blending the edges lightly so it stays attached. -
Refine the texture:
To mimic the metallic look in the photo, lightly stipple the surface of the sun with an old toothbrush or stiff brush to give it a subtle, bubbly texture. -
Insert hardware:
Carefully insert a gold eye pin into the top ray of the sun. Ensure it goes deep enough to be secure but doesn’t poke through the face.
Clean Clay Pro-Tip
Make the dark moon pendant first, or wash hands thoroughly between colors. Dark blue pigment can easily stain the light gold sun clay if you aren’t careful.
Step 2: Crafting the Midnight Moon
-
Prepare the blue clay:
Condition your deep blue clay. Roll it out into a sheet about 1/4 inch thick. -
Cut the crescent shape:
Use your round cutter to punch a circle. Then, move the cutter slightly to the side and punch again to cut a crescent ‘bite’ out of the first circle, leaving you with a perfect moon shape. Smooth any sharp edges with your finger. -
Create craters:
Using a ball tool or the rounded end of a paintbrush, press small indentations into the surface of the moon to simulate craters. Vary the sizes for a natural look. -
Add starry specks:
Take the tiniest specks of gold clay (scrap from your sun pendant) and press them randomly onto the blue surface. Flatten them flush with the moon so they look like distant stars. -
Insert hardware:
Insert a gold eye pin into the top tip of the crescent moon.
Step 3: Baking and Assembly
-
Bake the pieces:
Place both pendants on a baking sheet lined with parchment paper. Bake according to your polymer clay package instructions (usually 275°F/135°C for 15-30 minutes). -
Cool and paint details:
Once fully cooled, dip a fine brush into metallic gold paint. Carefully paint inside the larger craters on the moon to make them pop. -
Add speckles to the moon:
Flick a tiny bit of gold paint onto the moon using a stiff brush or toothpick to add extra galaxy dust texture. -
Seal (optional):
If you want extra shine and protection, apply a thin coat of gloss glaze to both pendants. -
Attach the chains:
Use jump rings to connect the eye pins of your finished pendants to your gold necklace chains.
Level Up: Mica Powder
Before baking, brush a tiny amount of gold mica powder over the sun’s rays and the moon’s craters. This adds an ethereal shimmer that paint alone can’t achieve.
Now you have a timeless set of jewelry ready to gift to the sun to your moon


Initial Letter Mini Charms
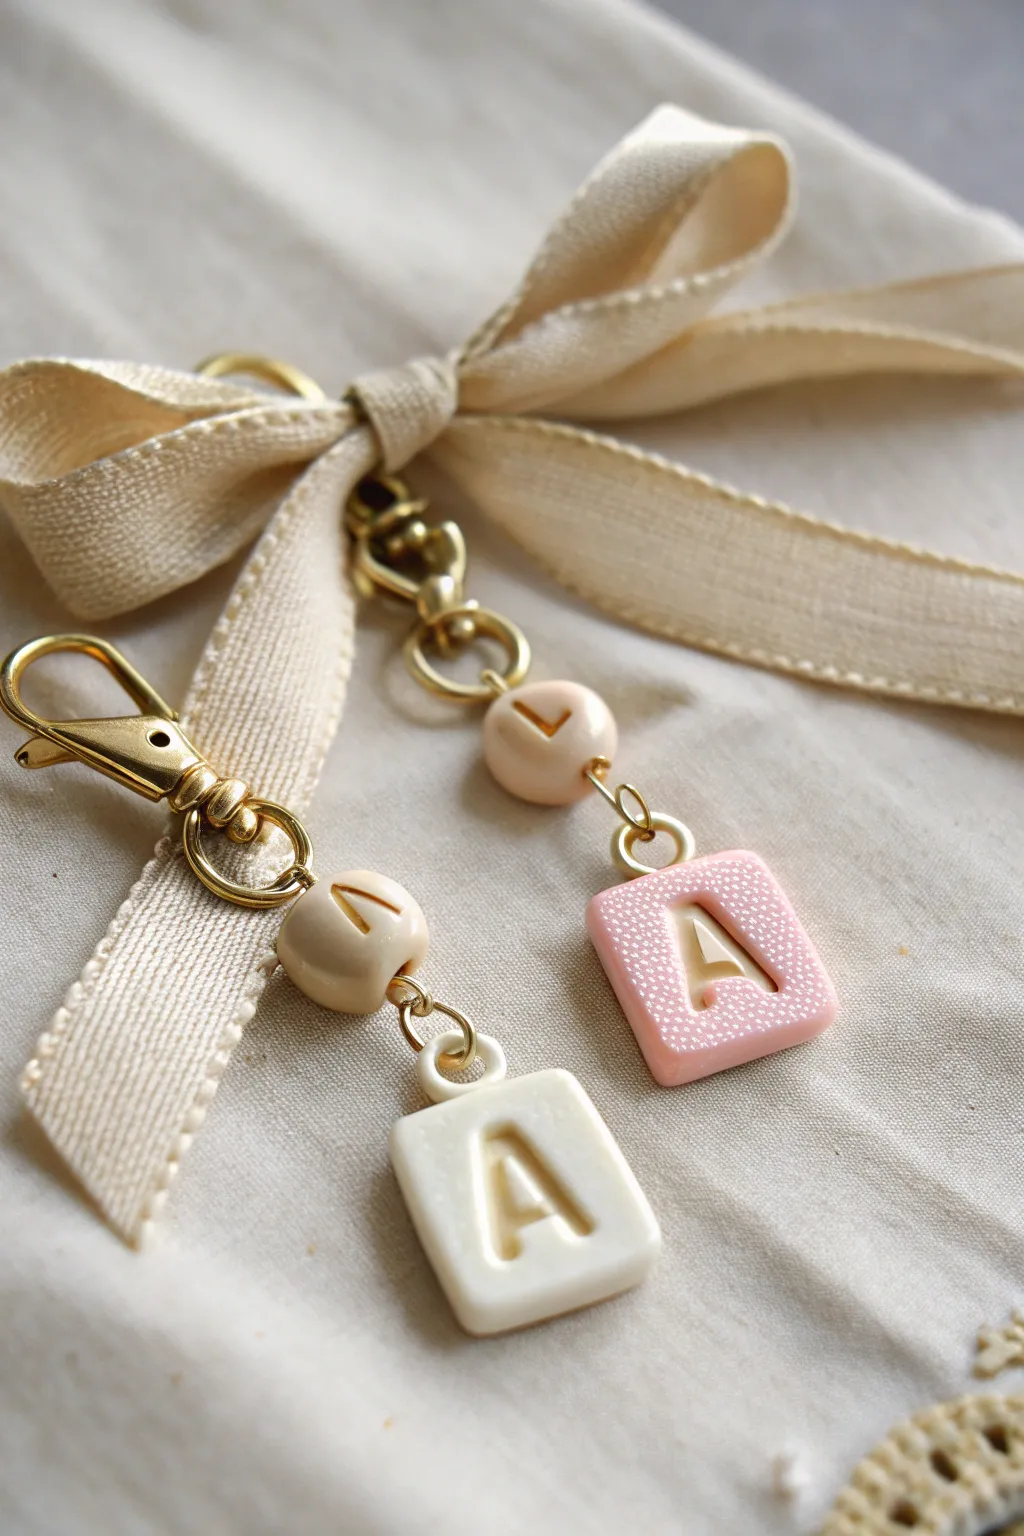
These sweet, personalized charms combine classic cream and pastel pink polymer clay for a soft, boutique aesthetic. Featuring stamped letter impressions and textured details, these dainty keychains make for a thoughtful and customized gift for your closest friends.
Step-by-Step
Materials
- Polymer clay (cream and pastel pink)
- Small square clay cutter (approx. 1 inch)
- Letter stamps or small alphabet cutters
- Rolling pin or pasta machine
- Baking sheet and parchment paper
- Gold screw eye pins
- Gold lobster clasp keychains
- Gold jump rings (approx. 6mm)
- Gold jewelry wire or headpins
- Round nose pliers
- Wire cutters
- Needle tool or toothpick
- Beige round beads (polymer or wood)
- Gloss glaze (optional)
Step 1: Shaping the Letter Charms
-
Condition the Clay:
Begin by warming the cream and pink polymer clay in your hands until soft and pliable. This prevents cracking later. -
Roll out Sheets:
Roll your clay out onto a clean surface to about a 1/4 inch thickness. You want it substantial enough to look like a tile but not too heavy. -
Cut the Squares:
Using your small square cutter, punch out your charm shapes. If edges are rough, gently smooth them with your finger. -
Create the Bead:
Roll small balls of leftover clay (about 1/2 inch diameter) to create the round beads that will sit above the square charm. Pierce a hole through the center with a needle tool. -
Stamp the Letter:
Press your letter stamp firmly into the center of the square charm. Don’t push all the way through; you just want a deep, clean impression. -
Add Texture (Optional):
For the pink charm look, use a needle tool to gently stipple the surface around the letter, creating a tiny dotted texture. -
Insert Eye Pin:
Carefully screw a small eye pin into the top center edge of the square charm. Remove it, add a tiny dot of liquid clay or bake-and-bond for security, and re-insert. -
Bake:
Place all clay pieces on parchment paper and bake according to your clay package instructions (usually 275°F for 15-30 minutes). Let them cool completely.
Sticky Stamps?
If your stamp pulls the clay up when you remove it, dust the stamp lightly with cornstarch or dip it in water before pressing it into the raw clay.
Step 2: Assembly & Finishing
-
Prepare the Connecting Bead:
Take a headpin or piece of wire and thread on your baked round bead. Create a simple loop at both the top and bottom of the bead using your round nose pliers. -
Connect the Charm:
Open the bottom loop of your bead wire and hook it onto the eye pin sticking out of your square letter charm. Close the loop securely. -
Attach the Clasp:
Using a gold jump ring, connect the top loop of your bead component to the bottom loop of the gold lobster clasp. -
Check Connections:
Give everything a gentle tug to ensure all jump rings and wire loops are closed tightly so pieces don’t fall off. -
Seal (Optional):
If you want a shiny finish like the white charm, apply a thin coat of gloss glaze to the clay surface. I prefer to leave the pink one matte for contrast. -
Add the Ribbon:
Tie a length of beige grosgrain or cotton ribbon into a neat bow around the base of the lobster clasp mechanism. -
Trim Ends:
Cut the ribbon tails at an angle to prevent fraying and give it a professional finish.
Make it Sparkle
Before baking, brush a tiny amount of gold mica powder or gold acrylic paint into the recessed letter impression to make the initial pop.
Attach these to a gift bag or keyring for a personalized touch your friends will love


Matching Trinket Dishes for Two
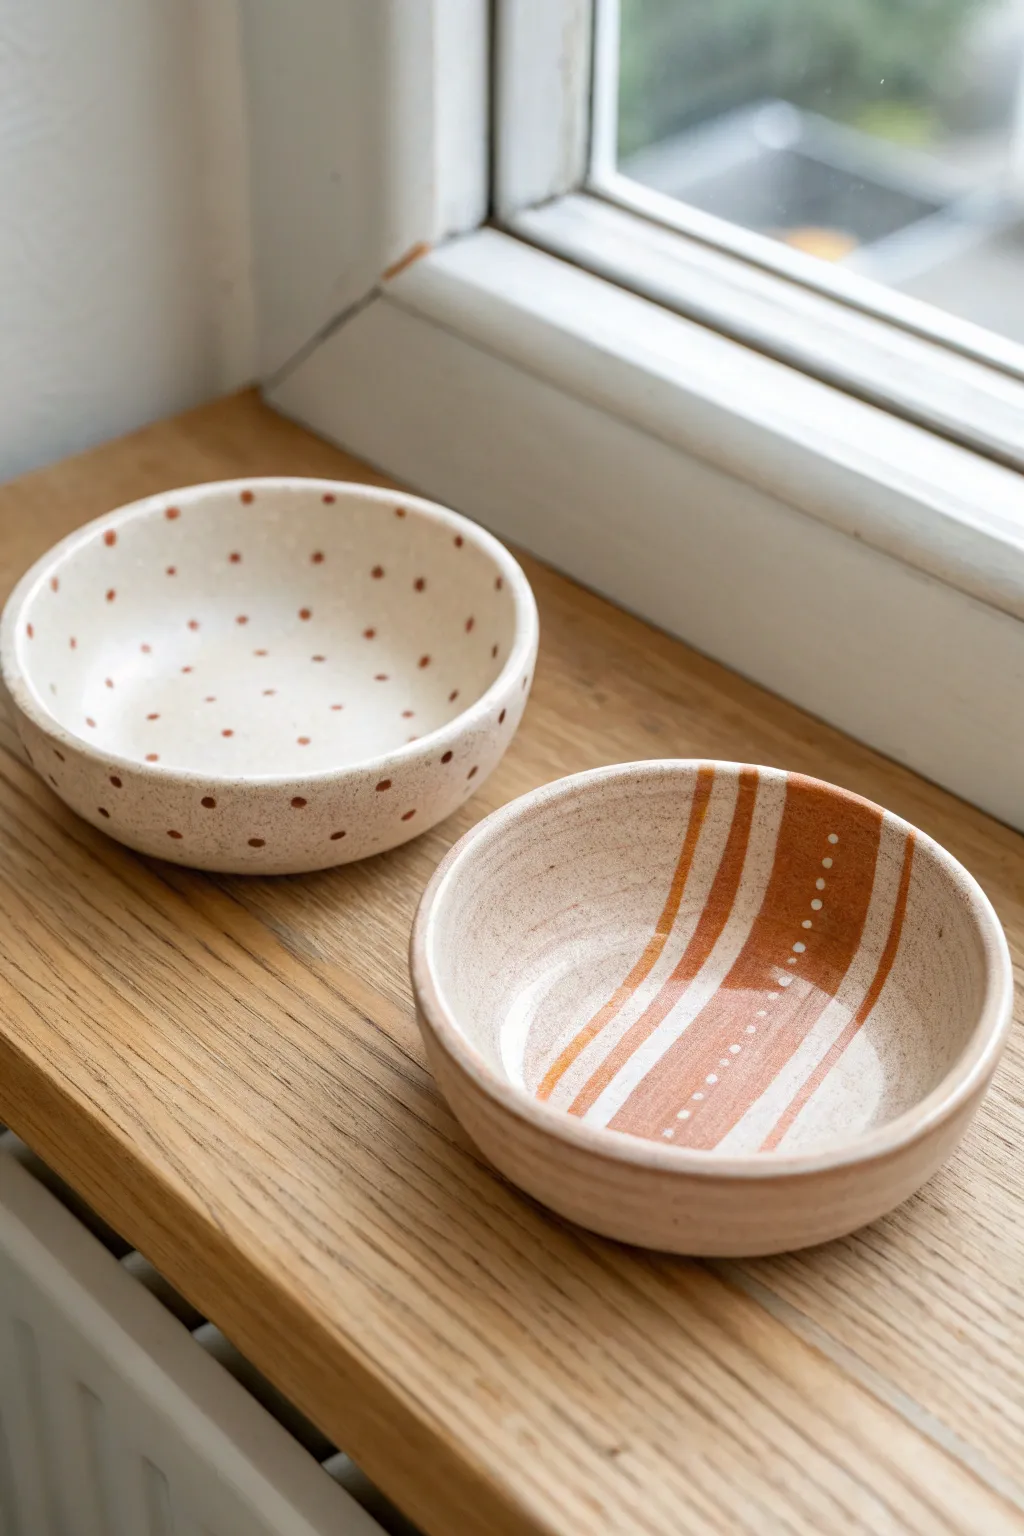
Celebrate a unique bond with this set of coordinating trinket dishes that balance playful polka dots with sophisticated stripes. Using speckled clay adds instant character and warmth, while the warm terracotta underglaze ties the mismatched designs together perfectly.
Detailed Instructions
Materials
- Speckled cone 6 stoneware clay
- Rolling pin
- Canvas work surface
- Circular cookie cutter or template (approx. 4-5 inches)
- Small sponge
- Rib tool (flexible metal or rubber)
- Loop tool for trimming
- Terracotta or rust-colored underglaze
- Small round paintbrush (size 2 or 4)
- Flat shader brush (1/4 inch)
- Clear transparent glaze
- Kiln access
Step 1: Forming the Dishes
-
Prepare the slabs:
Begin by wedging a baseball-sized amount of speckled clay to remove air bubbles. Roll it out on your canvas to an even thickness of about 1/4 inch so the bowls feel substantial but not heavy. -
Cut the circles:
Using your circular cutter or a needle tool tracing around a paper template, cut two identical circles from the slab. Remove the excess clay and smooth the freshly cut edges with a damp fingertip. -
Initial shaping:
Take the first circle and gently cup it in the palm of your hand. Use your thumb to softly press the center down while lifting the edges, creating a shallow curve. -
Refining the curve:
Place the curved slab onto a foam mat or a small slump mold if you have one. If working by hand, gently pinch and rotate the rim to lift the walls slightly higher, aiming for a shallow bowl rather than a flat plate. -
Smooth the interior:
Take a slightly damp sponge or a flexible rib tool and compress the inside bottom of the bowl. This not only smooths the surface for painting later but prevents cracking during drying. -
Repeat for the second dish:
Repeat the shaping process for the second circle, trying to match the depth and rim angle of the first bowl so they look like a sibling set. -
Slow drying:
Cover both dishes loosely with plastic and let them dry to a leather-hard state. This usually takes overnight; the clay should be firm enough to hold its shape but still cool to the touch and able to be carved.
Smooth Rim Secret
Use a strip of chamois leather designated for clean-up. Wet it slightly and run it over the rim while the clay is leather hard for an unmistakably professional, silky-smooth edge.
Step 2: Trimming and Finishing
-
Refine the rim:
Once leather hard, check the rims. Use a damp sponge to round over any sharp top edges. A comfortable, rounded lip makes the finished piece feel much more professional. -
Trim the foot:
Turn the bowls over carefully. Use a loop tool to carve away a small amount of clay from the bottom edge, creating a slight undercut or ‘foot’ that lifts the bowl slightly off the table. -
Smooth the exterior:
I like to take a metal rib at this stage and scrape away any rough texture on the outside walls, revealing more of the natural speckles in the clay body.
Step 3: Decoration & Glazing
-
Bisque fire:
Load the bone-dry bowls into the kiln for a bisque firing (usually Cone 04). This hardens the clay and prepares it for underglaze application. -
Paint the Polka Dots:
On the first bowl, dip the handle end of a paintbrush into the terracotta underglaze. Dot the glaze onto the interior and exterior randomly, keeping the spacing airy and light. -
Paint the Stripes:
For the second bowl, use the flat shader brush to paint bold terracotta stripes across the interior. Vary the thickness—one wide stripe flanked by thinner ones creates great visual rhythm. -
Add detail to stripes:
Using the small round brush, add a column of tiny white dots (or simply leave bare clay circles if using wax resist) down the center of one of the colored stripes for extra detail. -
Clear glaze application:
Once the underglaze designs are completely dry, dip the entire bowl into a clear transparent glaze. Shake off excess glaze gently to ensure an even coat. -
Wipe the feet:
Thoroughly wipe the bottom foot ring of each bowl with a wet sponge to remove all glaze, ensuring they won’t fuse to the kiln shelf. -
Final firing:
Fire the bowls to the maturity temperature of your clay (typically Cone 6). This final firing will vitrify the clay and turn the clear glaze into a glossy, durable finish.
Personalize the Bottom
Before the first firing, use a needle tool to carve initials or a short date into the bottom of the foot. It makes the set feel like a true commemorative gift for your friend.
Enjoy gifting these charming handmade dishes that perfectly balance individuality with connection

The Complete Guide to Pottery Troubleshooting
Uncover the most common ceramic mistakes—from cracking clay to failed glazes—and learn how to fix them fast.
Friendship Coaster Duo
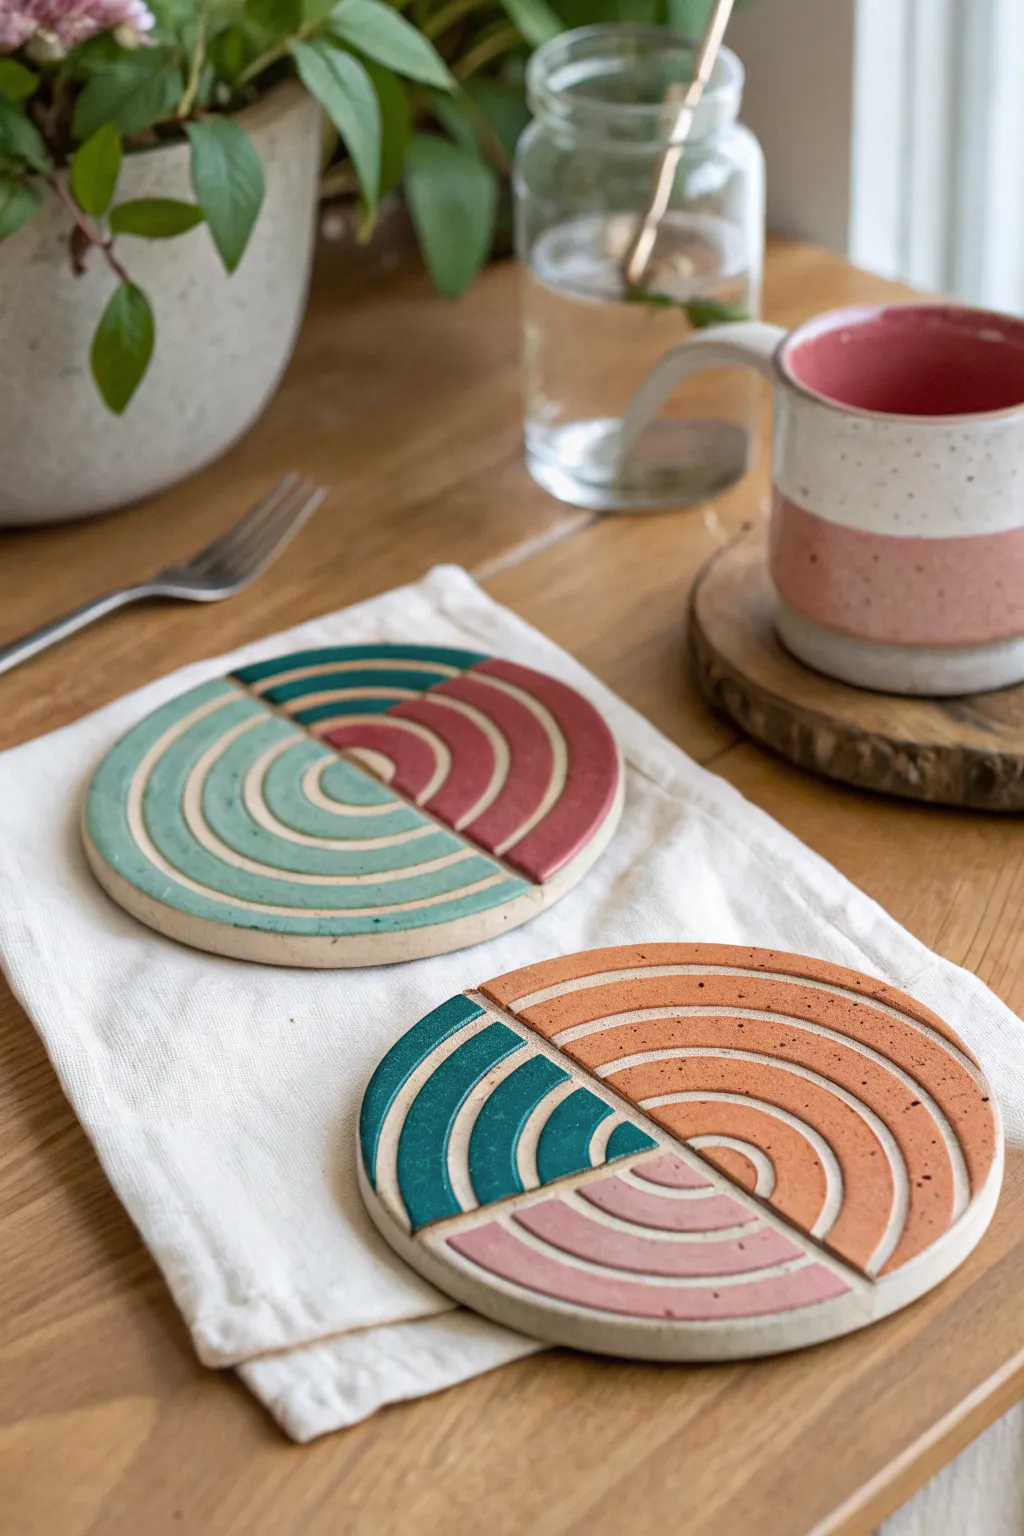
These charming ceramic coasters feature a modern, geometric take on the classic rainbow, perfect for gifting to your best friend. Their carved, concentric textures and matte color blocking create a sophisticated yet playful addition to any coffee table.
Step-by-Step Guide
Materials
- White or light-colored stoneware clay
- Rolling pin
- Two wooden guide strips (approx. 1/4 inch thick)
- Circular cookie cutter (approx. 4 inches diameter) or a bowl to trace
- Needle tool or sharp carving tool
- Small pottery sponge
- Fettling knife
- Underglazes in teal, mint green, terracotta, and dusty rose
- Fine detail paintbrush
- Medium flat paintbrush
- Clear matte glaze (optional)
- Small bowl of water
- Rolling mat or canvass
Step 1: Shaping the Base
-
Prepare the Clay:
Begin by wedging your stoneware clay thoroughly to remove any air bubbles. This is crucial to prevent the coasters from warping or exploding in the kiln. -
Roll the Slab:
Place your clay between two wooden guide strips on a rolling mat. Roll the clay out until the rolling pin rests on the strips, ensuring a perfectly even thickness of about 1/4 inch. -
Cut the Circles:
Press your circular cutter firmly into the slab to create two identical circles. If you are using a bowl template, place it upside down and trace around it carefully with a needle tool. -
Smooth the Edges:
Once cut, run a slightly damp sponge along the rim of each circle to soften the sharp cut edge. A rounded edge is much more pleasant to touch on a finished coaster.
Crisp Lines Trick
Use thin automotive masking tape or washi tape to block off sections while glazing. This ensures perfectly straight lines where the colors meet without needing a super steady hand.
Step 2: Carving the Design
-
Draft the Sections:
Lightly sketch your dividing lines with a needle tool. For the first coaster, draw a straight line splitting the circle in half. For the second, try a peace-sign division or irregular pie slices. -
Sketch the Arcs:
Within each section, lightly sketch concentric curved lines radiating from the center point outward, mimicking rainbow arches. -
Carve the Grooves:
Using a sharp carving tool or loop tool, carefully carve out the sketched lines. I find creating a ‘V’ shaped groove catches the glaze beautifully later on. -
Refine the Lines:
After carving, small ‘burrs’ or crumbs of clay will remain. wait until the clay is leather-hard, then gently brush them away with a dry soft brush or smooth them with a finger. -
Define the Borders:
Carve a slightly deeper line along the straight division marks to clearly separate the color sections. -
Drying:
Place the coasters between two pieces of drywall or under weighted plastic to dry slowly. This helps prevent the flat shapes from curling up at the edges. -
Bisque Fire:
Once bone dry, fire the pieces to cone 04 (or your clay’s specific bisque temperature) to prepare them for glazing.
Step 3: Adding Color
-
Clean the Bisqueware:
Wipe the fired coasters with a damp sponge to remove any kiln dust, which can prevent glaze from adhering properly. -
Apply First Color:
Select a section (e.g., the large half-circle) and apply a coat of mint green underglaze. Avoid filling the carved grooves too thickly; you want the texture to remain visible. -
Paint Differing Sections:
Paint the adjacent section in a contrasting color, like terracotta or dusty rose. Use a fine detail brush near the carved dividing line to keep the edges crisp. -
Layering:
Apply 2-3 coats of each underglaze color, letting each layer dry to the touch before adding the next, to ensure solid, opaque coverage. -
Leave Grooves Natural:
For a rustic look, try to keep the carved grooves relatively free of heavy glaze, or wipe them back slightly so the raw clay body shows through, highlighting the geometry. -
Protect the Rim:
Ensure the raw edge of the coaster is left unglazed if you prefer the look of the clay body framing the design, or paint it a solid neutral color. -
Final Fire:
If you want a waterproof finish, apply a thin layer of clear matte glaze over the top. Fire to the final temperature recommended for your specific clay and glaze combination.
Warped Coasters?
If your coasters curl while drying, flip them over and mist the bottom lightly. Place a heavy book on top (with a board in between) to flatten them back out before firing.
Stack your finished coasters on the table and enjoy the lovely patterns they create together
Tiny Bud Vase Set
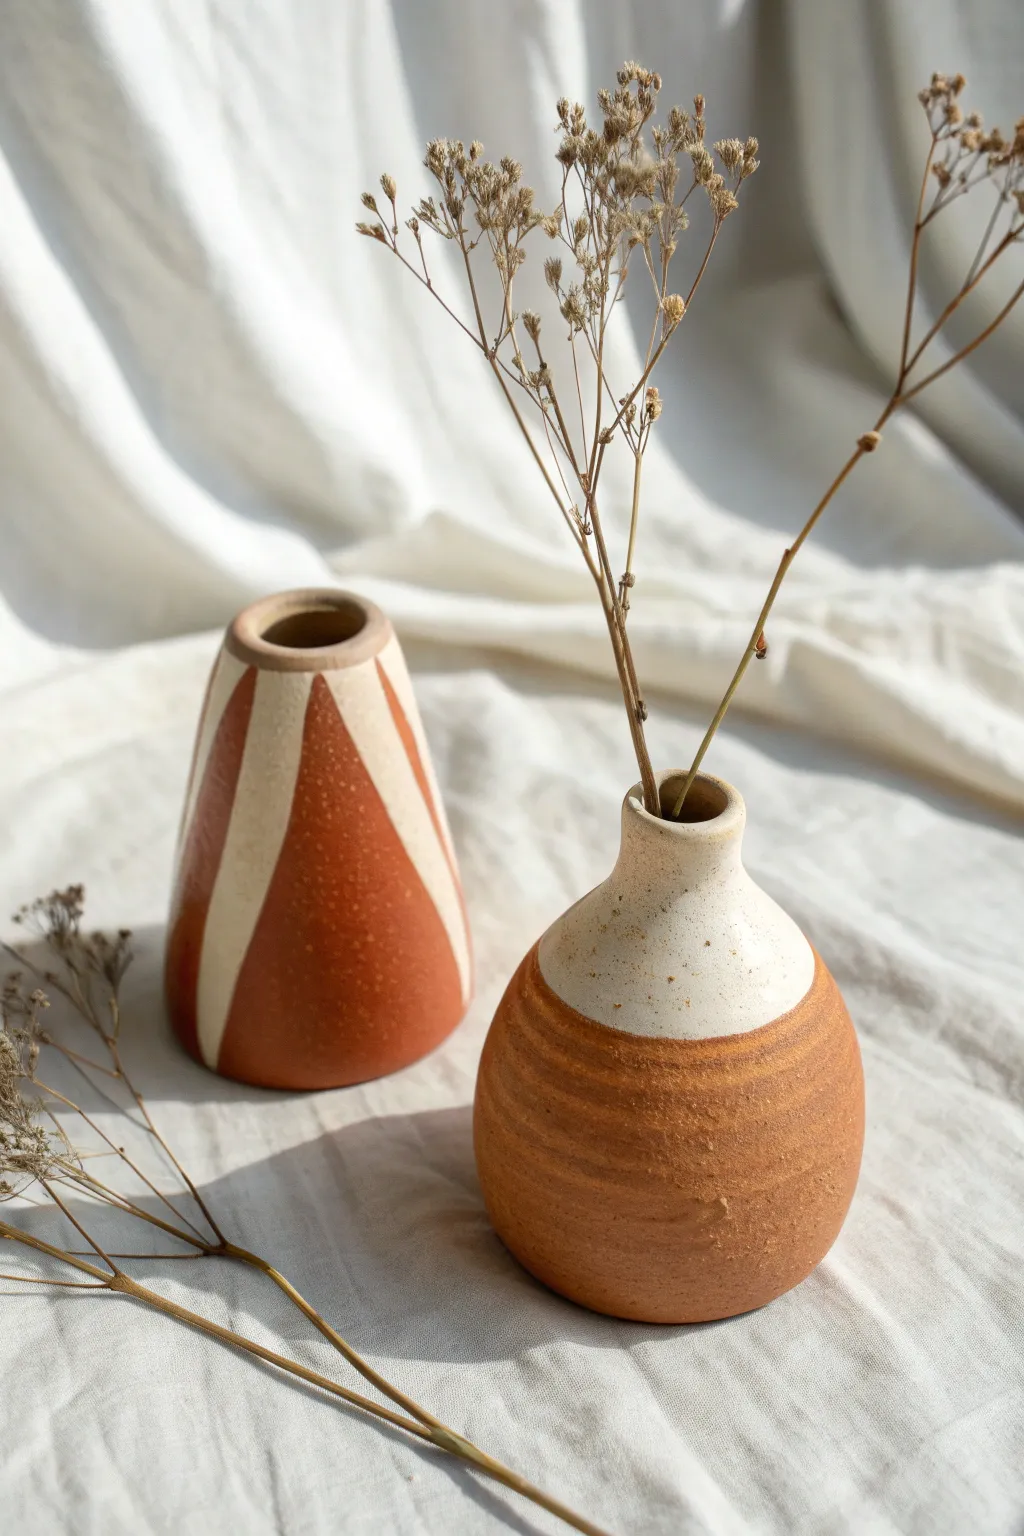
These charming miniature vases make the perfect gift set for a friend who loves earthy tones and modern design. By combining sgraffito-style carving with simple dipping techniques, you’ll create a complementary pair that looks effortlessly chic on any windowsill.
How-To Guide
Materials
- Red earthenware or terracotta clay bodies (cone 04-06)
- White underglaze
- Clear glossy glaze
- Pottery wheel (or coil-building tools for handbuilding)
- Needle tool
- Loop trimming tools
- Small sponge
- Pencil
- Wire cutter
- Sgraffito loop tool or carving stylus
Step 1: Throwing the Forms
-
Prepare your clay:
Wedge two small balls of terracotta clay, roughly 1 pound each. Ensure all air bubbles are removed to prevent explosions in the kiln later. -
Center the first ball:
Secure the first ball on the wheel head. Center it into a low, wide mound to prepare for the conical vase. -
Throw the conical vase:
Open the hole and pull the walls up, immediately tapering inward. Keep the base wide and bring the rim in significantly until you have a distinct cone shape with a narrow opening about 1 inch wide. -
Create the bulbous vase:
For the second vase, center your remaining clay. Open and pull the walls into a cylinder first, then gently push the belly out from the inside to create a round shape. Collar the neck in tightly to create the narrow bottle opening. -
Refine the rims:
Use a chamois or a small piece of plastic to smooth the lips of both vases. A rounded, smooth rim feels much nicer to the touch. -
Wire off and dry:
Wire the pots off the bat and let them dry to a ‘leather hard’ state. This is crucial—if they are too wet, you can’t trim them; too dry, and you can’t carve.
Oops, Underglaze Smudged?
If white underglaze smears onto the red clay during carving, don’t wipe it wet! Let it bone dry, then gently scratch the smudge off with a needle tool.
Step 2: Trimming & Surface Design
-
Trim the foot rings:
Place the leather-hard pots back on the wheel (centered and secured with clay lugs). Use a loop tool to trim away excess weight from the bottom and carve a clean foot ring. -
Underglaze the conical vase:
While the conical vase is leather hard, apply 2-3 coats of white underglaze over the entire exterior. I prefer to apply this while the wheel is spinning slowly for even coverage. -
Wait for surface drying:
Let the underglaze dry until it is no longer tacky. It should feel chalky to the touch. -
Mark vertical guides:
Using a pencil, lightly mark vertical lines from the rim to the base to divide the vase into four or five equal sections. -
Carve the triangles:
Using a sgraffito loop tool, carve away the white underglaze in large triangular shapes, exposing the red clay body underneath. Leave thick vertical bands of white separating the exposed clay triangles. -
Clean up the lines:
Brush away the clay crumbs carefully. Refine the edges of your white stripes to ensure they are crisp and sharp. -
Preparing the bulbous vase:
For the round vase, leave the bottom raw. Simply sponge it smooth to remove any throwing lines if you prefer a cleaner look, or leave the finger ridges for texture. -
The dipping technique:
Once the round vase surrounds are clean, paint or dip just the top neck and shoulder area in white underglaze. The goal is an organic, rounded transition, not necessarily a perfect straight line.
Step 3: Firing & Finishing
-
Bisque fire:
Load both vases into the kiln for a bisque firing (usually Cone 04). This hardens the clay and prepares it for the final glaze. -
Apply clear glaze:
Once cool, dip the entire conical vase into a clear glossy glaze. For the round vase, you can choose to glaze the whole thing or only glaze the white upper section for a contrast in texture. -
Wipe the feet:
Use a damp sponge to meticulously wipe all glaze off the foot rings. Any glaze left on the bottom will fuse your vase to the kiln shelf. -
Glaze fire:
Fire the pots again to your clay’s maturity temperature (likely Cone 05/06 for earthenware or Cone 5/6 for stoneware). -
Final sand:
After the final firing, use sandpaper to lightly smooth the unglazed bottom of the pots so they don’t scratch your furniture.
Add Speckled Texture
For a rustic look, use a clay body with grog or sand. When you wipe the final sponge over the raw clay, the grit will create a beautiful, tactile surface.
Fill these beauties with dried wildflowers or a single fresh stem to complete the look.


What Really Happens Inside the Kiln
Learn how time and temperature work together inside the kiln to transform clay into durable ceramic.
Photo Holder Bestie Arches
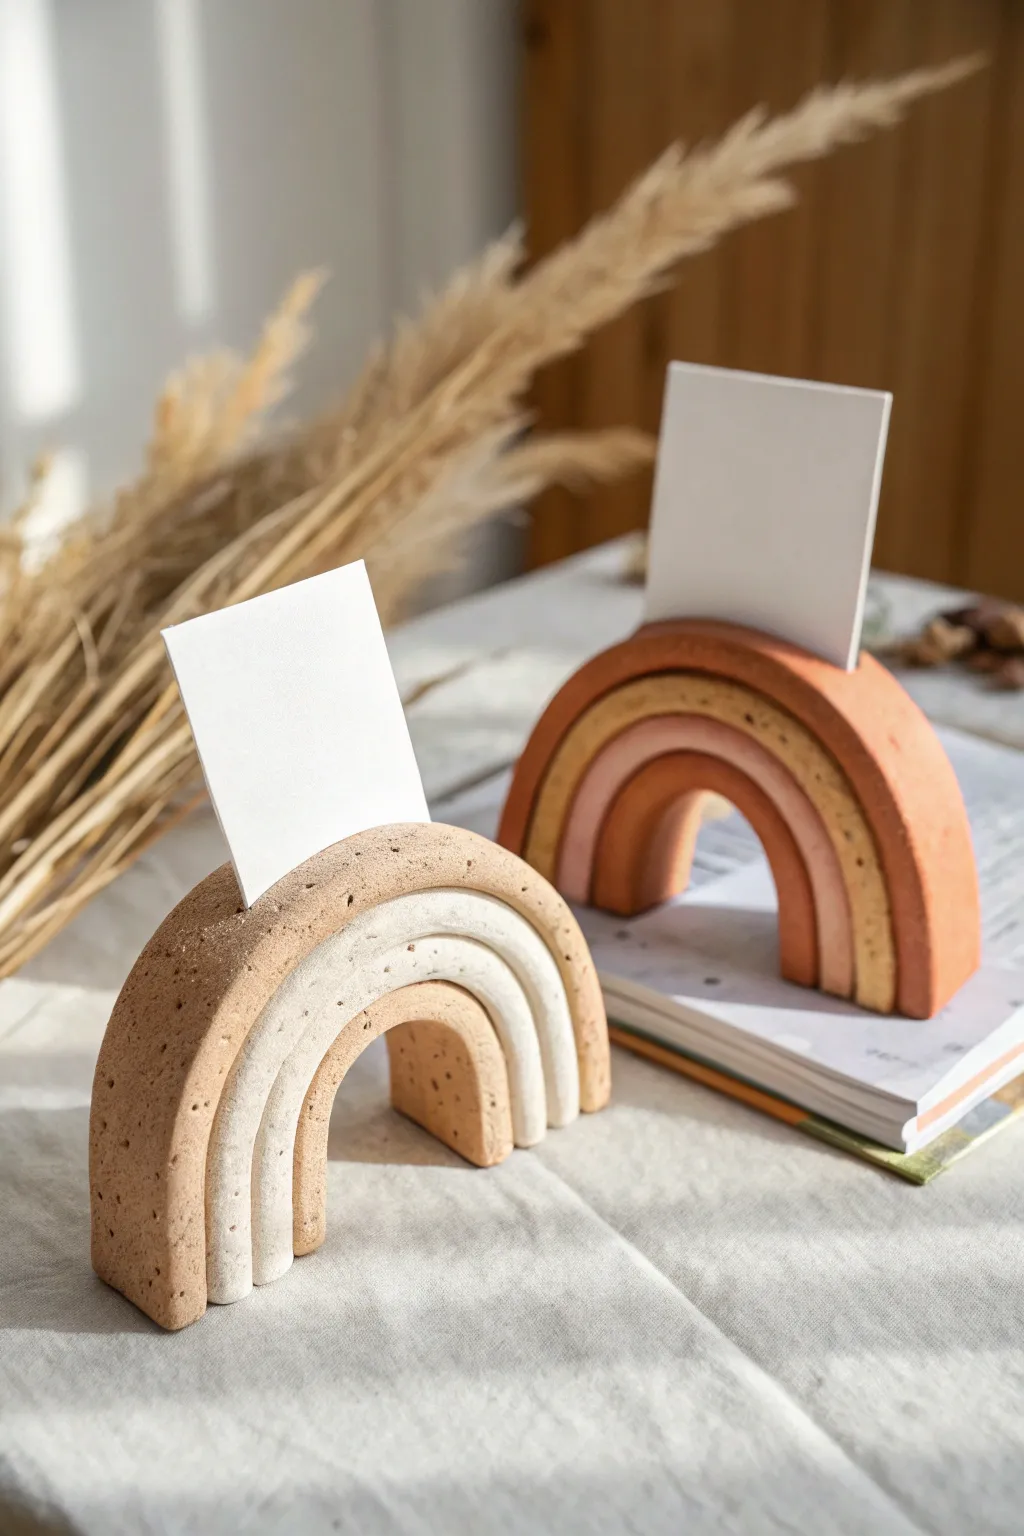
These charming, arch-shaped photo holders use warm, speckled tones to create a minimal yet cozy display for your favorite polaroids or notes. Their earthy texture and gentle curves make them a perfect handmade gift that feels both modern and heartfelt.
Step-by-Step Guide
Materials
- Polymer clay or air-dry clay (terracotta, beige, white, and warm brown)
- Speckled clay (or black pepper/sand for mix-ins)
- Acrylic rolling pin
- Clay knife or craft blade
- Circle cutters (graduated sizes) or cardboard templates
- Ruler
- Sandpaper (fine grit)
- Parchment paper or clay mat
- Oven (if using polymer clay)
Step 1: Preparing the Clay Colors
-
Condition the clay:
Start by warming up your clay in your hands to make it pliable. If you want that gorgeous speckled look but only have solid colors, try kneading in a tiny pinch of coarse black pepper or craft sand into your beige or terracotta clay. -
Mix custom shades:
Aim for a gradient palette. For the front rainbow shown, you’ll need a deep speckled tan, a creamy off-white, and a lighter beige. Mix white into your brown clay to create these varying tints. -
Roll out slabs:
Roll each color into a thick slab, approximately 1/4 to 1/2 inch thick. Uniform thickness helps the arches stand up properly later.
Uneven Layers?
If your arch layers separate after baking, use a tiny drop of superglue or clear liquid clay in the gaps to bond them permanently.
Step 2: Forming the Arches
-
Cut the strips:
Using your knife and a ruler, cut long, even strips from your rolled slabs. The width of the strip determines the depth of your holder (front to back), so keep them consistent at about 1 inch wide. -
Form the center arch:
Take your smallest strip (the lightest beige in the front example) and bend it gently into a tight U-shape. This forms the central tunnel. -
Layer the middle arch:
Take the next color (cream/off-white), lay it over the first U-shape, and trim the ends so they sit flush with the bottom of the first arch. -
Add the outer arch:
Drape the final, darkest strip over the stack. Press them gently together so the layers adhere without losing their distinct rounded shape. -
Trim the base:
Stand the rainbow up on your work surface. Use your blade to slice horizontally across the bottom feet to ensure the entire piece sits perfectly flat and stable.
Step 3: Creating the Photo Slot
-
Slice the top center:
Using a sharp, thin blade, carefully cut a slit directly into the top center of the rainbow. Go deep enough to hold a card securely, but not so deep you split the clay entirely. -
Widen gently:
Wiggle the blade very slightly to ensure the gap is wide enough for thick cardstock or a photo. I find that rocking the blade side-to-side just a millimeter helps prevent the slot from closing up during baking. -
Smooth the edges:
Run your finger over the cut edges and the seams between the colors to soften any sharp corners.
Make it Shine
After baking, apply a layer of matte or gloss varnish to protect the clay and make those speckled textures pop even more.
Step 4: Finishing Up
-
Final texture check:
If you want a more rustic, stone-like texture, gently tap the surface with an old toothbrush or a stiff paintbrush before hardening. -
Bake or dry:
If using polymer clay, place the rainbow on a parchment-lined baking sheet and bake according to package instructions (usually 275°F for 15-30 minutes). If using air-dry clay, let it sit undisturbed for 24-48 hours. -
Cool down:
Let the piece cool completely in the oven with the door slightly ajar to prevent cracking from sudden temperature changes. -
Check the slot:
Once hard, test your photo slot. If it shrank slightly and is too tight, use a piece of folded sandpaper to gently widen the gap. -
Sand the bottom:
Rub the feet of the rainbow against fine-grit sandpaper on a flat surface to ensure it doesn’t wobble.
Now you have a stylish little spot to keep your favorite memories on display
Bee and Hive Charm Set
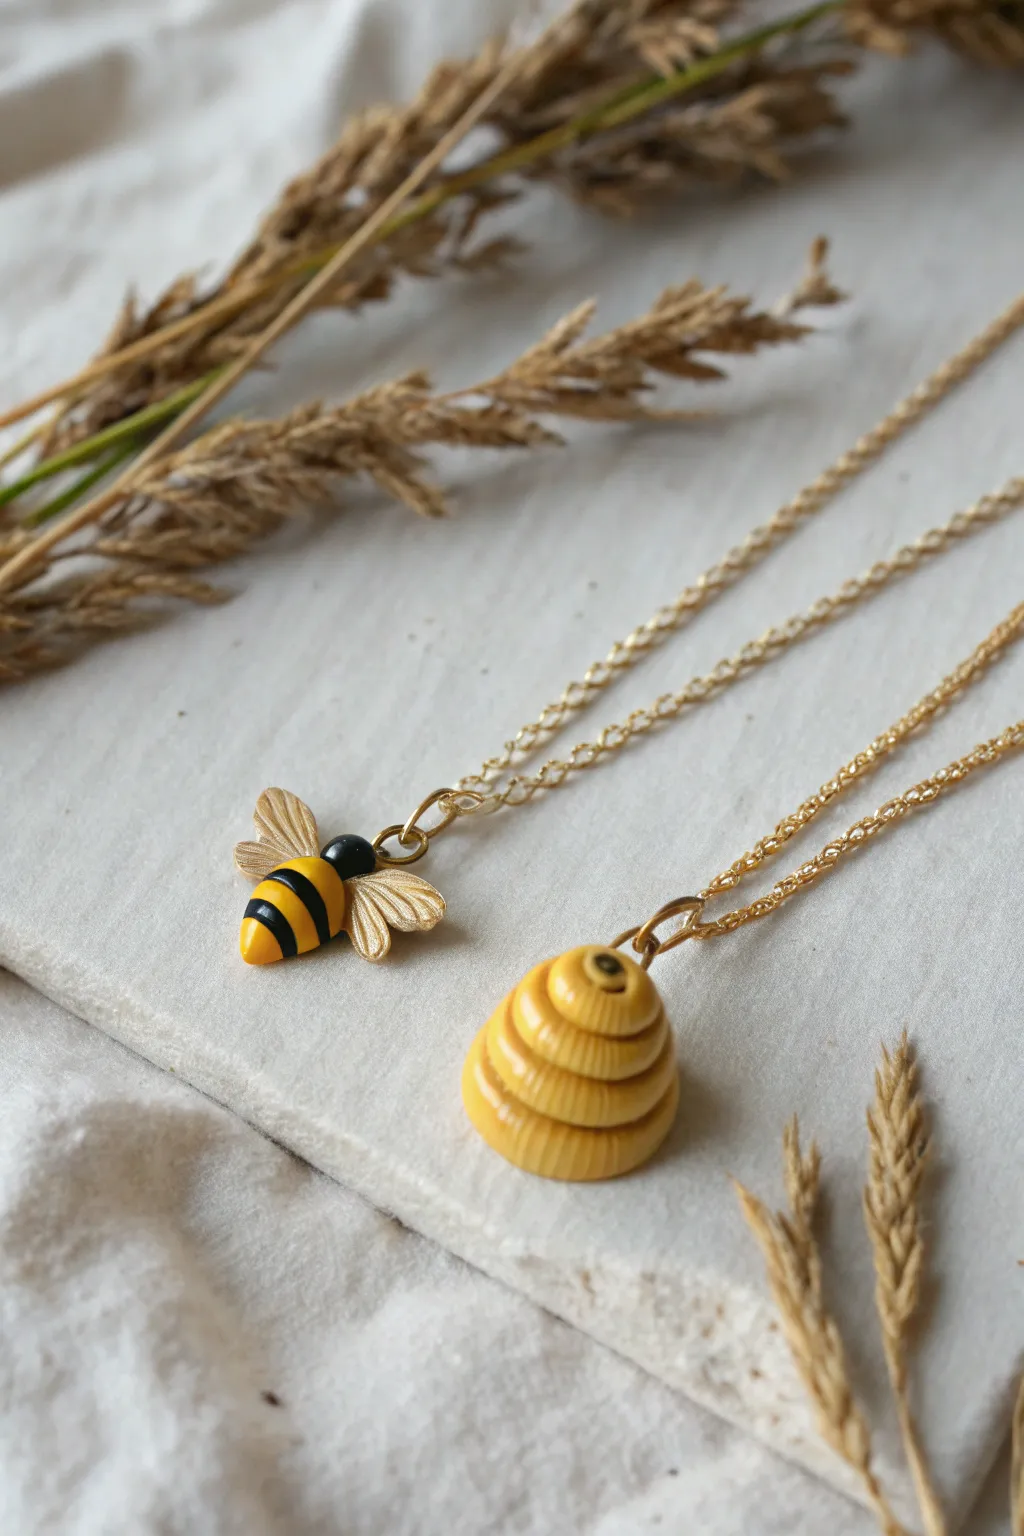
These adorable polymer clay charms are the perfect matching set for you and your best friend, featuring a sweet striped bee and a golden coiled hive. The project combines simple shaping techniques with delicate detailing to create professional-looking jewelry pieces with a glossy finish.
Step-by-Step Guide
Materials
- Polymer clay (sunshine yellow, black, translucent or pearl white)
- Gold mica powder or gold acrylic paint
- Sculpting tools (needle tool, ball stylus)
- Liquid clay (TLS or Fimo liquid)
- Eye pins (gold tone)
- Two gold necklace chains
- Jewelry pliers
- Gloss glaze (polyurethane or resin)
- Small paintbrush
- Oven for baking
Step 1: Sculpting the Bee
-
Form the body base:
Start by conditioning your yellow clay until it’s soft and pliable. Roll a small amount into a teardrop shape about 1 cm long to form the main abdomen of the bee. -
Add stripes:
Roll out a very thin snake of black clay. Gently press two bands of black clay around the yellow abdomen, spaced evenly apart, to create the bee’s classic stripes. -
Create the head:
Roll a tiny ball of black clay for the head. Attach it firmly to the wider end of the yellow teardrop; you can use a dab of liquid clay to ensure a secure bond. -
Shape the wings:
Take a small amount of translucent or pearl white clay. Divide it into two equal pea-sized balls and flatten them into teardrop shapes. -
Detail the wings:
Use a needle tool to gently etch vein lines into the wings for texture. I like to lightly brush these with gold mica powder before attaching them to make the details pop. -
Attach wings:
Press the wings onto the back of the bee, just behind the head. Carefully blend the clay at the attachment point or use a tiny bit of liquid clay. -
Insert hardware:
Trim an eye pin to an appropriate length and insert it into the top of the bee, right between the wings. Ensure the loop is facing the right direction for hanging.
Sticky Situation?
If your clay is too soft and fingerprints are showing, pop the unsculpted clay in the fridge for 10 minutes. A light dusting of cornstarch on your fingers also helps smooth prints.
Step 2: Crafting the Hive
-
Prepare the hive coils:
Condition more yellow clay—you might want to mix in a tiny bit of brown or orange to make it slightly darker than the bee if you wish, though matching yellow works great too. -
Roll the clay:
Roll the clay into a long, even snake, roughly 3-4mm in thickness. -
Build the base:
Start coiling the snake in a circle to form the base of the hive. As you spiral inward, stack the coil on top of the previous layer, effectively building a cone shape. -
Shape the dome:
Direct the coils inward as you go up to create a rounded, dome-like top rather than a sharp point. Aim for about 4-5 layers of coils. -
Smooth the shape:
Gently press the layers together so they adhere but maintain their distinct coiled ridges. -
Add the door:
Use a small ball tool to indent a hole near the top or middle of the hive. Place a tiny dot of black clay inside this indentation to represent the entrance. -
Insert hardware:
Trim another eye pin and insert it straight down through the center top of the hive.
Step 3: Finishing Touches
-
Bake the charms:
Place both charms on a tile or parchment paper. Bake according to your brand of clay’s instructions (usually around 275°F/130°C for 15-30 minutes). -
Cool and glaze:
Allow the pieces to cool completely. Once cool, apply a coat of gloss glaze or UV resin to both charms to give them a shiny, polished look like in the photo. -
Assembly:
Once the glaze is dry, use jewelry pliers to open the jump rings or necklace clasps and thread your new charms onto the gold chains.
Make it Sparkle
Mix a tiny amount of ultramine glitter into the translucent wing clay before shaping. The subtle sparkle will catch the light and make the wings look magical.
Gift one to your best friend and keep the other for a sweet reminder of your bond.

TRACK YOUR CERAMIC JOURNEY
Capture glaze tests, firing details, and creative progress—all in one simple printable. Make your projects easier to repeat and improve.
Cloud and Raindrop Charms
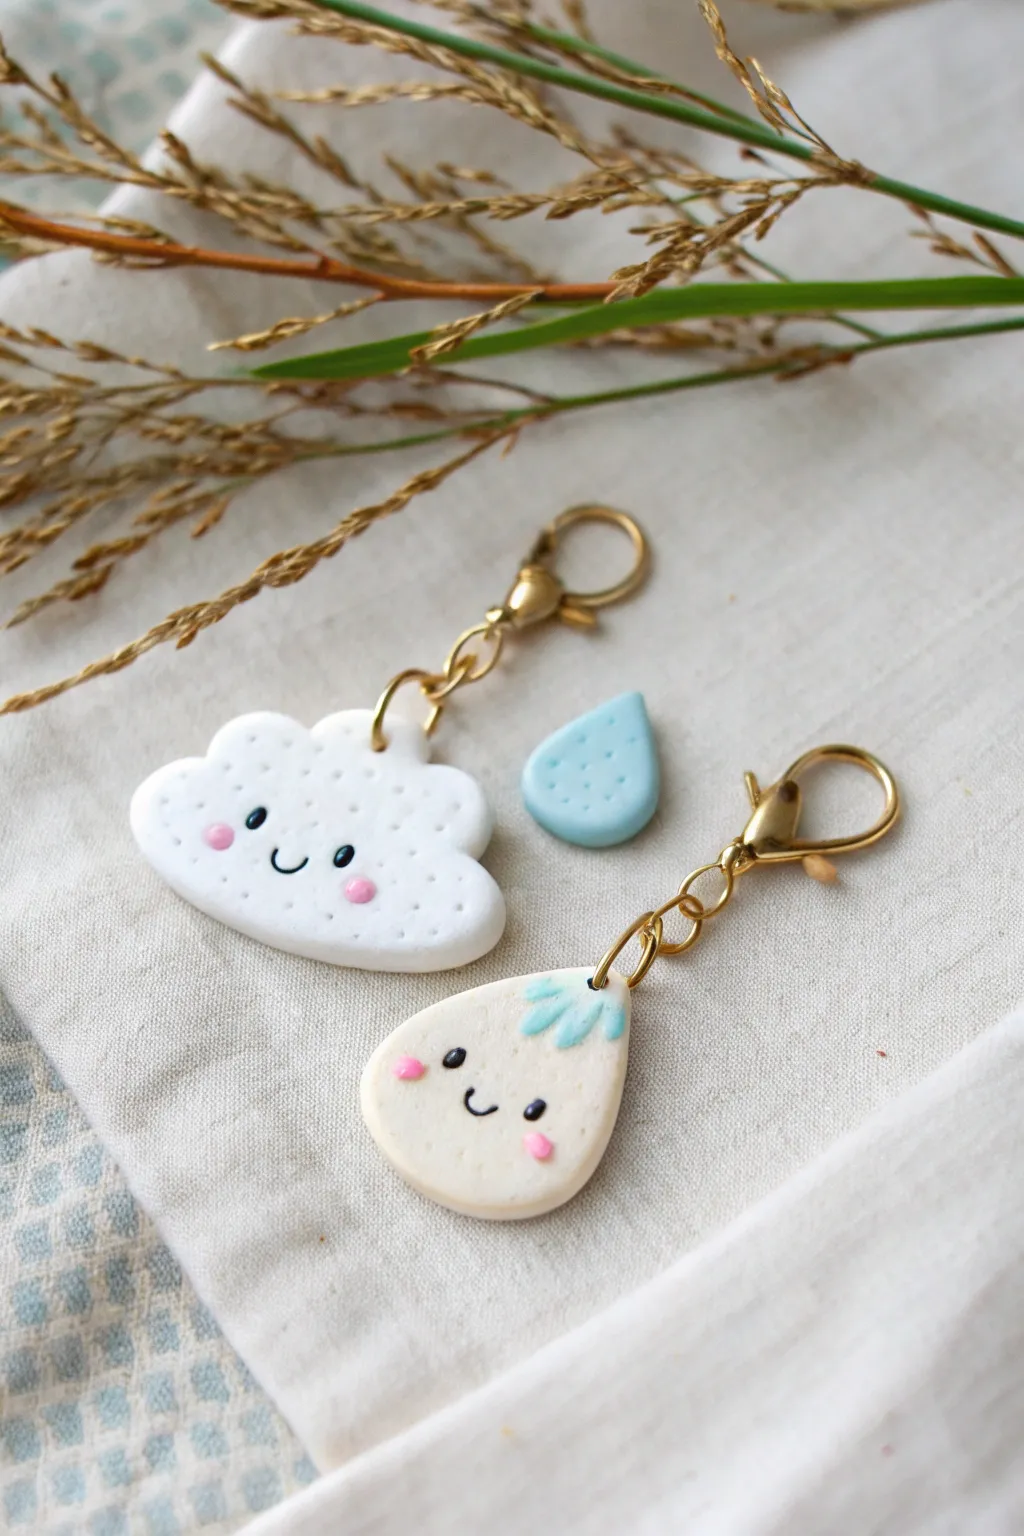
These adorable polymer clay cloud and raindrop charms make the perfect matching set for you and a best friend. With their sweet smiling faces and soft textures, they turn a rainy day theme into a heartwarming accessory.
Step-by-Step Tutorial
Materials
- White polymer clay
- Light blue polymer clay
- Black polymer clay (tiny amount)
- Pink polymer clay (tiny amount)
- Gold lobster clasp keychains
- Gold jump rings
- Gold eye pins
- Needle tool or toothpick
- Small ball tool
- Clay roller
- Cloud and teardrop clay cutters (optional, freehand works too)
- Gloss glaze (optional)
Step 1: Shaping the Charms
-
Condition the white clay:
Start by kneading your white polymer clay until it is soft and pliable. This prevents cracks later on. -
Roll out the base:
Roll the white clay into a smooth slab approximately 1/4 inch thick. You want it sturdy enough to hold hardware without being too heavy. -
Cut the cloud shape:
Using a cutter or by shaping it manually with your fingers, create a fluffy cloud shape with rounded bumps along the top and sides, and a flat bottom. -
Texture the cloud:
Take a needle tool or the tip of a toothpick and gently poke shallow dots all over the surface of the cloud to give it a porous, marshmallow-like texture. -
Create the raindrop character:
Shape a second piece of white clay (or very light cream) into a rounded teardrop shape for the main body of the rain character. -
Add a blue tuft:
Take a tiny amount of light blue clay, flatten it into a small wavy patch, and press it gently onto the top pointed end of the raindrop character to look like a little splash of water. -
Make the loose raindrop:
If you want the extra accessory shown, shape a small piece of light blue clay into a classic teardrop shape and add the same dotted texture you used on the cloud.
Clean Clay Tip
White clay picks up everything! Keep wet wipes nearby and clean your hands and tools thoroughly before handling the white clay to avoid dust specks.
Step 2: Adding Faces & Hardware
-
Make eye sockets:
On both large charms—the cloud and the white raindrop—use a small ball tool to gently indent where you want the eyes to sit. -
Insert the eyes:
Roll incredibly tiny balls of black clay and press them into the indented sockets. I find using a needle tool helps transfer these tiny pieces without squishing them. -
Add the smiles:
Roll a very thin ‘snake’ of black clay. Cut two tiny curves and press them onto the faces to create gentle U-shaped smiles. -
Blush the cheeks:
Roll tiny balls of pink clay, flatten them slightly, and press them onto the ‘cheeks’ just below the eyes for a rosy look. -
Insert eye pins:
Carefully push a metal eye pin into the top center of each charm. If the pin is too long, trim it first with wire cutters. -
Secure the pin:
Smooth the clay slightly around the entry point of the pin to ensure it’s gripped tightly during baking.
Preventing Fingerprints
If you’re leaving dents in your smooth shapes, lightly dust your fingertips with a tiny bit of cornstarch before final smoothing.
Step 3: Baking & Assembly
-
Bake the charms:
Place your pieces on a parchment-lined baking sheet or ceramic tile. Bake according to your specific clay brand’s instructions (usually around 275°F for 15-30 minutes). -
Cool down:
Let the charms cool completely in the oven or on a wire rack. They are fragile while hot. -
Seal the pin (optional):
If the eye pin feels loose after baking, pull it out gently, add a drop of super glue, and slide it back in. -
Attach the hardware:
Use pliers to open a gold jump ring. Thread it through the loop of the eye pin and the bottom loop of your lobster clasp chain. -
Close the rings:
Using two pairs of pliers for stability, twist the jump ring closed securely so there is no gap for the charm to slip through.
Now clip these onto your bags and enjoy sporting your handmade weather buddies
Magnetic Best-Friend Fridge Minis
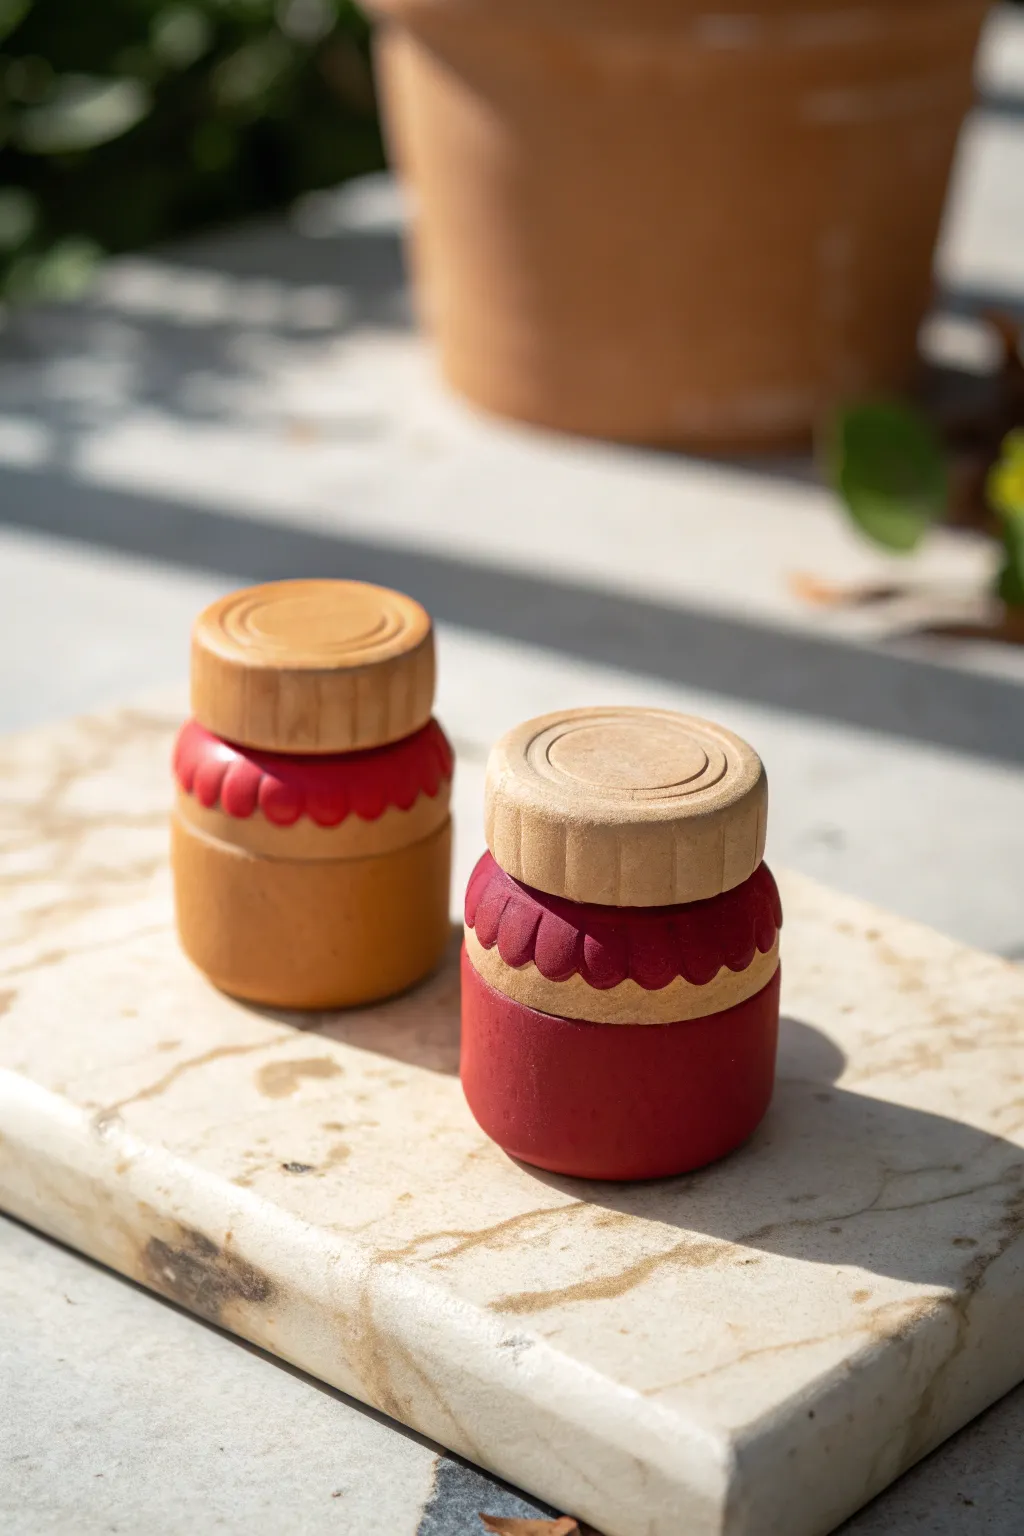
These adorable miniature preserve jars, inspired by classic pantry staples, make for the sweetest friendship tokens. With their realistic wooden lids and scalloped fabric-like details, they add a charming touch of artisanal flair to any magnetic surface.
Step-by-Step Guide
Materials
- Polymer clay (terracotta/honey color and deep red)
- Wooden dowel (1-inch diameter) or pre-cut wooden circles
- Acrylic paint (red, honey-gold, beige/wood tone)
- Fine grit sandpaper
- Heavy-duty craft glue or E6000
- Small round magnets
- Sculpting tools (needle tool, small ball stylus)
- Matte varnish or sealant
- X-acto knife or craft blade
- Rolling pin
Step 1: Shaping the Jar Bases
-
Form the main body:
Start by conditioning your polymer clay until it is soft and pliable. Roll two balls of clay, one in the honey tone and one in deep red, each about the size of a large grape. -
Cylinder shaping:
Gently flatten the top and bottom of each ball against your work surface to create a squat cylinder shape. You want the sides to be slightly rounded rather than perfectly straight to mimic a glass jar. -
Create the neck:
Using your fingers, slightly pinch the upper quarter of the cylinder to create a subtle indentation. This forms the ‘neck’ of the jar where the lid will eventually sit. -
Smooth the surface:
Check for any fingerprints. I find that lightly rolling the cylinder on the table helps smooth out imperfections without losing the rounded shape.
Clean Cuts
Chill your clay sheet in the fridge for 10 minutes before cutting the scalloped edge. Cold clay cuts cleaner and won’t drag or distort when you lift it.
Step 2: Creating the Fabric Detail
-
Roll the accent clay:
Take a contrasting color of clay (red for the honey jar, or a lighter clay for the red jar) and roll it out into a thin sheet, about 1-2mm thick. -
Cut the strip:
Cut a narrow strip from this sheet, long enough to wrap around the neck of your jar with a little overlap, and about 1/4 inch wide. -
Scallop the edge:
Before attaching it, use a small round cutter or the cap of a pen to cut half-circles along one long edge of the strip, creating a scalloped ‘lace’ or fabric effect. -
Attach to jar:
Wrap this scalloped strip around the neck of your jar, pressing it gently to adhere. The straight edge should be at the top, flush with the flat top of your clay cylinder. -
Refine the seam:
Smooth the seam where the strip ends meet at the back of the jar using a modeling tool so it looks continuous.
Texture Twist
Before baking, gently press a piece of real linen fabric onto the scalloped clay strip to imprint a realistic woven texture onto the ‘jam jar cover’.
Step 3: Lids and Assembly
-
Prepare the wooden lids:
If using a dowel, saw off two slices about 1/4 inch thick. Sand the edges until they are smooth. -
Add texture:
Project the look of a screw-top lid by using the side of a needle tool to press vertical lines around the side edge of the wooden disc. -
Top detail:
Use a small carving tool or something sharp to scribe a circle on the top flat surface of the wood, creating a decorative rim effect. -
Painting the wood:
If your wood is too pale, give it a wash of watered-down beige or light brown acrylic paint to define the grooves and give it a warm, aged look. Let it dry completely. -
Baking:
Bake your clay jar bases according to the manufacturer’s instructions (usually 275°F for 15-30 minutes). I recommend placing them on a ceramic tile to prevent shiny spots. -
Cooling:
Allow the clay pieces to cool completely before handling. They will be slightly soft when hot but harden as they cool. -
Final assembly:
Apply a strong craft glue to the top of the clay jar and press the wooden lid firmly in place. Ensure it is centered. -
Adding the magnet:
Flip the jar over and glue a strong round magnet to the bottom center. Let the glue cure for at least 24 hours for maximum strength. -
Sealing:
Brush a coat of matte varnish over the clay parts to protect the surface and give it a finished, professional look.
Now you have a set of charming preserves that will keep your notes sweet and secure
Friendship Plant Pal Planters
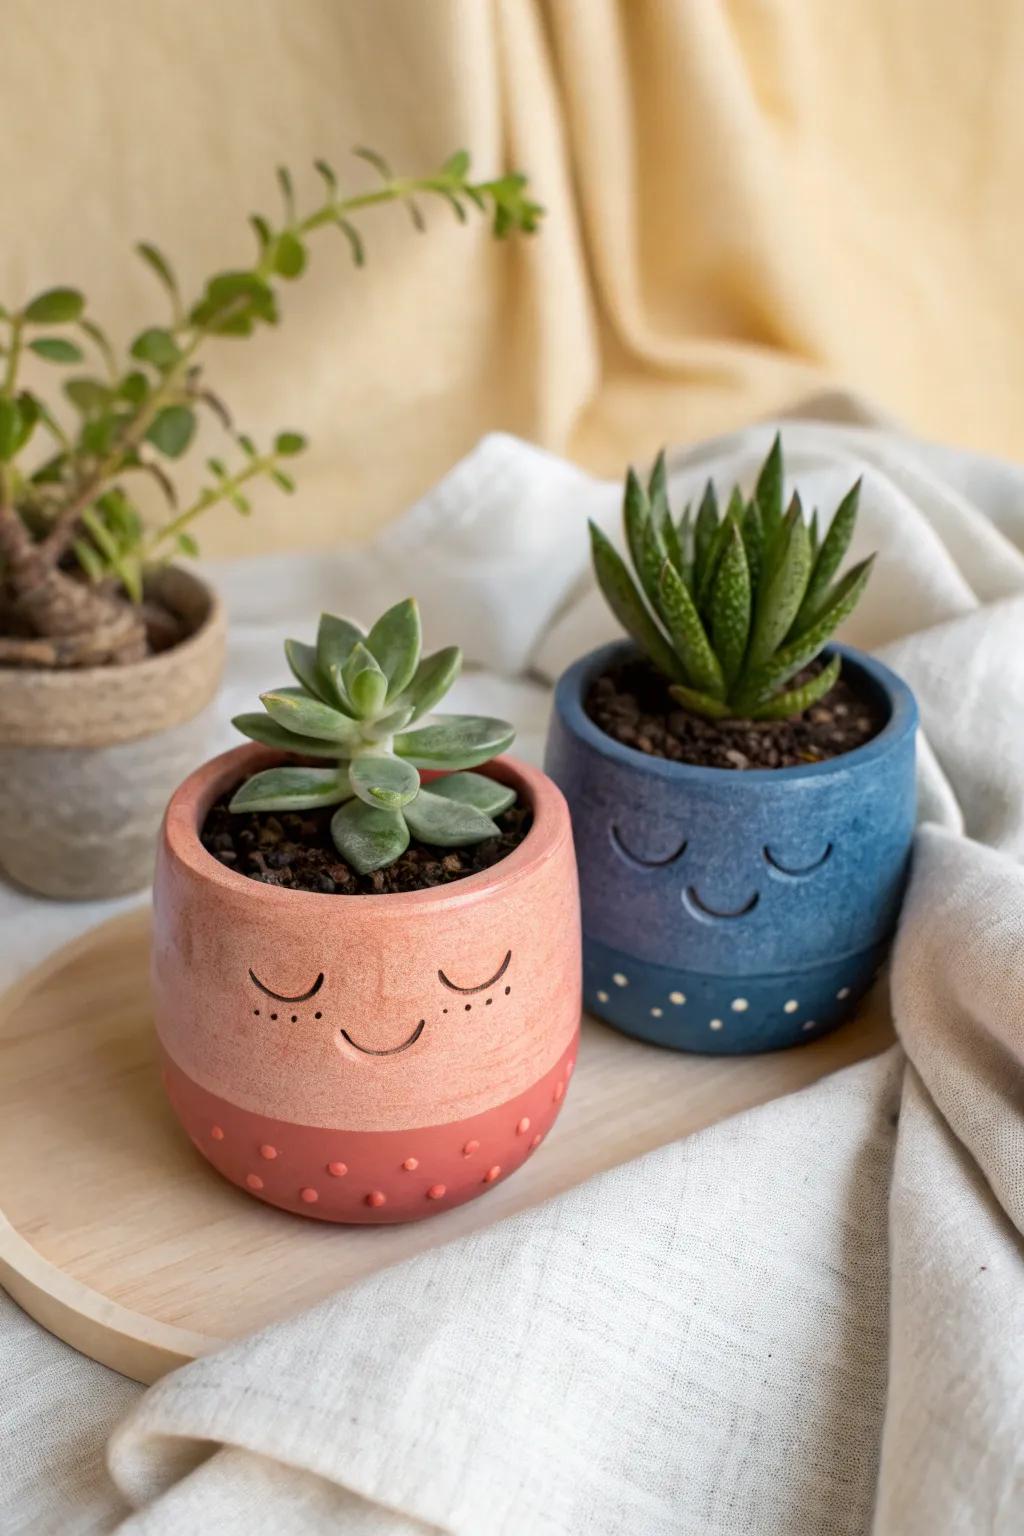
Create a charming duo of smiling succulent planters to share with your best creative friend. These hand-built clay pots feature sweet, sleepy faces and a delightful speckled texture that brings a cozy, handmade feel to any windowsill.
Step-by-Step Tutorial
Materials
- Air-dry clay or polymer clay (white or terracotta)
- Rolling pin
- Circle cutter or small bowl (appx. 4-inch diameter)
- Ruler
- Clay knife or craft blade
- Slip (water/clay mixture) or liquid clay adhesive
- Smoothing sponge and water
- Needle tool or toothpick
- Small carving loop tool (optional)
- Acrylic paints (Coral Pink, Deep Red, Denim Blue, Navy Blue, White)
- Small round paintbrush
- Clear matte varnish or sealant
- Two small succulents
Step 1: Building the Pot Base
-
Roll the Slab:
Begin by rolling out your clay on a flat surface to an even thickness of about 1/4 inch. If you are making two matching pots, ensure you have enough clay rolled out for both bases and walls. -
Cut the Base:
Use a circle cutter or trace around a small cup to cut out two identical circles for the bottom of your planters. These should be roughly 2.5 to 3 inches in diameter. -
Create the Walls:
Cut two long rectangular strips from your rolled clay. The length should match the circumference of your base circles (measure with a string if needed), and the height should be about 2.5 inches. -
Attach the Wall:
Score the outer edge of your circle base and the bottom edge of your rectangular strip. Apply a little slip or adhesive, then wrap the strip around the base, pressing gently to join them. -
Seal the Seams:
Where the two ends of the wall meet, score and slip the edges, then blend the clay together inside and out using your thumb or a modeling tool until the seam disappears. -
Smooth Everything Out:
Use a damp sponge to smooth the connection between the wall and the base. Gently round the top rim of the pot with your fingers to soften any sharp edges.
Step 2: Adding Personality
-
Carve the Face:
While the clay is still leather-hard (firm but workable), use a needle tool to gently carve two crescent shapes for sleepy eyes. Below them, carve a simple, upward-curved line for a smile. -
Add Cheeks (Optional):
For the pink pot, you can use the needle tool to poke three tiny dots on either side of the smile to mimic freckles. The blue pot keeps a simpler look without them. -
Create Texture:
For the bottom texture, roll tiny balls of clay and attach them in a row around the base, or simply use the back of a paintbrush to press indentations into the clay for a polka-dot effect. -
Dry Completely:
Allow your pots to dry fully. For air-dry clay, this usually takes 24-48 hours. If using polymer clay, bake according to the manufacturer’s instructions at this stage.
Crack Control
If using air-dry clay, cracks can appear if it dries too fast. Keep them away from direct heat or drafts while drying. Fill any hairline cracks with fresh slip.
Step 3: Painting and Planting
-
Base Coat – Top Half:
Paint the top two-thirds of the first pot with a soft coral pink mix. For the second pot, use a muted denim blue shade. Apply two thin coats for opaque coverage. -
Base Coat – Bottom Half:
Paint the bottom third (the textured area) in a slightly darker shade. Use deep red for the pink pot and navy blue for the blue pot to create a two-tone dipped look. -
Highlight the Features:
Take a very fine brush with dark grey or black paint and carefully trace inside the carved eye and mouth lines to make the expressions pop. I find steadving my hand against the table helps here. -
Add Decorative Dots:
Using a toothpick or the handle end of a brush dipped in white or light beige paint, add small dots to the darker bottom section of the blue pot. -
Seal the Work:
Once the paint is fully dry, coat the entire pot (inside and out) with a clear matte varnish. This is crucial to protect the clay from moisture, especially if using air-dry clay. -
Pot Introduction:
Fill your new planter pals with a bit of succulent soil and nestle your small plants inside.
Drainage Level-Up
Before drying, use a straw to punch a hole in the bottom center. Essential for plant health! Place a small saucer underneath when watering to catch drips.
Now you have a pair of adorable plant friends ready to brighten up your space
Friendship Time-Capsule Charm Set
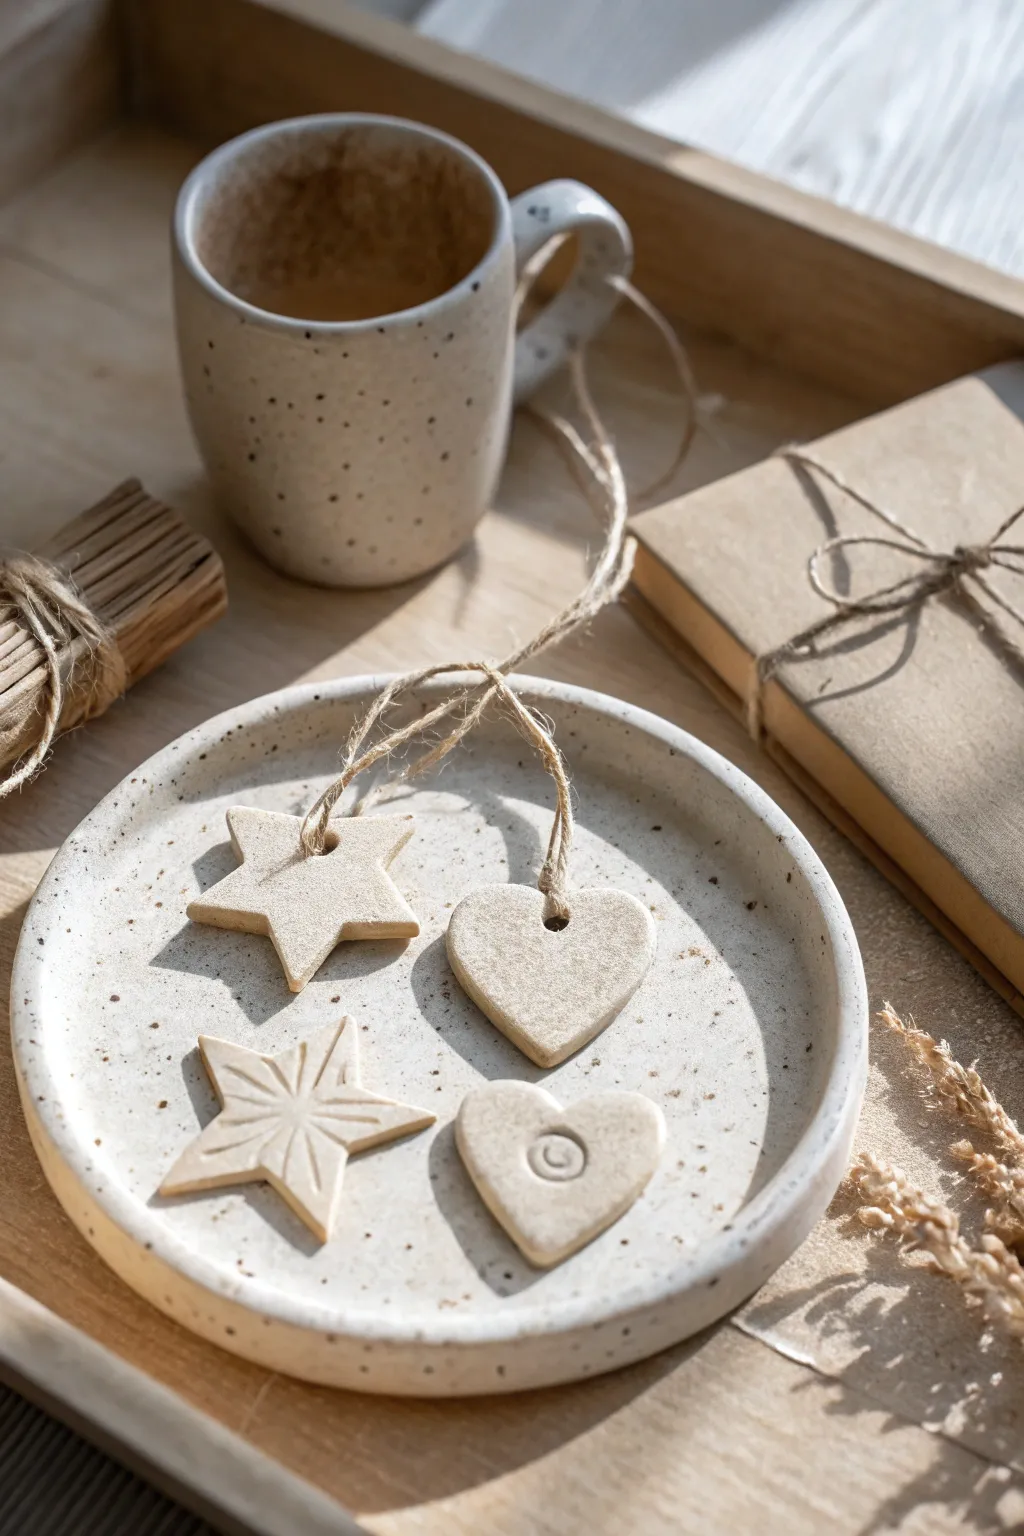
Create a set of beautifully minimal clay charms that capture a cozy, rustic aesthetic with their speckled finish and simple shapes. These heartfelt tokens are perfect for gifting or keeping as a reminder of shared memories.
Step-by-Step
Materials
- Air-dry clay (white or light beige)
- Speckled pottery glaze or diluted brown acrylic paint
- Rolling pin
- Parchment paper or canvas mat
- Star cookie cutter
- Heart cookie cutter
- Drinking straw or skewer
- Fine-grit sandpaper
- Pottery carving storage tool or small knife
- Small round stamp or pencil eraser (for the swirl detail)
- Jute twine or hemp cord
- Old toothbrush (for speckling)
Step 1: Shaping & Cutting
-
Condition the Caly:
Start by kneading a handful of air-dry clay until it is soft, pliable, and free of cracks. If it feels too dry, add a tiny drop of water. -
Roll it Out:
Place your clay on parchment paper or a canvas mat to prevent sticking. Roll it out evenly until it is about 1/4 inch thick. You want it substantial enough to be durable but not too heavy. -
Cut the Shapes:
Using your cookie cutters, press firmly into the clay to cut out two stars and two hearts. Wiggle the cutter slightly to ensure clean edges before lifting it away. -
Smooth the Edges:
Dip your finger in a little water and gently run it along the cut edges of each shape to smooth out any roughness or loose bits of clay.
Cracking Edges?
If edges crack while drying, you can fill them with a ‘slip’ mixture (clay mixed with water into a paste) and sand smooth once dry.
Step 2: Adding Details
-
Create Hanging Holes:
Use a drinking straw or a thick skewer to punch a hole near the top of three of the charms. Position the hole at least a few millimeters from the edge to prevent breaking later. -
Carve the Star Design:
For the non-hanging star, take your carving tool or a small knife. Score straight lines radiating from the center to the tips and inner corners to create a dimensional, faceted look. -
Stamped Detail:
On the non-hanging heart, press a small circle stamp or the end of a pencil eraser into the center gently. Use a needle tool to scratch a small spiral inside this depression for the ‘swirl’ eye effect. -
Initial Drying:
Let the pieces sit undisturbed for about 24-48 hours. I usually flip them over halfway through this time so both sides dry evenly and don’t warp.
Make Scented Stones
Add essential oils directly into the air-dry clay during the kneading phase. The porous clay will hold the scent for weeks as a diffuser.
Step 3: Finishing & Assembly
-
Sanding:
Once fully dry and hard, use fine-grit sandpaper to buff away any remaining sharp edges or bumps on the surface for a professional, smooth feel. -
The Speckle Effect:
Mix a tiny amount of brown acrylic paint with water until it’s very runny. Dip an old toothbrush into the mixture. -
Splatter Application:
Hold the toothbrush over your charms and run your thumb across the bristles to flick tiny droplets of paint onto the clay. Practice on paper first to control the spray. -
Optional Glazing:
If you want a slight sheen or extra protection, apply a matte sealant or varnish after the paint speckles are completely dry. -
Stringing:
Cut lengths of jute twine about 10 inches long. Fold a piece in half and thread the loop through the hole of a charm. -
Securing the Twine:
Pass the loose ends of the twine through the loop and pull tight to create a lark’s head knot. This secures the charm firmly. -
Final Presentation:
Tie the loose ends of the twine together if you plan to hang them, or leave them loose to tie onto a gift package.
Now you have a charming set of handmade tokens ready to share with your closest circle