
If you love that slow, cozy moment of lighting incense, making your own clay incense holder is such a satisfying little project. I pulled together my favorite clay incense holder ideas—starting with the classic, beginner-friendly shapes and drifting into playful mini scenes once you’re ready to have some fun.
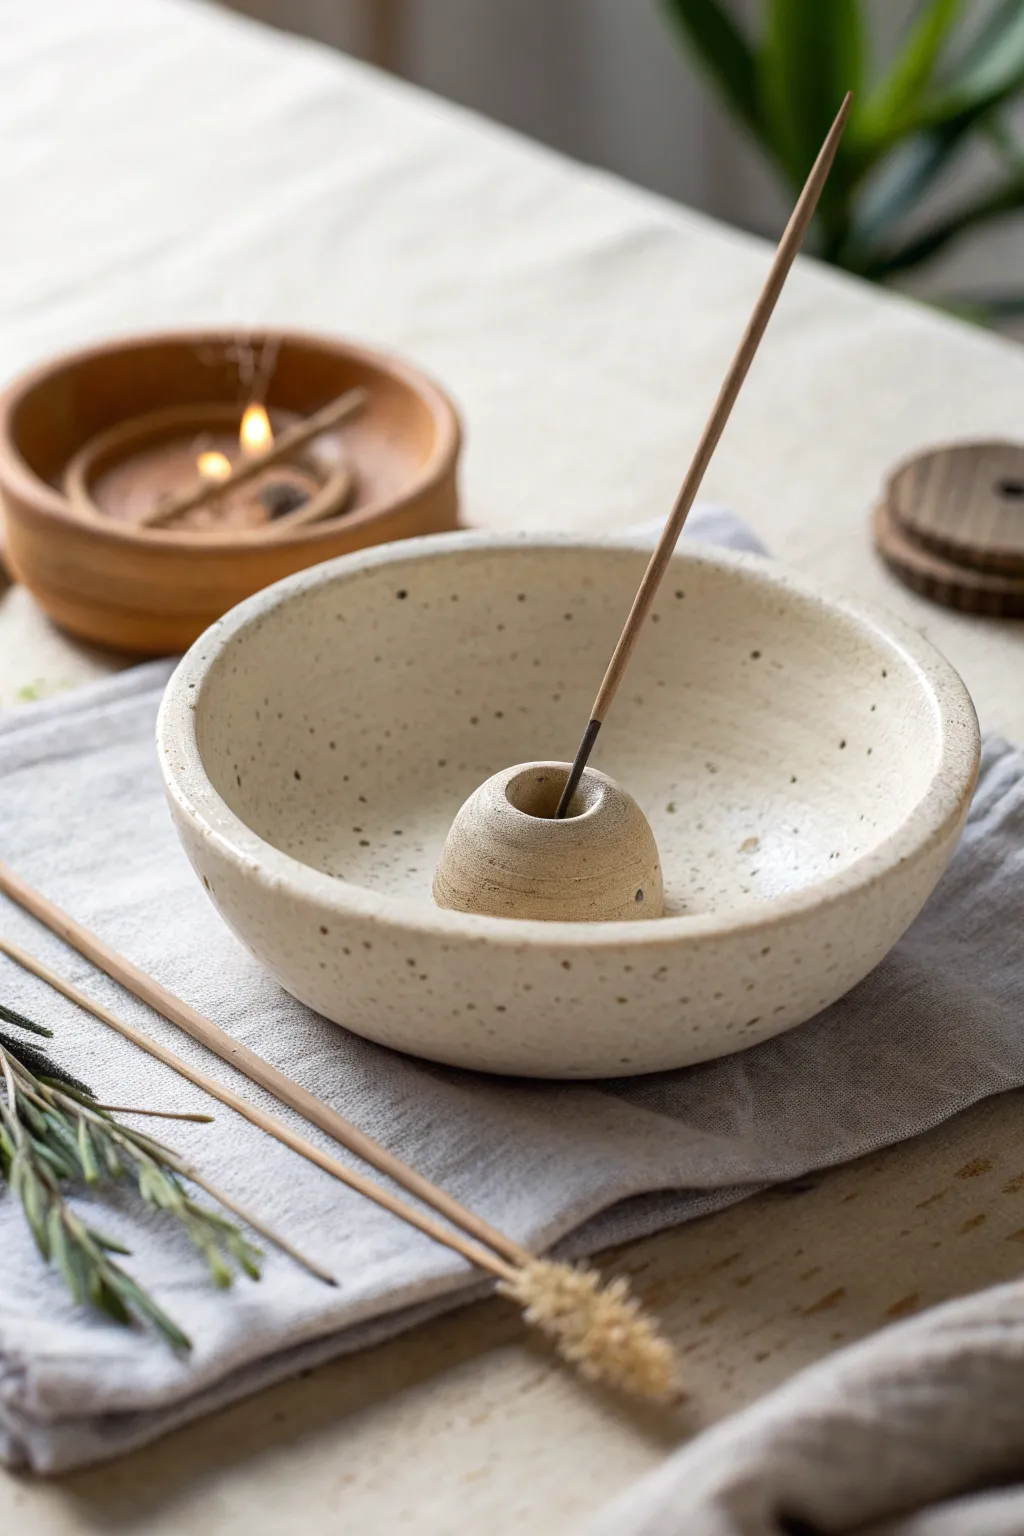
Classic Round Dish With a Center Hole
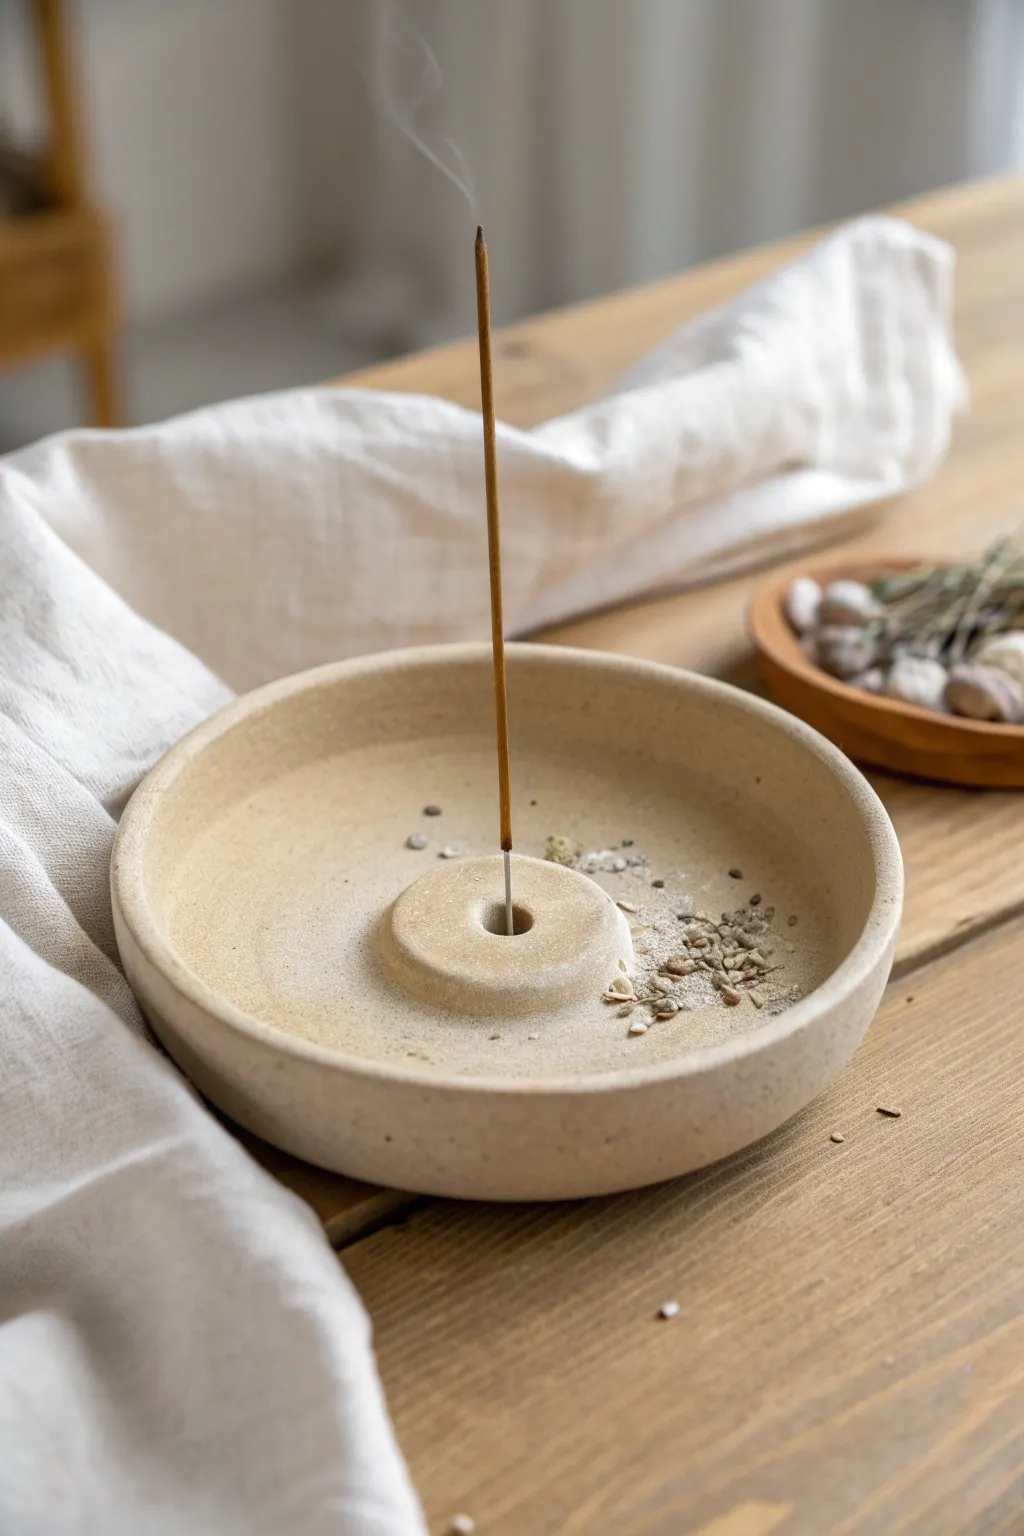
Embrace the beauty of simplicity with this understated incense holder, featuring a clean basin design and a dedicated central support ring. The natural sand-colored clay and speckled finish give it an organic, grounded feel perfect for any meditation space.
Step-by-Step Tutorial
Materials
- Speckled stoneware clay or air-dry clay with added sand
- Rolling pin
- Two non-stick guide strips (approx 1/4 inch thick)
- Round cookie cutter or bowl (approx 5-6 inches diameter)
- Small round cutter or bottle cap (approx 1.5 inches diameter)
- Needle tool or toothpick
- Sponge
- Small bowl of water
- Drill bit or straw (for the incense hole)
- Fine-grit sandpaper
Step 1: Forming the Base
-
Prepare the slab:
Begin by wedging your clay to remove air bubbles, then place it between two guide strips on a canvas or non-stick surface. Roll the clay out into an even slab until your rolling pin rests flat on the guides. -
Cut the main circle:
Place your larger round cutter or an inverted bowl onto the slab. Press down firmly to cut the primary circle shape, then peel away the excess clay from the outside. -
Smooth the edges:
Run a slightly damp finger or a soft sponge along the cut rim of your circle to compress the clay and round off the sharp angle left by the cutter. -
Create the rim:
Gently pinch up the outer edge of the circle all the way around. Use your thumb on the inside and fingers on the outside to lift a wall about half an inch high, keeping the thickness consistent. -
Refine the shape:
Once the wall is raised, use a damp sponge to smooth the transition between the floor of the dish and the wall, ensuring there are no cracks.
Step 2: Creating the Center Support
-
Cut the center piece:
From your leftover rolled slab, use the small round cutter or bottle cap to cut a small disk. This will become the incense holder mount. -
Shape the mount:
Smooth the edges of this small disk just like you did with the main plate, giving it a soft, rounded pebble-like appearance rather than a sharp cylinder. -
Create the connection point:
Use a needle tool to score (scratch up) the bottom of the small disk and the exact center of your large dish. Add a drop of water or slip to the scored areas. -
Attach the center:
Press the small disk firmly onto the center of the large dish. Give it a tiny wiggle to lock the clay particles together. -
Blend the seam:
Use a modeling tool or your finger to smooth the seam where the small disk meets the dish floor. It should look like one continuous piece of clay, not two pieces glued together.
Straight Stick Secret
Make the hole slightly larger than your incense sticks. As the clay shrinks during drying/firing, the hole will tighten. Too tight, and sticks will snap.
Step 3: Finishing Details
-
Poke the hole:
Find the dead center of the small raised disk. Use a drill bit (twisted by hand) or a drinking straw to create the hole for the stick. I prefer checking the size with an actual incense stick to ensure a good fit. -
Angle the hole:
Ensure the hole goes deep enough to hold the stick stable but doesn’t pierce all the way through the bottom of the main dish. -
Clean up:
Smooth away any displaced clay around the hole with a fingertip. Check the overall symmetry of the rim one last time. -
Drying process:
Let the piece dry slowly away from direct drafts. If using kiln clay, cover loosely with plastic for the first day to equalize moisture. -
Sanding:
Once bone dry (or fully cured if using air-dry clay), gently sand any rough spots on the rim or bottom with fine-grit sandpaper. -
Final Surface:
If using polymer or air-dry clay, seal with a matte varnish to mimic the natural stoneware look. If firing ceramic, glaze with a clear matte or leave the exterior raw for texture.
Warped Rims?
If the rim warps while drying, place a heavy book on top (with a paper towel barrier) once the clay is leather hard to gently press it back to flat.
Now you have a serene, functional sculpture ready to catch ash in style


Organic Pinch Dish Ash Catcher
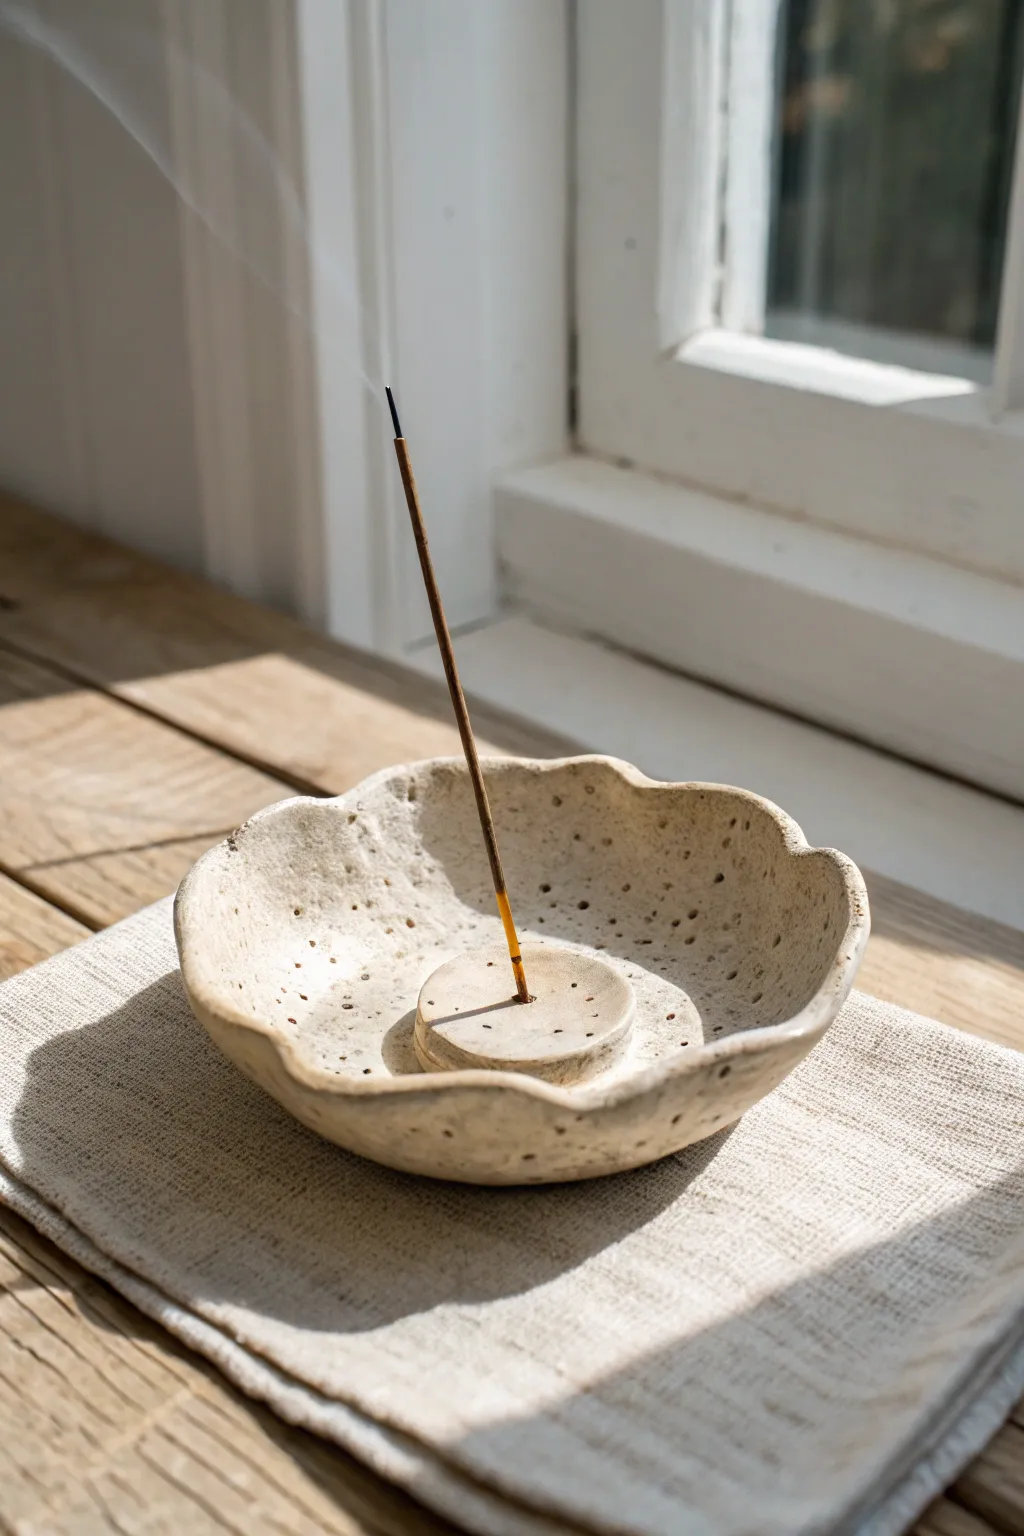
Embrace the beauty of imperfection with this handcrafted clay incense holder, designed to catch falling ash in a serene, nature-inspired vessel. The piece features gentle, wavy edges resembling a blossoming flower and a central pedestal to securely hold your stick, all finished with a lovely speckled texture.
Step-by-Step
Materials
- White or cream air-dry clay (or polymer clay)
- Dried coffee grounds or coarse black pepper (for speckling)
- Rolling pin
- Small bowl (for a mold support)
- Parchment paper or canvas
- Needle tool or toothpick
- Sponge
- Sandpaper (fine grit)
- Matte varnish or sealant
- Small round cutter or bottle cap (approx. 1.5 inches)
Step 1: Preparing the Clay
-
Condition the clay:
Begin by kneading a fist-sized ball of white clay until it is warm and pliable. -
Add the texture:
To achieve that organic, speckled look, sprinkle a pinch of dried coffee grounds or coarse pepper onto the clay. Fold and knead the clay repeatedly until the speckles are evenly distributed throughout the mass. -
Roll it out:
Place the clay between two sheets of parchment paper or on a canvas board. Roll it out to an even thickness of about 1/4 inch (6mm). Avoid going too thin, as the base needs some weight.
Cracked Clay?
If small cracks appear during drying, mix a tiny amount of fresh clay with water to make a paste. Fill the cracks, smooth with a finger, and let dry again.
Step 2: Forming the Bowl
-
Cut the base shape:
Using a knife or a large round cutter, cut a circle approximately 5-6 inches in diameter. This doesn’t need to be geometrically perfect; a little irregularity adds character. -
Create the wave:
Gently lift the edges of the circle with your fingertips. Pinch and curve the rim upwards to create a shallow bowl shape with an undulating, wavy edge reminiscent of flower petals. -
Support the form:
Place your clay inside a small bowl lined with plastic wrap or parchment paper. This will help it hold its curved shape while drying. Press it gently so it conforms to the curve but keep those wavy edges free. -
Smoothing:
Dip a sponge in a tiny bit of water and smooth out any fingerprints or harsh cracks on the rim and inside surface.
Make it Waterproof
To make the dish easier to clean, use a dishwasher-safe sealant like Mod Podge Dishwasher Safe or a specialized clay varnish for the final coat.
Step 3: Creating the Central Holder
-
Cut the pedestal:
From your remaining rolled clay, use a small round cutter or bottle cap to cut a small circle, about 1.5 inches wide. -
Shape the puck:
Smooth the edges of this small circle with your finger to create a soft, stone-like puck shape. -
Attach the pedestal:
Score the center of your main bowl and the bottom of the small puck with a needle tool (scratch hatch marks) and add a drop of water or slip. Press the puck firmly into the center of the bowl. -
Create the incense hole:
Take a standard incense stick (or a tool of slightly larger diameter to account for shrinkage) and press a hole vertically into the center of the pedestal. Ensure it goes deep enough to hold a stick stable, but not all the way through the main bowl. -
Add extra texture:
I like to use a needle tool to poke shallow, random dots around the pedestal and inner bowl to enhance the porous, stone-like appearance.
Step 4: Finishing Touches
-
Initial dry:
Let the piece dry in the support bowl for at least 24 hours. Keep it away from direct heat to prevent cracking. -
Refining:
Once leather hard or fully dry, remove it from the support bowl. Use fine-grit sandpaper to gently smooth any rough edges on the rim or the hole. -
Sealing:
Apply a coat of matte varnish to protect the clay from ash stains while maintaining that natural, unglazed aesthetic.
Place your favorite scent in the center and enjoy the calming atmosphere your new creation brings to the room


Flower Dish With a Hidden Stem Hole
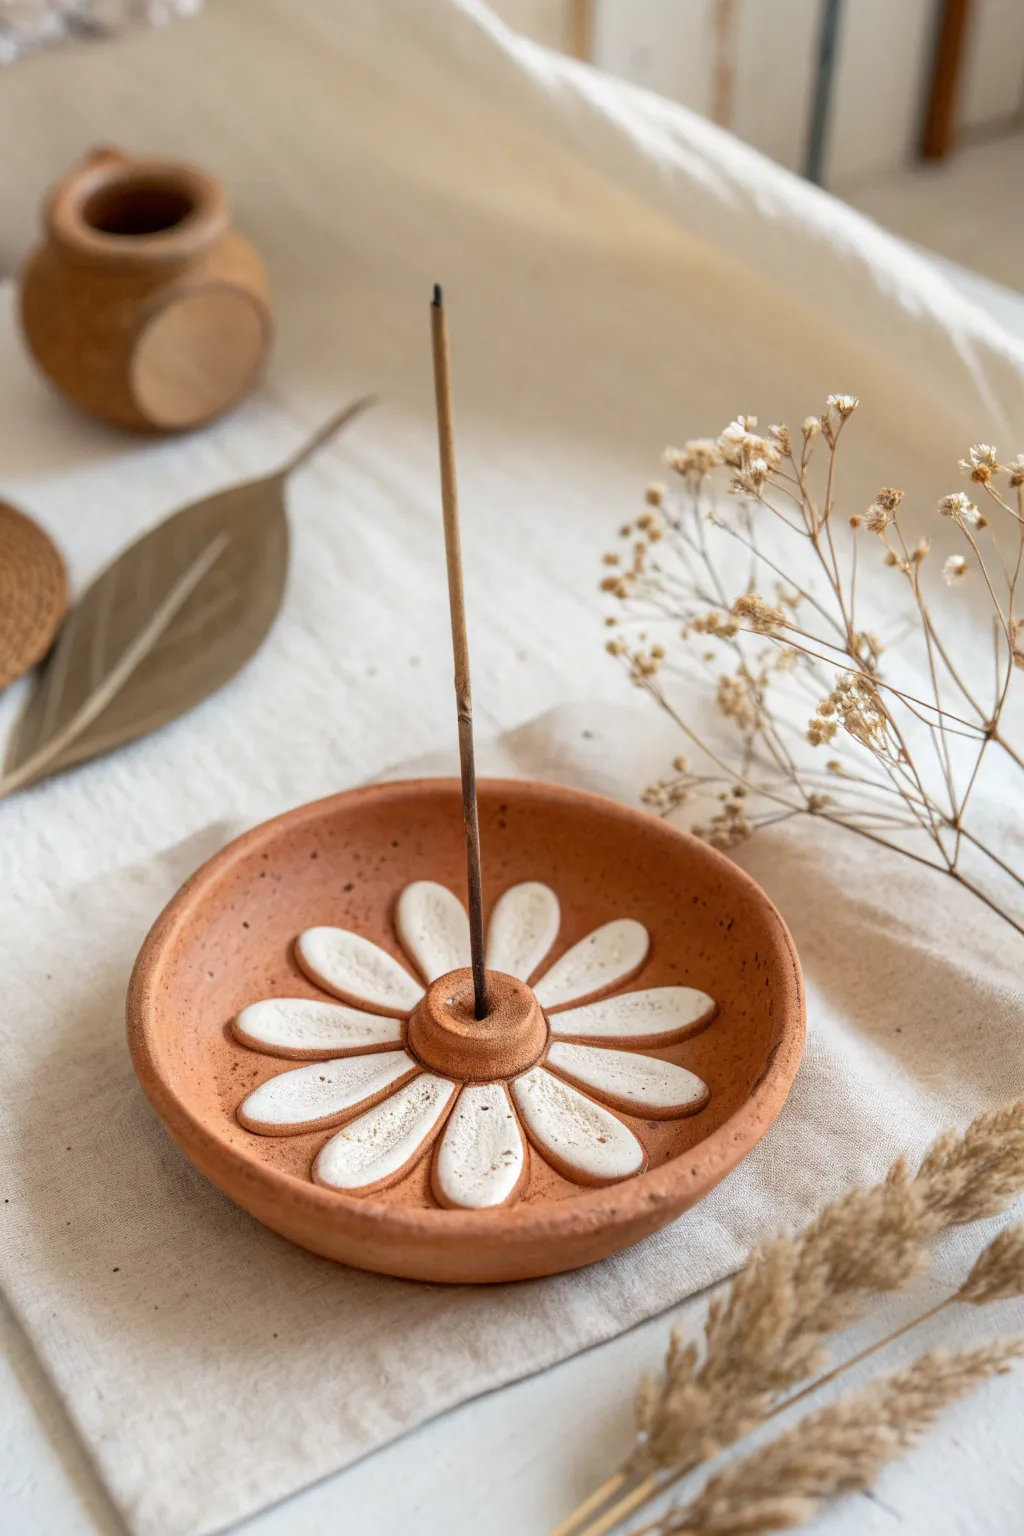
Bring a touch of earthy charm to your space with this beautiful two-toned incense holder. Featuring a warm terracotta base and contrasting white petals, this functional art piece captures a rustic, blooming aesthetic.
Step-by-Step
Materials
- Terracotta air-dry clay (or polymer clay)
- White air-dry clay
- Rolling pin
- Circular cookie cutter (approx. 4-5 inches)
- Small bowl (for shaping)
- Small teardrop cutter (optional) or craft knife
- Sponge or sandpaper
- Water cup (for joining)
- Incense stick (for sizing)
- Clear matte varnish or sealant
- Needle tool or toothpick
Step 1: Shaping the Base
-
Prepare the terracotta clay:
Begin by conditioning a handful of terracotta clay until it is soft and pliable. Use a rolling pin to roll it out into an even slab, roughly 1/4 inch thick to ensure durability. -
Cut the primary variety:
Press your large circular cookie cutter into the rolled slab to create a perfect circle. If the edges are jagged, smooth them gently with a damp finger. -
Form the shallow bowl:
Place your clay circle into a shallow bowl or saucer to give it a gentle curve. Press lightly so it takes the shape of the container without becoming too deep; you want a subtle dish shape. -
Smooth the surface:
While the clay is settled in the drying form, take a slightly damp sponge and wipe the surface to remove any fingerprints or imperfections.
Step 2: Creating the Floral Design
-
Prepare the petals:
Roll out a small amount of white clay, slightly thinner than your base. Use a small teardrop cutter to punch out roughly 8-10 petals. If cutting by hand with a craft knife, try to keep them uniform. -
Arrange the pattern:
Before attaching them, lay the white petals onto the terracotta base in a radial pattern to check spacing. Leave a clear gap in the absolute center for the stem holder. -
Score and slip:
To ensure a permanent bond, score (scratch) the back of each petal and the spot on the base where it will sit. Dab a tiny bit of water or liquid clay (slip) on the scored areas. -
Attach the petals:
Press each petal firmly onto the base. You can use your thumb to flatten them slightly, which gives them that organic, embedded look shown in the photo. -
Create the center stem:
Roll a small ball of terracotta clay and flatten the bottom. Adhere this to the very center of your flower using the score-and-slip method mentioned earlier. -
Make the incense hole:
Take an actual incense stick (or a tool of similar diameter) and press it vertically into the center knob. I prefer to wiggle it slightly to ensure the hole is loose enough for the stick to fit once the clay shrinks during drying.
Clean Edges
Wipe your finger with a tiny amount of baby oil before smoothing the clay. This eliminates fingerprints instantly without adding excess water that weakens the clay.
Step 3: Finishing Touches
-
Add texture:
For that speckled, rustic look seen in the image, you can gently flick a toothbrush with watered-down brown paint over the surface, or simply let the natural grain of the clay shine through if it’s already textured. -
Initial drying:
Let the piece dry slowly in a cool area away from direct sunlight. Quick drying can cause cracking, especially where the two clay types meet. -
Sanding edges:
Once fully bone dry, use fine-grit sandpaper to smooth out the rim of the dish and any rough spots on the white petals. -
Seal the piece:
Apply a coat of clear matte varnish. This seals the porous clay, protects the white petals from ash stains, and enriches the terracotta color.
Gold Center
For a glamorous twist, paint the center terracotta nub with metallic gold leaf or acrylic gold paint after the piece has dried and been sealed.
Now you have a serene spot to burn your favorite scents and admire your handiwork


Pebble-Texture Zen Dish
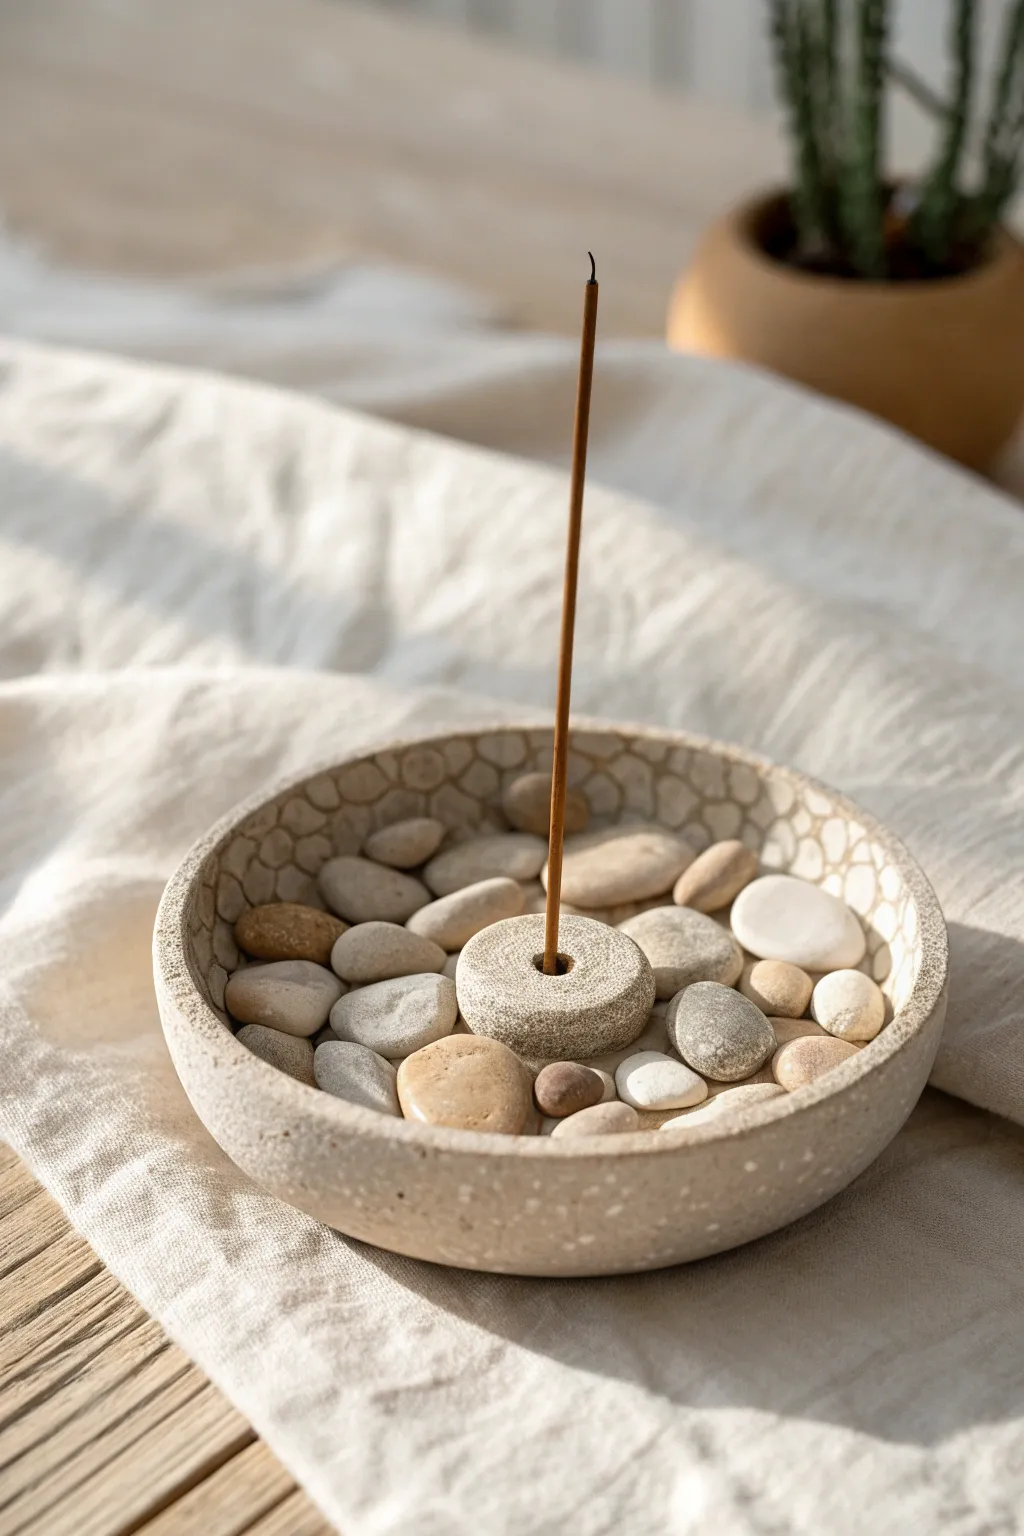
Bring a sense of calm to your space with this earthy, minimalist incense holder that mimics the tranquility of a Zen garden. Using speckled clay and simple texturing techniques, you will create a shallow basin perfect for holding smooth river stones and your favorite incense stick.
Step-by-Step Guide
Materials
- Speckled stoneware clay (light beige or oatmeal)
- Rolling pin
- Circle template or bowl (approx. 5-6 inches diameter)
- Needle tool or fettling knife
- Small carving tool or rounded loop tool
- Sponge
- Water slip or vinegar
- Small river stones or pebbles
- Kiln (or air-dry clay alternative if not firing)
Step 1: Forming the Base Dish
-
Prepare the Clay:
Begin by wedging a softball-sized luscious amount of speckled clay to remove air bubbles. Roll it out into an even slab, roughly 1/4 inch thick. -
Cut the Circle:
Place your circle template or a kitchen bowl onto the slab. Trace around it with a needle tool to cut out a perfect circle, which will form the base of your dish. -
Create the Walls:
Roll a separate coil of clay about 1/2 inch thick and long enough to maximize the circumference of your base. Flatten it slightly with your palm to create a long strip. -
Join the Wall:
Score and slip the outer edge of your circular base. Wrap the flattened coil around the edge to create a straight, vertical wall. -
Blend the Seams:
Use your thumb or a modeling tool to firmly blend the clay wall into the base on both the inside and outside, ensuring a seamless, watertight transition. -
Smooth the Rim:
Run a damp sponge along the top rim to even it out. I like to keep the rim slightly thick and flat to evoke a sturdy, stone-like quality.
Cracking Clay?
If you see tiny cracks forming while blending the coil wall, your clay might be too dry. Score deeply, add more slip, and compress the joint firmly.
Step 2: Texturing and Details
-
Carve the Texture:
Using a small rounded loop tool or a specialized carving tool, gently scoop out shallow, irregular divots along the inner wall and rim. Leave a little space between each scoop to create a honeycomb or pebble-like pattern. -
Refine the Scoops:
Once the clay is leather-hard, smooth the edges of your carved divots with a barely damp finger to remove any sharp burs or crumbs. -
Form the Center Holder:
Roll a small ball of clay, roughly the size of a walnut, and flatten it into a thick disc or donut shape. -
Punch the Hole:
Use the actual incense stick you plan to use (or a tool of similar gauge) to poke a hole directly into the center of the disc. Wiggle it slightly so the hole is loose enough to account for clay shrinkage. -
Texture the Holder:
Lightly tap the surface of the donut holder with a stiff bristle brush or a piece of sandpaper to give it a gritty, stone-like surface texture.
Step 3: Finishing and Assembly
-
Dry Slowly:
Cover both pieces loosely with plastic and allow them to dry slowly to the bone-dry stage to prevent warping. -
Bisque Fire:
Fire the pieces in a kiln to bisque temperature (usually Cone 04). Cleaning up any dust with a damp sponge before loading is essential. -
Glaze Application:
Apply a matte, transparent, or light oatmeal glaze. Wipe back the glaze from the carved divots if you want the raw clay body to contrast, or glaze overall for a uniform look. -
Final Fire:
Fire the glazed pieces to the final temperature required by your specific clay body (e.g., Cone 5 or 6). -
Arrange the Garden:
Once cool, place the donut holder in the center of the dish. Fill the surrounding space with your smooth river stones until they are level with the rim.
Incense Fit Tip
Make the hole slightly larger than you think you need. Clay shrinks 10-15% in the kiln, and a too-tight hole will snap your incense sticks.
Light your incense and enjoy the peaceful atmosphere created by your handmade ceramic art

The Complete Guide to Pottery Troubleshooting
Uncover the most common ceramic mistakes—from cracking clay to failed glazes—and learn how to fix them fast.
Crescent Moon Incense Holder Plate

Bring the celestial magic of a starry night into your home with this deep blue crescent moon incense holder. Its glossy, speckled finish and hand-painted constellations create a dreamy, functional piece of art that catches ash while looking beautiful.
Detailed Instructions
Materials
- Air-dry clay or polymer clay (white)
- Rolling pin
- Circle cutter or bowl (approx. 4-5 inches diameter)
- Small round cutter or bottle cap (approx. 1.5 inches)
- Clay knife or craft blade
- Small sponge and bowl of water
- Sculpting tools (needle tool)
- Acrylic paints: Navy Blue, Black, White
- Fine detail paintbrush (size 0 or 00)
- Medium flat paintbrush
- High-gloss varnish or sealant
- Sandpaper (fine grit)
Step 1: Shaping the Moon
-
Roll the Slab:
Begin by conditioning your clay until it is soft and pliable. Roll it out into an even slab, approximately 1/4 inch thick. Aim for a consistent thickness to ensure even drying. -
Cut the Base Circle:
Use your large circle cutter or trace around a bowl to cut a perfect circle from the clay slab. -
Create the Crescent:
Position your smaller cutter or bottle cap off-center on the large circle, near one edge, to bite out a curve. This creates the inner curve of your crescent moon shape, giving it that classic celestial silhouette. -
Smooth the Form:
Dip your finger in a little water and gently run it along the cut edges to smooth out any sharpness or roughness. I like to take a moment here to round the edges slightly for a softer, more finished look. -
Create the Rim:
Gently pinch and lift the outer edges of the crescent upwards to create a slight rim. This barrier is crucial as it will keep the incense ash contained within the plate.
Sticky Incense?
If your incense stick gets stuck after painting, the paint likely clogged the hole. Gently twist a small drill bit or needle tool by hand into the hole to clear excess dried paint.
Step 2: Adding the Incense Well
-
Form the Holder:
Roll a small ball of clay, roughly the size of a marble. Press it gently to flatten the bottom so it sits flush. -
Attach the Holder:
Score the center of your crescent plate and the bottom of the small clay ball with a needle tool. Apply a dab of water or slip (liquid clay) and press the ball firmly into place. -
Pierce the Hole:
Take an incense stick (or your needle tool) and press it into the center of the small mound to create the hole. Wiggle it slightly to ensure the hole is wide enough to hold a stick after the clay shrinks during drying. -
Final Smoothing:
Use a damp sponge to smooth the connection point between the holder mound and the plate, blending the seams so it looks like one solid piece. -
Dry Time:
Allow the piece to dry completely according to your clay package instructions. For air-dry clay, this usually takes 24-48 hours. Turn it over occasionally for even drying. -
Sanding:
Once bone dry, use fine-grit sandpaper to gently buff away any fingerprints or uneven spots on the rim and surface.
Step 3: Painting the Night Sky
-
Base Coat:
Mix a small amount of black paint into your navy blue to create a deep, midnight shade. Paint the entire surface of the holder, including the underside. You may need two coats for full opacity. -
Splatter Stars:
Dilute a small drop of white acrylic paint with water. Load a toothbrush or stiff brush, and flick the bristles with your thumb to mist tiny white specks across the blue surface, mimicking distant stars. -
Paint Larger Stars:
Using your finest detail brush and pure white paint, carefully hand-paint larger five-point stars scattered across the plate. Vary their sizes for visual interest. -
Paint Moons:
Paint a few small crescent moon shapes floating among the stars. Use a light hand to keep the lines crisp. -
Seal the piece:
Once the paint is fully dry, apply 2-3 coats of high-gloss varnish. This not only protects the paint from heat and ash but gives the piece that ceramic-like, glassy shine.
Cosmic Depth
For a galaxy effect, sponge lightly dabbing bright blue and purple paint in cloudy patches over the dark base before you add the white stars.
Now you have a serene little piece of the cosmos ready to hold your favorite scents
Soft Marbled Pastel Incense Tray
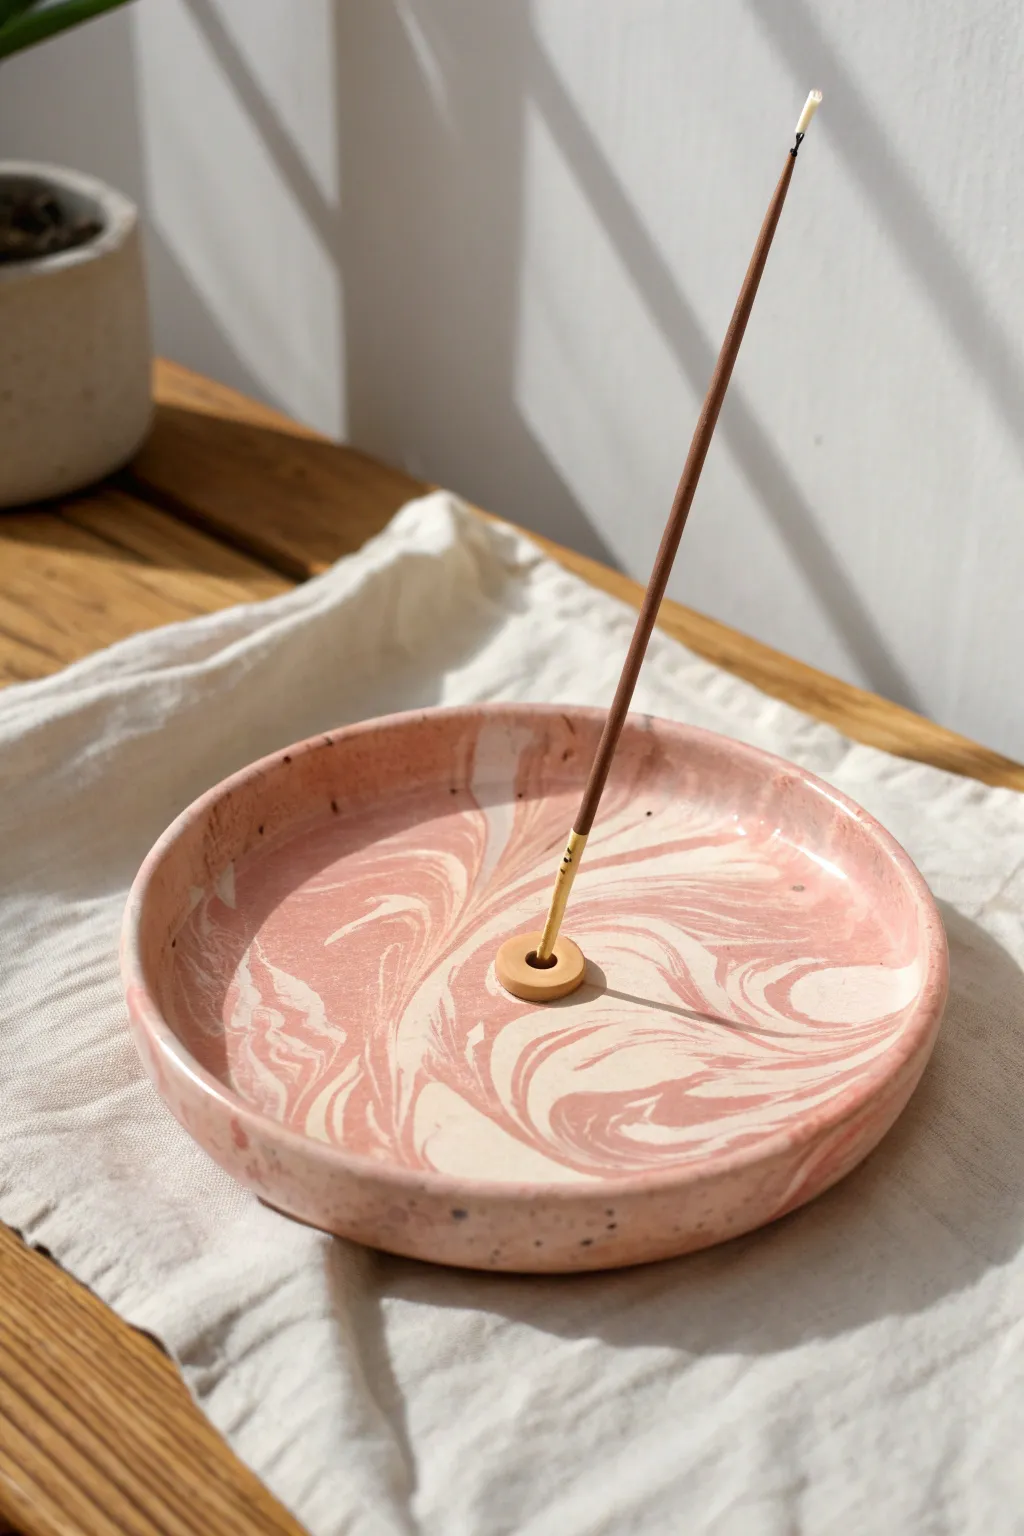
Bring a touch of calm to your space with this dreamy pink and white marbled incense holder. The swirling pattern creates a unique, fluid design that feels modern yet organic, perfect for catching ash in style.
How-To Guide
Materials
- White polymer clay (approx. 2oz)
- Pale pink polymer clay (approx. 2oz)
- Small wooden rolling pin or acrylic roller
- Round cookie cutter or bowl (approx. 4-5 inches diameter)
- Craft knife or clay slicer
- Small circle cutter (approx. 1/2 inch) or large straw
- Sandpaper (fine grit)
- Gloss glaze or polyurethane varnish
- Soft paintbrush
- Oven-safe baking sheet
- Parchment paper
Step 1: Preparing the Clay
-
Condition the white clay:
Start by taking your block of white polymer clay and kneading it thoroughly in your hands until it becomes soft, warm, and pliable. -
Condition the pink clay:
Repeat the process with the pink clay. Ensure both colors are of a similar consistency so they blend smoothly later. -
Form clay ropes:
Roll each color into a long snake or rope shape, roughly the thickness of a thick marker and about 6 inches long.
Muddy Colors?
Stop mixing as soon as you see streaks! Over-mixing or rolling too many times will blend the pink and white into a single solid light pink color instead of a marble.
Step 2: Creating the Marble Effect
-
Twist the colors:
Lay the white and pink ropes next to each other and twist them together tightly to form a single, candy-cane-like spiral. -
Fold and twist again:
Fold this twisted rope in half and twist it again. This step is crucial for creating those intricate, fine marble veins rather than big blocky chunks. -
Ball it up:
Once you have a tight twist, roll the entire piece into a smooth ball between your palms. You should already see the colors swirling together. -
Roll out the slab:
Place the ball on your work surface or parchment paper. Use your roller to flatten it into a disk about 1/4 inch thick. Work from the center outward to keep the thickness even.
Gold Accents
For a luxe upgrade, paint the very rim of the dish or the center incense holder bead with liquid gold leaf after the piece has been baked and cooled.
Step 3: Shaping the Tray
-
Cut the main circle:
Press your large circle cutter or bowl firmly onto the marbled slab to cut out the base shape. Remove the excess clay from the edges. -
Smooth the edges:
Gently run your finger along the cut edge of the circle to soften any sharp ridges left by the cutter. -
Lift the rim:
Carefully pinch the edges of the circle upwards to create a shallow rim. You want the sides to stand up about half an inch to ensure ash stays contained inside. -
Refine the shape:
Go around the rim again, smoothing the transition between the base and the wall so it looks seamless and organic.
Step 4: Making the Holder
-
Create the center bead:
Take a small pinch of leftover marbled clay (or a solid color if you prefer) and roll it into a small ball, lightly flattening it into a thick button shape. -
Pierce the hole:
Use a toothpick or skewer to poke a hole straight through the center of this button. Wiggle it slightly to ensure it’s wide enough for an incense stick. -
Attach the holder:
Place the button in the exact center of your tray. Press it down gently to bond the raw clays together.
Step 5: Baking and Finishing
-
Bake the piece:
Transfer the tray (on parchment paper) to a baking sheet. Bake according to your brand of polymer clay instructions—usually around 275°F (135°C) for 15-30 minutes. -
Cool completely:
Remove from the oven and let the tray cool down fully. The clay hardens as it cools, so don’t test its strength while hot. -
Sand rough spots:
I like to take a piece of fine-grit sandpaper and wet-sand the edges under a little running water to get them perfectly smooth. -
Apply glaze:
Brush a thin layer of gloss glaze over the entire top surface and rim to give it that polished, ceramic-like shine shown in the photo. -
Dry properly:
Let the glaze dry completely according to the bottle instructions before placing your first incense stick in the holder.
Enjoy the calming atmosphere your new handmade tray brings to your home


What Really Happens Inside the Kiln
Learn how time and temperature work together inside the kiln to transform clay into durable ceramic.
Spoon Rest Incense Holder (Breakfast Vibe)
Embrace the calm of slow mornings with this minimalist incense holder that mimics the shape of a breakfast bowl. The speckled clay body and wide rim catch falling ash perfectly while adding a cozy, rustic aesthetic to your coffee table.
Step-by-Step
Materials
- Speckled cream stoneware clay (e.g., Laguna Speckled Buff)
- Pottery wheel (or can be hand-built)
- Needle tool
- Wire cutter
- Sponge
- Wooden rib tool
- Trimming tools
- Drill bit or thin stick (sized to your incense)
- Clear matte glaze (optional)
- Kiln
Step 1: Throwing the Form
-
Prepare the Clay:
Begin by wedging about 1.5 to 2 pounds of speckled stoneware clay to remove any air bubbles. Wedge until the consistency is uniform and pliable. -
Center on the Wheel:
Slam your clay ball onto the center of the wheel batt. Add a little water and apply pressure to center the clay, pushing it up into a cone and then pressing it back down into a puck shape. -
Open the Clay:
Press your thumbs into the center of the puck, leaving about half an inch of thickness at the floor for the base. -
Pull the Walls:
Pull the clay outward and slightly upward to form a low, wide bowl shape. Aim for a rim height of about 1.5 to 2 inches, keeping the bottom wide and flat. -
Refine the Rim:
Use a chamois or a wet sponge to compress the rim, ensuring it is rounded and smooth. This adds durability and visual softness. -
Shape the Curve:
Use a wooden rib on the interior to create a seamless, smooth curve from the floor to the wall. This makes the bowl easy to wipe clean later. -
Create the Center Mound:
This step makes this piece unique. Take a small, separate ball of clay (about walnut-sized) and flatten the bottom. Place it directly in the absolute center of your bowl floor. -
Secure the Mound:
Score and slip the bottom of the small ball and the spot on the bowl floor to ensure a permanent bond. Press it down firmly. -
Shape the Holder:
With the wheel spinning slowly, use your fingers to shape that center lump into a neat, rounded cone or gumdrop shape.
Cracked center?
If the center mound cracks away during drying, slow down the drying process by keeping the center wrapped in plastic while the rim dries.
Step 2: Refining and Finishing
-
Create the Incense Hole:
While the clay is leather hard, take a stick or the back of a drill bit (matched to the size of your incense sticks) and press a hole into the center of the mound. Angle it slightly if you prefer the stick to lean. -
Dry to Leather Hard:
Cut the piece off the wheel with your wire tool and let it dry until it holds its shape firmly but can still be carved (leather hard). -
Trim the Foot:
Flip the bowl over and center it on the wheel. Use a trimming tool to carve away excess clay from the bottom, defining a clean foot ring. -
Smooth the Surface:
I like to run a slightly damp sponge over the entire piece one last time to bring the ‘grog’ or speckles to the surface and smooth any trimming marks. -
Bisque Fire:
Allow the piece to dry completely (bone dry) before loading it into the kiln for a bisque fire (usually Cone 04). -
Glazing:
For the look in the photo, dip the piece in a clear matte glaze to let the natural speckles shine through, or simply leave the exterior raw if the clay is vitreous enough. -
Final Firing:
Fire the piece again to the maturation temperature of your specific clay body (e.g., Cone 5 or 6).
Make it yours
Try using two different clay bodies—a darker clay for the center mound and lighter for the bowl—for a striking two-tone effect.
Once cool, place your favorite incense stick in the holder and enjoy the peaceful atmosphere you’ve created.
Hidden Hole Holder With a Tiny Doorway Scene
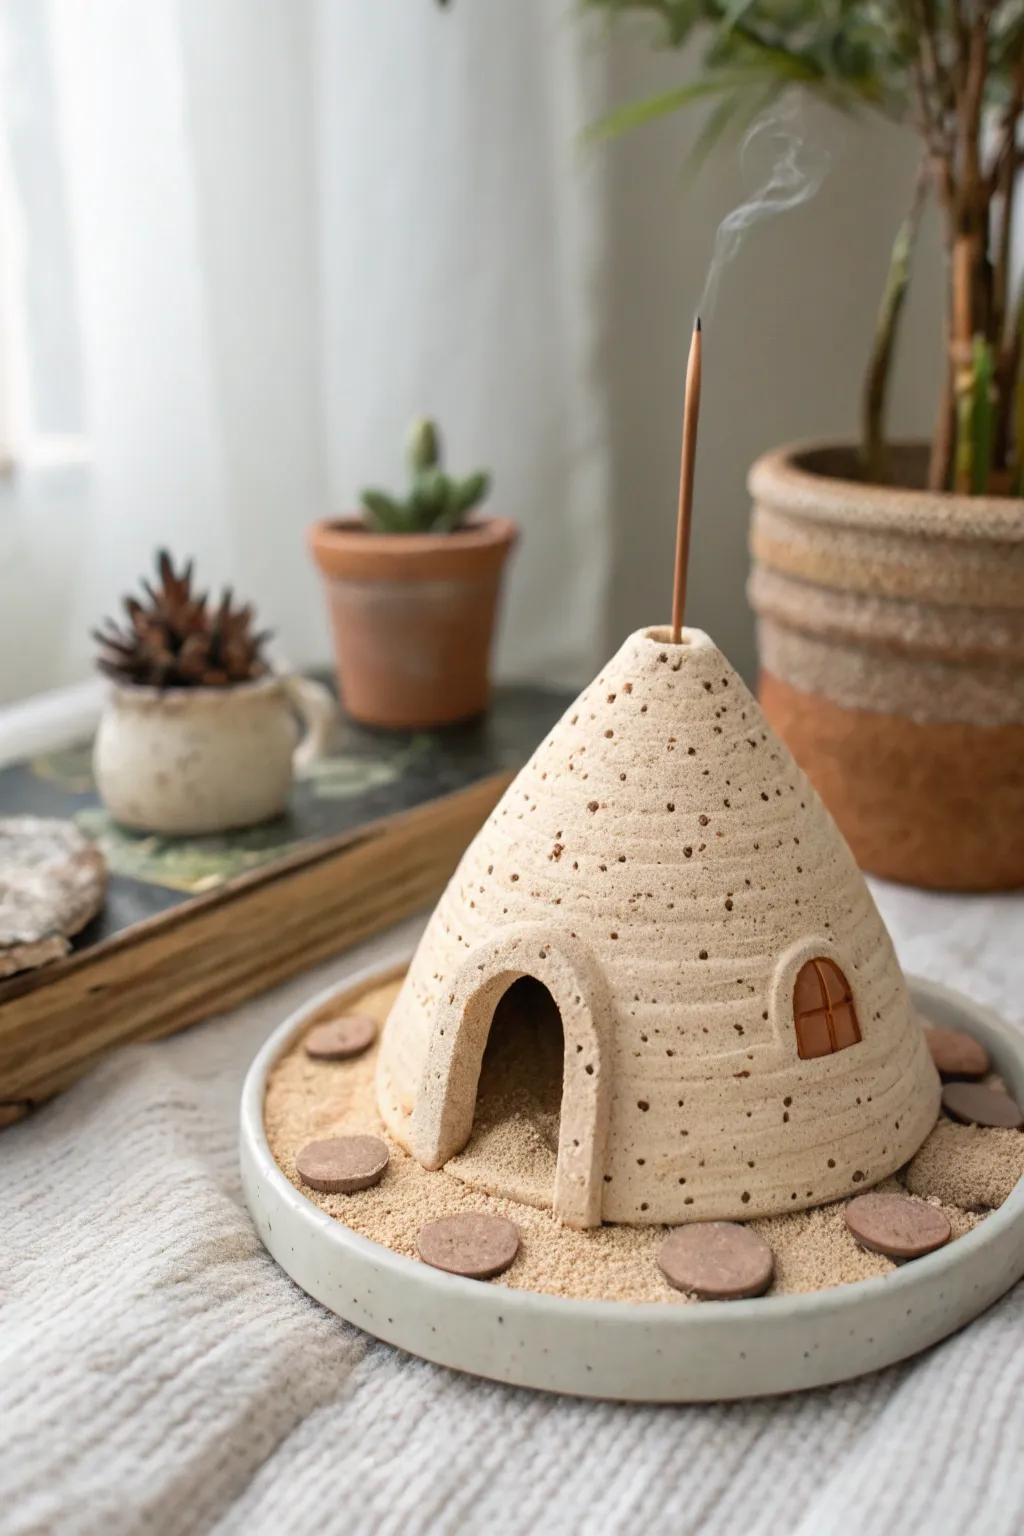
Transport your senses to a serene desert landscape with this textured clay incense holder shaped like a rustic dwelling. Sitting on a bed of sand within its own dish, this charming hut features a functional chimney vent and a cozy doorway that adds narrative to your aromatherapy routine.
Step-by-Step Tutorial
Materials
- Speckled stoneware clay (or polymer clay with a granite finish)
- Pottery wheel (optional, can be hand-built)
- Circular cookie cutter or template (approx. 6 inches)
- Fettling knife
- Pin tool
- Small loop tool
- Sponge
- Texturing tool (stiff brush or toothbrush)
- Rolling pin
- Wooden sculpting tools
- Dark brown underglaze or acrylic paint (for window)
- Kiln (if using stoneware) or Oven (if using polymer)
- Sand (for display)
- Small flat stones or clay discs
Step 1: Forming the Base Dish
-
Roll out the slab:
Begin by rolling out a medium-thick slab of speckled clay, aiming for about 1/4 inch thickness to ensure durability. -
Cut the circle:
Use your circular cutter or trace around a bowl to cut a perfect circle for the base plate. This will catch the ash and hold the sand. -
Create the rim:
Form a long coil of clay and attach it to the outer edge of your circle using the score and slip method. Smooth the transition so it looks like a shallow dish.
Uneven Airflow?
If the incense stops burning, your hidden hole might be too tight. Make sure the chimney hole at the top allows enough air to escape to keep the ember alive.
Step 2: Sculpting the Hut Structure
-
Shape the cone:
Form a lump of clay into a cone shape. You can do this by pinching a ball of clay upwards or wrapping a slab into a cone. It should be hollow inside. -
Add texture:
Before the clay hardens, tap a stiff brush or toothbrush all over the exterior surface. This creates that weathered, stucco-like texture seen in the photo. -
Create the horizontal grooves:
While rotating the cone, gently press a wooden tool or loop tool to create subtle horizontal rings around the structure, mimicking layered construction. -
Carve the doorway:
Use a fettling knife to carefully cut out an arched doorway at the base. Save the clay you remove. -
Build the door frame:
Roll a small coil and flatten it slightly. Attach this around the doorway arch to create a pronounced, raised frame. -
Add the window:
On the side of the hut, carve a small arched window indention. Don’t cut all the way through; just create a recess. -
Detail the window:
Form a tiny cross shape with thin clay strips and press it into the window recess to mimic panes.
Step 3: Functional Details
-
Make the chimney hole:
Use a pin tool to pierce a hole straight down through the very peak of the roof. Wiggle it slightly to ensure it’s wide enough for an incense stick stem. -
Check fit:
Place the hut onto the base dish to ensure the proportions look right. The hut shouldn’t be permanently attached to the dish; it sits loose on top.
Desert Bloom
Add tiny sculpted succulents or cacti around the base of the dish using green polymer clay to bring vibrant life to your desert scene.
Step 4: Creating the Interior Support
-
Make an incense stand:
Create a small, separate mound of clay with a hole in the center. This will sit inside the hut hidden from view to actually hold the incense stick upright. -
Create stepping stones:
With leftover scraps, flatten small blobs of clay into rough circles to look like paving stones.
Step 5: Finishing Touches
-
Fire or bake:
Follow the instructions for your specific clay type. If using ceramic clay, bisque fire, then glaze (matte clear or leave raw if the clay body is beautiful), and glaze fire. -
Paint details:
If you didn’t use different clay colors, paint the window recess a glossy brown to simulate depth or glass. -
Assembly:
Pour sand into the base dish. Place your hidden incense holder mound in the center, cover it with the hut, and arrange the clay paving stones around the perimeter.
Light your favorite scent and watch the smoke drift gently from the chimney of your miniature adobe home