There’s something ridiculously satisfying about turning a few simple clay shapes into tiny, charming little bugs. These clay insects ideas are meant to feel doable and playful—like we’re hanging out at the studio table, swapping favorite designs and quick tricks.
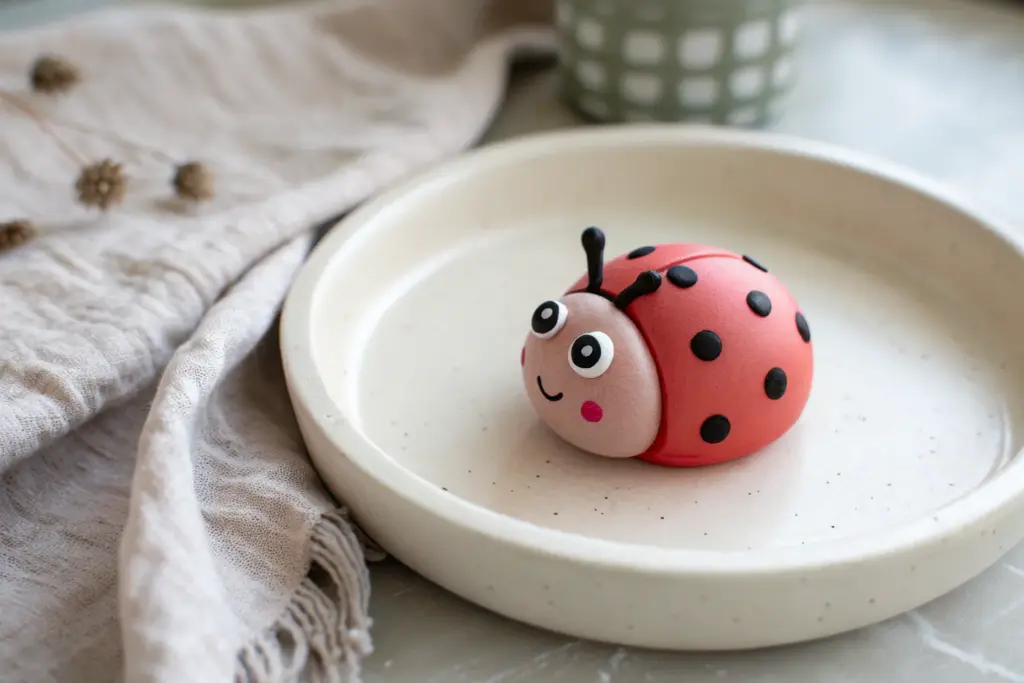
Classic Spotted Ladybug
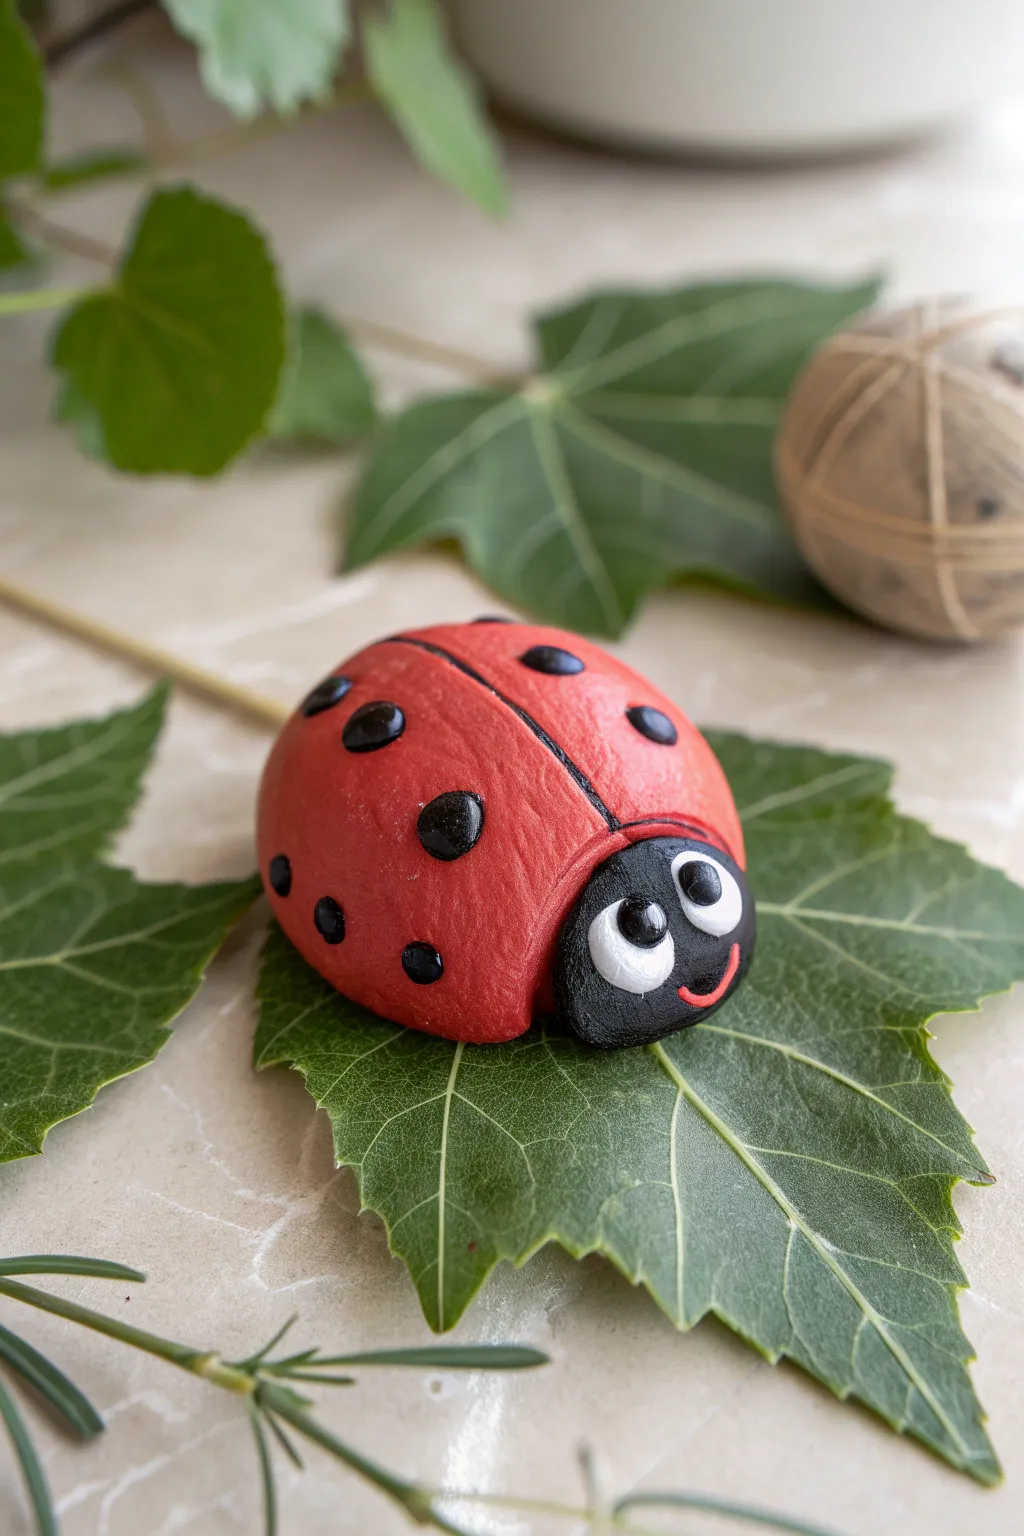
Bring a little luck to your indoor garden with this charming polymer clay ladybug. With its classic red shell, wide-set eyes, and friendly smile, this critter adds a pop of cheerful color to any potted plant.
Step-by-Step
Materials
- Polymer clay (Bright Red)
- Polymer clay (Black)
- Polymer clay (White)
- Acrylic rolling pin
- Pointed sculpting tool or toothpick
- Small ball stylus tool
- Detail knife or clay blade
- Gloss glaze (optional)
- Baking sheet and parchment paper
- Bamboo skewer (optional, for plant stake)
Step 1: Shaping the Body
-
Prepare the Red Clay:
Condition a golf-ball-sized chunk of bright red polymer clay by kneading it until it is soft and pliable. Roll it into a smooth sphere, ensuring there are no cracks on the surface. -
Form the Dome:
Gently press the sphere onto your work surface to flatten the bottom. Use your palms to smooth the top into a high, rounded dome shape, slightly elongated like an oval rather than a perfect circle. -
Create the Wing Division:
Using a clay knife or the edge of a ruler, press a straight line down the center of the red dome, starting from the back and stopping about three-quarters of the way to the front. -
Deepen the Crevice:
I like to go back over this line with a pointed sculpting tool to widen it slightly, creating a distinct separation between the two wing casings (elytra). -
Add the Head Section:
Condition a smaller piece of black clay and roll it into a slightly flattened semi-circle. Press this firmly against the front of the red body so it contours to the round shape. -
Blend the Seam:
Use your finger or a smoothing tool to gently blend the underside of the black neck onto the red body for a secure bond, but keep the top separation crisp. -
Define the Neckline:
If the red clay got smudged, use your knife to re-define the curved line where the red wings meet the black head.
Smudge Prevention
Red and black clay stain easily! Keep baby wipes nearby and clean your hands thoroughly before handling the white eye clay to keep it bright.
Step 2: Adding Details & Personality
-
Make the Spots:
Roll out a very thin snake of black clay. Cut small, equal-sized slices from it and roll each slice into a tiny ball. -
Flatten the Spots:
Press the tiny black balls onto the red wings. Flatten them flush with the surface so they look painted on rather than bumpy. -
Vary Spot Placement:
Place spots randomly, but ensure you have a few near the center line and some wrapping slightly down the sides for a realistic look. -
Create Eye Sockets:
Using a large ball stylus or the rounded end of a paintbrush, make two shallow indentations on the black head where the eyes will go. -
Form the Eyes:
Roll two small balls of white clay. Press them firmly into the indentations you just made, flattening them slightly. -
Add Pupils:
Roll two tiny specks of black clay. place them onto the white eyes. Placing them slightly cross-eyed or looking upward gives the ladybug a cuter expression. -
Carve the Mouth:
Take a very thin snake of red clay. Curve it into a ‘U’ shape and gently press it onto the bottom of the black face for a smiling mouth. -
Texture the Shell:
For a subtle organic texture, you can lightly tap a piece of coarse sandpaper or a toothbrush over the red clay, though keeping it smooth is also classic. -
Insert Stake (Optional):
If you plan to put this in a flower pot, gently insert a bamboo skewer into the underside of the bug. Remove the skewer before baking, or bake with it if it’s oven-safe wood.
Step 3: Baking and Finishing
-
Bake the Piece:
Place your ladybug on parchment paper. Bake according to your clay package instructions (usually 275°F/135°C for 15-30 minutes depending on thickness). -
Cool Down:
Let the ladybug cool completely in the oven with the door slightly ajar to prevent cracking. -
Glaze the Shell:
Once cool, brush a coat of gloss glaze over the red wings and black spots to simulate that shiny beetle shell look. Leave the face matte for contrast.
Leafy Lounge
Roll out a thin sheet of green clay and cut a leaf shape. Bake the ladybug sitting directly on this leaf for a complete, self-contained display piece.
Nestle your new little friend among your houseplants for a delightful surprise


Rainbow Ball Caterpillar
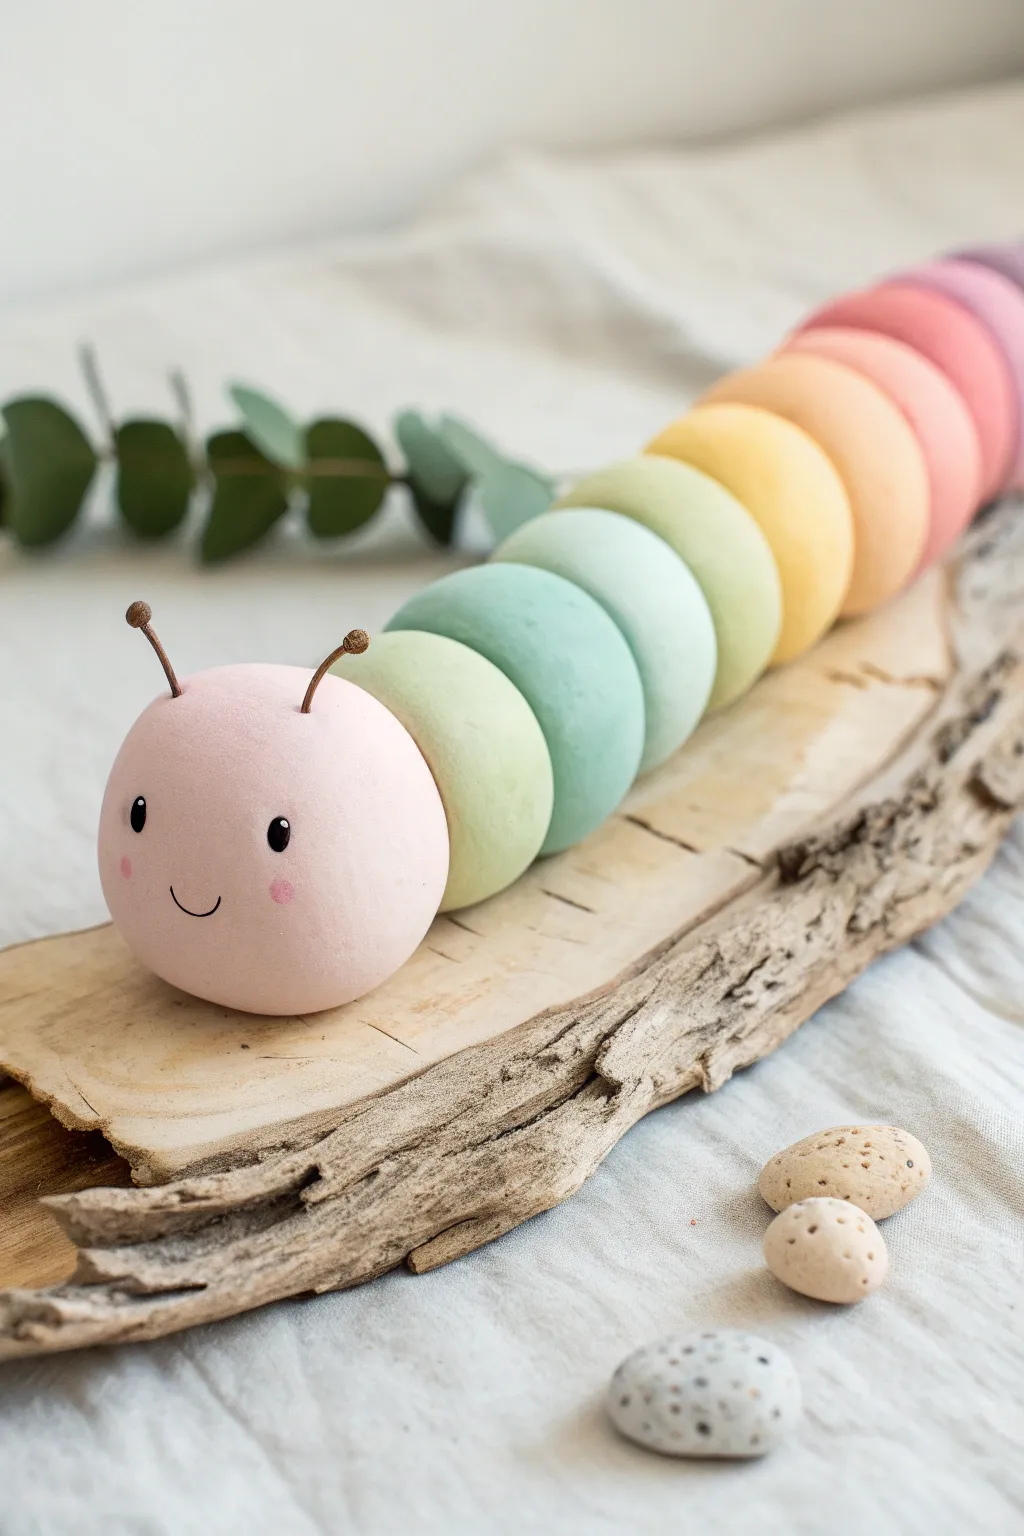
This adorable caterpillar brings a soft touch of whimsy to any shelf with its gentle pastel gradient and friendly face. Created from smooth spheres of polymer clay, this project is perfect for beginners looking to practice color blending and simple sculpting techniques.
Step-by-Step Guide
Materials
- Polymer clay (white, pink, red, orange, yellow, green, blue)
- Acrylic rolling pin or clay machine
- Aluminum foil (optional, for armature)
- Fine-grit sandpaper
- Liquid polymer clay or Bake & Bond
- Small ball stylus tool
- Black and pink acrylic paint (or paint pens)
- Matte varnish
- Thin floral wire or jewelry wire (brown)
- Wire cutters
- Craft knife
Step 1: Mixing the Gradient Colors
-
Prepare the base white:
Start by conditioning a large block of white polymer clay. This project relies heavily on pastels, so you’ll need white to mix into every single color to achieve that soft, matte look. -
Mix the head color:
Take a chunk of white clay and mix in a tiny pinch of pink. Knead thoroughly until the color is uniform. You want a very pale, baby pink for the face. -
Create the body palette:
Prepare 6-8 additional balls of clay in a rainbow sequence. Start with a light green, then move to teal, yellow, orange, coral, pink, and purple. Remember to mix plenty of white into each to keep them consistent with the head. -
Size the portions:
Roll your mixed colors into rough balls to check sizing. The head should be the largest, followed by a slightly smaller segment for the neck, and tapering down very gradually towards the tail end.
Keeping Pastels Clean
Pastel clay picks up dust easily. Keep a pack of baby wipes nearby and clean your hands and tools thoroughly between every color change.
Step 2: Forming and Assembling
-
Roll perfect spheres:
Take your time rolling each portion of clay between your palms. Use light pressure at the end to smooth out any fingerprints. The smoother the ball now, the less sanding you’ll need later. -
Flatten the connection points:
Gently press the back of the head and the front of the first body segment against your work surface to create a tiny flat spot. This increases the surface area for a stronger bond. -
Connect the segments:
Apply a small dot of liquid polymer clay or Bake & Bond to the flat spots. Press the segments together gently in your desired S-curve or straight line. -
Continue the chain:
Repeat the process down the line, connecting the teal, green, yellow, orange, and reddish segments. I find it helpful to assemble them directly on the baking tray or a ceramic tile to avoid moving the long structure later. -
Smooth the seams:
If any gaps appear between the balls, use a silicone tool to gently smooth the clay, though for this segmented look, just ensuring they touch firmly is usually enough.
Flattened Bottoms?
If your spheres flatten too much while baking, nestle the caterpillar on a bed of cornstarch or polyester batting to cradle the curves in the oven.
Step 3: Adding Details and Baking
-
Insert antennae wire:
Cut two small 1-inch pieces of brown wire. Poke two small holes on the top of the head using a needle tool, add a speck of liquid clay, and insert the wires. -
Add wire tips:
Roll two tiny, microscopic balls of brown clay and press them onto the tips of the wire antennae to cover the sharp ends. -
Bake the piece:
Bake the caterpillar according to your clay manufacturer’s instructions (usually 275°F/130°C for 15-30 minutes). Tent with foil if you are worried about the pastels darkening. -
Cool down:
Let the sculpture cool completely in the oven with the door slightly ajar. Sudden temperature changes can sometimes cause cracks.
Step 4: Finishing Touches
-
Sand for texture:
Once cool, lightly sand the surface with fine-grit sandpaper if you want that ultra-matte, stone-like texture shown in the photo. Wipe away dust with a damp cloth. -
Paint the eyes:
Dip a small ball stylus into black acrylic paint. Dot two wide-set eyes onto the face. Let the black dry completely. -
Add eye highlights:
Using a needle or a toothpick, add a tiny white dot to the upper right of each black eye pupil to bring the character to life. -
Draw the smile:
Use a super fine-tip black paint pen or a liner brush to draw a small, simple ‘U’ shape for the mouth. -
Rosy cheeks:
Dry brush a tiny amount of pink paint or pastel chalk dust onto the cheeks, just below the eyes. -
Seal:
Finish with a coat of matte varnish to protect the paint without making the caterpillar look plastic or shiny.
Now you have a charming little critter ready to brighten up your desk or planter.


Chubby Bumblebee With Stripes
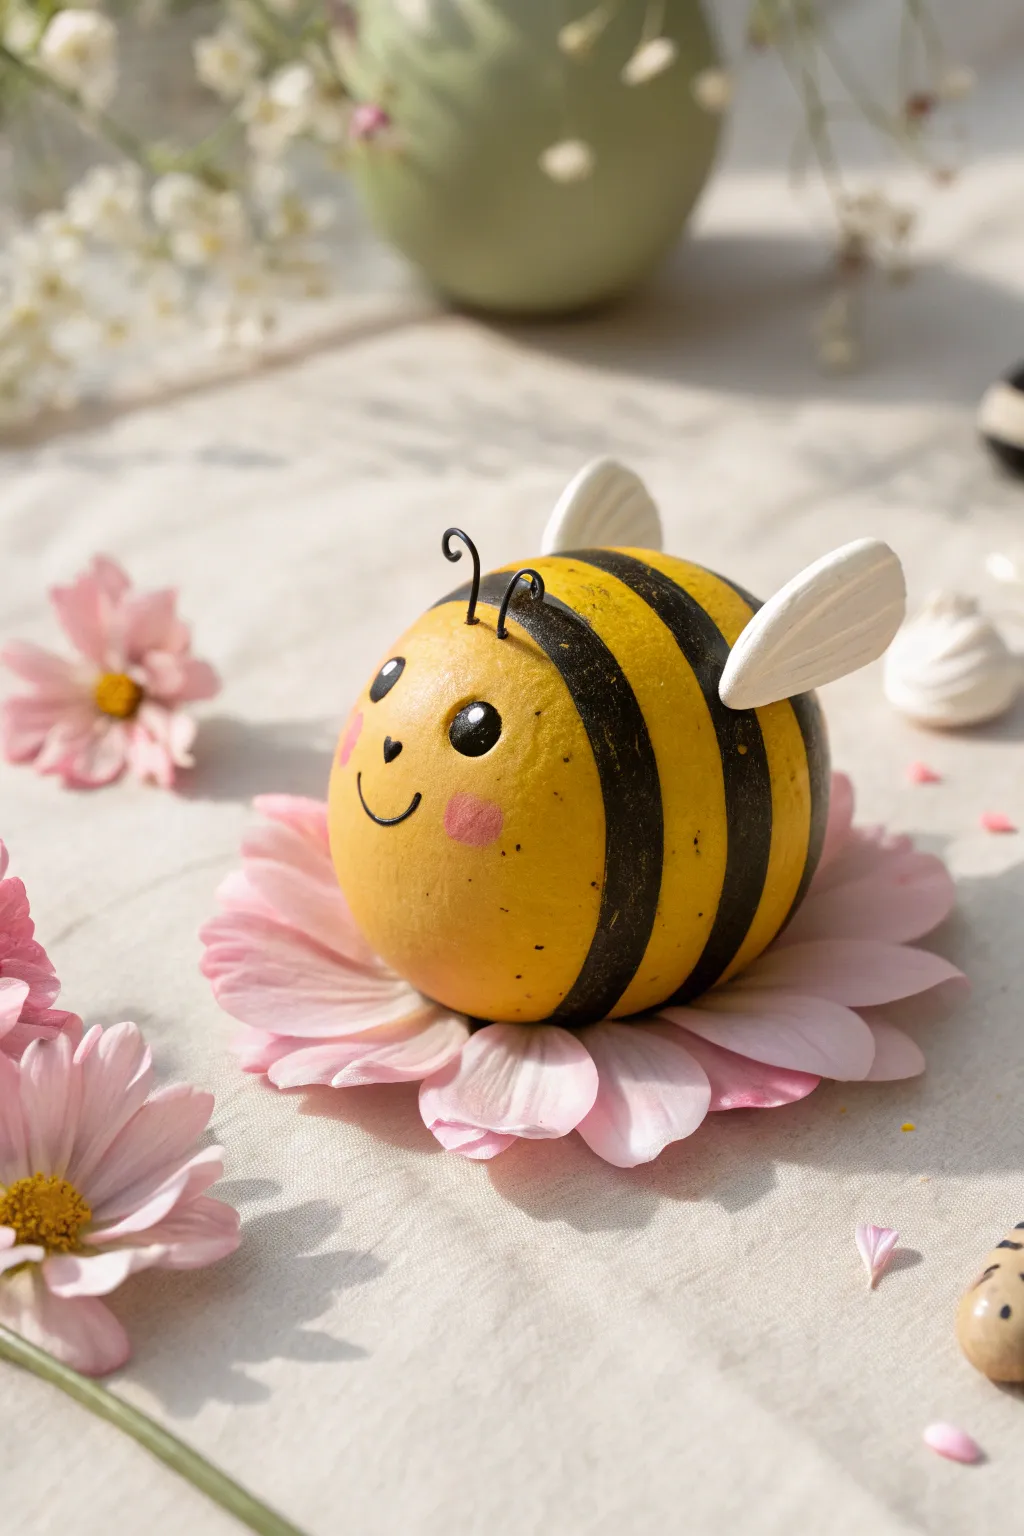
This cheerful little project creates a wonderfully rotund bumblebee that sits happily on any surface. Its simplified, spherical shape and bold stripes make it an approachable sculpting project with a charming, illustrative finish.
How-To Guide
Materials
- Yellow polymer clay or air-dry clay
- Black acrylic paint
- White acrylic paint
- Pink acrylic paint or soft pastel dust
- Black jewelry wire (thin gauge)
- Small white clay pieces or white cardstock for wings
- Clay smoothing tool or sponge
- Fine detail paintbrush
- Medium flat paintbrush
- Dotting tool or toothpick
- Matte or satin varnish (optional)
Step 1: Shaping the Base
-
Create the core shape:
Begin with a generous amount of yellow clay. Roll it firmly between your palms to create a smooth, seamless sphere. If you want a slightly more natural look, you can gently elongate it into a very subtle egg shape, but keeping it round adds to the ‘chubby’ aesthetic. -
Smooth the surface:
Inspect your sphere for any fingerprints or cracks. Use a slightly damp sponge (if using air-dry clay) or your finger with a touch of cornstarch (for polymer) to buff out any imperfections until the surface is perfectly sleek. -
Flatten the bottom:
Gently tap the sphere onto your work surface to create a small flat spot. This ensures your bee will sit flat without rolling away. -
Insert antennae holes:
Using a needle tool or a toothpick, poke two small, vertical holes near the top front of the ‘face’ area. These will hold the wire antennae later. -
Drying or Baking:
If using polymer clay, bake according to the manufacturer’s package instructions. For air-dry clay, set it aside in a dry spot for 24-48 hours until completely hardened.
Smoother Stripes
For ultra-crisp stripes, wrap thin painter’s tape or washi tape around the curved body to mask off the yellow areas before painting the black bands.
Step 2: Painting the Stripes
-
Mark your guidelines:
Once the base is hard and cool, lightly sketch two or three bands around the body with a pencil. Leave a large clear area at the front for the face. -
Paint the black bands:
Using a medium flat brush, fill in the bands with black acrylic paint. I find that rotating the bee while holding the brush steady helps create cleaner lines. Don’t worry if edges aren’t laser-straight; a little waver adds organic charm. -
Add texture (optional):
While the black paint is still wet, you can dab it slightly with a dry sponge to give it a fuzzy texture, or simply leave it smooth for a cartoon look. -
Touch up the yellow:
If any black paint smeared, wait for it to dry completely, then carefully touch up the edges with yellow paint to keep the stripes crisp.
Flower Pedestal
Create a matching display stand! Sculpt a simple pink flower with large, flat petals for your bee to nestle into, creating a complete scene.
Step 3: Adding the Face and Wings
-
Paint the eyes:
Dip a dotting tool or the handle end of a paintbrush into black paint. Stamp two solid black circles on the face area. Space them relatively wide apart for a cuter expression. -
Face details:
Using your finest detail brush, paint a small heart shape for the nose and a sweeping ‘U’ shape for the smile. Add tiny eyebrows above the eyes. -
Add the highlights:
Once the black eyes are dry, add a tiny white dot to the upper right curve of each eye. This ‘catchlight’ brings the character to life. -
Rosy cheeks:
Dip a small dry brush into pink paint (wipe most of it off) or use pink pastel dust. Gently dab circular rosy cheeks on either side of the smile. -
Create the wings:
Sculpt two small teardrop shapes from white clay (or cut from stiff cardstock). If using clay, impress a few linear indentations to mimic vein texture. -
Attach the wings:
Glue the wings onto the back, just behind the first black stripe. Angle them slightly upwards and outwards. -
Make the antennae:
Cut two short lengths of black wire. Curl one end of each wire into a spiral using pliers or by wrapping it around a toothpick. -
Final assembly:
Place a dab of strong glue into the holes you made earlier and insert the straight ends of the wire antennae.
Place your finished bee on a desk or shelf to add a buzz of happiness to your room


Cute, Not-Scary Spider
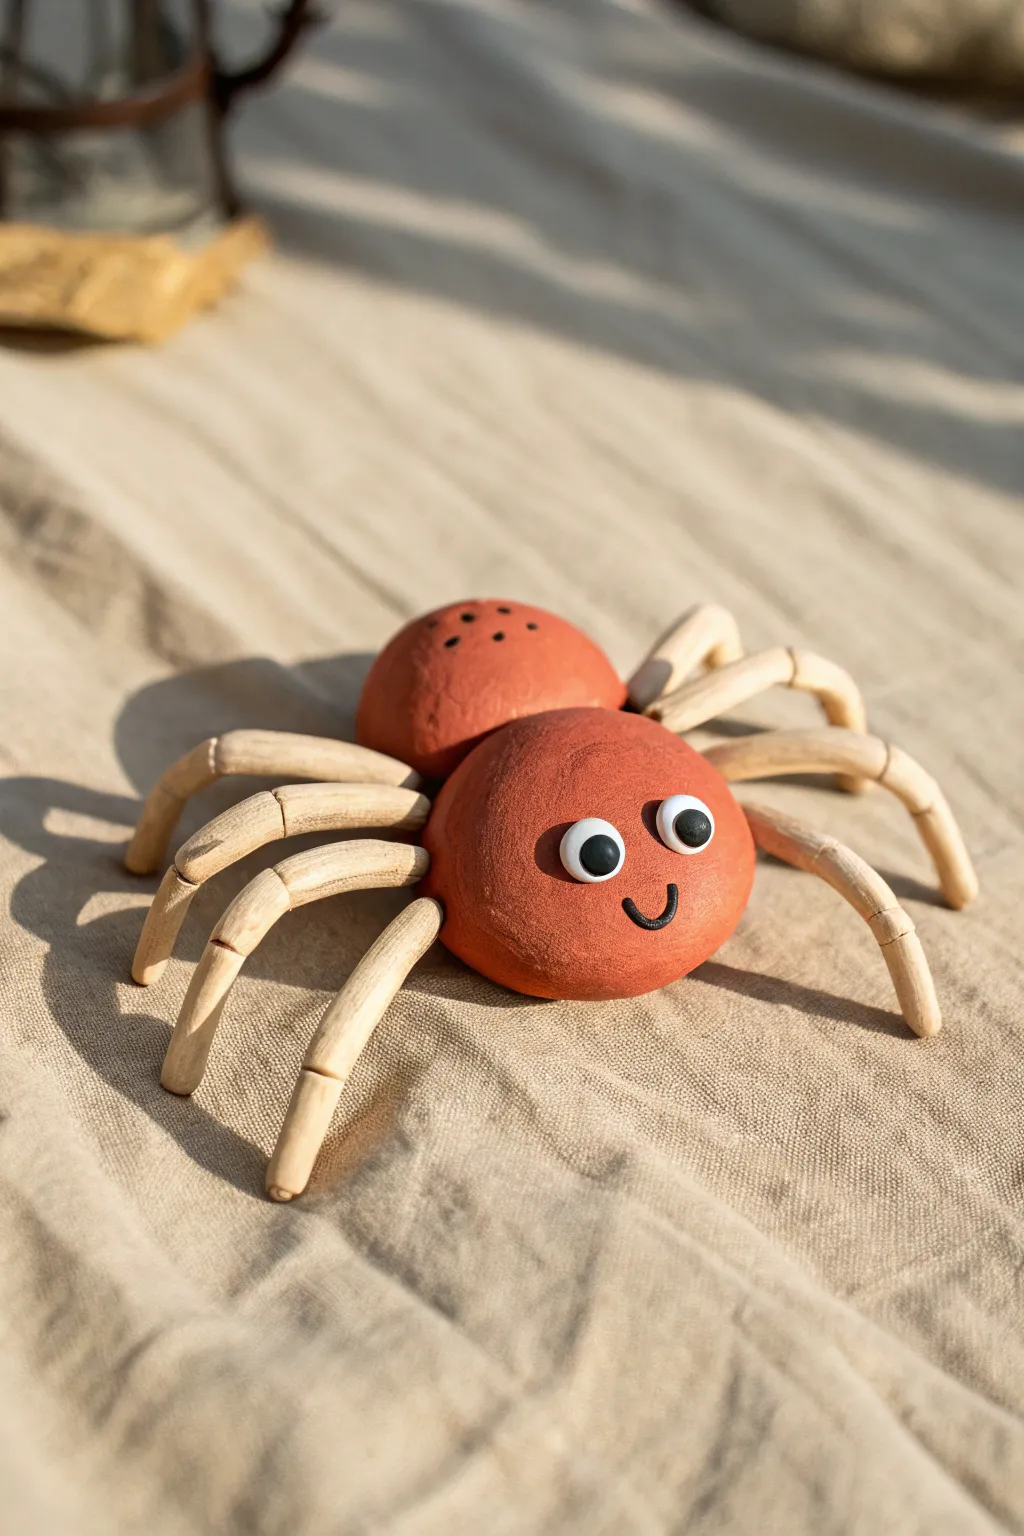
This friendly arachnid proves that spiders can be utterly charming rather than creepy. With his segmented wooden legs and warm terracotta finish, this smiley little guy adds a touch of rustic whimsy to any shelf or nature-themed display.
Step-by-Step
Materials
- Air-dry clay (terra cotta color) or polymer clay
- Light wooden dowels or craft sticks (approx. 5-7mm thick)
- Sandpaper (medium grit)
- Craft knife or small saw
- Googly eyes (medium size)
- Black polymer clay or black paint marker
- Strong craft glue (e.g., E6000 or super glue)
- Acrylic matte sealer (optional)
- Toothpick or needle tool
Step 1: Preparing the Wood Legs
-
Measure the segments:
Start by cutting your wooden dowels into small segments. You will need eight legs total, and each leg should have three segments to create that bent, realistic look. -
Cut the angles:
Using your craft knife or small saw, cut the ends of the segments at slight angles rather than straight across. This allows the pieces to fit together in a curve. -
Sand the edges:
Take your sandpaper and gently round off the sharp edges of every wooden segment. You want them to look worn and organic. -
Assemble the joints:
Glue the three segments of a single leg together to form a curve. The angles you cut earlier should help create a natural arch shape. -
Repeat the process:
Continue gluing until you have eight complete, arched legs. Lay them out on your workspace to ensure they are roughly symmetrical. -
Let them set:
Allow the glue on the wooden legs to dry completely before trying to attach them to the body.
Step 2: Sculpting the Body
-
Form the abdomen:
Take a chunk of terra cotta clay and roll it into a smooth ball. Flatten the bottom slightly so it sits stable on the table. -
Create the head:
Roll a second, slightly smaller ball for the head section (cephalothorax). It should also be slightly flattened on the bottom. -
Connect the parts:
Press the two clay balls together securely. If using air-dry clay, you might need to score the contact points and add a dab of water. -
Add texture:
Using a toothpick, gently poke a few small holes or dimples on the top of the abdomen (the larger back ball) for a bit of decorative texture. -
Drill leg holes:
While the clay is still soft, use one of your wooden dowel scraps to press four indentations into each side of the body where the legs will go. This creates a perfect socket.
Leg Logic
To make legs look natural, ensure the middle segment is the longest of the three. This gives the spider a better ‘stance’ and mimic real insect anatomy.
Step 3: Bringing it to Life
-
Insert the legs:
Apply a small amount of glue to the end of each wooden leg and press them firmly into the sockets you created in the clay body. I find it easiest to do one side at a time. -
Support while drying:
If gravity pulls the legs down, prop them up with small folded pieces of paper or cardboard until the clay and glue set. -
Make the mouth:
Roll a tiny, thin snake of black clay (or black polymer clay) into a ‘U’ shape for the smile. Press it gently onto the front of the head. -
Attach the eyes:
Glue the two googly eyes right above the smile. Position them close together for a cuter expression. -
Final drying:
Let the entire project dry completely according to your clay package instructions (usually 24-48 hours for air-dry clay). -
Seal (Optional):
If you want to protect your spider and give the clay a finished look, brush on a coat of matte acrylic sealer.
Clay Cracking?
If you see cracks forming as the clay dries, smooth a slurry of water and clay over the crack with your finger immediately to seal it back up.
Now you have a happy little critter ready to hang out on your desk

The Complete Guide to Pottery Troubleshooting
Uncover the most common ceramic mistakes—from cracking clay to failed glazes—and learn how to fix them fast.
Easy Dragonfly With Flat Wings
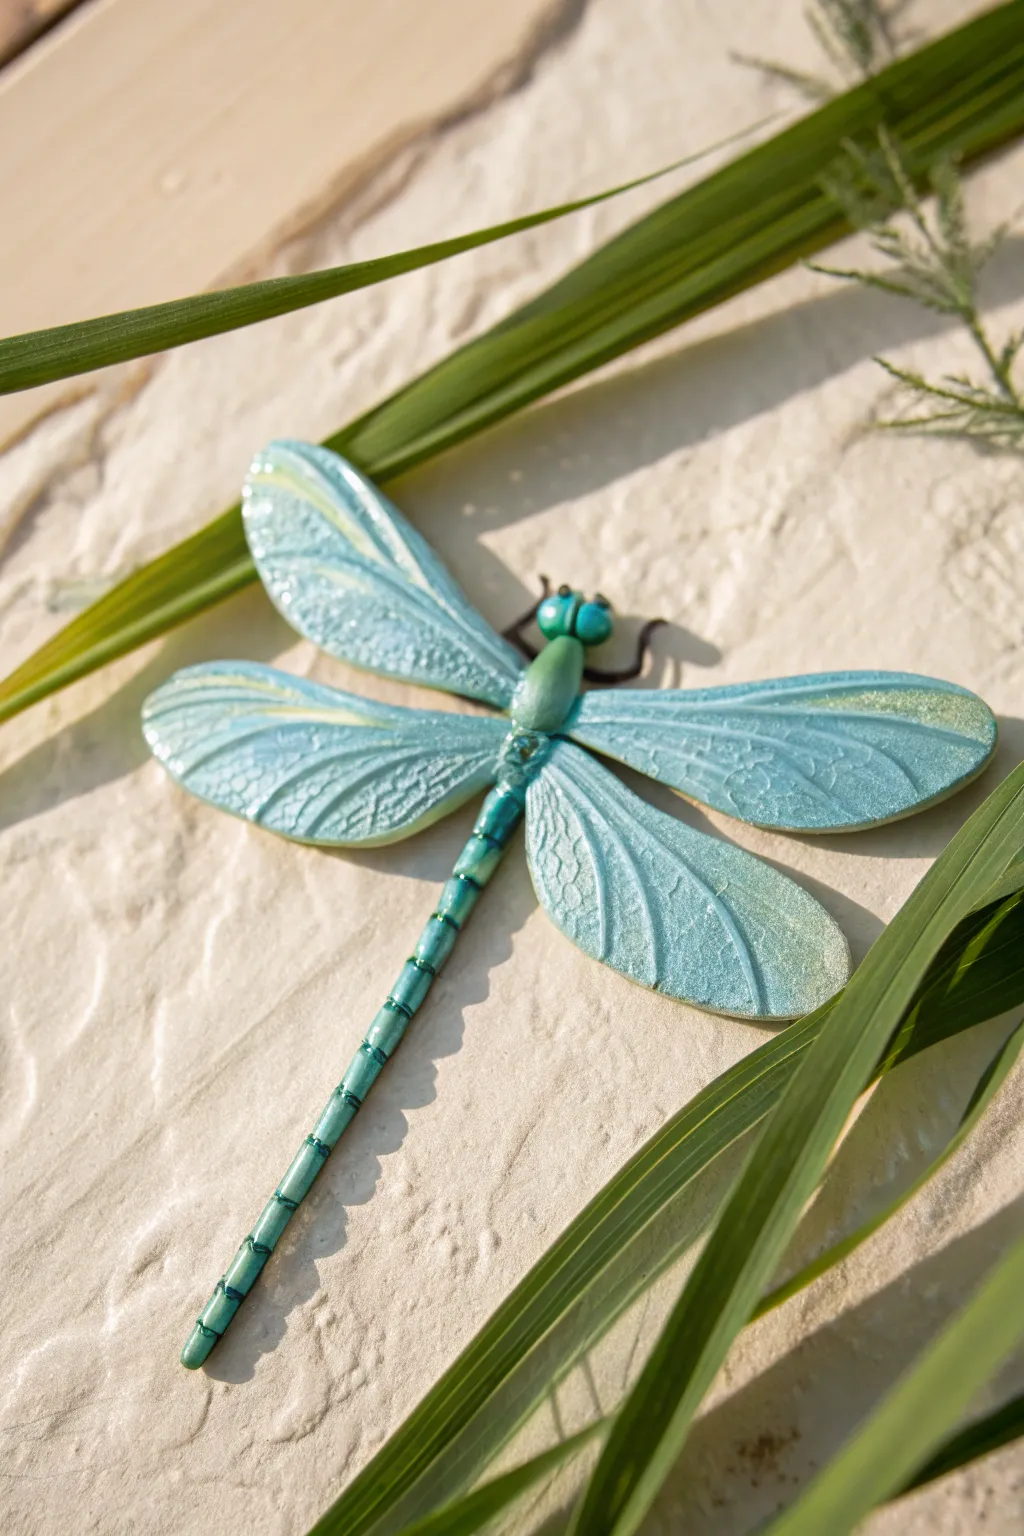
This elegant dragonfly project captures the iridescent beauty of nature using shimmering mica-infused clay. With its segmented body and textured flat wings, it makes a stunning brooch, plant stake, or decorative accent for your home.
Step-by-Step
Materials
- Teal or light blue polymer clay (mica/metallic finish recommended)
- Small amount of black or dark brown polymer clay (for legs)
- Acrylic rolling pin
- Leaf veining mold or texture sheet
- Craft knife or scalpel
- Needle tool
- Ball stylus tool
- Teal or green mica powder (optional for extra shimmer)
- Soft paintbrush
- Flexible metal blade
- Jewelry wire (thin gauge)
- Oven for baking
Step 1: Creating the Wings
-
Condition the Clay:
Begin by conditioning your teal metallic clay until it is soft and pliable. Warm clay takes impressions much better than cold clay. -
Roll the Sheet:
Roll the clay out into a medium-thin sheet, approximately 2-3mm thick. It needs to be sturdy enough to hold its shape but thin enough to look delicate. -
Add Texture:
Select a leaf veining mold or a nature-themed texture sheet. Place your clay sheet onto the texture and press firmly with your rolling pin to transfer the mesmerizing vein details deeply into the clay. -
Cut the Top Wings:
Using a craft knife, freehand cut two long, paddle-shaped wings for the top set. Ensure they taper towards the body connection point. -
Cut the Bottom Wings:
Cut two slightly shorter and rounder paddle shapes for the bottom wings. If you want symmetry, cut a paper template first, but slight organic variations look more natural. -
Enhance Edges:
Gently smooth the cut edges of all four wings with your fingertip to remove any sharpness, then use a soft brush to dust a little extra mica powder onto the raised veins if desired.
Step 2: Sculpting the Body
-
Form the Thorax:
Roll a small, smooth oval of teal clay about the size of a pea. This will be the central thorax where the wings attach. -
Create the Head:
Roll a slightly smaller sphere for the head. Flatten the front slightly and press two tiny balls of clay onto the sides to create the large, compound eyes prominent in dragonflies. -
Make the Tail Section:
Roll a long, thin snake of clay for the abdomen (tail). It should be uniform in thickness, tapering slightly at the very end. -
Detail the Tail:
Using a craft knife, gently roll the blade across the tail snake at regular intervals to create the segmented look without cutting all the way through. -
Assemble the Body Parts:
Press the head against the thorax, and the thorax against the segmented tail on your work surface. Blend the clay slightly on the underside so they stick together firmly.
Clean Cuts Pro-Tip
If your clay drags while cutting the wings, wrap your clay sheet in plastic wrap before cutting. The plastic creates a smooth, beveled edge without ragged bits.
Step 3: Assembly and Legs
-
Attach the Wings:
Press the tapered ends of the top wings onto the upper sides of the thorax. Then, tuck the bottom wings slightly underneath the top ones and press them into the lower thorax. -
Secure the Joints:
Use a ball stylus tool to gently blend the clay where the wings meet the body. This mechanical bond ensures your wings won’t pop off after baking. -
Add Main Legs:
Roll extremely thin snakes of black or dark brown clay. Cut two small pieces, bend them into an angled ‘L’ shape, and press them onto the underside of the thorax near the head. -
Add Antennae:
Cut two tiny bits of the dark wire or very thin dark clay and insert them into the top of the head for antennae. -
Final Shaping:
Before baking, give the wings a slight upward curve or ripple for movement. I find that propping the wing tips up on small bits of paper towel helps them hold a dynamic shape in the oven. -
Bake:
Bake the dragonfly according to your clay package instructions (usually around 275°F/135°C for 15-30 minutes). Let it cool completely before handling.
Level Up: Glossy Eyes
After baking, apply a tiny drop of UV resin or glossy polyurethane varnish specifically to the eyes. This makes them look wet and bug-like against the matte wings.
Once cooled, your shimmering creation is ready to flutter into a garden display or become a unique piece of wearable art
Wiggly Garden Worm Buddy
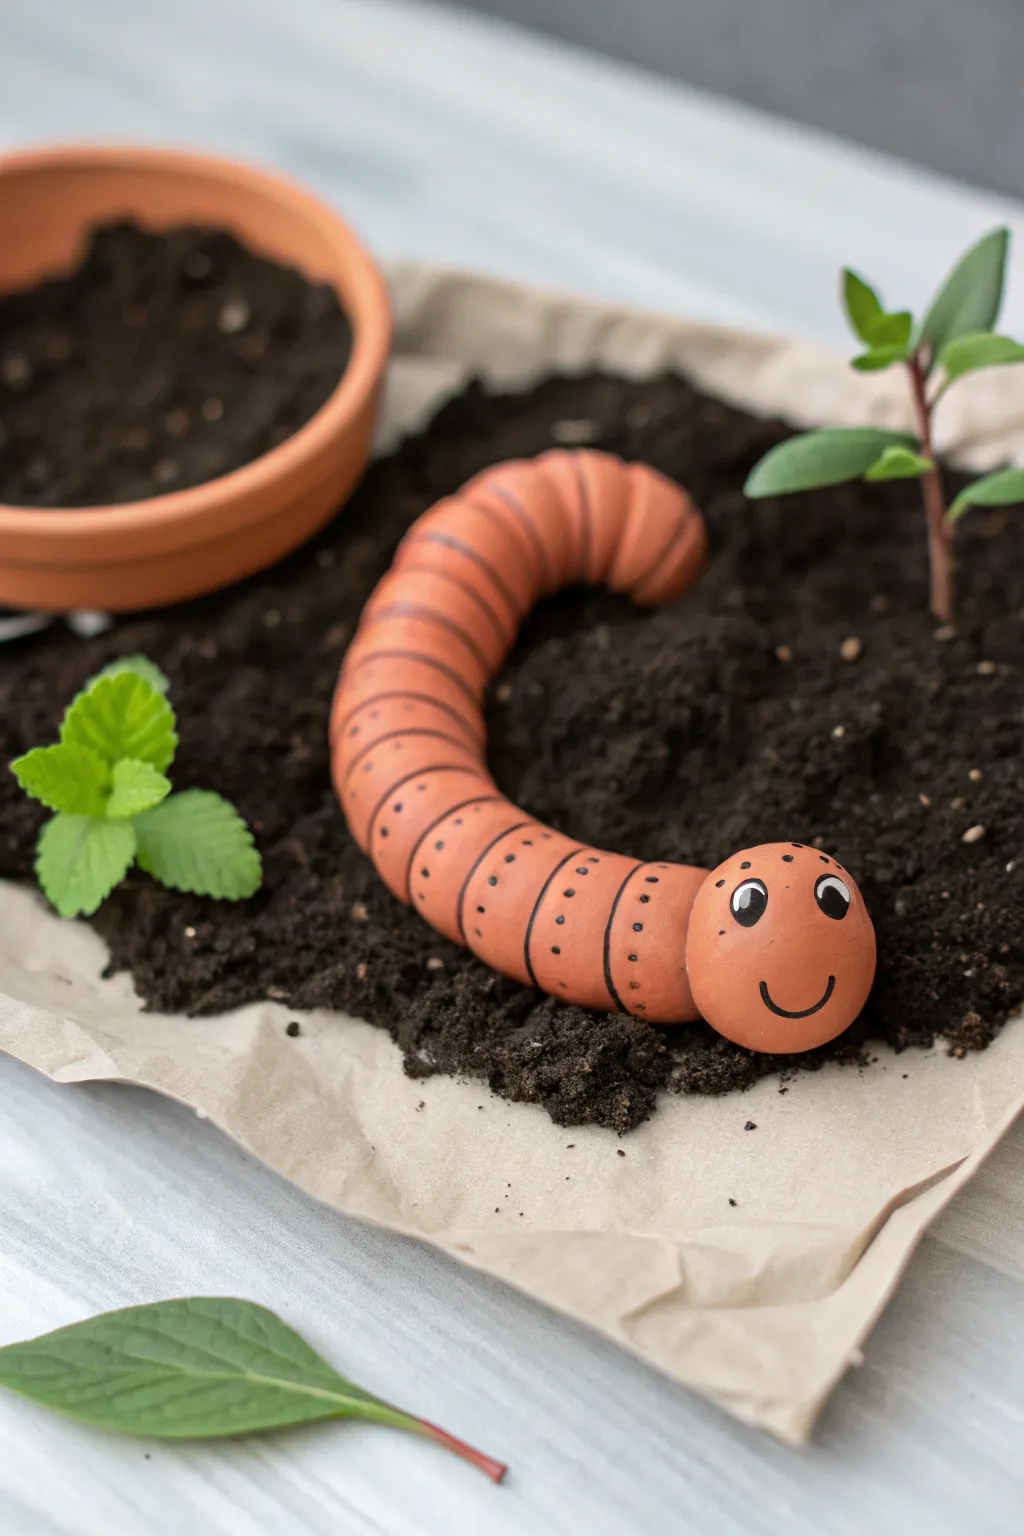
Bring your indoor garden to life with this charming, easy-to-make terracotta worm weaving through the soil. Its segmented body and cheerful face make it a perfect, low-maintenance companion for your favorite potted plants.
Step-by-Step Tutorial
Materials
- Terracotta-colored polymer clay (approx. 4-6 oz)
- Black acrylic paint
- White acrylic paint
- Fine-point paintbrush or toothpick
- Needle sculpting tool or toothpick
- Rolling pin (acrylic or wooden)
- Smooth work surface
- Clear matte varnish (waterproof)
Step 1: Forming the Body
-
Condition the Clay:
Begin by kneading your terracotta polymer clay in your hands until it becomes soft, pliable, and free of cracks. -
Roll the Log:
Roll the clay into a long, smooth log shape on your work surface. Aim for a thickness of about 3/4 inch and a length of roughly 6-8 inches. -
Taper the Tail:
Gently roll one end of the log with slightly more pressure to create a subtle taper for the worm’s tail. -
Add Texture:
Using a rolling motion with your hands, subtly press along the length of the log to create slight undulations, hinting at the different segments. -
Shape the Curve:
Bend the clay log into a gentle ‘C’ or ‘S’ curve. Imagine how a worm naturally moves through soil and try to capture that fluid motion.
Smooth Seams
To remove fingerprints before baking, lightly brush the raw clay with a tiny amount of baby oil or cornstarch for a perfect finish.
Step 2: Creating Segments
-
Mark the Lines:
Take your needle tool or a toothpick and gently press parallel lines across the top surface of the worm’s body. -
Space Evenly:
Space these indentations about a half-inch apart, working from the neck down to the tail. These lines create the classic segmented worm look. -
Deepen the Grooves:
Go back over your initial lines and deepen them slightly, ensuring they wrap partially down the sides but don’t need to go all the way underneath. -
Smooth Edges:
If the sculpting tool created any sharp ridges, gently smooth them down with your fingertip to keep the look organic and soft.
Step 3: The Head & Baking
-
Shape the Head:
Roll a separate ball of clay that is slightly larger than the width of the body log. -
Attach the Head:
Press the ball firmly onto the thicker end of your body log. You can blend the clay at the seam underneath the chin to ensure a secure bond. -
Final Shaping:
Check the connection point; the head should look like a distinct, rounded segment at the front. -
Bake:
Place your worm on a baking sheet and bake according to your polymer clay’s package instructions (usually around 275°F or 135°C for 15-30 minutes). -
Cool Down:
Allow the sculpture to cool completely before moving on to painting. It will harden fully as it returns to room temperature.
Paint Bleeding?
If your black lines are messy, wait for them to dry, then gently scrape away excess paint with a craft knife or paint over with a terracotta mix.
Step 4: Painting & Details
-
Paint Segment Rings:
Using black acrylic paint and a very fine brush, carefully paint thin lines inside the grooves you sculpted earlier. -
Add Decorative Dots:
Dip the very tip of a toothpick into black paint and add three tiny, vertical dots between each segment ring for extra detail. -
Paint the Eyes:
Paint two vertical black ovals on the face for eyes. Once dry, add a small white dot near the top of each oval for a life-like shine. -
Add the Smile:
I like to use a fine marker or the thinnest brush I have to paint a simple, wide ‘U’ shape for the smile. -
Seal the piece:
Once all paint is totally dry, apply a coat of matte waterproof varnish. This protects your buddy from moisture if he lives in real plant soil.
Nestle your new friend into the dirt of a planter and enjoy the whimsical touch it adds to your greenery


What Really Happens Inside the Kiln
Learn how time and temperature work together inside the kiln to transform clay into durable ceramic.
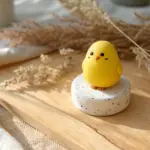
Firefly With a Glow Belly
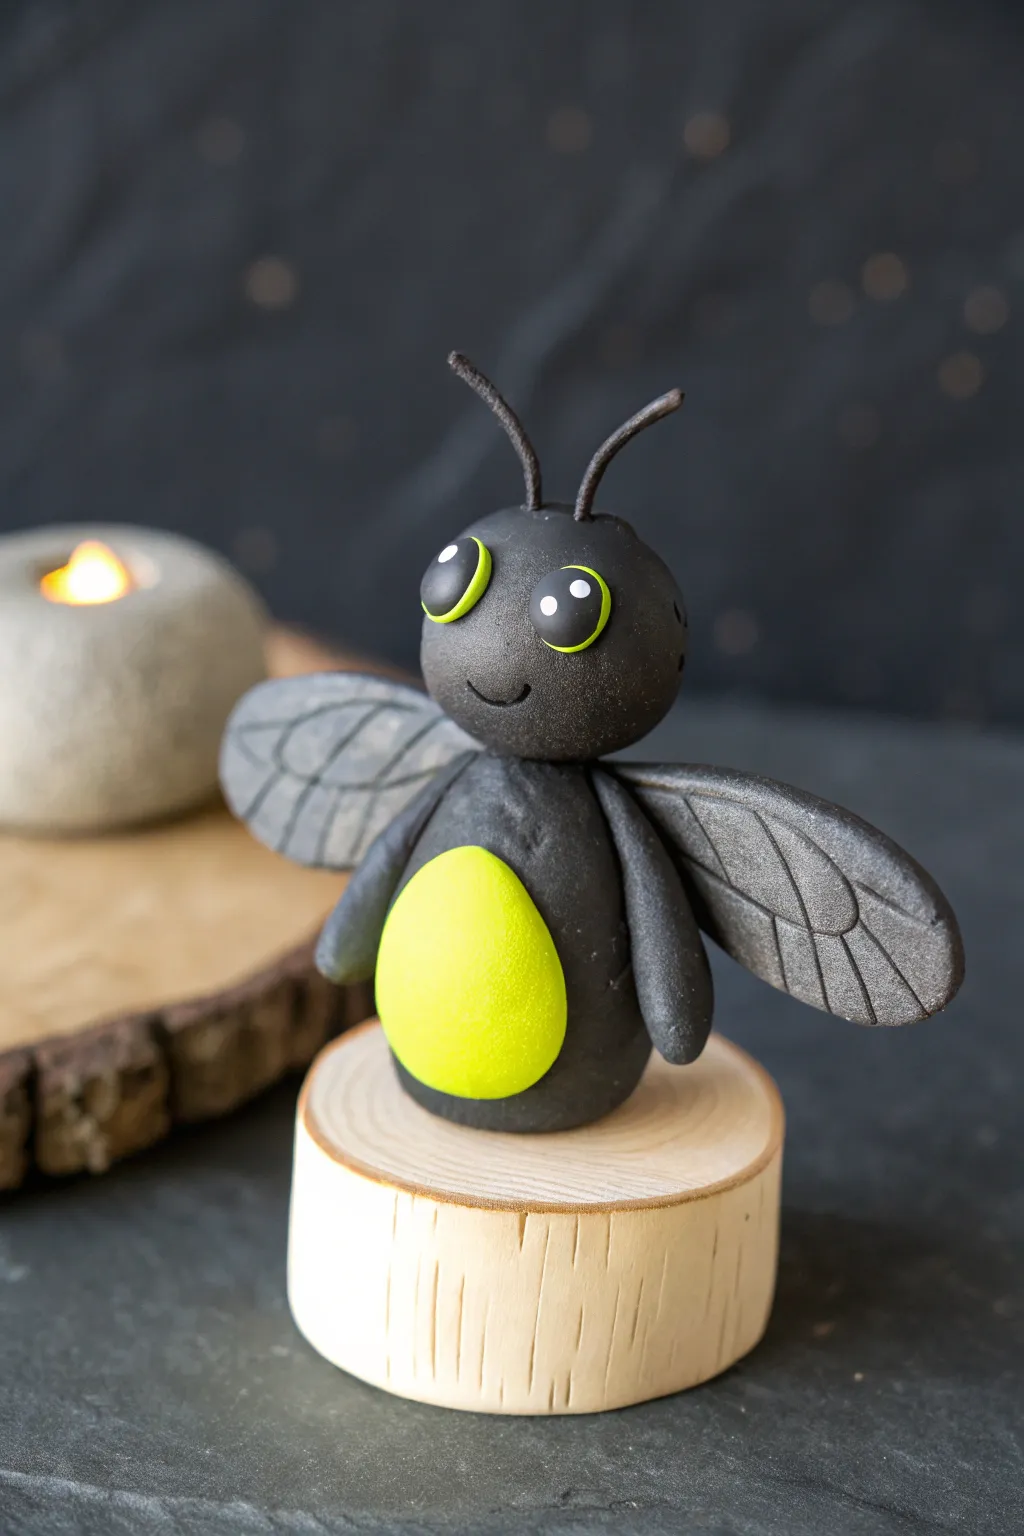
Capture the magic of summer nights with this adorable firefly figurine featuring a striking lime-green belly that truly pops against its charcoal body. This simple modeling project uses basic shapes to create a charming insect friend perfect for a nursery shelf or seasonal display.
Step-by-Step Guide
Materials
- Polymer clay (black, bright lime green, white, silver/gray)
- Modeling tools (ball tool, needle tool)
- Small rolling pin
- Craft knife or clay blade
- Round wooden disc (approx. 2 inches diameter)
- Strong craft glue (e.g., E6000 or super glue)
- Black acrylic paint (optional, for wood)
- Varnish (matte or satin)
Step 1: Shaping the Body
-
Prepare the clay:
Begin by conditioning your black polymer clay until it is soft and pliable. Warm clay prevents cracking and makes smoothing seams much easier. -
Form the torso:
Roll a piece of black clay into a smooth egg shape, slightly flattened at the bottom so it can stand on its own. This will be the main body connection point. -
Create the glow belly:
Take a ball of bright lime green clay and flatten it into a thin, oval disk. Gently press this onto the front of the black torso, smoothing the edges so it integrates seamlessly without distorting the egg shape. -
Roll the head:
Roll a second, slightly smaller sphere of black clay for the head. It should be round but can overlap the neck area slightly for stability. -
Connect head and body:
Place the head on top of the torso. I find inserting a small piece of wire or a toothpick between the two pieces adds necessary structural support before gently pressing them together.
Clean Fingers, Clean Clay
Black clay stains hands easily! Clean your hands and tools with baby wipes before handling the lime green or silver clay to keep the colors vibrant and smudge-free.
Step 2: Adding Features
-
Sculpt the arms:
Roll two small sausage shapes of black clay for the arms. Taper one end of each slightly. -
Attach the arms:
Press the tapered ends of the arms onto the sides of the body, just below the neck. Angle them slightly forward to frame the glowing belly. -
Form the eyes:
Create two small flattened discs of black clay. On top of these, place slightly smaller discs of the lime green clay, followed by tiny white dots for the ‘shine’ reflection. -
Place the eyes:
Position the layered eye pieces onto the face, spacing them wide apart for a cute, innocent expression. -
Carve the smile:
Use a needle tool or a small clay blade to gently imprint a curved smile into the clay between the eyes. Keep it simple and subtle.
Step 3: Wings and Assembly
-
Shape the wings:
Condition your silver or grey clay. Roll two teardrop shapes and flatten them to about 3mm thickness. -
Detail the wings:
Using a needle tool, draw veins onto the wings. Start with a central line and add branching lines extending outward to mimic insect wing patterns. -
Attach the wings:
Press the narrow end of the wings firmly onto the back of the body. You can blend the clay slightly at the connection point for a stronger bond. -
Make the antennae:
Roll two very thin snakes of black clay. Curve them gently and attach them to the top of the head. -
Bake the figurine:
Place your firefly on a baking sheet lined with parchment paper. Bake according to your brand of polymer clay instructions (usually around 275°F/130°C for 15-30 minutes). -
Mount the base:
While the clay cools, prepare your wooden disc base. You can leave it raw for a natural look or stain it. -
Final assembly:
Once fully cooled, use a strong craft glue to secure the firefly to the center of the wooden disc.
Make it Shine
Use glow-in-the-dark polymer clay for the belly instead of standard lime green. This way, your firefly works just like the real thing when the lights go out.
Now you have a charming little bug distinctive enough to brighten even the darkest corner of your room
Moth With Chunky Patterned Wings
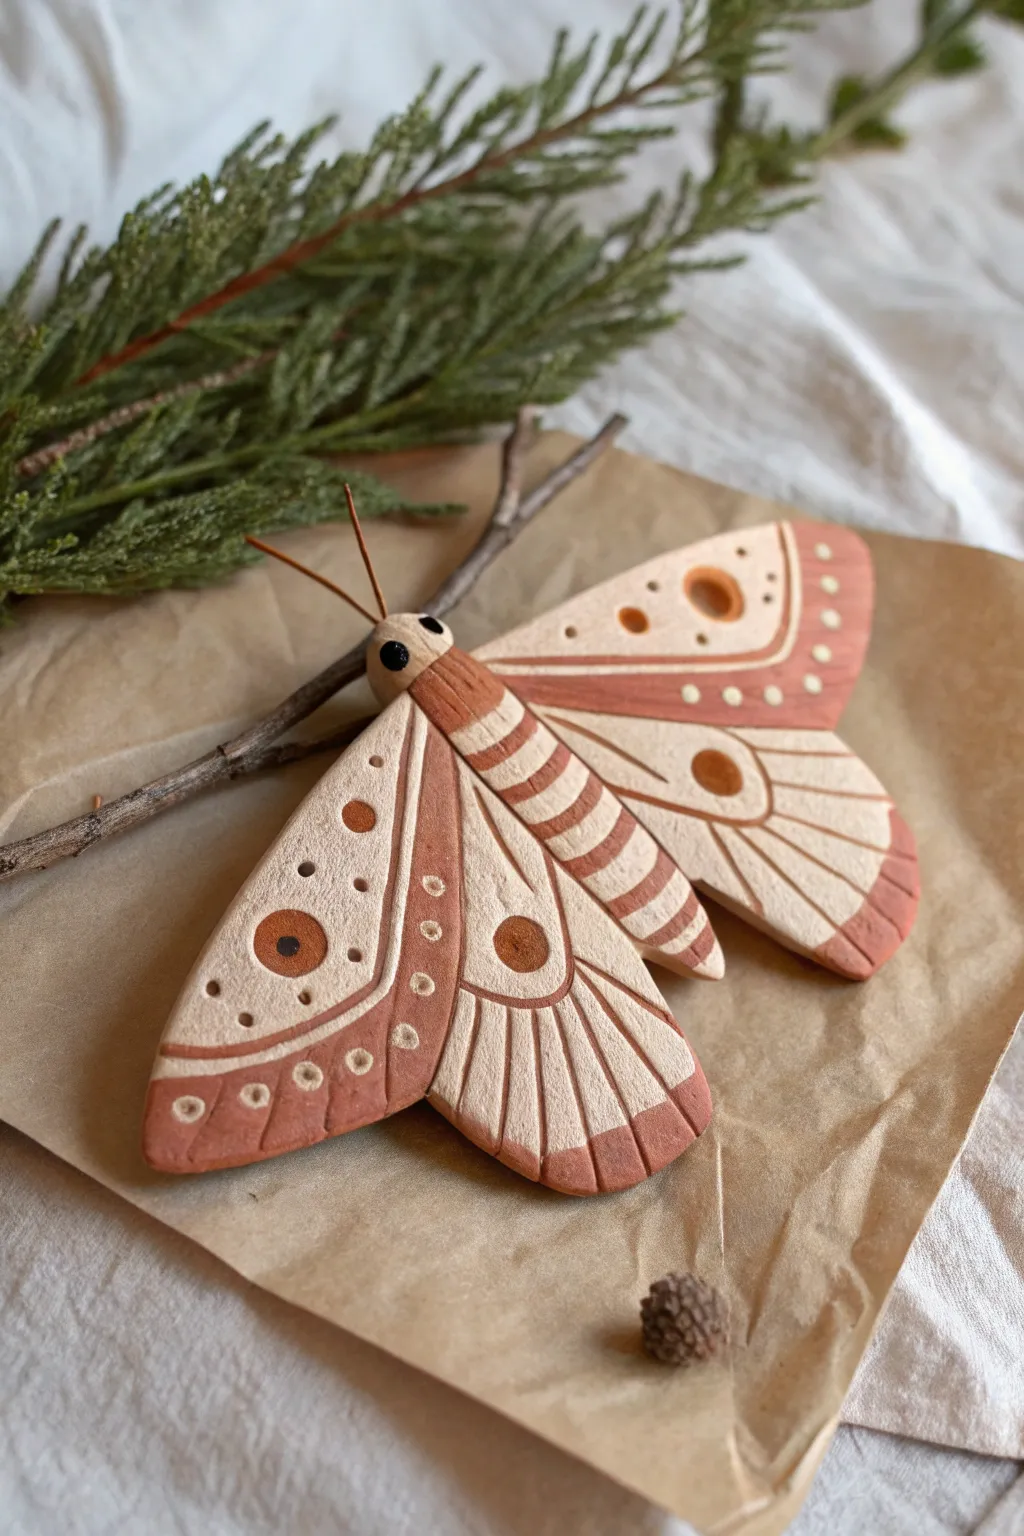
This charming moth project combines the rustic warmth of dual-toned clay with bold, folk-art inspired patterns. The chunky wings and incised details give it a wonderful tactile quality that looks lovely displayed on a desk or shelf.
Detailed Instructions
Materials
- Polymer or air-dry clay (Terracotta/Burnt Orange color)
- Polymer or air-dry clay (Cream/Off-white color)
- Small rolling pin
- Craft knife or scalpel
- Needle modeling tool or toothpick
- Small ball stylus tool
- Wire (thin gauge for antennae)
- Black acrylic paint
- Small detail paintbrush
- Super glue (optional)
- Matte varnish (optional)
Step 1: Shaping the Moth Body
-
Shape the torso:
Begin by rolling a piece of terracotta clay into a thick, elongated tear-drop shape for the main body. It should be slightly tapered at the bottom. -
Add the head:
Roll a smaller ball of the cream-colored clay and gently press it onto the wider end of the terracotta body to form the head. Smooth the seam slightly to ensure they bond. -
Stripe the abdomen:
Roll very thin, small ‘snakes’ of cream clay. Wrap these carefully around the terracotta body to create the striped abdomen look. I like to gently roll the body on the table afterward to flatten the stripes into the base clay so they look seamless.
Clay Not Sticking?
If your added clay shapes aren’t sticking to the base wing, score both surfaces (scratch crude Xs) and use a tiny drop of liquid clay or water as an adhesive bond.
Step 2: Crafting the Wings
-
Create the base slabs:
Roll out a slab of cream clay to about 1/4 inch thickness. Cut out two large, rounded triangular shapes for the forewings. -
Cut the hindwings:
Cut out two smaller, more rounded shapes for the hindwings (the bottom set of wings). -
Add terracotta borders:
Roll out a thin sheet of terracotta clay. Cut irregular strips and curved shapes to layer onto the outer edges and inner sections of your cream wings, mimicking the pattern in the reference image. Press them down firmly to adhere. -
Smooth the layers:
Use your rolling pin or a flat tool to gently compress the terracotta shapes into the cream base. You want a relatively flat surface, though some texture is nice. -
Refine the edges:
Use your craft knife to trim the edges of the wings cleanly, ensuring the terracotta and cream layers meet neatly at the borders.
Step 3: Adding Details & Assembly
-
Carve the lines:
Using a needle tool or the back of a knife, gently incise lines into the wings. Create radiating lines on the inner cream sections and distinct borders between color zones. -
Create dots and indents:
Use a small ball stylus to press circular indentations into the terracotta borders. You can also press small balls of terracotta clay into the cream sections to create the large ‘eye’ spots. -
Define the eye spots:
For the prominent eye spots on the wings, press a small circle of terracotta clay onto the cream area, then press a tiny dent in the center of that circle. -
Attach wings to body:
Press the wings firmly onto the back of the body. If using polymer clay, blending the clay on the underside helps strength. If the clay is stiff, use a dab of liquid clay or water (for air-dry) as ‘glue’. -
Insert antennae:
Cut two short lengths of thin wire. Poke them into the top of the cream-colored head. You can add a tiny drop of glue later if they feel loose after drying.
Clean Lines Pro-Tip
Wipe your tools often! Clay residue on your knife or needle tool can create drag marks and ruin your crisp incised lines. A baby wipe works perfectly for this.
Step 4: Finishing Touches
-
Paint the eyes:
Using a fine detail brush and black acrylic paint, create two large, round eyes on the sides of the head. -
Add final paint details:
Paint a small black dot in the center of the terracotta spots on the wings to complete the ‘false eye’ look. -
Bake or dry:
Follow the manufacturer instructions for your specific clay. If baking polymer clay, tenting with foil prevents scorching on the light colors. -
Seal (Optional):
If you want to protect the paint and clay, apply a thin coat of matte varnish over the finished piece.
Now you have a stunning, nature-inspired sculpture ready to be the start of your own insect collection

TRACK YOUR CERAMIC JOURNEY
Capture glaze tests, firing details, and creative progress—all in one simple printable. Make your projects easier to repeat and improve.
Dainty Damselfly With Pastel Palette
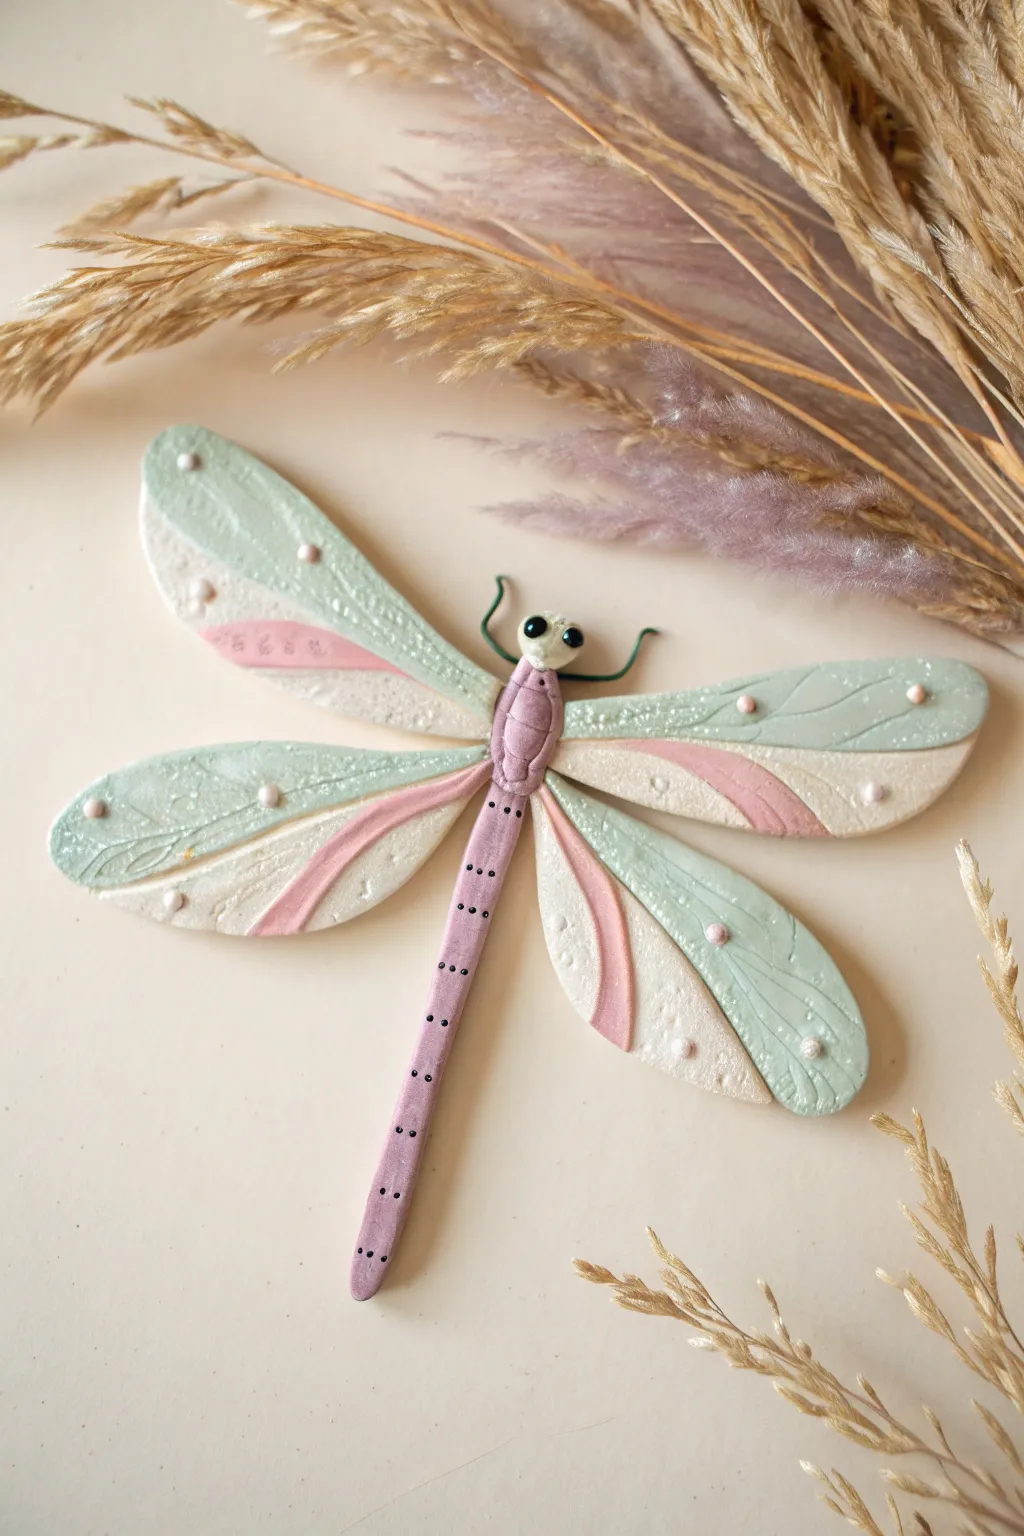
Capture the delicate grace of a damselfly with this soft, pastel-toned polymer clay project. Featuring shimmering wings and dainty textured details, this piece makes a lovely wall hanging or a centerpiece for a shadow box display.
Step-by-Step Guide
Materials
- Polymer clay (white, pearl white, mint green, mauve/dusty rose, black)
- Clay rolling acrylic roller
- Flexible clay blade or craft knife
- Needle tool or toothpick
- Small ball stylus tool
- Thin crafting wire (green or black)
- Liquid polymer clay or bake-and-bond
- Gloss glaze or polyurethane varnish (optional)
- Small paint brush
- Sandpaper 400 grit (optional)
Step 1: Body Construction
-
Create the head:
Roll a small pea-sized ball of white clay. Gently press it onto your work surface so it flattens slightly but retains a rounded top. -
Add the eyes:
Roll two tiny spheres of black clay. Position them on the sides of the white head piece, pressing gently to adhere them widely apart. -
Sculpt the thorax:
Condition a piece of mauve clay and roll it into a short, thick oval shape, slightly wider at the top than the bottom. Attach this directly below the head. -
Form the abdomen:
Roll a long, thin tapered snake of mauve clay for the tail. It should be significantly longer than the thorax. Attach it to the bottom of the thorax, blending the seam slightly on the back side if needed. -
Detail the body:
Using a needle tool, create horizontal indentations across the thorax to mimic segments. For the abdomen, gently press small black dots or use black paint after baking to create a row of tiny dots down the center. -
Insert antennae:
Cut two small 1-inch pieces of thin green wire. Bend them into curvy, organic shapes. Carefully insert them into the top of the head before baking.
Drooping Wings?
To prevent long wings from sagging during baking, prop them up on a bed of cornstarch or polyester batting. This keeps them flat without leaving shiny spots on the back.
Step 2: Wing Formation
-
Prepare the wing colors:
Roll out a sheet of mint green clay and a sheet of white clay (or pearl white) to a uniform thickness, about 2-3mm. -
Cut the wing shapes:
Using a flexible blade, cut out four long, teardrop shapes for the wings. You want two larger upper wings and two slightly smaller lower wings. I find it easiest to make paper templates first to ensure symmetry. -
Create the color blocking:
Cut wavy organic sections out of your mint wings and replace them with puzzle-pieced sections of white clay, or layer curved strips of pink clay on top. Smooth the seams with your finger so the wing surface becomes level. -
Add texture:
Take your needle tool and gently draw long, sweeping veins radiating from the base of the wing to the tips. Don’t cut through; just score the surface. -
Apply decorative dots:
Roll tiny balls of pale pink clay. Press them gently onto the wings at random intervals, mostly following the vein lines. -
Surface finish:
Lightly brush the wings with a little shimmer powder or pearl ex powder if you want extra sparkle before baking, though plain clay works beautifully too.
Make It Sparkle
Mix mica powder or ultra-fine glitter directly into the mint green clay before rolling. This gives the wings an iridescent, insect-like sheen straight out of the oven.
Step 3: Assembly and Baking
-
Attach wings to body:
Press the narrow ends of the upper wings into the sides of the thorax. Repeat with the lower wings just below them. Use a dab of liquid clay at the connection points for a stronger bond. -
Check alignment:
Ensure the wings are angled correctly—upper wings spreading slightly up, lower wings spreading slightly down. -
Final texture check:
Look over your piece for any fingerprints. Gently smooth them out with a drop of baby oil on your finger or texturize over them with a toothbrush. -
Bake the project:
Bake according to your clay manufacturer’s instructions (usually 275°F/130°C for 15-30 minutes). Support the wings with polyester fiberfill or folded paper so they don’t droop in the oven. -
Cool and finish:
Let the piece cool completely inside the oven to prevent cracking. Once cool, you can add a layer of gloss varnish to the eyes to make them look wet and alive.
Enjoy displaying your charming pastel creation on a nature table or framed on the wall
Textured “Realistic” Bug Body With Toothpick Marks
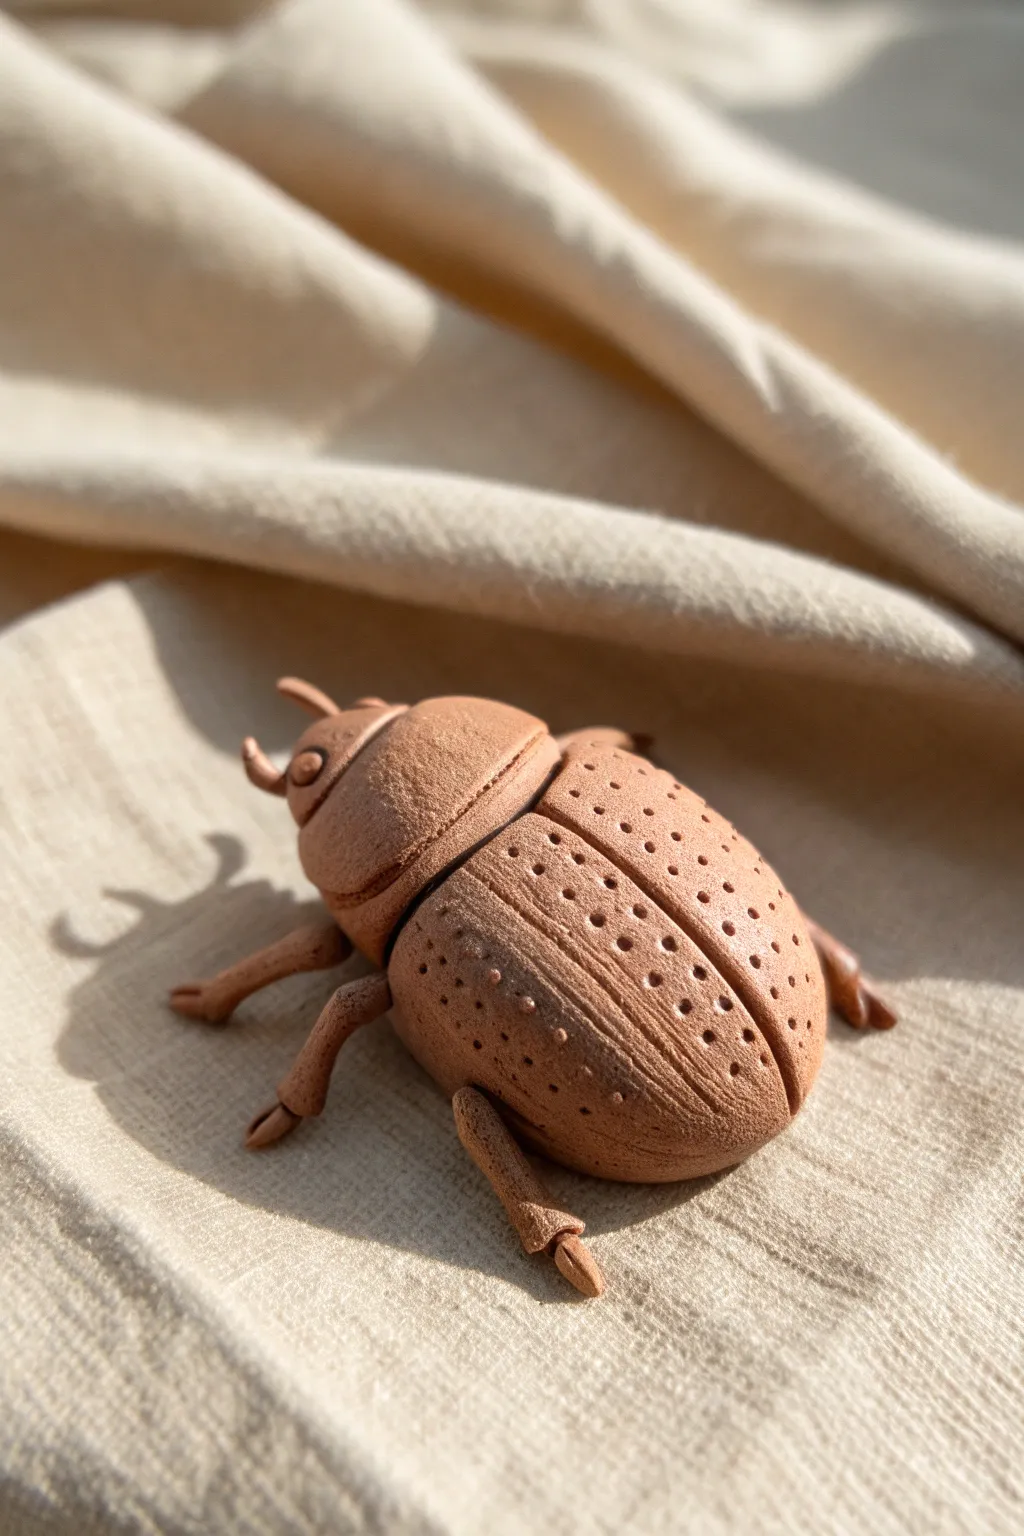
Capture the earthy charm of a garden beetle with this realistic clay project that focuses on texture over bright colors. By using simple tools like toothpicks, you can mimic the pitted shell of a beetle while maintaining a beautiful, matte terracotta finish.
Step-by-Step
Materials
- Terracotta-colored polymer clay (or air-dry clay mixed with brown acrylic)
- Small rolling pin
- Pointed sculpting tool or needle tool
- Wooden toothpick
- Soft paintbrush
- Cocoa powder or dark brown chalk pastel (for shading)
- Balling tool (small and medium sizes)
- Craft knife
Step 1: Forming the Base Anatomy
-
Condition the Clay:
Start by warming a chunk of terracotta-colored clay in your hands until it becomes soft and pliable. If you are using white air-dry clay, knead in brown and orange acrylic paint until you achieve a consistent earthy tone. -
Shape the Main Body:
Roll the clay into a smooth egg shape about the size of a kiwi fruit. Flatten the bottom slightly against your work surface so the beetle sits stably without rolling over. -
Separate the Head Section:
About one-third of the way from the narrower end of the oval, press a sculpting tool or the side of a toothpick into the clay to create a deep groove. This indentation separates the head/pronotum area from the main wing casing. -
Define the Wing Case:
Using a craft knife or needle tool, score a deep, straight line down the center of the larger body section (the abdomen). This creates the elytra, or wing covers. Gently round off the edges of this cut so it looks like two separate shell plates meeting. -
Sculpt the Face:
At the very front of the head section, use a small balling tool to press in slight sockets for eyes. Roll two tiny balls of clay and gently press them into these sockets.
Clean Pokes
If your toothpick pulls up jagged bits of clay when you poke holes, dip the tip in a tiny bit of water (for air-dry clay) or baby oil (for polymer) before piercing the surface.
Step 2: Texturing the Shell
-
Add Stippling:
This is the signature step. Take a toothpick or a needle tool and begin poking rows of small holes along the wing cases. I like to keep these somewhat orderly in parallel lines following the curve of the body, but random patterns work too. -
Vary the Pressure:
Make some holes slightly deeper and others shallower to create visual interest. Be careful not to poke all the way through the clay. -
Smooth the Head:
Leave the head section mostly smooth to contrast with the textured body, but you can add a faint ridge running horizontally across the pronotum (the neck plate) for extra realism. -
Softening the Surface:
Lightly brush the entire surface with a soft, dry brush or your finger to knock down any sharp ridges of clay created by the poking. The goal is a worn, organic look, not sharp plastic edges.
Step 3: Adding Appendages
-
Create the Legs:
Roll out thin snakes of clay for the legs. You will need six legs total. The front pair should be slightly shorter and angled forward. -
Joint the Limbs:
Cut the leg snakes to size and gently pinch them at the ‘knees’ to create joints. Use your sculpting tool to blend the upper thigh of each leg underneath the main body. -
Position the Feet:
Use a tool to press minute indentations into the ends of the legs to suggest claws or feet segments. -
Form the Antennae:
Roll two very tiny, short tapered pieces for the antennae. Attach them near the eyes, curving them slightly outward. -
Attach the Mandibles:
Add two small curved spikes at the very front of the face for jaws or horns, depending on the beetle species you are aiming for.
Ancient Artifact Look
Mix a tiny amount of black or dark green paint into a water wash and brush it over the finished hardened beetle. Wipe it off quickly to leave ‘grime’ in the crevices for an aged look.
Step 4: Finishing Touches
-
Apply Shading Powder:
Before baking (or drying), dip a soft brush into a little cocoa powder or scraped brown pastel dust. Dust this specifically into the cracks, the central line of the back, and the stippled holes. -
Wipe Away Excess:
Gently wipe the raised surfaces with a clean finger or cloth. The dark powder will stay trapped in the textures, enhancing the depth and ‘baked earth’ look. -
Cure the Clay:
Bake according to your polymer clay package instructions, or let air-dry clay sit for 24-48 hours until fully hard. -
Final Matte Varnish (Optional):
If you want to protect the piece without adding shine, apply a coat of ultra-matte varnish. Avoid gloss, as it ruins the natural terracotta effect.
Now you have a charming little specimen ready to display on a bookshelf or garden pot