Whenever I’m feeling stuck, I lean on clay inspiration ideas that start easy and leave tons of space for your personality to show up. Here are 20 of my favorite prompts—mixing air-dry clay, polymer clay, and classic handbuilding—to spark your next make.
Cute Animal Desk Buddy Figurines
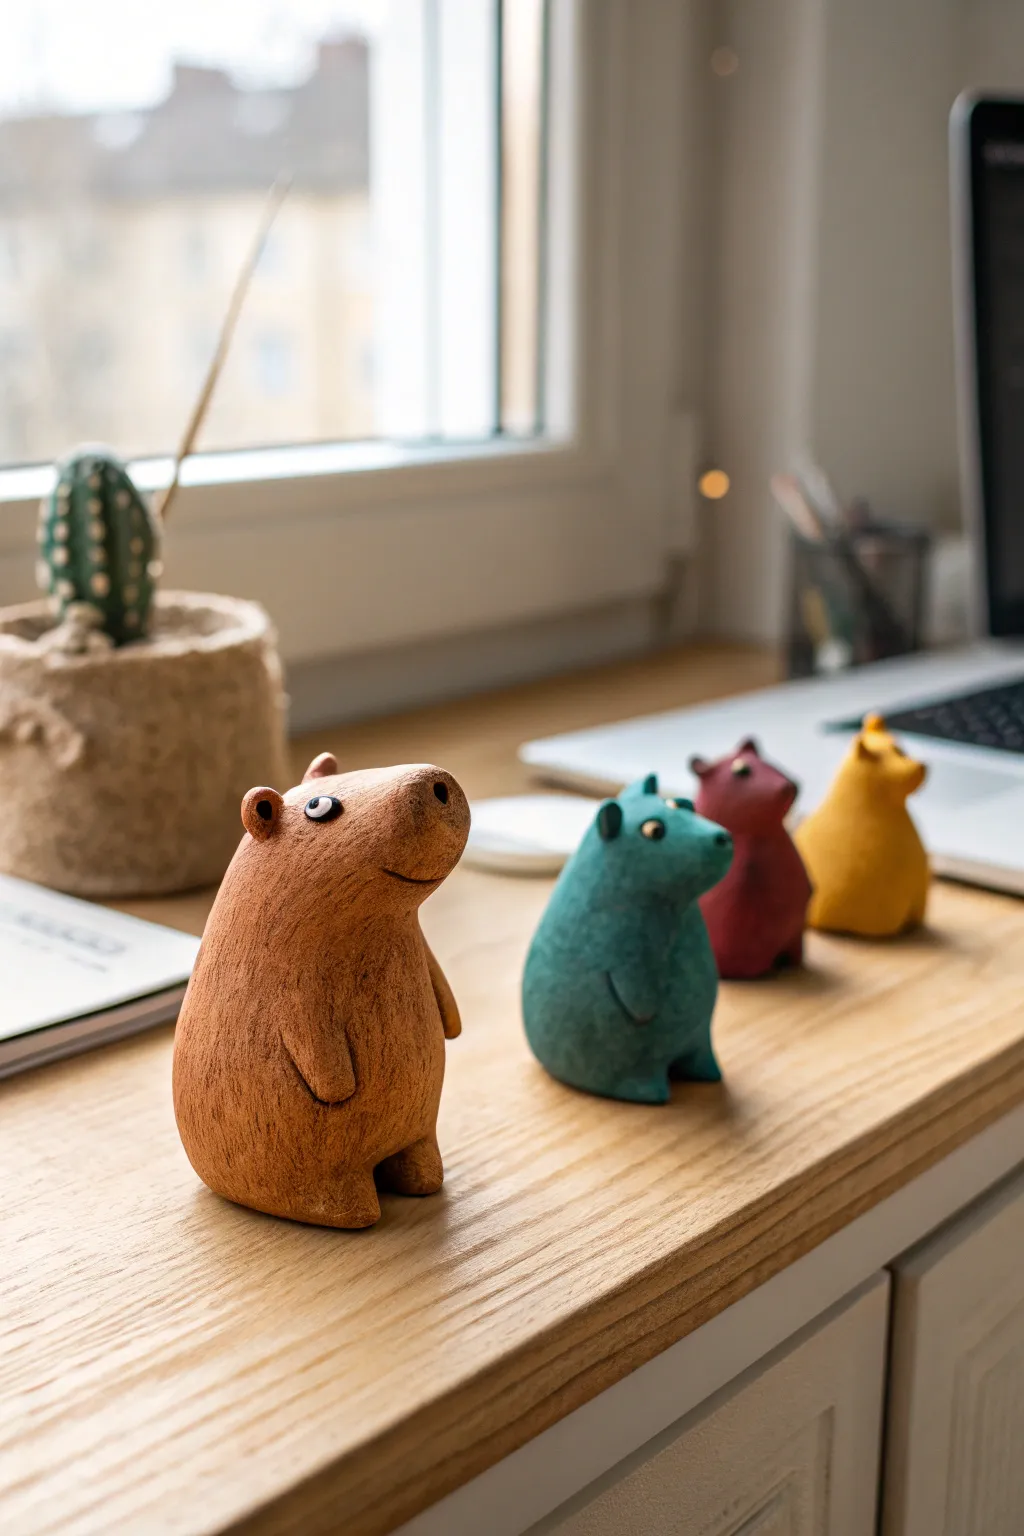
Brighten up your workspace with these charming, minimalist animal figurines that act as perfect silent companions for your daily tasks. With their smooth forms, earthy textures, and adorable expressions, creating this little family is a relaxing exercise in simple sculpting.
Step-by-Step Tutorial
Materials
- Air-dry clay or polymer clay (terracotta, teal, red, yellow)
- Small sculpting tools (needle tool, ball stylus)
- Rolling pin
- Aluminum foil for armature (optional)
- Acrylic paints (black, white) for eyes
- Fine detail paintbrush
- Matte varnish or sealant
- Texturing sponge or toothbrush
Step 1: Shaping the Base Forms
-
Prepare your clay:
Begin by kneading your chosen clay until it is soft and pliable. If you are making the main capybara-like figure, start with a terracotta or brown colored clay. Divide your clay into four portions if you plan to make the whole set. -
Form the main body:
Roll a smooth ball of clay, then gently elongate it into a pear shape. This wider bottom provides stability so your figurine won’t tip over easily on your desk. -
Flatten the base:
Tap the wider end of your pear shape firmly against your work surface to create a flat, stable bottom. The figure should stand upright independently at this stage. -
Refine the head shape:
Gently pull and smooth the narrower top section forward to create a snout. For the capybara, this snout should be somewhat blunt and rounded, distinct from the neck but not too separated.
Fixing Cracks
If small cracks appear while drying air-dry clay, mix a tiny bit of fresh clay with water to make a paste (slip) and fill the cracks, then smooth over.
Step 2: Adding Character Details
-
Create the arms:
Roll two small, tic-tac-sized logs of clay. Attach them to the sides of the body, blending the top seam smoothly into the shoulder area while leaving the bottom round and protruding slighty to look like little paws resting at its sides. -
Add the legs:
Form two small, stubby ovals and press them onto the bottom front of the figure. Blend the back edges into the body so they look like tiny feet poking out. -
Sculpt the ears:
Make two tiny balls of clay. Press your ball stylus tool into the center of each to create a cup shape, then attach them to the top of the head. Position is key here; placing them slightly to the side gives a cute, curious look. -
Texturize the surface:
This is where the magic happens. Take a stiff toothbrush or a texturing sponge and gently dab it all over the surface of the clay. This creates that lovely organic, matte texture visible in the photo. -
Smooth the face:
I prefer to leave the immediate area around the eyes and mouth slightly smoother than the body, so gently pat down the texture there with your finger. -
Carve the mouth:
Use a needle tool or a thin clay knife to carve a simple, curved line for the mouth. Adding a tiny indent at the corner of the smile adds extra personality.
Step 3: Finishing Touches
-
Add nose details:
Use a small needle tool to poke two nostrils at the end of the snout. Keeping them close together enhances the cute factor. -
Bake or dry:
If using polymer clay, bake according to package directions (usually 275°F/135°C for 15-30 mins). If using air-dry clay, let it sit undisturbed for 24-48 hours until fully hardened. -
Paint the eyes:
Once cool or dry, use a fine brush to paint small circles of white for the eyes. Let this layer dry completely before moving on. -
Add pupils:
Carefully paint a smaller black dot inside the white circle. Placing the pupil looking upward or sideways can give your buddy a thoughtful expression. -
Seal the work:
Finish by applying a coat of matte varnish. This protects the paint and preserves that natural, earthy look of the clay without making it look plasticky.
Make It a Pen Holder
Before the clay hardens, press a pen firmly into the figure’s side or have the figure ‘hug’ a short tube to turn it into a functional pen holder.
Place your new friends on your desk and enjoy the calm vibe they bring to your workspace


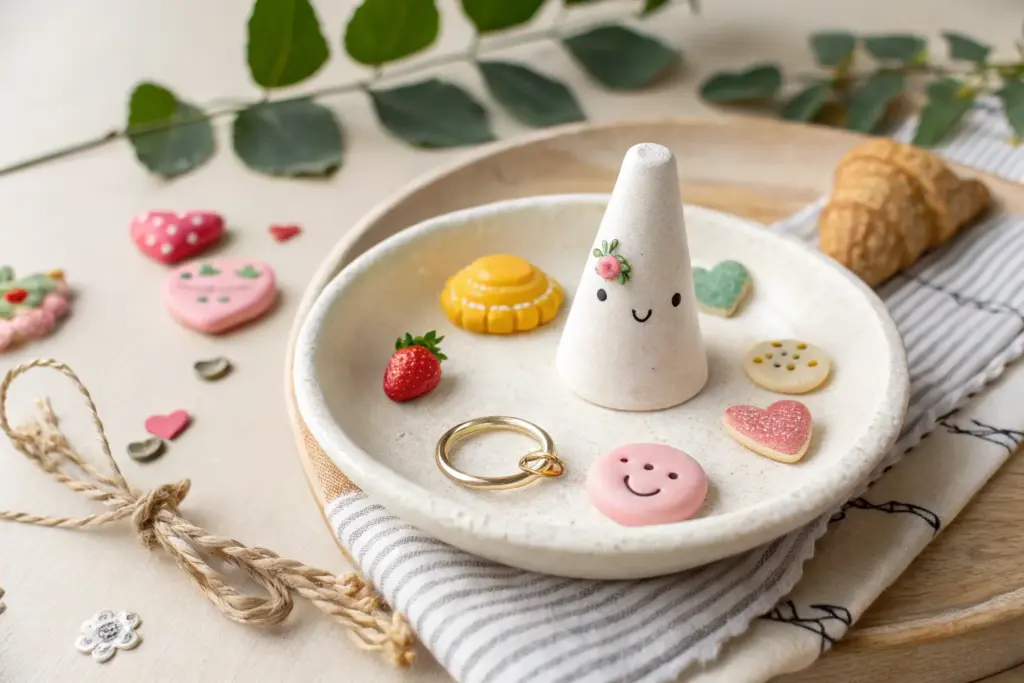
Mini Animal Charm Keychain Tags
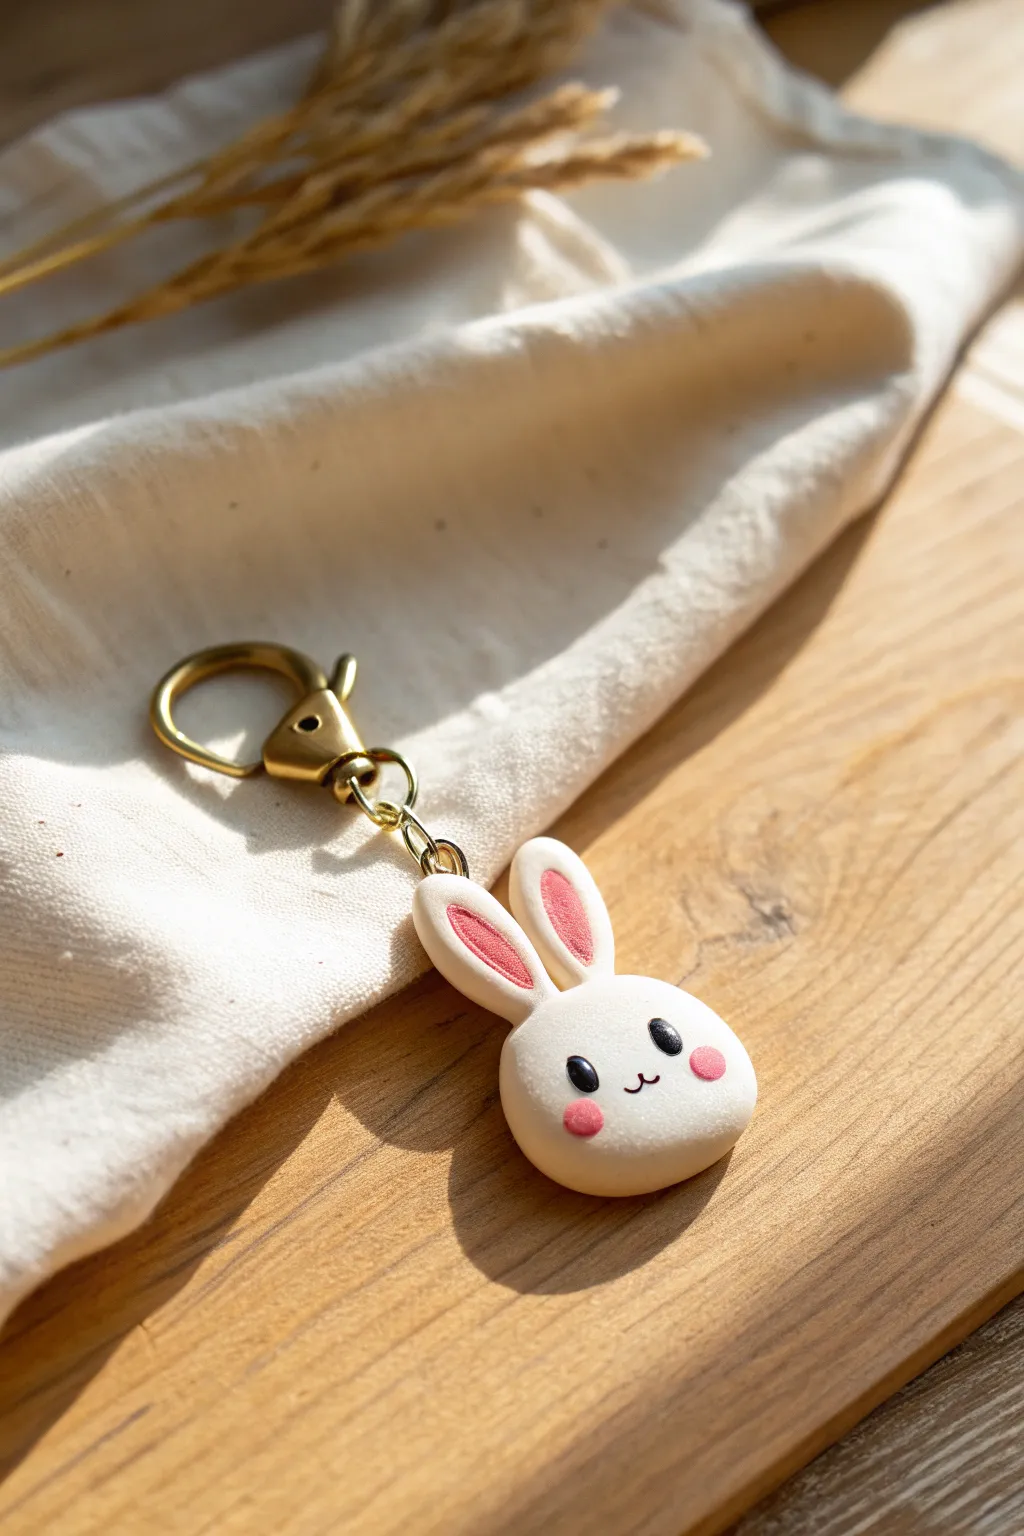
Capture the sweetness of spring all year round with this adorable rabbit keychain charm. With its velvety matte finish and simple geometric shapes, this project is perfect for beginners looking to create a functional piece of art.
Detailed Instructions
Materials
- White polymer clay (approx. 1 oz)
- Pink polymer clay (small amount)
- Black polymer clay (tiny amount)
- Eye pin or screw eye hook (gold)
- Split rings or jump rings (gold)
- Lobster clasp keychain attachment (gold)
- Needle tool or toothpick
- Ball stylus tool (small)
- Clay roller or acrylic rod
- Oven for baking
- Pliers (round nose and flat nose)
- Matte varnish or sealant (optional)
Step 1: Shaping the Head
-
Condition the clay:
Begin by conditioning your white polymer clay until it is soft and pliable. Roll it between your palms to warmth it up, ensuring there are no cracks. -
Form the base:
Roll a smooth, seamless ball of white clay about the size of a large grape or small walnut. This will be the main head. -
Flatten the shape:
Gently press the ball down onto your work surface with your palm to create a thick, rounded disc. You want it to look like a slightly puffed marshmallow rather than a flat pancake. -
Refine the contour:
Use your fingers to smooth the edges, making sure the shape is oval-like but wider at the bottom to give the bunny chubby cheeks.
Step 2: Creating the Ears
-
Prepare ear clay:
Take two equal-sized small balls of white clay. Roll them into elongated teardrop or tic-tac shapes, approximately 1 inch long. -
Add the inner ear:
Condition a very small amount of pink clay. Create two tiny, thin teardrops that are slightly smaller than the white ear shapes. -
Layer the colors:
Press the pink teardrops gently onto the center of the white ear shapes. Flatten them slightly so the pink becomes flush with the white clay. -
Attach the ears:
Press the wider bottom end of the ears onto the top of the head. I find using a blending tool to smooth the seam at the back helps ensure they won’t pop off later.
Keep it Clean
White clay attracts dust like a magnet. Wipe your hands and work surface with a baby wipe before starting, and keep some rubbing alcohol nearby.
Step 3: Adding the Face
-
Create eye sockets:
Using a small ball stylus, gently press two indentations into the face where you want the eyes to sit. This helps the eyes stay secure. -
Insert the eyes:
Roll two tiny specks of black clay into balls. Place them into the indentations and press gently to flatten them slightly into ovals. -
Add rosy cheeks:
Take two small balls of pink clay (slightly larger than the eyes) and flatten them onto the face, just below and to the outside of the eyes. -
Form the smile:
Roll an incredibly thin snake of black clay—as thin as a thread. Cut a tiny ‘V’ or ‘Y’ shape and carefully place it between the cheeks using a needle tool. -
Secure the hardware:
Insert a gold eye pin or screw eye into the top center of the head, between the ears. You can add a dab of liquid clay or bake-and-bond to the shaft for extra security.
Saggy Ears?
If the ears won’t stand up, slide a small piece of wire or a toothpick cut to size inside the ear and down into the head for internal structure.
Step 4: Finishing Up
-
Bake:
Bake the piece according to your clay manufacturer’s instructions (usually around 275°F or 130°C for 15-30 minutes). Use an oven thermometer to prevent burning. -
Cool down:
Let the bunny cool completely inside the oven or on a wire rack before handling. Moving it while hot might distort the shape. -
Assemble the keychain:
Using two pairs of pliers, twist open a jump ring. Loop it through the eye pin on the bunny’s head and the bottom loop of the lobster clasp. -
Close the ring:
Twist the jump ring closed securely so there is no gap for the charm to slip through. -
Seal (Optional):
If you want to protect the white clay from dirt, apply a thin coat of matte varnish.
Clip your new friend onto your keys or backpack for a daily dose of cuteness


Vegetables With Tiny Faces Collection
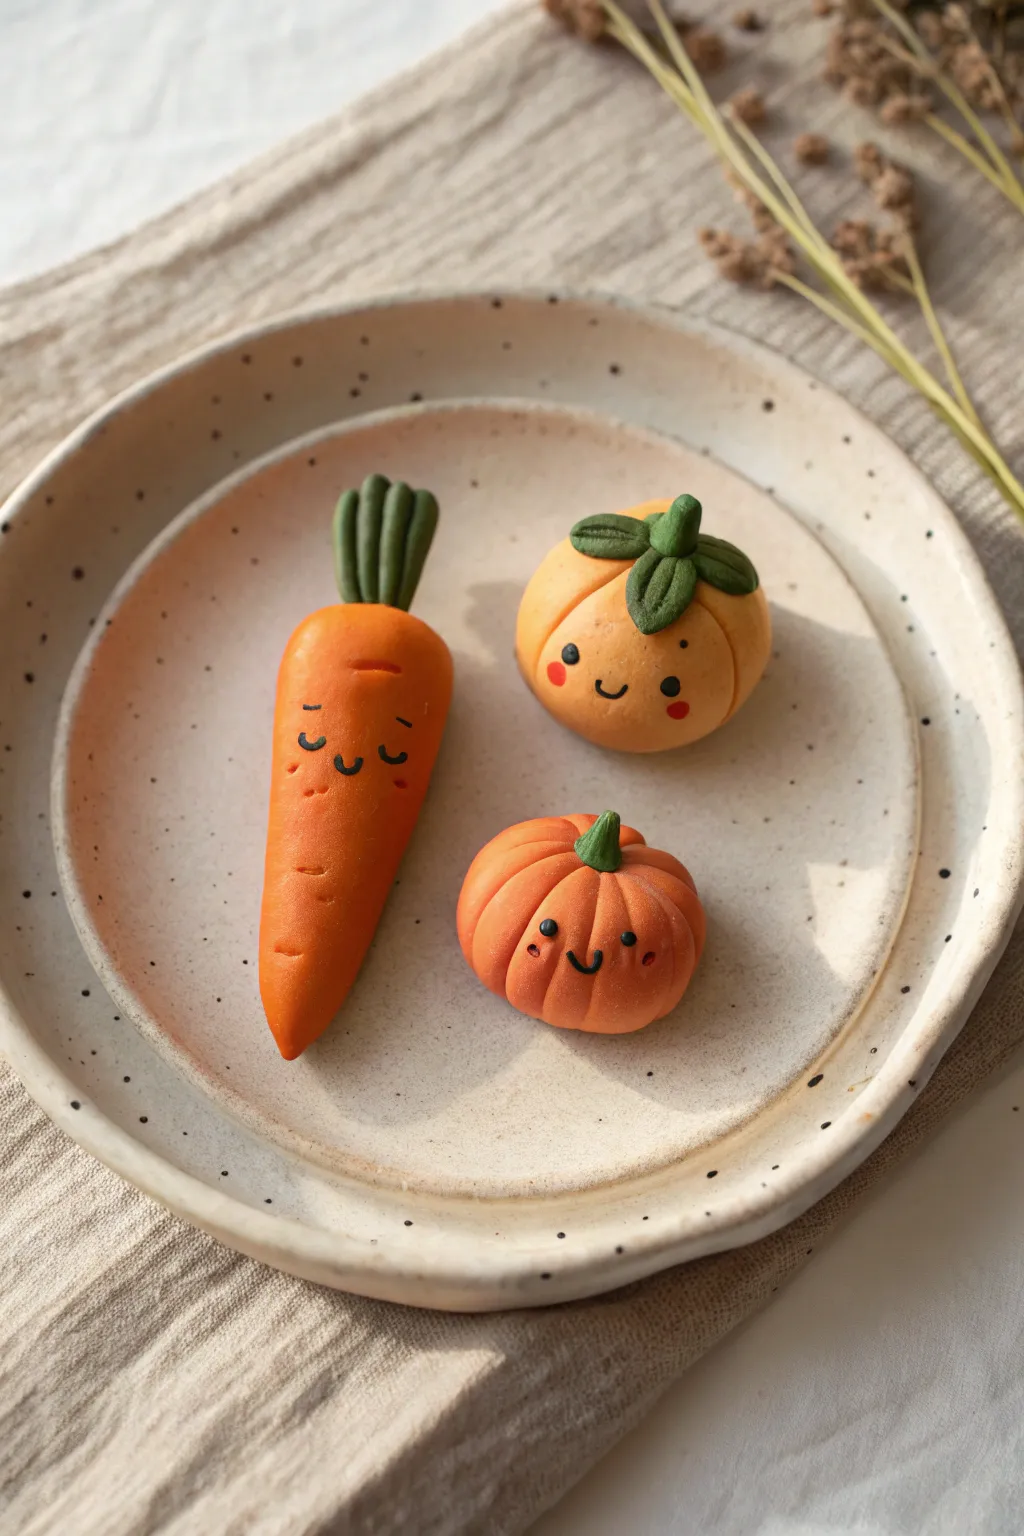
Bring a touch of sweetness to your space with these adorable, palm-sized vegetable figurines featuring cheerful little faces. This project captures the charm of minimalistic design with soft orange hues and simple, expressive details that make each character unique.
Step-by-Step Guide
Materials
- Polymer clay (Orange, Green, Black, Pink)
- Clay sculpting tools (needle tool, ball stylus)
- Acrylic rolling pin
- Parchment paper or baking tile
- Soft pastel chalks (red or pink) for shading
- Small soft brush
- Baking oven (if using polymer clay)
Step 1: Sculpting the Carrot
-
Create the base form:
Start by conditioning a medium-sized ball of orange clay until it is soft and pliable. Roll it into a smooth cone shape, slightly tapering the bottom end while keeping the top rounded and distinct. -
Add texture:
Using a needle tool or a dull knife, gently press faint horizontal lines across the body of the carrot. These shouldn’t be uniform; scatter them randomly to mimic natural root vegetable textures. -
Form the greenery:
Take three small pieces of green clay and roll them into elongated logs. Pinch them together at the base and attach this cluster firmly to the top center of your orange cone. -
Detail the leaves:
Use your needle tool to impress vertical lines down each green stalk, giving them a ribbed, leafy appearance.
Clean Clay Tip
Keep baby wipes or hand sanitizer nearby. Clean your hands thoroughly when switching from the dark green stems back to the light orange bodies to prevent color transfer.
Step 2: Crafting the Pumpkin & Persimmon
-
Shape the pumpkin body:
Roll another ball of orange clay, slightly smaller than the carrot. Press it down gently to flatten the bottom so it sits stable. -
Create pumpkin ribs:
Using the side of a needle tool or a toothpick, press vertical indentations from the center top to the bottom all around the sphere to create standard pumpkin segments. -
Add the pumpkin stem:
Mold a tiny piece of green clay into a stubby stem shape. Press it into the center indentation on top of the pumpkin. -
Shape the round fruit:
For the persimmon-style fruit, roll a smooth ball of light orange or golden-yellow clay. Keep this shape round and smooth without adding ribs. -
Sculpt the calyx:
Flatten a small piece of green clay and cut four minimal leaf shapes. Arrange these overlapping on top of the round fruit, adding a tiny stem emerging from the center.
Step 3: Bringing Them to Life
-
Placement planning:
Before committing to the faces, lightly mark where you want the eyes and mouth to go using a needle tool. Keeping the features low on the face makes them look cuter. -
Adding eyes:
Roll incredibly tiny specks of black clay into balls. Press them into your marked spots for the eyes. For the sleeping carrot, roll tiny black snakes and curve them into U-shapes. -
Creating mouths:
Roll hair-thin threads of black clay. Carefully curve them into small smiles and press them gently between the eyes using a tool, not your fingers, to avoid smudging. -
Blushing cheeks:
Shave a little pink or red soft pastel into a powder. I find using a dry, soft brush to lightly dust this powder onto the cheek area gives a softer, more natural blush than paint. -
Tiny cheek details:
Alternatively, place microscopic circles of pink clay or red clay on the cheeks for a more graphic, sticker-like look. -
Baking:
Place your trio on parchment paper. Bake according to your specific clay brand’s instructions—usually around 275°F (135°C) for 15-30 minutes depending on thickness. -
Cooling:
Let the pieces cool completely in the oven with the door cracked open. This prevents thermal shock and ensures the clay cures fully.
Make them Magnets
Before baking, press a small, strong neodymium magnet into the back of each veggie. Bake them with the magnet embedded to turn your fridge into a cute garden.
Arranging these cheerful little friends on a shelf or desk is sure to bring a smile to anyone’s face


Mini Food Charms for Necklaces
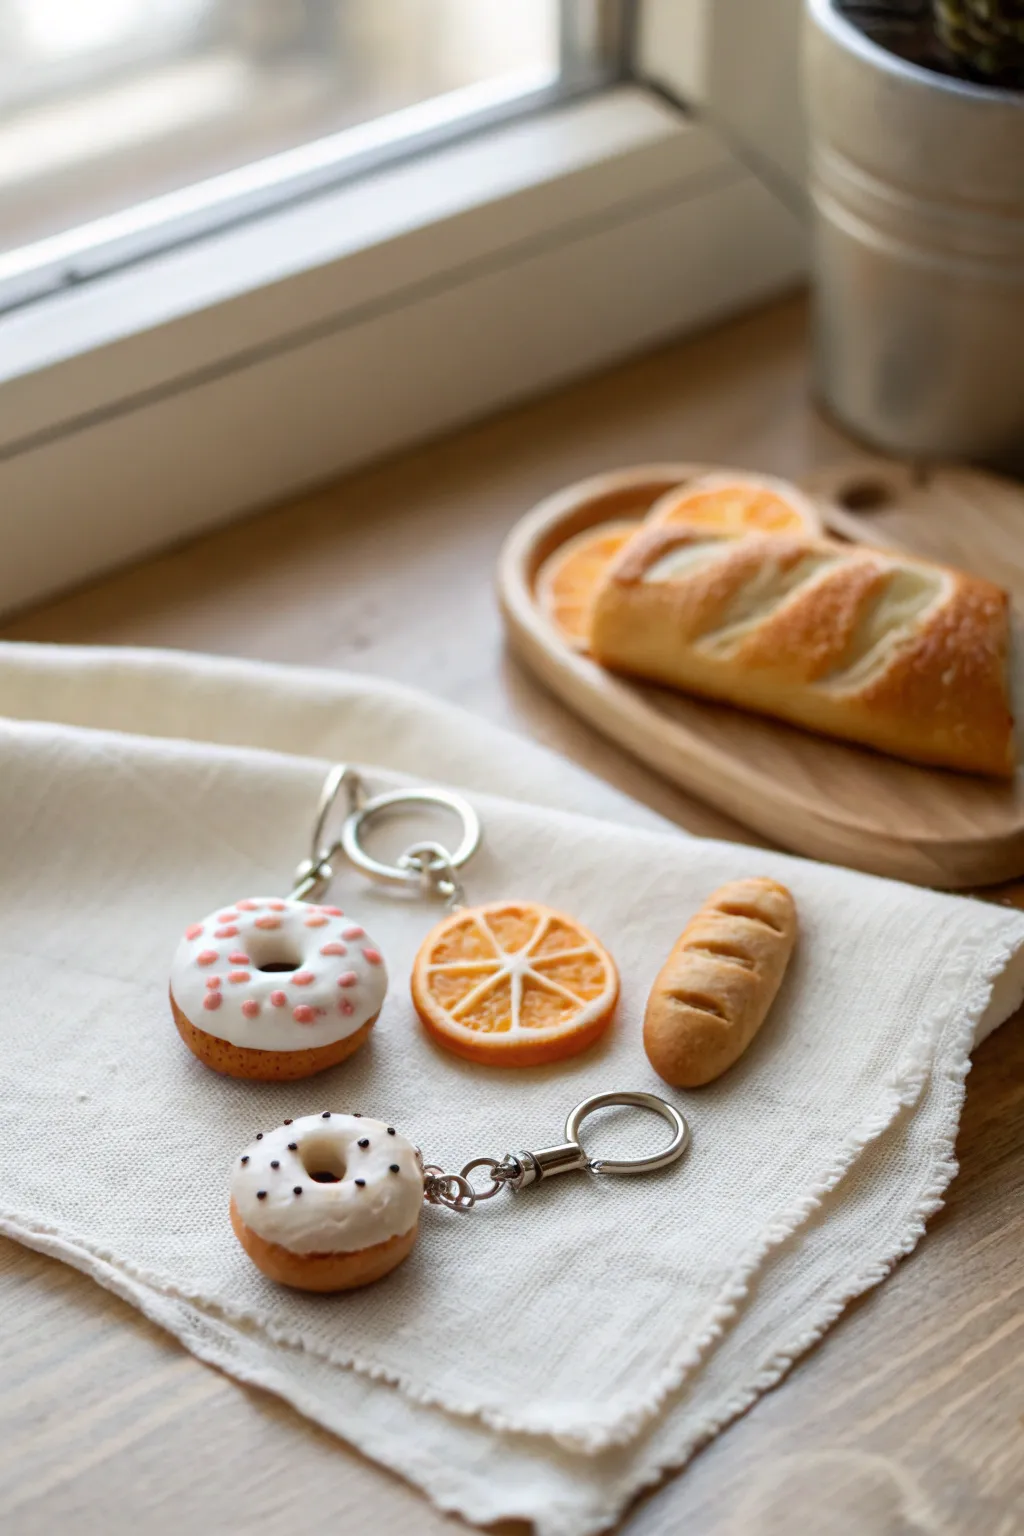
Transform polymer clay into delightful miniature treats that look good enough to eat but are perfect for wearing. This tutorial will guide you through crafting realistic donut, orange slice, and baguette charms with delectable textures.
How-To Guide
Materials
- Polymer clay (tan/beige, white, translucent, orange, brown)
- Liquid polymer clay (white and translucent)
- Chalk pastels (orange, yellow, brown/burnt umber)
- Needle tool or toothpick
- Small ball tool
- X-acto knife or craft blade
- Soft paintbrush
- Headpins or eye screws
- Jewelry pliers
- Gloss glaze (UV resin or polyurethane)
- Fine sandpaper
Step 1: Mini Donuts
-
Shape the base:
Start by conditioning a small ball of tan or ‘dough’ colored clay. Flatten it slightly into a thick disk, then use a ball tool or the handle of a paintbrush to poke a hole through the center. Gently widen the hole and smooth the edges to form a classic donut shape. -
Texture the dough:
For realism, take a toothbrush or crumpled aluminum foil and gently tap it all over the surface of the donut to create a baked texture. I like to pay special attention to the sides where the ‘golden brown’ color will be. -
Add shading:
Scrape some light brown and orange chalk pastels into a fine powder. Using a dry, soft brush, dust the powder lightly over the textured clay to mimic a golden-baked finish. -
Prepare the icing:
Mix liquid polymer clay with a tiny bit of white clay (or white pigment) until it reaches a thick, icing-like consistency. For the pink version seen in the photo, add a speck of red clay or pastel dust. -
Glaze the donut:
Carefully apply the liquid clay icing to the top of the donut. Use a needle tool to drag the icing down slightly on the sides to create realistic drips. -
Decorate and pin:
While the liquid clay is wet, add tiny bits of clay for sprinkles (pink dots or brown specks). Insert an eye screw or headpin into the side of the donut before baking.
Sticky Situation?
If your clay gets too soft and fingerprints are showing, pop the clay in the fridge for 10 minutes. Cold clay holds fine detail much better during sculpting.
Step 2: Citrus Slice
-
Create the segments:
Form a cane by shaping a wedge of translucent orange clay and wrapping it in a very thin sheet of white clay. This represents the membrane of the fruit segment. -
Assemble the slice:
Make 6-8 of these wedges and arrange them in a circle to form the center of the orange. Fill any center gap with a tiny roll of white clay. -
Add the rind:
Wrap the assembled circle in a thin layer of white clay (the pith), followed by a thicker layer of textured orange clay (the zest). Roll the entire cane gently to bond the layers. -
Slice and texture:
Use your craft blade to cut a clean slice from the cane. Use a needle tool to gently rough up the translucent orange segments for a juicy texture. Insert your hardware attachment at the top.
Step 3: Crusty Baguette
-
Form the loaf:
Roll tan clay into a short log, slightly tapering the ends to create a baguette shape. -
Score the bread:
Using your craft blade, make diagonal slashes across the top of the loaf. Gently pull the clay apart slightly at these cuts to simulate how bread expands in the oven. -
Texture the crust:
Use a toothbrush to aggressively texture the entire surface of the baguette, avoiding the inside of the cuts you just made. -
Bake effect:
Shade the baguette heavily with brown and burnt umber pastels, focusing on the top ridges and ends, leaving the inside of the cuts lighter to look like soft dough.
Pro Tip: ‘Flour’ Details
For the baguette, lightly brush tiny amounts of white pastel powder over the finished texture before baking to mimic dusting flour on artisan bread.
Step 4: Finishing
-
Bake:
Bake all your charms according to the manufacturer’s instructions for your specific brand of clay, usually at 275°F (135°C). -
Secure hardware:
Once cool, if your eye screws feel loose, remove them, add a dab of superglue, and screw them back in. -
Final glaze:
Coat the citrus slice and the icing on the donuts with gloss glaze or UV resin for a wet, shiny look. Leave the bread matte or use a satin varnish for a natural finish. -
Assembly:
Use jump rings to attach your finished bakery charms to keychain hardware or a necklace chain.
Now you have a delectable set of accessories ready to wear or gift to a friend who loves sweets

The Complete Guide to Pottery Troubleshooting
Uncover the most common ceramic mistakes—from cracking clay to failed glazes—and learn how to fix them fast.
Polymer Clay Statement Earrings Shapes
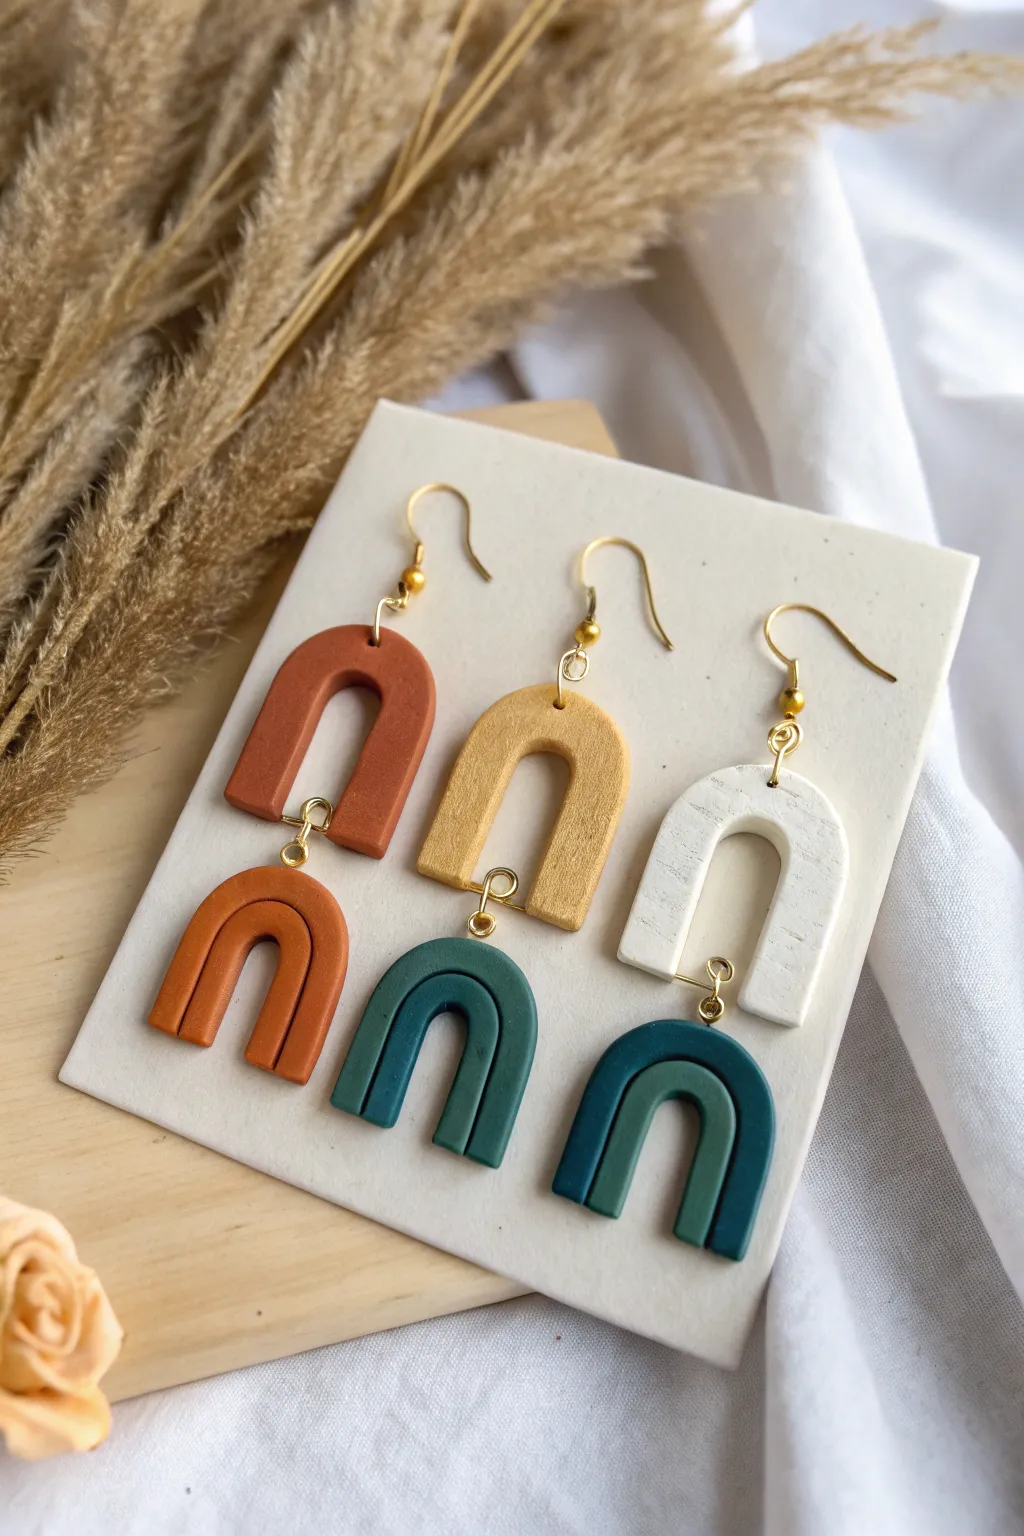
Create a stunning set of minimalist statement earrings featuring stacked U-shapes in a warm, earthy color palette. These dangles combine a rustic texture with clean modern lines, perfect for adding an artistic touch to your everyday wardrobe.
Step-by-Step
Materials
- Polymer clay (Terracotta, Mustard Yellow, White, Teal, Forest Green)
- Acrylic rolling pin
- Clay extruder with a medium round disc (or a steady hand for rolling coils)
- Texture sponge or sandpaper (optional)
- Tissue blade or X-Acto knife
- Ceramic tile or glass work surface
- Oven
- Hand drill or pin vibe
- Jewelry pliers (round nose and flat nose)
- Gold jump rings (6mm or 7mm)
- Gold earring hooks (fishhook style)
Step 1: Preparing the Clay
-
Condition the clay:
Begin by thoroughly kneading each color of polymer clay until it is soft and pliable. This conditioning step is crucial to prevent cracking later. -
Mix custom shades:
To match the image accurately, aim for muted, earthy tones. If your green is too bright, mix in a tiny brown speck; for the terracotta, a touch of white softens the orange. -
Create consistent snakes:
Load your conditioned clay into a clay extruder fitted with a medium round disc. Extrude long, even snakes of each color. If you don’t have an extruder, roll the clay by hand on your work surface until you have uniform coils about 4-5mm thick.
Clean Cuts Pro Tip
Pop your clay tray in the fridge for 10 minutes before cutting the bottom of the arches. Cold clay cuts cleanly without squishing the round profile.
Step 2: Forming the Arches
-
Shape the top arches:
Cut a segment of the Terracotta, Yellow, and White snakes (about 2.5 inches long). Gently bend each into a ‘U’ or arch shape on your ceramic tile. -
Shape the bottom arches:
Repeat the process for the bottom tier using Terracotta, Teal, and Forest Green clay. Make these arches slightly smaller or the same size as the top ones, ensuring the curves are smooth. -
Straighten the legs:
Use the flat side of your tissue blade to gently press against the sides of the arch legs to make them parallel and straight. -
Trim the ends:
Once you are happy with the shape, use your blade to cut the bottom of the legs straight across so the arch stands flat.
Step 3: Texturing and Baking
-
Add texture:
For that stone-like finish seen in the photo, gently press a coarse texture sponge or a piece of sandpaper onto the surface of the raw clay. Rotate the sponge to avoid a repeating pattern. -
Pierce holes:
Use a needle tool to poke a hole at the very top center of each arch (for the hook) and at the bottom center of the top arches (to connect the drop piece). Poke corresponding holes in the top of the bottom arches. -
Bake the pieces:
Bake the clay on the tile according to the manufacturer’s instructions (usually 275°F/135°C for 30 minutes). I usually check my oven with a dedicated thermometer to ensure the temperature is accurate. -
Cool down:
Allow the clay to cool completely inside the oven or on a cooling rack before handling, as warm clay is fragile.
Uneven Arches?
If your U-shapes look wonky, wrap the clay snake around a small circular object (like a lip balm tube or spice jar) to form a perfect curve before cutting.
Step 4: Assembly
-
Drill clean holes (optional):
If your pre-poked holes closed up slightly or look messy, use a small hand drill to clean them out carefully. -
Connect the tiers:
Open a jump ring with your pliers by twisting it sideways. Loop it through the bottom hole of a top arch and the top hole of the corresponding bottom arch, then close the ring securely. -
Attach earring hooks:
Open the loop on your earring hook (or use a small jump ring) and attach it to the top hole of the upper arch. -
Final check:
Ensure all jump rings are fully closed so the pieces don’t slip apart while wearing them.
Wear your new geometric dangles with pride, knowing you handcrafted them from scratch
Patterned Beads and Buttons Mix
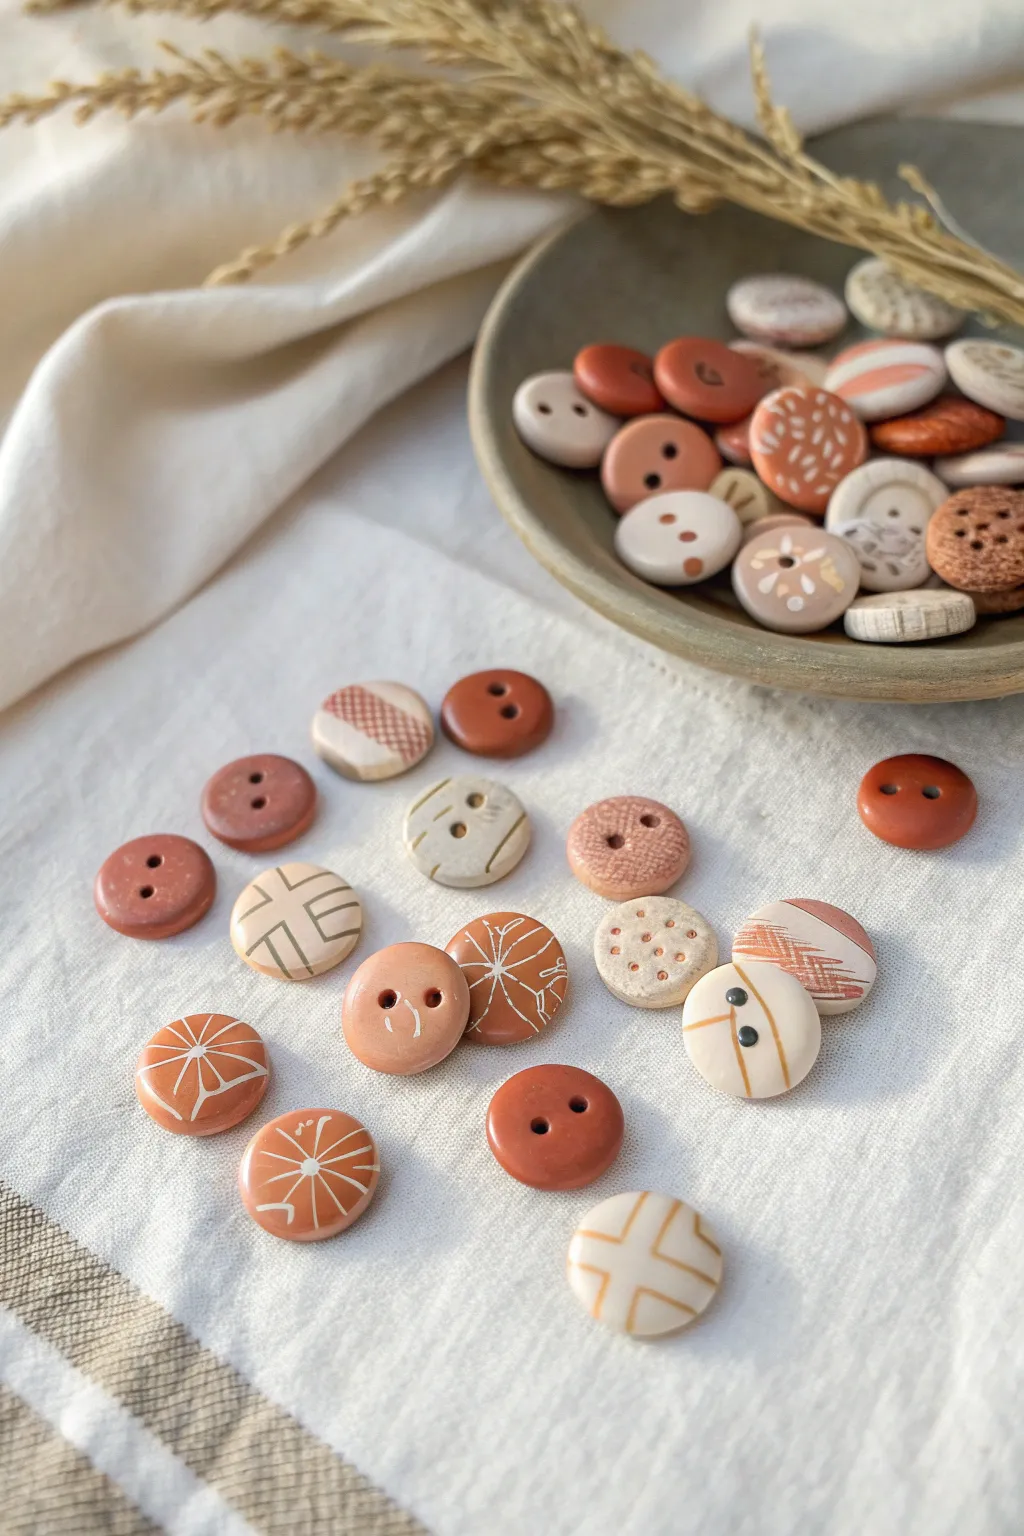
These charming, earthy buttons bring a unique, handmade touch to any garment or craft project. Using a warm palette of terracotta, beige, and soft browns, you’ll learn to create simple geometric patterns that look sophisticated and artisanal.
Detailed Instructions
Materials
- Polymer clay in terracotta, beige, white, and brown
- Small circular clay cutter (approx. 1 inch)
- Acrylic rolling pin
- Parchment paper or ceramic tile (for baking)
- Needle tool or toothpick
- White acrylic paint or specialized clay paint
- Fine detail paintbrush
- Sandpaper (fine grit)
- Matte varnish (optional)
Step 1: Clay Preparation
-
Condition the clay:
Start by warming the polymer clay in your hands, kneading each color separately until it is soft and pliable. This prevents cracking later on. -
Color mixing:
To achieve organic, varied tones, try mixing a small amount of white into your terracotta to create a soft peach, or a bit of brown into beige for a latte shade. Aim for 3-4 distinct earthy base colors. -
Roll out the slab:
Roll your conditioned clay out on a smooth surface to an even thickness of about 1/8th of an inch. Ensure it’s not too thin, as buttons need structural integrity. -
Cut the shapes:
Use your circular cutter to punch out multiple discs from your various clay colors. If the clay sticks to the cutter, dip the cutter in a little cornstarch first. -
Smooth the edges:
Gently run your finger around the edge of each cut circle to soften the sharp rim left by the cutter, giving them a more finished, pebble-like look.
Step 2: Creating the Holes
-
Mark the center:
Eyeball the center of your button. For two-hole buttons, imagine a line through the center and mark two equidistant points. -
Pierce the holes:
Using a needle tool or toothpick, press straight down to create the buttonholes. Wiggle the tool slightly to widen the opening enough for a standard needle and thread. -
Clean underneath:
Flip the button over and gently smooth down any clay that poked through the back during piercing to ensure the button sits flat.
Use an Oven Thermometer
Toasters and home ovens notoriously lie about temperature. Use a standalone oven thermometer to ensure you don’t burn your clay.
Step 3: Surface Design
-
Plan your patterns:
Decide on your designs. Looking at the image, we see crossed lines, simple dots, starbursts, and scratched textures. Variety is key. -
Texturing technique:
For the textured buttons (like the dotted beige ones), use the tip of your needle tool to gently impress a pattern into the raw clay before baking. -
Inlay method (optional):
For a flush design, you can take tiny microscopic snakes of contrasting clay, press them onto the button base in a geometric pattern, and gently roll over them to embed them into the surface. -
Baking:
Place all your buttons on a parchment-lined baking sheet or ceramic tile. Bake according to your specific clay manufacturer’s instructions (usually 275°F/135°C for 15-30 minutes). -
Cooling down:
Allow the buttons to cool completely in the oven with the door slightly ajar. This gradual cooling helps tougher the clay.
Turn Them Into Magnets
Skip the buttonholes and glue strong neodymium magnets to the back after baking for a stylish set of fridge magnets.
Step 4: Painting & Finishing
-
Painting details:
Once cool, use a fine detail brush and white acrylic paint to add the surface designs. Paint geometric crosses, starburst lines, or grids on your smooth buttons. -
Sgraffito effect:
For an alternative look, you can paint a shape and then scratch through the dry paint with a needle tool to reveal the clay color underneath. -
Drying:
Let the paint dry fully. I usually give this at least an hour to ensure the fine lines don’t smudge. -
Sanding (optional):
If you want a distressed, vintage look, lightly sand the painted surface with fine-grit sandpaper to soften the stark white lines. -
Sealing:
Apply a thin layer of matte varnish to protect the paint from wear and tear, especially if these will be used on clothing that requires washing.
Now you have a stunning collection of custom fasteners ready to upgrade your next cardigan or craft project


What Really Happens Inside the Kiln
Learn how time and temperature work together inside the kiln to transform clay into durable ceramic.
Happy Face Fridge Magnets Set
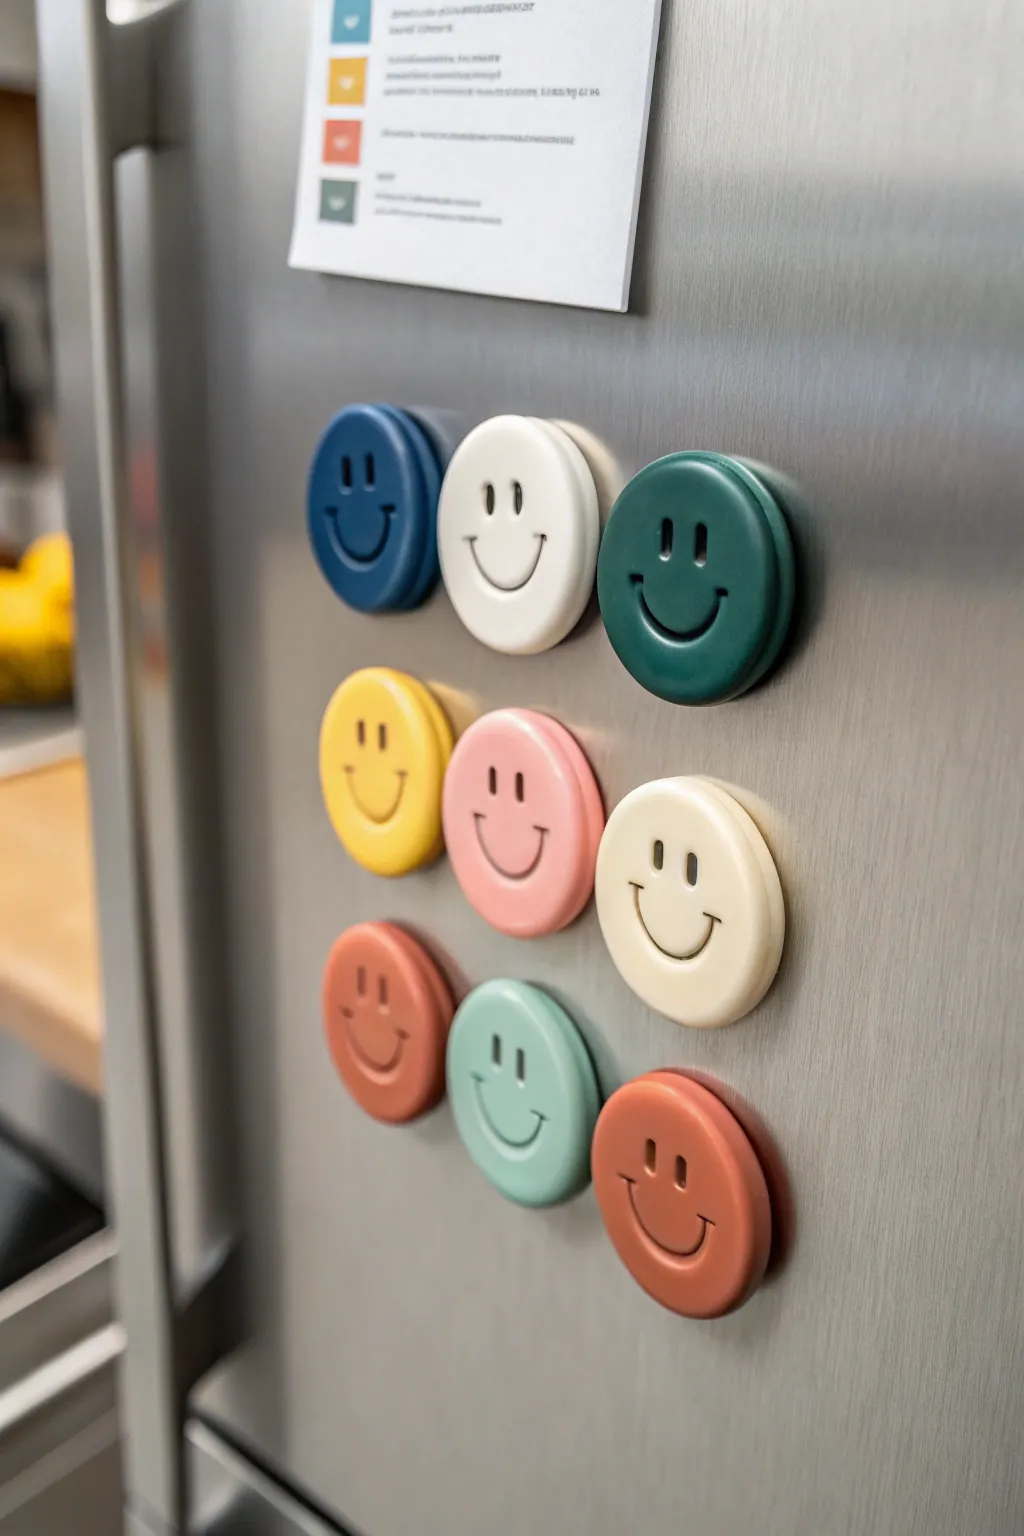
Brighten up your kitchen with these impossibly cute, minimalist smiley face magnets made from polymer clay. The smooth, matte finish and cohesive color palette give them a modern, store-bought look that is surprisingly easy to achieve at home.
Detailed Instructions
Materials
- Polymer clay (various colors: navy, off-white, dark green, yellow, pink, rust, mint green)
- Circle cutter (approx. 1.5 – 2 inches)
- Acrylic rolling pin or pasta machine
- Small round piping tip or straw (for eyes)
- Needle tool or small carving tool (for mouth)
- Ceramic tile or baking sheet
- Parchment paper
- Strong adhesive (E6000 or superglue)
- Neodymium magnets
- Fine grit sandpaper (optional)
Step 1: Prepping and Shaping
-
Condition the clay:
Start by taking your first color of polymer clay and warming it up in your hands. Knead and roll it until it’s soft, pliable, and free of any air bubbles. -
Roll out a slab:
Using an acrylic rolling pin or a pasta machine, roll the clay out to a uniform thickness. Aim for about 1/4 inch (6mm) thick—you want these to be chunky and substantial, not thin wafers. -
Cut the circles:
Place your circle cutter firmly onto the clay slab and press down evenly. Give it a tiny wiggle before lifting to ensure a clean cut. -
Smooth the edges:
Gently pop the clay circle out of the cutter. Run your finger lightly around the rim of the circle to soften the sharp edge left by the cutter, giving it a rounded, pillowy look.
Smudge Eraser
Before baking, wipe your unbaked clay with a Q-tip dipped in rubbing alcohol or acetone. This removes lint, dust, and fingerprints for a flawless finish.
Step 2: Creating the Faces
-
Make the eyes:
Take a small round piping tip or a sturdy straw to create the eyes. Press gently into the clay about a third of the way down from the top edge. Do not push all the way through; just create a clean indentation. -
Draft the smile:
Using a needle tool, lightly sketch the curve of the smile below the eyes to ensure it’s centered. I find marking the two end points first helps keep the smile symmetrical. -
Carve the smile:
Once happy with the placement, use a small carving tool or the side of your needle tool to deepen the smile line. Press firmly to create a groove that matches the depth of the eyes. -
Refine the expression:
Smooth out any tiny clay crumbs created during carving. You can use a silicone shaper tool or a brush dipped in a tiny bit of rubbing alcohol or baby oil to melt away imperfections.
Step 3: Baking and Assembly
-
Bake the clay:
Transfer your smiley faces to a ceramic tile or a baking sheet lined with parchment paper. Bake according to your specific clay brand’s instructions (typically 275°F/135°C for 30 minutes per 1/4 inch of thickness). -
Cool down:
Allow the pieces to cool completely in the oven with the door cracked open. This prevents thermal shock and ensures the clay cures to its maximum strength. -
Sand for finish:
If there are any fingerprints or rough spots, wet-sand the surface gently with fine-grit sandpaper under running water. This creates that ultra-smooth, matte professional finish seen in the photo. -
Clean surface:
Wipe the back of each clay piece with a little rubbing alcohol to ensure it is perfectly clean and free of dust before gluing. -
Attach the magnets:
Place a dab of strong adhesive like E6000 onto the back center of the smiley face. Press a neodymium magnet firmly into the glue. -
Final cure:
Let the glue cure for at least 24 hours before sticking them to your fridge to ensure the magnets stay securely attached.
Make ‘Em Pop
After baking, use a tiny brush to paint acrylic paint inside the eye and mouth grooves (wipe away excess from the surface) to make the expressions stand out.
Now your fridge is ready to greet you with a cheerful smile every time you reach for a snack
Moon Phase Wall Hanging Tiles
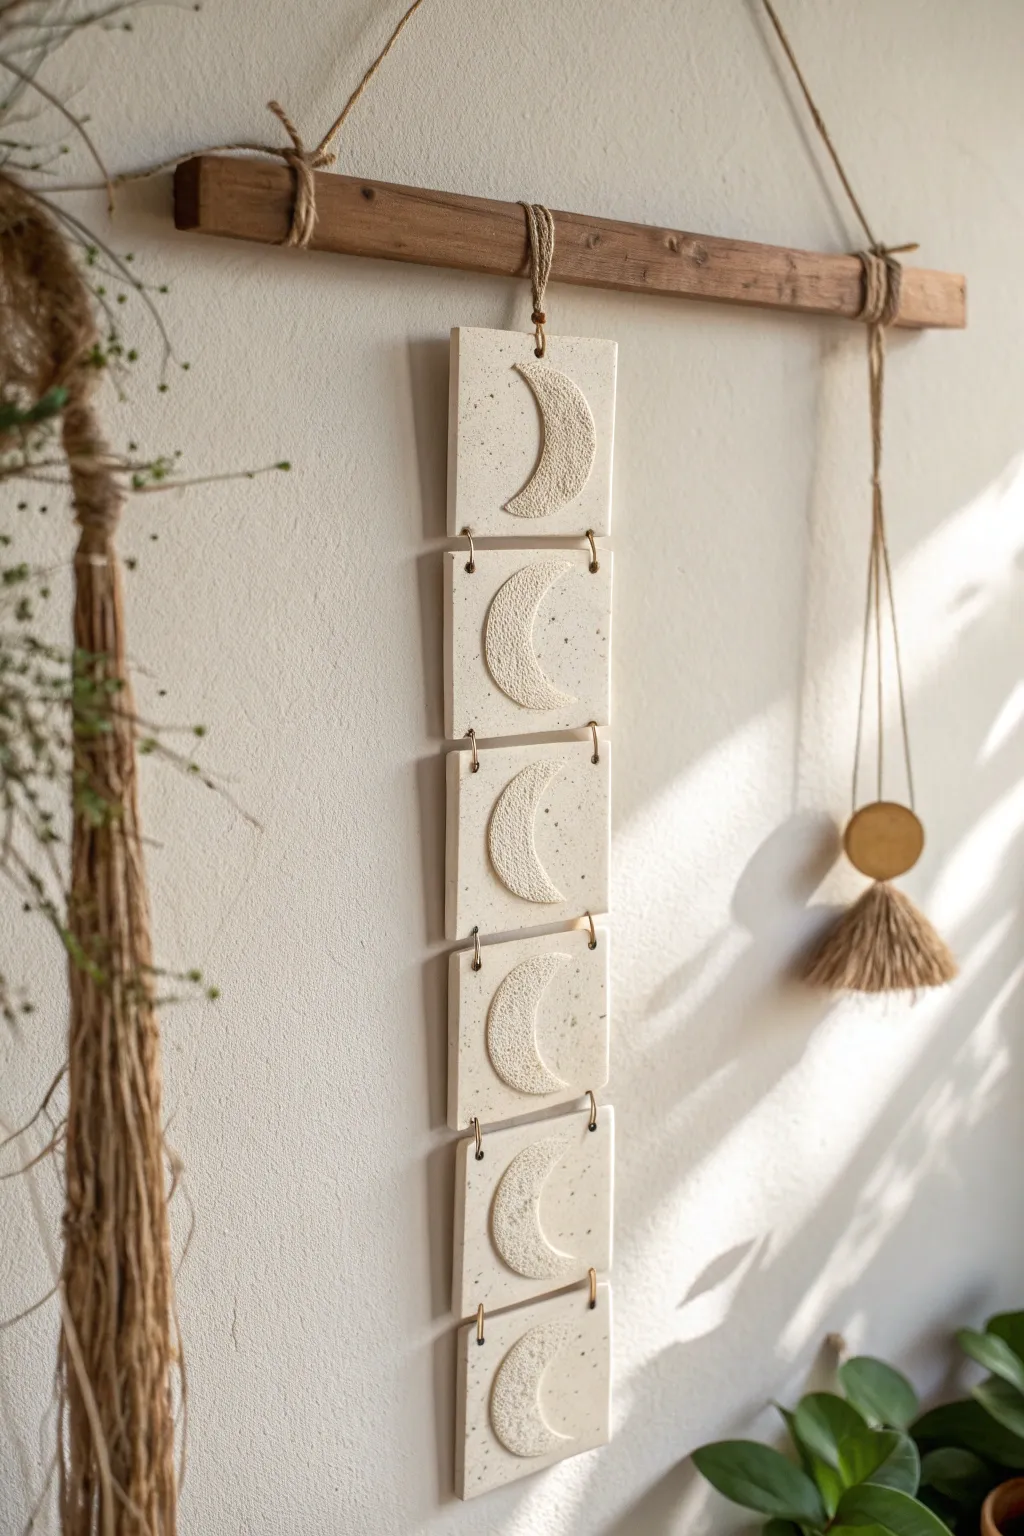
Bring celestial serenity to your space with this vertical hanging of textured clay tiles. The speckled, milky finish and natural wood support give this piece a distinctively rustic and minimalist charm perfect for boho or modern walls.
Step-by-Step Tutorial
Materials
- Air-dry clay or polymer clay (white or cream)
- Speckling agent (dried coffee grounds, black pepper, or coarse sand)
- Rolling pin
- Square cookie cutter (approx. 3-4 inches) or ruler and knife
- Circle cutter (smaller than the square width)
- Texturing tool (old toothbrush, sponge, or sandpaper)
- Wooden dowel or flat piece of reclaimed wood
- Jute twine or hemp cord
- Small metal jump rings (gold or brass, approx. 10mm)
- Pliers
- Awl, straw, or small drill bit
- Sandpaper (fine grit)
Step 1: Preparing the Clay Body
-
Conditioning:
Start by conditioning your clay until it is soft and pliable. If you are using polymer clay, warm it in your hands. For air-dry clay, ensure it’s moist but not sticky. -
Adding Texture:
To achieve that beautiful organic speckled look, knead a small pinch of dried coffee grounds, coarse sand, or cracked black pepper directly into the white clay body. Mix thoroughly until the specks are evenly distributed. -
Rolling Out:
Roll the clay out on a smooth surface or canvas mat to a uniform thickness of about 1/4 inch (6mm). Using thickness guides or playing cards stacked on either side of your roller can ensure the slab is perfectly even.
Uneven Drying?
If your air-dry tiles curl up at the corners while drying, place a heavy book on top of them (with parchment paper in between) once they are semi-dry to flatten them back out.
Step 2: Shaping the Tiles
-
Cutting Squares:
Using a square cookie cutter or a ruler and craft knife, cut out six identical squares. Clean up any rough edges with your finger or a damp sponge. -
Creating the Crescents:
This project features raised relief moons rather than painted ones. Roll out a second, thinner slab of clay (about 1/8 inch thick). -
Cutting Moon Shapes:
Use your circle cutter to punch out six circles. Then, offset the cutter slightly over each circle and cut again to create crescent moon shapes. Vary the thickness of the crescents if you want to depict different phases, though this design uses a uniform crescent shape for symmetry. -
Attaching the Moons:
Score the back of each moon and the center of each square tile with a needle tool or old toothbrush. Apply a tiny amount of liquid clay (for polymer) or water/slip (for air-dry) and press the moon firmly onto the center of the square. -
Adding Surface Texture:
I like to take a dry sponge or a stiff-bristled brush and gently tap the surface of the raised moon. This gives it that crater-like, stony texture that contrasts with the smoother square background.
Step 3: Assembly Prep
-
piercing Holes:
While the clay is still soft, use a straw or an awl to create holes for the jump rings. You need two holes at the top and two at the bottom of each square, positioned near the corners (about 1/4 inch from the edge). -
Exception for Ends:
Note that the very top tile only needs a center top hole for hanging, and the very bottom tile doesn’t necessarily need bottom holes unless you plan to add tassels. -
Drying or Baking:
If using polymer clay, bake according to the package instructions (usually 275°F for 15-30 minutes). If using air-dry clay, let the tiles dry flat for 24-48 hours, flipping them occasionally to prevent warping. -
Sanding:
Once fully cured or dry, lightly sand the edges of the squares to ensure they are crisp and smooth. Wipe away any dust with a damp cloth.
Go Golden
After the clay is dry, mix gold mica powder with a drop of varnish and paint just the raised crescent moons. This adds a subtle, luxurious shimmer that catches the light.
Step 4: Final Construction
-
Connecting the Tiles:
Using two pairs of pliers, carefully open your large jump rings. Thread them through the corner holes to connect the tiles in a vertical chain. Close the rings securely so there no gaps. -
Preparing the Wood:
Take your reclaimed wood piece or dowel. Cut a length of jute twine roughly three times width of the wood. -
Creating the Hanger:
Tie the twine securely to both ends of the wood using a double knot or a lark’s head knot, creating a triangle shape for hanging the entire structure on the wall. -
Mounting the Chain:
Cut a shorter piece of twine. Loop it through the single top hole of your first tile, and tie this loop around the center of your wooden bar. Adjust the length so the tiles hang centered and straight.
You now have a serene piece of lunar art that brings a grounded, earthy element to your wall decor

TRACK YOUR CERAMIC JOURNEY
Capture glaze tests, firing details, and creative progress—all in one simple printable. Make your projects easier to repeat and improve.
Curvy Torso Bud Vase Sculpture
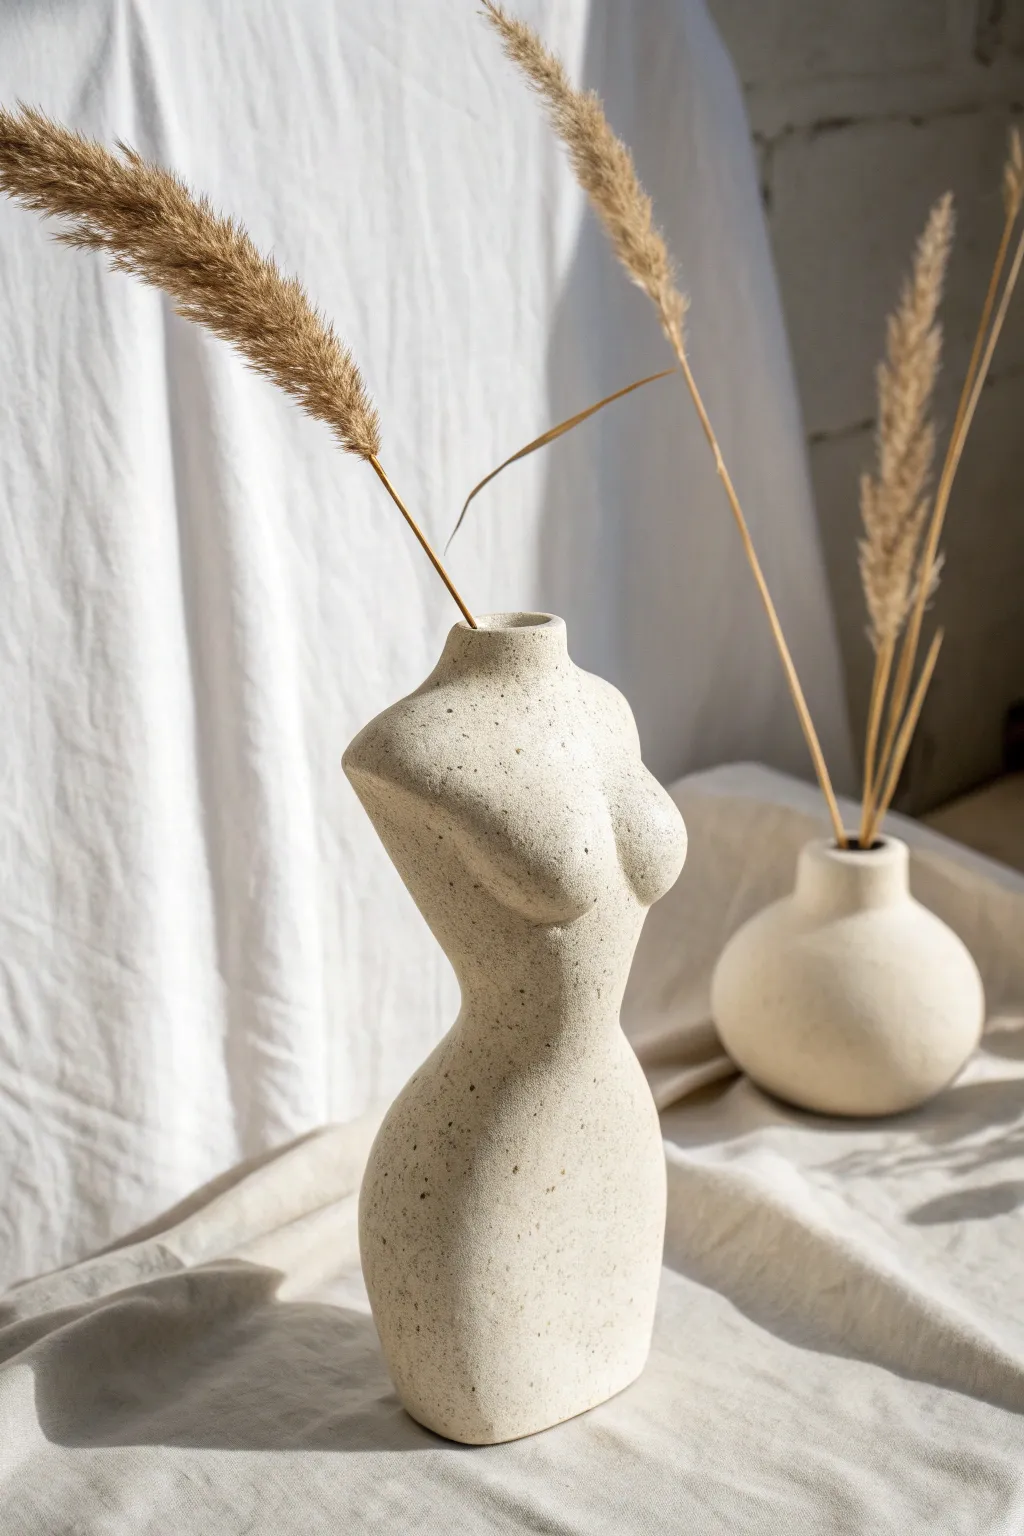
Sculpt a celebration of the female form with this elegant, speckled torso vase. Its gentle curves and natural stone texture make it a stunning minimalist centerpiece for holding dried pampas grass or bunny tails.
Detailed Instructions
Materials
- Speckled stoneware clay (or polymer clay with granite effect)
- Pottery wire cutter
- Needle tool
- Metal kidney scraper
- Sponge
- Wooden modeling tool
- Slip (clay mixed with water)
- Rolling pin
- Cup of water
- Small paintbrush
Step 1: Forming the Base Structure
-
Prepare the clay:
Begin by wedging your speckled clay thoroughly to remove any air bubbles. This ensures the structure won’t crack during firing or drying. Aim for a ball slightly larger than a grapefruit. -
Shape the initial cylinder:
Roll a thick coil or cylinder of clay that stands about 6-8 inches high. This will serve as the core of the torso. It doesn’t need to be perfect yet, just a solid vertical mass. -
Hollow the form:
Using your thumbs, gently press into the top center of the cylinder to create the opening. Work your way down, pinching the walls to hollow out the vessel. Leave the bottom at least half an inch thick for stability.
Unwanted Cracks?
If you see hairline cracks forming while drying, apply a tiny amount of vinegar to the crack and smooth it over with soft clay. The acid helps re-bond the clay particles.
Step 2: Sculpting the Silhouette
-
Define the waist:
Identify where the waistline should sit—roughly in the middle of your cylinder. Use your hands to gently squeeze and narrow the clay at this point, creating an hourglass indentation. -
Build the hips:
Below the waist, push the clay walls outward from the inside to create the curve of the hips. If the walls get too thin, add small coils of clay to the outside and smooth them seamlessly. -
Shape the shoulders:
Above the waist, gently flare the clay outward again to imply the ribcage and shoulders. The top opening should taper inward slightly to create a graceful neck area. -
Refine the asymmetry:
Study the photo’s silhouette. Note how one hip might curve slightly differently than the other to simulate a natural stance. Use a wooden modeling tool to shave away excess clay for a sharper profile.
Level Up: Glazing
Leave the outside unglazed to show the raw, speckled stone texture, but pour a clear glaze inside. This makes the vase fully waterproof for fresh flowers without altering the look.
Step 3: Adding Detail and Texture
-
Add the bust:
Roll two small, equal-sized balls of clay. Score the chest area of your sculpture and the back of the clay balls with a needle tool. Apply slip to the scored areas and press the balls firmly onto the chest. -
Blend the forms:
Using your thumb or a modeling tool, drag the edges of the added clay balls into the main body until the seams disappear completely. I find smoothing upward and outward creates a more natural transition. -
Refine the neck opening:
Ensure the top opening is neat and round. Use a damp sponge to soften the rim so there are no sharp edges. -
Smooth the surface:
Take a metal kidney scraper and run it vertically along the curves. This compresses the clay particles and removes fingerprints, leaving a clean, professional finish. -
Enhance the texture:
If your clay isn’t naturally speckled, you can gently splatter a bit of diluted dark brown underglaze or acrylic paint (if using air-dry clay) onto the surface with a toothbrush. -
Check balance:
Set the vase on a flat surface and view it from eye level. If it wobbles, tap the base gently on the table to flatten the bottom.
Step 4: Finishing
-
Slow drying:
Loosely cover the sculpture with plastic wrap for the first 24 hours to let the moisture redistribute evenly, preventing cracks at the thin neck or waist. -
Complete drying:
Remove the plastic and let the piece air dry completely for several days until it feels room temperature to the touch (bone dry). -
Firing or sealing:
If using stoneware, fire to the clay manufacturer’s recommended cone temperature (usually Cone 5 or 6). For air-dry clay, seal with a matte varnish to protect the surface.
Now you have a timeless piece of sculpture ready to display your favorite dried botanicals
Tiny Room Diorama Shelf Scene
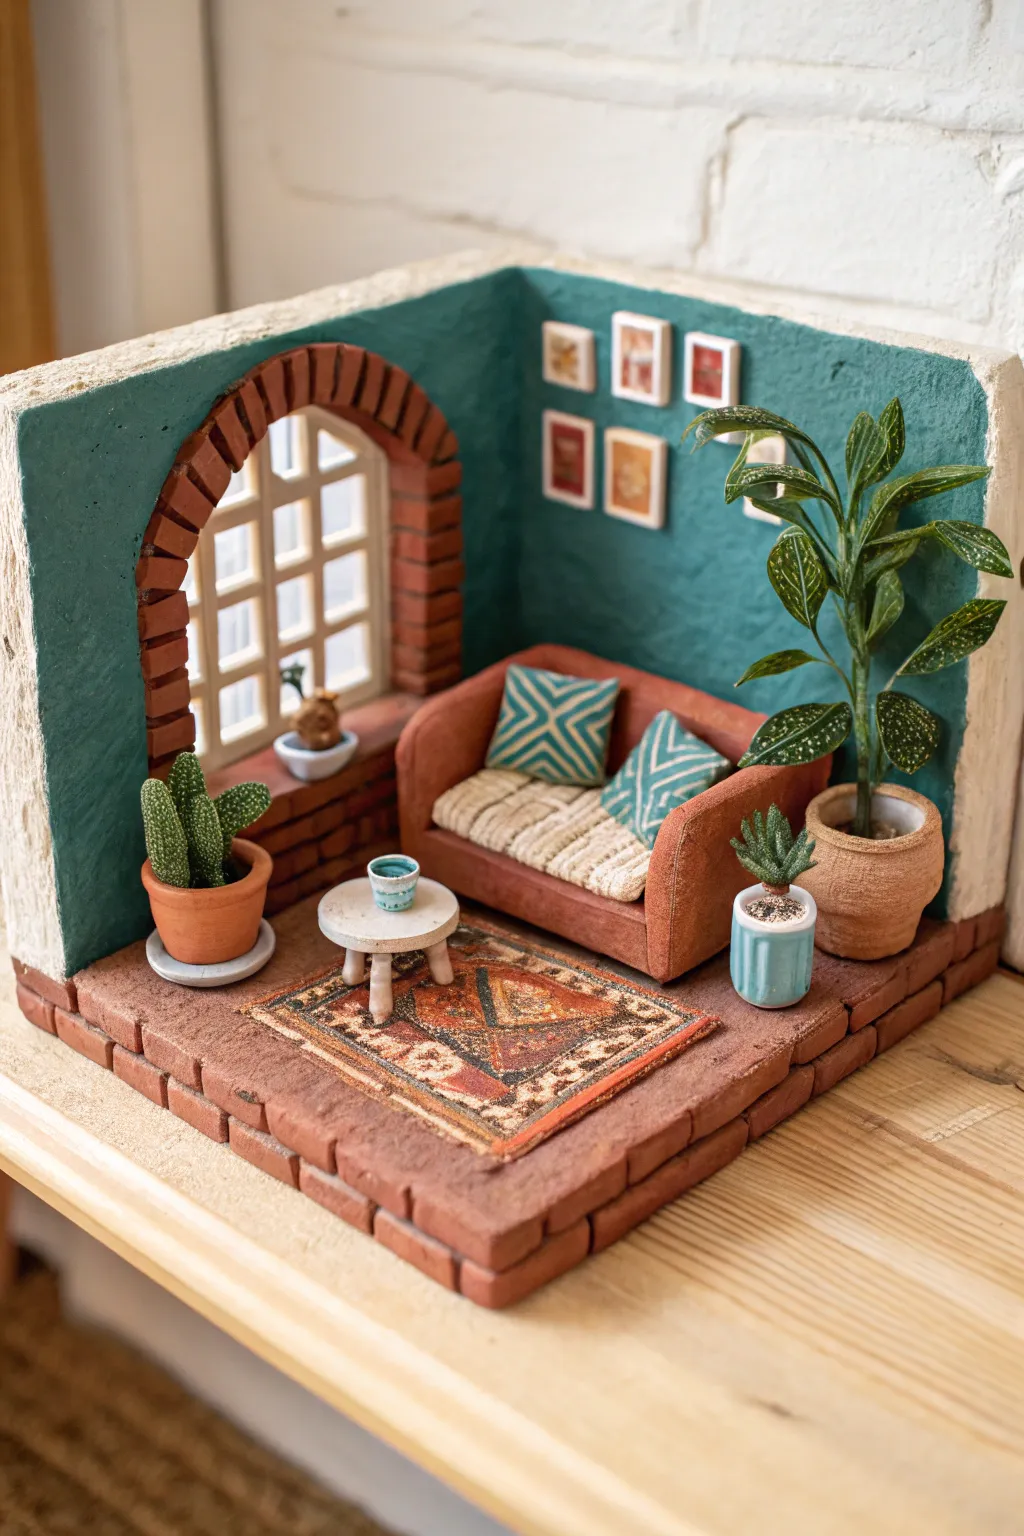
Step into a miniature world with this charming terracotta-tiled diorama featuring a cozy reading nook. The combination of warm brick textures and cool teal walls creates a delightful contrast perfect for a bookshelf display.
Step-by-Step
Materials
- Air-dry clay (terracotta color)
- Air-dry clay (white or grey for walls)
- Polymer clay (green, brown, mixed colors for details)
- Acrylic paints (teal, white, burnt sienna, cream)
- Thick cardboard or foam board (for base structure)
- Craft knife and sculpting tools
- Rolling pin
- Tacky glue or strong craft glue
- Texture sponge or toothbrush
- Fine grit sandpaper
- Gloss varnish (optional for pots)
Step 1: Base and Wall Structure
-
Prepare the foundation:
Cut two pieces of thick cardboard or foam board to create an L-shaped corner wall, and a square piece for the floor base. Glue them securely together. This acts as the skeleton for your clay work. -
Roll out floor tiles:
Roll out a sheet of terracotta-colored air-dry clay to about 3mm thickness. Using a ruler and knife, cut uniform rectangular strips, then cross-cut them to create small brick-like tiles. -
Install the flooring:
Apply a thin layer of glue to the cardboard floor base. Place your clay bricks row by row, leaving tiny gaps between them for a realistic grout look. Don’t worry if edges are slightly uneven; it adds rustic charm. -
Create the walls:
Cover the vertical cardboard walls with a layer of white or grey air-dry clay. While the clay is wet, dab it repeatedly with a texture sponge or an old toothbrush to create a rough, stucco-like plaster effect.
Step 2: Window and Architectural Details
-
Form the brick arch:
Using the same terracotta clay, fashion individual bricks. Arrange them in an arch shape directly onto the wet wall clay, pressing gently to adhere. Build up the sides to create a window recess. -
Construct the window frame:
Roll thin snakes or cut thin strips of white clay or cardstock to build the window pane grid. Glue this lattice inside your brick archway once the arch has firmed up slightly. -
Paint the walls:
Once the wall clay is fully dry, paint the stucco surface with a deep teal acrylic paint. Use a fairly dry brush to ensure the paint catches the texture without flooding the details.
Shrinking Clays
Air-dry clay shrinks as it dries. If gaps appear between your floor bricks, fill them with a mix of white paint and plaster or spackle to create realistic grout lines.
Step 3: Furniture and Decor
-
Sculpt the sofa base:
Form a block of clay into a basic sofa shape with rounded arms. I find it helpful to use a small foil core to save clay and reduce weight. -
Add sofa upholstery texture:
Cover the sofa form with a thin sheet of orange-brown clay. Use a needle tool to mimic fabric seams and create a separate cushion slab for the seat. -
Make the coffee table:
Cut a small circle from white clay for the table top. Attach three small wooden dowels or clay cylinders for legs. Let this dry upside down so the legs stay straight. -
Craft the rug:
Create the rug using a printed piece of paper glued to stiff fabric, or paint a intricate geometric design directly onto a thin rectangle of dried clay for a textured look. -
Shape the cushions:
Make small squares of clay for pillows. Paint them with geometric teal and white patterns using a fine detail brush to match the room’s color scheme.
Hyper-Realistic Lighting
Hide a small LED battery light or a string of fairy lights behind the window wall to simulate daylight streaming through the window lattice.
Step 4: Plant Life and Final Assembly
-
Pot the plants:
Mold miniature pots from terracotta clay—one large, one medium, and a tiny one for the table. Create texture on the large pot by rolling it gently over sandpaper before baking or drying. -
Create foliage:
For the tall plant, use polymer clay on thin florist wire to shape leaves. Paint varied green tones for realism. For the cactus, roll a green cylinder and prick it with a needle tool for texture. -
Frame the artwork:
Cut tiny rectangles of white cardstock or clay for frames. Paint or draw miniature abstract shapes inside them, then glue them in a gallery wall arrangement on the right wall. -
Arrange the scene:
Glue the rug in the center, position the sofa and coffee table, and place the plants. Add the tiny mug to the table as a finishing touch.
Place this miniature scene on your shelf and enjoy your handmade slice of architectural coziness