
If you’ve got an ordinary glass jar, I’ve got a million ways to give it a brand-new personality with air-dry clay or polymer clay. These clay jar ideas are all about turning everyday containers into whimsical little showpieces you’ll actually want to leave out on the counter.
Mushroom Roof Lid Jar
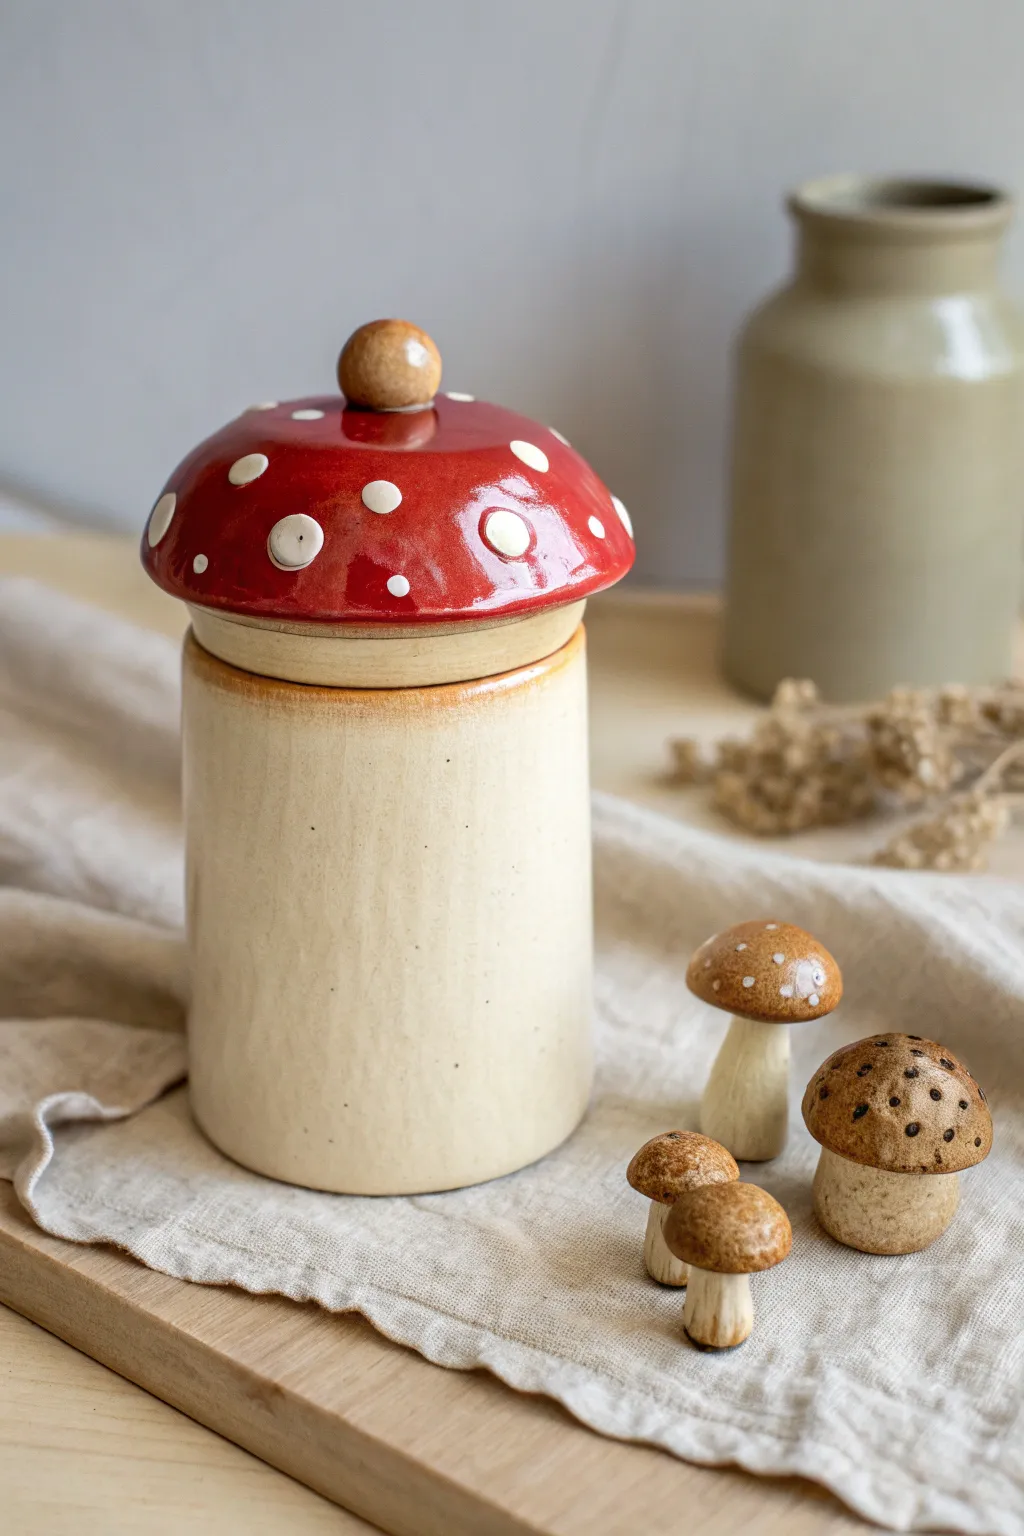
Transform a simple wheel-thrown cylinder into an enchanting forest keepsake with this mushroom-inspired lid design. The glossy red glaze and playful white dots create a striking contrast against the natural speckled clay body, making it perfect for storing tea or small treasures.
Detailed Instructions
Materials
- Stoneware clay (speckled or buff)
- Pottery wheel
- Throwing tools (sponge, wire cutter, rib tools, needle tool)
- Trimming tools
- Underglaze (bright red and white)
- Clear glossy glaze
- Pottery kiln
- Small paintbrush
- Calipers
Step 1: Throwing the Base and Lid
-
Center and open the base:
Start with about 1.5 lbs of wedged clay on the wheel. Center it firmly and open the vessel, aiming for a flat floor about 3-4 inches wide. -
Pull the cylinder walls:
Pull the walls up straight to create a cylinder. It should be uniform in thickness from bottom to top. Use a metal rib to smooth the outside and remove throwing lines for a clean finish. -
Shape the gallery:
At the rim, gently compress and flatten the top edge. You don’t need a complex locking gallery here, just a smooth, level rim. -
Measure the opening:
Use calipers to measure the exact diameter of your cylinder’s opening. This measurement is crucial for your lid fit. -
Throw the lid structure:
Using a smaller amount of clay (about 1 lb), throw a shallow bowl shape upside down. This will be the mushroom cap. -
Create the locking flange:
On the underside of your ‘bowl’ (which is facing up right now), throw a vertical flange that exactly matches your caliper measurement. This needs to fit inside the jar opening.
Step 2: Trimming and Sculpting
-
Dry to leather hard:
Let both pieces dry to a leather-hard state. The clay should be firm enough to hold its shape but soft enough to carve. -
Trim the jar base:
Place the jar upside down on the wheel. Trim away excess weight from the bottom and create a clean foot ring. -
Shape the mushroom cap:
Center the lid right-side up (flange down) on a chuck or foam bat. Trim the top surface into a smooth, rounded dome shape, mimicking a mushroom cap. -
Attach the knob knob:
Roll a small ball of clay for the stem knob. Score and slip the center of the dome and the ball, then press firmly to attach. Smooth the connection point so it looks seamless. -
Refine the edges:
Smooth the overhanging edge of the mushroom cap with a damp sponge to remove any sharp angles.
Natural Speckles
Use a clay body with iron pyrite speckles (often called ‘Speckled Buff’). When fired under a clear glaze, these burst into tiny dark spots.
Step 3: Glazing and Finishing
-
Bisque fire:
Once bone dry, fire both pieces in the kiln to bisque temperature (usually cone 04 or 06). -
Apply wax resist:
Apply wax resist to the bottom foot of the jar and the contact points where the lid touches the jar (the flange and the rim) to prevent sticking. -
Glaze the jar interior:
Pour clear glossy glaze inside the jar, swirl to coat, and pour out the excess. Wipe any drips off the rim immediately. -
Glaze the jar exterior:
Dip the exterior of the jar into the clear glaze. I prefer a clear glaze on a speckled clay body to let the natural earth tones shine through. -
Paint the mushroom cap:
Using a soft brush, apply 3 coats of bright red underglaze or glaze to the top of the lid, avoiding the knob if you want it to remain natural clay color. -
Add the dots:
Once the red is dry, carefuly dab or paint white dots in varying sizes onto the red surface. Make them slightly raised for texture if your glaze allows. -
Final clear coat:
If you used underglaze for the red and white, apply a coat of clear glaze over the entire lid top to make it glossy and food safe. -
Glaze fire:
Load the pieces into the kiln, ensuring the lid is not on the jar during firing to avoid fusing. Fire to the maturation temperature of your clay and glaze (e.g., cone 5 or 6).
Lid Wobbles?
If the lid rattles, mix a tiny bit of grinding paste (valve compound) on the rim and twist the lid back and forth to grind a perfectly tight seal.
Once cooled, your charming mushroom jar is ready to add a touch of woodland magic to your kitchen counter

Cottagecore Tile Roof Jar
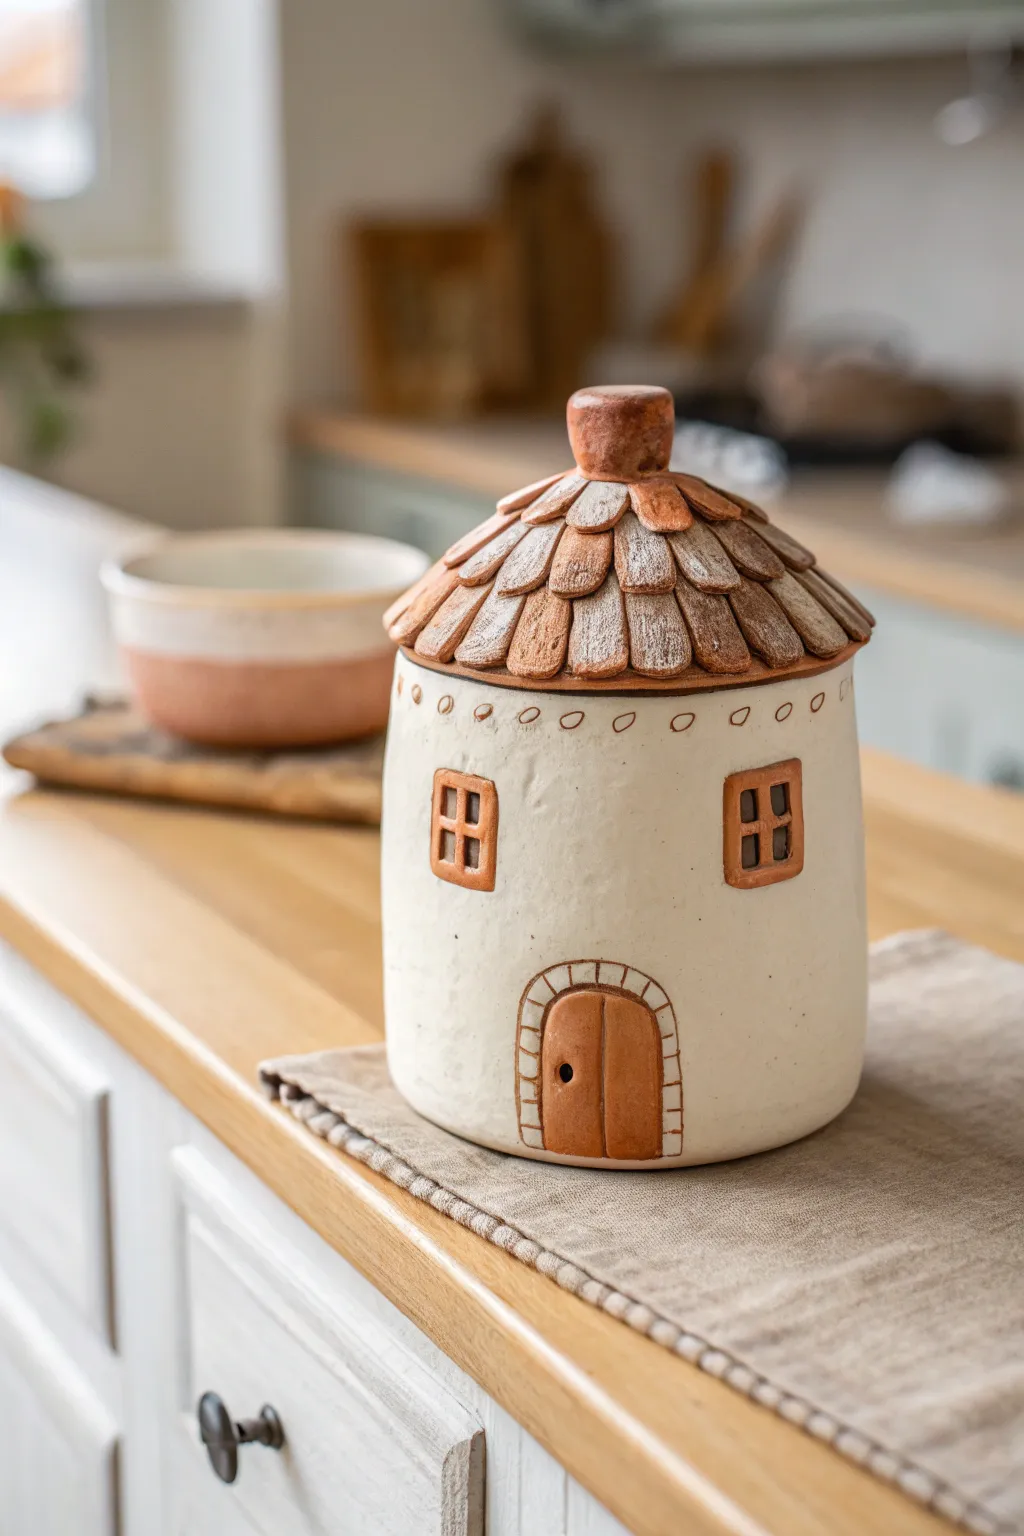
Transform simple clay slabs into an adorable cottagecore-inspired storage vessel featuring a textured tile roof and charming rustic details. This project combines hand-building techniques with decorative carving to create a functional piece that brings a touch of fairytale warmth to your kitchen counter.
Step-by-Step
Materials
- White stoneware clay or air-dry clay (approx. 2-3 lbs)
- Terracotta-colored underglaze or acrylic paint (if using air-dry clay)
- Clear matte glaze on sealant
- Rolling pin and canvas mat
- Circular cookie cutter or template (approx. 5 inches)
- Clay knife or needle tool
- Scoring tool (serrated rib)
- Slip (liquid clay)
- Small rolling tool or brush handle for texturing
- Sponge and water bucket
Step 1: Building the House Base
-
Roll the Cylinder Walls:
Begin by rolling out a rectangular slab of white clay to about a 1/4 inch uniform thickness. You’ll need a strip roughly 5 inches tall and 16 inches long, though you should measure your desired circumference carefully. -
Form the Base Circle:
Cut a circle for the floor of your jar using your circular template. Score the outer edge of this circle thoroughly and brush on a generous amount of slip. -
Assemble the Cylinder:
Wrap the rectangular slab around the base circle to create a cylinder. Score and slip the vertical seam where the walls meet, blending the clay together on both the inside and outside until the seam is invisible. -
Smooth and Refine:
Use a damp sponge to smooth out any fingerprints on the walls. I like to gently paddle the sides to ensure the jar is perfectly round and the walls are vertical.
Uneven Lid Fit?
If the lid wobbles, place a piece of sandpaper on a flat surface and gently rotate the dried lid (upside down) or the jar rim against it in a figure-8 motion to level them out perfectly.
Step 2: Creating the Tiled Roof Lid
-
Shape the Lid Structure:
Roll a slightly thicker slab and drape it over a bowl or mold to create a gentle dome shape that is slightly wider than your jar’s opening. Create a flange on the underside so it sits securely on the jar. -
Form the Chimney Knob:
Fashion a small, thick cylinder of clay for the handle. Attach this securely to the very center of your dome using the score-and-slip method. -
Craft Individual Tiles:
Roll out a thin sheet of clay and cut dozens of small, tongue-shaped shingles. They don’t need to be identical; slight variation adds character. -
Layer the Roofing:
Start attaching tiles at the bottom rim of the lid, overlapping them slightly as you work your way up toward the center chimney. Use a tiny dab of slip for each tile. -
Texture the Tiles:
Once applied, gently press a rough texture onto the tiles using a real stone or a texture tool to give them that weathered, rustic slate look.
Step 3: Adding Details and Finishing
-
Carve the Windows:
Cut out two small square openings on the cylinder wall. Roll tiny coils of clay to frame these squares, creating the window casing. -
Add Window Muffins:
Place very thin strips of clay horizontally and vertically inside the window frames to create the four-pane look. -
Sculpt the Door:
Roll a flat, arched piece of clay and attach it to the base for the door. Use a needle tool to incise a vertical line down the center and frame the arch with small brick impressions. -
Add Decorative Embellishments:
Using a needle tool, press a row of small circles or teardrop shapes around the very top rim of the jar wall for a decorative border. -
Initial Drying:
Allow the piece to dry slowly under plastic for at least 24 hours to prevent warping, then uncover for bone-dry stage. -
Applying Color:
Apply the terracotta color specifically to the roof tiles, the window frames, and the door. Leave the main wall of the house the natural white of the clay to create contrast. -
Distressing the Roof:
Once the roof color is dry, gently sand or wipe back some of the pigment on the high points of the tiles to reveal the white clay beneath, enhancing the weathered texture. -
Final Sealing:
If using ceramic clay, bisque fire and then clear glaze before the final firing. For air-dry clay, seal the entire piece with a matte varnish to protect the surface.
Add a Glow
Level up by cutting the window panes completely out and leaving them open. Once fired, place a battery-operated tea light inside to turn your storage jar into a cozy luminary.
Fill your new cottage jar with tea bags or cookies and enjoy the homely charm it brings to your space


Lantern Jar With Cutout Windows
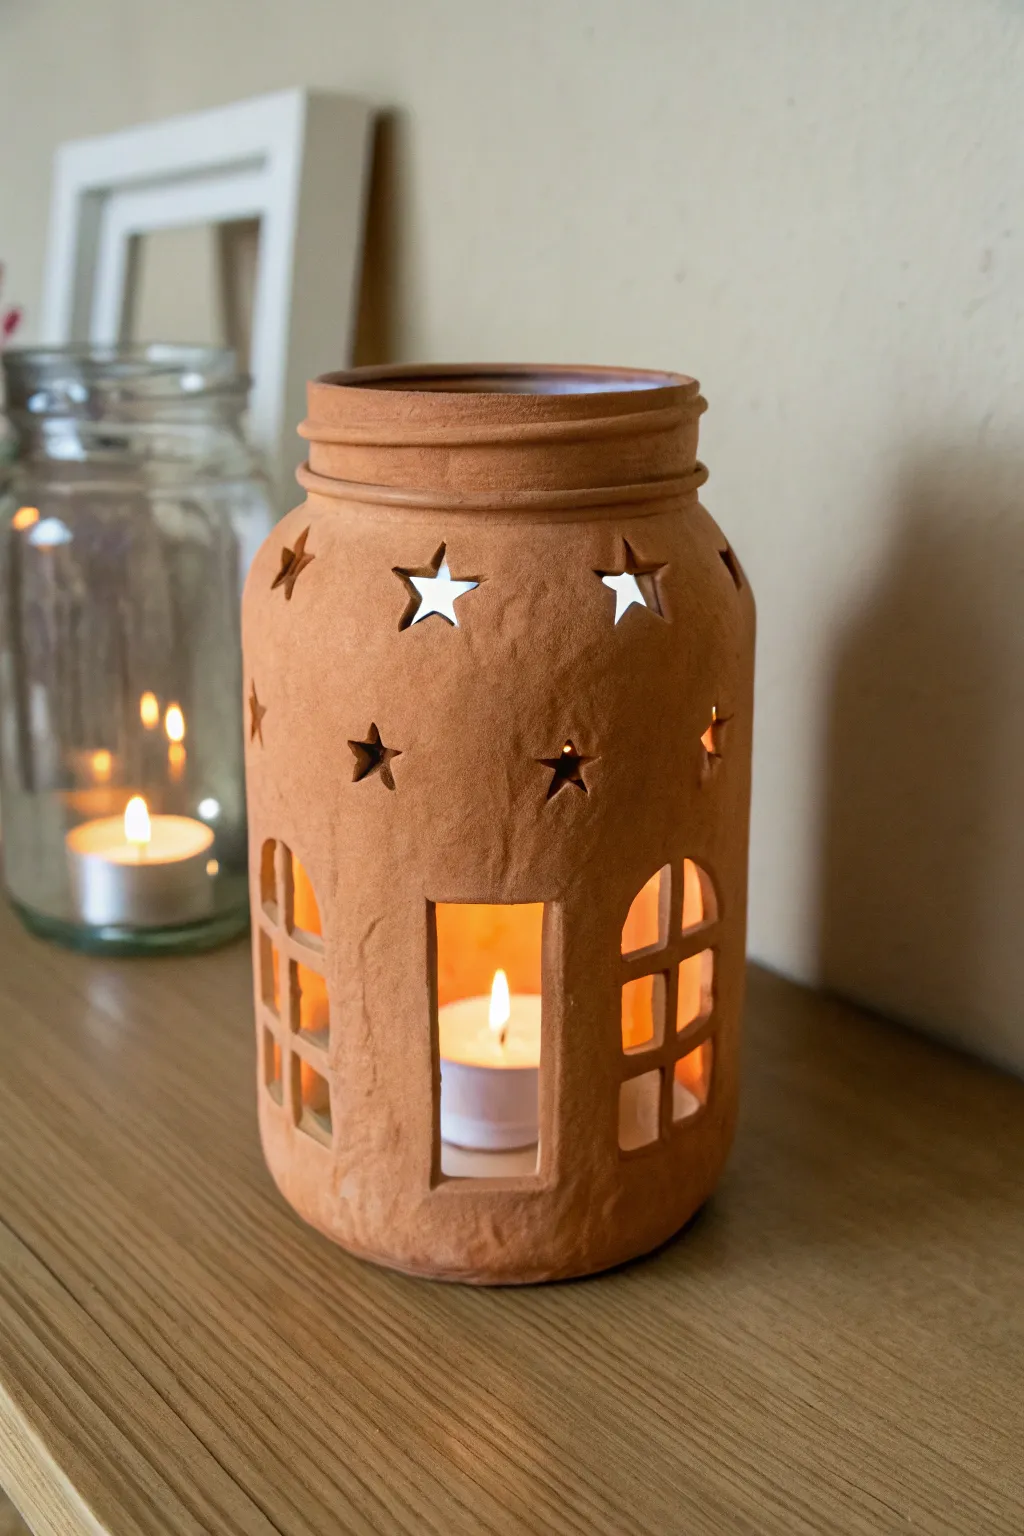
Transform a simple glass jar into a cozy cottage-themed luminary using air-dry clay and creative cutouts. The warm terracotta finish gives this piece a rustic, hand-built pottery feel that looks beautiful with a flickering tea light inside.
How-To Guide
Materials
- Clean glass mason jar (standard size)
- Terracotta-colored air-dry clay (or polymer clay)
- Rolling pin
- Parchment paper or wax paper
- Craft knife (X-Acto)
- Small star-shaped cookie cutter (optional)
- Water in a small cup
- Sponge or smoothing tool
- Tea light candle
Step 1: Preparing the Base
-
Clean the jar:
Begin by thoroughly cleaning and drying your glass mason jar to ensure the clay adheres properly to the surface. -
Roll the clay:
Roll out your terracotta clay on a piece of parchment paper until it is about 1/4 inch thick. You want an even slab that is long enough to wrap around the entire circumference of the jar. -
Size the slab:
Cut a straight edge along the bottom of your clay slab. Measure the height of your jar up to the neck threads and trim your slab to match this height.
Clean Cuts Tip
Wait for the clay to dry slightly (about 15-20 mins) before cutting windows. If the clay is too wet, it drags; a firmer texture yields sharper lines.
Step 2: Applying the Clay
-
Wrap the jar:
Carefully lift the clay slab and wrap it around the glass jar. Press it gently against the glass to secure it. -
Join the seam:
Where the two ends of the clay meet, press them together. Use a little water on your fingertip to blend the seam until it disappears completely. -
Cover the rim:
Roll a smaller snake of clay or a thin strip. Wrap this around the threaded neck of the jar to mimic the rim shown in the photo, blending the bottom edge into the main body of the jar. -
Smooth the surface:
Dip your finger or a sponge lightly in water and run it over the entire surface of the jar. This removes fingerprints and creates that slightly textured, matte finish seen in the example.
Faux Stone Finish
After drying, sponge on a very light layer of watered-down white acrylic paint, then wipe it off immediately to highlight the texture and cracks.
Step 3: Creating the Designs
-
Mark the windows:
Using a toothpick or a dull pencil, lightly sketch the location of your main door and the arched windows around the bottom half of the jar. -
Cut the main opening:
Use your craft knife to carefully cut out the central rectangular doorway. Remove the excess clay and smooth the cut edges with a damp finger. -
Carve the arched windows:
Cut out the arched window shapes on either side of the door. Leave the space open for now; we will add the pane details later. -
Add window panes:
Roll very thin coils of clay. Place these inside the window cutouts to create the grid or ‘mullions’ of the windows, pressing them gently into the cut edges to secure them. -
Cut the star details:
On the upper half of the jar, use a small star-shaped cutter or your craft knife to remove clay in a star pattern. I personally like to stagger them at different heights for a whimsical look. -
Refine the edges:
Go back over all your cutouts—windows, doors, and stars—and smooth any rough or jagged clay bits with a damp brush or finger.
Step 4: Finishing Touches
-
Texturize (Optional):
If your clay looks too smooth, gently pat it with a crumpled piece of aluminum foil or a textured sponge to give it that rustic, earthenware appearance. -
Dry the project:
Allow the jar to dry completely according to your clay package instructions. This usually takes 24-48 hours. Keep it away from direct heat to prevent cracking. -
Sand imperfections:
Once fully dry, you can very lightly sand any sharp edges created by the cutting process. -
Light it up:
Place a tea light candle inside the jar and enjoy the warm glow through the windows and stars.
This charming jar adds instant warmth to any shelf or mantelpiece


Wood Plank Pantry Jar Look
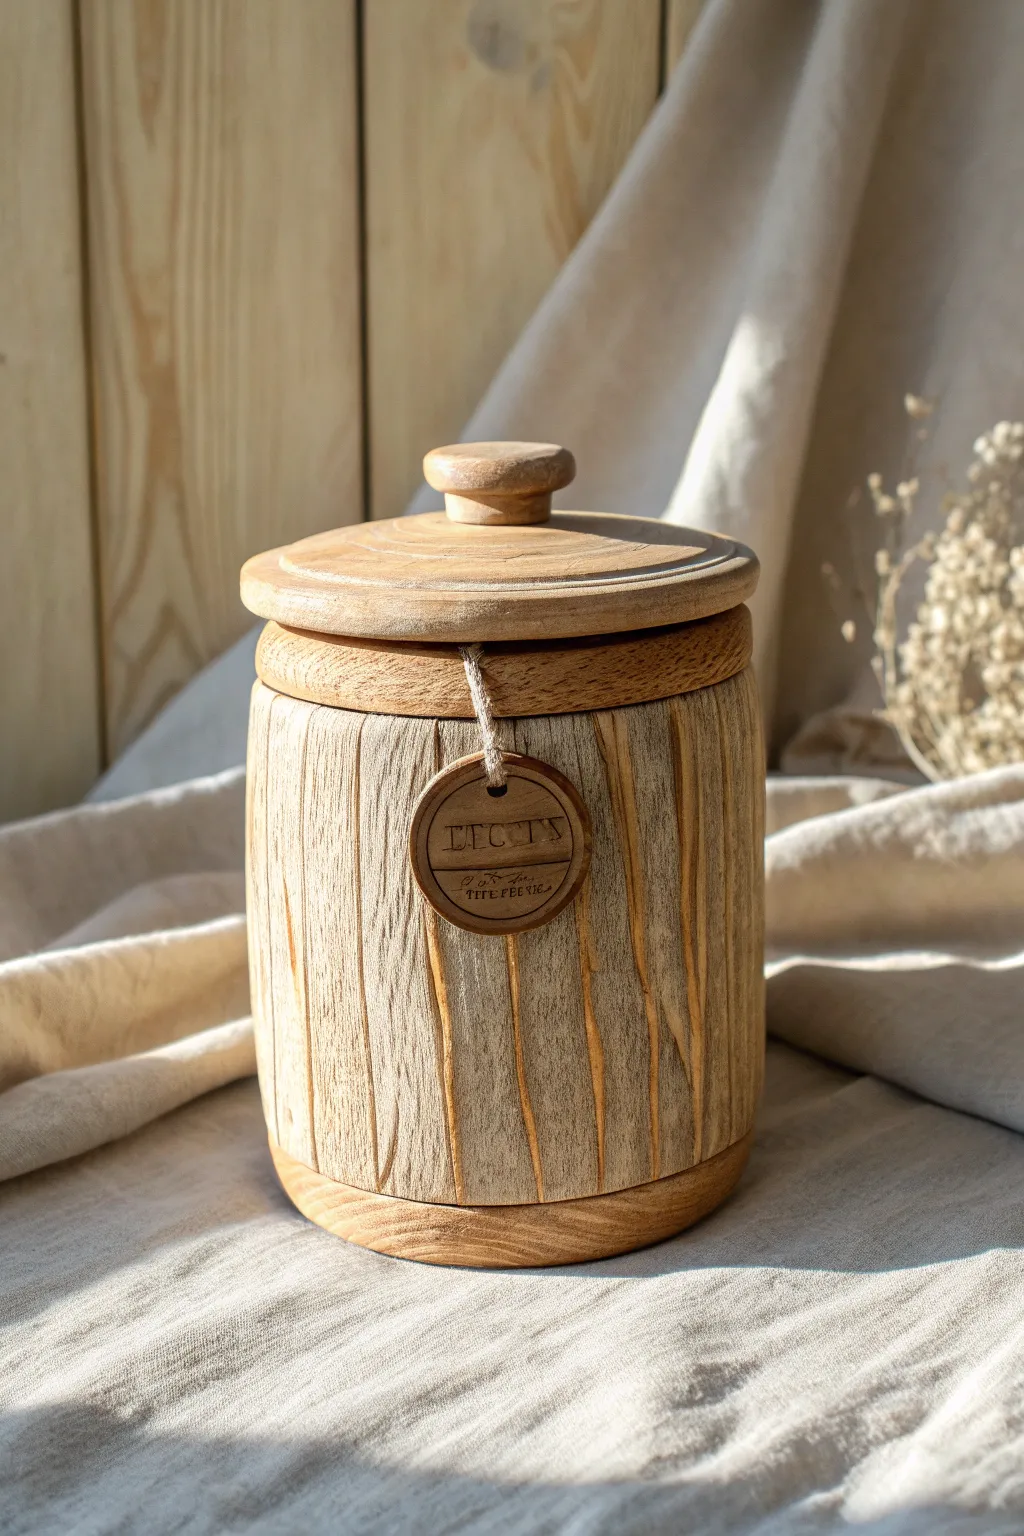
Transform a simple cylindrical container into a charming farmhouse staple that looks like it was carved from aged timber. Using polymer or air-dry clay, you’ll sculpt convincing wood planks complete with deep grain textures and a warm, honey-toned finish.
Detailed Instructions
Materials
- Cylindrical glass jar or ceramic canister (with lid)
- Air-dry clay or polymer clay (beige or light brown)
- Sculpting tools (needle tool, clay knife)
- Texture tools (wire brush or stiff bristle brush)
- Acrylic paints (raw sienna, burnt umber, cream, black)
- Matte varnish or sealant
- Jute twine
- Small round wooden tag or cardboard circle
- Rolling pin
- Water spray bottle (if using air-dry clay)
- Fine-grit sandpaper
Step 1: Preparing the Base
-
Clean surface:
Thoroughly wash and dry your base jar. If the surface is very slick glass, you might want to lightly scuff it with sandpaper or apply a thin coat of PVA glue to help the clay adhere. -
Roll the clay:
Roll out a large slab of clay to a uniform thickness of about 1/4 inch. Ensure the slab is long enough to wrap around the circumference of your jar and tall enough to cover the vertical surface. -
Wrap the jar:
Carefully lift your clay slab and wrap it around the jar body. Join the seam by smoothing the clay together with a bit of water (for air-dry) or liquid clay (for polymer), blending until the seam disappears.
Step 2: Sculpting the Wood Texture
-
Define the planks:
Use a clay knife or a ruler edge to press vertical lines into the clay around the entire jar. These don’t need to be perfectly straight; slight wobbles add to the hand-hewn look. -
Round the edges:
Gently press along the vertical groove lines to slightly round the edges of each ‘plank.’ This depth creates the shadow lines that make the planks look individual rather than drawn on. -
Create main grain lines:
Take a needle tool and drag it vertically down each plank. Vary the pressure to create deep fissures and cracks, just like aged wood splits. -
Add fine texture:
For the finer grain, brush a stiff wire brush or a crumpled ball of aluminum foil vertically along the planks. This micro-texture is crucial for holding the paint wash later. -
Sculpt the bands:
Roll two thick coils of clay. Flatten them slightly and attach one to the top rim and one to the bottom rim of the jar body to act as the barrel hoops or structural bands. Texture these horizontally to contrast with the vertical planks. -
Cover the lid:
If your lid allows, cover the top with a disc of clay. Sculpt concentric circles or a simple flat wood grain pattern on top, and add a small clay knob if your jar doesn’t already have one. -
Drying or curing:
Allow air-dry clay to dry completely (24-48 hours) or bake your polymer clay according to the manufacturer’s package instructions. I prefer to let air-dry clay sit loosely covered with plastic for the first few hours to prevent cracking.
Clay Shrinkage
If using air-dry clay, it shrinks when drying. Don’t wrap the clay too tightly around the rigid glass, or it may crack. Leave a hair of looseness.
Step 3: Painting and Finishing
-
Base coat:
Apply a solid base coat of cream or very light tan acrylic paint over the entire surface. Ensure you get paint into every deep crack. Let this dry completely. -
Apply the dark wash:
Mix burnt umber paint with water (about 1:1 ratio). Brush this dark wash over a section of the jar, letting it flow into the texture grooves. -
Wipe back:
Immediately use a damp cloth or sponge to wipe the dark paint off the raised surface areas. The dark color will remain trapped in the sculpted grain lines, revealing the wood texture. -
Dry brushing:
Once the wash is dry, lightly dip a dry brush into raw sienna or a warm honey tone. Offload most of the paint on a paper towel, then lightly brush over the raised areas to add warmth and dimension. -
Highlighting:
Repeat the dry brush technique with a tiny amount of off-white paint, hitting just the sharpest edges of the planks and the knob to mimic light catching worn wood. -
Sealing:
Protect your work with a coat of matte varnish. Avoid glossy finishes, as they ruin the natural timber illusion.
Knotty Details
Make a ‘knot’ in the wood by pressing a small circle into a plank and curving your grain lines around it for extra realism.
Step 4: The Final Detail
-
Create the tag:
Cut a small circle from leftover clay (or use a wood slice). Stamp or carve a word like ‘FLOUR’ or ‘SEEDS’ into it. Paint it to match the jar. -
Attach the twine:
Loop a piece of rough jute twine around the neck of the jar, threading it through your tag before tying it off with a simple knot.
Now your pantry shelf has a touch of rustic warmth that looks centuries old

The Complete Guide to Pottery Troubleshooting
Uncover the most common ceramic mistakes—from cracking clay to failed glazes—and learn how to fix them fast.
Bark and Ivy Enchanted Jar
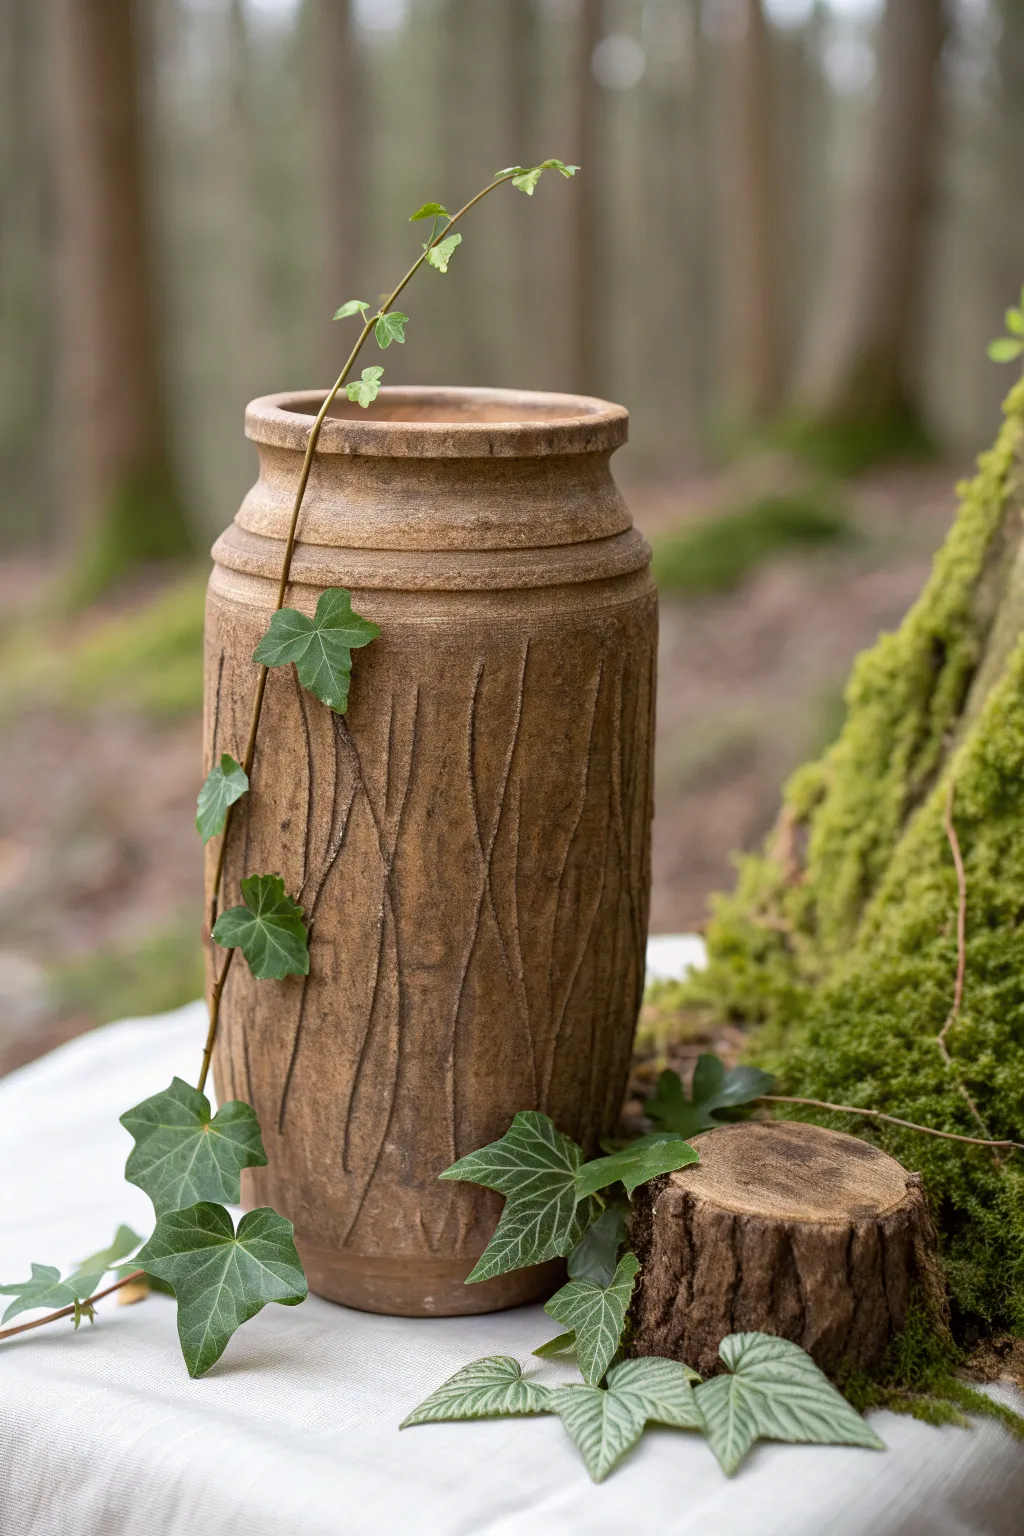
Transform a plain vase into a woodland treasure with this textured clay technique that mimics the organic grooves of tree bark. The finished piece looks remarkably like aged stoneware or wood, especially when paired with trailing ivy for a touch of living greenery.
Step-by-Step Guide
Materials
- Tall cylindrical vase (glass or ceramic base)
- Air-dry clay (terracotta or brown color)
- Pottery tools or a wooden skewer
- Rolling pin
- Bowl of water
- Sponge
- Acrylic paints (dark brown, burnt umber, black, cream)
- Matte spray sealant
- Fresh or faux ivy vines
Step 1: Preparing the Base
-
Clean the surface:
Before you begin, wipe down your base vase thoroughly with rubbing alcohol or soapy water to remove any oils. This ensures the clay will adhere properly to the sleek surface. -
Condition the clay:
Take a large chunk of your terracotta-colored air-dry clay and knead it well. You want it warm and pliable; if it feels stiff, dip your fingers in water and work the moisture in until it’s easy to manipulate. -
Roll a slab:
Roll out the clay on a flat surface into a large rectangular slab, aiming for about a quarter-inch thickness. This slab needs to be large enough to wrap around the circumference of your vase.
Natural Texture Hack
Before carving, gently press a piece of real tree bark or a crumpled ball of aluminum foil against the wet clay to imprint an authentic organic pattern.
Step 2: Sculpting the Form
-
Wrap the vase:
Carefully lift your clay slab and wrap it around the vase. Press it firmly against the glass or ceramic to create a bond. -
Seal the seam:
Where the two edges of the clay meet, smudge the clay together with wet fingers until the line disappears completely. I find a little extra water here helps smooth everything out invisibly. -
Create the rim:
Roll a separate, thick coil of clay. Attach this around the top opening of the vase to create a distinct, chunky rim. -
Add the neck detail:
About two inches below the top rim, add a second, slightly flatter coil around the neck. Use a sculpting tool or your thumb to blend the bottom edge of this coil into the main body, leaving the top edge distinct.
Mossy Integration
Mix green acrylic paint with a pinch of baking soda for a fluffy texture. Dab this ‘moss’ into the crevices near the base for an aged forest look.
Step 3: Texturing the Bark
-
Roughen the surface:
Take a damp sponge and dab it aggressively all over the smooth clay. You aren’t cleaning it; you’re creating a pitted, organic micro-texture to get rid of fingerprints. -
Carve vertical grooves:
Using a wooden skewer or a needle tool, act fast while the clay is damp. Drag the tool vertically from the neck down to the base to create deep, wandering lines. -
Vary the pressure:
Don’t make straight lines. Wiggle the tool slightly as you pull down, and press harder in some spots than others to mimic the random fissures found in natural tree bark. -
Add fine details:
Go back in with a finer tool and scratch tiny, shallow lines between the deep grooves. These smaller scratches add realism and depth to the ‘wood’ grain. -
Dry completely:
Allow the jar to dry for at least 24 to 48 hours. The clay will lighten significantly as it cures.
Step 4: Painting and Finishing
-
Apply a dark wash:
Mix dark brown acne paint with water to create a thin wash. Brush this over the entire jar, making sure it seeps deeply into the cracks you carved. -
Wipe back:
Before the wash dries fully, use a damp cloth to wipe the surface. This removes the paint from the raised areas but leaves the dark color in the crevices, highlighting the texture instantly. -
Dry brush highlights:
Dip a dry brush into a lighter, creamy tan paint. Offload most of the paint onto a paper towel, then lightly whisk the brush over the raised textures to catch the edges. -
Seal the work:
Once dry, spray the entire piece with a matte clear coat. This protects the water-soluble clay from moisture. -
Arrange the styling:
To recreate the enchanted look, wrap a long vine of ivy around the jar, tucking the stem behind the jar and letting the leaves naturally drape across the textured front.
Place your new creation on a mantle or table and enjoy the serenity of the woods inside your home
Flower Garden Jar With Mini Blooms

Transform a plain glass mason jar into a charming vase by covering it with texture and sculpted blooms. This project combines simple polymer clay appliqué techniques with a soft, matte finish to create a cottage-core inspired piece perfect for holding wildflowers.
How-To Guide
Materials
- Clean glass mason jar (quart size)
- Polymer clay (white, beige, sage green, dusty pink, teal blue, maroon)
- Liquid polymer clay (or Bake & Bond)
- Rolling pin or pasta machine
- Small flower petal cutters (teardrop shapes)
- Needle tool or toothpick
- Ball stylus tool
- X-Acto knife
- Textured sponge or sandpaper
- Matte finishing varnish (optional)
- Oven (for baking)
- Isopropyl alcohol
Step 1: Prepping the Base
-
Clean the surface:
Begin by wiping down the exterior of your mason jar with isopropyl alcohol to remove any oils or residue, ensuring the clay adheres properly. -
Mix the base color:
Condition a large block of white polymer clay, mixing in just a pinch of beige or translucent clay to achieve a creamy, off-white bone color rather than a stark bright white. -
Sheet the clay:
Roll your conditioned off-white clay into a long, consistent sheet about 2-3mm thick. It needs to be long enough to wrap around the entire jar. -
Cover the jar:
Wrap the clay sheet around the jar, smoothing it gently as you go to release trapped air bubbles. Trim the excess at the seam with your X-Acto knife and blend the edges together until the join is invisible. -
Refine the rim:
Trim the clay neatly just below the threading of the jar rim. I like to leave the threads exposed for a rustic look, but you can cover them if you prefer a seamless vase. -
Add texture:
Gently press a textured sponge or piece of coarse sandpaper all over the clay surface. This creates a stone-like, matte appearance that contrasts beautifully with the smooth flowers later.
Seamless Blending
If your clay isn’t sticking to the glass, brush a very thin layer of PVA glue on the jar and let it dry tacky before wrapping the clay sheet.
Step 2: Sculpting the Foliage
-
Make leaf stems:
Roll very thin snakes of sage green clay. Apply a tiny dot of liquid clay to the jar where you want a stem, then gently press the green snake onto the side of the jar, creating curved, natural lines. -
Create individual leaves:
Flatten a small ball of green clay and pinch one end to create a teardrop shape. Use a needle tool to impress a central vein down the middle, then make tiny diagonal indentations for texture. -
Attach the leaves:
Place the leaves onto the jar along your stems, pressing them gently to curve around the jar’s surface. Group them in pairs or alternate them for variety.
Step 3: Blooming Details
-
Cut out petals:
Roll out your dusty pink and teal blue clays. Use small teardrop cutters or hand-cut uniform petals for your main flowers. -
Assemble the flowers:
Arrange five petals in a circle directly on the jar surface. Use your ball stylus to press into the center of each petal, which helps secure the clay and adds dimension. -
Detail the petals:
With a needle tool, gently score lines radiating from the center of each petal to mimic the texture found in real blooms. -
Add flower centers:
Roll tiny balls of maroon or dark yellow clay. Place these in the center of your flowers, flattening them slightly and texturing them with the needle tool to look like pollen. -
Create filler flowers:
For the smaller scatter flowers, adhere tiny three-petal groupings in empty spaces. Add small dots of pink or teal clay randomly around the larger blooms for a whimsical confetti effect. -
Final inspection:
Look over the jar for any fingerprints. Smooth them out or re-texture those areas with your sponge before baking. -
Bake:
Bake the jar in your home oven according to your clay manufacturer’s instructions (usually 275°F/135°C for 15-30 minutes). Let it cool completely in the oven to prevent the glass from cracking due to thermal shock.
Speckled Stone Effect
Mix cracked black pepper or dried tea leaves into your base white clay before rolling it out to create an organic, speckled pottery look.
Your floral jar is now ready to bring a permanent burst of spring to your shelf or desk


What Really Happens Inside the Kiln
Learn how time and temperature work together inside the kiln to transform clay into durable ceramic.
Faux Ceramic Floral Jar Skin
Transform a plain glass or plastic container into an elegant piece of faux pottery with this clever texturing technique. The result is a soft, matte finish adorned with delicate botanical illustrations that mimics the look of high-end hand-painted bisque ware.
Step-by-Step
Materials
- Clean glass or plastic jar with a smooth lid
- Baking soda
- White acrylic paint (matte finish)
- Wide flat paintbrush
- Fine detail brushes (sizes 0 and 00)
- Acrylic paints in palette colors: Rust, Sage Green, Olive, Warm Brown, Mustard Yellow
- Spray matte sealant or varnish
- Palette or paper plate for mixing
- Pencil (optional)
Step 1: Creating the Faux Ceramic Base
-
Prepare the Mixture:
Begin by creating your texturing medium. Mix white acrylic paint with baking soda in a roughly 1:1 ratio. You are looking for a consistency similar to fluffy cake frosting or mousse. -
First Coat Application:
Using a wide flat brush, apply the paint and baking soda mixture onto the jar and lid. Dab the brush up and down rather than stroking it to create a pitted, stone-like texture. -
Dry and Repeat:
Allow the first coat to dry completely for at least an hour. Once dry to the touch, apply a second coat if you can still see the original jar underneath. The texture helps hide brush strokes, so don’t worry about perfection. -
Lid Texture:
Ensure the lid gets the same treatment. Because lids are handled often, I sometimes make the mixture slightly thinner here to prevent chipping later on. -
Smoothing (Optional):
If the texture feels too rough once dry, lightly sand high spots with fine-grit sandpaper, then wipe away any dust with a dry cloth.
Paint Flaking Off?
If the base coat flakes off the glass, create a ‘tooth’ first. Sand the glass lightly or apply a dedicated primer before the baking soda mix.
Step 2: Painting the Botanicals
-
Drafting the Design:
You can pencil your design lightly onto the dry textured surface, but be gentle so you don’t scrape off the paint. Planning a mix of tall stems and short blooms works best. -
Base Stems:
Load a size 0 detail brush with watered-down brown or deep olive paint. Paint thin, vertical lines for the main stems, varying their heights around the jar. -
Adding Leaves:
Switch to sage green. Using a simple press-and-lift motion with your brush, add leaves along the stems. Vary the green shades by mixing in a little white or brown for visual interest. -
Main Blooms:
For the focal point flowers, mix a rust or terra cotta shade. Paint circular shapes with scalloped edges to resemble zinnias or daisies. Leave the centers empty for now. -
Secondary Florals:
Add smaller, filler flowers in mustard yellow or pale pink. These can be simple dots or tiny teardrop shapes clustered on branching stems. -
Adding Detail:
Once the main colors are dry, use your smallest brush (00) to add veins to the leaves in a darker green. This crisp detail makes the illustration pop against the textured background. -
Flower Centers:
Fill the centers of your main blooms with dark brown dots or small cross-hatch patterns to give them depth. -
Berries and Buds:
Dip the back end of your paintbrush handle into red or orange paint and dot it onto the surface to create perfect little berries floating around the leaves. -
Decorating the Lid:
Don’t forget the top. Paint a simple sprig or a single large blossom on the center of the lid to tie the whole piece together.
Soften the Colors
To get that vintage botanical look, mix a tiny drop of grey or brown into every color you use to desaturate them slightly.
Step 3: Finishing
-
Final Drying:
Let all the detailed painting dry for at least 24 hours to ensure the acrylic has fully cured. -
Sealing:
Spray the entire jar with a matte clear sealant. This is crucial for faux ceramic projects, as the baking soda mixture can be brittle without a topcoat.
Now you have a charming storage vessel that brings a touch of nature indoors
Gnome Home Jar With Hat Lid
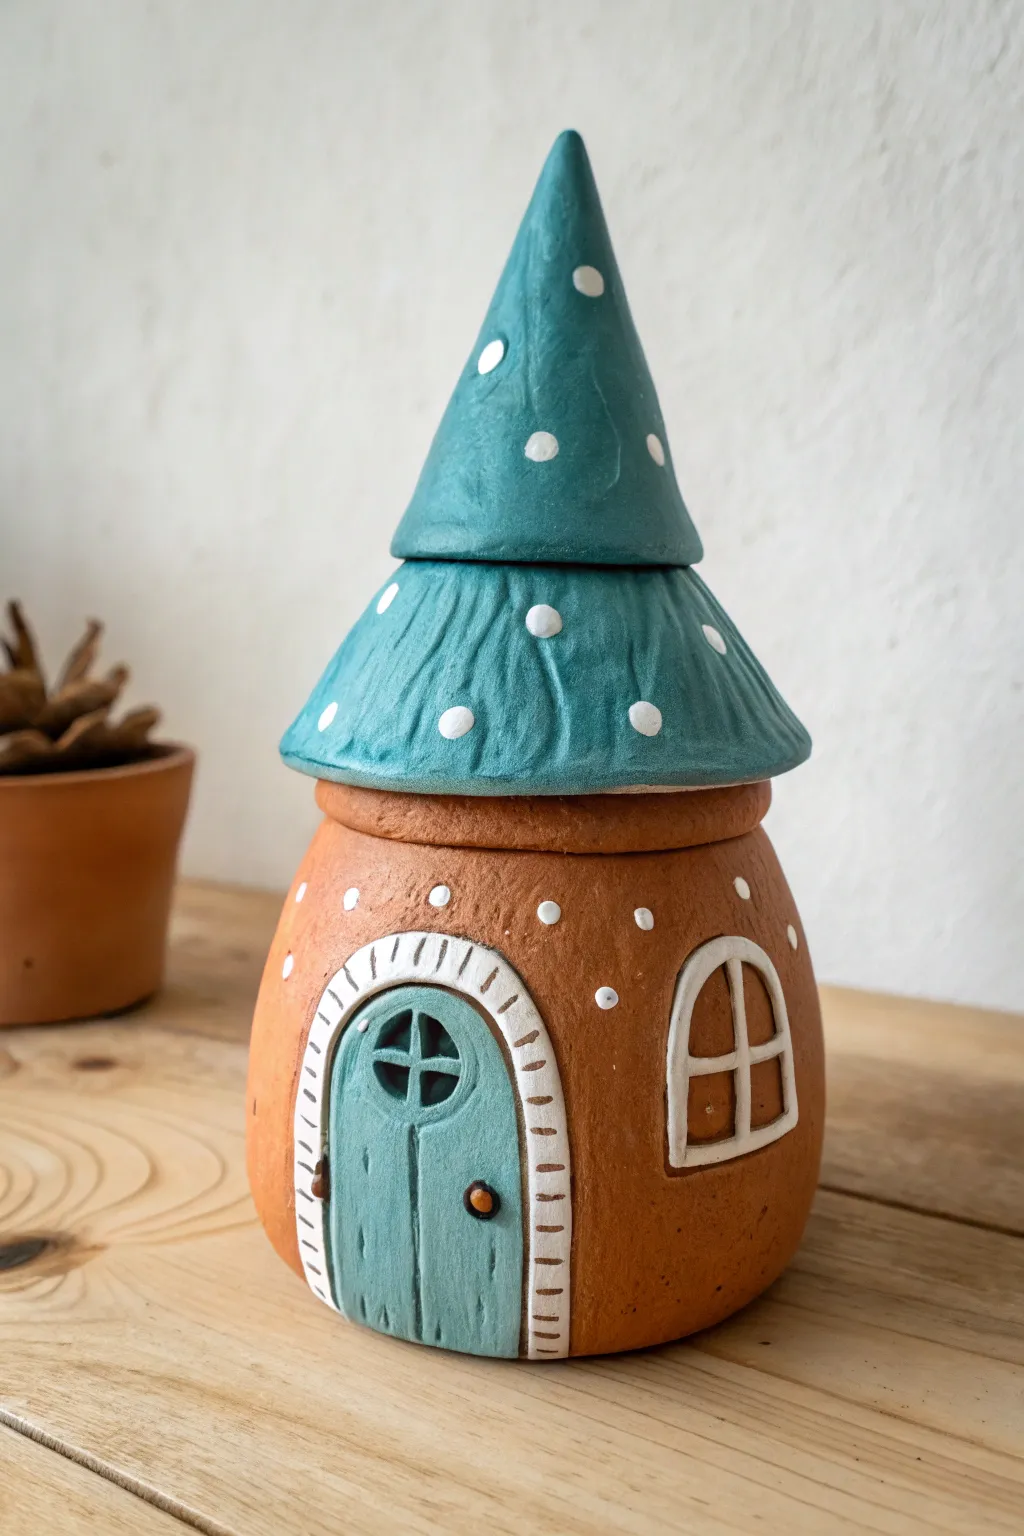
Transform a simple lump of clay into this enchanting woodland dwelling that doubles as a secret storage jar. Featuring a textured teal roof and charming white details, this terracotta-style mushroom house brings a touch of fairytale magic to any shelf.
Step-by-Step Guide
Materials
- Terracotta-colored air-dry clay or polymer clay
- Teal acrylic paint
- White acrylic paint
- Rolling pin
- Clay sculpting tools (needle tool, ball stylus)
- Small round cookie cutter or jar lid (for base shape)
- Aluminum foil (for creating an internal armature)
- Small paintbrushes (fine tip for details)
- Water and sponge (for smoothing)
- Matte varnish or sealant
Step 1: Building the Base Structure
-
Form the jar body:
Begin with a ball of terracotta-colored clay. Pinch and shape it into a hollow pot shape, slightly wider at the bottom like a gourd or bulb. Aim for walls about 1/4 inch thick for stability. -
Refine the rim:
Smooth the opening at the top of your jar body. Ensure it is perfectly circular so the lid will sit flush later. You can use a bit of water on your finger to smooth out any cracks. -
Create the lid armature:
Crumple aluminum foil into a cone shape. This will save on clay and keeps the lid lightweight. The base of the cone should be slightly wider than your jar’s opening.
Smoother Surfaces
Keep a small bowl of water nearby while sculpting. Dip your finger and gently rub the clay to erase fingerprints before drying.
Step 2: Sculpting the Mushroom Roof
-
Cover the armature:
Roll out a sheet of clay and drape it over your foil cone. Smooth it down, trimming excess at the bottom. Create a slight overhang at the base of the cone to mimic a mushroom cap’s edge. -
Shape the two tiers:
Notice the roof has two distinct tiers. Add a smaller cone shape on top of the main roof section, blending the seam underneath so it looks like one stacked structure, or sculpt a deep groove around the middle to create the separation visually. -
Add texture:
Using a needle tool or a dull knife, gently carve vertical lines down the roof surface. These striations give it an organic, aged mushroom look. -
Fit the lid:
Turn the lid over and add a small ring of clay on the underside that fits *inside* the jar opening. This flange will keep the lid secure so it doesn’t slide off.
Step 3: Adding Charming Details
-
Carve the door outline:
Roll a small oval slab of clay and attach it to the front of the jar body for the door. Use a needle tool to score vertical wood grain lines into the door surface. -
Create the door frame:
Roll a thin snake of clay and flatten it slightly. Wrap this around your door like an archway. Use a tool to press small horizontal lines into it, creating a brick or stone effect. -
Add the window:
Attach a small D-shaped piece of clay on the side. Roll tiny threads of clay to form a cross for the window pane mullions and press them gently into the window shape. -
Install hardware:
Roll tiny balls of clay for the doorknob and hinges. Attach them securely to the door with a dab of water or liquid clay.
Glow Up
Cut the windows out completely instead of adding them on top, then place a battery-operated tea light inside for a glowing nightlight.
Step 4: Painting and Finishing
-
Dry thoroughly:
Allow your clay to dry completely according to package instructions. Air-dry clay may take 24-48 hours. I find rushing this step often leads to cracks, so be patient. -
Paint the roof:
Paint the entire roof section with a muted teal acrylic paint. You might want to water the paint down slightly to let it settle into the texture grooves for depth. -
Paint the door:
Use a lighter shade of teal or mix your main teal with white to paint the door, distinguishing it from the roof. -
Add the dots:
Dip the end of a paintbrush handle or a ball stylus into white paint. Add polka dots randomly across the roof and the body of the house for that classic toadstool vibe. -
Highlight the frame:
Paint the door frame white. Once dry, you can lightly wipe it with a damp cloth if you want it to look weathered, or leave it crisp and bright. -
Seal the piece:
Once all paint is dry, apply a coat of matte varnish to protect your gnome home from dust and handling.
Now you have a whimsical hiding spot for small trinkets that looks like it was plucked straight from a fairy forest

TRACK YOUR CERAMIC JOURNEY
Capture glaze tests, firing details, and creative progress—all in one simple printable. Make your projects easier to repeat and improve.
Succulent Lid Planter Jar Illusion
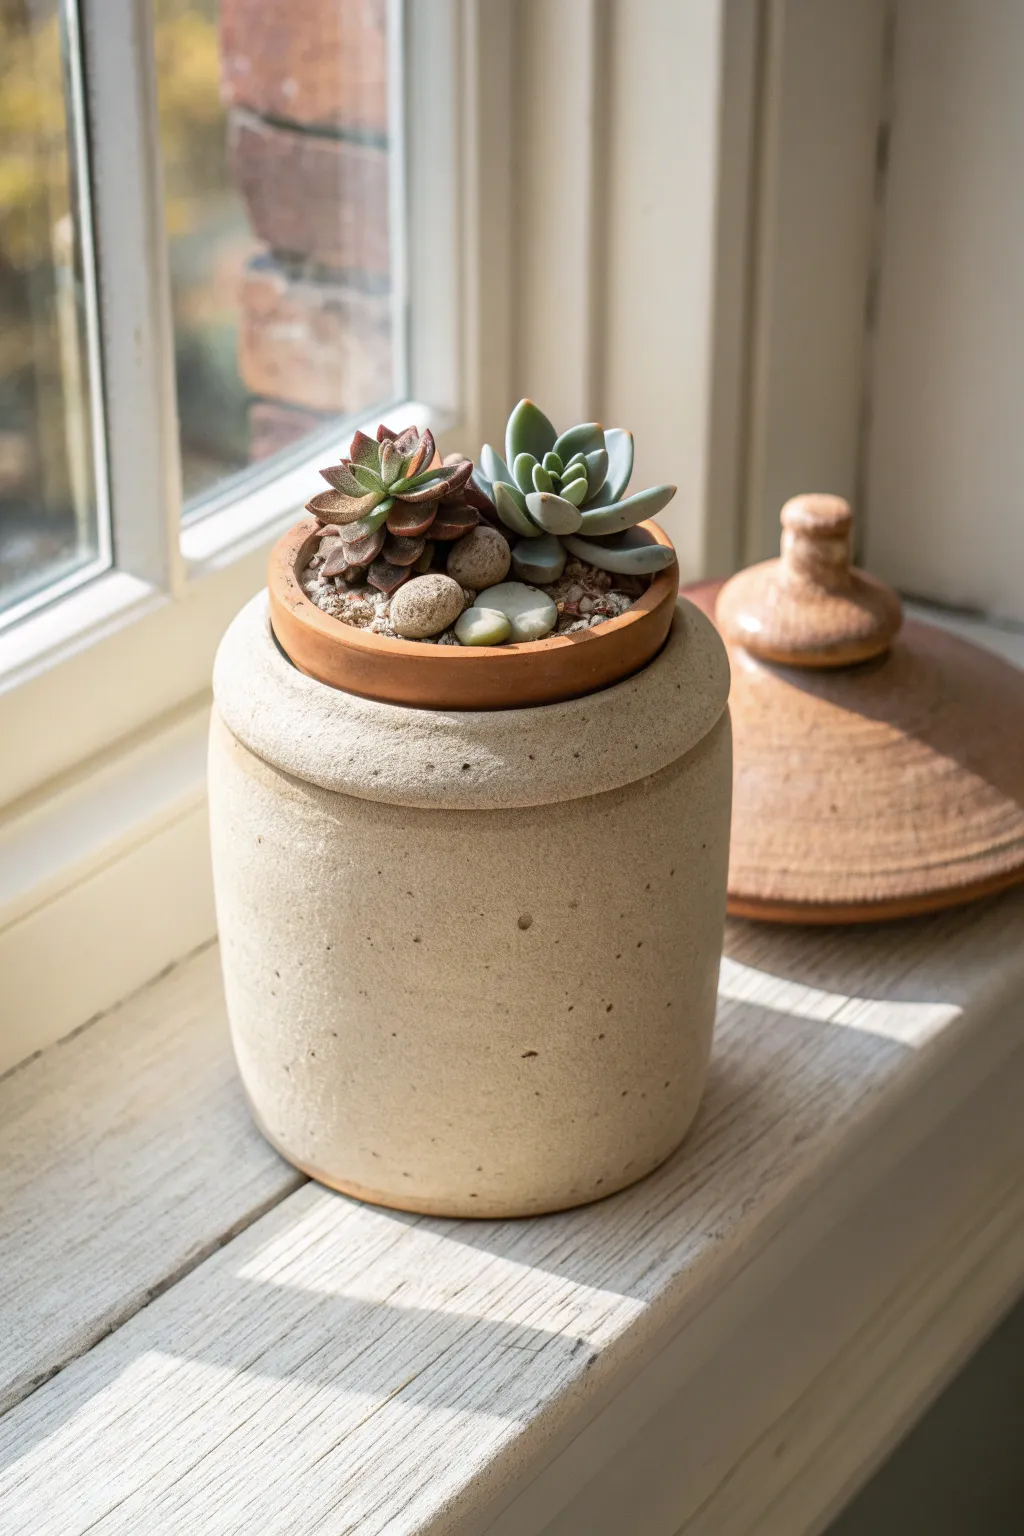
Transform a vintage-style ceramic storage crock into a clever housing for your succulents with this simple nesting project. By resting a shallow terracotta dish inside the jar’s mouth, you create a seamless, elevated display while keeping the jar’s original purpose intact.
Step-by-Step Guide
Materials
- Ceramic crock jar with lid (fermentation style or cookie jar)
- Shallow terracotta saucer or bulb pan (sized to fit jar opening)
- Succulent potting mix
- Small succulents (e.g., Echeveria, Sedum)
- Decorative top dressing stones or pebbles
- Small scoop or spoon
- Water spray bottle
Step 1: Preparation & Sizing
-
Measure the opening:
Before buying your terracotta insert, measure the inner diameter of your crock jar’s mouth. You need a saucer or shallow pot that is slightly wider at its rim than the jar’s opening so it catches reliably without falling through. -
Clean the crock:
Wipe down the stoneware jar with a damp cloth to remove any dust. Since we aren’t planting directly into the big jar, you don’t need to drill drainage holes in it, which preserves the vessel for future use. -
Test the fit:
Place your empty terracotta saucer into the mouth of the jar. It should sit flush or slightly raised, supported securely by the rim of the crock. Ensure it doesn’t wobble.
Step 2: Planting the Insert
-
Prepare the soil base:
Remove the saucer and fill it about halfway with succulent-specific potting mix. This soil drains quickly, which is crucial for shallow planting. -
Unpot the succulents:
Gently remove your succulents from their nursery containers. Massage the root balls lightly to loosen tightly packed soil. -
Arrange the plants:
Nestle the plants into the saucer. I like to group them slightly off-center for a more organic look. You can fit two or three small rosette types comfortably in a standard 4-inch saucer. -
Add surrounding soil:
Use a small spoon to fill in gaps around the roots with more potting mix until the plants are secure. Press down gently with your thumb to eliminate air pockets.
Drainage trick
If your insert saucer has a hole, place a small plastic liner or bottle cap underneath it inside the crock to catch drips.
Step 3: Finishing Details
-
Clean the rim:
Brush away any loose soil from the rim of the terracotta saucer so the final presentation looks tidy. -
Add top dressing:
Layer small decorative stones or pebbles over the exposed soil. This not only looks polished but helps keep the soil in place when watering. -
Tuck in accents:
Place a few slightly larger river stones between the succulent heads for texture variety. -
Assemble the illusion:
Carefully lower your planted saucer back into the mouth of the crock jar. -
Place the lid:
Set the original ceramic lid next to the jar on your shelf or windowsill. This completes the visual story that the plants are bursting out of the container. -
Final misting:
Give the succulents a very light misting or a small sip of water to settle the soil, being careful not to overwater since the saucer is distinct from the drainage-free bottom jar.
Height hack
If the saucer sits too deep, fill the bottom of the crock with crumpled paper or bubble wrap to prop it up.
Now you have a charming, rustic planter that adds personality to your windowsill
Celestial Moon and Stars Jar
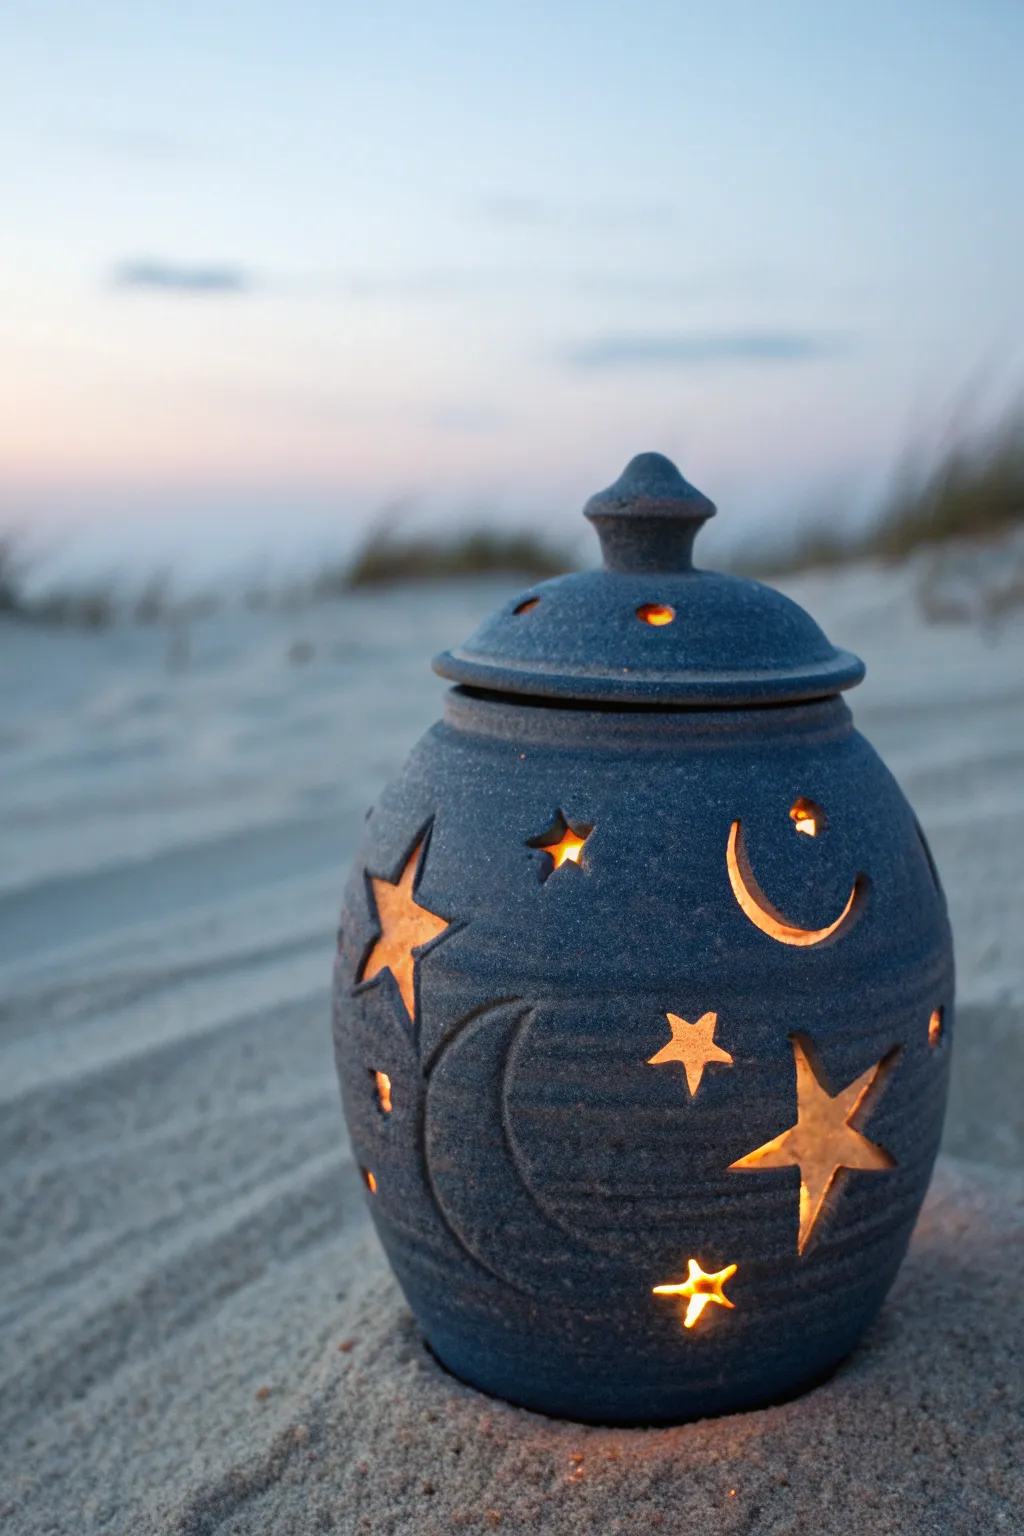
Bring a piece of the night sky into your home with this enchanting celestial jar luminary. The textured, speckled blue clay mimics the depth of twilight, while handcrafted star and moon cutouts cast a warm, dreamy glow.
How-To Guide
Materials
- Speckled blue stoneware clay (or polymer clay with granite effect)
- Medium-sized cylindrical mold (or empty can)
- Pottery knife or fettling knife
- Small star and moon shape cutters
- Needle tool
- Hole punch tool (various sizes)
- Rolling pin
- Smoothing sponge
- Slip and scoring tool (if using ceramic clay)
- Small tealight or LED candle
Step 1: Forming the Body
-
Prepare the Clay:
Start by wedging your speckled blue clay thoroughly to remove air bubbles. This step is crucial for ensuring the walls of your luminary are strong and won’t crack during firing or baking. -
Roll the Slab:
Use your rolling pin to roll out a smooth, even slab about 1/4 inch thick. Aim for a long rectangular shape that will wrap completely around your cylindrical mold. -
Wrap the Cylinder:
Gently wrap the clay slab around your mold. Cut away excess clay where the ends meet, creating a vertical seam. If you’re using real clay, score and slip the edges before pressing them together; for polymer clay, blend the seam with your finger until invisible. -
Create the Base:
Roll a smaller piece of clay for the base. Place your cylinder on top, trace around it with a needle tool, and cut out the circle. Attach this base to the cylinder, blending the clay upwards to seal the bottom securely. -
Shape the Shoulders:
Gently curve the top rim of the cylinder inward slightly to create a rounded shoulder effect. Use a damp sponge to smooth out any fingerprints or harsh angles.
Clean Cuts Tip
Wait until the clay is leather-hard before cutting the complex star shapes. Very soft clay tends to drag and warp the delicate points.
Step 2: Crafting the Lid
-
Cut the Lid Base:
Roll another small slab and cut a circle slightly larger than the top opening of your jar. This overlap will ensure the lid sits comfortably without falling in. -
Form the Dome:
Gently press this circle into a shallow concave mold or use your thumbs to gently pinch and curve it into a slight dome shape. -
Add the Knob:
Fashion a small, tiered knob from a scrap of clay. I find that creating a small cone and flattening the bottom gives it an elegant silhouette. Score and attach it firmly to the center of the domed lid. -
Create the Flange:
Roll a small coil (snake) of clay. Attach it to the *underside* of the lid in a circle that fits just inside the jar’s opening. This flange keeps the lid from sliding off. -
Ventilation Holes:
Punch two or three small holes near the top of the lid using a small hole punch. This is essential for heat escape if you plan to use a real candle.
Step 3: Celestial Details
-
Plan the Design:
Lightly sketch, or impress your cutters gently into the surface without cutting through, to plan where your moons and stars will go. Balance is key here—stagger the sizes. -
Cut the Stars:
Using your star cutters or a sharp knife, carefully remove the star shapes. For the sharp points, use the tip of a needle tool to clean up any ragged edges. -
Carve the Moons:
Cut out crescent moon shapes. You can also shallowly carve outlines of moons or planets that don’t go all the way through for added texture. -
Refine the Edges:
Once the clay is leather-hard (stiff but cool to the touch), use a slightly damp sponge to smooth the sharp edges of every cutout. This gives the piece a professional, finished look. -
Finish the Surface:
Run a rib tool or sponge over the entire exterior one last time to enhance the smooth, stone-like texture. Let the piece dry very slowly to prevent warping. -
Fire or Bake:
Follow the specific instructions for your material. For ceramic clay, fire it in a kiln to stoneware temperatures. For polymer clay, bake in your home oven according to the package directions.
Color Depth Glaze
For ceramics, wipe a dark oxide wash over the surface and sponge it off before firing to highlight the natural speckles and texture.
Place your light inside and watch the stars dance on your walls
Underwater Coral Reef Jar
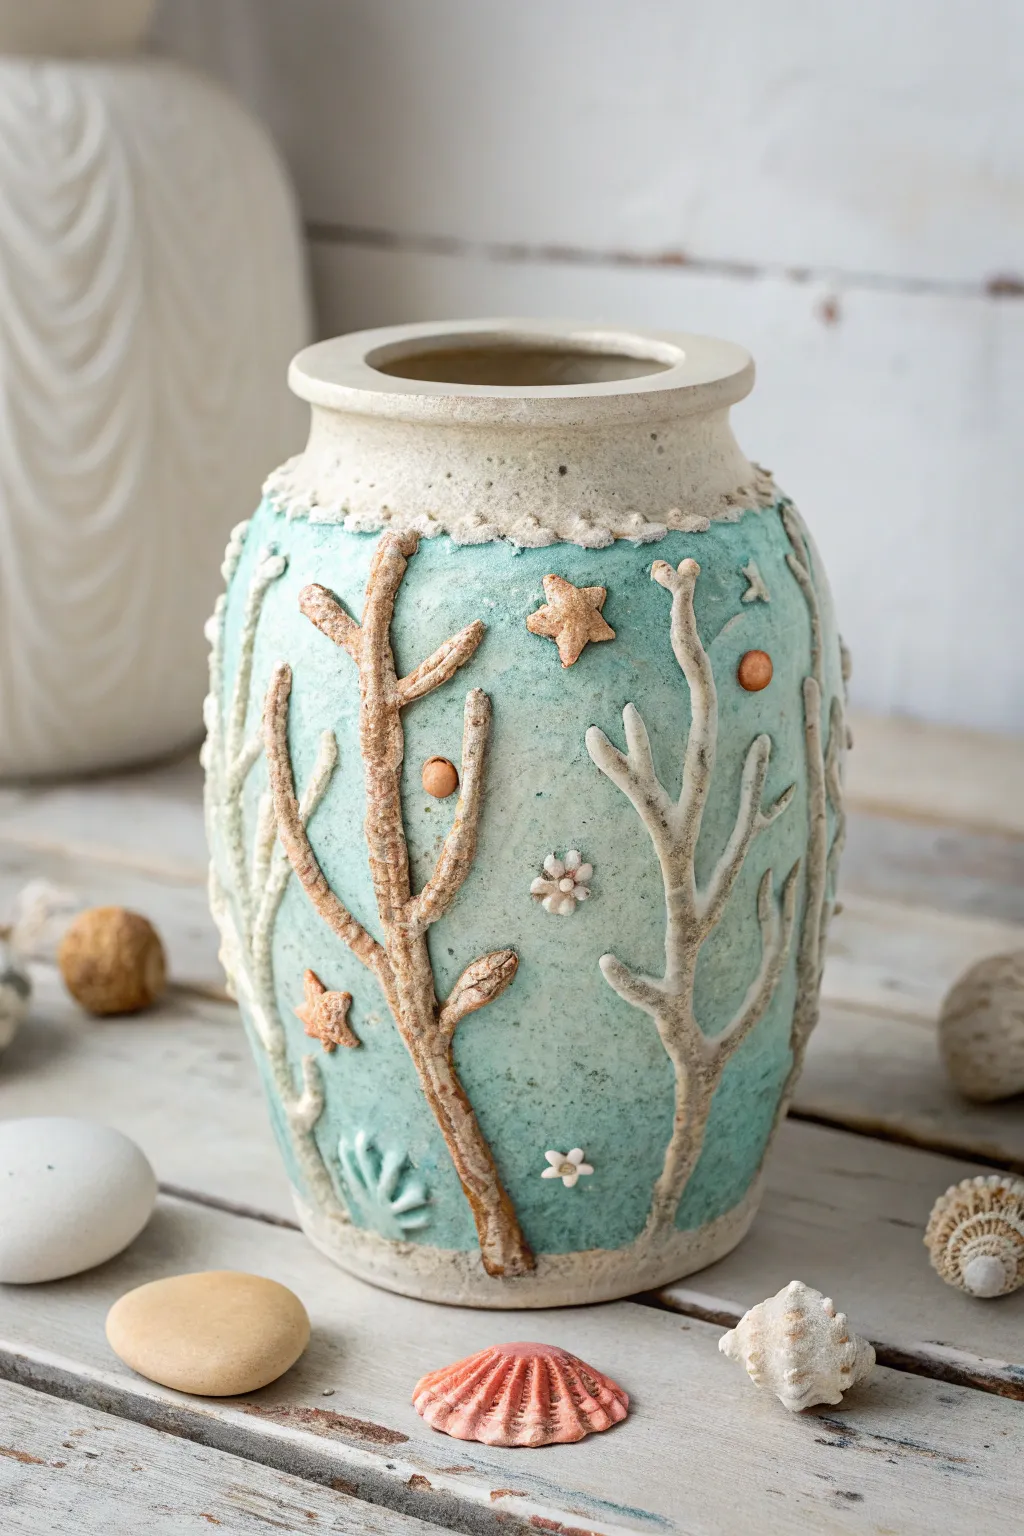
Bring the calming beauty of a reef ecosystem into your home with this textured ceramic project. By layering raised clay elements over a wheel-thrown or coil-built base, you’ll create a tactile stunning vessel that feels like it was just pulled from the ocean floor.
Step-by-Step Guide
Materials
- Stoneware clay body (white or buff)
- Pottery wheel (or supplies for coil building)
- Needle tool
- Scoring rib or serrated kidney tool
- Slip (liquid clay)
- Modeling tools (wooden and metal)
- Turquoise/Teal matte glaze
- White or cream matte glaze
- Brown oxide wash (optional)
- Sponge
- Small brushes
Step 1: Forming the Base Vessel
-
Shape the jar:
Begin by throwing a medium-sized cylinder on the wheel, or use coil-building techniques to hand-build a similar shape. Aim for a slightly bulbous body that tapers gently toward the neck. -
Define the rim:
Pull the neck inward to create a distinct collar, roughly 1-2 inches tall. Flare the rim horizontally at the top to give it a finished, classic jar silhouette. -
Trim the foot:
Once the vessel is leather-hard, trim the bottom to create a neat foot ring. This lifts the piece and gives it a professional appearance. -
Surface prep:
While the clay is still leather-hard, use a serrated kidney tool to lightly texture the main body area where the turquoise glaze will eventually go. This roughness mimics a sandy texture.
Cracking Coral?
If coral branches crack off during drying, your slip wasn’t wet enough. Score deeper and really adhere the clay. Dry very slowly under loose plastic.
Step 2: Sculpting the Reef Details
-
Roll coral coils:
Roll out several thin coils of clay. Vary their thickness slightly to represent different organic coral branches. -
Apply the main branches:
Score the surface of the jar and brush on a little slip. Attach your longest coils vertically, allowing them to branch out naturally like a tree. -
Texture the coral:
Using a needle tool or a small texturing stone, gently stipple the surface of the applied coral coils. This rough, pitted texture is crucial for realism. -
Create background coral:
Add thinner, shorter branches in the background areas. I find overlapping a few branches creates better depth and shadows. -
Sculpt small starfish:
Form tiny spheres of clay and pinch them into five-pointed stars. Attach these randomly among the coral branches. -
Add barnacles and urchins:
Make small balls of clay and press them flat against the jar. Poke the centers or create radiating lines to mimic sea urchins or barnacles. -
Detail the rim:
Roll a small coil and attach it to the base of the neck. Texture this ring heavily to look like a crust of small shells or foam meeting the tide line.
Ocean Sparkle
Add a pinch of coarse sand or grog into your turquoise glaze mix. It creates physical texture that feels gritty and authentic like a real seabed.
Step 3: Glazing and Finishing
-
Bisque fire:
Allow the jar to dry slowly and completely to prevent cracking around the added elements, then bisque fire it according to your clay body’s specifications. -
Wax resist application:
Apply wax resist carefully to the raised coral branches, starfish, and the textured neck ring. This keeps them raw for now. -
Background glazing:
Dip or brush the turquoise matte glaze over the entire body. The wax will protect your sculpts. Wipe away any stray droplets on the raised parts. -
Glazing the details:
Once the background dries, use a small brush to apply a creamy white or sandy beige glaze to the coral and stars. For the ‘woodier’ looking coral, you might mix a touch of iron oxide into the white glaze. -
Highlighting texture:
If you want extra depth, wipe a very diluted brown oxide wash over the textured coral and sponge it off immediately, leaving dark color only in the deepest pits. -
Glaze the rim:
Leave the very top rim and the neck natural or apply a simple clear matte glaze to let the clay color show through. -
Final firing:
Glaze fire the piece to the appropriate cone (likely Cone 5 or 6 for stoneware). Ensure no glaze is on the foot ring before loading the kiln.
Place your finished jar in a sunny spot where the light can play across the textured surface
Stained-Glass Mosaic Clay Jar
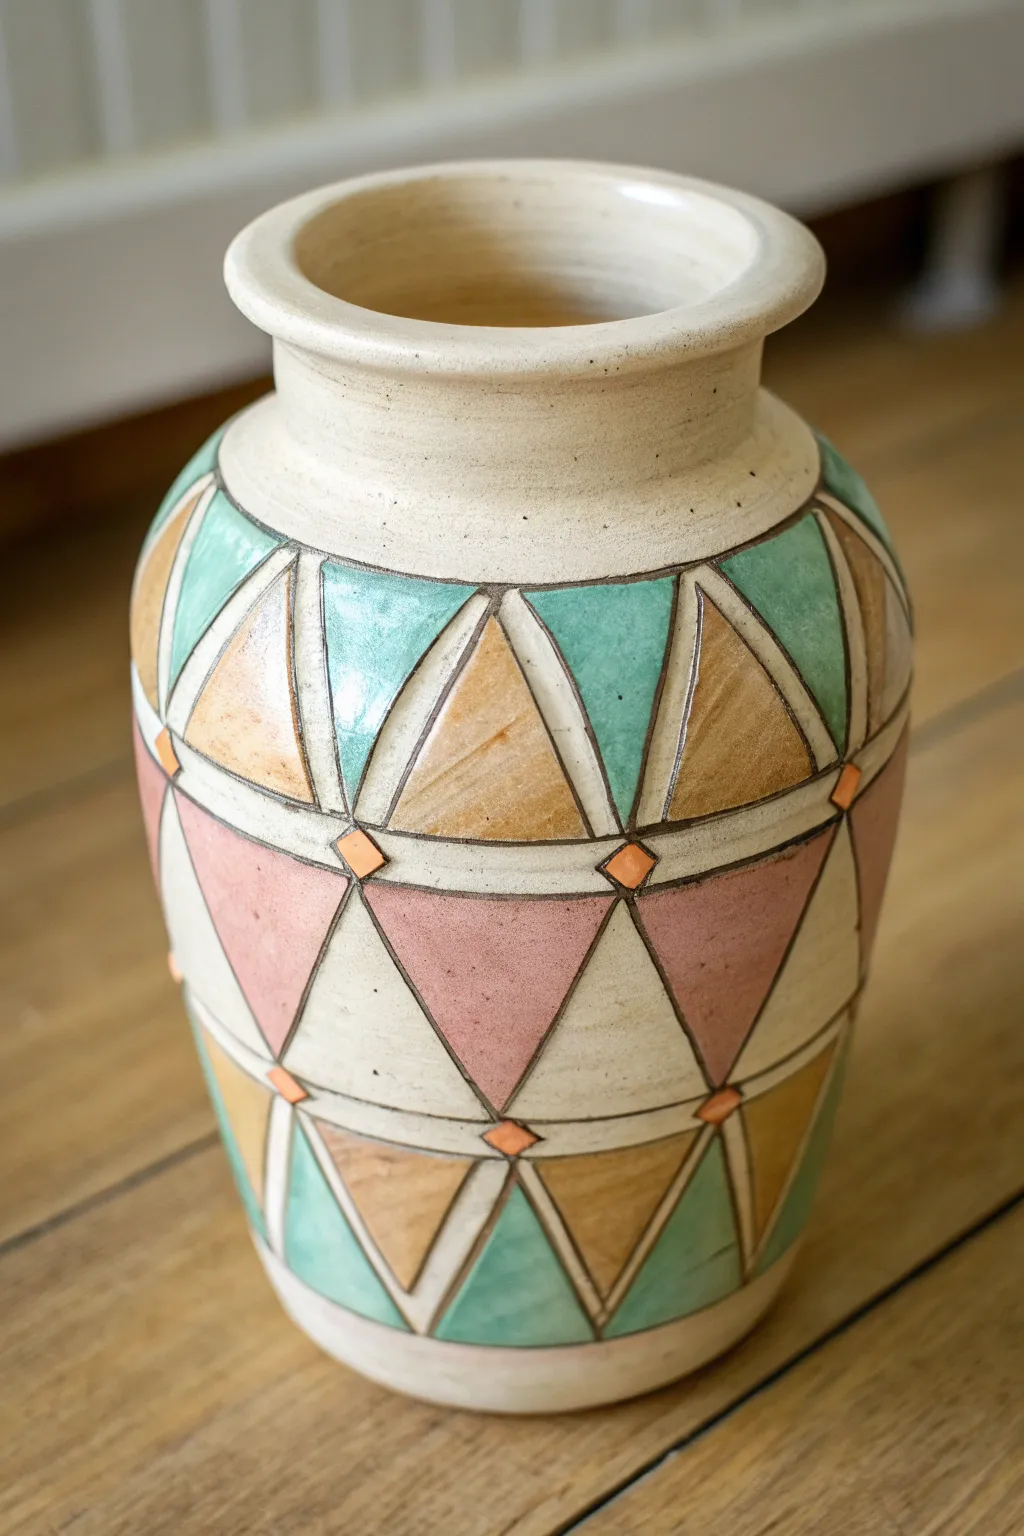
Transform a plain terra cotta or bisque vase into a stunning geometric masterpiece that mimics the look of leaded stained glass. This project uses precise carving and carefully applied glazes or paints to create a structured, colorful design with a satisfying tactile finish.
Step-by-Step Guide
Materials
- Bisque fired clay jar or plain terra cotta vase
- Pencil
- Flexible ruler or measuring tape
- Carving tool (V-tip or loop tool) or linoleum cutter
- Fine-grit sandpaper
- Damp sponge
- Acrylic paints or ceramic glazes (mint green, mustard yellow, dusty pink, burnt orange)
- Small flat synthetic brushes
- Detail brush
- Black or dark brown puff paint (for lead lines) or black acrylic paint
- Clear matte or satin sealant spray
Step 1: Preparation and Design
-
Clean surface:
Begin by wiping down your clay jar with a damp sponge to remove any dust or oils that might interfere with adhesion. -
Mark horizontal bands:
Using your flexible ruler, lightly mark horizontal rings around the vase with a pencil. Based on the vase’s curve, create three main bands: a top band for the neck, a middle band for the shoulder, and a lower band for the base. -
Sketch the grid:
Vertical lines are needed next to create the triangular grid. Mark points along your horizontal rings at equal intervals. -
Draw triangles:
Connect your points diagonally to form a repeating pattern of triangles. Some should point up, others down, creating a tessellated effect. -
Add detail accents:
At the intersections where the points of the triangles meet, draw small diamond shapes. This small detail adds complexity and mimics the joinery found in real stained glass work.
Fixing Wobbly Lines
If your carved lines look uneven, don’t fill them with dark paint. Instead, use a thick puff paint to trace over them, which hides the jittery carving underneath.
Step 2: Carving the Texture
-
Carve main lines:
Using your V-tip carving tool or linoleum cutter, carefully carve over your pencil lines. You want to create a groove that is deep enough to feel but not so deep it weakens the jar. -
Refine intersections:
Pay special attention to the small diamond accents. Carve around them carefully so they stand out as raised relief elements. -
Smooth the edges:
Once all lines are carved, take a piece of fine-grit sandpaper and gently sand over the grooves to remove any sharp burrs or clay crumbs. -
Final wipe:
Use a dry brush or a barely damp sponge to sweep away all the carving dust. The grooves must be clean for the next step.
Step 3: Applying Color
-
Paint the mint sections:
Select specific triangles to be mint green. I prefer to space these out essentially in every other row or column to balance the color. Apply the paint smoothly within the carved triangular borders. -
Apply mustard tones:
Fill in adjacent triangles with a warm mustard yellow or tan. Allow the natural texture of the brushstrokes to remain slightly visible to mimic the variation in stained glass. -
Add pink hues:
Paint the remaining large triangles with a dusty rose or pink shade. Ensure the paint extends fully to the edge of the carved groove. -
Highlight the accents:
Using a very fine detail brush, paint the small diamond intersections a bright burnt orange. These pop against the softer pastel tones. -
Leave negative space:
Leave the top rim and the very bottom base of the vase unpainted or paint them a neutral cream color to frame the main design.
High-Gloss Finish
To make the ‘glass’ sections look real, apply a coat of dimensional clear glaze or glossy Mod Podge just on the colored triangles, leaving the lines matte.
Step 4: Defining Lines and Finishing
-
Darken the grooves:
Dip a thin brush into black or dark brown paint (watered down slightly) and carefully run it into the carved grooves. Alternatively, trace the grooves with dimensional puff paint for a raised ‘lead’ look. -
Clean up spills:
If any dark paint spills onto the colored triangles, wipe it away immediately with a damp paper towel or paint over it once dry. -
Dry thoroughly:
Let the jar sit overnight to ensure all paint layers are completely cured. -
Seal the work:
Finish by spraying the entire piece with a clear matte or satin sealant. This protects the paint and unifies the sheen of the different colors.
Now you have a striking décor piece that brings geometric elegance to any shelf