Clay keychains are one of my favorite quick projects because they’re tiny, useful, and basically made for personal touches. If you’re craving ideas that feel cute, durable, and totally you, these clay key chain ideas will keep your hands happily busy.
Stamped Word Tag Keychain
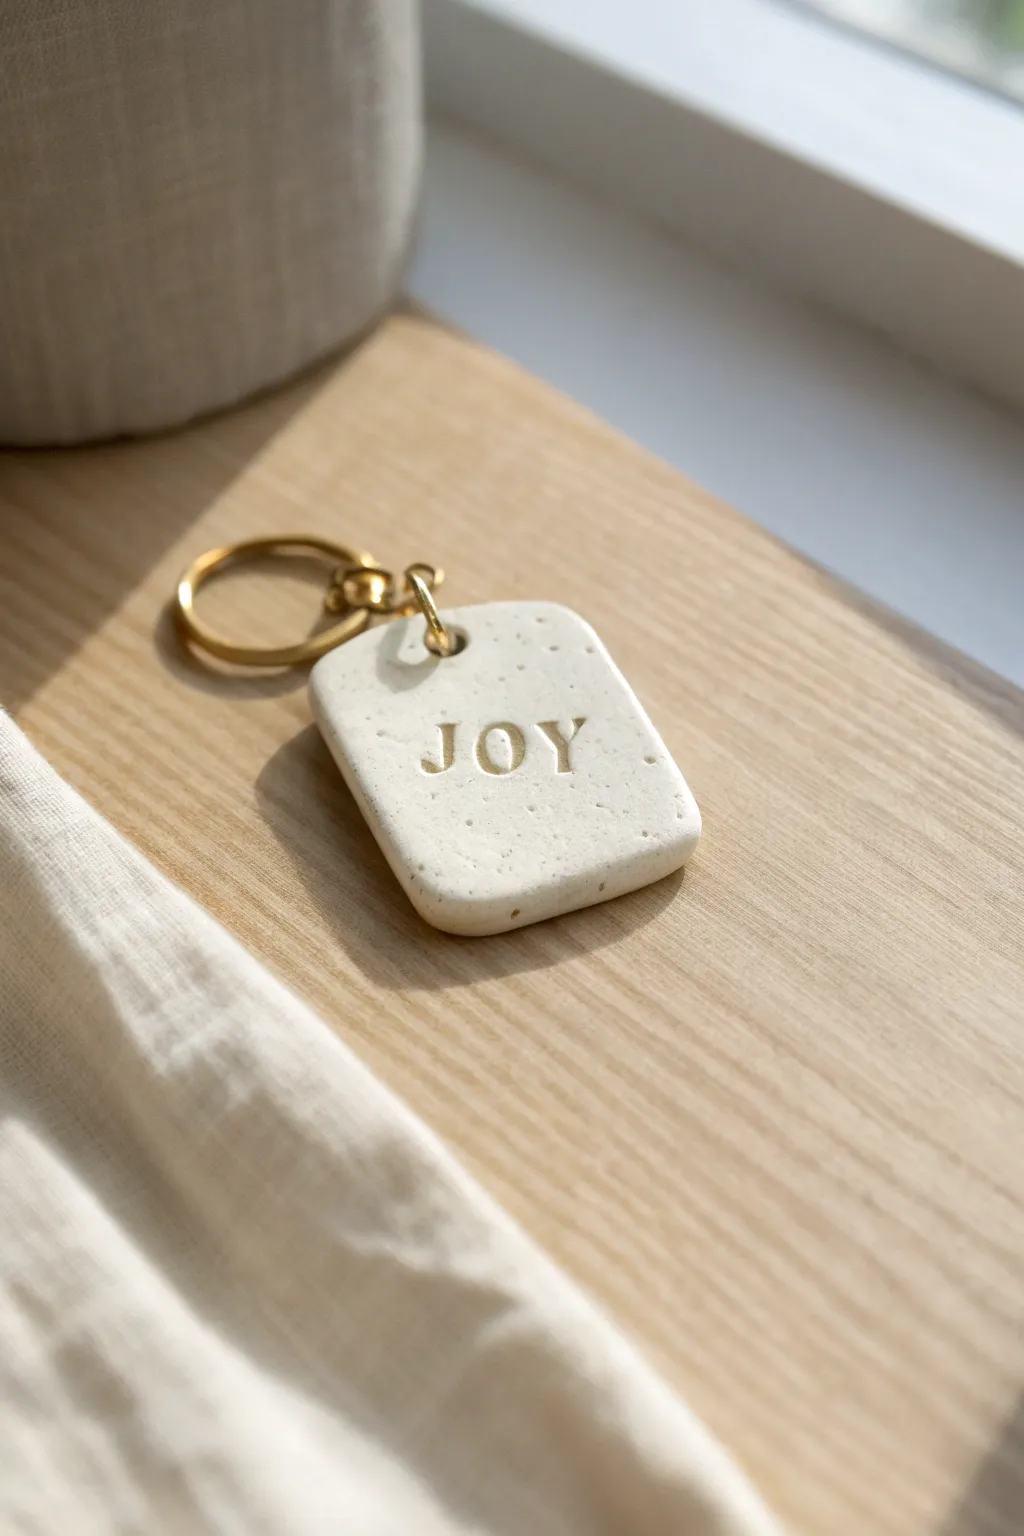
Embrace simplicity with this minimalist keychain featuring a trendy speckled finish and clean typography. The creamy white clay paired with gold lettering creates an elegant, earthy accessory perfect for gifting or keeping.
Step-by-Step
Materials
- Polymer clay (white or cream)
- Black pepper or dried coffee grounds (for speckles)
- Acrylic rolling pin
- Rectangle clay cutter (approx. 1.5 inch)
- Mini alphabet stamp set
- Gold acrylic paint
- Fine tip paintbrush
- Needle tool or toothpick
- Sandpaper (fine grit)
- Gold split ring keychain
- Gold jump ring (large)
- Jewelry pliers
- Parchment paper
- Oven
Step 1: Preparing the Clay
-
Condition the white clay:
Start by kneading a small block of your white or cream polymer clay in your hands until it becomes soft, warm, and pliable. This prevents cracking later. -
Add the speckles:
Sprinkle a tiny pinch of ground black pepper or dried coffee grounds onto the flattened clay. Knead the clay again thoroughly to distribute the specs evenly throughout the block. -
Roll it out:
Place the clay on a sheet of parchment paper. Use your acrylic roller to flatten it into a slab. Aim for a thickness of about 1/4 inch (6mm) so it feels substantial and sturdy. -
Check for bubbles:
Inspect the surface for any trapped air bubbles. If you see one, gently pierce it with your needle tool and smooth the area with your finger. -
Cut the shape:
Position your rectangle cutter over the best part of the slab. Press down firmly and evenly to cut out your tag shape. -
Softening the edges:
After removing the excess clay, use your fingertip to gently tap and smooth the cut edges of the rectangle. This removes the sharp ‘cookie cutter’ look and gives it that soft stone aesthetic.
Step 2: Stamping and Baking
-
Plan your placement:
Lightly hover your letter stamps over the clay without touching it to visualize the spacing for the word ‘JOY’. Center it both vertically and horizontally. -
Stamp the letters:
Press the ‘J’, ‘O’, and ‘Y’ stamps firmly into the clay one by one. Apply even pressure so the impression is deep enough to hold paint later, but not so deep it distorts the tag. -
Pierce the hole:
Use a straw or a small circle cutter to unexpected create a hole at the top center of the tag. Ensure the hole is large enough for your jump ring to move freely. -
Pre-bake check:
Give the piece a final look over. Remove any stray dust particles or fingerprints by lightly brushing them with a bit of baby oil or cornstarch. -
Bake the clay:
Transfer the parchment paper with the clay to a baking sheet. Bake according to your polymer clay package instructions (usually around 275°F/135°C for 15-30 minutes). -
Cool down:
Once baked, remove the tray from the oven and let the clay cool completely. It will harden fully as it cools down to room temperature.
Uneven Stamping?
If you mess up a letter stamp, don’t try to fix it! It’s cleaner to balled up the clay, re-roll, and start fresh. Clay is forgiving until baked.
Step 3: Finishing Touches
-
Sand the edges:
If there are any rough spots on the sides, gently buff them with fine-grit sandpaper under running water. This keeps dust down and creates a polished finish. -
Paint the letters:
Dip a fine paintbrush into gold acrylic paint. Carefully fill the indented letters. Don’t worry if you get some paint on the surface; we’ll fix that. -
Wipe excess paint:
While the paint is still slightly wet, dampen a paper towel or cotton swab and lightly wipe across the surface. This removes paint from the high points, leaving the gold only inside the stamped letters. -
Open the jump ring:
Using two pairs of jewelry pliers, grip the gold jump ring and twist the ends away from each other (front to back) rather than pulling them apart, to maintain the circle shape. -
Attach the hardware:
Slide the open jump ring through the clay tag’s hole and loop the split keyring onto it as well. -
Close the ring:
Use your pliers to twist the jump ring ends back together until they meet perfectly flush.
Level Up: Glaze It
Apply a coat of satin or gloss polyurethane varnish after the paint dries. This seals the gold paint and gives the ‘stone’ a ceramic-like sheen.
Now you have a chic, personalized accessory ready to add a touch of joy to your daily routine.

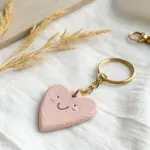

Minimal Heart Charm Keychain
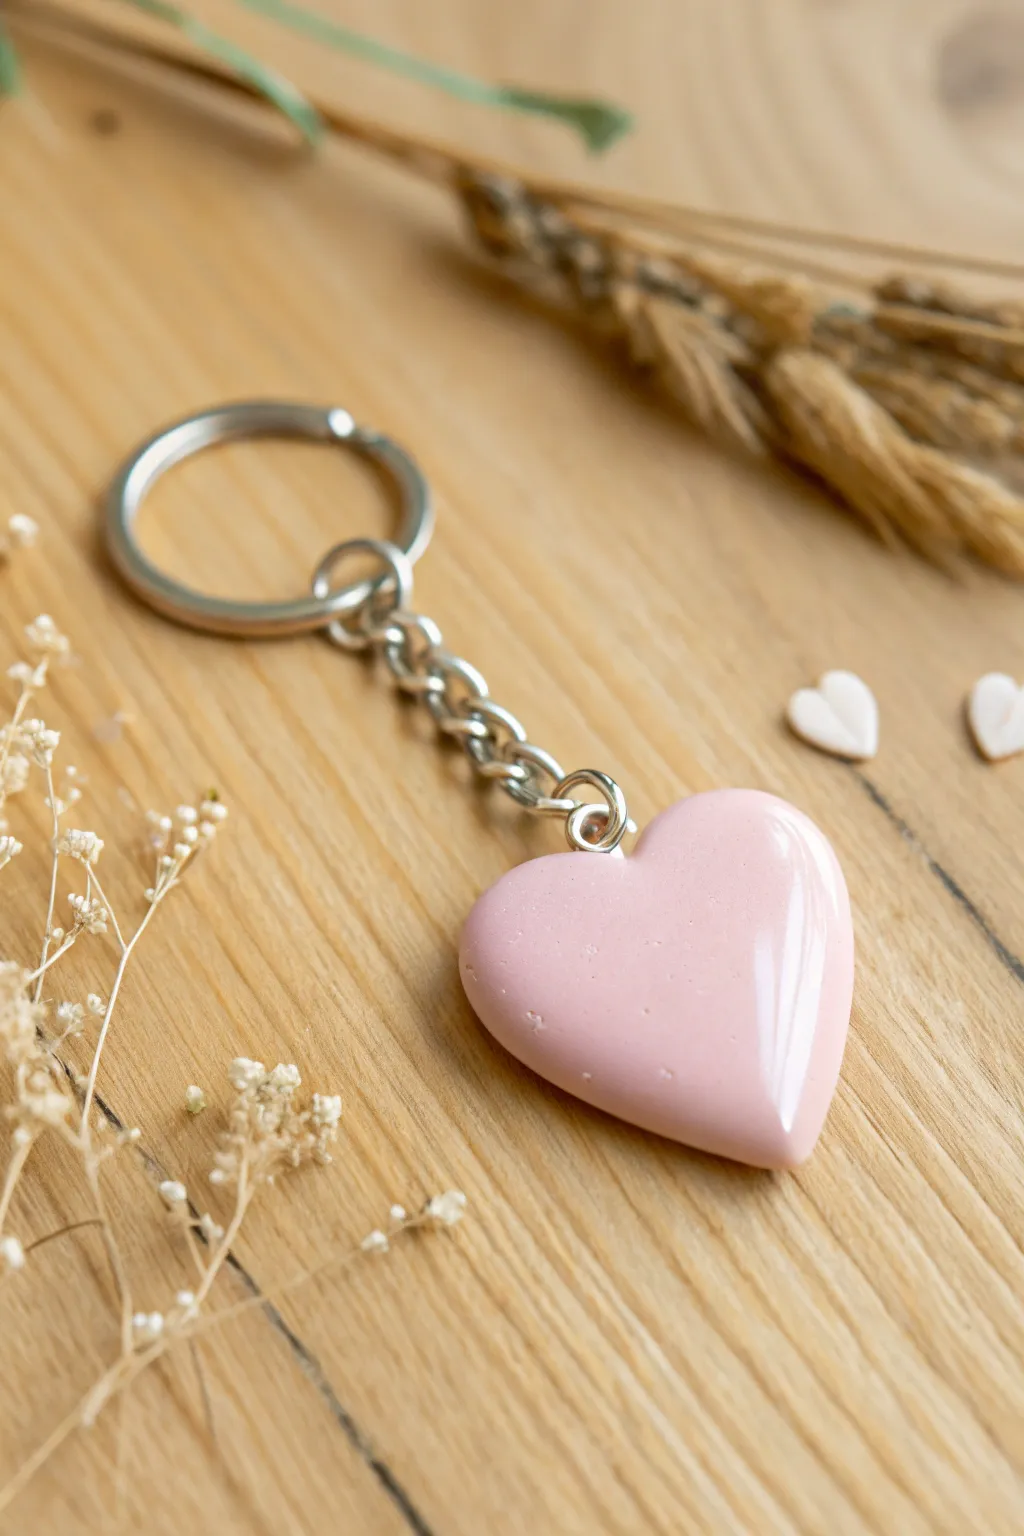
Embrace simplicity with this ultra-smooth, high-gloss heart charm that balances minimalist design with professional finishes. The gentle, dusty pink shade offers a sophisticated timelessness, while the thick glossy coat ensures durability for daily use.
Step-by-Step Guide
Materials
- Polymer clay (Dusty Pink or Rose Quartz color)
- Heart-shaped clay cutter (medium size)
- Acrylic roller
- Ceramic tile or glass work surface
- UV Resin or Gloss Polyurethane Varnish
- UV Lamp (if using resin)
- Small paintbrush (synthetic bristles)
- Silver screw eye pin
- Silver keychain hardware (split ring and chain)
- Needle nose pliers
- Fine grit sandpaper (400, 600, 1000 grit)
Step 1: Shaping the Base
-
Condition the Clay:
Begin by warming the pink polymer clay in your hands, kneading it thoroughly until it is soft and pliable. This step prevents cracking later on. -
Roll the Slab:
Place your clay on a ceramic tile and roll it out using an acrylic roller. Aim for a thickness of about 5mm to 6mm—you want the heart to feel substantial and chunky, not flat. -
Cut the Shape:
Press your heart-shaped cutter firmly into the clay slab. Wiggle it slightly to ensure a clean separation from the surrounding clay, then lift the cutter. -
Soften the Edges:
Gently run your finger along the sharp cut edges of the heart to slightly round them off. This creates that ‘puffy’ stone-like look rather than a sharp cookie-cutter edge. -
Insert the Eye Pin:
Take a silver screw eye pin and carefully twist it into the center of the top curves of the heart. Screw it in until only the loop is visible. -
Remove Fingerprints:
I like to dampen a cotton swab with a tiny bit of rubbing alcohol and lightly brush over the surface to smooth away any accidental fingerprints. -
Bake:
Bake the heart according to your specific clay brand’s package instructions (usually 275°F/135°C for 15-30 minutes). Let it cool completely before moving to the next phase.
Smooth as Glass
To get perfectly domed resin edges, don’t brush it on like paint. Pour a pool in the center and drag it outward. Surface tension stops it from dripping.
Step 2: Finishing and Assembly
-
Sand for Smoothness:
Once cool, use fine-grit sandpaper under running water (wet sanding) to buff out any remaining imperfections or lint on the surface. -
Clean the Surface:
Wash the heart with soap and water to remove sanding dust, then dry it thoroughly. The surface must be bone dry before glazing. -
Apply Glaze or Resin:
For that glass-like shine, drip a small amount of UV resin onto the center of the heart. Use a toothpick or small brush to guide the liquid to the very edges without spilling over. -
Pop Bubbles:
Inspect the wet surface closely. If you see tiny air bubbles, quickly pass a lighter flame near the surface (don’t touch the clay!) or pop them with a needle. -
Cure the Finish:
Place the heart under a UV lamp for 2-3 minutes to cure the resin hard. If using gloss varnish instead, apply two thin coats, letting them dry fully in between. -
Repeat for Back:
Flip the heart over and repeat the glazing and curing process on the back side so the finished piece feels uniform. -
Open the Jump Ring:
Use your pliers to twist open the jump ring or the bottom link of your keychain hardware. Remember to twist sideways, not pull apart. -
Attach Hardware:
Slip the open link through the eye pin loop on your heart charm. -
Secure the Connection:
Use the pliers to twist the link back into a closed position, ensuring the ends meet perfectly flush so the chain doesn’t slip off.
Personalize It
Before baking, use small letter stamps to imprint an initial or short word into the clay, then fill the impression with white acrylic paint after baking.
Your minimal heart charm is now ready to add a subtle pop of color to your keys or bag


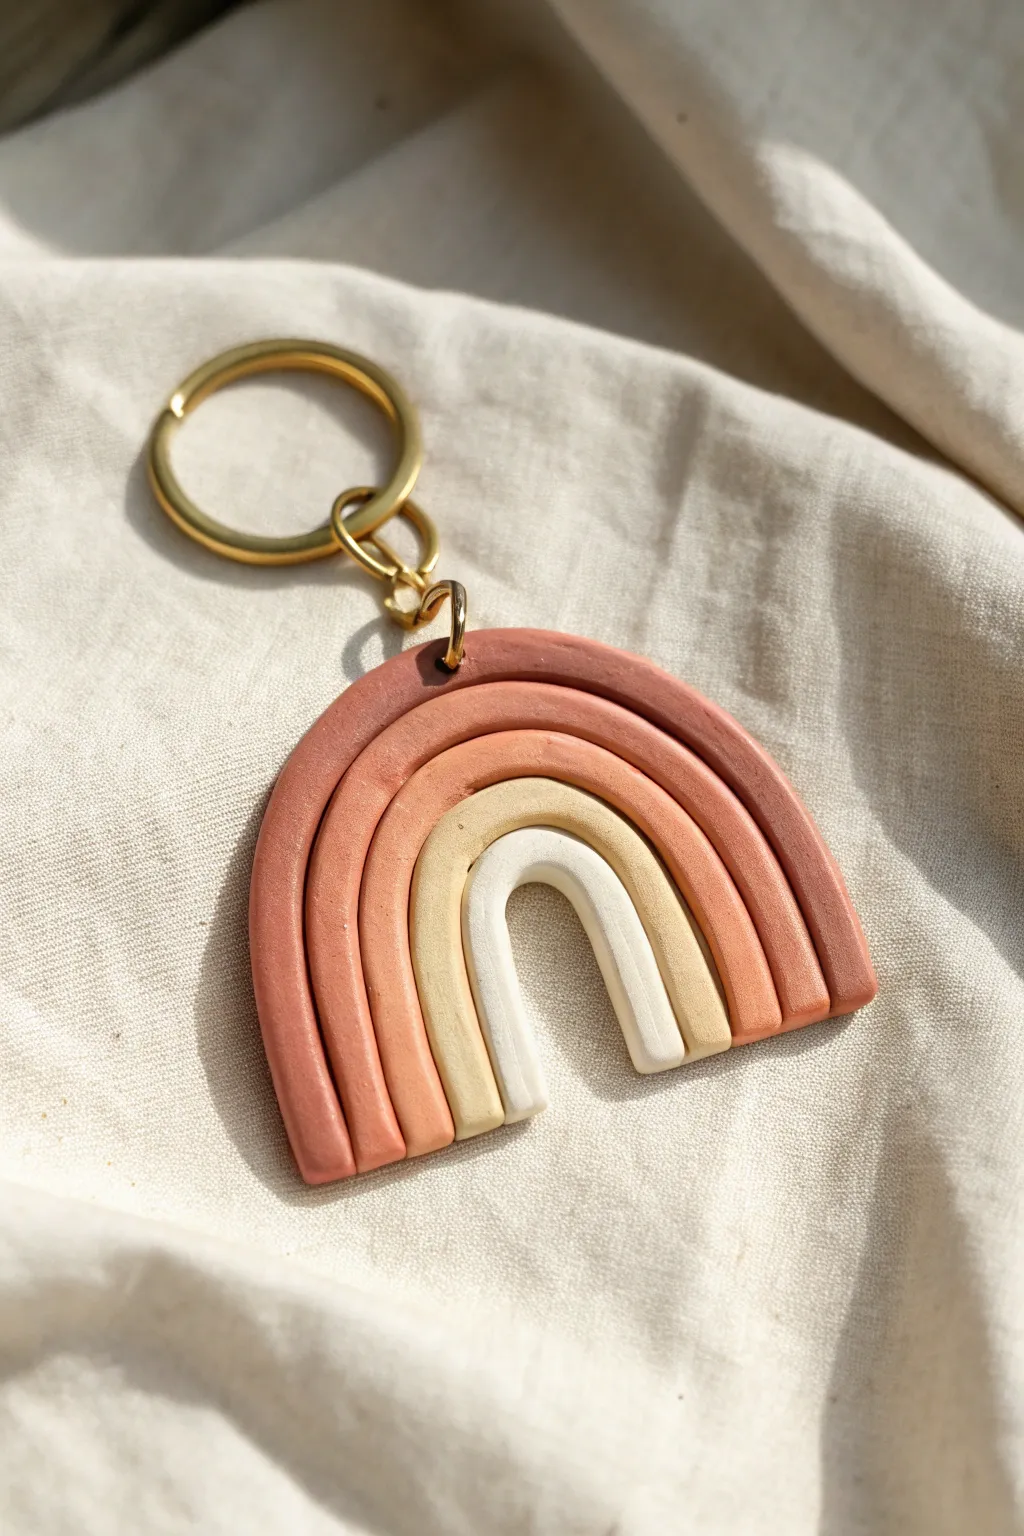
Rainbow Arch Keychain
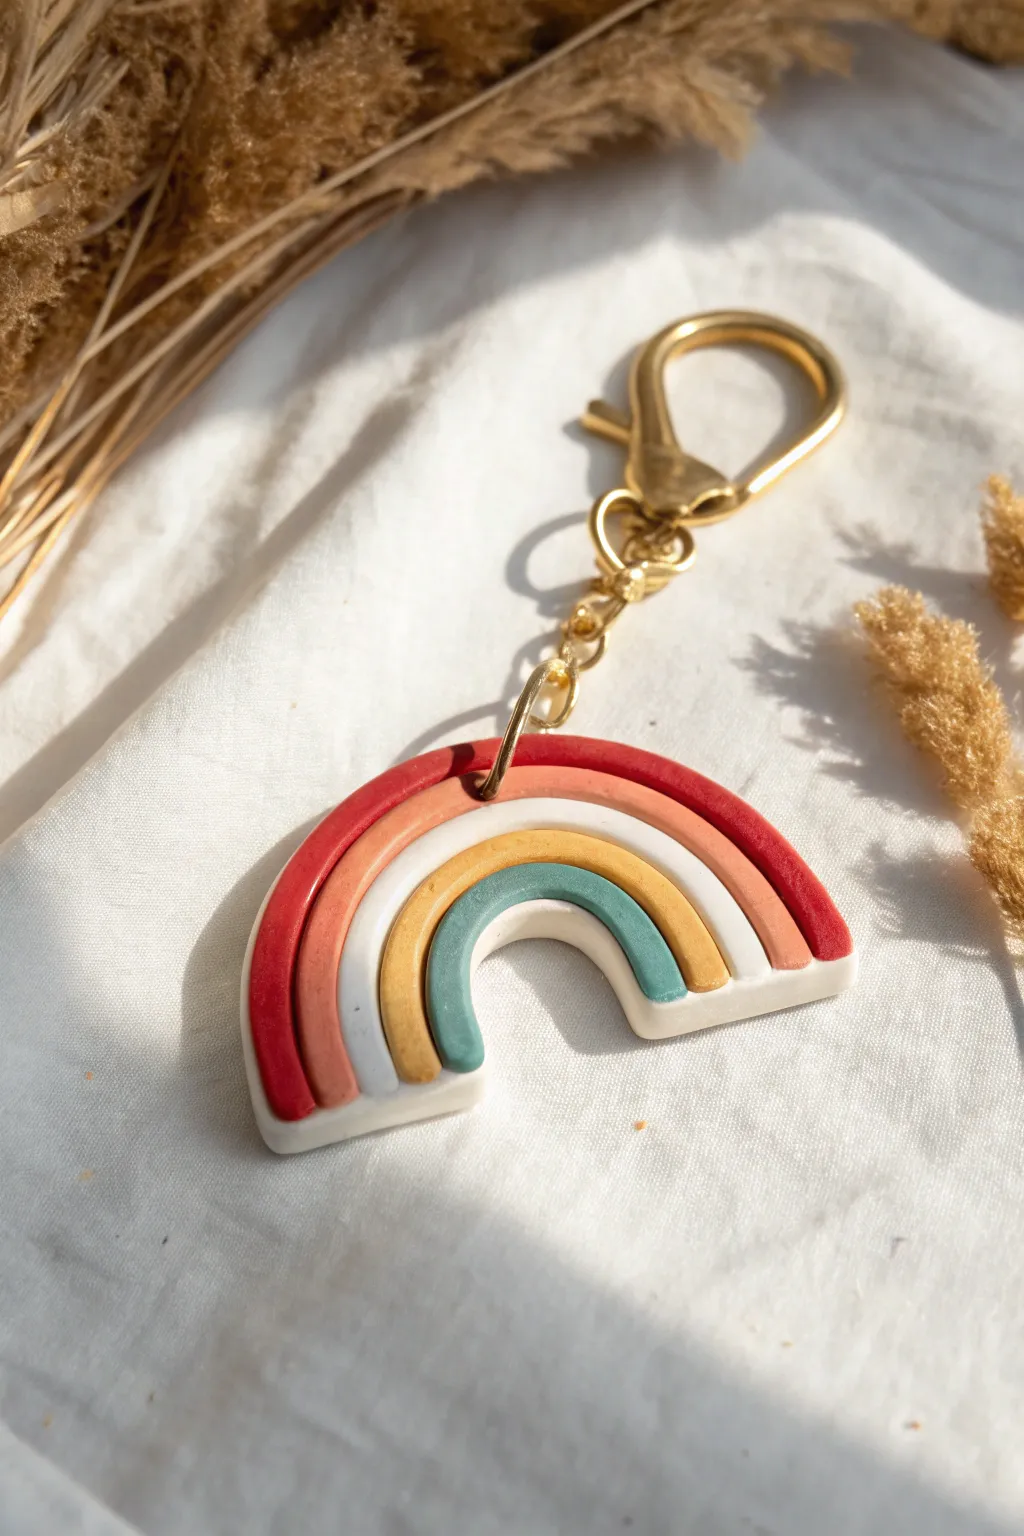
This charming arched rainbow keychain brings a touch of bohemian style to your keys or bag. With its earthy color palette of deep red, terracotta, mustard, and teal set against crisp white, it’s a delightful afternoon project that looks professionally made.
How-To Guide
Materials
- Polymer clay (white, deep red, terracotta/peach, mustard yellow, teal)
- Acrylic rolling pin or clay machine
- Flexible tissue blade or X-acto knife
- Smooth work surface (ceramic tile or glass)
- Clay extruder (optional but helpful for even ropes)
- Small circle cutter or straw (for the hole)
- Liquid polymer clay (optional)
- Oven
- Gold keychain lobster clasp with chain
- Gold jump ring (8mm or 10mm)
- Jewelry pliers
- Fine grit sandpaper
Step 1: Prepping the Clay
-
Condition the Clay:
Begin by kneading each color of clay individually until it is soft, pliable, and free of any air bubbles. Wash your hands or use baby wipes between each color to prevent staining, especially before handling the white clay. -
Color Mixing (Optional):
If you don’t have the exact shades shown, mix standard colors. Create the terracotta by mixing orange with a little brown and white. Soften a bright teal with a tiny touch of grey or translucent clay for that earthy look.
Clean Edges Trick
Before baking, use a cotton swab dipped in a tiny bit of rubbing alcohol or acetone to smooth out fingerprints and dust from the clay surface.
Step 2: Forming the Rainbow
-
Roll the Snakes:
Roll out a ‘snake’ or rope for each of your five colors: deep red, terracotta, white, mustard, and teal. Aim for a consistent thickness of about 4-5mm for each rope. -
Use an Extruder (Alternative):
For perfectly uniform ropes, I personally prefer using a clay extruder with a medium circle disc. This guarantees every band is exactly the same size. -
Create the Arch:
Start with the smallest inner arch (the teal rope). Bend it gently into a U-shape on your work surface. -
Layer the Bands:
Place the mustard rope over the teal one, gently pressing them together along the curve. Repeat with the white, then terracotta, and finally the deep red rope on the outside. -
Bonding the Strands:
Once all five ropes are arched together, lightly press the sides inward to ensure they adhere to one another without flattening the rounded tops too much. You can brush a tiny amount of liquid clay between strands for extra durability, though it’s not strictly necessary if the clay is tacky. -
Trim the Ends:
Use your flexible tissue blade to make a clean, straight cut across the bottom of the rainbow legs, removing the uneven ends so the arch sits flat.
Step 3: Backing and Baking
-
Roll the Backing:
Roll out a sheet of white clay to about 2-3mm thickness. It needs to be large enough to effectively cover the entire back of your rainbow. -
Attach the Rainbow:
Place your rainbow arch on top of the white sheet. Press down firmly but carefully to bond the rainbow to the backing sheet. This backing provides the structural strength needed for a keychain. -
Cut the Shape:
Use your X-acto knife or blade to cut the white backing clay, tracing exactly around the outline of the rainbow. Smooth the edges with your finger to blend the seams slightly. -
Create the Hole:
Use a small circle cutter, a straw, or a tool to poke a hole through the top center of the rainbow (through the red and terracotta bands). Wiggle it slightly to ensure the hole is wide enough for your jump ring. -
Bake:
Place the piece on a ceramic tile or baking sheet lined with parchment paper. Bake according to your clay manufacturer’s instructions (usually 275°F/130°C for 15-30 minutes). -
Cool Down:
Allow the piece to cool completely in the oven or on a wire rack before handling. Polymer clay is fragile when hot.
Make it Sparkle
After baking, brush a thin layer of UV resin or glossy glaze over the colored stripes to make the colors pop and add a durable, shiny finish.
Step 4: Assembly
-
Sand (Optional):
If there are any rough fingerprints or uneven edges on the bottom or sides, lightly wet-sand them with fine-grit sandpaper for a professional finish. -
Open the Jump Ring:
Using two pairs of pliers, twist your gold jump ring open sideways (never pull it apart). -
Attach Hardware:
Slide the jump ring through the hole in your clay rainbow and attach the chain of the lobster clasp. Twist the jump ring closed securely.
Now you have a sturdy, stylish accessory ready to brighten up your daily routine


Terrazzo Sprinkle Keychain
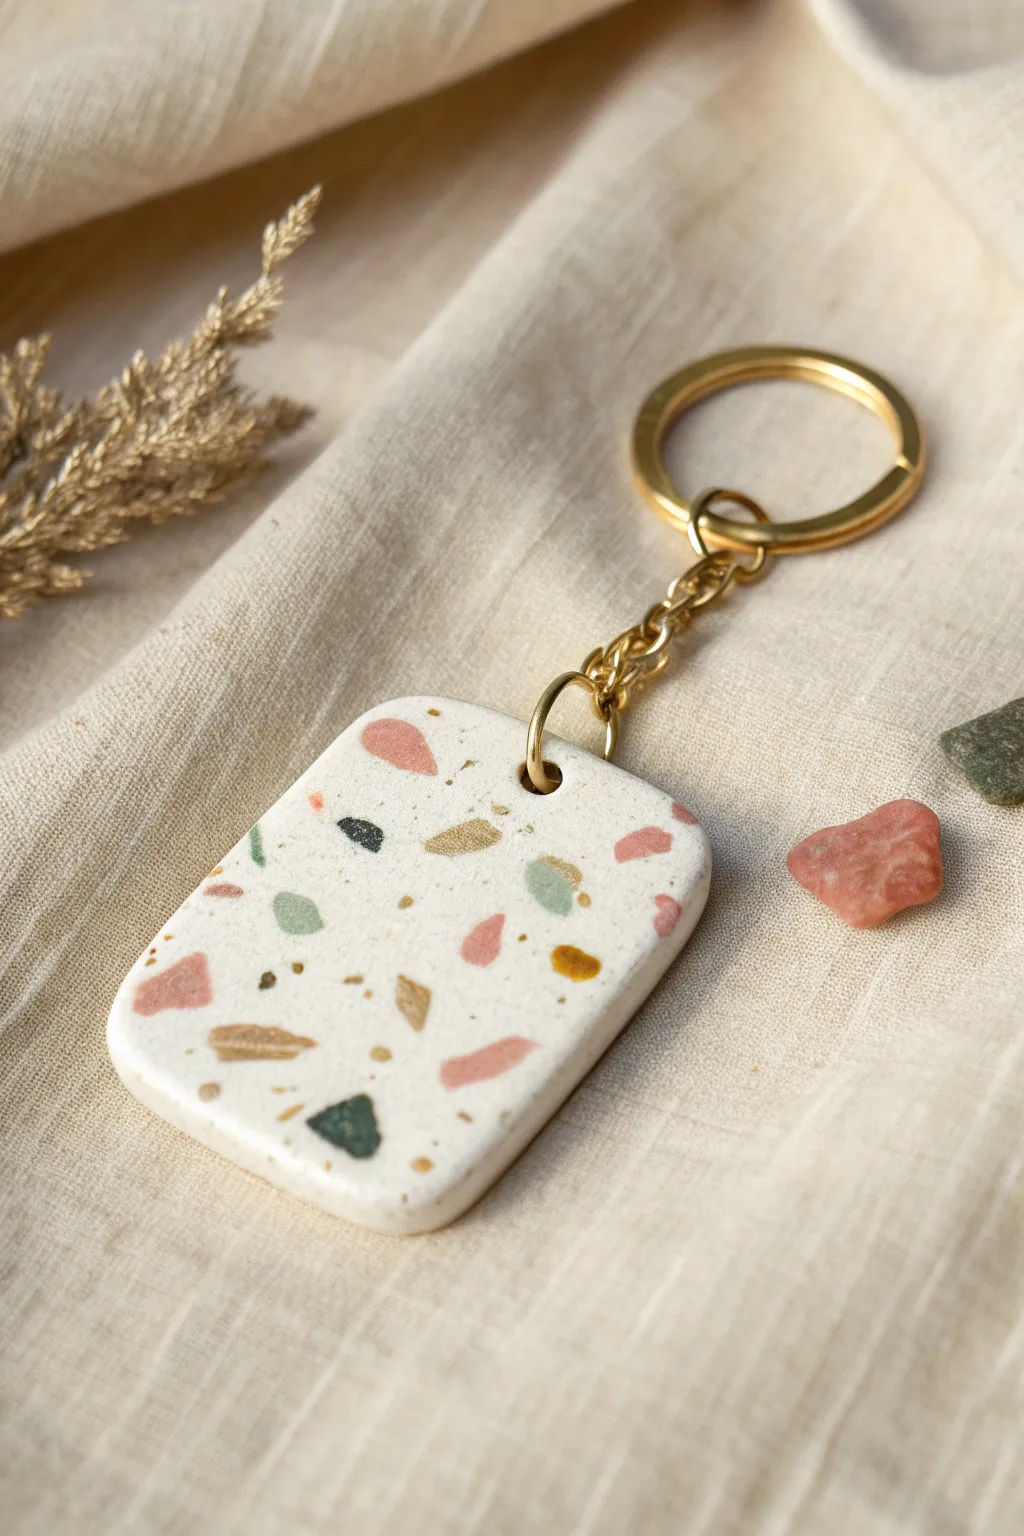
This trendy keychain captures the classic look of Italian terrazzo flooring in a palm-sized accessory. The white base is scattered with playful organic chips in muted pinks, sage greens, and gold, creating a sophisticated yet fun aesthetic.
Detailed Instructions
Materials
- White polymer clay (base)
- Small amounts of pink, sage green, mustard yellow, black, and gold polymer clay
- Acrylic rolling pin
- Rectangular clay cutter (approx. 1.5 x 2.5 inches)
- Craft knife or tissue blade
- Parchment paper or baking tile
- Small round cutter or straw (for the hole)
- Wet/dry sandpaper (400, 600, 1000 grit)
- UV resin (optional, for shine) and UV lamp
- Gold keychain hardware (key ring, chain, jump ring)
- Jewelry pliers (flat nose and round nose)
- Oven
Step 1: Making the Terrazzo Chips
-
Condition the Colored Clay:
Start by taking very small amounts of your colored clays—pink, sage green, mustard, black, and gold. Knead each color individually until soft and pliable. -
Flatten the Colors:
Roll each colored piece into a very thin sheet. You want these to be quite delicate, almost paper-thin, so they look like authentic stone chips rather than chunky blobs. -
Bake the Sheets (Method A):
For easier handling, you can rough-chop the raw clay now, but I prefer to partially bake these thin sheets for about 10 minutes first. This makes them easier to crumble into sharp, angular fragments later. -
Create the Chips:
Once the thin sheets are cool (or while raw if you skipped the pre-bake), use your craft knife to chop them into irregular, tiny confetti-sized pieces. Vary the sizes slightly for a natural look.
Step 2: Forming the Base
-
Prepare the White Base:
Condition a larger block of white polymer clay until it is smooth. -
Roll the Slab:
Roll the white clay out into a slab that is about 1/4 inch thick. This will be the main body of your keychain. -
Apply the Chips:
Scatter your prepared colored chips onto the white slab. Don’t cover the whole thing; leave plenty of white ‘negative space’ showing through. -
Embed the Pattern:
Place a piece of parchment paper over the slab to prevent sticking. Gently roll over the clay with your acrylic roller to press the chips firmly into the white base until the surface is flush and smooth. -
Cut the Shape:
Position your rectangular cutter over a section of the slab with a pleasing distribution of colors. Press down firmly to cut the shape.
Chip Distribution
Don’t just dump the chips in the center. Make sure to press some chips right near the edges of the cutter area. When you cut the shape, bisecting these edge pieces creates a realistic terrazzo cross-section effect.
Step 3: Finishing Touches
-
Smooth the Edges:
Gently lift the rectangle and smooth the sharp cut edges with your finger. This gives it that professional, stone-like softened edge seen in the photo. -
Create the Hanging Hole:
Use a small round cutter or a straw to punch a hole centered near the top edge. Ensure the hole is not too close to the very edge to prevent breakage later. -
Final Bake:
Bake the piece according to the manufacturer’s instructions for your specific brand of clay (usually 275°F for 30 minutes). Let it cool completely. -
Sand and Polish:
Place your sandpaper on a flat surface and wet it. Rub the baked piece in circular motions, starting with 400 grit and moving up to 1000 grit, to reveal the sharp edges of the terrazzo chips. -
Seal (Optional):
To get that glossy, ceramic look, brush a thin layer of UV resin over the surface and cure it under a UV lamp, or use a water-based glossy varnish. -
Attach Hardware:
Use your pliers to twist open a gold jump ring. Thread it through the hole in the clay and attach the chain and keyring. -
Close the Ring:
Twist the jump ring closed securely, ensuring there is no gap where the chain could slip out.
Smearing Colors?
If your colored chips smear into the white base while rolling, your clay was likely too warm or soft. Pop the clay in the fridge for 10 minutes before rolling, or use the pre-bake method for the chips.
Now you have a durable, stylish accessory that looks like a miniature piece of modern art ready to hold your keys

The Complete Guide to Pottery Troubleshooting
Uncover the most common ceramic mistakes—from cracking clay to failed glazes—and learn how to fix them fast.
Faux Marble Slab Keychain
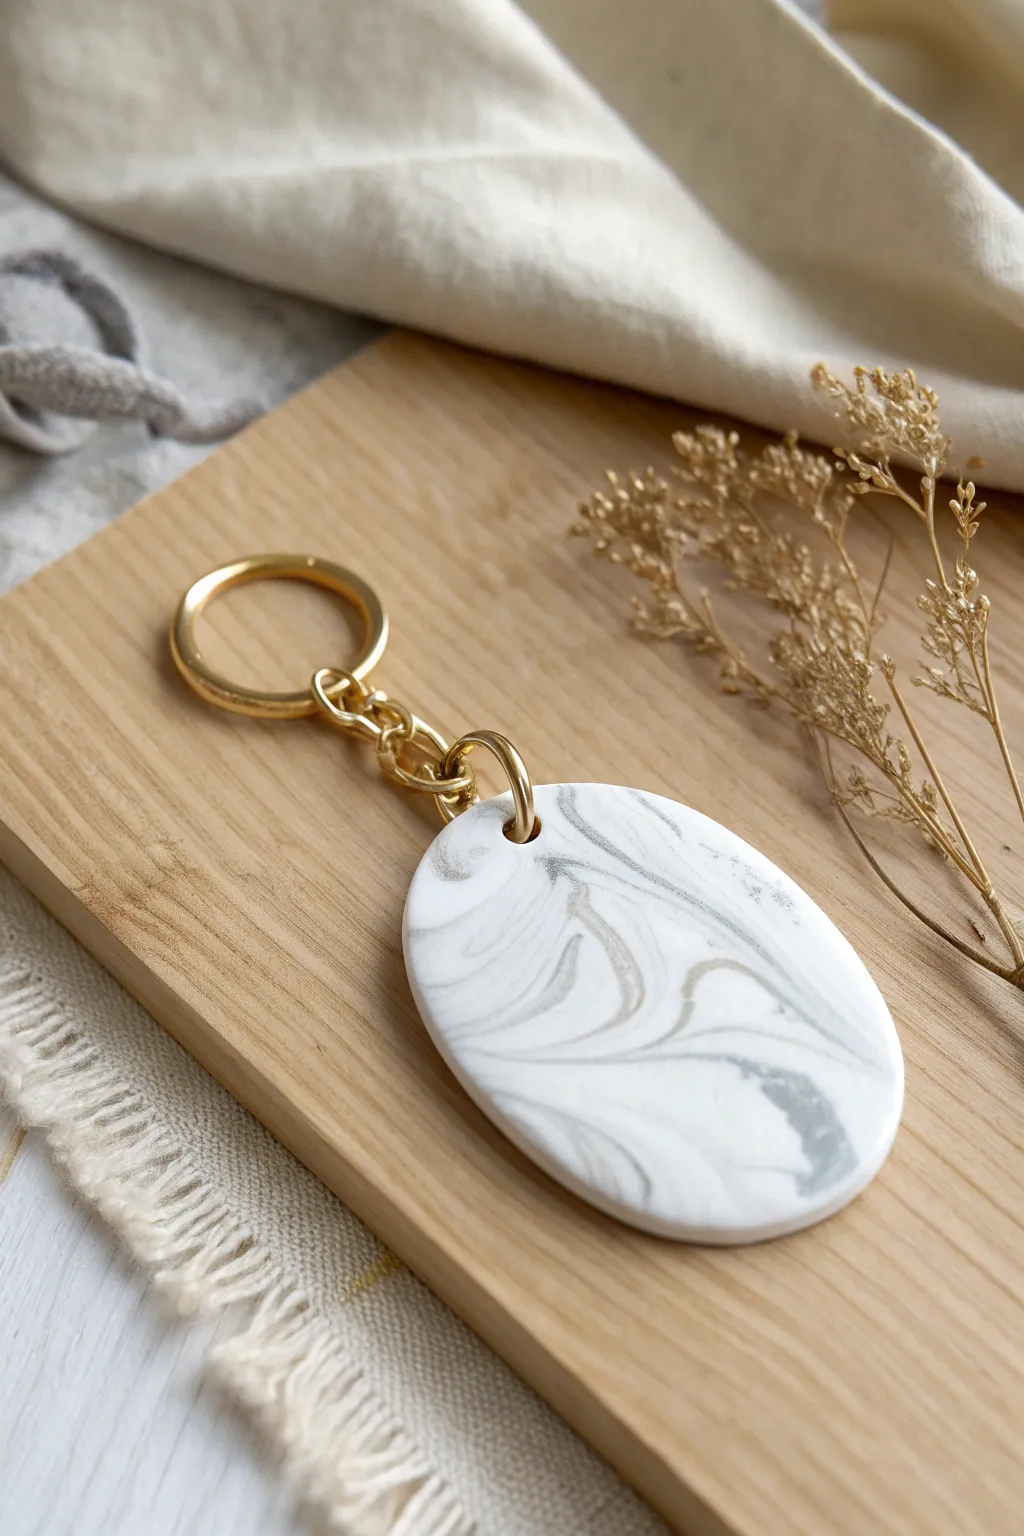
Elevate your key ring with this sophisticated faux marble design that captures the timeless beauty of natural stone in lightweight polymer clay. The subtle grey veining against a crisp white background, paired with gold hardware, creates a luxurious accessory that looks far more expensive than it is to make.
Step-by-Step
Materials
- White polymer clay
- Grey polymer clay (or black mixed with white)
- Translucent polymer clay (optional, for depth)
- Acrylic rolling pin or pasta machine
- Oval clay cutter
- Small circle cutter or straw (for the hole)
- Wet/dry sandpaper (400 to 1000 grit)
- UV resin or polyurethane gloss varnish
- UV lamp (if using resin)
- Small paintbrush
- Gold keyring with chain
- Gold jump ring (8mm or 10mm)
- Pliers (flat nose and chain nose)
- Ceramic tile or baking sheet
- Parchment paper
Step 1: Preparing the Clay Marbling
-
Condition the base:
Start by taking a substantial chunk of white polymer clay. Knead it in your hands until it is soft, warm, and pliable to prevent cracking later. -
Prepare the veining colors:
Condition a very small amount of grey clay. If you don’t have grey, mix a tiny speck of black into white clay until you achieve a slate-grey tone. -
Create clay snakes:
Roll the white clay into a thick log. Then, roll your grey clay into very thin, spaghetti-like strands. I like to make these uneven in thickness for a more organic look. -
Apply the veins:
Lay the thin grey strands randomly across the white log. Run them lengthwise, twist them slightly, and overlap a few areas to mimic natural stone formations. -
Twist and combine:
Gently twist the white log like a candy cane to distort the straight lines of the grey clay. Fold the log in half and twist it again. -
Consolidate the log:
Roll the twisted clay between your palms to smooth it back into a solid log shape, ensuring no air bubbles are trapped inside.
Muddy colors?
If your grey veins look blurry or mix into a solid light grey, you’ve over-mixed the clay. Stop rolling sooner next time to keep the color separation crisp and distinct.
Step 2: Shaping and Baking
-
Roll out the slab:
Using your acrylic roller or pasta machine, flatten the log into a slab about 1/4 inch thick. Roll in different directions to stretch the marble pattern organically. -
Check the pattern:
Inspect your slab. If the marbling looks too chunky, fold the clay and roll it out one more time to make the veins more delicate. -
Cut the shape:
Place your oval cutter on the most attractive part of the pattern. Press down firmly to cut the shape. If the clay sticks to the surface, slide a craft blade underneath to release it. -
Create the hardware hole:
Use a small circle cutter or a sturdy straw to punch a hole near the top edge of the oval. Ensure it isn’t too close to the edge to prevent breakage. -
Smooth the edges:
Dip your finger in a little water or baby oil and gently run it along the cut edges of the clay to smooth out any roughness before baking. -
Bake the piece:
Place the clay oval on a parchment-lined baking sheet or ceramic tile. Bake according to the manufacturer’s instructions for your specific brand of clay (usually around 275°F for 15-30 minutes). -
Cool down:
Allow the clay to cool completely in the oven or on a wire rack. Don’t handle it while hot, as it stays slightly soft until fully cooled.
Step 3: Finishing and Assembly
-
Sand for perfection:
Once cool, submerge the piece in a bowl of water and sand the edges and surface with wet/dry sandpaper, starting with 400 grit and moving to higher grits for a glass-smooth finish. -
Clean surface:
Wash off any sanding dust with soap and water, then dry the piece thoroughly with a lint-free cloth. -
Apply gloss (optional):
For a high-shine polished stone look, brush on a thin layer of UV resin or polyurethane gloss varnish. Cure the resin under a UV lamp or let the varnish air dry completely. -
Open the jump ring:
Using two pairs of pliers, twist the gold jump ring open sideways (never pull it apart outward) to preserve its circular shape. -
Attach hardware:
Slide the jump ring through the hole in the clay oval, then loop the end of the keychain onto the jump ring. -
Close the ring:
Twist the jump ring back into a closed position using your pliers, ensuring the two ends meet perfectly flush so the chain doesn’t slip out.
Pro Tip: Translucency
Mix a small amount of translucent clay into your white base. It adds depth and mimics the semi-opaque quality of real Carrara marble much better than solid white.
Now you have a chic, handmade accessory ready to organize your keys or gift to a stylish friend
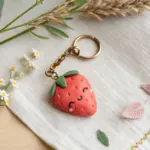
Donut With Icing Keychain
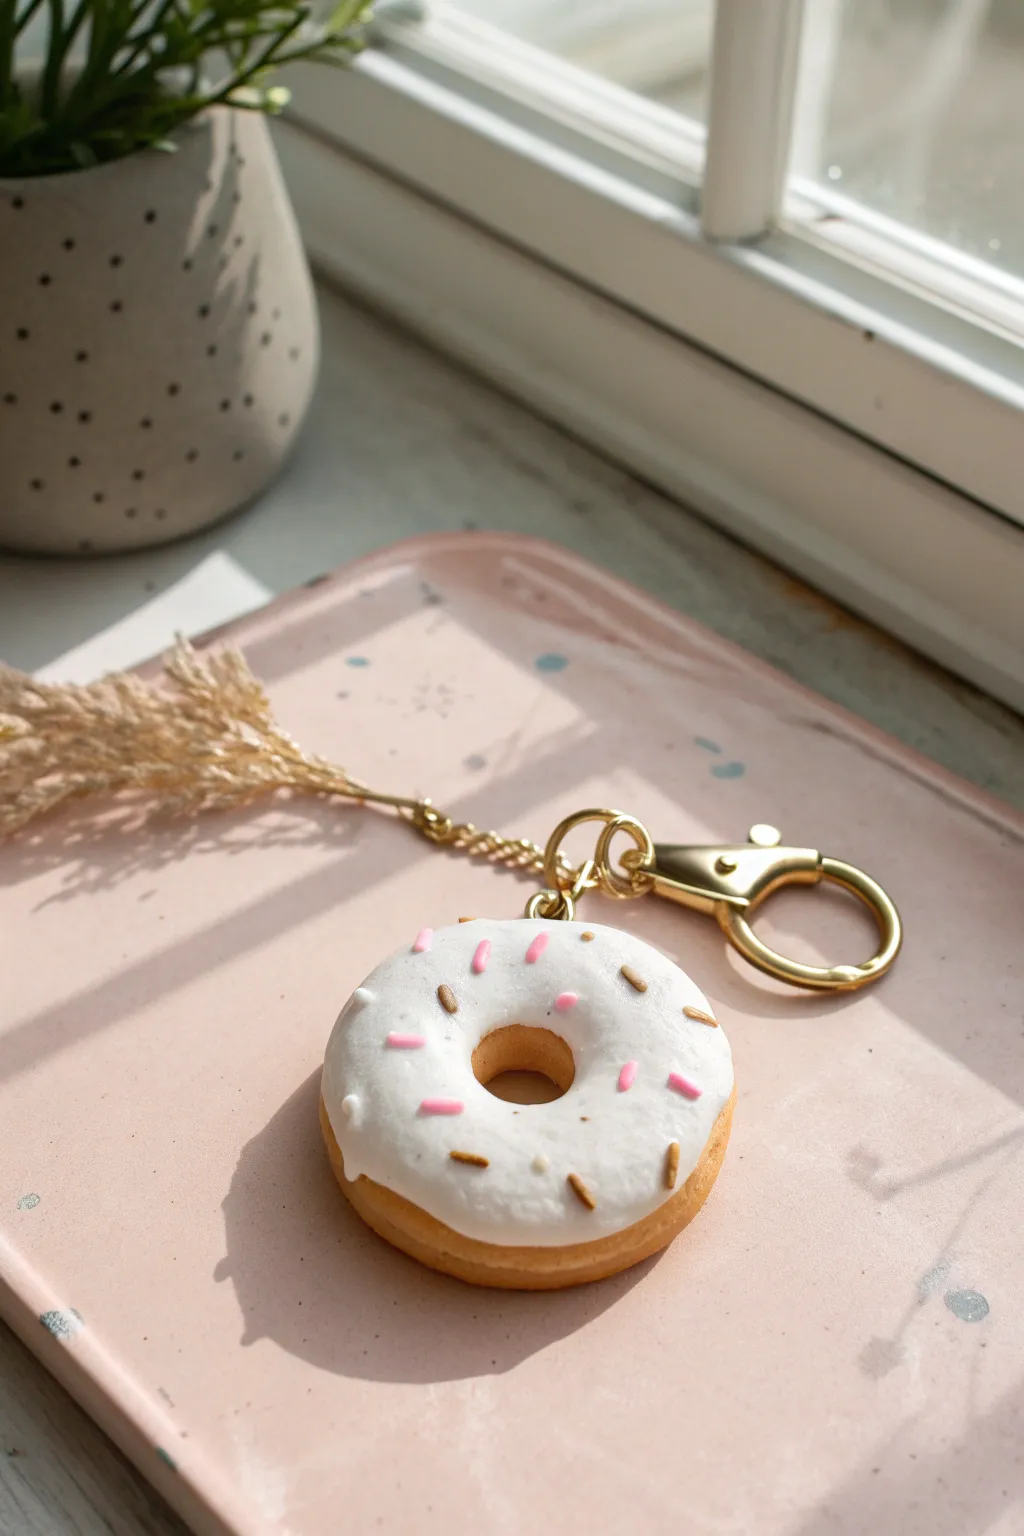
Capture the sweetness of your favorite bakery treat with this realistic polymer clay donut keychain. The white icing and delicate sprinkles give it a chic, minimalist look that’s perfect for adding a touch of whimsy to your keys.
Step-by-Step Tutorial
Materials
- Polymer clay (dough color/beige)
- Liquid polymer clay (translucent or white)
- White acrylic paint (if using translucent liquid clay)
- Polymer clay scraps (pink and golden brown) for sprinkles
- Gold finish keychain hardware with jump rings
- Eye pin (gold)
- Dotting tool or small ball stylus
- Toothbrush (for texture)
- Soft pastel chalks (orange, golden brown)
- Paintbrush
- Oven for baking
- Glaze (optional)
Step 1: Shaping the Base
-
Mix the dough color:
Start by conditioning your beige polymer clay. If it looks too pale, mix in a tiny speckled of translucent and a very small amount of orange to get that perfect baked-dough warmth. -
Form the shape:
Roll the clay into a smooth ball about 1.5 inches wide, then gently flatten it into a thick disc. Don’t make it too thin; a good donut needs a bit of loft. -
Create the center hole:
Use the back of a paintbrush or a large dotting tool to push through the center of the disc. Gently widen the hole by rotating the tool to get that classic ring shape. -
Round the edges:
Use your fingertips to smooth out the hole relative to the outer edge, ensuring the donut looks puffy rather than sharp or angular. -
Add texture:
Take a clean toothbrush and gently tap it all over the surface of the clay. This stippling effect mimics the airy texture of fried dough. I find soft circular motions work best here. -
Shade the dough:
Scrape some orange and golden brown soft pastel chalk into a powder. With a dry paintbrush, dusted the powder lightly around the edges and bottom of the donut to create a golden-baked effect.
Fixing Runny Icing
If your liquid clay is too runny, let it sit on a piece of cardboard for 10 minutes. The paper will leech out some plasticizer, thickening the ‘frosting’ so it drips less.
Step 2: The Icing & Toppings
-
Prepare the sprinkles:
Roll out very thin snakes of pink and golden-brown polymer clay. Cure these thin strands in the oven for about 5 minutes just to harden them, then chop them into tiny bits once cool. -
Mix the glaze:
In a small cup or on a tile, mix liquid polymer clay with a few drops of white acrylic paint or white clay pigment until it is opaque and has a honey-like consistency. -
Apply the icing:
Carefully drizzle the white liquid clay mixture over the top of your donut. Use a toothpick to guide the drips down the sides naturally, making it look melting and gooey. -
Add the hardware:
Before the icing is set, insert a gold eye pin into the top of the donut. You may want to add a tiny dab of liquid clay to the shaft of the pin to act as glue. -
Sprinkle placement:
Using tweezers or a slightly damp toothpick, place your pre-baked sprinkles onto the wet icing. Random placement looks most realistic.
Step 3: Finishing Up
-
Final Bake:
Place the donut on a tile or parchment paper and bake according to your clay package instructions (usually 275°F/135°C for 15-30 minutes). -
Cooling:
Let the piece cool completely inside the oven or on the counter. Moving it while hot can distort the shape or crack the icing. -
Secure the pin:
Once cool, gently tug the eye pin. If it feels loose, remove it, add a drop of superglue, and insert it back into the hole. -
Optional shine:
If you want a wet-glaze look, brush a thin layer of gloss glaze over just the white icing parts, avoiding the textured dough areas. -
Assembly:
Use pliers to open a jump ring and attach your gold keychain clasp to the eye pin loop. Close the ring securely.
Scented Charm
Mix a tiny drop of vanilla or sweet bakery fragrance oil into the liquid clay icing before applying it. Your keychain will smell just as delicious as it looks.
Enjoy showing off your calorie-free treat on your bag or keys


What Really Happens Inside the Kiln
Learn how time and temperature work together inside the kiln to transform clay into durable ceramic.
Avocado Half Bestie Keychains
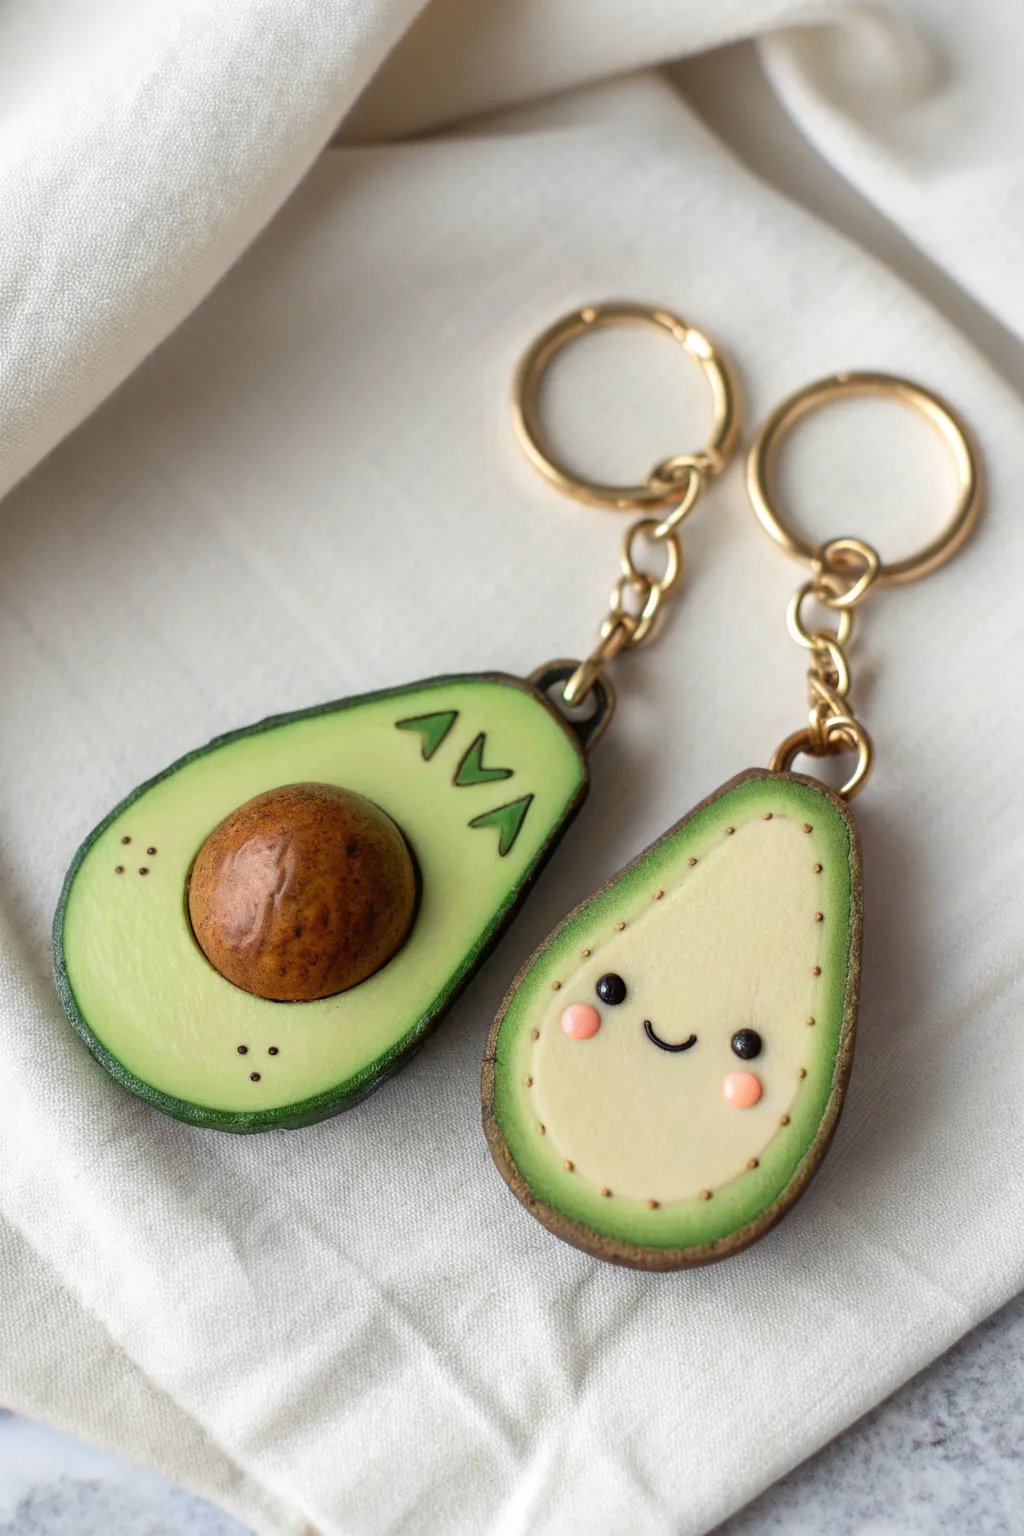
Celebrate friendship with these adorable interlocking avocado keychains sculpted from polymer clay. One side holds the textured pit while the other features a sweet kawaii face, making them the perfect matching set for you and your bestie.
Step-by-Step
Materials
- Polymer clay (Dark green, light avocado green, cream/off-white, brown, pink, black)
- Clay rolling pin or pasta machine
- Teardrop-shaped cutter (approx. 2 inches)
- Ball stylus tools (various sizes)
- Needle tool or toothpick
- X-acto knife or clay blade
- Soft pastels (brown, dark green) for shading
- Small paintbrush
- Eyepin screws (gold)
- Keychain hardware (gold jump rings and lobster clasp rings)
- Gloss glaze (UV resin or polyurethane)
- Oven for baking
Step 1: Shaping the Base
-
Prepare the greens:
Begin by conditioning your dark green clay (for the skin) and light avocado green clay (for the flesh) until soft and pliable. -
Roll the sheets:
Roll out the light green clay to about 1/4 inch thickness. Roll the dark green clay much thinner, like a sheet of paper. -
Wrap the skin:
Cut a thick slab of the light green clay. Carefully wrap the thin dark green sheet around the edges of the light green slab, smoothing the seam so it looks like avocado skin. -
Cut the shapes:
Using your teardrop cutter, punch out two identical avocado shapes from your wrapped slab. The dark green rim should now form a perfect border around the light green center.
Pro Tip: Realism Hack
Mix a tiny amount of translucent clay into your light green avocado flesh color. This gives the clay a slightly waxy, realistic fruit depth.
Step 2: Creating the Halves
-
Create the pit hollow:
On one of the avocado halves, gently press a large ball stylus or your thumb into the lower center to create a smooth, concave indentation where the pit would sit. -
Sculpt the pit:
Take a ball of brown clay that fits perfectly into that indentation. I like to test the fit to ensure it protrudes slightly but sits snugly. -
Texture the pit:
Remove the brown ball and texture it using a toothbrush or stiff brush to mimic a realistic seed surface. Place it securely onto the *other* avocado half (the flat one without the indentation). -
Refine the hollow side:
Fill the indentation on the first half with a thin layer of cream-colored clay to represent the empty seed cavity. Smooth the edges so it blends seamlessly into the light green.
Step 3: Adding Details
-
Shade the edges:
USe a small brush and shaved dark green soft pastels to gently shade the outer rim of the light green flesh on both halves, giving it that ripened gradient look. -
Add the face:
On the half with the cream center (the hollow side), add two tiny balls of black clay for eyes and a very thin snake of black clay for a smile. -
Cheeky details:
Place two small flattened circles of pink clay below the eyes for blush cheeks on the kawaii face. -
Add speckles:
Using a needle tool, poke tiny shallow dots around the light green flesh of both halves to mimic natural texture. You can also add tiny brown clay specks. -
Initial carving:
If desired, carve initials or tiny geometric triangles into the flesh of the pit-side avocado using a needle tool for personalization.
Level Up: Magnetic Attraction
Embed small neodymium magnets inside the pit and behind the face layer before baking so the two halves actually snap together!
Step 4: Assembly & Finishing
-
Insert eyepins:
Carefully screw a gold eyepin into the top center of each avocado half. Use a drop of liquid clay or bake-and-bond on the threads for extra security. -
Bake:
Bake the pieces according to your clay manufacturer’s instructions (usually 275°F/135°C for 15-30 minutes). Let them cool completely. -
Glaze the pit:
Apply a coat of gloss glaze or UV resin specifically to the brown pit to make it look shiny and realistic. -
Glaze the face:
Add a tiny dot of glaze to the black eyes and pink cheeks to make them pop. -
Attach hardware:
Once the glaze is dry, use pliers to attach the jump rings and keychain loops to your eyepins.
Attach these to your keys or backpacks and enjoy your matching friendship accessories.
Daisy Flower Keychain

Bring a touch of perpetual spring to your keys with this charming daisy keychain. The key to its soft, organic look is the simple texturing technique that transforms basic polymer clay into something that feels almost like stone or fabric.
Detailed Instructions
Materials
- White polymer clay
- Yellow or gold polymer clay
- Keychain ring with chain and jump ring
- Hard bristle toothbrush or stiff stipple brush
- Clay roller or pasta machine
- Small teardrop cutter (approx. 1 inch)
- Small circle cutter (approx. 0.5 inch)
- Needle tool or toothpick
- Parchment paper
- Jewelry pliers
- Oven for baking
Step 1: Shaping the Petals
-
Condition the clay:
Start by warming up your white polymer clay in your hands until it is soft and pliable, ensuring there are no air bubbles trapped inside. -
Roll it out:
Roll the white clay into a slab that is roughly 1/4 inch thick. You want it substantial enough to be durable as a keychain. -
Cut the shapes:
Using your small teardrop cutter, punch out about 10 to 12 petal shapes. If you don’t have a specific cutter, you can hand-form small logs and flatten them into teardrops. -
Add first texture:
Place the petals on a piece of parchment paper. Take your stiff toothbrush and gently tap the entire top surface of each petal to create a pitted, porous texture. -
Arrange the flower base:
Lay the petals in a circle with the pointed ends touching in the center. Gently press the inner points together; you can use a dab of liquid clay here for a stronger bond.
Sticky Situation?
If your textured clay sticks to the toothbrush, dip the bristles in a tiny bit of cornstarch or baby powder before tapping perfectly releases every time.
Step 2: Creating the Center
-
Form the center:
Condition a small ball of yellow or gold clay. Flatten it slightly into a dome shape that fits over the center gap where your petals meet. -
Attach the center:
Place the yellow dome directly onto the center of your flower arrangement, pressing down firmly but carefully to bond it to the petals underneath. -
Texture the center:
Using the same toothbrush technique, texturize the yellow dome. I like to be a bit firmer here to make the center look distinctly fuzzy like a real pollen disc. -
Add the backing:
To secure the structure, create a smaller, flat circle of white clay and press it onto the *back* of the flower, covering the seams where the petals join. -
Texture the back:
Flip the flower over gently and texturize this back circle as well so the finish is consistent on all sides.
Step 3: Assembly & Baking
-
Create the hole:
Choose one petal to be the top. Use a needle tool or toothpick to pierce a hole near the outer edge of that petal perfectly sized for your jump ring. -
Widen straight:
Ensure the hole goes straight through and isn’t too close to the edge, or the clay might break later. Give the tool a little wiggle to ensure clean clearance. -
Bake the piece:
Transfer the parchment paper to a baking sheet. Bake according to your clay manufacturer’s instructions (usually 275°F for 15-30 minutes). -
Cool down:
Allow the clay to cool completely in the oven or on a wire rack. Do not handle it while hot as it can be fragile. -
Open the jump ring:
Using two pairs of jewelry pliers, twist your jump ring open sideways (never pull it apart outwards) to preserve its shape. -
Attach hardware:
Slide the open jump ring through the hole in the petal and attach the chaotic chain part of your keyring mechanism. -
Close securely:
Twist the jump ring closed again with your pliers, ensuring the two ends meet perfectly flush so the chain can’t slip out.
Level Up: Ombré Petals
Before cutting petals, mix a gradient of white to pale pink clay. Arrange them from light to dark around the center for a stunning, realistic fade effect.
Now you have a durable, textured floral piece ready for your daily adventures

TRACK YOUR CERAMIC JOURNEY
Capture glaze tests, firing details, and creative progress—all in one simple printable. Make your projects easier to repeat and improve.
Mushroom Cap Keychain
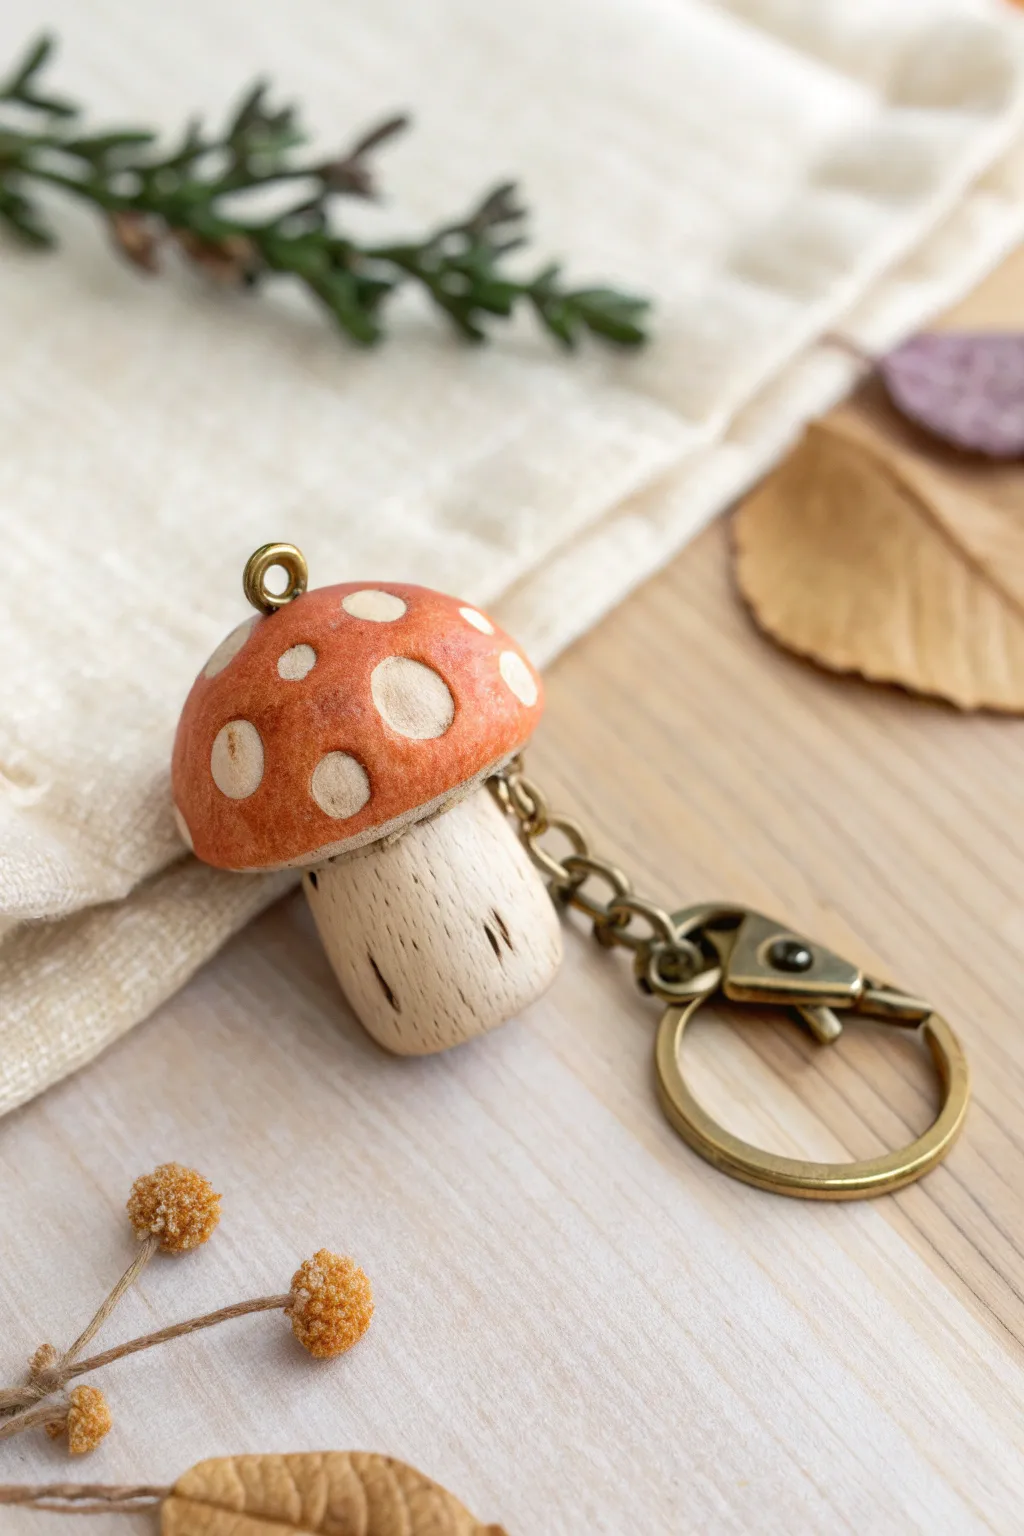
This charming toadstool keychain brings a touch of woodland whimsy to your everyday carry, featuring realistic textures and a classic red-capped design. The project combines sculpting simple shapes with clever painting techniques to achieve an organic, earthy finish.
Step-by-Step Tutorial
Materials
- Polymer clay (white or beige)
- Acrylic paints (burnt orange, rust red, raw sienna, dark brown)
- Clay sculpting tools (specifically a needle tool and a small ball stylus)
- Small metal eye screw (bronze finish)
- Keyring and lobster claw clasp hardware (bronze finish)
- Crumpled aluminum foil
- Fine grit sandpaper
- Matte varnish or sealant
- Small paintbrush
- Paper towel or sponge
Step 1: Sculpting the Form
-
Form the Stalk:
Start by conditioning a chunk of white or beige polymer clay until it is soft and pliable. Roll it into a thick cylinder, slightly wider at the top than the bottom to create a sturdy mushroom stalk. -
Texture the Stalk:
Using a needle tool, drag vertical lines down the sides of the stalk. Vary the depth and length of these lines to mimic the natural striations found on mushroom stems. -
Create the Cap:
Roll a slightly larger ball of clay and flatten the bottom against your work surface to create a dome shape. Gently curve the edges inward so it cups slightly. -
Add the Spots:
Instead of adding clay on top, use a small ball stylus tool or the end of a paintbrush to press indentations into the cap. These divots create the sunken spots characteristic of this design. -
Refine the Surface:
Gently roll a ball of crumpled aluminum foil over the top of the cap. This impresses a subtle, organic texture into the clay so it doesn’t look like smooth plastic. -
Insert Hardware:
Carefully screw the metal eye screw into the very center top of the cap. Remove it, add a tiny dot of liquid clay or glue if you have it (optional), and screw it back in for a secure hold. -
Connect Cap and Stalk:
Press the stalk firmly onto the underside of the cap. Blending the clay together at the connection point isn’t necessary here, as we want a distinct separation, but ensure they are stuck well. I usually score the meeting surfaces to help them grip. -
Bake the Clay:
Bake the mushroom in your oven according to the manufacturer’s instructions on your clay package. Allow it to cool completely before moving to the painting phase.
Natural Texture
For the most realistic stalk texture, twist the clay slightly as you make the vertical lines. Nature rarely makes perfectly straight lines.
Step 2: Painting and Finishing
-
Base Coat the Cap:
Mix burnt orange with a touch of rust red. Paint the entire cap, getting into the indented spots. Don’t worry about keeping the spots white yet. -
Define the Spots:
Once the red paint is dry, use a fine-tip brush to paint cream or watered-down white paint into the indented circles. The slight depression makes it easier to keep the paint contained. -
Wash the Stalk:
Water down dark brown acrylic paint until it is very thin. Brush this wash over the entire stalk, ensuring it seeps into all the vertical texture lines you carved earlier. -
Wipe Back:
Immediately wipe the stalk with a damp paper towel. The dark paint will stay in the cracks, while the raised surfaces will reveal the lighter clay color underneath, highlighting the texture. -
Dry Brush Detail:
Take a tiny amount of raw sienna paint on a dry brush and lightly dust the bottom of the stalk and the edges of the cap. This adds a ‘dirty’ look, making it feel like it was just plucked from the ground. -
Seal the piece:
Apply a coat of matte varnish over the entire mushroom. A glossy finish tends to look artificial, while matte preserves that natural, velvety woodland look. -
Attach the Hardware:
Using pliers, open the jump ring on your bronze keychain finding. Loop it through the eye screw on top of your mushroom and close the ring securely.
Hardware Loose?
If the eye screw feels loose after baking, unscrew it, add a drop of superglue into the hole, and screw it back in immediately.
Now you have a durable little piece of the forest ready to accompany you on your travels
Tiny Leaf Botanical Keychain
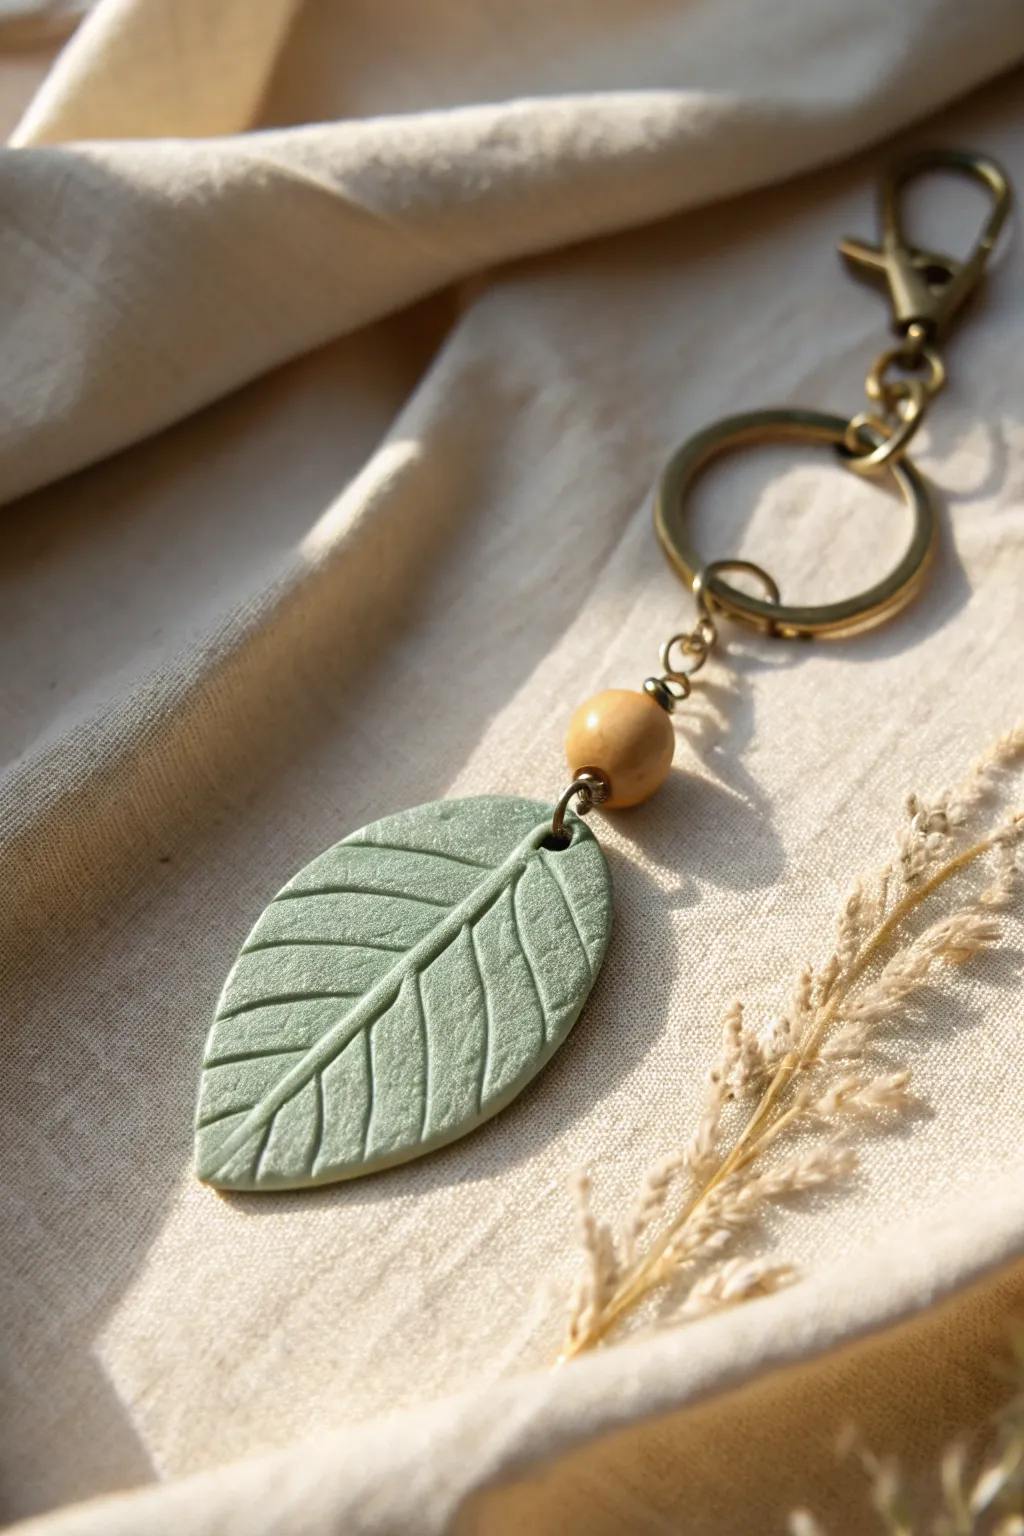
Capture the serene beauty of nature with this minimalist botanical accessory. Featuring a textured sage green leaf and a warm wooden accent, this durable polymer clay keychain brings an organic touch to your everyday essentials.
Step-by-Step
Materials
- Sage green polymer clay (e.g., Soufflé or Premo)
- Acrylic rolling pin
- Pointed detailing tool or needle tool
- Ball stylus tool
- X-acto knife or craft blade
- Small oval or teardrop clay cutter (optional)
- Fine grit sandpaper (400-600 grit)
- Hand drill or 2mm drill bit
- Round wooden bead (approx. 8-10mm)
- Brass keychain ring with clasp
- Brass jump rings (6mm)
- Jewelry pliers (flat nose and round nose)
- Parchment paper or ceramic tile
Step 1: Sculpting the Leaf
-
Condition the Clay:
Begin by warming the sage green polymer clay in your hands. Knead and roll it until it becomes soft, pliable, and free of cracks. This ensures the leaf won’t be brittle after baking. -
Roll to Thickness:
Place the clay on a clean ceramic tile or parchment paper. Use your acrylic roller to flatten the clay into an even slab, aiming for a thickness of about 3mm to 4mm so it’s sturdy enough for daily use. -
Cut the Shape:
Use a teardrop-shaped cutter to punch out the base form. If you don’t have a cutter, use your X-acto knife to freehand a simple oval shape with pointed ends, mimicking a classic leaf silhouette. -
Refine the Edges:
Gently smooth the cut edges with your fingertip to remove any sharp burrs or irregularities left by the cutter. The edges should look soft and finished. -
Create the Center Vein:
Take your needle tool or the back of a knife blade and gently press a curved line down the vertical center of the leaf. Be careful not to cut all the way through; you just want a deep impression. -
Details the Side Veins:
Using the same tool, press diagonal lines branching out from the center vein toward the edges. Vary the pressure slightly to give the veins a natural, organic look rather than perfectly uniform mechanical lines. -
Texture the Surface:
To achieve the stony, matte texture seen in the photo, lightly tap the surface of the clay with a stiff toothbrush or a piece of crumpled aluminum foil. This removes the plastic shine and adds realism. -
Pierce the Hole:
Use a needle tool or small straw to poke a hole at the top (stem end) of the leaf. Ensure the hole is large enough to fit your jump ring but leave at least 2mm of clay above it for strength.
Clean Cuts
If your clay drags while cutting, put the rolled slab in the fridge for 10 minutes. Cooler clay is firmer and cuts much cleaner.
Step 2: Baking and Finishing
-
Bake the Piece:
Place your clay leaf on a baking sheet lined with paper. Bake according to the manufacturer’s instructions on your specific package of clay—usually around 275°F (135°C) for 30 minutes. -
Cool Down:
Allow the clay to cool completely inside the oven or on a cooling rack. Do not try to flex or handle the clay while it is still warm, as it is fragile in this state. -
Sand for Smoothness:
Once cool, inspect the edges. If there are any rough spots, gently wet-sand the edges with fine-grit sandpaper under running water for a polished finish. -
Buff the Surface:
Rub the leaf vigorously with a piece of denim or a soft cotton cloth. This burnishing step gives the clay a lovely velvety sheen without making it glossy.
Stone Effect
Mix a tiny pinch of black pepper or translucent clay into your green clay before rolling. This creates a speckled, realistic stone granite effect.
Step 3: Assembly
-
Prepare the Jump Ring:
Using two pairs of pliers, twist open a brass jump ring. I find the ‘twist’ motion is crucial—never pull the ring apart sideways, or it keeps its shape poorly. -
Attach the Clay:
Thread the open jump ring through the hole in your clay leaf. Before closing it, determine if you need a chain extender; for this look, we connect directly to the bead component. -
Add the Bead:
Thread a headpin or a piece of wire through your wooden bead. Create a loop at both ends with round-nose pliers. Connect one loop to the jump ring on the leaf. -
Connect Hardware:
Attach another jump ring to the top loop of the wooden bead component. Connect this ring to the main brass keychain clasp mechanism. -
Final Check:
Use your flat-nose pliers to ensure all jump rings are closed tightly and flush. Give the keychain a gentle tug to verify everything is secure before attaching your keys.
Now you have a charming piece of handmade nature to carry with you wherever you go
Smiley Face Coin Keychain
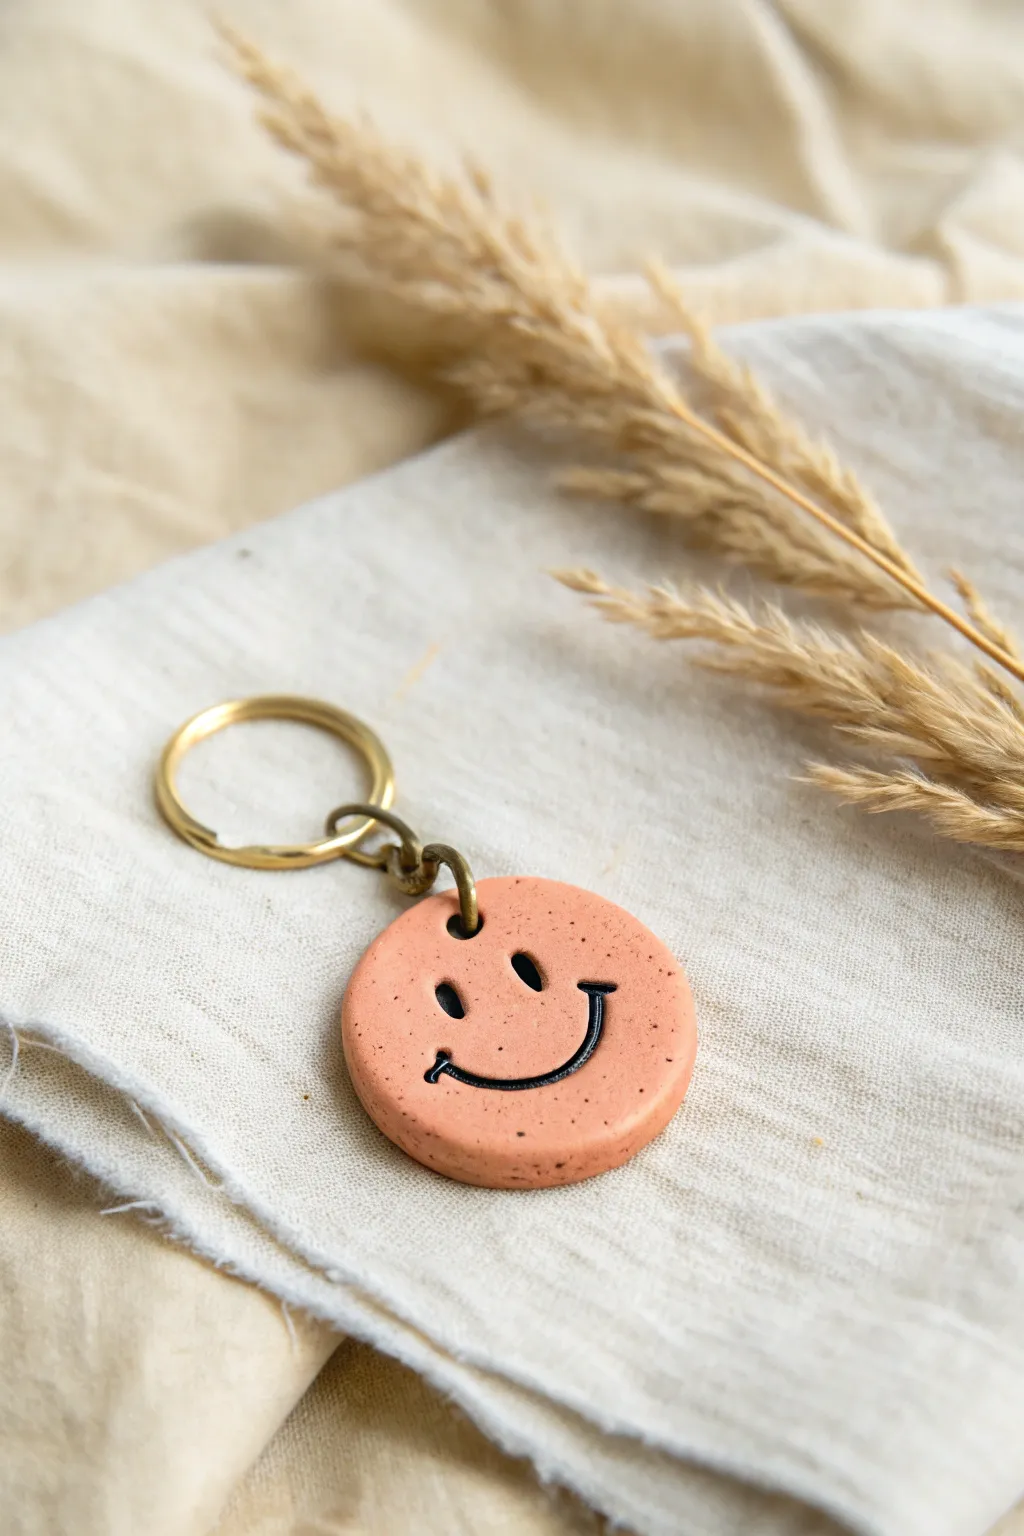
This cheerful terracotta-colored keychain adds a touch of retro happiness to your everyday carry. With its simple, stamped features and subtle speckled texture, it combines minimalist design with handmade charm.
Step-by-Step Guide
Materials
- Polymer clay (terracotta or peach color)
- Faux granite or speckled clay (optional for mixing)
- Black acrylic paint
- Fine grit sandpaper
- Circle clay cutter (approx. 1.5 – 2 inches)
- Small jump ring (antique brass finish)
- Key ring (antique brass finish)
- Small pliers
- Acrylic roller
- Needle tool or small awl
- Smiling face stamp or carving tools
- Fine paintbrush
- Gloss glaze (optional)
Step 1: Preparation and Shaping
-
Condition the clay:
Begin by warming the terracotta polymer clay in your hands until it becomes soft and pliable. If you want that lovely speckled look shown in the photo but don’t have pre-speckled clay, mix in a very small pinch of black pepper or fine black sand during this conditioning phase. -
Roll it out:
Using an acrylic roller, flatten the clay into an even slab. Aim for a thickness of about 1/4 inch (6mm) to ensure the keychain is sturdy enough for daily use. -
Cut the circle:
Press your circle cutter firmly into the clay slab to create a clean, round disc. Twist slightly before lifting to release the clay cleanly. -
Smooth the edges:
Gently run your finger around the cut edge of the circle to soften any sharp ridges left by the cutter. A smooth, rounded edge gives a more professional finish.
Clean Lines Hack
Use a baby wipe wrapped tightly around your finger to clean up overfilled paint grooves. It removes surface paint without dipping into the recessed lines.
Step 2: Creating the Design
-
Imprint the face:
If you have a smiley face stamp, press it evenly into the center of the disc. If not, use tools to carve it manually. Use the rounded end of a paintbrush handle to press two oval indentations for eyes. -
Carve the smile:
For the mouth, carefully drag a needle tool or small carving tool in a wide ‘U’ shape. Deepen the line slightly so it can hold paint later, creating distinct little ‘dimple’ lines at the ends of the smile. -
Add the hole:
Use a straw or a small circle cutter to punch a hole near the top edge of the disc. Ensure there is at least 3-4mm of clay between the hole and the edge to prevent breakage. -
Check for imperfections:
Look over the clay surface for fingerprints or lint. Lightly buff them away with a drop of baby oil on your fingertip or a soft brush.
Double-Sided Fun
Stamp a different expression on the back side—maybe a winking face or a frown—so your keychain can match your mood throughout the day.
Step 3: Baking and Finishing
-
Bake the piece:
Place your clay disc on a parchment-lined baking sheet. Bake according to your specific clay manufacturer’s instructions—usually around 275°F (135°C) for 30 minutes depending on thickness. -
Cool down:
Allow the piece to cool completely on a flat surface. Do not attempt to paint or sand it while it is still warm. -
Paint the features:
Dip a very fine brush into black acrylic paint. Carefully fill in the indented eyes and smile line. Don’t worry if you get paint outside the lines; we will fix that in the next step. -
Clean up paint:
Once the paint is dry to the touch, take a slightly damp paper towel or fine-grit sandpaper and gently wipe the surface of the clay. This removes excess paint from the flat surface, leaving crisp black lines only inside the recessed grooves. -
Sand the surface:
I like to give the whole piece a quick wet-sand with fine-grit sandpaper at this stage to achieve that matte, stone-like texture visible in the photo. -
Seal (Optional):
If you prefer a shiny finish or want extra protection, apply a thin layer of matte or gloss glaze. For the natural look in the image, you can skip this step.
Step 4: Assembly
-
Open the jump ring:
Using two pairs of pliers, twist the antique brass jump ring open laterally (twist ends away from each other, don’t pull them apart). -
Attach the hardware:
Slide the open jump ring through the hole in your clay coin and loop the main keyring onto it as well. -
Close the loop:
Twist the jump ring ends back together until they meet flush. Give it a gentle squeeze to ensure it is secure.
Now your keys have a friendly companion that’s sure to bring a smile every time you head out the door
Little Octopus Buddy Keychain
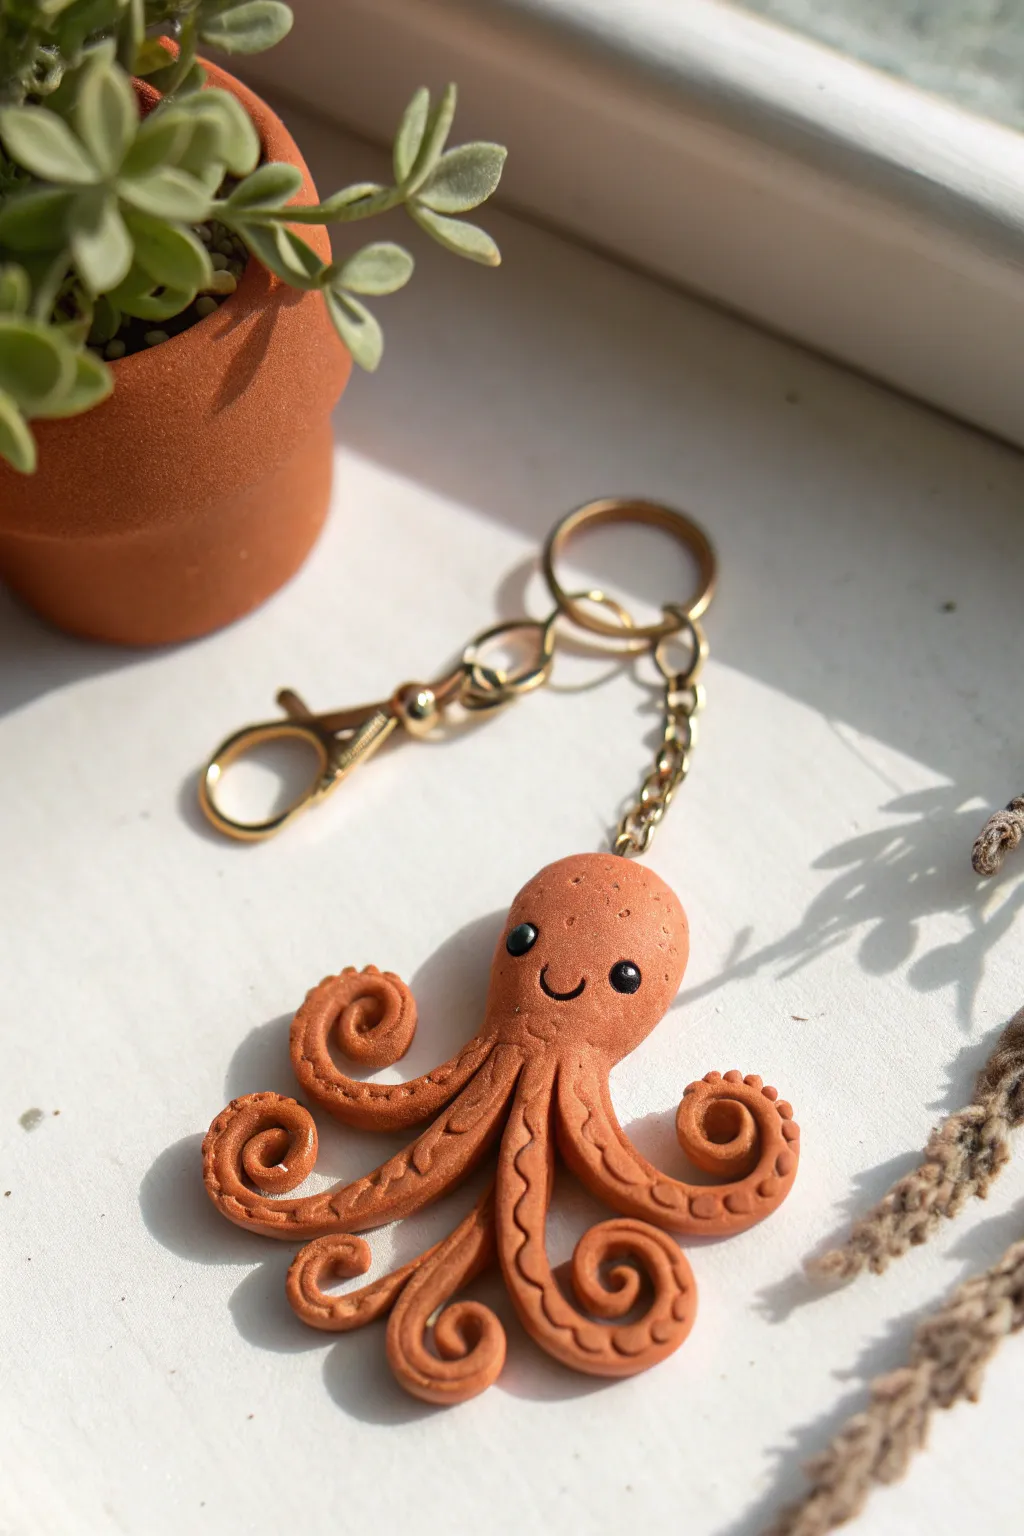
Create a charming sea-inspired accessory with this polymer clay octopus tutorial. The finished piece features a warm, earthy tone with intricate curled tentacles and a friendly face that adds character to any set of keys.
Detailed Instructions
Materials
- Terracotta or rust-orange colored polymer clay
- Black polymer clay (tiny amount for eyes)
- Needle tool or toothpick
- Ball stylus tool (small)
- Eye pin (gold finish)
- Keychain hardware (gold finish jump rings, chain, lobster clasp)
- Jewelry pliers
- Gloss glaze (optional for eyes)
- Oven for baking
Step 1: Shaping the Body
-
Condition the clay:
Begin by kneading your terracotta-colored polymer clay until it is soft, pliable, and free of cracks. If you want a speckled look like the photo, you can mix in a tiny pinch of black pepper or ground spices. -
Form the head:
Roll a portion of clay into a smooth ball about the size of a large grape to form the main head of the octopus. -
Elongate the shape:
Gently pinch and pull the bottom of the ball slightly downwards to create a neck area where the tentacles will eventually attach, making it look a bit like a lightbulb shape. -
Pre-texture the head:
Before adding features, use a needle tool to gently poke very shallow, random dots on the top of the head for a subtle, porous texture.
Texturing Tip
To get that gritty, stone-like texture without special tools, gently roll a clean toothbrush or a ball of aluminum foil over the surface of the unbaked clay.
Step 2: Creating the Tentacles
-
Prepare tentacle logs:
Roll out a long, thin snake of clay, approximately 3-4mm in thickness. It needs to be long enough to cut into eight individual sections. -
Cut sections:
Cut the snake into eight equal segments, each about 1.5 to 2 inches long. Tap the ends so they are tapered rather than blunt. -
Attach the legs:
Turn the head upside down. Press the thicker ends of the eight tentacles onto the bottom center of the head piece, blending the seams smooth with your finger or a modeling tool so they are securely attached. -
Curl the tips:
Flip the octopus back over. One by one, take the tapered end of each tentacle and curl it tightly into a spiral. Vary the direction of the curls slightly for a natural, dynamic look. -
Add suction cups:
Use a small ball stylus or needle tool to press a line of small indentations running down the length of each tentacle. This mimics the look of suction cups and adds essential detail.
Step 3: Adding Details and Assembly
-
Make the eye sockets:
Use a medium-sized ball tool to press two small indentations into the face area where you want the eyes to sit. This helps secure the clay eyes later. -
Insert the eyes:
Roll two tiny spheres of black clay. I find it helpful to pick these up with the tip of a needle tool to place them precisely into the sockets. Press gently to secure. -
Create the smile:
Use a needle tool or a small curved blade to impress a tiny, U-shaped mouth right between the eyes. -
Insert hardware:
Take your gold eye pin. If it’s too long, trim the wire stem. Push it vertically into the top center of the octopus head. To secure it better, you can add a dab of liquid clay or bake-and-bond to the stem before inserting. -
Bake the piece:
Place your octopus on a baking sheet lined with parchment paper or a ceramic tile. Bake according to your polymer clay manufacturer’s instructions (usually 275°F/135°C depending on brand) for about 30 minutes. -
Cool and vanish:
Let the piece cool completely. Once cool, you can add a tiny dot of gloss glaze to the black eyes to make them shine and look more alive. -
Assemble keychain:
Use jewelry pliers to open a jump ring. Loop it through the eye pin on top of your octopus and connect it to your keychain hardware. Close the jump ring securely.
Loose Eye Pin?
If the eye pin pulls out after baking, pull it all the way out, put a drop of super glue on the stem, and slide it quickly back into the existing hole.
Now you have a sturdy and adorable little sea creature to guard your keys
Puzzle Piece Pair Keychains
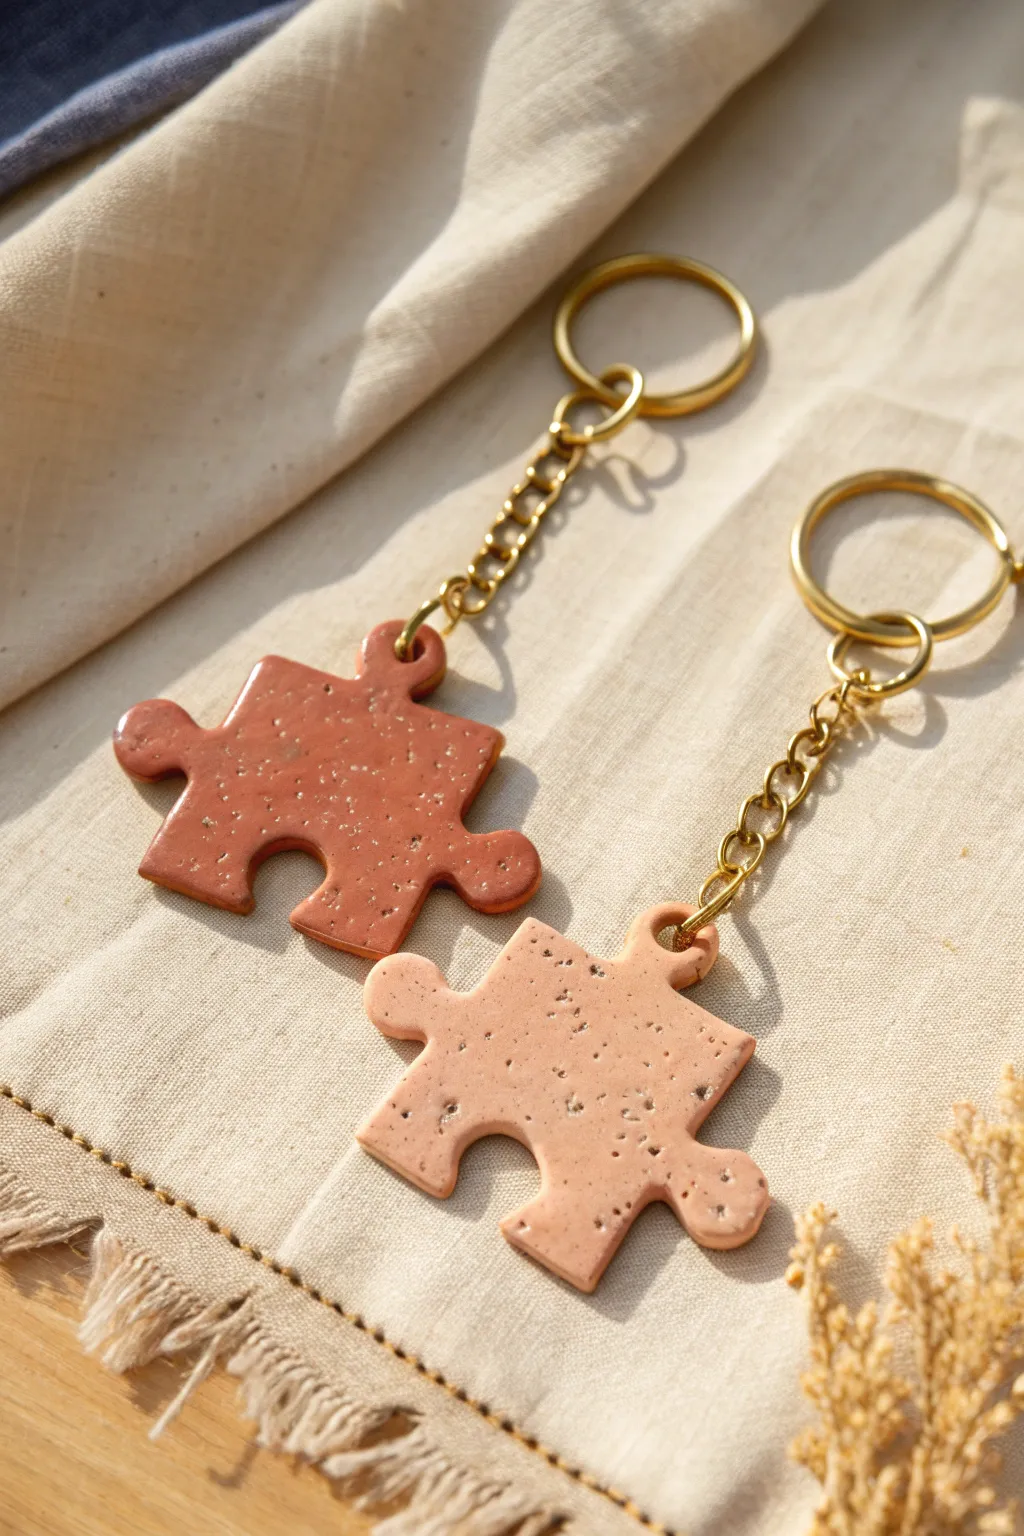
Celebrate connection with this charming set of interlocking puzzle piece keychains. The project features a realistic stone-effect finish in warm terracotta and soft sand tones, making them perfect for best friends or significant others.
Step-by-Step
Materials
- Polymer clay (terracotta or reddish-brown)
- Polymer clay (beige or light peach)
- Black pepper or dried coffee grounds (for speckling)
- Small rolling pin or acrylic roller
- Puzzle piece cookie cutter (or craft knife and paper template)
- Needle tool or toothpick
- Gold keyrings with chain extenders
- Jump rings (gold)
- Pliers (round nose and flat nose)
- Baking sheet and parchment paper
- Fine-grit sandpaper (optional)
- Gloss or matte glaze (optional)
Step 1: Preparing the Clay
-
Condition the base colors:
Begin by kneading your terracotta and beige clay blocks separately until they are soft, pliable, and free of cracks. Warm hands help this process significantly. -
Create the speckled texture:
Flatten each ball of clay slightly. Sprinkle a small pinch of course black pepper or fine dried coffee grounds onto each color to mimic the stone look seen in the photo. Fold the clay over and knead it again until the specks are evenly distributed throughout the material. -
Roll out the slabs:
Using your acrylic roller or rolling pin, roll both clay colors out into smooth slabs. Aim for a thickness of about 4-5mm (approx. 1/4 inch) to ensure the final pieces are sturdy enough for daily use.
Fixing Broken Tags
If the clay breaks near the hole after baking, don’t panic. Superglue a flat pad bail to the back of the piece instead of re-drilling.
Step 2: Shaping the Puzzle Pieces
-
Cut the shapes:
Press your puzzle piece cutter firmly into the terracotta slab. Repeat with the beige slab. If you are using a paper template instead, lay it on the clay and carefully trace around it with a craft knife, ensuring clean, sharp edges. -
Check the fit:
Before baking, gently slide the two clay pieces together to ensure they interlock correctly. If the fit is too tight, lightly trim the connecting edges with your craft knife. -
Smooth the edges:
Lift the pieces and gently run your finger along the cut edges to soften any sharp corners or clay burrs left by the cutter. This professional touch makes a huge difference. -
Create the hole:
Using a needle tool or a toothpick, pierce a hole in one of the outer tabs of each puzzle piece. Wiggle the tool slightly to ensure the hole is large enough for your heavy-duty jump ring.
Step 3: Baking and Assembly
-
Bake carefully:
Place your pieces on a parchment-lined baking sheet. Bake according to your brand of polymer clay instructions (usually around 275°F/135°C for 15-30 minutes). I essentially tend to under-bake slightly rather than burn them, but following the package is safest. -
Cool down:
Allow the clay pieces to cool completely on the baking sheet. They will harden fully as they return to room temperature. -
Sand for perfection:
Once cool, if there are any rough spots, lightly buff the edges with fine-grit sandpaper for a smooth finish. -
Open the jump rings:
Using two pairs of pliers, twist (don’t pull) a gold jump ring open sideways. -
Attach the hardware:
Slide the open jump ring through the hole you made in the clay puzzle piece. Before closing it, loop the bottom link of the keychain chain onto the jump ring. -
Secure the closure:
Use your pliers to twist the jump ring back into a closed position, ensuring the ends meet perfectly flush so the chain doesn’t slip out. -
Repeat for the second piece:
Attach the hardware to the second puzzle piece using the same method.
Smoother Surfaces
Before baking, wipe the raw clay surface gently with a baby wipe or a finger dipped in baby oil to remove fingerprints and dust.
Hook these onto your keys and snap a photo of the completed pair together before gifting the matching half to someone special
Mini Nameplate Keychain
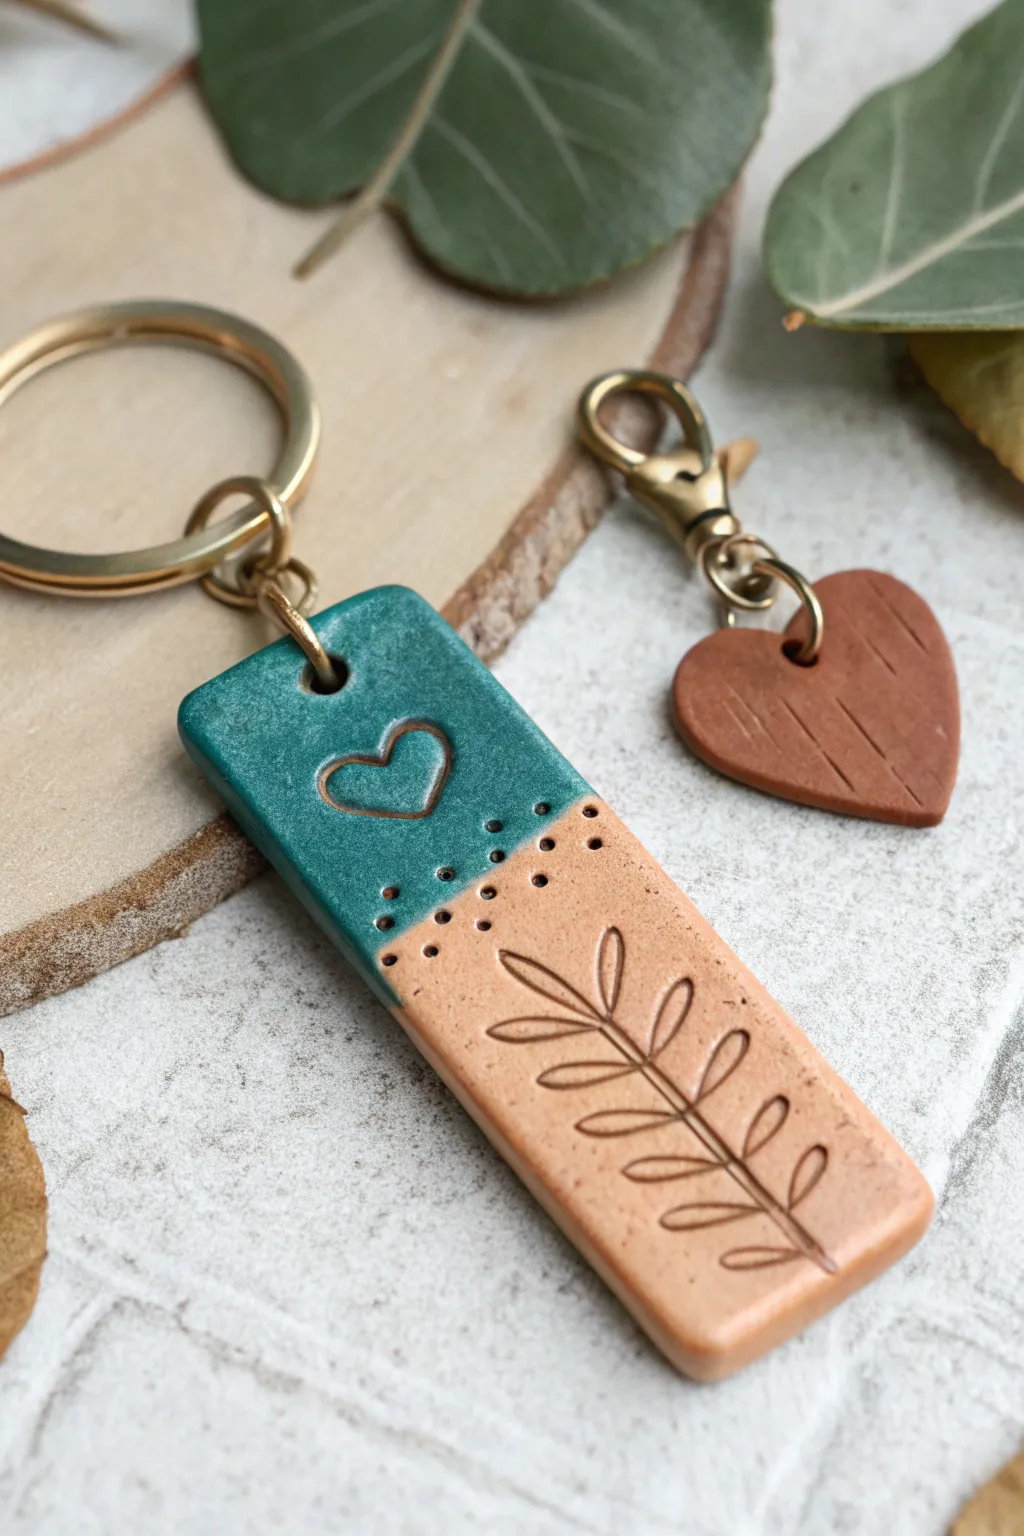
Create a rustic yet elegant keychain set featuring a rectangular pendant with a striking teal-dipped effect and a matching mini heart charm. This project combines simple stamping techniques with selective glazing to achieve a beautiful contrast between the raw clay texture and the glossy finish.
Step-by-Step Guide
Materials
- Polymer clay (terracotta or beige color)
- Rolling pin or clay machine
- Rectangular clay cutter
- Small heart cutter
- Leaf or branch rubber stamp
- Small heart stamp
- Pin tool or needle tool
- Gold jump rings (various sizes)
- Gold split ring keychain
- Gold lobster clasp
- Teal acrylic paint or teal gloss glaze
- Paintbrush (small, flat)
- Gloss varnish (optional)
- Oven and baking sheet
- Parchment paper
- Jewelry pliers
Step 1: Shaping the Clay Base
-
Condition the clay:
Begin by kneading your terracotta or beige polymer clay in your hands until it is soft, pliable, and free of cracks. -
Roll it out:
Use a rolling pin or a clay machine to roll a sheet of clay to a uniform thickness, approximately 1/4 inch (6mm) thick. You want it sturdy enough to hold up as a keychain. -
Cut the rectangle:
Press the rectangular cutter firmly into the rolled clay. If you don’t have a specific cutter, use a sharp craft knife and a ruler to cut a rectangle roughly 1 inch wide by 2.5 inches long. -
Cut the charm:
Using the remaining scrap clay, roll it out again if necessary and cut out a small heart shape for the secondary charm. -
Smooth the edges:
Gently run your finger along the cut edges of both clay pieces to smooth out any harsh lines or burrs left by the cutters.
Step 2: Adding Texture & Details
-
Stamp the branch:
On the rectangular piece, position your leaf or branch stamp near the bottom. Press gently but firmly to leave a clean impression without distorting the shape of the rectangle. -
Stamp the heart:
Press a small heart stamp into the upper half of the rectangle. Ensure it’s centered horizontally. -
Add texture dots:
Using a needle tool or a very small ball stylus, poke a series of tiny holes across the middle of the rectangle, creating a dotted line that separates the top and bottom sections. -
Texture the heart charm:
For the mini heart charm, use a needle tool to scratch delicate, organic lines across the surface, giving it a wood-grain or sketched appearance. -
Create hole for hardware:
Use a straw or a larger detailing tool to punch a clean hole at the top center of the rectangle and the top curve of the heart charm. Make sure the hole is big enough for your jump rings.
Paint Line Perfection
For a razor-sharp transition between the painted top and raw bottom, place a strip of painter’s tape across the clay before painting the teal section.
Step 3: Baking & Finishing
-
Bake the pieces:
Place both clay pieces on a parchment-lined baking sheet. Bake according to your clay package instructions (usually 275°F/135°C for 15-30 minutes per 1/4 inch of thickness). -
Cool down:
Allow the pieces to cool completely before determining if any edges need light sanding with fine-grit sandpaper. -
Paint the top section:
Using a flat brush, carefully paint the top half of the rectangular keychain with teal acrylic paint. Use the dotted line texture as your guide for where to stop painting. -
Seal the paint:
Once the paint is dry, apply a coat of gloss varnish or glaze over the painted teal section and inside the stamped heart. Leave the bottom half raw for a matte contrast. -
Highlight the grooves:
If you want the stamped designs to pop, I like to dilute a tiny bit of brown acrylic paint with water, brush it into the grooves, and immediately wipe the surface clean, leaving dark pigment only in the recesses.
Fixing Uneven Glaze
If the glaze pools in the stamped heart, use the corner of a paper towel to wick away excess liquid before it dries to preserve the indentation.
Step 4: Assembly
-
Open jump rings:
Use two pairs of jewelry pliers to twist open your gold jump rings. Never pull them apart; always twist side-to-side. -
Attach the main keychain:
Thread a jump ring through the hole of the rectangular piece and connect it to the main split ring keychain. Close the jump ring securely. -
Assemble the heart charm:
Attach a small jump ring to the heart charm, then attach that ring to the lobster clasp mechanism. -
Final check:
Ensure all jump rings are closed tightly so your beautiful new accessories simply cannot slip off.
Clip this lovely set onto your keys or gift it to a friend who appreciates handmade charm
Pressed Texture Tile Keychain
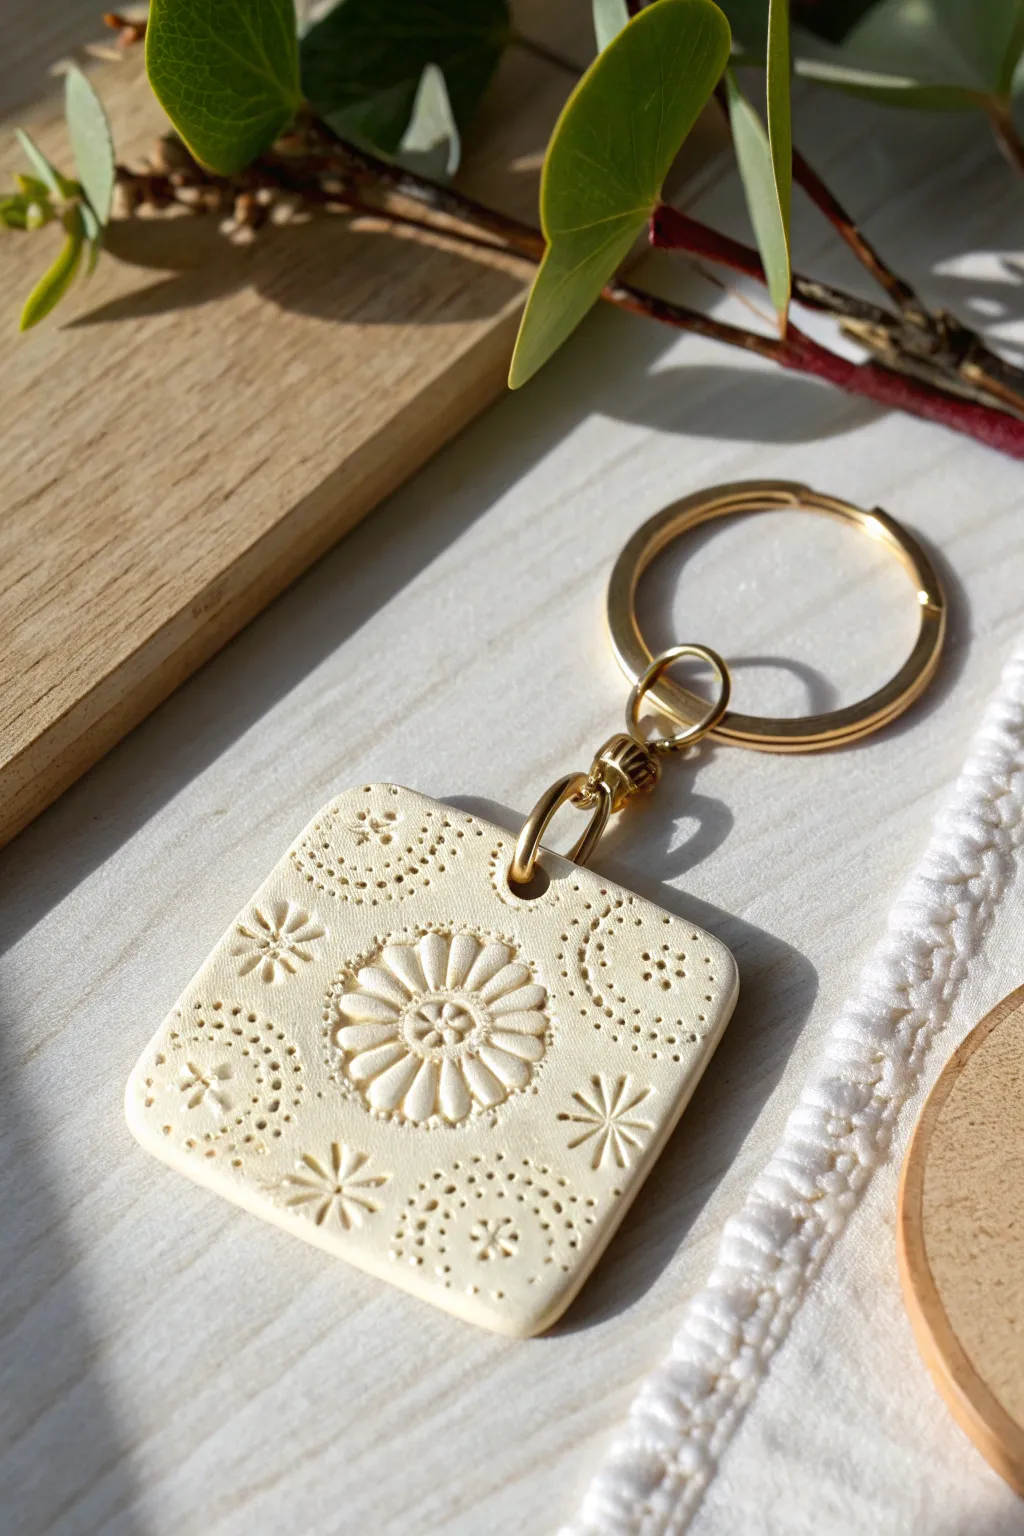
Embrace a subtle bohemian vibe with this elegant square keychain, featuring intricate raised floral patterns on a smooth cream surface. This project combines the simplicity of polymer clay with the beauty of texture stamping for a sophisticated, professional-looking accessory.
Step-by-Step Tutorial
Materials
- White or cream polymer clay (e.g., Fimo Soft or Sculpey Premo)
- Acrylic rolling pin
- Square clay cutter (approx. 1.5 – 2 inches)
- Texture sheet, rubber stamp, or lace (floral mandala pattern)
- Cornstarch or baby powder (as a release agent)
- Small round cutter or drinking straw (for the hole)
- Sandpaper (fine grit, 400-600)
- Gold keychain ring with chain attached
- Two gold jump rings (6mm or 8mm)
- Two pairs of jewelry pliers
- Gloss or matte varnish (optional)
- Oven and baking sheet
Step 1: Preparing the Clay Base
-
Condition the Clay:
Begin by taking a block of your cream polymer clay and warming it up in your hands. Knead it thoroughly until it is soft, pliable, and free of any air bubbles. -
Roll the Sheet:
Place the clay on a smooth work surface or silicone mat. Use your acrylic rolling pin to roll it out into an even sheet. Aim for a thickness of about 4mm to ensure the keychain is sturdy enough for daily use. -
Inspect the Surface:
Check the surface for accidental fingerprints or dust specks. Gently smooth them away with your finger or roll over the clay lightly one last time.
Stamp Master Tip
Can’t find a stamp? Vintage lace doilies make incredible texture tools. Lay the lace on the clay, roll over it once firmly, and peel it back for an instant intricate design.
Step 2: Adding Texture and Cutting
-
Prep the Texture Tool:
Select your floral mandala stamp or texture sheet. Lightly dust the surface of the clay or the stamp itself with a tiny bit of cornstarch to prevent sticking. -
Impress the Pattern:
Position your stamp over the clay. Press down firmly and evenly. If using a texture sheet, you can roll your acrylic pin over the sheet to ensure a deep, consistent impression. -
Reveal the Design:
Carefully lift the stamp or peel back the texture sheet to reveal the raised floral pattern. Inspect the details to make sure the impression is crisp. -
Cut the Shape:
Position your square cutter over the most attractive part of the pattern, centering the main floral motif if possible. Press the cutter down firmly through the clay. -
Clean the Edges:
Lift the cutter away and carefully remove the excess clay surrounding your square. If the clay stuck to the cutter, gently push it out from the back without distorting the shape. -
Create the Hardware Hole:
Use a small round cutter or a straw to punch a hole in one of the corners. Make sure not to place it too close to the edge—leave at least 3-4mm of clay border for strength. -
Smooth Imperfections:
Before baking, gently tap the edges with your fingertip to soften any sharp cuts left by the cutter. I like to do a quick visual check here to ensure the square hasn’t warped.
Make It Antique
After baking, rub a little brown or tan acrylic paint into the grooves of the pattern, then quickly wipe the surface clean. The paint stays in the crevices for an aged look.
Step 3: Baking and Finishing
-
Bake the Piece:
Transfer the clay tile to a baking sheet lined with parchment paper. Bake according to the manufacturer’s instructions on your clay package (usually around 275°F/130°C for 15-30 minutes). -
Cool Down:
Once the baking time is up, remove the tray from the oven and let the clay cool completely. It will harden fully as it returns to room temperature. -
Sand the Edges:
If there are any rough spots on the sides, use fine-grit sandpaper to gently buff the edges until they are perfectly smooth. -
Wash and Dry:
Rinse the piece quickly under water to remove sanding dust and dry it thoroughly with a lint-free cloth. -
Open the Jump Ring:
Using your two pairs of pliers, grip a gold jump ring on either side of the split. Twist one hand forward and one back to open the ring sideways (never pull it apart). -
Attach the Hardware:
Thread the open jump ring through the hole in your clay tile. Slide the bottom link of the gold keychain hardware onto the jump ring as well. -
Close the Ring:
Use the pliers to twist the jump ring back into place, ensuring the ends meet perfectly flush so the chain doesn’t slip out. -
Optional Varnish:
If you want extra protection or a shine, apply a thin coat of polymer clay varnish, though the matte raw finish offers a lovely natural stone look.
Now you have a chic, custom accessory that looks great on your keys or as a handmade gift bag charm
Layered Color Block Keychain
This trendy, layered keychain brings warm, earthy tones to your everyday carry with its simple yet charming design. You’ll create four distinct arches of polymer clay in a gradient that shifts from deep terracotta to soft white, all suspended from elegant gold hardware.
How-To Guide
Materials
- Polymer clay (Terracotta, Peach/Salmon, Beige/Sand, White)
- Gold keychain ring with chain and jump ring
- Gold screw eye pin (miniature)
- Clay roller or consistent rolling surface
- Tissue blade or sharp craft knife
- Needle tool or toothpick
- Parchment paper or ceramic tile (for baking)
- Oven
- Jewelry pliers (round nose and flat nose)
- Super glue (liquid or gel)
Step 1: Preparing the Clay
-
Condition the colors:
Begin by kneading each of your four clay colors individually until they are soft, pliable, and free of cracks. Warm clay is much easier to roll smoothly. -
Roll the snakes:
Take a small portion of the white clay and roll it into a long, even snake (log) about 4-5mm thick. Repeat this process with the beige, salmon, and terracotta clays, aiming for consistent thickness across all four strands. -
Measure the lengths:
The specific length doesn’t matter yet, but ensure your outer color (terracotta) is the longest snake, and the inner color (white) is the shortest. They need to be long enough to form arches.
Sticky Situation
If your clay is too sticky and hard to handle, try leaching it by placing the rolled clay between sheets of plain white paper for an hour to absorb excess oil.
Step 2: Forming the Rainbow
-
Create the center arch:
Take the white clay snake and bend it gently into a tight U-shape. This forms the innermost arch of your rainbow. -
Add the second layer:
Wrap the beige snake snuggly over the top of the white arch. Press them gently together along the seam so they adhere without smashing the round shape of the logs. -
Add the third layer:
Place the peach/salmon snake over the beige arch. Continue to gently press the layers together as you go to ensure a strong bond. -
Add the outer layer:
Finish by draping the terracotta snake over the entire stack. You should now have a complete four-color rainbow shape.
Step 3: Refining and Prep
-
Trim the bottom:
Using your sharp tissue blade or craft knife, cut straight across the bottom of the rainbow legs to create a clean, flat edge where all four colors are level. -
Smooth the back:
Flip the rainbow over carefully. I like to gently run a finger or a smoothing tool across the seams on the back to reinforce the connection between the strands. -
Insert the hardware anchor:
Take your small metal screw eye pin. Carefully twist it into the top center of the outermost (terracotta) arch. Screw it in until the eye loop sits flush against the clay. -
Secure the pin:
For extra security, you can unscrew the pin, add a tiny dot of super glue to the threads, and screw it back into the same hole before baking. -
Final smooth:
Check for any fingerprints or lint. You can gently wipe the surface with a tiny bit of rubbing alcohol or baby oil on your finger to smooth imperfections.
Seamless Finish
To prevent fingerprints, lightly dust your fingertips with cornstarch before the final smoothing step. It brushes right off after baking.
Step 4: Baking and Assembly
-
Bake the piece:
Place the rainbow on parchment paper or a ceramic tile. Bake according to your polymer clay package instructions (usually around 275°F or 130°C for 15-30 minutes depending on thickness). -
Cool down:
Allow the piece to cool completely in the oven or on a wire rack. Polymer clay is fragile while hot and hardens fully as it cools. -
Check the bond:
Once cool, gently test the strength of the arches. If they feel loose, you can add a thin line of super glue to the back seams for reinforcement. -
Open the jump ring:
Using two pairs of jewelry pliers, twist your jump ring open sideways (never pull it apart outwards) to preserve its shape. -
Attach the hardware:
Loop the open jump ring through the eye pin on your rainbow and the bottom link of your keychain hardware. -
Close the ring:
Twist the jump ring back into a closed position using your pliers, ensuring the gap is completely shut so the chain doesn’t slip out.
Attach your new creation to your keys or bag and enjoy those warm, creative vibes every time you head out the door
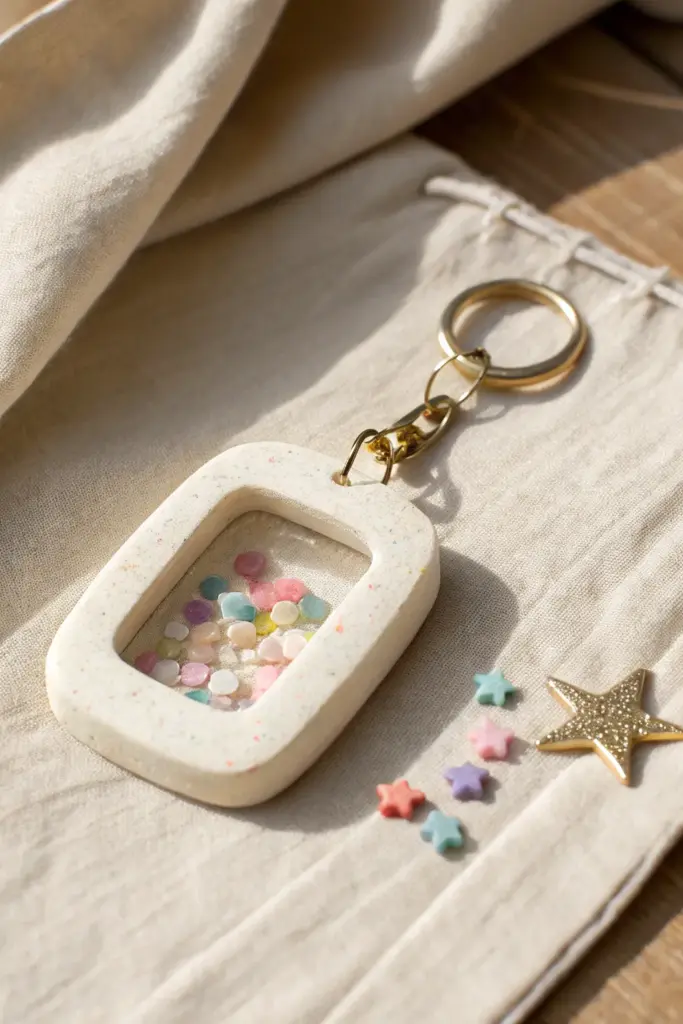
Shaker Window Confetti Keychain
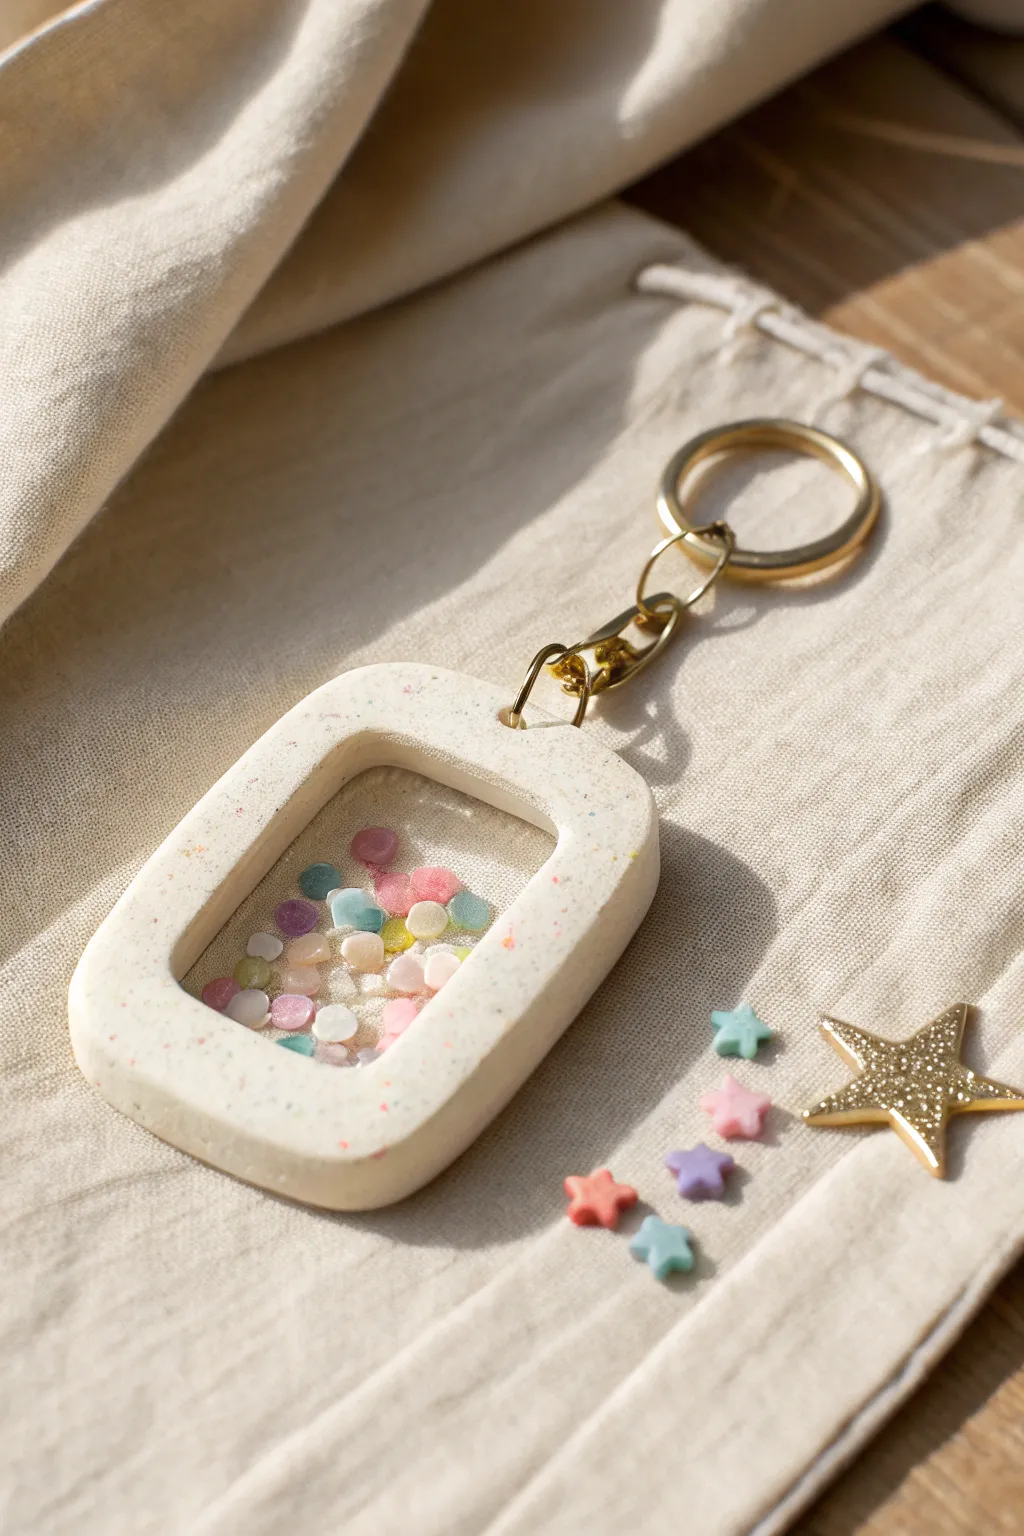
This whimsical keychain mimics the fun of a shaker toy, featuring a sleek, speckled frame encasing a tiny world of pastel confetti. The clear window creates a delightful rattle and movement, making it a perfect fidget-friendly accessory for your keys.
Detailed Instructions
Materials
- White polymer clay
- Fine colored glitter or clay sprinkles (for the speckled effect)
- Rectangular clay cutters (two sizes to create a frame)
- UV resin or clear liquid polymer clay
- UV lamp (if using UV resin)
- Pastel shaker inclusions (hearts, circles, stars)
- Clear acetate sheet or transparency film
- Gold keychain hardware (jump rings and split ring)
- Hand drill or needle tool
- Rolling pin
- Super glue or strong craft adhesive
- Sandpaper (fine grit)
Step 1: Preparing the Frame
-
Mix the Speckles:
Begin by conditioning the white polymer clay until it is soft and pliable. Knead in a small amount of fine colored glitter or tiny clay sprinkles to achieve the confetti-speckled granite look seen in the photo. -
Roll the Slab:
Roll the clay out evenly to a thickness of about 4mm. I find that a slightly thicker slab makes the final shaker more durable and gives depth for the window. -
Cut the Shape:
Use the larger rectangular cutter to cut the main shape. Then, carefully center the smaller rectangular cutter inside it to remove the middle, creating a hollow frame. -
Create the Backing:
Roll a second piece of clay, but make this one very thin (about 1-2mm). Cut it with the larger rectangular cutter only. This will serve as the solid back of your shaker. -
Add Hardware Hole:
Before baking, use a needle tool or toothpick to poke a decent-sized hole at the top center of the frame for the jump ring to pass through later. -
Bake the Clay:
Bake both the frame and the backing piece according to the manufacturer’s instructions on your clay package. Let them cool completely before moving on.
Sticky Shaker?
If static makes confetti stick to the plastic window, wipe the acetate with an anti-static dryer sheet before gluing it down. This keeps pieces moving freely.
Step 2: Assembling the Window
-
Attach the Backing:
Apply a thin line of liquid clay or strong glue to the back of the baked frame and press it firmly onto the thin backing piece. If using liquid clay, bake again briefly to bond them. -
Seal the Interior:
To ensure the confetti doesn’t stick to raw clay, brush a very thin layer of UV resin or varnish on the interior floor of the frame and cure it under the lamp. -
Add Confetti:
Place your pastel inclusions—little hearts, circles, and stars—inside the frame cavity. Don’t overfill it; you want enough room for the pieces to slide around freely. -
Cut the Acetate:
Trace the outer shape of your frame onto a piece of clear acetate or transparency film. Cut slightly inside this line so the plastic fits perfectly on top of the frame walls without hanging over the edge. -
Secure the Window:
Apply a thin bead of UV resin or super glue along the top rim of the clay frame. Carefully place the acetate cutout on top, pressing gently to seal the confetti inside. Cure under the lamp immediately if using resin.
Level Up: Double Sided
Instead of a solid clay backing, use acetate on both sides to make a fully see-through window where you can see the confetti floating from front and back.
Step 3: Finishing Touches
-
Domed Top Layer:
To hide the edges of the acetate and give a glassy finish, pour a layer of UV resin over the entire front face of the keychain. Use a toothpick to guide the resin to the very edges. -
Final Cure:
Place the piece under your UV lamp for several minutes until the top is hard, glossy, and tack-free. -
Clean Up:
If any resin dripped over the sides or the edges feel rough, use fine-grit sandpaper to smooth them down gently. -
Drill Cleanup:
If resin filled your hardware hole, use a small hand drill to carefully reopen it. -
Attach Hardware:
Open a gold jump ring using two pliers (twist, don’t pull). Thread it through the hole in the clay and attach the gold lobster clasp chain. -
Final Connection:
Connect the split ring to the chain assembly to complete your functional keychain.
Now you have a charming, interactive accessory ready to brighten up your daily routine