Clay keychains are my favorite tiny project because you get a big dose of personality in a small, totally doable piece. Here are a bunch of clay keychain ideas you can mix, match, and personalize until your keys feel like they actually belong to you.
Classic Initial Disc Keychain
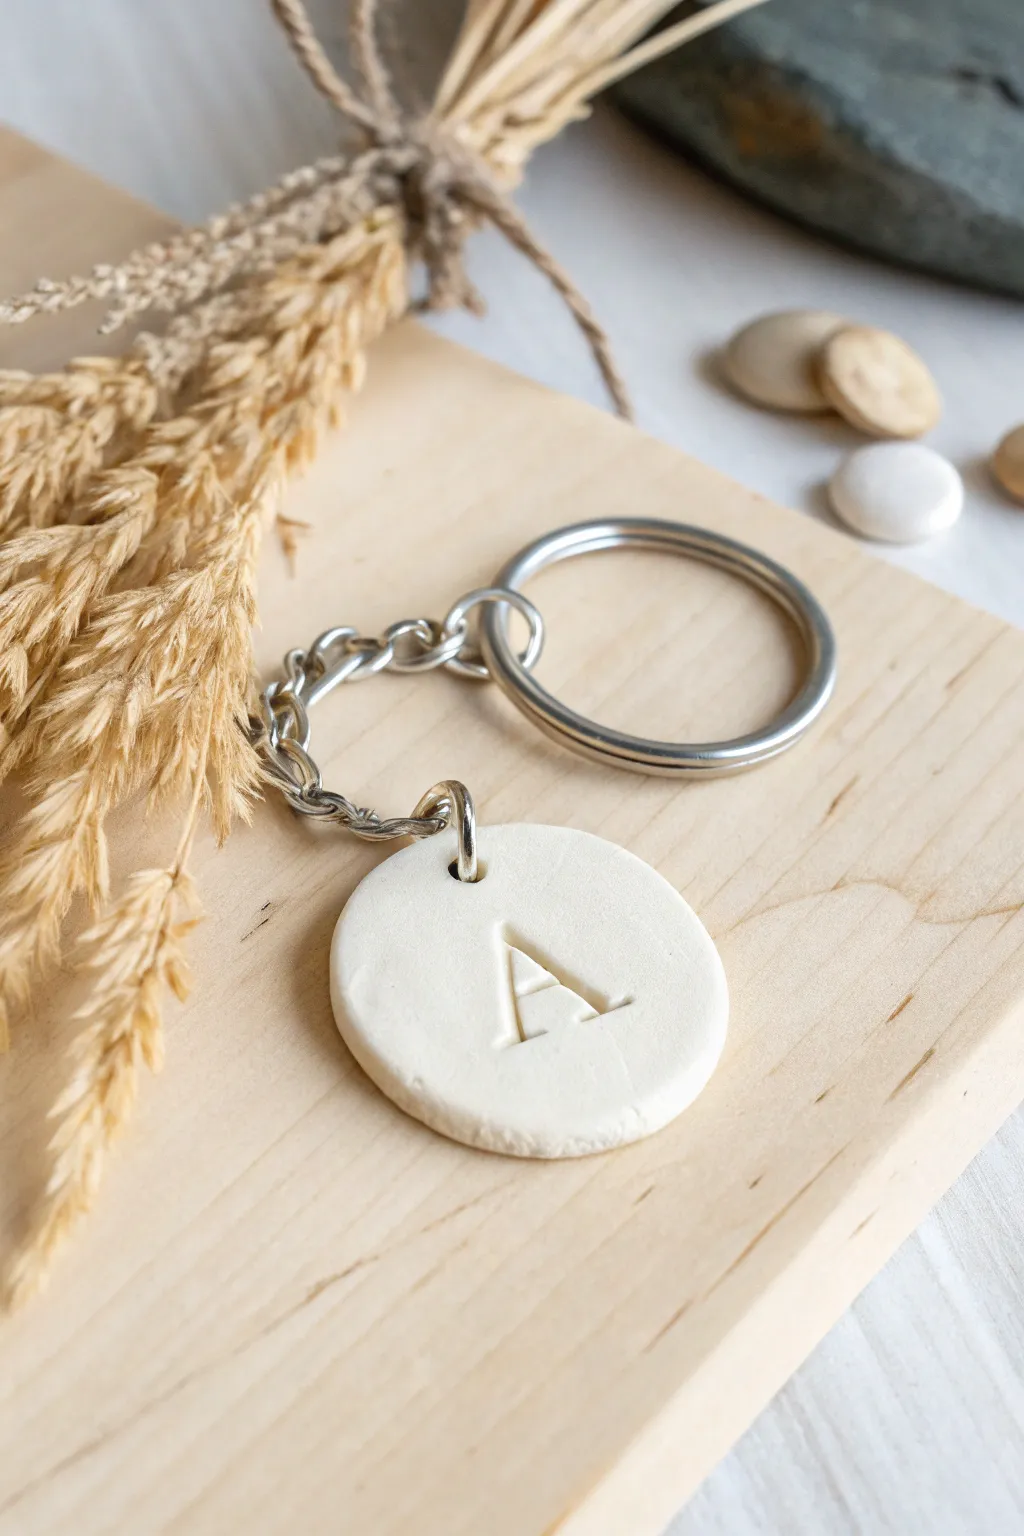
Embrace simplicity with this clean, elegant white clay keychain featuring a crisp embossed initial. The smooth, matte finish and classic typography make it a timeless accessory perfect for gifting or keeping for yourself.
Detailed Instructions
Materials
- White or translucent polymer clay (or air-dry clay)
- Acrylic rolling pin
- Circular clay cutter (approx. 1.5 – 2 inches)
- Letter stamp set (capital letters)
- Small jump rings (silver)
- Keychain hardware with chain (silver)
- Needle tool or toothpick
- Fine-grit sandpaper (optional)
- Parchment paper or ceramic tile
Step 1: Prepping the Clay Base
-
Condition the Clay:
Begin by taking a chunk of your white clay and kneading it thoroughly in your hands. You want it to be warm, soft, and pliable to prevent any cracks from forming later. -
Roll it Out:
Place the clay on a clean, flat surface like a ceramic tile or parchment paper. Use your acrylic rolling pin to roll the clay out evenly. -
Check Thickness:
Aim for a thickness of about 1/4 inch (approx. 6mm). This ensures the keychain is sturdy enough to be used daily without being too heavy. -
Cut the Circle:
Press your circular cutter firmly into the clay. Give it a tiny wiggle to ensure it cuts all the way through, then lift the cutter. Peel away the excess clay from around the circle. -
Smooth the Edges:
Gently run your finger around the edge of the clay circle to soften any sharp ridges left by the cutter. A smooth, rounded edge gives it that finished, professional look.
Clean Stamp Trick
Dust your letter stamp lightly with cornstarch or dip it in water before pressing into the clay. This acts as a release agent and prevents the clay from sticking inside the stamp details.
Step 2: Adding the Initial
-
Position the Stamp:
Select the capital letter stamp you wish to use. Hover it over the center of the clay circle to get your alignment right before committing. -
Press the Letter:
Press the stamp straight down into the clay with firm, even pressure. Don’t press all the way through; just deep enough to leave a clear, crisp impression. -
Remove Gently:
Lift the stamp straight up to avoid dragging the clay or distorting the letter shape. If the clay pulls up slightly, gently pat it back down. -
Create the Hole:
Using a needle tool or toothpick, pierce a hole slightly inward from the top edge of the circle. Make sure the hole is large enough to fit your jump ring comfortably. -
Clean Up:
Inspect the piece for any lint or fingerprints. I find a little bit of rubbing alcohol on a cotton swab works wonders to smooth out minor imperfections before baking.
Step 3: Finishing Touches
-
Bake or Dry:
Follow the instructions for your specific clay. For polymer clay, bake on a parchment-lined tray at the recommended temperature (usually round 275°F/135°C). For air-dry clay, let it sit undisturbed for 24-48 hours. -
Cool Down:
Once baked, let the clay cool completely before handling. It will harden fully as it returns to room temperature. -
Sand (Optional):
If there are any rough spots on the edges, lightly buff them with fine-grit sandpaper for a buttery smooth finish. -
Open the Jump Ring:
Using two pairs of pliers, twist your jump ring open sideways (never pull it apart). -
Assemble:
Thread the opened jump ring through the hole in your clay disc. -
Attach the Chain:
Before closing the ring, slide the last link of the keychain hardware onto the jump ring as well. -
Secure the Ring:
Twist the jump ring back closed, ensuring the two ends meet perfectly flush so the chain doesn’t slip out. -
Final Polish:
Give the keychain a final wipe with a soft cloth to remove any dust from assembly.
Add Subtle Color
After baking, dilute a tiny bit of acrylic paint with water and brush it into the indented letter. Wipe the surface quickly to leave color only inside the impression for high contrast.
Now you have a chic, personalized accessory ready to organize your keys or decorate a bag


Bagel With Cream Cheese Mini Keychain
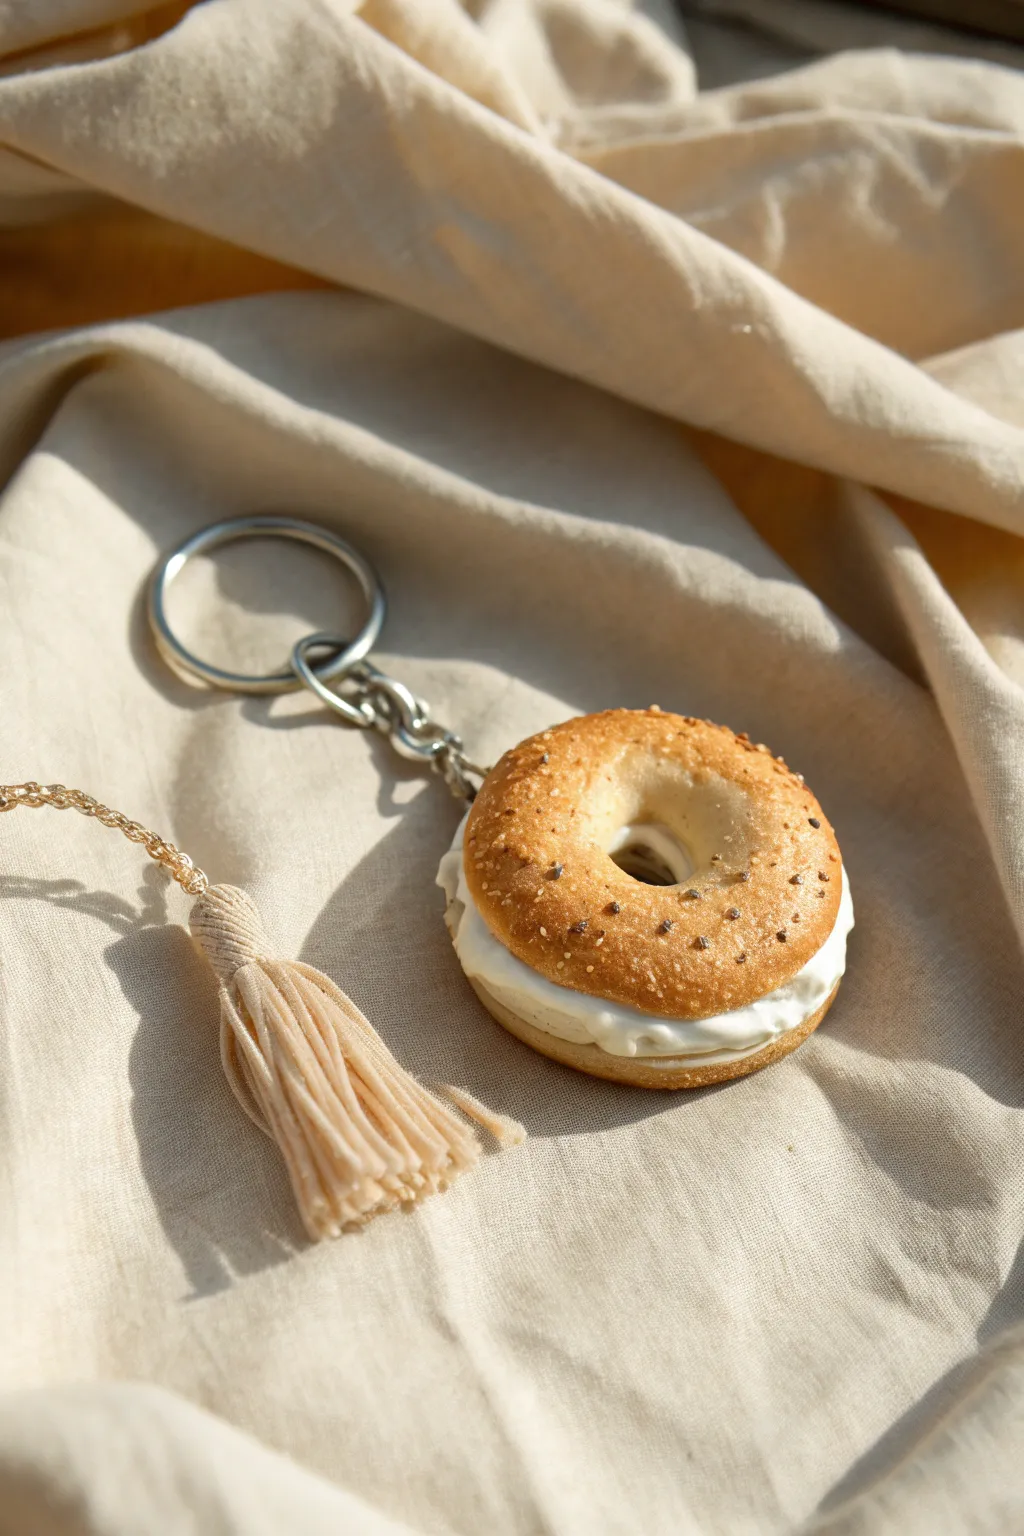
This bite-sized breakfast treat captures the satisfying texture of a perfectly toasted bagel loaded with cream cheese. Using polymer clay and some clever texturing techniques, you’ll sculpt a realistic mini charm perfect for your keys.
How-To Guide
Materials
- Polymer clay (dough color/beige, white, translucent)
- Soft pastels (yellow ochre, burnt sienna, brown)
- Liquid polymer clay (translucent)
- Faux toppings: brown craft sand, poppy seeds, or clay bits
- Texture tools: toothbrush, needle tool, ball stylus
- Eye pin
- Keychain ring and chain
- Gloss varnish (optional)
- Craft knife or tissue blade
- Paintbrush for pastels
Step 1: Sculpting the Bagel
-
Mix the dough color:
Start by mixing beige polymer clay with a tiny amount of translucent clay. This helps the bagel look like real bread rather than opaque plastic. -
Form the basic shape:
Roll the clay into a ball about an inch in diameter, then gently flatten it into a thick disc shape with your palm. -
create the center hole:
Use a ball stylus or the handle of a paintbrush to poke a hole directly through the center. Wiggle it slightly to widen the hole just enough, smoothing the edges so they look rounded and baked. -
Slice it open:
Carefully slice the bagel horizontally through the middle using a tissue blade or craft knife. Separate the top and bottom halves. -
Texture the crust:
Take an old toothbrush and firmly tap it over the rounded top and bottom surfaces. This stippling creates that signature bubbly bread texture. -
Texture the interior:
On the cut faces of the bagel, use a needle tool to pick and swirling the clay gently. You want to create distinct crumbs and air pockets to mimic the inside of bread.
Burnt Bagel?
To prevent browning on the white cream cheese, tent a piece of aluminum foil over the charm while baking. This shields the white clay from direct heat.
Step 2: Shading and Toppings
-
Prepare the pastels:
Scrape your yellow ochre, burnt sienna, and brown soft pastels into fine powders. -
Apply the base toast:
With a dry brush, dust the yellow ochre over the textured crust. Focus on the edges for a golden look. -
Deepen the bake:
Layer burnt sienna on the very top and around the outer rim where a bagel would naturally brown the most in an oven. -
Add spot browning:
I like to use a tiny bit of the dark brown on just the highest bumps of the texture to make it look crispy. -
Add seeds and seasoning:
Brush a very thin layer of liquid clay on top. Sprinkle your faux seeds (brown sand or tiny clay specks) over the surface so they stick securely.
Flavor Variations
Mix tiny green clay bits into your cream cheese for a ‘scallion’ spread, or tint the bagel dough pinkish-purple for a blueberry bagel variant.
Step 3: Assembly and Baking
-
Make the cream cheese:
Condition white polymer clay until it is very soft. Roll it into a thick log or disc roughly the size of your bagel. -
Initial assembly:
Place the white clay onto the bottom bagel slice. Press the top bagel slice gently onto the white clay. -
Sculpt the spread:
Use a needle tool or a small spatula to pull and smear the white clay outwards slightly. You want it to look like it was spread with a knife, slightly overflowing evenly around the edges. -
Smooth the filling:
If the cream cheese looks too ragged, smooth it lightly with your finger or a silicone tool to get that creamy consistency. -
Add hardware:
Insert an eye pin into the side of the bagel. You may need to trim the pin so it doesn’t poke through the center hole. -
Bake carefully:
Bake the piece according to your clay manufacturer’s instructions. A lower temperature for a longer time often prevents the white cream cheese from scorching. -
Finish the piece:
Once cool, create a stronger bond for the eye pin by pulling it out, adding a drop of super glue, and reinserting it. Attach your keychain ring to complete the project.
Now you have a delicious-looking accessory to keep your keys organized


Pizza Slice Keychain With Chunky Toppings
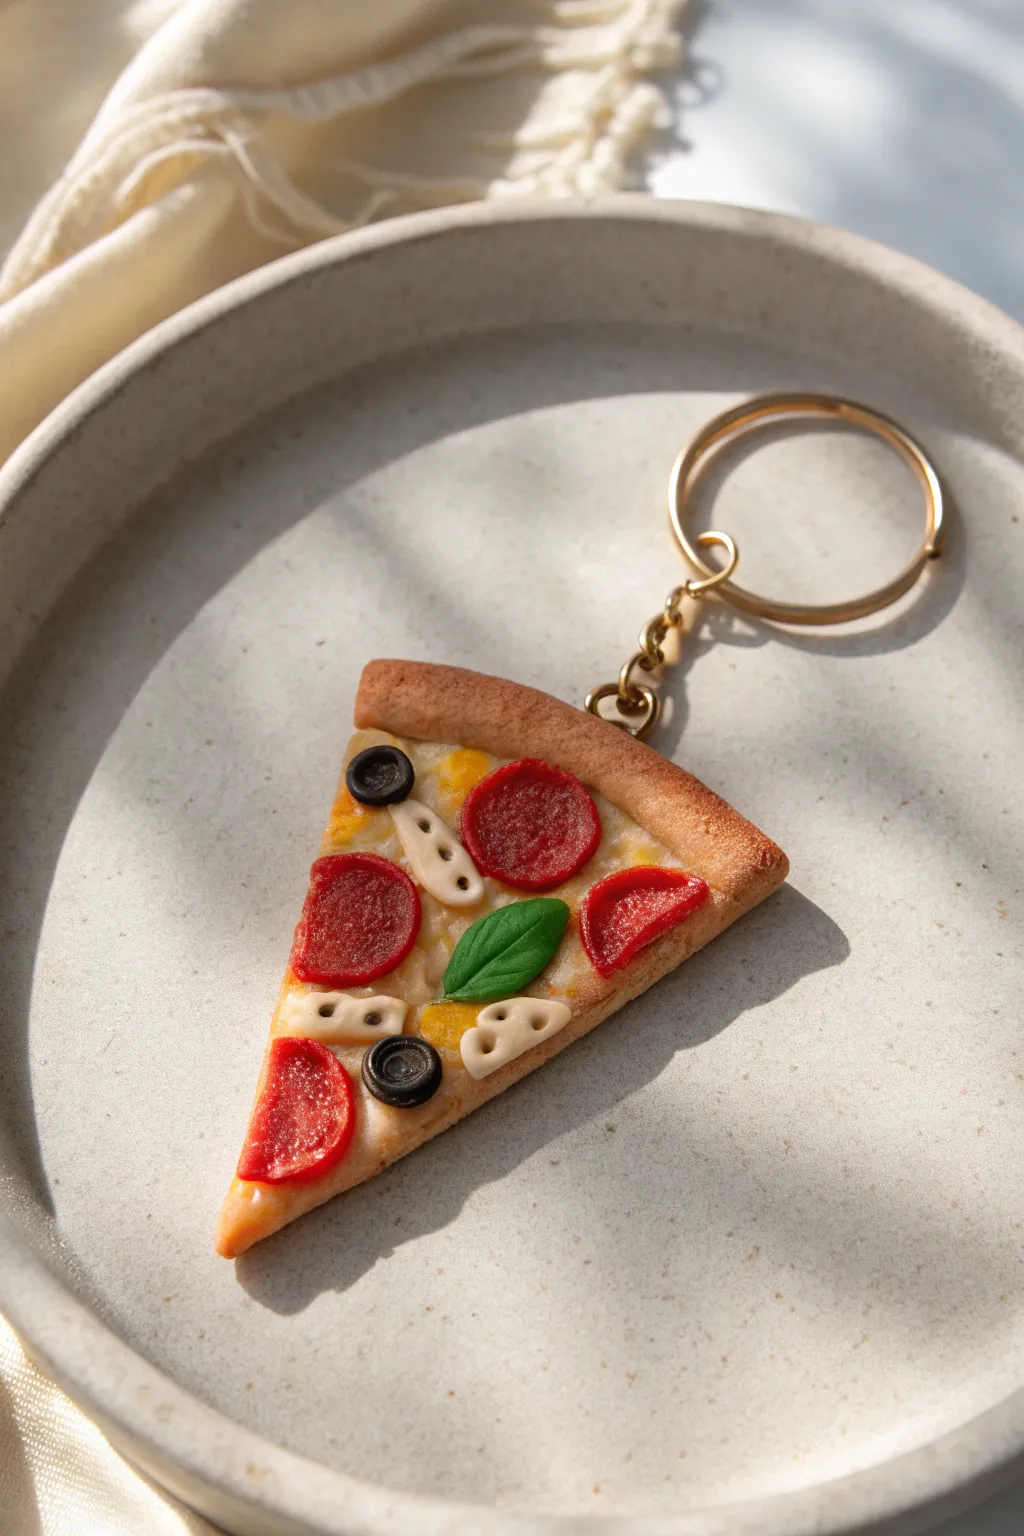
Carry a slice of everyone’s favorite comfort food wherever you go with this hyper-realistic polymer clay charm. This project features incredible texture detailing, from the bubbly crust to the miniature melted cheese and individually crafted toppings.
Step-by-Step Guide
Materials
- Polymer clay (beige/tan, translucent, red, dark brown, black, green, yellow)
- Liquid polymer clay (translucent)
- Chalk pastels (orange, brown, yellow ochre)
- Soft paintbrush for shading
- Dotting tool or ball stylus
- Needle tool or toothpick
- Small circular cutter or straw (for pepperoni)
- Texture sponge or toothbrush
- X-acto knife or craft blade
- Keychain hardware (jump ring, chain, keyring)
- Gloss glaze or polyurethane varnish
Step 1: Prepping the Base
-
Mix the dough color:
Start by mixing beige clay with a tiny amount of translucent and yellow to create a realistic pizza dough shade. It should look like unbaked bread. -
Shape the slice:
Roll the clay into a ball, flatten it slightly, and cut it into a triangular wedge shape. Keep it relatively thick, about 1/4 inch, to make it sturdy for a keychain. -
Form the crust:
Roll a separate snake of the same dough color. Attach this along the wider, curved edge of your triangle, blending the seam on the bottom so it looks like one cohesive piece of dough. -
Texturize the dough:
Use a toothbrush or a crumpled ball of aluminum foil to texture the entire surface of the crust and the bottom of the slice. This mimics the rough texture of baked bread. -
Shade the crust:
Shave some yellow ochre, orange, and brown chalk pastels into fine powders. Using a soft dry brush, gently dust the outer crust edge to give it a ‘baked’ appearance, focusing the darker brown on the very edges.
Pizza Pro Tip
For ultra-realistic pepperoni, mix translucent clay into your red clay. This makes the ‘meat’ look slightly fatty and realistic rather than like flat plastic.
Step 2: Adding Sauce & Cheese
-
Create the sauce base:
Mix a small amount of liquid polymer clay with red chalk pastel or red clay until you have a thick, sauce-like consistency. Spread a thin layer over the flat part of the triangle, stopping just before the crust. -
Mix the cheese:
Combine translucent clay with a tiny bit of yellow and white. Chop this mixture into tiny, jagged crumbles rather than a smooth sheet. -
Apply the cheese:
Sprinkle your cheese crumbles over the sauce layer. Use a dotting tool to gently press them down, smearing some areas to look like melted mozzarella. -
Create a golden melt:
Lightly dust the cheese layer with yellow-orange chalk pastel to simulate the oils and browning that happen in a hot oven.
Step 3: Crafting the Toppings
-
Make the pepperoni:
Roll out a thin sheet of red clay. Use a small circular cutter or the end of a straw to punch out circles. Texture the surface with a toothbrush or sandpaper. -
Detail the pepperoni:
Press the edges of the pepperoni circles downward slightly to make them cup, and arrange them generously on the slice. -
Form the mushrooms:
Roll a thin log of beige clay. Squeeze it slightly into a teardrop shape for stems or flatten small balls for caps. Use a needle tool to poke two tiny holes in each piece for that sliced mushroom look. -
Create black olives:
Roll a very thin snake of black clay. Slice off tiny discs. Use a small ball tool or needle to press a hole in the center of each disc to create olive rings. -
Add fresh basil:
Take a tiny piece of green clay and shape it into a tear-drop leaf. Use a needle tool to press a central vein down the middle and place it centrally for a pop of color. -
Embed the hardware:
Insert a screw eye pin into the top center of the crust. For extra security, I like to add a dab of liquid clay to the threads before screwing it in.
Level Up: Seasoning
Before baking, sprinkle real dried oregano or poppy seeds (or tiny specks of green/black clay) over the cheese to add that gourmet Italian seasoning look.
Step 4: Baking & Finishing
-
Bake the slice:
Bake the piece according to your clay manufacturer’s instructions (usually 275°F for 15-30 minutes). Let it cool completely. -
Glaze toppings:
Apply a gloss glaze specifically to the pepperoni and olives to make them look greasy and juicy. Leave the crust matte for contrast. -
Assemble keychain:
Attach your jump ring and keychain hardware to the eye pin using jewelry pliers.
Enjoy your delicious-looking accessory that’s sure to make everyone hungry when they see your keys.


Cute Fried Egg Keychain
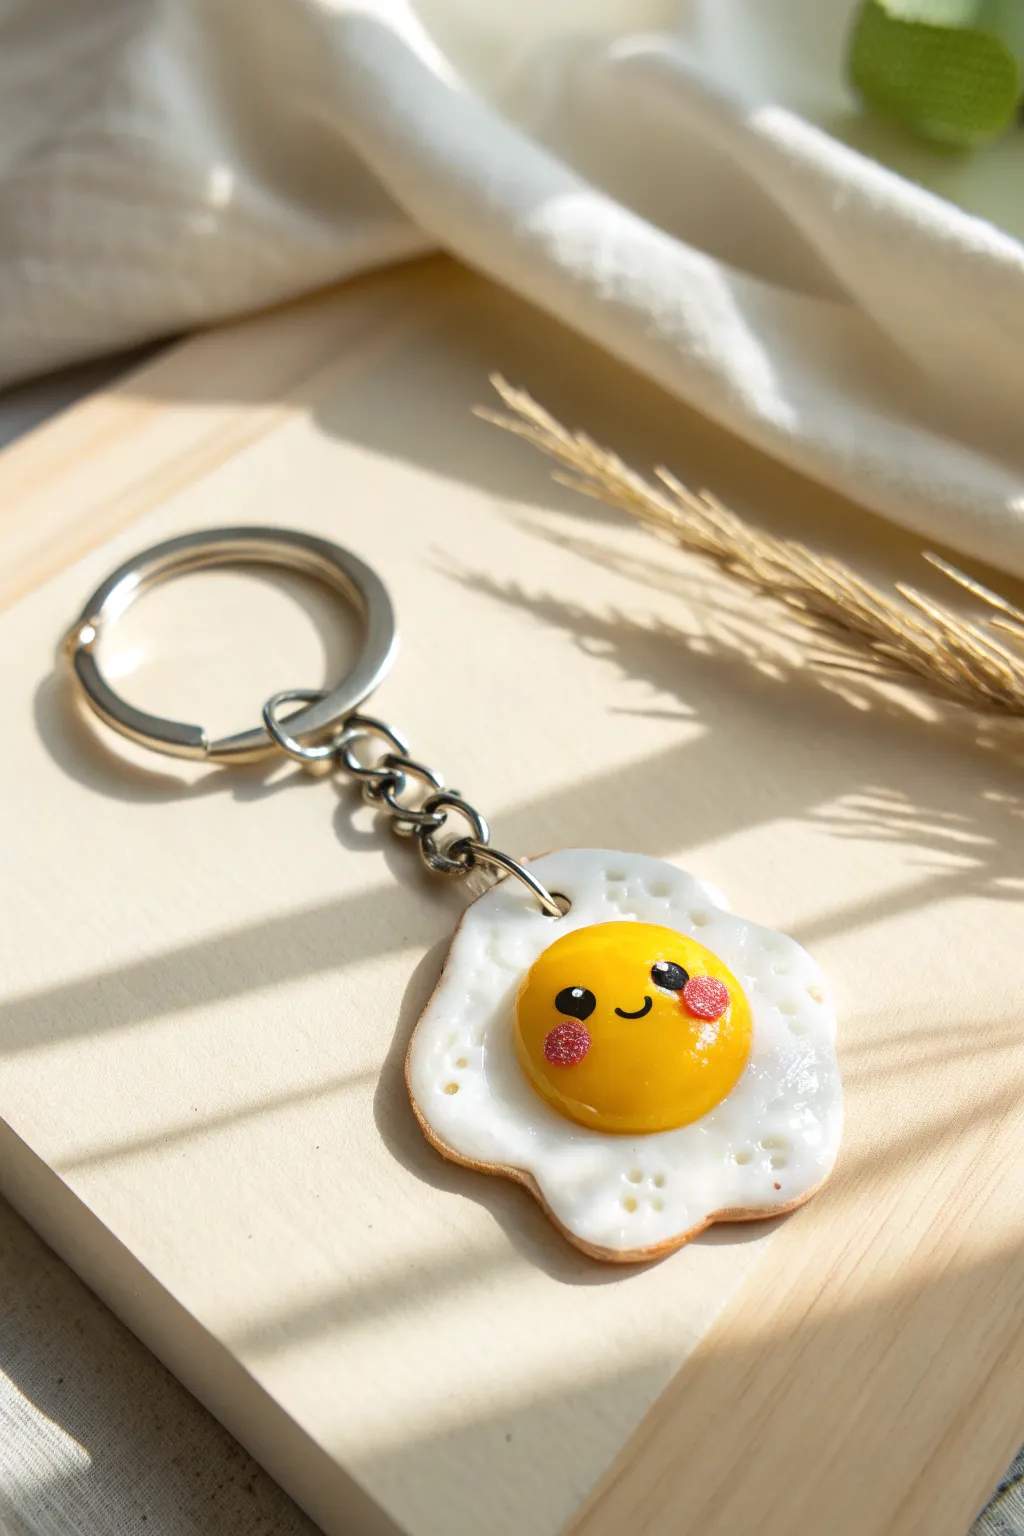
Brighten up your keys with this adorably happy fried egg keychain made from polymer clay. With its glossy finish, blushed cheeks, and realistic crispy edges, this little breakfast buddy is sure to start your day with a smile.
Step-by-Step
Materials
- White polymer clay
- Yellow polymer clay (sunshine or golden yellow)
- Small amount of translucent clay (optional)
- Soft pastels (brown/orange)
- Black acrylic paint
- Pink or red acrylic paint
- Fine detail paintbrush or dotting tool
- Gloss glaze or UV resin
- UV lamp (if using resin)
- Eye pin
- Jump ring and keychain hardware
- Needle tool or toothpick
- Ball tool (large)
Step 1: Shaping the Egg White
-
Condition the Clay:
Begin by thoroughly kneading your white polymer clay until it is soft and free of cracks. This ensures the edges won’t split later. -
Form the Base:
Roll the white clay into a ball about the size of a large marble, then flatten it into an irregular, wavy disk shape. -
Texturize the Edges:
Using your fingers, gently pull and stretch the edges outward to create an organic, uneven outline that mimics a real egg white cooking in a pan. -
Add Bubbles:
Take a large ball tool or the end of a paintbrush and press small indentations randomly around the white area to simulate air bubbles formed during frying. -
Create the Yolk Seat:
Press a gentle, shallow indentation in the center (or slightly off-center) of the white clay where the yolk will sit.
Crispy Texture Trick
Before baking, gently tap the edges of the white clay with a clean toothbrush or sandpaper. This creates a realistic fried texture that catches the pastel shading perfectly.
Step 2: Adding the Yolk and Details
-
Mix the Yolk Color:
For a more realistic look, I like to mix a tiny pinch of translucent clay into the yellow clay; roll this into a smooth, round ball. -
Attach the Yolk:
Place the yellow ball into the indentation on your egg white, pressing down gently so it adheres but maintains a nice dome shape. -
Shade the Edges:
Shave some brown soft pastel into a fine powder. Use a soft brush to lightly dust the very edges of the egg white to give it a ‘crispy’ fried appearance. -
Insert Hardware:
Carefully insert an eye pin into the top edge of the egg white. You may need to trim the pin if it’s too long to ensure it doesn’t poke through the yolk. -
Bake:
Bake the piece according to your specific clay brand’s package instructions, usually around 275°F (135°C) for 15-30 minutes.
Step 3: Bringing it to Life
-
Cool Down:
Allow the clay to cool completely before painting. Painting on warm clay can make the acrylics tacky and hard to work with. -
Paint the Eyes:
Using a very fine detail brush or a dotting tool, dab two small black circles onto the yolk for eyes. -
Add a Smile:
With the finest brush you have, carefully paint a tiny, u-shaped smile between the eyes using black acrylic paint. -
Blush the Cheeks:
Dip a dotting tool into pink or reddish paint and dab it onto the cheeks. Using a textured sponge or stippling motion can give it that cute, fuzzy look. -
Highlight the Eyes:
Once the black paint is dry, add a tiny white dot to the upper corner of each eye to create a spark of life.
Make it a Meal
Create a full breakfast set by sculpting a tiny strip of bacon or a slice of toast to hang alongside your egg on the same keychain ring.
Step 4: Assembly and Finish
-
Glaze:
Apply a coat of gloss glaze or UV resin over the entire yolk to make it look ready to run. You can leave the white matte or glaze it too. -
Cure:
If using UV resin, cure it under a UV lamp for a few minutes until hard and tack-free. If using varnish, let it air dry completely. -
Secure the Pin:
For extra security, pull the eye pin out gently to add a drop of superglue, then slide it back in provided it feels loose after baking. -
Attach Keyring:
Use pliers to open a jump ring, loop it through the eye pin and the keychain hardware, and close it securely.
Now your keys have a cheerful companion to remind you that every day is a fresh start

The Complete Guide to Pottery Troubleshooting
Uncover the most common ceramic mistakes—from cracking clay to failed glazes—and learn how to fix them fast.
Toast Slice Keychain With Tiny Face Detail
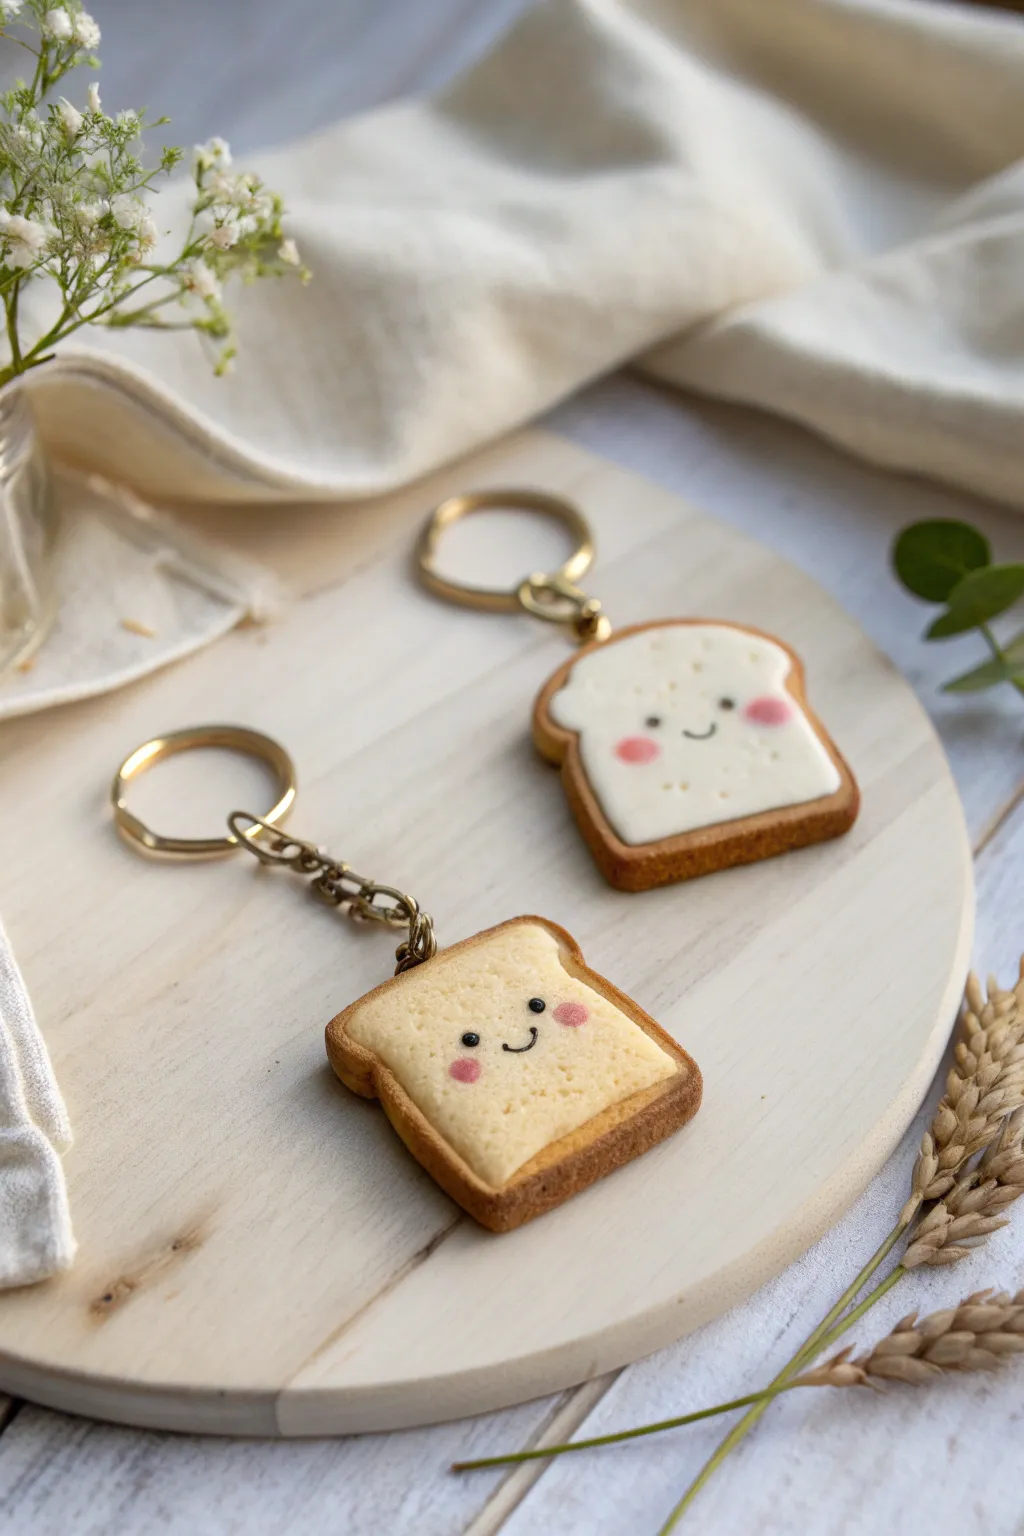
These adorable toast slice keychains are the perfect blend of cute and realistic, featuring a perfectly textured crust and a sweet little face. Customizable to look like golden brown toast or soft white bread, they make charming accessories or heartfelt gifts for friends.
Detailed Instructions
Materials
- Polymer clay (white, beige, translucent, and a tiny bit of dark brown/black)
- Soft pastel chalks (yellow ochre, burnt sienna, brown)
- Small paintbrush (soft bristle)
- Texture tools (old toothbrush, needle tool, or crumpled foil)
- Liquid polymer clay (optional, for sauce effects)
- Acrylic paint (black, pink)
- Fine detail paintbrush or dotting tool
- Eye pins or screw eyes
- Keychain hardware (jump rings, chains, keyring)
- Oven for baking
Step 1: Shaping the Base
-
Mix your dough color:
Start by mixing white polymer clay with a small amount of beige and a tiny pinch of translucent. This creates a realistic bread color that isn’t unnaturally stark white. -
Form the slice shape:
Roll the clay into a ball, then flatten it into a thick square slab, about 1/4 inch thick. Gently round off the bottom corners and press the top center down slightly to create the classic ‘M’ indentation of a loaf slice. -
Mix the crust color:
Take some of your base color and mix in more beige and a touch of brown until you have a warm, light crust shade. Roll this into a long, thin snake. -
Apply the crust:
Wrap the crust snake around the edges of your white slice. Gently smooth the seam where the crust meets the bread using your finger or a clay tool, ensuring they bond without losing the distinctive border.
Uneven Texture?
If the toothbrush leaves distinct bristle marks, gently tap over the area with your finger to soften the pattern. Rotating the brush as you tap prevents repetitive lines.
Step 2: Texturing and Shading
-
Create bread texture:
Pat the white surface of the bread gently with an old toothbrush or a ball of crumpled aluminum foil. This step is crucial for that fluffy, aerated bread look—don’t forget to texture the sides of the crust lightly too. -
Prepare the pastels:
Shave a small amount of yellow ochre and burnt sienna soft pastels into a powder using a craft knife or sandpaper. -
Shade the edges:
Using a soft, dry paintbrush, dust the yellow ochre powder around the very edges of the white bread part, blending inward just slightly to show where the bread has ‘toasted’ near the crust. -
Darken the crust:
Apply the burnt sienna powder heavily to the outer crust snake. Adding layers of brown pastel builds depth and makes it look like perfectly baked dough.
Step 3: The Cute Face
-
Position the eyes:
Use a small dotting tool or the end of a paintbrush handle to create two shallow indents where the eyes will go. Placing them slightly wide apart increases the cuteness factor. -
Add the smile:
Use a needle tool or a very thin piece of black clay rolled into a thread to create a small ‘U’ shape between the eyes for the smile. I find pressing a tiny curved tool gently into the clay works best. -
Insert hardware:
Carefully insert an eye pin or screw eye into the top center of the crust. Ensure it goes deep enough to be secure but doesn’t distort the shape. -
Bake the clay:
Bake the pieces according to your clay manufacturer’s instructions. Usually, this is around 275°F (130°C) for 15-30 minutes depending on thickness.
Toasty Trick
For a ‘burnt’ toast look, add a tiny bit of dark brown pastel powder to the corners of the slice. Build color slowly; it’s easier to add darkness than remove it.
Step 4: Finishing Touches
-
Cool down:
Allow the clay to cool completely before handling. It creates a harder, more durable finish. -
Paint the features:
If you made indents earlier, use a fine brush to paint two black dots for eyes. Add a tiny white highlight dot in each eye for life. Use pink paint for rosy cheeks just below the eyes. -
Seal the piece:
Apply a matte varnish to the bread area to protect the pastels and paint. You can use a satin glaze on the crust if you want a slight sheen. -
Assemble the keychain:
Once the varnish is dry, use pliers to open a jump ring, attach your keychain hardware to the eye pin, and twist the jump ring closed securely.
Now you have a charming little breakfast companion to keep your keys company
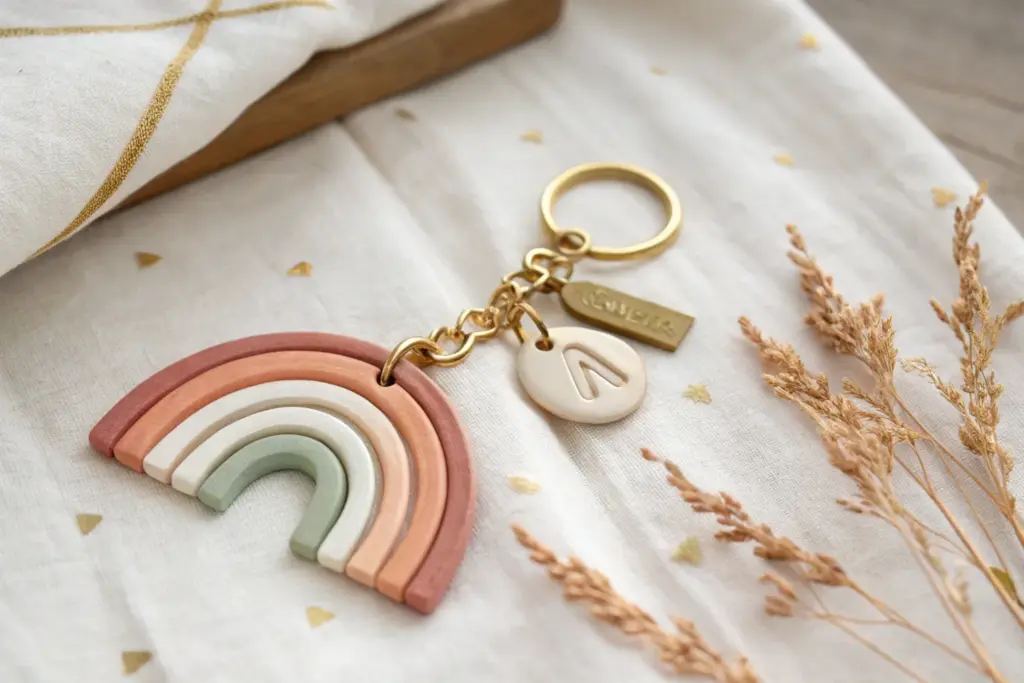
Rainbow Arch Keychain With Rolled Clay Ropes

Create a soothing, earthy accessory with this four-tier polymer clay rainbow arch keychain. Featuring a mix of matte pastels and a touch of stone texture, this project combines simple rolled techniques with elegant gold hardware for a professional-looking finish.
How-To Guide
Materials
- Polymer clay in four colors: dusty rose, textured beige/tan, white, and sage green
- Gold keychain ring with chain and jump ring
- Eye pin (gold finish)
- Clean ceramic tile or glass work surface
- Acrylic rolling pin or clay machine
- Clay cutting blade or craft knife
- Sandpaper (fine grit)
- Strong craft glue (e.g., E6000 or Loctite Gel)
- Needle nose pliers
- Oven (for baking)
- Optional: Cornstarch (to prevent sticking)
Step 1: Prepping and Rolling
-
Condition the Clay:
Begin by thoroughly conditioning each color of polymer clay separately. Knead them warm in your hands until they are soft and pliable, ensuring there are no air bubbles trapped inside. -
Roll Initial Ropes:
Take a portion of the sage green clay and roll it on your work surface into a smooth, even snake. Aim for a thickness of about 5-6mm. -
Roll Remaining Colors:
Repeat this rolling process for the white, textured beige, and dusty rose clays. Try to keep the thickness consistent across all four strands for a uniform look. -
Check Consistency:
Lay the four ropes side-by-side to compare their diameters. If one is too thick or thin, gently roll or stretch it to match the others.
Step 2: Forming the Arch
-
Create the Center Arch:
Take the sage green rope and bend it into a tight ‘U’ shape to form the smallest, innermost arch. This will dictate the size of your final piece. -
Layer the White:
Take the white rope and gently curve it over the green arch. Ensure it hugs the green clay tightly with no gaps between them. -
Add the Texture:
Place the textured beige rope over the white layer. Press gently as you curve it to ensure the layers adhere to one another without flattening the round profile. -
Finish the shape:
Finally, drape the dusty rose rope over the beige layer to complete the rainbow stack. Press the whole stack gently together from the sides to secure the bond. -
Trim the Base:
Using your sharp clay blade, make a clean, straight cut across the bottom of all four legs simultaneously to create a flat base where the arch stands.
Fixing Gaps
If your arch layers separate after baking, don’t panic. Apply a tiny amount of super glue liquid (brush-on type is best) between the arches and press firmly.
Step 3: Hardware and Baking
-
Insert the Eye Pin:
Trim a gold eye pin so the stem is about 1cm long. Push it gently into the exact top center of the rainbow, going through the rose and beige layers. -
Remove and Add Glue:
This is a little trick I use to ensure longevity: pull the eye pin back out, dip the end in a tiny dot of liquid bakeable clay or super glue, and re-insert it. -
Final Smoothing:
Check the project for any fingerprints. Gently buff them away with a finger dipped in a little cornstarch or baby oil. -
Bake:
Place the rainbow on a ceramic tile or baking sheet lined with parchment paper. Bake according to your clay package instructions (usually 275°F/135°C for 15-30 minutes). -
Cool Down:
Allow the piece to cool completely inside the oven or on the counter. Do not handle it while hot, as the clay is fragile until fully cool.
Add Sparkle
Before baking, lightly brush gold mica powder onto the textured beige layer to highlight the speckles and give the piece a subtle, shimmering glow.
Step 4: Assembly
-
Open the Jump Ring:
Using two pairs of pliers, twist the jump ring open laterally (don’t pull it apart). -
Attach to Chain:
Loop the open jump ring through the eye pin on your rainbow and the end of the keychain chain. -
Close the Ring:
Twist the jump ring back into a closed position, ensuring the ends meet perfectly flush so the chain doesn’t slip out. -
Sand the Feet:
If the bottom cut feels sharp or uneven after baking, lightly run the base over fine-grit sandpaper for a smooth finish.
Clip your new handmade rainbow onto your keys or bag for a pop of personalized color


What Really Happens Inside the Kiln
Learn how time and temperature work together inside the kiln to transform clay into durable ceramic.
Sunburst Keychain With Hidden Back Message

Capture the warmth of the sun with these earthy terracotta clay keychains, featuring a stamped celestial design and a meaningful secret message on the back. The simple circular shape highlights the intricate sunburst pattern, creating a rustic yet modern accessory that fits perfectly in your pocket.
How-To Guide
Materials
- Terracotta polymer clay (or air-dry clay)
- Circular cookie cutter (approx. 2 inches)
- Rolling pin or pasta machine
- Small round piping tip or straw (for the center circle)
- Needle tool or toothpick
- X-Acto knife or clay blade
- Sandpaper (fine grit)
- Letter stamp set (small)
- Jump rings (gold)
- Keychain rings with chain (gold)
- Jewelry pliers
- Parchment paper or baking tile
Step 1: Shaping the Base
-
Condition the clay:
Start by taking a chunk of your terracotta-colored clay and kneading it in your hands until it becomes soft and pliable. This warmth helps prevent cracks later on. -
Roll it out:
Place the clay on a smooth surface or parchment paper. Roll it out evenly to a thickness of about 1/4 inch (4-5mm). You want it sturdy enough to be a keychain but not too heavy. -
Cut the circles:
Using your circular cookie cutter, press firmly into the clay to cut out your round bases. Gently lift the surrounding clay away so you don’t distort the circle shape. -
Smooth the edges:
Dip your finger in a tiny bit of water (if using air-dry) or baby oil (if using polymer) and gently run it around the cut edge to soften any sharp ridges.
Clean Imprints
Cover the clay surface with a sheet of plastic wrap before cutting or stamping. This softens the edges of the impressions for a pillowy, professional finish.
Step 2: Creating the Sun Design
-
Mark the center:
Take a small round piping tip or a sturdy straw and press it gently into the exact center of the circle to create the sun’s core. Don’t go all the way through; just create an impression. -
Add center details:
Use a needle tool to stipple tiny dots inside that center circle for texture, or leave it smooth if you prefer a cleaner look. -
Carve the cardinal rays:
Using your needle tool or a small knife tool, impress four long triangles radiating from the center at the 12, 3, 6, and 9 o’clock positions. Press the tool flat into the clay rather than dragging it to get clean lines. -
Fill in the secondary rays:
Add smaller triangle rays in the gaps between your main four rays. Aim for symmetry, but remember that slight handmade variations add charm. -
Add decorative dots:
Take the blunt end of a toothpick or a small dotting tool and press a single dot of texture near the outer rim of the circle, positioned between each ray tip.
Step 3: Finishing and Message
-
Create the hole:
Use a straw or a small hole cutter to punch a hole near the top edge for the hardware. Ensure it’s not too close to the edge to prevent breaking. -
Flip and stamp:
Carefully turn the piece over. Use your letter stamps to press a hidden message, initials, or a date onto the back. I find it helpful to line the letters up on a piece of tape first to keep them straight. -
Bake or dry:
Follow the instructions on your specific package of clay. If baking polymer clay, create a tent with foil to prevent scorching the terracotta color. -
Sand for perfection:
Once fully cured and cooled, use fine-grit sandpaper to buff the edges and surface lightly, removing any fingerprints or lint. -
Attach the hardware:
Using two pairs of pliers, twist a jump ring open sideways. Slide it through the clay hole and attach the keychain chain. -
Secure the ring:
Twist the jump ring closed again, ensuring the ends meet perfectly flush so the chain doesn’t slip out.
Gilded Rays
After baking, use a fine detail brush to paint inside the carved rays with liquid gold leaf or metallic acrylic paint to make the sunburst pattern pop.
Now you have a durable piece of pocket art that carries a little sunshine with you everywhere you go
Terrazzo Speckled Disc Keychain
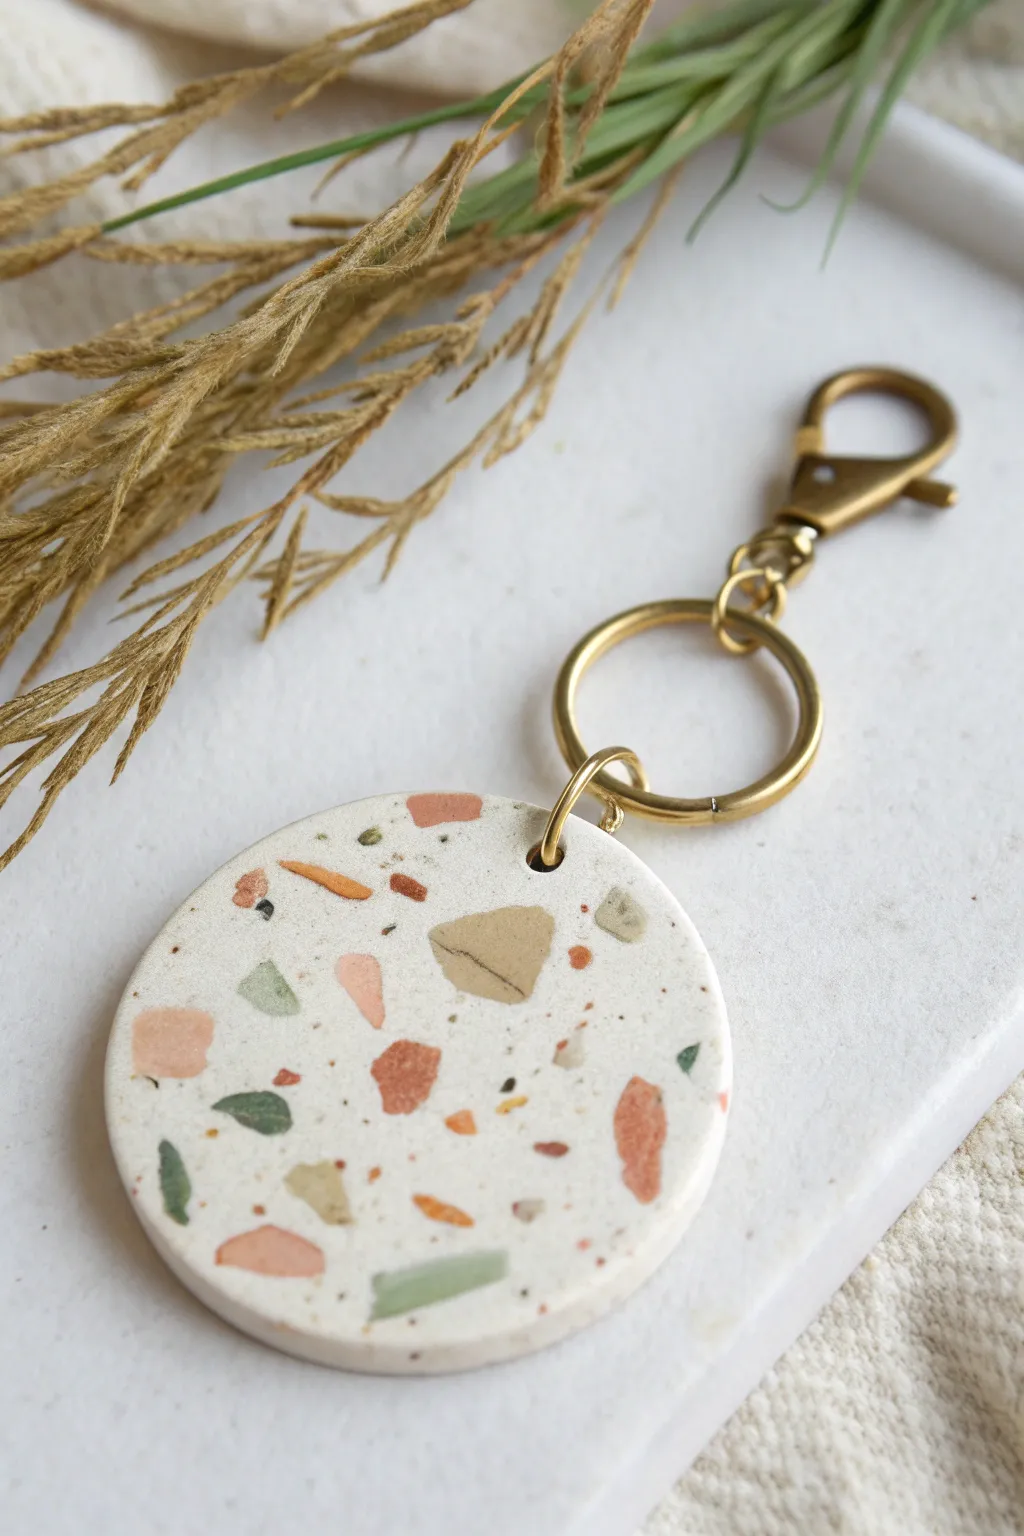
This trendy keychain captures the artistic charm of terrazzo flooring in a palm-sized accessory. With its neutral base and pops of earthy colors like rust, peach, and sage green, it makes for a sophisticated and modern addition to your daily carry.
Step-by-Step
Materials
- White polymer clay (approx. 2 oz)
- Small amounts of colored polymer clay (rust, beige, sage green, peach, mustard, black)
- Acrylic rolling pin or clay machine
- Round clay cutter (approx. 2-3 inches diameter)
- Parchment paper or ceramic tile work surface
- Sharp clay blade or X-acto knife
- Brass or gold-tone keychain hardware (lobster clasp and keyring)
- Large jump ring (gold tone)
- Small jump ring (gold tone)
- Needle tool or small drill bit (for the hole)
- Fine grit sandpaper (400-1000 grit, optional)
- UV resin or clear glaze (optional for shine)
- Jewelry pliers (flat nose and round nose)
Step 1: Preparing the ‘Chips’
-
Condition the colors:
Begin by conditioning your colored clays independently. We are aiming for an earthy palette, so mix standard colors with a bit of white or brown to mute them down if they are too bright. -
Flatten the colors:
Roll each colored piece of clay into a very thin sheet. The thinner these sheets are, the more delicate your terrazzo flecks will look. -
Create the terrazzo bits:
Use your clay blade to chop these thin sheets into tiny, irregular angular pieces. Aim for variety in size—some tiny specks and some larger, bolder chunks. -
Separate the pieces:
Gently separate the chopped pieces so they aren’t sticking together in clumps. I find it helpful to nudge them apart with the tip of a blade.
Step 2: Creating the Base
-
Condition the white clay:
Thoroughly condition your white polymer clay until it is soft and pliable. This will be the main canvas for your design. -
Roll the base sheet:
Roll the white clay out into a thick sheet, approximately 1/4 inch thick. It needs to be sturdy since it’s a keychain. -
Apply the color chips:
Randomly sprinkle your prepared colored clay chips onto the white sheet. Don’t overthink the placement—terrazzo is beautiful because of its randomness. -
Embed the chips:
Gently roll your acrylic roller over the surface just enough to press the colorful chips flush into the white base. Don’t roll it too thin; you just want the surface flat.
Smudged Colors?
If your colorful chips look smeared after rolling, your clay was likely too warm or soft. Pop the chipped clay into the fridge for 10 mins before rolling next time.
Step 3: Cutting and Baking
-
Cut the shape:
Place your round cutter over the most visually interesting section of your patterned slab and press down firmly to cut out the disc. -
Pierce the hole:
Using a needle tool or a small drinking straw, create a clean hole near the top edge of the circle. Ensure it isn’t too close to the edge to prevent breaking later. -
Smooth the edges:
Gently run your finger along the cut edge of the circle to soften any sharp corners left by the cutter. -
Bake the clay:
Transfer the disc to a baking sheet lined with parchment paper. Bake according to your brand of clay’s instructions (usually 275°F for 30 minutes). -
Cool down:
Allow the clay to cool completely before determining if you want to sand it. Cooling hardens the clay fully.
Clean Pro Finish
Before baking, gently wipe the white surface with a Q-tip dipped in acetone or rubbing alcohol. This removes fingerprints and lint for a pristine white background.
Step 4: Finishing Touches
-
Sand for smoothness:
For that professional stone-like finish, wet-sand the surface using fine-grit sandpaper circular motions. This reveals the crisp edges of your colored chips. -
Open the jump ring:
Take your jewelry pliers and twist the small jump ring open sideways (never pull it apart). -
Attach the hardware:
Thread the small jump ring through the hole in your clay disc, then loop on the larger keyring. -
Close the ring:
Use your pliers to twist the jump ring closed again securely so there is no gap. -
Final assembly:
If your lobster clasp isn’t already attached to the main ring, attach it now using the larger jump ring system.
Clip this artistic accessory onto your bag or keys to carry a piece of handmade modern art wherever you go

TRACK YOUR CERAMIC JOURNEY
Capture glaze tests, firing details, and creative progress—all in one simple printable. Make your projects easier to repeat and improve.
Marbled Swirl Keychain In Two or Three Colors
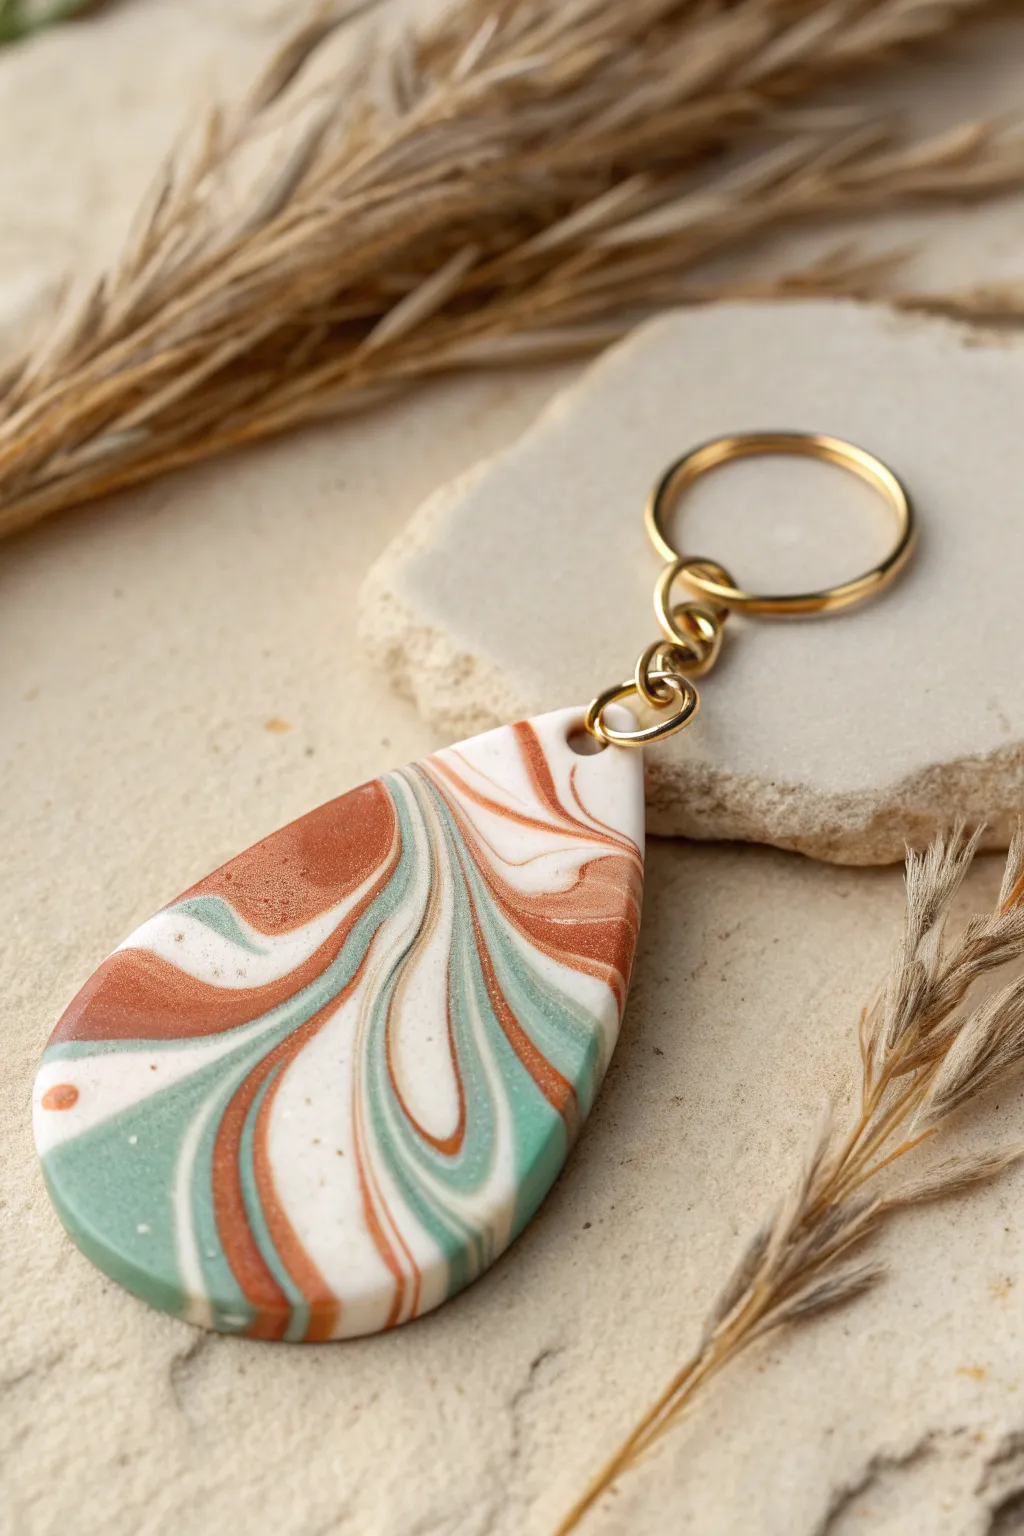
Capture the organic beauty of natural stone with this elegant marbled keychain project. Using a soothing palette of terracotta, sage green, and white, you will create swirling patterns that mimic the flow of sedimentary rock.
Detailed Instructions
Materials
- Polymer clay (white, terracotta/burnt orange, sage green)
- Acrylic rolling pin or pasta machine
- Teardrop-shaped clay cutter (medium to large size)
- Clay knife or tissue blade
- Hand drill or small round cutter (for the hole)
- Sandpaper (grits 400, 600, 1000)
- Gold keychain ring with chain
- Gold jump ring (8mm or 10mm)
- Pliers (flat nose and round nose)
- Ceramic tile or baking sheet
- Parchment paper
Step 1: Preparing the Clay Palette
-
Condition the clay:
Start by working each color of polymer clay—white, terracotta, and sage green—in your hands until they are soft and pliable. Conditioning is crucial to prevent cracks later. -
Roll into logs:
Roll each conditioned color into a distinct snake or log shape. Aim for the white log to be slightly thicker than the colored ones if you want that to be your base tone. -
Create the bundle:
Twist the three logs of clay together into one large rope. Fold this rope in half and twist it again. Repeat this twist-and-fold process about 3-4 times to begin merging the colors.
Clean Slates Only
Wipe your work surface and hands with a baby wipe before handling the white clay. Dust or lint shows up instantly on white marble patterns.
Step 2: Creating the Marbling
-
Roll and compress:
Roll your twisted rope into a smooth ball in your palms. This compression helps eliminate air bubbles trapped between the colors. -
Form a slab:
Place the ball on your work surface and use your acrylic roller to flatten it into a slab about 3-4mm thick. I find rolling in different directions helps stretch the pattern organically. -
Check the pattern:
Examine your slab. If the marble lines are too chunky, weave the slab back into a ball and roll it flat one more time to make the lines finer and more intricate. -
Select your cutout area:
Use your teardrop cutter to frame the most interesting part of the pattern. Look for an area where the three colors swirl together in flowing, curved lines.
Gilded Touch
Before baking, press small bits of gold leaf specifically into the colored veins of the marble for a high-end, geode-inspired sparkle effect.
Step 3: Shaping and Refining
-
Cut the shape:
Press the teardrop cutter firmly into the slab. Give it a tiny wiggle before lifting to ensure a clean cut. -
Smooth the edges:
Gently run your finger along the raw edges of the clay to smooth out any sharpness or cutter seams before baking. This saves sanding time later. -
Add the hardware hole:
Using a small stray or a tiny round cutter, punch a hole near the top point of the teardrop. Make sure it isn’t too close to the edge to prevent breakage.
Step 4: Baking and Assembly
-
Bake the piece:
Place the teardrop on a ceramic tile or baking sheet lined with parchment paper. Bake according to your brand of clay’s instructions—usually around 275°F (135°C) for 30 minutes. -
Cool down:
Let the piece cool completely inside the oven or on a wire rack. The clay hardens fully only after it has returned to room temperature. -
Sand for finish:
Dip your sandpaper in water and gently wet-sand the edges and surface, starting with 400 grit and moving to 1000 grit for a silky smooth, professional finish. -
Buff (optional):
Rub the dry piece briskly with a piece of denim or a soft cotton cloth to bring out a subtle, natural sheen without using varnish. -
Open the jump ring:
Using two pairs of pliers, twist the gold jump ring open sideways (never pull it apart outward). -
Connect the hardware:
Slide the open jump ring through the hole in the clay and attach the gold keychain loop. Twist the jump ring closed securely.
Now you have a chic, stone-effect accessory that looks far more expensive than the clay used to make it
Boho Bead Stack Keychain With Clay Beads
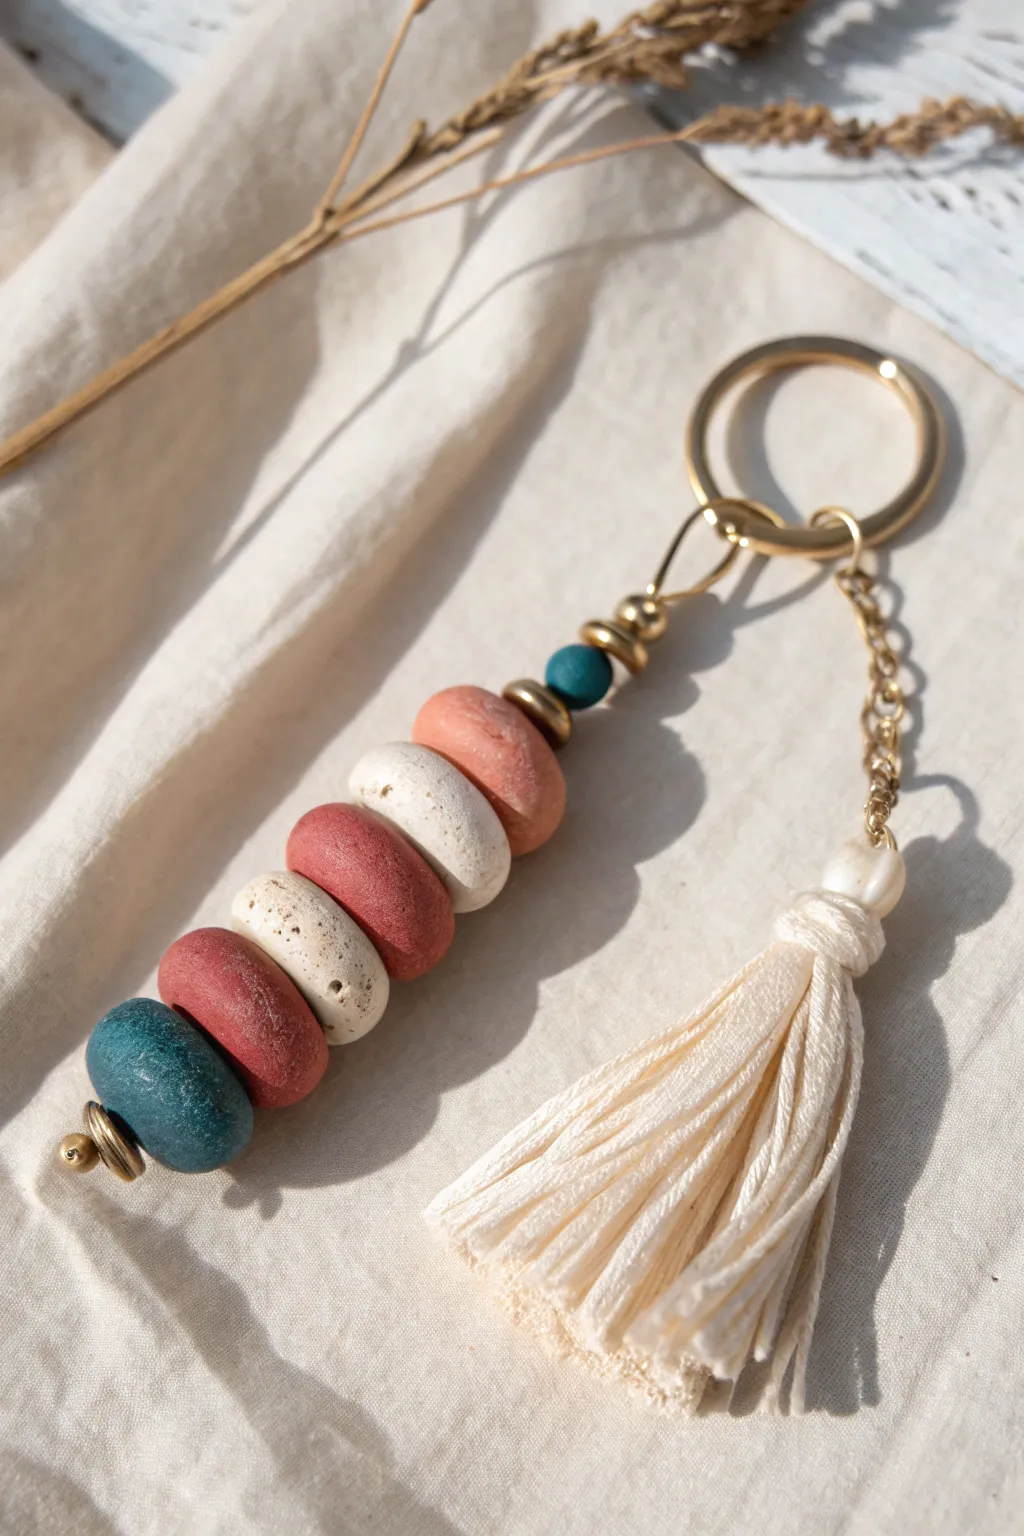
Embrace organic textures and soothing desert hues with this stylish stacked bead keychain. Featuring handmade clay beads in a rhythm of terracotta, cream, and teal alongside a soft cotton tassel, this accessory adds a touch of bohemian elegance to your keys or bag.
Step-by-Step
Materials
- Polymer clay (terracotta/rust, antique white/cream, teal)
- Gold finish keychain ring with chain extender or jump rings
- Gold beading wire or eye pin (approx. 3-4 inches)
- Small gold spacer beads or heishi beads
- Gold bead cap (optional for tassel top)
- Natural cotton macrame cord or embroidery floss
- Baking sheet and parchment paper
- Round nose pliers
- Wire cutters
- Toothpick or bead piercing tool
- Rough sandpaper or texture sponge (optional for stone effect)
- Oven
Step 1: Sculpting the Clay Beads
-
Condition the clay:
Begin by warming up your polymer clay in your hands. Knead the terracotta, antique white, and teal blocks separately until each is soft and pliable. -
Portion the clay:
Pinch off roughly equal amounts of clay to create about 7 to 8 beads. You’ll want a mix of sizes: larger pieces for the main stack and a tiny ball of teal for the top accent. -
Shape the rounds:
Roll each portion of clay into a smooth ball between your palms. Don’t worry about perfect spheres; a slightly organic shape adds to the boho charm. -
Create the flattened discs:
Gently press down on each ball to flatten it into a thick disc or ‘pebble’ shape. Keep the edges rounded and soft rather than sharp. -
Add texture:
To mimic the look of natural stone found in the image, lightly dab the surface of your white and terracotta beads with rough sandpaper or a texture sponge. This prevents them from looking too ‘plastic’. -
Pierce the holes:
Using a toothpick or a piercing tool, carefully poke a hole directly through the center of each disc. Rotate the tool gently as you push through to avoid distorting the shape. -
Bake the beads:
Arrange your beads on a parchment-lined baking sheet. Bake exactly according to your specific clay package’s instructions (usually around 275°F or 135°C for 15-30 minutes). Let them cool completely before handling.
Pepper Shaker Trick
To get the speckled ‘stone’ effect on the white clay without painting, mix in a tiny pinch of ground black pepper or dried used coffee grounds into the raw clay before rolling.
Step 2: Crafting the Tassel
-
Cut the cord:
While the beads cool, cut about 10 to 12 strands of cotton cord, each measuring approximately 6 inches long. -
Fold and tie:
Gather the strands together and fold the bundle in half. Thread a piece of gold wire or a jump ring through the loop created at the top fold. -
Secure the neck:
Take a separate piece of cord and wrap it tightly around the bundle, about half an inch below the fold, creating the ‘neck’ of the tassel. Tie it off securely and tuck the ends inside using a needle. -
Trim the fringe:
Comb out the strands with your fingers or a clean comb to separate the fibers, then trim the bottom straight across for a neat finish.
Step 3: Assembling the Keychain
-
Prepare the main wire:
Take your eye pin, or if you are using wire, create a small loop at one end using your round nose pliers. This bottom loop will act as the stopper. -
Add the decorative bottom bead:
String a decorative gold bead or cap onto the wire first, so it sits right on top of your bottom loop. -
Stack the large bead:
Slide on your bottom-most clay bead—in this design, it’s the large teal pebble. Follow it immediately with the large terracotta pebble. -
Build the pattern:
Continue stacking your beads. The pattern shown alternates: speckled white, terracotta, speckled white again, then a smaller terracotta bead. -
Add the top details:
Finish the clay stack with two thin gold spacer beads, followed by the smallest teal bead you made earlier. -
Top with hardware:
Place a final gold spacer bead on top of the small teal one for a polished look. -
Close the loop:
Using your wire cutters, trim the excess wire about 1cm above the top bead. Use round nose pliers to roll this tail into a secure loop.
Glaze it Up
For a dual-texture look, apply a satin or gloss glaze only to the teal beads while leaving the terracotta and white beads matte. This creates a striking visual contrast.
Step 4: Final Connections
-
Attach the bead stack:
Open a jump ring (or the loop you just made) and connect the top of your bead stack directly to the large gold keyring. -
Attach the tassel chain:
Attach a small length of gold chain (about 1.5 inches) to the keyring next to the bead stack. Connect your cotton tassel to the bottom of this chain.
Now you have a stunning, handcrafted accessory that brings an artistic vibe to your everyday essentials
Shaker-Style Window Keychain With Embedded Confetti
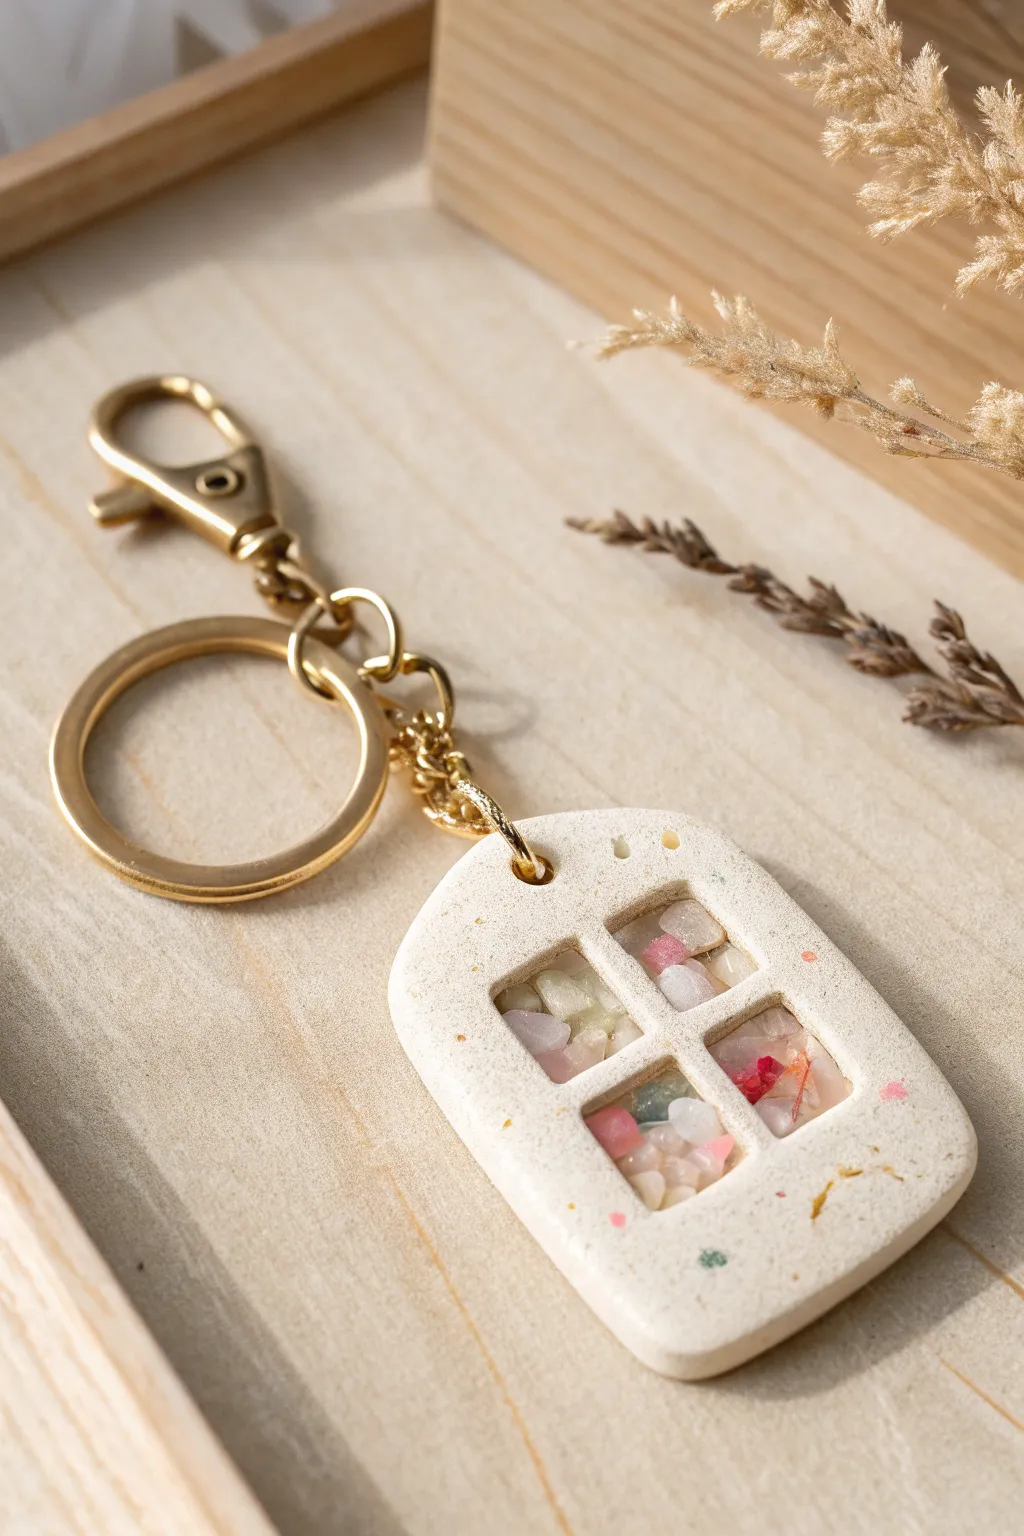
Capture the magic of a tiny view with this charming arched window keychain. Made from speckled polymer clay and filled with crystalline resin confetti, it creates a delightful miniature scene that dangles right from your keys.
How-To Guide
Materials
- Speckled cream or ‘granite’ polymer clay
- Rolling pin or acrylic roller
- Arch-shaped clay cutter (approx. 1.5 – 2 inches tall)
- Small square clay cutter or craft knife
- UV resin or two-part epoxy resin
- Tiny crushed glass, glitter, or gemstone chips (pink, white, clear)
- Parchment paper or silicone mat
- UV lamp (if using UV resin)
- Hand drill or needle tool
- Gold jump rings
- Gold keychain lobster clasp and ring assembly
- Jewelry pliers
- Sandpaper (optional)
Step 1: Shaping the Frame
-
Condition the Clay:
Begin by warming the speckled polymer clay in your hands. Knead it until it’s soft and pliable, ensuring the specks are evenly distributed throughout the mass. -
Roll It Out:
Roll the clay into a flat slab on your work surface. Aim for a thickness of about 1/4 inch (4-5mm)—you want it sturdy enough to hold the resin windows later without cracking. -
Cut the Arch:
Press your arch-shaped cutter firmly into the clay slab. If you don’t have a specific cutter, create a paper template and carefully trace around it with a craft knife. -
Create the Windowpanes:
This is the delicate part. Use a very small square cutter or your craft knife to cut out four equal square sections within the arch. Leave a cross-shaped grid of clay in the center to form the window frame. -
Smooth the Edges:
Gently tap the raw edges with your finger to soften any sharp cuts. If the frame distorted slightly during cutting, nudge it back into a perfect arch shape now. -
Add the Hole:
Use a needle tool or a small straw to pierce a hole at the very top center of the arch. Make sure the hole is wide enough for your jump ring but not so close to the edge that it becomes fragile. -
Baking:
Transfer your piece to a baking sheet lined with parchment paper. Bake according to your brand of clay’s instructions—usually around 275°F (130°C) for 15-30 minutes. Let it cool completely before moving to the next phase.
Sticky Situation?
Does your resin feel tacky after curing under the lamp? Wipe the surface with a cotton pad dipped in rubbing alcohol, or leave it in direct sunlight for 20 minutes to finish the cure.
Step 2: Filling the Windows
-
Prepare the Backing:
To pour resin into the open window spaces, you need a seal on the back. Place a piece of strong packing tape tightly across the *back* of the keychain, sticky side up, pressing firmly against the clay frame to prevent leaks. -
Add the Sparkle:
Sprinkle your tiny crushed glass, gemstone chips, or chunky glitter into the four window cavities. I usually fill them about halfway so there’s still room for the resin to encapsulate them fully. -
Pour the Resin:
Carefully drip your clear resin into each pane, filling it right to the top edge of the clay frame. A toothpick helps guide the resin into corners and pop any stubborn bubbles. -
Curing:
If using UV resin, place the piece under a UV lamp for 2–3 minutes until rock hard. If using epoxy, cover it with a dust dome and let it cure for 24 hours. Peel off the backing tape once fully cured. -
Seal the Back (Optional):
If the back looks cloudy from the tape texture, add a very thin layer of resin to the back side and cure again to make it crystal clear.
Make it a Shaker
Instead of embedding the chips, seal the back with a thin sheet of acetate first. Then add loose gems and a top acetate sheet before sealing the edges with resin for a moving shaker!
Step 3: Assembly
-
Attach Jump Ring:
Open a large gold jump ring using two pairs of jewelry pliers. Slide it through the hole you created at the top of the arch. -
Connect Chain:
Before closing the jump ring, loop the end of your keychain hardware onto it. Close the jump ring securely, ensuring the ends meet flush so nothing slips off. -
Final Polish:
Give the clay parts a quick rub with a soft cloth or fine sandpaper if there are any rough spots on the exterior edges, making sure the resin windows stay scratch-free.
Now you have a little architectural gem to brighten up your daily commute