If you’re staring at a little pile of clay and a few basic tools, you’re already halfway to something adorable or genuinely useful. I’m sharing my favorite clay kit ideas that feel doable at the kitchen table but still give you that “I made this!” glow.
Cute Animal Figurine Mini Kit
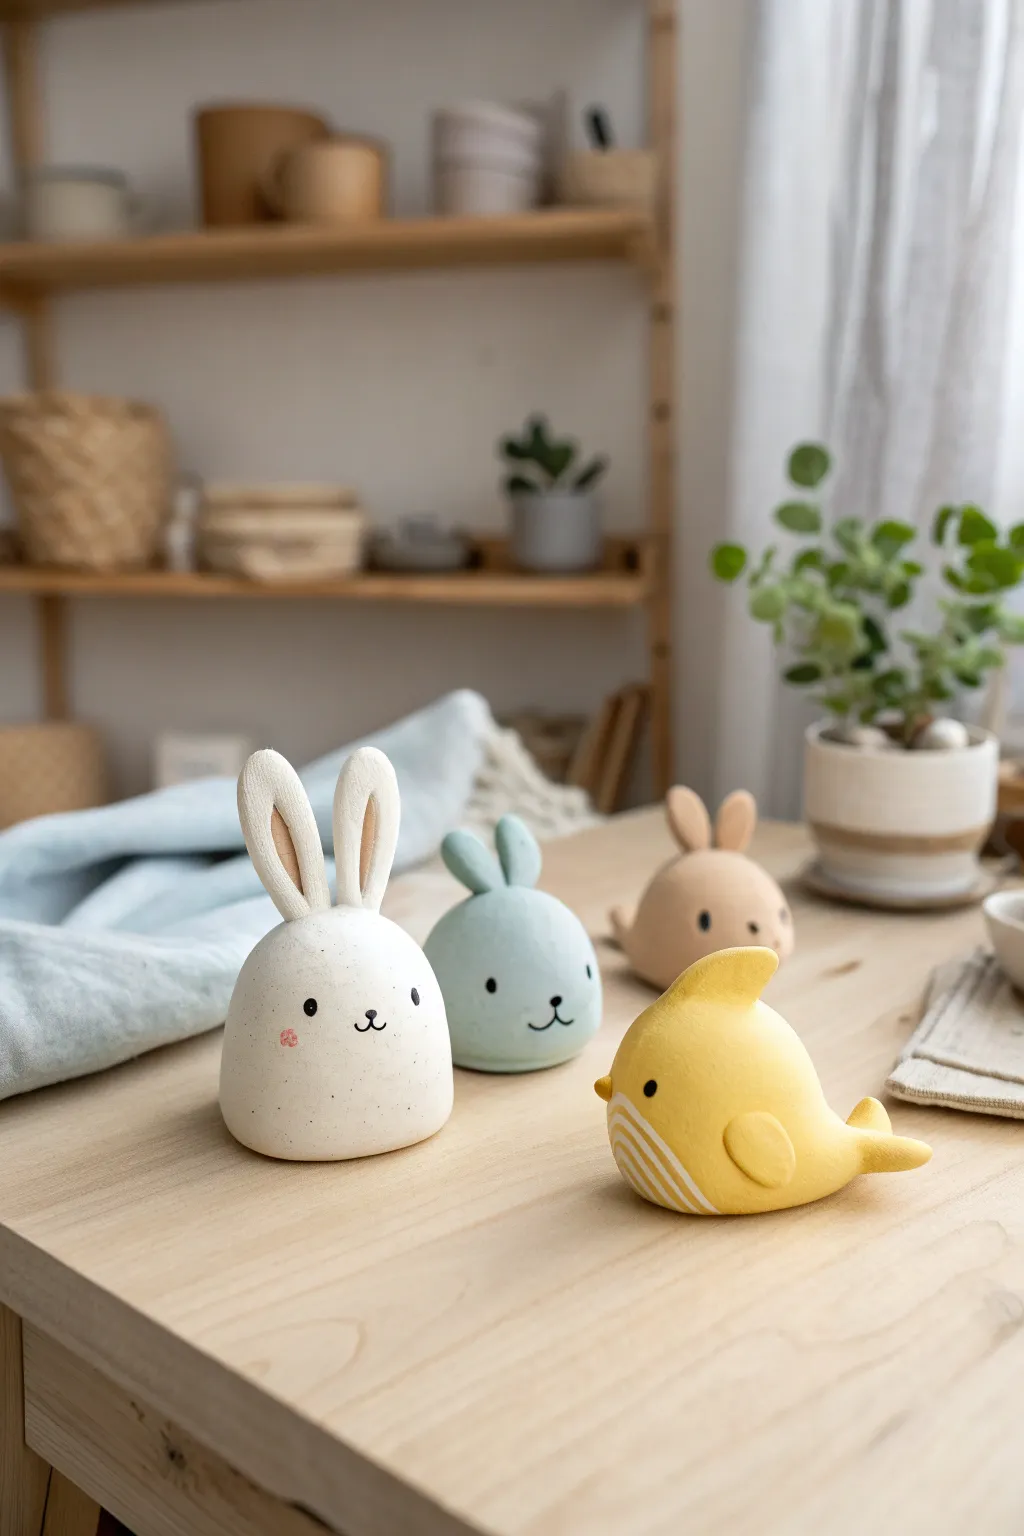
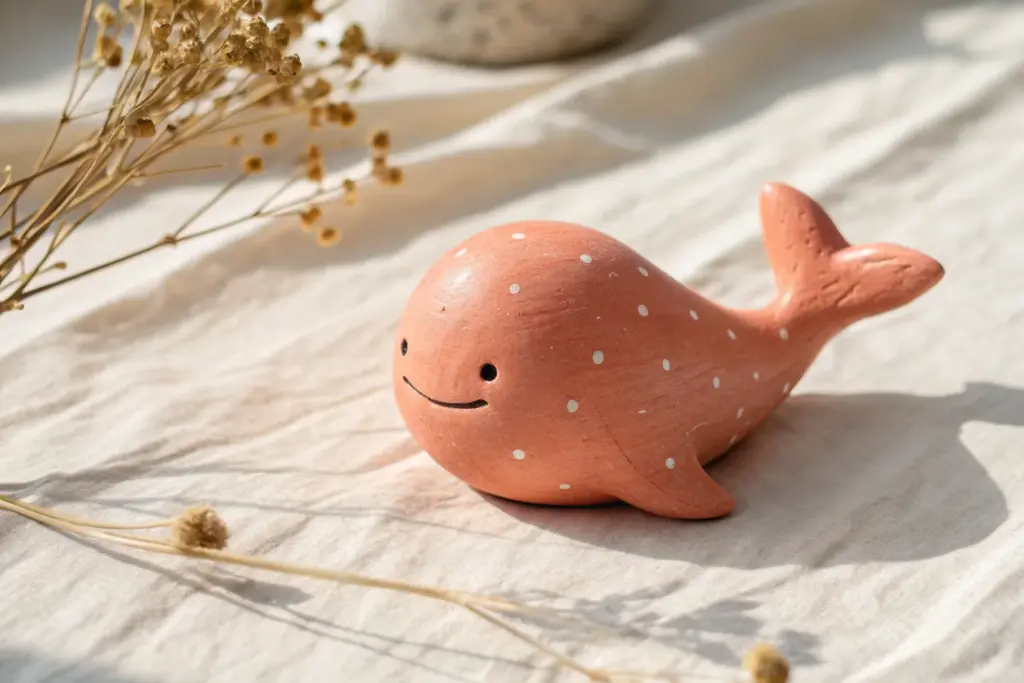
These charming, palm-sized figurines use soft, matte colors and simple shapes to create a serene woodland aesthetic. Their clean lines and tiny features make them perfect for beginners looking to practice basic sculpting forms.
How-To Guide
Materials
- Air-dry clay (white)
- Acrylic paints (White, Pale Blue, Beige, Butter Yellow, Black)
- Matte finish sealant or varnish
- Sculpting tools (needle tool, smoothing tool)
- Fine grit sandpaper
- Small paintbrush
- Cup of water
- Tinfoil (for creating core structures)
Step 1: Shaping the Rabbit Base
-
Prepare the Core:
Start by crumpling a small ball of tinfoil into a rough gumdrop shape. This saves clay and helps the thick body dry evenly. -
Form the Body:
Roll a ball of white clay and flatten it slightly. Wrap it completely around your foil core, rolling it on the table until the surface is perfectly smooth and dome-like. -
Create the Ears:
Roll two smaller logs of clay, tapering one end of each to create long teardrops. Gently flatten them with your thumb to create the ear shape. -
Attach the Ears:
Score the top of the head and the bottom of the ears with a needle tool. Add a dab of water (slip) and press the ears firmly onto the head, smoothing the seam with a tool so they look like one continuous piece. -
Indent the Ears:
Using a rounded tool or your pinky finger, gently press an indentation into the center of each ear to give it depth.
Smooth Surface Secret
Keep a tiny bit of water on your fingertips while smoothing clay. It creates a ‘slip’ that erases fingerprints instantly.
Step 2: Sculpting the Yellow Bird
-
Shape the Bird Body:
Roll a fresh ball of clay into a large teardrop shape. Bend the tapered end upward slightly to form the tail. -
Form the Fin/Wing:
Create a small, flattened triangle for the dorsal fin or crest on top of the head. I like to curve this slightly backward for a streamlined look. -
Add Side Fins:
Make two small oval shapes and press them onto the sides of the body to act as little wings or pectoral fins. -
Refine the Edges:
Use a damp finger to smooth out any fingerprints or cracks on both the rabbit and the bird figures. -
Dry Completely:
Let your figures sit undisturbed for 24-48 hours. They must be bone dry before painting.
Texture Twist
Before the clay dries, gently press a clean piece of linen fabric against the body to create a subtle, cozy woven texture.
Step 3: Painting and Finishing
-
Sand for Smoothness:
Once dry, gently rub the surface with fine-grit sandpaper to remove any bumps or uneven textures. -
Base Coat – Rabbit:
Paint the main rabbit body with creamy white acrylic. You may need two coats for opaque coverage. -
Base Coat – Bird:
Paint the bird figurine a soft butter yellow. For the blue rabbit shown in the inspo, mix white with a tiny dot of blue and a touch of grey. -
Paint Ear Details:
Mix a very pale beige or peach color and carefully paint the indented insides of the rabbit ears. -
Add Facial Features:
Using your smallest brush or a toothpick, dip into black paint. Dot two small eyes wide apart and draw a tiny ‘w’ shape for the mouth. -
Decorative Accents:
For the bird, paint fine white stripes on the belly area. For the rabbit, adding subtle pink cheek dots gives it extra character. -
Seal the Work:
Finish with a matte varnish to protect the paint while maintaining that soft, velvety clay look.
Now you have a sweet set of minimalist creatures ready to brighten up your desk or shelf


Tiny Food Charms Kit
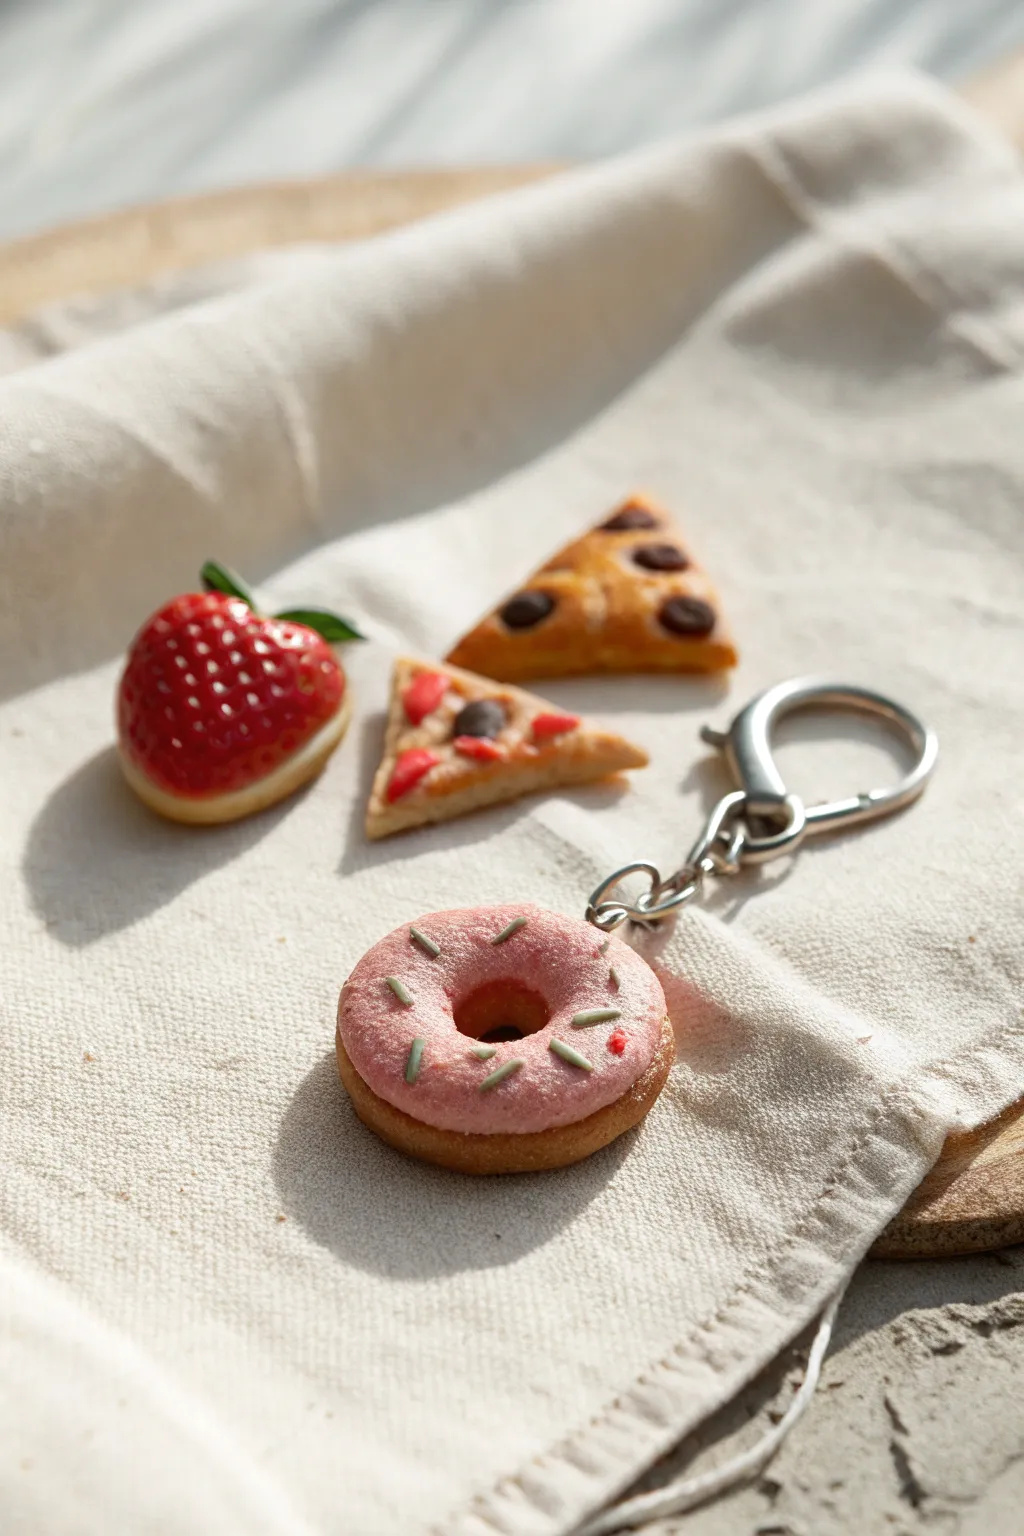
Create an adorable assortment of tiny clay treats including a frosted donut keychain, a juicy strawberry cookie, and miniature cookie slices. These hyper-realistic polymer clay charms feature textured details and sweet toppings that look good enough to eat but are designed to accessorize.
Detailed Instructions
Materials
- Polymer clay (beige/tan, translucent white, red, pink, dark brown, green)
- Liquid polymer clay (translucent)
- Chalk pastels (orange, yellow, brown) for shading
- Soft paintbrush for shading
- Needle tool or toothpick
- Dotting tool or ball stylus
- Texture sponge or toothbrush
- Round cookie cutters (various small sizes)
- Blade or X-Acto knife
- Gloss glaze or UV resin
- Keychains and screw eye pins
- Oven for baking
Step 1: The Pink Donut Keychain
-
Shape the base:
Mix beige clay with a tiny amount of yellow to create a golden dough color. Roll a small ball, flatten it slightly into a puck shape, and use a small round cutter or straw to remove the center hole. -
Texture the dough:
Gently press a clean toothbrush or texture sponge around the sides and edges of the donut to mimic a fried dough texture, leaving the very center ‘belt’ line smoother. -
Shade the dough:
Scrape some orange and brown chalk pastel into separate piles of dust. Using a soft, dry brush, gently dust the top and bottom of the donut to simulate a baked golden-brown crust. -
Frost perfectly:
Condition pink clay until very soft, or mix it with a drop of liquid clay to make a thick frosting paste. Apply it to the top of the donut, gently teasing the edges down with a needle tool so it looks like it’s dripping naturally. -
Add texture and sprinkles:
While the frosting is uncured, tap it lightly with your toothbrush for a sugary texture. Roll tiny threads of green and red clay, cut them into microscopic segments, and press them gently into the pink frosting. -
Attach hardware:
Insert a screw eye pin securely into the top of the donut. Bake according to your clay package instructions (usually 275°F/130°C for 15-20 minutes).
Step 2: The Strawberry Cookie
-
Form the cookie:
Create a beige dough base similar to the donut, essentially a flattened round disc. Texture the edges with your toothbrush. -
Create the strawberry layer:
Shape a piece of red clay into a strawberry silhouette (rounded top, slightly pointed bottom) and press it firmly onto the dough disc. It should be slightly smaller than the base so the ‘cookie’ shows underneath. -
Seed details:
Using your needle tool, poke tiny, evenly spaced indentations all over the red surface to mimic strawberry seeds. -
Leafy green top:
Roll a tiny snake of green clay and cut small teardrop shapes. Arrange these at the top of the strawberry for leaves. -
Glossy finish:
Bake the piece. Once cooled, apply a coat of gloss glaze or UV resin specifically to the red strawberry part to make it look juicy and jam-like.
Realistic Texture Tip
For ultra-realism, texture your clay immediately after shaping but BEFORE adding toppings. Use a crumpled ball of aluminum foil for a deeper, craggier baked texture than a toothbrush provides.
Step 3: Cookie Triangles
-
Cut the shapes:
Roll out a sheet of textured beige clay about 3mm thick. Use a blade to cut small isosceles triangles. -
Heavy shading:
These cookies look crisper, so shade the edges and surface more heavily with brown chalk pastel dust to achieve a ‘well-baked’ appearance. -
Chocolate chip version:
Roll tiny balls of dark brown clay and press them firmly into one triangle. Flatten them slightly so they look baked into the surface rather than sitting on top. -
Decorated version:
For the other triangle, add tiny bits of red clay and a brown center dot. I like to use a needle tool to drag the edges of the clay slightly, blending them into the dough for a rustic look. -
Final assembly:
If you want these to be charms, insert eye pins now. Bake all remaining pieces together once satisfied with the details. -
Assembly:
Once everything is baked and cooled, attach your chain and keyring to the eye pin on the donut using jump rings and pliers.
Troubleshooting Fingerprints
If you smudge your textured clay while handling it, brush a tiny amount of baby oil or clay softener over the surface and re-texture gently. This smooths prints without destroying the shape.
Attach these sweet miniatures to your keychain or zipper pull for a delightful pop of handmade charm


Easy Trinket Dish Kit

Capture a relaxed, organic aesthetic with this simple air-dry clay project featuring earthy tones and botanical motifs. These shallow bowls are perfect for holding your everyday jewelry and make lovely handmade gifts.
Step-by-Step
Materials
- White decorative air-dry clay
- Rolling pin
- Circle cutter or small bowl (approx. 4-5 inches)
- Craft knife
- Small bowl of water
- Sponge
- Acrylic paints (Sage Green, Terracotta/Muted Pink)
- Small flat paintbrush
- Fine liner paintbrush
- Matte spray varnish or sealant
- Sandpaper (fine grit)
Step 1: Shaping the Clay
-
Prepare your workspace:
Lay down a piece of parchment paper or a silicone mat to prevent the clay from sticking to your table. -
Condition the clay:
Take a handful of air-dry clay and knead it in your hands until it feels soft, warm, and pliable. This prevents cracks later. -
Roll it out:
Use your rolling pin to flatten the clay into a slab that is roughly 1/4 inch thick. Try to keep the thickness consistent throughout. -
Cut the shape:
Place your circle cutter or an upside-down bowl onto the clay and trace around it with a craft knife to cut out a perfect circle. -
Form the rim:
Gently lift the edges of the clay circle upwards with your fingers creating a shallow lip. You want it to look organic, so don’t worry if it isn’t perfectly symmetrical. -
Smooth the edges:
Dip your finger into a little water and run it along the rim and the inside of the bowl to smooth out any rough cracks or fingerprints. -
Dry the dish:
Set the dish aside in a safe spot to dry completely. This usually takes 24-48 hours depending on humidity. Flip it over halfway through so the bottom dries evenly.
Cracks happen
If small cracks appear as it dries, mix a tiny bit of fresh clay with water to make a paste (slip) and fill the gaps, then sand smooth once dry.
Step 2: Painting and Finishing
-
Sand imperfections:
Once the clay is bone dry, use fine-grit sandpaper to gently buff away any sharp edges on the rim or bumps inside the bowl. -
Dust off:
Wipe the dish with a slightly damp sponge or dry cloth to remove all the sanding dust before painting. -
Mix your colors:
Prepare your palette. If your green is too bright, mix in a tiny drop of red or brown to mute it into a sage tone. I find this helps achieve that natural look. -
Paint the abstract shapes:
Using the flat brush and the terracotta paint, create a few organic, semi-circle blobs. Place one near the rim and perhaps one opposite it. -
Paint the leaves:
Switch to your fine liner brush and sage green paint. Paint a central stem line curling slightly, roughly following the curve of the bowl. -
Add the foliage:
Add small, simple leaf shapes coming off the stem. Keep your brush strokes loose and painterly rather than trying to be geometrically perfect. -
Let the paint set:
Allow the paint to dry completely. Acrylics dry fast, so 20 minutes should be sufficient. -
Seal the dish:
Apply a coat of matte varnish or spray sealant to protect the paint and clay from moisture and wear.
Add texture
Before drying, gently press a piece of lace or a real leaf into the wet clay surface for an imprinted texture alongside the painted design.
Place your favorite rings inside your new dish to see how the gold accents pop against the matte earth tones


Ring Holder Gift Kit
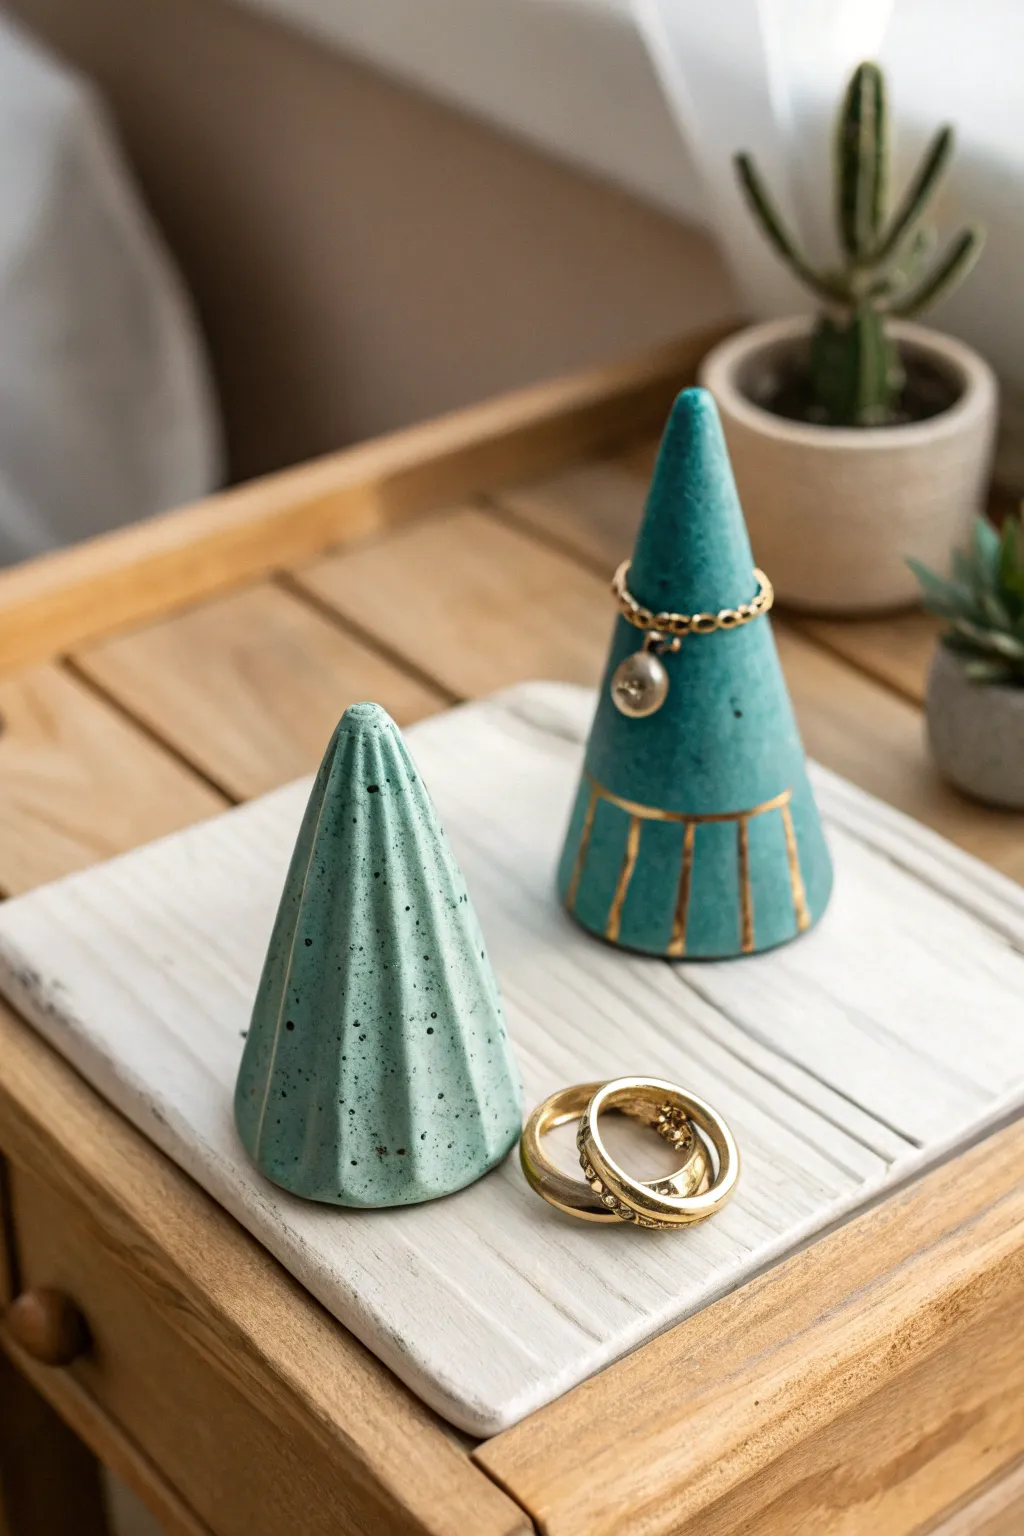
These stylish, modern ring holders blend function with a trendy aesthetic, featuring textured and smooth finishes in a soft teal hue. The speckled stone effect and gold accents elevate a simple clay cone into a boutique-worthy piece for your vanity.
Step-by-Step Guide
Materials
- Air-dry clay or polymer clay (white or light grey)
- Teal acrylic paint (matte finish)
- Black acrylic paint (for speckling)
- Gold leaf pen or fine-tip metallic gold paint marker
- Rolling pin
- Clay knife or craft blade
- Cardstock or thin cardboard (for templates)
- Old toothbrush
- Fine-grit sandpaper
- Gloss or matte varnish (optional)
- Masking tape
Step 1: Shaping the Cones
-
Create a Cone Template:
Cut a circle out of your cardstock, roughly 4-5 inches in diameter. Cut a wedge out of the circle (like a slice of pie but slightly larger—about one-third of the circle) and tape the remaining edges together to test the cone shape. Adjust the size until you have the height and width you desire. -
Condition the Clay:
Knead your clay thoroughly until it is soft, pliable, and free of cracks. If using polymer clay, the warmth of your hands is essential here. -
Roll and Cut:
Roll out a slab of clay to about 1/4 inch thickness. Lay your flattened cardstock template (untaped) on top of the clay and cut out the shape using your craft knife. -
Form the Base Cone:
Gently curl the clay cutout into a cone shape. Press the seam together firmly. I like to smooth the seam from the inside with a modeling tool or my finger to ensure it doesn’t split later. -
Smooth the Exterior:
Roll the finished cone gently on your work surface to smooth out the seam on the outside. Trim the bottom edge with a knife so it sits perfectly flat.
Seamless Finish
Use a touch of water (air-dry) or baby oil (polymer) to smooth seams instantly. Before painting, wipe cones with a damp cloth to remove sanding dust.
Step 2: Adding Texture & Details
-
Create the Ribbed Cone:
For the fluted holder, use the back of a butter knife or a modeling tool to press vertical indentations from the tip to the base. Space them evenly around the circumference. -
Refine the Smooth Cone:
For the smooth holder, focus on making the surface as flawless as possible. Use a tiny bit of water on your fingertip (for air-dry clay) to buff away fingerprints. -
Drying or Baking:
If using air-dry clay, let the cones sit for 24-48 hours until fully hardened. If using polymer clay, bake according to the package instructions (usually 275°F for 15-30 minutes). -
Sand for Perfection:
Once fully cured and cooled, lightly sand any rough spots or uneven bottom edges with fine-grit sandpaper.
Marbled Magic
Instead of painting, knead teal, white, and black clay together slightly before rolling. Stop while streaks remain for a beautiful marble effect.
Step 3: Painting & Finishing
-
Base Coat:
Apply two thin coats of teal acrylic paint to both cones. Allow the first coat to dry completely before applying the second to ensure solid, opaque coverage. -
The Speckle Effect:
To achieve the stone look, water down a small amount of black acrylic paint. Dip an old toothbrush into the mixture and run your thumb across the bristles to flick tiny droplets onto the cones. Practice on paper first to control the spray. -
Adding Grid Lines:
On the smooth cone, you can verify the paint is dry and then adhere thin strips of masking tape near the bottom to mark off geometric sections if you prefer crisp lines. -
Gilding the Details:
Use a gold leaf pen or metallic marker to draw vertical accents at the base of the smooth cone. Add a horizontal ring around the middle to connect the vertical lines, creating a geometric border. -
Optional Hoop:
Start by finding a small jewelry jump ring or loop a piece of thin wire into a circle. -
Attach the Hoop:
If you want the small gold detail shown near the top of the right cone, adhere your small metal loop with a dot of strong craft glue. -
Seal the Deal:
Protect your paint job with a coat of matte varnish. This prevents the paint from chipping when you take rings on and off.
Place your new creations on your nightstand to keep your favorite jewelry safe and displayed in style

The Complete Guide to Pottery Troubleshooting
Uncover the most common ceramic mistakes—from cracking clay to failed glazes—and learn how to fix them fast.
Stamped Coaster Set Kit
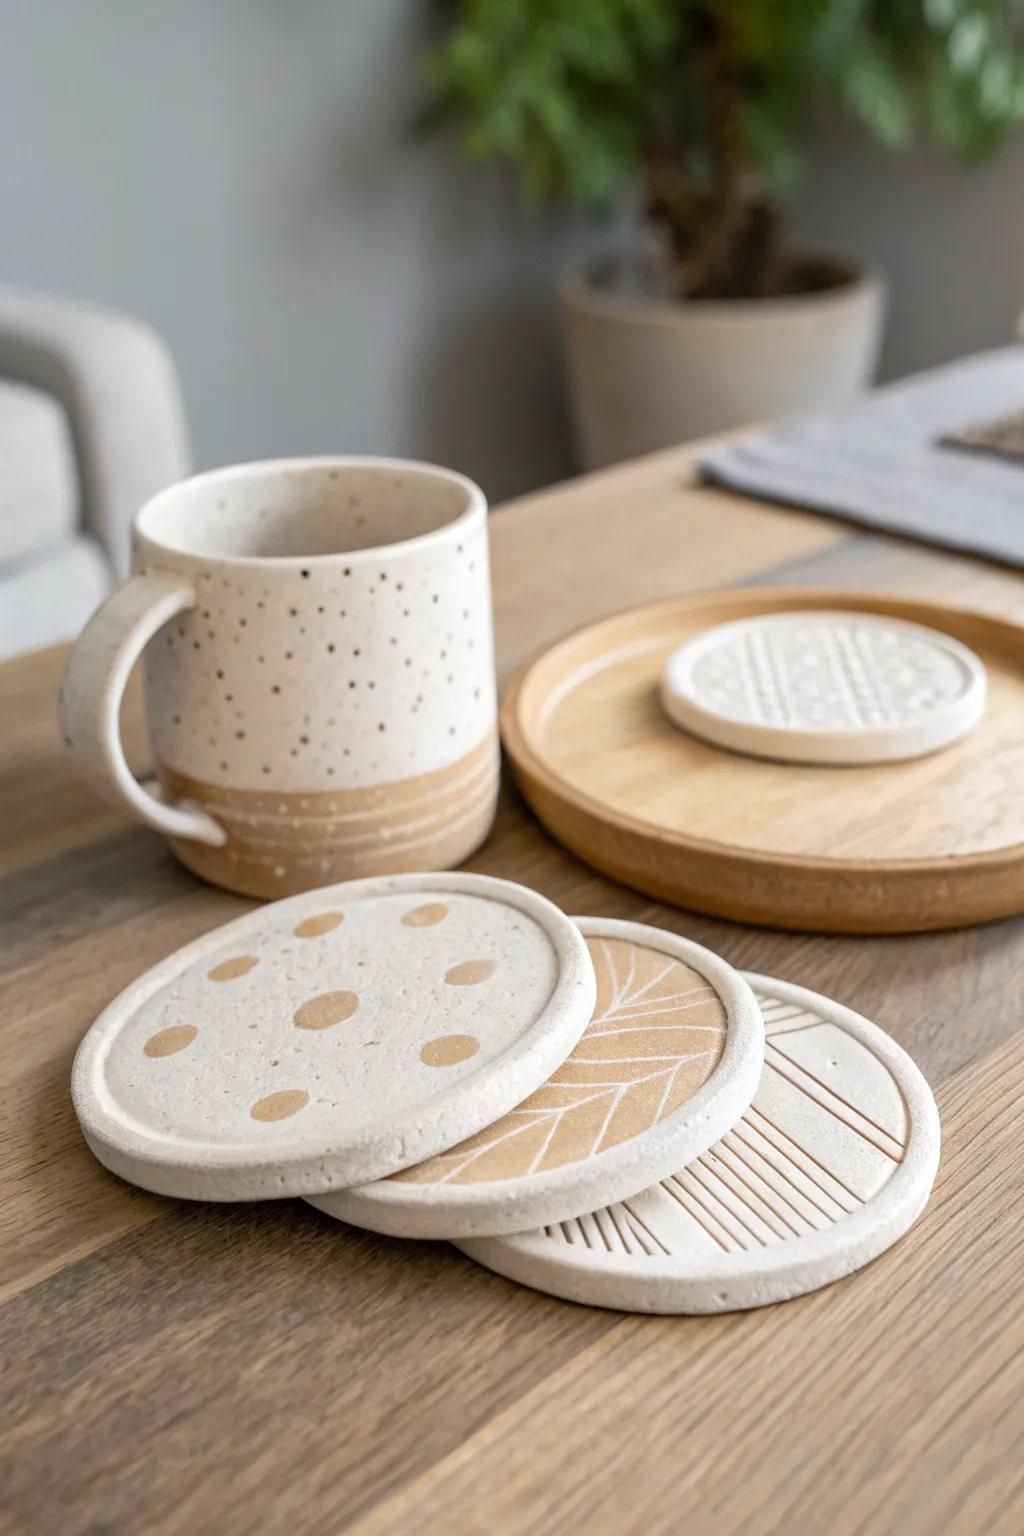
Bring an artisan touch to your coffee table with this set of coordinating stamped clay coasters. Featuring a mix of geometric textures and soft metallic accents, these durable pieces mimic the look of high-end ceramic studio wares using simple air-dry clay techniques.
Step-by-Step
Materials
- Air-dry clay (white)
- Rolling pin
- Circle cookie cutter (large, approx. 4 inches)
- Parchment paper or canvas mat
- Texture stamps or found objects (fabric, leaves, carved wood)
- Clay knife or rib tool
- Fine-grit sandpaper (220 grit)
- Acrylic paint (warm creamy beige and gold)
- Small flat paintbrush
- Detail paintbrush
- Matte sealant or varnish (waterproof)
Step 1: Preparation & Shapes
-
Condition the clay:
Begin by grabbing a handful of air-dry clay and kneading it in your hands until it feels warm and pliable. This removes air pockets and prevents cracks later. -
Roll out the slab:
Place the clay on a sheet of parchment paper. Use your rolling pin to flatten it into an even slab, aiming for a consistent thickness of about 1/4 inch. Too thin, and they will be brittle; too thick, and they take forever to dry. -
Cut the bases:
Use your large circle cutter to press firmly into the clay slab. Create at least four circles for a full set. Keep the excess clay aside for the smaller accent piece. -
Smooth the edges:
Dip your finger in a tiny bit of water and run it along the cut edges of your circles. This smooths out any jagged bits left by the cutter.
Fixing the Curl
If edges curl upward while drying, dampen the concave side slightly and place a heavy book on top (with parchment paper in between) to flatten it back out.
Step 2: Adding Texture & Design
-
Create the geometric lines:
For the geometric coaster, take a ruler or the back of a knife. Gently press parallel lines into one half of the circle, changing angles to create a triangular intersecting pattern. -
Make the leaf impression:
For the botanical coaster, lightly sketch a central stem line with a needle tool or toothpick. Then press angled lines branching off it to mimic veins, creating a fern-like aesthetic. -
Create the mini coaster:
Roll a smaller ball of clay and flatten it slightly. Use a patterned stamp or a piece of textured fabric to press a detailed design into the top, creating the small accent piece shown on the tray. -
Leave the dot coaster plain:
For the coaster destined to have gold dots, leave the surface perfectly smooth. We will add the design with paint later, though you can press slight indentations now if you want the dots embossed. -
Create the rim:
Using a flat tool or your fingers, slightly bevel the top edge of each coaster to give it a finished, professional look similar to wheel-thrown pottery.
Step 3: Drying & Finishing
-
Dry slowly:
Place the coasters on a wire rack or leave them on parchment. Let them air dry for 24-48 hours. I like to flip them over halfway through so the bottoms dry evenly without curling. -
Sand for perfection:
Once bone dry, take your fine-grit sandpaper and gently buff the edges and surface. Remove any sharp points or uneven textures. -
Base coat (optional):
If your clay dried greyish, paint a thin wash of creamy white acrylic over the pieces to unify the color, keeping it somewhat translucent to look like stone. -
Paint the leaf design:
For the botanical coaster, mix a warm ochre or light brown paint. Carefully paint negative space around the indented lines so the white ‘veins’ stand out against the colored background. -
Paint the dots:
On the smooth coaster, use a detail brush dipped in gold or warm beige paint to create organic, slightly imperfect polka dots scattered across the surface. -
Seal the coasters:
Since these will hold drinks, waterproofing is crucial. Apply 2-3 coats of a matte varnish or sealant, letting each coat dry completely. Ensure you seal the bottom as well.
Stamp Improvisation
No stamps? Look in your kitchen! The bottom of a cut crystal glass or the textured handle of a fork can make incredible geometric patterns in clay.
Stack your new creations on your coffee table or gift them as a handmade housewarming present.
Fridge Magnet Variety Kit
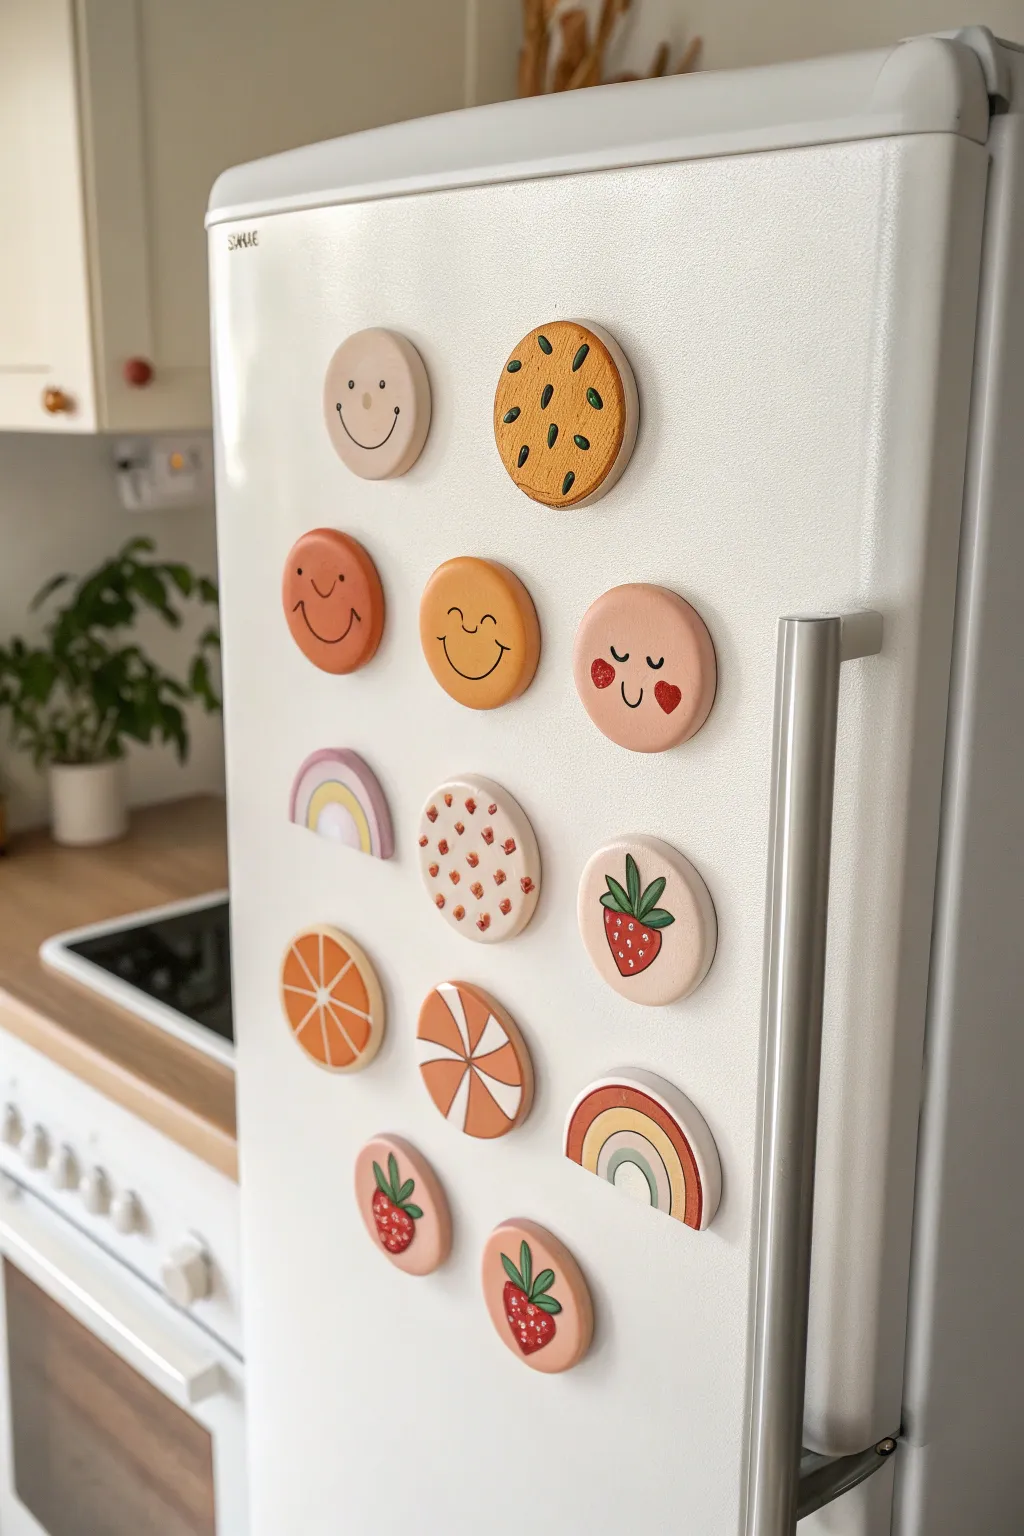
Brighten up your kitchen with this delightful assortment of handmade polymer clay magnets featuring smiling faces, cheerful rainbows, and sweet fruit slices. The smooth, matte finish and cohesive pastel color palette make these look like high-end ceramic pieces, though they are surprisingly simple to sculpt at home.
Step-by-Step Tutorial
Materials
- Polymer clay (white, terra cotta, pastel pink, orange, yellow)
- Acrylic paints (black, red, green, white)
- Fine detail paintbrush (sizes 0/0 and 1)
- Round clay cutter (approx. 2-inch diameter)
- Rolling pin or clay machine
- Strong craft magnets (neodymium recommended)
- E6000 glue or superglue gel
- Sculpting tools (needle tool and ball stylus)
- Oven and parchment paper
- Matte varnish (optional)
Step 1: Prepping the Bases
-
Condition the clay:
Begin by warming your polymer clay colors in your hands until they are soft and pliable. You’ll need primarily white, soft pink, terra cotta, and a light orange. -
Roll out the slab:
Roll your conditioned clay into a smooth, even sheet about 1/4 inch thick. A slightly thicker slab gives these magnets a nice, substantial feel. -
Cut the circles:
Use your round cutter to punch out several circles from each color. These will become your faces, cookies, fruits, and background for the strawberries. -
Shape the rainbows:
For the rainbow magnets, cut a circle in half. Use a smaller round cutter to remove the inner semicircle, creating an arch shape. -
Smooth the edges:
Gently run your finger around the cut edge of each shape to soften any sharp corners left by the cutter, giving the piece a rounded, ceramic-like look.
Unwanted Fingerprints?
Before baking, lightly brush your raw clay pieces with a tiny amount of baby oil or cornstarch. This helps smooth out fingerprints and dust for a flawless finish.
Step 2: Detailed Sculpting
-
Create the orange slice:
Take a terra cotta circle. Roll thin snakes of white clay and press them onto the surface in a wheel-spoke pattern to create the segments of an orange slice. -
Create the peppermint swirl:
For the swirl candy, start with a terra cotta circle. Cut small wedges of white clay and press them onto the circle, alternating spaces to create a pinwheel effect. -
Texture the cookie:
Choose a yellow-orange circle for the cookie. Use a ball stylus to gently press small indentations into the surface where the ‘chocolate chips’ will be painted later. -
Layer the rainbow arches:
For the rainbow shapes, roll thin snakes of contrasting clay colors (like white, yellow, or pink). Curve them to fit inside your main arch shape and gently press them together so they bond.
Pro Tip: Make Them Pop
If your painted details look flat, add a tiny white dot to the eyes or fruit highlights. This ‘catchlight’ brings instant life and dimension to the character.
Step 3: Baking & Assembly
-
Bake the pieces:
Arrange your clay shapes on a parchment-lined baking sheet. Bake according to your specific clay brand’s instructions (usually 275°F for 15-30 minutes). -
Cool down:
Allow the pieces to cool completely before moving on to painting. If the clay is still warm, the acrylic paint may dry too quickly or clump. -
Paint the smiley faces:
Using a very fine brush and black acrylic paint, add the simple U-shaped smiles and small dots for eyes on the pink and terra cotta circles. -
Detail the blushing cheeks:
For the blushing face, paint two small red hearts on the cheeks and add little curved eyelashes for a sleeping expression. -
Paint the cookie chips:
Fill the indentations you made on the yellow circle with black or dark brown paint to create the chocolate chips. -
Paint the strawberries:
On the white circles, paint simple strawberry shapes using red for the body and green for the leaves. Add tiny white or black dots for seeds once the red base is dry. -
Add confetti details:
For the confetti designs, simply dab small, irregular spots of terra cotta or pink paint onto a white circle base. -
Attach the magnets:
Flip all your finished pieces over. Apply a strong dab of E6000 glue to the center of the back and press your neodymium magnet firmly into the glue. -
Final cure:
Let the glue cure for at least 24 hours to ensure a permanent bond before placing them on your fridge.
Enjoy arranging your cheerful new magnet collection to hold up your grocery lists and photos


What Really Happens Inside the Kiln
Learn how time and temperature work together inside the kiln to transform clay into durable ceramic.
Mini Planter and Tray Kit
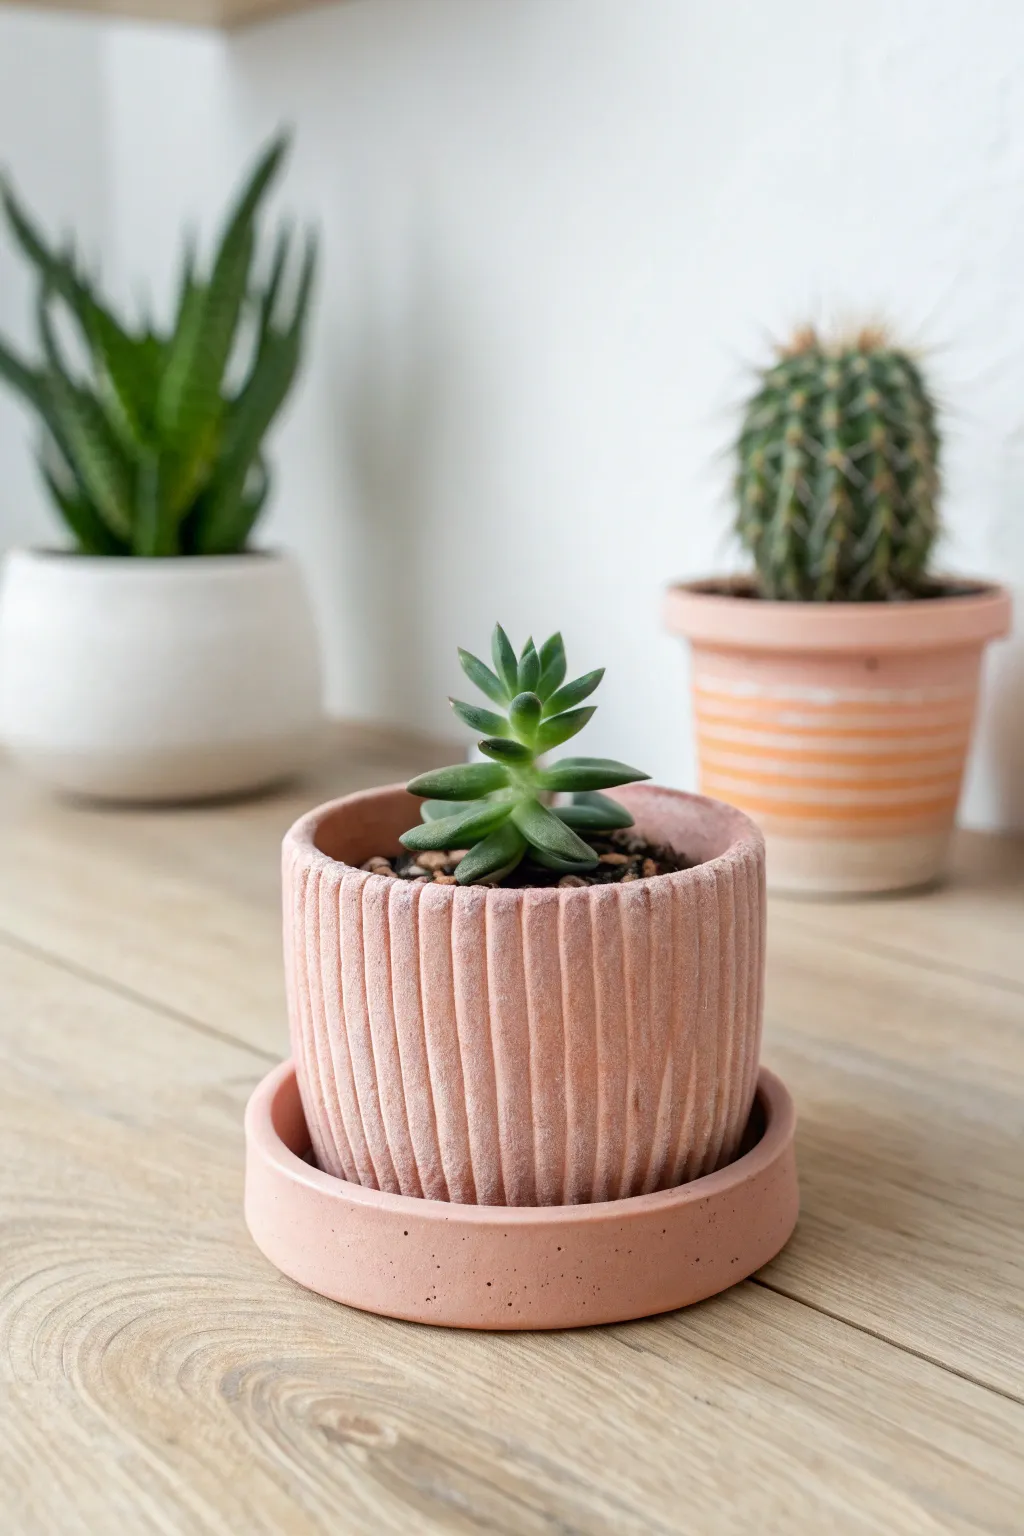
Achieve a modern, minimalist aesthetic for your succulents with this textured planter and matching saucer project. The subtle vertical ribs and matte pink finish give it a professional, store-bought look that is surprisingly easy to sculpt by hand.
Detailed Instructions
Materials
- Air-dry clay or polymer clay (terracotta or pink color)
- Rolling pin
- Circle cutters (sized for base and saucer)
- Modeling tool (needle tool or wooden styling stick)
- Ruler
- Small sponge
- Water (for air-dry clay) or clay softener (for polymer)
- Craft knife
- Fine-grit sandpaper
Step 1: Forming the Planter Body
-
Roll the slab:
Begin by conditioning your clay until it is pliable and smooth. Roll it out on a non-stick surface into a long, even rectangular slab, roughly 1/4 inch thick. -
Measurement check:
Determine the height of your pot. Cut a straight strip from the slab using your ruler and craft knife; for a mini planter like the one shown, a strip about 2.5 inches wide works perfectly. -
Create the texture:
Before assembling the cylinder, lay the strip flat. Using the rounded edge of a wooden modeling tool or the back of a knife, press vertical indentations into the clay. -
Refine the ribs:
Ensure the lines are spaced evenly, roughly 1/8 inch apart. It’s important to press deeply enough to create visible texture but not so hard that you cut through the slab. -
Soften the edges:
Gently run a damp finger or sponge over the textured surface to smooth out any sharp ridges or burrs created by the tool, giving it that soft, stone-like appearance. -
Form the cylinder:
Carefully curl the textured strip into a circle to form the walls of your pot. Bring the two ends together. -
Seal the seam:
Join the ends by scoring and slipping the clay (if using air-dry) or blending the seam from the inside (if using polymer). Keep the seam as invisible as possible on the outside.
Texture trick
Use a comb to press the indentations instead of a single tool. This ensures perfectly parallel spacing and speeds up the texturing process significantly.
Step 2: Creating the Base and Saucer
-
Cut the bases:
Roll out a fresh slab of clay. Use your circle cutters to punch out two discs: one small disc that fits perfectly inside your cylinder walls, and a larger disc for the saucer. -
Attach the pot bottom:
Place the cylinder onto the smaller clay disc. Blend the clay from the disc up onto the inner walls of the pot using a modeling tool to secure it firmly. -
Smooth the exterior joint:
Check the bottom edge where the wall meets the base. I usually tap the pot gently on the table to help flatten the connection and ensure it sits level. -
Form the saucer rim:
For the tray, roll a thin snake of clay. Wrap this snake around the top edge of your larger circle base to create a raised lip. -
Blend the saucer:
Blend the snake coil downwards into the base on the inside and outside until no seam is visible, creating a smooth, low-profile rim. -
Refine the saucer shape:
Use a damp sponge to smooth the rim of the saucer, ensuring it is rounded and uniform, mirroring the softness of the planter’s ribs.
Step 3: Finishing Touches
-
Drainage hole check:
If you plan to plant directly inside, use a straw or small round tool to punch a drainage hole in the center of the pot’s base. -
Drying or baking:
Follow the specific instructions for your clay type. Air-dry clay needs 24-48 hours to fully cure, while polymer clay requires baking in an oven. -
Sand for perfection:
Once fully cured, use fine-grit sandpaper to gently smooth the top rim of both the pot and the saucer, removing any final thumbprints or irregularities. -
Final cleaning:
Wipe away the sanding dust with a slightly damp cloth to reveal the clean, matte finish of your textured clay.
Cracking concerns
If using air-dry clay, drape a damp paper towel loosely over the pot while it dries. This slows evaporation and prevents the seam from cracking open.
Place your favorite succulent inside and enjoy the organic charm your new handmade planter adds to the shelf
Textured Bud Vase Kit
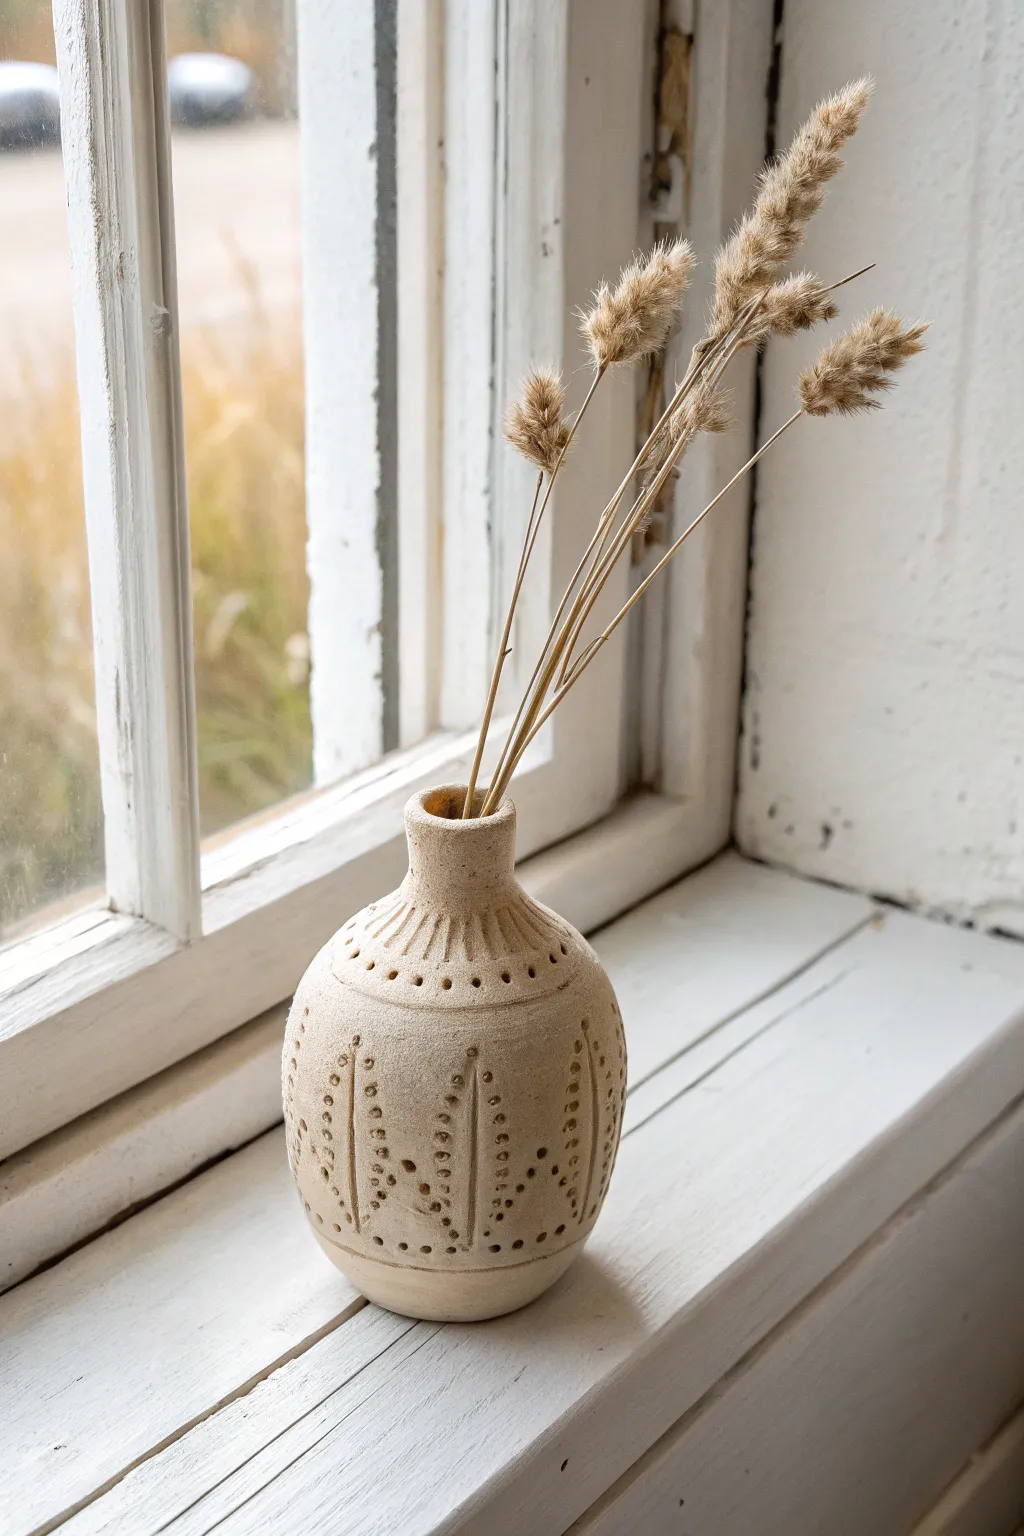
This charming bud vase features a raw, earthen finish and delicate carved details that mimic organic leaf patterns. It’s the perfect size for displaying dried grasses or a single wildflower stem on a sunny windowsill.
How-To Guide
Materials
- Air-dry clay (stone or white color)
- Small rolling pin
- Pin tool or needle tool
- Small loop tool or carving tool
- Sponge
- Water cup
- Fine-grit sandpaper
- Clay knife or wire cutter
Step 1: Forming the Shape
-
Prepare the clay:
Start with a ball of clay roughly the size of a large orange. Knead it thoroughly to remove air bubbles and ensure it’s pliable. -
Start a pinch pot:
Push your thumb into the center of the ball, leaving about half an inch at the bottom. Begin pinching the walls upwards while rotating the ball in your hand. -
Build the body:
Continue pinching and turning to create a bulbous, round shape. Keep the walls even, roughly 1/4 inch thick. Aim for a rounded belly that tapers slightly at the top. -
Form the neck:
Gently collar the clay inward at the top opening to narrow it. You can do this by encircling the top with your hands and gently squeezing while turning the pot. -
Extend the neck:
Once narrowed, pull the clay upwards slightly to create a distinct neck about an inch high. Smooth the rim with a damp finger so it’s even and soft. -
Smooth the surface:
Use a slightly damp sponge to wipe down the exterior. We want a relatively smooth canvas for our carving, but a little handmade texture is nice too.
Clean Carving Tip
Wait for the ‘leather hard’ stage! If the clay is too wet, your tools will drag and create messy edges rather than crisp lines.
Step 2: Carving the Details
-
Let it firm up:
Before carving, let the vase sit until it’s ‘leather hard’—firm to the touch but still cool and carveable without squishing. -
Mark vertical guides:
Lightly scratch four to six vertical lines down the body of the vase using your pin tool. These will be the spines of your fern-like leaves. -
Carve the leaf spines:
Go back over your guide lines with a deeper score line to create the central stem for each leaf motif. -
Add the dots:
Using the blunt end of a small paintbrush or a dedicated dotting tool, press rows of small dots on either side of each vertical spine. These represent the leaves or spores. -
Detail the neck:
Create short, vertical carved lines radiating from the base of the neck down to the shoulder of the vase. This creates a subtle collar effect. -
Add shoulder accents:
Just under the neck carving, press a horizontal row of small dots that encircles the entire vase. -
Refine the base:
Tap the vase gently on the table to flatten the bottom slightly for stability, and smooth out any fingerprints around the lower edge.
Cracks Appearing?
If small cracks form while drying, mix a tiny bit of clay with vinegar to make a paste (slip) and fill them in gently, then smooth over.
Step 3: Finishing Touches
-
Initial drying:
Let the piece dry slowly away from direct heat or drafts to prevent cracking. This usually takes 24-48 hours depending on humidity. -
Sand away burrs:
Once bone dry, take your fine-grit sandpaper and gently rub over the carving areas. This removes the little clay ‘crumbs’ created during the dotting process. -
Final wipe down:
Use a dry, soft brush to dust off any sanding powder. I prefer leaving this project unsealed for a matte, rustic look, but you can add a matte varnish if desired.
Place your favorite dried stems inside and enjoy the organic warmth this piece brings to your space

TRACK YOUR CERAMIC JOURNEY
Capture glaze tests, firing details, and creative progress—all in one simple printable. Make your projects easier to repeat and improve.
Photo and Card Holder Kit
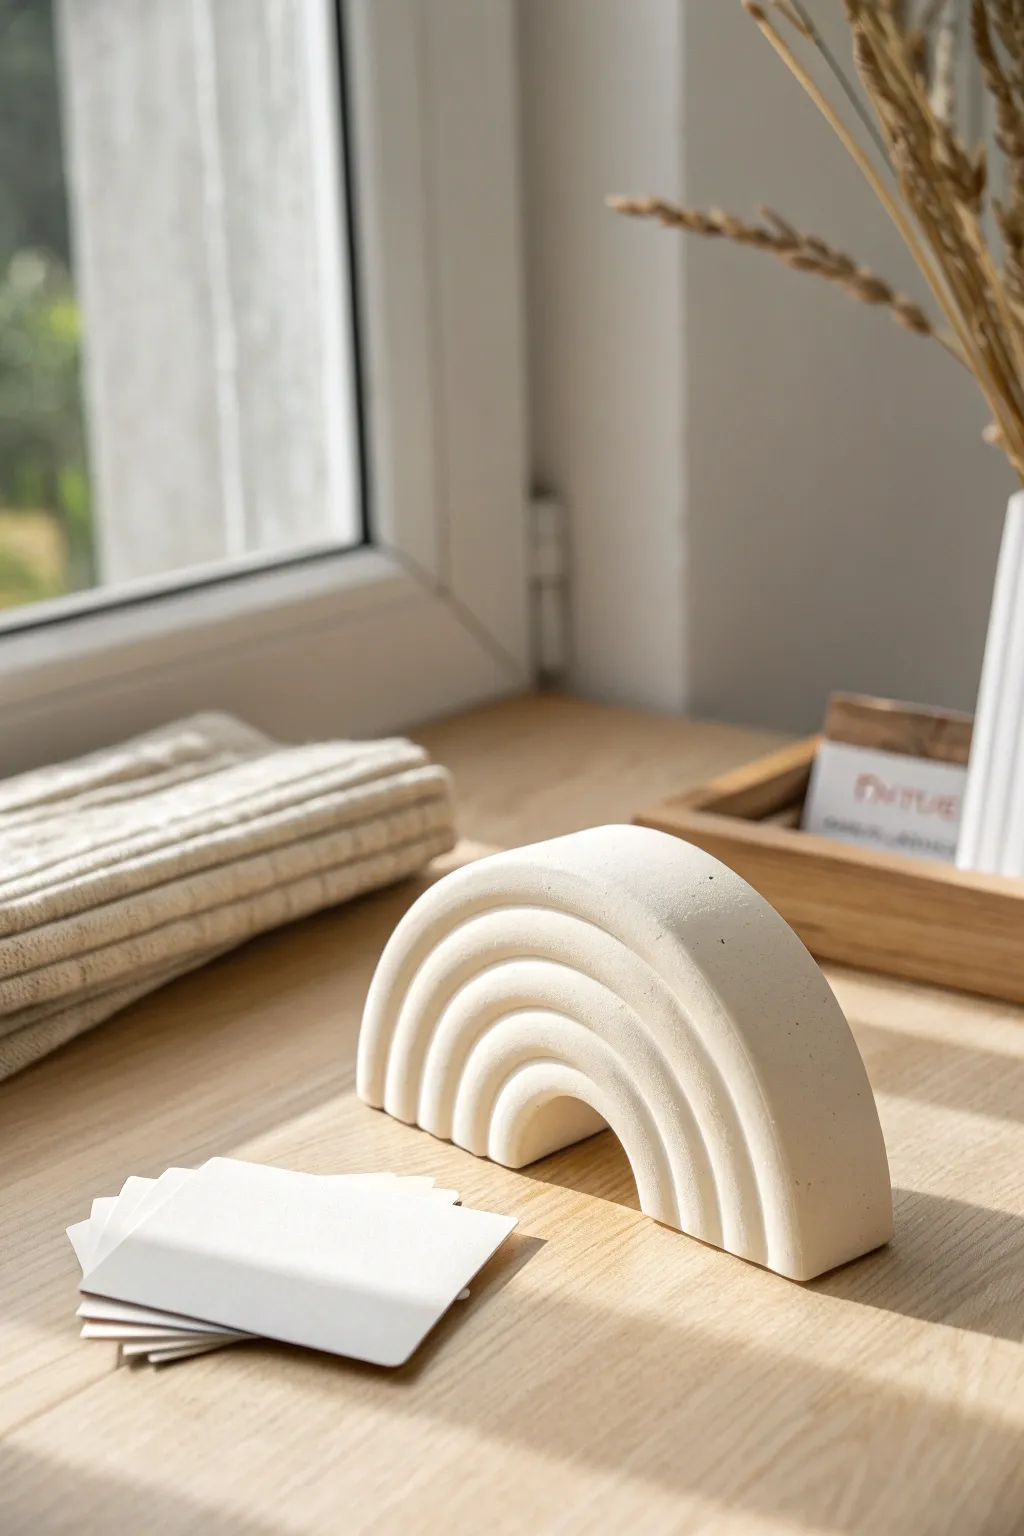
Bring modern, Scandinavian simplicity to your desk with this sculptural rainbow card holder. Crafted from air-dry clay or plaster, its grooved concentric arches create a soothing, tactile piece perfect for displaying photos or notes.
Step-by-Step Guide
Materials
- Air-dry clay (white or stone color) OR casting plaster
- Rolling pin
- Cardboard or plastic sheet (for templates)
- Craft knife or scalpel
- Loop sculpting tool (various sizes)
- Sanding sponge (fine grit)
- Bowl of water
- Ruler
- Parchment paper or silicone mat
- Clear matte sealant spray
Step 1: Preparation and Shaping
-
Create the Template:
Sketch a semi-circle arch on a piece of cardboard to determine your desired size. For a standard photo holder, a base width of about 5-6 inches works well. Cut this shape out to use as your master guide. -
Condition the Clay:
Take a large chunk of air-dry clay and knead it well. You want it warm and pliable to prevent internal air bubbles. If it feels too stiff, dip your fingers in water and work the moisture in. -
Form the Base Block:
Roll or press the clay into a thick, solid block. It should be slightly larger than your cardboard template and roughly 1.5 to 2 inches thick to ensure it stands stably. -
Cut the Arch Shape:
Place your template on top of the clay slab. Using a sharp craft knife, cut vertically down around the curved edge to create your distinct semi-circle shape. -
Smooth the Edges:
The freshly cut edges might be sharp or jagged. Dip your finger in water and gently run it along the perimeter to round off the corners slightly.
Cracks Appearing?
If you see hairline cracks while drying, mix a tiny amount of fresh clay with water to make a paste (slip). Paint this into the crack and smooth it over with a wet finger.
Step 2: Carving the Details
-
Mark the Guidelines:
Using a needle tool or the tip of your knife, very lightly sketch concentric arches onto the front face of the block. These don’t need to be deep; they are just guides for where the grooves will go. -
Select the Right Tool:
Choose a U-shaped loop tool. The width of the loop will determine the width of the gap between the rainbow ‘ribs’. -
Carve the First Groove:
Start with the outermost groove. Press the loop tool into the clay and drag it slowly along your marked guideline. Keep your hand steady and maintain consistent pressure for an even depth. -
Clean the Tool:
After every pass, wipe the excess clay off your tool. A clogged tool creates ragged edges. -
Continue Carving Inward:
Move to the next inner line and repeat the carving process. I find it helpful to rotate the entire piece on the paper rather than twisting my hand into awkward angles. -
Refine the Ridges:
Once the main channels are carved, use a smaller tool or your finger to smooth the ‘valleys’ between the ridges. Check that the remaining raised arches are roughly the same width. -
Create the Card Slot (Optional):
If you want this to function specifically as a card holder, slice a thin, straight line across the very top center of the arch, going about half an inch deep.
Terrazzo Effect
Before rolling your initial block, knead in small chips of dried colored clay or colored sand. When you carve and sand the final piece, you’ll reveal a speckled stone texture.
Step 3: Finishing Touches
-
Slow Drying:
Place the piece on a wire rack or a fresh sheet of parchment paper. Let it dry slowly away from direct sunlight or heat sources to prevent cracking. This usually takes 24-48 hours depending on thickness. -
Initial Sanding:
Once fully dry and hard, take a fine-grit sanding sponge to the surface. Gently buff away any tool marks or burrs in the grooves. -
Details and Dusting:
Use a dry, soft paintbrush to sweep away the white clay dust from inside the deep grooves so the lines look crisp. -
Seal the piece:
To protect against moisture and stains, spray the finished piece with a clear matte fixative or varnish. Two light coats are better than one heavy one.
Place your finished arch on a sunny windowsill where the shadows can play across the textured ridges
Earring and Pendant Jewelry Kit
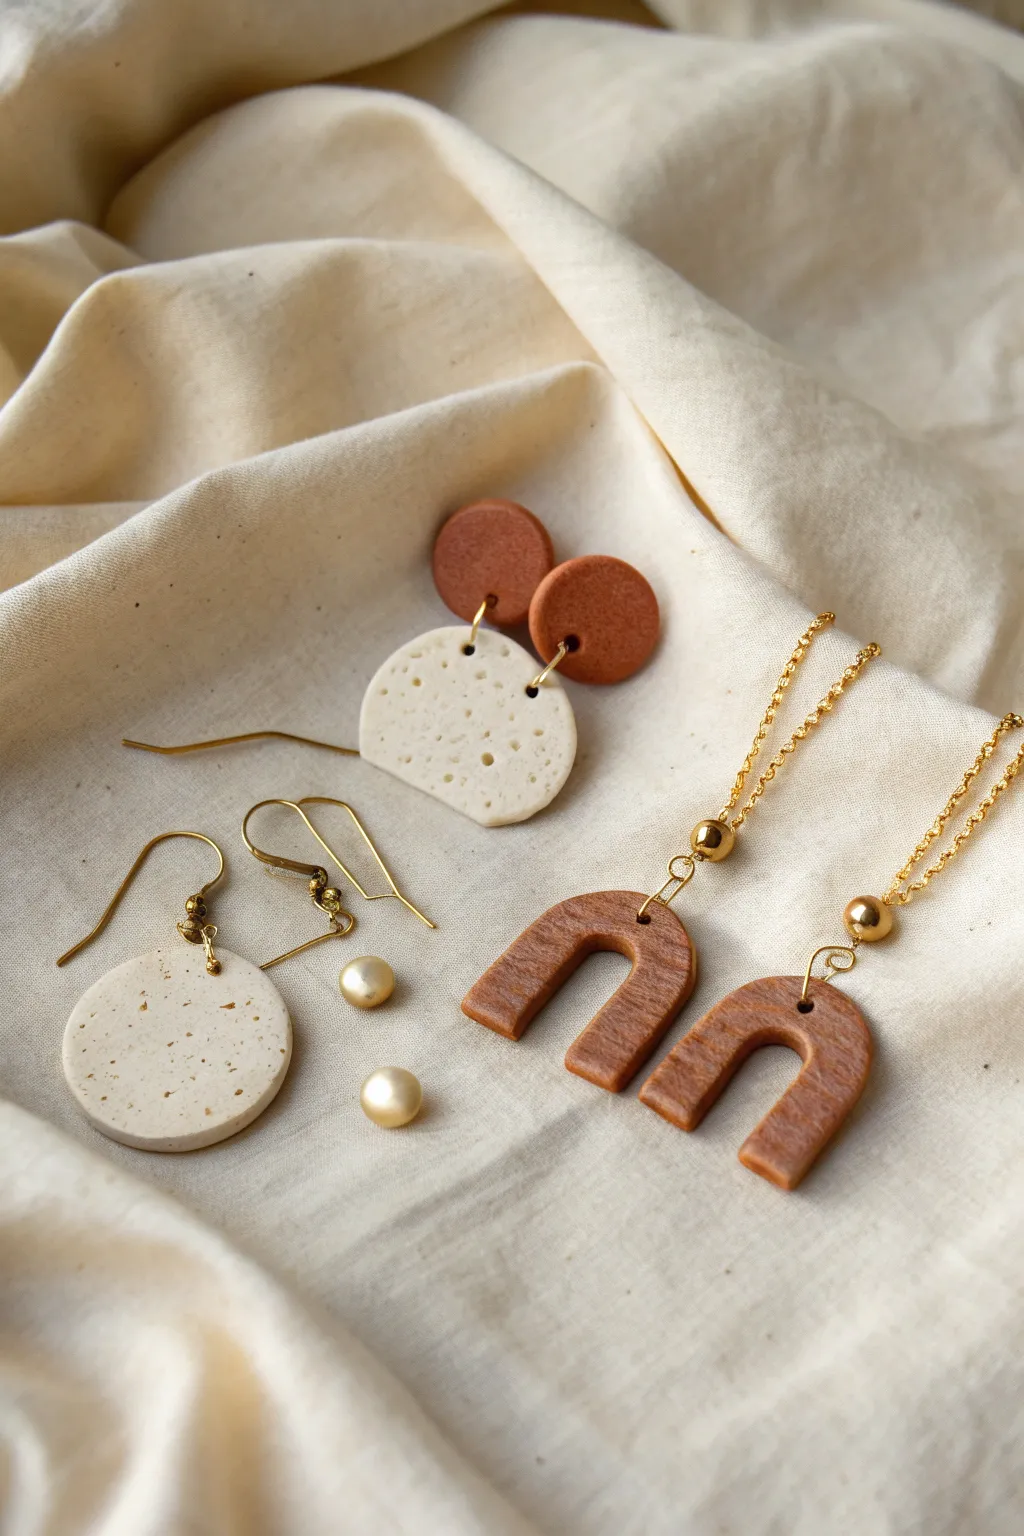
Create a stunning collection of polymer clay earrings featuring earthy terracottas and speckled creams. This project combines geometric shapes with delicate textures for a boutique-style finish that looks deceptively professional.
Step-by-Step
Materials
- Polymer clay (terracotta/burnt orange)
- Polymer clay (white or cream)
- Dried spices (like black pepper or oregano) or coffee grounds for speckling
- Rolling pin (acrylic roller)
- Clay cutters (small circle, larger circle, U-shaped arch)
- Pin tool or toothpick
- Parchment paper
- Jewelry pliers (round nose and flat nose)
- Jump rings (gold)
- Earring posts and backs
- Gold chain
- Ball-head pins
- Earring hooks (French hooks)
- Super glue (liquid or gel)
- Fine-grit sandpaper
Step 1: Prepping the Clay
-
Condition the Clay:
Start by warming the terracotta clay in your hands, kneading it until it is soft and pliable. Do the same for the white clay, ensuring your hands are clean between colors to avoid staining. -
Create the Speckled Effect:
Flatten your conditioned white clay. Sprinkle a tiny pinch of dried spices or coffee grounds over it, then fold the clay over and knead it until the specks are evenly distributed. This gives that lovely organic, stone-like appearance seen in the photo. -
Roll Out Sheets:
Place your clay on parchment paper. Use your acrylic roller to roll both the terracotta and the speckled white clay into sheets of even thickness, roughly 3mm thick.
Step 2: Cutting and Shaping
-
Cut the Studs:
For the two-tiered pair, use your smallest circle cutter on the terracotta clay to punch out two uniform circles for the top studs. -
Cut the Organic Shapes:
For the bottom part of the terracotta pair, use a larger cutter on the speckled white clay. To get the irregular geometric shape shown, you can gently squeeze the cut circle or use a blade to slice the bottom edge flat. -
Texture the White Pieces:
Using your pin tool or a crumpled ball of aluminum foil, gently press into the surface of the white shapes to create a porous, crater-like texture. -
Cut the Arches:
Use a U-shaped cutter on the terracotta sheet to create the two arch shapes. If you don’t have a cutter, trace a U-shape on paper, lay it on the clay, and carefully cut around it with a craft knife. -
Create Holes:
Before baking, use a toothpick or pin tool to pierce holes for assembly. For the white pieces, place a hole near the top. For the terracotta studs, place a hole near the bottom edge. For the U-arches, pierce a hole in the center top of the arch.
Uneven Surface?
If your clay shows fingerprints, lightly brush the unbaked clay with a tiny amount of baby oil or cornstarch before baking to smooth it out.
Step 3: Baking and Finishing
-
Bake the Clay:
Transfer the parchment paper with your clay pieces onto a baking sheet. Bake according to your specific brand’s package instructions (usually around 275°F/135°C for 15-30 minutes). -
Cool Down:
Allow the pieces to cool completely on the tray. Clay is fragile when hot and hardens fully as it cools. -
Sand the Edges:
Once cool, use fine-grit sandpaper to gently smooth any rough edges or cutter marks for a polished look.
Add a Glossy Finish
Coat finished pieces with UV resin or a water-based polyurethane gloss varnish. This deepens the color and mimics the look of ceramic glazing.
Step 4: Assembly
-
Assemble the Stud Pair:
Use a jump ring to connect the bottom hole of the terracotta stud to the top hole of the white organic shape. Close the ring securely with pliers. -
Attach Earring Posts:
Flip the terracotta studs over. Apply a drop of super glue to the flat pad of an earring post and press it firmly onto the back of the stud. Let it dry completely. -
Prepare the Chain Elements:
For the arch earrings, cut two equal lengths of gold chain (about 1.5 inches). Thread a ball-head pin through a small gold bead if desired, or attach directly. -
Link the Arches:
Open a jump ring, thread it through the top hole of the terracotta arch and the end of your chain segment. Close the ring. -
Finish with Hooks:
Attach the top end of the chain to an earring hook, adding a decorative gold bead at the connection point if you like a little extra shine. -
Assemble the Drops:
For the single circle earrings (bottom left), attach an earring hook directly to the clay piece using a jump ring and a crimp connector.
Enjoy wearing your handcrafted, artisan-style jewelry collection
Wall Hanging Tile Kit
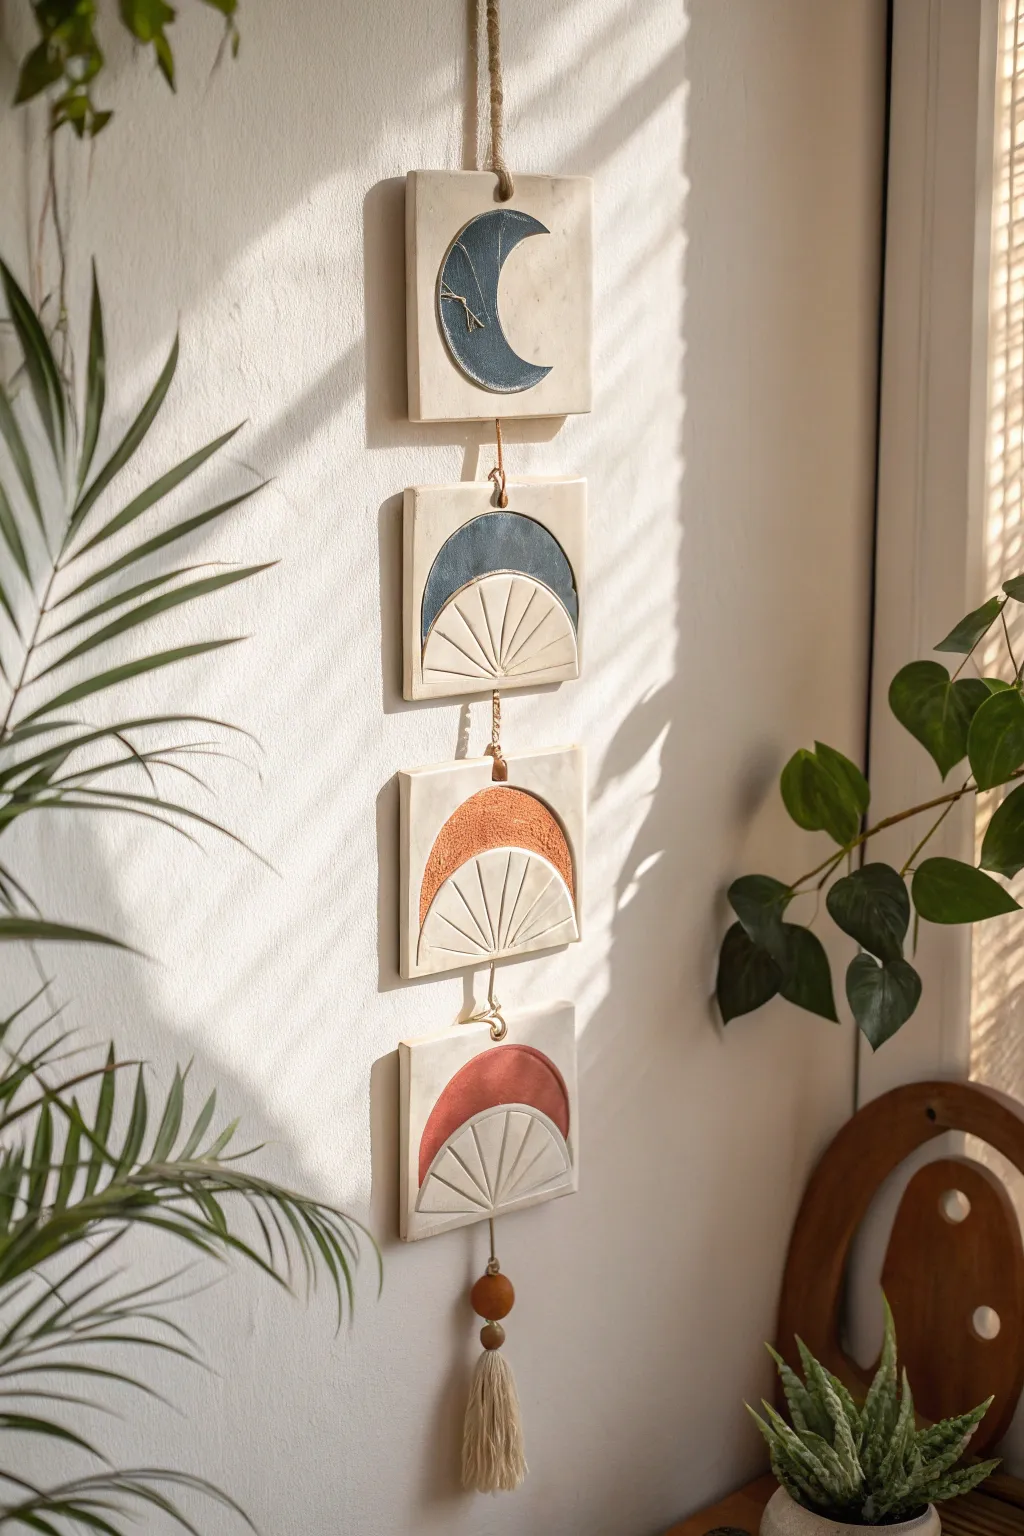
Bring a touch of bohemian elegance to your space with this vertical wall hanging featuring moon phases and sunburst motifs. The combination of textured clay, muted earth tones, and natural twine creates a calming, organic piece of art.
Step-by-Step Tutorial
Materials
- Air-dry clay (white or light cream)
- Rolling pin
- Square cookie cutter (approx. 3-4 inches) or ruler and craft knife
- Circle cutters (various sizes for moon and sun shapes)
- Modeling tools or a blunt knife for carving rays
- Acrylic paints (Navy Blue, Terracotta, Rust Red, Cream/White)
- Fine grit sandpaper
- Jute twine or hemp cord
- Wooden beads (optional)
- Skewer or straw (for piercing holes)
- Matte sealant or varnish
- Paintbrushes (flat and fine tip)
Step 1: Shaping the Clay Tiles
-
Roll out the clay:
Begin by conditioning your clay and rolling it out on a flat surface to an even thickness of about 1/4 inch. Use guides or rulers on either side of the clay to ensure consistent thickness across the slab. -
Cut the squares:
Using a square cutter or a ruler and craft knife, cut four identical squares. Smooth the edges with a bit of water on your finger to remove any sharp ragging from the cut. -
Pierce hanging holes:
Before the clay hardens, use a straw or skewer to poke holes. For the top tile, poke one centered hole near the top and one near the bottom. For the middle two tiles, poke holes at the top and bottom center. For the final bottom tile, poke one hole at the top and one at the bottom for the tassel.
Step 2: Adding the Designs
-
Create the crescent moon:
For the top tile, take a small separate piece of rolled clay. Use two circle cutters of slightly different sizes to cut a crescent moon shape. Score the back of the moon and the tile surface, add a little water (slip), and press the moon firmly onto the center of the square. -
Form the sunburst shapes:
For the remaining three tiles, cut three circles from your clay sheet. Cut each circle in half to create semi-circles. You will need one semi-circle per tile. Attach them using the score-and-slip method, placing them in the center of each square. -
Carve the rays:
Once the semi-circles are attached, use a modeling tool or blunt knife to gently carve radiating lines into the bottom half of the semi-circles. I like to start with the center vertical line and then angle the side lines for symmetry.
Warping Woes?
If tile corners curl up while drying, place a lightweight book or board on top of them once they are leather-hard (partially dry) to keep them flat.
Step 3: Finishing and Assembly
-
Dry and sand:
Allow the tiles to dry completely for 24-48 hours, flipping them occasionally to prevent warping. Once fully dry, gently sand any rough edges or surface bumps with fine-grit sandpaper. -
Paint the crescent moon:
Paint the crescent moon shape on the top tile with a deep navy blue acrylic paint. Use a fine brush to keep the edges crisp against the white background. -
Paint the sunbursts:
Paint the top (smooth) portion of the semi-circles on the remaining tiles. Use navy blue for the second tile, terracotta orange for the third, and a deep rust red for the bottom tile. Leave the carved ray sections unpainted (creamy white). -
Seal the tiles:
Apply a coat of matte varnish or sealant to all tiles to protect the paint and give the clay a finished look. -
Connect the tiles:
Cut short lengths of jute twine. Tie the tiles together vertically, leaving about an inch of space between each one. Knot the twine securely at the back of each hole. -
Create the tassel:
Wrap twine around your hand about 20 times. Slide it off, tie a piece of twine through the top loop, and wrap another piece around the ‘neck’ of the tassel. Cut the bottom loops open and trim evenly. -
Final assembly:
Thread the tassel through a wooden bead and attach it to the bottom hole of the last tile. Create a simple loop of twine at the very top of the first tile for hanging.
Add Some Shine
Mix a tiny amount of gold mica powder into your varnish or use gold leaf paint on the rays for a subtle metallic shimmer that catches the sunlight.
Hang your new celestial creation near a window to enjoy how the shadows play across the textured clay surfaces
Moon Phase Mobile Kit

Bring the serene beauty of the night sky into your home with this minimalist clay mobile. Featuring textured white moon phases suspended from natural wood, this hanging piece catches the light beautifully and adds a calming, bohemian touch to any window or wall.
Step-by-Step
Materials
- Air-dry clay (white or off-white)
- Rolling pin
- Circle cookie cutters (approx. 2-3 inches diameter)
- Craft knife or clay tools
- Wooden dowel (approx. 12-15 inches long)
- Heavy-duty thread or thin twine (white or natural)
- Small gold or wooden beads
- Sandpaper (fine grit)
- Needle or toothpick used for piercing holes
- Scissors
- Embroidered floss or yarn for tassels (beige/cream)
- Texturing tool (optional: old toothbrush or sponge)
Step 1: Shaping the Moons
-
Roll out the clay:
Begin by taking a generous amount of air-dry clay and kneading it until soft. Roll it out on a flat surface to a uniform thickness of about 1/4 inch. If you want a textured look like the example, gently press a sponge or crumpled paper onto the surface before cutting. -
Cut the full circles:
Use your circle cutter to punch out several full circles. For the mobile shown, you will need approximately 15-18 distinct pieces, though cutting a few extras is always wise in case of breakage. Keep the scraps covered so they don’t dry out. -
Carve the phases:
To create the crescent and gibbous shapes, take your full circles and use the same circle cutter to slice off portions. Position the cutter off-center to create crescent moons of varying thicknesses. Save the cut-off pieces; sometimes the negative space creates the perfect opposing phase. -
Create hanging holes:
Before the clay starts to dry, use a needle or toothpick to pierce holes for the string. For pieces that will be in the middle of a strand, you need a hole at the top and bottom. For the bottom-most piece on a strand, you only need a top hole. Ensure the holes are large enough for your thread to pass through easily. -
Smooth the edges:
Dip your finger in a little water and gently run it along the cut edges of each moon to smooth out any sharpness or burrs. This gives the final piece a more polished, professional look. -
Let them dry:
Arrange your clay moons on a flat surface lined with parchment paper. Let them air dry completely, which usually takes 24-48 hours depending on humidity. Flip them over halfway through the drying process to ensure they dry evenly and stay flat.
Fixing Cracks
If you notice small hairline cracks after drying, mix a tiny amount of fresh clay with water to make a paste (slip) and fill them in. Let dry and sand smooth.
Step 2: Assembling the Mobile
-
Sand and refine:
Once fully dry, lightly sand any rough spots or uneven edges with fine-grit sandpaper. Be gentle, as dried air-dry clay can be brittle. This is where I like to verify that the holes are still clear of debris. -
Plan your layout:
Lay out your wooden dowel and arrange the clay pieces in three vertical columns below it on your workspace. Experiment with the order of phases—you might want a full moon in the center or a gradual progression from crescent to full. -
Cut the strings:
Measure and cut three lengths of thread or twine. Make them significantly longer than you think you need—at least 30 inches each—to allow for knots and adjustments. -
String the first piece:
Start with the bottom-most clay piece of a column. Tie a secure double knot at the end of your string and thread it through the top hole of the moon. If using beads, thread a small bead onto the string first to catch the moon. -
Add connecting beads:
To space out the next moon, you can tie a knot further up the string or use a small bead crimped or knotted in place to act as a stopper. The example uses tiny gold beads just above each moon to hold them in position. -
Thread the column:
Continue threading the string through the bottom hole and out the top hole of the next moon in the sequence. Adjust the spacing so the moons hang freely without bumping into each other. Repeat until the strand is complete. -
Attach to the dowel:
Tie the top of each completed strand onto the wooden dowel. Space the three strands evenly apart. A simple cow hitch or multiple square knots will secure them well.
Step 3: Finishing Touches
-
Create the tassels:
Cut a bundle of beige yarn or floss about 5 inches long. Fold the bundle in half and tie a piece of yarn tightly around the top to create a head. Make two of these tassels. -
Attach tassels and hanger:
Tie a long piece of twine to both ends of the dowel to create the main hanging loop. At the points where this hanging string meets the dowel, attach your tassels to hide the knots and add a decorative flair. -
Final adjustments:
Hang the mobile up temporarily against a wall. Step back and check if the strands are hanging evenly. Trim any excess thread tails closely for a neat finish.
Metallic Magic
Add a touch of celestial shimmer by painting the edges of your moons with gold leaf paint or adding gold splatter specks across the surfaces.
Hang your new moon mobile near a window to watch the phases dance in the sunlight
Desk Organizer Essentials Kit
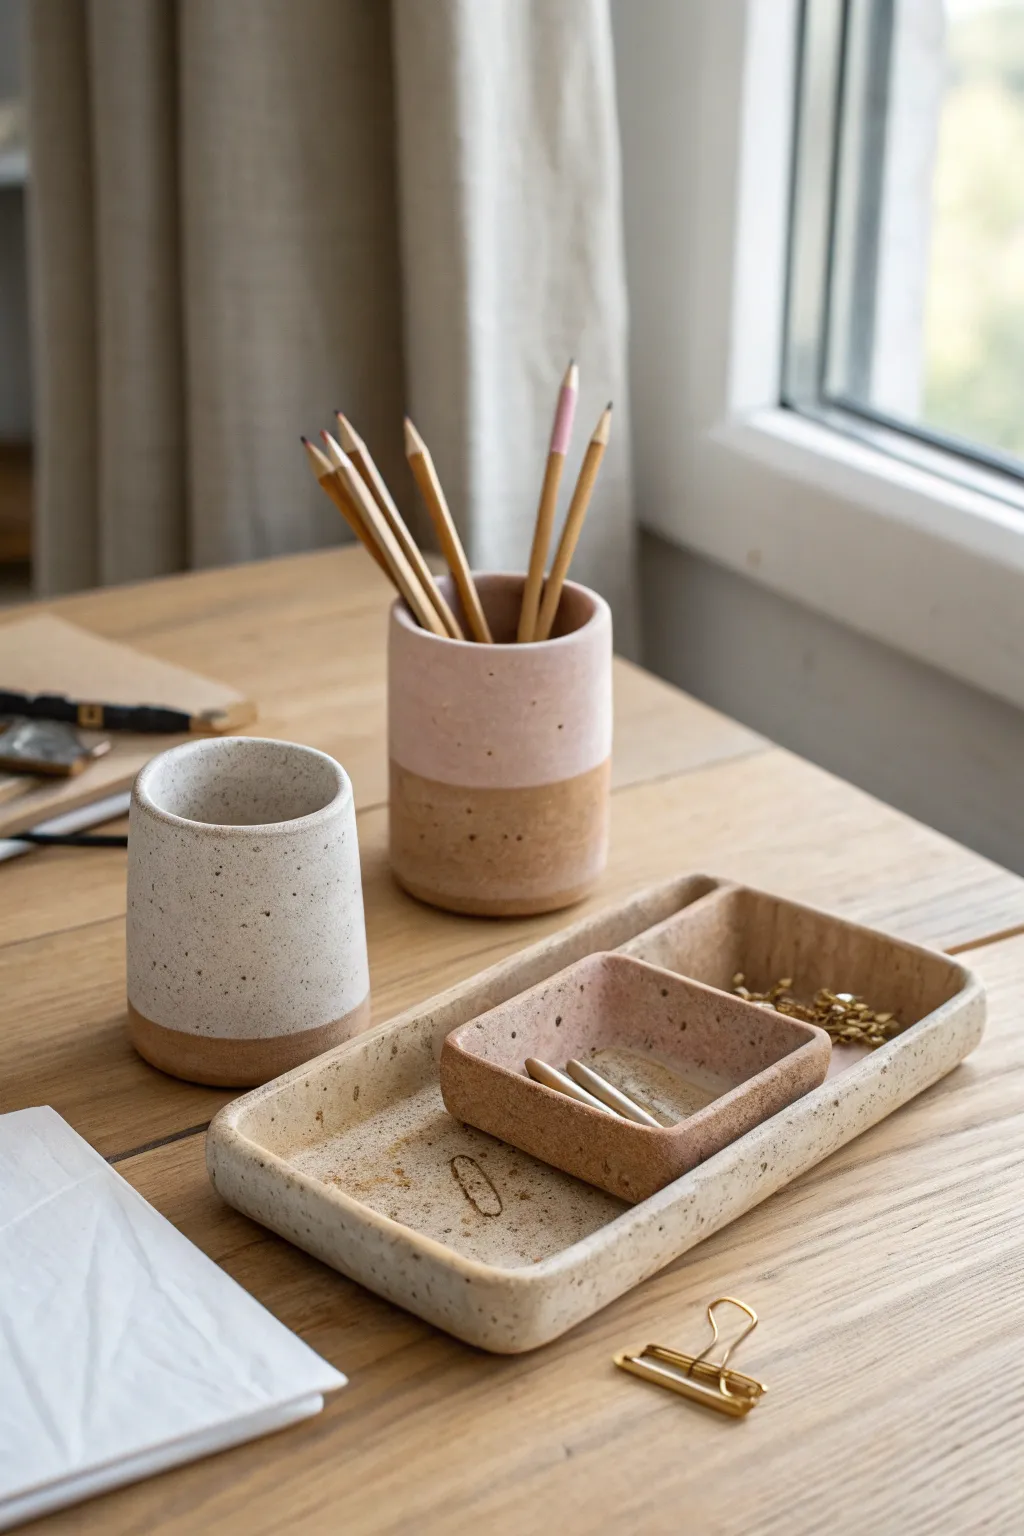
Elevate your workspace with this modern, cohesive desk organizer set featuring a pencil cup, a catch-all tray, and a smaller nesting dish. The design highlights a stunning two-tone effect with raw, speckled clay bases and soft, matte glazes.
How-To Guide
Materials
- Speckled stoneware clay (mid-fire or air-dry with sealant)
- Small rolling pin
- Clay knife or fettling knife
- Flexible metal rib
- Sponge
- Slip (clay and water mixture)
- Scoring tool or old toothbrush
- Circular cookie cutters or templates (for container bases)
- Ruler
- Matte white glaze
- Matte dusty pink glaze
- Paintbrushes
- Kiln (if using stoneware) or matte varnish (if using air-dry)
Step 1: Creating the Pencil Cup
-
Roll the slab:
Begin by rolling out a slab of speckled clay to an even thickness of about 1/4 inch. Smooth the surface with a flexible rib to compress the clay and remove any canvas texture. -
Cut the components:
Using a template or ruler, cut a long rectangle for the cylinder walls (approx. 4 inches high by 10 inches long) and a circle for the base that matches the cylinder’s diameter. -
Form the cylinder:
Score the short ends of your rectangle and apply a little slip. Gently bend the slab into a tube shape, overlapping the scored ends, and press firmly to seal the seam. -
Attach the base:
Score the bottom edge of your cylinder and the outer edge of your circular base. Apply slip, place the cylinder on top, and smooth the clay from the outside wall down onto the base to create a seamless join. -
Smooth the lip:
Use a damp sponge or your finger to round over the top rim of the cup, ensuring it is smooth and comfortable to the touch.
Step 2: Building the Nesting Trays
-
Shape the large tray base:
Roll out another slab and cut a large rectangle with rounded corners, approximately 8 inches by 4 inches. This will serve as the bottom of your main catch-all tray. -
Add the walls:
To build the walls, roll a long coil of clay or cut thin strips from a slab (about 3/4 inch tall). Attach these to the perimeter of the base using the score-and-slip method. -
Refine the edges:
Blend the walls into the base on the inside and outside. I like to use a wooden modeling tool here to get into the corners. Gently pinch the walls to taper them slightly at the top. -
Create the mini dish:
Repeat the process to make a small square dish (approx. 3×3 inches). Make sure you test the fit to ensure it nests comfortably inside the larger tray before drying. -
Dry slowly:
Loosely cover all pieces with plastic and let them dry slowly to the bone-dry stage. This prevents warping, especially on the flat tray bottoms.
Clean Lines Pro Tip
For a razor-sharp glaze line on the two-tone cup, apply automotive detailing tape or thin vinyl tape instead of masking tape. It seals tighter against the bisque and prevents bleeding.
Step 3: Glazing and Finishing
-
Bisque fire:
If using stoneware, fire the bone-dry pieces in a kiln to bisque temperature (usually cone 04). If using air-dry clay, ensure they are fully cured. -
Tape the resist lines:
To achieve the dipped look without actually dipping, use masking tape or wax resist to create a straight horizontal line around the bottom third of the pencil cup and the mini dish. -
Apply the white glaze:
Pour matte white glaze inside the pencil cup and swirl to coat, then pour it out. Brush or dip the upper two-thirds of the exterior with the white glaze. -
Apply the pink glaze:
For the other cup shown in the back, use a matte dusty pink glaze on the top two-thirds, leaving the bottom raw. Glaze the interior of the mini dish in pink as well. -
Glaze the tray:
The large tray looks best with a raw, unglazed finish to highlight the speckles, but you can add a clear matte glaze to the interior for easier cleaning if desired. -
Clean the feet:
Wipe away any glaze that may have dripped onto the bottoms of your pieces with a damp sponge to prevent them from sticking to the kiln shelf. -
Final firing:
Fire the pieces again to the glaze temperature appropriate for your clay body (typically cone 5 or 6). Once cool, sand the unglazed bottoms lightly with fine-grit sandpaper to prevent scratching your desk.
Warping Trays?
If your flat trays curl up while drying, place a small weighted board or bag of rice on the center of the base while it dries to keep it perfectly flat.
Now you have a custom, serene desk set that brings order and earthy charm to your workspace