Clay lanterns are one of my favorite projects because they’re equal parts cozy and creative—light on the inside, personality on the outside. Here are clay lantern ideas that play with cutouts, shadow patterns, and fun forms so your space can glow in a way that feels totally you.
Classic Cutout Cylinder Luminary
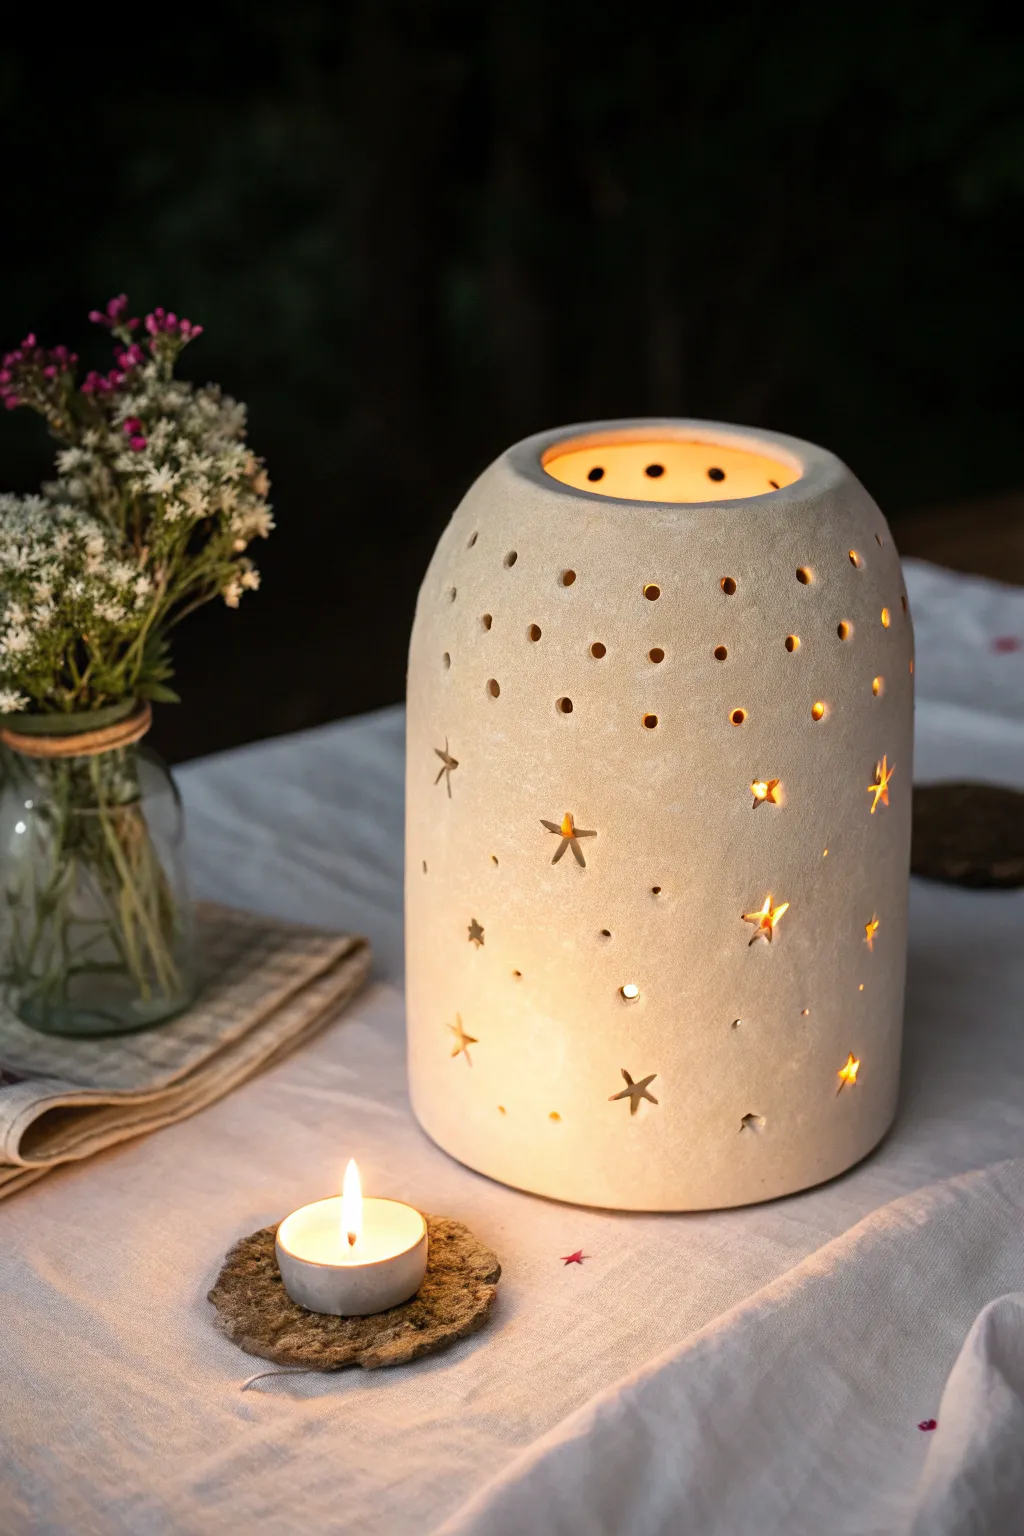
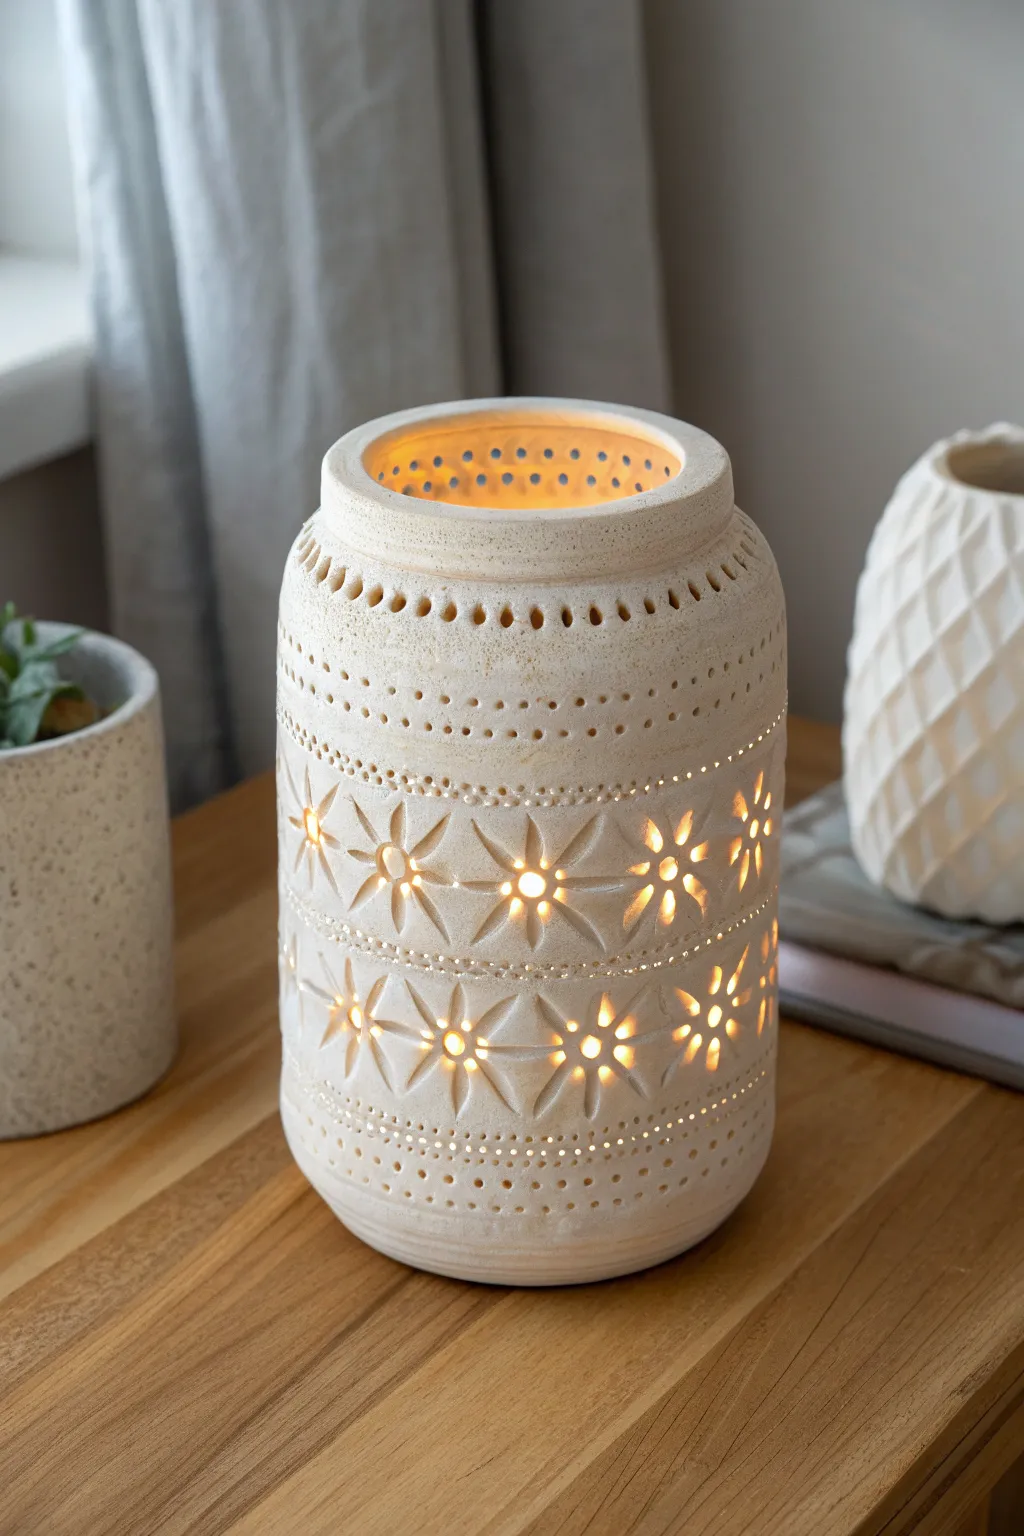
This rustic, elegant lantern brings the charm of simple white clay into your home, casting a warm, starlight glow through careful cutouts. The textured, unglazed finish gives it a timeless, organic feel perfect for winter evenings or year-round ambiance.
Step-by-Step
Materials
- White air-dry clay or polymer clay (approx. 1-1.5 lbs)
- Non-stick rolling pin
- Large cylindrical form (e.g., a large juice can, glass vase, or mailing tube)
- Parchment paper or wax paper
- Star-shaped cookie cutters (small and medium sizes)
- Straw or small circular clay tool
- Craft knife or scalpel
- Potter’s needle tool
- Small bowl of water
- Sponge
- Sandpaper (fine grit)
Step 1: Preparing the Slab
-
Prepare your workspace:
Lay down a sheet of parchment paper on a flat, stable surface. This will prevent your clay from sticking and allow you to move the slab easily later without warping it. -
Condition the clay:
Take your white clay and knead it well in your hands until it becomes pliable and free of cracks. This conditioning step is crucial for preventing tears during rolling. -
Roll the slab:
Using your rolling pin, flatten the clay into a long, rectangular shape. Aim for a consistent thickness of about 1/4 inch (6mm) throughout the entire piece. -
Measure the circumference:
Wrap a piece of string or paper around your chosen cylindrical form to get the exact circumference needed. Add about 1/2 inch to this measurement for the overlap seam. -
Trim to size:
Use a craft knife and a ruler to cut your clay slab into a sharp, clean rectangle based on your measurements. I prefer to keep the leftover scraps nearby for test cuts.
Slumping Walls?
If your clay is too soft and slumps when standing, let the slab sit flat for 30-45 minutes to firm up slightly (leather hard) before attempting to wrap it vertically around the form.
Step 2: Creating the Design
-
Plan your stars:
Before cutting into the clay, lightly impress your star cutters onto the slab to plan out a pleasing arrangement. Don’t press all the way through yet; just mark where they will go. -
Cut the larger stars:
Press your star-shaped cutters firmly into the clay slab to remove the star shapes. If the clay sticks inside the cutter, gently push it out using a soft tool. -
Refine the points:
Sometimes cookie cutters blunt the star tips. Use your craft knife to carefully sharpen the corners of the cutouts for a crisp, professional look. -
Add the constellations:
Using a drinking straw or a small circular tool, punch random small holes scattered around and between the stars to mimic distant planets or stardust. -
Smooth the edges:
Dip your finger or a small sponge in water and gently run it over the cut edges of the stars and holes. This removes any rough burrs or crumbles created during cutting.
Golden Glow
For a warmer light, paint the *inside* of the lantern with a metallic gold acrylic paint after drying. This reflects the candlelight beautifully through the star cutouts.
Step 3: Forming the Cylinder
-
Wrap the form:
Wrap your cylindrical mold (the can or vase) with a layer of parchment paper. This ensures the clay won’t bond to the mold as it dries. -
Lift and wrap:
Carefully lift your clay rectangle and wrap it around the paper-covered mold. Bring the two short ends together to meet. -
Score the seam:
Use a needle tool or fork to scratch up (score) the edges where the clay will overlap. Dab a little water or clay slip onto the scratched areas. -
Join the seam:
Press the two ends together firmly to seal the cylinder. Use your thumb to smooth the clay over the join line until it disappears completely. -
Create the texture:
To achieve the rustic finish seen in the inspiration image, gently dab the entire outer surface with a textured sponge or crumpled aluminum foil.
Step 4: Finishing Touches
-
Initial dry time:
Let the lantern sit on the form for a few hours until it is leather-hard. It needs to support its own weight before you remove the support. -
Remove the form:
Gently slide the inner mold out, leaving the paper inside if necessary, then carefully peel the paper away from the clay wall. -
Smooth the rim:
Check the top rim of your cylinder. If it got distorted during wrapping, gently gently reshape it and smooth it down with a damp finger. -
Full cure:
Allow the piece to dry completely according to your clay package instructions (usually 24-48 hours for air dry). Turn it occasionally for even arlow. -
Final sanding:
Once bone dry, use fine-grit sandpaper to lightly buff away any remaining sharp bumps or fingerprints, leaving a soft, matte stone-like surface.
Place a battery-operated tea light inside and watch your personal constellation light up the room


Slab-Built Box Lantern With Window Panels
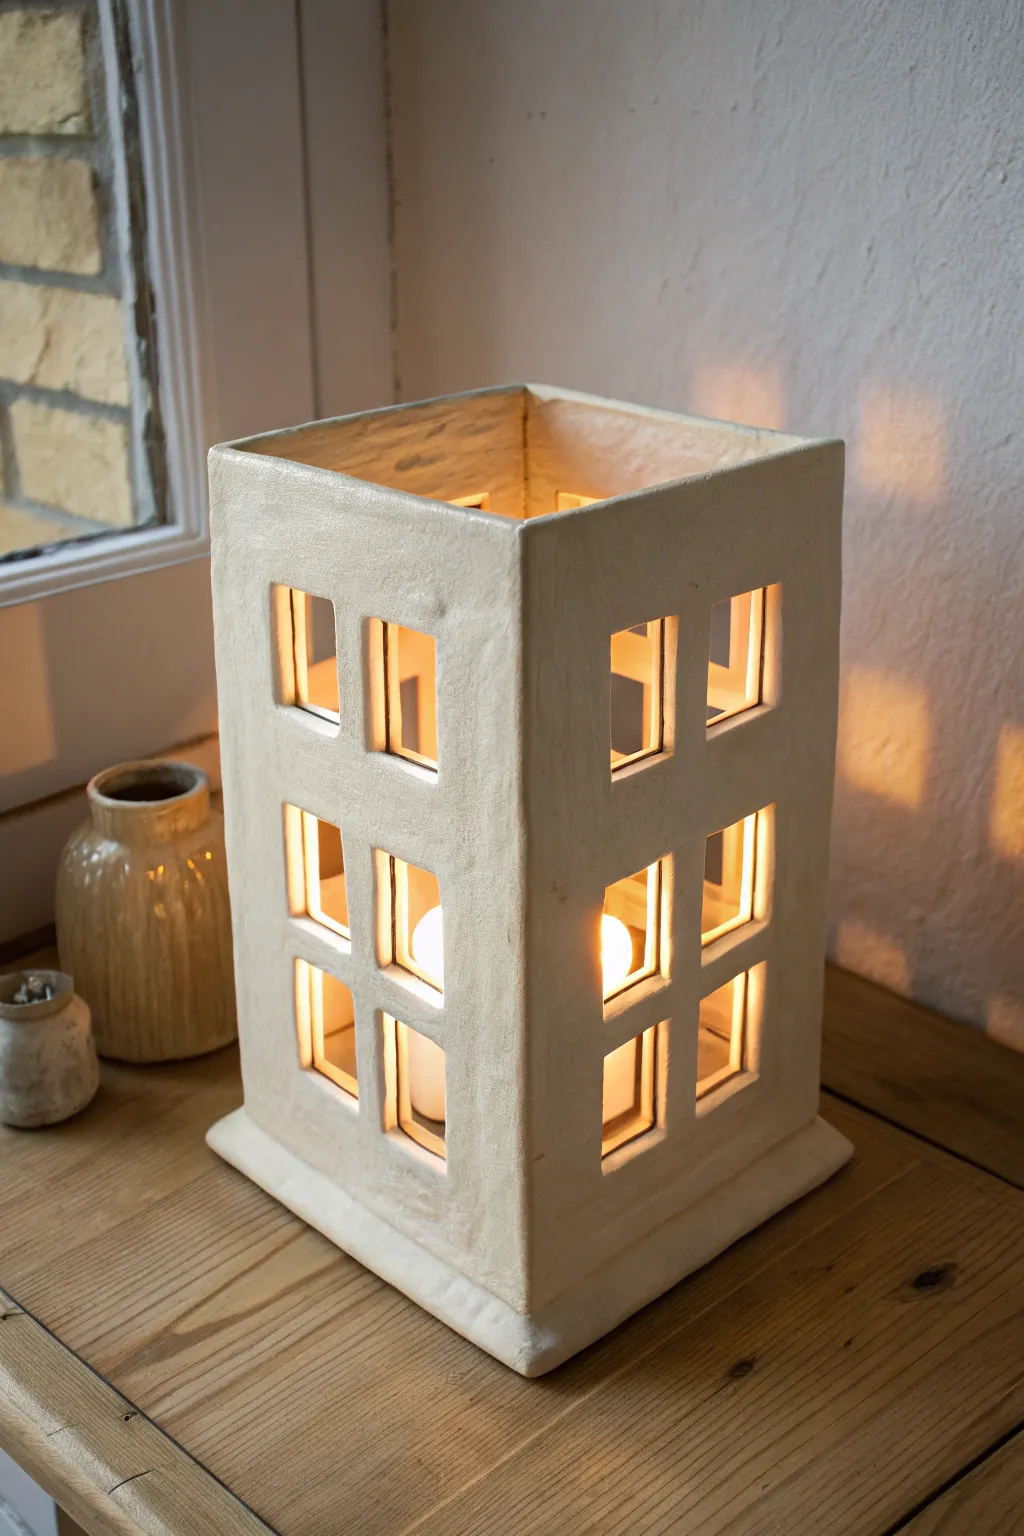
This project transforms simple clay slabs into a sophisticated, architectural lantern reminiscent of a luminous city building. The finished piece features a textured, creamy white surface with neatly recessed window panes that cast a warm, inviting grid of shadows when lit.
Detailed Instructions
Materials
- Light-colored stoneware clay (grogged for stability)
- Rolling pin and guide sticks (approx. 0.5 cm thickness)
- Fettling knife or sharp craft knife
- Ruler or set square
- Serrated rib or fork (for scoring)
- Clay slip or vinegar
- Wooden modeling tools
- Sponge
- Cardboard or stiff paper for templates
- Matte white or cream glaze
Step 1: Planning and Preparing the Slabs
-
Design your template:
Begin by sketching your lantern walls on paper. For this rectangular tower look, you will need two wider rectangular panels and two slightly narrower ones, depending on whether you want a square or rectangular footprint. Don’t forget a square base piece. -
Roll out the clay:
Roll your clay out onto a canvas or cloth surface. Use guide sticks to ensure an even thickness of about 0.5 cm to 0.7 cm. I find that going much thinner can cause warping during the firing. -
Texture the surface:
Before cutting, gently compress the slab with a rib. To achieve the slightly stucco-like texture seen in the photo, lightly dab the surface with a coarse sponge or a crumpled plastic bag. -
Cut the components:
Place your paper templates onto the clay and carefully cut around them using your fettling knife. You need four walls and one base. Keep the slabs flat. -
Firming up:
Let the cut slabs sit until they reach a ‘leather-hard’ state. They should be stiff enough to stand up without bending but soft enough to be carved and joined.
Clean Corner Pro-Tip
Use a straight 2×4 wooden board inside the lantern when joining walls. Pressing the clay against this rigid surface ensures your walls stay perfectly straight during assembly.
Step 2: Carving the Windows
-
Map the grid:
Lightly trace your window placement onto the leather-hard slabs using a needle tool. Create a mix of square and rectangular shapes, leaving sturdy frames (mullions) between them. -
Cut the window openings:
Carefully slice out the window panels. Support the clay from the back with your hand to prevent the wall from buckling while you apply pressure. -
Bevel the edges:
To create the recessed, framed look, use a modeling tool to smooth and slightly compress the interior edges of each window cutout. This step is crucial for that clean, architectural finish. -
Clean up crumbs:
Wait for the cut edges to dry a little more, then use a damp sponge or stiff brush to soften any sharp burrs left from cutting.
Level Up: Stained Glass
After firing, glue pieces of colored tissue paper or thin vellum behind the window openings. When a specific LED candle is placed inside, it creates a colorful stained-glass effect.
Step 3: Assembly and Finishing
-
Miter the joints:
For a seamless 90-degree corner, cut the vertical edges of your wall slabs at a 45-degree angle. This increases surface area for a stronger bond. -
Score and slip:
Aggressively score (scratch) all joining surfaces—the vertical sides of the walls and the perimeter of the base. Apply a generous amount of clay slip or vinegar. -
Construct the tower:
Attach the first wall to the base. Press firmly. Add the second wall, pressing the mitered corner together. Continue until the box is closed. -
Reinforce the interior:
Roll a very thin coil of soft clay and press it into the interior corners where the walls meet. Smooth this out with a wooden tool to reinforce the structure. -
Add the footer:
The example image features a slightly flared base. To replicate this, attach a slightly larger, flat square of clay to the bottom, smoothing the seam so it looks like a continuous pedestal. -
Final smoothing:
Go over the exterior texturing once more to hide any fingerprints from assembly. Ensure the top rim is level. -
Drying:
Cover the piece loosely with plastic for the first day to let the moisture redistribute, then uncover to dry slowly. This prevents the window frames from cracking. -
Firing and glazing:
Bisque fire the piece. Once fired, apply a matte cream or white glaze. A semi-opaque glaze works best to highlight the subtle surface texture without obscuring the sharp lines of the windows.
Place a flickering LED candle inside to see your architectural creation glow warmly


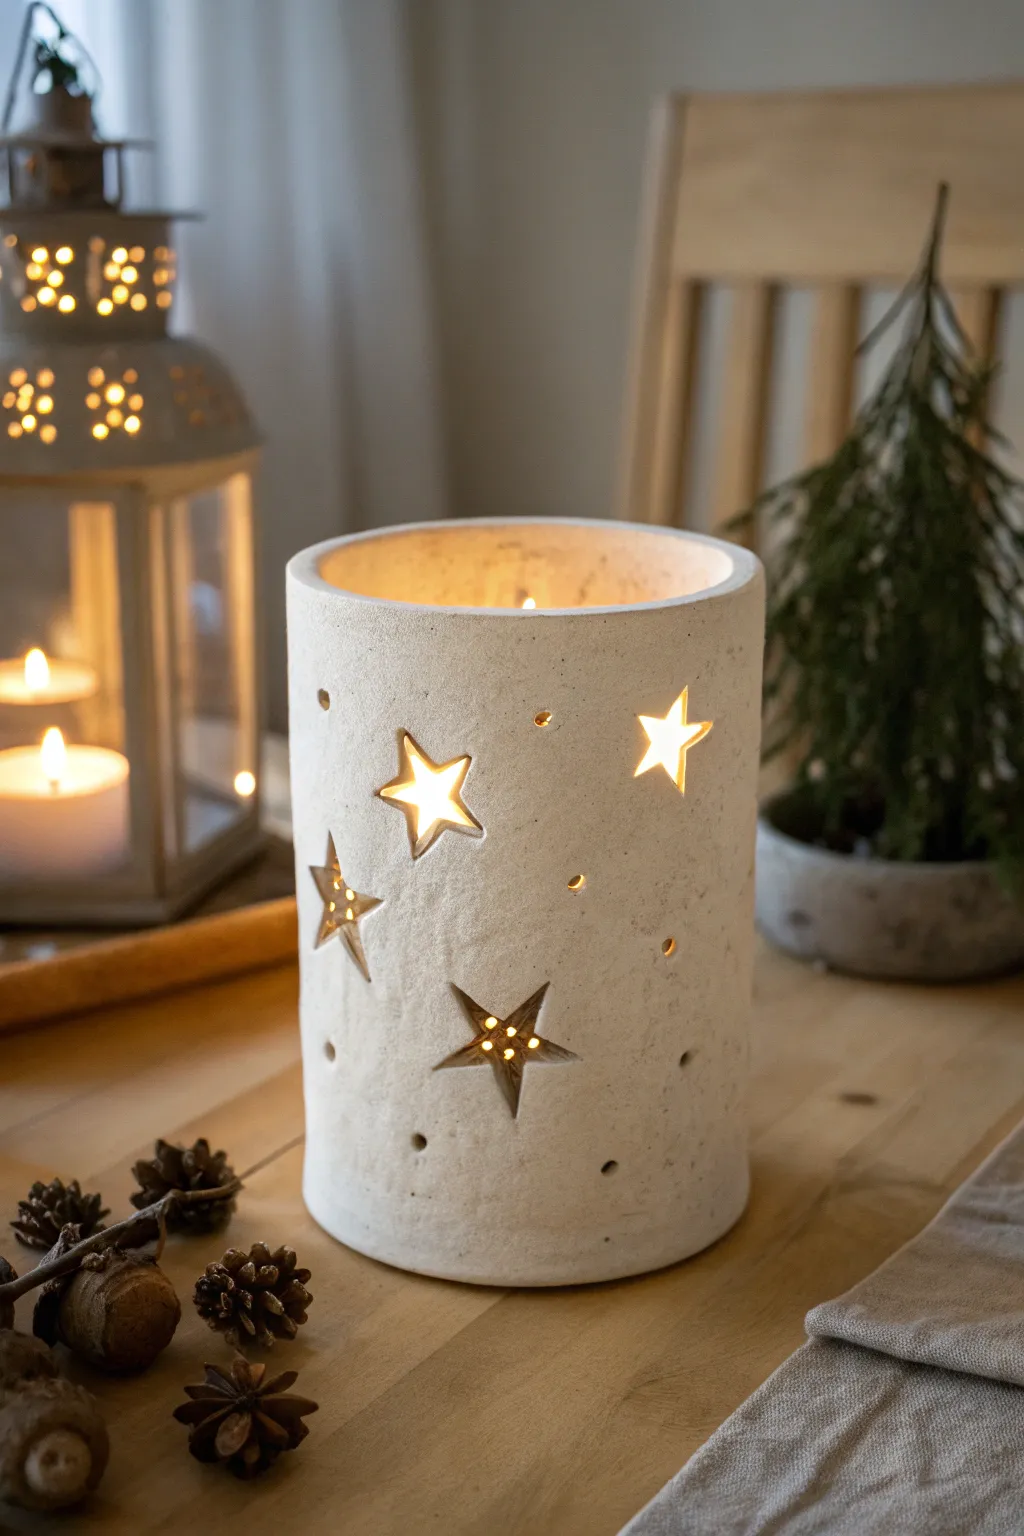
Pierced “Starry Night” Hole Pattern Lantern
Illuminate your evenings with a hand-built ceramic lantern that mimics a starry night sky. This project features delicate star-shaped cutouts and tiny pinholes that cast a warm, twinkling pattern when lit from within.
Step-by-Step Guide
Materials
- White or speckled stoneware clay
- Rolling pin
- Canvas mat or slab roller
- Cylindrical mold (or large PVC pipe)
- Small star-shaped cookie cutters (various sizes)
- Hole punch tool or drinking straw
- Needle tool
- Scoring tool (serrated rib)
- Slip (clay and water mixture)
- Sponge
- Paintbrush for smoothing
Step 1: Forming the Base Cylinder
-
Roll the Slab:
Begin by rolling out a generous slab of clay to an even thickness of about ¼ inch. Check that the slab is large enough to wrap completely around your chosen cylindrical mold with a little overlap. -
Cut to Size:
Measure the height you want for your lantern—the one in the photo looks to be about 8-10 inches tall. Use a ruler and needle tool to cut a clean rectangle from your slab. -
Wrap the Mold:
Carefully lift your clay slab and wrap it around your cylindrical form. I find it helpful to place a piece of newspaper between the mold and the clay to prevent sticking later. -
Join the Seam:
Where the clay edges meet, score both sides thoroughly with a serrated rib and apply slip. Press the edges firmly together to create a seamless bond. -
Smooth the Join:
Use a wooden rib or your fingers to smooth over the seam on both the outside and inside, making the connection disappear completely.
Pro Tip: Clean Cuts
Wait until the clay is ‘leather hard’ (stiff but cool/damp) before punching holes. If the clay is too soft, the lantern walls will collapse under the pressure of the cutter.
Step 2: Shaping the Dome
-
Dart the Top:
To create the rounded, domed top seen in the image, cut triangular notches (darts) around the top rim of your cylinder. Remove these wedges of clay. -
Fold and smooth:
Gently fold the remaining flaps inward until they touch. Score and slip these edges, then blend them together to form a curved shoulder. -
Create the Top Opening:
Leave a circular opening at the very center of the top for heat to escape, ensuring the rim is smooth and rounded. -
Refine the Shape:
With the basic form built, use a damp sponge to smooth out any fingerprints or tool marks, perfecting the gentle curve of the lantern’s silhouette.
Step 3: Creating the Starry Pattern
-
Plan the Design:
Before cutting, lightly mark where you want your larger stars to go. A random, scattered placement looks more organic and natural than a rigid grid. -
Punch the Stars:
Using small star-shaped cutters, press firmly into the leather-hard clay to remove the star shapes. Vary the sizes if you have multiple cutters. -
Add the Pinholes:
Fill the empty spaces between stars with small circular holes. A needle tool works for tiny points of light, while a hole punch tool creates slightly larger ‘planets’. -
Check the Rim:
Add a row of evenly spaced holes around the upper shoulder of the lantern to frame the design as shown in the example. -
Clean Up Edges:
Once the clay has stiffened slightly, go back with a small detail brush or sponge to smooth the sharp edges of every cutout. This prevents snagging later.
Troubleshooting: Warping
If your cylinder starts to oval or warp while drying, place it back over your mold form briefly to gently push it back into a perfect circle.
Step 4: Finishing
-
Dry Slowly:
Cover the lantern loosely with plastic to let it dry very slowly. This helps prevent the delicate cutouts from causing cracks as the clay shrinks. -
Bisque Fire:
Once bone dry, fire the piece to bisque temperature in a kiln. -
Glaze Application:
Dip or brush the lantern with a matte cream or white glaze. Be careful not to clog the small star holes with thick glaze. -
Clear the Holes:
Before the final firing, inspect all holes and prick through any glaze blockages with a needle tool to ensure the light will shine through clearly. -
Final Fire:
Fire the lantern a second time according to your clay and glaze specifications.
Place a tea light inside and enjoy the magical constellations dancing on your table


Botanical Leaf Cutout Garden Lantern
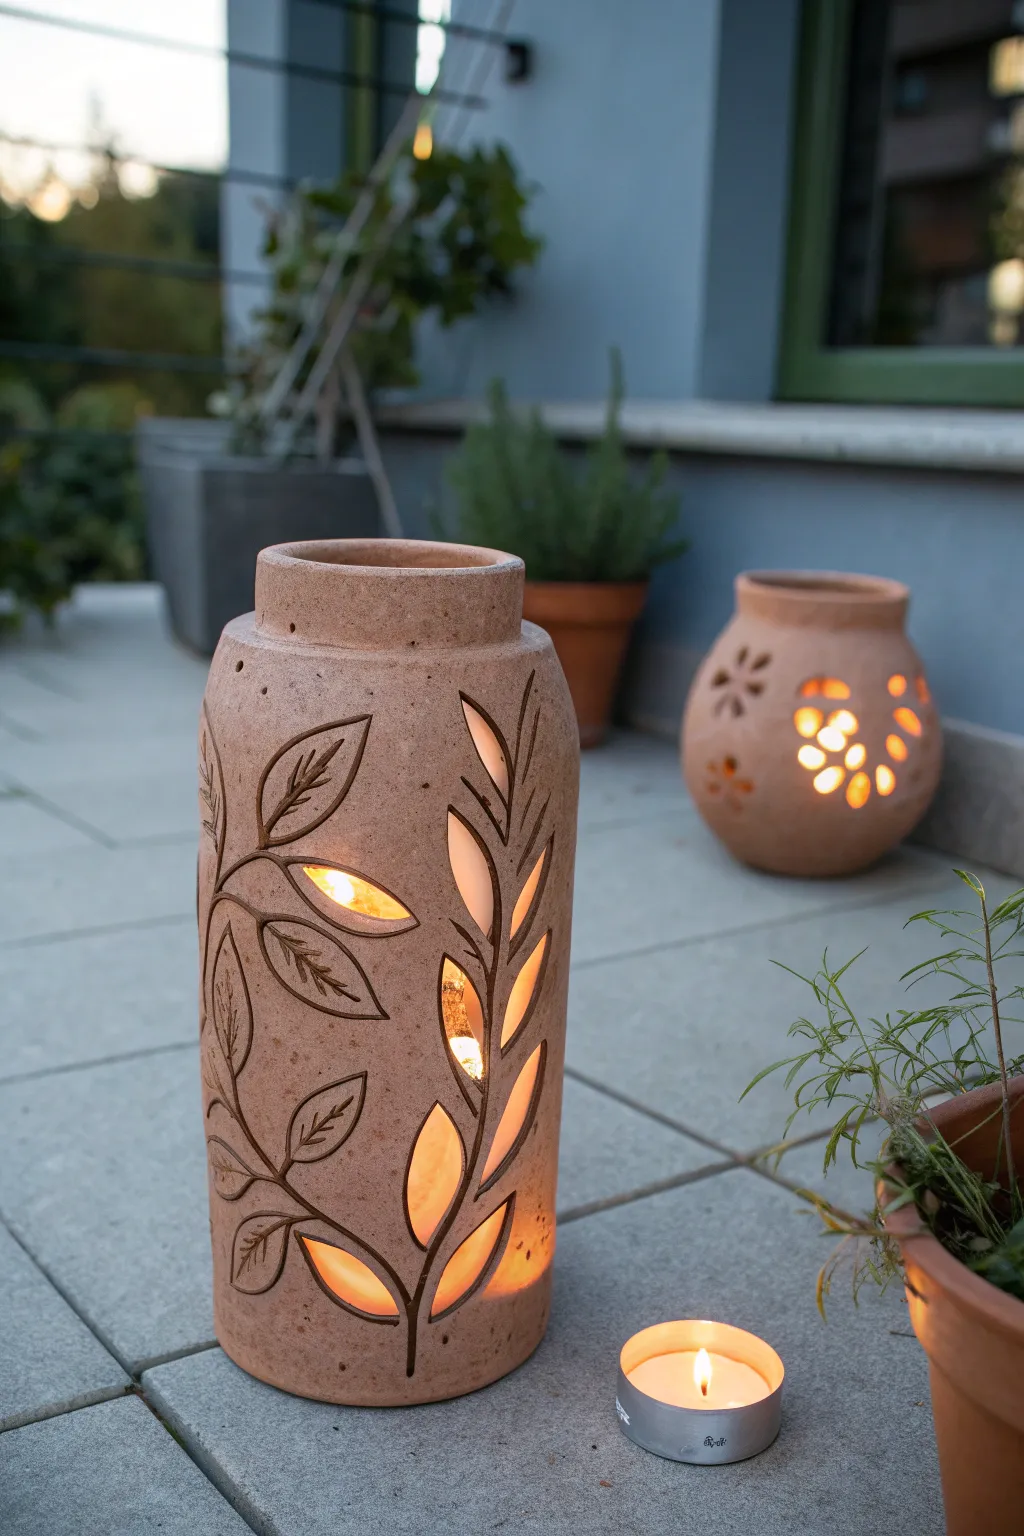
Bring the warmth of a garden evening to your patio with this handcrafted terracotta lantern featuring elegant botanical motifs. The clever combination of incised lines and negative space allows candlelight to flicker through leaf-shaped cutouts, casting dancing shadows around your outdoor space.
Step-by-Step Tutorial
Materials
- Terracotta pottery clay (grogged for strength)
- Cardboard mailing tube or PVC pipe (approx. 4-5 inch diameter) for forming
- Newsprint or paper
- Rolling pin and guide strips (3/8 inch thickness)
- Fettling knife
- Needle tool
- Loop tool or small carving tool
- Serrated rib or scoring tool
- Slip (clay mixed with water)
- Sponge
- Tea light or pillar candle for display
Step 1: Forming the Cylinder
-
Prepare the workspace:
Begin by cleaning your work surface and laying down a piece of canvas or heavy fabric to prevent the clay from sticking. Wedge your terracotta clay thoroughly to remove air bubbles and ensure an even consistency. -
Roll the slab:
Roll out a large slab of clay using guide strips to maintain an even thickness of about 3/8 of an inch. You want the slab to be tall enough for your lantern (about 10-12 inches) and wide enough to wrap around your forming tube. -
Wrap the form:
Wrap your cardboard tube or PVC pipe with a layer of newsprint; this prevents the clay from bonding to the mold. Lift the clay slab and gently wrap it around the tube. -
Create the seam:
Where the two ends of the clay meet, cut through both layers simultaneously with your fettling knife at a slight angle. This creates a perfect bevel joint. -
Join the cylinder:
Score both cut edges deeply with a serrated rib and apply a generous amount of slip. Press the edges together firmly to create a seamless bond. Smooth the seam inside and out with a rib tool so it becomes invisible.
Smooth Cutouts
When cutting out leaf shapes, wait until the clay is truly leather-hard. If you cut while it’s soft, the knife will drag and adhere, deforming the delicate leaf points.
Step 2: Shaping and Refining
-
Add the base:
Roll a smaller slab for the bottom. Place your cylinder on top of it, trace around it, cut the circle out, score and slip the contact points, and attach the base firmly to the cylinder walls. -
Form the shoulder:
While the clay is still on the tube (or just after removing it if it’s stiff enough), gently paddle the top inch of the cylinder inward to create a slightly rounded shoulder. -
Add the collar:
Roll a strip of clay about 1 inch tall. Attach this to the top of the rounded shoulder to form a distinct vertical rim or collar, smoothing the connection point well. -
Initial drying:
Allow the cylinder to dry to a ‘leather hard’ state. This is crucial—if creating cutouts while the clay is too wet, the walls will slump. The clay should be firm to the touch but still cold.
Slumping Walls?
If your cylinder starts to sag while working, stuff the interior with crumpled newspaper or plastic bags. This provides internal support while you carve the exterior.
Step 3: Carving the Design
-
Sketch the pattern:
Using a needle tool, very lightly sketch a trailing vine pattern up the side of the lantern. Draw large, simple leaf shapes attached to a central swirling stem. -
Define the vine:
Use a carving tool to deepen the lines of the main stem and the outlines of the leaves. I like to vary the line weight here to make the plant look more organic. -
Incise leaf details:
For some of the leaves, do not cut all the way through. Instead, use a loop tool to carve out the veins and texture deeply into the surface, leaving a thin background layer of clay. -
Cut the light windows:
Select specific leaves to be the ‘windows’ for the light. Using a sharp fettling knife, carefully cut these leaf shapes completely out of the wall. Smooth the cut edges with a damp sponge or finger to remove sharp burrs. -
Add ventilation:
Use a small hole punch or drill tool to create several small vent holes around the upper collar. This helps heat escape when a candle is burning inside.
Step 4: Finishing
-
Texture the surface:
To mimic the rustic look in the photo, gently dab the exterior surface with a coarse sponge or a crumpled ball of aluminum foil to give it a stone-like texture, avoiding your carved designs. -
Slow drying:
Cover the lantern loosely with plastic and let it dry very slowly over several days to prevent warping or cracking at the seam. -
Bisque fire:
Once bone dry, fire the piece in a kiln to bisque temperature (usually cone 04). Since this is a garden lantern, you can choose to leave it unglazed for a natural terracotta look. -
Surface finish (optional):
If you want the speckled look shown, you can splatter a small amount of dark iron oxide wash onto the surface before firing, or use a clay body that contains grog or speckles naturally.
Place a tea light inside your finished vessel and watch the leaves glow warm against the twilight.

The Complete Guide to Pottery Troubleshooting
Uncover the most common ceramic mistakes—from cracking clay to failed glazes—and learn how to fix them fast.
Floral Lace-Inspired Cutout Lantern
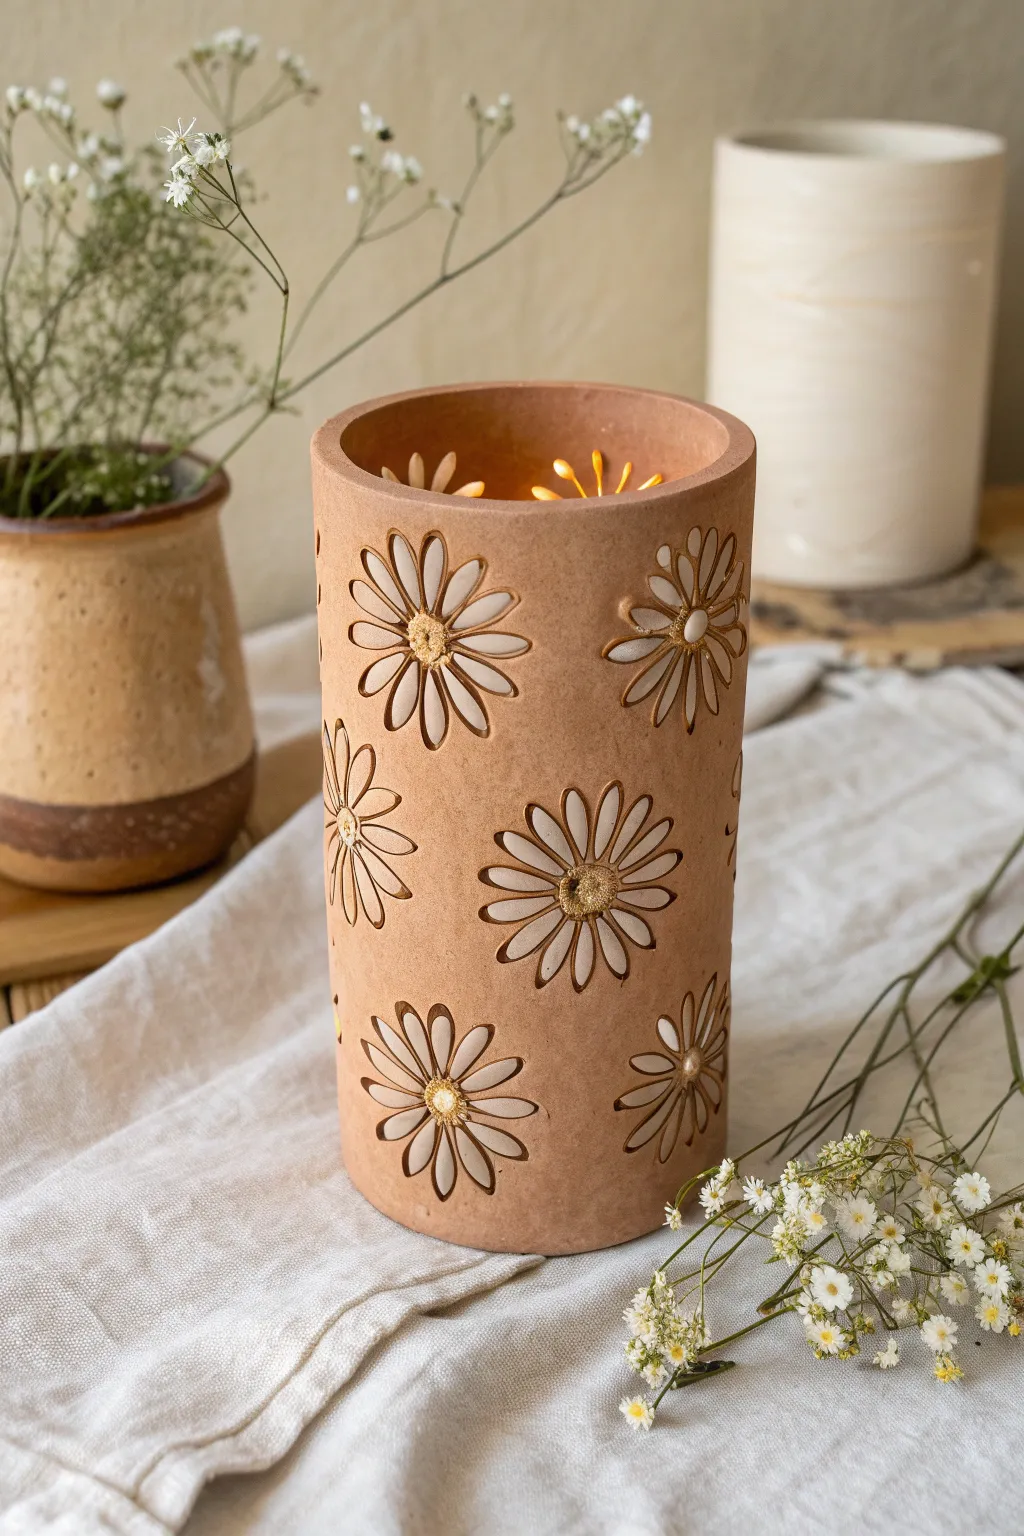
Bring the warmth of a summer garden indoors with this charming cylindrical lantern, featuring delicate daisy cutouts that cast playful shadows when lit. The natural terracotta tone gives it an earthy, rustic appeal perfect for cozy evenings.
Step-by-Step
Materials
- Terracotta-colored air-dry clay (or polymer clay)
- Rolling pin
- Cylindrical form (glass jar or cardboard tube)
- Parchment paper
- Daisy-shaped cookie cutters (small and medium)
- X-acto knife or craft scalpel
- Modelling tools (ball stylus)
- Small sponge
- Sandpaper (fine grit)
- Clear matte varnish (optional)
- Tea light candle (battery-operated recommended)
Step 1: Preparing the Clay Cylinder
-
Prepare your workspace:
Lay down a sheet of parchment paper on a flat surface to prevent sticking. This will make it much easier to lift your delicate clay later. -
Roll the clay slab:
Take a large chunk of terracotta clay and knead it until soft. Roll it out into a long rectangular slab, aiming for a consistent thickness of about 1/4 inch (6mm). -
Measure the circumference:
Take your cylindrical form (like a large glass jar) and wrap a piece of string around it to find the circumference. Add about half an inch for the overlap seam. -
Cut the rectangle:
Using the measurements from your form, trim your clay slab into a clean rectangle using a ruler and craft knife. Keep the excess clay wrapped so it doesn’t dry out. -
Wrap the form:
Wrap your parchment paper around the cylindrical form first. Then, carefully lift the clay slab and wrap it around the form. The parchment prevents the clay from fusing to the jar.
Clean Cuts Hack
Cover the clay area with a thin sheet of plastic wrap before pressing your cutters down. This creates beautifully rounded edges on your petals and prevents sticking.
Step 2: Creating the Daisy Patterns
-
Join the seam:
Where the two ends of the clay meet, score the edges with a tool and add a tiny bit of water (or slip) to join them. Smooth the seam with your finger or a modelling tool until it’s invisible. -
Plan your placement:
Lightly press your daisy cutters into the surface of the clay just to mark where you want the flowers to go. Stagger them randomly for a natural, wildflower look. -
Cut the petals:
Press the cutters firmly through the clay to remove the flower shapes. If the clay is sticky, I find it helps to let it firm up for about 15 minutes before cutting. -
Refine the edges:
Use your craft knife to gently lift out the cut clay pieces. If the edges are ragged, smooth them carefully with a slightly damp brush or your fingertip. -
Detailing the centers:
Take small pinches of fresh clay and roll them into tiny balls. Press these into the center of each flower cutout. They should bridge the gap, holding the shape together while leaving space for light. -
Add texture:
Use a ball stylus tool to stipple the center dots, giving them that fuzzy, pollen-like texture seen in real daisies. -
Carve petal details:
With a needle tool or knife, gently score lines into the clay surrounding the cutouts to emphasize the petal shapes, adding definition to the negative space.
Sagging Walls?
If the clay slumps while working, it’s too soft. Leave it exposed to air for 20 minutes to firm up (leather hard stage), then continue cutting.
Step 3: Finishing Touches
-
Initial drying phase:
Let the lantern dry on the form for at least 12-24 hours. Drying it upright ensures it keeps its perfect cylindrical shape. -
Remove the form:
Once the clay is leather-hard (firm but not fully dry), carefully slide the cylinder form and parchment paper out from the center. -
Smooth the interior:
Now that the inside is accessible, smooth out any rough bits on the interior seam or around the flower cutouts. -
Full cure:
Allow the clay to dry completely for another 24-48 hours. The color will lighten as moisture leaves the clay. -
Sanding:
Gently sand the top rim and bottom edge to ensure they are perfectly flat and smooth. Wipe away any dust with a slightly damp sponge. -
Seal (Optional):
For durability, apply a coat of matte varnish. This deepens the terracotta color slightly and protects the surface.
Place a flickering battery tea light inside and enjoy the botanical patterns dancing on your walls
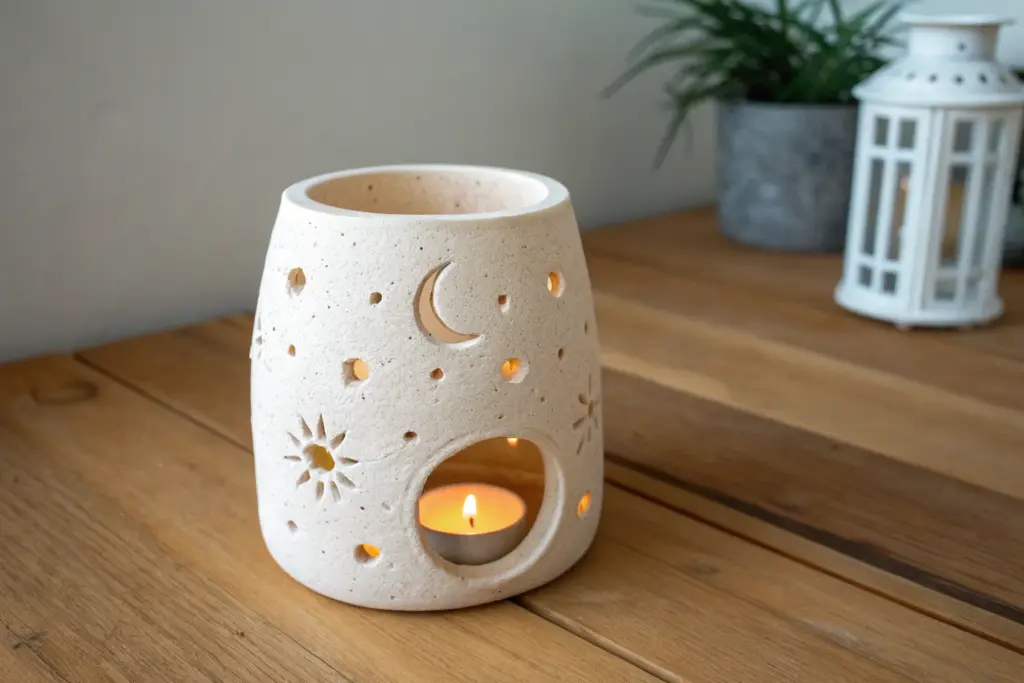
Moon And Sun Motif Clay Lantern
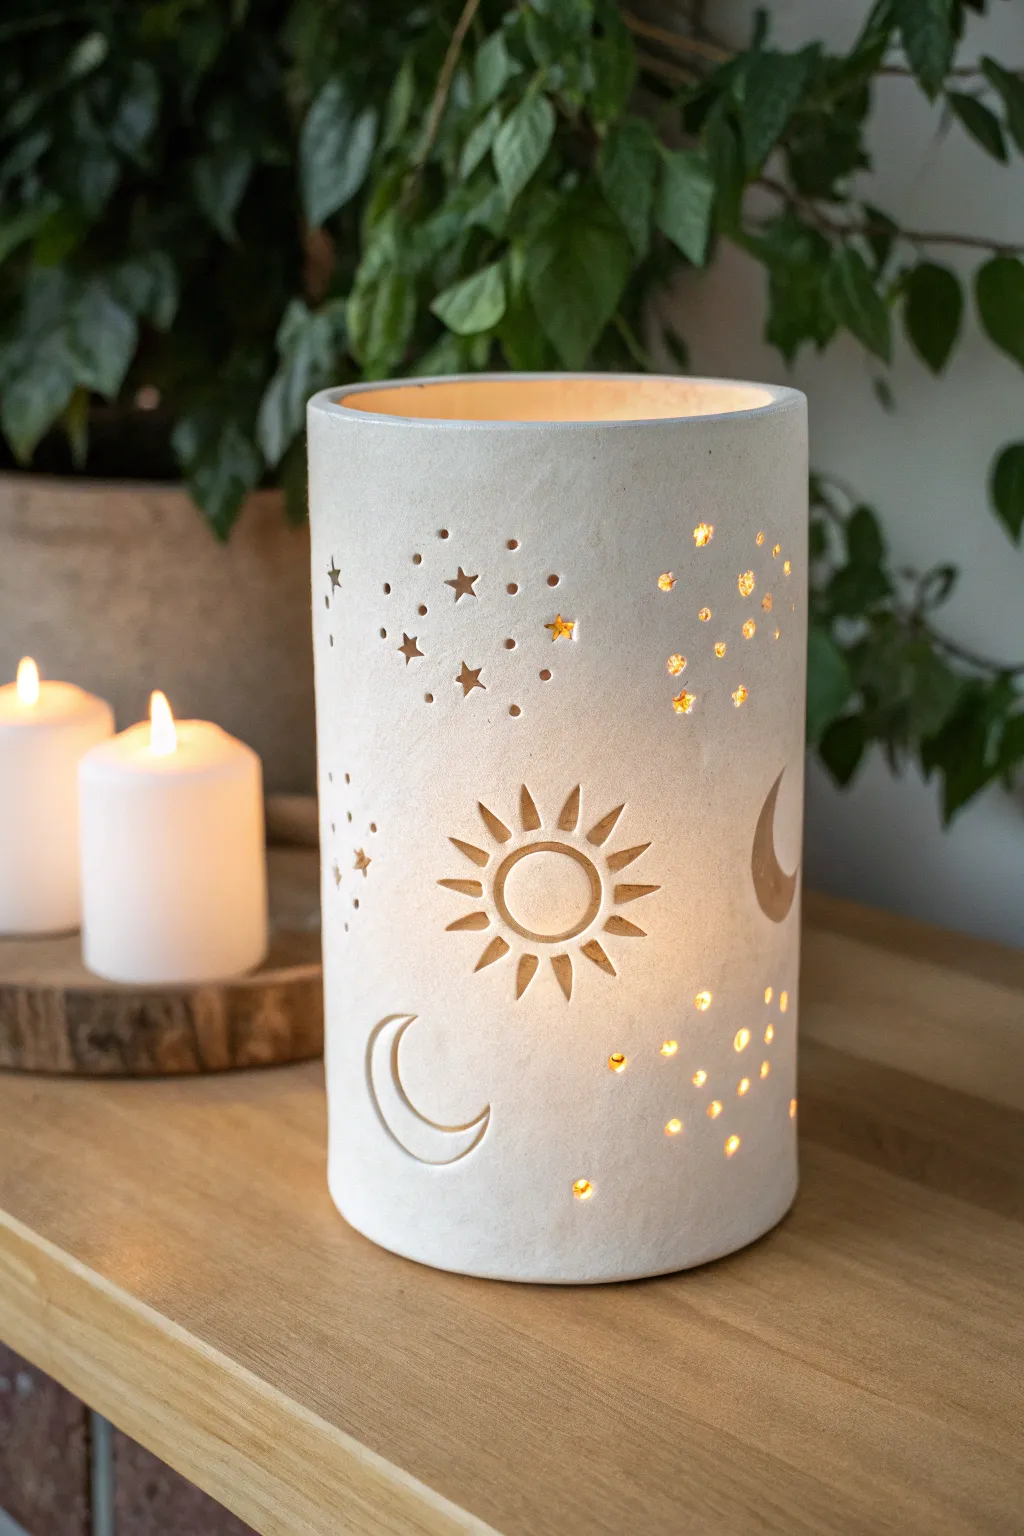
Bring the magic of the night sky into your home with this stunning cylindrical lantern featuring hand-carved celestial motifs. The warm glow of a candle flickers through star-shaped punctures and crescent moon cutouts, casting playful shadows while highlighting the textured beauty of unglazed clay.
Step-by-Step Guide
Materials
- White stoneware or porcelain clay
- Rolling pin
- Two long wooden guide strips (approx. 1/4 inch thick)
- Canvas mat or cloth work surface
- Cylindrical form (e.g., a sturdy cardboard tube or PVC pipe wrapped in newspaper)
- Needle tool
- Fettling knife
- Small star-shaped clay cutters (optional but helpful)
- Scoring tool (or serrated rib)
- Slip (clay mixed with water)
- Sponge
- Drill bit or small hole punch tool
- Loop tool for carving
Step 1: Forming the Cylinder
-
Prepare the slab:
Begin by wedging your white clay to remove air bubbles. Place it on your canvas mat between two wooden guide strips. Roll the clay out into a long rectangle, ensuring the thickness is uniform across the entire slab to prevent warping later. -
Measure and cut:
Determine the circumference of your cylinder mold. Add about half an inch for the overlap seam. Using a ruler and fettling knife, cut a clean rectangle from your slab that matches these dimensions. -
Wrap the form:
Stand your cardboard tube or PVC pipe upright. Carefully lift the clay slab and wrap it around the form. It helps to have the form wrapped in newspaper first so the clay doesn’t stick permanently. -
Join the seam:
Where the two ends of the clay meet, score both edges aggressively with your scoring tool and apply a generous amount of slip. Press the edges together firmly. -
Blend the join:
Use a wooden modeling tool or your thumb to smudge the clay across the seam line, both on the inside and outside, until the join is invisible. Smooth the area with a damp sponge. -
Create the base:
Roll out a small separate piece of clay for the floor of the lantern. Place your cylinder (still on the mold) onto this clay and trace around it with a needle tool. Score and slip the bottom edge of the cylinder and the new base circle, then attach them securely.
Clean Cuts Pro-Tip
Wait until the clay is ‘leather hard’ (firm but cool to the touch) before cutting. If you cut while it’s too wet, the walls will deform.
Step 2: Designing the Cosmos
-
Plan your sky:
Lightly sketch your design directly onto the leather-hard clay using a needle tool. I find it helpful to mark the four ‘sides’ first to ensure the sun, moons, and star clusters are evenly distributed around the circumference. -
Carve the sun:
For the central sun motif, use a loop tool to gently carve out the circle and the surrounding rays. Don’t cut all the way through yet; instead, carve halfway into the clay wall to create a relief effect, or cut through completely for maximum light—the image shows a mix of deep carving and full cutouts. -
Add the moons:
Carve the crescent moon shapes. You can create a nice bevel on the edge of the moon cutouts by angling your knife slightly, which catches the light beautifully. -
Punch the stars:
For the star clusters, use a small hole punch tool or a drill bit twisted by hand to create tiny circular constellations. If you have tiny star-shaped cutters, press them through for the larger stars. -
Refine the edges:
Once the clay has stiffened slightly more, go back to every cutout and smooth the sharp edges with a damp brush or sponge. This prevents the glaze or finish from feeling jagged later. -
Dry slowly:
Cover the lantern loosely with plastic to let it dry very slowly. This is crucial for cylindrical forms to prevent the seam from cracking open.
Step 3: Firing and Finishing
-
Bisque fire:
Once bone dry, fire the piece to bisque temperature (usually Cone 04). This hardens the clay and prepares it for the final steps. -
Sand for texture:
To achieve the matte, stone-like texture seen in the photo, sand the exterior lightly after bisque firing. Wear a respirator mask for this step. -
Final fire:
Fire the lantern to the maturity temperature of your specific clay body. For this project, leaving the clay unglazed on the outside preserves that crisp, natural white stone look. -
Sand the base:
After the final firing, use sandpaper to smooth the bottom of the lantern so it sits perfectly flat and won’t scratch your furniture.
Level Up: Color Wash
Before the final firing, apply a wash of diluted black underglaze into the carved lines, then wipe the surface clean with a sponge to make the sun and moon details pop.
Place a pillar candle inside and watch your personal galaxy illuminate the room.


What Really Happens Inside the Kiln
Learn how time and temperature work together inside the kiln to transform clay into durable ceramic.
Open-Top Clay Lantern Bowl With Cutout Rim
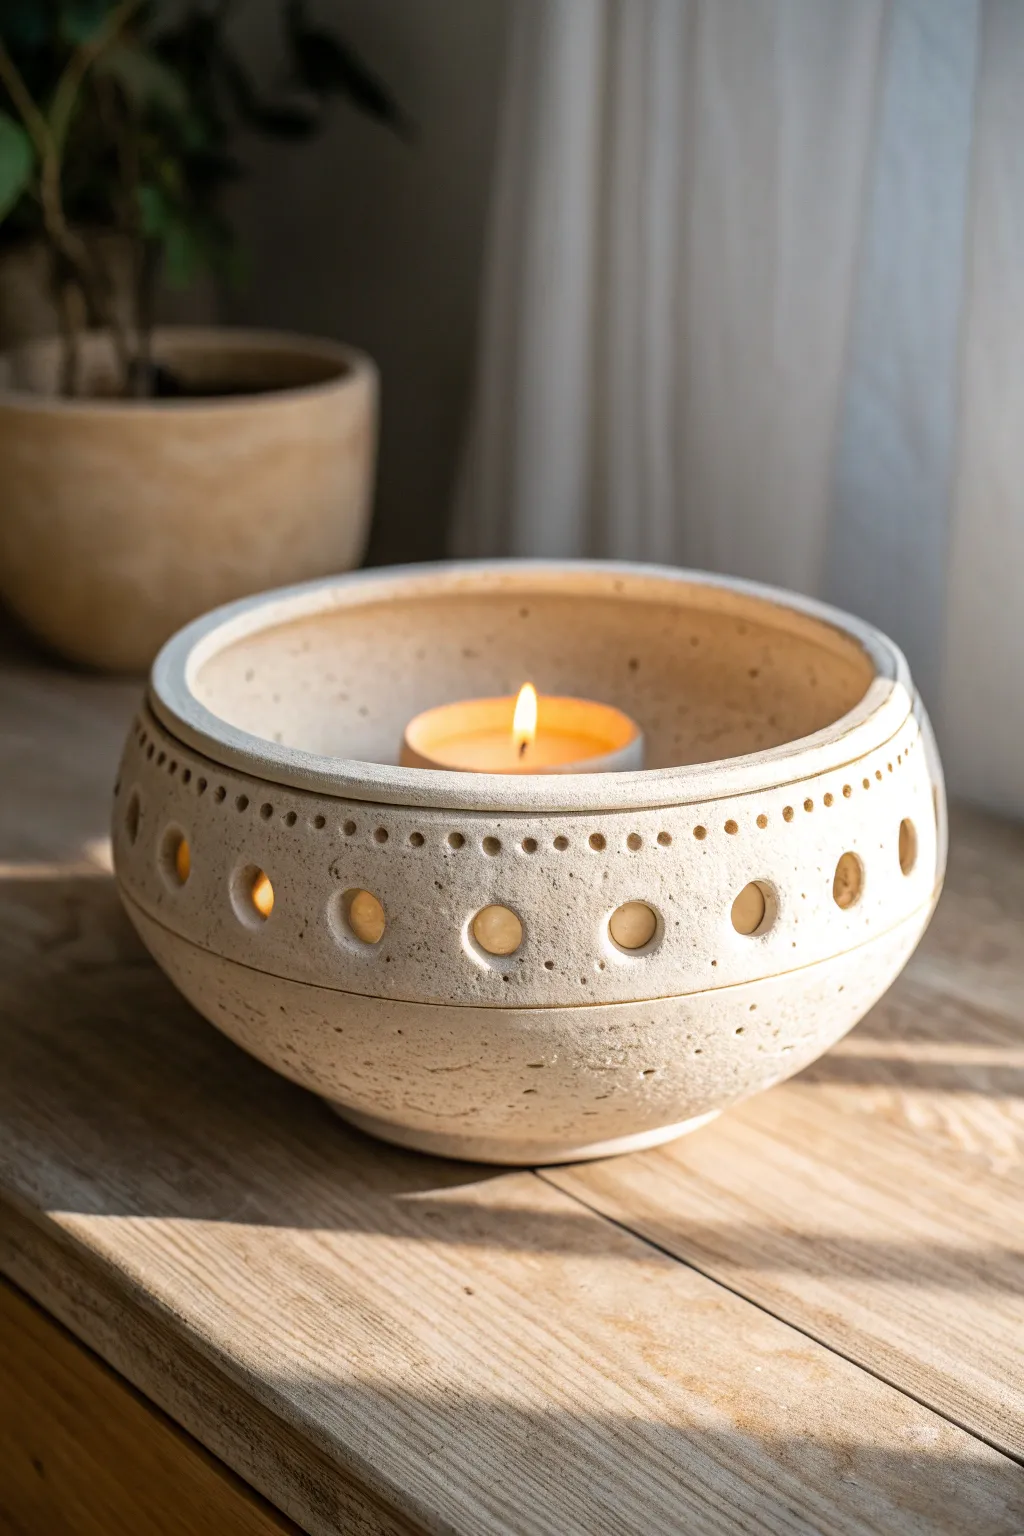
This project features a serene, earthy lantern bowl that combines a modern silhouette with traditional piercing techniques. The wide, open rim allows for easy candle placement, while the delicate circular cutouts cast a warm, playful glow on your table.
Step-by-Step
Materials
- Stoneware clay with grog (for the speckled texture)
- Rolling pin
- 2 wooden guide strips (approx. 1/4 inch thick)
- Large plaster or bisque mold (bowl shape)
- Fettling knife
- Metal rib tool
- Sponge
- Hole cutters (various sizes: roughly 1/2 inch and 1/8 inch)
- Slip and scoring tool
- Matte cream or transparent glaze
Step 1: Forming the Base Bowl
-
Roll the Slab:
Start by wedging your clay thoroughly to remove air bubbles. Place the clay between two wooden guide strips and roll it out into a smooth, even slab about 1/4 inch thick. I find turning the clay periodically prevents it from sticking to the surface. -
Cut the Circle:
Using a needle tool, cut a large circle from your slab. The size should be slightly larger than your slump or hump mold to account for the depth of the curve. -
Shape the Bowl:
Gently drape your clay circle over a hump mold (or press it into a slump mold). Use a damp sponge to smooth the clay against the form, starting from the center and working outward to eliminate air pockets. -
Define the Rim:
Once the clay is in the mold, trim the excess clay around the rim with a fettling knife to create an even, level edge. Run a wet finger or a piece of chamois leather around this rim to round it off smoothly. -
Add Texture:
While the clay is still leather-hard on the mold, gently dab surface imperfections or use a stiff brush to enhance the natural, stony texture if your clay body isn’t naturally grogged.
Warped Rim?
If your upper rim goes oval while drying, place a lightweight circular object (like a rigid plastic lid) gently on top to hold the shape while it firms up to leather hard.
Step 2: Creating the Upper Rim
-
Prepare the Upper Strip:
Roll out a second strip of clay of the same thickness. This long rectangular strip needs to be long enough to encircle the diameter of your bowl. -
Attach the Rim:
Score the top edge of your bowl and one edge of your new clay strip. Apply slip generously. Attach the strip to the bowl’s rim, creating a vertical ‘collar’ or wall that stands up straight. -
Blend the Seams:
Use a modeling tool to blend the seam where the strip meets the bowl, both on the inside and outside. Smooth it further with a metal rib so the transition looks seamless, like it was thrown on a wheel. -
Refine the Top Lip:
Trim the top of this new wall so it is perfectly level. You can add a very small, thin coil to the very top edge to create the slight overhang or ‘lip’ seen in the reference photo, then smooth it down.
Try Colored Light
Glaze the interior with a metallic gold or copper luster. When the candle is lit, the inner reflection will make your lantern glow with a much warmer, richer light.
Step 3: Carving and Finishing
-
Mark Cutout Placements:
Wait until the clay is leather-hard—firm enough to hold shape but soft enough to cut. Lightly mark evenly spaced positions for your main circle cutouts around the center of the vertical rim. -
Cut the Large Circles:
Using a circular hole cutter (about 1/2 inch to 3/4 inch diameter), punch out the main row of decorative holes. Support the wall from the inside with your hand to prevent the pressure from deforming the bowl. -
Add Small Details:
Use a much smaller hole cutter or a drill bit tool to create the row of tiny dots just below the top lip. Keep the spacing consistent with the larger holes below for a rhythmic pattern. -
Create the Lower Groove:
Use a carving tool with a loop tip to carve a subtle horizontal groove just below the large circles. This visual line separates the pierced rim from the solid bowl base. -
Clean Up Edges:
Once the clay dries a bit more, use a dry sponge or a soft brush to clean up any burrs or sharp crumbs of clay left inside the cutout holes. -
Dry and Fire:
Allow the piece to dry slowly under loose plastic to prevent the rim from warping. Bisque fire according to your clay’s specifications. -
Glaze Application:
Apply a matte, creamy beige glaze. Consider wiping the glaze back slightly with a sponge if you want the natural speckles of the clay to show through more prominently.
Enjoy the gentle ambiance this handmade piece brings to your evenings
Lidded Clay Lantern With Chimney Vents
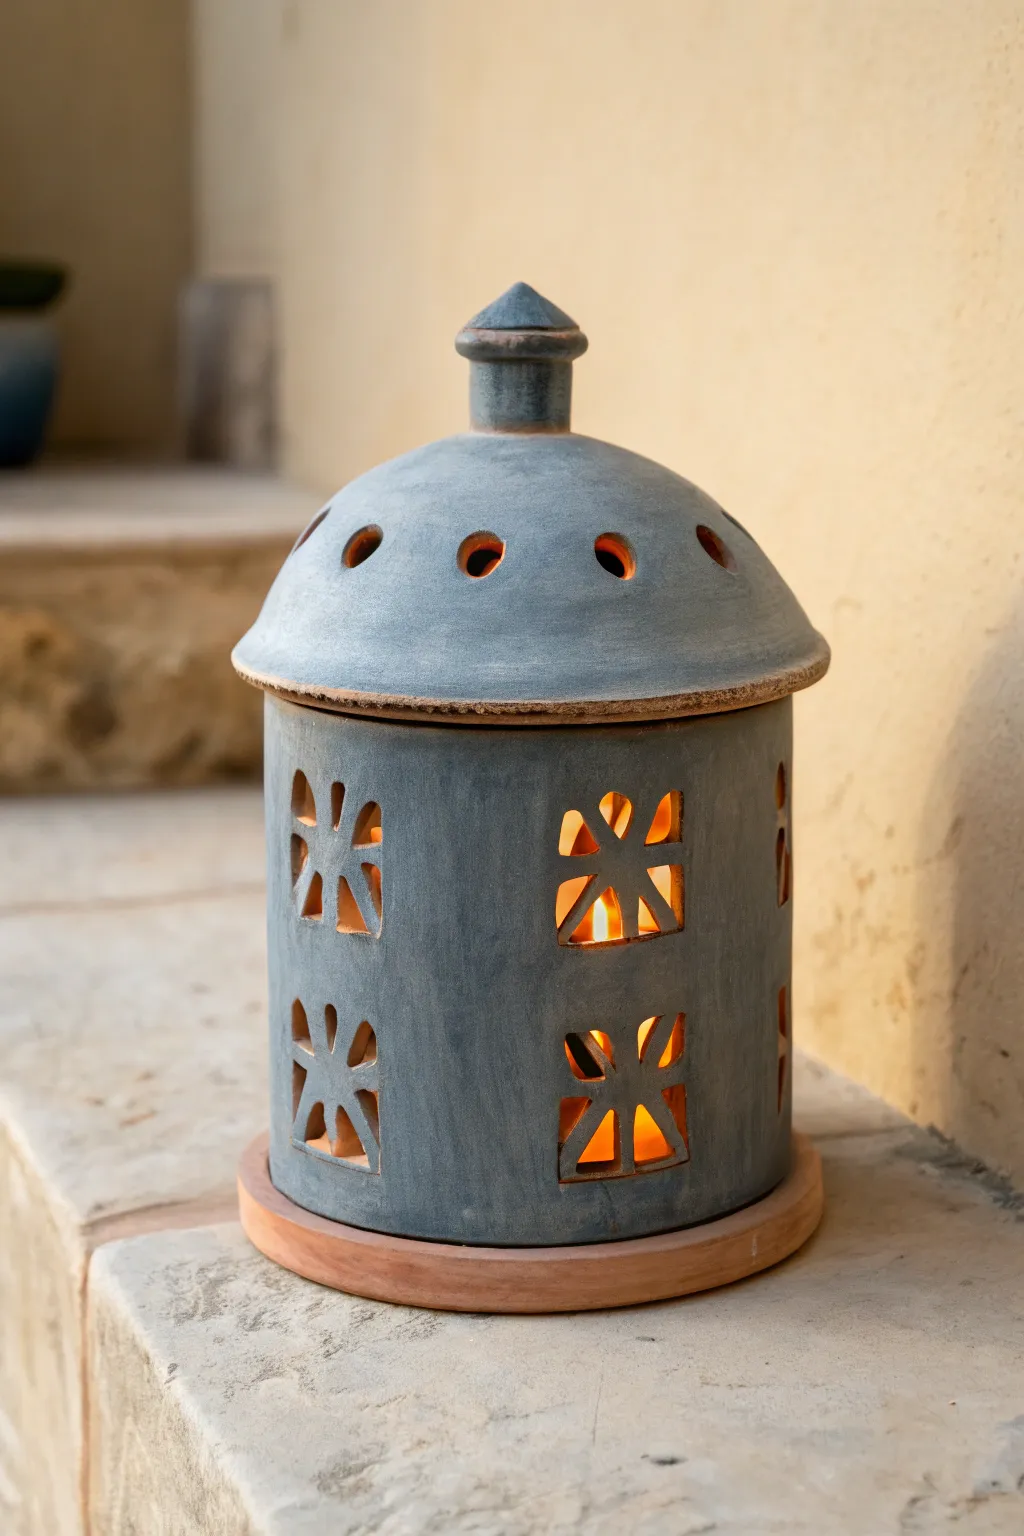
This charming two-piece lantern features a cylindrical body with intricate geometric cutouts and a matching domed lid, glazed in a soft slate blue that contrasts beautifully with the exposed terracotta edges. Whether sitting on a patio step or a mantel, the warm candlelight glows invitingly through the unique window designs.
Step-by-Step Tutorial
Materials
- Earthenware clay (terracotta or cone 04 stoneware)
- Circular rolling pin and guide strips (1/4 inch)
- Cylindrical form for draping/slumping (like a large can or PVC pipe)
- Pottery knife or fettling knife
- Kemper cutout tool or small sharp blade window cutter
- Small circular hole cutter (approx 1/2 inch)
- Scoring tool and slip
- Sponge and bucket of water
- Slate blue brush-on glaze
- Wax resist
- Kiln
Step 1: Forming the Body
-
Roll the slab:
Begin by rolling out a consistent slab of clay about 1/4 inch thick. Use guide strips to ensure the thickness is even across the entire surface so your walls stand straight. -
Cut the rectangle:
Measure the circumference of your cylindrical mold. Cut a rectangle from your slab that matches this length plus a tiny overlap, and is the desired height of your lantern. -
Form the cylinder:
Wrap the clay rectangle around your mold. Score and slip the vertical seam thoroughly, pressing the edges together firmly to create a strong join. -
Smooth the seam:
Use a rib or your fingers to smooth the join inside and out until the seam is invisible. Let the cylinder stiffen slightly on the form before sliding it off to stand on its own.
Step 2: Creating the Lid and Base
-
Form the lid dome:
Roll another slab and drape it over a convex form like a bowl or a specialized hump mold to create a gentle dome shape. -
Trim the lid:
Once the clay is leather hard, trim the rim of the dome so it is just slightly wider than your cylinder body, creating a nice overhang. -
Add the chimney knob:
Throw or hand-build a small, hollow knob shape. Attach this securely to the absolute center of your dome using the score-and-slip method. -
Make the base:
Roll a final small slab and cut a circle slightly larger than the cylinder’s footprint. This will serve as the separate saucer shown in the project. -
Raise the rim:
Gently curve the outer edge of this base slab upward to create a shallow lip, which will catch any potential wax drips.
Slumping Issues?
If the dome lid collapses while drying, leave it on the mold longer until truly leather hard. Don’t rush removing the support.
Step 3: Carving and Detailing
-
Plan the windows:
Lightly sketch your grid pattern onto the leather-hard cylinder. This design uses two rows of rectangular windows, aligned vertically. -
Cut main squares:
Cut out the main rectangular or square windows first. Keep the edges sharp and clean. -
Add geometric details:
Within each window space, leave clay bridges or add small triangular inserts to create the ‘starburst’ or cross-hatch effect seen in the reference. -
Vent the lid:
Using your small circular hole cutter, punch a ring of holes around the upper part of the lid dome. This is crucial for airflow so the candle stays lit. -
Refine edges:
Once all cutting is done, use a damp sponge to smooth every cut edge. Sharp, jagged clay can be dangerous after firing.
Shadow Play
Experiment with the angle of your cuts. Beveling the window edges inward allows more light to escape and casts larger shadows.
Step 4: Glazing and Finishing
-
Bisque fire:
Slowly dry the piece to prevent warping, then load it into the kiln for a bisque firing. -
Apply wax resist:
Before glazing, carefully paint wax resist on the very bottom rim of the cylinder, the rim of the lid, and the top edge of the base saucer to keep the raw clay look. -
Glaze application:
Brush 2-3 coats of slate blue glaze onto the body and lid exterior. I prefer leaving the interior unglazed or coated with a clear liner glaze to reflect more light. -
Wipe back edges:
If you want that distressed look, take a damp sponge and gently wipe the glaze off the raised edges of the knob and the rim of the lid. -
Final fire:
Fire the piece to the glaze maturity temperature.
Place a tea light or small pillar candle inside and enjoy the warm atmosphere your new lantern creates

TRACK YOUR CERAMIC JOURNEY
Capture glaze tests, firing details, and creative progress—all in one simple printable. Make your projects easier to repeat and improve.
Orb Lantern Made From Two Joined Pinch Pots
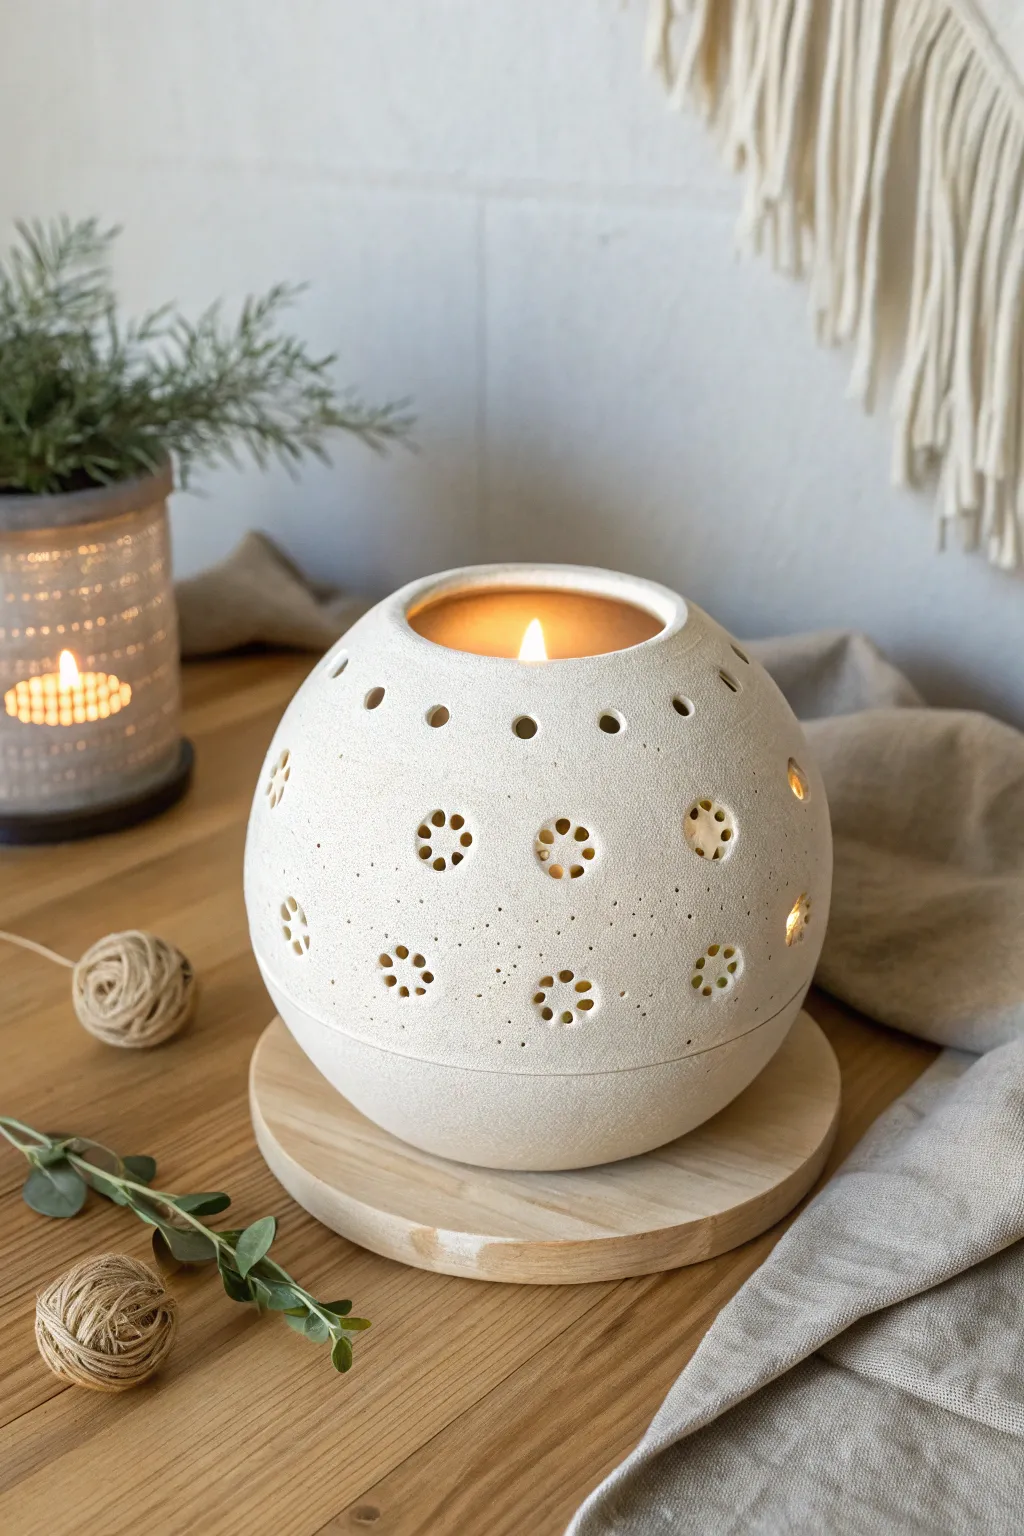
Create a stunning, minimalist centerpiece by joining two simple pinch pots into a perfect sphere. This speckled white clay lantern features delicate cutout patterns that cast a warm, inviting glow when lit from within.
Step-by-Step Guide
Materials
- White speckled stoneware clay (or air-dry clay)
- Small bowl of water
- Serrated rib tool or fork (for scoring)
- Wooden sculpting tool
- Pin tool or needle tool
- Hole cutters or small straw (various sizes)
- Sponge
- Sanding block or fine-grit sandpaper
- Rolling pin (optional)
- Round light-colored wooden disk (for the base)
Step 1: Forming the Sphere
-
Prepare your clay balls:
Start by dividing your clay into two equal-sized lumps. Roll each lump vigorously between your palms or on a table to create two smooth, dense spheres about the size of a large orange. -
Create the first pinch pot:
Hold one sphere in your non-dominant hand. Press your thumb into the center, stopping before you push through the bottom. Gently pinch and rotate the clay between your thumb and fingers to open up the bowl, aiming for an even wall thickness of about 1/4 inch. -
Form the second pot:
Repeat the process with the second sphere. Ideally, the rim diameter of this second pot should match the first one exactly so they fit together seamlessly. -
Score the rims:
Using a serrated rib or a fork, rough up the rims of both pinch pots. Criss-cross your scoring marks to create a good texture for bonding. -
Slip and join:
Dab a little water (or clay slip) onto the scored edges. Place one pot upside down on top of the other, aligning the rims carefully. Push them gently together to secure the bond. -
Seal the seam:
With a wooden tool or your thumb, drag clay from the top pot down across the seam to the bottom pot, then drag clay up from the bottom. Do this all the way around until the seam is fully covered. -
Smooth the surface:
Use a damp sponge or a flexible rib to smooth out the seam area and reshape the sphere if it got slightly flattened. Tapping it gently with the wooden paddle can helps round out any lumpy spots.
Uneven Seams?
If the seam where the two pots join keeps cracking open, roll a very thin coil of wet clay, press it into the crack, and smooth it thoroughly with a rib tool.
Step 2: Carving and Finishing
-
Cut the candle opening:
Decide which side will be the top. Use a needle tool to trace a large circle at the very top, large enough for a tea light or votive to pass through easily. Cut this circle out and smooth the raw edge with a damp finger. -
Refine the surface:
Let the sphere dry until it reaches a ‘leather hard’ state—firm to the touch but still carveable. At this stage, I like to give it one final smoothing with a very lightly damp sponge to remove fingerprints. -
Plan the pattern:
Lightly sketch your design onto the clay surface using a pencil. For the look in the photo, plan for a ring of single dots near the top, and larger rosette clusters around the middle. -
Punch the vent holes:
Using a small circular hole cutter or a sturdy straw, punch out the single holes around the upper shoulder of the sphere. Twist the tool as you pull it out to remove the clay plug cleanly. -
Create the flower clusters:
For the larger main pattern, punch a central hole, then punch five or six holes closely surrounding it to create a flower shape. Repeat this pattern around the circumference of the orb. -
Create the base connection:
To ensure the orb sits flat on the wooden coaster later, gently flatten the very bottom of the sphere by pressing it onto your work surface. -
Final cleanup:
Once the clay is bone dry, use fine sandpaper to gently rub away any sharp burrs left from the hole punching. Be gentle, as bone dry clay is brittle. -
Bisque fire:
If using ceramic clay, fire the piece in a kiln to bisque temperature. If using air-dry clay, simply let it cure completely according to the package instructions. -
Glazing (Optional):
For the matte, stone-like finish shown, you might choose to leave the exterior unglazed (raw clay) and only glaze the interior with a clear glaze to reflect light. If glazing, fire the piece a second time. -
Assemble the lamp:
Place your finished ceramic orb onto the wooden disk base. Insert a small LED votive or tea light carefully through the top opening.
Level Up: Texture
Before cutting holes, gently press a piece of coarse linen or burlap onto the damp clay surface to imprint a subtle fabric texture that catches the candlelight.
Light your lantern and enjoy the gentle patterns dancing on your walls
Pagoda-Inspired Tiered Roof Clay Lantern
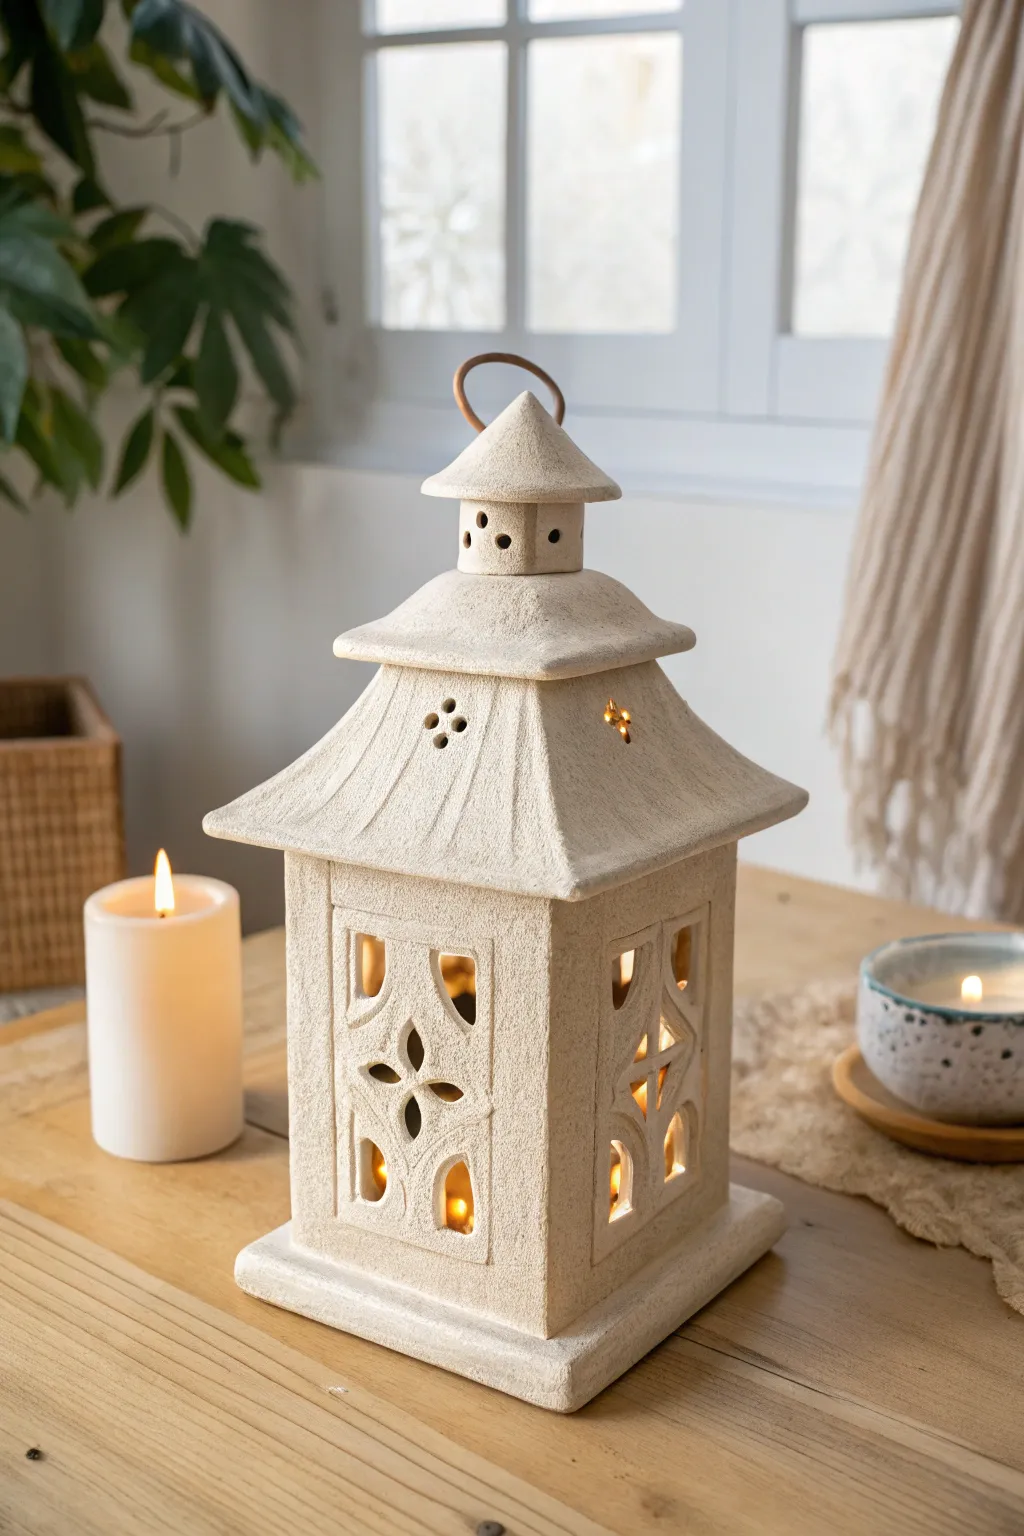
Bring serene architectural lines to your living space with this pagoda-style clay lantern featuring a multi-tiered roof and intricate lattice windows. The textured, sandy finish gives it an ancient, weathered stone appearance that glows beautifully when illuminated from within.
Step-by-Step
Materials
- Grogged stoneware clay or textured pottery clay
- Rolling pin
- Guide strips (1/4 inch thick)
- Ruler and square
- Fettling knife or craft knife
- Score and slip tool (needle tool or serrated rib)
- Slip (clay slurry)
- Clay hole cutters (small circles)
- Small geometric clay cutters (optional, for lattice)
- Sponge
- Copper wire (for handle)
- Wooden sculpting tools
Step 1: Constructing the Main Body
-
Roll the Slabs:
Start by rolling out a generous amount of clay into a large slab, using your 1/4 inch guide strips to ensure even thickness throughout. -
Cut the Panel Pieces:
Measure and cut four identical rectangular panels for the lantern walls (approximately 4 inches wide by 6 inches tall). Also cut a square base slightly larger than the assembled walls. -
Create the Lattice Design:
While the slabs are still flat and leather-hard, lightly sketch your window design. Carve out the geometric lattice shapes using a sharp craft knife. I like to smooth the inner cut edges immediately with a damp brush to avoid sharp burs later. -
Assemble the Walls:
Score the sides of the base and the bottom edges of your four wall panels. Apply slip generously. -
Join the Corners:
Attach the first wall to the base, then add an adjacent wall. Score and slip the vertical seam where they meet. Reinforce the inside corner with a thin coil of clay, smoothing it down. -
Complete the Box:
Attach the remaining two walls in the same manner, ensuring the structure is square and the seams are blended seamlessly on the outside.
Clean Cuts Pro Tip
When cutting out the lattice windows, let the clay dry to a ‘firm leather-hard’ state first. Soft clay drags and deforms; firm clay cuts crisply like cheese.
Step 2: Building the Pagoda Roof
-
Cut Roof Tiers:
You will need three distinct roof sections. Cut three squares of decreasing size from your slab. The largest will overhang the main body significantly. -
Shape the Main Roof:
Take the largest square and gently curve the edges downward to create a draped effect. You can drape it over a foam mold or crumpled newspaper to hold the shape while it stiffens. -
Add Decorative Vent Holes:
On the sloped sections of this main roof, use a small hole cutter to punch a decorative floral or cross pattern, allowing heat to escape. -
Form the Middle Tier:
Create a square ‘riser’ or neck piece—a small hollow box—that sits on top of the main roof. Attach the second, medium-sized roof square on top of this riser. -
Create the Top Lantern Cap:
Make a smaller cylindrical or square neck for the very top. Attach the smallest roof tier (the cap) to this. Punch small circular ventilation holes around the neck of this top piece. -
Install the Copper Handle:
Before the clay dries, pierce two small holes near the peak of the top cap. Insert a loop of heavy-gauge copper wire to serve as the handle. Secure it carefully so it doesn’t tear the clay.
Level Up: Light Play
Glaze the interior with a bright, glossy white or metallic gold. This won’t be seen from outside but will dramatically reflect the candlelight for a brighter glow.
Step 3: Assembly and Finish
-
Stack the Components:
Once all sections are leather-hard and can support weight, score and slip the contact points to stack the tiered roof assembly onto the main body walls. -
Refine the Texture:
To achieve that specific stone-like finish, dab the entire exterior surface with a stiff brush or a coarse sponge. This stippling hides join lines and mimics carved stone. -
Dry Slowly:
Cover the finished lantern loosely with plastic. Let it dry very slowly over several days to prevent warping, especially around the roof overhangs. -
Bisque Fire:
Fire the piece to bisque temperature (usually Cone 04) once completely bone dry. -
Surface Treatment:
Leave the raw clay if using a nice speckled stoneware, or apply a very dry, matte white or beige wash to enhance the texture before the final firing.
Place a pillar candle inside and enjoy the tranquil shadows cast by your handmade pagoda
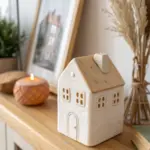
Mini Clay House Lantern Village Set
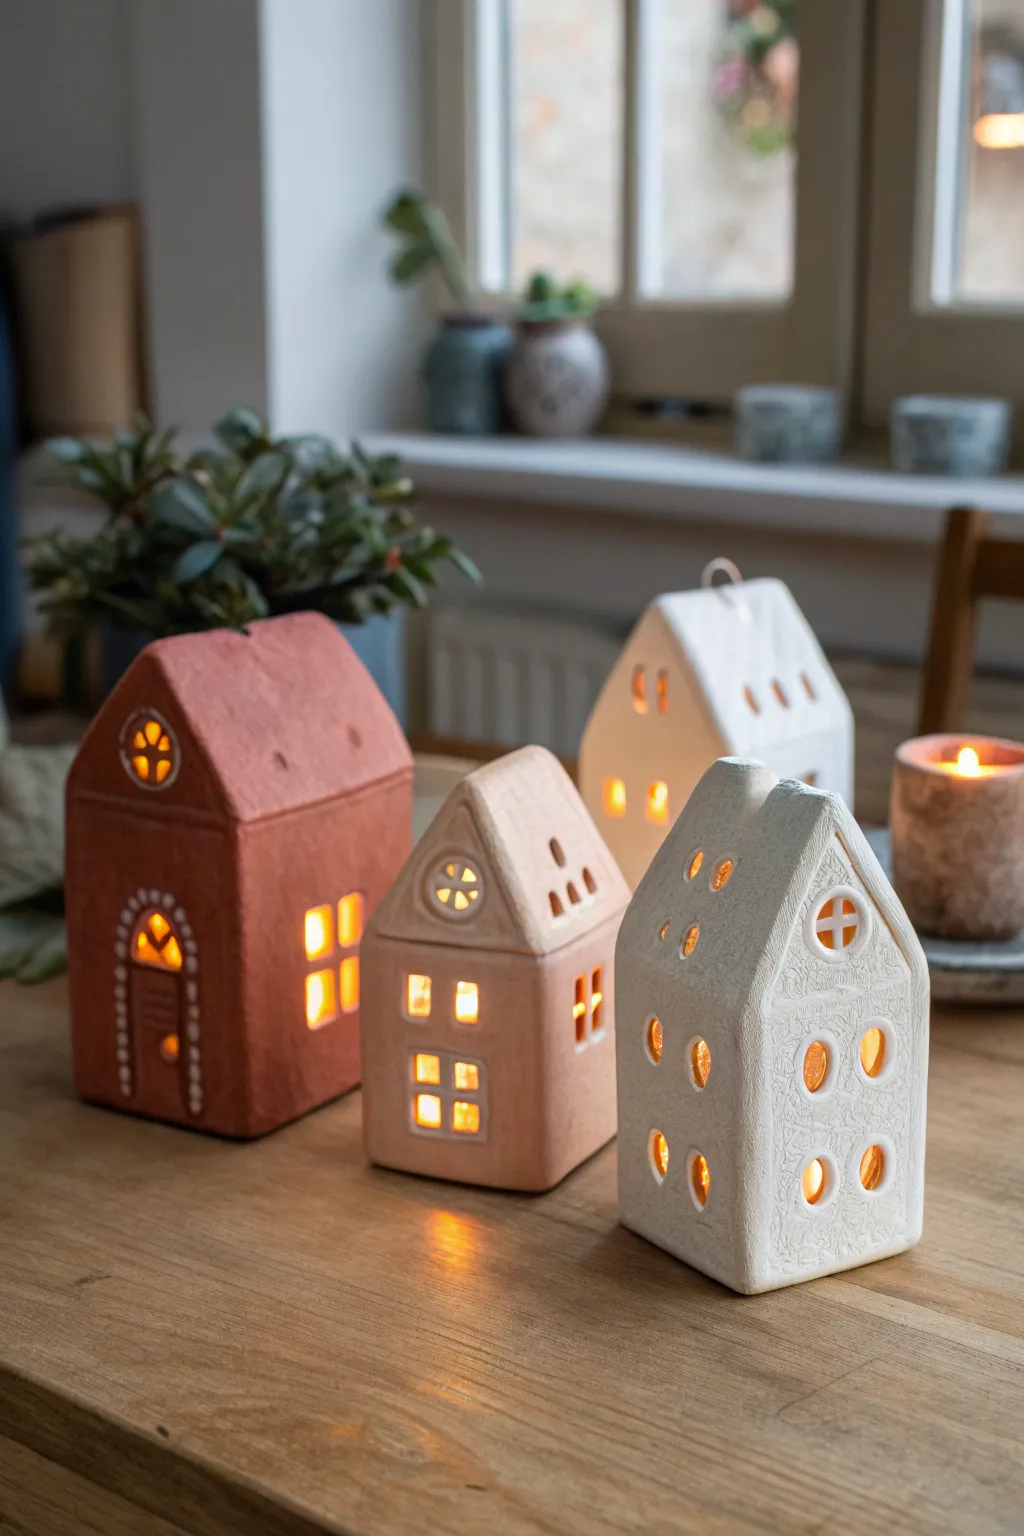
Create a warm and inviting atmosphere in your home with this set of miniature Scandinavian-inspired clay houses. These charming lanterns are crafted from simple air-dry clay and glow beautifully when illuminated with small LED tea lights, perfect for a cozy mantel or table centerpiece.
Step-by-Step Tutorial
Materials
- White and terracotta air-dry clay (or polymer clay)
- Rolling pin
- Parchment paper or clay mat
- Craft knife or scalpel
- Ruler
- Small cookie cutters (square, circle, arch) or straw for windows
- Slip (clay mixed with water) or scoring tool
- Fine-grit sandpaper
- Acrylic rolling heavy guides (optional, for even thickness)
- Textured rolling pin or lace (optional for pattern)
- White acrylic paint or puff paint (for details)
- LED tea lights
Step 1: Planning and Cutting Walls
-
Draft your templates:
Sketch out simple paper templates for your houses. You will need a front and back panel (with peaked roofs) and two side rectangular panels for the walls. Vary the heights and widths to create the diverse village look shown in the image. -
Condition the clay:
Knead your chosen clay color until it is soft and pliable. I find that warming the clay in your hands for a few minutes prevents cracking later. -
Roll out the slab:
Roll the clay out onto parchment paper to an even thickness of about 1/4 inch (6mm). Using thickness guides here really helps ensure your walls are sturdy enough to stand. -
Add texture:
For the white house shown on the right, gently press a textured tool or a crumpled piece of foil onto the slab before cutting to create a subtle, stucco-like surface. -
Cut the shapes:
Place your paper templates onto the clay slab and carefully cut around them using a sharp craft knife or scalpel for clean, straight edges.
Fixing Cracks
If you see hairline cracks as the air-dry clay dries, mix a tiny bit of fresh clay with water to make a paste. Fill the crack, smooth it over, and let it dry again.
Step 2: Adding Details and Windows
-
Carve the windows:
While the panels are flat, cut out your window shapes. Use tiny cutters for uniformity, or freehand cut small squares, arches, and circles. Don’t forget the circular attic windows near the roof peak. -
Smooth the edges:
Dip your finger in a little water and gently run it along all cut edges of the windows and walls to remove any rough burrs or crumbles. -
Create the roof pieces:
Cut two rectangular slabs for the roof. They should be slightly longer than the side walls to create an overhang if desired, though the houses in the image have flush or minimal overhangs. -
Initial drying phase:
Let the flat pieces dry for about an hour until they are leather-hard. This makes them stiff enough to stand up during assembly without sagging.
Step 3: Assembly
-
Score the joints:
Use a scoring tool or a needle to scratch cross-hatch marks on the edges where the walls will connect. This rough texture acts like velcro for the clay. -
Apply slip:
Dab a small amount of clay slip (or liquid polymer clay if using polymer) onto the scored edges. -
Join the walls:
Press the side walls against the back panel first at a 90-degree angle. Smooth the seam on the inside with a modeling tool or your finger to reinforce the bond. -
Attach the front:
Attach the front panel with the door and windows, ensuring the corners are square. You now have a roofless box. -
Attach the roof:
Score and slip the top edges of the peaked walls. Place your roof panels on top, joining them at the center ridge. Smooth the ridge seam gently so it doesn’t split. -
Add chimney detail:
For the white house, shape a tiny rectangle of clay and attach it to the roof slope to mimic a chimney.
Level Up: Frosted Glass
Glue small pieces of tracing paper or vellum behind the window cutouts on the inside. This diffuses the candlelight for a softer, dreamier glow without showing the bulb.
Step 4: Finishing Touches
-
Final drying:
Let the assembled houses dry completely. For air-dry clay, this takes 24-48 hours; for polymer, bake according to package instructions. Keep them away from direct heat to prevent warping. -
Sand imperfections:
Once fully cured, use fine-grit sandpaper to buff away any fingerprints or rough seams for a professional matte finish. -
Paint details:
Use white puff paint or thickened acyclic paint to add the decorative dots around the door arch and windows on the terracotta-colored house. -
Light them up:
Place a battery-operated LED tea light inside each house to bring your little village to life with a warm, flickering glow.
Now you have a charming custom village that looks beautiful by day and magical by night.
Tower Lantern With Arched Doorway Cutouts
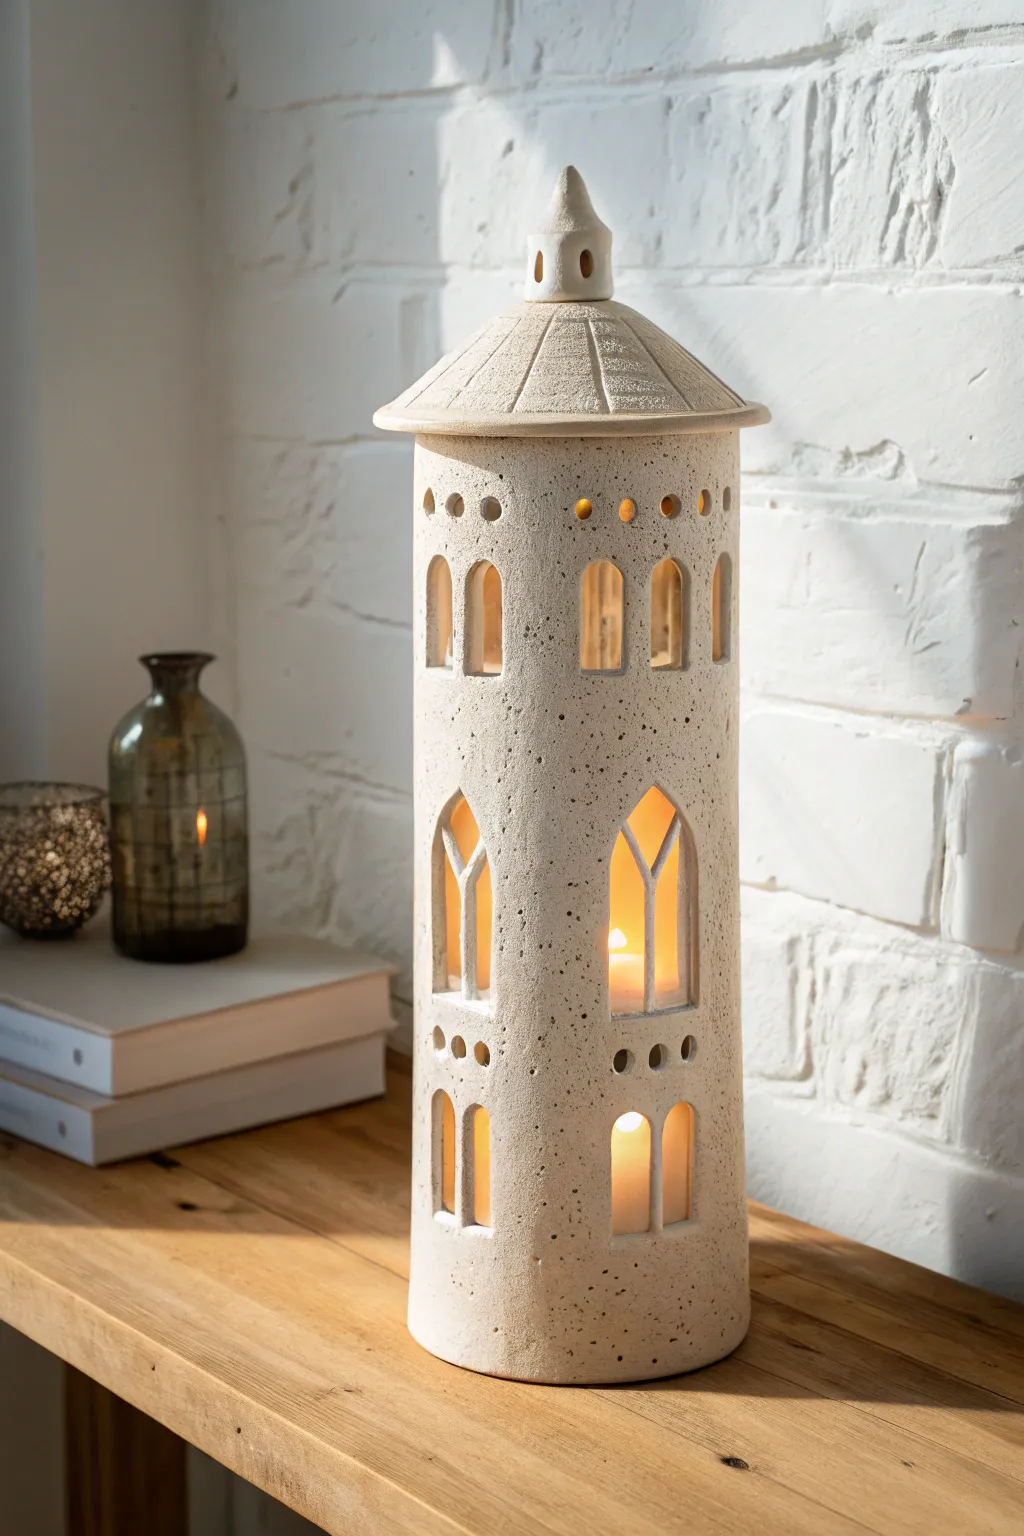
Evoke the charm of an old-world castle with this striking ceramic tower lantern. Crafted from speckled stoneware clay, its tiered cutout windows allow candlelight to cast warm, architectural shadows across your room.
Detailed Instructions
Materials
- Speckled buff stoneware clay (approx. 3-4 lbs)
- Rolling pin with guide strips (1/4 inch thickness)
- Large rectangular template (approx. 14x’10 inches)
- Conical roof template
- Fettling knife or craft knife
- Needle tool
- Scoring tool or serrated rib
- Slip (clay and water slurry)
- Cookie cutters (small arch and circle shapes)
- Sponge and water
- Wooden sculpting tool (for smoothing seams)
Step 1: Forming the Tower Base
-
Roll the slab:
Begin by rolling out your speckled clay into a large, consistent slab. Use guide strips to ensure an even 1/4-inch thickness, which provides enough stability for a tall structure without being too heavy. -
Cut the main wall:
Place your rectangular template onto the slab and cut around it using a fettling knife to create the main body of the tower. Smooth the cut edges gently with a damp finger to remove any sharp burrs. -
Create the cylinder:
Stand the slab up and curve it into a cylinder. Bevl the meeting edges at a 45-degree angle to create a stronger join and a seamless look on the outside. -
Join the seam:
Score both beveled edges aggressively and apply a generous amount of slip. Press the edges together firmly from the bottom to the top. -
Reinforce the seam:
Roll a thin coil of soft clay and press it into the interior seam. Use a wooden tool to blend this coil seamlessly into the wall, ensuring the structure won’t crack open during drying. -
Attach the floor:
Roll a smaller slab and cut a circle slightly larger than your cylinder’s diameter. Score and slip the bottom edge of your cylinder and attach it to this base, trimming away any excess clay flush with the wall.
Slumping Walls?
If your cylinder starts to oval or slump while working, stuff the inside loosely with crumpled newspaper or foam padding to support the shape while it firms up.
Step 2: Carving the Architecture
-
Plan the windows:
Before cutting, lightly trace your window layout onto the clay leather-hard surface. I find it helpful to use a ruler to ensure the tiered rows are perfectly level. -
Cut the grand arches:
For the large bottom windows, carefully cut out tall Gothic arch shapes. Leave a thin vertical strip of clay in the center to mimic a mullion, or add a separate strip back in if cutting it as one piece is too difficult. -
Add the upper tiers:
Move up the tower and cut smaller, rounded arch windows for the second level. Keep the spacing consistent to maintain structural integrity. -
Detail with portholes:
near the top rim and above the lower arches, use a small circular cutter or the back of a distinct tool to punch out tiny decorative holes, creating a ‘pixie dust’ light effect. -
Refine the edges:
Once the clay has stiffened slightly more, use a damp sponge or a soft brush to smooth the inside rims of all your cutouts. Sharp, jagged edges can be sharp after firing.
Step 3: Sculpting the Roof
-
Form the cone:
Roll a slab and use your conical template to cut a wedge shape. Join the straight edges together (score and slip) to form a wide, shallow cone that sits slightly wider than the tower body. -
Texture the roof:
Using a needle tool or a dull knife, lightly scribe vertical lines radiating from the center to the edge to suggest roofing panels or thatch. -
Add the finial:
Hand-build a small, hollow spire or knob for the very top. Add tiny window cutouts to this piece as well, mirroring the main tower. -
Create the flange:
Flip the roof over and attach a small ring of clay on the underside. This inner rim should fit just inside the main tower cylinder to keep the lid from sliding off. -
Attach finial to roof:
Score and slip the finial onto the peak of the cone. Blend the clay downwards so it looks like one meaningful piece. -
Dry and fire:
Let the tower and lid dry slowly under loose plastic to prevent warping. Once bone dry, bisque fire, then fire to stoneware temperature (Cone 5/6) without glaze to maintain the raw stone texture.
Pro Tip: Clean Cuts
Wait until the clay is ‘leather hard’ (firm like cheddar cheese) before cutting the windows. Wet clay drags and deforms; firm clay cuts cleanly.
Place a tea light or LED candle inside and watch your miniature tower glow with life
Carved Sgraffito Lantern With Backlit Lines
Illuminate your evenings with this handcrafted cylindrical lantern, featuring intricate geometric and botanical carvings that glow warmly from within. The soft, textured biscuit finish highlights the delicate patterns, creating a stunning interplay of light and shadow.
Step-by-Step
Materials
- White or buff stoneware clay (with fine grog)
- Rolling pin
- Canvas mat or slab roller
- Cylindrical mold (PVC pipe or bisque tube, approx 5-6 inches diameter)
- Fettling knife
- Needle tool
- Loop tool (small)
- Carving tools (V-tip and U-tip gouges)
- Slip and scoring tool
- Sponge
- Tea light or LED candle
Step 1: Forming the Cylinder
-
Prepare the slab:
Roll out a consistent slab of clay approximately 1/4 inch thick on your canvas mat. Compress the clay on both sides with a rib to prevent warping during firing. -
Cut to size:
Measure the circumference of your cylindrical mold. Cut a rectangular strip of clay that is slightly longer than the circumference and about 8-10 inches tall. -
Wrap the mold:
Wrap a layer of newspaper around your mold to prevent sticking. Carefully lift the clay slab and wrap it around the form. -
Join the seam:
Bevel the connecting edges at 45-degree angles. Score both edges thoroughly and apply clay slip. Press the edges together firmly to create a seamless cylinder. -
Smooth the exterior:
Using a rib and a damp sponge, smooth the joined seam on the outside until it is invisible. Wait for the clay to stiffen to leather-hard before removing the mold. -
Create the top rim:
Roll a thick coil of clay and attach it to the top opening of your cylinder. Flatten and smooth it to create a sturdy, finished rim that steps inward slightly.
Step 2: Carving the Patterns
-
Mark horizontal guides:
Once leather-hard, lightly use a needle tool to scratch horizontal guide lines around the cylinder to divide your design into three distinct bands: top, middle, and bottom. -
Map the geometry:
In the middle band, lightly sketch a series of diamonds. In the bottom band, sketch upright leaf shapes. Accuracy helps here, but organic variation adds charm. -
Carve the top band:
Use a small loop tool or drill bit to create a row of evenly spaced circular indentations or holes around the upper rim section. -
Sculpt the diamonds:
Using a V-tip carving tool, carve concentric diamond shapes in the middle band. I find it easiest to carve the outermost diamond first and work inward. -
Add triangular vents:
Between the diamonds and leaves, carefully cut out small triangles completely through the clay wall. These openings will allow the brightest points of light to escape. -
Carve the leaves:
For the bottom band, carve the outline of the leaves. Use the V-tip tool to etch a central vein and diagonal veins inside each leaf shape. -
Refine the surface:
Use a U-tip tool to gently carve away negative space if you want simpler textured areas, or deepen the lines for higher contrast.
Clean Cuts Only
When cutting the full pass-through triangles, do it when the clay is leather hard, not wet. Use an X-Acto knife for sharp, crisp corners that won’t slump.
Step 3: Finishing and Firing
-
Final smoothing:
Once all carving is complete, gently sponge the surface to remove any sharp burrs or clay crumbs created during the carving process. -
Dry slowly:
Cover the lantern loosely with plastic and allow it to dry slowly over several days to prevent cracking, especially around the cutout areas. -
Bisque fire:
Fire the piece to bisque temperature (usually cone 04 or 06). This hardens the clay and prepares it for optional glazing. -
Leave unglazed:
To achieve the natural, matte look in the photo, leave the exterior unglazed. You may apply a clear matte glaze to the inside for easier cleaning. -
Final firing:
Fire again to the maturity temperature of your clay body (likely cone 5 or 6 for stoneware) to make it durable and weather-resistant.
Stained Glass Effect
Before the final firing, fill the open triangle cutouts with crushed vibrant glass bits. They will melt and pool during firing for a colorful glow.
Place a tea light inside and watch your geometric patterns dance on the walls.
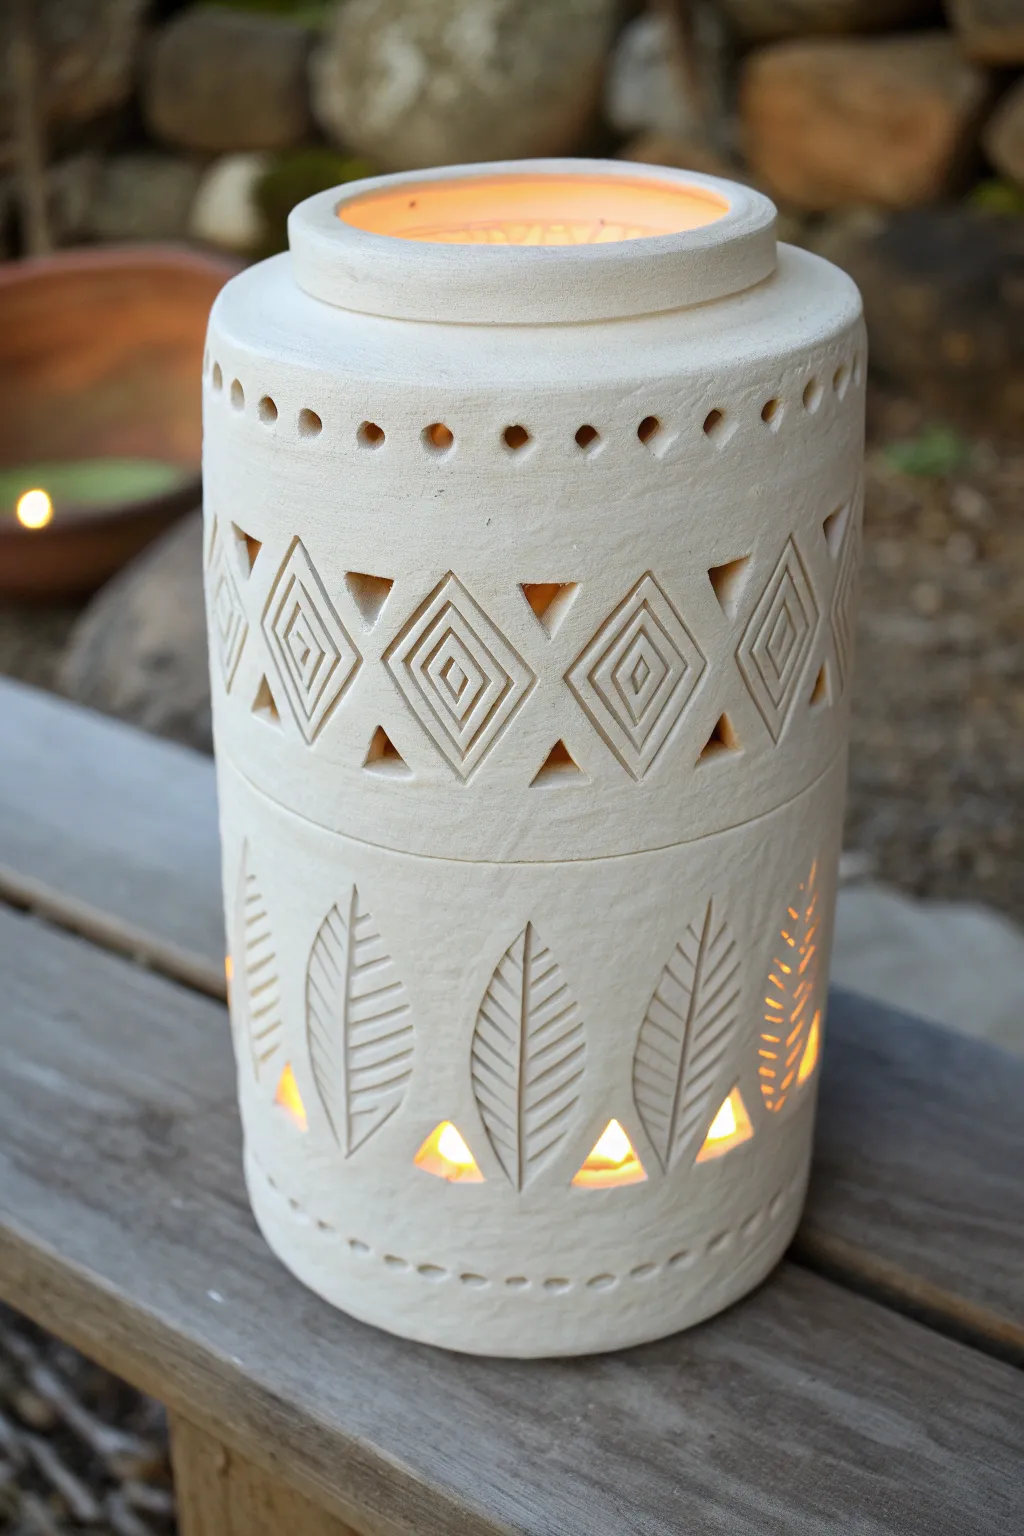
Textured Impression Lantern With Punched Accents
This rustic, elegant lantern combines the smooth matte look of natural white clay with intricate punched patterns that cast a warm, starlike glow. The design utilizes simple stamping and piercing techniques to create a repetitive floral motif that feels both artisanal and modern.
Step-by-Step Tutorial
Materials
- White stoneware or air-dry clay (approx. 2-3 lbs)
- Circular cookie cutter (approx. 4 inches) for base
- Rolling pin
- Canvas mat or slab roller
- Rectangular template (paper or card)
- Slip and scoring tool (if using kiln clay)
- Hole punch tools (various sizes, or drill bits)
- Flower-shaped clay stamp or makeshift stamp tool
- Sharp needle tool or X-Acto knife
- Sponge and water
- Rib tool
- Sanding sponge (fine grit)
Step 1: Forming the Cylinder
-
Prepare the slab:
Begin by rolling out your white clay on a canvas mat to a consistent thickness of about 1/4 inch. If you want a uniform finish, wooden guide rails on either side of your rolling pin work wonders. -
Cut the shapes:
Using your circular cutter, punch out a round base. Then, using your rectangular template, cut a long strip for the walls; the length should equal the circumference of your base plus a half-inch for overlapping. -
Texture preparation:
Before assembling, lightly smooth the surface of your rectangular slab with a rib tool to remove any canvas texture, creating a blank slate for your design. -
Score and slip:
Score the edges of the circular base and the bottom edge of the rectangular wall. Apply a generous amount of slip (liquid clay) to the scored areas. -
Attach the wall:
Carefully stand the rectangular slab up and wrap it around the base disc. Press the scored edges together firmly to create a seal. -
Seal the vertical seam:
Overlap the vertical edges of the cylinder slightly. Score, slip, and compress this seam from both the inside and outside, blending the clay until the join is invisible. -
Shape the rim:
I like to gently taper the top inch of the cylinder inward to create a bottleneck shape. Use damp fingers to smooth the rim, slightly flattening it for a polished look.
Collapsing Walls?
If the cylinder sags while working, stuff the inside loosely with crumpled newspaper or plastic bags. This supports the shape while you punch holes without distorting the walls.
Step 2: Designing the Motifs
-
Mark guid lines:
Lightly trace horizontal guidelines around the cylinder using a needle tool while spinning the vessel on a banding wheel. These will mark where your floral bands and dotted borders go. -
Stamp the flowers:
Press your flower-shaped stamp into the clay between the guidelines. Aim for two distinct bands of flowers—one near the center and one lower down—spacing them evenly around the circumference. -
Refine the petals:
If your stamp is shallow, use a modeling tool to deepen the impressions of each petal, carving slightly outward to give them a carved, relief look. -
Punch the centers:
Take a medium-sized circular hole punch or drill bit and remove the clay from the very center of each stamped flower to let the most light through. -
Detail the petals:
For added intricacy, pierce a tiny hole at the outer tip of every single petal using a small needle tool or the smallest drill bit available.
Step 3: Adding Accents & Finishing
-
Create dotted borders:
Above and below the floral bands, create rows of small, dense punctures. A small drinking straw or a hollow tube tool works perfectly for these uniform circles. -
Add separation lines:
Between the floral bands and the dotted borders, create a horizontal line of texture by pressing a small, round tool repeatedly into the clay without punching all the way through. -
Detail the shoulder:
Near the top tapered rim, add a ring of vertical, teardrop-shaped indentations or punches to mirror the petal shapes below. -
Smooth the interior:
Once all punching is done, check the inside of the lantern. Pushing tools through often creates burrs on the interior; gently smooth these down with your finger or a sponge. -
Dry slowly:
Cover the piece loosely with plastic to let it dry slowly over a few days. This prevents the delicate pierced areas from cracking as the clay shrinks. -
Sand and refine:
Once bone dry (or fully cured if using air-dry clay), gently sand the exterior with a fine-grit sponge to remove any sharp edges or burrs from the holes. -
Finalize:
If using ceramic clay, bisque fire and then fire to temperature (leaving it unglazed preserves the stone texture). For air-dry clay, seal with a matte varnish.
Glow Up
Paint the inside of the lantern with a metallic gold or copper acrylic paint. When lit, the inner reflection will make the candlelight significantly warmer and brighter.
Place a battery-operated candle inside and watch your floral patterns dance on the walls
Geometric Faceted Lantern With Triangle Cutouts
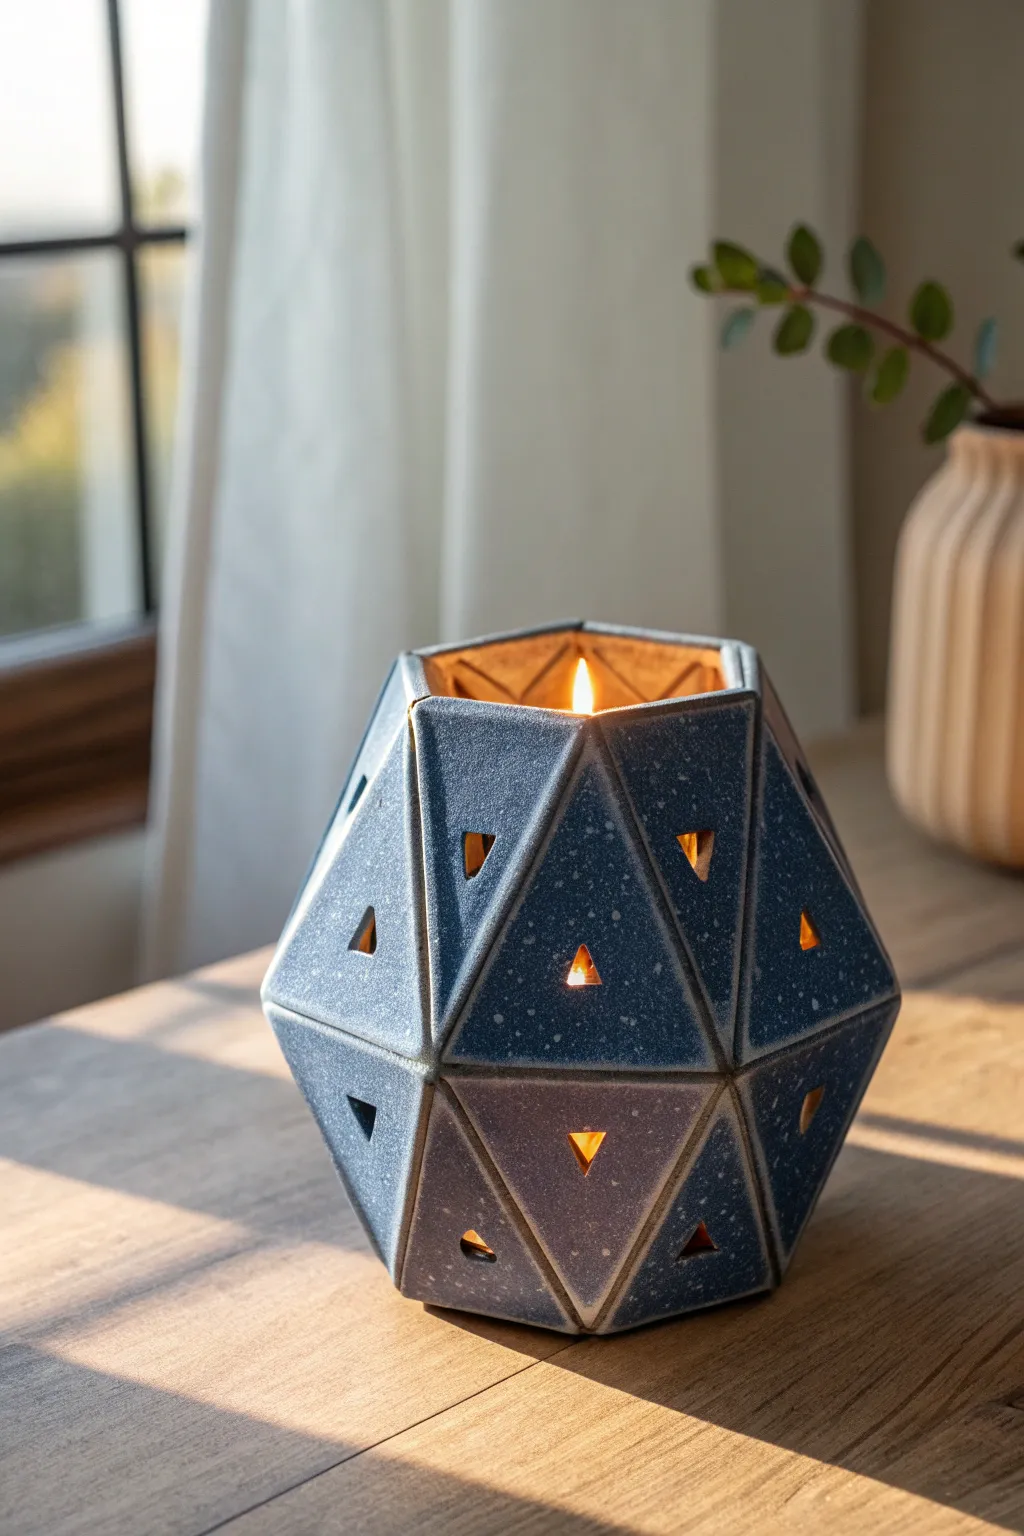
This stunning lantern features a modern, polyhedral shape composed of joining triangular facets, each punctured with a small window to let the candlelight dance. The speckled blue-grey glaze adds a cosmic, dusty texture that contrasts beautifully with the warm glow from within, making it a perfect centerpiece for a cozy evening.
Detailed Instructions
Materials
- Stoneware clay (groggy clay holds shape well)
- Rolling pin
- Two wooden guide strips (approx. 1/4 inch thick)
- Paper template (equilateral triangle, approx. 3-inch sides)
- Fettling knife or creative cutter
- Pin tool or small triangular cutter
- Scoring tool (serrated rib)
- Slip (clay and water mixture)
- Sponge
- Small paintbrush (for slip)
- Speckled blue-grey stoneware glaze
- Clear matte glaze (optional)
- Kiln
Step 1: Preparing the Components
-
Roll the Slabs:
Begin by wedging your stoneware clay thoroughly to remove air pockets. Place the distinct wooden guide strips on either side of your clay and roll it out into a uniform slab. The thickness should be consistent, about 1/4 inch, to ensure the facets hold their weight without sagging. -
Cut the Facets:
Place your equilateral triangle template onto the slab. Using a fettling knife, carefully cut out approximately 30 to 40 triangles. It’s always wise to cut a few extras in case of mishaps during assembly. -
Add the Windows:
While the triangles are still flat on the table, use a small triangular cutter or a steady hand with a pin tool to remove a smaller triangle from the center of each piece. Center these cutouts carefully for a symmetrical look. -
Leather Hard Stage:
Let the cut triangles sit until they reach a firm leather-hard state. They need to be stiff enough to stand up on their edges without bending, but still soft enough to score and slip.
Slumping Walls?
If the lantern collapses while building, your clay is too soft. Use a hairdryer to stiffen the walls periodically or support the inside with crumpled newspaper.
Step 2: Assembling the Form
-
Bevel the Edges:
For the cleanest seams, gently bevel the edges of your triangles at a 45-degree angle. This allows them to fit together snugly when creating the 3D form. -
The Base Layer:
Start by arranging five triangles in a circle (points meeting in the center) to form the base. Score and slip the connecting edges, then press them together firmly to create a pentagon shape. -
Building the Walls:
Begin attaching triangles to the outer edges of your base pentagon. I like to build row by row, attaching point-up triangles first, and then filling the gaps with point-down triangles. -
Smooth as You Go:
After every few attachments, use a dampened tool or your finger to smooth the seams on the inside. It becomes very difficult to reach the bottom seams once the form grows taller. -
Structuring the Curve:
To make the lantern curve inward toward the top, slightly angle the triangles inward as you attach upper rows. The geometry naturally forces a curve, but you can manipulate the angle slightly while the clay is plastic. -
Closing (or Leaving Open) the Top:
Continue building until you have a satisfying height. Leave the top open with a jagged, geometric rim formed by the tips of the final row of triangles. Ensure the opening is wide enough to safely insert a candle.
Geometric Pro-Tip
For a mathematically perfect sphere approximation, look up the pattern for an ‘Icosahedron’ (20 faces) or a geodesic dome pattern to guide your triangle placement.
Step 3: Refining and Glazing
-
Clean the Connections:
Once the full form is built, go over every exterior seam. You can choose to smooth them completely flat for a unified look or leave slight indentations to emphasize the faceted construction. -
Refining Cutouts:
Use a damp sponge or a cleaning tool to smooth the sharp edges of the small triangular windows. Sharp edges can cause glaze to crawl or break too thinly. -
Bisque Fire:
Allow the lantern to dry very slowly under loose plastic to prevent uneven shrinkage and cracking. Once bone dry, bisque fire it in the kiln according to your clay body’s specifications. -
Glaze Application:
Dip or brush on the speckled blue-grey glaze. Ensure you get coverage inside the cutout windows, but be careful not to let the glaze clog them. If the glaze is thick, wipe the edges of the cutouts slightly with a sponge. -
Glaze Firing:
Fire the piece for the final glaze firing. The high heat will bring out the speckles and the rich color variation seen in the final piece.
Place a tea light or small pillar candle inside and watch the geometric shadows cast across your room
Double-Wall Shadow Box Lantern With Layered Cutouts
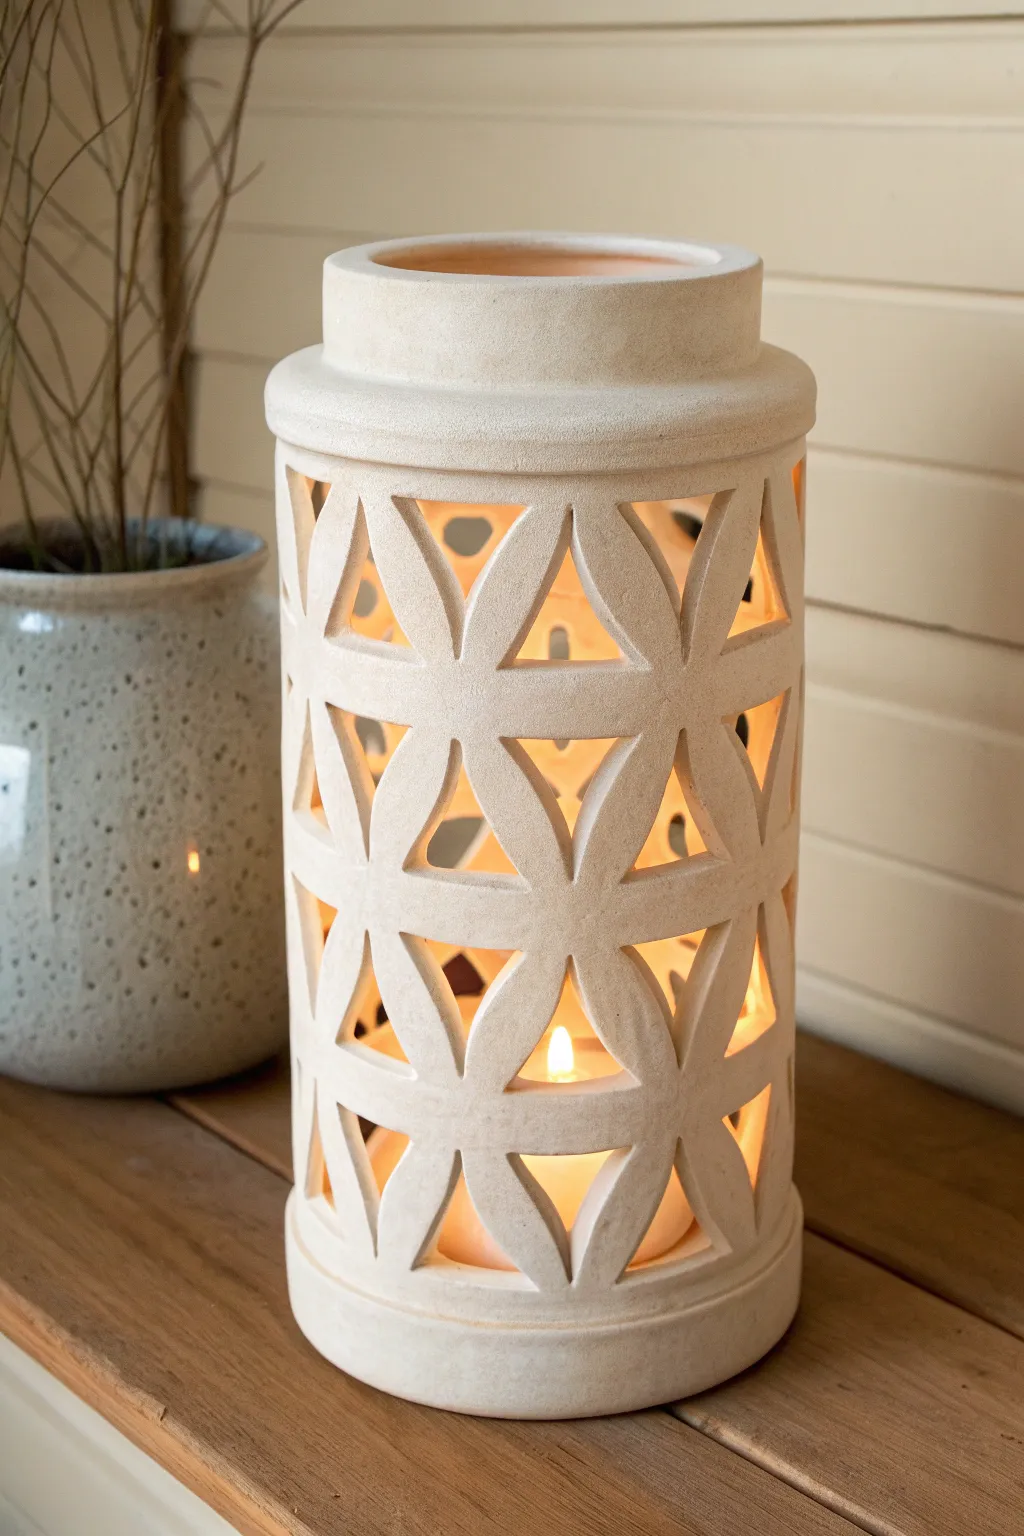
This elegant clay lantern features a double-walled effect with a mesmerizing Flower of Life cutout pattern that casts beautiful geometric shadows. The natural, sandy finish gives it a timeless, organic feel perfect for warming up any corner of your home.
How-To Guide
Materials
- High-grog stoneware clay (sand or buff color)
- PVC pipe or sturdy tube form (approx. 5-6 inches diameter)
- Pattern template (Flower of Life design)
- Needle tool
- Fettling knife
- Small circle cutter or exacto knife
- Large rolling pin
- Canvas mat or slab roller
- Slip and scoring tool
- Sponge
- Flexible rib tool
- Wooden paddle
Step 1: Forming the Cylinder Base
-
Roll the main slab:
Begin by rolling out a large, even slab of clay approximately 3/8-inch thick. You want this thick enough to support the height but not so heavy it collapses. -
Cut to size:
Measure the circumference of your PVC pipe form plus a little overlap. Use your fettling knife and a straight edge to cut a clean rectangle from your slab that matches these dimensions. -
Wrap the form:
Wrap the slab around your PVC pipe form, which should be covered in a layer of newspaper to prevent sticking. Join the seam by scoring both edges thoroughly and applying slip, pressing them firmly together. -
Smooth the seam:
Use a wooden paddle to gently beat the seam flat against the pipe, then smooth it completely with a flexible rib until the join is invisible. -
Create the heavy rim:
Roll a thick coil of clay and attach it to the top edge of the cylinder to create the distinct, weighted upper rim seen in the photo. Smooth this down so it integrates directly into the cylinder wall. -
Form the collar:
Add a slightly narrower slab ring on top of the thickened rim to create the recessed neck or collar of the lantern. Ensure the connection is seamless.
Slumping Walls?
If the cylinder sags while cutting, put the PVC pipe back inside (wrapped in paper) to support the walls while you carve the detailed sections.
Step 2: Carving the Geometric Pattern
-
Leather hard transition:
Allow the cylinder to dry to a sturdy leather-hard stage. I usually leave it overnight covered loosely in plastic so it’s firm enough to cut without warping. -
Map the grid:
Lightly trace your geometric pattern onto the surface. The design relies on overlapping circles or arches; using a paper template wrapped around the cylinder ensures the pattern meets perfectly at the back. -
Initial cuts:
Using a sharp fettling knife or exacto blade, begin cutting out the negative spaces—the triangular shapes between the arches. -
Beveling edges:
Instead of cutting straight through, try to angle your blade slightly inward if you want to emphasize the thickness of the wall, giving that shadow-box depth. -
Refining the shapes:
Once the main shapes are removed, use a damp sponge or a small smoothing tool to round over the sharp cut edges. This softens the look and mimics the stone-like texture. -
Interior clean-up:
Reach inside carefully to smooth any clay burrs or rough spots that were pushed inward during the cutting process.
Glow Up
Paint the MAIN interior wall with a metallic gold underglaze before firing. This reflects the candlelight warmly and increases the lantern’s brightness.
Step 3: Finishing and Firing
-
Create the bottom:
Cut a circular slab for the base. Score and slip the bottom edge of your cylinder and attach it to this base, trimming away any excess clay. -
Texturing the surface:
To achieve the sandy, matte look shown, gently pat the exterior with a heavily grogged sponge or a rough cloth while the clay is still leather hard. -
Slow drying:
Dry the piece very slowly under loose plastic for several days. Because of the many cutouts, rapid uneven drying can cause cracks between the lattice sections. -
Bisque fire:
Fire the piece to bisque temperature (usually Cone 04 or 06). -
Apply wash (optional):
If your clay is too white, apply a very thin iron oxide wash and wipe almost all of it back to leave just a hint of warmth in the texture. -
Final firing:
Fire to the final maturity of your clay body. Leave unglazed to maintain the raw, stone texture.
Place a pillar candle or LED inside and enjoy the mesmerizing shadows your handiwork casts.