If you’ve ever looked at a garden and thought, “It needs a little coastal charm,” a clay lighthouse is such a fun way to get there. I love how these projects can be as simple as stacked terracotta pots or as artsy as a hand-built lighthouse luminary.
Classic Stacked Clay Pot Lighthouse

Transform ordinary terracotta pots into a charming coastal beacon for your garden or patio. This classic project uses graduated pot sizes stacked to create a tapering tower, topped with a functional solar lantern to guide the way at night.
Detailed Instructions
Materials
- 4 terracotta pots (graduated sizes, e.g., 12″, 10″, 8″, 6″)
- 3 terracotta saucers (sized to fit inverted pots)
- Small glass or ceramic solar lantern (to fit the smallest pot)
- Outdoor acrylic craft paint (Terracotta/Red-Brown and White)
- Strong outdoor adhesive (e.g., E6000 or construction adhesive)
- Painter’s tape or masking tape
- Small wooden craft pieces (for windows/doors) or black paint
- Paintbrushes (large flat brush and fine detail brush)
- Clean rag and sandpaper
- Clear outdoor sealant spray (matte or satin)
Step 1: Preparation and Base Coat
-
Clean the pots:
Thoroughly wipe down all your clay pots and saucers with a damp rag to remove any garden center dust. Let them dry completely, as moisture will trap bubbles under the paint. -
Smooth the surface:
Give the exterior of the pots a quick sand with fine-grit sandpaper if they feel rough. This helps the paint glide on smoother and adhere better. -
Paint the rims:
Start by painting the thick rim of every pot with your terracotta-colored paint. This mimics the look of the project image where the connection points remain the natural clay color. -
Paint the saucers:
Paint the outer edges and bottoms of your saucers with the same terracotta color. These will become the platforms between your lighthouse levels.
Wobbly Tower?
If the pots don’t sit flush against the saucers, create a ‘cushion’ of glue or use outdoor silicone caulk to fill the gaps and level the tower before it dries.
Step 2: Creating the Stripes
-
Tape firmly:
Once the rims are fully dry, apply painter’s tape just under the rim of each pot to protect your brown paint work. Press the edges of the tape down firmly to prevent bleeding. -
Apply the white base:
Paint the body of the largest pot (the base) and the second-smallest pot completely white. You may need 2-3 coats to fully cover the orange clay tone. -
Apply the brown base:
Paint the body of the second-largest pot and the smallest top pot with the terracotta brown paint. This engages the alternating stripe pattern seen in the main image. -
Remove tape:
Peel off the painter’s tape carefully while the final coat is still slightly tacky to get the crispest line possible between the rim and the body. -
Seal individual pieces:
Before assembly, I prefer to spray all components with a clear outdoor sealant. It’s much easier to get even coverage now than when it’s fully stacked.
Shine Brighter
Paint the inside of the very top lantern housing (or the area just under the solar light) with metallic silver or mirror paint to reflect more light outward at night.
Step 3: Assembly and Details
-
Start the stack:
Place your largest pot upside down on a flat surface. Apply a generous ring of strong outdoor adhesive around the drainage hole area. -
Add a saucer:
Place the largest saucer upside down over the glue, centering it perfectly. Let this bond set for a few minutes if your glue requires it. -
Continue upward:
Glue the next largest pot upside down onto that saucer, followed by the next saucer. Repeat this pattern until all four pots are stacked. -
Add windows:
Using small black wooden craft shapes (arched shapes work best), glue one ‘window’ to the center of each pot level. Alternatively, paint these arched shapes directly onto the pots with black paint. -
Create the lantern gallery:
For the very top, glue a smaller saucer right-side up (or a flat wooded disk painted white) to act as a gallery railing base for the top light. -
Install the beacon:
Adhere your solar path light or lantern to the very top. If the lantern has a stake, you may need to remove it or glue the lantern housing directly to the top saucer. -
Final touch-ups:
Check for any paint chips that occurred during stacking and touch them up with a small brush. Place the structure on a bed of flat stones to keep it off damp soil.
Now you have a sturdy, nautical accent ready to watch over your garden path


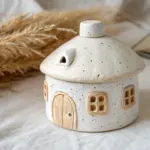
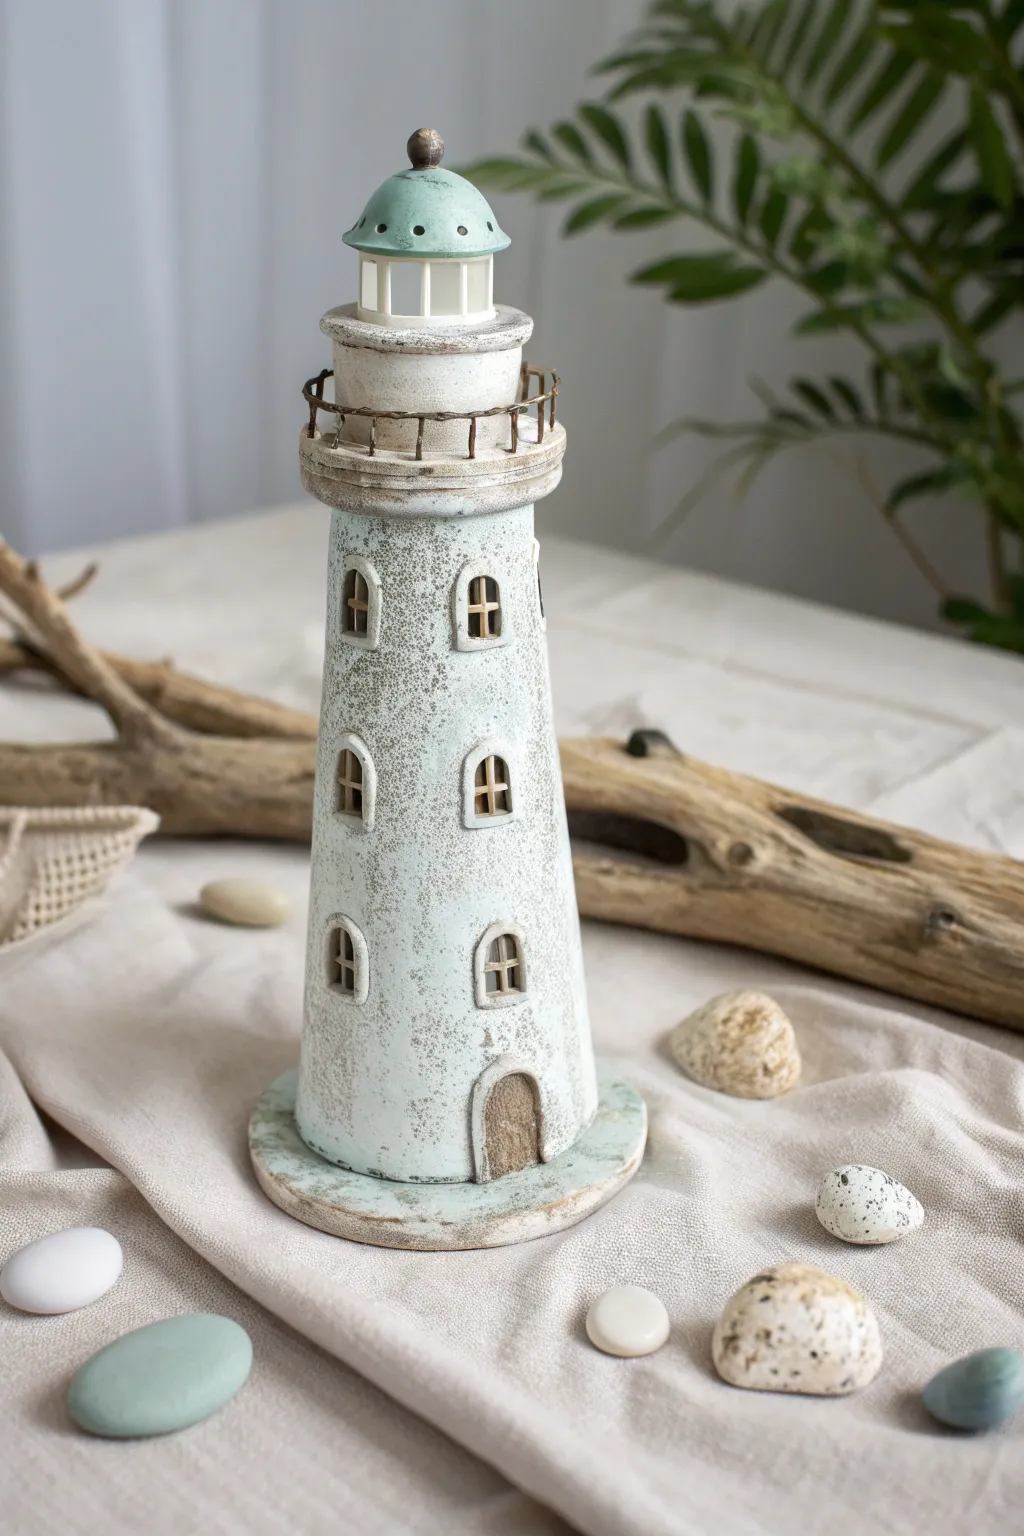
Blue and White Coastal Stripe Lighthouse
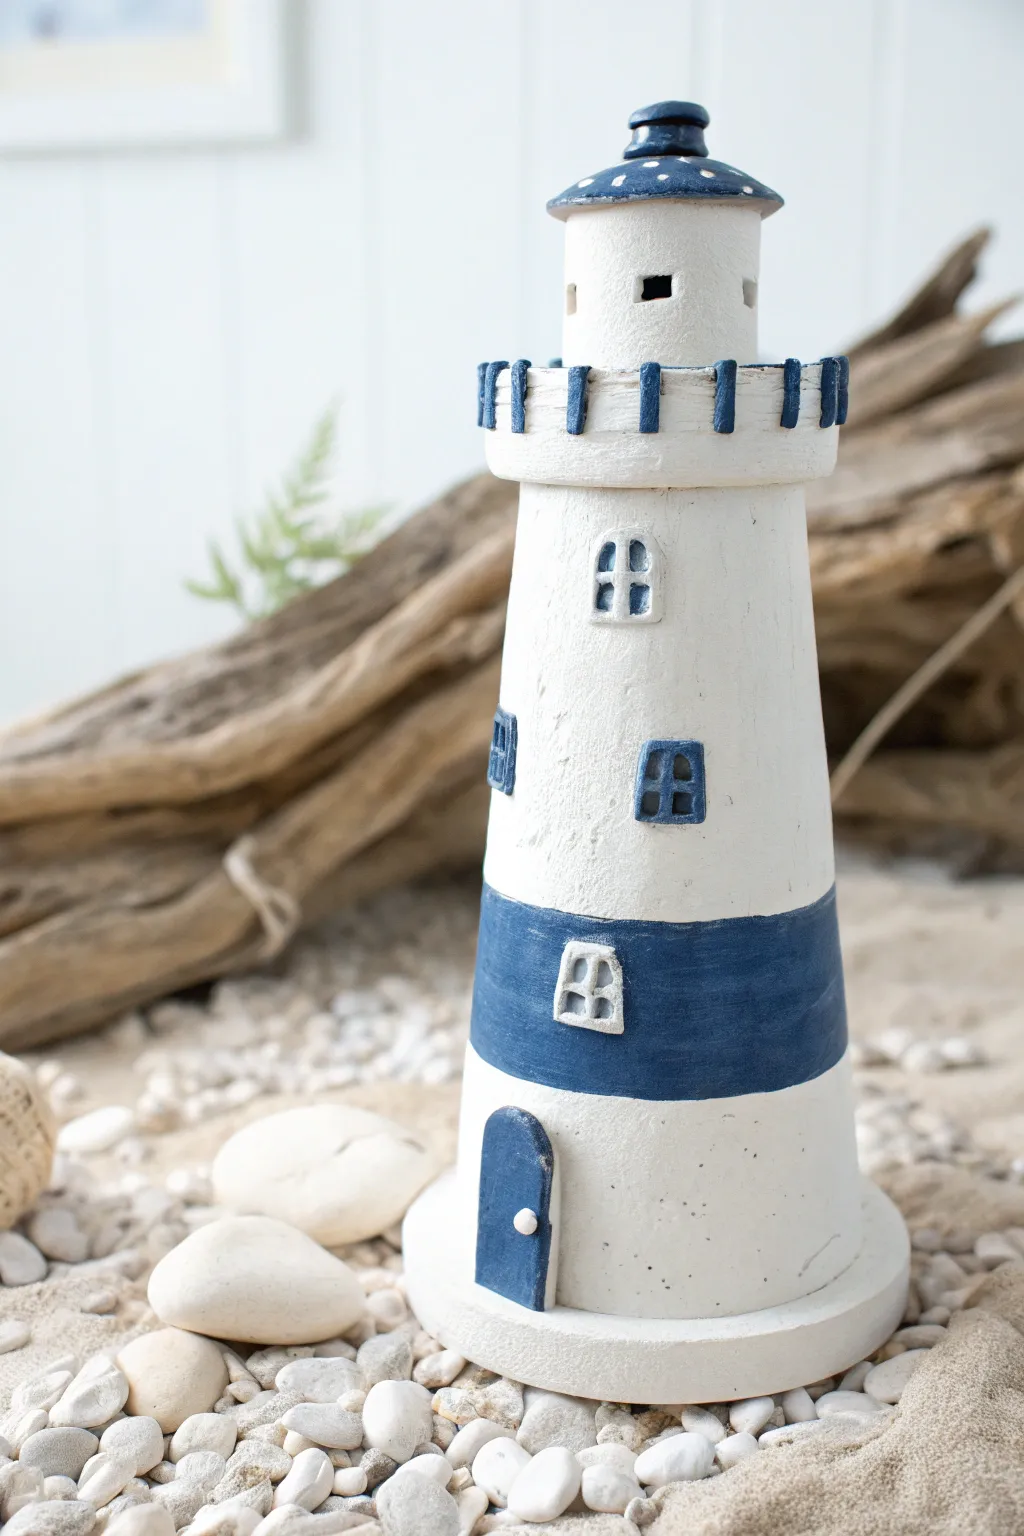
Bring the calming vibes of the coast into your home with this textured clay lighthouse project. It features a classic nautical blue and white palette with charmingly imperfect details that give it an authentic, hand-sculpted feel.
Step-by-Step
Materials
- Air-dry clay (white or grey)
- Rolling pin
- Clay knife or craft knife
- Cardboard or stiff paper (for the cone template)
- Tape
- Small bowl of water
- Acrylic paints (Matte White, Navy Blue)
- Paintbrushes (medium flat brush, small detail brush)
- Sandpaper (fine grit)
- Clay sculpting tools (needle tool, smoother)
- Strong craft glue (optional)
Step 1: Building the Base Structure
-
Create a cone form:
Start by creating a support structure. Roll a piece of stiff paper or thin cardboard into a tall cone shape. Tape it securely so it holds its shape. This will act as the armature for your clay. -
Roll out the clay:
Roll out a slab of air-dry clay to about 1/4 inch thickness. You want it even, but not paper-thin, as it needs to support its own weight once dry. -
Wrap the cone:
Wrap the clay slab around your cardboard cone. Trim the excess clay with a knife where the edges meet. -
Seal the seam:
Score the meeting edges (scratch them up a bit) and add a dab of water. Press the seam together firmly and smooth it over with your finger or a clay tool until the join is invisible. -
Form the base:
Cut a circle of clay slightly larger than the bottom of your cone. Place the cone on top of this circle and blend the clay upwards to seal the bottom. This creates the sturdy foundation.
Step 2: Adding Architectural Details
-
Construct the balcony:
Roll a thick snake of clay and flatten it slightly. Wrap this around the top portion of the lighthouse tower to create the balcony platform. Blend the bottom edge of this strip onto the tower so it sticks securely. -
Add the lantern room:
Form a smaller cylinder of clay and attach it to the top of the balcony platform. This is the lantern room. Create a small conical roof shape separately and attach it to the very top. -
Sculpt the railing:
Roll very small, short cylinders of clay to act as railing posts. Space them evenly around the balcony rim. Attach them carefully using a little water, pressing them gently onto the platform edge. -
Create the door:
Fashion a small, arched slab of clay for the door. Attach it to the base of the tower. Roll a tiny ball of clay for the doorknob and press it into place. -
Make the windows:
For the windows, cut small rectangles of clay. Use a sculpting tool or knife to verify the panes by impressing a cross shape into each one. Attach these at random intervals up the tower. -
Add texture:
To achieve that rustic look, gently pat the entire surface with a crumpled ball of foil or a stiff bristle brush. You don’t want it perfectly smooth; the texture grabs the paint beautifully later. -
Dry thoroughly:
Let the lighthouse dry completely. Depending on the thickness and your climate, this usually takes 24 to 48 hours. Don’t rush this step or cracks may appear.
Cracks happen!
If you see hairline cracks while drying, mix a tiny bit of fresh clay with water to make a paste (slip) and fill the cracks. Smooth it out and let it dry again.
Step 3: Painting and Finishing
-
Base coat:
Cover the entire lighthouse in matte white acrylic paint. It might take two coats to get a solid, crisp finish. Let this dry completely. -
Paint the stripe:
Using a flat brush, carefully paint a thick navy blue stripe around the lower third of the lighthouse. If you want a perfectly straight line, you can use painter’s tape, but a hand-painted edge adds charm. -
Highlight the railing:
With a steady hand and a small detail brush, paint the vertical railing posts navy blue. Leave the spaces between them white. -
Detail the door and roof:
Paint the door, the window frames, and the roof cap in the same navy blue. I usually switch to my smallest brush here to keep the paint from getting onto the white walls. -
Create depth:
Paint the insides of the window panes white (or leave them if your base coat covered them well), ensuring the blue ‘frames’ stand out. -
Light sanding (optional):
Once all paint is dry, you can very lightly sand edges of the blue paint to reveal a bit of white underneath for a weathered, sun-bleached look.
Pro Tip: Hollow Core
Once the clay is leather-hard but not fully dry, gently twist and remove the cardboard cone. This helps the inside dry faster and prevents mold.
Place your finished lighthouse on a shelf with some shells or driftwood to complete the coastal scene


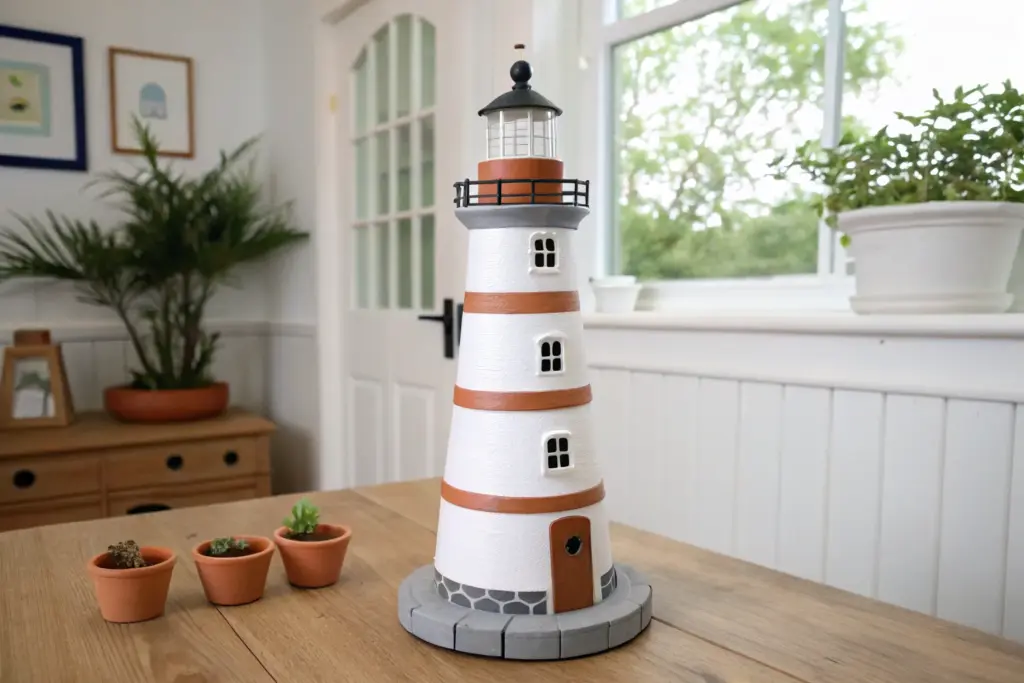
Working Solar Light Beacon Top
This charming lighthouse sculpture merges rustic stoneware textures with functional garden lighting, featuring a striped body and a solar-powered lantern room. It’s designed to cast a warm, welcoming glow over your patio or garden path as evening sets in.
Step-by-Step Tutorial
Materials
- Stoneware or earthenware clay (terracotta or groggy white)
- Inexpensive solar garden light (stake style)
- Rolling pin and canvas mat
- Cylindrical form or PVC pipe (approx. 4-5 inch diameter)
- Slip and scoring tool
- Needle tool and fettling knife
- Cookie cutters (small arch and square)
- Underglazes (terracotta red, white, dark blue)
- Clear glaze (optional for shiny finish)
- Wire for railing (16-gauge steel or copper)
- Ceramic glue or epoxy
Step 1: Adapting the Solar Light
-
Light disassembly:
Begin by dismantling your store-bought solar stake light. You need the top housing—which contains the solar panel, battery, and LED—and the clear plastic lens section. Discard the stake. -
Measure for fit:
Measure the diameter of the bottom of the solar light housing. Your clay tower needs a top opening that will support this component securely without it falling through.
Uneven Stripes?
If painting straight bands is difficult on a tapered form, place the tower on a banding wheel. Hold your brush steady in one spot and slowly spin the wheel for perfect horizontal rings.
Step 2: Constructing the Tower Body
-
Roll the slab:
Roll out a large slab of clay to a consistent 1/4-inch thickness. You want it sturdy enough to stand tall but not overly heavy. -
Form the cylinder:
Cut a large rectangle and wrap it around your cylindrical form or PVC pipe. I find wrapping a layer of newspaper around the form first helps the clay slide off easily later. -
Seam and shape:
Score and slip the overlapping potential seam thoroughly to join the cylinder. Gently taper the form by pressing inward as you move up, creating that classic conical lighthouse shape. -
Create the base:
Cut a circular slab slightly wider than the bottom of your tower (about 1 inch wider all around) to act as the foundation. Score and slip to attach the tower to this base. -
Add windows and door:
Using your needle tool or small cutters, cut out an arched doorway at the bottom and two window openings higher up. Don’t discard the cutouts; you can trim them to make frames. -
Detail the entrance:
Roll a thin coil or small strip to frame the door arch. Add texture or small indentations to mimic stones or bricks around the door frame.
Step 3: The Lantern Room & Gallery
-
The gallery deck:
Cut a donut-shaped ring of clay that extends slightly past the top of your tower walls. This ‘gallery’ creates the walkway look and supports the railing. -
Attach the deck:
Score the top rim of your tower and attach the gallery ring securely. Ensure the hole in the center matches the measurement you took of the solar light earlier. -
Create railing holes:
While the clay is still leather-hard, use a needle tool to poke evenly spaced vertical holes around the perimeter of the gallery deck. These will hold your wire railing later. -
Dry fit:
Gently place your solar light component on top to ensure the fit is correct before the clay dries further. It should sit flush on the gallery deck.
Solar Fit Tip
Account for clay shrinkage! Make the top opening 10-12% larger than your solar light’s base. If it shrinks too much, file the opening with a rasp after the bisque firing.
Step 4: Decoration and Firing
-
Smooth the surface:
Use a damp sponge to smooth out any rough edges, particularly around the window cutouts and the base rim. -
Paint the stripes:
Apply alternating bands of white and terracotta red underglaze. I like to use masking tape for crisp lines, but a freehand approach gives it a lovely rustic feel. -
Detail work:
Paint the window frames and door arch in a contrasting blue. If you want a lit door like the photo, you can leave the door open or paint a yellow ‘light’ inside. -
Bisque fire:
Allow the piece to dry completely—this may take up to a week for a thick sculpture. Bisque fire strictly according to your clay body’s specifications.
Step 5: Final Assembly
-
Install the railing:
Cut lengths of wire for the vertical posts and a longer piece for the horizontal rail. Glue the vertical posts into the pre-made holes, then solder or wrap the top rail wire to connect them. -
Attach the light:
Place the solar light unit on top. If the fit is loose, a few dabs of clear outdoor silicone or epoxy will hold it in place while keeping it weather-resistant. -
Optional accent:
For the finishing touch shown in the scene, make a small separate pinch pot candle holder for a tealight to sit near the base.
Set your lighthouse outside in a sunny spot to charge during the day and enjoy the coastal ambiance at night


Saucer Balcony Lantern Deck Detail
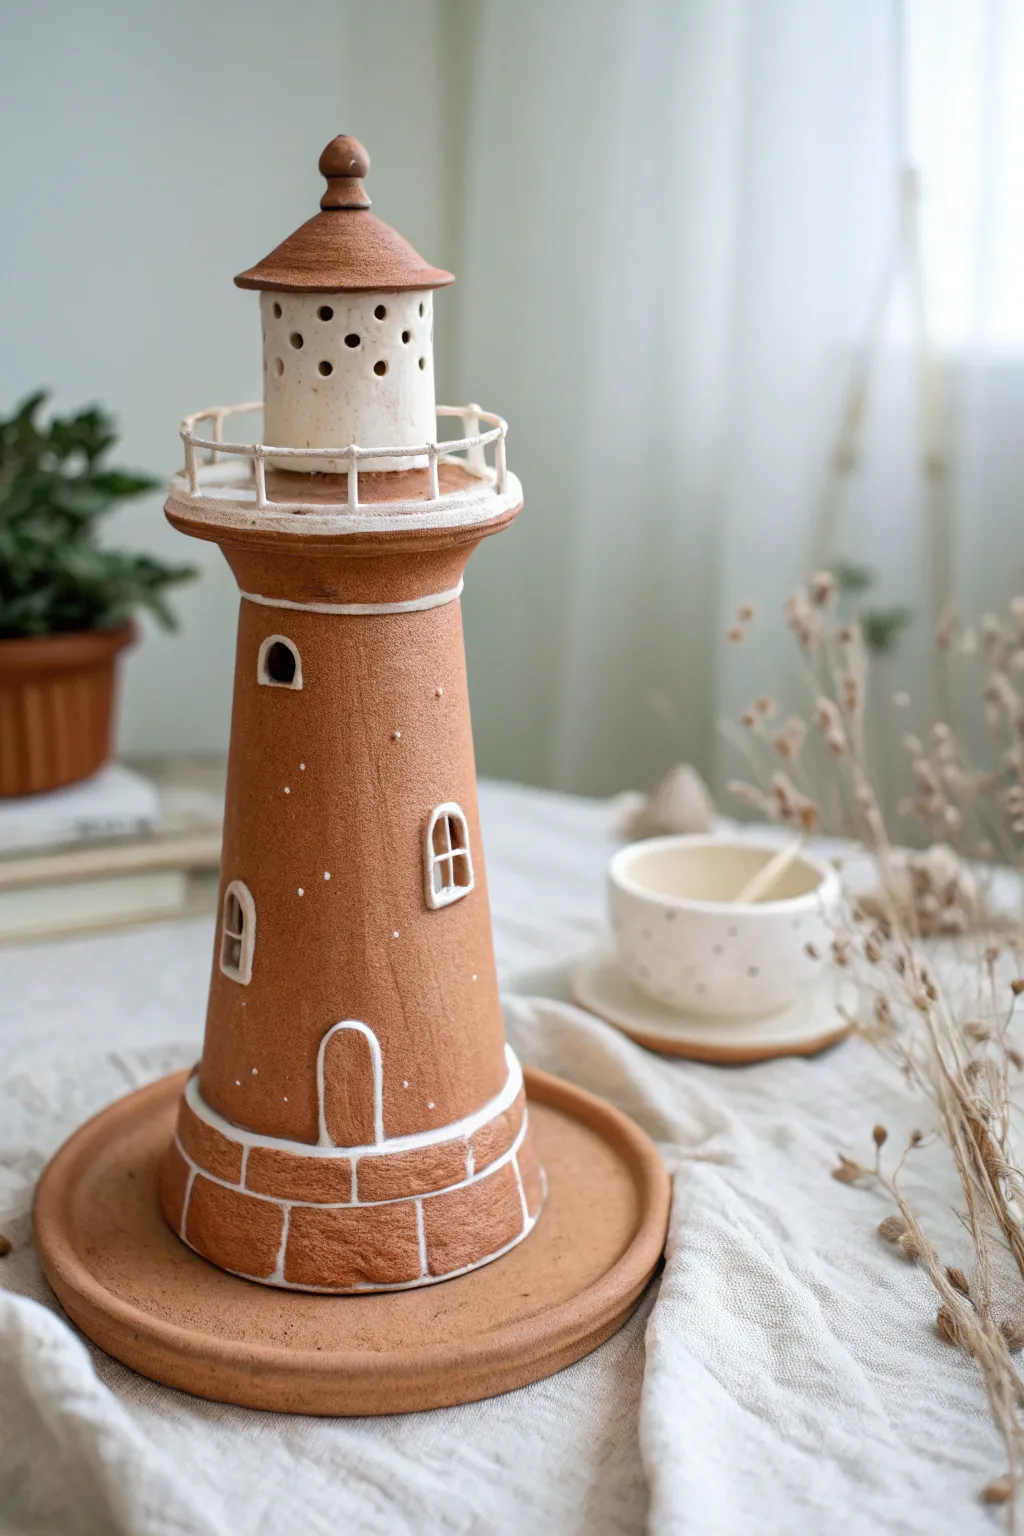
The warm, earthy tones of this terracotta lighthouse bring a touch of coastal charm to any space. With its distinctive white detailing and rustic finish, this project combines coil and slab building techniques to create a delightful decorative piece.
Step-by-Step
Materials
- Red earthenware clay or terracotta clay
- Cream or white underglaze
- Rolling pin and guide sticks (approx. 5mm)
- Clay knife or needle tool
- Scoring tool (serrated rib or old toothbrush)
- Slip (clay mixed with water)
- Small round cutter or straw (for lantern holes)
- Cardboard or paper for templates
- Fine detail brush
- Sponge
Step 1: Building the Base Structure
-
Prepare the template:
Create a paper template for a tall, tapered cone. The bottom curve should be roughly 12-14 inches long to form a substantial base, tapering up to a 4-inch top opening. -
Roll the slab:
Roll out your terracotta clay to a consistent 5mm thickness. Lay your template on the slab and cut out the main lighthouse body shape using a sharp knife. -
Form the cone:
Score the side edges of the cut slab and apply slip. Gently curve the clay into a cone shape, pressing the scored edges together firmly. Smooth the seam inside and out so it disappears. -
Add the base rim:
Roll a strip of clay about 1 inch wide and long enough to wrap around the bottom. Attach this to the base of the cone to create the foundation layer. -
Create the platform:
Cut a clay disc slightly larger than the top opening of your cone. Score and slip the top rim of the cone and attach the disc to create the floor for the lantern room.
Preventing Cracks
If the railing cracks while drying, wrap it loosely in plastic to slow the process. Fix minor cracks with a vinegar-and-clay slurry (magic water) before firing.
Step 2: Crafting the Lantern and Roof
-
Build the lantern room:
Roll a smaller rectangular strip of clay. Form it into a cylinder that fits neatly on top of the platform you just made. -
Add light holes:
Before attaching the cylinder, use a small round cutter or a stiff straw to punch several rows of small holes. This is where the light will shine through. -
Attach the cylinder:
Score and slip the bottom of your perforated cylinder and secure it to the center of the platform disc. -
Form the roof:
Fashion a small cone for the roof. I like to add a tiny clay ball or finial to the very tip for a classic silhouette. -
Secure the roof:
Score and slip the top rim of the lantern cylinder and place the roof on top. Ensure the connection is tight.
Step 3: Adding Details and Windows
-
Sculpt the railing:
Roll exceedingly thin coils of clay. Carefully construct a railing around the edge of the platform using tiny vertical posts and a horizontal top rail. Use plenty of slip here. -
Add relief windows:
Cut small U-shapes from a thin slab scrap. Attach these to the main body of the lighthouse to simulate window frames, and one larger arch for the door at the base. -
Texture the base:
Using a needle tool, carve vertical and horizontal lines into the bottom rim strip to create a faux brick or stone block appearance. -
Refine the surface:
Smooth out any rough fingerprints with a damp sponge, but leave some texture to maintain that rustic, handmade feel.
Coastal Shine
Leave the bottom open and place an LED tea light underneath. The holes in the lantern room will cast magical patterns on your walls at night.
Step 4: Glazing and Finishing
-
Dry thoroughly:
Allow the piece to dry completely to the bone-dry stage. This is crucial to prevent cracking during firing. -
Apply white details:
Using a fine brush and white underglaze, carefully paint the railing, the window frames, the door outline, and the grout lines of the brick base texture. -
Paint the lantern:
Apply the white underglaze to the entire perforated lantern cylinder (between the roof and the platform) to make it stand out against the terracotta. -
Add speckles:
Dip a stiff brush or toothbrush in watered-down white underglaze and flick it gently near the lantern room to create subtle white speckles on the surrounding terracotta. -
Fire the piece:
Bisque fire the lighthouse according to your clay’s specifications. Since the finish relies on the matte clay texture, a clear glaze is optional and often skipped to keep the earthy look.
Now you have a charming seaside beacon ready to add warmth to your home decor.

The Complete Guide to Pottery Troubleshooting
Uncover the most common ceramic mistakes—from cracking clay to failed glazes—and learn how to fix them fast.
Painted Windows and Arched Door Accents
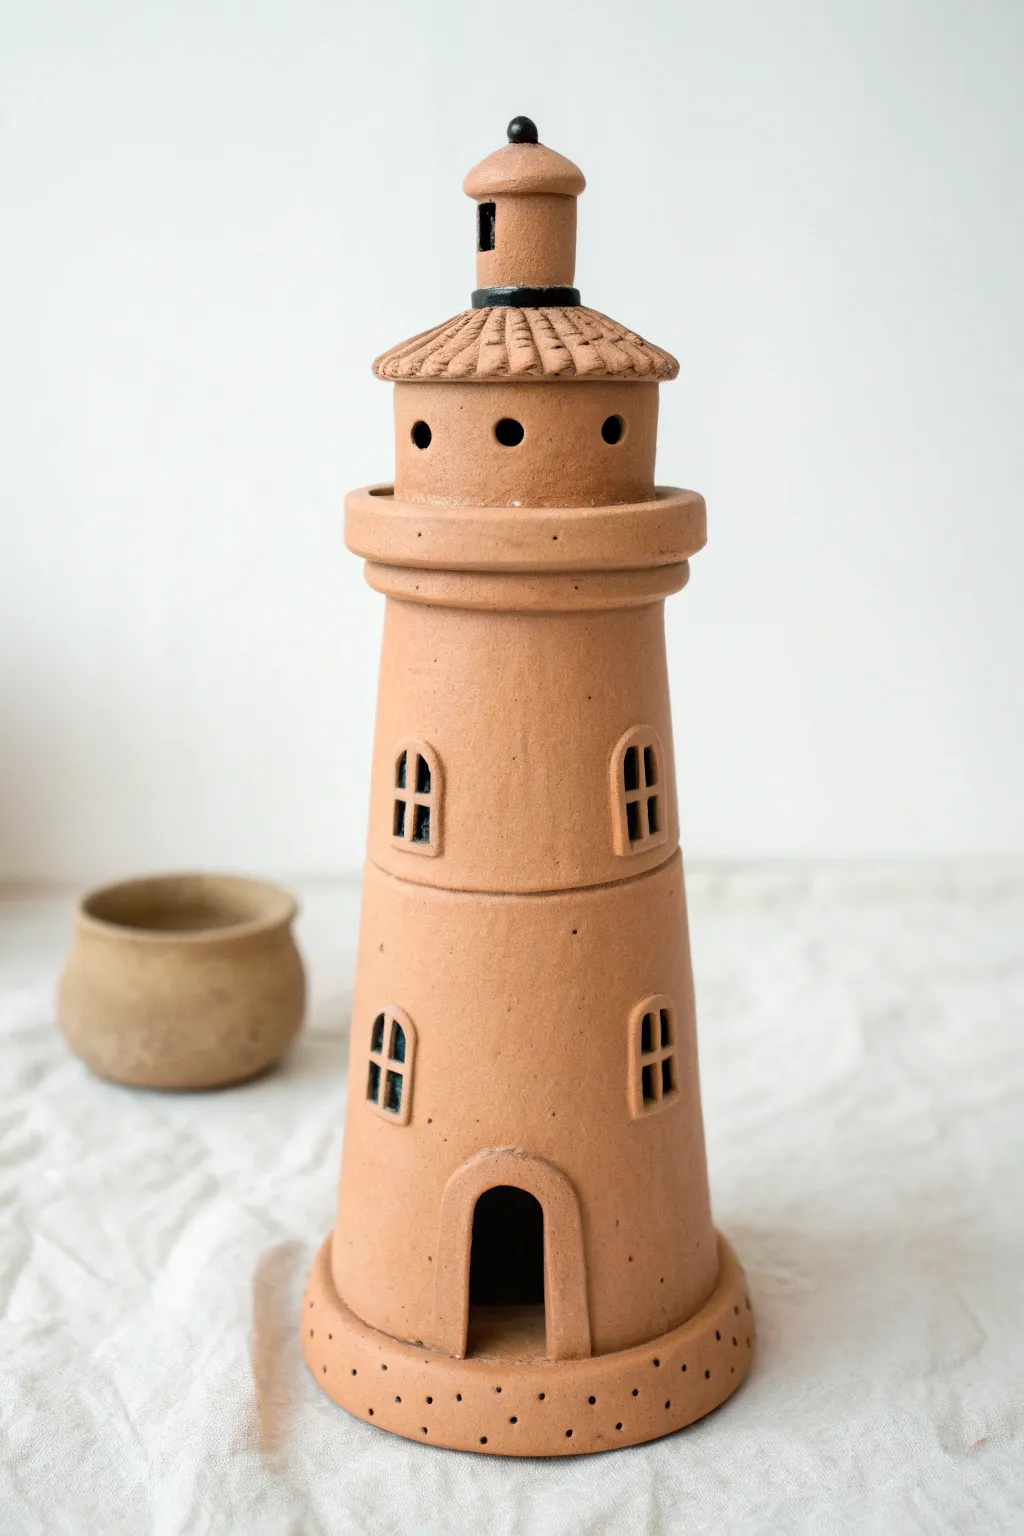
This charming, rustic lighthouse projects a warm, nautical vibe with its natural terracotta finish and simple architectural details. Standing tall with arched windows and a sturdy base, it makes for a perfect garden ornament or a cozy candle holder.
Step-by-Step Guide
Materials
- Terracotta clay (low-fire or air-dry depending on kiln access)
- Rolling pin
- Guide strips or dowels (1/4 inch thick)
- Clay knife or fettling knife
- Needle tool
- Slip and scoring tool (or serrated rib)
- Conical form or template (cardboard cone)
- Small circle cutter or straw
- Black acrylic paint or glaze
- Small detail brush
- Sponge and water
Step 1: Building the Main Structure
-
Prepare the clay:
Begin by wedging your terracotta clay thoroughly to remove air bubbles. This is crucial for structural integrity, especially if you plan to fire it in a kiln later. -
Roll out the slab:
Using guide strips to ensure even thickness, roll out a large slab of clay to approximately 1/4 inch thick. You need enough surface area to cut the main cone body. -
Cut the cone shape:
Using a cardboard template shaped like a large fan or truncated cone sector, cut the main body of the lighthouse from the slab using your fettling knife. -
Form the cylinder:
Carefully curve the clay slab around to form a tapering cylinder. Score the edges where they meet, apply slip, and press firmly to join the seam. Smooth the seam inside and out so it disappears. -
Create the upper observation deck:
Roll a smaller, separate cylinder for the top section where the light would be. Attach this to the top of your main cone using the score-and-slip method.
Smooth Seams
Use a wooden spoon handle inside the cone while pressing from the outside to seal the main vertical seam without collapsing the shape.
Step 2: Adding Architectural Details
-
Craft the gallery walkway:
Roll a thick coil of clay and flatten it slightly. Attach this ring around the junction between the main body and the upper deck to create the protruding balcony or gallery. -
Construct the roof:
Create a small, shallow cone for the roof. Before attaching it, gently press lines radiating from the center using the edge of a ruler or knife to simulate roof shingles or ridges. -
Assemble the lantern room:
Attach the roof to the very top of the structure. Add a tiny chimney-like cylinder and a small ball of clay at the very peak for the finial. -
Cut the arched door:
At the base, use your needle tool to sketch an arched doorway. Carefully cut out the opening. Use the excess clay to roll a thin coil, flattening it to frame the archway for added definition. -
Add windows:
Cut four arched windows into the main body—two on the lower level and two on the upper level. Like the door, frame these with tiny, flattened clay coils to create sills and lintels. -
Divide the panes:
Roll incredibly thin ‘snakes’ of clay and place them inside the window frames to create a cross shape, mimicking window panes. -
Ventilation holes:
Using a small circular cutter or a sturdy straw, punch three holes in the upper observation deck section. I find this helps with airflow if you put a candle inside.
Step 3: Refining and Finishing
-
Create the base:
Set the lighthouse onto a fresh slab of clay and cut a circle slightly wider than the bottom. Attach the tower to this base, smoothing the connection point. -
Detail the base:
Poke a series of small, evenly spaced holes around the perimeter of the base rim for a decorative touch. -
Smooth the surface:
Wipe the entire piece down with a slightly damp sponge to remove fingerprints and rough edges, smoothing out the clay texture. -
Drying:
Allow the piece to dry slowly under plastic for several days to prevent cracking. Once bone dry, fire it to bisque temperature if using kiln clay. -
Painting the lantern:
Using a small detail brush and black paint (or glaze), carefully paint the tiny top cylinder and the small ring just below the roof to create contrast against the natural clay.
Slumping Clay?
If the tower sags, stuff the inside with crumpled newspaper to support the walls while the clay stiffens to leather-hard.
Place a small tea light inside to watch your new creation glow warmly in the evening
Weathered Coastal Clay Lighthouse Finish
Capture the charm of a sun-bleached coastal tower with this textured clay lighthouse project. The weathered finish, featuring speckled paint and distressed edges, gives this piece an authentic, aged look that feels like it’s been standing guard by the sea for decades.
Detailed Instructions
Materials
- Air-dry clay or polymer clay (white or light grey)
- Acrylic paints (pale blue-green, white, dark brown, rust/copper)
- Clay sculpting tools (knife, needle tool)
- Thin crafting wire (rust or copper colored)
- Rolling pin
- Empty paper towel roll or cardboard cone (for armature)
- Old toothbrush (for spattering)
- Texture sponge or crumpled foil
- Sandpaper (medium to fine grit)
- Sealer (matte finish)
Step 1: Building the Structure
-
Prepare the Armature:
Cut a cardboard cone or paper towel roll to your desired height, creating a slight taper towards the top if possible. This supportive core helps maintain the lighthouse shape while minimizing the amount of clay needed. -
Roll the Base Layer:
Roll out a slab of clay about 1/4 inch thick. Cut a circle slightly larger than the base of your armature to serve as the foundation, pressing the edges down to give it a solid, grounded look. -
Wrap the Tower:
Roll out a larger slab of clay and carefully wrap it around your cardboard form. Seam the edges together at the back by scoring the clay and using a bit of water or slip to blend the join until invisible. -
Sculpt the Upper Gallery:
Create a cylindrical ring of clay slightly wider than the top of the tower for the walkway. Attach this atop the main tower structure, smoothing the connection underneath to create a flared support. -
Add the Lantern Room:
Form a smaller cylinder to sit inside the gallery ring. Cut small rectangular holes for windows or simply indent vertical lines to simulate the glass panes of the lantern room. -
Top with a Dome:
Shape a smooth, rounded dome from a ball of clay and attach it to the very top. Add a tiny spherical finial at the peak for that classic nautical silhouette.
A Speckled Secret
Mix sand into your base coat of white paint. This adds gritty, realistic texture before you even start the distress painting process.
Step 2: Adding Details
-
Carve Windows and Doors:
Using a knife or needle tool, cut arched window shapes into the tower body. You can create depth by pressing a smaller tool inside the arch to simulate a recessed window frame. -
Create the Doorway:
At the base, sculpt an arched doorway. Instead of leaving it hollow, texture a small piece of clay to look like weathered wood and insert it into the frame. -
Add Crossbars:
Roll very thin snakes of clay to create the crossbars for the windows. Carefully place them horizontally and vertically inside the window arches. -
Install the Railing:
Cut small lengths of thin wire and insert them vertically around the gallery rim. Wrap a longer horizontal wire around them, securing it with a dab of superglue or pressing it into the wet clay if possible.
Step 3: The Weathered Finish
-
Base Coat:
Once the clay is fully dry, paint the entire structure with a base coat of creamy white acrylic paint. Don’t worry about perfection; a little streakiness adds character. -
Apply the Coastal Color:
Mix a pale robin’s egg blue or seafoam green. Sponge this color onto the tower body, leaving the white showing through in patches to mimic peeling paint. -
Distress the Edges:
Use a dry brush with a tiny amount of brown paint to darken the window frames, the door arch, and the underside of the gallery. This creates shadows and simulates accumulated grime. -
Rust the Railing:
Dab the wire railing with a mix of burnt sienna and copper paint. This rusty effect is crucial for the aged seaside aesthetic. -
Spatter for Texture:
Dip an old toothbrush into watered-down dark grey or brown paint. Run your thumb across the bristles to flick tiny speckles over the lighthouse surface, creating the look of pitted, weathered stone. -
Seal the piece:
Finish with a spray of matte sealer to protect the paint without adding an unnatural glossy shine.
Wire Won’t Stick?
If the wire railing keeps popping out of dry clay, use a tiny drill bit to widen the holes slightly, then secure with a drop of gel superglue.
Place your finished lighthouse among some driftwood and smooth stones to complete the serene coastal scene.


What Really Happens Inside the Kiln
Learn how time and temperature work together inside the kiln to transform clay into durable ceramic.
Rope-Wrapped Base Nautical Trim Lighthouse
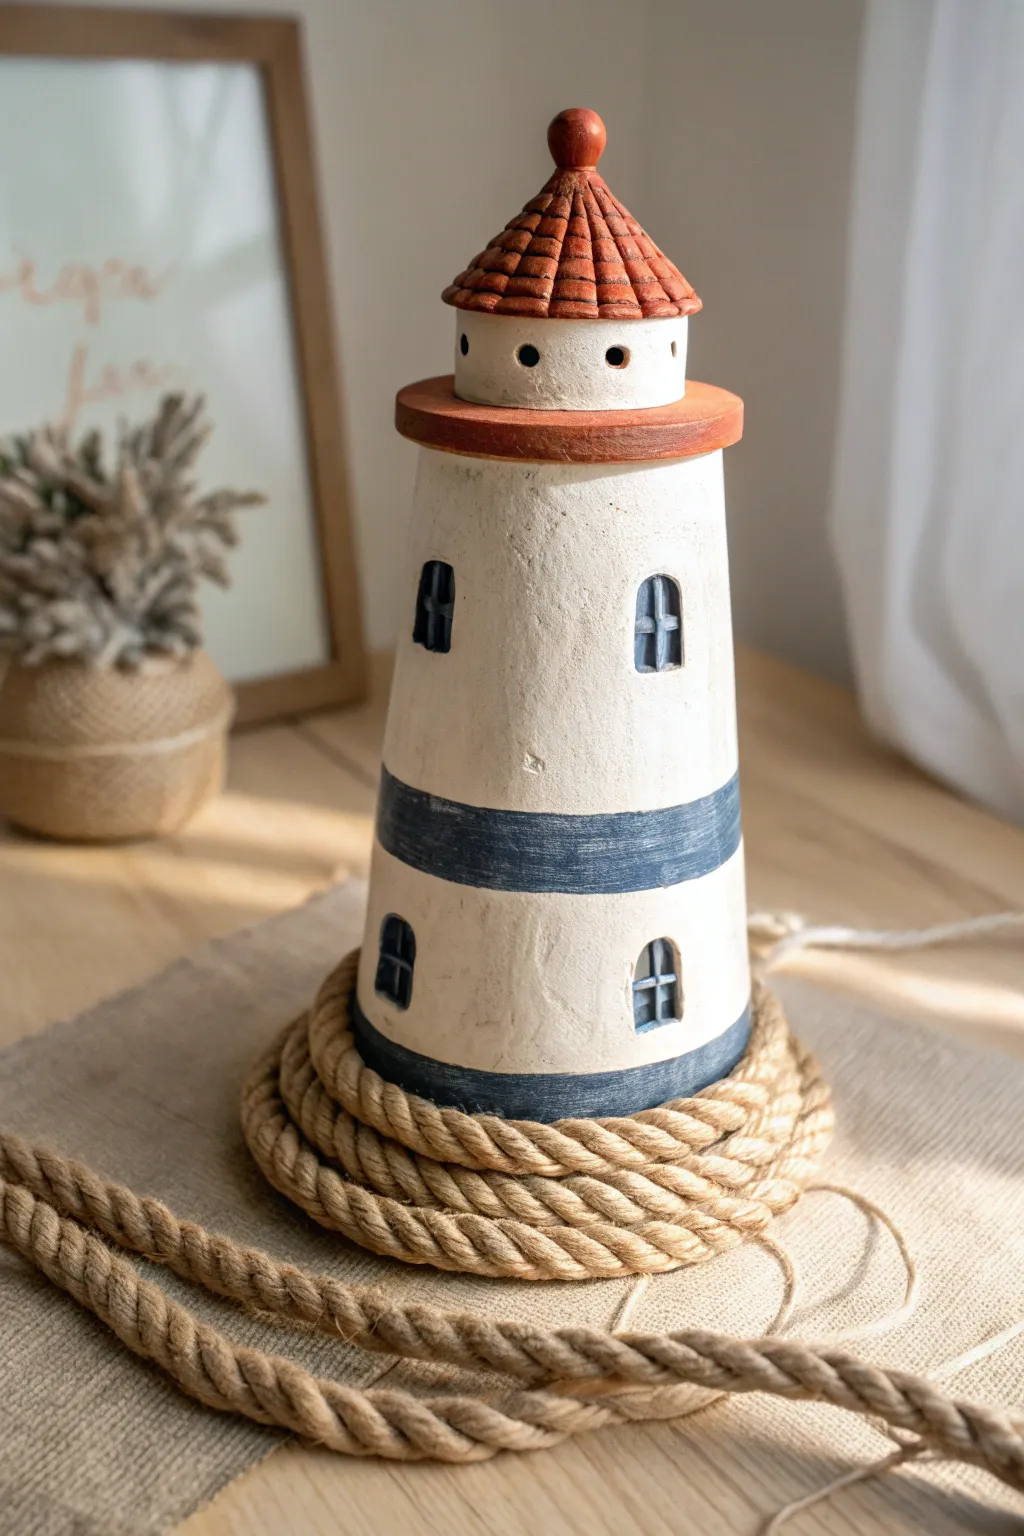
Bring the serene feeling of the seaside into your home with this handcrafted clay lighthouse, featuring classic nautical stripes and rustic textures. The rope-wrapped foundation adds weight and visual interest, perfectly grounding the piece as a standalone accent or part of a larger vignette.
Step-by-Step
Materials
- Air-dry clay (white or grey)
- Conical styrofoam form or sturdy cardstock cone (as an armature)
- Thick jute or hemp rope (approx. 1/2 inch diameter)
- Acrylic paints: White, Navy Blue, Terracotta/Brick Red
- Rolling pin
- Sculpting tools (needle tool, flat modeling tool)
- Paintbrushes (flat shader and fine detail)
- Strong craft glue or hot glue gun
- Fine-grit sandpaper
Step 1: Sculpting the Tower Base
-
Prepare the clay:
Begin by kneading a large portion of air-dry clay until it is pliable and smooth. Roll it out into a large, even slab approximately 1/4 inch thick. -
Wrap the armature:
Place your styrofoam cone or cardstock form onto the slab. Carefully wrap the clay around the form to create the tower’s body. Smooth the vertical seam where the clay edges meet, blending it until it completely disappears. -
Refine the surface:
Using slightly damp fingers or a wet sponge, smooth out the exterior of the cone. While you want it generally smooth, leaving a few minor uneven spots adds to the aged, handmade stucco look. -
Carve the windows:
Use a sculpting tool to gently press four small arched window shapes into the clay—two near the top and two near the bottom. Don’t cut all the way through; just create a recessed indentation. -
Add window details:
Roll tiny, thin snakes of clay. Place two crossed pieces inside each recessed window to form the ‘muntins’ or window panes.
Step 2: Creating the Roof and Finial
-
Construct the upper deck:
Roll out a slightly thicker disc of clay that is just wider than the top of your tower. Attach this to the top of the cone using a bit of water and scoring (scratching up the surfaces) to secure it. This acts as the walkway. -
Form the lantern room:
Create a smaller cylinder of clay to sit on top of the deck. Poke small holes around its circumference to mimic the ventilation portholes seen on real lighthouse lanterns. -
Sculpt the roof cone:
Shape a separate, smaller cone of clay for the roof. Using a needle tool or knife, gently score lines radiating from the center to the edge to mimic roof tiles or seams. Add horizontal rings to define the rows of shingles. -
Add the finial:
Roll a small ball of clay and attach it to the very tip of the roof cone. Once the roof is assembled, attach it securely to the top of the lantern room cylinder. -
Dry thoroughly:
Allow the entire sculpture to dry completely. Depending on humidity and clay thickness, this often takes 24 to 48 hours. I find it helps to rotate the piece occasionally for even drying.
Pro Tip: Rustic Texture
Don’t over-sand your dried clay before painting. The natural fingerprints and slight bumps catch the paint beautifully and enhance the aged, seaside stucco appearance.
Step 3: Painting and Finishing
-
Base coat:
Apply an off-white or creamy white acrylic paint to the main body of the lighthouse. You may need two coats for opaque coverage. -
Paint the roof:
Paint the roof cone and the finial with a terracotta or brick red color. Drybrush a little bit of brown over the top once dry to emphasize the tile texture. -
Add the stripes:
Using painter’s tape or a steady hand, paint a thick horizontal band of navy blue around the middle of the tower and another band at the very bottom edge. While painting, try to keep the edges somewhat soft to maintain that weathered feel. -
Detail the windows:
Use a fine detail brush and navy blue paint to carefully color the recessed background of the windows and the ‘cross’ bars. This creates depth and makes them look like dark glass. -
Paint the lantern room:
Paint the small cylinder section under the roof white, but fill the porthole dots with dark black or dark blue paint.
Level Up: Illuminated Top
Create the lantern room with translucent polymer clay instead of regular clay. Place a small battery-operated LED tea light inside before attaching the roof for a real glow.
Step 4: The Rope Base
-
Prepare the anchor rope:
Take your thick jute rope and wrap it around the base of the lighthouse to measure the length needed for three full coils. -
Attach the first coil:
Apply a generous amount of strong glue or hot glue to the very bottom painted rim of the lighthouse. Press the start of the rope firmly into the glue. -
Stack the coils:
Continue wrapping the rope upward, gluing it directly to the rope layer below it rather than the lighthouse body itself. This builds a freestanding ‘nest’ of rope around the base. -
Secure the end:
Once you have three nice layers, cut the rope at an angle. Tuck the end visually behind the coil structure or glue it down firmly so it doesn’t fray.
Now you have a timeless nautical decoration ready to stand guard on your shelf or mantle
Lighthouse Birdbath With Wide Saucer Base
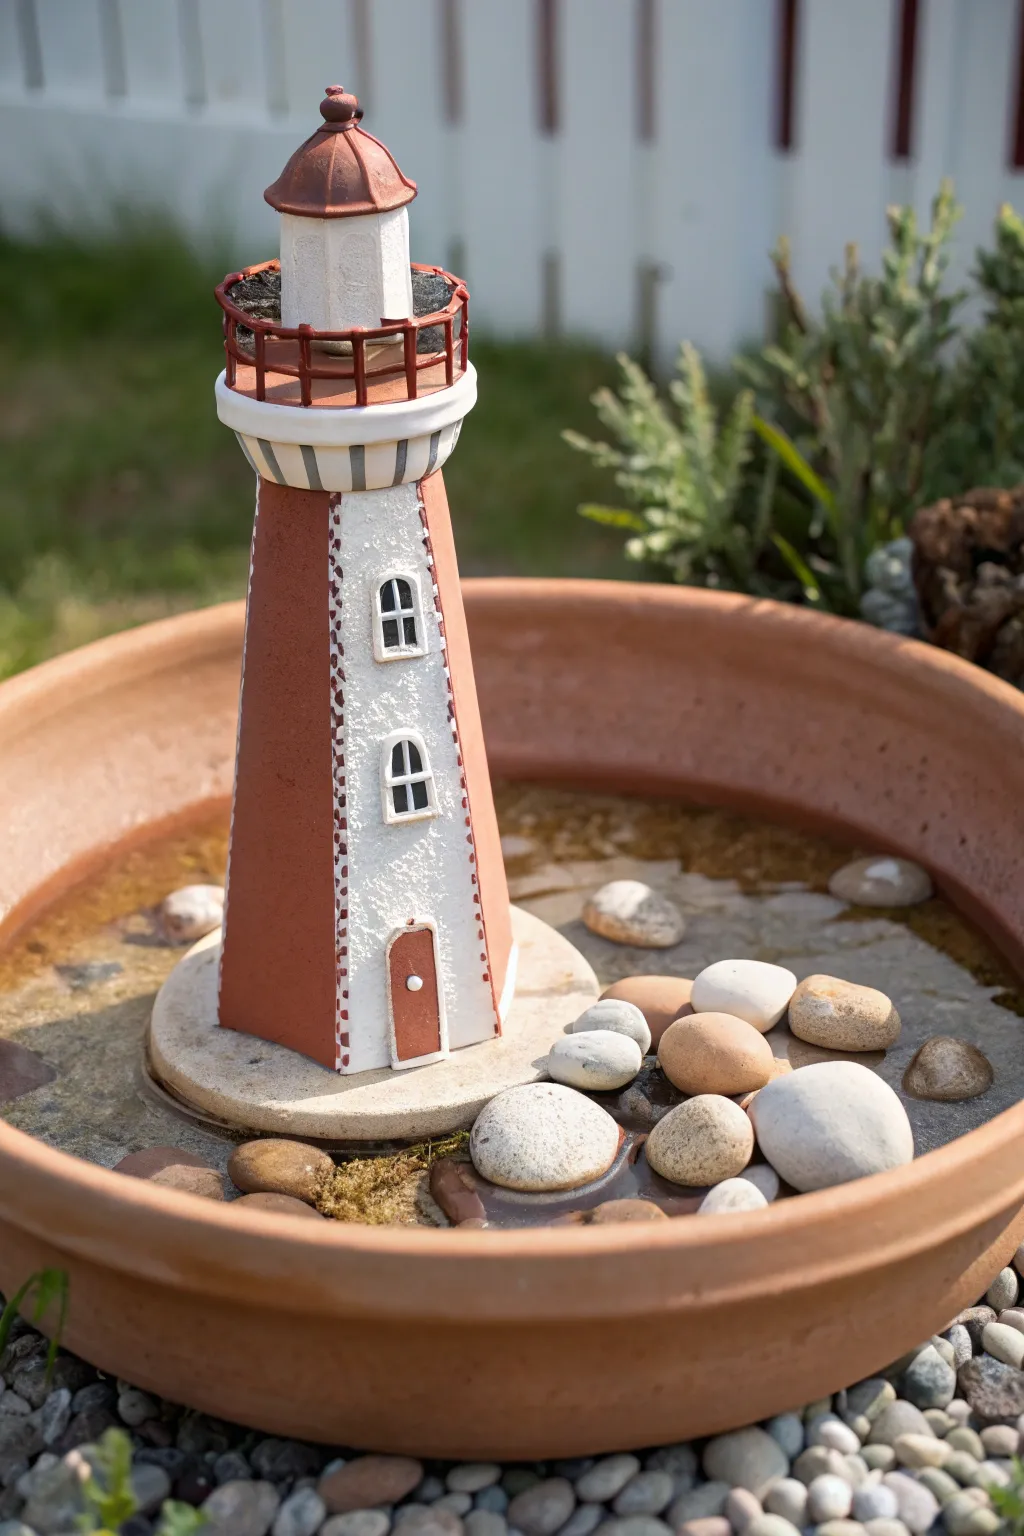
Transform a simple terracotta saucer into a charming nautical scene with this hand-sculpted clay lighthouse centerpiece. This project combines functional garden decor with whimsical artistry, featuring a red-and-white striped tower nestled among river stones in a shallow water basin.
How-To Guide
Materials
- Large terracotta saucer (12-14 inches diameter)
- Air-dry clay or polymer clay (white and terracotta/red colors)
- Small rolling pin
- Pottery tools (needle tool, modeling tool, knife)
- Acrylic paints (white, red, black, grey)
- Clear outdoor waterproof sealant (essential)
- Strong waterproof adhesive (e.g., E6000)
- Smooth river stones and small pebbles
- Water and sponge for smoothing
Step 1: Constructing the Tower Base
-
Prepare the foundation:
Begin by rolling out a thick slab of white clay, roughly 1/2 inch thick. Cut out a circle that is about 4-5 inches in diameter to serve as the sturdy island base for your lighthouse. -
Shape the tower walls:
Roll out a large slab of terracotta-colored clay. Cut a trapezoid shape that is wider at the bottom (approx. 4 inches) and narrower at the top (approx. 2.5 inches), with a height of about 8-9 inches. -
Form the cone:
Carefully curl the trapezoid slab to meet at the edges, forming a tapering hollow cone. Score the edges with a needle tool, add a bit of water or slip, and press them firmly together to seal the seam. -
Attach to the base:
Position your tapered cone onto the center of the white circular base. Blend the clay from the bottom of the tower down onto the base using a modeling tool to create a seamless, watertight bond. -
Add white panels:
Roll a thin strip of white clay. Apply this vertically down the front of the tower to create the distinct white panel where the door and windows will go. I like to texture this white section slightly with a stiff brush to mimic stucco. -
Create the decorative borders:
Roll very thin ‘snakes’ or coils of terracotta clay. Press these along the vertical edges of the white panel to define the separation between the red walls and the white front detail.
Pro Tip: Hidden Weight
Before sealing the cone, place a small, heavy rock inside the hollow tower. This added weight prevents the lighthouse from tipping over in strong winds or if a larger bird lands on it.
Step 2: Sculpting the Lantern Room
-
Form the gallery deck:
Create a slightly wider ring of white clay and attach it to the top of the red tower. This acts as the balcony or gallery deck. -
Build the lantern housing:
Shape a smaller cylinder of white clay and place it centrally on top of the gallery deck. This will hold the ‘light’ of the lighthouse. -
Add the railing:
The railing requires patience; form tiny posts from red clay and attach them around the gallery deck edge. Connect them with a thin horizontal strip of red clay. -
Cap it with a roof:
Fashion a dome or bell shape from terracotta clay for the roof. Add a small clay bead at the very peak for a finial detail. -
Detail the woodwork:
Use a knife tool to gently impress vertical lines into the gallery deck ring, simulating wooden slats or architectural details.
Level Up: Solar Glow
Instead of a solid clay top, use a small, disassembled solar pathway light for the lantern room. Build the clay roof around the solar panel so it lights up at night.
Step 3: Windows, Doors, and Finishing
-
Install the door:
Cut a small arch shape from terracotta clay and press it into the bottom of the white panel. Add a tiny white dot for the doorknob. -
Place the windows:
Create two small arched windows. Press them into the white panel above the door, evenly spaced. -
Paint the details:
Once the clay is dry (or cured if using polymer), paint the window panes black and add white grid lines. Paint the upper lantern housing windows black as well. -
Waterproof the structure:
Apply at least two coats of heavy-duty outdoor waterproof sealant to the entire lighthouse. This is critical to prevent the clay from dissolving or softening in the birdbath water. -
Secure the lighthouse:
Use a strong waterproof adhesive to glue the lighthouse base permanently to the center of your large terracotta saucer. -
Arrange the scene:
Place smooth river stones and pebbles around the base of the lighthouse, partially covering the white clay island to make it look natural. -
Fill the basin:
Pour water into the saucer until it creates a shallow pool around the stones, leaving the lighthouse island just above the waterline.
Enjoy watching your feathered friends visit their new coastal retreat

TRACK YOUR CERAMIC JOURNEY
Capture glaze tests, firing details, and creative progress—all in one simple printable. Make your projects easier to repeat and improve.
Lighthouse Bird Feeder With Seed Tray
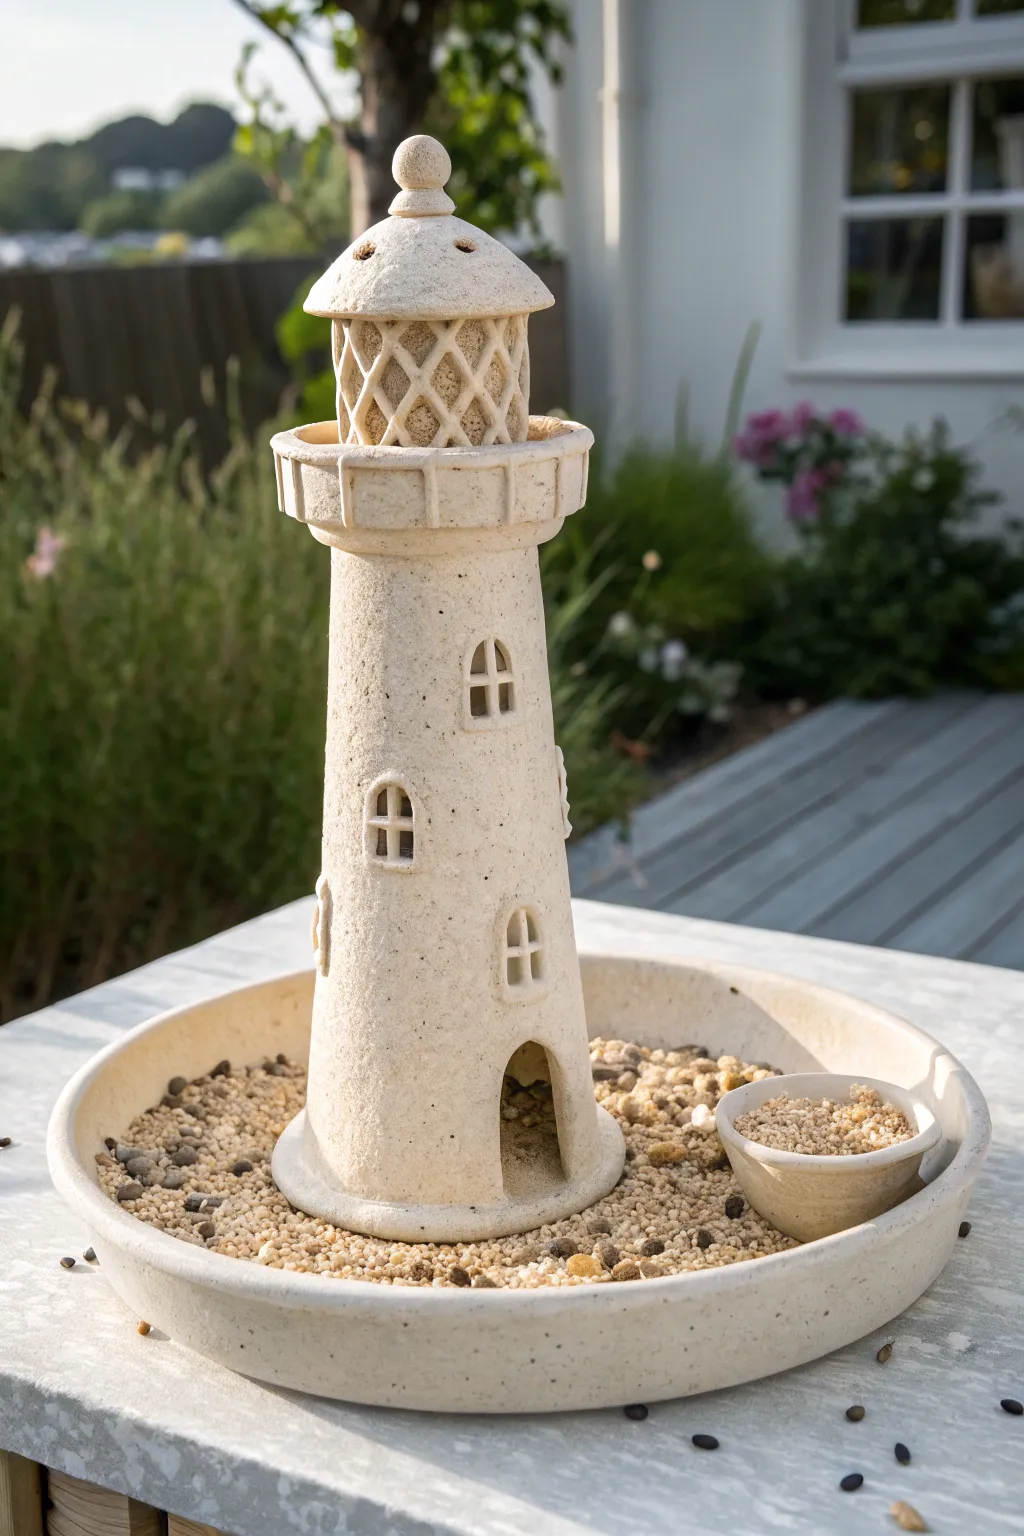
Bring coastal charm to your garden with this functional lighthouse bird feeder, featuring a hollow tower for aesthetic height and a broad tray for feeding. The textured, sandy finish gives it an authentic stone look, perfect for blending naturally into outdoor spaces.
Detailed Instructions
Materials
- White or speckled stoneware clay (groggy clay works best for texture)
- Pottery wheel (optional, can be hand-built)
- Rolling pin and canvas
- Fettling knife
- Carving tools (needle tool, small loop tool)
- Circular cookie cutters (various small sizes)
- Slip and scoring tool
- Sponge
- Small bowl for seeds (to model the removable cup)
- Ruler
- Kiln
Step 1: Forming the Base Tray
-
Roll the slab:
Begin by rolling out a thick slab of clay, roughly 1/2 inch thick, to serve as the sturdy base. You want this heavy enough to withstand wind. -
Cut the circle:
Cut a large circle, approximately 10-12 inches in diameter. I find using a large dinner plate as a template makes this effortless. -
Raise the rim:
Create a long coil or a strip of clay about 1.5 inches tall. Score and slip the outer edge of your base circle, then attach the strip to create a vertical wall, blending the seam thoroughly on the inside and outside.
Clean Lines
When carving the lattice work on the lantern room, let the clay stiffen to ‘leather hard’ first. Soft clay will slump and ruin the delicate diamond shapes.
Step 2: Constructing the Tower
-
Prepare the cone:
Roll out a large slab for the tower body. Cut a fan shape (a truncated sector of a circle) which, when rolled up, will form a tall, tapered cone. -
Assemble the cylinder:
Stand the fan shape up and curve it into a cone. Bevel the vertical edges, score, slip, and join them to create the main lighthouse structure. -
Create the base connection:
Roll a thick coil and attach it to the bottom of your cone to create a widened, decorative footer. This adds stability when it sits in the tray. -
Add the gallery deck:
Cut a clay ring slightly wider than the top of your tower. Attach it to the narrow top opening. Add small rectangular bits of clay around the edge to simulate the railing posts.
Step 3: Detailing and Lantern Room
-
Carve the windows:
Using a needle tool, sketch small arched windows up the sides of the tower. Carve them out completely or recess them deeply. Add a cross-bar of clay within each arch for the window panes. -
Carve the door:
Cut a larger arched doorway at the very bottom of the tower. This allows any water that gets inside to drain out onto the tray. -
Make the lantern section:
Form a smaller, short cylinder that fits inside the gallery deck. Use a diamond-shaped cutter or careful knife work to cut a lattice pattern into the walls of this cylinder. -
The roof cap:
Fashion a small conical roof. Smooth it out and add a tiny ball or decorative finial on top for a classic silhouette. -
Final assembly:
Score and slip the lattice cylinder onto the gallery deck, then attach the roof cap on top of the lattice.
Lighting Upgrade
Make the tower hollow all the way through the base. After firing, you can place a solar-powered garden light underneath it to illuminate the windows at night.
Step 4: Finishing Touches
-
Texture the surface:
Gently pat the entire outer surface with a coarse sponge or a rock to give it a weathered, sandy stone texture. -
Create the seed cup:
Pinch a small, separate bowl that matches your clay. This will sit loose in the tray for holding special treats like mealworms. -
Drying:
Let all pieces dry slowly under loose plastic for several days to prevent warping, especially the large tray. -
Firing:
Bisque fire the pieces. Since the look relies on the clay’s natural texture, you can leave the exterior unglazed or apply a very dry, matte oxide wash before the final high firing.
Once fired and placed in your garden, fill the tray with seed and watch your local birds enjoy their new seaside dining spot
Mini Clay Lighthouses as Pathway Markers
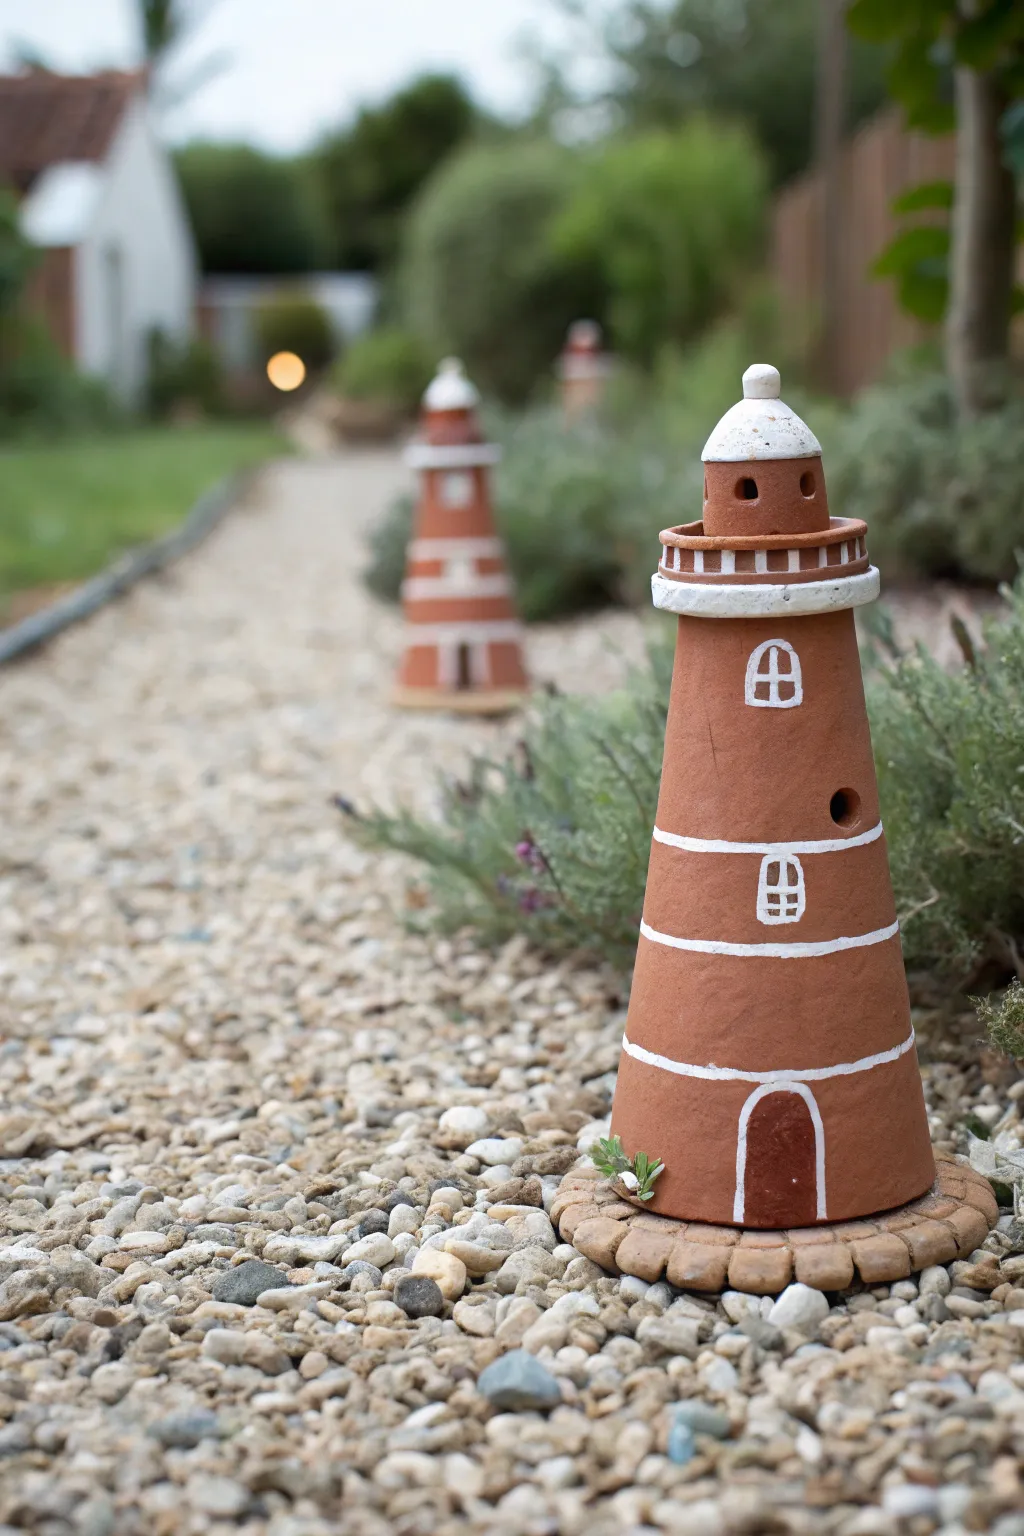
Transform a simple garden path into a coastal walkway with these charming, rustic lighthouses crafted from reddish-brown clay. Their sturdy cone shape and crisp white details create a delightful nautical accent that looks wonderful nestled among pebbles or low-lying plants.
Step-by-Step Guide
Materials
- Reddish-brown air-dry clay or polymer clay (terracotta color)
- White acrylic paint
- Small flat paintbrush
- Fine-point paintbrush (size 0 or 1)
- Clay carving tools or a plastic knife
- Small round cutter (or a bottle cap)
- Rolling pin
- Water (for smoothing clay)
- Clear outdoor varnish or sealant spray (matte finish)
Step 1: Base Construction
-
Form the main cone:
Take a large handful of your terracotta-colored clay and roll it into a smooth ball to remove air bubbles. Then, gently roll it on your work surface while applying more pressure to one side to form a tall, sturdy cone shape. The base should be wide enough to stand independently. -
Create the circular foundation:
Roll out a separate slab of clay to about 1/4 inch thickness. Place your cone on top to measure, then cut a circle slightly larger than the cone’s base. This will act as the stone foundation. -
Texture the foundation:
Using a clay knife or sculpting tool, press vertical indentations into the edge of the circular base to simulate individual paving stones or bricks. -
Attach the cone:
Score the bottom of the cone and the top of the circular base by making small cross-hatch marks. Apply a dab of water (slip) to both scored areas and press the cone firmly onto the base to bond them.
Step 2: Adding Architectural Details
-
Form the lantern room:
Roll a smaller ball of clay and flatten it slightly into a thick disc. Place this on the very top of your cone to create the floor of the lantern room. -
Add the railing:
Roll a very thin snake of clay. Wrap it around the top disc you just placed to create a railing border. Use a tool to press tiny vertical lines into this strip to look like railing posts. -
Sculpt the tower cap:
Create a small, rounded dome shape from a new piece of clay. Attach this to the top of the lantern room disc. I find smoothing the seam with a wet finger helps it look like one cohesive piece. -
Carve the windows:
Use a small, round sculpting tool or the end of a paintbrush to gently press two deep indentations into the dome for the lantern windows. You can also press a small hole into the side of the main cone body for extra detail. -
Dry the structure:
Allow your clay lighthouse to dry completely according to the package instructions. For air-dry clay, this usually takes 24-48 hours depending on thickness.
Cracking Up?
If you see cracks forming while the clay dries, mix a tiny bit of fresh clay with water to make a paste and fill them in immediately before sealing.
Step 3: Painting and Finishing
-
Paint the defining stripes:
Dip a small flat brush into white acrylic paint. Carefully paint two or three horizontal bands around the cone body. Don’t worry if lines aren’t perfectly straight; it adds rustic charm. -
Detail the door:
Near the base, paint a simple arch outline in white to represent the door frame. Leave the inside unpainted to let the clay color serve as the wooden door. -
Paint the windows:
Switch to your fine-point brush. Paint small arched window outlines on the tower body, adding a cross in the center for panes. -
Highlight the railing:
Use the very tip of your brush to dab white paint onto the vertical lines of the railing you sculpted earlier, making the architectural details pop. -
Finish the dome:
Paint the very top dome white. You can leave the very peak unpainted or paint it fully depending on your preference. -
Seal for weather resistance:
Once the paint is fully dry, take the lighthouse outside and spray it with a clear, matte outdoor artistic sealer. This protects the clay from moisture if you plan to keep them in the garden.
Solar Upgrade
Before drying, hollow out the top dome and insert a small solar pathway light cap so your lighthouse actually glows at night.
Now you have a quaint set of navigational markers ready to guide guests down your garden path
Sand-and-Pebble Base Poolside Lighthouse Decor
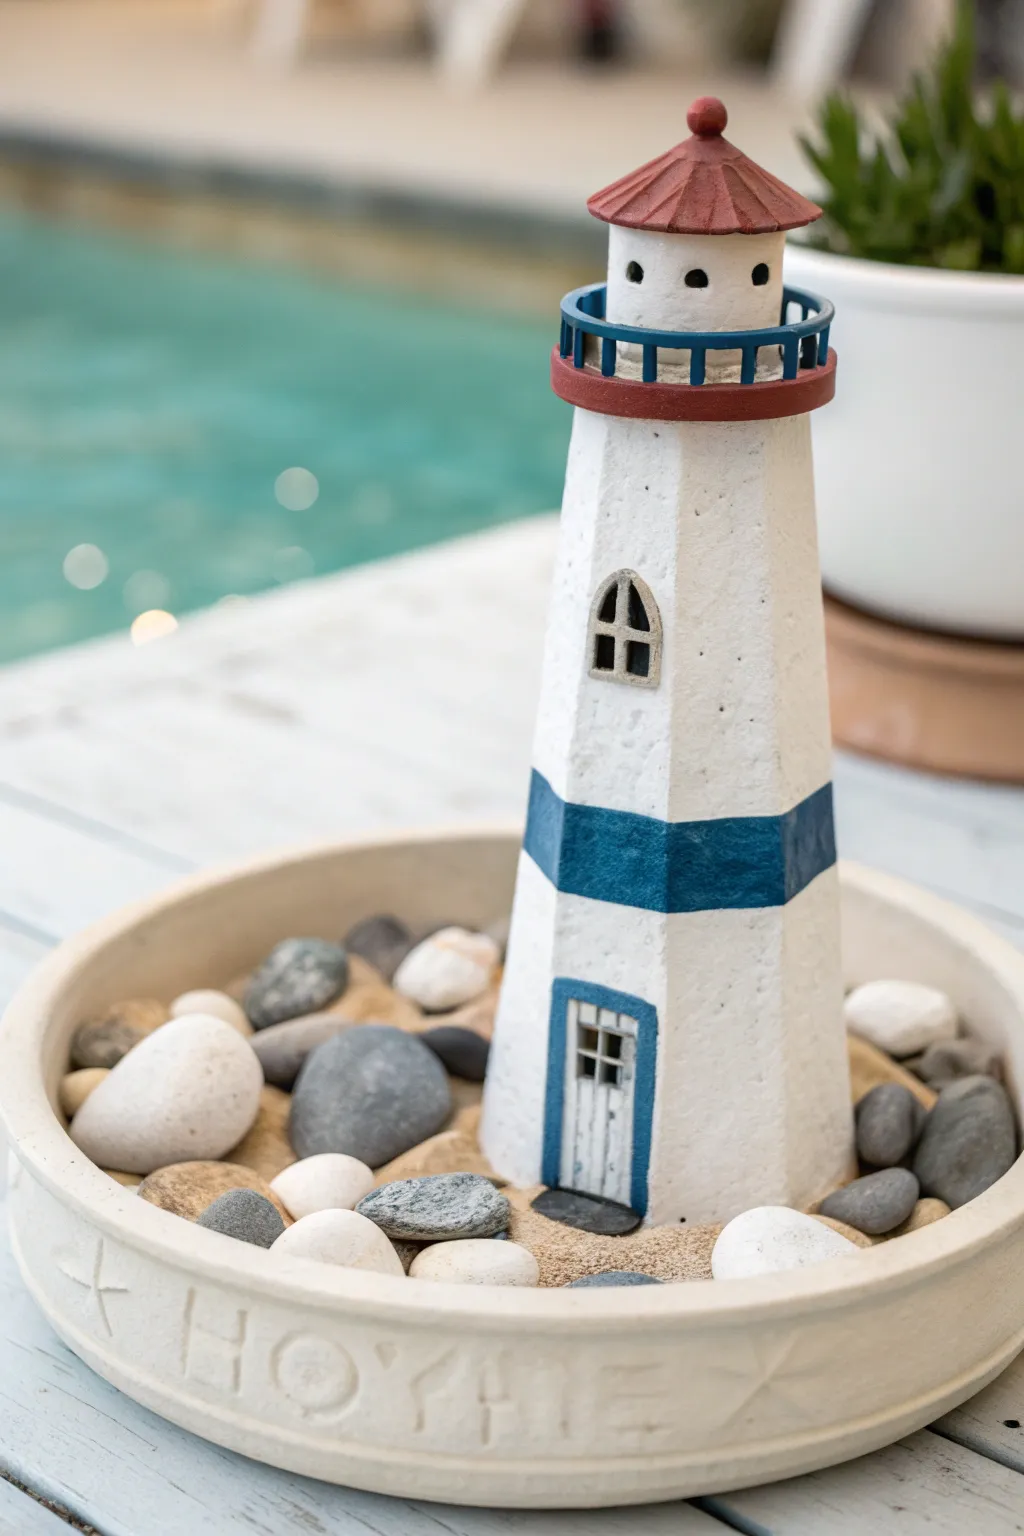
Bring the calming spirit of the coast to your tabletop with this delightful clay lighthouse project. Nestled in a bed of sand and pebbles within a custom-stamped tray, this miniature beacon captures the rustic, sun-bleached look of seaside architecture.
Detailed Instructions
Materials
- White creative paper clay or air-dry clay
- Rolling pin
- Craft knife
- Ruler
- Acrylic paints (white, navy blue, brick red, charcoal grey)
- Small flat paintbrush
- Detail paintbrush
- Shallow round dish or planter saucer
- Play sand or fine decorative sand
- Assorted smooth river stones or beach pebbles
- Letter stamps (optional)
- Sandpaper (fine grit)
- Wood glue or heavy-duty craft glue
Step 1: Constructing the Tower
-
Create the tower walls:
Roll out a slab of clay to about 1/4 inch thickness. Cut a trapezoid shape where the bottom edge is wider than the top, creating the tapered look of a lighthouse. -
Score and fold:
Using a ruler and a dull tool, score vertical lines evenly across your clay slab to create the faceted, hexagonal exterior. Gently fold the clay along these score lines without breaking it. -
Join the seam:
Bring the long edges together to form the tower. Score the connecting edges, apply a dab of water or slip, and press them firmly together. Smoothing this seam inside helps structural integrity. -
Add the gallery deck:
Roll a small coil of clay and flatten it slightly. Attach this ring to the top of your tower to form the base of the upper lantern room. -
Form the lantern room:
Create a smaller cylinder of clay that fits just inside your gallery deck ring. Attach it securely. Poke small holes around the top to simulate windows. -
Top with a roof:
Fashion a small cone shape for the roof and texture it with a craft knife to suggest shingles or metal ribbing. Place a tiny ball of clay at the very peak for a finial and attach the roof. -
Refine the surface:
Before the clay dries, gently press a rough texture onto the main walls using a piece of crumpled foil or a sponge to give it that weathered stucco appearance.
Step 2: Creating the Base Tray
-
Prepare the saucer:
You can use a store-bought terra cotta saucer or make your own shallow dish from clay. If making it, roll a long coil and attach it to a flat clay circle base. -
Add custom details:
While the clay of the saucer is still soft, press letter stamps into the rim to spell out ‘HOME’ or a seaside name. Use a star-shaped stamp or tool to add decorative starfish motifs between words. -
Dry completely:
Allow both your lighthouse structure and the tray to dry fully. This usually takes 24-48 hours depending on humidity.
Leaning Tower?
If your tower sags while drying, stuff the hollow inside with crumpled newspaper or paper towels to support the walls until the clay hardens completely.
Step 3: Painting and Assembly
-
Base coat:
Paint the main body of the lighthouse with a matte white acrylic. Apply two thin layers for solid coverage while letting that stone texture show through. -
Paint the stripes:
Carefully paint a bold navy blue band around the mid-section of the tower. I like to use painter’s tape here to keep the lines crisp on the faceted edges. -
Detail the features:
Paint the roof and the base of the gallery deck in a muted brick red. Use a fine brush to paint the window trim and door frame in blue or grey. -
Make the railing:
For the railing around the lantern room, you can paint a thin strip of paper or cardstock blue and glue it on, or carefully paint vertical blue dashes directly onto the white clay. -
Prepare the scene:
Once the paint is dry, place the lighthouse in the center of your tray. You don’t necessarily need to glue it down if you want to swap decor later. -
Add the landscape:
Pour fine sand into the tray, filling it enough to cover the base of the lighthouse slightly. Smooth it out for an even drift. -
Arrange the stones:
Place your smooth river stones and pebbles randomly around the base in the sand, mixing sizes and colors for a natural, washed-up look.
Light It Up
Make the project functional by leaving the lantern room hollow and the roof removable. Place a small battery-operated LED tea light inside for a real glow.
Now you have a serene coastal accent piece perfect for displaying on a patio table or bookshelf
Fairy Garden Mini Clay Lighthouse
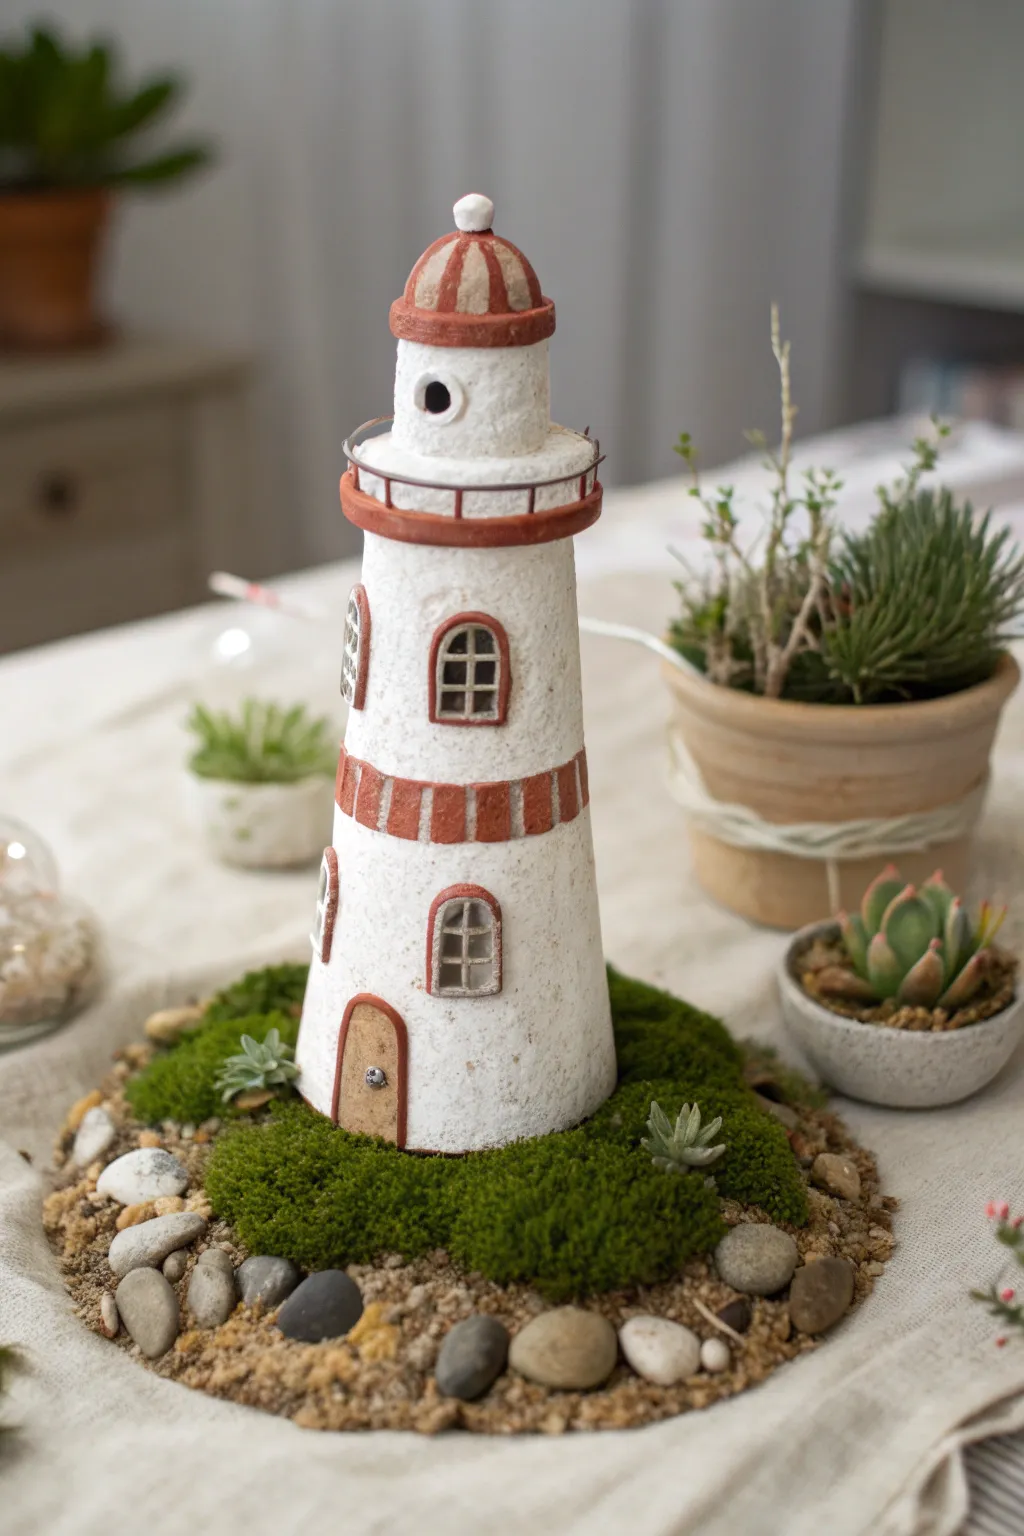
Bring a touch of the seaside to your miniature world with this textured white clay lighthouse. Featuring rust-colored accents and a rugged, sandy base, this piece makes a perfect focal point for any coastal fairy garden theme.
How-To Guide
Materials
- Air-dry clay (white, textured variety works best)
- Acrylic paints (white, terracotta/rust brown, dark grey)
- Clay sculpting tools (knife, needle tool)
- Small rolling pin
- Empty spice jar or cardboard tube (for structure armature)
- Fine grit sandpaper
- Craft glue or tacky glue
- Preserved moss (sheet moss or mood moss)
- Coarse sand
- Small pebbles and smooth river stones
- Cardboard or plastic circle (for the base)
Step 1: Sculpting the Tower
-
Prepare the Armature:
If using a cardboard tube or spice jar, cover it thinly with glue. This helps the clay adhere better and prevents it from sliding off the smooth surface. -
Roll the Clay:
Roll out a slab of white air-dry clay to about 1/4 inch thickness. I like to keep the texture slightly rough here rather than smoothing it perfectly, as it mimics old stucco. -
Wrap the Form:
Wrap the clay sheet around your armature to create the main tower cylinder. Trim the excess and blend the vertical seam using a little water on your finger until it disappears. -
Create the Taper:
If you aren’t using a rigid jar, gently squeeze the top third of the clay cylinder to taper it slightly inward, creating the classic lighthouse shape. -
Form the Lantern Room:
Roll a smaller cylinder of clay for the top lantern room. Attach this to the top of your tower using the score-and-slip method (scratching both surfaces and adding a drop of water). -
Add the Roof:
Fashion a small dome or cone shape for the roof and place it atop the lantern room. Add a tiny ball of clay at the very peak for the finial.
Wire Railing Pro-Tip
For a thin, realistic railing, embed small staples or bent wire into the wet clay runway. Once dry, paint them rust-red to match the trim details.
Step 2: Adding Details & Texture
-
Sculpt the Windows:
Roll out thin snakes of clay to create arched window frames. Press these firmly onto the tower body. Use a needle tool to impress a grid pattern inside the frames to suggest panes. -
Create the Balcony:
Roll a thin strip of clay and wrap it around the base of the lantern room to form the balcony walkway. For the railing, you can use very thin rusty wire or create a delicate clay rim. -
Define the Door:
Cut a small arch shape from a thinly rolled piece of clay for the door. Press a tiny bead of clay into it to serve as the doorknob. -
Apply Texture:
Use an old stiff toothbrush or a ball of crumpled foil to gently tap the surface of the white walls. This creates that weathered, stony look seen in the photo.
Clay Cracking?
If small fissures verify as the clay dries, mix a tiny bit of fresh clay with water to make a paste (slip) and fill the cracks. Smooth with a damp finger.
Step 3: Painting and Assembly
-
Base Coat:
Once fully dry (usually 24 hours), paint the entire lighthouse white. Even if the clay is white, paint gives a uniform finish and seals the surface. -
Paint Accents:
Use a terracotta or rust-brown acrylic paint for the roof stripes, the window frames, the door frame, and the horizontal band around the middle of the tower. -
Detail Work:
Paint the inside of the windows a dark grey to simulate depth. Use a lighter tan or wood color for the door itself. -
Prepare the Base:
Cut a circle from cardboard or plastic, slightly wider than your lighthouse. Glue your lighthouse to the center. -
Landscaping:
Apply a thick layer of glue around the base of the tower. Press preserved moss securely into the glue to create a grassy mound. -
Adding the path:
Spread glue around the outer edge of the moss. Sprinkle coarse sand over the glue and press in small pebbles and river stones to create a rugged shoreline effect.
Place your finished lighthouse near some succulents or blue glass beads to complete the seaside scene
Air-Dry Clay Lighthouse Pencil Holder
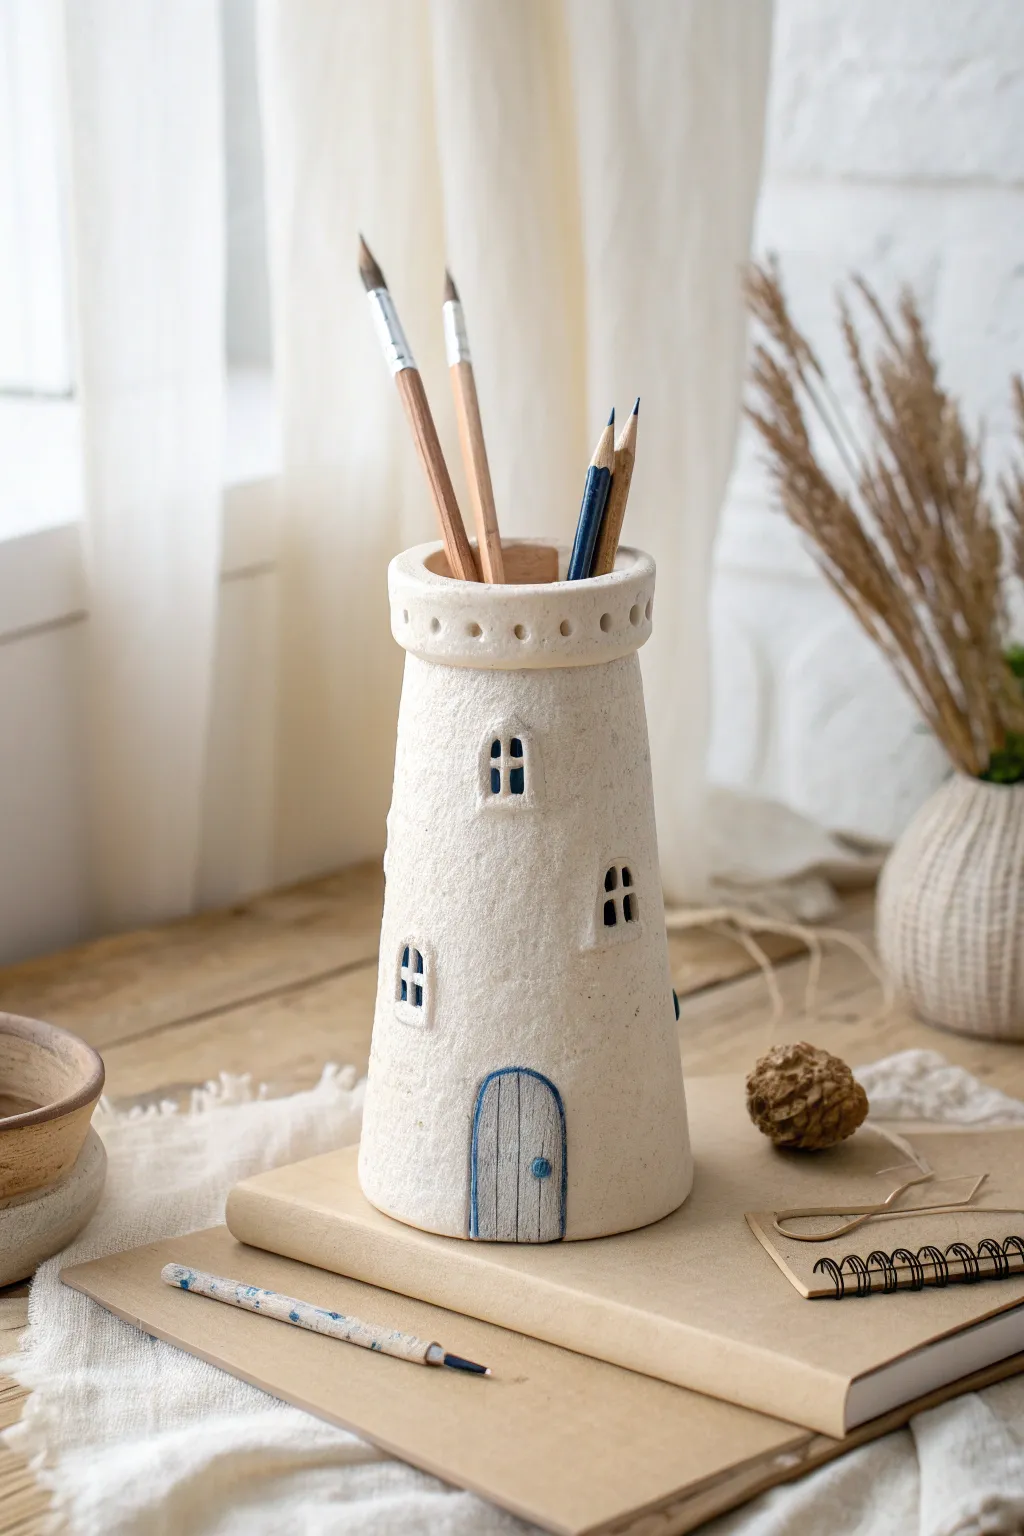
Bring a touch of coastal whimsy to your desk with this charming lighthouse pencil holder made from air-dry clay. Its rustic white finish and delicate blue details make it a functional piece of art that looks like ceramic pottery.
Step-by-Step Tutorial
Materials
- Air-dry clay (white or stone texture)
- Rolling pin
- Cardboard tube or PVC pipe (about 2-inch diameter) for the form
- Parchment paper
- Clay sculpting tools (knife tool, needle tool)
- Small bowl of water
- Slip (clay mixed with water)
- Sponge
- Fine-grit sandpaper
- Acrylic paints (dark blue, black, watered-down brown/grey for wash)
- Fine detail paintbrush
- Matte varnish or sealant
Step 1: Forming the Base Structure
-
Prepare your workspace:
Begin by covering your work surface with a mat or parchment paper to prevent sticking. Wrap your cardboard tube or PVC pipe form loosely in a layer of parchment paper; this ensures you can slide the clay off later. -
Roll out the clay:
Take a large chunk of air-dry clay and condition it by kneading until pliable. Roll it out into a slab that is roughly 1/4 inch thick. You want it substantial enough to stand tall without collapsing. -
Cut the main panel:
Measure the height you want your pencil holder to be (around 5-6 inches is standard). Cut a long trapezoid shape from your slab. The bottom edge should be slightly longer than the top edge to create that classic tapered lighthouse silhouette. -
Wrap the form:
Carefully lift your clay trapezoid and wrap it around your parchment-covered tube. Join the two edges together. If I find the clay isn’t sticking, I score both edges with a needle tool and apply a little water or slip. -
Smooth the seam:
Use your thumb or a modeling tool to blend the seam until it disappears completely. Smooth the clay vertically to ensure the taper is even all around. -
Create the base:
Roll a small ball of clay and flatten it into a disc slightly larger than the bottom of your cylinder. Place your wrapped tube onto this disc. Blend the clay from the disc up onto the walls of the lighthouse to seal the bottom securely.
Clean Seams Pro-Tip
When joining clay seams, use a slightly wet finger to smooth perpendicular to the cut first, then parallel. This ‘zips’ the clay together for a seamless finish that won’t crack while drying.
Step 2: Adding Architectural Details
-
Form the top rim:
Roll a snake of clay about 1/2 inch thick. Flatten it slightly into a strip. Wrap this strip around the very top opening of the lighthouse to create the observation deck rim. -
Blend and texturize:
Blend the bottom edge of this rim into the main body so it’s secure but sticks out slightly. Use a damp sponge to gently dab the entire surface of the lighthouse, giving it that lovely limestone-like texture. -
Create the crenellations:
Using the back of a paintbrush or a small round tool, press small indentations evenly around the top rim to mimic the look of a railing or castle-top texture. -
Sculpt the windows:
Roll tiny balls of clay and flatten them into small arches, or simply cut small arch shapes from leftover slab scraps. Attach these to the body of the lighthouse using slip. Add one or two near the top and another lower down. -
Add window depth:
Use a sculpting tool to press into these added window shapes, creating a recessed frame. This adds dimension without cutting all the way through the pencil holder. -
Construct the door:
Determine where the front is and add a larger arch shape at the base for the door. Press vertical lines into the clay of the door area to simulate wooden planks.
Coastal Level-Up
Before the clay dries, press a piece of real coral or a rough seashell gently into the surface to imprint authentic organic textures into the lighthouse walls.
Step 3: Finishing and Painting
-
Remove the core:
Once the clay has stiffened slightly (usually after an hour or two), carefully slide the cardboard or pipe form out. Peel away the parchment paper from the inside. -
Dry completely:
Let the piece dry for 24-48 hours until it is bone dry and hard. It should turn a lighter white color. -
Sand imperfections:
Gently sand any rough edges, particularly around the top rim or base, with fine-grit sandpaper. -
Paint the details:
Using a fine brush and dark blue paint, draw a cross inside each window indentation. Outline the door arch in blue and paint a tiny blue dot for the doorknob. Leave the main body unpainted for a natural look, or add a very watered-down grey wash to highlight the texture. -
Seal the piece:
Apply a coat of matte varnish to protect the clay and paint from scratches and moisture.
Place your favorite pens and brushes inside and enjoy your mini coastal getaway right at your desk