Whenever I’m teaching little makers, clay magnets are my go-to project because they’re quick, colorful, and actually useful. Here are my favorite kid-friendly clay magnet ideas that feel totally doable, even if you’re brand-new to polymer clay or air dry clay.
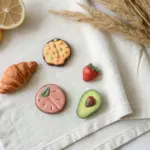
Smiling Avocado Magnets
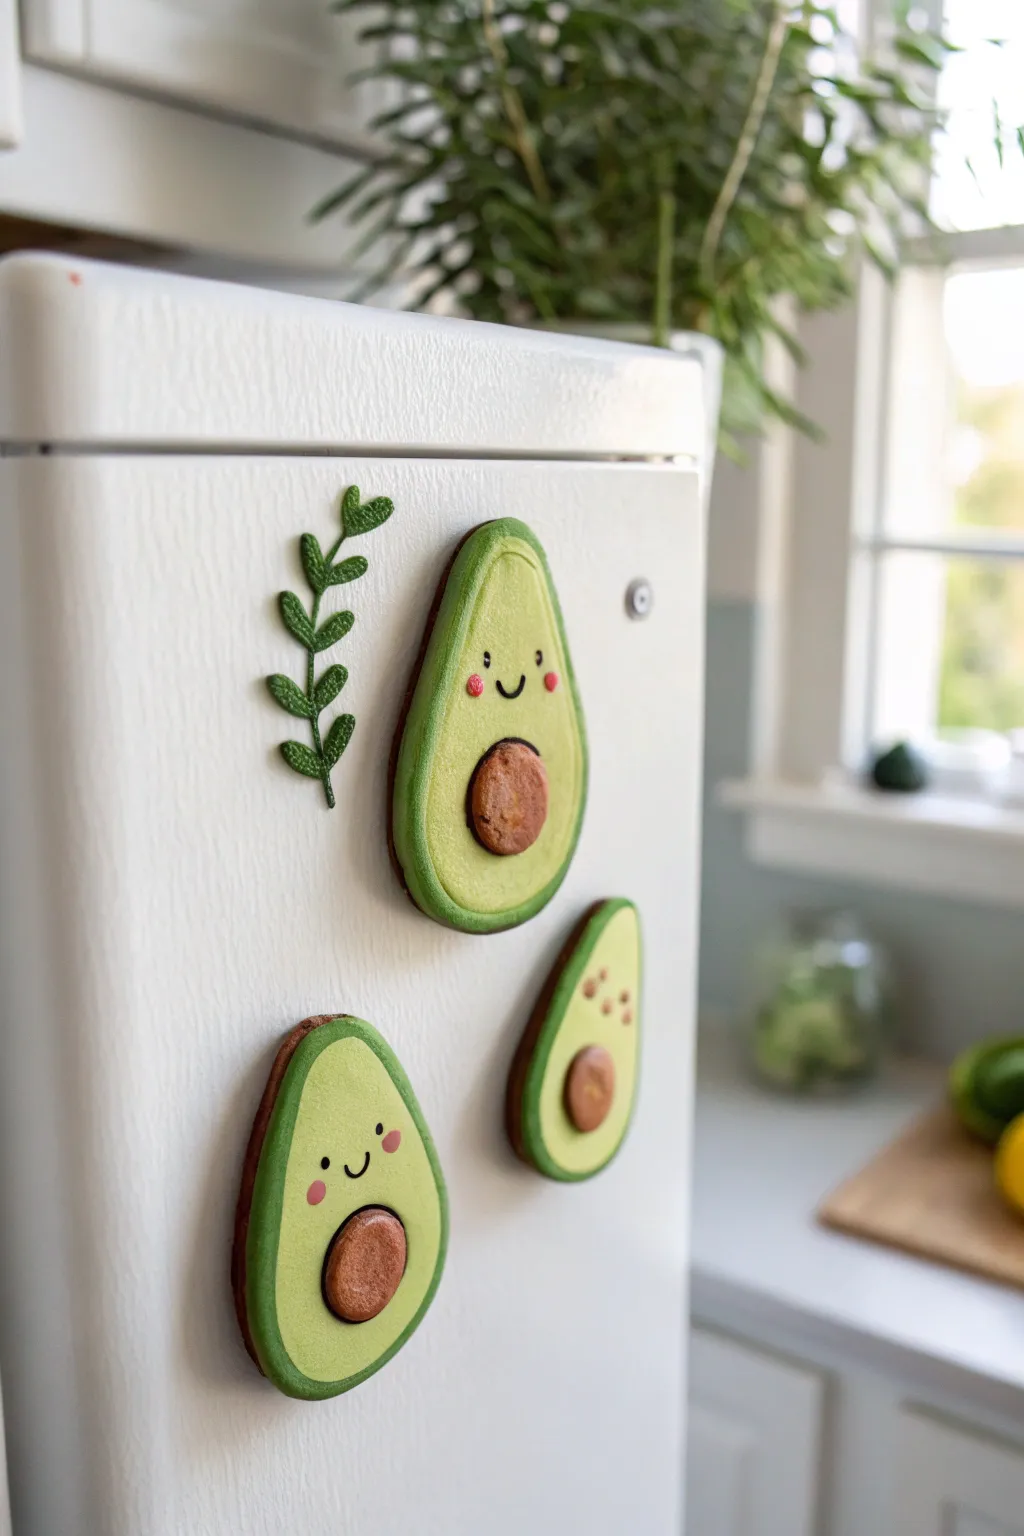
These utterly adorable avocado magnets bring a pop of cheery personality to your fridge door with their sweet, smiling faces and soft green tones. Simple enough for beginners but polished enough to look professional, they are the perfect afternoon clay project for kids.
Step-by-Step
Materials
- Polymer clay (dark green, light/lime green, brown, black, pink)
- Small round magnet discs
- Rolling pin or smooth glass jar
- Small teardrop-shaped cookie cutter (or a craft knife)
- Small circle cutter (like a large straw or bottle cap)
- Super glue or E6000
- Baking sheet and parchment paper
- Sculpting tool or toothpick
- Gloss glaze (optional)
Step 1: Shaping the Base
-
Prepare the skin layer:
Start by conditioning the dark green clay until it is soft and pliable, then roll it out into a sheet about 1/4 inch thick. -
Cut the outer shape:
Use your teardrop cutter to punch out the main avocado shapes from the dark green sheet. If you don’t have a cutter, outline a pear shape with a toothpick and carefully cut it out with a plastic knife. -
Prepare the flesh layer:
Clean your rolling pin, then roll out the light lime green clay. Make this layer slightly thinner than the dark green base. -
Create the inner avocado:
Cut out teardrop shapes from the light green clay using the same cutter. To make them fit inside the ‘skin,’ gently squish the sides inward with your fingers to shrink the shape slightly, or trim a tiny border off the edge. -
Assemble the layers:
Place the smaller light green teardrop directly on top of the dark green one. Press them together gently from the center moving outward to remove air bubbles and seal the edges.
Clean Clay Tip
Use baby wipes to clean your hands and tools when switching between the dark green and light green clay to keep the colors bright.
Step 2: Adding Details
-
Make the pit:
Roll a small ball of brown clay and flatten it into a thick disc. This will be the seed. -
Texture the pit:
Before attaching it, use a toothbrush or a ball of crinkled foil to tap the surface of the brown disc, giving it a realistic, rough texture. -
Attach the pit:
Press the textured brown disc firmly onto the lower, wider part of the light green avocado. You can create a small indentation first with your thumb to help it sit snugly. -
Create the smile:
Roll an incredibly thin snake of black clay. Cut a tiny u-shape for the mouth and gently press it onto the face area using a needle tool or toothpick. -
Add the eyes:
Roll two minuscule balls of black clay and press them onto the face above the mouth. Space them widely for that kawaii look. -
Add happy cheeks:
Roll two tiny dots of pink clay and flatten them. Place these directly under the eyes to give your avocado a cheerful blush. -
Add leaf accents:
Roll a thin green snake and attach tiny flattened teardrops along the sides to create the separate leafy branch magnet seen in the photo.
Go Smaller
Make tiny versions to glue onto thumb tacks for a matching corkboard set, or add a loop at the top before baking to make a charm.
Step 3: Finishing Up
-
Bake the clay:
Place your finished avocados on a parchment-lined baking sheet. Bake according to your brand of polymer clay instructions (usually 275°F for 15-30 minutes). -
Cool down:
Let the pieces cool completely on the baking sheet. This ensures the clay hardens properly and prevents fingerprints on warm clay. -
Optional glaze:
If you want a shiny finish, brush a coat of polymer clay gloss glaze over the light green and brown parts. -
Attach the magnet:
Flip the avocado over. Apply a dab of strong glue to the back of the dark green layer and press the magnet disc firmly into place. -
Final dry:
Allow the glue to cure fully for at least an hour before sticking your new friends to the fridge.
Now your fridge is home to the healthiest and happiest little family of magnets


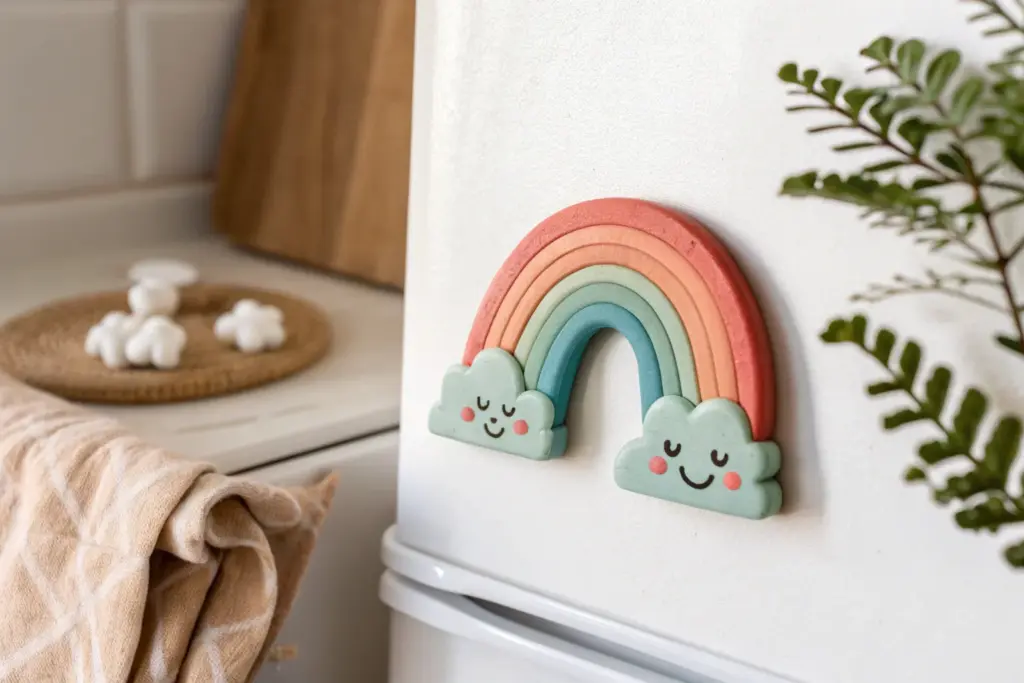
Rainbow With Cloud Magnets
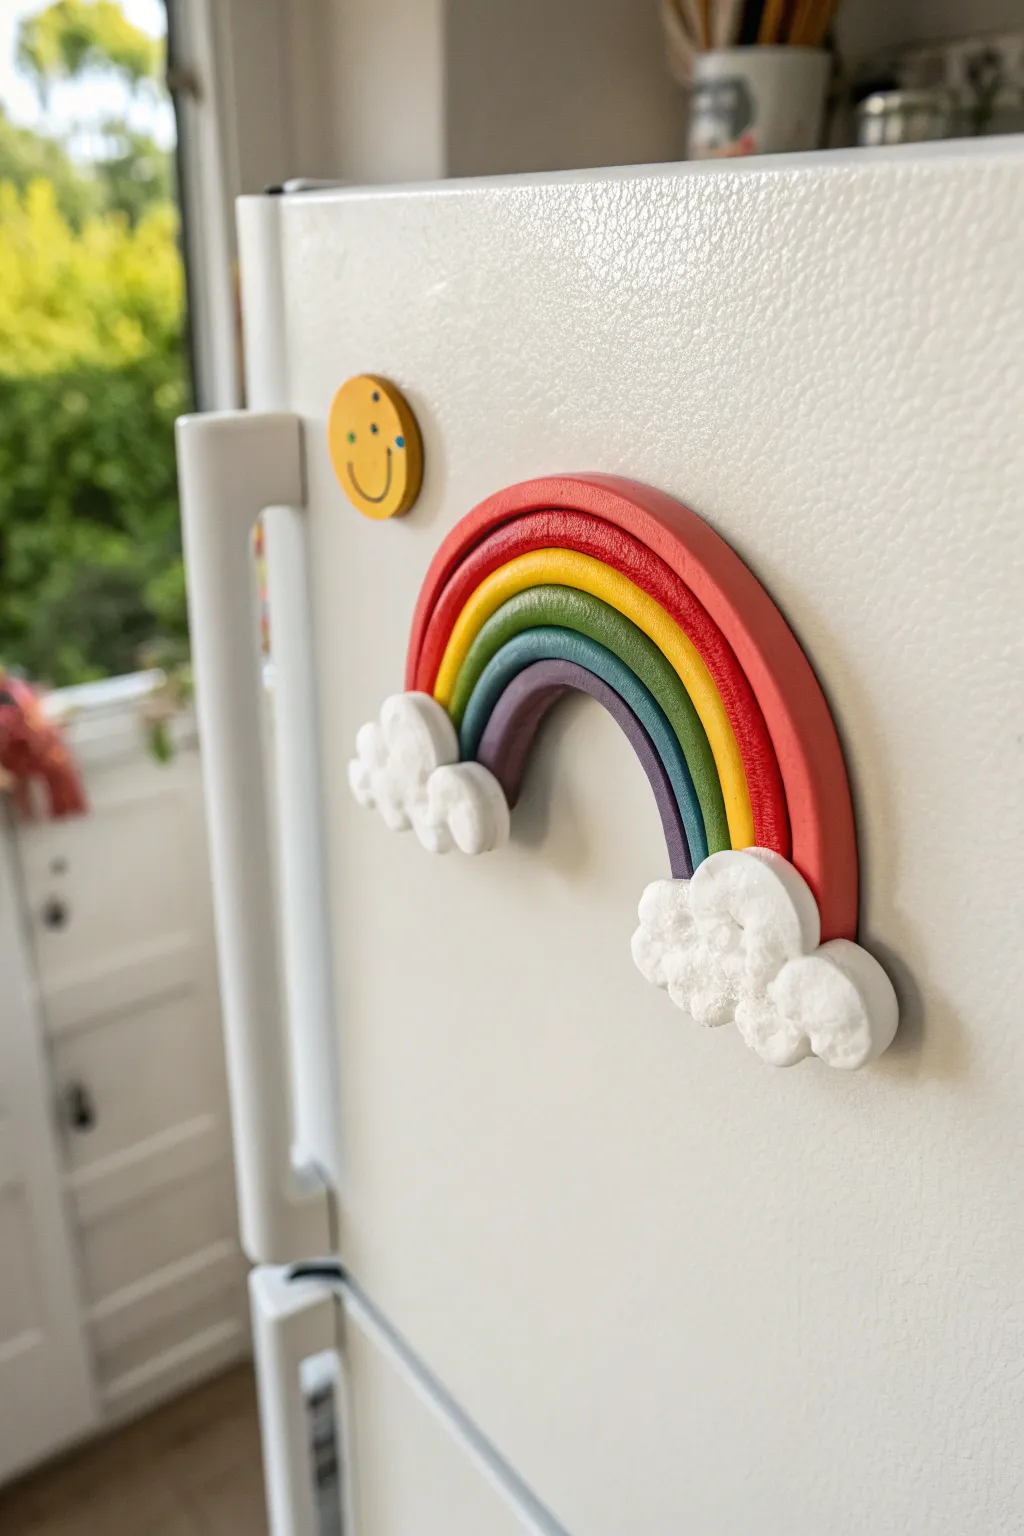
Bring a burst of color to your kitchen with this delightful 3D rainbow magnet. By layering vibrant clay strips and capping them with fluffy, textured clouds, you’ll create a cheerful accessory that stands out on any fridge.
Step-by-Step Tutorial
Materials
- Polymer clay (red, yellow, green, teal/blue, purple, and white)
- Rolling pin or pasta machine
- Clay cutting blade or sharp knife
- Circle cutter (approx. 3-4 inch diameter) or a round bowl
- Texture tools (or crumpled foil/toothpick)
- Strong craft glue (E6000 or similar)
- Round ceramic or neodymium magnets
- Oven for baking
- Parchment paper
Step 1: Preparing the Rainbow Arches
-
Condition the colors:
Start by kneading each colored clay block (red, yellow, green, teal, and purple) separately until they are soft and pliable. Warm clay prevents cracking later. -
Roll out the red layer:
Roll your red clay into a long snake, then flatten it slightly with your rolling pin so it is about 1/4 inch thick. This will be the outermost arch. -
Shape the red arch:
Gently curve the red strip into a high arch shape on your parchment paper. Trim the ends so they are flat. -
Create the yellow layer:
Repeat the rolling process with the yellow clay. Place it snugly underneath the red arch, pressing the edges gently together so they bond. -
Add consecutive colors:
Continue rolling and placing your strips. Place green under yellow, then the teal/blue shade under the green. -
Finish with purple:
Add the final purple strip at the very bottom. Ensure all the strips are pressed firmly against their neighbors without distorting the rounded shape. -
Trim the base:
Using your blade, make a straight cut across the bottom of the rainbow legs to ensure all colors end at the exact same length.
Step 2: Crafting the Clouds
-
Form cloud balls:
Take your white clay and roll about 6 to 8 small balls of varying sizes for each cloud. -
Cluster the shapes:
Group the small white balls together at the base of the rainbow legs. I like to overlap them slightly to create a natural, fluffy look. -
Blend the backs:
Turn the project over carefully and smooth the seams of the white balls on the backside only, creating a solid base for the cloud. -
Attach to the rainbow:
Press the cloud clusters firmly onto the bottom ends of the rainbow arch. The clay needs to overlap the colored ends significantly for a strong bond. -
Add fluffy texture:
Use a toothbrush or a ball of crumpled aluminum foil to tap textured dimples into the white clay. This makes it look like real, puffy clouds. -
Refine the edges:
Go around the perimeter of the clouds with your fingers to soften any harsh fingerprints or sharp angles.
Arch Separation?
If the clay strips separate after baking, apply a tiny amount of liquid clay or superglue between the colored bands and press them back together.
Step 3: Baking and Assembly
-
Check structure:
Before baking, ensure the rainbow isn’t too thin. If it feels flimsy, you can add a thin backing sheet of scrap clay behind the entire rainbow area for reinforcement. -
Bake the project:
Preheat your oven according to the clay manufacturer’s instructions (usually around 275°F or 130°C). Bake on a parchment-lined tray for 15-20 minutes. -
Cool down completely:
Let the rainbow cool completely on the tray. Moving it while hot can cause the bonds between colors to separate. -
Prepare the magnets:
Once cool, flip the rainbow over. roughen the back slightly with sandpaper where you plan to attach the magnets. -
Glue the magnets:
Apply a dab of strong craft glue to two round magnets. Place one near the top of the arch and one lower down to prevent spinning. -
Final cure:
Allow the glue to cure fully (often 24 hours) before placing your new masterpiece on the fridge.
Glittery Skies
Mix a pinch of iridescent white glitter into your white clay before forming the clouds. It adds a magical shimmer that catches the kitchen light beautifully.
Your fridge now has a bright, permanent spot of sunshine to hold up your most important notes

Unicorn Face Magnets
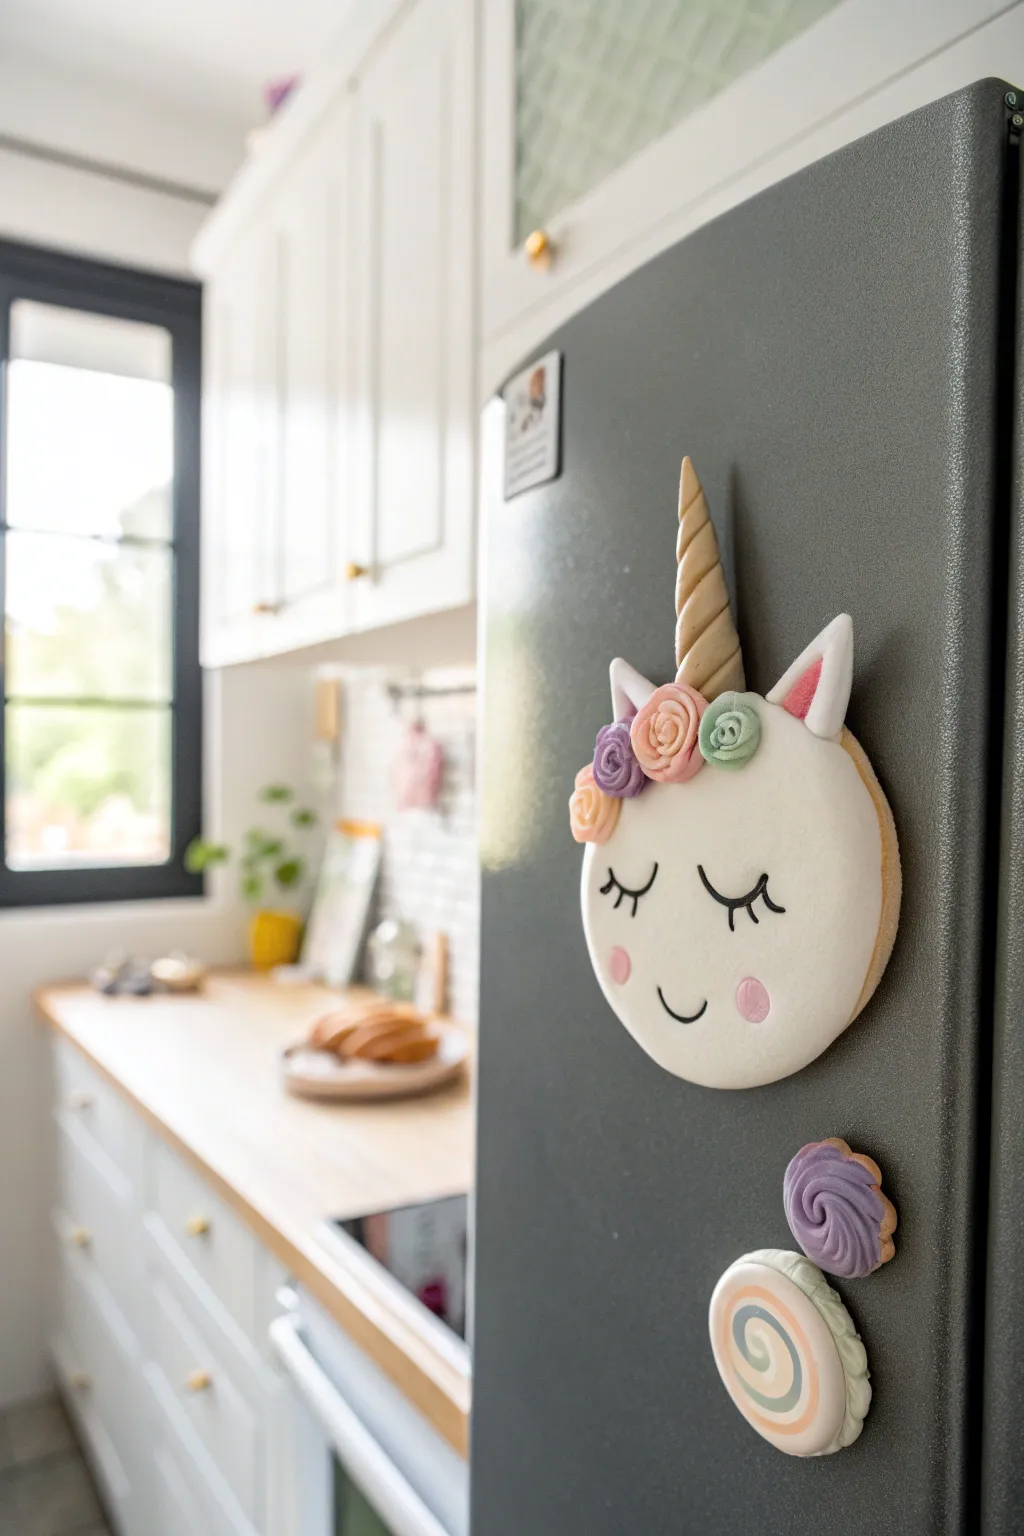
Bring a dash of magic to your refrigerator with this adorable unicorn face magnet featuring a floral crown and golden horn. The soft, rounded edges and pastel color palette give it a delightful, cookie-like appearance that’s perfect for brightening up any kitchen.
Step-by-Step
Materials
- White polymer clay (approx. 50g-70g)
- Pink, purple, orange, green, and pastel blue polymer clay
- Gold mica powder or gold acrylic paint
- Pointed sculpting tool or toothpick
- Small round cutter (approx. 3-4 inches)
- Black acrylic paint and fine liner brush (00 size)
- Strong round magnets
- Super glue (cyanoacrylate)
- Glaze or satin varnish (optional)
- Rolling pin
Step 1: Shaping the Base
-
Condition the Clay:
Begin by kneading your white polymer clay until it is soft and pliable. This conditioning step is crucial to prevent cracks later on. -
Roll the Face:
Roll the white clay into a smooth ball, then flatten it with your rolling pin until it is about 1/4 inch thick. You want it substantial enough to hold the weight of the decorations. -
Cut the Circle:
Use your round cutter to stamp out a perfect circle for the unicorn’s head. Smooth the edges gently with your finger to remove any sharp cut lines for that soft, fondant-like look. -
Form the Ears:
Shape two small triangles of white clay. Indent the centers slightly and fill them with smaller triangles of pink clay. Attach these to the top left and right of the circle, blending the seams on the back so they are secure.
Clean Clay Tip
Keep baby wipes nearby to clean your hands between colors. White clay attracts lint and color transfer easily, so wipe your tools often.
Step 2: Creating the Horn & Crown
-
Twist the Horn:
Roll a small snake of white clay that tapers at one end. Twist it gently to create a spiral effect, forming a cone shape. -
Gild the Horn:
Before attaching, brush the unbaked horn with gold mica powder for a metallic sheen. Alternatively, you can bake it plain and paint it gold later. -
Attach the Horn:
Press the horn firmly onto the top center of the head, right between the ears. You can use a dab of liquid clay or bake-and-bond if you have it to ensure a strong hold. -
Make Tiny Roses:
Roll very thin strips of purple, orange, and green clay. Roll these strips up like a sleeping bag to create miniature rosebuds. -
Assemble the Crown:
Arrange the clay roses in a cluster at the base of the horn. I like to press them down gently so they look like they are resting on the unicorn’s forehead.
Sparkle Upgrade
Before baking, lightly dust the rose crown or cheeks with iridescent glitter powder to give the unicorn an extra magical, shimmering finish.
Step 3: The Sweet Details
-
Add Cheeks:
Take two tiny balls of pink clay, flatten them into discs, and press them onto the lower half of the face for rosy cheeks. -
Sculpt Lollipops (Bonus):
For the matching magnets, create two long snakes of different colors (like pastel blue and white). Twist them together, then coil them into a spiral circle. -
Baking Time:
Preheat your oven according to your clay manufacturer’s instructions (usually around 275°F or 130°C). Bake the unicorn and lollipops on a parchment-lined tray for about 25-30 minutes. -
Cool Down:
Allow the pieces to cool completely inside the oven with the door slightly ajar to prevent thermal shock and cracking.
Step 4: Finishing Touches
-
Paint the Face:
Using a very fine liner brush and black acrylic paint, carefully draw two curved arches with eyelashes for sleeping eyes. Add a small ‘u’ shape for the smile. -
Seal (Optional):
If you want a glossy finish or need to protect the paint, apply a thin coat of satin varnish or glaze over the entire piece once the paint is dry. -
Magnetizing:
Flip the hardened clay face over. Apply a drop of strong super glue to the back and press your round magnet firmly into place. -
Final Cure:
Let the glue set for at least an hour before testing its hold on your fridge.
Now you have a charming enchanted guardian to hold up your grocery lists and family photos

Silly Alien Head Magnets
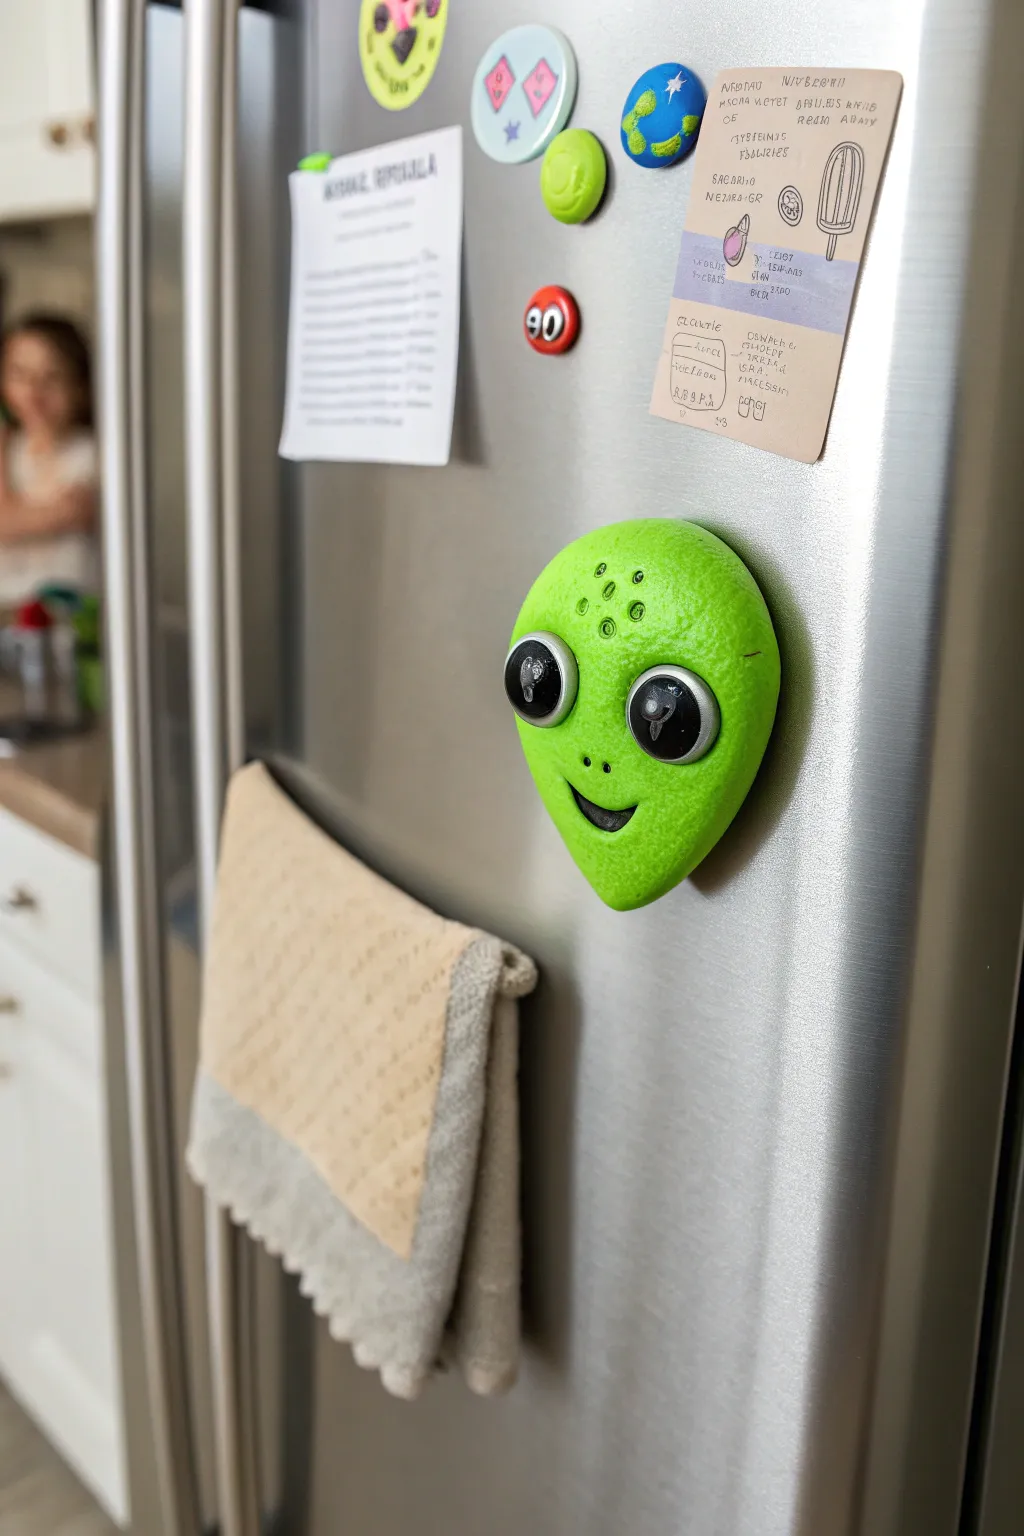
Bring a little extraterrestrial fun to your kitchen with these vibrant, textured alien head magnets. Their quirky expressions and oversized eyes make them a perfect afternoon project for clay enthusiasts of all ages.
Step-by-Step Guide
Materials
- Polymer clay (lime green, black, and white)
- Round magnet (strong ceramic or neodymium)
- Clay sculpting tools (or a toothpick)
- Texturing tool (clean sponge or sandpaper)
- Gloss glaze or polyurethane varnish
- Super glue (cyanoacrylate)
- Baking sheet and parchment paper
- Rolling pin or acrylic roller
Step 1: Shaping the Head
-
Condition the clay:
Start by taking a generous chunk of lime green polymer clay. Knead it thoroughly in your hands until it becomes soft, pliable, and warm to the touch, ensuring there are no air bubbles. -
Form the basic shape:
Roll the conditioned clay into a smooth ball about the size of a walnut. Then, gently roll one end between your palms to taper it, creating a teardrop or pear shape. -
Flatten the back:
Place the teardrop on your work surface and press down gently with your palm to flatten the back. You want a domed front surface but a flat back so it sits flush against the magnet later. -
Refine the jaw:
Use your fingers to lightly pinch and shape the narrow end, defining a pointed chin typical of classic alien depictions. -
Widen the forehead:
Press gently on the wider top section to broaden the forehead area, giving it that distinct bulbous cranium look.
Sticky Situation?
If your white clay gets dirty from the black clay residue on your hands, clean your hands with a wet wipe or use a piece of scotch tape to lift dust off the white clay before baking.
Step 2: Adding Details & Texture
-
Create eye sockets:
Using your thumbs or a large ball tool, press two deep oval indentations into the middle of the face where the eyes will go. Angle them slightly upwards for that classic playful alien expression. -
Shape the eyes:
Take two pieces of black clay and roll them into small balls, then flatten them into ovals. Press these firmly into the sockets you just created. -
Add reflection highlights:
Roll two tiny specks of white clay into balls. Press one onto the upper right corner of each black eye to create a ‘gleam’ or reflection, bringing the character to life. -
Adding texture:
I personally love giving the skin a weird texture, so take a clean piece of rough sandpaper or a stiff sponge and gently press it all over the green skin areas. Be careful not to texture the smooth black eyes. -
Forehead details:
Use a toothpick or a small dotting tool to poke a pattern of small holes or dots on the forehead for extra alien skin detail. -
Carve the mouth:
Use a clay knife or the edge of a credit card to slice a curved line for the mouth. Gently pull the clay downwards slightly to open the smile. -
Fill the mouth:
Roll a very thin snake of black clay and press it deep into the mouth crevice you just carved to give the mouth create depth and shadow. -
Nose details:
Use a small needle tool to poke two tiny nostrils right above the mouth area.
Glow Up
Swap the lime green clay for glow-in-the-dark polymer clay. Your fridge will look delightfully spooky at night with floating glowing alien heads.
Step 3: Baking & Assembly
-
Make space for the magnet:
Flip the head over. If you are using a thick ceramic magnet, press it into the back of your clay now to create an impression, then remove it. This ensures the magnet sits flush later. -
Bake the clay:
Place your alien on a parchment-lined baking sheet. Bake according to your polymer clay package instructions (usually 275°F/135°C for 15-30 minutes). -
Cool down:
Allow the clay to cool completely on the baking sheet. It creates a stronger bond if the clay isn’t warm when you handle it next. -
Glue the magnet:
Apply a drop of super glue to the indentation on the back and press your magnet firmly into place. hold for 30 seconds to set. -
Gloss the eyes:
For a wet, lively look, carefully paint a layer of gloss glaze or polyurethane varnish over just the black and white eye areas. Leave the green skin matte for contrast.
Pop your new celestial friend onto the fridge to guard your snacks with style

The Complete Guide to Pottery Troubleshooting
Uncover the most common ceramic mistakes—from cracking clay to failed glazes—and learn how to fix them fast.
Mix-And-Match Monster Magnets
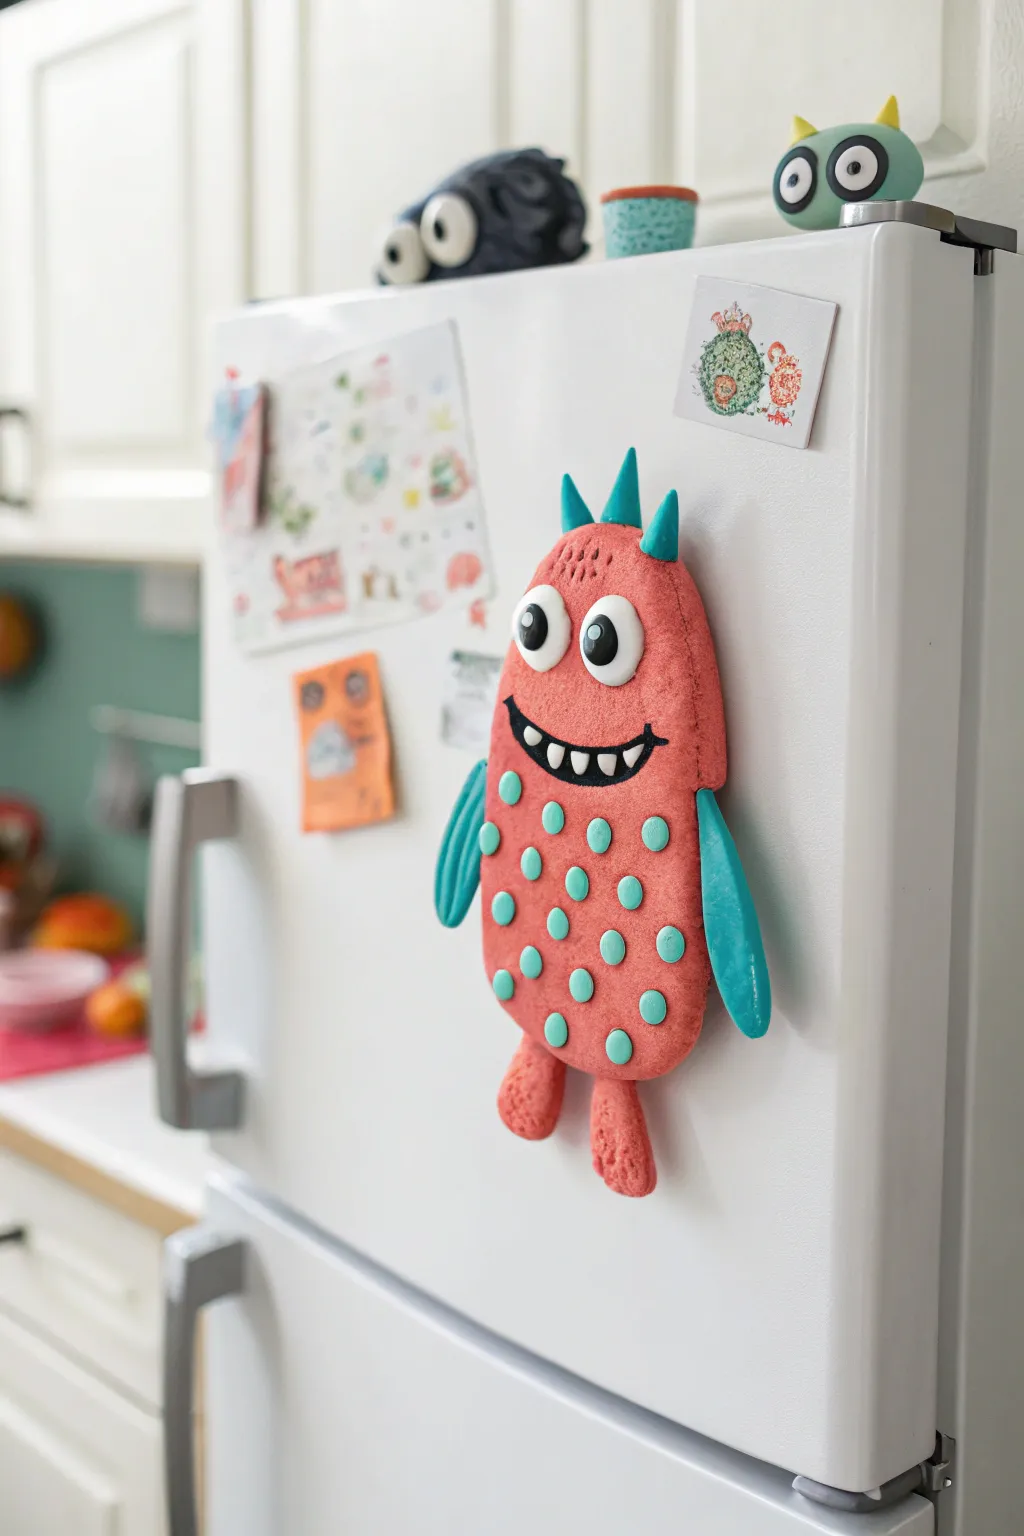
Bring your fridge to life with this quirky, textured monster made from colorful clay. With its bumpy pink skin, teal accents, and oversized eyes, this goofy guardian is perfect for holding up your kid’s latest masterpieces.
Step-by-Step Tutorial
Materials
- Polymer clay (coral pink, teal/turquoise, black, white)
- Strong round magnets (neodymium recommended)
- Texturing tool (clean toothbrush or stiff bristle brush)
- Clay roller or rolling pin
- Modeling tools (dotting tool, craft knife)
- Oven and baking sheet (foil-lined)
- Strong craft glue (E6000 or super glue gel)
Step 1: Shaping the Body
-
Prepare the pink clay:
Start by conditioning the coral pink clay in your hands until it’s soft and pliable. Roll it into a smooth ball, ensuring there are no cracks. -
Form the base shape:
Flatten the ball into an elongated oval shape, roughly the size of a large cookie. It should be about 1/4 inch thick to be sturdy without being too heavy for the magnet. -
Create the texture:
This is the fun part—take a clean toothbrush or a texture brush and gently tap it all over the surface of the pink clay. Press just enough to leave a stippled, skin-like texture without distorting the overall shape.
Step 2: Adding Features
-
Make the eyes:
Roll two medium-sized balls of white clay. Flatten them slightly and press them onto the upper third of the body, making sure they touch each other. -
Add pupils:
Roll two small balls of black clay and press them onto the white circles. Add a tiny speck of white clay to each pupil for that shiny ‘sparkle’ effect. -
Form the mouth base:
Roll a thin snake of black clay and curve it into a wide smile shape underneath the eyes. Press it flat against the textured body. -
Add teeth:
Create tiny triangles or squares of white clay. Carefully place them along the top edge of the black mouth piece to create a goofy grin.
Clean Clay Tip
Keep baby wipes nearby! Teal and black clay can stain your fingers, smudging the pink body. Wipe hands thoroughly between handling different colors.
Step 3: Teal Accents & Limbs
-
Create the spots:
Roll many small balls of teal clay. Press them randomly all over the pink body, flattening them slightly so they look like distinct polka dots. -
Make the horns:
Form three small cone shapes from the teal clay. Attach these to the very top of the monster’s head, pressing down firmly to bond the clay. -
Shape the arms:
Roll two tear-drop shapes from teal clay. Flatten them and attach one to each side of the body, curving them slightly downward. -
Add the legs:
Using the pink clay again, make two small sausage shapes. Attach them to the bottom of the body for legs, texturing them with your toothbrush to match the torso. -
Detail the forehead:
Use a needle tool or toothpick to poke three small vertical lines on the forehead, right between the eyes and the horns, for extra character.
Monster Mash-Up
Don’t stop at one! Make separate magnetic body parts (eyes, mouths, hats) so kids can rearrange the monster’s face directly on the fridge door.
Step 4: Baking & Assembly
-
Embed the magnet (Option A):
If you want the magnet hidden, press your magnet into the back of the clay now. However, I prefer to bake first and glue later for a stronger hold. -
Bake the monster:
Place your monster on a foil-lined baking sheet. Bake according to your polymer clay package instructions (usually 275°F/135°C for 15-30 minutes). -
Cool down:
Let the clay cool completely on the tray before moving it. It will be slightly soft when hot but hardens as it cools. -
Attach the magnet:
Apply a dab of strong craft glue to the back of the cooled monster and press your magnet firmly in place. Let the glue set for 24 hours.
Once the glue is dry, your playful monster is ready to guard the snacks and showcase high-priority artwork on the fridge
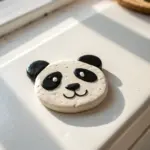
Bear Face Magnets
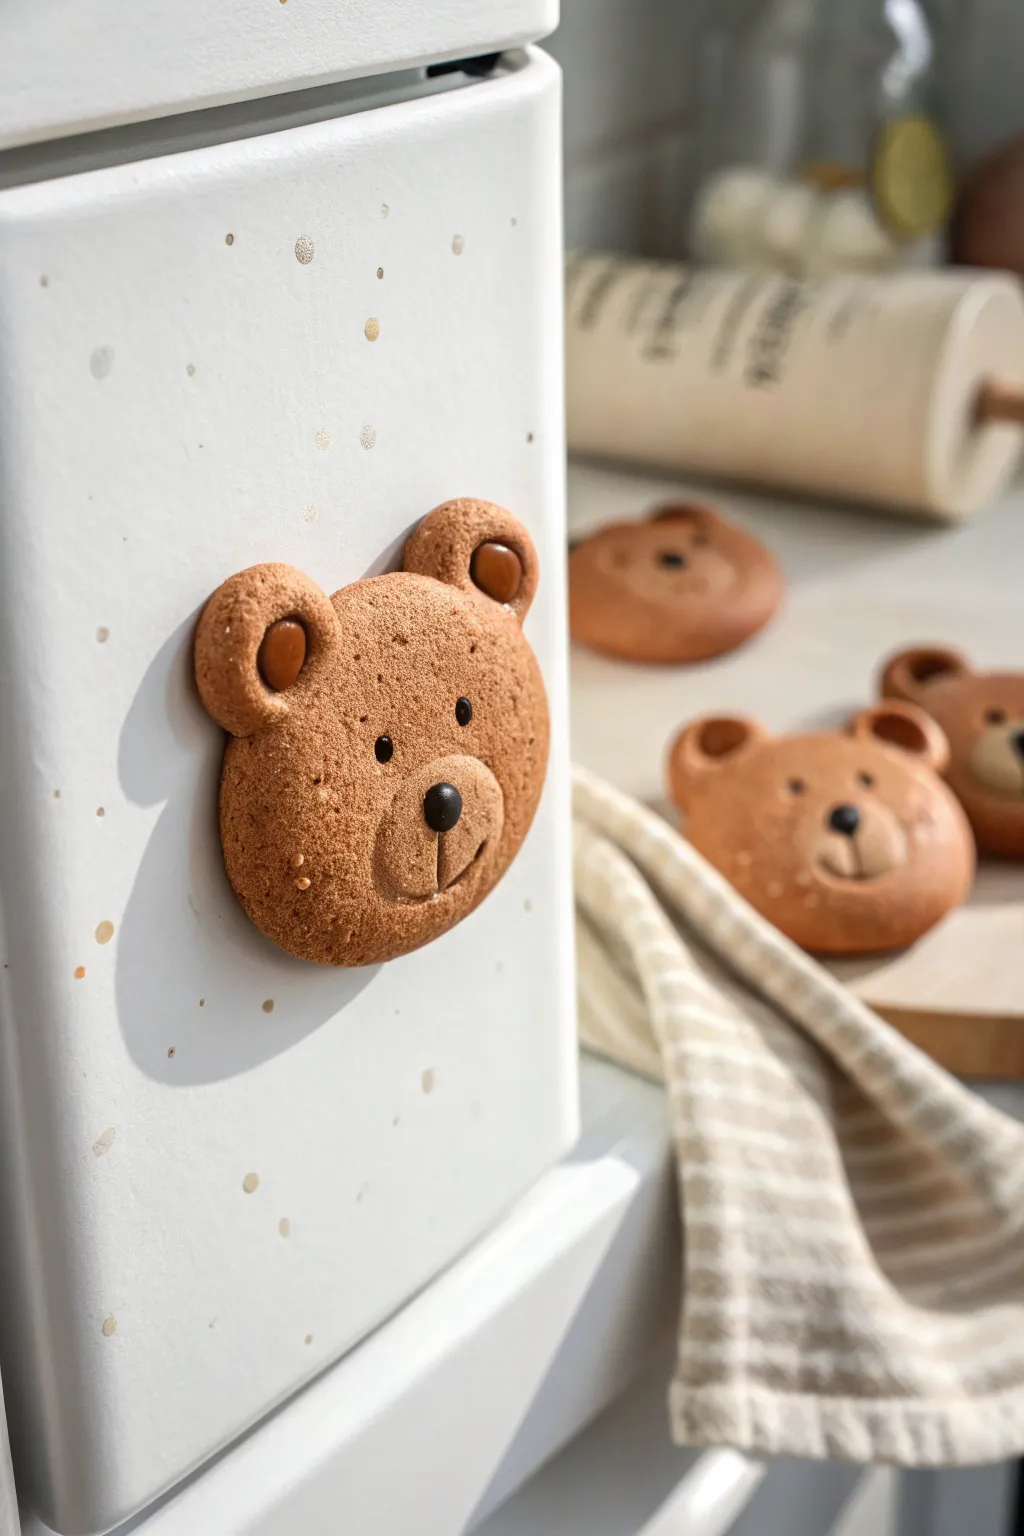
Transform simple clay into an adorable, faux-cookie bear face that looks good enough to eat but is designed to hold your photos. This project focuses on achieving a realistic baked texture and sweet, expressive features using basic sculpting techniques.
Step-by-Step
Materials
- Light brown polymer clay (biscuit or cookie color)
- Dark brown polymer clay (chocolate color)
- Black polymer clay
- Translucent liquid sculpey or strong craft glue
- Toothbrush or stiff bristle brush (for texturing)
- Sandpaper or salt (optional for texture)
- Small round cutter (approx. 2 inches)
- Small dotting tool or toothpick
- Strong round ceramic or neodymium magnet
- Rolling pin
- Soft artist pastels (brown/orange) for shading
- Soft brush
Step 1: Shaping the Base
-
Prepare the dough color:
Start by conditioning your light brown polymer clay until it is soft and pliable. If you want a speckled ‘whole wheat’ look like the image, mix in a tiny pinch of black or dark brown clay, but don’t blend it fully; leave tiny streaks or specks. -
Roll out the slab:
Roll the clay into a sheet approximately 1/4 inch thick. You want it thick enough to hold the magnet but not so heavy it slides down the fridge. -
Cut the face shape:
Use your round cutter to punch out a perfect circle. Gently tap the edges with your finger to round them off slightly so it doesn’t look too sharp or mechanical. -
Texture the surface:
This is crucial for the ‘cookie’ look. Gently tap the surface of the clay with a clean toothbrush or a ball of crumpled aluminum foil. Cover the entire front and sides with this stippled texture.
Step 2: Adding Features
-
Form the ears:
Roll two small balls of the same light brown clay. Flatten them slightly into thick discs and press them onto the top left and right of the head. -
Blend the seams:
Use a modeling tool or your finger to smooth the seam where the ears meet the head on the back side, ensuring a strong bond. -
Create the inner ear:
Take two tiny pieces of darker brown clay (caramel color). Roll them into balls and press them firmly into the center of each ear to create slight indentations. -
Shape the muzzle:
Roll a slightly larger ball of the light brown clay for the snout. Flatten it into an oval and place it lower down on the face, centered horizontally. -
Texture the additions:
Use your texture tool (toothbrush) again to tap over the ears and muzzle. This unifies the piece and makes it look like one baked item. -
Add shading:
I like to scrape a little brown pastel into a powder and brush it gently around the edges of the face and ears. This mimics the ‘golden brown’ edges of a real cookie.
Uneven Texture?
If the toothbrush texture isn’t showing up well, try using a stiff stippling brush or even a crumpled ball of aluminum foil for deeper, craggier dimples.
Step 3: Detailing & Baking
-
Place the eyes:
Roll two tiny glossy black clay balls. Press them into the face above the muzzle, spacing them somewhat wide apart for a cute expression. -
Add the nose:
Create a slightly larger black oval for the nose. Press it into the top center of the muzzle area. -
Carve the mouth:
Using a needle tool or a sharp blade, carefully impress a vertical line down from the nose, curving into a smile shape at the bottom. Keep the lines clean but not too deep. -
Embed the magnet:
Flip the bear over gently. Press your magnet firmly into the back to create an indentation, then remove it. We will glue it in later to avoid heat damage. -
Bake the clay:
Bake the bear according to your clay package instructions (usually 275°F for 15-30 minutes). Let it cool completely inside the oven to prevent cracking. -
Secure the magnet:
Once cool, place a drop of strong glue into the indentation on the back and press the magnet in. Let it cure fully before placing it on the fridge.
Scented Clay
Mix a tiny drop of vanilla or cinnamon scent oil into the clay before conditioning. Your magnet won’t just look like a cookie, it will smell like one too!
You have crafted a sweet, permanent treat that adds warmth and whimsy to any metallic surface.


What Really Happens Inside the Kiln
Learn how time and temperature work together inside the kiln to transform clay into durable ceramic.
Sunflower Smile Magnets
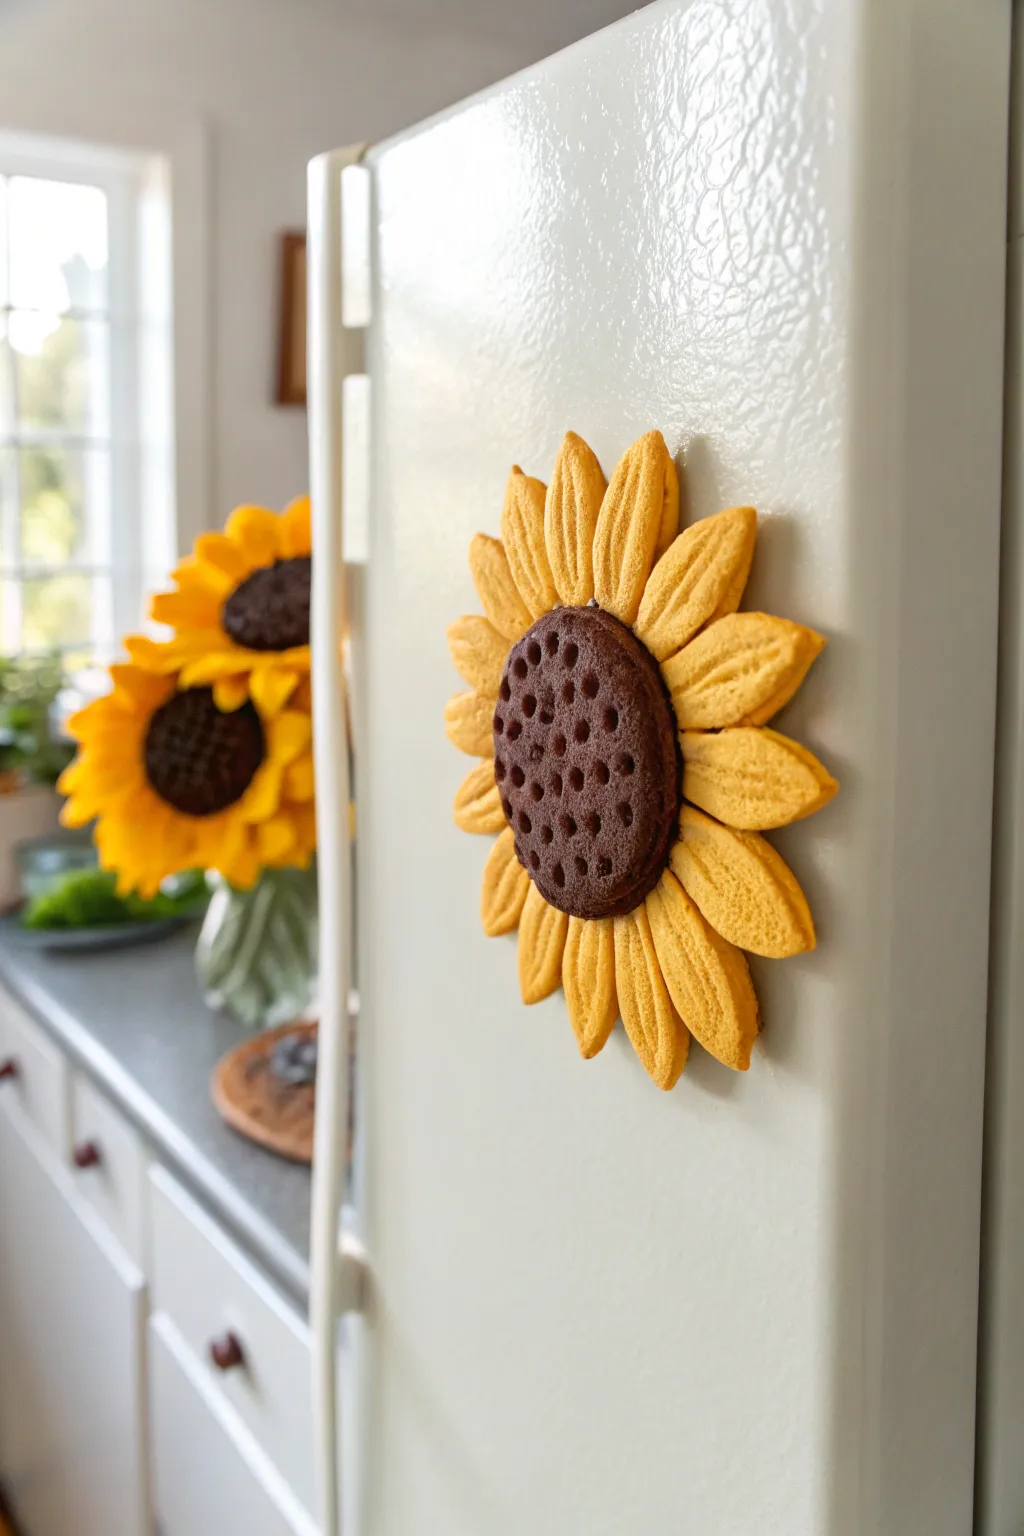
Brighten up your kitchen with these charming sunflower magnets that look almost good enough to eat. With their textured petals and dotted centers, they mimic the delightful appearance of sugar cookies.
Step-by-Step Tutorial
Materials
- Yellow polymer clay (warm, golden tone)
- Dark brown polymer clay (chocolate tone)
- Circular cookie cutter (approx. 1.5 inch)
- Tear-drop shaped cutter (small) or a craft knife
- Toothpick or dotting tool
- Needle tool or clean toothbrush
- Round ceramic magnet (strong)
- Strong craft glue (e.g., E6000)
- Rolling pin
- Parchment paper
Step 1: Forming the Center
-
Condition the clay:
Start by kneading the dark brown clay until it is soft and pliable. This conditioning step prevents cracks later on. -
Roll the disc:
Roll the brown clay into a smooth ball, then flatten it with your rolling pin to about a 1/4-inch thickness. -
Cut the circle:
Use your circular cookie cutter to punch out a perfect circle. Smoothing the edges gently with your finger removes any sharp cuts. -
Add texture:
Gently press a clean toothbrush or crumpled aluminum foil over the surface to give it a baked, porous texture. -
Create the seeds:
Using a blunt toothpick or dotting tool, press a pattern of small divots across the entire surface of the brown circle to mimic sunflower seeds.
Realistic shading
Before baking, lightly brush orange soft pastel powder onto the center of the yellow petals for a sun-kissed, baked look.
Step 2: Crafting the Petals
-
Prepare the yellow clay:
Clean your hands thoroughly to avoid transferring brown pigment, then condition the golden yellow clay until soft. -
Roll out the yellow sheet:
Roll the yellow clay to the same thickness as your brown center, ensuring it’s even. -
Cut the shapes:
Use a small tear-drop cutter to create 12-15 petals. If you don’t have a cutter, cut small ovals with a craft knife and pinch one end to a point. -
detail the petals:
Take a needle tool or the back of a knife and press a single central line down the middle of each petal, starting from the wide end and fading toward the tip. -
Apply texture:
Lightly tap the surface of each petal with your texture tool (toothbrush or foil) to match the cookie-like finish of the center.
Step 3: Assembly and Baking
-
Arrange the first layer:
Place the brown center face down on your parchment paper. We will build the flower upside down initially to bond the petals seamlessly to the back. -
Attach the petals:
Flip the petals over and press the wide, rounded ends firmly against the back edge of the brown circle. Smooth the clay where they join so they stick together. -
Flip and adjust:
Carefully turn the entire flower face up. Gently lift the tips of the petals slightly to give the flower a bit of 3D movement, rather than lying perfectly flat. -
Bake the clay:
Bake the sunflower according to your polymer clay package instructions (usually 275°F for 15-30 minutes). Let it cool completely on the baking sheet. -
Attach the magnet:
Once hardened and cooled, apply a dab of strong craft glue to the back center of the flower and press the round magnet firmly in place. -
Dry and display:
Allow the glue to cure fully for 24 hours before placing your new sunny creation on the fridge.
Make it Sparkle
Mix a tiny pinch of translucent glitter into the yellow clay before rolling it out to mimic sugar crystals.
Now you have a cheerful piece of everlasting floral art to hold your favorite photos