Whenever you’re craving a quick creative win, easy clay projects are my go-to because they start with simple shapes and end with something you can actually use or gift. Grab a small lump of air-dry clay or polymer clay, and let’s make something cute without overthinking it.
Classic Pinch Pot Trinket Bowl
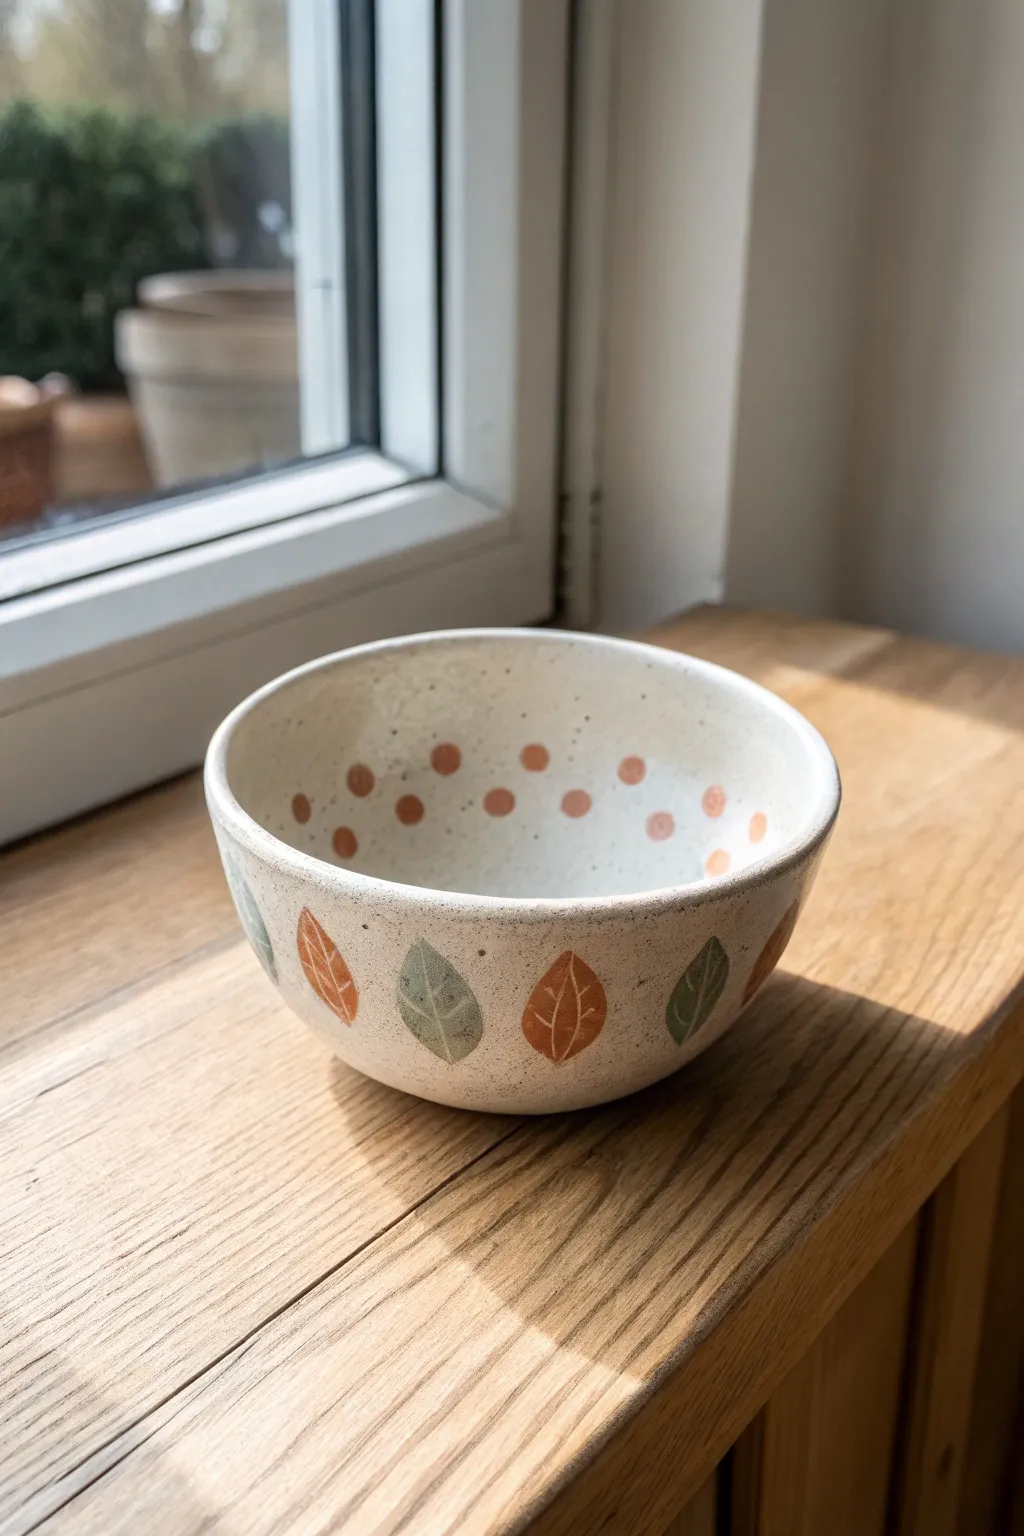
Learn to create this charming speckled pinch pot, perfect for holding precious trinkets or serving snacks. Its simple rounded form acts as a canvas for alternating autumn-hued leaves and playful interior polka dots.
Detailed Instructions
Materials
- Speckled stoneware clay (or white clay with speckles added)
- Pottery wheel (optional, but described as a pinch pot for accessibility)
- Wooden rib tool
- Sponge
- Underglazes: Muted Orange (terracotta), Sage Green, Red-Brown
- Small round paintbrush (size 2 or 4)
- Detail liner brush
- Clear transparent glaze
- Needle tool or fettling knife
- Kiln (or access to a firing service)
Step 1: Forming the Bowl
-
Prepare the Clay:
Start with a ball of speckled stoneware clay roughly the size of a tennis ball. Wedge it thoroughly to remove air bubbles and ensure an even consistency. -
Begin the Pinching:
Hold the clay ball in one hand and push your thumb into the center, stopping about a half-inch from the bottom. This establishes your base thickness. -
Shape the Walls:
Gently pinch the clay between your thumb and fingers, rotating the ball as you go. Work from the bottom up to thin the walls and raise the height. -
Refine the Curve:
Aim for a uniform bowl shape with slightly upright walls like the reference photo. If the rim gets uneven, gently tap the bowl upside down on your table to level it. -
Smooth the Surface:
Once the shape is set, use a damp sponge or a flexible rib tool to smooth out finger marks. I find using a rib here really helps achieve that professional, wheel-thrown look even with hand-building. -
Dry to Leather Hard:
Let the bowl sit uncovered until it reaches the leather-hard stage. It should be firm enough to handle without warping but still cool to the touch.
Smooth Rim Secret
Use a small strip of chamois leather or a folded piece of plastic bag to compress the rim while spinning the bowl slowly. This prevents cracks later.
Step 2: Decorating the Interior
-
Plan the Dots:
Visualize two rows of dots inside the rim. The top row sits just below the lip, and the second row sits staggered below the first. -
Paint the Top Row:
Using your terracotta or muted orange underglaze and a round brush, dab small, circular dots around the upper interior. Keep the spacing generous and airy. -
Add Staggered Row:
Paint a second row of dots below the first, positioning these in the gaps between the upper dots. Use a slightly darker red-brown shade for visual interest if desired, or stick to the same orange tone.
Change the Season
Swap the palette for seasonal variations: try icy blues and silver for winter snowflakes, or bright pinks and greens for spring tulip motifs.
Step 3: Painting the Exterior Leaves
-
Outline the Leaves:
On the outside wall, lightly sketch almond-shaped leaf outlines with a pencil if you need a guide, or go straight in with your brush for a more organic feel. -
Fill the Orange Leaves:
Using the terracotta underglaze, fill in every other leaf shape. Ensure you apply 2-3 coats for solid opacity. -
Fill the Green Leaves:
Switch to your sage green underglaze and fill in the remaining leaf shapes, creating an alternating pattern around the bowl. -
Add Vein Details:
Once the base colors are dry to the touch, use a very fine liner brush or a sgraffito tool to scratch through the paint to reveal the clay color beneath, creating the central stem and veins. -
White Highlights:
Alternatively, use a thin white underglaze to paint delicate vein lines over the dried colored leaves if you prefer adding paint rather than scratching it away.
Step 4: Finishing and Firing
-
Bisque Fire:
Allow the bowl to dry completely (bone dry). Place it in the kiln for a bisque firing to cone 04. -
Apply Clear Glaze:
Wipe the bisque-fired bowl with a damp sponge to remove dust. Dip the entire piece into a clear transparent glaze, ensuring even coverage inside and out. -
Wipe the Foot:
Carefully wipe any glaze off the very bottom of the bowl so it doesn’t fuse to the kiln shelf. -
Final Firing:
Fire the piece again to the maturity temperature of your clay body (likely cone 5 or 6 for stoneware).
Once cooled, your custom bowl is ready to bring a touch of handcrafted warmth to your windowsill


Simple Coil Ring Dish
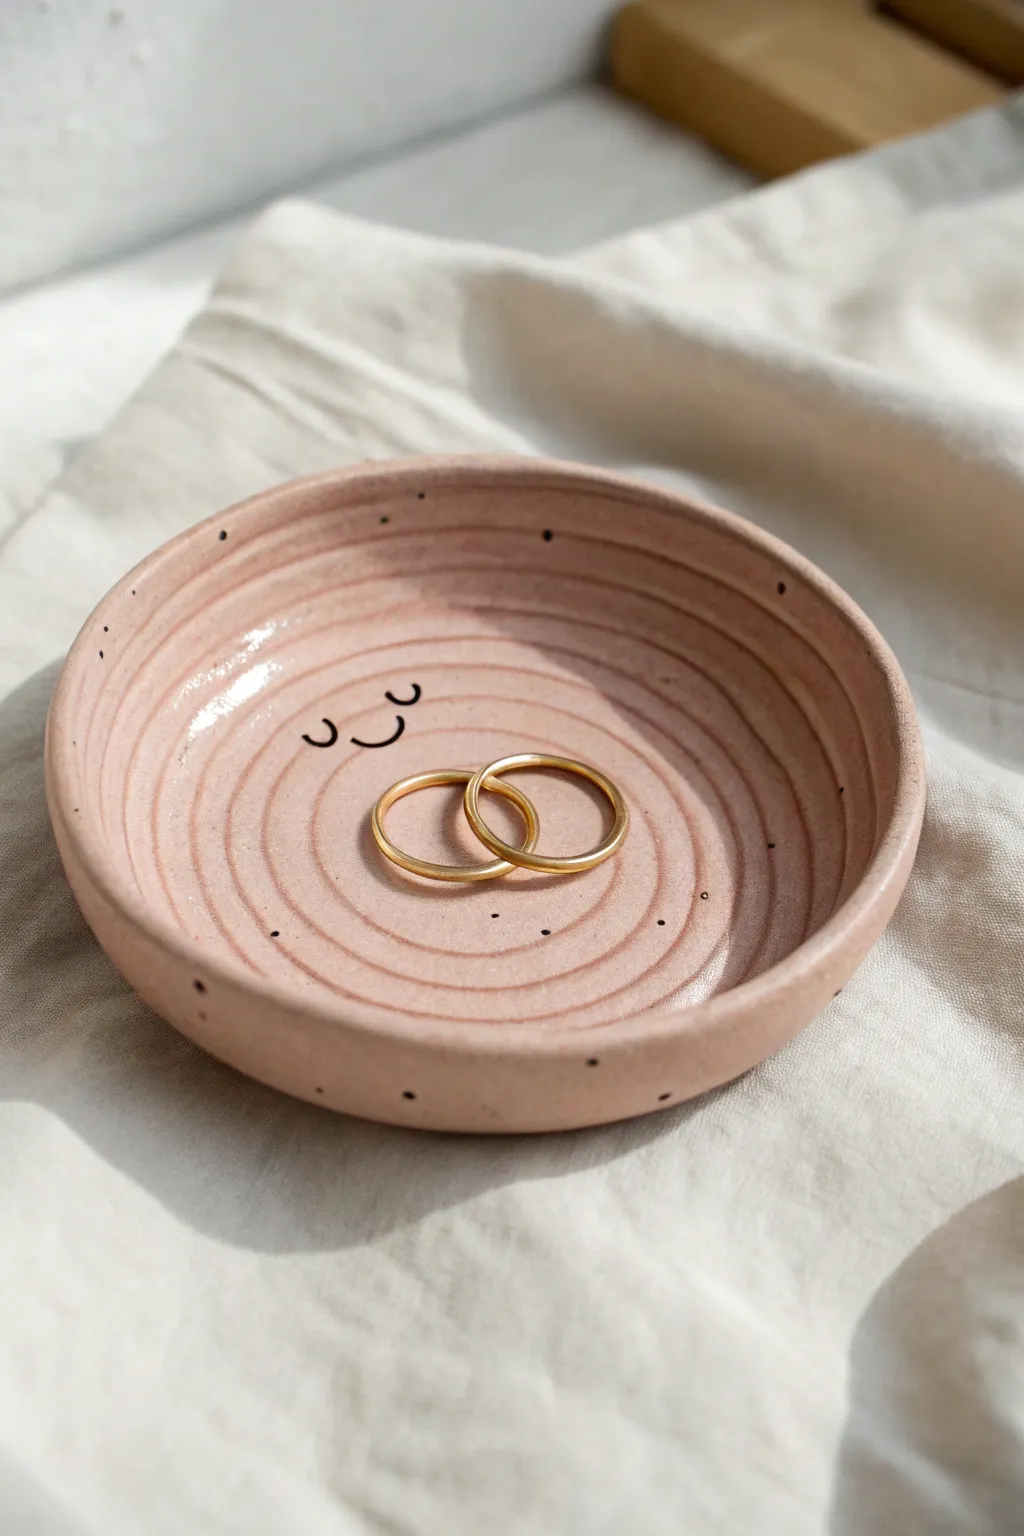
This charming little ring dish combines the classic coil pottery technique with a modern, speckled aesthetic and a sweet, minimalist face. Its gentle ridges and rosy hue make it the perfect bedside guardian for your favorite jewelry pieces.
How-To Guide
Materials
- Air-dry clay (terracotta or white)
- Acrylic paint (blush pink/terracotta shade)
- Black acrylic paint or fine-tip permanent marker
- Rolling pin
- Clay knife or plastic cutting tool
- Small bowl (to use as a mold)
- Gloss varnish or sealant
- Old toothbrush (optional for speckling)
- Water and a small sponge
- Sandpaper (fine grit)
Step 1: Forming the Base
-
Prepare your workspace:
Lay down a canvas mat or wax paper to prevent sticking. Grab a chunk of clay about the size of a lemon and knead it until it’s soft and pliable. -
Roll the coil:
Place the clay on your surface and roll it back and forth with your palms to create a long, even snake. You want a consistent thickness of about 1/4 inch essentially like a thick pencil. -
Start the spiral:
Take one end of your clay snake and curl it tightly inward to start a spiral. This will be the very center of your dish. -
Build the flat disc:
Continue winding the coil around itself, keeping it flat on the table. Gently press the coils together as you wind so they adhere to each other without losing their definition. -
Check the size:
Keep winding until your spiral disc is approximately 3 to 4 inches in diameter. Cut off any excess clay coil and smooth the very end into the side of the disc so it disappears. -
Smooth the back:
Carefully flip the disc over. Use your fingers or a modeling tool to smudge the coils together on the backside only. This reinforces the structure so it won’t break apart, while keeping the spiral design visible on the front.
Seamless Coils
Score (scratch) and slip (wet) the sides of the clay coil before winding them together. This acts like glue and prevents the spiral from cracking apart as it dries.
Step 2: Shaping and Drying
-
Form the curve:
Take your flat spiral disc and gently drape it inside your small bowl mold. Press it lightly so it takes on a shallow cupped shape. -
Refine the edges:
Run a damp sponge or your finger along the top rim of the dish to smooth out any rough textures or sharp edges caused by the coil termination. -
Let it dry:
Leave the clay inside the mold for a few hours until it’s stiff enough to hold its shape, then remove it to air dry completely. This usually takes 24-48 hours depending on humidity. -
Sand it down:
Once fully dry, lightly sand any rough spots on the rim or underside. Be careful not to sand away the beautiful spiral texture inside the bowl.
Step 3: Painting and Finishing
-
Apply the base color:
Mix a warm, muted pink tone using your acrylic paints. Paint the entire dish, working the brush into the grooves of the coil to ensure full coverage. -
Add the speckles:
Dip an old toothbrush into slightly watered-down black paint. Run your thumb across the bristles to flick tiny speckles onto the dish. Practice on paper first to control the splatter. -
Draw the face:
Once the paint is dry, use a fine detail brush or a permanent marker to draw two small “U” shapes for closed eyes and a simple curved smile in the center. -
Seal the surface:
Apply a coat of gloss varnish to give the dish a finished, ceramic-like shine. This also protects the paint from scratching. -
Final cure:
Allow the varnish to dry completely according to the bottle instructions before placing any jewelry inside.
Uneven Drying?
If the edges curl up too fast, lightly cover the dish with a plastic bag while it dries. This slows the evaporation process and prevents warping or cracking.
Now you have a sweet little spot to keep your treasures safe and organized


Easy Slab Coasters With Stamped Texture
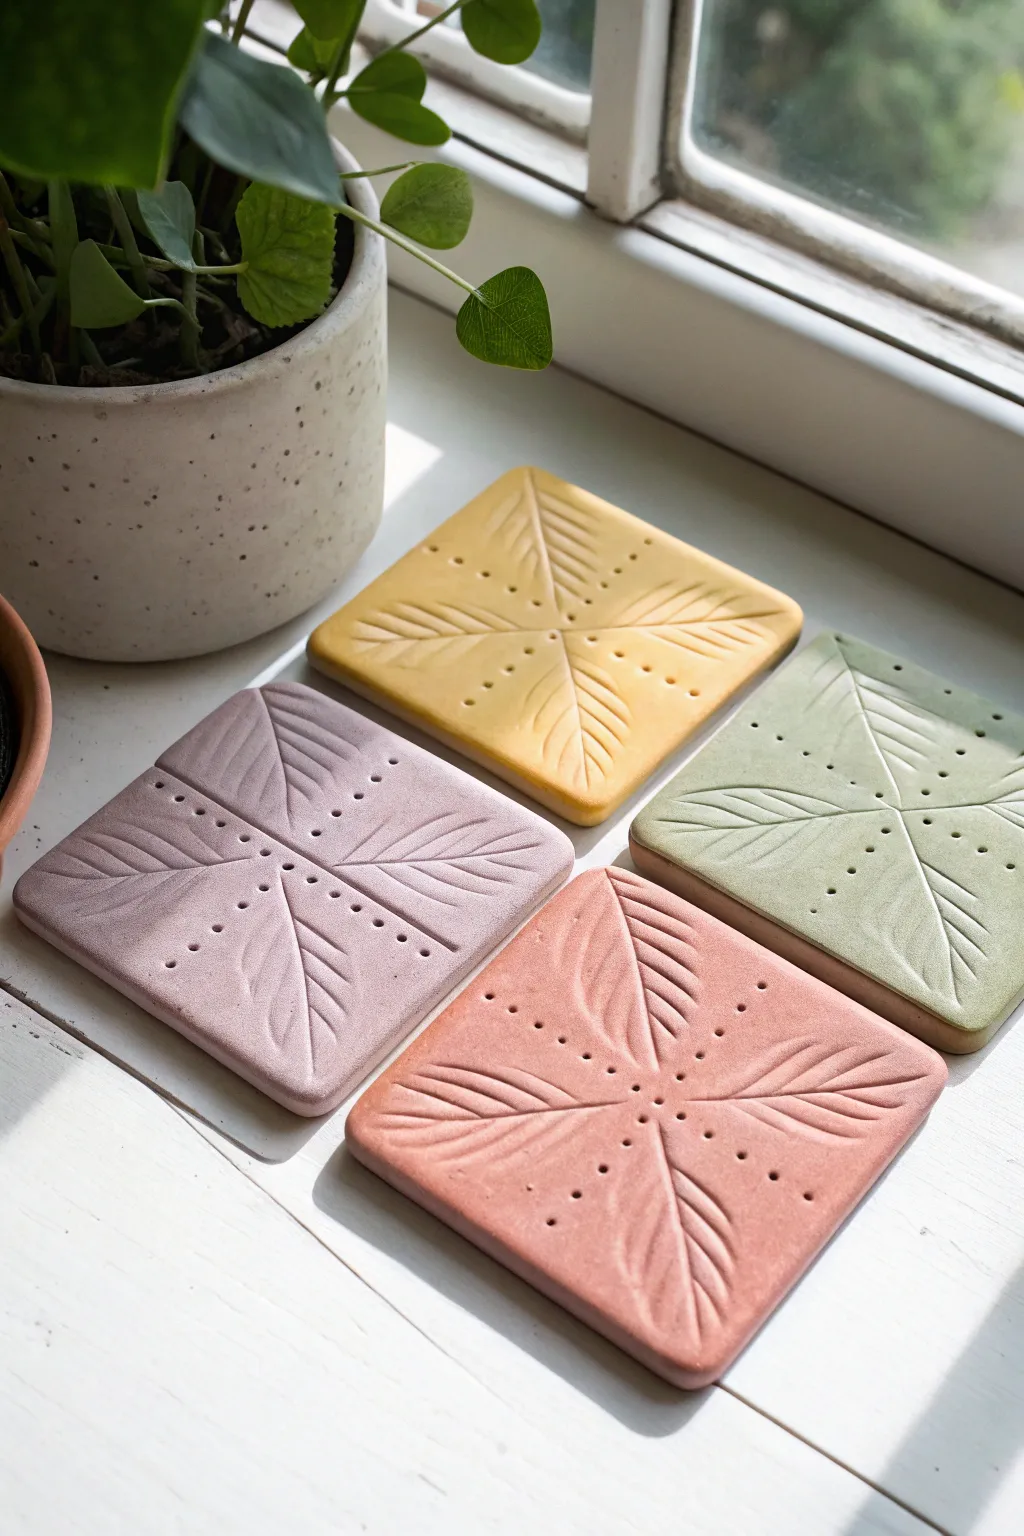
These charming, matte coasters combine a modern geometric arrangement with organic leaf details for a balanced, minimalist aesthetic. Using simple slab-building techniques and basic tools, you can create a functional set featuring soft pastel hues of mustard, sage, lavender, and terracotta.
Step-by-Step
Materials
- Polymer clay or air-dry clay (in muted yellow, purple, green, and reddish-pink)
- Acrylic roller or rolling pin
- Square cookie cutter (approx. 4×4 inches) or craft knife
- Veining tool, needle tool, or toothpick
- Smooth work surface (ceramic tile or glass mat)
- Fine-grit sandpaper (400-600 grit)
- Matte sealer or varnish (optional)
Step 1: Preparing the Clay Slabs
-
Condition the materials:
Begin by thoroughly kneading your chosen clay color until it is soft, pliable, and free of any air bubbles. If mixing custom pastel shades, do this now by blending white clay with small amounts of pigment. -
Roll the slab:
Place the clay on your work surface and use your acrylic roller to flatten it into an even slab. Aim for a thickness of about 1/4 inch (6mm) to ensure the coaster is sturdy enough for daily use. -
Cut the shape:
Using a square cookie cutter or a ruler and craft knife, cut out a perfect square. Lift away the excess clay, but leave the square in place on your work surface so you don’t distort the shape while texturing. -
Soften the edges:
Gently embrace the edges with your finger to smooth out any sharp cutting lines, giving the coaster a slightly rounded, finished look.
Step 2: Creating the Design
-
Mark the center:
Use a needle tool to make a tiny, faint indentation in the absolute center of the square. This will serve as the convergence point for your leaf stems. -
Draw part one:
Draw a diagonal line from one corner toward the center, stopping slightly short of the middle dot. Press deep enough to make a groove, but not enough to cut through. -
Complete the diagonal cross:
Repeat this for all four corners, creating an ‘X’ shape where the lines almost meet in the center but remain distinct separate stems. -
Add leaf veins:
along each main stem line, use your tool to press short, angled lines branching outward. Make these marks symmetrical, mirroring the veins on either side of the stem to create a stylized leaf look. -
Detail with dots:
Using a needle tool or toothpick, prick a series of small, evenly spaced holes alongside the leaf stems. I find that following the negative space between the leaves creates a lovely radiating sunburst effect. -
Refine the center:
Add a small cluster of four dots right in the center, between the stem ends, to tie the design together visually.
Fixing Warped Edges
If your slab curls up while drying, gently flip it over halfway through the drying process. You can also place a light book on top (with parchment paper in between) to keep it perfectly flat.
Step 3: Finishing Touches
-
Dry or bake:
If using polymer clay, bake according to the package instructions (usually around 275°F/135°C for 15-30 minutes). If using air-dry clay, let the coasters sit in a draft-free area for 24-48 hours until fully hardened. -
Sand for smoothness:
Once fully cured and cooled, take a piece of fine-grit sandpaper and gently sand the edges and surface. This removes any fingerprints or rough burrs left from the texturing process. -
Wipe clean:
Use a slightly damp cloth or baby wipe to remove all sanding dust from the grooves of your design. -
Seal (Optional):
To protect the coasters from moisture, apply a thin coat of matte varnish or sealant. This preserves the soft, unglazed look while adding durability against condensation from cups.
Elevate the Look
Mix granite-effect clay or tiny specks of black pepper into your solid colors before rolling. This mimics a speckled ceramic glaze and adds deeper visual interest to the matte surface.
Stack your finished set on the coffee table and enjoy the satisfaction of handmade decor


Cute Clay Face Magnets
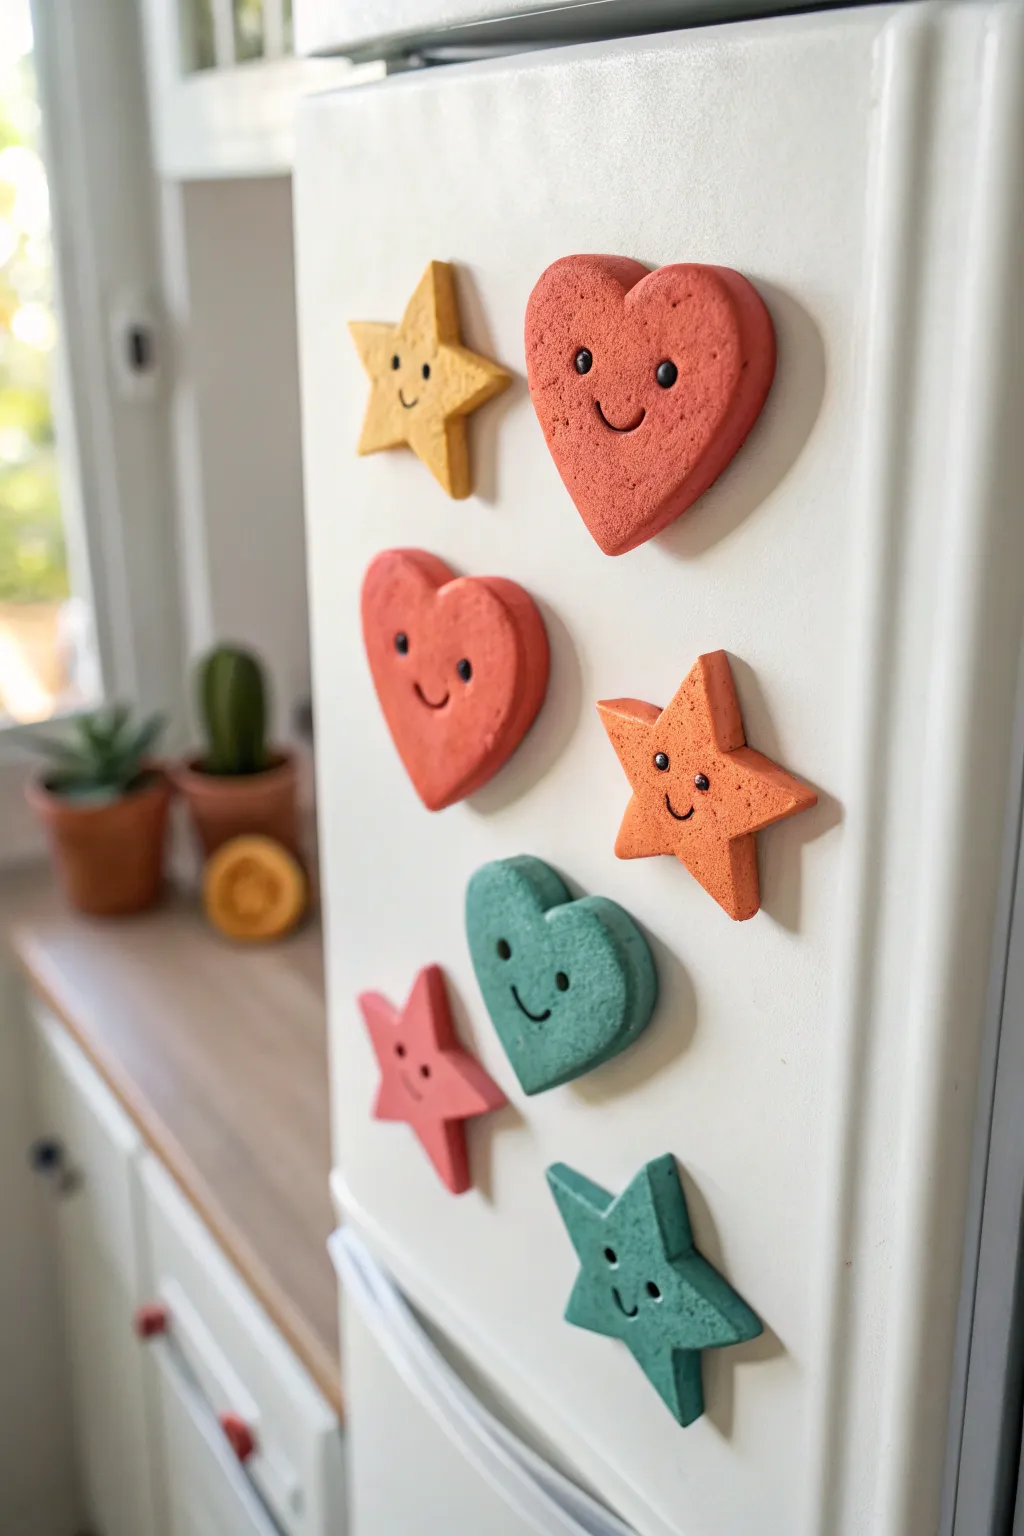
Brighten up your kitchen with these adorable, textured clay magnets featuring cheerful little faces. This simple project uses basic clay shaping techniques to create chunky hearts and stars that add a pop of personality to any magnetic surface.
Detailed Instructions
Materials
- White polymer clay or air-dry clay
- Rolling pin
- Heart and star cookie cutters (approx. 2-3 inches)
- Sandpaper or a clean toothbrush (for texturing)
- Acrylic paints (Red, Orange, Yellow, Teal, Pink)
- Small paintbrush
- Black fine-tip acrylic paint marker or permanent marker
- Strong round craft magnets
- Strong craft glue (E6000 or super glue)
- Parchment paper
Step 1: Shaping the Clay bases
-
Condition the clay:
Start by kneading your white clay until it is soft, pliable, and free of cracks. If you are using polymer clay, the warmth of your hands will help soften it up significantly. -
Roll it out:
Place the clay on a sheet of parchment paper and use your rolling pin to flatten it. Aim for a nice, chunky thickness of about 1/4 to 1/2 inch so the magnets feel substantial. -
Cut the shapes:
Press your heart and star cookie cutters firmly into the clay. Give them a little wiggle to ensure a clean cut, then gently remove the excess clay from around the shapes. -
Soften the edges:
Once you pop the shapes out of the cutters, use your fingertip to gently tap round the sharp top edges. This gives them that soft, puffed look rather than a harsh, machine-cut appearance. -
Add texture:
To mimic the stone-like texture seen in the photo, gently tap the surface of your wet clay with a clean toothbrush or extremely fine-grit sandpaper. This breaks up the smooth surface just enough to catch the paint beautifully later.
Step 2: Painting and Drying
-
Initial drying or baking:
If using air-dry clay, let the shapes sit in a dry spot for 24-48 hours until fully hard. If using polymer clay, bake according to the package instructions (usually around 275°F for 15-30 minutes depending on thickness) and let them cool completely. -
Apply base colors:
Using a soft brush, paint each shape largely in solid matte colors. Go for a deep red and teal for the hearts, and mix up sunny yellow, orange, mint green, and pink for the stars. -
Layer for opacity:
You will likely need two coats to get that rich, opaque coverage. Let the first coat dry completely before adding the second to avoid lifting the paint. -
Create the texture effect:
Once the base color is dry, I like to take a dry brush with a tiny amount of slightly lighter or darker paint and dab it gently over the surface. This enhances the ‘stippled’ texture we created earlier.
Texturing Tip
For a really organic, stone-like feel, mix a tiny pinch of used coffee grounds or cracked black pepper into the clay before baking for built-in speckles.
Step 3: Bringing them to Life
-
Draft the faces:
Before committing to ink, you can lightly sketch the placement of the eyes and mouth with a pencil. Place them low on the shape for that classic ‘kawaii’ cute aesthetic. -
Drawing the eyes:
Using your black paint marker or a very fine brush with black acrylic, draw two small, solid circles for eyes. Space them fairly wide apart. -
Add the smile:
Draw a small, simple ‘U’ shape right between the eyes. Keep the line thin and neat. -
Add eye highlights:
This is the secret to cuteness: dip the very tip of a toothpick or a dotting tool into white paint. Add a tiny white dot to the upper right corner of each black eye. -
Attach the magnet:
Flip the dry, finished pieces over. Apply a pea-sized drop of strong craft glue to the center of the back. -
Secure and cure:
Press the round magnet firmly into the glue. Let the glue cure undisturbed for several hours to ensure the heavy clay won’t slide off the magnet later.
Make Them Sparkle
Before the paint dries, sprinkle ultra-fine glitter over just the edges of the stars to make them catch the light when the fridge door opens.
Pop these cheerful characters onto your fridge and enjoy their little smiles every time getting a snack

The Complete Guide to Pottery Troubleshooting
Uncover the most common ceramic mistakes—from cracking clay to failed glazes—and learn how to fix them fast.
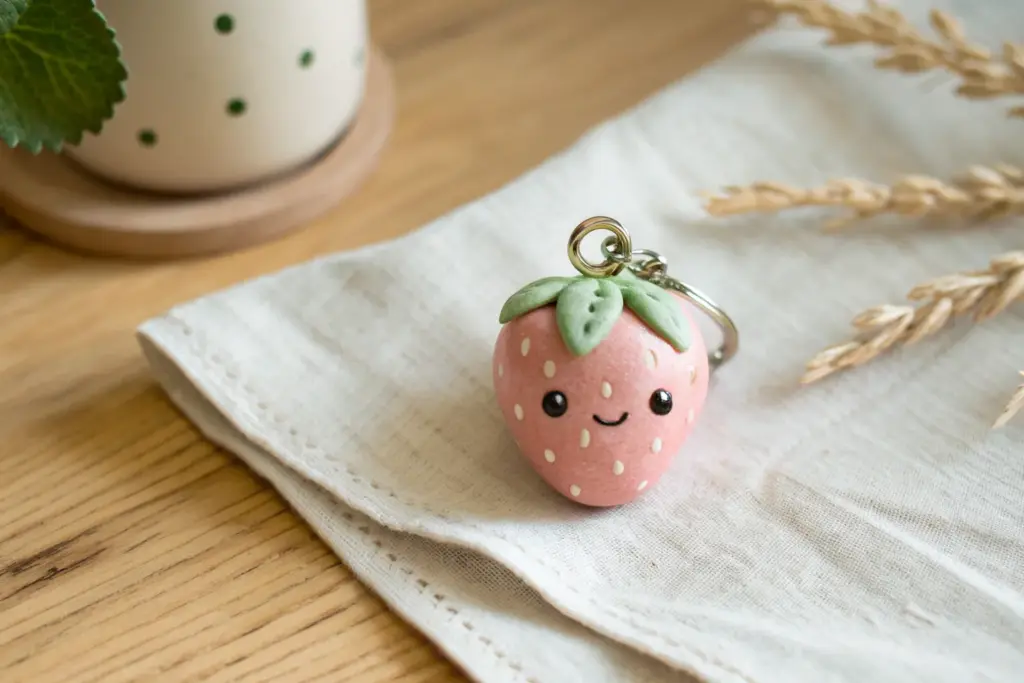
Mini Fruit Charms With Dot Eyes
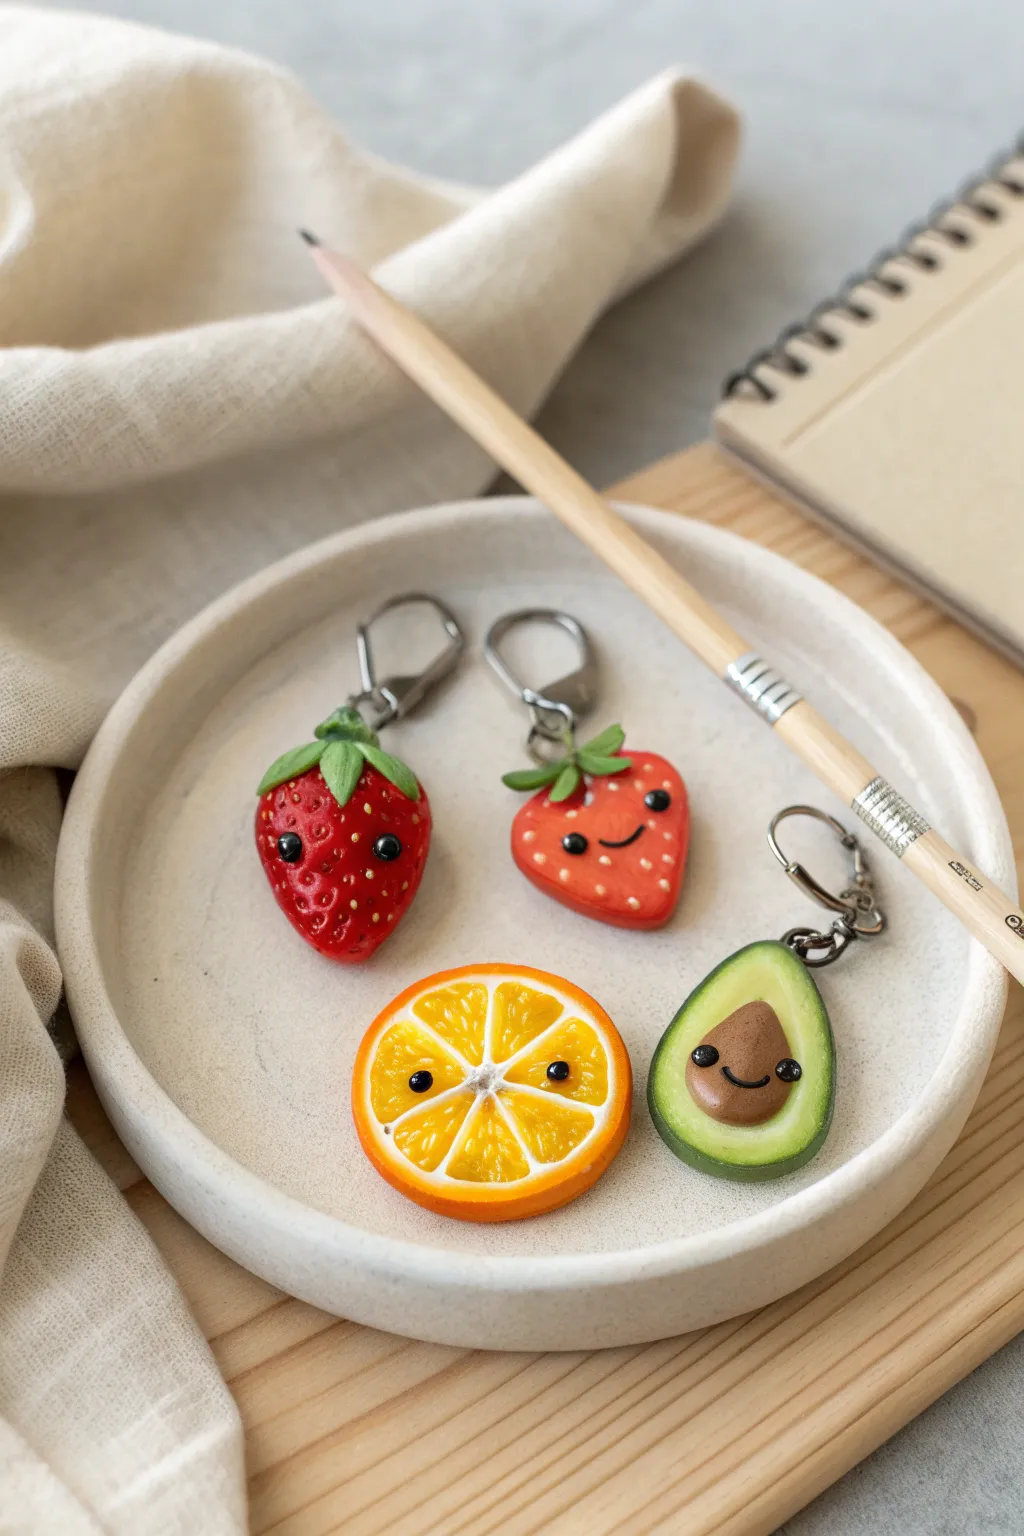
These adorable polymer clay fruit charms bring a dose of kawaii cuteness to your keychain or jewelry collection. With their tiny, expressive faces and realistic textures, the little strawberries, orange slice, and avocado are surprisingly simple to sculpt.
How-To Guide
Materials
- Polymer clay (red, green, orange, yellow, translucent, white, brown, black)
- Clay tools (needle tool, dotting tool, blade)
- Headpins or eye screws
- Keychain hardware or jump rings
- Gloss glaze or UV resin
- Parchment paper or ceramic tile for baking
- Small brush
Step 1: Sculpting the Strawberries
-
Shape the Base:
For the whole strawberry, roll a ball of red clay into a rounded cone shape, slightly flattened on top for the leaves. For the sliced version, flatten a similar cone shape so it looks like a half-berry. -
Add Texture:
Using a needle tool, gently poke small indentations all over the red surface to mimic seeds. Keep the pressure light so you don’t distort the overall shape. -
Create the Leaves:
Flatten a small piece of green clay and cut a star or flower shape. Press this onto the top of your strawberry. Use your needle tool to drag the green clay slightly downward for a natural look. -
Add the stem:
Roll a tiny snake of green clay and attach it to the center of the leaves to form the stem.
Uneven Eyes?
If tiny clay balls are too fiddly, bake the charms first without eyes. Then, paint the eyes on with black acrylic paint and a dotting tool for perfect symmetry.
Step 2: Creating the Orange Slice
-
Mix the colors:
Mix orange clay with a bit of translucent clay to give the fruit segments a juicy, realistic depth. Keep some regular orange clay separate for the rind. -
Form the segments:
Create a thick cane or log of the translucent orange mix. Wrap it thinly in white clay. Slice this log into six or eight wedges. -
Reassemble the slice:
Arrange the wedges in a circle, placing a very thin snake of white clay between them to define the segments clearly. -
Wrap the rind:
Wrap the entire circle of segments in a layer of white clay, followed by a layer of the opaque orange clay for the peel. Gently roll to smooth the seams. -
Texture the fruit:
Slice off a disc to be your charm. Use a needle tool to scratch tiny radiating lines into the translucent orange sections for pulpy texture.
Step 3: Making the Avocado
-
Shape the body:
Mix green clay with a touch of yellow for the inner flesh. Shape it into a pear-like oval. Wrap the outside with a thin strip of darker green clay for the skin. -
Add the pit:
Press a thumb or ball tool into the lower center to make an indentation. Roll a ball of brown clay and press it firmly into this hollow.
Level Up: Scent it!
Mix a tiny drop of essential oil (like sweet orange or strawberry) into the clay before sculpting. Your charms will smell as delicious as they look.
Step 4: Kawaii Details & Finishing
-
Add the hardware:
Insert an eye screw or headpin into the top of each fruit charm. I find twisting it in slowly helps it grip the raw clay better. -
Make the faces:
Roll tiny balls of black clay for eyes. Press them gently onto the fruit. For the smile, roll an incredibly thin snake of black clay and curve it into a ‘U’ shape, pressing it on with a needle tool. -
Bake:
Bake the pieces according to the instructions on your specific brand of polymer clay. Let them cool completely. -
Glaze:
Brush a coat of gloss glaze or UV resin over the fruit surfaces (avoiding the crust/rind if you prefer a matte look there) to make them look fresh and juicy. -
Assemble:
Once the glaze is cured or dry, use pliers to attach your jump rings and keychain hardware to the eye pins.
Now you have a refreshing set of pocket-sized fruit friends to carry with you everywhere
Kawaii Animal Blob Figurines
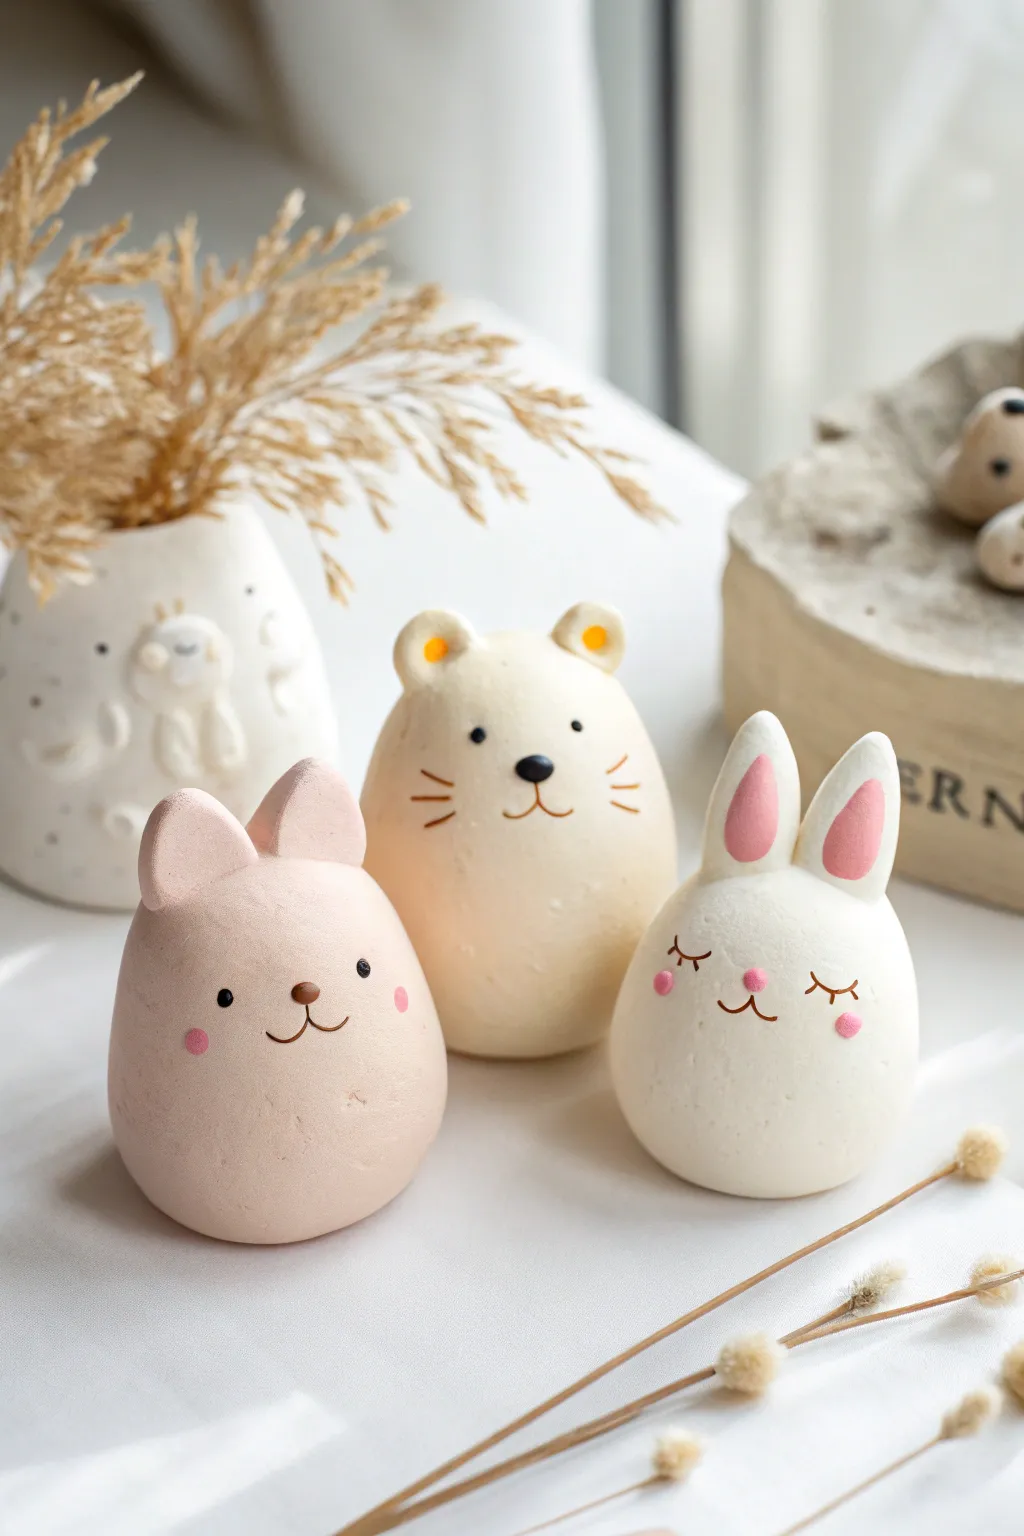
These simple, rounded animal figurines are perfect for beginners looking to create something adorable without needing complex sculpting skills. The project features a trio of smooth, egg-shaped characters—a blushing pink rabbit, a cheerful cream bear, and a sleepy white bunny—that make for charming desk companions or gentle decor.
Detailed Instructions
Materials
- Air-dry clay or polymer clay (in white, cream, and soft pink)
- Acrylic paints (black, pink, brown, orange)
- Fine-grit sandpaper (optional)
- Fine liner paintbrush or dotting tool
- Ball stylus tool
- Small bowl or foil (for shaping structural support if desired)
- Water (for smoothing)
- Clear matte varnish (optional)
Step 1: Shaping the Bodies
-
Prepare the Clay Bases:
Start by conditioning your clay until it is soft and pliable. Divide your clay into three equal portions: one soft pink, one cream or off-white, and one bright white. -
Roll Smooth Spheres:
Roll each portion of clay into a tight ball between your palms to remove any initial cracks or seams. -
Form the Egg Shape:
Gently taper the top of each ball slightly to create a subtle egg or pear shape. The base should be wide and flat enough for the figurine to stand stably on its own. Tap the bottom gently against your work surface to flatten it. -
Smooth the Surface:
Dip your finger in a tiny bit of water (for air-dry clay) or baby oil (for polymer clay) and run it over the surface to ensure it is perfectly smooth and free of fingerprints.
Smooth Operator
Keep a damp sponge nearby while working. Wiping your tools frequently prevents dried clay buildup, which causes drags and uneven textures on your smooth surfaces.
Step 2: Adding Ears and Features
-
Sculpting Bear Ears:
For the cream bear in the center, roll two tiny balls of matching clay. Press these gently onto the top of the head, flattening them slightly to form rounded ears. Use a blending tool to seamless join the clay at the back of the ears. -
Sculpting Bunny Ears:
For the white and pink bunnies, roll small logs of clay that taper at the ends. Attach them to the top of the heads, pressing them firmly. For the white bunny, position the ears straight up; for the pink one, you can make them slightly shorter and rounder. -
Indenting the Ears:
Use a ball stylus or the rounded end of a paintbrush to gently press an indentation into the front of the white bunny’s ears and the bear’s ears. This creates a recessed area for painting later. -
Drying or Baking:
If using polymer clay, bake according to the manufacturer’s instructions. If using air-dry clay, set the figures in a safe, dry place for 24-48 hours until fully hardened. Turning them occasionally helps the bottom dry. -
Optional Sanding:
Once fully cured, inspect your figures. If there are any rough spots, I like to gently buff them away with fine-grit sandpaper for a professional matte finish.
Step 3: Painting the Details
-
Inner Ears Coloring:
Using a small brush, paint the insides of the white bunny’s ears soft pink. For the cream bear, paint the inner ear depressions a warm yellow-orange. -
Painting the Bear Face:
Use black acrylic paint and a very fine liner brush to paint two small dots for eyes and a small triangular nose. Draw a thin ‘w’ shape for the mouth connected to the nose. Add three thin whiskers on each cheek. -
Painting the Pink Bunny Face:
Paint simple black dot eyes set widely apart. Add a small brown oval nose and a simple curved mouth line underneath. Finish with soft pink circles for blush cheeks. -
Painting the Sleepy Bunny Face:
For the white bunny, draw two downward curving lines with tiny lashes for closed, sleeping eyes. Add a small pink nose and a curved mouth. Dot the cheeks with pink paint. -
Allow to Dry:
Let the paint dry completely before handling. Be careful not to smudge the fine lines. -
Sealing the Figures:
To protect your work, apply a thin coat of matte varnish. This preserves the soft, velvety look of the clay while preventing the paint from chipping.
Uneven Standing?
If your figure wobbles after drying, glue a small circle of felt to the base. It levels out minor imperfections and protects your table surface from scratches.
Arrange your trio on a shelf or windowsill to add a touch of handcrafted sweetness to your room


What Really Happens Inside the Kiln
Learn how time and temperature work together inside the kiln to transform clay into durable ceramic.
Easy Bead-Style Keychain Beads
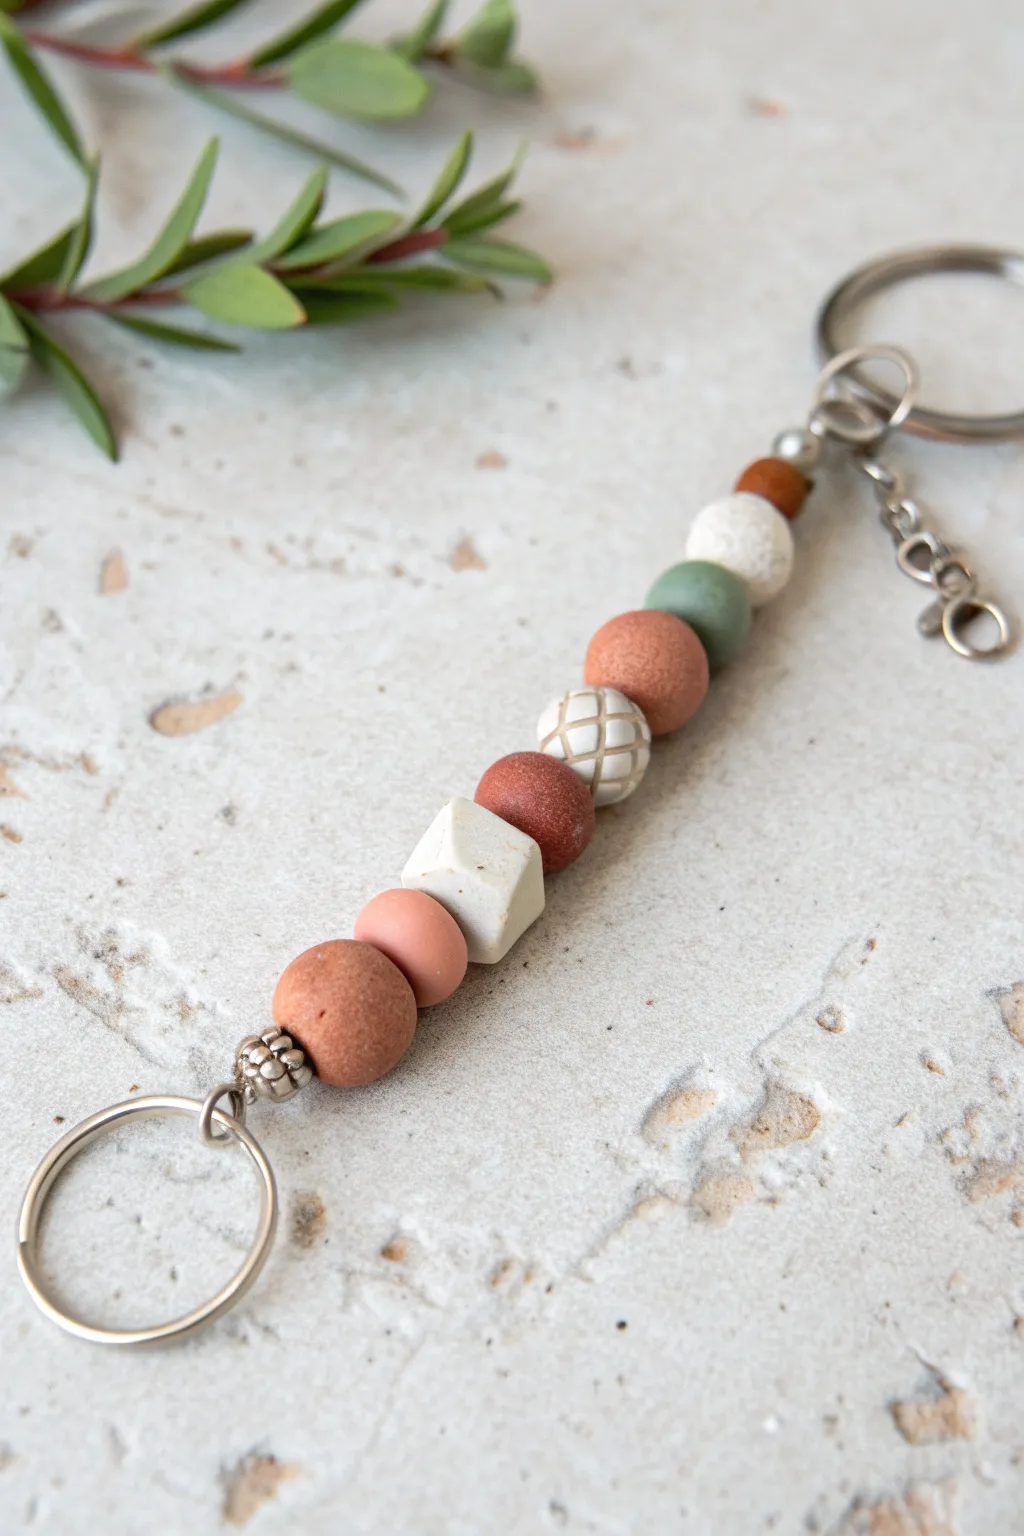
Create a stylish and functional accessory with this beaded keychain project, featuring a mix of earthy terracotta, sage, and cream tones. The combination of simple round beads, a geometric accent, and textured details gives this piece a modern, artisanal look that is surprisingly easy to achieve.
Step-by-Step Tutorial
Materials
- Polymer clay (terracotta, white, sage green, beige/sand)
- Acrylic rolling pin or clay roller
- Clay blades or craft knife
- Bead piercing pins or toothpicks
- Sandpaper (fine grit)
- Split ring keyring (large)
- Small jump rings
- Metal spacer bead (silver-tone)
- Cord or strong beading thread
- Texture tool (or a needle tool for carving)
- Toaster oven for baking
Step 1: Shaping the Round Beads
-
Condition the Clay:
Begin by kneading your polymer clay blocks until they are soft and pliable. You will need small amounts of terracotta, sage green, white, and a sand/beige color to match the reference image. -
Portion the Clay:
Cut off small, equal-sized chunks of clay for your round beads. For this design, you’ll need roughly pea-to-marble sized amounts: two terracotta, one sage green, one white, and one beige. -
Roll Smooth Spheres:
Take each portion of clay and roll it between your palms. Apply even pressure to create smooth, perfect spheres. If you see any fingerprints, lightly brush them away with a finger or roll gently on a flat surface. -
Create the Small Top Bead:
Roll a very small amount of terracotta clay into a tiny bead, smaller than the others, which will sit at the very top of the keychain assembly near the clasp.
Step 2: Creating Texture and Geometry
-
Form the Geometric Bead:
Roll a slightly larger ball of white or light beige clay. Instead of keeping it round, press it gently against your work surface on different sides to create flat planes, forming a rough, faceted gemstone or cube shape. -
Texture the White Bead:
Take one of your round white or cream beads and roll it gently over a textured surface, like coarse sandpaper or a stone, to give it a porous, pumice-like appearance. -
Carve the Grid Pattern:
For the patterned beige bead, roll a smooth round ball first. Using a needle tool or a sharp craft knife, carefully score shallow diagonal lines in one direction, then cross them in the other direction to create a diamond grid pattern. -
Pierce the Holes:
Using a bead piercing pin or a toothpick, carefully poke a hole through the center of every bead. I find it helpful to twist the pin as I push through to avoid squashing the shape.
Clean Lines Tip
To keep white clay pristine, always roll it first before handling darker colors like terracotta or sage, or wipe hands with a baby wipe between colors.
Step 3: Baking and Finishing
-
Bake the Beads:
Arrange your beads on a baking sheet lined with parchment paper. Bake them according to your polymer clay package instructions (usually around 275°F or 135°C for 15-30 minutes). Let them cool completely. -
Sand for Smoothness:
Once cool, inspect the beads. Use fine-grit sandpaper to buff away any fingerprints or rough edges, particularly on the faceted geometric bead to crisp up the edges. -
Prepare the Cord:
Cut a length of strong cord or beading thread, about 10-12 inches long. Prepare a loop at the bottom end and attach your large split ring keyring. -
Start Assembly:
Thread the cord through the loop on the keyring. To hide the knot or connection point, thread on a silver-tone metal spacer bead first. -
String the Beads:
Thread your clay beads onto the cord in the following order: large terracotta, pinkish-terracotta, faceted white bead, reddish-terracotta, patterned grid bead, plain terracotta, sage green, textured white bead, and finally the tiny terracotta bead. -
Secure the Top:
Tie a secure knot at the very top of the bead stack. Add a dab of super glue to the knot for extra security. -
Attach the Clasp:
Attach a jump ring and a lobster clasp or hook to the top loop of your cord so the keychain can be easily clipped onto bags.
Use Essential Oils
For the porous textured white bead, use air-dry clay or unsealed polymer. Add a drop of essential oil to it to turn your keychain into a travel diffuser.
You now have a beautiful, custom keychain ready to organize your keys or decorate your favorite bag
Tiny Vase Magnets for Mini Flowers
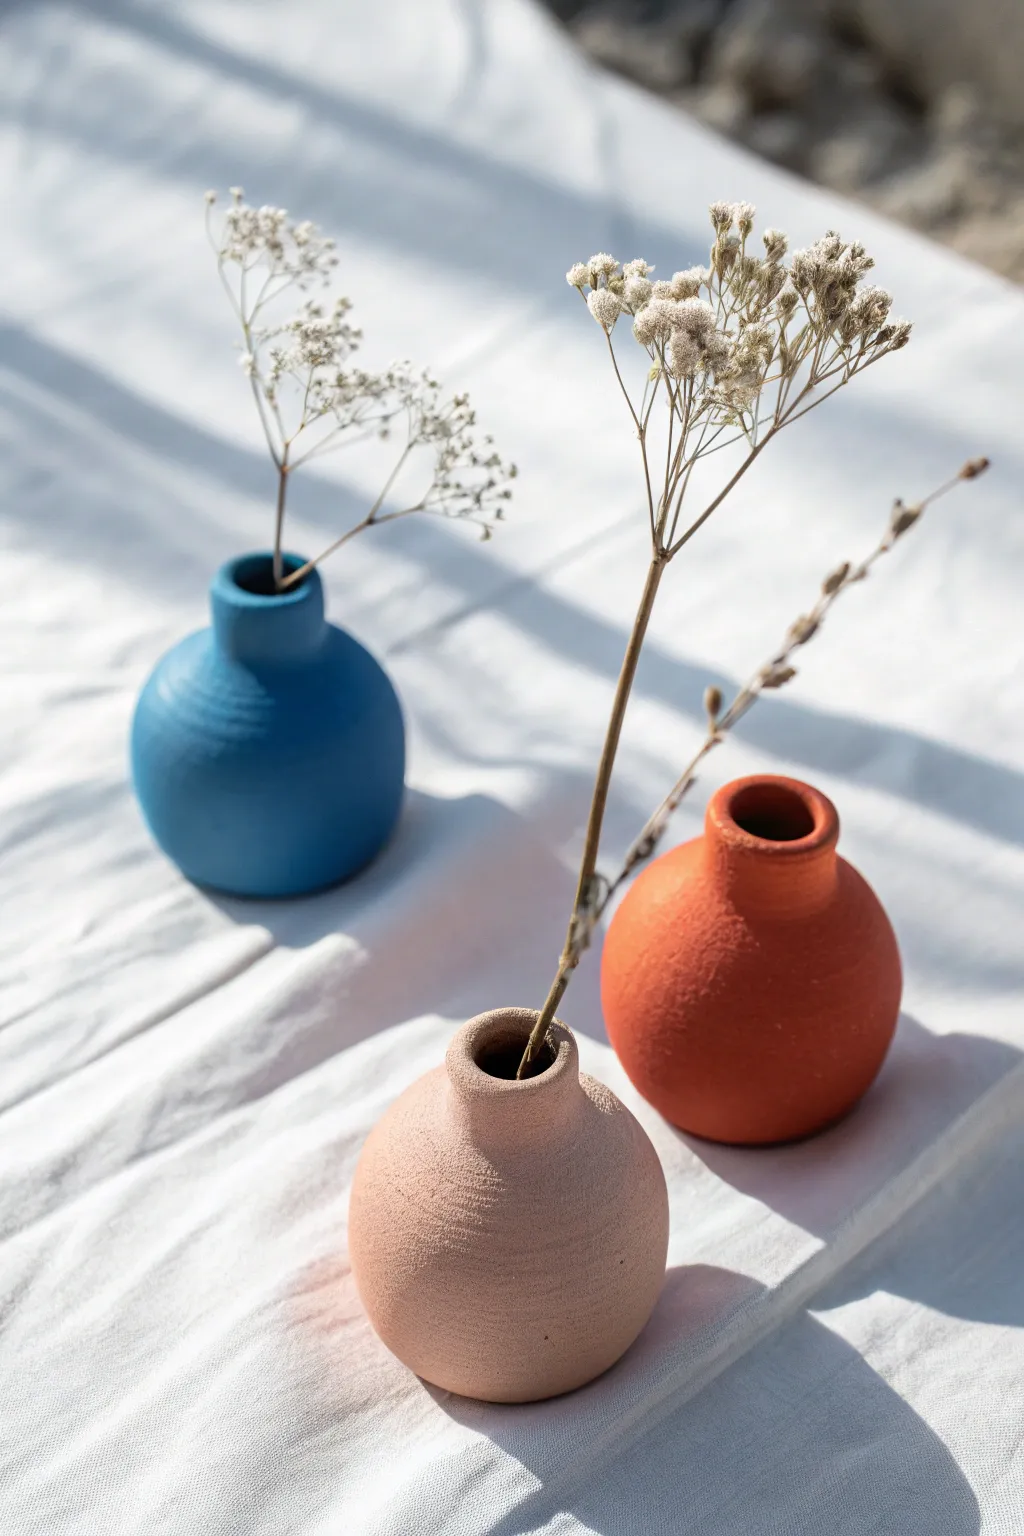
These charming, petite vases bring a touch of rustic elegance to any metallic surface with their textured, matte finish and rounded forms. Perfect for holding tiny sprigs of dried baby’s breath or wildflowers, they turn your fridge into a miniature art gallery.
Detailed Instructions
Materials
- Air-dry clay (white or terracotta)
- Small round magnets (strong neodymium recommended)
- Acrylic paints (matte finish: cobalt blue, terracotta orange, muted pink)
- Baking soda (to create texture)
- Small paintbrush
- Modeling tools (or a toothpick)
- Fine-grit sandpaper
- Water in a small cup
- Sealant (matte spray, optional)
- Super glue (cyanoacrylate)
Step 1: Shaping the Vases
-
Portion the clay:
Start by grabbing three small balls of air-dry clay, each roughly the size of a walnut or a ping-pong ball. Knead them well until they are soft and crack-free. -
Form the base:
Roll each piece into a smooth sphere between your palms. Gently tap the bottom of the sphere onto your work surface to create a flat base so the vase can stand upright while you work. -
Create the opening:
Using your thumb or a rounded modeling tool, press an indentation into the top center of the sphere. Don’t go all the way through; stop about two-thirds of the way down. -
Shape the neck:
Gently pinch the clay around the opening and pull it upwards slightly to form a narrow neck. You want a distinct transition between the round body and the collar-like rim. -
Refine the rim:
Smooth the lip of the vase with a wet fingertip to ensure it is even and rounded, removing any sharp edges or cracks. -
Add surface texture:
At this stage, if you want slight ridges like the peach vase, use a modeling tool to lightly score or spiral horizontal lines around the body. Alternatively, keep the clay mostly smooth but don’t over-polish; minor imperfections add to the handmade look. -
Flatten the back:
Since these will be magnets, press the back side of the vase gently against a flat surface. This creates a small flat plane where the magnet will eventually sit, ensuring a strong bond. -
Final smoothing:
Dip your finger in a little water and smooth out any unwanted fingerprints or harsh cracks, paying close attention to the neck area. -
Drying time:
Set your trio of vases aside in a safe spot. I like to let them dry for at least 24-48 hours, flipping them occasionally so the bottom dries thoroughly.
Cracks appeared?
Mix a tiny amount of fresh clay with water to create a paste (slip). Fill any cracks that formed during drying, smooth it out, and let it dry again before painting.
Step 2: Painting and Finishing
-
Prep the paint mixture:
To achieve that specific grainy, ceramic look without a kiln, mix your acrylic paints with baking soda. Use a ratio of roughly 1 part baking soda to 2 parts paint. -
Sand imperfections:
Once fully dry, use fine-grit sandpaper to gently buff away any sharp jagged bits, but remember we want to keep some texture. -
Apply the first coat:
Paint the blue, terracotta, and pink hues onto their respective vases using the baking soda mixture. The mixture will feel thick and gritty—this is perfect. -
Dab for texture:
Instead of long smooth strokes, use a dabbing motion with your brush as the paint starts to set. This enhances the stone-like, earthy appearance. -
Let it cure:
Allow the first coat to dry completely. The baking soda paint tends to dry faster than regular acrylics, but give it an hour to be safe. -
Second coat:
Apply a second layer of the textured paint to ensure full coverage and deepen the color opacity. Let this dry fully. -
Attach the magnet:
Flip the dried vases over. Apply a drop of super glue to the flat spot you created on the back and press your neodymium magnet firmly into place. Hold for 30 seconds. -
Final touches:
Once the glue is cured, you can arrange your tiny dried flowers or twigs inside. The textured paint mimics fired clay beautifully.
Texture Pro Tip
If the paint looks too flat, dust a tiny pinch of actual baking soda directly onto the wet paint on the vase, then brush over it for an ultra-realistic stone effect.
Enjoy arranging your new miniature floral display on the refrigerator door

TRACK YOUR CERAMIC JOURNEY
Capture glaze tests, firing details, and creative progress—all in one simple printable. Make your projects easier to repeat and improve.
Minimal Photo or Card Holders
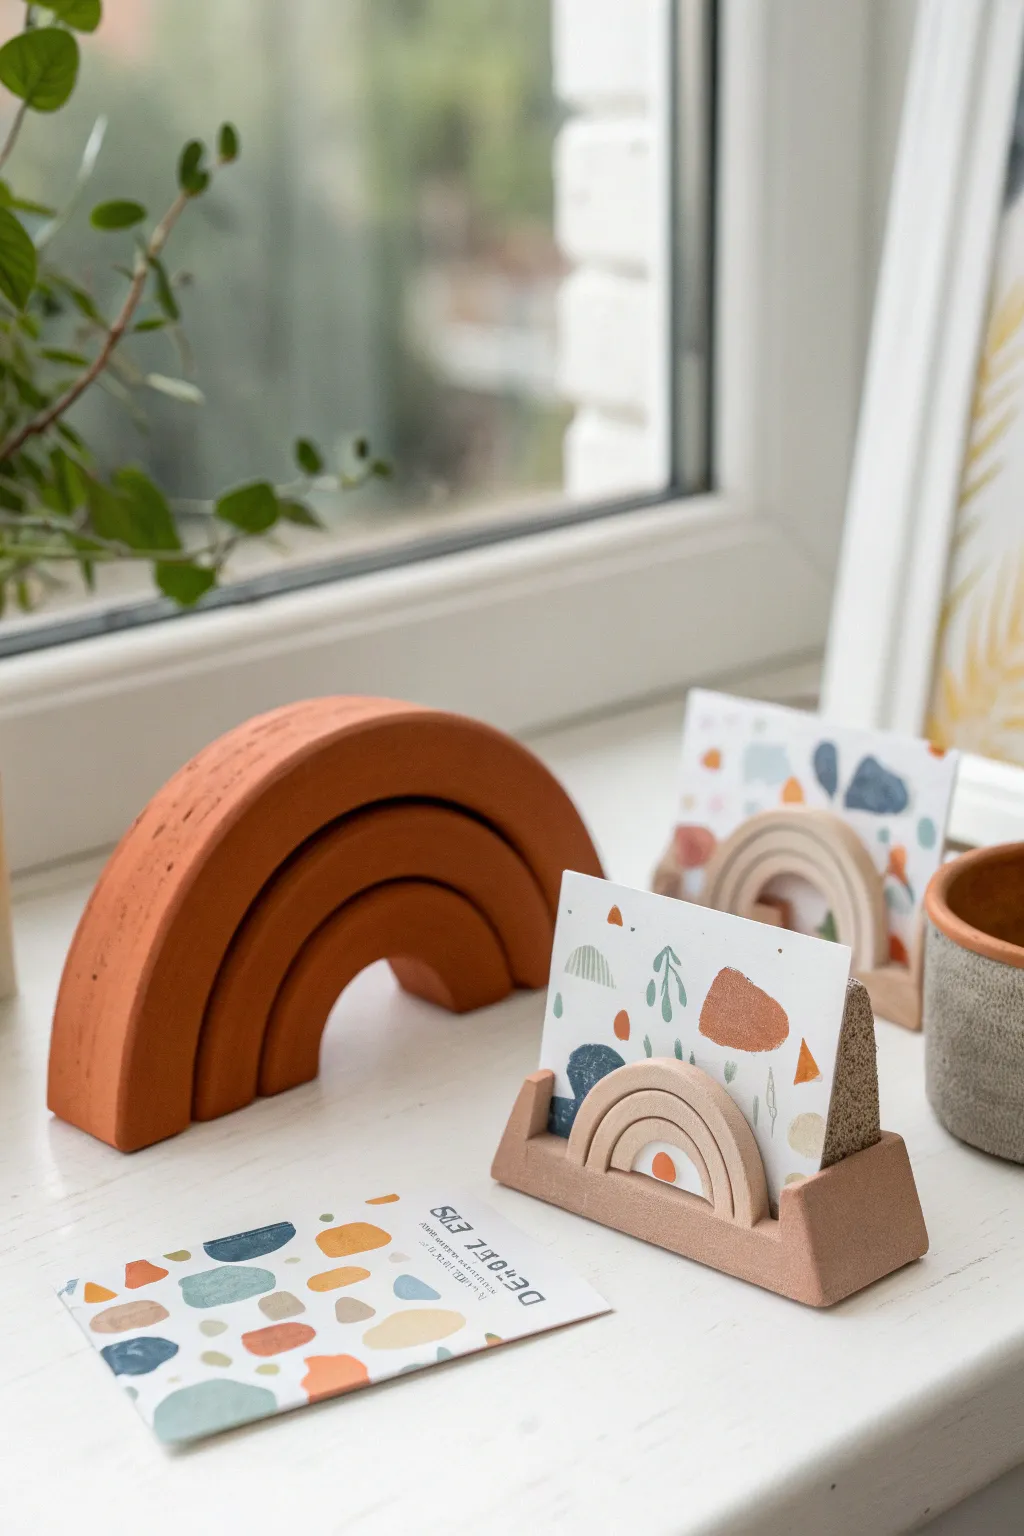
Create a stylish home for your favorite photos or business cards with these minimalist clay holders. Featuring a trendy arch motif and a natural matte finish, they add a touch of modern bohemian charm to any desk or shelf.
How-To Guide
Materials
- Air-dry clay or polymer clay (terracotta or beige tone)
- Acrylic rolling pin
- sharp craft knife or clay slicer
- Ruler
- Small round cookie cutters (nested set) or bottle caps
- Sandpaper (fine grit)
- Water and small sponge (for smoothing)
- Rectangular block logic (optional, for shaping main base)
Step 1: Preparation & Base
-
Condition the Clay:
Begin by kneading a fist-sized ball of clay until it is warm, pliable, and free of cracks. If you are using air-dry clay, keep your hands slightly moist to prevent drying. -
Form the Main Block:
Shape a rectangular log of clay roughly 3 inches long, 1 inch tall, and 1.5 inches deep. This will form the heavy base that holds the card upright. -
Create the Slot:
You need a channel for the card to sit in. Carefully slice a slit down the center length of the rectangle, going about half an inch deep. Gently wiggle the knife to widen it slightly so it can accommodate cardstock thickness. -
Refine the Edges:
Use your fingers dipped in water to smooth the sharp edges of the rectangle, softening them slightly for a more organic look. Tap the sides on your work surface to ensure the bottom is perfectly flat.
Clean Lines Pro Tip
To get a perfectly distinct card slot, insert a folded piece of cardstock wrapped in parchment paper into the slot while the clay dries. This prevents the gap from shrinking or closing up.
Step 2: Creating the Arch Detail
-
Roll a Slab:
Roll out a separate piece of clay into a flat slab, approximately 1/4 inch thick. Ensure the thickness is even throughout for a professional finish. -
Cut the Largest Arch:
Using a round cutter or a guide, cut out a semi-circle shape that is slightly shorter than the length of your rectangular base. -
Create the Inner Arches:
To mimic the rainbow effect seen in the photo, take a smaller cutter or freehand carefully to impress curved lines into your semi-circle slab. You satisfy the look by either incising lines or layering thin clay snakes to create the relief. -
Attach the Arch:
Score the back of the arch and the front face of your rectangular base with a needle tool. Apply a dab of water (or liquid clay if using polymer) and press the arch firmly onto the front of the block. -
Secure the Seam:
Gently smooth the seam where the arch meets the base so they look like one cohesive unit, rather than two stuck-together parts.
Level Up: Terrazzo
Mix tiny chips of different colored dried clay into your wet clay block before shaping. When you sand the finished piece later, a beautiful speckled terrazzo pattern will be revealed.
Step 3: Finishing Touches
-
Texture Check:
Before the clay hardens, inspect the surface. For the stone-like texture evident in the photo, you can gently pat the surface with an old toothbrush or a piece of crumpled foil. -
Final Smoothing:
Do one last pass with a dampened finger to erase any accidental fingerprints or harsh tool marks. -
Drying or Baking:
If using air-dry clay, set the piece aside in a cool, dry place for 24-48 hours, turning it occasionally for even drying. If using polymer clay, bake according to the package instructions (usually 275°F for 15-30 minutes). -
Sanding:
Once fully cured and dry, take a piece of fine-grit sandpaper and gently sand the edges and flat surfaces. I find this step is crucial for achieving that high-end matte ceramic feel. -
Dusting Off:
Wipe the finished piece with a slightly damp cloth to remove any sanding dust.
Place your favorite abstract art card or a cherished Polaroid in the slot and admire your handiwork on your display shelf
Pencil Cup With Wavy Paint
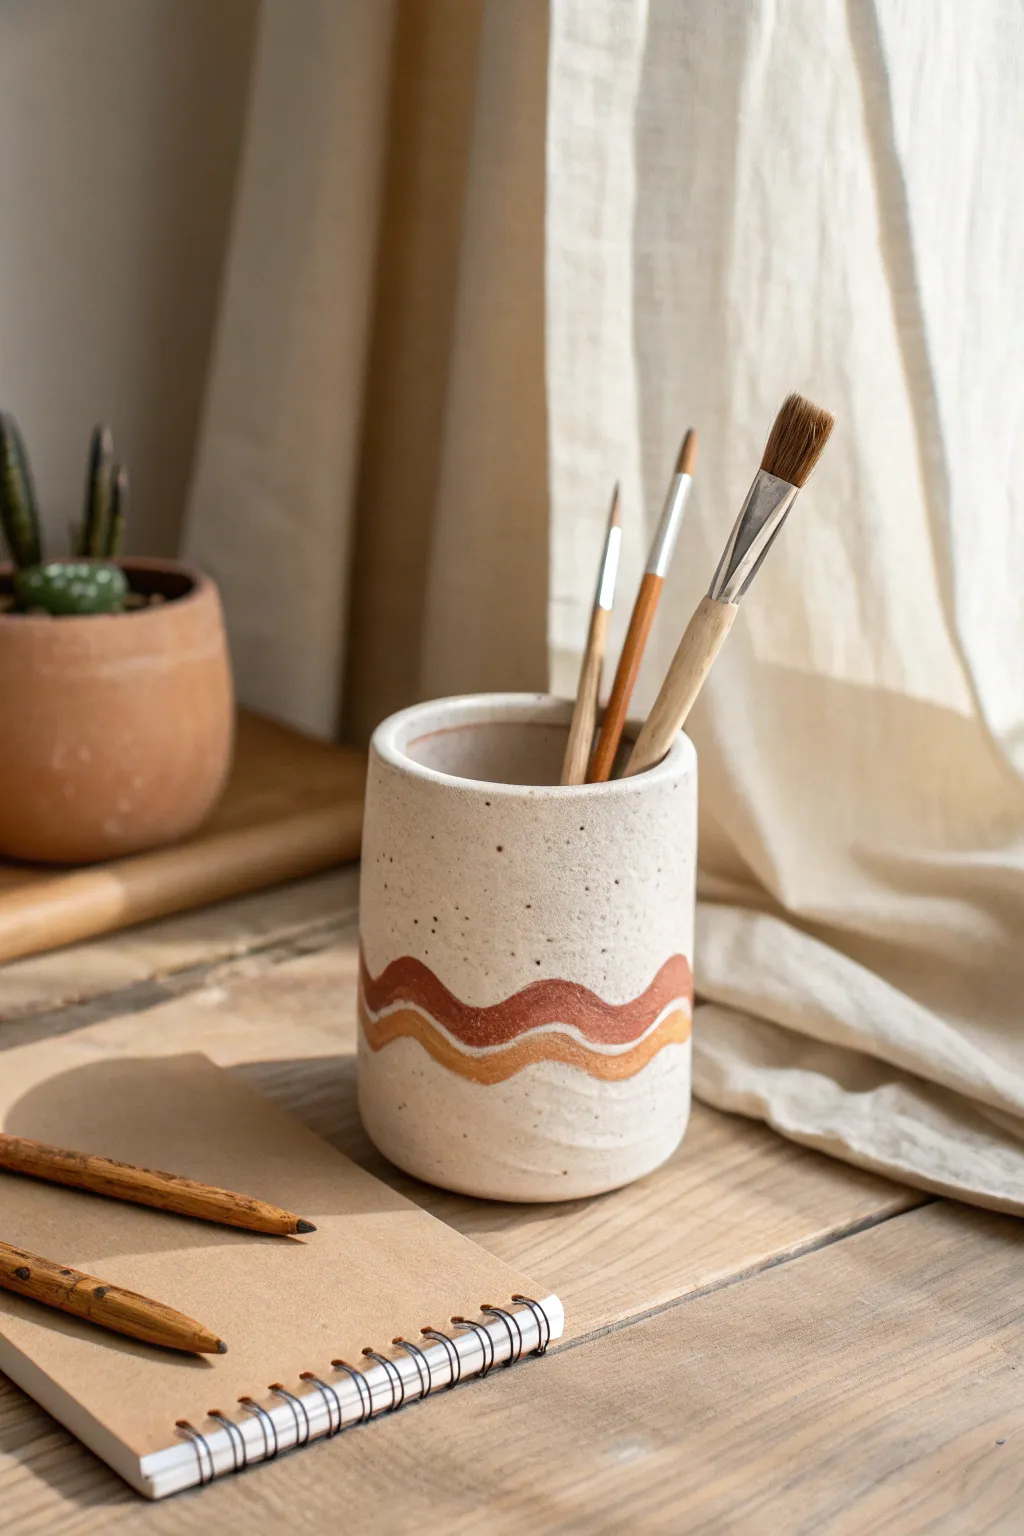
This charming, speckled pencil cup brings a touch of desert warmth to your desk with its earthy tones and undulating design. Combining a simple cylindrical form with a playful wavy relief, it is a perfect beginner project that looks effortlessly chic.
Step-by-Step Tutorial
Materials
- Speckled stoneware clay (or white clay with speckle additive)
- Rolling pin
- Canvas or cloth mat
- Needle tool or fettling knife
- Slip and scoring tool
- Cylindrical form for template (like a can or PVC pipe)
- Sponge
- Earth-toned underglazes (Terracotta, Ochre, and Cream)
- Small flat brush
- Clear matte glaze
Step 1: Forming the Cup
-
Roll the slab:
Begin by rolling out a medium-sized ball of speckled clay on your canvas mat. Aim for a consistent thickness of about 1/4 inch to ensure the walls of your cup are sturdy but not too heavy. -
Cut the rectangle:
Measure a rectangle that corresponds to the height and circumference of your desired cup size. Using a ruler and a needle tool, cut this rectangle cleanly from your slab. -
Cut the base:
Roll out a small separate piece of clay for the base. Place your cylindrical template or a circular cookie cutter on the clay and cut out a circle that matches the diameter of your eventual cylinder. -
Score and slip edges:
Score the short ends of your rectangular slab and the outer edge of your circular base. Apply a generous amount of potter’s slip to these rough areas to act as glue. -
Assemble the cylinder:
Curve the rectangular slab to meet end-to-end, forming a tube. Press the scored ends together firmly. I like to reach inside the cylinder to support the seam while smoothing the outside with a rib or sponge. -
Attach the base:
Place the cylinder onto the scored base. Use a modeling tool to blend the clay from the outside wall down onto the base, ensuring a seamless, watertight connection. -
Smooth the rim:
Use a damp sponge or your fingers to round off the top rim of the cup. A sharp rim can be prone to chipping, so a soft curve is best.
Step 2: Designing the Waves
-
Mark the wave path:
Lightly sketch a continuous wavy line around the lower third of the cup using a needle tool. Don’t dig too deep yet; this is just your guide. -
Define the bands:
Sketch a second wavy line parallel to the first, about half an inch below it. Repeat this process until you have three distinct wavy bands marked out near the base. -
Carve the relief (optional):
For a slightly textured feel like the original, you can gently carve away a hair’s breadth of clay between the bands, or simply leave the lines incised to separate the colors later. -
Refine the surface:
Once your carving is done, give the entire piece a final wipe with a barely damp sponge to unclog any clay crumbs from the incised lines and smooth the surface.
Smooth Seams
When joining the cylinder seam, use a wooden spoon handle inside the cup as an anvil while you paddle the outside seam flat.
Step 3: Painting and Finishing
-
Bisque fire:
Allow your cup to dry slowly until bone dry, then bisque fire it in the kiln according to your clay body’s specifications. -
Apply the darkest wave:
Using a small flat brush, apply the terracotta or rust-colored underglaze to the top wavy band. Apply 2-3 coats for solid, opaque coverage. -
Paint the middle wave:
Rinse your brush and apply the ochre or mustard-colored underglaze to the middle band. Be careful to stay within lines, but don’t worry if it looks slightly organic. -
Paint the bottom wave:
Typically, you can leave the bottom band as bare raw clay if you like the contrast, or paint it with a lighter cream or white underglaze depending on your preference. -
Glaze interior:
Pour a clear matte glaze inside the cup, swirl it around to coat the entire interior surface, and pour out the excess. This makes the inside easy to clean. -
Glaze exterior:
Dip or brush the clear matte glaze over the exterior of the cup. The matte finish preserves the earthy look of the underglazes and the texture of the speckled clay. -
Final firing:
Fire the piece for the final glaze firing. Once cool, your pencil cup is ready to organize your workspace.
Go Geometric
Swap the organic waves for sharp zig-zags or clean horizontal stripes for a more modern, structured aesthetic.
Place your favorite brushes or pens inside and enjoy the handmade warmth it adds to your creative space
Incense Holder With Simple Grooves
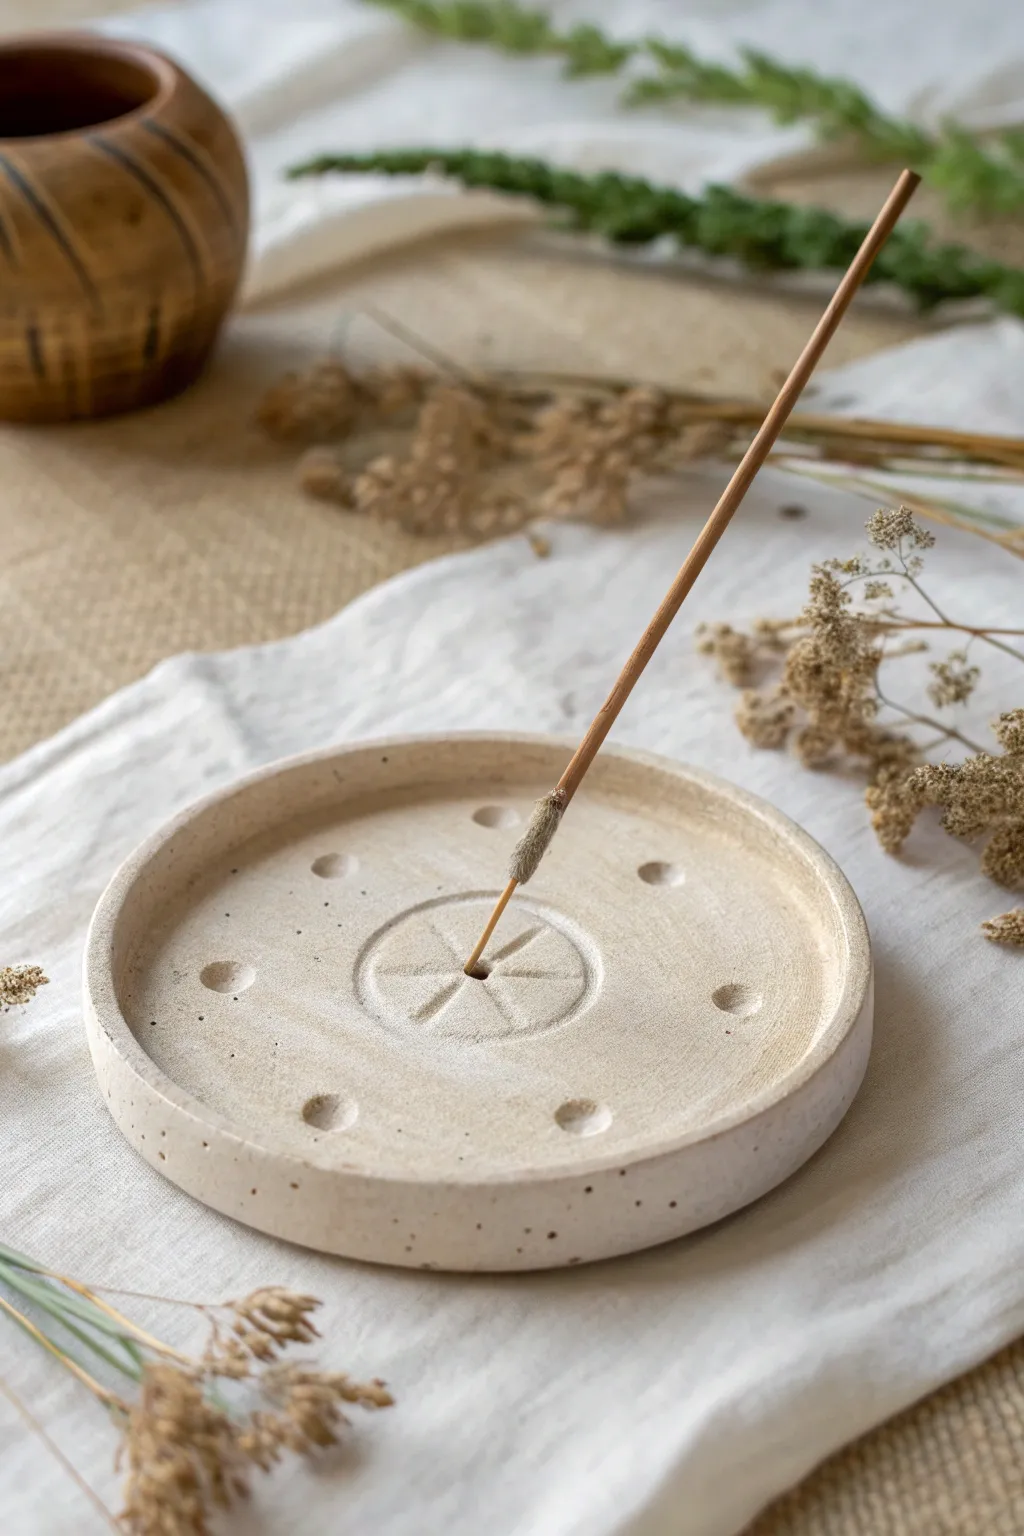
This minimalist incense holder brings a touch of ancient elegance to your space with its stone-like texture and simple geometric carvings. The design features a shallow catch-dish and a central sun-ray motif that securely holds your favorite incense sticks while catching the ash.
Detailed Instructions
Materials
- Speckled stoneware clay or polymer clay (granite effect)
- Rolling pin
- Circle cutter (approx. 4-5 inches diameter) or bowl to trace
- Small circle cutter (approx. 1 inch diameter) or bottle cap
- Modeling tool or dull knife
- Small ball stylus tool or smooth rounded end of a paintbrush
- Wooden skewer or needle tool
- Sponge and water (for smoothing)
- Sandpaper (fine grit)
Step 1: Forming the Base
-
Condition the clay:
Begin by warming up a ball of your speckled clay in your hands, kneading it until it is pliable and smooth. If you are using polymer clay, ensure there represent no air bubbles trapped inside. -
Roll out the slab:
Use your rolling pin to flatten the clay into an even slab. Aim for a thickness of about 1/4 to 1/3 of an inch—thick enough to feel substantial but not too heavy. -
Cut the main circle:
Place your large circle cutter or overturned bowl onto the clay slab. Press down firmly to cut out the perfect round base for your dish. -
Create the rim:
Gently curve the outer edges of the circle upwards to create a shallow lip. You can do this by pinching lightly with your fingers while rotating the base on your work surface. -
Smooth the edges:
Dip a sponge or your finger in a little water (or clay softener) and run it along the rim to soften any sharp cutting marks, ensuring a rounded, professional finish.
Uneven Rim?
If your raised edge looks wobbly, place the clay slab on a banding wheel or lazy susan. hold your finger steady against the edge while spinning to even it out.
Step 2: Adding Details
-
Mark the center:
Find the exact center of your dish. Lightly press your small 1-inch circle cutter or bottle cap into the center to create an impressed ring. Don’t cut all the way through; just make a clear indentation. -
Carve the sun rays:
Inside the small central circle you just made, use a modeling tool or dull knife to press in intersecting lines. Create a cross first, then add diagonal lines to form an eight-point star or sunburst pattern. -
Create the incense hole:
Take your wooden skewer or needle tool and poke a hole directly in the center where your carved lines meet. Wiggle it slightly to ensure the hole is wide enough for a standard incense stick. -
Check the angle:
I always test a loose incense stick at this stage to make sure it stands relatively straight or leans slightly over the dish, so the ash won’t fall on the table. -
Add decorative dimples:
Using a ball stylus or the rounded end of a paintbrush handle, press small indentations into the clay. Arrange them in a circle halfway between the central medallion and the outer rim. -
Refine the surface:
Check the surface for any stray fingerprints. Gently buff them out with your damp sponge or finger, preserving the speckled texture of the clay.
Step 3: Finishing
-
Dry or bake:
If using air-dry clay, let the piece sit in a cool, dry place for 24-48 hours. If using polymer clay, bake according to the manufacturer’s instructions on the package. -
Check for rough spots:
Once fully cured or dried, run your fingers over the edges. If there are any sharp bits, use fine-grit sandpaper to gently smooth them away. -
Seal (Optional):
For a matte look like the photo, leave the clay natural. If you want durability or a glossy finish, apply a thin coat of matte varnish or glaze.
Try Contrast
Once dried, rub a dark acrylic wash into the carved grooves and dimples, then wipe away the excess. This highlights the carvings and adds an antique look.
Now you have a serene, custom-made spot to burn your favorite scents and relax
Little Candle Holder Pods
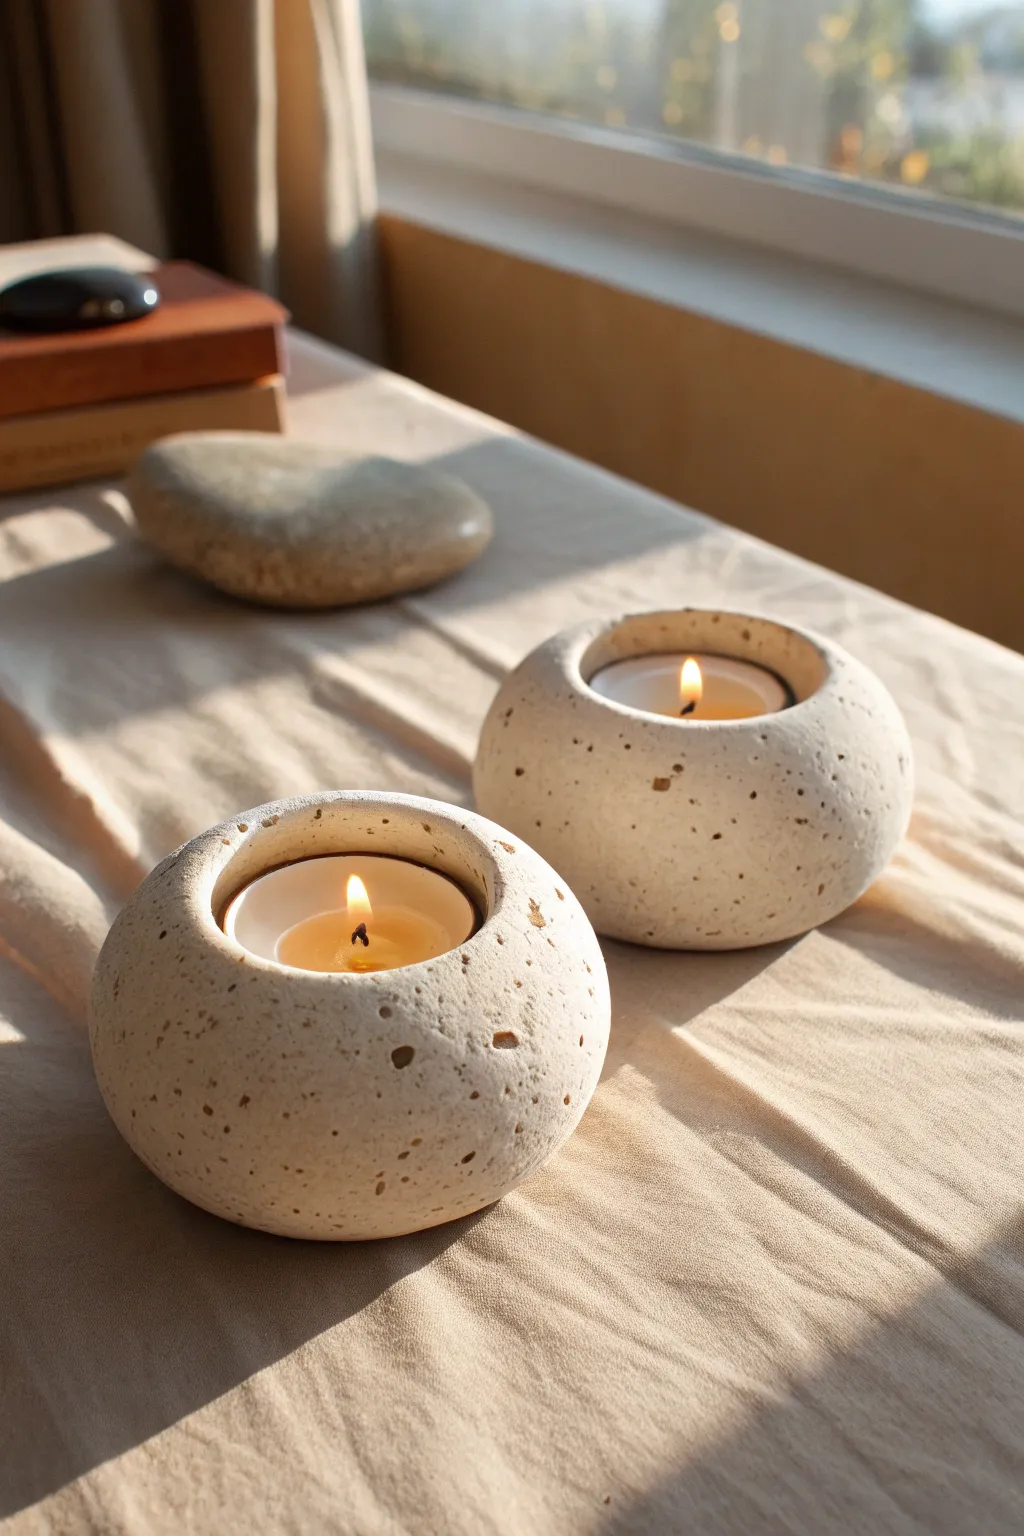
These minimalist candle holders mimic the organic look of heavy river stones, providing a serene, grounded aesthetic for your space. Using simple air-dry clay and natural texturing techniques, you’ll create durable little pods perfect for nested tea lights.
Step-by-Step
Materials
- White or light grey air-dry clay (stone effect clay is ideal)
- Standard metal tea light candle (for sizing)
- Coarse sand or espresso grounds (if not using textured clay)
- Plastic wrap or aluminum foil
- Rolling pin (optional)
- Old toothbrush or stiff bristle brush
- Bowl of water
- Fine-grit sandpaper (220 grit)
- Matte spray varnish
Step 1: Shaping the Base
-
Prep your clay:
Begin by taking a chunk of air-dry clay about the size of a tennis ball. If you are using standard smooth white clay, knead in a small amount of coarse sand or dried espresso grounds now to create that speckled, stony texture seen in the photo. -
Form a sphere:
Roll the clay firmly between your palms to create a smooth, tight ball. Aim for a unified shape without any deep cracks or seams. -
Create the pebble shape:
Gently press the ball onto your work surface to flatten the bottom so it sits stable. Then, use your palm to slightly flatten the top, creating a soft, rounded oblate spheroid shape rather than a perfect circle. -
Make the indentation:
Take your metal tea light candle and wrap the metal cup loosely in a small piece of plastic wrap. This prevents the metal from sticking to the wet clay. -
Press the candle:
Center the wrapped tea light on top of your clay pod. Press straight down firmly until the top rim of the candle cup is flush with or just slightly below the clay’s surface.
Natural Texture Hack
Instead of a brush, gently roll a real rock with a rough surface over your damp clay. This transfers genuine organic patterns directly onto your project.
Step 2: Texturing and Refining
-
Remove the form:
Gently twist and lift the tea light out of the clay. You should have a clean, perfect well for a candle to sit in later. -
Smooth the rim:
Dip your finger in a little water and run it around the top edge of the hole. You want to soften any sharp ridges created by the pressing action, making the rim look eroded and natural. -
Add surface texture:
To achieve the porous stone look, take an old toothbrush or a stiff bristle brush. Gently tap and stipple the exterior surface of the clay, creating random pitting. -
Enhance imperfections:
I find that using a toothpick to poke a few deeper, irregular holes here and there adds realistic character. Focus these deeper pits more towards the bottom third of the pod. -
Check the shape:
Step back and look at the silhouette. If the texturing warped the roundness, cup your hands around the pod and gently reshape it back into that smooth river-stone curve.
Step 3: Finishing
-
Drying time:
Place your pods in a cool, dry area away from direct sunlight. Let them dry slowly for at least 24 to 48 hours. Flipping them over halfway through helps the bottom dry evenly. -
Sanding:
Once fully cured and hard, use fine-grit sandpaper to lightly buff the exterior. You don’t want to remove your texture, just knock down any sharp burrs or unnatural peaks. -
Dusting off:
Wipe the pod down with a slightly damp cloth or a dry brush to remove the white clay dust from the sanding process. -
Sealing:
Since air-dry clay is porous, seal your work with a matte spray varnish. This protects it from humidity and keeps the ‘stone’ looking natural rather than glossy. -
Final test:
Once the varnish is dry, drop a fresh tea light into the center well and enjoy your calming new decor piece.
Color Wash
Dilute brown or grey acrylic paint with lots of water. Brush it over the dry clay and immediately wipe it off to let dark pigment settle into the tiny pits.
Group three of these pods together on a linen tablecloth for an effortlessly chic centerpiece
Desk Organizer With Three Wells
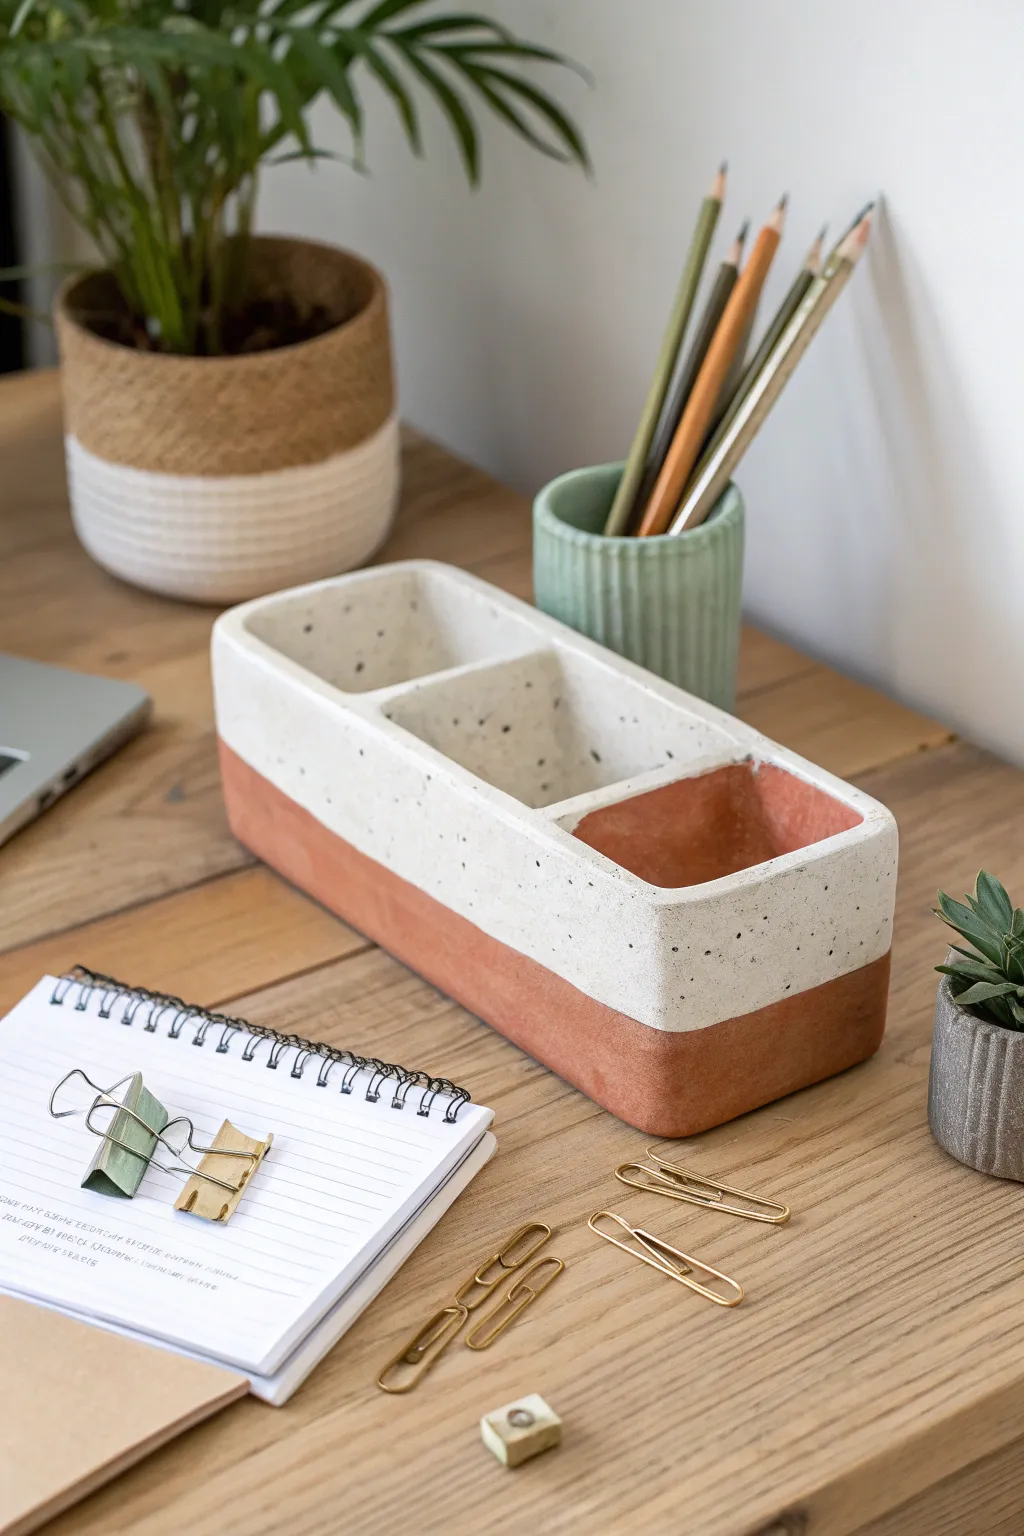
This minimalist desk organizer combines the warmth of terracotta with a modern, speckled stone finish. Its three deep wells are perfect for keeping pens, clips, and small plants tidy while adding an earthy, sophisticated touch to your workspace.
Detailed Instructions
Materials
- Air-dry clay (terracotta color)
- Air-dry clay (white)
- Black acrylic paint
- Rolling pin
- Clay knife or craft knife
- Ruler
- Water in a small cup
- Cardboard or plastic mold (optional but helpful)
- Fine-grit sandpaper
- Matte spray sealant or varnish
- Old toothbrush
Step 1: Forming the Base
-
Prepare the terracotta clay:
Start by conditioning a large chunk of terracotta air-dry clay. Knead it in your hands until it is pliable and smooth, removing any air bubbles. -
Shape the main block:
Form the clay into a long, rectangular log shape. You want this base section to be about 1.5 inches tall and sufficiently wide to hold your items. -
Flatten the sides:
Gently tap the log against your work surface to flatten the bottom, long sides, and ends. Use a wooden block or ruler to press against the sides to ensure they are perfectly straight and the corners are crisp. -
Refining the top edge:
Slice the very top of the terracotta block with a wire cutter or long blade to create a completely flat surface where it will join the white layer. Cross-hatch this surface (scratch it up) to prepare for joining.
Crack Control
If small cracks appear while drying, don’t panic. Mix a tiny amount of fresh clay with water to make a paste and fill the crack, then sand smooth once dry.
Step 2: Adding the Speckled Top
-
Prepare the speckled mixture:
Take your white air-dry clay and flatten it slightly. Dip an old toothbrush into black acrylic paint and flick tiny droplets onto the clay. Fold and knead the clay until the black specks are distributed throughout to resemble stone. -
Shape the white layer:
Roll your speckled white clay into a block that matches the width and length of your terracotta base, but slightly shorter in height (around 1 to 1.5 inches). -
Join the layers:
Apply a little water or slip (clay mixed with water) to the scratched top of the terracotta base. Place the white block on top. Press them firmly together, smoothing the seam with your finger or a clay tool so the transition feels seamless. -
Square the block:
Once joined, use your ruler or flat tool again to ensure the entire combined block has uniform sides. The walls should be flush from the orange bottom to the white top.
Step 3: Creating the Wells
-
Mark the openings:
Use a ruler and a light touch with a needle tool to outline three equal squares or rectangles on the top surface where you want the compartments to be. -
Excavate the clay:
Using a loop tool or a small knife, carefully scoop out the clay from inside your marked lines. I find it easiest to work from the center out to the edges. -
Deepen the wells:
Continue digging down until you go past the white layer and into the terracotta layer. Seeing the terracotta color inside the well gives it that authentic dipped look. -
Refine the interior walls:
Use a flat modeling tool or your finger dipped in water to smooth the inside walls and floor of each compartment. Try to keep the corners relatively sharp. -
Clean the rim:
Run a damp sponge or finger along the top rim to smooth out any roughness from the carving process, slightly rounding the edge if you prefer a softer look.
Add Heft
Embed small, clean stones or fishing weights into the bottom layer of the clay before drying to give the organizer a satisfying, heavy weight.
Step 4: Finishing Touches
-
Dry properly:
Let the organizer dry slowly away from direct heat or sunlight. This usually takes 24-48 hours depending on thickness. Rotate it occasionally so the bottom dries evenly. -
Sand for smoothness:
Once fully dry and hard, use fine-grit sandpaper to buff the outside surfaces. This will make the two clay types feel like one continuous piece of stone. -
Seal the piece:
Apply a coat of matte varnish or spray sealant. This protects the clay from moisture and gives the ‘stone’ speckles a nice finished quality.
Once sealed and dry, your new organizer is ready to bring order and style to your desk
Clay Plant Markers With Names
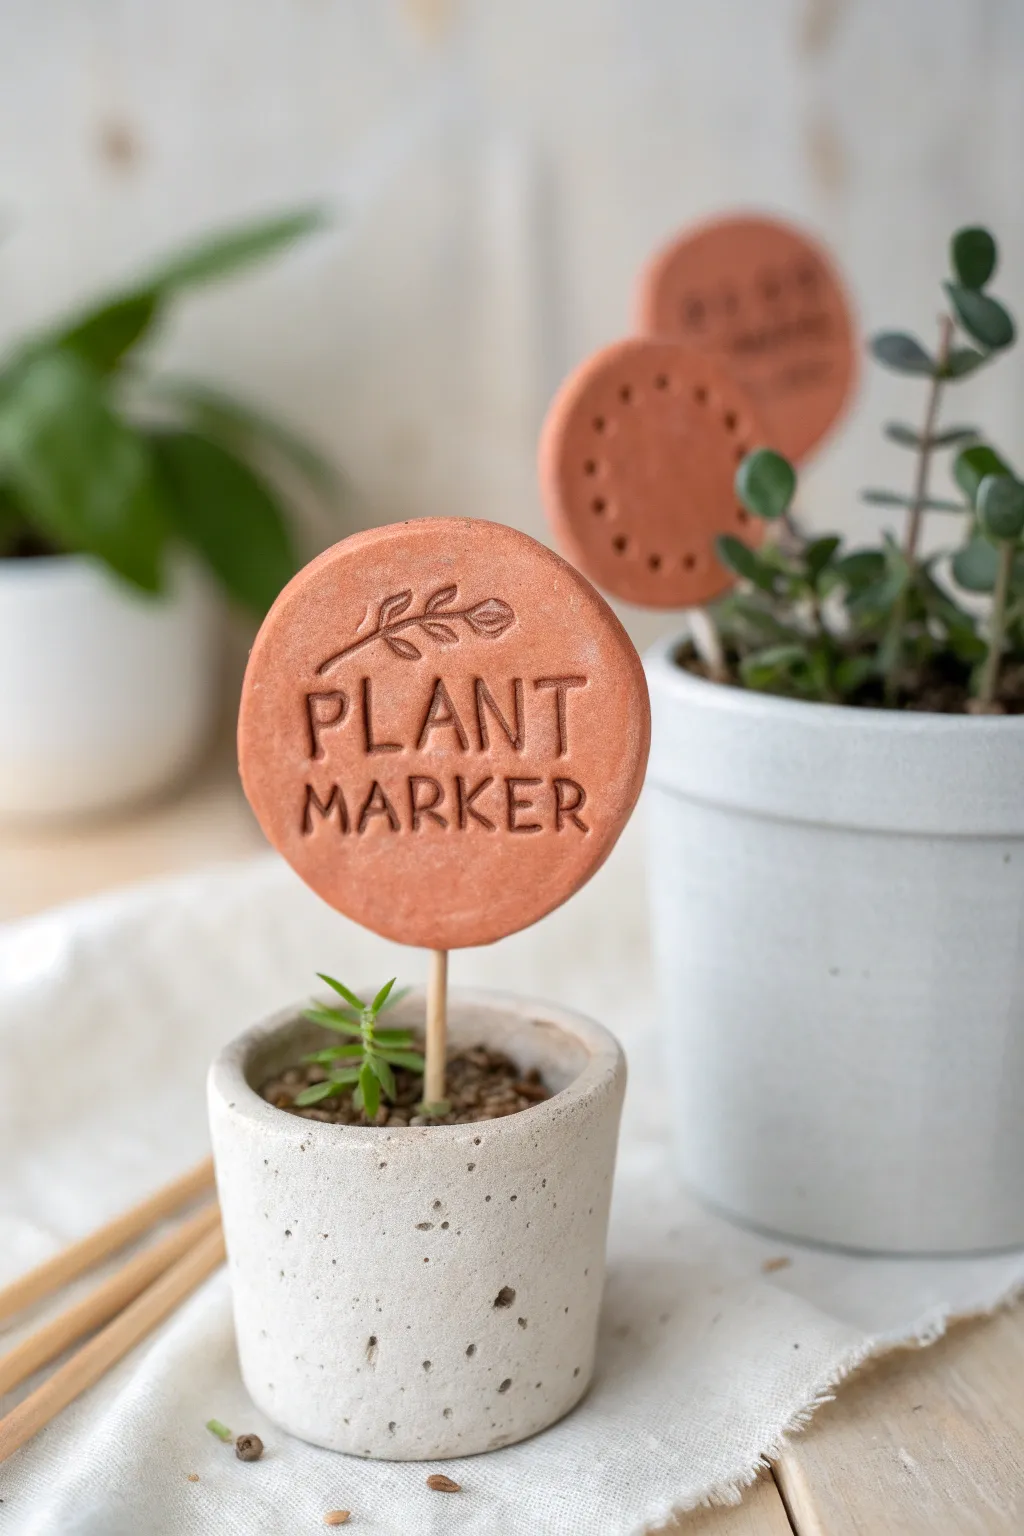
These charming, rustic plant markers are a delightful way to keep track of your seedlings while adding an earthy touch to your indoor garden. Made to resemble classic terracotta, they feature personalized stamped names and sweet botanical motifs.
Step-by-Step Guide
Materials
- Terracotta-colored air-dry clay or polymer clay
- Rolling pin
- Circle cookie cutter (approx. 2 inches diameter)
- Small wooden skewers or dowels
- Alphabet stamp set
- Leaf or botanical rubber stamp (small)
- Sandpaper (fine grit)
- Textured tools (optional, for dot patterns)
- Parchment paper or craft mat
- Super glue or strong craft glue
Step 1: Shaping the Clay Discs
-
Condition the clay:
Begin by kneading a ball of terracotta-colored clay in your hands until it becomes soft, pliable, and free of cracks. This ensures a smooth surface for stamping later. -
Roll it out:
Place the clay on a sheet of parchment paper. Use your rolling pin to flatten the clay to an even thickness of about 1/4 inch. You want it thick enough to hold the skewer but not so heavy that it topples over. -
Cut the circles:
Press your circle cookie cutter firmly into the rolled clay to create clean, round shapes. Depending on how many plants you have, you can re-roll the scraps to make more markers. -
Smooth the edges:
Gently run your finger dipped in a tiny bit of water around the circumference of each circle to smooth out any sharp ridges left by the cutter.
Step 2: Stamping and Designing
-
Plan your spacing:
Before pressing down, hover your alphabet stamps over the clay circle to visualize where the word needs to sit to be centered. I find it helpful to start with the middle letter of the word and work outwards. -
Stamp the text:
Press each letter stamp firmly and evenly into the clay. Don’t press so hard that you deform the circle, but go deep enough to get a crisp impression. -
Add botanical details:
Take your small leaf stamp and press it into the space above the text. Rock it slightly to ensure the stem and leaves transfer clearly. -
Create texture variations:
For variety, like the background markers in the photo, use the end of a paintbrush handle or a dotting tool to create patterns of small recessed dots instead of text.
Stamp Stuck?
If your stamps are sticking to the clay and ruining the finish, lightly dust the surface of the clay with cornstarch or dip the stamp in water before pressing.
Step 3: Assembly and Finishing
-
Insert the mounting hole:
While the clay is still wet, carefully insert the blunt end of a wooden skewer into the bottom edge of the circle. Push it in about half an inch to create a channel, then remove it. This prevents the clay from cracking as it shrinks during drying. -
Let it dry:
Place your clay circles on a flat surface away from direct heat. Let them air dry completely according to the package instructions, usually 24-48 hours. Turn them over halfway through so both sides dry evenly. -
Sand imperfections:
Once fully cured and hard, use a piece of fine-grit sandpaper to gently buff away any rough spots on the edges or surface. -
Secure the sticks:
Dip the tip of your wooden skewer into a small amount of super glue or strong craft adhesive. -
Final assembly:
Insert the glue-covered tip back into the pre-made hole in the clay disc. Hold it steady for a few seconds until the glue grabs. -
Protect the surface (Optional):
If these will be used outdoors or in humid conditions, brush on a coat of matte spray varnish or sealant to protect the clay from moisture.
Pro Tip: Contrast
To make the letters pop, dilute a little dark brown acrylic paint with water. Brush it into the stamped grooves, then immediately wipe the surface clean.
Pop these finished markers into your pots and enjoy the organized, custom look of your new plant collection
Alphabet Tiles for Games or Decor

These charming, rustic alphabet tiles are perfect for creating custom game pieces, educational tools, or personalized décor accents. The soft, natural finish and debossed letters give them a timeless, artisanal quality that feels wonderful to the touch.
Step-by-Step
Materials
- White air-dry clay or polymer clay
- Rolling pin or acrylic roller
- Two wooden rulers or rolling guides (approx. 1/4 inch thick)
- Small square cookie cutter (approx. 1 inch)
- Letter stamp set (serif font)
- Fine-grit sandpaper (400-600 grit)
- Canvas cloth or parchment paper
- Small bowl of water
- Soft brush
- Matte spray sealant (optional)
Step 1: Preparing the Clay Base
-
Prepare your surface:
Lay down a piece of canvas cloth or parchment paper on your work surface. This prevents the clay from sticking and adds a subtle texture to the back of the tiles. -
Condition the clay:
Take a handful of your white clay and knead it thoroughly in your hands until it becomes warm, soft, and pliable. This eliminates air bubbles and prevents cracking later. -
Set up guides:
Place your two wooden rulers or guides on either side of the clay ball. These will ensure your slab is perfectly even in thickness, which is crucial for a uniform set of tiles. -
Roll out the slab:
Using your rolling pin, roll the clay out until the pin rests on the guides. Roll in multiple directions to ensure the clay is relaxed. -
Smooth the surface:
Dip your finger in a tiny bit of water and gently smooth over the surface of the clay slab to remove any fingerprints or imperfections.
Stamp Clarity Tip
Dust your letter stamps lightly with cornstarch before pressing them into the clay. This acts as a release agent and prevents the clay from getting stuck inside tight letter grooves like ‘A’ or ‘R’.
Step 2: Cutting and Stamping
-
Cut the squares:
Press your square cutter firmly into the clay. Lift it straight up to create clean edges. I find cutting as close together as possible minimizes waste. -
Release the shapes:
Carefully remove the excess clay from around the squares. If the squares stick to the surface, slide a blade or thin spatula underneath to lift them without distorting the shape. -
Center the stamps:
Select your first letter stamp. Hover it over a clay square to visually center it before pressing down. -
Press the letter:
Press the stamp firmly and evenly into the clay. You want a deep, clear impression, but be careful not to push all the way through to the table. -
Repeat for all letters:
Continue stamping until you have your desired letters. If making a game set, refer to a standard distribution list to ensure you have enough vowels and common consonants. -
Smooth the edges again:
After stamping, the edges might have bulged slightly. Gently tap the sides of each square with your finger or a flat tool to regain the perfect square shape.
Fixing Distortion
If a tile warps while lifting it, simply pat it back into shape, or re-roll that scrap and start over. It is much easier to fix shape issues while the clay is wet than to sand them out later.
Step 3: Refining and Finishing
-
Initial drying:
Place the tiles on a piece of parchment paper on a flat board. Let them dry for about 24-48 hours. Flip them over halfway through to ensure even drying and prevent curling. -
Check for dryness:
The tiles are ready when they feel room temperature to the touch (not cool) and assume a chalky, matte appearance. -
Soften the edges:
Take a piece of fine-grit sandpaper and gently rub the sharp corners and edges of each tile. This gives them that worn, softer look shown in the photo. -
Clean the dust:
Use a soft, dry brush to whisk away any clay dust from the sanding process, paying special attention to the deep grooves of the letters. -
Optional sealing:
If these will be handled frequently as game pieces, create a protective barrier by applying a very light coat of matte spray sealant.
Now you have a beautiful set of custom tiles ready for your next game night or craft project
Mini Donut and Pastry Desk Friends
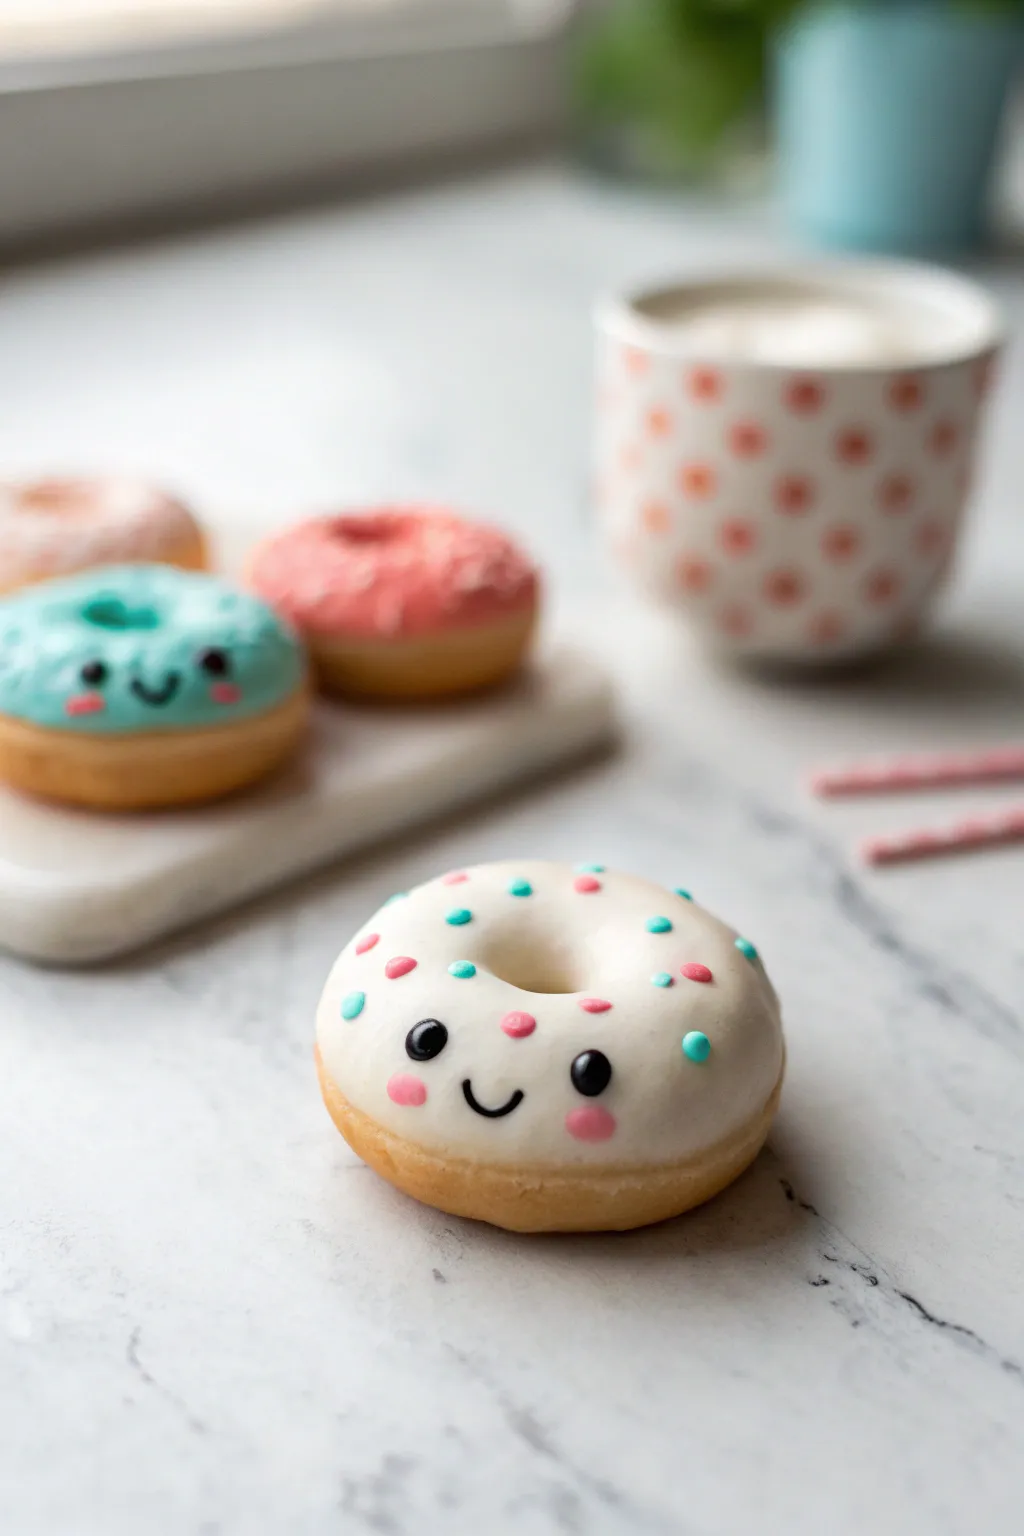
Brighten up your workspace with this adorable polymer clay donut featuring a sweet smile and pastel sprinkles. Its smooth white frosting and cheerful expression make it the perfect little desk companion to keep you company while you work.
Step-by-Step Guide
Materials
- Polymer clay (tan/beige for dough)
- Polymer clay (white for frosting)
- Small dotting tool or toothpick
- Black acrylic paint
- Pink acrylic paint
- Light blue acrylic paint
- Fine detail paintbrush (size 0 or 00)
- Gloss glaze or polyurethane varnish
- Flat working surface (tile or glass)
- Round cookie cutter (approx 1.5 inch)
- Small round cutter (for donut hole, e.g., straw or piping tip)
Step 1: Shaping the Dough Base
-
Condition the Clay:
Start by taking a chunk of tan or beige polymer clay. Massage and knead it in your hands until it becomes soft, pliable, and free of cracks. -
Form the Base Shape:
Roll the clay into a smooth ball about the size of a walnut. Place it on your work surface and gently press it down to flatten it slightly into a thick disk, keeping the edges rounded like a real donut. -
Create the Donut Hole:
Using a small circular cutter, a piping tip, or even a drinking straw, punch a hole directly in the center of your flattened clay disk to create the classic ring shape. -
Soften the Edges:
The cut hole might look sharp, so use your fingertip to gently smooth and round off the inner edges of the hole so the pastry looks baked and fluffy rather than sliced.
Step 2: Adding the Frosting
-
Prepare the Frosting Layer:
Clean your hands thoroughly to avoid transferring color, then condition a piece of white clay. Roll it out into a thin sheet, slightly uneven in shape. -
Cut the Frosting Shape:
Use a cutter slightly larger than your donut hole cutter to make the center, then cut a wavy, irregular edge around the outside that is roughly the same diameter as your donut base. -
Apply the Frosting:
Gently lift the white clay and drape it over the tan donut base. Line up the center holes and smooth the white clay down over the sides. -
Create Drips:
To make it look like real glaze, gently press and drag the edges of the white clay downward in certain spots to mimic gravity pulling the thick icing down the sides. -
Smooth the Connection:
I like to take a moment here to gently tap the white clay everywhere to ensure it has fully adhered to the tan base without trapping any air bubbles.
Clean Clay Pro-Tip
Keep a pack of baby wipes or rubbing alcohol nearby. Wipe your hands and tools before touching the white clay to ensure the frosting stays bright and pure.
Step 3: Decorating and Baking
-
Add Sprinkles:
Condition tiny amounts of pink and light blue clay. Roll them into extremely thin snakes. -
Place the Sprinkles:
Cut tiny bits off the colored snakes and press them gently onto the white frosting. Arrange them randomly, leaving the lower center area clear for the face. -
Bake the Donut:
Place your creation on a baking tile or parchment-lined tray. Bake according to your brand of polymer clay instructions (usually around 275°F/135°C for 15-30 minutes). -
Cool Completely:
Let the donut cool completely before painting. Painting on warm clay can make the paint dry too fast and clump up.
Level Up: Magnet Fun
Before baking, press a strong round magnet onto the back of the donut. Remove it, bake the clay, then glue the magnet into the indentation afterwards for a cute fridge accessory.
Step 4: Bringing the Face to Life
-
Paint the Eyes:
Using a dotting tool or the back of a paintbrush dipped in black acrylic paint, stamp two small, solid circles onto the front/center of the white frosting for the eyes. -
Add the Smile:
With your finest detail brush and black paint, draw a tiny, U-shaped mouth positioned perfectly between and slightly below the eyes. -
Rosy Cheeks:
Dip a smaller dotting tool into pink paint. Place a small dot slightly below and to the outside of each eye to give your donut a blushing look. -
Add Eye Highlights:
Once the black eye paint is fully dry, use a toothpick with a speck of white paint to add a tiny ‘reflection’ dot in the upper corner of each eye. -
Seal the Donut:
Finish by coating the entire piece with a gloss glaze. This protects the paint and gives the ‘icing’ a realistic sugary shine.
Enjoy your sweet new desk buddy as it brings a cheerful vibe to your daily tasks
Color-Blend Cane Slices for Jewelry

Create a sophisticated, minimalist pendant that mimics the look of inlaid stone using simple polymer clay techniques. This project combines earthy tones of terracotta, sage, and peach with a cream accent to form a modern oval shape perfect for everyday wear.
Step-by-Step Tutorial
Materials
- Polymer clay (terracotta/rust, sage green, light peach, white/translucent)
- Acrylic rolling pin or pasta machine
- Tissue blade or X-Acto knife
- Oval shape cutter (medium size)
- Ceramic tile or glass work surface
- Sandpaper (wet/dry, various grits from 400 to 1000)
- Hand drill or pin vibe
- Gold jump ring (6-8mm)
- Jewelry pliers
- Oven (for baking)
Step 1: Preparing the Clay Slab
-
Condition the clay:
Begin by conditioning each color of polymer clay separately until they are soft and pliable. Warm the clay in your hands and roll it out repeatedly. -
Mix the stone effect:
For the cream section, mix a small amount of white clay with translucent clay. Add tiny speckles of brown or beige clay if you want a more natural, stone-like appearance, kneading just enough to streak it. -
Roll out sheets:
Roll each color into a sheet of uniform thickness, approximately 3mm to 4mm. A pasta machine on a medium setting works best for consistency, but an acrylic roller with depth guides is also excellent. -
Cut geometric shapes:
Using your tissue blade, cut straight-edged triangles or irregular polygons from each colored sheet. Think of this like a puzzle; you need pieces that will fit together to form a larger rectangle. -
Assemble the pattern:
On your work surface, press the cut edges of the different colored shapes together. Ensure the terracotta, sage, peach, and cream pieces touch firmly without trapping air bubbles between the seams. -
Consolidate the slab:
Once your patchwork sheet is assembled, gently roll over the entire surface with your acrylic roller to bond the seams. I like to roll in multiple directions to ensure the joins are completely smooth and the surface is level.
Clean Cuts Pro Tip
To prevent the oval shape from distorting when you lift the cutter, place a piece of plastic wrap over the clay slab before pressing the cutter down.
Step 2: Cutting and Baking
-
Cut the pendant shape:
Position your oval cutter over a section of the slab where the colors intersect in a pleasing way. Press down firmly to cut out your pendant shape. -
Smooth the edges:
Gently lift the oval from the work surface. Use your finger to softly smooth the bottom edge and remove any harsh lines left by the cutter. -
Create the hole:
Use a toothpick or a small straw to poke a hole near the top edge for the hardware. Alternatively, you can bake it first and drill the hole later for a cleaner finish. -
Bake the piece:
Place the pendant on a ceramic tile or a baking sheet lined with plain paper. Bake according to your brand of clay’s temperature instructions (usually around 275°F/130°C) for 30-45 minutes. -
Cool down:
Allow the piece to cool completely in the oven with the door slightly ajar. This gradual cooling helps prevent brittleness.
Texture Level Up
Before baking, lightly gently roll a piece of sandpaper or a toothbrush over the clay surface to give it a realistic, pitted stone texture.
Step 3: Finishing Touches
-
Wet sanding:
Once cool, submerge the pendant in a bowl of water and sand the surface and edges. Start with 400 grit sandpaper to remove fingerprints and progress to 1000 grit for a silky smooth, matte finish. -
Buffing:
For a slight sheen that mimics polished stone, rub the dry pendant briskly with a piece of denim or a soft cotton cloth. -
Drilling the hole:
If you didn’t create a hole before baking, mark the spot with a needle tool. Uses a hand drill or pin vise to carefully drill through the top center of the oval. -
Add hardware:
Open a gold jump ring by twisting it sideways with two pairs of pliers. Slide it through the drilled hole. -
Close the ring:
Twist the jump ring back into place so the ends meet perfectly flush. Your stone-effect pendant is now ready to be strung on a chain.
Enjoy styling your new geometric jewelry piece with your favorite neutral outfits