When kids get their hands in clay, the whole world turns into something they can squish, shape, and proudly show off. Here are my go-to clay crafts for kids that feel simple to make, but still come out looking like real little treasures.
Cute Pinch Pots for Tiny Treasures
These adorable little containers are perfect for holding tiny pebbles, buttons, or jewelry and make for a wonderfully tactile project for kids. With their sweet painted faces and smooth, rounded sides, they add a touch of personality to any windowsill.
Detailed Instructions
Materials
- Air-dry clay (white or terra cotta)
- Acrylic paints (peach/terra cotta, yellow, teal, white)
- Fine-point black permanent marker or posca pen
- Small paintbrush
- Bowl of water
- Sponge
- Clear matte varnish or sealant (optional)
- Smooth work surface
Step 1: Shaping the Clay
-
Prepare the Clay:
Start by taking a chunk of clay about the size of a golf ball. Knead it in your hands for a minute to warm it up and make it pliable, smoothing out any major cracks. -
Roll a Sphere:
Roll the clay between your palms to create a smooth, even ball. Try to get it as round as possible, as this forms the base of your pot. -
Create the Opening:
Hold the ball in one hand and gently press your thumb into the center of the sphere. Push down until you are about half an inch from the bottom, being careful not to push all the way through. -
Pinch the Walls:
Using your thumb on the inside and your fingers on the outside, gently pinch and rotate the pot. Work your way from the bottom up to thin out the walls evenly. -
Flatten the Base:
Once you are happy with the shape, gently tap the bottom of the pot against your table to create a flat base so it stands up sturdily without wobbling. -
Smooth the Rim:
Dip your finger in a little bit of water and run it along the top rim of the pot to smooth out cracks or uneven edges. You want a nice, soft lip for this design. -
Refine the Surface:
Use a slightly damp sponge to wipe the outside walls of the pot. This removes fingerprints and creates a professional, smooth surface ready for painting.
Step 2: Decorating & Detail
-
Dry Completely:
Let your pots air dry completely. Depending on the thickness and humidity, this usually takes 24 to 48 hours. The clay will lighten in color when it is fully dry. -
Base Color Application:
Paint the exterior of your main pot with a terra cotta or peach acrylic paint. For the other variations, use a sunny yellow or a bright teal. I find two thin coats work better than one thick one. -
Paint the Interior:
Don’t forget the inside! Paint the interior with the same color, or choose a contrasting shade for a fun surprise. -
Add Polka Dots:
For the teal pot variation shown in the background, dip the non-brush end of your paintbrush into white paint and stamp small dots around the exterior. -
Draw the Face:
Once the base paint is bone dry, use a fine-point black marker to draw the face on the front. Draw two ‘U’ shapes for sleeping eyes and add three small vertical dashes under each eye for cute blushing cheeks. -
Add the Smile:
Draw a tiny, simple curved line between the cheeks for a smile. Keep it small to maintain the ‘kawaii’ look. -
Finishing Touches:
Optionally, you can add a pattern or texture to the yellow pot using a darker shade of yellow or by scratching designs into the paint before it fully dries. -
Seal the Pot:
To protect your paint job, apply a coat of clear matte varnish. This seals the clay and keeps the marker from smudging over time.
Smooth Operator
Work a drop of water into surface cracks immediately. If clay dries with cracks, fill them with a ‘slip’ (mad paste) of clay and water.
Marker Bleeding?
If your black marker lines bleed into the paint, the paint wasn’t fully dry. Wait longer or use a Posca paint pen instead of a permanent marker.
Fill your new little friends with polished stones or trinkets and place them in a sunny spot to enjoy


Silly Monster Magnets With Big Eyes
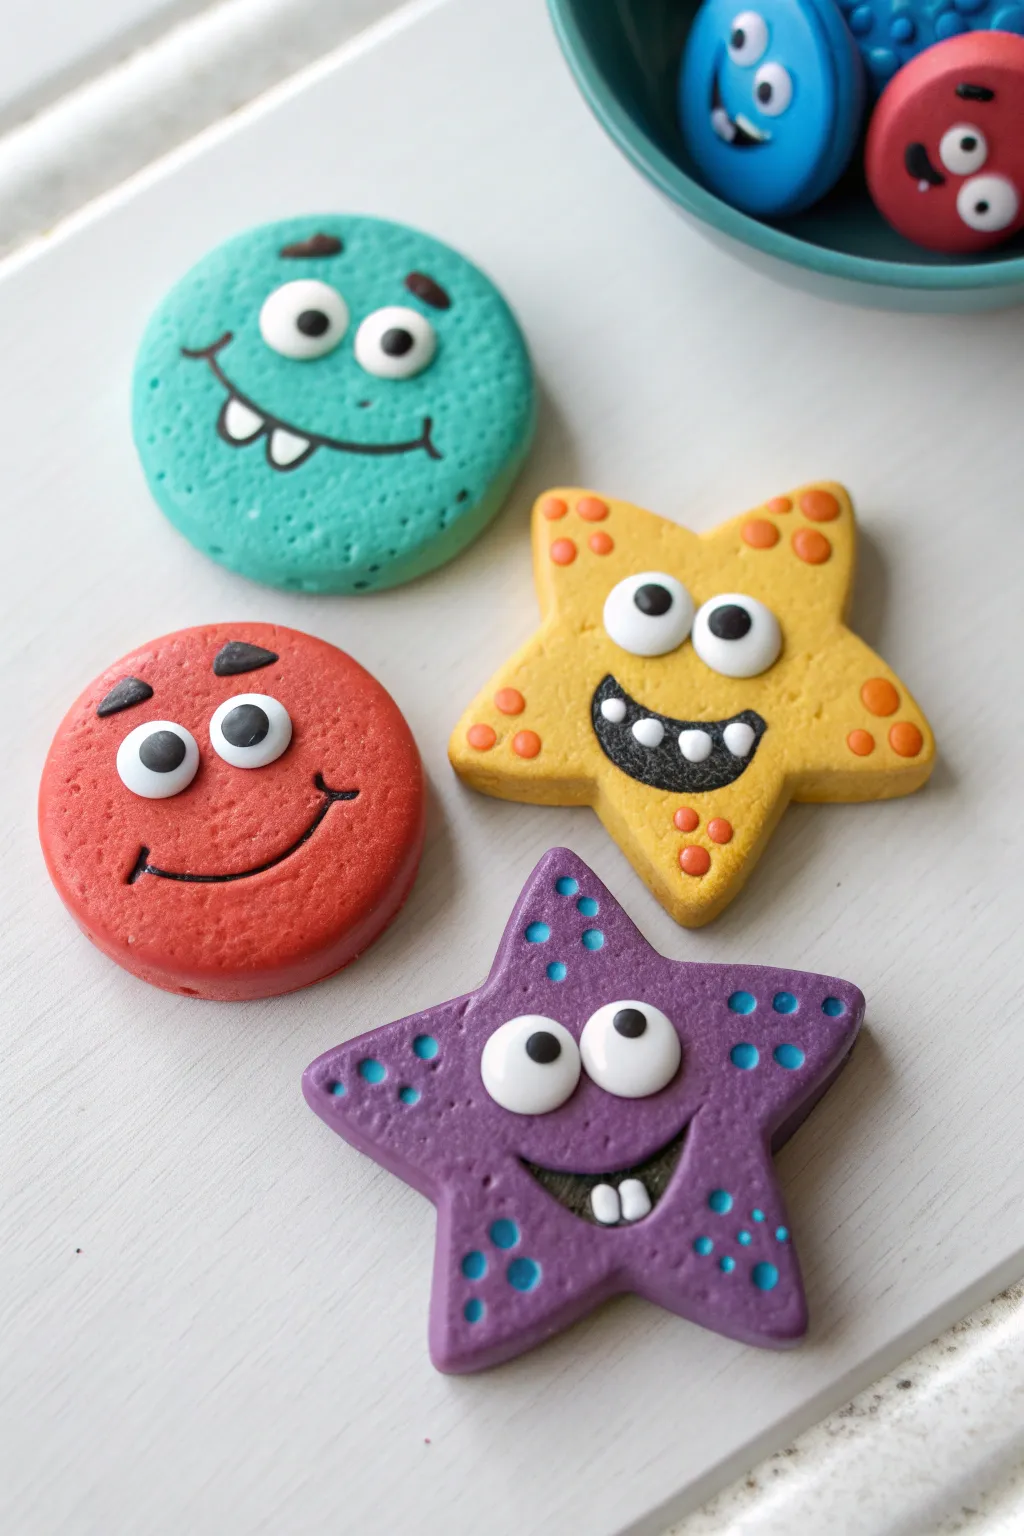
These adorable, expressive monsters are perfect for brightening up any fridge or locker. With their goofy grins and starry shapes, you can mix and match colors to create a whole squad of friendly creatures.
How-To Guide
Materials
- Polymer clay (teal, red, yellow, purple, black, and white)
- Round cookie cutter (approx. 2 inches)
- Star cookie cutter (approx. 2.5 inches)
- Small round piping tip or straw (for dots)
- Clay carving tool or toothpick
- Rolling pin
- Small round magnets
- Strong craft glue (e.g., E6000)
Step 1: Shaping the Base Bodies
-
Condition the clay:
Start by warming up your colored clays (teal, red, yellow, and purple) in your hands until they are soft and pliable. This prevents cracks later on. -
Roll out the slabs:
Roll each color into a smooth slab about 1/4 inch thick. You want them sturdy enough to hold a magnet but not too heavy. -
Cut the shapes:
Use your round cutter on the teal and red clay, and the star cutter on the yellow and purple clay. Smooth the edges with your finger to remove any sharp cuts. -
Texture the purple star:
For the purple star, gently tap the surface with a piece of crumpled aluminum foil or a stiff brush to give it a slightly bumpy, skin-like texture.
Clean Clay Tip
Baby wipes are your best friend! Clean your hands and tools between colors, especially before touching white clay, to keep the eyes bright and smudge-free.
Step 2: Creating the Faces
-
Make the eyes:
Roll small balls of white clay and flatten them slightly into discs. Place two onto each monster face. Vary the sizes for a goofy look—some matching, some mismatched. -
Add pupils:
Roll tiny balls of black clay and press them onto the white discs. I like to place them looking in different directions to give each monster a unique personality. -
Carve the mouths:
Use a clay tool or the edge of a spoon to press a smile into the clay. For the red one, a simple carved line works well. For others, crave out a deeper, open-mouth shape. -
Detail the open mouths:
For the yellow and purple stars, fill the open mouth area with a thin layer of black clay to create depth before adding teeth. -
Add teeth:
Roll tiny white rectangles or squares and press them into the mouths. Give the teal circle two snaggle teeth, and the stars a few scattered chompers. -
Eyebrows:
Roll very thin snakes of black or dark brown clay for eyebrows. Place them above the eyes to create expression—angled down for ‘mischievous’ or curved up for ‘happy’.
Make Them Sparkle
Before baking, brush a tiny bit of mica powder or glitter eyeshadow over the textured parts (like the purple star’s skin) for a magical, iridescent shimmer.
Step 3: Adding Texture & Details
-
Dotted details on the yellow star:
Roll tiny balls of orange clay. Press them onto the points of the yellow star to look like suckers or warts. -
Texture the purple star:
Use a small ball tool or the end of a paintbrush to gently press indentations into the purple star’s points to create spots. -
Paint the purple spots:
Fill these indentations with tiny balls of light blue clay and smooth them flat, so they look like embedded polka dots. -
Final smooth:
Do a final check over your monsters. Gently smooth out any fingerprints using a tiny bit of baby oil on your finger if you are using polymer clay.
Step 4: Baking and Finishing
-
Bake the clay:
Place your monsters on a parchment-lined baking sheet. Bake according to your polymer clay package instructions (usually 275°F for 15-30 minutes). -
Cool down:
Let the clay cool completely on the baking sheet. It will harden fully as it returns to room temperature. -
Attach the magnets:
Flip the monsters over. Apply a dab of strong craft glue to the back of each and press a round magnet firmly into the center. -
Dry time:
Let the glue cure for at least 24 hours before sticking your new friends onto the fridge.
Enjoy arranging your colorful monster family on magnetic surfaces to greet everyone who walks by


Ladybugs, Snails, and Tiny Bug Buddies
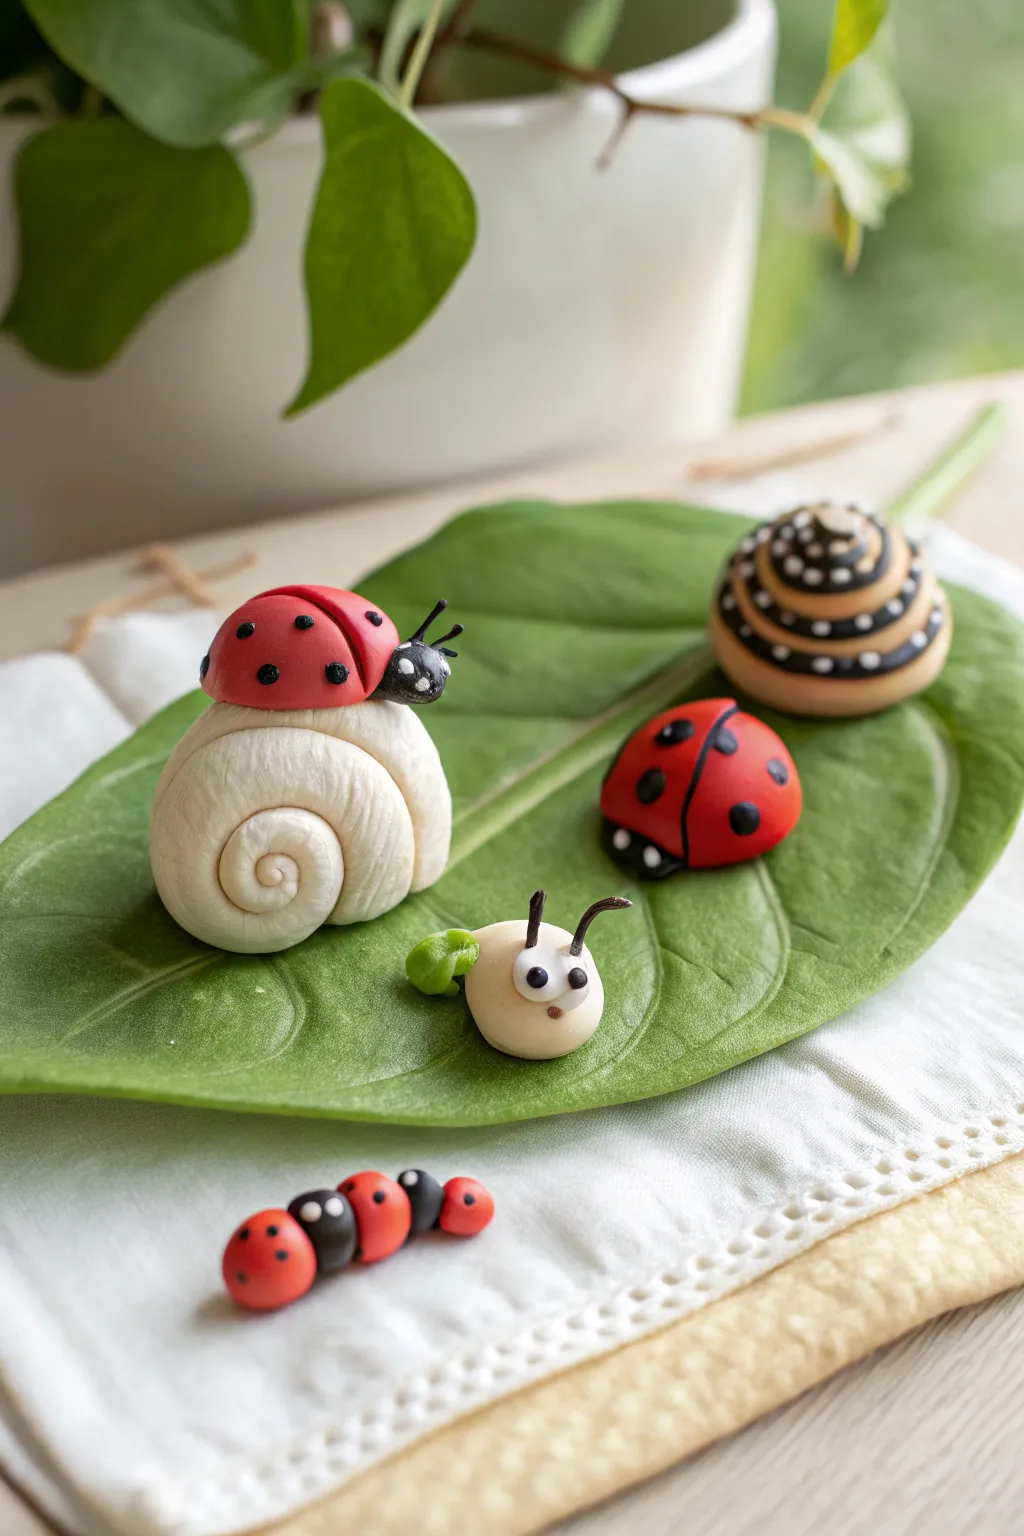
Bring a miniature garden scene to life with this adorable collection of polymer clay critters resting on a vibrant green leaf. This project focuses on simple shapes like spheres and coils to create charming ladybugs, a swirled snail, and a tiny caterpillar friend.
Step-by-Step Guide
Materials
- Polymer clay (Red, black, white, beige/tan, light green)
- Clay sculpting tools (Ball tool, needle tool)
- Acrylic rolling pin
- Parchment paper or baking mat
- Oven (for baking per clay instructions)
- Gloss glaze (optional)
Step 1: Setting the Scene: The Leaf Base
-
Shape the leaf:
Start by conditioning a large piece of green clay until it is soft and pliable. Roll it into a ball and then flatten it into a teardrop or oval shape, about 4-5 inches long. -
Add texture:
Press the clay flat to create the leaf surface. Use a needle tool or a dull knife to gently score a central vein down the middle, branching out with smaller veins on the sides to mimic a real leaf texture. -
Finish the edges:
Smooth the edges with your finger so they aren’t sharp, and give the leaf a slight wave or curve to make it look natural rather than perfectly flat.
Clean Hands, Clean Clay
White clay picks up lint easily! Always wash your hands or use baby wipes before switching to light colors like the white snail shell to keep it pristine.
Step 2: Sculpting the Large Snail
-
Roll the shell:
Taking a chunk of white or cream clay, roll it into a long, even tapered snake. Starting from the thin end, roll the snake tightly inward to create a spiral shell shape. -
Form the body:
Create the snail’s body by shaping a creamy beige piece of clay into a thick slug shape, flattening the bottom so it sits well on the leaf. -
Assemble the snail:
Gently press the spiral shell onto the back of the body. I find that lightly scoring the contact points helps them stick together better. -
Mount the rider:
This snail has a ladybug friend hitching a ride! Make a small red semi-circle and attach it to the top of the white shell shell. -
Add ladybug details:
Attach a small black ball for the ladybug head. Use tiny bits of black clay to add spots to the red back and two small antennae on the head.
Step 3: Different Ladybug Friends
-
Make the grounded ladybug:
For the ladybug sitting directly on the leaf, roll a smooth ball of bright red clay and flatten the bottom slightly so it doesn’t roll away. -
Create the distinctive line:
Use a needle tool or a thin strip of black clay to create a line down the center of the red back, separating the wings. -
Add head and spots:
Attach a semi-circle of black clay to the front for the head. Press small, flat discs of black clay onto the red body for its spots. -
Create the segmented caterpillar:
Roll three or four graduated balls of red clay and one black one. Press them together in a line to form a tiny segmented bug crawling off the leaf.
Glossy Finish
After baking and cooling, paint a layer of polymer clay glaze or clear nail polish over the ladybug shells and eyes to make them look wet and shiny.
Step 4: The Tiny White Worm & Decorative Snail
-
Form the worm:
Roll a small piece of beige clay into a short, thick bean shape. Add two tiny white balls for eyes and press minute black dots into the centers for pupils. -
Give it antennae:
Roll two very thin strands of black clay and attach them to the top of the worm’s head. -
Sculpt the brown snail:
Create a round, bun-shaped shell using light brown clay. Roll thin ropes of dark brown or black clay and wrap them horizontally around the shell form to create stripes. -
Detail the shell:
Using a small dotting tool or toothpick, add white dots along the dark stripes for extra pattern and interest.
Step 5: Final Assembly
-
Arrange the scene:
Place all your creatures onto the green leaf base. Press them down gently to ensure they bond with the leaf clay. -
Bake carefully:
Bake the entire piece in the oven according to the manufacturer’s instructions for your specific brand of clay. Watch the temperature to prevent scorching lighter colors.
Now you have a lively little garden scene that captures the busy life of bugs without any of the bites


Leaf Imprint Keepsakes From a Nature Walk

Transform a simple walk in the park into a stunning keepsake by pressing fallen leaves into soft clay. These elegant ornaments feature a muted sage green base with a shimmering gold inlay that highlights every delicate vein.
Detailed Instructions
Materials
- Air-dry clay (white)
- Acrylic paint (sage green, muted teal)
- Metallic gold acrylic paint or gilding wax
- Clean, fresh leaf (with prominent veins)
- Rolling pin
- Round cookie cutter (approx. 3-4 inches)
- Straw or skewer (for the hole)
- Fine grit sandpaper
- Jute twine
- Small paintbrush
- Matte sealant spray (optional)
Step 1: Shaping the Base
-
Condition the clay:
Begin by taking a handful of white air-dry clay. Knead it in your hands for a minute or two until it feels warm, pliable, and free of cracks. -
Roll it out:
Place the clay on a clean, smooth surface or parchment paper. Use a rolling pin to flatten it to an even thickness of about 1/4 inch. -
Prepare the leaf:
Select a leaf that is slightly smaller than your desired ornament size. Ensure it is clean and dry throughout. -
Create the imprint:
Place the leaf onto the clay slab with the vein side facing down. Roll over the leaf firmly with your rolling pin once or twice to embed it deep into the clay surface. -
Reveal the texture:
Carefully find the stem of the leaf and slowly peel it back to reveal the detailed impression underneath. -
Cut the shape:
Center your round cookie cutter over the leaf impression and press down firmly to cut out the ornament shape. Remove the excess clay from around the edges. -
Smooth the edges:
Dip your finger in a tiny bit of water and run it along the cut edge of the circle to smooth out any roughness or fraying clay. -
Add a hanging hole:
Using a straw or a skewer, poke a hole near the top edge of the circle. Make sure it goes all the way through and is large enough for your twine.
Step 2: Color and Finish
-
Dry thoroughly:
Allow the clay to dry completely according to the package instructions. This usually takes 24-48 hours. Turn it over halfway through to ensure even drying. -
Sand imperfections:
Once fully hard, gently run fine-grit sandpaper over the edges to remove any sharp points or burrs. -
Apply base color:
Paint the entire surface of the ornament, including the indented leaf area, with a sage green acrylic paint. You may need two coats for full opacity. -
Let the base dry:
Wait for the green paint to dry completely. It must be dry to the touch before moving to the next step so the colors don’t muddy. -
Dry brush technique:
Dip a dry brush into a tiny amount of gold paint, then wipe most of it off on a paper towel. Lightly sweep the brush over the raised parts of the leaf texture. -
Highlight the veins:
For deeper veins, use a very fine detail brush to carefully paint gold into the main structural lines of the leaf imprint. -
Seal the work:
If desired, spray the finished piece with a clear matte sealant to protect the paint from chipping over time. -
Attach the hanger:
Cut a length of jute twine, thread it through the hole at the top, and tie a secure knot to create a loop for hanging.
Cracking Clay?
If small cracks appear while the clay dries, mix a tiny bit of fresh clay with water to make a paste and smooth it into the cracks with your finger.
Sharper Details
Use a fresh leaf rather than a dried one. Fresh leaves are flexible and won’t shatter under the rolling pin, leaving a much cleaner initial impression.
Hang your new nature-inspired creation in a window or on a festive tree to enjoy the sparkle

The Complete Guide to Pottery Troubleshooting
Uncover the most common ceramic mistakes—from cracking clay to failed glazes—and learn how to fix them fast.
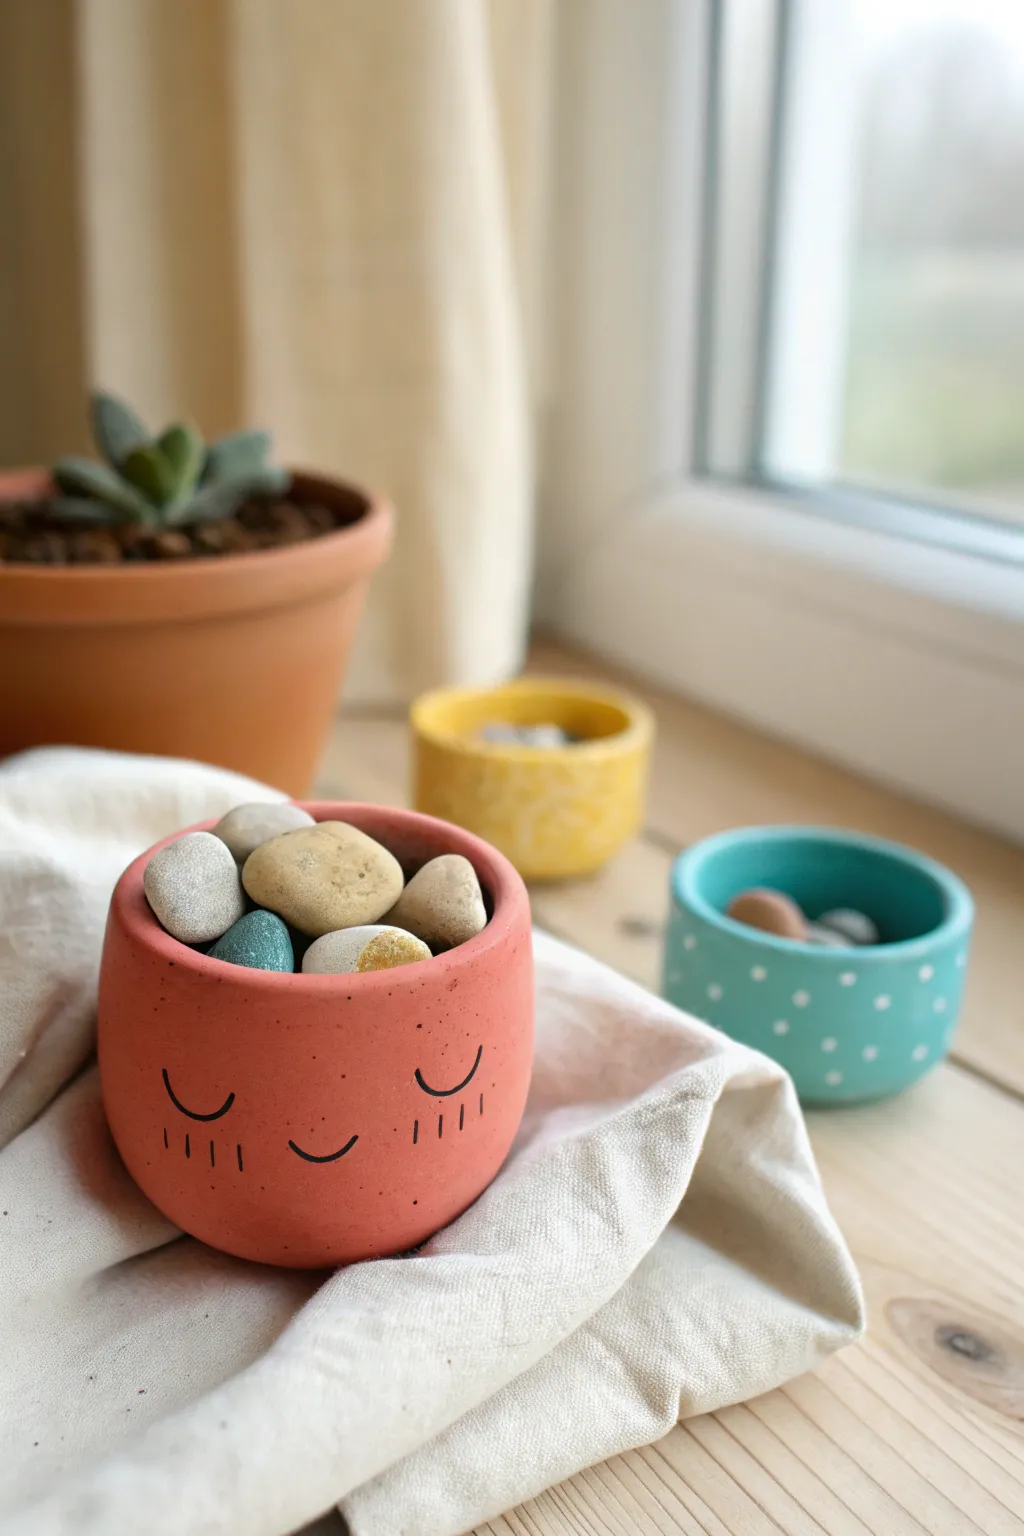
Simple Character Planters With Faces
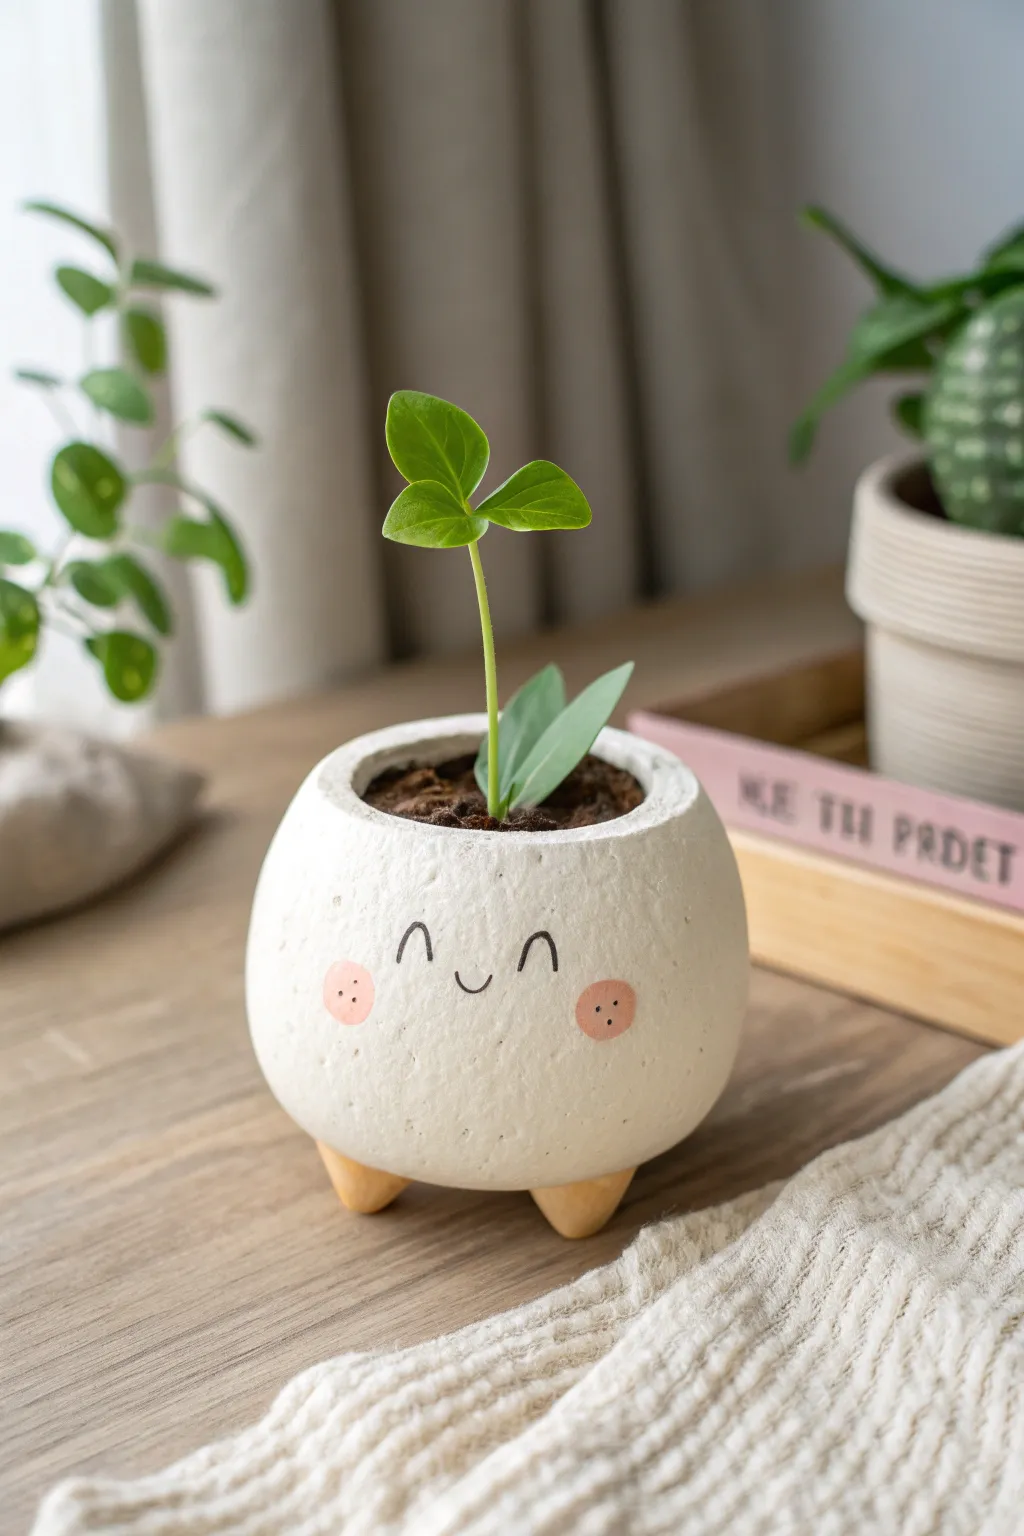
Bring your windowsill to life with these adorable, bubbly character planters that smile back at you. This project uses air-dry clay to create a textured, stone-like bowl shape raised on tiny wooden feet for a modern yet playful look.
How-To Guide
Materials
- White air-dry clay (about 1 lb per pot)
- Small styrofoam ball or rounded bowl (to use as a mold)
- Plastic wrap
- Rolling pin
- Texture sponge or stiff bristle brush
- Three small wooden beads or wooden dowel caps (per pot)
- Strong craft glue (e.g., E6000 or Tacky Glue)
- Black fine-tip acrylic paint marker or permanent marker
- Pink acrylic paint
- Small round paintbrush
- Matte spray varnish (optional)
- Potting soil and a small seedling
Step 1: Shaping the Bowl
-
Prepare your mold:
Find a small rounded bowl or a large styrofoam ball to act as your form. Cover it completely with plastic wrap to ensure the clay doesn’t stick later. -
Roll the clay:
Take a generous handful of white air-dry clay and knead it until soft. Roll it out into a thick, even slab, aiming for about 1/4 inch thickness. -
Drape the clay:
Gently lift your clay slab and drape it over your prepared mold. Press it down softly to take the shape of the bowl, smoothing out any major wrinkles with your fingers. -
Trim the excess:
Using a plastic knife or clay tool, cut away the uneven edges around the rim creates a clean, circular opening. Leave the walls high enough to hold plenty of soil. -
Thicken the rim:
If the edges look too sharp or thin, I like to gently tap them down with a flat finger to create a nice, rounded lip that looks more like a ceramic pot. -
Add texture:
For that charming, stone-like finish seen in the photo, take a stiff bristle brush or a textured sponge and dab it all over the outside of the wet clay.
Step 2: Drying and Assembly
-
Initial drying:
Let the clay sit on the mold for about 2-3 hours until it is firm enough to hold its shape but not fully hard. -
Remove the mold:
Carefully pop the clay form off the mold and peel away the plastic wrap. Set the bowl upside down on a flat surface to let the inside dry completely (usually 24 hours). -
Adding feet:
Once the clay is fully dry and white, flip the bowl upside down. Arrange three wooden beads or dowel caps in a triangle formation on the bottom to act as feet. -
Glue time:
Apply a strong craft glue to the flat side of your wooden feet and press them firmly onto the clay base. Let the glue cure according to the bottle instructions.
Wobbly Feet?
If the pot rocks, the wooden beads might not be glued evenly. Sand the bottom of the beads slightly flat before gluing to create a stable surface.
Step 3: Adding Personality
-
Sketch the face:
Before committing to paint, lightly sketch a simple face design with a pencil. Aim for wide-set eyes and a tiny mouth to match the cute style in the photo. -
Draw the features:
Using a black fine-tip paint marker, carefully trace over your pencil lines. Draw two inverted ‘U’ shapes for happy eyes and a small ‘U’ for the smiling mouth. -
Paint the cheeks:
Dip a small round brush into pink acrylic paint. Dab two soft circles underneath the eyes to create rosy cheeks. -
Add cheek details:
Once the pink paint is dry, use your black marker to add two or three tiny freckle dots inside each pink circle. -
Seal the pot:
To protect your art from water splashes, spray the entire outside of the pot with a matte varnish. -
Planting:
Fill your new friend with potting soil and tuck in a small green seedling, like the sprout shown, to give it ‘hair’.
Go 3D!
Instead of drawing the face, shape tiny balls of clay for the eyes and nose before the pot dries for a fun, raised texture effect.
Place your happy little pot in a sunny spot and enjoy the smile it brings to your room
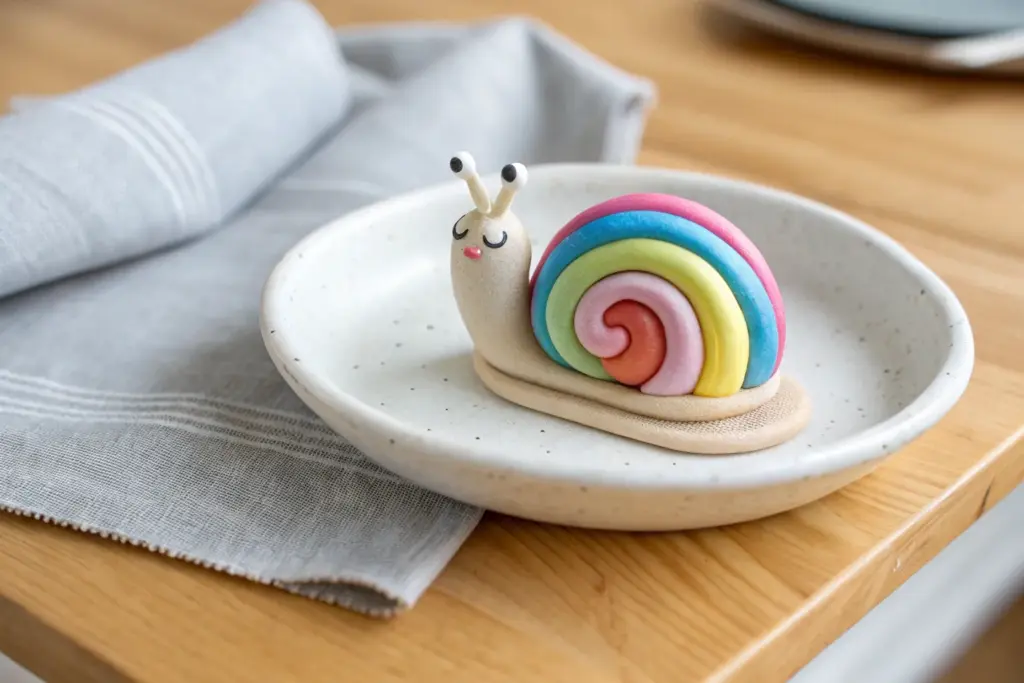
Trinket Dishes With Easy Stamped Patterns
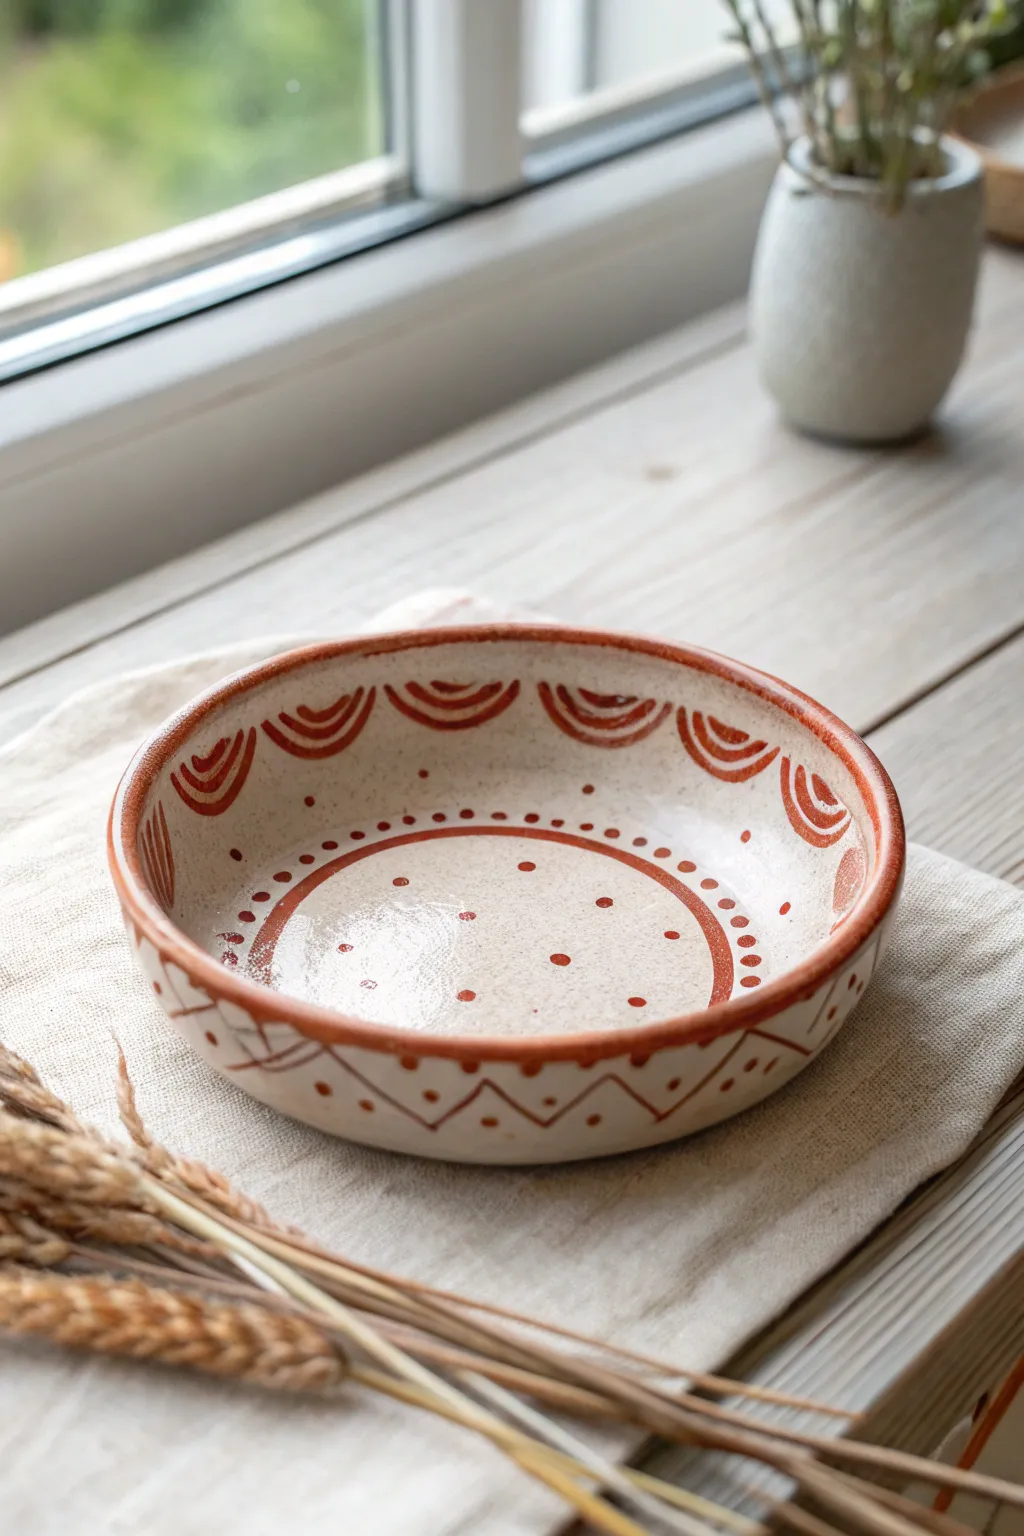
This charming, earthy bowl features simple repeating patterns that look impressive but are easy to master. Using basic red oxide or underglaze on a speckled clay body creates a warm, folk-art feel perfect for holding keys or jewelry.
Detailed Instructions
Materials
- Speckled stoneware clay or air-dry clay (light beige)
- Rolling pin
- Wooden guide strips (1/4 inch thick)
- Small bowl or circle template (approx. 5-6 inches)
- Needle tool or fettling knife
- Small soft sponge
- Red-brown underglaze or iron oxide wash
- Fine detail brush (size 0 or 1)
- Clear glossy glaze (if firing) or gloss varnish
- Shallow bowl for use as a slump mold
Step 1: Forming the Dish
-
Prepare the clay:
Begin by wedging a softball-sized ball of speckled clay to remove air bubbles. Since this is a kids’ project, ensure the clay is soft and pliable before starting. -
Roll the slab:
Place your wooden guide strips on either side of the clay ball. Roll the clay out into an even slab about 1/4 inch thick, rotating the clay occasionally to keep it circular. -
Cut the circle:
Place your template or small bowl upside down on the slab. Using the needle tool held vertically, trace around the edge to cut a perfect circle. -
Smooth the edges:
Dip your sponge in a little water and gently run it around the cut rim to soften the sharp edge. This simple step makes the finished piece look much more professional. -
Shape the bowl:
Gently lift your clay circle and place it inside your slump mold (a slightly larger bowl lined with plastic wrap or cornstarch). Press it down gently so it takes the curved shape. -
Let it firm up:
Allow the clay to dry to a ‘leather hard’ stage. It should be firm enough to hold its shape without the mold but still soft enough to absorb the underglaze.
Step 2: Painting the Pattern
-
Mix the color:
Prepare your reddish-brown underglaze. If it’s too thick, water it down slightly so it flows smoothly like ink. -
Paint the rim:
Using your detail brush, carefully paint a solid line along the very top edge of the rim. Steady your hand by resting your pinky finger on the table or the bowl’s edge. -
Create the arches:
Just under the rim on the inside, paint small semi-circles or arches. Space them out evenly. I find it helpful to mark four cardinal points first to keep spacing consistent. -
Fill the arches:
Inside each arch, paint two smaller concentric curves to create a rainbow effect. -
Paint the inner circle:
Paint a large ring in the bottom center of the bowl. Don’t worry if it’s not a perfect circle; a little wobble adds to the handmade charm. -
Add the dots:
Dip the back end of your paintbrush (the wooden handle) into the paint to use as a stamp. Dot around the outside of the inner circle. -
Detail the center:
Add a few larger, spaced-out dots inside the central ring using the same stamping technique. -
Decorate the exterior:
Once the inside is touch-dry, carefully flip the bowl. Paint a zigzag line around the outside wall, adding a small dot inside each triangle formed by the zigzag.
Pro Tip: Steady Hands
Use a lazy susan or banding wheel when painting the circular lines. Hold your brush steady in one spot and slowly rotate the wheel to create cleaner continuous lines.
Step 3: Finishing Touches
-
Final drying:
Let the piece dry completely. If you are kiln firing, this is the bone-dry stage. If using air-dry clay, wait 24-48 hours. -
Bisque fire:
If using ceramic clay, bisque fire the piece to cone 04. -
Glazing:
Dip the entire piece in a clear glossy glaze. This will amplify the speckled clay and protect the painted design. -
Final fire or seal:
Glaze fire to cone 5/6 (or apply varnish for air-dry clay) to achieve that shiny, durable finish.
Troubleshooting: Smudges
If you smudge the red underglaze while painting, don’t wipe it while wet! Let it dry completely, then gently scratch the mistake off with a needle tool or stiff brush.
Once fired or sealed, you’ll have a delightful custom dish ready to be wrapped up as a gift or placed on your bedside table


What Really Happens Inside the Kiln
Learn how time and temperature work together inside the kiln to transform clay into durable ceramic.
Clay Beads for Chunky Kid Jewelry
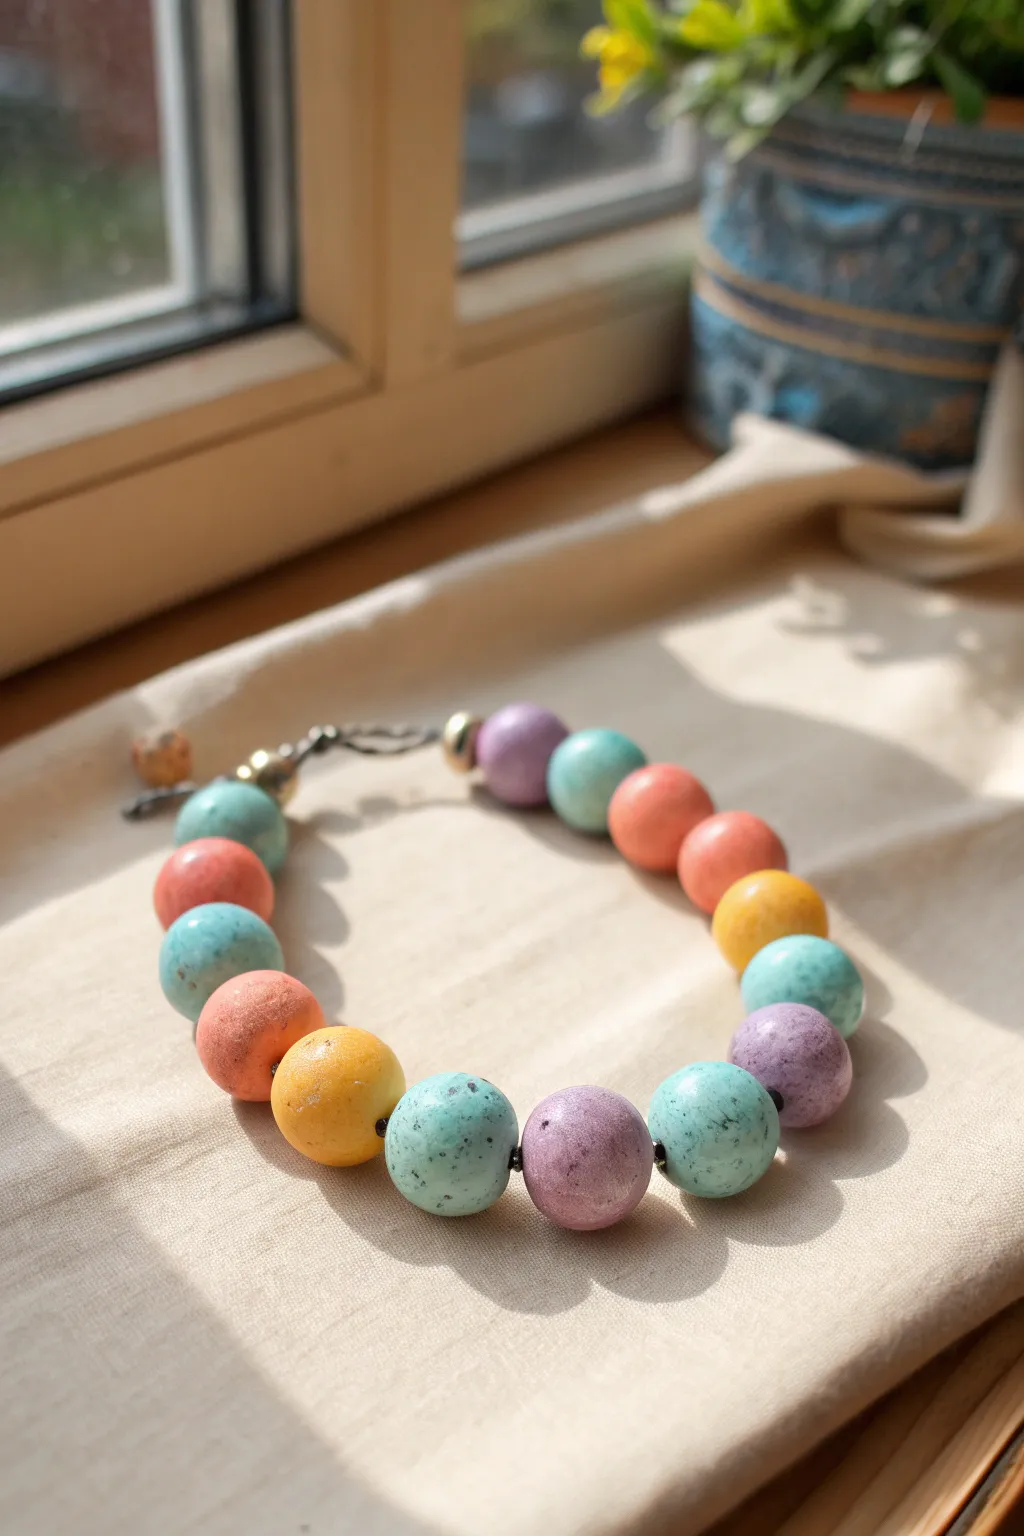
Create a statement piece with these oversized, colorful clay beads that mimic the look of natural stone or speckled eggs. The soft matte finish and playful speckling make them perfect for a fun, chunky necklace or a bold bracelet.
Step-by-Step
Materials
- Polymer clay (white base plus pastel colors: calm teal, coral pink, mustard yellow, lavender)
- Black acrylic paint
- Old toothbrush or stiff bristle brush
- Toothpicks or a bead piercing tool
- Glossy glaze (optional, though matte is pictured)
- Durable beading cord or elastic string
- Jewelry findings (clasp, jump rings, crimp beads)
- Parchment paper-lined baking sheet
- Oven (for baking polymer clay)
Step 1: Preparing the Clay
-
Color Mixing:
Start by conditioning your polymer clay until it is soft and malleable. You will need four distinct colors: a soft teal, a warm coral-pink, a sunny mustard yellow, and a muted lavender. If you only have primary colors, mix them with a significant amount of white to achieve these pastel tones. -
Portioning:
Pinch off equal-sized chunks of clay for each bead. Aim for a size roughly slightly smaller than a grape to account for the chunky look shown in the photo. Consistency is key, so you might want to roll a log and slice it evenly first. -
Rolling Spheres:
Roll each chunk of clay between your palms to form a smooth sphere. Don’t worry if they aren’t geometric perfection; a little hand-rolled character adds to the charm.
Clean Hole Trick
To keep the bead hole from closing during baking, consider baking the beads directly on a stiff wire or a knitting needle suspended over a baking dish.
Step 2: Adding Texture and Baking
-
Piercing the Beads:
While the clay is still soft, use a toothpick or a dedicated bead piercing tool to create a hole through the center of each sphere. Gently rotate the tool as you push through to prevent squashing the bead’s shape. -
Smoothing the Holes:
Once the tool pierces through the other side, inspect the exit hole. Smooth down any rough edges with your finger so the bead sits flush against its neighbors later. -
Creating the Speckles:
Dip an old toothbrush into a small amount of black acrylic paint. Run your thumb across the bristles to flick tiny splatters of paint onto the raw clay beads. Rotate the beads to ensure coverage on all sides. -
Drying Time:
Let the acrylic paint spatters dry completely on the raw clay before handling them again. This usually takes about 10-15 minutes. -
Baking:
Arrange the beads on a parchment-lined baking sheet. Bake them according to your specific brand of polymer clay’s instructions—usually around 275°F (135°C) for 15-30 minutes per 1/4 inch of thickness. -
Cooling:
Allow the beads to cool completely in the oven with the door slightly ajar. This helps prevent cracking from sudden temperature changes.
Faux Stone Effect
Mix a tiny pinch of black pepper or dried used coffee grounds into the clay before rolling to create internal texture and speckles that look like real granite.
Step 3: Assembly
-
Sealing (Optional):
The beads in the image have a lovely matte stone finish. If you prefer this look, skip the glaze. If you want durability, apply a very thin layer of matte varnish now. -
Arranging the Pattern:
Lay out your beads on a table to design your color sequence. The example uses a pleasing random mix, avoiding placing two of the same color directly next to each other. -
Stringing:
Cut a length of beading cord or elastic string. Thread your beads onto the cord in your chosen pattern. -
Adding Metals (Optional):
For an extra professional touch, you can add small gold spacer beads or a large metallic accent bead near where the clasp will go, as seen in the photo. -
Attaching the Clasp:
If using non-elastic cord, thread a crimp bead and one half of your toggle clasp onto the end. Loop the wire back through the crimp bead and use pliers to smash it flat, securing the clasp. -
Finishing the Loop:
Repeat the crimping process on the other end of the necklace with the second half of the clasp. Trim any excess wire close to the crimp bead.
Now you have a stunning, trendy piece of jewelry that looks boutique-bought but was made right at home
Mini Animal Figures for Pocket Pets
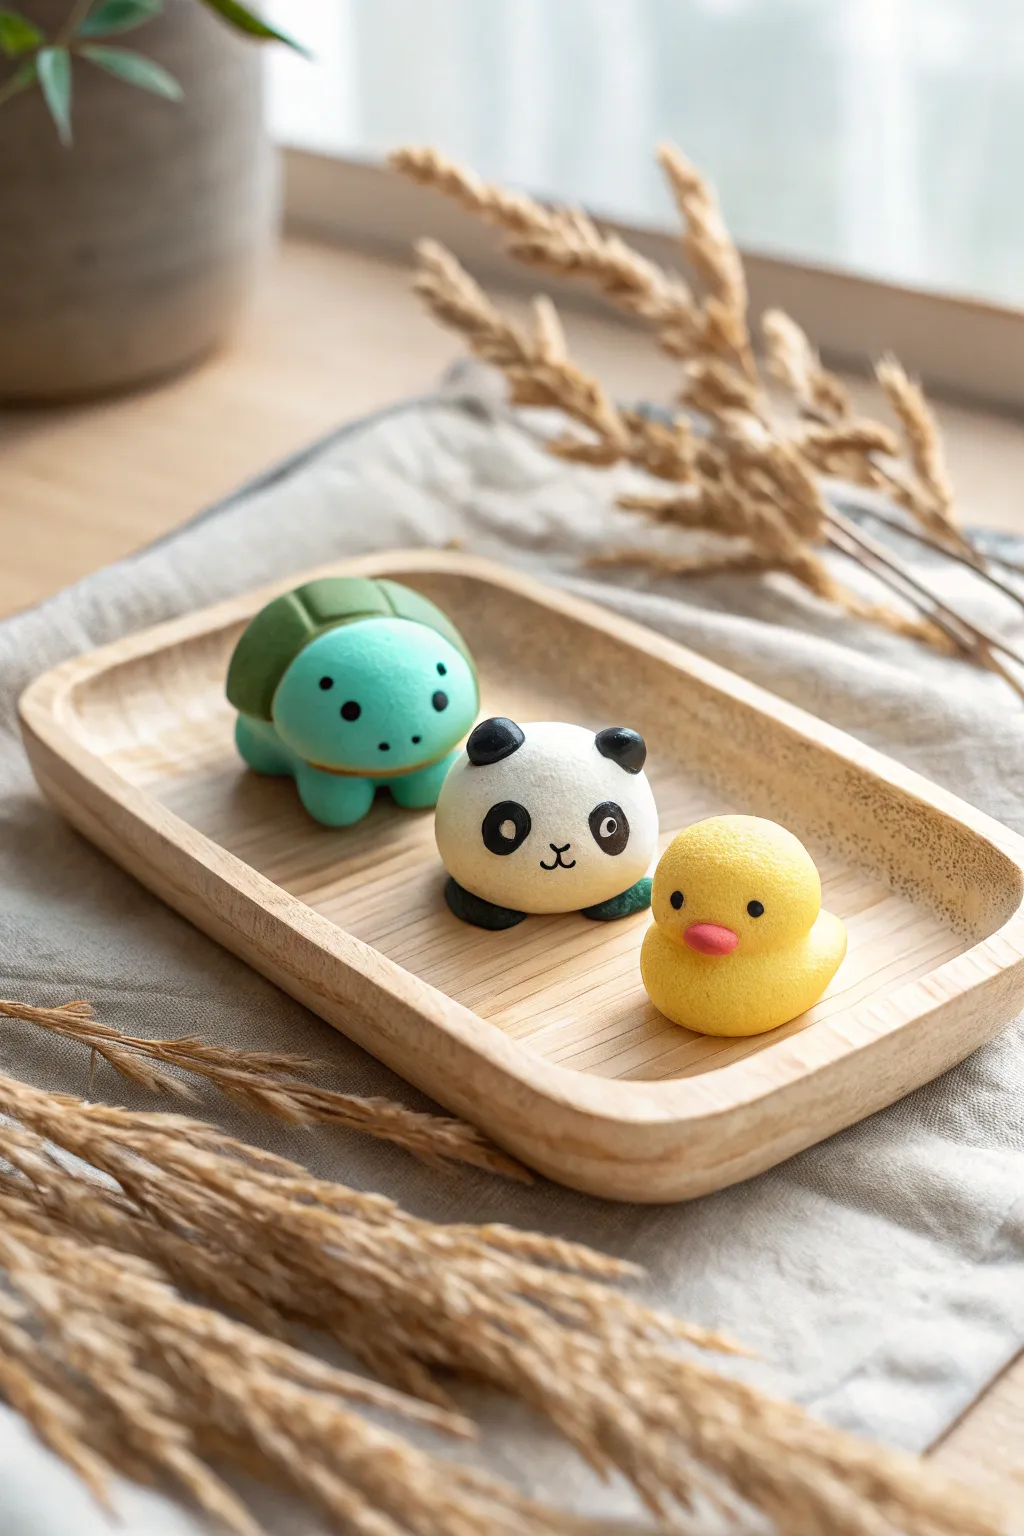
These adorable mini animal figures are perfect little friends to keep in your pocket or display on a desk. We’ll be making a trio of cuties: a gentle green turtle, a round panda, and a bright yellow duckling, all with a smooth, matte finish.
How-To Guide
Materials
- Polymer clay or air-dry clay (White, Black, Yellow, Teal/Light Green, Dark Green, Orange/Red)
- Clean rolling surface or clay mat
- Basic clay sculpting tools (ball tool, needle tool)
- Small blade or plastic knife
- Wet wipes (to clean hands between colors)
Step 1: Shaping the Turtle
-
Base Body:
Start by conditioning a small ball of teal or light green clay. Roll it into a smooth sphere against your palm, then flatten the bottom slightly so it sits stable on your work surface. -
Adding Legs:
Create four tiny, equal-sized balls from the same teal clay. Press these gently into the bottom sides of the body to form chubby little feet that just peek out. -
The Shell:
Take a piece of dark green or olive clay and flatten it into a thick disc. Gently dome it with your fingers so it fits perfectly over the back of the teal body. -
Shell Details:
Using a plastic knife or a needle tool, lightly score a grid pattern onto the dark green shell to mimic turtle markings. I like to keep the lines soft for a cartoonish look. -
Golden Rim:
Roll a very thin snake of yellow or gold clay. Wrap this around the base of the shell where it meets the teal body to create a neat border. -
Turtle Face:
Use a small ball tool to make indentations for eyes. Place tiny black clay balls inside. Add two pin-prick nostrils with a needle tool.
Step 2: Crafting the Panda
-
Panda Body:
Roll a larger ball of white clay. This needs to be very smooth, so take your time rolling out any cracks. -
Ears and Paws:
Make two tiny black balls for ears and two slightly flattened black ovals for feet. Attach the ears to the top of the head and the feet tucked under the bottom front. -
Eye Patches:
Create two small ovals of black clay. Flatten them significantly and press them onto the face, slanting them slightly downward for that classic sad-panda expression. -
Face Details:
Add tiny white dots inside the black eye patches for highlights. Roll a microscopic snake of black clay to form the nose and mouth in a ‘Y’ shape.
Clean Hands Tip
Baby wipes are essential! Clean your hands thoroughly when switching from dark colors (like the panda’s black clay) to light colors (like the yellow duck) to avoid staining.
Step 3: Sculpting the Duck
-
Body Form:
Take yellow clay and roll a ball. Gently pinch one side to pull out a small tail shape, keeping the rest round and chubby. -
Head Shape:
Roll a slightly smaller yellow ball for the head. Press it firmly onto the body. You can blend the clay at the neck slightly if you want a seamless look. -
Beak Creation:
Use a tiny amount of orange or reddish-pink clay. Shape it into a small oval, flatten it, and attach it to the center of the face for the bill. -
Final Eyes:
Just like the turtle, press two small black clay balls onto the face. Place them wide apart to make the duck look extra cute.
Make Them Blush
Before baking or sealing, use a soft brush to dab a tiny bit of real pink pastel chalk powder onto the cheeks of your animals for a sweet, rosy kawaii effect.
Step 4: Finishing Touches
-
Smooth & Check:
Give all three figures a final check. Smooth out any fingerprints deeply but gently with a fingertip. If using polymer clay, bake according to package instructions. -
Protective Coat:
Once fully dry or baked and cooled, applying a matte varnish will protect your new pets while keeping that soft, non-glossy finish seen in the photo.
Now you have a trio of pocket-sized pals ready to accompany you on any adventure

TRACK YOUR CERAMIC JOURNEY
Capture glaze tests, firing details, and creative progress—all in one simple printable. Make your projects easier to repeat and improve.
Fairy Garden Mushrooms and Pebble Doors
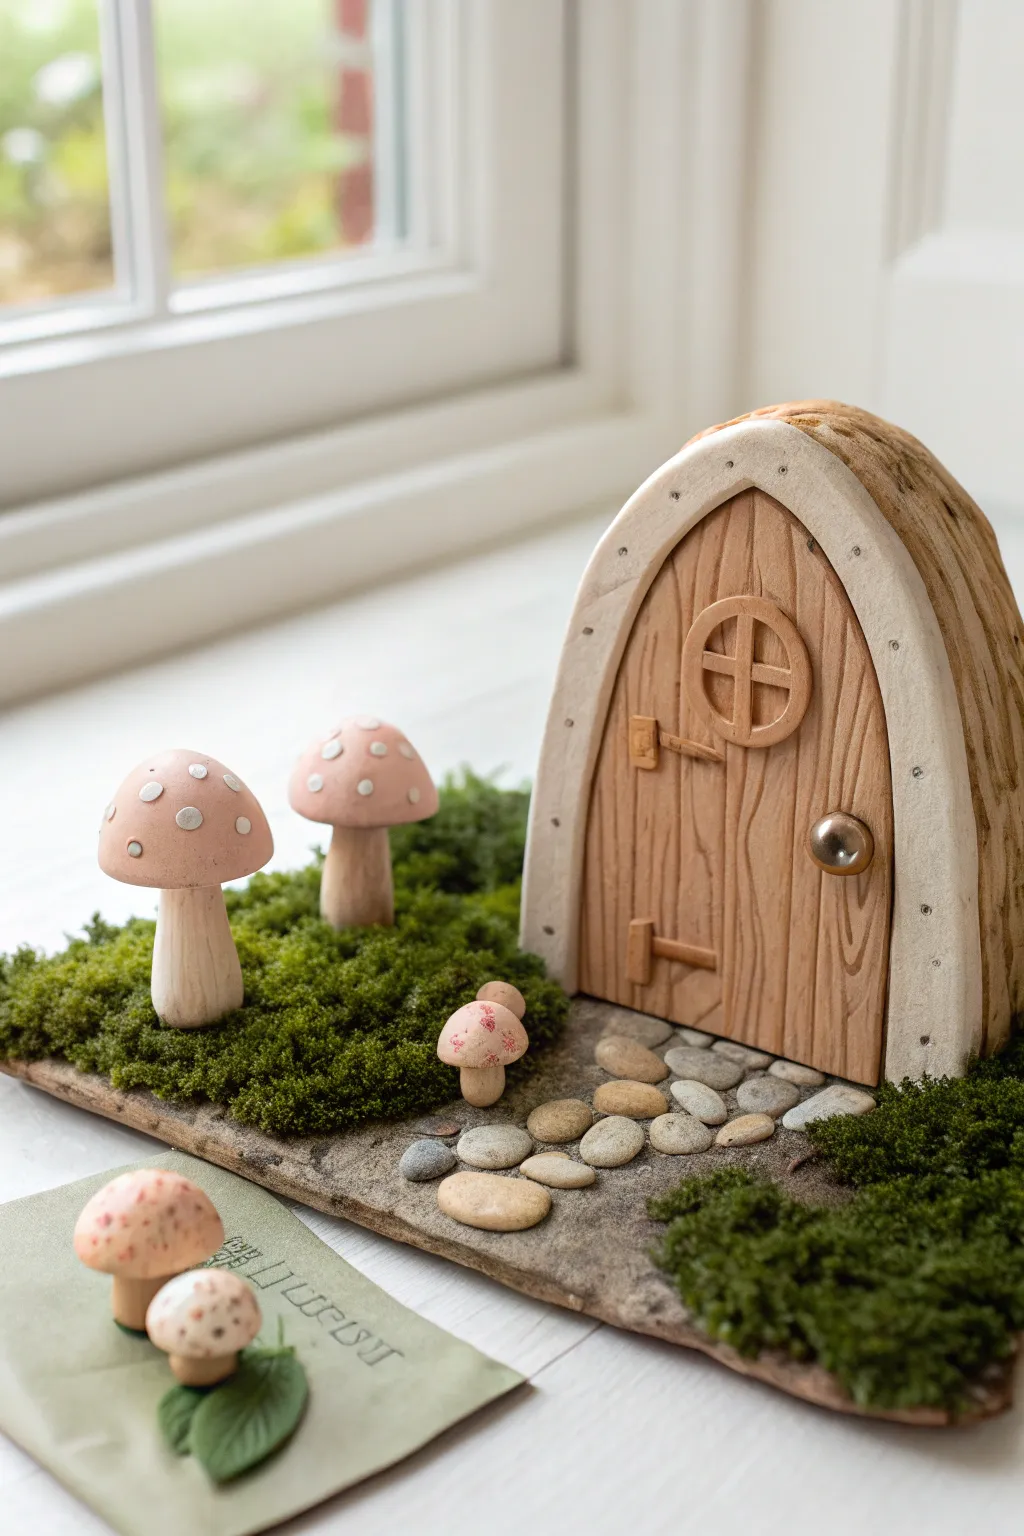
Transport yourself to a magical world by sculpting this adorable fairy door diorama, complete with speckled mushrooms and a charming pebble path. This project combines polymer clay modeling with natural textures to create a cozy, woodland entryway perfect for a windowsill display.
Step-by-Step Guide
Materials
- Polymer clay (wood-brown, light beige, pink, white)
- Flat wooden base or sturdy cardboard
- Aluminum foil
- Sculpting tools (needle tool, small blade)
- Faux moss (loose or sheet)
- Small smooth river stones or grey polymer clay
- Tacky craft glue or super glue
- Rolling pin
- Texture tool (or toothbrush/sandpaper for texture)
- Metallic gold paint or tiny bead (doorknob)
Step 1: Sculpting the Fairy Door
-
Form the Core:
Crumple a small amount of aluminum foil into a sturdy arch shape. This saves clay and keeps the door lightweight. -
Create the Wood Plank Layer:
Roll out a sheet of wood-brown polymer clay. Cut it to fit the front and sides of your foil arch, smoothing the seams at the back. -
Add Wood Grain Texture:
Using a needle tool or a dull knife, gently score vertical lines down the front of the brown clay to mimic wooden planks. Add tiny knots and squiggles for realistic wood grain. -
Make the Stone Archway:
Roll a snake of light beige clay and flatten it slightly. Drape this over the top curve of your door to act as the stone frame. -
Detail the Frame:
Use a needle tool or toothpick to poke small holes evenly spaced along the beige arch, giving it a rustic, hewn-stone appearance. -
Add Hardware:
Press a small ball of clay (or a tiny bead) onto the right side for a doorknob. Create two small L-shaped clay pieces for hinges on the left. -
Create the Window:
Make a small circle of brown clay and add a cross-shape in the middle. Press this onto the upper center of the door for a little window.
Natural Texture Hack
Press a piece of real bark or a rough rock against your unbaked clay door frame to instantly give it an authentic, weathered stone texture without tools.
Step 2: Crafting the Mushrooms
-
Shape the Stems:
Roll thick cylinders of light beige or white clay. Keep the bases slightly wider than the tops so they stand independently. -
Form the Caps:
Roll balls of soft pink clay and flatten the bottoms with your thumb to create domes. I find pressing the center underneath slightly helps it sit better on the stem. -
Add Polka Dots:
Press tiny, flat circles of white clay onto the pink caps. Gently roll the cap in your palm to smooth the dots flush with the surface. -
Assemble the Fungi:
Attach the caps to the stems. You can insert a small piece of wire or toothpick for extra stability before baking. -
Bake the Clay:
Bake all your clay pieces (door and mushrooms) according to your clay package instructions. Let them cool completely before handling.
Sticky Situation?
If your fingerprints are visible on the smooth mushroom caps, lightly brush them with a drop of baby oil or cornstarch before baking to smooth them out.
Step 3: Assembling the Scene
-
Prepare the Base:
Take your flat wooden base or cardboard. If you want a textured ground, spread a thin layer of grey clay or glue mixed with sand over the surface first. -
Lay the Pebble Path:
Glue small river stones (or baked balls of grey clay) leading from the front edge of the base up to where the door will sit. -
Secure the Door:
Apply strong glue to the bottom of your baked door and press it firmly onto the base at the end of the path. -
Plant the Mushrooms:
Glue your large mushrooms to the left of the path, varying their height for interest. Place the tiny baby mushroom closer to the path. -
Add the Mossy Lawn:
Complete the look by gluing faux moss around the base of the mushrooms and along the sides of the path, covering any exposed base material.
Place your finished fairy garden scene near a window to catch the light and invite a little magic into your room
Texture Hunt Sculptures Using Everyday Imprints
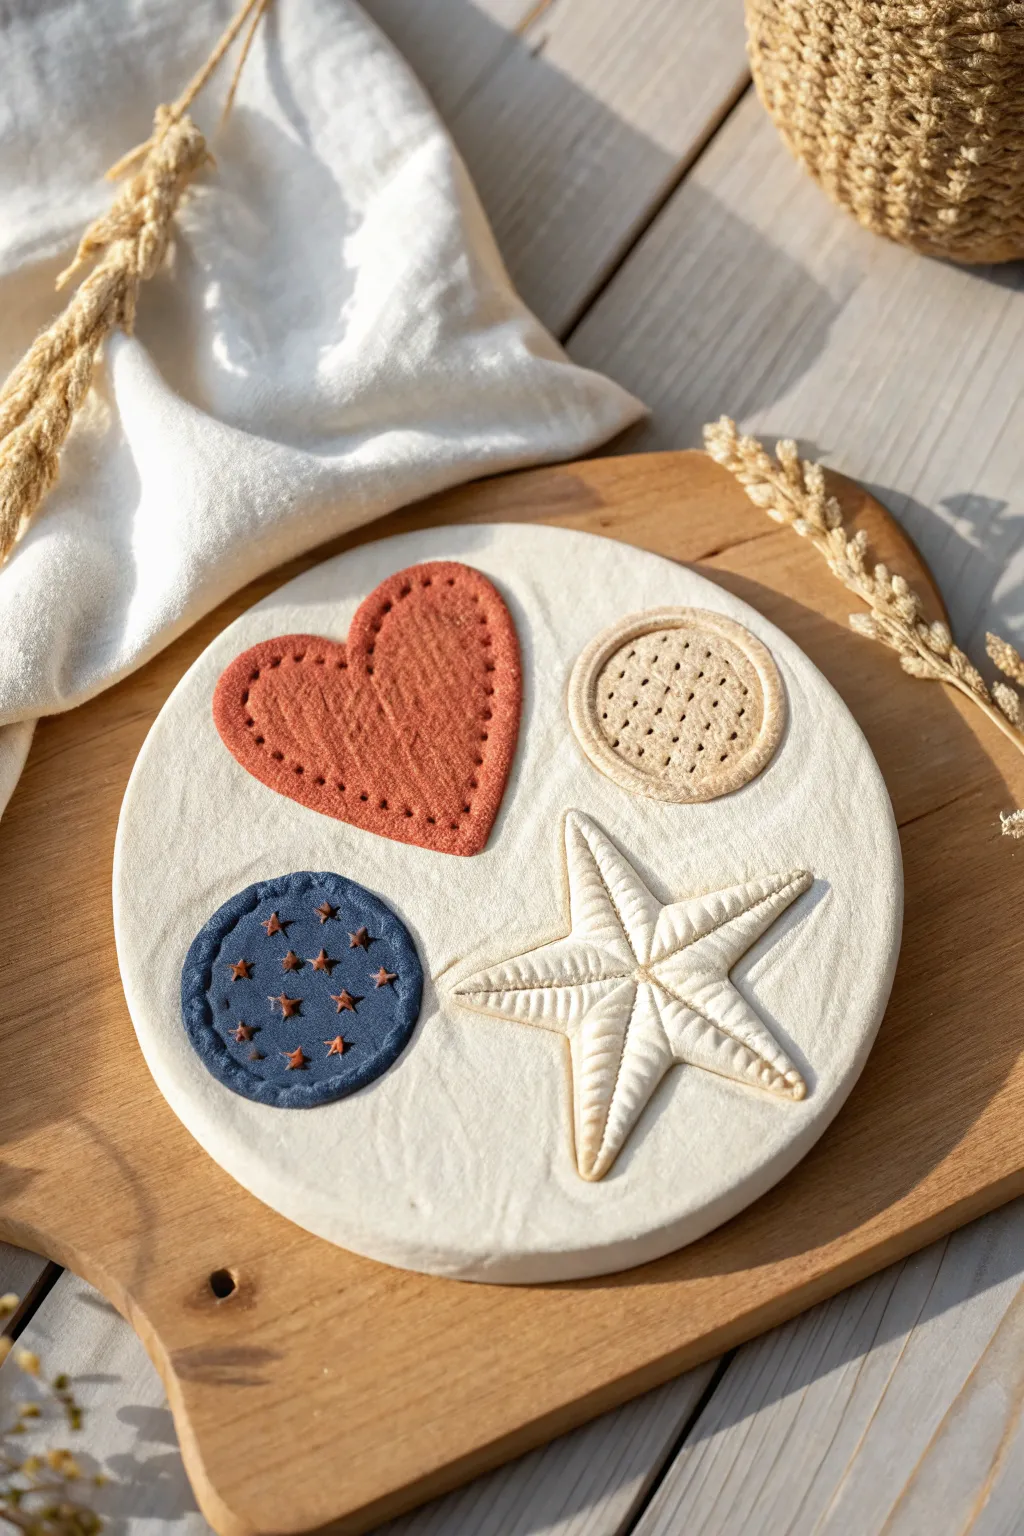
Create a calming, tactile piece of art that freezes the cozy textures of everyday life into a permanent display. This project combines simple clay shapes with embossed patterns like knit fabric and stars to celebrate the little details we often overlook.
Step-by-Step
Materials
- White air-dry clay or polymer clay
- Rolling pin
- Round cookie cutter (large, approx. 6-8 inches) or a bowl to trace
- Clay knife or craft knife
- Textured fabrics (like a ribbed sweater or linen)
- Small star stamps or a star-shaped tool
- A button or textured cracker (for the beige circle imprint)
- Acrylic paints (Rust Red, Navy Blue, Beige, White)
- Small detail paintbrushes
- Fine grit sandpaper (optional)
- Water cup
Step 1: Preparing the Base
-
Condition the Clay:
Begin by kneading your white clay until it is soft, pliable, and free of cracks. Warm clay is much easier to work with and will take textures better later on. -
Roll the Slab:
Roll out a large slab of clay to an even thickness of about 1/4 inch. Try to keep the surface smooth; if air bubbles appear, prick them with a pin and smooth over with your finger. -
Cut the Circle:
Using your large round cutter or by tracing around a bowl, cut out a perfect circle to serve as your canvas. Smooth the edges with a little water on your fingertip to remove any harsh cut lines.
Pro Tip: Clean Impressions
Dust your texture tools (fabric, buttons, stamps) with a tiny bit of cornstarch before pressing them into the clay. This acts as a release agent and prevents sticky clay from getting trapped in the details.
Step 2: Creating the Elements
-
Cut Out the Shapes:
From the remaining scraps of rolled clay, cut out three shapes: a heart, a medium circle, and a five-pointed starfish shape. Keep the starfish slightly thicker so you can sculpt its legs later. -
Texture the Heart:
Take a piece of textured fabric, like linen or a ribbed shirt, and press it firmly into the clay heart. Alternatively, you can use a needle tool to stipple the surface manually for a faux-fabric look. -
Emboss the Beige Circle:
For the circle element, press a textured object like a button or a wire mesh gently into the center to create a grid pattern of dots. Leave a smooth rim around the edge to frame the texture. -
Sculpt the Starfish:
For the star shape, use a modeling tool or the back of a knife to gently press a central spine down each arm. Pinch the ridges slightly to give it a 3D, organic starfish appearance rather than a flat star. -
Create the Starry Circle:
Cut a final circle shape directly out of the main base slab, or add a thin circular layer on top. Use a small star stamp to press a pattern of stars into this circle. If you don’t have a stamp, carefully carve small ‘v’ shapes or asterisks with a needle tool.
Step 3: Assembly and Drying
-
Attach the Pieces:
Score the back of your textured shapes (the heart, the textured circle, and the starfish) and the spots on the base where they will go. Apply a dab of water or liquid clay (slip) to join them securely to the main round slab. -
Refine the Edges:
Once everything is attached, do a final check of your edges. Smooth any joining seams gently with a brush dipped in water so the pieces look integrated but distinct. -
Let it Dry:
Allow the entire piece to dry completely. For air-dry clay, this usually takes 24-48 hours. I stick it on a wire rack to ensure air circulates underneath, preventing warping. -
Sand Imperfections:
Once bone dry, use fine-grit sandpaper to lightly sand any rough edges on the main circle rim, being careful not to sand away your beautiful textures.
Level Up: Nature’s Touch
Instead of fabric or buttons, take a nature walk and use real objects like seashells, pinecone scales, or acorn caps to create the textures. It turns the art piece into a memory of a specific day out.
Step 4: Painting the Details
-
Paint the Heart:
Mix a warm rust-red acrylic paint. Carefully paint just the heart shape. Use a fairly dry brush technique to ensure the paint doesn’t flood the texture holes, keeping that fabric-like appearance visible. -
Paint the Starry Circle:
Paint the circle with the star imprints in a deep navy blue. If you accidentally get paint inside the stars that you wanted to keep light, don’t worry—we can highlight them later. -
Highlight the Stars:
Once the blue paint is dry, use a very fine brush with a tiny bit of metallic copper or light beige paint to touch the centers of the stars, making them pop against the dark background. -
Paint the Textured Circle:
Paint the button-imprinted circle with a soft beige or biscuit color. You can add a darker wash (watered down brown paint) and wipe it off quickly to let the dark color settle into the dots for extra depth. -
Finish the Starfish:
Leave the starfish and the base white for a clean, fresh look, or add a very subtle pearlescent glaze to the starfish to mimic a sea creature’s sheen. -
Seal the Project:
Finish by applying a matte varnish over the painted areas to protect the colors and a satin varnish over the starfish if you want it to shine.
Hang this textured collage on your wall or use it as a centerpiece to bring a touch of handcrafted warmth to your room
Glow-Style Space Charms With Stars and Planets

Create a set of out-of-this-world accessories featuring nebulous planets, twinkling stars, and a deep blue crescent moon. Using polymer clay and some clever glitter techniques, these charms capture the magic of deep space in a wearable format.
Step-by-Step Tutorial
Materials
- Dark purple or navy blue polymer clay
- Teal or turquoise polymer clay
- Silver or white glitter (fine)
- Small gold star confetti or sequins
- Glossy glaze or UV resin
- Eye pins and jump rings
- Beige or white macrame cord/waxed cotton cord
- Teal speckled beads (ceramic or plastic)
- Small silver spacer beads
- Rolling pin
- Small circle cutters (various sizes)
- Star cutter
- Needle tool or toothpick
Step 1: Shaping the Celestial Bodies
-
Condition the base clay:
Start by warming up your dark purple or navy blue clay in your hands until it becomes soft and pliable, then mix in a generous pinch of fine silver glitter to create the starry background effect. -
Roll and cut the shapes:
Roll the glittered dark clay into a sheet about 3-4mm thick. Use your cutters to punch out a large star, a crescent moon shape, a small circle, and a medium circle for the planet body. -
Creating the planet ring:
Condition a small amount of teal clay. Roll it into a very thin snake, then flatten it gently with your rolling pin to create a flat ribbon. -
Assemble the planet:
Drape the flat teal ribbon across the front of your dark planet circle. Gently press it down so it adheres, wrapping the ends around the back. I find smoothing the connection points on the back ensures it doesn’t peel off later. -
Adding texture to the ring:
To give the ring that speckled asteroid belt look, lightly prick the teal clay with a toothbrush or stiff brush, or mix a tiny bit of white sand/glitter into the teal clay before shaping. -
Insert hardware:
Carefully push an eye pin into the top of the star and the planet shapes. For the moon assembly, you will need a hole or eye pin at the top of the crescent, and a separate eye pin in the small circle charm.
Sticky Situation?
If the clay gets too soft and sticky to cut cleanly, pop it in the fridge for 10 minutes. The cooler temperature firms it up, making it easier to handle without distortion.
Step 2: Adding Detail and Baking
-
Applying gold stars:
While the clay is still uncured, gently press tiny gold star confetti pieces onto the moon and the small circle charm. Push them slightly into the surface so they sit flush. -
Final smoothing:
Check all your edges for fingerprints. If you find any, lightly buff them away with a drop of baby oil on your fingertip. -
Bake the pieces:
Place your charms on a baking sheet lined with parchment paper. Bake according to your polymer clay package instructions (usually around 275°F/135°C for 15-30 minutes). -
Cooling down:
Let the charms cool completely inside the oven or on a wire rack before handling them, as hot clay can be brittle.
Star Power
Don’t have star confetti? Use a tiny dotting tool and gold acrylic paint to add the constellations after the clay has been baked and cooled.
Step 3: Glazing and Assembly
-
Adding the gloss:
Once cool, coat the front of each charm with a layer of glossy glaze or UV resin. This makes the glitter pop and seals in the gold stars. -
Curing the finish:
Allow the glaze to air dry fully or cure the UV resin under a UV lamp until hard and non-tacky. -
Prepare the cords:
Cut lengths of beige cord for your necklaces. Use jump rings to attach the planet and star charms directly to their own cords. -
Complex assembly:
For the moon piece, use a large jump ring to connect the crescent moon and the small circle charm together, then thread the cord through that main ring. -
Beading the cords:
Thread a teal speckled bead and a few silver spacer beads onto the cord just above the charm. Knot the cord securely above the beads to keep them in place. -
Secure knots:
Check all knots for tightness. You can add a tiny dab of superglue to the final knots for extra durability.
Wear your new galaxy collection together or share them with friends for a coordinated cosmic look
Story Stones With Characters Kids Invent
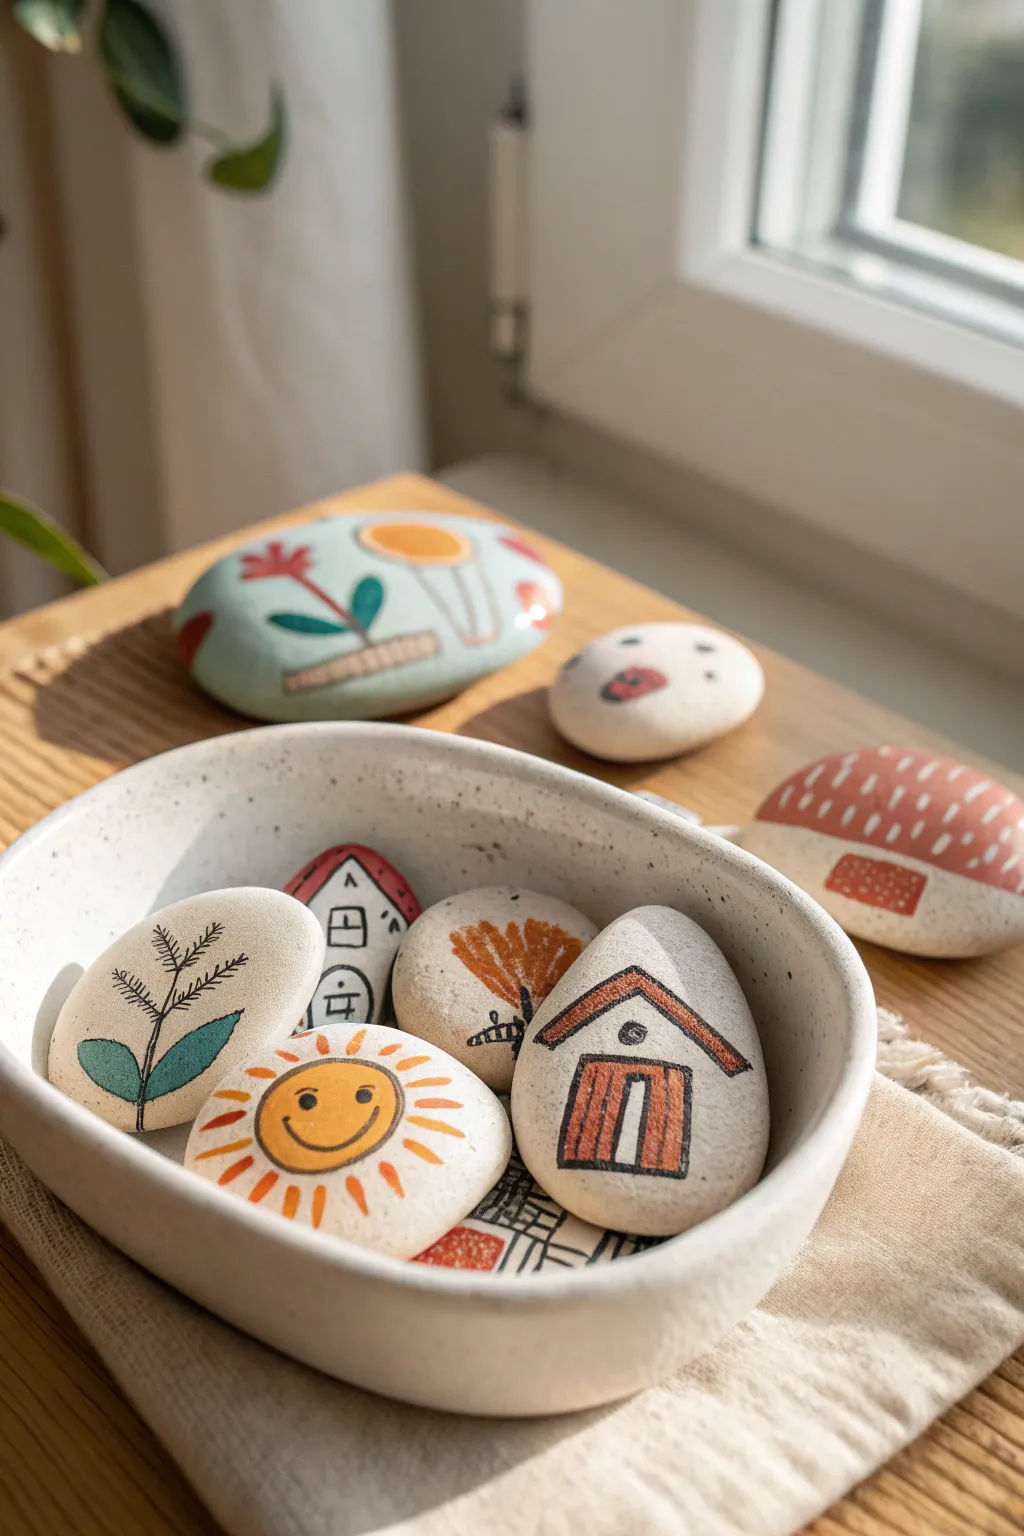
Transform smooth river rocks or formed clay pebbles into a cast of characters for open-ended storytelling. These charming, pocket-sized treasures feature simple illustrations like sunny faces and cozy cottages, perfect for sparking imaginative play.
Step-by-Step
Materials
- Smooth river stones or air-dry clay (to make your own shapes)
- White acrylic paint or gesso
- Acrylic paints (terracotta, teal, yellow, black)
- Fine detail paintbrushes (size 0 and 2)
- Ultra-fine tip permanent marker or black paint pen
- Matte spray varnish or Mod Podge
- Water cup and paper towels
Step 1: Prepping the Canvas
-
Clean the surfaces:
If using natural stones, wash them thoroughly with warm soapy water and a scrub brush to remove dirt and oils. Let them dry completely in the sun. -
Create clay alternatives:
If you don’t have river rocks, roll air-dry clay into smooth, palm-sized ovals. Flatten them slightly so they don’t roll away, and allow them to cure for 24-48 hours until hard. -
Apply the base coat:
Paint the top surface of each stone with a layer of white acrylic paint or gesso. The goal is a matte, slightly textured background that looks like ceramic. -
Check opacity:
Once the first layer is dry to the touch, assess if you need a second coat. You want a solid, creamy white surface where the stone’s natural color doesn’t peek through too much.
Paint Pen or Brush?
If brush lines feel shaky, use a Posca marker or micron pen for outlines. Ensure paint is 100% dry first or the nib will clog instantly.
Step 2: Sketching and Blocking
-
Plan your characters:
Decide on your icons. The image features a smiling sun, a simple house with a gabled roof, a fern-like plant, and abstract patterns. -
Light pencil sketch:
Very lightly sketch your designs onto the white base using a standard pencil. Keep lines faint so they are easy to cover later. -
Block in color: The Sun:
For the sun stone, paint a yellow circle in the center. Use a slightly watered-down orange or terracotta color to create the radiating sunbeams. -
Block in color: The House:
On a triangular-shaped stone or oval, paint the roof sections. Use a rust or brown shade for the roof outline and door, leaving the walls white. -
Block in color: The Plant:
Paint two large, teal-colored leaves at the base of your plant stem. Don’t worry about the black outlines yet; just focus on the solid color shapes.
Mix & Match Sets
Theme your stones! Create a ‘weather’ set, a ‘forest’ set, or a ‘family’ set to help structure the stories kids can tell.
Step 3: Adding Details
-
Outline work:
Once the color blocks are bone dry, switch to your ultra-fine black paint pen or a size 0 brush with thinned black acrylic. -
Defining the Sun:
Draw the smiling face on the yellow circle. Add eyes and a wide, curved mouth. Outline the sunbeams with quick, dashed or solid lines for a playful look. -
Detailing the Leaves:
Draw a central stem rising from the teal leaves. Add delicate, fern-like branches coming off the main stem using quick, light strokes. -
House architecture:
Outline the roof and draw the door frame. I like to add vertical lines inside the door to look like wood planks, and a small dot for a doorknob. -
Texture and pattern:
For background stones (like the reddish one in the back), paint a solid color block and add small white dashes or dots once dry to mimic rain or snow.
Step 4: Sealing and Finishing
-
Final drying time:
Let all the paint work sit for at least an hour to ensure the ink and acrylics are fully set. -
Apply varnish:
Spray the stones with a matte clear varnish. This protects the paint from chipping during play without making them too slippery or shiny. -
Styling the set:
arrange your finished story stones in a simple ceramic bowl or draw-string bag, ready for the next storytelling session.
You now have a durable, pocket-sized collection of characters ready for their next adventure