I love how clay modelling lets you make something playful with your hands, then polish it up so it totally belongs in an adult home. These clay modelling ideas for adults are my go-to projects when you want that sweet spot of relaxing creativity and actually-usable, good-looking results.
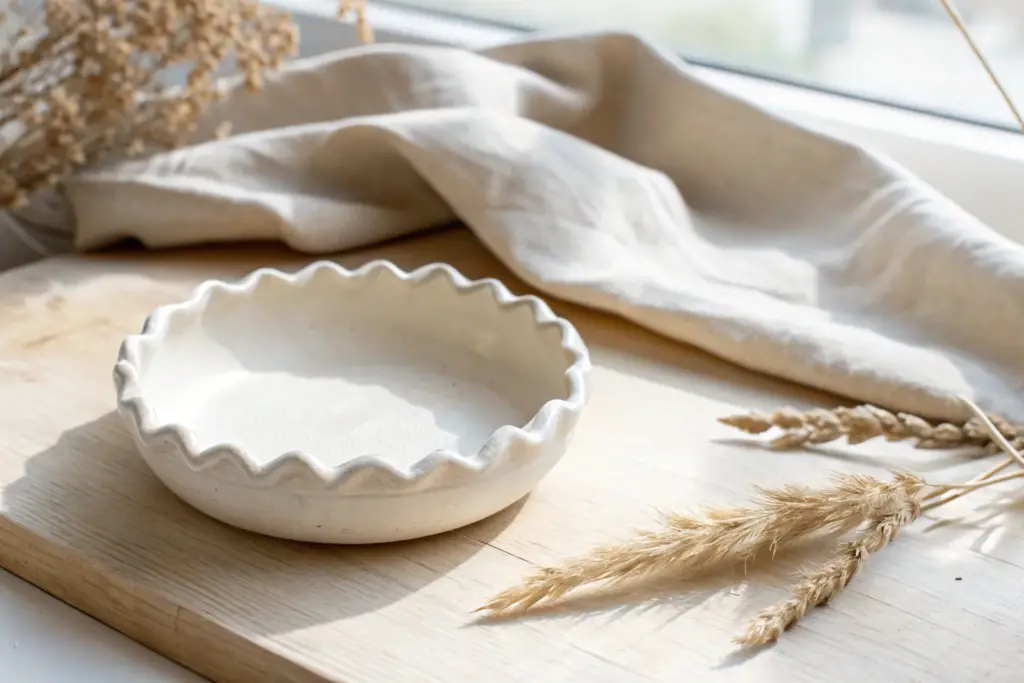
Minimalist Ring Dish With Organic Rim
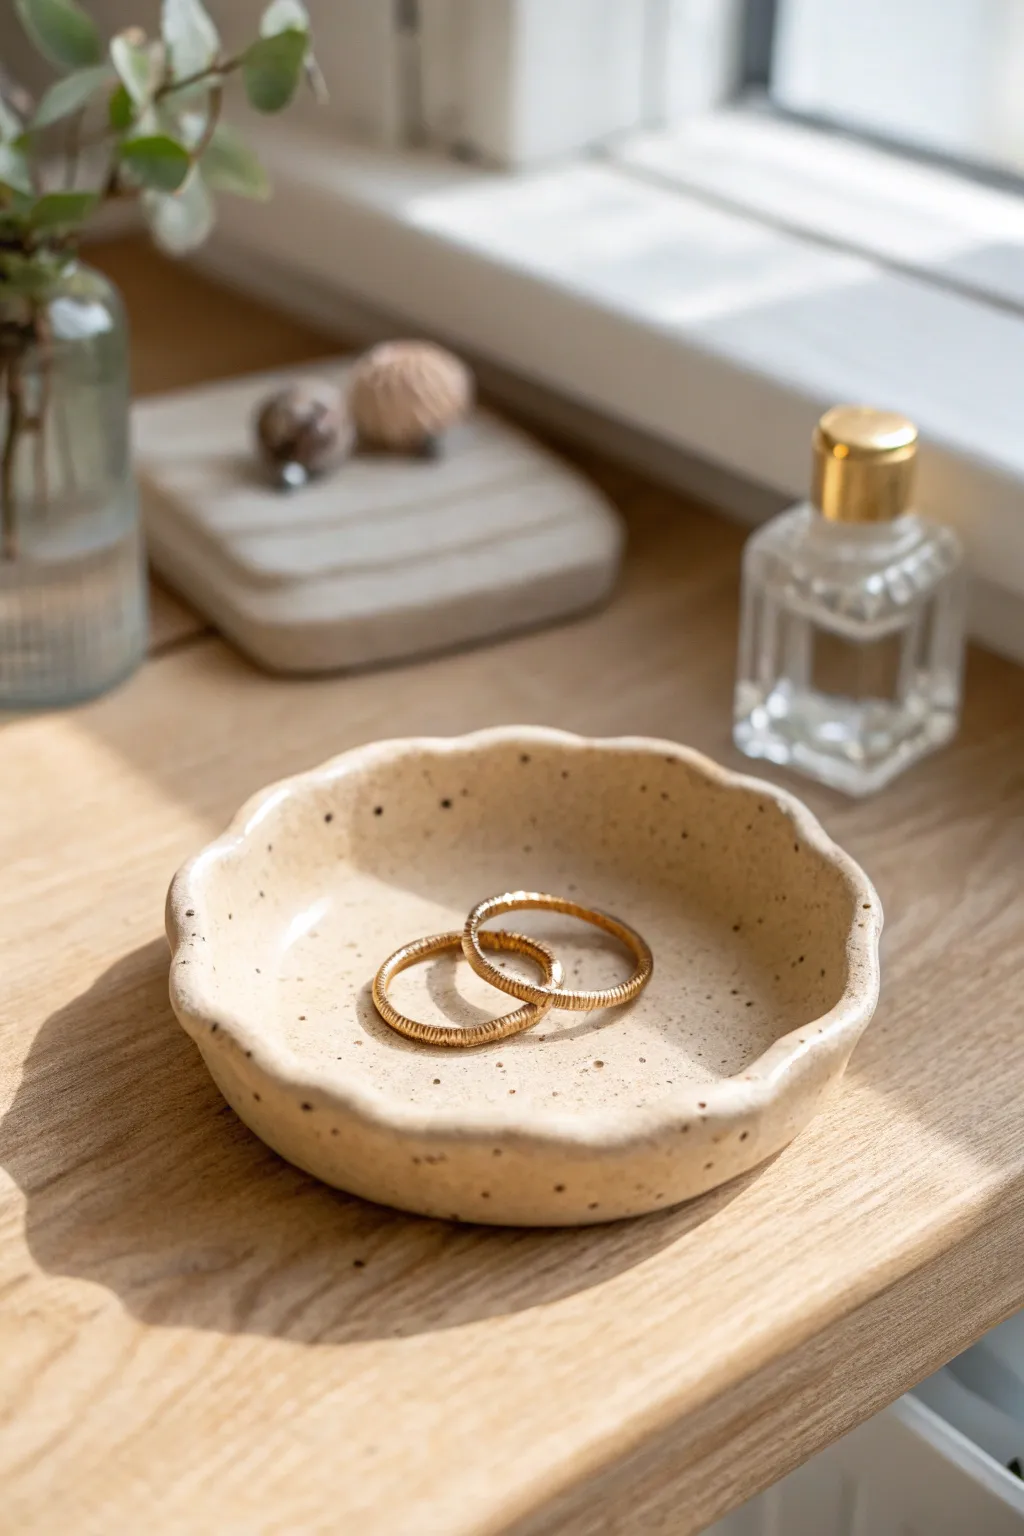
This charming ring dish achieves a perfect balance between organic, handmade warmth and minimalist elegance. The speckled cream finish and gently scalloped edges make it a beautiful catch-all for your favorite jewelry pieces.
Step-by-Step Guide
Materials
- Polymer clay (white or translucent)
- Black pepper or dried coffee grounds (for speckles)
- Acrylic rolling pin
- Circle cookie cutter (approx. 3-4 inches)
- Small sponge (sea sponge is ideal)
- Sandpaper (fine grit)
- Gloss or satin varnish
Step 1: Preparation and Mixing
-
Condition the Clay:
Begin by warming up a small block of white or translucent polymer clay in your hands. Knead it thoroughly until it is soft, pliable, and free of any cracks. -
Add Texture:
To achieve that beautiful faux-ceramic speckled look, sprinkle a pinch of ground black pepper or finely dried coffee grounds onto your flattened clay. -
Incorporate the Speckles:
Fold the clay over the darker particles and knead again. Continue folding and kneading until the specks are evenly distributed throughout the entire ball.
Rim Collapsing?
If the wavy rim won’t hold its shape, your clay might be too warm. Pop the shaped dish in the fridge for 10 minutes before baking to firm it up.
Step 2: Shaping the Form
-
Roll It Out:
Place your clay ball on a smooth, clean surface. Use your acrylic roller to flatten it into a sheet about 1/4 inch thick. Aim for an even thickness so the dish sits flat. -
Cut the Base:
Press your circle cookie cutter firmly into the rolled clay to create a clean, round shape. Remove the excess clay from around the edges. -
Smooth the Edges:
Take a moment to run your finger gently around the cut edge of the circle. This softens the sharp cut line and gives the piece a more finished, pottery-like appearance. -
Create the Rim:
Gently pinch the edge of the circle between your thumb and forefinger. Move around the circumference, slightly thinning the clay at the very rim. -
Form the Waves:
Using your thumb, gently push sections of the rim inward and upward to create a wavy, organic shape. I like to make these waves slightly irregular for a more natural look. -
Lift the Sides:
Cup the entire circle in your palm to curve the sides upward, forming a shallow bowl shape. Ensure the bottom remains relatively flat so it won’t wobble.
Add a Gold Rim
After baking and cooling, use a fine-tip gold paint pen to carefully trace the very edge of the organic rim for a luxurious, gilded finish.
Step 3: Refining and Baking
-
Texture the Surface:
Lightly dab a small, dry sponge over the surface of the clay. This remove fingerprints and adds a subtle, earthen texture that mimics stoneware. -
Final Shape Check:
Place the dish on your baking tile or tray. Do a final check of the rim’s waviness; gravity might have flattened it slightly, so prop it up again if needed. -
Bake the Clay:
Bake the piece in a preheated oven according to your clay manufacturer’s specific instructions (usually around 275°F or 130°C for 15-30 minutes). -
Cool Down:
Allow the dish to cool completely inside the oven with the door slightly ajar. This gradual cooling helps prevent thermal shock and potential cracking.
Step 4: Finishing Touches
-
Sand Imperfections:
Once fully cool, inspect the rim for any sharp bits. Use a fine-grit sandpaper to gently buff the edges smooth if necessary. -
Apply Varnish:
Using a soft brush, apply a thin coat of satin or gloss varnish to the inside and outside of the dish. This seals the pepper/coffee inclusions and gives it a glazed ceramic look. -
Dry and Cure:
Let the varnish dry completely according to the bottle instructions. Apply a second coat if you want a deeper shine.
Place your new dish near a window to catch the light and enjoy having a stylish home for your rings


Terrazzo Coasters in a Grown-Up Color Palette
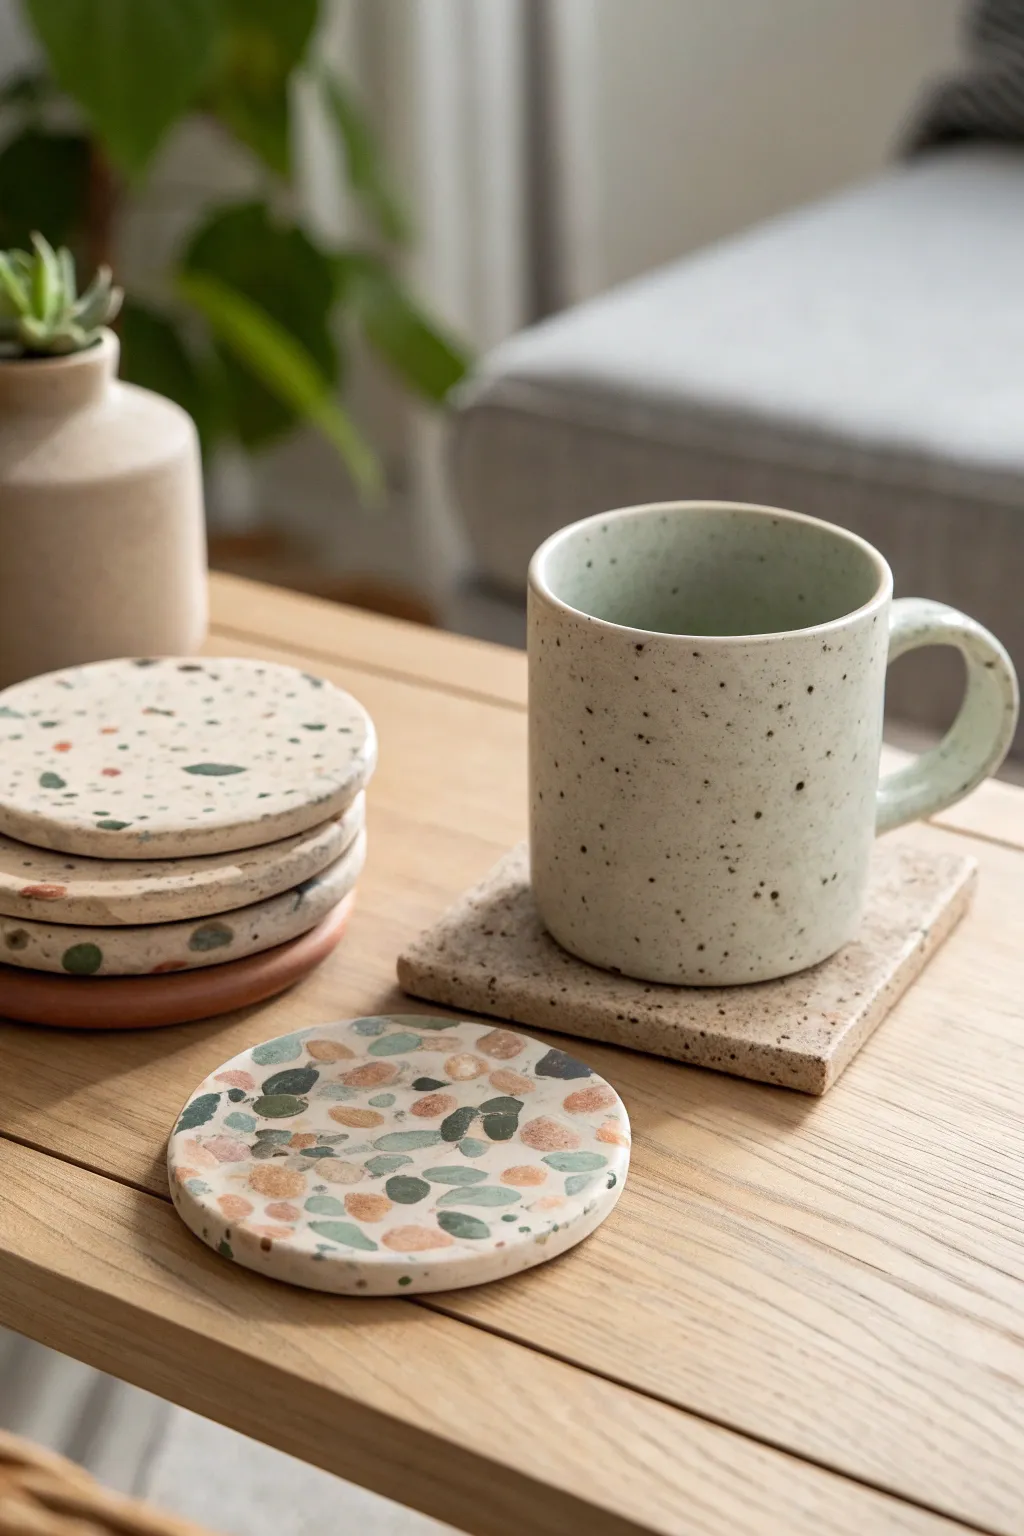
Achieve that chic, high-end terrazzo look right at home using polymer clay. These sophisticated coasters feature a speckled design with muted earth tones, perfect for adding a touch of artisanal charm to your coffee table.
Step-by-Step Tutorial
Materials
- Polymer clay (white or cream for base)
- Polymer clay (terracotta, sage green, grey, and black for chips)
- Acrylic rolling pin
- Circular cookie cutter (approx. 4 inches)
- Square cookie cutter (optional)
- Parchment paper
- Blade or craft knife
- Fine-grit sandpaper (400 and 600 grit)
- Matte or satin glaze (optional)
- Oven
Step 1: Creating the Terrazzo Chips
-
Prepare the chip colors:
Start by conditioning the small amounts of colored clay you want for your speckles—terracotta, sage green, grey, and a tiny bit of black. -
Flatten the colors:
Roll each color out into a thin sheet. The thickness doesn’t need to be perfectly uniform, but keep them fairly thin, about 1-2mm. -
Bake the sheets:
Here is the trick for crisp chips: bake these thin color sheets for about 10-15 minutes at the temperature recommended on your clay package. Let them cool completely. -
Chop the chips:
Once cool and hard, use your craft blade to chop the baked clay sheets into irregular, jagged fragments. Make a mix of sizes, from tiny specks to larger chunks, to mimic real stone.
Uneven Surface?
If you feel bumps where the chips are, keep rolling the raw slab in different directions. The surface must be totally flat before baking for that seamless stone look.
Step 2: Forming the Coaster Base
-
Condition the base clay:
Take a large block of your white or cream clay and condition it thoroughly until it is soft and pliable. -
Roll the slab:
Roll the base clay out on parchment paper to a thickness of about 5-6mm. Ensure it’s thick enough to be sturdy. -
Add the chips:
Scatter your chopped baked chips generously over the surface of the raw white clay. I prefer to press them down slightly with my fingers first to set them in place. -
Embed the pattern:
Cover the clay with a sheet of parchment paper and roll over it firmly with your acrylic roller. This pushes the chips into the base and creates a smooth, unified surface. -
Check coverage:
Peel back the paper. If there are large empty gaps, add more chips to those spots and roll again until you have a dense, random pattern.
Step 3: Shaping and Finishing
-
Cut the shapes:
Place your circular (or square) cutter onto the terrazzo slab and press down firmly to cut your coaster shapes. -
Smooth the edges:
Carefully lift away the excess clay. Run your finger gently around the rim of each coaster to smooth out any harsh cutting lines or drag marks. -
Final bake:
Place the cut coasters on a baking sheet lined with parchment paper. Bake according to the manufacturer’s instructions, usually for 30 minutes to ensure durability. -
Cooling:
Remove from the oven and allow them to cool slowly on a flat surface to prevent warping. -
Sanding for stone effect:
Once cool, wet-sand the surface using 400 grit sandpaper. This exposes the clean cross-sections of the chips and removes any haziness from the base clay. -
Polishing:
Follow up with 600 grit sandpaper for a smoother finish. Rinse the coaster under water to remove the clay dust and dry firmly. -
Protection (Optional):
For extra stain resistance against coffee rings, apply a thin layer of matte or satin glaze with a soft brush.
Level Up: Stone Texture
Mix a small amount of black pepper or refined sand into your white base clay before rolling it out. This adds a subtle, gritty texture that looks incredibly realistic.
Enjoy your durable, custom-designed coasters that look like real Italian stone


Modern Taper Candle Holders as a Matching Set
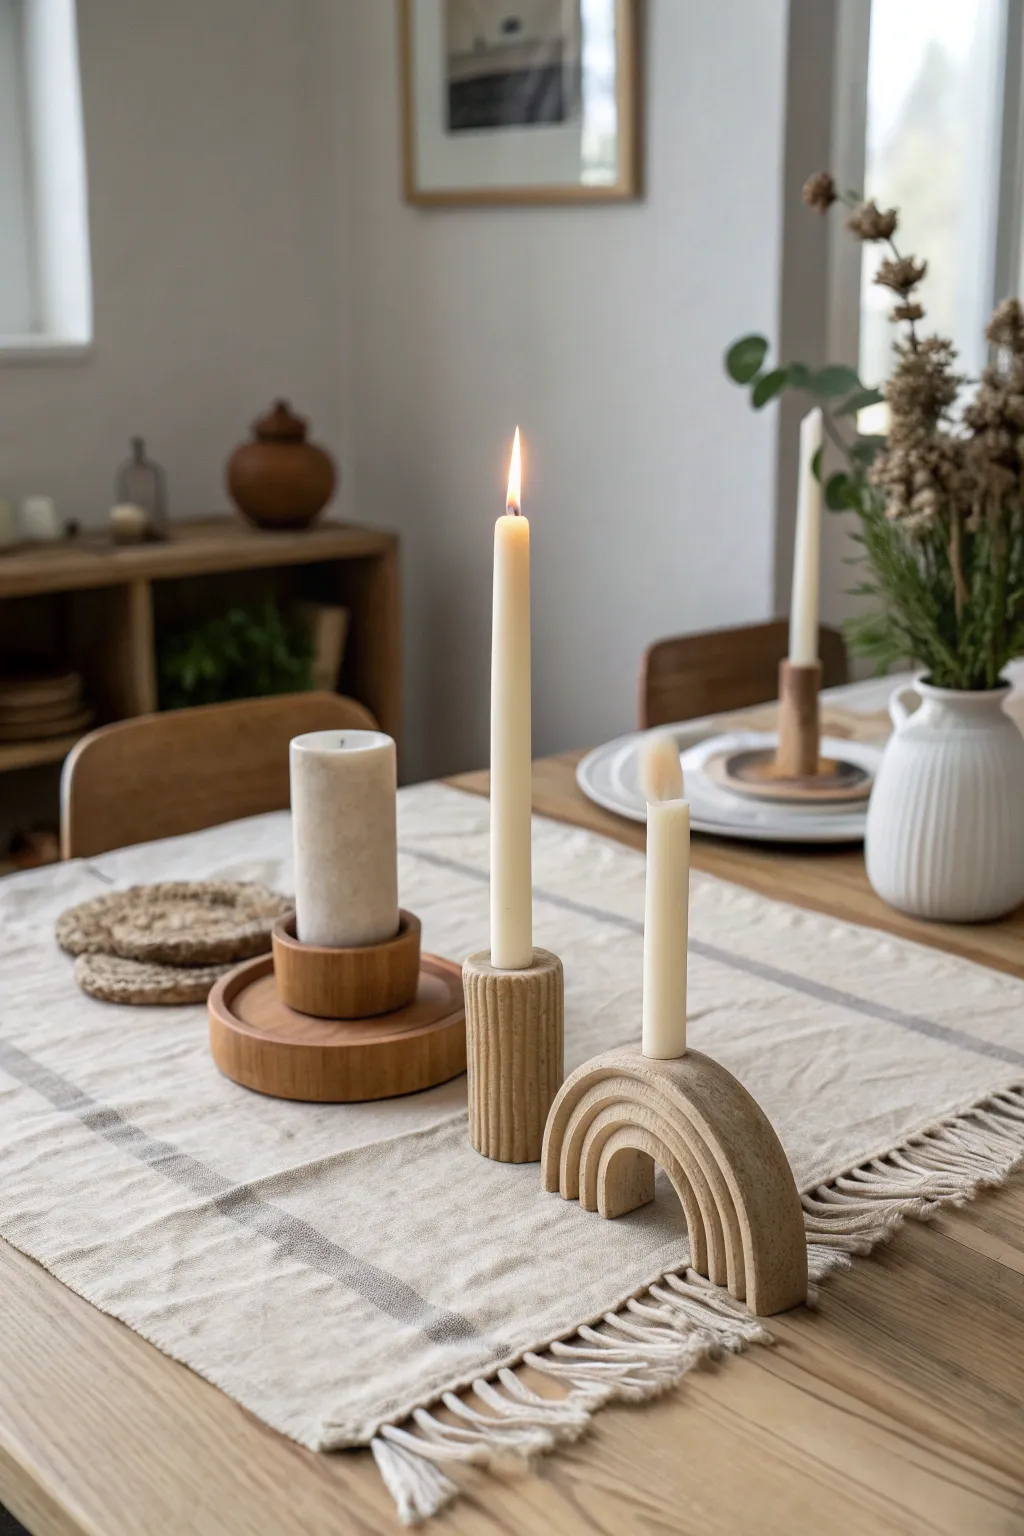
Bring a touch of modern sculptural elegance to your table with this dual-style candle holder set. Featuring a minimalist ribbed pillar and a striking rainbow arch design, these pieces mimic natural sandstone texture for a warm, earthy aesthetic.
Detailed Instructions
Materials
- Air-dry clay (stone, sand, or white color)
- Taper candles (for sizing)
- Small rolling pin
- Clay knife or craft knife
- Ruler
- Sandpaper (fine and medium grit)
- Small cup of water
- Old toothbrush or texture tool
- Acrylic sealant (matte)
Step 1: The Ribbed Pillar
-
Prepare the base cylinder:
Start by conditioning a large ball of clay in your hands until it is pliable. Roll it into a thick cylinder shape, approximately 2 inches wide and 3-4 inches tall, tapping the ends on your work surface to flatten them. -
Size the candle hole:
Take one of your taper candles and gently press the base into the top center of your cylinder. Twist slightly to create an indentation about an inch deep, ensuring the fit is snug but not too tight as clay shrinks slightly when drying. -
Refine the shape:
Smooth out any bulging caused by the indentation process. Roll the cylinder gently on the table again to ensure the sides are perfectly straight and the walls are even around the candle hole. -
Create the ribs:
Use a clay knife or a ruler edge to press vertical lines into the side of the cylinder. Space these lines evenly around the entire circumference to create a ribbed, fluted texture. -
Soften the edges:
Dip your finger in a little water and gently run it over the sharp edges of your ribs to soften them slightly, giving the piece a more weathered, natural stone look.
Step 2: The Rainbow Arch Holder
-
Roll the coils:
Take three portions of clay, each slightly larger than the last. Roll them into long, even snakes (coils) about 0.75 inches thick. I find rolling from the center outwards helps keep the thickness consistent. -
Form the inner arch:
Take the shortest coil and bend it into a tight ‘U’ shape. This will be the innermost arch. Trim the bottom ends so they sit flat on the table. -
Add the middle layer:
Take the second coil and drape it over the first arch. Score the touching surfaces with a toothbrush and add a dab of water (slip) to bond them. Press them together gently but firmly. -
Complete the arch stack:
Repeat the process with the third and final coil, draping it over the previous layer. Ensure all three arches are aligned perfectly at the front and back faces. -
Level the base:
Stand the arch up. Use your knife to slice across the bottom of all ‘legs’ simultaneously to ensure the entire structure stands perfectly flat and wobble-free. -
Create the candle mount:
Roll a small ball of clay and flatten it into a thick disk. Attach this to the very top center of the outer arch using the score-and-slip method. -
Insert the candle socket:
Just like with the pillar holder, use your taper candle to press a hole into this top disk. Smooth the clay around the base of the candle to integrate the holder seamlessly into the arch.
Clean Cuts Pro Tip
Chill your clay in the fridge for 10 minutes before cutting the base of the arch. Firmer clay distorts less under the knife, giving you a sharper, flatter standing surface.
Step 3: Finishing Touches
-
Texturizing:
To achieve the sandstone look seen in the photo, gently tap the surface of both damp holders with an old toothbrush or a crumpled ball of aluminum foil. This removes the ‘plastic’ smoothness of the clay. -
Slow drying:
Set your pieces aside in a cool, dry place away from direct sunlight. Let them dry for 24-48 hours, turning them occasionally to ensure even airflow. -
Sand and refine:
Once fully bone dry, use fine-grit sandpaper to smooth out any unintentional bumps or sharp ridges, while careful to preserve your intentional texture. -
Sealing:
Finish by applying a coat of matte acrylic sealant. This protects the clay from moisture and gives the surface a professional, finished sheen without being glossy.
Fixing Cracks
If hairline cracks appear while drying, don’t panic. Make a paste of clay and water (slip) and fill the crack, then smooth it over with a damp finger before letting it dry again.
Place your new holders on a linen runner and enjoy the warm, handmade atmosphere they bring to your dining space


Small Air-Dry Clay Planter With Subtle Face Details
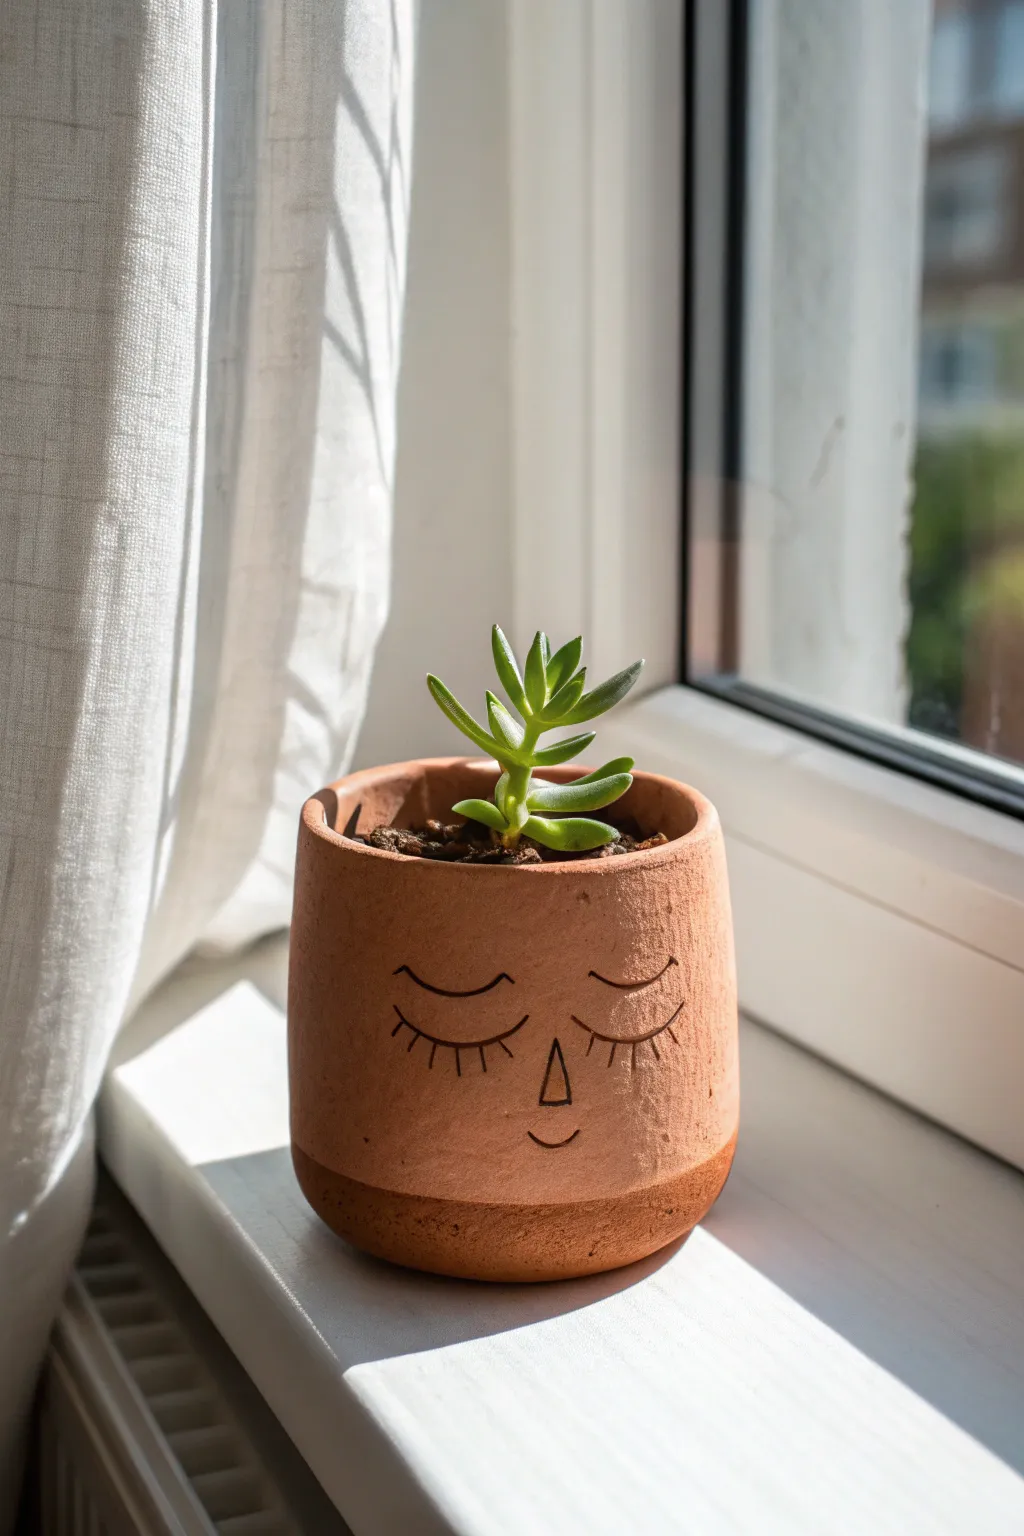
Create a calming presence for your windowsill with this adorable air-dry clay planter featuring a simple, sleeping face. This project mimics the warm, earthy look of terracotta while using accessible materials to craft a cozy home for your favorite small succulent.
Step-by-Step Tutorial
Materials
- Terracotta-colored air-dry clay (or white clay + acrylic paint to mix)
- Small rolling pin
- Rolling guides or wooden slats (approx. 5mm thick)
- Circular cookie cutter or template (approx. 8-10cm diameter)
- Rectangular template (for the walls)
- Clay knife or craft knife
- Small cup of water
- Slip (a paste made of clay and water)
- Needle tool or toothpick
- Smoothing sponge
- Fine-grit sandpaper
- Black acrylic paint or fine-tip permanent marker
- Clear matte acrylic sealant spray
Step 1: Forming the Pot Structure
-
Prepare the clay:
Begin by kneading your terracotta air-dry clay until it is soft, pliable, and free of air bubbles. If you are using white clay, knead in a small amount of terracotta-colored acrylic paint now to tint the clay body itself. -
Roll out the base:
Place your clay between rolling guides or wooden slats to ensure an even thickness. Roll out a slab approximately 5mm thick. -
Cut the shapes:
Using your circular cutter or a paper template, cut one circle for the base. Then, measure the circumference of your circle and cut a long rectangular strip that length plus 1cm for the overlap; the height should be about 7-8cm. -
Score and slip:
Take your needle tool and vigorously scratch (score) the outer edge of the circular base and the bottom edge of your rectangular wall strip. Apply a generous amount of slip to these roughened areas. -
Assemble the walls:
Carefully wrap the rectangular strip around the circle base. Press the slipped edges together firmly to create a seal. -
Join the seam:
Where the two ends of the wall meet, score and slip the vertical edges. Press them together, overlapping slightly if needed, or butting them together. -
Smooth the exterior:
Use your thumb or a modeling tool to smudge the clay downwards across the seam until it disappears. Repeat this on the inside for structural integrity. -
Refine the connection:
Run a coil of clay along the inside bottom seam where the wall meets the floor, smoothing it into both surfaces to reinforce the bond.
Cracks Appearing?
Mix a tiny amount of vinegar into your slip paste. This helps break down the clay particles for a stronger bond and can fill small hairline cracks as they appear during drying.
Step 2: Refining and Decorating
-
Create the bottom texture:
Looking at the reference image, the bottom section has a rougher texture. You can achieve this by lightly tapping the bottom 1-2cm of the pot with a stiff brush or a crumpled ball of aluminum foil. -
Smooth the upper surface:
Dip your finger or a sponge in water and smooth the upper portion of the pot perfectly. Allow the pot to dry until it is leather-hard (firm but still cool to the touch). -
Draft the face:
Using a needle tool, very lightly sketch the sleeping face onto the smooth section. Draw two curved lines for eyelids, small vertical dashes for lashes, a tiny triangle nose, and a small curved smile. -
Carve the details:
Once you are happy with the placement, go over your sketch lines with the needle tool again, pressing slightly deeper to carve the design into the clay surface. -
Dry completely:
Let the pot dry for 24-48 hours. Turn it upside down halfway through so the bottom dries evenly. The clay will lighten in color as it dries. -
Sand for perfection:
Once fully dry, take your fine-grit sandpaper and gently sand the rim and the smooth upper section to remove any fingerprints or sharp edges. -
Inking the face:
Using a fine-tip brush with black acrylic paint (or a marker), carefully trace inside the carved lines of the face to define the features. -
Seal the pot:
Air-dry clay is not naturally waterproof. Apply 2-3 coats of a clear matte acrylic sealant spray inside and out to protect it from moisture. -
Waterproofing tip:
If you plan to put a live plant directly inside, I recommend lining the interior with a plastic cup or applying a specifically designed heavy-duty waterproofing varnish, as standard sealant isn’t enough for constant watering.
Add Freckles
Before sealing, flick a stiff toothbrush loaded with watered-down brown paint comfortably over the nose area to give your sleeping face some adorable, natural-looking clay speckles.
Now you have a tranquil little friend ready to hold your plants and brighten your day

The Complete Guide to Pottery Troubleshooting
Uncover the most common ceramic mistakes—from cracking clay to failed glazes—and learn how to fix them fast.
Textured Bud Vases for Single Stems
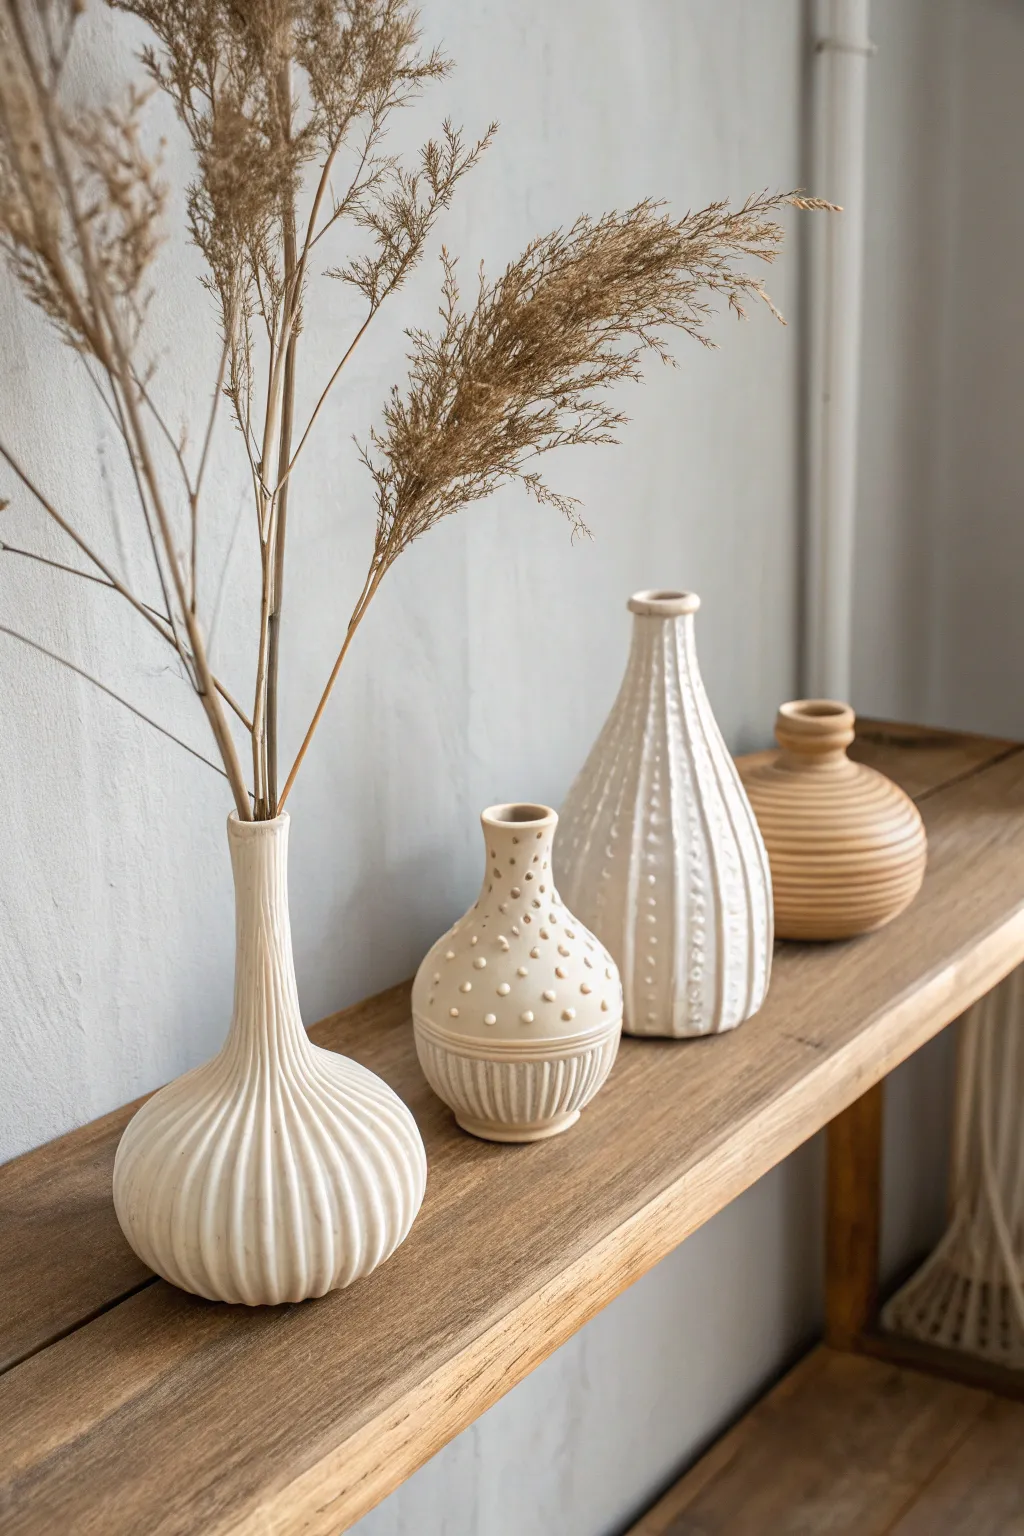
Create a stunning collection of minimalist bud vases that bring organic warmth to any shelf. These clay pieces feature varied silhouettes—from tall and ribbed to squat and dotted—unified by a natural, matte finish perfect for displaying dried botanicals.
How-To Guide
Materials
- Air-dry clay (white or cream) or polymer clay
- Rolling pin
- Needle tool or toothpick
- Loop tool (for carving)
- Small sponge
- Bowl of water
- Pencil or small dowel (for dots)
- Flexible rib tool
- Fine-grit sandpaper
- Optional: matte varnish
Step 1: Shaping the Base Forms
-
Conditioning:
Start by taking chunks of your clay and kneading them thoroughly until they are warm and pliable. This prevents cracking later on. -
Rough shaping:
Divide your clay into four portions of varying sizes. Roll each into a smooth ball to start. -
Forming the teardrop vase:
For the tall, leftmost vase, take the largest ball and roll it into a thick teardrop shape. Gently pinch and pull the top upwards to elongate the neck while keeping the base bulbous. -
Creating the squat vase:
For the small, second vase, flatten the bottom of a smaller ball slightly. Pinch the top to create a very short neck, keeping the body round and pumpkin-like. -
Sculpting the cone vase:
For the third tall vase, roll a cone shape that tapers gradually from a wide base to a narrow neck. Flatten the bottom so it stands stable. -
Shaping the ribbed sphere vase:
For the final vase on the right, create a simple sphere with a slightly flattened top and bottom. Create a small opening for the stem. -
Hollowing out:
Use the handle of a wooden spoon or a dowel to gently press a hole down the center of each neck. Don’t go all the way through; stop about a half-inch from the bottom. I find rotating the tool slowly while pressing helps keep the neck centered.
Cracks Appearing?
If small cracks appear while drying, mix a tiny bit of fresh clay with water to make a paste (slip) and fill the cracks. Smooth over with a finger and let dry again.
Step 2: Adding Textures
-
Refining the surface:
Before texturing, use a slightly damp sponge to smooth out any fingerprints or uneven bumps on your forms. -
Vertical ribbing (Vase 1):
On the tall teardrop vase, use a loop tool or the side of a needle tool to carve vertical grooves. Start from the very rim of the neck and drag the tool all the way down to the base in continuous lines. Space them evenly around the entire circumference. -
Dotted detailing (Vase 2):
for the small squat vase, use the eraser end of a pencil or a small dowel to press indentations into the upper half of the sphere. Arrange them in loose rows. -
Lower ribs (Vase 2):
Switch to your needle tool to carve short vertical lines on the lower half of this same small vase, creating a fluted bottom texture. -
Raised dots (Vase 3):
For the conical vase, roll tiny little balls of spare clay. Score and slip the surface of the vase in vertical lines, then press these tiny balls onto the vase to create columns of raised bumps. -
Horizontal grooves (Vase 4):
On the final round vase, use a needle tool to carve horizontal rings around the body. You can place the vase on a banding wheel (or a lazy susan) and spin it while holding your tool steady to get straight lines.
Step 3: Finishing Touches
-
Smooth the edges:
Once your textures are carved, go back with your finger or a soft brush to gently soften any sharp jagged clay bits usually left by carving. -
Drying:
Let the vases dry completely. Air-dry clay usually takes 24-48 hours depending on thickness. Rotate them occasionally so the bottoms dry evenly. -
Sanding:
Once bone dry, use fine-grit sandpaper to smooth the rims and gently knock back any overly rough texture spots. -
Sealing:
Apply a matte varnish if you want to protect the finish, or leave them raw for a purely natural look. Remember, air-dry clay isn’t waterproof, so these are best for dried stems only.
Try Terracotta
For the rightmost vase look, shape it using terracotta-colored clay instead of white, or mix brown acrylic paint into your white clay before sculpting for a swirled earth tone.
Arrange your finished vases in a cluster and fill with dried pampas grass or wheat for an elegant display
Polymer Clay Earrings With Clean Geometric Shapes

Embrace the beauty of simplicity with these stunning polymer clay earrings, featuring a classic arch shape paired with clean circles. The warm terracotta tone combined with speckled cream creates a sophisticated, earthy palette perfect for everyday wear.
Step-by-Step Tutorial
Materials
- Polymer clay in terracotta (burnt orange) color
- Polymer clay in cream or off-white with speckles
- Acrylic rolling pin or pasta machine
- Circle cutters in two sizes (approx. 1cm and 1.5cm)
- U-shape or arch clay cutter (approx. 3-4cm wide)
- Jump rings (gold or brass, 6-8mm)
- Earring hooks (gold or brass)
- Needle tool or small drill bit
- Jewelry pliers (flat nose and round nose)
- Parchment paper or ceramic tile for baking
- Fine grit sandpaper (optional)
Step 1: Preparing the Clay
-
Condition the terracotta clay:
Begin by taking a portion of your terracotta clay and kneading it in your hands until it becomes soft and pliable. Warm clay is much less likely to crack during baking. -
Condition the cream clay:
Clean your hands thoroughly to avoid color transfer, then repeat the conditioning process with your speckled cream clay. -
Roll out the slabs:
Using your acrylic roller or pasta machine on a medium setting, roll out both colors of clay into even slabs. Aim for a thickness of about 3mm—thick enough to be sturdy but light enough for ears.
Clean Edges Pro-Tip
Place a piece of cling film over the clay slab before cutting shapes. The cutter presses the plastic into the clay, creating perfectly rounded, domed edges that require zero sanding later.
Step 2: Cutting and Shaping
-
Cut the top circles:
Take your smallest circle cutter and press firmly into the terracotta slab to cut two identical circles. These will be the top studs. -
Cut the middle circles:
Switch to your medium-sized circle cutter and use it on the cream slab. Cut out two circles. -
Cut the arches:
Using the terracotta slab again, position your arch cutter carefully to maximize clay usage. Press down to cut two U-shapes. -
Smooth the edges:
Before baking, gently run your finger along the cut edges of each piece to soften any sharp ridges or loose bits of clay. -
Create holes for assembly:
Use a needle tool to pierce holes near the edges where the jump rings will connect. Each top circle needs one bottom hole; middle circles need a top and bottom hole; arches need one top hole centered on the curve.
Level Up: Texture
Before cutting your shapes, press a piece of coarse sandpaper or a fabric mesh onto the raw clay slab. This imitates a stone or linen texture that adds depth to the matte finish.
Step 3: Baking and Assembly
-
Arrange components:
Place all your cut pieces on a parchment-lined baking sheet or a ceramic tile. Ensure they are laying perfectly flat. -
Bake the clay:
Bake according to your specific brand’s package instructions. I find that baking for the full recommended time is crucial for durability. -
Cool and sand:
Let the pieces cool completely. If there are any rough spots on the edges, lightly sand them with fine-grit sandpaper for a professional finish. -
Open jump rings:
Using two pairs of pliers, twist your jump rings open sideways (never pull them apart outward). -
Connect middle to bottom:
Thread an open jump ring through the hole in the arch and the bottom hole of the cream circle. Close the ring securely. -
Connect top to middle:
Use another jump ring to connect the top hole of the cream circle to the bottom hole of the small terracotta circle. -
Attach earring hooks:
Finally, attach the earring hook to the very top edge of the small terracotta circle using a small jump ring, or glue a post onto the back if you prefer a stud style.
Now you have a chic pair of handmade earrings ready to wear or gift


What Really Happens Inside the Kiln
Learn how time and temperature work together inside the kiln to transform clay into durable ceramic.
Marbled Pendant Charms for Layered Necklaces
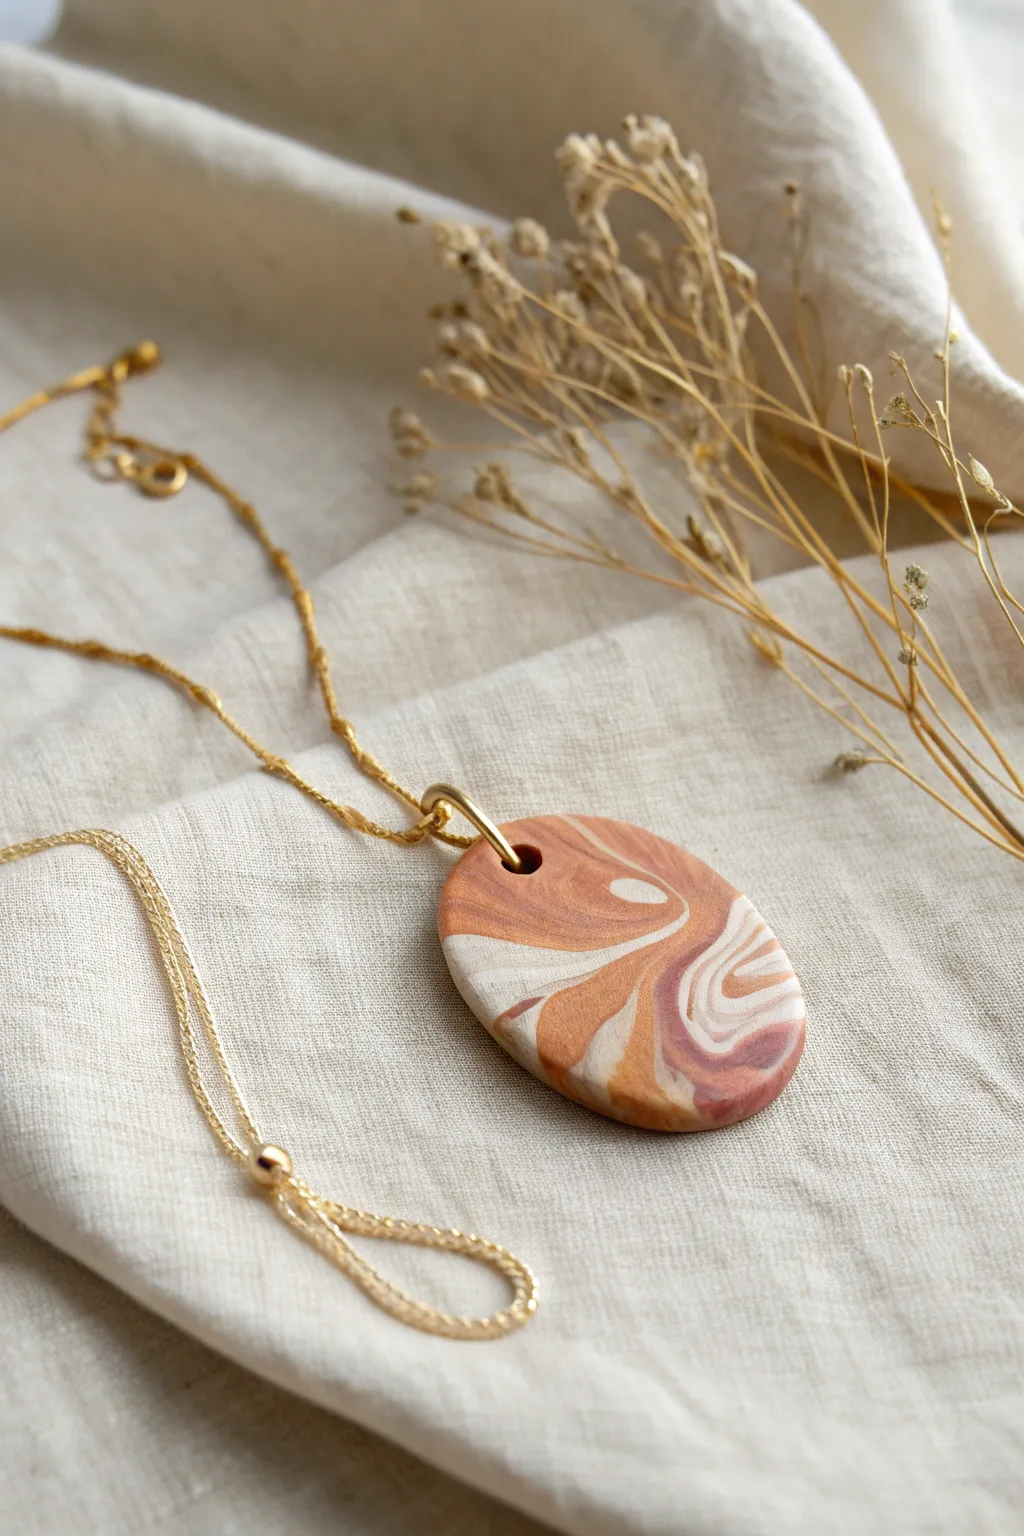
Capture the fluid beauty of stone with this sophisticated polymer clay pendant featuring organic swirls of terra cotta, cream, and shimmering copper. This project creates a lightweight, statement piece perfect for layering with delicate gold chains for that effortless bohemian aesthetic.
Step-by-Step Guide
Materials
- Polymer clay (terra cotta, white/cream, and metallic copper/gold)
- Acrylic rolling pin or clay machine
- Oval clay cutter (medium size)
- Hobby knife or clay blade
- Toothpick or small drill bit
- Fine-grit sandpaper (400 to 1000 grit)
- Gold jump ring (large diameter)
- Gold layered chain necklace
- Gloss or matte varnish (optional)
- Baking sheet and parchment paper
- Jewelry pliers
Step 1: Preparing the Clay Palette
-
Condition the clay:
Start by warming up your three clay colors separately in your hands. Knead them until they are soft, pliable, and free of any cracks. -
Create snakes:
Roll each color into a long, thin cylinder or ‘snake.’ Aim for them to be roughly the same length, about 4-5 inches long. -
Combine the colors:
Twist the three snakes together into one large rope. Fold this rope in half and twist it again. Repeat this twisting and folding process 2-3 times, but be careful not to over-blend or the colors will become muddy. -
Consolidate the clay:
Roll the twisted rope into a smooth ball. You should see the different colors distinctively swirling around the surface.
Clean Cuts Only
To avoid fingerprints or distortion when lifting your cut shape, roll your clay directly onto a piece of parchment paper or a ceramic tile before cutting.
Step 2: Creating the Marbled Slab
-
Flatten the ball:
Place the ball on your work surface and gently press it down with your palm to start flattening it. -
Roll it out:
Using your acrylic roller, roll the clay out into a slab approximately 3mm to 4mm thick. Roll in different directions to stretch the marble pattern organically. -
Inspect the pattern:
Look at both sides of your slab. Often, the underside hides a more interesting swirl pattern than the top, so choose your favorite side to be the face of the pendant. -
Cut the shape:
Position your oval cutter over the most pleasing part of the pattern. Press down firmly and lift away the excess clay. -
Smooth the edges:
Gently run your finger around the cut edge of the oval to smooth out any sharpness or drag marks left by the cutter.
Step 3: Finishing and Assembly
-
Create the hole:
Use a toothpick or a small straw to punch a hole near the top edge of the oval. Make sure the hole is large enough to accommodate your heavy-gauge jump ring. -
Bake the pendant:
Place the pendant on a parchment-lined baking sheet. Bake according to the manufacturer’s instructions on your clay package (usually around 275°F/130°C for 15-30 minutes). -
Cool and sanding:
Allow the piece to cool completely. Once cool, I prefer to dip the sandpaper in a little water and gently sand the edges and surface for a silky-smooth, professional finish. -
Clean surface:
Wipe away any sanding dust with a damp cloth or a baby wipe. If you want a glossy look, apply a thin coat of polymer clay varnish now and let it dry. -
Attach hardware:
Open your large gold jump ring using two pairs of jewelry pliers to twist it sideways (never pull it apart). intricate the jump ring through the clay hole. -
Thread the chain:
Before closing the jump ring, slide the pendant onto your gold chain. -
Complete the necklace:
Twist the jump ring back into a closed position, ensuring the ends meet perfectly flush so the chain doesn’t slip out.
Level Up: Gold Leaf
Before rolling your final slab, press small flakes of real gold leaf onto the clay ball. As you roll it out, the gold will crackle and embed into the surface.
Wear your new pendant with a simple linen shirt to let the natural textures shine
Sleek Incense Holder With a Long Ash Groove
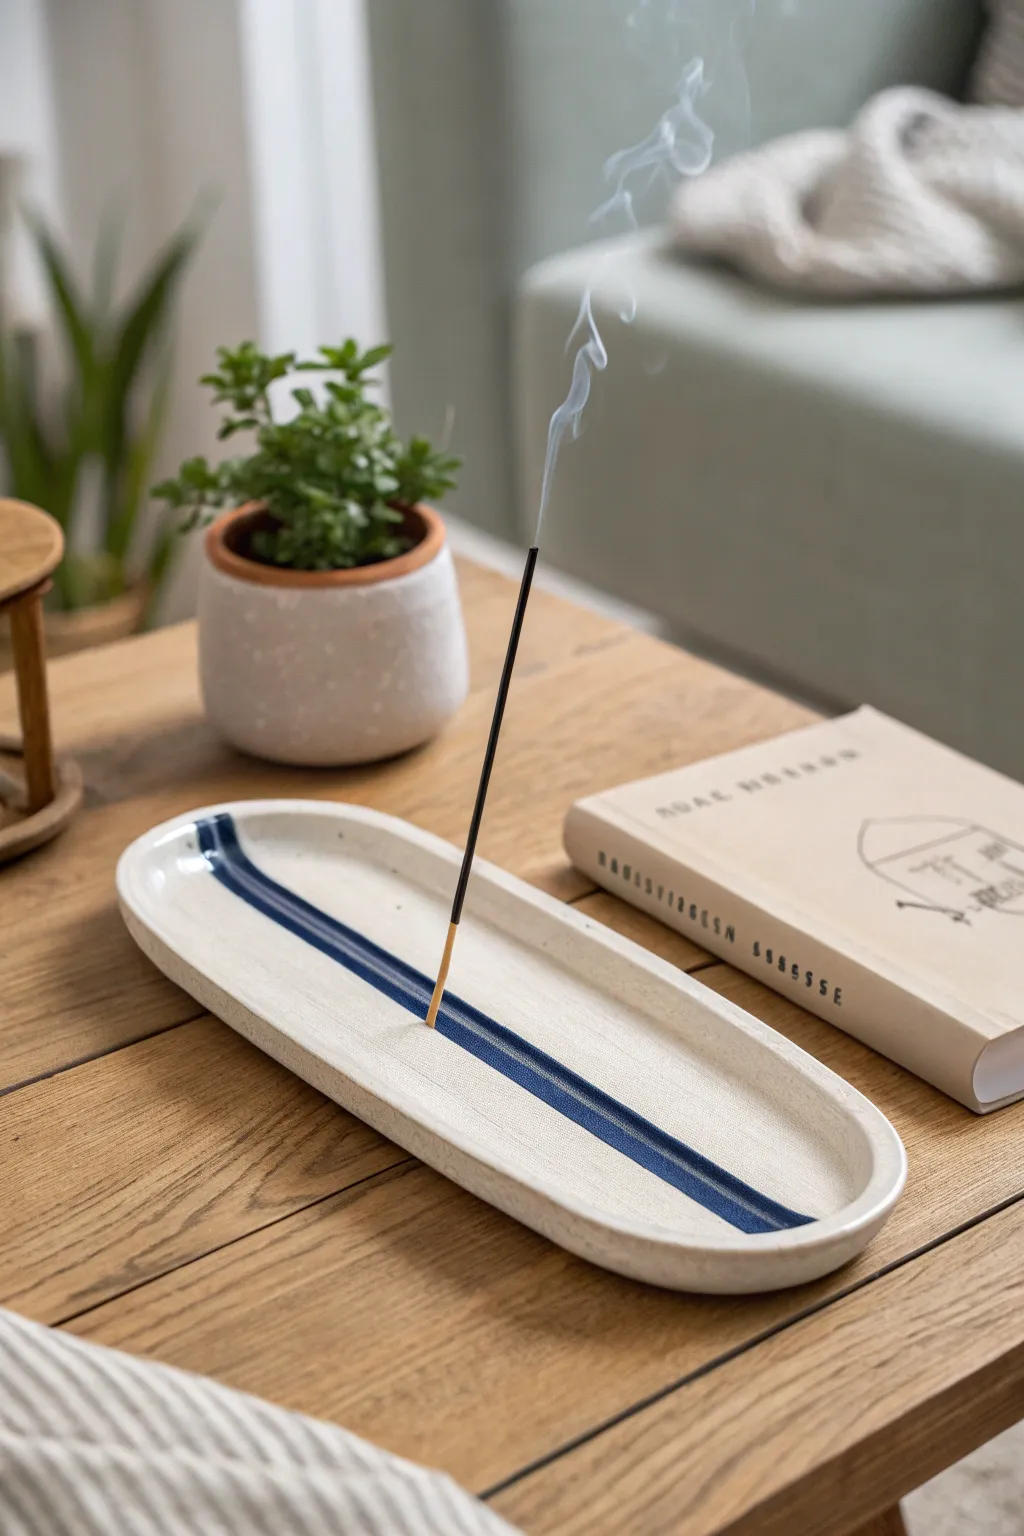
This elegant incense holder features a sleek oval form with a striking central channel for catching ash. The natural speckled clay body contrasts beautifully with a bold, hand-painted indigo stripe, creating a modern centerpiece that is both functional and meditative.
Step-by-Step Tutorial
Materials
- Speckled stoneware clay (approximately 1 lb)
- Rolling pin
- Canvas mat or cloth (to prevent sticking)
- Oval template (paper or cardstock, approx. 10 inches long)
- Needle tool or fettling knife
- Pattern paddle or flat wooden rib
- Modeling tool with a rounded or v-shaped tip
- Small sponge
- Underglaze pencil or thin brush
- Deep blue underglaze (e.g., cobalt or indigo)
- Clear matte or satin glaze
- Pin tool (for the hole)
- Kiln (or access to firing services)
Step 1: Shaping the Base
-
Prepare the Clay:
Begin by wedging your speckled clay thoroughly to remove air bubbles. This step is crucial for preventing cracks during firing. -
Roll the Slab:
Roll the clay out into an even slab, approximately 1/4 inch thick. I like to frequently lift and rotate the clay to ensure it doesn’t stick to the canvas. -
Cut the Shape:
Place your oval template onto the slab. Using a needle tool held perpendicular to the table, carefully trace around the template to cut out the base shape. -
Smooth the Edges:
Run a damp finger or a small piece of soft sponge along the cut edge to soften the sharpness and compress the clay particles.
Step 2: Forming the Rim and Groove
-
Create the Coil:
Roll out a separate long, thin coil of clay—about the thickness of a pencil—that is long enough to go around the entire circumference of your oval base. -
Score and Slip:
Score (scratch) the outer edge of the base and the underside of the coil. Apply a small amount of slip (liquid clay) to the scored areas. -
Attach the Rim:
Gently press the coil onto the edge of the base. Use your thumb or a wooden tool to blend the inside seam of the coil down into the base so it looks like one continuous piece. -
Define the Groove:
Using a ruler as a light guide, gently press a rounded modeling tool down the center length of the tray to create a shallow, straight indentation. This will be your painting guide later. -
Create the Holder Hole:
Find the spot where you want the incense to stand, likely near one end of the central groove. Pierce the clay at an angle with a pin tool, ensuring the hole is slightly larger than a standard incense stick to account for shrinkage. -
Final Smoothing:
Use a damp sponge to smooth out any tool marks, fingerprints, or rough connections on the rim and the base. Let the piece dry to a leather-hard state.
Uneven Drying?
If your oval base starts warping as it dries, place a small weighted board or book on top of it (sandwiching it between drywall boards) to keep it perfectly flat while the moisture evaporates.
Step 3: Decorating and Glazing
-
Bisque Fire:
Once the piece is bone dry, fire it in the kiln to bisque temperature (usually Cone 04 or 06). This makes the clay porous and ready for glazing. -
Apply Design Tape:
To get crisp lines for the central stripe, place two strips of masking tape or specialized glazing tape on either side of your central groove indentation. -
Paint the Stripe:
Using a soft brush, apply 2-3 coats of deep blue underglaze into the groove between your tape lines. Allow each coat to dry slightly before adding the next. -
Remove Tape:
Carefully peel away the tape while the underglaze is still slightly damp to reveal crisp, straight edges. -
Clear Glaze Application:
Dip the entire piece into a clear matte or satin glaze. Ensure the glaze doesn’t pool too thickly in the holder hole, or it might clog during firing. -
Clean the Foot:
Wipe away any glaze from the very bottom of the piece with a sponge so it doesn’t stick to the kiln shelf. -
Final Firing:
Fire the piece again to your clay body’s maturity temperature (often Cone 5 or 6 for stoneware). Once cool, test the fit of an incense stick.
Pro Tip: Sharp Lines
For the crispest blue line, lightly paint a layer of clear glaze (or wax resist) over the tape edges first. This seals the tape so no blue bleeds underneath.
Light your favorite scent and watch the ash fall perfectly into the groove you created

TRACK YOUR CERAMIC JOURNEY
Capture glaze tests, firing details, and creative progress—all in one simple printable. Make your projects easier to repeat and improve.
One-Piece Desk Organizer Tray With Simple Compartments
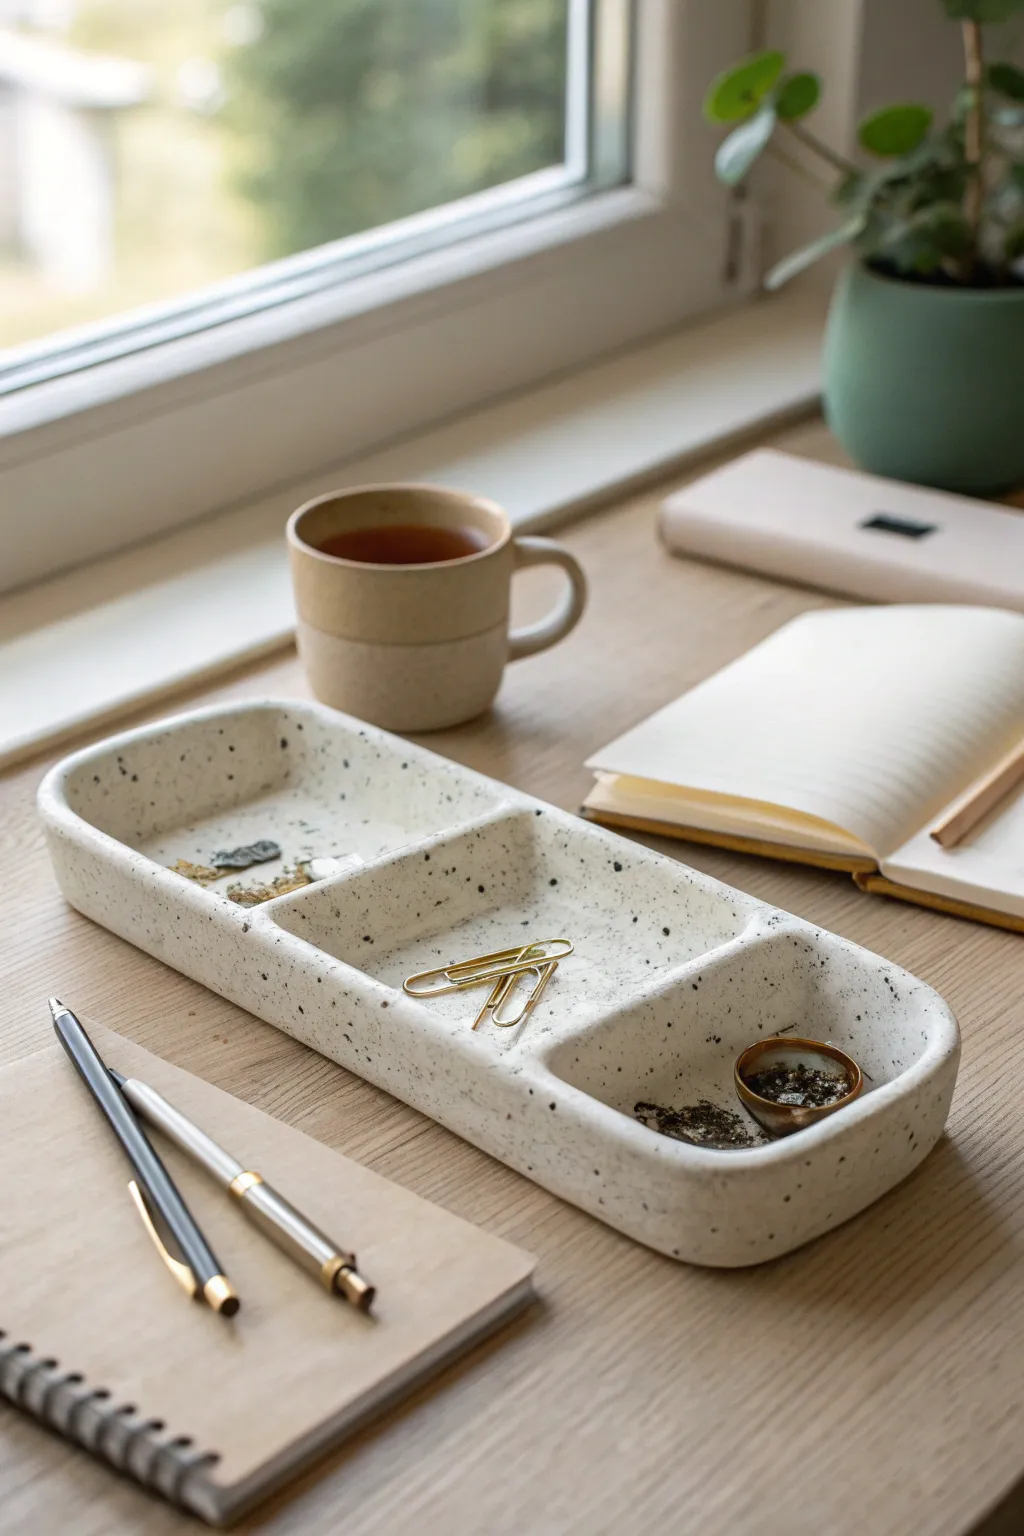
Bring a sense of calm to your workspace with this sleek, three-compartment organizer tray. Its long, rounded form and speckled finish mimic high-end ceramic stoneware, making it perfect for corralling pens, clips, and small treasures.
Step-by-Step Guide
Materials
- White polymer clay or air-dry clay (approx. 500g)
- Speckled clay additive or coarse black pepper/dried coffee grounds
- Rolling pin
- Ruler
- Craft knife or clay blade
- Smoothing tool or sponge
- Sandpaper (fine grit)
- Matte or satin varnish
- Small paintbrush
- Cardstock for templates (optional)
Step 1: Preparing the Base
-
Condition the clay:
Start by kneading your white clay until it is soft and pliable. This warmth helps prevent cracks later on. -
Add the speckled effect:
If your clay isn’t pre-speckled, sprinkle in your speckling agent now. I find that a pinch of coarse black pepper or specialised granite-effect clay inclusions works wonders. Knead thoroughly until the specks are evenly distributed. -
Roll out the slab:
Roll the clay out into a long, even slab, aiming for a consistent thickness of about 5-6mm. Use depth guides or two stacks of playing cards on either side of your rolling pin to keep it level. -
Cut the base shape:
With a ruler and craft knife, cut a long rectangle approximately 25cm by 8cm. This will be the floor of your tray. -
Round the corners:
Instead of sharp 90-degree angles, gently use your blade or a small round cookie cutter to trim the four corners of your rectangle into soft curves.
Uneven Walls?
If your walls look wavy, place a firmly packed box or a block of wood wrapped in parchment paper inside the tray while it dries or bakes to act as a support structure.
Step 2: Building the Walls
-
Prepare wall strips:
Re-roll your excess clay scraps to the same thickness as the base. Cut long strips that are about 2.5cm tall. -
Attach the outer wall:
Score the outer edge of your base lightly. Place the long clay strip on top of the base edge, following the curve. If using air-dry clay, apply a tiny bit of water or slip to join them. -
Blend the seams:
Using a modeling tool or your finger, drag the clay from the wall down onto the base on the inside, and from the base up onto the wall on the outside. This ensures a strong, seamless bond. -
Close the loop:
When the wall strip meets its starting point, cut it at a slight angle for a cleaner join, press the ends together, and smudge the seam until it vanishes.
Step 3: Creating Compartments
-
Measure the dividers:
Cut two smaller strips of clay, identical in height to your outer walls, to serve as the interior dividers. Measure the interior width of your tray to ensure a snug fit. -
Position the dividers:
Place these strips inside the tray to create three distinct sections. You can make them equal sizes or vary them—one large section for pens and two smaller ones for clips looks great. -
Secure the dividers:
Just like the outer walls, blends the edges of these dividers into the floor and the side walls. Smooth the clay so it looks like one continuous piece rather than inserted parts. -
Level the rim:
Flip the entire tray upside down gently on a flat surface for just a moment to ensure the top rim is perfectly level. Alternatively, use a long blade to shave off any high spots on the rim. -
Soften the edges:
Run a damp sponge or a finger dipped in water (or baby oil for polymer clay) over all top edges to give them that smooth, rounded ceramic look.
Level Up: Gold Rim
After sealing, paint just the very top edge of the rim with liquid gold leaf or a metallic gilding paint for a luxurious, modern contrast against the speckles.
Step 4: Finishing Touches
-
Cure or dry:
Bake the clay according to the package instructions if using polymer, or let it air dry completely for 24-48 hours. Keep it away from direct heat sources to prevent warping. -
Sand for perfection:
Once fully cured and cooled, use fine-grit sandpaper to buff away any fingerprints or rough textures, focusing on the rim and the corners. -
Seal the piece:
Apply a coat of satin or matte varnish. This seals the specks in place and gives the tray a finished, stone-like sheen.
Place your new organizer on your desk and enjoy the instant visual clutter-clearing effect it brings to your work day
Entryway Catchall Tray for Keys and Sunglasses
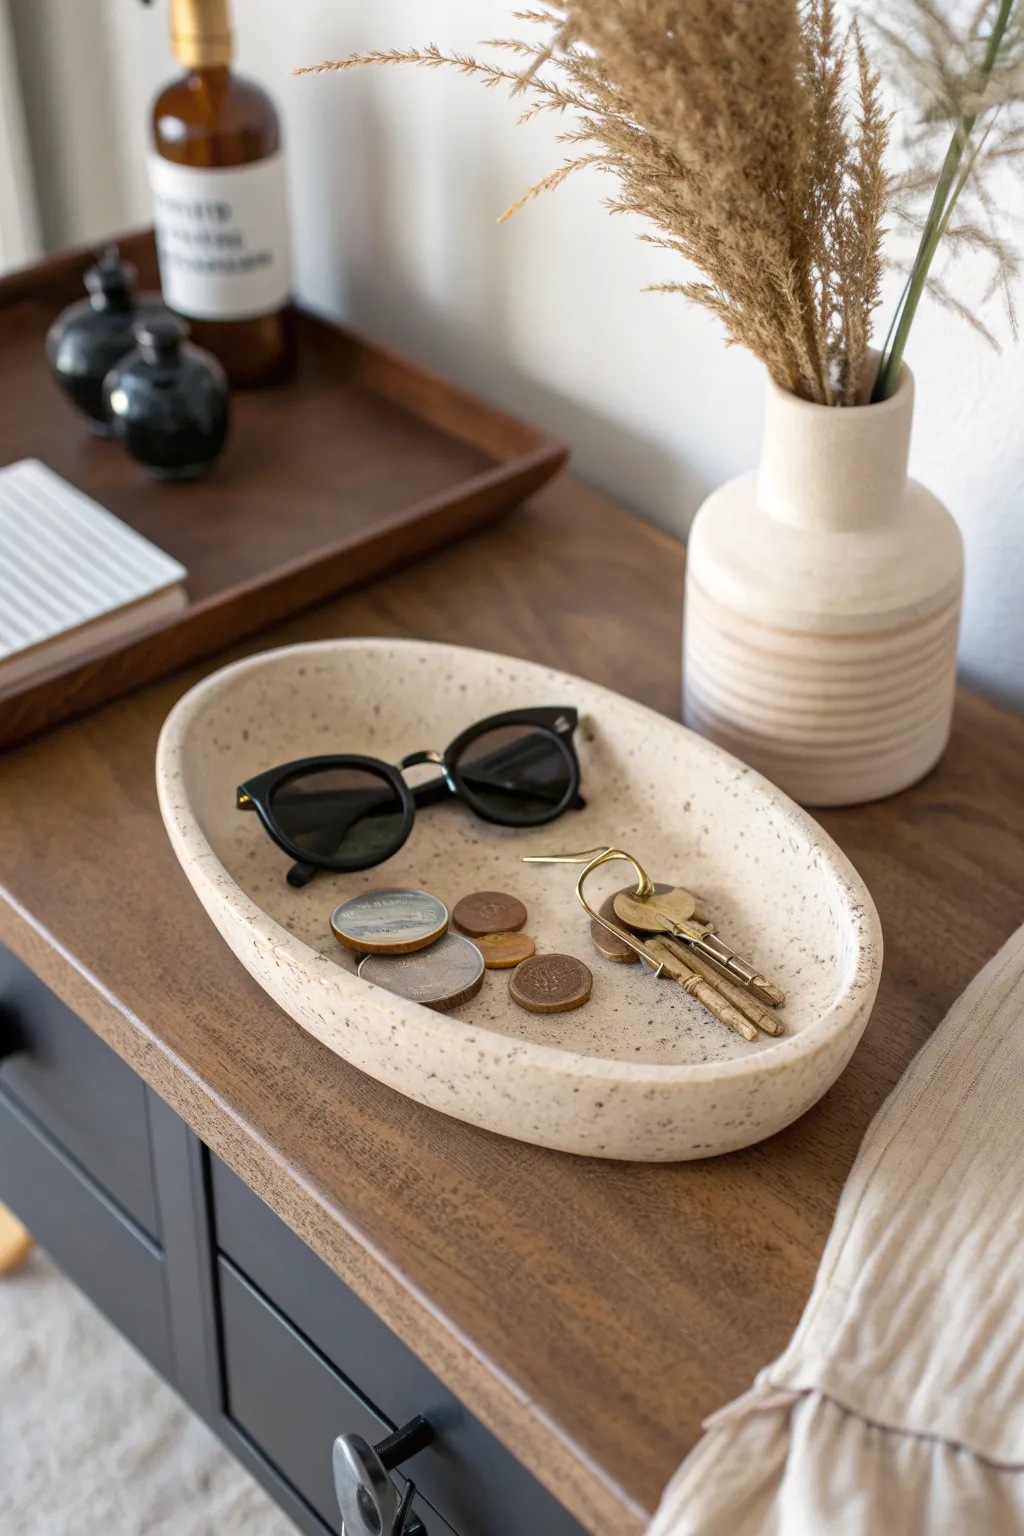
This elegant catchall tray combines a minimalist, organic shape with a warm, speckled finish reminiscent of stone. It is the perfect size for holding your daily essentials like sunglasses, keys, and loose change, adding a touch of rustic modern charm to your entryway. The gentle curve of the rim keeps everything secure while maintaining a sleek, low profile.
How-To Guide
Materials
- Air-dry clay (white or cream)
- Acrylic rolling pin
- Canvas mat or parchment paper
- Pottery sponge
- Oval paper template (approx. 8″ x 5″)
- Needle tool or craft knife
- Bowl of water
- Sandpaper (fine grit)
- Acrylic paint (cream/off-white and brown)
- Old toothbrush
- Matte varnish or sealant
Step 1: Shaping the Base
-
Prepare your workspace:
Begin by setting up a flat, clean surface covered with a canvas mat or parchment paper to prevent the clay from sticking. Having a small bowl of water nearby is essential for smoothing as you work. -
Condition the clay:
Take a generous handful of air-dry clay and knead it in your hands until it becomes soft, pliable, and free of air bubbles. If the clay feels too dry, dip your fingers in water and work the moisture in. -
Roll out a slab:
Place your clay ball on the mat and use the acrylic rolling pin to roll it out into an even slab. Aim for a thickness of about 1/4 inch to ensure the tray feels substantial but not clunky. -
Cut the shape:
Lay your oval paper template gently onto the clay slab. Using a needle tool or a craft knife, trace around the template with a steady hand to cut out your base oval shape. -
Smooth the edges:
Remove the excess clay and dip your finger in water to run it along the cut edge of the oval. This softens the sharp cut lines and prepares the edge for the coil addition.
Step 2: Building the Rim
-
Roll a coil:
Take the excess clay you trimmed away and roll it into a long, even snake or coil. It should be roughly the thickness of a pencil and long enough to go around the entire circumference of your oval base. -
Score and slip:
Use your needle tool to make small hatch marks (scoring) along the outer edge of the base and on one side of your coil. Dab a little water (slip) onto the scored areas to act as glue. -
Attach the coil:
Place the coil on top of the scored edge of the base. Press it down gently but firmly to ensure good contact all the way around without squishing the coil completely flat. -
Blend the seams:
Using your thumb or a modeling tool, drag the clay from the coil down onto the base on the inside of the tray to merge them. Then, do the same on the outside, dragging clay from the coil down to the base until the seam disappears. -
Shape the wall:
Once the seams are blended, pinch the wall gently between your thumb and forefinger to shape it. You want a low, slightly curved wall that flares upward just enough to contain items. -
Final smooth:
Moisten your pottery sponge and wipe the entire piece. Focus on the rim to make it consistently rounded and smooth out any fingerprints or tool marks on the interior floor.
Natural Texture
Instead of sanding perfectly smooth, use a slightly damp sponge during the final wet stage to leave a subtle texture. It makes the faux-stone finish look more authentic.
Step 3: Finishing and Speckling
-
Dry thoroughly:
Set the tray aside to dry completely. This usually takes 24 to 48 hours depending on humidity; turn it over halfway through so the bottom dries evenly. -
Sand imperfections:
Once bone dry, use fine-grit sandpaper to gently buff away any rough spots on the rim or surface. Wipe away the dust with a slightly damp cloth. -
Base coat:
Paint the entire tray with a cream or off-white acrylic paint. I find applying two thin coats gives a better, more solid finish than one thick coat. -
Prepare the speckles:
Dilute a small amount of brown acrylic paint with water until it has an inky consistency. It needs to be fluid enough to splatter easily. -
Apply the splatter effect:
Dip an old toothbrush into the watered-down brown paint. Hold the brush over the tray and run your thumb across the bristles to flick tiny specks of paint onto the surface. Vary the density for a natural stone look. -
Seal the piece:
After the paint is fully dry, apply a coat of matte varnish or sealant. This protects the finish from scratches and gives the tray that professional ceramic feel.
Uneven Drying?
If the edges curl up while drying, place a light book or board on top of the tray (once it’s firm but not fully dry) to weigh it down gently and keep it flat.
Place your new creation on a console table and enjoy the satisfaction of seeing your handmade art every time you walk through the door.
Modern Photo Holders With an Arched Slot
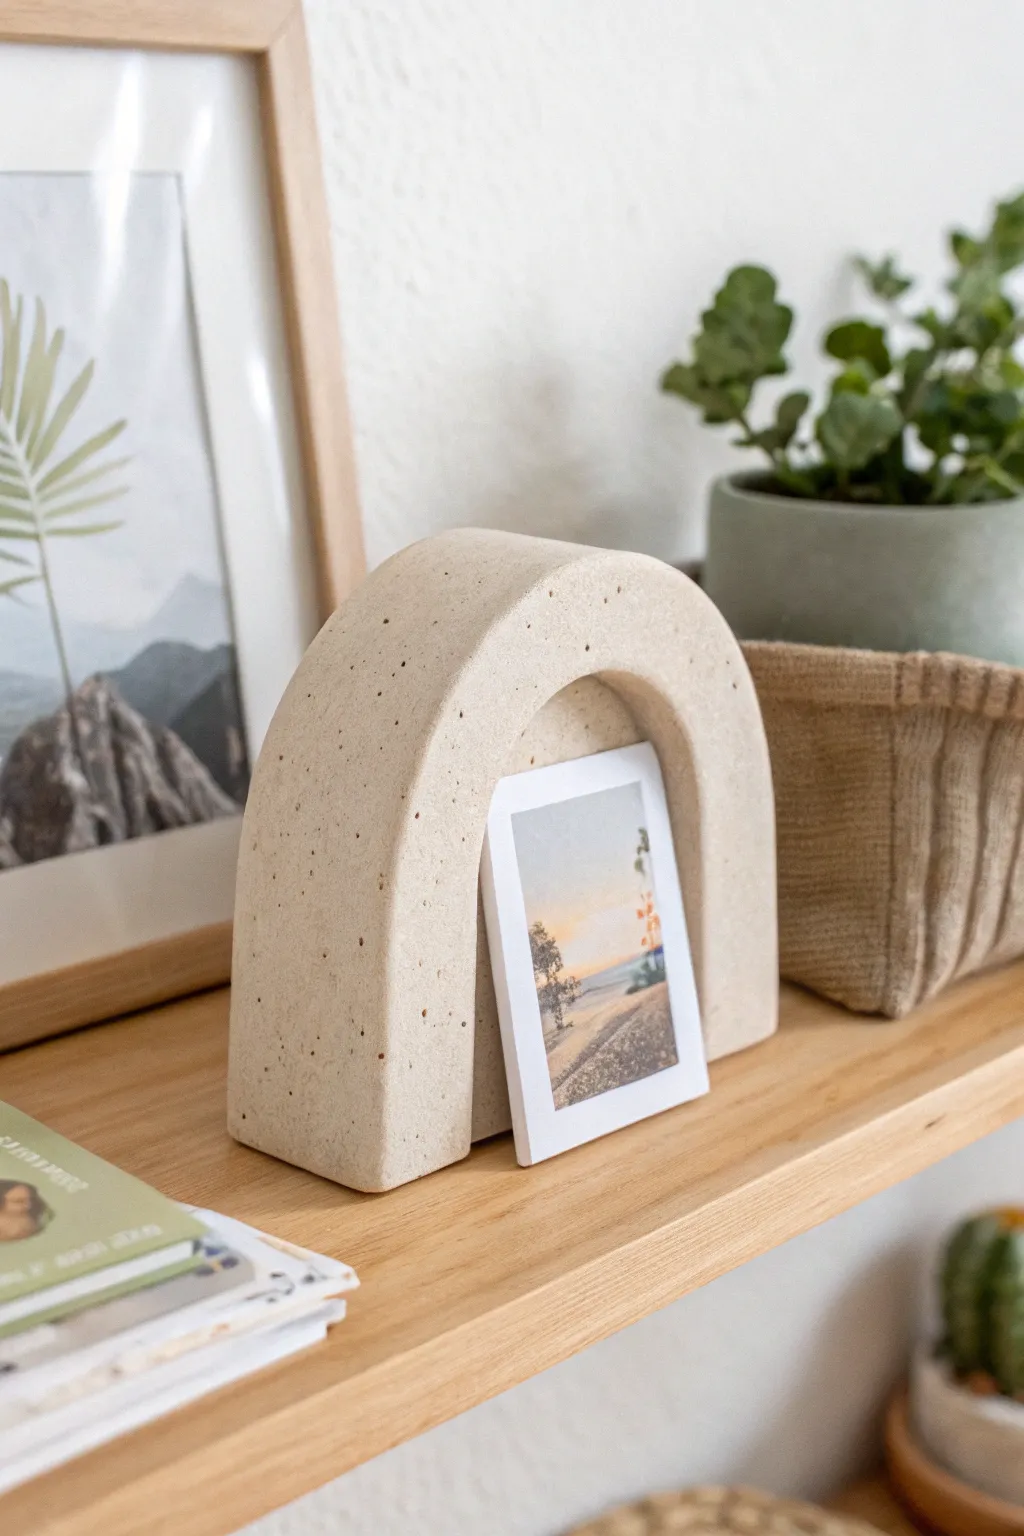
Embrace minimalist design with this sturdy, concrete-look photo holder featuring a clean arched silhouette. Its speckled texture adds depth to the neutral tone, creating a perfect modern frame for your favorite instant prints.
Step-by-Step Tutorial
Materials
- Air-dry clay (stone or concrete color) or polymer clay
- Rolling pin
- Sharp craft knife or clay blade
- Ruler
- Fine-grit sandpaper (400-600 grit)
- Black pepper or dried coffee grounds (for speckling)
- Cardboard or firm cardstock (for the template)
- Small bowl or cup (optional, for curve guide)
- Water (for smoothing)
- Clear matte varnish (optional)
Step 1: Preparation & Shaping
-
Prepare the speckle mix:
If your clay isn’t already speckled, you’ll need to create that stone-like texture manually. Take a handful of plain stone-colored air-dry clay and sprinkle in a small pinch of coarse black pepper or dried used coffee grounds. -
Knead thoroughly:
Work the clay in your hands until the speckles are evenly distributed throughout the mass. The goal is a random, natural stone appearance, so don’t worry if some areas are denser than others. -
Create a template:
Draw an arch shape on a piece of cardboard to serve as your guide. Aim for a width of about 4-5 inches and a height of 3-4 inches to match the proportions in the image, then cut it out. -
Roll the slab:
Roll your clay out into a thick, even slab. For this chunky look, you want a thickness of at least 3/4 of an inch to 1 inch so it stands up firmly. -
Cut the outer shape:
Place your cardboard template onto the clay. Using a sharp craft knife held perpendicular to the table, carefully cut around the outer edge of the arch. -
Define the inner curve:
Using a smaller circular object or a steady hand with your knife, cut out the inner arch. Make sure to leave the legs of the arch quite thick—about 1.5 inches wide on each side—to maintain that substantial, sculptural look.
Natural Texture Hack
Instead of sandpaper, try smoothing the wet clay with a damp sponge before drying. It exposes the grit/speckles more effectively for a rougher, more organic stone look.
Step 2: Refining & Finishing
-
Create the photo slot:
This is the most crucial step. Decide which side will be the ‘front.’ On the inner sides of both arch legs, near the base, you need to create a groove for the photo to sit in. -
Cut the groove:
Carefully slice a distinct, angled notch into the inner back edge of the arch legs. Test this with a piece of thick cardstock to ensure an instant photo will lean back slightly at a pleasing angle. -
Smooth the edges:
Dip your finger in a little water and run it along all the cut edges to soften the sharpness. I find this really helps the piece look like cast stone rather than cut clay. -
Let it dry:
Place the arch on a flat surface to dry. Because the clay is thick, this will take longer than usual—likely 48 to 72 hours. Flip it gently halfway through to ensure even drying. -
Initial sanding:
Once fully dry, take your fine-grit sandpaper and gently buff the surface. Focus on flattening the bottom so it stands perfectly straight without wobbling. -
Refining the curve:
Use the sandpaper to round off the sharpness of the arch’s top curve, giving it that soft, molded appearance seen in the photo. -
Dust off:
Wipe the piece down with a slightly damp cloth or a dry paintbrush to remove all the clay dust from sanding. -
Seal (optional):
To protect the piece and keep the ‘stone’ specs visible, apply a thin coat of matte varnish. Avoid glossy finishes if you want to maintain the raw, natural aesthetic.
Add a Backing
For better stability, glue a heavy felt pad to the bottom. Or, attach a thin, flat rectangle of clay to the back of the legs during the wet phase to create a permanent backstop.
Now you have a stylish, minimalist display piece ready to hold your most cherished memories
Napkin Rings With Stamped Initials

Elevate your next dinner party with these sophisticated napkin rings that possess the warm, tactile charm of cognac leather. Using polymer clay, you can achieve an expensive-looking, personalized finish that makes a thoughtful gift or a perfect table setting upgrade.
Detailed Instructions
Materials
- Terracotta or leather-colored polymer clay
- Rolling pin or pasta machine
- Metal ruler
- Craft knife or clay slicer
- Letter stamps (metal or acrylic)
- Round cookie cutter or dedicated napkin ring mold (approximately 1.5-inch diameter)
- Small hole punch or straw
- Texturing tool (clean sponge or leather piece)
- Oven-safe cardboard tube or soda can (for baking form)
- Parchment paper
Step 1: Preparation and Shaping
-
Condition the Clay:
Begin by thoroughly kneading your terracotta or leather-colored polymer clay. You want it warm and pliable to prevent cracking during the rolling process. -
Roll to Thickness:
Roll out the clay to a uniform thickness, aiming for about 3mm or 1/8 inch. Using a pasta machine on a medium setting ensures an even surface. -
Create Texture:
To mimic the grain of real leather, gently press a clean, coarse sponge or a crumpled piece of aluminum foil over the entire surface of the rolled sheet. Don’t press too hard; you just want surface imperfections. -
Measure and Cut:
Use your metal ruler and craft knife to cut a long rectangular strip. A good size is typically 6 inches long by 1.5 inches wide, but you can adjust the width based on your preference. -
Refine Edges:
Smooth the cut edges with your finger. Real leather crafts often have burnished edges, so slightly rounding the sharp corners of your clay strip adds realism.
Step 2: Personalizing and Forming
-
Position the Stamp:
Locate the center point of your strip. This is where the initial will sit prominently on top of the napkin. -
Stamp the Initial:
Press your chosen letter stamp firmly into the clay. If you find the clay sticks to the stamp, dust the stamp lightly with cornstarch or water before pressing. -
Prepare the Join:
Overlap the two ends of the strip to form a circle. You can simply overlap them for a rustic look, or create holes for a faux-stitch effect. -
Punch Holes (Optional):
As seen in the image, punch two small vertical holes on the underside end of the overlap using a small straw or tool. This decorative detail mimics a belt or strap adjustment. -
Form the Ring:
Wrap the clay strip around your baking form (like an oven-safe cardboard tube wrapped in parchment paper). This ensures the ring stays perfectly round while curing. -
Secure the Ends:
Gently press the overlapping ends together against the tube. You don’t need to blend the seam; the overlap is part of the leather-strap aesthetic.
Leather Look Pro-Tip
After baking, rub a tiny amount of brown acrylic paint into the stamped letter and wipe away the excess immediately. This darkens the ‘branded’ area for higher contrast.
Step 3: Curing and Finishing
-
Bake:
Place the baking form with the clay rings into a preheated oven. Follow the specific temperature and time instructions on your package of polymer clay. -
Cool Down:
Once baked, I like to let the pieces cool completely inside the oven with the door slightly ajar to prevent thermal shock. -
Remove from Form:
Gently slide the cooled rings off your cardboard tube or mold. -
Buffing (Optional):
For a slight sheen that resembles conditioned leather, buff the surface vigorously with a soft denim cloth or a piece of flannel.
Level Up: Stitch It
Before baking, use a needle tool to poke evenly spaced holes along the top and bottom edges. After baking, weave waxed linen thread through for a real stitched leather look.
Now you have a set of durable, custom napkin rings ready to charm your guests at your next gathering.
Sculptural Decorative Chain Links for Coffee Tables
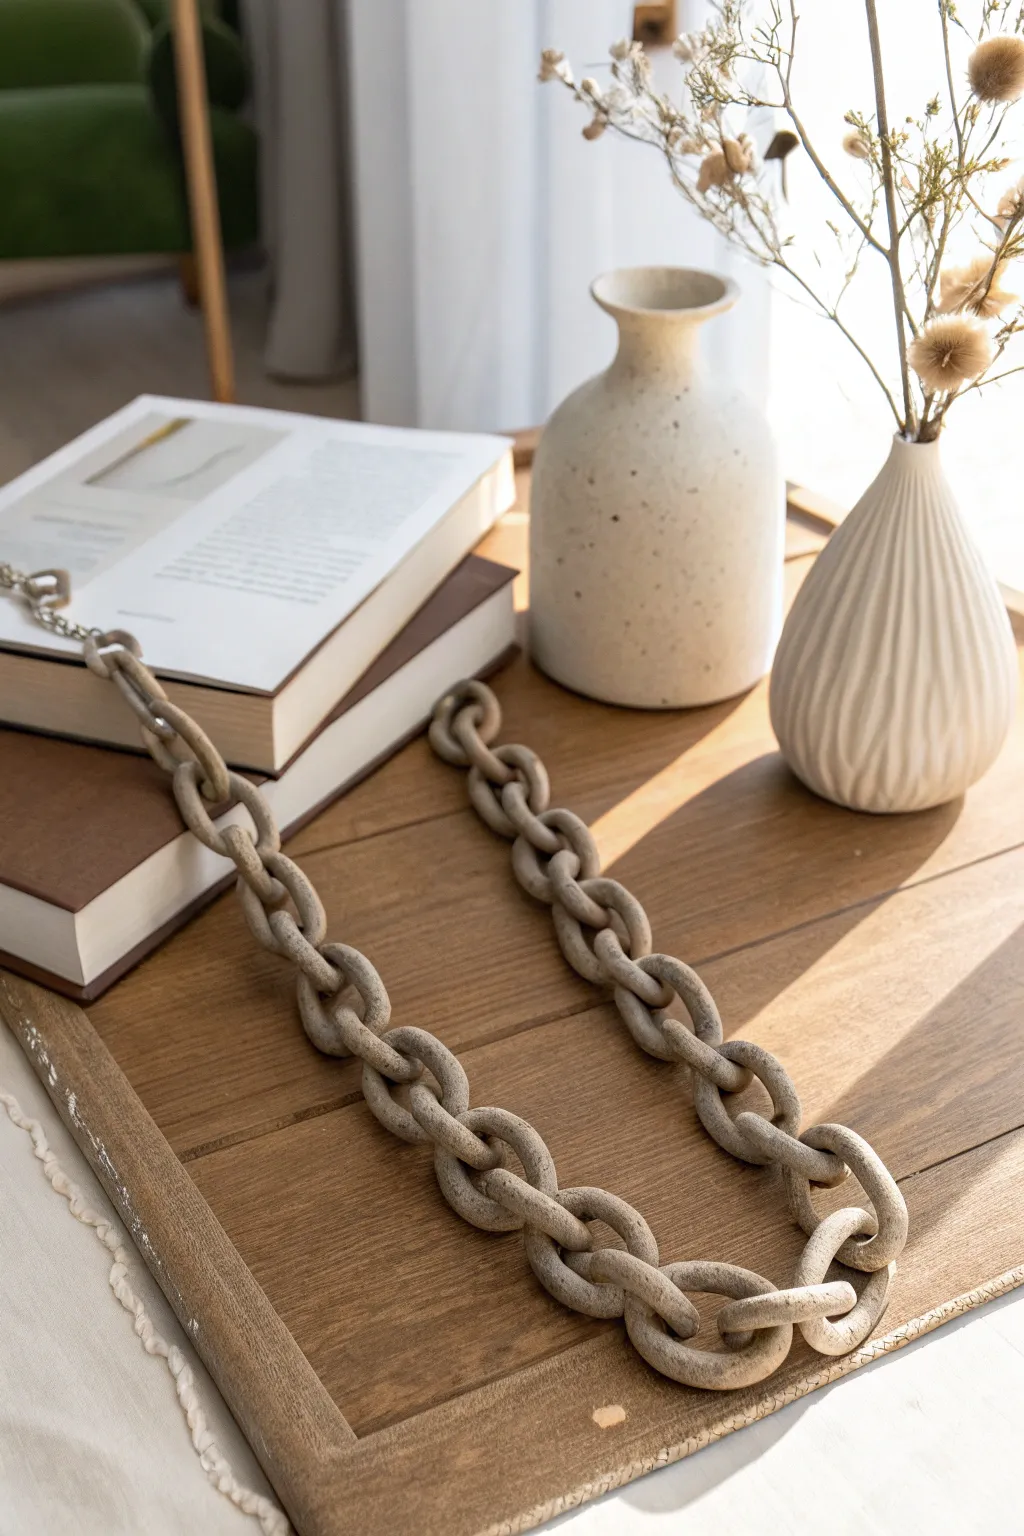
Elevate your coffee table decor with this sophisticated, sculptural chain that mimics the look of raw stone. Despite its high-end gallery appearance, this project is surprisingly simple to model and creates a grounded, organic focal point for any vignette.
How-To Guide
Materials
- Air-dry clay (white or light grey)
- Acrylic paint (beige, taupe, white, stone grey)
- Baking soda or fine sand
- Rolling pin
- Ruler
- Sharp crafting knife
- Cup of water
- Small sponge or paintbrush
- Clear matte varnish spray
Step 1: Forming the Links
-
Condition the Clay:
Begin by taking a large chunk of air-dry clay and kneading it thoroughly until it is warm and pliable. This prevents cracks later on. -
Roll the Coil:
On a clean, flat surface, roll a portion of the clay into a long, even snake or coil. Aim for a thickness of about 3/4 inch to match the chunky aesthetic in the photo. -
Measure and Cut:
Decide on the size of your links. For an oval shape like the reference, cut your clay coil into equal segments, roughly 6 to 7 inches long. -
Create the First Link:
Take one segment and bring the ends together to form an oval. Overlap the ends slightly or butt them together firmly. -
Seamless Join:
Dip your finger in a little water and smooth the seam where the ends meet. Use a modeling tool or your fingertip to drag clay across the line until it disappears completely. -
Shape the Oval:
Gently gently press the loop into a consistent oval shape. It doesn’t need to be geometrically perfect; the organic irregularity adds charm. -
Connect the Second Link:
Take your next clay segment and feed it *through* the first finished link before joining the ends. This is crucial—you must build the chain link by link. -
Repeat and Build:
Continue this process, looping each new segment through the previous one, smoothing the seams, and reshaping as you go, until you reach your desired length.
Step 2: Texturing and Finishing
-
Initial Drying Phase:
Let the chain sit to dry. I find it helpful to wiggle the links every few hours during the first day so they don’t stick to each other or flatten too much on one side. -
Mixing the Stone Texture:
While the clay cures (usually 24-48 hours), prepare your faux-stone coating. Mix a beige or taupe acrylic paint with a teaspoon of baking soda or fine sand. -
Applying the Base Coat:
Once dry, paint the entire chain with your textured mixture. Use a dappling motion with your brush to create a rough, stony surface rather than smooth strokes. -
Adding Dimension:
Mix a slightly lighter shade of off-white or cream paint. Use a mostly dry sponge to dab this color randomly over the raised areas of the texture. -
Deepening Shadows:
For that weathered look, dilute a tiny drop of dark grey paint with water to make a wash. Lightly apply this into the crevices and wipe away excess immediately with a paper towel. -
Final Dry:
Allow the paint layers to dry completely. The baking soda mixture will dry to a lovely matte, chalky finish. -
Seal (Optional):
If you want to protect the finish, spray a light coat of matte varnish over the piece. Avoid glossy sealers, as they will ruin the natural stone effect.
Fixing Cracks
If hairline cracks appear while drying, mix a small amount of fresh clay with water to create a paste (slip). Fill the cracks, smooth over, and let dry again.
Level Up: Marble Effect
Before rolling your coils, twist two different colors of clay together (like white and grey) but don’t fully blend them. This creates a stunning marbled vein effect.
Drape your new sculptural piece over a stack of art books to complete the look
Botanical Imprint Tiles for a Wall Hanging
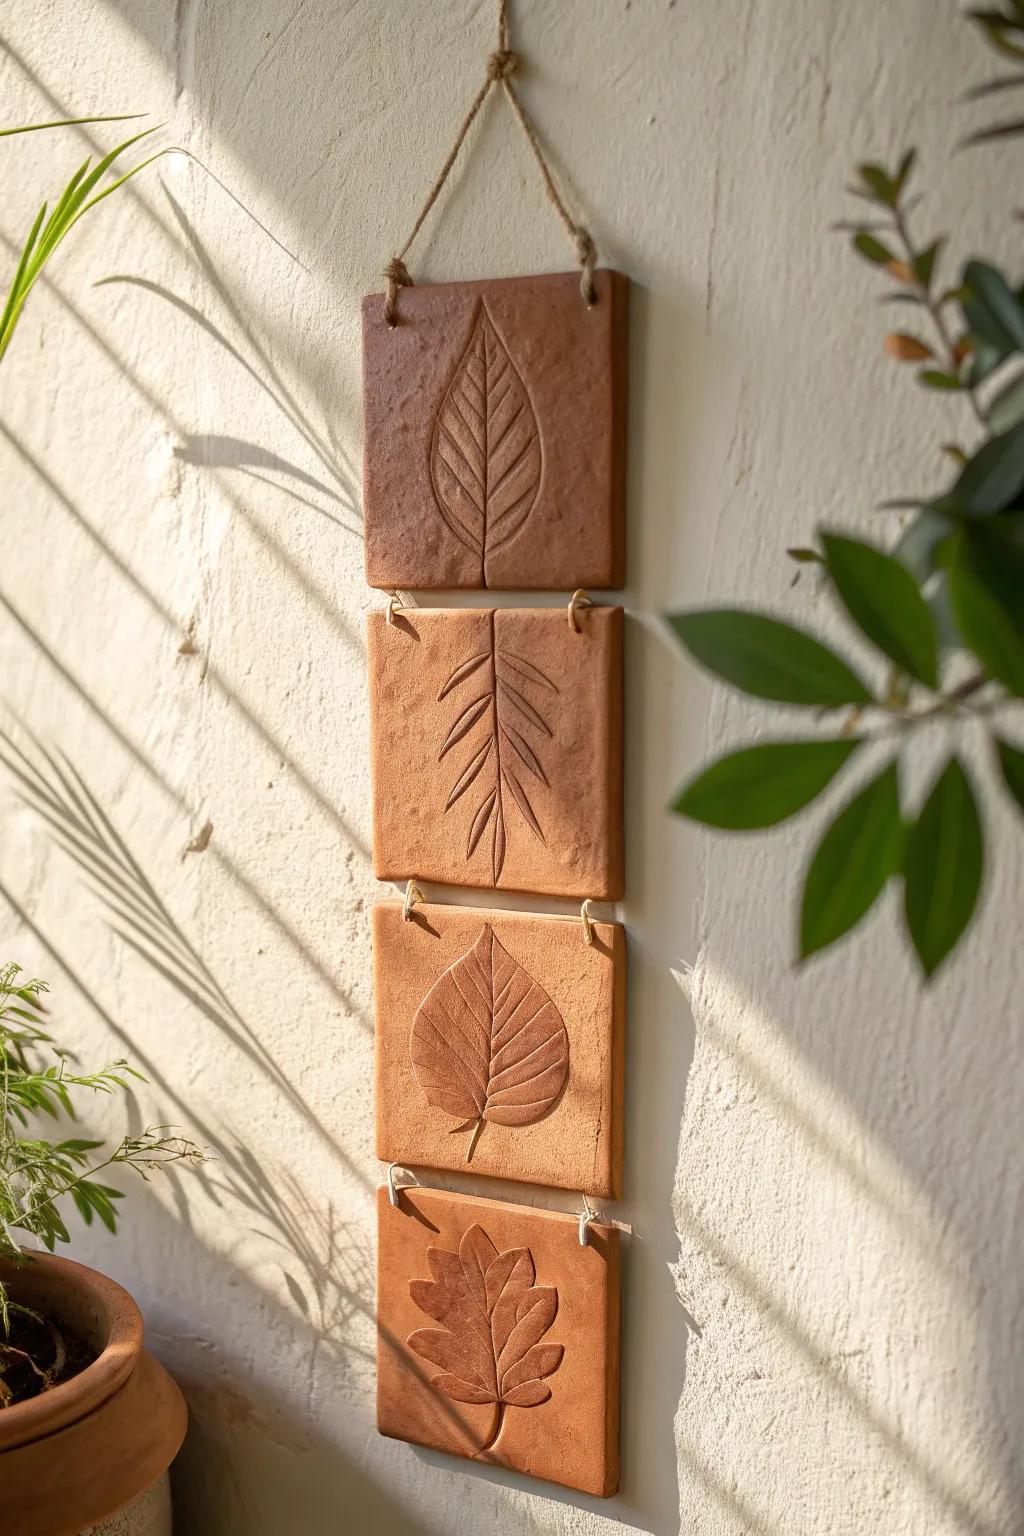
Bring the outdoors in with this rustic, earth-toned wall hanging featuring four distinct botanical designs. This project uses the simple beauty of natural clay to create a textured, vertical focal point that warms up any sunlit corner.
Step-by-Step Tutorial
Materials
- Terracotta self-hardening or kiln-fire clay
- Rolling pin
- Two wooden guide strips (approx. 1/4 inch thick)
- Square cookie cutter (approx. 4×4 or 5×5 inches) or ruler and knife
- Assorted carving tools (needle tool, loop tool)
- Sponge and water bowl
- Canvas or heavy cloth (to roll clay on)
- Straw or coffee stirrer (for hole punching)
- Parchment paper
- Jute twine or hemp cord
- Scissors
Step 1: Preparing the Clay Canvas
-
Prepare your workspace:
Lay down your canvas or heavy cloth to prevent sticking. Place your wooden guide strips on either side of your working area to ensure an even thickness when rolling. -
Wedge the clay:
Take a substantial chunk of terracotta clay and wedge it thoroughly by kneading to remove air bubbles. This is crucial to prevent cracking later. -
Roll out the slab:
Place the clay between the guide strips. Using your rolling pin, roll the clay out until it is smooth and the rolling pin rests flat on the wooden guides. -
Cut the tiles:
Use your square cutter or a ruler and knife to cut four identical squares. I find that 4×4 inches is a manageable size that isn’t too heavy to hang. -
Smooth the edges:
Dip a sponge lightly in water and run it gently around the cut edges of each square to soften them. You want them to look finished, not sharp.
Uneven Drying?
If edges curl while drying, the center is drying too slowly. Place a light board or book (with paper in between) on top of the tiles during the drying phase to keep them perfectly flat.
Step 2: Sculpting the Botanicals
-
Sketch the outline:
Using a needle tool, very lightly scratch the outline of a different leaf onto each tile. Reference the image to create variety: a simple ovate leaf, a compound leaf, a cordate (heart-shaped) leaf, and a lobed leaf like an oak. -
Carve the main veins:
Start with the central vein of your first leaf. Press your tool slightly deeper here to create a definitive line down the middle. -
Add texture and depth:
Instead of just drawing lines, try to scoop out a tiny bit of clay along the veins or press down the areas between veins to make the leaf structure pop out in relief. -
Define the margins:
Go back over the outer edge of the leaf design, cutting slightly deeper or beveling the clay inward so the leaf appears raised from the background. -
Detail the background:
Gently stipple the background area around the leaf with a stiff brush or a textured sponge. This creates a subtle contrast between the smooth leaf and the rough ‘stone’ look. -
Repeat the process:
Move to the next three tiles, carving a unique leaf design on each one following the same steps.
Step 3: Assembly Prep and Finishing
-
Punch connecting holes:
On the first (top) tile, punch two holes near the top edge for the main hanger, and two along the bottom edge to connect to the next tile. -
Continue hole punching:
For the middle two tiles, punch two holes at the top and two at the bottom, aligning them vertically with the first tile. For the bottom tile, punch only two holes at the top. -
Clean up holes:
Ensure the holes are clean and large enough for your twine. If the clay mushroomed out while punching, smooth it back down. -
Dry the tiles:
Place the tiles on wire racks or parchment paper to dry slowly away from direct heat. If using kiln clay, stick to your firing schedule; if air-dry, wait 24-48 hours until fully cured. -
Seal surface (Optional):
Once dry, you can apply a matte varnish to protect the surface, though leaving it raw preserves that lovely chalky texture. -
Create the top hanger:
Cut a long piece of jute twine. Thread it through the top two holes of the first tile and tie a sturdy knot to create a triangular hanging loop. -
Link the tiles:
Cut six smaller pieces of twine. Use them to tie the bottom holes of the upper tile to the top holes of the tile below it. -
Final adjustments:
Trim any excess twine ends for a neat look, or fray them slightly for a more rustic appearance.
Use Fresh Leaves
For ultra-realism, press real leaves into the wet clay first to get the basic shape and vein pattern, then carve over those lines to deepen them.
Hang your new terracotta creation near a window to let the shadows play across the textured leaves
Hanging Clay Suncatchers With Simple Cutouts
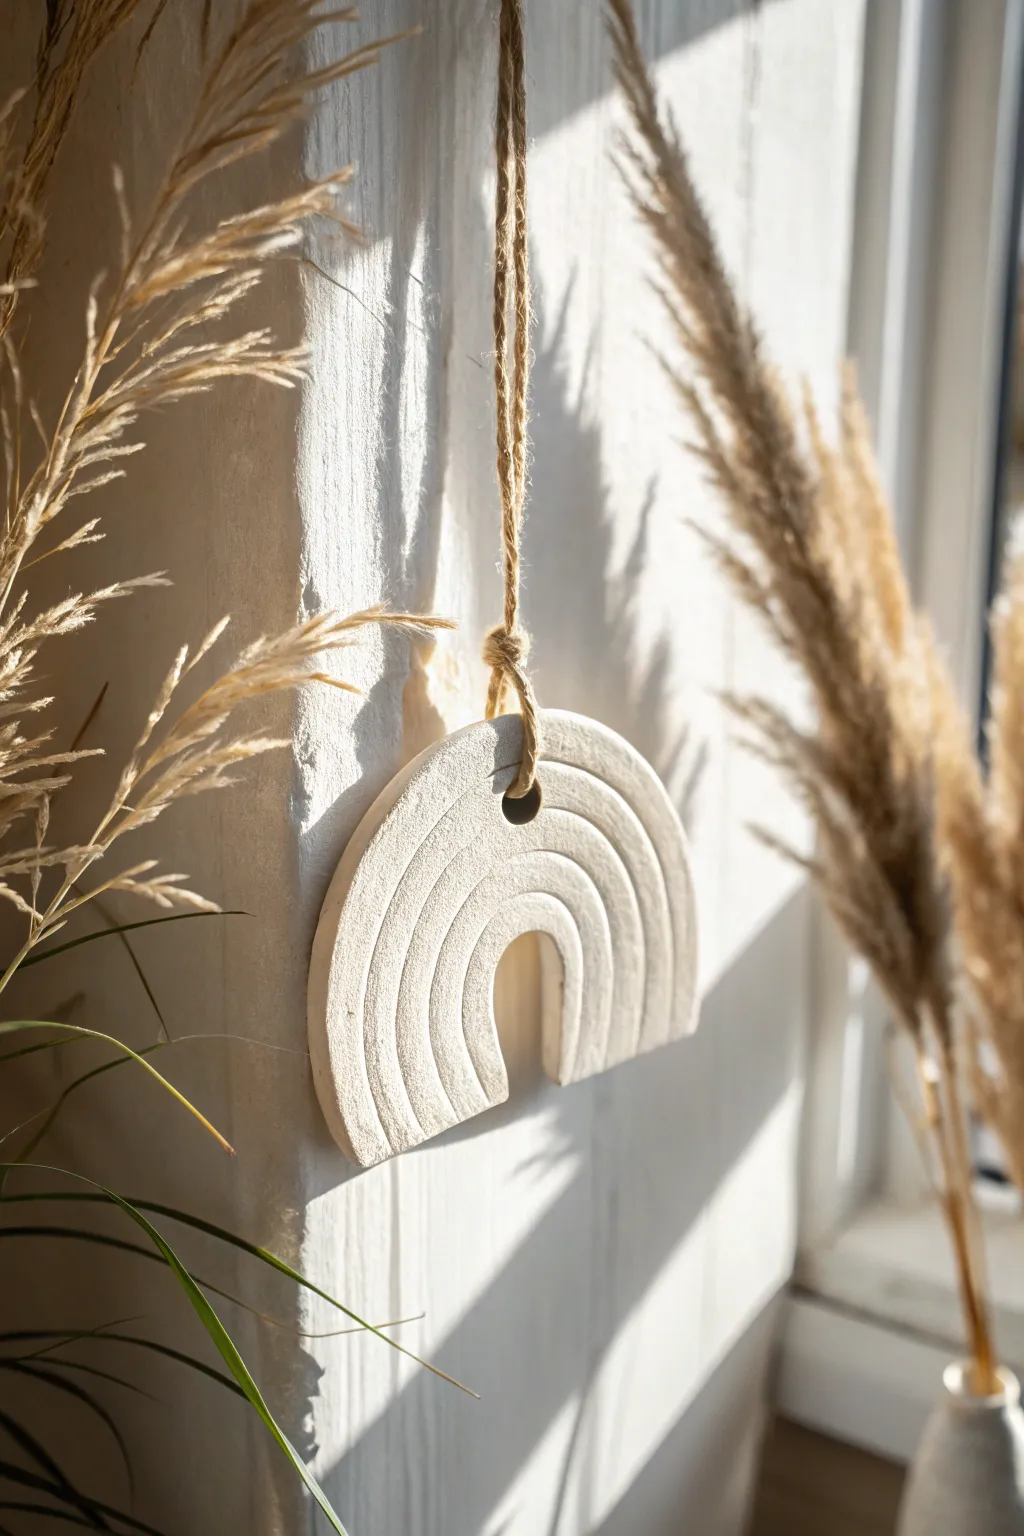
This minimalist hanging decoration brings a touch of textured warmth to your walls with its subtle rainbow arches and organic cream tones. The unglazed finish and natural twine suspension create a serene, grounded aesthetic perfect for catching the play of light and shadow.
Detailed Instructions
Materials
- Air-dry clay (white or cream)
- Rolling pin
- Parchment paper or canvas mat
- Carving tool or needle tool
- Circular cookie cutter or jar lid (approx. 4-inch diameter)
- Small circular cutter (for the hanging hole)
- Ruler
- Sponge and water
- Natural jute or hemp twine
- Scissors
Step 1: Planning and Shaping the Base
-
Prepare your clay:
Begin by taking a handful of air-dry clay and kneading it in your hands to warm it up. You want a smooth consistency without cracks. Place your parchment paper or canvas mat down to protect your work surface. -
Roll out the slab:
Use your rolling pin to flatten the clay into an even slab. Aim for a thickness of about 1/4 inch (6mm). If it’s too thin, it might be brittle; too thick, and it will be heavy. -
Cut the circle:
Press your large circular cutter into the clay to create a perfect circle. If you don’t have a cutter large enough, trace around a bowl with a needle tool. -
Slicing the semi-circle:
Use your ruler as a guide to slice the circle exactly in half. You now have two semi-circles; set one aside for a future project or roll it back up. -
Create the inner arch:
Find the center point on the straight edge of your semi-circle. Use a smaller cutter or freehand cut a small U-shape out of the bottom center to separate the ‘legs’ of the rainbow. This creates that classic arched silhouette.
Step 2: Adding Texture and Detail
-
Smooth the edges:
Dip your finger or a small sponge in a little water and gently run it along all the cut edges. Soften any sharp angles to give the piece a more organic, handmade feel. -
Mark the arches:
Using a needle tool or a dull carving tool, lightly sketch concentric arches on the surface. Start from the inner cutout and work your way outward. These are just guidelines for your deeper grooves. -
Carve the grooves:
Press your tool firmly into the clay along your guidelines to create distinct channels. Widen them slightly by moving the tool back and forth to ensure the lines are visible even from a distance. -
Refine the surface:
Gently rub the surface with a barely damp sponge to smooth out any clay crumbs created during carving, but be careful not to erase your grooves. -
Create the hanging hole:
At the very top center of the arch, punch a hole using a straw or a small circular cutter. Make sure the hole is wide enough to accommodate your jute twine later.
Clean Lines Hack
To get perfectly spaced rainbow arches, use bowls or lids of varying sizes to gently impress guide lines into the clay before carving them deeper.
Step 3: Finishing Up
-
Drying process:
Let the piece dry flat on a piece of cardboard or a wire rack. I find flipping the piece over after the first 12 hours helps prevent warping. -
Dry completely:
Allow fully 24-48 hours for drying, depending on humidity. The clay should turn a chalky white and feel room temperature to the touch, not cool. -
Sand for smoothness (optional):
If there are any rough burrs on the edges after drying, lightly sand them with fine-grit sandpaper for a polished look. -
Prepare the twine:
Cut a length of natural jute twine, approximately 12-15 inches long. Fold it in half to create a loop at one end. -
Attach the hanger:
Push the folded loop end through the hole in the clay from front to back. Then, thread the loose ends through that loop and pull tight to create a lark’s head knot directly on the artwork. -
Final knot:
Tie the loose ends of the twine together in a simple overhand knot at your desired hanging length and trim any excess.
Warping Woes?
If the edges curl up while drying, place a light book on top of the clay (wait until it’s ‘leather hard’ first so you don’t squish the texture).
Hang your new sculpted piece near a window to let the texture catch the changing daylight throughout the day
Wall Sconce-Style Clay Shade With Warm Ambient Glow

Bring an earthy, handmade warmth to your walls with this textured clay lamp shade. The pitted surface and grooved lines mimic ancient pottery, casting a cozy and directional glow perfect for bedside reading.
Step-by-Step Tutorial
Materials
- Air-dry clay (terracotta color) or kiln-fire clay if you have access
- Rolling pin
- Canvas mat or cloth (to prevent sticking)
- Cardboard or stiff paper (for the cone template)
- Tape
- Pottery knife or craft knife
- Sponge
- Needle tool or toothpick
- Small irregularly shaped stone or coarse sandpaper
- Slip (clay and water mixture)
- Sanding block (fine grit)
- Matte sealant or varnish
Step 1: Shaping the Form
-
Create a templates:
Begin by making a template for your cone shape. Draw an arc on a piece of cardboard or stiff paper; the size of the arc determines the width of your shade. Cut this out and test the form by rolling it up to ensure you like the dimensions. -
Prepare the slab:
Roll out your terracotta clay on a canvas mat until it is an even thickness, approximately 1/4 inch thick. Since this will hang on a wall, you don’t want it too heavy, but it needs to be sturdy. -
Cut the shape:
Place your cardboard template onto the rolled clay. Using your pottery knife or a sharp craft knife, carefully trace around the template to cut out the clay fan shape. -
Bevel the edges:
To make a seamless join later, gently bevel the two straight edges of your clay cutout at opposing 45-degree angles. This helps the seam lock together. -
Form the cone:
Lift the clay and curve it into the cone shape. Score the beveled edges (scratch them up with a needle tool to create texture) and apply a generous amount of slip. -
Seal the seam:
Press the scored edges together firmly. Use your fingers or a modeling tool to smooth the clay over the seam inside and out so it becomes invisible. I like to support the inside with my other hand to keep the curve shape true. -
Level the rim:
Stand the cone upright on your work surface. If the bottom rim is uneven, use your needle tool or knife to trim it parallel to the table surface for a clean, professional look.
Step 2: Adding Texture and Detail
-
Create horizontal grooves:
While the clay is still leather-hard (firm but damp), hold a needle tool or the edge of a ruler against the surface. Rotate the cone or drag the tool across to create two distinct horizontal indented lines that divide the shade into sections. -
Add pockmarks:
This gives the piece its distinctive character. Use a needle tool to poke small, random holes of varying depths. Don’t go all the way through; just create surface interest. -
Texture the surface:
Take a small rough stone or a crumpled ball of aluminum foil and gently press it into the clay surface randomly. This removes the ‘manufactured’ smoothness and mimics aged stone or porous ceramic. -
Refine the top opening:
Ensure the top opening is perfectly round and large enough to accommodate your specific light fixture hardware or cord kit. Measure your hardware twice to be safe. -
Smooth the edges:
Use a slightly damp sponge to wipe down the bottom rim and the top opening. This softens any sharp cutting marks but leaves the surface texture intact.
Seam Security
For extra strength at the vertical seam, roll a very thin ‘snake’ of clay and press it into the join on the inside of the cone, blending it out completely until smooth.
Step 3: Finishing
-
Slow drying:
Cover the shade loosely with plastic wrap to let it dry slowly over 24-48 hours. Drying too fast can cause warping or cracking, especially at the seam. -
Sanding:
Once bone dry (and lighter in color), use a fine-grit sanding block to gently smooth the bottom rim so it sits flat or hangs flush, and refine any overly sharp texture bumps. -
Seal or fire:
If using kiln clay, fire according to instructions. For air-dry clay, apply a matte varnish or sealant inside and out to protect the material from humidity and dust. -
Installing:
Thread your pendant cord or sconce hardware through the top hole. Secure it with the socket ring and mount it to your wall to see the texture come alive with light.
Antique Wash
After drying, dilute a dark brown acrylic paint with water. Brush it over the entire piece and immediately wipe it off; paint will remain in the pockmarks, enhancing the texture.
Once lit, the texture on your new sconce will cast beautiful shadows and create a soothing atmosphere in your room
Marbled Clay Clock That Looks Store-Bought
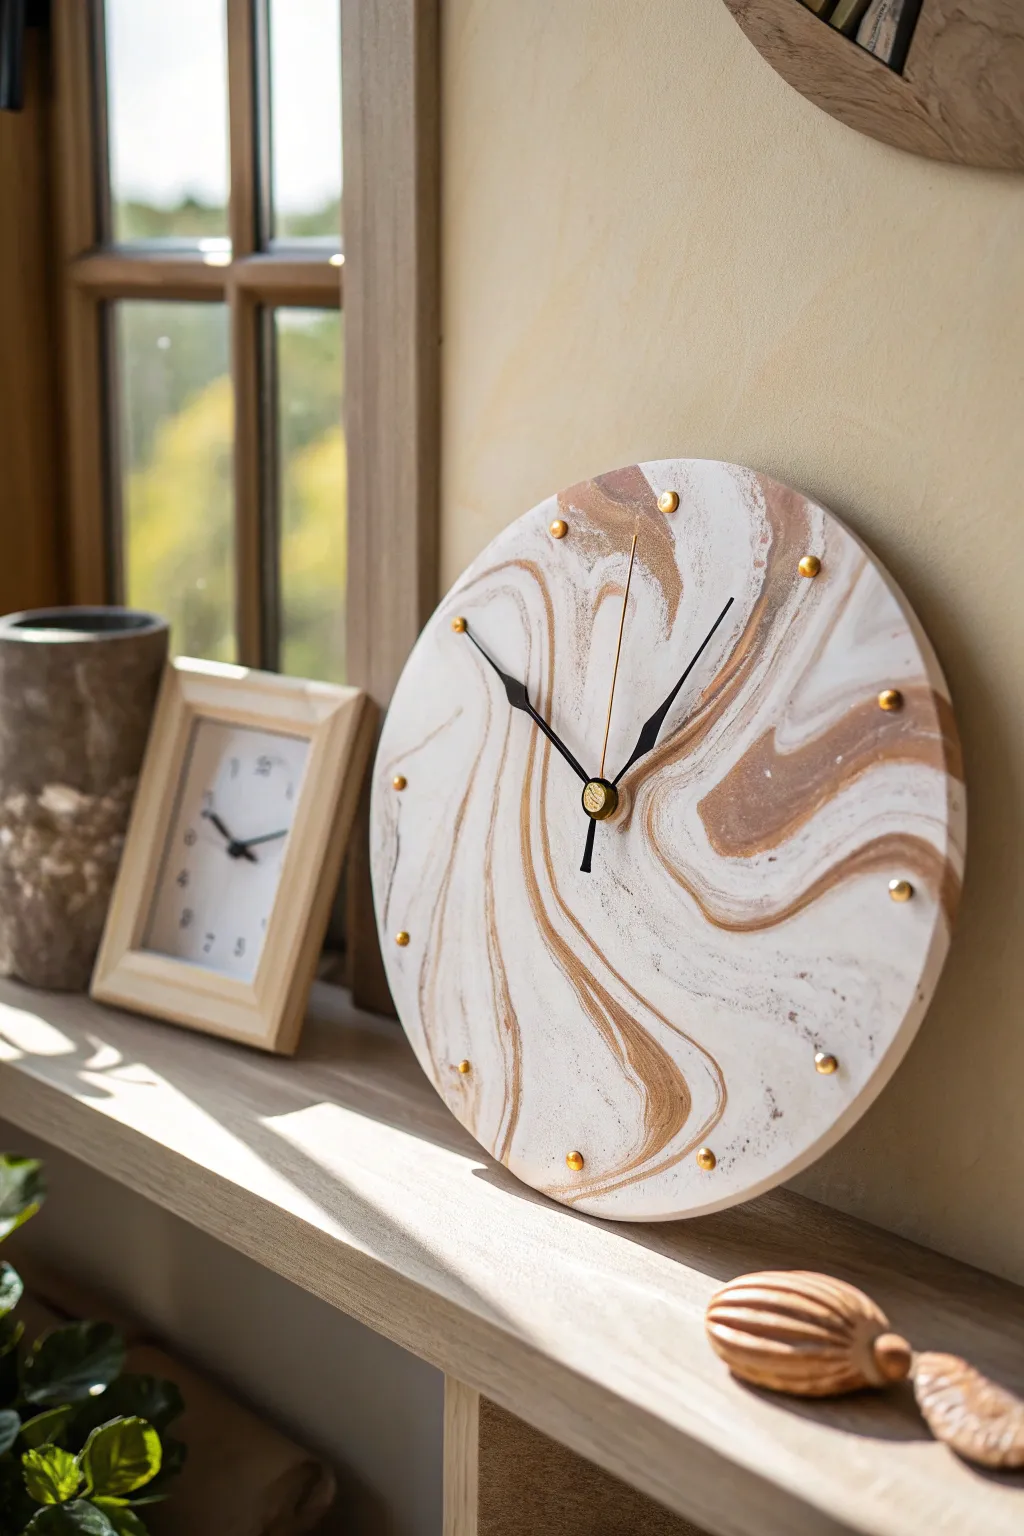
Recreate the sophisticated look of expensive agate or marble with nothing but polymer clay and a simple clock mechanism. The swirling cream, white, and bronze tones create a mesmerizing pattern that turns a functional timepiece into a stunning piece of modern wall art.
Detailed Instructions
Materials
- Polymer clay (white, beige/cream, and metallic bronze/gold)
- Acrylic rolling pin
- Circle cutter or a round template (plate or bowl)
- X-acto knife or craft blade
- Clock mechanism kit (movement, hands, washer, nut)
- Small gold bead embellishments or brass brads
- Superglue or heavy-duty craft adhesive
- Drill with a bit matching your clock shaft size
- Sandpaper (fine grit)
- Parchment paper or baking mat
- Oven
Step 1: Creating the Marble Pattern
-
Condition the clay:
Start by warming up your clay blocks. Take approximately one generous block of white, half a block of cream/beige, and a quarter block of the metallic bronze. Knead each color separately until they are soft and pliable. -
Form clay ropes:
Roll each color into several long, snake-like ropes of varying thicknesses. You want more white and cream ropes than bronze ones to keep the design light and airy. -
Combine the colors:
Gather all your ropes into a single bundle, twisting them together gently. I like to fold the bundle in half, twist again, and roll it into a thick log. Repeat this folding and twisting process 3-4 times, but stop before the colors blend completely; distinct lines are key. -
Roll out the slab:
Place your marbled log on parchment paper. Using your acrylic rolling pin, roll the clay out into a flat slab about 1/4 inch thick. Roll in different directions to stretch the swirling pattern organically. -
Cut the circle:
Place your circular template or bowl onto the most attractive part of the marbled pattern. Use your craft knife to trace around the template, cutting a clean, perfect circle. Remove the excess clay scraps (save them for bead making!). -
Smooth the edges:
Dip your finger in a tiny bit of water or baby oil and run it along the cut edge of the circle to smooth out any sharpness or roughness left by the blade. -
Create the center hole:
Find the exact center of your circle. Use a tool slightly larger than your clock shaft to punch a hole through the raw clay. It’s better to make this hole now rather than drilling later to avoid cracking, though you can drill after baking if you are very careful.
Clean Cuts Pro-Tip
For the smoothest edges, wrap your clay slab in plastic wrap before cutting with your circle cutter. The plastic rounds over the edges as you cut, minimizing sanding later.
Step 2: Baking and Assembly
-
Bake the clock face:
Transfer the clay (still on the parchment paper) to a baking sheet. Bake according to your brand’s specific instructions—usually around 265°F (130°C) for 15-30 minutes depending on thickness. Let it cool completely on a flat surface to prevent warping. -
Sand for perfection:
Once cool, inspect the edges. If there are any rough spots, gently wet-sand the rim with fine-grit sandpaper until it feels essentially smooth to the touch. -
Mark the hours:
Lay the clock face flat. Using a protractor or a printed clock template, lightly mark where the 12 hour positions should be with a pencil. -
Attach the hour markers:
Take your small gold beads or brass brad heads. Apply a tiny dot of superglue to the back of each one and press them firmly onto your pencil marks. These raised dots add a professional, 3D element to the design. -
Insert the mechanism:
Push the clock movement shaft through the hole from the back of the clay circle. -
Secure the movement:
On the front side, place the washer over the shaft and screw on the mounting nut. Tighten it gently just until the mechanism is secure—don’t overtighten or you might crack the clay. -
Attach the hands:
Press the hour hand onto the shaft first, pointing it to the 12 position. Follow with the minute hand, also pointing to 12. Finally, press on the second hand or the cap nut if your kit includes one. -
Align the hands:
Check that the hands are parallel to the clock face and don’t touch each other as they rotate. If they touch, gently bend them slightly so they clear one another. -
Install the battery:
Pop a battery into the mechanism on the back and use the wheel to set the correct time.
Level Up: Resin Finish
Pour a thin layer of UV resin over the top of the baked clay before adding the hardware. It adds a glossy, glass-like finish that mimics polished stone perfectly.
Now you have a timeless piece of decor that looks like it came straight from a high-end boutique
Handmade Clay Domino Set for Coffee Table Games
Elevate your game night aesthetic with this set of chunky, handmade dominoes that double as modern coffee table decor. Crafted from air-dry clay with a smooth, matte finish, these pieces feature deep-set pips for a tactile and sophisticated feel.
Step-by-Step
Materials
- White air-dry clay (or polymer clay)
- Acrylic rolling pin
- Parallel rolling guides or 0.5-inch wood slats
- Sharp clay blade or craft knife
- Fine-grit sandpaper (400-800 grit)
- Water and a small sponge
- Ball stylus tool or rounded chopstick end
- Black acrylic paint
- Fine detail paintbrush
- Matte spray varnish or sealant
Step 1: Shaping the Tiles
-
Condition the CLay:
Begin by taking a substantial chunk of white air-dry clay and kneading it in your hands. You want it warm, pliable, and free of any air pockets before you start rolling. -
Roll the Slab:
Place your clay between two parallel rolling guides or wood slats (about 0.5 inches thick) to ensure an even thickness. Roll the clay out into a smooth, uniform slab using your acrylic roller. -
Cut Main Strips:
Using a long clay blade, slice long, straight strips from the slab. Make sure the width of these strips matches the desired width of your dominoes. -
Slice Individual Tiles:
Cut the strips perpendicularly to create your individual rectangles. For standard dominoes, cut rectangles where the length is twice the width. For the cubic dice shapes seen in the photo, cut perfect squares. -
Soften the Edges:
Dip your finger or a small sponge in water and gently run it over the sharp cut edges of each tile. This “beveling” step removes the harsh angles and gives the pieces that soft, premium look. -
Check Consistency:
Line up all your cut pieces side-by-side. Make minor adjustments to ensure they are all roughly the same height and width, though slight handmade variations add charm.
Step 2: Creating the Pips
-
Mark the Centers:
Lightly visualize or mark a faint line across the center of the rectangular tiles to separate the two playing zones. The square dice shapes don’t need this division. -
Press the Dots:
Take a ball stylus tool or the rounded end of a chopstick. Press firmly into the soft clay to create the pips (dots). Ensure you press straight down and pull straight up to keep the holes clean. -
Follow the Patterns:
Recreate standard domino patterns (double-six or double-nine sets) on your tiles. Be careful not to press so deep that you distort the shape of the tile itself. -
Smoothing the Indents:
If the stylus tool raised any small ridges around the holes, gently tap them down with a damp fingertip to keep the surface strictly flat.
Pro Tip: Density Matters
To make the pieces feel heavier and more luxurious like real stone, try kneading a small amount of heavy filler or sand into the clay body before rolling it out.
Step 3: Refining and Finishing
-
Allow to Dry:
Place all pieces on a drying rack or a sheet of parchment paper. Let them dry completely for 24-48 hours. I find flipping them halfway through the drying process helps prevent warping. -
Sand for Perfection:
Once fully dry and hard, use fine-grit sandpaper to buff the surfaces. Focus on the corners and flat faces until they feel polished and smooth to the touch. -
Paint the Pips:
Load a fine detail brush with black acrylic paint. Careful fill in the indented dots. If you get paint on the flat surface, quickly wipe it away with a damp paper towel before it dries. -
Clean Up Smudges:
If any black paint persists on the white surface, you can lightly sand it off once the paint is dry. -
Seal the Set:
Arrange the pieces in a well-ventilated area and apply a light coat of matte spray varnish. This protects the clay from moisture and dirt while maintaining that natural stone-like appearance.
Level Up: Gold Accents
Instead of black paint for the pips, use liquid gold leaf or metallic copper paint. This small switch transforms the set from rustic fun to high-end luxury decor.
Stack your finished set on a wooden tray to invite guests for a quick game
Mini Clay Room Diorama as a Bookshelf Conversation Piece
Create a charming world-within-a-world with this miniature room diorama, designed to nestle perfectly onto your actual bookshelf. Combining polymer clay sculpting with simple woodworking, you’ll craft tiny furniture and decor that looks cozy enough to live in.
Step-by-Step Guide
Materials
- Polymer clay (terracotta, white, beige, brown, green)
- Wooden craft box or balsa wood planks
- Wood glue
- Wood stain (light oak or walnut)
- Sculpting tools (needle tool, ball stylus)
- Coarse sandpaper or texture roller (for fabric effect)
- Wire mesh or tulle (for wicker texture)
- Aluminum foil
- Acrylic paints (white, grey, green)
- Fabric scraps (linen or burlap)
- Craft knife
- Oven for baking clay
Step 1: Building the Diorama Frame
-
Assemble the box structure:
If you aren’t using a pre-made wooden box, cut balsa wood connected with wood glue to create a rectangular frame with one central shelf. The depth should be about 4-5 inches to fit on a standard bookshelf. -
Apply the finish:
Sand the wood edges until smooth, then apply a light oak wood stain. Wipe away excess stain with a rag to let the natural grain show through, matching the rustic aesthetic of the inspiration image.
Make it Matte
Polymer clay can look plasticky when cured. Dust your raw clay with cornstarch or baby powder before baking to remove fingerprints and ensure a realistic matte finish.
Step 2: Sculpting the Miniature Furniture
-
Form the chair connection armature:
Crumple a small ball of aluminum foil to form the core of the chair’s seat and backrest. This saves clay and ensures the furniture isn’t too heavy. -
Cover the chair in clay:
Roll out a sheet of brown or beige clay and drape it over your foil armature. Smooth the seams with your fingers or a clay shaper to create a seamless base shape. -
Create the woven texture:
For the chair frame, press a piece of wire mesh or tulle firmly into the clay to simulate a tight wicker weave. Alternatively, use a needle tool to scratch a cross-hatch pattern manually. -
Add upholstery details:
Roll out thin squares of lighter beige clay for the cushions. Gently press a piece of real linen fabric onto the surface to transfer the texture, then drape them onto the chair to look like soft pads. -
Sculpt the side table:
Form a small cylinder for the table base and a flat circle for the top using brown clay. Texture it lightly with a toothbrush to mimic wood grain.
Step 3: Creating Tiny Accessories
-
Make the woven basket:
Roll a small ball of brown clay and pinch the top to form a pear shape. Use a needle tool to create spiral or woven indentations starting from the bottom and working up. -
Form the miniature books:
Cut small rectangular blocks of white clay. Wrap three sides of each block with a thin layer of grey or white clay to represent the cover, leaving the ‘pages’ exposed. -
Detail the book spines:
Once baked and cooled, you can use a fine-tip pen or a tiny decal to add text to the spines. Using a blade, lightly score the page edges to simulate individual sheets of paper. -
Shape the plant pots:
Using terracotta-colored clay, form small tapered cylinders. Indent the top with the back of a paintbrush to create space for your greenery. -
Sculpt the greenery:
Mix green clay with a tiny bit of translucent clay for realism. Roll tiny teardrop shapes for the snake plant leaves and assemble them in a cluster inside one pot. -
Create the leafy plant:
For the second plant, make smaller, flatter leaves and attach them to a central stem made of wire or a toothpick masked with brown clay.
Level Up: Real Light
Hide a tiny battery-operated LED or a grain-of-wheat bulb behind the books on the top shelf to cast a warm, cozy glow over the reading chair below.
Step 4: Baking and Assembly
-
Bake the clay elements:
Arrange all your clay pieces on a tile or parchment paper. Bake according to your clay manufacturer’s instructions (usually 275°F/135°C for 15-30 minutes). -
Paint finishing touches:
After cooling, use a dry brush with white acrylic paint to highlight the texture on the wicker chair and basket. This really pops the details. -
Mount the scene:
Using a tiny dab of strong craft glue or museum wax, secure the furniture and accessories into the wooden box. Place the books on the top shelf and the cozy reading nook below. -
Final weathering:
I like to add a tiny wash of diluted brown paint to the plant pots to make them look like aged terracotta before placing the final piece.
Slide your finished diorama between your favorite novels and enjoy a tiny peek into a serene miniature world