When I need a quick creativity boost, I start doodling clay monster faces—because monsters can be goofy, sweet, or totally unhinged, and they’re all “right.” Here are my favorite clay monster ideas that work with air-dry clay, ceramic clay, or polymer clay, depending on what you’ve got on your table.
Pinch Pot Big-Mouth Monster
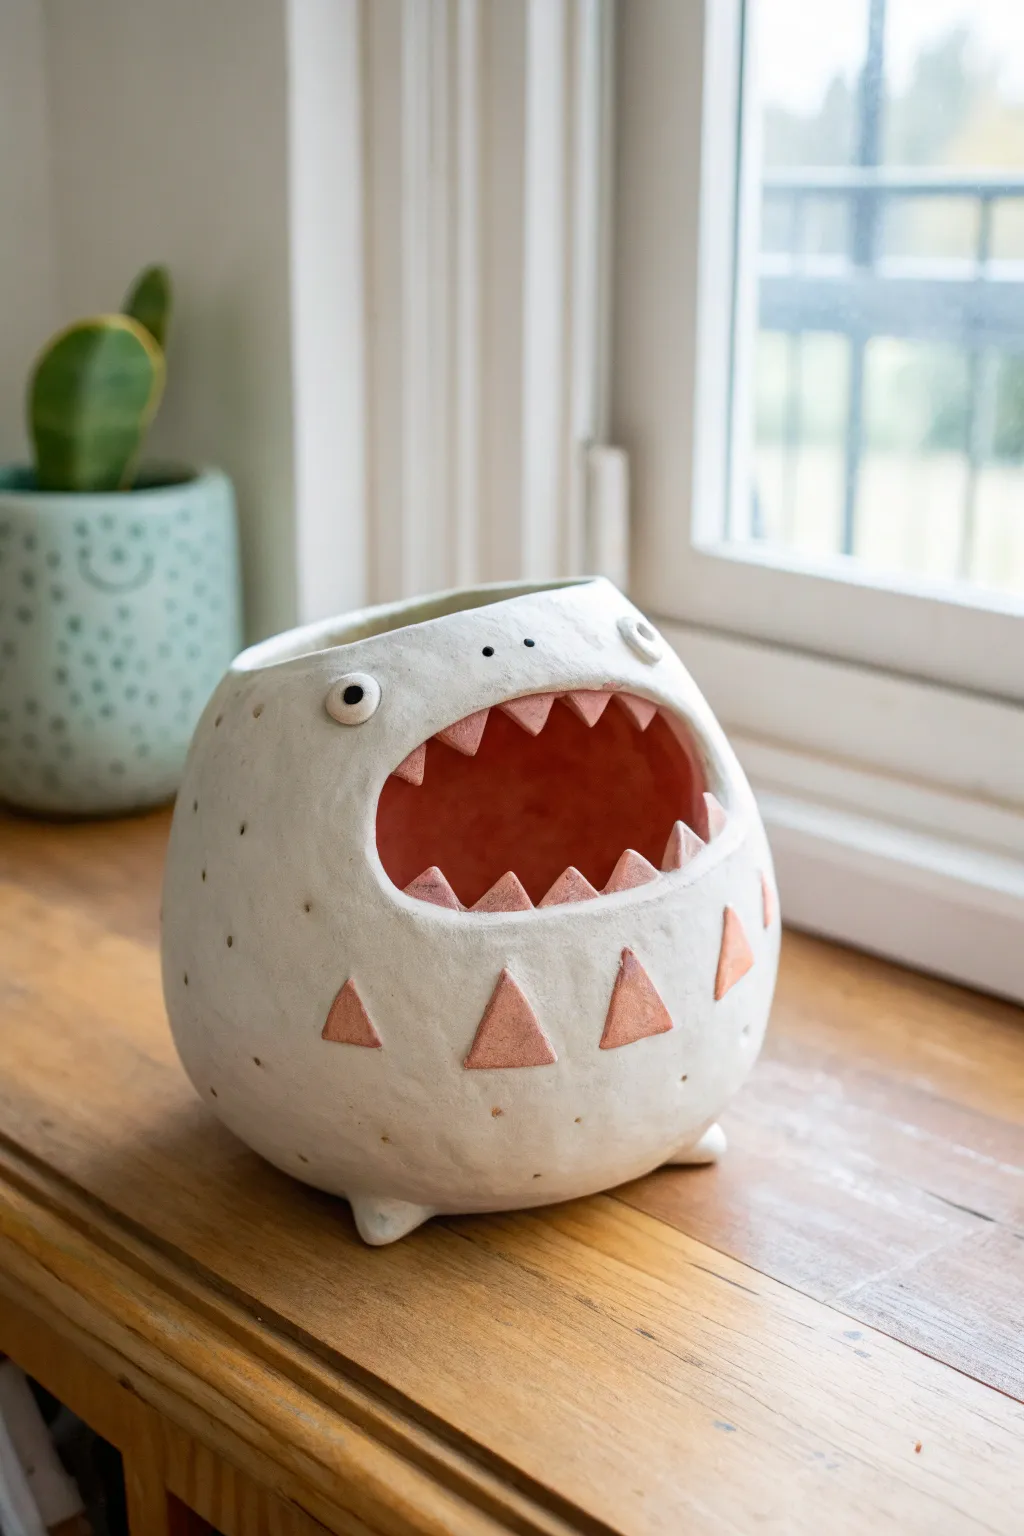
This charming, hungry little creature makes use of two pinch pots joined together to create an adorable spherical shape with a gaping maw. The finished piece features a textured, speckled white glaze with a contrasting pinkish-red interior and playful triangular accents.
Detailed Instructions
Materials
- White stoneware or earthenware clay
- Pottery tools (needle tool, scoring tool/ribbed kidney, wooden modeling tool, rib)
- Small bowl of slip (clay mixed with water)
- Small sponge
- Rolling pin
- Fettling knife
- Pink/Red underglaze
- Matte white glaze (preferably speckled)
- Clear glaze (optional)
Step 1: Forming the Body
-
Prepare two clay balls:
Start by wedging your clay to remove air bubbles, then separate it into two equal balls, each roughly the size of a large orange. -
Pinch the pots:
Insert your thumb into the center of the first ball and gently pinch the walls while rotating the clay, aiming for an even 1/4-inch thickness. Repeat this process for the second ball to create two matching hemispheres. -
Score and slip:
Using a serrated tool or a needle, score the rims of both pinch pots to rough up the surface. Apply a generous amount of slip to the scored areas. -
Join the halves:
Press the two rims together firmly. I like to give them a little twist as they meet to lock the clay particles together. -
Smooth the seam:
Drag clay across the seam with a wooden tool or your thumb to marry the two halves, then use a rib tool to smooth the entire surface until the sphere is seamless and round.
Step 2: Sculpting the Features
-
Cut the mouth:
Decide where the monster’s face will be. Use a needle tool to sketch a large, wide football shape for the mouth, then carefully cut it out with a fettling knife. -
Refine the opening:
Smooth the cut edges of the mouth with a damp sponge or your finger to ensure they are rounded and not sharp. -
Create the feet:
Roll four small balls of clay and shape them into tiny cones. Score and slip the bottom of the monster, then attach these feet so the creature sits sturdily. -
Make the teeth:
Roll out a small slab of clay and cut numerous small triangles. You will need enough to line both the upper and lower jaws. -
Attach the teeth:
Score and slip the base of each triangle and press them just inside the rim of the mouth opening, spacing them somewhat evenly. -
Add body details:
Cut slightly larger triangles from your slab and attach them in a row across the creature’s belly for decoration. Use a needle tool to poke small random holes around the body for texture. -
Form the eyes:
Roll two small balls for eyes and attach them above the mouth. Poke a hole in the center of each to create pupils.
Air Escape Method
Before sealing your two pinch pots fully, it is crucial to poke a tiny, hidden hole somewhere in the body. This allows trapped hot air to escape in the kiln so your monster doesn’t explode.
Step 3: Glazing and Finishing
-
Bisque fire:
Allow the monster to dry completely (bone dry) before firing it in a kiln to bisque temperature (usually Cone 04). -
Underglaze the interior:
Apply 2-3 coats of pink or red underglaze to the entire inside of the mouth and the throat area. -
Paint the details:
Use the same pink underglaze to carefully paint the decorative triangles on the belly and the triangular teeth. -
Highlight the eyes:
Paint a tiny dot of black underglaze inside the pupil holes of the eyes. -
Apply the main glaze:
Brush or dip the exterior of the monster (avoiding the painted triangles and teeth if you want them raw, or use a clear glaze over them) with a matte speckled white glaze. Wipe the bottom of the feet clean before the final firing. -
Glaze fire:
Fire the piece again to the maturation temperature of your specific glaze (often Cone 5 or 6 for stoneware).
Teeth Falling Off?
If decorative bits like teeth pop off as they dry, your clay was likely too dry when joining. Wrap the piece in plastic for a day to equalize moisture, then re-score and slip the detached piece.
Once fired, you will have a delightful little monster ready to hold your treasures or just smile on your shelf


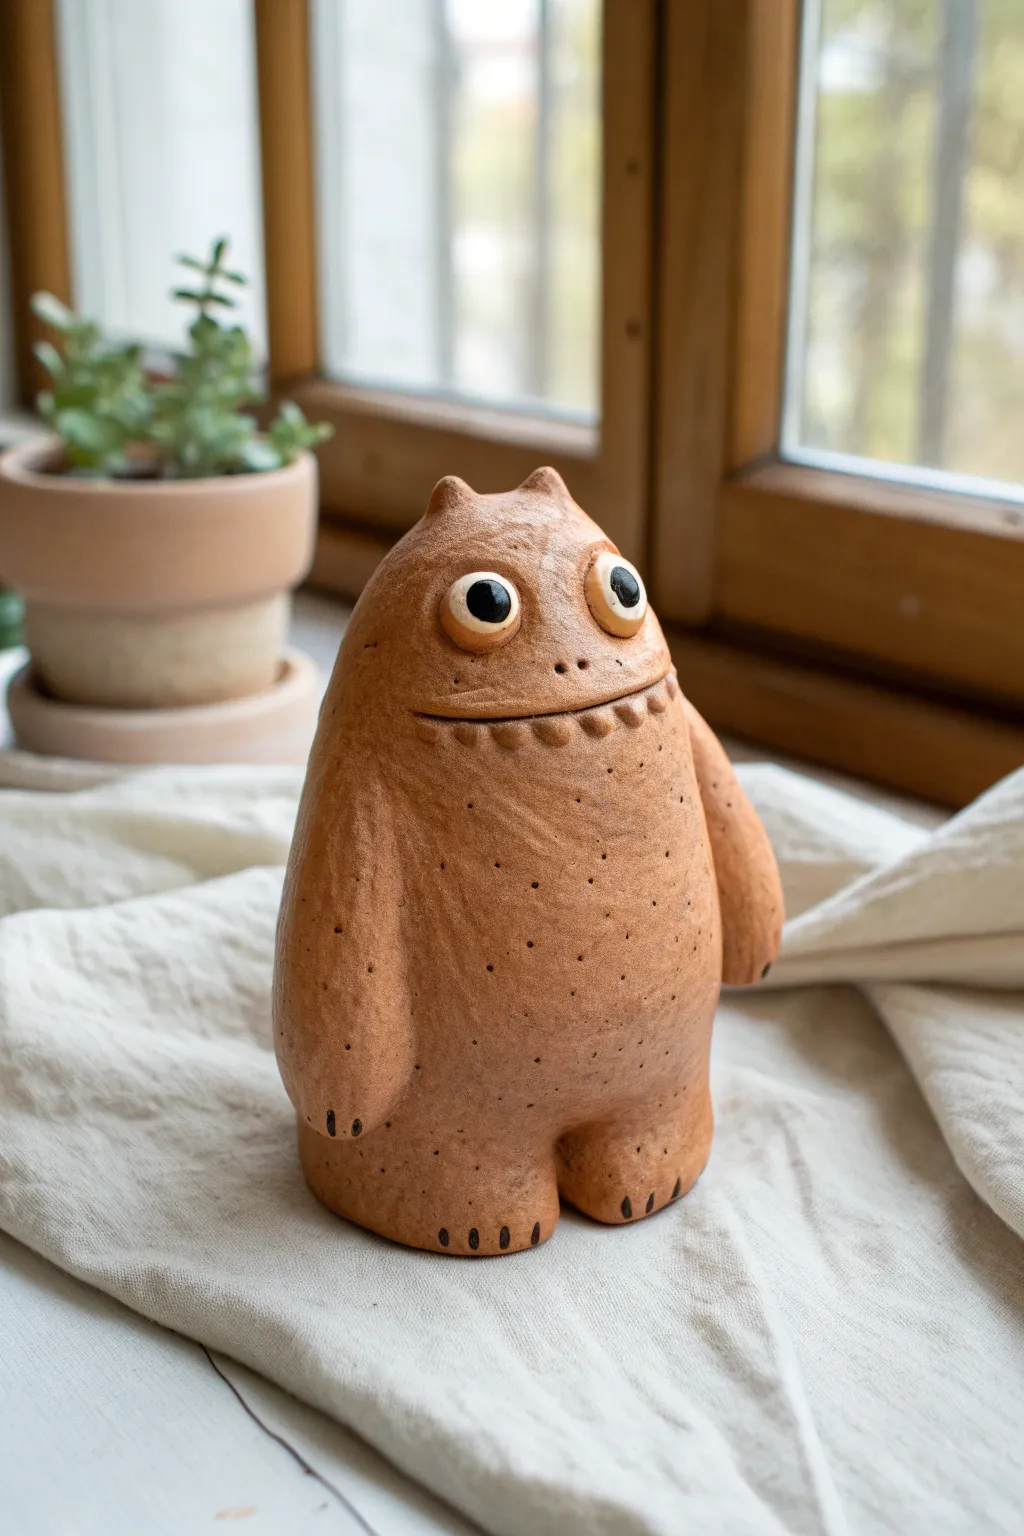
Simple Blob Monster With One Giant Eye
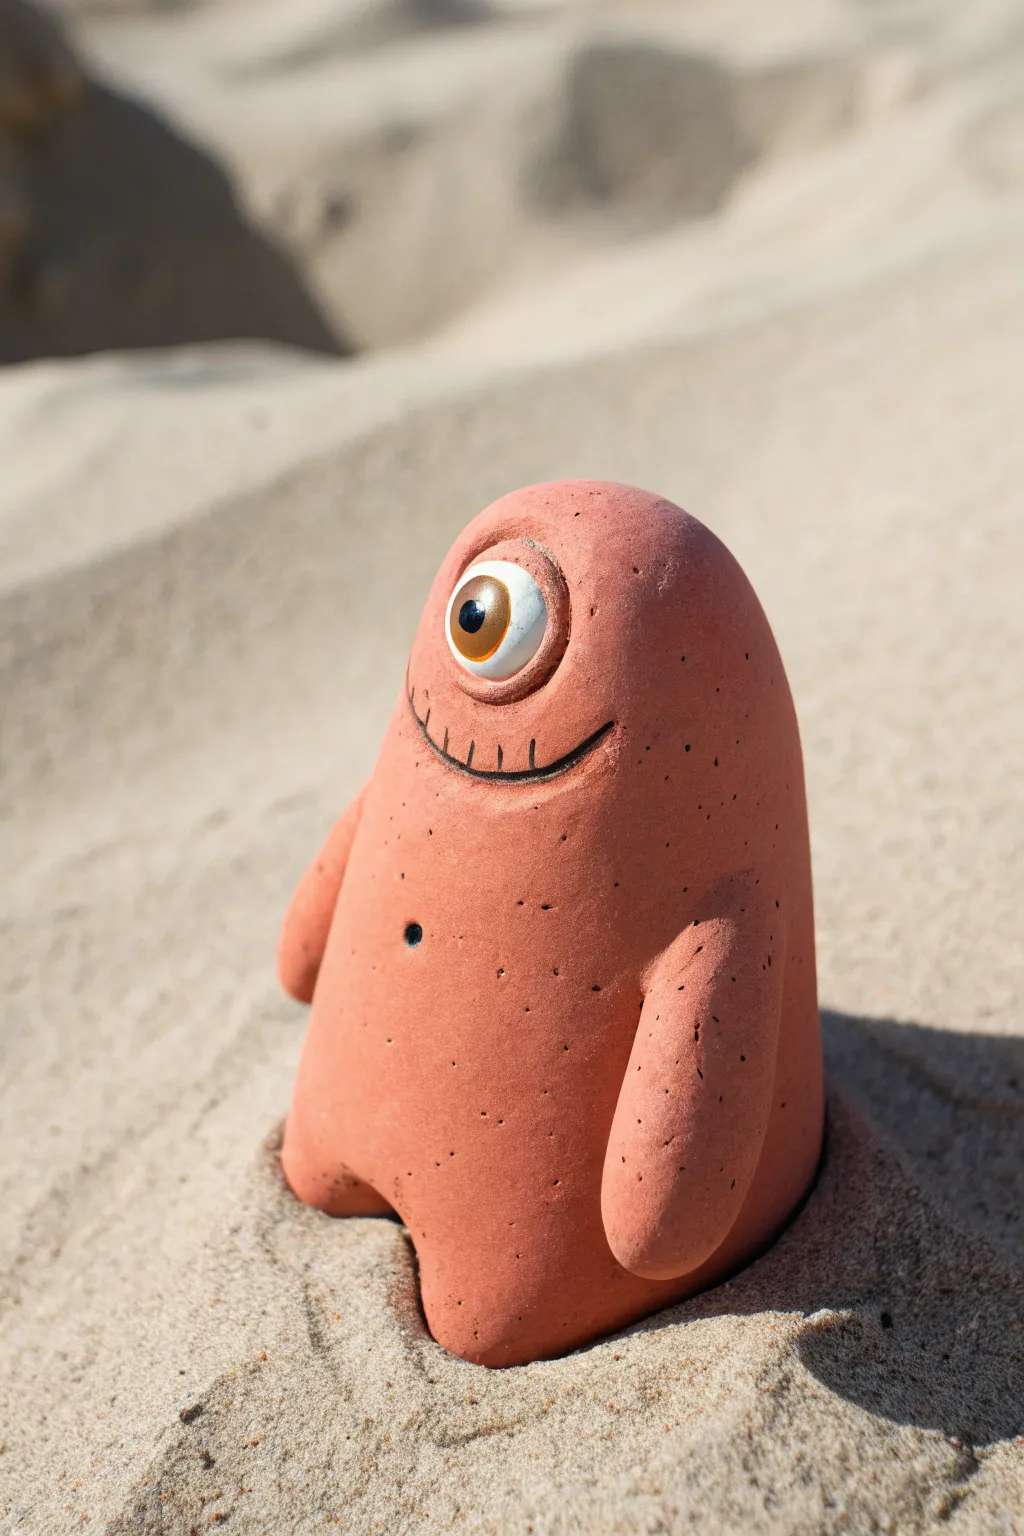
This charming, terracotta-hued cyclops is a perfect beginner project that proves simple shapes have the most personality. With its single oversized eye and gentle smile, this little sand-dweller brings a touch of whimsy to any shelf or potted plant using basic sculpting techniques.
How-To Guide
Materials
- Terracotta-colored polymer clay (or air-dry clay painted terracotta)
- White polymer clay
- Amber/Gold glass cabochon or glass eye bead (approx 10-12mm)
- Black acrylic paint
- Very fine detail paintbrush
- Toothbrush or texturing sponge
- Blade or craft knife
- Needle tool
- Black clay (tiny amount for pupil if not using pre-made eye)
- Modeling tools (ball styluses, smoothing tool)
Step 1: Forming the Body
-
Condition the Clay:
Begin by thoroughly kneading your terracotta clay until it is soft and pliable. This prevents cracks later on. -
Roll the Basic Shape:
Roll a large handful of clay into a smooth ball, then gently roll it back and forth on your work surface to elongate it into a tall oval or pill shape. -
Flatten the Base:
Tap the bottom of your oval firmly against your table to create a flat standing surface so your monster won’t wobble. -
Tape the Head:
Gently gently squeeze the top portion of the oval to make it slightly narrower than the bottom, giving the creature a rounded, dome-like head. -
Smooth the Surface:
Use your fingers or a smoothing tool to erase any fingerprints. The finish should be matte and relatively seamless.
Fixing Fingerprints
Can’t smooth out a stubborn print? Brush on a tiny amount of baby oil or clay softener and rub gently. It melts the top layer just enough to erase marks.
Step 2: Adding Features
-
Create the Eye Socket:
Press your thumb or a large ball tool firmly into the upper center of the face to create a shallow indentation where the eye will sit. -
Make the Sclera:
Take a ball of white clay, flatten it slightly into a thick disc, and press it securely into the indentation you just made. -
Insert the Iris:
Press your amber glass cabochon or eye bead into the center of the white clay. If you don’t have glass, you can create an iris from colored clay, but glass gives that realistic shine. -
Add the Eyelid:
Roll a thin snake of terracotta clay. Flatten it and drape it over the top of the eye to create a heavy upper lid, blending the top edge seamlessly into the forehead. -
Form the Lower Lid:
Repeat with a slightly thinner strip for the lower eyelid, blending it downwards into the cheek area. -
Attach the Arms:
Roll two thick, short logs of terracotta clay. Attach them low on the body’s sides, blending the shoulder joint smoothly so the arms look like they are growing out of the torso. -
Shape the Feet:
Instead of adding separate feet, simply pinch the bottom corners of the main body slightly outward to suggest little nubby feet.
Step 3: Texturing and Finishing
-
Skin Texture:
Gently tap a clean toothbrush or a coarse sponge all over the terracotta skin (avoiding the eye) to create a subtle, sandy, pore-like texture. -
Sculpt the Smile:
Use a needle tool to incise a wide, curved line below the eye for the mouth. Add tiny vertical tick marks along the line to simulate teeth. -
Add the Belly Button:
Press a small hole into the center of the tummy using a medium-sized ball tool or the back of a paintbrush. -
Bake or Dry:
Follow the instructions for your specific clay. If baking polymer clay, create a foil tent to prevent scorching the lighter terracotta color. -
Painting Details:
Once cool or dry, dilute black acrylic paint with a little water. Carefully paint the mouth line and the belly button indentation. -
Freckling:
Using the same diluted black paint and a stiff brush or toothbrush, flick tiny speckles onto the clay body to give it that natural stone or ceramic look. -
Final Varnish:
I like to add a dot of gloss varnish to the eye (if it isn’t glass) to make it look wet, while leaving the body matte.
Level Up: Environment
Make a base! Glue your baked monster onto a small wooden disc, cover the disc in glue, and sprinkle real fine sand over it to mimic the dune scene.
Place your little cyclops in a sunny spot where his giant eye can watch over the room


Tri-Eyed Monster With Eye Stalks
This whimsical little sculpture features a wonderfully textured, speckled clay body and an irresistibly goofy expression. With its wide, toothy grin and prominent eyes, it makes a charming companion for any plant shelf or windowsill.
Step-by-Step
Materials
- Speckled Stoneware Clay (or mid-fire clay with grog)
- Pottery wire cutter
- Needle tool
- Small wooden modeling tool
- Slip (clay and water mixture)
- Black underglaze
- White underglaze
- Clear glossy glaze (optional)
- Scoring tool (or fork)
- Small rounded brush
- Sponge
Step 1: Shaping the Base Body
-
Prepare the Clay:
Start by wedging a fist-sized ball of speckled stoneware clay to remove air bubbles. This ensures your monster won’t crack during firing. -
Form the Torso:
Roll the clay into a smooth, slightly elongated pear shape. The bottom should be wider and flatter to provide a stable base, tapering gently toward the top where the head will be. -
Create the Feet:
At the very bottom front of the pear shape, use your thumbs to gently press and define two rounded mounds for feet. You don’t need to add separate clay; just sculpt them out of the main mass. -
Add Toe Details:
Using a needle tool, press three small vertical lines into the front of each foot mound to suggest clawed toes. Keep them simple and slightly dark for contrast.
Wobbly Monster?
If your monster tips over, tap the bottom firmly on a table while the clay is still plastic to create a completely flat base.
Step 2: Sculpting the Face
-
Define the Mouth:
About one-third of the way down from the top, use a wooden tool or wire to slice a horizontal line across the face for the mouth. Curve it slightly upwards at the ends for a smile. -
Sculpt the Lips:
Gently smooth the clay above and below the cut line to create separate lips. The bottom lip can protrude slightly more than the top. -
Add Scale Detail:
Just under the mouth line, press the rounded end of a wooden tool repeatedly to create a row of small, semi-circle indentations. This mimics a row of teeth or textured scales along the jawline. -
Form the Nostrils:
Poke two very small holes just above the mouth line with your needle tool for nostrils.
Step 3: Adding Appendages
-
Make the Arms:
Roll two small coils of clay, tapering one end of each to be slightly thinner. These will be the arms. -
Attach the Arms:
Score the sides of the body and the flat inner side of the arms. Apply a dab of slip, press the arms firmly onto the torso, and blend the seams at the shoulder area until invisible. -
Detail the Hands:
At the bottom tip of each arm, press two small lines with the needle tool to match the claw marks on the feet. -
Create Horns:
Pinch the very top of the head into two small, pointed triangles. Smooth the clay between them so they look like organic protrusions rather than stuck-on triangles.
Texture Trick
To enhance the natural speckles, wipe the raw clay with a damp sponge just before drying. This exposes the grog/speckles for more character.
Step 4: The Eyes and Finishing Touches
-
Shape the Eyes:
Roll two small spheres of white clay (or the same clay body if you plan to paint them white later). Flatten them slightly. -
Mount the Eyes:
Score and slip the area above the mouth. Press the eye spheres on firmly. I find placing them slightly wide apart gives a goofier, friendlier expression. -
Add Pupils:
Roll tiny balls of clay for pupils or, for a flatter look, simply wait until the bisque phase to paint them. -
Refine the Surface:
Use a damp sponge to smooth out any fingerprints or rough tool marks on the body, but be careful not to erase the speckled texture of the clay. -
Dry and Bisque:
Let the monster dry slowly under plastic for a day, then uncovered until bone dry. Fire to bisque temperature.
Step 5: Glazing
-
Paint the Eyes:
Apply white underglaze to the whites of the eyes (if you didn’t use white clay) and distinct raised black underglaze dots for pupils. -
Accentuate Details:
Wash a very thinned black underglaze into the mouth line, claw marks, and nostril holes, then wipe away the excess with a damp sponge. This brings out the depth. -
Final Fire:
Leave the raw clay body unglazed to show off the natural speckles, or apply a clear matte glaze if you want it sealed. Fire to the final maturity temperature of your clay.
Place your little clay friend near a sunny window to watch over your plants


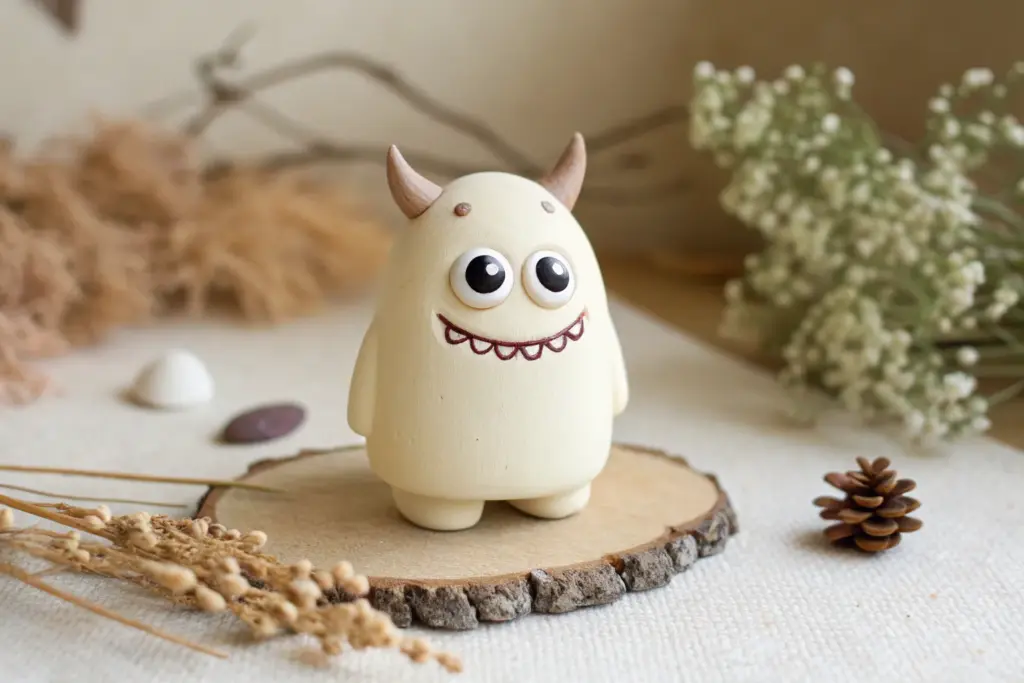
Tiny Horned Monster Figurines
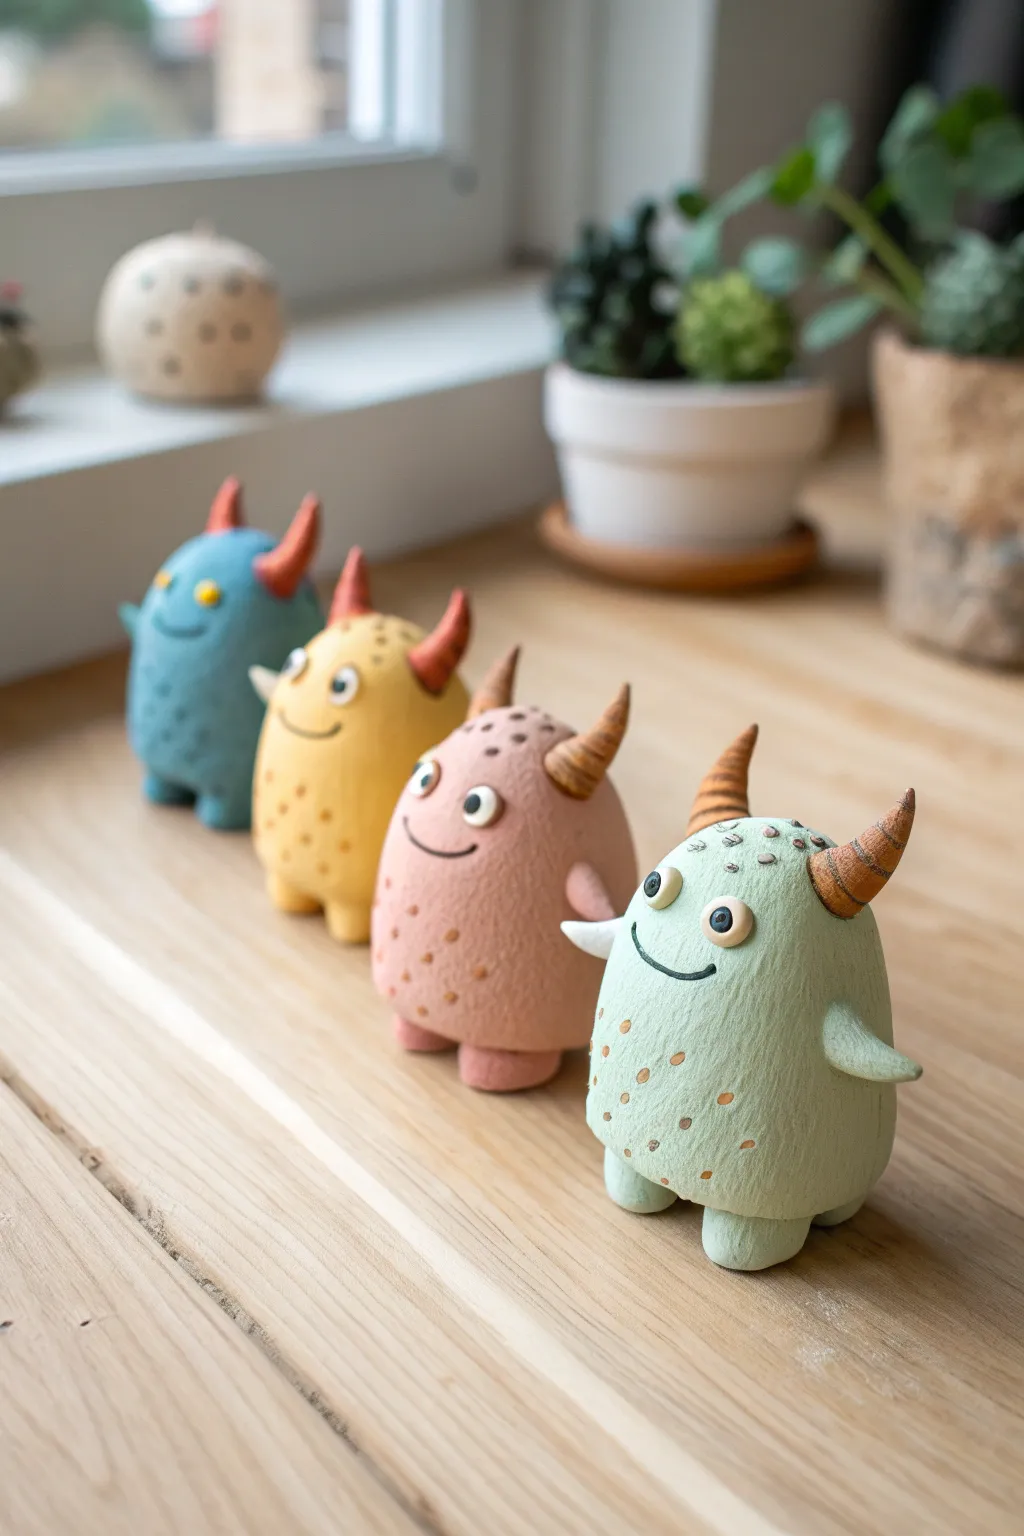
These charming clay horned monsters bring a splash of personality with their rounded bodies, stubby legs, and expressive little horns. Their smooth, matte finish with subtle speckling gives them a delightful, handcrafted stoneware feel that looks great on any windowsill.
Step-by-Step Tutorial
Materials
- Polymer clay (light blue, yellow, pink, and mint green colors)
- Brown polymer clay (for horns)
- White and black polymer clay (for eyes/pupils)
- Dark brown acrylic paint (for speckles/details)
- Small ball tool or toothpick
- Old toothbrush or stiff bristle brush
- Aluminum foil (optional for core)
- Parchment paper
- Toaster oven or conventional oven for baking
- Matte varnish (optional)
Step 1: Shaping the Base
-
Condition the clay:
Start by warming up your colored clay (blue, yellow, pink, or green) in your hands until it is soft and malleable. This prevents cracks later on. -
Form the body:
Roll a ping-pong ball sized amount of clay into a smooth sphere. Gently roll one end slightly more to create an egg shape, but keep it plump and rounded. -
Flatten the bottom:
Tap the wider end of your egg shape onto your work surface to create a flat bottom so the monster stands up on its own. -
Add texture:
Before adding limbs, gently tap the entire surface of the body with an old toothbrush or a ball of aluminum foil. This creates that lovely organic, stony texture seen in the photo.
Use a Toothbrush
For that realistic ‘stone’ finish shown in the image, tap the unbaked clay gently with an old dry toothbrush. The bristles create perfect micropores.
Step 2: Arms and Legs
-
Create stubby legs:
Roll two small pea-sized balls of the same body color clay. Squish them slightly and press them onto the bottom of the body to form short, sturdy feet to support the weight. -
Blend the seams:
Use your thumb or a modeling tool to smooth the clay where the legs meet the body, ensuring a seamless connection. -
Form the arms:
Roll two small teardrop shapes for the arms. They should be quite short and slightly tapered. -
Attach the arms:
Press the wider end of the teardrops onto the sides of the body, positioning them fairly low down. Smooth the join again so they look like they are growing naturally out of the torso.
Make Them Glow
Try using glow-in-the-dark polymer clay for the eyes or the horns. They’ll look normal in daylight but turn into little night-lights when the sun sets.
Step 3: Expressive Features
-
Make the mouth:
Use a small needle tool or a blade to carefully carve a small, curved smile into the face area. I like to make this slightly off-center for a quirky look. -
Create the eyes:
Flatten two tiny discs of white clay and press them onto the face above the mouth. Add minuscule balls of black clay to the centers for pupils. -
Shape the horns:
Take your brown clay (or a contrasting color like reddish-orange) and roll two small cones. Gently curve the tips to give them a crescent shape. -
Detail the horns:
Using a craft knife, very lightly score horizontal rings around the horns to give them a ribbed texture. -
Attach the horns:
Press the horns firmly onto the top of the monster’s head. You can vary the position—some pointing up, some angled back—to give each monster a different personality.
Step 4: Finishing Touches
-
Initial bake:
Place your monsters on parchment paper and bake according to your clay manufacturer’s instructions. Usually, this is around 275°F (135°C) for 15-20 minutes. -
Cool down:
Let the figurines cool completely before handling them. The clay is fragile while hot. -
Add speckles:
Dilute a tiny drop of dark brown acrylic paint with water. Dip a stiff brush (or toothbrush) into the paint and flick the bristles with your thumb to splatter tiny decorative dots over the body. -
Darken the mouth:
Use a very fine brush to paint a thin line of black or dark brown into the carved mouth groove to make the smile pop. -
Seal it:
Once the paint is totally dry, apply a thin coat of matte varnish if you want to protect the finish without making them shiny.
Now you have a whole squad of colorful, textured monsters ready to guard your desk.

The Complete Guide to Pottery Troubleshooting
Uncover the most common ceramic mistakes—from cracking clay to failed glazes—and learn how to fix them fast.
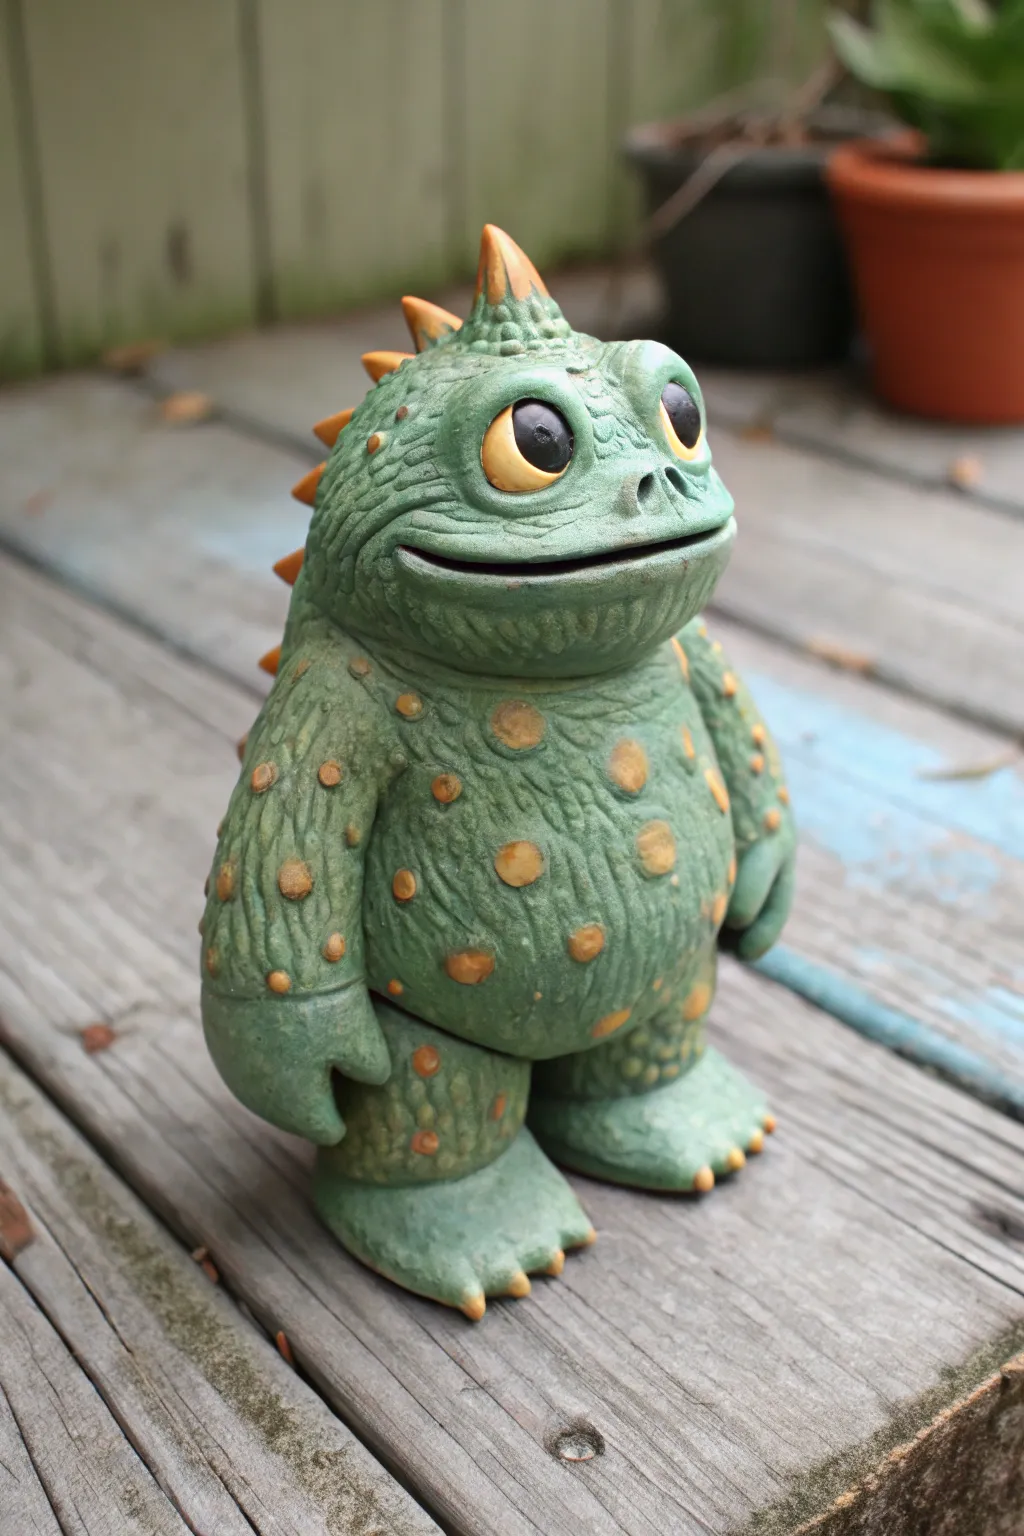
Spiky-Back Snail-Style Monster
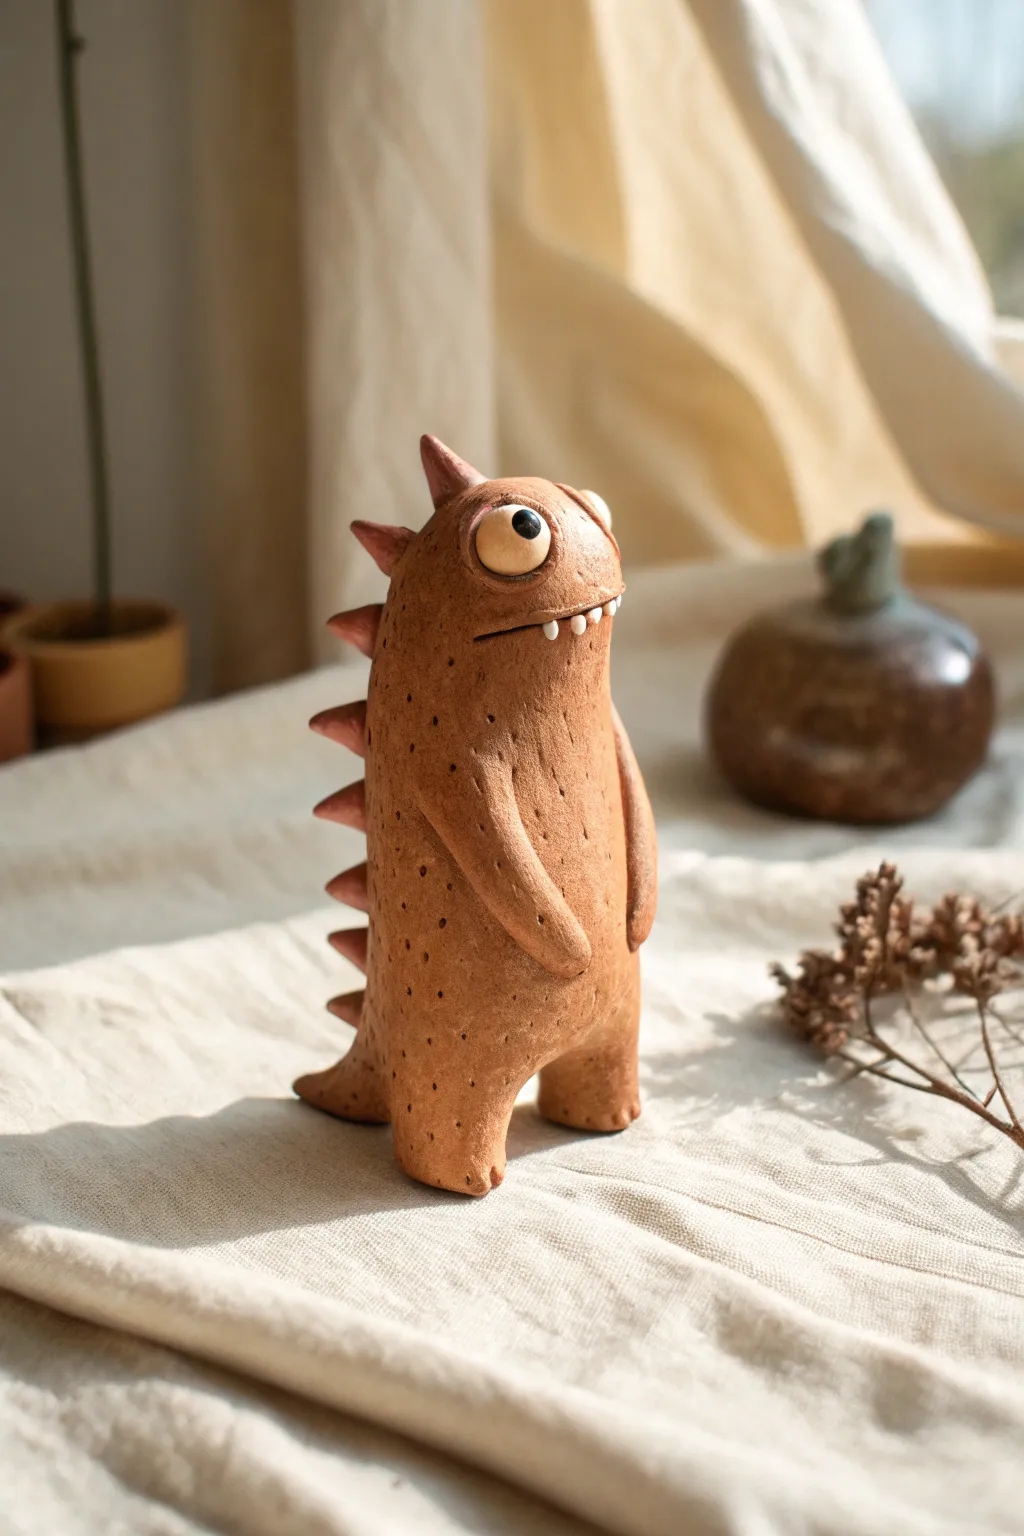
This whimsical little creature stands tall with a speckled, stoneware texture and a row of playful spikes running down its back. Its comical, wide-eyed expression and tiny teeth give it a personality that balances between grumpy and confused.
How-To Guide
Materials
- Speckled buff stoneware clay (or polymer clay with faux speckles)
- White clay slip or white polymer clay (for eyes/teeth)
- Black underglaze (or black acrylic paint)
- Needle tool
- Small loop tool
- Finishing sponge
- Scoring tool (serrated rib)
- Clear glaze (if using ceramic clay)
- Small paintbrush
Step 1: Shaping the Base Body
-
Create the main form:
Start with a softball-sized lump of clay. Roll it into a smooth cylinder, slightly tapered at the top to create a gentle pear shape that stands upright. -
Define the legs:
At the wider base, use your thumb to press an indentation into the bottom center. Gently pull and pinch the clay on either side of this indentation to form two short, sturdy legs. -
Flatten the feet:
Tap the figure firmly onto your work surface to flatten the bottoms of the feet, ensuring the monster stands stable and doesn’t wobble. -
Smooth the surface:
Use a damp sponge or your finger to smooth out any large bumps, refining the transition from the legs to the main body.
Step 2: Adding Arms and Features
-
Form the arms:
Roll two small coils of clay, about the thickness of a pencil. Taper one end of each coil so it blends seamlessly into the body. -
Attach the arms:
Score and slip the sides of the torso where the arms will go. Attach the arms so they hang down casually, curving slightly inward to rest on the belly. -
Carve the mouth:
Decide on the expression—this guy looks a bit bewildered. Use a needle tool to slice a horizontal line for the mouth, curving it naturally. -
Create the eye sockets:
Using a small loop tool or your thumb, gently press two shallow indentations where the eyes will sit. This helps the eyeballs look integrated rather than just stuck on.
Clean Connections
When attaching the spikes, utilize a ‘wiggling’ motion after scoring and slipping. This forces air bubbles out and ensures the spikes won’t pop off during the drying phase.
Step 3: Spikes and Details
-
Make the spikes:
Roll out a small slab of clay or form 6-8 individual triangles. Vary the sizes, keeping the largest ones for the upper back and smaller ones for the neck and tail area. -
Attach the spine:
Score a vertical line down the center of the monster’s back. Slip and attach the spikes in a row, blending the base of each spike into the body clay for a strong bond. -
Add texture:
Using a needle tool, poke random small holes all over the body. This mimics the porous texture of the reference image and adds visual interest. -
Form the eyes:
Roll two balls of white clay (or slip-painted clay). Place them into the eye sockets. Make one slightly larger than the other for a quirky look. -
Sculpt the teeth:
create incredibly tiny triangles of white clay. Carefully attach three or four of these to the bottom lip, letting them poke upward.
Give Him Accessories
Customize your monster by adding a tiny clay backpack, a holding object like a flower, or even a small party hat to change the narrative of the sculpture completely.
Step 4: Finishing Touches
-
Pupil placement:
Roll tiny balls of black clay (or paint later) for the pupils. Place them slightly off-center or looking in extended directions to heighten the goofy expression. -
Refine the eyelids:
I like to roll incredibly thin coils of body clay and place them over the top and bottom of the eyeballs to create heavy eyelids. -
Dry and fire:
Let the piece dry slowly under plastic to prevent the spikes from cracking. Once bone dry, bisque fire the piece. -
Glaze application:
If you used speckled clay, a clear matte glaze works best to show off the spots. If using paint, apply a terracotta base coat and flick brown paint for speckles.
Set your finished monster on a shelf where his confused stare can keep you company
Toothy Grin Monster With a Dangly Tongue
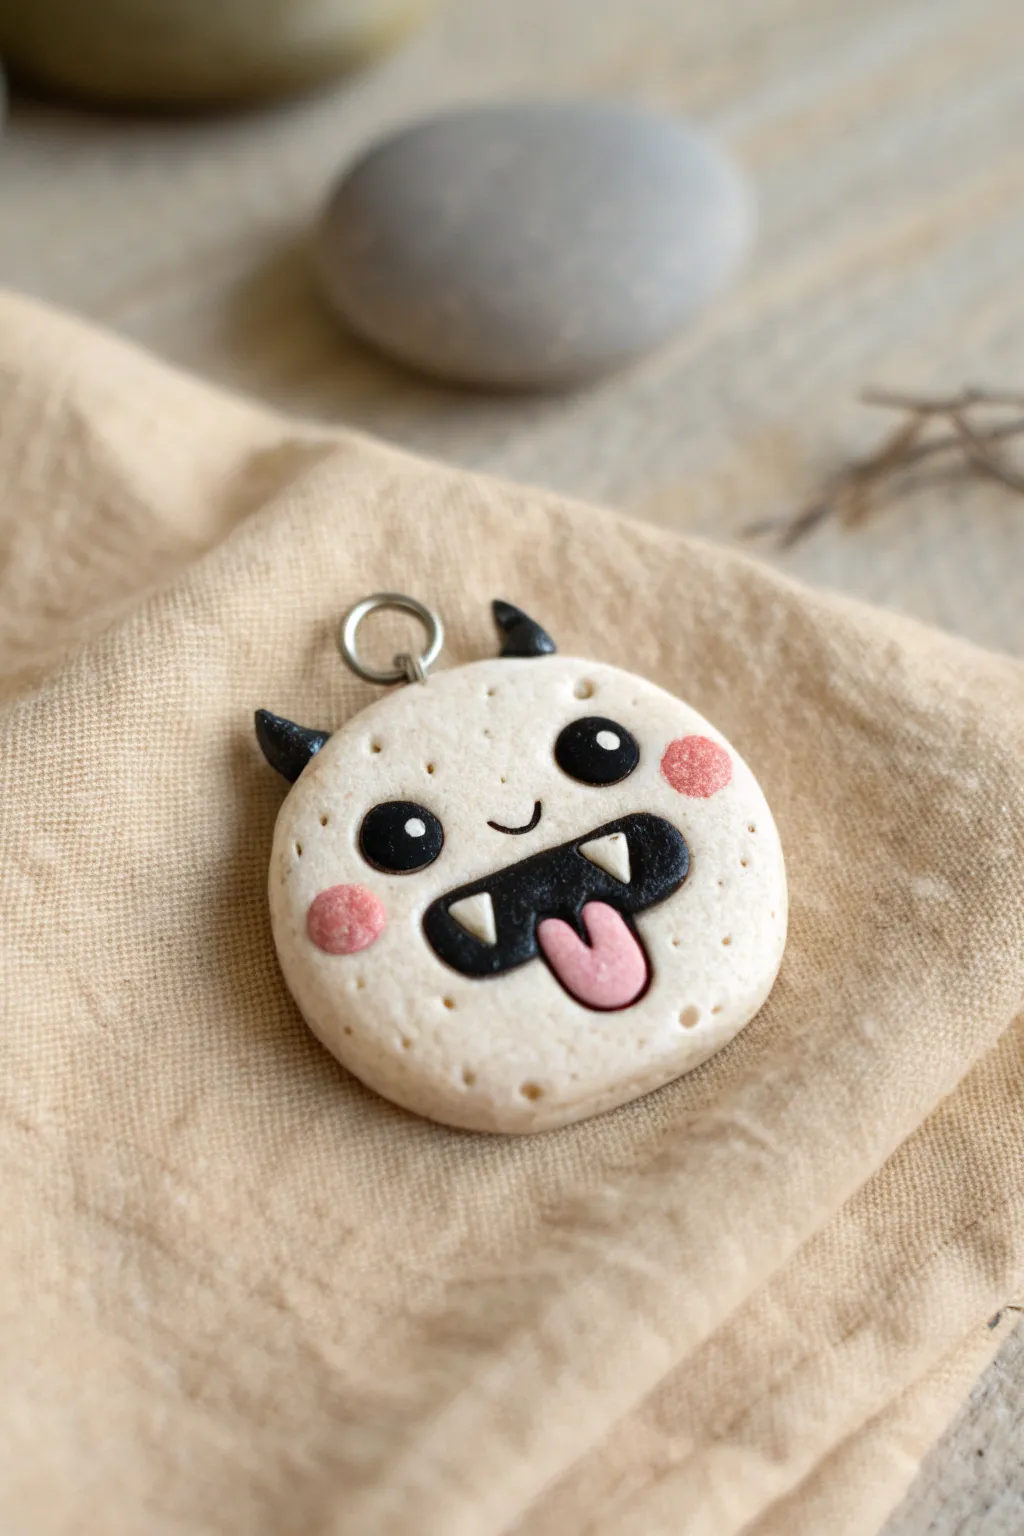
This adorable little monster charm looks almost like a sugar cookie gone rogue, complete with tiny horns and a sticking-out tongue. Its round, textured face and bright, playful expression make it a perfect beginner-friendly polymer clay project for a keychain or necklace.
Step-by-Step
Materials
- Polymer clay (white/beige for the base, black, pink)
- Small metal jump ring
- Pointed sculpting tool or toothpick
- Ball tool (small and medium)
- Soft pastel chalk (pink or red)
- Small paintbrush
- Clay roller or pasta machine
- Circle cutter (approx. 1.5 inches)
- Gloss glaze or UV resin (optional for eyes/mouth)
- Oven and baking sheet
Step 1: Shaping the Base
-
Condition the clay:
Start by kneading your white or beige clay until it is soft and pliable. If you want that ‘cookie’ look, mix a tiny speck of brown into white clay to get a warm, grainy off-white shade. -
Roll and cut:
Roll the clay out into a thick slab, about 1/4 inch thick. Use your circle cutter to punch out a perfect round shape. Smooth the edges gently with your finger to remove any sharp cut lines. -
Add texture:
Using a pointed tool or a toothbrush, gently stipple the surface of the circle to give it a porous, cookie-like texture. Leave the center area slightly smoother where the face will go. -
Insert the hardware:
Take your metal jump ring and gently press it into the top edge of the circle. I like to add a tiny snake of clay over the embedded part on the back to secure it firmly.
Smudged clay?
If black clay smudges onto the white skin, dip a cotton swab in rubbing alcohol or nail polish remover and gently wipe the stain away before baking.
Step 2: Creating the Face
-
Blush the cheeks:
Before adding features, shave a little pink soft pastel into a powder. Use a dry paintbrush to gently dust two round pink spots onto the cheeks for a soft, airbrushed blush effect. -
Form the mouth shape:
Roll a small piece of black clay into an oval. Flatten it and press it onto the lower half of the face. Shape the top edge to be slightly curved upwards at the corners for a smile. -
Add the teeth:
Roll two tiny cones of white clay. Press these onto the top corners of the black mouth shape, pointing downward as little fangs. -
Shape the tongue:
Create a small, flattened teardrop shape from pink clay. Press this onto the bottom center of the mouth, overlapping the black area slightly so it looks like it’s sticking out. -
Detail the tongue:
Use a needle tool or toothpick to press a vertical line down the center of the pink tongue for added realism.
Glow-in-the-dark upgrade
Swap the white clay for glow-in-the-dark polymer clay for the teeth or the entire body to make a spooky Halloween version.
Step 3: Eyes and Horns
-
Create the eyes:
Roll two small balls of black clay. Flatten them slightly and press them onto the face above the mouth, spacing them evenly apart. -
Add eye sparkle:
For that cute look, place a tiny dot of white clay in the upper right corner of each black eye. This reflection creates instant personality. -
Sculpt the nose:
Roll a very thin, tiny snake of black clay. Curve it into a gentle ‘U’ shape and place it right between the eyes, just slightly lower, to connect the look. -
Attach the horns:
Shape two small cones of black clay. Press them firmly onto the top edge of the head, one on each side of the jump ring. Curve the tips slightly outward for a devilish flair. -
Final texture check:
Go back with your texturing tool and ensure the areas around the added features blend well with the rest of the ‘cookie’ texture.
Step 4: Baking and Finishing
-
Bake the piece:
Place your monster on a baking sheet lined with parchment paper. Bake according to your clay manufacturer’s instructions (usually around 275°F/135°C for 15-30 minutes depending on thickness). -
Cool down:
Let the piece cool completely inside the oven or on a wire rack before handling it, as hot clay is fragile. -
Glaze the features:
Using a fine brush, apply a layer of gloss glaze or UV resin specifically to the black eyes, the mouth, and the tongue. This makes them look wet and shiny while keeping the skin matte.
Once the glaze is dry, you can thread a cord through the ring and wear your new little buddy with pride


What Really Happens Inside the Kiln
Learn how time and temperature work together inside the kiln to transform clay into durable ceramic.
Monster Buddy Trio Display Set
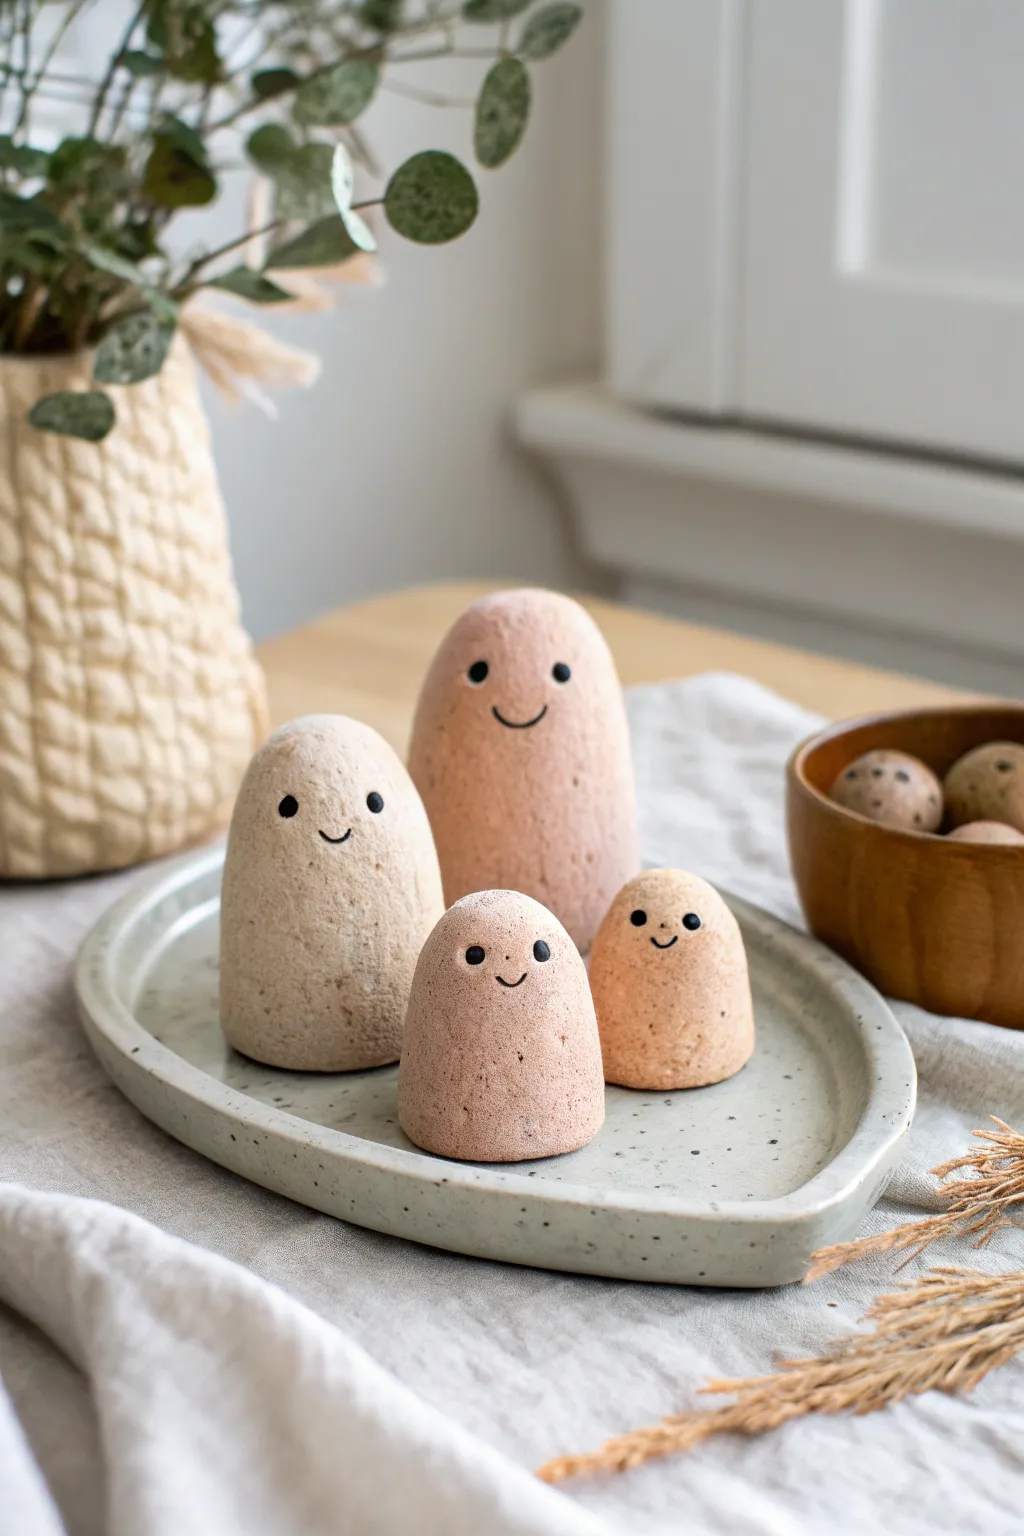
These charming, pebble-shaped friends bring a touch of whimsy to any shelf or desk with their organic textures and simple, friendly faces. The project focuses on soft, rounded forms and natural earth tones to create a peaceful, minimalist display.
Step-by-Step Guide
Materials
- Air-dry clay (stone or terracotta color)
- Acrylic paint (beige, light terracotta, sand)
- Black acrylic paint or Posca marker (fine tip)
- Foil or scrap paper (for armatures)
- Texture sponge or toothbrush
- Fine-grit sandpaper
- Matte sealant or varnish
- Water and small bowl
Step 1: Shaping the Base Forms
-
Create the core:
To save clay and reduce weight, crumple small balls of aluminum foil into rough conical shapes. Make four distinct sizes: one large tall oval, one medium stout oval, and two smaller rounded nubs. -
Prepare the clay:
Condition your air-dry clay by kneading it until it is pliable and smooth. I like to keep a damp cloth nearby to keep the unused clay from drying out while I work. -
Cover the armatures:
Flatten pancakes of clay roughly 1/4 inch thick. Wrap these around your foil cores, ensuring the foil is completely hidden. -
Smooth the seams:
Dip your finger in a little water and blend the seams where the clay edges meet. You want a continuous surface with no visible join lines. -
Refine the shape:
Roll each figure gently on your work surface to smooth out lumps. Aim for a shape that resembles a river stone standing on end—slightly wider at the bottom and rounded at the top. -
Flatten the bottoms:
Press the base of each figure firmly onto the table. This creates a flat surface so they stand upright securely without wobbling.
Stone Effect
Mix sand or used coffee grounds directly into the wet clay before shaping. This creates genuine grit and texture without needing to paint faux speckles later.
Step 2: Adding Texture and Color
-
Add surface texture:
While the clay is still slightly soft, gently tap the surface with a dry texture sponge or an old toothbrush. This mimics the porous look of natural stone. -
Drying time:
Allow the figures to dry completely. Depending on humidity and thickness, this usually takes 24 to 48 hours. Rotate them occasionally to ensure the bottoms dry out too. -
Sand for finish:
Once fully dry, lightly sand any sharp ridges or uneven bumps with fine-grit sandpaper, but be careful not to remove the texture you created earlier. -
Mix your base colors:
Prepare a palette of earth tones. Mix white with small amounts of brown and ochre to get a range of sandy beige and light terracotta shades. -
Apply the base coat:
Paint each figure a slightly different shade. Use a dry-brush technique (remove most paint from the brush) to drag color over the textured surface, enhancing the stone-like effect. -
Speckling effect:
Dilute a tiny bit of brown or black paint with water. Load an old toothbrush and flick the bristles with your thumb to spray fine speckles over the figures for a granite look.
Make Them Functional
Before drying, insert a heavy gauge wire loop into the top of the largest figure to turn it into a photo holder, or press a magnet into the back.
Step 3: Bringing Them to Life
-
Practice the faces:
Before painting on the clay, sketch a few simple smiley faces on paper. Wide-set eyes and a small U-shaped mouth give the cutest expression. -
Paint the eyes:
Using a fine-tip brush or a black paint marker, place two small dots for eyes. Keep them relatively high up on the ‘face’ area. -
Add the smile:
Draw a thin, curved line connecting the area below the eyes. A slightly crooked or asymmetrical smile adds character and handmade charm. -
Seal the artwork:
Finish with a coat of matte spray varnish to protect the paint and give the figures a unified, non-glossy finish that feels modern. -
Arrange your display:
Place the figures together on a small tray or coaster. Grouping them in a huddle makes them look like a little family.
Enjoy your new little family of stone-faced friends sitting happily on your desk
Color-Blocked Shape Monsters
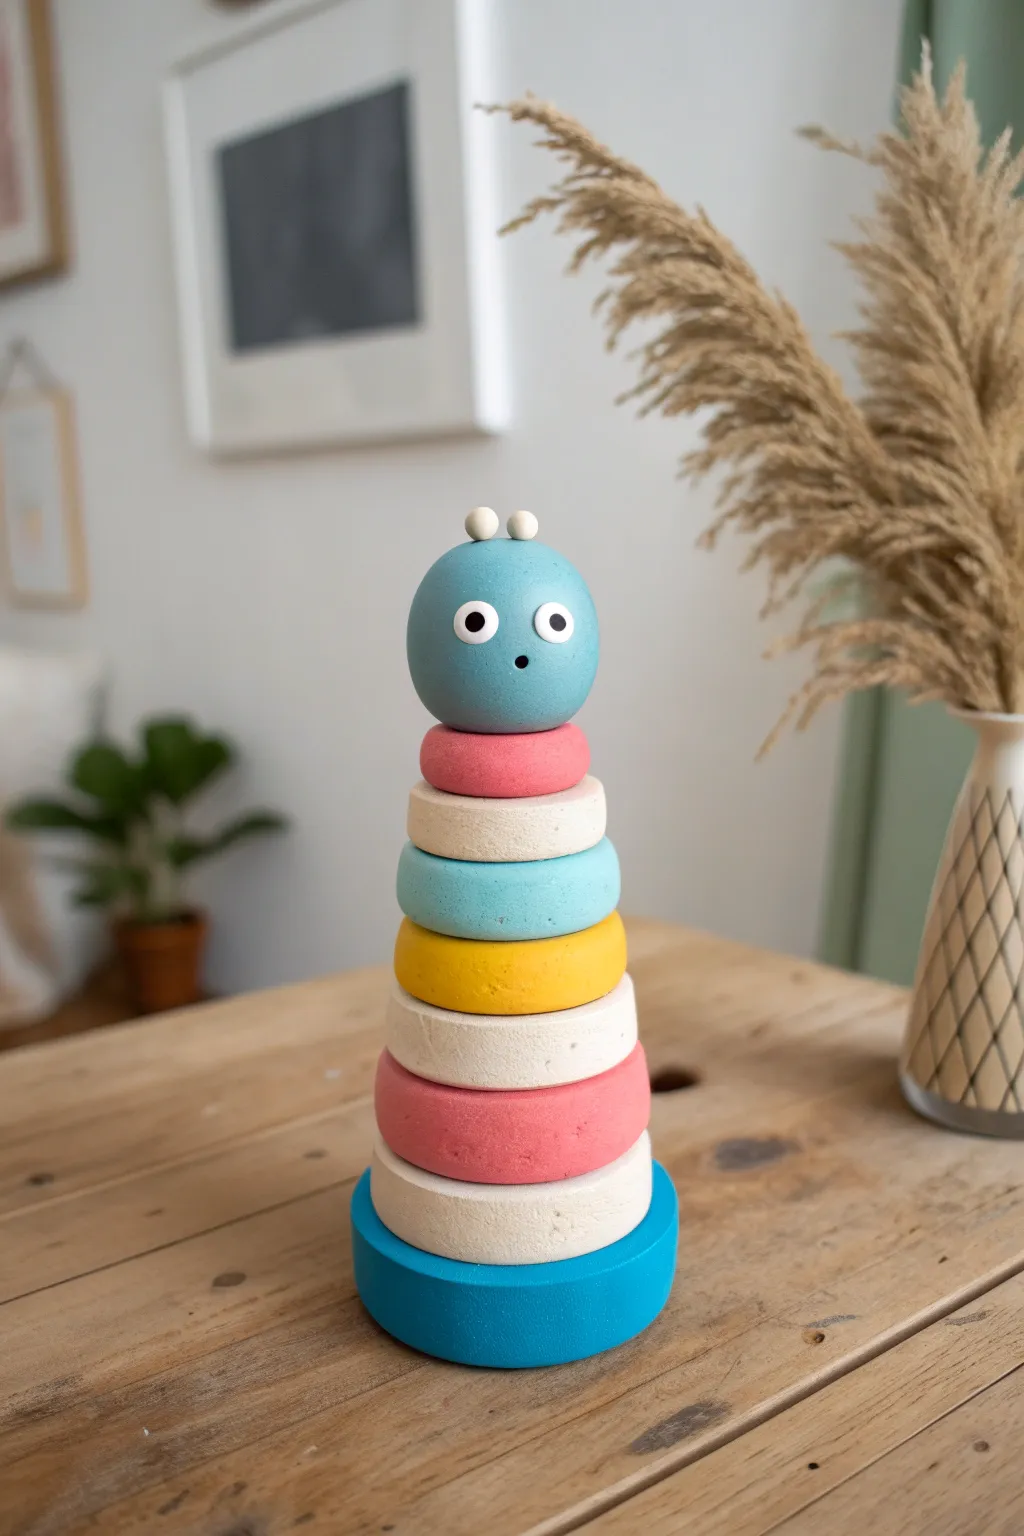
Bring a dash of modern design and playfulness to your shelf with this stacked clay creation that doubles as a charming character. Featuring bold color blocking and a minimalist face, this project transforms simple geometric forms into a friendly desk companion.
How-To Guide
Materials
- Air-dry clay or polymer clay (white base recommended)
- Acrylic paints (Teal, pastel pink, cream/off-white, mustard yellow)
- Paintbrushes (flat shader for blocks, fine detail for face)
- Rolling pin
- Circle cutters (graduated sizes) or jar lids
- Sandpaper (fine grit)
- Water cup
- Wooden skewer or dowel (optional for stability)
- Matte spray varnish or sealant
- Super glue (if not using a dowel)
Step 1: Forming the Base Shapes
-
Prepare your clay:
Begin by conditioning your clay. Knead it thoroughly until it is warm, soft, and pliable to prevent cracking later. -
Roll out the slab:
Roll your clay out onto a clean surface to a consistent thickness of about 3/4 inch. You want these discs to be chunky and substantial. -
Cut the circles:
Using circle cutters or various household round objects, cut out seven discs in graduating sizes. You need a large base, tapering up to a small neck piece. -
Shape the head:
Roll a separate ball of clay for the head. It should be slightly larger than the smallest top disc to create a nice rounded finish. -
Create the antennae:
Roll two very tiny spheres for the antennae and attach them to the top of the head using a dab of water and by blending the clay seams gently with a tool. -
Smooth the edges:
Dip your finger in water and run it along the edges of every disc and the head sphere. Round off the sharp cuts to create a soft, donut-like appearance. -
Add structural support (Optional):
If you want a permanently fixed sculpture, poke a hole through the center of every piece (except the very top of the head) using a skewer while the clay is wet. This allows for a dowel later. -
Dry thoroughly:
Let all pieces dry completely. Air-dry clay often takes 24-48 hours depending on thickness. Flip them occasionally for even drying.
Cracking Clay?
If you see small hairline cracks as the clay dries, mix a tiny bit of fresh clay with water to make a paste (slip) and fill the cracks. Sand smooth once dry.
Step 2: Coloring and Assembly
-
Sand imperfections:
Once fully dry, use fine-grit sandpaper to gently buff away any fingerprints or rough textures on the sides of your discs. -
Paint the base:
Paint the largest bottom disc a deep teal blue. Apply 2-3 coats for opaque coverage, letting each layer dry in between. -
Paint the alternating layers:
Follow the pattern up the stack: Cream for the second disc, deep pink for the third, cream again for the fourth, mustard yellow for the fifth, teal for the sixth, and cream for the neck. -
Paint the head:
Paint the spherical head the same teal shade as the base. I prefer to use a smaller brush near the antennae to keep them clean for now. -
Detail the antennae:
Carefully paint the two tiny antennae spheres in a cream or off-white color. -
Add the face:
Use a fine detail brush or a paint pen to add two white circles for eyes. Once dry, add small black pupils and a tiny black dot for the surprised mouth. -
Seal the pieces:
Spray each component with a matte varnish. This protects the paint and gives the finish that smooth, ceramic-like look. -
Assemble the stack:
Stack your dried pieces from largest to smallest. Glue them together with strong adhesive, or slide them onto your dowel if you created a hole earlier.
Pro Tip: Matte Finish
To get that velvety, stone-like texture shown in the photo, mix a teaspoon of baking soda into your acrylic paint before applying it to the clay.
Now you have a charming, color-blocked friend ready to brighten up your workspace

TRACK YOUR CERAMIC JOURNEY
Capture glaze tests, firing details, and creative progress—all in one simple printable. Make your projects easier to repeat and improve.
Furry Texture Monster With Combed Strands
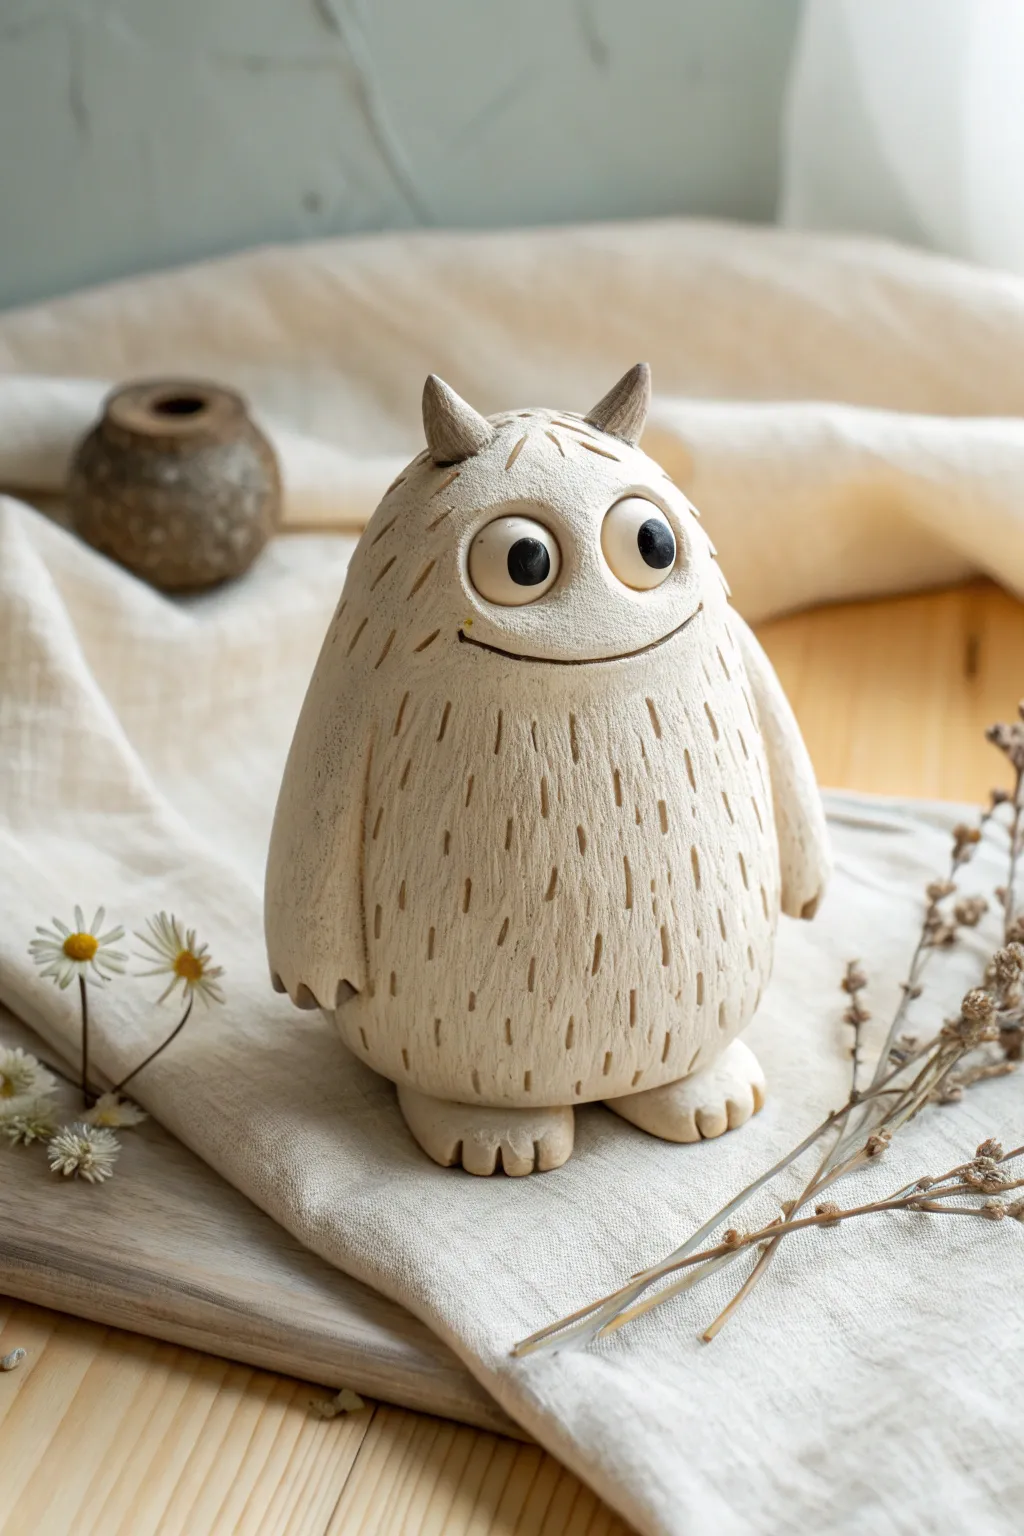
This charming little monster project focuses on creating simple, egg-like forms with engaging textures. The result is a friendly, nature-inspired figurine with a carved “fur” pattern that adds depth and character to the unpainted clay surface.
Step-by-Step Tutorial
Materials
- Stone-colored polymer clay or air-dry clay (light beige/cream)
- Needle tool or sharp toothpick
- Ball stylus tool (medium size)
- Black glass beads or small balls of black clay (for eyes)
- Clay knife or scalpel
- Small rolling pin
- Aluminum foil (for armature core)
- Soft brush for smoothing
Step 1: Forming the Base Body
-
Build the armature:
Crumple a piece of aluminum foil into a tight egg shape. This will save on clay and keep the figurine lightweight while helping it bake evenly. -
Cover with clay:
Roll out a sheet of your beige clay to about 1/4 inch thickness. Wrap this sheet fully around your foil egg, pressing seams together and smoothing them until invisible. -
Shape the silhouette:
Gently roll the clay-covered egg on your work surface to smooth it out. Taper the top slightly so it’s narrower than the base, giving it a classic pear or drop shape. -
Create the base:
Tap the bottom of the figure firmly against the table to create a flat standing surface so your monster doesn’t tip over.
Step 2: Adding Feet and Arms
-
Shape the feet:
Roll two small balls of clay and flatten them slightly into thick discs. Place the body on top of them to gauge the size—they should poke out just enough to look like sturdy paws. -
Carve toes:
Use a knife or needle tool to press two indentations into the front of each foot disc, creating three distinct, chubby toes. -
Attach the feet:
Score the bottom of the body and the tops of the feet, add a tiny bit of liquid clay or water (depending on your clay type), and press them firmly onto the base. Blend the clay at the back so the seam disappears. -
Make the arms:
Roll two long tear-drop shapes for the arms. Flatten them slightly against the sides of the body. -
Detail the hands:
Just like the feet, cut small notches at the ends of the arms to suggest claws or fingers. Press the arms flush against the body so they look tucked in comfortably.
Natural Speckle Tip
Mix a tiny pinch of black pepper or used dried coffee grounds into your clay before sculpting. This gives a realistic ‘stone’ finish without painting.
Step 3: Face and Horn Details
-
Eyes sockets:
About one-third of the way down from the top, press your thumbs gently into the clay to create a subtle depression for the face area. -
Adding eyes:
Roll two balls of white or light beige clay for the eyeballs and press them into the depression side-by-side. I like to make one slightly larger for a quirky expression. -
Pupils:
Embed black glass beads or press small black clay balls into the center of the white eyeballs. Press them in deeply so they don’t pop out. -
The smile:
Use your needle tool to carve a long, curving smile line directly under the eyes. Deepen the corners slightly to emphasize the grin. -
Adding horns:
Shape two small cones of clay. Attach them to the very top of the head, blending the clay downwards at the base to secure them.
Fixing Cracks
If small cracks appear while the clay dries or after baking, fill them with a mix of clay dust and white glue/liquid clay, then smooth.
Step 4: Creating the Fur Texture
-
Planning the flow:
Visualize the fur growing downwards from the top of the head. Your texture marks should follow gravity. -
The first incisions:
Starting near the horns, use your needle tool to make short, vertical dashes into the clay surface. Press in, then flick downward slightly. -
Working down the body:
Continue making these dashes in rows, working your way down the body. Stagger the marks like bricks so they don’t look like perfect grid lines. -
Varying the marks:
Make some dashes slightly longer and some shorter. This randomness makes the ‘fur’ look more organic and natural. -
Avoiding the face:
Leave the area immediately around the eyes smooth. This creates a mask-like effect that draws attention to the expression. -
Final touches:
Gently brush the surface with a soft dry brush to remove any clay crumbs created by the carving, then bake or dry according to your specific clay’s instructions.
Once dry or baked, your textured monster is ready to sit on a shelf and bring a smile to your face
Scaly Swamp Monster With Warts and Bumps
This charming, wide-eyed swamp creature combines classic monster aesthetics with an approachable, almost cute expression. You will sculpt a sturdy body covered in intricate scale textures and finish it with a weathered, mossy paint job that really makes the details pop.
Detailed Instructions
Materials
- Polymer clay (green, white, and translucent)
- Aluminum foil (for armature)
- Sculpting tools (needle tool, ball stylus, rubber shaper)
- Small texture stamp or mesh (for scales)
- Acrylic paints (dark green, light green, orange, yellow, black, white)
- Matte varnish
- Gloss varnish
- Paintbrushes (flat brush for dry brushing, detail brush)
- Wire (optional, for spine support)
Step 1: Armature & Base Form
-
Build the core:
Start by crumpling aluminum foil into a tight egg shape for the body and a slightly smaller, flattened sphere for the head. Press them firmly together to form a pear-like silhouette. -
Cover with clay:
Condition your green polymer clay until soft. I like to mix a little translucent clay into the green to give the skin a fleshy depth. Sheet the clay out to about 1/4 inch thickness and wrap it entirely around your foil armature, smoothing all seams until invisible. -
Add limbs:
Roll two thick logs of clay for legs and attach them to the bottom, blending the clay upward into the body so there are no seams. Flatten the bottoms so the figure stands on its own. -
Form the arms:
Create two shorter, curved logs for the arms. Attach them to the sides of the body, blending the shoulders seamlessly. Shape rudimentary hands at the ends, making a simple mitten-like shape with a slit for a thumb.
Step 2: Sculpting Details
-
Define the face:
Add a wide, flattened sausage of clay across the face area for the upper lip/snout. Use a knife tool to cut a wide, smiling mouth slit underneath it. -
Create eye sockets:
Press deep indentations above the snout for the eyes. Roll two balls of white clay and press them into these sockets. Use a thin snake of green clay to form eyelids over the top and bottom of the eyeballs to embed them. -
Add warts and bumps:
Roll tiny balls of clay in varying sizes. Press these randomly all over the body—chest, arms, and legs. Press them down so they look like organic growths rather than just stuck-on spheres. -
Texture the skin:
This is crucial for the ‘swamp’ look. Use a needle tool to scratch fine lines radiating around the eyes and snout. For the body, gently press a texture stamp, a piece of mesh, or the end of a small straw into the clay to create a scaly pattern between the warts. -
The dorsal spines:
Form several triangular spikes from the green clay. Attach them in a row running down the back from the head to the lower back. Blend the base of each spine into the body clay.
Texturing Trick
Use a rough piece of coral, a stiff toothbrush, or even a ball of crumpled aluminum foil to roll over the clay. This creates natural, organic skin texture instantly.
Step 3: Finishing & Painting
-
Bake the figure:
Bake your monster according to the clay manufacturer’s instructions (usually 275°F/135°C for 15-30 minutes per 1/4 inch of thickness). Let it cool completely. -
Base coat:
Apply a wash of dark green acrylic paint over the entire figure. While it’s still wet, wipe most of it off with a paper towel. The dark paint will stay in the textured crevices and scales, creating instant shadows. -
Dry brush the skin:
Load a flat brush with light sage green paint and wipe most of it off on a towel until the brush is almost dry. Lightly brush over the raised surfaces of the skin to highlight the texture. -
Paint the embellishments:
Paint the warts and the dorsal spines with a muted orange or yellow-ochre color. You might need two thin coats for opacity. -
Detail the eyes:
Paint the eyeballs a warm yellow-orange. Once dry, add a large black pupil in the center and a tiny white dot for a reflection highlight. -
Seal:
Coat the entire figure with a matte varnish to protect the paint. Finally, use a high-gloss varnish only on the eyes and the inside of the mouth to make them look wet and alive.
Sticky Fingerprints?
If you see fingerprints on your smooth clay areas before baking, lightly brush the clay with a little baby oil or clay softener to smooth them away without destroying the shape.
Now your little swamp dweller is ready to guard your desk with its friendly stare
Tentacled Pocket Monster With Curled Arms
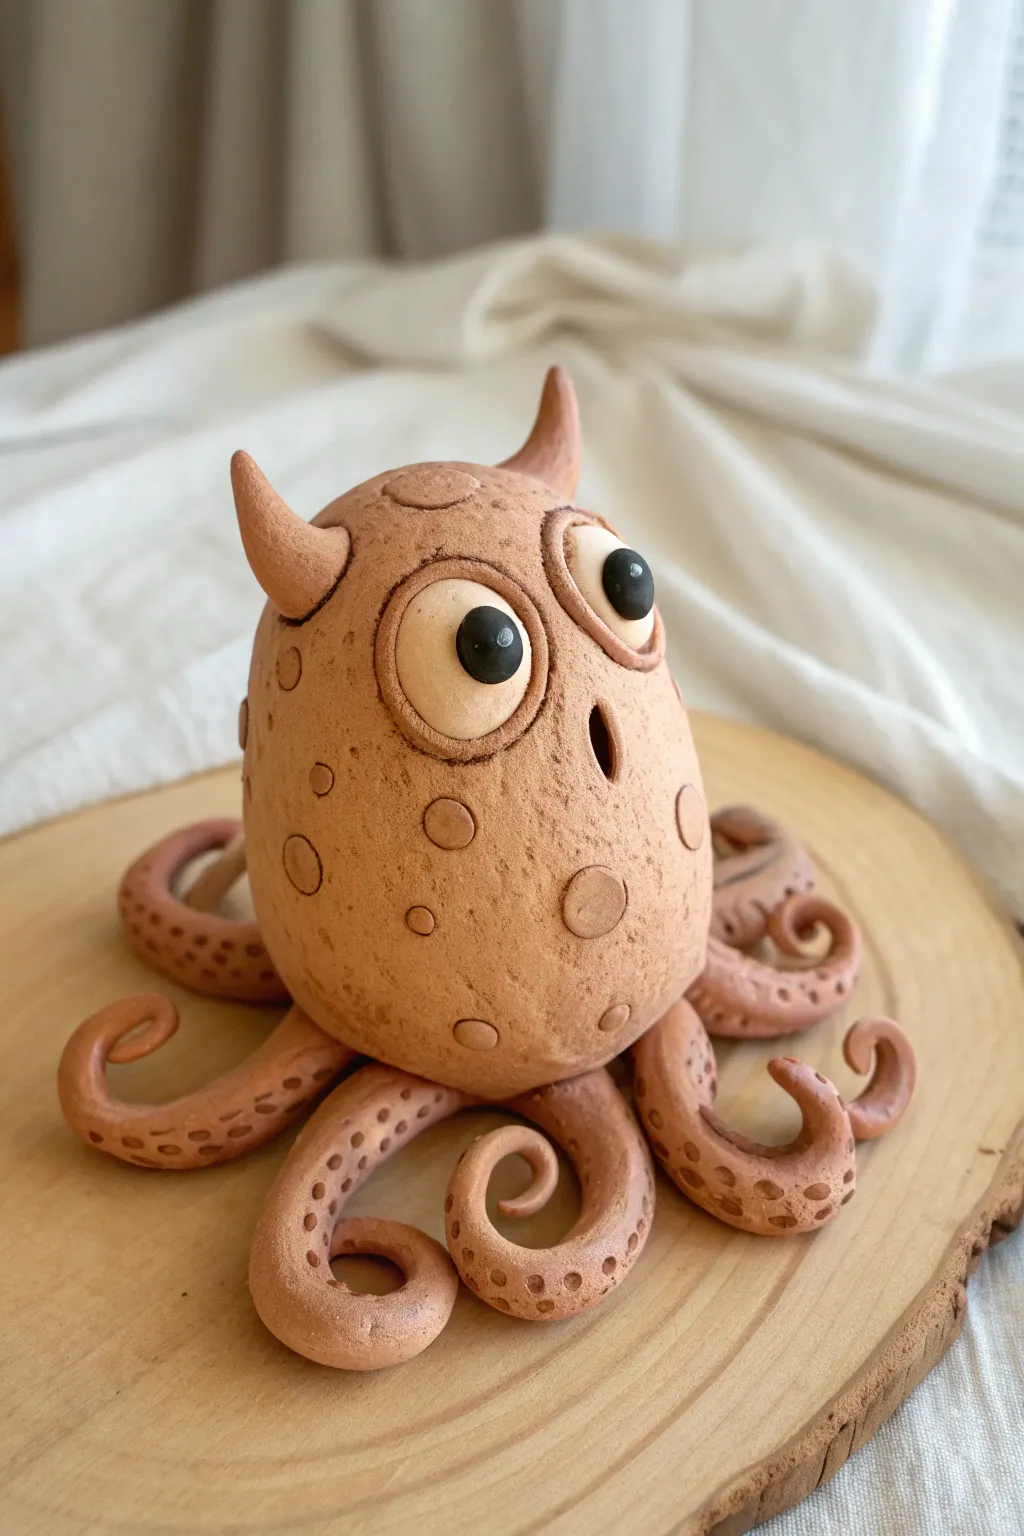
This charming little desktop companion combines the body of an egg with the soul of an octopus, featuring expressive eyes and playful, curled tentacles. The texture work and natural clay tones give it an earthy, organic feel that looks great on any shelf.
Step-by-Step
Materials
- Air-dry clay or polymer clay (terracotta or light brown color)
- Small amount of white clay (for eyes)
- Small amount of black clay (for pupils)
- Ball stylus tools (various sizes)
- Needle tool or toothpick
- Small round cutter or straw (optional for spots)
- Rolling pin
- Water or slip (for joining)
- Smooth wooden board or work mat
Step 1: Shaping the Core
-
Form the main body:
Start with a large ball of your terracotta-colored clay, about the size of a tennis ball. Roll it in your palms until smooth, then gently elongate it into a solid, egg-like shape. -
Smooth the surface:
Once you have your egg shape, use a tiny bit of water on your finger to smooth out any fingerprints or cracks. The surface needs to be relatively clean before adding texture. -
Create the eye sockets:
Choose the front of your ‘egg’ and press two large, shallow indentations where you want the eyes to sit. This helps the eyes look integrated rather than just stuck on the surface. -
Add the mouth:
Using a medium-sized ball tool or the handle of a paintbrush, press a single, small round hole below the eye area to create an ‘O’ shaped mouth.
Step 2: Tentacles and Appendages
-
Roll clay coils:
Roll out eight tapered coils of the same terracotta clay. Each should be thicker at one end (where it attaches) and taper to a point at the other. -
Detail the suckers:
Before attaching them, use a small needle tool or a very small ball stylus to press two rows of tiny dots along the length of each tentacle to mimic suckers. -
Curl the tips:
Take the thin end of each tentacle and roll it tightly inward to create a spiral curl. Vary the tightness of the curls slightly for a more natural, organic look. -
Attach tentacles to the base:
Score the bottom of the egg body and the thick ends of the tentacles. Apply a dab of water or slip and press the tentacles firmly onto the underside of the body, radiating outward like a star. -
Create the horns:
Fashion two small cones from the leftover clay. Curve them slightly so they look like little devil horns. -
Mount the horns:
Score and slip the top of the head, then press the horns into place. Smooth the seam where the horn meets the head with a sculpting tool so they look like they grew there.
Cracks while rolling?
If your clay coils or curls are cracking as you bend them, the clay is too dry. Use a spray bottle to mist the clay lightly or knead in a drop of water before reshaping.
Step 3: Eyes and Texturing
-
Place the whites:
Roll two balls of white clay and flatten them slightly into thick discs. Try to make one slightly larger than the other for a quirky expression. Press these into the eye sockets you made earlier. -
Add eyelids:
Roll very thin snakes of the terracotta clay. Wrap one around the top edge of each white eye disc to create eyelids, blending the outer edge into the head. -
Insert the pupils:
Take two tiny pieces of black clay, roll them into balls, and press them onto the white eyeballs. Place them slightly askew to give the monster a confused or curious look. -
Texture the skin:
Using different sized tools—like the end of a straw, a marker cap, or ball tools—lightly press random circular indentations all over the body. Do not pierce through the clay; just make surface craters. -
Refine the surface:
Gently sponge the surface with a barely damp sponge to soften any sharp edges created by the texturing tools, giving the skin a weathered, stone-like appearance. -
Final check:
Verify the tentacles are supporting the body evenly so it doesn’t tip over. If needed, gently adjust the curls to act as feet. -
Let it dry:
Allow your monster to dry completely according to your clay’s package instructions. I find slow drying away from direct heat prevents cracking.
Pro Tip: Realistic Weight
To prevent the heavy egg-body from crushing the tentacles while wet, support the body on a small block of wood or a overturned shot glass until the clay firms up.
Once fully dry, your little tentacled friend is ready to guard your desk.
Hatching Monster Egg With a Peek-Out Face
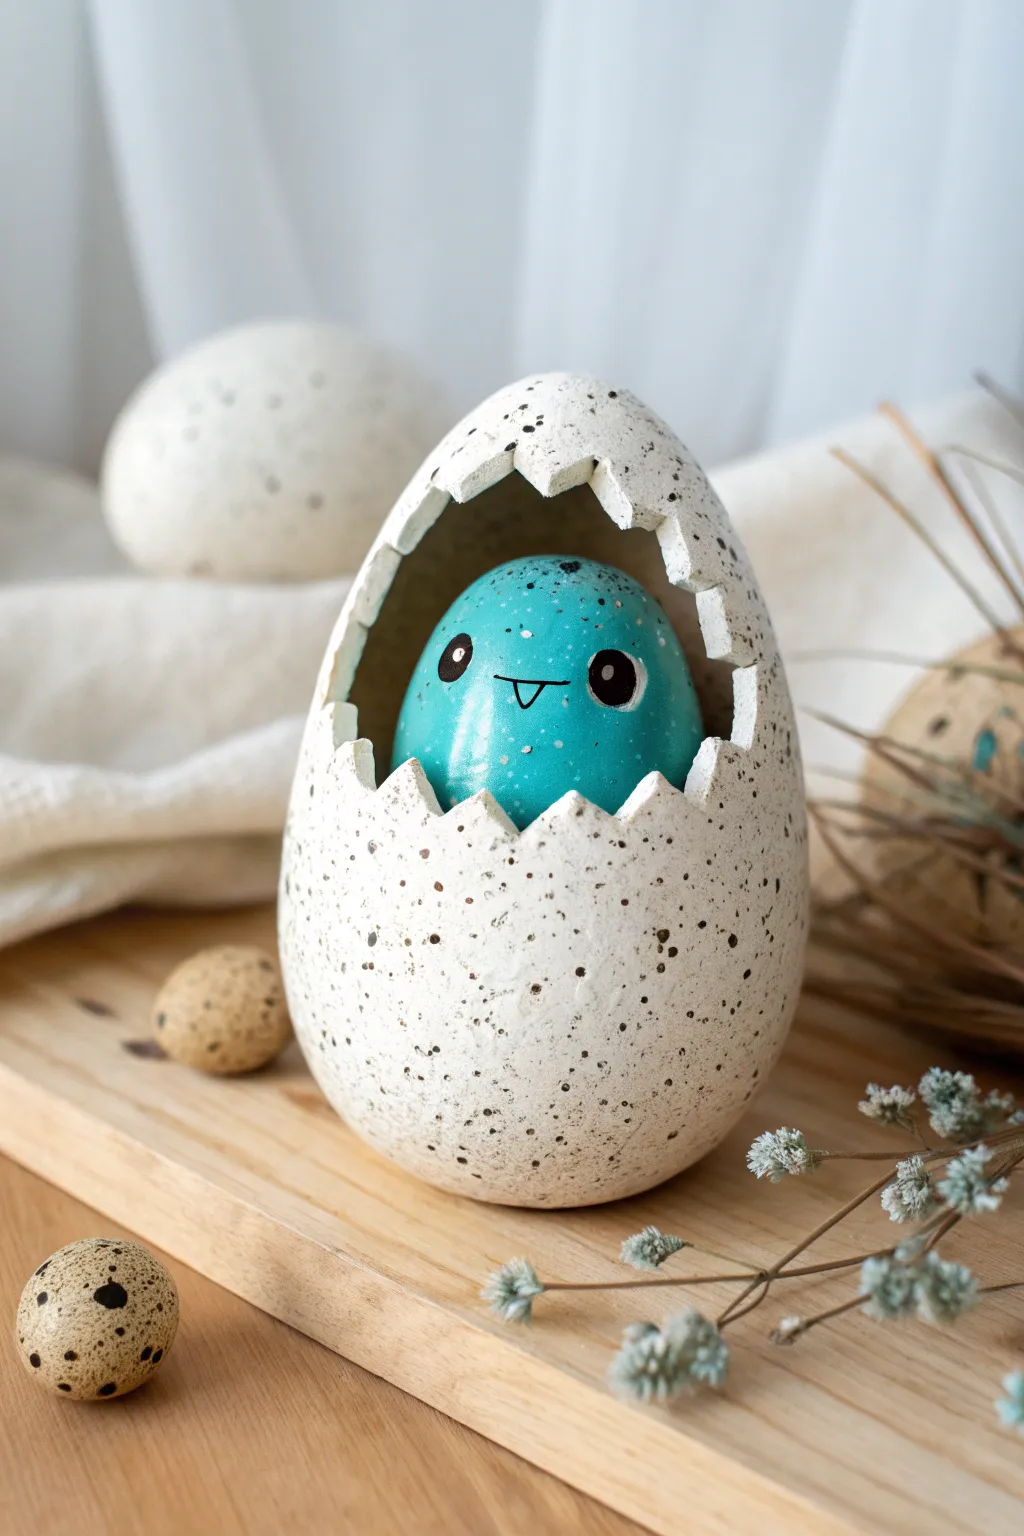
Create this adorable surprise by crafting a speckled, cracked eggshell that reveals a cute turquoise monster hiding inside. This project combines simple pinch pot techniques with whimsical painting to make a charming little desk buddy.
Step-by-Step Tutorial
Materials
- Air-dry clay or polymer clay (white)
- Acrylic paints (white, turquoise/teal, black)
- Old toothbrush or stiff bristle brush
- Small round paintbrush
- Rolling pin
- Craft knife or scalpel tool
- Aluminum foil
- Matte varnish or sealant
- Fine grit sandpaper
Step 1: Sculpting the Inner Monster
-
Form the core shape:
Start by rolling a ball of aluminum foil into an egg shape, roughly the size of a large chicken egg. This saves clay and keeps the figure lightweight. -
Cover with clay:
Roll out a sheet of clay to about 1/4 inch thickness. Wrap it entirely around your foil egg, smoothing out any seams with a little water on your finger until you have a perfect, smooth egg shape. -
Refine the surface:
Check for any lumps or bumps. Gently roll the clay egg between your palms to ensure it is perfectly round and smooth, then set it aside to firm up slightly.
Step 2: Creating the Cracked Shell
-
Roll out the shell layer:
Roll out a second, slightly larger sheet of clay. This needs to be thin enough to look like a shell but thick enough to hold its shape—aim for about 1/8 inch. -
Drape the shell:
Gently drape this sheet over your inner monster egg. I find it easiest to work in two halves—a bottom cup and a top dome—molding them loosely around the inner shape without pressing them together permanently. -
Cut the jagged edge:
Using your craft knife, carefully cut a zig-zag, cracked pattern across the middle of the ‘shell’ layer. Create deep V-shapes to mimic a hatched egg. -
Separate and shape:
Pull the top and bottom shell pieces apart. Gently flare the jagged teeth outward just a tiny bit to give it that ‘bursting open’ look. -
Create the window:
Take the top half of the shell and cut away a large section of the front, following the zig-zag pattern, so the monster’s face will be visible once assembled. -
Final assembly:
Place the inner egg into the bottom shell cup. Use a tiny bit of water or slip to secure it. Then, attach the top shell dome to the back of the inner egg, ensuring the opening aligns with where the face will be.
Clean Splatter
Cover the teal monster face with masking tape or a scrap of paper while splattering the shell. This keeps the cute face clean and avoids rogue black spots on the brightly colored skin.
Step 3: Painting and Details
-
Dry and sand:
Allow the entire sculpture to dry completely (this can take 24-48 hours for air-dry clay). Once dry, lightly sand any rough edges on the shell or monster. -
Base coat the shell:
Paint the outer shell a creamy white or light beige. Apply two coats if necessary to get solid coverage. -
Paint the monster:
Carefully paint the exposed inner egg with a vibrant turquoise or teal acrylic paint. Use a small brush to get cleanly into the corners where the shell meets the monster. -
Add the speckles:
Dilute some black or dark brown acrylic paint with water. Dip an old toothbrush into it, and running your thumb over the bristles, flick a fine mist of speckles over the entire white shell. Practice on paper first to control the splatter size. -
Paint the face:
Using a very fine detail brush and black paint, draw two large circles for eyes and a small ‘w’ shape for the mouth. Add tiny white dots inside the black eyes for a reflection highlight. -
Seal the piece:
Once all paint is totally dry, coat the inner monster with a satin varnish for a bit of shine, and use a matte varnish on the shell to keep it looking like natural ceramic.
Level Up: Texture
Before the clay dries, gently press a piece of coarse sandpaper or a rough sponge against the outer shell. This gives it a realistic, porous eggshell texture instead of being perfectly smooth.
Now you have a hatched monster friend to keep you company on your desk
Stacked Totem Monster Made of Segments
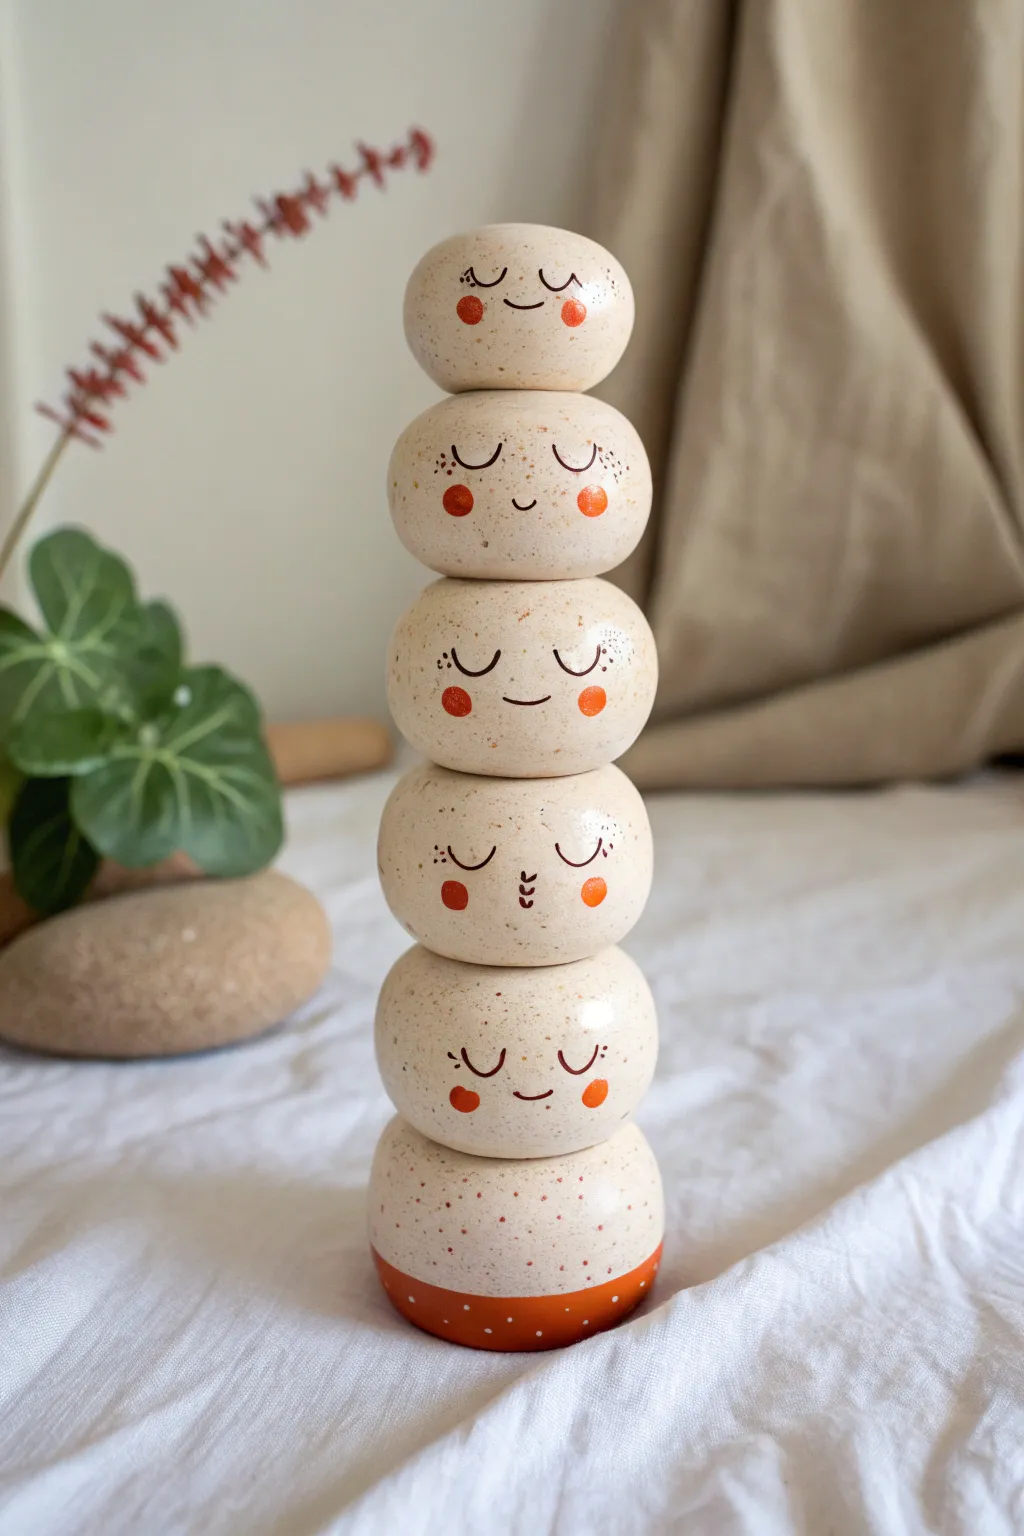
This charming, smiling sculpture is built from a vertical stack of smooth, rounded segments that mimic the look of speckled river stones. With sweet, dreaming faces painted on each level, it serves as a peaceful little guardian for a desk or shelf.
Step-by-Step Guide
Materials
- Light beige or cream polymer clay (or air-dry clay)
- Flecked clay additive or ground black pepper (for speckling)
- Acrylic rolling pin
- Fine-grit sandpaper
- Terracotta or rust-orange acrylic paint
- Black acrylic paint or fine-tip permanent marker
- Small dotting tool or toothpick
- Fine detail paintbrush (00 size)
- Matte spray varnish or Mod Podge
- Strong craft glue or liquid clay (if baking)
- Aluminum foil (for creating an internal armature)
Step 1: Shaping the Segments
-
Prepare the speckled clay:
Start by conditioning your beige clay until it is soft and pliable. If your clay isn’t pre-speckled, I like to knead in a tiny pinch of ground black pepper or specialized clay flecks to create that natural, stony texture found in the original image. -
Divide into portions:
Cut your clay into six equal portions. For the very bottom piece, you might want to use slightly more clay to create a stable, weighted base. -
Form the spheres:
Roll each portion into a smooth ball between your palms. Ensure there are no cracks or seams, as these will show up later. -
Flatten into pebbles:
Gently press each ball down onto your work surface to flatten it slightly. You want a rounded ‘pebble’ shape—flat enough to stack securely, but still chubby and rounded on the sides. -
Refine the edges:
Pick up each pebble and smooth the perimeter with your thumb to remove any sharp edges from the pressing. They should look soft and organic. -
Create the base segment:
Take the bottom-most pebble and flatten its underside more significantly than the rest. This ensures your totem won’t wobble once assembled.
Uneven Stack?
If your pebbles keep sliding or leaning while gluing, insert a dry piece of spaghetti pasta or a toothpick through the center of all wet clay pieces to keep them aligned while they dry or bake.
Step 2: Adding Details and Assembly
-
Painting the base dip:
Before assembling, create the ‘dipped’ look on the bottom segment. Use tape to mask off a line if you want it crisp, or freehand paint the lower half of the bottom pebble with rust-orange acrylic paint. Let it dry completely. -
Add base texture:
Once the orange paint is dry, use a toothpick or small brush tip to add tiny white or beige dots over the orange section, mimicking the speckling of the clay. -
Initial stacking check:
Stack your dried or unbaked pieces (depending on your clay type) to check the balance. If using polymer clay, adding a core of crumpled foil through the center or a wire armature helps stability before baking. -
Secure the segments:
Glue the segments together. If using potential polymer clay, apply a thin layer of liquid clay between each pebble and bake the entire stack according to package directions. For air-dry clay, glue them after they are fully cured.
Level Up: Mood Swing
Make the totem interactive! Instead of gluing the pieces together, drill a vertical hole through the center of each and stack them on a wooden dowel. This lets you spin the faces around.
Step 3: Bringing the Faces to Life
-
Sketch the faces:
Once the stack is solid and cool, lightly sketch the sleepy faces with a pencil. Notice that the expressions alternate slightly—some have simple ‘U’ eyes, and one in the middle has small vertical dashes for a mouth. -
Paint the eyes and mouths:
Using your finest brush and black paint (or a marker), carefully trace over your pencil lines. Keep the strokes thin and delicate to maintain the peaceful expression. -
Add the cheeks:
Dip a dotting tool or the decorative end of a paintbrush into the rust-orange paint. Gently stamp two round cheeks on every face, placing them fairly wide apart. -
Freckle (optional):
For extra character, add three tiny dots or ‘freckles’ near the eyes on a few of the faces using the black paint. -
Seal the work:
Coat the entire totem in a matte varnish. This protects the paint and unifies the surface sheen, giving it that finished ceramic look.
Place your warm and friendly totem in a spot where you need a little moment of calm throughout your day
Mini Monster Planter With a Bite-Edge Rim

This charmingly grumpy little planter transforms a standard succulent pot into a friendly desktop companion. With its textured finish, indented eyes, and etched toothy grin, it strikes the perfect balance between spooky and sweet.
How-To Guide
Materials
- White polymer clay (or air-dry clay)
- Black pepper or dried tea leaves (for speckled texture)
- Small rolling pin
- Circular clay cutter (approx. 3-4 inches diameter)
- Small spherical tool or rounded end of a paintbrush
- Needle tool or X-Acto knife
- Slip (liquid clay) or water for joining
- Gloss glaze or matte varnish (optional)
- Small succulent plant and potting soil
Step 1: Prepping and Shaping the Base
-
Create the Speckled Dough:
Begin by conditioning your white clay until it is soft and pliable. To achieve that organic, stone-like look, mix in a pinch of coarse black pepper or dried tea leaves, kneading thoroughly until the specks are evenly distributed. -
Roll the Slab:
Roll out the clay to a uniform thickness of about 1/4 inch. You want it sturdy enough to hold soil but not clunky. -
Cut the Base:
Using your circular cutter, stamp out a round base for the bottom of the pot. Set this aside on a piece of parchment paper. -
Form the Walls:
Cut a long rectangular strip from the remaining rolled clay. The length should match the circumference of your base circle, and the height depends on how deep you want the pot—usually about 2-3 inches. -
Assemble the Cylinder:
Wrap the rectangular strip around the circular base. Score and slip the bottom edge where it meets the base, and join the vertical seam where the wall ends meet. Blend the seams completely smooth with your fingers or a modeling tool so they disappear.
Stone Effect
Don’t over-blend the pepper specks! Leaving them slightly coarse mimics real granite or stoneware pottery perfectly.
Step 2: Adding Personality and Feet
-
Smooth the Rim:
Gently run a damp finger along the top rim of the pot to soften any sharp edges from cutting. It should have a nice, rounded feel. -
Create the Eye Sockets:
Decide where the face will go. Using a small spherical tool or the rounded back end of a paintbrush handle, press firmly into the clay to create two deep, circular indentations for the eyes. -
Draft the Mouth:
Below the eyes, lightly sketch a wide, curved smile using a needle tool. Keep the pressure light at first so you can adjust the positioning. -
Carve the Teeth:
Once happy with the smile, press deeper with the needle tool to outline the mouth. Then, carefully carve a zig-zag line inside the mouth shape to create sharp, triangular teeth. I find it easiest to connect the top and bottom lines with V-shapes. -
Shape the Feet:
Roll three small balls of speckled clay, slightly flattening the bottoms to create stout little nubs. -
Attach the Feet:
Flip the pot upside down. Score and slip the three nub feet onto the base in a triangular formation for stability. Press them on firmly and blend the clay connection points so they don’t pop off later. -
Balance Check:
Turn the pot right-side up and gently press it onto the table to ensure it sits level on its new feet. -
Refine the Texture:
If the handling smoothed out your surface too much, gently tap the exterior with a toothbrush or crumpled foil to bring back that stone-like texture.
Monster Mash-up
Make a whole family by varying the height and width of the pots, or give one a single Cyclops eye instead of two.
Step 3: Finishing Touches
-
Bake or Dry:
Follow the instructions for your specific clay. If using polymer clay, bake it in the oven as directed. If using air-dry clay, let it sit in a dry spot for 24-48 hours. -
Highlight the Features:
Once fully cured or dry, you can use a very watered-down brown acrylic wash to settle into the eye sockets and teeth crevices, wiping away the excess on the surface to make the details pop. -
Seal the Pot:
Apply a coat of matte varnish or gloss glaze to protect the clay, especially if you plan to water a real plant inside. -
Planting:
Fill with gritty succulent soil and settle your chosen plant, like a spiky Haworthia, which looks like funny monster hair.
Now your little speckled beast is ready to guard your windowsill with a smile
Toothbrush Holder Mouth Monster
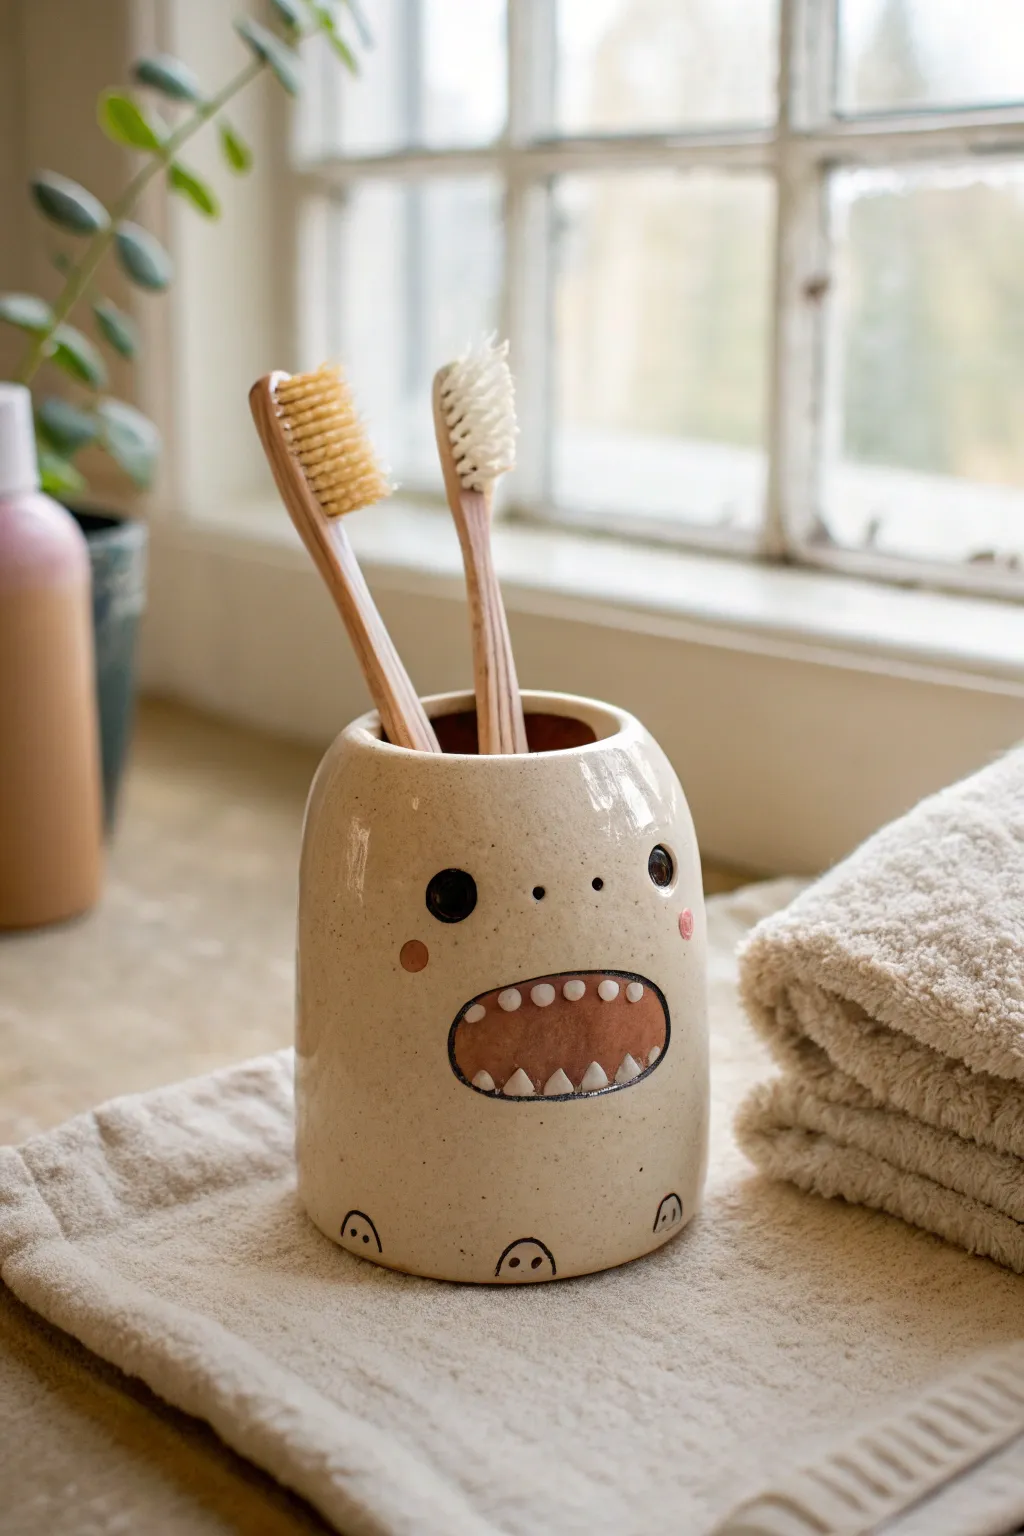
Add a touch of playful whimsy to your bathroom sink with this adorable ceramic monster cup. This project features an organic, speckled beige glaze and a wide, toothy grin that perfectly holds your bamboo toothbrushes.
Step-by-Step
Materials
- Light-colored stoneware clay (speckled clay recommended)
- Pottery wheel (or rolling pin/slab roller for hand-building)
- Pin tool or needle tool
- Small carving tool
- Slip and scoring tool (serrated rib)
- Sponge
- Underglazes: Black, white, pink, terra cotta/rust
- Clear glaze (transparent)
- Fine detail paintbrush
- Kiln
Step 1: Forming the Base
-
Prepare the Clay:
Begin by wedging about 1-1.5 pounds of speckled stoneware clay to remove air bubbles. This amount ensures a sturdy base that won’t tip over easily. -
Throw or Build the Cylinder:
If using a wheel, throw a cylinder roughly 4-5 inches tall. Aim for a slightly tapered shape—wider at the bottom and gently curving inward at the top for that ‘blob’ monster look. If hand-building, roll a slab and form a tube. -
Refine the Rim:
Smooth the upper rim with a chamois or sponge to ensure it’s soft and rounded, which is important for items stored in the bathroom. -
Curve the Walls:
While the clay is still plastic, gently push the walls out from the inside to create a subtle belly, enhancing the cute, chubby aesthetic. -
Dry to Leather Hard:
Set the piece aside until it reaches a leather-hard state, where it is firm enough to be handled without deforming but still retains moisture.
Clean Lines Pro-Tip
Use wax resist on the tiny clay teeth before painting the rust-colored mouth background. This keeps the teeth perfectly white without needing a painfully steady hand.
Step 2: Adding the Monster Features
-
Outline the Mouth:
Using a needle tool, lightly sketch a large, wide oval shape in the center of the cylinder for the open mouth. -
Recess the Mouth:
Gently press inside the sketched oval or carve away a very thin layer of clay to create a slight depression. This adds dimension where the mouth color will go. -
Sculpt Tiny Teeth:
Roll very small triangles of clay for the teeth. You’ll need about 5 for the bottom and 5 for the top. Keep them slightly irregular for character. -
Attach the Teeth:
Score and slip the flat side of each tooth and attach them inside the mouth outline. Smooth the seams lightly so they look integrated but distinct. -
Add Foot Details:
Near the bottom edge of the cup, I like to use a small loop tool to carve three small semi-circles to represent little toes or paws.
Texture Upgrade
Before the clay dries, gently press a coarse sponge against the ‘skin’ areas of the monster to give it a bumpy, organic texture that contrasts with the smooth mouth.
Step 3: Decoration and Glazing
-
Bisque Fire:
Once the piece is bone dry, fire it in the kiln to bisque temperature (usually Cone 04 or 06). -
Paint the Mouth:
Using the terra cotta or rust-colored underglaze, fill in the oval space around the teeth. Be careful not to paint over the white clay teeth. -
Detail the Teeth:
Paint the triangular teeth with bright white underglaze to make them pop against the darker mouth interior. -
Outline the Mouth:
With a very fine brush and black underglaze, paint a thin outline around the entire mouth oval to define the shape. -
Add Eyes and Cheeks:
Paint two solid black circles for eyes above the mouth. Add two small pink circles just below the eyes for rosy cheeks. -
Final Touches:
Paint small black details inside the carved toe semi-circles at the bottom. -
Clear Glaze Application:
Dip the entire piece in a transparent clear glaze. This seals the clay and makes the toothbrush holder waterproof and easy to clean. -
Final Firing:
Fire the piece again to glaze temperature (Cone 5 or 6 depending on your clay body). Let it cool completely before adding your toothbrushes.
Now you have a charming little sink companion ready to guard your dental tools
Desk Pen Cup Monster With Side Eyes

Brighten up your workspace with this charmingly simple cylindrical pen holder featuring a quirky toothy smile. The natural clay finish combined with minimal painted details gives it a modern, playful look that’s perfect for organizing your writing tools.
How-To Guide
Materials
- Air-dry clay or polymer clay (terracotta or buff color)
- Rolling pin
- Circle cutter or circular template (approx. 3-inch diameter)
- Sharp craft knife
- Ruler
- Slip (clay water mixture) or liquid clay adhesive
- Acrylic paints (black, white, coral/salmon pink)
- Small round paintbrush
- Fine detail brush
- Fine-grit sandpaper
- Matte varnish (optional)
Step 1: Forming the Cylinder
-
Prepare the Base:
Begin by rolling out a portion of your clay to a consistent thickness of about 1/4 inch. Use your circle cutter or a template to cut out a perfect circle for the base of the cup. -
Measure the Walls:
Measure the circumference of your base circle. Roll out a large rectangular slab of clay for the walls. The length needs to match your base circumference (plus a tiny overlap), and the height should be roughly 4-5 inches. -
Cut the Rectangle:
Use your ruler and craft knife to cut the slab into a clean rectangle with straight edges. I find cutting on a piece of parchment paper makes it easier to lift later. -
Score and Slip:
Score (scratch cross-hatch marks) along the outer edge of the circular base and the bottom edge of your rectangular wall. Apply a little slip or adhesive to the scratched areas. -
Assemble the Body:
Carefully wrap the rectangular wall around the base circle. Score and slip the vertical edges where the wall meets itself to create a cylinder. -
Blend the Seams:
Using a modeling tool or your finger, smooth the vertical seam on both the inside and outside until it disappears. Do the same for the bottom seam where the wall meets the base. -
Smooth the Rim:
Check the top rim of the cup. If it’s uneven, trim it gently with your knife. Use a little water on your finger to round over the sharp edge for a polished look.
Uneven Cylinder?
If your cup looks wobbly, wrap the clay slab around a soda can covered in parchment paper. This acts as a mold to keep the shape perfectly round while you join the seams.
Step 2: Painting the Monster
-
Drying and Sanding:
Allow the clay to dry completely according to package instructions (24-48 hours for air-dry). Once bone dry, lightly sand any bumps or rough spots with fine-grit sandpaper. -
Outline the Mouth:
Using a pencil, very lightly sketch the grin about halfway up the cylinder. Paint the main crescent shape with coral or salmon pink acrylic paint. -
Add Cheeks and Base:
While the mouth dries, paint two small circular blushing cheeks in the same pink color. Then, paint a zig-zag pattern around the very bottom edge of the cup. -
Paint the Teeth:
Once the pink mouth is dry, use white paint to add small triangular teeth pointing inward from the top and bottom of the mouth shape. -
Detail the Eyes:
Paint two white circles for eyes above the mouth. Let them dry, then add a black ring around them and a small black dot in the center for the pupils. -
Add Fine Details:
Switch to your finest brush. Carefully outline the mouth and teeth with black paint. Add two tiny dots for nostrils between the eyes. -
Decorate the Rim:
Create a decorative border near the top rim by painting a series of small black dots all the way around the circumference. -
Seal the Project:
Protect your paint job by applying a coat of matte varnish over the entire piece once the paint is fully cured.
Sharper Lines
For the zig-zag pattern at the bottom, use pieces of low-tack painter’s tape to mask off the triangles before painting. This guarantees crisp, uniform points.
Place your favorite pens inside and enjoy your new friendly desk companion
Pocket-Size Monster Charms and Mini Heads
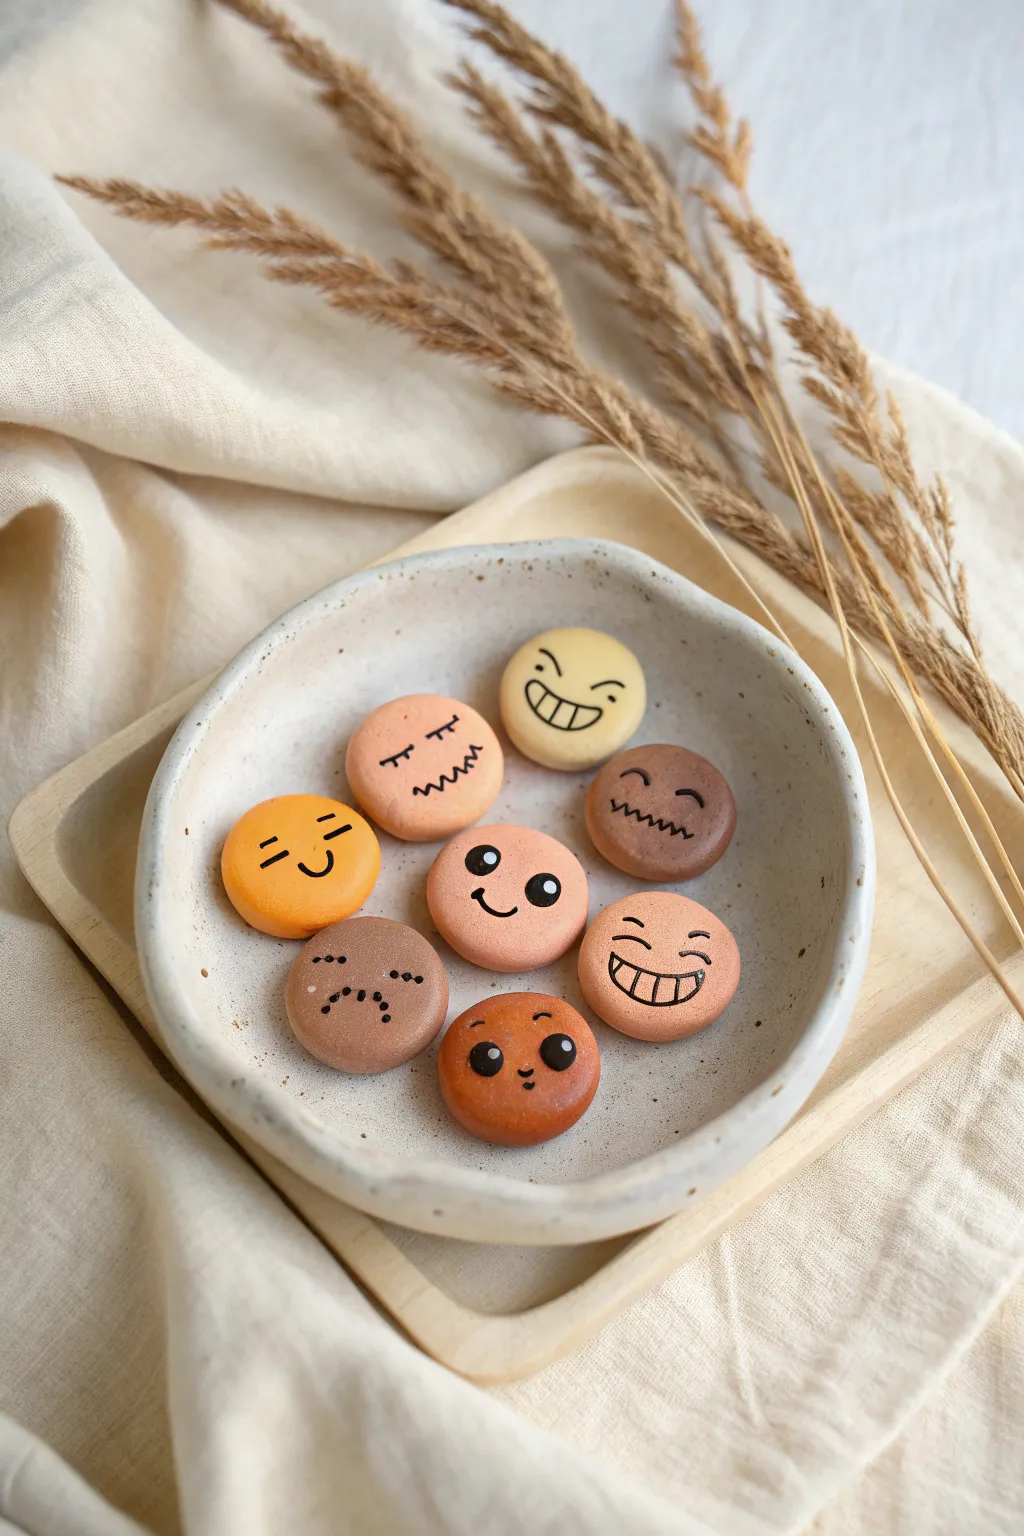
These delightful little charms are perfect for exploring feelings or just carrying a tiny friend in your pocket. Using simple round forms and a warm, earthy color palette, you’ll create a collection of expressive faces that are as satisfying to hold as they are to look at.
Step-by-Step Guide
Materials
- Polymer clay (various skin tones: beige, tan, brown, terracotta, yellow-orange)
- Acrylic paint (black and white)
- Fine detail paintbrush (size 0 or 00)
- Dotting tool or toothpick
- Parchment paper or baking tile
- Oven (for baking polymer clay)
- Glaze or varnish (matte or satin finish)
- Smooth ceramic bowl for display (optional)
Step 1: Shaping the Base Forms
-
Prepare your palette:
Begin by conditioning your polymer clay. You want a nice variety of earthy tones, so feel free to mix colors. For example, add a little white to brown for a milky coffee shade, or mix orange with beige for a warm sunset hue. -
Portion the clay:
Pinch off small amounts of clay, aiming for pieces roughly the size of a large marble or a chocolate truffle. Keeping them similar in volume helps them look like a cohesive set. -
Roll spheres:
Roll each piece of clay between your palms to create a smooth, tight sphere. The heat from your hands will help remove any cracks. -
Flatten into discs:
Gently press each sphere down onto your work surface to create a thick, rounded disc shape. You don’t want them flat like coins; keep them chubby, like a macaron shell or a cookie. -
Smooth the edges:
Run your finger around the circumference of each disc to soften the edge. The shape should be organic and pebble-like rather than perfectly sharp cylinder.
Step 2: Baking and Prep
-
Bake the pieces:
Arrange your clay discs on a parchment-lined baking sheet or a ceramic tile. Bake them according to the package instructions for your specific brand of clay (usually around 275°F/135°C for 15-30 minutes). -
Cool completely:
Let the clay stones cool down fully before attempting to paint. Painting on warm clay can make the acrylic paint gummy and difficult to control. -
Surface Check:
Once cool, inspect the surfaces. If you have any rogue fingerprints, you can very lightly sand them with fine-grit sandpaper, though the matte paint finish usually hides minor imperfections.
Shaky Hands?
If painting fine lines is difficult, swap the paintbrush for a fine-tip permanent marker or an acrylic paint pen. It gives you much more control over the tiny facial details.
Step 3: Painting Expressions
-
Plan your faces:
Before painting, sketch out a few fleeting emotions on a scrap piece of paper. Think about simple lines: zig-zags for anxiety, wide U-shapes for smiles, and simple dashes for eyes. -
Load the brush:
Squeeze a tiny dot of black acrylic paint onto a palette. Thin it slightly with a drop of water until it flows like ink—this helps create crisp lines without clumps. -
Paint the anxiety face:
For the nervous looking stone, paint two small curved dashes for eyes. Below them, paint a squiggly, zig-zag line for a mouth. -
Paint the grinning face:
For the happy stone, paint two arched eyes. Draw a wide semi-circle for the mouth, then add a straight line across the top and vertical lines to create teeth. -
Create the wide-eyed face:
I like to use a dotting tool for the larger eyes. Dip the tool in black paint and press firmly to make large circles. Once dry, add a tiny dot of white paint to each black circle for a ‘highlight’ reflection. -
Paint the sleeping face:
Draw two straight horizontal lines for closed eyes. Add a jagged or wavy line below for a quirky, snoring mouth expression. -
Add variety:
Continue with the remaining stones, mixing up the expressions. Try a sad face with a downturned curve and dotted eyes, or a mischievous face with slanted eyebrows.
Texture Trick
Before baking, lightly roll a piece of sandpaper or a toothbrush over the clay surface. This adds a realistic ‘stone’ texture that looks amazing once baked.
Step 4: Finishing Touches
-
Let the paint dry:
Allow the black paint to cure completely. If you applied the paint thickly, give it at least 20 minutes to ensure it won’t smear. -
Seal the charms:
Apply a thin layer of matte or satin varnish over the entire surface of each stone. This protects the acrylic paint from scratching off and gives the clay a finished, professional feel.
Arranged in a bowl or scattered on a desk, these little emotive stones serve as a gentle reminder that all feelings are welcome here
Glow-Accented Night Monster With Gradient Skin
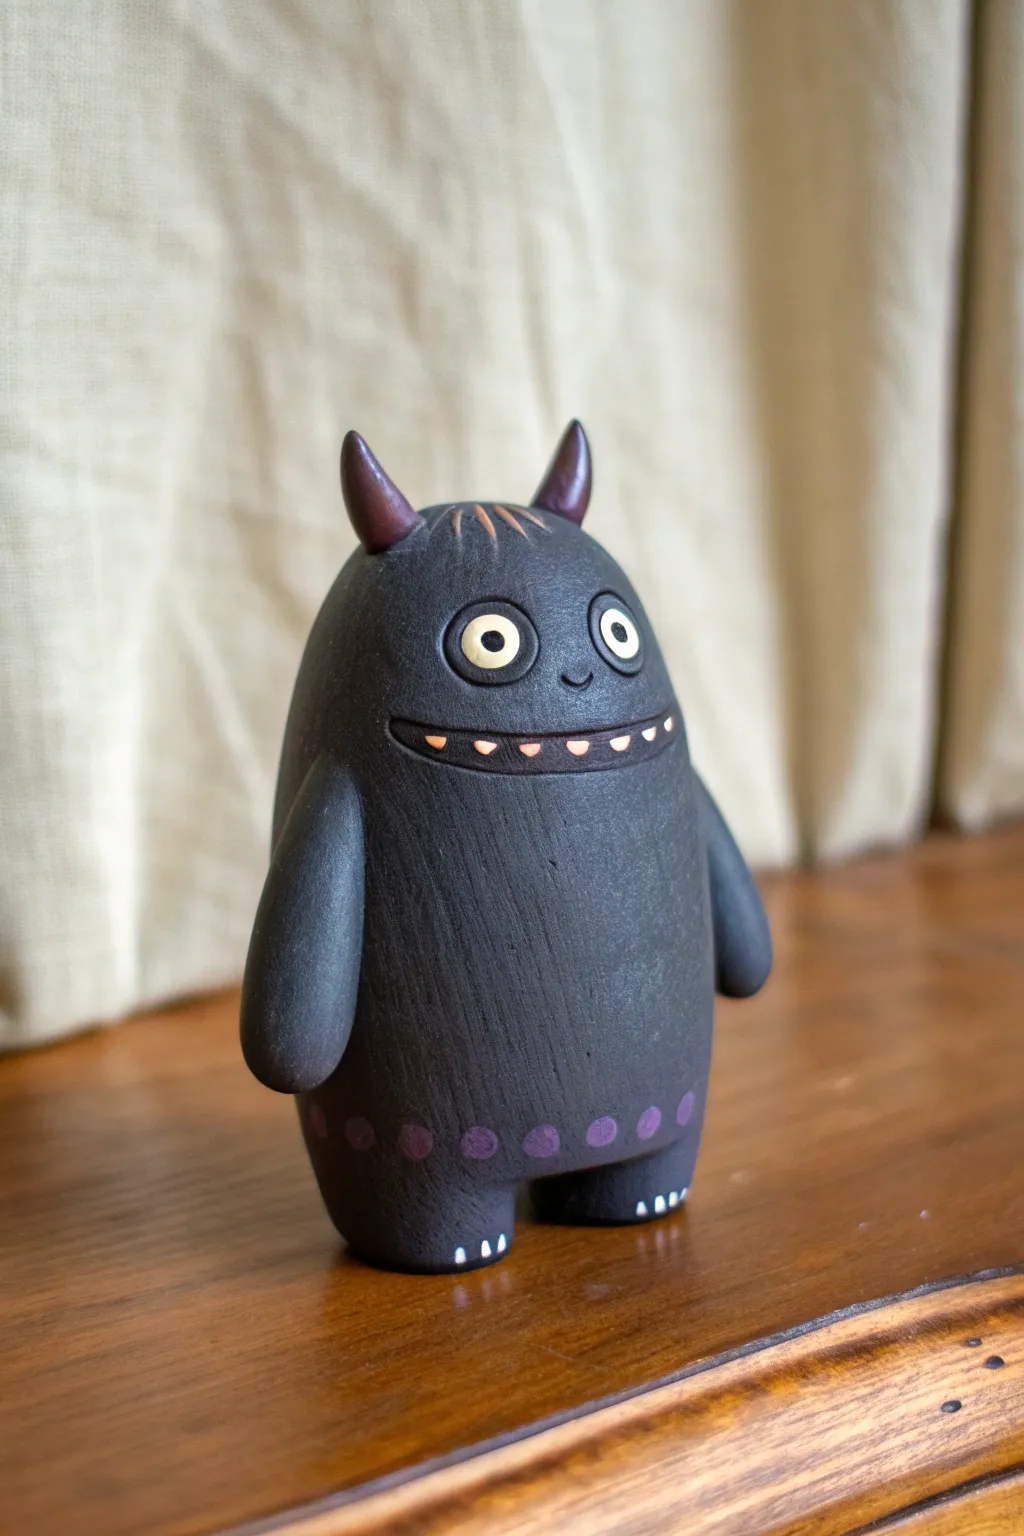
Create a friendly, rotund creature with a captivating dark gradient finish and subtle glowing accents. This clay project features charmingly simple shapes, distinctive yellow eyes, and a dotted belly pattern that adds character to its minimal design.
Step-by-Step
Materials
- Polymer clay (black, white, and translucent/glow-in-the-dark)
- Acrylic paints (dark purple, black, pale yellow, orange)
- Armature wire or foil ball (for the core)
- Clay sculpting tools (ball stylus, needle tool)
- Soft pastel chalks (black, dark purple)
- Fine detail paintbrush
- Matte varnish
- Gloss varnish (for eyes)
Step 1: Forming the Body Base
-
Core Preparation:
Start by creating a dense ball of aluminum foil roughly the size of a tangerine to serve as the lightweight core. This saves clay and ensures the figure isn’t too heavy. -
Base Layer:
Condition a large block of black polymer clay until it’s soft and pliable. Roll it into a thick sheet and wrap it completely around your foil core, smoothing out any seams with your thumbs. -
Shaping the Silhouette:
Roll and gently squeeze the clay-covered ball into an upright, elongated egg shape. Flatten the bottom exclusively so it stands sturdily on your work surface. -
Adding Legs:
Form two short, stump-like cylinders from black clay. Press these firmly onto the bottom of the body, blending the clay upwards with a modeling tool so there are no visible seams between the legs and the torso.
Smooth Surface Trick
Before adding texture, wipe the raw clay with a little baby oil on your finger. This effortlessly smooths away fingerprints and prepares the surface perfectly for the stippling texture technique.
Step 2: Adding Features and Limbs
-
Creating Arms:
Roll two sausage shapes of black clay, slightly tapered at the bottom. Attach these to the sides of the body, just below the midpoint, blending the top connection point smoothly into the shoulder area while leaving the arms hanging freely. -
Horn Attachment:
Shape two small cones for the horns. Press them onto the top of the head, spacing them evenly apart. I like to use a small dab of liquid clay adhesive here to ensure they stay put during baking. -
Texturing the Surface:
Using a stiff-bristled brush or a texture sponge, gently tap the entire surface of the black clay. This creates a subtle stone-like or skin texture, removing any fingerprints. -
Adding Toes:
Make six tiny white triangles or cones. Press three onto the bottom front edge of each leg to create cute little claws.
Make it Shine
Mix mica powder into your varnish for the horns to give them a magical, metallic sheen that contrasts with the matte texture of the monster’s body.
Step 3: Face Details
-
Eye Sockets:
Use a large ball stylus to press two indentations into the upper third of the face where the eyes will sit. -
Setting the Eyes:
Roll two balls of pale yellow clay (or white clay you plan to paint later) and press them into the sockets. Add tiny black clay pupils to the center of each. -
Carving the Smile:
Use a curved blade or a needle tool to incise a wide, shallow smile line across the face. -
Adding Teeth:
Inside the smile incision, press small triangles of orange or white clay to form the row of teeth, spacing them out slightly.
Step 4: Coloring and Finishing
-
Applying Pastels:
Before baking, shave some purple soft pastel into a powder. Dust this powder onto the horns and the lower belly area to create a gradient effect that fades into the black preparation. -
Baking:
Bake the figure according to your clay manufacturer’s instructions. Usually, this means around 275°F (130°C) for 30 minutes per quarter-inch of thickness. -
Cooling:
Let the monster cool completely inside the turned-off oven to prevent cracking. -
Painting Details:
Using a fine brush and purple acrylic paint, add a row of dots along the bottom of the belly if your pastel gradient needs more definition. -
Adding Glow:
Paint the teeth and eyes with a thin layer of glow-in-the-dark medium or phosphorescent paint for that special night-monster effect. -
Sealing:
Apply a coat of matte varnish over the body to protect the pastels. Use a gloss varnish specifically on the eyes to make them look wet and lively.
Place your new nocturnal friend on a shelf where it can soak up light during the day and watch over you at night