Whenever I’m teaching handbuilt pottery, monster mugs are the project that gets everyone giggling and leaning in closer. These clay monster mug ideas will help you turn a basic cup into a bold little creature you can actually sip from.
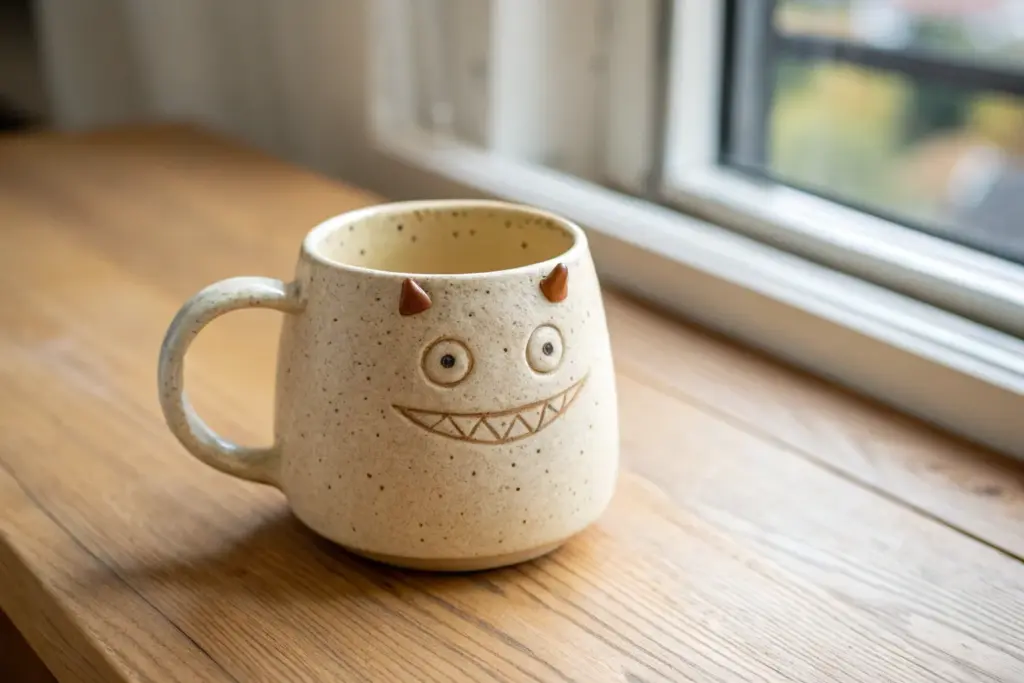
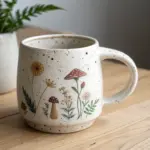
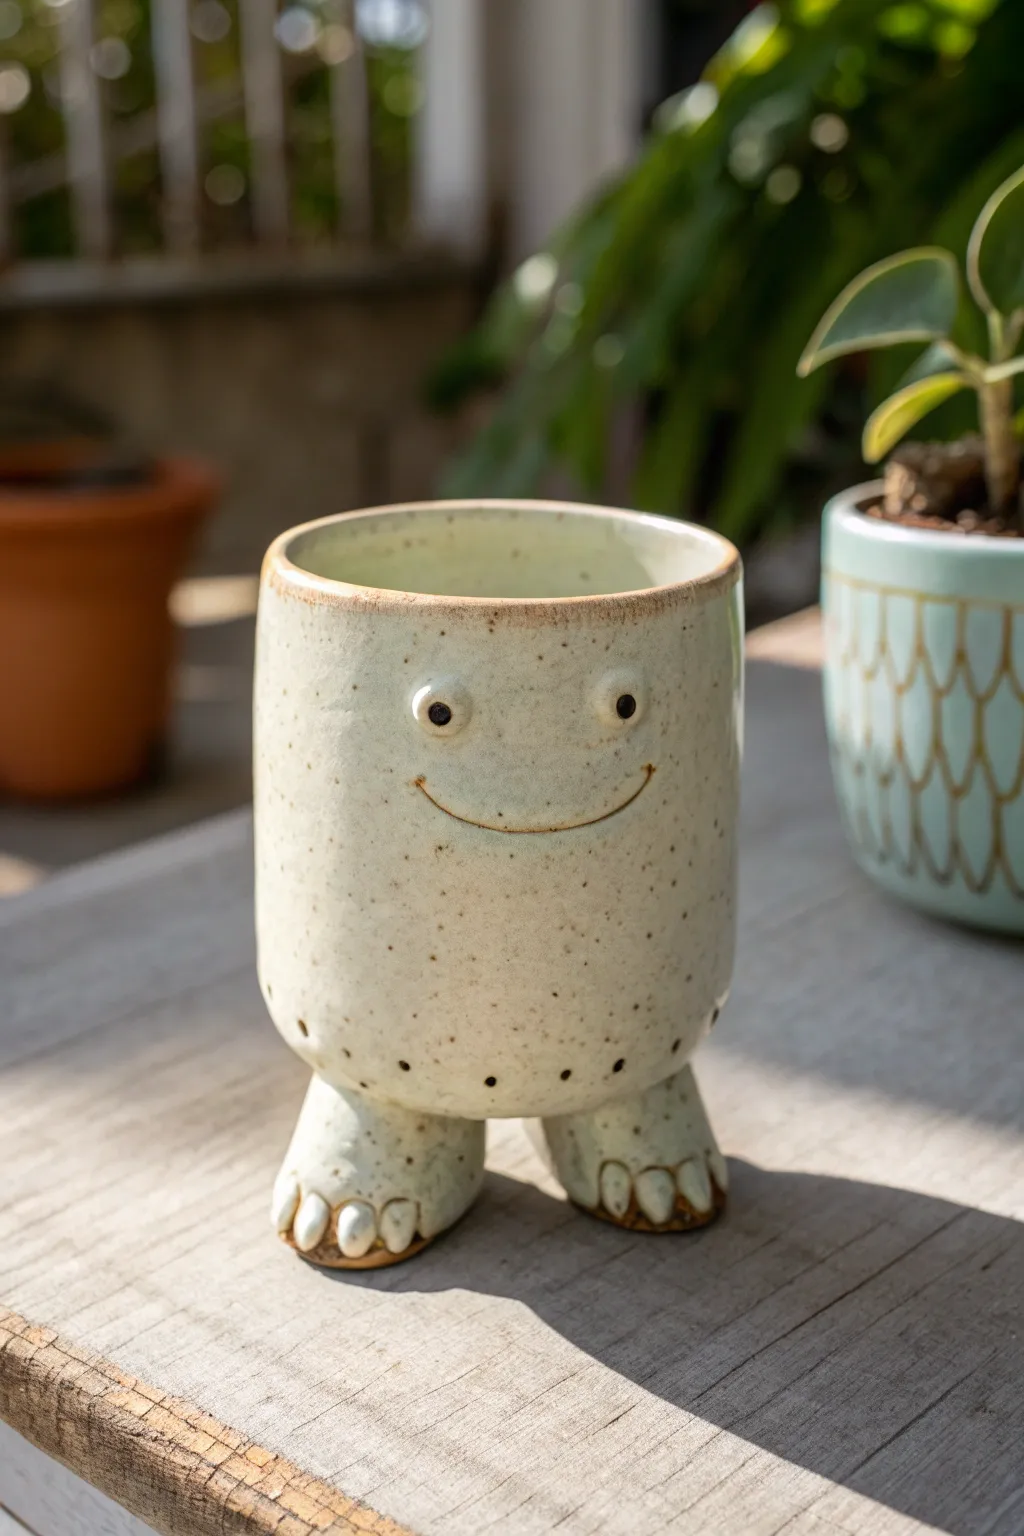
Classic Cyclops Eye Mug
This charming ceramic mug features a classic cyclops design with a solitary, wide eye and a gentle, toothy grin. With its speckled cream finish and straightforward construction, it balances monster vibes with an approachable artistic style.
Step-by-Step Tutorial
Materials
- Stoneware clay (speckled or buff)
- Pottery wheel (or slab roller for hand-building)
- Rib tool (wood or rubber)
- Needle tool
- Small loop tool
- Scoring tool or serrated rib
- Slip (clay slurry)
- Underglazes: Light green, dark brown/black, rust/brown
- Clear or semi-transparent speckled glaze
- Sponge
- Fine paintbrush
Step 1: Forming the Base Mug
-
Prepare the Clay:
Wedge about 1 to 1.5 pounds of speckled stoneware clay until it is free of air bubbles and uniform in consistency. -
Throw the Cylinder:
Center the clay on the wheel and open it up. Pull the walls to create a straight-sided cylinder, aiming for a consistent thickness of about a quarter-inch. -
Refine the Shape:
Use a rib tool to smooth the outside and inside, removing throwing lines if you want the smooth look shown in the photo. Leave the rim slightly rounded for comfortable sipping. -
Trim the Base:
Once the mug is leather-hard (firm but still cool to the touch), trim the bottom to create a neat foot ring. This elevates the visual weight of the piece. -
Add the Handle:
Pull a clay handle or extrude a coil. Attach it to the side using the score-and-slip method, blending the seams thoroughly so it looks like it grew out of the mug.
Step 2: Sculpting the Monster Face
-
Position the Features:
Look at the mug face-on, opposite the handle. Lightly trace a circle for the eye and a curved line for the mouth with a needle tool to plan your spacing. -
Create the Eye Slab:
Roll a small, thin slab of fresh clay. Cut out a perfect circle (about 1.5 inches diameter) using a cookie cutter or knife. -
Attach the Eye:
Score the back of the clay circle and the spot on the mug where it will go. Apply slip and press the circle firmly onto the mug wall, smoothing the edges down so it integrates seamlessly. -
Add the Horn:
Form a tiny triangular pyramid out of clay. Score and slip this small ‘horn’ just above the eye circle. -
Carve the Pupil:
Using a small loop tool, gently carve a shallow depression in the center of the eye circle. This creates a physical boundary for the pupil glaze later. -
Define the Mouth:
deepen the curved smile line you traced earlier. I find a dull pencil works great here to make a smooth, wide groove rather than a sharp cut. -
Add Vertical Teeth:
Use a needle tool or small knife to draw vertical lines across the smile groove. Keep them evenly spaced to create the ‘teeth’ effect shown in the image. -
Smooth Imperfections:
Take a slightly damp sponge or your finger and gently go over all your added features to remove sharp crumbles or burrs from the carving.
Clean Lines
For the crispest smile lines, let the clay firm up to a hard leather-hard stage before carving. Soft clay drags and creates jagged edges.
Step 3: Glazing and Finishing
-
Bisque Fire:
Allow the mug to dry completely (bone dry) and fire it in a kiln to bisque temperature (usually Cone 04 or 06). -
Underglaze the Eye:
Paint the outer ring of the eye with a light sage green underglaze. Then, fill the center pupil depression with dark brown or black underglaze. -
Detail the Smile:
Carefully carefully paint dark brown underglaze into the carved lines of the mouth and teeth. Wipe the surface with a damp sponge to leave color only in the recesses. -
Highlight the Horn:
Paint the small triangular horn with a rust or reddish-brown underglaze. -
Add the Sparkle:
Dip the back of a paintbrush into white underglaze and place a single dot on the upper right side of the pupil for that essential spark of life. -
Apply Main Glaze:
Dip the entire mug into a clear or transparent cream glaze. If your clay isn’t naturally speckled, choose a glaze with speckles included. -
Final Firing:
Fire the mug to your clay body’s maturity temperature (e.g., Cone 5, 6, or 10) to finalize the glossy finish.
Glaze Running?
If your underglaze designs smudge when dipping the clear coat, try dabbing the clear glaze over the face first with a soft brush, then dipping the rest.
Now you have a whimsical, one-eyed companion ready for your morning coffee


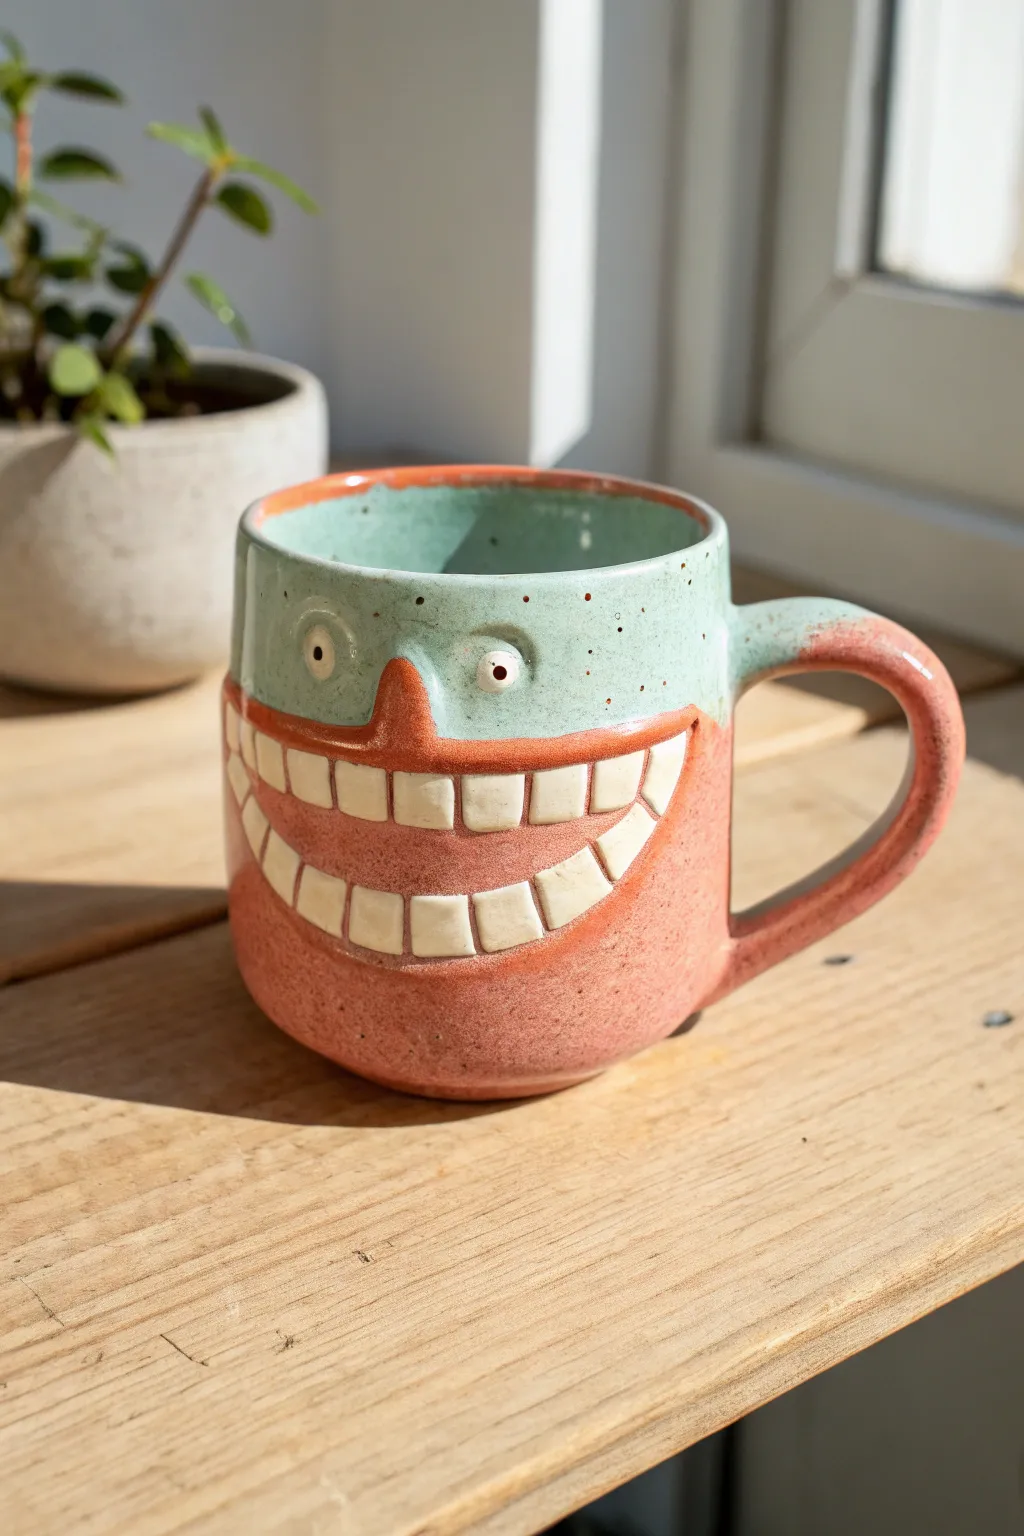
Goofy Bug-Eyed Monster Face
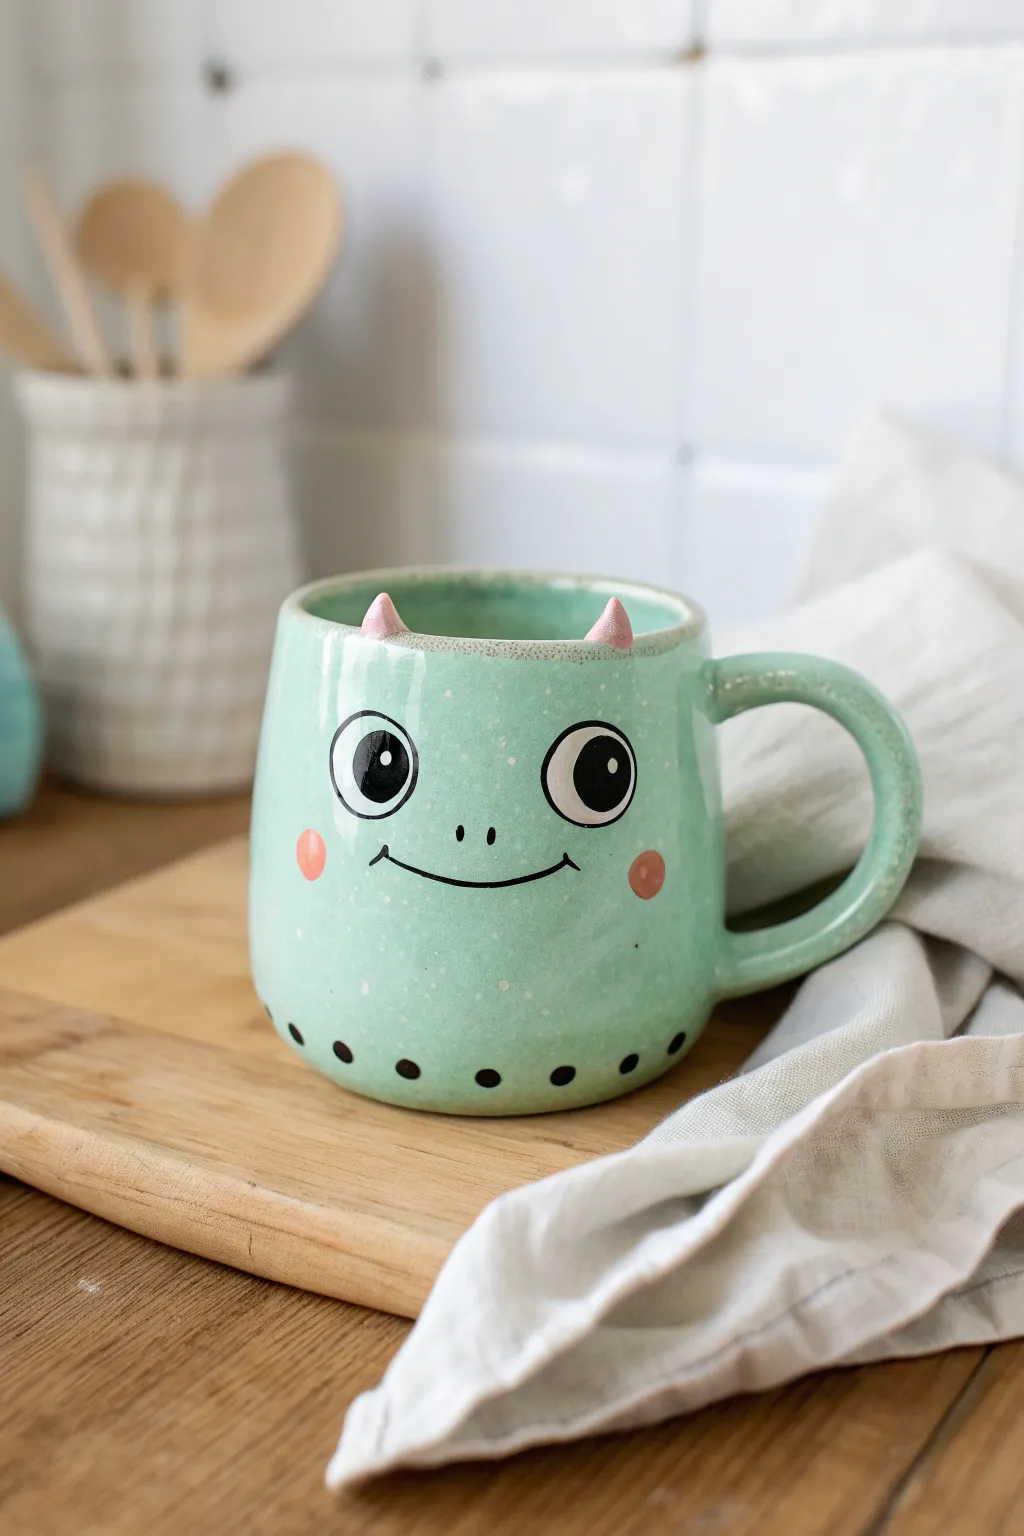
Brighten your morning coffee routine with this adorable, mint-green monster mug that smiles right back at you. Featuring tiny pink horns perched on the rim and a simple, hand-painted goofy expression, this project combines functional pottery with whimsical character design.
How-To Guide
Materials
- Stoneware clay body
- Pottery wheel (or slab roller for hand-building)
- Throwing tools (sponge, rib, wire cutter)
- Trimming tools
- Underglaze (Mint Green, Black, White, Soft Pink)
- Detail brushes (fine liner and small round)
- Clear transparent glaze
- Scoring tool and slip
- Kiln
Step 1: Forming the Body
-
Prepare the Clay:
Wedge about 1 to 1.5 pounds of stoneware clay thoroughly to remove air bubbles. -
Throw the Cylinder:
Center the clay on the wheel and open it up. Pull the walls up to create a cylinder with a slightly rounded bottom profile, giving it a friendly, chubby shape rather than a straight-sided form. -
Shape the Rim:
Compress the rim with a chamois or sponge to ensure it’s smooth for drinking. Leave the rim slightly thick to support the horns later. -
Dry to Leather Hard:
Cut the mug from the bat and let it dry slowly to a leather-hard state. This is crucial for successful trimming and handle attachment.
Glaze Crawling?
If your clear glaze separates over the underglaze, your underglaze layer may have been applied too thickly or wasn’t fully dry. Let underglaze bone-dry overnight before dipping in clear.
Step 2: Adding Features & Handle
-
Trim the Foot:
Place the mug upside down on the wheel (use a chuck if necessary) and trim the excess clay from the bottom to create a defined foot ring. -
Create the Handle:
Pull a handle from a lug of clay or extrude a coil. Curve it into a classic ‘C’ shape or ear shape that complements the roundness of the mug body. -
Attach the Handle:
Score the side of the mug and the contact points of the handle. Apply slip and press the handle firmly onto the mug, smoothing the seams with a damp sponge or modeling tool. -
Sculpt the Horns:
Roll two very small cones of clay for the horns. They should be tiny, roughly the size of a chocolate chip. -
Attach the Horns:
Score two spots on the *inside* edge of the rim, near the front. Slip and attach the horns so they peek over the top. I find using the back of a paintbrush helps smooth the tiny seam inside.
Step 3: Decoration & Glazing
-
Bisque Fire:
Once the mug is bone dry, fire it in the kiln to bisque temperature (usually cone 04). -
Apply Base Color:
Apply 2-3 coats of mint green underglaze to the entire exterior and interior of the mug. sponge it on for a speckled look or brush it smooth. -
Paint the Eyes:
Using white underglaze, paint two large circles for the eyes. Let this layer dry completely before adding the pupils. -
Add Facial Details:
With a fine liner brush and black underglaze, paint the pupils (looking slightly sideways for goofiness), the small nose dots, and the wide, curved smile. -
Cheeks and Horns:
Use a soft pink underglaze to paint small circular blushing cheeks on either side of the smile. Carefully paint the tiny horns pink as well. -
The Bottom Dots:
Create a row of small black dots around the very bottom edge of the mug using the tip of a brush handle or a detail tool dipped in black underglaze. -
Clear Glaze Application:
Once the underglaze is dry, dip the entire mug into a clear transparent glaze. Ensure the coating is even and doesn’t pool in the eyes. -
Final Firing:
Fire the mug to maturity (likely cone 5 or 6 depending on your clay body). Ensure the bottom is wiped clean of glaze before firing.
Pro Tip: Eye Shine
Add a tiny, pin-prick of white underglaze inside the black pupil before the final clear coat. This ‘catchlight’ brings the character to life instantly.
Enjoy your morning brew with a little extra monster personality


Snarling Fang Rim Mouth
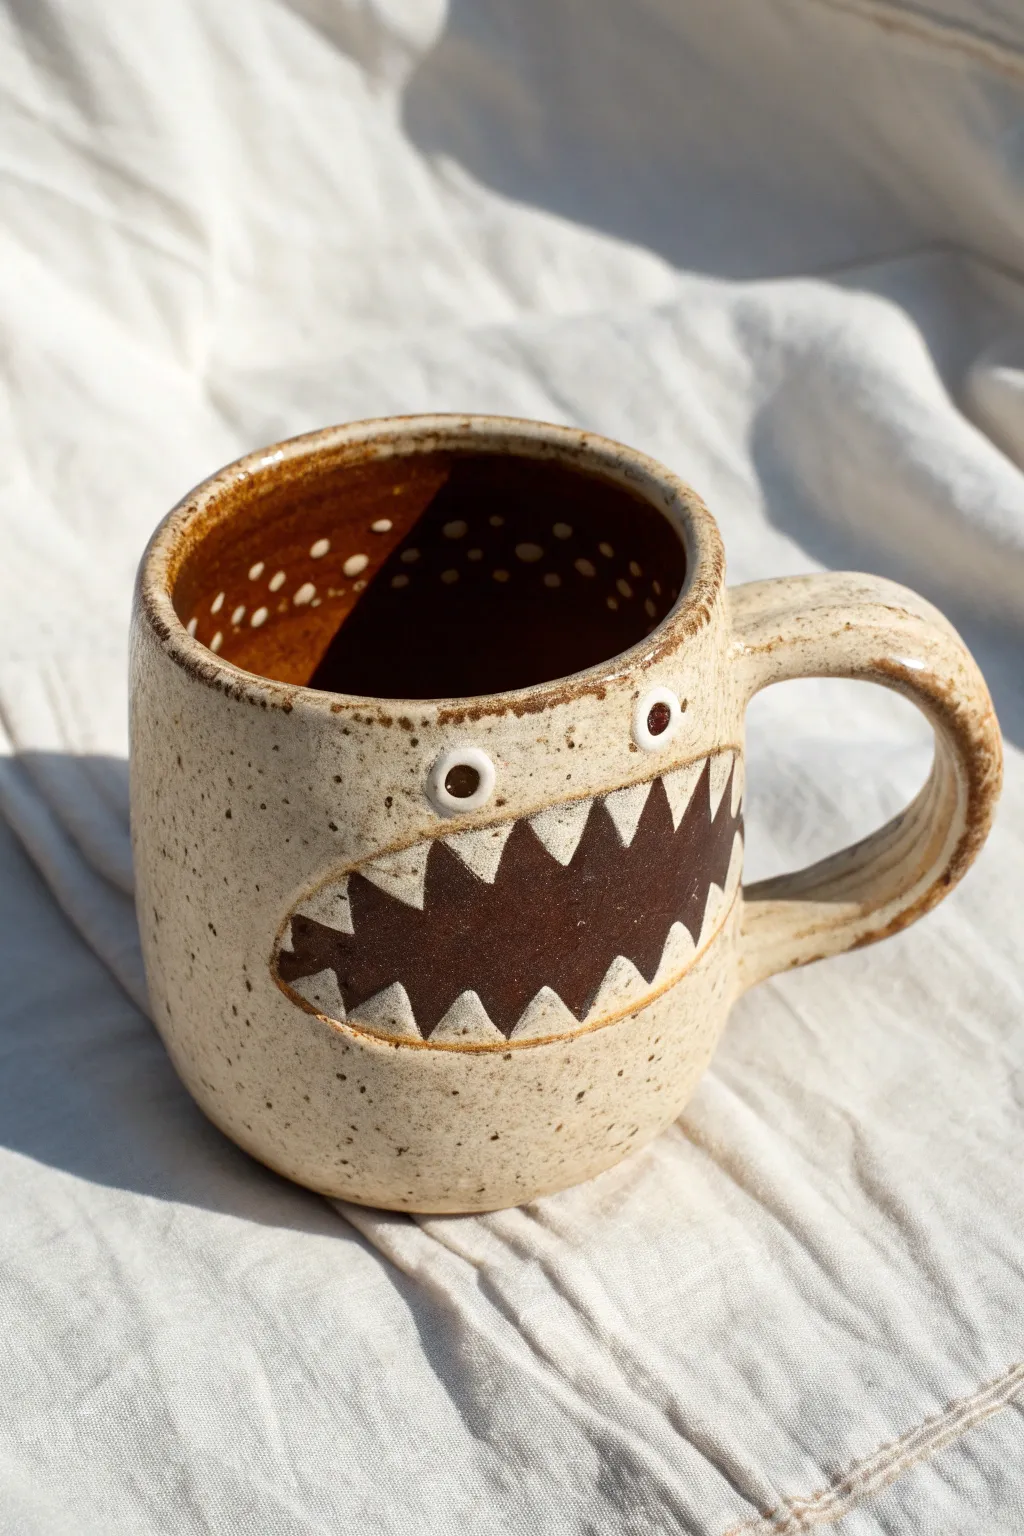
This charmingly fierce mug features a speckled clay body with a wide, toothy grin carved directly into the surface. The contrasting dark brown interior and mouth detail give it a bold, graphic look that’s perfect for your morning brew.
Step-by-Step
Materials
- Speckled stoneware clay (approx. 1 lb)
- Pottery wheel (or rolling pin for hand-building)
- Cylindrical rib tool
- Underglaze (Dark Brown or Chocolate)
- Small loop tool or carving tool
- Needle tool
- Scoring tool (serrated rib)
- Slip
- Sponge
- Clear glaze (cone 5/6 transparent)
- Small fine-point brush
- Wax resist
Step 1: Forming the Body
-
Throw the Cylinder:
Begin by wedging your speckled clay thoroughly to remove air bubbles. Center the clay on the wheel and open it up, pulling the walls into a standard cylinder shape about 4-5 inches tall. Aim for an even thickness throughout the walls. -
Shape the Belly:
Once the height is established, gently push the walls outward from the inside to create a slightly rounded, barrel-like shape. This gives the monster face a nice ‘plump’ canvas. Refine the rim with a chamois or sponge. -
Trim the Foot:
Allow the mug to dry to a leather-hard state. I like to trim a clean, defined foot ring at the bottom to give the mug visual lift and a professional finish. -
Pull and Attach Handle:
Pull a strap handle from a separate piece of clay. Let it set up briefly until it holds a curve. Score and slip both the handle ends and the attachment points on the mug body, then press firmly to attach. Smooth the seams with your thumb or a modeling tool.
Messy Teeth?
If underglaze bleeds onto the white teeth, wait for it to dry completely. Gently scrape the excess paint off the raised tooth surface with an X-Acto knife.
Step 2: Creating the Monster Face
-
Outline the Mouth:
On the side of the mug opposite the handle, use a needle tool to lightly scratch the outline of a large, football-shaped mouth. Keep the lines faint so they can be smoothed over if you need to reposition. -
Add the Eyes:
Roll two very small balls of clay for the eyes. Score and slip the area above the mouth, then press the balls onto the mug. Flatten them slightly so they look like discs rather than marbles. -
Detail the Eyes:
Using the back of a small drill bit or a specialized hole-punch tool, gently impress a small circle into the center of each eye to create the pupil divot. Don’t punch all the way through. -
Carve the Teeth:
Inside the mouth outline, draw a zig-zag line to define the upper and lower teeth. Using a small carving tool, carefully lower the surface level of the ‘inside’ of the mouth (the negative space between the teeth), leaving the triangular teeth raised at the original surface level. -
Refine Edges:
Use a damp sponge or a soft brush to smooth away any sharp clay crumbs or burrs created during the carving process.
Step 3: Decorating and Glazing
-
Bisque Fire:
Allow the mug to dry completely (bone dry). Fire it in the kiln to a bisque temperature (usually cone 04). -
Underglaze the Interior:
Pour dark brown underglaze into the inside of the mug. Swirl it around to coat the entire interior surface up to the rim, then pour out the excess. Wipe the rim clean with a sponge. -
Paint the Mouth:
Using a fine brush, carefully paint the recessed area of the mouth with the same dark brown underglaze. Be precise near the teeth edges to keep them crisp and white. -
Pupil Detail:
Dab a tiny dot of the dark brown underglaze into the impressed pupils of the eyes. -
Inner Rim Decoration:
With the detail brush and white underglaze (or by scratching through the brown layer if it’s still damp—sgraffito style), add two rows of small dots just inside the upper rim for extra texture. -
Wax Resist:
Apply wax resist to the foot of the mug and over the dark brown painted areas of the mouth and eyes if you want to prevent the glaze from clouding the dark color too much. -
Glaze Application:
Dip the entire mug into a clear, transparent glaze. This will seal the clay, make it food safe, and allow the natural speckles of the clay body to shine through. -
Standard Firing:
Consult your clay and glaze packaging for temperature guidelines. Fire the mug to maturity (typically cone 5 or 6 for stoneware).
Pro Tip: Contrast
Use a clay body with heavy iron flecks or ‘speckles.’ The clear glaze will activate these spots, giving the monster’s skin a rugged, organic texture.
Once the kiln cools, you’ll have a delightful little monster ready to guard your morning coffee


Big Lips and Block Teeth Grin
This charming monster mug features a wide, toothy smile that dominates the design, balanced by a soft two-tone glaze palette. It combines a wheel-thrown base with hand-built sculptural elements to create a functional piece with loads of personality.
Step-by-Step Tutorial
Materials
- Stoneware clay
- Pottery wheel (or slab roller for hand-building)
- Needle tool
- Scoring tool or serrated rib
- Slip
- Wood modeling tool
- Small sponge
- Glazes: Mint Green, Coral/Terracotta, Glossy White
- Underglaze: Black
- Detail brush
- Fan brush or dipping tongs
Step 1: Forming the Base Mug
-
Throw the cylinder:
Begin by centering your clay on the wheel and throwing a standard cylinder shape. Aim for a slightly rounded bottom edge rather than a sharp corner to give the monster a friendly, chubby look. -
Shape the belly:
Gently balloon the walls outward slightly as you pull up, creating a soft curve. Ensure the rim is smooth and slightly thicker than the walls to prevent chipping. -
Attach the handle:
Pull a sturdy handle from a lug of clay. Once the mug is leather hard, score and slip the attachment points and secure the handle on the right side. Smooth the connection points seamlessly. -
Trim the foot:
Flip the leather-hard mug and trim a clean foot ring. This elevates the mug and gives it a professional finish.
Glaze Running?
If your glazes are runny, leave a larger gap between the mint and coral sections. They will naturally melt together in the kiln. Overlapping unstable glazes can cause dripping onto the kiln shelf.
Step 2: Sculpting the Monster Features
-
Outline the mouth:
Using a needle tool, lightly sketch a wide, U-shaped mouth that stretches almost handle-to-handle. This will be your guide for the lips. -
Form the lips:
Roll a thin coil of clay. Score and slip along your sketched mouth line, then press the coil onto the surface. Flatten it slightly to create a defined lip ridge. -
Add the nose:
Shape a small triangle or gumdrop of clay for the nose. Attach it right above the center of the upper lip, blending the bottom edge into the lip line so they feel connected. -
Create the gum line:
Inside the lip boundary, press the clay down slightly to create a recessed area where the teeth will sit. This adds depth to the smile. -
Sculpt the blocky teeth:
Roll small balls of clay and flatten them into squares (chicklet shapes). Score the recessed mouth area and attach two rows of teeth—upper and lower. Keep them slightly irregular for character. -
Define tooth separation:
Use a needle tool or thin knife to deepen the lines between the teeth, ensuring they look like individual blocks rather than one solid strip. -
Add the eyes:
Make two very small spheres of clay. Attach them widely spaced above the nose. Gently press a small indentation into the center of each for the pupil.
Level Up: Texture
Before the clay dries, gently sponge the ‘skin’ areas (green and coral parts) to expose the gritty grog in the clay body. This creates a speckled, organic texture like the photo.
Step 3: Glazing and Finishing
-
Bisque fire:
Once bone dry, fire the mug to bisque temperature (usually cone 04 or 06) to prepare it for glazing. -
Wax resist teeth and eyes:
Apply wax resist carefully over the white clay teeth and the whites of the eyes to keep the main body glazes off these detailed areas. -
Glaze the interior:
Pour your Mint Green glaze inside the mug, roll it around to coat the entire interior surface, and pour out the excess. -
Apply the top glaze:
Dip the top third of the mug (rim and forehead area) into the Mint Green glaze. I prefer to hold it at a slight angle so the line isn’t perfectly straight. -
Apply the bottom glaze:
Dip the bottom two-thirds directly into the Coral/Terracotta glaze. Overlap slightly with the green, or leave a small gap depending on how much your glazes run. -
Paint the teeth:
Once the body glaze is dry, carefully paint the teeth with a Glossy White glaze. You may need a small detail brush to stay inside the lip lines. -
Detail the eyes:
Use a tiny dot of Black underglaze or glaze for the pupils to bring the expression to life. -
Final wipe and fire:
Wipe the foot ring clean with a damp sponge. Fire the mug to your clay body’s maturity temperature (e.g., cone 6).
Now fill up your new friend with coffee and enjoy the cheerful start to your morning

The Complete Guide to Pottery Troubleshooting
Uncover the most common ceramic mistakes—from cracking clay to failed glazes—and learn how to fix them fast.
Heavy Brow and Squinty Eyes
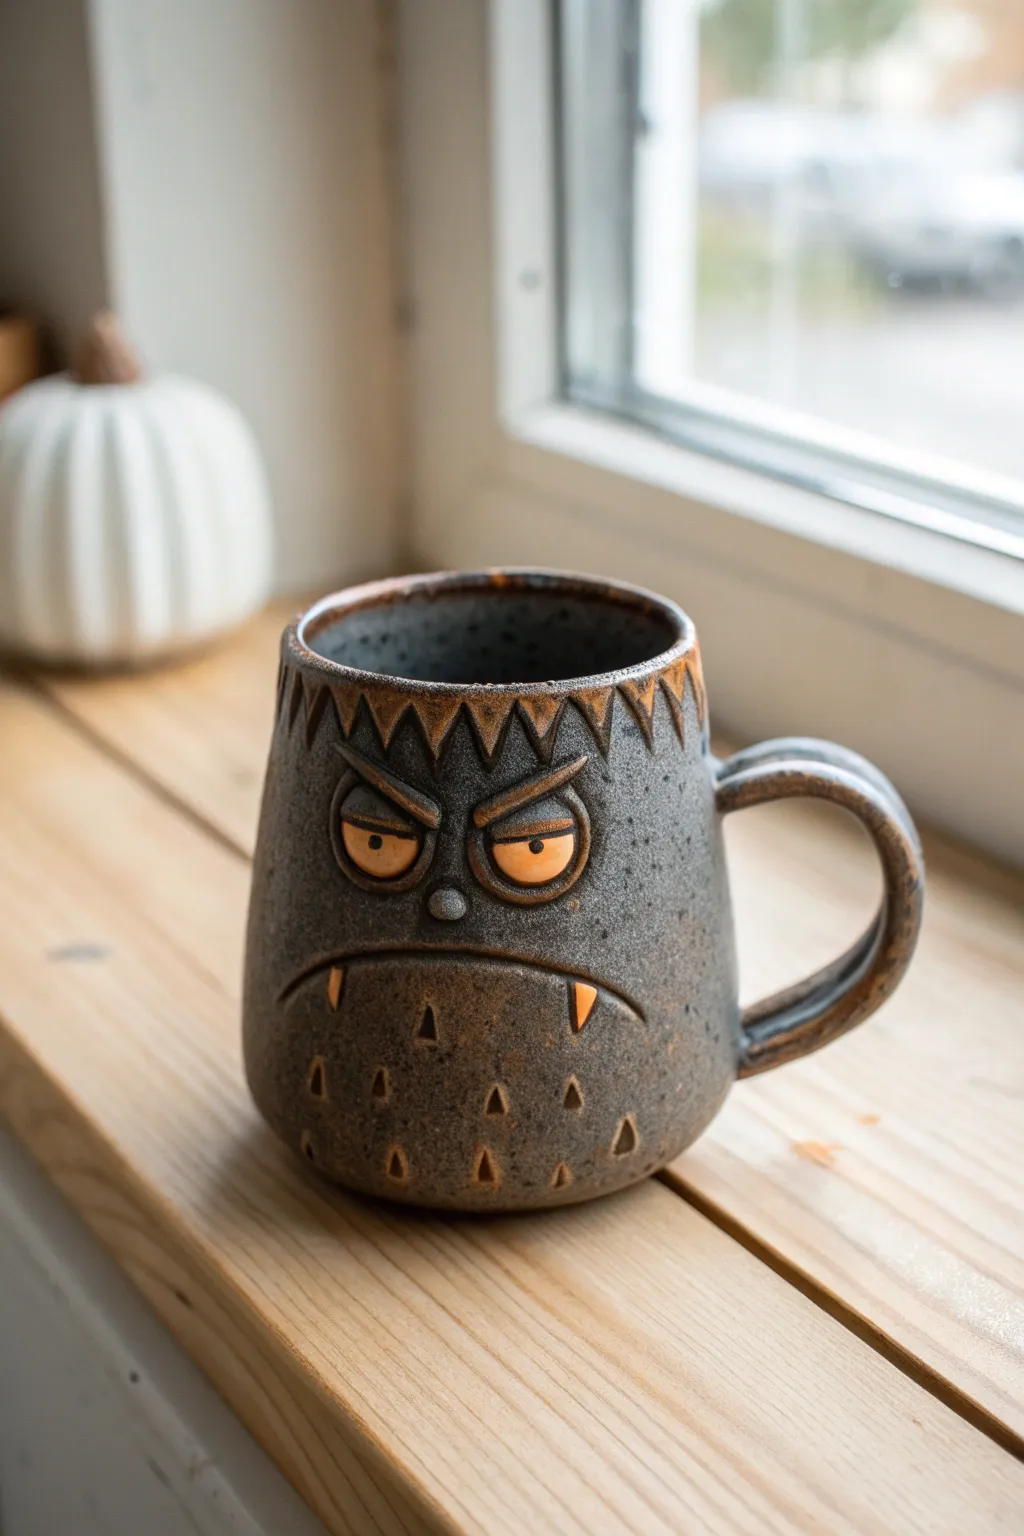
This mug packs a punch of personality with its heavy brow, narrowed eyes, and jagged haircut, perfect for guarding your morning coffee. The finish uses a beautiful interplay between raw speckled clay and strategic oxide washing to create depth around the carved features.
Step-by-Step
Materials
- Speckled grey stoneware clay (medium grog)
- Pottery wheel (or slab roller for handbuilding)
- Needle tool
- Loop carving tools (small and medium)
- Yellow underglaze
- Iron oxide wash (or brown underglaze)
- Clear matte glaze
- Sponge
- Small paintbrush
- Kemper wire tool
Step 1: Throwing the Form
-
Center and open:
Begin with about 1.5 lbs of speckled stoneware clay. Center it firmly on the wheel and open the clay to a flat bottom. -
Pull the walls:
Pull the cylinder up to a height of about 4-5 inches. Aim for a shape that is slightly tapered inward at the top, creating a solid, stable base that narrows just a bit near the rim to capture heat. -
Refine the rim:
Compress the rim well with a shammy or sponge. Don’t make it too thin, as the thick, rustic look suits this monster’s character. -
Create the handle:
Pull a strap handle separately. Aim for a medium thickness that matches the mug’s visual weight. Let the cylinder and handle dry to a soft leather-hard stage.
Step 2: Carving the Monster
-
Attach the handle:
Before carving the face, attach your handle to the side using the score and slip method. This helps you center the facial features properly opposite the handle. -
Outline the face:
Using a needle tool, lightly sketch the placement of the eyes, the uni-brow line, and the mouth. Keep the eyes roughly in the middle third of the mug. -
Carve the hair:
At the rim, carve downward triangular notches all the way around the circumference to create jagged, spiky hair. Remove the clay completely from these recessed triangles to create a relief texture. -
Define the eyes:
Carve deep outlines for the eyes. The key here is the heavy brow: carve deeply above the eyes to make the forehead protrude, giving that squinty, angry look. Add a small clay ball for the nose. -
Sculpt the mouth:
Carve a long, downward-curving frown. It should be a deep groove that separates the chin area from the face. -
Texture the body:
On the lower half (the ‘shirt’ area), use a small loop tool to carve rows of small, rough triangles. These mimic a patterned sweater or monster scales. -
Add teeth:
Score slightly inside the mouth groove and add two small triangles of clay for downward-pointing fangs. -
Clean up:
Use a damp sponge to smooth any sharp burrs from carving, but leave the edges crisp enough to catch the glaze.
Oxide running?
If your oxide wash runs during firing, your mixture was too watery or applied too thick. Next time, allow the wash to dry for a minute before sponge-wiping, and wipe more aggressively.
Step 3: Glazing and Finishing
-
Bisque fire:
Let the mug dry completely (bone dry) and fire it to cone 04 (or your clay body’s bisque temperature). -
Apply oxide wash:
Mix iron oxide with water and brush it liberally over the carved ‘hair’ rim, the outline of the eyes, the mouth groove, and the handle edges. -
Wipe back:
Use a damp sponge to wipe away the excess oxide from the high points. You want the dark brown color to stay trapped in the recessed carving lines to accentuate the details. -
Paint the eyes:
Carefully paint two to three coats of bright yellow underglaze into the eyeball area, leaving the pupils unpainted (or paint them black later). -
Highlight the fangs:
Dab a tiny bit of the yellow or an orange underglaze onto the fangs to make them pop against the grey clay. -
Clear glaze:
Dip the entire mug into a clear matte glaze. A glossy glaze works too, but matte tends to suit the stony texture better. -
Final Fire:
Fire to cone 6 (or the maturity temperature of your stoneware). I prefer a slow cool if possible, to let the iron oxide really develop those rusty tones.
Level Up: Glowing Eyes
Instead of yellow underglaze, try using a low-fire luster overglaze (like gold or mother of pearl) on the eyes in a third firing for a metallic, supernatural shine.
Once cooled, your grumpy guardian is ready for use, staring down anyone who dares interrupt your morning routine
Long Snout Creature Mug
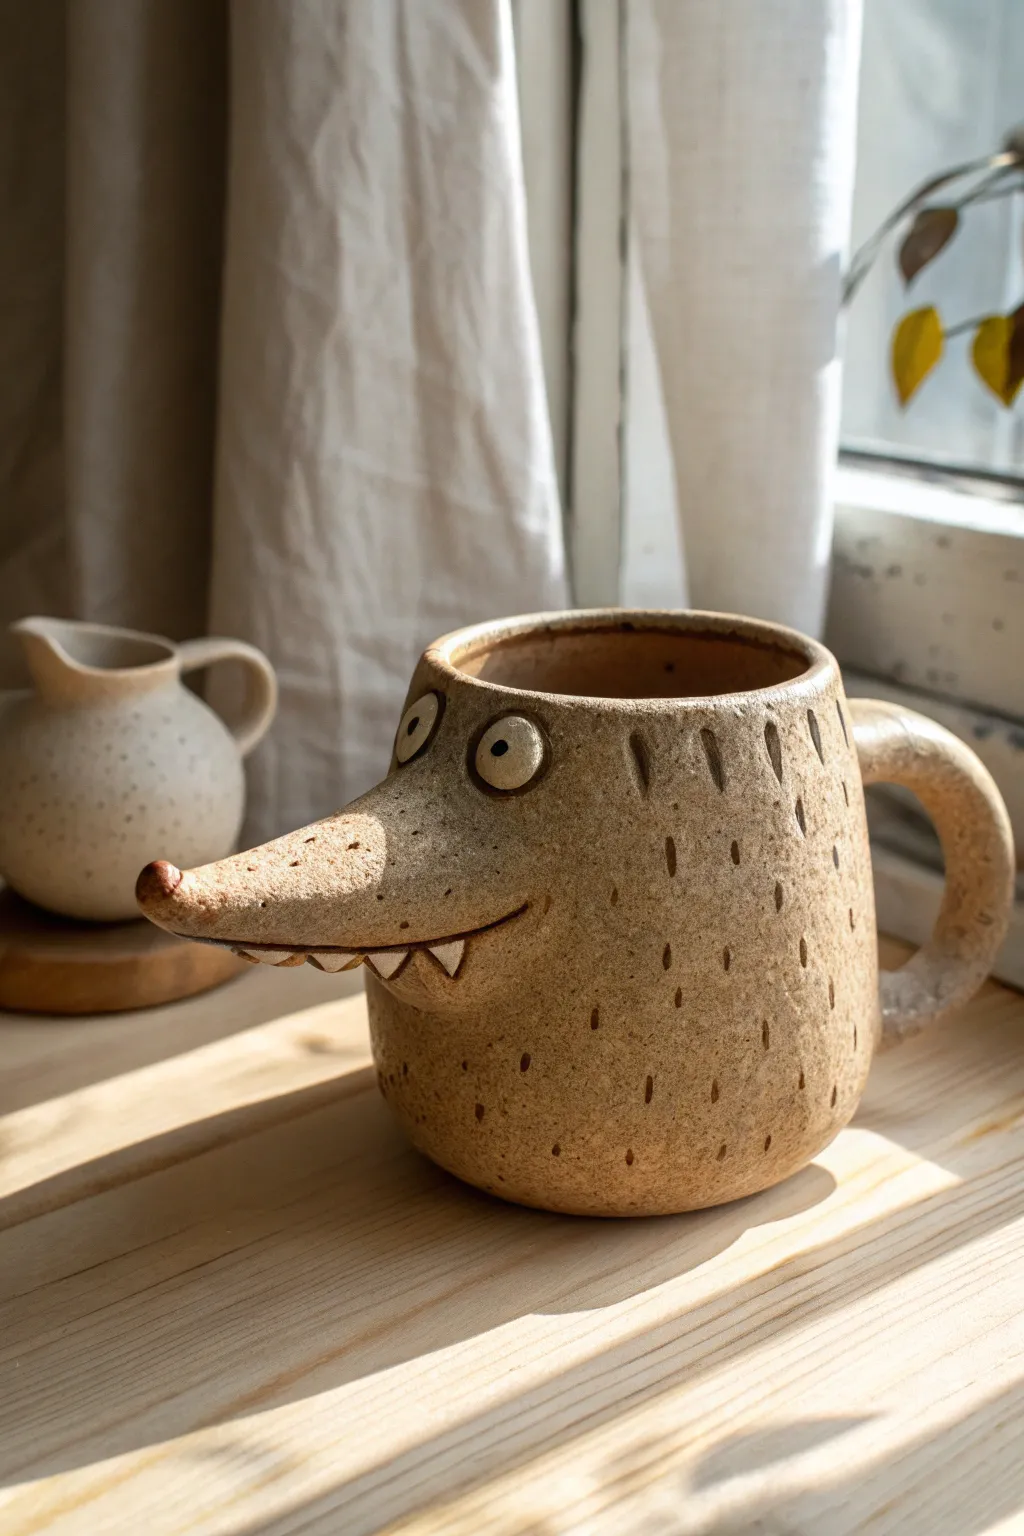
This whimsical ceramic mug features a charmingly goofy creature with an elongated snout and a friendly, toothy grin. Its speckled beige surface and carved fur texture give it an organic, handmade feel that turns a morning coffee into a moment of joy.
Detailed Instructions
Materials
- Speckled stoneware clay (mid-fire)
- Standard pottery tools (needle tool, sponge, rib, wire cutter)
- Rolling pin and canvas or slab roller
- Cylindrical form or wide PVC pipe (for template)
- Scoring tool (serrated rib or needle tool)
- Slip (clay and water slurry)
- Modeling tools (wooden knife, small rounded tip)
- Small paintbrush
- Ceramic underglaze (white and black)
- Clear or matte transparent glaze
Step 1: Forming the Base
-
Prepare the slab:
Begin by rolling out a consistent slab of speckled stoneware clay to about 1/4 inch thickness. Use a canvas surface to prevent sticking. -
Cut the rectangle:
Measure and cut a rectangle that corresponds to the height and circumference of your desired mug size, plus a little overlap for the seam. -
Roll the cylinder:
Wrap the slab around your cylindrical form or simply curl it by hand to form a tube. Score and slip the connecting edges generously. -
Secure the seam:
Press the scored edges together firmly. Smooth the seam inside and out using a rib tool, blending the clay until the join is invisible. -
Add the bottom:
Place your cylinder on a fresh piece of rolled slab. Trace around the base, cut out the circle, score and slip both contact surfaces, and attach the floor of the mug. Smooth the connection seamlessly.
Snout Saver
Place a small support, like a piece of foam or a wad of paper towel, under the long snout while the mug dries to prevent it from drooping.
Step 2: Sculpting the Character
-
Form the snout:
Shape a cone of clay for the distinctive long snout. It should be thick enough to be sturdy but not solid heavy clay—you may want to hollow it slightly from the back if it’s very thick. -
Attach the snout:
Choose a spot about halfway up the mug wall. Score and slip extremely well here, as the snout is heavy. Press the snout onto the mug, blending the clay from the snout onto the body for a strong bond. -
Shape the mouth:
Using a knife tool, slice a horizontal line along the side of the snout to create the mouth opening. Gently pry it open to create an underbite look. -
Create the teeth:
Roll tiny triangles of clay. Score the lower jaw area and attach these little teeth inside the mouth line, making them irregular for character. -
Make the eyes:
Roll two small balls of clay and flatten them into discs. Attach them just above the snout connection point, spacing them slightly apart. -
Detail the pupils:
Add tiny clay dots to the center of the eyes for pupils, or simply poke a small indentation which we will glaze later. -
Add the handle:
Pull or roll a coil for the handle. Attach it opposite the snout, ensuring the top curve is comfortable for a thumb and the bottom attachment is secure.
Step 3: Texture and Finishing
-
Refine the surface:
Once the clay is leather hard, smooth out any rough fingerprints with a slightly damp sponge, but leave the natural clay texture visible. -
Carve the fur:
Using a sharp needle tool or a small carving gouge, make short, vertical dashed lines all over the body of the mug. I find varying the pressure creates a more natural, furry look. -
Bisque fire:
Allow the mug to dry completely (this may take several days due to the snout thickness) and bisque fire it to your clay’s specification. -
Apply underglaze:
Paint the eye discs white and the tiny pupils black using underglaze. You can also dab a tiny bit of pink or brown on the tip of the nose. -
Glaze and final fire:
Dip or brush the entire mug with a transparent matte or satin glaze to seal it while letting the speckled clay body show through. Fire a final time to the glaze temperature.
Wild Hair Level Up
Rather than carving dashes, use thick slip in a piping bag to pipe actual raised texture lines for a 3D shaggy dog effect.
Your new monster mug is ready to add a dose of whimsical charm to your morning routine


What Really Happens Inside the Kiln
Learn how time and temperature work together inside the kiln to transform clay into durable ceramic.
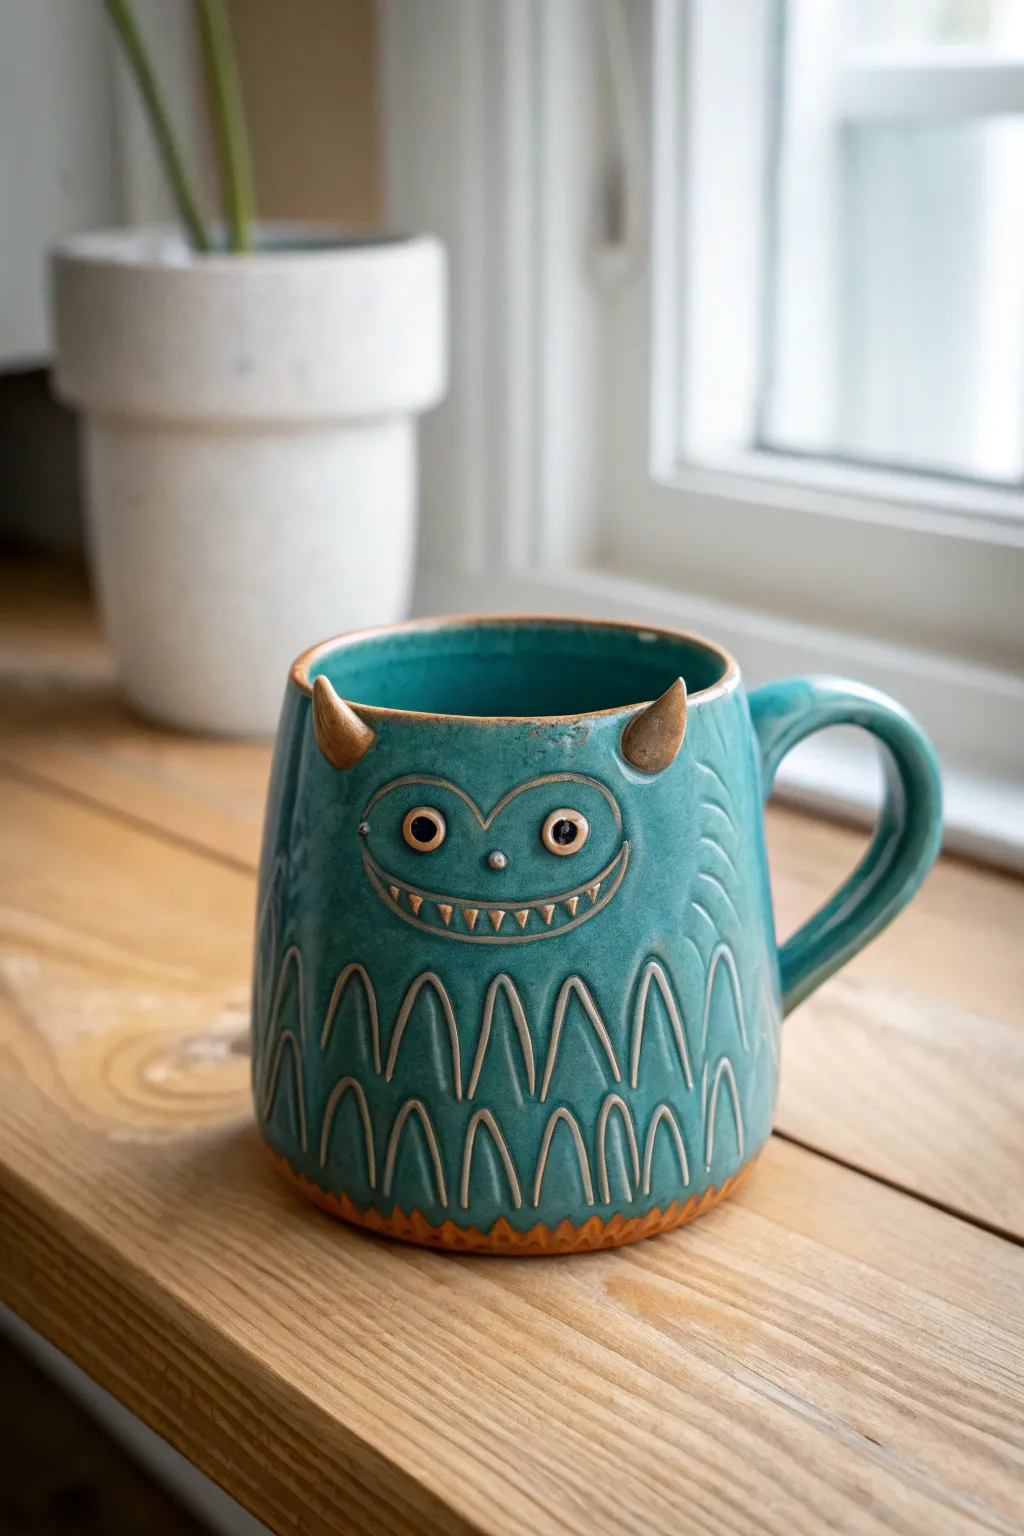
Spiky Punk Monster Mug
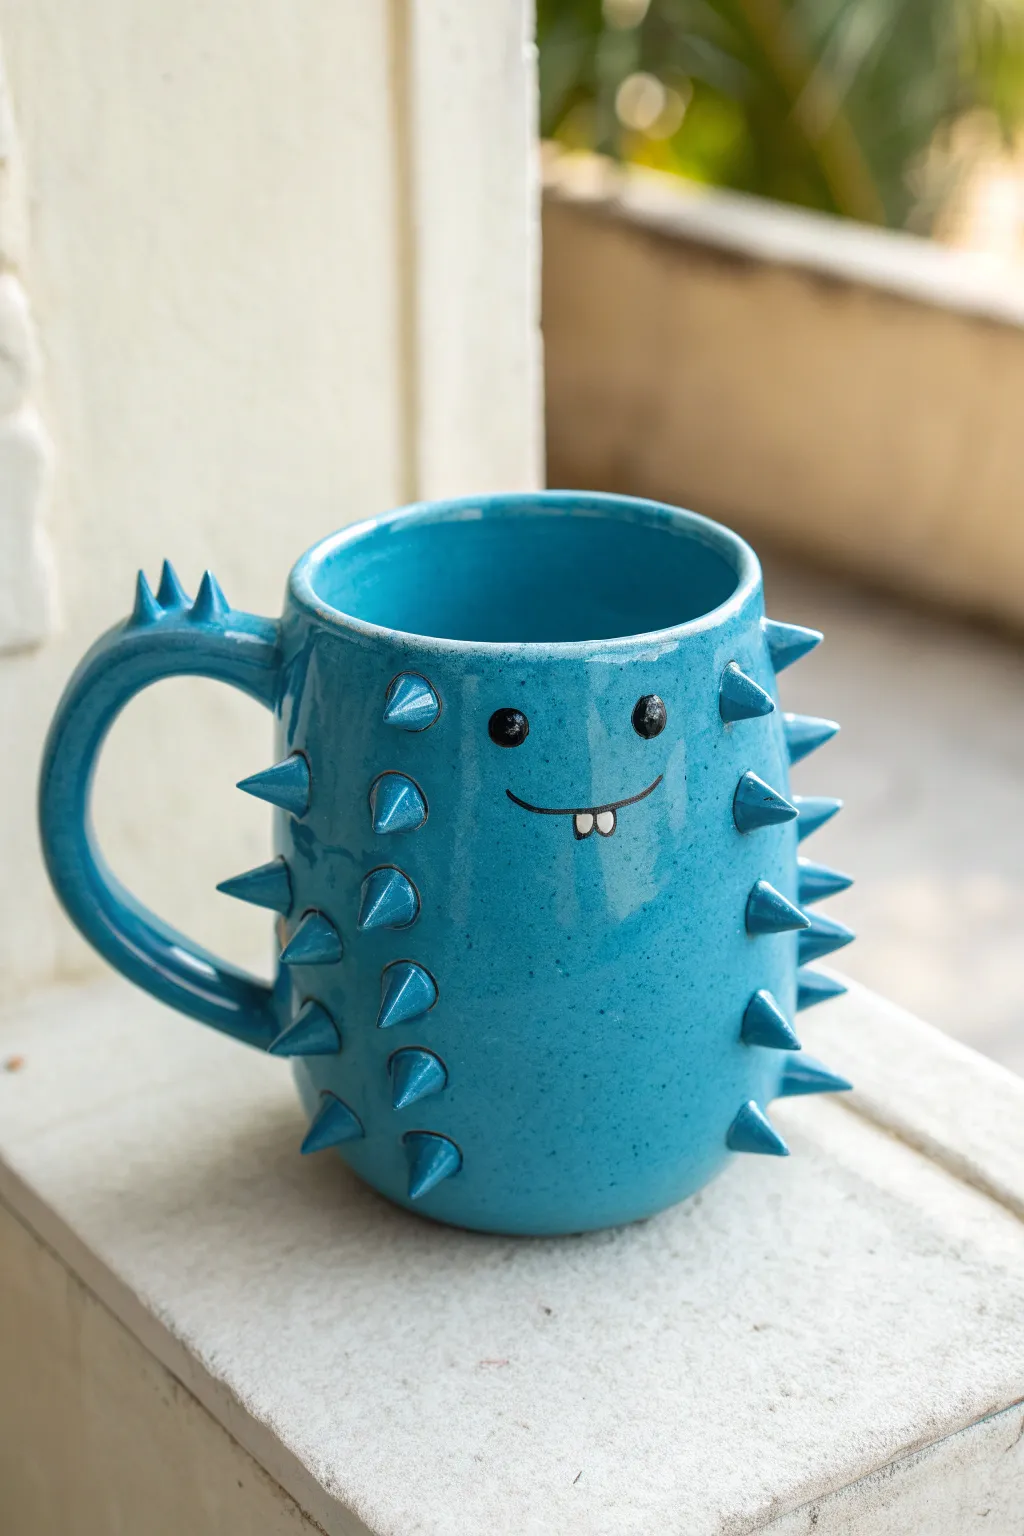
This charming ceramic mug combines a functional vessel with a playful monster personality, featuring a vibrant turquoise glaze and rows of quirky spikes. With its goofy two-toothed smile and round eyes, it transforms your morning coffee routine into a cheerful encounter with a friendly little beast.
How-To Guide
Materials
- Stoneware clay (smooth body recommended)
- Rolling pin and canvas mat
- Pottery wheel (optional, can be hand-built)
- Needle tool
- Scoring tool or serrated rib
- Slip (clay and water slurry)
- Small sponge
- Underglaze (black and white)
- Fine detail paintbrush
- Turquoise glossy glaze
- Soft fan brush
Step 1: Forming the Body
-
Prepare the cylinder:
Begin by throwing a consistent cylinder on the wheel, aiming for about 4-5 inches in height with straight walls. If you are hand-building, roll a slab to 1/4 inch thickness, cut a rectangle, and join the seams securely to form a tube, attaching a circular base at the bottom. -
Smooth the surface:
Use a smooth rib tool to compress the clay and remove any throwing lines or finger marks. A smooth canvas is essential for the face and spikes to stand out clearly later. -
Trim the base:
Once the clay is leather hard, trim the bottom to create a neat foot ring. This lifts the mug slightly and gives it a professional finish. -
Pull the handle:
Pull a strap of clay for the handle. I prefer to pull it directly off the mug for a seamless look, but you can also pull it separately, let it stiffen slightly, and attach it. Aim for a comfortable C-curve shape. -
Attach the handle:
Score and slip the attachment points on both the mug body and the handle ends. Press firmly to join, then smooth the clay around the connection points with a damp sponge or modeling tool.
Step 2: Adding the Spikes
-
Roll cones:
Roll out about 20-30 small balls of clay, roughly the size of large peas. Shape each one into a sharp cone or spike between your fingers. -
Plan the placement:
Lightly mark the mug surface where the spikes will go. Leave a large, clear oval space in the upper center front for the face. Notice the spikes run in vertical columns on the sides and back. -
Score and slip spikes:
Score the bottom of a spike and the corresponding spot on the mug. Apply a dab of slip and press the spike on. Wiggle it slightly to create a vacuum seal. -
Blend the seams:
Use a small modeling tool to smooth the base of each spike into the mug wall so it looks like it’s growing out of the surface rather than just stuck on. -
Add handle spikes:
Don’t forget to add a few smaller spikes to the top of the handle for extra character. -
Dry slowly:
Cover the mug loosely with plastic to let the moisture equalize. The spikes will dry faster than the body, so slow drying prevents cracking.
Spike Security
When attaching spikes, twist them gently as you press them onto the slipped surface. This ‘screw’ motion removes trapped air and creates a significantly stronger bond than pressing alone.
Step 3: Firing and Glazing
-
Bisque fire:
Once the mug is bone dry, fire it to cone 04 (or your clay body’s bisque temperature) in the kiln. -
Clean the bisque:
Wipe the fired mug with a damp sponge to remove any kiln dust, which helps the glaze adhere properly. -
Paint the face details:
Using a fine detail brush and black underglaze, paint two small round eyes and a thin, curved smile line. Outline two small square teeth hanging from the smile line. -
Fill the teeth:
Carefully fill in the two teeth squares with white underglaze. You may need two coats for opacity. Let the underglaze dry completely. -
Apply wax resist:
Paint a layer of wax resist over the eyes, mouth, and teeth. This protects your detailed drawing from being covered by the blue glaze. -
Glaze the mug:
Dip the entire mug into a turquoise glossy glaze, or brush on 3 even coats. The wax resist will repel the glaze from the face features. -
Clean up face:
Use a damp sponge to gently wipe any beads of turquoise glaze that might be sitting on top of the waxed facial features. -
Final fire:
Glaze fire the piece to the temperature recommended for your specific clay and glaze combination (usually cone 5 or 6 for stoneware).
Make it a Set
Vary the expressions to create a whole monster family! Try one with three eyes, one with fangs, or adjust the spike patterns to create different ‘hair’ styles for each mug.
Now you have a delightfully prickly companion ready to hold your favorite hot beverage
Tentacle Handle Monster Mug
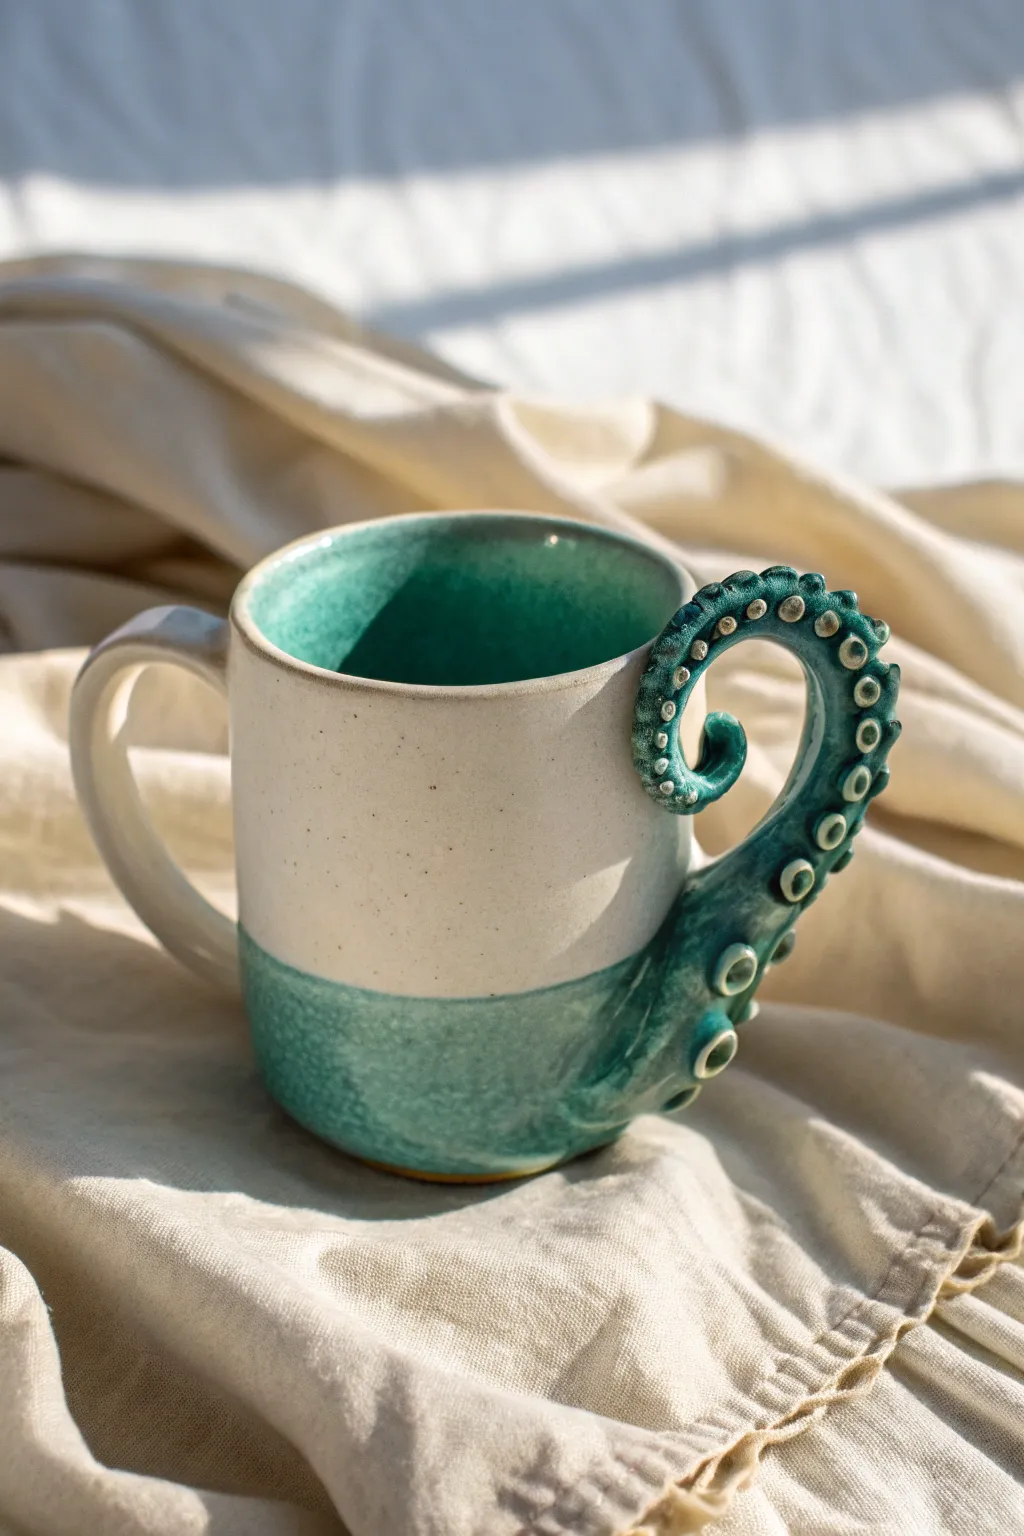
This nautical-themed mug brings the deep sea to your morning routine with a striking tentacle handle that curls elegantly against the cup. The design features a beautiful contrast between the smooth, speckled cream clay body and the textured, vibrant teal of the octopus arm.
Step-by-Step Guide
Materials
- Stoneware clay (smooth or lightly groggy)
- Pottery wheel (or slab roller/rolling pin for hand-building)
- Needle tool
- Scoring tool (serrated rib)
- Slip (clay and water mixture)
- Modeling tools (ball stylus, small loop tool)
- Sponge
- Teal/Turquoise restrictive glaze (e.g., celadon or translucent)
- Speckled cream or white matte glaze
- Kiln
Step 1: Forming the Mug Body
-
Throw or Build the Cylinder:
Begin by throwing a standard cylinder on the pottery wheel, aiming for a height of about 4-5 inches with straight, vertical walls. If you are hand-building, roll out a slab, cut a rectangle, and join the seams to create your cylinder. -
Refine the Rim:
Chamois or sponge the rim to ensure it is smooth and pleasant to drink from. I find that a slightly rounded lip holds glaze beautifully later on. -
Attach a Standard Handle:
Pull a strap handle and attach it to one side of the mug using the score and slip method. This acts as the functional handle on the left side, providing a sturdy grip opposing the decorative tentacle. -
Leather Hard Drying:
Allow the mug to dry slowly until it reaches a leather-hard state. The clay should be firm enough to handle without warping but soft enough to carve and attach additions.
Cracking Handles?
If the tentacle cracks where it meets the mug during drying, your clay was likely too dry when attaching. Cover the connection point with plastic or wax resist to slow drying.
Step 2: Sculpting the Tentacle
-
Roll the Tentacle Coil:
Roll a tapered coil of clay that is thicker at the base and thins out significantly toward the tip. It should be long enough to curve dramatically, roughly 6-7 inches. -
Shape the Curve:
Bend the coil into an ‘S’ shape or a question mark curve. The thick end will attach near the bottom of the mug, while the thin tip curls upward and inward, creating a handle-like loop. -
Attach the Tentacle:
Score and slip the attachment points heavily on both the mug and the tentacle base. Press the thick base of the tentacle firmly onto the lower side of the mug, blending the clay seamlessly so it looks like it’sc growing out of the cup. -
Secure the Upper Curl:
Attach the top part of the curl to the upper wall of the mug. Ensure there is enough negative space for a finger to hook through if desired, though this is primarily decorative. -
Detail the Suckers:
Using a small ball of clay for each sucker, roll tiny spheres and press them in rows along the outer edge of the tentacle curve. -
Define the Suckers:
Take a ball stylus tool or the back of a small paintbrush and press into the center of each flattened sphere to create the cup-like depression of the suckers. -
Smoothing and Drying:
Use a damp brush to smooth any harsh tool marks around the suckers and attachments. Let the mug dry completely to bone dry before bisque firing.
Go 24k Gold
For a luxury finish, apply gold luster to individual suckers or the rim of the mug after the glaze firing, then fire again at a very low temperature (Cone 018).
Step 3: Glazing and Firing
-
Bisque Fire:
Fire the piece to cone 04 (or your clay’s specific bisque temperature). -
Wax Resist Method:
Apply wax resist to the bottom of the mug and slightly up the foot ring to prevent sticking to the kiln shelf. -
Interior Glazing:
Pour your turquoise glaze into the interior of the mug, swirl to coat completely, and pour out the excess. -
Dip the Top Half:
Hold the mug by the foot and dip the top 2/3 into the speckled cream glaze. Alternatively, brush this glaze on carefully, avoiding the tentacle area if you want a sharp line. -
Glaze the Tentacle and Bottom:
Carefully brush the turquoise glaze onto the bottom third of the mug and the entire tentacle handle. The glaze should pool slightly in the sucker depressions to highlight the texture. -
Clean Up:
Wipe away any glaze drips on the foot ring or areas where the two glazes might have overlapped messily, though a slight organic overlap is lovely. -
Final Fire:
Fire the mug to maturity (Cone 5, 6, or 10 depending on your clay and glaze). Let the kiln cool completely before opening to prevent thermal shock.
Enjoy your morning brew in this mysterious deep-sea vessel knowing you sculpted every curve yourself

TRACK YOUR CERAMIC JOURNEY
Capture glaze tests, firing details, and creative progress—all in one simple printable. Make your projects easier to repeat and improve.
Tail-Wrap Handle Creature
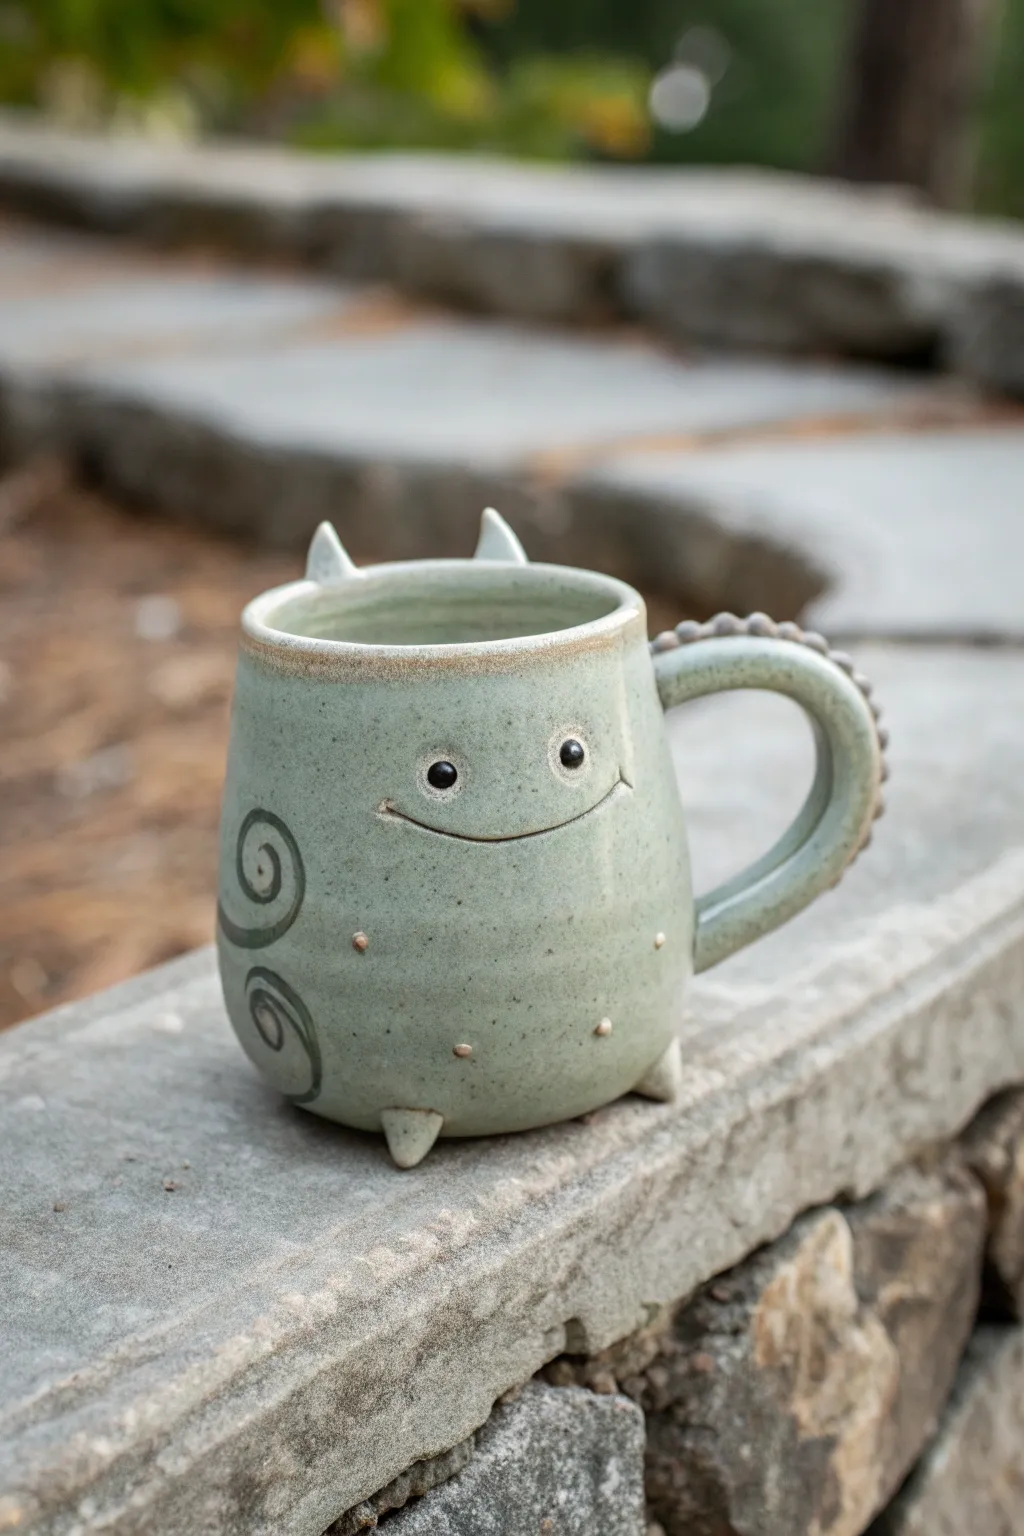
This charming, sage-green ceramic mug transforms your morning coffee into a whimsical encounter with a friendly forest creature. Featuring a spiked tail handle, spiral side etchings, and tiny feet, this project balances functionality with delightful character design.
How-To Guide
Materials
- Stoneware clay (speckled or buff)
- Pottery wheel (or rolling pin for hand-building)
- Fettling knife
- Needle tool
- Scoring rib or serrated kidney scraper
- Slip (clay mixed with water)
- Loop tool for trimming
- Modeling tool (wooden/plastic)
- Celadon or semi-transparent green glaze
- Black underglaze
- Small paintbrush
Step 1: Forming the Body
-
Throwing the Cylinder:
Center roughly 1 pound of speckled clay on your wheel and open it up. Pull the walls to create a cylinder that is approximately 4-5 inches tall. -
Applying the Bellying Technique:
Gently push the walls outward from the inside using your fingers or a rib to create a rounded, bellied shape. The top rim should taper inward slightly to give the mug a self-contained, creature-like silhouette. -
Trimming the Base:
Once the piece is leather hard, trim the bottom. Instead of a traditional foot ring, aim for a rounded bottom, as we will be adding custom feet later. -
Adding Texture (Optional):
While the clay is still slightly soft, smooth the exterior with a flexible rib to erase throwing lines, creating a clean canvas for the monster’s features.
Step 2: Sculpting Features
-
Creating the Tail Handle:
Roll a coil of clay that tapers at one end. Flatten it slightly to form a strap handle shape, but keep it thick enough to feel substantial. -
Attaching the Handle:
Score and slip the attachment points on the mug body and the handle. Attach the handle in a ‘C’ shape. I like to blend the clay thoroughly at the seams for durability. -
Spiking the Tail:
Roll tiny balls of clay and attach them along the top spine of the handle using slip. Gently pinch them into small triangular ridges to resemble a dinosaur or dragon tail. -
Adding Horns and Feet:
Create two small triangular cones for the horns and two slightly larger ones for the feet. Score and slip them into place—horns on the front rim, pointing up, and feet at the base so the mug stands slightly elevated. -
Checking Balance:
Set the mug on a flat surface to ensure the feet and the base of the handle create a stable tripod.
Spine Stability
When adding spines to the handle, score the handle surface deeply first. This ensures the tiny ridges don’t knock off during daily use.
Step 3: Detailing & Decorating
-
Carving Spirals:
Using a loop tool or a carving needle, gently carve large spiral patterns into the sides of the mug body to suggest fur swirls or magical markings. -
Sculpting the Face:
Use a needle tool or fettling knife to incise a long, wide, curved smile across the belly of the mug. Add tiny dimples at the corners of the mouth. -
Wait for Leather Hardness:
Let all added components stiffen to the same consistency as the mug body. This is crucial to prevent cracking at the seams. -
Adding Warts:
Roll extremely tiny balls of clay and attach them randomly around the lower body and near the smile for texture. Score these connection points well so they don’t pop off during firing. -
Bisque Firing:
Once bone dry, fire the piece to bisque temperature (usually Cone 04 or 06, depending on your clay).
Creative Twist
Swap the spirals for scales or leafy vines to change the creature’s elemental type from forest spirit to water or swamp beast.
Step 4: Glazing
-
Detailing the Eyes:
Use a small brush to apply black underglaze to paint two small, simple round eyes above the smile. Let this dry completely. -
Wax Resist:
Apply wax resist over the black eyes so the main glaze doesn’t cover them. -
Main Glaze Application:
Dip or brush the entire mug with a transparent celadon or light sage green glaze. This type of glaze breaks beautifully over the textures and spirals you carved. -
Rim Accent:
Wipe the very top rim slightly with a damp sponge to thin the glaze there, allowing the toasted color of the clay body to peek through. -
Final Firing:
Fire the mug to maturity (usually Cone 5 or 6). The glaze should become glassy and highlight the speckles in the clay body.
Now you have a charismatic little companion to guard your tea or coffee break
Claw-Foot Monster Base
This charming ceramic vessel stands on its own two feet—literally. With a speckled cream glaze, a minimalist smiley face, and distinctive clawed toes, this project adds heaps of personality to a simple cylindrical form.
Step-by-Step Tutorial
Materials
- Stoneware clay (preferably speckled)
- Pottery wheel (optional, hand-building works too)
- Needle tool
- Scoring tool or fork
- Slip (clay mixed with water)
- Wooden modeling tool
- Sponge
- Speckled matte white glaze
- Iron oxide wash (optional for details)
- Kiln
Step 1: Forming the Body
-
Create the cylinder:
Whether throwing on the wheel or slab-building, create a straight-sided cylinder approximately 4 inches wide and 5 inches tall. Ensure the walls are even, about 1/4 inch thick. -
Smooth the exterior:
Using a rib tool, compress the outside and inside walls to remove throwing lines or canvas texture. You want a smooth, blank canvas for the monster’s face. -
Trim the bottom:
If wheel-throwing, let the pot dry to leather hard, then trim the bottom. Instead of a traditional foot ring, trim the bottom to be completely round and smooth, as it will sit on added legs.
Level Up: Belly Breathing
Before attaching legs, gently push the clay wall outward from the inside while the cylinder is rotating. This gives the monster a cute ‘pot belly’ shape.
Step 2: Sculpting the Feet
-
Shape the legs:
Roll two balls of clay, slightly larger than golf balls. Gently flatten them into stout, tapered cylinders that are wider at the bottom. -
Flatten the contact points:
Tap the top of each leg against your work surface to create a flat shelf where it will attach to the mug body. Do the same for the bottom so it stands stable. -
Carve the toes:
Using a wooden modeling tool or needle tool, press three distinct indentations into the front of each foot to delineate four toes. -
Add claws:
Roll tiny cones of clay for the claws. Score and slip the tip of each toe, then attach the claws, smoothing the seams so they look like they grow naturally from the foot. -
Attach the legs:
Score the bottom of your cylinder and the tops of your legs heavily. Apply slip generously and press the legs onto the base. I like to space them slightly wide for better balance. -
Reinforce the connection:
Use a small coil of clay around the seam where the leg meets the body. Smooth this coil down completely with a tool or your finger to ensure a strong bond that won’t crack during firing.
Troubleshooting: Wobble Wars
If the finished piece wobbles, the legs may have dried unevenly. Sand the bottom of the higher foot on concrete or sandpaper after the bisque firing.
Step 3: Character Details
-
Poke the eyes:
While the clay is leather hard, use the blunt end of a paintbrush handle or a round shaping tool to press two eye sockets into the upper third of the cup. -
Add pupils:
Roll two tiny spheres of clay and press them firmly into the center of the indented eye sockets to create bulging pupils. -
Carve the smile:
Use a needle tool to draw a long, shallow, U-shaped mouth. Keep the line thin and delicate for that minimalist look. -
Add texture dots:
Using a small drill bit or the tip of a needle tool, poke a row of shallow decorative holes along the bottom edge of the cup, just above the legs. -
Clean up edges:
Once bone dry, gently rub the rim and any sharp edges on the claws with a slightly damp sponge or green scour pad to soften them.
Step 4: Glazing and Finishing
-
Bisque fire:
Fire the piece to Cone 04 (or your clay’s specific bisque temperature). -
Highlight the smile:
Brush a small amount of iron oxide wash into the smile line and around the claws. Wipe away the excess with a damp sponge, leaving color only in the crevices. -
Wax the feet:
Apply wax resist carefully to the bottom of the claws and feet to prevent them from sticking to the kiln shelf. -
Apply the main glaze:
Dip the entire mug into a speckled cream or matte white glaze. Ensure the glaze covers the body evenly but doesn’t pool too thickly near the feet connections. -
Detail the eyes:
Carefully dab a dot of black underglaze or a dark glaze onto the pupils for contrast. -
Glaze fire:
Fire to the maturation temperature of your clay and glaze (typically Cone 5 or 6 for stoneware).
Now you have a loyal little creature ready to hold your morning coffee or favorite plant
Furry Carved Texture Beast
Bring a friendly beast to your breakfast table with this wheel-thrown mug featuring carved fur details and a mischievous grin. The combination of glossy teal glaze breaking over brown clay creates stunning depth in the texture, making every sip an adventure.
Detailed Instructions
Materials
- Stoneware clay (buff or brown speckle works best)
- Pottery wheel and basic throwing tools
- Carving tools (loop tools and needle tool)
- Score and slip tool (or serrated rib)
- Small paintbrush for slip application
- Teal celadon or breaking glaze
- Clear glaze (optional for inside)
- Kiln
Step 1: Throwing the Base Form
-
Center and open:
Start with about 1-1.5 lbs of stoneware clay. Center it firmly on the wheel head and open the clay to establish the interior floor of your mug. -
Pull the walls:
Pull the walls up into a cylinder shape. Aim for a slightly tapered form that is wider at the bottom and slightly narrower at the rim to give the monster a stable, chubby look. -
Refine the shape:
Use a rib tool to smooth the exterior and remove throwing lines. The surface needs to be relatively smooth initially so your carving stands out later. -
Trim the rim:
Compress the lip with a chamois or your finger to ensure it’s comfortable for drinking. Cut the mug off the wheel and let it dry to a solid leather-hard state.
Choosing the Right Glaze
Use a translucent celadon or a glaze marked ‘breaks over texture’. Opaque glazes will hide all your hard carving work.
Step 2: Adding Character Features
-
Trim the foot:
Once leather hard, flip the mug over and trim a clean foot ring. I like to leave the walls slightly thick to allow for deep carving without puncturing through. -
Sculpt the horns:
Roll two small cones of clay for the horns. Score and slip the rim area where you want them to sit, then firmly attach them, smoothing the seams completely. -
Add the eyes:
Roll two small balls of clay. Flatten them slightly and attach them below the horns using the score and slip method. Use a small tool to press a pupil into the center of each. -
Outline the face:
Using a needle tool, lightly sketch the heart-shaped brow line around the eyes and the wide, U-shaped mouth curve. -
Define the mouth:
Press a small coil of clay along the bottom mouth line for a lip, or just carve deeply to define it. Scratch in triangular teeth shapes along the grin.
Crack Control
If horns crack at the join during drying, wrap the mug in plastic for a day to re-homogenize moisture, then compress the join again.
Step 3: Carving the Fur Texture
-
Plan the pattern:
Visualize rows of inverted ‘V’ shapes or triangles. You want these to look like tufts of fur hanging down. -
Carve the first row:
Starting near the bottom, use a small loop tool to carve out negative space, leaving raised triangular ‘fur’ shapes. Carve cleanly to avoid burrs. -
Layer the fur:
Move up to the next row, offsetting the triangles so the point of the upper row falls between two peaks of the lower row. Continue this pattern up the body of the mug. -
Detail the brows:
Use a finer carving tool to add small texture lines around the eye mask area, distinguishing the face from the rest of the fur. -
Attach the handle:
Pull a sturdy handle and attach it opposite the face. Ensure the curve is generous enough for fingers to fit comfortably.
Step 4: Glazing and Firing
-
Bisque fire:
Let the mug dry slowly to prevent the handle or horns from cracking. Bisque fire to cone 04 (or your clay’s specific bisque temperature). -
Wax resist:
Apply wax resist to the foot ring and the very tips of the horns if you want the raw clay to show through as an accent. -
Apply glaze:
Dip or brush your teal glaze over the entire mug. A ‘breaking’ glaze is crucial here—it will pool in the carved recesses and thin out on the raised fur edges, highlighting texture. -
Clean the eyes:
Carefully wipe the glaze off the pupil indentations or the whites of the eyes if you want contrast, or simply let the glaze break over the relief for a subtler look. -
Final fire:
Glaze fire to cone 5/6 (or your clay’s maturity temperature). Check that the horns didn’t adhere to anything in the kiln loading process.
Once cooled, your durable little monster is ready to guard your coffee with a smile
Warty Toad-Skin Monster
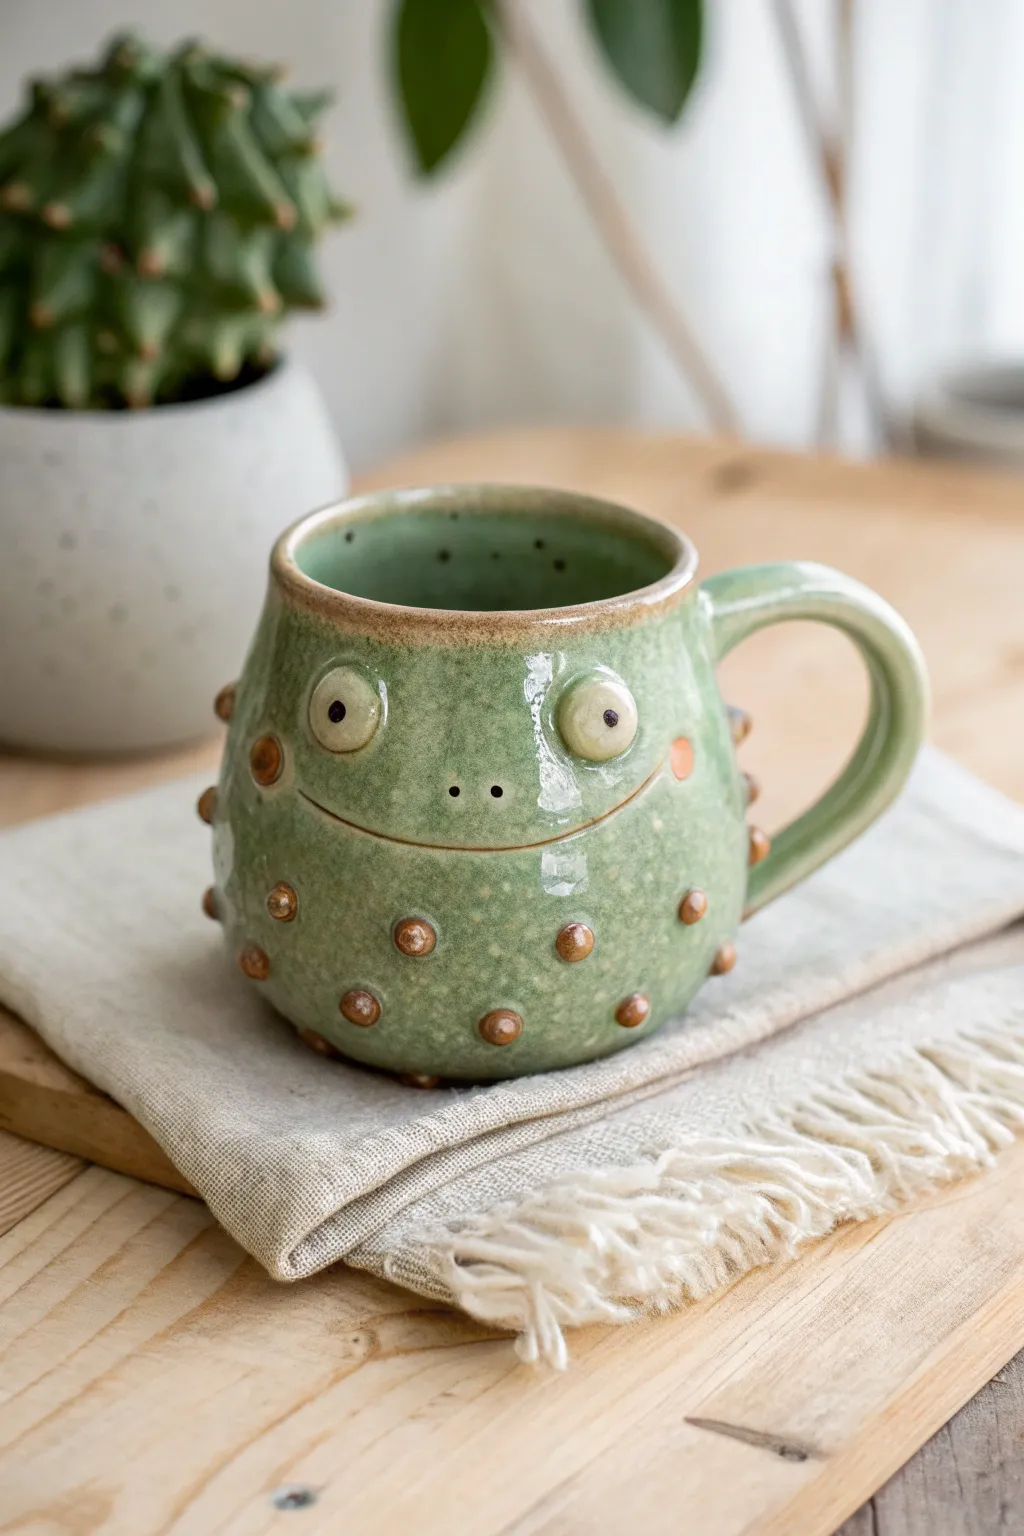
Bring a swampy smile to your morning coffee with this delightful toad-inspired monster mug. Characterized by its textured green skin, prominent warts, and friendly wide-set eyes, this piece balances monstrous charm with functional design.
Step-by-Step Tutorial
Materials
- Stoneware clay (smooth or speckled)
- Pottery wheel (or rolling pin for hand-building)
- Needle tool
- Rib tool (wooden and rubber)
- Small loop tool
- Scoring tool or serrated rib
- Slip (liquid clay)
- Sponge
- Celadon or translucent green glaze
- Iron oxide wash or rust-colored underglaze
- Clear glaze (optional)
- Kiln
Step 1: Forming the Body
-
Throw the base cylinder:
Begin by centering about 1-1.5 lbs of clay on the wheel. Open the ball and pull up a standard cylinder with a floor about 1/4 inch thick. Keep the walls even. -
Belly out the form:
Use a wooden rib inside the cylinder to gently push the walls outward, creating a rounded, bulbous belly shape. Leave the rim slightly narrower to define the ‘head’ area. -
Refine the rim:
Use a chamois or a damp sponge to compress and smooth the rim. I like to make it slightly thick and rounded for a comfortable drinking experience. -
Trim the foot:
Once the mug is leather hard, flip it over and trim a neat foot ring. This lifts the round belly slightly off the table surface.
Step 2: Sculpting the Features
-
Create the eye sockets:
With the mug upright, gently press your thumbs into the clay near the top rim to create two shallow depressions where the eyes will sit. -
Attach the eyeballs:
Roll two small balls of clay. Score and slip the depressions you made, then firmly press the balls into place. They should bulge out significantly. -
Define the pupils:
Using the back of a small drill bit or a needle tool, press a small indentation into the center of each eye to create the pupil. -
Carve the smile:
Use a needle tool to draw a long, wide smile that stretches almost handle-to-handle. Curve it slightly upwards at the ends to ensure a friendly expression. -
Add the nose:
Poke two small holes between the eyes, slightly lower down, to serve as nostrils. Keep them small and subtle.
Warts Falling Off?
If your warts pop off during drying, you didn’t score deeply enough. Use a serrated rib to really rough up both surfaces and use plenty of slip before joining.
Step 3: Adding Texture & Handle
-
Make the warts:
Roll roughly 15-20 small varied-size balls of clay. These will become the signature toad warts. -
Attach the warts:
Score and slip the belly of the mug in a random pattern. Press the clay balls onto the surface, concentrating them on the lower half and sides. -
Flatten the warts:
Gently press the center of each attached wart with your finger or a tool so they look like integrated bumps rather than just stuck-on marbles. -
Pull the handle:
Pull a strap handle from a separate piece of clay. Aim for a curve that mimics the roundness of the mug’s body. -
Attach the handle:
Score and slip the attachment points opposite the face. Attach the top of the handle near the rim and the bottom near the lower belly curve. Smooth the seams well. -
Slow drying:
Cover the mug loosely with plastic to let the added features and handle dry evenly with the body effectively avoiding cracks.
Level Up: Texture
Before attaching warts, gently roll a textured item (like a lemon peel or rough sponge) over the leather-hard clay to give the main skin a realistic, porous look.
Step 4: Glazing
-
Bisque fire:
Fire the completely dry piece to cone 04 (or your clay’s specific bisque temperature). -
Accent the warts:
Dab a small amount of iron oxide wash or rust-colored underglaze onto each wart, the cheeks, and the rim of the mug. Wipe away any excess with a damp sponge so the color stays mostly in the crevices and on the peaks. -
Apply the main color:
Dip or brush the entire mug with a celadon or translucent green glaze. This transparency allows the clay body and the oxide accents to show through, creating depth. -
Glaze fire:
Fire the mug to maturity (likely cone 5 or 6). Once cool, sand the foot ring smooth before use.
Now you have a charming, warty companion ready to hold your favorite hot beverage
Stitched-Up Patchwork Monster
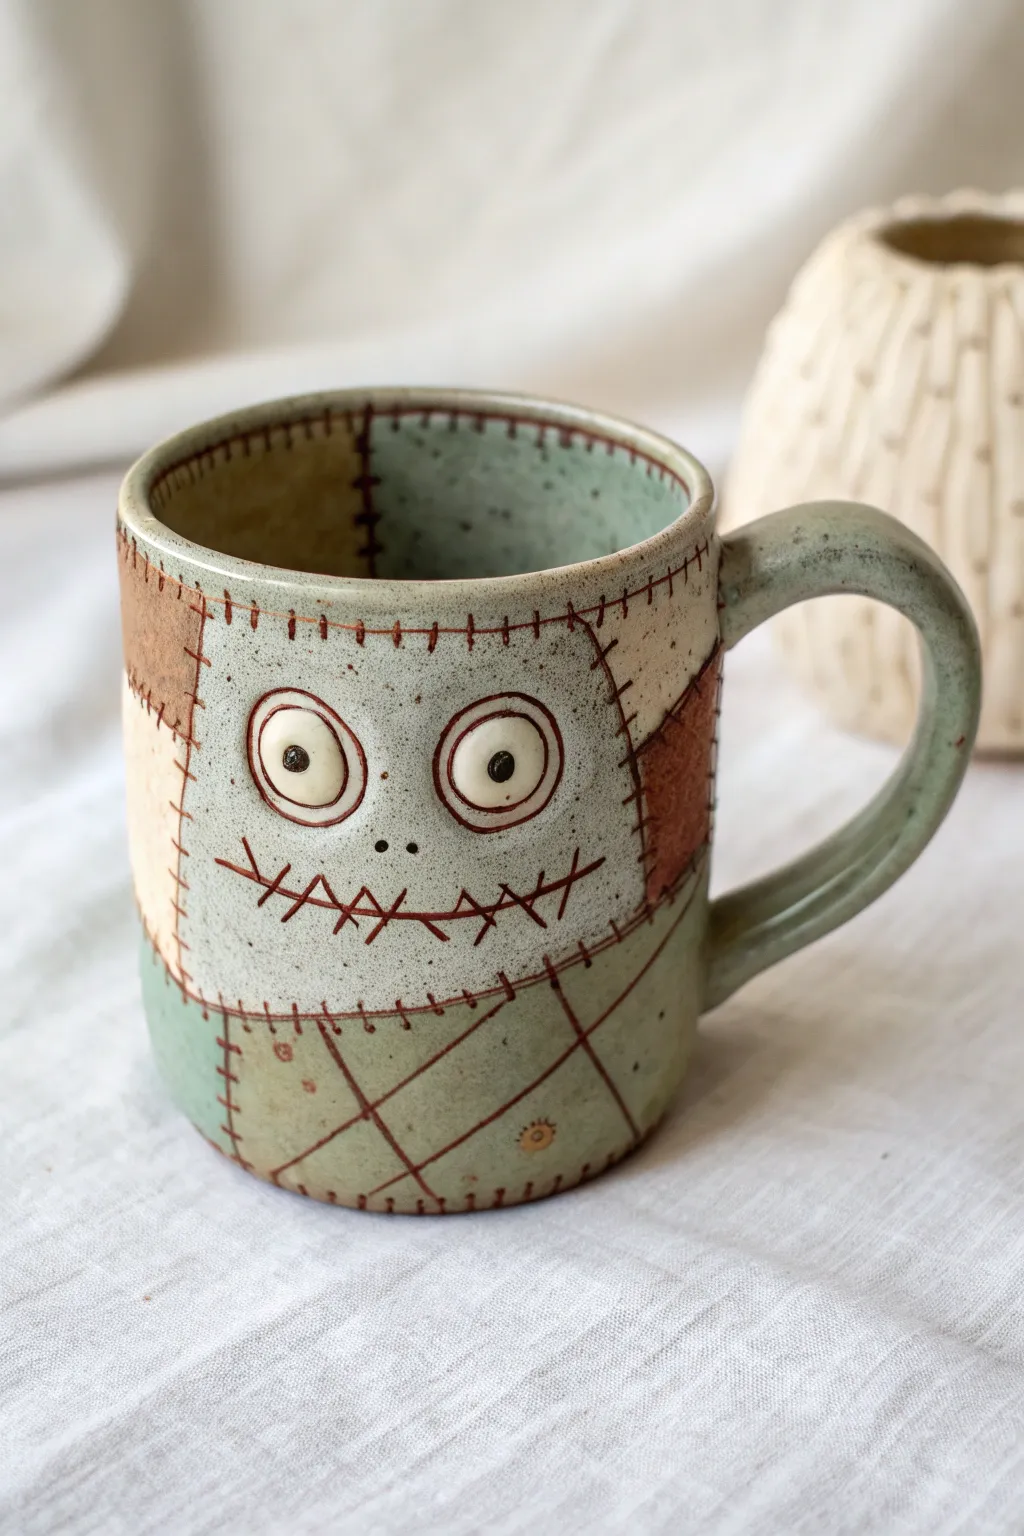
This whimsical ceramic mug features a patchwork zombie aesthetic, combining different clay textures and glaze colors to create a distinctive, charmingly spooky character. With wide staring eyes and prominent stitch marks, it’s a delightful project for intermediates looking to practice slab building and detailed surface decoration.
How-To Guide
Materials
- Stoneware clay (a speckled buff body works best)
- Rolling pin and guide sticks (approx. 1/4 inch)
- Needle tool
- Fettling knife
- Scoring tool (serrated rib)
- Slip (clay and water slurry)
- Small circle cutters (two sizes)
- Underglazes: Light blue-green, warm brown, cream/beige, white, black
- Fine liner brush for details
- Clear transparent glaze
- Pottery sponge
- Ware board or bat
Step 1: Forming the Mug Body
-
Roll the Slab:
Begin by rolling out your stoneware clay into a smooth, even slab about 1/4 inch thick. Compress the clay on both sides with a rib tool to align particles and prevent warping later. -
Cut the Rectangle:
Measure and cut a rectangle approximately 12 inches long by 4.5 inches high (adjust based on your desired mug size, accounting for shrinkage). Bevel the short edges at a 45-degree angle to create a cleaner seam when joined. -
Construct the Cylinder:
Score the beveled edges thoroughly and apply slip. Bring the ends together to form a cylinder, pressing the seam firmly. Use a wooden tool or your finger to smooth the join inside and out so it’s seamless. -
Attach the Base:
Roll a small piece of slab for the base. Place your cylinder on top, trace around it, and cut out the circle. Score and slip both the bottom of the cylinder and the edge of the base, then press them together firmly. Smooth the connection with a modeling tool. -
Shape the Handle:
Pull a handle from a lug of clay or cut a strip from your remaining slab. Shape it into a comfortable ‘C’ curve. Let it stiffen slightly until it holds its shape without drooping. -
Attach the Handle:
Score and slip the attachment points on both the mug body and the handle. Press the handle firmly onto the side of the mug, opposite where you plan to put the face. Clean up any excess slip with a damp sponge.
Clean Lines
When carving stitch marks, let the clay reach ‘leather hard’ first. If the clay is too wet, the needle tool will create messy burrs rather than crisp lines.
Step 2: Creating the Patchwork Face
-
Carve the Patch Lines:
Using a needle tool, lightly sketch varied geometric shapes—rectangles and squares—across the surface of the mug to simulate fabric patches. Press deeper once you are happy with the layout to define the boundaries. -
Add Stitch Markings:
Along every ‘patch’ line, make small, perpendicular hatch marks with your needle tool. These represent the classic Frankenstein-style stitching that holds the monster together. -
Make the Eyes:
Roll two small balls of clay and flatten them slightly into discs. Score the back of each and slip them onto the front of the mug. Use a smaller tool to press a tiny indentation in the center of each for the pupil. -
Detail the Eye Sockets:
Draw large circles around the applied eyes with your needle tool to create the ‘socket’ appearance. Add radiating lines or concentric circles inside this area to give the eyes a wide, staring look. -
Carve the Mouth:
Carve a long, slightly wavy horizontal line for the mouth. Cross it with vertical ‘stitch’ marks, similar to the patch borders but perhaps slightly longer and more prominent. -
Add Texture:
Use a texturing tool or a small stamp to add subtle details to specific patches, like the cross-hatching seen on the lower section of the example mug.
Step 3: Glazing and Finishing
-
Bisque Fire:
Allow the mug to dry slowly and completely. Once bone dry, bisque fire it according to your clay body’s specifications (usually Cone 04 or 06). -
Apply Base Colors:
Using underglazes, paint the different ‘patches’ in varying shades. For the main face, use a speckled light green. Contrast this with patches of warm brown and cream on the sides and back. -
Highlight the Stitches:
I find it helpful to mix a dark brown or oxide wash and brush it into all the carved lines and stitches. Wipe back the excess with a damp sponge, leaving the dark color only in the recesses to make the design pop. -
Detail the Eyes:
Paint the raised eyeballs initially white, then carefully dot the pupils with black underglaze. This brings the character to life instantly. -
Clear Glaze:
Dip the entire mug into a clear transparent glaze. This will seal the clay and make the underglaze colors vibrant and food-safe. -
Final Firing:
Fire the mug to maturity (Cone 5 or 6 for stoneware). Ensure the bottom is wiped clean of glaze before loading it into the kiln.
Button Nose
Instead of just painting patches, add a small clay button attachment or a 3D clay ‘patch’ layered on top for extra tactile dimension.
Once fired, you’ll have a wonderfully quirky mug perfect for sipping warm drinks on a chilly evening
Scarred and “Torn Skin” Look
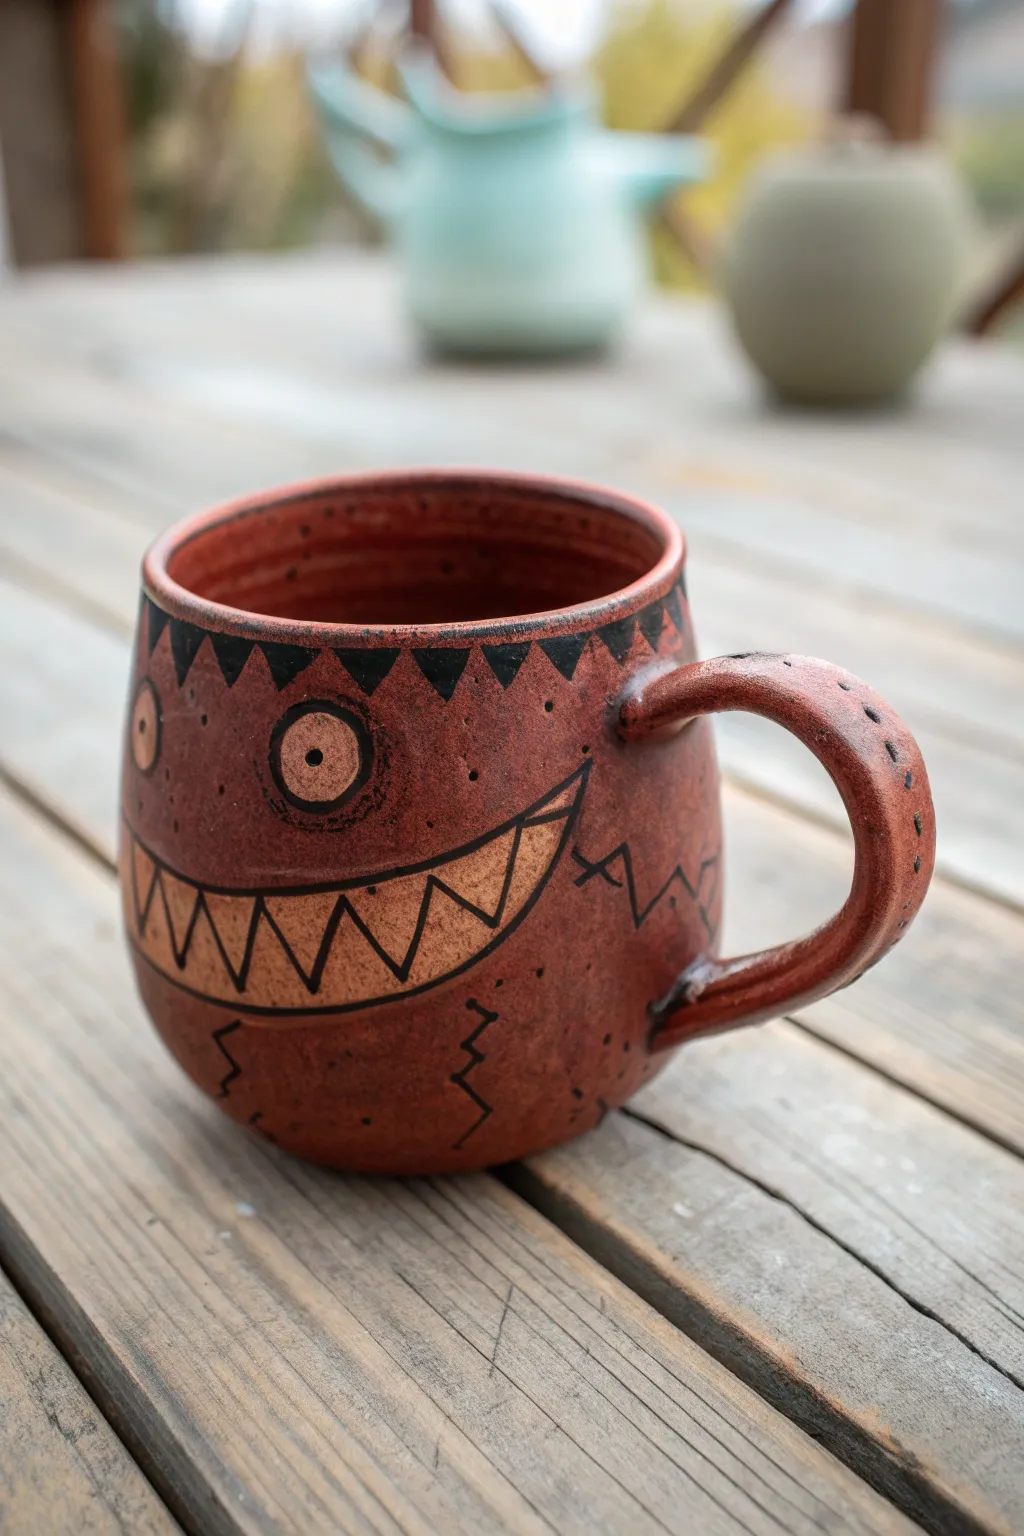
This quirky, reddish-brown clay mug features a mischievous monster face with wide, staring eyes and a toothy grin that looks like it’s been stitched together. The design combines sgraffito-style line work with earthy tones to create a piece that feels both rustic and playful.
Detailed Instructions
Materials
- Stoneware clay (smooth or with fine grog)
- Pottery wheel (or rolling pin for slab building)
- Needle tool
- Loop tool for trimming
- Underglaze pencil or distinct black underglaze
- Small liner brush
- Wax resist (optional)
- Red iron oxide wash or reddish-brown matte glaze
- Clear matte glaze (optional)
- Sponge
- Rib tool
- Scoring tool
- Slip
Step 1: Forming the Body
-
Throw the cylinder:
Begin by centering your clay on the wheel and throwing a standard cylinder. Aim for a slightly rounded belly rather than straight walls to give the monster a chubby, friendly shape. -
Shape the rim:
Collar the neck in slightly to create a gentle curve inward at the top. Use a chamois or sponge to compress and round the lip, ensuring it’s comfortable for drinking. -
Trim the foot:
Once the mug is leather hard, flip it over and trim a neat foot ring. This lifts the heavy monster body off the table and adds elegance to the form.
Step 2: Adding the Handle
-
Pull a handle:
Pull a strap of clay for the handle. For this rustic look, keep the handle slightly thick and robust, matching the sturdy feeling of the mug. -
Attach firmly:
Score and slip the attachment points on both the mug body and the handle. Press the handle firmly onto the mug, smoothing the joints with your thumb or a modeling tool. -
Refine the curve:
Shape the handle into a comfortable ear-shape loop. Ensure there is enough space for fingers to grip it securely without touching the hot wall of the mug.
Keep it Sharp
For the crispest black lines, let the underglaze dry slightly, then carefully scratch through it with a needle tool to clean up any messy edges.
Step 3: Designing the Monster Face
-
Sketch the layout:
Lightly sketch your design onto the leather-hard clay using a needle tool or a dull pencil. Mark out two large circles for eyes and a wide, curved crescent for the mouth. -
Outline the features:
Using a fine liner brush and black underglaze, or a black underglaze pencil, carefully trace over your sketched lines. Draw thick outlines for the eyes and the main sweep of the smile. -
Draw the teeth:
Inside the mouth smile, draw a zig-zag line to create sharp, triangular teeth. Ensure the line continues from one corner of the mouth to the other. -
Add the pupils:
Place a solid dot in the center of each eye circle. Making one pupil slightly smaller or off-center can give the monster a confused or crazy expression.
Go Wilder
Add small clay horns or warts to the surface before the bisque firing for extra 3D texture that breaks up the smooth silhouette.
Step 4: Adding Markings & Texture
-
Decorate the rim:
Paint a row of small, downward-pointing triangles all around the upper rim of the mug. Fill them in with solid black underglaze for high contrast. -
Add scarring details:
Draw zig-zag ‘crack’ lines or scar marks on the cheeks and lower body of the mug. Keep these lines thinner than the main facial features. -
Stitch the handle:
I prefer to add small dash marks running down the spine of the handle. This mimics the look of stitching and ties the handle into the overall monster theme. -
Reserve the colors:
Apply wax resist carefully over the whites of the eyes and the triangular teeth inside the mouth. This will keep the raw clay body (or a white underglaze, if you used one) visible after the final glazing.
Step 5: Glazing and Firing
-
Bisque fire:
Load the mug into the kiln for a bisque firing to harden the clay and set the underglaze design. -
Apply the oxide wash:
Mix a red iron oxide wash. Brush this liberally over the entire outside of the mug. Wipe it back with a damp sponge so the color stays in the pores and textures, creating that warm, reddish-brown skin tone. -
Internal glaze:
Pour a food-safe liner glaze into the interior of the mug, swirl it to coat, and pour out the excess. A dark or clear glaze works well here. -
Final firing:
Fire the mug to cone 6 (or whatever temperature your clay and glaze require). The wax resist will burn off, leaving the teeth and eyes distinctly lighter than the ruddy skin.
Once cooled, your little goblin mug is ready to guard your morning coffee with a goofy grin
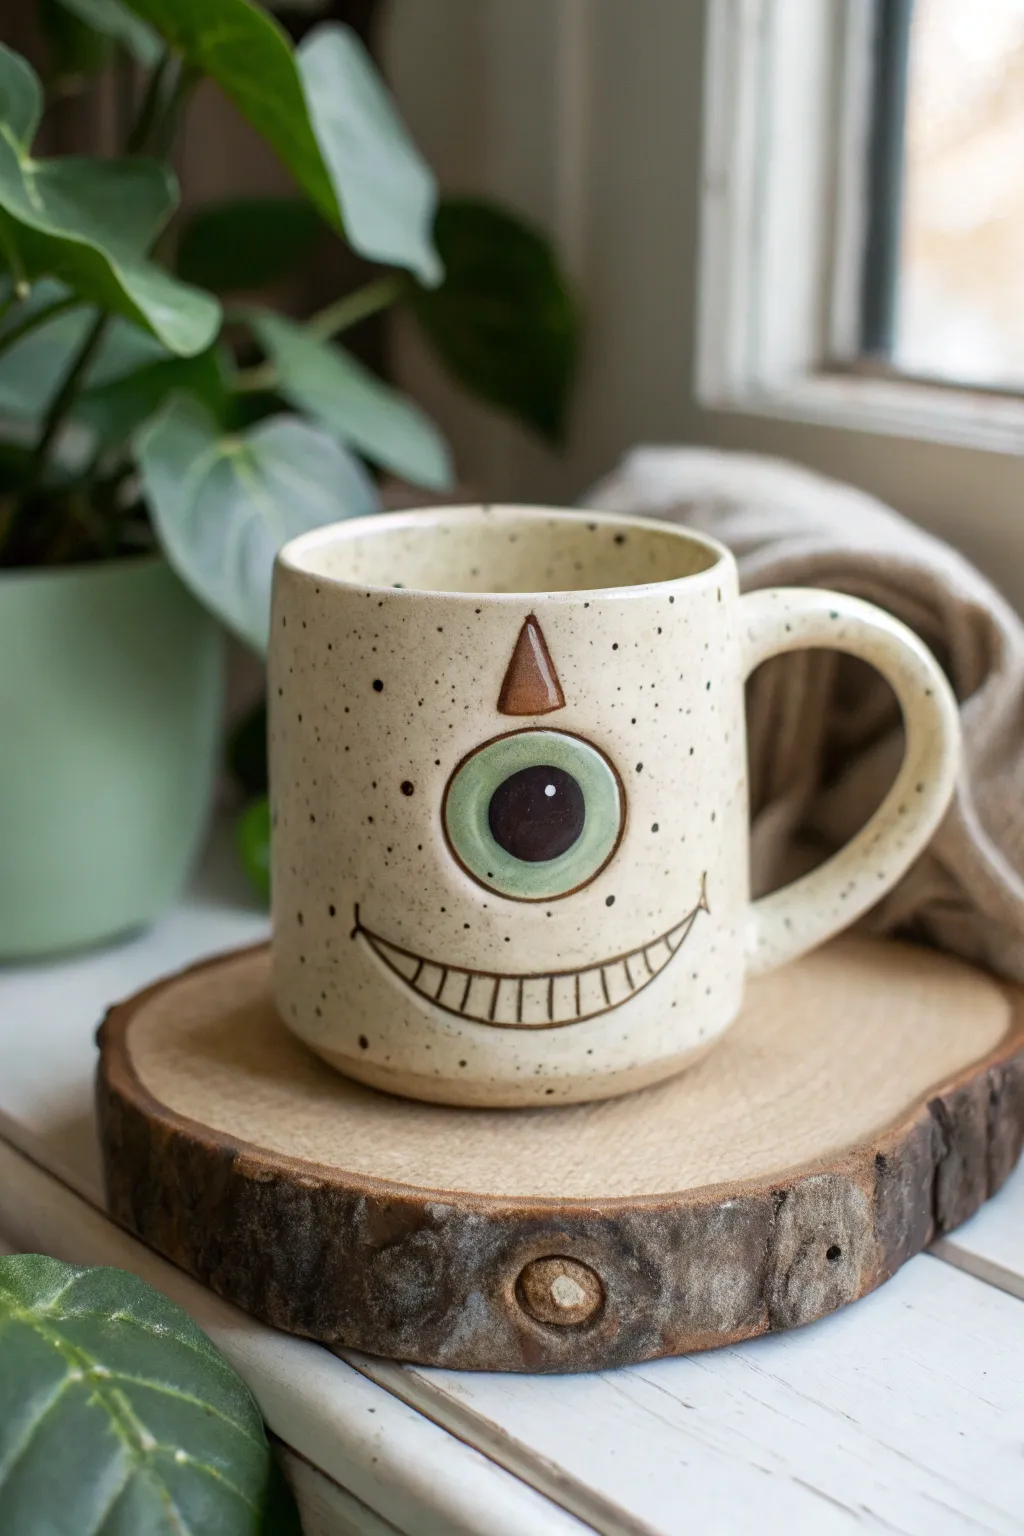
Many-Eyed Monster Cluster
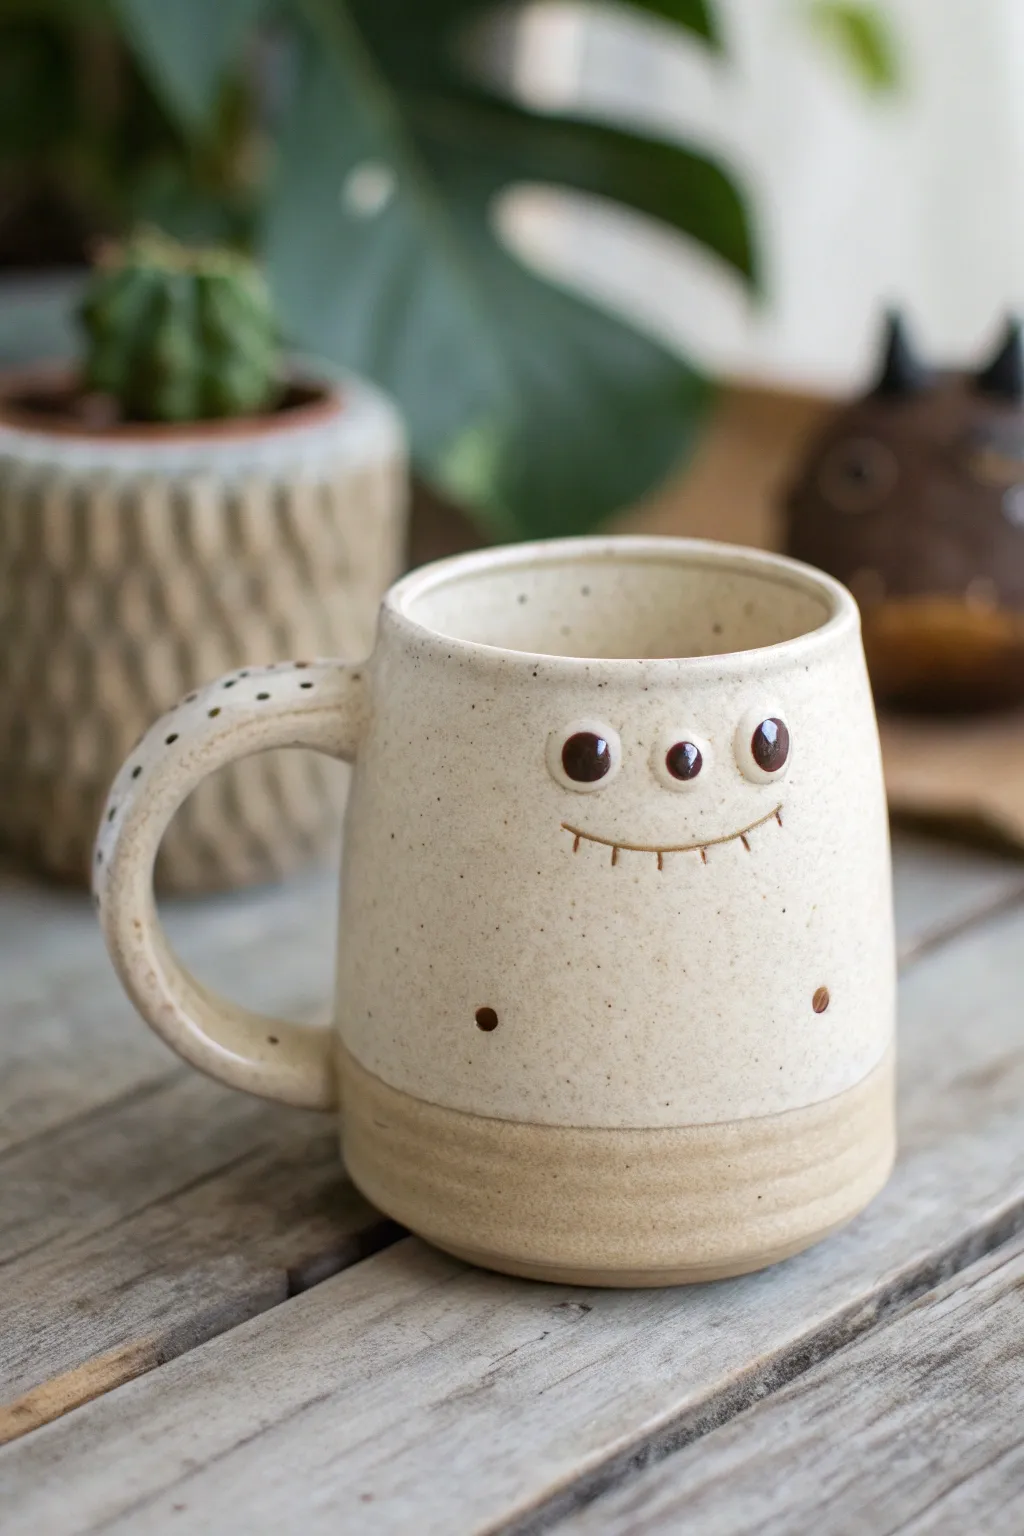
This charming, handmade ceramic mug features a minimalist monster design with a cluster of three friendly eyes and a stitched smile. The natural speckled clay body contrasts beautifully with the glossy white glaze, leaving the textured raw clay base exposed for a rustic touch.
How-To Guide
Materials
- Speckled stoneware clay (mid-fire)
- Pottery wheel (or rolling pin for hand-building)
- Needle tool
- Loop trimming tool
- Scoring tool
- Slip (clay slurry)
- Small round clay cutter or straw
- Underglaze (dark brown or black)
- Fine detail brush
- Clear or translucent cream glaze
- Sponge
Step 1: Forming the Body
-
Throw the Cylinder:
Begin by centering about 1-1.5 lbs of speckled stoneware clay on your wheel. Pull the walls up to create a straight-sided cylinder with a slightly tapered rim, aiming for a consistent wall thickness of about 1/4 inch. -
Shape the Profile:
Gently belly out the middle of the form just slightly to give it a soft, organic curve, then compress the rim with a chamois or sponge to ensure it’s smooth for drinking. -
Trim the Foot:
Once the mug is leather hard, trim the bottom to create a defined foot ring. I like to leave the bottom inch unglazed later to show off the raw clay texture, so make sure this area is neatly smoothed.
Eye Placement Tip
Don’t center the eyes perfectly. Placing them slightly higher up the mug makes the monster look cuter and more curious.
Step 2: Adding Features & Handle
-
Pull the Handle:
Pull a strap of clay for the handle, tapering it slightly. Curve it into a comfortable ‘C’ shape and let it stiffen until it holds its form without sagging. -
Attach the Handle:
Score and slip the contact points on both the mug and the handle. Press the handle firmly onto the side, smoothing the connection points with a modeling tool or your finger for a seamless join. -
Create the Eyes:
Roll three very small balls of clay. Flatten them slightly into discs. Score and slip the area on the upper front of the mug where the face will sit, arranging the eyes in a tight triangular cluster. -
Sculpt the Details:
With a needle tool, gently impress the center of each eye to create a pupil. Add two tiny balls of clay lower down on the ‘body’ for the monster’s nipples, pressing them flat. -
Carve the Smile:
Using your needle tool, scratch a wide, curved line for the mouth just below the eyes. Add short, vertical hash marks across the line to give it a stitched or toothy appearance.
Level Up: Texture
Before the clay dries, use a stiff bristle brush to tap texture onto the monster’s ‘skin’ around the face for a fuzzy look.
Step 3: Decoration & Glazing
-
Bisque Fire:
Allow the mug to dry completely (bone dry) before loading it into the kiln for a bisque firing (usually Cone 04 or 06). -
Apply Underglaze Details:
Once bisqued, use a fine detail brush to paint dark brown underglaze onto the pupils of the eyes, the nipple dots, and carefully fill in the carved mouth lines. A dotting tool works great for the eyes. -
Dot the Handle:
Continue the pattern by painting a row of evenly spaced underglaze dots running all the way down the spine of the handle. -
Wax Resist:
Apply wax resist to the bottom inch of the mug (the unglazed foot area) and the very bottom of the handle to prevent glaze from adhering to these spots. -
Glaze the Mug:
Dip the entire mug into a translucent cream or white glaze. The glaze should be thin enough to let the clay’s natural speckles show through. Shake off excess glaze gently. -
Clean the Eyes:
If the glaze covers the dark pupils too heavily, you can gently wipe just the very center of the eye with a fingertip to ensure the underglaze pops through, though a translucent glaze usually works fine. -
Final Fire:
Fire the mug to maturity (typically Cone 5 or 6 for stoneware). The heat will fuse the glaze and bring out the iron speckles in the clay body.
Once cooled, your little monster mug is ready for your morning coffee or tea ritual
Brain-Top Monster Mug
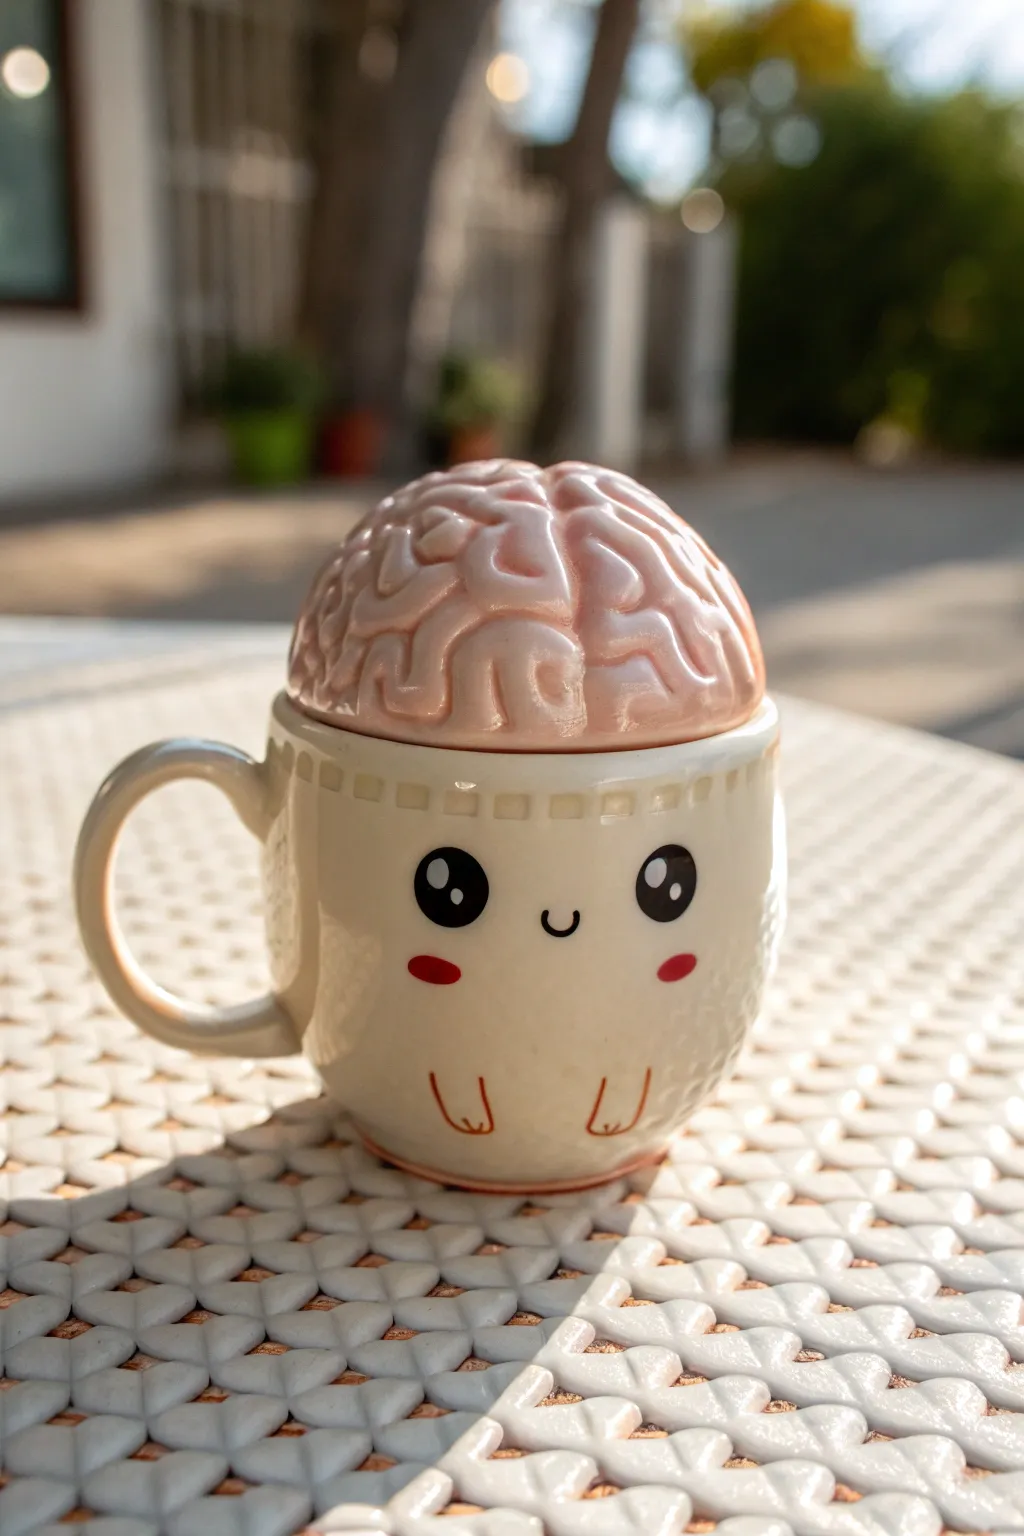
Combine adorable charm with a touch of the macabre in this ceramic monster mug project. Featuring a creamy, sweet face on the body and a hyper-realistic pink brain lid, this mug is the perfect companion for your morning coffee or a brainstorming session.
Step-by-Step Tutorial
Materials
- White stoneware clay
- Pottery wheel (or rolling pin for hand-building)
- Needle tool
- Loop tool for trimming
- Scoring tool or fork
- Slip (clay and water mixture)
- Underglazes: Black, Red (or dark pink), Light Pink
- Clear glossy glaze
- Small detail paintbrush
- Sponge
- Kiln
Step 1: Throwing and Shaping the Body
-
Center and throw the cylinder:
Start with about 1 lb of white stoneware clay. Center it on your wheel and throw a simple, straight-walled cylinder, leaving the walls slightly thicker at the rim to support the lid later. -
Shape the belly:
Gently belly out the bottom half of the cylinder using a rib tool to give the monster a cute, rounded shape. Smooth the surface with a sponge to remove throwing lines. -
Create the gallery:
At the rim, use a wooden modeling tool or your finger to split the rim and create a sunken gallery. This ledge is crucial as it will hold the brain lid securely in place. -
Refine the foot:
Trim excess clay from the base using a wooden knife tool while the wheel is spinning. Wire the mug off the bat and set it aside to stiffen to leather-hard.
Lid Fit Issues?
Clay shrinks! Ensure you use the same clay body for lid and mug so they shrink at the same rate. Dry them together on the mug rim (with paper in between) to keep the fit perfect.
Step 2: Sculpting the Brain Lid
-
Measure the lid size:
Use calipers to measure the diameter of the gallery you created on the mug’s rim. This ensures your lid will fit perfectly once fired. -
Form the lid base:
Roll out a slab of clay or throw a shallow bowl shape that fits your caliper measurements. If throwing, trim it into a dome shape once leather-hard. -
Make the brain coils:
Roll out many thin, long coils of clay, roughly the thickness of a pencil. I prefer to vary the thickness slightly for a more organic look. -
Attach the gyri:
Score and slip the surface of the lid dome. Begin attaching the coils in a squiggly, meandering pattern to mimic brain gyri (folds). Pack them tightly together so no base clay shows through. -
Refine the texture:
Use a modeling tool to smooth the connections between coils slightly, ensuring they look like continuous folded tissue rather than separate worms.
Step 3: Handle and Details
-
Pull the handle:
Pull a traditional strap handle from a fresh lug of clay. Let it curve into a ‘C’ shape and allow it to stiffen until it can hold its arch. -
Attach the handle:
Score and slip the attachment points on the side of the mug. Press the handle firmly in place, blending the clay seams until invisible. -
Add decorative rim texture:
Just below the rim, press a small square tool or chopstick end into the clay at regular intervals to create the dentil-like pattern seen in the reference.
Make it Zombiesque
Want a creepier look? Use a translucent green glaze over the brain instead of clear, or add dark red iron oxide washes in the crevices to simulate dried blood.
Step 4: Decoration and Glazing
-
Paint the face:
Once the mug is bone dry, wipe it down with a damp sponge. Use a fine liner brush and black underglaze to paint two large, solid circles for eyes, adding small white highlights (negative space or white underglaze) for cuteness. -
Add the smile and blush:
Paint a tiny ‘u’ shape for the mouth between the eyes using black underglaze. Dab two small oval spots of red underglaze on the cheeks for blush. -
Sketch the feet:
near the bottom of the mug, paint two simple ‘u’ shapes with small vertical lines to suggest tiny monster feet. -
Glaze the brain:
Apply a light pink underglaze to the entire brain lid, ensuring you get into all the crevices between the coils. Wipe back the high points slightly with a damp sponge if you want to accentuate the depth. -
Bisque fire:
Load the pieces into the kiln and bisque fire to Cone 04 (or your clay’s specific bisque temperature). -
Final glaze application:
Dip the body of the mug into a clear glossy glaze. For the lid, carefully brush on a clear glossy glaze over the pink underglaze to make the brain look wet and slimy. -
Glaze fire:
Fire the project a final time to the maturity temperature of your clay body (likely Cone 5 or 6 for stoneware).
Now you have a brilliantly clever vessel ready to hold your smartest beverages
Surprise Tongue Inside the Mug
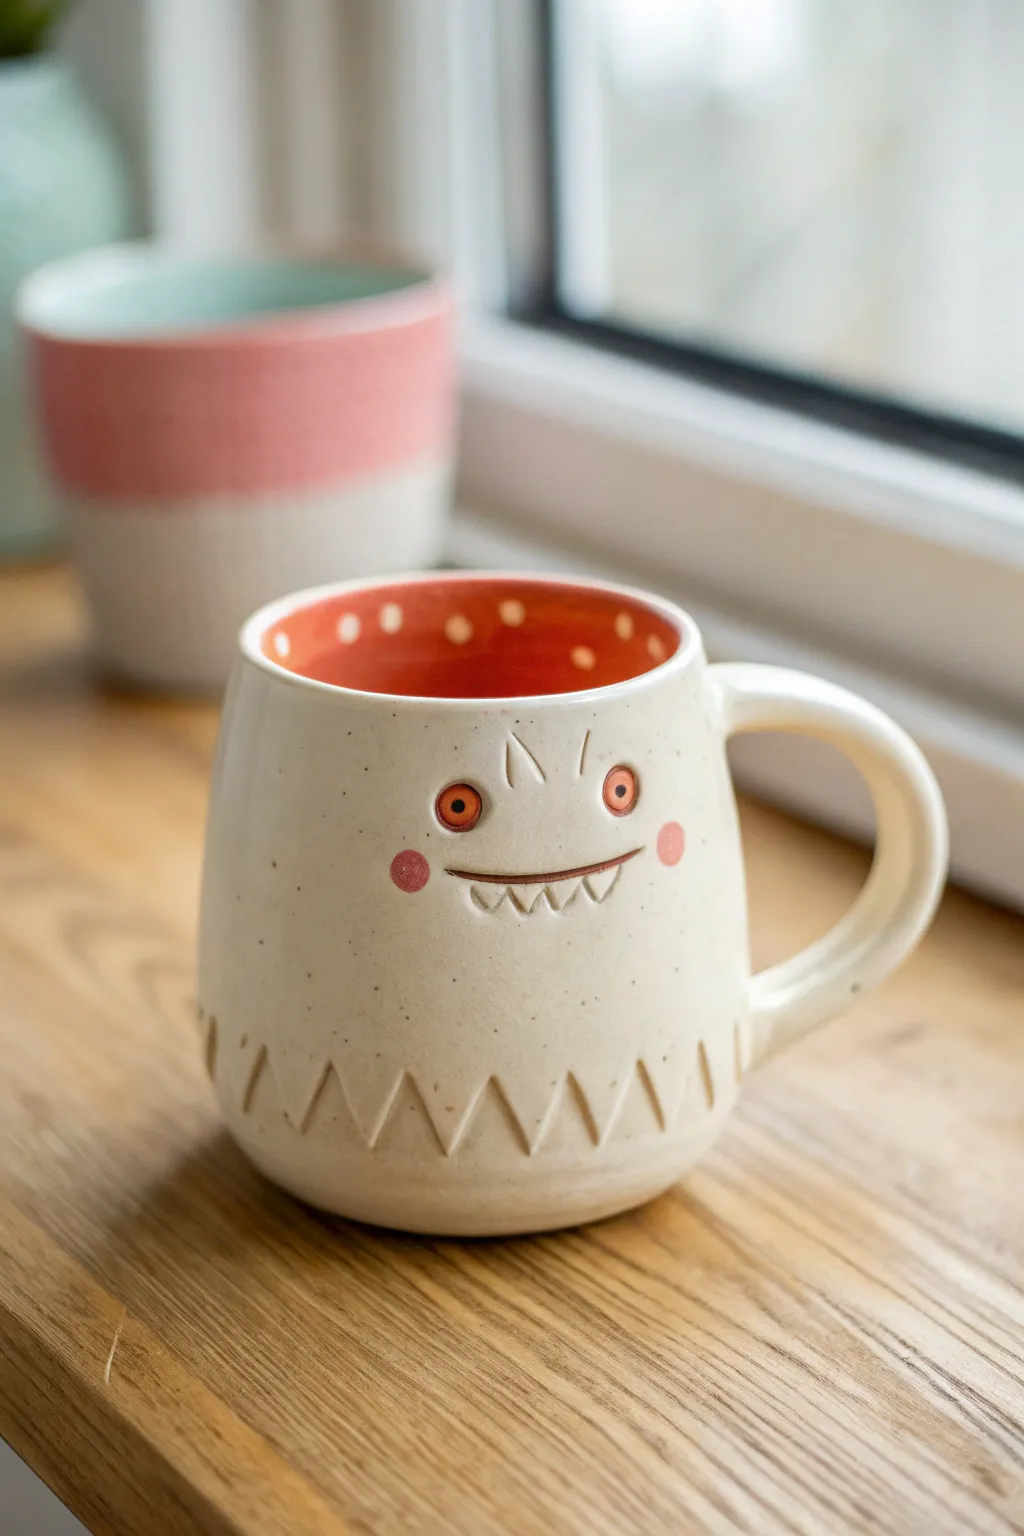
This charming ceramic mug features a friendly monster face carved into speckled clay, complete with a bright surprise interior. Its tapered shape and textured details make it a delightful project for intermediate potters looking to practice surface decoration and glazing techniques.
Step-by-Step Guide
Materials
- Speckled cone 6 stoneware clay
- Pottery wheel (or slab roller for hand-building)
- Throwing tools (sponge, rib, needle tool)
- Wire cutter
- Trimming tools
- Carving tool or small loop tool
- Detail needle tool
- Underglaze (Black or Dark Brown)
- Underglaze (Coral or Pink)
- Glossy Clear Glaze
- Bright Orange/Coral Glaze
- Wax resist
- Small paintbrush
Step 1: Throwing and Shaping
-
Center the clay:
Start with about 1-1.5 lbs of speckled stoneware clay. Center it firmly on the wheel head, ensuring it’s fully compressed to prevent cracks later. -
Open and pull walls:
Open the clay to your desired floor width, leaving about 1/4 inch thickness for the base. Pull the walls upward, tapering them slightly inward as you reach the top to create a cozy, rounded form. -
Refine the shape:
Use a kidney rib to smooth the outside and define the curve. The bottom should be slightly wider than the rim, giving it a stable, chubby appearance. -
Trim the foot:
Once the pot is leather hard, trim the bottom to create a clean foot ring. I like to keep the bottom curve continuous with the walls for a seamless look.
Clean Lines
When carving the zigzag bottom pattern, wait until the clay is a distinct leather-hard. If it’s too wet, the clay will drag and create burrs; too dry, and it will chip.
Step 2: Adding Handle and Details
-
Pull a handle:
Pull a medium-thickness handle from a lug of clay. Let it set up to a soft leather-hard stage until it can hold an arch without collapsing. -
Attach the handle:
Score and slip the attachment points on both the mug body and handle. Press firmly to join, smoothing the seams with a damp sponge or modeling tool. -
Carve the bottom texture:
Using a sharp carving tool, cut a zigzag pattern around the base of the mug. These triangles mimic fur or monster teeth; vary the depth slightly for visual interest. -
Sketch the face:
Lightly trace the face placement with a needle tool. You’ll want wide-set eyes, a simple curved mouth, and two sharp little teeth pointing down from the upper lip. -
Define facial features:
Carve deeply into the mouth line and the two teeth. For the eyes, press a small circular tool or the back of a paintbrush into the clay to create the pupils. -
Add expressive lines:
Use a needle tool or very fine carving tool to add the ‘angry eyebrows’ (just two vertical angled lines) above the eyes for character.
Step 3: Decoration and Glazing
-
Bisque fire:
Let the mug dry slowly and completely, then bisque fire it to Cone 04 (or your clay body’s recommendation). -
Underglaze the details:
Apply a wash of dark brown or black underglaze into the carved lines of the mouth and eyebrows. Wipe away the excess with a damp sponge so the color remains only in the recesses. -
Paint the cheeks:
Dab two small circles of pink or coral underglaze onto the cheeks. You can also add a tiny dot of color to the center of the eyes. -
Wax resist the exterior:
Apply wax resist to the entire outer surface of the mug, including the handle and the unglazed foot, protecting the raw clay look. -
Glaze the interior:
Pour a bright orange or coral glaze into the inside of the mug. Roll it around to coat the interior fully, then pour out the excess. Wipe any drips off the rim immediately. -
Add polka dots:
Dip a brush handle or a specialized dotting tool into wax resist. Dot the wax onto the wet interior glaze near the rim. This will resist the glaze during firing, revealing the clay spots underneath. -
Clear coat (Optional):
If you want the outside to be glossy and food safe but still show the speckles, dip the whole mug in a clear glaze. If your clay is vitrified without glaze, you can skip this for a matte finish. -
Final Fire:
Fire the mug to maturity (likely Cone 6). Ensure the foot is wiped clean so it doesn’t stick to the kiln shelf.
Make it a Set
Create a whole family of monsters by varying the height of the mugs and changing the eyebrow angles—make one sad, one surprised, and one sleepy.
Once cooled, your little monster is ready to start the day with coffee or tea
Two-Faced Monster (Front and Back)
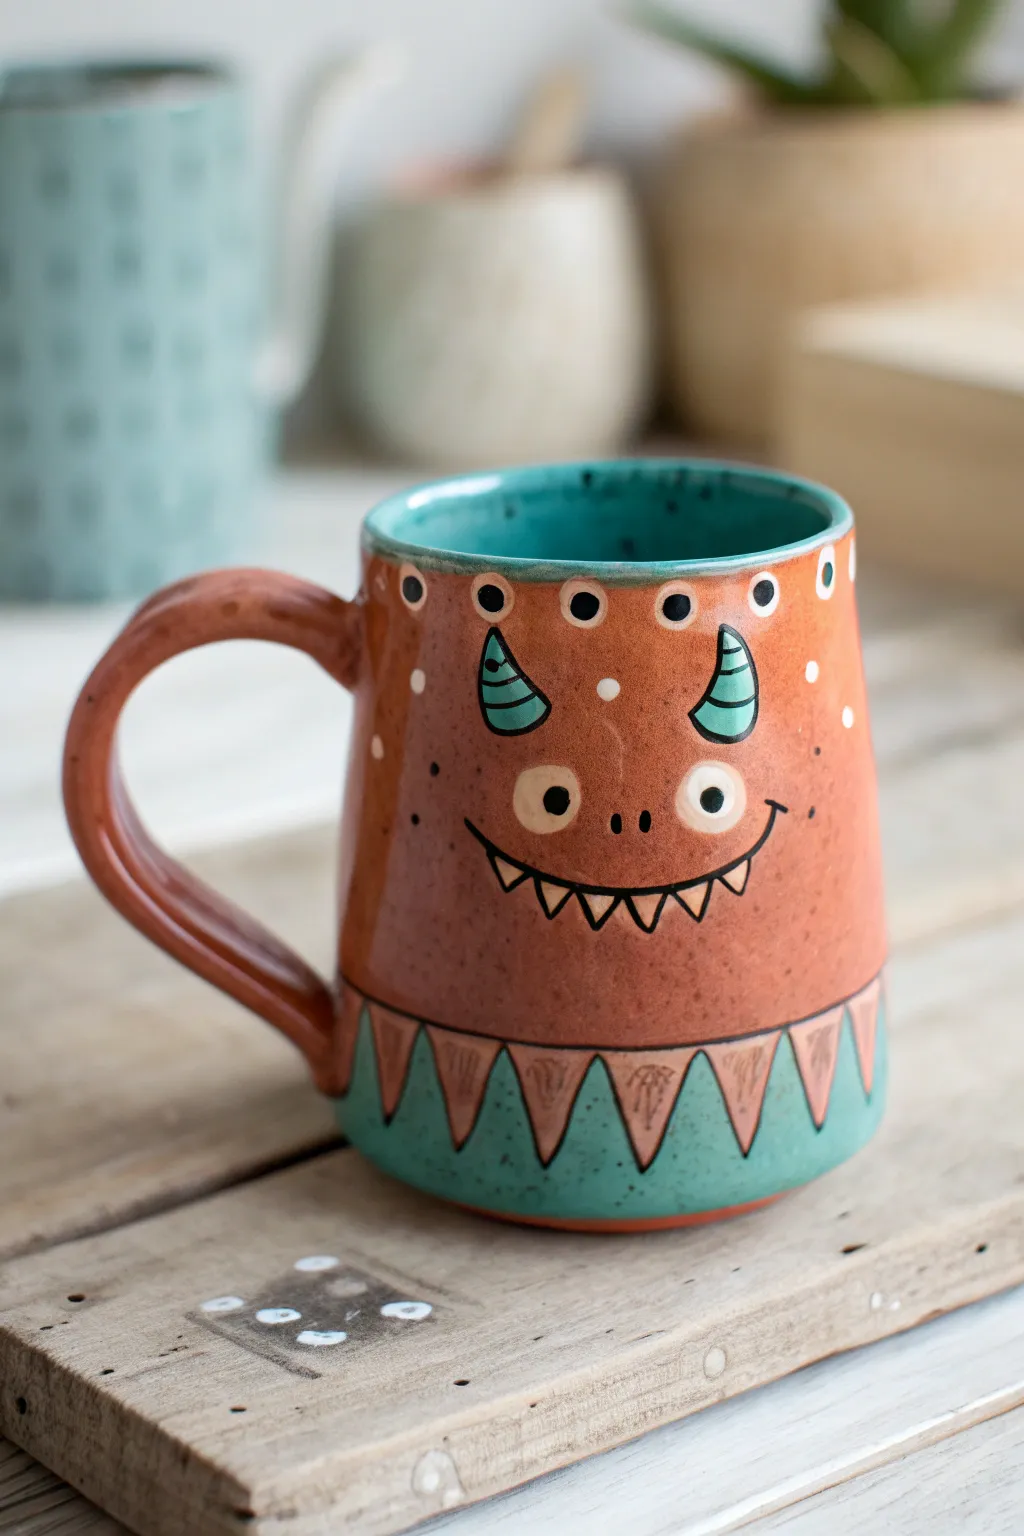
Transform a simple wheel-thrown cylinder into a delightful monster companion for your morning coffee. With its cheeky grin, stubby horns, and vibrant contrasting glazes, this terracotta-toned mug brings character to every sip.
Detailed Instructions
Materials
- Stoneware clay body
- Pottery wheel
- Throwing tools (sponge, rib tool, wire cutter)
- Trimming tools
- Needle tool
- Scoring tool
- Slip
- Underglazes (Black, Teal/Turquoise, White)
- Small liner brush
- Detail brush
- Clear transparent glaze
- Speckled orange/terracotta glaze
Step 1: Throwing and Shaping
-
Center and throw:
Center roughly 1.5 lbs of stoneware clay on your wheel and open it up. Throw a cylinder with slightly angled walls, keeping the rim somewhat thick for durability. -
Refine the shape:
Use a metal or wooden rib to smooth the outside walls, compressing the clay and removing any finger marks. Ensure the walls are even from top to bottom. -
Dry to leather hard:
Cut the cylinder from the bat and let it dry slowly until it reaches a leather-hard state, where it is firm enough to handle but still holds moisture. -
Trim the foot:
Place the leather-hard cylinder back on the wheel, center it, and trim a neat foot ring. This cleans up the bottom and reduces weight.
Clean Lines
Use a latex-based resist on the horns and teeth before applying the main orange glaze. Peel it off before doing the black lining for crisp edges.
Step 2: Adding the Handle
-
Pull a strap handle:
Pull a strap handle from a fresh lug of clay. It should be wide enough to be comfortable but proportionate to the mug size. -
Attach the handle:
Score the mug body and the attachment points of the handle. Apply slip generously. Press the handle firmly onto the mug, smoothing the connection points with your thumb or a modeling tool. -
Shape the curve:
Ensure the handle has a nice ear-shaped curve that allows for a comfortable three-finger grip. I personally like to refine the edges with a damp sponge.
Go 3D
Instead of just painting them, model small balls of clay and slip-and-score them onto the mug for 3D popping eyes or raised horns.
Step 3: Surface Decoration
-
Sketch the face:
Lightly sketch your monster face directly onto the leather-hard clay using a dull pencil or needle tool. Outline the horns, the wide eyes, the toothy mouth, and the zigzag pattern at the base. -
Apply wax resist (optional):
If you are confident in your glazing, you can skip this, but applying wax resist over the areas you want to remain bare or specifically colored later can help with clean lines. -
Bisque fire:
Let the mug dry completely to the bone-dry stage. Fire it in the kiln to cone 04 (or your clay’s specific bisque temperature).
Step 4: Glazing and Detailing
-
Glaze the interior:
Pour a bright teal or turquoise glaze into the interior of the bisque-fired mug, swirl it around to coat completely, and pour out the excess. Wipe the rim clean. -
Paint the horns and base:
Using a small brush, carefully paint the horns and the triangular shapes at the base with the same teal glaze used for the interior. -
Apply the main body color:
Carefully brush a speckled terracotta or rusty orange glaze around the rest of the mug’s exterior, avoiding the horns, eyes, mouth, and bottom triangles. You may need 2-3 coats for opacity. -
Detail the eyes:
Paint the round eyeballs with a white underglaze or glaze. Let this dry completely before moving to the pupils. -
Line work:
Using a very fine liner brush and black underglaze, paint the outlines. Define the horns, outline the eyes and pupils, draw the smiling mouth with teeth, and create the dots along the rim. -
Add texture details:
Don’t forget the small details: add tiny black lines inside the teal base triangles for texture and small white dots on the cheeks for whimsy. -
Final clear coat (if needed):
If your underglazes need sealing, apply a thin layer of clear transparent glaze over the detailed areas. If using all gloss glazes, this step isn’t necessary. -
Glaze fire:
Fire the mug again to the maturation temperature of your glaze and clay body (typically Cone 5 or 6 for stoneware).
Now you have a charming, one-of-a-kind mug ready to hold your favorite warm beverage